

LG W122CM, W182CM, W121CM, W081CM Owner's Manual

OWNER’S MANUAL
AIR
CONDITIONER
Please read this manual carefully before operating
your set and retain it for future reference.
NORSK SUOMI DANSK
TYPE :
MODELS
P/NO : MFL69364001
WINDOW
W081CM
W122CM W182CM
TSB3
SC1 TSN3
W121CM
SC1
www.lg.com

2
Window-Type Air Conditioner Owner’s Manual
TABLE OF CONTENTS
FOR YOUR RECORDS
Write the model and serial numbers here:
Model #
Serial #
You can find them on a label on the side of each unit.
Dealer's Name
Date Purchased
1. Safety Precautions
2. Operating Instructions
3. Care and Maintenance
4. Hardware Installation
5. Common Issues
■Staple your receipt to this page in the event you need
it to prove date of purchase or for warranty issues.
READ THIS MANUAL
Inside you will find many helpful hints on how to use
and maintain your air conditioner properly. Just a little
preventive care on your part can save you a great deal
of time and money over the life of your air conditioner.
You'll find many answers to common problems in the
chart of troubleshooting tips. If you review our chart of
Troubleshooting Tips first, you may not need to call
for service at all.
This appliance is not intended for use by persons
(including children) with reduced physical, sensory or mental capabilities, or lack of experience and
knowledge, unless they have been given supervision or instruction concerning use of the
appliance by a person responsible for their safety.
Children should be supervised to ensure that they
do not play with the appliance.
WARNING: Before accessing the terminals, all
power circuits must be disconnected.
WARNING: Fixed installations will incorporate
disconnect means in accordance with installation
rules.
WARNING: This device will not be accessible to public.
WARNING: The appliance must be installed in
accordance with national regulations for electrical
installations.

Precautions
Safety
Precautions
3
ENGLISH
To prevent injury to the user or other people and property damage, the following instructions must
be followed.
■ Incorrect operation due to ignoring instruction will cause harm or damage. The seriousness is
classified by the following indications.
This symbol indicates the possibility of death or serious injury.
This symbol indicates the possibility of injury or damage to properties only.
■ Meanings of symbols used in this manual are as shown below.
Be sure not to do.
Be sure to follow the instruction.
WARNING
■ Installation
Always install the expansion panel(s).
• No installation may cause fire and electric
shock accident.
Do not place the power cord near a heater.
• It may cause fire and electric shock.
Do not use the power cord near flammable
gas or combustibles such as gasoline,
benzene, thinner, etc.
• It may cause explosion or fire.
Do not disassemble or modify products.
• It may cause failure and electric shock.
Gasolin
WARNING
CAUTION

4
■ Operation
Plug in the power plug
properly.
• Otherwise, it will cause
electric shock or fire due to
heat generation or electric
shock.
Do not operate or stop the
unit by inserting or pulling
out the power plug.
• It will cause electric shock or
fire due to heat generation.
Do not damage or use an
unspecified power cord.
• It will cause electric shock or
fire.
Do not modify power cord
length.
• It will cause electric shock or
fire due to heat generation.
Do not share the outlet with
other appliances.
• It will cause electric shock or
fire due to heat generation.
Always plug into a
grounded outlet.
• No grounding may cause
electric shock (See
Installation Manual).
Unplug the unit if strange
sounds, odors, or smoke
come from it.
• Otherwise it may cause fire
and electric shock accident.
Do not use the socket if it is
loose or damaged.
• It may cause fire and electric
shock.
Do not operate with wet
hands or in damp
environment.
• It will cause electric shock.
ON

5
ENGLISH
Do not allow water to run
into electric parts.
• It will cause failure of machine
or electric shock.
Leave the door closed while
the air conditioner is
running.
• It is not designed to cool the
entire house.
Do not operate the air
conditioner if you smell gas.
• It may cause explosion, fire,
and burn.
Never touch the metal parts
of the unit when removing
the filter.
• They are sharp and may
cause injury.
Do not block the inlet or
outlet.
• It may cause failure of
appliance or accident.
Ensure that the outer case
is not damaged by age or
wear.
• If leaving appliance damaged,
there is concern of damage
due to the falling of product.
Be cautious not to touch the
sharp edges when
installing.
• It may cause injury.
Hold the plug by the head
when taking it out.
• It may cause electric shock
and damage.
Turn off the main power
switch when not using it for
a long time.
• Prevent accidental startup
and the possibility of injury.
CAUTION
■ Installation
Sharp
edges
■ Operation

6
Do not place heavy object
on the power cord and take
care so that the cord should
not be pressed.
• There is danger of fire or
electric shock.
If water enters the product,
turn off the the power switch
of the main body of appliance.
Contact service center after
taking the power-plug out
from the socket.
Do not clean the air
conditioner with water.
• Water may enter the unit and
degrade the insulation. It may
cause an electric shock.
Turn off the power and
breaker firstly when
cleansing the unit.
• Since the fan rotates at high
speed during operation, it
may cause injury.
Do not put a pet or house
plant where it will be
exposed to direct air flow.
• This could injure the pet or
plant.
Do not use this appliance for
special purposes such as
cooling pets, foods, precision
machinery, or objects of art.
• It is an air conditioner, not a
precision refrigeration system.
Always insert the filter
securely.
Clean it every two weeks.
• Operation without filters will
cause failure.
Use a soft cloth to clean. Do
not use wax, thinner, or a
strong detergent.
• The appearance of the air
conditioner may deteriorate,
change color, or develop
surface flaws.
Do not drink water drained
from air conditioner. / Do
not direct airflow at room
occupants only.
• It contains containments and
will make you sick. / This
could damage your health.
Wax
Thinner


Thermostat Operation
FAN FAN
Thermostat
Warmer Cooler
Heater
Operation
NOTICE
: Optional
9
ENGLISH
Controls
■
AUTO SWING (Optional)
ON ( ) :
Air swing is operated while OPERATION
knob is set to the COOL or HEAT position.
OFF( ) : Stops the operation of air swing.
■ THERMOSTAT
Turn the thermostat control to the desired
setting. The control position is a normal setting for
average conditions. You can change this setting, if
necessary, in accordance with your temperature
preference.
The thermostat automatically controls cooling or
heating, but the fan runs continuously
whenever the air conditioner is in operation. If the
room is too warm, turn the thermostat
control clockwise. If the room is too cool, turn the
thermostat control counterclockwise.
■ HEATER ( ) LAMP
When the unit sets heating operation condition, the
green lamp is lighted.
When the frost settles on the heat exchanger of the
outside, defrosting is made automatically and the
green lamp is turned off.
The unit may give a "hiss" and the fan motor stops for
1 to 10 minutes.
This should not be regarded as a problem.
After defrosting, the heating operation begins again.
■ OPERATION
OFF ( ) : Turns the air conditioner off.
LOW FAN ( ) : Permits the low fan speed
operation without cooling
(heating).
LOW COOL ( ) : Permits cooling with the low fan
speed operation.
HIGH COOL ( ) : Permits cooling with the high
fan speed operation.
LOW HEAT ( ) : Permits heating with the low
fan speed operation.
HIGH HEAT ( ) : Permits heating with the high
fan speed operation.
CAUTION : When the air conditioner has
been performed its cooling operation and
is turned off or set to the fan position, wait
at least 3 minutes before resetting to the
cooling operation again.
o
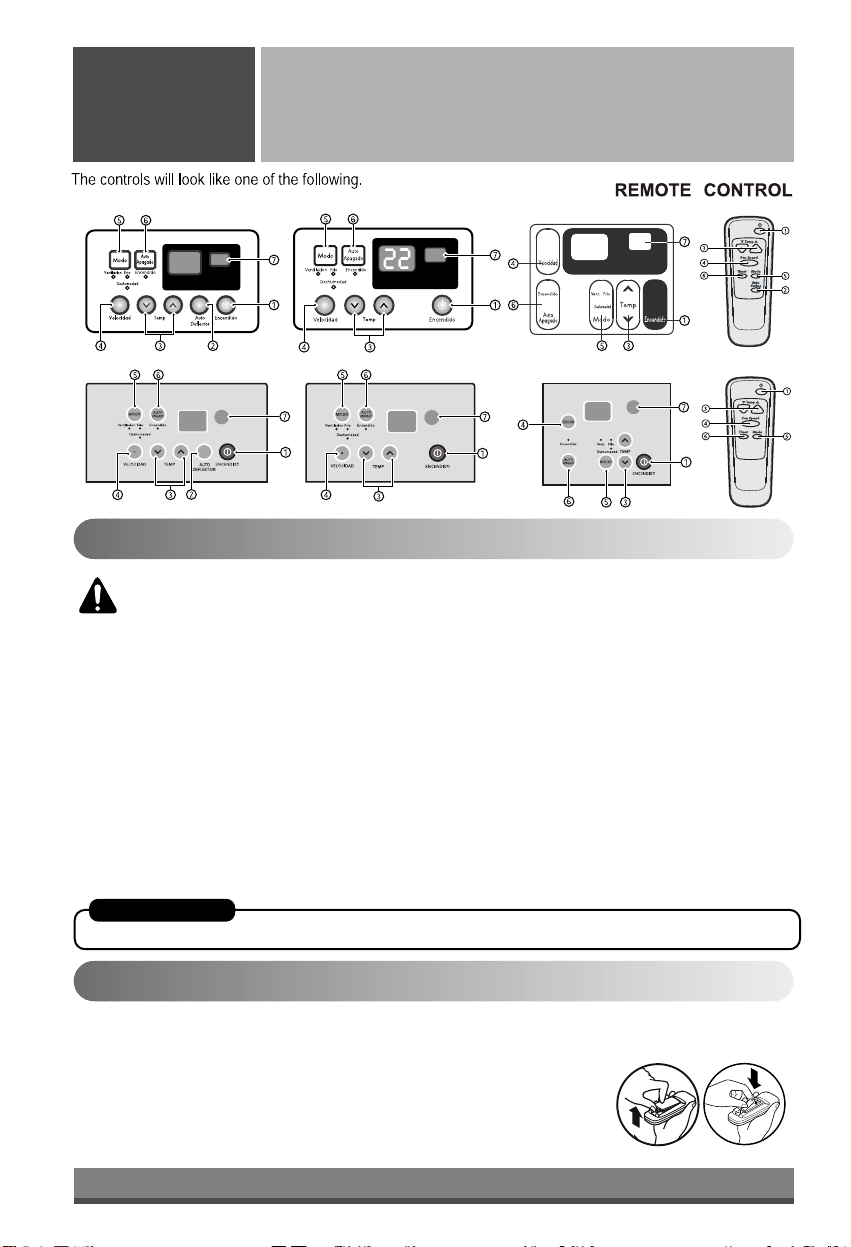
The controls will look like one of the following.
10
Remote Control Operation
Operating
Instructions
Controls
1. POWER BUTTON
Operation starts, when this button is pressed and stops when you press the button again.
2. AUTO SWING (Optional)
The vertical louver swings horizontally by the automatic system and stops when you press the button again.
3. ROOM TEMPERATURE SETTING BUTTON
Control the room temperature within a range of 16°C to 30°C
4. FAN SPEED SELECTOR
Select the fan speed in three steps {High[F3] → Low[F1] → Med[F2] → High[F3]...}.
5. OPERATION MODE SELECTION BUTTON
Select Cooling, Fan, or Dehumidification mode with this button.
6. ON/OFF TIMER BUTTON
Set the time of starting and stopping operation. The timer is set by 1 hour.
7. SIGNAL RECEIVER
CAUTION: The Remote Control unit will not function properly if strong light strikes the sensor
window of the air conditioner or it there are obstacles between the Remote Control unit and the
air conditioner.
AUTO RESTART
In failure of electric power, the unit runs as previous setting operation.
How to Insert the Battery
1. Remove the cover from the back of
the remote controller.
2. Insert the one battery.
3. Re-attach the cover.
• Do not use rechargeable battery, such battery differ from
standard dry cells in shape, dimensions, and performance.
• Remove the battery from the
remote controller if the air
conditioner is not going to be
used for an extended length
of time.

Operating
NOTICE
Instructions
Additional controls and important information.
Adjusting the Air Flow Direction
Ventilation
The ventilation lever must be in the CLOSE position in order to maintain the best cooling conditions.
When fresh air is necessary in the room, set the ventilation lever to the OPEN position.
The damper is opened and room air is drawn out.
Part B
Part A
VENTCLOSE OPEN
:Before using the ventilation feature,
position the lever, as shown. First, pull down part
to horizontal line with part .
Air Filter Cleaning
The direction of air can be controlled whenever you want to cool by adjusting the horizontal louver and the
vertical louver.
• HORIZONTAL AIR DIRECTION CONTROL
To control horizontal direction of air flow, press the air flow
direction control button and the air flow will be swept
horizontally by the automatic air-swing system.
If you want to stop the air flow from moving, press the button
again at the desired position of the vane.
ENGLISH
• VERTICAL AIR-DIRECTION CONTROL
The vertical air direction is adjusted by moving the horizontal
louver.
• Auto Swing Models
The horizontal air direction is automatically controlled by
setting the AUTO SWING switch to the ON position.
11
 Loading...