


LG VTCP743NB Owner’s Manual [ar]

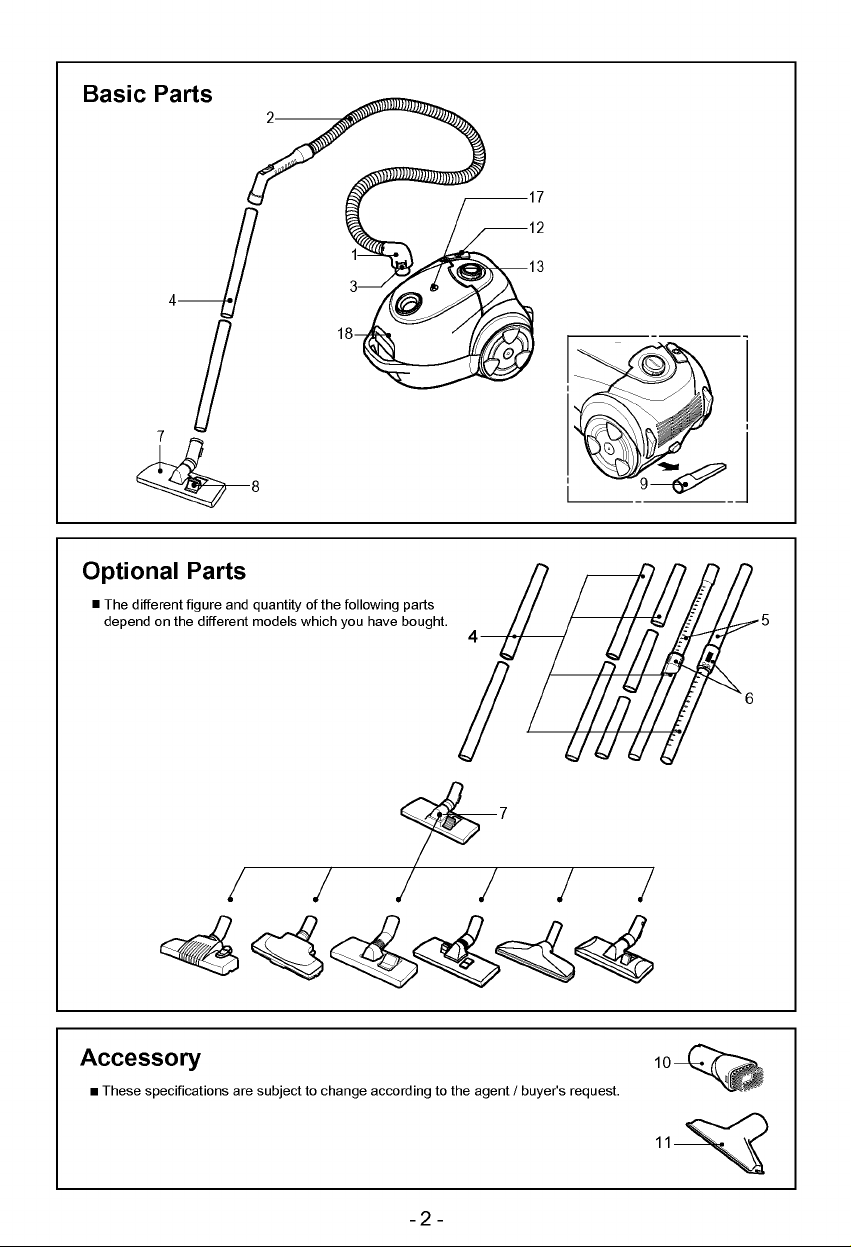
Basic
Parts
4
7
2
17
12
1
3
18
13
Optional
The
different
on
depend
Accessory
These
specifications
Parts
figure
the
and
different
8
quantity
models
are
subjecttochange
of
which
the
following
have
you
according
parts
bought.
9
5
6
7
10
to
the
agent
/
buyer's
request.
-2-
11

2
1
7
3
4
65
8
9
V-CP733NBR/NB
V-CP743NB/NBB/ND/NT
V-CP753NB
V-CP743RD
V-CP752RD/RT/RDN
V-CP753RD
12
11
10
13
14
16
15
13
17
18
19
20
21
22
--3--
Information
Please
which
safety,use
read
contains
for
all
the
important
and
your
following
instructions
maintenance
safety
information,
appliance.
This
appliance
complies
with
the
following
Directives:-73/23/EEC,93/68/EEC-Low
Voltage
Never
Directive-89/336EEC
allow
children
-EMC
to
use
the
unsupervised.
not
the
ash,
or
LG
filters.
the
use
other
if
the
Electronics
cleaner
cover
force!
or
embers
liquids.
Do
not
use
cord
is
If
the
replaced
Service
Always
before
?
changing
?
changingorcleaning
If
no
dustbag
be
closed.
Do
not
substances
Do
not
sharp
Do
not
How
the
damaged
main
lead
byanapproved
in
Agent
switch the
:
the
dust
is
inserted,
Please
vacuum
(liquidsorgases).
vacuum
objects.
vacuum
to
water
Use
ordertoavoidahazard.
appliance
or
faulty.
is
damaged,
vacuum
bag.
do
flammable
hot
for
of
the
Directive.
appliance
supply
it
must
cannot
explosive
etc.
the
EC
off
be
Fit
the
large
the
tube.
?
The
2-position
pedal
position
cleaned.
Hard
floors...).
brush.
Carpet
to
pedal
?
Crevice
For
vacuuming
inaccessible
or
down
?
Dusting
For
vacuuming
outlines,
?
Upholstery
For
vacuuming
The
thread
threads
How
to
Pull
out
and
length
Press
button
cleaner.
To
cleaning
which
(8)
according
floor
Press
or
rug
lift
the
Tool
places
the
side
brush
books
Nozzle
collectors
and
plug
the
supply
plug
stop
head
allows
to
position
on
the
position.
brush
(9)
ofasofa!
(10)
picture
and
other
uphostery,
fluff.
in
and
into
the
to
(13)
it
press
head
onto
(7)isequipped
you
the
type
of
(tiles,
to
pedal
Press
up.
in
those
i.e.
reaching
frames,
uneven
(11)
mattresses,
helptopick
use
cord
to
the
socket.
start
the
the
button
the
end
with
to
alter
floortobe
parquet
lower
on
normally
cobwebs,
furniture
objects.
the
desired
vacuum
(13) again.
of
a
its
the
the
etc.
Connecting
Push
the
endofthe
hose
vacuum
To
vacuum
situatedonthe
(2)
remove
into
cleaner.
cleaner,
Assembling
?
Metal
or
-
Fit
slightly.
?
Telescopic
-
Push
-
Pull
-
Release
Using
Nozzles
plastic
together
spring
out
the
(dependingonmodel)
the
the
attachment
the
flexible
press
then
head,
the
tube
the
tube
(4)
latch
tube
to
spring
cleaning
flexible
head
(1)
on
pull
hose
on
hose
the
upwards.
tubes
(27,33)
two
tubes
forward.
(5)
required
latchtolock.
head
length.
and
the
flexible
on
point
from
button
by
twisting
Accessory
the
the
(3)
Storage(16)
When
the
automatically
You
vertical
large
underside
4
have
you
appliance,
can
move
position
cleaning
of
switched
press
rewind
or
by
head
the
appliance.
the
store
sliding
the
into
off
cord.
your
and
button
appliance
the
hook
the
clip
unplugged
(12)
in
on
the
on
the
to
a