


V-C3860RDV
E
English
D
Deutsch
LG
Service
Hotline
Tel.
:
01805-47378423
(0180-LGSERVICE)

2
11
18
4
6
7
8
2
1
1
5
3
19
12
13
910
4
3
9
7
8
65
11
10
--2--
3828Fi2009Q
13
12
13
V-C3860ND/NT
16
14
15
18
19
V-C3860RDR/RDS/RDV
17
20
21
22
23
24
25
--3--
3828Fi2009Q

E
Information
Please
which
safety,
appliance.
This
Directives:
Voltage
Connecting
Push
hose(2)
uum
To
vacuum
ated
Assembling
(dependingonmodel)
?
?Telescopic
Using
Nozzles
Fit
read
the
all
use
complies
important
and
contains
appliance
-73/23/EEC,
Directive-89/336EEC
Never
allow
children
unsupervised.
Do
not
use
the
is
damaged
If
the
mains
replaced
Service
Always
before
:
?
changing
?
changingorcleaning
If
no
dustbag
be
closed.
Do
not
appliance
or
faulty.
lead
byanapproved
in
Agent
switch
the
dust
is
Please
vacuum
substances(liquidsorgases).
Do
not
vacuum
sharp
objects.
Do
not
vacuum
How
to
Use
the
the
endofthe
into
the
attachment
cleaner.
remove
on
the
cleaner,
the
head,
flexible
press
the
Metal
tube(4)
-
Fit
together
the
slightly.
-
Push
-
Pull
-
Release
the
tube(5)
latch(6)
spring
out
tube
to
spring
the
cleaning
(dependingonmodel)
large
cleaning
for
your
the
following
the
maintenance
with
to
is
damaged,
ordertoavoidahazard.
the
vaccum
safety
information,
instructions
the
following
93/68/EEC-Low
-EMC
use
the
If
the
supply
LG
Electronics
cleaner
Directive.
appliance
it
must
bag.
the
filters.
cover
do
not
ash,
or
head(1)
hose
on
pull
the
use
embers
other
hose
on
point
from
the
button(3)
upwards.
force!
or
explosive
liquids.
the
on
the
the
inserted,
flammable
hot
water
flexible
then
tubes
two
tubes
by
forward.
required
latchtolock.
head
head
length.
and
Accessory
onto
the
for
the
of
the
EC
cord
be
off
cannot
etc.
nor
flexible
vac-
situ-
twisting
end
of
the
tube.
?
The
2
position
which
pedal(8)
tion
according
cleaned.
Hard
floor
Press
on
Carpet
to
pedal
?
Crevice
For
vacuuming
ible
places
the
side
?
Dusting
For
vacuuming
books
lines,
?
Upholstery
For
vacuuming
The
thread
threads
How
to
Pull
out
the
and
Press
To
Adjusting
?
If
tronic
choose
task.
?
The
flow
reduce
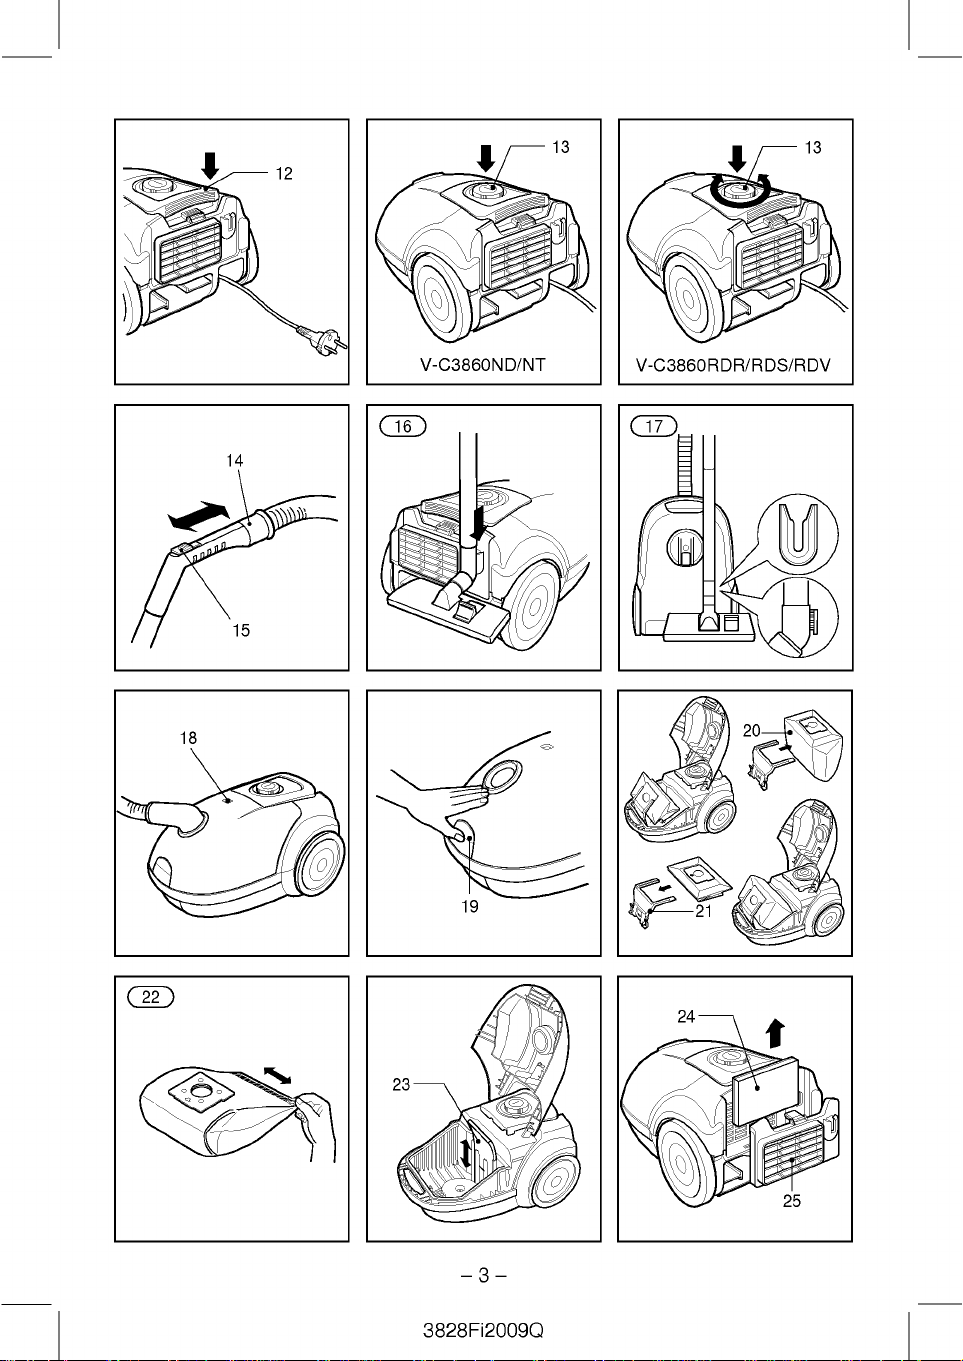
Park-System(16)
For
example
a
flexible
?
Slide
tool into
Storage(17)
When
the
automatically
You
vertical
large
underside
into
plug
button
it
stop
your
applianceisequipped
variable
(dependingonmodel)
flexible
regulator(15)
the
short
to
use
rug,
hose
the
you
appliance,
can
move
positionbysliding
cleaning
allows
to
position(tiles,
the
pedal
or
rug
lift
the
brush
Tool(9)
in
i.e.
reaching
ofasofa!
brush(10)
picture
and
Nozzle(11)
uphostery,
collectors
and
fluff.
in
plug
supply
the
(13)
the button
press
the
power
the
power
hose
suction
breaks
move
the¡APark
and
hook
attachedtothe
the
slotonthe
have
switched
press
rewind
or
head
of
the
appliance.
the
you
type
is
equipped
to
head(7)
parquet
to
lower
position.
up.
those
normally
cobwebs,
frames
other
uneven
mattresses,
helptopick
and
use
cordtothe
socket.
to
start
the
vacuum
(13)
power
level
control(13),
appropriated
handle(14)
which
allows
level.
a
during
small
vacuuming,
piece
system¡Btosupport
the
on
into
rear
cord.
your
head.
of
off
the
the
the
cleaning
store
alter
its
of
floortobe
floors...).
the brush.
Press
on
inaccess-
or
furniture
objects.
desired
cleaner.
again.
withanelec-
you
for
hasamanual
to
you
of
furniture
large
cleaning
the
appliance.
and
unplugged
handle
appliance
hook
on
clip
with
posi-
the
down
out-
etc.
the
up
length
can
the
briefly
the
(12)
in
on
the
the
a
air
for
or
to
a
--4--
3828Fi2009Q

the
Changing
The
dustbag
is
set
to
is
dow(18)
Evenifthe
fullatthis
It
has
?
?
Your
paper
(22)(dependingonmodel).
?
?
maximum
off
the
floor
is
could
be
clogged
Turn
off
the
the
Open
and
lifting
applianceisequipped
dust
Take
holdofthe
and
pull.Remove
away.
To
refit
a
support
of
(21)until
If
your
ric
as
Empty
Note:
device
you
ted
Cleaning
The
ance
Each
we
appliance
dust
above.
it
and
as
the
which
cannot
correctly.
motor
between
time
advise
ter(23)and
the
dirt
cleaner.
and
dust
needs
power
but
the
completely
dustbag
it
stage,
that
a
great
the
up
appliance
cover
by
itupuntil
(20)
bag
new
bag
a
new
it
will
go
follow
bag
replace
appliance
checks
close
the
the
motor
filter is
the
that
you
to
you
to
clean
then
replacing
bag
changing
and
"bag
coloured
does
should
deal
pores
and
pressing
it
snaps
or
dust
the
push
bag
no
further.
is
fitted
the
it(22).
is
that
lidifthe
situated
dust
bag
change
remove
it
by
when
the
full"
not
be
of
of
the
unplug
a
fabric
bag
bag
the
into
the
same
Do
fitted
the
filter
inside
and
the
tapping
itinthe
the
cleaner
cleaner
indicator
red.
appear
changed.
fine
very
dust
bag.
it.
the
hook(19)
into
place.
with
either
dust
the
and
handle
throw
by
cardboard
bag
withafab-
instructions
not
wash
with
a
is
in
bag
is
bag
the
the
air
outlet
the
motor
to
remove
vacuum
head
win-
to
be
dust
bag
mount
it.
safety
place
not
fit-
appli-
motor.
filter
fil-
What
does
Check
in
and
What
performance
?
Stop
a
?
Check
cleaning
?
Check
it
if
necessary.
?
Check
blocked.
to
not
that
that
to
the
that
that
that
if
do
your
work?
the
applianceiscorrectly
the
electrical
do
socket
when
reduces?
the
are
dust
air
and
tubes,
not
bag
outlet
if
necessary.
unplug
blocked.
appliance
tool
the
the
Replace
appliance
is
working.
the
suction
it.
flexible
is
filter
hose
not
full.Replace
is
not
E
plugged
and
Changing
Depending
your
types
ter
or
?
To
change
the
filter
of
the
?
The
the
on
applianceisequipped
of
filters:foam
anti-odour
these
compartment(25)
appliance.
foam
filter
lybytapping
?
The
electrostatic
charcoal
filter
(approximately
air
outlet
the
model
filterorelectrostatic
charcoal
filters
remove
should
it
to
remove
filteroranti-odor
should
be
6
every
filters
have
you
with
filter(24).
the
situatedatthe
be
cleaned
the
dirt.
changed
bag
changes)
chosen
different
fil-
cover
of
rear
regular-
regularly.
--5--
3828Fi2009Q
D
Sicherheitshinweise
Bitte
lesen
Sie
da
sie
Einsatz
Dieses
wichtige
und
Wartung
Gerat
die
nachfolgenden
Erklarungen
des
entspricht
Gerats
den
Hinweise,
uber
Sicherheit,
enthalten.
folgenden
EU-
Verordnungen:-Niedrigspannungsrichtlinen
73/23/EEC,
Niemals
benutzen
Bei
darf
Schaden
das
93/68/EEC,
Kinder
lassen.
Gerat
Beschadigte
LG-Vertragshandler
da
zur
Reparatur
den
den
werden.
Sie
Sie:
Staubbeutel
Filter
wechseln
kein
der
Deckel
keine
Bitte
entflammbare
(Flussigkeiten
heifle
benotigt
Schalten
bevor
?
?
Solange
kann
den!
Keinesfalls
Substanzen
saugen.
Keinesfalls
Gegenstande
Keinesfalls
saugen.
Wasser
oder
Netzkabel
den
89/336EEC-EMC.
das
Gerat
Defekten
nicht
verwendet
mussen
ausgetauscht
Spezialwerkzeuge
Staubsauger
wechseln.
oder
Staubbeutel
nicht
geschlossen
Gewalt
Asche,
anwenden!
oder
Glut
aufsaugen.
oder
Flussigkeiten
unbeaufsichtigt
am
Netzkabel
werden.
von
einem
werden,
stets
aus,
reinigen.
eingefuhrt
ist,
wer-
explosive
oder
Gase)
oder
scharfe
Bedienungsanleitung
Anschluss
Staubsaugerschlauchs
Den
Anschluss
in
die
(2)
Zum
Losen
Anschluss
Fassung
Zusammenbau
nach
(je
?
Metallrohr
-
Die
zusammenfugen.
des
des
(1)
Staubsaugerschlauchs
FassungamStaubsauger
des
Schlauchs
drucken
ziehen.
der
den
und den
Saugrohre
Modell)
(4)
zwei
Rohre
unter
leichtem
Knopf
Schlauch
einfuhren.
(3)
Dre
hen
am
aus
der
?
Teleskoprohr
-
Halten
sie
Rohr
die
bis
-
Das
herausziehen.
-
Die Rastklinke
Verwendung
und
-bursten
Die
Bodensaugduse
?
Die
Bodensaugduse
Fußhebel
Burste
ein-
(8)
und
Hartbodenposition
Den
usw.):
auszufahren.
Hebel
Teppichposition:
die
Burste
einzufahren.
?
Spaltsaugduse
Diese
Duse
dient
unzuganglichen
zwischen
?
Staubburste
Zum
nten,
Heizkorperrippen
Absaugen
Buchern
ungleichmafliger
?
Polstersaugduse
Zum
Absaugen
usw.
Netzanschluss
Das
Netzkabel
herausziehen
anschlieflen.
Staubsaugers
Zum
Ausschalten
drucken.
Einstellen
?
Falls
(13)
ausgerustet
Ihr
undander
Zum
den
der
Gerat
Saugleistung
nach
(je
?
Im
mit
reduzieren
Modell)
Schlauchgriff
dem
Sie
die
konnen.
Parksystem
Wenn
Sie
das
Verschieben
Staubsaugen
von
(5)
federklinke
zur
gewunschten
loslassen.
von
Saugdusen
nach
(je
auf
mit
auf,
dem
ausfahren
(Kachel-,
drucken,
Den
(9)
zum
Stellen
(10)
von
Bilderrahmen,
und
anderen
Oberflache.
(11)
von
Polstern,
und
bis
zur
erforderlichen
Einschalten
Knopf
den
Knopf
Leistung
mit
einem
konnen
ist,
nach
Erforderlichkeit
ist
(14)
Saugleistung
(16)
Mobeln
(6).
Lange
Modell)
das
Rohr
weist
Sie
bei
konnen.
Parkettboden
um
die
drucken,
wie
Polsterritzen,
usw.
einen
von
(7)
Hebel
Reinigen
Objekten
Matratzen
Bedienung
Steckdose
des
drucken.
(13)
erneut
(13)
Leistungsregler
Sie
die
ein
Luftregler
kurzzeitig
z.B.zum
usw.
kurz
aufsetzen.
Bedarf
Burste
um
Mobelka-
mit
Lange
andern.
(15),
die
--6--
3828Fi2009Q

D
unterbrechen
[Parksystem]
und
Saugburste
?
Den
Haken
mussen,
zum
der
sollten
Abstutzen
verwenden.
groflen
Reinigungsvorrichtung
Ruckseite
Aufbewahren
Nach
Netzsteckers
das
Sie
konnen den
abstellen,
Saugburste
Gerats
Wechseln
Wechseln
Staubfullungsanzeige
Saugleistung
Staubduse
Auch
nicht
konnte
des
?
Das
aus
?
Am
offnen.
Ihr
Staubbeutel
ausgerustet.
?
Den
hochziehen.
des
Gerats
(17)
dem
Ausschalten
den
Netzkabel automatisch
wenn
einhaken.
wenn
voll
erscheint,
sein,
Staubbeutels
Gerat
der
Steckdose
Riegel
Staubsauger
Staubbeutel
Handgriff
Staubsauger
Sie
den
in
den
Clip
des
Staubbeutels
Sie
den
Staubbeutel,
und
vom
komplett
der Staubbeutel
dass
rot
sollten
sehr
verstopft
ausschalten
ziehen.
ziehen
(19)
istjenach
aus
Papier
nach
(je
am
Den
Staubbeutel
(18)
Boden
feiner
Modell)
Griff
wegwerfen.
?
Die
Kartonfassung
bis
(21)
zum
Staubbeutelfassung
Bei
Staubsaugern
den
Beutel
wie
Den
Beutel
Den
(22)
Beutel
:
Dieses
zen.
Hinweis
des
Anschlag
mit
oben
entfernen
entleeren
nicht
Gerat
einfuhren.
Staubbeuteln
waschen.
Sicherheitsvorrichtung,
Deckels
nicht
korrekt
Reinigen
Der
Motorfilter
verhindert,
des
wenn
eingesetzt
Motorfilters
befindet
von
in
den
einfuhren.
und
Ziehen
(12)
aufzuwickeln.
Haken
auf
der
bei
wird.
zu
Sie
ihn
Staub
hat.
und
und den
Modell
(20)
fassen
neuen
in
die
und
enthalt
die
das
der
ist.
sich
zwischen
Sie
das
Schlauch
Schlitz
des
drucken,
vertikal
an
der
Unterseite
sobald
maximaler
abgehobener
diesem
Zeitpunkt
wechseln.
die
Poren
den
Netzstecker
Deckel
mit
oder
Stoff
und
entfernen
Staubbeutels
aus
und
einsetzen.
wieder
einset-
eine
Schileßen
Stoubbeutel
auf
der
um
groflen
des
die
Es
einem
(22)
und
Stoff,
des
Staubbeutel
Wechseln
ichzeitig
und
des
Luftauslassfilters
den
Motorfilter
Motor.
auszuklopfen.
Danach
einsetzen.
Wechsel
Je
Filtertypen
trostatischer
Geruchsfilter
?
?
?
Uberprufen
angeschlossen
Steckdose
?
?
?
?
den
Filter
des
Auslassfilters
nach
Modell
kommen
zum
Einsatz:
Filter
(24).
Zum
Filterwechsel
anheben
filtergehauses
nen.
Der
ausgeklopft
nen.
Der
Aktivkohle-Geruchsfilter
regelmaflig
werden
Was
und
die
(25)
Schaumstofffilter
werden,
elektrostatische
gewechselt
alle
(etwa
tun
bei
ob
Sie,
ist
anliegt.
Was
tun
bei
Das
Gerat
ausschalten
aus
der
Steckdose
Sicherstellen,
und
Saugdusen
Darauf
voll
ist.
Darauf
von
Verstopfungen
das
achten,
dass
Gegebenenfalls
achten,
dass
Gegebenenfalls
Wir
empfehlen
zu
(23)
wiederinden
verschiedene
Schaumstoff-,
oder
Aktivkohle-
den
kleinen
muss
Schmutz
Filter
des
regelmaflig
und
sollten
Abdeckung
hintenamGerat
um
6
Staubbeutelwechsel).
beim
auch
gle-
entfernen
Staubsauger
elek-
Riegel
entfer-
zu
entfer-
der
Storungen?
der
und
Netzstecker
dass
Strom
korrekt
an
der
Leistungsverlust?
und
den
Netzstecker
ziehen.
weder
verstopft
der
der
ist.
wechseln.
Staubbeutel
wechseln.
Luftauslassfilter
Rohre,
sind.
Schlauch
nicht
und
frei
--7--
3828Fi2009Q
Memo
--8--
3828Fi2009Q

Memo
--9--
3828Fi2009Q

Memo
--10--
3828Fi2009Q

E
For
offera24-month
the
available
of
apparatus:
of
buyer:
date:
24-month
defects.
costs.
spare
Yourwarranty
During
make
or
material
of
providenceordamages
packaging
Type
Name
Purchase
Warranty
warranty
parts
Further
Warranty
period,
to
dealer
your
claims
are
occurring
conditions
conditions
warranty
we
will
free,
excluded.
during
on
Certificate
for
repair
your
if
this
apparatus
We
are
Serial
Dealer's
rear
number:
vacuum
The
also
stamp
transport.
the
for
this
apparatus
not
liable for
buyer
apply!
apparatus
fails
assumes
and
signature
cleaner
atnocost
due
to
damages
to
or
you
manufacturing
due
to
acts
shipping
and
1.
The
warranty
purchase
of
Begin
submits
buyer
with
the
signedby
the
product
2.
entered
During
correct
can
onto
the
any
be
proven
manufacturingor
3.
Damages
compliance
normal
wear
warranty.
cover
wear
(for
example,
The
buyerisresponsible
during
transport
packaging
period
date
andisvalid
warranty
periodis
purchase
warranty
the
must
the
defects
duetoincorrect
with
Also,
parts
card,
seller.
The
agree
warranty
warranty
atnocost
that
these
material defects.
instructions
are
not
the
or
viewing
as
costs.
well
begins
for24months.
receipt
serial
with
card.
period,
are
handling,
covered
warranty
easily
glass,
for
as
on
if,
proven
together
filledinand
number
the
number
we
will
to
you,
attributed
non-
for
use
and
this
by
does
broken
any
shipping
light
damages
parts
bulbs).
and
3828Fi2009Q
the
the
of
if it
to
not
--11--
4.
We
decide
exchange
or
replaced
original
a
refrigeratorisrepaired
are
replaced.
5.
The
intervenes
authorised
apparatus
6.
Always
thatifthe
can
be
7.
If
a
repair
always
authorised
8.
Further
these
the
sense
the
other
or
warranty
warranty
in
by
is
used
keep
apparatus
transported
is
contact
service
claims
provisions
of
provisions
whether
parts
the
make
to
replace
the
the
covered
parts.
our
property.
or
certain
if
packaging,so
damaging
this
by
or
they
The
not
effected.
Exchanged
any
that
servicing,
an
are
periodisnotprolonged
is
nullified
apparatus
LG
Electronics,
for
commercial
original
requires
without
dealer
your
centre.
are
excluded.
are
invalid,
wording.
is
repairs,
The
parts
person
are
not
if
the
purposes.
it.
warranty,
If
parts
apply
validity
if
it
of
in
of

D
Garantieurkunde
F
r
dieses
Ger
t
bernehmen
wir
24
Monate
Garantie!
Wir
verpflichten
zu
setzen
bzw.
es
Anspr
auf
Im
Ger
Name
Kaufdatum:
1.
Die
und
der
Kaufer
zusammen
und
Seriennummer
eingetragenen
ubereinstimmen!
2.
Wahrend
kostenlos
auf
zuruckzufuhren
3.
Ausgeschlossen
Schaden,
eines
infolge
che
gegen
dem
Transportweg
brigen
gelten
tetyp:
desKufers:
Garantiezeit
erstreckt
Garantiezeit
den
unterschriebenen
alle
Fabrikations-
die
sich
Kaufbeleg
mit
der
durch
Nichtbeachtung
ingte
Abnutzung
die
Garantie
zerbrechliche
nicht
Sichtscheiben,
Schaden,
gehen
die
ebenso
Verpackungskosten
w
hrend
uns,
Ihrem
Fachh
Fabrikations-
uns
unsere
der
ndler
oder
sind
ausgeschlossen.
sowie
Versand-
umseitig
24-monatigen
die
Ersatzteile
Materialfehlers
und
Verpackungskosten
hrten
aufgef
Garantiebedingungen
mit
dem
beginnt
uber24Monate.
als
gilt
nachgewiesen,
(Quittung/Kassenzettel)
der
vom
Verkaufer
Garantiekarte
des
Produkts
Nummer
Mangel,
sind.
der
auf
auf
Garantiezeit
soweit
oder
von
der
Garantie
unsachgemaße
Anleitung
auftreten.
Glimm-
Ebenso
auf
Verschleißteile
Produktteile
oder
dem
Transport
wie
zu
Lasten
Kaufdatum
Der
wenn
ausgefullten
vorlegt.
muss
der
Garantiekarte
beheben
sie
nachweislich
Materialfehler
sind
Behandlung,
und
betriebsbed-
erstreckt
und
(wie
Gluhlampen).
entstehen,
Versand-
des
Kaufers.
Beginn
mit
wir
sich
leicht
z.B.
und
der
Die
der
Garantiezeit
kostenlos
versagen
Besch
digungen
Ihr
zur
Verf
sollte.
durchhhere
gehen
Garantiebedingungen!
Seriennummer:
/
Stempel
4.
5.
6.
Unterschrift
fur
Staubsauger
Die
Entscheidung
oder
ersetzte
Durch
ursprungliche
Der
Personenindas
Electronics
ebenso,
Zwecken
Heben
auf,
bleibt
Ersatz
Teile
Reparatur
Garantiezeit
Garantieanspruch
nicht
sobald
eingesetzt
Sie
unbedingt
damit
das
gehen
Beschadigungen
7.
Wenden
Fachhandler
Service-Center.
8.
Weitergehende
geschlossen.
Bestimmungen
sinngemaß.
Bestimmungen
Sie
sich
oderaneines
Sollten Teile
Die
wird
Gertkostenlosinstand
zu
gung
stellen,
Weitergehende
Gewalt
zu
Ihren
Lasten.
des
Fachh
ndlers
uber
bei
oder
uns.
in
Reparatur,
unser
Teileersatz
nicht
Austausch
Ausgetauschte
Eigentum
verlangert.
erlischt,
Gerat
eingreifen,
fur
den
Service
das
Gerat
wird.
die
Originalverpackung
Gerat im
transportiert
im
Garantiefall
Anspruche
unwirksam
Wirksamkeit
hiervon
autorisiert
zu
Servicefall
werden
unserer
dieser
sein,
nicht
die
gewerblichen
kann.
autorisierten
sind
so
gelten
der
beruhrt.
wenn
oder
oder
uber.
wird
sobald
von
sind
ohne
an
lhren
aus-
ubrigen
die
LG
sie
-
P/No.:
3828Fi2009Q
 Loading...