

LG VR657LVMP, VR95 SERIES, VR86 SERIES Service Manual
P/NO : MFL67646518
July, 2015
Printed in Korea
MODEL : VR657* LVMP
VR657** LVMP
VR95** Ser
VR86** Ser
ROBOTIC CLEANER
SERVICE MANUAL
Caution
Please read the safety cautions of this booklet
before the maintenance of the product.

-2-
Table of Contents
1. Product SPEC
2. Structure and Name of Each Part
3. Cautions and Methods during the Usage
4. How to Use Main Body Operation Buttons and Remote Controller
5. Technical Descriptions of the Parts
6. Safety Cautions and Verifications During the Repair
7. How to Disassemble/Assemble and Repair Major Parts
8. Cabling Diagram
9. Types of Defects and the Countermeasures
10. How to Use R-Manager RK diagnosis program
11. How to Use Black Box Viewer
12. Deal Drawing of the Structure and List of the Parts
-3-
Product Specifications
■ Main Unit
ITEM LG Robot Cleaner
MODEL
VR657*LVMP / VR657**LVMP / VR95** Ser / VR86** Ser
Battery (Fully Charging)
Li ion, DC 16.8V
Power Consumption
58W
Charging Time
3 hours
Use Time
Approx. 100 minutes
(based on general wooden oor )
Traveling Velocity
0.35 m/s
Cleaning Mode
zigzag cleaning / Cell by Cell Cleaning / My Space Cleaning / Spot Cleaning
Weight
3kg
External Dimensions
340mm x 340mm x 89mm
Accessary
Home station / remote controller / Filter / Cleaning Brush / Brush
Main Function
Turbo Mode / Learning Mode / Obstacle Sensing / Anti-Plunge function /
Scheduled Cleaning / Error Displaying / Navigation / Auto/Manual Recharging /
Corner Clean / Voice Messaging / Map Drawing /
Spot Cleaning / Repeat Cleaning / My Space Cleaning / Cell by Cell cleaning /
Zigzag Cleaning /
■ Home Station
ITEM Home Station
Model
VR621
Rating
AC 220V, 60Hz
Power Consumption
23W
Output Voltage/Current
DC 17.1V / 1.1A
■ Remote Controller
ITEM AKB73296002
Battery
DC 3V(AAA, 2ea)
Type
Infra Red(38kHz)
Operating Range
5m
Size(WxLxH)
45 X 22 X 115 mm
-4-
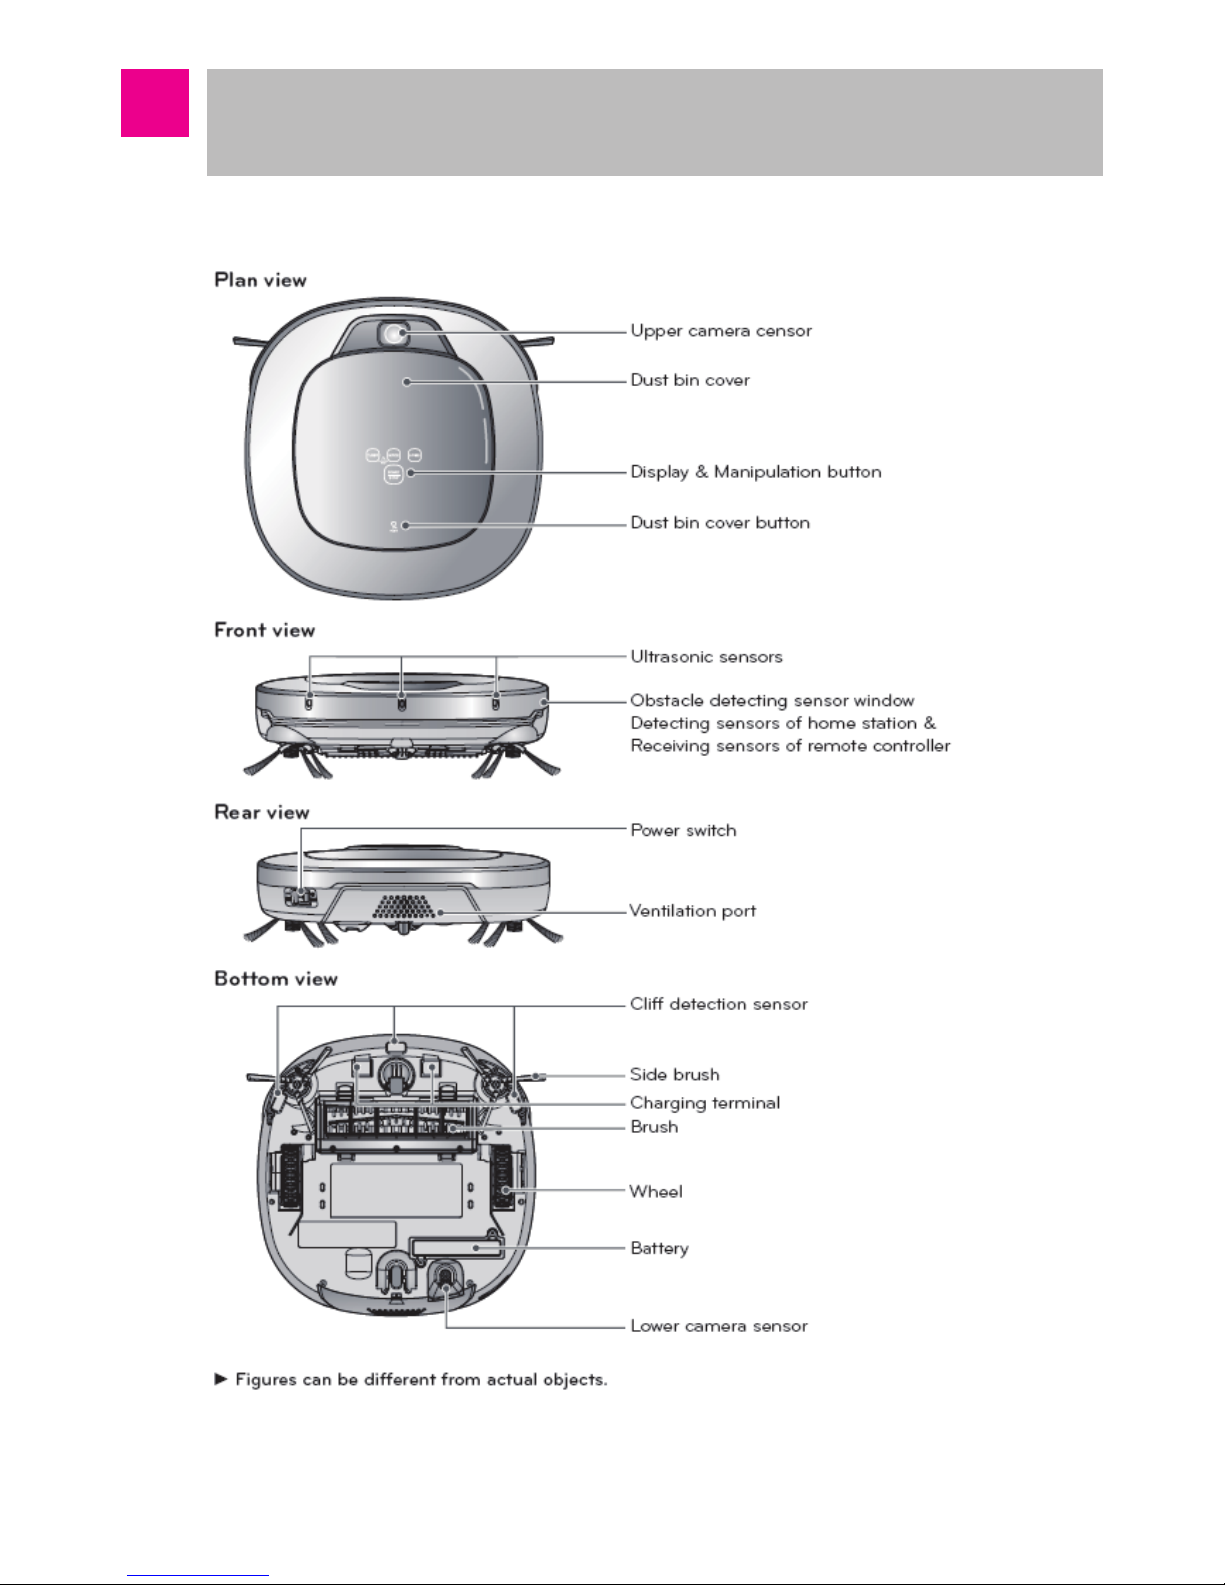
Structure and Name of Each Part
– Robot Cleaner
-5-
Structure and Name of Each Part
– Robot Cleaner
-6-
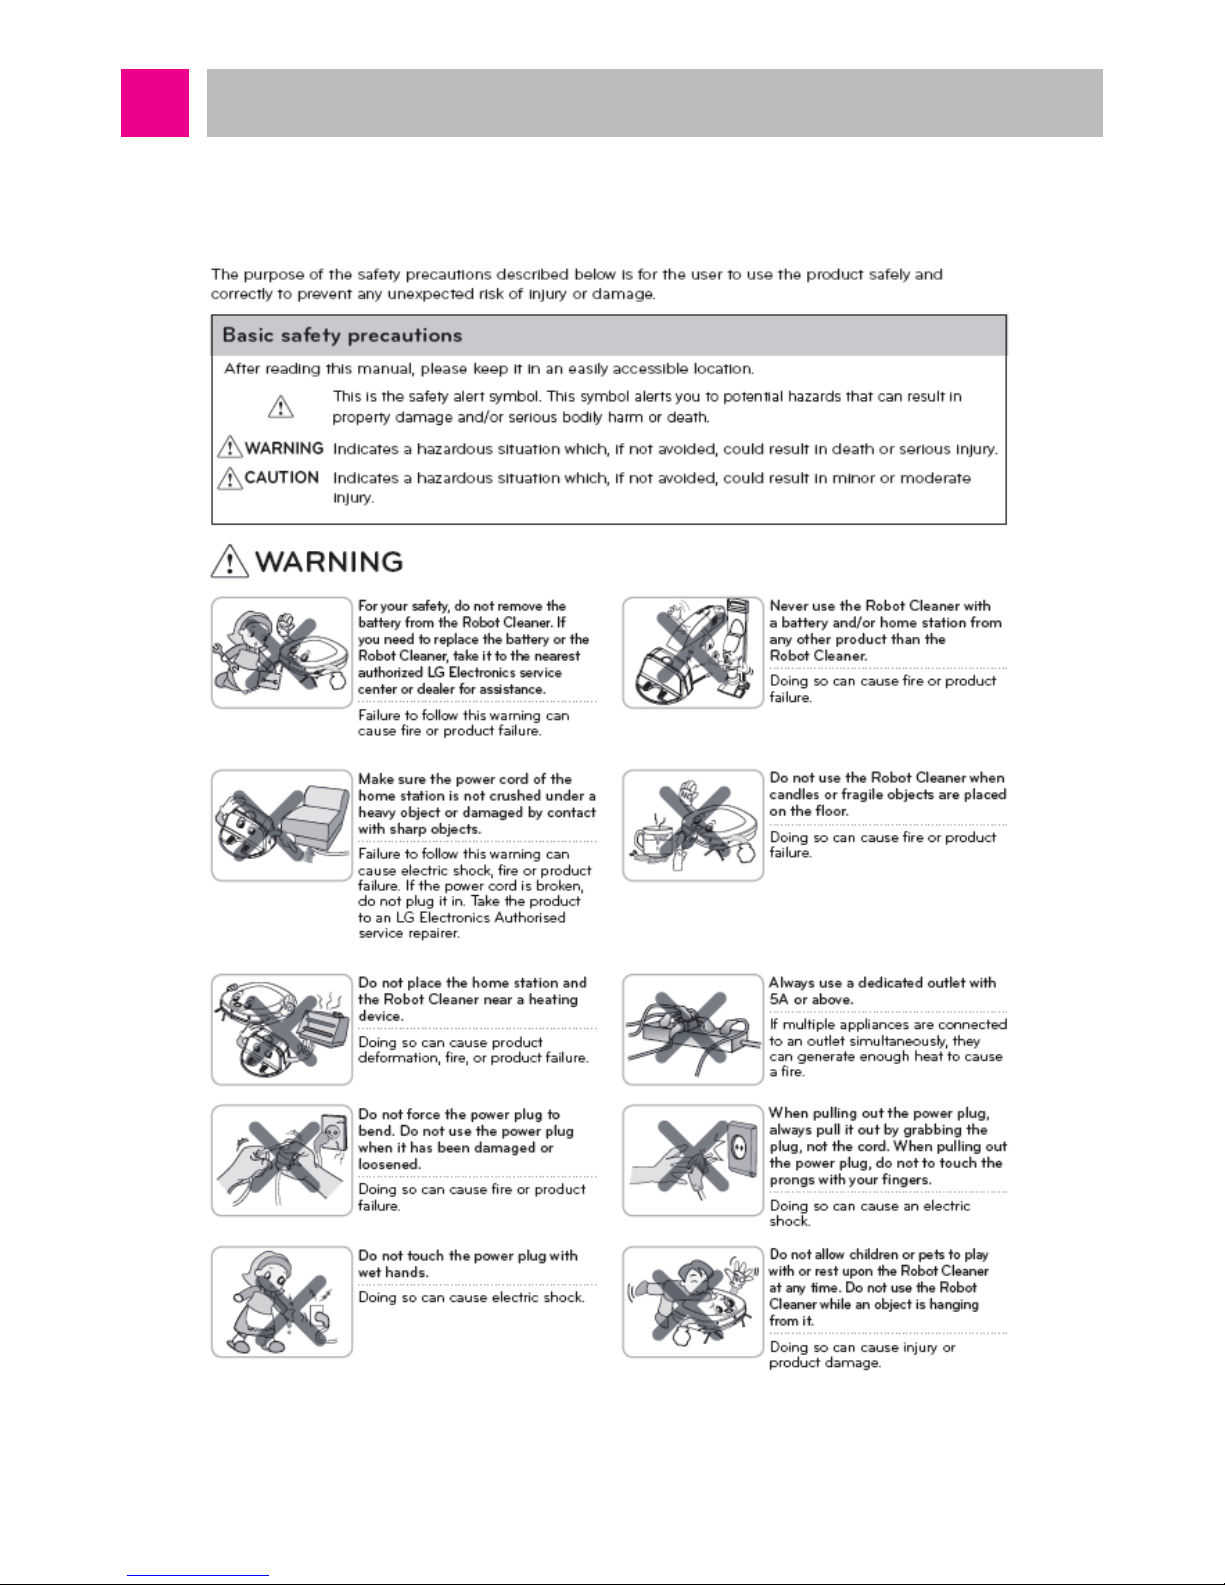
Cautions and Methods during the Usage
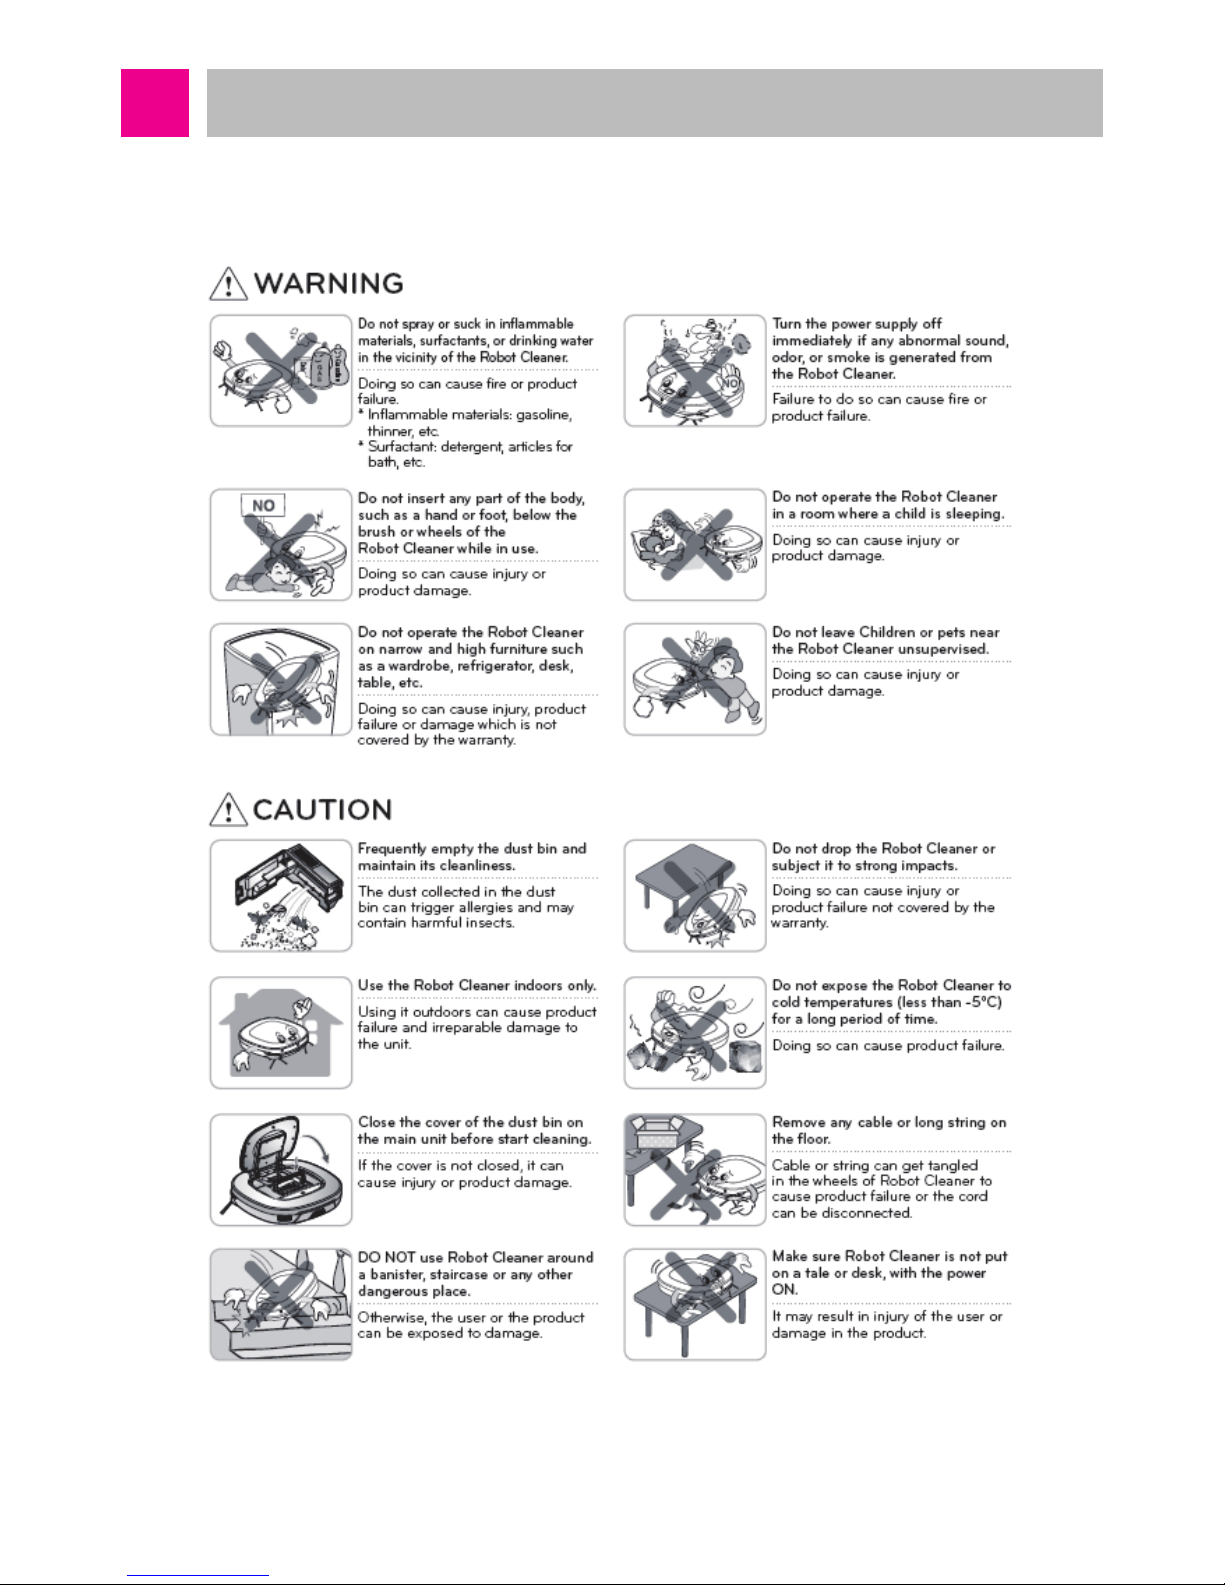
-7-
Cautions and Methods during the Usage

-8-
Cautions and Methods during the Usage
-9-
Cautions and Methods during the Usage
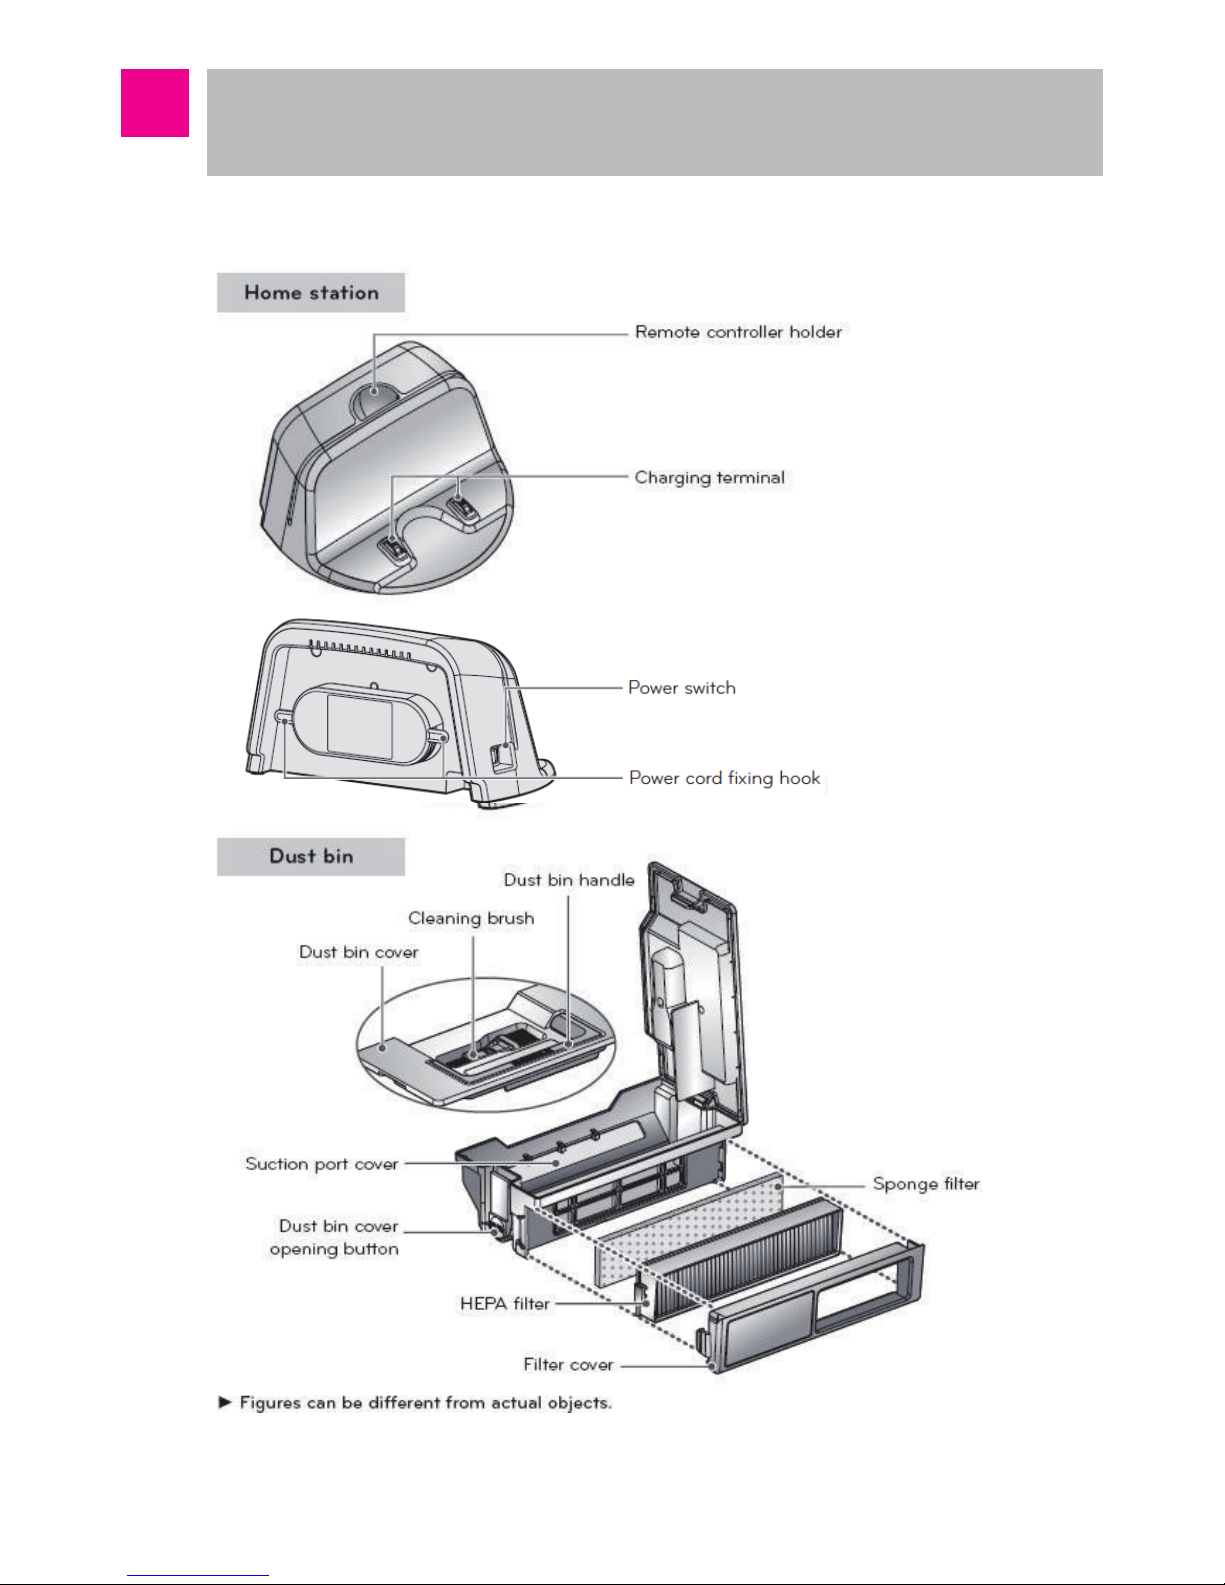
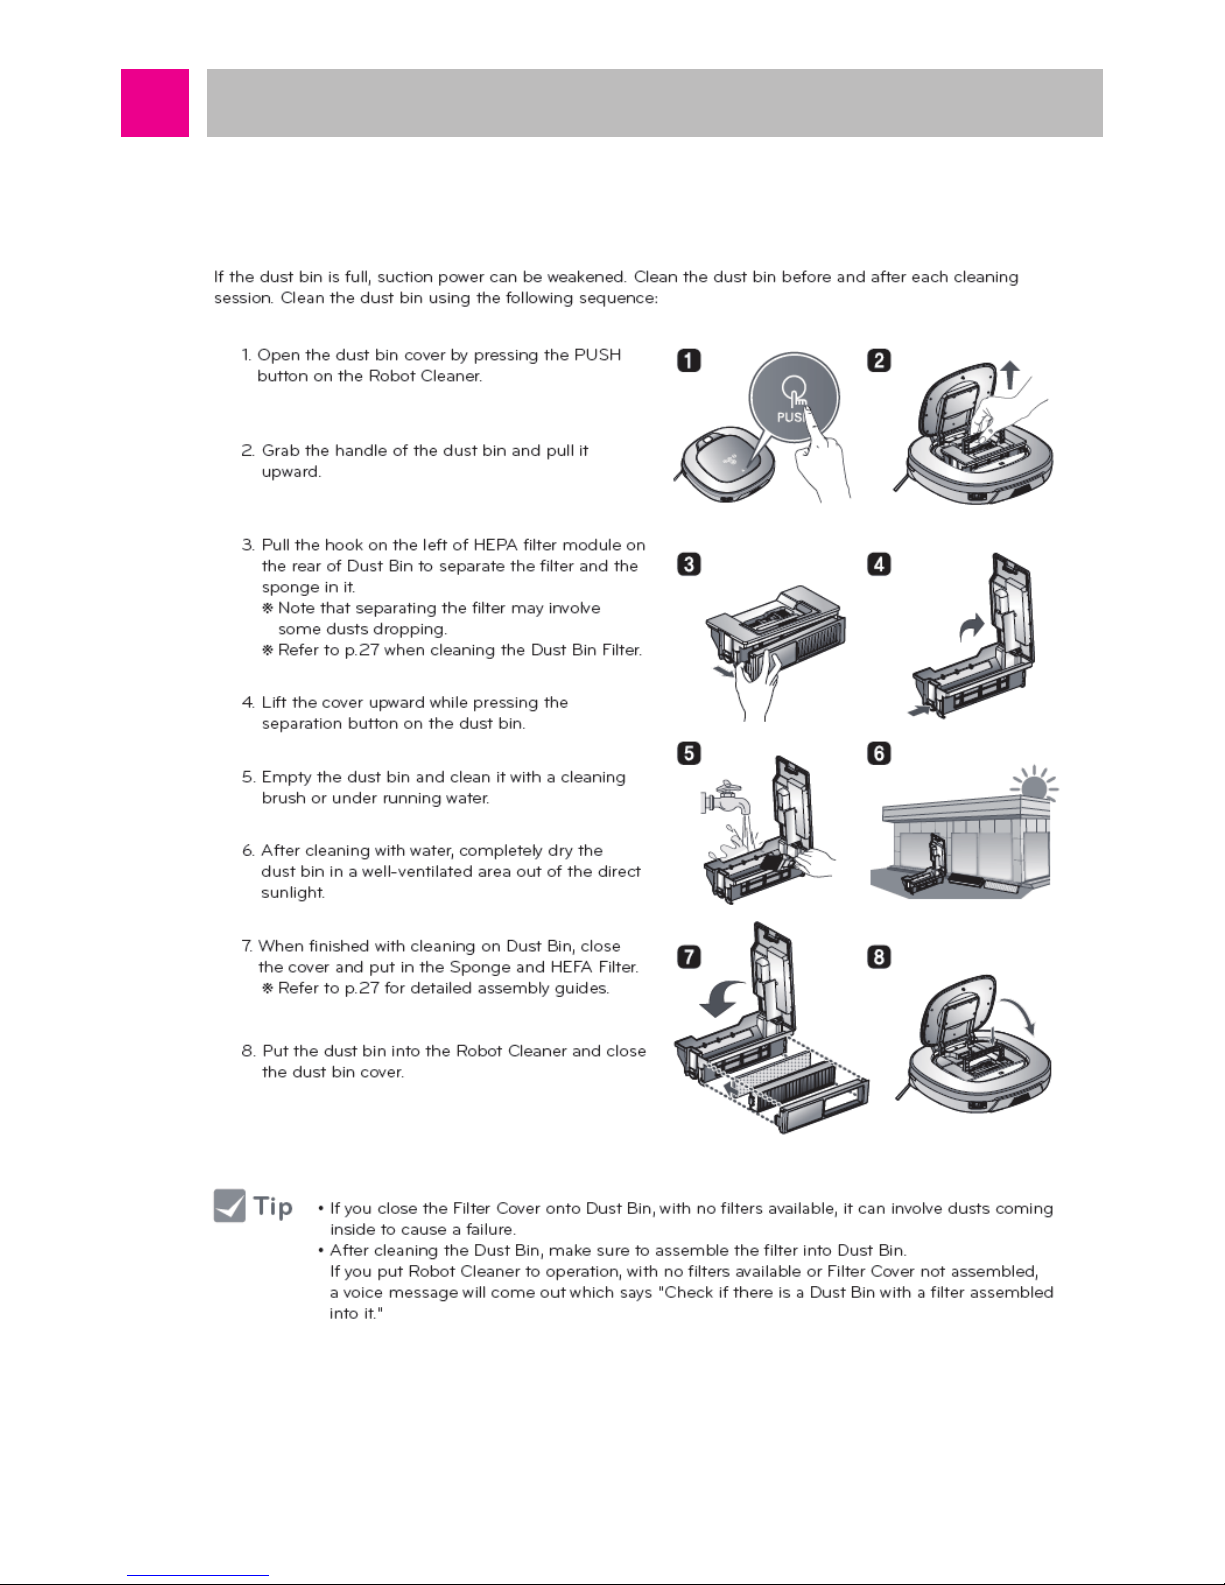
1. About Dust Bin
-10-
Cautions and Methods during the Usage
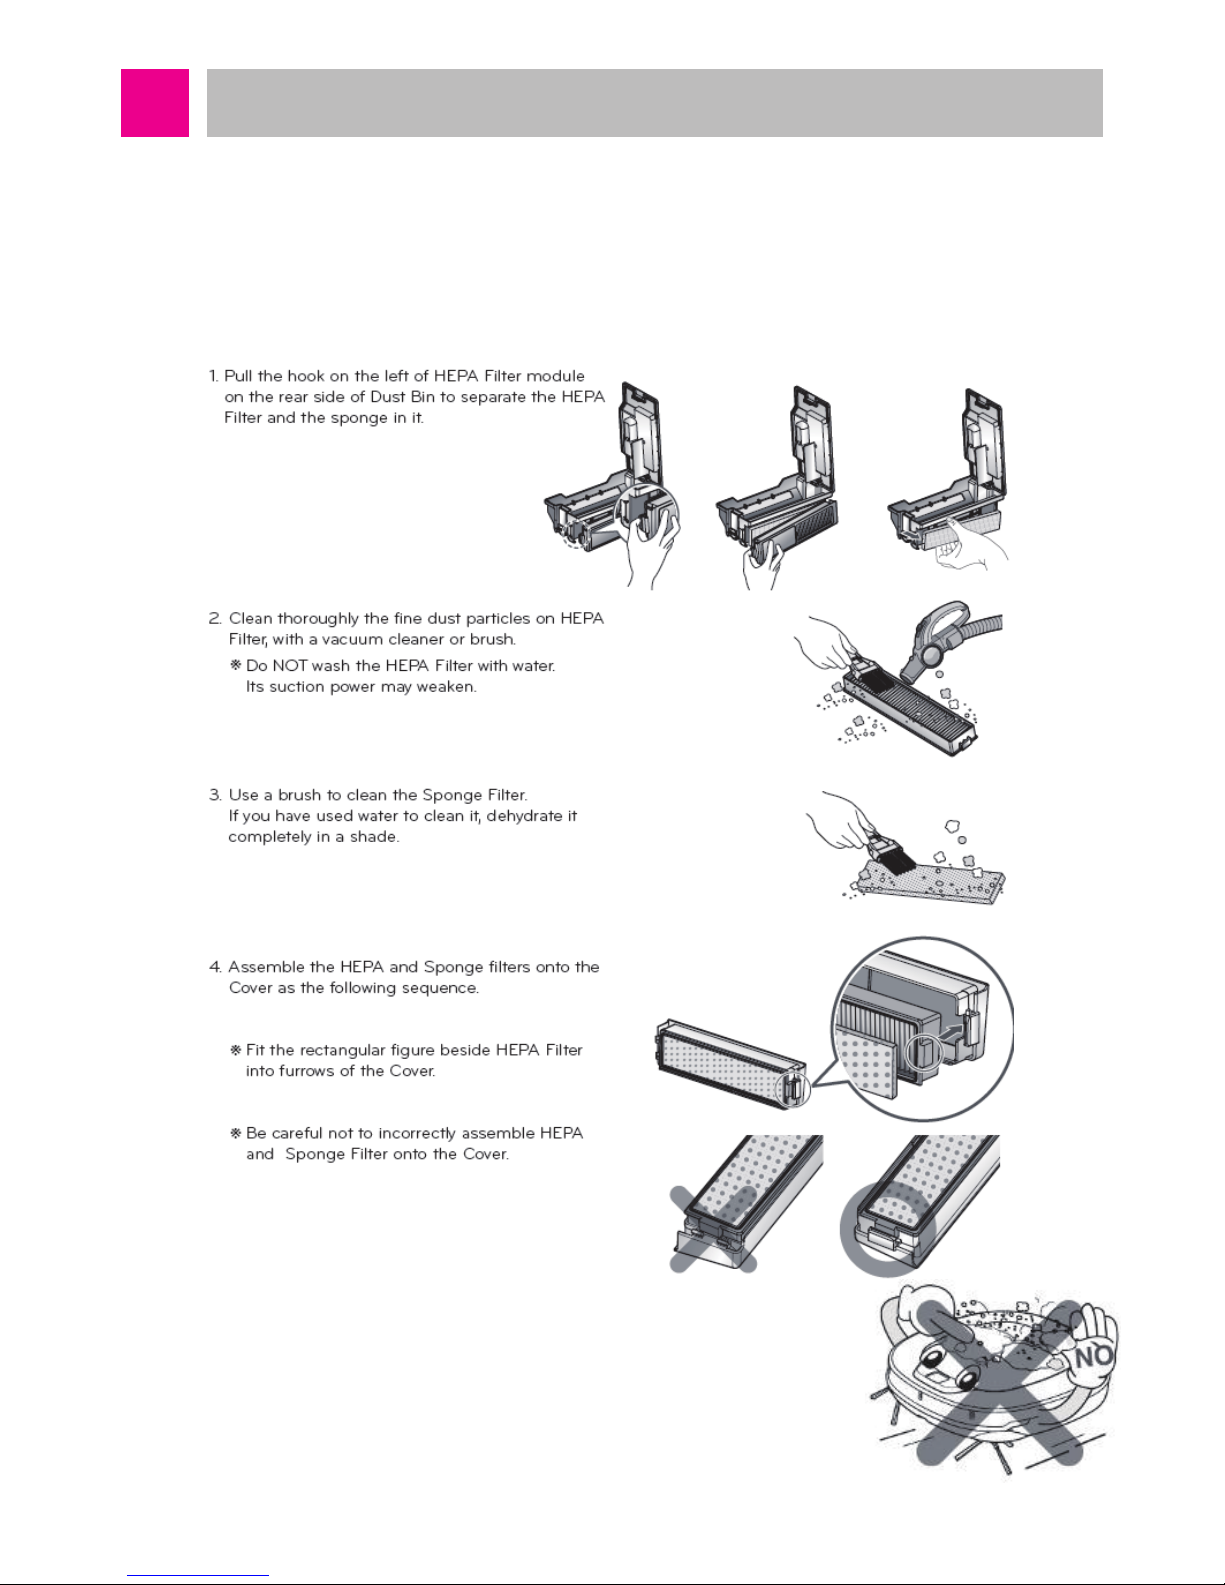
2. About Filter
■
Dust Bin Filter
It is recommended to clean the dust bin filter with HEPA 11 once a week. During the cleaning,
clean thoroughly with cleaning brush and the cleaner. Never clean the filter with water. When it
is washed with water, the cleaning performance will be degraded.
Make sure to install the dust bin filter (HEPA filter, sponge
filter) to the dust bin after the cleaning.
If the dust bin or dust bin filter is not installed, dust may enter
inside Roboking and cause disorder.
-11-
Cautions and Methods during the Usage
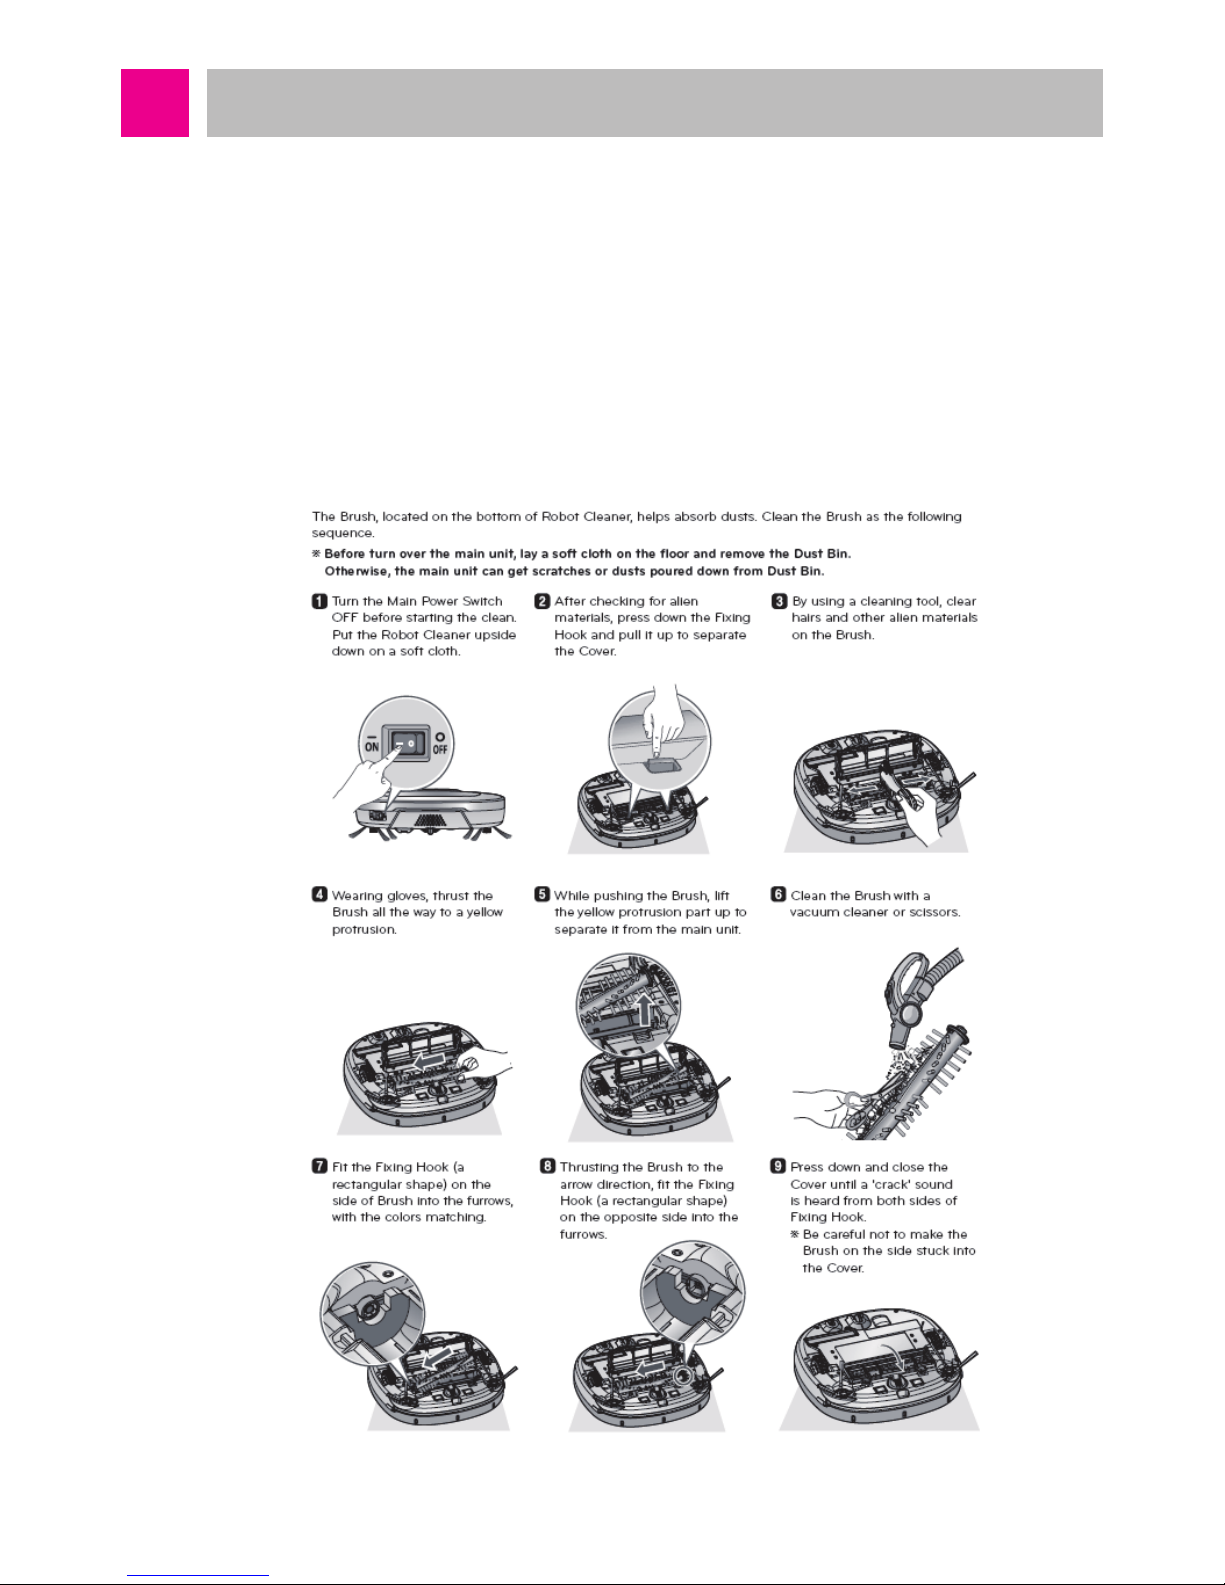
3. About Agitator
If foreign object is stuck in the agitator, it decreases the rotation speed and degrades the
cleaning performance to cause disorder. Especially, after cleaning hair or hair of pets, make
sure to clean the agitator. Clean periodically after 10 usages in ordinary homes.
If the agitator stops by foreign object during the cleaning, a voice alarm of “check foreign object
in the agitator at the bottom” will sound. At this time, remove the foreign object stuck in the
agitator before the usage.
Side agitator rotates synchronized with the bottom agitator. If the bottom agitator does not
rotate, the side agitator will not rotate either.
-12-
Cautions and Methods during the Usage
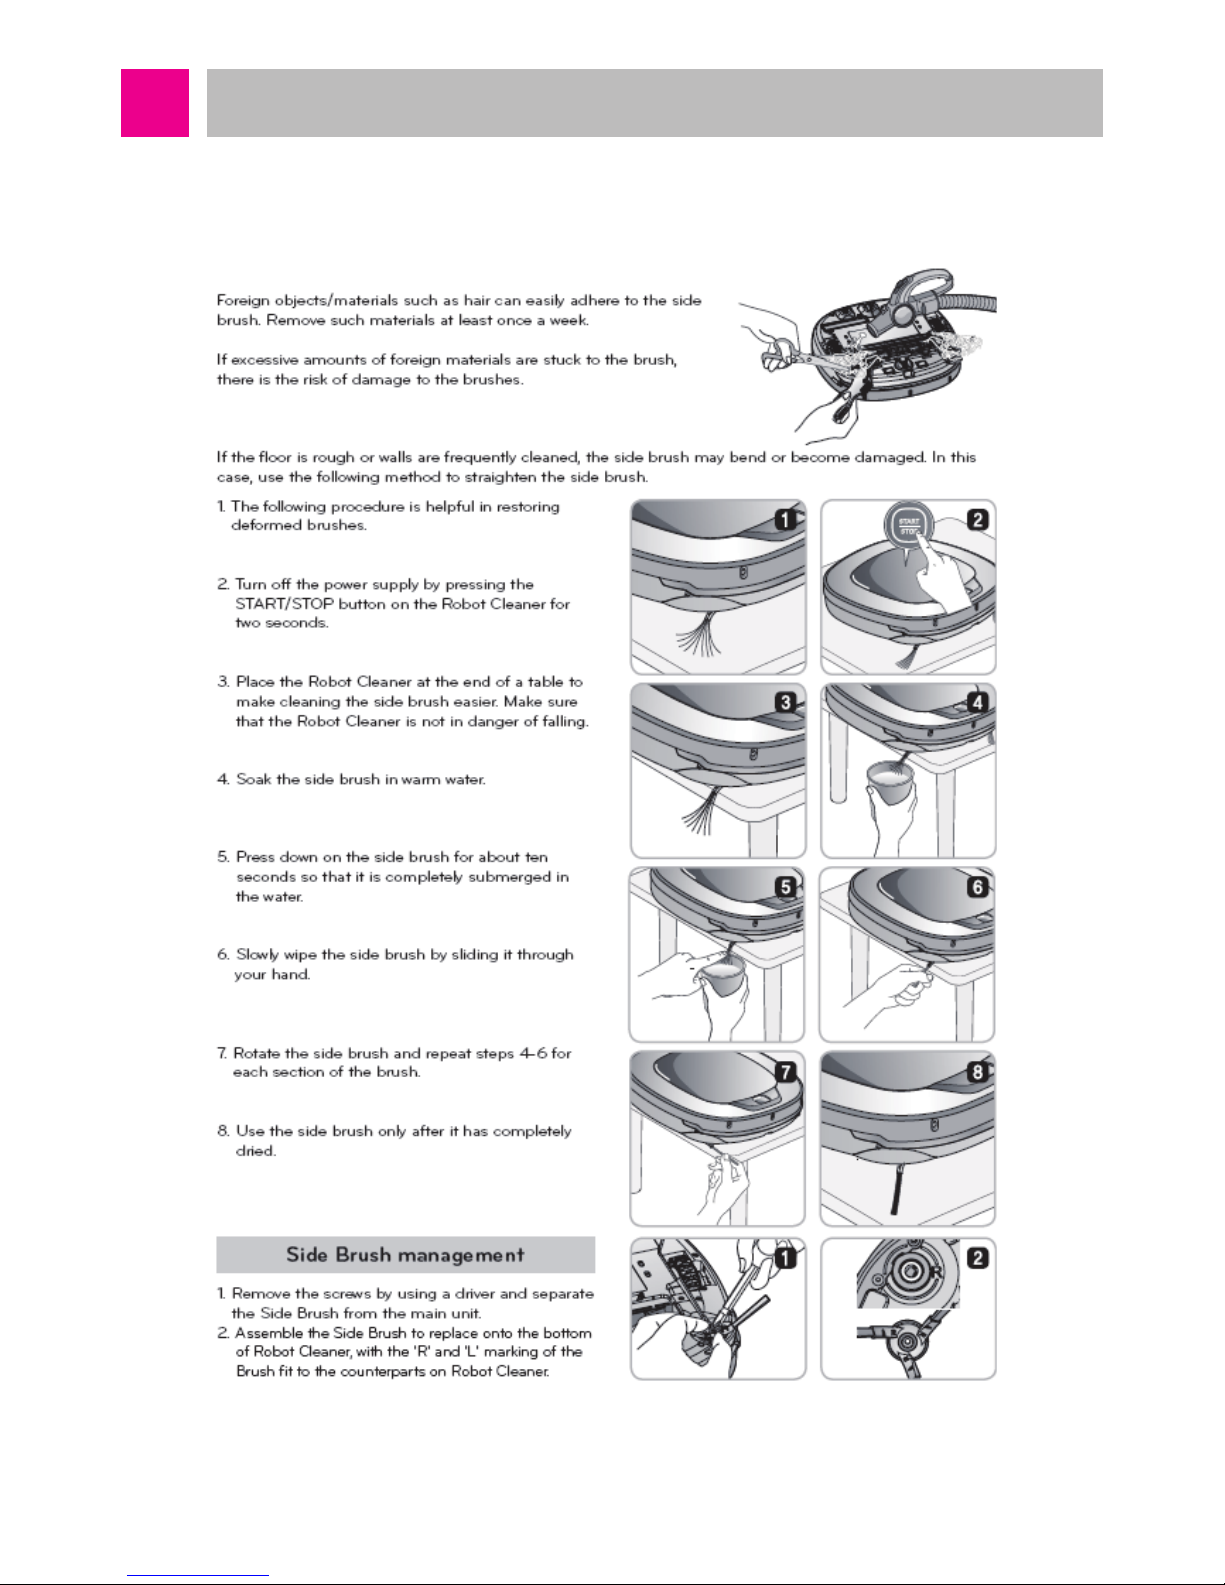
4. Cleaning the Side Brush
-13-
Cautions and Methods during the Usage
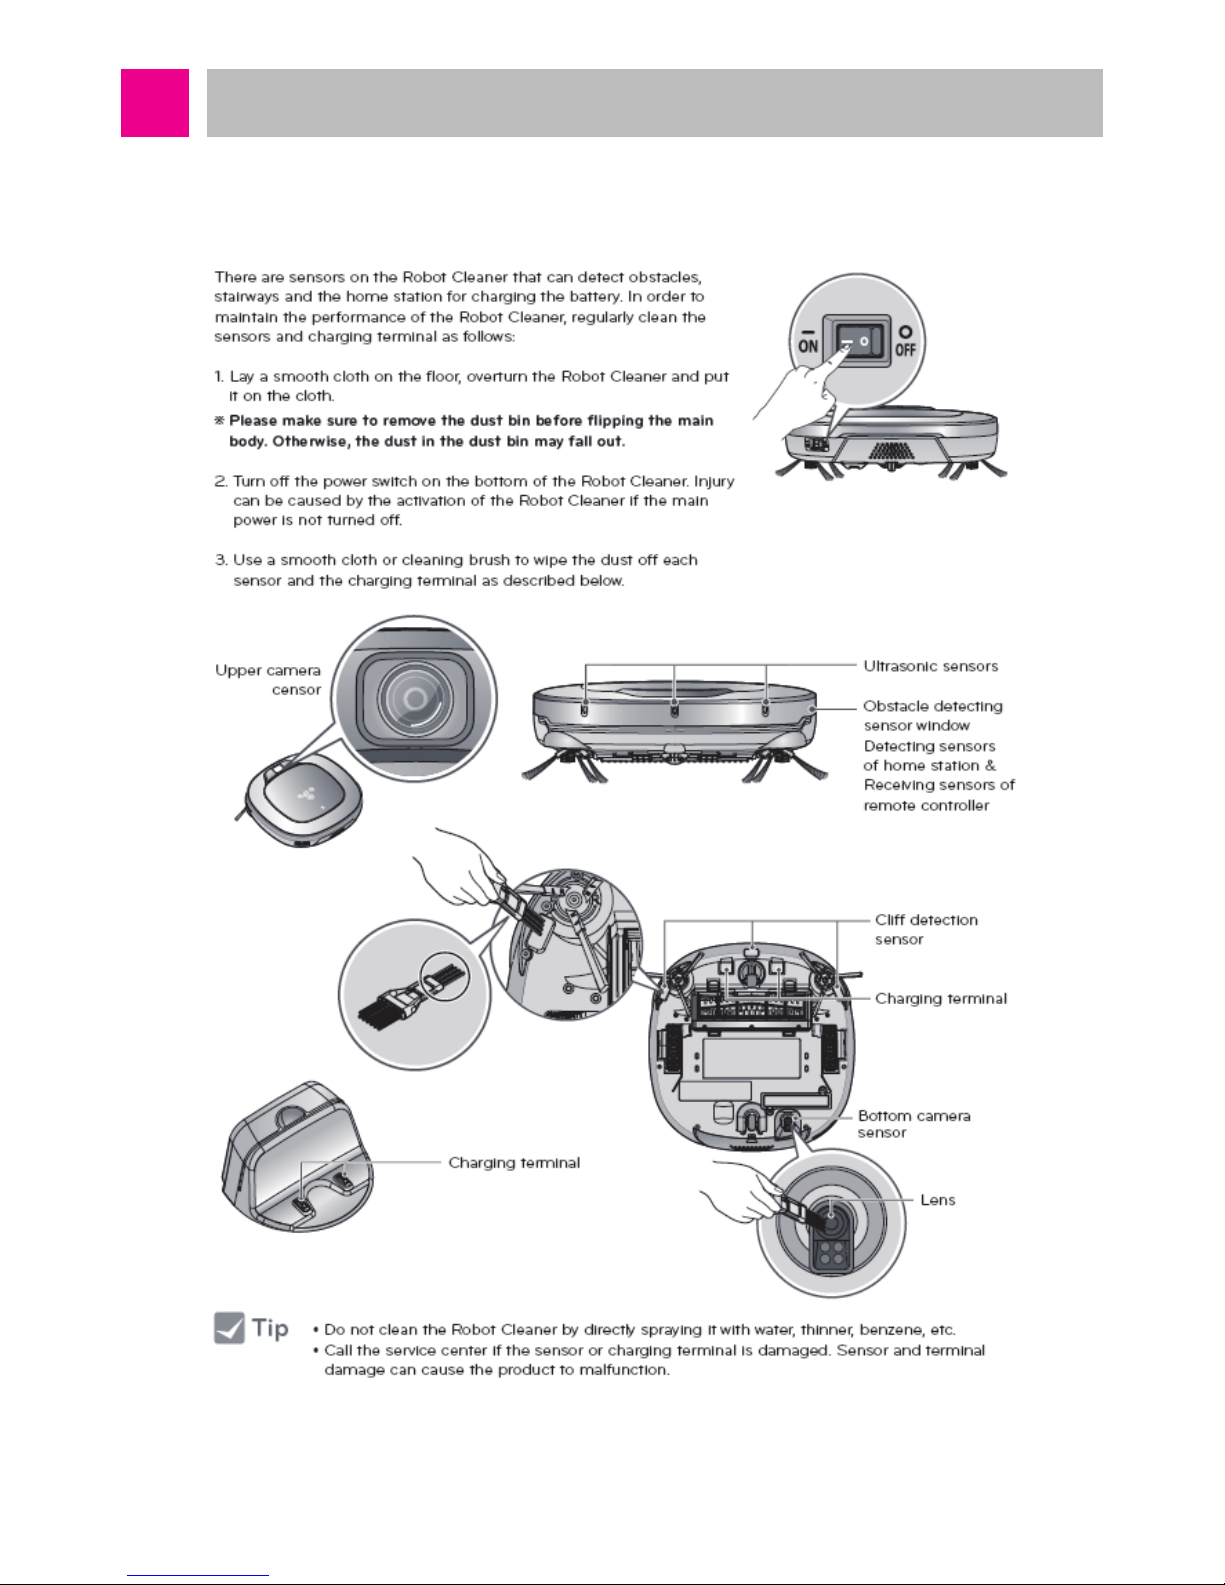
5. Cleaning the Sensor / Charging Terminal
-14-
Cautions and Methods during the Usage
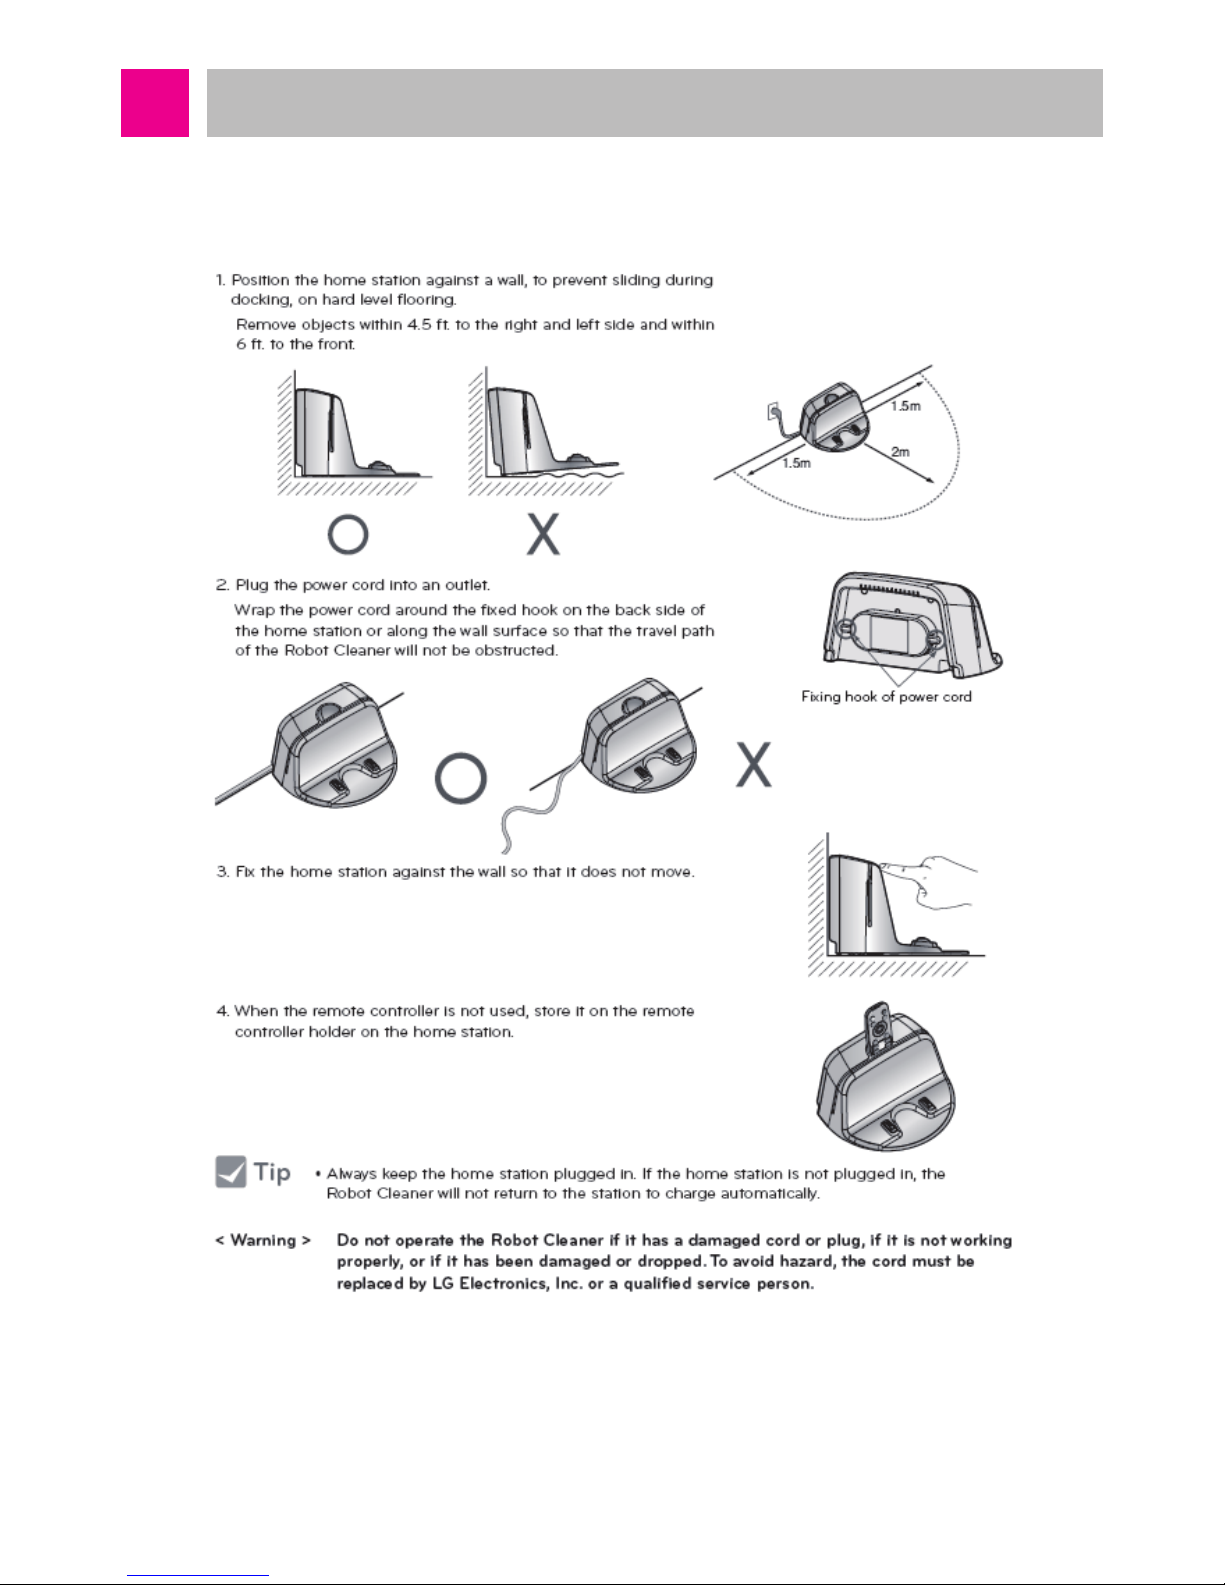
6. How to Install the Home Station
-15-
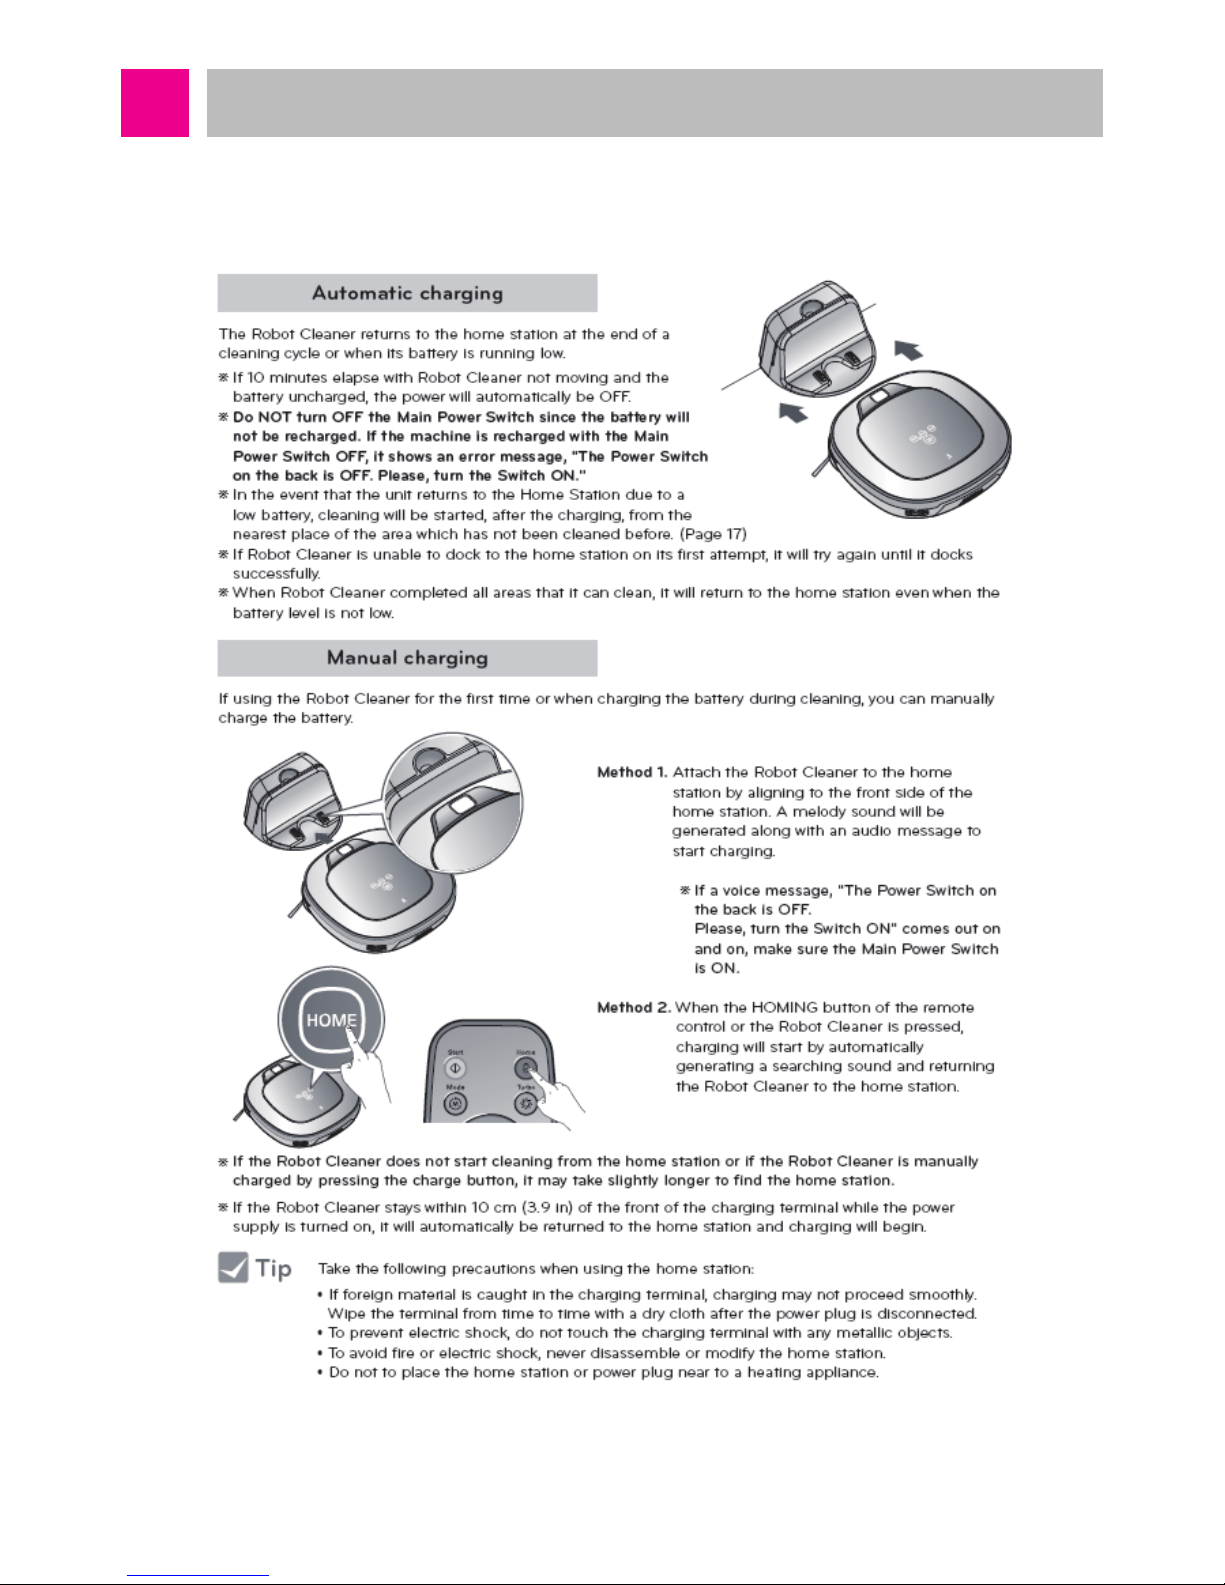
Cautions and Methods during the Usage
7. How to Charge the Battery
-16-
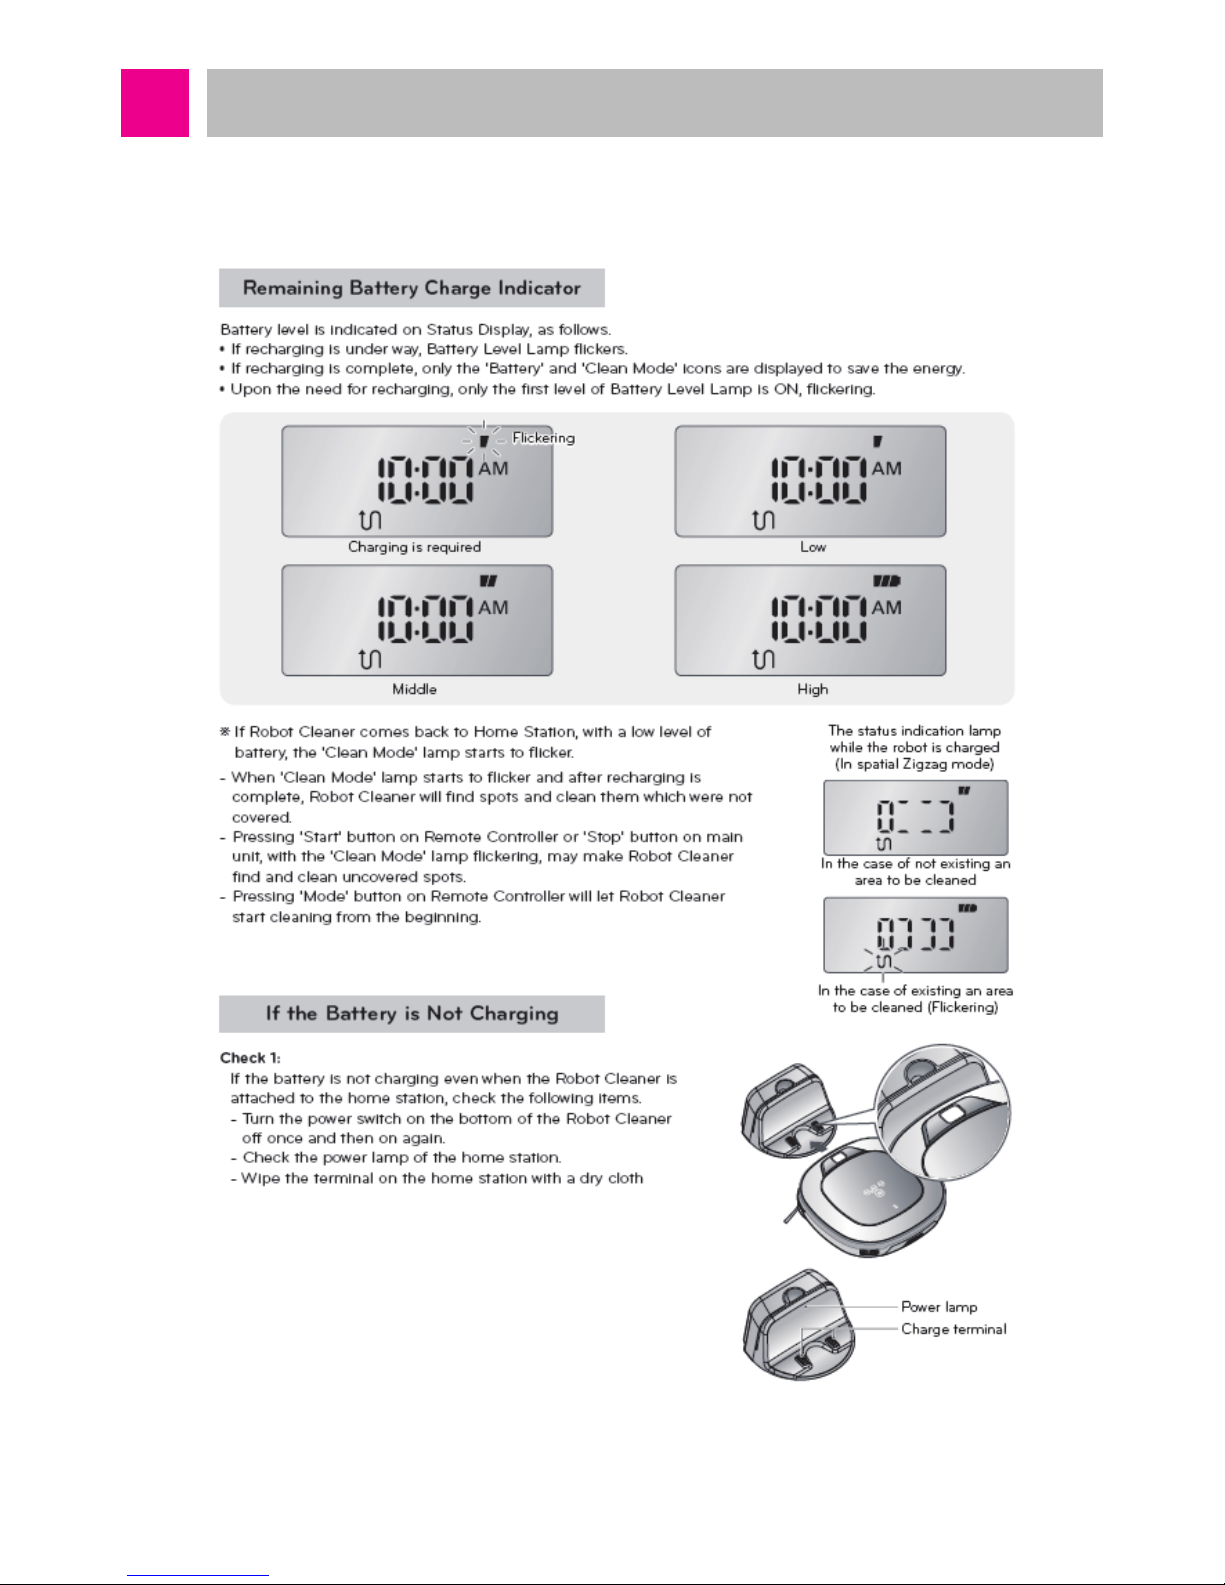
Cautions and Methods during the Usage
8. Remaining Battery Charge Indicator
-17-
How to Use Main Body Operation Buttons
and Remote Controller
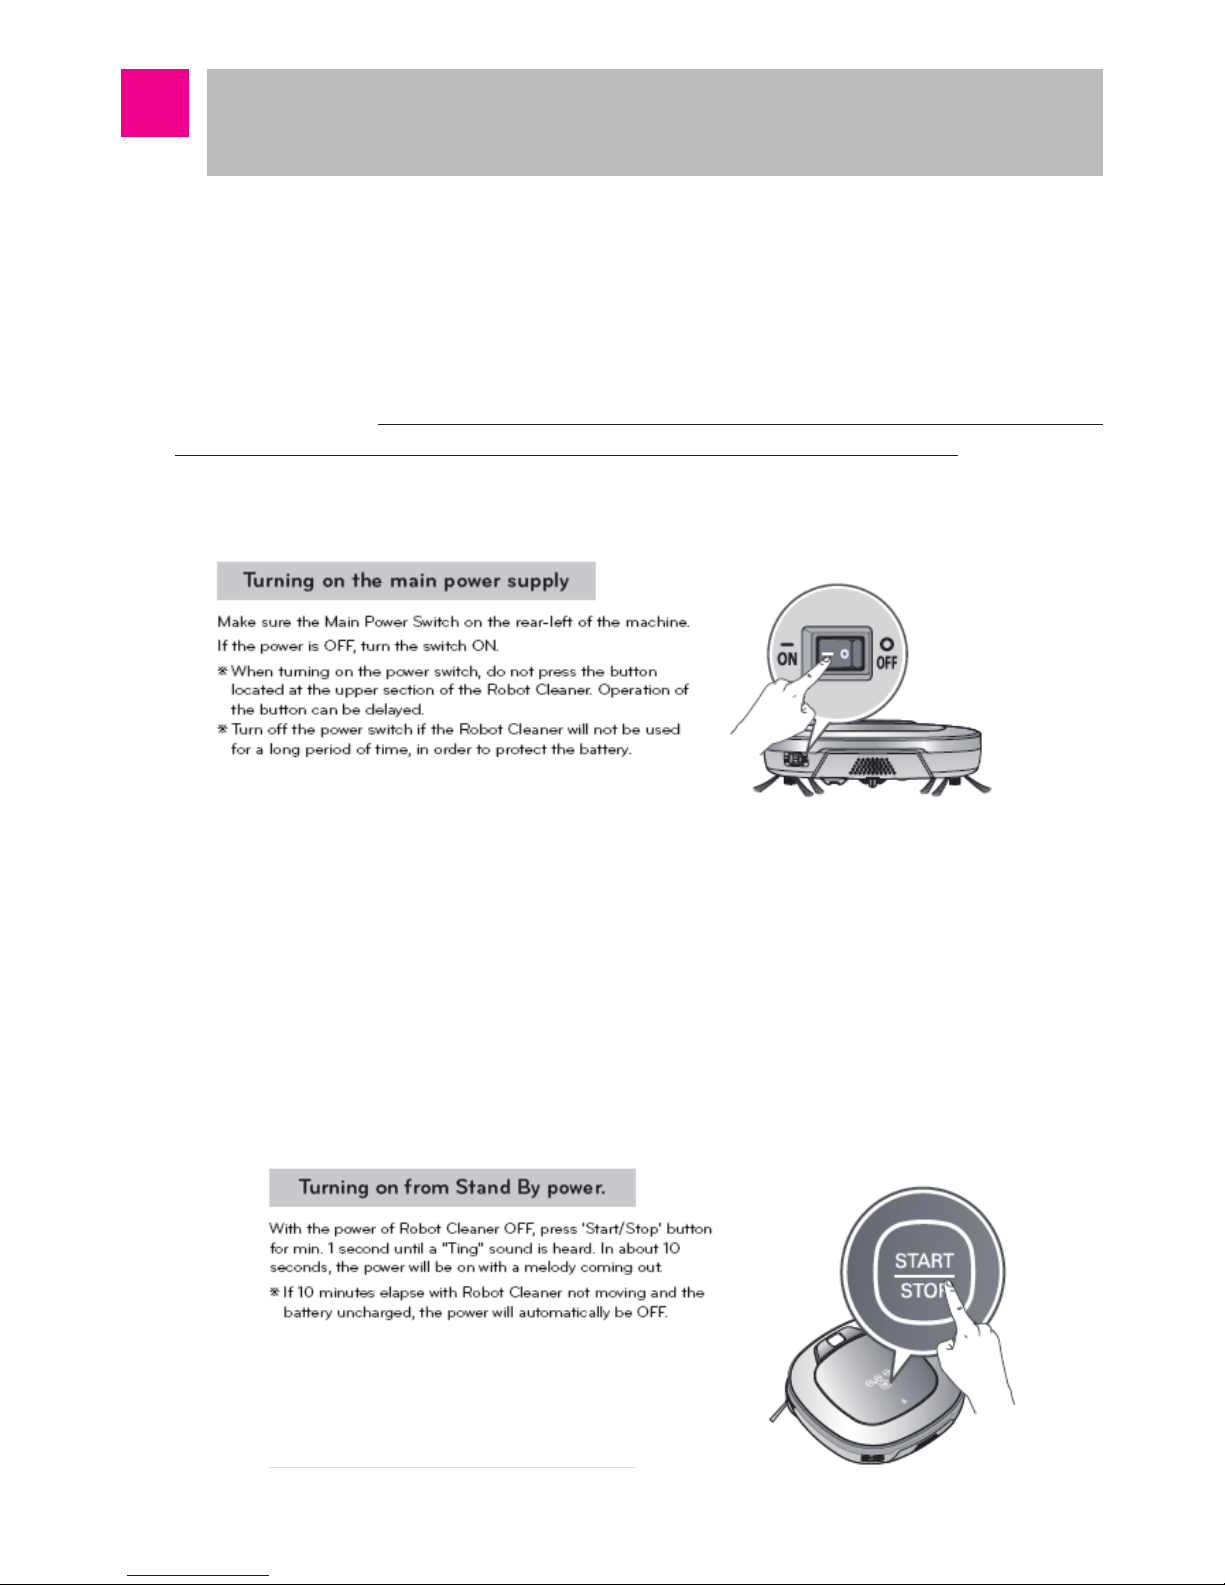
■ Turning ON/OFF the Power Button
The power switch at the left backside of the main body is connected between the battery and the Main circuit to
function to supply or block the power. Also, it is connected between the recharging connector of the main body
and the Main circuit to functions to supply or block the power of the recharging station.
When the main body power switch remains in ON state, the product can be turned on by pressing the button
on the main body, and recharge is possible. If the power is not turned ON even if the power button on the
main body is pressed, or if power is not turned on even if the main body is connected to the recharging
station, check the status of the main power switch at the left backside of the main body.
※ When you turn on the main power button, do not turn it on while pressing the button at the top of the cleaning
robot. Button operation may be delayed.
Even if the main body power switch is turned on, Micom does not operate, so there is no change is the status
indication window. To start Micom, press the start/stop button of the main body for 1 second after turning on
the main body power switch. Then, Micom will start, LED of the screen display window will be turned on, and
Booting will start. Booting time may be different for each model, and when the Booting is over, it converts to
standby state with a melody.
In the standby state, if the start/stop button of the main body is pressed for 2 seconds or longer, the power will
be turned off with the ending melody.
It is the state with the power off, but a small amount of electricity is used for button operation, so when it is left
alone for long period of time, the battery may be consumed and power may not be turned on. When it is not
used for long period of time, please store it with the power switch turned off.
-18-
How to Use Main Body Operation Buttons
and Remote Controller
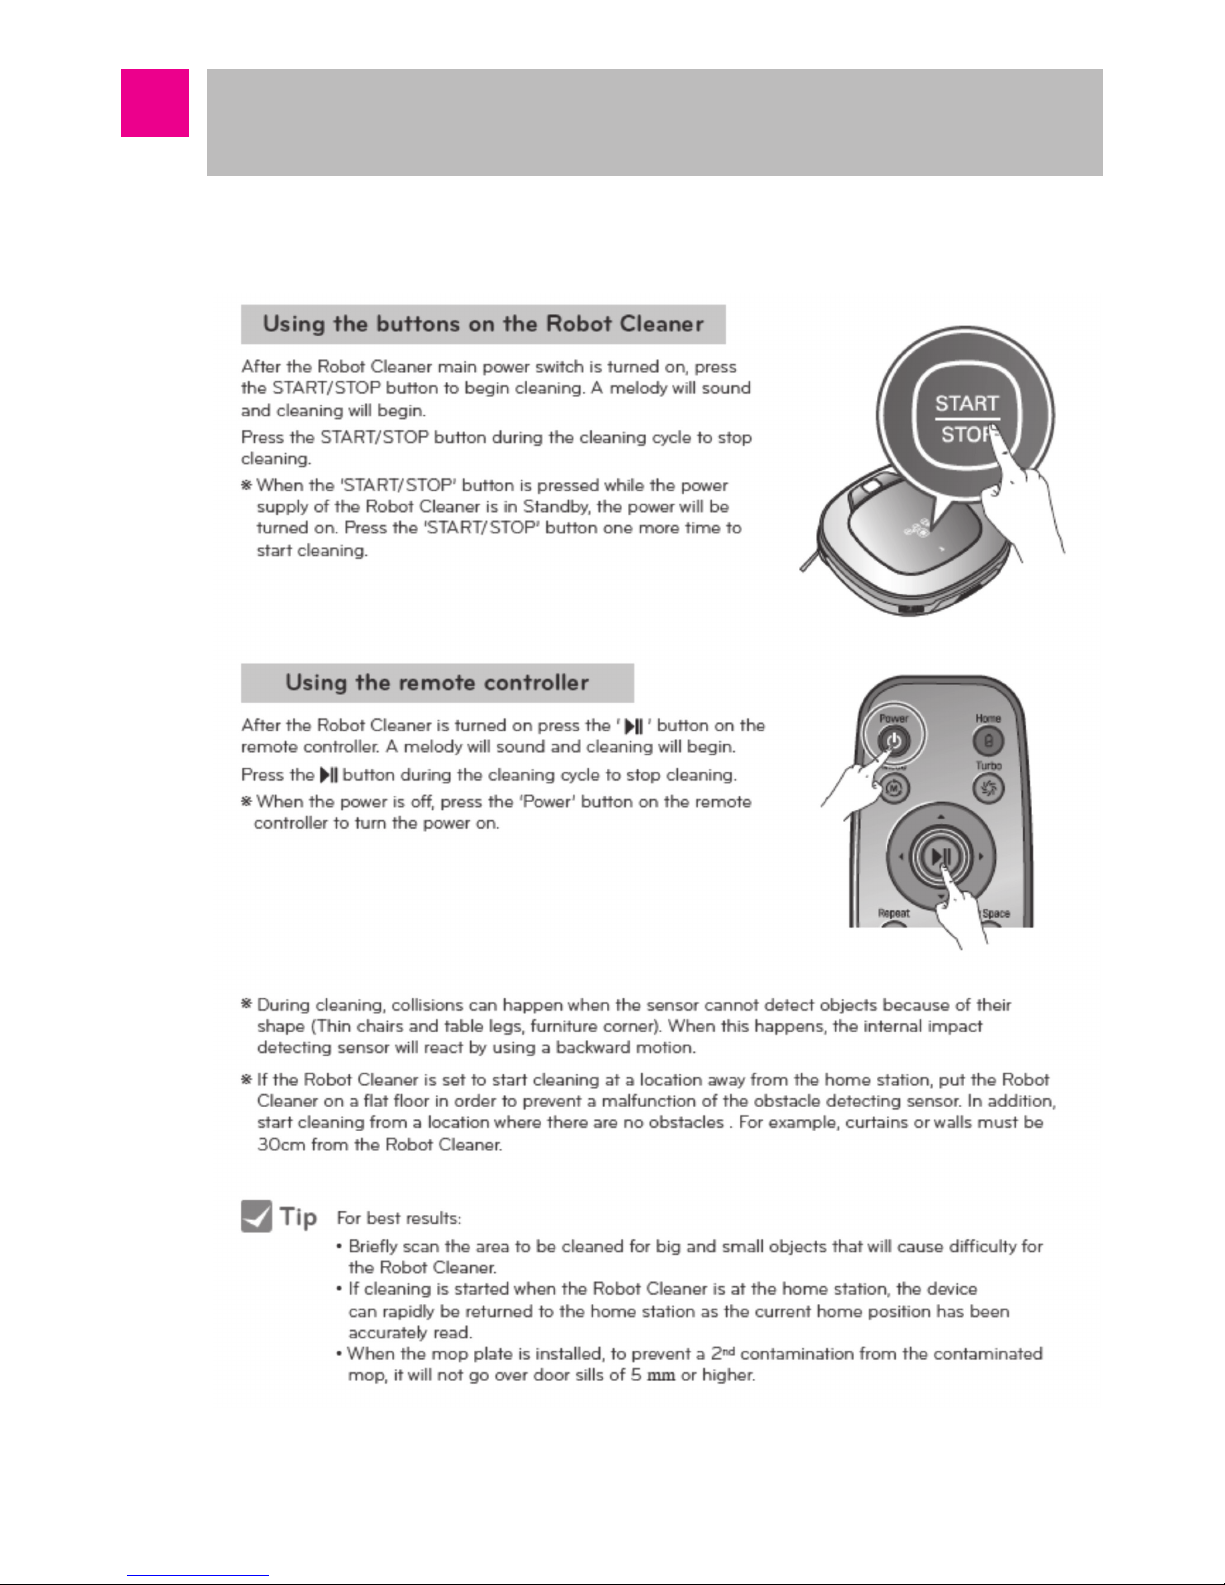
■ How to Start and Stop Cleaning

-19-
How to Use Main Body Operation Buttons
and Remote Controller
■ Time Setting
-20-
How to Use Main Body Operation Buttons
and Remote Controller
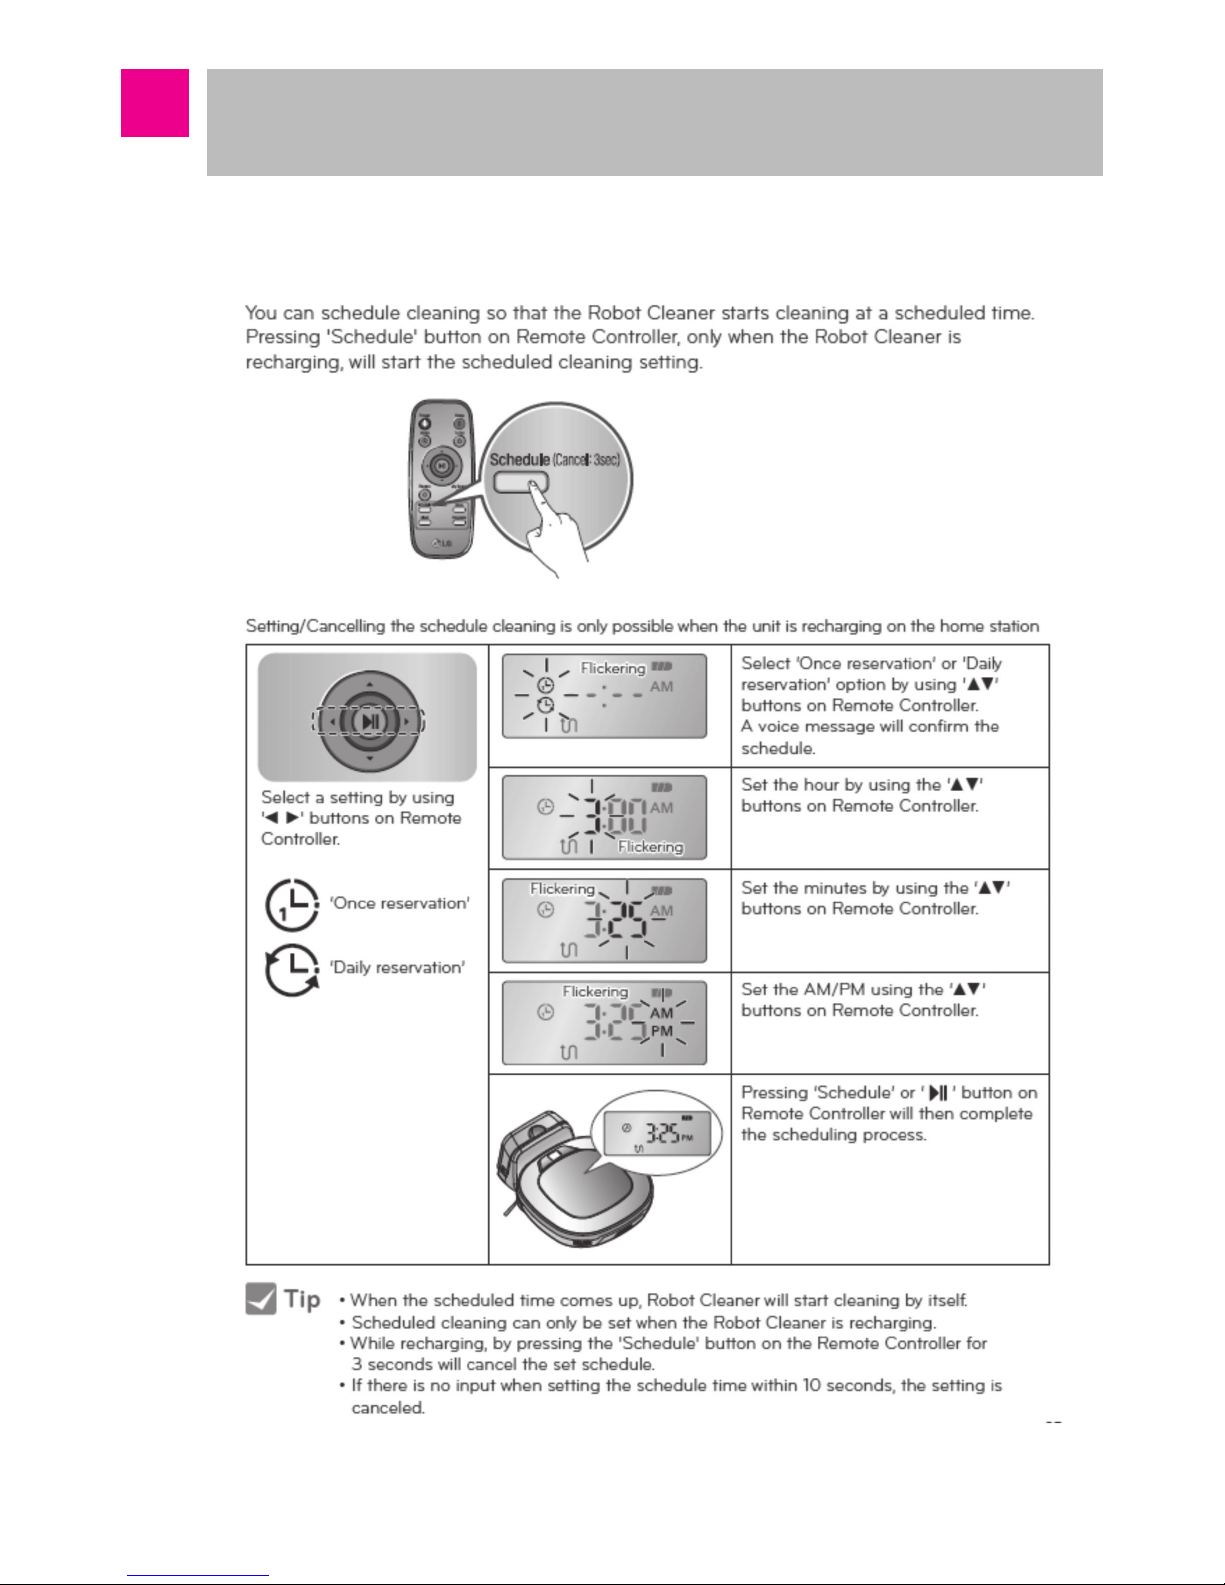
■ Schedule Cleaning
-21-
How to Use Main Body Operation Buttons
and Remote Controller
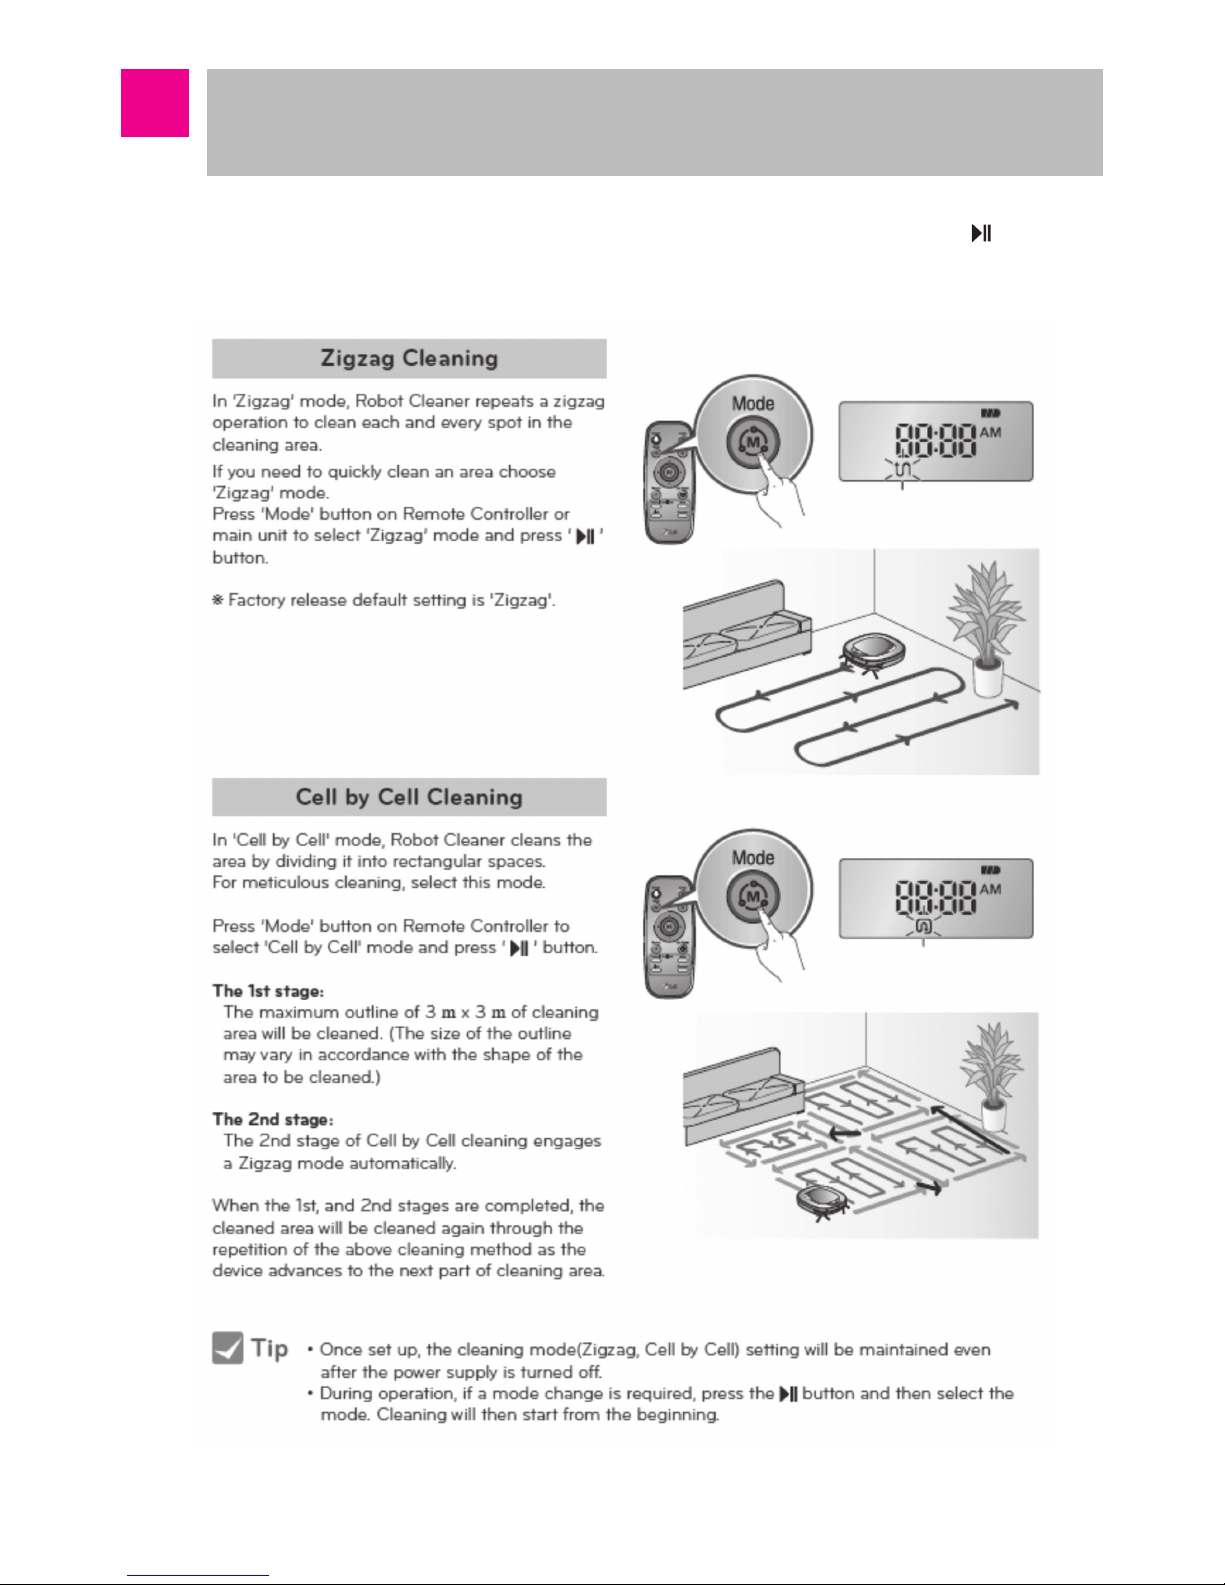
■ Cleaning Modes ※ If you want to change the mode during the operation, press and select
the mode.
-22-
How to Use Main Body Operation Buttons
and Remote Controller
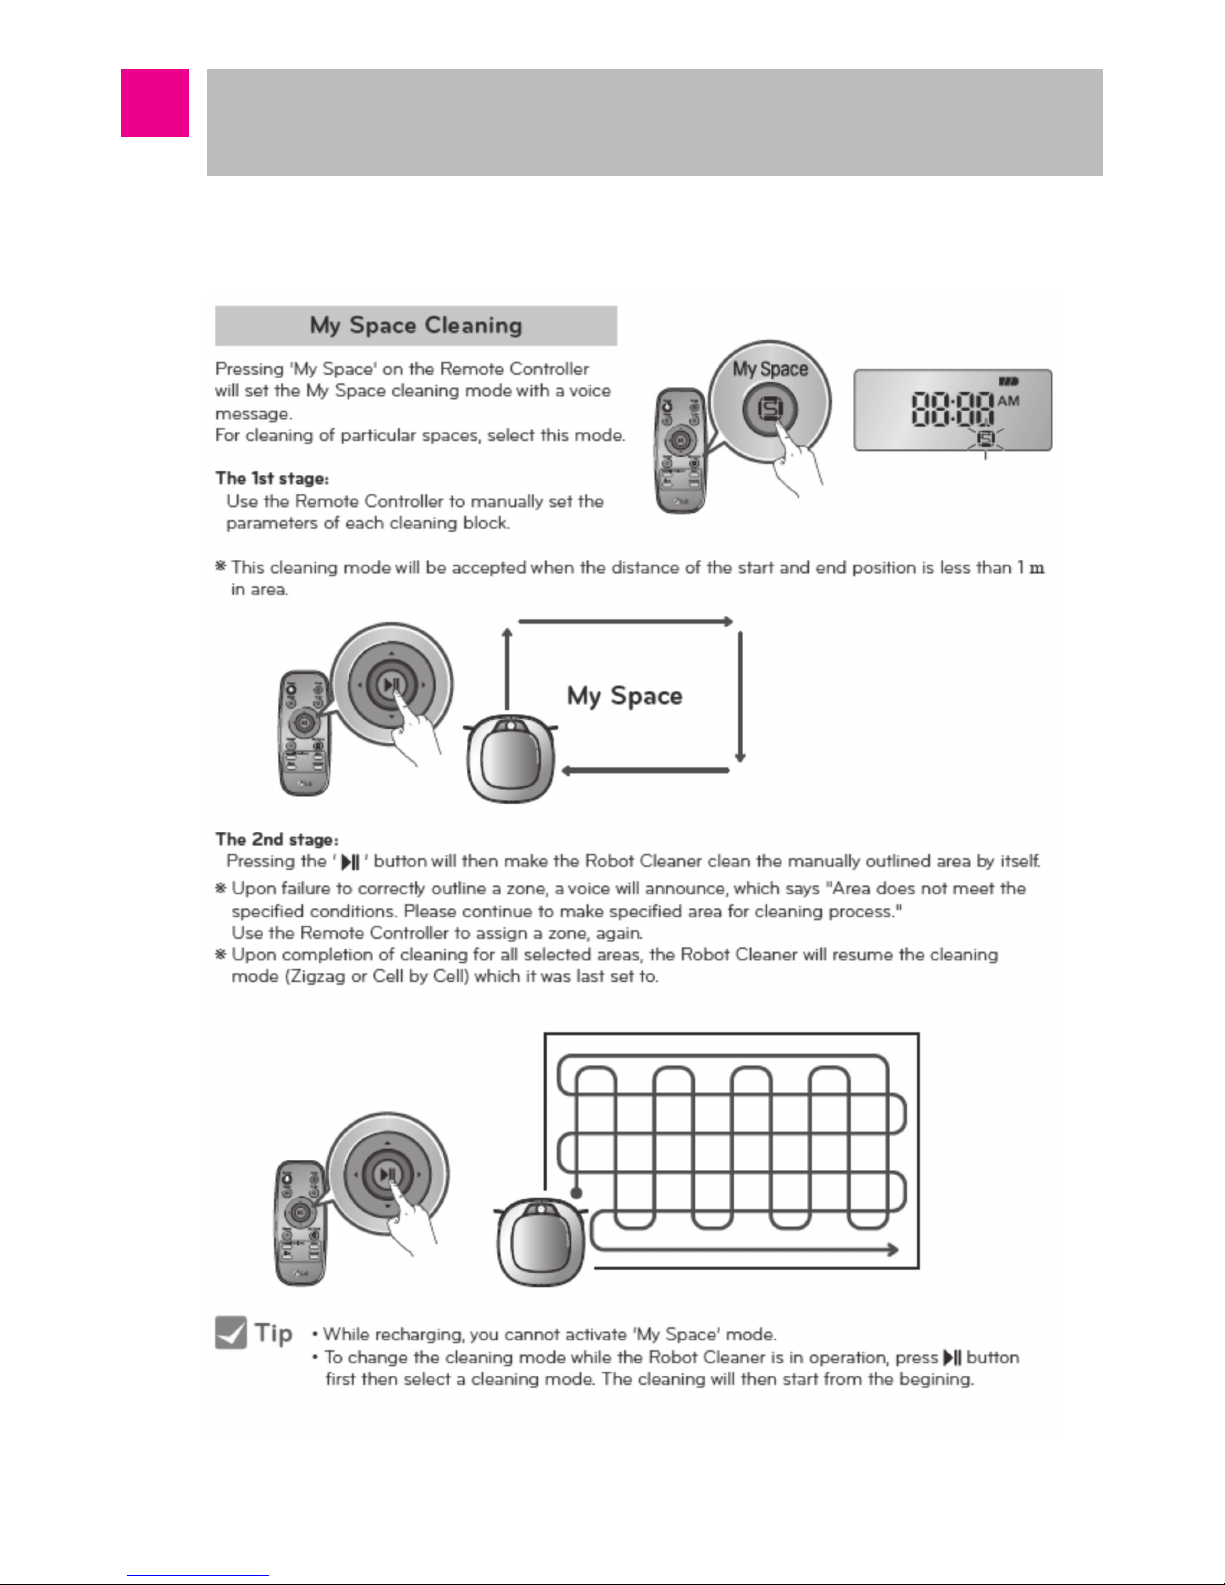
■ My space clean
-23-
How to Use Main Body Operation Buttons
and Remote Controller
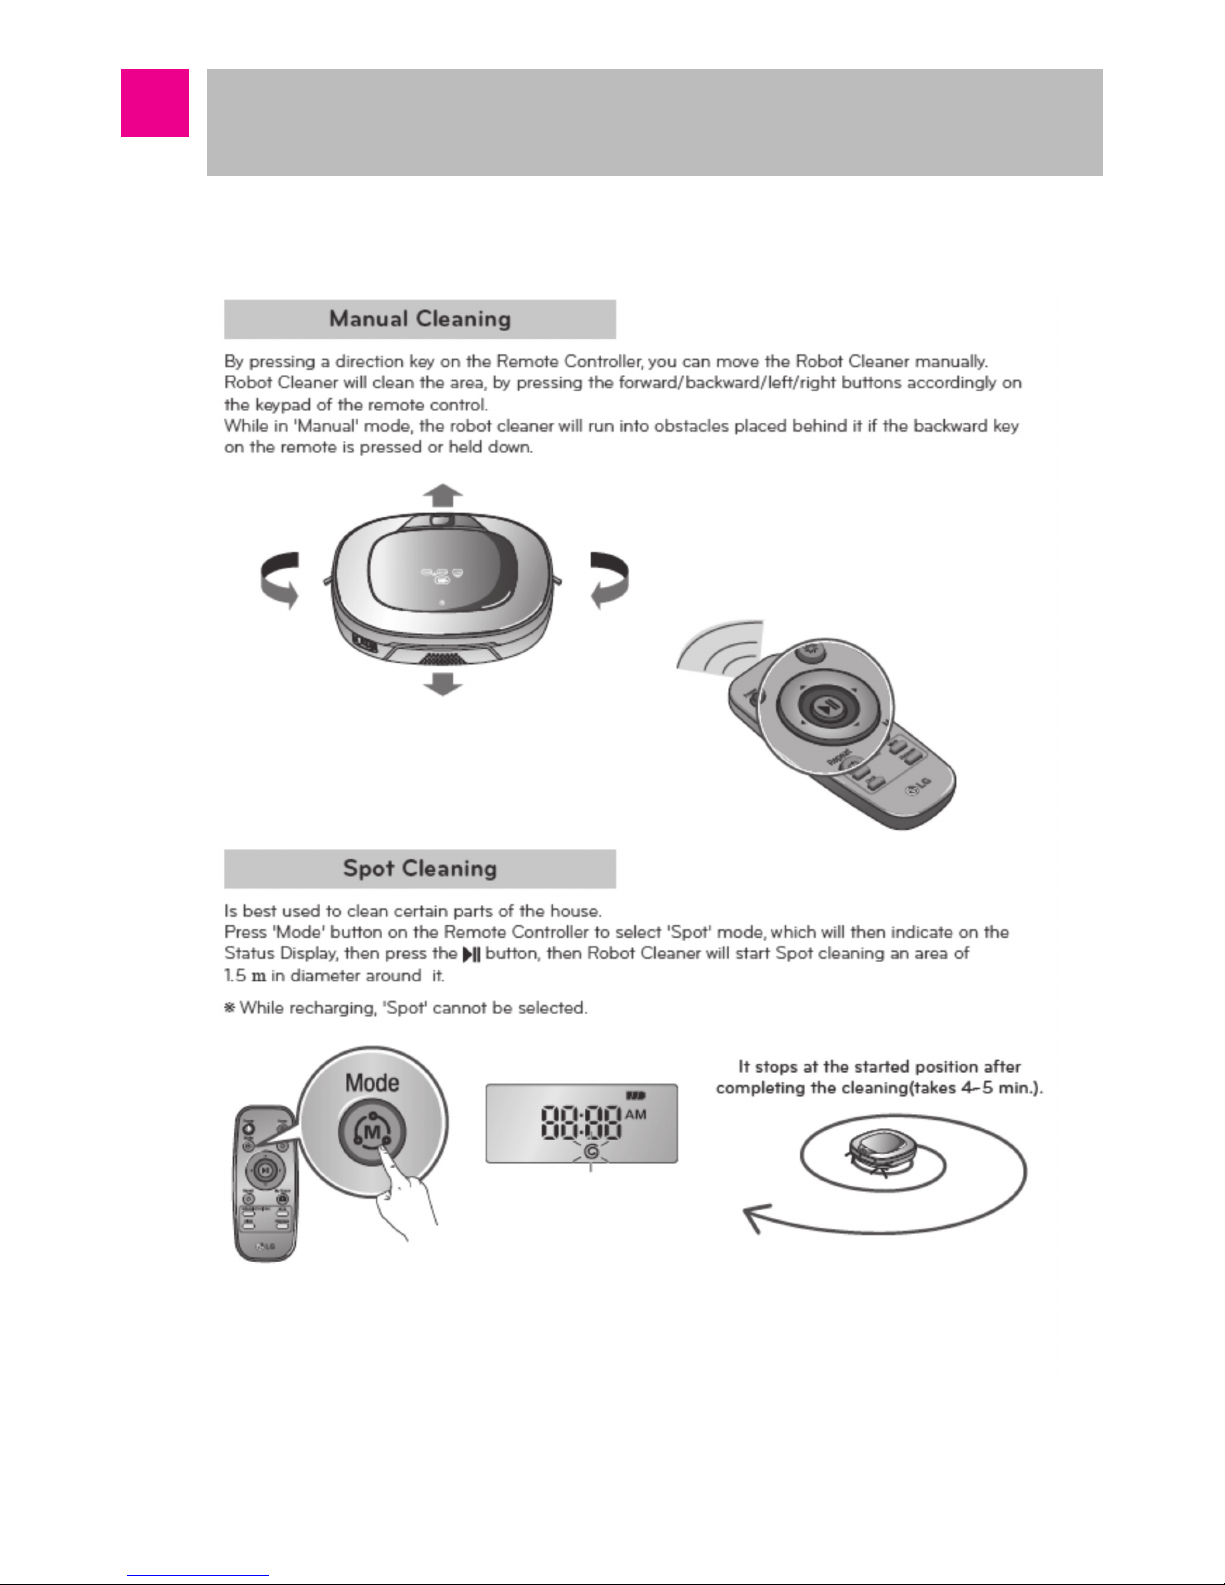
■ Manual Cleaning and Spot Cleaning
-24-
How to Use Main Body Operation Buttons
and Remote Controller
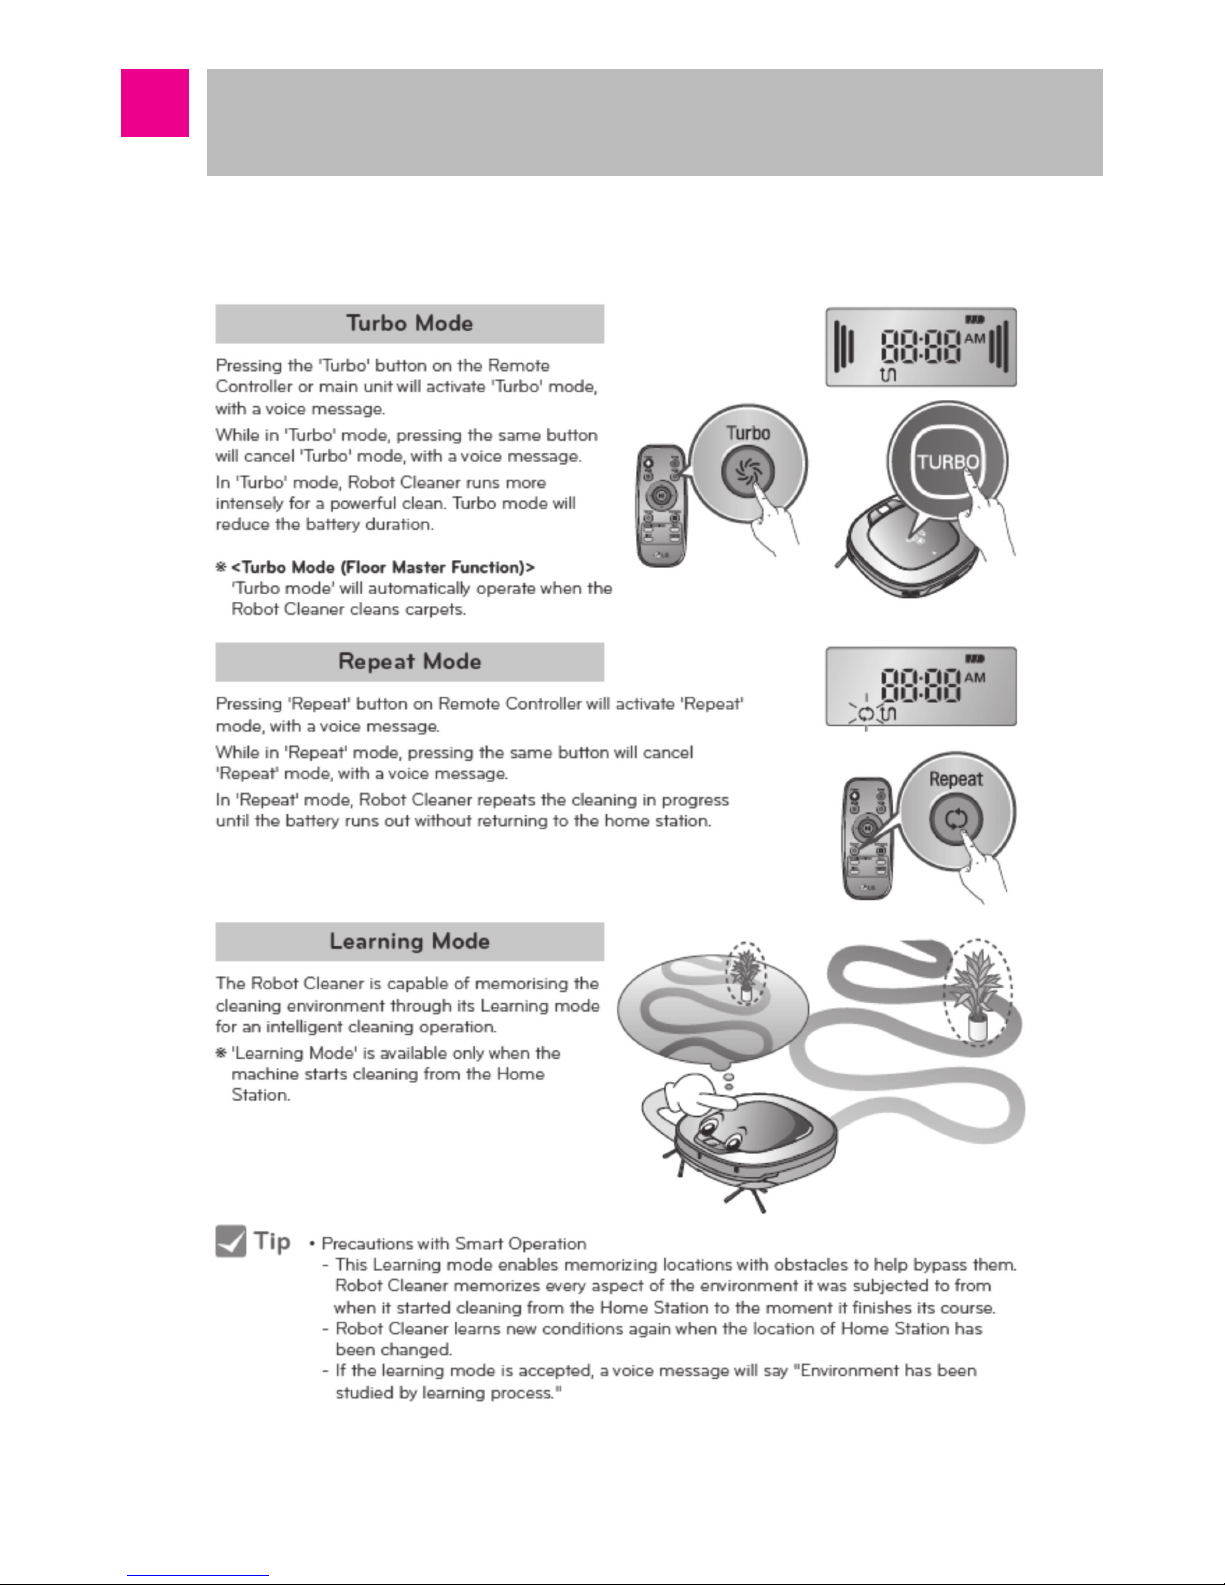
■ Turbo Mode, Repeat Mode and Learning Mode
-25-
How to Use Main Body Operation Buttons
and Remote Controller
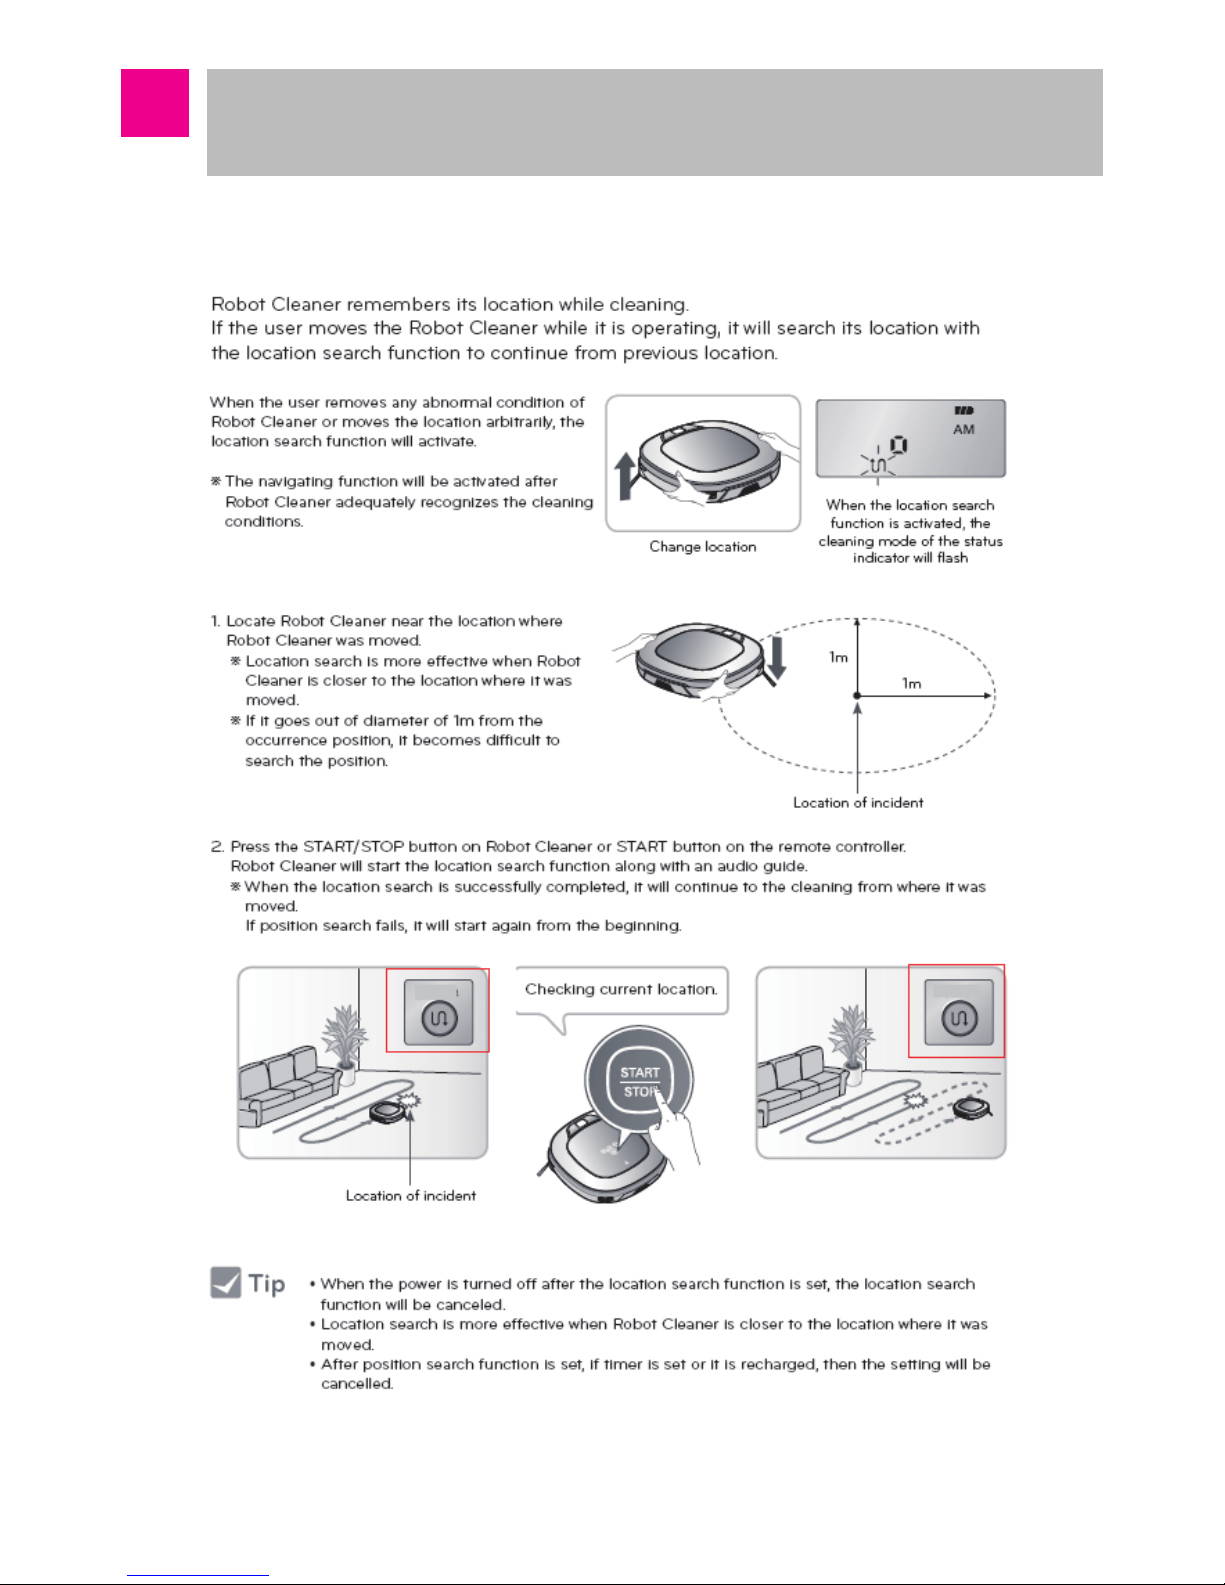
■ Location Search Function
-26-
How to Use Main Body Operation Buttons
and Remote Controller
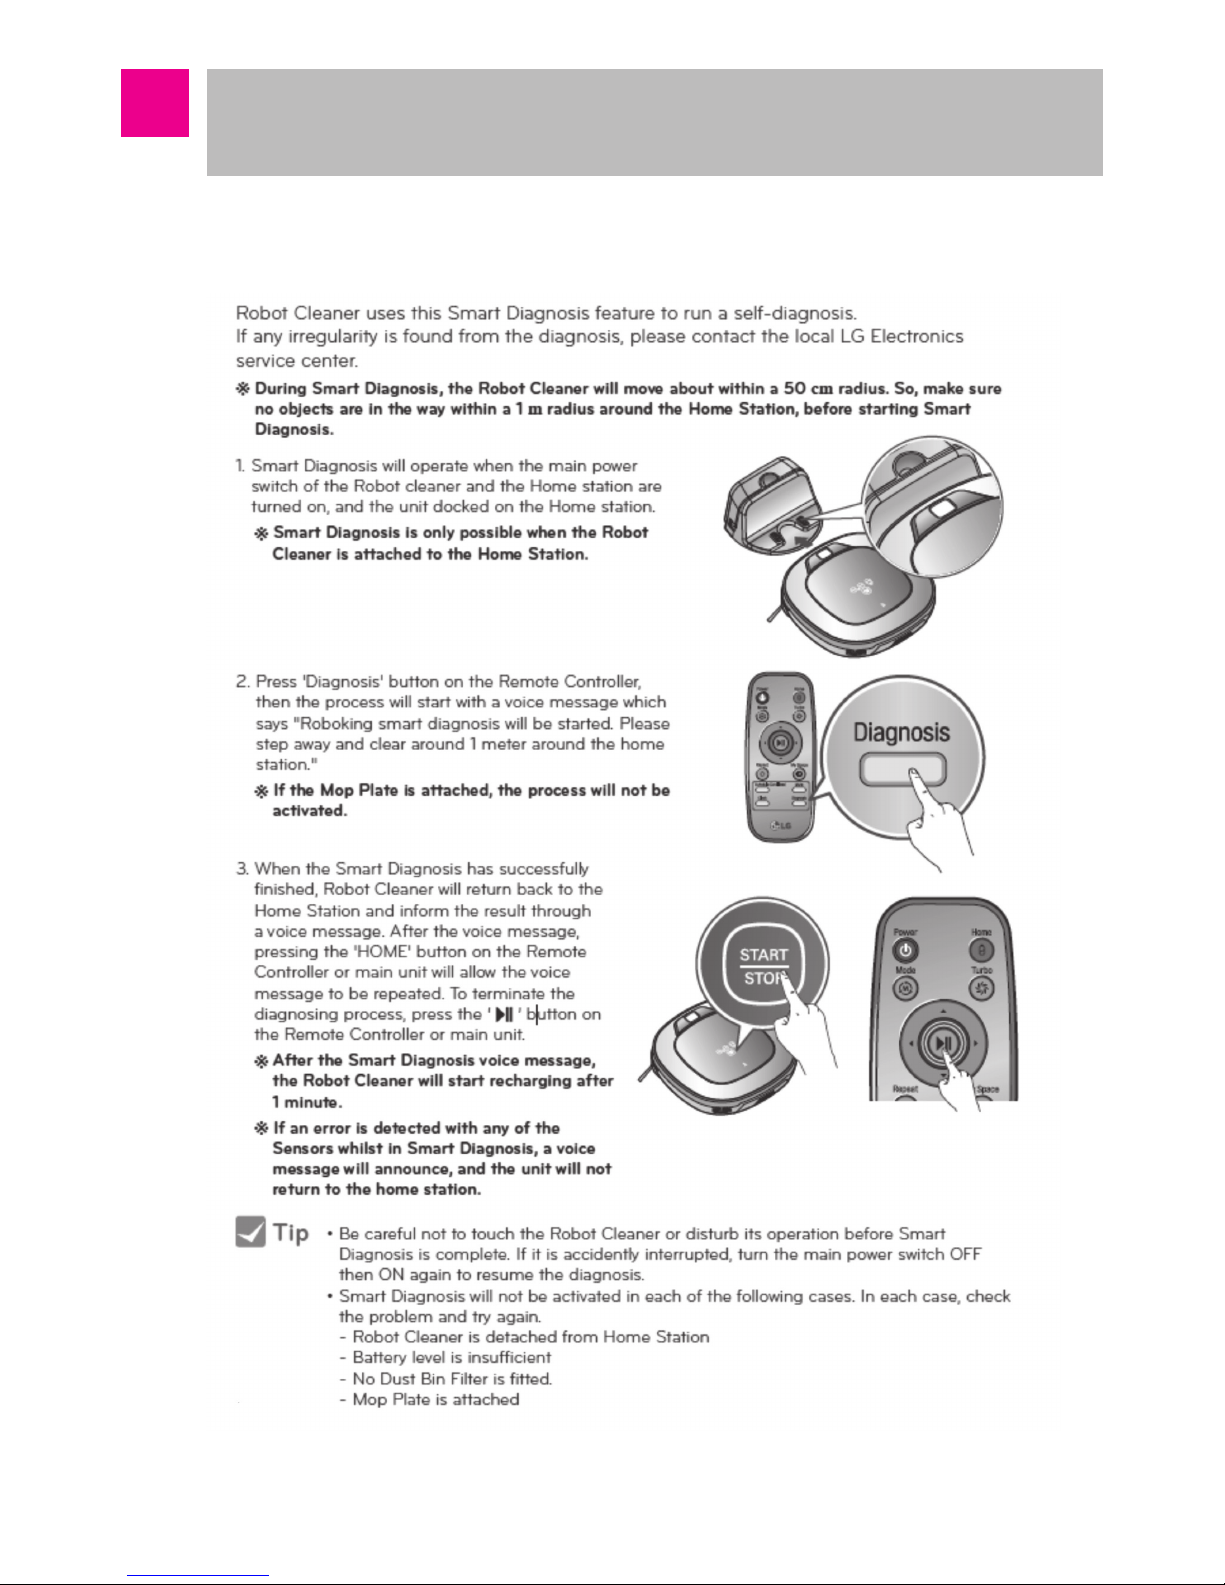
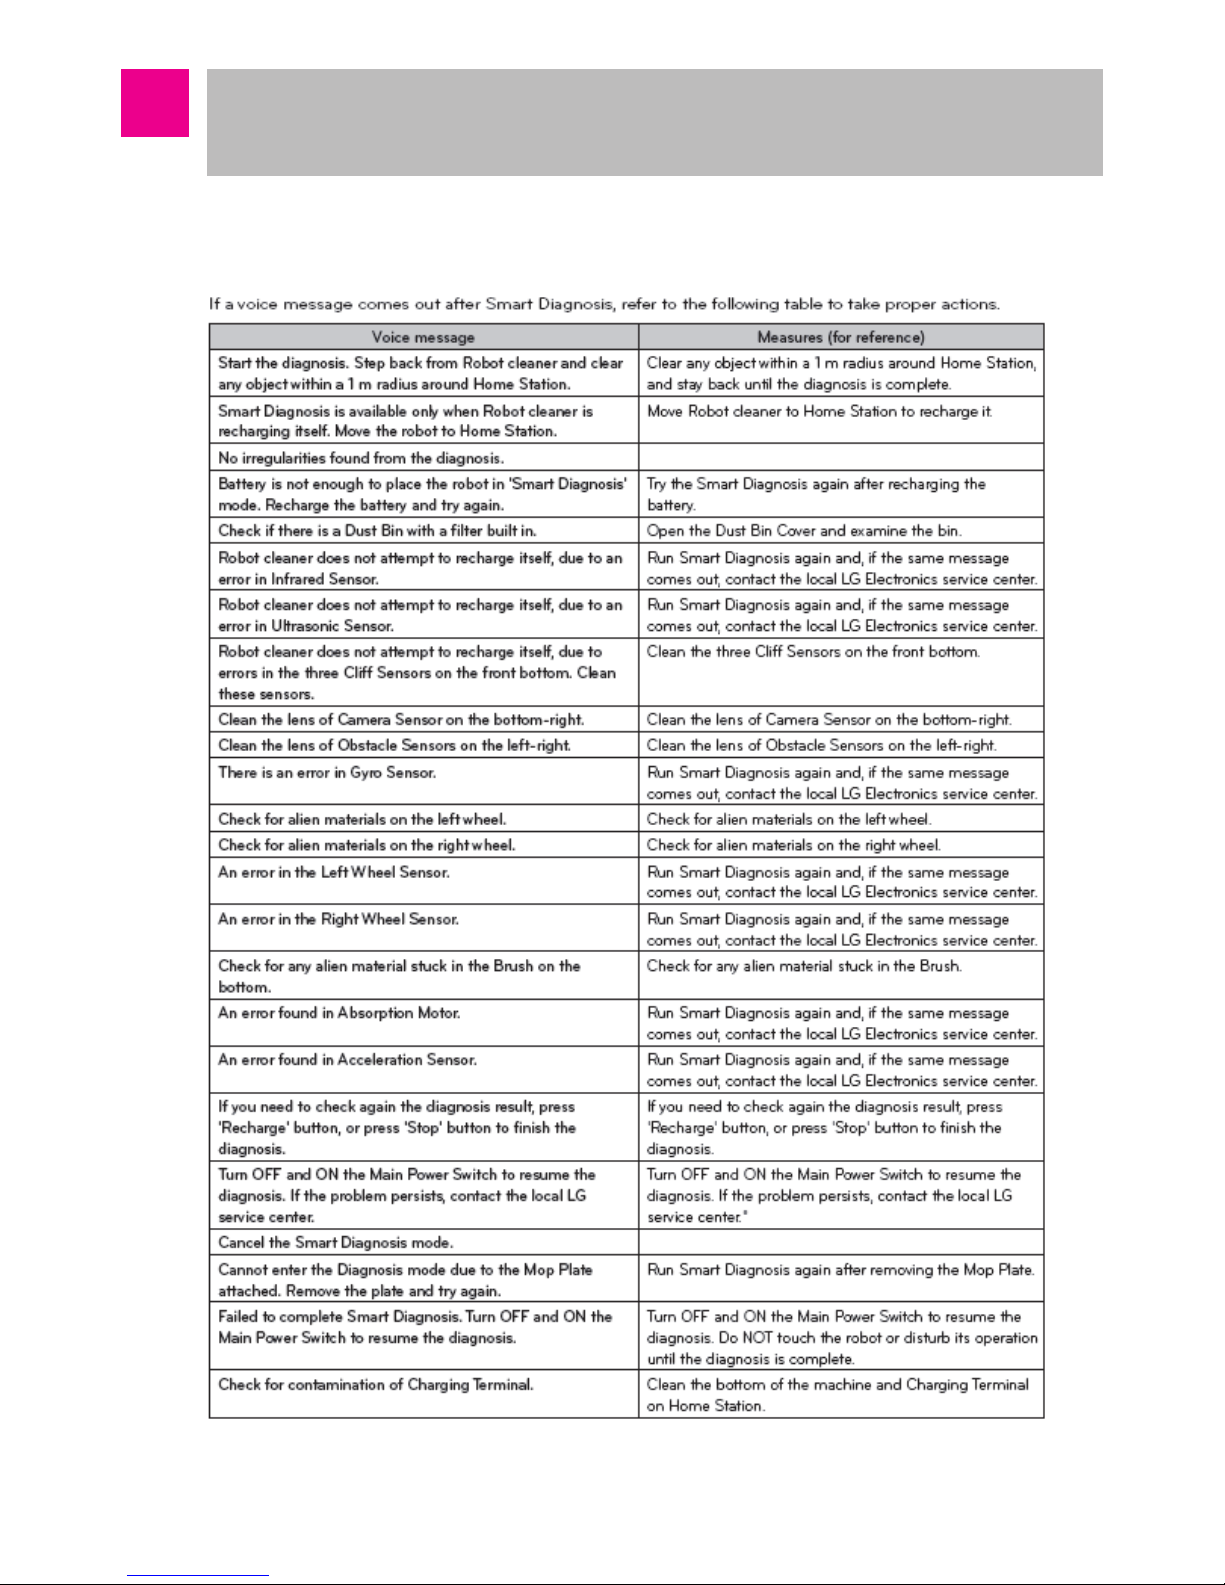
■ Smart Diagnosis
-27-
How to Use Main Body Operation Buttons
and Remote Controller
■ Smart Diagnosis
-28-
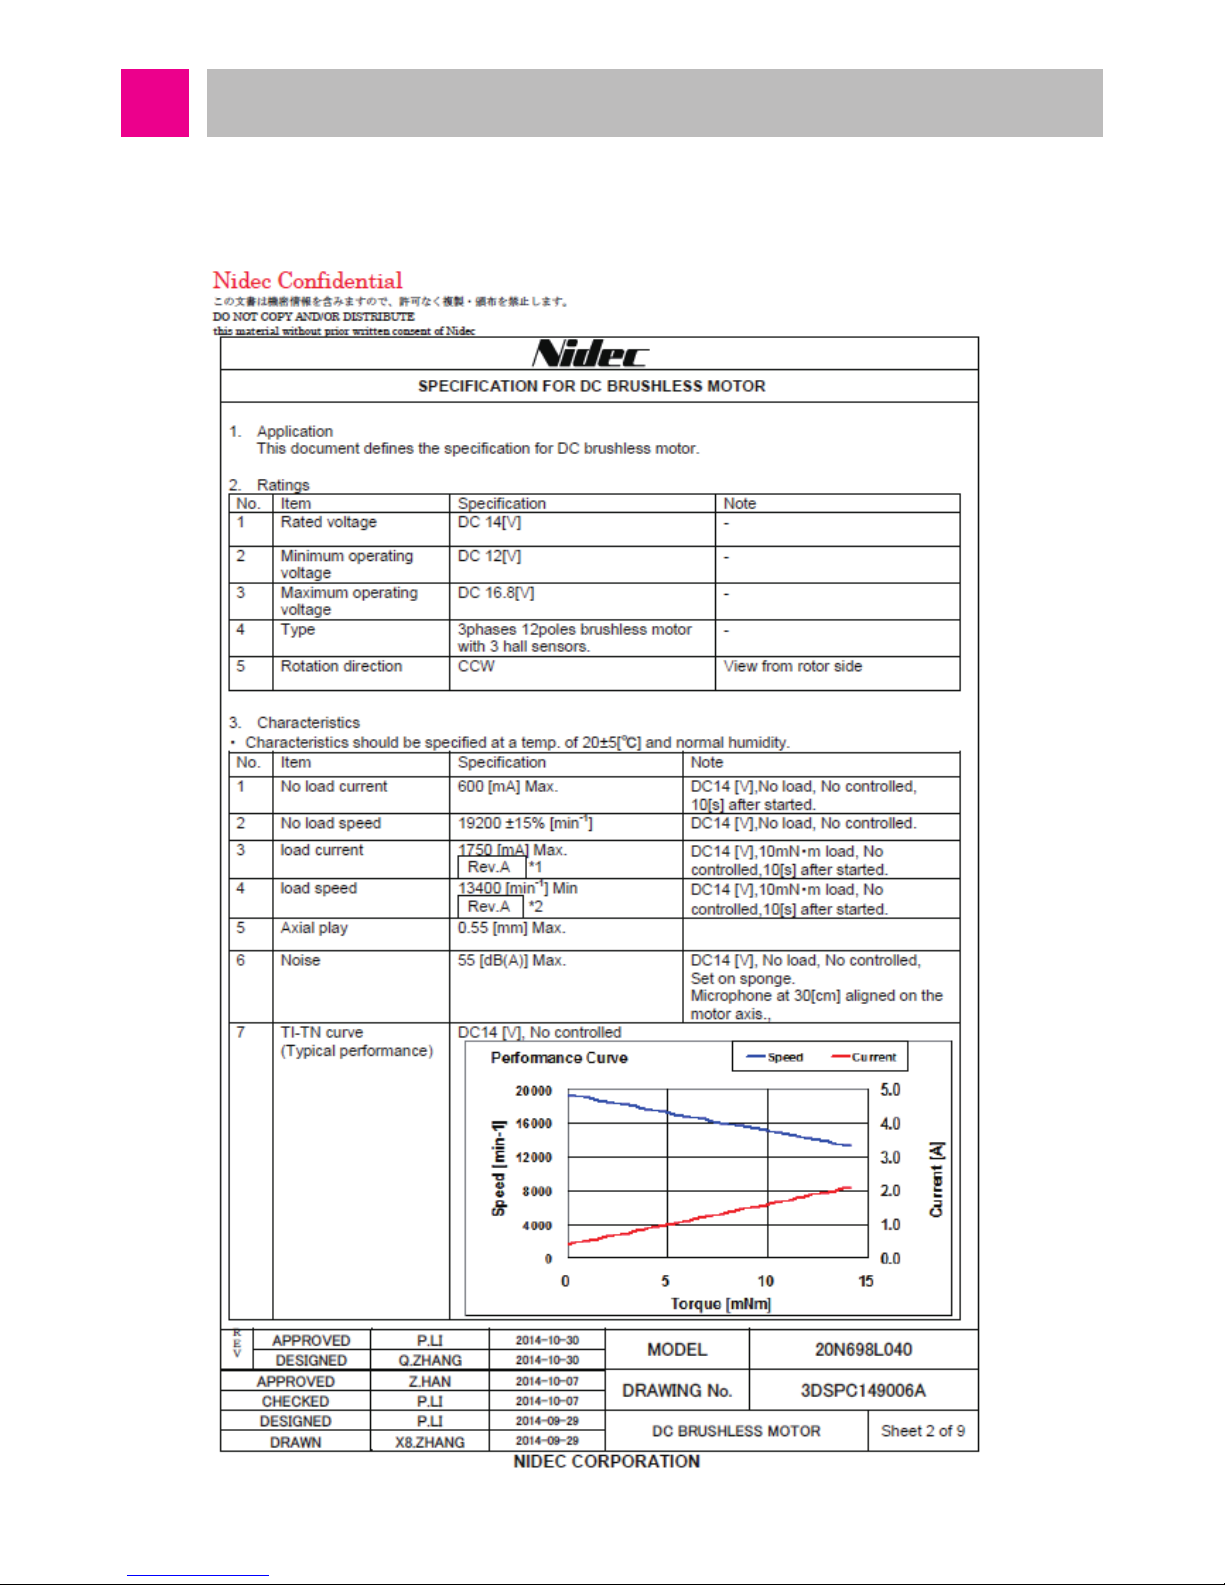
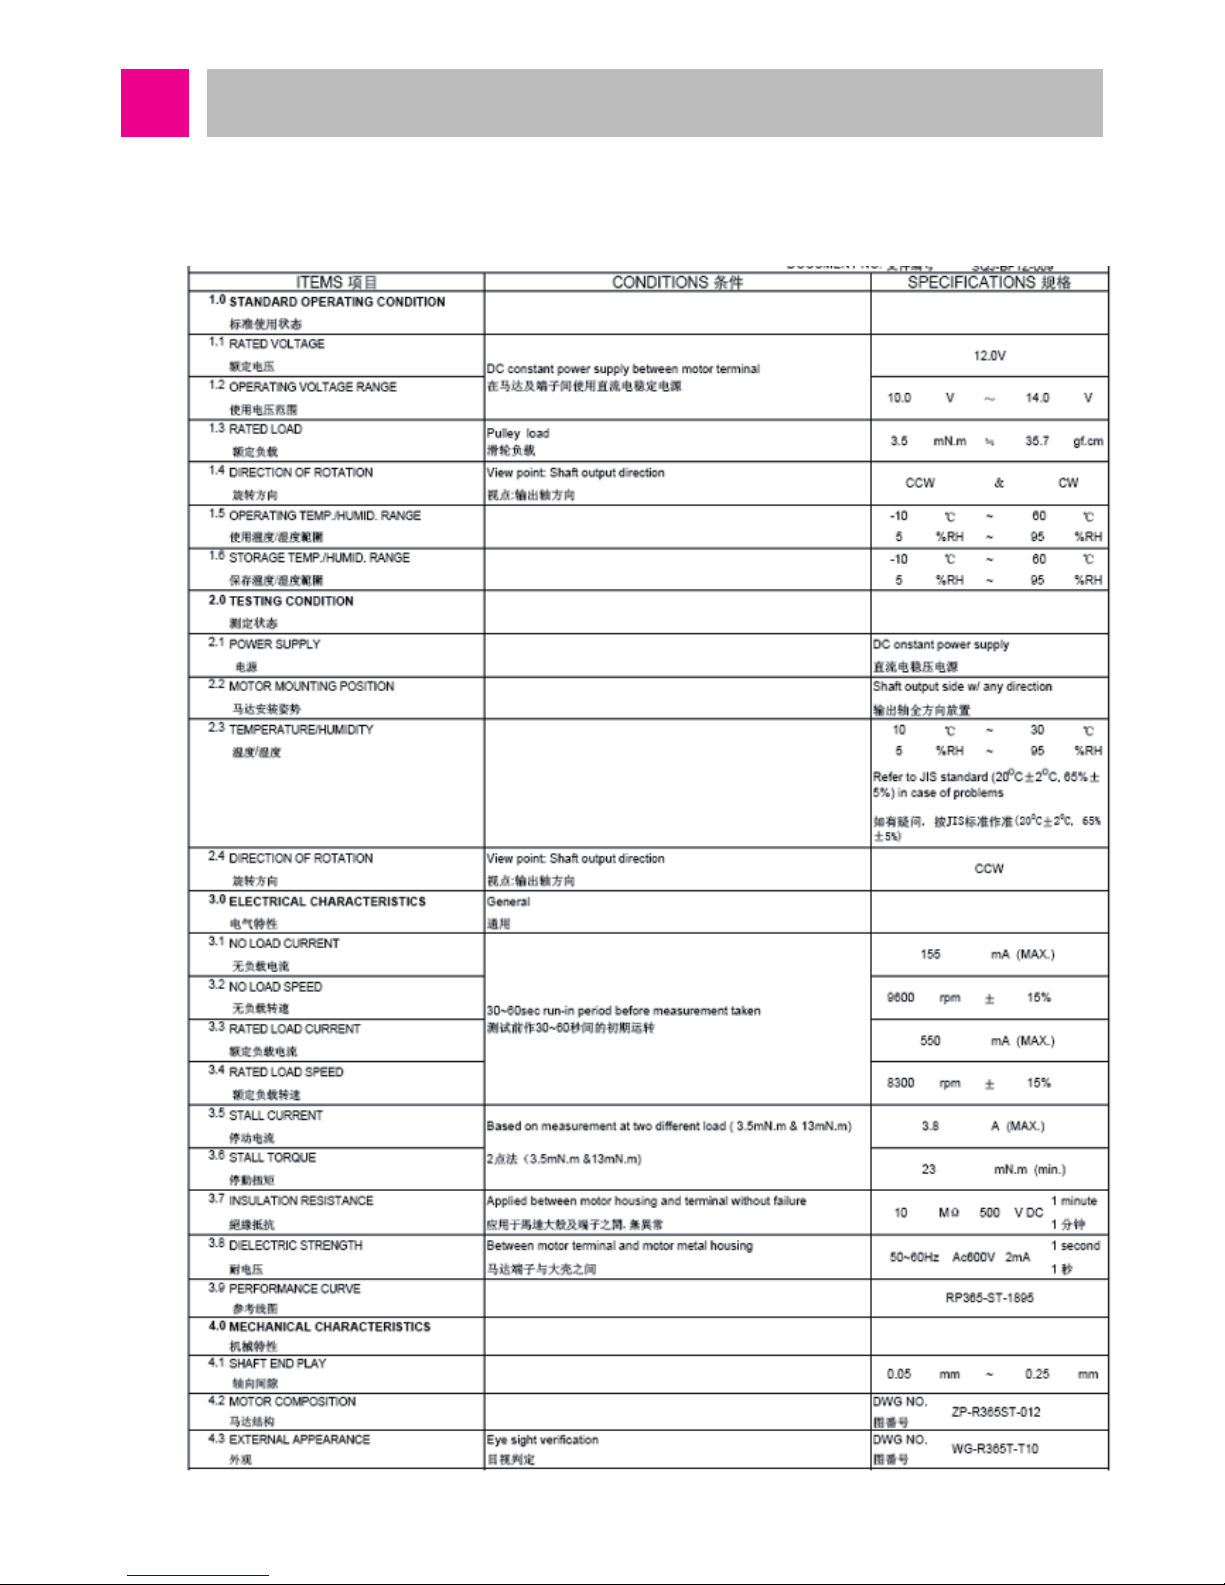
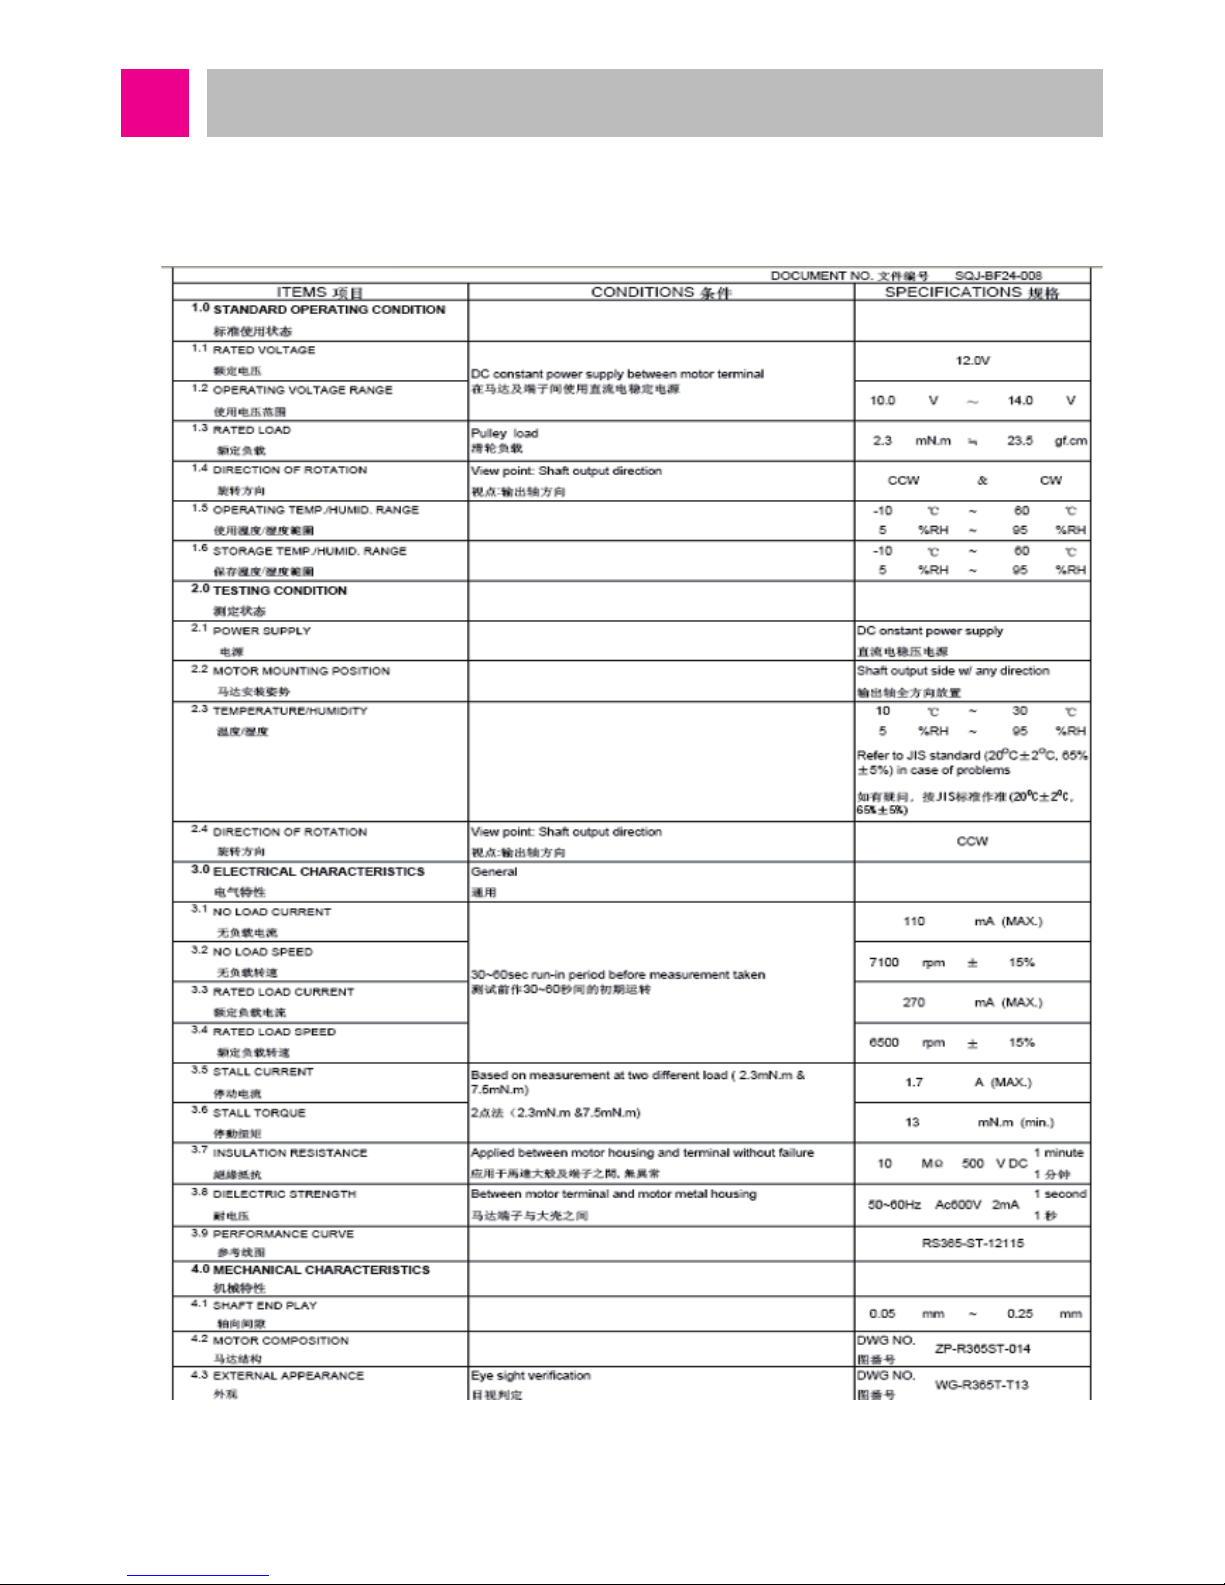
Technical Descriptions of the Parts
■ Suction Motor
Manufacturer: Nidec
-29-
Technical Descriptions of the Parts
■ Agitator Motor
Manufacturer: STANDARD
-30-
Technical Descriptions of the Parts
■ Wheel Motor
Manufacturer: SHARP
 Loading...