

Page 1

ENGLISH
NEDERLANDS
FRANÇAIS MAGYAR
OWNER’S MANUAL
CLEANING ROBOT
Before using, please carefully read the Safety Precautions pages to
allow for safe operation of the product. After reading the operation
manual, please keep it in an easily accessible location.
VR6260 Ser.
VR6270 Ser.
www.lg.com
Page 2
FEATURES
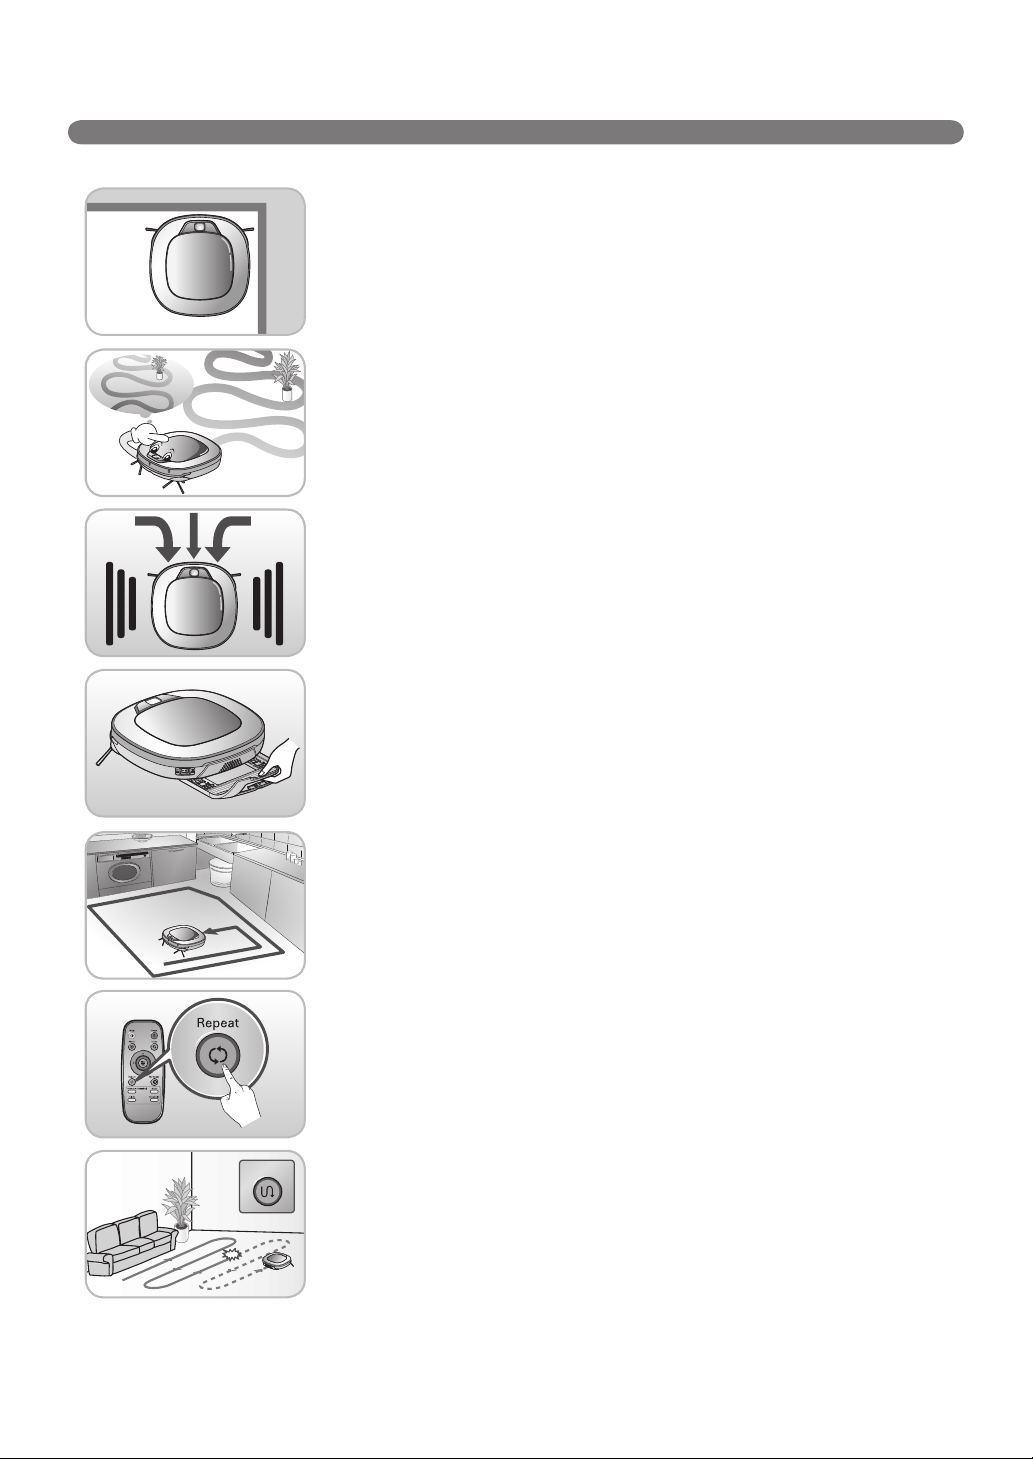
Corner Master
By having adopted a brand new concept design that is appropriate for walls, the Robot
Cleaner's cleaning performance is incredibly effi cient.
Learning Mode
The Robot Cleaner is capable of memorizing the cleaning environment via its Smart Operation
feature for smarter cleaning.
Turbo Mode
In the "Turbo" mode, the Robot Cleaner runs more powerful giving cleaner results.
When selected, the "Turbo" mode is automatically activated on carpets, which enables the
Robot Cleaner to run more effi ciently.
Zigzag
Drawer Mop Plate
The "Drawer mop plate" makes it much easier for users to change the mop without having to
fl ip the device over.
My Space Mode
By commanding it to clean a particular space, the Robot Cleaner quickly cleans the desired
space.
Repeat Cleaning
The Robot Cleaner will continuously clean until the battery runs out.
Location Search Function
When the Robot Cleaner is moved from a spot while operating, the device will automatically
search for the previous location and return to the spot from where it was interrupted.
Page 3

CONTENTS
ENGLISH
1
BEFORE USING
Safety precautions
2~5
Included with product
6
Parts description
7~8
Button functions
9~10
Display status information
11
Before you start
12
Overview
13
2
METHOD OF USE
14
How to install the home station
15
How to turn the Robot Cleaner power supply on & off
16
How to start and stop cleaning
17~18
How to charge the battery
19~20
Cleaning modes
21~22
Auxiliary cleaning modes
23
Time setting
24
Scheduled cleaning
25
Mop cleaning (option)
26
Location search function
27~28
Smart diagnosis
4
ADDITIONAL INFORMATION
35~37
38
Troubleshooting
Before you call for service
5
REFERENCE
39
40
Product specifi cations
Open source software notice
3
HANDLING METHOD AFTER USE
29
Cleaning the dust bin
30
Cleaning the dust bin fi lter
31
Cleaning the brush
32
Cleaning the sensor/charging terminal
33
Cleaning the side brush
34
Cleaning the ultra microfi ber mop (option)
Page 4
SAFETY PRECAUTIONS
The purpose of the safety precautions described below is for the user to use the product safely and correctly to prevent any
unexpected risk of injury or damage.
Basic safety precautions
After reading this manual, please keep it in an easily accessible location.
This is the safety alert symbol. This symbol alerts you to potential hazards that can result in property damage
and/or serious bodily harm or death.
WARNING
CAUTION
WARNING
1. This appliance is not intended for use by persons (including
children) with reduced physical, sensory or mental capabilities,
or lack of experience and knowledge, unless they have been
given supervision or instruction concerning use of the appliance
Indicates a hazardous situation which, if not avoided, could result in death or serious injury.
Indicates a hazardous situation which, if not avoided, could result in minor or moderate injury.
by a person responsible for their safety.
2. Children should be supervised to ensure that they do not play
with the appliance.
3. If the supply cord is damaged, it must be replaced by LG
Electronics Service Agent in order to avoid a hazard
4. This appliance can be used by children aged from 8 years and
above and persons with reduced physical, sensory or mental
capabilities or lack of experience and knowledge if they have
been given supervision or instruction concerning use of the
appliance in a safe way and understand the hazards involved.
Children shall not play with the appliance. Cleaning and user
maintenance must not be made by children without supervision.
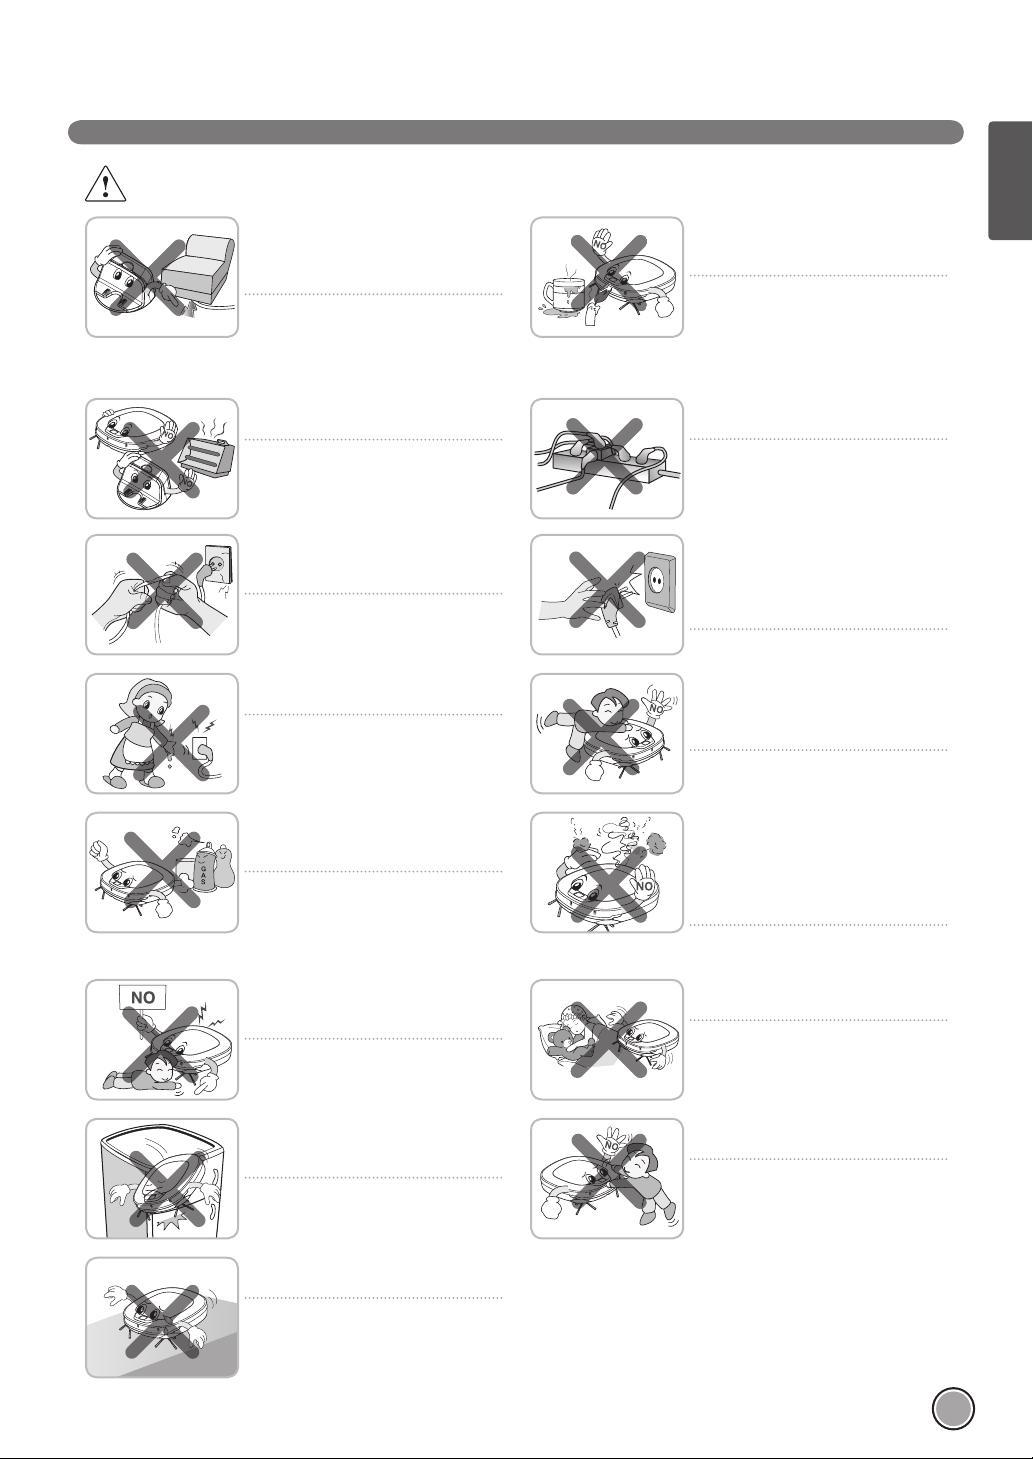
For your safety, do not remove the battery
from the Robot Cleaner. If you need to
replace the battery or the Robot Cleaner,
take it to the nearest authorized LG
Electronics service center or dealer for
assistance.
Failure to follow this warning can cause fi re
or product failure.
Never use the Robot Cleaner with a
battery and/or home station from any
other product than the Robot Cleaner.
Doing so can cause fi re or product failure.
2
Page 5
WARNING
Gasoline
Detergent
SAFETY PRECAUTIONS
ENGLISH
Make sure the power cord of the home
station is not crushed under a heavy
object or damaged by contact with sharp
objects.
Failure to follow this warning can cause
electric shock, fi re or product failure. If the
power cord is broken, do not plug it in. Take
the product to an LG Electronics Authorised
service repairer.
Do not place the home station and the
Robot Cleaner near a heating device.
Doing so can cause product deformation,
fi re, or product failure.
Do not force the power plug to bend. Do
not use the power plug when it has been
damaged or loosened.
Doing so can cause fi re or product failure.
Do not touch the power plug with wet
hands.
Doing so can cause electric shock.
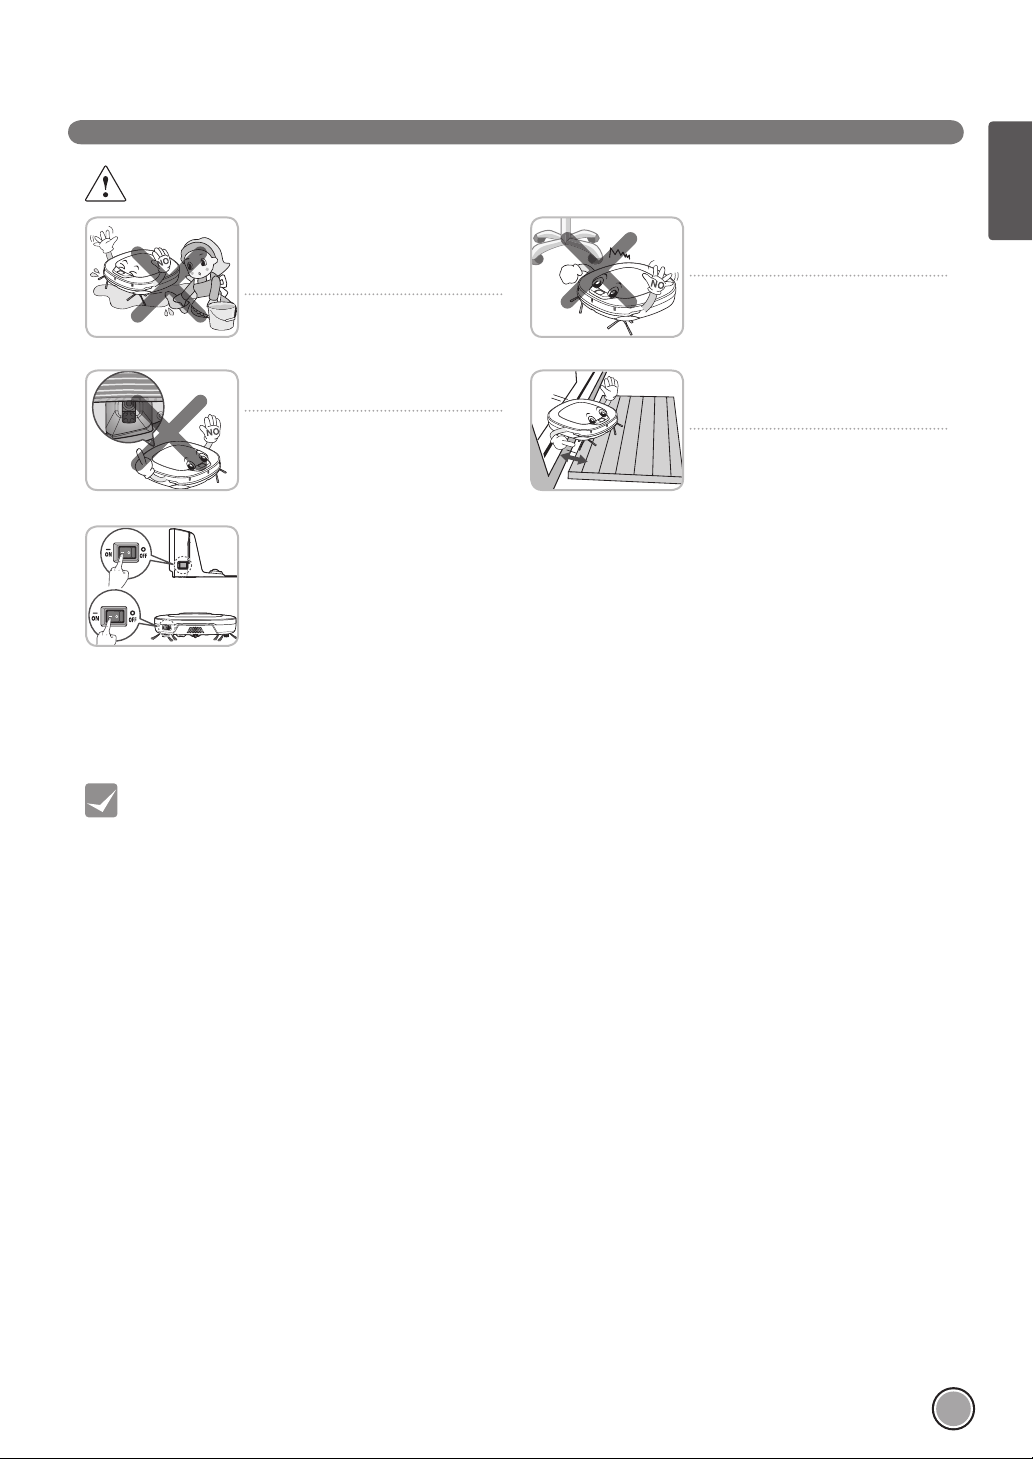
Do not use the Robot Cleaner when
candles or fragile objects are placed on
the fl oor.
Doing so can cause fi re or product failure.
Always use a dedicated power outlet with
a 10 amp rating.
If multiple appliances are connected to an
outlet simultaneously, they can generate
enough heat to cause a fi re.
When pulling out the home station power
plug, always pull it out by grabbing the
plug, not the cord. When pulling out the
power plug, do not to touch the prongs
with your fi ngers.
Doing so can cause an electric shock.
Do not allow children or pets to play with
or rest upon the Robot Cleaner at any
time. Do not use the Robot Cleaner while
an object is hanging from it.
Doing so can cause injury or product
damage.
Do not spray or use infl ammable materials,
surfactants, or drinking water in the
vicinity of the Robot Cleaner.
Doing so can cause fi re or product failure.
* Infl ammable materials: gasoline, thinner,
etc.
* Surfactant: detergent, articles for bath,
etc.
Do not insert any part of the body, such as
a hand or foot, below the brush or wheels
of the Robot Cleaner while in use.
Doing so can cause injury or product
damage.
Do not operate the Robot Cleaner on
narrow and high furniture such as a
wardrobe, refrigerator, desk, table, etc.
Doing so can cause injury, product failure
or damage which is not covered by the
warranty.
Do not activate the device on a fl oor that
has more than a 10 degree incline.
The device may not work properly.
Turn the power supply off immediately
if any abnormal sound, odor, or smoke
is generated from the Robot Cleaner by
removing it from the home station and
turning off the main switch on the rear
side of the unit.
Failure to do so can cause fi re or product
failure.
Do not operate the Robot Cleaner in a
room where a child is sleeping.
Doing so can cause injury or product
damage.
Do not leave Children or pets near the
Robot Cleaner unsupervised.
Doing so can cause injury or product
damage.
3
Page 6
SAFETY PRECAUTIONS
CAUTION
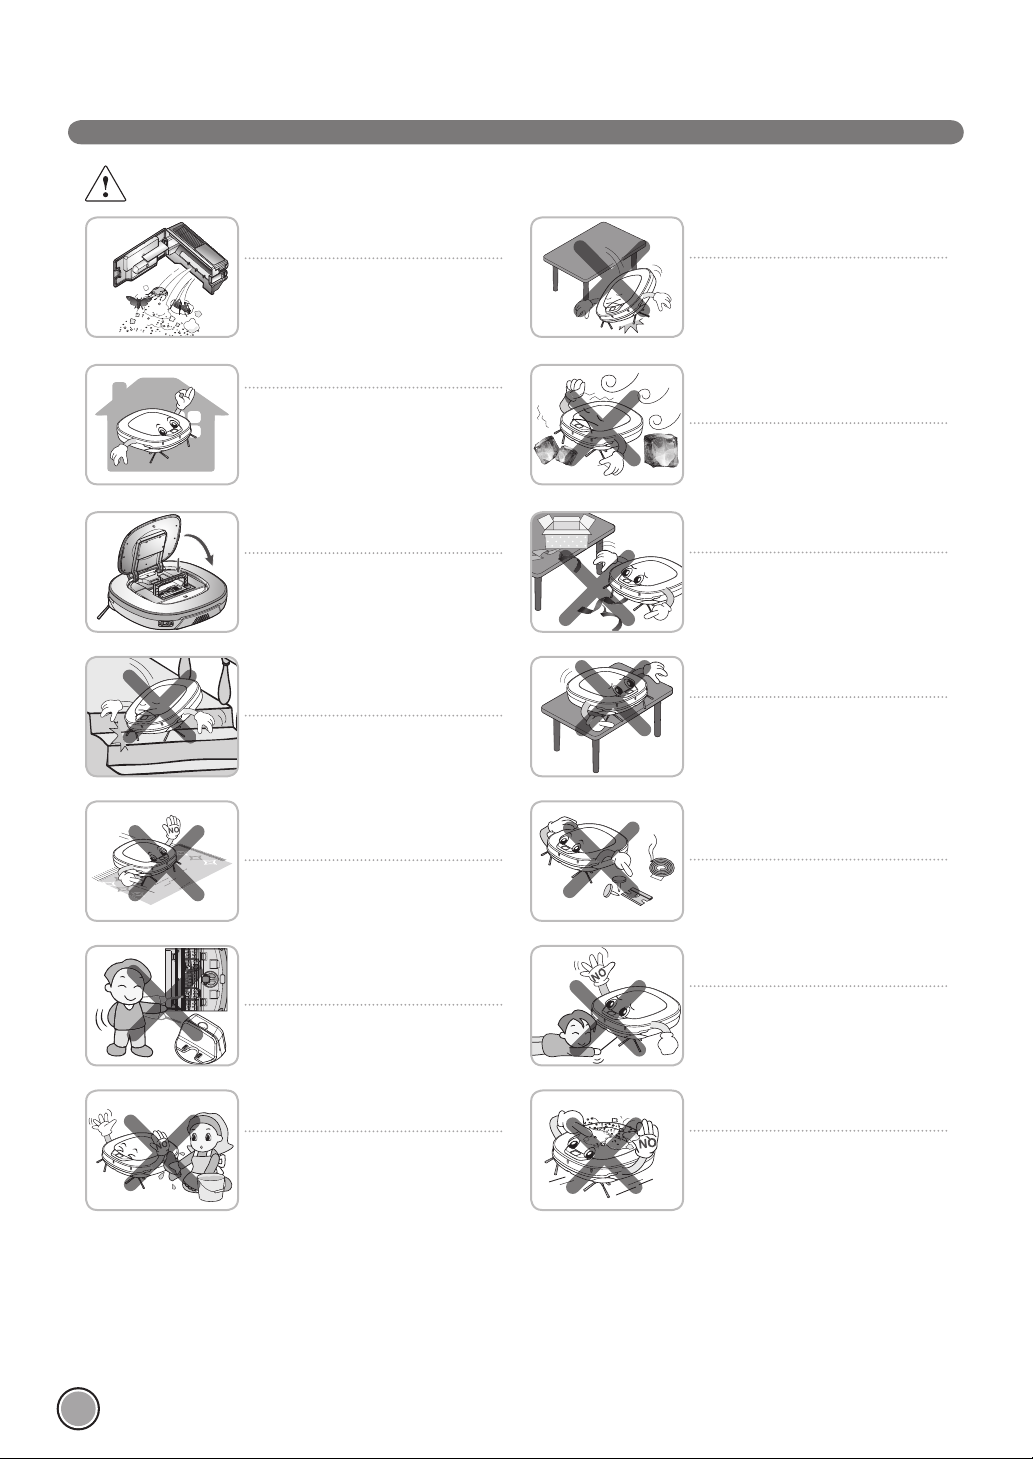
Frequently empty the dust bin and
maintain its cleanliness.
The dust collected in the dust bin can
trigger allergies and may contain harmful
insects.
Use the Robot Cleaner indoors only.
Using it outdoors can cause product failure
and irreparable damage to the unit.
Close the cover of the dust bin on the
main unit before starting cleaning.
If the cover is not closed, it can cause injury
or product damage.
DO NOT use the Robot Cleaner around a
banister, staircase or any other dangerous
place.
Otherwise, the user or the product can be
exposed to damage.
Do not drop the Robot Cleaner or subject
it to strong impacts.
Doing so can cause injury or product failure
not covered by the warranty.
Do not expose the Robot Cleaner to cold
temperatures (less than -5 °C) for a long
period of time.
Doing so can cause product failure.
Remove any cables or string from the fl oor
before starting.
Cable or string can get tangled in the
wheels of Robot Cleaner and cause product
failure or the cord of an appliance can be
disconnected.
Make sure the Robot Cleaner is not put on
a table or desk, with the power ON.
It may result in injury of the user or damage
in the product.
In rare cases, the Robot Cleaner’s brush
can damage the carpet. If this happens,
immediately stop the cleaning operation.
When a carpet has long tassels, the tassels
can be damaged.
Do not let the main unit and charging
terminal of the home station come into
contact with metallic objects.
Doing so can cause product failure.
Do not put water, detergent, etc. into the
Robot Cleaner.
Doing so can cause product failure. Do not
put any water or detergent on the Robot
Cleaner. If liquids get inside of the Robot
Cleaner, turn off the power supply and
contact an LG Electronics sales agent or
customer care center.
Do not allow the Robot Cleaner to sweep
up liquids, blades, thumb tacks, kindling,
etc.
These items can cause product failure.
Do not put sharp objects into the opening
of the Robot Cleaner’s ultrasonic sensor.
Doing so can cause product failure.
Do not use the Robot Cleaner when the
dust bin is completely fi lled up.
Doing so can cause product failure.
4
Page 7
CAUTION
SAFETY PRECAUTIONS
ENGLISH
Tip
If the fl oor is wet or has wet spots, wipe
them up before using the Robot Cleaner.
Do not use the Robot Cleaner on a wet
surface.
Failure to do so can cause product failure.
When attaching the mop, do not block the
bottom camera sensor.
Blocking the bottom camera sensor may
not allow the product to work smoothly.
If you do not use it to save the energy,
turn off the power switch, and turn on the
power switch when you are cleaning or
recharging it.
When the robot cleaner is operating, it
may hit the chair leg, desk leg, table leg or
other narrow pieces of furniture.
For quicker and better cleaning, place the
dining chairs on top of the dining table.
Make sure the plate on the fl oor is higher
than 2 cm from the ground before starting
the cleaning.
If the threshold is low, the Robot Cleaner
can go over it and perhaps into an
undesirable location. Make sure that all
the doors of the rooms that are not to be
cleaned are closed.
Check the following items before use:
• Empty the dust bin after each operation or prior to it filling up.
• Remove any cables or long strings from the floor.
• Remove any moisture from the floor before cleaning.
• Close the cover of the dust bin before cleaning.
• Remove fragile or unnecessary objects from the room to be cleaned.
For example, remove expensive ceramics and valuables from the floor.
• Confirm whether the battery has sufficient power, and if it is low, recharge it.
• Close the doors of any room that you do not want the Robot Cleaner to enter.
During cleaning, the Robot Cleaner may enter another room and continue cleaning.
• Do not use this product in the room where a child is sleeping alone. The child can be hurt or woken.
• Remove towels, foot towel or any other thin cloth from the floor as they can get caught by the brush.
• Before starting the device, it's better to remove carpets that are thicker than 20 mm as they may cause it to
malfunction.
• Please close any balcony doors. The wheels may get stuck while cleaning.
5
Page 8
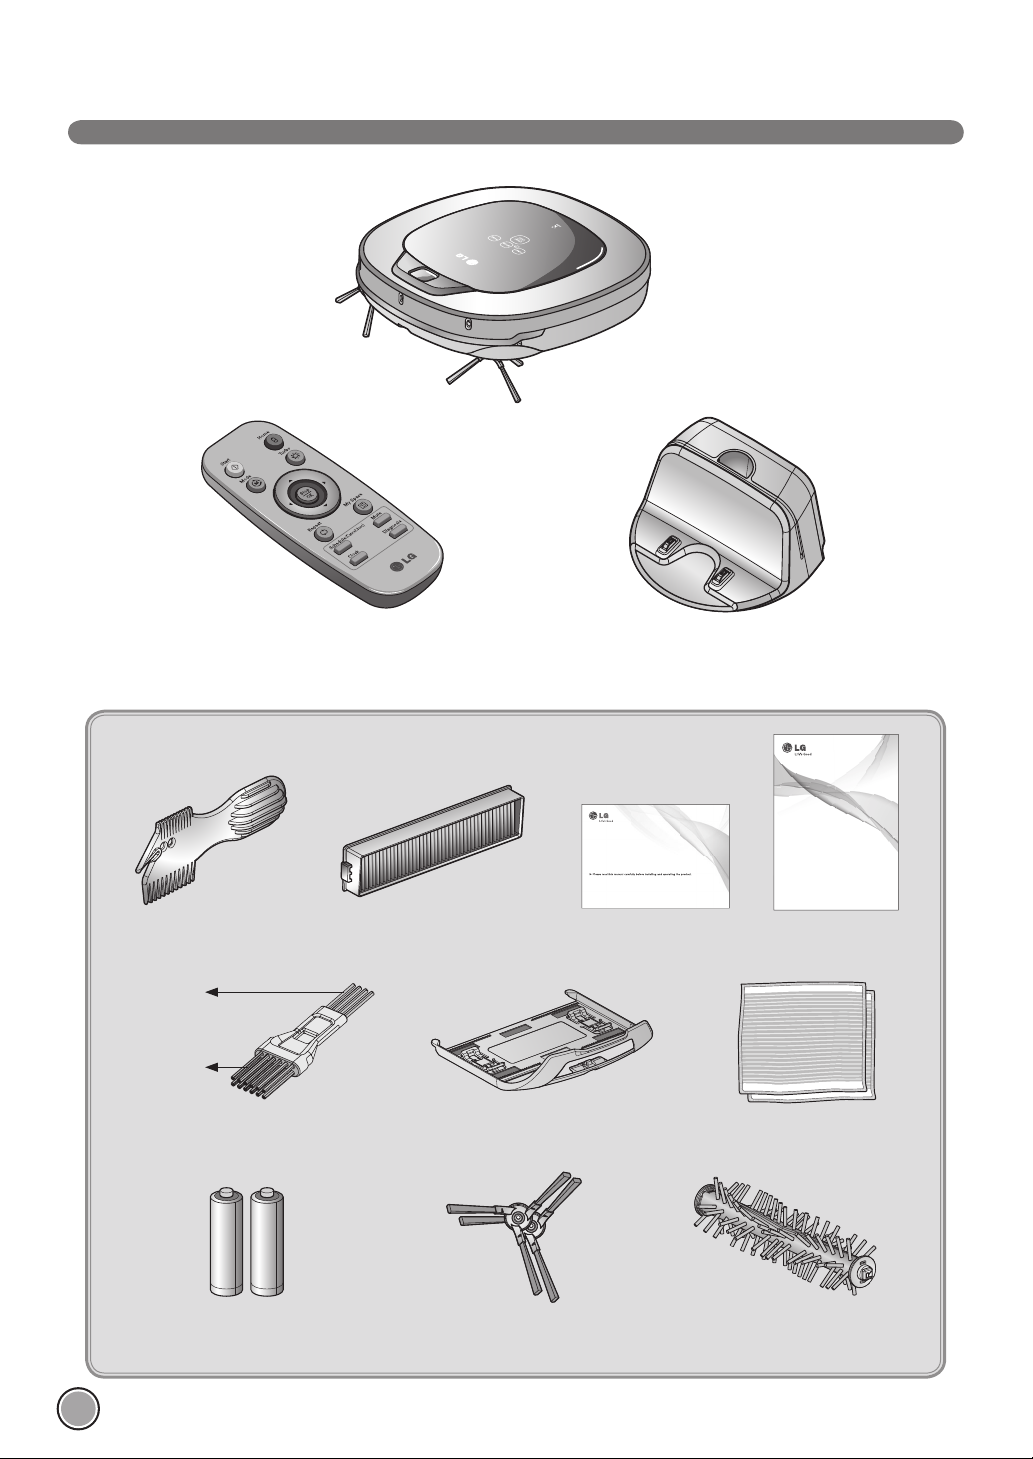
INCLUDED WITH PRODUCT
Robot Cleaner
Remote controller
Figures can be different from actual objects.
Cleaning Tool
for cleaning
sensors
for cleaning
the fi lter
Cleaning brush
(It’s on the dust bin cover)
Dust bin fi lter (spare)
(option)
Mop plate (option)
Home station
QUICK GUIDE
CLEANING ROBOT
This guide briefly describes how to use the Cleaning Robot.
For more detail, please refer to the user manual
www.lg.com
Quick guide Operation manual
OWNER’S MANUAL
CLEANING ROBOT
Before using, please carefully read the Safety Precautions pages to
allow for safe operation of the product. After reading the operation
manual, please keep it in an easily accessible location.
Ultra microfi ber mop
(2 pieces) (option)
www.lg.com
Dry cell for remote controller
(2 units of AAA size)
Side brush (2 pieces)
(option)
Carpet Master
(option)
6
Page 9
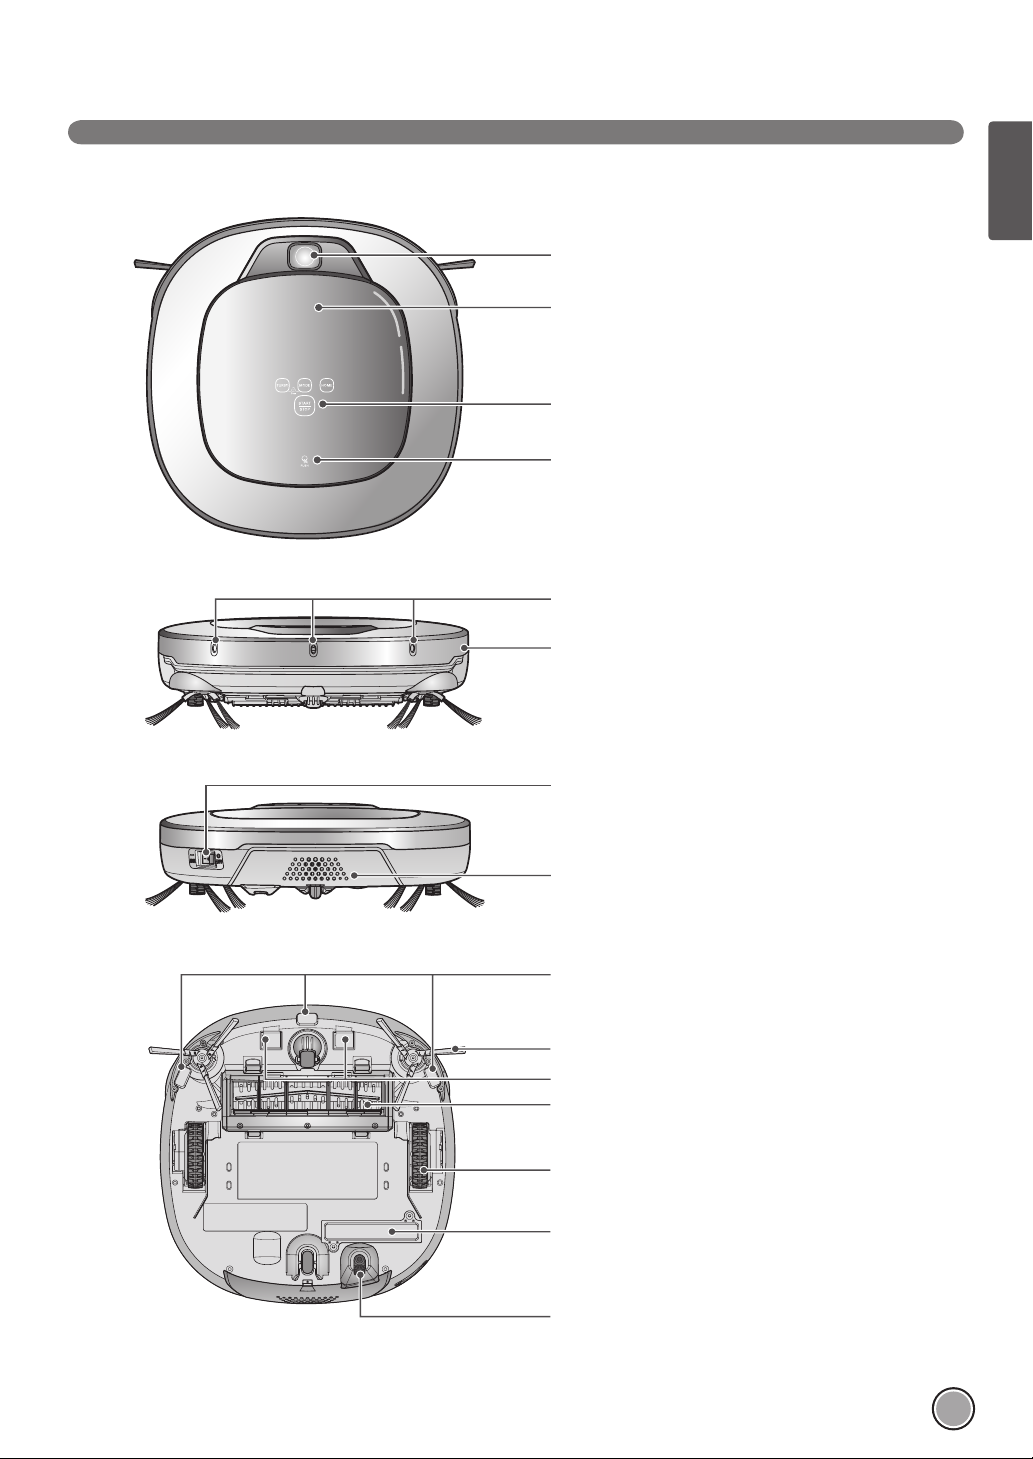
Plan view
Front view
PARTS DESCRIPTION - ROBOT CLEANER
ENGLISH
Upper camera sensor
Dust bin cover
Display & Manipulation button
Dust bin cover button
Ultrasonic sensors
Obstacle detecting sensor window Detecting
sensors of home station & Receiving sensors of
remote controller
Rear view
Bottom view
Power switch
Ventilation port
Cliff detection sensor
Side brush
Charging terminal
Brush
Wheel
Battery
Lower camera sensor
Figures can be different from actual objects.
7
Page 10
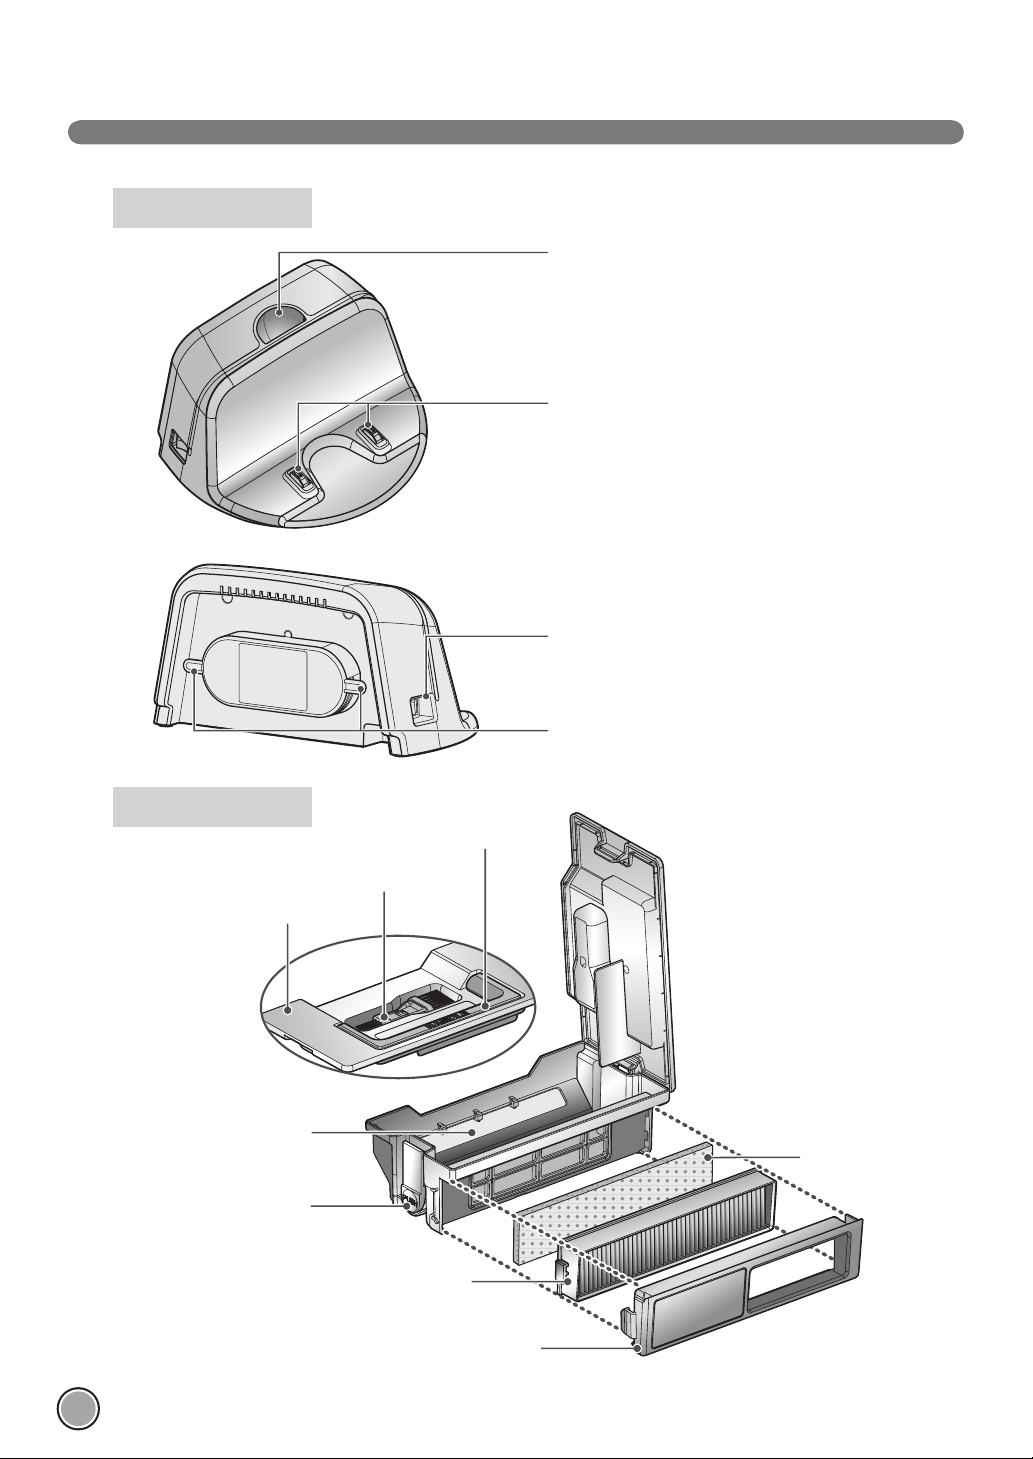
PART DESCRIPTION – HOME STATION / DUST BIN
Home station
Remote controller holder
Charging terminal
Power switch
Dust bin
Dust bin cover
Suction port fl ap
Dust bin cover opening
button
Power cord fi xing hook
Dust bin handle
Cleaning brush
Sponge fi lter
HEPA fi lter
Figures can be different from actual objects.
8
Filter cover
Page 11
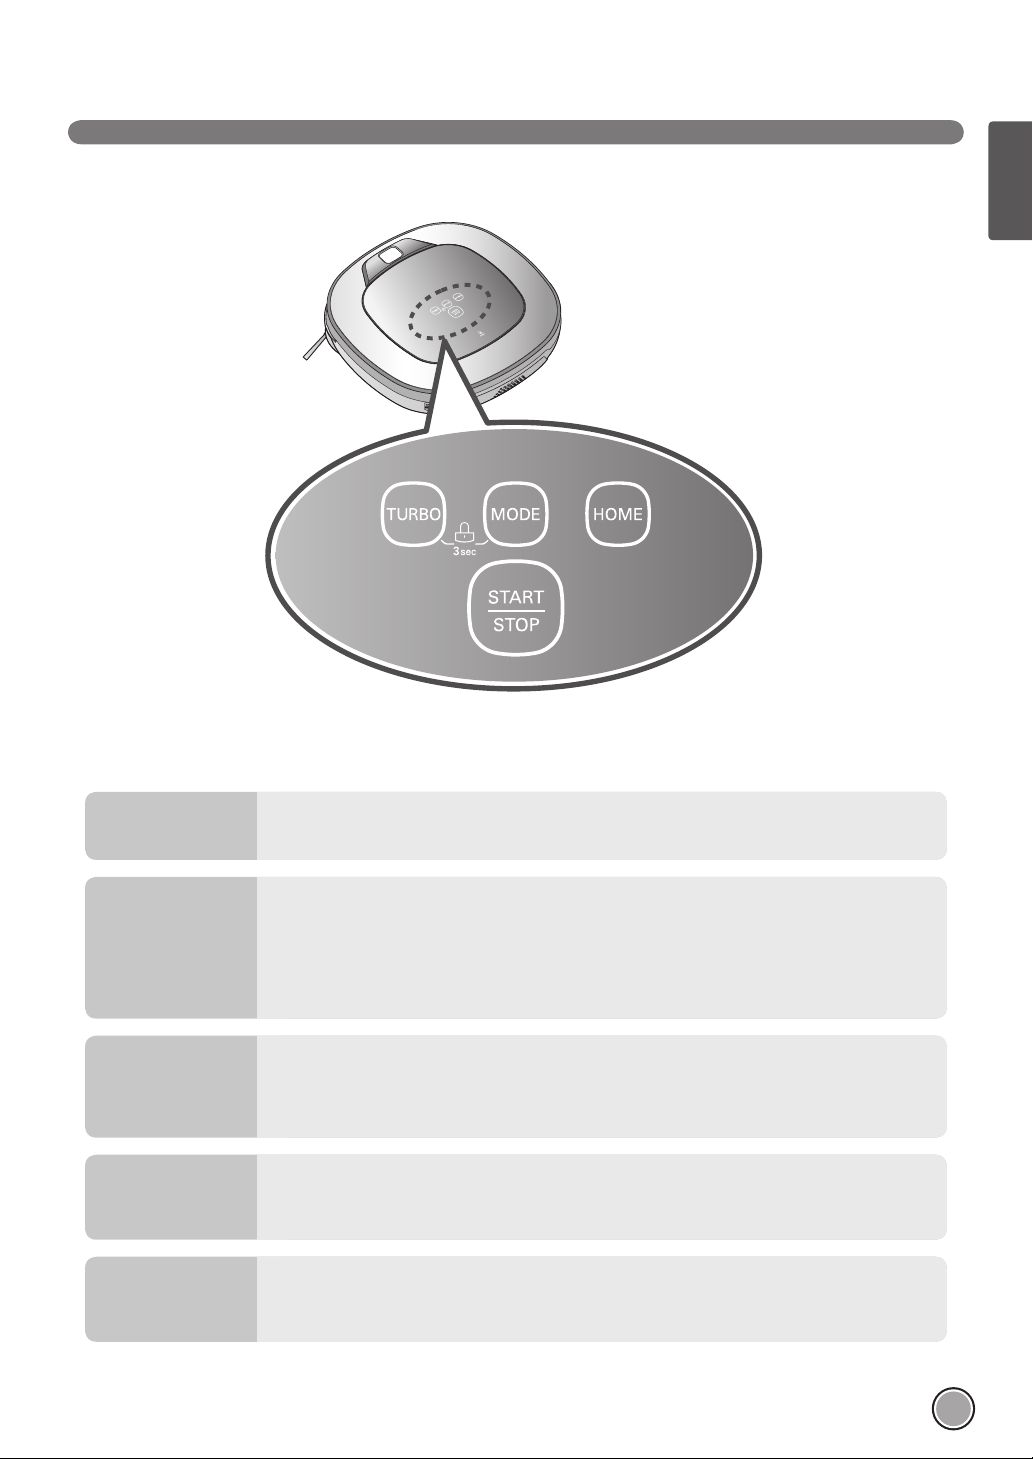
BUTTON FUNCTIONS – ROBOT CLEANER
ENGLISH
TURBO
START/STOP
MODE
HOME
BUTTON LOCK
On/Off
• If the button is pressed, ‘Turbo Mode’ will be set with a voice confirmation.
• If the button is pressed whilst in ‘Turbo Mode’, it will be canceled.
• Used to turn the power ON, start or stop cleaning.
• If the button is pressed whilst the unit is powered ON, it will start cleaning.
• If button is pressed during the cleaning, it will stop the cleaning.
• If the button is pressed for about 2 sec. whilst the power is ON, the power will be OFF.
• If the button is pressed in 'Smart Diagnosis' mode, it will end the diagnosis.
• Used to change the clean mode setting.
• If the machine is at the Home Station, ‘Spot Clean’ option is not available.
• The 'My Space' mode can only be selected by remote control (when the Robot Cleaner is not on the
home station).
• Used to return the Robot Cleaner back to the home station for charging.
• If cleaning is finished or the battery is low, the Robot Cleaner will return to the Home Station by
itself to recharge its battery.
• Pressing the ‘Turbo' and 'Mode' button for 3 seconds will activate or deactivate the Lock function.
• If 'Lock' is ON, a voice announcement "Key has been locked" will be heard each time a button is
pressed.
9
Page 12
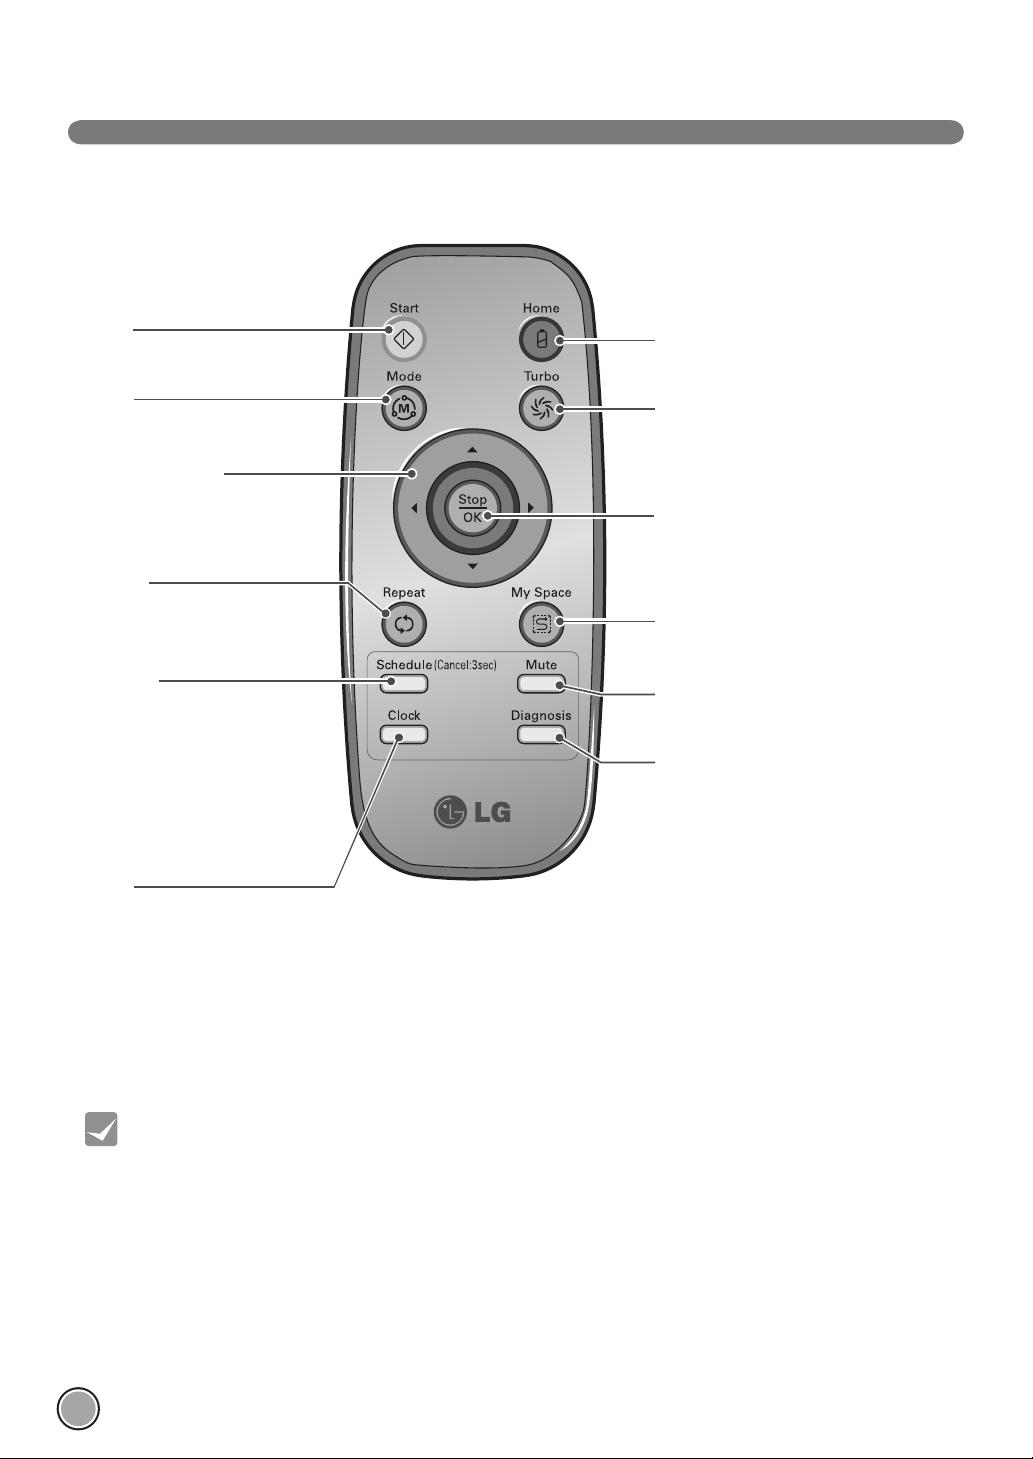
BUTTON FUNCTIONS – REMOTE CONTROLLER
Start
Pressing this button will start the
cleaning. (p16)
Mode
Change the cleaning mode.
(p19)
Directional button
This button enables Manual
Operation and selection of an area
in 'My Space cleaning' mode.
Repeat
This button allows activating or
deactivating 'Repeat Cleaning'
mode. (p22)
Schedule
Used to start cleaning at a
scheduled time.
Pressing the button for 3 sec. will
cancel the scheduled cleaning.
Schedule Setting/Cancel options
※
are available only in 'Charge'
mode. (p24)
Clock
Used to set the current time
indicated on the Robot Cleaner.
(p23)
Home
Used to recharge the Robot Cleaner by
making it return to the Home Station. (p17)
Turbo
Used to activate or deactivate 'Turbo'
mode. (p22)
Stop/OK
Pressing the button will stop the Robot
Cleaner, or confi rm a cleaning schedule or
time setting.
My Space
Used to put the Robot Cleaner in
'My Space clean' mode. (p20)
Mute
Used to activate or deactivate 'Mute'
mode. (p11)
Diagnosis
Used to run Smart Diagnosis.
Available only when Robot Cleaner is
recharging. (p27)
10
Tip
• Remote Controller does NOT provide a Power ON function.
• With the machine's power OFF, the Remote Controller will not work.
• To turn the power ON/OFF, use the 'Start/Stop' button on the upper section of
the Robot Cleaner.
• Only use the 'Mode', 'My Space' or 'Clock' button after stopping Robot Cleaner.
Page 13
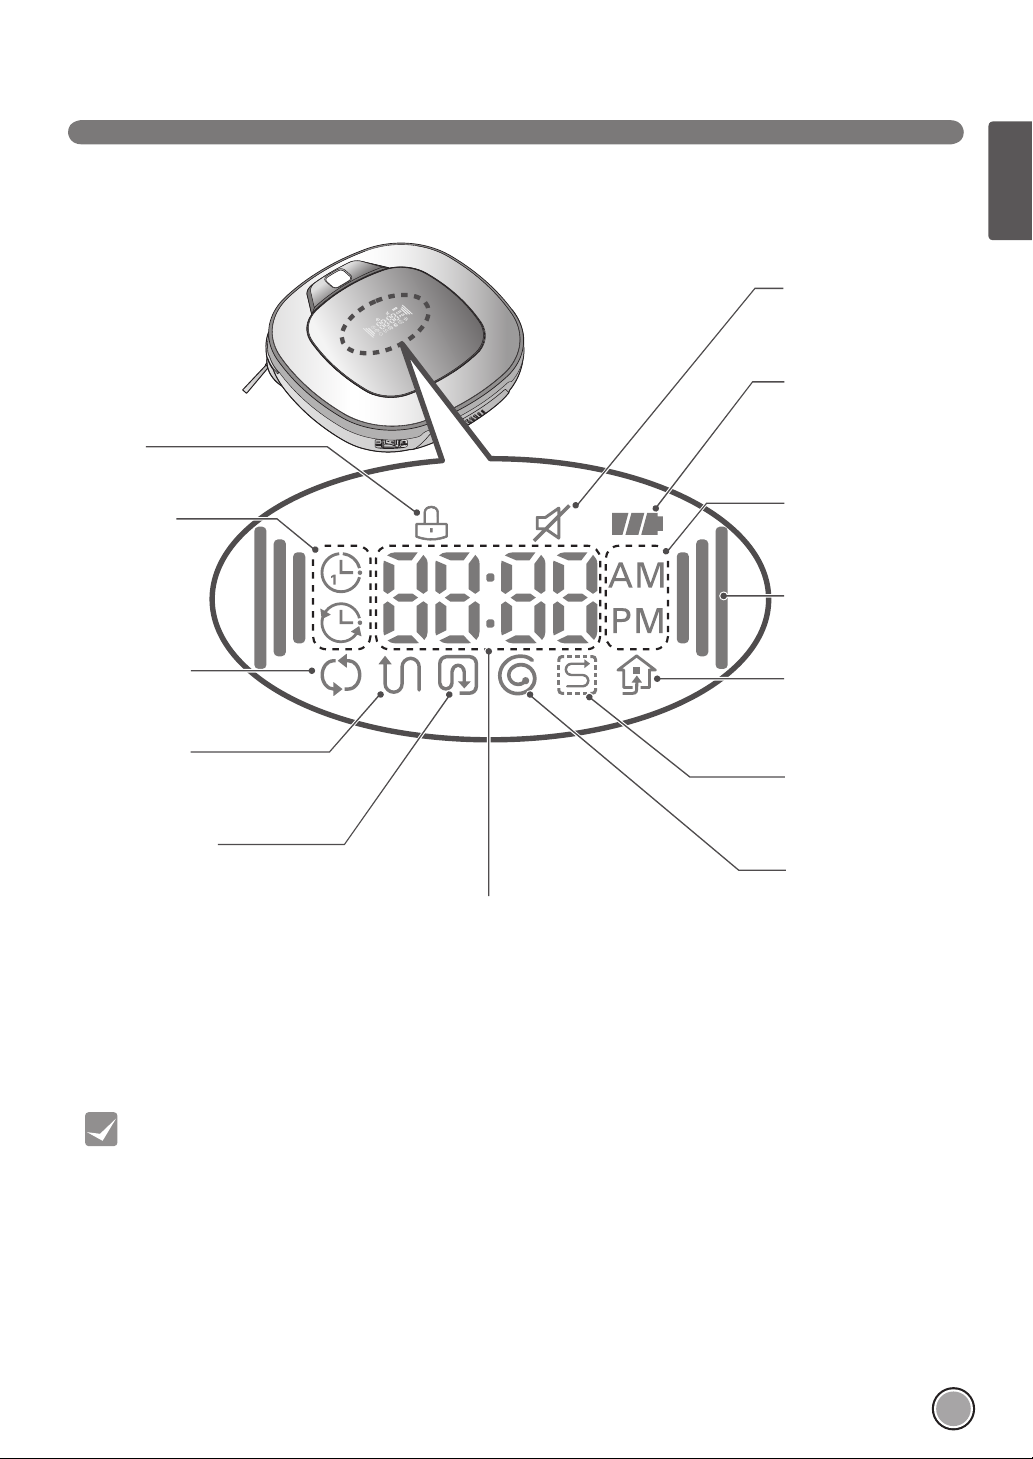
Lock icon
Indicates whether 'Lock‘ is
activated or not.
Schedule icon
Indicates the status
of Schedule/'One
time', or 'Everyday'
setting.
Repeat cleaning
Displayed if the machine is
in 'Repeat Cleaning' mode.
Zigzag cleaning
This icon is displayed to indicate
Robot Cleaner is working in a
Zigzag Clean.
Cell by Cell cleaning
This icon is displayed to indicate Robot
Cleaner is working in a Cell by Cell
cleaning mode.
DISPLAY STATUS INFORMATION
Mute icon
This icon indicates
whether the Mute is ON
or OFF.
Battery icon
This icon indicates the
residual battery level,
it fl ickers if the battery
needs recharging.
AM/PM icon
This indicates whether
it's a.m. or p.m. according
to the clock setting.
Turbo icon
This display is ON if Turbo
Mode is activated.
Homing icon
This icon is displayed
if Robot Cleaner is in
'Homing' mode.
My Space cleaning
Displayed when the
Robot Cleaner runs My
Space clean.
Spot cleaning
Time display
This indicates the current and
scheduled time.
This icon appears when
Robot cleaner starts Spot
cleaning.
ENGLISH
Tip
• Once the clean mode is selected (Zigzag or Cell by Cell) it will be remembered even if the power is OFF.
• To cancel the reservation, please press the 'Schedule' button on the remote for 3 seconds while the Robot
Cleaner is recharging.
11
Page 14
BEFORE YOU START
–
+
+
–
Check these items before cleaning
• Do not use this device in a room where a child is left alone. The child could be injured.
• Remove fragile or unnecessary objects from the room to be cleaned.
Especially, remove expensive ceramics and valuables from the floor.
• Close the cover of the dust bin before cleaning.
• Remove any moisture that might be on the floor.
• Remove cables, strips, towels, mats etc. from the floor so they will not get caught by the brush.
• Confirm whether the battery charge is sufficient, and if it is low, recharge it.
• Empty the dust bin before or after each clean, or before it becomes full.
• Close the doors of any room that you do not want the Robot Cleaner to enter. During cleaning,
the Robot Cleaner may enter another room and continue cleaning.
• When the mop is attached, Robot Cleaner will not be able to go over thresholds of 5 mm or higher.
If you are not planning to use the mop for cleaning, separate the mop before using Robot Cleaner.
• Before starting the device, it's better to remove carpets that are thicker than 20 mm as they may cause it to malfunction.
• Please close any balcony doors. The wheels may get stuck while cleaning.
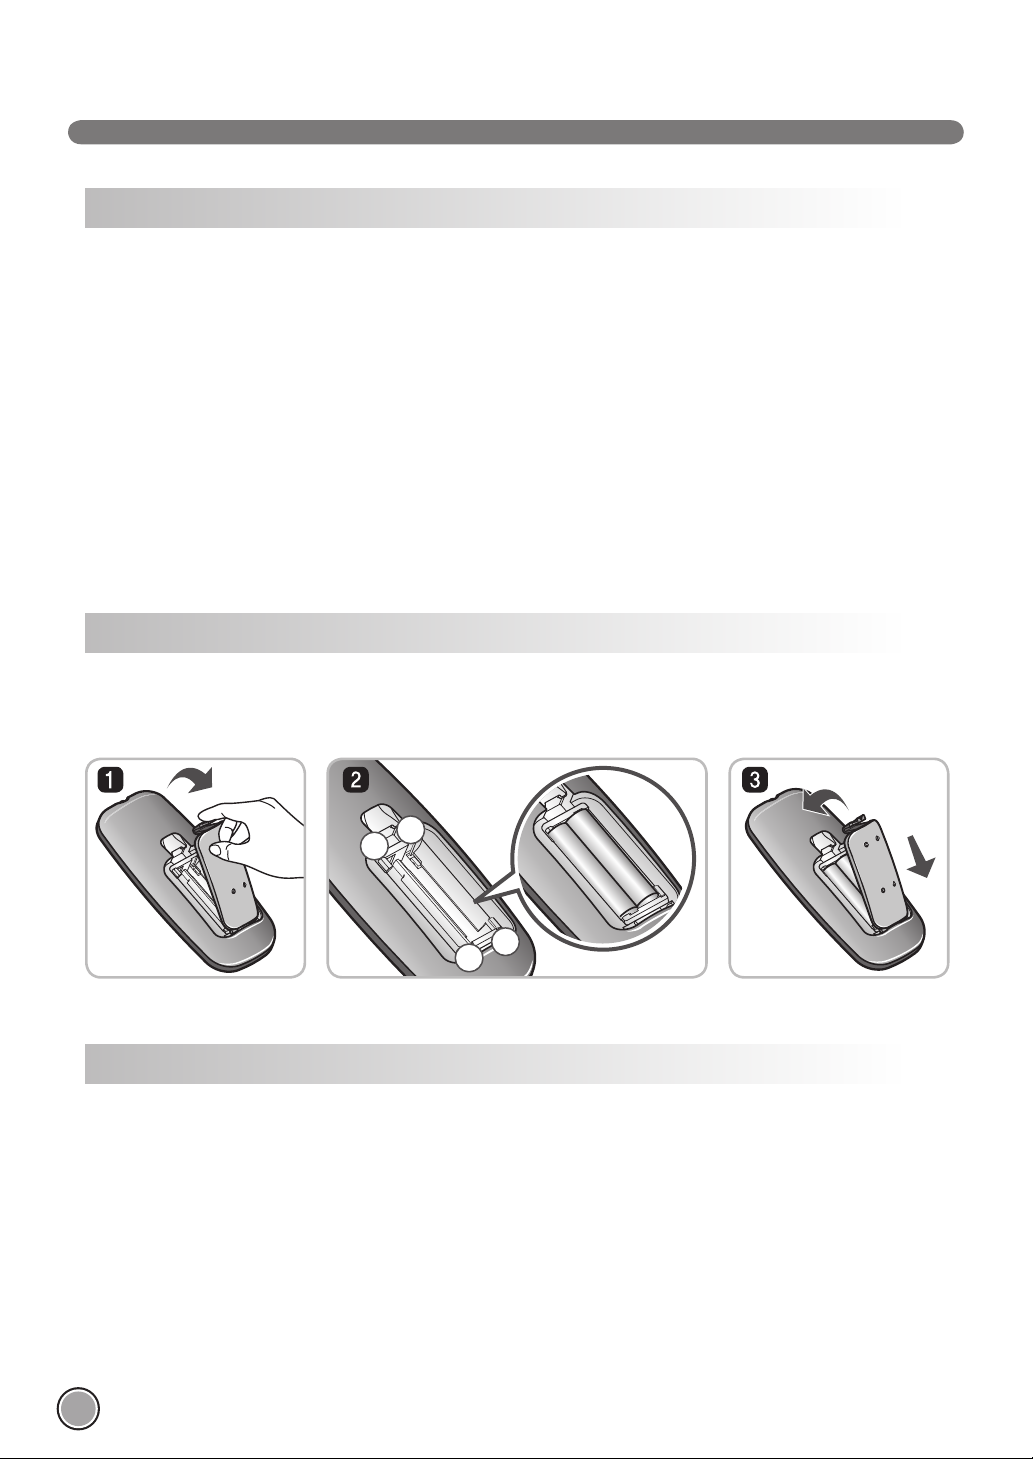
Loading the remote controller battery
1. Open the battery cover by lifting the rear hook of the remote controller.
2. Insert two AAA batteries, checking for +, - nodes while loading.
3. Close the battery cover completely so that the batteries will not fall out.
Precautions while using the remote control
• Only press one button at a time.
• Do not drop or subject it to forceful impact.
• Do not store it near devices that give off heat, fire or hot air.
• Certain fluorescent lamps, such as the three band radiation lamp, can interfere with the activation of the remote control.
Therefore, use it as far away as possible from such lamps.
• If the remote control is far from the Robot Cleaner when activated, it may fail to operate properly. Use the device within 3 m of
the Robot Cleaner if possible.
12
Page 15
OVERVIEW
ENGLISH
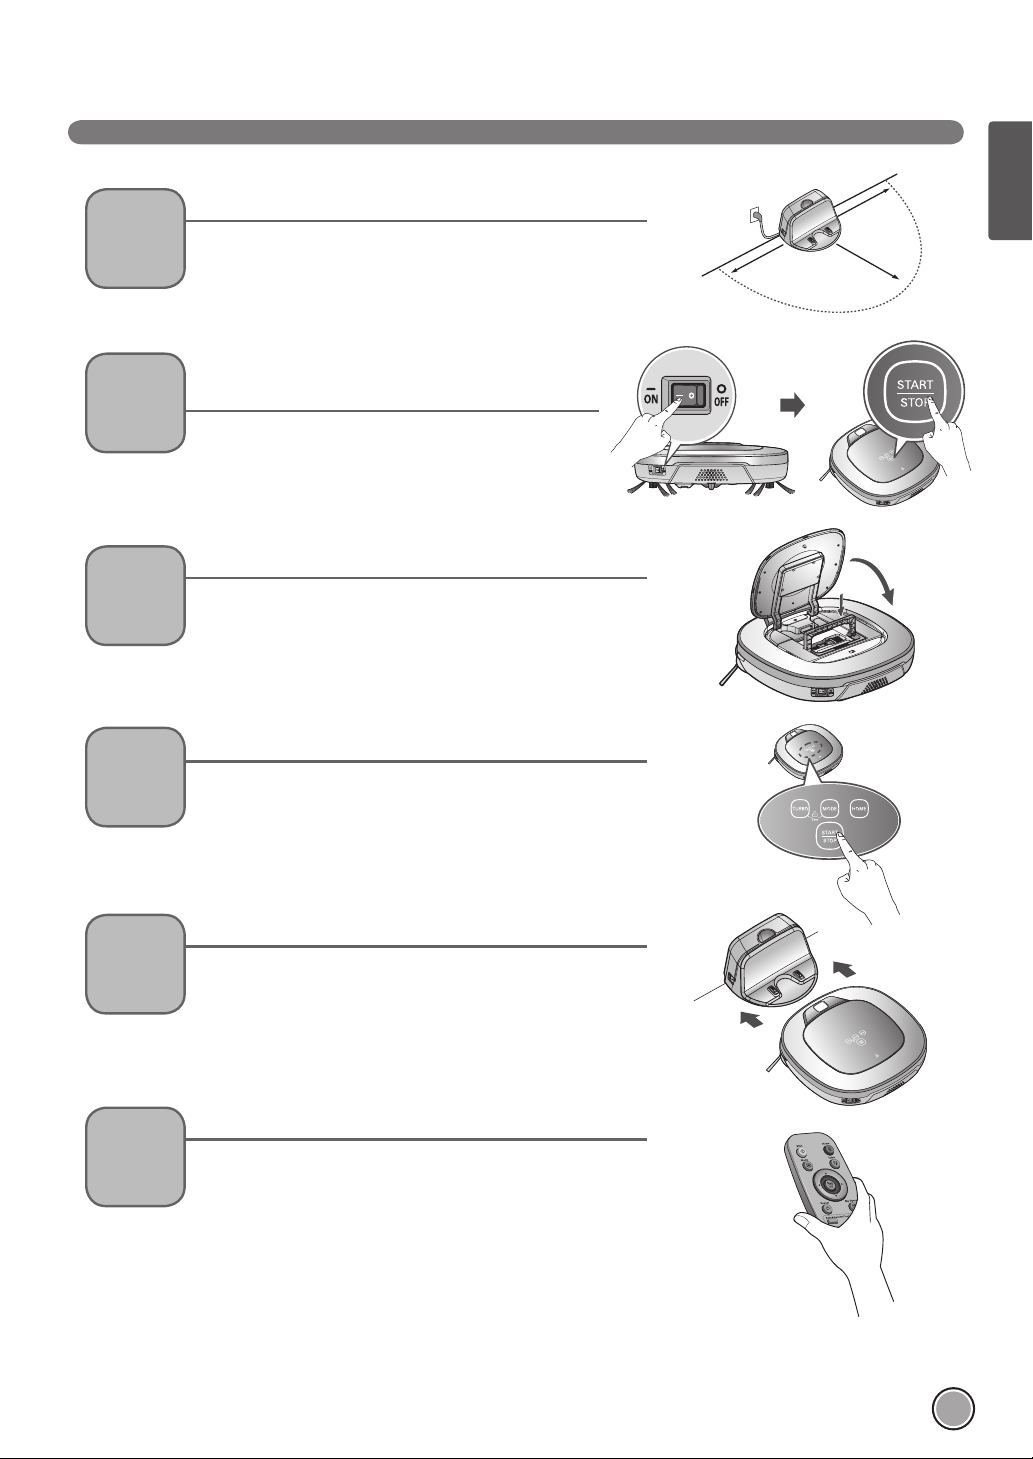
1
2
3
4
Install the home station. (p14)
Insert the power cord plug into an outlet and locate the station
against a wall. If power is not supplied to the home station, the
Robot Cleaner will not charge.
Turn on the power supply of the Robot Cleaner.
(p15)
Turn ON the power switch on the rear-left of Robot Cleaner,
and press the 'Start/Stop' button on the top.
※
If the power supply is not turned on, refer to page 15.
Check the dust bin.
Check the cleanness of the dust bin before start cleaning and close
the cover of the dust bin on the main unit.
Start cleaning. (p16)
Press the START/STOP button once again while the Robot Cleaner
is turned on. You will hear the sound of cleaning and cleaning will
begin.
1.5
1.5
2
Automatic charge. (p17~18)
5
6
< Warning > When Robot Cleaner is operated with the cover of the dust bin open,
The Robot Cleaner will self-diagnose and automatically return to
the home station to recharge before the complete discharge of the
battery. It takes approximately three hours to charge the battery.
Use the cleaning mode and auxiliary functions. (p19~25)
Use the buttons on Robot cleaner and Remote Controller to use
each cleaning mode and supporting feature.
Cleaning modes include ZigZag, Cell by Cell, Spot, My space, and
Repeat cleaning; supporting features include Manual, Scheduled and
Microfi ber Mop cleaning.
it can cause an injury or serious damage to the product.
13
Page 16
HOW TO INSTALL THE HOME STATION
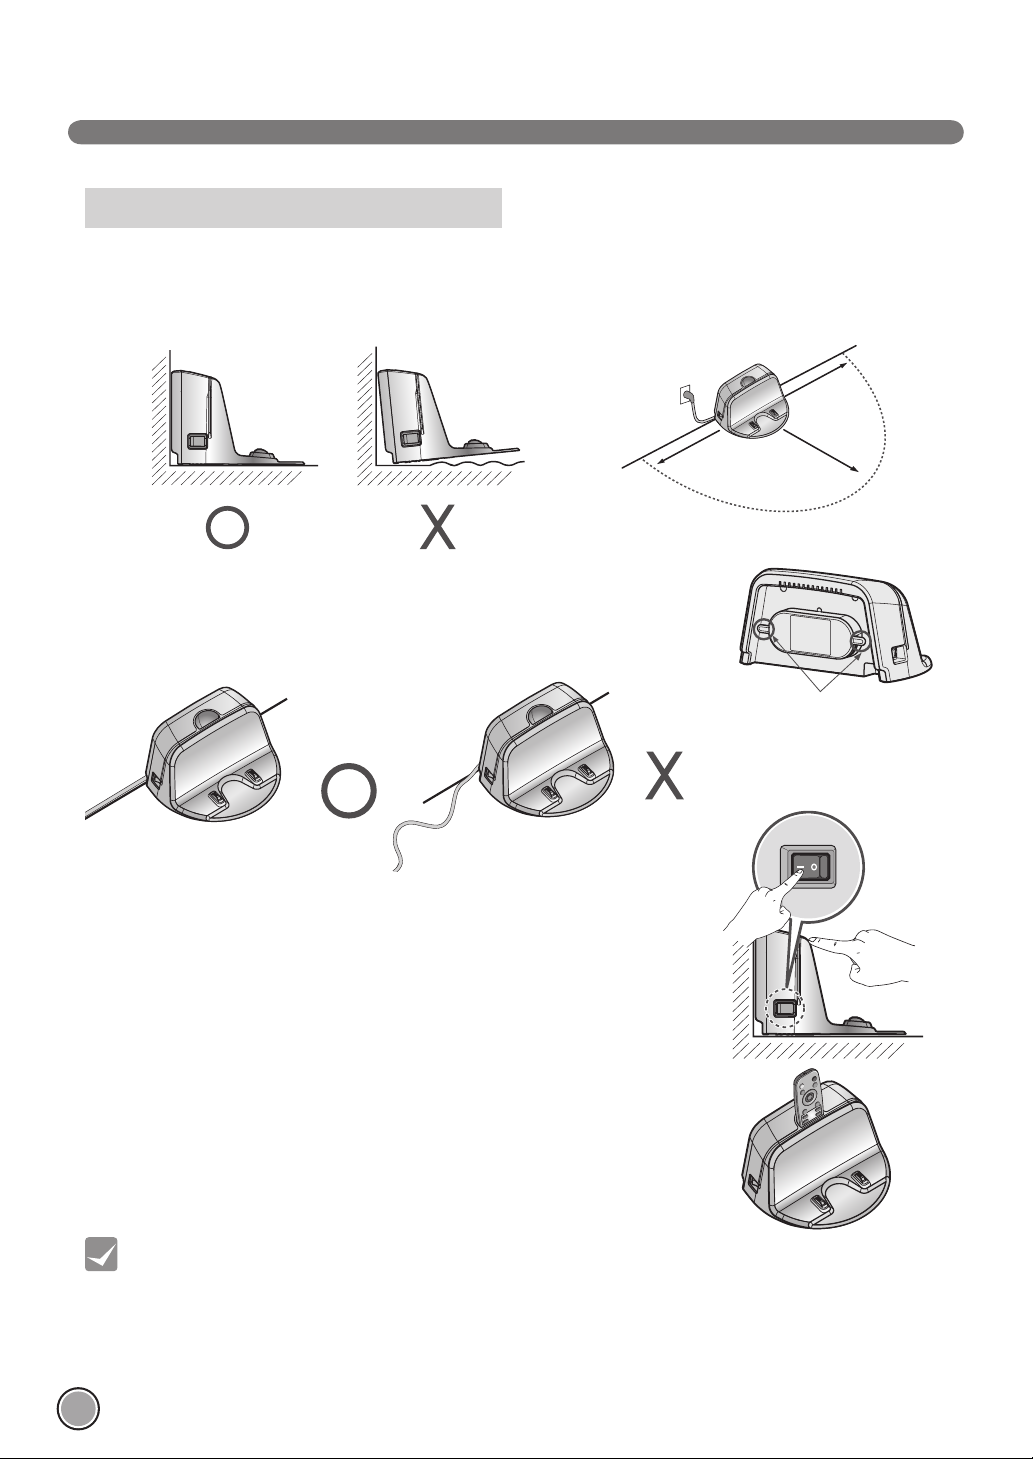
How to Install the Home Station
1. Position the home station against a wall on hard level fl ooring to prevent sliding
during docking.
Remove objects within 1.5 m to the right and left side and within 2 m to the
front.
1.5
2. Plug the power cord into an outlet.
Wrap the power cord around the fi xed hook on the back side of the home
station or along the wall surface so that the travel path of the Robot Cleaner
will not be obstructed.
3. Fix the home station against the wall so that it does not move.
Please turn on the power switch.
1.5
Fixing hook of power cord
2
4. When the remote controller is not used, store it on the remote controller holder
on the home station.
Tip
< Warning > Do not operate the Robot Cleaner if the Home Station has a damaged cord or plug, if it is not working
14
• Always keep the home station plugged in. If the home station is not plugged in, the Robot Cleaner will not
return to the station to charge automatically.
properly, or if it has been damaged or dropped. To avoid hazard, the cord must be replaced by LG
Electronics, Inc. or a qualified service person.
Page 17

HOW TO TURN THE ROBOT CLEANER POWER SUPPLY ON & OFF
Turning on the main power supply
Make sure the Power Switch on the rear-left of the Robot Cleaner.
If the power is OFF, turn the switch ON.
※
When turning on the power switch, do not press the button located at the
upper section of the Robot Cleaner. Operation of the button can be delayed.
※
Turn off the power switch if the Robot Cleaner will not be used for a long
period of time, in order to protect the battery. The Robotic Cleaner cannot
charge if the main switch is in the "OFF" position.
Turning on from Stand By power.
With the power of Robot Cleaner OFF, press 'Start/Stop' button for 1 second
until a "Ting" sound is heard. In about 10 seconds, the power will be on and a
melody will sound.
※
If 10 minutes elapse without the Robot Cleaner having being given an active
command after being turned on, the power will automatically turn OFF.
ENGLISH
Turning off the power supply
Press the START/STOP button for two seconds while the
Robot Cleaner is turned on. A melody will sound when the power is turned off.
Tip
• If the power cannot be turned on, do the following.
- Turn on the power switch and wait for more than 3 seconds.
- Press the ‘START/STOP’ button when the power switch is turned on.
- If the power is not turned on or if there is no display but only the “Ting” sound, put the Robot Cleaner
manually on to the home station.
15
Page 18
HOW TO START AND STOP CLEANING
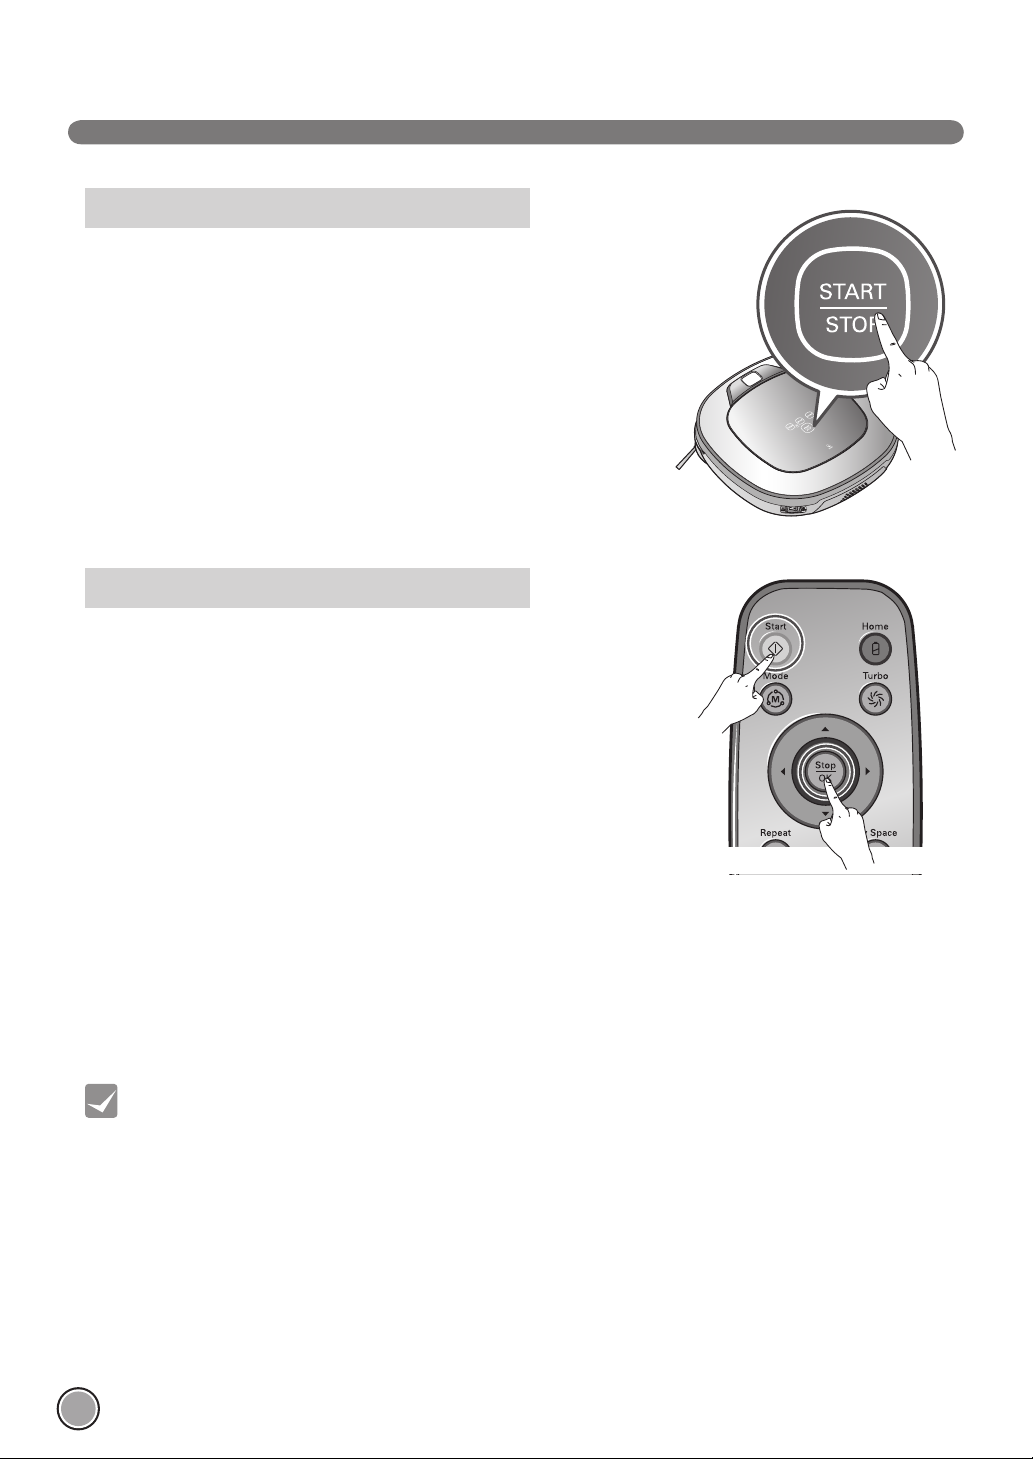
Using the buttons on the Robot Cleaner
After the Robot Cleaner is turned on, press the START/STOP button to begin
cleaning. A melody will sound and cleaning will begin.
Press the START/STOP button during the cleaning cycle to stop cleaning.
※
When the ‘START/STOP’ button is pressed while the power supply of the Robot
Cleaner is turned off, the power will be turned on. Press the ‘START/STOP’ button
one more time to start cleaning.
Using the remote controller
After the Robot Cleaner is turned on from the Robotic Cleaner, press the START
button on the remote control. A melody will sound and cleaning will begin.
Press the STOP button during the cleaning cycle to stop cleaning.
※
The Robot Cleaner cannot be turned on from Stand By, by using the remote
controller when the power of the Robot Cleaner is off. When the power is off,
press the ‘START/STOP’ button on the upper side of Robot Cleaner to turn the
power on and to allow the remote to be used.
※
During cleaning, collisions can happen when the sensor cannot detect objects because of their shape (Thin chairs and table legs,
furniture corner). When this happens, the internal impact detecting sensor will react by using a backward motion.
※
If the Robot Cleaner is set to start cleaning at a location away from the home station, put the Robot Cleaner on a fl at fl oor in
order to prevent a malfunction of the obstacle detecting sensor. In addition, start cleaning from a location where there are no
obstacles such as curtains or walls within 30 cm of the Robot Cleaner.
Tip
16
For best results:
• Briefly scan the area to be cleaned for big and small objects that will cause difficulty for the Robot Cleaner.
• If cleaning is started when the Robot Cleaner is at the home station, the device can rapidly be returned to the
home station as the current home position has been accurately read.
• When the mop plate is installed, to prevent a 2
door sills of 5 mm or higher.
nd
contamination from the contaminated mop, it will not go over
Page 19
HOW TO CHARGE THE BATTERY
Automatic charging
The Robot Cleaner returns to the home station at the end of a cleaning cycle or
when its battery is running low.
※
If 10 minutes elapse without the Robot Cleaner moving or the battery is too low,
the power will automatically be turned OFF.
※
Do NOT turn OFF the Main Power Switch as the battery will not be recharged.
If the machine is returned manually with the Main Power Switch OFF, it shows
an error message, "Main power switch on the back of the HOM-BOT is turned
off. Please turn the switch on."
※
In the event that the unit returns to the Home Station due to a low battery
during the cleaning, cleaning will be started, after the charging, from the nearest
place of the area which has not been cleaned before. (Page 18)
※
If Robot Cleaner is unable to dock to the home station on its fi rst attempt, it will try again until it docks successfully.
※
When Robot Cleaner has completed all areas that it can clean, it will return to the home station even when the battery level is
not low.
Manual charging
If using the Robot Cleaner for the fi rst time or when charging the battery during cleaning, you can manually charge the battery.
ENGLISH
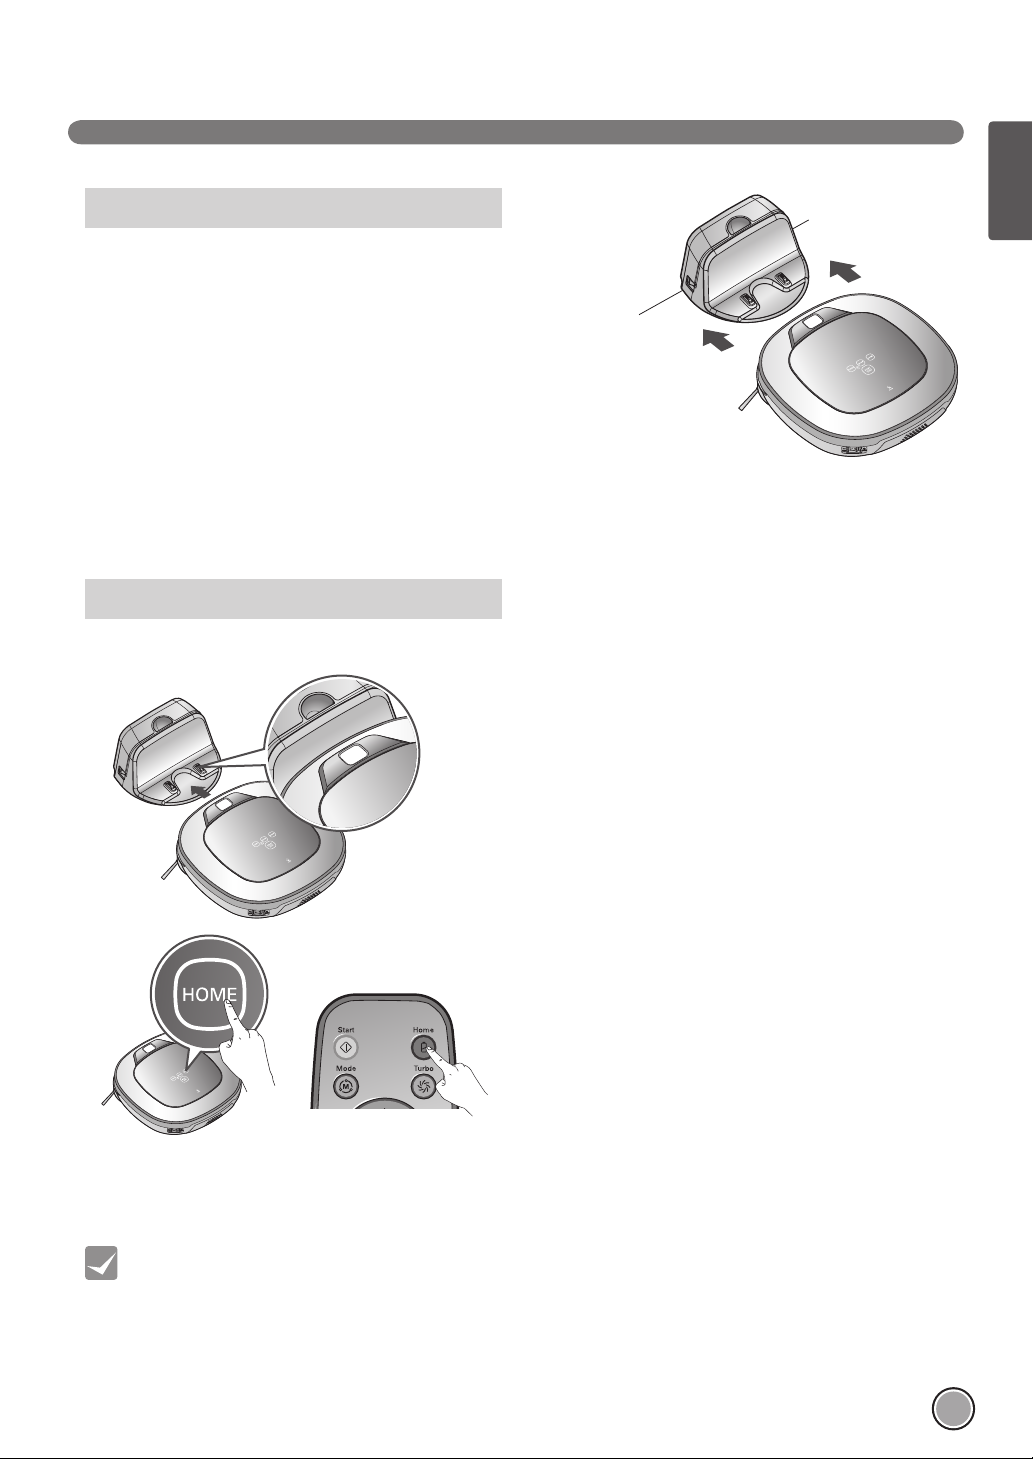
Method 1. Attach the Robot Cleaner to the home station by
aligning to the front side of the home station. A melody
sound will be generated along with an audio message to
start charging.
※ If a voice message, "Main power switch on the back
of the HOM-BOT is turned off. Please turn the switch
on." is announced repeatedly, then turn on the Main
Power Switch.
Method 2. When the 'HOME' button of the remote control or the
Robot Cleaner is pressed, charging will be prompted
by automatically generating a searching signal and
returning the Robot Cleaner to the home station.
※
If the Robot Cleaner did not start cleaning from the home station or if the Robot Cleaner is manually charged by pressing the
Home button, it may take slightly longer to fi nd the home station.
※
If the Robot Cleaner is within 10 cm of the front of the charging terminal while the power supply is turned on, it will
automatically be returned to the home station and charging will begin.
Tip
Take the following precautions when using the home station:
• If foreign material is caught in the charging terminal, charging may not proceed smoothly. Wipe the terminal from
time to time with a dry cloth after the power plug is disconnected.(p32)
• To prevent electric shock or damage to the home station, do not touch the charging terminal with any metallic
objects.
• To avoid fire or electric shock, never disassemble or modify the home station.
• Do not to place the home station or power plug near a heating source.
17
Page 20
HOW TO CHARGE THE BATTERY
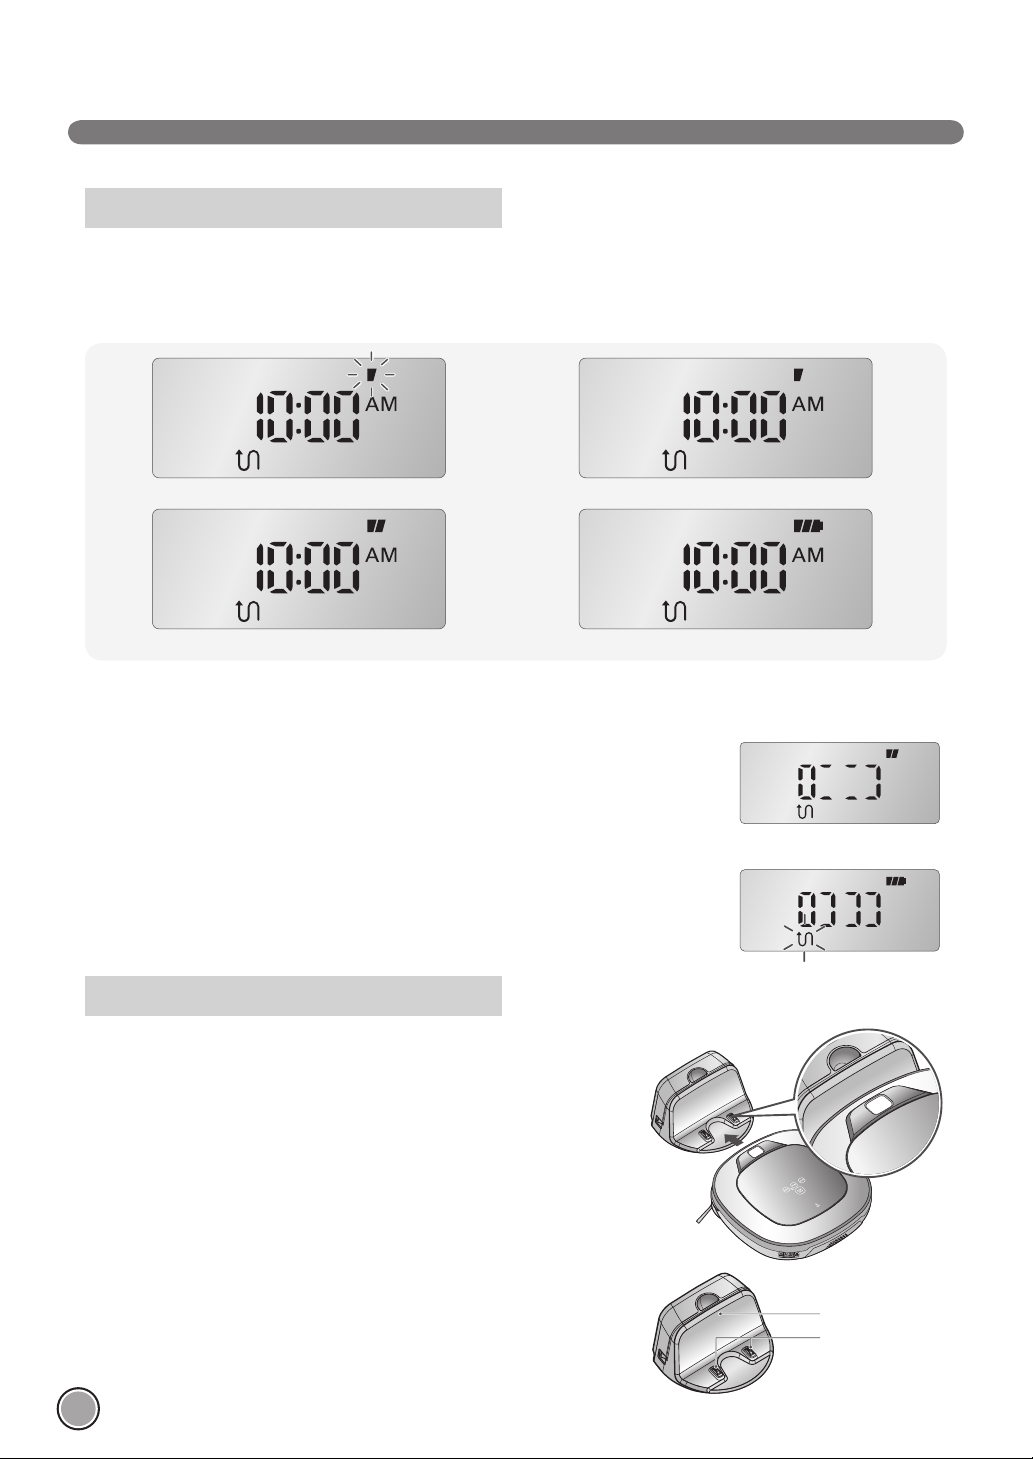
Flickering
Remaining Battery Charge Indicator
Battery level is indicated on Status Display, as follows.
• If recharging is in progress, the Battery Level Lamp fl ickers.
• If recharging is complete, only the 'Battery' and 'Clean Mode' icons are displayed to save the energy.
• Upon the need for recharging, only the fi rst level of Battery Level Lamp will be on and fl ickering.
Flickering
Charging is required
Middle
※
If Robot Cleaner goes back to Home Station, with a low level of battery while it is the
'Clean Mode' lamp starts to fl icker.
- When the 'Clean Mode' lamp starts to fl icker after recharging is complete, Robot
Cleaner will then resume cleaning the areas which were not covered.
- Pressing the 'Start' button on the Remote Controller or 'Stop' button on main unit
whilst it is recharging, with the 'Clean Mode' lamp fl ickering, will also make Robot
Cleaner fi nd and clean uncovered spots.
- Pressing the "Start" button on the remote control or the "Start/Stop" button on
the device after changing the mode will make the Robot Cleaner start to clean from
beginning again.
If the Battery is Not Charging
Check 1:
If the battery is not charging even when the Robot Cleaner is attached to
the home station, check the following items.
- Turn the power switch on the rear-left of the Robot Cleaner off once and
then on again.
- Check the power lamp of the home station.
- Wipe the terminal on the home station with a dry cloth. (p32)
Low
High
The status indication lamp while the
robot is charged
(In spatial Zigzag mode)
In the case of no existing area to
be cleaned
In the case of an existing area to
be cleaned (Flickering)
18
Power lamp
Charge terminal
Page 21
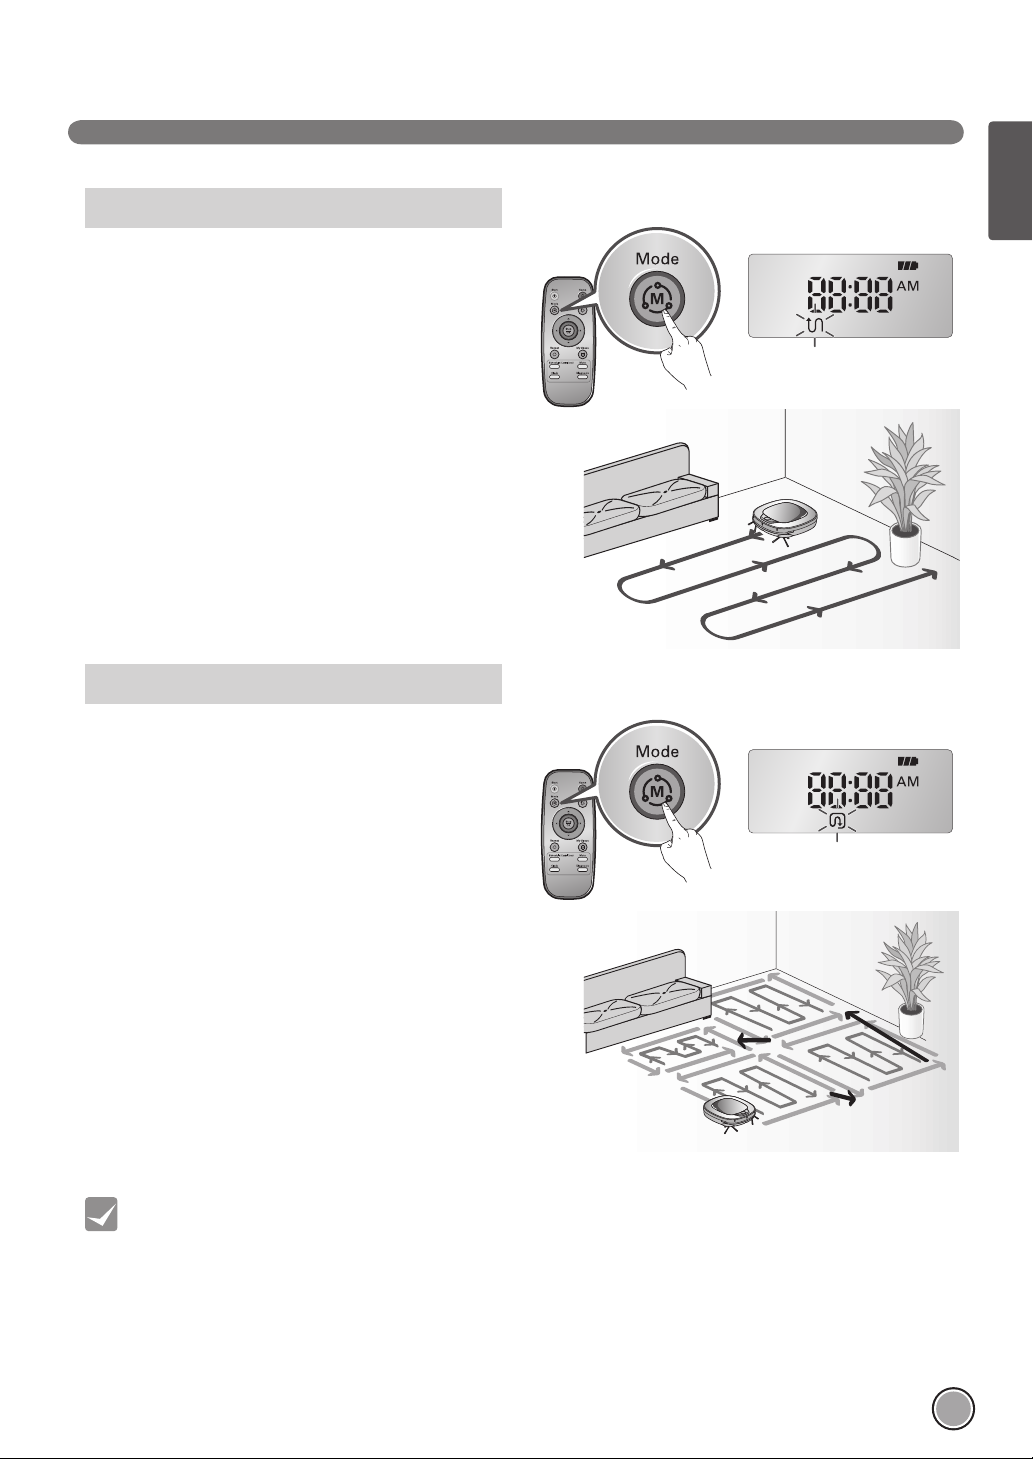
Zigzag Cleaning
In 'Zigzag Clean' mode, Robot Cleaner repeats a zigzag
operation to clean every and each spot in the cleaning area.
If you need to quickly clean an area choose 'Zigzag Clean'
mode.
Press ‘Mode’ button on Remote Controller or main unit to
select 'Zigzag Clean' mode and press 'Start' button.
※
Factory release default setting is 'Zigzag Clean.'
CLEANING MODES
ENGLISH
Cell by Cell Cleaning
In 'Cell by Cell' mode, Robot Cleaner cleans the area by dividing
it into rectangular spaces.
For meticulous cleaning, select this mode.
Press ‘Mode’ button on Remote Controller to select 'Cell by
Cell' mode and press 'Start' button.
The 1st stage:
The maximum outline of 3 m x 3 m of cleaning area will be
cleaned. (The size of the outline may vary in accordance with
the shape of the area to be cleaned.)
The 2nd stage:
The 2nd stage of Cell by Cell cleaning engages a Zigzag mode
automatically.
When the 1st, 2nd stages are completed, the cleaned area
will be cleaned through the repetition of the above cleaning
method as the device is being moved to the next part of
cleaning area.
Tip
• Once set up, the cleaning mode(Zigzag, Cell by Cell) setting will be maintained even after the power supply is
turned off.
• During operation, if a mode change is required, press the Stop/OK button and then select the mode. Cleaning will
then start from the beginning.
19
Page 22
CLEANING MODES
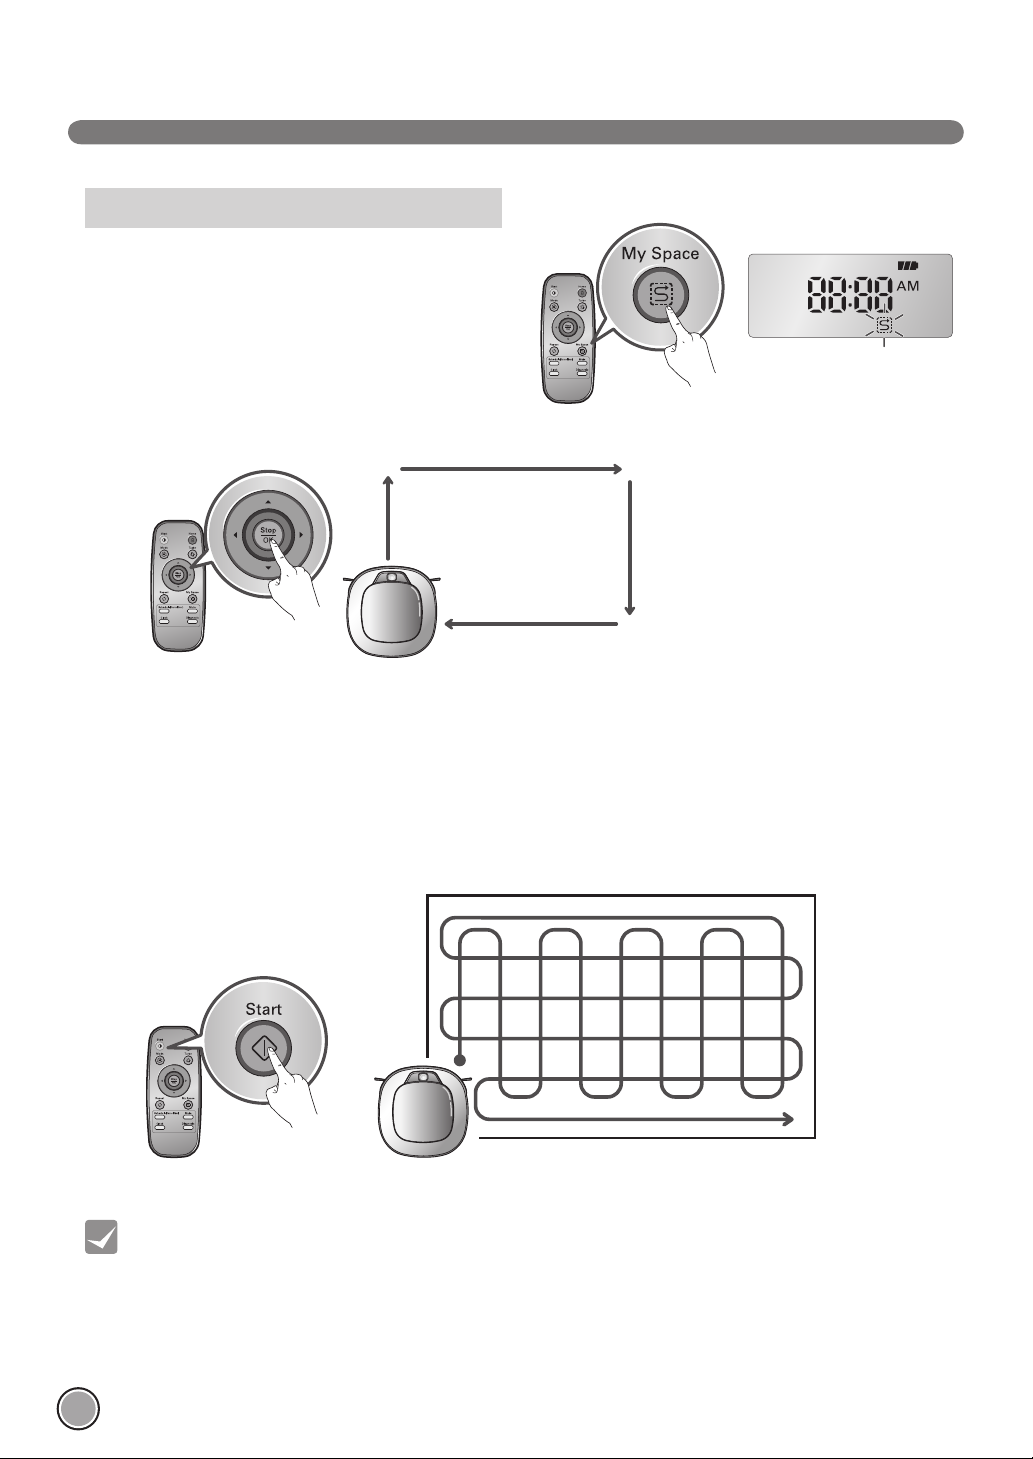
My Space Cleaning
Pressing 'My Space' on Remote Controller will set the My Space
cleaning mode with a voice message.
For cleaning of particular spaces, select this mode.
The 1st stage:
Use the Remote Controller to manually run
the cleaning on outskirts of each cleaning block.
※
This cleaning mode will be accepted when the distance of the start and end position is less than 1 m.
My Space
The 2nd stage:
Pressing the 'Start' button will then make the Robot Cleaner clean the manually outlined area by itself.
※
Upon failure to correctly outline a zone, a voice will announce, which says "Area does not meet the specifi ed conditions. Please
continue to make specifi ed area for cleaning process."
Use the Remote Controller to assign a zone, again.
※
Upon completion of cleaning for all selected areas, the Robot Cleaner will be placed in the cleaning mode (Zigzag or Cell by Cell)
which was run, right before.
Tip
• While recharging, you cannot activate 'My Space clean' mode.
• To change the cleaning mode while Robot Cleaner is in operation, press 'Stop/OK' button first to select a mode
The cleaning will the start from the begining.
20
Page 23
AUXILIARY CLEANING MODES
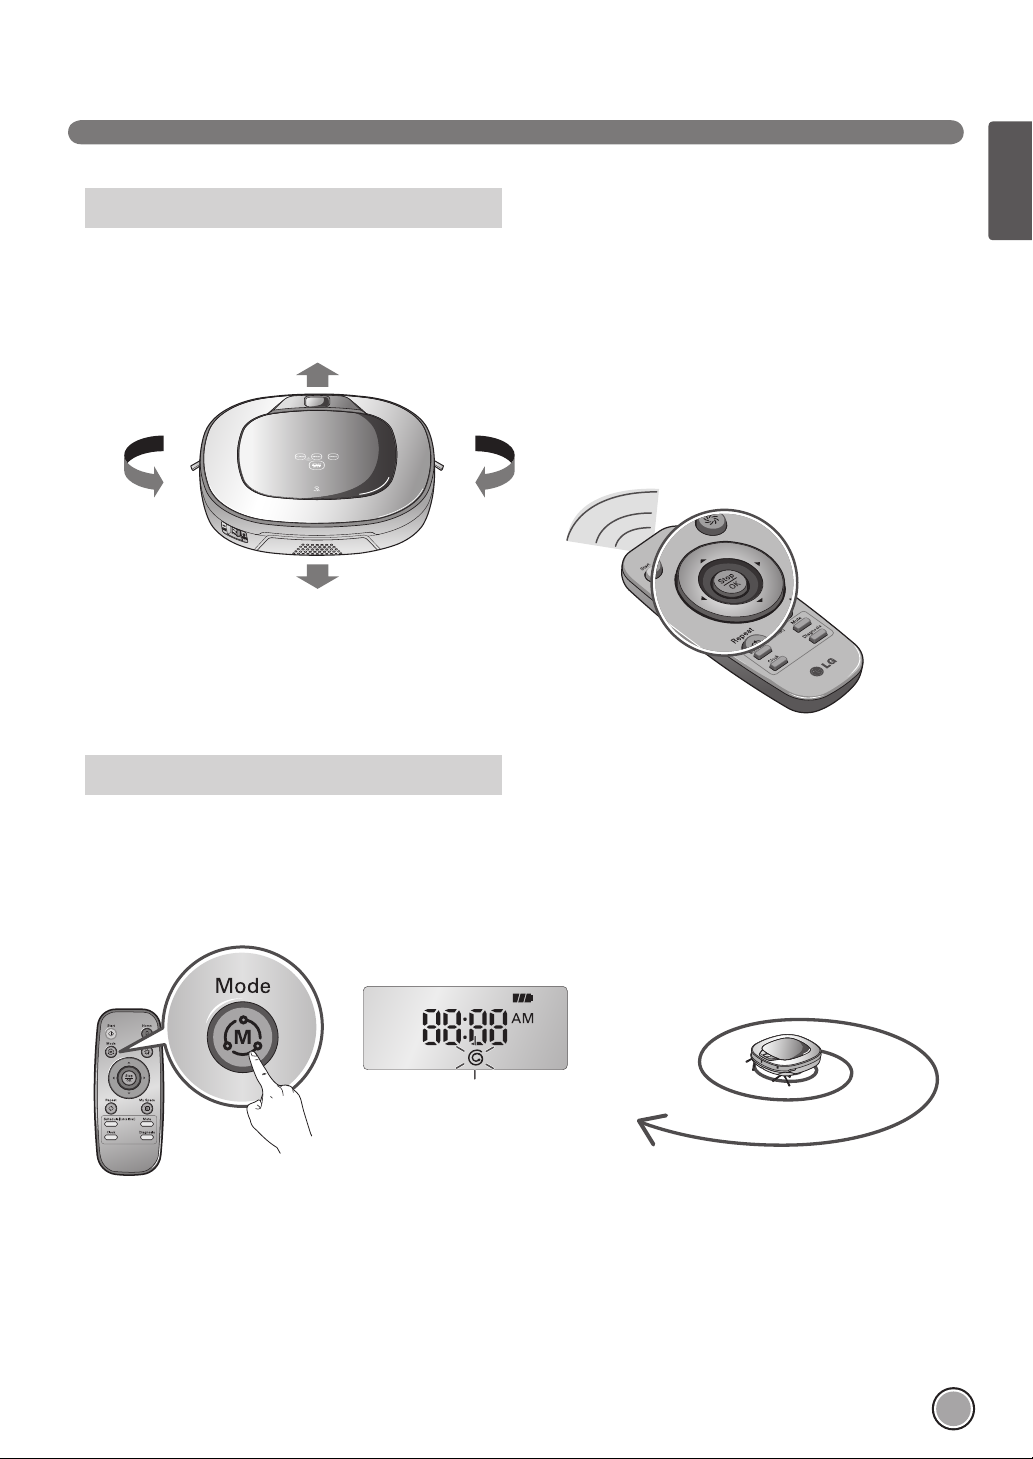
Manual cleaning
By pressing a direction key on Remote Controller, you can move Robot Cleaner in a Manual mode.
Robot Cleaner will clean the area, moving forward/backward/left/right, according to the input of the direction key.
While in 'Manual' mode, the robot cleaner will run into obstacles placed behind it if the backward key on the remote remains held
down.
ENGLISH
Spot Cleaning
Is best used used to clean certain parts of the house.
Press 'Mode’ button on Remote Controller to select 'Spot Clean' mode, indicated on Status Display, and 'Start' button, then Robot
Cleaner will start Spot cleaning for a space within a 1.5 m diameter.
※
While recharging, 'Spot Clean' cannot be selected.
It stops at the started position after
completing the cleaning(takes 4~5 min.).
21
Page 24
AUXILIARY CLEANING MODES
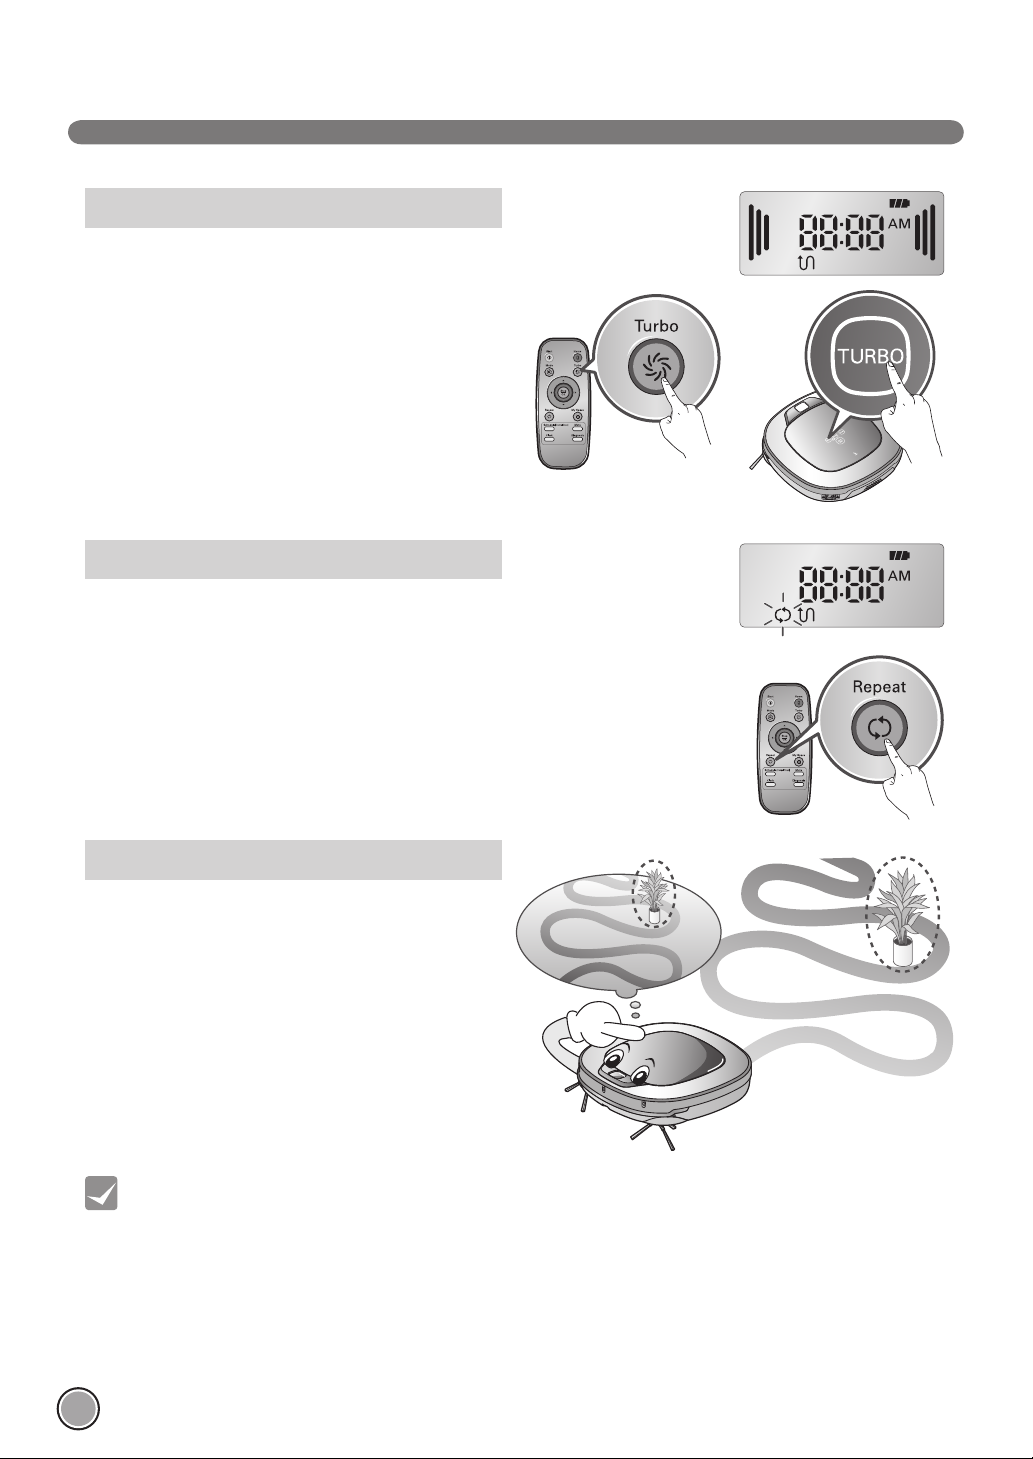
Turbo Mode
Pressing 'Turbo' button on Remote Controller or main unit will
activate 'Turbo' mode, with a voice message.
While in 'Turbo' mode, pressing the same button will cancel
'Turbo' mode, with a voice message.
In 'Turbo' mode, Robot Cleaner runs more intensely for a
powerful clean.
※
<Turbo Mode (Floor Master Function)>
‘Turbo mode’ will automatically operate when the Robot
Cleaner cleans carpets.
Repeat Mode
Pressing 'Repeat' button on Remote Controller will activate 'Repeat' mode, with a
voice message.
While in 'Repeat' mode, pressing the same button will cancel 'Repeat' mode, with a
voice message.
In 'Repeat' mode, Robot Cleaner repeats the cleaning in progress until the battery
runs out.
Learning Mode
Robot Cleaner is capable of memorising the cleaning
environment through its Learning mode for an intelligent
cleaning operation.
※
'Learning Mode' is available only when the machine starts
cleaning from the Home Station.
Tip
22
• Precautions with Smart Operation
- This Learning mode enables memorizing locations with obstacles to bypass them. Robot Cleaner memorizes
every aspect of the environment it was put under from when it started cleaning from the Home Station to the
moment it finishes its course.
- Robot Cleaner learns the new conditions when the location of Home Station has been changed.
- If the learning mode is accepted, a voice message will say "The learning cleaning process is complete."
Page 25
TIME SETTING
Flickering
Flickering
Flickering
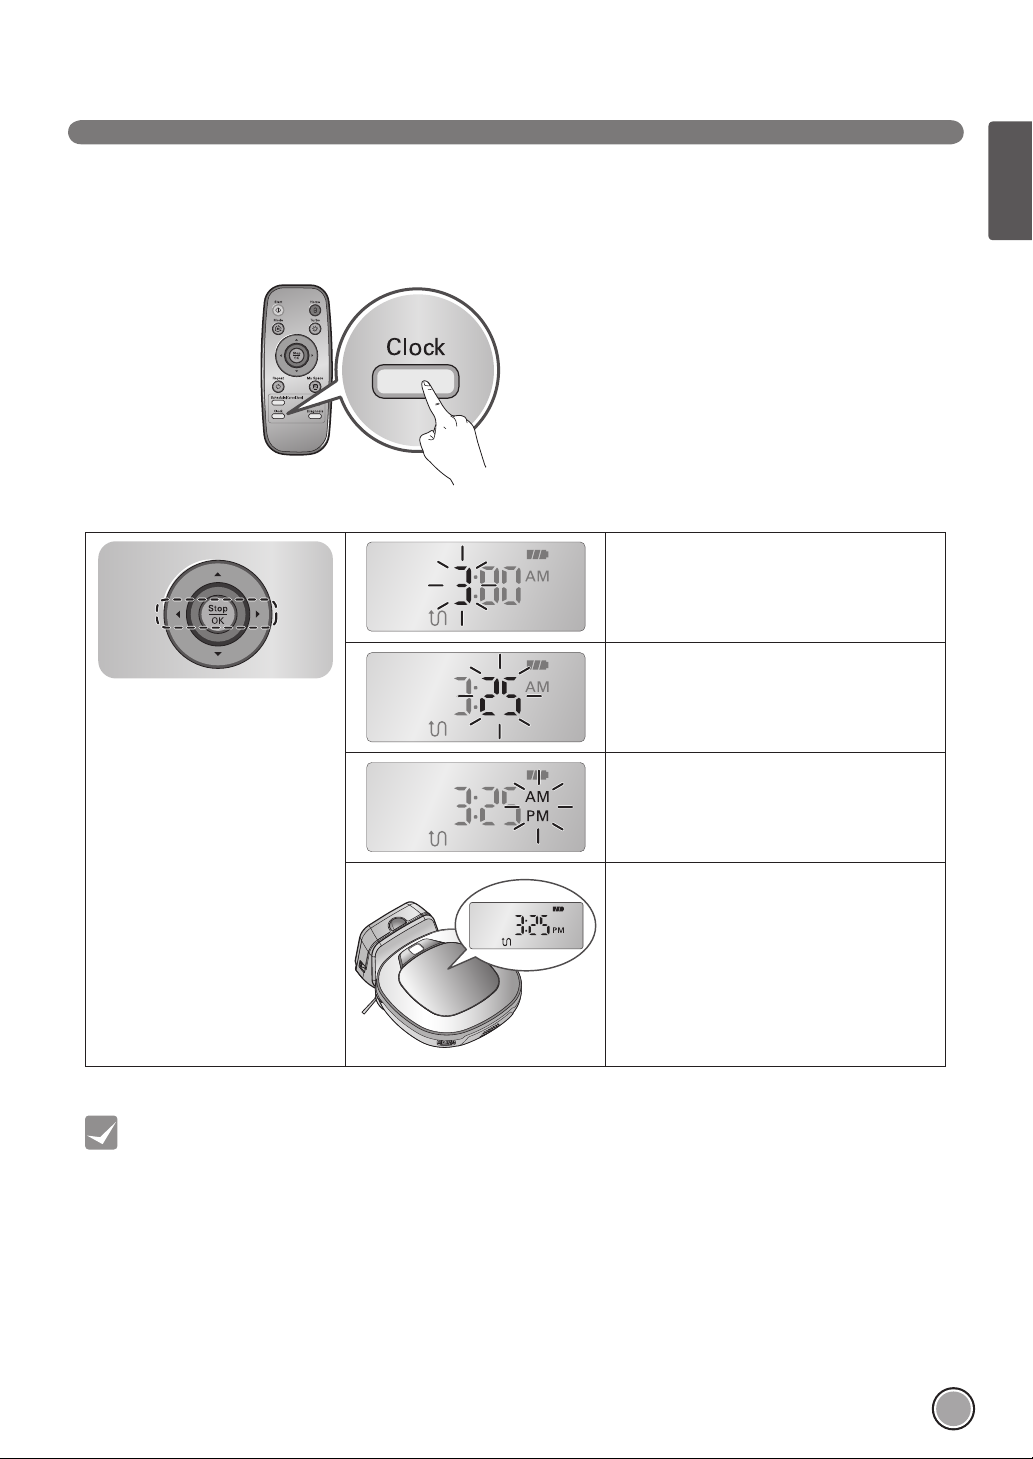
You can set the current time on the Robot Cleaner.
Pressing ‘Clock' button on Remote Controller, when Robot Cleaner is waiting, will start the current time
setting.
ENGLISH
Select by using '
the Remote Controller.
The function can be heard through
the voice guide.
' buttons on
Flickering
Flickering
Flickering
Set the time units by using '' buttons on
Remote Controller.
Set the unit of minutes using '' buttons on
Remote Controller.
Set the AM/PM using '' buttons on Remote
Controller.
Pressing ‘Clock’ or ‘Stop/OK’ button on Remote
Controller will complete the time setting process.
Tip
• Any scheduled cleaning will be activated based on the time on the Robot Cleaner. You must set the clock before
setting scheduled cleaning.
• If there is no input for 10 seconds, the clock setting is canceled.
23
Page 26
SCHEDULED CLEANING
Flickering
Flickering
Flickering
Flickering
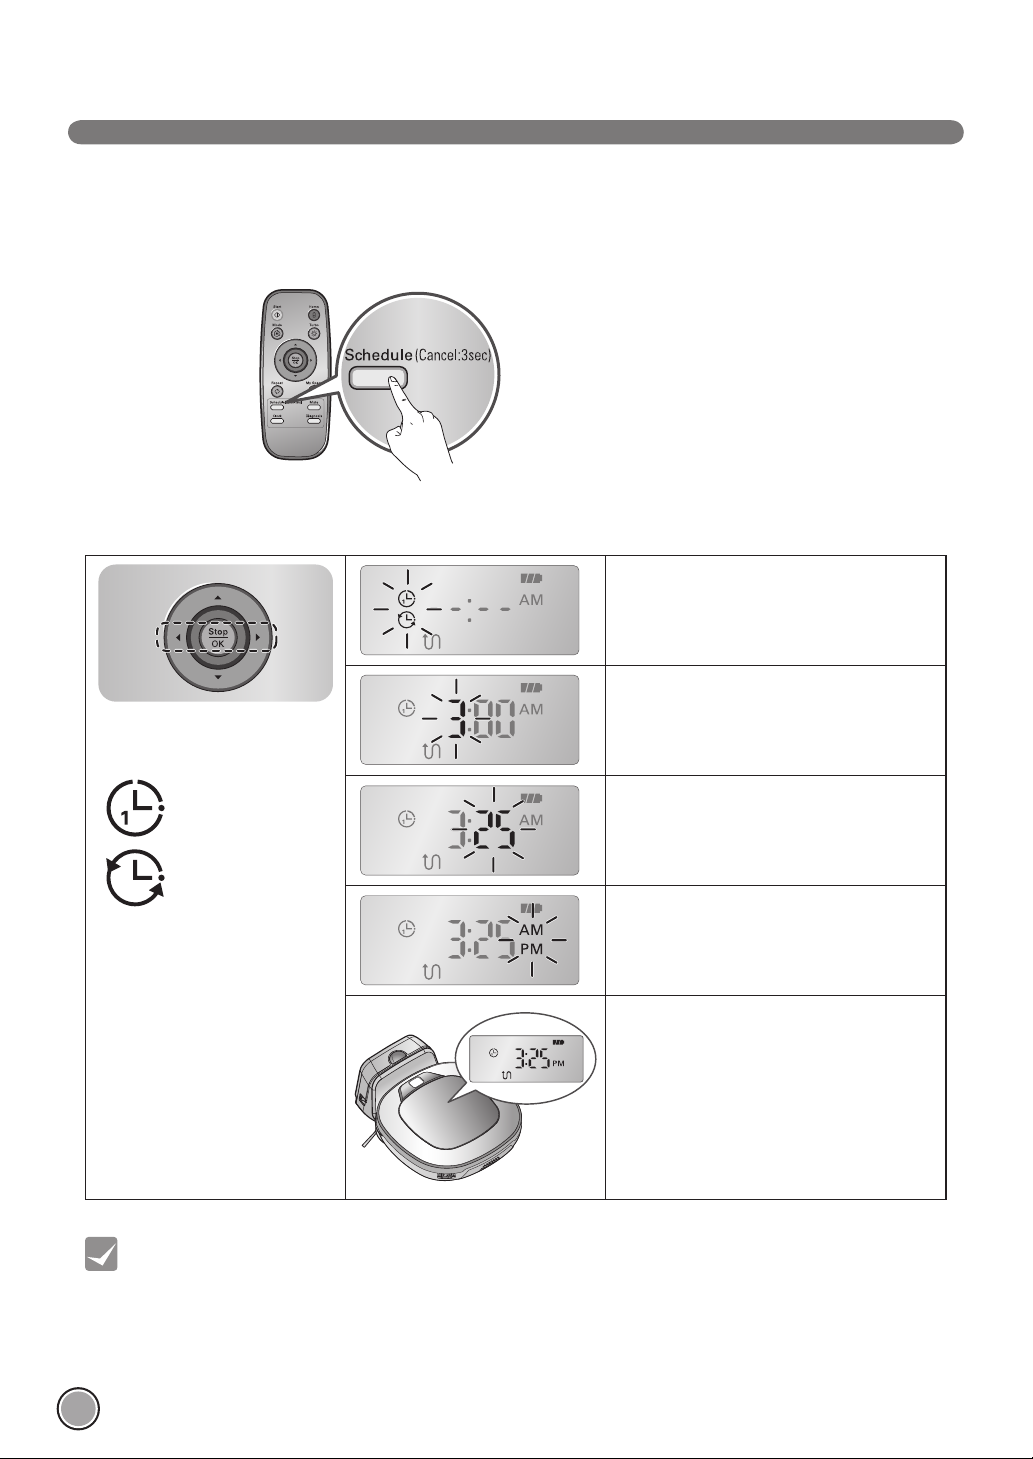
You can schedule a cleaning so that the Robot Cleaner starts cleaning at a scheduled time.
Pressing 'Schedule' button on Remote Controller, when the battery is recharging, will start the scheduled
cleaning setting.
Setting/Cancelling the reservation is only possible when the unit is recharging.
Select a level by using '
buttons on Remote Controller.
'One time'
'Everyday'
Flickering
'
Flickering
Flickering
Flickering
Select 'One Time' or 'Everyday' option by using
'' buttons on Remote Controller.
A voice message will confi rm the schedule.
Set the hour units by using the '' buttons on
Remote Controller.
Set the minutes by using the '' buttons on
Remote Controller.
Set the AM/PM using the '' buttons on
Remote Controller.
Pressing ‘Schedule’ or ‘Stop/OK’ button on
Remote Controller will then complete the
scheduling process.
24
Tip
• When the scheduled time comes up, Robot Cleaner will start cleaning by itself.
• Scheduled cleaning can only be set when the Robot Cleaner is recharging.
• While recharging, by pressing the 'Schedule' button on the Remote Controller for 3 seconds will cancel the set
schedule.
• If there is no input when setting the schedule time within 10 seconds, the setting is canceled.
Page 27

MOP CLEANING (OPTION)
“Click!”
By attaching the ultra microfi ber mop, you can effectively use
the Robot Cleaner to remove dust.
When the mop plate is attached, the Robot Cleaner will not
climb on to carpets or over thresholds, in order to prevent
transferring dirt from the mop.
Caution
Do not cover the bottom camera
sensor by mop.
For mop cleaning, mount the mop and mop plate to the Robot Cleaner according to the following instructions:
1. Attach the ultra microfi ber mop to the Velcro of the
mop plate as shown in the fi gure.
ENGLISH
2. Firmly push the Mop Plate into the furrows until you
hear a 'click' sound.
※ Note that, if the Mop Plate is not secured correctly, it
may separate during the cleaning.
3. It is essential that the fi xing hooks on the Mop Plate
align correctly on to the fi xing grooves on the underside
of the cleaner.
Tip
• To avoid odors, wash any foreign material or dust off the mop after cleaning is complete.
• To avoid staining floors, do not use the ultra microfiber mop to clean when dirt is mixed with liquids such as
coffee or ink.
• To avoid damage to carpets from the Velcro or dirt transfer from the mop, do not clean the carpet while the mop
plate or mop is attached.
• Keep the ultra microfiber mop dry. Do not use it on wet surfaces.
If there is moisture, it can interfere with the navigation.
• Smart Diagnosis feature is not available, when the Mop Plate is attached.
Fixing hook
Fixing groove
“Click!”
25
Page 28
LOCATION SEARCH FUNCTION
Zigzag
Zigzag
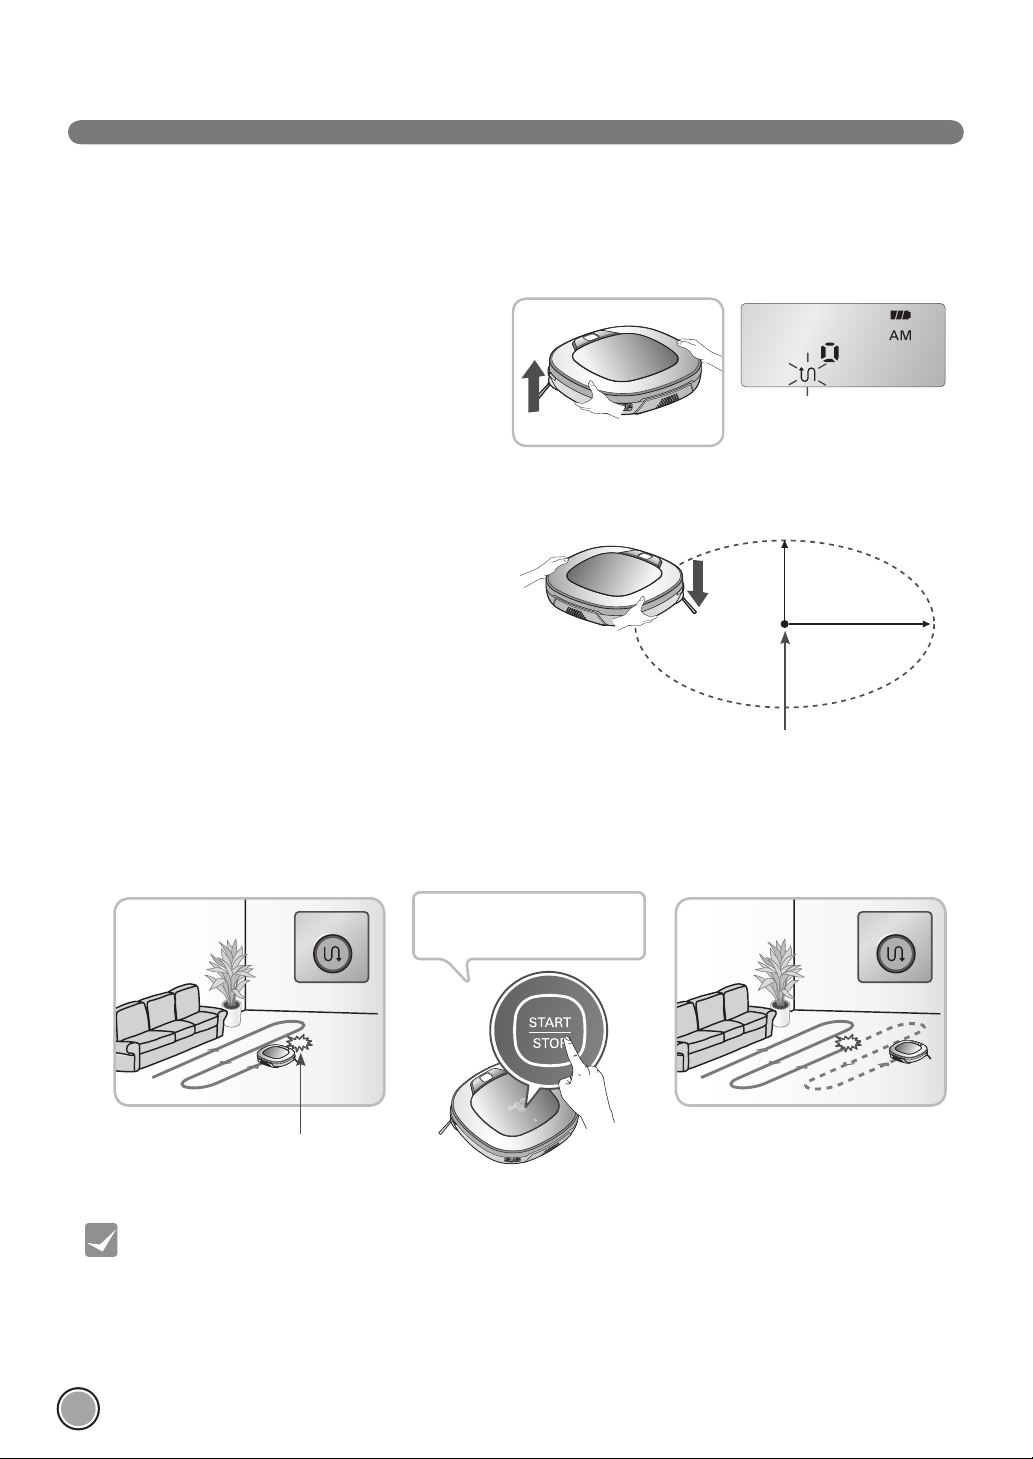
The Robot Cleaner remembers its location while cleaning.
If the user moves the Robot Cleaner while it is operating, it will search for the location it was moved from
by using its navigational location search function before continuing to clean.
※
The navigating function will be activated after the Robot
Cleaner adequately recognizes the cleaning environment.
When the location search function
is activated, the cleaning mode of
the status indicator will fl ash
1 m
1 m
Manual Relocation.
1. Locate the Robot Cleaner near the location where it was
originally moved from.
※
The location search is more effective when the Robot
Cleaner is closer to the location where it was moved from.
※
If it is moved from its original cleaning position by more
than 1 m, it becomes diffi cult for the Robot Cleaner to
search for it's previous location.
Change location
2. Press the START/STOP button on the Robot Cleaner or START button on the remote controller.
Robot Cleaner will then start the location search function along with an audio guide.
※
When the location search is successfully completed, it will continue cleaning from where it was moved.
If the location search fails, it will start again from the beginning.
To improve its accuracy, do not
stand near the HOM-BOT when it
is in location search mode.
Location of incident
Tip
• When the power is turned off after the location search function is set, the location search function will be
canceled.
• Location search will be more effective when the Robot Cleaner is closer to the location where it was moved from.
Location of incident
26
Page 29
SMART DIAGNOSIS
Robot Cleaner uses this Smart Diagnosis feature to run a self-diagnosis.
If any irregularity is found from the diagnosis, please contact the local LG Electronics service center.
※
During Smart Diagnosis, the Robot Cleaner will move about within a 50 cm radius. So, make sure no objects are in the
way within a 1 m radius around the Home Station, before starting Smart Diagnosis.
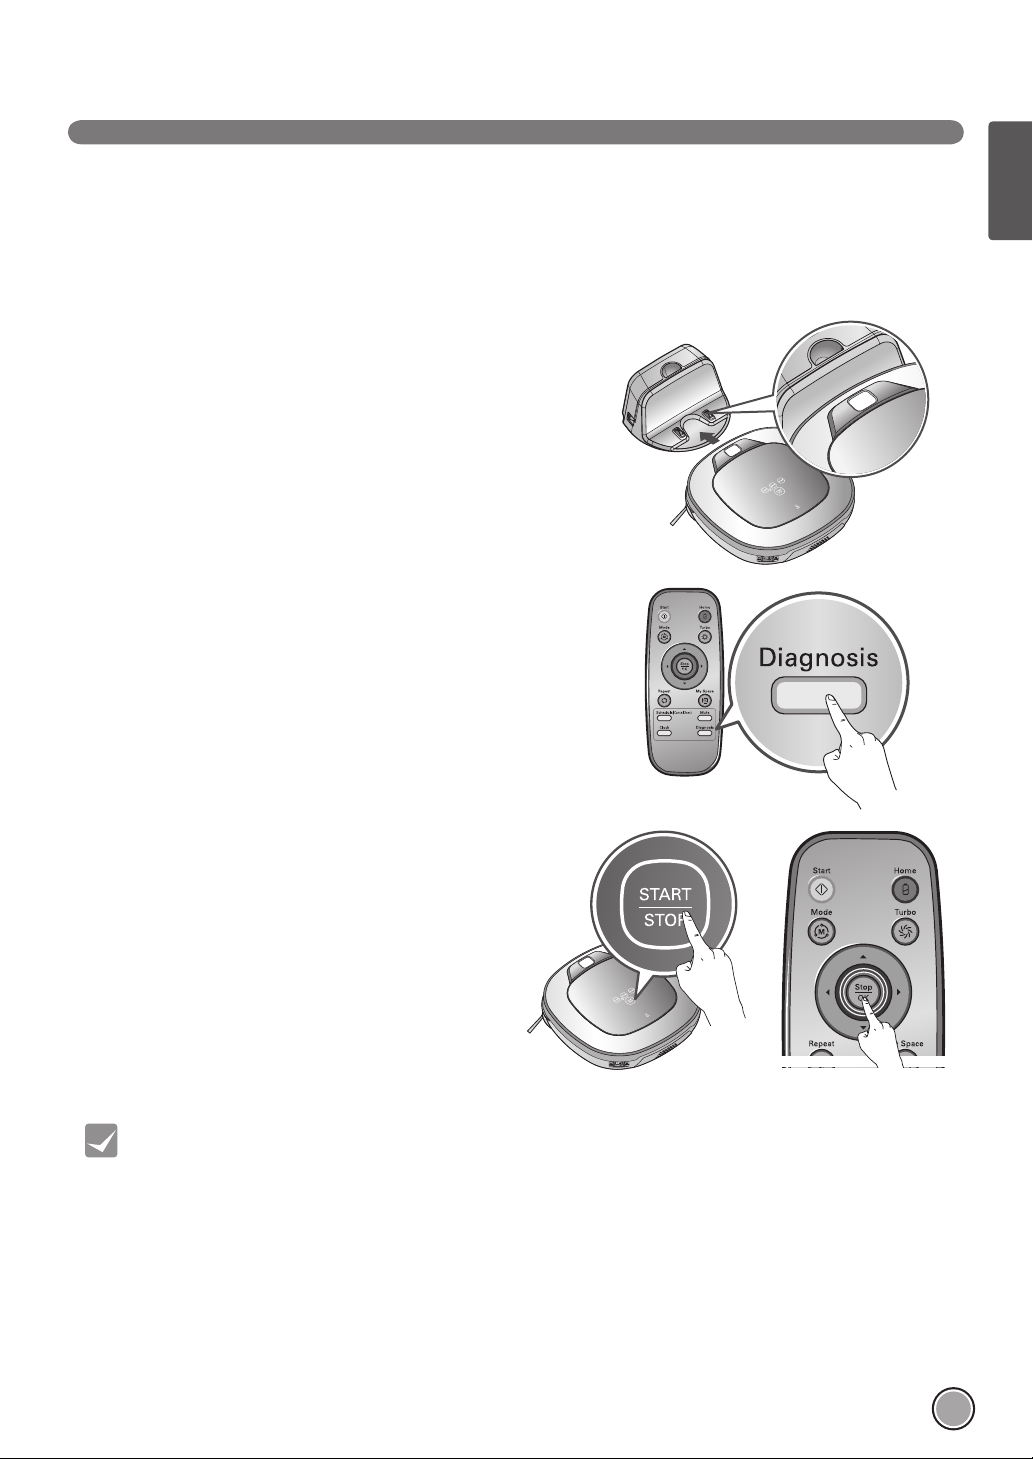
1. Turn ON the Main Power Switch on the back after making sure the
Robot Cleaner is attached to the Home Station.
※
Smart Diagnosis is only possible when the Robot Cleaner is
attached to the Home Station.
2. Press 'Diagnosis' button on the Remote Controller, then the process
will start with a voice message which says "Starting HOM-BOT smart
diagnosis. Please step away and remove any items within 1 meter, or
about 3 feet."
※
If the Mop Plate is attached, the process will not be activated.
ENGLISH
3. When the Smart Diagnosis has successfully fi nished, Robot
Cleaner will return back to the Home Station and inform the
result through a voice message. After the voice message,
pressing the 'HOME' button on the Remote Controller
or main unit will allow the voice message to be repeated.
To terminate the diagnosing process, press the ‘Stop/OK’
button on the Remote Controller or main unit.
※
After the Smart Diagnosis voice message, the Robot
Cleaner will start recharging after 1minute.
※
If an error is detected with any of the Sensors whilst
in Smart Diagnosis, a voice message will announce,
and the unit will not return to the home station.
Tip
• Be careful not to touch the Robot Cleaner or disturb its operation before Smart Diagnosis is complete. If it is
accidently interrupted, turn the main power switch OFF then ON again to resume the diagnosis.
• Smart Diagnosis will not be activated in each of the following cases. In each case, check the problem and try
again.
- Robot Cleaner is detached from Home Station
- Battery level is insufficient
- No Dust Bin Filter is fitted.
- Mop Plate is attached
27
Page 30
SMART DIAGNOSIS
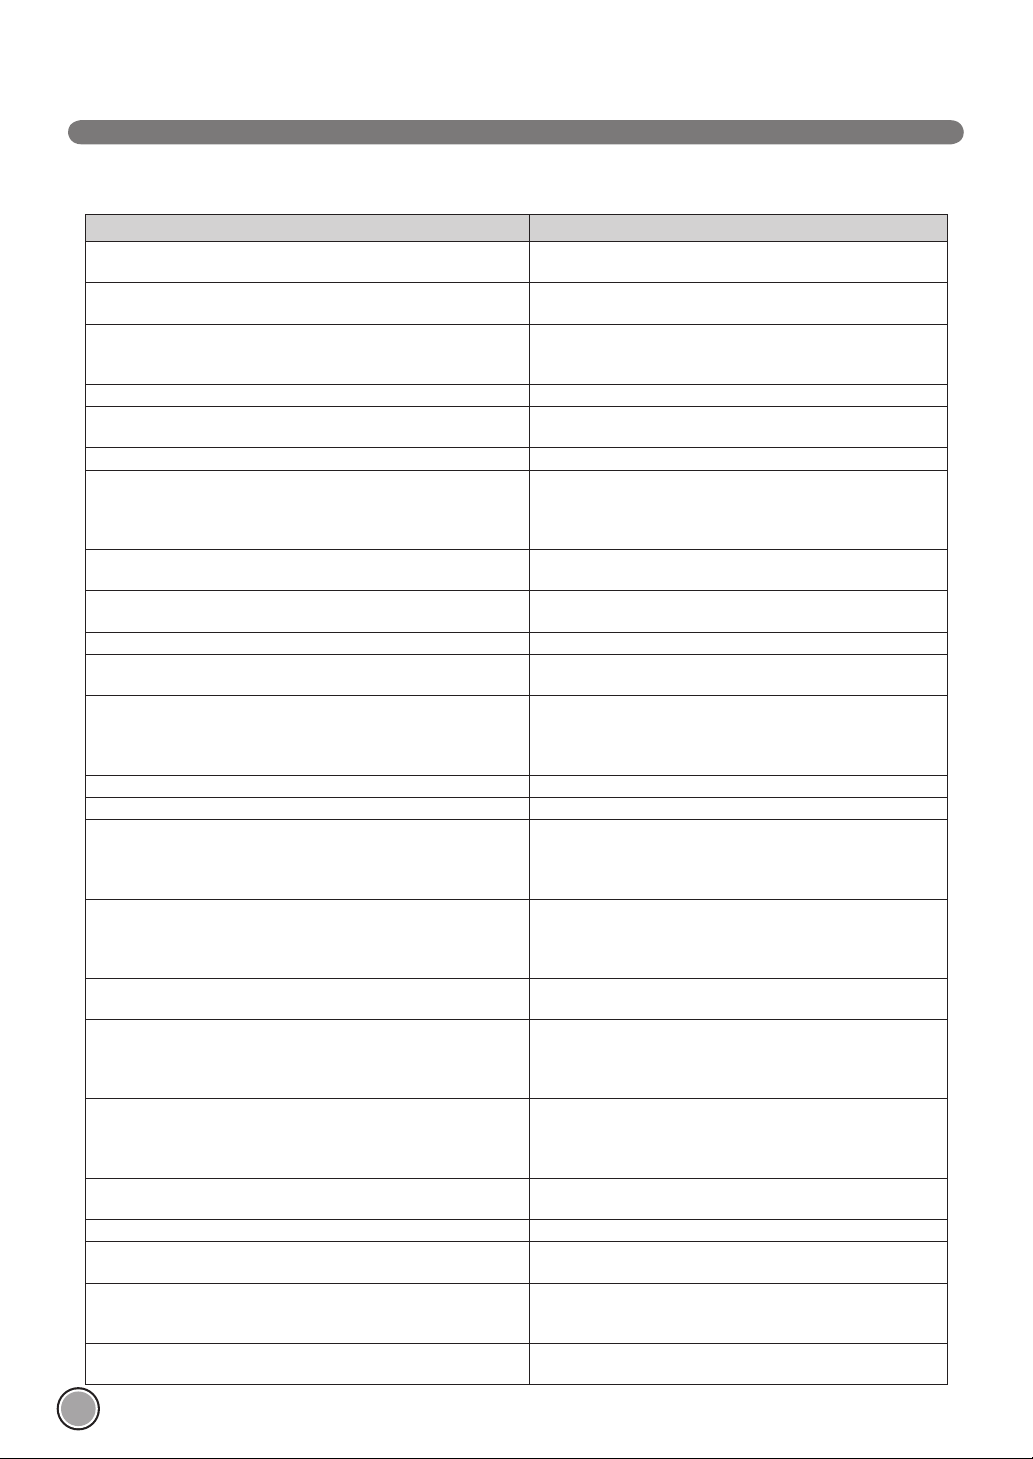
If a voice message is announced after Smart Diagnosis, refer to the following table to take proper actions.
Voice message Measures (for reference)
Starting HOM-BOT smart diagnosis. Please step away and remove any
items within 1 meter, or about 3 feet.
HOM-BOT needs to be charging in order to activate smart diagnosis.
Please dock the HOM-BOT to the home station.
Starting HOM-BOT smart diagnosis. Reservation has been cancelled
for smart diagnosis. Please step away and remove any items within
1 meter, or about 3 feet.
No defect found during diagnosis.
Unable to initiate smart diagnosis due to a low battery. Please try
again after battery is charged.
Please check that the dust bin and fi lter are properly installed. Open the Dust Bin Cover and examine the bin.
HOM-BOT will not charge due to infrared sensor error. Please try
smart diagnosis again after turning the main power switch on the
back of the HOM-BOT 'Off' then 'On' again. If the problem continues,
please contact LG Electronics customer care.
HOM-BOT will not charge due to ultrasonic sensor error. Run Smart Diagnosis again and, if the same message is announced,
HOM-BOT will not charge due to a problem with the cliff sensors on
bottom. Please wipe the sensors clean.
Please clean the camera sensor on bottom right side. Clean the lens of Camera Sensor on the bottom-right
Please clean the obstacle detecting sensor windows on the left and
right side of the HOM-BOT.
A problem has been found on the Gyro Sensor. Please try smart
diagnosis again after turning the main power switch on the back of
the HOM-BOT 'Off' then 'On' again. If the problem continues, please
contact LG Electronics customer care.
Please check for foreign material on the left wheel. Check for foreign materials on the left wheel.
Please check for foreign material on the right wheel. Check for foreign materials on the right wheel.
A problem has been found on the left wheel sensor. Please try smart
diagnosis again after turning the main power switch on the back of
the HOM-BOT 'Off' then 'On' again. If the problem continues, please
contact LG Electronics customer care.
A problem has been found on the right wheel sensor. Please try smart
diagnosis again after turning the main power switch on the back of
the HOM-BOT 'Off' then 'On' again. If the problem continues, please
contact LG Electronics customer care.
A problem has been found with the brush. Please check for any foreign
material.
A problem has been found in the suction motor. Please try smart
diagnosis again after turning the main power switch on the back of
the HOM-BOT 'Off' then 'On' again. If the problem continues, please
contact LG Electronics customer care.
A problem has been found in the acceleration sensor. Please try smart
diagnosis again after turning the main power switch on the back of
the HOM-BOT 'Off' then 'On' again. If the problem continues, please
contact LG Electronics customer care.
In order to listen to the smart diagnosis result again, please press the
charging button. To stop, please press the stop button.
Smart diagnosis mode will be turned off.
Smart Diagnosis mode will not operate with the mop plate attached.
Please try again after removing it.
Smart diagnosis has failed to complete its diagnostics. Please try
again after turning the main power switch on the back of the HOMBOT 'Off' then 'On' again.
Please check if the charging terminal is damaged or dirty. Clean the bottom of the machine and Charging Terminal on Home
Clear any object within a 1 m radius around Home Station, and stay
back until the diagnosis is complete.
Move Robot cleaner to the Home Station to recharge it.
Try the Smart Diagnosis again after recharging the battery.
Run Smart Diagnosis again and, if the same message is announced,
contact an LG Electronics service center.
contact an LG Electronics service center.
Clean the three Cliff Sensors on the bottom at the front of the unit.
Clean the lens of the Obstacle Sensors on both the left and right
hand sides.
Run Smart Diagnosis again and, if the same message is announced,
contact an LG Electronics service center.
Run Smart Diagnosis again and, if the same message is announced,
contact an LG Electronics service center.
Run Smart Diagnosis again and, if the same message is announced,
contact an LG Electronics service center.
Check for any foreign material stuck in the Brush.
Run Smart Diagnosis again and, if the same message is announced,
contact an LG Electronics service center.
Run Smart Diagnosis again and, if the same message is announced,
contact an LG Electronics service center.
If you need to repeat the diagnosis result, press the 'Home' button,
or press 'Stop/OK' button to fi nish the diagnosis.
Run Smart Diagnosis again after removing the Mop Plate.
Turn the main power switch OFF and then ON again to resume the
diagnosis. Do NOT touch the robot or disturb its operation until the
diagnosis is complete.
Station.
28
Page 31

CLEANING THE DUST BIN
If the dust bin is full, suction power can be reduced. Clean the dust bin before and after each cleaning session. Clean the dust bin
using the following sequence:
1. Open the dust bin cover by pressing the PUSH button on the
Robot Cleaner.
2. Grab the handle of the dust bin and pull it upward.
3. Pull the hook on the left of Filter Cover on the rear of Dust
Bin to separate the fi lter and the sponge.
※ Note that separating the fi lter may result in dust dropping.
※ Refer to p.30 when cleaning the Dust Bin Filter.
4. Lift the cover upward while pressing the separation button
on the dust bin.
ENGLISH
5. Empty the dust bin and clean it with a cleaning brush or
under running water.
6. After cleaning with water, completely dry the dust bin in a
well-ventilated area out of the direct sunlight.
7. When reassembling or fi tting the cleaned Dust Bin, close the
cover and put in the Sponge and HEPA Filter.
※ Refer to p.30 for detailed assembly guides.
8. Put the dust bin into the Robot Cleaner and close the dust
bin cover.
Tip
• Operating the unit without Filters fitted to the dust bin can cause a motor malfunction not covered by warranty.
• After cleaning the Dust Bin, make sure to assemble the filter and fit it to the Dust Bin.
If you initiate cleaning, with no filters fitted to the dust bin or Filter Cover not assembled,
a voice message will be announced which says "Please check that the dust bin and filter are properly installed."
• Always ensure that the dust bin cover is refitted correctly after cleaning the
dust bin so that it closes easily and accurately.
29
Page 32

CLEANING THE DUST BIN FILTER
The Dust Bin Filter consists of a HEPA Filter and Sponge Filter.
Clean both the HEPA and Sponge fi lters as per the following sequence.
1. Pull the hook on the left of the HEPA Filter module on the
rear side of Dust Bin to separate the HEPA Filter and the
sponge.
2. Thoroughly clean out the fi ne dust particles on the HEPA Filter,
with a vacuum cleaner or cleaning brush.
※
Do NOT wash the HEPA Filter with water.
Its suction power will be reduced.
3. Use a cleaning brush to clean the Sponge Filter.
If using water to clean it, allow it to dry completely in the
shade before refi tting.
4. Assemble the HEPA and Sponge fi lters back onto the Filter
Cover as per the following sequence.
※
Fit the rectangular locator on the HEPA Filter into the
locating slot of the fi lter body.
※
Be careful not to incorrectly assemble HEPA and Sponge
Filter onto the Filter Cover.
30
Tip
• To preserve the performance of Robot Cleaner, clean the HEPA Filter at least once a week, with a brush or
vacuum cleaner.
• If you run Robot Cleaner, with the Filter Cover assembled onto Dust Bin and without no filters inserted, it may
involve dusts coming inside to cause a failure.
Page 33

CLEANING THE BRUSH
The rotating Brush, located on the bottom of Robot Cleaner, helps collect the dust. Clean the Brush as per the following sequence.
※
Before turning over the main unit, lay a soft cloth on the fl oor and remove the Dust Bin.
Otherwise, the main unit can get scratches and dust will fall from Dust Bin.
ENGLISH
Turn the Main Power Switch OFF
before starting the clean.
Put the Robot Cleaner upside down
on a soft cloth.
Push the Brush all the way into
the yellow protrusion.
After checking for foreign materials,
press down the Fixing Hook and pull it
up to separate the brush Cover.
While pushing the Brush, lift the
white protrusion part up to separate
it from the main unit.
By using a cleaning tool, clear
hairs and other debris and foreign
materials on the Brush and from the
2 smaller jockey wheels.
Carefully clean the Brush with a
vacuum cleaner or scissors.
Fit the Fixing Hook (rectangular
shape) on the side of the Brush into
the slots, with the colors matching.
While pushing the Brush to the
arrow direction, fi t the Fixing Hook
(rectangular shape) on the opposite
side into the slot.
Press down and close the Cover until
a 'crack' sound is heard from both
sides of Fixing Hook.
※
Be careful not to trap the side
brush bristles under the cover
when closing it.
31
Page 34

CLEANING THE SENSOR/CHARGING TERMINAL
There are sensors on the Robot Cleaner that detect obstacles, stairways and the
home station for charging the battery. In order to maintain the performance of the
Robot Cleaner, regularly clean the sensors and charging terminal as follows:
1. Turn off the power switch on the bottom of the Robot Cleaner. Injury can be caused
by the activation of the Robot Cleaner if the main power is not turned off.
2. Lay a smooth cloth on the fl oor, overturn the Robot Cleaner and put it on the cloth.
※
Please make sure to remove the dust bin before rotating the main body.
Otherwise, the dust in the dust bin may fall out.
3. Use a smooth cloth or cleaning brush to wipe the dust off each cliff sensors,
camera sensors and ultrasonic sensors and the charging terminal as described below.
Upper camera sensor
Ultrasonic sensors
Obstacle detecting
sensor window Detecting
sensors of home station
& Receiving sensors of
remote controller
Cliff detection
sensor
Charging terminal
Bottom camera
sensor
32
Tip
Charging terminal
• Do not clean the Robot Cleaner by directly spraying it with water, thinner, benzene, or any other liquids.
• Call the service center if the sensor or charging terminal is damaged. Sensor and terminal damage can cause the
product to malfunction.
• To clean the sensor/charging terminal, use the cleaning brush.
Lens
Page 35

CLEANING THE SIDE BRUSH
Foreign objects/materials such as hair can easily adhere to the side brush. Remove
such materials at least once a week.
If excessive amounts of foreign materials are stuck to the brush, there is the risk of
damage to the brushes.
If the fl oor is rough or walls are frequently cleaned, the side brush may bend or become damaged. In this case, use the following
method to straighten the side brush.
1. The following procedure is helpful in restoring deformed
brushes.
2. Turn off the power by switching the main switch off on the
rear off the unit.
3. Place the Robot Cleaner at the end of a table to make
cleaning the side brush easier. Make sure that the Robot
Cleaner is not in danger of falling.
ENGLISH
4. Soak the side brush in warm water.
5. Press down on the side brush for about ten seconds so that
it is completely submerged in the water.
6. Slowly wipe the side brush by sliding it through your hand.
7. Rotate the side brush and repeat steps 4-6 for each section
of the brush.
8. Use the side brush only after it has completely dried.
Side Brush management
1. Remove the screws by using a driver and separate the Side
Brush from the main unit.
2. Remove any hair after the separation.
3. Assemble the Side Brush by replacing it onto the bottom of
the Robot Cleaner, with the 'R' and 'L' marking of the Brush
matching the counterparts on Robot Cleaner.
33
Page 36

CLEANING THE ULTRA MICROFIBER MOP (OPTION)
To avoid odors, dirt and dust should be washed off the mop after it is used for cleaning. Follow these directions to wash the ultra
microfi ber mop:
1. Separate the ultra microfi ber mop from the mop plate.
210 mm
2. Carefully clean it with warm water.
3. Use the Mop after completely drying it in direct sunlight.
※
If the Mop is used in a damp or wet state, it will cause the Robot
Cleaner to malfunction.
Tip
34
• To avoid product malfunction, only use the ultra microfiber mop provided with
the Robot Cleaner.
• Additional microfiber mops can be purchased by visiting a nearby LG Electronics service center.
Page 37

TROUBLESHOOTING
Upon a voice message, "The wheels are not touching the fl oor. Please move HOM-BOT
onto fl at fl oor."
A warning message will be given if a wheel does not contact the fl oor surface for any reason.
• Is a wheel trapped in the front door, balcony, stairway, etc?
Move the Robot Cleaner on to the fl at fl oor.
Upon a voice message, "Please remove any foreign material on the left/right wheel."
• Is any foreign material wound around the wheel?
Lay smooth cloth on the fl oor, overturn the Robot Cleaner, and put it on the cloth.
Remove foreign material after observing the wheel.
※ Please make sure to remove the dust bin before fl ipping the main body.
Otherwise, the dust in the dust bin may fall out.
ENGLISH
Upon a voice message, "HOM-BOT cannot continue cleaning. Please check the area
around it."
A warning message will be given if Robot Cleaner cannot go on cleaning due to any unfavourable condition.
• Is the Robot Cleaner stuck?
After removing the part that is stuck, place the Robot Cleaner on fl at fl oor.
35
Page 38

TROUBLESHOOTING
Upon a voice message, "Please check that the dust bin and fi lter are properly installed."
A warning message will be given if there is no Dust Bin or Filter Cover fi tted.
• Is the Dust Bin fi tted to the Robot Cleaner?
Open the Dust Bin Cover and check to ensure the Dust Bin is in place.
Do NOT leave the Dust Bin Cover open.
• Make sure the Filter Cover is assembled onto the Dust Bin.
Upon a voice message, "Battery is low. Please move HOM-BOT onto the home station to
charge."
When the remaining amount of battery power is almost nil, the voice, “Battery is low”, is generated.
• Initiate battery charging of the Robot Cleaner by moving it to the home station.
When the Robot Cleaner is attached to the docking station successfully, it will start the recharging with the recharging start
melody.
36
Page 39

TROUBLESHOOTING
Upon a voice message, "Please remove any foreign material from the brush on the
bottom of the HOM-BOT."
A warning message will be given if foreign materials restrict the Brush's rotation.
Lay a soft cloth on the fl oor and put the Robot Cleaner upside down on it.
※
Before turning over the main unit, remove the Dust Bin.
Otherwise, it will cause dust to fall from Dust Bin.
• The brush is making a loud, abnormal sound.
Confi rm the correct assembly of the brush by checking the separation groove of the brush
Remove the brush from Robot Cleaner and remove any foreign material from the brush.
ENGLISH
• The brush or side brush is stuck.
Remove any foreign materials such as cables, thread of hair caught in the side brush or the brush.
※
For a more detailed description of this process, refer to the instructions on page 31, 33.
37
Page 40

BEFORE YOU CALL FOR SERVICE
Confi rm before reporting the failure of Robot Cleaner.
Problem Solutions (Reference page)
The power supply cannot be turned
on.
The power supply automatically
turns off.
The Robot Cleaner will not charge. Check whether the main power switch is turned on.
Suction power becomes weak. Check whether there is foreign material blocking the suction port. (Page 31)
Noise becomes louder. Confi rm that the dust bin has been mounted properly.
The Robot Cleaner will not activate. Confi rm that the power switch is turned on. (Page 15)
The brush does not rotate. Clean the brush. (Page 31)
Movements or travel path are
abnormal.
Check that the power switch is turned on. (Page 15)
This is not a failure. Robot Cleaner has its own power saving function.
If it is not used for ten minutes after the power supply is turned on,
the power will automatically turn off. (Page 17)
Remove objects around the home station. (Page 15)
Confi rm that the power supply is connected to the home station. (Page 14)
Wipe the charging terminal with a dry cloth.
Empty the dust bin. (Page 29)
Clean the dust bin fi lter. (Page 30)
Confi rm that the dust bin fi lter has been mounted properly. (Page 30)
Check whether foreign material is caught in the brush. (Page 31)
Confi rm that the battery has been charged. (Page 18)
Confi rm that the brush has been mounted properly. (Page 31)
Carefully wipe the sensor with a smooth cloth. (Page 32)
If the ultra microfi ber mop is attached, confi rm that it is mounted properly.
(Page 25)
Turn the power switch off and on.
The Robot Cleaner cannot be
activated with the remote control.
38
Replace the remote control batteries. (Page 12)
Confi rm that the control is within the coverage area of the main unit, which is less
than 3 m. (Page 12)
Check whether the main power switch is turned on. (Page 15)
Page 41

PRODUCT SPECIFICATIONS
Item/Model LG HOM-BOT
VR6260 Ser. / VR6270 Ser.
ENGLISH
External Dimensions
Weight
Power Consumption
Battery (Fully Charging)
Traveling Velocity
Use Time Approx. 100 minutes
Charging Time 3 hours
Main Functions Turbo Mode
340 mm × 340 mm × 89 mm
DC 16.8 V
350 mm/s (Maximum)
(Based on general wooden fl oor)
Learning Mode
Obstacle Sensing
Anti-Plunge function
Scheduled Cleaning
Error Displaying
Navigation
Auto/Manual Recharging
Dry Mopping (cleaning)
Corner Clean
Voice Messaging
Map Drawing
Spot Cleaning
Repeat Cleaning
My Space Cleaning
Cell by Cell cleaning
Zigzag Cleaning
3 kg
18 W
Item/Model Home Station (VR621)
External Dimensions
Rating
Output Voltage/Current
Power Consumption
Item/Model Battery
Type Lithium Ion Polymer Battery
Rating
236 mm Ⱋ 181 mm Ⱋ 128 mm
230 V~ 50 Hz
DC 17.1 V / 1.1 A
DC 14.8 V / 1900 mAh
23 W
39
Page 42

REFERENCE ITEMS
Open source software notice
To obtain the source code under GPL, LGPL, MPL and other open source licenses, that is contained in this product, please visit
http://opensource.lge.com.
In addition to the source code, all referred license terms, warranty disclaimers and copyright notices are available for download.
Dis/Assembling the battery
Turn off the main power switch on the
back-left side of the Robot Cleaner.
Please assemble the battery in the
reverse order.
Place a soft cloth on the fl oor,
remove the dust bin, and fl ip the
Robot Cleaner over.
Separate the wire from the battery
while pressing the connector hook.
Remove the screw by using the
screwdriver.
Remove the battery from the device.
WARNING
Please be careful of fire, explosion, electric shock, or breakdown.
• Do not charge this Battery Pack(Pack hereafter) with any other type of charger than the one originally provided whit the
charger.
• Do not damage the Pack in such ways as drop, crush, puncture, cut or short extemal contacts.
• Do not attempt to disassembly the pack In any case. When the Pack is damaged or malfunctioning, bring it to the service
center.
• Do not place this pack near a heat source or do not dispose of in fire or water.
• Please keep the Pack away from damp or wet environment when the pack is charged.
• Please keep away from children, infant or pets.
40
Page 43
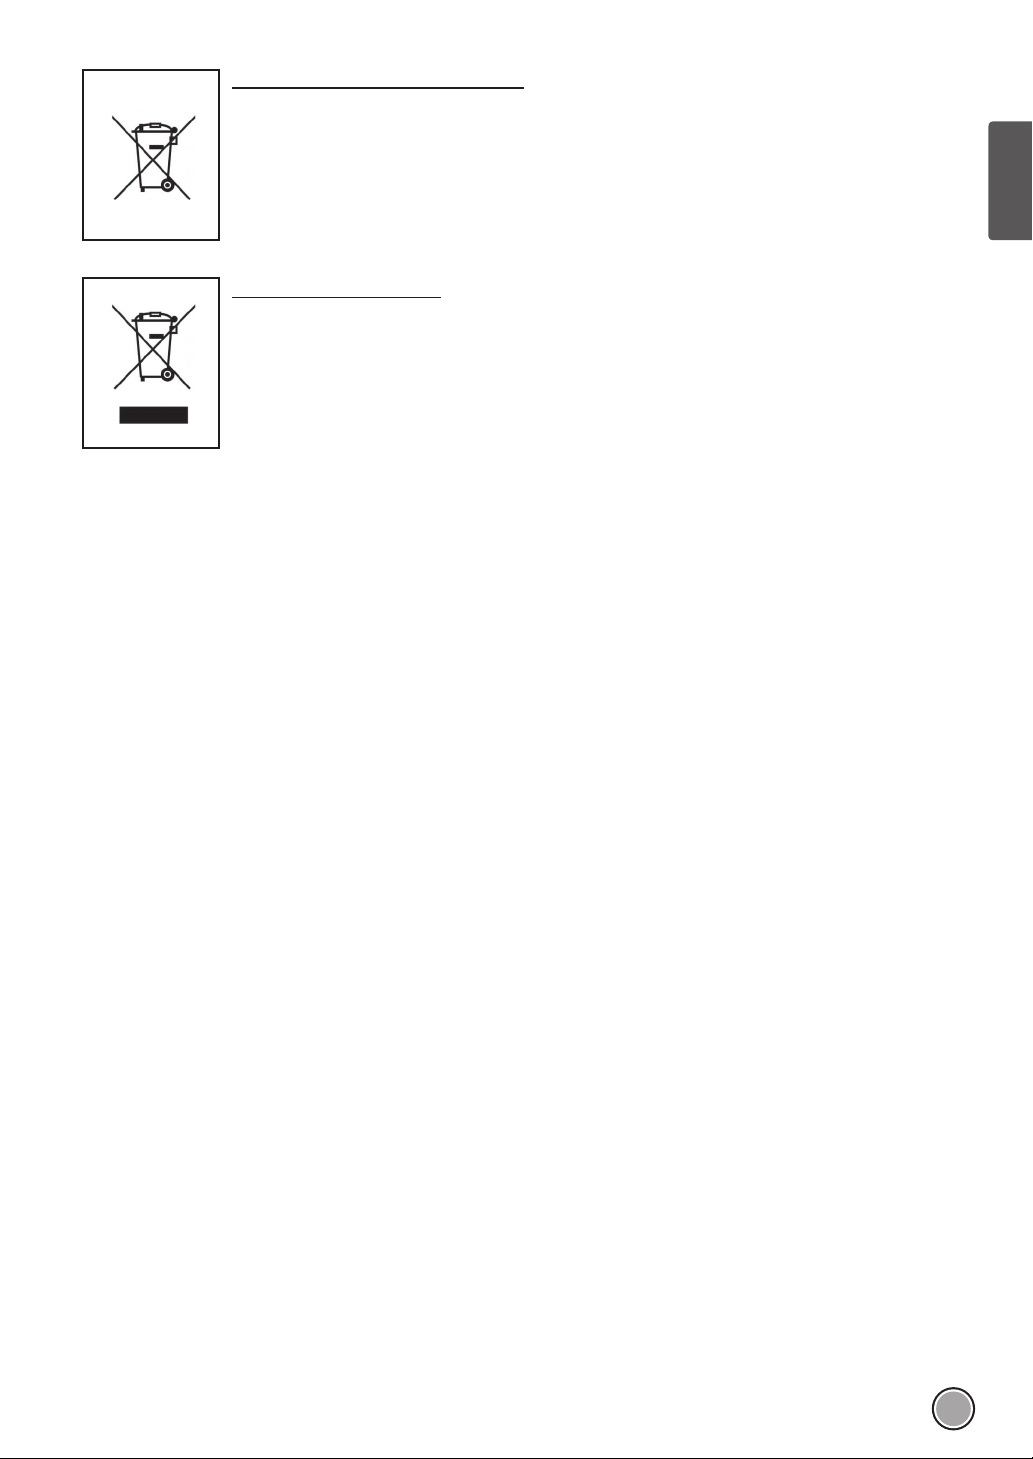
Disposal of waste batteries/accumulators
1. When this crossed-out wheeled bin symbol is attached to batteries/accumulators of Your product it means they are covered by
European Directive 2006/66/CE.
2. This symbol may be combined with chemical symbols for mercury(Hg), cadmium(Cd) or lead(Pb) if the battery Contains more that
0.0005% of mercury, 0.002% of cadmium or 0.004% of lead.
3. All batteries/accumulators should be disposed separately from the municipal waste stream via designated collection facilities appointed
by the government or the local authorities.
4. The correct disposal of Your old batteries/accumulators will help to prevent potential negative consequences for the environment, animal
and human health.
5. For more detailed information about disposal of Your old batteries/accumulators, please contact Your city offi ce, waste disposal service
or the shop where You purchased the product.
Disposal of your old appliance
1. When this crossed-out wheeled bin symbol is attached to a product it means the product is covered by the European Directive 2002/96/EC.
2. All electrical and electronic products should be disposed of separately from the municipal waste stream via
designated collection facilities appointed by the government or the local authorities.
3. The correct disposal of your old appliance will help prevent potential negative consequences for the environment and human health.
4. For more detailed information about disposal of your old appliance, please contact your city offi ce, waste disposal service or the shop
where you purchased the product.
ENGLISH
41
Page 44

Warranty Certificate
For offer a 24-month warranty for this apparatus
During the 24-month warranty period, (Battery of cleaning robot : 12month) we will repair your apparatus
at no cost to you or make available spare parts to your dealer free, if this apparatus fails due to
manufacturing or material defects. Further claims are excluded.
We are not liable for damages due to acts of providence or damages occurring during transport. The buyer
assumes shipping and packaging costs.
Your warranty conditions on the rear also apply!
Type of apparatus:
Name of buyer:
Purchase date:
Serial number:
Dealer’s stamp and signature
Warranty conditions for vacuum cleaner
The warranty period begins on the purchase
1. We decide whether to make repairs, exchange
date and is valid for 24 months. Begin of
warranty period is proven if, the buyer submits
purchase receipt together with the warranty
card, filled in and signed by the seller. The serial
number of the product must agree with the
number entered onto the warranty card.
During the warranty period, we will correct any
2.
defects at no cost to you, if it can be proven that
these are attributed to manufacturing or
material defects.
Damages due to incorrect handling, non-
3.
compliance with instructions for use and normal
wear are not covered by this warranty. Also,
the warranty does not cover wear parts or easily
broken parts (for example, viewing glass, light
bulbs). The buyer is responsible for any damages
during transport as well as shipping and
packaging costs.
4.
or replace parts. Exchanged or replaced parts
are our property. The original warranty period is
not prolonged if a refrigerator is repaired or
certain parts are replaced.
5.
The warranty is nullified if any person
intervenes in the apparatus that are not
authorised by LG Electronics, if the apparatus is
used for commercial purposes.
Always keep the original packaging, so that if
6.
the apparatus requires servicing, it can be
transported without damaging it.
If a repair is covered by this warranty, always
7.
contact your dealer or an authorised service
centre.
Further claims are excluded. If parts of these
8.
provisions are invalid, they apply in the sense of
the wording. The validity of the other provisions
is not effected.
Page 45

NEDERLANDS
HANDLEIDING VOOR DE EIGENAAR
ROBOTSTOFZUIGER
Voor het gebruik, lees de pagina's met de veiligheidsvoorschriften
aandachtig door voor een veilige werking van het product. Nadat u de
gebruiksaanwijzing heeft gelezen, bewaart u deze op een gemakkelijk
toegankelijke locatie.
VR6260 Ser.
VR6270 Ser.
P/No.: MFL67680030
www.lg.com
Page 46

FUNCTIES
Hoekreiniging
Door de aanwending van een gloednieuw conceptontwerp dat geschikt is voor wanden, is het
reinigend vermogen van de Robot Cleaner uiterst doelmatig.
De stand 'Learning' (leren)
De Robot Cleaner is in staat om de reinigingsomgeving te onthouden door middel van de
leermodus voor slimmere reiniging.
Stand Turbo
In de stand "Turbo" reinigt de robotstofzuiger krachtiger waarmee een schoner resultaat
wordt verkregen.
Indien geselecteerd, wordt de stand "Turbo" automatisch ingeschakeld op tapijten, zodat de
robotstofzuiger doelmatiger kan reinigen.
Zigzag
Handgreep dweilhouder
Met de "Handgreep dweilhouder" kunnen gebruikers gemakkelijker de dweil vervangen
zonder het apparaat om te hoeven draaien.
Mijn ruimte-modes
Als u de robotstofzuiger opdraagt een bepaalde ruimte te reinigen, reinigt deze snel de
gewenste ruimte.
Stofzuigen herhalen
De robotstofzuiger reinigt continu totdat de batterij leeg is.
Locatiezoekfunctie
Wanneer de robotstofzuiger tijdens de werking van een plek wordt verplaatst, zal het
apparaat automatisch zoeken naar de vorige locatie en terugkeren naar de plek waar het
werd onderbroken.
Page 47

INHOUD
1
VOOR HET GEBRUIK
Veiligheidsmaatregelen
2~5
Meegeleverd met product
6
Beschrijving van de onderdelen
7~8
Functies van de knoppen
9~10
Informatie over de display-status
11
Voordat u begint
12
Overzicht
13
2
WIJZE VAN GEBRUIK
14
Hoe het oplaadstation te installeren
15
Hoe de stroomvoorziening naar de robotstofzuiger
aan en uit te zetten
Hoe te starten en te stoppen met reinigen
16
Hoe de batterij op te laden
17~18
Reinigingsmodi
19~20
Extra reinigingsmodi
21~22
Tijdsinstelling
23
Reiniging volgens schema
24
Dweilreiniging (optie)
25
Locatiezoekfunctie
26
Slimme diagnose
27~28
4
AANVULLENDE INFORMATIE
35~37
38
Problemen oplossen
Voordat u belt voor service
5
VERWIJZING
39
40
Productspecifi caties
Melding open-bron-software
NEDERLANDS
3
HANTERINGSMETHODE NA GEBRUIK
29
De opvangbak reinigen
30
Het fi lter van de opvangbak reinigen
31
De borstel reinigen
32
De sensor/contactpunten reinigen
33
De zijborstel reinigen
34
De ultramicrovezel-dweil (optie) reinigen
Page 48

VEILIGHEIDSMAATREGELEN
Het doel van de hieronder beschreven veiligheidsvoorschriften is dat de gebruiker het product veilig en correct gebruikt om
eventuele onverwachte risico op verwondingen of schade te voorkomen.
Elementaire voorzorgsmaatregelen
Nadat u de handleiding heeft gelezen, bewaart u deze op een gemakkelijk toegankelijke locatie.
Dit is het symbool voor een veiligheidswaarschuwing. Dit symbool waarschuwt u voor mogelijke gevaren
die schade aan eigendommen kan toebrengen en/of tot ernstig lichamelijk letsel of de dood kan leiden.
WAARSCHUWING
LET OP
Geeft een gevaarlijke situatie aan die, indien niet vermeden, de dood of ernstig letsel ten gevolge kan
hebben.
Geeft een gevaarlijke situatie aan die, indien niet vermeden, licht tot letsel letsel ten gevolge kan hebben.
WAARSCHUWING
1. Dit apparaat is niet bedoeld voor gebruik door personen (inclusief
kinderen) met beperkte lichamelijke, zintuiglijke of geestelijke
vermogens, of gebrek aan ervaring en kennis, tenzij ze onder toezicht
staan of worden geïnstrueerd over het gebruik van het apparaat door
een persoon die verantwoordelijk is voor hun veiligheid.
2. Kinderen moeten onder toezicht staan om ervoor te zorgen dat ze
niet met het apparaat spelen.
3. Indien het netsnoer beschadigd is, moet om gevaar te voorkomen
deze worden vervangen door een service-vertegenwoordiger van LG
Electronics
4. Dit apparaat kan worden gebruikt door kinderen van 8 jaar en ouder
en personen met verminderde lichamelijke, zintuiglijke of verstandelijke
vermogens of gebrek aan ervaring en kennis als ze onder toezicht
staan of instructies hebben gekregen over hoe het apparaat op een
veilige manier te gebruiken en de risico's hiervan begrijpen. Kinderen
mogen niet met het apparaat spelen. Reiniging en onderhoud mogen
niet zonder toezicht door kinderen worden uitgevoerd.
Verwijder de batterij niet uit de
robotstofzuiger voor uw eigen veiligheid
Als u de batterij of de robotstofzuiger
moet vervangen, brengt u deze naar
het dichtstbijzijnde geautoriseerde
servicecentrum van LG Electronics of
wederverkoper voor hulp.
Als u deze waarschuwing niet opvolgt,
kan dit brand of defecten in het apparaat
2
veroorzaken.
Gebruik de robotstofzuiger nooit met een
batterij en/of laadstation van een ander
product dan deze robotstofzuiger.
Dit kan brand of veroorzaken of kunnen er
defecten in het apparaat optreden.
Page 49

WAARSCHUWING
Gasoline
Detergent
VEILIGHEIDSMAATREGELEN
Zorg ervoor dat het netsnoer van het
oplaadstation niet wordt verpletterd onder
een zwaar voorwerp of worden beschadigd
door aanraking met scherpe voorwerpen.
Als u deze waarschuwing niet opvolgt, kan
dit elektrische schokken, brand of defecten in
het apparaat veroorzaken. Steek de stekker
niet in de wandcontactdoos als het netsnoer
beschadigd is. Breng het product naar een
erkend service-reparateur van LG Electronics.
Plaats het oplaadstation en de
robotstofzuiger niet in de buurt van een
verwarmingsapparaat.
Hierdoor kan het apparaat vervormen,
brand veroorzaken of kunnen er defecten in
het apparaat optreden.
Forceer de stekker niet dat deze doorbuigt.
Gebruik de stekker niet wanneer deze is
beschadigd of losgeraakt.
Dit kan brand of veroorzaken of kunnen er
defecten in het apparaat optreden.
Raak de stekker niet aan met natte
handen.
Dit kan leiden tot elektrische schokken.
Gebruik de robotstofzuiger niet wanneer
er kaarsen of breekbare voorwerpen op de
vloer staan.
Dit kan brand of veroorzaken of kunnen er
defecten in het apparaat optreden.
Gebruik altijd een eigen wandcontactdoos
die geschikt moet zijn voor een stroom
van 10 amp.
Als er meerdere apparaten gelijktijdig zijn
verbonden met een wandcontactdoos
kunnen ze voldoende warmte genereren om
brand te veroorzaken.
Bij het uittrekken van de stekker van het
oplaadstation trekt u de stekker altijd uit
door aan de stekker, en niet aan het snoer,
te trekken. Als u de stekker eruit trekt, mag
u de pinnen niet met uw vingers aanraken.
Dit kan een elektrische schok veroorzaken.
Sta niet toe dat kinderen of huisdieren op enig
moment met de robotstofzuiger spelen met of
erop gaan liggen. Gebruik de robotstofzuiger
niet als er een voorwerp uitsteekt.
Hierdoor kan letsel of schade aan het
apparaat worden toegebracht.
NEDERLANDS
Spuit of gebruik geen of ontvlambare
materialen, oppervlakte-actieve stoffen,
of drinkwater in de nabijheid van de
robotstofzuiger.
Dit kan brand of veroorzaken of kunnen er
defecten in het apparaat optreden.
* Brandbare materialen: benzine, thinner, enz.
* Oppervlakte-actieve stoffen:
wasmiddelen, badproducten, enz.
Steek tijdens het gebruik geen
lichaamsdelen, zoals een hand of voet,
onder de borstel of wielen van de
robotstofzuiger.
Hierdoor kan letsel of schade aan het
apparaat worden toegebracht.
Laat de robotstofzuiger niet op smalle
en hoge meubelen werken zoals een
kledingkast, koelkast, bureau, tafel, enz.
Dit kan persoonlijk letsel veroorzaken,
kunnen er defecten optreden of schade aan
het apparaat worden toegebracht die niet
onder de garantie vallen.
Schakel het apparaat niet in op een vloer
met een helling van meer dan 10 graden.
Hierdoor werkt het apparaat mogelijk niet
naar behoren.
Zet de stroomvoorziening onmiddellijk
uit als er een abnormaal geluid, geur
of rook door de robotstofzuiger wordt
gegenereerd. U doet dit door de stekker
uit het oplaadstation te halen en de
hoofdschakelaar aan de achterkant van
het apparaat uit te schakelen.
Als u dit niet doet, kan dit brand veroorzaken of
kunnen er defecten in het apparaat optreden.
Laat de robotstofzuiger niet in een kamer
werken waar een kind ligt te slapen.
Hierdoor kan letsel of schade aan het
apparaat worden toegebracht.
Laat geen kinderen of huisdieren
zonder toezicht in de buurt van de
robotstofzuiger.
Hierdoor kan letsel of schade aan het
apparaat worden toegebracht.
Dit product is bedoeld voor huishoudelijk gebruik binnenshuis
en mag niet worden gebruikt in mobiele toepassingen. Het
mag niet worden gebruikt in commerciële toepassingen zoals
werkplaatsen of garages, enz.
3
Page 50

VEILIGHEIDSMAATREGELEN
LET OP
Leeg de opvangbak veelvuldig en houd
deze schoon.
Het in de opvangbak verzamelde stof kan
leiden tot allergieën en kan schadelijke
insecten bevatten.
Gebruik de robotstofzuiger alleen
binnenshuis.
Als dit apparaat buitenshuis wordt gebruikt,
kunnen er zowel defecten in het apparaat
optreden als onherstelbare schade aan het
apparaat worden toegebracht.
Sluit vóór het stofzuigen de klep van de
opvangbak op het motorlichaam.
Als de klep niet gesloten is, kan er
persoonlijk letsel of schade aan het
apparaat worden toegebracht.
Gebruik de robotstofzuiger NIET rond een
trapleuning, trap of andere gevaarlijke
plaats.
Anders kan er persoonlijk letsel worden
toegebracht of het apparaat worden
blootgesteld aan schade.
In zeldzame gevallen kan de borstel van
de robotstofzuiger het tapijt beschadigen.
Als dit gebeurt, stop dan onmiddellijk met
stofzuigen.
Als een tapijt lange franje heeft, kan deze
franje worden beschadigd.
Laat de robotstofzuiger niet vallen en stel
het niet bloot aan sterke schokken.
Dit kan persoonlijk letsel veroorzaken, of
kunnen er defecten optreden die niet onder
de garantie vallen.
Stel de robotstofzuiger niet bloot aan
koude temperaturen (lager dan -5
voor een lange periode van tijd.
Als u dit toch doet, kunnen er defecten in
het apparaat optreden.
Voordat u begint, verwijder alle kabels of
draadjes van de vloer.
Er kunnen kabels of draadjes verstrikt raken
in de wielen van de robotstofzuiger, hetgeen
defecten in het apparaat kan veroorzaken
of kan het snoer van het apparaat kan
worden losgetrokken.
Zorg ervoor dat de robotstofzuiger niet
op een tafel of bureau wordt gezet als de
stroom is ingeschakeld.
Zo kan er persoonlijk letsel of schade aan
het apparaat worden toegebracht.
Zorg ervoor dat de robotstofzuiger
geen vloeistoffen, messen, punaises,
aanmaakhoutjes, enz. kan opzuigen.
Hierdoor kunnen er defecten in het
apparaat optreden.
°C)
Laat het motorlichaam en de
contactpunten van het oplaadstation
niet in contact komen met metalen
voorwerpen.
Als u dit toch doet, kunnen er defecten in
het apparaat optreden.
Laat geen water, reinigingsmiddelen, enz.
in de robotstofzuiger lopen.
Als u dit toch doet, kunnen er defecten
in het apparaat optreden. Gebruik geen
water, reinigingsmiddelen, enz. op de
robotstofzuiger. Als er vloeistof aan
binnenkant van de robotstofzuiger mocht
komen, zet u de stroom uit en neemt
u contact op met een verkoper van LG
Electronics of de klantenservice.
Laat geen water, reinigingsmiddelen,
enz. in de ultrasonische sensor van de
robotstofzuiger lopen.
Als u dit toch doet, kunnen er defecten in
het apparaat optreden.
Gebruik de robotstofzuiger niet wanneer
de opvangbak helemaal vol is.
Als u dit toch doet, kunnen er defecten in
het apparaat optreden.
4
Page 51

LET OP
VEILIGHEIDSMAATREGELEN
Wenk
Als de vloer nat is of natte plekken heeft,
haalt u de vochtigheid weg voordat u
de robotstofzuiger gebruikt. Gebruik
de robotstofzuiger niet op een natte
ondergrond.
Als u dit niet doet, kunnen er defecten op
het apparaat optreden.
Bij het bevestigen van de dweil, blokkeert
u niet de onderste sensor van de camera.
Als de onderste sensor van de camera
wordt geblokkeerd, kan het apparaat
wellicht niet soepel werken.
Als u de robotstofzuiger niet gebruikt
om energie te besparen, zet u de
stroomschakelaar uit en zet u de
stroomschakelaar weer aan wanneer u
stofzuigt of oplaadt.
Als de robotstofzuiger in werking is, kan
deze tegen de stoelpoot, bureaupoot,
tafelpoot of andere smalle stukken
meubilair stoten.
Voor een snellere en betere stofzuigbeurt
plaatst u de stoelen bovenop de eettafel.
Controleer vóór het stofzuigen dat de
plaat op de vloer hoger is dan 2 cm van de
vloer.
Als de drempel laag is, kan de
robotstofzuiger erover gaan en misschien
naar een ongewenste locatie gaan. Zorg
ervoor dat alle deuren van de kamers,
die niet moeten worden gestofzuigd, zijn
gesloten.
Controleer de volgende punten voor het gebruik:
• Leeg de opvangbak na elke stofzuigbeurt of voordat deze vol raakt.
• Verwijder alle kabels of lange draadjes van de vloer.
• Verwijder vóór het stofzuigen vocht van de vloer.
• Sluit vóór het stofzuigen de klep van de opvangbak.
• Verwijder breekbare of overbodige voorwerpen uit de kamer die moet worden gestofzuigd.
Verwijder bijvoorbeeld duur keramiek en kostbaarheden van de vloer.
• Controleer of de batterij voldoende vermogen heeft, en als het laag is, laadt u deze op.
• Sluit de deuren van elke kamer waarvan u niet wilt dat de robotstofzuiger deze ingaat.
Tijdens het stofzuigen kan de robotstofzuiger een andere kamer ingaan en verder stofzuigen.
• Gebruik dit apparaat niet in de kamer waar een kind alleen aan het slapen is. Het kind kan worden verwond of
wakker worden.
• Verwijder handdoeken, voetdoekjes of andere dunne doekjes van de vloer om deze door de borstel kunnen
worden opgepakt.
• Voordat u het apparaat opstart, is het beter om tapijten die dikker zijn dan 20 mm weg te halen, omdat deze
problemen kunnen veroorzaken.
• Sluit alle balkondeuren. De wielen kunnen tijdens het stofzuigen vast komen te zitten.
NEDERLANDS
5
Page 52

INBEGREPEN BIJ HET APPARAAT
Robotstofzuiger
Afstandsbediening
Cijfers kunnen afwijken van de werkelijke objecten.
Reinigingshulpstuk
om de sensoren
te reinigen
om het fi lter te
reinigen
CReinigingsborstel
(op de klep van de opvangbak)
Stofcontainerfi lter
(reserve) (optie)
Dweilhouder (optie)
Dockingstation
BEKNOPTE HANDLEIDING
ROBOTSTOFZUIGER
Deze handleiding beschrijft in het kort hoe u de robotstofzuiger moet gebruiken.
Voor meer details verwijzen wij u naar de gebruikershandleiding.
Lees deze handleiding zorgvuldig door voordat u het apparaat installeert en in gebruik neemt.
www.lg.com
Beknopte handleiding Gebruiksaanwijzing
HANDLEIDING VOOR DE EIGENAAR
ROBOTSTOFZUIGER
Voor het gebruik, lees de pagina's met de veiligheidsvoorschriften
aandachtig door voor een veilige werking van het product. Nadat u de
gebruiksaanwijzing heeft gelezen, bewaart u deze op een gemakkelijk
toegankelijke locatie.
Ultramicrofi ber-dwei l
(2 stuks) (optie)
www.lg.com
Droge cel voor afstandsbediening
(2 stuks AAA-formaat)
Zijborstel (2 stuks)
(optie)
Tapijtreiniger (optie)
6
Page 53
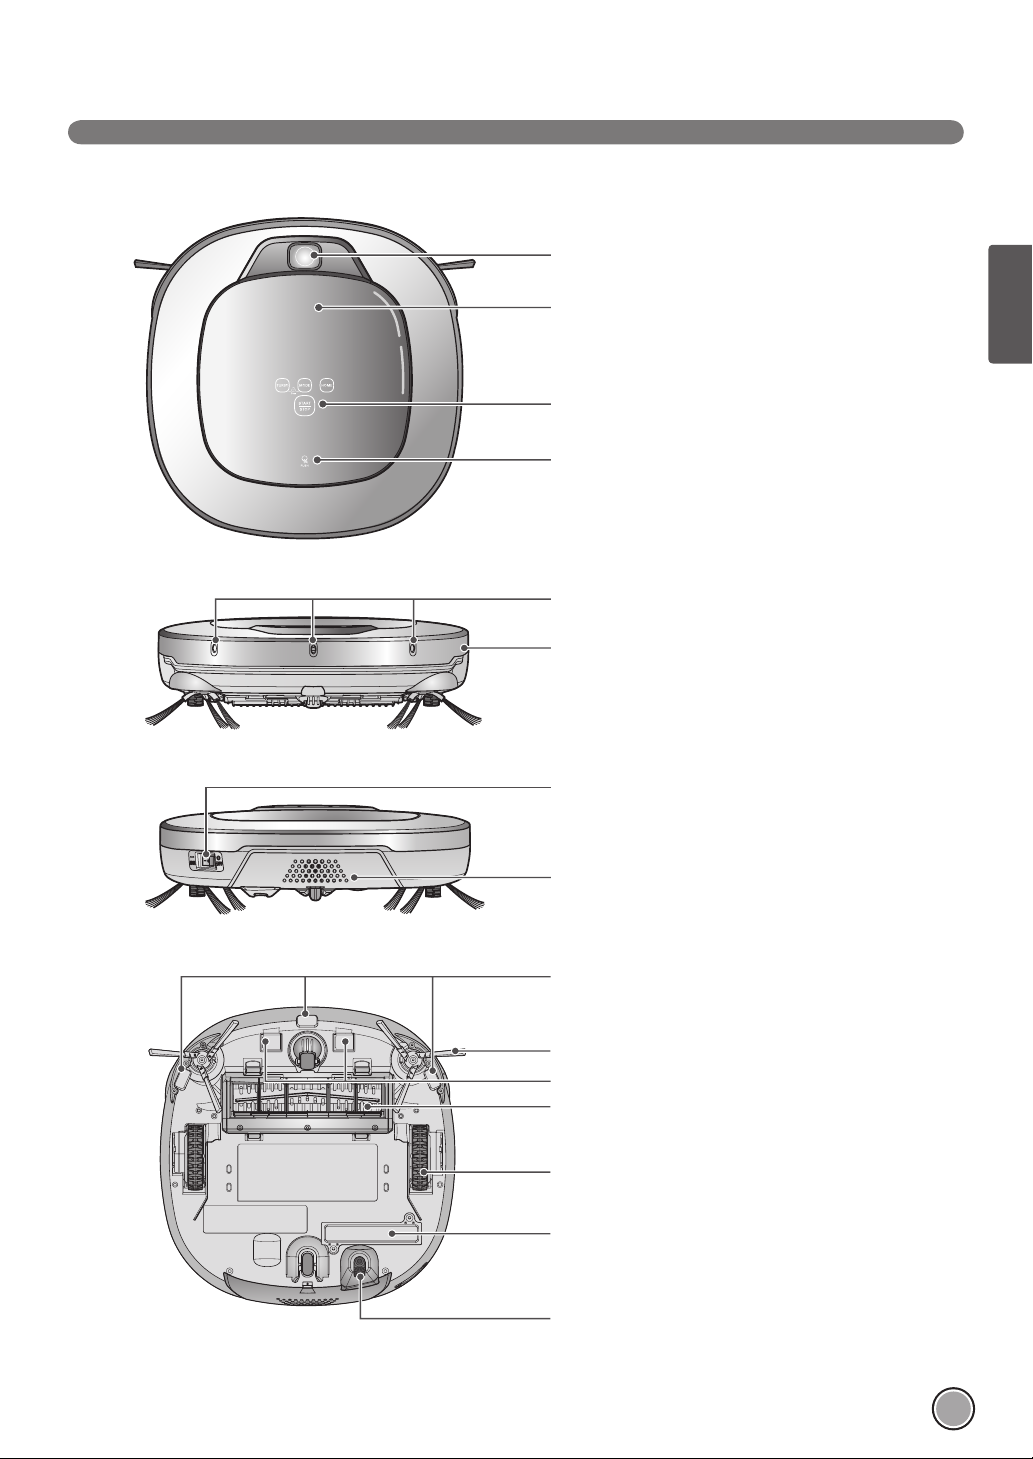
BESCHRIJVING ONDERDELEN - ROBOTSTOFZUIGER
Bovenaanzicht
Vooraanzicht
Achteraanzicht
Bovenste camerasensor
Stofcontainerklep
Display & Manipulatieknop
Knop voor de klep van de opvangbak
Ultrasone sensoren
Obstakeldetectie sensorvenster Sensoren van
het oplaadstation detecteren & sensoren van de
afstandsbediening ontvangen
Aan-/uitschakelaar
NEDERLANDS
Onderaanzicht
Cijfers kunnen afwijken van de werkelijke objecten.
Ventilatiepoort
Hoogtedetectiesensor
Zijborstel
Contactpunten
Borstel
Wiel
Batterij
Lagere camerasensor
7
Page 54

DEEL BESCHRIJVING - DOCKINGSTATION/STOFCONTAINER
Dockingstation
Afstandsbedieninghouder
Contactpunten
Aan-/uitschakelaar
Stofcontainer
Stofcontainerklep
Flapje zuigopening
Openingsknop klep van
de opvangbak
Bevestigingspunt netsnoer
Handgreep opvangbak
Reinigingsborstel
Filterklep
HEPA-fi lter
Cijfers kunnen afwijken van de werkelijke objecten.
8
Filterklep
Page 55

KNOPFUNCTIES - ROBOTSTOFZUIGER
NEDERLANDS
TURBO
STARTEN/STOPPEN
MODE (STAND)
HOME
(DOCKINGSTATION)
KNOPVERGRENDELING
Aan/Uit
• Als de knop wordt ingedrukt, wordt de stand 'Turbo' ingesteld met een stembevestiging.
• Als de knop in de stand 'Turbo' wordt ingedrukt, wordt het geannuleerd.
• Wordt gebruikt om de stroom aan te zetten, te starten met of te stoppen met stofzuigen.
• Als de knop wordt ingedrukt, terwijl het toestel wordt ingeschakeld, wordt het stofzuigen gestart.
• Als de knop wordt ingedrukt tijdens het stofzuigen, wordt het stofzuigen gestopt.
• Als de knop ongeveer 2 seconden lang wordt ingedrukt terwijl het apparaat is ingeschakeld, wordt
de stroom uitgeschakeld.
• Als de knop wordt ingedrukt in de stand 'Smart Diagnosis' (slimme diagnose), wordt de diagnose
gestopt.
• Wordt gebruikt om de instelling van de reinigingsstand te wijzigen.
• Als het apparaat in het oplaadstation staat, is de optie 'Spot Clean' (gerichte reiniging van een
bepaald oppervlak) niet beschikbaar.
• De stand 'My Space' (mijn ruimte) kan alleen worden geselecteerd met de afstandsbediening
(wanneer de robotstofzuiger niet in het oplaadstation staat).
• Wordt gebruikt om de robotstofzuiger terug te laten keren naar het oplaadstation om op te laden.
• Als het stofzuigen is voltooid of de batterij bijna leeg is, zal de robotstofzuiger zelf terugkeren naar
het oplaadstation om de batterij op te laden.
• Door 3 seconden lang op de knop 'Turbo' en 'Mode' (stand) te drukken, wordt de functie Lock
(vergrendeling) in- of uitgeschakeld.
• Als 'Lock' (vergrendeling) aanstaat, is telkens wanneer een toets wordt ingedrukt dit gesproken
bericht te horen: "Key has been locked" (knop is vergrendeld).
9
Page 56

KNOPFUNCTIES - AFSTANDSBEDIENING
Start
Door op deze knop te drukken,
wordt de reiniging gestart. (p. 16)
Mode (stand)
De reinigingsstand wijzigen. (p. 19)
Richtingsknop
Met deze knop wordt de
handbediening ingeschakeld en
kan er een gebied in de stand
'My Space cleaning' (mijn ruimte
reinigen) worden geselecteerd.
Repeat (herhalen)
Met deze knop kunt u de stand
'Repeat Cleaning' (nogmaals
stofzuigen) in- of uitschakelen.
(p. 22)
Schedule (schema)
Wordt gebruikt op een gepland tijdstip
om te beginnen met stofzuigen.
Door 3 sec. lang op de knop te
drukken, wordt het geplande
stofzuigen geannuleerd.
※
De opties schema-instellingen/
annulering zijn alleen beschikbaar in
de stand 'Charge' (opladen). (p. 24)
Home (dockingstation)
Wordt gebruikt om de robotstofzuiger op
te laden door deze terug te laten keren
naar het oplaadstation. (p. 17)
Turbo
Wordt gebruikt om de stand 'Turbo' in of
uit te schakelen. (p. 22)
Stop/OK
Het indrukken van de knop zorgt ervoor
dat de Robot Stofzuiger stopt, of de knop
bevestigd een schoonmaak programma of
tijdsinstelling.
My Space (mijn ruimte)
Wordt gebruikt om de robotstofzuiger in
de stand ''My Space clean' (mijn ruimte
stofzuigen) te zetten. (p. 20)
Mute (geluid dempen)
Wordt gebruikt om de stand 'Mute' (geluid
dempen) in of uit te schakelen. (p. 11)
Diagnose
Wordt gebruikt om Smart Diagnosis
(slimme diagnose) uit te voeren.
Alleen beschikbaar wanneer de
robotstofzuiger is opladen. (p. 27)
Klok
Wordt gebruikt om de huidige tijd,
die op de robotstofzuiger wordt
weergegeven, in te stellen. (p. 23)
Wenk
• Afstandsbediening beschikt niet over een stroom ON-stand.
• Als de stroom van de machine uitstaat, werkt de afstandsbediening niet.
• Om de stroom AAN/UIT te zetten, gebruikt u de knop 'Start/Stop' op het bovenste deel van de
robotstofzuiger.
• Gebruik alleen de knoppen 'Mode' stand), 'My Space' (mijn ruimte) of 'Clock' (klok) als de robotstofzuiger is
gestopt.
10
Page 57
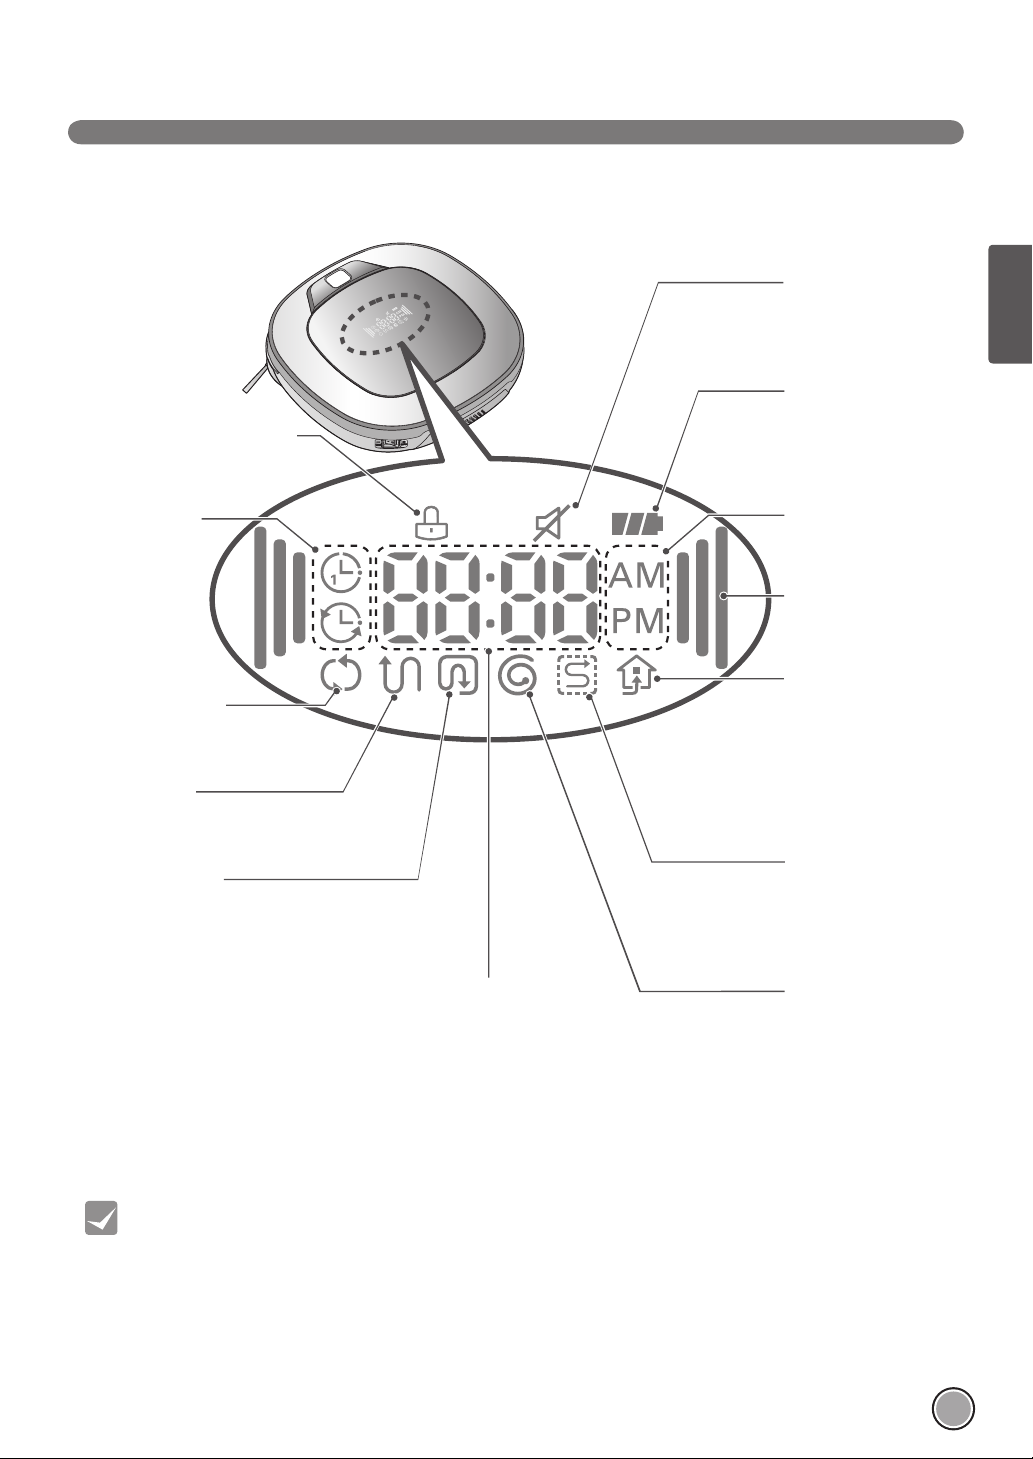
Pictogram Lock (vergrendeling)
Geeft aan of 'Lock' (vergrendeling)
al dan niet is ingeschakeld.
Pictogram Schedule
(schema)
Geeft de status van
de schema weer wat
betreft de instelling
'One time' (één
keer), of 'Everyday'
(elke dag).
Nogmaals stofzuigen
Wordt weergegeven als het apparaat
zich in de stand 'Repeat Cleaning'
(nogmaals stofzuigen) bevindt.
Zigzag-reiniging
Dit pictogram wordt weergegeven om
aan te geven dat de robotstofzuiger in
een Zigzag-reiniging werkt.
Cell by Cell Cleaning
(cel-voor-cel-reiniging)
Dit pictogram wordt weergegeven om
aan te geven dat de robotstofzuiger
werkt in de stand cel-voor-cel-reiniging.
INFORMATIE OVER DE DISPLAY-STATUS
Pictogram geluid
dempen
Dit pictogram geeft
weer of de stand geluid
dempen aan of uit staat.
Pctogram btterij
Dit pictogram geeft het
resterende batterijniveau
weer, het knippert als
de batterij moet worden
opgeladen.
Pictogram AM/PM
Dit geeft aan volgens de
klokinstelling of het AM
of PM is.
Pictogram Turbo
Dit display staat aan
als de stand Turbo is
ingeschakeld.
Pictogram Homing
(terugkeren naar
oplaadstation
Dit pictogram wordt
weergegeven als
robotstofzuiger is in
de stand 'Homing'
stand (terugkeren naar
oplaadstation) is.
Mijn ruimte reiningen
Wordt weergegeven
wanneer de robotstofzuiger
het reiningen van My Space
(mijn ruimte) aan het
uitvoeren is.
Tijdweergave
Dit geeft de huidige en
geplande tijd weer.
Spot-reiniging (gerichte
reiniging van een
bepaald oppervlak)
Dit pictogram verschijnt
als de robotstofzuiger
begint met de 'Spot'reiniging (gerichte
reiniging van een bepaald
oppervlak).
NEDERLANDS
Wenk
• Zodra de reinigingstand is geselecteerd (zigzag of cel-voor-cel) wordt dit opgeslagen, zelfs als de stroom is
uitgeschakeld.
• Om de reservering te annuleren, drukt u 3 seconden lang op de knop 'Schedule' (schema) op de
afstandsbediening terwijl de robotstofzuiger wordt opgeladen.
11
Page 58

VOORDAT U BEGINT
–
+
+
–
Controleer de volgende punten vóór het stofzuigen
• Gebruik dit apparaat niet in een kamer waar een kind alleen gelaten wordt. Het kind kan gewond raken.
• Verwijder breekbare of overbodige voorwerpen uit de kamer die moet worden gestofzuigd.
Verwijder met name duur keramiek en kostbaarheden van de vloer.
• Sluit vóór het stofzuigen de klep van de opvangbak.
• Verwijder eventueel vocht dat er op de vloer kan zijn.
• Verwijder kabels, strips, handdoeken, matjes enz. van de vloer, zodat ze niet door de borstel worden opgepakt.
• Controleer of de batterij voldoende is opgeladen, en als het laag is, laadt u deze alsnog op.
• Leeg de opvangbak voor of na elke stofzuigbeurt, of voordat deze vol raakt.
• Sluit de deuren van elke kamer waarvan u niet wilt dat de robotstofzuiger deze ingaat. Tijdens het stofzuigen kan de
robotstofzuiger een andere kamer ingaan en verder stofzuigen.
• Als de dweilis bevestigd, zal de robotstofzuiger niet in staat zijn om over drempels van 5 mm of hoger heen te gaan. Als u niet van
plan om de dweil te gebruiken voor het stofzuigen, haalt u de dweil uit de houder voordat u de robotstofzuiger gebruikt.
• Voordat u het apparaat opstart, is het beter om tapijten die dikker zijn dan 20 mm weg te halen, omdat deze problemen kunnen
veroorzaken.
• Sluit alle balkondeuren. De wielen kunnen tijdens het stofzuigen vast komen te zitten.
De batterij van de afstandsbediening opladen
1. Open het batterijklepje door het achterste punt van de afstandsbediening eruit te halen.
2. Plaats twee AAA-batterijen hierbij controleert u of de +, - contactpunten zijn aangesloten tijdens het laden.
3. Doe het batterijklepje helemaal dicht, zodat de batterijen er niet uitvallen.
Voorzorgsmaatregelen tijdens het gebruik van de afstandsbediening
• Druk slechts op één knop per keer.
• Niet laten vallen of blootstellen aan krachtige schokken.
• Bewaar het apparaat niet bij apparaten die warmte, vuur of hete lucht afgeven.
• Bepaalde fluorescentielampen, zoals felle stralingslampen, kunnen interfereren met het inschakelen van de afstandsbediening.
Houd het apparaat daarom zo ver mogelijk uit de buurt van dergelijke lampen.
• Als bij het inschakelen de afstandsbediening te ver van de robotstofzuiger verwijderd is, kan het niet naar behoren functioneren.
Gebruik het apparaat zo mogelijk op een afstand van minder dan 3 m van de robotstofzuiger.
12
Page 59
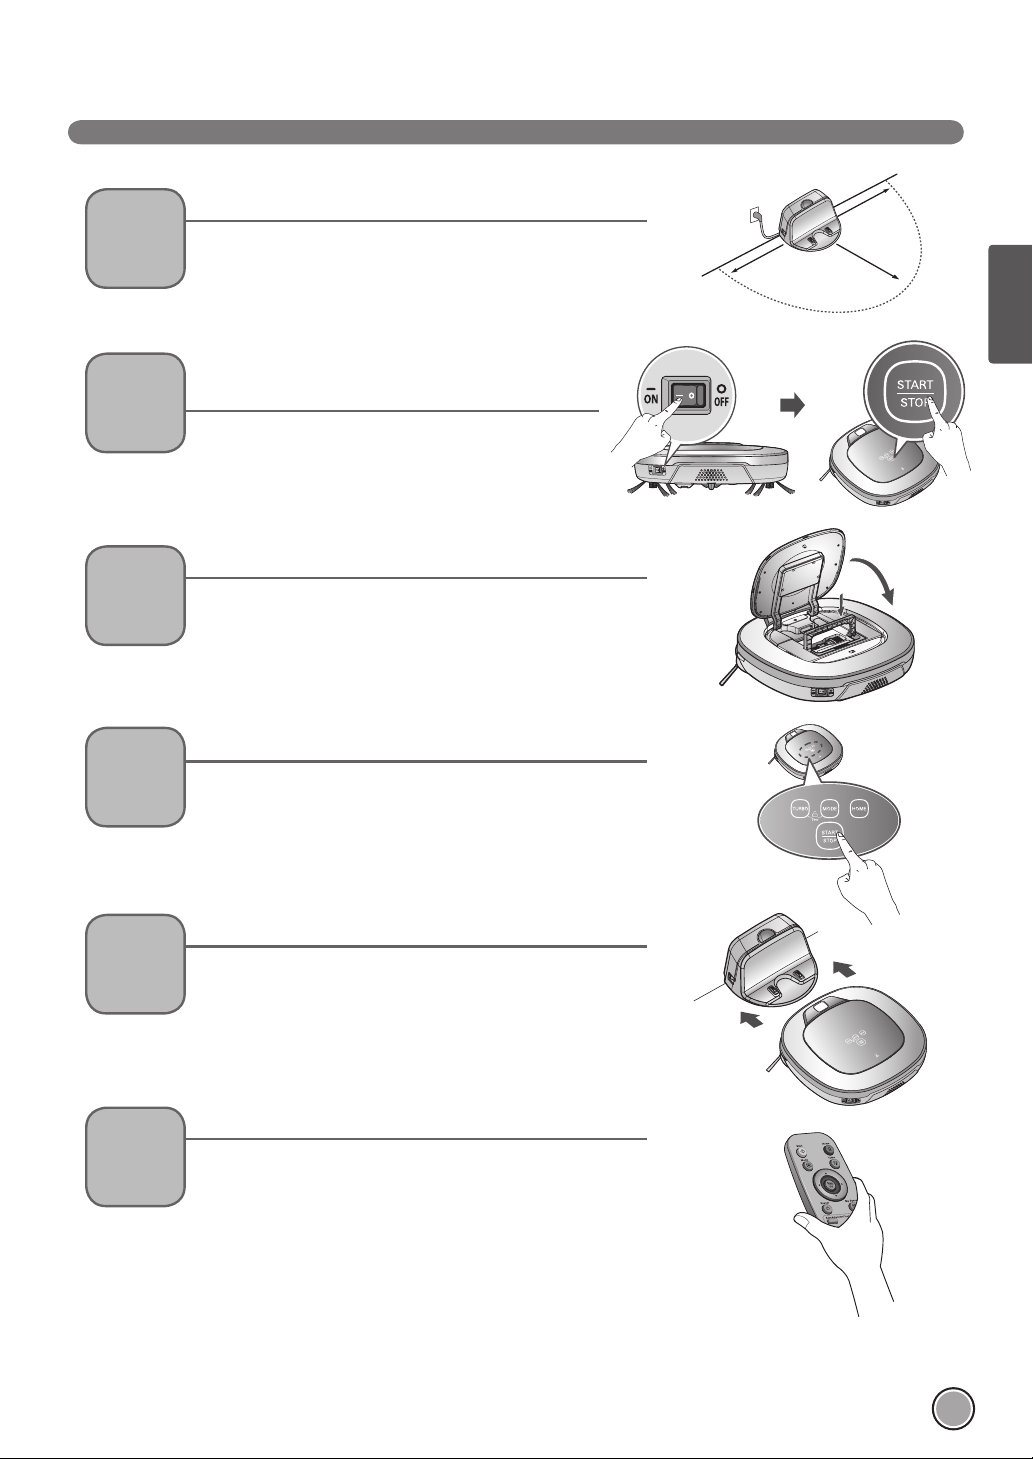
OVERZICHT
1
2
3
4
Het oplaadstation installeren. (p. 14)
Steek de stekker van het netsnoer aan op een stopcontact en zoek
een goede plek voor het station tegen een muur. Als er geen stroom
aan het oplaadstation wordt geleverd, wordt de robotstofzuiger
niet opgeladen.
De stroom aanzetten van de robotstofzuiger.
(p. 15)
Zet de stroomschakelaar links op de achterkant van de
robotstofzuiger ON (aan) en druk op de de knop "Start/
Stop"op de bovenkant.
※
Als de stroom niet wordt aangezet, raadpleegt u
pagina 15.
Controleer de opvangbak.
Controleer dat de opvangbak schoon is voordat u begint met
stofzuigen en sluit de klep van de opvangbak op het motorlichaam.
Begin met stofzuigen. (p. 16)
Druk nogmaals op de knop START/STOP terwijl de robotstofzuiger
aanstaat. U hoort het geluid van de stofzuiger en het reinigen
begint.
1.5
1.5
2
NEDERLANDS
Automatisch opladen. (p. 17~18)
5
6
< Waarschuwing > Als robotstofzuiger wordt bediend als de klep van de opvangbak open is, kan dit persoonlijk
De robotstofzuiger zal zelf een diagnose stellen en automatisch
terugkeren naar het oplaadstation op te laden voordat de batterij
helemaal leeg is. Het duurt ongeveer drie uur om de batterij op te
laden.
Gebruik de reinigingsstand en extra functies. (p. 19~25)
Gebruik de knoppen op robotstofzuiger en afstandbediening om
elke reinigingsstand en ondersteunende functie te gebruiken.
Reinigingstanden zijn ZigZag, (cell by Cell (cel-voor-cel), Spot
(gerichte reiniging van een bepaald oppervlak), My Space (mijn
ruimte) en Repeat cleaning (nogmaals stofzuigen); ondersteunende
functies zijn onder meer handmatig, gepland en reiniging met de
Microfi ber-dweil.
letsel of ernstige schade aan het apparaat toebrengen.
13
Page 60

HOE HET OPLAADSTATION TE INSTALLEREN
Hoe het oplaadstation te installeren
1. Plaats op harde vloeren het oplaadstation tegen een muur om schuiven te
voorkomen tijdens het opladen.
Verwijder voorwerpen binnen 1,5 m van de rechter-en linkerkant en binnen 2 m
van de voorkant.
1.5
2. Sluit het netsnoer aan op een stopcontact.
Wikkel het netsnoer om de bevestigingshaak aan de achterkant van het
oplaadstation of langs het muuroppervlak zodat de bewegingsbaan van de
robotstofzuiger niet wordt belemmerd.
3. Bevestig het oplaadstation aan de muur, zodat het niet kan bewegen.
Zet de stroomschakelaar aan.
1.5
Bevestigingshaak van het
2
netsnoer
4. Wanneer de afstandsbediening niet wordt gebruikt, zet u het in de
afstandsbedieninghouder op het oplaadstation.
Wenk
• Houd het oplaadstation altijd aangesloten met de stroom Als het oplaadstation niet is aangesloten, zal de
robotstofzuiger niet terugkeren naar het station om automatisch op te laden.
< Waarschuwing > Gebruik de robotstofzuiger niet als het snoer of de stekker van het oplaadstation beschadigd
is, als het niet goed werkt, of als het beschadigd of gevallen is. Om gevaar te voorkomen, moet
het snoer worden vervangen door LG Electronics, Inc of door een erkend onderhoudsmonteur.
14
Page 61
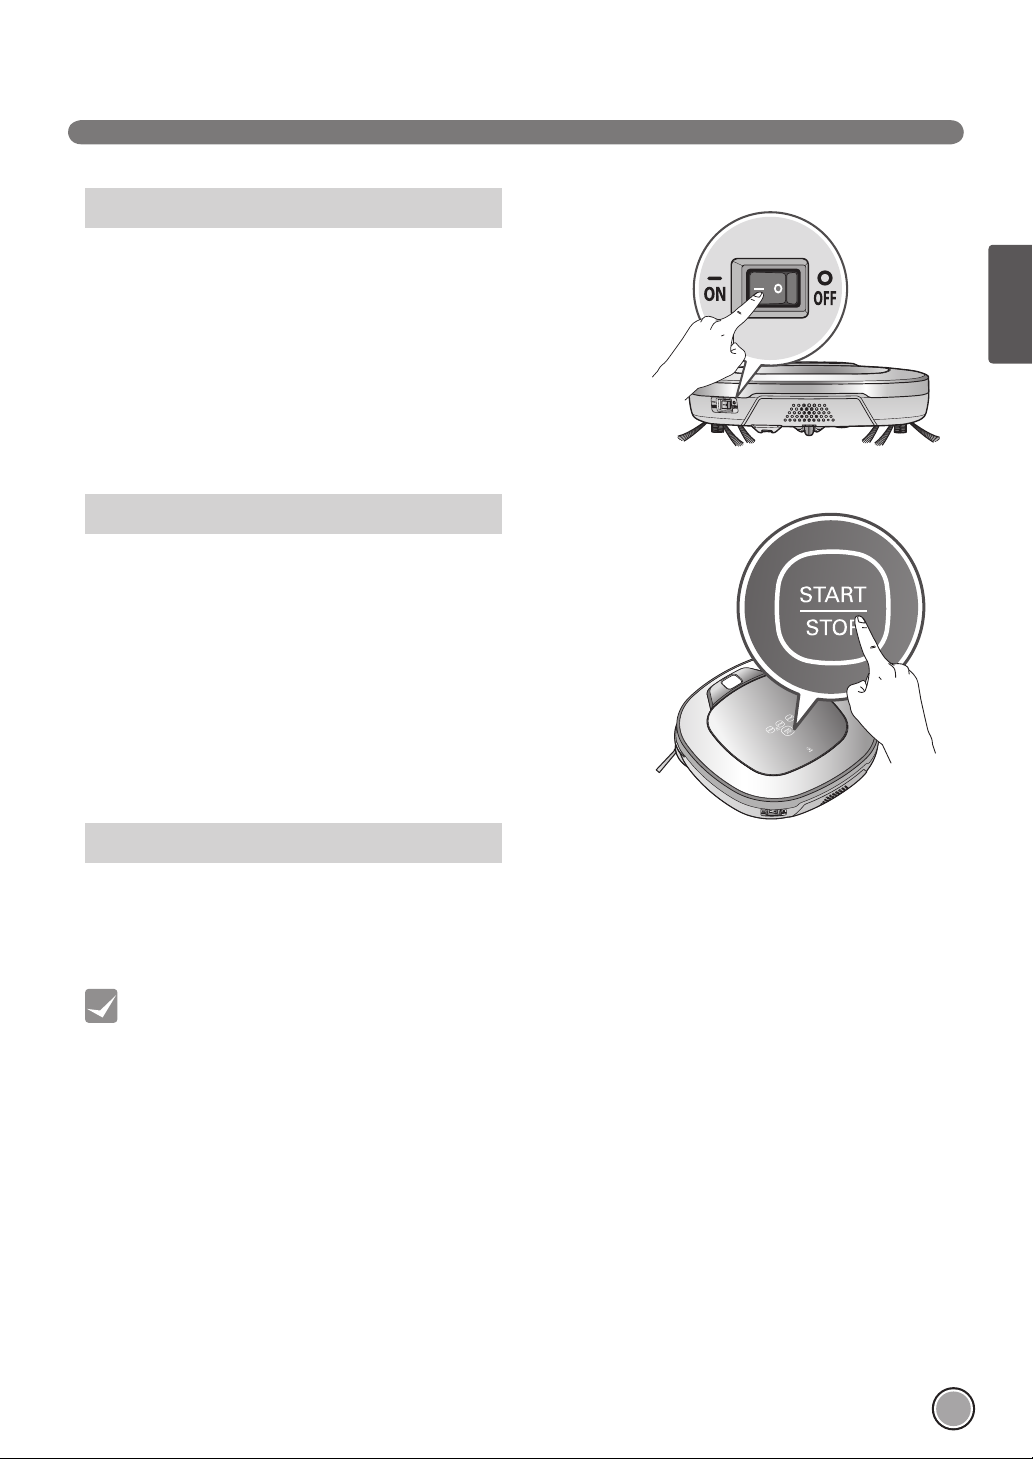
HOE DE STROOMVOORZIENING VAN DE ROBOTSTOFZUIGER AAN EN UIT TE ZETTEN
De stroomvoorziening aanzetten
Controleer dat de schakelaar links op de achterkant van de robotstofzuiger zit.
Als de stroom uitstaat, zet u de schakelaar op ON.
※
Wanneer u de schakelaar aanzet, druk dan niet op de knop in het bovenste
gedeelte van de robotstofzuiger. De bediening van de knop kan worden
uitgesteld.
※
Om de batterij te beschermen, zet u de netschakelaar uit als de
robotstofzuiger enige tijd niet wordt gebruikt. De Robotic Cleaner kan niet
opladen als de hoofdschakelaar in de stand “OFF” (uit) staat.
Aanzetten vanuit de standby-stroom.
Met de stroom van de robotstofzuiger UIT, druk 1 seconde lang op de
knop 'Start/Stop' totdat u een "Ting" geluid hoort.Met de stroom van de
robotstofzuiger UIT, druk 1 seconde lang op de knop 'Start/Stop' totdat u een
"Ting" geluid hoort. Na ongeveer 10 seconden wordt de stroom aangezet en
wordt er een melodie afgespeeld.
※
Als na het aanzetten er 10 minuten verstrijken zonder dat er actieve
opdrachten aan de robotstofzuiger worden gegeven, wordt de stroom
automatisch uitgezet.
NEDERLANDS
De stroomvoorziening uitzetten
Druk twee seconden lang op de knop START/STOP terwijl de robotstofzuiger
aanstaat. Er wordt een melodie afgespeeld wanneer de stroom uitstaat.
Wenk
• Als de stroom niet kan worden aangezet, doet u het volgende.
- Zet de stroomschakelaar en wacht minstens 3 seconden.
- Druk op de knop 'START/STOP' wanneer de stroomschakelaar aanstaat.
- Als de stroom niet aanstaat of als er geen display is, maar alleen het “Ting”-geluid wordt
afgespeeld, zet dan handmatig de robotstofzuiger tegen het oplaadstation.
15
Page 62

HOE HET REINIGEN TE STARTEN EN TE STOPPEN
Met behulp van de knoppen op de robotstofzuiger
Nadat de robotstofzuiger is aangezet, drukt u op de knop START/STOP om te
beginnen met stofzuigen. Er wordt een melodie afgespeeld en het stofzuigen
begint. Druk tijdens de stofzuigencyclus op de knop START/STOP om te stoppen
met stofzuigen.
※
Als de knop 'START/STOP' wordt ingedrukt terwijl de stroomvoorziening van de
robotstofzuiger uitstaat, wordt de stroom aangezet. Druk nog een keer op de
knop 'START/STOP' om te beginnen met stofzuigen.
De afstandsbediening gebruiken
Nadat de robotstofzuiger is aangezet, drukt u op de knop 'START' op de
afstandsbediening. Er wordt een melodie afgespeeld en het stofzuigen begint.
Druk op de knop Stop/OK tijdens de stofzuigencyclus om te stoppen met stofzuigen.
※
De robotstofzuiger kan niet worden aangezet vanuit stand-by met behulp van
de afstandsbediening wanneer de stroom van de robotstofzuiger uitstaat. Als
de stroom is uitgezet, drukt u op de knop 'START/STOP' op de bovenzkant van
de robotstofzuiger om de camera in te schakelen en om de afstandsbediening te
gebruiken.
※
Tijdens het stofzuigen kunnen er botsingen plaatsvinden wanneer de sensor geen objecten kan detecteren vanwege hun vorm
(dunne stoel- en tafelpoten, meubelhoekjes). Wanneer dit gebeurt, zal de interne effecten detecteren sensor reageren door een
achterwaartse beweging te maken.
※
Als de robotstofzuiger is ingesteld om op een locatie op afstand van het oplaadstation te starten met stofzuigen, zet u de
robotstofzuiger op een vlakke vloer om een storing van de obstakeldetectiesensor te voorkomen. Daarnaast begint u te
stofzuigen vanaf een locatie waar er geen obstakels zoals gordijnen of muren binnen 30 cm van de robotstofzuiger zijn.
Wenk
16
Voor de beste resultaten:
• Controleer het gebied dat moet worden gestofzuigd even op grote en kleine voorwerpen die problemen
kunnen veroorzaken voor de robotstofzuiger.
• Als het stofzuigen wordt gestart wanneer de robotstofzuiger tegen het oplaadstation staat, kan het
apparaat snel worden geretourneerd naar het oplaadstation omdat de huidige uitgangspositie nauwkeurig is
gelezen.
• Als de dweilhouder is geïnstalleerd, gaat de eenheid niet over drempels van 5 mm of hoger om een 2e
verontreiniging van de verontreinigde dweil te voorkomen
Page 63

Automatisch opladen
HOE DE BATTERIJ OP TE LADEN
De robotstofzuiger keert terug naar het oplaadstation aan het einde van een
reinigingscyclus of wanneer de batterij bijna leeg is.
※
Als er 10 minuten verstrijken zonder dat de robotstofzuiger beweegt of als de
batterij bijna leeg is, wordt de stroom automatisch uitgezet.
※
Zet de hoofdstroomschakelaar NIET UIT want anders wordt de batterij
niet opgeladen. Als de machine met de handbediening met behulp van
de hoofdstroomschakelaar wordt geretourneerd, wordt een foutmelding
weergegeven, “Hoofdstroomschakelaar aan de achterkant van de HOM-BOT
staat uit. Zet de schakelaar aan."
※
Indien het apparaat terugkeert naar het oplaadstation omdat batterij tijdens het
stofzuigen leeg is geraakt, wordt het stofzuigen gestart na het laden van de dichtstbijzijnde plaats van het gebied dat niet eerder
is gereinigd. (Pagina 18)
※
Als robotstofzuiger niet in staat is om tijdens de eerste poging zich aan het oplaadstation te koppelen, wordt opnieuw
geprobeerd totdat deze koppeling met succes plaatsvindt.
※
Als robotstofzuiger alle gebieden die het kan stofzuigen heeft voltooid, keert het terug naar het oplaadstation zelfs wanneer
het batterijniveau niet bijna leeg is.
Met de handbediening opladen
Als de robotstofzuiger voor het eerst wordt gebruikt of wanneer tijdens het stofzuigen de batterij wordt opgeladen, kunt u
handmatig de batterij opladen.
Methode 1. Bevestig de robotstofzuiger het oplaadstation
door deze aan de voorkant van het oplaadstation
aan te sluiten. Er wordt zowel een melodie als een
audiobericht afgespeeld om aan te geven dat u kunt
beginnen met opladen.
NEDERLANDS
※ Als dit audiobericht wordt afgespeeld, “De
hoofdstroomschakelaar aan de achterkant van
de HOM-BOT staat uit. Zet de schakelaar aan."
herhaaldelijk wordt aangekondigd, zet dan de
hoofdstroomschakelaar aan.
Methode 2. Wanneer de knop 'HOME' van de afstandsbediening
of van de robotstofzuiger wordt ingedrukt, vindt deze
opgeladen doordat het een zoeksignaal automatisch
wordt gegenerereerd en de robotstofzuiger naar het
oplaadstation wordt geretourneerd.
※
Als de robotstofzuiger niet beginnen met het stofzuigen van het oplaadstation of als de robotstofzuiger wordt handmatig
opgeladen door op de knop Home (oplaadstation), kan het iets langer duren om het oplaadstation te vinden.
※
Als de robotstofzuiger zich binnen 10 cm van de voorkant van de contactpunten bevindt terwijl de stroomvoorziening aanstaat,
keert deze automatisch terug naar het oplaadstation en het opladen begint.
Wenk
Neem de volgende voorzorgsmaatregelen bij het gebruik van het oplaadstation:
• Als er vreemd materiaal in de contactpunten terecht komt, kan het opladen niet goed verlopen. Veeg de
contactpunten van tijd tot tijd met een droge doek af na de stekker uit het stopcontact te hebben gehaald. (p. 32)
• Om elektrische schokken of schade aan het oplaadstation te voorkomen, laat u de contactpunten niet in
aanraking komen met metalen voorwerpen.
• Om brand of een elektrische schok te voorkomen, mag het oplaadstation nooit uit elkaar worden gehaald of
aangepast.
• Plaats het oplaadstation of de stroomstekker niet in de buurt van een warmtebron.
17
Page 64

HOE DE BATTERIJ OP TE LADEN
Knippert
Resterende batterij-oplaadlampje
Het batterijniveau wordt als volgt op het statusdisplay aangegeven.
• Als de batterij wordt opgeladen, knippert de batterijniveaulamp.
• Als het opladen is voltooid, worden alleen de pictogrammen 'Batterij' en 'Reinigingsstand' weergegeven om energie te besparen.
• Als het apparaat moet worden opgeladen, knippert alleen het eerste niveau van de batterijniveaulamp af en toe.
Knippert
Opladen is nodig
Midden
※
Als robotstofzuiger teruggaat naar het oplaadstation, als de batterij bijna leeg is terwijl
de lamp 'Clean Mode' (reinigingsstand) begint te knipperen.
- Als het de lamp 'Clean Mode' (reinigingsstand) begint te knipperen als het opladen
is voltooid, zal de robotstofzuiger de gebieden stofzuigen die niet eerder werden
gereinigd.
- Druk op de knop 'Start' op de afstandsbediening of de knop 'Stop' op het motorlichaam
terwijl het wordt opgeladen, terwijl de lamp van de 'Clean Mode' (reinigingsstand)
knippert, zal ook robotstofzuiger de niet eerder gereinigde plekken vinden en
stofzuigen.
- Als na het wijzigen van de stand de knop "Start" op de afstandsbediening of op de knop
"Start/Stop” op het apparaat wordt ingedrukt, begint de robotstofzuiger opnieuw met
stofzuigen vanaf het begin.
Als de batterij niet wordt opgeladen
Controle 1:
Als de batterij niet wordt opgeladen, zelfs wanneer de robotstofzuiger aan
het oplaadstation is bevestigd, controleer dan de volgende punten.
- Zet de stroomschakelaar links op de achterkant van de robotstofzuiger
uit en dan weer aan.
- Controleer het controlelampje van het oplaadstation.
- Veeg de aansluiting op het oplaadstation af met een droge doek. (p. 32)
Laag
Hoog
Het statusindicatielampje terwijl de
robot wordt opgeladen
(in ruimtelijke zigzagstand)
In het geval dat het te reinigen
gebied niet bestaat
In het geval dat het te reinigen
gebied bestaat (knippert)
18
Stroomlampje
Contactpunten
Page 65

Zigzagreiniging
REINIGINGSSTANDEN
In de stand 'zigzagreiniging' herhaalt de robotstofzuiger een
zigzagbeweging om elke plek in het te reinigen gebied te
reinigen.
Als u snel stofzuigen een gebied moet reiningen, kiest u de
stand 'Zigzag Clean' (zigzagreiniging).
"Druk op de knop 'Mode' (stand) op de afstandsbediening of op
het motorlichaam
om de stand 'Zigzag Clean' (zigzagreiniging) te selecteren en
druk op de knop 'Start'.
※
De standaardinstelling van de fabriekinstelling is 'Zigzag
Clean' (zigzagreiniging).
Cell by Cell Cleaning (cel-voor-cel-reiniging)
In de stand Cell by Cell (cel-voor-cel) reinigt de robotstofzuiger
het gebied door het in rechthoekige ruimten te verdelen.
Voor een uiterst zorgvuldige reiniging selecteert u deze stand.
Druk op de knop 'Mode' (stand) op afstandsbediening om de
stand 'cel voor cel' te selecteren en druk op de knop 'Start'.
NEDERLANDS
De 1e fase:
De maximale omtrek van 3 m x 3 m van het reinigingsgebied
wordt gereinigd. (De grootte van de omtrek kan variëren in
overeenstemming met de vorm van het te stofzuigen gebied.)
(De grootte van de omtrek kan variëren in overeenstemming
met de vorm van het te stofzuigen gebied.)
De 2e fase:
In de 2e fase van de Cell by Cell Cleaning (cel-voor-celreiniging) wordt de zigzag-stand automatisch uitgevoerd.
Wanneer de 1e en 2e fasen zijn voltooid, zal het te
reinigen gebied worden gereinigd door de bovenstaande
reinigingsmethode te herhalen als het apparaat wordt
verplaatst naar het volgende deel van het te reinigen gebied.
Wenk
• Eenmaal ingesteld blijven de instellingen voor de reinigingsstand (zigzag, cel-voor-cel) behouden, zelfs nadat
de stroomvoorziening is uitgezet.
• Als u tijdens de werking de stand wilt wijzigen, drukt u op de knop Stop/OK en selecteert u vervolgens de
gewenste stand. Het reinigen zal dan vanaf het begin starten.
19
Page 66

REINIGINGSSTANDEN
My Space Cleaning (mijn ruimte reinigen)
Als u op 'My Space' (mijn ruimte reinigen) op de afstandsbediening
drukt, zal de My Space Cleaning (mijn ruimte reinigen) met een
audiobericht worden ingesteld.
Voor het stofzuigen van bepaalde ruimten, kiest u deze stand.
De 1e fase:
Gebruik de afstandsbediening om handmatig het stofzuigen aan
de rand van elke reinigingsblok uit te voeren.
※
Deze reinigingsstand wordt geaccepteerd wanneer de afstand van de start- en eindpositie minder bedraagt dan 1 m.
My Space
(mijn ruimte)
De 2e fase:
Door op de knop 'Start' te drukken, zal dan de robotstofzuiger het handmatig aangegeven gebied zelf stofzuigen.
※
Als een zone niet volledig is aangegeven, wordt een audiobericht afgespeeld: "Area does not meet the specifi ed conditions.”
(Ruimte voldoet niet aan de gestelde voorwaarden. Please continue to make specifi ed area for cleaning process.” Ga verder met
het gebied aan te geven voor het reinigingsproces." Gebruik de afstandsbediening om een zone nogmaals toe te wijzen.
※
Als de reiniging van alle geselecteerde gebieden is voltooid, wordt de robotstofzuiger in de de net uitgevoerde reinigingsstand
(zigzag of cel-voor-cel) gezet.
Wenk
• Tijdens het opladen, kunt u de stand 'mijn ruimtestofzuigen' niet activeren.
• Om de reinigingsstand te veranderen als de robotstofzuiger in werking is, drukt u eerst op de knop 'Stop/OK'
om een stand te selecteren. Het stofzuigen start vanaf het begin.
20
Page 67

Handmatige reiniging
EXTRA REINIGINGSSTANDEN
Door het indrukken van een richtingknop op de afstandsbediening, kunt u robotstofzuiger in een handmatige stand verplaatsen.
De robotstofzuiger zal het gebied stofzuigen, door zich vooruit/achteruit/links/rechts te verplaatsen, afhankelijk van de bediening
van de richtingsknop.
Terwijl in de stand 'Manual'(Handmatig), zal de robotstofzuiger obstakels tegenkomen die er achter zijn geplaatst als de knop op
de afstandsbediening ingedrukt blijft.
Spot Cleaning (gerichte reiniging van een bepaald oppervlak)
NEDERLANDS
Wordt het best gebruikt gebruikt om bepaalde delen van het huis te reinigen.
Druk op knop 'Mode' (stand) op de afstandsbediening om de stand 'Spot Clean' (gerichte reiniging van een bepaald oppervlak),
aangegeven op het Statusdisplay, te selecteren, en de knop 'Start', dan start de robotstofzuiger de Spot Clean (gerichte reiniging
van een bepaald oppervlak) voor een ruimte binnen 1,5 m diameter.
※
Tijdens het opladen, kan 'Spot Clean' (gerichte reiniging van een bepaald oppervlak) niet worden geselecteerd.
Het stopt bij de startpositie als het stofzuigen
voltooid is (duurt 4~5 min.).
21
Page 68

EXTRA REINIGINGSSTANDEN
Stand Turbo
Door op de knop 'Turbo' op de afstandsbediening of op het
motorlichaam te drukken, wordt de stand 'Turbo' geactiveerd
met een audiobericht.
Terwijl in de stand 'Turbo' wordt door op dezelfde knop te
drukken, de stand 'Turbo' met een audiobericht geannuleerd.
In de stand 'Turbo' werkt de robotstofzuiger intenser voor een
krachtige reiniging.
※
<De stand Turbo (Floor Master Function)>
De stand 'Turbo' werkt automatisch wanneer de
robotstofzuiger tapijten reinigt.
De stand Repeat (herhalen)
Door op de knop 'Repeat' (herhalen) op afstandsbediening te drukken, wordt de stand
'Repeat' met een audiobericht geactiveerd.
Terwijl in de stand 'Repeat' (herhalen) wordt door op dezelfde knop te drukken
'Repeat' met een audiobericht geannuleerd.
In de stand 'Repeat' (herhalen), herhaalt de robotstofzuiger de reiniging die wordt
uitgevoerd totdat de batterij leeg is.
De stand 'Learning' (leren)
De robotstofzuiger is in staat om de te reinigen omgeving op
te slaan door middel van de stand 'Learning' (leren) voor een
intelligente reiniging.
※
De stand 'Learning' (leren) is alleen beschikbaar wanneer de
machine begint te reinigen vanaf het oplaadstation.
Wenk
22
• Voorzorgsmaatregelen met Smart Operation (slimme werking)
- Met deze stand 'Learning' (leren) worden locaties met obstakels opgeslagen om deze te omzeilen. De
robotstofzuiger slaat elk aspect van het omgevingstraject op: vanaf het moment van de starten van de
reiniging vanaf het oplaadstation tot het moment van voltooiing van het traject.
- De robotstofzuiger leert de nieuwe omstandigheden als de locatie van het oplaadstation is gewijzigd.
- Als de leerstand wordt aanvaard, zal een audiobericht te zeggen: "The learning cleaning process is
complete.” (Het leerreinigingsproces is voltooid.)
Page 69

TIJDSINSTELLING
Knippert
Knippert
Knippert
U kunt de actuele tijd op de robotstofzuiger instellen.
Door op de knop 'Clock' (klok) op afstandsbediening, wanneer robotstofzuiger wacht, wordt de actuele
tijdsinstelling gestart.
NEDERLANDS
Selecteer met behulp van '
knoppen op de afstandsbediening.
De functie kan worden beluisterd via de
audioberichten.
'
Knippert
Knippert
Knippert
Stel de tijdseenheden in met behulp van de
knoppen '' op de afstandsbediening.
Stel de eenheid van minuten in met behulp van
de knoppen '' op de afstandsbediening.
Stel de AM/PM in met behulp van de knoppen
'' op de afstandsbediening.
Door op de knop ‘Clock’ of ‘Stop/OK’ op de
afstandsbediening te drukken, wordt het
tijdsinstellingsproces voltooid.
Wenk
• Al het geplande stofzuigen wordt geactiveerd op basis van de tijd op de robotstofzuiger. U moet de klok
instellen voordat u het stofzuigschema instelt.
• Als er 10 seconden lang geen invoer is, wordt de klokinstelling geannuleerd.
23
Page 70

REINIGING VOLGENS SCHEMA
Knippert
Knippert
Knippert
Knippert
U kunt een reiniging plannen, zodat de robotstofzuiger op een gepland tijdstip begint met stofzuigen.
Door op de knop 'Schedule' (schema) op de afstandsbediening te drukken, als de batterij is opgeladen, zal
de geplande reinigingsinstelling starten.
Instellen/annuleren van de reservering is alleen mogelijk wanneer het apparaat aan het opladen is.
Selecteer een niveau met behulp
van de knoppen '
afstandsbediening.
' op de
'One Time (eenmalig)
Everyday' (dagelijks)
Knippert
Knippert
Knippert
Knippert
Selecteer 'One Time' (eenmalig) of 'Everyday'
(dagelijks) met behulp van de knoppen '' op
de afstandsbediening. Een audiobericht bevestigt
het schema.
Stel het uur in eenheden in met behulp van de
knoppen '' op de afstandsbediening.
Stel de minuten in met behulp van de knoppen
'' op de afstandsbediening.
Stel de AM/PM in met behulp van de knoppen
'' op de afstandsbediening.
Door op de knop ‘Schedule’ of ‘Stop/OK’ op
de afstandsbediening te drukken wordt het
schemaproces voltooid.
24
Wenk
• Wanneer de geplande tijd komt, zal de robotstofzuiger zelf gaan stofzuigen.
• Gepland stofzuigen kan alleen worden ingesteld als de robotstofzuiger wordt opgeladen.
• Tijdens het opladen, door 3 seconden lang op de knop 'Schedule' (schema) op de afstandsbediening te
drukken, wordt het ingestelde schema geannuleerd.
• Als er 10 seconden lang niets wordt ingevoerd bij het instellen van het geplande tijdstip, wordt de instelling
geannuleerd.
Page 71

DWEILREINIGING (OPTIE)
"Klik!"
Door de ultramicrovezel-dweil te bevestigen, kunt u effectief
gebruik maken van de robotstofzuiger om stof te verwijderen.
Wanneer de dweilhouder is bevestigd, zal de robotstofzuiger
niet over tapijten of over drempels gaan, om de overdracht van
vuil met de dweil te voorkomen.
Let op
Bedek de onderste camerasensor
niet met de dweil.
Voor dweilstofzuigen, bevestigt u de dweil en de dweilhouder aan de robotstofzuiger volgens de volgende aanwijzingen:
1. Bevestig de ultramicrovezel-dweil aan de klittenband
van de dweilhouder, zoals op de afbeelding.
NEDERLANDS
2. Duw de dweilhouder stevig in de openingen totdat u
een 'klik' geluid hoort.
※ Houd er rekening mee dat als de dweilhouder niet
goed is bevestigd, deze tijdens het stofzuigen los
kan raken.
3. Het is essentieel dat de bevestigingshaken
op de dweilhouder correct zijn afgesteld in de
bevestigingsopeningen aan de onderkant van de
zuiger.
Wenk
• Om geurtjes te voorkomen, spoel vreemde voorwerpen of stof uit de dweil als het stofzuigen is voltooid.
• Om vlekken op vloeren te voorkomen, maakt u geen gebruik van de ultramicrovezel-dweil om te reinigen
wanneer vuil vermengd is met vloeistoffen, zoals koffie of inkt.
• Om schade aan tapijten van het klittenband of vuilafgifte van de dwei lte voorkomen, reinigt u het tapijt niet
als de dweilhouder of dweil is bevestigd.
• Houd de ultramicrovezel-dweil droog. Gebruik deze niet op een natte ondergrond.
Als er vocht is, kan het interfereren met de navigatie.
• De stand Smart Diagnosis (slimme diagnose) is niet beschikbaar, wanneer de dweilhouder is bevestigd.
Bevestigingshaak
Bevestigingsopening
"Klik!"
25
Page 72

Zigzag
Zigzag
LOCATIEZOEKFUNCTIE
De robotstofzuiger onthoudt de locatie tijdens het stofzuigen.
Als de gebruiker de robotstofzuiger verplaatst terwijl deze in werking is, zal deze zoeken naar de locatie
van waar het werd verplaatst met behulp van de navigatielocatiezoekfunctie voordat u verder kunt gaan
met stofzuigen.
※
De navigatiestand wordt geactiveerd nadat de
robotstofzuiger de te reinigen omgeving voldoende herkent.
Als de locatiezoekstand is
geactiveerd, knippert de
Reinigingsstand van de
statusindicator
1 m
1 m
Locatie van het incident
Handmatige relocatie.
1. Zoek de robotstofzuiger in de buurt van de locatie vanaf
waar het oorspronkelijk werd verplaatst.
※
Het zoeken naar de locatie is effectiever wanneer de
robotstofzuiger dichter bij de plaats is vanaf waar het werd
verplaatst.
※
Als deze wordt verplaatst van de oorspronkelijke
reinigingspositie met meer dan 1 m, wordt het moeilijk
voor de robotstofzuiger om de vorige locatie op te kunnen
zoeken.
Locatie wijzigen
2. Druk op de knop START/STOP op de robotstofzuiger of de knop START op de afstandsbediening.
De robotstofzuiger zal vervolgens de locatiezoekfucntie beginnen, samen met een audiobericht.
※
Als het zoeken naar de locatie is voltooid, zal deze blijven stofzuigen vanaf waar het werd verplaatst. Als het zoeken naar de
locatie mislukt, zal deze weer vanaf het begin beginnen.
Om de nauwkeurigheid te verbeteren, blijft
u uit de buurt van de HOM-BOT wanneer
het in de stand locatie zoeken staat.
Locatie van het incident
Wenk
• Wanneer de stroom wordt uitgezet nadat de locatiezoekfunctie is ingesteld, wordt de locatiezoekfunctie
geannuleerd.
• Het zoeken naar de locatie zal effectiever zijn wanneer de robotstofzuiger dichter bij de plaats is vanaf waar
het werd verplaatst.
26
Page 73

SMART DIAGNOSIS (SLIMME DIAGNOSE)
De robotstofzuiger gebruikt deze Smart Diagnosis (slimme diagnose) om een zelfdiagnose uit te voeren.
Als een onregelmatigheid wordt gevonden d.m.v. de diagnose, neem dan contact op met het lokale
servicecentrum van LG Electronics.
※
Gedurende Smart Diagnosis (slimme diagnose), zal de robotstofzuiger bewegen binnen een straal van 50 cm. Controleer
daarom dat dat er geen voorwerpen in de weg staan binnen een straal van 1 m rond het oplaadstation, voordat u begint
met de Smart Diagnosis (slimme diagnose).
1. Zet de de hoofdstroomschakelaar aan de achterkant ON (aan) na te
hebben gecontroleerd dat de robotstofzuiger aan het oplaadstation is
bevestigd.
※
Smart Diagnosis (slimme diagnose) is alleen mogelijk wanneer
de robotstofzuiger is bevestigd aan het oplaadstation.
2. Druk op de knop 'Diagnose' op de afstandsbediening, dan start het
proces met het volgende audiobericht: "Starting HOM-BOT smart
diagnosis. (De HOM-BOT slimme diagnose wordt gestart.) Please step
away and remove any items within 1 meter, or about 3 feet.” (Zorg
dat u niet in de weg staat en verwijder voorwerpen binnen 1 meter, of
ongeveer 3 meter.)
※
Als de dweilhouder is bevestigd, wordt het proces niet
geactiveerd.
NEDERLANDS
3. Wanneer de Smart Diagnosis (slimme diagnose) met
succes is voltooid, keert de robotstofzuiger terug naar
het oplaadstation en biedt de uitkomst hiervan aan door
middel van een audiobericht. Na het stembericht, kan het
stembericht opnieuw worden afgespeeld door de knop
'HOME' op de afstandsbediening of op het motorlichaam
te drukken. Om het diagnoseproces te beëindigen, drukt u
op de knop 'Stop/OK' op de afstandsbediening of op het
motorlichaam.
※
Na het stembericht Smart Diagnosis (slimme
diagnose) wordt de robotstofzuiger na 1 minuut
opgeladen.
※
Als er een fout wordt gedetecteerd met een van de
sensoren terwijl in Smart Diagnosis (slimme diagnose),
kondigt een audiobericht dit aan en keert het apparaat
niet terug naar het oplaadstation.
Wenk
• Zorg dat u de robotstofzuiger niet aanraakt of de werking ervan verstoort voordat Smart Diagnosis (slimme
diagnose) is voltooid. Als het per ongeluk onderbroken wordt, zet de de hoofdstroomschakelaar dan weer
OFF (uit) en vervolgens weer ON (aan) om de diagnose te hervatten.
• Smart diagnose zal niet worden geactiveerd in elk van de volgende gevallen. In elk geval, controleer dan het
probleem en probeer het opnieuw.
- De robotstofzuiger is ontkoppeld van het oplaadstation
- Het batterijniveau is niet toereikend
- Er is geen opvangbakfilter geplaatst.
- De dweilhouder is bevestigd
27
Page 74

SMART DIAGNOSIS (SLIMME DIAGNOSE)
Als er een audiobericht wordt aangekondigd na Smart Diagnosis (slimme diagnose), raadpleegt u de volgende tabel om de juiste
acties te ondernemen.
Audiobericht Maatregelen (als verwijzing)
Starting HOM-BOT smart diagnosis. Please step away and remove any
items within 1 meter, or about 3 feet.
HOM-BOT needs to be charging in order to activate smart diagnosis.
Please dock the HOM-BOT to the home station.
Starting HOM-BOT smart diagnosis. Reservation has been cancelled
for smart diagnosis. Please step away and remove any items within
1 meter, or about 3 feet.
No defect found during diagnosis.
Unable to initiate smart diagnosis due to a low battery. Please try
again after battery is charged.
Please check that the dust bin and fi lter are properly installed. Open de klep van de opvangbak en onderzoek de bak.
HOM-BOT will not charge due to infrared sensor error. Please try
smart diagnosis again after turning the main power switch on the
back of the HOM-BOT 'Off' then 'On' again. If the problem continues,
please contact LG Electronics customer care.
HOM-BOT will not charge due to ultrasonic sensor error. Voer de slimme diagnose opnieuw uit en als hetzelfde bericht wordt
HOM-BOT will not charge due to a problem with the cliff sensors on
bottom. Please wipe the sensors clean.
Please clean the camera sensor on bottom right side. Reinig de lens van de camerasensor rechtsonderaan.
Please clean the obstacle detecting sensor windows on the left and
right side of the HOM-BOT.
A problem has been found on the Gyro Sensor. Please try smart
diagnosis again after turning the main power switch on the back of
the HOM-BOT 'Off' then 'On' again. If the problem continues, please
contact LG Electronics customer care.
Please check for foreign material on the left wheel. Controleer het linkerwiel op vreemde voorwerpen.
Please check for foreign material on the right wheel. Controleer het rechterwiel op vreemde voorwerpen.
A problem has been found on the left wheel sensor. Please try smart
diagnosis again after turning the main power switch on the back of
the HOM-BOT 'Off' then 'On' again. If the problem continues, please
contact LG Electronics customer care.
A problem has been found on the right wheel sensor. Please try smart
diagnosis again after turning the main power switch on the back of
the HOM-BOT 'Off' then 'On' again. If the problem continues, please
contact LG Electronics customer care.
A problem has been found with the brush. Please check for any foreign
material.
A problem has been found in the suction motor. Please try smart
diagnosis again after turning the main power switch on the back of
the HOM-BOT 'Off' then 'On' again. If the problem continues, please
contact LG Electronics customer care.
A problem has been found in the acceleration sensor. Please try smart
diagnosis again after turning the main power switch on the back of
the HOM-BOT 'Off' then 'On' again. If the problem continues, please
contact LG Electronics customer care.
In order to listen to the smart diagnosis result again, please press the
charging button. To stop, please press the stop button.
Smart diagnosis mode will be turned off.
Smart Diagnosis mode will not operate with the mop plate attached.
Please try again after removing it.
Smart diagnosis has failed to complete its diagnostics. Please try
again after turning the main power switch on the back of the HOMBOT 'Off' then 'On' again.
Please check if the charging terminal is damaged or dirty. Reinig de onderkant van de machine en de contactpunten op het
Verwijder objecten binnen een straal van 1 m rond het oplaadstation,
en bewaar afstand totdat de diagnose is voltooid.
Verplaats de robotstofzuiger naar het oplaadstation om op te laden.
Probeer de Smart Diagnosis (slimme diagnose) nogmaals na het
opladen van de batterij.
Voer de slimme diagnose opnieuw uit en als hetzelfde bericht wordt
afgespeeld, neemt u contact op met het servicecentrum van LG
Electronics.
afgespeeld, neemt u contact op met het servicecentrum van LG
Electronics.
Reinig de drie hoogtesensoren aan de onderkant van de voorkant
van het apparaat.
Reinig de lens van de obstakelsensoren aan zowel de linker- als de
rechterkant.
Voer de slimme diagnose opnieuw uit en als hetzelfde bericht wordt
afgespeeld, neemt u contact op met het servicecentrum van LG
Electronics.
Voer de slimme diagnose opnieuw uit en als hetzelfde bericht wordt
afgespeeld, neemt u contact op met het servicecentrum van LG
Electronics.
Voer de slimme diagnose opnieuw uit en als hetzelfde bericht wordt
afgespeeld, neemt u contact op met het servicecentrum van LG
Electronics.
Controleer of er geen vreemde voorwerpen in de borstel vastzitten.
Voer de slimme diagnose opnieuw uit en als hetzelfde bericht wordt
afgespeeld, neemt u contact op met het servicecentrum van LG
Electronics.
Voer de slimme diagnose opnieuw uit en als hetzelfde bericht wordt
afgespeeld, neemt u contact op met het servicecentrum van LG
Electronics.
Als u de diagnose-uitkomst wilt herhalen, drukt u op de knop
'Home', of op de knop 'Stop/OK' om de diagnose te voltooien.
Voer de slimme diagnose opnieuw uit nadat u de dweilhouder hebt
verwijderd.
Zet de hoofdstroomschakelaar OFF (uit) en vervolgens weer ON
(aan) om de diagnose te hervatten. Raak de robot NIET aan of
verstoor de werking ervan niet totdat de diagnose is voltooid.
oplaadstation.
28
Page 75

DE STOFCONTAINER REINIGEN
Als de opvangbak vol is, kan de zuigkracht afnemen. Reinig de opvangbak voor en na elke reinigingssessie.
3FJOJHEFPQWBOHCBLNFUEFWPMHFOEFTFRVFOUJF
1. Open de opvangbakklep met behulp van de drukknop op de
robotstofzuiger.
2. Pak de hendel van de opvangbak en trek deze omhoog.
3. Om het fi lter en de spons van elkaar te scheiden, trekt u aan
de haak aan de linkerkant van de fi lterklep aan de achterkant
van de opvangbak.
※ Houd er rekening mee dat als u het fi lter eruit haalt, er stof
uit kan komen vallen.
※ Raadpleeg p. 30 voor het reinigen van het fi lter van de
opvangbak.
4. Til de klep op terwijl u op de scheidingaknop op de opvangbak
drukt.
NEDERLANDS
5. Leeg de opvangbak en reinig deze met een borstel of onder
stromend water.
6. Na de opvangbak met water te hebben gereinigd, droogt
u deze in een goed geventileerde ruimte uit het directe
zonlicht.
7. Terwijl u de gereinigde opvangbak weer in elkaar zet en weer
op zijn plaats zet, sluit u de klep en plaatst u de spons en het
HEPA-fi lter.
※ Raadpleeg p. 30 voor gedetailleerde montage-aanwijzingen
8. Zet de opvangbak in de robotstofzuiger en sluit de klep van
de opvangbak.
Wenk
• Gebruik van het apparaat zonder dat de filters in de opvangbak zijn geplaatst, kan een defect tot gevolg
hebben dat niet onder de garantie valt.
• Na het reinigen van de opvangbak, dient u het filter samen te stellen en in de opvangbak te plaatsen. Als
u begint met stofzuigen, zonder filters gemonteerd te hebben in de opvangbak of als de filterklep niet is
gemonteerd, wordt het volgende audiobericht afgespeeld: "Please check that the dust bin and filter are
properly installed.” (Controleer of de opvangbak en het filter correct zijn geïnstalleerd.)
• Zorg dat na het reinigen van de opvangbak altijd dat de klep van de
opvangbak weer op de juiste manier is geplaatst, zodat deze gemakkelijk
en nauwkeurig kan sluiten.
29
Page 76

HET FILTER VAN DE OPVANGBAK REINIGEN
Het fi lter van de opvangbak bestaat uit zowel een HEPA-fi lter als een sponsfi lter.
Reinig zowel het HEPA- als de sponsfi lters in de volgende volgorde.
1. Trek aan de haak aan de linkerkant van de HEPA-fi ltermodule
aan de achterkant van de opvangbak om de HEPA-fi lter en
de spons van elkaar te scheiden.
2. Reinig de fi jne stofdeeltjes op het HEPA-fi lter grondig, met
een stofzuiger of borstel.
※
Was het HEPA-fi lter NIET met water.
De zuigkracht neemt dan af.
3. Gebruik een borstel om het sponsfi lter te reinigen. Als u
water heeft gebruikt om het fi lter te reinigen, laat het dan
volledig in de schaduw voordat u het terugplaatst.
4. Monteer zowel het HEPA- als de sponsfi lters terug op de
fi lterklep in de volgende volgorde.
※
Plaats de rechthoekige locator op het HEPA-fi lter in de
daarvoor bestemde opening van het fi lterhuis.
※
Let erop dat u het HEPA- en de sponsfi lters niet verkeerd
op de fi lterklep monteert.
30
Wenk
• Om de prestaties van de robotstofzuiger te behouden, dient u het HEPA-filter minstens één keer per week te
reinigen, met een borstel of stofzuiger.
• Als u met de Robot Cleaner werkt, met de filterklep gemonteerd op opvangbak en zonder ingevoegde filters,
kan er stof binnen komen en een storing veroorzaken.
Page 77

DE BORSTEL REINIGEN
De roterende borstel, aan de onderkant van de robotstofzuiger, helpt om stof te verzamelen. Reinig de borstel in de volgende
volgorde.
※
Voordat u het motorlichaam omdraait, legt u een zachte doek op de vloer en verwijdert u de opvangbak.
Anders kan het motorlichaam krassen oplopen en komt er stof uit de opvangbak.
NEDERLANDS
Zet de hoofdstroomschakelaar OFF
(uit) voordat u gaat stofzuigen.
Zet de robotstofzuiger
ondersteboven op een zachte doek.
Duw de borstel helemaal in het
gele uitsteeksel.
Na te hebben gecontroleerd of er
vreemde voorwerpen zijn, drukt u de
bevestigingshaak naar beneden en
trek u deze omhoog om de borstelklep
eraf te halen.
Terwijl u aan de borstel duwt, tilt u jet
witte uitsteekseldeel om het van het
motorlichaam te scheiden.
Door gebruik te maken van een
reinigingsgereedschap, verwijdert
u haren en ander vuil en vreemde
voorwerpen uit de borstel en van de
2 kleinere jwieltjes.
Reinig de borstel met een stofzuiger
of een schaar.
Plaats de bevestigingshaak
(rechthoekige vorm)
de zijkant van de borstel in de
openingen en zorg dat de kleuren
overeenkomen.
Terwijl u de borstel in de richting
van de pijl duwt, plaatst u de
bevestigingshaak (rechthoekige vorm)
in de opening aan de andere kant.
Druk naar beneden en sluit de klep
totdat er een 'krak' geluid uit beide
kanten van de bevestigingshaak
komt.
※
Let erop dat bij het sluiten er geen
borstelharen van de zijborstel
onder de klep komen.
31
Page 78

DE SENSOR/CONTACTPUNTEN REINIGEN
Er zijn sensoren op de robotstofzuiger die obstakels, trappen en het oplaadstation
voor het opladen van de batterij detecteren. Om de prestaties van de robotstofzuiger
handhaven, reinigt u de sensoren en oplaadstation regelmatig als volgt:
1. Zet de stroomschakelaar uit aan de onderkant van de robotstofzuiger. Er kan
schade worden veroorzaakt door de robotstofzuiger te activeren als de stroom niet
is uitgezet.
2. Leg een zachte doek op de vloer, draai de robotstofzuiger om en leg deze op de
doek.
※
Controleer dat u de opvangbak verwijdert voordat u aan het motorhuis draait.
Anders kan er stof uit de opvangbak vallen.
3. Gebruik een gladde doek of borstel om stof af te nemen van elke hoogtesensor, camerasensoren en ultrasone sensoren en de
contactpunten zoals hieronder beschreven.
Bovenste
camerasensor
Ultrasone sensoren
Obstakeldetectie
sensorvenster Sensoren
van het oplaadstation
detecteren & sensoren
van de afstandsbediening
ontvangen
Hoogtedetectiesensor
Contactpunten
Onderste camerasensor
32
Wenk
Contactpunten
• Reinig de robotstofzuiger niet door er rechtstreeks met water, verdunner, benzeen of andere vloeistoffen op
te spuiten.
• Bel het servicecentrum als de sensor of de contactpunten beschadigd zijn. Schade aan sensor- en
contactpunten kan tot gevolg hebben dat er stroringen aan het apparaat optreden.
• Om de sensor/contactpunten te reinigen, moet u de stofzuigenborstel gebruiken.
Lens
Page 79

DE ZIJBORSTEL REINIGEN
Vreemde voorwerpen/materialen zoals haren kunnen zich gemakkelijk hechten aan
de zijborstel. Verwijder dergelijke materialen ten minste één keer per week.
Als grote hoeveelheden vreemde voorwerpen vast aan de borstel zitten, bestaat
het risico dat de borstels beschadigd kunnen raken.
Als de vloer ruw is of muren vaak worden gereinigd, kan de zijborstel verbogen of beschadigd raken. In dit geval gebruikt u de
volgende methode om de zijborstel recht te buigen.
1. De volgende procedure is nuttig om verbogen borstels te
herstellen.
2. Schakel de stroom uit door de hoofdschakelaar op de
achterkant van het apparaat uit te zetten.
3. Zet de robotstofzuiger op het uiteinde van een tafel om het
reinigen van de zijborstel makkelijker te laten verlopen. Zorg
dat de robotstofzuiger niet om kan vallen.
NEDERLANDS
4. Week de zijborstel in warm water.
5. Druk tien seconden lang op de zijborstel, zodat deze volledig
wordt ondergedompeld in het water.
6. Veeg de zijborstel langzaam af door het met uw hand te
omvatten terwijl u het uitknijpt.
7. Draai de zijborstel rond en herhaal de stappen 4-6 voor elke
sectie van de borstel.
8. Gebruik de zijborstel pas als het volledig is opgedroogd.
Onderhoud zijborstel
1. Verwijder de schroeven met behulp van een schroevendraaier
en verwijder de zijborstel uit het motorlichaam.
2. Verwijder daarna eventuele haren.
3. Monteer de zijborstel door het te vervangen aan de onderkant
van de robotstofzuiger, met de 'R' en 'L' markering van de
borstel die overeenkomen met de tegenhangers op de
robotstofzuiger.
33
Page 80

DE ULTRAMICROFIBER-DWEIL (OPTIE) REINIGEN
Om geurtjes te voorkomen, moet vuil en stof worden afgespoeld uit de dweil nadat deze bij het reinigen is gebruikt.
Volg deze aanwijzingen om de ultra microfi ber-dweil te wassen:
1. Haal de ultramicrovezel-dweil van de dweilhouder af.
2. Reinig deze zorgvuldig met warm water.
210 mm
3. Gebruik de dweil na het volledig in direct zonlicht te hebben gedroogd.
※
Als de dweil in een vochtige of natte staat wordt gebruikt, zal de
robotstofzuiger wellicht niet goed meer werken.
Wenk
34
• Om storingen aan het apparaat te voorkomen, gebruikt u alleen de bij de robotstofzuiger geleverde
ultramicrovezel-dweil
• Er kunnen extra microfiber-dweilen worden gekocht bij een servicecentrum van LG Electronics in de buurt..
Page 81

PROBLEMEN OPLOSSEN
Upon a voice message, "The wheels are not touching the fl oor. Please move HOM-BOT
onto fl at fl oor."
Er wordt een waarschuwing gegeven als een wiel het vloeroppervlak niet raakt om welke reden dan ook.
• Zit er een wiel vast in de voordeur, balkon, trap, enz?
Zet de robotstofzuiger op de vlakke vloer.
Upon a voice message, "Please remove any foreign material on the left/right wheel."
• Is het het wiel omwikkeld met draden of haren?
Leg een zachte doek op de vloer, draai de robotstofzuiger om en leg deze op de doek. Verwijder vreemde voorwerpen na het
wiel te hebben bekeken.
※ Controleer dat u de opvangbak verwijdert voordat u het motorhuis omkeert.
Anders kan er stof uit de opvangbak vallen.
NEDERLANDS
Upon a voice message, "HOM-BOT cannot continue cleaning. Please check the area
around it."
Er wordt een waarschuwing gegeven als de robotstofzuiger niet verder kan reinigen als gevolg van een ongunstige omstandigheid.
• Is de robotstofzuiger vastgelopen?
Na het verwijderen van het deel dat vastzit, plaatst u de robotstofzuiger op een vlakke vloer.
35
Page 82

PROBLEMEN OPLOSSEN
Upon a voice message, "Please check that the dust bin and fi lter are properly installed."
Er wordt een waarschuwing gegeven als er geen opvangbak of fi lterklep is geplaatst.
• Is de opvangbak geplaatst op de robotstofzuiger?
Open de de klep van de opvangbak en controleer dat de opvangbak goed is geplaatst.
Laat de klep van opvangbak NIET open.
• Controleer dat het fi lterklep is geplaatst op de opvangbak.
Upon a voice message, "Battery is low. Please move HOM-BOT onto the home station to
charge."
Wanneer de resterende hoeveelheid van de batterij bijna nihil is, wordt het stembericht afgespeeld: “Battery is low” (Batterij is
bijna leeg).
• Zorg dat de batterij van de robotstofzuiger wordt opgeladen door deze tegen het oplaadstation te zetten.
Wanneer de robotstofzuiger met succes is bevestigd aan het dockingstation, begint het opladen door de melodie af te spelen
die voor het starten van het opladen wordt gebruikt.
36
Page 83

PROBLEMEN OPLOSSEN
Upon a voice message, "Please remove any foreign material from the brush on the bottom of the HOM-BOT."
Er wordt een waarschuwing gegeven als vreemde voorwerpen de borstelrotatie beperken.
Leg een zachte doek op de vloer en zet de robotstofzuiger er ondersteboven op.
※
Voordat u het motorlichaam omdraait, verwijdert u de opvangbak.
Anders valt er stof uit de opvangbak.
• De borstel maakt een luid, abnormaal geluid.
Bevestig de juiste montage van de borstel door de scheidingsopening van de borstel te controleren
Haal de borstel uit robotstofzuiger en verwijder vreemde voorwerpen uit de borstel.
NEDERLANDS
• De borstel of zijborstel zit vast.
Verwijder eventuele vreemde voorwerpen, zoals kabels, draadjes of haren die in de zijborstel of de borstel zijn geraakt.
※
Voor een meer gedetailleerde beschrijving van dit proces, raadpleegt u de instructies op pagina's 31, 33.
37
Page 84

VOORDAT U BELT VOOR ONDERSTEUNING
Controleer alvorens de storing van de robotstofzuiger door te geven.
Probleem Oplossingen (verwijzingspagina)
De stroomvoorziening kan niet
worden aangezet.
De stroomvoorziening wordt
automatisch uitgeschakeld.
De robotstofzuiger wordt niet
opgeladen.
De zuigkracht wordt zwakker. Controleer dat geen vreemde voorwerpen de zuigopening blokkeren. (Pagina 31)
Er is meer lawaai. Controleer dat de opvangbak naar behoren is gemonteerd.
De robotstofzuiger wordt niet
geactiveerd.
De borstel draait niet. Reinig de borstel. (Pagina 31)
Bewegingen zijn abnormaal of de
bewegingsbaan is abnormaal.
Controleer dat de stroomschakelaar is aangezet. (Pagina 15)
Dit is geen storing. De robotstofzuiger beschikt over een eigen
energiebesparingsfunctie.
Als na het aanzetten er geen tien minuten lang geen stroom wordt gebruikt, wordt de
stroom automatisch weer uitgezet. (Pagina 17)
Controleer dat de hoofdstroomschakelaar is aangezet.
Verwijder objecten rondom het oplaadstation. (Pagina 15)
Controleer dat de stroomvoorziening is aangesloten op het oplaadstation.
(Pagina 14)
Veeg de contactpunten met een droge doek af.
Leeg de opvangbak. (Pagina 29)
Reinig het fi lter van de opvangbak. (Pagina 30)
Controleer dat de opvangbakfi lter naar behoren is gemonteerd. (Pagina 30)
Controleer dat vreemde voorwerpen in de borstel zijn geraakt. (Pagina 31)
Controleer dat de stroomschakelaar is aangezet. (Pagina 15)
Controleer dat de batterij is opgeladen. (Pagina 18)
Controleer dat de borstel op de juiste wijze is gemonteerd. (Pagina 31)
Veeg de sensor zorgvuldig met een zachte doek af. (Pagina 32)
Als de ultramicrovezel-dweil is bevestigd, controleert u of deze goed vastzit.
(Pagina 25)
Zet de stroomschakelaar uit en aan.
De robotstofzuiger kan niet
worden geactiveerd met de
afstandsbediening.
38
Vervang de batterijen van de afstandsbediening. (Pagina 12)
Controleer of de bediening binnen het dekkingsgebied van het motorlichaam werkt,
dat minder dan 3 m. bedraagt. (Pagina 12)
Controleer dat de hoofdstroomschakelaar is aangezet. (Pagina 15)
Page 85

APPARAATSPECIFICATIES
Artikel/Model LG robotstofzuiger
VR6260 Ser. / VR6270 Ser.
Externe afmetingen
340 mm × 340 mm × 89 mm
NEDERLANDS
Gewicht
Stroomverbruik
Batterij (volledig opladen)
Bewegingssnelheid
Verbruikstijd Ca. 100 minuten
Oplaadtijd 3 uur
Hoofdfuncties Stand Turbo
Spot Cleaning (gerichte reiniging van een
My Space Cleaning (mijn ruimte reinigen)
Cell by Cell cleaning (cel-voor-cel-reiniging)
350 mm/s (maximaal)
(op basis van algemene houten vloer)
De stand 'Learning' (leren)
Obstakeldetectie
Anti-valfunctie
Reiniging volgens schema
Foutweergave
Automatisch/handmatig opladen
Droge doek (reiniging)
Hoekreiniging
Audiobericht
Kaarttekening
bepaald oppervlak)
Stofzuigen herhalen
Zigzagreiniging
3 kg
18 W
DC 16.8 V
Navigatie
Artikel/Model Dockingstation (VR621)
Externe afmetingen
Classifi catie
Uitvoerspanning/-stroom
Stroomverbruik
Artikel/Model Batterij
Type Lithium Ion Polymeer batterij
Classifi catie
236 mm × 181 mm × 128 mm
230 V~ 50 Hz
DC 17.1 V / 1.1 A
23 W
DC 14.8 V / 1900 mAh
39
Page 86

VERWIJZINGSPUNTEN
Melding open-bron-software
Om de broncode te verkrijgen onder GPL, LGPL, MPL en andere open bronlicenties, die zijn opgenomen in dit apparaat, kunt u
terecht op http://opensource.lge.com.
In aanvulling op de broncode, zijn alle genoemde licentieomstandigheden, afwijzing van garantie en auteursrechtvermeldingen
beschikbaar voor download.
De batterij eruit halen en er weer inzetten
Zet de hoofdstroomschakelaar
aan links op de achterkant van de
robotstofzuiger.
Monteer de batterij in de
omgekeerde volgorde.
Plaats een zachte doek op de vloer,
verwijder de opvangbak, en draai de
robotstofzuiger om.
Haal de draad uit de batterij terwijl u
op de bevestigingshaak drukt.
Verwijder de schroef met behulp van
de schroevendraaier.
Verwijder de batterij uit het apparaat.
WAARSCHUWING
Wees voorzichtig bij brand, ontploffing, elektrische schok of storingen.
• Laad dit batterijpakket (“pakket” hierna) niet op met een ander type oplader dan oorspronkelijk voorzien met de oplader.
• Laat het pakket geen beschading oplopen door dit te laten vallen, in elkaar drukken, doorboren, snijden of door kortsluiting
van de externe contacten.
• Probeer in ieder geval niet om het pakket te demonteren. Wanneer het pakket beschadigd of defect is, brengt u het naar het
servicecentrum.
• Gebruik dit pakket niet in de buurt van een warmtebron en gooi het niet in vuur of water.
• Houd het pakket uit de buurt van een vochtige of natte omgeving wanneer de verpakking is opgeladen.
• Houd uit de buurt van kinderen, baby's of huisdieren.
40
Page 87

Verwijdering van oude batterijen/accu's
1. Indien dit doorkruiste verrijdbare afvalbaksymbool is bevestigs aan batterijen/accu 's van uw apparaat staat, betekent dat ze vallen onder
de Europese Richtlijn 2006/06/EC.
2. Dit symbool kan worden gecombineerd met chemische symbolen voor kwik (Hg), cadmium (Cd) of lood (Pb) als de batterij meer dan
0,0005% kwik, 0,002% cadmium of 0,004% lood. bevat
3. Alle batterijen/accu 's moeten gescheiden worden afgevoerd met het huishoudelijk afval naar speciale, door de overheid of plaatselijke
autoriteiten aangewezen inzamelingspunten.
4. Door de correcte verwijdering van uw oude batterijen/accu 's helpt u mogelijk schadelijke gevolgen voor het milieu, mens en dier te
voorkomen.
5. Voor meer informatie over het afvoeren van uw oude batterijen/accu 's kunt u contact opnemen met uw gemeente,
afvalverwerkingsbedrijf of de winkel waar u het apparaat heeft gekocht.
Verwijdering van uw oude apparaat
1. Indien dit doorkruiste verrijdbare afvalbaksymbool zich bevindt op een apparaat betekent dat het apparaat valt onder de Europese
Richtlijn 2002/96/EC.
2. Alle elektrische en elektronische apparaten moeten gescheiden worden afgevoerd met het huishoudelijk afval naar speciale, door de
overheid of plaatselijke autoriteiten aangewezen inzamelingspunten.
3. De correcte verwijdering van uw oude apparaat helpt negatieve gevolgen voor het milieu en de menselijke gezondheid te voorkomen.
4. Voor meer informatie over het afvoeren van uw oude apparaat, kun u contact opnemen met uw gemeente, afvalverwerkingsbedrijf of de
winkel waar u het apparaat heeft gekocht.
NEDERLANDS
41
Page 88

Garantiebewijs
Aanbieding van een garantie 24 maanden op dit apparaat
Tijdens de 24-maanden garantie periode (Batterij van het stofzuigen robot: 12 maanden)
zullen wij de reparatie van uw apparaat zonder kosten voor u uitvoeren of gratis onderdelen
aan uw dealer ter beschikking stellen, als dit apparaat defect is als gevolg van fabricage- of
materiaalfouten. L'acheteur assume les frais de livraison et d'emballage. Wij zijn niet
aansprakelijk voor schade als gevolg van force majeure of tijdens het transport
opgelopen schade.
De koper neemt de verzend-en verpakkingskosten voor rekening.
Uw garantievoorwaarden aan de achterkant zijn ook van toepassing!
Type inrichting: Naam van de koper:
Aankoopdatum:
Volgnummer:
Garantievoorwaarden van de stofzuiger
De garantieperiode begint op de datum
van aankoop en geldt voor 24 maanden.
Begin van de garantieperiode is aangetoond,
als de koper de aankoopbon samen met de
garantiekaart, ingevuld en ondertekend door
de verkoper, overlegt. Het serienummer van
het apparaat moet overeenkomen met het
ingevoerde nummer op de garantiekaart.
Tijdens de garantieperiode van 24
maanden, corrigeren we eventuele
gebreken zonder kosten voor u, indien
kan worden bewezen dat deze worden
toegeschreven aan fabricage- of
materiaalfouten.
Schade als gevolg van onjuist gebruik, nietnaleving van instructies voor gebruik en normale
slijtage zijn niet gedekt door deze garantie.
Ook dekt de garantie geen slijtage-onderdelen
of breekbare delen (zoals kijkglaasjes en
gloeilampen). De koper is verantwoordelijk voor
eventuele schade tijdens het transport alsmede
de verzendings- en verpakkingskosten.
Stempel en handtekening van de dealer
We beslissen om reparaties uit te voeren,
onderdelen om te ruilen of te vervangen.
Ingewisseld eof vervangen onderdelen
blijven ons eigendom. De oorspronkelijke
garantieperiode wordt niet verlengd als
er een koelkast wordt gerepareerd of een
bepaalde delen worden vervangen.
elektronica De garantie wordt
vernietigd, indien een persoon ingrijpt in het
apparaat hetgeen niet door LG Electronics is
geautoriseerd, indien het apparaat wordt
gebruikt voor commerciële doeleinden.
Bewaar altijd de originele verpakking,
dus als het apparaat onderhoud vereist,
het kan worden vervoerd zonder het te
beschadigen.
Als een reparatie onder deze garantie
valt, moet u altijd contact opnemen met uw
dealer of geautoriseerd servicecentrum.
Verdere aanspraken zijn uitgesloten.
Indien delen van deze bepalingen ongeldig
zijn, zijn deze van toepassing n de zin van
de tekst. De geldigheid van de overige
bepalingen wordt niet beïnvloed.
Page 89

GUIDE D'UTILISATION
FRANÇAIS
ASPIRATEUR ROBOT
Avant toute utilisation, lisez attentivement la rubrique "Précautions
relatives à la sécurité" pour le bon fonctionnement du produit.
Après avoir lu le manuel d'utilisation, conservez-le dans un endroit
facilement accessible à tout moment.
VR6260 Ser.
VR6270 Ser.
P/No.: MFL67680030
www.lg.com
Page 90

FONCTIONNALITES DE L’ASPIRATEUR ROBOT
Nettoyage des coins
Grâce à sa nouvelle conception adaptée aux angles et coins, l'aspirateur robot affi che des
performances de nettoyage incroyables.
Conduite intelligente
L'aspirateur robot peut mémoriser son environnement de nettoyage grâce à l'option de
fonctionnement intelligent qui lui permet d'optimiser le nettoyage.
Fonction Turbo
En mode « Turbo », l'aspirateur robot est encore plus puissant et effi cace.
Le mode « Turbo » s'active automatiquement sur les tapis pour une plus grande effi cacité de
l'aspirateur robot. En mode « Turbo », l'aspirateur robot est encore plus puissant et effi cace.
Zigzag
Support pour lingette microfi bre
Le support s'enlève facilement pour accéder à la lingette microfi bre : plus besoin de retourner
l'appareil !
Nettoyage de zones spécifi ques
Lorsqu'il est programmé pour nettoyer une zone particulière, l'aspirateur robot nettoie
rapidement la zone désignée.
Répétition du nettoyage
L'aspirateur robot poursuit le nettoyage jusqu'à épuisement de la batterie.
Localisation intelligente
Lorsque l'aspirateur robot est déplacé pendant le nettoyage, il recherche automatiquement
sa position dans la pièce, retourne à l'endroit qu'il vient de quitter et poursuit le nettoyage.
Page 91

TABLE DES MATIERES
1
AVANT UTILISATION
2~5
6
7
8
9~10
11
12
13
Précautions relatives à la sécurité
Constitution du produit
Nom de chaque élément
Nom de chaque section
Fonction associée à chaque bouton
Informations d'indication d'état
Mise en service de l’aspirateur robot
Principales étapes de fonctionnement
2
MODE D'UTILISATION
14
15
16
17~18
19~20
21~22
23
24
25
26
27~28
Méthode d'installation de la base de chargement
Mise sous/hors tension
Démarrage et arrêt du nettoyage
Méthode de chargement de la batterie
Mode de nettoyage
Mode de nettoyage manuel
Réglage de l’heure
Programmation du nettoyage
Utilisation de la lingette microfi bre(en option)
Fonction de recherche de zones à nettoyer
Fonction auto-diagnostic
4
INFORMATIONS SUPPLÉMENTAIRES
35~37
38
Mesures correctives face à des anomalies de
l’aspirateur robot
Confi rmation des éléments avant de signaler une
panne
5
ÉLÉMENTS DE RÉFÉRENCE
39
40
Spécifi cations du produit
Note sur les logiciels Open source
FRANÇAIS
3
MANIPULATION APRÈS USAGE
29
30
31
32
33
34
Nettoyage du bac à poussière
Nettoyage du fi ltre du réceptacle à poussière
Nettoyage des brosses
Manipulation des capteurs / de la borne de
chargement
Manipulation des brosses latérales
Nettoyage de la lingette microfi bre(en option)
Page 92

PRÉCAUTIONS RELATIVES À LA SÉCURITÉ
Les précautions suivantes visent à prévenir tout danger ou dommage imprévisible grâce à un usage sécurisé et approprié du
produit.
Contenu des avertissements
Après avoir lu ce manuel, conservez-le dans un endroit facilement accessible à tout moment.
Ce symbole a pour objet d'éveiller votre attention sur certains éléments et manipulations et le
danger que cela pourrait causer. Pour éviter tout risque, lisez ce qui suit soigneusement et suivez les
instructions.
AVERTISSEMENT
ATTENTION
Le non respect des instructions peut provoquer des blessures graves, voire la mort de l'utilisateur.
Le non respect des instructions peut provoquer des blessures ou des dommages matériels.
AVERTISSEMENT
1. Cet appareil n'est pas prévu pour être utilisé par des personnes
(y compris les enfants) dont les capacités physiques, sensorielles
ou mentales sont réduites, sauf si elles ont pu bénéficier, par
l'intermédiaire d'une personne responsable de leur sécurité,
d'une surveillance ou d'instructions préalables.
2. Il est important de surveiller les enfants afin qu'ils ne jouent pas
avec l'appareil.
3. Si le cordon d'alimentation est endommagé, il doit être remplacé
uniquement pas un agent de service de LG Electronics pour
éviter tout risque.
4. Cet appareil peut être utilisé par des enfants de 8 ans et plus.
Les personnes aux capacités physiques, sensorielles ou mentales
réduites ne peuvent utiliser l'appareil que sous sourveillance, ou
si elles ont reçu des instructions préalables pour une utilisation
sécurisée de l'appareil, en ayant bien compris les risques.
Les enfants ne doivent pas jouer avec l'appareil.
Le nettoyage et l'entretien de doivent pas être réalisés par des
enfants non surveillés.
Pour votre sécurité, ne démontez pas
l’aspirateur robot ni sa batterie. En cas de
problème, confi ez l’appareil à une Station
Technique Agréée.
Ceci pourrait être à l'origine d'un incendie
ou d'une panne.
2
N'utilisez jamais la batterie et la base de
chargement pour un autre produit que
l’aspirateur robot.
Ceci pourrait être à l'origine d'un incendie
ou d'une panne.
Page 93

PRÉCAUTIONS RELATIVES À LA SÉCURITÉ
Gasoline
Detergent
AVERTISSEMENT
Veillez à ce que le cordon d'alimentation
de la base de chargement ne soit pas
compressé par un objet lourd ou en contact
avec un matériau aiguisé ou pointu.
Ceci pourrait être à l'origine d'un incendie
ou d'une panne. Si le cordon d'alimentation
est abîmé ou cassé, faites-le changer au
SAV.
Ne placez pas la base de chargement et
l’aspirateur robot à proximité d'un élément
de chauffage.
Vous risqueriez de voir une déformation
de la coque extérieure ou de provoquer
un incendie ou une défaillance suite à une
collision.
Ne pliez pas le cordon d'alimentation en
forçant dessus. N'utilisez pas le cordon
d'alimentation s'il a été endommagé ou
détendu (étiré).
Ceci pourrait être à l'origine d'un incendie
ou d'une panne.
Ne touchez pas la fi che du cordon
d'alimentation si vos mains sont mouillées.
Ceci pourrait être à l'origine d'une décharge
électrique (électrocution).
N'utilisez pas l’aspirateur robot si des
bougies ou des objets fragiles ont été
disposés au sol.
Ceci pourrait être à l'origine d'un incendie
ou d'une panne.
Utilisez toujours une prise murale de plus
de 5 A et indépendante.
Si plusieurs appareils sont branchés en
même temps sur une même prise, vous
vous exposez à un risque d'incendie dû à la
chaleur générée sur la prise.
Lorsque vous débranchez l'appareil du
secteur, faites-le en tirant sur la fi che
située au bout du cordon. Lorsque vous
débranchez la fi che, veillez à ne pas
toucher les broches avec vos doigts.
Ceci pourrait être à l'origine d'une décharge
électrique (électrocution).
N'utilisez pas l’aspirateur robot alors qu'un
enfant ou un objet est dessus. N'utilisez
pas l’aspirateur robot alors qu'un objet est
accroché dessus.
Ceci pourrait être à l'origine de blessures et
de dommages à l'appareil.
FRANÇAIS
Ne vaporisez ni répandez de produit
infl ammable, de détergent ou de l'eau
autour de l’aspirateur robot.
Ceci pourrait être à l'origine d'un incendie
ou d'une panne.
* Matériau infl ammable : essence, diluant,
etc.
* Détergent : détergent, articles de bain,
etc.
Éloignez vos mains, vos pieds ou toute
autre partie du corps des brosses et roues
pendant le fonctionnement de l’aspirateur
robot.
Ceci pourrait être à l'origine de blessures et
de dommages de l'appareil.
Ne faites pas fonctionner l’aspirateur
robot sur du mobilier étroit et élevé
comme une armoire, un réfrigérateur, un
bureau, une table, etc.
Ceci pourrait être à l'origine de blessures et
de défaillances de l'appareil.
Ne pas activer l'appareil sur un sol incliné
à plus de 10 %.
Cela risque d'entraver le fonctionnement de
l'appareil.
Coupez immédiatement l'alimentation
en cas de son anormal, d'odeur de fumée
provenant de l’aspirateur robot.
Ceci pourrait être à l'origine d'un incendie
ou d'une panne.
Ne faites pas fonctionner l’aspirateur
robot dans une pièce où un bébé dort.
Ne laissez pas les enfants s'accrocher à
l'aspirateur robot.
Ceci pourrait être à l'origine de blessures et
de dommages à l'appareil.
3
Page 94

PRÉCAUTIONS RELATIVES À LA SÉCURITÉ
ATTENTION
Videz fréquemment le réceptacle à
poussière et maintenez-le propre.
La poussière collectée dans le réceptacle
à poussière peut provoquer des allergies
aux personnes sensibles et des insectes
nuisibles peuvent s'y être logés.
Utilisez l’aspirateur robot à l'intérieur des
maisons et appartements uniquement.
À défaut, cela pourrait être à l'origine de
défaillances de l'appareil.
Fermez le couvercle du bac à poussière sur
l'unité principale avant de commencer le
nettoyage.
Si le couvercle n'est pas fermé, il peut
occasionner des blessures ou endommager
le produit.
Ne pas utiliser le l'aspirateur robot
près d'une barrière, d'un escalier, ou de
n'importe quel autre endroit dangereux.
Faire cela peut exposer l'utilisateur à des
risques de blessures ou le produit peut être
endommagé.
Ne laissez pas tomber l'appareil ou ne lui
infl igez des coups violents.
Ceci pourrait être à l'origine de blessures et
de défaillances de l'appareil.
Ne laissez pas le produit dans des lieux
à température basse (inférieure à –5 °C)
pendant un long moment.
Ceci pourrait être à l'origine d'une panne de
l'appareil.
Retirez tous les câbles et les longs fi ls du
sol.
Les câbles et les longs fi ls peuvent se
coincer dans les roues de l'aspirateur robot
et ainsi entraîner un dysfonctionnement ou
débrancher le cordon.
Veillez à ce que l'appareil ne soit pas posé
sur une table ou un bureau alors quil est
allumé.
Cela peut entraîner des blessures ou
détériorer l'appareil.
Dans certains cas exceptionnels, la brosse
de l’aspirateur robot peut endommager la
moquette. Si c'est le cas, arrêtez l'appareil.
Si les fi ls à l'extrémité des tapis sont longs,
ceux-ci peuvent être endommagés.
Ne laissez jamais le le corps de l’aspirateur
ni la base de chargement entrer en contact
avec un objet métallique.
Ceci pourrait être à l'origine d'une panne de
l'appareil.
Ne versez pas d'eau, de détergent, etc.
dans l’aspirateur robot.
Ceci pourrait être à l'origine d'une panne
de l'appareil. Si de l'eau ou un autre liquide
pénètre dans l'appareil, mettez l'appareil
hors tension et contactez le SAV.
Évitez que l’aspirateur robot n'aspire des
liquides, des lames, des punaises, du petit
bois, etc.
Ceci pourrait être à l'origine d'une panne de
l'appareil.
N’introduisez aucune bague, ni tige, dans
les capteurs et détecteurs de l’aspirateur
robot.
Ceci pourrait être à l'origine d'une panne de
l'appareil.
N'utilisez pas l’aspirateur robot lorsque le
réceptacle à poussière est plein.
Ceci pourrait être à l'origine d'une panne de
l'appareil.
4
Page 95

ATTENTION
PRÉCAUTIONS RELATIVES À LA SÉCURITÉ
Si le sol est mouillé ou humide, essuyez le
sol avant d'utiliser le produit.
Ceci pourrait être à l'origine d'une panne de
l'appareil.
En fi xant la lingette, n'obturez pas le
capteur de la caméra situé en bas de
l'appareil.
Cela empêcherait le produit de fonctionner
correctement.
Pour économiser de l'énergie, éteignez le
commutateur lorsque vous n'utilisez pas
l'appareil et allumez-le pour le nettoyage
et le chargement.
Pendant son fonctionnement, l’aspirateur
robot risque de percuter des meubles
tels que les pieds de chaises, de tables et
autres meubles fi ns et longs.
Pour un nettoyage plus rapide et un
meilleur résultat, otez les chaises et placezles en hauteur sur la table.
Avant de commencer le nettoyage,
assurez-vous que les extérieurs de votre
domicile soient au moins à 3 cm de
hauteur du sol.
Si le seuil de la porte est suffi samment
bas, l'aspirateur robot peut aller tout seul
jusqu'à la porte d'entrée.
FRANÇAIS
Tip
Vérifiez les éléments suivants avant usage.
• Videz le bac à poussière lorsqu’il est plein.
• Retirez câbles et long fils situés au sol.
• Retirez toute humidité du sol avant le nettoyage.
• Fermez le couvercle du bac à poussière avant de nettoyer.
• Retirez les objets fragiles et inutiles de la pièce à nettoyer. Notamment, retirez systématiquement tous les objets
fragiles et autres objets situés sur le sol.
• Vérifiez que la puissance de la batterie est suffisante, sinon effectuez le chargement.
• Fermez la porte des pièces que vous ne souhaitez pas nettoyer.
Durant le nettoyage, l'aspirateur robot se déplacera partout où il lui sera possible de se déplacer.
• N'utilisez pas ce produit dans une pièce où un bébé dort seul. Le bébé risquerait d'être blessé.
• Retirez du sol les serviettes, torchons, tapis et tout tissu peu épais qui risqueraient d'être pris par la brosse.
• Lors d’un nettoyage sur un tapis de plus de 20 mm d’ épaisseur ou avec franges, il est conseillé de bien le ranger
pour éviter qu’il ne s’abîme.
• Veiller à fermer les portes d'accès aux balcons. Les roues risquent de se bloquer pendant le nettoyage.
5
Page 96

CONSTITUTION DU PRODUIT
Aspirateur robot
Télécommande
Les dessins peuvent être différents des objets réels.
Outil de nettoyage
Capteurs de
nettoyage
Filtre de
nettoyage
Brosse
(sur le couvercle du bac à poussière)
Filtre (Hepa11)
(en option)
GUIDE RAPIDE
ASPIRATEUR ROBOT
Ce guide décrit brièvement comment utiliser l’aspirateur robot.
Pour plus de détails, veuillez consulter le manuel de l’utilisateur.
Veuillez lire attentivement ce qui suit avant d ‘installer et de mettre en service le produit.
Guide de prise en
main rapide
Support lingette microfi bre
(en option)
Base de chargement
GUIDE D'UTILISATION
ASPIRATEUR ROBOT
Avant toute utilisation, lisez attentivement la rubrique "Précautions
relatives à la sécurité" pour le bon fonctionnement du produit.
Après avoir lu le manuel d'utilisation, conservez-le dans un endroit
facilement accessible à tout moment.
www.lg.com
Manuel d'utilisation
Lingettes microfi bre
(2 pieces) (en option)
www.lg.com
Piles pour la télécommande
(2 piles de type AAA)
Brosse latérale
(nombre : 2) (en option)
Brosse principale
(en option)
6
Page 97

Vue de dessus
Vue de face
NOM DE CHAQUE ELEMENT
Capteur caméra supérieure
Capot du réceptacle à poussière
FRANÇAIS
Bouton de manipulation
Bouton du capot du réceptacle à poussière
Capteurs ultrason
Fenêtre des capteurs de détection d'obstacles
Vue arrière
Vue du dessous
Commutateur Marche/Arrêt
Ventilation
Capteurs de détection de dénivelé
Brosses auxiliaires
Base de chargement
Brosse principale
Roues
Batterie
Capteur caméra inférieure
Les dessins peuvent être différents des objets réels.
7
Page 98

NOM DE CHAQUE SECTION
Base de chargement
Support de la télécommande
Base de chargement
Commutateur Marche/Arrêt
Bac à poussière
Brosse de nettoyage
Capot du réceptacle à poussière
Capot du port
d'aspiration
Bouton d'ouverture capot
du Bac à poussière
Rainure de fi xation du cordon d'alimentation
Poignée du bac à poussière
Filtre éponge
Filtre HEPA
Les dessins peuvent être différents des objets réels.
8
Couvercle du fi ltre
Page 99

FONCTION ASSOCIÉE À CHAQUE BOUTON
FRANÇAIS
TURBO
START/STOP
(Démarrer/Arrêter)
MODE
HOME
(Base)
VERROUILLAGE
activé / désactivé
• Si le turbo est enclenché, le mode turbo se lancera par reconnaissance vocale.
• Si le bouton est enclenché en mode turbo, la commande sera annulée.
• Utilisé pour mettre l'aspirateur robot sous tension, commencer ou terminer le nettoyage.
• Si le bouton est enclenché et que l'appareil est sous tension, celui-ci démarrera.
• Si le bouton est enclenché pendant le nettoyage, il arrêtera le nettoyage.
• Si le bouton est maintenu appuyé pendant environ 2 secondes et que l'aspirateur robot est sous
tension, l'alimentation se coupera.
• Si le bouton est enclenché en position 'Mode Intelligent" le diagnostic s'arrêtera.
• Utilisé pour modifier le paramétrage du mode "nettoyage".
• Si l'aspirateur robot est sur la base de chargement, la fonction Spirale n'est pas disponible.
• Le mode « My space clean » (nettoyage de mon espace) peut uniquement être sélectionné avec la
télécommande (sous réserve que l'appareil ne soit pas en charge).
• Utilisée pour recharger le Robot en le faisant retourner sur sa base.
• Si le nettoyage est terminé où que la batterie n'est plus suffisamment chargée, le robot reviendra
de lui-même sur sa base afin de se recharger.
• Appuyer sur les boutons Turbo et mode pendant 3 secondes minimum pour activer ou désactiver le
bouton de verrouillage.
• Si le verrouillage est activé, appuyer sur ce bouton le fera clignoter, et vous aurez le message vocal :
"Les touches sont verrouillées."
9
Page 100

FONCTION ASSOCIÉE À CHAQUE BOUTON
START (Démarrer)
Appuyer sur ce bouton pour
démarrer le nettoyage. (p16)
Mode
Changer le mode de nettoyage.
(p19)
De direction
Ce bouton permet de passer en
mode manuel et de sélectionner
une zone en mode "Nettoyage de
Mon Espace".
Repeat (Répétition)
Ce bouton permet d'activer ou
de désactiver le mode "Répéter le
nettoyage". (p22)
Schedule (Programmation)
Utilisé pour commencer le nettoyage
à une heure donnée.
Presser ce bouton pendant un
minimum de 3 secondes annulera le
nettoyage programmé.
※
Les options « Programmer/annuler
le nettoyage » ne sont disponibles
qu'en mode charge. (p24)
Clock (Horloge)
Utilisé pour régler l'heure sur le
Robot. (p23)
Home (Base)
Utilisée pour recharger le Robot en le
faisant retourner à sa base. (p17)
Turbo
Utilisé pour activer ou désactiver le mode
Turbo. (p22)
Stop (Arrêter)/OK
Appuyer sur ce bouton arrêtera le Robot,
ou confi rmera un nettoyage programmé ou
le réglage de l'heure.
My Space (Mon Espace)
Utilisé pour mettre le Robot en mode
"Nettoyage de Mon Espace". (p20)
Mute (Silencieux)
Utilisé pour activer ou désactiver le mode
silencieux. (p11)
Diagnosis (Diagnostic)
Utilisé pour lancer un Diagnostic Intelligent.
Disponible uniquement lorsque le Robot
est en fonction. (p27)
10
Tip
• La télécommande ne permet pas d'allumer l'appareil.
• Lorsque l'aspirateur robot est hors tension, la télécommandera ne fonctionnera pas.
• Pour mettre l'aspirateur robot sur / hors tension, utilisez le bouton START/STOP situé sur la partie supérieure du
robot.
• Utiliser le Sélecteur de Mode, "Nettoyage de mon espace" ou "Réglage de l'horloge" après avoir arrêté l'appareil.
 Loading...