

Page 1

USER GUIDE
GUÍA DEL
USUARIO
USER
GUIDE
This booklet is printed with soy ink.
This booklet is made from 60% post-consumer recycled paper.
SAMPLE(1.0) H
Page 2

Copyright©2010 LG Electronics, Inc. All rights reserved.
LG and the LG logo are registered trademarks of LG Group
and its related entities. VORTEX
TM
is a trademark of Verizon
Wireless. All other trademarks are the property of their
respective owners.
Page 3

Important Health Information and Safety Precautions
When using this product, the safety precautions below must be
taken to avoid possible legal liabilities and damages.
Retain and follow all product safety and operating instructions.
Observe all warnings in the product operating instructions. To
reduce the risk of bodily injury, electric shock, fire, and damage to
the equipment, observe the following precautions.
1
ELECTRICAL SAFETY
This product is intended for use when supplied with power from the
designated battery or power supply unit. Other usage may be
dangerous and will invalidate any approval given to this product.
SAFETY PRECAUTIONS FOR PROPER GROUNDING
INSTALLATION
CAUTION: Connecting to improperly grounded equipment can result in an
electric shock to your device. This product is equipped with a USB Cable
for connecting to a desktop or notebook computer. Be sure your
computer is properly grounded (earthed) before connecting this product
to the computer.The power supply cord of a desktop or notebook
computer has an equipment-grounding conductor and a grounding plug.
The plug must be plugged into an appropriate outlet which is properly
installed and grounded in accordance with all local codes and ordinances.
SAFETY PRECAUTIONS FOR POWER SUPPLY UNIT
Use the correct external power source
A product should be operated only from the type of power source
indicated on the electrical ratings label. If you are not sure of the
type of power source required, consult your authorized service
provider or local power company. For a product that operates from
battery power or other sources, refer to the operating instructions
that are included with the product.
Handle battery packs carefully
This product contains a Li-ion battery. There is a risk of fire and
burns if the battery pack is handled improperly. Do not attempt to
open or service the battery pack. Do not disassemble, crush,
Page 4

Important Health Information and Safety Precautions
2
puncture, short external contacts or circuits, dispose of in fire or
water, or expose a battery pack to temperatures higher than 60°C
(140°F).
WARNING: Danger of explosion if battery is incorrectly replaced. To
reduce risk of fire or burns, do not disassemble, crush, puncture,
short external contacts, expose to temperature above 60°C (140°F),
or dispose of in fire or water. Replace only with specified batteries.
Recycle or dispose of used batteries according to the local
regulations or reference guide supplied with your product.
Take extra precautions
●
Keep the battery or device dry and away from water or any liquid
as it may cause a short circuit.
●
Keep metal objects away so they don’t come in contact with the
battery or its connectors as it may lead to short circuit during
operation.
●
The phone should be only connected to products that bear the
USB-IF logo or have completed the USB-IF compliance program.
●
Do not use a battery that appears damaged, deformed, or
discolored, or one that has any rust on its casing, overheats, or
emits a foul odor.
●
Always keep the battery out of the reach of babies and small
children, to avoid swallowing of the battery. Consult a doctor
immediately if the battery is swallowed.
●
Only use the battery with a charging system that has been
qualified with the system per this standard, IEEE-Std-1725-200x.
Use of an unqualified battery or charger may present a risk of fire,
explosion, leakage or other hazard.
●
Replace the battery only with another battery that has been
qualified with the system per this standard, IEEE-Std-1725-200x.
Use of an unqualified battery may present a risk of fire, explosion,
Page 5

Important Health Information and Safety Precautions
leakage or other hazard.
●
Avoid dropping the phone or battery. If the phone or battery is
dropped, especially on a hard surface, and the user suspects
damage, take it to a service center for inspection.
●
If the battery leaks:
Do not allow the leaking fluid to come in contact with skin or
clothing. If contact occurs, flush the affected area immediately
with clean water and seek medical advice.
Do not allow the leaking fluid to come in contact with eyes. If
contact occurs, DO NOT rub; rinse with clean water immediately
and seek medical advice.
Take extra precautions to keep a leaking battery away from fire as
there is a danger of ignition or explosion.
SAFETY PRECAUTIONS FOR DIRECT SUNLIGHT
Keep this product away from excessive moisture and extreme
temperatures. Do not leave the product or its battery inside a
vehicle or in places where the temperature may exceed 140°F
(60°C), such as on a car dashboard, window sill, or behind glass that
is exposed to direct sunlight or strong ultraviolet light for extended
periods of time. This may damage the product, overheat the battery,
or pose a risk to the vehicle.
PREVENTION OF HEARING LOSS
CAUTION: Permanent hearing loss may occur if earphones or
headphones are used at high volume for prolonged periods of time.
3
SAFETY IN AIRCRAFT
Due to the possible interference caused by this product to an
aircraft’s navigation system and its communications network, using
this device’s phone function on board an airplane is against the law
in most countries. If you want to use this device when its use is
restricted on board an aircraft, remember to switch to Airplane
Mode which turns off RF functions that could cause interference.
Page 6

Important Health Information and Safety Precautions
4
ENVIRONMENT RESTRICTIONS
Do not use this product in gas stations, fuel depots, chemical plants or
where blasting operations are in progress, or in potentially explosive
atmospheres such as fueling areas, fuel storehouses, below deck on
boats, chemical plants, fuel or chemical transfer or storage facilities,
and areas where the air contains chemicals or particles, such as grain,
dust, or metal powders. Please be aware that sparks in such areas
could cause an explosion or fire resulting in bodily injury or even death.
EXPLOSIVE ATMOSPHERES
When in any area with a potentially explosive atmosphere or where
flammable materials exist, the product should be turned off and the
user should obey all signs and instructions. Sparks in such areas could
cause an explosion or fire resulting in bodily injury or even death.
Users are advised not to use the equipment at refueling points such
as service or gas stations, and are reminded of the need to observe
restrictions on the use of radio equipment in fuel depots, chemical
plants, or where blasting operations are in progress. Areas with a
potentially explosive atmosphere are often, but not always, clearly
marked. These include fueling areas, below deck on boats, fuel or
chemical transfer or storage facilities, and areas where the air
contains chemicals or particles, such as grain, dust, or metal powders.
ROAD SAFETY
Vehicle drivers in motion are not permitted to use communication
services with handheld devices, except in the case of emergency.
In some countries, using hands-free devices as an alternative is
allowed.
SAFETY PRECAUTIONS FOR RF EXPOSURE
●
Avoid using your phone near metal structures (for example, the
steel frame of a building).
●
Avoid using your phone near strong electromagnetic sources,
such as microwave ovens, sound speakers, TV and radio.
Page 7

Important Health Information and Safety Precautions
●
Use only original manufacturer-approved accessories, or
accessories that do not contain any metal.
●
Use of non-original manufacturer-approved accessories may
violate your local RF exposure guidelines and should be avoided.
INTERFERENCE WITH MEDICAL EQUIPMENT FUNCTIONS
This product may cause medical equipment to malfunction. The use
of this device is prohibited in most hospitals and medical clinics.
If you use any personal medical device(s), consult the manufacturer
of your device(s) to determine if the device(s) are adequately
shielded from external RF energy. Your physician may be able to
assist you in obtaining this information.
Turn your phone OFF in health care facilities when any regulations
posted in these areas instruct you to do so.
Hospitals or health care facilities may be using equipment that could
be sensitive to external RF energy.
HEARING AIDS
Some digital wireless phones may interfere with some hearing aids. In
the event of such interference, you may want to consult your service
provider, or call the customer service line to discuss alternatives.
NON-IONIZING RADIATION
Your device has an internal antenna. This product should be
operated in its normal-use position to ensure the radiative
performance and safety from interference. As with other mobile
radio transmitting equipment, users are advised that for satisfactory
operation of the equipment and for personal safety, it is
recommended that no part of the human body be allowed to come
too close to the antenna during operation of the equipment.
Use only the supplied integral antenna. Use of unauthorized or
modified antennas may impair call quality and damage the phone,
causing loss of performance and SAR levels exceeding the
recommended limits as well as result in non-compliance with local
5
Page 8

Important Health Information and Safety Precautions
6
regulatory requirements in your country.
To assure optimal phone performance and ensure human exposure
to RF energy is within the guidelines set forth in the relevant
standards, always use your device only in its normal-use position.
Contact with the antenna area may impair call quality and cause
your device to operate at a higher power level than needed.
Avoiding contact with the antenna area when the phone is IN USE
optimizes the antenna performance and the battery life.
HAC
This phone has been tested and rated for use with hearing aids for
some of the wireless technologies that it uses.
However, there may be some newer wireless technologies used in
this phone that have not been tested yet for use with hearing aids.
It is important to try the different features of this phone thoroughly
and in different locations, using your hearing aid or cochlear implant,
to determine if you hear any interfering noise.
Consult your service provider or the manufacturer of this phone for
information on hearing aid compatibility.
If you have questions about return or exchange policies, consult
your service provider or phone retailer.
Warning
In Android, applications do not work directly with resolution that
some of the applications from Android Market would support only
the certain resolution. Please be advised that some of the
downloaded applications from the Adroid Market would not be
available on your phone due to LCD resolution difference. In
addition, please be aware that your phone could get into reset
mode by downloading bugged applications.
The UI of Google GMS application can vary depends on its version.
Page 9

Table of Contents
Important Health Information and Safety Precautions . . . .1
Important Customer Information . . . . . . . . . . . . . . . . . . . .14
Technical Details . . . . . . . . . . . . . . . . . . . . . . . . . . . . . . . . . .15
The Basics . . . . . . . . . . . . . . . . . . . . . . . . . . . . . . . . . . . . . . .19
Phone Overview. . . . . . . . . . . . . . . . . . . . . . . . . . . . . . . . . . . . . . . . . . . . . 19
Installing the Battery and microSD Card . . . . . . . . . . . . . . . . . . . . . . . . 22
Charging the Phone . . . . . . . . . . . . . . . . . . . . . . . . . . . . . . . . . . . . . . . . . 24
Optimizing Battery Life . . . . . . . . . . . . . . . . . . . . . . . . . . . . . . . . . . . . . . 26
Turning the Phone On and Off . . . . . . . . . . . . . . . . . . . . . . . . . . . . . . . . 28
SETTING UP YOUR DEVICE . . . . . . . . . . . . . . . . . . . . . . . . . . . . . . . . . .29
Setting up your Google Account . . . . . . . . . . . . . . . . . . . . . . . . . . . . . . .30
Phone’s Status Icons . . . . . . . . . . . . . . . . . . . . . . . . . . . . . . . . . . . . . . . . 32
Getting to Know the Home Screen . . . . . . . . . . . . . . . . . . . . . . . . . . . . . 34
Touchscreen . . . . . . . . . . . . . . . . . . . . . . . . . . . . . . . . . . . . . . . . . . . . . . . 36
Text Input Methods . . . . . . . . . . . . . . . . . . . . . . . . . . . . . . . . . . . . . . . . . .38
Using the Swype Keyboard . . . . . . . . . . . . . . . . . . . . . . . . . . . . . . . . . . . .38
Swype Tips . . . . . . . . . . . . . . . . . . . . . . . . . . . . . . . . . . . . . . . . . . . . . . . . .39
Swype Settings . . . . . . . . . . . . . . . . . . . . . . . . . . . . . . . . . . . . . . . . . . . . . .39
Using the Android keyboard . . . . . . . . . . . . . . . . . . . . . . . . . . . . . . . . . . 42
Entering text by speaking . . . . . . . . . . . . . . . . . . . . . . . . . . . . . . . . . . . . 45
Editing text . . . . . . . . . . . . . . . . . . . . . . . . . . . . . . . . . . . . . . . . . . . . . . . . 47
Applications: How to View, Open and Switch . . . . . . . . . . . . . . . . . . . . . 49
Working with Menus. . . . . . . . . . . . . . . . . . . . . . . . . . . . . . . . . . . . . . . . . 53
Managing Notifications . . . . . . . . . . . . . . . . . . . . . . . . . . . . . . . . . . . . . . 54
Searching Your Phone and the Web . . . . . . . . . . . . . . . . . . . . . . . . . . . . 56
Locking the Screen . . . . . . . . . . . . . . . . . . . . . . . . . . . . . . . . . . . . . . . . . 58
Customizing the Home Screen . . . . . . . . . . . . . . . . . . . . . . . . . . . . . . . . 60
Connecting Quickly With Your Contacts. . . . . . . . . . . . . . . . . . . . . . . . . 62
Connecting to Networks and Devices . . . . . . . . . . . . . . . .63
7
Page 10

Table of Contents
8
Connecting to Mobile Networks . . . . . . . . . . . . . . . . . . . . . . . . . . . . . . . 63
Connecting to Wi-Fi Networks . . . . . . . . . . . . . . . . . . . . . . . . . . . . . . . . 64
ActiveSync . . . . . . . . . . . . . . . . . . . . . . . . . . . . . . . . . . . . . . . . . . . . . . . . . .67
USB Autorun . . . . . . . . . . . . . . . . . . . . . . . . . . . . . . . . . . . . . . . . . . . . . . .70
Enable DUN . . . . . . . . . . . . . . . . . . . . . . . . . . . . . . . . . . . . . . . . . . . . . . . .74
Sharing your phone’s mobile data connection . . . . . . . . . . . . . . . . . . . . 75
Make Your Device a 3G Mobile Hotspot . . . . . . . . . . . . . . . . . . . . . . . . . 75
Connecting to Bluetooth Devices . . . . . . . . . . . . . . . . . . . . . . . . . . . . . . 79
Connecting to Virtual Private Networks . . . . . . . . . . . . . . . . . . . . . . . . . 82
Working With Secure Certificates . . . . . . . . . . . . . . . . . . . . . . . . . . . . . . 84
microSD Card . . . . . . . . . . . . . . . . . . . . . . . . . . . . . . . . . . .85
microSD Card. . . . . . . . . . . . . . . . . . . . . . . . . . . . . . . . . . . . . . . . . . . . . . 85
Your Device's microSD Card and Adapter . . . . . . . . . . . . . . . . . . . . . . .85
microSD Card Settings . . . . . . . . . . . . . . . . . . . . . . . . . . . . . . . . . . . . . . .87
Connecting Your Device to Your Computer . . . . . . . . . . . . . . . . . . . . . .88
Placing and Receiving Calls . . . . . . . . . . . . . . . . . . . . . . . .90
Placing and Ending Calls. . . . . . . . . . . . . . . . . . . . . . . . . . . . . . . . . . . . . 90
Answering or Rejecting Calls. . . . . . . . . . . . . . . . . . . . . . . . . . . . . . . . . . 92
Working with the Call Log . . . . . . . . . . . . . . . . . . . . . . . . . . . . . . . . . . . . 93
Calling Your Contacts. . . . . . . . . . . . . . . . . . . . . . . . . . . . . . . . . . . . . . . . 95
Voice Dialer. . . . . . . . . . . . . . . . . . . . . . . . . . . . . . . . . . . . . . . . . . . . . . . . 95
Options During a Call. . . . . . . . . . . . . . . . . . . . . . . . . . . . . . . . . . . . . . . . 96
Managing Multiple Calls. . . . . . . . . . . . . . . . . . . . . . . . . . . . . . . . . . . . . . 97
Listening to Your Voicemail . . . . . . . . . . . . . . . . . . . . . . . . . . . . . . . . . . . 99
Search. . . . . . . . . . . . . . . . . . . . . . . . . . . . . . . . . . . . . . . . . . . . . . . . . . . . 101
Bing Search . . . . . . . . . . . . . . . . . . . . . . . . . . . . . . . . . . . . . . . . . . . . . . . .101
Setting Web and Quick Search Box Options . . . . . . . . . . . . . . . . . . . . .101
Searching the Web and Your Phone Using the Quick Search Box . .102
Browser . . . . . . . . . . . . . . . . . . . . . . . . . . . . . . . . . . . . . . . . . . . . . . . . . . 102
Internet . . . . . . . . . . . . . . . . . . . . . . . . . . . . . . . . . . . . . . . . . . . . . . . . . . .102
Page 11

Table of Contents
Bing Maps . . . . . . . . . . . . . . . . . . . . . . . . . . . . . . . . . . . . . . . . . . . . . . . . 106
Searching For Locations and Places . . . . . . . . . . . . . . . . . . . . . . . . . . . 106
Getting Directions . . . . . . . . . . . . . . . . . . . . . . . . . . . . . . . . . . . . . . . . . . .106
VZ Navigator . . . . . . . . . . . . . . . . . . . . . . . . . . . . . . . . . . . . . . . . . . . . . . 107
Navigating with Spoken, Turn-by-Turn Directions . . . . . . . . . . . . . . . . .108
Checking the news and weather . . . . . . . . . . . . . . . . . . . . . . . . . . . . . . . 111
Changing News and Weather Settings. . . . . . . . . . . . . . . . . . . . . . . . . . 112
RSS Reader . . . . . . . . . . . . . . . . . . . . . . . . . . . . . . . . . . . . . . . . . . . . . . . 115
Using RSS Reader . . . . . . . . . . . . . . . . . . . . . . . . . . . . . . . . . . . . . . . . . .115
City ID. . . . . . . . . . . . . . . . . . . . . . . . . . . . . . . . . . . . . . . . . . . . . . . . . . . . 115
Slacker . . . . . . . . . . . . . . . . . . . . . . . . . . . . . . . . . . . . . . . . . . . . . . . . . . . 116
Skype mobile . . . . . . . . . . . . . . . . . . . . . . . . . . . . . . . . . . . . . . . . . . . . . . 117
Backup Assistant . . . . . . . . . . . . . . . . . . . . . . . . . . . . . . . . . . . . . . . . . . . 118
How to Access and Register Backup Assistant . . . . . . . . . . . . . . . . . . .118
Using Backup Assistant . . . . . . . . . . . . . . . . . . . . . . . . . . . . . . . . . . . . . .120
Kindle. . . . . . . . . . . . . . . . . . . . . . . . . . . . . . . . . . . . . . . . . . . . . . . . . . . . 122
Video . . . . . . . . . . . . . . . . . . . . . . . . . . . . . . . . . . . . . . . . . . . . . . . . . . . . 123
Music and Tones . . . . . . . . . . . . . . . . . . . . . . . . . . . . . . . . . . . . . . . . . . . 124
Communication . . . . . . . . . . . . . . . . . . . . . . . . . . . . . . . . .128
Mobile IM . . . . . . . . . . . . . . . . . . . . . . . . . . . . . . . . . . . . . . . . . . . . . . . . 128
Contacts . . . . . . . . . . . . . . . . . . . . . . . . . . . . . . . . . . . . . . . . . . . . . . . . . 128
Using Your Contacts . . . . . . . . . . . . . . . . . . . . . . . . . . . . . . . . . . . . . . . . .128
Contact Multiselect . . . . . . . . . . . . . . . . . . . . . . . . . . . . . . . . . . . . . . . . .130
Adding Contacts . . . . . . . . . . . . . . . . . . . . . . . . . . . . . . . . . . . . . . . . . . .132
Importing, Exporting, and Sharing Contacts . . . . . . . . . . . . . . . . . . . . .133
Adding a Contact to Your Favorites . . . . . . . . . . . . . . . . . . . . . . . . . . . .135
Searching for a Contact . . . . . . . . . . . . . . . . . . . . . . . . . . . . . . . . . . . . . .135
Editing Contact Details . . . . . . . . . . . . . . . . . . . . . . . . . . . . . . . . . . . . . .136
Communicating with Your Contacts . . . . . . . . . . . . . . . . . . . . . . . . . . . .138
Selecting Which Contacts are Displayed . . . . . . . . . . . . . . . . . . . . . . . .140
Joining Contacts . . . . . . . . . . . . . . . . . . . . . . . . . . . . . . . . . . . . . . . . . . .142
Separating Contact Information . . . . . . . . . . . . . . . . . . . . . . . . . . . . . . .143
9
Page 12

Table of Contents
10
Adding and Removing Accounts . . . . . . . . . . . . . . . . . . . . . . . . . . . . . . 144
Configuring Account Sync and Display Options . . . . . . . . . . . . . . . . . . 147
Email . . . . . . . . . . . . . . . . . . . . . . . . . . . . . . . . . . . . . . . . . . . . . . . . . . . . 150
Opening Email and the Accounts Screen . . . . . . . . . . . . . . . . . . . . . . .150
Reading Your Messages . . . . . . . . . . . . . . . . . . . . . . . . . . . . . . . . . . . . . .152
Responding to a Message . . . . . . . . . . . . . . . . . . . . . . . . . . . . . . . . . . . .154
Starring Messages . . . . . . . . . . . . . . . . . . . . . . . . . . . . . . . . . . . . . . . . . .155
Composing and Sending Email . . . . . . . . . . . . . . . . . . . . . . . . . . . . . . .156
Working with Account Folders . . . . . . . . . . . . . . . . . . . . . . . . . . . . . . . . .157
Adding and Editing Email Accounts . . . . . . . . . . . . . . . . . . . . . . . . . . .158
Changing Email Account Settings . . . . . . . . . . . . . . . . . . . . . . . . . . . . .160
Facebook . . . . . . . . . . . . . . . . . . . . . . . . . . . . . . . . . . . . . . . . . . . . . . . . . 165
Facebook for LG Application . . . . . . . . . . . . . . . . . . . . . . . . . . . . . . . . . .165
Visual Voice Mail . . . . . . . . . . . . . . . . . . . . . . . . . . . . . . . . . . . . . . . . . . . 169
Gmail is Different . . . . . . . . . . . . . . . . . . . . . . . . . . . . . . . . . . . . . . . . . . .172
Opening Gmail and Your Inbox . . . . . . . . . . . . . . . . . . . . . . . . . . . . . . . .173
Reading Your Messages . . . . . . . . . . . . . . . . . . . . . . . . . . . . . . . . . . . . . .175
Composing and Sending a Message . . . . . . . . . . . . . . . . . . . . . . . . . . .178
Replying to or For warding a Message . . . . . . . . . . . . . . . . . . . . . . . . . . .179
Working with Conversations in Batches . . . . . . . . . . . . . . . . . . . . . . . . .180
Labeling a Conversation . . . . . . . . . . . . . . . . . . . . . . . . . . . . . . . . . . . . . .181
Starring a Message . . . . . . . . . . . . . . . . . . . . . . . . . . . . . . . . . . . . . . . . .183
Viewing C
Reporting Spam . . . . . . . . . . . . . . . . . . . . . . . . . . . . . . . . . . . . . . . . . . . .185
Se
Archiving Conversations . . . . . . . . . . . . . . . . . . . . . . . . . . . . . . . . . . . . .186
Synchronizing Your Messages . . . . . . . . . . . . . . . . . . . . . . . . . . . . . . . . .186
Appending a Signature to Your Messages . . . . . . . . . . . . . . . . . . . . . .188
Changing Gmail Settings . . . . . . . . . . . . . . . . . . . . . . . . . . . . . . . . . . . .188
Messaging . . . . . . . . . . . . . . . . . . . . . . . . . . . . . . . . . . . . . . . . . . . . . . . . 190
Opening Messaging . . . . . . . . . . . . . . . . . . . . . . . . . . . . . . . . . . . . . . . . .190
Exchanging Messages . . . . . . . . . . . . . . . . . . . . . . . . . . . . . . . . . . . . . . . .191
Changing Messaging Settings . . . . . . . . . . . . . . . . . . . . . . . . . . . . . . . .194
Talk. . . . . . . . . . . . . . . . . . . . . . . . . . . . . . . . . . . . . . . . . . . . . . . . . . . . . . 196
onversations by Label . . . . . . . . . . . . . . . . . . . . . . . . . . . . . . .184
for Messages . . . . . . . . . . . . . . . . . . . . . . . . . . . . . . . . . . . . .185
ching
ar
Page 13

Table of Contents
Signing in and Opening your Friends List . . . . . . . . . . . . . . . . . . . . . . .196
Chatting with Friends . . . . . . . . . . . . . . . . . . . . . . . . . . . . . . . . . . . . . . . .197
Changing and Monitoring Online Status . . . . . . . . . . . . . . . . . . . . . . .200
Managing Your Friends List . . . . . . . . . . . . . . . . . . . . . . . . . . . . . . . . . . .201
Changing Google Talk Settings . . . . . . . . . . . . . . . . . . . . . . . . . . . . . . .204
Twitter . . . . . . . . . . . . . . . . . . . . . . . . . . . . . . . . . . . . . . . . . . . . . . . . . . . 206
Twitter for LG application . . . . . . . . . . . . . . . . . . . . . . . . . . . . . . . . . . . .206
The Phone application. . . . . . . . . . . . . . . . . . . . . . . . . . . . . . . . . . . . . . 209
Phone . . . . . . . . . . . . . . . . . . . . . . . . . . . . . . . . . . . . . . . . . . . . . . . . . . . .209
Voice Dialer . . . . . . . . . . . . . . . . . . . . . . . . . . . . . . . . . . . . . . . . . . . . . . . 211
Call a Contact by Voice Dialling . . . . . . . . . . . . . . . . . . . . . . . . . . . . . . . .211
Open an Application . . . . . . . . . . . . . . . . . . . . . . . . . . . . . . . . . . . . . . . . .211
Voice Search . . . . . . . . . . . . . . . . . . . . . . . . . . . . . . . . . . . . . . . . . . . . . . 212
Entertainment . . . . . . . . . . . . . . . . . . . . . . . . . . . . . . . . . . .213
Camera . . . . . . . . . . . . . . . . . . . . . . . . . . . . . . . . . . . . . . . . . . . . . . . . . . 213
Video Camera . . . . . . . . . . . . . . . . . . . . . . . . . . . . . . . . . . . . . . . . . . . . . .218
Your Photos and Videos . . . . . . . . . . . . . . . . . . . . . . . . . . . . . . . . . . . . .220
Gallery . . . . . . . . . . . . . . . . . . . . . . . . . . . . . . . . . . . . . . . . . . . . . . . . . . . 221
Opening Gallery and Viewing Your Albums . . . . . . . . . . . . . . . . . . . . . .221
Working with Albums . . . . . . . . . . . . . . . . . . . . . . . . . . . . . . . . . . . . . . .222
To Work with Batches of Pictures or Videos . . . . . . . . . . . . . . . . . . . . .224
Working with Pictures . . . . . . . . . . . . . . . . . . . . . . . . . . . . . . . . . . . . . . .226
Working with Videos . . . . . . . . . . . . . . . . . . . . . . . . . . . . . . . . . . . . . . . .230
Market. . . . . . . . . . . . . . . . . . . . . . . . . . . . . . . . . . . . . . . . . . . . . . . . . . . 232
Opening Android Market and Finding Applications . . . . . . . . . . . . . .232
Downloading and Installing Applications . . . . . . . . . . . . . . . . . . . . . . .235
Managing Your Downloads . . . . . . . . . . . . . . . . . . . . . . . . . . . . . . . . . . .237
Music . . . . . . . . . . . . . . . . . . . . . . . . . . . . . . . . . . . . . . . . . . . . . . . . . . . . 241
Transferring Music Files to Your Phone . . . . . . . . . . . . . . . . . . . . . . . . .241
Opening Music and Working with Your Library . . . . . . . . . . . . . . . . . .242
Playing Music . . . . . . . . . . . . . . . . . . . . . . . . . . . . . . . . . . . . . . . . . . . . . .244
Working with Playlists . . . . . . . . . . . . . . . . . . . . . . . . . . . . . . . . . . . . . . . .247
Video Player . . . . . . . . . . . . . . . . . . . . . . . . . . . . . . . . . . . . . . . . . . . . . . 249
11
Page 14

Table of Contents
12
YouTubeTM. . . . . . . . . . . . . . . . . . . . . . . . . . . . . . . . . . . . . . . . . . . . . . . . 250
Opening YouTube and Watching Videos . . . . . . . . . . . . . . . . . . . . . . .250
Voice Recorder. . . . . . . . . . . . . . . . . . . . . . . . . . . . . . . . . . . . . . . . . . . . 252
Record a Voice Memo . . . . . . . . . . . . . . . . . . . . . . . . . . . . . . . . . . . . . . .253
Play a Voice Memo . . . . . . . . . . . . . . . . . . . . . . . . . . . . . . . . . . . . . . . . .253
Managing your Voice Memos . . . . . . . . . . . . . . . . . . . . . . . . . . . . . . . . .253
Scrabble . . . . . . . . . . . . . . . . . . . . . . . . . . . . . . . . . . . . . . . . . . . . . . . . . 254
Tetris . . . . . . . . . . . . . . . . . . . . . . . . . . . . . . . . . . . . . . . . . . . . . . . . . . . . 255
Tool . . . . . . . . . . . . . . . . . . . . . . . . . . . . . . . . . . . . . . . . . . .256
Calendar . . . . . . . . . . . . . . . . . . . . . . . . . . . . . . . . . . . . . . . . . . . . . . . . . 256
Viewing Your Calendar and Events . . . . . . . . . . . . . . . . . . . . . . . . . . . .256
Working in Agenda View . . . . . . . . . . . . . . . . . . . . . . . . . . . . . . . . . . . .258
Working in Day View . . . . . . . . . . . . . . . . . . . . . . . . . . . . . . . . . . . . . . . .259
Working in Week View . . . . . . . . . . . . . . . . . . . . . . . . . . . . . . . . . . . . . .260
Working in Month View . . . . . . . . . . . . . . . . . . . . . . . . . . . . . . . . . . . . . .261
Viewing Event Details . . . . . . . . . . . . . . . . . . . . . . . . . . . . . . . . . . . . . . .262
Creating an Event . . . . . . . . . . . . . . . . . . . . . . . . . . . . . . . . . . . . . . . . . .263
Editing or deleting an event . . . . . . . . . . . . . . . . . . . . . . . . . . . . . . . . . .264
Setting an Event Reminder . . . . . . . . . . . . . . . . . . . . . . . . . . . . . . . . . .265
Responding to an Event Reminder . . . . . . . . . . . . . . . . . . . . . . . . . . . .266
onizing and Displaying Calendars . . . . . . . . . . . . . . . . . . . . . . . .267
Synchr
Changing Calendar Settings . . . . . . . . . . . . . . . . . . . . . . . . . . . . . . . . .268
Calculator . . . . . . . . . . . . . . . . . . . . . . . . . . . . . . . . . . . . . . . . . . . . . . . . 269
. . . . . . . . . . . . . . . . . . . . . . . . . . . . . . . . . . . . . . . . . . . . . . . . . . . . 270
Clock
Viewing the Date, Time, and Other Information . . . . . . . . . . . . . . . . . .270
Setting Alarms . . . . . . . . . . . . . . . . . . . . . . . . . . . . . . . . . . . . . . . . . . . . .272
Changing Clock Alarm Settings . . . . . . . . . . . . . . . . . . . . . . . . . . . . . . .273
ThinkFree Office. . . . . . . . . . . . . . . . . . . . . . . . . . . . . . . . . . . . . . . . . . . 274
Create a New Document . . . . . . . . . . . . . . . . . . . . . . . . . . . . . . . . . . . . .274
Settings. . . . . . . . . . . . . . . . . . . . . . . . . . . . . . . . . . . . . . . . . . . . . . . . . . 278
Opening Settings . . . . . . . . . . . . . . . . . . . . . . . . . . . . . . . . . . . . . . . . . . .278
Changing Browser settings . . . . . . . . . . . . . . . . . . . . . . . . . . . . . . . . . . .278
Page 15

Table of Contents
Settings . . . . . . . . . . . . . . . . . . . . . . . . . . . . . . . . . . . . . . .278
Wireless & networks . . . . . . . . . . . . . . . . . . . . . . . . . . . . . . . . . . . . . . . .280
Call settings . . . . . . . . . . . . . . . . . . . . . . . . . . . . . . . . . . . . . . . . . . . . . . .283
Sound . . . . . . . . . . . . . . . . . . . . . . . . . . . . . . . . . . . . . . . . . . . . . . . . . . . .284
Display . . . . . . . . . . . . . . . . . . . . . . . . . . . . . . . . . . . . . . . . . . . . . . . . . . .286
Location & security . . . . . . . . . . . . . . . . . . . . . . . . . . . . . . . . . . . . . . . . .286
Applications . . . . . . . . . . . . . . . . . . . . . . . . . . . . . . . . . . . . . . . . . . . . . . .288
Accounts & sync . . . . . . . . . . . . . . . . . . . . . . . . . . . . . . . . . . . . . . . . . . .290
Privacy . . . . . . . . . . . . . . . . . . . . . . . . . . . . . . . . . . . . . . . . . . . . . . . . . . . .291
SD card & phone storage . . . . . . . . . . . . . . . . . . . . . . . . . . . . . . . . . . . .291
Search . . . . . . . . . . . . . . . . . . . . . . . . . . . . . . . . . . . . . . . . . . . . . . . . . . . .292
Language & keyboard . . . . . . . . . . . . . . . . . . . . . . . . . . . . . . . . . . . . . . .292
Voice input & output . . . . . . . . . . . . . . . . . . . . . . . . . . . . . . . . . . . . . . . .294
Connectivity . . . . . . . . . . . . . . . . . . . . . . . . . . . . . . . . . . . . . . . . . . . . . . .295
Accessibility . . . . . . . . . . . . . . . . . . . . . . . . . . . . . . . . . . . . . . . . . . . . . .295
Date & time . . . . . . . . . . . . . . . . . . . . . . . . . . . . . . . . . . . . . . . . . . . . . . .296
About phone . . . . . . . . . . . . . . . . . . . . . . . . . . . . . . . . . . . . . . . . . . . . . .296
Safety . . . . . . . . . . . . . . . . . . . . . . . . . . . . . . . . . . . . . . . . .297
TIA Safety Information . . . . . . . . . . . . . . . . . . . . . . . . . . . . . . . . . . . . . 297
Safety Information . . . . . . . . . . . . . . . . . . . . . . . . . . . . . . . . . . . . . . . . . 301
Caution: Avoid potential hearing loss. . . . . . . . . . . . . . . . . . . . . . . . . . 305
FDA Consumer Update . . . . . . . . . . . . . . . . . . . . . . . . . . . . . . . . . . . . . 307
10 Driver Safety Tips. . . . . . . . . . . . . . . . . . . . . . . . . . . . . . . . . . . . . . . . 315
Consumer Information on SAR(Specific Absorption Rate) . . . . . . . . . 317
FCC Hearing-Aid Compatibility (HAC) Regulations for Wireless
Devices . . . . . . . . . . . . . . . . . . . . . . . . . . . . . . . . . . . . . . . . . . . . . . . . . . 320
Specifications . . . . . . . . . . . . . . . . . . . . . . . . . . . . . . . . . .322
FAQ . . . . . . . . . . . . . . . . . . . . . . . . . . . . . . . . . . . . . . . . . . .324
LIMITED WARRANTY STATEMENT . . . . . . . . . . . . . . .335
13
Page 16

Important Customer Information
14
Please be advised that many services and applications offered
through this unique device are provided by various device, operating
system, software and application developers (e.g., GoogleTM,
Motorola, Microsoft, Palm). If you use, link to or download such a
service, or an application such as a non-Verizon Wireless location
based GPS-type service, chat room, marketplace or social network
from this device, you should carefully review the terms of such
service or application. If you USE ANY of these non-Verizon
Wireless services or applications, personal information you submit
may be read, collected, or used by the service or application
provider and/or other users of those forums.
Verizon Wireless is not responsible for your use of those
applications or information you choose to submit or share with
others. Specific terms and conditions, terms of use, and privacy
polices apply to those applications and services. Please review
carefully any and all terms and conditions applicable to those
applications and services including those related to any locationbased services for any particular privacy policies, risks, or waivers.
Your Verizon Wireless customer agreement terms and conditions
and certain other specifically identified terms govern your use of
any Verizon Wireless products and services.
TIP!
●
Please hold the mobile phone straight up as a regular phone. While
making/receiving calls or sending/receiving data, try to avoid holding the lower
part of the phone where the antenna is located. It may affect call quality.
●
If the phone does not respond to user input or the screen freezes:
Remove the battery, insert it again and power on the phone.
If it still does not work, please contact the service center.
Page 17

Technical Details
Important Information
This user’s guide provides important information on the use and
operation of your phone. Please read this guide carefully prior to
using the phone to be able to use your phone to its greatest
advantage and to prevent any accidental damage or misuse. Any
unapproved changes or modifications will void your warranty.
Technical Details
The LG VortexTMis an all digital phone that operates on both Code
Division Multiple Access (CDMA) frequencies: cellular services at
800 MHz and Personal Communication Services (PCS) at 1.9 GHz.
CDMA technology uses a feature called DSSS (Direct Sequence
Spread Spectrum) that enables the phone to keep communication
from being crossed and to use one frequency channel by multiple
users in the same specific area. This results in a 10-fold capacity
increase when compared with analog mode. In addition, features
such as soft/softer handoff, hard handoff, and dynamic RF power
control technologies combine to reduce call interruptions.
The Cellular and PCS CDMA networks consist of MSO (Mobile
Switching Office), BSC (Base Station Controller), BTS (Base Station
Transmission System), and MS (Mobile Station).
The 1xRTT system receives twice as many subscribers in the
wireless section as IS-95. Benefits from using 1xRTT instead of IS95 include extending your device's battery life (up to twice as long)
and high speed data transmission capability. However, in applicable
areas, EV-DO system is optimized for data service and therefore is
much faster than 1xRTT.
The table on the following page lists some major CDMA standards.
15
Page 18
Technical Details
16
CDMA
Standard
Basic Air
Interface
Network
Service
Designator Description
TIA/EIA-95A
TSB-74
ANSI J-STD-008
TIA/EIA-IS2000
TIA/EIA/IS-634
TIA/EIA/IS-651
TIA/EIA/IS-41-C
TIA/EIA/IS-124
TIA/EIA/IS-96-B
TIA/EIA/IS-637
TIA/EIA/IS-657
IS-801
TIA/EIA/IS-707-A
CDMA Dual-Mode Air Interface
14.4kbps Radio Link Protocol and Inter-band
Operations
IS-95 Adapted for PCS Frequency Band
CDMA2000 1xRTT Air Interface
MAS-BS
PCSC-RS
Intersystem Operations
Non-Signaling Data Communications
Speech CODEC
Short Message Service
Packet Data
Position Determination Service (gpsOne)
High Speed Packet Data
CDMA2000 High Rate Packet Data Air Interface
1x EV-DO
Related
Interface
TIA/EIA/IS-856
TIA/EIA/IS-878
TIA/EIA/IS-866
TIA/EIA/IS-890
1x EV-DO Inter-Operability Specification for HRPD
Access Network Interfaces
Recommended Minimum Performance Standards
for HRPD High Rate Packet Data Access Terminal
Test Application Specification (TAS) for High Rate
Packet Data Air Interface
FCC RF Exposure Information
WARNING!
Read this inf
ormation before operating the phone.
In August 1996, the Federal Communications Commission (FCC) of
the United States, with its action in Report and Order FCC 96-326,
adopted an updated safety standard for human exposure to Radio
Frequency (RF) electromagnetic energy emitted by FCC regulated
transmitters. Those guidelines are consistent with the safety
standard previously set by both U.S. and international standards
bodies. The design of this phone complies with the FCC guidelines
and those international standards.
Page 19

Technical Details
Bodily Contact During Operation
This device was tested for typical use with the back of the phone
kept 0.79 inches (2.0 cm) from the body. To comply with FCC RF
exposure requirements, a minimum separation distance of 0.79
inches (2.0 cm) must be maintained between the user’s body and
the back of the phone, including the antenna. Third-party belt-clips,
holsters, and similar accessories containing metallic components
should not be used. Avoid the use of accessories that cannot
maintain 0.79 inches (2.0 cm) distance between the user
the back of the phone and have not been tested for compliance
with FCC RF exposure limits.
Vehicle-Mounted External Antenna
(Optional, if available.)
To satisfy FCC RF exposure requirements, keep 8 inches (20 cm)
between the user / bystander and vehicle-mounted external
antenna. For more information about RF exposure, visit the FCC
website at www.fcc.gov.
FCC Notice and Cautions
This device and its accessories comply with part 15 of FCC rules.
Operation is subject to the following two conditions: (1) This device
and its accessories may not cause harmful interference, and (2) this
device and its accessories must accept any interference received,
including interference that causes undesired operation.
Any changes or modifications not expressly approved in this user
guide could void your warranty for this equipment. Use only the
supplied antenna. Use of unauthorized antennas (or modifications to
the antenna) could impair call quality, damage the phone, void your
warranty and/or violate FCC regulations.
’
t use the phone with a damaged antenna. A damaged antenna
Don
could cause a minor skin burn. Contact your local dealer for a
replacement antenna.
’
s body and
17
Page 20

Technical Details
18
Part 15.21 statement
Changes or modifications that are not expressly approved by the
manufacturer could void the user’s authority to operate the
equipment.
Part 15.105 statement
This equipment has been tested and found to comply with the
limits for a class B digital device, pursuant to Part 15 of the FCC
rules. These limits are designed to provide reasonable protection
against harmful interference in a residential installation. This
equipment generates, uses, and can radiate radio frequency energy
and, if not installed and used in accordance with the instructions,
may cause harmful interference to radio communications. However,
there is no guarantee that interference will not occur in a particular
installation. If you experience interference with reception (e.g.,
television), determine if this equipment is causing the harmful
interference by turning the equipment off and then back on to see if
the interference is affected. If necessary, try correcting the
interference by one or more of the following measures:
- Reorient or relocate the receiving antenna.
- Increase the separation between the equipment and receiver.
- Connect the equipment into an outlet on a circuit different from
that to which the receiver is connected.
- Consult the dealer or an experienced radio/TV technician for help.
Page 21
The Basics
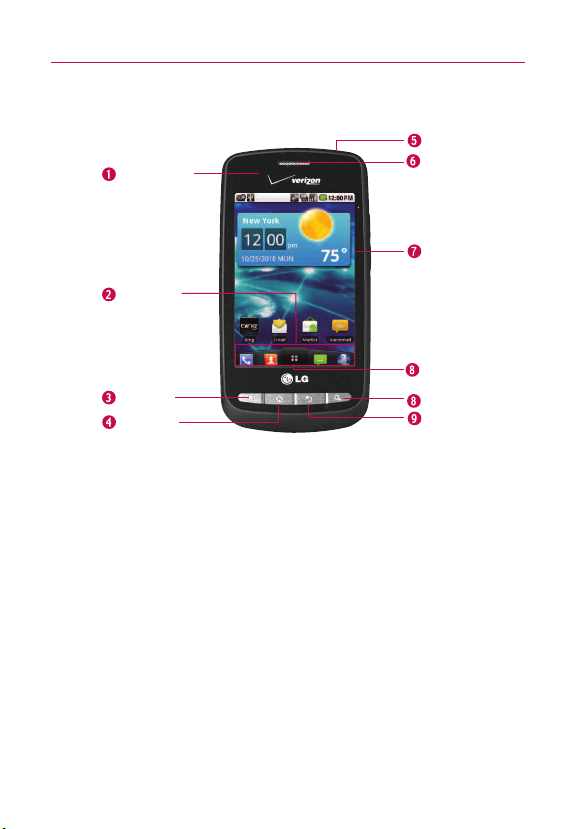
Phone Overview
Front View
Proximity
Sensors
Quick Keys
- Phone Key
- Contacts Key
- Messaging Key
- Browser Key
Menu Key
Home Key
1.
Proximity Sensors
touch commands are not accidentally activated during a call.
Note *Do not block the sensor or near sensor area with film cover or phone case.
* The use of a film cover produced by other manufacturers other than LG can
Quick Keys
2.
Phone Key opens the Phone Application for access to the dialpad, Call log, Contacts,
-
and Favorites.
-
Contacts Key opens the Contacts Application.
-
Messaging Key opens the Messaging Application.
-
Browser Key opens the Browser Application.
3.
Menu Key
application.
Home Key
4.
extension panes, it navigates you to the central Home screen pane. Press and hold to view
the most recently used applications.
5. Power/Lock
the following options): Silent mode, Airplane mode, and Power off.
Earpiece
6.
senses proximity towards other objects (such as your head) so that
cause a disturbance in touch operation, the display, etc.
Opens an options menu with options that affect the current screen or
returns to the Home screen. If you're already viewing one of the Home screen
Key
locks the screen. Press and hold to open the phone options menu (for
lets you hear callers and automated prompts.
Power/Lock Key
Earpiece
Touchscreen
Applications
Launcher K
Search Key
Back Key
19
ey
Page 22
The Basics
20
7.
Touchscreen
applications, call status, date, time, signal status, and battery strength.
Applications Launcher Key
8.
applications.
9.
Search Key
the web. In many applications, you may touch this key to search within the application
itself. Touch and hold to open Bing search by voice.
Back Key
10.
and dialog boxes.
displays all the information needed to operate your phone, such as
opens the Launch screen, where you can view installed
opens Quick Search BoxTMfrom the Home screen to search the phone and
returns to the previous screen. Also closes pop-up display items such as menus
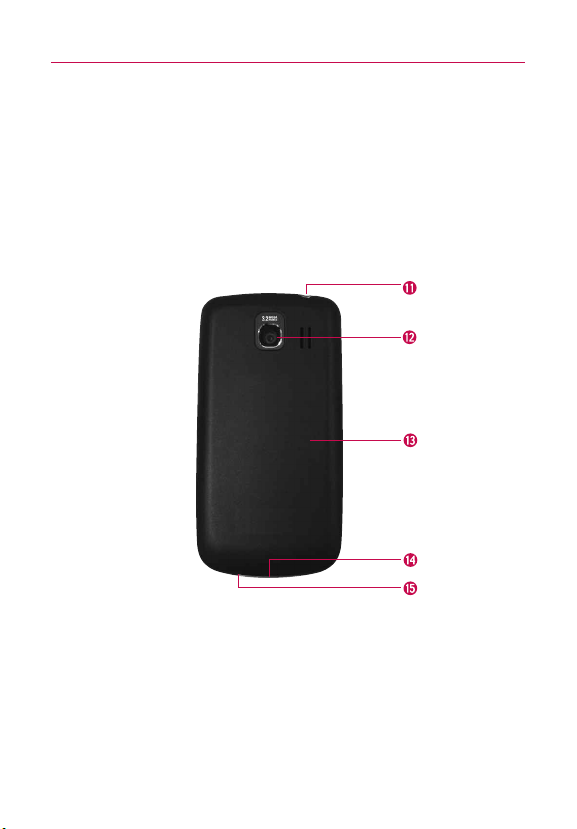
Rear View
11.
3.5mm Headset Jack
conversations. The 3.5mm jack also allows you to plug in headphones to listen to music.
Camera Lens
12.
ormance.
perf
13.
Back Cover
Accessory/Charger Port
14.
compatible accessories.
Microphone
15.
encloses the battery compartment.
tr
ws you to plug in an optional headset for convenient, hands-free
allo
use for taking pictures and recording videos. Keep clean for optimal
allows you to connect the phone charger, USB cable, or other
s your voice to the other caller and to Voice-activated functions.
ansmit
3.5mm Headset
Jack
Camera Lens
Back Cover
Accessory/
Charger Port
Microphone
Page 23
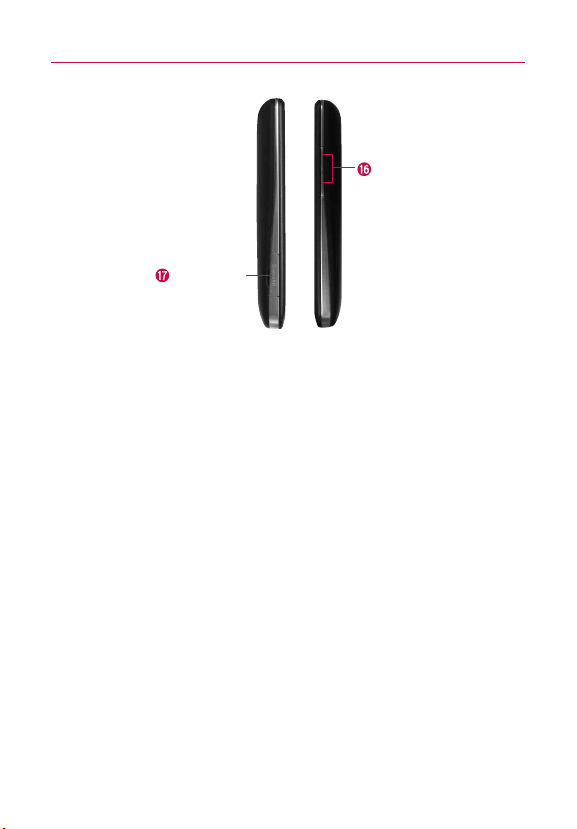
The Basics
Left Side Right Side
Volume Keys
microSD Slot
16.
Volume Keys
call.
17.
microSD Slot
16GB)
NOTE Insert a microSD card to use the camera and other multimedia features.
allow you to adjust the ringer, media volumes, or the in-call volume during a
accommodates the pre-installed 2GB microSDTMcard (expandable up to
Multimedia contents will be saved in the microSD card.
Your LG Vortex has a microSD
TM
card pre-installed.
21
Page 24
The Basics
22
Installing the Battery and microSD Card
NOTE
It is important to fully charge the battery before initial use of the phone.
The phone comes with a rechargeable battery. Keep the battery
charged while not in use in order to maximize talk, use, and standby
time. The battery charge level is shown at the top right part of the
screen.
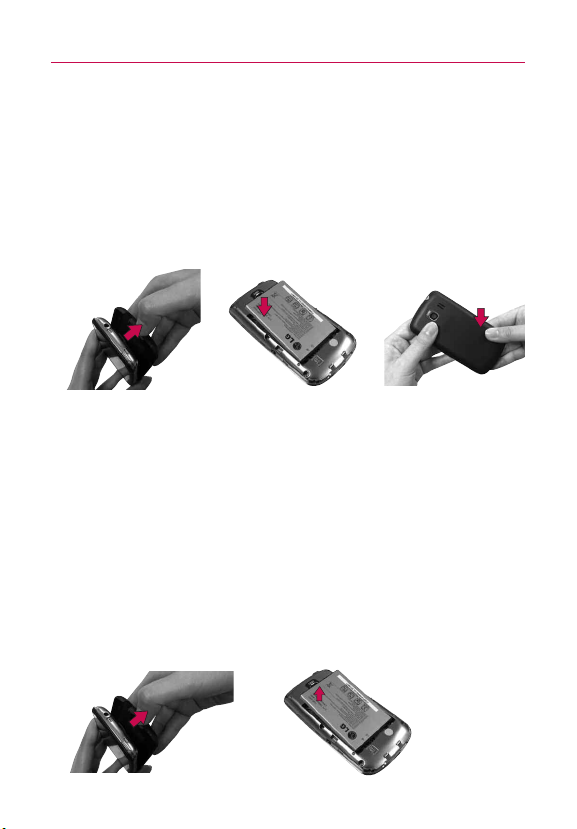
Installing the battery
1. Hold the phone
with both hands
and use the
fingertip cutout at
the top of the
phone to pull
open the battery
cover (as shown
above).
2. Align the battery
contacts with the
terminals near the
bottom of the
phone, then press
the battery into
place.
3. Replace the
battery cover over
the back of the
phone (as
demonstrated).
Apply a steady
downward
pressure until the
battery cover
clicks into place.
Removing the battery
Turn the power off. Remove the battery cover (as demonstrated in
the previous instructions). Then use the fingertip cutout to lift the
top edge of the battery out.
Page 25
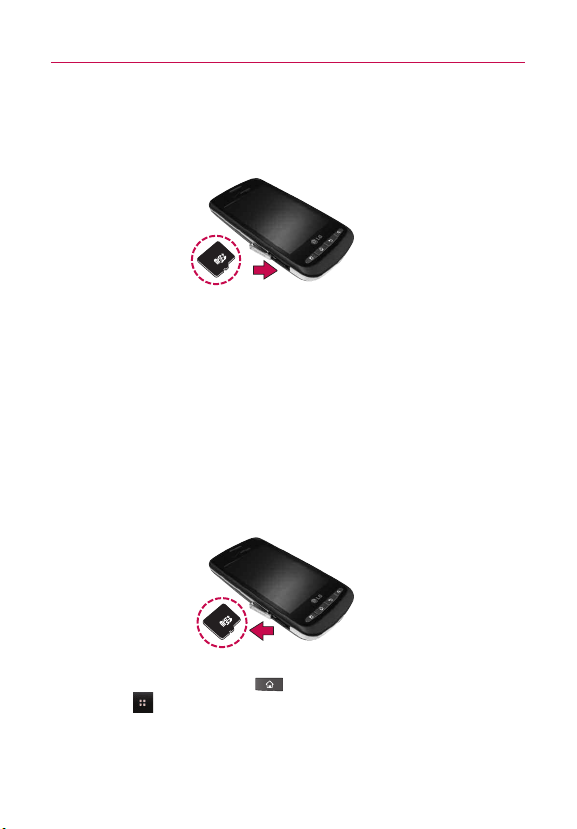
Inserting a microSD card
Gently uncover the microSD slot located on the left side of the
phone. Position the microSD card facing up and slide it into place
until it is fully inserted and locked in place.
NOTE
The microSD card can be easily damaged by improper operation. Please be
careful when inserting, removing or handling it.
To remove the microSD card
1. Unmount the microSD card (see steps below), then uncover
the microSD slot located on the left side of the phone.
2. Gently push the exposed edge of the microSD card in with
your fingertip to release it from the slot.
3. Carefully pull the microSD card out of the slot and replace
the cover to the slot.
NOTE
To safely remove the microSD card from your phone, unmount it from your
phone first, as described below.
23
To unmount the microSD card
1. Press the Home Key , press the Applications Launcher
Key
.
2. Touch
3. Touch Unmount SD card.
Settings > SD card & phone storage.
Page 26

The Basics
24
Charging the Phone
Your LG VortexTMdevice comes with a Wall/USB charger and a USB
data cable which connect together to charge your phone. To charge
your phone:
NOTICE
Please use only an approved charging accessory to charge your LG phone.
Improper handling of the charging port, as well as the use of an incompatible charger,
may cause damage to your phone and void the warranty.
1. Connect the USB cable into the Wall/USB charger. When
connecting, as shown below, the LG logo on the USB cable
should face toward you.
USB Cable
Wall/USB charger
2. Plug the USB cable (as shown below) into the phone's
charger port.
Page 27

The Basics
Battery temperature protection
Though extremely rare, if the battery becomes overheated, the
phone will automatically turn off.
Battery charge level
You can find the battery charge level at the top right part of the
screen. When the battery level becomes low, the phone will notify
you. Once the battery level becomes exceedingly low, the phone
will shut off without notice. As a result, unsaved items may be lost.
Charging with USB
You can use your computer to charge your phone. To be able to
charge with the USB cable, you need to have the necessary USB
drivers installed on your PC first. Connect one end of the USB
cable to the charger port on your phone and connect the other
end to a USB port on your PC. It is best to use the rear USB port
when connecting to a desktop PC. The USB hub should be
powered by an external power source.
NOTES
●
Low-power USB ports are not supported, such as the USB port on your
keyboard or bus-powered USB hub.
●
LG USB Driver is downloadable from the following site:
http://www.lgmobilephones.com > Click
Carrier(Verizon) > Select the Model > Click USB Cable Driver to download.
Mobile Support > Select the
Using the phone without battery
It is possible to use the phone without the battery. Connect the
charger to the phone and plug the charger into a wall. After doing
this, you can turn the phone on and place calls.
NOTE
Using the phone without a battery may cause the phone to turn off
unexpectedly if the supply of power is interrupted.
25
Page 28

The Basics
26
Optimizing Battery Life
You can extend your battery's life between charges by turning off
features that run in the background. You can also monitor how
applications and system resources consume battery power.
Tips to extend the life of your battery
'
Turn off radio communications that you aren't using.
If you aren't using Wi-Fi, Bluetooth, or GPS, use the Settings
menu to turn them off. (Note that the GPS receiver is only
turned on when you're using an application that makes use
of it.)
'
Turn down screen brightness and set a shorter screen timeout.
'
If you don't need them, turn off automatic syncing for Gmail,
Calendar, Contacts, and other applications.
'
Use the Power Control widget to control the wireless
connections, GPS connection, Bluetooth power, display
brightness, and syncing activity.
To check the battery charge level
'
Press the Home Key , then touch the Applications
Launcher Key
The battery status (Charging and Discharging) and level (as a
percentage of fully charged) will be displayed at the top of
the screen.
> Settings > About phone > Status.
Page 29

The Basics
To monitor and control what uses the battery
The Battery use screen allows you to see which applications are
consuming the most battery power. Information on this screen
allows you to identify downloaded applications you may want to
turn off when not being used, so you can get the most out of your
battery power.
'
Press the Home Key , then touch the Applications
Launcher Key
use
. The screen will display battery usage time. Either how
long since last connected to a power source, if connected to
a power source, and how long you were last running on
battery power.
The list of applications or services using battery power are
displayed in order of energy used, from greatest amount to
least.
'
Touch an application in the Battery Use screen to see the
details about its power consumption.
Different applications offer different kinds of information, and
they may even include options to modify the settings so you
can reduce power consumption by that application.
> Settings > About phone > Battery
27
Page 30
28
Turning the Phone On and Off
Turning the phone on
'
Press and hold the Power/Lock Key for a couple of
seconds until the display lights up.
NOTE
When you turn on your phone for the first time, follow the instructions on
the screen to activate your device.
Turning the phone off
1. Press and hold the Power/Lock Key until the pop-up
menu appears.
2. Touch
3. Touch
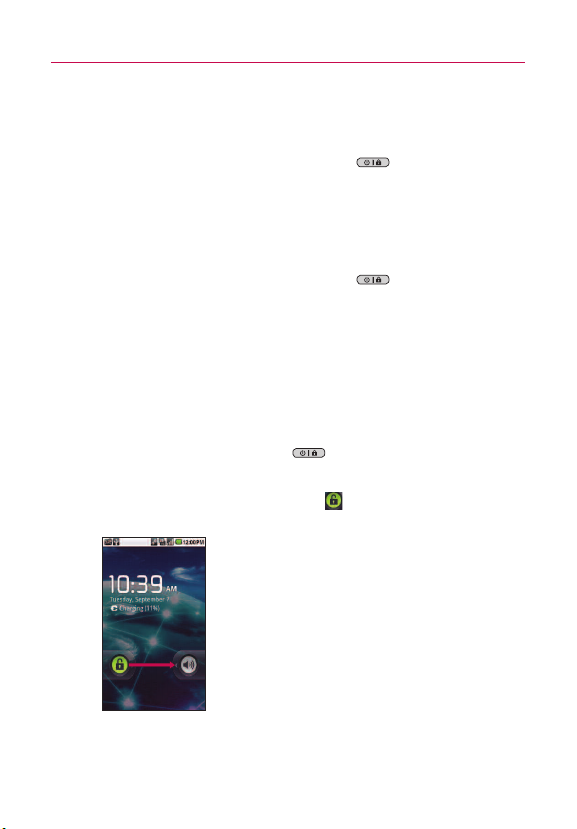
To unlock the phone
If you don’t use the phone for a while, the screen and backlight
will shut off to conserve battery power. To unlock the phone:
1. Press the
2. Touch and drag the
Power Off in the pop-up menu.
OK to confirm that you want to turn off the phone.
Power/Lock Key .
Your Lock Screen will appear.
Unlock icon to the right.
The last screen you were working on opens.
NOTE
This is the default Lock Screen. If you have set up
an Unlock Pattern, use your fingertip to draw the
pattern.
Page 31

To turn the phone sounds off
If you're in a place where your phone sounds may disturb others,
you can quickly silence your phone from the Lock Screen.
1. Press the
2. Drag the
Power/Lock Key .
Sounds off icon to the left.
To turn the phone sounds back on, drag the Sounds on icon
to the left.
SETTING UP YOUR DEVICE
When you turn on your wireless device for the first time, you have
the option to quickly set up various accounts. Simply follow the
onscreen instructions to complete the initial setup of your wireless
device.
To set up your device, follow the steps below :
1. Select your language between English and Español.
2. If you see the ‘Welcome to the LG Vortex’ page, touch
Continue on the bottom.
3. Select whether to
4. Select whether to
With a Google Account, Google applications are
automatically synced between your phone and computer
regardless of where you make an update.
5. Select the account you want to set up. (
and Twitter
6. Select the Location Consent. (Verizon Location Services/
Standalone GPS Services/ Google Location Services
7. Touch
Begin to start using the phone.
Skip or Start the Backup Assistant.
Skip or Start the Google account setup.
E-Mail, Facebook,
).
)
29
Page 32

The Basics
30
For more information on how to set up your email, visit
smartphones.verizonwireless. com/. Click on the Smartphone
Support tab
and select your phone.
Setting up your Google Account
1. At the setup screen, touch Create or Sign in.
2. Enter your username and password.
3. Touch
Now your Gmail, Google Contacts, and Google Calendar events
will all be loaded to your phone automatically.
Use the area below to record your Google account information for
future reference.
Username:___________________________@gmail.com
Password:________________________________________________
Your Google Account
You must sign into a Google Account to use Gmail, Google Talk,
Google Calendar, and other Google Apps; to download applications
from Android Market; to back up your settings to Google servers;
and to take advantage of other Google services on your phone.
Sign in.
IMPORTANT
c
If you want to restore your settings to this phone, from
another phone that was running Android release 2.0 or later,
you must sign into your Google Account now, during setup. If
you wait until after setup is complete, your settings are not
restored.
c
If you don’t have a Google Account, you’re prompted to
create one.
c
If you have an enterprise account through your company or
other organization, your IT department may have special
instructions on how to sign into that account.
c
When you sign in, your contacts, Gmail messages, Calendar
events, and other information from these applications and
services on the web are synchronized with your phone.
Page 33

The Basics
c
If you don’t sign into a Google Account during setup, you are
prompted to sign in or to create a Google Account the first
time you start an application that requires one, such as Gmail
or Android Market.
c
When you sign in, you’re prompted to enter your username
and password, using the onscreen keyboard.
Touch to open the onscreen
keyboard to enter your Google
Account username.
Touch to enter your password.
31
ou’re finished, touch
When y
the phone’s Back Key) to close the onscreen keyboard. Then
h
touc
Sign in at the bot
Done on the k
tom of the screen.
eyboard (or press
If you have a Google Account but have forgotten your password,
you must reset it before you can sign in. Go to
http://www.google.com, click Sign In, click “Can’t access your
account?”
below the sign-in box, and then follow the instructions
for resetting your password.
Additional accounts
After setting up your Google Account, you can set up additional
accounts. These include, Google, Microsoft Exchange Server,
Facebook, Twitter, and other e-mail accounts. However, only the first
Google Account you sign into is backed up to Google servers. Some
applications that only work with a single account and display data
only from the first account that you sign into.
Page 34

The Basics
32
Phone’s Status Icons
The Status bar appears at the top of every screen. It displays icons
indicating that you’ve received notifications (on the left) and icons
indicating the phone’s status (on the right), along with the current time.
Notification icons
Status icons
If you have more notifications than can fit in the Status bar, a plus
icon prompts you to open the Notifications panel to view them all.
Status icons
The following icons indicate the status of your phone.
3G connected Roaming
3G in use No signal
Connected to a Wi-Fi network No microSD card installed
Bluetooth is on Vibrate mode
Connected to a Bluetooth device Ringer is silenced
Airplane mode is set Phone microphone is muted
Alarm is set Battery is very low
Signal strength Battery is low
Speakerphone is on Battery is partially drained
GPS is on Battery is full
Receiving location data from
Location Off Location On
GPS Battery is charging
Page 35

The Basics
Notification icons
The following icons indicate that you've received a notification.
33
New Gmail message
New text or multimedia
message
Problem with text or
multimedia message delivery
New Google Talk message Missed call
New voicemail Uploading data
Upcoming event Downloading data
Data is syncing Download finished
Problem with sign-in or sync Connected to VPN
New email Disconnected from VPN
An open Wi-Fi network is
available
Phone is connected via USB
cable
3 more notifications not
displayed
Call in progress
Call in progress using
Bluetooth headset
Song is playing
USB debugging connected
Page 36

The Basics
34
Getting to Know the Home Screen
The Home screen is your starting point to access all the features on
your phone. It displays application shortcuts, icons, widgets,
and other features.
Status Bar
Shows device status information
including the time, signal strength,
battery status, and notification
icons.
Application Icon
Touch an icon (application, folder,
etc.) to open and use it.
Quick Keys
Provide easy, one-touch access to
the functions you use the most.
Applications Launcher Key
Touch to open the Launch screen
to view installed applications.
Page 37

The Basics
Quick Keys
On the home screen, the Quick Keys are located on a bar along the
bottom of the Home screen and the Launch screen.
: opens the
Phone application, which displays the dialpad so
you can dial an unsaved number. You can also access the Call
log, Contacts and Favorites by touching the tabs across the
top.
: opens your Contacts list. You can also access access Phone,
Call log, and Favorites by touching the tabs across the top.
: opens the Launch screen, where you can view all of your
installed applications.
: opens the
: opens the
Messaging application.
Browser application.
To return to the Home screen
'
Press the Home Key at any time, from any application.
To view other Home screen panes
'
Slide your finger left or right across the Home screen. The
Home screen spans five panels, allowing more space for
icons, widgets, shortcuts, etc.
35
Page 38

The Basics
36
T
he dots indicate which Home screen pane you are viewing.
Location Indicator
Touchscreen
Your touchscreen provides an excellent way to interact with and use
your Android phone. With the touch of your finger, you can
download and use available applications, make menu selections,
and access data saved to your phone.
The following terms are used for describing the different available
actions using the touchscreen:
Touch A single finger touch selects items. For example, touch an
icon (e.g., application or menu item), touch words (e.g., menu
selection or to answer onscreen question), or touch letters to type.
Touch and hold Touch and hold an item on the screen by
touching it and not lifting your finger until an action occurs. For
example, to open a pop-up menu for customizing the Home
screen, touch an empty area on the Home screen until the menu
pops up.
Drag Touch and hold an item for a moment and then, without
lifting your finger, move your finger on the screen until you reach
the target position. You can drag items on the Home screen to
reposition them.
Page 39

The Basics
Swipe or slide To swipe or slide, quickly move your finger across
the surface of the screen, without pausing when you first touch it
(so you don’t drag an item instead). For example, you can slide the
screen up or down to scroll a list, or browse through the different
Home screens by swiping from left to right (and vice versa).
Double-tap Double-tap to zoom a webpage or a map. For
example, quickly double-tap a section of a webpage to zoom that
section to fit the width of the screen. You can also double-tap to
control the Camera zoom, in Bing Maps, and in other applications.
Pinch-to-Zoom Use your index finger and thumb in a pinch or
spread motion to zoom in or out when using the browser, viewing
a map or pictures.
Rotate the screen From many applications, the orientation of the
screen rotates with the phone as you turn it from upright to
sideways and back again.
37
Rotate the phone counter-clockwise for
landscape orientation.
NOTE
To turn this feature on and off, from the Home screen, touch the Applications
Launcher Key > Settings > Display. Then touch the Auto-rotate screen
checkbox.
Rotate the phone clockwise for portrait
orientation.
Page 40

The Basics
38
Text Input Methods
Swype (default): Swype
enter a word by sliding your finger or stylus from letter to letter,
lifting your finger between words.
Android keyboard: The Android keyboard can also be used to enter
text. To switch to the Android keyboard, touch and hold a text field,
then touch Input method > Android keyboard.
Toggles from 123/ABC
mode to SYM mode
ou to view Swype
Allows y
Tips and Help.
™
is a text input method that allows you to
Using the Swype Keyboard
The default keyboard uses Swype™. Swype uses error correcting
algorithms and a language model to predict the next word. Swype
also includes a touch predictive text system.
Page 41

The Basics
Swype Tips
Access the Swype Tips to watch a video or tutorial on using Swype.
You can also use the following Swype text entry tips.
'
Create a squiggle (like an S shape) to create a double letter
(such as pp in apple).
'
Touch and hold a key to enter the alternate letter or symbol
located at the top right corner of the key.
'
Move your finger or stylus over the apostrophe to enter
contractions.
'
Double-touch on the word you want to change to correct a
misspelled word.
'
Touch the delete key to erase one character. Touch and hold
the delete key to erase an entire word.
Swype Settings
To configure Swype settings
1. From the Home screen, touch the Applications Launcher
Key
> Settings Language & keyboard > Swype.
2. Touch one of the following Swype settings to configure the
setting:
Preferences settings
Preferences settings provide access to Swype operation
preferences.
Language allows you to select the current text input language.
Default language is US English.
Word prediction allows you to use a built-in word database to
predict words while entering text in Swype.
39
Page 42

The Basics
40
Audio feedback allows you to turn on sounds generated by the
Swype application.
Vibrate on keypress allows you to activate a vibration sensation
as you enter text using the keypad.
Enable tip indicator allows you to turn on an on-screen flashing
indicator that provides helpful user information.
Swype Advanced Settings
Swype Advanced Settings provide access to Swype advanced
operation settings.
Auto-spacing allows you to automatically insert a space between
words. When you finish a word, just lift your finger or stylus and
start the next word.
Auto-capitalization allows you to automatically capitalize the first
letter of a sentence.
Show complete trace allows you choose whether or not you
want the complete Swype path to display.
Word choice window sets the amount of times the word choice
selection window displays on screen. Move the slider between
Never or Always and touch OK.
Speed vs. accuracy sets how quickly Swype responds to on-
screen input. Move the slider between Fast Response (speed) or
olerance
ror T
Er
(accuracy) and touch OK.
Page 43

The Basics
Help
This menu provides help and a tutorial to guide you through the
process.
Swype help displays the Swype User Manual.
Tutorial provides an on-screen tutorial.
About
The about menu provides the current software version for the
Swype application.
41
Page 44

The Basics
42
Using the Android keyboard
You enter text using the onscreen keyboard. Some applications
open the keyboard automatically. In others, you touch a text field
where you want to enter text to open the keyboard.
You can also enter text by speaking instead of by typing.
See 'Swype Advanced Settings' on p38 to know
how to set the suggestion function.
Touch once to capitalize the next letter you type.
Touch and hold for all caps.
Touch space or a punct
mark to enter the red
suggestion.
uation
Page 45

To enter text
Deutsch
1. Touch a text field.
The onscreen keyboard opens.
2. Touch the keys on the keyboard to type.
The characters you’ve entered appear in a predictive word
box above the keyboard, with suggestions for the word you
are typing. Touch the arrow to view more suggestions.
3. Enter text into the text field.
'
Touch the word you want as soon as it appears in the
predictive word box.
'
Touch the Space Key or a punctuation key to enter
the predicted word.
'
Touch another word in the predictive word box.
'
Continue touching letters until the word appears in the
predictive word box.
'
Touch the Delete Key to erase characters to the left of
the cursor.
NOTE
Words that do not appear in the predictive word box before you enter it
completely are automatically added to your dictionar
manually add a word, touch and hold the word to open a dialog box, then
touch Add to dictionary.
4. When you're finished typing, press the Back Key to
close the keyboard.
y for future use. To
The Basics
43
Page 46

The Basics
44
To enter numbers, symbols, and other characters
'
Touch the Symbols Key to switch to the numbers and
symbols keyboard.
Touch the Alt Key on the symbols keyboard to access
additional symbols; touch it again to switch back.
'
Touch and hold any of the letter keys to access alternate
symbols. Initially, the symbol at the top of the key pops up.
When the menu pops up, touch any of the alternate
characters or symbols displayed.
'
Touch and hold the Period Key (.) from abc mode to open a
small window to choose from various symbols.
'
Touch and hold a number or symbol key to open a window of
additional symbols.
To change the keyboard orientation
'
Turn the phone sideways or upright.
The keyboard is reoriented to take best advantage of the
new phone orientation.
Many people find the larger horizontal onscreen keyboard
easier to use.
You can control whether the screen
changes orientation automatically when
you turn the phone.
Page 47

The Basics
Entering text by speaking
You can use voice input to enter text by speaking. Voice input is an
experimental feature that uses Google’s speech-recognition service,
so you must have a data connection on a mobile or Wi-Fi network
to use it.
To enter text by speaking
You can enter text by speaking in most places where text is
allowed to be introduced.
1. Touch a text field.
2. Touch the
the Microphone Key to appear on the symbols keyboard,
touch the
Microphone Key on the keyboard (if you set
Symbols Key first).
45
Page 48

The Basics
46
3. When prompted to “Speak now,” speak what you want to
enter.
Say “comma,” “period,” “question mark,” “exclamation
mark,” or “exclamation point” to enter punctuation.
Text that you enter by speaking is underlined. You can
delete it, or you can continue entering text to keep it.
Touch once to capitalize the next letter you type.
Touch and hold for all caps.
When you pause, what you spoke is transcribed by the speechrecognition service and entered in the text field, underlined. You can
touch the
Delete Key to erase the underlined text. If you start
typing or entering more text by speaking, the underline disappears.
You can edit the text that you enter by typing or speaking.
Page 49

The Basics
Editing text
You can edit the text you enter in text fields and use menu
commands to cut, copy, and paste text, within or across
applications. Some applications don’t support editing some or all of
the text they display; others may offer their own way to select text
you want to work with.
To edit text
1. Touch and hold the text field that contains the text you want
to edit.
2. A context menu with editing options is displayed. Choose an
option to edit the text.
3. Once you are finished editing the text, press the
to close the keyboard.
To select text
You can select text to cut or copy. Selected text is highlighted in
orange.
1. Touch and hold the text field or other portion of the screen
that contains the text to select.
2. In the context menu that opens, touch
3. Select text by touching and dragging across the text you
want to select.
4. Touch and hold the text field again and touch
Select text.
Back Key
Cut or Copy.
47
Page 50

The Basics
48
To cut or copy text
1. Select the text to cut or copy.
2. Touch and hold the text field, then touch Cut or Copy in the
menu that opens.
If you touch Cut, the selected text is removed from the text
field. In either case, the text is temporarily stored in the
phone memory so that you can paste it into another text
field.
To paste text
1. Copy (or Cut) the text to paste.
2. Touch the position on the text field where you want to paste
the text. This will set the cursor to the desired position.
You can paste text that you copied from one application into
a text field in another application.
3. Touch and hold the text field, then touch
that opens.
The text is inserted at the cursor and remains temporarily
stored in the phone memory so you can paste that same
text in another location.
Paste in the menu
Page 51

The Basics
Applications: How to View, Open and Switch
All of the applications on your phone, including any applications that
you downloaded and installed from Android MarketTMor other
sources, are grouped together on one Launch screen that you
access from your Home screen. You can slide the screen up or
down to view more applications.
Overview
Home screen
Touch to open the Launch screen
Launch screen
Slide the screen up or down to
bring more icons into view
Touch an application icon to open
the application
Touch to close the Launch screen
Quick Keys
49
Page 52

The Basics
50
Opening and Closing the Launch screen
Opening the Launch screen
With your LG Vortex, it's easy to access the Launch screen no
matter what feature you're currently using. Simply press the
Home Key , then touch the Applications Launcher Key .
Closing the Launch screen
To manually close the Launch screen, press the Home Key
, or touch Home .
NOTE
The Launch screen closes automatically when you touch an icon to
open its application. Dragging an icon onto your Home screen also
closes the Launch screen automatically.
Customizing the Launch screen
The items on the Launch screen are listed alphabetically. You can
customize the Launch screen by moving the position of
applications so that you don't have to scroll the screen up to
access the applications you use most often. You can also add
additional categories to the screen to organize your files.
Moving application positions
1. From the Home screen, touch the Applications Launcher
Key
.
2. Press the Menu Key and touch Move Item.
3. Touch and drag the application icon to the position you want,
then lift your finger. Application icons to the right of the
position shift accordingly.
Page 53

The Basics
Adding a category
1. From the Home screen, touch Applications Launcher Key
.
2. Press the Menu Key and touch Add category.
3. Enter the category name, then touch
OK.
Opening and Switching Applications
Multi-tasking is easy with AndroidTMbecause open applications
keep running even when you open another application. There’s no
need to quit an application before opening another. You can use
and switch among several open applications. Android manages
each application, stopping and starting them as needed to ensure
that unused applications don’t waste your device's resources.
Opening an application
'
Open an application simply by touching its icon on the
screen.
TIP!
You can customize your Home screen with the application icons you use
most often. Applications are located on the Launch screen, but you can
copy any application icon to your Home screen for faster access. No
matter where the icon is, on the Launch screen or your Home screen,
just touch it to open and use it.
Opening multiple applica
tions
1. Touch an application icon to open it.
2. Press the Home Key .
NOTE
If the application icon you want is on your Home screen, simply touch
the icon to open and use it.
3. Touch the Applications Launcher Key .
4. Touch the icon for the other application you want to open.
51
Page 54

The Basics
52
Switching between multiple applications
1. Press and hold the Home Key .
A window opens with icons of applications that you’ve used
recently.
2. Touch the application icon you want to open.
Or touch the Back Key to return to the
current application.
Touch an icon to open an application
you
've used recently.
Adding application icons to the Home screen
Customize your Home screen with the applications you use most
often.
1. Open the Launch screen.
2. Touch and hold the application icon you want to add to your
Home screen. Your Launch screen will close so that you can
place the icon on a Home screen.
3. Lift your finger to place it, or drag the icon to where you
want it on the screen, then lift your finger.
Page 55

The Basics
Working with Menus
There are two kinds of Android menus: Options menus and Context
menus.
Options menus
Options menus contain tools that apply to the activities of the
current screen or application, not to any specific item on the
screen. To open the available Options menu, press the Menu Key
. Not all applications have Options menus; if you press the
Menu Key on a screen that has no Options menu, nothing
will happen.
Some applications have more Options menu items than can fit in
the options menu; touch
More to open the additional items.
Options menus contain items that
apply to the current screen or
to the application as a whole.
h to open more menu items.
ouc
T
53
Page 56

The Basics
54
Context menus
Context menus contain options that apply to a specific item on
the screen. To open a Context menu, touch and hold an item on
the screen. Not all items have Context menus. If you touch and
hold an item that has no Context menu, nothing will happen.
When you touch and hold
certain items on a screen, a
Context menu opens.
Managing Notifications
Notification icons report the arrival of new messages, calendar
events, alarms, as well as ongoing events, such as when you are in
a call.
When you receive a notification, text appears briefly and the
notification icon will be displayed in the Status bar.
You can open the Notifications panel to view a list of all recent
notifications. Depending on your settings, you may hear a
notification sound or the phone may vibrate.
Applications whose activities produce notifications, such as Gmail
and Google Talk, have their own settings, which you can use to
configure whether, and how, they send notifications.
TM
Page 57
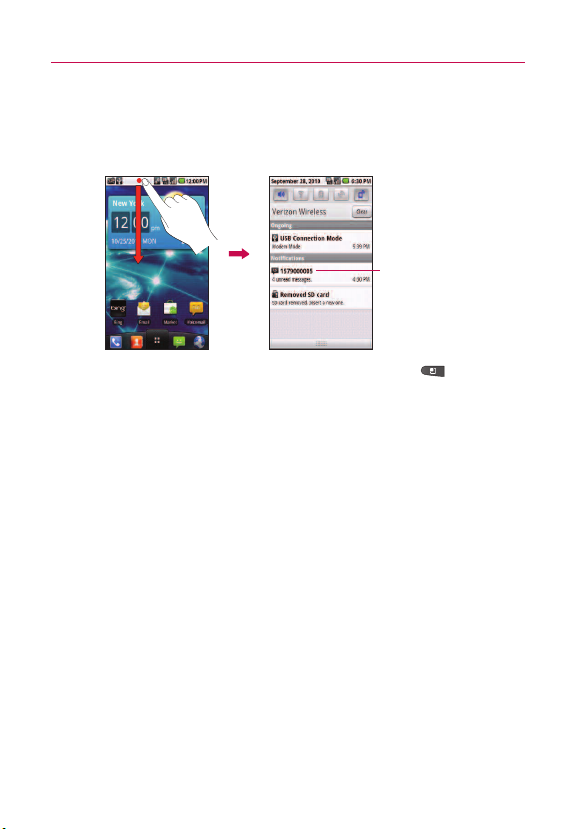
The Basics
To open the Notifications panel
'
Touch and drag the Status bar to the bottom of the screen.
OR
Touch a notification
to open it.
'
From the Home screen, press the Menu Key and touch
Notifications.
The Notifications panel displays your wireless provider and a
list of your current notifications, organized into ongoing and
event-based notifications.
To respond to a notification
1. Open the Notifications panel. Your current notifications are
listed in the panel, each with a brief description.
2. Touch a notification to view it.
The Notification panel will close and the application that
corresponds to your response will open. For example, new
voicemail notifications dial your voicemail box, and Gmail
notifications will open up the Gmail application so you can read
your messages.
55
Page 58

The Basics
56
To clear all notifications
1. Open the Notifications panel.
2. Touch the Clear button at the top right of the panel.
All event-based notifications will be cleared; ongoing
notifications will remain in the list.
To close the notifications panel
Touch and drag the tab at the bottom of the Notifications panel to
the top of the screen or just touch the Back Key .
The panel will also close when you touch a notification.
Searching Your Phone and the Web
You can search for information on your phone and on the web by
using the Quick Search Box or Bing search.
Some applications, such as Gmail, Contacts, and Browser have the
ability to search contents within those specific applications.
Along with being able to search by typing in search terms, you are
also able to search by voice.
Phone and Web search using text entry
1. Press the Search Key .
When you press the
or in other applications that support this, the Quick Search
Box will open automatically.
Search Key on the Home screen
Voice Search
ouc
T
h to searc
h by voice.
esults
ch r
Sear
vides one-touc
ro
P
matching search items.
h shortcut to
Page 59
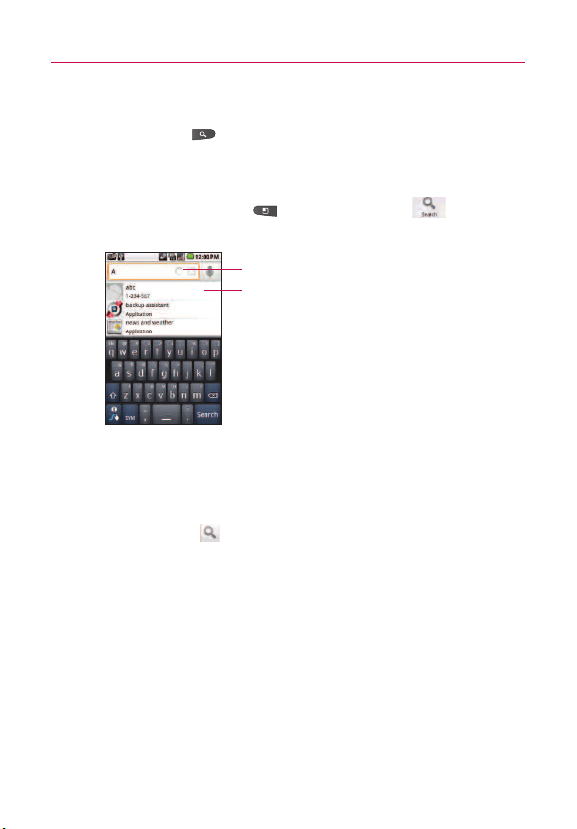
The Basics
In some applications, such as Gmail, Contacts, and Browser,
the application's own search box opens when you press the
Search Key . This is indicated by the application's icon
on the left side of the search box.
OR
Press the
Enter the text you're searching for in the Quick Search Box.
You can use the Search preferences to configure some
aspects of Bing web search (for example, whether it makes
suggestions below the Quick Search Box as you type), and
what phone features you want to include in searches.
2. Touch
OR
If what you want to search for what appears in the
suggestions list, touch that item to conduct the search.
Menu Key and touch Search .
Touch to conduct the search.
As you type, search results from
your phone, previous search
terms, and web search
suggestions appear. Touch an
item to search that term.
Search to search for the entered terms.
57
Page 60

The Basics
58
Locking the Screen
You can lock your screen so that only you can unlock it to make
calls, access your data, buy applications, and so on.
Setting a Lock Pattern for the First Time
1. Press the Home Key , then touch the Applications
Launcher Key
2. Scroll down and touch
3. Touch
Set up screen lock (under Screen unlock section).
4. Touch Pattern.
5. Read the instruction screen, touch
instructions on how to create an unlock pattern, then touch
Next when you're ready to create your unlock pattern.
6. You're prompted to draw and redraw your own pattern.
From then on, any time you wish to turn the phone on or
unlock the screen, you will need to draw your unlock pattern to
unlock the screen.
.
Settings > Location & security.
Next to see tutorial
Draw your unlock pattern.
Touch Continue to draw your
pattern again to confirm it.
Changing Your Lock Pattern
1. Press the Home Key , then touch the Applications
Launcher Key
.
Page 61

2. Scroll down and touch Settings > Location & security.
3. Touch
Change screen lock (under Screen unlock section).
4. Draw your current lock pattern.
5. Touch
Pattern to change it (or touch None to remove it).
6. You're prompted to draw and redraw your new pattern.
Using a PIN or Password to Lock the Screen
1. Press the Home Key , then touch the Applications
Launcher Key
2. Scroll down and touch
3. Touch
4. Touch
Change screen lock (under Screen unlock section).
Pin to lock the screen with a number sequence or
touch Password for an alphanumeric lock sequence.
5. You're prompted to enter and reenter the lock sequence.
From then on, you will need to enter the sequence and
touch
OK to unlock the screen.
NOTES
●
You have 5 opportunities to enter your unlock Pattern, PIN or Password. If
you used all the 5 opportunities, you can attempt it after 30 seconds.
●
When you can’t recall your unlock Pattern, PIN, or Password:
- If you’ve created a Google account on the phone, touch the Forgot
pattern? Key. Then, you are required to sign in with your Google account
to unlock your phone.
- If you haven’t created a Google account on the phone, you need to
perform a factory reset.
(Caution: If you perf
will be deleted. Please remember to back up any important data before
performing a factory reset.)
1. Turn the power off.
2. Press and hold the following keys at the same time for 5 seconds:
Down Volume Key + Home Key + Power/Lock Key.
3. When the power turns on, release the keys.
.
Settings > Location & security.
orm a factory reset, all user applications and user data
The Basics
59
Page 62

The Basics
60
Customizing the Home Screen
You can personalize your Home screen by adding application icons,
shortcuts, widgets, and other items to any Home screen pane. You
can also change the wallpaper.
To add an item to the Home screen
1. Go to the Home screen pane where you want to add the
item.
2. Press the
Or, just touch and hold an empty spot on the Home screen
pane.
NOTE
3. In the menu that opens, touch the type of item to add.
You can add the following types of items to the Home screen:
Shortcuts Add shortcuts to applications, a bookmarked webpage,
a favorite contact, a destination in Bing Maps, a Gmail label, a
music playlist, and more. The shortcuts available depend on the
applications you have installed.
Widgets Add any of a variety of widget applications to your Home
screen, including a clock, a music player, a picture frame, Bing
search bar, a power manager, a calendar of upcoming
appointments, a News and Weather widget, and more. Note that
more widgets can also be found on Android Market
Folders Add a folder where you can organize other Home screen
shortcuts and icons, or folders that contain all your contacts,
contacts with phone numbers, or starred contacts. Your folders'
contents are kept up-to-date automatically.
Menu Key and touch Add.
If there is no available space on a particular Home screen pane, Add will
not be available; you must delete or remove an item before you can add
another item. In this case, you have the option of switching to another
Home screen pane.
TM
.
Page 63

To move an item on the Home screen
1. Touch and hold the item.
2. Drag the item to a new location on the screen.
Pause at the left or right edge of the screen to drag the item
onto the next available Home screen pane.
3. When the item is where you want it, lift your finger.
To remove an item from the Home screen
1. Touch and hold the item, note that the Applications
Launcher Key
changes to an icon of a trash can.
2. Drag the item to the Trash Can.
3. When the icon turns red, lift your finger.
To change the Home screen wallpaper
1. Press the Home Key , then press the Menu Key
and touch Wallpaper.
You can also touch and hold an empty spot on the Home
screen, then touch Wallpapers in the menu that opens.
2. Touch
3. Touch
Gallery, Live wallpapers, or Wallpaper gallery.
'
Touch Gallery to use a picture on your phone as a
wallpaper. You can crop the picture before setting it as a
wallpaper.
'
Touch Live wallpapers to open a list of animated
wallpapers installed on your phone. Live wallpapers can
change according to the time of day, respond to touching
the screen, tell the time, or offer other information.
'
Touch Wallpapers to open a screen of wallpaper images
that come with the phone. Slide the thumbnail images left
and right to view the available images.
Set wallpaper or Save.
The Basics
61
Page 64

The Basics
62
To rename a folder
1. Touch the folder icon to open it.
2. Touch and hold the folder window's title bar.
3. Edit the current folder name.
4. Touch
OK.
Connecting Quickly With Your Contacts
As you build up your list of contacts on your phone, you can use
Quick Contact for Android to quickly chat, email, text message,
place a call, or to locate your contacts. Quick Contact for Android is
a special set of icons that you can use to quickly and easily connect
to a contact.
'
Open your Contacts list and touch the contact icon to the left
of the contact's name. A bubble will open with the available
options, displayed as icons. This is the Quick Contact bubble.
Depending on the contact information saved, the available
actions will be displayed above the name.
'
Touch a Quick Contact icon to communicate with the
contact.
Depending on the icon you've touched, a different application
will open. For example, the Bing Maps icon will be available
if an address is saved in that contact entry. By touching the
Bing Maps icon, the Bing Maps application will open and the
address will be mapped in Bing Maps.
If you add a shortcut for a contact to your Home screen, you will be
able to open Quick Contact for that contact.
Page 65

Connecting to Networks and Devices
Connecting to Mobile Networks
When you buy your phone and sign up for service, your phone is
configured to use your provider's mobile networks for voice calls
and for transmitting data.
Different locations may have different mobile networks available.
Initially, your phone is configured to use the fastest mobile network
available for data. But you can configure your phone to use only a
slower 1X network for data, to extend the life of your battery,
between charges. You can also configure your phone to access a
different set of networks entirely, or to behave in specific ways
when roaming.
The icons in the Status bar indicate which kind of data network
you're connected to and the network signal strength.
Connected to the 3G network (EVDO revA)
Connected to a 2G network (1x)
The more bars that are lit, the stronger the wireless signal
Connected to another wireless service provider’s network (roaming)
When connected to slower networks, you may want to postpone
using your phone for data-intensive tasks until you are connected to
a faster network again, or find a Wi-Fi network to connect to.
To disable data when roaming
You can prevent your phone from transmitting data over other
carriers' mobile networks when you leave an area that is covered
by your carrier's networks. This is useful for controlling expenses if
your cell plan doesn't include data roaming.
1. Press the
Launcher Key
2.
Scroll down and touch Settings > Wireless & networks >
Mobile networks.
Home Key , then touch the Applications
.
63
Page 66

Connecting to Networks and Devices
64
3. Touch Data roaming to remove the checkmark from the box.
With Data roaming unchecked, you can still transmit data
with a Wi-Fi connection.
To limit your data connection to 2G networks
You can extend your battery life by limiting your data connections
to 2G networks. When you are connected to a 2G network, you
may want to postpone activities that transmit a lot of data, such
as sending, uploading, or downloading pictures or video, until you
are connected to a faster mobile or other wireless network.
1. Press the
Launcher Key
2. Scroll down and touch
Mobile networks > Network mode.
3. Touch
Home Key , then touch the Applications
.
Settings > Wireless & networks >
1x only.
Connecting to Wi-Fi Networks
Wi-Fi is a wireless networking technology that can provide Internet
access at distances of up to 100 meters, depending on the Wi-Fi
router and your surroundings.
To use Wi-Fi on your phone, you must connect to a wireless access
point, or
simply connect to them. Others are hidden or implement other
security features, so you must configure your phone so it can
connect to them.
Turn off Wi-Fi when you're not using it, to extend the life of your
battery.
The following Status bar icon indicates your Wi-Fi status.
“
hotspot.”Some access points are open and you can
Connected to a Wi-Fi network (waves indicate connection strength)
Notification that an open Wi-Fi network is in range
Page 67

Connecting to Networks and Devices
When you connect to a Wi-Fi network, the phone obtains a network
address and other information it needs from the network, using the
DHCP protocol. To configure the phone with a static IP address and
other advanced settings, from Wi-Fi settings press the Menu Key
and touch Advanced.
To turn Wi-Fi on and connect to a Wi-Fi network
1. Press the Home Key , then touch the Applications
Launcher Key
2. Scroll down and touch
Wi-Fi settings
3. If the Wi-Fi box is not checkmarked, touch
and scan for available Wi-Fi networks.
c
A list of available Wi-Fi networks will be displayed. Secured
networks are indicated by a lock icon.
c
If the phone finds a network that you have connected to
previously, it automatically connects to it.
4. Touch a network to connect to it.
c
If the network is open, you will be prompted to confirm
that you want to connect to that network by touching
Connect.
c
If the network is secured, you will be prompted to enter a
password. (Ask your network administrator for details.)
c
When you're connected to a network, you can touch the
network name in the Wi-Fi settings screen for details about
the speed, security, address, and related settings.
.
Settings > Wireless & networks >
.
Wi-Fi to turn it on
65
Page 68

Connecting to Networks and Devices
66
To receive notifications when open networks are in range
By default, when Wi-Fi is on, you receive notifications in the
Status bar when your phone detects an open Wi-Fi network.
1. Turn on Wi-Fi, if it's not already on.
2. From the Wi-Fi settings screen, touch
Network notification
to checkmark the box.
Touch again to remove the checkmark and stop receiving
notifications.
To add a Wi-Fi network
You can add a Wi-Fi network so the phone will remember it, along
with any security credentials, and connect to it automatically when
it is in range. You can also add a Wi-Fi network manually if it does
not broadcast its name (SSID) or if you want to add a Wi-Fi
network when you are out of its range.
To add a secured network, you need to contact the network's
administrator to obtain the password or other required security
credentials.
1. Turn on Wi-Fi, if it's not already on.
2. From the Wi-Fi settings screen, touch
3. Enter the
Network SSID (name) of the network.
4. Touch the drop-down menu arrow in the
touch the type of security used on the network.
5. Enter the required passwords and security credentials.
6. Touch
Save.
The phone will connect to the wireless network. Any
credentials that you entered are saved, so you are
connected automatically the next time you come within
range of this network.
Add Wi-Fi network.
Security box, then
Page 69

Connecting to Networks and Devices
To forget a Wi-Fi network
You can make the phone forget about the details of a Wi-Fi
network that you added. For example, if you don't want the phone
to connect to it automatically or if it is a network that you no
longer use.
1. Turn on Wi-Fi, if it's not already on.
2. In the Wi-Fi settings screen, touch and hold the name of the
network.
3. Touch
Forget network.
ActiveSync
ActiveSync synchronizes information on your device with
information on your PC, such as Outlook content. ActiveSync can
also synchronize over a cellular network with Microsoft Exchange
Server, if your company or service provider is running Microsoft
Exchange Server with Exchange ActiveSync. When you synchronize,
ActiveSync compares the information on your device with the
information on your PC and/or Exchange Server and updates all
locations with the most recent information.
With ActiveSync, you can:
'
Synchronize information, such as Outlook E-mail, Contacts,
Calendar, or Tasks information on your device with your PC,
as well as pictures, video, and music.
'
Synchronize Outlook E-mail, Contacts, Calendar
appointments, and Tasks on your device directly with
Exchange Server so that you can stay up to date even when
your PC is turned off.
'
Exchange files between your device and your PC without
synchronizing.
67
Page 70

Connecting to networks and devices
68
'
Select which types of information are synchronized and
specify how much information is synchronized. For example,
you can choose how many weeks of past Calendar
appointments to synchronize.
Before you can synchronize information with a PC, first, install
ActiveSync on your PC, then create a synchronization pairing
between your device and the PC. You can install ActiveSync from
the Getting Started disc that comes with your Vortex
TM
.
Once you have installed ActiveSync and set up a synchronization
relationship, ActiveSync on the PC recognizes your device when you
connect it, and automatically transfers the synchronization settings
you specified on your device.
You may be able to synchronize your device with Exchange Server
through your company or wireless service provider. If you plan to do
so, obtain e-mail address, Exchange Server address, user name,
password, and domain name from your administrator before starting
the Sync Setup Wizard.
Windows Media Sync
By using PC Client programs like Windows Media Player or
Rhapsody you can easily sync the Multimedia files from the PC
(Music, Video, Image).
Follow the process below to Connect.
1. Touch the
Key
OR
Connect the USB Cable. Then open the Notifications panel and
touch
Applications Launcher Key > Music > Menu
> Sync .
USB Connection Mode > Windows Media Sync.
Page 71

Connecting to networks and devices
Follow the process below to Disconnect.
1. Open the Notifications panel and touch
Mode
> Modem Mode or Mass Storage Mode.
2. Open the Notifications panel and touch
sync
. When the pop-up appears, touch OK for disconnection.
3. Disconnect the USB Cable.
NOTE
SD Card must be inserted on the mobile and it is recommended to use
the USB Cable that is supplied by LG. If the microSD Card is used in
other device, it is better to use after the format.
69
USB Connection
Windows media
Page 72

Connecting to networks and devices
70
USB Autorun
USB Autorun is a feature that allows a LG VortexTMto connect to a
PC using a USB cable and sets up the on a PC without a physical
CD-ROM.
'
Automatically installs the LG USB Modem Driver.
'
Allows the phone to be used as a Mass Storage when a
microSD card is present in the LG VortexTM. It allows transfer
of unprotected content from phone to PC and vice versa.
To select USB mode for Autorun
1. Press the Home Key , then touch the Applications
Launcher Key
connection mode
2. Touch
NOTES
Mass Storage mode to connect PC for Autorun.
●
USB Autorun only works with Windows®XP, Window 7 and, Vista
operating systems.
●
Log on to the PC as Administrator. Non-Administrator accounts have
insufficient privilege to install USB Modem driver and don’t run Autorun
feature.
●
Do not unplug USB cable during Autorun.
Autorun automatically installs USB device driver for every USB
mode.
> Settings > Connectivity > Default
.
TM
Page 73

Connecting to networks and devices
Modem Mode with Autorun
Autorun may automatically use Modem mode in certain
circumstances.
'
If no SD card is inserted in device, Autorun automatically
switches to Modem mode even if the mode is set to
Window Media Sync or Mass Storage mode.
'
Even if the option Always ask is checkmarked, Autorun
automatically switches to Modem mode without additional
pop-up message notice.
'
Autorun automatically switches to Modem mode if the
connection fails while syncing or connecting.
Autorun is not available when:
'
Phone is booting (powering up).
'
PC operating system is not set to Autorun (automatic
execute command).
To set Autorun on your PC operating system:
Insert the LG disk in your PC, double-click the CD drive, when the
disc drive window opens, double-click the LG Autorun application
(TL_Bootstrap.exe).
TM
For Autorun in Windows Vista
and Windows 7, open the Control
Panel, then click Autoplay > Software and games > Install (or run
program. Autorun is only executed manually when it's set as:
Open folder to view files using Windows Explorer - Take no action
/ Ask me every time.
To change the setting while Autorun is running :
You can change the settings while Autorun is running. Press the
Home Key , then touch the Applications Launcher Key >
Settings > Connectivity > Default connection mode > Mass
Storage mode
.
71
Page 74
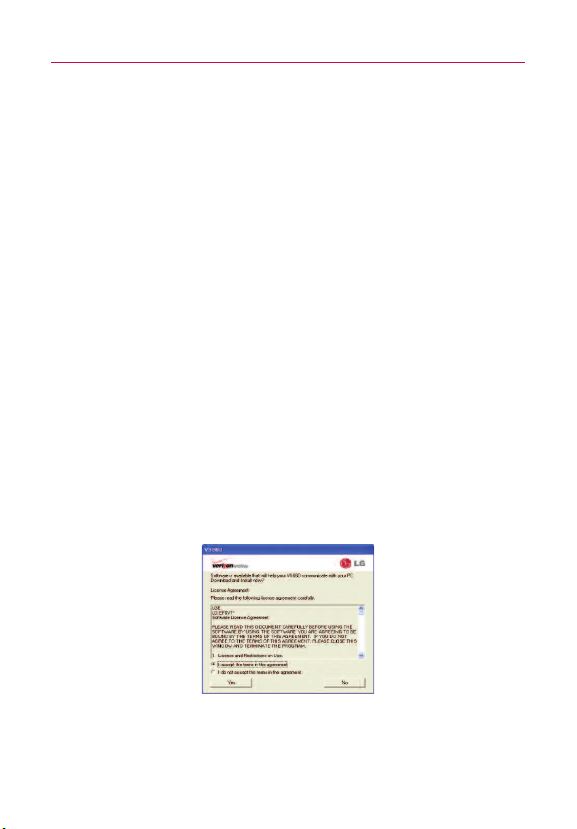
Connecting to networks and devices
72
NOTE
Be sure to checkmark the box Always ask if you want to be asked to
confirm the USB mode connection when the phone is connected to a computer.
Using the Status bar to change the settings
The Status bars shows the current USB connection mode so you
can easily open the the Status bar and change the settings as
needed.
When the USB is connected, the current USB connection mode
appears on the Notifications panel. Touch the connection setting to
display a pop-up box where you can change the USB connection
mode.
NOTE
If the Always ask checkbox is marked, the pop-up box is only provided
during USB connection, but is not provided in the notification area.
If the default sync mode is 'Windows media sync', the sync
connection is listed separately in the Notifications panel. Select it
to display a pop-up box that asks if you want to disconnect. If you
choose to disconnect, the connection changes to modem mode.
Step 1. Connecting Phone to PC
'
Connect your phone to your PC with a compatible USB cable
(supplied) and LG Autorun starts automatically.
'
Click ‘I accept the terms in the agreement’ and ‘Yes’.
NOTES
●
Without the Autorun, the release notes for USB Autorun would pop-up as
shown.
●
Autorun is only supported for Windows®XP, Windows®Vista, Windows®7,
®
Mac OS X
above v10.5.
Page 75
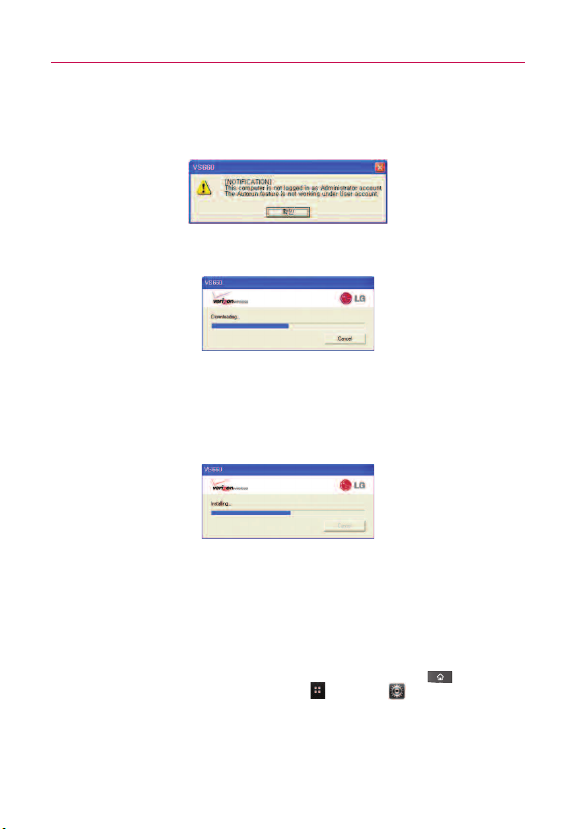
Connecting to networks and devices
●
The ‘USB Autorun’ feature works only under an Administrator account.
The installer has insufficient privileges under a Non-Administrator account.
Log on as Administrator. The device is switched back to the user set
mode with 30 seconds.
Step 2. Downloading LG USB Modem Driver.
NOTES
●
If previous version of LG USB Modem Driver is installed in the computer,
it will automatically be updated to the recent version of Driver.
●
If recent version of LG USB Modem Driver is installed in the computer,
LG Autorun skips ‘Step 2.’
Step 3. Installing LG USB Modem Driver.
Step 4: Downloading or Running V Cast Media Manager
NOTES
●
If V Cast Media Manager is already installed in the computer, USB
Autorun would not download V Cast Media Manager and just runs the
installed program.
●
Downloading or running V Cast Media Manager works only in Mass
storage mode. To set the mode, press the Home Key , then touch
Applications Launcher Key > Settings > Connectivity >
the
Default connection mode > Mass storage mode.
73
Page 76

Connecting to networks and devices
74
Enable DUN
While traveling, you can use your phone as a modem for your
notebook. Use either VZAccess Manager or the Modem Link
program to use your phone as a USB or Bluetooth modem.
Before you proceed
'
To connect your device to a computer via USB, you must first
install the LG USB driver on the computer.
'
Make sure your phone has a data or dial-up modem
connection on the device manager of your computer.
'
To use a Bluetooth connection, make sure your computer
has built-in Bluetooth capability. If your computer does not
have Bluetooth, you can connect and use a Bluetooth
dongle.
Page 77
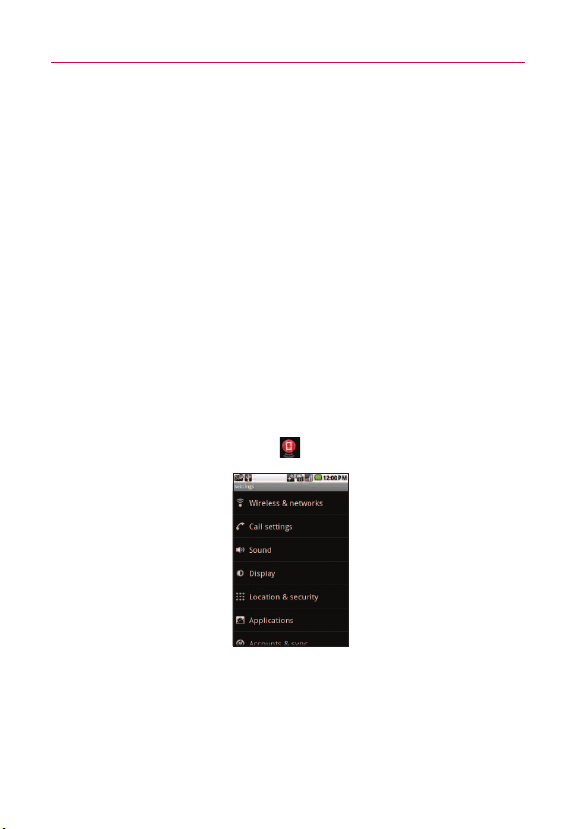
Connecting to networks and devices
Sharing your phone’s mobile data connection
You can share your phone’s data connection with up to eight
devices at once, by turning your phone into a portable Wi-Fi hotspot.
When your phone is sharing its data connection, an icon appears in
the Status bar and as an ongoing notification in the Notifications
panel.
For the latest information about tethering and portable hotspots,
including supported operating systems and other details, visit
www.android.com/tether.
Make Your Device a 3G Mobile Hotspot
3G Mobile Hotspot can share the phone’s 3G data connection with
any Wi-Fi capable devices.
WARNING!
There are security risks associated with creating a wi-fi network open to the
public. It is highly recommended that you take steps to protect your wi-fi
network from unauthorized access. To add encr
yption to your Wi-Fi hotspot:
1. Touch 3G Mobile Hotspot from the Menu.
75
Page 78

Connecting to networks and devices
76
2. Touch 3G Mobile Hotspot.
3. Touch the
3G Mobile Hotspot checkbox to enable this
feature.
4. Touch
3G Mobile Hotspot settings to set up and manage the
3G Mobile Hotspot.
Page 79
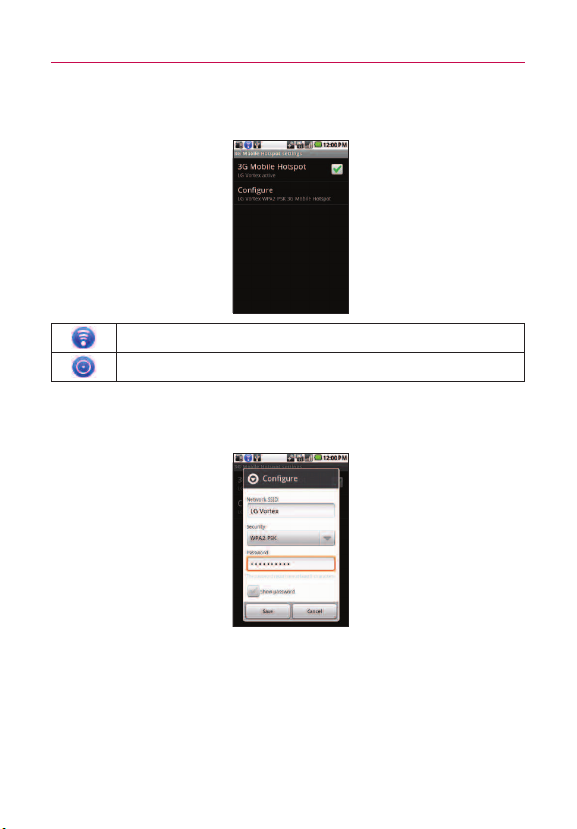
Connecting to networks and devices
5. Touch Configure from menu to view the SSID, Security, and
Password.
Portable Wi-Fi hotspot is active
Portable hotspot are active
6. You are allowed to configure the SSID and Password on this
screen.
77
Page 80

Connecting to Networks and Devices
78
7. If you want to change the security protocol, touch the
Security menu and choose Open or WPA2 PSK from the pop
up menu.
If you select WPA2 PSK, input a password for the connection and
then touch
Save.
Your portable hotspot is now created.
You will use the Portable Wi-Fi hotspot checkbox from above to
enable and disable the connection. Once the connection is active,
go to the device you wish to connect and configure its wireless
connection to the Network SSID for your Android device and input
the password (if you are using WPA2 PSK). You will now have
wireless access on your device.
NOTE
WEP is the weakest option because it is highly vulnerable to hacking.
WPA2 is recommended by IEEE.
Page 81

Connecting to Networks and Devices
Connecting to Bluetooth Devices
Bluetooth is a short-range wireless communications technology that
devices can use to exchange information over a distance of about
30 feet. The most common Bluetooth devices are headphones for
making calls or listening to music, hands-free kits for cars, and other
portable devices, including laptops and cell phones.
There are several Bluetooth profiles that define the features and
communications standards for Bluetooth devices.
To connect to a Bluetooth device, you must turn on your phone's
Bluetooth. To use your phone's Bluetooth with another device, you
must first pair the two devices. Pairing creates a secure
Bluetooth is on
Connected to a Bluetooth device
connections between the two devices.
Turn off Bluetooth when you're not using it to extend the life of your
battery between charges. Bluetooth is one of the wireless functions
that is turned off when Airplane mode is set to On.
The Status bar displays icons that indicate the Bluetooth status.
To turn Bluetooth on or off
1. Press the Home Key , then touch the Applications
Launcher Key
2. Scroll down and touch Settings > Wireless & networks.
3. Touch
The phone supports HFP, HSP, A2DP, AVRCP, OPP, PBAP, FTP, DUN.
Bluetooth®QD ID B016832
Bluetooth to turn the function on or off.
.
79
Page 82

Connecting to Networks and Devices
80
To change your phone’s Bluetooth name
Your phone has a generic Bluetooth name by default, which is
visible to other devices when you set the phone as 'Discoverable'.
You can change the name to customize it to your preference.
1. Press the
Launcher Key
2. Scroll down and touch
Bluetooth settings
c
3. Touch
Home Key , then touch the Applications
.
Settings > Wireless & networks >
.
If Bluetooth is off, touch Bluetooth to turn it on.
Device name, enter a new name then touch OK.
To pair your phone with a Bluetooth device
You must pair your phone with another device before you can
connect to it.
1. Press the
Launcher Key
2. Scroll tdown and touch
Bluetooth settings
c
c
Touch Scan for devices to scan for and display the IDs of all
c
3. Touch the ID of the device you want to pair with your phone.
c
Home Key , then touch the Applications
.
Settings > Wireless & networks >
.
If Bluetooth is off, touch Bluetooth to turn it on.
available in-range Bluetooth devices.
If the device you want to pair with isn't on the list, make
sure the target device is set to be discoverable, then touch
Scan for devices to scan again.
Often, the target device will be discovered and pairing will
occur automatically.
Page 83

Connecting to Networks and Devices
c
If you're prompted to enter a passcode, try entering 0000
or 1234 (the most common passcodes), or consult the
documentation that came with the target device to find its
passcode.
c
Once the pairing is successful, your phone will connect to
the device.
To connect to a Bluetooth device
Once paired, you can connect to a Bluetooth device as needed.
1. Press the
Launcher Key
2. Scroll down and touch
Bluetooth settings
c
Home Key , then touch the Applications
.
Settings > Wireless & networks >
.
If Bluetooth is off, touch Bluetooth to turn it on.
3. In the list of Bluetooth devices, touch and hold the name for
the paired device on the list.
To configure the Bluetooth features you want to use
Some Bluetooth devices have multiple profiles. Profiles can be the
ability to transmit your phone conversations, to play music with
Bluetooth stereo headphones, or to transfer files or other data.
1. Touch and hold the device listed in the Bluetooth settings
screen.
2. Touch
3. Touch a profile to add or remove the checkmark (to enable or
4. When you're finished, press the
Options in the menu that opens.
A screen opens with a list of the available profiles.
disable the profile).
Back Key .
81
Page 84

Connecting to Networks and Devices
82
To disconnect from a Bluetooth device
1. Touch the device in the Bluetooth settings screen.
2. Touch
OK to confirm that you want to disconnect.
To unpair a Bluetooth device
You can unpair a Bluetooth device and erase all pairing information
about it.
1. Touch and hold the device listed in the Bluetooth settings
screen.
2. Touch Disconnect and unpair or Unpair in the menu that opens.
Connecting to Virtual Private Networks
Virtual private networks (VPNs) allow you to connect to resources
inside a secured local network, from outside that network. VPNs are
commonly deployed by corporations, schools, and other institutions
so that their users can access local network resources when not on
campus, or when connected to a wireless network.
There are numerous systems for securing VPN connections,
including some that rely on secure certificates or other methods to
ensure that only authorized users can connect. For information
about installing secure certificates, see Working with Secure
Certificates on page 84.
To configure VPN access from your phone, you must obtain the
details from your network administrator.
To add a VPN
1. Press the Home Key , then touch the Applications
Launcher Key
2. Scroll down and touch
VPN settings.
3. Touch
4. Touch the type of VPN to add.
Add VPN.
.
Settings > Wireless & networks >
Page 85

Connecting to Networks and Devices
5. In the screen that opens, follow the instructions from your
network administrator to configure each component of the
VPN settings.
6. Press the
Menu Key and touch Save.
The VPN will be added to the list on the VPN settings
screen.
To connect to a VPN
1. Press the Home Key , then touch the Applications
Launcher Key
2. Scroll down and touch
VPN settings.
.
Settings > Wireless & networks >
The VPNs you've added are listed on the VPN settings
screen.
3. Touch the VPN to which you want to connect.
4. In the dialog box that opens, enter any requested credentials
then touch
c
When you're connected to a VPN, you will receive an
Connect.
ongoing notification in the Status bar.
c
If you are disconnected, you will receive a notification that
you can touch to return to the VPN settings screen.
To disconnect from a VPN
'
Open the Notifications panel then touch the ongoing
notification for the VPN connection. This will allow you to
disconnect.
83
Page 86

Connecting to Networks and Devices
84
Working With Secure Certificates
If your organization's VPN or Wi-Fi network relies on secure
certificates, you must obtain the certificates and store them in your
phone's secure credential storage before you can configure access
to that VPN or Wi-Fi network on your phone.
For specific instructions, contact your network administrator.
To install a secure certificate from the microSD card
1. Copy the certificate from your computer to the root (that is,
not in a folder) of the microSD card.
2. Press the
Launcher Key
3. Scroll down and touch
4. Scroll down and touch
5. Touch the file name of the certificate to install.
Only the names of certificates that you have not already
installed on your phone are displayed.
6. If prompted, enter the certificate's password then touch
7. Enter a name for the certificate then touch
If you have not already set a password for your phone's
credential storage, you will be prompted to enter a password
for it, twice, then touch OK.
You can now use the certificate that you installed when
connecting to a secure network. For security purposes, the
certificate will be deleted from the microSD card.
Home Key , then touch the Applications
.
Settings > Location & security.
Install from SD card.
OK.
OK.
Page 87

microSD Card
microSD Card
'
Your Device's microSD Card and Adapter
'
microSD Card Settings
'
Connecting Your Device to Your Computer
Your Device's microSD Card and Adapter
The microSD Card
Your phone is equipped with a preinstalled microSDTMmemory card
to expand the phone’s available memory space. It allows you to
store images, videos, music, and voice data in your device.
Removing the microSD Card
To safely remove the microSD card from your device, first you need
to unmount the microSD card before removing it from the phone.
WARNING!
On the Android OS 2.2, you can download applications from Android Market
and can store them on microSD card as well as on the device. Since that, if
you skip the unmount procedure, it can cause an error because information
between microSD card and the device is accorded properly. In worst case,
the microSD card can be corrupted or damaged.
1. Touch the Applications Launcher Key > Settings > SD
card & phone storage
> Unmount SD card > OK. Now you
can safely remove the microSD card.
2. Uncover the microSD slot located on the left side of the
phone.
3. Gently push the exposed edge of the microSD card in with
your fingertip to release it from the slot.
4. Carefully pull the microSD card out of the slot.
NOTE
You can easily damage the microSD card and its adapter by improper
operation. Please be careful when inserting, removing, or handling them.
85
Page 88

microSD Card
86
Inserting the microSD Card
1. Gently uncover the microSD slot located on the left side of
the device.
2. Position the microSD card with the label side facing up and
slide it into place until it is fully inserted and locked in place.
NOTE
Be sure to use only recommended microSD cards (up to 32GB). Using
non-recommended microSD cards could cause data loss and damage
your device.
microSD Icon Indicators
The following icons show your microSD card connection status at a
glance:
card has been unmounted (released from use) from the device.
card is being prepared for use and for mounting.
NOTE
DO NOT remove a microSD card while files are being accessed or
transferred. Doing so will result in loss or damage of dat
your battery is fully charged before using the microSD card. Your data may
become damaged or unusable if the battery runs out while using the
microSD card.
a. Make sure
microSD Adapter
The supplied microSD adapter allows you to use microSD cards in
other SD-compatible devices, like computers, cameras, and printers.
Before using the microSD card with an SD-compatible device, you
will need to insert the microSD card into the microSD adapter.
To insert the microSD card into the microSD adapter:
'
With the label side of the microSD card facing up, insert the
card into the supplied microSD adapter, and gently slide the
card until it is fully inserted.
To remove the microSD card from the microSD adapter:
'
Hold the front edge of the microSD card, and gently pull it
out to remove it from the adapter.
Page 89

microSD Card
Write Protection
The microSD adapter has a built-in Write Protection lock to prevent
accidental overwriting or removal of your data when the microSD
card and adapter are inserted in another device.
'
Slide the Write Protection lock tab down into the “Lock”
position to prevent overwriting of data. To allow data to be
added or removed from the microSD card, slide the Write
Protection lock tab up into the normal position.
microSD Card Settings
Viewing Memory in the microSD Card
1. Touch the Applications Launcher Key > Settings >
SD card & phone storage
2. Review the available information.
c
The storage capacity page is divided into two sections:
External SD card and Internal phone storage.
3. Press to return to the previous page.
Formatting the microSD Card
Formatting a microSD card permanently removes all files stored on
the card.
1. Touch the
SD card & phone storage
2. Touch Unmount SD card to release the microSD card from
its use by the device. Touch OK to confirm you want to
unmount the microSD card. The icon appears within the
Notifications panel to indicate an unmounted internal
microSD card.
3. Once released, touch
Erase everything
c
Once completely formatted, the card is automatically remounted (reconnected for use by the device).
Applications Launcher Key > Settings >
.
.
.
Format SD card > Format SD card >
87
Page 90

microSD Card
88
NOTE
The formatting procedure erases all the data on the microSD card, after
which the files CANNOT be retrieved. To prevent the loss of important
data, please check the contents before you format the card.
Connecting Your Device to Your Computer
Before using your device's mass storage capabilities, you need to
prepare your device's data services to synchronize with your
desktop or laptop computer. Once you have connected the device
to the computer, you can transfer your data to or from the microSD
card.
To connect your device to a computer via USB:
1. Use the USB cable that came with your phone to connect
the phone to a USB port on your computer.
2. Open the Notifications panel, and then touch
Connection Mode
.
3. Touch the connection mode you want to connect to the PC
as. Choose from the following options:
Sync
, Modem mode, or Mass storage mode.
c
When the device is connected as USB storage, you receive
a notification.
c
You device's microSD card is mounted as a removable drive
on your computer. You can now copy files to and from the
microSD card. For more information, see the
documentation for your computer.
c
During this time, you will not be able to access the
microSD card in your device, so you can't use applications
that rely on the microSD card, such as Camera, Gallery,
and Music.
USB
Windows Media
Page 91

microSD Card
To remove the connection:
WARNING!
Carefully follow your computer's instructions to unmount, remove, or
disconnect any removable USB devices or disks, to avoid losing information
on the microSD card when disconnecting your phone from your computer.
1. On your computer, complete the process to safely Stop, or
Remove, the USB device (in this case, the phone). For
example, use the Safely Remove Hardware option to Stop
the USB device, on Windows®XP.
2. If using Windows Media Sync, make sure you disconnected
by opening the Notifications panel and touching
media sync
.
Windows
3. Carefully remove the USB cable from the phone.
Important Connection Information
'
To avoid loss of data, DO NOT remove the USB cable, the
microSD card, or the battery while accessing or transferring
files.
'
DO NOT use your computer to change or edit folder or file
names on the microSD card, and do not attempt to transfer
large amounts of data from the computer to the microSD
card. Doing so may cause the microSD card to fail.
'
DO NOT turn off or restart your computer, or put it into
standby mode, while using a mass storage device. Doing so
will result in loss or damage of data.
'
The internal microSD card can only be mounted for use by
either the device or a connected computer. Prior to
accessing the card via a different method, it must first be
unmounted from its current device (phone or computerUSB).
IMPORTANT
The internal microSD card can only share a connection
with one device at a time, either your device or your
computer (via its USB connection), not both. You cannot
browse the contents of the card via your device if they
are currently being browsed via your computer.
89
Page 92

Placing and Receiving Calls
X
X
90
Placing and Ending Calls
You can place calls using the Phone application on any of the four
tabs across the top of the screen. You can dial calls manually using
the Phone tab. You can dial using your phone's memory, using the
Call log tab; the Contacts tab; or the Favorites tab.
To open the Phone application
'
From the Home screen, touch the Phone Key .
To place a call by dialing
1. Open the Phone application.
Touch and hold to enter +, for
international calls.
h to erase a digit.
ouc
T
to erase the entire number.
2. Touch the keys on the dial pad to manually enter a phone
number.
c
If you enter a wrong number, touch the Delete Key to
erase digits one by one.
c
To erase the entire number, touch and hold the Delete Key
.
c
To dial an international number, touch and hold the 0 key to
enter the plus ( + ) symbol. Then, enter the international
prefix for the country; followed by the full phone number.
3. Touch the
Call Key to dial the number that you entered.
Touch and hold
Page 93

The duration of the call.
Information from Contacts about the
person you're calling.
Touch to enter additional numbers
during your call.
Touch to end a call.
c
You can use other phone features while the call is
underway. If you open another application, the Call icon
appears in the Status bar for the duration of the call.
c
Press the Up/Down Volume Keys to adjust the call volume.
c
Use the onscreen buttons to enter additional numbers,
place the call on hold and take an incoming call, add
another call, use the speakerphone, end the call, and other
options.
NOTE
If you opened other applications while on a call, you'll need to press the
Home Key and touch the Phone Key or drag down the
Notifications panel down and touch the Call icon .
Airplane mode
Some locations may require you to turn off your phone's wireless
connections by placing your phone in Airplane mode.
1. Press and hold the Power/Lock Key .
2. Touch
Airplane mode.
The Wireless & networks settings also has a checkbox to
enable or disable Airplane mode.
91
Page 94

Placing and Receiving Calls
92
Answering or Rejecting Calls
When you receive a phone call, the Incoming Call screen opens
with the caller ID and any additional information about the caller that
you have saved in the Contacts list.
All incoming calls are recorded in the Call log.
To answer a call
'
Use the Answer Key to answer a call. If your screen is
unlocked, simply touch the Answer Key , but if the screen
is locked, drag the Answer Key to the right.
If you were already on a call, the first call is placed on hold
while you answer the new call.
To silence the incoming call ringer, press the Up/Down
Volume Key.
When unlocked When locked
Touch the
Answer Key to
answer the call.
Touch the Send
SMS Key to send
an Excuse
message to the
caller instead of
answering the call.
Drag the
Answer Key to
the right to
answer the call
Page 95

Placing and Receiving Calls
To decline a call and divert it to voicemail
'
Drag the Decline Key to the left. The caller is sent directly to
your voicemail box to leave a message.
When unlocked When locked
You can touch
the Send SMS
Touch the
Decline Key to
decline the call.
'
To silence the ringer, press the Down Volume Key.
Key to send an
Excuse message
instead of
sending the
caller to your
voicemail.
Working with the Call Log
The Call log is a list of all the calls you’ve placed, received, or
missed. It offers a convenient way to redial a number, return a call,
or add a number to your Contacts.
To open the Call log
'
Press the Home Key , touch the Phone Key , then
touch the Call log tab at the top of the screen.
Calls are listed in the Call log tab, the most recent calls are
located at the top of the list. Scroll down to see older entries.
93
Touch to return the call.
Indicates an outgoing call.
h to open a group of calls exchanged
ouc
T
sequentially with the same number
Touch and hold an entry for more options.
.
Page 96

Placing and Receiving Calls
94
To dial a number in the Call log
'
From the Call log, touch the Call Key at the right of the
entry.
You can also touch and hold the entry to open a menu with
more options, to communicate with that contact in other
ways.
To add an entry’s number to your Contacts
1. Touch and hold the entry.
2. Touch Add to contacts.
3. In the list of contacts that opens, touch
at the top, or touch an existing contact to add the new
number to that existing contact.
To take other actions on a Call log entry
'
Touch a Call log entry to open a screen from where you can
call the contact, send the contact a message, add the
number to your Contacts list, and learn more about the
original call.
'
Touch and hold a Call log entry to open a menu where you
can call the contact, view contact information, edit the
number before you redial, and more.
To clear the Call log
'
Press the Home Key , touch the Phone Key , then
touch the Call log tab at the top of the screen. Press the
Menu Key , then touch Clear call log.
You can also touch and hold an entry in the log. In the menu
that opens, touch
entry from the log.
Remove from call log to remove just that
Create new contact
Page 97

Placing and Receiving Calls
Calling Your Contacts
Instead of manually dialing phone numbers using the dialpad, you
can use your Contacts list to dial quickly and easily.
You can also quickly call a contact by using Quick Contact.
If you have contacts on the web, they're synchronized with your
phone when you first connect to your GoogleTMAccount.
To call a contact
1. Press the Home Key , then touch Contacts .
2. Touch the contact to call.
3. Touch the desired phone number to call the contact.
To call a favorite contact
1. Press the Home Key , touch Contacts then the
Favorites tab.
You can add and remove favorites by touching the star next
to their name (when you're viewing information about the
contact).
2. Touch the favorite you want to call.
3. Touch the desired phone number to call the contact.
Voice Dialer
You can use the Voice Dialer application to place a phone call by
speaking the name of a contact or a phone number.
To place a call by speaking
1. Touch Voice Dialer in the Launch screen or on the Home
screen.
If you have a BlueTooth headset that supports “voicerecognition” or “voicedialing,” you may be able to open Voice
Dialer by pressing your headset’s main button or in some
other way, and dial by voice using your headset. For details,
see the documentation that came with your headset.
95
Page 98

Placing and Receiving Calls
96
The Voice Dialer application opens, listening for your spoken
instructions, and displaying some hints for how to use it.
2. Say “Call” followed by the name of the contact to call.
Or follow one of the suggestions for dialing a number or
controlling your phone in other ways.
Options During a Call
When a call is in progress, you have various convenient features at
your disposal, such as muting your microphone, using the
speakerphone, or making a conference call.
To mute the microphone during a call
'
Touch the Mute Key .
The Mute Key lights up to indicate that the microphone is
muted. The Mute Key will appear in the Status bar to
remind you that the microphone is turned off.
When viewing the current call screen, you can unmute the
microphone by touching the
The microphone is unmuted automatically when the call
ends.
Mute Key again.
Page 99

Bluetooth
Speaker
Speaker
Placing and Receiving Calls
To turn the speakerphone on or off
'
Touch the Speaker Key .
The Speaker Key lights up to indicate that the speakerphone
is on. The Speaker icon will appear in the Status bar
and the sound from your call is played through the phone's
speaker.
When viewing the current call screen, you can turn the
speakerphone off by touching the Speaker Key again.
The speaker is turned off automatically when the call ends.
WARNING!
To avoid damage to your hearing, do not hold the phone against
your ear when the speakerphone is turned on.
To switch between a Bluetooth headset and the phone
When a Bluetooth headset is paired and connected to your phone,
you can conduct calls on the headset for hands-free conversation.
During a call, you can opt to use the Bluetooth headset or just the
phone.
When using the Bluetooth headset during a call, the Ongoing Call
notification icon is blue in the Status bar.
'
Touch the Bluetooth Key to switch the call from the
headset to the phone, or vice versa.
Managing Multiple Calls
If you accept a new call when you're already on a call, you can
switch between the two calls or merge the two calls into a single
conference call. You can also set up a conference call with multiple
callers.
97
To switch between current calls
'
Touch the Swap Key .
The current call will be placed on hold and you will be
connected with the other call.
Page 100

Placing and Receiving Calls
98
Touch to swap calls.
To set up a conference call
Contact your wireless service provider to learn whether they
support conference calls and how many participants you can
include.
1. Place a call to the first participant.
2. When you're connected,
Contacts to search for a contact to call. Touch Dialpad to
open the dialpad and introduce a number to dial.
The first participant is put on hold and you're prompted to
dial the second caller.
3. After you're connected, touch the Merge calls button .
The participant is added to the conference call.
Contacts or Dialpad . Touch
Touch to end a conference call
and disconnect all callers.
 Loading...