

LG VN280 Users manual

USER
GUIDE
VN280
MFL68240201 (1.0)

Copyright©2014 LG Electronics, Inc. All rights reserved.
VN280 is registered trademark of Verizon Wireless and its
related entities. All other trademarks are the property of their
respective owners.

6CDNGQH%QPVGPVU
Table of Contents ··········1
Phone Overview ···········6
Quick Glance of the Touch
Screen and How to Use It · · 10
Getting Started with Your
Phone ··················· 11
Turning the Phone On and Off ······11
Turning the Phone On ············11
Turning the Phone Off ············11
The Battery ······················11
Installing the Battery· · · · · · · · · · · · · ·11
Removing the Battery ·············11
Charging the Battery ··············12
Charging with USB ················12
How to Install a microSD™ Card ····13
How to Remove a microSD™ Card · · 13
Battery Temperature Protection · · · · 14
Battery Charge Level ··············14
Signal Strength ···················14
Screen Icons ·····················14
Making Calls ·····················14
Correcting Dialing Mistakes ········15
Redialing Calls ····················15
Receiving Calls ···················15
Shorcuts Menu ···········16
Entering and Editing
Information ·············· 18
Menu Tree ···············19
Menu Access ·············22
Shortcuts Menu on the Touch
Screen· · · · · · · · · · · · · · · · · · · 23
Shortcuts Menu ··················23
Quick Access to Convenient
Features ·················24
Restrictions ······················24
Quick Volume Adjustment ··········24
Vibrate Mode ····················24
Call Waiting ······················24
Voice Commands ·················25
Contacts in Your Phone’s
Memory ·················26
Storing New Contacts ·············26
Changing Contact Entries ··········26
Speed Dials ······················26
Storing a Number with Pauses ······27
Deleting ·························27
Contacts ················28
1. New Contacts ··············28
2. Contacts List ···············28
3. Backup Assistant ···········29
4. Groups ····················29
5. Speed Dials ················29
1

Table of Contents
6. In Case of Emergency (ICE) · · ·30
Recent Calls ··············31
1. Missed ····················31
2. Received ··················31
3. Dialed ····················32
4. All ························32
5. View Timers ················33
Recent Calls/ My Verizon · · 33
Tools ····················34
1. Voice Commands ···········34
1 Call <Name or Number> ··········34
2 Send Msg to <Name or Number or
Group> ····················· 34
3 Go to <Menu> ··················34
4 Check <Item> ···················34
5 Contacts <Name> ···············35
6 Redial ·························35
7 Play ···························35
8 My Verizon ·····················35
9 Help ··························35
2. Notepad ··················35
Viewing a Notepad Entry ··········35
3. Calendar ··················36
4. Alarm Clock ···············36
5. Stopwatch ·················37
6. World Clock ···············37
7. Calculator ··················38
8. Ez Tip Calculator ············38
9. Eco-Calculator ·············39
10. Drawing Pad ··············39
Options for a Drawing Pad Entry · · 40
11. USB Mass Storage ··········41
Settings ·················42
1. Bluetooth Menu ············42
Add New Device ··················43
My Phone Name ··················44
Discovery Mode ··················44
My Device Info ···················45
Supported Profiles ················45
2. Sounds Settings ············45
2.1 Master Volume ················45
2.2 Ringtones ····················46
2.3 Caller ID Readout ·············46
2.4 Emergency Tone ··············46
2.5 Alert Vibrate ··················46
2.6 Alert Reminder ···············46
2.7. Button Sounds ················47
2.8 Service Alerts ·················47
2.9 Power On/Off ················47
2.10 Menu Readout ··············48
2.11 Digit DiaReadout ·············48
2.12 Mono Sound ················48
3. Display Settings ············48
3.1 Wallpaper ····················48
3.2 Banner ······················48
3.2.1 PersonaBanner ············48
3.2.2 ERI Banner ················ 49
3.3 Lockscreen Type ··············49
3.4 Main Menu Setting ············49
3.4.1 Position Menu Items ·······49
3.4.2 Replace Menu Items ········ 50
2

3.4.3 Reset Menu Settings ·······50
3.5 Brightness ···················50
3.6 Notification Light ·············50
3.7 Display Backlight ··············50
3.8 Keypad Backlight ·············51
3.9 Charging Screen ··············51
3.10 Display Themes ··············51
3.11 Fonts ·······················52
3.12 DiaFonts ····················52
3.13 Menu Font Size ··············52
3.14 Clock Format ················52
3.15 Invert Color ·················53
3.16 Favorite Bin ··················53
4. Touch Settings ··············53
5. Phone Settings ·············53
5.1 Set Qwerty Shortcut ··········54
5.2 Voice Commands ·············54
5.3 Language ····················54
5.4 Location ····················55
5.5 Current Country ·············55
5.6 Security ·····················55
5.6.1 Edit Codes ················56
5.6.2 Security Unlock ············56
5.6.3 Restrictions ···············56
5.6.4 Reset Default ··············57
5.6.5 Restore Phone ·············57
5.7 System Select ················57
5.8 NAM Select ··················58
6. Call Settings ···············58
6.1 Answer Options ···············58
6.2 End CalOptions ···············58
6.3 Call Forwarding ···············58
6.4 Show Dialpad ·················59
6.5 Auto Retry ···················59
6.6 TTY Mode ···················59
Connecting TTY Equipment and a
Telephone ····················· 60
6.7 One Touch Dial ···············61
6.8 Voice Privacy ·················61
6.9 DTMF Tones ·················61
6.10 Assisted Dialing ··············61
7. USB Mode ·················62
8. Memory ···················62
8.1 Save Options ·················62
8.2 Phone Memory ···············63
8.3 Card Memory ················63
9. Phone Info ·················63
9.1 My Number ··················63
9.2 SW/HW Version ··············64
9.3 Icon Glossary ·················64
9.4 Software Update ··············64
Mobile Email ·············65
Messaging ···············66
1. New Message ···············66
2. Messages ··················66
3. Drafts ·····················68
4. Voicemail ··················69
5. Mobile Email ···············69
6. Social Networks ············70
7. Erase Options ··············70
8. Quick Text Options ·········71
9. Settings ···················71
10. Vault Message ·············73
3

Table of Contents
Mobile Web ··············74
Media Center ············75
1. Music & Tones ··············75
1.1 My Ringtones ················75
1.2 My Music ····················76
1.3 My Sounds ···················77
2. Picture & Video ·············78
2.1 My Pictures ··················78
2.2 My Videos ···················79
2.3 Take Picture ··················80
2.4 Record Video ·················81
3. Games ····················81
4. Mobile Web ················81
5. Browse & Download ·········82
6. My Place ··················82
7. Extras ·····················82
8. Info ·······················82
Apps/ Calendar ··········83
My Music/ Alarm Clock/ My
Pictures· · · · · · · · · · · · · · · · · · 84
Important Safety Precautions ·
85
Safety ···················88
TIA Safety Information ·········88
Exposure to Radio Frequency Signal 88
Antenna Care ··················· 88
Phone Operation ················ 88
Tips on Efficient Operation ······· 89
Driving ························ 89
Electronic Devices ··············· 89
Pacemakers· · · · · · · · · · · · · · · · · · · · · 89
Persons with pacemakers:· · · · · · · · · 89
Hearing Aids ··················· 90
Other MedicaDevices and Health Care
Facilities ······················· 90
Vehicles ························ 90
Aircraft ························ 90
Blasting Areas ·················· 90
Potentially Explosive Atmosphere · · 90
For Vehicles Equipped with an Air Bag ·
91
Safety Information ············91
Charger and Adapter Safety ······ 92
Battery Information and Care ····· 92
Explosion, Shock, and Fire Hazards· ·95
GeneraNotice ···················95
Caution:
Avoid potentiahearing loss. ·····96
FDA Consumer Update ·········98
10 Driver Safety Tips ·········105
Consumer Information on SAR ·108
FCC Hearing-Aid Compatibility
(HAC) Regulations for Wireless
Devices ·····················110
4

LIMITED WARRANTY
STATEMENT ············ 113
Technical Details ········· 116
Glossary ················120
Terminology ·················120
Acronyms and Abbreviations · · ·120
Index ···················122
5
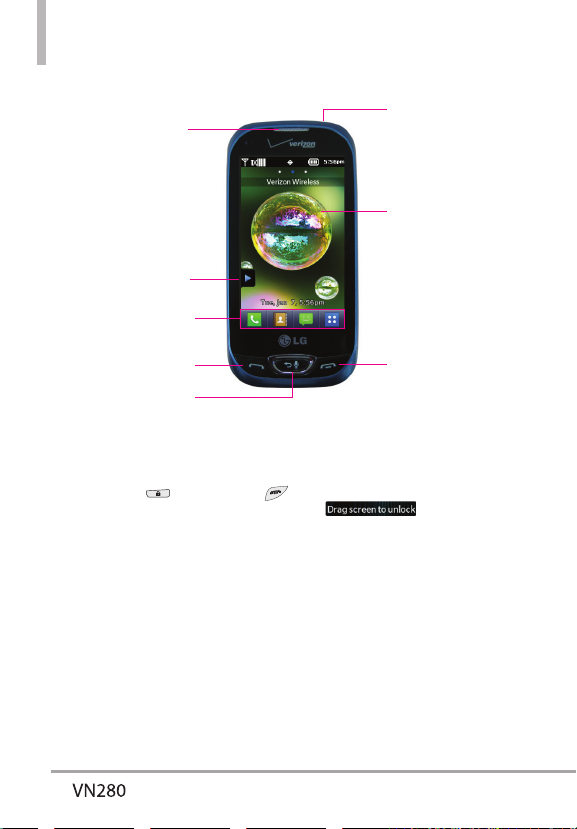
2JQPG1XGTXKGY
1. Earpiece
2. Shortcuts Key
3. Quick Keys
6. Headset Jack
7. Touch Screen
4. Send Key
5. Voice Commands/
Back Key
NOTE
The Send, Clear/Voice Commands, PWR/End Keys are not illuminated when the display is off.
Press the Lock Key
the screen and keys, lightly slide up the on-screen icon
Earpiece Lets you hear the caller.
Shortcuts Key Allows quick access to a
customizable Shortcuts Menu.
Quick Keys The Quick Keys provide easy
access to Messages, the phone Dialpad, the
Main Menu, and the Contact List which easily
activate with the touch of your fingertip.
Send Key Use to answer incoming calls and
to place calls from the Dialpad. From Standby
mode, pressing this key wilopen the AlCalls list
of your Recent Calls menu.
, or PWR/End Key to illuminate the display and keys. To unlock
Voice Commands/Back Key Backs out of
menus, one leveat a time. While in Standby
mode, use for quick access to Voice
Commands or press and hold to access Voice
Recorder mode.
Headset Jack Allows you to plug in an
optionaaccessory.
Touch Screen Displays incoming calls,
messages and status icons as welas a wide
variety of content you select to view.
PWR /End Key Use to turn the power on/
off and to end a call. Also returns to Standby
mode.
8. PWR/End Key
.
6
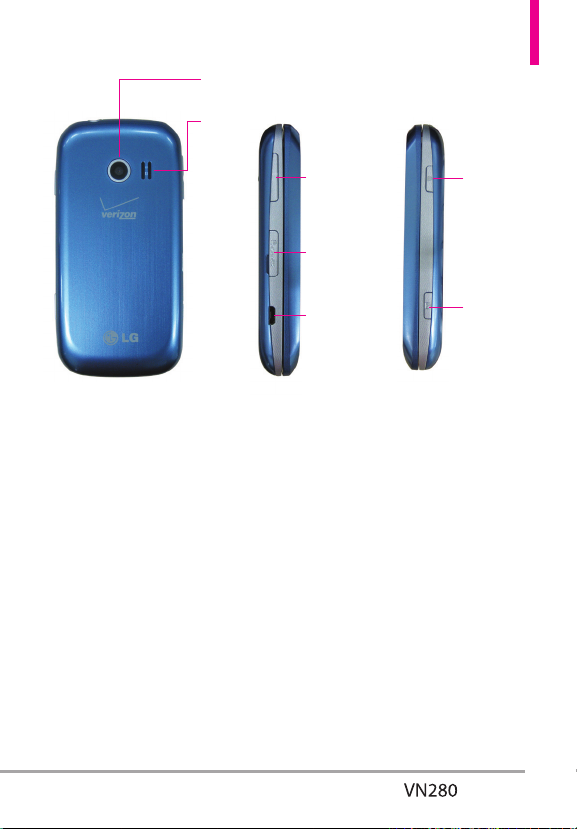
9. Camera Lens
10. Speaker
Camera Lens Used for taking pictures. Keep it
clean for optimaphoto quality.
Speaker Sound comes from the rear speaker.
Volume Keys Use to adjust the Master
Volume in Standby mode* and the Earpiece
Volume during a call.
MicroSD
Charging/Data Port Connects the phone
to the battery charger, or other compatible
accessories.
Lock Key Press to lock the touch screen
and keys.
11. Volume Keys
12. microSD
13. Charging/
Data Port
Camera/Video Key Press for quick access to
the Camera function. Press and hold for quick
access to the Video function.
* Standby mode is when the phone is waiting
for input from you. No menu is displayed and
the phone isn’t performing any action. It’s the
starting point for alof the instruction steps.
14. Lock Key
15. Camera/
Video Key
7
Phone Overview
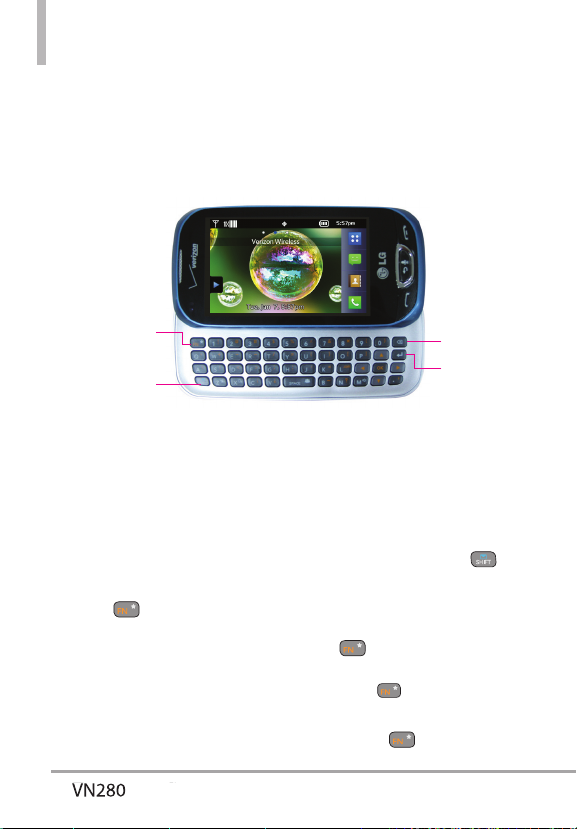
Using the QWERTY Keyboard
Your phone features a slide-out QWERTY keyboard, specifically designed
for easy and comfortable text entry. The QWERTY keyboard uses the same
layout as the keyboard on your computer, but has severaadded features
and options to make text entry easier.
Function Key /
Favorites Key
Shift Key/
Messaging Key
To enter text with the QWERTY keyboard
1. In a text entry screen, slide open the QWERTY keyboard.
(The display automatically adjusts to landscape mode.)
2. Use your thumbs to enter text.
To change capitalization, press the Shift Key/Messaging Key .
To enter an alternate character on a key, press the Function/Favorites
Key
, then press the key with the alternate character. The next key
press resumes normacharacter entry. To lock in alternate character
entry, press the Function/Favorites Key
NOTE
To quickly enter ".com", press the Function/Favorites Key
To access Favorites from standby mode, slide open the QWERTY
keyboard and press the Function/Favorites Key
twice.
, then press .
.
8
Clear Key
Return Key

DirectionaKey Shortcuts on the QWERTY keyboard
Up Key Opens the Browser.
Down Key Allows you quick access to your notifications and to
change the ringer volume.
Right Key Allows you to access the Favorites Home screen pane
where you can add up to 12 media files for quick access.
Left Key Allows you quick access to the Messaging Home screen
pane.
9
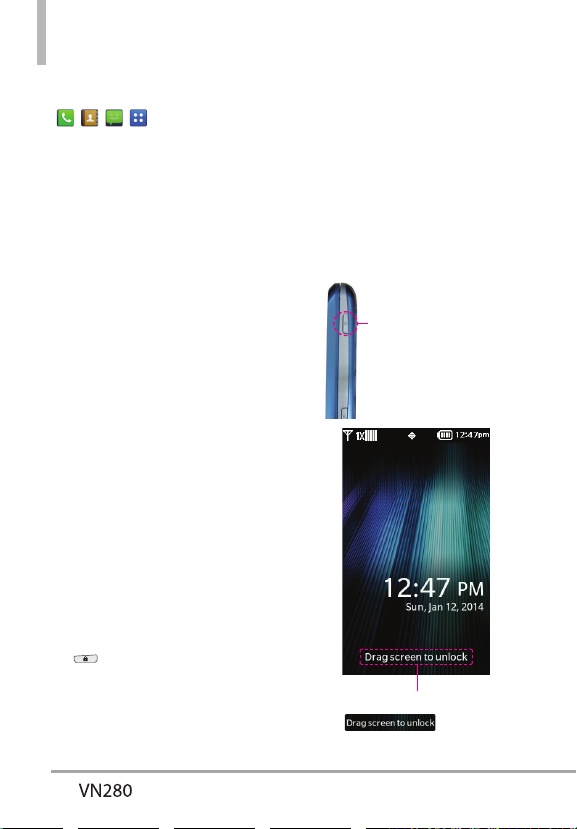
3WKEM)NCPEGQHVJG6QWEJ5ETGGPCPF*QYVQ7UG+V
Quick Keys
( , , , )
For optimaperformance, make
sure your hands are clean and
dry. Remove moisture from the
surface of your hands. Don't
use the Quick Keys in a humid
environment.
The touch screen is sensitive to
your light touch. You don't need
to press it forcefully to use it.
Protect your phone from severe
impact to prevent the touch
screen sensors from becoming
damaged from harsh use.
Use the tip of your finger to
touch the center of a Quick Key.
If you touch off-center, it may
activate the nearby function
instead.
The touch feedback levecan be
adjusted to your preference. See
page 58.
When both the LCD screen
and backlight are off, alkeys are
deactivated. Press the Lock Key
(
) to turn on the screen and
slide the screen up to unlock it.
The Proximity Sensor protects
against accidentakey presses
during phone calls by locking
the screen.
Keep metaand other conductive
materiaaway from the surface
of touch screen because
contact may cause electronic
interference.
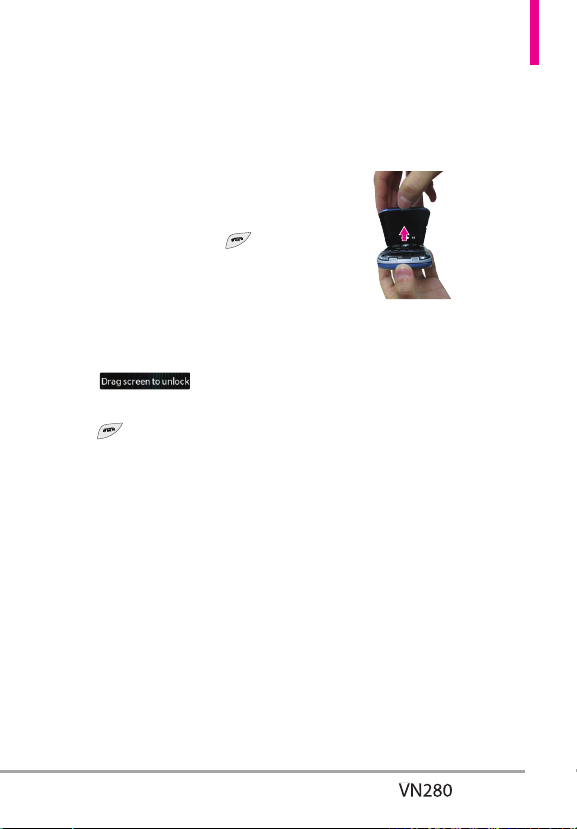
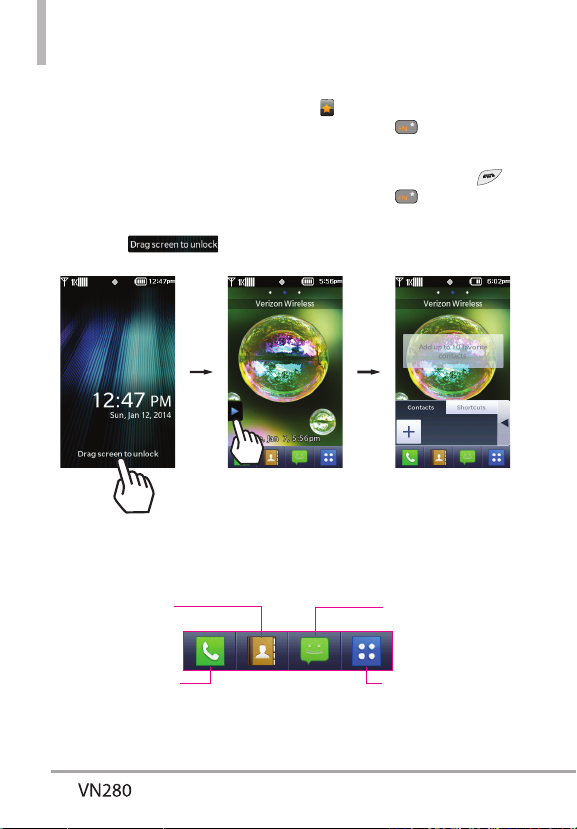
How to Unlock the Screen
Press the Lock Key at
the top of the phone
to turn the screen on.
Lightly slide up the on-screen
icon
the screen.
to unlock
10
Getting Started with Your Phone
Turning the Phone On and Off
Turning the Phone On
1. Instala charged battery or
connect the phone to an
externapower source if the
battery leveis low.
2. Press the PWR/End Key
for a few seconds untithe LCD
screen turns on.
Turning the Phone Off
1. Unlock the touch screen by
lightly sliding the on-screen
icon
2. Press and hold the PWR/End
Key
untithe LCD screen
turns off.
up.
The Battery
NOTE It is important to fully charge
the battery before initiause of
the phone.
The phone comes with a
rechargeable battery. The battery
charge leveis shown at the top
right corner of the LCD screen.
Installing the Battery
Use the fingertip cutout at the
bottom of the phone to lift and
remove the battery cover.
Align the battery contacts with the
phone terminals at the top of the
battery compartment. Gently push
down on the battery untiit clicks
into place. Place the battery cover
over the battery compartment and
press it downward untiit clicks into
place.
Removing the Battery
Turn the phone off and use the
fingertip cutout at the bottom of
the phone to lift and remove the
battery cover. Use the fingertip
cutout near the bottom of the
battery compartment to lift the
battery out.
11
Getting Started with Your Phone
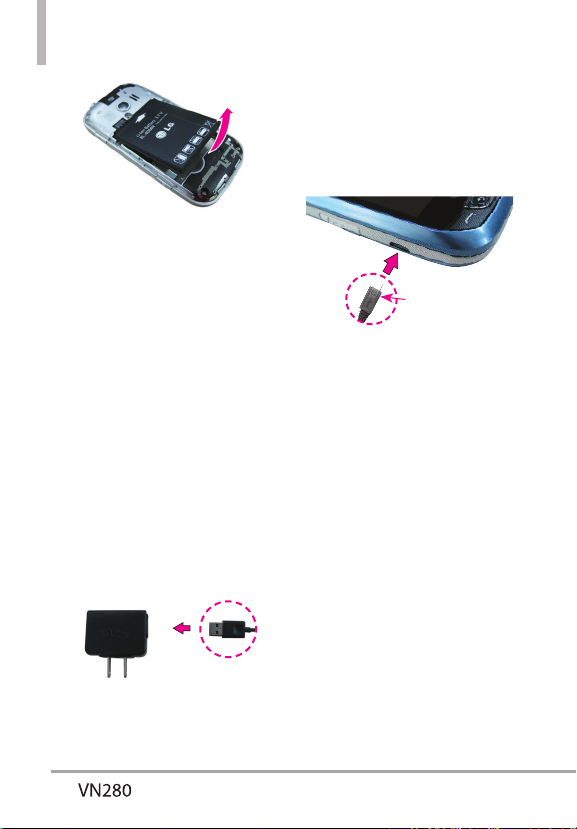
2. Gently uncover the phone's
Charging the Battery
Your phone comes with a Wall/USB
Charger and a USB Cable which
connect together to charge your
phone. To charge your phone:
NOTICE
Please use only an approved charging
accessory to charge your LG phone.
Improper handling of the Charging/Data
Port, as welas the use of an incompatible
charger, may cause damage to your
phone and void the warranty.
NOTE
Using the phone with only the adapter
may cause abrupt resets. Use the phone
with the battery installed.
1. Connect the USB Cable into
the Wall/USB Adapter, as shown
below.
Wall/USB Adapter
The charge time varies depending
upon the battery level.
Charging with USB
You can use your computer to
charge your phone. To be able to
charge with the USB Cable, you
may need to have the necessary
USB Driver installed on your PC
first. Connect one end of the USB
Cable to the USB/Charging Port
on your phone and the other end
to a bus-powered USB port on
your PC.
Charging/Data Port. Then plug
the USB Cable (as shown in the
next image) into the Charging/
Data Port and the other end
into an electricaoutlet.
NOTICE
Please make sure that
the 'B' side is facing
up before inserting a
charger or USB Cable
into the Charging/
Data Port of your
phone.
12
NOTE Low-powered USB ports are
not supported, such as the USB
port on your keyboard or buspowered USB hub.
NOTE If the phone is about to reset, a
warning message wilappear on
the Home screen.
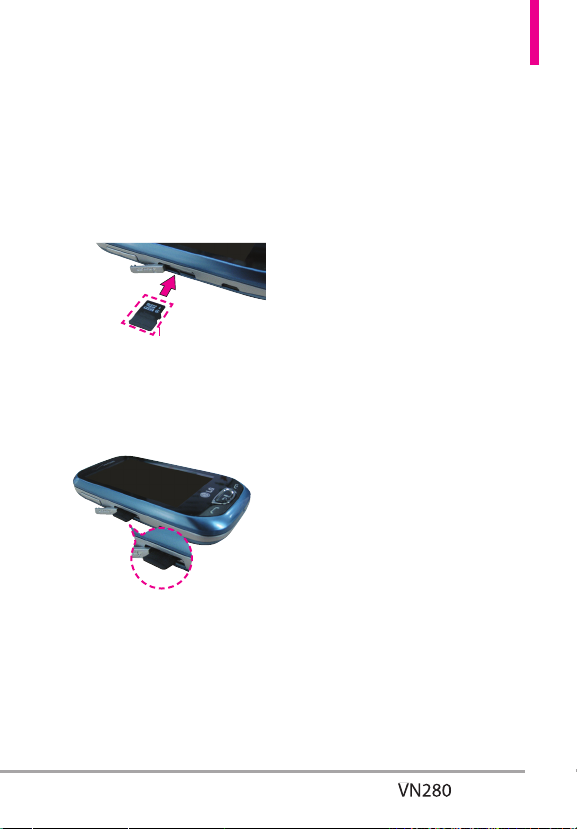
How to Install a microSD™ Card
microSD™ slot
1. Use the fingertip cutout to
uncover the microSD slot. It is
located on the left side of the
phone.
2. Insert the microSD™ card
(purchased separately) with the
labeside facing up. Gently push
it in untiit clicks into place.
NOTE Please note that if you insert
the card in the wrong direction,
it may damage your phone or
your card.
How to Remove a microSD™
Card
1. Remove the back cover and
gently push the card inward, this
wilrelease the exposed edge of
the microSD™ card to eject it.
2. Remove the microSD™ card
from the slot and replace the
cover.
NOTE
• Do not attempt to remove the
microSD™ card while reading or writing
to the card.
• Users wishing to transfer or download
music onto a microSD™ card inserted
into this phone (through MTP Sync)
should format the microSD™ card
on this handset before using it (with
the phone unlocked, touch the Menu
Quick Key -> Settings -> Memory ->
Card Memory -> Format). Warning:
Formatting the microSD™ card wilerase
alcontents on the card. In the event
the microSD™ card is used on this
phone without first formatting it, the
phone wildisplay “License acquisition
failed” during MTP Sync. Song files
downloaded or otherwise purchased
from third party providers and stored
on a microSD™ card inserted into this
device may be protected or encrypted
by such provider and may not be
playable on this device.
13
Getting Started with Your Phone
Battery Temperature Protection
Though extremely rare, if the
battery becomes overheated, the
phone wilautomatically turn off.
When you turn the phone back on,
a message pops up alerting you
that the phone was powered off for
your safety.
Battery Charge Level
You can find the battery charge
leveat the top right corner of the
LCD screen. When the charge
levebecomes low, the battery
sensor sounds a warning tone,
blinks the battery icon, and
displays a warning message. As the
charge leveapproaches empty, the
phone automatically switches off
without saving any current tasks.
Signal Strength
Calquality depends on the
signastrength in your area. You
can telhow much signastrength
you have by the number of bars
next to the signastrength icon:
the more bars, the stronger the
signal. If you’re having problems
with signaquality, move to an open
area or, when inside a building, try
moving near a window.
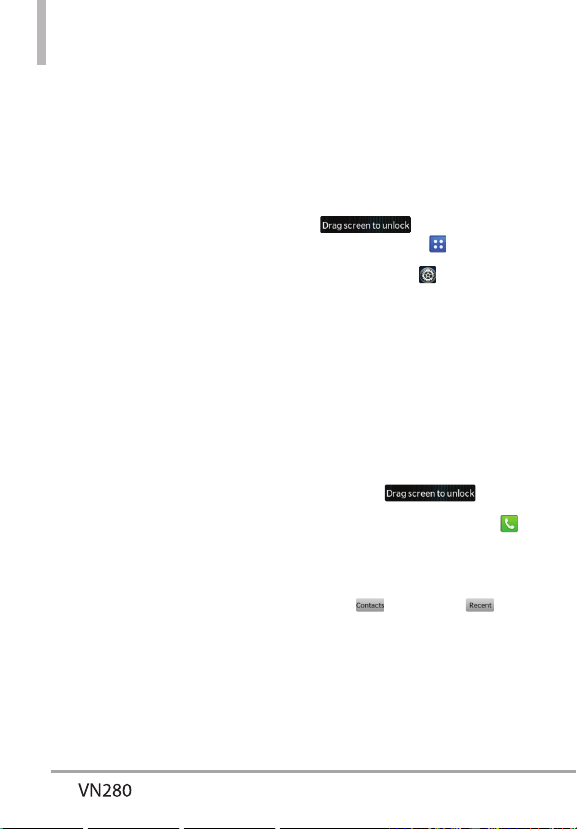
Screen Icons
When the phone is on, the LCD
screen displays the phone's status
icons. To view what they mean:
1. Unlock the touch screen by
sliding the on-screen icon
Menu Quick Key
2. Touch Settings
3. Touch Phone Info.
4. Touch Icon Glossary.
5. Touch a category of icons from
the list to display its status
icons.
up and touch the
.
.
Making Calls
1. Unlock the touch screen by
sliding up
2. Touch the Phone Quick Key
to display the dialpad. Enter the
phone number you want to call.
NOTE You can search your Contact List
or Recent Calls
and select a number to
calinstead of manually dialing.
.
14
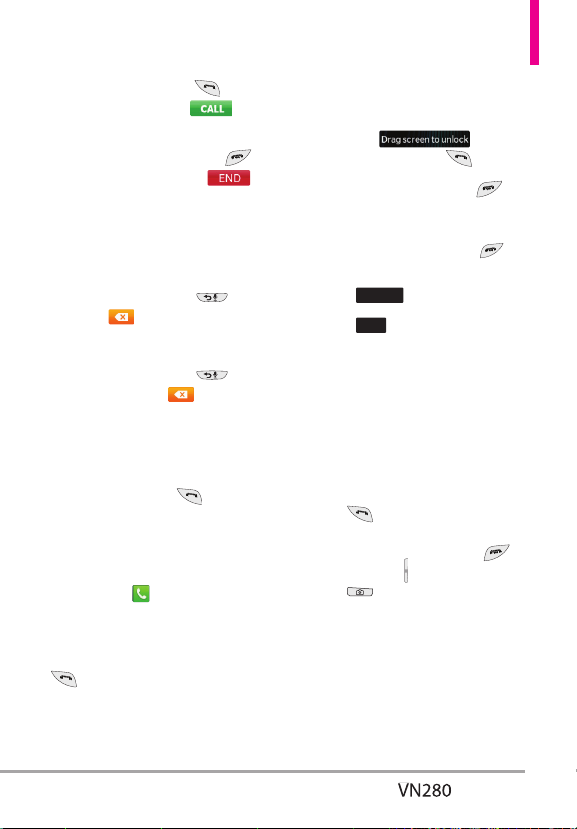
3. Press the Send Key or
touch the Call Key
to
place the call.
4. Press the PWR/End Key
or touch the End Key
to
end the call.
Correcting Dialing Mistakes
If you make a mistake while
dialing a number, touch the Voice
Commands/ Back Key
or touch
on the dialing keypad
once
to erase the last digit entered.
You can also hold the Voice
Commands/ Back Key
or touch and hold
down
on the
dialing keypad to delete aldigits.
Redialing Calls
With the touch screen unlocked,
press the Send Key
view a list of alof your recent calls.
The last 270 calls (90 Received,
90 Missed and 90 Dialed) are
stored in the calhistory list. Touch
the Dial Key
the entries to place a calto that
number.
You can also press the Send Key
twice to rediathe last number
you dialed, received or missed in
the calhistory.
once to
next to any of
Receiving Calls
1. Answer the touch screen by
dragging
press the Send Key
2. Press the PWR/End Key
end the call.
NOTE To ignore the incoming call,
press the PWR/End Key
twice to immediately end
the call. Or, you can touch
. You can also send
IGNORE
text messages by touching
.
MSG
There are severaways of
answering a call, depending on
your selected Answer Options:
Slide Out: Sliding the QWERTY
keyboard out answers the
caland turns the speaker on.
Any Key: Press the Send
Key
or, with the phone
unlocked, press any other key
except the PWR/End Key
Volume Keys
Key
Auto with Handsfree: The
and the Camera
.
calautomatically connects
when connected to a handsfree
device.
up, or
.
to
,
15
5JQTEWVU/GPW
Shortcuts Menu
The Shortcuts Menu allows
instant access to menus and
phone features with the quick
touch of your fingertip. To use the
Shortcuts Menu:
1. Unlock the touch screen by
dragging
Quick Keys
Contact list: Displays your
Contact List.
up.
2. Touch the Shortcuts Menu icon
on the Home screen or press
the FN Key
.
3. To close the Shortcuts Menu,
press the PWR/End Key
the FN Key
.
Messaging: Displays Menu
Displays the Main Menu.
or
Phone: Displays the Dialpad
so you can make a call.
Diamanually using the numeric
keys or easily from your Recent
Calls, Contacts, or Voice
Diamenus.
16
Menu: Displays the Main
Menu.
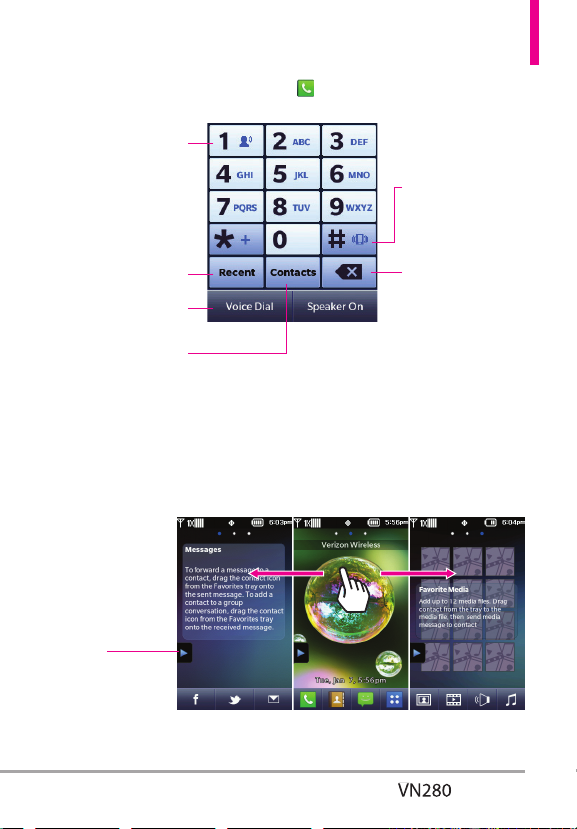
When you touch the Phone Quick Key the following Dialpad is
displayed:
Touch and hold
this key to call your
voicemail box.
Touch this key to view
recent call history.
Touch this key to dial
using Voice Commands.
Touch this key to display
your Contact List to view
or call a Contact.
Touch and hold this
key to toggle your
phone between Vibrate
Mode and Normal
Mode.
Touch this key to
delete digits entered
one by one. Hold down
to delete the entire
entry.
To view other Home screen panes
Slide your finger left or right across the Home screen. If you slide your
finger left, you could access and edit Favorites. If you slide your finger
right, you can access Messaging.
Favor ites
Allows you to add up
to 10 Contact entries
or Contact groups to
your list of Favorites to
easily view, call, or send
messages.
17
Entering and Editing Information
Text Input
You can enter information using
the touch screen keypad. There are
speciakey functions to help you
with text entry.
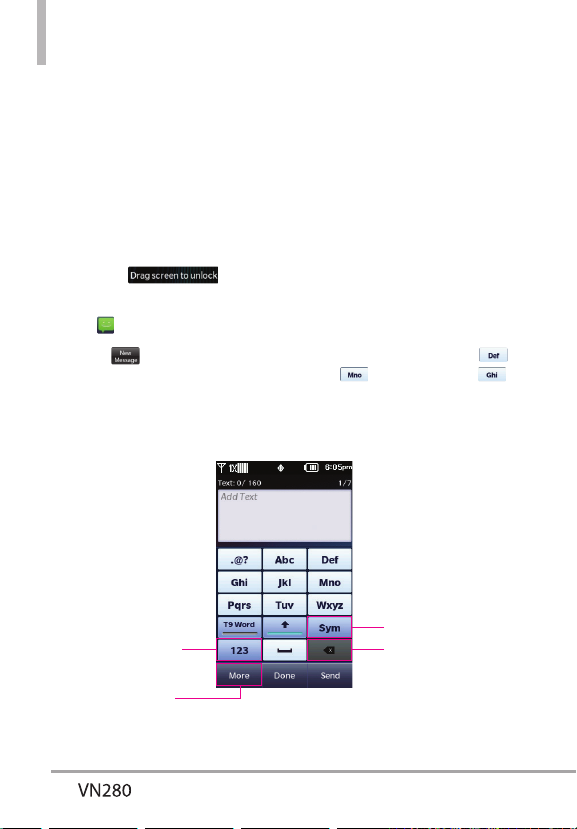
Text Input While Composing a
TXT Message
1. Unlock the touch screen by
dragging
2. Touch the Messaging Quick
Key
.
3. Touch
.
4. Touch the Text field to begin
entering text. A touch keypad
wilpopup.
Touch to change text
input methods.
Touch for
additionaoptions.
up.
5. To access Text Input options,
touch More for options below:
Insert Quick Text/
Add Contact#/ Email/
Add Signature/ Copy Text/
Language
Entering text with the on-screen
keyboard
To enter text using the on-screen
keyboard, you must tap each key
according to the position of the
letter. For example, if you want
to enter 'dog' you must tap
once,
three times, and
once.
Touch to add Symbols.
Touch to delete the
text you typed.
18
My Verizon
Tools
1. Voice Commands
2. Notepad
3. Calendar
4. Alarm Clock
5. Stopwatch
6. World Clock
7. Calculator
8. Ez Tip Calculator
9. Eco-Calculator
10. Drawing Pad
11. USB Mass Storage
Settings
Airplane Mode
Bluetooth
Music Only
Mode
1. Bluetooth Menu
2. Sounds Settings
1. Master Volume
2. Ringtones
3. Caller ID
Readout
4. Emergency
Tone
5. Alert Vibrate
6. Alert Reminder
7. Button Sounds
8. Service Alerts
9. Power On/Off
10. Digit Dial
Readout
/GPW6TGG
3. Display Settings
1. Wallpaper
2. Banner
3. Lockscreen Type
4. Main Menu Setting
5. Brightness
6. Display Backlight
7. Keypad Backlight
8. Charging Screen
9. Display Themes
10. Fonts
11. Dial Fonts
12. Menu Font Size
13. Clock Format
14. Favorite Bin
4. Touch Settings
1. Vibrate Type
2. Vibrate Level
3. Vibrate
Feedback
4. Audio
Feedback
5. Calibration
19
Menu Tree
5. Phone Settings
1. Set Qwerty
Shortcut
2. Voice Commands
3. Language
4. Location
5. Current Country
6. Security
7. System Select
8. NAM Select
6. Call Settings
1. Answer Options
2. End Call Options
3. Call Forwarding
4. Show Dialpad
5. Auto Retry
6. TTY Mode
7. One Touch Dial
8. Voice Privacy
9. DTMF Tones
10.Assisted Dialing
7. USB Mode
8. Memory
1. Save Options
2. Phone
Memory
3. Card Memory
9 .Phone Info
1. My Number
2. SW/HW
Version
3. Icon Glossary
4. Software
Update
Mobile Email
Messaging
1. New Message
2. Messages
3. Drafts
4. Voicemail
5. Mobile IM
6. Mobile Email
7. Social Networks
Mobile Web
Media Center
1. Music & Tones
1.1 My Ringtones
1.2 My Music
1.3 My Sounds
2. Picture & Video
2.1 My Pictures
2.2 My Videos
2.3 Take Picture
2.4 Record Video
20

3. Games
4. Mobile Web
5. Browse &
Download
6. My Place
7. Extras
8. Info
8.1 Application Memory
8.2 Phone Memory
8.3 Veiw Log
8.4 Help
Apps
Calendar
My Music
1. All Songs
2. Playlists
3. Artists
4. Genres
5. Albums
6. Manage
My Music
1. Erase
2. Move to Card
3. Move to Phone
Airplane Mode
Music Only
Mode
Alarm Clock
Set Time
Repeat
Ringtone
My Pictures
*
* Move to Card is displayed only when the microSD card is inserted.
21

Menu Access
Menu Access
The Menu Quick Key provides access to the phone's main menu. To
access the main menu, unlock the phone first by sliding the Unlock icon
screen to open the main menu.
The main menu is displayed as shown below. Touch any of the menu icons
with your fingertip to open that menu.
up. Touch the Menu Quick Key at the bottom of the
22
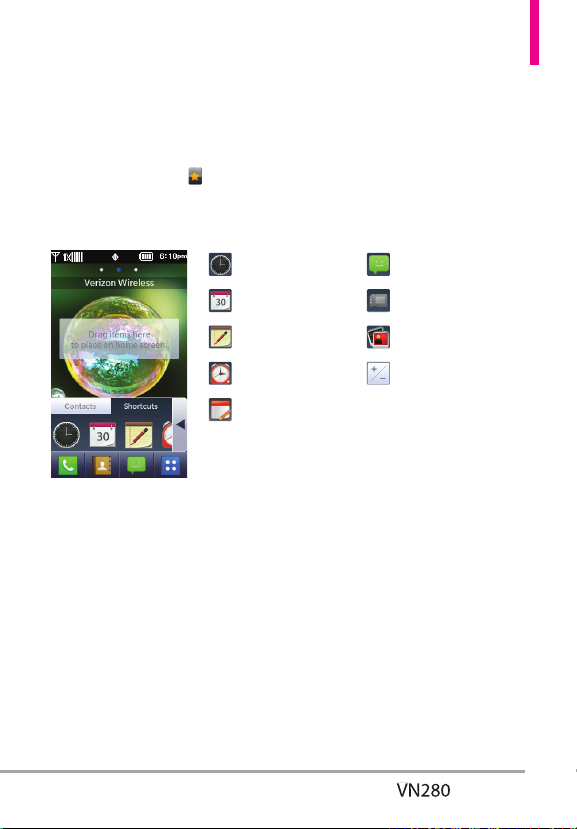
Shortcuts Menu on the Touch Screen
Shortcuts Menu
The Shortcuts Menu allows quick, direct access to severafrequently used
features from the touch screen. Up to 8 different shortcuts can be set.
To access the Shortcuts Menu, unlock the touch screen, then touch the
Shortcuts Menu icon
Shortcuts tab. By default, the shortcuts below are provided, but you can
customize them to your preferences.
along the left side of the screen. Then touch the
Clock Widget
Calendar Widget
Memo Widget
Alarm Widget
Drawing Pad
New Message
Memory Widget
My Pictures
Add/Remove
23
Quick Access to Convenient Features
Restrictions
Sets your phone to require a 4
digit password in order to use the
phone.
To set Lock Mode on with the
touch screen unlocked, touch
Menu ->
Settings -> Phone
Settings -> Security -> Touch OK
and then enter the Phone Lock
Code. Touch Security Unlock to
alternate between ON and OFF.
The next time you wake your
phone's screen, you wilneed to
enter the phone lock code.
NOTE The default phone lock code is
the last 4-digits of your phone
number.
Quick Volume Adjustment
Quickly adjust the Master Volume
and Earpiece Volume by pressing
the upper Volume Key to increase
and lower Volume Key to decrease.
NOTE The Earpiece Volume can only
be adjusted by the Volume Keys
during a call.
NOTE To turn sounds off, unlock
the phone, press the lower
Volume Key to select AlSounds
Off. Press and hold the upper
Volume Key to return to
NormaMode.
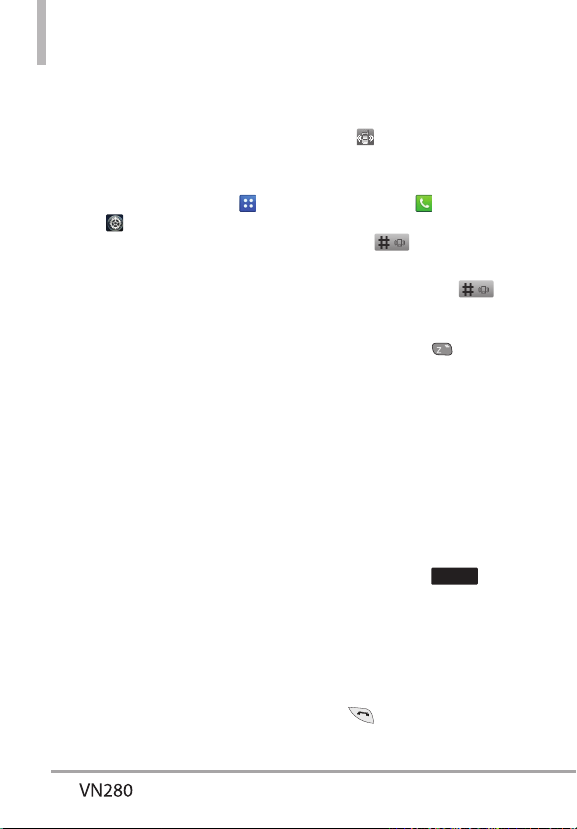
Vibrate Mode
Sets the phone to vibrate instead
of ring (
is displayed on the
Notification bar).
To set Vibrate Mode, touch the
Phone Quick Key
dialpad, then touch and hold the
Pound Key
.
To return to NormaMode, touch
and hold the Pound Key
again.
NOTE From the QWERTY keyboard,
press and hold
Vibrate Mode. You can also
press the lower Volume Key to
set Vibrate Only.
Call Waiting
During a call, one beep indicates
that you have another incoming
call.
Ignoring Call Waiting
If you don't want to answer an
incoming call, touch
the touch screen. The Call Waiting
beep stops and the calgoes to
your voicemail, if available.
Answering Call Waiting
1. While on a call, press the Send
Key
, to automatically put
to display the
to set
Ignore
on
24
the first calon hold and answer
the new call.
2. Press the Send Key
again,
to put the second calon hold
and return to the first caller.
Voice Commands
Voice Commands allow you to do
things by verbacommand (e.g.,
make calls, check Voicemail, etc.).
1. With the touch screen unlocked,
press the Voice Commands/
Back Key
extended press activates the
Voice Recorder feature instead).
OR
From the Home screen, touch
the Menu Quick Key
> Voice Commands.
2. Follow the prompts to use your
voice command(s).
CLR Key Activation
By default, the Voice Commands/
Back Key
externakeypad activates the Voice
Commands feature. To deactivate,
change the CLR Key Activation
setting to Off.
To change this setting, touch
the Menu Quick Key
once (an
> Tools
on the
>
Settings > Phone Settings > Voice
Commands. Then touch CLR Key
Activation to switch it to OFF.
NOTE Voice Commands can also be
started with the designated
key on your Bluetooth
Please check the manuaof the
Bluetooth
instructions.
®
device.
®
device for further
25
%QPVCEVUKP;QWT2JQPG¶U/GOQT[
New
Contact
Done
Save
Save
Save
Edit
Done
Save
Storing New Contacts
1. Unlock the touch screen by
dragging
2. Touch the Contacts Quick Key
.
3. Touch
.
4. Touch an information field and
use the keypad to enter the
necessary information. Then
touch
. Do this for each
field you want to enter.
5. When alfields are complete,
touch
.
OR
1. Unlock the touch screen by
dragging
2. Touch the Phone Quick Key
to display the Dialpad.
3. Use the Dialpad to enter the
phone number and touch
.
4. Touch Add New Contact/
Update Existing.
NOTE If you choose Update Existing,
you wilneed to choose the Contact
whose information you want to change.
Then touch Mobile 1/ Home / Business/
Mobile 2/ Fax.
up.
up.
5. Touch Mobile 1/ Home/
Business/ Mobile 2/ Fax.
6. Enter information into the
remaining fields, as necessary,
and touch
to save.
Changing Contact Entries
1. Unlock the touch screen by
dragging
2. Touch the Contacts Quick Key
.
3. Touch the Contact you want to
customize.
4. Touch
, touch and edit
the fields you want to change
then touch
5. Touch
editing the contact to save the
entry.
.
when you finish
Speed Dials
Allows you to set up your Speed
Dials.
1. Unlock the touch screen by
dragging
2. Touch the Contacts Quick Key
.
3. Touch Edit, then scroldown and
touch Speed Dials.
up.
up.
26
NOTE If you have more than 1 number
Release
Save
Erase
assigned to a Contact, you must
first select the desired number
and then choose the speed
diaentry.
4. Touch an unassigned Speed
Dianumber.
5. Touch Yes to confirm.
6. Touch Save to save your
updates to the contact entry.
Storing a Number with Pauses
Pauses allow you to enter
additionaseries of numbers to
access automated systems such as
Voicemaior credit billing numbers.
Pause types are: Wait (W) The
phone stops dialing untiyou touch
to advance to the next
number. 2-Sec Pause (P) The
phone waits two seconds before
sending the next string of digits
automatically.
1. Unlock the touch screen by
dragging
2. Touch the Phone Quick Key
3. Use the Dialpad to enter the
number, then touch More.
4. Touch Add 2-Sec Pause/
Add Wait and enter the
additionanumbers.
up.
5. Touch
, then complete the
Contact entry as necessary.
Deleting
Deleting a Contact Entry
1. Unlock the touch screen by
dragging
2. Touch the Contacts Quick Key
.
3. Touch the Contact you want to
delete.
4. Touch
5. Touch Yes.
.
.
up.
27
Contacts
New
Contact
Done
Save
Save
Save
Erase
Edit
Contacts
The Contacts Menu allows you to
store names, phone numbers and
other information in your phone’s
memory.
1. New Contacts
1. Unlock the touch screen by
dragging
2. Touch the Contacts Quick Key
.
3. Touch
.
4. Touch an information field and
use the keypad to enter the
necessary information. Then
touch
. Do this for each
field you want to enter.
5. When alfields are complete,
touch
.
OR
1. Unlock the touch screen by
dragging
2. Touch the Phone Quick Key
to display the Dialpad.
3. Use the Dialpad to enter the
phone number and touch
.
up.
up.
4. Touch Add New Contact/
Update Existing.
NOTE If you choose Update Existing,
you wilneed to choose the Contact
whose information you want to change.
Then touch Mobile 1/ Home / Business/
Mobile 2/ Fax.
5. Touch Mobile 1/ Home/
Business/ Mobile 2/ Fax.
6. Enter information into the
remaining fields, as necessary,
and touch
to save.
2. Contacts List
Allows you to view your Contacts
List.
1. Unlock the touch screen by
dragging
and touch the Contacts Quick
Key
.
2. Touch a Contacts entry.
3. The following options are
available.
Touch
Contacts.
Touch
Contacts.
Touch the phone number to
diathe contact.
to erase the
to edit the
up
28
 Loading...