

Page 1

V-CQ382H**
English
Deutsch
Slovenïina
Magyarul
Cesky jazyk
Polski
E
D
S
M
C
P
Page 2
– 2 –
2
4
5
23
24
25
6
7
3
1
MAX
MIN
OPEN
8
9
7
6
3
2
1
10
(OPTIONAL)
(OPTIONAL)
(VOLITE–N„)
(OPCIONÁLIS)
(VOLITELNÉ)
(OPCJA)
(OPTIONAL)
(OPTIONAL)
(VOLITE–N„)
(OPCIONÁLIS)
(VOLITELNÉ)
(OPCJA)
Dust bag full LED
Anzeige Staubbeutel voll
LED kontrolka plného vreú•cka na prach
’Porzsák tele’ LED-kijelzò
LED kontrolka plného sáïku na prach
Kontrola LED pe¢nego worka
(when the dust bag is full
the "RED LED" twinkles)
(bei vollem Staubbeutel blinkt die
"ROTE LED-Anzeige")
("ÏERVENÁ KONTROLKA“bliká,
keõ je vrecú•ko na prach plné.)
(ha a porzsák tele van, a
’PIROS LED’ villog)
(kdy¥ je sáïek na prach plnƒ,
ÏERVENÁ KONTROLKA bliká)
(gdy worek zape¢ni sië czerwona
kontrolka LED zaczyna migaç)
Filter working Lamp
Anzeige Filter bereit
Kontrolka ïinnosti filtra
’Szûrò bekapcsolva’ lámpa
Kontrolka filtru
Lampka wska¶nika filtra
(HEPA filter is working)
(Der HEPA-Filter arbeitet normal)
(HEPA filter pracuje)
(A HEPA szûrò mûködik)
(HEPA filtr je v ïinnosti)
(w¢åczony jest filtr HEPA)
Power on Lamp
Anzeige Ein
Kontrolka zapnutia
’Üzemben’ lámpa
Kontrolka zapnutí
Lampka wska¶nika zasilania
(when the power is on
power on lamp is always on)
(bei eingeschaltetem Gerät
leuchtet die Anzeige)
(keõ je prístroj zapnutƒ,
kontrolka zapnutia v¥dy svieti)
(A lámpa folyamatosan ég, ha
a készülék be van kapcsolva)
(je-li zapnuto, ¥árovka v¥dy svítí)
(gdy w¢åczone jest zasilanie, lampka
wska¶nika pali sië ÿwiat¢em ciåg¢ym)
Page 3
– 3 –
13
14
UNLOCK LOCK
19
22
21
17
11
15
23
25
24
12
20
16
18
Page 4

– 4 –
E
Please read all the following information,
which contains important instructions for
the safety, the use and the maintenance
of the appliance.
This appliance complies with the following
EC Directives: -73/23/EEC, 93/68/EECLow Voltage Directive-89/336EEC -EMC
Directive.
■ Never allow children to use the
appliance unsupervised.
■ Do not use the appliance If the main
lead is damaged or faulty.
■ If the main lead is damaged, it must be
replaced by an approved LG
Electronics Service Agent to avoid a
hazard.
■ Always switch the vacuum cleaner off
before :
• changing the dust bag
• changing or cleaning the filters.
■ If no dustbag is inserted, the cover
cannot be closed. Please do not use
force!
■ Do not vacuum flammable or explosive
substances(liquids or gases).
■ Do not vacuum hot ash, embers etc.
nor sharp objects.
■ Do not vacuum water or other liquids.
■
When you vacuum with an attachment
appliance that has a rotating brush roller,
do not reach into the running brush roller.
WARNING! Should it become necessary
to replace the moulded on plug then the
detective plug should be destroyed to
avoid any possible shock hazard that
could occur should such a plug be
inserted into a 13 amp socket elsewhere
in the house.
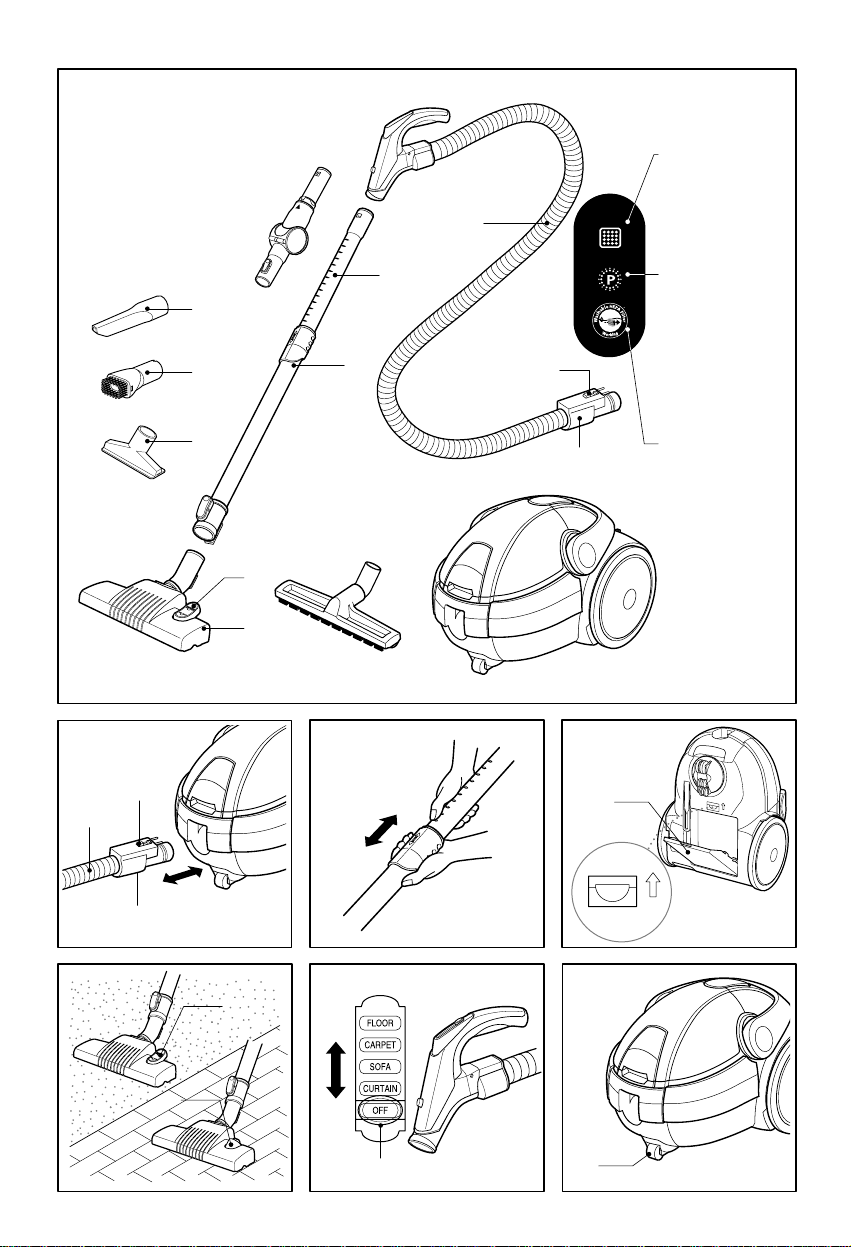
Connecting the flexible hose
Push the end of the head (1) on the
flexible hose (2) into the attachment point
on the vacuum cleaner.
To remove the flexible hose from the
vacuum cleaner, press on the button (3)
situated on the head, then pull upwards.
Assembling the tubes
• Telescopic tube (4)
- Hold spring latch (5)
- Pull out the tube to required length.
- Release spring latch to lock.
Using the cleaning head and
Accessory Fit the large cleaning head
onto the end of the tube.
•
The 2 position head (6) is equipped with a
pedal (7) which allows you to alter its
position according to the type of floor to be
cleaned. Hard floor position(tiles, parquet
floors...). Press on the pedal to lower the
brush. Carpet or rug position. Press on
the pedal to lift the brush up.
Dust bag storage(8)
Dust bag storage(8) can easily lay up the
new dust bag.
It prevent dust bag from missing.
How to plug in and use
Pull out the mains lead to the desired
length and plug into the socket.
Slide button (9) to start the vacuum
cleaner. To stop it slide the button (9)
again.
Electronic power control(9)
Suction capacity increases steplessly up
to MAX.
OFF : Power off CURTAIN : Low
FLOOR : Full power.
Urethane Wheel(10), (11)
The three urethane wheel of stairs(10)
and urethane wheel(11) prevent a scratch
on the floor.
They reduce the rolling noise.
LED Display (13)
YELLOW: Power on RED: Bag Full
Park-System (14)
For short breaks during vacuuming, for
example to move a small piece of
furniture or a rug, use the Park system to
support the flexible hose and cleaning
head.
Information for your safety
How to Use
Page 5

– 5 –
E
• Slide the hook attached to the large
cleaning tool into the slot on the rear of
the appliance.
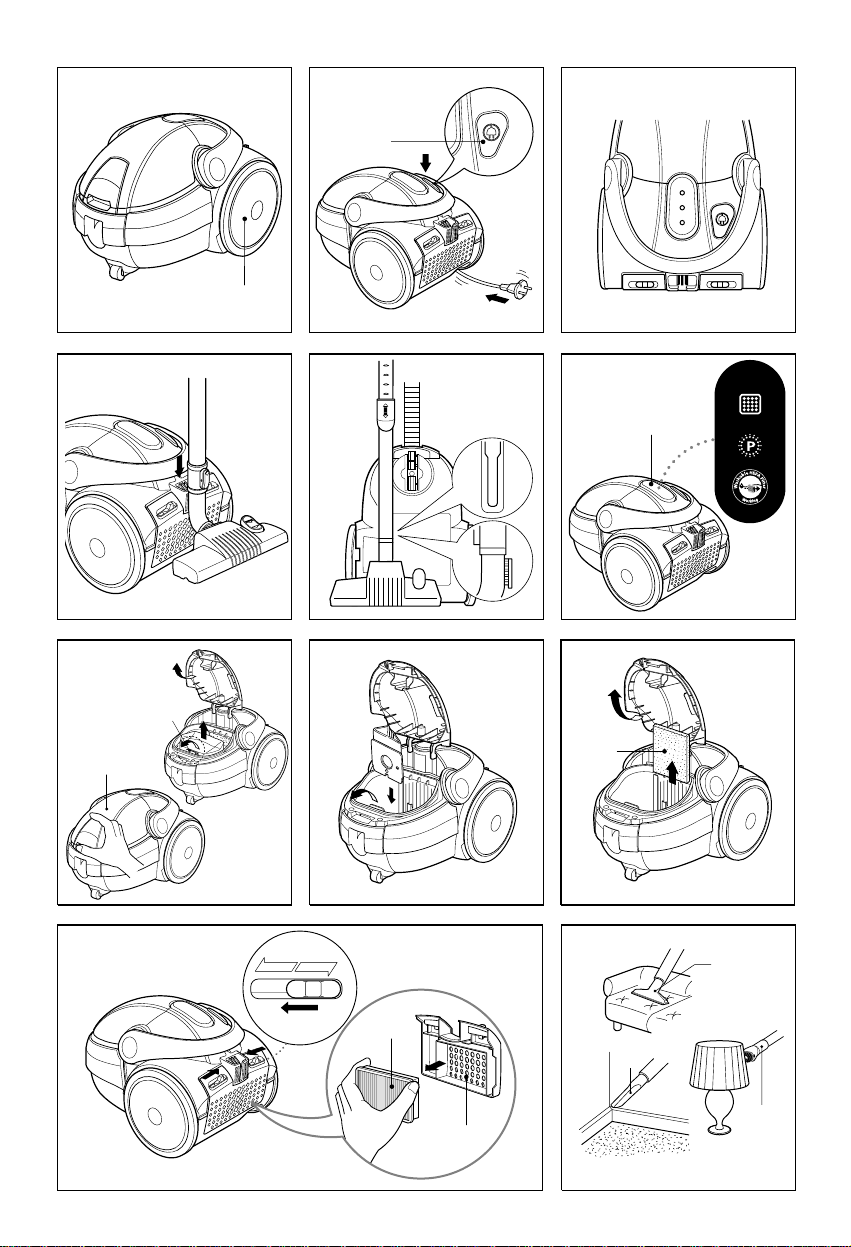
Carring and storage (15)
When you have switched off and
unplugged the appliance, press on the
button (12) to automatically rewind the
cord.
You can move or store your appliance in
a vertical position by sliding the hook on
the large cleaning head into the clip on
the underside of the appliance.
Changing the dust bag
The dustbag needs changing when the
cleaner is set to maximum power and the
cleaner head is off the floor but the "bag
full" LED (red)(16) shine.
When the bag is full lamp(Red) is on.
also, it(cleaner) makes suction power low
rapidly by itself to protect the motor after
1 and half minute.
This time bag full lamp(Red) is still on.
Even if the dustbag does not appear to be
full at this stage, it should be changed.
It could be that a great deal of very fine
dust has clogged up the pores of the dust
bag.
• Turn off the appliance and unplug it.
• Open the cover by pulling the cover(17).
• Pull out the filter bag carrier.
• Push the latch (18) forwards in the
direction of the arrow and remove the
full dust bag throw it away.
• Insert the new dust bag into the
cleaner(19).
Note: as the appliance is fitted with a
safety device which checks that the bag is
in place you cannot colse the cover if the
bag is not fitted correctly.
Cleaning the motor filter
The motor filter is situated inside the
appliance between the dust bag and the
motor. Each time that you change the air
outlet filter we advise you to remove the
motor filter (20) and to clean it by tapping
to remove the dirt and then replacing it in
the vacuum cleaner.
Changing the air outlet filters
• To change filter (21) remove the cover
of the filter compartment (22) situated at
the rear of the appliance, by pushing the
little catch.
Crevice Tool (23)
For vacuuming in those normally
inaccess- ible places i.e. reaching
cobwebs, or down the side of a sofa!
Set the suction power control switch to
sofa before vacuuming
Dusting brush (24)
For vacuuming picture frames furniture
outlines, books and other uneven
objects.
Upholstery Nozzle (25)
For vacuuming uphostery, mattresses,
etc. The thread collectors help to pick
up the threads and fluff.
Check that the appliance is correctly
plugged in and that the electrical socket is
working.
• Stop the appliance and unplug it.
• Check that the tubes, flexible hose and
cleaning tool are not blocked.
• Check that the dust bag is not full.
Replace it if necessary.
• Check that the air outlet filter is not
blocked. Replace it if necessary.
SVC Filter
• LG filter TB62 (Paper filter)
• Swirl filter Y61 (Paper filter)
What to do if your appliance
does not work
What to do when the suction
performance reduces?
Page 6
– 6 –
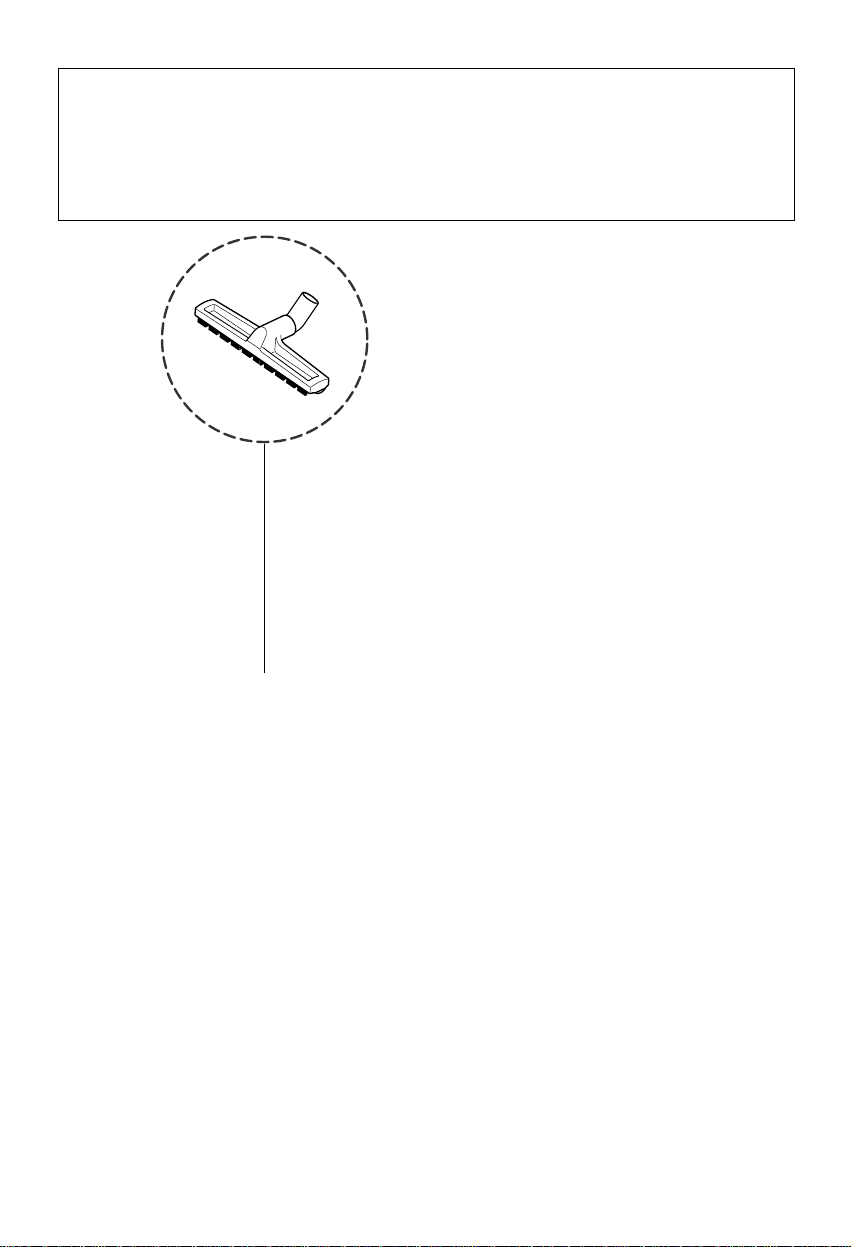
How to use Hard Floor Nozzle (OPTIONAL)
Verwendung des Aufsatzes für harte Böden (OPTIONAL)
Ako pou¥ívafl hubici na tvrdé dlá¥ky (VOLITE–NÁ)
A keménypadló-szívófej használata (opcionális)
Jak pou¥ívat hubici na tvrdé podlahy (VOLITELNÁ)
Sposób u¯ycia przystawki do czyszczenia pod¢óg twardych (OPCJA)
Hard Floor Nozzle
Efficient cleaning of hard floor (wood, linoleum, etc)
Aufsatz für harte Böden
Gründliche Reinigung harter Bodenbeläge (Holz, Linoleum usw.)
Násadec na tvrdé dlá¥ky
Efektívne ïistenie tvrdƒch dlá¥ok (drevo, linoleum, atõ.)
Keménypadló-szívófej
Kemény burkolatú felületek hatékony tisztításához (fa, linóleum stb.)
Hubice na tvrdé podlahy
Pro úïinné ïi•têní tvrdƒch podlah (d¡evo, linoleum, atd.)
Przystawka do pod¢óg twardych
Wydajne czyszczenie twardych pod¢óg (z drewna, linoleum itd.)
Page 7

– 7 –
Bitte lesen Sie die folgenden Informationen
sorgfältig durch, da sie wichtige Anleitungen
zur Sicherheit, zum Gebrauch und zur
Wartung des Gerätes enthalten.
Dieses Gerät entspricht den folgenden
EU-Richtlinien: -73/23/EEC,93/68/EECNiedrig-spannungsrichtlinie-89/336EEC EMV- Richtlinie.
■ Kinder dürfen dieses Gerät niemals
unbeaufsichtigt benutzen.
■ Dieses Gerät niemals verwenden,
wenn das Netzkabel beschädigt oder
fehlerhaft ist.
■ Zur Sicherheit muss das Netzkabel ggf.
von einem qualifizierten LG Electronics
- Servicetechniker ersetzt werden.
■ Vor diesen Tätigkeiten muss der Staub-
sauger immer ausgeschaltet werden:
• Auswechseln des Staubbeutels.
•
Auswechseln oder Reinigung der Filter.
■ Ohne eingesetzten Staubbeutel kann
das Gehäuse nicht geschlossen
werden. Niemals Gewalt anwenden!
■
Keine brennbaren oder explosiven Stoffe
einsaugen (Flüssigkeiten oder Gase)
■ Keine heiße Asche, Glut usw. oder
scharfe Gegenstände einsaugen.
■ Niemals Wasser oder Flüssigkeiten
einsaugen.
■ Beim Saugen mit einem Aufsatz mit
rotierender Bürste niemals in die sich
drehende Bürste greifen.
WARNUNG! Falls der angeschweißte
Stecker erneuert werden sollte, muss die
Sicherung entsorgt und ausgetauscht
werden, um die Gefahr von Stromschlägen
beim Einstecken eines defekten Steckers in
eine Haussteckdose zu vermeiden.
Anschluss des flexiblen Schlauchs
Drücken Sie das Ende des Kopfes (1) des
flexiblen Schlauchs (2) in die Anschlussöffnung
des Staubsaugers.
Um den flexiblen Schlauch vom Staubsauger
zu trennen, drücken Sie auf den Riegel (3) am
Kopf und ziehen Sie den Schlauch ab.
Zusammenbau der Saugrohre
• Teleskoprohr (4)
- Den Federriegel (5) festhalten.
- Das Rohr auf die gewünschte Länge
ausziehen.
-
Den Federriegel zum Verriegeln loslassen.
Verwendung des Reinigungsaufsatz
und der Zubehörteile
Den großen Reinigungsaufsatz auf das
Saugrohr stecken.
• Der zweistufige Aufsatz (6) besitzt ein
Pedal (7), mit dem die Stellung
entsprechend dem zu reinigenden
Untergrund angepasst wird. Harte
Böden (Fliesen, Parkett-böden, usw.)
Drücken Sie auf das Pedal, um die
Bürste auszufahren. Auslegeware oder
Teppich. Drücken Sie auf das Pedal,
um die Bürste einzufahren.
Staubbeutelfach (8)
Im Staubbeutelfach (8) kann der neue
Staubbeutel bequem aufbewahrt werden.
So haben Sie immer einen neuen Beutel
griffbereit.
Netzanschluss und Bedienung
Netzkabel auf die gewünschte Länge
heraus ziehen und an die Steckdose
anschließen.
Zum Einschalten den Schalter (9) in die
gewünschte Position schieben.
Zum Ausschalten den Schalter (9)
zurückschieben.
Elektronische Saugstärkeregelung (9)
Die Saugstärke lässt sich stufenlos bis
zur Einstellung MAX. einstellen.
OFF : Abschalten
CURTAIN : Niedrige Leistung
FLOOR : Volle Leistung.
Urethan-Rollen (10), (11)
Die drei weichen Urethan-Rollen (10) und
(11) wird ein Verkratzen des Bodens
vermieden.
Auch sorgen sie für ein leises Rollen.
Sicherheitsinformationen
Verwendung des Gerätes
D
Page 8

– 8 –
LED-Anzeige (13)
GELB: Gerät eingeschaltet
ROT: Staubbeutel voll
Abstellsystem (14)
Bei kurzen Pausen während des Saugens,
z. B. beim Verschieben von Möbeln oder
Teppichen, können Sie das Abstellsystem
benutzen, um den Schlauch und den
Reinigungsaufsatz kurz abzustellen.
• Schieben Sie den Haken am großen
Reinigungsaufsatz in den Steckplatz auf
der Geräterückseite.
Transport und Abstellen (15)
Wenn das Gerät ausgeschaltet und der
Stecker gezogen wurde, drücken Sie auf
den Schalter (12), um das Kabel
automatisch aufzuwickeln.
Das Gerät kann senkrecht durch Schieben
des Hakens des großen Reinigungsaufsatzes in die Klemme an der Unterseite des
Gerätes bewegt oder abgestellt werden
.
Auswechseln des Staubbeutels
Der Staubbeutel muss gewechselt
werden, wenn der Sauger auf maximale
Saugkraft eingestellt ist, der Aufsatz nicht
auf dem Boden aufliegt und die (rote)
Anzeige "Beutel voll" (16) leuchtet. Bei
leuchtender "Beutel voll"-Anzeige
verringert sich zudem die Saugleistung
nach ca. 1,5 Minuten automatisch, um
den Motor vor Schäden zu bewahren.
Die rote Anzeige leuchtet dabei weiterhin.
Der Staubbeutel sollte gewechselt
werden, selbst wenn er jetzt nicht voll zu
sein scheint. Eine große Menge feiner
Staub könnte sich in den Poren des
Staubbeutels angesammelt haben.
•
Gerät ausschalten und Netzstecker ziehen.
• Zum Öffnen an der Klappe (17) ziehen.
• Die Filterhalterung herausziehen.
• Den Riegel (18) in Pfeilrichtung drücken,
den vollen Staubbeutel heraus nehmen
und entsorgen.
• Nun den neuen Staubbeutel in den
Staubsauger (19) einsetzen.
Hinweis: Da das Gerät zur Sicherheit
erkennt, ob ein Beutel eingesetzt ist, kann
die Klappe bei falsch eingesetztem Beutel
nicht geschlossen werden.
Reinigung des Motorfilters
Der Motorfilter befindet sich im Gerät
zwischen dem Staubbeutel und dem
Motor. Bei jedem Wechsel des Luftfilters
sollte der Motorfilter (20) entfernt, durch
Klopfen von Schmutz gereinigt und dann
wieder in den Staubsauger eingesetzt
werden.
Auswechseln der Luftfilter
•
Um diese Filter (21) auszuwechseln,
entfernen Sie die Abdeckung des
Filtergehäuses (22) auf der Geräte-rückseite
durch Drücken des kleinen Riegels.
Aufsatztülle (23)
Zum Saugen an schwer zugänglichen
Orten, wie z. B. bei Spinnweben oder
unter dem Sofa! Stellen Sie den Schalter
für die Saugleistung vor dem Saugen auf
SOFA.
Saugbürste (24)
Zum Absaugen von Bilderrahmen, Möbelkanten, Büchern u. a. unebenen Gegenständen.
Polsteraufsatz (25)
Zum Absaugen von Polstermöbeln,
Matratzen usw. Mit den Flusenbürsten
werden Fusseln und Flusen entfernt.
Prüfen Sie, ob das Gerät richtig angeschlossen ist
und ob die Steckdose funktioniert.
• Gerät ausschalten und Stecker ziehen.
• Prüfen Sie, ob Saugrohre, Schlauch
oder Reinigungsaufsatz verstopft sind.
• Prüfen Sie, ob der Staubbeutel voll ist.
Wechseln Sie ihn nötigenfalls aus.
• Prüfen Sie, ob der Luftfilter verstopft ist.
Wechseln Sie ihn nötigenfalls aus.
Ersatzfilter
• LG Filter TB62 (Papierfilter)
• Swirl Filter Y61 (Papierfilter)
Falls das Gerät nicht arbeitet
Falls die Saugleistung abnimmt
D
Page 9

– 9 –
Preïítajte si prosím nasledovné informácie,
ktoré obsahujú dôle¥ité pokyny o
bezpeïnosti, pou¥ití a údr¥be zariadenia.
Zariadenie sp†ña nasledovné smernice ES: 73/23/EEC, 93/68/EEC-Smernica o nízkom
napätí-89/336EEC -EMC Smernica.
■ Nikdy nenechávajte deti pou¥ívafl
zariadenie bez dozoru.
■ Zariadenie nepou¥ívajte, ak je napájací
kábel po•kodenƒ alebo vadnƒ.
■
Ak je hlavnƒ prívod po•kodenƒ, musí ho
vymenifl schválenƒ servisnƒ zástupca LG
Electronics, aby ste sa vyhli nebezpeïenstvu.
■ Vysávaï v¥dy vypnite pred:
• vƒmenou vrecú•ka na prach
• vƒmenou alebo ïistením filtrov.
■
Kryt sa nedá zatvorifl, ak ste nevlo¥ili
vrecú•ko na prach. Prosím nepou¥ívajte
silu!
■ Nevysávajte horŸavé alebo vƒbu•né látky
(tekutiny alebo plyny).
■ Nevysávajte horúci popol, uhlíky, atõ. ani
ostré predmety.
■ Nevysávajte vodu, ani iné tekutiny.
■ Keõ vysávate s prídavnƒm zariadením,
ktoré má rotaïnú valcovú kefu, do
rotaïnej valcovej kefy nesiahajte.
UPOZORNENIE! Ak je potrebné vymenifl
odliatu zástrïku, je potrebné zniïifl
po•kodenú zástrïku, aby ste sa vyhli
nebezpeïenstvu zasiahnutia elektrickƒm
prúdom, ktoré sa mô¥e vyskytnúfl, keby sa
táto zástrïka pripojila k 13 ampérovej
zásuvke kdekoŸvek v dome.
Pripojenie ohybnej hadice
Koniec hlavice (1) na ohybnej hadici (2)
zatlaïte k bodu pripevnenia na vysávaïi.
Keõ chcete ohybnú hlavicu z vysávaïa
odstránifl, stlaïte tlaïidlo (3) umiestnené na
hlavici a potom potiahnite smerom hore.
Nastavenie trubíc
• Teleskopická trubica (4)
- Podr¥te pru¥inovú západku (5)
- Trubicu vytiahnite do po¥adovanej d†¥ky.
- Na uzamknutie pru¥inovú západku
pustite.
Pou¥itie ïistiacej hlavice a príslu•enstva
VeŸkú ïistiacu hadicu pripevnite na koniec
trubice.
• Dvojpolohová hlavica (6) je vybavená
pedálom (7), ktorƒ vám umo¥ní menifl
polohu podŸa druhu ïistenej dlá¥ky. Poloha
pre tvrdé dlá¥ky (dla¥dice, parkety...).
Stlaïením pedálu dajte kefu ni¥•ie. Poloha
pre koberce alebo predlo¥ky. Stlaïením
pedálu dajte kefu vy••ie.
Priestor pre ulo¥enie vrecú•ka na
prach (8)
Do priestoru na ulo¥enie vrecú•ka na prach
(8) mô¥ete vlo¥ifl nové vrecú•ko na prach.
Zabránite tƒm tomu, ¥e by vrecú•ko na
prach chƒbalo.
Návod na pripojenie a pou¥itie
Hlavnƒ prívod vytiahnite do po¥adovanej
polohy a pripojte k zásuvke.
Na spustenie vysávaïa posuñte tlaïidlo (9).
Na zastavenie opäfl posuñte tlaïidlo (9).
Elektronické ovládanie vƒkonu (9)
Vƒkonnosfl nasávania sa plynulo zvƒ•i a¥ k
MAX.
OFF (Vypnuté) : Nasávanie vypnuté
CURTAIN (Závesy) : Nízke nasávanie
FLOOR (dlá¥ka) : Plná vƒkonnosfl.
Polyuretánové kolieska (10), (11)
Tri polyuretánové kolieska (10) a
polyuretánové koleso (11) slú¥ia ako
prevencia proti po•kriabaniu dlá¥ky.
Redukujú hluk pri posúvaní.
LED displej (13)
ÆÆ
LT„ : Prístroj zapnutƒ
ÏERVENÁ : Vrecú•ko je plné
Odkladací systém (14)
Na ulo¥enie poïas vysávania, napríklad
kvôli presunutiu malého kúsku nábytku
alebo predlo¥ky, pou¥ite odkladací systém,
na ktorƒ zavesíte ohybnú hadicu a ïistiacu
hlavicu.
Informácie pre va•u bezpeïnosfl
Návod na pou¥itie
S
Page 10

– 10 –
• Posuñte háïik na veŸkej ïistiacej hlavici do
otvoru na zadnej strane vysávaïa.
Starostlivosfl a uskladnenie (15)
Keõ ste zariadenie vypli a odpojili od zdroja
elektrickej energie, stlaïte tlaïidlo (12) pre
automatické navinutie kábla.
Posunutím háïiku na veŸkej ïistiacej hlavici
do svorky na spodnej strane zariadenia
mô¥ete uskladnifl vá• vysávaï vo vertikálnej
polohe.
Vƒmena vrecú•ka na prach
Vrecú•ko na prach musíte vymenifl vtedy,
keõ je vysávaï nastavenƒ na maximálny
sací vƒkon, hlavica sa nachádza nad
dlá¥kou a pritom svieti kontrolka (ïervená)
vrecú•ko plné“ (16).
Keõ je vrecú•ko plné, kontrolka (ïervená)
svieti. Po 1 a pol minúte vysávaï prudko
zní¥i sací vƒkon kvôli ochrane motora.
Poïas tejto doby kontrolka naplnenia
vrecú•ka (ïervená) stále svieti.
Vrecú•ko by ste mali vymenifl aj v tom
prípade, ak sa vám nezdá byfl plné. Mô¥e to
byfl zapríïinené tƒm, ¥e póry vrecú•ka na
prach upchalo veŸké mno¥stvo veŸmi
jemného prachu.
• Zariadenie vypnite a odpojte od zdroja
elektrickej energie.
• Potiahnutím krytu (17), kryt otvorte
• Vytiahnite nosiï filtra.
• Potlaïte západku (18) dopredu, v smere
•ípky, vyberte plné vrecú•ko na prach a
vyhoõte ho.
• Do vysávaïa (19) vlo¥te nové vrecú•ko na
prach.
Poznámka: pokiaŸ je zariadenie vybavené
bezpeïnostnƒm zariadením, ktoré
kontroluje, ïi je vrecú•ko na mieste,
nebudete môcfl zatvorifl kryt, kƒm ho
nevlo¥íte správne.
Ïistenie filtra motora
Filter motora je ulo¥enƒ vo vnútri zariadenia,
medzi vrecú•kom na prach a motorom.
V¥dy, keõ meníte filter odvodu vzduchu,
vám odporúïame vybrafl filter motora (20) a
vyïistifl ho.
Oklepte •pinu a vráflte ho na pôvodné
miesto do vysávaïa.
Ïistenie vzduchovƒch filtrov
• Ak chcete vymenifl filter (21), vyberte
zatiahnutím za úchytku kryt z priehradky
na filter (22), ktorá je ulo¥ená na zadnej
strane zariadenia.
‡trbinová kefa (23)
J
e urïená na vysávanie na fla¥ko
dosiahnuteŸnƒch miestach, ako napríklad
boïná strana na gauïi, alebo na dosiahnutie
pavuïín. Pred vysávaním nastavte spínaï
ovládania sacieho vƒkonu na sofa (gauï).
Kefa na prach (24)
Je urïená na vysávanie rámov, nábytku,
kníh a inƒch nepravidelnƒch povrchov.
Násadec na ïalúnenie (25)
Je urïenƒ na vysávanie ïalúnenia,
matracov, atõ. Zberaïe pomáhajú pozbierafl
nite a chumáïe.
Skontrolujte, ïi je zariadenie správne
pripojené a elektrická zásuvka funkïná.
• Zariadenie vypnite a odpojte od zdroja
elektrickej energie.
• Skontrolujte, ïi nie sú upchaté rúry,
ohybná rúra a ïistiaci násadec.
• Skontrolujte, ïi nie je vrecú•ko na prach
plné. V prípade potreby vymeñte.
• Skontrolujte, ïi nie je upchatƒ vzduchovƒ
filter. V prípade potreby vymeñte.
SVC Filter
• LG filter TB62 (papierovƒ filter)
• Vírivƒ filter Y61 (papierovƒ filter)
Ïo robifl, ak va•e zariadenie
nepracuje
Ïo robifl, ak sa zní¥i sací
vƒkon?
S
Page 11

– 11 –
Kérjük, hogy gondosan olvassa el a
készülék biztonságos használatára és
karbantartására vonatkozó alábbi
információkat.
Ez a készülék az alábbi Európai Uniós
Irányelveknek felel meg: 73/23/EEC,
93/68EEC-Alacsony Feszültségi Irányelv,
89/336EEC-EMC.
■ A készüléket gyermek kizárólag felügyelet
mellett használhatja.
■ Ne használja a készüléket, ha a
csatlakozózsinór sérült vagy hibás.
■ A kockázatok elkerülése érdekében a
sérült csatlakozózsinórt kizárólag az LG
Electronics hivatalos márkaszervizének
képviselòje cserélheti ki.
■ Mindig kapcsolja ki a készüléket, mielòtt:
• kiüríti a portartályt;
• tisztítja vagy cseréli a szûròket.
■ Ha a készülékben nincs porzsák, a
fedelet nem lehet lecsukni. Kérjük, ne
próbálja eròvel lezárni a fedelet!
■ Ne használja a készüléket gyúlékony
vagy robbanásveszélyes anyagok
felszívására (folyadékok vagy gázok).
■ Ne használja a készüléket forró hamu,
parázs, stb. továbbá éles tárgyak
felszívására.
■ Ne használja a készüléket víz vagy egyéb
folyadék felszívására.
■ Ha forgókefés tartozékot használ, soha
ne nyúljon a mozgó kefék közé.
FIGYELEM! Ha a sajtolt csatlakozódugasz
meghibásodik, és ki kell azt cserélni, a
meghibásodott dugaszt meg kell
semmisíteni. Ellenkezò esetben a hibás
dugasz áramütést okozhat, ha azt a lakás
egy másik pontján lévò 13 amperes aljzatba
dugják.
A flexibilis csò csatlakoztatása
Nyomja a flexibilis csò (2) fejének végét (1) a
készüléken található csatlakoztatási pontba.
A flexibilis csò eltávolításához nyomja meg
a fej oldalán található gombot (3), majd
húzza felfelé a fejet.
Csövek összeszerelése
• Teleszkópos csò (4)
- Nyomja a rugós reteszt elòre (5).
- Húzza ki a csövet a kívánt hosszúságúra.
- Engedje vissza a rugós reteszt.
A tisztítófej és kiegészítò szívófejek
használata
Illessze a nagy szívófejet a csò végére.
• A 2-állású tisztítófejen (6) egy pedál (7)
helyezkedik el, melynek segítségével Ön a
porszívózni kívánt felületnek megfelelòen
állíthatja be a szívófejet. Keménypadló-
állás (kòburkolat, parketta stb.) A kefe
leeresztéséhez nyomja meg a pedált.
Szònyeg vagy szònyegpadló-állás
Nyomja a pedált a másik állásba, ekkor a
kefe felemelkedik.
Porzsáktároló rekesz (8)
A porzsáktároló rekeszben (8) praktikusan tárolható
a tartalék porzsák. A rekesz használatával
megelòzhetò, hogy a porzsák elvesszen.
Csatlakoztatás a hálózati
áramforrásba és használat
Húzza ki a csatlakozózsinórt a kívánt hosszúságra,
és dugja be a csatlakozódugót a hálózati
áramforrásba. A készülék bekapcsolásához
csúsztassa el a bekapcsológombot (9). A készülék
kikapcsolásához ugyanezt a gombot (9) kell az
ellenkezò irányba csúsztatni.
Elektronikus teljesítményszabályozás (9)
A szíváseròsség a ’MAX’ jelzés felé haladva
folyamatosan emelkedik.
OFF : kikapcsolt állapot
FÜGGÖNY : alacsony
PADLÓ : maximális teljesítmény.
Uretán kerekek (10), (11)
A három uretán kerék elòl és hátul (10,11)
megakadályozza, hogy a padló felkarcolódjon.
Az uretán kerekeknek köszönhetòen a
készülék gurításakor keletkezò zaj is kisebb.
LED-kijelzò (13)
SÁRGA : Bekapcsolva
PIROS : Porzsák tele
Biztonsági információ
A készülék használata
M
Page 12

– 12 –
Parkoló-funkció (14)
Ha porszívózás közben pl. egy kisebb
bútordarabot vagy szònyeget kell arrébb
tenni, használja az ún. parkoló-funkciót a
gégecsò és a szívófej megtámasztására.
•
Csúsztassa a nagy szívófejen lévò kampót a
készülék hátsó részén található nyílásba.
Szállítás és Tárolás (15)
A használat befejezése után kapcsolja ki a
készüléket, húzza ki a csatlakozódugót, majd
nyomja meg a vezetékfeltekerò gombot (12),
ekkor a vezeték magától feltekeredik.
A készülék függòleges helyzetben történò
tárolásához csúsztassa a nagy szívófejen
lévò kampót a készülék alján található
nyílásba.
Porzsák cseréje
A porzsákot akkor kell kicserélni, ha a
készülék maximális szívóeròre van állítva, a
szívófej nincs a padlón, és a “porzsák tele”
(piros) LED-kijelzò (16) mégis világít.
Amikor a “porzsák tele” lámpa (piros) világít,
a készülék a motor védelme érdekében
másfél perc után automatikusan lecsökkenti
a szívóeròt.
Ekkor a “porzsák tele” lámpa (piros) még
mindig világít. Az ilyen esetben a porzsákot
akkor is ki kell cserélni, ha az nem tûnik
teljesen megteltnek.
Elòfordulhat ugyanis, hogy nagyon finom
szemcséjû por tömítette el a porzsák
pórusait.
• Kapcsolja ki a készüléket, és húzza ki a
hálózati csatlakozódugót.
• Nyomja meg a fedelet (17), ekkor az
felnyílik.
• Húzza ki a porzsáktartó-keretet.
• Nyomja a reteszt (18) elòre, a nyíllal jelzett
irányba, vegye ki a megtelt porzsákot, és
tegye a szemetesbe.
•
Helyezze be az új porzsákot a készülékbe (19).
Figyelem: a készülékben olyan biztonsági
kapcsoló van, amelyik ellenòrzi, hogy a
porzsák a helyén van-e, ezért a fedelet csak
akkor lehet lezárni, ha a porzsák pontosan a
helyére került.
A motorszûrò tisztítása
A motorszûrò a készülék belsejében
található, a porzsák és a motor között.
Javasoljuk, hogy minden alkalommal,
amikor a kimenò levegò szûròt cseréli,
vegye ki a motorszûròt (20) is, rázogatással
és ütögetéssel tisztítsa ki, majd helyezze
vissza a készülékbe.
Kimenò levegòszûròk cseréje
• A szûrò (21) cseréjéhez a kis fülecske
megnyomásával vegye le a készülék hátsó
részén található szûròkamra (22) fedelét.
Résszívó fej (23)
Az olyan nehezen megközelíthetò helyek
tisztítására alkalmas, mint pl. az
ülògarnitúra oldala vagy a szûk sarkokban
található pókhálók.
Portalanító kefe (24)
A portalanító kefe képkeretek, bútorvázak,
könyvek és egyéb egyenetlen felületek
porszívózására alkalmas.
Kárpittisztító fej (25)
A kárpittisztító fej kárpitozott felületek,
ágybetétek stb. tisztítására használható. A
szálgyûjtòk segítségével a textilszálak és
szöszök könnyedén eltávolíthatók.
Ellenòrizze, hogy a csatlakozódugó
rendesen be van-e dugva, valamint hogy a
konnektorban van-e áram.
• Kapcsolja ki a készüléket, és húzza ki a
hálózati csatlakozódugót.
•
Ellenòrizze, hogy nem dugult-e el a teleszkópos
csò, a flexibilis csò vagy a szívófej.
• Ellenòrizze, nincs-e tele a porzsák. Ha
igen, ürítse ki.
• Ellenòrizze, hogy a kimenò-levegò szûrò
nem dugult-e el. Szükség esetén tisztítsa
meg a szûròt.
SCV Szûrò
• LG szûrò TB62 (papírszûrò)
•
Whirl filter (Örvényszûrò) Y61 (papírszûrò)
Mi a teendò, ha a készülék
nem mûködik
Mi a teendò, ha a
szívásteljesítmény lecsökken
M
Page 13

Ïtête, prosím, v•echny následující
informace, které obsahují dºle¥ité
instrukce pro bezpeïnost, pou¥ívání a
údr¥bu za¡ízení.
Toto za¡ízení splñuje následující smêrnice
EC: -73/23/EEC, 93/68/EEC- smêrnice pro
nízké napêtí-89/336EEC-smêrnice o
elektromagnetické kompatibilitê.
■ Nikdy nedovolte dêtem pou¥ívat
za¡ízení bez dohledu.
■ Nepou¥ívejte za¡ízení, je-li hlavní
p¡ívod po•kozenƒ nebo vadnƒ.
■ Je-li hlavní p¡ívod po•kozenƒ, musí bƒt
nahrazen schválenƒm servisním
zástupcem LG Electronics, aby se
zabránilo nebezpeïí.
■ V¥dy vypnête vysavaï p¡ed:
• vƒmênou prachového sáïku
• cvƒmênou nebo ïi•têním filtrº.
■ Není-li vlo¥en prachovƒ sáïek, víko
nemº¥e bƒt zav¡eno. Prosím,
nepou¥ívejte sílu!
■ Nevysávejte ho¡lavé nebo vƒbu•né
látky (kapaliny nebo plyny).
■ Nevysávejte horkƒ popel, doutnající
uhlíky, ani ostré p¡edmêty.
■ Nevysávejte vodu ani jiné kapaliny.
■ Kdy¥ vysáváte s p¡ídavnƒm za¡ízením,
které má rotující kartáïovƒ válec,
nezasahujte do rotujícího kartáïového
válce.
V„STRAHA! Kdyby bylo nezbytné
vymênit odlitou vidlici, pak by vidlice mêla
bƒt zniïena, aby se zamezilo mo¥nému
nebezpeïí úrazu elektrickƒm proudem,
které by mohlo vzniknout, kdyby taková
vidlice byla zasunuta do zásuvky 13 A
kdekoliv v domê.
P¡ipojení ohebné hadice
Zatlaïte konec hlavice (1) na ohebné
hadici (2) do p¡ípojného bodu na
vysavaïi. Pro vyjmutí ohebné hadice z
vysavaïe stisknête tlaïítko (3), umístêné
na hlavici, potom zatáhnête nahoru.
Sestavení trubek
• Teleskopická trubka (4)
- p¡idr¥te pru¥nou západku (5)
-
vytáhnête trubku na po¥adovanou délku
- k zaji•têní uvolnête pru¥nou západku.
Pou¥ití hubice vysavaïe a p¡íslu•enství
Nasaõte •irokou ïisticí hlavici na konec
trubky.
• Dvoupolohová hlava (6) je opat¡ena
pedálem (7), kterƒ vám umo¥ñuje mênit
její polohu podle typu podlahy, která se
má vysávat. Poloha pro tvrdou
podlahu (dla¥dice, parketové podlahy,
...). Stisknête pedál, abyste sní¥ili
polohu kartáïe. Poloha pro koberce
nebo p¡edlo¥ky. Stisknête pedál,
abyste zvedli kartáï nahoru.
Místo pro prachovƒ sáïek (8)
Do prostoru pro prachovƒ sáïek (8) se
mº¥e snadno vlo¥it novƒ prachovƒ sáïek.
Zabrání se ztrátê prachového sáïku.
Jak zapnout a pou¥ívat
Vytáhnête p¡ívodní •ñºru na po¥adovanou
délku a zasuñte ji do elektrické zásuvky.
Posuñte tlaïítko (9) do startovací polohy
vysavaïe. Pro zastavení posuñte tlaïítko (9)
znovu.
Elektronické ¡ízení vƒkonu (9)
Sací vƒkon se zvy•uje plynule a¥ do
maxima.
VYPNUTO: Vypnuto
ZÁCLONY: Nízkƒ vƒkon
PODLAHA: Plnƒ vƒkon.
Polyuretanové koleïko (10), (11)
T¡i polyuretanová koleïka (10) a
polyuretanové kolo (11) zabrañují
po•krábání podlahy. Sni¥ují hluk p¡i
odvalování.
Displej LED (13)
ÆÆ
LUTÁ: Zapnuto
ÏERVENÁ: sáïek je plnƒ
– 13 –
Informace pro va•i bezpeïnost
Jak pou¥ívat
C
Page 14

– 14 –
Parkovací systém (14)
Pro krátké p¡eru•ení práce bêhem
vysávání, na p¡íklad pro posunutí malého
kusu nábytku nebo p¡edlo¥ky pou¥ijte
parkovací systém k podep¡ení ohebné
hadice a hubice vysavaïe.
• Zasuñte háïek p¡ipojenƒ k •iroké hubici
vysavaïe do •têrbiny na zadní stranê
za¡ízení.
P¡ená•ení a skladování (15)
Kdy¥ jste vypnuli a odpojili za¡ízení,
stisknête tlaïítko (12), aby se •ñºra
automaticky navinula zpêt.
Za¡ízení mº¥ete p¡emístit nebo ulo¥it ve
svislé poloze zasunutím háïku na •iroké
hubici vysavaïe do spony na spodní
stranê za¡ízení.
Vƒmêna prachového sáïku
Prachovƒ sáïek vy¥aduje vƒmênu, kdy¥
je vysavaï nastavenƒ na maximální
vƒkon a hubice vysavaïe je zvednutá od
podlahy, ale indikaïní okénko “plnƒ
sáïek” (16) je úplnê zbarveno ïervenê.
V takové situaci rovnê¥ vysavaï po asi
jedné aºp l minutê automaticky rychle
sní¥ sací vƒkon, aby p¡ede•el po•kození
motoru.
Ïervená kontrolka “plnƒ sáïek” svítí po
celou tuto dobu. I kdy¥ se nezdá, ¥e je
prachovƒ sáïek naplnên do této míry, mêl
by se vymênit. Mohlo by se stát, ¥e velké
mno¥ství velmi jemného prachu ucpalo
póry v prachovém sáïku.
• Vypnête za¡ízení a odpojte je.
• Otev¡ete víko zata¥ením za víko (17).
• Vytáhnête ven dr¥ák prachového sáïku.
•
Zatlaïte západku (18) vp¡ed ve smêru
•ipky a vyjmête plnƒ prachovƒ sáïek ven.
• Vlo¥te novƒ prachovƒ sáïek do
vysavaïe (19).
Poznámka: Proto¥e je za¡ízení opat¡eno
bezpeïnostním ústrojím, které kontroluje,
jestli je sáïek na místê, nemº¥ete zav¡ít
víko, kdy¥ není sáïek správnê vlo¥enƒ.
Ïi•têní filtru motoru
Filtr motoru je umístênƒ uvnit¡ za¡ízení
mezi prachovƒm sáïkem a motorem.
Kdykoliv mêníte vzduchovƒ vƒstupní filtr,
doporuïujeme vám vyjmout filtr motoru
(20) a vyïistit jej oklepáním, aby se
odstranila neïistota a potom jej vlo¥it do
vysavaïe.
Vƒmêna vƒstupních vzduchovƒch filtrº
• Pro vƒmênu filtru (21) sejmête víko
prostoru pro filtr (22), umístêného na
zadní stranê za¡ízení stisknutím malého
záchytu.
‡têrbinová hubice (23)
Pro vysávání v normálnê nep¡ístupnƒch
místech, tj. pro dosa¥ení na pavuïiny
nebo na spodní stranê pohovky! P¡ed
vysáváním nastavte sací vƒkon
ovládacím spínaïem na pohovku.
Opra•ovací kartáï (24)
Pro vysávání rámº obrazº, hran nábytku,
knih a jinƒch nerovnƒch p¡edmêtº.
Hubice na ïalounêní (25)
Pro vysávání ïalounêní, matrací atd.
Sbêraïe nití pomáhají zvednout nitê a
chomáïe prachu.
Zkontrolujte, je-li za¡ízení správnê
zapojeno a ¥e v elektrické zásuvce je
napêtí.
• Vypnête za¡ízení a odpojte je.
• Zkontrolujte, ¥e trubky, ohebná hadice a
hubice vysavaïe nejsou ucpané.
• Zkontrolujte, ¥e prachovƒ sáïek není
plnƒ. Vymêñte jej, je-li to t¡eba.
• Zkontrolujte, ¥e vzduchovƒ vƒstupní filtr
není ucpanƒ. Vymêñte jej, je-li to t¡eba.
Filtr SVC
• LG filtr TB62 (Papírovƒ filtr)
• Vírovƒ filtr Y61 (Papírovƒ filtr)
Co dêlat, kdy¥ za¡ízení
nefunguje
Co dêlat, kdy¥ se sni¥uje sací
vƒkon?
C
Page 15

– 15 –
P
Informacje dotyczåce bezpieczeæstwa
Sposób u¯ycia
Prosimy o przeczytanie poni¯szych informacji w
ca¢oÿci, poniewa¯ zawierajå one wa¯ne instrukcje
dotyczåce u¯ytkowania, bezpieczeæstwa oraz
konserwacji urzådzenia.
Urzådzenie jest zgodne z Dyrektywami KE:
73/23/EWG, 93/68/EWG-Dyrektywå dotyczåcå
niskich napiëç, oraz z Dyrektywå 98/336 EWG,
dotyczåcå kompatybilnoÿci elektromagnetycznej.
■ Nigdy nie nale¯y zezwalaç dzieciom na
u¯ytkowanie urzådzenia bez dozoru.
■
Nie u¯ywaç urzådzenia, gdy kabel zasilajåcy
jest uszkodzony lub niesprawny.
■ Je¯eli kabel zasilajåcy jest uszkodzony, w
celu zapewnienia bezpieczeæstwa nale¯y
zleciç jego wymianë autoryzowanemu
serwisantowi LG Electronics.
■ Zawsze wy¢åczaj odkurzacz przed:
- wymianå worka na kurz;
- wymianå lub czyszczeniem filtrów
■ Nie wolno zamykaç pokrywy bez
uprzedniego w¢o¯enia worka. Nie
stosowaç si¢y!
■ Nie odkurzaç substancji palnych lub
wybuchowych (p¢ynów i gazów).
■ Nie odkurzaç popio¢u, ¯u¯lu lub ostrych
przedmiotów.
■ Nie odkurzaç wody ani innych p¢ynów.
■ Przy odkurzaniu z u¯yciem koæcówki z
obrotowå rolkå szczotkowå nie nale¯y
dotykaç obracajåcej sië rolki.
UWAGA! Je¯eli wyståpi koniecznoÿç
wymiany zatapianej wtyczki, nale¯y odciåç
wadliwå wtyczkë, poniewa¯ dalsze jej
u¯ytkowanie mo¯e groziç pora¯eniem przy
próbie w¢o¯enia jej do któregokolwiek
gniazdka w domu.
Pod¢åczanie elastycznego wë¯a
Wcisnåç koæcówkë (1) elastycznego wë¯a
(2) do otworu w odkurzaczu.
Aby od¢åczyç wå¯ od odkurzacza, wcisnåç
przycisk (3) na koæcówce, a nastëpnie
pociågnåç wå¯ do góry.
Sk¢adanie rur
• Rura teleskopowa (4)
- Przytrzymaç zacisk sprë¯ynowy (5)
- Wyciågnåç rurë na ¯ådanå d¢ugoÿç
- Zwolniç zacisk sprë¯ynowy w celu
zablokowania w pozycji
Stosowanie koæcówek czyszczåcych
i akcesoriów
Zamontowaç du¯å koæcówkë czyszczåcå na
koæcu rury.
• Koæcówka dwupozycyjna (6) posiada
przycisk no¯ny (7), który umo¯liwia zmianë
ustawienia w zale¯noÿci od pod¢o¯a, które
ma byç odkurzane. Pozycja do pod¢o¯a
twardego (p¢ytki, parkiety...). Wcisnåç
przycisk no¯ny w celu opuszczenia
szczotki. Pozycja do czyszczenia
dywanów/chodników. Wcisnåç przycisk
no¯ny w celu podniesienia szczotki.
Schowek na worek (8)
Schowek na worek (8) ¢atwo zmieÿci nowy
worek na kurz. Zamkniëcie zapobiegnie
wypadniëciu worka.
W¢åczanie i u¯ytkowanie
Wyciågnåç kabel zasilajåcy na ¯ådanå
d¢ugoÿç, a nastëpnie w¢o¯yç wtyczkë do
gniazdka. Nacisnåç przycisk przesuwny (9)
w celu uruchomienia odkurzacza. Aby
wy¢åczyç, ponownie nacisnåç przycisk (9).
Elektroniczne sterowanie mocå(9)
Moc ssåca mo¯e byç bezstopniowo
zwiëkszana do MAX.
OFF: zasilanie od¢åczone
CURTAIN :niska moc
FLOOR : pe¢na moc
Kó¢ka z uretanu (10, 11)
Kó¢ko sterujåce z uretanu (10) i kó¢ka (11)
zapobiegajå zadrapaniom pod¢ogi, oraz
przyczyniajå sië do zmniejszenia ha¢asu
przy przesuwaniu urzådzenia.
Wyÿwietlacz z diodami
˜Ó·TY: w¢åczone zasilanie
DIODA W KOLORZE CZERWONYM:
worek zape¢niony
Funkcja parkowania (14)
Przy krótkich przerwach w trakcie
odkurzania, w celu np. przesuniëcia
Page 16

– 16 –
P
niewielkiego mebla lub chodniczka mo¯na
skorzystaç z funkcji parkowania, mocujåc
elastyczny wå¯ i koæcówkë czyszczåcå.
• Wsunåç hak zamontowany na du¯ej
koæcówce czyszczåcej w szczelinë
znajdujåcå sië z ty¢u urzådzenia
Przechowywanie (15)
Po wy¢åczeniu urzådzenia i wyjëciu kabla
zasilajåcego z gniazdka, wcisnåç przycisk
(12) w celu zwiniëcia kabla.
Po wsuniëciu haka do zacisku w dolnej
czëÿci urzådzenia, mo¯na je przesuwaç i
przechowywaç w pozycji pionowej.
Wymiana worka na kurz
Worek nale¯y zmieniç, gdy odkurzacz jest
nastawiony na moc maksymalnå, koæcówka
czyszczåca nie dotyka pod¢ogi, a ÿwiate¢ko
diody “worek zape¢niony” (16) ÿwieci na
czerwono. Gdy worek jest pe¢ny, ÿwieci sië
na czerwono lampka diody; ponadto po ok.
1,5 minuty silnik gwa¢townie zwalnia obroty
w celu ochrony przed przegrzaniem.
Lampka diody bëdzie sië nadal ÿwieciç .
Nawet je¯eli worek nie jest faktycznie
zape¢niony, nale¯y go wymieniç. Mog¢o
zdarzyç sië tak, ¯e znaczna iloÿç drobnych
py¢ków zapcha¢a pory worka.
• Wy¢åczyç urzådzenie i od¢åczyç je z sieci.
• Otworzyç pokrywë (17) przez pociågniëcie.
• Wyciågnåç pojemnik na worek
• Wcisnåç zatrzask (18) zgodnie z
kierunkiem strza¢ki i wyjåç pe¢ny worek, a
nastëpnie wyrzuciç go.
• Za¢o¯yç na miejsce nowy worek (19)
Uwaga: poniewa¯ urzådzenie jest wyposa¯one
w uk¢ad zabezpieczenia, który sprawdza, czy
worek zosta¢ prawid¢owo za¢o¯ony, pokrywy nie
bëdzie mo¯na zamknåç, dopóki worek nie
znajduje sië we w¢aÿciwej pozycji.
Czyszczenie filtra silnika
Filtr silnika znajduje sië wewnåtrz
urzådzenia, miëdzy workiem a silnikiem.
Przy ka¯dej wymianie filtra powietrza
wylotowego zalecany jest demonta¯ filtra
silnika (20) i jego przeczyszczenie przez
wytrzepanie zeæ kurzu, a nastëpnie
zamocowanie go na swoim miejscu.
Wymiana filtrów powietrza wylotowego
W celu wymiany filtra (21), zdjåç pokrywë
przedzia¢u filtra (22) zlokalizowanå w tylnej
czëÿci urzådzenia, naciskajåc ma¢å
zapadkë.
Koæcówka do czyszczenia szczelin (23)
• S¢u¯y do czyszczenia miejsc zazwyczaj
niedostëpnych, jak szczeliny w kanapie,
czy odkurzanie pajëczyn. Przed
czyszczeniem prze¢åczyç odkurzacz na
tryb “SOFA” (kanapa).
Szczotka odkurzajåca (24)
Do czyszczenia opraw obrazów, zewnëtrznych
powierzchni mebli, ksiå¯ek i innych obiektów o
nieregularnej powierzchni.
Koæcówka do czyszczenia tapicerki (25)
Do odkurzania tapicerki, materaców itp.
Koæcówki zbierajåce pomagajå zbieraç nitki
i k¢aczki.
Sprawd¶, czy urzådzenie jest w¢aÿciwie
pod¢åczone, i czy w gniazdku jest zasilanie.
• Wy¢åczyç odkurzacz, i wyjåç wtyczkë z
gniazdka.
• Sprawdziç, czy rury, wå¯ elastyczny i
nak¢adki czyszczåce nie så zablokowane.
• Sprawdziç, czy worek nie jest zape¢niony;
w razie potrzeby wymieniç.
• Sprawdziç, czy filtr powietrza wylotowego
nie jest zapchany; w razie potrzeby
wymieniç.
Filtr SVC
• Filtr LG TB62 (papierowy)
• Filtr wirowy Y61 (papierowy)
Co zrobiç, gdy sprzët
odmawia pos¢uszeæstwa
Co zrobiç, gdy zmniejsza sië
si¢a ssania?
Page 17

– 17 –
MEMO
Page 18

– 18 –
Page 19

_ _
19
Page 20

P/No.: 3828Fi3838R
 Loading...