

Page 1

Model
Language
Page
Material Size(W*H)
Date
Part No. Description
V-CP943**/V-CP953**/V-CP963**
ENGLISH+ROMARY+GERMANY+FRANCH+HUNRAY+Bugaria+Solvak
24
Weight 100g
2005.05.30
3828FI2852R
Color(cover/body)
Designer
1/1
150×220(mm)
WanHaiLong
Owners Manual
Chage Record
No. Date
1 Add the Solvak language ACTT600518 2006.01.19 Shi Pengfei He Xingmao
2 add the noize information ACTT604463 2006. 07.11 Shi Pengfei W.H.L
3
4
5
6
7
8
9
Change content
ECO No.
Designer
Confirm
Page 2

Page 3

(Option)
(Option)
- 2 -
Page 4
- 3 -
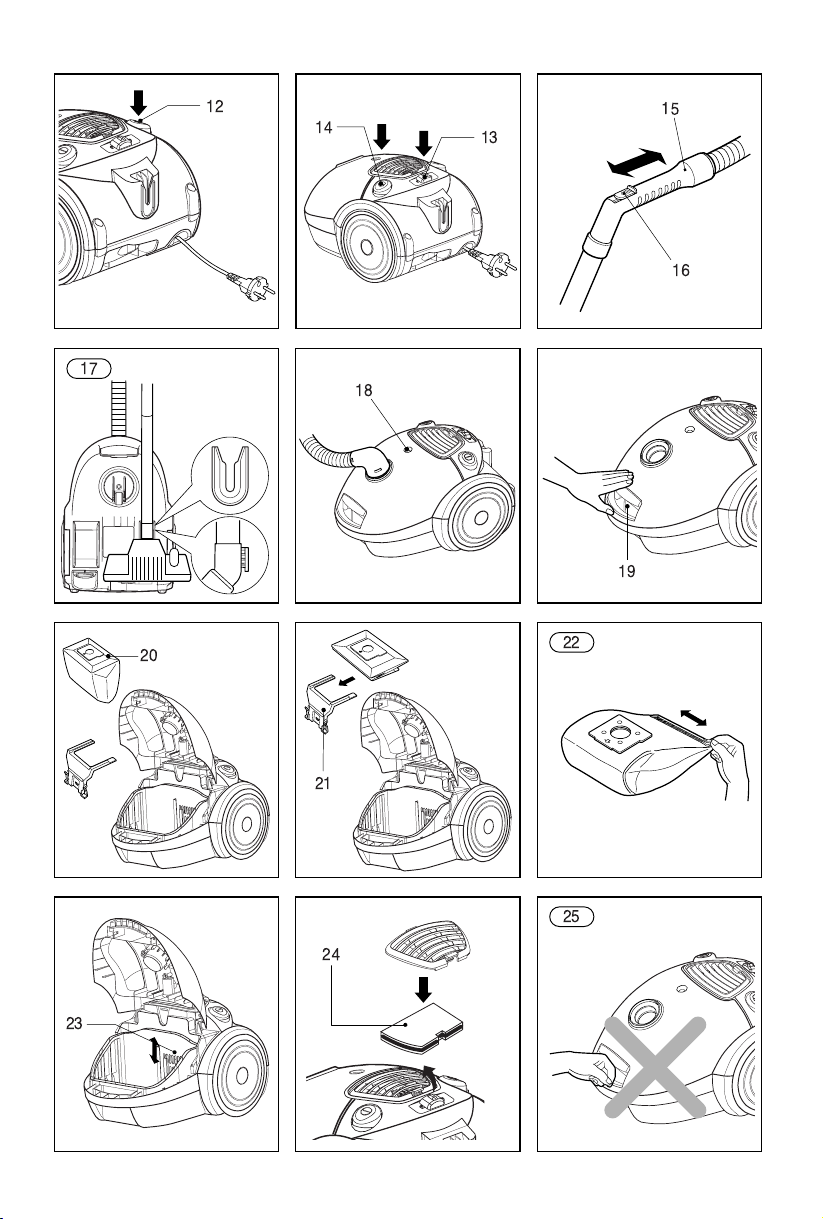
12
13
14
16
15
17
18
19
21
20
22
25
23
24
Page 5
- 4 -
E
Please read all the following information,
which contains important instructions for the
safety, the use and the maintenance of the
appliance.
This appliance complies with the following EC
Directives: -73/23/EEC, 93/68/EEC-Low
Voltage Directive-89/336EEC -EMC Directive.
Never allow children to use the appliance
unsupervised.
Do not use the appliance If the supply
cord is damaged or faulty.
If the mains lead is damaged, it must be
replaced by an approved LG Electronics
Service Agent in order to avoid a hazard.
Always switch the vaccum cleaner off
before :
¥ changing the dust bag.
¥ changing or cleaning the filters.
If no dustbag is inserted, the cover cannot
be closed. Please do not use force!
Do not vacuum flammable or explosive
substances(liquids or gases).
Do not vacuum hot ash, embers etc. nor
sharp objects.
Do not vacuum water or other liquids.
Connecting the flexible hose
Push the end of the head
(1)
on the flexible
hose
(2)
into the attachment point on the
vacuum cleaner.
To remove the flexible hose from the
vacuum cleaner, press on the button
(3)
situated on the head, then pull upwards.
Assembling the tubes
(depending on model)
¥
Metal(or Plastic) Pipe(4)
- Fit together the two tubes by twisting
slightly.
¥
Telescopic tube(5)
- Push spring latch
(6)
forward.
- Pull out tube to required length.
- Release spring latch to lock.
Using the cleaning head and Accessory
Nozzles
(depending on model)
Fit the large cleaning head onto the end of
the tube.
¥
The 2 position head(7)
is equipped with a
pedal
(8)
which allows you to alter its
position according to the type of floor to be
cleaned.
Hard floor position
(tiles, parquet
floors...). Press on the pedal to lower the
brush.
Carpet or rug position.
Press on the
pedal to lift the brush up.
¥
Crevice Tool(9)
For vacuuming in those normally inaccess-
ible places i.e. reaching cobwebs, or down
the side of a sofa!
¥
Dusting brush(10)
For vacuuming picture frames furniture
outlines, books and other uneven objects.
¥
Upholstery Nozzle(11)
For vacuuming uphostery, mattresses, etc.
The thread collectors help to pick up the
threads and fluff.
How to plug in and use
Pull out the supply cord to the desired
length and plug into the socket.
Press button
(14)
to start the vacuum cleaner.
To stop it press the button
(14)
again.
Adjusting the power level
¥ If your appliance is equipped with an
electronic variable power control
(13),
you
can choose the power appropriated for the
task.
The more you slide the button towards
the right, the greater the suction power.
¥
The flexible hose handle
(15)
has a manual
air flow regulator
(16)
which allows you to
briefly reduce the suction level.
Storage(17)
When you have switched off and unplugged
the appliance, press on the button
(12)
to
automatically rewind the cord.
You can move or store your appliance in a
vertical position by sliding the hook on the
large cleaning head into the clip on the
underside of the appliance.
Information for your safety
How to Use
Page 6
- 5 -
E
Changing the dust bag
The dustbag needs changing when the cleaner
is set to maximum power and the cleaner head
is off the floor but the Òbag fullÓ indicator
window
(18)
is completely coloured red.
Even if the dustbag does not appear to be
full at this stage, it should be changed.
It could be that a great deal of very fine dust
has clogged up the pores of the dust bag.
¥ Turn off the appliance and unplug it.
¥ Open the cover by pressing the hook
(19)
and lifting it up until it snaps into place.
Your appliance is equipped with either a
paper dust bag
(20)
or a fabric dust bag
(22)
(depending on model).
¥ Take hold of the dust bag by the handle
and pull.Remove the bag and throw it
away.
¥ To refit a new bag push the cardboard
support of a new bag into the bag mount
(21)
until it will go no furthe
r.
If your appliance is fitted with a fab-
ric dust bag
follow the same instructions
as above.
Empty it and replace it
(22)
.
Note
: as the appliance is fitted with a safety
device which checks that the bag is in place
you cannot close the lid if the bag is not
fitted correctly.
Cleaning the motor filter
The motor filter is situated inside the
appliance between the dust bag and the
motor. Each time that you change the air
outlet filter we advise you to remove the
motor filter
(23)
and to clean it by tapping to
remover the dirt and then replacing it in the
vacuum cleaner.
Check that the appliance is correctly plugged
Please never close the Filter Cover like
(25)
,
To avoid nipping your hand.
in and that the electrical socket is working.
¥
Stop the appliance and unplug it.
¥
Check that the tubes, flexible hose and
cleaning tool are not blocked.
¥
Check that the dust bag is not full.Replace
if necessary.
What to do if your appliance
WARNING
does not work?
What to do when the suction
performance reduces?
Cleaning the exhaust filter (24)
¥ Check the exhaust filter occasion-ally and
clean when dirty.
¥ Unplug cord from outlet.
¥ Open the exhaust cover and remove
exhaust filter as shown.
¥ Next procedures are the same as the
moter safety filter.
Page 7
M
Biztonsági információ
Kérjük, hogy gondosan olvassa el a készülék
biztonságos használatára és karbantartására
vonatkozó alábbi információkat.
Ez a készülék az alábbi Európai Uniós
Irányelveknek felel meg: 73/23/EEC,
93/68EEC-Alacsony Feszültségi Irányelv,
89/336EEC –EMC.
A készüléket gyermek kizárólag felügyelet
mellett használhatja.
Ne használja a készüléket, ha a csatla
kozózsinór sérült vagy hibás.
A kockázatok elkerülése érdekében a sérült
csatlakozózsinórt kizárólag az LG Electron
ics hivatalos márkaszervizének képviselője
cserélheti ki.
Mindig kapcsolja ki a készüléket, mielőtt:
- porzsákcsere esetén;
- tisztítja vagy cseréli a szűrőket.
Ha a készülékben nincs porzsák, a
fedelet nem lehet lecsukni. Kérjük, ne
próbálja erővel lezárni a fedelet!
Ne használja a készüléket gyúlékony vagy
robbanásveszélyes anyagok felszívására
(folyadékok vagy gázok).
Ne használja a készüléket forró hamu,
parázs, stb. továbbá éles tárgyak
felszívására.
Ne használja a készüléket víz vagy egyéb
folyadék felszívására.
-
-
A készülék használata
A flexibilis cső csatlakoztatása
Nyomja a flexibilis cső (2) fejének végét (1) a
készüléken található csatlakoztatási pontba.
A flexibilis cső eltávolításához nyomja meg a
fej oldalán található gombot (3), majd húzza
felfelé a fejet.
Csövek összeszerelése
(típustól függően)
• Fém (vagy műanyag) cső (4)
Enyhe csavarással illessze össze a két
csövet.
• Teleszkópos cső (5)
– Nyomja a rugós reteszt előre (6).
– Húzza ki a csövet a kívánt hosszúságúra.
– Engedje vissza a rugós reteszt.
- 6 -
A tisztítófej és kiegészítő szívófejek
használata
Illessze a nagy szívófejet a cső végére.
• A 2-állású tisztítófejen (7) egy pedál (8)
helyezkedik el, melynek segítségével Ön a
porszívózni kívánt felületnek megfelelően
állíthatja be a szívófejet.
Kemény burkolat-állás (kőburkolat, parketta stb.)
A kefe leeresztéséhez nyomja meg a pedált.
Szőnyeg vagy szőnyegpadló-állás Nyomja
a pedált a másik állásba, ekkor a kefe felemelkedik.
• Résszívó fej (9)
Az olyan nehezen megközelíthető helyek
tisztítására alkalmas, mint pl. az ülőgarnitúra
oldala vagy a szűk sarkokban található pókhálók.
• Portalanító kefe (10)
A portalanító kefe képkeretek, bútorvázak,
könyvek és egyéb egyenetlen felületek
porszívózására alkalmas.
•
Kárpittisztító fej (11)
Bútorkárpitok, matracok stb. porszívózásához.
A szöszgyűjtők segítségével könnyedén
összeszedhetők a szöszök, pihék.
Csatlakoztatás a hálózati áramfor
(típustól függően)
-
rásba és használat
Húzza ki a csatlakozózsinórt a kívánt
hosszúságra, és dugja be a csatlakozódugót
a hálózati áramforrásba.
Nyomja meg a bekapcsológombot (14).
A készülék kikapcsolásához ugyanezt a
gombot (14) kell megnyomni.
Szíváserősség beállítása
Amennyiben készüléke rendelkezik
•
elektromos szíváserősség-állító gombbal
(13), Ön az adott felületnek vagy feladat
nak megfelelően állíthatja be a
szíváserősséget. A gomb jobbra tolásával
a szívóerő fokozatosan növekszik.
•
A flexibilis cső fogóján (15) található
manuális szíváserősség-állító szeleppel
(16) lehet rövid ideig csökkenteni a
szíváserősséget.
Tárolás (17)
A használat befejezése után kapcsolja ki a
készüléket, húzza ki a csatlakozódugót, majd
nyomja meg a vezetékfeltekerő gombot (12),
ekkor a vezeték magától feltekeredik.
A készülék függőleges helyzetben történő
tárolásához csúsztassa a nagy szívófejen lévő
kampót a készülék alján található nyílásba.
-
Page 8
M
Porzsák cseréje
A porzsákot akkor kell kicserélni, amikor a
készülék maximális szívóerőre van állítva, a
szívófej nem ér a padlóhoz, és a „porzsák tele”
kijelzőablak (18) mégis teljes egészében piros.
Ebben az esetben a porzsákot akkor is ki kell
cserélni, ha az nem tűnik teljesen megteltnek.
Előfordulhat ugyanis, hogy nagyobb
mennyiségű, nagyon finom szemcséjű por
tömítette el a porzsák pórusait.
• Kapcsolja ki a készüléket, és húzza ki a
hálózati csatlakozódugót.
• Nyomja meg a kampót (19) ,és emelje fel
addig, amíg a helyére nem csúszik: ekkor a
fedél kinyílik.
A készülékben típustól függően papír (20)
vagy textil (22) porzsák van.
• Fogja meg a porzsákot, húzza ki a
készülékből, és tegye a szemetesbe.
• Az új porzsák behelyezésekor nyomja
ütközésig a porzsák kartontámasztékát a
porzsáktartó-sínbe (21).
Ha készülékében textil
porzsák van
Ürítse ki a porzsákot és helyezze vissza a
készülékbe (22).
Figyelem: a készülékben olyan biztonsági
kapcsoló van, amelyik ellenőrzi, hogy a
porzsák a helyén van-e, ezért a fedelet csak
akkor lehet lezárni, ha a porzsák pontosan a
helyére került.
a fentiek szerint járjon el.
Kimenő levegő szűrők cseréje (24)
• Időről időre ellenőrizze a kimenő levegő
szűrőt, és ha bepiszkolódott, tisztítsa meg.
• Kapcsolja ki a készüléket, és húzza ki a
hálózati csatlakozódugót.
• Nyissa ki a fedelet, és az ábrán látható módon
vegye ki a szűrőt.
• Ettől a ponttól kezdve ugyanúgy járjon el, mint
a motorszűrő esetében.
FIGYELEM
Soha ne csukja le a szűrőfedelet a 25-ös ábrán
látható módon, mert a keze becsípődhet.
Mi a teendő, ha a készülék
nem működik
Ellenőrizze, hogy a csatlakozódugó rendesen
be van-e dugva, valamint hogy a konnektorban
van-e áram.
Mi a teendő, ha a
szívásteljesítmény lecsökken
• Kapcsolja ki a készüléket, és húzza ki a
hálózati csatlakozódugót.
• Ellenőrizze, hogy nem dugult-e el a teleszkó
pos cső, a flexibilis cső vagy a szívófej.
• Ellenőrizze, nincs-e tele a porzsák. Ha igen,
ürítse ki.
A motorszűrő tisztítása
A motorszűrő a készülék belsejében
található, a porzsák és a motor között.
Javasoljuk, hogy minden alkalommal, amikor
a kimenő levegő szűrőt cseréli, vegye ki a
motorszűrőt (23) is, rázogatással és
ütögetéssel tisztítsa ki, majd helyezze vissza
a készülékbe.
- 7 -
Page 9

- 8 -
F
Veuillez lire toute l'information ci-dessous, qui
contient d'importantes instructions concernant
votre sécurité ainsi que l'utilisation et l'entretien
de cet appareil.
Cet appareil respecte les Directives de la CE
suivantes: -73/23/CEE, 93/68/CEE-Directive
sur la Basse Tension-89/336CEC – Directive
en matière de CEM.
■ Ne permettez jamais aux enfants d'utiliser
cet appareil sans supervision.
■ N'utilisez pas cet appareil si le cordon
d'alimentation est endommagé ou
défectueux.
■ Si le cordon d'alimentation est endommagé,
il doit être remplacé par un technicien
accrédité par LG Electronics afin d'éviter des
risques.
■ Arrêtez toujours l'aspirateur avant de:
• remplacer le sac à poussière.
• remplacer ou nettoyer les filtres.
■ S'il n'y pas de sac à poussière inséré, le
couvercle ne peut pas être fermé. Ne le
forcez pas SVP!
■ N'aspirez pas des substances inflammables
ou explosives (liquides ou gazeuses).
■ N'aspirez pas des cendres ou des braises
chaudes, des objets aiguisés, etc.
■ N'aspirez pas de l'eau ou d'autres liquides.
Connexion du tube flexible
Poussez l'extrémité de la tête (1) du tube
flexible (2) dans le point d'attache de l'aspirateur.
Pour enlever le tube flexible de l'aspirateur,
appuyez sur le bouton (3) qui se trouve dans la
tête, puis tirez vers le haut.
Assemblage des tubes
(en fonction du modèle)
• Tuyau en métal (ou en plastique) (4)
- Assemblez les deux tubes en les tordant
légèrement.
• Tube télescopique (5)
- Poussez le loquet à ressort (6) en avant.
- Sortez la longueur requise du tube.
- Lâchez le loquet à ressort pour le verrouiller.
Utilisation de la tête de nettoyage et
des suceurs accessoires
(en fonction du
modèle)
Encastrez la large tête de nettoyage dans
l'extrémité du tube.
• La tête à 2 positions (7) est équipée d'une
pédale (7) qui vous permet de modifier sa
position suivant le type de plancher à
nettoyer.
Position plancher dur (carreaux, parquet,
planchers...). Appuyez sur la pédale pour
faire descendre la brosse.
Position tapis ou carpette. Appuyez sur la
pédale pour lever la brosse.
• Suceur plat (9)
Pour aspirer dans des endroits normalement
inaccessibles, c'est-à-dire pour atteindre les
toiles d'araignée ou la zone au-dessous du sofa!
• Brosse à épousseter (10)
Pour aspirer les cadres des tableaux, les
bords des meubles, les livres et d'autres
objets irréguliers.
•
Suceur à tissus et à meubles rembourrés (11)
Pour aspirer des tissus et des meubles
rembourrés, des matelas, etc. Les collecteurs
de fils vous aident à ramasser des fils et du
duvet détachés.
Comment le brancher et l'utiliser
Sortez le cordon d'alimentation jusqu'à la
longueur désirée et branchez-le dans la prise de
courant.
Appuyez sur le bouton (14) pour mettre en
marche l'aspirateur. Pour l'arrêter, appuyez
encore une fois sur ce bouton (14).
Réglage du niveau de puissance
• Si votre appareil est équipé d'une commande
de puissance variable électronique (13), vous
pouvez choisir la puissance appropriée pour
la tâche à effectuer. La puissance
d'aspiration augmente dans la mesure où
vous glissez le bouton vers la droite.
• La poignée du tube flexible (15) a un
contrôleur de débit manuel (16) qui vous
permet de réduire rapidement le niveau
d'aspiration.
Stockage (17)
Après avoir arrêté et débranché l'appareil,
appuyez sur le bouton (12) pour enrouler
automatiquement le cordon d'alimentation.
Vous pouvez déplacer ou stocker votre appareil
en position verticale en faisant glisser le crochet
attaché à la large tête de nettoyage dans l'agrafe
qui se trouve dans la partie basse de l'appareil.
Information pour votre sécurité
Mode d'emploi
Page 10

- 9 -
F
Remplacement du sac à poussière
Il faut remplacer le sac à poussière lorsque
l'aspirateur est réglé à puissance maximale,
que la tête de nettoyage est au-dessus du
plancher mais que le voyant de "sac plein" (18)
est complètement rouge.
Même si le sac à poussière ne semble pas
plein à ce moment-là, il doit être remplacé.
Il peut se passer qu'une grande quantité de
très fine poussière ait obstrué les pores du sac
à poussière.
• Arrêtez l'appareil et débranchez-le.
• Ouvrez le couvercle en appuyant sur le
crochet (19) et levez-le jusqu'à ce qu'il
s'enclenche à sa place. Votre appareil est
équipé, soit d'un sac à poussière en
papier(20), soit un sac à poussière en tissu
(22). (en fonction du modèle)
• Soutenez le sac à poussière par la poignée
et tirez. Enlevez le sac et jetez-le.
• Pour encastrer un sac neuf poussez le support
en carton d'un sac neuf dans le support du sac
(21) jusqu'à ce qu'il n'avance plus.
Si votre appareil est équipé d'un sac
à poussière en tissu
suivez les mêmes
instructions ci-dessus indiquées.
Videz-le et remplacez-le (22).
Remarque: étant donné que cet appareil est
équipé d'un dispositif de sécurité qui vérifie
que le sac est à sa place, vous ne pouvez pas
fermez le couvercle si le sac n'est pas
correctement encastré.
Nettoyage du filtre du moteur
Le filtre du moteur se trouve à l'intérieur de
l'appareil entre le sac à poussière et le
moteur. Nous vous conseillons d'enlever,
chaque fois que vous remplacez le filtre de la
sortie d'air, le filtre du moteur (23), de le
nettoyer en le secouant pour enlever la saleté
et puis le remettre à sa place dans l'aspirateur.
Nettoyage du filtre d'évacuation (24)
• Examinez de temps en temps le filtre
d'évacuation et nettoyez-le s'il est sale.
• Débranchez le cordon de la prise de courant.
• Ouvrez le couvercle du filtre d'évacuation et
enlevez-le comme montré.
• Les procédures à suivre sont les mêmes
utilisés pour le filtre de sécurité principal.
Veillez à ne pas fermer le couvercle du filtre
comme montré dans la figure (25), pour éviter
de vous pincer la main.
Vérifiez que l'appareil soit correctement
branché et que la prise de courant marche
bien.
• Arrêtez l'appareil et débranchez-le.
• Vérifiez que les tubes, le tube flexible et la
tête de nettoyage ne sont pas obstrués.
• Vérifiez que le sac à poussière n'est pas
plein. Remplacez-le si besoin.
Quoi faire si votre appareil
ne marche pas ?
AVERTISSEMENT
Quoi faire lorsque la performance
d'aspiration est réduite?
Page 11

L
Informaţii pentru siguranţă
Vă rugăm să citiţi următoarele informaţii, care
conţin instrucţiuni importante pentru siguranţa,
utilizarea şi întreţinerea aparatului.
Acest aparat se conformează următoarelor
Directive CE: -73/23/EEC, 93/68/EEC- Directiva
pentru tensiuni scăzute-89/336/EEC-Directiva
EMC.
Nu le permiteţi copiilor să folosească
aparatul fără supraveghere.
Nu folosiţi aparatul dacă cablul de alimentare
este deteriorat sau defect.
În cazul în care cablul de alimentare este
deteriorat, trebuie înlocuit de către un Agent
de Service aprobat LG Electronics pentru
evitarea accidentelor.
Opriţi întotdeauna aspiratorul înainte de a:
- schimba sacul pentru praf.
- schimba sau curăţa filtrele.
Dacă sacul pentru praf nu este introdus,
capacul nu se poate închide. Nu faceţi uz
de forţă!
Nu aspiraţi substanţe inflamabile sau
explozive (lichide sau gazoase).
Nu aspiraţi scrum fierbinte, tăciuni aprinşi
etc. şi nici obiecte ascuţite.
Nu aspiraţi apă sau alte lichide.
Mod de folosire
Conectarea furtunului flexibil
Împingeţi capătul capului (1) de pe furtunul
flexibil (2) în punctul de ataşare al aspiratoru
lui. Pentru a scoate furtunul flexibil din
aspirator, apăsaţi butonul (3) situat pe cap şi
apoi trageţi în sus.
Asamblarea tuburilor
(în funcţie de model)
• Tub metalic (sau din plastic) (4)
Conectaţi cele două tuburi, răsucind uşor.
• Tubul telescopic (5)
- Împingeţi înainte dispozitivul de fixare cu
resort (6).
- Trageţi afară tubul până la lungimea
dorită.
- Eliberaţi dispozitivul de fixare cu resort.
-
Folosirea capului de curăţare şi a
accesoriilor
Fixaţi capul mare de curăţare la capătul tubului.
• Capul cu 2 poziţii (7) este echipat cu o
pedală (8) care vă permite să-i schimbaţi
poziţia în funcţie de tipul podelei care
urmează să fie curăţată.
Poziţia pentru suprafeţe dure (cărămidă,
parchet…) Apăsaţi pedala pentru a coborî peria.
Poziţia pentru covor sau carpetă Apăsaţi
pedala pentru a ridica peria.
• Instrumentul pentru spaţii înguste (9)
Pentru aspirare în locuri inaccesibile în mod
normal, adică pentru aspirarea pânzelor de
păianjen sau în spatele unei canapele!
• Peria de praf (10)
Pentru aspirarea ramelor tablourilor,
obiectelor de mobilier, cărţilor sau altor
obiecte neuniforme.
•
Accesoriul pentru tapiţerie (11)
Pentru aspirarea tapiţeriei, saltelelor etc.
Colectoarele de scame slujesc la culegerea
scamelor şi a pufului.
(în funcţie de model)
Cum se alimentează şi cum se
foloseşte
Trageţi cablul de alimentare la lungimea
dorită şi introduceţi-l în priză. Apăsaţi butonul
(14) pentru a porni aspiratorul. Pentru a-l opri,
apăsaţi din nou butonul (14).
Ajustarea nivelului de putere
În cazul în care aparatul este echipat cu un
•
dispozitiv electronic variabil de control al
puterii (13), puteţi alege puterea
corespunzător necesităţilor. Cu cât glisaţi
butonul mai mult spre dreapta, cu atât
puterea de aspirare creşte.
•
Mânerul furtunului flexibil (15) dispune de
un regulator manual al fluxului de aer (16),
care vă permite să reduceţi rapid nivelul de
aspirare.
Depozitare (17)
După ce aţi oprit aparatul şi l-aţi scos din priză,
apăsaţi butonul (12) pentru a înfăşura automat
cablul la loc. Puteţi deplasa ori depozita
aparatul în poziţie verticală, glisând cârligul de
la capul mare de curăţare în clema din partea
inferioară a aspiratorului.
- 10 -
Page 12

L
Schimbarea sacului pentru praf
Sacul pentru praf trebuie schimbat dacă
aspiratorul este setat pe putere maximă şi capul
acestuia nu este pe podea, iar fereastra
indicatoare „sac plin” (18) este colorată complet
în roşu.
Chiar dacă sacul pentru praf nu pare plin în
această etapă, trebuie schimbat. Este posibil ca
o cantitate mare de praf foarte fin să se fi blocat
în porii sacului pentru praf.
• Opriţi aspiratorul şi scoateţi-l din priză.
• Deschideţi capacul apăsând cârligul (19) şi
ridicându-l până când se aude un declic.
Aparatul dvs. este echipat fie cu un sac
pentru praf din hârtie (20), fie cu unul din
material textil (22) (în funcţie de model).
• Ţineţi sacul pentru praf de mâner şi trageţi.
Scoateţi sacul şi aruncaţi-l.
• Pentru a introduce un nou sac, împingeţi
suportul de carton al sacului nou în lăcaşul
sacului (21) până la capăt.
Dacă aparatul dvs. este
prevăzut cu un sac pentru praf
din material textil,
urmaţi aceleaşi instrucţiuni de mai sus.
Goliţi-l şi puneţi-l la loc (22).
Curăţarea filtrului de evacuare (24)
• Verificaţi ocazional filtrul de evacuare şi
curăţaţi-l dacă este murdar.
• Scoateţi cablul din orificiul de evacuare.
• Deschideţi capacul de la evacuare şi scoateţi
filtrul conform figurii.
• Procedurile ulterioare sunt aceleaşi ca la filtrul
de siguranţă.
ATENŢIE
Nu închideţi capacul filtrului ca în (25), pentru a
nu vă prinde mâna.
Ce trebuie să faceţi dacă
aparatul nu funcţionează?
Ellenőrizze, hogy a csatlakozódugó rendesen
be van-e dugva, valamint hogy a konnektorban
van-e áram.
Ce trebuie să faceţi dacă
puterea de aspirare se
diminuează?
• Opriţi aspiratorul şi scoateţi-l din priză.
• Verificaţi dacă tuburile, furtunul flexibil şi
instrumentul de curăţare nu sunt
obstrucţionate.
• Verificaţi dacă sacul pentru praf nu este plin.
Înlocuiţi-l dacă este necesar.
Notă: având în vedere faptul că aparatul
este prevăzut cu un dispozitiv de siguranţă
care verifică dacă sacul se află la locul lui, nu
veţi putea închide capacul dacă sacul nu
este potrivit corect.
Curăţarea filtrului motorului
Filtrul motorului este situat în interiorul
aparatului, între sacul pentru praf şi motor.
De fiecare dată când schimbaţi filtrul de
acces al aerului, vă recomandăm să scoateţi
filtrul motorului (23) şi să-l curăţaţi bătându-l
uşor, pentru a îndepărta murdăria, şi apoi
să-l puneţi la loc în aspirator.
- 11 -
Page 13

- 12 -
Page 14

C
Výměna sáčku na prach
Sáček na prach je třeba vyměnit, pokud
nastavíte vysavač na nejvyšší sací výkon,
zvednetečistící hlavici ze země, ale okno
indikátoru zaplnění sáčku (18) je zbarveno
zcelačerveně.
I když sáček nevypadá za těchto podmínek
plný, je třeba jej vyměnit. Důvodem můžebýt
velké množství velmi jemného prachu, který
ucpává póry sáčku.
• Vypněte zařízení a odpojte jej ze zásuvky.
• Stisknutím háčku (19) otevřete kryt a
zvedněte jej tak, aby zaklapl na místo.
Zařízení je vybaveno papírovým (20)
nebolátkovým (22) sáčkem na prach
(podle modelu).
• Uchopte sáček za rukojeť a vysuňte.
Sáček vyjměte a zlikvidujte.
• Chcete-li vložit nový sáček,
zasuňtekartónovou opěrku nového sáčku
do zcela do držáku (21).
Je-li zařízení vybaven
látkovým sáčkem na prach,
postupujte podle stejných pokynů.
Vyjměte sáček a vyprázdněte (22).
Poznámka: Vzhledem k tomu, že toto
zařízení je vybaven
bezpečnostnímzařízením, které kontroluje,
zda je sáček na místě, nelze zavřít víko,
pokud není sáčeksprávně nasazen.
Čištění filtru výstupního vzduchu
(24)
• Filtr výstupního vzduchu pravidelně
kontrolujte a v případě znečištěnívyčistěte.
• Odpojte napájecí šňůru ze zásuvky.
• Otevřete kryt výstupu a vyjměte filtr
výstupního vzduchu (viz obrázek).
• Dále postupujte stejně, jako v
případěbezpečnostního filtru motoru.
UPOZORNĚNÍ
Nikdy nezavírejte kryt filtru jako na obrázku
(25), aby nedošlo ke zranění ruky.
Co dělat,
když zařízenínefunguje?
Zkontrolujte, zda je zařízení správnězapojeno a
zda je elektrická zásuvka funkční.
Co dělat, když se sníží sací
výkon?
• Vypněte zařízení a odpojte jej ze zásuvky.
• Zkontrolujte, zda nejsou ucpány trubky,
ohebná hadice nebo čistící nástroj.
• Zkontrolujte, zda není sáček na prach plný.
V případě potřeby vyměňte.
Čištění filtru motoru
Filtr motoru se nachází uvnitř zařízení mezi
sáčkem na prach a motorem. Při každé
výměně filtru výstupního vzduchu
doporučujeme vyjmout filtr motoru (23),
vyklepat prach a vložit zpět do vysavače.
- 13 -
Page 15

D
Bitte lesen Sie die folgenden Informationen
sorgfältig durch, da sie wichtige Anleitungen
zur Sicherheit, zum Gebrauch und zur Wartung
des Gerätes enthalten.
Dieses Gerät entspricht den folgenden ECRichtlinien: -73/23/EEC,93/68/EEC-Niedrigspannungsrichtlinie-89/336EEC -EMV-Richtlinie.
■ Kinder dürfen dieses Gerät niemals
unbeaufsichtigt benutzen.
■ Dieses Gerät niemals verwenden, wenn das
Netzkabel beschädigt oder fehlerhaft ist.
■ Wenn das Netzkabel beschädigt ist, muss es
von einem qualifizierten LG ElectronicsServicetechniker ersetzt werden.
■ Vor diesen Tätigkeiten muss der Staubsauger immer ausgeschaltet werden:
• Auswechseln des Staubbeutels.
• Auswechseln oder Reinigung der Filter.
■ Ohne eingesetzten Staubbeutel kann die
Abdeckung nicht geschlossen werden.
Niemals Gewalt anwenden!
■ Keine brennbaren oder explosiven Stoffe
einsaugen (Flüssigkeiten oder Gase).
■ Keine heiße Asche, Glut usw. oder scharfen
Gegenstände einsaugen.
■ Niemals Wasser oder Flüssigkeiten
einsaugen.
Anschluss des flexiblen Schlauchs
Drücken Sie das Ende des Kopfes (1) des
flexiblen Schlauchs (2) in die
Anschlussöffnung des Staubsaugers.
Um den flexiblen Schlauch vom Staubsauger
zu trennen, drücken Sie auf den Riegel (3)
am Kopf und ziehen Sie den Schlauch ab.
Zusammenbau der Saugrohre
(modellabhängig)
• Metallrohr (oder Kunststoff) (4)
- Stecken Sie die beiden Saugrohre durch
Drehen zusammen.
• Teleskoprohr (5)
- Drücken Sie den Federriegel (6) nach vorn.
- Ziehen Sie das Rohr in die gewünschte
Länge.
-
Lassen Sie den Federriegel zum Verriegeln los.
Verwendung des
Reinigungsaufsatzes
und der
Zubehöraufsätze (modellabhängig)
Stecken Sie den großen Reinigungsaufsatz
auf das Saugrohr.
• Der 2-Stellungen-Aufsatz (7) besitzt ein
Pedal (8) zur Einstellung der Position, je
nach zu reinigendem Untergrund.
Harte Böden (Fliesen, Parkett-böden...).
Drücken Sie auf das Pedal, um die Bürste
herauszufahren.
Auslegeware oder Teppich. Drücken Sie
auf das Pedal, um die Bürste einzufahren.
• Aufsatztülle (9)
Zum Saugen an schwer zugänglichen
Orten, wie z. B. bei Spinnweben oder unter
dem Sofa!
• Saugbürste (10)
Zum Absaugen von Bilderrahmen, Möbelkanten, Büchern u. a. unebenen
Gegenständen.
• Polsteraufsatz (11)
Zum Absaugen von Polstermöbeln,
Matratzen usw. Mit den Flusenbürsten
werden Fusseln und Flusen entfernt.
Netzanschluss und Gebrauch
Netzkabel auf die gewünschte Länge heraus
ziehen und an die Steckdose anschließen.
Drücken Sie zum Einschalten die Taste (14).
Drücken Sie zum Ausschalten die Taste (14)
erneut.
Einstellen der Saugstärke
• Falls das Gerät eine elektronische
Saugkraftsteuerung (13) besitzt, kann die
gewünschte Saugkraft beliebig eingestellt
werden. Je weiter der Schalter nach rechts
ge-schoben wird, desto höher die
Saugkraft.
• Der Griff des flexiblen Schlauchs (15)
besitzt einen Luftstromregler (16) zur
vorüber-gehenden Verringerung der
Saugstärke.
Lagerung (17)
Wenn das Gerät ausgeschaltet und der Stecker
gezogen ist, drücken Sie auf die Taste (12), um
das Kabel automatisch aufzurollen. Das Gerät
kann senkrecht durch Schieben des Hakens
des großen Reinigungsauf-satzes in die
Klemme an der Unterseite des Gerätes bewegt
oder abgestellt werden.
Sicherheitsinformationen
Verwendung des Gerätes
- 14 -
Page 16

- 15 -
D
Auswechseln des Staubbeutels
Der Staubbeutel muss gewechselt werden,
wenn der Sauger auf maximale Saugkraft
eingestellt ist, der Aufsatz nicht auf dem
Boden aufliegt und die Anzeige "Beutel voll"
(18) vollständig rot gefärbt ist.
Der Staubbeutel sollte gewechselt werden,
selbst wenn er jetzt nicht voll zu sein scheint.
Eine große Menge feiner Staub könnte sich
in den Poren des Staubbeutels
angesammelt haben.
• Gerät ausschalten und Netzstecker ziehen.
• Öffnen Sie die Klappe durch Drücken des
Hakens (19) und heben Sie sie an, bis sie
einrastet. Das Gerät besitzt entweder
einen Staubbeutel aus Papier (20) oder
aus Stoff (22) (modellabhängig).
• Halten Sie den Staubbeutel am Griff fest,
ziehen Sie ihn heraus und entsorgen Sie
ihn.
• Drücken Sie zum Auswechseln die
Papphalterung des neuen Beutels bis zum
Anschlag in die Beutelhalterung (21).
Wenn das Gerät einen Stoffbeutel
besitzt,
gehen Sie wie zuvor beschrieben vor.
Beutel entleeren und wieder einsetzen (22).
Hinweis: Da das Gerät zur Sicherheit
erkennt, ob ein Beutel eingesetzt ist, kann
die Klappe bei falsch eingesetztem Beutel
nicht geschlossen werden.
Reinigung des Motorfilters
Der Motorfilter befindet sich im Gerät
zwischen dem Staubbeutel und dem
Motor. Bei jedem Wechsel des Luftfilters
sollte der Motorfilter (23) entfernt und durch
Klopfen von Schmutz gereinigt und dann
wieder in den Staubsauger eingesetzt
werden.
Reinigung des Abluftfilters (24)
• Überprüfen Sie den Abluftfilter gelegentlich
und reinigen Sie ihn bei Bedarf.
• Ziehen Sie den Netzstecker.
• Öffnen Sie die Abluftklappe und nehmen
Sie den Abluftfilter wie gezeigt heraus.
• Dieser Filter wird wie der Motorfilter
ausgewechselt.
Die Filterklappe niemals wie in Abb. 25
schließen, um Verletzungen der Hand zu
vermeiden.
Prüfen Sie, ob das Gerät richtig
angeschlossen ist und dass die Steckdose
funktioniert.
• Gerät ausschalten und Stecker ziehen.
• Prüfen Sie, ob Saugrohre, Schlauch oder
Reinigungsaufsatz verstopft sind.
• Prüfen Sie, ob der Staubbeutel voll ist.
Wechseln Sie ihn nötigenfalls aus.
Falls das Gerät nicht arbeitet
WARNUNG
Falls die Saugleistung
abnimmt
Page 17

Page 18

Page 19

P
Informacje dotyczące
bezpieczeństwa
Proszę przeczytać wszystkie informacje
znajdujące się poniżej; zawierają one ważne
instrukcje dotyczące bezpieczeństwa, używania
i konserwacji urządzenia.
Urządzenie spełnia wymagania zawarte w
następujących Dyrektywach UE: -73/23/EEC,
93/68/EEC – Dyrektywa dotycząca niskiego
napięcia; 89/336EEC – Dyrektywa dotycząca
kompatybilności elektromagnetycznej (EMC).
Pod żadnym pozorem nie pozwól dzieciom
używać urządzenia bez nadzoru.
Nie używaj urządzenia, gdy przewód
zasilający jest uszkodzony lub wadliwy.
Jeżeli przewód zasilający jest uszkodzony,
musi zostać wymieniony przez autory
zowanego serwisanta firmy LG Electronics,
aby uniknąć ryzyka.
Zawsze wyłączaj odkurzacz przed:
• wymianą worka na kurz
• wymianą lub czyszczeniem filtrów.
Jeżeli do odkurzacza nie został włożony
worek na kurz, pokrywy nie da się
zamknąć. Proszę nie zamykać pokrywy
na siłę!
Nie wciągaj odkurzaczem substancji palnych
lub wybuchowych (płynnych ani gazowych).
Nie wciągaj odkurzaczem gorącego popiołu,
żaru itp., ani ostrych przedmiotów.
Nie wciągaj odkurzaczem wody ani innych cieczy.
-
Eksploatacja
Podłączenie węża giętkiego
Włóż końcówkę (1) węża giętkiego (2) do otworu
ssącego odkurzacza.
Aby odłączyć wąż od odkurzacza, naciśnij
przycisk (3), znajdujący się na końcówce,
następnie wyciągnij wąż.
Montaż rur
(w zależności od modelu)
• Rura metalowa (lub plastikowa) (4)
-
Połącz rury delikatnie wkręcając jedną w drugą.
• Rura teleskopowa (5)
- Przesuń zatrzask sprężynowy (6) do przodu.
- Wyciągnij rurę na żądaną długość.
- Zwolnij zatrzask, aby zablokować rurę.
- 18 -
Korzystanie ze ssawko-szczotki i
dodatkowych końcówek
(zależnie od modelu)
Załóż dużą ssawko-szczotkę na koniec rury.
• Dwupołożeniowa ssawko-szczotka (7) jest
wyposażona w pedał (8) pozwalający na
zmianę położenia w zależności od rodzaju
odkurzanej podłogi.
Twarde podłogi (płytki, parkiety...). Naciśnij
pedał, aby obniżyć szczotkę.
Dywany lub wykładziny. Naciśnij pedał, aby
podnieść szczotkę.
• Ssawka szczelinowa (9)
Do odkurzania zwykle niedostępnych miejsc,
np.: zbierania pajęczyn lub odkurzania boków
kanapy!
• Ssawka do kurzu (10)
Do odkurzania ram obrazów, krawędzi mebli,
książek i innych nierównych przedmiotów.
•
Szczotka do obić tapicerskich (11)
Do odkurzania obić tapicerskich, materaców, itp.
Szczotka pomaga zbierać luźne nitki i kłaczki.
Podłączenie i używanie odkurzacza
Wysuń przewód zasilający na żądaną
długość i włóż wtyczkę do gniazdka siecio
wego.
Naciśnij przycisk (14), aby włączyć
odkurzacz.
Aby wyłączyć odkurzacz – ponownie naciśnij
przycisk (14).
-
Regulacja mocy
Jeśli Twój odkurzacz wyposażony jest w
•
elektroniczny regulator siły ssania (13),
możesz ustawić za jego pomocą moc
potrzebną do wykonania danej czynności.
Im bardziej przesuwasz suwak w prawo,
tym większa jest siła ssania.
W uchwycie węża giętkiego (15) znajduje
•
się ręczny regulator strumienia powietrza
(16), który umożliwia szybkie zmniejszenie
siły ssania.
Przechowywanie (17)
Po wyłączeniu odkurzacza i wyjęciu wtyczki z
gniazdka, naciśnij przycisk (12), aby automatyc
znie zwinąć przewód zasilający.
Możesz przenosić i przechowywać odkurzacz w
pozycji pionowej, wsuwając zaczep z tyłu dużej
ssawko-szczotki w otwór znajdujący się na
spodzie odkurzacza.
-
Page 20

P
Wymiana worka na kurz
Worek na kurz wymaga wymiany, jeżeli
odkurzacz nastawiony jest na maksymalną moc
ssania, szczotka jest uniesiona ponad podłogę,
a okienko wskaźnika “bag full” (pełny worek)
(18) jest w całości zaczerwienione.
Nawet jeżeli worek na kurz nie wydaje się w tym
momencie pełny, należy go wymienić.
Istnieje możliwość, że cząsteczki drobnego
kurzu zatkały pory worka.
• Wyłącz urządzenie i wyjmij wtyczkę z
gniazdka.
• Otwórz pokrywę, naciskając zaczep (19) i
podnosząc pokrywę tak, aby „wskoczyła”
na właściwe miejsce.
Odkurzacz posiada papierowy (20) lub
tekstylny (22) worek na kurz (zależnie od
modelu).
• Uchwyć worek za rączkę, wyciągnij i
wyrzuć go.
• Aby założyć nowy worek wciśnij tekturowy
element nowego worka na kurz do uchwytu
(21) aż do momentu, w którym nie będzie
już wsuwał się dalej.
Jeżeli twój odkurzacz
wyposażony jest w tekstylny
również postępuj
worek na kurz –
zgodnie z powyższymi instrukcjami.
Opróżnij worek i załóż go ponownie (22).
Uwaga: Ponieważ urządzenie wyposażone
jest w zabezpieczenie, które sprawdza, czy
worek na kurz został założony, zamknięcie
pokrywy przy nieprawidłowo założonym
worku jest niemożliwe.
Czyszczenie filtra wydmuchu (24)
• Sprawdzaj okazjonalnie filtr wydmuchu i czyść
go, gdy jest brudny.
• Wyjmij wtyczkę z gniazdka.
• Otwórz pokrywę wydmuchu i wyjmij filtr jak
pokazano.
• Kolejne czynności są takie same, jak w
przypadku czyszczenia filtra ochronnego
silnika.
OSTRZEŻENIE
Nigdy nie zamykaj pokrywy filtra jak na rys.
(25), gdyż może to prowadzić do
przytrzaśnięcia palców.
Co zrobić, jeżeli urządzenie
nie działa?
Sprawdź ,czy urządzenie jest właściwie
podłączone do gniazdka i czy gniazdko
funkcjonuje prawidłowo.
Co zrobić jeżeli siła ssania
odkurzacza słabnie?
• Wyłącz odkurzacz i wyjmij wtyczkę z gniazdka.
• Sprawdź, czy rury, wąż giętki i ssawko szczotka nie są zatkane.
• Sprawdź, czy worek na kurz nie jest pełny.
Wymień go w razie potrzeby.
Czyszczenie filtra ochronnego silnika
Filtr ochronny silnika znajduje się wewnątrz
urządzenia, pomiędzy workiem na kurz a
silnikiem. Przy każdej wymianie
zewnętrznego filtra powietrza, zaleca się
wyjęcie filtra ochronnego silnika (23) i
wytrzepanie go w celu usunięcia zgromadzo
nego kurzu, a następnie założenie filtra do
odkurzacza.
-
- 19 -
Page 21

- 20 -
Page 22

Page 23

– 22 –
MEMO
Page 24

http://www.lge.com/
P/No.:3828FI2852R
 Loading...