

Page 1
Model
VC49*ETH
Language English+Thai
Page
Material Size(W*H)
Date
Part No.
26
Weight 100g
2010.04.26
MFL62558837
Color(cover/body)
Designer
Description
Chage Record
No. Date
1
2
3
4
5
6
7
8
9
Change content
ECO No.
1/1
150h220(mm)
QIAOLIANG
Owners Manual
Designer
Confirm
Page 2
OWNER’S MANUAL
คู่มือการใช้งาน
VC4916**
VC4918**
VC4920**
New Type Cyclone Vacuum Cleaner
เครื่องดูดฝุ่นแบบไซโคลนรุ่นใหม่
This information contains important instructions for the safe use and maintenance of the vacuum cleaner.
Especially, please read all of the information on page 4,5 for your safety.
Please keep this manual in an easily accessible place and refer to it anytime.
ข้อมูลนี้ประกอบไปด้วยวิธีการใช้งานที่สำคัญ เพื่อการใช้งานที่ปลอดภัย และการดูแลรักษาเครื่องดูดฝุ่น
โดยเฉพาะอย่างยิ่ง, โปรดอ่านข้อมูลการใช้งานนี้ที่หน้า 4-5 เพื่อความปลอดภัยของท่าน
โปรดเก็บคู่มือการใช้งานนี้ไว้ในสถานที่ที่สะดวกต่อการหยิบอ่าน
Page 3

2
Page 4
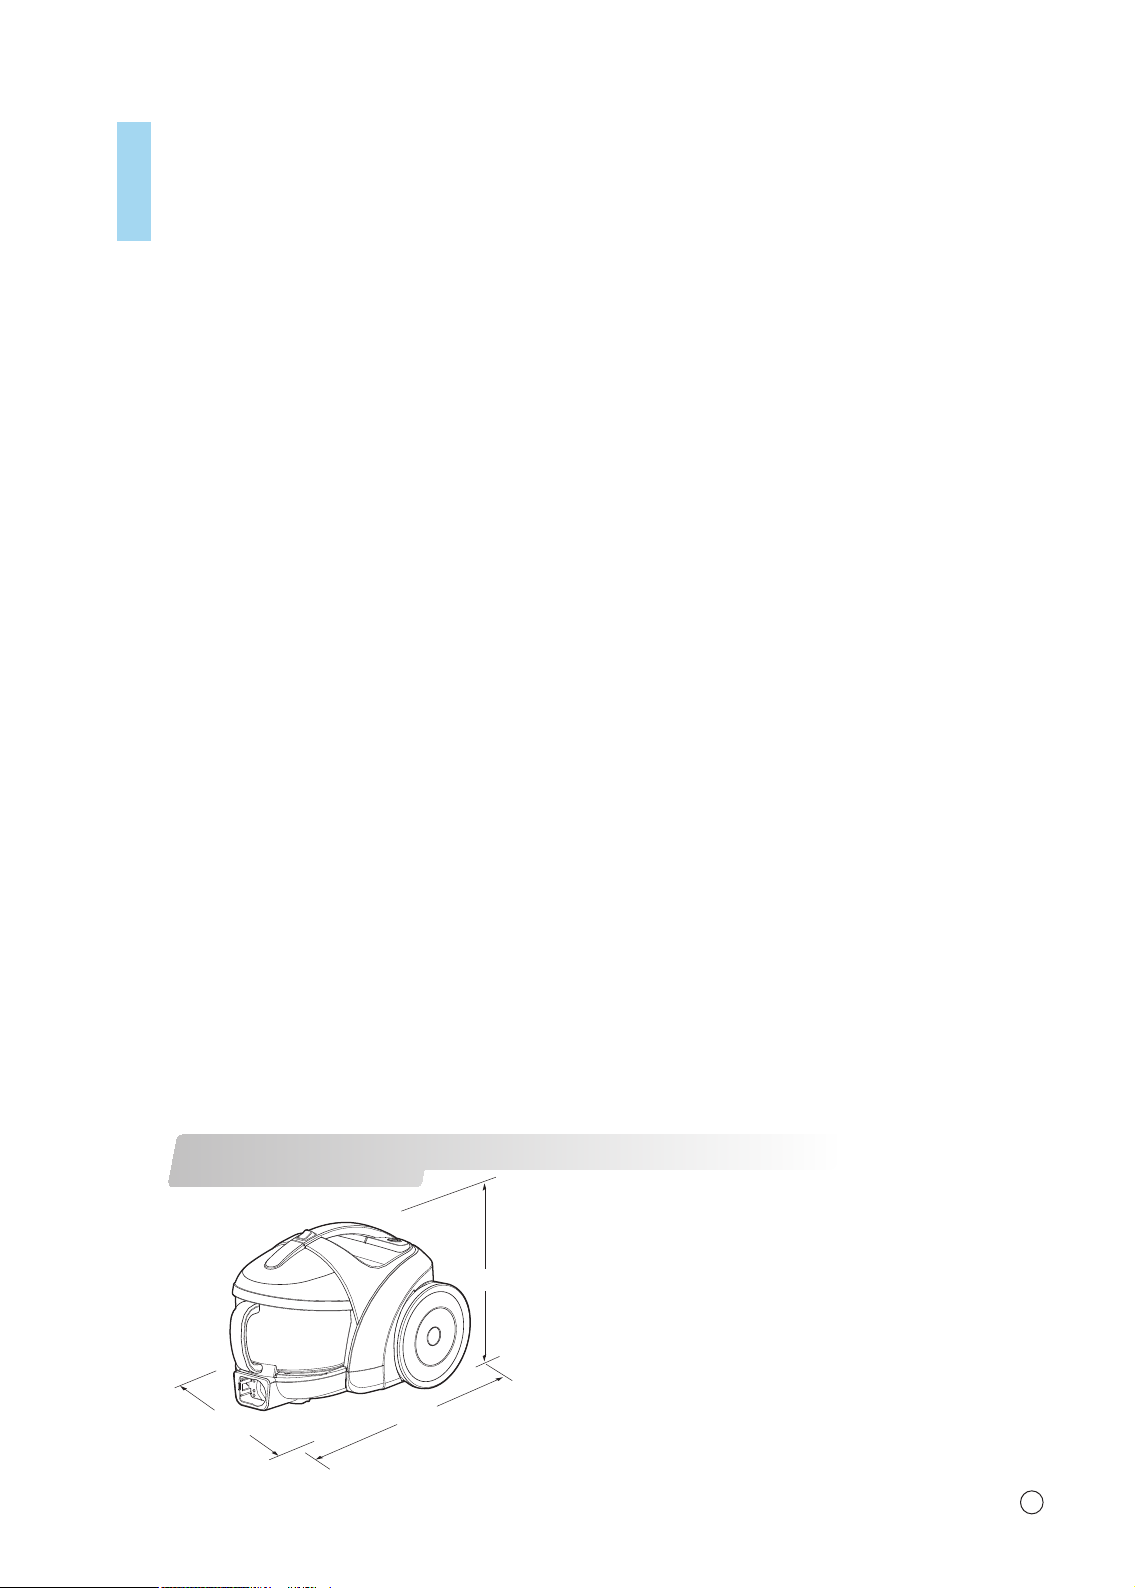
Table of contents
ญับราส
Specifications ........................................................................................................... 3
ดักำจอ้ข
Important safety instructions ................................................................................. 4 ~ 7
ยัภดอลปมาวคบักวย่ีกเำนะนแำค
How to use ................................................................................................................8 ~ 23
นาง้ชใรากีธิว
Assembling vacuum cleaner ................................................................................................................. 8 ~ 10
Operating vacuum cleaner
Using carpet and floor nozzle ................................................................................................................ 14 ~ 15
Using All Floor nozzle and mini turbine nozzle ...................................................................................... 16
User’s guide for sani punch ................................................................................................................... 17
User’s guide for Mop Nozzle....................................................................................................................... 18
คำแนะนำสำหรับหัวของซับ
Using accessory nozzles ....................................................................................................................... 19 ~ 20
Emptying dust tank ................................................................................................................................ 21
Cleaning dust tank ................................................................................................................................. 22
Cleaning air filter and motor safety filter ................................................................................................ 23
Cleaning exhaust filter ........................................................................................................................... 24
นุ่ฝดูดงอ่ืรคเบอกะรปราก
.....................................................................................................................
ดูดงอ่ืรคเงอขนางำทราก
น้ืพะลแ มรพดูดวัหนาง้ชใราก
นัหงักบบแดูดวัหะลแ วิผน้ืพกุทดูดวัหนาง้ชใราก
hcnuP inaS ดูดวัหนาง้ชใรากำนะนแำค
ๆงา่ตมิรสเดูดวัหนาง้ชใราก
นุ่ฝบ็กเงัถนุ่ฝทเราก
นุ่ฝบ็กเงัถดาอะสมาวคำทราก
์รอตเอมงอรกน่ผแะลแ ศากาองอรกน่ผแดาอะสมาวคำทราก
)APEH( ศากาองอรกน่ผแดาอะสมาวคำทราก
12 ~ 13
What to do if your vacuum cleaner does not work?
? รไงา่ยอำทะจ นางำท่มไนุ่ฝดูดงอ่ืรคเา้ถ
What to do when suction performance decreases?
? งลดลนุ่ฝดูดงอ่ืรคเงอขดูดงัลพอ่ืมเรไงา่ยอำทะจ
Specifications
นุ่ฝดูดงอ่ืรคเงอขดักำจอ้ข
275
259
402
Dimension: 402(mm) x 259(mm) x 275(mm)=L x W x H
ขนาด : 402(mm) x 259(mm) x 275(mm) = L x W x H
............................................. 25
............................................. 25
3
Page 5
IMPORTANT SAFETY INSTRUCTIONS
4
Page 6
IMPORTANT SAFETY INSTRUCTIONS
5
Page 7
คำเตือน
ข้อระวัง
คำเตือน
คําแนะนําเกี่ยวกับความปลอดภัย
6
Page 8
ข้อระวัง
คําแนะนําเกี่ยวกับความปลอดภัย
7
Page 9
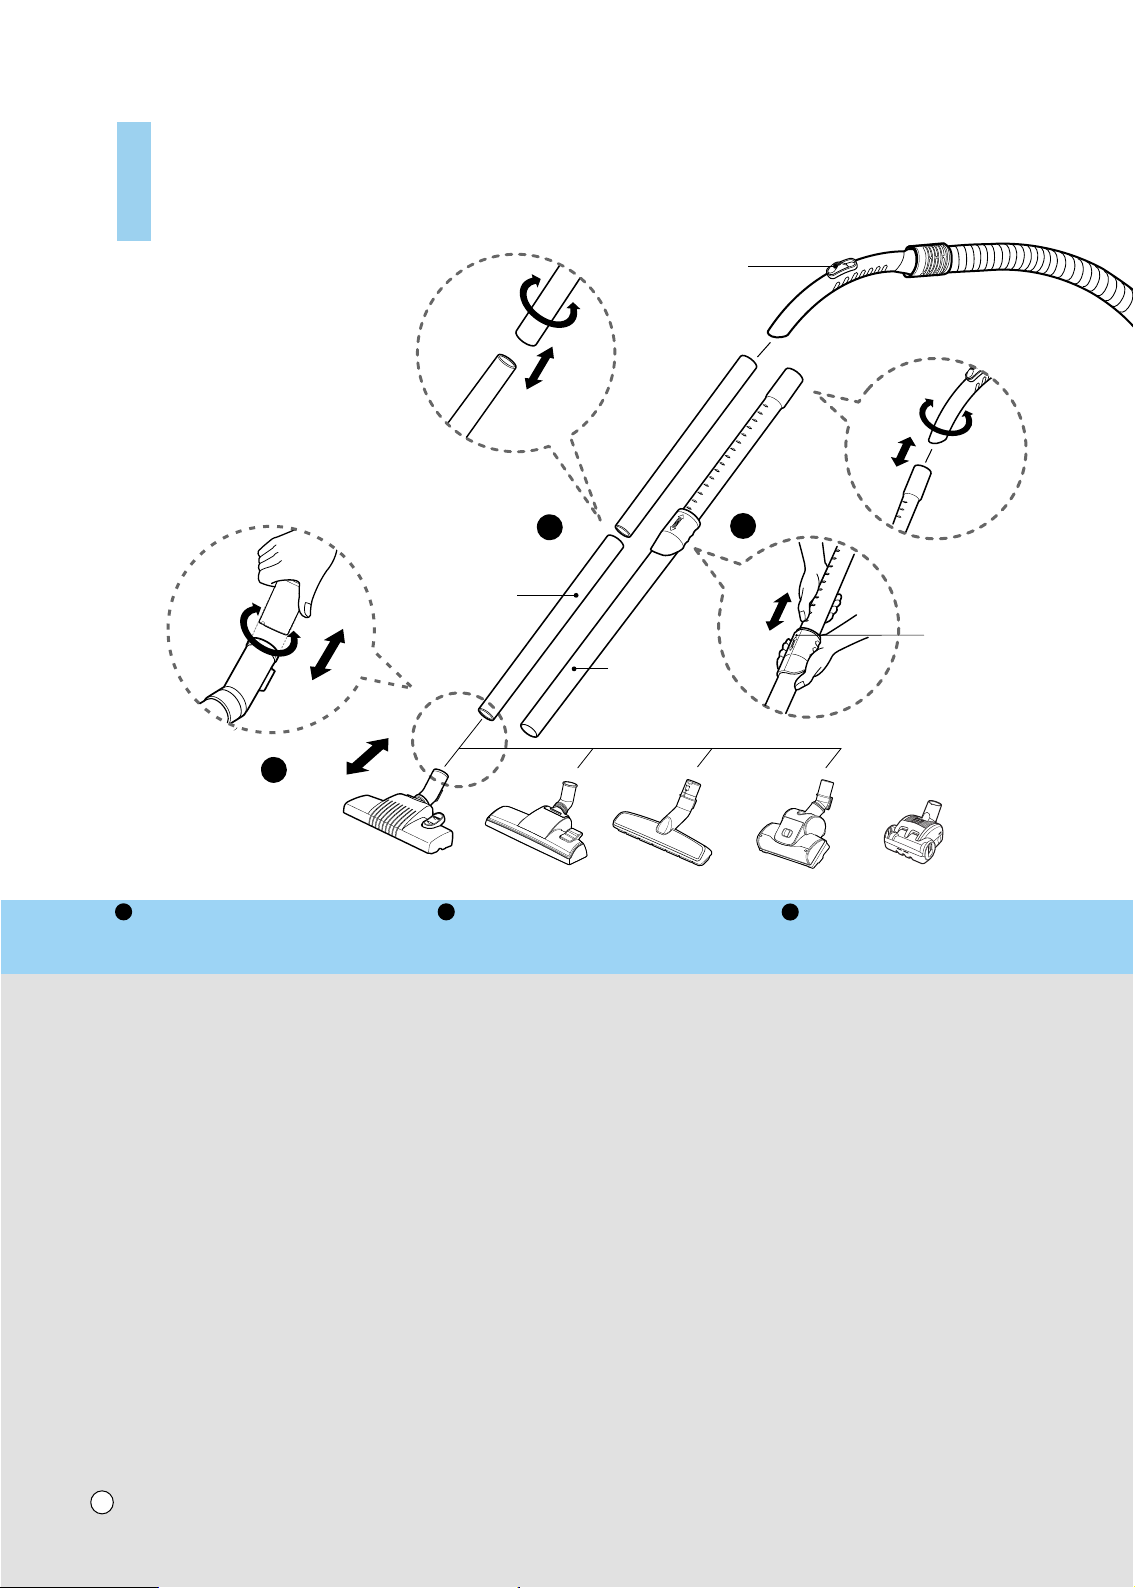
How to use Assembling vacuum cleaner
วิธีการใช้งาน
ON/OFF type with dual pipe or common telescopic pipe (depending on the model)
สำหรับเครื่องดูดฝุ่นแบบเปิด/ปิด จะเป็นท่อดูดคู่ หรือท่อดูดแบบปรับความยาวได้ (เฉพาะรุ่น)
การประกอบเครื่องดูดฝุ่น
Hose Handle
ด้ามจับ
3
Dual pipe
ท่อดูดคู่
Telescopic pipe
ท่อดูดแบบ
ปรับระดับได้
2
1
(depending on model)
(เฉพาะเครื่องดูดฝุ่นบางรุ่น)
1
Carpet and Floor nozzle
(depending on model)
หัวดูดพรม และพื้น (เฉพาะรุ่น) ท่อดูดแบบปรับระดับได้(เฉพาะรุ่น) ท่อดูดคู่(เฉพาะรุ่น)
Push telescopic pipe or dual
pipe into the nozzle outlet.
ดันท่อดูดแบบปรับระดับได้
หรือท่อดูดคู่เข้าไปในหัวดูด
2
Telescopic pipe
(depending on model)
• Push the spring latch to release.
• Pull out the pipe to the desired length.
• Release spring latch to lock the pipe
in position.
• ดันตัวล็อคสปริงเพื่อปลดล็อก
• ดึงท่อออกยาวตามความต้องการ
• ปล่อยตัวล็อคสปริง
3
Dual pipe
(depending on model)
Fit together the two pipes by
twisting slightly when choose
dual pipe.
ต่อท่อทั้งสองเข้าด้วยกัน โดย
การบิดท่อทั้งสองให้แน่น
Spring latch
ตัวล็อคสปริง
8
Page 10

Assembling vacuum cleaner
นาง้ชใรากีธิว
การประกอบเครื่องดูดฝุ่น
ON/OFF type and Rotary type with advanced telescopic pipe (depending on the model)
Hose Handle
บัจมา้ด
2
(depending on model)
( นุ่รงาบนุ่ฝดูดงอ่ืรคเะาพฉเ )
Telescopic pipe
บบแดูดอ่ท
้ดไบัดะรบัรป
)นุ่ระาพฉเ( ้ดไวายมาวคบัรปบบแดูดอ่ทน็ปเะจ ้ดไดูดงัลพบัรปบบแะลแ ดิป/ดิปเบบแนุ่ฝดูดงอ่ืรคเบัรหำส
Spring latch
Spring latchSpring latch
งิรปสคอ็ลวัต
1
(depending on model)(depending on model)
1
Carpet and floor nozzle
(Depending on model)
(
2
Telescopic pipe
นุ่รงาบนุ่ฝดูดงอ่ืรคเะาพฉเ )( นุ่รงาบนุ่ฝดูดงอ่ืรคเะาพฉเ )
(Depending on model)
มรพดูดวัห น้ืพะลแ ( นุ่ระาพฉเ ) ้ดไบัดะรบัรปบบแดูดอ่ท ( นุ่ระาพฉเ )
Push the nozzle into the telescopic pipe. • Push telescopic pipe firmly into hose handle.
• Grasp the spring latch to expand.
• Pull out the pipe to desired length.
ดูดวัหนใปไา้ขเ้ดไบัดะรบัรปบบแดูดอ่ทนัด
• บัจมา้ดบักา้ขเบัดะรบัรปบบแดูดอ่ทอ่ต
• งิรปสคอ็ลวัต่ีทปไบัจ
• รากงอ้ตมาตวายมาวค้ดไ้หใอ่ทงึด
9
Page 11

How to use
Assembling vacuum cleaner
นาง้ชใรากีธิว
Hose slide Type (depending on the model)
(depending on model)
นุ่ฝดูดงอ่ืรคเบอกะรปราก
)นุ่ระาพฉเ( บัจมา้ด่ีทดูดงัลพบัรปบบแนุ่ฝดูดงอ่ืรคเบัรหำส
Hose Handle
บัจมา้ด
2
Telescopic pipe
)นุ่รงาบนุ่ฝดูดงอ่ืรคเะาพฉเ(
บบแดูดอ่ท
้ดไบัดะรบัรป
Spring latch
Spring latchSpring latch
งิรปสคอ็ลวัต
1
1
Carpet and floor nozzle
(depending on model)
มรพดูดวัห น้ืพะลแ ( นุ่ระาพฉเ ) )นุ่ระาพฉเ( ้ดไบัดะรบัรปบบแดูดอ่ท
Push the nozzle into the telescopic pipe.
2
Telescopic pipe
(depending on model)
• Push telescopic pipe firmly into hose handle.
• Grasp the spring latch to expand.
• Pull out the pipe to desired length.
ดูดวัหนใปไา้ขเ้ดไบัดะรบัรปบบแดูดอ่ทนัด • บัจมา้ดบักา้ขเบัดะรบัรปบบแดูดอ่ทอ่ต
• งิรปสคอ็ลวัต่ีทปไบัจ
• รากงอ้ตมาตวายมาวค้ดไ้หใอ่ทงึด
(depending on model) (depending on model)
)นุ่รงาบนุ่ฝดูดงอ่ืรคเะาพฉเ()นุ่รงาบนุ่ฝดูดงอ่ืรคเะาพฉเ(
10
Page 12

Button
ปุ่ม
3
Attachment Point
ช่องเสียบสายดูดฝุ่น
3
Connecting the hose to the vacuum cleane
การต่อสายดูดฝุ่นเข้ากับตัวเครื่องดูดฝุ่น
Push the fitting pipe on the flexible hose into the attachment point
on the vacuum cleaner.
To remove the flexible hose from the vacuum cleaner, press the
button situated on the fitting pipe, then pull the fitting pipe out of the
vacuum cleaner.
ต่อสายดูดฝุ่นเข้ากับช่องเสียบสายของเครื่องดูดฝุ่น
ถ้าต้องการถอดสายดูดฝุ่นออกให้กดปุ่มตรงบริเวณ
ด้านบนของสายดูดฝุ่น และดึงออกจากตัวเครื่อง
r
11
Page 13

Air Flow Regulator
ที่ความคุมแรงลม
Open
Close
ปิด
How to use Operating vacuum cleaner
Air Flow Regulator
Open
Close
วิธีการใช้งาน การทำงานของเครื่องดูดฝุ่น
ON/OFF type
1 1 1
(Depending on model)
แบบเปิด/ปิด
(เฉพาะรุ่น)
Plug
Power
switch
ปุ่ม
เปิด/ปิด
เปิด
ปลั๊ก
Close
ปิด
Open
เปิด
Air Flow Regulator
ที่ความคุมแรงลม
Cord
reel button
ปุ่มเก็บสาย
Power
switch
ปุ่ม
เปิด/ปิด
MIN MAX
MIN MAX
control knob
ที่ปรับแรงดูด
Rotary type
(Depending on model)
แบบปรับแรงดูดได้
(เฉพาะรุ่น)
Rotary
control knob
ที่ปรับแรงดูด
Plug
Rotary
reel button
ปุ่มเก็บสาย
ปลั๊ก
ที่ความคุมแรงลม
เปิด
ปิด
Cord
Hose slide type
(Depending on model)
แบบปรับแรงดูดที่ด้ามจับ
(เฉพาะรุ่น)
Plug
ปลั๊ก
Cord
reel button
ปุ่มเก็บสาย
POWER
CONTROL
FLOOR
CARPET
SOFA
CURTAIN
OFF
Control knob
ที่ปรับแรงดูด
MAX
MIN
1
How to operate
วิธีการใช้งาน
Pull out the power cord to the desired
•
(ON/OFF type)
(แบบเปิด/ปิด)
length and plug into the socket.
•
Press power switch to start the vacuum
cleaner.
•
The flexible hose handle has a manual
air flow regulator which allows you to
briefly reduce the suction level.
•
Press the cord reel button to rewind
the power cord after use.
ดึงสายไฟออกจนได้ความยาว
•
ที่ต้องการและเสียบปลั๊ก
กดปุ่มเปิดเครื่องดูดฝุ่น
•
ที่ด้ามจับมีที่ควบคุมแรงลม
•
เมื่อท่านต้องการลดแรงดูดลง
กดปุ่มเก็บสายไฟ เมื่อท่านใช้
•
งานเสร็จแล้ว
12
1
How to operate
วิธีการใช้งาน
•
Pull out the power cord to the desired
(Rotary type)
(แบบปรับแรงดูดได้)
length and plug into the socket.
Press power switch to start the vacuum
•
cleaner.
Slide the rotary control knob to adjust
•
the suction level.
•
The flexible hose handle has a manual
air flow regulator which allows you to
briefly reduce the suction level.
•
Press the cord reel button to rewind
the power cord after use.
ดึงสายไฟออกจนได้ความยาว
•
ที่ต้องการและเสียบปลั๊ก
กดปุ่มเปิดเครื่องดูดฝุ่น
•
เลื่อนปรับแรงดูดตามความ
•
ต้องการของท่าน
ที่ด้ามจับมีที่ควบคุมแรงลม
•
เมื่อท่านต้องการลดแรงดูดลง
กดปุ่มเก็บสายไฟ เมื่อท่านใช้
•
งานเสร็จแล้ว
1
How to operate
วิธีการใช้งาน
Pull out the power cord to the
•
(Hose slide type)
(แบบปรับแรงดูดที่ด้ามจับ)
desired length and plug into the
socket.
•
Place the control knob of the hose
handle to the required position
To turn off, slide control knob to
•
OFF position
Press the cord reel button to
•
rewind the power cord after use.
ดึงสายไฟออกจนได้ความยาว
•
ที่ต้องการและเสียบปลั๊ก
เลื่อนสวิตซ์ตามลักษณะการ
•
ใช่งานของท่านตามต้องการ
เลื่อนสวิตซ์
•
ไปที่ปุ่ม Off
สำหรับปิด
กดปุ่มเก็บสายไฟ เมื่อท่านใช้
•
งานเสร็จแล้ว
Page 14

32
2
Park mode
3
Storage
การเก็บขณะใช้งานอยู่ การเก็บ
• To store during vacuuming, for example
to move a small piece of furniture or a rug,
use park mode to support the flexible hose
and nozzle.
- Slide the hook on the nozzle into the slot
on the side of vacuum cleaner.
เป็นการเก็บเครื่องดูดฝุ่ขณะที่ยัง
•
ใช้งานอยู่
- เลื่อนที่เกี่ยวบนหัวดูดเข้าไปที่
ช่องด้านข้างของเครื่องดูดฝุ่นดังรูป
• When you have switched off and
unplugged the vacuum cleaner,
press the cord reel button to
automatically rewind the cord.
• You can store your vacuum cleaner
in a vertical position by sliding the
hook on the nozzle into the slot on
the underside of the vacuum cleaner.
•
•
เมื่อท่านปิดสวิตซ์ ถอดปลั๊ก และ
เก็บสายไฟแล้ว
ท่านสามารถเก็บเครื่องดูดฝุ่นของท่านได้
โดยตั้งเครื่องดูดฝุ่นขึ้น และสอดที่เกี่ยว
บนหัวดูดลงไปตรงช่องเสียบด้านลงของ
เครื่องดูดฝุ่นดังรูป
13
Page 15

How to use Using carpet and floor nozzle
วิธีการใช้งาน
1
พื้น
การใช้หัวดูดสำหรับดูดพรม และพื้น
2
พรม
คันเหยียบ
14
1
Carpet and floor nozzle
(depending on model)
2
Hard Floor Nozzle
หัวดูดพรม และพื้น (เฉพาะรุ่น) หัวดูดพื้นแข็ง (เฉพาะรุ่น)
• The 2 position nozzle
This is equipped with a pedal which
allows you to alter its position according
to the type of floor to be cleaned.
• Carpet or rug position
Press the pedal to lift the brush up.
•
Hard floor position (tiles, parquets floor)
Press the pedal to lower brush.
เป็นหัวดูด 2 ใน 1
•
ท่านสามารถเปลี่ยนลัษณะของหัวดูดได้
• Efficient cleaning of hard floors
(wood, linoleum, etc)
ใช้สำหรับทำความสะอาดพื้นแข็ง เช่น
•
ไม้ และเสื้อน้ำมัน เป็นต้น
โดยการกดที่คันเหยียบ ตามลัษณะของ
พื้นที่ท่านต้องการทำความสะอาด
ดูดพรม
•
กดที่คันเหยียบให้แปรงยื่นออกมา
ดูดพื้น เช่น กระเบื้อง และปาเก้
•
กดที่คันเหยียบให้แปรองหุบเข้าไป
(depending on model)
Page 16

3
4
Long Carpet
พรมสูง
Cleaning Turbine Nozzle
Hard Floor Nozzle
หัวดูดพื้นแข็ง
Short Carpet
พรมต่ำ
การทำความสะอาดหัวดูดแบบใบพัด
เปิด
ด้านล่าง
Hard floor nozzle
(depending on model) (depending on model)
23 4
Turbine Nozzle
หัวดูดพื้นแข็ง (เฉพาะรุ่น) หัวดูดแบบใบพัด (เฉพาะรุ่น)
• You can perform cleaning at any
place like corner or crevice since
revolution is free.
ท่านสามารถทำความสะอาดได้ทุกพื้นที่
•
ไม่ว่าจะเป็นมุม หรือรอยแตกต่างๆ
• Cleaning turbine brush nozzle.
• Press the button on the rear side of the nozzle
to separate the air cover
• Use the dusting brush & crevice tool to vacuum
clean the brush and fan.
การทำความสะอาดหัวดูดแบบใบพัด
•
กดปุ่มบริเวณใต้หัวดูด เพื่อถอดที่ครอบออก
•
•
ใช้แปรงปัดฝุ่น หรือเครื่องดูดฝุ่น ทำความสะอาด
.
15
Page 17

How to use
Using All Floor nozzle and mini turbine nozzle
นาง้ชใรากีธิว
5
Floor
Carpet
พรม
Pedal
บยียหเนัค
น้ืพ
6
Press
ก็ลเดานขดัพบใบบแดูดวัหะลแ ดินชกุทน้ืพบัรหำสดูดวัห้ชใราก
กด
16
All Floor nozzle
(depending on model)
วิผน้ืพกุทดูดวัห ( นุ่ระาพฉเ ) ก็ลเดานขดัพบใดูดวัห ( นุ่ระาพฉเ )
• The 2 position nozzle
This is equipped with a pedal which allows you
to alter its position according to the type of floor
to be cleaned.
• Carpet or rug position
Press the pedal ( ), then brush will rotate.
•
Hard floor position
Press the pedal ( ), then brush will stop rotating.
•
มรพดูด
•
•
Cleaning All Floor nozzle
1 นใ 2 ดูดวัหน็ปเ
มหงรปแ้หใบยียหเนัค่ีทดก
นุ
ง็ขแน้ืพดูด
นุมหดุยหงรปแ้หใบยียหเนัค่ีทดก
• Open the cover by pulling the hook.
•
• Clean the hole and brush of the nozzle.
•
่ีทดกรากยดโ ้ดไดูดวัหงอขะณษัลนย่ีลปเถรามาสนา่ท
วิผน้ืพกุทบัรหำสดูดวัหดาอะสมาวคำทราก
ดึย่ีทณวเิรบงึดรากยดโ บอรค่ีทดิปเ
งรปแะลแ ูรณวเิรบดูดวัหดาอะสมาวคำท
256
Mini turbine nozzle
• Mini turbine is used for stairs and other hard
to reach places.
• To clean the mini turbine nozzle, remove the
nozzle cover : Remove 2 screws on the bottom
and take mini turbine nozzle cover off as shown.
• Frequently clean and remove hair, string, and
lint build-up in the brush area.
Failure to do so could damage to mini turbine nozzle.
•
(depending on model)
งึถา้ขเรากอ่ตกาย่ีท่ีท
ดาอะสมาวคำทรากงอ้ตนา่ท่ีทน้ืพงอขะณษัลมาต บยียหเนัค
•
,ก็ลเดานขดัพบใดูดวัหดาอะสมาวคำทราก
กออดูดวัหบอรค่ีทงึดะลแ
•
ัจขะลแ ดาอะสมาวคำท
ดูดวัหงอขงรปแณวเิรบ
ะลแ ดไนับดูดบัรหำส้ชใก็ลเดานขดัพบใดูดวัห
ดอถ
กอองา่ลนา้ดวัต 2 ูรกสดอถ : กออดูดวัหบอรค่ีท
กาจกออ กอืชเ มผษศเด
Page 18

How to use User’s guide for sani punch
นาง้ชใรากีธิว
Use it as shown in the diagram
ดูดวัหนาง้ชใรากงดสแ
Sani Punch
Assembling
การประกอบ
Effective cleaning
การทำความสะอาด
• Bed, bedding, heavy blanket
นอน่ีท , หมอน, ่ญหในืผม่หา้ผๆงาบนอนกูฝอืรห งาบม่หา้ผ
ดูดวัหนาง้ชใรากำนะนแำค Sani Punch
Connect to Tube
ดูดอ่ทบักา้ขเอ่ต
Connect to Hose
บัจมา้ดบักา้ขเอ่ต
• Light blanket & sheet
To increase cleaning efficiency
for light blankets, lay on top of
a bulky blanket and then clean.
7
SANI PUNCH (depending on model)
)นุ่ระาพฉเ( hcnuP inaS ดูดวัห
• Cleaning Sani Punch
The vibrator may break down due to the cleansing of the inhaler with water.
If the dust settles in the box
while cleaning, press the button
2 or 3 times.
(It will remove most of the dust.)
2-3 ง้ัรค นุ่ฝ่ลไอ่ืพเ
ออกจากหลอด
Separate the bottom plate by
pressing the buttons in the back.
Vibrator
ดูดวัหณวเิรบมุ่ปดก
เครื่องสั่น
Pressing boutons
Pressez les boutons
ยดโ กอองา่ลนา้ดน่ผแดอถ
ดูดวัหงัลหนา้ดมุ่ปดกราก
After the cleaning,if there are lots
of dusts in the box, separate the
box from the inhaler by turning it
anticlockwise.
บัรหำสมุ่ปดก
งา่ลนา้ดน่ผแดอถ
hcnuP inaS ดูดวัหดาอะสมาวคำทราก
นุ่ฝีมะลแ ดาอะสมาวคำทงัลห
นา่ท้หใดอลหนใู่ยอกามนวนำจ
นุมหรากยดโกออดอลหดอถ
ากิฬานม็ขเนวท
Clean the dirty body of the inhaler
carefully with a cloth.
Joining spiral
ูรณวเิรบดาอะสมาวคำท
ร่วมงานกับเกลียว
า้ผยว้ดงัวะรดัมะรงา่ยอดูดวัหะลแ
Empty the box.
ง้ิทนุ่ฝทเ
กาจม่หา้ผดาอะสมาวคำทม่ิรเรวค
พาภิธทิสะรปม่ิพเอ่ืพเนอ่กนบนา้ดงาท
ในการทำความสะอาด
ปไา้ขเำ้นาอเดูดา้ถ ้ดไดาอะสมาวคำทงา่วหะรดุยหะจจาอดูดวัหงอขนางำทราก
Aim at the Spiral, Fix the box into
the inhaler by turning it clockwise.
ากิฬานม็ขเมาตนุมห
Wash the separated bottom
plate and dry it in the shade.
ง้หแ้หใฝ่ึผะลแ
คอ็ล่ีท
ากยดโ คอ็ล่ีทงรตดอลห่สใ
ร
ำ้นยว้ดงา่ลนา้ดน่ผแงา้ล
Arrange the vibrator in order.
นใดูดวัหน่ผแงาว
มสะามหเ่ีทง่นหแำต
Joining groove
ร่วมงานกับร่อง
Insert the joining spiral into the groove.
สอด Join spiral
คอ็ลงล้หใงอ่รนใปไา้ขเ
Attach the bottom plate properly
by pressing down.
นา้ดน่ผแ่สใ
น่นแ้หใงลดกรากยดโ งา่ล
17
Page 19

How to use User’s guide for Mop Nozzle
นาง้ชใรากีธิว
Using the Mop and Mop Nozzle
บัซงอขวัหะลแบัซ้ชใ
Using the Mop
.นาง้ชในอ่กบัซงอขวัหง้หแะจรวคณุค
.ษศเิพ GL งอขบัซ้ชใรวคณุค
:ุตหเยามห
คำแนะนำสำหรับหัวของซับ
บัซ้ชใ
.นบนา้ดญิชผเงอ้ตวิผน้ืพะลแวัหงอขงา่ลนา้ดนใบัซ่สใ
.นอ่อดุจดัจำกงัลำกกอืลเรวคา้ผกัซงอ่ืรคเนใบัซง้หแณุคอ่ืมเ
.าวขนา้ด่ีทง้ัตดิตรากนใำนะนแำคน็หเะจณุค่ีทบัซรากนทแบัซงอขวัห้ชใณุคอ่ืมเ
.ดาอะสมาวคำทอ่ตยารตนัอน็ปเงัยะลแปไนิกเกามน้ืชมาวคบัซบัก้ชใะจ่ีทยารตนัอน็ปเ
.ง่นหแำตกาจดุลหอ่ืมเขไ้กแถรามาส่มไบัซ
..น
ุ่ฝดูดา้ขเาขนักงอ้ป่มไบัซขไ้กแณุคอ่ืมเ
บัซงอขวัห้ชใ
Connecting
method
1.Fix the mop according to the
method showed on the diagram.
Disconnecting
method
3.Disconnect the mop board according
to method showed below, and then
take down the mop.
2.
.พาภปูรนบำนะนแำคมาตบัซขไ้กแราก
.ขไนอ่ืงเมาตบัซดอถอืรหอ่ตมอ่ืชเถรามาสณุค
อ่ตมอ่ืชเรากีธิว
After the mop nozzle matches
with the mop board, connect the
mop nozzle from the top down.
When you hear a sound of Ta Ta,
it means the connection is ok.
ขด์รอบบักงรตบัซงอขวัห่ีทกาจงัลห
คบอรงา่ยอวัหบัซอ่ตมอ่ืชเ่ีทบอ็มงอ
หะจยาลำท"งยีสเ"นิย้ดไณุคอ่ืมเบอ
.์ณรูบมสจ็รสเอ่ตมอ่ืชเรากงึถยาม
Mop nozzle
บัซ
งอขวัห
Mop board
บัซะณค
Mop
บัซ
ดัตรากีธิว
.บัซาอเว้ลแ้ีนปไอ่ตำน
Use method of mop nozzle when the mop is not attached
ง้ัตดิต้ดไ่มไบัซอ่ืมเบอ็มงอขดีฉวัห้ชใราก
To protect the attaching
location of mop, it is
recommend connect the
mop nozzle according to
the left diagram when
mop is not used.
When the mop is not
used, you couldn't use
the method showed on
the left diagram. If not,
the mop nozzle will
damage the attaching
location of mop.
ทำนะนแำคม
.บัซ
Please clean the mop and mop nozzle as the following diagram.
.้ีนปไอ่ตบอกะรปพาภมาตบอ็มงอขวัหด็ชเะลแดาอะสมาวคำทาณุรก
ะนแำคมาตรากมรรกะณคบัซดอถ
ุคบัซงอขง้ัตดิตรากนักงอ้ปอ่ืพเ
มาตบอ็มงอขวัหอ่ตมอ่ืชเรวคณ
.้ชใ้ดไ่มไบัซอ่ืมเบอกะรปพาภ
าตำทรวค่มไณุคบัซ้ชใ้ดไ่มไอ่ืมเ
น้ันะฉิมยา้ซนา้ดงา
ดิต่ีทนาถสงอขยาหยีสเจาอณุค
18
Page 20

How to use Using accessory nozzles
วิธีการใช้งาน
Crevice tool
Upholstery nozzle
การใช้งานหัวดูดต่างๆ
หัวดูดตามซอกมุมหัวดูดแบบแปรงหัวดูดโซฟา / เบาะผ้า
1
2 3
Dusting brush
1
Crevice Tool
(depending on model)
2
Upholstery Nozzle
(depending on model)
3
Dusting Brush
(depending on model)
หัวดูดตามซอกมุม (เฉพาะรุ่น) หัวดูดโซฟา (เฉพาะรุ่น) หัวดูดแบบแปรง (เฉพาะรุ่น)
Crevice tool is for vacuuming
in those normally hard-to-reach
places such as reaching cobwebs
or between the cushions of a sofa.
หัวดูดตามซอกมุมใชสำหรับ
ดูดในพื้นที่ที่ยากต่อการเข้าถึง
เช่น ใยแมงมุมตามซอกมุม หรือ
บริเวณร่องโซฟา, เบาะ เป็นต้น
Upholstery nozzle is for
vacuuming upholstery,
mattresses etc.
หัวดูดโซฟา
ใช้สำหรับดูดโซฟา
และเบาะผ้าต่างๆ
Dusting brush is for vacuuming
picture frames, furniture frames,
books and other irregular surfaces.
หัวดูดแบบแปรง ใช้สำหรับดูดกรอบรูป
เฟนอร์นิเจอร์, หนังสือ และพื้นผิวที่
ไม่เรียบต่างๆ
19
Page 21

How to use Using accessory nozzles
NOTICE
ข้อสังเกต
Use accessory in the sofa mode.
ใช้อุปกรณ์นี้สำหรับดูดโซฟา
วิธีการใช้งาน
Crevice tool
Upholstery nozzle Dusting brush
การใช้งานหัวดูดต่างๆ
หัวดูดตามซอกมุมหัวดูดแบบแปรงหัวดูดโซฟา / เบาะผ้า
1
2 3
1
Crevice Tool
(depending on model)
หัวดูดตามซอกมุม (เฉพาะรุ่น) หัวดูดโซฟา (เฉพาะรุ่น) หัวดูดแบบแปรง (เฉพาะรุ่น)
Crevice tool is for vacuuming
in those normally hard-to-reach
places such as reaching cobwebs
or between the cushions of a sofa.
หัวดูดตามซอกมุมใชสำหรับ
ดูดในพื้นที่ที่ยากต่อการเข้าถึง
เช่น ใยแมงมุมตามซอกมุม หรือ
บริเวณร่องโซฟา, เบาะ เป็นต้น
2
Upholstery Nozzle
(depending on model)
Upholstery nozzle is for
vacuuming upholstery,
mattresses etc.
หัวดูดโซฟา ใช้สำหรับดูดโซฟา
และเบาะผ้าต่างๆ
3
Dusting Brush
(depending on model)
Dusting brush is for vacuuming
picture frames, furniture frames,
books and other irregular surfaces.
หัวดูดแบบแปรง ใช้สำหรับดูดกรอบรูป
เฟนอร์นิเจอร์, หนังสือ และพื้นผิวที่
ไม่เรียบต่างๆ
20
Page 22

How to use Emptying dust tank
วิธีการใช้งาน
การเทฝุ่นทิ้ง
Caution: Do not push the button when
you carry the vacuum cleaner.
If push the button, it is easy to
detach the dust tank from the
vacuum cleaner.
คำเตือน : ห้ามกดปุ่มขณะที่ท่านยังถือ
เครื่องดูดฝุ่นอยู่ เพราะถ้า
กดปุ่ม ถังเก็บฝุ่นจะง่ายต่อการ
หลุดออกจากเครื่องดูดฝุ่น
Cleaning the dust tank.
• Open the tank cap.
• Wash both parts with soft material.
Gently rinse both parts under a cold running tap.
การทำความสะอาดถังเก็บฝุ่น
เปิดฝาถังเก็บฝุ่น
•
ล้างชิ้นส่วนทั้งคู่ด้วยวัสดุนุ่มๆ
•
ล้างด้านล่างชิ้นส่วนทั้งสอง ที่เป็นทางผ่านของลม
WARNING!
Gently rinse both parts separately under a cold
running tap until the water runs clear.
Do not use detergent or a washing machine or
dishwasher.
คำเตือน
ก่อนที่จะประกอบถังเก็บฝุ่น ต้องให้ด้านล่าง
ที่เป็นทางผ่านของลมปราศจากน้ำ
ห้ามล้างโดยผงซักฟอก หรือเครื่องซักผ้า
หรือเครื่องล้างจานา
21
Page 23

How to use
Cleaning dust tank
วิธีการใช้งาน
การเทฝุ่นทิ้ง
22
Push button and pull out dust tank.
Raise dust tank cap.
Dry fully in shade so that moisture is entirely removed.
กดปุ่ม และดึงถังเก็บฝุ่นออก
เปิดฝาถังเก็บฝุ่น เทฝุ่น และล้างถังเก็บฝุ่น
ผึ่งถังเก็บฝุ่นให้แห้งก่อนทำการประกอบ
NOTICE
If suction power decreases after cleaning dust tank, clean
air filter and motor safety filter. Next page
ข้อสังเกต
ถ้าพลังดูดลดลงหลังจากทำความสะอาดถังเก็บฝุ่น
ให้ล้างแผ่นกรองอากาศ และแผ่นกรองมอเตอร์ หน้าต่อไป
Page 24

How to use Cleaning air filter and motor safety filter
นาง้ชใรากีธิว
์รอตเอมงอรกน่ผแะลแ ศากาองอรกน่ผแดาอะสมาวคำทราก
Air filter
กรองอากาศ
Motor
safety filter
กรองปลอดภัยข
องเครื่องยนต์
ตกเงัสอ้ข
ีจลอแรากิรบ์ยนูศอ่ตดิต้หใ ยาหยีสเ่ีทงอรกน่ผแ่ชใมา้ห
ศากาองอรกน่ผแงา้ล้หใ นุ่ฝบ็กเงัถดาอะสมาวคำทกาจงัลหงลดลดูดงัลพา้ถ
กน่ผแะลแ
นุ่ฝดูดงอ่ืรคเงอข
ศากาองอรกน่ผแนว่สกยแ
อมะลแ ศากาองอรกน่ผแงา้ล
นอ้รำ้นยว้ดงอรกน่ผแงา้ลมา้ห
ง้หแ้หใง่ึผ
่ผแ
ำ้นยว้ด์รอตเ
งาลกง่ึกณวเิรบู่ยอะจ ์รอตเอมะลแศากาองอรกน่ผแ ์รอตเอมงอร
กอองอรกน่ผแงึดะลแ น้ึขบอรค่ีทงึดยดโ ศากาองอรกน่ผแบอรค่ีทดิปเ
ำจะรปน็ปเดาอะสมาวคำทะจรวค ์รอตเอมะลแ ศากาองอรกน
23
Page 25

How to use
Cleaning exhaust filter
วิธีการใช้งาน
การทำความสะอาดแผ่นกรองอากาศ (HEPA)
24
• The exhaust filter is a reusable HEPA filter.
• To change the exhaust filter, remove the filter cover on the body by release hook.
• Pull out the exhaust filter.
• Dust off filter.
• The exhaust filter should be cleaned at least once a year.
• แผ่นกรองอากาศออก จะเป็นแผ่นกรอง HEPA
• ถอดที่ครอบแผ่นกรองอากาศ โดยปลอดล็อกตัวยึด
• ดึงแผ่นกรองอากาศออก
• เทฝุ่นทิ้ง
• ควรทำความสะอาดอย่างน้อยปีละ 1 ครั้ง
Page 26

What to do if your vacuum cleaner does not work?
ถ้าเครื่องดูดฝุ่นไม่ทำงาน จะทำอย่างไร ?
Check that the vacuum cleaner is plugged in correctly and that the electrical socket is working.
ตรวจสอบปลั๊กเครื่องดูดฝุ่น และกระแสไฟฟ้าที่เต้าเสียบ
What to do when suction performance decreases?
• Turn off the vacuum cleaner and unplug it.
• Check the dual pipe or telescopic pipe, flexible hose and cleaning tool for blockages or obstructions.
• Check that the dust tank is not full. Empty if necessary.
• Check that the exhaust filter is not clogged. Clean the exhaust filter if necessary.
• Check that the air filter is not clogged. Clean the air filter if necessary.
จะทำอย่างไรเมื่อพลังดูดของเครื่องดูดฝุ่นลดลง ?
• ปิดเครื่องดูดฝุ่น และถอดปลั๊กออก
• ตรวจสอบท่อดูด และทำความสะอาด เพื่อขจัดสิ่งอุดตันที่ท่อดูด
• ตรวจสอบถังเก็บฝุ่นว่าฝุ่นเต็มหรือไม่ เทฝุ่นทิ้งถ้าจำเป็น
• ตรวจสอบแผ่นกรองอากาศ (HEPA) ต้องไม่อุดตัน ทำความสะอาดแผ่นกรองถ้าจำเป็น
• ตรวจสอบแผ่นกรองอากาศ ต้องไม่อุดตัน ทำความสะอาดแผ่นกรองถ้าจำเป็น
25
Page 27

Note
บันทึก
26
Page 28

P/No.: MFL62558837
 Loading...