

Page 1

VC391**H*
English
E
У
Page 2
- 2 -
Page 3

- 3 -
Page 4
IMPORTANT SAFETY INSTRUCTIONS
Read and follow all instructions before using your vacuum cleaner to prevent the risk of fire,electric
shock, personal injury,or damage when using the vacuum cleaner.This guide do not cover all possible
conditions that may occur.Always contact your service agent or manufacturer about problems that you do
not understand. This appliance complies with the following ECDirectives :-73/23/EEC,93/68/EEC-Low
Voltage Directive–89/336EEC –EMC Directive.
This is the safety alert symbol.
This symbol alerts you to potential hazards that can kill or hurt you and others.
All safety messages will follow the safety alert symbol and either the word “WARNING” or
“CAUTION.” These words mean:
WARNING
CAUTION
This symbol will alert you to hazards or unsafe practices which could
cause serious bodily harm or death.
This symbol will alert you to hazards or unsafe practices which could cause
bodily injury or property damage.
WARNING
•
Disconnect electrical supply before servicing
or cleaning the unit or when cleaner is not in
use.
Failure to do so could result in electrical shock or
personal injury.
•
Do not use vacuum cleaner to pick up anything
that is burning or smoking such as cigarettes,
or hot ashes.
Doing so could result in death, fire or electrical shock.
•
Do not vacuum flammable or explosive
substances such as gasoline, benzene, thinners,
propane (liquids or gases).
The fumes from these substances can create a fire
hazard or explosion. Doing so could result in death
or personal injury.
Do not handle plug or vacuum cleaner with
•
wet hands.
Doing so could result in death or electrical shock.
• • Do not unplug by pulling on cord.
Doing so could result in product damage or electrical
shock. To unplug, grasp the plug, not the cord.
Keep hair, loose clothing, fingers, and all parts
of the body away from openings and moving
parts.
Failure to do so could result in electrical shock or
personal injury.
•
Do not pull or carry by cord, use cord as a
handle, close a door on cord, or pull cord
around sharp edges or corners. Do not run
vacuum cleaner over cord. Keep cord away
from heated surfaces.
Failure to do so could result in electrical shock
or personal injury or fire or product damage.
•
Do not allow to be used as toy. Close
attention is necessary when used by or
near children.
Personal injury or product damage could result.
•
Do not use the vacuum cleaner if the
power cord or plug is damaged or faulty.
Personal injury or product damage could result.
In these cases, contact LG Electronics Service
Agent to avoid hazard.
•
Do not use vacuum cleaner if it has been
under water.
Personal injury or product damage could result.
In these cases, contact LG Electronics Service
Agent to avoid hazard.
- 4 -
Page 5

WARNING
•
Do not continue to vacuum if any parts
appear missing or damaged.
Personal injury or product damage could result.
In these cases, contact LG Electronics Service
Agent to avoid hazard.
•
Do not use an extension cord with this
vacuum cleaner
Fire hazard or product damage could result.
•
Using proper voltage.
Using improper voltage may result in damage
to the motor and possible injury to the user.
Proper voltage is listed onthe bottom of vacuum
cleaner.
•
Turn off all controls before unplugging.
Failure to do so could result in electrical
shock or personal injury.
•
Do not change the plug in any way.
Failure to do so could result in electrical
shock or personal injury or product damage.
Doing so result in death. If plug does not fit,
contact a qualified electrician to install the
proper outlet.
•
Repairs to electrical appliances may
only be performed by qualified service
engineers.
Improper repairs may lead to serious hazards
for the user.
•
Do not plug in if control knob is not in
OFF position.
Personal injury or product damage could result.
(Depending on model)
•
Keep children away and beware of
obstructions when rewinding the cord
to prevent personal injury.
The cord moves rapidly when rewinding.
(Depending on model)
•
The hose contains electrical wires. Do not
use it if it is damaged, cut or punctured.
Failure to do so could result in death,or electrical
shock. (Depending on model)
- 5 -
Page 6

IMPORTANT SAFETY INSTRUCTIONS
CAUTION
•
Do not put any objects into openings.
Failure to do so could result in product
damage.
•
Do not use with any opening blocked:
keep free of dust, lint, hair, and anything
that may reduce air flow.
Failure to do so could result in product
damage.
•
Do not use vacuum cleaner without
dust tank and/or
Failure to do so could result in product
damage.
•
Do not use vacuum cleaner to pick up
sharp hard objects, small toys, pins,
paper clips, etc.
They may damage the cleaner or dust bin.
•
Store the vacuum cleaner indoors.
Put the vacuum cleaner away after use to
prevent tripping over it.
•
This appliance is not intended for use by
persons (including children) with reduced
physical, sensory or mental capabilities,
or lack of experience and knowledge,
unless they have been given supervision
or instruction concerning use of the
appliance by a person responsible for
their safety.
Children should be supervised to ensure
that they do not play with the appliance.
•
Only use parts produced or
recommended by LG Electronics
Service Agents.
Failure to do so could result in product
damage.
• Use only as described in this manual.
Use only with LG recommended or
approved attachments and accessories.
Failure to do so could result in personal
injury or product damage.
•
To avoid personal injury and to prevent
the machine from falling when cleaning
stairs, always place it at the bottom of
stairs.
Failure to do so could result in personal
injury or product damage.
filters in place.
•
Use accessory nozzles in sofa mode.
Failure to do so could result in product
damage.
•
Make sure the filters (exhaust filter and
motor safety filter) are completely
dry before replacing in the machine.
Failure to do so could result in product damage.
•
Do not dry the filter in an oven or
microwave.
Failure to do so could result in fire hazard.
•
Do not dry the filter in a clothes dryer.
Failure to do so could result in fire hazard.
• Do not dry near an open flame.
Failure to do so could result in fire hazard.
•
Always clean the dust bin after vacuuming
carpet cleaners or fresheners, powders
and fine dust.
These products clog the filters,reduce airflow
and can cause damage to the cleaner.
Failure to clean the dust bin could cause
permanent damage to the cleaner.
(Depending on model)
•
Don ’t grasp the tank handle when you
are moving the vacuum cleaner.
The vacuum cleaner s body may fall when
separating tank and body. Personal injury
or product damage could result. You should
grasp the carrier handle when you
aremoving the vacuum cleaner.
(Depending on model)
•
If after emptying the dust tank the
indicator light is on(red), clean the dust
tank.
Failure to do so could result in product
damage. (Depending on model)
- 6 -
Page 7

IMPORTANT SAFETY INSTRUCTIONS
CAUTION
Thermal protector :
This vacuum cleaner has a special thermostat that protects the vacuum cleaner in case of
motor overheating. If the vacuum cleaner suddenly shuts off, turn off the switch and unplug
the vacuum cleaner. Check the vacuum cleaner for possible source of overheating such as
a full dust tank, a blocked hose or clogged filter. If these conditions are found, fix them and
wait at least 30 minutes before attempting to use the vacuum cleaner. After the 30 minute
period, plug the vacuum cleaner back in and turn on the switch.
- 7 -
Page 8

- 8 -
Page 9

- 9 -
Page 10

- 10 -
Page 11

- 11 -
Page 12

E
- 12 -
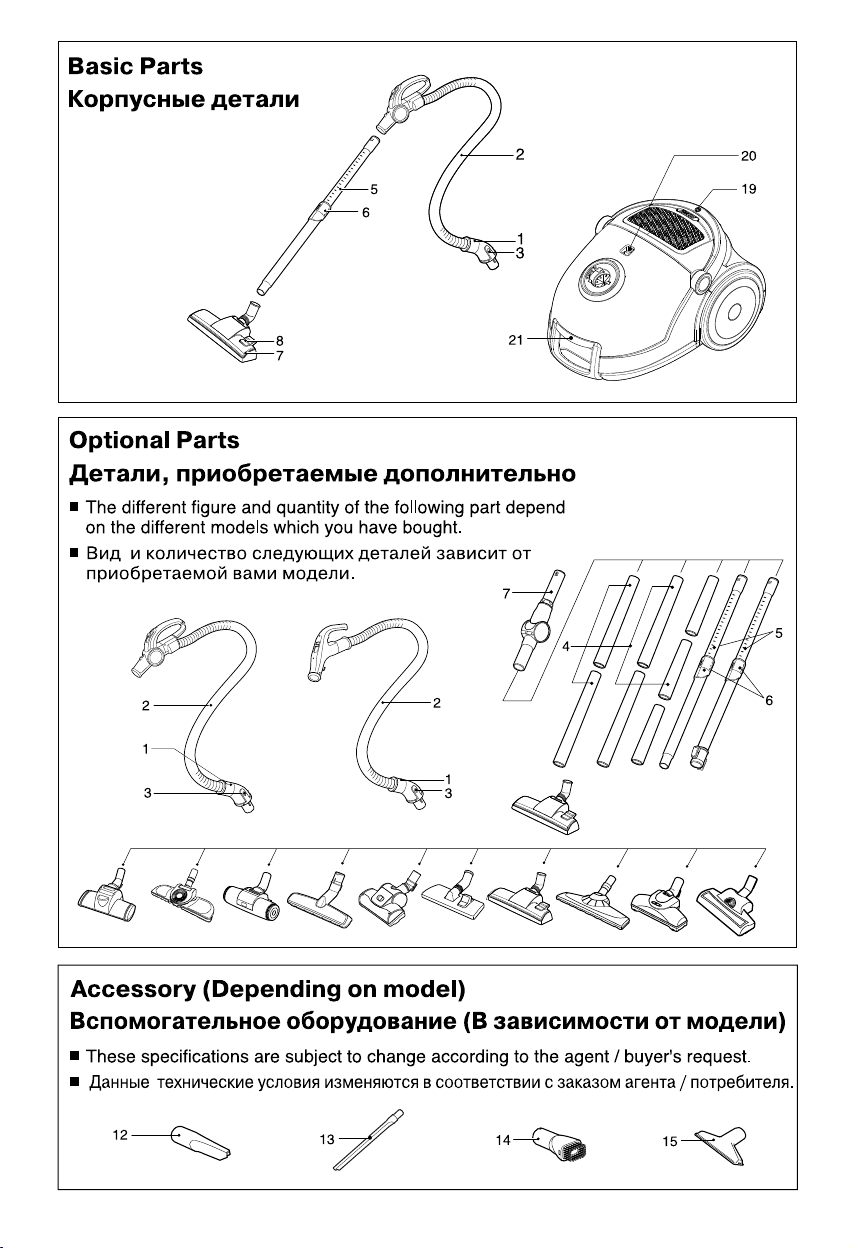
Connecting the flexible hose
Push the end of the head (1) on the flexible
hose (2) into the attachment point on the
vacuum cleaner.
To remove the flexible hose from the vacuum
cleaner, press on the button (3) situated on
the head, then pull upwards.
Assembling the tubes
(depending on model)
• Metal(or Plastic) Pipe (4)
- Fit together the two tubes by twisting
slightly.
• Telescopic tube (5)
- Push spring latch (6) forward.
- Pull out tube to required length.
- Release spring latch to lock.
• Elbow tube (7)
The elbow tube is for uses such as cleaning
under the sofa, table and bed easily.
- Fit the elbow tube onto the end of the
telescopic tube and the grip handle.
- If you pull the latch (8), the elbow tube can
be bent.
- If you stretch the elbow tube, it is returned
to its position.
Using the cleaning head and Accessory
Nozzles (depending on model)
Fit the large cleaning head onto the end of
the tube.
• The 2 position head (9) is equipped with a
pedal (10) which allows you to alter its
position according to the type of floor to be
cleaned.
Hard floor position (tiles, parquet
floors...). Press on the pedal to lower the
brush.
Carpet or rug position. Press on the
pedal to lift the brush up.
• Hard Floor Nozzle (11)
Efficient cleaning of hard floors (wood,
linoleum.etc.)
• Crevice Tool (12)
Flexible Crevice Tool (optional) (13)
For vacuuming in those normally
inaccess-ible places i.e. reaching cobwebs,
or down the side of a sofa!
• Dusting brush (14)
For vacuuming picture frames furniture
outlines, books and other uneven objects.
• Upholstery Nozzle (15)
For vacuuming uphostery, mattresses, etc.
The thread collectors help to pick up the
threads and fluff.
How to plug in and use
Pull out the supply cord to the desired
length and plug into the socket. Tune the
slide knob on the flexible handle from
“OFF” place to the upper place. And then
adjust the power level what you need.
Adjusting the power level
Electronic power control
Slide the knob (16) to desired appropriate
position.
OFF: Power off
Curtain: Lower power
Floor: Full power
Park-System (17)
For short breaks during vacuuming, for
example to move a small piece of furniture
or a rug, use the "Park system" to support
the flexible hose and cleaning head.
Storage (18)
When you have switched off and unplugged
the appliance, press on the button (19) to
automatically rewind the cord.
You can move or store your appliance in a
vertical position by sliding the hook on the
large cleaning head into the clip on the
underside of the appliance.
Changing the dust bag
The dust bag needs changing when the
cleaner is set to maximum power and the
cleaner head is off the floor but the "bag
full" indicator window (20) is completely
coloured red.
Even if the dustbag does not appear to be
full at this stage, it should be changed. It
could be that a great deal of very fine dust
has clogged up the pores of the dust bag.
• Turn off the appliance and unplug it.
• Open the cover by pressing the hook (21)
and lifting it up until it snaps into place.
Your appliance is equipped with either a
paper dust bag (22) or a fabric dust bag
(23) (depending on model).
• Take hold of the dust bag by the handle
and pull.Remove the bag and throw it
away.
• To refit a new bag push the cardboard
support of a new bag into the bag mount
(24) until it will go no further.
• Before you replace the full dust bag, you
should hold the bag mount and lift it after
opening the filter cover (25).
How to Use
Page 13

- 13 -
E
If your appliance is fitted with a fabric
dust bag follow the same instructions as
above. Empty it and reuse it (23). Do not
wash it.
Note: as the appliance is fitted with a safety
device which checks that the bag is in place
you cannot close the lid if the bag is not
fitted correctly.
Cleaning the motor filter
The motor filter is situated inside the
appliance between the dust bag and the
motor. Each time that you change the air
outlet filter we advise you to remove the
motor filter (26) and to clean it by tapping to
remover the dirt and then replacing it in the
vacuum cleaner.
Changing the air outlet filter
• To change the filter or wash the HEPA
filter(28), push the HEPA locker (27), then
remove the washable HEPA filter (28)
from the HEPA frame (29) and clean it.
• Clean the washable HEPA filter with water
at least once a year.
• The washable HEPA filter should be
cleaned with cold and running water at
least once a year.
- Do not use the brush.
- Allow HEPA filter to dry in a shaded
place for a day.
Mini turbine nozzle (optional) (30)
• Mini turbine is used for stairs and other
hard to reach places.
• To clean the mini turbine nozzle, remove
the nozzle cover: (34)
Remove 2 screws on the bottom and take
mini turbine nozzle cover off as shown.
• Frequently clean and remove hair, string,
and lint build-up in the brush area. Failure
to do so could damage to mini turbine
nozzle.
Please do not hold the hose when we lift
the main body off the floor (31).
Please never close the filter cover like (32),
to avoid nipping your hand.
Please check that the inlet of damper (33)
is not jammed by dust and pet hair.
Check that the appliance is correctly
plugged in and that the electrical socket is
working.
• Stop the appliance and unplug it.
• Check that the tubes, flexible hose and
cleaning tool are not blocked.
• Check that the dust bag is not full.Replace
if necessary.
What to do if your appliance
does not work?
WARNING
What to do when the suction
performance reduces?
Page 14

У
- 14 -
Присоединение гибкого шланга
Вдавите наконечник (1) на гибком шланге (2)
в крепление на пылесосе.
Для отсоединения гибкого шланга от
пылесоса нажмите на кнопку (3), находящуюся
на наконечнике, а затем потяните вверх.
Сборка труб (в зависимости от модели)
• Металлическая (или пластиковая) труба (4)
- Соедините две трубки, осторожно
поворачивая.
• Телескопическая труба (5)
- Надавите на пружинную защелку (6);
- Вытяните трубу на нужную длину;
- Отпустите пружинную защелку для
фиксации.
• Кривая труба (7)
Кривая труба применяется для лёгкой
отчистки места под диваном, столом и
кроватью.
- Установить кривую трубу на наконечнике и
захвате компенсаторной трубы.
- Тянуть ригель (8), и кривая труба
сгибается.
- Развертывать кривую трубу, и его
нормальная позиция восстанавливается.
Использование чистящих насадок и
сопел (в зависимости от модели)
Наденьте большую чистящую насадку на
конец трубы.
• Насадка с двумя положениями (9)
оснащена педальным переключателем (10),
который позволяет менять положение в
зависимости от типа очищаемой
поверхности.
Положение для чистки жесткого
покрытия (кафель, паркета и т.п.). Нажать
педаль для того, чтобы опустить щётку.
• Положение для чистки ковра или
половика. Нажать педаль для того, чтобы
поднять щётку.
• Насадка для жесткого покрытия (11)
Эффективная чистка для жесткого покрытия
(деревянный пол, линолеумный пол и т. п.).
• Щелевая насадка (12)
гибкое приспособление для трещины
(заказное) (13) Для чистки
труднодоступных мест, например, для
удаления паутины или очистки плинтусов.
• Щетку для удаления (14)
Для чистки картинных рам, элементов
мебели, книг или других неровных
предметов.
• Насадка для чистки обивки (15)
Для чистки обивки, матрасов и т. п.
Сборник ниток помогает удалять нитки
и пух.
Как включать пылесос в сеть и
использовать его
Вытащить шнур питания на нужную длину и
воткнуть штеккер в розетку.
Наладить рулёжную кнопку на гибкой ручке с
“OFF” на верхнюю позицию. Потом
регулировать энергию до нужного уровня.
Регулирование уровня мощности
Кнопка управления источником
Скользить кнопку (16) в подходящее место.
OFF: Отключиться
Curtain: низкая энергия
Floor: полная энергия
Система паузы (17)
Для минутной паузы в процессе чистки,
например, передвижения малой мебели или
малого куска ковра, можно использовать
«систему паузы» для поддержания гибкого
шланга и насадки отчистки.
Хранение (18)
После того, как Вы выключили пылесос и
вынули вилку из розетки, нажать кнопку (19)
для автоматического сматывания шнура.
Вы можете перемещать или хранить пылесос
в вертикальном положении, скользнув
крючок в нижней стороне аппарата.
Замена мешка для сбора пыли
Необходимо произвести замену мешка для
сбора пыли, когда пылесос работает на
полной мощности и чистящая насадка
приподнята над полом, а окошко индикатора
наполнения мешка (20) полностью
становится красным.
Даже если мешок не выглядит полным на
данной стадии, его всё равно необходимо
заменить, а то большое количество очень
мелкой пыли забьёт поры мешка для сбора
пыли.
• Выключите пылесос и выньте вилку из
розетки.
• Откройте крышку, нажав на крючок (21) и
поднимая его, пока он не защелкнется.
Ваш пылесос оснащен либо бумажным (22),
либо матерчатым (23) мешком для сбора
пыли (в зависимости от модели).
• Взять за ручку мешка и потянуть его.
Извлечь мешок и выбросить его в мусор.
Как использовать?
Page 15

У
- 15 -
• Для установки нового мешка вставлять его
картонное основание в держатель (24) до тех
пор, пока он не остановится.
• Прежде снятия полной пылевой сумки, держайте
упор сумки и снимайте ее после открытия
фильтрующего чехла.(25)
Если на вышей машине установлена ткацкая
пылевая сумка, то соблюдайте одинаковый
мотод по предыдущем. Опорожните его и
установите на место (23).
Примечание: поскольку пылесос оборудован
защитным приспособлением, которое проверяет,
установлен ли мешок для сбора пыли, Вы не
сможете закрыть крышку, если мешок не
установлен правильно.
Чистка моторного фильтра
Моторный фильтр находится между мешком для
сбора пыли и мотором. Каждый раз, когда Вы
сменяете воздушный фильтр, рекомендуется
извлекать моторный фильтр (26) и чистить его,
постучав по нему для удаления грязи, а затем
снова установить его в пылесос.
Сменить дренажный фильтр
• Для того, чтобы сменить или очистить
дренажный фильтр HEPA (High Efficiency
Particulate Air filter, высокоэффективный
мелкозернистый воздушный фильтр) (28),
нажать замок фильтра HEPA (27), потом снять
фильтр HEPA (28) с рамы HEPA (29), потом
очистить его.
• Очищение водой фильтра HEPA провести не
менее 1 раза в год.
• Используя проточную холодную воду, очистить
очищаемый фильтр НЕРА, по крайней мере,
один раз в год.
- Нельзя использовать щётку.
- Положить фильтр НЕРА в прохладное место на
день для его сушки.
Насадка с мини-туpбиной (опция) (30)
• Мини-туpбо насадка используется для чистки
лестниц и дpугих тpуднодоступных мест.
• Чтобы вычистить мини-туpбо насадку (34),
снимите кожух насадки. Вывеpните 2 винта на
днище и снимите кожух насадки с
мини-туpбиной, как показано на pисунке.
• Чаще чистите и удал яйте волосы, нити и пух,
скапливающиеся в области щетки.
Несоблюдение этого указания может пpивести к
повpеждению насадки с мини-туpбиной.
Нельзя держать шланг когда вы поднимаете
машину с пола.(31)
Никогда не закрывайте чехол фильтра как
показан в схеме (32), а то ваши руки будут
ущипнуты.
Контролируйте вход дросселя (33), чтобы
там не были забиты тылем и волосами
дамошних животных.
проверьте правильность подключения
пылесоса в сеть и рабочее состояние
розетки.
• Выключите пылесос и выньте вилку из
розетки.
• Убедитесь, что трубы, гибкий шланг и
чистящие насадки не заблокированы.
• Убедитесь, что мешок для сбора пыли не
заполнен. Замените его, если
необходимо.
Что делать, если ваш
пылесос не pаботает?
ОСТОРОЖНО
Что делать, когда снижается
мощность всасывания?
Page 16

http://www.lg.ru
Disposal of your old appliance
1. When this crossed-out wheeled bin symbol is attached to a product it
means the product is covered by the European Directive 2002/96/EC.
2. All electrical and electronic products should be disposed of separately from
the municipal waste stream via designated collection facilities appointed by
the government or the local authorities.
3. The correct disposal of your old appliance will help prevent potential
negative consequences for the environment and human health.
4. For more detailed information about disposal of your old appliance, please
contact your city office, waste disposal service or the shop where you
purchased the product.
Утилизация старого оборудования
1. Символ на устройстве, изображающий перечеркнутое мусорное
ведро на колесах означает, что на изделие распространяется
Директива 2002/96/EC.
2. Электрические и электронные устройства должны утилизовываться
не вместе с бытовым мусором, а через специальные места,
указанные правительственными или местными органами власти.
3. Правильная утилизация старого оборудования поможет
предотвратить потенциально вредное воздействие на окружающую
среду и здоровье человека.
4. Для получения более подробных сведений о старом оборудовании
обратитесь в администрацию города, службу, занимающуюся
утилизацией или в магазин, где был приобретен продукт.
P/No.:MFL58829708
 Loading...