


LG V-C3850RD, V-C3850NT, V-C3850RT, V-C3850RDV, V-C3850RTV Service Manual
...
VACUUM CLEANER
M
K
SERVICE MANUAL
CAUTION
BEFORE SERVICING THE UNIT, READ THE "SAFETY PRECAUTIONS"
IN THIS MANUAL.
MODEL :
V-C3850ND/NT/NDV/NTV/RD/RT/RDV/RTV
V-C3852ND/NT/NDV/NTV/RD/RT/RDV/RTV
V-C3854RTV
V-C3860RD/RT/RDV/RTV

CONTENTS
SAFETY PRECAUTIONS..............................................................................................................3
SERVICING PRECAUTIONS........................................................................................................ 4
SPECIFICATIONS......................................................................................................................... 4
FEATURES.................................................................................................................................... 4
DESCRIPTION.............................................................................................................................. 5
CONTROL PANEL ........................................................................................................................ 5
VACUUM POWER ADJUSTMENT................................................................................................ 5
DISASSEMBLY INSTRUCTIONS.............................................................................................. 6~7
TROUBLESHOOTING GUIDE................................................................................................ 8~10
BLOCK DIAGRAM ................................................................................................................ 11~12
SCHEMATIC DIAGRAM........................................................................................................ 11~12
PRINTED CIRCUIT BOARD................................................................................................. 11~12
EXPLODED VIEW ............................................................................................................... 13~16
REPLACEMENT PARTS LIST .............................................................................................. 17~18
APPENDIX............................................................................................................................ 19~21
1. THE TYPE OF POWER PLUG AND PART NUMBER............................................................................... 19
2. COLOR & PARTS NUMBER...................................................................................................................... 20
3. MOTOR & P.W.B ASS’Y & CORD REEL ASS’Y PARTS NUMBER........................................................... 21
-2-

SAFETY PRECAUTIONS
BEFORE OPERATING THIS VACUUM CLEANER, READ THIS SERVICE MANUAL THOROUGHLY,
AND OBSERVE EACH POINT CAREFULLY.
1. Change the paper bag or clean the cloth
bag in case the indicator moves toward red.
1) If the dust bag is full, intake power will be reduced.
2) When the dust bag is full of dust, pull out the dust
bag from the inside of body base.
2. Filter
1) The filter is composed of a clean filter, an exhaust filter and a paper bag or a cloth bag.
2) Never use the vacuum cleaner without filters.
It may harm to the motor.
3) When the cloth bag, the clean filter and the exhaust
filter are soiled, wash the filter with neutral cleanser.
Note : Re-use of the cloth bag, clean filter and exhaust
filter.
• Never wash the filter in a washing machine or in a
dishwasher.
• Never use hot water for washing the filter.
• Re-use the filter after drying it completely in the shade.
• Do not dry near fire or direct sun ray.
3. Dust indicator
Dust indicator shows you red color when the filter is full
of dust.
Then, change the paper bag with new one or clean the
cloth bag.
5. Attachments
• Nozzle : For cleaning wooden floor, the room floor and
carpet.
• Crevice Tool: for cleaning any crevice, inside corners
of window frames.
However, do not use the crevice tool more than 20 minutes because it may cause harm to the motor.
6. Close supervision is necessary when this
vacuum cleaner is used by or near children.
Children's carelessness may cause damage
to the cleaner or injure persons.
7. Air exhausted from the vacuum cleaner is
normally warm. But if extraordinarily hot air
is exhausted, check if the telescopic tube,
hose or dust bag is clogged or not.
8. Electric shock could occur if used outdoors
or on wet surfaces.
4. Avoid suction such materials as:
1) Liquid or wet dust:
Clogging the ventilation holes, reduces the intake
power significantly and harms the motor.
2) Inflammable liquids such as benzene, alcohol or solvents.
3) Burning objects such as cigarette butts.
4) Bulky objects such as vinyl, paper etc.
5) Sharp objects such as needles, pins, metal or glass
particles etc.
-3-
SERVICING PRECAUTIONS
BEFORE ATTEMPTING TO SERVICE OR ADJUST ANY PART OF THE VACUUM CLEANER, DISCONNECT THE ELECTRICAL POWER SUPPLY CORD FROM THE WALL OUTLET.
1. Motor exchange
1) Separate the Body Cover and Body Base by unfastening
the screws.
2) Disconnect the lead wires.
3) Lift the old motor and replace it with a new one.
2. In case of exchanging other parts, refer to the
exploded view.
SPECIFICATIONS
• MODEL : REFER TO THE COVER PAGE
• POWER SOURCE : ON RATING PLATE
• POWER CONSUMPTION : ON RATING PLATE
• POWER CONTROL :
- MAIN : ROTARY ON BODY
(V-C3850RD/RT/RDV/RTV)
(V-C3854RTV)
(V-C3860RD/RT/RDV/RTV)
ON/OFF ON BODY
(
V-C3850ND/NT/NDV/NTV
(V-C3852ND/NT/NDV/NTV)
-SUB : VACUUM POWER ADJUSTMENT BY
SLIDE KNOB
• CAPACITY : 3.3
• CORD LENGTH : 7 m
• HOSE LENGTH : 1.5 m / 1.8 m
• NET WEIGHT : 4.1 kg
• PACKING WEIGHT : 7.0 kg
• NET DIMENSION : 400 280 220 (L W H)mm
• PACKING DIMENSION : 495 330 290 (L W H)mm
• This specifications are subject to change according to the buyer's request.
L
(with steel pipe)
565 330 290 (L W H)mm
(with telescopic pipe)
)
• ATTACHMENTS
HOSE ......................................................................... 1EA
STEEL PIPE ASS’Y.................................................... 2EA
TELESCOPIC PIPE ASS’Y........................................ 1EA
PLASTIC PIPE .......................................................... 2EA
NOZZLE ASS’Y...........................................................1EA
CREVICE TOOL (ON BOARD).................................. 1EA
DUST BRUSH (ON BOARD).......................................1EA
CLOTH BAG ASS’Y (OPTION)...................................1EA
EXTRA PAPER BAG ASS’Y (PAPER, OPTION)........1EA
UPHOLSTERY NOZZLE(OPTION).............................1EA
QUILT, NOZZLE ASM(OPTION).................................1EA
FEATURES
THIS VACUUM CLEANER IS THE MOST MODERN STYLE GOODS, SUITABLE FOR HOUSEHOLD USE
AND IT RUNS AFTER A NEW VARIATION IN ORDER TO MEET MODERN LIFE SENSE BY IMPROVING THE
DESIGN, THE STRUCTURE AND THE POWER.
1. Strong Suction Power
This vacuum cleaner has a strong suction power because
it utilizes a highly efficient and powerful motor.
2. Automatic Cord Winding Mechanism
It is very convenient becasue it winds the cord
automatically after operating the unit.
3. Vacuum Power Adjustment
It is very convenient because vacuum power varies with
cleaning work by rotating the control button.
4. Convenient Push Button Switch
Using the switch located in the main body, this vacuum
cleaner can be operated easily.
5. Excellent Running
Running is execllent by adopting large wheel.(˘ 150)
6. Miscellaneous
1) The dust indicator shows you red color when to
exchange the filter bag or to clean the cloth bag.
2) The washable cloth bag can be used for a long time.
-4-

CONTROL LOCATION
Telescopic Tube
Handle &
Cord Reel Button
Metal or Plastic
Tube
Nozzle
Pedal
Pedal
Nozzle
Suction Hole
Flexible Hose Ass’y
Hose Head
Hose Button
Dust Indicator
Control Button
(ON/OFF)
(Rotary)
Power Cord
Body Cover
Wheel
Filter Cover
Cover Latch
ATTACHMENTS
Filter Bag
(Option)
Crevice Tool
(On Board)
Dusting Brush
(On Board)
Upholstery Nozzle
(Option)
Cloth Bag
(Option)
Quilt Nozzle Ass’y
(Option)
Control Button
Flexible Hose Ass’y
CONTROL PANEL
To allow precise regulation of the suction power of the
vacuum cleaner or to suit the type of cleaning work being
undertaken, simply rotate the control button, or push
“Control Button”
VACUUM POWER ADJUSTMENT
When you want to control the vacuum power for
curtains and clothes, slide the slide knob on the
handle.
-5-
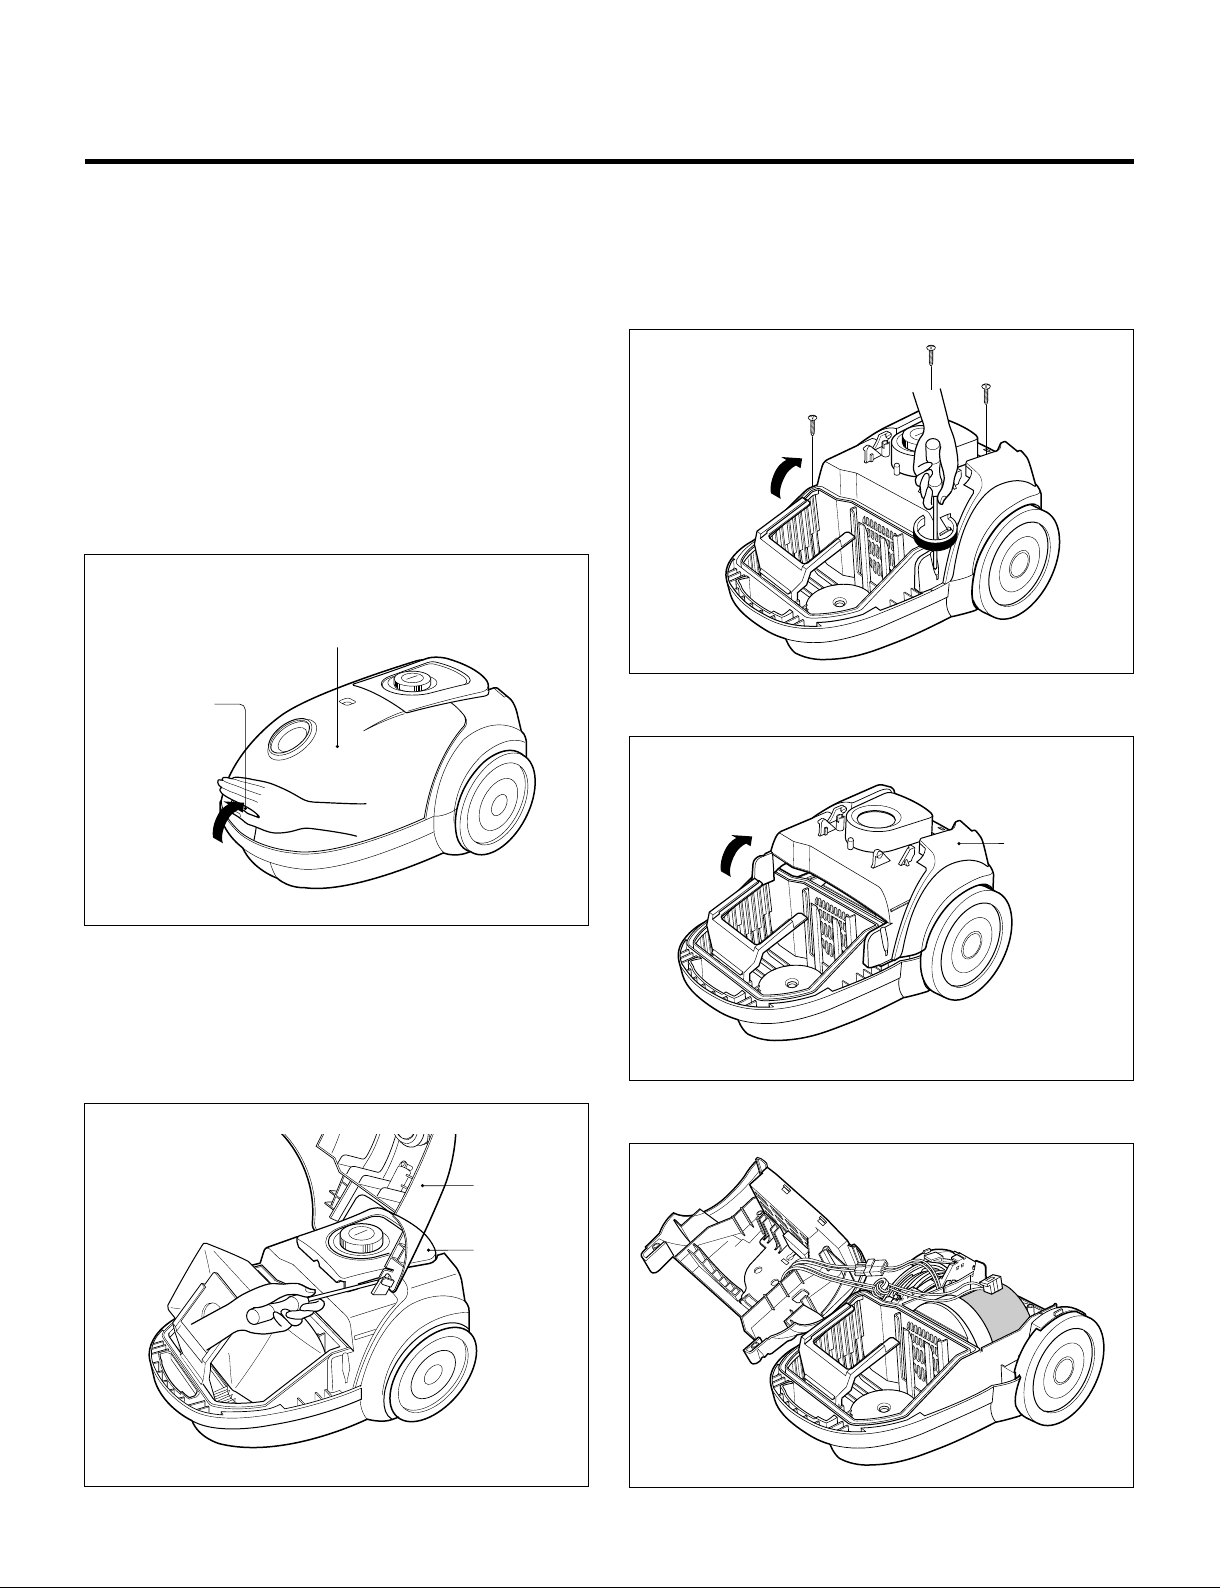
DISASSEMBLY INSTRUCTIONS
Filter Cover
Cover Latch
Filter Cover
Handle
Body Cover
NOTE: Before attempting to service or adjust any part of the vacuum cleaner, disconnect the electrical power supply cord
from the wall outlet.
•
Almost all of the parts of this vacuum cleaner can be
disassembled with a screw driver and each connecting
component easily fits each other.
Disassemble one by one referring to the exploded view.
•
If possible, don't disassemble except for the necessary
parts. It is not necessary to disassemble the parts that
are not detailed in the exploded view.
1. Filter Cover Assembly Replacement
1) Open filter cover by pushing cover latch.
2. Body Cover Assembly Replacement
1) Remove the four screws fastening the body base.
2) First, lift the filter cover
- Push the hinge side by inserting flat screw driver in gap
between hinge and handle.
Then the “Handle” will be detached.
- As same method, detach the filter cover.
2) Lift body cover in the direction of the arrow.
3) Strip off the lead wires from the motor & cord reel.
-6-
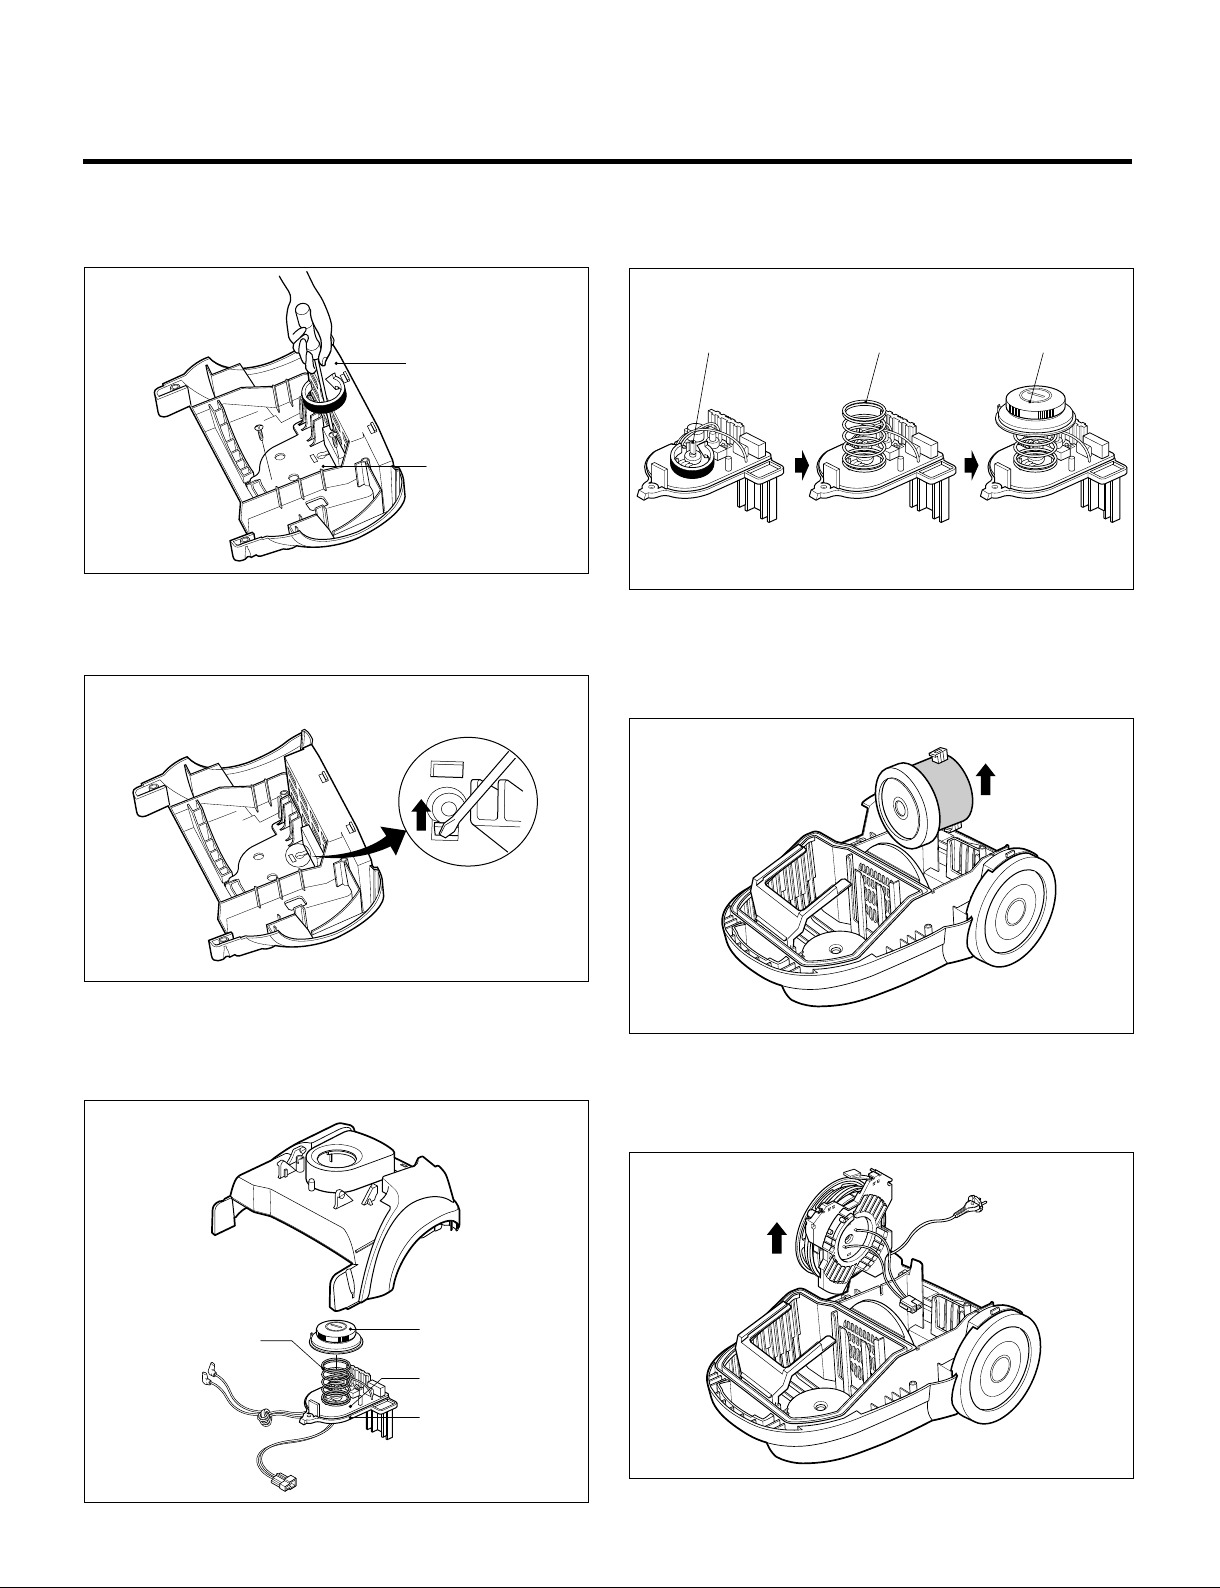
Body Cover
Support Board
Button Spring Control ButtonSwitch
Control Button
Button Spring
Support Board
PWB Assembly
3. P.W.B Assembly Replacement
1) Remove a screw fastening “Support Board” on body cover
4) When reassembling, assemble control button after rotating
the switch of P.W.B assembly in the direction of the arrow.
2) Push the flat driver in the direction of arrow.
3) Detatch P.W.B assembly, control button, button spring and
support board from body cover.
4. Motor Assembly Replacement.
• Lift the motor assembly in the direction of the arrow after
stripping off the lead wires.
5. Cord Reel Assembly Replacement
• Lift the cord reel assembly from the body base in the
direction of the arrow.
-7-
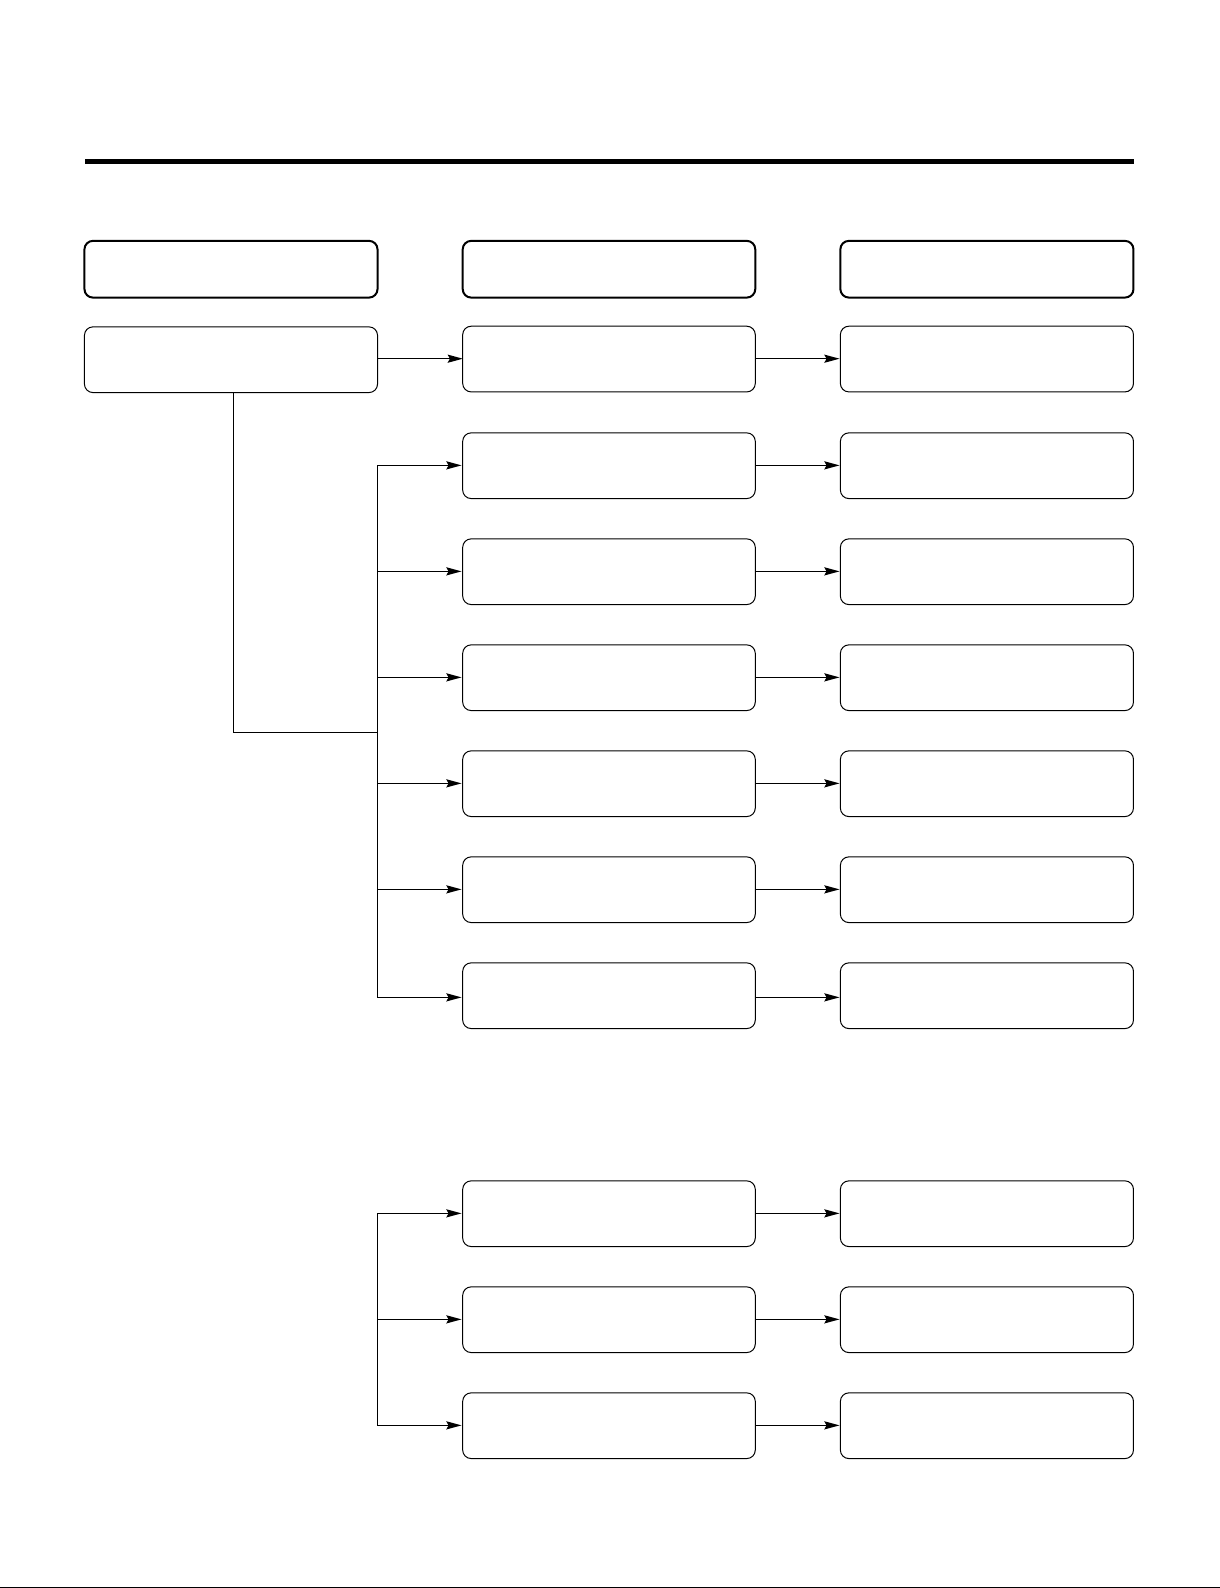
SOLUTIONCAUSE
Check the power source
CHECKING
Poor plug insertion
Power cord cut
Interior lead wire cut
Motor(stator armature) coil cut
or damaged
Poor contact carbon brush
defaced
Motor armature cut
Ball bearing defacement
Impeller hindrance
(Caused by foreign matters)
Insert again
The fuse is melt down
in the coverknife switch
Exchange the fuse
Repair or exchange
Exchange the lead wire
Exchange the motor
Exchange or repair
Poor switch contact point Exchange the switch
Exchange the motor
Exchange the motor
Remove the foreign matters
Normal
Abnormal
TROUBLE SHOOTING GUIDE
1. SWITCH ON BUT MOTOR DOSE NOT RUN.
2. SWITCH ON, MOTOR DOES NOT RUN BUT BUZZES.
-8-
 Loading...