

Page 1

M
K
VACUUM
ASPIRATEUR
STOFZUIGER
STAUBSAUGER
V-2620DE
E
English
F
Francais
N
Nederlands
D
Deutsch
CLEANER
M
K
Page 2
E
Important
For
your
safety
Read
this
Useris
for
the
first
?
The
vacuum
?
The
vacuum
?
Never
paper
Take
When
thrash the
Bring
recycling
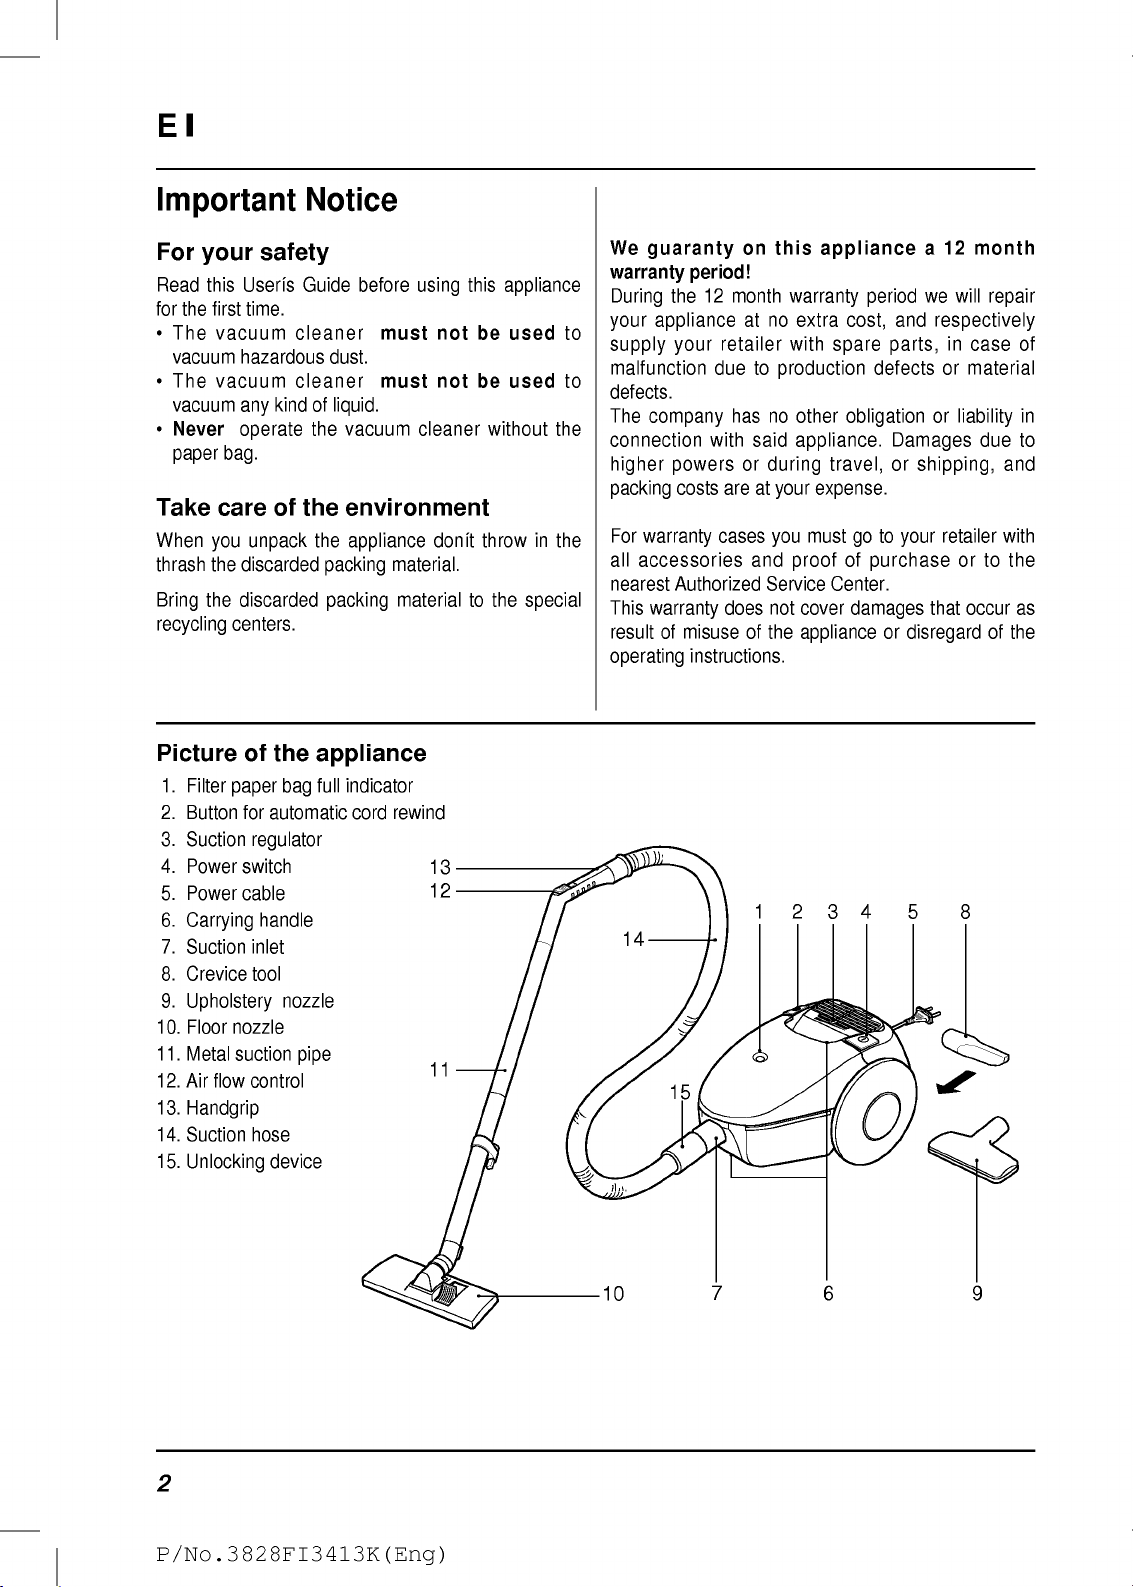
Picture
1.
2.
3.
4.
5.
6.
7.
8.
9.
10.
11.
12.
13.
14.
15.
time.
vacuum
hazardous
vacuum
any
operate
bag.
care
you
unpack
discarded
the
discarded
centers.
of
Filter
paper
Button
for
Suction
Power
Power
Carrying
Suction
Crevice
regulator
switch
cable
handle
inlet
tool
Upholstery
Floor
nozzle
Metal
suction
Air
flow
control
Handgrip
Suction
hose
Unlocking
kind
of
the
automatic
device
Notice
Guide
cleaner
dust.
cleaner
of
liquid.
the
the
the
packing
packing
appliance
full
bag
nozzle
pipe
before
using
must
must
vacuum
cleaner
environment
appliance
material.
materialtothe
indicator
cord rewind
not
not
donit
13
12
11
this
appliance
be
used
be
used
without
throwinthe
special
We
guaranty
warranty
During
your
to
to
the
appliance
supply
malfunction
defects.
The
company
connection
higher
packing
For
warranty
all
accessories
nearest
This
warranty
resultofmisuseofthe
operating
14
on
period!
the12month
atnoextra
retailer
your
due
has
with
said
powers
costs
Authorized
15
or
are
cases
and
does
instructions.
this
appliance
warranty
period
cost,
with
spare
to
production
no
other
defects
obligationorliability
appliance.
your
you
travel,
expense.
must
gotoyour
during
at
proofofpurchase
Service
not
cover
Center.
damages
applianceordisregard
123458
a
we
and
respectively
parts,
Damages
or
shipping,
that
12
month
will
in
case
or
material
due
retailer
or
to
occur as
repair
of
in
to
and
with
the
of
the
2
P/No.3828FI3413K(Eng)
10
7
96
Page 3
E
1.
Operation
1.1
Connect
power
?
The
power
?
Pull
the
cord
marking.
?
the
Plug
1.2
?
Insert
the
engaged.
?
Insert
the
?
According
suction
nozzle
(9).
?
The
the
from
1.3
?
Turnonthe
?
Make
(see
cordinthe
Install
the
appliance.
the
suction
tubeorsuction
(10)
crevice
vacuum
there.
Operation
sure
point
outlet
cord
(5)
out,
the
suction
metal
suction
hose
to
your
or
crevice
tool
cleaner
appliance
a
filter
4.1)
the
appliance
isinthe
however
power
accessories
hose
(14)
Make
sure
pipe
(13).
need
you
hose
tool
is
incorporated
and
can
of
the
with
paper
bag
to
the
automatic
not
outlet.
in
(11)
can
cord
further
than
suction
the
hose
on
the
attachtothe
inlet
handgrip
handgrip,
(8)orupholstery
on
the
backside
be
simply
appliance
the
is
switch
power
installedatall
rewind.
the
is
the
taken
(4).
red
of
(7)
firmly
of
metal
floor
nozzle
of
out
times
2.
Use
2.1
Working
Floor
nozzle
With
the
floor
floors.
Crevice
Mit
Ritzen
With
corners
der
Fugenduse
aussaugen.
the
tool
and
Upholstery
To
vacuum
2.2
Suction
?
You
can
by
sliding
required
2.3
Filter
?
As
long
GREEN,
?
The
filter
filter
paper
2.4
Air
?
You
can
power
by
with
(10)
nozzle
(8)
crevice
tool
cracks.
nozzle
upholstery,
regulator
regulate
the
step-less
position.
full
indicator
as
the
filter
neednit
you
paper
bag
full
bag
flow
control
regulate,
opening
you
konnen
you
(9)
mattresses
the
suction
replace
must
indicator
on
the
air
the
can
can
power
paper
(12)
short
flow
accessories
vacuum
Sie
Fugen,
vacuum
etc.
(3)
of
power
slider
(1)
full
bag
the
filter
be
replaced,
RED
is
notice,
control.
carpets
Ecken und
the
(3)
indicator
paper
(see
the
and
crevices,
aspirator
onto
the
bag.
when
the
point
4.1)
suction
is
:
Air
Hint
achieve
3.
Appliance
?
Turn
off
?
Unplug
the
foot
The
cord
appliance.
?
.
Store
the
of
the
appliance.
flow
control
must
the
maximum
storage
the
appliance
the
cord
operated
is
automatically
crevice
P/No.3828FI3413K(Eng)
with
from
the
switchtorewind
in
tool
(8)
the
be
closedinorder
suction
the
power
outlet
power
wound
housing
power.
switch
the
away
on
and
the
(4).
cord
into
backside
to
push
(2).
the
3
Page 4
E
4.
?
Clean
filter
?
Clean
around
Hint
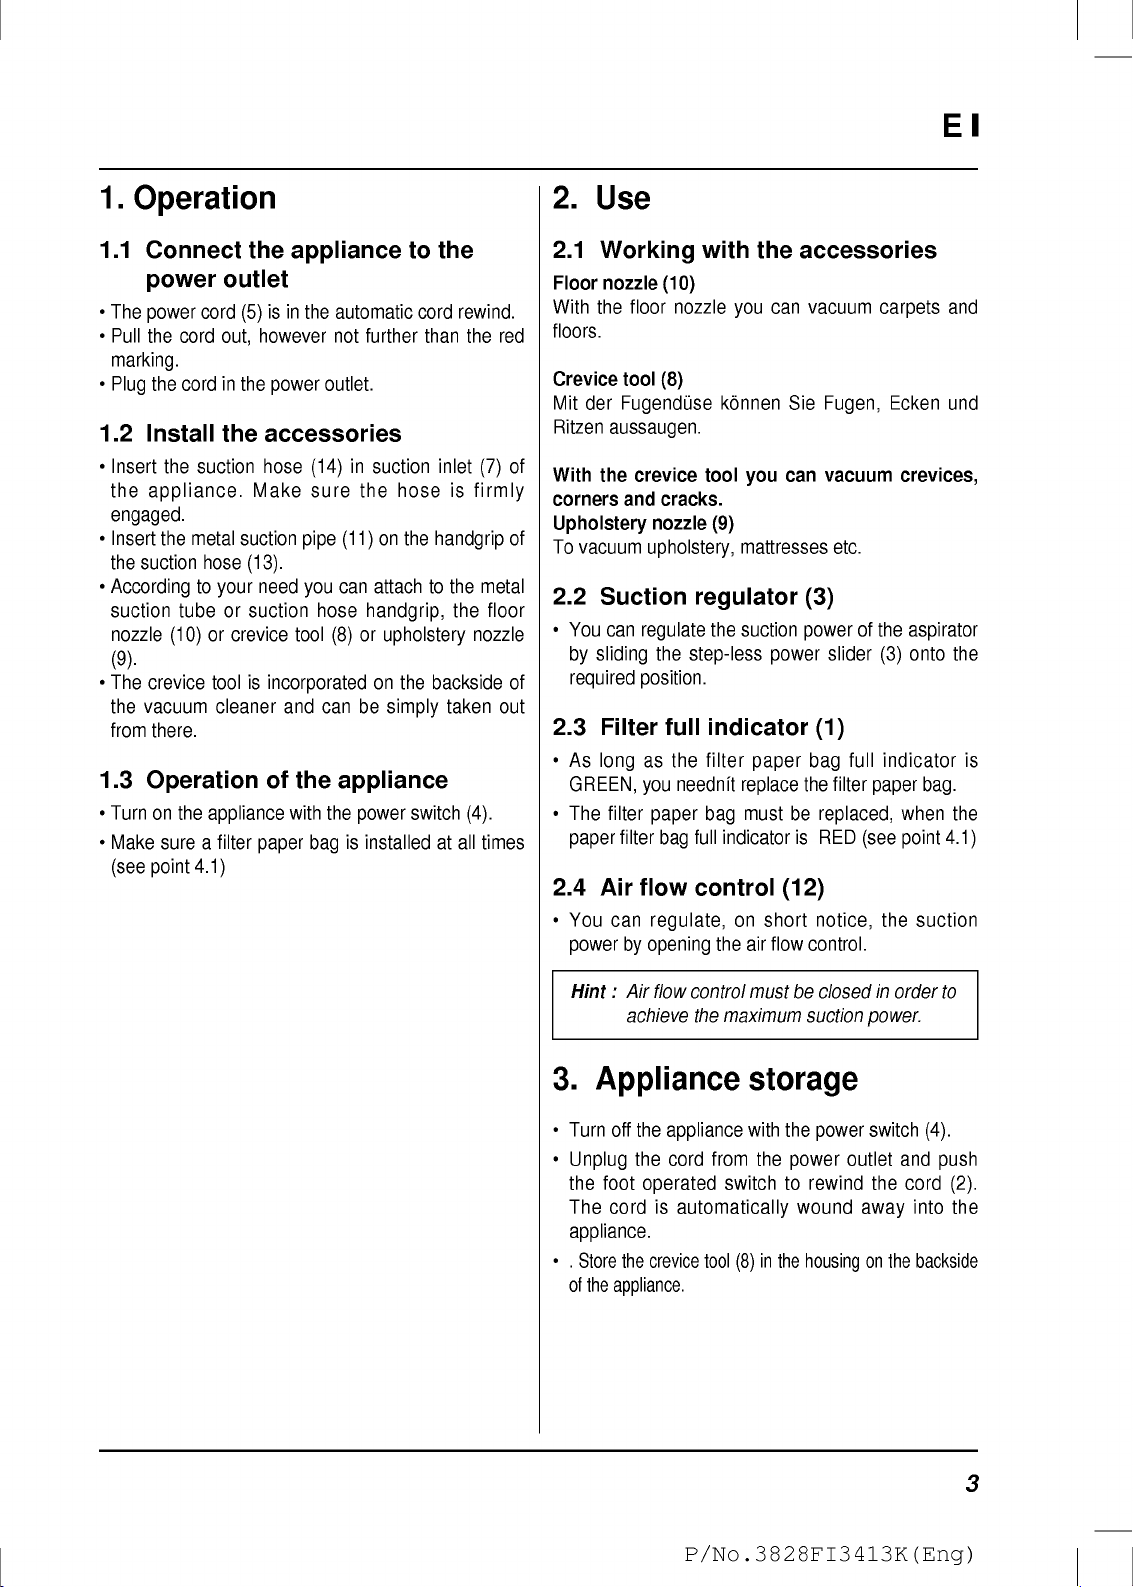
4.1
?
Open
suction
?
Pull
and
Service
The
from
work.
the
appliance
compartment
also
the
the
cover
:
TB-42
Y
201
filter
substitutes.
Filter
the
hose.
the
pull
bag
compartment
lever
away
and
appliance
the
rubber
Maintenance
must
mains
for
regularly
with
a
damp
packing
be
servicing
after
cloth.
of
the
opening
(fromLGElectronics)
are
(from
Swirl)
availableasdust
substitution
cover,
forwardinthe
backwards
by
directionofthe
the
full
paper
disconnected
and
repair
use.
Wipe
compartment
or
pulling
bag.
up
arrow
the
the
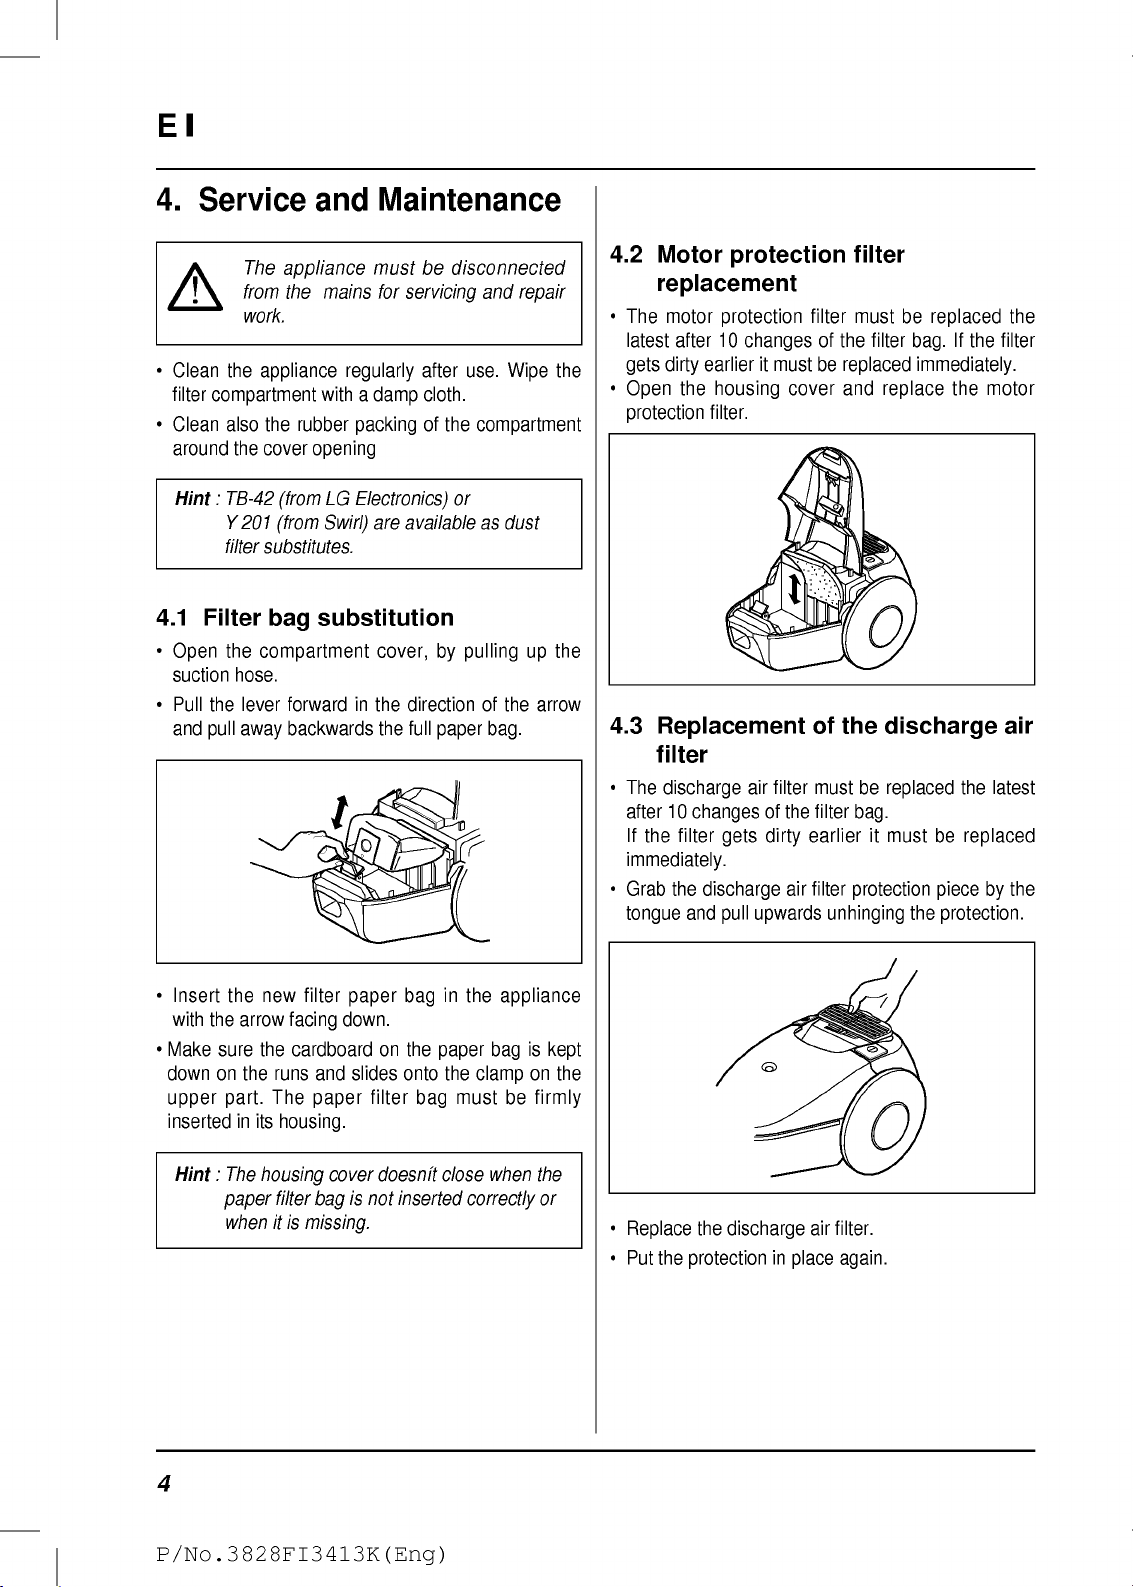
4.2
Motor
replacement
?
The
motor
latest
after
gets
dirty
?
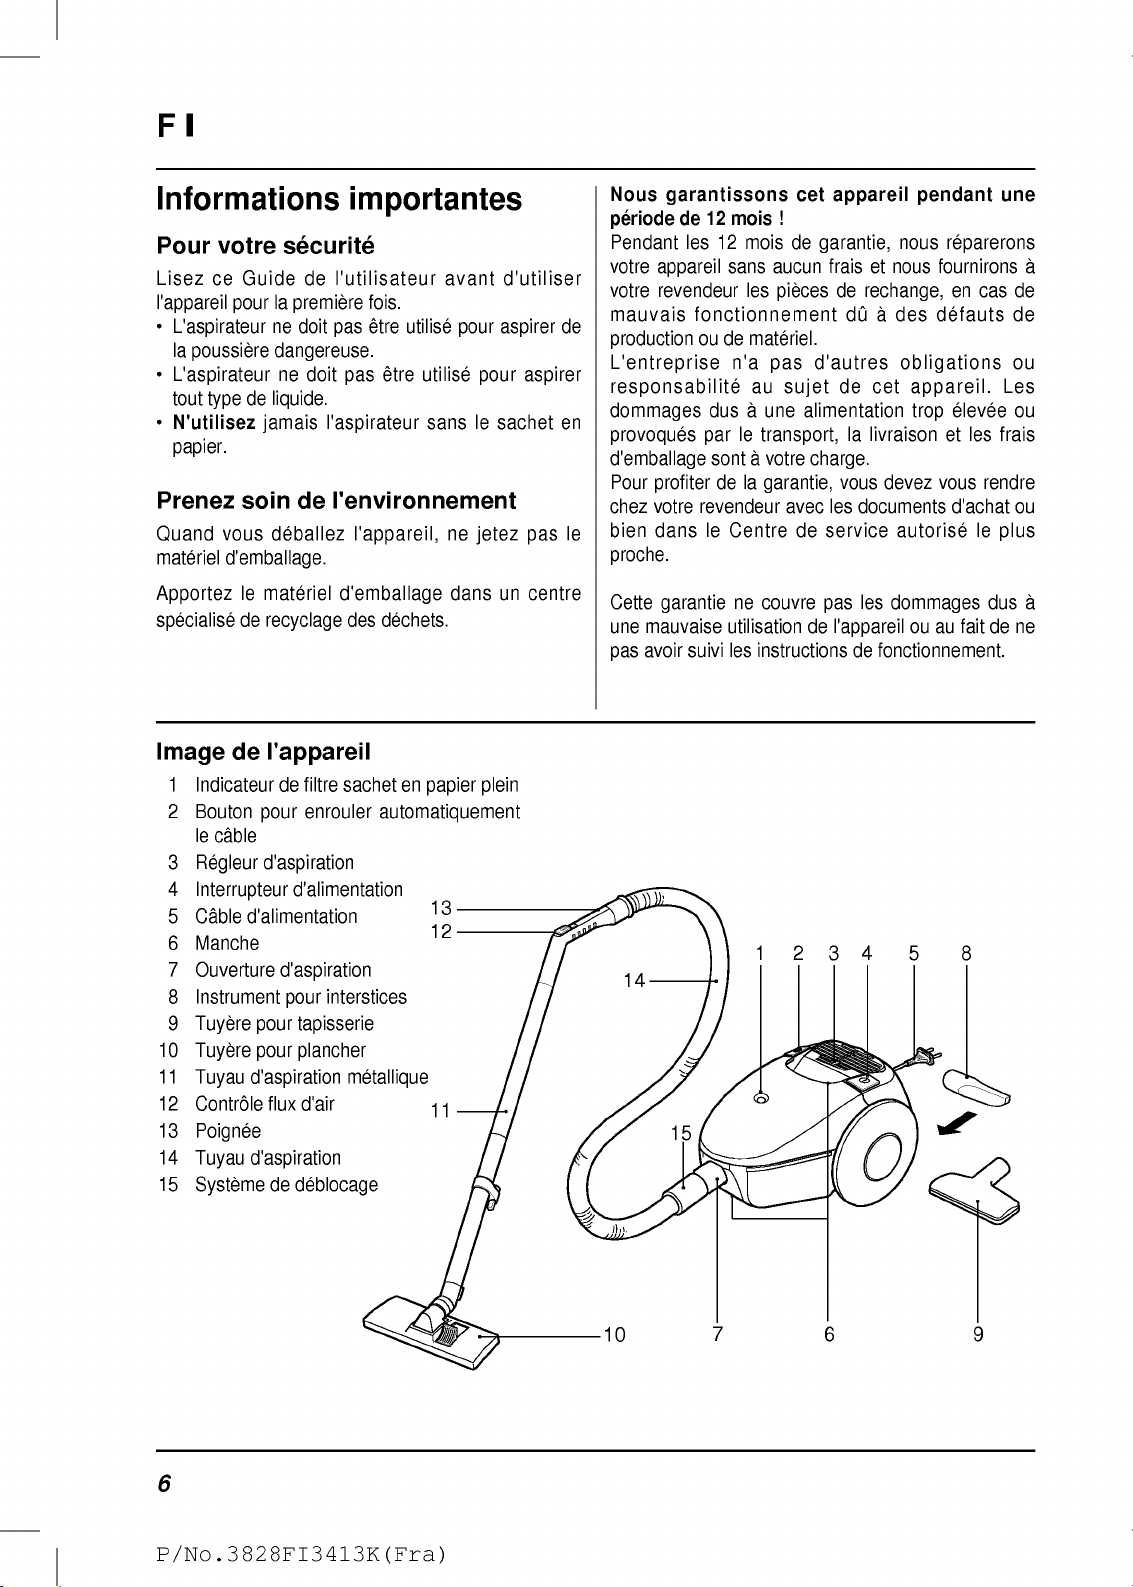
4.3
?
?
the
Open
protection
Replacement
filter
The
discharge
after
10
If
the
filter
immediately.
Grab
the
tongue
and
protection
protection
10
changes
earlier
housing
filter.
air
changes
gets
discharge
pull
it
must
cover
filter
of
the
dirty
air
upwards
filter
filter
must
of
the
be
replaced
and
of
the
must
filter
bag.
earlier
filter
protection
unhinging
be
filter
bag.
immediately.
replace
discharge
be
replaced
it
must
the
replaced
If
the
filter
the
motor
air
the
latest
be
replaced
piece
by
protection.
the
the
?
Insert
the
new
filter
paper
with
the
arrow
?
Make
sure
down
on
upper
part.
insertedinits
Hint:The
paper
whenitis
the
the
runs
The
housing
filter
housing.
facing
cardboard
and
paper
cover
bag
missing.
down.
slides
is
4
P/No.3828FI3413K(Eng)
on
filter
doesnit
not
bag
the
paper
onto
bag
inserted
in
the
the
clamp
must
close
correctly
appliance
bagiskept
on
the
be
firmly
when
the
or
?
Replace
?
Put
the
discharge
the
protectioninplace
air
filter.
again.
Page 5

5.
Technical
E
Data
Voltage
Fuse
Power
output:
Power
output
(Aspirator
max.
output
Air
quantity
Vacuum
Sound
pressure
ll
Class
Dimensions
Dimensions
Weight
Working
Length
Power
Technical
6.
equipment
without
range
x
cable
Troubleshooting
level
:
sack
Paper
the
accessories
x
Width
Height
:
specifications
Turbine)
according
are
subjecttochange.
to
EC-Guidelines
1~50/60
350--1200
381x286x232
lange
230
1300
225
10A
43
64
4,1
8,5
V
Hz
Watt
Watt
l/sec.
mbar
Circuit
diagram
X1
S1
S2
dB(A)
M1
2l
kg
m
mm
5m
C1
M1
N1
S1
S2
X1
Suppression
Suction
Electronics
Switch
Thermal
turbine
turbine
switch
Plug
C1
N1
capacitor
Before
components
Problem
The
motor
(Suction
turbine)
Absenceofsuction
(Suction
Suction
insufficient
The
during
Please
doesnit
turbine
power
appliance
operation
notify
ins
is
turns
Customer
starting
start
power
can
any
be
operational)
off
Service
disconnect
repair
undertaken
Cause
Absence
Filter
paper
of
only
tension
bag
(properly)
Filter
paper
bag
Filter,
nozzle,
tube
are
clogged
Holeinsuction
Suction
to
Air
Reduced
turbine
Filter,
tube
the
vacuum
flow
nozzle,
are
if
problems
hose
control
performance
clogged
by
was
is
suction
hose
is
not
cleaner
is
open
suction
continue
the
appliance
an
authorized
not
inserted
full
hoseorsuction
connected
firmly
of
the
hoseorsuction
suction
from
customer
the
mains.
service.
Solution
Check
circuit
Insert
(properly)
Replace
clean
Verify,
replace
if
Verify,
necessary
Verify
Close
air
flow
Set
slideronthe
performance
Turn
off
appliance
(Thermal
switch)
Testing
breaker,
filter
filter,
control
position
then
of
the
cord,
paper
if
necessary
replace
let
cool
turn
electrical
and
bag
of
maximum
down
on
again
plug
P/No.3828FI3413K(Eng)
5
Page 6
F
Informations
Pour
Lisez
l'appareil
?
?
?
Prenez
Quand
materiel
Apportez
specialisederecyclage
Image
votre
ce
Guide
pour
L'aspirateur
la
poussiere
L'aspirateur
tout
N'utilisez
type
de
papier.
soin
vous
d'emballage.
le
de
1
Indicateurdefiltre
2
Bouton
le
cable
3R
egleur
4
Interrupteur
5C
able
d'alimentation
6
Manche
7
Ouverture
8
Instrument
9
Tuyere
10
Tuyere
11
Tuyau
d'aspiration
12
Controle
13
Poignee
14
Tuyau
d'aspiration
15
Systeme
securite
de
la
premiere
ne
doit
pas
dangereuse.
ne
doit
liquide.
jamais
materiel
de
deballez
l'aspirateur
l'environnement
l'appareil
enrouler
pour
d'aspiration
d'alimentation
d'aspiration
interstices
pour
pour
tapisserie
pour
plancher
flux
d'air
de
deblocage
importantes
l'utilisateur
fois.
etre
etre
pas
l'appareil,nejetez
d'emballage
des
dechets.
sachet
automatiquement
metallique
utilise
utilise
sans
en
papier
13
12
11
avant
pour
dans
d'utiliser
aspirer
pour
le
sachet
un
plein
de
aspirer
en
le
pas
centre
Nous
garantissons
periode
Pendant
votre
votre
mauvais
production
de12mois
les12mois
appareil
revendeur
fonctionnement
ou
de
L'entreprise
responsabilite
dommages
provoques
d'emballage
Pour
chez
bien
dus
par
profiter
votre
revendeur
dans
le
sontavotre
de
proche.
Cette
garantie
une
mauvaise
avoir
pas
14
suivi
15
cet
appareil
!
de
garantie,
sans
aucun
frais
les
piecesderechange,
materiel.
n'a
au
a
le
d'autres
pas
sujet
une
alimentation
transport,
de
nous
et
nous
du
a
des
obligations
cet
appareil.
trop
la
livraisonetles
charge.
la
garantie,
Centre
ne
couvre
utilisation
les
instructionsdefonctionnement.
123458
avec
de
de
vous
devez
les
documents
service
les
pas
dommages
l'appareil
autorise
ou
pendant
reparerons
fournirons
en
defauts
elevee
vous
d'achat
au
fait
cas
rendre
le
dus
de
une
a
de
de
ou
Les
ou
frais
ou
plus
a
ne
6
P/No.3828FI3413K(Fra)
10
7
96
Page 7
F
1.
Fonctionnement
1.1
Branchez
courant
?
Le
cable
d'alimentation
d'enroulement
?
Tirez
le
cable,
?
Branchez
1.2
?
Inserez
le
Installation
le
tuyau
d'aspiration
soit
tuyau
?
Inserez
manche
?
Selon
tuyau
tuyau
l'instrument
tapisserie
?
L'instrument
l'arriere
retire.
1.3
?
Allumez
bien
le
tuyau
du
tuyau
votre
d'aspiration
d'aspiration,latuyere
(9).
de
Fonctionnement
l'appareil
(4).
?
Faites
bien
soit
papier
toujours
l'appareil
(5)
possedeunsysteme
automatique.
au-deladela
pas
cable
dans
la
prise
des
accessoires
d'aspiration
(7)del'appareil.
insere.
d'aspiration
d'aspiration
vous
choix,
metallique
interstices
pour
interstices
pour
l'aspirateur
avec
attention
installe
Faites
pouvez
pour
(8)
et
peut
de
l'interrupteur
le
que
(voir
a
la
prise
marque
de
courant.
dans
(14)
attention
metallique
(13).
brancher
ou
sur
le
manche
plancher
ou
la
tuyere
est
incorpore
simplement
l'appareil
d'alimentation
filtredusachet
point
4.1).
de
rouge.
l'ouverture
que
sur
(11)
sur
du
ou
(10)
pour
etre
en
le
le
le
a
2.
Utilisation
2.1
Utilisation
Tuyere
Avec
tapis
Instrument
Avec
aspirer
Tuyere
Pour
2.2
?
la
et
aspirer
Regleur
Vous
faisant
pour
tuyere
les
l'instrument
les
pour
pouvez
position
2.3
Indicateur
?
Tant
que
est
VERT,
filtre.
?
Le
filtre
filtre
plein
2.4
Controle
?
Vous
pouvez
ouvrant
Attention:Le
avec
plancher
pour
plancher
(10)
les
accessoires
vous
pouvez
planchers.
interstices
pour
pour
interstices,
tapisserie
les
tapisseries,
(8)
interstices
les
fissuresetles
(9)
les
matelas,
d'aspiration
reglerlapuissance
le
glisser
curseur
requise.
de
l'indicateurdufiltredusachet
vous
n'avez
doit
etre
remplace
est
ROUGE
flux
reglerlapuissance
le
controle
controle
dose
pour
maximale
de
d'alimentation
filtre
pas
plein
besoin
quand
(voir
point
4.1)
d'air
(12)
flux
d'air.
de
flux
d'air
obtenir
la
puissance
d'aspiration.
aspirer
vous
pouvez
coins.
etc.
(3)
d'aspiration
(1)
en
de
remplacer
l'indicateur
d'aspiration
doit
etre
les
en
en
(3)
papier
le
de
en
3.
Stockage
?
Eteignez
d'alimentation
?
Debranchez
courant
le
cable.
l'interieur
?
Replacez
logement
de
l'appareil
(4).
le
cable
d'alimentation
et
appuyez
(2).
de
l'instrument
a
l'arriere
sur
l'interrupteur
Le
cable
s'enroule
l'appareil.
pour
de
l'appareil.
P/No.3828FI3413K(Fra)
l'appareil
avec
interstices
l'interrupteur
de
la
prise
enrouler
pour
automatiquement
dans
(8)
de
a
son
7
Page 8

F
4.
Service
et
Entretien
L'appareil
completement
et
de
reparation.
?
Nettoyez
regulierement
Nettoyezlecompartiment
humide.
?
Nettoyez
compartiment
Attention
4.1
?
Ouvrez
vers
?
Tirezlelevier
flecheetenlevez
aussi
l'emballage
autour
:
TB-42
Y
201
(de
pour
remplacer
Remplacement
le
couvercle
le
haut
le
tuyau
en
vers
(deLGElectronics)
avant
plein.
doit
etre
debranche
le
pour
de
Swirl)
du
travail
l'appareil
du
l'ouvertureducouvercle.
sont
les
du
apres
filtre
avec
en
caoutchouc
disponibles
filtres
sales.
filtre
compartiment
d'aspiration.
dans
la
direction
l'arrierelesachet
d'entretien
usage.
un
chiffon
ou
en
tirant
de
en
papier
4.2
Remplacement
protection
?
Le
filtre
de
protection
au
sachet.
immediatement
?
Ouvrez
du
filtre.
la
4.3
tard
plus
apres10changements
Si
le
filtre
remplace.
le
logement
Remplacement
du
est
moteur
du
du
du
filtre
moteur
sale
plus
couvercle
du
filtre
doit
tot,
et
de
etre
remplace
de
filtre
il
doit
remplacez
de
l'air
du
etre
le
evacue
?
Le
filtredel'air
tard
apres10changements
le
filtre
est
sale
evacue
plus
tot,
doit
il
etre
remplaceauplus
de
filtredusachet.
doit
etre
immediatement
Si
remplace.
?
Tenez
les
la
doigts
protection
et
tirez
du
filtredel'air
vers
le
haut
evacue
en
degondant
entre
la
protection.
?
Inserez
fleche
?
Faites
est
superieure.
son
Attention:Le
le
nouveau
tournee
attention
abaisse
Le
logement.
vers
le
que
sur
les
guides
filtre
doit
couvercle
pas
quand
correctement
oublie.
8
P/No.3828FI3413K(Fra)
filtre
dans
bas.
le
carton
delabridedela
etre
insere
du
logement
le
filtre
ou
quand
l'appareil
du
sachet
fermement
n'est
pas
vous
ne
insere
avec
en
ferme
l'avez
la
papier
partie
dans
?
Remplacez
?
Remettez
le
filtredel'air
la
protectionenplace.
evacue.
Page 9

5.
Donnees
F
techniques
Voltage
Fusible
Puissance
Puissance
Sortie
Quantite
max.
de
de
d'air
sortie
sortie
(Turbine
Depression
Niveau
Equipement
Dimensions
Dimensions
Poids
Porteedefonctionnement
LongueurxLargeur
Cable
Les
6.
de
son
en
accord
Classe
:
sachet
sans
accessoires
d'alimentation:
specifications
techniques
Recherche
en
x
:
aux
papier
Hauteur
des
d'aspiration)
directives
CE
381x286x232
longueur
peuvent
etre
pannes
1~50/60
350--1200
changees.
230
1300
225
10A
43
64
4,1
8,5
V
Hz
Watt
Watt
l/sec.
mbar
Diagramme
du
circuit
X1
S1
S2
dB(A)
ll
2l
M1
kg
m
mm
m
5
C1
Condensateur
M1
Turbine
N1
Electronique
S1
Interrupteur
S2
Interrupteur
X1
Prise
d'aspiration
C1
N1
antiparasites
turbine
thermique
Avant
composants
Probleme
Le
moteur
(turbine
ne
se
met
pas
Absence
de
puissance
(turbine
d'aspiration
La
puissance
est
insuffisante
L'appareil
le
fonctionnement
SVP
contactez
de
d'aspiration)
en
marche
d'aspiration
ne
fonctionne
d'aspiration
s'eteint
pendant
le
Service
commencer
electriques
pas)
apres-vente
toute
reparation,
peuvent
Cause
Absence
Le
filtredusachet
insere
Le
filtredusachet
Le
filtre,
d'aspiration
Trou
dans
Le
tuyau
fermement
Le
controle
Performances
etre
de
courant
(correctement).
les
tuyeres,
sont
le
tuyau
d'aspiration
branche
du
d'aspiration.
Le
d'aspiration
filtre,
les
tuyeres,
sont
si
le
debranchez
effectues
en
papier
en
papier
le
tuyau
obstrues
d'aspiration
n'est
a
l'aspirateur.
flux
d'air
reduitesdela
ou
obstrues.
probleme
continue.
uniquement
n'est
est
pas
est
ouvert.
turbine
le
tuyau
l'appareil
par
pas
plein.
completement.
un
personnel
Solution
Controlez
les
automatiques,
Inserez
sachet
(correctement)
en
papier
Remplacez-le
Verifiez
necessaire
Verifiez-leetsi
Verifiez-le.
Fermez
Reglez
et
nettoyez
remplacez-le.
le
controle
le
curseur
performance
Eteignez
(interrupteur
allumez-le
l'appareil,
thermique),
de
Les
tests
autorise.
interrupteurs
les
cables
et
le
filtre
le
filtre,
necessaire
maximale.
remplacez-le.
du
flux
sur
la
position
laissez-le
puis
nouveau.
sur
les
et
d'air.
refroidir
les
prises
du
si
de
P/No.3828FI3413K(Fra)
9
Page 10
N
Belangrijk
Voor
Lees
apparaat
?
?
?
uw
eerst
De
stofzuiger
voor
de
De
stofzuiger
zuigen.
De
stofzuiger
worden.
veiligheid
de
gebruikershandleiding
gebruikt.
is
gezondheid
is
niet
niet
mag
geschikt
opleveren
geschikt
nooit
zonder
om
stoffen
te
op
om
vloeistoffen
voordatuhet
die
zuigen.
stofzak
gebruikt
gevaar
op
U
hebt12maanden
Wij
verplichten
durende
repareren
garantieperiode
resp.
beschikking
te
fabricage-
dan
of
bovengenoemde
uitgesloten.
overmacht
of
verzendingenverpakking
garantie
ons
om
gedurende
uw
leverancier
te
stellen,
materiaalfouten
schadeclaims
Beschadiging
gedurende
de
op
uw
als
het
defect
transport
voor
zijn
dit
apparaat!
de
apparaat
gratis
ten
zou
ten
uw
12
maanden
gratis
onderdelen
gevolge
Andere
zijn.
ons
tegen
gevolge
en
kosten
rekening.
te
ter
van
zijn
van
voor
Voor
Gooit
huisvuil,
verpakking
u
het
de
milieu
verpakking
maar
naar
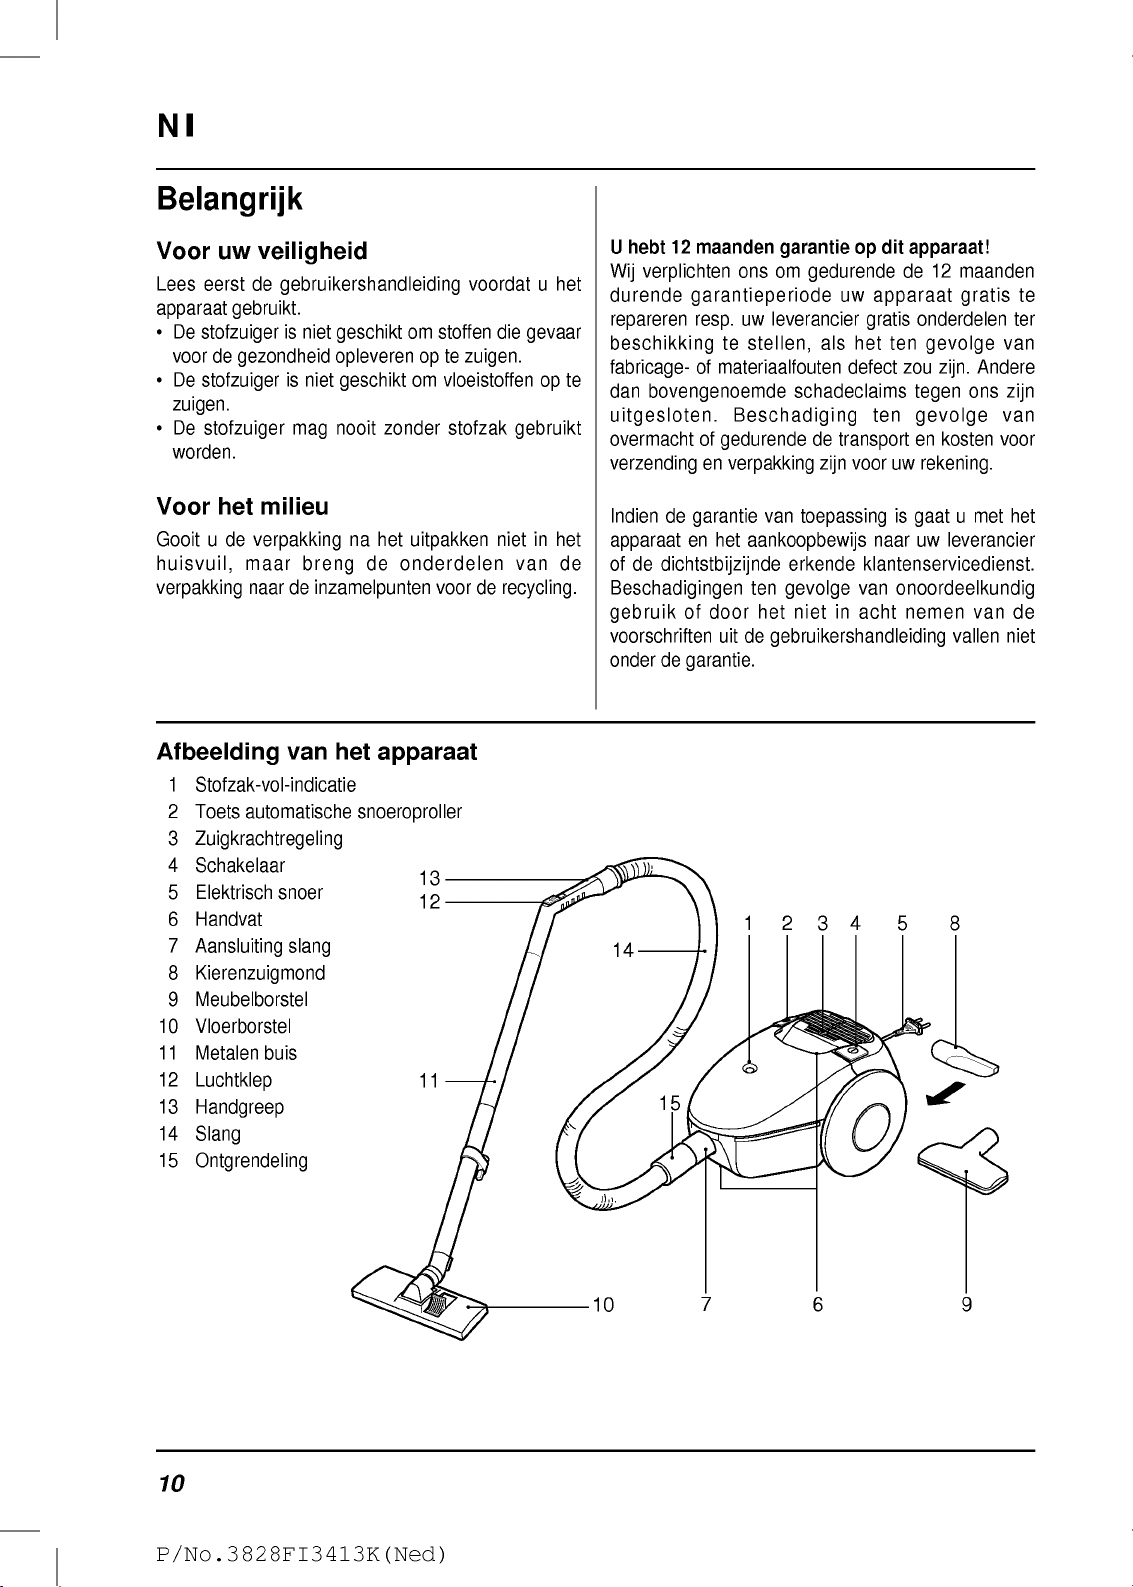
Afbeelding
1
Stofzak-vol-indicatie
2
Toets
automatische
3
Zuigkrachtregeling
4
Schakelaar
5
Elektrisch
6
Handvat
7
Aansluiting
8
Kierenzuigmond
9
Meubelborstel
10
Vloerborstel
11
Metalen
12
Luchtklep
13
Handgreep
14
Slang
15
Ontgrendeling
buis
breng
de
inzamelpunten
van
het
snoer
slang
na
het
uitpakken
de
onderdelen
voor
apparaat
snoeroproller
13
12
11
nietinhet
van
de
recycling.
Indien
apparaat
de
of
Beschadigingen
gebruik
voorschriften
onder
14
de
garantie
en
het
de
dichtstbijzijnde
of
door
uit
de
garantie.
15
van
toepassing
aankoopbewijs
erkende
ten
gevolge
het
nietinacht
de
gebruikershandleiding
123458
is
naar
klantenservicedienst.
van
onoordeelkundig
gaat
uw
nemen
u
met
het
leverancier
van
de
vallen
niet
10
P/No.3828FI3413K(Ned)
10
7
96
Page 11
N
1.
Het
apparaat
nemen
1.1
Het
apparaat
aansluiten
?
Het
snoer
(5)
snoeroproller.
?
Trek
het
snoer
naar
buiten.
?
Steek
de
stekkerinhet
1.2
Hulpstukken
?
Bevestigdeslang
houder
aansluit.
?
Bevestig
van
?
U
de
kunt
(7).
de
slang
kiezen
kierzuigmond
de
op
handgreep
te
voeren
?
De
karweitje.
kierzuigmond
geintegreerd
1.3
Het
apparaat
gebruiken
?
Schakel
?
Let
apparaat
het
apparaat
er
dat
op
moet
aan
bevindt
niet
zichinde
verder
stopcontact.
aanbrengen
in
(14)
Let
er
dat
op
metalen
(13).
(8)
en
zitten
buis
ofuhet
ofdemeubelborstel
bevestigt,
is
achter
kan
makkelijk
voor
met
de
er
altijd
(zie
in
het
stroomnet
dan
tot
de
daarvoor
de
verbinding
(11)
op
vloermondstuk
afhankelijk
in
verwijderd
het
aan/uittoets
een
papierfilter
punt
4.1).
gebruik
automatische
de
rode
streep
bestemde
goed
de
handgreep
(10)
de
buis
op
van
het
de
stofzuiger
worden.
eerst
aan.
(4)
in
de
of
uit
het
2.
Het
apparaat
2.1
De
hulpstukken
Vloerborstel
Met
deze
enz.
zuigen.
Kierzuigmond
Met
de
kieren
Meubelborstel
Om
alle
enz.
schoontemaken.
2.2
Zuigkrachtregeling
?
De
zuigkracht
schuifregelaar
2.3
Stofzak-vol-indicatie
?
Zolang
nieuwe
?
Er
moet
gedaan
punt
2.4
Luchtklep
?
Met
alsude
Opmerking
(10)
vloerborstel
(8)
kierzuigmond
zuigen.
(9)
soorten
de
indicatie
stofzak
een
worden
4.1)
de
luchtklep
klep
open
:
Als
moet
(3)
in
nieuwe
gebruiken
gebruiken
kunt
u
tapijt
kunt
gestoffeerde
kunt
u
traploos
de
op
gewenste
GROEN
te
doen.
stofzak
zodra
de
indicatie
(12)
kuntude
zet.
u
optimale
de
luchtklep
en
ook
u
plinten,
meubels,
(3)
regelen,
stand
(1)
hoeft
is,
in
het
ROOD
zuigkracht
zuigkracht
dicht
zeil,
hoeken
matrassen
zet.
u
apparaat
snel
wenst,
zijn.
tegels
alsude
er
geen
is
(zie
regelen
en
3.
Het
?
Schakelt
uit.
(4)
?
Trekdestekker
voetpedaal
Het
snoer
?
Doe
de
kierenzuigmond
van
de
stofzuiger.
apparaat
u
het
apparaat
uit
van
de
wordt
dan
P/No.3828FI3413K(Ned)
met
het
stopcontact
automatische
automatisch
in
(8)
opbergen
de
aan/uitschakelaar
en
gebruik
snoeroproller
opgerold.
het
vak
aan
de
het
(2).
acherkant
11
Page 12

N
4.
Reinigen
?
Maak
bovendien
ruimte
schoon.
?
Maak
deksel
Opmerking
4.1
Vervangen
?
Maak
aan
de
?
Druk
voren
Voordatuhet
steeds
stopcontact
het
apparaat
alsuhet
voor
de
ook
de
schoon.
:
Leverbare
TB-42
of
de
deksel
aan
slang
de
hefboom
en
trekdevolle
en
onderhoud
apparaat
eerst
de
trekken.
regelmatig
niet
meer
stofzak
rubberrand
met
van
stofzakken:
(vanLGElectronics)
Y
201(van
van
van
naar
in
Swirl).
de
de
behuizing
boventetrekken.
de
richting
stofzak
schoonmaakt,
stekker
gebruikt.
een
vochtige
de
behuizing
stofzak
open
van
naar
achteren
uit
schoon
door
de
Veeg
pijl
weg.
het
doek
bij
deze
naar
4.2
Een
nieuwe
?
Nadatutien
hebt,
ter
bescherming
en
de
de
worden.
al
?
Maak
vervang
4.3
vroeger
Wisselen
moet
het
er
Als
deze
vervangen
deksel
de
filter.
keer
stoffilter
een
nieuwe
in
ieder
van
filteraleerder
worden.
van
van
de
aanbrengen
stofzak
een
geval
de
motor
de
behuizing
uitblaasluchtfilter
aangebracht
nieuwe
aangebracht
vuil
is,
stoffilter
moet
open
deze
en
?
Doe
in
het
?
Let
er
onderkant
aan
de
stofzak
Opmerking
een
nieuwe
apparaat.
dat
op
door
bovenkant
moet
stofzak
het
de
dan
stevig
:
Als
zitofals
gedaan
dicht.
met
karton
lipjes
vastgehouden
in
de
in
de
er
stofzakinhet
geen
dezeerverkeerd
is,
gaat
de
van
de
klem
moet
behuizing
de
pijl
stofzak
deksel
naar
passen.
zitten.
apparaat
in
niet
beneden
aan
wordt
?
Nadatutien
hebt,
uitblaasluchtfilter
al
eerder
?
Trek
de
naar
klep
de
en
De
?
Vervang
?
Brengdebedekking
keer
moet
er
vuil
is,
behuizing
boven
de
filter.
een
nieuwe
in
ieder
aangebracht
deze
al
van
en
verwijderdebedekking.
weer
stofzak
geval
worden.
vroeger
de
vervangen.
uitblaasopening
op
zijn
plaats.
aangebracht
een
nieuwe
Alsdefilter
aan
de
12
P/No.3828FI3413K
Page 13

5.
Technische
N
gegevens
Stroomspanning
Stroomnetbeveiliging
Vermogen:
Vermogen
Max.
(zuigturbine)
Vermogen
Zuiglucht
Vacuum
Geluidsdrukniveau
(EG-richtlijn)
Beveiligingsklasse
Afmetingen:
Inhoud
stofzak
Gewicht
Actieradius
Lengte
Snoer:
Technische
6.
zonder
x
accessoires
Breedte
wijzigingen
Eventuele
x
Hoogte
voorbehouden
problemen
1~50/60
350--1200
381x286x232
lengte
230
1300
225
10A
43
64
4,1
8,5
V
Hz
Watt
Watt
l/sec.
mbar
Stroomdiagram
X1
S1
S2
dB(A)
ll
2l
M1
kg
m
mm
5m
C1
Ontstoringscondensator
M1
Zuigturbine
N1
Elektronica
S1
Turbineschakelaar
S2
Thermoschakelaar
X1
Stekker
C1
N1
Trekt
Elektrische
Storing
Motor
(zuigturbine)
niet
aan
Stofzuiger
zuigt
(zuigturbine
de
storingen
onvoldoende
gaat
Zuigkracht
Apparaat
Als
is
wel
vanzelf
u
altijd
niet
niet
aan)
eerst
onderdelen
gaat
uit
verholpen
de
stekker
mogen
Oorzaak
Geen
Stofzak
Stofzak
Filter,
uit
alleen
stroom
nietofniet
vol
mondstuk,
het
doordeerkende
juist
slang
verstopt
in
Gat
de
slang
Slang
niet
goed
aan
bevestigd
Luchtklep
staat
open
Zuigturbineteweinig
Filter,
mondstuk,
slang
verstopt
kunnen
worden,
bel
stopcontact,
voordat
klantenservice
aangebracht
of
buis
de
stofzuiger
zuigkracht
of
buis
dandeklantenservice.
er
reparaties
uitgevoerd
nagekeken
Oplossing
Elektrische
en
stopcontact
Stofzak
Stofzak
Nakijken,
eventueel
Nakijken
zekering,
(goed)
vervangen
filter
schoonmaken
vervangen
en
eventueel
controleren
in
het
Nakijken
Luchtklep
Schuifregelaar
Apparaat
sluiten
max.
op
uitdoenenaf
(Thermoschakelaar),
aan
doen
worden.
snoer,
apparaat
vervangen
zetten
laten
daarna
worden.
stekker
doen
of
koelen
weer
P/No.3828FI3413K(Ned)
13
Page 14

D
Sicherheit
vor
der
ist
ist
aller
ohne
Sie
die
nicht
die
Hinweise
ersten
nicht
nicht
geeignet
Art.
Papierfiltertute
zuliebe
beim
einfachinden
anfallenden
an
Wichtige
Zu
lhrer
Lesen
Sie
diese
Bedienungsanleitung.
?
Der
Sauger
gesundheitsgefahredender
?
Der
Sauger
Flussigkeiten
?
Niemals
Der
Umwelt
Werfen
Verpackung
Geben
Wiederverwertung
Sammelstellen.
Sie
Gerateabbildung
1
Filterfullstandsanzeige
2
Taster
fur
Kabeleinzug
3
Leistungsregulierung
4
Gerateschalter
5
Netzkabel
6
Tragegriff
7
Saugschlauchanschluß
8
Fugenduse
9
Polsterduse
10
Bodenduse
11
Metallsaugrohr
12
Luftklappe
13
Handgriff
14
Saugschlauch
15
Entriegelung
Benutzung
Staube.
zur
saugen.
zur
Absaugung
geeignet
Auspacken
Hausmull.
Verpackungsteile
die
entsprechenden
13
12
11
des
Gerates
Absaugung
anfallende
Fur
Garantie!
Wir
Garantiezeit
bzw.
Verfugung
von
Fabrikations-
Weitergehende
ausgeschlossen.
Gewalt
und
Im
und
zur
autorisierte
Fur
mit
der
ubernommen.
dieses
verpflichten
Ihrem
Fachhandler
oder
Gerat
lhr
zu
oder
auf
uns,
Gerat
stellen,
dem
Verpackungskosten
Garantiefall
Kaufbeleg
Schaden,
dem
wenden
an
Kundendienststelle.
die
Gerat
entstehen
Betriebsanleitung,
14
15
ubernehmen
wahrend
kostenlos
die
Ersatzteile
wenn
Materialfehlers
Anspruche
Beschadigungen
Transportweg
zu
gehen
Sie
sich
lhren
Handler oder
durch
unsachgemaßen
oder
durch
wird
123458
wir 12
der
12-monatigen
instandzusetzen
kostenlos
es
infolge
versagen
sowie
bitte
uns
durch
Lasten.
mit
die
gegen
lhren
Nichtbeachtung
keine
Monate
zur
eines
sollte.
sind
hohere
Versand-
Zubehor
nachste
Umgang
Haftung
14
P/No.3828FI3413K(Deu)
10
7
96
Page 15
D
1.
Inbetriebnahme
1.1
?
Das
?
Ziehen
weiter
?
Stecken
1.2
?
Stecken
Gerat
Netzkabel
Zubehor
an
das
(5)
Sie
das
Netzkabel
als biszuder
Sie
den
Netzsteckerindie
montieren
Sie
den
befindet
Saugschlauchanschluß
Sie
darauf,
?
Stecken
Handgriff
?
Je
nach
(10)
auf
stecken.
?
Die
intergriert
werden.
1.3
Gerat
?
Schalten
?
Achten
eingelegt
daß
Sie
des
Anwendung
oder
die
das
Metallsaugrohr
Fugenduse
und
in
Sie
das
Sie
darauf,
ist
(siehe
die
das
Saugschlauches
Fugenduse
istander
kann
Betrieb
Gerat
Netz
anschließen
sichimKabelroller.
heraus,
roten
Markierung.
Saugschlauch
des
(7)
Verbindung
einrastet.
Metallsaugrohr
(13).
konnen
dort
(8)
bzw.
Ruckseite
einfach
Sie
oder
auf
nehmen
mit
dem
Gerateschalter
daß
immer
eine
dazu
Punkt
4.1)
Jedoch
Steckdose
(14)
Gerates.
(11)
die
Polsterduse
den
des
nicht
in
Achten
auf
Bodenduse
Handgriff
Saugers
ein.
den
den
herausgenommen
(4)
Papierfiltertute
(9)
ein.
2.
Bedienung
2.1
Arbeiten
Bodenduse
Mit
der
Bodenduse
Teppichboden
Fugenduse
Mit
der
Fugenduse
Ritzen
aussaugen.
Polsterduse
Zum
Saugen
2.2
Leistungsregulierung
?
Die
Saugleistung
stufenlos
auf
die
von
2.3
Filterfullstandsanzeige
?
Solange
brauchen
?
Die
Papierfiltertute
wenn
die
dazu
Punkt
2.4
Luftklappe
?
Mit
der
Luftklappe
kurzfristig
mit
dem
(10)
konnen
absaugen.
(8)
konnen
(9)
aller
Polstermobel,
der
regulieren,
lhnen
die
Filterfullstandsanzeige
Sie
die
wenn
gewunschte
Papierfiltertute
muß
Filterfullstandsanzeige
4.1)
(12)
konnen
regulieren,
indem
Zubehor
Sie
Hartflachen
Sie
Fugen,
Matratzen
(3)
Saugturbine
Sie
den
Stellung
nicht
ausgewechselt
Sie
die
Sie
diese
Ecken und
etc.
konnen
Schieber
schieben.
(1)
GRUN
auswechseln.
werden,
ROT
ist
(siehe
Saugleistung
offnen.
und
Sie
(3)
ist,
Hinweis:Fur
Luftklappe
3.
Gerat
?
Schalten
(4)
?
Ziehen
betatigen
(2).
?
Stecken
aus.
Das
Sie
Sie
Sie
Kabel
den
den
Sie
Aufbewahrungsfach
Saugers.
volle
Saugleistung
geschlossen
aufbewahren
das
Gerat
mit
Stecker
Fußschalter
wird
die
dann
aus
automatisch
Fugendu
auf
der
muß
sein.
dem
Gerateschalter
der
Steckdose
fur
den
se
Ruckseite
die
und
Kabeleinzug
eingerollt.
in
(8)
das
des
15
P/No.3828FI3413K(Deu)
Page 16

D
4.
Pflege
?
Reinigen
Abstanden
den
Filterraum
?
Reinigen
Gehauses
Hinweis:Als
4.1
Wechseln
?
Offnen
oberhalb
?
Klappen
und
ziehen
hinten
Vor
ist
trennen.
Sie
des
Sie
weg.
und
allen
das
Sie
und
mit
Sie
ebenso
an
der
staubfiltersatz
TB-42
Y
201
den
Wartung
Pflege-
Gerat
vom
das
Gerat
nach
Arbeitsende.
einem
die
Deckeloffnung.
(vonLGElectronics)
(von
Swirl)
der
Papierfiltertute
Gehausedeckel,
Schlauches
Hebel
die
in
volle
den
Sie
und
Wartungsarbeiten
elektrischen
in
regelmaßigen
Wischen
feuchten
Tuch
Gummidichtung
oder
lieferbar.
indem
nach
oben
zieben.
Pfeilrichtung
Papierfiltertute
Netz
aus.
Sie
nach
zu
Sie
des
diesen
vorne
nach
4.2
Wechseln
?
Spatestens
muß
der
werden.
vorher
?
Offnen
den
Motorschutzfilter.
4.3
Wechseln
?
Spatestens
muß
der
Bei
vorzeitiger
austauschen.
?
Ziehen
Lasche
aus.
nach
Motorschutzfilter
Bei
vorzeitiger
austauschen.
Sie
den
Gehausedeckel
nach
Abluftfilter
Verschmutzung
Sie
die
Abdeckung
nach
oben
des
Motorschutzfilters
jedem
10.
Verschmutzung
des
Abluftfilters
jedem
und
10.
mit
ausgetauscht
des
hangen
Filtertutenwechsel
mit
ausgetauscht
bitte
schon
und
ersetzen
Filtertutenwechsel
werden.
bitte
schon
vorher
Abluftfiltersander
Sie
die
Abdeckung
Sie
?
?
Achten
Papierfiltertute
und
Papierfiltertute
Sie
unten
die
in
Legen
nach
Sie
oben
Hinweis:Wenn
das
darauf,
unten
in
muß
neue
Gerat
die
dann
keine
Papierfiltertute
schließt
der
16
P/No.3828FI3413K(Deu)
Papierfiltertute
ein.
daß
der
von
den
Nasen
Halterung
fest
oder
falsch
Gehausedeckel
im
Gehause
wenn
eingelegt
einrastet.
die
mit
dem
Karton
gehalten
sitzen.
wurde,
nicht.
Pfeil
der
wird
Die
?
Ersetzen
?
Setzen
Sie
Sie
die
den
Abluftfilter.
Abdeckung
wieder
ein.
Page 17

5.
Technische
D
Daten
Spannung
Netzabsicherung
Leistungsdaten:
Leistung
max.
(Saugturbine)
Leistung
Luftmenge
Vakuum
Schalldruckpegel
Schutzklasse
:
Maße
Inhalt
Papierfiltertute
Gewicht
Aktionsradius
Lange
Netzkabel
Technische
6.
ohne
x
BreitexHohe
Storungshilfe
nach
zubehor
:
Anderungen
EG-Richtlinie
vorbehalten.
1~50/60
350--1200
381x286x232
lange
230
1300
225
10A
43
64
4,1
8,5
V
Hz
Watt
Watt
l/sec.
mbar
Stromlaufplan
X1
S1
S2
dB(A)
ll
2l
M1
kg
m
mm
5m
C1
Entstorkondensator
M1
Saugturbine
N1
Elektronik
S1
Schalter
S2
Thermoschalter
X1
Stecker
Turbine
C1
N1
Trennen
elektrischen
Storung
Motor
(Saugturbine)
nicht
an
Sauger
saugt
(Saugturbine
Saugkraft
Gerat
des
Bei
ist
schaltet
Betriebes
weitergehenden
Sie
das
Bauteile
lauft
nicht
lauft)
ungenugend
wahrend
ab
Storungen
Gerat
vor
allen
darf
nur
vom
Ursache
Keine
elektrische
Papierfiltertute
eingelegt
Papierfiltertute
Filter,
Duse,
Saugrohr
Loch
verstopft
im
Saugschlauch
Saugschlauch
Staubsauger
Luftklappe
Leistung
Filter,
Saugrohr
bitte
ist
der
Duse,
verstopft
den
Reparaturarbeiten
autorisierten
Spannung
nicht
(richtig)
ist
voll
Saugschlauch
ist
nicht
richtig
angeschlossen
geoffnet
Saugturbine
reduziert
Saugschlauch
Kundendienst
einschalten.
vom
Kundendienst
oder
an
den
oder
elektrischen
Netz.
durchgefuhrt
Behebung
Netzsicherung,
Steckdose
Papierfiltertute
Auswechseln
Uberprufen,
auswechseln
Uberprufen,
Uberprufen
Luftklappe
Schieber
stellen
Gerat
lassen
wieder
auf
ausschalten
(Thermoschalter),
einschalten
Die
Uberprufung
werden.
Kable,
uberprufen
(richtig)
Filter
reinigen,
notfalls
schließen
auswechseln
maximale
und
Stecker
einlegen
notfalls
Leistung
abkuhlen
danach
der
und
P/No.3828FI3413K(Deu)
17
Page 18
Memo
18
P/No.3828FI3413K
Page 19

E
During
spare
claims
during
rear
Type
Name
Purchase
the
parts
are
transport.
also
apply!
of
apparatus
of
buyer
date
24-month
to
your
excluded.
:
:
For
offera24-month
warranty
dealer
free,
We
are
The
buyer
:
period,
if
not
assumes
Warranty
we
this
apparatus
liable
shipping
will
for
warranty
repair
fails
damages
and
Certificate
for
your
apparatus
due
to
manufacturing
due
to
acts
packaging
Serial
number
Dealer's
this
apparatus
atnocost
or
of
providenceordamages
costs.
Your
warranty
:
and
stamp
signature
to
you
material
or
make
defects.
conditions
available
Further
occurring
on
the
1.
The
warranty
date
and
warranty
purchase
filledinand
card,
serial
number
the
number
2.
During
defects
any
proven
manufacturing
3.
Damages
noncompliance
normal
the
Also,
or
easily
glass,
light
any
damages
shipping
period
receipt
the
that
wear
warranty
broken
and
period
is
valid
of
entered
warranty
at
or
due
are
bulbs).
during
packaging
Warranty
begins
for
24
is
proven
together
the
no
these
material
with
not
parts
The
if,
signed
product
onto
the
period,
cost
to
are
defects.
to
incorrect
instructions
covered
does
not
(for
buyerisresponsible
transport
costs.
on
months.
the
buyer
with
the
by
must
warranty
we
you,
attributed
by
cover
example,
conditions
the
purchase
Begin
submits
the
warranty
seller.
agree
card.
will
correct
if
it
can
handling,
for
use
this
warranty.
wear
viewing
as
well
The
with
be
and
parts
for
as
for
vacuum
4.
We
decide
of
exchange
replaced
warranty
refrigeratorisrepaired
or
parts
period
cleaner
whether
replace
are
our
is
make
to
parts.
property.
not
prolonged
or
certain
repairs,
Exchanged
The
original
parts
or
if
a
are
replaced.
5.
The
warranty
intervenes
authorised
to
6.
is
used
Always
if
the
for
keep
apparatus
transported
7.
If
a
repair
contact
centre.
claims
8.
always
service
Further
provisions
of
the
wording.
provisions
in
the
LG
by
commercial
the
without
is
covered
your
are
are
invalid,
is
not
is
nullified
apparatus
Electronics,
purposes.
original
requires
damaging
dealer
excluded.
they
The
validity
effected.
if
any
that
if
the
packaging,
servicing,
it.
this
by
or
an
If
parts
in
apply
of
person
are
apparatus
so
it
can
warranty,
authorised
of
these
the
sense
the
other
not
that
be
P/No.3828FI3413K(Eng)
19
Page 20

F
Cet
appareil
Nous
nous
et/ouafournir
de
fabrication
dommages
engageons,
gratuitement
ou
dus
a
de
matiere.
un
pendant
cas
d'expeditionetd'emballage
au
verso
specifiees
Modele
Nom
Date
:
de
l'acheteur
d'achat
:
sont
:
Certificat
est
couvert
la
duree
a
votre
revendeur
Des
revendications
de
force
majeure
sontavotre
applicables
!
de
de
garantie
une
par
de
garantie
les
ou
intervenant
charge.
24
piecesderechange,
plus
importantes
Pour
N°de
Cachet/signature
garantie
a
mois,
serie
en
le
reparer
a
cours
reste,
:
de
en
notre
de
nos
du
24
mois
gratuitement
cas
de
panne
encontre
transport
conditions
revendeur
sont
ainsi
!
votre
due
exclues.
que
de
appareil
aunvice
Les
les
frais
garantie
1.
La
periode
d'achat
periode
atteste
d'achat
de
garantie
revendeur.
coincider
de
garantie
2.
Pendant
remedions
pour
aunvicedefabrication
3.
Sont
a
une
non-respect
normale
s'applique
elements
lampes
Les
transport
que
de
et
s'etend
de
garantie
lorsque
/
(recu
Le
avec
!
la
gratuitement
autant
qu'ils
exclus
de
manipulation
du
de
l'appareil.
pas
fragilesduproduit
a
effluves
dommages
sont
a
les
frais
d'expeditionetd'emballage.
Conditions
garantie
sur
24
est
l'acheteur
ticket
de
le
t
de
numero
comple
numero
periode
soient
ou
la
garantie
mode
d'emploi
De
aux
pie
ou
lampesaincandescence).
surviendraient
qui
de
charge
prend
mois.
considere
presente
caisse)
e
e
et
serie
figurant
de
garantie,
a
tous
dus,
preuve
de
matiere.
les
inapproprie
meme,
ces
(p.
l'acheteur,
cours
signe
ouaune
Le
debut
la
avec
e
du
produit
sur
les
a
dommages
la
garantie
use
es
ex.,
pendant
de
de
garantie
aladate
de
comme
preuve
la
carte
par
doit
la
carte
nous
defauts,
l'appui,
dus
e,
usure
et
aux
voyants,
meme
du
Aspirateur
4.
La
decision
la
remplacement
echanges
La
reparation
ne
5.
Le
personnes
pour
que
6.
Conservez
prolonge
droit
le
celuici
le
original
toute
securite
7.
En
cas
au
ne
le
votre
service
8.
Des
revendications
exclues!
devaient
par
dispositions
analogie.
ou
a
non
service
est
pour
de
revendeur
agrees.
Si
s'averer
la
de
reparation,
nous
revient.
remplaces
ou
le
remplacement
la
duree
pas
garantie
autorisees
interviennent
utiliseades
imperativement
pouvoir
en
recours
cas
ou
transporter
de
en
l'un
plus
des
points
caducs,
La
validite
n'en
est
pas
d'echange
Les
sont
notre
de
garantie
s'eteint
des
LG
par
sur
l'appareil,
fins
professionnelles.
l'emballage
service.
garantie,
de
nos
importantes
de
ces
ils
sont
des
affectee.
ou
elements
propriete.
de
pieces
initiale
que
Electronics
l'appareil
contactez
centres
sont
conditions
applicables
autres
de
!
des
ou
en
de
20
P/No.3828FI3413K(Fra)
Page 21

Voor
dit
apparaat
Garantiecertificaat
verlenen
wij
een
garantie
van
24
N
maanden!
Gedurende
herstellen
niet
meer
uitgesloten.
deze
of
garantieperiode
de
vervangingsstukken
naar
behoren
Kosten
en
functioneert
risico's
die
verzendings-enverpakkingskosten,
de
keerzijde
Toesteltype
Naam
Aankoopdatum
vermelde
:
van
de
koper
:
garantiebepalingen!
:
Garantievoorwaarden
1.
De
garantietermijn
en
duurt24maanden.
-termijn
het
aankoopbewijs
samen
ondertekende
van
het
ingevulde
2.
Tijdensdegarantieperiode
alle
gebreken,
dat
ze
materiaalfouten.
3.
De
garantie
als
geldt
met
de
product
nummer
veroorzaakt
door
garantiekaart.
moet
indien
is
beschadigingen
ondeskundige
nemen
De
onderdelen
van
garantie
behandeling,
de
handleiding
geldt
en
licht
kijkvensters, glim-engloeilampen).
Beschadigingen
en
ook
de
vallen
niet
die het
verzendings-enverpakkingskosten
onder
deze
met
Het
de
begin
wanneer
begint
bevestigd,
(kwitantie/kassabon)
de
verkoper
Het
overeenstemmen
de
op
garantiekaart!
verhelpen
aangetoond
door
zijn
niet
van
en
niet
gevolg
toepassing
voortkomen
het
normale
voor
delen
zijn
die
ook
breekbare
garantie.
van
24
maanden
ter
gratis
door
ontstaan
vallen
niet
aankoopdatum
van
de
garantie
de
koper
voorlegt
ingevulde
serienummer
met
wij
gratis
kan
worden
fabricage-
nietinacht
slijtage.
versleten
(zoals
van
transport
beschikking
fabricage-
door
overmacht
onder
en
het
of
voor
uit
bijv.
verplichten
te
stellen
of
materiaalfouten.
of
deze
garantie.
Serienr
stempel/
4.
voor
De
beslissing
:
handtekening
stofzuiger
vervan-ging
Omgeruilde
onze
eigendom.
van
onderdelen
verlengd.
5.
De
garantie
het
apparaat
niet
voor
Electronics
wordt
ingezet
6.
Het
is
noodzakelijk
bewaard
zonder
tran-sporteren.
7.
Om
de
wenden
servicecenter.
8.
Andere
delen
gelden
andere
beinvloed.
garantie
van
ze
ons
wij
bij
het
gevolg
Voor
over
is
aan ons
of
vervangen
vervalt
verricht
service
en
vervalt
voor
om
wordt,
risico
op
tot
uw
handelaar
aanspraken
deze
naar
inhoud.
bepa-lingen
ertoe
uw
uw
het
van
apparaat
vakhandelaar,
Andere
zijn
aanspraken
van
transport,
overige
de
handelaar
gelden
herstelling,
voorbehouden.
onderdelen
Door
herstellingofvervanging
wordt
de
garantietermijn
zodra
herstellingen
worden
door
geautoriseerd
tevens
zodra
professionele
dat
de
het
apparaat
doeleinden.
originele
voor
beschadigingen
aan
te
spreken
of
een
zijn
uitgesloten!
bepalingen
De
wordt
ongeldig
geldigheid
hierdoor
te
gratis
indien
het
zijn
zoals
de
op
worden
niet
aan
het
die
door
LG
apparaat
of
omruiling
personen
zijn
het
verpakking
herstelling
te
kunnen
moet
u
zich
geautoriseerd
Indien
dan
zijn,
van
de
niet
P/No.3828FI3413K(Ned)
21
Page 22

D
Garantieurkunde
wir
Fur
dieses
Gerat
ubernehmen
24
Monate
Garantie!
Wir
verpflichten
Ihrem
Fachhandler
Fabrikations
ausgeschlossen.
und
Verpackungskosten
uns,
-
oder
Beschadigungen
Garantiebedingungen!
Geratetyp
Name
Kaufdatum
1.
Die
und
der
Kaufer
zusammen
und
Die
eingetragenen
ubereinstimmen!
2.
Wahrend
kostenlos
auf
zuruckzufuhren
3.
Ausgeschlossen
Schaden,
Nichtbeachtung
Abnutzung
Garantie
zerbrechliche
Glimm-
Transport
und
:
des
Kaufers
:
Garantiezeit
erstreckt
Garantiezeit
unterschriebenen
Seriennummer
sich
den
Kaufbeleg
mit
der
alle
die
auftreten.
nicht
Produktteile
oder
Gluhlampen).
Mangel,
durch
der
Fabrikations-
gilt
der
Nummer
sind.
auf
entstehen,
Verpackungskosten
wahrend
die
Materialfehlers
:
der
Ersatzteile
gehen
24-monatigen
kostenlos
versagen
durch
zu
lhren
Garantiebedingungen
mit
dem
beginnt
uber
24
Monate.
als
nachgewiesen,
(Quittung/Kassenzettel)
vom
Verkaufer
Garantiekarte
des
Produkts
auf
Garantiezeit
soweit
oder
von
der
unsachgemaße
Ebenso
(wie
zu
und
z
Schaden,
ebenso
Lasten
Anleitung
Verschleiß
gehen
Kaufdatum
Der
ausgefullten
vorlegt.
muß
der
Garantiekarte
beheben
sie
nachweislich
Materialfehler
Garantie
Behandlung,
betriebsbedingte
erstreckt
teile
und
.B
.
Sichtscheiben,
die
wie
des
Kaufers.
hohere
Lasten.
Beginn
wenn
mit
sich
leicht
auf
Versand
der
der
wir
sind
die
dem
Garantiezeit
zur
Verfugung
sollte.
Weitergehende
Gewalt
Im
Ubrigen
Seriennummer
Stempel
fur
4.
Die
oder
ersetzte
Durch
ursprungliche
5.
Der
Personen
LG
sind
Zwecken
6.
Heben
auf,
Beschadigungen
7.
Wenden
Fach-handler
Servicecenter.
8.
Weitergehende
ausgeschlossen!
Bestimmungen
-
sinngemaß.
Bestimmungen
lhr
Gerat
zu
oder
auf
dem
gelten
:
/
Unterschrift
Staubsauger
Entscheidung
Ersatz
bleibt
Teile
Reparatur
Garantieanspruch
in
Electronics
-
ebenso,
eingesetzt
Sie
unbedingt
damit
das
Sie
kostenlos
stellen,
wenn
Anspruche
Transportweg
unsere
gehen
Garantiezeit
das
nicht
sobald
umseitig
des
uber
bei
uns.
in
oder
Gera
fur
das
wird.
die
Geratim
transportiert
sich
im
oderaneines
Anspruche
Sollten
unwirksam
Die
Wirksamkeit
wird
hiervon
instandzusetzen
es
infolge
sowie
uns
Versand-
gegen
aufgefuhrten
Fachhandlers
Reparatur,
Austausch
Ausgetauschte
unser
Eigentum
Teileersatz
nicht
verlangert!
erlischt,
t
eingreifen,
den
Service
Gerat
autorisiert
zu
gewerblichen
Originalverpackung
Servicefall
werden
Garantiefall
unserer
sind
sein,
nicht
kann.
autorisierten
Teile
so
gelten
der
beruhrt.
wird
sobald
die
an
dieser
u
brigen
bzw.
eines
sind
oder
uber.
die
von
ohne
lhren
sie
22
P/No.3828FI3413K(Deu)
Page 23

P/No.:
3828Fi3413K
 Loading...