

Page 1

Touch Slim
OWNER’S MANUAL
MODEL: V25
Please read this manual carefully before operating
your set.
Retain it for future reference.
Designs and specifications are subject to change
without notice for improvement.
Page 2
IMPORTANT SAFETY INSTRUCTIONS
2
Warning
- To reduce the risk of fire or electric shock, do not expose
this appliance to rain or moisture.
Caution
- The appliance is not intended for use by young children or infirm
persons without supervision.
- Young Children should be supervised to ensure that they do not
play appliance.
- Use of controls or adjustments or performance of procedures other
than those specified herein may
result in hazardous radiation ex-
posure.
Industry Canada requirement
- This Class B digital apparatus complies with Canadian ICES-003.
- Cet appareil numérique de la classe B est conforme qa la norme à
NMB-003 du Canada.
FCC COMPLIANCE STATEMENT
Note
This equipment has been tested and found to comply with the limits for a
Class B digital device, pursuant to Part 15 of FCC Rules. These limits are
designed to provide reasonable protection against harmful interference in a
residential installation. This equipment generates, uses, and can radiate
radio frequency energy and, if not installed and used in accordance with
the instructions, may cause harmful interference to radio communications.
However, there is no guarantee that interference will not occur in a particular installation.If this equipment does cause harmful interference to radio or
television reception, which can be determined by turning the equipment off
and on, the user is encouraged to try to correct the interfer- ence by one or
more of the following measures:
- Reorient or relocate the receiving antenna.
- Increase the separation between the equipment and receiver.
- Connect the equipment into an outlet on a circuit
different from that to which the receiver is connected.
- Consult the dealer or an Authorized Service Center for help.
FCC WARNING
This equipment may generate or use radio frequency
energy. Changes or modifications to this equipment may cause harmful interference unless the modifications are expressly approved in the
instruction manual.
You could lose the authority to operate this equipment if an unauthorized change or modification is made.
- Changes or modifications not expressly approved by the party responsible for compliance could void the user's authority to operate
the equipment.
- This MP3 player is for use only with UL listed personal computers
that have installation instructions detailing user installation of card
cage accessory.
Disposal of your old appliance
1. When this crossed-out wheeled bin symbol is attached to a product it
means the product is covered by the European Directive 2002/96/EC.
2. All electrical and electronic products should be disposed of separately
from the municipal waste stream via designated collection facilities
appointed by the government or the local authorities.
3. The correct disposal of your old appliance will help prevent potential
negative consequences for the environment and human health.
4. For more detailed information about disposal of your old appliance,
please contact your city office, waste disposal service or the shop
where you purchased the product.
- The lithium battery contains lithium and can explode if it is not properly
handled of disposed of.
- Replace only with a battery of the type recommended by LG.
- Caution: Danger of explosion if battery is incorrectly replaced. Replace
only the rechargeable lithium battery with Amperex Technology Ltd. or
LG, Part No.(GB-S10-422339-0400) having the cell, 422339. Use of
Another Cell May Present a Risk of Fire or Explosion.
CAUTION
RISK OF ELECTRIC SHOCK
DO NOT OPEN
CAUTION: TO REDUCE THE RISK
OF ELECTRIC SHOCK
DO NOT REMOVE COVER (OR BACK)
NO USER-SERVICEABLE PARTS INSIDE
REFER SERVICING TO QUALIFIED SERVICE
PERSONNEL.
This product is manufactured to comply with the
EEC DIRECTIVE 2004/108/EC and 2006/95/EC.
The working life of this product is 7 years
since the date of purchase.
Page 3
IMPORTANT SAFETY INSTRUCTIONS
3
CAUTION
PLEASE READ AND OBSERVE ALL WARNINGS AND INSTRUCTIONS
IN THIS OWNER MANUAL AND THOSE MARKED ON THE UNIT. RETAIN THIS BOOKLET FOR FUTURE REFERENCE.
This product has been designed and manufactured to assure personal safety. Improper use can result in electric shock or fire hazard.
The safeguards incorporated in this unit will protect you if you observe the following procedures for installation, use, and servicing.
This unit does not contain any parts that can be repaired by the user.
DO NOT REMOVE THE CABINET COVER, OR YOU MAY BE EXPOSED
TO DANGEROUS VOLTAGE. REFER SERVICING TO QUALIFIED SERVICE PERSONNEL ONLY.
1. Read these instructions.
- All these safety and operating instructions should be read before the
product is operated.
2. Keep these instructions.
- The safety, operating and use instructions should be retained for future reference.
3. Heed all warnings.
- All warnings on the product and in the operating instructions should
be adhered to.
4. Follow all instructions.
- All operating and use instructions should be followed.
5. Do not use this apparatus near water
- For example: near a bath tub, wash bowl, kitchen sink, laundry tub,
in a wet basement; or near a swimming pool;and like.
6. Clean only with dry cloth.
- Unplug this product from the wall outlet before cleaning.Do not use
liquid cleaners.
7. Do not block any ventilation openings. Install in accordance with
the manufacturer is instructions.
- Slots and openings in the cabinet are provided for ventilation and to
ensure reliable operation of the product and to protect it from overheating.
- The openings should never be blocked by placing the product on a
bed, sofa, rug or other similar surface.This product should not be
placed in a built-in installation ventilation is provided or the manufacturer instructions have been adhered to.
- Important Safety Instructions
8. Do not install near any heat sources such as radiators, heat regis-
ters, stoves, or other apparatus (including amplifiers) that produce
heat.
9. Do not defeat the safety purpose of the polarized or grounding-
type plug. A polarized plug has two blades with one wider than the
other.A grounding type plug has two blades and a third grounding
prong. The wide blade or the third prong are provided for your
safety.
- If the provided plug does not fit into your outlet, consult
an electrician for replacement of the obsolete outlet.
10. Protect the power cord from being walked on or pinched particu-
larly at plugs, convenience receptacles, and the point where they
exit from the apparatus.
11. Only use attachments/accessories specified by the manufacturer.
12. Use only with the cart, stand, tripod, bracket, or table specified by
the manufacturer, or sold with apparatus.
- When a cart is used, use caution when moving the cart/apparatus combination to avoid injury from tip over.
13. Unplug this apparatus during lightning storms or when unused for
long periods of time.
14. Refer all servicing to qualified service personnel.
Servicing is required when the apparatus has been damaged in
any way, such as power- supply cord or plug is damaged, liquid
has been spilled or objects have fallen into the apparatus, the apparatus has been exposed to rain or moisture, does not operate
normally, or has been dropped.
Page 4

Safety tips . . . . . . . . . . . . . . . . . . . . . . . . . . . . .5
General information of MP3 player . . . . . . . . .6
Name of each component . . . . . . . . . . . . . . . .7
Installing software . . . . . . . . . . . . . . . . . . . . .8-9
Before installing the operating program . . . . . . . . . . . . . .8
About LG Media Center . . . . . . . . . . . . . . . . . . . . . . . . .8
Installing LG Media Center . . . . . . . . . . . . . . . . . . . . .8-9
Installation of the Adobe Acrobat Reader . . . . . . . . . . . . .9
View the manual . . . . . . . . . . . . . . . . . . . . . . . . . . . . . . .9
Connecting to the PC . . . . . . . . . . . . . . . .10-13
To connect the USB cable . . . . . . . . . . . . . . . . . . . . . . .10
To disconnect the USB cable . . . . . . . . . . . . . . . . . . . . .10
To download files-MTP mode . . . . . . . . . . . . . . . . . .11-12
To download files - MSC mode . . . . . . . . . . . . . . . . . . .12
To download files-LG Media Center . . . . . . . . . . . . . . . .13
Converting video files . . . . . . . . . . . . . . . . . .14
Charging the MP3 player . . . . . . . . . . . . . . . .15
Basic operation . . . . . . . . . . . . . . . . . . . . . . . .16
To Turn on/off the power . . . . . . . . . . . . . . . . . . . . . . . .16
Lock feature . . . . . . . . . . . . . . . . . . . . . . . . . . . . . . . . . .16
Reset feature . . . . . . . . . . . . . . . . . . . . . . . . . . . . . . . . .16
Home menu screen . . . . . . . . . . . . . . . . . . . . . . . . . . . .16
General operations of Home menu . . . . . . . . . . . . . . . .16
Volume control . . . . . . . . . . . . . . . . . . . . . . . . . . . . . . . .16
Playing music . . . . . . . . . . . . . . . . . . . . . .17-18
Music playing screen . . . . . . . . . . . . . . . . . . . . . . . . . . .17
Music menu . . . . . . . . . . . . . . . . . . . . . . . . . . . . . . . . . .17
To play the music files . . . . . . . . . . . . . . . . . . . . . . . . . .18
To pause . . . . . . . . . . . . . . . . . . . . . . . . . . . . . . . . . . . .18
Speed search . . . . . . . . . . . . . . . . . . . . . . . . . . . . . . . .18
Skipping to the next or previous music file . . . . . . . . . . .18
EZ menu . . . . . . . . . . . . . . . . . . . . . . . . . . . . . . . . . . . .18
Playing video . . . . . . . . . . . . . . . . . . . . . . . . . .19
Video playing screen . . . . . . . . . . . . . . . . . . . . . . . . . . .19
To play video files . . . . . . . . . . . . . . . . . . . . . . . . . . . . .19
To pause . . . . . . . . . . . . . . . . . . . . . . . . . . . . . . . . . . . .19
Skipping to the next or previous video file . . . . . . . . . . .19
Speed search . . . . . . . . . . . . . . . . . . . . . . . . . . . . . . . .19
Volume control . . . . . . . . . . . . . . . . . . . . . . . . . . . . . . . .19
EZ menu . . . . . . . . . . . . . . . . . . . . . . . . . . . . . . . . . . . .19
Viewing photo . . . . . . . . . . . . . . . . . . . . . . . .20
To view the photo files . . . . . . . . . . . . . . . . . . . . . . . . . .20
To view the previous or next photo . . . . . . . . . . . . . . . .20
EZ menu . . . . . . . . . . . . . . . . . . . . . . . . . . . . . . . . . . . .20
FM radio reception(Optional) . . . . . . . . . .21-22
FM radio reception screen . . . . . . . . . . . . . . . . . . . . . . .21
Setting preset channels . . . . . . . . . . . . . . . . . . . . . . . . .21
Set/Cancel mute . . . . . . . . . . . . . . . . . . . . . . . . . . . . . .21
Listening to the FM the radio . . . . . . . . . . . . . . . . . . . .21
Scanning the FM radio stations . . . . . . . . . . . . . . . . . . .21
Recording the FM radio broadcasting . . . . . . . . . . . . . .21
Listening to the recorded file . . . . . . . . . . . . . . . . . . . . .21
EZ menu . . . . . . . . . . . . . . . . . . . . . . . . . . . . . . . . . . . .22
All files . . . . . . . . . . . . . . . . . . . . . . . . . . . . . . .22
Voice recording . . . . . . . . . . . . . . . . . . . . . . . .22
Listening to the recorded file . . . . . . . . . . . . . . . . . . . . .22
EZ menu . . . . . . . . . . . . . . . . . . . . . . . . . . . . . . . . . . . .22
Advanced setting . . . . . . . . . . . . . . . . . . . . . .23
Settings menu list . . . . . . . . . . . . . . . . . . . . . . . . . . . . . .23
Music . . . . . . . . . . . . . . . . . . . . . . . . . . . . . . . . . . . . . . .23
Photo . . . . . . . . . . . . . . . . . . . . . . . . . . . . . . . . . . . . . . .23
Time . . . . . . . . . . . . . . . . . . . . . . . . . . . . . . . . . . . . . . . .23
Display setting . . . . . . . . . . . . . . . . . . . . . . . . . . . . . . . .23
Power management . . . . . . . . . . . . . . . . . . . . . . . . . . .23
General . . . . . . . . . . . . . . . . . . . . . . . . . . . . . . . . . . . . .23
Additional information . . . . . . . . . . . . . . .24-25
Running Firmware updater . . . . . . . . . . . . . . . . . . . . . .24
Running recovery . . . . . . . . . . . . . . . . . . . . . . . . . . . . . .25
Firmware update . . . . . . . . . . . . . . . . . . . . . . . . . . . . . .25
Troubleshooting . . . . . . . . . . . . . . . . . . . . . . .26
Specifications . . . . . . . . . . . . . . . . . . . . . .27-28
Supported file specification . . . . . . . . . . . . . . . . . . . . . .28
4
Table of Contents
Page 5
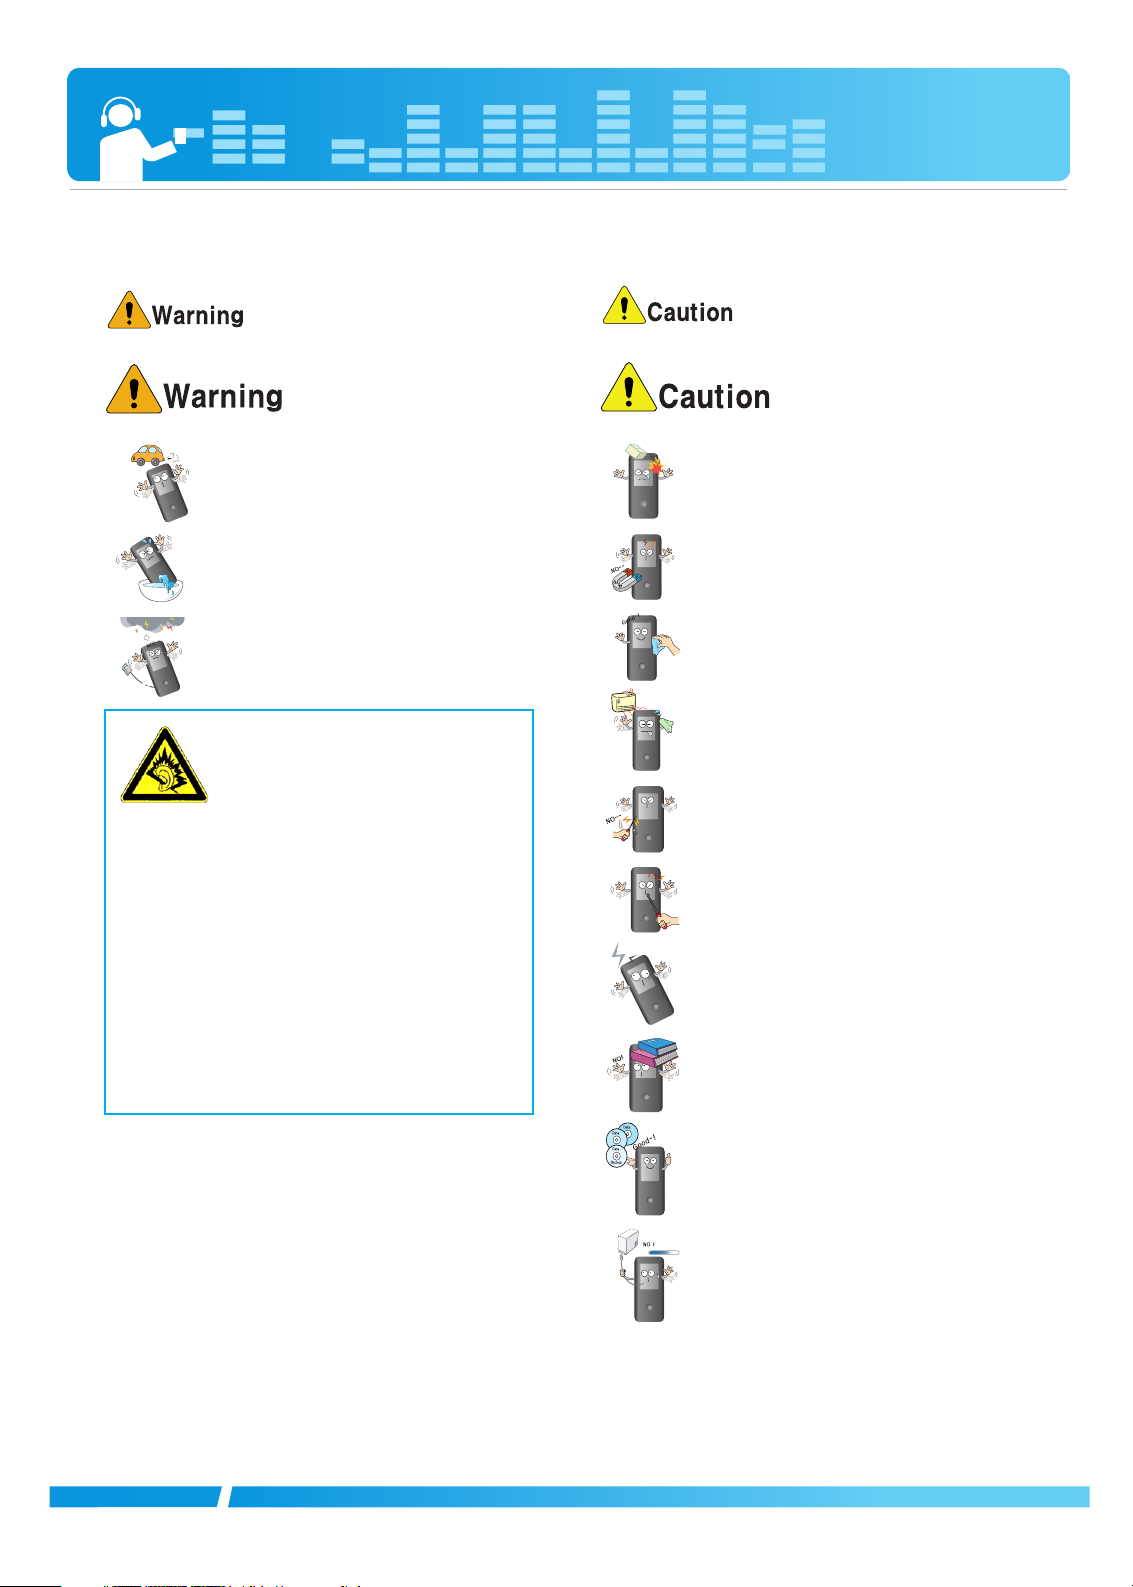
Please follow the safety tips closely to reduce the risk of accidents or damage to equipment.
Safety instructions are divided into Warning and Caution.
Keep this manual in an easily accessible place.
Do not use the Player and connect with the
cable or AC adapter when the rain is pouring
down and thunderstorms produce lightning.
Do not use this product while driving.
Do not operate the Player near water, dust, or
soot.
Not following the safety tips may result
in a light accident or damage.
Not following the safety tips may result
in death or serious injury.
Do not use the earphones loud while
walking,especially on the crosswalks.
Stop using earphones or lower the
volume when you have ringing in your ears.
Careful that headphones or earphones do not
slip into the subway doors or automatic doors.
Listening to the music loud for a long time may
compromise your hearing ability.
Do not use earphones while riding bicycles
and motor cycles or driving a car.
Check the volume before using a
headphone. If headphones are used at high
volume for more than 30 minutes, it may result
in noise induced hearing damage.
Do not place the player near a magnet or within the
magnetic field.
Note that the player may malfunction in an electrostatic environment.
Do not disconnect the USB cable. Do not turn off the
player while the USB cable is connected. Otherwise,
the data may get lost.
Back up important data. (Note that the manufacturer
is not responsible for the loss of major data caused
by the user's mistake.)
Do not insert a metallic object (coins or hair pins,
etc.) or flammable objects in the product.
Do not drop such objects on the product either.
Do not place an object on the product.
Keep this product away from heat.
Clean the Player with soft cloth.
Do not disassemble, repair, or remodel the product.
Do not drop an object or give shock on the
product.
5
Safety tips
Page 6

Features
Portable Data Storage
Easy storage and transfer of any file type.
USB 1.1 and 2.0
You can download files at a fast speed. (USB 2.0 high speed)
Touch pad
You can use the menus and functions of MP3 player by tapping the
touch pad.
Brilliant 1.77" Color OLED
Photos and video are reproduced in vivid detail on the highly portable
260,000 color OLED.
FM Reception(Optional)
With auto frequency selection feature, you can conveniently listen to
the FM radio broadcasting.
Voice Recording
With the built-in microphone, you can record your voice and FM radio
broadcasting anywhere.
Photo Viewer
Store and display photos on the vivid display for entertaining slide
shows.
File Format Flexibility
- Music: MP3, OGG, WMA, WAV
- Video: LG AVI (
The player can be only played the video files down-
loaded via LG Media Center.)
- Photo: JPG, BMP, GIF
Media Device(MTP) Mode /
Removable Disk(MSC) Mode
What is the MTP mode?
MTP stands for the Media Transfer Protocol. MTP applies the latest
technology of Microsoft to support the multimedia devices.
What is the MSC mode?
The MSC stands for the Mass Storage Class. The device in the MSC
mode functions as if the portable memory.
Converting video file
MP3 player can be only played the video files downloaded via LG
Media Center.
For details about download, see the Help menu [Converting video
file] on LG Media Center.
PC Connection
Media Device(MTP) Mode
- You should download music files via LG Media Center or Windows Media Player 10 or higher.
- You should download music, video and photo files via LG Media
Center.
- You can copy data files to the Data folder. (You can’t see the data
folder in your MP3 player.)
- If the Windows OS does not support the MTP, the player will function in the MSC mode.
Removable Disk(MSC) Mode
You can copy the Media file to the Removal Disc. (But you should
download video files via LG Media Center.)
Supplying Power via USB
- If the battery status is low when connecting MP3 player to your
PC with USB cable, MP3 player may not be connected for a few
minutes.
- If your PC is suspended, MP3 player is also suspended.
Package contents
- The images inserted herein are examples to make users understand
the more easily and may be little bit different from the real product.
- The contents of the product are subject to change without prior notice for functional improvement.
M
EZ
V25 USB cable
Software CD Earphones Quick Setup Guide
6
General information of MP3 player
On Windows 98SE/ME version, the player is connected and
functions only in MSC mode. ; On Windows 2000/XP/Vista is
connected and functions in both MTP and MSC mode.
Page 7
M
EZ
* Precautions in using the touch pad
Do not tap the touch pad hard to make it work.
- If you apply too much strength, it can damage the sensor of the touch pad.
Do not tap on the touch pad with your fingers unclean or gloves on.
- Otherwise, the selected function may not operate in any way. Use it with bare hands lightly.
Be careful not to press any conductive material such as metallic object on the touch pad.
- Otherwise, it can cause malfunctions.
ih gf
a
b
c
7
Name of each component
e
d
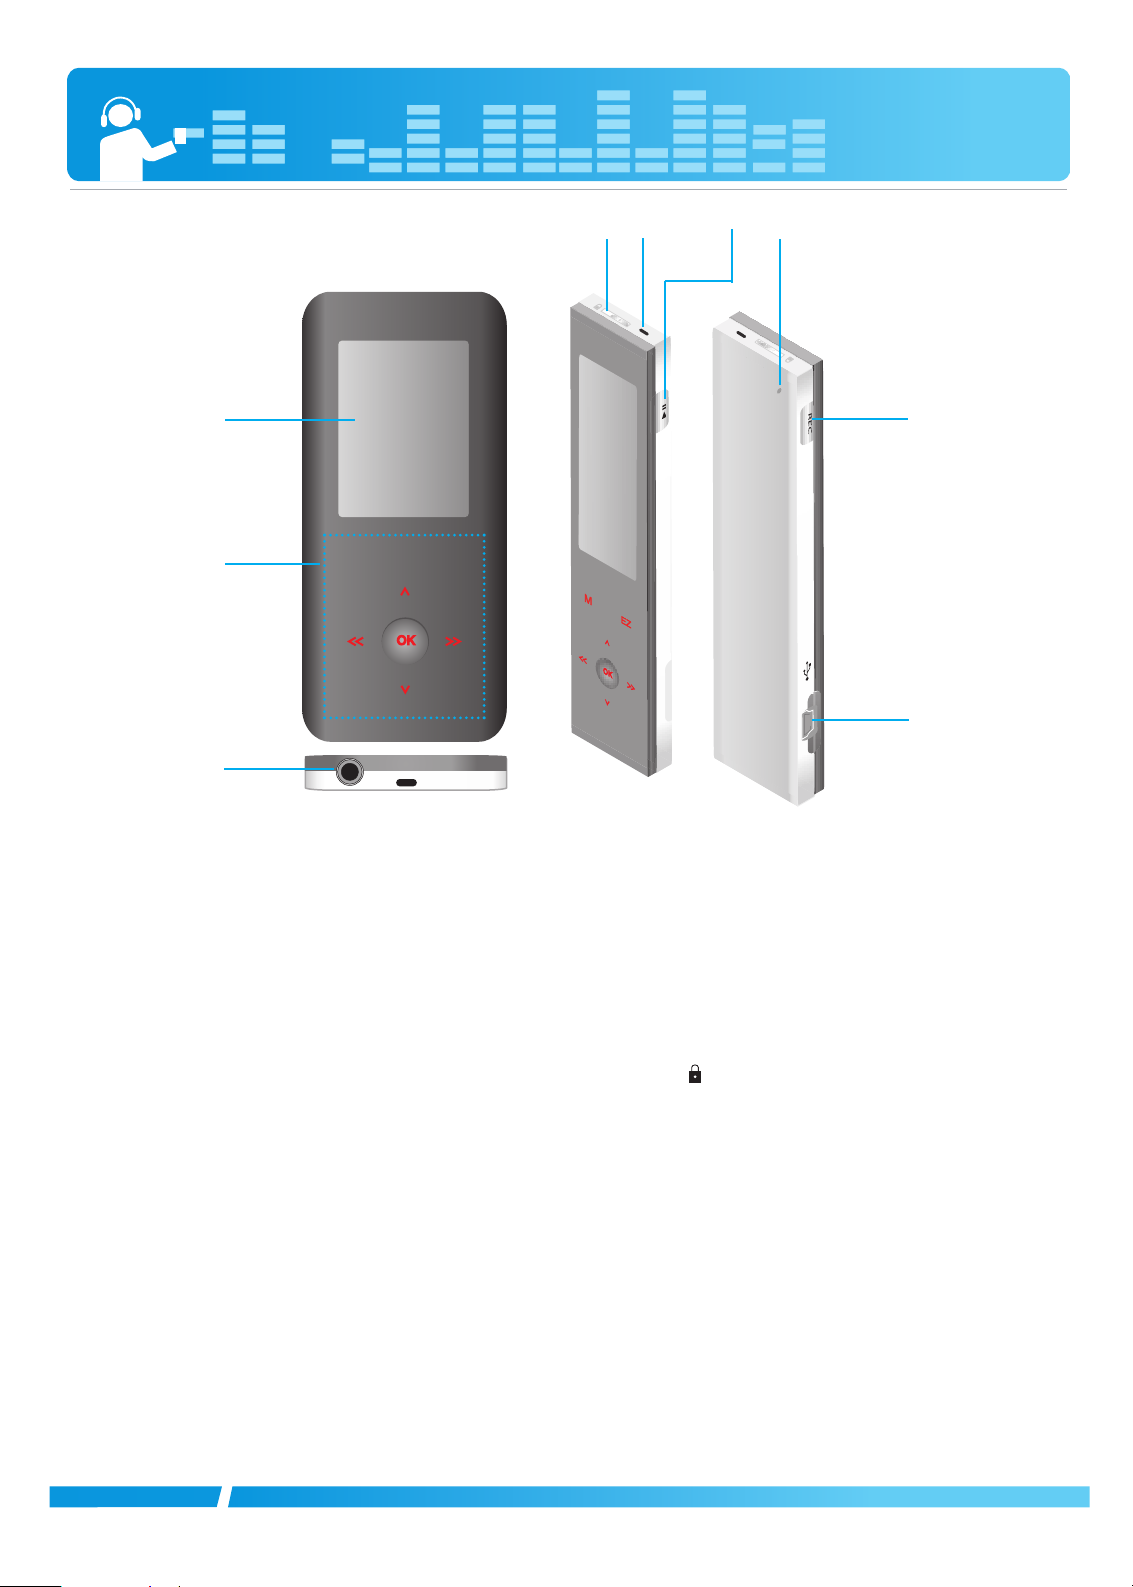
1 Display screen
2 (*Touch pad)
• M: Moves to Menu
• EZ : Takes a shortcut for ez menu
• OK: Confirms selected menus
•
uu//UU
: Adjusts volume in music/radio mode
Searches menu lists/files/channels
•
IIII
//
iiii
: Operates as REW/FF button
Adjusts volume in movie mode
3 Earphone jack
4 USB port
5 Record (REC) button
6 RESET hole
7 • Power on/off
• Play/Pause (BX)
8 Microphone hole
9 Hold switch ( )
Page 8

Before installing the operating program
Check the specifications of your PC before using
the Player.
Minimum system requirements
- CD-ROM Drive
- Pentium ΙΙΙ or higher level CPU / 128MB or larger memory
- 300MB or larger hard disc space, 800 X 600 mode
- Hi-color (16 bit) or higher level video card, Sound card
Operating environment
- The MTP mode is applied to the PC equipped with Windows XP
(SP1) or higher-version OS or the Windows Media Player 10/11.
To the lower-version OS, the MSC mode is applied.
Windows Media Player 10/11
- You can download the file using Synchronize with Windows Media
Player 10/11 menu.
- For more information, see the Help menu of Windows Media Player
10/11.
LG Media Center
- Windows 2000/XP/Vista
- Windows Media Player 10/11/ Internet Explorer 6.0
- Windows Media Player or Internet Explorer will be
automatically installed during installation of the LG Media Center.
Internet connection must be connected in order to install Internet
Explorer.
About LG Media Center
The LG Media Center program is an integrated data
management program developed for users to more
conveniently use the MP3 player.
Features of the LG Media Center
You can efficiently manage music, video, and photo files through the
Media Library rule and download them to the MP3 player.
Installing LG Media Center
1 Insert the operation program CD into the CD-ROM.
2 Select [LG Media Center].
3 Read the License Agreement. Select the check box and click [Next].
4 Select the installation path and click [Next].
Installing software
8
Page 9

5 Click [Install] to start installation.
6 After finishing the installation, click [Finish].
- You can install CODEC if it is not installed on PC.
7 Click [Start] k [All Programs] k [LG Media Center] to start the
program.
Note
- During installation of the LG Media Center, you can install the Windows Media Player and the Internet Explorer for an operating environment.
- The pop up image may be different depending on the OS of PC.
Installation of the Adobe Acrobat Reader
1 Insert the operation program CD into the CD-ROM.
2 Select [Adobe Acrobat Reader].
3 Follow the displayed instructions.
View the manual
1 Insert the operation program CD into the CD-ROM.
2 Select [Manual].
3 You can see the manual.
Note
You must install the Adobe Acrobat Reader to read the manual.
Installing software
9
Page 10

Connecting to the PC
10
To connect the USB cable
1 Connect one end of the USB cable to the USB port of the PC and
the other to the USB port of the player.
- Check whether both ends are correctly plugged in.
2 If the USB device is normally recognized after the cable is con-
nected, the following will be displayed.
- The software version is displayed on screen.
3 In case of a correct connection, an icon will be displayed on the
task bar of the PC.
- The icon shapes on the task bar may differ depending on the OS of the
PC.
To disconnect the USB Cable
Media Device(MTP) mode
Disconnect the USB cable from the PC after checking whether a file is
transferring.
If the file is transferring, disconnect it after the transfer is completed.
Removable Disk(MSC) mode
This feature is to safely remove MP3 player from the PC after uploading or downloading the files.
1 Double-click on the Remove Hardware icon on the task bar of
the PC.
2 Click [Stop] when the window appears.
3 Click [OK].
4 After a message that the large-capacity USB storage can be safely
removed is displayed, remove MP3 player from the PC.
- If the USB cable is disconnected while storing or deleting the file, the
data may get lost.
USB Connected
Page 11

Connecting to the PC
11
To download files - MTP mode
MP3 player will be recognized as a mobile device, not a mass storage, and will interwork with the Windows Media Player 10/11.
1 Connect one end of the USB cable to the USB port of the PC and
the other to the USB port of MP3 player.
- Check whether both ends of the cable are correctly plugged in.
2 The window “MTP Media Player” appears in the PC.
1) a. “Synchronize media files to this device” k “OK”
b. “Manual” k “Finish”
c.
Drag the synchronizing files to the left window.
d. Click
“Start Sync”.
Page 12

Connecting to the PC
12
2) a. “Take no action” k “OK”
b. Click “LGE MTP Player-V25”
.
- Data folder: You can download or upload all data files.
- Media folder:You can download only the file that Windows Media
Player 10 supports.
3 Drag the file to copy to the portable media drive.
Note
- When you cannot check the downloaded files on Media folder,
download it to the Data folder again.
- When you connect the device with Windows Media Player 10 or
higer version, you can download files directly to the device. That is,
lower folders below the device are not seperated to Data and Media
on Window Media Player 10 or higher.
To download files - MSC mode
1 Connect one end of the USB cable to the USB port of the PC and
the other to the USB port of MP3 player.
-
Check whether both ends of the cable are correctly plugged in.
2 Check whether a new drive has been added in the Windows Ex-
plorer in the PC.
- The drive name may differ depending on the OS.
3 Drag the file to copy to the removable disc drive.
- Disconnecting the USB cable while the file is being copied may cause
malfunction of MP3 player.
- MP3 player will be charged when connected to the PC through the
USB cable.
- Download video files from LG Media Center.
- Download the JANUS DRM-applied files through the Windows Media
Player 10 or higher, or LG Media Center (MTP Mode only).
Data
Media
Data
Media
Data
Media
LGE V25R
Page 13

Connecting to the PC
13
To download files - LG Media Center
You can download from MP3 player the files you want via LG Media
Center.
For details, see the Help menu on LG Media Center.
- You can check the downloaded files in the Music, Video, Photo, or
Document folder.
- OGG files only are supported in MSC mode.
1 Connect one end of the USB cable to the USB port of the PC and
the other to the USB port of MP3 player.
-
Check whether both ends of the cable are correctly plugged in.
2 Execute the LG Media Center and then click [Add Library].
3 [Add file/folder] k Selecting the downing file (Ex: Music file) k
[Apply] k [Ok] k [Close]
4 [Music] k [Send to Device]
5 Drag the files to the [Send to Device].
Page 14

Converting video files
14
MP3 player can only play the video files downloaded via LG Media
Center.
For details about download, see the Help menu [Converting video file]
on LG Media Center.
1 Execute the LG Media Center.
2 Selecting [Tools] k [Advanced Tools] k [Convert Format].
3 In case that PlayDec(codec for converting) is not installed or the lat-
est version, the pop-up window appears as below.
Press [Ok] to move to the site you can download the updated PlayDec version.
4 Download and install the latest updated PlayDec version.
5 Click [Ok].
6 Click [Add] to select a video file you want to convert.
7 Check the video file and then select the Model, Resolution, and
Output in [Convert Format] menu.
8 Click [Start], the selected video file start converting.
- After converting, check the video file where the file is .
- For details, see the Help menu on LG Media Center.
Page 15

USB cable
MP3 player will be also automatically charged when connecting
the PC and MP3 player with USB cable.
- On the display of MP3 player, the charging status will be displayed
as follows: (Charging time : More than 2 hours)
Note
- MP3 player may be completely discharged first time you purchase
the product. Charge the battery first.
- Charging time may vary according to PC system requirements or op-
erating environment. If your PC is suspended, MP3 player is not
charged.
-
Do not charge MP3 player for longer than 12 hours. Overcharge and
overdischarge may shorten the battery life.
-
After checking the state of a remaining battery of note book, connect
the USB cable and charge it.
-
Do not charge it when the remaining battery of the note book is not
enough.
-
If you transfer files on charging, the charging time will be extended.
-
Charge the battery in a place with a normal temperature.
Charging the MP3 player
15
USB Connected
Firmware Ver. S 0.42
Charging status
Page 16

Basic operation
To Turn on/off the power
Press and hold BX for about 2 seconds until the player is turned on.
Press and hold
- Downloading files in the MTP/MSC mode may take time for rebuilding
depending on the number of files.
Note
In case the available space of the player is smaller than 10 MB after
downloading files into the player, you cannot turn it on. Remove files
to ensure enough space in it.
BX for about 2 seconds again to turn off the player.
Power On
Power Off
Lock feature
This feature locks the player to prevent it from operating when
you accidentally press a button.
1 Push the Hold switch in the direction of the to lock
MP3 player.
- Upon locked status, will be displayed on screen.
Upon pressing of each button, will appear for two seconds and disappear.
Locked
Locked
2 Push the Hold switch in the opposite direction of the
button to unlock the player.
Reset feature
This feature is to reset the player if the player is not operated
normally.
1 Press the RESET hole with pointed object like a sharp pencil when
the player is suspended.
Reset hole
Home menu screen
You can operate various features by using the Home menu.
* Home menu screen varies according to product models (See on
page 27)
List type
Wheel type
1 Music: Plays the music files.
2 Movie: Plays the movie files.
3 Photo: Plays the image files.
4 Radio: Receives and records FM broadcasting.
(Optional according to models)
5 Record: Records the voice.
(Optional: According to models, it may not be displayed.)
6 Settings: Sets the operating environment of the player.
7 All Files: Displays the playable total list.
General operations of Home menu
1 Press and hold MENU button for about 2 seconds to display the
Home menu.
//
IIII
2 Press
iiii
to select the desired menu.
3 Press OK to enter submenu.
4 Press M(MENU) to return to the previous menu.
Volume control
uu//UU
Press
- The volume level can be adjusted by 30 steps. (MIN, 1 - 29, MAX)
- If you press
step.
- The default volume is 15.
- To protect hearing, the maximum volume is set as 21 when you turns
on the player.
to control the volume.
uu//UU
, the volume levels will decrease or increase by 1
2 After the power is turned off, press and hold BX for about two sec-
onds. Then, the power will be turned on.
- Reset function initializes setting values.
16
Page 17

Music playing screen
1 Battery status
2 Playback time
3 Play/Pause diaplay image
4 Playing time bar
5 Remaining time
6 Music information display(Album, Artist, Title)
7 Playback image (Album art)
Tip
- The playback image is displayed as an album art of a currently playing
music file when you download the music fle via Windows Media Player
10/11.
- Supported album art - ID3 Tag
Music menu
Random All
Plays the music file randomly.
- When you set [Random All] during operation, the play mode is changing
to [Random All].
Play list
• My Playlist
You can check the music files you already selected and added
from each music menu.
1 Select the music you want to add on the [My Playlist] from the
music menu list and then press EZ.
- changes to and it is added in [My Playlist].
- It can add one at a time.
- You can confirm and play the added music in [My Playlist].
2 Press EZ again to delete an added music in [My Playlist].
-
Press EZ for longer that 2 seconds after selecting an added file to
delete all of the music files added in [My Playlist].
- icon changes to .
- When the list is updated, the my playlist will be automatically disabled.
•
PC Playlist :
You can play the MP3 player automatically the playlist created in the
WMP 10/11 (Windows Media Player 10/11) or the LG Media Center
through the Auto Sync mode.
- When the playlist and corresponding files are unchecked in the Auto
Sync mode, music will be deleted in the MP3 player. It is recommended to keep all Music files always checked.
All Music
Displays the total music.
Artist
Plays the music by artist.
Album
Plays the music by album.
Genre
Classifies and plays music by genre.
Recorded File
Plays the radio recording file (Optional) or voice recording file.
Playing music
17
g
f
e
d
a
b
c
Page 18

Playing music
18
To play the music files
1 Move to the Home menu, and press
IIII
//
iiii
to select [Music]
menu.
2 Press OK to enter the submenu.
3 Press
uu//UU
to select a desired menu and OK to confirm.
4 Press
uu//UU
to select a music file.
5 Press OK to play.
Note
You can play other music file on the music file list while playing a
music.
1. Press M(MENU) during playback.
- The music file list appears.
2. Press
uu//UU
to select the music file. And then press OK to play the
selected file.
- Press and hold M(MENU) for 2 seconds to display home menu.
Tip
- By pressing BX, you can check the currently playing music file or
play the even last played music file In Home or in other submenu
list.
To pause
1 Press BX during playback.
2 Press BX again to resume playback.
Speed search
1 Press
IIII
for longer than 2 seconds, and you can jump to the for-
mer part of the currently playing music file during playback.
2 Press
iiii
for longer than 2 seconds, and you can jump to the latter
part of the currently playing music file during playback.
3 If you skip to the beginning/end of the current file with
IIII
//
iiii
, the
previous or next file will be played.
Skipping to the next or previous music
file
1 In play/pause state, press
iiii
briefly to skip to the next music file.
2 In play/pause state, press
IIII
, the music will go back to the previous music file if the music is playing within 5 seconds; and the
music will restart playing if the music is playing after 5 seconds.
EZ menu
You can set the desired function or switch to the other mode using EZ
menu.
1
Press EZ to display EZ menu screen while playing or pausing.
2 Press
uu//UU
to move to the desired item.
3 Press OK to move to the submenu.
4 Press OK once to change the setting.
5 Press EZ to exit the EZ menu.
Play Mode
You can select the play mode you want.
- [Repeat One]: Plays the current file repeatedly.
- [Play All]:
Plays all music within the selected folder in order.
- [Repeat All]: Plays all music within the selected folder repeatedly.
- [Random All]: Plays all music within the selected folder randomly.
- [Random Repeat All]: Repeats all music within the selected folder
randomly.
EQ
You can set the sound effect.
• Auto EQ, FLAT, XTS-Pro, POP, ROCK, R&B/SOUL, HIPHOP/RAP,
JAZZ, CLASSICAL, DANCE, LIVE
Create/Delete My Playlist
- When a currently playing music file is not added in Playlist, “Cre-
ate My Playlist” is displayed.
- When a currently playing music file is added in Playlist, “Dlete My
Playlist” is displayed.
Delete File
You can delete a currently playing file.
1 Select [Delete File].
2 Select [Yes] or [Cancel] when the message “Delete file?”.
View Information
- You can check bitrate, file size, sampling frequency, Codec, and
the settings of Auto Power OFF and Sleep Mode.
Page 19

Playing video
19
Video playing screen
1 Playing screen
2 Playback time
3 Playing time bar
4 Remaining time
To play video files
MP3 player can be only played the video files downloaded via LG
Media Center. For details about downloading, see [Converting video
file] of Help menu on LG Media Center.
1 Move to the Home menu, and press
IIII
//
iiii
to select [Movie]
menu.
2 Press OK to enter the [Movie] menu.
3 Press
uu//UU
to select the video file.
- The list is displayed on screen.
- If there is no list, “No file” appears on screen.
- If you select [Last Played File], the last played file will be played.
4 Press OK to play.
- The movie file is played.
- The movie file will be displayed on the horizontal screen.
5 Enter to the movie list screen if M(MENU) is pressed while playing
the video file.
- Press and hold M(MENU) for two seconds to enter home menu.
To pause
1 To pause, press BX once.
2 Press BX again to resume playing.
Skipping to the next or previous video
file
•
Press IIto skip to the previous file.
•
Preess
ii
to skip to the next file.
-
If you press IIafter 5 seconds of playing time, the current video file will
be played from the beginning.
Speed search
Press and hold
II
//
ii
for more than two seconds while playing video
file.
- The file will start playing as soon as you stops pressing the button.
- It moves to the next video file in the ending point but does not
move to the previous video file in the beginning point.
Volume control
Press or
to control the volume.
- The volume level can be adjusted by 30 steps. (MIN, 1 - 29, MAX)
- If you press
or , the volume levels will decrease or increase by 1
step.
EZ menu
You can set the desired function or switch to the other mode
using EZ menu.
1 Press EZ to display EZ menu screen while playing or pausing.
2 Press
uu//UU
to move to the desired item.
3 Press OK to move to the submenu.
4 Press OK once to change the setting and press it once more.
5 Press EZ to exit the EZ menu.
Delete files
You can delete a currently playing file.
1 Select [Delete File].
2 Select [Yes] or [Cancel] when the message “Delete file?”.
View Information
- You can check the information of file name, file size, play time,
and the settings of Auto Power OFF and Sleep Mode.
d
a
b
c
00:0041
-00:02:23
Page 20

Viewing photo
20
To view the photo files
1 Move to the Home menu, and press
IIII
//
iiii
to select [Photo] menu.
2 Press OK to enter the [Photo] menu.
3 Press
uu//UU
to select the photo file.
- The list is displayed on screen.
- If there is no list, “No file” appears on screen.
4 Press OK to play.
- The photo file appears on screen.
- If you select [Last Played File], the last displayed file will be played.
- Horizental size is longer thant vertical size of a photo file will be displayed on the horizontal screen.
-
Enter to the photo list screen if M(MENU) is pressed while viewing
the photo.
- Press and hold M(MENU) for two seconds to enter home menu.
- Large-sized photos may not be opened or played.
- In case of the JPG file downloaded from the LG Media Center, all photos can be viewed regardless of the size. It is recommended to download JPG files from the LG Media Center for quicker display.
To view the previous or next photo
•
Press
IIII
to skip to the previous photo file.
•
Preess
iiii
to skip to the next photo file.
Tip
- Just after
playing a music or listening to radio and then entering
photo mode with the music playing or radio broadcasting, you can
view photos while listening to music or radio.
In the case, you can adjust volume by pressing
uu//UU
.
EZ menu
You can set the desired function or switch to the other mode using EZ
menu.
1
Press EZ to display EZ menu screen while playing or pausing.
2 Press
uu//UU
to move to the desired item.
3 Press OK to move to the submenu.
4 Press OK once to change the setting and press it once more.
5 Press EZ to exit the EZ menu.
Slide interval
You can set the slide show interval.
- You can select [Off], [2 sec], [3 sec], [4 sec], or [5 sec].
Tip
- When you set slide interval
1
Press
BX once, you can pause the slide show.
2
Press
it again, you can make the slide show activate.
View 4 Slides
You can show 4 slides on one screen.
- You can select [On] or [Off].
Delete File
You can delete a currently playing file.
1 Select [Delete File].
2 Select [Yes] or [Cancel] when the message “Delete file?”.
View Information
- You can check the information of file name, file size, and the set-
tings of Auto Power OFF and Sleep Mode.
Page 21

FM radio reception(Optional)
FM radio reception screen
The images inserted in the FM radio reception section are just exam-
ples to help you understand this function more easily.
a
b
c
Non Preset Mode
1 Battery status
2 FM radio frequency
display
3 FM radio frequency
display bar
Preset Mode
1 Battery status
2 FM radio frequency
display
3 Channel no. (Channel
mode)
a
b
c
Setting preset channels
//
IIII
1 Move to the Home menu, and press
2 Press OK to open the reception screen.
iiii
to select [Radio] menu.
Listening to the FM radio
1 Select of the home menu.
- The stored channel list is displayed on screen.
2 Select the channel you want on the channel list.
- You can listen to the FM radio.
Scanning the FM radio stations
Auto Scan
In Non-Preset mode, press
you can find available radio stations automatically.
Manual Scan
1 In Non-Preset mode, press
decreases/increases.
2 In present mode, press
ous/next preset station.
Note
•
Reception may be weak in some areas.
• Earphones function as an antenna. Earphones made by other
manufacturers do not guarantee optimal performance.
IIII
//
IIII
iiii
for longer than 2 seconds, and
//
IIII
iiii
, and the frequency
//
iiii
, and you can listen to the previ-
3 If you store the channel press [Yes], otherwise press [Cancel].
Channel Search
- You can save maximum 20 channels and existing channels will be
deleted.
- In an area with weak reception, the detected channels may be less
than 20.
While scanning frequencies, the player will not be powered off
-
and you can not hear any sound.
4 The FM radio broadcasting is received.
Set/Cancel Mute
1 Press BX while listening to the radio.
Then, the sound will become mute.
- “Mute” will appear and the sound will mute.
2 Press BX to listen to the sound of the received radio broadcasting.
- The volume control bar appears.
-You can also deactivate mute operation by p
ressing
uu//UU
.
Recording the FM radio broadcasting
1 To record while listening to the radio, press the REC button for
longer than 2 seconds.
- The recording time will be displayed and the recording will start.
2 Press the REC button to pause.
//
IIII
Note
iiii
to select [Resume] or [End].
3 Press
Then, press OK to confirm selection.
- Files less than one second long will not be saved.
- The recorded files will be saved under Recorded file named
“R0001.WAV”
- If the remaining memory space is less than 15MB, the player may not
record.
Listening to the recorded file
//
IIII
1 Move to the Home menu, and press
menu.
2 Press OK to enter the submenu.
3 Press
4 Press
uu//UU
to select [Recorded File] and OK to confirm.
uu//UU
to select a recored file you want.
5 Press OK to play.
iiii
to select [Music]
21
Page 22

FM radio reception / All Files / Voice Recording
EZ menu
You can set the desired function or switch to the other mode using EZ
menu.
1
Press EZ to display EZ menu screen while playing or pausing.
uu//UU
2 Press
3 Press OK to move to the submenu.
4 Press OK once to change the setting and press it once more.
5 Press EZ to exit the EZ menu.
Radio Mode
You can select the non-preset mode or preset mode.
• Non-Preset Mode
You can set the FM radio broadcasting to frequency mode.
• Preset Mode
You can set the FM radio broadcasting to channel mode.
Save/Delete Channel
You can save or delete a currently broadcasting channel.
• Non-Preset Mode
1. Select [Save Channel].
- “Channel Saved” is displayed on screen.
2. Press [Yes] to confirm saving.
• Preset Mode
1. Select [Delete Channel].
2. Select [Yes] or [Cancel] when the message “Delete Channel?”.
to move to the desired item.
All Files
//
IIII
1 Move to the Home menu, and press
menu.
iiii
to select [All Files]
2 You can confirm and play the playable list on each mode.
Tip
- You can check all files stored in this player. However you can play and
show only the files displayed with the icon
.
Voice Recording
1 Press the REC button for longer than 2 seconds.
- The player turns into stand-by mode for recording.
2 Press the REC button again to start recording.
- The recording time will be displayed and the recording will start.
3 Press the REC button to pause.
//
IIII
4 Press
Then, press OK to confirm selection.
- Files less than one second long will not be saved.
- The recorded files will be saved under Recorded file named
“V0001.WAV”
iiii
to select [Resume] or [End].
Channel Search
You can store the FM radio channel automatically.
- The previous memorized channel will deleted.
- Press [Cancel] to stop while searching the channel.
View information
Displays the information of the radio frequency, and the settings of
Auto Power OFF and Sleep Mode.
Note
- If the remaining memory space is less than 15MB, the player may not
record.
Listening to the recorded file
//
IIII
1 Move to the Home menu, and press
menu.
iiii
to select [Music]
2 Press OK to enter the submenu.
uu//UU
3 Press
4 Press
to select [Recorded File] and OK to confirm.
uu//UU
to select a recored file you want.
5 Press OK to play.
EZ menu
• Recording Quality: The user can set the quality of the recorded
file.
- The user can set 16kHz, 22.05kHz, 32kHz, or 44.1kHz.
• View Information
- You can check recording quality, and the settings of Auto Power
OFF and Sleep Mode.
22
Page 23

Settings menu list
Music
• Play Mode :You can select the play mode you want.
- [Repeat One]: Plays the current file repeatedly.
- [Play All]:
Plays all music within the selected folder in order.
- [Repeat All]: Plays all music within the selected folder repeatedly.
- [Random All]: Plays all music within the selected folder randomly.
- [Random Repeat All]: Repeats all music within the selected folder
randomly.
• EQ : The user can set the sound effect.
- Auto EQ, FLAT, XTS-Pro, POP, ROCK, R&B/SOUL, HIPHOP/RAP,
JAZZ, CLASSICAL, DANCE, LIVE
• Fade In: You can gradually increase the volume to protect ears.
- You can select [On] or [Off].
• Scroll speed: Sets the speed of the file name and ID3 tag information in the music playing mode.
- You can select [Off], [0.5 times], [1 time], [2 times], and [3 times].
Photo
• Slide interval: You can select the slide show interval.
- You can select [Off], [2 sec], [3 sec], [4 sec], or [5 sec].
• View 4 Slides: You can show 4 slides on one screen.
- You can select [On] or [Off].
Time
• Sleep Reservation: When the defined time passes, the player
will be automatically turned off.
- You can select [Off], [10 min], [30 min], [1 hr], or [2 hr].
- If the user sets the sleep reservation, the player will automatically
store files and be turned off at the reserved time.
- After the player is turned off at the reserved time, the sleep reser-
vation will be automatically cancelled.
• Time System: You can set the current time to 12/24 hour time
system.
• Time Setting: Sets the current time.
- You can select [Hour]/[min.] by pressing
uu//UU
.
- You can set each item pressing
IIII
//
iiii
.
• Screen Saver: After the defined time passes, the screen saver
is activated to protect display screen.
- You can select [Off], [5 sec], [10 sec], [30 sec], or [60 sec].
- When the set time for screen saver activation is the same as or
longer than that for Auto Power off, the screen saver is not activated.
- When playing video file and performing photo slide show, the
screen saver is not activated.
Display setting
• Brightness
:You can adjust the brightness level from 1 to 9.
- The default brightness is 5.
• Theme Setting : Sets menu type.
- You can select [List type] or [Wheel type] by pressing
IIII
//
iiii
.
• Menu Color : You can set the color of the home menu to
[Red]/[Blue].
Power Management
• Auto Display off: If no button is inputted during the given time,
the screen will be automatically turned off.
- You can select [5 sec], [10 sec], [30 sec], [1 min], [3 min], or
[5 min].
• Auto Power off: If no button in selected in the standby mode for
playing, the screen will be automatically turned
off.
- You can select [Off], [30 sec], [1 min], [5 min], or [10 min].
General
• Initialize Settings: You can initialize the setting of the player.
- You can select [Yes] or [Cancel].
- If you selects [Yes], the player is automatically turned off after the
player is initialized.
- If you selects [Cancel], the player moves to the previous menu.
• System Info: You can check product information.
- The model name, firmware version, used memory, and remaining
memory space are displayed.
• Language: You can select the language.
- English, Português, кЫТТНЛИ, Dansk, Deutsch, Nederlands,
Français,Magyar, Italiano, Norsk, Polski, Español, Svenska,
ìÍp‡ªÌҸ͇, , Suomi, ∂ÏÏˢÈο, Ingilizce.
• Format: You can delete all data in the memory, and initialize the
memory.
- You can select [Yes] or [Cancel].
- If you selects [Yes], formatting will be made. If you selects [Can-
cel], the player will return to the general setup screen.
- Back up the data stored in the player before initializing it.
- Deleted data cannot be recovered.
Advanced setting
23
Page 24

Additional information
24
Running Firmware updater
The user can update the firmware for addition and change of features
of the player and for functional improvement.
1 Download the firmware updater from CD.
- In case you activate the program on CD, the compressed program
will automatically be decompressed into the folder
C:\LGE\V25E/R/S.
2 Connect the MP3 player to the USB port on your computer.
Note
Make sure your connection is solid while updating. It may result in
the data loss or damage to the player.
3 Move to the folder C:\LGE\V25E/R/S and run the firmware updater.
4 When the LGE MP3 Firmware download window appears, check
the current firmware version.
Do not check “Format Data Area” not to do format.
Click [Start] to run the firmware updater.
Note
• We recommend the “Format Data Area”.
•
Back up your data before executing this option.
Otherwise, all files will be deleted from the player.
• Do not disconnect the USB connector from the pc during update,
or the unit will not operate.
5 When you format the data, the message shown below appears on
display window .
Click [Yes] to continue the firmware update.
6 Update starting.
7 Check the updated firmware version on the display window.
8 Click [Close] to finish the program.
Remove the USB connector by safely removing hardware.
Page 25

Running recovery
Running a recovery will result in a total loss of data. Always make
sure to back up important data. We do not take any responsibilities for data loss.
- The PC does not recognize the player properly.
- Text appears broken and somewhat unreadable on the screen.
- The player does not work.
- You cannot download or upload files.
1 Activate the updater.
2 When a screen appears, connect the player to the USB port of the PC
while pressing
B/X.
3 Release B/X when the player is recognized properly as seen in the
progress bar completion status.
4 When the LGE MP3 Firmware download window appears, check
the current firmware version.
You should not check “Format Data Area” in order not to do format.
Click [Start] to run the firmware updater.
Note
- We recommend the “Format Data Area”.
- Back up your data before executing this option.
Otherwise, all files will be deleted from the player.
5 Repeat the steps from 5 to 8(page 24).
Firmware update
Connect the player to the PC where the LG Media Center is installed to download a new version of firmware.
Note
Functions only in the Internet-connected PC.
1 Connect the USB connector to the USB port of the PC with the LG
Media Center installed.
2 Check whether a new drive has been added in the Windows
Explorer in the PC.
3 The LG Media Center will compare the firmware versions of the
player and the server. If it detects a new firmware version, it asks
the user whether to update the version.
Check [Now] and click [OK].
4 Press [OK] to download the latest firmware updater.
5 Select the installation path and click [OK].
6 Activate the updater.
7 Repeat the steps from 4 to 7(page 24).
8 When the update finishes, remove the USB connector by safely re-
moving hardware.
9 Turn on the player and check the updated version of firmware.
Additional information
25
Page 26

Troubleshooting
26
Q : The player will not be turned on.
A: Check whether the battery is remaining.
A:In case the available space of the player is smaller than 10 MB
after downloading files into the player, you cannot turn it on.
Remove files to ensure enough space in it.
Q : The player is’t powered off. Instead, the message “No space
for Booting. Please delete files more than 10MB” is displayed.
A:The data base(DB) cannot be made because the memory of
the player is full. Delete unnessary files. At least 10MB of some
free space is necessary to function normally.
Q : The screen is blur.
A: Avoid direct sun rays and adjust the brightness.
A: Check the screen brightness.
Q : The button does not function.
A: Check whether the Hold feature is active.
A: Check whether you pressed right button.
Refer to the page 7 for using touch pad.
A: Press the reset hole. Refer to the page 16.
Q : The noise is severe during listening to the radio, and the re-
ception is poor.
A:The earphone functions as an antenna.
Be sure to handle carefully.
A: Slightly change the directions of the player and the earphones.
Q : The player can not receive FM broadcasting.
A:The bundled earphones operates as an antenna. Stetch the
wires not to be entangled while listening FM radio.
A:Move to other locations where you can receive the reception
and enhance its quality.
A:Check whether you set mute.
In that case, deactivate mute operation.(Refer to page 21)
Q : After the files are downloaded, the play list will not show the
newly added files.
A: Check the downloaded file format
A: Format the product, and download the file.
Q : After the firmware is updated, the player is not normally func-
tioning.
A: Reset the product (See page 16)
A: Back up the data, and format the player.
Q : My PC can not detect an MP3 Player.
A: Check if the USB driver on the provided CD is installed.
Q : AVI file will not play.
A:Only video files transcoded by LG Media Center can be played.
Make sure the files to be played are converted by LG Media
Center. Refer to the LG Media Center [Help] how to transcode
your files.
Q : An error occurs during FW download and Auto FW upgrade of
LG Media Center, and MP3 player does not work after finishing the operation of FW download and Auto FW upgrade of
LG Media Center.
Q : The “Booting Error. F/W update Recovery Mode” is displayed.
The player is not turned on.
A:Connect the player to the USB port of the PC while pressing
BX and run FW download program. And so run Recovery.
(However you should press and hold B/X until the initialized
progressive bar of Firmware download program reaches the
end.) Please refer to the page 25 about the Recovery.
Page 27

Specifications
27
Capacity 2GB/4GB
File system FAT32
OS for MP3 Player Device Win2000/XP/Vista
OS for LG Media Center Win2000 / XP/Vista
Interface USB 2.0
Dimensions 42 (W) X 95 (H) X 7.8 (D) (mm)
Weight
51g (1.48oz) (with battery) / Depends on the product model.
Operating temperature -5°C + 45°C
Frequency range 20Hz ~ 20kHz
Signal-to-noise ratio 85dB
Channel seperation 35dB (1kHz)
Maximum output 9mW+9mW
Frequency range 87.5~108MHz
Signal-to-noise ratio 38dB
Stereo seperation 25dB(1kHz)
Antenna Earphones antenna
Video About 1.5 hours
Audio About 16 hours (for 128Kbps/44.1KHz EQ Flat, Vol 15)
FM radio(Optional)/ Voice recording Maximum 10 hours
AC adapter DC5V, 1A
Battery (Built-in) Li-polymer DC 3.7V 320mAh Rechargeable Battery
Audio
MP3, OGG, WMA, WAV
Video LG AVI(MPEG4 + MP3. QCIF 128 x 160, 30fps, 600kbps)
Image viewer
JPG/BMP/GIF
Display 1.77" (OLED) / 260,000 colors
Memory
PC
General specifications
Audio
FM radio
(Optional)
Playback time
Power supply
Type Item Specifications
Files
Display
Note
Some parts of the storage space of the MP3 player are usually used for storing the information that is internally treated.
Therefore, the storage capacity that can be actually used may be somewhat smaller than specified in the manual.
(The size of the storage space for the internally treated information can be changed for product upgrade without any notice to the end
users.)
http://www.lge.com
Information related to the product is available at this site.
- By updating the firmware, you can improve the performance of the product.
Type Memory Model Name
2GB V25SEE2K
4GB V25SEE4K
2GB V25REE2K
4GB V25REE4K
2GB V25EEE2K
4GB V25EEE4K
With FM
(100kHz)
With FM
(50kHz)
Without FM
Optional by Models
Recording time
Page 28

Specifications
28
Supported file specification
MP3 Decoder
- Support MP3 decoding including Variable Bit Rate(VBR)
- O : Support both Stereo and Mono
- O(s) : Only Stereo
- O(m) : Only Mono
WMA Decoder
- Ver 4x, 7, 8 (o) Ver 9 (z) (ASF not supported)
WAV Encoder(ADPCM)
- 16KHz, 22.05KHz, 32KHz, 44.1KHz Spec
- FM Radio = 44.1 KHz
WAV Decoder
OGG Decoder
- Q(-1) ~ Q(10) Supported
Supported photo file format
- JPG(MAX 5120 x 3840 pixels), BMP (8bit, 24bit bmp),
GIF(MAX 2560 x 1920 pixels, 8bpp)
- Progressive JPEG not supported
Page 29

 Loading...