

LG V177ZLA Users manual

Over The Range Combination Oven
Owner's Manual
MV-1773MAB
Installer: Please leave this manual
with this appliance.
Consumer: Please read and keep
this manual for future reference. Keep
sales receipt and/or cancelled check
as proof of purchase.
Model Number
Serial Number
Date of Purchase
If you have questions, write us
(include your model number and
phone number) or call:
Maytag Services
sm
Attn: CAIR®Center
P. O. Box 2370
Cleveland, TN 37320-2370
1-800-688-9900 U.S.A.
1-800-688-2002 Canada
1-800-688-2080 (U.S.A. TTY for
hearing or speech impaired)
(Mon.-Fri., 8 am-8 pm Eastern Time)
Internet: http://www.maytag.com
Combination Oven
Keep instructions for future reference.
Be sure manual stays with oven.
In our continuing effort to improve the quality and performance of our appliances, it may
be necessary to make changes
to the appliance without revising
this guide.
Contents
Important Safety Instructions ............................................................... 2-4
Features ............................................................................................... 5-6
Operation ............................................................................................ 7-20
Heating / reheating guide ....................................................................... 21
Fresh vegetable guide............................................................................ 22
Maintenance...................................................................................... 23-24
Recommended Utensils ........................................................................ 25
Trouble Shooting ................................................................................... 26
Questions and Answers ........................................................................ 27
Warranty ................................................................................................ 28
A/03/04
©
2004 Maytag Appliance Sales Co. Part No.8112P265-60
3828W5A3891

2
IMPORTANT SAFETY INSTRUCTIONS
What You Need
to Know About
Safety Instructions
Warning and Important Safety Instructions appearing in this manual
are not meant to cover all possible
conditions and situations that may
occur. Common sense, caution, and
care must be exercised when
maintaining, or operating microwave.
Always contact your dealer, distributor, service agent, or manufacturer
about problems or conditions you do
not understand.
Grounding
Instructions
Oven MUST be
grounded.
Grounding reduces risk of electric
shock by providing an es-
cape wire for the electric current if an
electrical short occurs. This oven is
equipped with a cord having a
grounding wire with a grounding plug.
The plug must be plugged into an
outlet that is properly installed and
grounded.
Consult a qualified electrician or servicer if grounding instructions are not
completely understood, or if doubt
exists as to whether the oven is properly grounded.
Do not use an extension cord. If
the product power cord is too short,
have a qualified electrician install a
three-slot receptacle. This oven
should be plugged into a separate 60
hertz circuit with the electrical rating
as shown in specifications table.
When the combination oven is on a
circuit with other equipment, an
increase in cooking times may be
required and fuses can be blown.
Microwave operates on standard
household current, 110-120V.
SAVE THESE INSTRUCTIONS
FEDERAL COMMUNICATIONS COMMISSION RADIO FREQUENCY
INTERFERENCE STATEMENT ( U.S.A. ONLY)
This equipment generates and uses ISM frequency energy and if not installed and used properly, that is in strict
accordance with the manufacturer's instructions, may cause interference to radio and television reception. It has
been type tested and found to comply with limits for ISM Equipment pursuant to part 18 of FCC Rules, which are
designed to provide reasonable protection against such interference in a residential installation.
However, there is no guarantee that interference will not occur in a particular installation. If this equipment does
cause interference to radio or television reception, which can be determined by turning the equipment off and on,
the user is encouraged to try to correct the interference by one or more of the following:
• Reorient the receiving antenna of the radio or television.
• Relocate the microwave oven with respect to the receiver.
• Move the microwave oven away from the receiver.
• Plug the microwave oven into a different outlet so that the microwave oven and the receiver are on different
branch circuits.
The manufacturer is not responsible for any radio or TV interference caused by unauthorized modification to this
microwave oven. It is the responsibility of the user to correct such interference.
To avoid risk of electrical shock or
death, this oven must be grounded and plug must not be altered.
Recognize Safety Symbols, Words, Labels
DANGER— Immediate hazards which WILL result in severe personal injury or
death.
WARNING— Hazards or unsafe practices which COULD result in severe per-
sonal injury or death.
CAUTION— Hazards or unsafe practices which COULD result in minor per-
sonal injury.

IMPORTANT SAFETY INSTRUCTIONS
3
SAVE THESE INSTRUCTIONS
PRECAUTIONS TO AVOID POSSIBLE EXPOSURE TO
EXCESSIVE MICROWAVE ENERGY
A. DO NOT attempt to operate this oven with the door open since open door operation can result in harmful expo-
sure to microwave energy. It is important not to defeat or tamper with the safety interlocks.
B. DO NOT place any object between the oven front face and the door to allow soil or cleaner residue to accu-
mulate on sealing surfaces.
C. DO NOT operate the oven if it is damaged. It is particularly important that oven door close properly and that
there is no damage to:
1. door (bent),
2. hinges and latches (broken or loosened),
3. door seals and sealing surfaces.
D. Oven should not be adjusted or repaired by anyone except properly qualified service personnel.
When using electrical appliances, basic safety precautions should be followed to reduce the risk of burns, electric
shock, fire, or injury to persons or exposure to excessive microwave energy.
1. READ all instructions before using oven.
2. READ AND FOLLOW the specific “PRECAUTIONS TO
AVOID POSSIBLE EXPOSURE TO EXCESSIVE
MICROWAVE ENERGY” on this page.
3. This oven MUST BE GROUNDED. Connect only to
properly GROUNDED outlet. See installation instructions.
4. Install or locate this oven ONLY in accordance with the
installation instructions in this manual.
5. Some products such as whole eggs and sealed
containers–for example, closed glass jars–are able to
explode and SHOULD NOT be HEATED in this oven.
6. Use this oven ONLY for its intended use as described in
this manual. Do not use corrosive chemicals or vapors in
this oven. This type of oven is specifically designed to
heat, cook, or dry food. It is not designed for industrial or
laboratory use.
7. As with any appliance, CLOSE SUPERVISION is
necessary when used by CHILDREN or INFIRM
PERSONS.
8. See door cleaning instructions in the Care and
Cleaning section of manual on page 23.
9. Baby food jars shall be open when heated and
contents stirred or shaken before consumption, in
order to avoid burns.
10. DO NOT use this oven for commercial purposes.
It is made for household use only.
11. DO NOT heat baby bottles in oven.
12. DO NOT operate this oven if it has a damaged cord or
plug, if it is not working properly, or if it has been
damaged or dropped.
13. This oven, including power cord, must be serviced ONLY
by qualified service personnel. Special tools are required
to service oven. Contact nearest authorized service
facility for examination, repair, or adjustment.
14. DO NOT cover or block filter or other openings on oven.
15. DO NOT store this oven outdoors. DO NOT use
this product near water – for example, near a
kitchen sink, in a wet basement, near a swimming
pool or similar locations.
16. DO NOT immerse cord or plug in water.
17. Keep cord AWAY from HEATED surfaces.
18. DO NOT let cord hang over edge of table or counter.
19. Clean the ventilating hood frequently.
20. Do not allow grease to accumulate on the hood or filters.
21. Use care when cleaning the ventilating hood filters.
Corrosive cleaning agents such as lyebased oven
cleaners may damage the filters.
22. When flaming foods under the hood, turn the fan on.
23. Suitable for use above both gas and electric cooking
equipment 36 inches or less wide.
24. DO NOT insert oversized foods or oversized utensils in a
microwave/grill/convection oven as they may create a
fire, an electrical arc or risk of electrical shock.
25. DO NOT use paper products not intended for cooking
when oven is operated in grill or convection or
combination mode.

IMPORTANT SAFETY INSTRUCTIONS
4
Recognize this symbol as a SAFETY message
To avoid risk of fire in the oven cavity:
a. DO NOT overcook food. Carefully attend oven
when paper, plastic, or other combustible materials are placed inside the oven to facilitate
cooking.
b. Remove wire twist-ties from paper or plastic bags
before placing bag in oven.
c. If materials inside the oven ignite, keep oven door
CLOSED, turn oven off and disconnect the power
cord, or shut off power at the fuse or circuit
breaker panel.
d. DO NOT use the cavity for storage. DO NOT
leave paper products, cooking utensils, or food in
the cavity when not in use.
Liquids such as water, coffee, or tea are able to be
overheated beyond the boiling point without appearing to be boiling due to surface tension of the liquid.
Visible bubbling or boiling when the container is
removed from the microwave oven is not always
present. THIS COULD RESULT IN VERY HOT LIQ-
UIDS SUDDENLY BOILING OVER WHEN A
SPOON OR OTHER UTENSIL IS INSERTED INTO
THE LIQUID. To reduce the risk of injury to persons:
1. DO NOT overheat the liquid.
2. Stir the liquid both before and halfway through
heating it.
3. DO NOT use straight-sided containers with
narrow necks.
4. After heating, allow the container to stand in the
microwave oven for a short time before removing
the container.
5. Use extreme care when inserting a spoon or
other utensil into the container.
To avoid personal injury or property damage, observe
the following:
1. DO NOT deep fat fry in oven. Fat could overheat and
be hazardous to handle.
2. DO NOT cook or reheat eggs in shell or with an
unbroken yolk using microwave energy.
Pressure may build up and erupt. Pierce yolk with
fork or knife before cooking.
3. Pierce skin of potatoes, tomatoes, and similar foods
before cooking with microwave energy. When skin is
pierced, steam escapes evenly.
4. DO NOT operate oven without load or food in oven
cavity.
5. Use only popcorn in packages designed and labeled
for microwave use. Popping time varies depending
on oven wattage. Do not continue to heat after
popping has stopped. Popcorn will scorch or burn.
Do not leave oven unattended.
6. DO NOT use regular cooking thermometers in oven.
Most cooking thermometers contain mer-cury and may
cause an electrical arc, malfunc-tion, or damage to oven.
7. DO NOT use metal utensils in oven except when
recommended by microwave food manufacturers or
recipe requires metal utensils in convection or
combination mode. Heat food in containers made of
glass or china if possible.
8. Never use paper, plastic, or other combustible
materials that are not intended for cooking.
9. When cooking with paper, plastic, or other combustible materials, follow manufacturer's recommendations on product use.
10. DO NOT use paper towels which contain nylon or
other synthetic fibers. Heated synthetics could melt
and cause paper to ignite.
11. DO NOT heat sealed containers or plastic bags in
oven. Food or liquid could expand quickly and cause
container or bag to break. Pierce or open container
or bag before cooking.
12. Racks, utensils and oven surfaces may become hot
during or after use. Use utensils or protective
clothing, like pan grips or dry oven mitts, when
necessary to avoid burns.
13. To avoid pacemaker malfunction, consult physi-cian
or pacemaker manufacturer about effects of
microwave energy on pacemaker.
SAVE THESE INSTRUCTIONS

1
5
4
8
11
10
13
16
18
19
20
23
25
28
31
30
2
7
6
9
12
14
15
17
21
22
24
26
27
29
3
Door Handle
Window with
Metal Shield
Oven Control
Broiling Rack
Convection
Rack
Turntable
Rotate
Ring
Panel
Cooktop/Countertop
Light
Grease Filter
Door Safety
Lock System
Model and Serial
Number Plate
Cooking Guide
Vent Grille
Glass Turntable
FEATURES
5
OVEN SPECIFICATIONS
Power Supply
Input Power
Cooking Power
Frequency
Rated Current
Outer Dimensions
(WxHxD)
Cavity Volume
Net Weight
120 VAC,
60 Hz
1,600 W
950 W
(IEC 60705
Standard)
2,450 MHz
14.0 A
2915⁄16" x 167⁄16"
x 155⁄8"
1.7 Cu. Ft.
65 lbs.

FEATURES
(cont’d)
6
FEATURES
NOTE: Styling and features vary by
model.
1. DISPLAY: The Display includes
a clock and indicators to tell you
time of day, cooking time settings and cooking functions
selected.
2. MICRO: Touch this pad when
setting Microwave cooking.
3. CONV: Touch this pad when
setting Convection cooking.
4. BROIL: Touch this pad when
setting broil cooking.
5. COMBI: Touch this pad when
setting combination cooking or
preheat.
6. SENSOR POPCORN: Touch this
pad when popping popcorn in
your microwave oven. The oven’s
sensor will tell the oven how long
to cook depending on the amount
of humidity it detects from the
popcorn.
7. SENSOR COOK: Touch this pad
to cook baked potato, frozen
vegetable, fresh vegetable,
canned vegetable, frozen entree
and rice. The oven’s sensor will
tell the oven how long to cook
depending on the amount of
humidity coming from the food.
8. SENSOR REHEAT: Touch this
pad to reheat casserole, dinner
plate, pizza and soup/sauce. The
oven’s sensor will tell the oven
how long to cook depending on
the amount of humidity coming
from the food.
9. CUSTOM PROGRAM: Touch
this pad to recall one cooking
instruction previously programmed into memory.
10. AUTO COOK: Touch this pad to
cook Bacon, Fresh Roll & Muffin,
Frozen Roll & Muffin, Beverage,
Chicken Pieces, Hot Cereal.
11. AUTO DEFROST: Meat, poultry,
fish. Touch this pad to select food
type and defrost food by weight.
12. AUTO COMBI: Touch this pad
when setting weight combination
cooking.
13. AUTO BROIL: Touch this pad
when setting weight broil cooking.
14. SOFTEN: Touch this pad to
soften Butter, Ice Cream, Cream
Cheese or Frozen Juice.
15. MELT: Touch this pad to melt
Butter, Chocolate, Cheese,
Marshmallow.
16. Add 30 SEC.: Touch this pad to
set and start quickly at 100%
power level.
17. NUMBER: Touch number pads
to enter cooking time, power
level, quantities, weights, or
cooking temperature.
18. KITCHEN TIMER: Touch this
pad to set the kitchen timer.
19. CLOCK: Touch this pad to enter
the time of day.
20. CONTROL SETUP: Touch this
pad to change the oven’s default
settings for sound, clock, display
speed and defrost weight.
21. MORE: Touch this pad to add ten
seconds of cooking time each
time you press it.
22. LESS: Touch this pad to subtract ten seconds of cooking time
each time you press it.
23. POWER: Touch this pad to select
a cooking power level.
24. STOP/CLEAR: Touch this pad to
stop the oven or to clear all
entries.
25 ENTER/START: Touch this pad
to start a function or enter all
entries. If you open the door after
oven begins to cook, touch
ENTER/START again.
26. TURNTABLE STOP: Touch this
pad to turn off the turntable. OFF
will appear in the display.
NOTE: This option not available
in sensor cook and defrost
modes.
27. LIGHT HIGH/LOW/OFF: Touch
this pad to turn on the cooktop/
countertop light.
28. LIGHT TIMER: Touch this pad to
set the light timer.
29. VENT ON/OFF: Touch this pad
to turn the fan on/off.
30. VENT 5-SPEED: Touch this pad
to choose one of 5 fan speeds.
31. AUTO TIME SET: Touch this pad
when setting ventilation time.
(1, 3, 5, 10, 30 minutes.)
OPERATION
7
LEARN ABOUT YOUR
MICROWAVE OVEN
This section discusses the concepts
behind microwave cooking and introduces you to the basics you need to
know to operate your microwave
oven. Please read this information
before use.
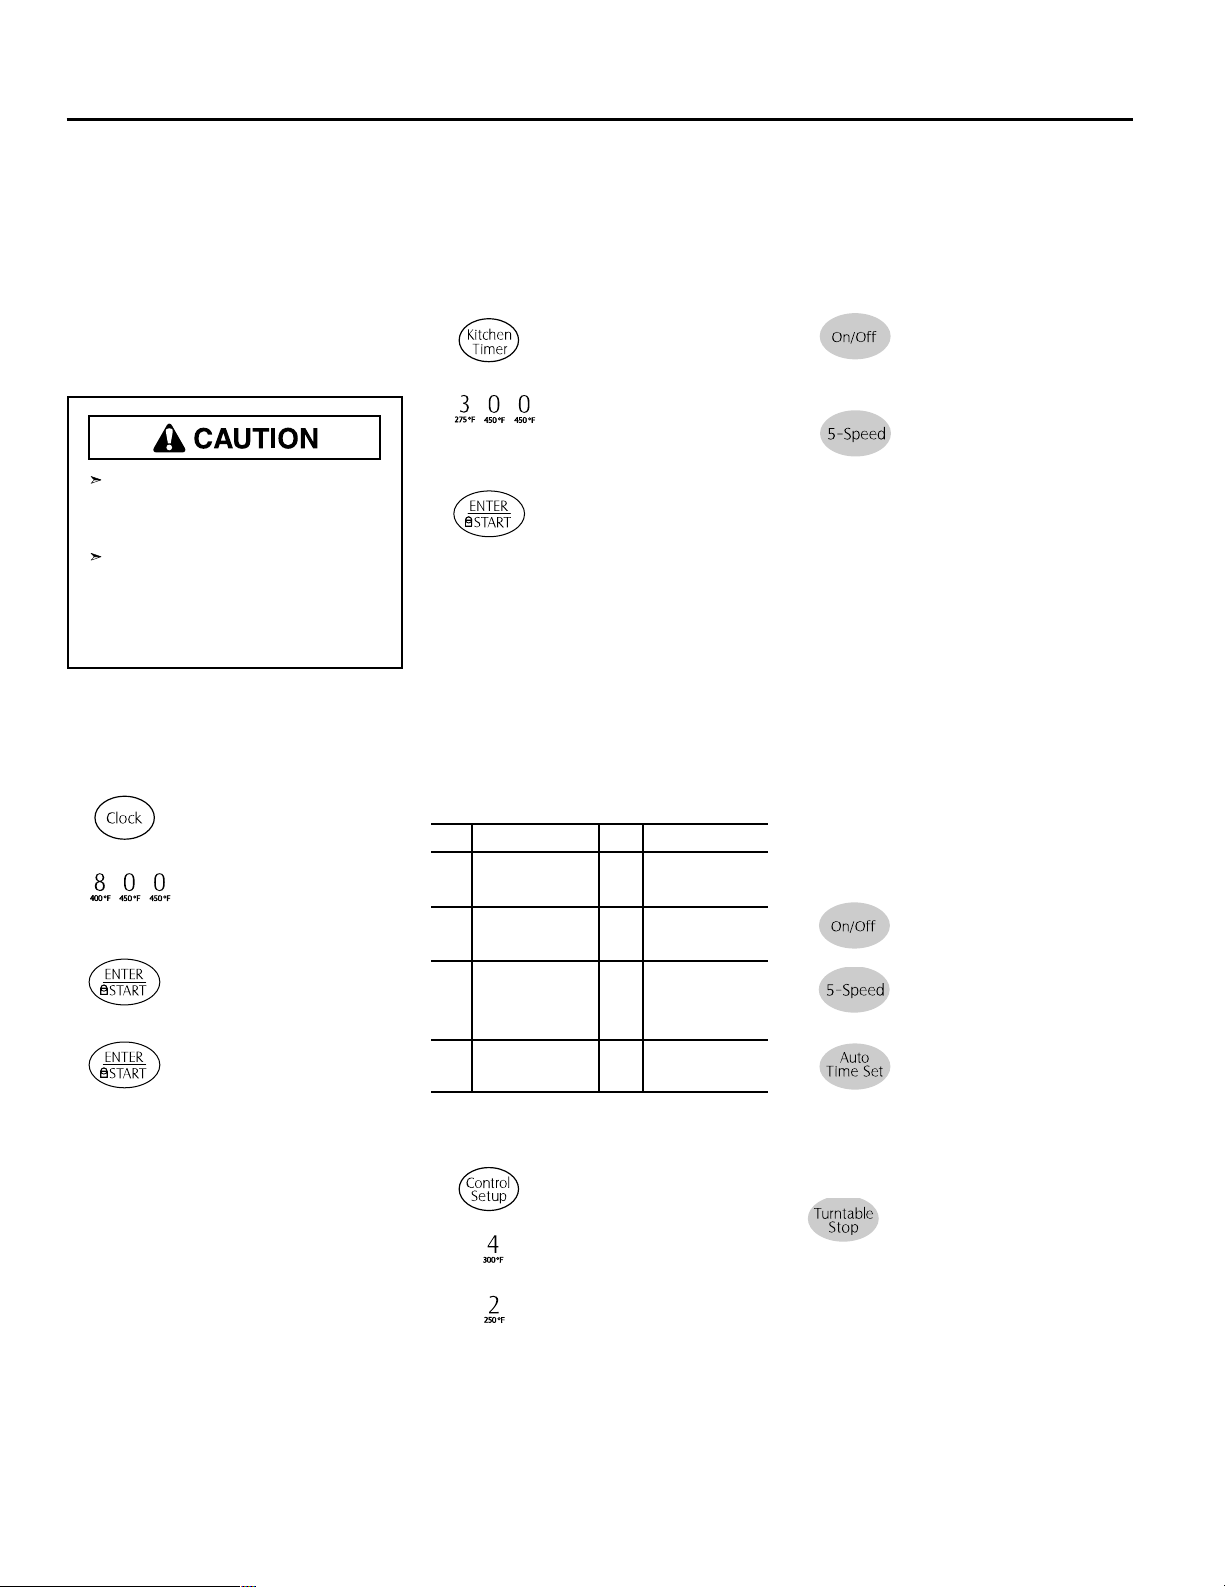
CLOCK
This oven includes a 12-hour clock.
Example: To set 8:00 AM.
1. Touch CLOCK
pad.
2. Enter the time by
using the number
key pad.
3. Touch ENTER/
START pad. (Press
number 1 for AM,
number 2 for PM.)
4. Touch ENTER/
START pad.
KITCHEN TIMER
You can use your microwave oven as
a timer. Use the Timer for timing up
to 99 minutes, 99 seconds.
Example: To time 3 minutes.
1. Touch KITCHEN
TIMER pad.
2. Enter the time by
using the number
key pad.
3. Touch ENTER/
START pad. When
the time is over, you
will hear beep and
END will display.
CONTROL SETUP
You can change the default values
for beep sound, clock, display speed
and defrost weight mode.
See following chart for more information.
Example: To change weight mode
(from Lbs. to Kg).
1. Touch CONTROL
SETUP pad.
2. Touch number 4
pad.
3. Touch number 2
pad.
VENT FAN
The fan moves steam and other
vapors from the cooking surface.
Example for Level 4:
1.
Touch ON/OFF pad.
This shows the last
level until you select
the fan speed level.
2. Touch this pad until
appears level 4 in
the display.
Touch ON/OFF pad to turn off fan
when desired.
NOTE: If the temperature from the
range or cooktop below the oven
gets too hot, the exhaust fan in the
vent hood will automatically turn on
at the LEVEL 4 setting to protect the
oven.
It may stay on up to an hour to cool
the oven. When this occurs, the
VENT button will not turn the fan off.
AUTO TIME SET
Example: To turn off fan after
30 minutes for level 4.
1. Touch ON/OFF
pad.
2. Touch this pad until
level 4 appears in
the display.
3. Touch this pad five
times.
TURNTABLE STOP
For best cooking results, leave the
turntable on. It can be
turned off for large dishes.
Touch TURNTABLE STOP to turn
the turntable on or off.
NOTE:
• This option is not available in sensor cook and defrost modes.
• Sometimes the turntable can
become hot to touch. Be careful
touching the turntable during and
after cooking.
• Do not run the oven empty.
To avoid risk of personal injury
or property damage, do not run
oven empty.
To avoid risk of personal injury
or property damage, do not use
stoneware, aluminum foil, metal
utensils, or metal trimmed
utensils in the oven.
No.
1
2
3
4
Function
Sound ON/
OFF control
Clock ON/
OFF control
Scroll speed
Weight mode
selected
No.
1
2
1
2
1
2
3
1
2
Result
Sound ON
Sound OFF
Clock ON
Clock OFF
Slow speed
Normal speed
Fast speed
Lbs.
Kg.
OPERATION
(cont’d)
8
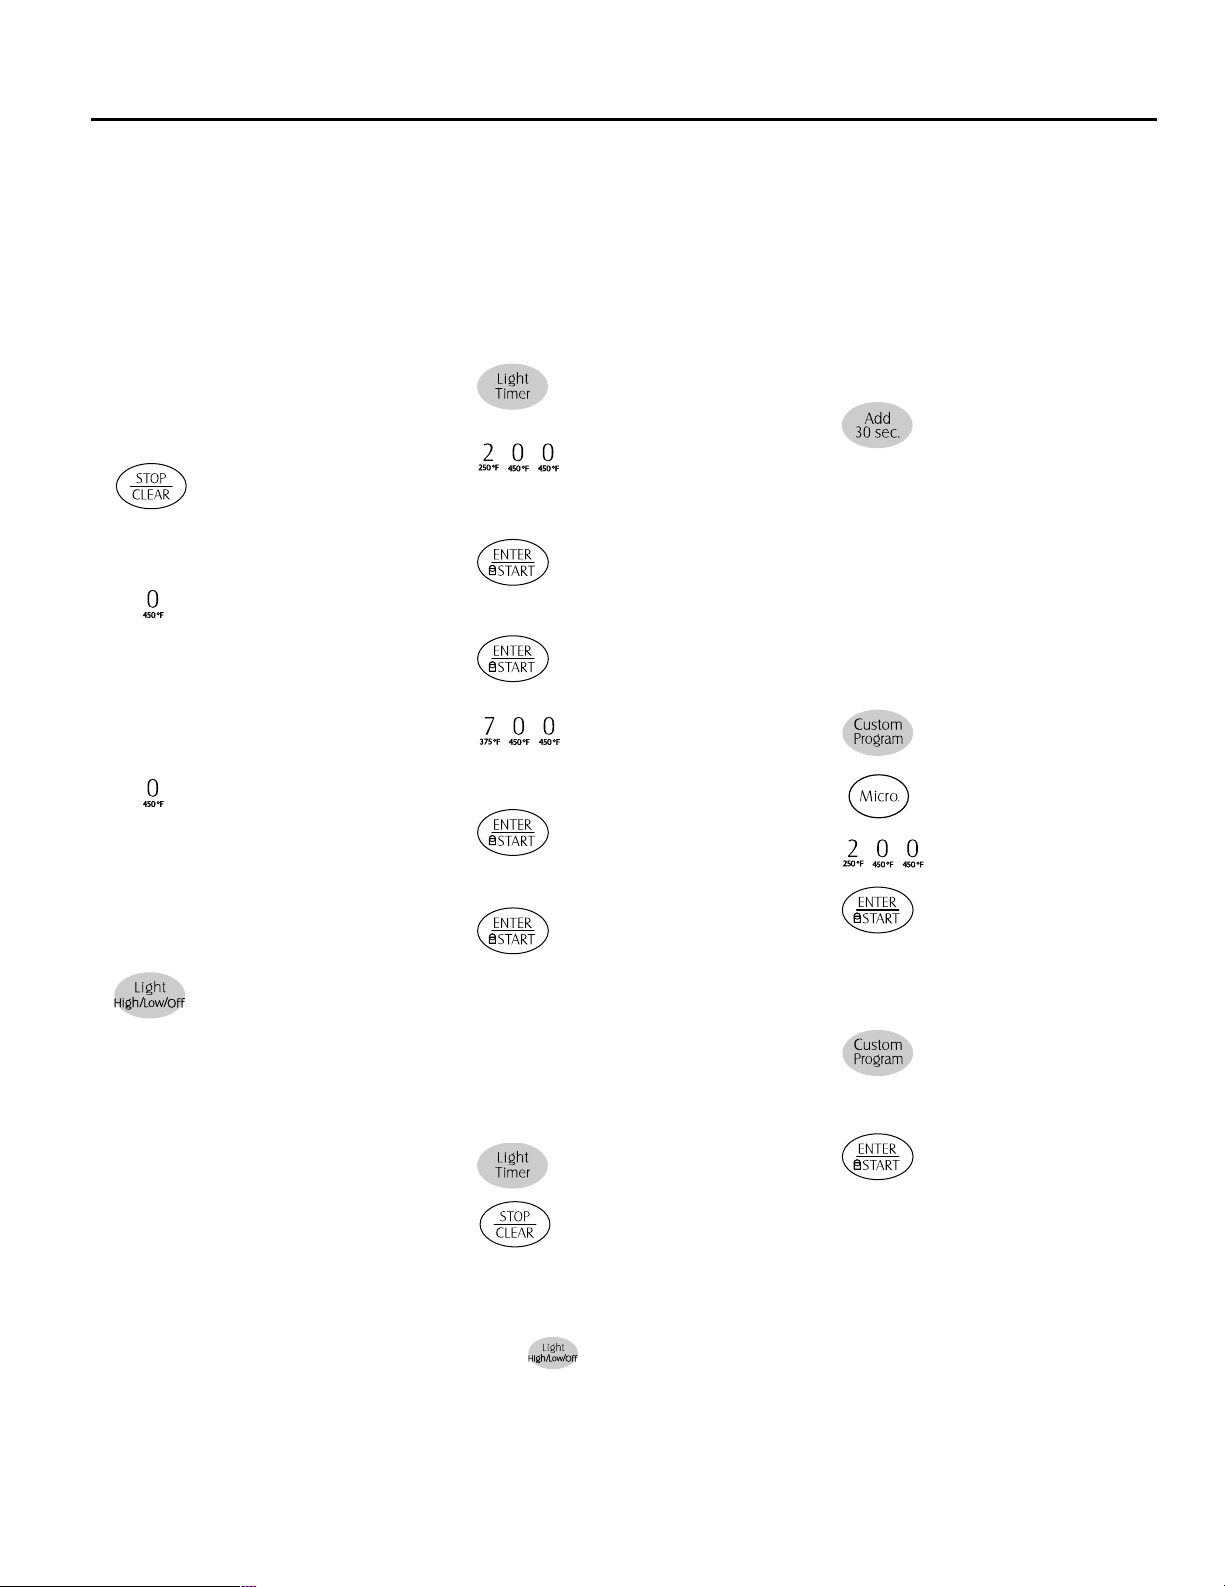
CHILD LOCK
You may lock the control panel to
prevent the microwave from being
accidentally started or used by
children.
The Child Lock feature is also useful
when cleaning the control panel.
Child Lock prevents accidental programming when wiping the control
panel.
Example: To set the child lock.
1. Touch STOP/
CLEAR pad.
2. Touch and hold 0
pad more than 4
seconds.
LOCKED will
appear in the display window with
two beeps.
Example: To cancel the child lock.
1. Touch and hold 0
pad more than 4
seconds. LOCKED
will disappear and
you hear two beeps.
LIGHT HIGH/LOW/OFF
Touch LIGHT pad
once for bright light,
twice for night light, or
three times to turn the
light off.
LIGHT TIMER
You can set the LIGHT to turn on
and off automatically at any time. The
light comes on at the same time
every day until reset.
Example: Turn on 2:00 AM, turn off
7:00 AM.
1. Touch LIGHT
TIMER pad.
2. Enter the time you
want the LIGHT to
turn on.
3. Touch ENTER/
START pad.
(Press number 1
for AM, number 2
for PM.)
4. Touch ENTER/
START pad.
5. Enter the time you
want the LIGHT to
turn off.
6. Touch ENTER/
START pad.
(Press number 1
for AM, number 2
for PM.)
7. Touch ENTER/
START pad again.
NOTE:
• To reset the time to turn on and off
the LIGHT, repeat steps 1 to 7.
Example: To cancel the LIGHT
TIMER.
1. Touch LIGHT
TIMER pad.
2. Touch STOP/
CLEAR pad.
NOTE:
• If you want to cancel the
LIGHT TIMER in operation,
touch pad.
ADD 30 SEC.
A time-saving pad, this simplified
control lets you quickly set and start
microwave cooking without the need
to touch the ENTER/START pad.
Example: To set Add 30 SEC. for 2
minutes.
1.
Touch Add 30 SEC.
pad 4 times. The
oven begins cooking
and display shows
time counting down.
CUSTOM PROGRAM
CUSTOM PROGRAM lets you recall
one cooking instruction previously
placed in memory and begin cooking
quickly.
Example: To cook for 2 minutes.
1. Touch CUSTOM
PROGRAM pad.
2. Touch MICRO
pad.
3. Enter the cook
time.
4. Touch ENTER/
START pad.
Example: To recall the custom
program.
1. Touch CUSTOM
PROGRAM pad.
2. Touch ENTER/
START pad. When
the cook time is
over, you will hear
four beeps and
END will display.
MORE/LESS
By using the MORE or LESS keys,
all of the pre-programmed cook and
time cook features can be adjusted to
cook food for a longer or shorter
time. Pressing MORE will add 10
seconds of cooking time each time
you press it. Pressing LESS will
subtract 10 seconds of cooking time
each time you press it.

9
COOKING AT HIGH
POWER
Example: To cook food for 8 minutes 30 seconds at 100% power.
1.
Enter the cook
time.
2. Touch
ENTER/
START
pad. When
the cook time is
over, you will hear
four beeps and END
will display.
COOKING AT LOWER
POWER LEVELS
HIGH power cooking does not
always give you the best results with
foods that need slower cooking, such
as roasts, baked goods, or custards.
Your oven has 10 power settings in
addition to HIGH. See Cooking Guide
for Power Levels, page 10.
Example: To cook food for 7 minutes 30 seconds at 70% power.
1. Enter the cook
time.
2. Touch POWER
pad.
3. Enter the power
level.
4. Touch ENTER/
START pad. When
the cook time is
over, you will hear
four beeps and
END will display.
COOKING WITH MORE
THAN ONE COOK
CYCLE
For best results, some recipes call for
one Power Level for a certain length
of time, and another Power Level for
another length of time. Your oven
can be set to change from one to
another automatically, for up to two
cycles.
Example: To cook food for 3
minutes at 100% power and then
70% power for 7 minutes 30
seconds.
1.
Enter the cook
time.
2. Touch MICRO
pad.
3. Enter the second
cook time.
4. Touch POWER
pad.
5. Enter the power
level.
6. Touch
ENTER/
START
pad. When
the cook time is
over, you will hear
four beeps and END
will display.
MELT
(Butter, Chocolate, Cheese, Marsh
Mallow)
This oven uses low power to melt
foods. Choose the category of the
food you are cooking and enter the
quantity.
See the MELT CHART on this page
for the settings available.
1. Touch STOP/
CLEAR pad.
2. Touch MELT
pad.
3. Choose food
category.
4. Touch number for
food quantity.
5. Touch ENTER/
START pad.
MELT CHART
SOFTEN
(Butter, Ice Cream, Cream Cheese,
Frozen Juice)
This oven uses low power to soften
foods. Choose the category of the
food you are cooking and enter the
quantity.
See the SOFTEN CHART on this
page for the settings available.
1. Touch STOP/
CLEAR pad.
2. Touch SOFTEN
pad.
3. Choose food
category.
4. Touch number for
food quantity.
5. Touch ENTER/
START pad.
SOFTEN CHART
Category
Butter
Chocolate
Cheese
Marshmallow
Touch Pad
Number
1
2
3
4
Amount
1 - 3 sticks
4 or 8 oz.
8 or 16 oz.
5 or 10 oz.
Category
Butter
Ice Cream
Cream
Cheese
Frozen Juice
Touch Pad
Number
1
2
3
4
Amount
1 - 3 sticks
Pint, Quart,
Half gallon
3 or 8 oz.
6, 12 or 16 oz.
 Loading...