

ENGLISH
OʻZBEK TILI
РУССКИЙ ЯЗЫК
УКРАÏНСЬКА
OWNER’S MANUAL
AIR
CONDITIONER
Please read this manual carefully before operating
your set and retain it for future reference.
CEILING CASSETTE
ҚАЗАҚ ТІЛІ
БЕЛАРУСКАЯ МОВА
P/NO. : MFL68525411
REV.00_170719
www.lg.com
2
TIPS FOR SAVING ENERGY
ENGLISH
TIPS FOR SAVING ENERGY
Here are some tips that will help you minimize the power consumption when you use the air
conditioner. You can use your air conditioner more efficiently by referring to the instructions
below:
• Do not cool excessively indoors. This may be harmful for your health and may consume more
electricity.
• Block sunlight with blinds or curtains while you are operating the air conditioner.
• Keep doors or windows closed tightly while you are operating the air conditioner.
• Adjust the direction of the air flow vertically or horizontally to circulate indoor air.
• Speed up the fan to cool or warm indoor air quickly, in a short period of time.
• Open windows regularly for ventilation as the indoor air quality may deteriorate if the air conditioner is used for many hours.
• Clean the air filter once every 2 weeks. Dust and impurities collected in the air filter may block
the air flow or weaken the cooling / dehumidifying functions.
For your records
Staple your receipt to this page in case you need it to prove the date of purchase or for warranty
purposes. Write the model number and the serial number here:
Model number :
Serial number :
You can find them on a label on the side of each unit.
Dealer’s name :
Date of purchase :

IMPORTANT SAFETY INSTRUCTIONS
IMPORTANT SAFETY INSTRUCTIONS
READ ALL INSTRUCTIONS BEFORE USING THE APPLIANCE.
Always comply with the following precautions to avoid dangerous situations and ensure peak
performance of your product
WARNING
It can result in serious injury or death when the directions are ignored
CAUTION
It can result in minor injury or product damage when the directions are ignored
WARNING
• Always ground the product. There is a risk of electric shock.
• Do not use a defective or underrated circuit breaker. Use the correctly rated breaker and fuse.
There is risk of fire or electric shock .
• Do not use a multi consent. Always use this appliance on a dedicated cicuit and breaker. Otherwise it can cause electric shock or fire.
• For electrical work, contact the dealer, seller, a qualified electrician, or an Authorized Service
Center. Do not disassemble or repair the product by yourself. There is risk of fire or electric
shock.
• Always ground the product as per the wiring diagram. Do not connect the ground wire to gas
or water pipes lightening rod or telephone ground wire. There is risk of fire or electric shock.
• Install the panel and the cover of control box securely. There is risk of fire or electric shock
due to dust , water etc.
• Use the correctly rated breaker or fuse. There is risk of fire or electric shock.
• Do not modify or extend the power cable. If the power cable or cord has scrathes or skin
peeled off or deteriorated then it must be replaced. There is risk of fire or electric shock.
• For installation, removal or reinstall , always contact the dealer or an Authorized Service Center. There is risk of fire, electric shock, explosion, or injury.
• Do not install the product on a defective installation stand. Be sure that the installation area
does not deteriorate with age. It may cause product to fall.
• Never install the outdoor unit on a moving base or a place from where it can fall down. The
falling outdoor unit can cause damage or injury or even death of a person.
• When the product is soaked (flooded or submerged) in water , contact an Authorized Service
Center for repair before using it again. There is risk of fire or eletric shock.
• Be sure to check the refrigerant to the used. Please read the label on the product. Incorrect
refrigerant used can prevent the normal operation of the unit.
• Don't use a power cable, a plug or a loose socket which is damaged. Otherwise it may
cause a fire or electrical shock.
• Do not touch , operate, or repair the product with wet hands. Hold the plug by hand when
taking out. There is risk of electric shock or fire.
• Do not place a heater or other heating appliances near the power cable. There is risk of fire
and electric shock.
• Do not allow water to run into electric parts. Install the unit away from water sources. There
is risk of fire, failure of the product, or electric shock.
• Do not store or use or even allow flammable gas or combustibles near the product. There is
!
!
!
3
ENGLISH

4
IMPORTANT SAFETY INSTRUCTIONS
ENGLISH
risk of fire.
• Indoor/outdoor wiring connections must be secured tightly and the cable should be routed
properly so that there is no force pulling the cable from the connection terminals. Improper or
loose connections can cause heat generation or fire.
• Safely dispose off the packing materials. Like screws, nails, batteries, broken things etc after
installation or svc and then tear away and thraw away the plastic packaging bags. Children
may play with them and cause injury.
• Make sure to check that the power cable plug is not dirty, loose or broken and then only insert the plug completely. Dirty, loose or broken power plug can cause electric shock or fire.
• In outdoor unit the step-up capacitor supplies high voltage electricity to the electrical components. Be sure to discharge the capacitor completely before conducting the repair work. An
charged capacitor can cause electrical shock.
• When installing the unit, use the installation kit provided with the product. Otherwise the unit
may fall and cause severe injury.
• Be sure to use only those parts which are listed in the svc parts list. Never attempt to modify the equipment. The use of inappropriate parts can cause an electrical shock, excessive
heat generation or fire.
• Do not use the product in a tightly closed space for a long time. Perform ventilation regularly.
Oxygen deficiency could occur and hence harm your health.
• Do not open the front grille of the product during operation. (Do not touch the electrostatic filter, if the unit is so equipped.) There is risk of physical injury, electric shock, or product failure.
• If strange sounds, smell or smoke comes from product.Immediately turn the breaker off or
disconnect the power supply cable. There is risk of electric shock or fire.
• Ventilate the product room from time to time when operating it together with a stove, or
heating element etc. Oxygen deficiency can occur and hence harm your health.
• Turn the main power off and unplug the unit when cleaning or repairing the product. There is
risk of electric shock.
• When the product is not to be used for a long time, disconnect the power supply plug or turn
off the breaker. There is risk of product damage or failure, or unintended operation.
• Take care to ensure that nobody especially kids could step on or fall onto the outdoor unit.
This could result in personal injury and product damage.
• Take care to ensure that power cable could not be pulled out or damaged during operation.
There is risk of fire or electric shock.
• Do not place ANYTHING on the power cable. There is risk of fire or electric shock.
• Do not plug or unplug the power supply plug to turn the unit ON/OFF. There is risk of fire or
electric shock.
• When flammable gas leaks, turn off the gas and open a window for ventilation before turn the
product on. Do not use the telephone or turn switches on or off. There is risk of explosion or
fire.
CAUTION
• Two or more people must lift and transport the product. Avoid personal injury.
• Do not install the product where it will be exposed to sea wind (salt spray) directly. It may
cause corrosion on the product.
• Install the drain hose to ensure that the condensed water is drained away properly. A bad
connection may cause water leakage.
• Keep level even when installing the product. To avoid vibration or noise.
• Do not install the product where the noise or hot air from the outdoor unit could damage or
disturb the neighborhoods. It may cause a problem for your neighbors and hence dispute.
!

IMPORTANT SAFETY INSTRUCTIONS
• Always check for gas (refrigerant) leakage after installation or repair of product. Low refrigerant levels may cause failure of product.
• Do not use the product for special purposes, such as preserving foods, works of art, etc. It is
a consumer air conditioner, not a precision refrigeration system. There is risk of damage or
loss of property.
• Do not block the inlet or outlet of air flow. It may cause product failure.
• Use a soft cloth to clean. Do not use harsh detergents, solvents or splashing water etc. There
is risk of fire, electric shock, or damage to the plastic parts of the product.
• Do not touch the metal parts of the product when removing the air filter. There is risk of personal injury.
• Do not step on or put anyting on the product. (outdoor units) There is risk of personal injury
and failure of product.
• Always insert the filter securely after cleaning. Clean the filter every two weeks or more often
if necessary. A dirty filter reduces the efficiency.
• Do not insert hands or other objects through the air inlet or outlet while the product is operating. There are sharp and moving parts that could cause personal injury.
• Be cautious when unpacking and installing the product. Sharp edges could cause injury.
• If the refrigerant gas leaks during the repair, do not touch the leakaing refrigerant gas. The refrigernat gas can cause frostbite (cold burn)
• Do not tilt the unit when removing or uninstalling it. The condensed water inside can spill .
• Do not mix air or gas other than the specified refrigerant used in the system. If air enters the
refrigerant system, an excessively high pressure results, causing equipment damage or injury.
• If the refrigerant gas leaks during the installation, ventilate the area immediately. Otherwise it
can be harmfull for your health.
• Dismantling the unit, treatment of the refrigerant oil and eventual parts should be done in accordance with local and national standards. Replace the all batteries in the remote control
with new ones of the same type. Do not mix old and new batteries or different types of batteries. There is risk of fire or product failure.
• Do not recharge or disassemble the batteries. Do not dispose off batteries in a fire. They may
burn or explode.
• If the liquid from the batteries gets onto your skin or clothes, wash it well with clean water.
Do not use the remote if the batteries have leaked. The chemicals in batteries could cause
burns or other health hazards.
• If you eat the liquid from the batteries, brush your teeth and see doctor. Do not use the remote if the batteries have leaked. The chemicals in batteries could cause burns or other
health hazard.
• Do not let the air conditioner run for a long time when the humidity is very high and a door or
a window is left open. Moisture may condense and wet or damage furniture.
• Do not expose your skin or kids or plants to the cool or hot air draft. This could harm to your
health.
• Do not drink the water drained from the product. It is not sanitary and could cause serious
health issues.
• Use a firm stool or ladder when cleaning, maintaining or repairing the product at an height.
Be careful and avoid personal injury.
5
ENGLISH

TABLE OF CONTENTS
6
ENGLISH
TABLE OF CONTENTS
2 TIPS FOR SAVING EN-
ERGY
3 IMPORTANT SAFETY IN-
STRUCTIONS
7 BEFORE USE
7 Preparing for operation
7 Usage
7 Cleaning and maintenance
7 Service
8 PRODUCT INTRODUC-
TION
8 Name and function of parts
Operation Indication Lamps
9
10 Wireless Remote Controller
11 OPERATING INSTRUC-
TION
11 How to insert the Batteries
11 Wireless Remote Controller Mainte-
nance
11 Operating Method
12 OWNER'S INSTRUC-
TION
12 Cooling Mode - Standard Operation
12 Cooling Mode - Power Cooling
13 Heating Mode
14 Dehumidification Mode
15 Fan Mode
16 Auto Operation Mode
17 Auto Changeover Mode
18 Auto Changeover Mode - Setting the
Mode Change Temperature
19 Airflow Setting
19 Celsius/Fahrenheit Switching
20 Temperature Setting/Room Tempera-
ture checking
21 SUB FUNCTION
21 Plasma Purification(Optional)
21 Auto Clean (Optional)
22 Smart Clean (Optional)
23 Individual vane angle control (Optional)
24 TIMER
24 Setting the Current Time
24 Sleep Timer Setting
24 On Timer Setting
25 Off Timer Setting
25 To cancel the Timer Setting
26 MAINTENANCE AND
SERVICE
26 Indoor Unit
27 Purifying filter(Optional)
28 Operation Tips!
28 When the air conditioner is not
going....
29 Troubleshooting Tips! Save time and
money!
29 Call the service immediately in the fol-
lowing situations

BEFORE USE
7
ENGLISH
Preparing for operation
• Contact an installation specialist for installation.
• Use a dedicated circuit.
Usage
• Being exposed to direct airflow for an extended period of time could be hazardous to your
health. Do not expose occupants, pets, or plants to direct airflow for extended periods of time.
• Due to the possibility of oxygen deficiency, ventilate the room when used together with stoves
or other heating devices.
• Do not use this air conditioner for non-specified special purposes (e.g. preserving precision devices, food, pets, plants, and art objects). Such usage could damage the items.
Cleaning and maintenance
• Do not touch the metal parts of the unit when removing the filter. Injuries can occur when handling sharp metal edges.
• Do not use water to clean inside the air conditioner. Exposure to water can destroy the insulation, leading to possible electric shock.
• When cleaning the unit, first make sure that the power and breaker are turned off. The fan rotates at a very high speed during operation. There is a possibility of injury if the unit’s power is
accidentally triggered on while cleaning inner parts of the unit.
Service
For repair and maintenance, contact your authorized service dealer.
BEFORE USE
PRODUCT INTRODUCTION
8
ENGLISH
PRODUCT INTRODUCTION
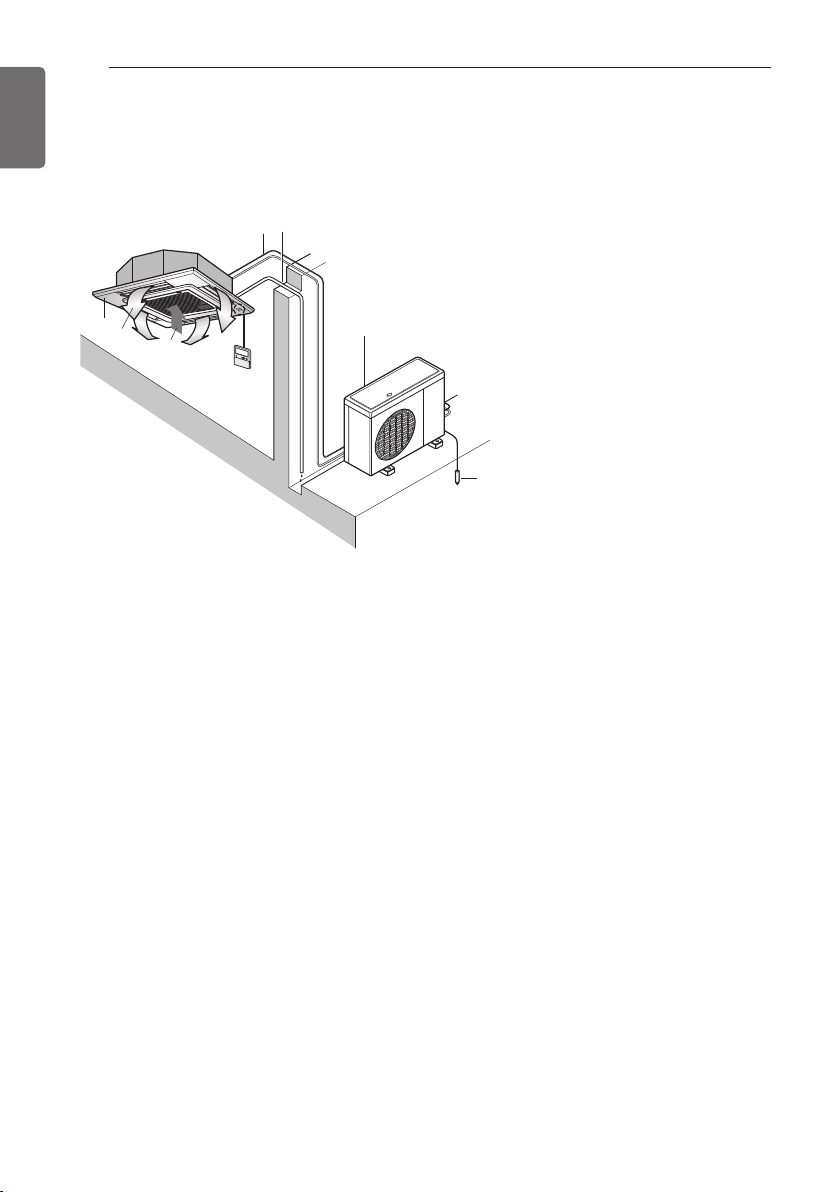
Name and function of parts
7
6
1
5
4
4
3
2
1 Indoor unit
2 Outdoor unit
3 Remote controller
4 Inlet air
5 Discharge air
6 Refrigerant piping, connection electric wire
7 Drain pipe
8 Ground wire
Wire to ground outdoor unit to prevent electrical shocks.
8
PRODUCT INTRODUCTION
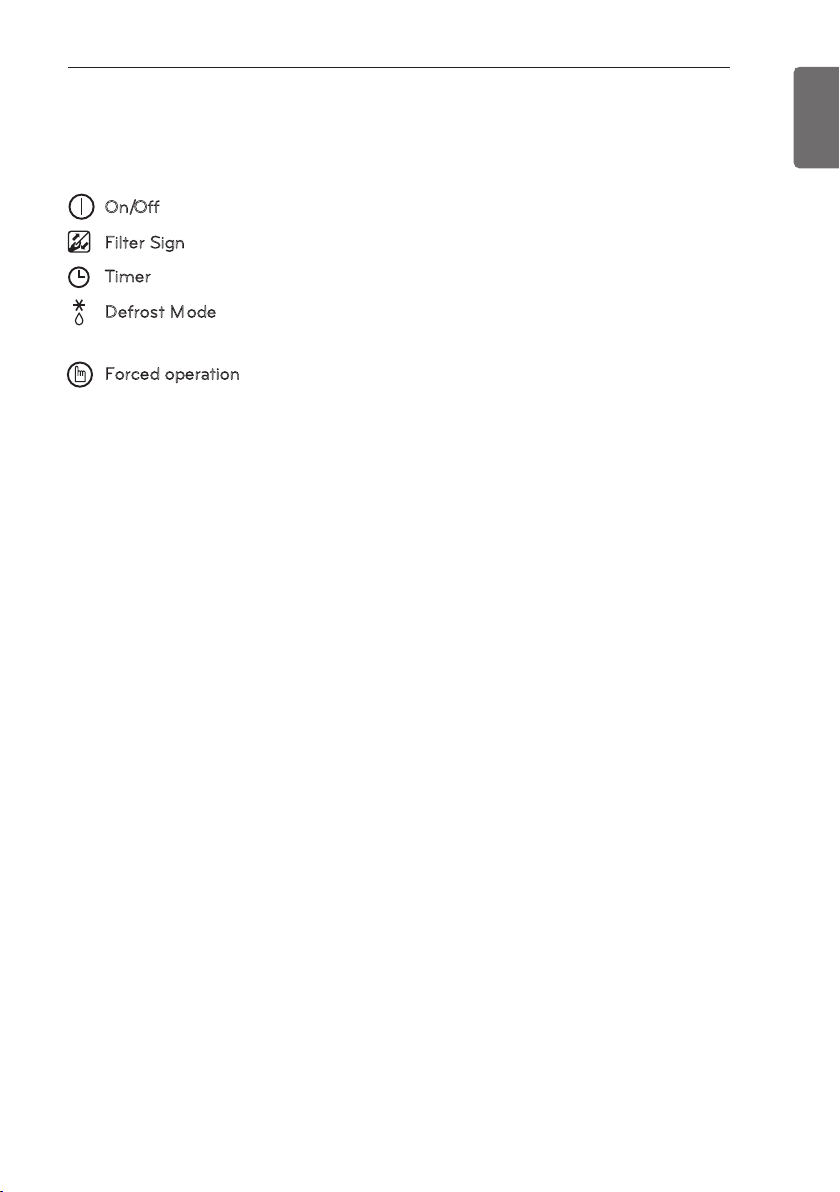
Operation Indication Lamps
On/Off : Lights up during the system operation.
F
ilter Sign : Lights up after 2400 hours from the time of first operating unit.
imer : Lights up during Timer operation.
T
D
efrost M ode : Lights up during Defrost Mode or Hot Start operation.
(Heat pump model only)
F
orced operation : To operate the unit when the remote control can't be used for
any reason.
9
ENGLISH
10
PRODUCT INTRODUCTION
ENGLISH
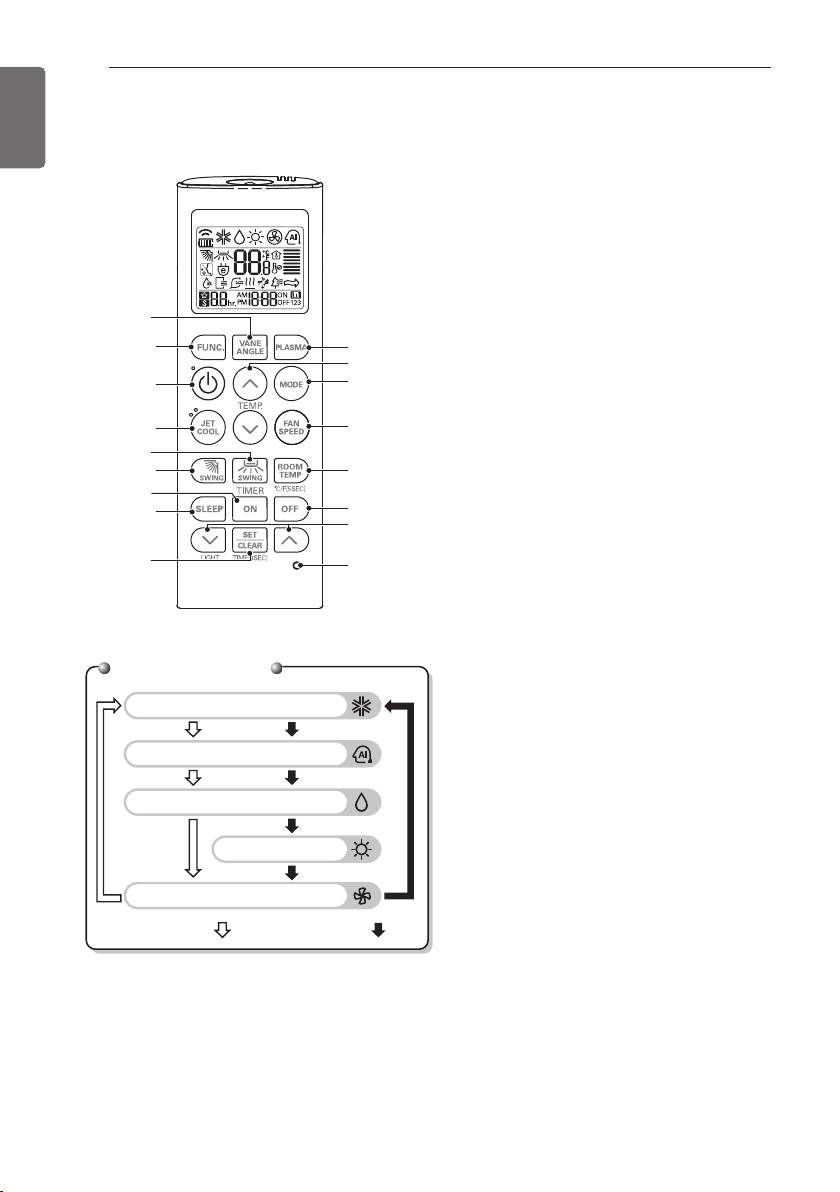
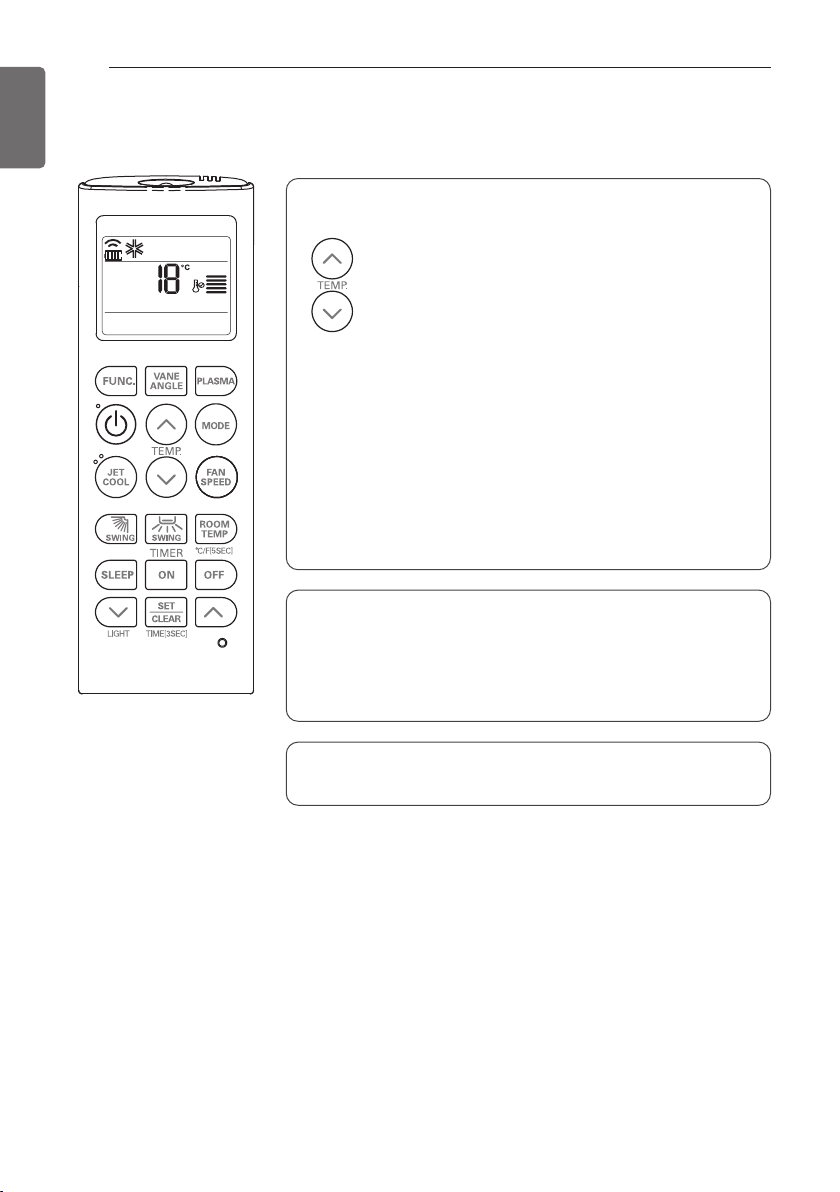
1
VANE ANGLE Button
Used to set each vane angle.
2
FUNCTION SETTING Button
Used to set or clear Auto Clean, Smart
Clean, Electric heater or Individual vane
angle control.
3
ON/OFF Button
Used to turn on/off the unit.
4
JET COOL Button
Speed cooling operates super high fan
speed.
5
LEFT/RIGHT AIRFLOW Button (OPTIONAL)
Used to set the desired left/right(horizontal)
airflow direction.
6
UP/DOWN AIRFLOW Button
Used to stop or start louver movement and
set the desired up/down airflow direction.
7
ON TIMER Button
Used to set the time of starting operation.
8
SLEEP TIMER Button
Used to set the time of sleeping operation.
9
SET / CLEAR Button
Used to set/clear the timer.
Used to set the current time(if it input for
3sec.)
10
PLASMA Button (OPTIONAL)
Used to start or stop the plasma-purification
function.
11
ROOM TEMPERATURE SETTING Button
Used to select the room temperature.
12
OPERATION MODE SELECTION Button
Used to select the operation mode.
13
INDOOR FAN SPEED SELECTION Button
Used to select fan speed in four steps low,
medium, high and chaos.
14
ROOM TEMPERATURE CHECKING Button
Used to check the room temperature.
15
OFF TIMER Button
Used to set the time of stopping operation.
16
TIMER SETTING(Up/Down)/LIGHT Button
Used to set the timer.
Used to adjust the brightness.(if it is not
time adjust mode)
17
RESET Button
Used to reset the remote controller.
Wireless Remote Controller
1
2
3
4
5
6
7
8
9
Operation Mode
Cooling Mode
Auto Mode or Auto Changeover
Dehumidification mode
Heating Mode
Fan Mode
• Cooling Model( ), Heat Pump Model( )
10
11
12
13
14
15
16
17
OPERATING INSTRUCTION
11
ENGLISH
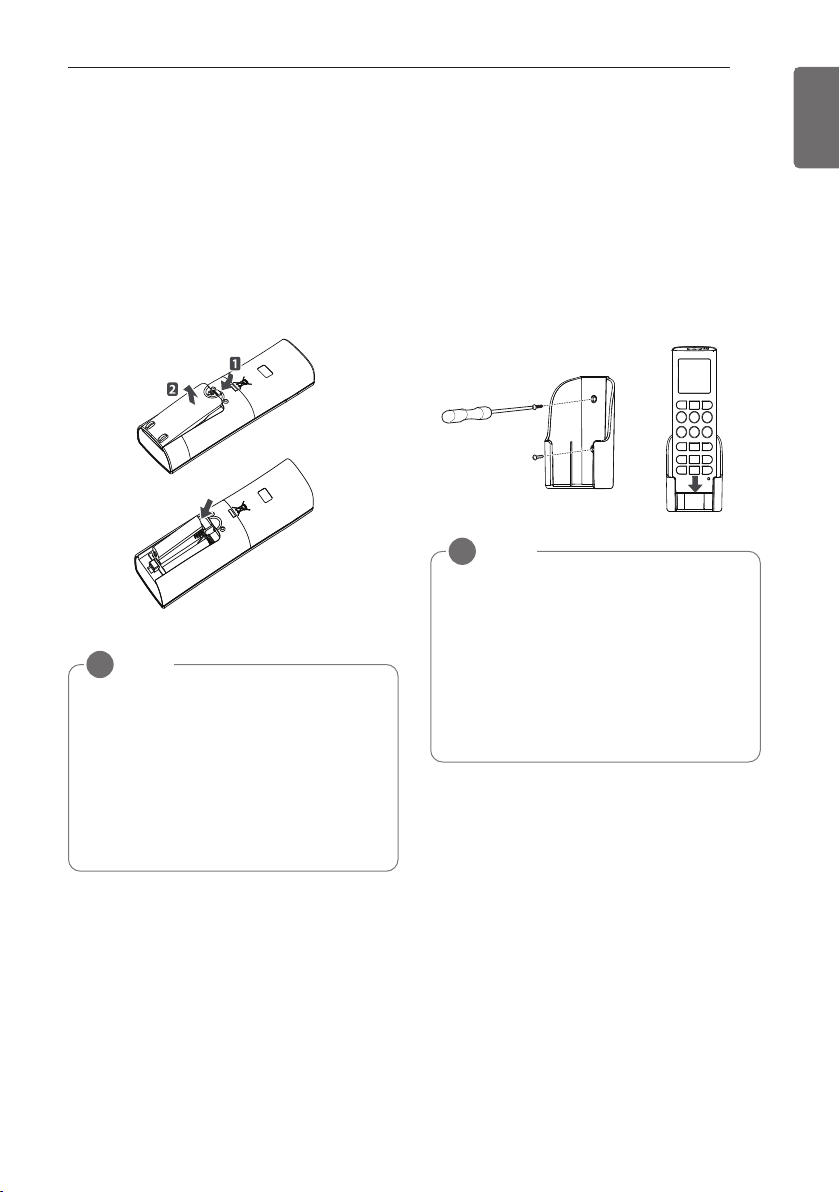
How to insert the Batteries
1 Remove the battery cover by pulling it ac-
cording to the arrow direction.
2 Insert new batteries making sure that the
(+) and (-) of battery are installed correctly.
3 Reattach the cover by sliding it back into
position.
Wireless Remote Controller
Maintenance
1 Choose a suitable place where its safe &
easy to reach.
2 Fix the holder to wall etc with the supplied
screws firmly.
3 Slide the remote controller inside the
holder.
Operating Method
1 The signal receiver is inside the unit.
2 Aim the remote controller towards the unit
to operate it. There should not be any
blockage in between.
NOTE
!
• Always use/replace both batteries of
same type.
• If the system is not to be used for a
long time, remove the batteries to save
their working life.
• If the display screen of remote controller starts, fading replace both of the
batteries.
NOTE
!
• Remote controller should never be exposed to direct sunlight.
• Signal transmitter & receiver should always be clean for proper communication. Use a soft cloth to clean them.
• In case some other appliances also get
operated with remote control, change
their position or consult your serviceman.
OPERATING INSTRUCTION
12
ENGLISH
OWNER'S INSTRUCTION
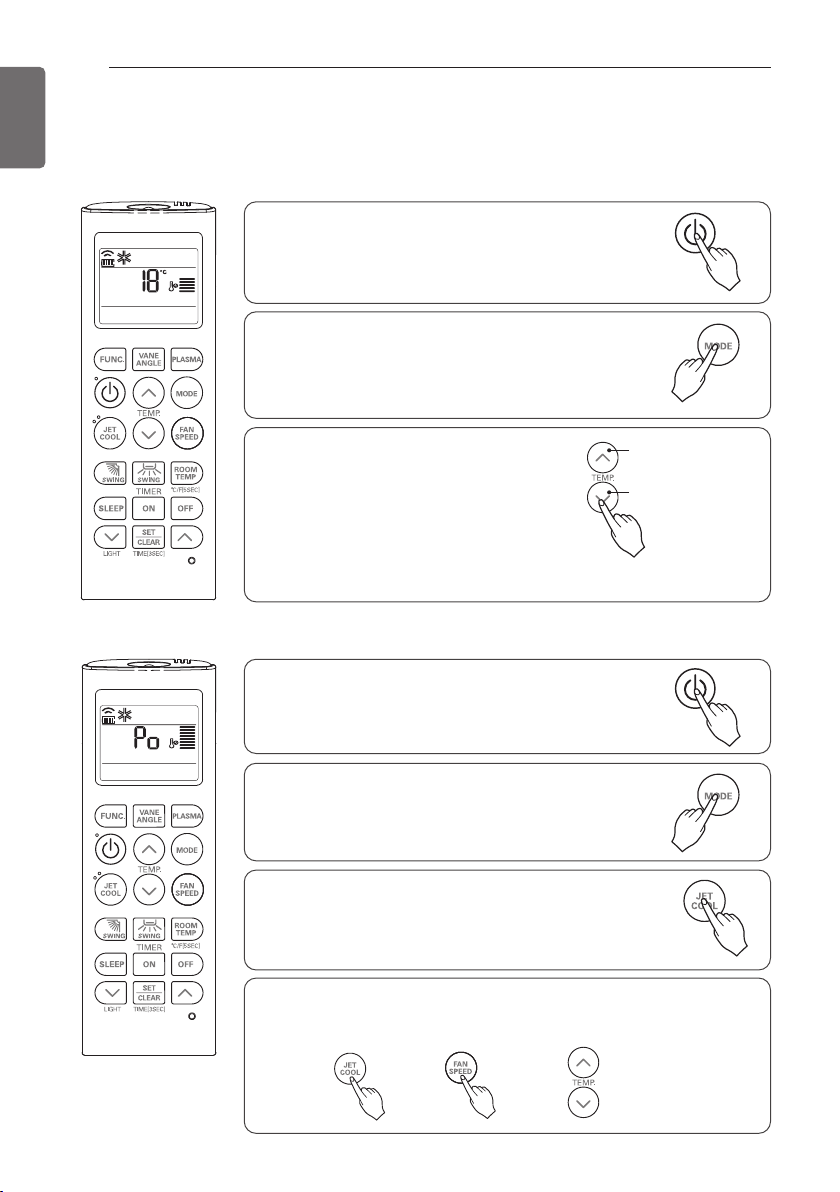
Press the ON/OFF button.
The unit will respond with beep sound.
1
Press MODE button to select Cooling Mode.
2
3
Set the desired temperature by pressing
TEMP button.
Press ROOM TEMPERATURE CHECKING
button to check the room temperature.
When setting the desired temperature is
higher than room temperature, cooling
wind isn’t blow out.
* Setting Temp. Range : 18~30 °C(64~86 °F)
Cooling Mode - Power Cooling
Press the ON/OFF button.
The unit will respond with beep sound.
1
Press MODE button to select Cooling Mode.
2
3
Press the JET COOL button. The unit will operate in
super high fan speed in cooling mode.
* Wall mounted models operate power cooling mode
for 30 minutes.
4
or or
To cancel the Power cooling Mode press the Jet Cool button or the
fan button or the room temperature setting button again and the
unit will operate in high fan speed in cooling mode.
Cooling Mode - Standard Operation
OWNER'S INSTRUCTION
To raise the temperature
To lower the temperature
13
ENGLISH
OWNER'S INSTRUCTION
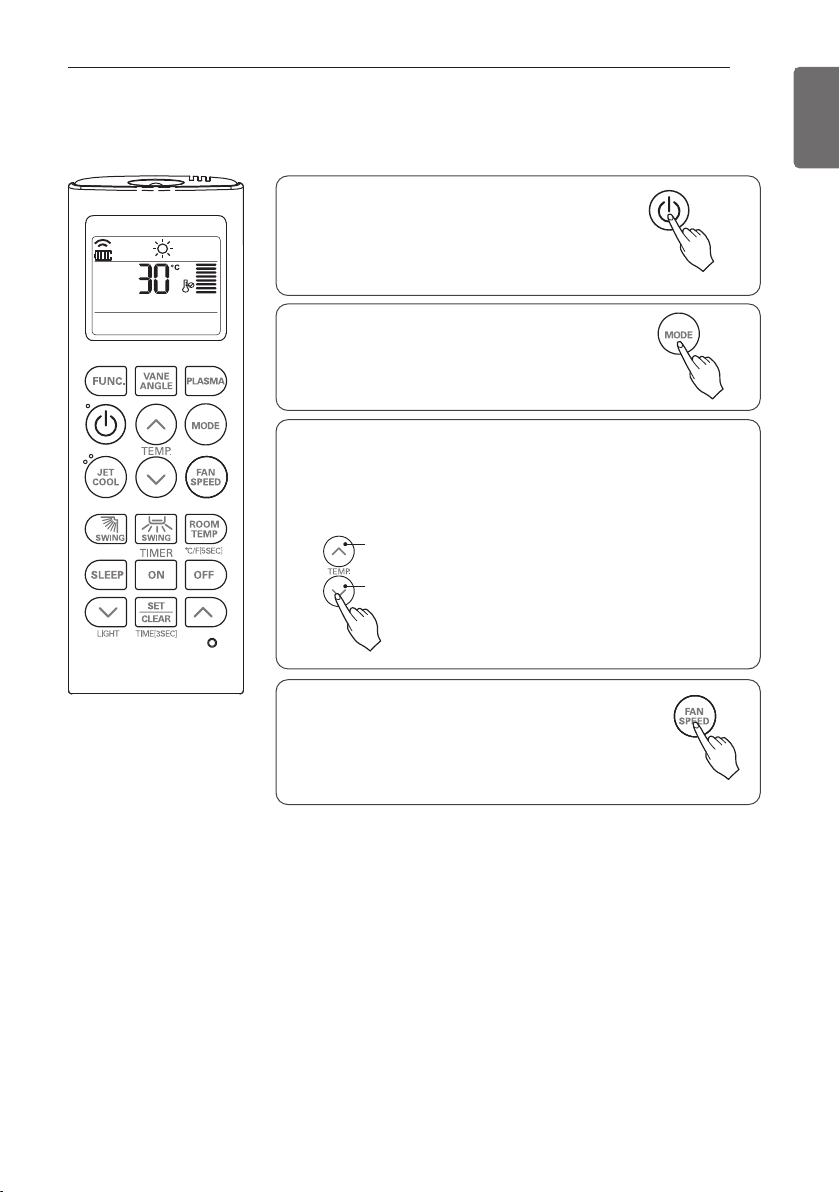
Heating Mode
This Function is only for H/P model.
Press the ON/OFF button.
The unit will respond with beep sound.
1
2
3
Set the desired temperature by pressing TEMP button.
Press ROOM TEMPERATURE CHECKING button to check the
room temperature.
When setting the desired temperature is lower than room
temperature, heating wind isn’t blow out.
4
Press MODE button to select Heating Mode.
* Setting Temp. Range in
Heating Mode :
16~30 °C (60 °F~86 °F)
Set the fan speed again. You can select the fan
speed in four steps–low, medium, high, or chaos.
Each time the button is pressed, the fan speed
mode is shifted.
To raise the temperature
To lower the temperature
14
OWNER'S INSTRUCTION
ENGLISH
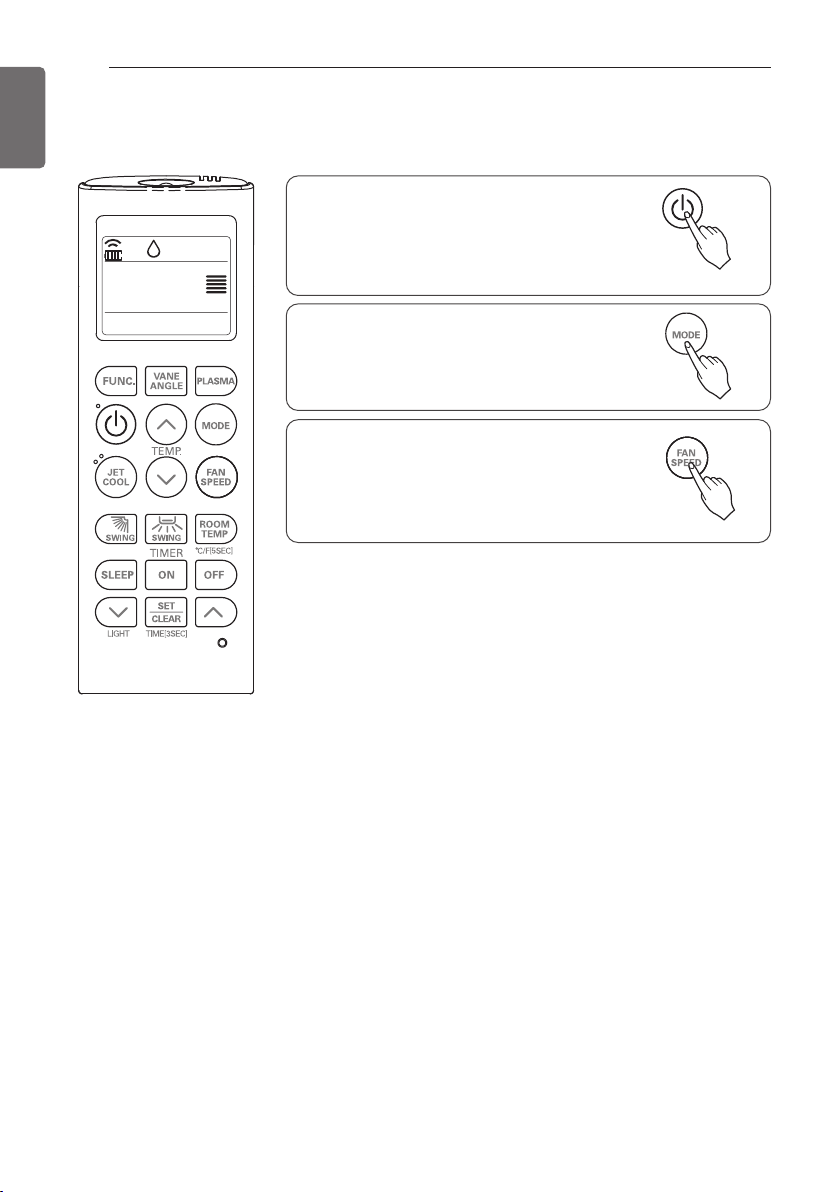
Dehumidification Mode
Press the ON/OFF button.
The unit will respond with beep sound.
1
2
3
Set the fan speed. You can select the fan speed
in four steps - low, medium, high, or chaos.
Each time the button is pressed, the fan speed
mode is shifted.
Press MODE button to select Dehumidification Mode.
OWNER'S INSTRUCTION
15
ENGLISH
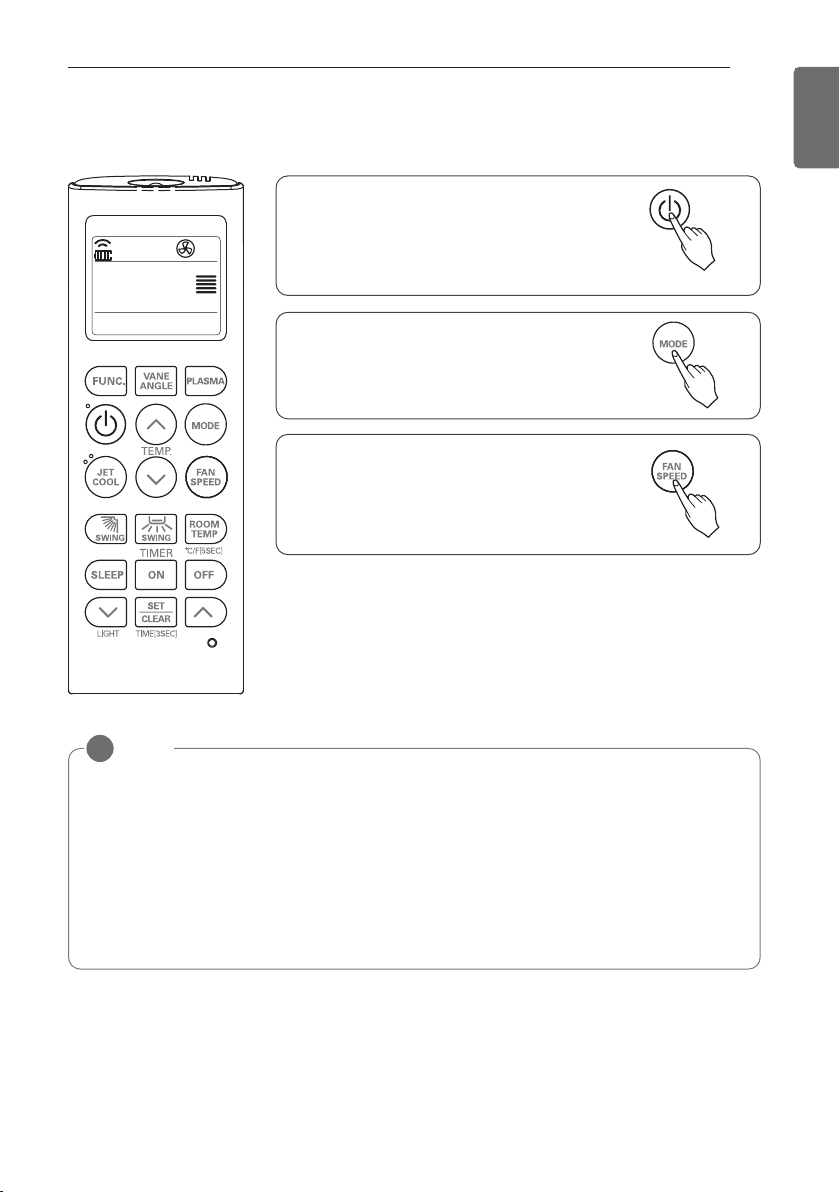
Fan Mode
Press the ON/OFF button.
The unit will respond with beep sound.
1
2
3
Set the fan speed again. You can select the fan
speed in four steps–low, medium, high, or
chaos. Each time the button is pressed, the fan
speed mode is shifted.
Press MODE button to select Fan Mode.
NOTE
!
• Natural Wind by the chaos Logic
For more fresh feeling than other fan speed, press the Indoor Fan Speed Selector and set to
chaos mode. In this mode, the wind blows like natural breeze by automatically changing fan
speed according to the chaos logic.
• During Fan Mode
The outdoor compressor doesn't work.
Have a function to circulate the indoor as it sends out the air that doesn't have much temperature difference with indoor.
16
OWNER'S INSTRUCTION
ENGLISH
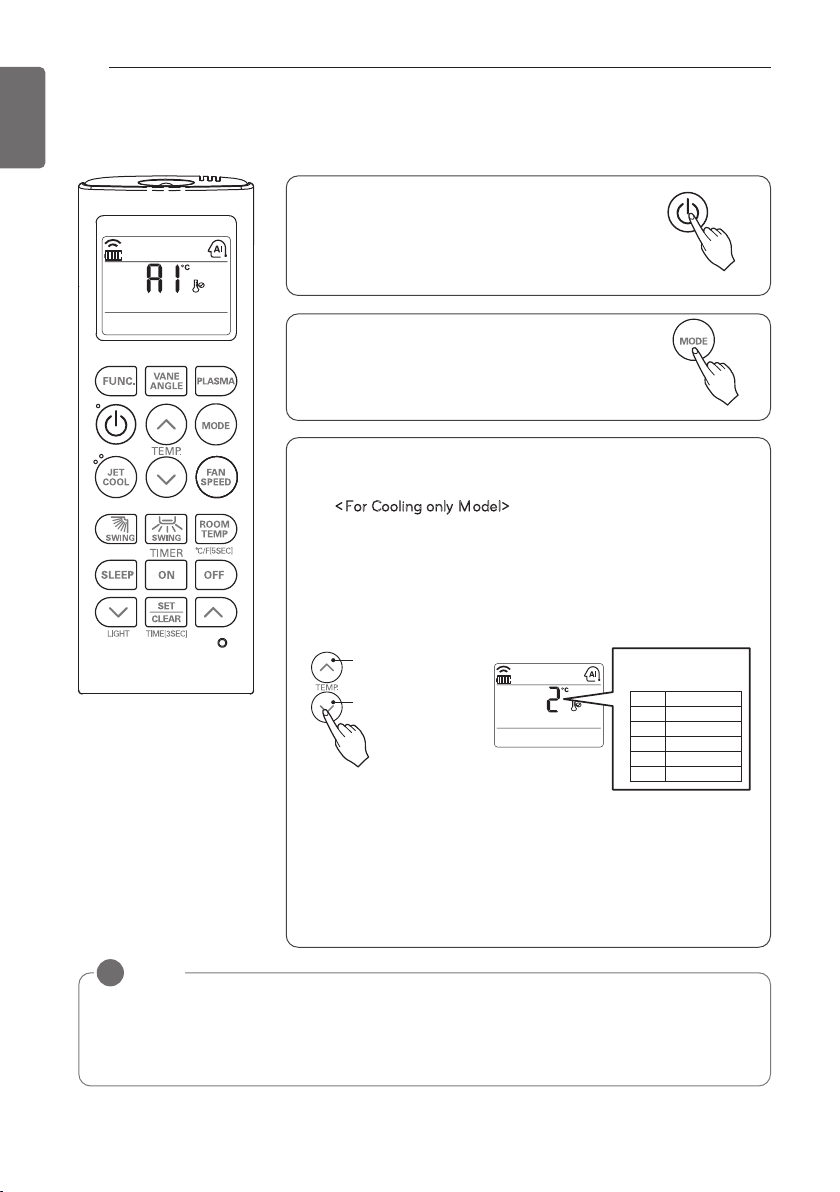
Auto Operation Mode
Press the ON/OFF button.
The unit will respond with beep sound.
1
2
3
Press MODE button to select Auto Operation
Mode.
Code Feel
2 Cold
1 Slightly cool
0 Neutral
-1 Slightly warm
-2 Warm
* Please select the code
depend on your feeling.
NOTE
!
During Auto Operation Mode
- If the system is not operating as desired, manually switch to another mode. The system will not
automatically switch from the cooling mode to the heating mode, or from heating to cooling, then
you must set the mode and the desired temperature again.
Set the desired temperature.
For Cooling only Model>
<
The temperature and fan speed are automatically set by the
electronic controls based on the actual room temperature.
If you feel hot or cold, press TEMPERATURE SETTING buttons
for more cooling or heating effect.
You cannot switch the indoor fan speed. It has already been
set by the Auto Operation Mode rule.
To raise the temperature
To lower the temperature
OWNER'S INSTRUCTION
17
ENGLISH
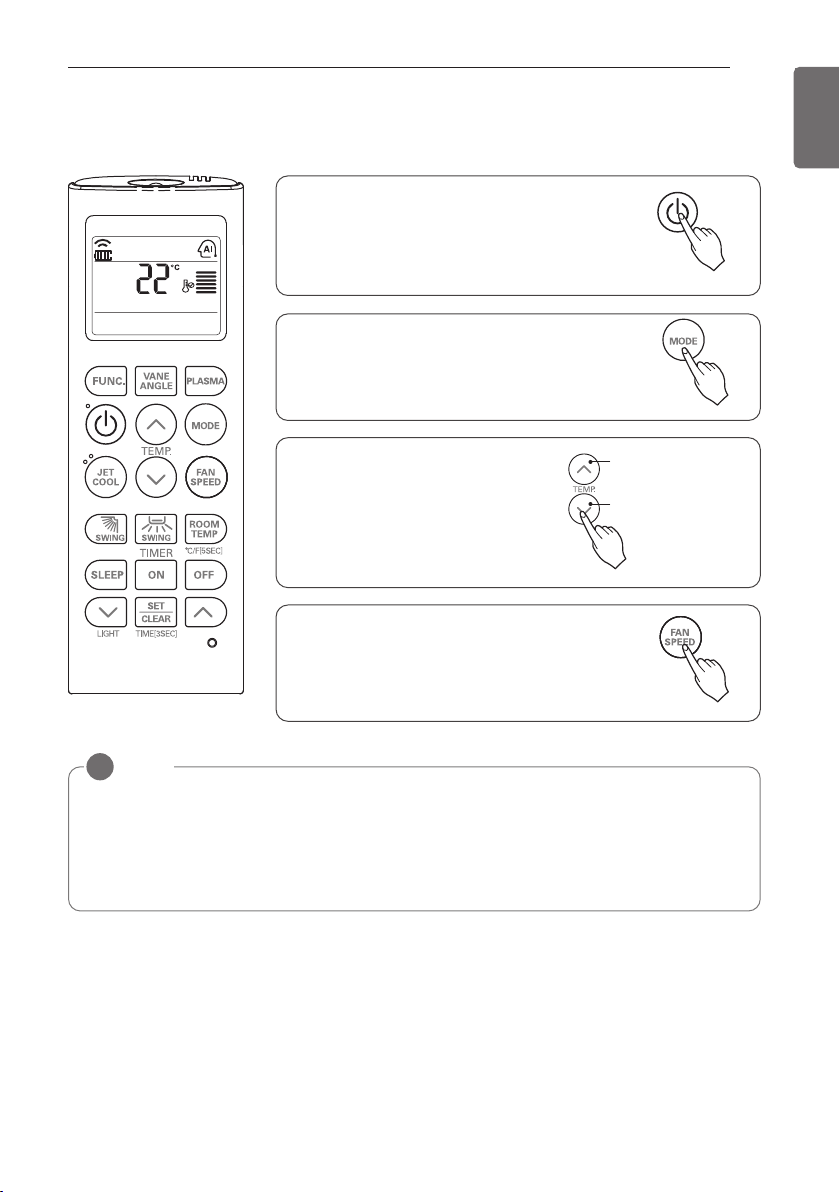
Auto Changeover Mode
Press the ON/OFF button. The unit will respond with beep sound.
1
2
3
Press MODE button to select Auto
Changeover Mode.
Set the desired room temperature.
* Setting Temp. Range in Auto
Changeover Mode : 18~30 °C
(64~86 °F)
4
You can select the fan speed in four stepsslow, medium, high and chaos. Each time the
button is pressed, the fan speed mode is
shifted.
NOTE
!
During Auto changeover Mode
The air conditioner changes the operation mode automatically to keep indoor temperature.
When room temperature vary over ±2 °C(4 °F) with respect to setting temperature, air conditioner keeps the room temperature within ±2 °C(4 °F) with respect to setting temperature by
auto changeover mode.
To raise the temperature
To lower the temperature
18
OWNER'S INSTRUCTION
ENGLISH
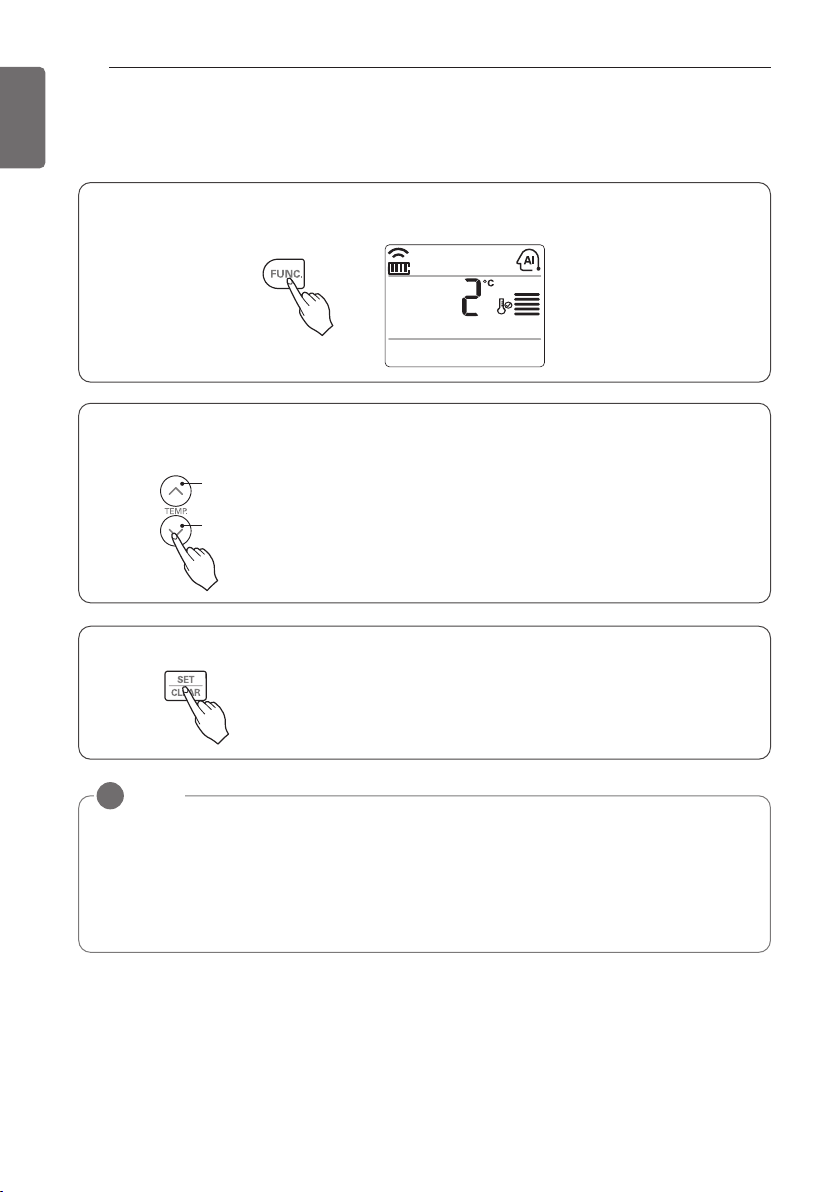
Auto Changeover Mode - Setting the Mode Change Temperature
This Function is to set the operating mode of the Auto Changeover Mode.
In Auto Changeover Mode, Press FUNCTION button to select
Setting the Mode Change Temperature.
1
Press the TEMPERATURE SETTING button to set desired Mode Change Temperature.
(Default value is 2 °C(4 °F).)
2
Complete the setting by pressing SET/CLEAR button.
3
* Mode Change Temp. Range :
1~7 °C(2~14 °F)
NOTE
!
The Mode Change Temperature is the difference of temperature when from cooling mode
to heating mode or from heating mode to cooling mode.
Ex) When setting temperature is 25 °C(76 °F) and room temperature is 20 °C(68 °F), then
operating mode is heating. If you set the mode change temperature to 2 °C(4 °F), when
the room temperature up to 27 °C(25 °C + 2 °C)(80 °F(76 °F + 4 °F)), the unit start cooling operation.
To raise the temperature
To lower the temperature
OWNER'S INSTRUCTION
19
ENGLISH
Up/Down Airflow Direction Control (Optional)
The up/down airflow (Vertical Airflow) can be adjusted by using the remote controller.
1 Press the ON/OFF button to start the unit.
2 Press up/down airflow button and the louvers will swing up and down.
Press the up/down airflow button again to set the vertical louver at the desired airflow direction.
Celsius/Fahrenheit Switching
NOTE
Airflow Setting
!
• If you press the UP/DOWN AIRFLOW button, the horizontal airflow direction is changed automatically based on the Auto Swing algorithm to distribute the air in the room evenly and
at the same time to make the human body feel more comfortable, as if enjoying a natural
breeze.
• Always use the remote controller to adjust the up/down airflow direction. Manually moving
the vertical airflow direction louver by hand, could damage the air conditioner.
• When the unit is shut off, the up/down airflow direction louver will close the air outlet vent
of the system.
- Press the °C/°F SWITCH button to change from Celsius to Fahrenheit or from Fahrenheit to
Celsius.
- Whenever press TEMPERATURE SETTING button in Fahrenheit mode, the temperature
will increase/drop 1 °F.
20
OWNER'S INSTRUCTION
ENGLISH
Temperature Setting/Room Temperature checking
We can simply adjust the desired temperature
- Press the buttons to adjust the desired temperature
: Increase Temp. per one time pressing
: Decrease Temp. per one time pressing
Room temp: Indicate the current room temperature
Set temp: Indicate the temperature that user want to set
<Cooling Mode>
The cooling mode doesn't work if desired temperature is higher
than room temperature Please lower the desired temperature
<Heating Mode>
The heating mode doesn't work if desired temperature is lower
than room temperature Please increase the desired temperature
Whenever press ROOM TEMPERATURE button, the room temperature will be displayed within 5 seconds.
After 5 seconds, it turns to display the desired temperature.
Because of location of remote controller, the real room temperature
and the this displayed value can be different.
Press ROOM TEMPERATURE button for 5 seconds, temperature
unit change Celsius to Fahrenheit or Fahrenheit to Celsius.
SUB FUNCTION
21
ENGLISH
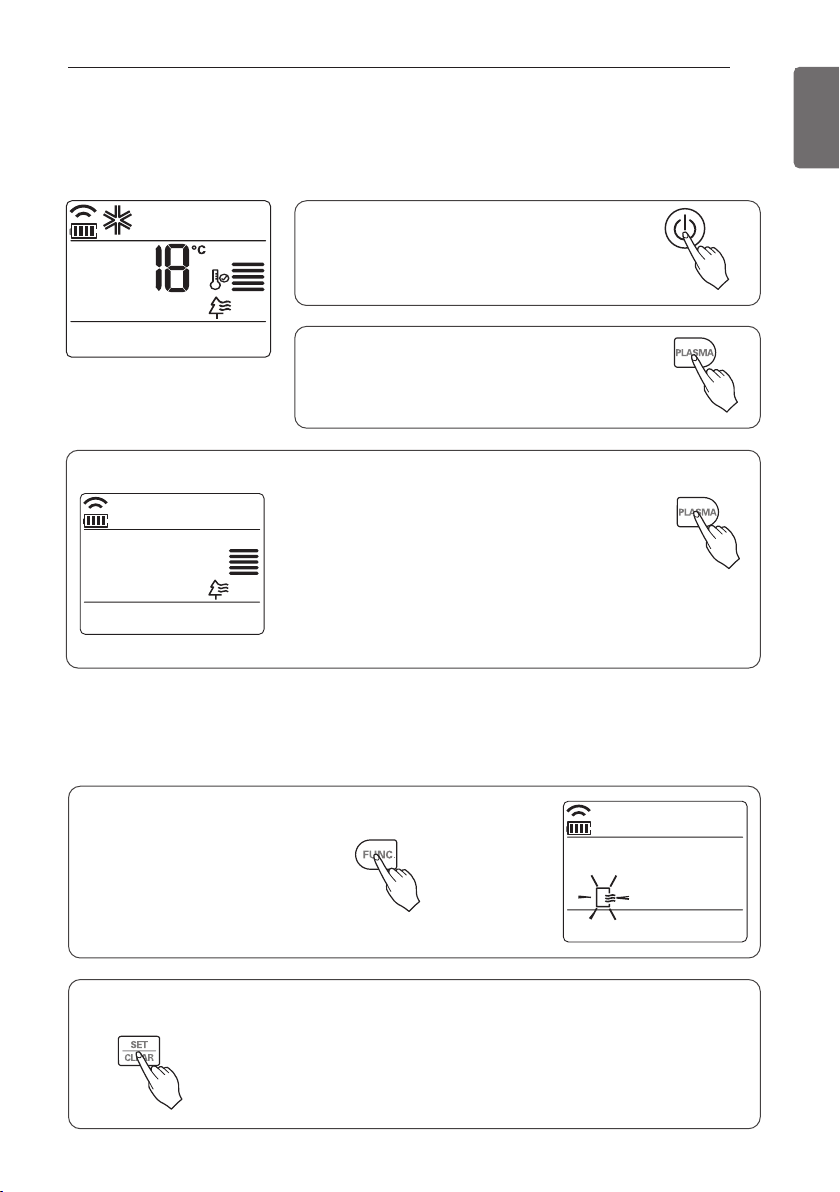
Auto Clean (Optional)
Press the ON/OFF button.
The unit will respond with beep sound.
1
Press the PLASMA button. Plasma Purification will start when the button is pressed
and stop when the button is pressed again.
2
PLASMA Purification only
If you press the PLASMA button, Plasma Purification operates.
• Plasma filter is a technology developed by LG to
get rid of microscopic contaminants in the intake
air generating a plasma of high charge electrons.
This plasma kills and destroys the contaminants
completely to provide clean and hygienic air.
• This function can be used in any operation mode
and any fan speed can be used while plasma filter
is functioning.
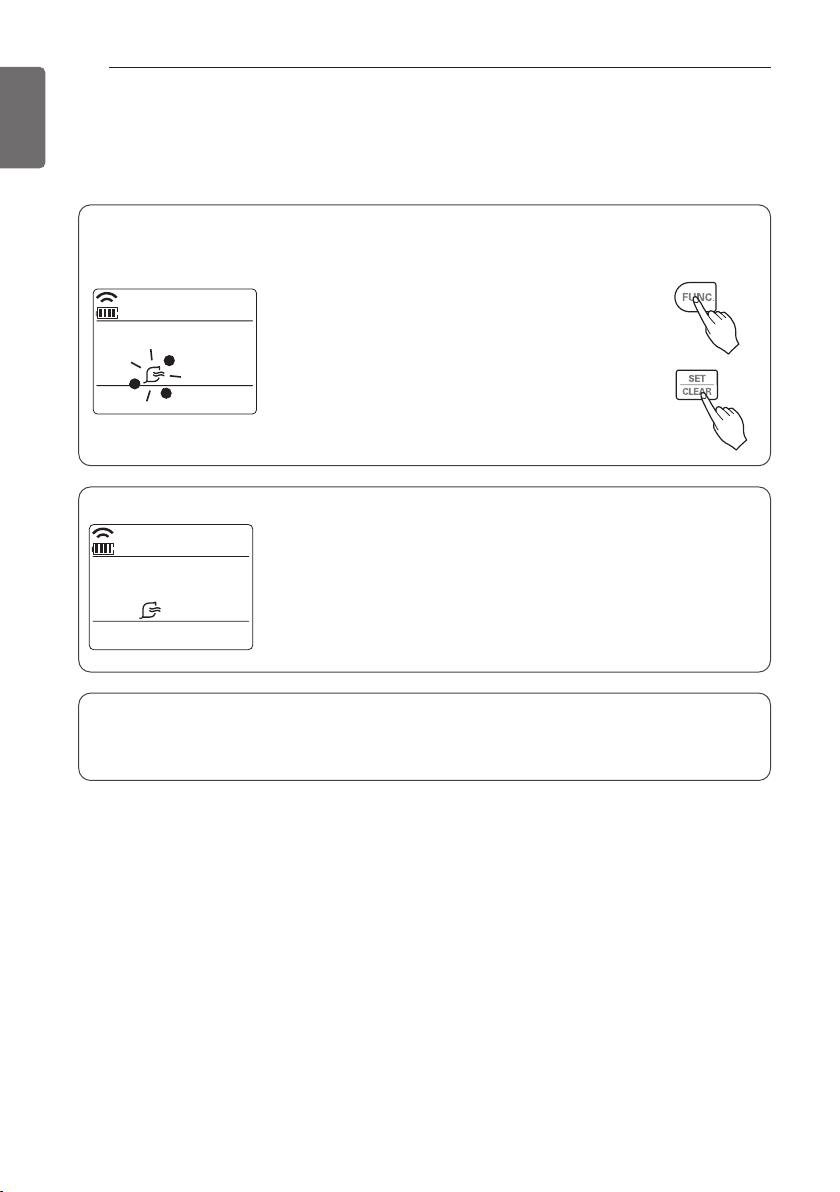
This function operate when the unit is turned off.
Press the FUNCTION SETTING button 1 time.
Auto Clean symbol will blink.
1
Press the SET/CLEAR button to reserve or cancel the Auto Clean function.
If the Auto Clean function is reserved, whenever the unit is turned off,
the indoor fan is still running for about 30 minutes internally without
cooling or dehumidification operation. Also the louver is closed.
This dries up any remains of moisture & cleans the unit internally.
2
Plasma Purification(Optional)
SUB FUNCTION
22
SUB FUNCTION
ENGLISH
Smart Clean (Optional)
The Smart Clean function can be used by setting to manual or automatic.
Auto Smart Clean operation
If the accumulated operation time of the product exceeds 30 hours, the Smart Clean auto-
matically starts when the unit is turned off.
1 Press the FUNCTION SETTING button 2 times.
Smart Clean symbol will blink.
2 Press the SET/CLEAR button to reserve or cancel
the Smart Clean function.
You can set/clear with out on or off.
Manual Smart Clean operation
The brush clean a dust from the filter by moving from left to right or from right to left on the
filter. The sucked dust is collected into the dust box.
The operating process of Smart Clean is different from the product type.
1 When the unit stop, press the FUNCTION button to select
Smart Clean.
Smart Clean symbol blinks, then press SET/CLEAR button.
2 To stop Manual Smart Clean operation, press the FUNCTION
button to select Smart clean and press SET/CLEAR button.
SUB FUNCTION
23
ENGLISH
1st stage 2nd stage 3rd stage
4th stage5th stage6th stage
• If you press the VANE ANGLE button 3sec. all vanes are set to standard angle.
• There may be differences between wireless remote controller up/down/left/right buttons
and the wind discharge port directions.
• Set desired angle with checking the vane angle movement of the product.
• The individual vane control function is an additional function of a product, and it may not
work in some products.
No1. Vane No2. Vane No3. Vane
No4. VaneRelease
Complete the setting by pressing SET/CLEAR button.
Vane angle control mode is released.
3
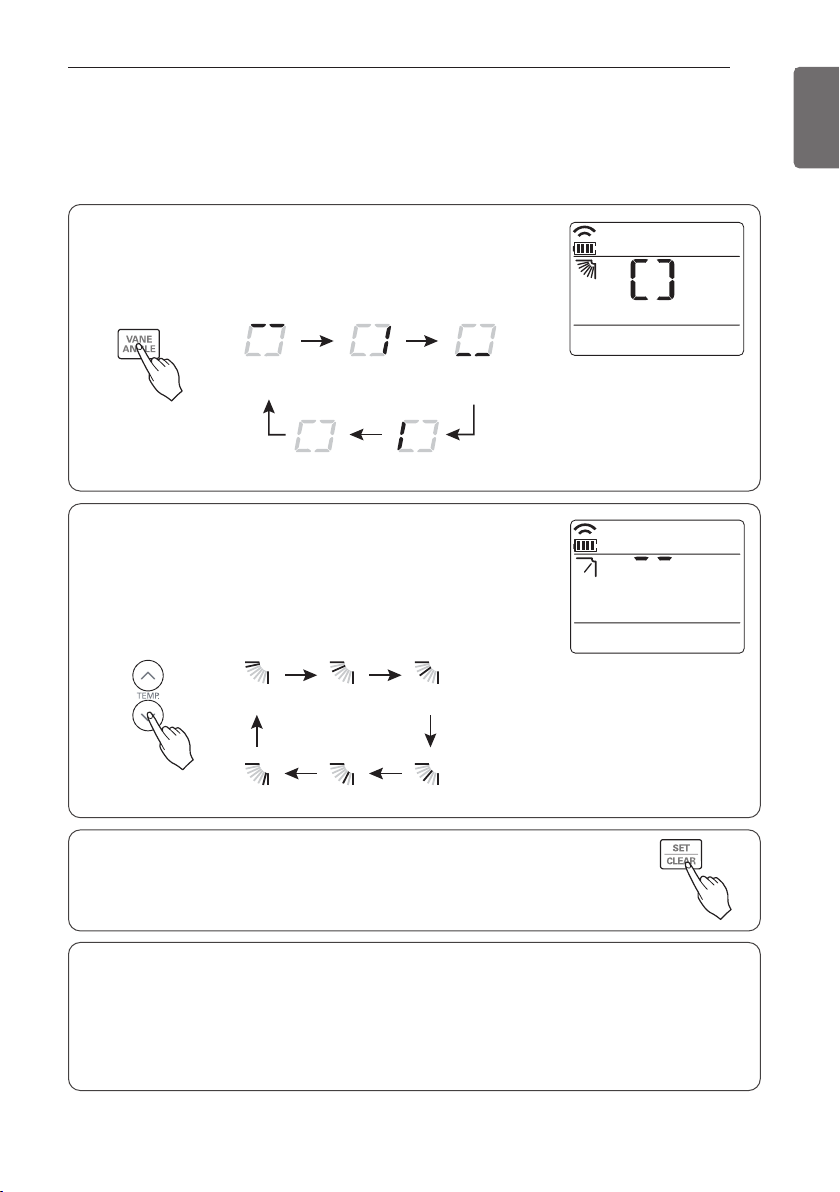
It is the function that can control 4 vane angles individually in the ceiling type 4Way cassette
product group.
Press the VANE ANGLE button, Individual vane angle control
symbol will blink.
When vane angle control button is pressed, it repeats in the
order of No.1 vane → No.2 vane → No.3 vane → No.4 vane
→ vane angle control mode is released.
1
Set each vane angle by pressing TEMPERATURE SETTING
buttons.
• Every time VANE ANGLE button is pressed, corresponding
vane angle and set values are displayed.
• When temperature setting button is pressed, the display
window appears asof the figure in the right, and the angle
can be set to 1 ~6.
2
Individual vane angle control (Optional)
24
TIMER
ENGLISH
NOTE
!
Check the indicator for A.M. and P.M.
Timer Sleep
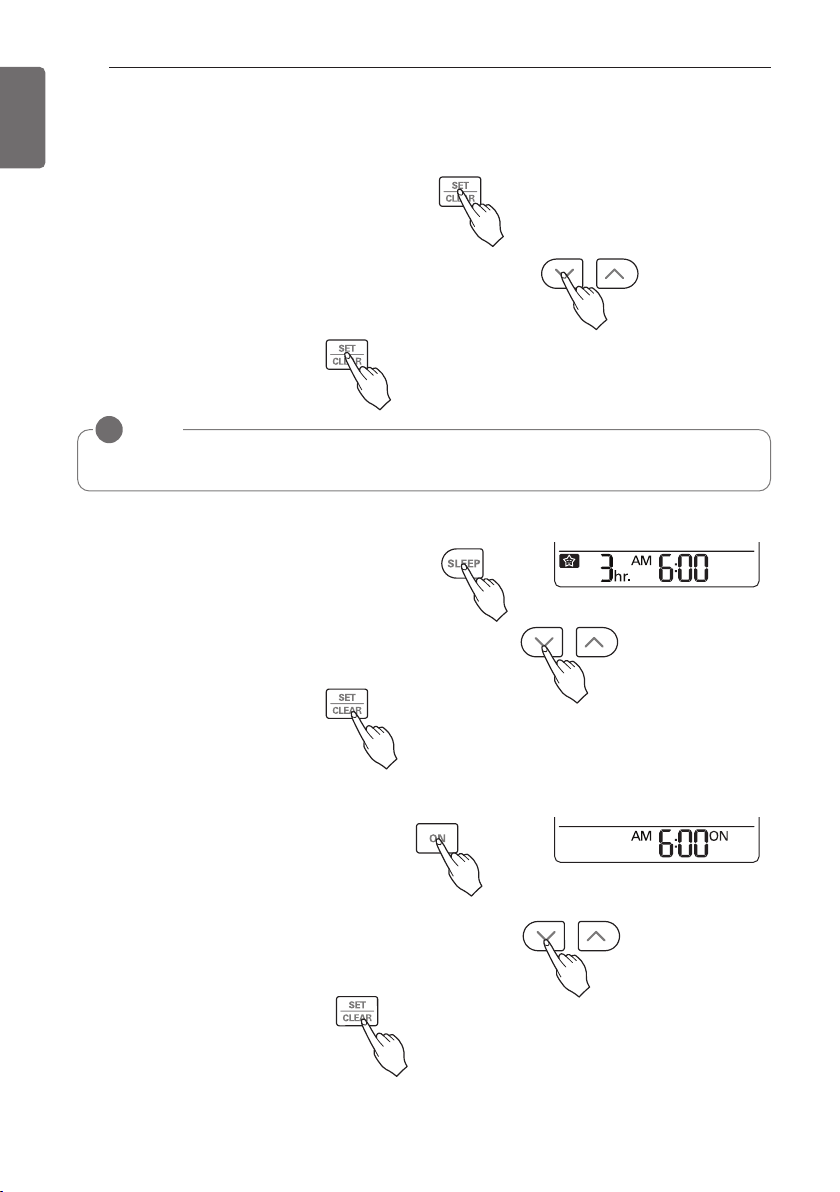
On Timer Setting
1 Press the ON button to turn timer on or off.
2 Press TIME SETTING buttons until the desired time is set.
3 Press the SET / CLEAR button.
Timer ON
Sleep Timer Setting
1 Press the TIMER button to turn timer on or off.
2 Press TIME SETTING buttons until the desired time is set.
(7 hours is the maximum setting)
3 Press the SET / CLEAR button.
Setting the Current Time
1 Press the SET / CLEAN button for 3 seconds.
2 Press TIME SETTING buttons until the desired time is set.
(If you press down the button for a long time, it will change
quickly in the units of 10 min.)
3 Press the SET / CLEAR button.
TIMER
TIMER
25
ENGLISH
Timer OFF
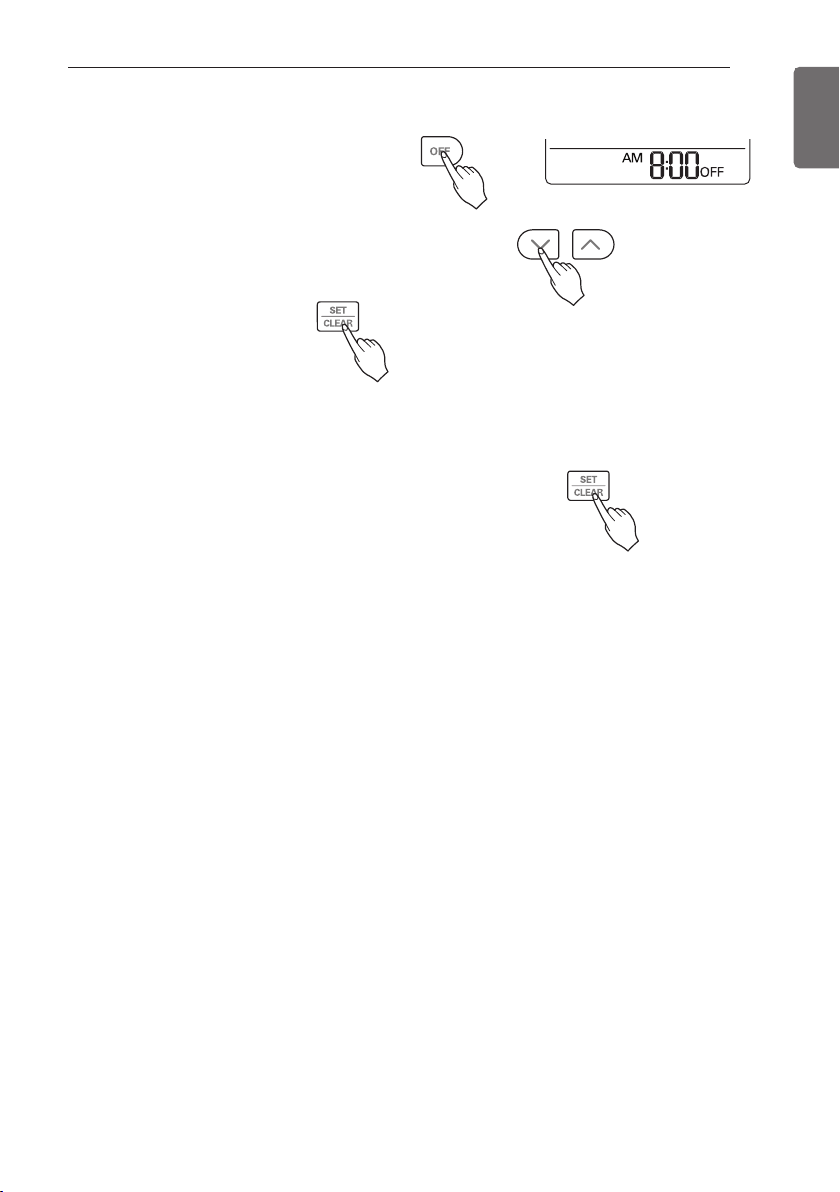
To cancel the Timer Setting
- If you wish to cancel all timer setting, press the CLEAR ALL button.
- If you wish to cancel each timer setting, press the
each timer button to turn timer sleep or on or off as you want.
And then press the SET/CLEAR button aiming the remote
controller at the signal receptor.
(The timer lamp on the air conditioner and the display will go off.)
Off Timer Setting
1 Press the OFF button to turn timer on or off.
2 Press TIME SETTING buttons until the desired time is set.
3 Press the SET / CLEAR button.
Indoor Unit
Grille, Case and Remote Control
- Turn the system off before cleanining, To
clean, wipe with a soft, dry cloth. Do not use
bleach or abrasives.
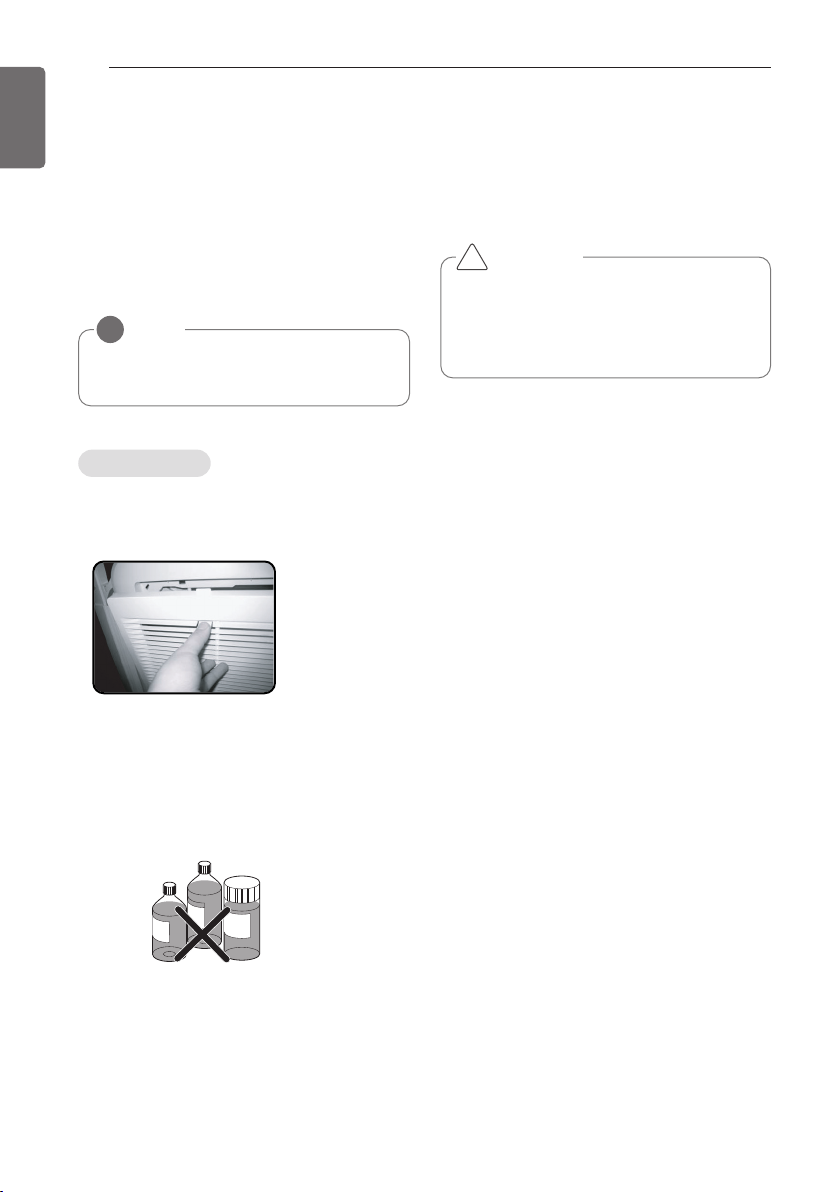
The air filters behind the front grille should be
checked and cleaned once every 2 weeks or
more often if neccessary.
- Never use any of the followings:
Water hotter than 40 °C.
Could cause deformation and or discoloration.
Volatile substances.
Could damage the surfaces of the air conditioner.
- Remove the Air filters.
Take hold of the tab and pull slightly forward
to remove the filter.
- Clean dirt from the air filter using a vacuum
cleaner or washing with water.
If dirt is conspicuous, wash with a neutral
detergent in lukewarm water.
If hot water (40 °C or more) is used, it may
be deformed.
- After washing with water, dry well in the
shade.
Do not expose the air filter to direct sunlight
or heat from a fire when drying it.
- Install the air filter.
NOTE
!
Supply power must be disconnected before cleaning the indoor unit.
CAUTION
When the air filter is to be removed, do
not touch the metal parts of the indoor
unit.
It may cause an injury.
!
Air Filters
B
e
n
z
e
n
e
S
C
O
U
R
I
N
C
L
B
A
R
G
E
S
I
N
N
E
R
26
MAINTENANCE AND SERVICE
ENGLISH
MAINTENANCE AND SERVICE
MAINTENANCE AND SERVICE
27
ENGLISH
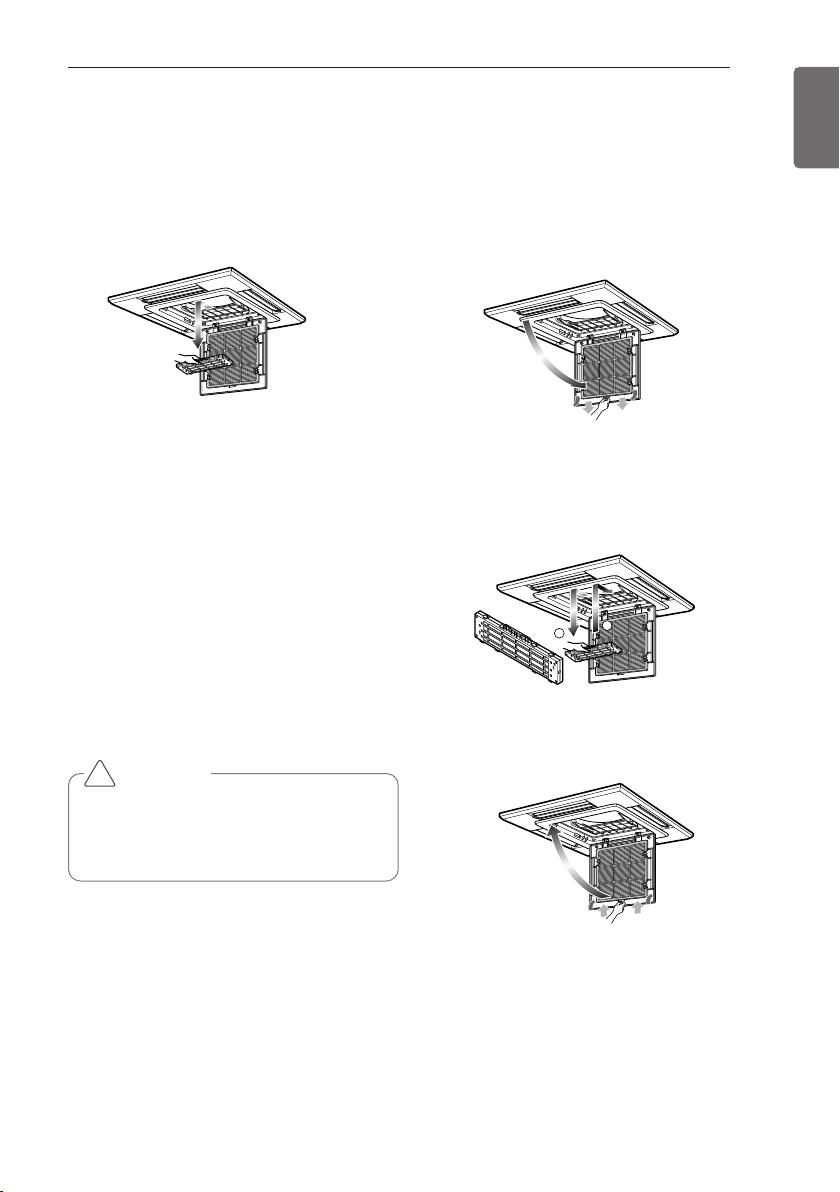
- After removing the air filters, pull
slightly forward to remove the PLASMA
filter.
- Dip the PLASMA filter into the water
mixed with neutral detergent, for 20~30
minutes.
- Dry the PLASMA filter in the shade for
a day (Especially, the humidity must be
removed perfectly on this parts).
- Note the cuts of electric discharge
lines.
- Re-install the PLASMA filter to the original position.
Replacement
Recomended use period : About 2 years
- Open front panel and remove air filter.
- Remove air purifying filter.
- Insert new air purifying filter.
- Reinsert air filter and close front panel.
Purifying filter(Optional)
Cleaning
- The PLASMA filter behind the air filters
should be checked and cleaned once every 3
months or more often if necessary.
CAUTION
Don’t touch this PLASMA Filter within 10
seconds after opening the inlet grille, it
may cause an electric shock.
!
1
2
28
MAINTENANCE AND SERVICE
ENGLISH
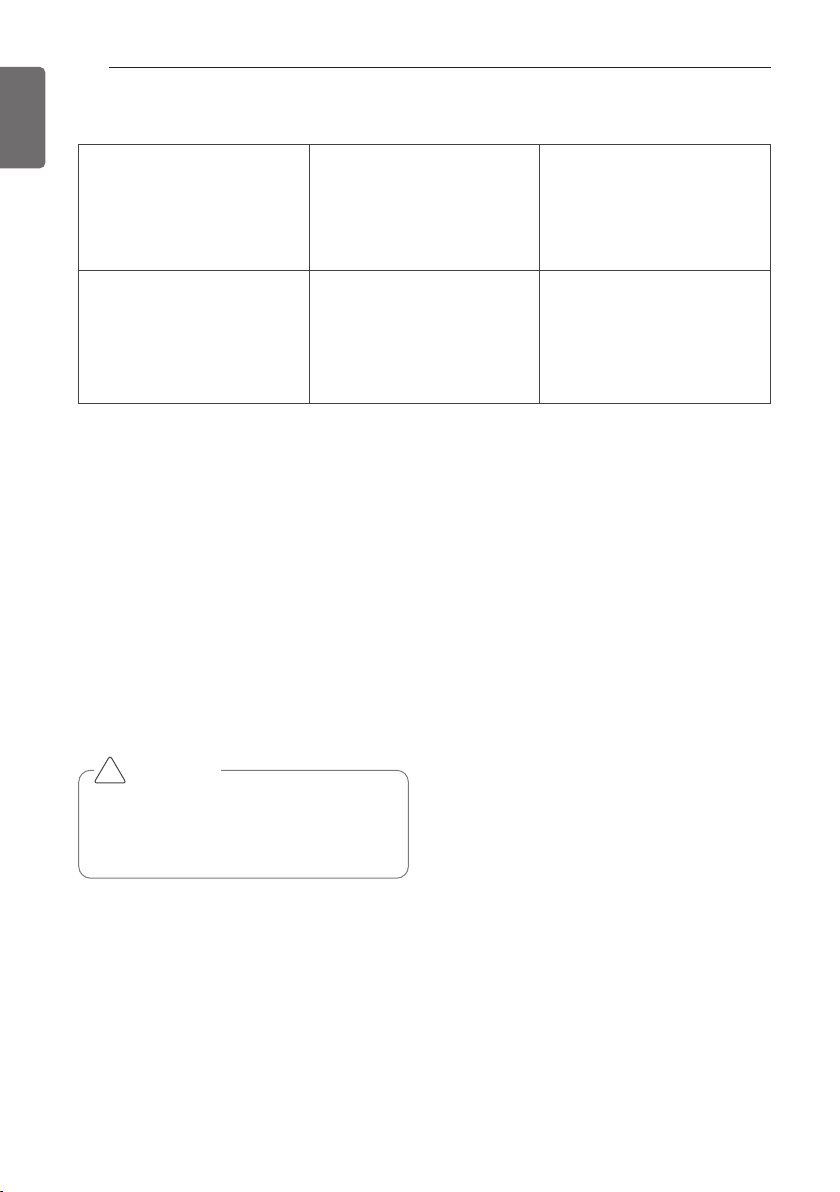
Do not overcool the room.
This is not good for the health
and wastes electricity.
Keep blinds or curtains closed.
Do not let direct sunshine
enter the room when the air
conditioner is in operation.
Keep the room temperature
uniform.
Adjust the vertical and horizontal airflow direction to ensure a uniform temperature in
the room.
Make sure that the doors
and windows are shut tight.
Avoid opening doors and windows as much as possible to
keep the cool air in the room.
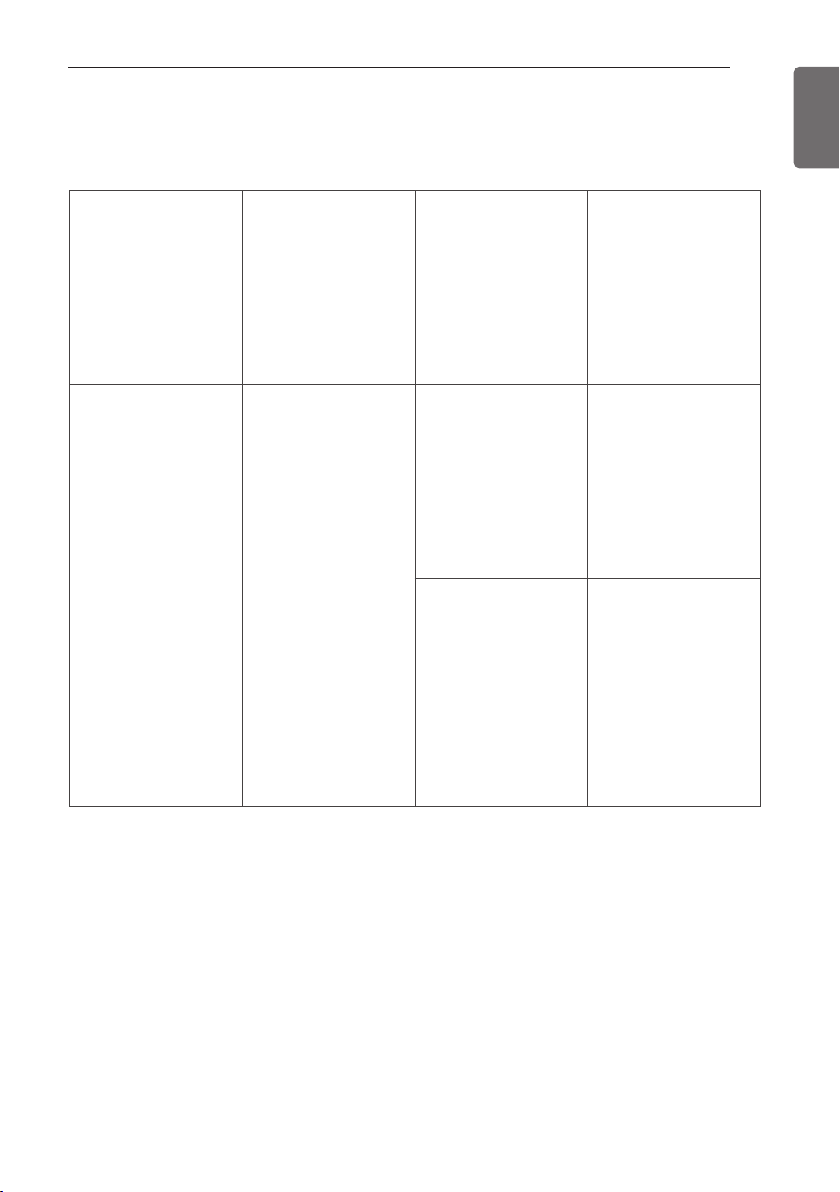
Clean the air filter regularly.
Blockages in the air filter re-
duce the airflow and lower
cooling and dehumidifying effects. Clean at least once
every two weeks.
Ventilate the room occasionally.
Since windows are kept
closed, it is a good idea to
open them and ventilate the
room now and then.
When the air conditioner is not
going....
When air conditioner is not going to
be used for a long time.
- Operate the air conditioner at the following
settings for 2 to 3 hours.
Type of operation: Fan operation mode.
(Refer to page “Fan Mode”.)
This will dry out the internal mechanisms.
- Turn off the breaker.
- Remove the batteries from the Remote Con-
troller.
Helpful information
The air filters and your electiric bill.
If the air filters become clogged with dust, the
cooling capacity will drop, and 6% of the electricity used to operate the air conditioner will
be wasted.
When the air conditioner is to be
used again.
- Clean the air filter and install it in the indoor
unit. (Refer to page “MAINTENANCE AND
SERVICE”.)
- Check that the air inlet and outlet of the in-
door/outdoor unit are not blocked.
- Check that the ground wire is connected cor-
rectly. It may be connect to the indoor unit
side.
CAUTION
Turn off the breaker when the air conditioner is not going to be used for a long
time.
Dirt may collect and may cause a fire.
!
Operation Tips!
MAINTENANCE AND SERVICE
29
ENGLISH
Call the service immediately in the following situations
- Anything abnormal such as burning smell, loud noise etc. happen. Stop the unit and turn the
breaker off. Never try to repair by yourself or restart the system in such cases.
- Main power cable is too hot or damaged.
- Error code is generated by self diagnosis.
- Water leaks from indoor unit even if the humidity is low.
- Any switch, breaker (safety, earth) or fuse fails to work properly
User must carry routine checkup & cleaning to avoid unit’s poor performance.
In case of special situation, the job must be carried out by service person only.
The air conditioner
does not operate.
- Have you made a
mistake in timer operation?
- Has the fuse blown
or has the circuit
breaker been
tripped?
The room has a peculiar odor.
- Check that this is not
a damp smell exuded by the walls,
carpet, furniture or
cloth items in the
room.
It seems that condensation is leaking from
the air conditioner.
- Condensation occurs
when the airflow
from the air conditioner cools the
warm room air.
Air conditioner does
not operate for about
3 minutes when
restart.
- This is the protector
of the mechanism.
- Wait about three
minutes and operation will begin.
Does not cool or heat
effectively.
- Is the air filter dirty?
See air filter cleaning
instructions.
- The room may have
been very hot when
the room air conditioner was first
turned on. Allow
time for it to cool
down.
- Has the temperature
been set incorrectly?
- Are the indoor unit's
air inlet or outlet
vents obstructed?
The air conditioner operation is noisy.
- For a noise that
sounds like water
flowing.
* This is the sound
of freon flowing inside the air conditioner unit.
- For a noise that
sounds like the compressed air releasing
into atmosphere.
-
This is the sound of
the dehumidifying
water being
processed inside the
air conditioning unit.
Crack sound is heard.
- This sound is generated by the expansion/ constriction of
the front panel, etc.
due to changes of
temperature.
Remote control display is faint, or no display at all.
- Are the batteries depleted?
- Are the batteries inserted in the opposite (+) and (-)
directions?
Filter sign lamp (LED)
is ON.
- Cleaning the filter,
press the Timer button and ◀ button of
wired remote controller at the same
time for 3 sec.
The error code is occurred after lightning
struck
-
This product has been
applied to the over
current protection circuit.
Error can occur, but it
is normal behavior.
After few minutes, It
will operate normally.
Troubleshooting Tips! Save time and money!
Check the following points before requesting repairs or service.... If the malfunction persist,
please contact your dealer.

ENGLISH
30

РУКОВОДСТВО ПОЛЬЗОВАТЕЛЯ
КОНДИЦИОНЕР
РУССКИЙ ЯЗЫК
Перед эксплуатацией устройства внимательно прочитайте данное руководство и
сохраните его для использования в будущем.
ПОТОЛОЧНАЯ КАССЕТА
Данное устройство соответствует техническим требованиям по
ограничению использования определенных опасных веществ в
электрическом и электронном оборудовании.
www.lg.com

СОВЕТЫ ПО ЭНЕРГОСБЕРЕЖЕНИЮ
РУССКИЙ ЯЗЫК
2
СОВЕТЫ ПО ЭНЕРГОСБЕРЕЖЕНИЮ
Вот некоторые советы, которые помогут сократить энергопотребление при эксплуатации данного кондиционера. Данный кондиционер можно использовать более эффективно при соблюдении следующих указаний:
• Не переохлаждайте воздух в помещении. Это может нанести вред вашему здоровью и привести к повышенному потреблению электроэнергии.
• Во время работы кондиционера закройте жалюзи или шторы для защиты от солнечных лучей.
• Держите двери и окна плотно закрытыми.
• Отрегулируйте направление воздушного потока по вертикали и горизонтали, чтобы воздух циркулировал
в помещении.
• Увеличивайте скорость вращения вентилятора для ускоренного охлаждения или нагрева воздуха в помещении на короткий период времени.
• Периодически открывайте окна для проветривания, так как качество воздуха в помещении может ухудшиться при работе кондиционера в течение нескольких часов подряд.
• Каждые 2 недели очищайте воздушный фильтр. Пыль и грязь, скапливающиеся на воздушном фильтре,
могут перекрыть воздушный поток или ухудшить функции охлаждения/осушения воздуха.
Для заметок
Прикрепите чек к данной странице, чтобы можно было подтвердить дату покупки, а также для
использования гарантии. Запишите номер модели и заводской номер:
Номер модели :
Заводской номер :
Они указаны на паспортной табличке сбоку каждого устройства.
Продавец :
Дата продажи :

ВАЖНЫЕ УКАЗАНИЯ ПО ТЕХНИКЕ БЕЗОПАСНОСТИ
ВАЖНЫЕ УКАЗАНИЯ ПО ТЕХНИКЕ БЕЗОПАСНОСТИ
ПЕРЕД ИСПОЛЬЗОВАНИЕМ ДАННОГО УСТРОЙСТВА ПРОЧТИТЕ ВСЕ УКАЗАНИЯ.
Во избежание создания опасной обстановки и обеспечения наивысшей эффективности при использовании
данного устройства соблюдайте следующие меры предосторожности
ОСТОРОЖНО!
Несоблюдение данных указаний может привести к тяжким телесным повреждениям или смертельному исходу
ВНИМАНИЕ!
Несоблюдение данных указаний может привести к телесным повреждениям незначительной тяжести или
повреждению устройства
ОСТОРОЖНО!
• Всегда заземляйте устройство. Опасность поражения электрическим током.
• Не пользуйтесь автоматическими выключателями, которые имеют неисправности или рассчитаны на меньшую нагрузку. Используйте автоматический выключатель или плавкий предохранитель с соответствующими рабочими характеристиками. Существует опасность возгорания или поражения электрическим током.
• Не допускается использование блоков из нескольких розеток. Всегда используйте это устройство в специальной выделенной цепи с автоматическим прерывателем. В противном случае существует опасность поражения электрическим
током или возгорания.
• Для проведения электротехнических работ обращайтесь к поставщику, продавцу, квалифицированному электрику или
в авторизованный сервисный центр. Не разбирайте и не ремонтируйте изделие самостоятельно. Существует риск возгорания или поражения электрическим током.
• Всегда заземляйте изделие в соответствии со схемой электропроводки. Не подсоединяйте провод заземления к трубам
газо- и водоснабжения или к заземлению телефонного кабеля. Существует риск возгорания или поражения электрическим током.
• Надежно закрепите панель и крышку блока управления. Существует опасность возгорания или поражения электрическим током из-за присутствия пыли, воды и т. п.
• Используйте автоматический выключатель или плавкий предохранитель необходимого номинала. Существует риск возгорания или поражения электрическим током.
• Не заменяйте и не удлиняйте силовой кабель. Поврежденный кабель электропитания, кабель с порезами или нарушенной изоляцией необходимо заменить. Существует риск возгорания или поражения электрическим током.
• Для установки, демонтажа или повторной установки всегда пользуйтесь услугами поставщика или авторизованного
сервисного центра. Существует риск возгорания, поражения электрическим током, взрыва или травмы.
• Не устанавливайте изделие на неисправную монтажную стойку. Проверьте, чтобы место установки не разрушалось со
временем. Это может привести к падению устройства.
• Не допускается монтировать наружный блок кондиционера на подвижном основании или в местах, откуда он может
упасть. Падение наружного блока может привести к поломке, телесному повреждению и даже летальному исходу.
• Если устройство подверглось воздействию воды (оказалось залитым водой или было погружено в воду), перед повторным использованием обратитесь в авторизованный сервисный центр. Существует опасность возгорания или поражения электрическим током.
• Проверьте срок годности хладагента. Прочтите информацию на бирке продукта. Неправильно подобранный хладагент
может нарушить нормальную работу устройства.
• Не используйте поврежденный кабель, разъем или незакрепленную розетку. Это может привести к возгоранию или поражению электрическим током.
!
!
!
РУССКИЙ ЯЗЫК
3

ВАЖНЫЕ УКАЗАНИЯ ПО ТЕХНИКЕ БЕЗОПАСНОСТИ
РУССКИЙ ЯЗЫК
4
• Не прикасайтесь к изделию мокрыми руками во время его работы или ремонта. Кабель питания следует извлекать из розетки за
вилку. Существует опасность возгорания или поражения электрическим током.
• Не устанавливайте обогреватели или другие отопительные приборы вблизи кабеля питания. Существует опасность возгорания
или поражения электрическим током.
• Не допускайте попадания воды в электрические детали. Устанавливайте блок на расстоянии от источников воды. Существует
опасность возгорания, повреждений устройства или поражения электрическим током.
• Не храните, не используйте горючие вещества и избегайте мест с присутствием горючего газа или других горючих веществ
рядом с устройством. Существует опасность возгорания.
• Необходимо проверить надежность подключения проводки к внутреннему и наружному блокам кондиционера, а также правильность прокладки кабеля, чтобы не нарушить контакт в местах соединений. Неправильное или неплотное соединение может
привести к пожару.
• Утилизацию упаковочных материалов проводите в соответствии с действующими нормами. После установки или обслуживания
соберите винты, гвозди, батарейки, сломанные предметы, снимите и утилизируйте пластиковую упаковку. Убедитесь, что сетевая вилка не загрязнена и не повреждена.
• Убедитесь, что вилка кабеля электропитания не загрязнена и не имеет повреждений, затем плотно вставьте вилку в розетку. Загрязненная, ослабленная или поврежденная вилка может привести к возгоранию или поражению электрическим током.
• Высокое напряжение для электрических компонентов подается от высоковольтного конденсатора, установленного в наружном
блоке кондиционера. Перед выполнением ремонта убедитесь, что конденсатор полностью разряжен. Заряженный конденсатор
может привести к поражению электрическим током.
• Выполняйте монтаж изделия с применением монтажного комплекта, входящего в комплект поставки изделия. В противном случае устройство может упасть и привести к телесным повреждениям.
• Используйте только детали, перечисленные в списке запасных деталей. Никогда не пытайтесь модифицировать оборудование.
Использование несоответствующих деталей может привести к поражению электрическим током, перегреву или возгоранию.
• Не пользуйтесь изделием длительное время в условиях замкнутого пространства. Периодически проветривайте помещение.
Недостаток кислорода может нанести вред здоровью.
• Не открывайте переднюю решетку устройства во время работы. (Не прикасайтесь к электростатическому фильтру, если устройство оборудовано им.) Существует опасность получения травм, поражения электрическим током и повреждения изделия.
• При возникновении необычных звуков, запаха или дыма из изделия сразу же отключите автоматический выключатель или отключите кабель питания. Существует опасность возгорания или поражения электрическим током.
• Время от времени проветривайте помещение, в котором установлено изделие, когда оно эксплуатируется вместе с печкой, нагревательным элементом или другими приборами. Может возникать нехватка кислорода, которая вредна для здоровья.
• Перед чисткой или ремонтом устройства отключите электропитание и извлеките вилку кабеля питания из розетки. Существует
опасность поражения электрическим током.
• Если устройство длительное время не будет использоваться, извлеките вилку из розетки или отключите автоматический выключатель.Существует опасность повреждения или выхода устройства из строя или выполнение незапланированной операции.
• Будьте осторожны: убедитесь в том, что никто, в особенности дети, не может наступить или упасть на наружный блок. Это
может привести к телесному повреждению или повреждению устройства.
• Во время эксплуатации соблюдайте осторожность, чтобы не выдернуть и не повредить кабель питания. Существует риск возгорания или поражения электрическим током.
• Не кладите на кабель электропитания НИКАКИХ предметов. Существует риск возгорания или поражения электрическим током.
• Запрещается включать/выключать устройство непосредственно путем включения в розетку и выключения из розетки.
Существует риск возгорания или поражения электрическим током.
• При утечке горючего газа перед включением устройства перекройте поступление газа и откройте окно, чтобы проветрить помещение. Не пользуйтесь телефоном и электрическими выключателями. Это может привести к возгоранию или взрыву.
ВНИМАНИЕ!
• Поднимать и транспортировать изделие должны как минимум два человека.Избегайте получения травм.
• Не устанавливайте устройство в местах, где оно будет подвержено непосредственному воздействию морского воздуха
(солевого тумана). Это может привести к коррозии устройства.
!

ВАЖНЫЕ УКАЗАНИЯ ПО ТЕХНИКЕ БЕЗОПАСНОСТИ
• Установите сливной шланг для надлежащего слива конденсата. Неправильное соединение может привести к утечке
воды.
• Держите изделие ровно, даже во время монтажа. Чтобы избежать вибрации или шума.
• Не устанавливайте устройство в местах, где шум или нагретый воздух от наружного блока может повредить окружающие предметы или помешать соседям. Это может создать проблемы для соседей и привести к конфликту.
• Всегда проверяйте изделие на утечку газа (хладагента) после установки или ремонта изделия. Низкий уровень хладагента может привести к повреждению устройства.
• Не используйте прибор для специальных целей, таких как хранение пищевых продуктов, произведений искусства и т. д.
Это бытовой кондиционер, а не холодильная установка. Существует опасность повреждения или причинения ущерба
имуществу.
• Не перекрывайте входящий и выходной потоки воздуха. Это может привести к выходу устройства из строя.
• Для очистки пользуйтесь мягкой тканью. Не используйте сильнодействующих моющих средств, растворителей, разбрызгиваемой воды и т. д. Существует опасность возгорания, поражения электрическим током и повреждения пластмассовых деталей изделия.
• Не прикасайтесь к металлическим деталям изделия при снятии воздушного фильтра. Существует опасность телесных
повреждений.
• Не наступайте на изделие и не кладите на него предметы (наружные устройства). Существует опасность получения телесных травм и повреждения устройства.
• После чистки надежно установите фильтр. Производите очистку фильтра раз в две недели или чаще, при необходимости. Загрязненный фильтр снижает эффективность работы.
• Не допускайте попадания рук или каких-либо посторонних предметов во входные и выходные воздушные отверстия
при работе кондиционера. Внутри устройства имеются острые и подвижные детали, о которые можно пораниться.
• Будьте осторожны при распаковке и монтаже изделия. Можно пораниться об острые края.
• Если во время ремонта произошла утечка газообразного хладагента, не прикасайтесь к месту утечки незащищенными
руками. Газообразный хладагент может привести к обморожению.
• При демонтаже или перемещении устройства не наклоняйте его. Это может привести к попаданию конденсата воды
внутрь устройства
• Не допускается использовать газовые или воздушные смеси хладагентов, отличные от указанных для данной системы.
Попадание воздуха в систему циркуляции хладагента может привести к чрезмерному возрастанию давления и привести к повреждению устройства или травме.
• При утечке газообразного хладагента во время монтажа сразу же проветрите помещение. Газообразный хладагент
может нанести вред здоровью.
• При демонтаже устройства утилизация хладагента и других деталей должна выполняться в соответствии с региональными или национальными стандартами. Батарейки в пульте управления следует заменять новыми батарейками того
же типа. Не следует устанавливать использованные батарейки вместе с новыми, а также использовать батарейки разных типов. Существует опасность возгорания или выхода устройства из строя.
• Не перезаряжайте и не разбирайте батарейки. Не бросайте батарейки в огонь. Они могут загореться или взорваться.
• При попадании жидкости из батареек на кожу или одежду необходимо сразу же смыть ее водой. Не допускается использование пульта управления в случае протекания батареек. Химические вещества, содержащиеся в батарейках,
могут вызвать ожоги и нанести иной вред здоровью.
• При случайном попадании жидкости из батарей в полость рта, почистите зубы и обратитесь к врачу. Не допускается использование пульта управления в случае протекания батареек. Химические вещества, содержащиеся в батарейках,
могут вызвать ожоги и нанести другой вред здоровью.
• Не включайте кондиционер надолго, если открыта дверь или окно и влажность воздуха очень высокая. Возможна конденсация влаги на мебели, что может привести к ее повреждению.
• Не подвергайте воздействию холодного или теплого потока воздуха открытые участки тела, детей или растения. Это
может нанести вред здоровью.
• Не пейте воду, отводимую из устройства. Это техническая вода, которая может нанести серьезный вред здоровью.
• При проведении очистки, технического обслуживания или ремонта кондиционера пользуйтесь устойчивой подставкой
или стремянкой. Будьте осторожны и избегайте получения травм.
РУССКИЙ ЯЗЫК
5

СОДЕРЖАНИЕ
6
СОДЕРЖАНИЕ
2
РУССКИЙ ЯЗЫК
СОВЕТЫ ПО ЭНЕРГОСБЕРЕЖЕНИЮ
3
ВАЖНЫЕ УКАЗАНИЯ ПО
ТЕХНИКЕ БЕЗОПАСНОСТИ
7
ПЕРЕД ИСПОЛЬЗОВАНИЕМ
7
Подготовка к эксплуатации
7
Применение
7
Чистка и техническое обслуживание
7
Сервисное обслуживание
8
ОПИСАНИЕ УСТРОЙСТВА
8
Наименование и назначение деталей
9
Индикаторы операций
10
Беспроводной пульт управления
11
ИНСТРУКЦИЯ ПО ЭКСПЛУАТАЦИИ
11
Установка батареек
11
Использование пульта беспроводного дистанционного управления
11
Способ использования
12
ИНСТРУКЦИЯ ДЛЯ ПОЛЬЗОВАТЕЛЯ
12
Режим охлаждения – Стандартная операция
12
Режим охлаждения – Ускоренное охлаждение
13
Режим обогрева
14
Режим снижения влажности
15
Режим вентилятора
16
Автоматический режим
17
Режим автоматического переключения
18
Режим автоматического переключения режимов работы - Настройка режима изменения температуры
19
Регулировка воздушного потока
19
Переключение шкалы измерения «Цельсий/Фаренгейт»
20
Установка/контроль температуры в помещении
21
ПОДФУНКЦИЯ
21
Плазменная чистка (дополнительно)
21
Автоматическая очистка (дополнительно)
22
Интеллектуальная очистка (дополнительно)
23
Индивидуальная регулировка угла наклона
заслонок (дополнительно)
24
ТАЙМЕР
24
Установка текущего времени
24
Установка режима сна для таймера
24
Настройка таймера включения
25
Настройка таймера выключения
25
Отмена настройки таймера
26
ТЕХНИЧЕСКОЕ ОБСЛУЖИВАНИЕ
26
Внутренний блок
27
Фильтр тонкой очистки (дополнительно)
28
Советы по эксплуатации!
28
Если кондиционер не предполагается ис-
пользовать....
29
Советы по устранению неисправностей.
Экономьте время и деньги!
29
Сразу же обращайтесь в центр обслуживания в следующих ситуациях

ПЕРЕД ИСПОЛЬЗОВАНИЕМ
РУССКИЙ ЯЗЫК
7
Подготовка к эксплуатации
• Свяжитесь со специалистом по установке для монтажа изделия.
• Используйте выделенную цепь электропитания.
Применение
• Обдув прямым воздушным потоком в течение продолжительного времени вреден для здоровья. Не подвергайте обитателей помещения, животных и растения обдуву прямым воздушным потоком в течение длительного времени.
• Когда используете кондиционер вместе с печками или другими нагревательными приборами, проветривайте помещение из-за возможной нехватки кислорода.
• Не используйте этот кондиционер для неуказанных особых целей (например, для хранения высокоточных
устройств, продуктов питания, содержания домашних животных, растений и предметов искусства). Такое
применение может быть причиной повреждения деталей.
Чистка и техническое обслуживание
• Не прикасайтесь к металлическим деталям изделия при снятии воздушного фильтра. Острые металлические края травмоопасны.
• Не используйте воду для чистки кондиционера. Воздействие воды может нарушить изоляцию и привести к
поражению электрическим током.
• Перед чисткой блока убедитесь, что питание и прерыватель выключены. Во время работы вентилятор вращается с очень большой скоростью. Существует риск получения травмы, если во время чистки внутренних
деталей устройства случайно включится его питание.
Сервисное обслуживание
По вопросам ремонта и технического обслуживания обращайтесь к своему уполномоченному сервисному
дилеру.
ПЕРЕД ИСПОЛЬЗОВАНИЕМ

ОПИСАНИЕ УСТРОЙСТВА
8
ОПИСАНИЕ УСТРОЙСТВА
Наименование и назначение деталей
РУССКИЙ ЯЗЫК
7
6
1
5
4
4
3
2
8
1 Внутренний блок
2 Наружный блок
3 Пульт дистанционного управления
4 Поступающий воздух
5 Отводящийся воздух
6 Трубопровод хладагента, подключаемый электропровод
7 Сливная трубка
8 Провод заземления
Заземлите внешний блок для предотвращения поражения электрическим током.

Индикаторы операций
ОПИСАНИЕ УСТРОЙСТВА
9
Вкл/Выкл: загорается во время работы системы.
Знак фильтра : загорается через 2 400 часов после начала эксплуатации устройства.
Таймер : горит в режиме таймера.
Режим размораживания : горит в режиме размораживания или запуска операции нагре-
вания (только для моделей с тепловым насосом)
Принудительно : для управления устройством, если использование пульта дистанцион-
ного управления по какой-либо причине невозможно.
.
РУССКИЙ ЯЗЫК

ОПИСАНИЕ УСТРОЙСТВА
РУССКИЙ ЯЗЫК
10
1 Кнопка "НАКЛОН ЗАСЛОНКИ"
Используется для установки каждого из углов наклона заслонки.
2 Кнопка "НАСТРОЙКА ФУНКЦИИ"
Используется для установки или сброса "Автоматической очистки", "Интеллектуальной очистки", "Электронагревателя" или
индивидуального управления углом наклона заслонки.
3 Кнопка "ВКЛ./ВЫКЛ."
Используется для включения/выключения изделия.
4 Кнопка "УСКОРЕННОЕ ОХЛАЖДЕНИЕ"
Быстрое охлаждение функционирует на сверхвысокой скорости
вентилятора.
5 Кнопка "ВОЗДУШНЫЙ ПОТОК ВЛЕВО/ВПРАВО" (НЕОБЯЗА-
ТЕЛЬНАЯ)
Используется для установки требуемого направления воздушного поток влево/вправо (по горизонтали).
6 Кнопка "ВОЗДУШНЫЙ ПОТОК ВВЕРХ/ВНИЗ"
Используется для останова или пуска перемещения шторки и
установки требуемого направления воздушного потока
вверх/вниз.
7 Кнопка "ТАЙМЕР ВКЛ."
Используется для установки времени пуска рабочей операции.
8 Кнопка "ТАЙМЕР СНА"
Используется для установки времени перехода в спящий режим.
9 Кнопка "УСТАНОВИТЬ/ОЧИСТИТЬ"
Используется для установки/очистки таймера.
Используется для установки текущего времени (если вводится в
течение 3 сек.)
10 Кнопка "ПЛАЗМА" (НЕОБЯЗАТЕЛЬНАЯ)
Используется для пуска или останова выполнения функции
плазменной очистки.
11 Кнопка "НАСТРОЙКА КОМНАТНОЙ ТЕМПЕРАТУРЫ"
Используется для выбора комнатной температуры.
12 Кнопка "ВЫБОР РЕЖИМА РАБОТЫ"
Используется для выбора режима работы.
13 Кнопка "ВЫБОР СКОРОСТИ ВНУТРЕННЕГО ВЕНТИЛЯТОРА"
Используется для ступенчатого выбора скорости вентилятора:
"низкая", "средняя", "высокая" и "хаотическая".
14 Кнопка "ПРОВЕРКА КОМНАТНОЙ ТЕМПЕРАТУРЫ"
Используется для проверки комнатной температуры.
15 Кнопка "ТАЙМЕР ВЫКЛ."
Используется для установки времени останова рабочей операции.
16 Кнопка "НАСТРОЙКА ТАЙМЕРА (Вверх/Вниз)/ОСВЕЩЕНИЕ"
Используется для установки таймера.
Используется для регулировки яркости. (Если это не режим настройки времени)
17 Кнопка "СБРОС"
Используется для сброса пульта ДУ в исходное состояние.
Беспроводной пульт управления
1
2
3
4
5
6
7
8
9
Рабочий режим
Автоматический режим или автоматическое переключение
Режим снижения влажности
• Модель с охлаждением ( ), модель с тепловым насосом l( )
Режим охлаждения
Режим обогрева
Режим вентилятора
10
11
12
13
14
15
16
17

ИНСТРУКЦИЯ ПО ЭКСПЛУАТАЦИИ
Установка батареек
1 Снимите крышку отсека для батареек, сдвинув
ее в направлении, указанном стрелкой.
2 Установите новые батарейки с соблюдением
правильной полярности (+) и (-).
3 Установите крышку батарейного отсека на место.
Использование пульта беспроводного дистанционного управления
1 Для установки выберите безопасное и легкодо-
ступное место.
2 Надежно закрепите фиксатор пульта на стене с
помощью прилагаемых винтов.
3 Установите пульт ДУ в фиксатор.
Способ использования
1 Приемник сигналов установлен в блоке.
2 Для управления устройством направьте пульт ДУ
на устройство. Между ними не должно быть препятствий.
ПРИМЕЧАНИЕ
!
• Всегда используйте или заменяйте батарейки одного типа.
• Если кондиционер не используется продолжительное время, извлеките батарейки для
продления срока их службы.
• Если экран дисплея пульта ДУ становится
тусклым, замените обе батарейки.
ПРИМЕЧАНИЕ
!
• Не подвергайте пульт ДУ воздействию прямых солнечных лучей.
• Для надежной передачи сигналов датчики передатчика и приемника должны содержаться
в чистоте. Для очистки используйте мягкую
ткань.
• Если какие-либо другие устройства также
управляются с помощью пульта ДУ, установите
их в другом месте или проконсультируйтесь со
специалистом.
РУССКИЙ ЯЗЫК
11
ИНСТРУКЦИЯ ПО ЭКСПЛУАТАЦИИ

РУССКИЙ ЯЗЫК
12
ИНСТРУКЦИЯ ДЛЯ ПОЛЬЗОВАТЕЛЯ
Нажмите кнопку включения питания.
Устройство подаст звуковой сигнал.
1
Нажмите кнопку РЕЖИМ, чтобы выбрать режим охлаждения.
2
3
Установите требуемую температуру,
нажав кнопку TEMP (ТЕМПЕРАТУРА).
Нажмите кнопку ПРОВЕРКИ ТЕМПЕРАТУРЫ В ПОМЕЩЕНИИ. Если настройка
нужной температуры выше температуры
в помещении, охлаждённый воздух не
поступает.
* Диапазон настройки температуры: 18–30 °C(64~86 °F)
Режим охлаждения – Ускоренное охлаждение
Нажмите кнопку включения питания.
Устройство подаст звуковой сигнал.
1
Нажмите кнопку РЕЖИМ, чтобы выбрать режим охлаждения.
2
3
Нажмите кнопку БЫСТРОЕ ОХЛАЖДЕНИЕ.
Устройство начинает работать с сверхвысокой скоростью
вращения вентилятора в режиме охлаждения.
* Монтируемые на стене модели работают в ре-
жиме усиленного охлаждения в течение 30 минут.
4
Понижение температуры
Повышение температуры
или или
Для отмены режима усиленного охлаждения снова нажмите кнопку струйного охлаждения, кнопку вентилятора или кнопку настройки температуры в
помещении, и устройство будет работать в режиме охлаждения с высокой
скоростью вращения вентилятора.
Режим охлаждения – Стандартная операция
ИНСТРУКЦИЯ ДЛЯ ПОЛЬЗОВАТЕЛЯ

РУССКИЙ ЯЗЫК
13
ИНСТРУКЦИЯ ДЛЯ ПОЛЬЗОВАТЕЛЯ
Режим обогрева
Эта функция применяется только для модели H/P.
Нажмите кнопку включения питания.
Устройство подаст звуковой сигнал.
1
2
3
Установите требуемую температуру, нажав кнопку TEMP
(ТЕМПЕРАТУРА). Нажмите кнопку ПРОВЕРКИ ТЕМПЕРАТУРЫ В ПОМЕЩЕНИИ.
Если настройка нужной температуры ниже температуры в
помещении, нагретый воздух не поступает.
4
Нажмите кнопку РЕЖИМ, чтобы выбрать режим
обогрева.
* Диапазон настройки тем-
пературы в режиме обогревания : 16~30 °C
(60 °F~86 °F)
Снова установите скорость вращения вентилятора. Можно выбрать одно из четырех значений скорости вращения вентилятора: низкая,
средняя, высокая или произвольная.
При каждом нажатии кнопки переключается
скорость вращения вентилятора.
Повышение температуры
Понижение температуры

ИНСТРУКЦИЯ ДЛЯ ПОЛЬЗОВАТЕЛЯ
РУССКИЙ ЯЗЫК
14
Режим снижения влажности
Нажмите кнопку включения питания.
Устройство подаст звуковой сигнал.
1
2
3
Установите скорость вращения вентилятора.
Можно выбрать одно из четырех значений
скорости вращения вентилятора: низкая,
средняя, высокая или произвольная.
При каждом нажатии кнопки переключается
скорость вращения вентилятора.
Нажмите кнопку РЕЖИМ, чтобы выбрать режим
осушения.

ИНСТРУКЦИЯ ДЛЯ ПОЛЬЗОВАТЕЛЯ
РУССКИЙ ЯЗЫК
15
Режим вентилятора
Нажмите кнопку включения питания.
Устройство подаст звуковой сигнал.
1
2
3
Снова установите скорость вращения вентилятора. Можно выбрать одно из четырех
значений скорости вращения вентилятора:
низкая, средняя, высокая или произвольная.
При каждом нажатии кнопки переключается
скорость вращения вентилятора.
Нажмите кнопку РЕЖИМ, чтобы выбрать
режим вентиляции.
ПРИМЕЧАНИЕ
!
• Имитация естественного движения воздуха в режиме CHAOS
Для большего освежения воздуха кнопкой выбора скорости вращения вентилятора внутреннего блока выберите режим CHAOS. В этом режиме имитируется естественное дуновение лёгкого ветерка, при этом скорость вращения вентилятора будет изменяться в
соответствии с логикой режима CHAOS.
• В режиме вентиляции
Компрессор наружного блока не работает. Температура выходящего из внутреннего блока воздуха
мало отличается от температуры в помещении.

ИНСТРУКЦИЯ ДЛЯ ПОЛЬЗОВАТЕЛЯ
РУССКИЙ ЯЗЫК
16
Автоматический режим
Нажмите кнопку включения питания.
Устройство подаст звуковой сигнал.
1
2
3
Кнопкой РЕЖИМ выберите автоматический режим
работы.
Код Ощущение
2 Холоднее
1 Прохладно
0 нейтральный
-1 Те п л о
-2 Те п ла я
* Выберите код с учетом
своих ощущений.
ПРИМЕЧАНИЕ
!
В автоматическом режиме работы
- Если система не работает надлежащим образом, переключитесь вручную на другой режим.
Если система не переключается автоматически из режима охлаждения в режим нагревания
или наоборот, необходимо снова установить соответствующий режим и задать нужную температуру.
Задание желаемой температуры
<Только для модели охлаждения>
Температура и скорость вращения вентилятора устанавливаются автоматически блоком электронного управления на основе текущей температуры
в помещении. Если вам жарко или холодно, кнопками УСТАНОВКИ ТЕМПЕРАТУРЫ В ПОМЕЩЕНИИ уменьшите или увеличьте температуру для
охлаждения или нагрева воздуха. Скорость вращения вентилятора внутреннего блока переключить нельзя. Она устанавливается в соответствии с
алгоритмом работы в автоматическом режиме.
Повышение температуры
Понижение температуры

ИНСТРУКЦИЯ ДЛЯ ПОЛЬЗОВАТЕЛЯ
РУССКИЙ ЯЗЫК
17
Режим автоматического переключения
Нажмите кнопку включения питания.
Устройство подаст звуковой сигнал.
1
2
3
Кнопкой РЕЖИМ выберите режим автоматического переключения режимов работы.
Задание желаемой температуры
в помещении.
* Диапазон настройки темпера-
туры в режиме автоматического
переключения режимов работы :
18~30 °C (64~86 °F)
4
Можно выбрать одно из четырех значений
скорости вращения вентилятора: низкая,
средняя, высокая или произвольная.
При каждом нажатии кнопки переключается скорость вращения вентилятора.
ПРИМЕЧАНИЕ
!
В режиме автоматического переключения
Кондиционер автоматически переключает режим работы для поддержания в помещении заданной температуры. Когда комнатная температура меняется более чем на ±2 °C(4 °F) по отношению к заданной
температуре, кондиционер поддерживает температуру в помещении в пределах ±2 °C(4 °F) по отношению к заданной температуре, автоматически переключая режим работы.
Повышение температуры
Понижение температуры

ИНСТРУКЦИЯ ДЛЯ ПОЛЬЗОВАТЕЛЯ
РУССКИЙ ЯЗЫК
18
Режим автоматического переключения режимов работы - Настройка режима изменения температуры
Данная функция используется для задания режима работы автоматического переключения.
В режиме работы с автоматическим переключением нажмите кнопку FUNCTION (ФУНКЦИЯ),
чтобы выбрать значение температуры для изменения режима работы.
1
Нажмите кнопку НАСТРОЙКИ ТЕМПЕРАТУРЫ для установки требуемого значения температуры
для смены режима работы. (По умолчанию используется значение 2 °C(4 °F).)
2
Завершите настройку, нажав кнопку SET/CLEAR (ЗАДАТЬ/ОЧИСТИТЬ).
3
* Диапазон настройки температуры в
режиме авт. переключения режимов
работы : 1~7 °C(2~14 °F)
ПРИМЕЧАНИЕ
!
Температура для смены режима работы определяет разность температур при переходе из режима
охлаждения в режим нагрева или наоборот.
Пример. Когда задана температура 25 °C(76 °F), а температура в повешении составляет 20 °C(68 °F),
устройство работает в режиме обогревания. Если задать температуру изменения режима работы равной 2 °C(4 °F), то если температура в помещении поднимется до 27 °C(25 °C + 2 °C)(80 °F(76 °F +
4 °F)), устройство начнет работать в режиме охлаждения.
Повышение температуры
Понижение температуры

Регулировка воздушного потока
ИНСТРУКЦИЯ ДЛЯ ПОЛЬЗОВАТЕЛЯ
19
Управление направлением воздушного потока вверх/вниз (дополнительно)
Направление воздушного потока вверх/вниз (вертикальный воздушный поток) можно регулировать с пульта ДУ.
1 Нажмите кнопку включения питания, чтобы запустить устройство.
2 Нажмите кнопку "вверх/вниз", и шторки начнут перемещаться вверх-вниз. Повторно нажмите кнопку
"вверх/вниз" для установки вертикальной шторки в нужное положение и выбора направления воздушного
потока.
ПРИМЕЧАНИЕ
!
• При нажатии кнопки НАПРАВЛЕНИЯ ВОЗДУШНОГО ПОТОКА ВВЕРХ/ВНИЗ направление воздушного
потока по горизонтали автоматически меняется в соответствии с заданным алгоритмом автоматического поворота, что позволяет равномерно распределять воздух в помещении и создавать наиболее
комфортные условия благодаря имитации дуновения лёгкого ветерка.
• Для регулирования направления перемещения воздушного потока вверх/вниз всегда пользуйтесь
пультом ДУ. При попытке вручную изменить положение шторки, регулирующей движение воздушного
потока по вертикали, возможно повреждение кондиционера.
• При отключении устройства шторка, регулирующая перемещение воздушного потока вверх/вниз, перекрывает отверстие воздухозаборника системы.
Переключение шкалы измерения «Цельсий/Фаренгейт»
- Нажмите кнопку ПЕРЕКЛЮЧЕНИЯ шкал температуры °C/°F, чтобы перейти от градусов Цельсия к граду-
сам Фаренгейта или наоборот.
- Когда вы нажимаете кнопку ЗАДАНИЯ ТЕМПЕРАТУРЫ в режиме градусов Фаренгейта, температура поднимется/опустится на 1 градуса.
РУССКИЙ ЯЗЫК

ИНСТРУКЦИЯ ДЛЯ ПОЛЬЗОВАТЕЛЯ
РУССКИЙ ЯЗЫК
20
Установка/контроль температуры в помещении
Вы можете легко задать нужную температуру.
- Нажимайте кнопки, чтобы задать желаемую температуру
: увеличение температуры при однократном нажатии
: уменьшение температуры при однократном нажатии
Температура в помещении: отображение текущей температуры
в помещении. Отображается температура, которую хочет задать пользователь.
<Режим охлаждения>
Режим охлаждения не работает, если заданная температура
выше температуры в помещении. Уменьшите значение задаваемой температуры.
<Режим нагрева>
Режим нагревания не работает, если заданная температура
ниже температуры в помещении. Увеличьте значение задаваемой температуры.
При нажатии кнопки ROOM TEMPERATURE (ТЕМПЕРАТУРА В
ПОМЕЩЕНИИ) соответствующее значение температуры будет
отображаться в течение 5 секунд.
Через 5 секунд отображается заданная температура.
В зависимости от расположения пульта дистанционного управ-
ления, фактическая температура в помещении и отображаемое
значение могут различаться.
Нажмите и удерживайте кнопку ROOM TEMPERATURE (ТЕМПЕРАТУРА В ПОМЕЩЕНИИ) в течение 5 секунд, единицы измерения температуры изменятся с градусов Цельсия на градусы
Фаренгейта или наоборот.

ПОДФУНКЦИЯ
РУССКИЙ ЯЗЫК
21
Автоматическая очистка (дополнительно)
Нажмите кнопку включения питания.
Устройство подаcт звуковой сигнал.
1
Нажмите кнопку ПЛАЗМА. Плазменная очистка
запускается при нажатии кнопки и отключается
при ее повторном нажатии.
2
Только ПЛАЗМЕННАЯ чистка
При нажатии кнопки ПЛАЗМА запускается плазменная
чистка.
• Плазменный фильтр основан на технологии, разработанной LG для удаления микроскопических вредных примесей, содержащихся в забираемом воздухе. Это
осуществляется посредством генерации плазмы из электронов, имеющих высокий заряд. Эта плазма полностью
обеззараживает и разрушает данные примеси, обеспечивая получение чистого воздуха, отвечающего гигиеническим требованиям.
• Эта функция может использоваться при любом режиме
работы устройства. Скорость вентилятора при этом
может быть любой.
Эта функция работает, когда устройство отключено.
Нажмите кнопку НАСТРОЙКИ ФУНКЦИЙ 1 раз.
Начнет мигать значок автоматической очистки.
1
Нажмите кнопку ЗАДАТЬ/ОЧИСТИТЬ, чтобы зарезервировать или отменить функцию автоматической очистки.
Если выполняется резервирование функции автоматической очистки, то при отключении устройства внутренний вентилятор будет по-прежнему работать в
течение примерно 30 минут, не выполняя, однако, операций охлаждения или
осушения. При этом также закрывается шторка.
В результате из устройства удаляется вся оставшаяся влага и осуществляется
его внутренняя очистка.
2
Плазменная чистка (дополнительно)
ПОДФУНКЦИЯ

ПОДФУНКЦИЯ
РУССКИЙ ЯЗЫК
22
Интеллектуальная очистка (дополнительно)
Использование функции интеллектуальной очистки может задаваться вручную или в автоматическом режиме.
Использование интеллектуальной очистки в автоматическом режиме
Если накопленное время работы устройства превышает 30 часов, то при его выключении автоматически запускается интеллектуальная очистка.
1 Нажмите кнопку НАСТРОЙКИ ФУНКЦИЙ 2 раза.
Начнет мигать значок интеллектуальной очистки.
2 Нажмите кнопку ЗАДАТЬ/ОЧИСТИТЬ, чтобы зарезерви-
ровать или отменить функцию интеллектуальной очистки.
Вы можете задать или очистить функцию, не включая и
не выключая устройство.
Задание интеллектуальной очистки вручную
Пыль из фильтра можно очищать с помощью щетки, перемещая ее слева направо или справа налево
по фильтру. Засасываемая пыль собирается в пылесборнике.
Особенности операции интеллектуальной очистки зависят от типа устройства.
1 Когда устройство перестанет работать, нажмите кнопку НАСТРОЙКИ
ФУНКЦИЙ, чтобы выбрать интеллектуальную очистку.
Начнет мигать значок интеллектуальной очистки, после чего нажмите
кнопку Задать/Очистить.
2 Чтобы остановить работу интеллектуальной очистки в ручном режиме,
нажмите кнопку НАСТРОЙКИ ФУНКЦИЙ, чтобы выбрать интеллектуальную очистку, после чего нажмите кнопку ЗАДАТЬ/ОЧИСТИТЬ.

ПОДФУНКЦИЯ
РУССКИЙ ЯЗЫК
23
1-й шаг 2-й шаг 3-й шаг
4-й шаг5-й шаг6-й шаг
• Если нажать и удерживать кнопку УГОЛ ЗАСЛОНКИ в течение 3 сек., для всех заслонок будет задан
стандартный угол.
• Между кнопками вверх/вниз/влево/вправо беспроводного пульта дистанционного управления и направлениями выпускных отверстий могут иметься различия.
• Задавайте нужный угол, сверяясь с фактическим изменением положения угла на устройстве.
• Функция индивидуальной регулировки заслонок является для устройства дополнительной, поэтому
она может не работать не некоторых устройствах.
Заслонка №1 Заслонка №2 Заслонка №3
Заслонка №4Отключение
Завершите настройку, нажав кнопку SET/CLEAR (ЗАДАТЬ/ОЧИСТИТЬ).
Режим регулировки угла наклона заслонок будет отключен.
3
С помощью этой функции можно индивидуально настраивать 4 угла наклона заслонок для группы
устройств с 4-сторонней потолочной кассетой.
Нажмите кнопку УГОЛ ЗАСЛОНКИ, после чего замигает значок индивидуальной регулировки угла наклона заслонок.
При повторных нажатиях кнопки угла наклона заслонок последовательно выводятся номера заслонок: заслонка №1 → заслонка №2 → заслонка №3 → заслонка №4 → отключение режима регулировки угла
наклона заслонок.
1
Задайте угол каждой заслонки, нажимая кнопки ЗАДАНИЯ ТЕМПЕРАТУРЫ.
• При каждом нажатии кнопки УГОЛ ЗАСЛОНКИ отображается соответствующий угол наклона заслонки и заданные для него значения.
• При нажатии кнопки температуры на дисплее отображается окно,
как показано на рис. справа, после чего для угла может быть выбран один из вариантов 1–6.
2
Индивидуальная регулировка угла наклона заслонок (дополнительно)

Установка текущего времени
1 Нажмите и удерживайте кнопку SET / CLEAN в течение 3 секунд.
2 2 Нажимайте кнопку "НАСТРОЙКА ВРЕМЕНИ", пока не будет установлено требуемое время.
(Если вы нажмете и будете удерживать кнопку в течение
длительного времени, соответствующие значения времени
будут быстро меняться с шагом 10 мин.)
3 3. Нажмите кнопку SET/CLEAR (ЗАДАТЬ/ОЧИСТИТЬ).
ТАЙМЕР
РУССКИЙ ЯЗЫК
24
ПРИМЕЧАНИЕ
!
Проверьте индикатор времени до и после полудня (A.M. и P.M).
Настройка таймера включения
1 Нажмите кнопку "ВКЛ.", чтобы включить
или выключить таймер.
2 Нажимайте кнопку "НАСТРОЙКА ВРЕМЕНИ",
пока не будет установлено требуемое время.
3 Нажмите кнопку SET/CLEAR
(ЗАДАТЬ/ОЧИСТИТЬ).
Таймер включен
Установка режима сна для таймера
1 Для включения/выключения таймера нажмите
кнопку TIMER (ТАЙМЕР).
2 Нажимайте кнопку "НАСТРОЙКА ВРЕМЕНИ",
пока не будет установлено требуемое время.
(Максимальное значение составляет 7 часов)
3 Нажмите кнопку SET/CLEAR
(ЗАДАТЬ/ОЧИСТИТЬ).
ТАЙМЕР
Таймер сна

ТАЙМЕР
РУССКИЙ ЯЗЫК
25
Отмена настройки таймера
- Для отмены всех настроек таймера нажмите кнопку CLEAR ALL (ОЧИСТИТЬ ВСЕ).
- Для отмены настроек отдельных таймеров нажмите кнопку соответствующего
таймера для его перевода в режим сна, включения или отключения.
Затем нажмите кнопку SET/CLEAR (ЗАДАТЬ/ОЧИСТИТЬ),
направив пульт ДУ на приемник сигналов.
(При этом индикатор таймера на кондиционере и экране дисплея пульта ДУ погаснет.)
Настройка таймера выключения
1 Нажмите кнопку "ВЫКЛ.",
чтобы включить или выключить таймер.
2 Нажимайте кнопку "НАСТРОЙКА ВРЕМЕНИ",
пока не будет установлено требуемое время.
3 Нажмите кнопку SET/CLEAR
(ЗАДАТЬ/ОЧИСТИТЬ).
Таймер ВЫКЛЮЧЕН

Внутренний блок
Решетка, корпус и пульт дистанционного управления
- - Перед очисткой выключите систему. Протирайте
устройство мягкой сухой тканью. Не пользуйтесь
отбеливателями и абразивными материалами.
Необходимо проверять и при необходимости чистить воздушные фильтры за передней решеткой
не реже одного раза в две недели.
- Не используйте:
Воду с температурой выше 40 °C.
Это может вызвать деформацию и/или обесцвечивание.
Летучие вещества.
Они могут повредить поверхности кондиционера.
- Извлеките воздушные фильтры.
Взявшись за выступ, слегка нажмите вперед,
чтобы извлечь воздушный фильтр.
- Удалите с фильтра грязь с помощью пылесоса
или промойте его водой.
Если грязь полностью не удалена, промойте
фильтр в теплой воде с нейтральным моющим
средством.
При использовании горячей воды (40 °C и выше)
может произойти деформация фильтра.
- После промывки в воде хорошо просушите
фильтр в затененном месте.
Не оставляйте воздушный фильтр под прямым
солнечным светом. Не сушите его вблизи огня.
- Установите воздушный фильтр.
Воздушные фильтры
ПРИМЕЧАНИЕ
!
Перед очисткой внутреннего блока его необходимо обесточить.
ВНИМАНИЕ!
При извлечении воздушного фильтра не прикасайтесь к металлическим деталям внутреннего
блока. Это может привести к травме.
!
B
e
n
z
e
n
e
S
C
O
U
R
I
N
C
L
B
A
R
G
E
S
I
N
N
E
R
ТЕХНИЧЕСКОЕ ОБСЛУЖИВАНИЕ
РУССКИЙ ЯЗЫК
26
ТЕХНИЧЕСКОЕ ОБСЛУЖИВАНИЕ

ТЕХНИЧЕСКОЕ ОБСЛУЖИВАНИЕ
РУССКИЙ ЯЗЫК
27
- После удаления воздушных фильтров,
слегка потяните вперед фильтр PLASMA,
чтобы снять его.
- Поместите фильтр PLASMA в емкость с
водой, в которую добавлено нейтральное
моющее средство, и оставьте его там на 20–
30 минут.
- Просушите фильтр PLASMA в тени в течение одного дня (необходимо полностью удалить влагу с этой детали).
- Обратите особое внимание на повреждения
электрических линий.
- Установите фильтр PLASMA на место.
Замена
Рекомендованный период использования: около 2
лет
- Откройте переднюю панель и извлеките воздушный фильтр.
- Снимите воздушный фильтр тонкой очистки.
- Вставьте новый воздушный фильтр тонкой очистки.
- Снова вставьте воздушный фильтр и закройте переднюю панель.
Фильтр тонкой очистки (дополнительно)
Очистка
- Необходимо проверять и чистить фильтр
PLASMA, расположенный за воздушными фильтрами, каждые 3 месяца или чаще (при необходимости).
ВНИМАНИЕ!
В течение 10 секунд после открытия решетки
воздухозаборника не прикасайтесь к фильтру
PLASMA: существует риск поражения электрическим током.
!
1
2

ТЕХНИЧЕСКОЕ ОБСЛУЖИВАНИЕ
РУССКИЙ ЯЗЫК
28
Не допускайте переохлаждения
помещения.
Это вредно для здоровья, а также
приводит к повышенному энергопотреблению.
Закрывайте шторы и занавески.
Во время работы кондиционера
избегайте попадания в помещение прямых солнечных лучей..
Поддерживайте в помещении
постоянную температуру.
Для поддержания постоянной температуры в помещении отрегулируйте направление воздушного
потока по вертикали и горизонтали.
Плотно закройте двери и окна.
Не раскрывайте двери и окна
слишком широко, чтобы сохранить в помещении прохладный
воздух.
Регулярно очищайте воздушный фильтр.
Засорение воздушного фильтра уменьшает
воздушный поток и снижает эффект охлаждения и осушения воздуха. Производите
очистку не реже одного раза в две недели.
Периодически проветривайте
помещение.
Поскольку окна постоянно закрыты, рекомендуется время от
времени их открывать для проветривания.
Если кондиционер не предпо-
лагается использовать....
Если кондиционер не будет использоваться продолжительное время.
- Включите кондиционер на 2–3 часа со следую-
щими настройками.
Тип операции: режим вентиляции. (См. стр. с
разделом "Режим вентиляции".)
Это позволит просушить внутренние механизмы.
- Отключите автоматический прерыватель.
- Извлеките батарейки из пульта ДУ.
Полезная информация
Воздушные фильтры и экономия электроэнергии.
Если воздушный фильтр забит пылью, мощность
охлаждения будет падать, и 6 % электроэнергии,
потребляемой кондиционером, будет расходоваться впустую.
Если вы снова собираетесь использовать кондиционер.
- Почистите воздушный фильтр и установите его во
внутренний блок. (См. стр. с разделом "ТЕХНИЧЕСКОЕ ОБСЛУЖИВАНИЕ".)
- Проследите, чтобы воздухозаборное и воздуховы-
пускное отверстия внутреннего и наружного блоков не были перекрыты.
- Проверьте правильность подключения провода
заземления. Он может быть подключен к стенке
внутреннего блока.
ВНИМАНИЕ!
Если кондиционер не будет использоваться
продолжительное время, выключите выключатель. Скопившаяся грязь может привести к возгоранию.
!
Советы по эксплуатации!

ТЕХНИЧЕСКОЕ ОБСЛУЖИВАНИЕ
РУССКИЙ ЯЗЫК
29
Сразу же обращайтесь в центр обслуживания в следующих ситуациях
- Признаки аномальной работы, такие как запах гари, громкий шум и т. п. Выключите кондиционер и отключите автоматический выключатель. В таких случаях никогда не пытайтесь устранить неисправность самостоятельно или перезапустить систему.
- Кабель электропитания сильно нагревается или поврежден.
- Самодиагностика выдает код ошибки.
- Вода из внутреннего блока вытекает даже при низкой влажности в помещении.
- Неправильно работает какой-либо переключатель, автоматический прерыватель (предохранительный, заземления) или перегорел плавкий предохранитель.
Во избежание снижения эффективности работы устройства пользователь должен регулярно выполнять процедуру проверки и очистки.
В определенных случаях для выполнения такой работы необходимо обращаться к специалисту.
Кондиционер не работает.
- Нет ли ошибки в ра-
боте таймера?
- Возможно, сгорел пре-
дохранитель или сработал автоматический
выключатель.
В помещении стоит
специфический запах.
- Проверьте, не являются ли источником
запаха отсыревшие
стены, ковер, мебель
или одежда, находящиеся в комнате.
Возможно, происходит
утечка конденсата из
кондиционера.
- Конденсат возникает,
когда поток воздуха из
кондиционера охлаждает теплый воздух в
помещении.
Кондиционер не работает примерно 3 минуты после
перезапуска.
- Это результат срабатывания защитного механизма.
- Подождите три минуты, и
кондиционер заработает.
Недостаточная эффективность охлаждения
или нагревания воздуха.
- Не загрязнен ли воздушный фильтр? См.
инструкции по чистке
фильтра.
- Возможно, в помещении было очень жарко
при первом включении
кондиционера. Немного
подождите, пока температура понизится.
- Возможно, неправильно
задана температура.
- Возможно, что воздухозаборное или выпускное отверстие
внутреннего блока засорилось.
Повышенный шум при
работе кондиционера.
- Шум напоминает журчание воды.
* Этот звук издает
фреон, циркулирующий внутри кондиционера.
- Похоже на звук воздуха, выпускаемого в
атмосферу.
- Такой звук является
результатом процесса
осушения воды внутри
агрегата.
Слышится потрескивание.
- Такой звук издается
при расширении и сжатии передней панели и
других деталей из-за
изменений температуры.
Индикация на дисплее
пульта ДУ нечеткая или
вообще не видна.
- Возможно, сели батарейки.
- Возможно, батареи
вставлены с нарушением полярности (перепутаны + и –).
Значок фильтра (светодиод) включен.
- Очистив фильтр, одновременно зажмите
кнопку таймера и
кнопку ◀ на пульте
проводного ДУ на 3 секунды.
После разряда молнии
отображается код ошибки
- Данное устройство подключено к схеме защиты
от перегрузки по току.
Такое сообщение может
появиться, однако это
нормальное явление.
Через несколько минут
устройство будет работать нормально.
Советы по устранению неисправностей. Экономьте время и деньги!
Прежде чем обращаться за помощью для ремонта или технического обслуживания, обратитесь к приводимой ниже
таблице возможных неисправностей. Если неисправность устранить не удалось, обратитесь к своему поставщику.

РУССКИЙ ЯЗЫК
30

ІНСТРУКЦІЯ З ЕКСПЛУАТАЦІЇ
КОНДИЦІОНЕР
ПОВІТРЯ
Перед тим як почати користуватися приладом, уважно прочитайте цю інструкцію
та збережіть її для звернень у майбутньому
СТЕЛЬОВИЙ КАСЕТНИЙ
Устаткування відповідає вимогам Технічного Регламенту Обмеження
Використання деяких Небезпечних Речовин в електричному та
електронному обладнанні.
.
УКРАÏНСЬКА
Імпортер в Україні – ПП «УЛК» : 03124, м.Київ, бульвар Вацлава Гавела, будинок 8-В, кімната 409
ТОВ «АКТА 2010» : 08136, Києво-Святошинський район, Крюківщіна, вул. Европейська 2А
www.lg.com
001

ПОРАДИ ЩОДО ЗАОЩАДЖЕННЯ ЕЛЕКТРОЕНЕРГІЇ
2
ПОРАДИ ЩОДО ЗАОЩАДЖЕННЯ ЕЛЕКТРОЕНЕРГІЇ
У цьому розділі наведено поради, як зменшити споживання електроенергії під час роботи кондиціонера.
Щоб користуватися кондиціонером більш ефективно, дотримуйтеся наведених нижче інструкцій:
• Не охолоджуйте надмірно приміщення. Це може бути шкідливо для вашого здоров’я та може призвести
до надмірного споживання електроенергії.
• Під час користування кондиціонером закривайте вікна жалюзі або занавісками, щоб у кімнату не потрапляли прямі сонячні промені.
• Під час роботи кондиціонера щільно зачиняйте двері та вікна.
• Для циркуляції повітря в приміщенні відрегулюйте вертикальний і горизонтальний напрямок потоку повітря.
• Щоб швидко охолодити або нагріти повітря в приміщенні, на короткий час збільште швидкість роботи вентилятора.
• Регулярно відкривайте вікна, щоб провітрити приміщення, оскільки якість повітря погіршується при тривалій роботі кондиціонера.
• Очищуйте повітряний фільтр один раз на 2 тижні. Пил і сміття, накопичені в повітряному фільтрі, можуть
блокувати потік повітря або знизити ефективність функцій охолодження або осушення повітря.
Ваша пам’ятка
Прикріпіть до цієї сторінки ваш чек. Він знадобиться, якщо потрібно буде підтвердити дату придбання, або в разі настання гарантійного випадку. Запишіть номер моделі та заводський номер:
Номер моделі :
Заводський номер :
Їх можна довідатися з етикетки на бічній панелі кожного блока.
Торговий представник :
Дата придбання :
УКРАÏНСЬКА

ВАЖЛИВІ ІНСТРУКЦІЇ З ТЕХНІКИ БЕЗПЕКИ
ВАЖЛИВІ ІНСТРУКЦІЇ З ТЕХНІКИ БЕЗПЕКИ
ПЕРЕД КОРИСТУВАННЯМ ПРИЛАДОМ УВАЖНО ОЗНАЙОМТЕСЯ З УСІМА ІНСТРУКЦІЯМИ.
Завжди дотримуйтеся наведених нижче вказівок, щоб уникнути небезпечних ситуацій та забезпечити максимальну ефективність вашого приладу.
ПОПЕРЕДЖЕННЯ
Недотримання цих заходів безпеки може призвести до серйозних травм або смерті
УВАГА
Недотримання цих заходів безпеки може призвести до легких травм або пошкодження виробу
ПОПЕРЕДЖЕННЯ
• Виріб обов'язково повинен бути заземлений.
• Не користуйтеся несправними автоматичними вимикачами або автоматичними вимикачами з параметрами живлення
нижче номінальних. Використовувати автоматичний вимикач і запобіжник відповідного номіналу. Небезпека пожежі
або удару електричним струмом.
• Не використовувати трійники. Завжди підключайте пристрій до окремої лінії з окремими автоматичним вимикачем. У
протилежному випадку можливе ураження електричним струмом або пожежа.
• З питань проведення електромонтажних робіт звертайтеся до торговельного агента, продавця, кваліфікованого електрика або в офіційний сервісний центр. Не розбирайте та не ремонтуйте виріб власноруч. Небезпека пожежі або ураження електричним струмом.
• Завжди заземлюйте виріб у відповідності зі схемою електричних з'єднань. Забороняється підключати провідник заземлення до водопровідних або газових труб, громовідводу або до заземленого кабелю телефонної лінії. Небезпека
пожежі або ураження електричним струмом.
• Надійно встановлюйте панель та кришку блока управління. Небезпека виникнення пожежі або удару електричним
струмом через потрапляння всередину пилу, вологи тощо.
• Використовуйте автоматичний вимикач і запобіжник відповідного номіналу. Небезпека пожежі або ураження електричним струмом.
• Не змінюйте конструкцію та не подовжуйте кабель живлення. Якщо на кабелі живлення є подряпини або його покриття відшаровується або ушкоджене, кабель підлягає заміні. Небезпека пожежі або ураження електричним струмом.
• З питань монтажу, демонтажу або повторного монтажу пристрою завжди звертайтеся до торговельного агента або в
офіційний сервісний центр. Небезпека пожежі, удару електричним струмом, вибуху або травмування.
• Не встановлюйте виріб на пошкодженій монтажній стійці. Переконайтеся, що характеристики зони монтажу не погіршуються з часом. Це може призвести до падіння виробу.
• Не встановлюйте зовнішній блок на нестійкій основі або в місці, де він може впасти. Падіння зовнішнього блока може
завдати матеріальних збитків, стати причиною травмування або смерті.
• У випадку затоплення виробу (залиття або занурення у воду), перед поновленням експлуатації зверніться в офіційний
сервісний центр з питання його ремонту. Небезпека пожежі або ураження електричним струмом.
• Обов'язково перевірити холодоагент, що використовується.Ознайомтеся з інформацією на шильдику пристрою. Використання невідповідного холодоагенту може унеможливити нормальну роботу пристрою.
• Не використовуйте пошкоджені кабель живлення, вилку, або незакріплену розетку. Це може призвести до виникнення
пожежі або ураження електричним струмом.
• Не торкайтеся, не керуйте й не ремонтуйте кондиціонер вологими руками. При вийманні шнура живлення з розетки
рукою тримайтеся за вилку, а не за шнур. Небезпека удару електричним струмом або пожежі.
• Не розміщуйте обігрівач або інші нагрівальні прилади поблизу кабелю живлення. Небезпека пожежі або ураження
електричним струмом.
!
!
!
3
УКРАÏНСЬКА

IMPORTANT SAFETY INSTRUCTIONS
4
• Не допускайте потрапляння води на електричні компоненти. Не встановлюйте пристрій поруч із джерелами вологи.
Небезпека пожежі, виходу виробу з ладу або удару електричним струмом.
• Не зберігайте, не використовуйте й не допускайте перебування горючих газів і легкозаймистих матеріалів поруч із виробом. Небезпека пожежі.
• Внутрішні й надвірні з'єднання провідні повинні бути надійно закріплені, а кабель повинен бути прокладений відповідним чином, що виключає натяг і від'єднання кабелю від з’єднувальних клем. Неправильні або ненадійно закріплені
з’єднання можуть призвести до виникнення пожежі.
• Слід утилізувати пакувальні матеріали з дотриманням правил безпеки. такі як гвинти, цвяхи, батарейки, зламані предмети тощо, які залишились після монтажу або ремонту. Потім розірвіть і викиньте пластикові пакувальні мішки. Діти
можуть використовувати їх у грі, що може призвести до травм.
• Переконатися, що вилка шнура живлення не забруднена і справна, і тільки після цього повністю вставити її в розетку
мережі живлення. Використання забрудненої, несправної або нещільно вставленої в розетку вилки може призвести до
ураження електричним струмом або пожежі.
• У зовнішньому блоці пусковий конденсатор подає високу напругу на електричні компоненти. Перед проведенням ремонту переконайтеся, що конденсатор повністю розряджений. Заряджені конденсатори можуть стати причиною ураження електричним струмом.
• При монтажі використовувати спеціальний монтажний комплект, що постачається разом із виробом. У протилежному
випадку пристрій може впасти та спричинити тяжку травму.
• Використовуйте тільки запасні частини, які вказані у списку запасних частин, наведеному в інструкції з ремонту й технічного обслуговування. Ніколи не змінюйте нічого в приладі. Використання невідповідних деталей може призвести до
ураження електричним струмом, перегріву або пожежі.
• Не слід довго використовувати прилад у щільно зачиненому просторі. Приміщення слід регулярно провітрювати. Можлива нестача кисню, і як результат, може бути завдана шкода здоров'ю.
• Не можна відкривати передню решітку виробу під час роботи приладу. (Не торкайтеся електростатичного фільтра,
якщо прилад ним обладнано). Небезпека травми, електричного удару або пошкодження виробу.
• Якщо під час роботи виробу з’являються незвичні звуки, запахи або дим, Слід негайно вимкнути автоматичний вимикач або відключити кабель живлення від розетки. Небезпека удару електричним струмом або пожежі.
• Періодично провітрюйте приміщення, де встановлено кондиціонер, якщо він працює одночасно з плитою, обігрівачем
тощо. Може статися нестача кисню, шкідлива для вашого здоров'я.
• Під час чищення та обслуговування пристрою, треба вимикати пристрій із розетки та автоматичний вимикач. Небезпека удару електричним струмом.
• Якщо виріб не використовується протягом тривалого часу, потрібно виймати вилку з розетки або вимикати автоматичний вимикач. Небезпека пошкодження, виходу з ладу або несанкціонованого ввімкнення виробу.
• Уживіть заходів, щоб ніхто, особливо діти, не наступав або не падав на зовнішній блок. Небезпека травмування і ушкодження пристрою.
• Виключіть можливість висмикування або ушкодження кабеля живлення під час експлуатації пристрою. Небезпека пожежі або ураження електричним струмом.
• Не розташовуйте на кабелі живлення ЖОДНИХ предметів. Небезпека пожежі або ураження електричним струмом.
• Не вмикайте й не вимикайте пристрій вставлянням або вийманням вилки із розетки мережі живлення. Небезпека пожежі або ураження електричним струмом.
• У випадку витоку горючих газів відключіть джерело газу й, перед тим як увімкнути виріб, провітріть приміщення. Не користуйтеся телефоном і вимикачами. Небезпека вибуху або пожежі.
УВАГА
• Піднімати або переносити виріб повинні двоє або більше осіб. Уникайте травмування.
• Не слід установлювати виріб у місці, де він зазнаватиме прямої дії морського вітру (соляний туман). Це може призвести до корозії виробу.
• Установіть дренажний шланг для належного відведення водяного конденсату. Погане з'єднання може призвести до
протікання води.
!
УКРАÏНСЬКА

IMPORTANT SAFETY INSTRUCTIONS
• Установлюючи виріб, дотримуйтеся горизонтального рівня. З метою виключення вібрації і шуму.
• Виріб не можна встановлювати в місцях, де шум або гаряче повітря від зовнішнього блока можуть завдати шкоди або
заважати сусідам. Це може призвести до проблем із сусідами та подальших судових позовів.
• Завжди перевіряйте наявність витоку газу (холодоагенту) після встановлення або ремонту виробу. Низький рівень холодоагенту може призвести до виходу виробу з ладу.
• Не використовуйте виріб в особливих цілях, наприклад, для зберігання продуктів, творів мистецтва тощо, оскільки це
побутовий кондиціонер, а не система охолодження з точним контролем температури. Небезпека пошкодження або
втрати майна.
• Не перекривайте впускний або випускний повітряний отвір. Це може призвести до виходу виробу з ладу.
• Для чищення використовуйте м'яку тканину. Не використовуйте агресивні миючі засобі, розчинники, струмінь води
тощо. Небезпека пожежі, ураження електричним струмом або пошкодження пластикових частин виробу.
• При знятті повітряного фільтра не доторкайтеся до металевих частин виробу. Небезпека отримання травми.
• Не наступайте на виріб та не кладіть нічого на нього. (зовнішні блоки) Небезпека травмування або виходу виробу з
ладу.
• Після чищення надійно зафіксуйте фільтр. Чистьте фільтр кожні два тижні, а в разі потреби – частіше. Забруднений
фільтр знижує ефективність роботи пристрою.
• Не вставляти руки або інші предмети у впускний або випускний повітряний отвір кондиціонера під час його роботи. У
ньому є гострі деталі, що рухаються та можуть спричинити травму.
• Будьте обережні при розпакуванні й установці виробу. Гострі краї можуть завдати травм.
• Уникайте контакту з холодоагентом, який може витікати із пристрою під час ремонту. Контакт холодоагенту з тілом
може призвести до обмороження
• Не нахиляйте пристрій під час зняття або демонтажу. Може пролитися водний конденсат, що накопичився всередині
• Не слід заправляти в систему повітря або газ, не призначений для даної системи. При потраплянні повітря в систему
охолодження створюється надмірно високий тиск, який може призвести до травмування або виходу виробу з ладу.
• У випадку витоку холодоагенту під час монтажу, слід негайно провітріть приміщення. У протилежному випадку може
бути заподіяна шкода вашому здоров'ю.
• Демонтаж пристрою, переробка холодоагенту і компонентів пристрою повинні виконуватися відповідно до місцевих і
національних стандартів. Для заміни батарейок у пульті дистанційного управління використовуйте нові батарейки однакового типу. Не змішуйте старі й нові батарейки, або батарейки різних типів.
Небезпека пожежі або виходу виробу з ладу.
• Не перезаряджайте й не розбирайте батарейки. Не кидати елементи живлення у вогонь. Вони можуть зайнятися або
вибухнути.
• Якщо рідина з батарейок потрапила вам на шкіру або одяг, ретельно вимийте їх чистою водою. Не користуйтеся пультом дистанційного управління у випадку витоку електроліту із батарейки. Хімікати із батарейок можуть спричинити
опіки або завдати іншої шкоди здоров'ю.
• При потраплянні електроліту із батарейок до рота ретельно почистіть зуби та зверніться по медичну допомогу. Не користуйтеся пультом дистанційного управління у випадку витоку електроліту із батарейки. Хімічні речовини з елементів
живлення можуть спричинити опіки або завдати іншої шкоди здоров'ю.
• Не залишайте кондиціонер працювати надто довго в умовах високої вологості та при відкритому вікні чи двері. Через
це може утворюватися конденсат і вологість, що шкідливо впливає на меблі.
• Не можна піддавати людей, дітей або рослини впливу потоку холодного або гарячого повітря. Це може заподіяти
шкоди здоров'ю.
• Не пийте воду, яка витікає із виробу. Вона не відповідає санітарним нормам і може завдати серйозної шкоди здоров'ю.
• При чищенні, технічному обслуговуванні або ремонті виробу на висоті використовуйте міцний табурет або драбину.
Будьте обережні та уникайте травмування.
5
УКРАÏНСЬКА

6
ЗМІСТ
2
3
УКРАÏНСЬКА
7
7
7
7
7
8
8
9
10
11
11
11
11
12
12
12
13
14
15
16
17
18
ЗМІСТ
ПОРАДИ ЩОДО ЗАОЩАДЖЕННЯ ЕЛЕКТРОЕНЕРГІЇ
ВАЖЛИВІ ІНСТРУКЦІЇ З
ТЕХНІКИ БЕЗПЕКИ
ПЕРЕД ТИМ ЯК РОЗПОЧАТИ КОРИСТУВАННЯ
Підготовка до експлуатації
Користування
Чищення й обслуговування
Обслуговування
ЗАГАЛЬНІ ВІДОМОСТІ ПРО
ВИРІБ
Назви й функції компонентів
Світлові індикатори режиму роботи
Бездротовий пульт дистанційного управління
ВКАЗІВКИ З ЕКСПЛУАТАЦІЇ
Установка батарейок
Зберігання бездротового пульта дистанційного управління
Метод роботи
ІНСТРУКЦІЯ КОРИСТУВАЧА
Режим охолодження - Стандартний режим
Режим охолодження - Швидкісне охолодження
Режим обігріву
Режим осушення повітря
Режим вентилятора
Автоматичний режим роботи
Режим автоматичного чергування функцій
Функція автоматичної зміни режиму - Настройка температури для зміни режиму
19
Налаштування повітряного потоку
19
Перемикання відображення градусів Цельсія/Фаренгейта
20
Установка температури / Перевірка температури в приміщенні
21
ПІДФУНКЦІЯ
21
Плазмова чистка (додатково)
21
Автоматичне очищення (додатково)
22
Інтелектуальне очищення (додатково)
23
Індивідуальне регулювання кута нахилу заслінок (додатково)
24
ТАЙМЕР
24
Установлення поточного часу
24
Налаштування таймера автоматичного вимкнення
24
Установка часу ввімкнення
25
Установка часу вимкнення
25
Скасування установок таймера
26
ДОГЛЯД І ТЕХНІЧНЕ ОБСЛУГОВУВАННЯ
26
Внутрішній блок
27
Очищувальний фільтр (не в усіх моделях)
28
Практичні поради з експлуатації
28
Коли кондиціонер не використовується....
29
Поради по виявленню та усуненню несправностей. Заощаджуйте час і гроші!
29
Негайно звертайтеся до сервісного центру
в наступних ситуаціях

ПЕРЕД ТИМ ЯК РОЗПОЧАТИ КОРИСТУВАННЯ
7
УКРАÏНСЬКА
Підготовка до експлуатації
• З питань установки зверніться до кваліфікованого установника.
• Використовуйте окрему лінію.
Користування
• Тривала дія прямого потоку повітря може бути шкідливою для вашого здоров'я. Не піддавайте мешканців,
домашніх тварин або рослини тривалій дії прямого потоку повітря.
• Через небезпеку нестачі кисню, провітрюйте приміщення у випадку одночасного використання з плитою
або іншими нагрівальними приладами.
• Не використовуйте даний кондиціонер у непередбачених особливих цілях (наприклад, для зберігання точних механізмів, харчових продуктів, домашніх тварин, рослин та творів мистецтва). Таке використання
може призвести до пошкодження даних об'єктів.
Чищення й обслуговування
• При знятті фільтра не доторкайтеся до металевих частин виробу. Торкання гострих країв металевих частин
може призвести до травм.
• Не використовуйте воду для чищення кондиціонера зсередини. Дія води може призвести до руйнування
ізоляції, що може стати причиною удару електричним струмом.
• Перед проведенням чищення виробу вимкніть живлення і автоматичний вимикач. Під час роботи вентилятор обертається з дуже великою швидкістю. При випадковому ввімкненні живлення установки під час чищення її внутрішніх компонентів виникає небезпека отримання травм.
Обслуговування
З питань проведення ремонту й технічного обслуговування звертайтеся до авторизованого сервісного центру.
ПЕРЕД ТИМ ЯК РОЗПОЧАТИ КОРИСТУВАННЯ

8
ЗАГАЛЬНІ ВІДОМОСТІ ПРО ВИРІБ
Назви й функції компонентів
УКРАÏНСЬКА
ЗАГАЛЬНІ ВІДОМОСТІ ПРО ВИРІБ
7
6
1
5
4
4
3
2
1 Внутрішній блок
2 Зовнішній блок
3 Пульт дистанційного управління
4 Вхідне повітря
5 Вихідне повітря
6 Трубопровід холодоагенту, з'єднувальні електропроводи
7 Дренажна труба
8 Дренажна труба
Заземліть зовнішній блок, щоб запобігти електричним ударам.
8

ЗАГАЛЬНІ ВІДОМОСТІ ПРО ВИРІБ
Світлові індикатори режиму роботи
Увімк./Вимк. : Світить під час роботи системи.
Значок фільтра : Загорається за 2400 годин після першого ввімкнення пристрою.
Таймер : Світить під час роботи за таймером.
Режим розморожування : Світить під час роботи в режимі розморожування або теплого
пуску. (Тільки моделі з тепловим насосом)
Примусовий режим : Управління системою за неможливості скористатися пультом дис-
танційного управління.
9
УКРАÏНСЬКА

ЗАГАЛЬНІ ВІДОМОСТІ ПРО ВИРІБ
10
1 Кнопка КУТ НАХИЛУ ЖАЛЮЗІ
Використовується для налаштування кута нахилу окремих жалюзі.
2 Кнопка ВИБІР ФУНКЦІЇ
Використовується для встановлення або скасування функцій автоматичного очищення, інтелектуального очищення, електрообігрівача або керування кутом нахилу окремих жалюзі.
3 Кнопка УВІМК./ВИМК.
Використовується для вмикання й вимикання пристрою.
4 Кнопка ПРИСКОРЕНЕ ОХОЛОДЖЕННЯ
Прискорене охолодження забезпечується надвисокою швидкістю
обертання вентилятора.
5 Кнопка ПОВІТРЯНИЙ ПОТІК ВЛІВО/ВПРАВО (ДОДАТКОВО)
Використовується для встановлення потрібного напрямку повітряного потоку – вліво або вправо (горизонтально).
6 Кнопка ПОВІТРЯНИЙ ПОТІК ВГОРУ/ВНИЗ
Використовується для запуску й зупинки руху жалюзі вгору або
вниз та установки бажаного напрямку потоку повітря.
7 Кнопка ТАЙМЕР УВІМКНЕННЯ
Використовуються для установки часу початку роботи.
8 Кнопка ТАЙМЕР НІЧНОГО РЕЖИМУ
Використовується для налаштування часу переходу в режим сну.
9 Кнопка ВСТАНОВИТИ / ОЧИСТИТИ
Використовується для встановлення/скасування таймера.
Використовується для налаштування поточного часу (якщо натиснути і утримувати кнопку впродовж 3 секунд).
10 Кнопка ПЛАЗМА (ДОДАТКОВО)
Використовується для запуску або зупинення функції очищення
за допомогою плазмового фільтра.
11 Кнопка УСТАНОВКА ТЕМПЕРАТУРИ У ПРИМІЩЕННІ
Використовуються для вибору температури в приміщенні.
12 Кнопка ВИБІР РЕЖИМУ РОБОТИ
Використовується для вибору режиму роботи.
13 Кнопка ВИБІР ШВИДКОСТІ ОБЕРТАННЯ ВЕНТИЛЯТОРА
ВНУТРІШНЬОГО БЛОКА
Використовується для вибору однієї з чотирьох швидкостей
обертання вентилятора: низька, середня, висока та хаотична.
14 Кнопка ВІДОБРАЖЕННЯ ТЕМПЕРАТУРИ У ПРИМІЩЕННІ
Використовується для відображення температури в приміщенні.
15 Кнопка ТАЙМЕР ВИМКНЕННЯ
Використовується для налаштування часу зупинення роботи.
16 Кнопка УСТАНОВКА ЧАСУ (більше/менше)/ПІДСВІЧУВАННЯ
Використовується для налаштування таймера.
Використовується для регулювання яскравості (якщо не в режимі регулювання часу).
17 Кнопка СКИДАННЯ
Використовується для скидання параметрів на пульті дистанційного управління.
Бездротовий пульт дистанційного управління
УКРАÏНСЬКА
1
2
3
4
5
6
7
8
9
10
11
12
13
14
15
16
17
Режими роботи
Режим охолодження
Автоматичний режим або автоматична зміна режиму
Режим осушення повітря
Режим обігріву
Режим вентилятора
• Модель з охолодженням ( ), Модель з тепловим насосом ( )

ВКАЗІВКИ З ЕКСПЛУАТАЦІЇ
Установка батарейок
1 Зніміть кришку відсіку для батарейок, висунувши
її в напрямку стрілки.
2 Вставте нові батарейки, дотримуючись поляр-
ності (+) і (-).
3 Установіть кришку, посунувши її на місце.
Зберігання бездротового пульта
дистанційного управління
1 Для пульта дистанційного управління рекоменду-
ється знайти місце, у якому до нього буде забезпечений безпечний і зручний доступ.
2 Гвинтами із комплекту виробу надійно закріпіть
тримач пульта на стіні.
3 Вставте пульт дистанційного управління в три-
мач.
Метод роботи
1 Приймач сигналу знаходиться на корпусі при-
строю.
2 Для керування пристроєм наведіть на нього
пульт дистанційного управління. Між ними не повинно бути ніяких перешкод.
ПРИМІТКА
!
• Завжди використовуйте/встановлюйте батарейки одного типу.
• Якщо планується не використовувати систему протягом тривалого часу, вийміть батарейки, щоб подовжити строк їхньої
експлуатації.
• Якщо дисплей на пульті дистанційного управління починає тьмяніти, замініть обидві батарейки.
ПРИМІТКА
!
• Не допускається піддавати пульт дистанційного управління впливу прямого сонячного
світла.
• Передавач і приймач сигналу повинні бути завжди чистими, що забезпечить якісний зв'язок
між ними. Використовуйте м'яку тканину для
їх очищення.
• У випадку, якщо пульт дистанційного управління впливає також на роботу інших пристроїв, поміняйте їх місце розташування або
зверніться за консультацією до сервісної
служби.
11
УКРАÏНСЬКА
ВКАЗІВКИ З ЕКСПЛУАТАЦІЇ

12
ІНСТРУКЦІЯ КОРИСТУВАЧА
Натисніть кнопку ON/OFF.
Пристрій відреагує звуковим сигналом.
1
Кнопкою MODE оберіть режим охолодження.
2
3
Установіть потрібну температуру, натискаючи кнопку TEMP.
Натисніть кнопку ROOM TEMPERATURE
CHECKING, щоб перевірити температуру в
приміщенні. Якщо задана температура перевищує температуру в приміщенні, холодне повітря не буде надходити.
* Діапазон установки температури : 18~30 °C(64~86 °F)
Режим охолодження - Швидкісне охолодження
Натисніть кнопку ON/OFF.
Пристрій відреагує звуковим сигналом.
1
Кнопкою MODE оберіть режим охолодження.
2
3
Натисніть кнопку JET COOL. Пристрій буде працювати на дуже високій швидкості вентилятора в режимі охолодження.
* Настінні моделі працюють у режимі прискореного
охолодження впродовж 30 хвилин
4
або або
Для скасування режиму прискореного охолодження, знову натисніть кнопку
прискореного охолодження, або кнопку вентилятора, або кнопку установки
температури в приміщенні, після чого прилад працюватиме на високій
швидкості вентилятора в режимі охолодження.
Режим охолодження - Стандартний режим
ІНСТРУКЦІЯ КОРИСТУВАЧА
УКРАÏНСЬКА
Збільшити температуру
Зменшити температуру

13
УКРАÏНСЬКА
ІНСТРУКЦІЯ КОРИСТУВАЧА
Режим обігріву
Ця функція доступна лише в моделях з тепловим насосом.
Натисніть кнопку ON/OFF.
Пристрій відреагує звуковим сигналом.
1
2
3
Установіть потрібну температуру, натискаючи кнопку TEMP.
Натисніть кнопку ROOM TEMPERATURE CHECKING, щоб
перевірити температуру в приміщенні. Якщо задана температура нижча за температуру в приміщенні, тепле повітря
не буде надходити.
4
Кнопкою MODE оберіть режим обігріву.
* Діапазон установки темпе-
ратури для режиму обігріву : 16~30 °C (60 °F~86 °F)
Повторно встановіть швидкість обертання вентилятора. Використовується для вибору однієї з
чотирьох швидкостей вентилятора: низької, середньої, високої та хаотичної. З кожним натисканням цієї кнопки швидкість вентилятора
змінюється.
Збільшити температуру
Зменшити температуру

ІНСТРУКЦІЯ КОРИСТУВАЧА
14
Режим осушення повітря
Натисніть кнопку ON/OFF.
Пристрій відреагує звуковим сигналом.
1
2
3
Установіть швидкість обертання вентилятора.
Можна обрати одну з чотирьох швидкостей
вентилятора: низька, середня, висока та хаотична. З кожним натисканням цієї кнопки
швидкість вентилятора змінюється.
Кнопкою MODE оберіть режим осушення повітря.
УКРАÏНСЬКА

ІНСТРУКЦІЯ КОРИСТУВАЧА
15
УКРАÏНСЬКА
Режим вентилятора
Натисніть кнопку ON/OFF.
Пристрій відреагує звуковим сигналом.
1
2
3
Повторно встановіть швидкість обертання
вентилятора. Використовується для вибору
однієї з чотирьох швидкостей вентилятора:
низької, середньої, високої та хаотичної. З
кожним натисканням цієї кнопки швидкість
вентилятора змінюється.
Кнопкою MODE оберіть режим вентилятора.
ПРИМІТКА
!
• Природний вітер за допомогою логіки симулювання хаотичності
Для більшого відчуття свіжості в порівнянні з іншими режимами, натисканням кнопки вибору
швидкості обертання вентилятора установіть режим хаотичного руху. У цьому режимі потік
повітря подібний до природного бризу завдяки автоматичній зміні швидкості обертання вентилятора за логікою симулювання хаотичності.
• Під час роботи в режимі вентилятора
Компресор зовнішнього блока не працює. Виконується функція циркуляції внутрішнього повітря, оскільки температура повітря, що подається, значно не відрізняється від температури в приміщенні.

16
Автоматичний режим роботи
Натисніть кнопку ON/OFF.
Пристрій відреагує звуковим сигналом.
1
2
3
Кнопкою MODE оберіть функцію автоматичного режиму.
Код Відчуття
2 Холодна вода
1 Прохолодно
0 Нейтраль
-1 Трох и жарко
-2 Теп л а вода
* Оберіть потрібний код
залежно від вашого відчуття.
ПРИМІТКА
!
Якщо система працює не так, як потрібно, оберіть інший режим вручну.
- Якщо система працює не так, як потрібно, оберіть інший режим вручну. Система не змінює
режим автоматично з охолодження на обігрів, або з обігріву на охолодження. Потрібно повторно встановити режим та задану температуру.
УКРАÏНСЬКА
ІНСТРУКЦІЯ КОРИСТУВАЧА
Установіть задану температуру.
<Тільки для моделі охолодження>
При роботі в даному режимі настройки температури й швидкість обертання вентилятора встановлюються автоматично
електронним керуючим контролером відповідно до фактичної температури в приміщенні. Якщо ви відчуваєте, що в
приміщенні жарко або холодно, остудіть або нагрійте повітря в приміщенні натисканням кнопок TEMPERATURE
SETTING. У цьому режимі роботи ви не зможете змінити
швидкість обертання вентилятора внутрішнього блока. Вона
задається згідно з правилом роботи автоматичного режиму.
Збільшити температуру
Зменшити температуру

ІНСТРУКЦІЯ КОРИСТУВАЧА
17
УКРАÏНСЬКА
Режим автоматичного чергування функцій
Натисніть кнопку ON/OFF.
Пристрій відреагує звуковим сигналом.
1
2
3
Кнопкою MODE оберіть функцію автоматичної
зміни режиму.
Установіть задану температуру
в приміщенні.
* Діапазон установки темпера-
тури для функції автоматичної
зміни режиму : 18~30 °C
(64~86 °F)
4
Можна обрати одну з чотирьох швидкостей
вентилятора: низька, середня, висока та
хаотична. З кожним натисканням цієї
кнопки швидкість вентилятора змінюється.
ПРИМІТКА
!
Під час використання функції автоматичної зміни режиму
Кондиціонер автоматично змінює режим роботи для підтримки заданої температури в приміщенні. Якщо
температура в приміщенні змінюється більше ніж на ±2°C (4°F) відносно заданої температури, кондиціонер підтримує температуру в приміщенні в межах ±2°C (4°F) відносно заданої температури за допомогою
функції автоматичної зміни режиму.
Збільшити температуру
Зменшити температуру

ІНСТРУКЦІЯ КОРИСТУВАЧА
18
Функція автоматичної зміни режиму - Настройка температури для зміни режиму
Ця функція задає режим роботи при автоматичній зміні режиму.
Під час роботи з автоматичною зміною режиму натисніть кнопку FUNCTION, щоб обрати установку
температури для зміни режиму.
1
Кнопками TEMPERATURE SETTING встановіть задану температуру зміни режиму.
(За умовчанням установлено 2 °C(4 °F).)
2
Завершіть налаштування, натиснувши кнопку SET/CLEAR (ВСТАНОВИТИ / ОЧИСТИТИ).
3
* Діапазон установки температури для
зміни режиму :1~7 °C(2~14 °F)
ПРИМІТКА
!
Температура зміни режиму це різниця температур, при якій відбувається перемикання з режиму охолодження в режим обігріву або з режиму обігріву в режим охолодження.
Приклад) Коли задана температура 25°C (76°F), а температура в приміщенні 20°C (68°F), то режимом
роботи буде обігрів. Якщо задано температуру для зміни режиму 2°C (4°F), то, коли температура в приміщенні підніметься до 27°C(25°C + 2°C)(80°F(76°F + 4°F)), прилад перейде в
режим охолодження.
УКРАÏНСЬКА
Збільшити температуру
Зменшити температуру

ІНСТРУКЦІЯ КОРИСТУВАЧА
19
УКРАÏНСЬКА
Керування напрямком повітряного потоку вгору/вниз (додатково)
Напрямок повітряного потоку вгору/вниз (вертикальний напрямок потоку) можна регулювати за допомогою
пульта дистанційного управління.
1 Увімкніть пристрій натисканням кнопки ON/OFF.
2 Натисніть кнопку повітряного потоку вгору/вниз, жалюзі почнуть рухатися вгору і вниз. Ще раз натисніть
кнопку повітряного потоку вгору/вниз, щоб установити вертикальні жалюзі в положення, яке забезпечить
потрібний напрямок потоку повітря.
Перемикання відображення градусів Цельсія/Фаренгейта
ПРИМІТКА
Налаштування повітряного потоку
!
• Під час натискання кнопки ПОВІТРЯНИЙ ПОТІК ВГОРУ/ВНИЗ горизонтальний напрямок повітряного
потоку автоматично змінюється внаслідок застосування алгоритму автоматичного руху жалюзі для забезпечення рівномірного розподілу повітря в приміщенні й максимального комфорту для людини шляхом імітації ефекту природного вітру.
• Для регулювання повітряного потоку вгору/вниз завжди використовуйте пульт дистанційного управління. Зміна положення жалюзі вручну може призвести до пошкодження пристрою.
• Після вимкнення пристрою жалюзі, що задають вертикальний напрямок повітряного потоку, закриють
випускний отвір для повітря системи.
- Натисніть кнопку ПЕРЕМИКАННЯ °C/°F, щоб змінити відображення в градусах Цельсія на відображення
в градусах Фаренгейта або навпаки.
- При натисканні кнопки TEMPERATURE SETTING в режимі відображення температури в градусах Фаренгейта температура змінюватиметься з кроком 1°F.

ІНСТРУКЦІЯ КОРИСТУВАЧА
20
Установка температури / Перевірка температури в приміщенні
Регулювати температуру дуже просто
- Натискайте кнопки для установки потрібного значення температури
: Збільшити температуру одноразовим натисканням
: Зменшити температуру одноразовим натисканням
Температура в приміщенні: Відображається поточне значення температури в приміщенні.
Задана температура: Відображається температура, яку встановив
користувач
<Режим охолодження>
Функція охолодження не працює, якщо задана температура перевищує температуру в приміщенні. Установіть нижчу бажану температуру
<Режим обігріву>
Функція обігріву не працює, якщо задана температура нижче температури в приміщенні. Установіть вищу бажану температуру
Функція обігріву не працює, якщо задана температура нижче
температури в приміщенні. Установіть вищу бажану температуру. При натисканні кнопки ROOM TEMPERATURE впродовж 5
секунд буде відображатися температура в приміщенні. За 5 секунд дисплей повертається до відображення заданої температури. У залежності від місця розташування пульта дистанційного
управління, фактична температура в приміщенні може відрізнятися від значення температури, що відображається на дисплеї.
Натисніть кнопку ROOM TEMPERATURE на 5 секунд, щоб змінити відображення в градусах Цельсія на відображення в градусах Фаренгейта або навпаки.
УКРАÏНСЬКА

ПІДФУНКЦІЯ
21
УКРАÏНСЬКА
Автоматичне очищення (додатково)
Натисніть кнопку ON/OFF.
Пристрій подаcть звуковий сигнал.
1
Натисніть кнопку ПЛАЗМА. Плазмове очищення
запускається при натисканні кнопки і відключається при її повторному натисканні.
2
Тільки ПЛАЗМОВЕ очищення
При натисканні кнопки ПЛАЗМА запускається плазмове
очищення.
• Плазмовий фільтр заснований на технології, розробленій
LG для видалення мікроскопічних шкідливих домішок,
що містяться у повітрі, що забирається. Це здійснюється
за допомогою генерації плазми з електронів, що мають
високий заряд. Ця плазма повністю знезаражує і руйнує
дані домішки, забезпечуючи отримання чистого повітря,
що відповідає гігієнічним вимогам.
• Ця функція може використовуватися при будь-якому режимі роботи пристрою. Швидкість вентилятора при
цьому може бути будь-якою.
Ця функція працює, коли пристрій вимкнено.
Натисніть кнопку FUNCTION SETTING 1 раз.
Почне блимати значок автоматичного очищення.
1
Натисніть кнопку SET/CLEAR, щоб зарезервувати або скасувати функцію автоматичного очищення.
Якщо виконується резервування функції автоматичного очищення, то при відключенні пристрою внутрішній вентилятор буде як і раніше працювати протягом
приблизно 30 хвилин, не виконуючи, однак, операцій охолодження або осушення. При цьому також закривається шторка. В результаті з пристрою видаляються всі залишки вологи і здійснюється його внутрішнє очищення.
2
Плазмова чистка (додатково)
ПІДФУНКЦІЯ

ПІДФУНКЦІЯ
22
Інтелектуальне очищення (додатково)
Використання функції інтелектуального очищення може задаватися вручну або в автоматичному режимі.
Використання інтелектуального очищення в автоматичному режимі
Якщо накопичений час роботи пристрою перевищує 30 годин, то при його виключенні автоматично запускається інтелектуальне очищення.
1 Натисніть кнопку FUNCTION SETTING 2 рази.
Почне блимати значок інтелектуального очищення.
2 Натисніть кнопку SET/CLEAN, щоб зарезервувати або
скасувати функцію інтелектуального очищення.
Можна легко задати або очистити функцію, не включаючи і не вимикаючи пристрій. Можна легко задати або
очистити функцію, не включаючи і не вимикаючи пристрій.
Завдання інтелектуального очищення вручну
Пил з фільтра можна очищати за допомогою щітки, переміщуючи її зліва направо або справа наліво по
фільтру. Засмоктуваний пил збирається в пилозбірнику.
Особливості операції інтелектуального очищення залежать від типу пристрою.
1 Коли пристрій перестане працювати, натисніть кнопку FUNCTION, щоб
вибрати інтелектуальну очистку. Почне блимати значок інтелектуального очищення, після чого натисніть кнопку SET/CLEAR.
2 Щоб зупинити роботу інтелектуального очищення в ручному режимі, на-
тисніть кнопку FUNCTION, щоб вибрати інтелектуальне очищення, після
чого натисніть кнопку SET/CLEAR.
УКРАÏНСЬКА

ПІДФУНКЦІЯ
23
УКРАÏНСЬКА
1-й крок 2-й крок 3-й крок
4-й крок5-й крок6-й крок
• Якщо натиснути і утримувати кнопку VANE ANGLE протягом 3 сек., для всіх заслінок буде задано стандартний кут.
• Між кнопками вгору / вниз / вліво / вправо бездротового пульта дистанційного керування і напрямками
випускних отворів можуть бути відмінності.
• Задавайте потрібний кут, звіряючись з фактичною зміною положення кута на пристрої.
• Функція індивідуального регулювання заслінок є для пристрою додатковою, тому вона може не працювати не деяких пристроях.
Заслінка №1 Заслінка №2 Заслінка №3
Заслінка №4Відключення
Завершіть налаштування, натиснувши кнопку SET/CLEAR.
Режим регулювання кута нахилу заслінок буде відключений.
3
За допомогою цієї функції можна індивідуально налаштовувати 4 кута нахилу заслінок для групи
пристроїв з 4-сторонньою стельовою касетою.
Натисніть кнопку VANE ANGLE, після чого почне блимати значок індивідуального регулювання кута нахилу заслінок.
При повторних натисканнях кнопки кута нахилу заслінок послідовно
виводяться номери заслінок: заслінка №1 → заслінка №2 → заслінка №3 → заслінка №4 → відключення режиму регулювання кута
нахилу заслінок.
1
Задайте кут кожної заслінки, натискаючи кнопки TEMPERATURE
SETTING.
• При кожному натисканні кнопки VANE ANGLE відображається відповідний кут нахилу заслінки і задані для нього значення.
• При натисканні кнопки температури на дисплеї відображається
вікно, як показано на рис. праворуч, після чого для кута може бути
обраний один з кроків 1-6.
2
Індивідуальне регулювання кута нахилу заслінок (додатково)

Налаштування таймера автоматичного вимкнення
1 Натисніть кнопку TIMER, щоб увімкнути
або вимкнути таймер.
2 За допомогою кнопок TIME SETTING налаштуйте потрібний час.
(Максимальна установка - 7 годин)
3 Натисніть кнопку SET / CLEAR.
ТАЙМЕР
24
ПРИМІТКА
!
Перевірте установку індикатора A.M./P.M.
Установка часу ввімкнення
1 Натисніть кнопку УВІМК., щоб увімкнути
або вимкнути таймер.
2 За допомогою кнопок TIME SETTING налаштуйте потрібний час.
3 Натисніть кнопку SET / CLEAR.
Таймер вмикання
Установлення поточного часу
1 Натисніть кнопку SET / CLEAN на 3 секунди.
2 За допомогою кнопок TIME SETTING налаштуйте потрібний час.
(При тривалому натисканні кнопки вниз показання змінюватимуться
швидко з кроком 10 хв.)
3 Натисніть кнопку SET / CLEAR.
ТАЙМЕР
Таймер нічного режиму
УКРАÏНСЬКА

ТАЙМЕР
25
УКРАÏНСЬКА
Скасування установок таймера
- Щоб скасувати всі установки таймера, натисніть кнопку CLEAR ALL.
- Щоб скасувати установки таймера вибірково,
натисканням кнопки окремого таймера оберіть настройку
нічного режиму або часу вмикання/вимикання.
Після цього натисніть кнопку SET/CLEAR, направивши пульт
дистанційного управління на приймач сигналу.
(Індикатор таймера на кондиціонері та дисплеї згаснуть.)
Установка часу вимкнення
1 Натисніть кнопку OFF, щоб увімкнути
або вимкнути таймер.
2 За допомогою кнопок TIME SETTING налаштуйте потрібний час.
3 Натисніть кнопку SET / CLEAR.
Таймер вимикання

Внутрішній блок
Решітка, корпус і пульт дистанційного управління
- Перед очищенням системи її слід вимкнути. Для
очищення пристрою його достатньо витерти
м'якою сухою тканиною. Не використовуйте вибільники та абразивні матеріали.
Повітряні фільтри за передньою решіткою потрібно
перевіряти й чистити не рідше одного разу на два
тижні або частіше, якщо необхідно.
- Ніколи не застосовуйте нічого з зазначеного
нижче:
Воду температурою понад 40°С.
Може викликати деформацію та/або зміну кольору.
Леткі речовини.
Можуть пошкодити поверхні кондиціонера повітря.
- Зняти повітряні фільтри.
Щоб вийняти фільтр, візьміться за виступ і легко
потягніть вперед.
- За допомогою пилососу видалити із фільтру бруд
або змити його водою.
Якщо фільтр сильно забруднений, промийте його
в теплій воді нейтральним мийним засобом.
Використання гарячої води (40°C або більше)
може призвести до деформування.
- Після промивання водою добре висушити, не під-
даючи дії сонячних променів.
При сушінні не піддавайте повітряний фільтр дії
прямих сонячних променів та тепла від відкритого
полум'я.
- Встановити повітряний фільтр на штатне місце.
Повітряні фільтри
ПРИМІТКА
!
Перед чищенням внутрішнього блока його необхідно відключити від джерела живлення.
УВАГА
Виймаючи фільтр, уникайте торкання металевих частин внутрішнього блока.
Це може призвести до травми.
!
B
e
n
z
e
n
e
S
C
O
U
R
I
N
C
L
B
A
R
G
E
S
I
N
N
E
R
ДОГЛЯД І ТЕХНІЧНЕ ОБСЛУГОВУВАННЯ
26
ДОГЛЯД І ТЕХНІЧНЕ ОБСЛУГОВУВАННЯ
УКРАÏНСЬКА

ДОГЛЯД І ТЕХНІЧНЕ ОБСЛУГОВУВАННЯ
27
УКРАÏНСЬКА
- Зніміть повітряний фільтр, після чого зніміть
ПЛАЗМОВИЙ фільтр, легко потягнувши вперед.
- Занурте ПЛАЗМОВИЙ фільтр у воду з нейтральним мийним засобом на 20~30 хвилин.
- Висушіть ПЛАЗМОВИЙ фільтр у затінку протягом дня (видалення вологи з цієї деталі є
особливо важливим).
- Запам'ятайте місця контактів ліній відведення електричного розряду.
- Установіть ПЛАЗМОВИЙ фільтр на штатне
місце.
Заміна
Рекомендований термін експлуатації : прибл. 2 роки
- Відкрийте передню панель і вийміть повітряний
фільтр.
- Вийміть фільтр очищення повітря.
- Вставте новий фільтр очищення повітря.
- Установіть на місце повітряний фільтр і закрийте
передню панель.
Очищувальний фільтр (не в усіх
моделях)
Чищення
- ПЛАЗМОВИЙ фільтр, розташований за повітряними фільтрами, необхідно перевіряти і очищувати кожні 3 місяці або частіше, якщо необхідно.
УВАГА
Не торкайтеся ПЛАЗМОВОГО фільтра протягом 10 секунд після відкриття передньої решітки, оскільки це може призвести до ураження
електричним струмом.
!
1
2

ДОГЛЯД І ТЕХНІЧНЕ ОБСЛУГОВУВАННЯ
28
Не переохолоджуйте повітря в
приміщенні.
Це шкідливо для здоров'я та приводить до надмірних витрат електроенергії.
Тримайте жалюзі або штори закритими.
При роботі кондиціонера не допускайте потрапляння в приміщення прямого сонячного світла.
Підтримуйте в приміщенні рівномірну температуру.
Відрегулюйте вертикальний і горизонтальний напрямок потоку повітря
таким чином, щоб забезпечити рівномірну температуру в приміщенні.
Щільно закривайте вікна й
двері.
Для підтримки прохолоди в приміщенні відкривайте двері й вікна
якомога рідше.
Регулярно чистіть повітряний фільтр.
Засмічення в повітряному фільтрі зменшують інтенсивність потоку повітря і знижують ефективність охолодження і
осушення. Чистіть фільтр не рідше одного разу на два тижні.
Періодично провітрюйте приміщення.
У зв'язку з тим, що вікна в приміщенні переважно закриті, необхідно періодично відкривати їх і
провітрювати приміщення.
Коли кондиціонер не викорис-
товується....
Якщо кондиціонер повітря не буде використовуватися протягом тривалого
часу.
- Перемкнути кондиціонер в наступний режим на 2-
3 години.
Режим роботи: Режим вентилятора. (Див. розділ
«Режим вентилятора».)
Це висушить внутрішні механізми.
- Знеструмити кондиціонер за допомогою вимикача.
- Також слід видалити елементи живлення з пульту
дистанційного керування.
Корисна інформація
Повітряні фільтри й ваші рахунки за електроенергію.
Якщо повітряні фільтри забиті пилом, ефективність
охолодження знижується, і 6% електроенергії, яка
використовується для роботи кондиціонера повітря,
витрачаються марно.
При відновленні користування кондиціонером.
- Очистіть повітряний фільтр і встановіть його у
внутрішній блок. (Див. розділ «ТЕХНІЧНЕ ОБСЛУГОВУВАННЯ І ДОГЛЯД»)
- Переконайтеся, що впускні й випускні повітряні от-
вори внутрішнього/зовнішнього блока не перекриті.
- Перевірити справність підключення заземлюючого
кабелю. Його можна приєднати зі сторони внутрішнього блока.
УВАГА
Вимкніть автоматичний вимикач, якщо кондиціонер повітря не буде використовуватися протягом тривалого часу. За цей час може
накопичитися бруд, що призведе до пожежі.
!
Практичні поради з експлуатації
УКРАÏНСЬКА

ДОГЛЯД І ТЕХНІЧНЕ ОБСЛУГОВУВАННЯ
29
УКРАÏНСЬКА
Негайно звертайтеся до сервісного центру в наступних ситуаціях
- Якщо трапляється щось ненормальне: запах горілого, гучний шум тощо. Негайно припиніть роботу пристрою та вимкніть автоматичний вимикач. Не намагайтеся ремонтувати пристрій самостійно або знову вмикати його в подібних ситуаціях.
- Кабель живлення надто гарячий або ушкоджений.
- Самодіагностика показує код помилки.
- Вода витікає з блоку, що знаходиться в приміщенні, навіть при низькій вологості.
- Будь-який перемикач, розмикач (запобіжний, заземлюючий) або запобіжник не працює як слід.
З метою забезпечення належної роботи пристрою користувач повинен виконувати його регулярну
перевірку й чищення.
В особливих ситуаціях робота повинна виконуватися тільки спеціалістом з обслуговування.
Кондиціонер не працює.
- Невірно налаштований
таймер.
- Перегорів запобіжник
або спрацював автоматичний вимикач.
Сторонній запах у приміщенні.
- Можливо стіни, килим,
меблі або предмети
одягу виділяють запах
плісняви.
Із кондиціонера витікає
конденсат.
- Конденсат утворюється, коли потік повітря із кондиціонера
охолоджує тепле повітря в приміщенні.
При повторному ввімкненні кондиціонер не
запускається протягом
3 хвилин.
- Це передбачений захист механізму.
- Почекайте, через три
хвилини пристрій відновить роботу.
Недостатнє охолодження або обігрів.
- Засмітився повітряний
фільтр. Виконайте вказівки з очищення повітряного фільтра.
- - Дуже висока температура повітря в приміщенні при першому
ввімкненні кондиціонера. Для охолодження
потрібен певний час.
- Чи правильно задана
температура?
- Чи не заблоковані впускний та випускний повітряні отвори
внутрішнього блока?
Шум при роботі кондиціонера.
- Якщо чути звук, схожий
на потік води.
* Це звук фреону, який
тече всередині кондиціонера.
- Якщо шум нагадує звук,
який утворюється при
випуску стисненого повітря в атмосферу.
-
Цей звук виникає
при обробці всередині кондиціонера
води, яка утворюється під час осушування повітря.
Чути тріск.
- Цей звук виникає при
подовженні/укороченні
передньої панелі тощо
внаслідок зміни температури.
Дисплей пульта дистанційного управління
темний, або на ньому
нічого не відображається.
- Чи не розрядилися батарейки?
- Ч
и не переплутані по-
люси (+) і (-) бата
рейок?
Індикатор стану фільтра (світлодіодний) світить.
- Після чищення фільтра
одночасно на 3 секунди
натисніть кнопку ТАЙМЕР і ◀ на дротовому
пульті дистанційного
управління.
Після удару блискавки відображається код помилки
- Виріб обладнаний системою захисту від струмового
перевантаження.
Поява повідомлення про
помилку є нормальною
функцією.
За кілька хвилин виріб повернеться до нормальної
роботи.
Поради по виявленню та усуненню несправностей. Заощаджуйте час і гроші!
Перед тим як звернутися з приводу ремонту чи технічного обслуговування.... Якщо несправність не усунута,
зверніться до вашого дилера.

30
УКРАÏНСЬКА

ПАЙДАЛАНУШЫ НҰСҚАУЛЫҒЫ
АУА
САЛҚЫНДАТҚЫШ
Құрылғыны іске пайдаланар алдында осы нұсқаулықты мұқият оқып шығыңыз
жəне болашақта қарау үшін сақтап қойыңыз.
ТӨБЕЛІК-КАССЕТАЛЫҚ
Жабдық Техникалық Ережелер талаптарына сай келеді, электр
немесе электронды жабдыққа белгілі бір қауіпті заттардың
қолданылуы шектелген.
ҚАЗАҚ ТІЛІ
www.lg.com

ҚУАТТЫ ҮНЕМДЕУ ТУРАЛЫ КЕҢЕСТЕР
2
ҚУАТТЫ ҮНЕМДЕУ ТУРАЛЫ КЕҢЕСТЕР
Бұл жерде ауа салқындатқышын пайдаланғанда қуат шығынын азайтуға мүмкіндік беретін бірнеше кеңес
беріледі. Ауа салқындатқышын төмендегі нұсқауларды орындай отырып тиімді пайдалануға болады:
• Бөлменің ішін өте қатты салқындатпаңыз. Бұл денсаулығыңызға зиян тигізуі жəне электр қуатын көп
жұмсауы мүмкін.
• Ауа салқындатқышын пайдаланған кезде күн сəулесін шымылдықпен немесе пердемен жауып қойыңыз.
• Ауа салқындатқышын пайдаланған кезде есіктер мен терезелерді жабық күйде ұстаңыз.
• Іштегі ауаны айналдыру үшін ауа ағынын көлденеңінен немесе тігінен реттеңіз.
• Бөлме ішіндегі ауаны аз уақыт ішінде жылдам суыту не жылыту үшін желдеткіш жылдамдығын
арттырыңыз.
• Ауа салқындатқышы бірнеше сағат жұмыс істеп тұрса, бөлме ішіндегі ауа сапасы нашарлауы мүмкін,
сондықтан терезелерді жүйелі түрде ашып, ауаны тазартып отырыңыз.
• Ауа сүзгісін 2 аптада бір рет тазалаңыз. Ауа сүзгісіне жиналған шаң мен қоқыстар ауа өтетін саңылауды
бітеуі немесе салқындату / ылғалсыздандыру функцияларын əлсіретуі мүмкін.
Жазбаларыңызға арналған
Сатып алған күніңізді дəлелдеу үшін не кепілдік мақсаттарында түбіртекті осы бетке
жапсырыңыз.
Модель нөмірі мен сериялық нөмірді мына жерге жазыңыз:
Үлгі нөмірі :
Сериялық нөмір :
Оларды əр құрылғының бүйіріндегі жапсырмадан таба аласыз.
Дилердің мекенжайы :
Сатылып алынған күні :
ҚАЗАҚ ТІЛІ

МАҢЫЗДЫ ҚАУІПСІЗДІК НҰСҚАУЛАРЫ
МАҢЫЗДЫ ҚАУІПСІЗДІК НҰСҚАУЛАРЫ
ҚҰРЫЛҒЫНЫ ПАЙДАЛАНУДАН БҰРЫН БАРЛЫҚ ЕРЕЖЕЛЕРДІ ОҚЫП ШЫҒЫҢЫЗ.
Қауіпті жағдайлардың алдын алу үшін жəне өнімнің тиімді жұмысын қамтамасыз ету үшін, əрдайым
келесідей сақтық шараларына сай əрекет етіңіз
ЕСКЕРТУ
Нұсқауларды елемеген жағдайда ауыр жарақат не өлім орын алуы мүмкін
АБАЙ БОЛЫҢЫЗ
Нұсқаулар елемеген жағдайда, жеңіл жарақат алуыңыз не өнім зақымдалуы мүмкін
ЕСКЕРТУ
• Өнімді əрқашан жерге тұйықтаңыз. Электр тогының соғу қаупі бар.
• Ақаулығы бар немесе техникалық сипаттамасы төмен автоматты ажыратқышты пайдаланбаңыз. Дұрыс
дəрежелі ажыратқышты жəне сақтандырғышты пайдаланыңыз. Өрт шығу немесе электр тогының соғу қаупі
бар.
• Бірнеше ашалы розетканы пайдаланбаңыз. Осы құрылғыны əрдайым белгіленген тізбекке жəне ажыратқышқа
пайдаланыңыз. Əйтпесе, электр тогының соғуына не өрттің шығуына алып келуі мүмкін.
• Электр жұмыстарын жүргізу үшін дилерге, сатушыға, білікті электр маманына немесе өкілетті қызмет көрсету
орталығына хабарласыңыз. Өнімді өз бетіңізбен бөлшектемеңіз немесе жөндемеңіз. Өрт шығу немесе электр
тогының соғу қаупі бар.
• Өнімді əрқашан сым диаграммасына сай жерге тұйықтаңыз. Жерге тұйықталу сымын газ немесе су
құбырларының жайтартқышына не телефонның жерге тұйықталу сымына жалғамаңыз. Өрт шығу немесе
электр тогының соғу қаупі бар.
• Басқару блогының панелі мен қақпағын нық орнатыңыз. Шаң, су жəне т. б. салдарынан өрт немесе электр
тогының соғу қаупі бар.
• Дұрыс номиналды ажыратқышты немесе сақтандырғышты пайдаланыңыз. Өрт шығу немесе электр тогының
соғу қаупі бар.
• Қуат кабелін өзгертпеңіз немесе ұзартпаңыз. Қуат кабелінде немесе сымда сызаттар, олардың беті тозған
немесе ескірген болса, олар ауыстырылу тиіс. Өрт шығу немесе электр тогының соғу қаупі бар.
• Орнату жұмысы үшін дилерге немесе өкілетті қызмет көрсету орталығына хабарласыңыз. Өрт шығу, электр
тогының соғуы, жарылыс немесе жарақаттану қаупі бар.
• Өнімді зақымдалған орнату тұғырына орнатпаңыз. Орнату аумағы уақыт өткен сайын нашарламайтынына көз
жеткізіңіз. Бұл өнімнің құлауына əкелуі мүмкін.
• Сыртқы блокты жылжымалы негізге немесе құлауы мүмкін жерге орнатпаңыз. Сыртқы блок құласа,
зақымдауы, жарақаттауы не тіпті адам өліміне əкелуі мүмкін.
• Құрылғыға су кірсе (суға батқанда), жөндеу үшін қайта пайдаланудан бұрын өкілетті қызмет көрсету
орталығына хабарласыңыз. Өрт шығу немесе электр тогының соғу қаупі бар.
• Пайдаланылатын хладагентті тексеріңіз. Өнімдегі жапсырманы оқыңыз. Дұрыс емес хладагентті пайдалану
блоктың қалыпты жұмысына кедергі келтіруі мүмкін.
• Зақымданған қуат кабелін, айырды немесе бекітілмеген розетканы қолданушы болмаңыз. Əйтпесе өрттің орын
алуына не электр тогының соғуына алып келуі мүмкін.
• Құрылғыны су қолмен ұстамаңыз, басқармаңыз немесе жөндемеңіз. Розетканы қолмен ұстап ажыратыңыз.
Электр тогының соғу немесе өрттің шығу қаупі бар.
• Қыздырғыш немесе басқа қыздыратын құрылғыларды қуат кабелінің қасына қоймаңыз. Өрт шығу жəне электр
тогының соғу қаупі бар.
!
!
!
3
ҚАЗАҚ ТІЛІ

МАҢЫЗДЫ ҚАУІПСІЗДІК НҰСҚАУЛАРЫ
4
• Электр бөлшектерге су кетуіне жол бермеңіз. Блокты су көздерінен алшақ орнатыңыз. Өрт, өнімнің зақымдалу
немесе электр тогының соғу қаупі бар.
• Жанғыш газ немесе тұтанғыш заттарды өнімнің жанында сақтамаңыз немесе пайдаланбаңыз. Өрттің пайда
болу қаупі бар.
• Кіріс немесе шығыс сым қосылымдары мықтап бекітілуі тиіс жəне қосылым клеммеларынан ешқандай
кабельді тарту күші болмайтындай етіп кабель дұрыс бағытталуы керек. Дұрыс жалғанбау немесе
байланыстың жоғалуы қызып кетуге немесе өртке əкелуі мүмкін.
• Қаптама материалдарын қауіпсіз түрде қоқысқа тастаңыз. Монтаждаудан немесе қызмет көрсетуден кейін
бұрандалар, шегелер, батареялар, сынған заттар жəне т.б. сияқты заттарды алып тастап, пластикалық орама
қабын лақтырыңыз. Балалар олармен ойнап жарақаттануы мүмкін.
• Қуат кабелі кір еместігін, босап кетпегендігін немесе зақымдалмағанын тексеріңіз, содан кейін айырын
толығымен салыңыз. Кір, бос немесе зақымдалған қуат кабелі өрттің шығуына немесе электр тогының соғуына
себеп болуы мүмкін.
• Сыртқы блокта өсу конденсаторы электр құрамдастарын жоғары кернеу электрімен қамтамасыз етеді. Жөндеу
жұмысын жүргізуден бұрын, конденсатордың зарядын толығымен бітіріңіз. Зарядталған конденсатор электр
тогының соғуына əкелуі мүмкін.
• Блокты орнатқан кезде, блокпен қамтамасыз етілген орнату жинағын пайдаланыңыз. Əйтпесе, блок құлап,
қатты жарақаттауы мүмкін.
• Қызмет көрсету бөлшектері тізімінде көрсетілген бөлшектерді ғана пайдаланыңыз. Құрылғыны өзгертуге
ешқашан əрекет етпеңіз. Сəйкес емес бөлшектерді пайдалану электр тогының соғуына, жылудың шамадан
тыс бөлінуіне немесе өртке алып келуі мүмкін.
• Өнімді ұзақ уақыт бойы тығыз жабылған кеңістікте пайдаланбаңыз. Үнемі желдетіп отырыңыз. Оттегі
жетіспеушілігі туындап, нəтижесінде денсаулығыңызға зиян келтіруі мүмкін.
• Құрылғы жұмыс істеп тұрғанда алдыңғы торды ашпаңыз. (Құрылғы элетростатикалық сүзгішпен жабдықталған
болса, ұстамаңыз.) Физикалық жарақаттану, электр тогының соғу жəне құрылғының зақымдалу қаупі бар.
• Өнімнен əдеттен тыс дауыс, иіс немесе түтін шыққан жағдайда. Ажыратқышты дереу өшіріңіз не электр
қуатының кабелін ажыратыңыз. Электр тогының соғу немесе өрттің шығу қаупі бар.
• Құрылғы пеш немесе басқа жылыту құрылғысымен бірге жұмыс істегенде бөлмені анда-санда желдетіңіз.
Оттек жетіспеушілігі туындап, денсаулығыңызға зиян келтіруі мүмкін.
• Өнімді тазалау немесе жөндеу кезінде электр қуатын өшіріңіз. Электр шогының қаупі бар.
• Өнімді ұзақ уақыт пайдаланбасаңыз, электр қуатының розеткасын ажыратыңыз не ажыратқышты өшіріп
қойыңыз. Өнімнің зақымдалу немесе ақаулық пайда болу немесе мақсатсыз жұмыс істе қаупі бар.
• Сыртқы блокқа ешкім, əсіресе балалардың басып не құлап кетпеуін қамтамасыз етіңіз. Бұл жеке жарақат алу
немесе өнімнің зақымдалуына əкелуі мүмкін.
• Жұмыс барысында қуат кабелі тартылып немесе зақымдалмайтынына көз жеткізіңіз. Өрт шығу немесе электр
тогының соғу қаупі бар.
• Қуат кабелінің үстіне ЕШНƏРСЕ қоймаңыз. Өрт шығу немесе электр тогының соғу қаупі бар.
• Құрылғыны ҚОСУ/ӨШІРУ үшін қуат көзінің тығынын розеткаға тықпаңыз немесе ажыратпаңыз. Өрт шығу
немесе электр тогының соғу қаупі бар.
• Тұтанғыш газ шыққан кезде, өнімді қоспас бұрын, газды өшіріп, терезені ашып, бөлмені желдетіңіз. Телефонды
пайдаланбаңыз немесе қосқыштарды қоспаңыз немесе өшірмеңіз. Жарылу немесе өрт шығу қаупі бар.
АБАЙ БОЛЫҢЫЗ
• Өнімді екі немесе бірнеше адам көтеріп, тасымалдау керек. Адам жарақатының алдын алыңыз.
• Өнімді теңіз желі (тұздың бүркуі) тікелей əсер ететін жерге орнатпаңыз. Бұл өнімнің тот басуына əкелуі мүмкін.
• Конденсаттың тиісті түрде төгілуін қамтамасыз ету үшін, төгу шлангісін орнатыңыз. Қосылымның дұрыс
орнатылмауы судың ағып кетуіне себеп болуы мүмкін.
• Өнімді орнатқан кезде деңгейі тең болуы тиіс. Дірілді немесе шуды болдырмау үшін.
!
ҚАЗАҚ ТІЛІ

МАҢЫЗДЫ ҚАУІПСІЗДІК НҰСҚАУЛАРЫ
• Өнімді сыртқы блоктан шығатын шу не ыстық ауа айналаны зақымдауы не мазалауы мүмкін жерге
орнатпаңыз. Бұл көршілерге кедергі етіп, жанжалға əкелуі мүмкін.
• Өнімді орнату немесе жөндеуден кейін əрқашан газдың (суық агенттің) ақпайтындығын тексеріңіз. Суық агент
деңгейінің төмен болуы өнімнің бұзылуына əкеліп соғуы мүмкін.
• Құрылғыны азықты сақтау, өнер туындылары жəне т. б. сияқты арнайы мақсат үшін пайдаланбаңыз. Бұл
белгілі бір мұздату жүйесі емес, тұтынушылық ауа салқындатқыш. Зақымдалу немесе мүліктен айырылу қаупі
бар.
• Ауа ағынының кірісін немесе шығысын бітемеңіз. Бұл өнімнің бұзылуына алып келуі мүмкін.
• Өнімді тазалау үшін жұмсақ шүберек қолданыңыз. Өткір тазалау құралдарын, еріткіштерді пайдаланбаңыз
немесе су шашпаңыз. Өрт, электр тогының соғу немесе құрылғының пластикалық бөлшектерінің зақымдалу
қаупі бар.
• Ауа сүзгісін алып жатқанда, өнімнің металл бөліктерін ұстамаңыз. Жарақат алу қаупі бар.
• Жабдықты басуға немесе оның үстіне зат қоюға болмайды. (сыртқы блоктар) Жабдық бұзылып немесе сынып
қалуы мүмкін.
• Тазалаған соң əрқашан сүзгішті мықтап енгізіңіз. Сүзгіні екі апта сайын немесе қажет болса, одан да жиі
тазалап отырыңыз. Кір сүзгі тиімділікті азайтады.
• Құрылғы жұмыс істеп тұрғанда ауа кірісі немесе шығысы арқылы қолдарыңызды немесе басқа заттарды
кіргізбеңіз. Жеке жарақат келтіруі мүмкін өткір жəне жылжымалы бөлшектер бар.
• Өнімді қаптан шығару жəне орнату кезінде абай болыңыз. Өткір шеттері жарақаттауы мүмкін.
• Жөндеу кезінде тоңазытқыш агенттің буы сыртқа шықса, сыртқа шыққан тоңазытқыш агенттің буына
жақындамаңыз. Салқындатқыш газы мұздауға алып келуі мүмкін (суық күйік)
• Блокты алғанда не орнатқан кезде, оны еңкейтпеңіз. Ішіндегі конденсат төгілу мүмкін.
• Жүйеде пайдаланылатын, көрсетілген хладагенттен басқа ауа немесе газды араластырмаңыз. Суық агент
жүйесіне ауа кіріп кетсе, ол шамадан тыс жоғары қысым пайда тудырып, жабдықтың зақымдалуына немесе
адамның жарақат алуына себеп болуы мүмкін.
• Орнату барысында хладагент газ шықса, аймақты дереу желдетіңіз. Кері жағдайда, бұл Сіздің
денсаулығыңызға зиянды болу мүмкін.
• Блок демонтажы, хладагент майын төгу жəне соңғы бөлшектерді алу жергілікті жəне ұлттық стандарттарға
сəйкес орындалуы тиіс. Қашықтан басқару пультіндегі батареяларды дəл сондай жаңа батареялармен
алмастырыңыз. Ескі жəне жаңа батареяларды немесе əртүрлі батареяны бірге пайдаланбаңыз. Өрт немесе
өнім ақаулығының орын алу қаупі бар.
• Батареяларды қайта зарядтамаңыз немесе бөлшектемеңіз. Батареяларды отқа жақындатпаңыз. Олар өртенуі
немесе жарылуы мүмкін.
• Батареялардан шыққан сұйықтық денеңізге немесе киіміңізге тиіп кетсе, таза сумен жақсылап жуыңыз.
Батареялардан сұйықтық ағып кетсе, қашықтан басқару пультін пайдаланбаңыз. Батареялардағы химиялық
заттар күйдіруі мүмкін немесе денсаулыққа басқа да кесірін тигізуі мүмкін.
• Батареялардан шыққан сұйықтықты жеп қойсаңыз, тістеріңізді жуып, дəрігерге қаралыңыз. Батареялардан
сұйықтық ағып кетсе, қашықтан басқару пультін пайдаланбаңыз. Батареялардағы химиялық заттар күйдіруі
мүмкін немесе денсаулыққа басқа да кесірін тигізуі мүмкін.
• Ылғалдылық өте жоғары болған жағдайда жəне есік немесе терезе ашық қалған жағдайда, ауа
салқындатқыштың ұзақ уақыт бойы қосылуына жол бермеңіз. Ылғал жиналып, жиһазыңызды сулауы немесе
зақымдауы мүмкін.
• Суық немесе ыстық ауаны тартатын жерге теріңізді, балаларды немесе өсімдіктерді жақындатпаңыз. Ол сіздің
денсаулығыңызға кері əсер етуі мүмкін.
• Өнімнен шыққан суды ішпеңіз. Ол санитарлық талаптарға сай емес жəне денсаулығыңызға кері əсерін тигізуі
мүмкін.
• Өнімді биіктікте тазартқанда, қызмет көрсеткенде немесе жөндегенде берік орындық немесе тасымалы
баспалдақты пайдаланыңыз. Абай болыңыз жəне жеке жарақат алуды болдырмаңыз.
5
ҚАЗАҚ ТІЛІ

6
МАЗМҰНЫ
2
3
7
7
7
ҚАЗАҚ ТІЛІ
7
7
8
8
9
10
11
11
11
11
12
12
12
13
14
15
16
17
18
19
19
МАЗМҰНЫ
ҚУАТТЫ ҮНЕМДЕУ
ТУРАЛЫ КЕҢЕСТЕР
МАҢЫЗДЫ ҚАУІПСІЗДІК
НҰСҚАУЛАРЫ
ҚОЛДАНАР АЛДЫНДА
Жұмысқа дайындау
Қолданыс
Тазалау жəне техникалық қызмет көрсету
Қызмет көрсету
ӨНІМГЕ КІРІСПЕ
Бөлшектердің аты мен функциясы
Операцияны анықтау шамдары
Сымсыз қашықтан басқару пульті
ПАЙДАЛАНУ
НҰСҚАУЛЫҒЫ
Батареяларды салу əдісі
Сымсыз қашықтан басқару пультіне
техникалық қызмет көрсету
Басқару əдісі
ПАЙДАЛАНУШЫ
НҰСҚАУЛЫҒЫ
Салқындату режимі – Стандартты жұмыс
істеуі
Салқындату режимі – Қатты салқындату
Жылыту режимі
Ылғалсыздандыру режимі
Желдеткіш режимі
Автоматты түрде жұмыс істеу режимі
Автоматты түрде ауысу режимі
Автоматты түрде ауысу режимі –
Температураны өзгерту режимін баптау
Ауа ағынын орнату
Цельсий/Фаренгейт температурасына
ауыстыру
20
Температураны орнату/Бөлме
температурасын тексеру
21
ҚОСАЛҚЫ ФУНКЦИЯ
21
Плазмалық тазалау (опциялық)
21
Автоматты тазалау (опциялық)
22
Ақылды тазалау (опциялық)
23
Жеке қалақ бұрышын реттеу (опциялық)
24
ТАЙМЕР
24
Ағымдағы уақытты орнату
24
Ұйықтау таймерінің параметрі
24
Таймерді іске қосу параметрі
25
Таймерді өшіру параметрі
25
Таймер параметрін болдырмау үшін
26
ТЕХНИКАЛЫҚ ҚЫЗМЕТ
КӨРСЕТУ ЖƏНЕ ҚЫЗМЕТ
КӨРСЕТУ
26
Ішкі құрылғы
27
Тазарту сүзгісі (Қосымша)
28
Жұмыс кеңестері!
28
Ауа салқындатқыш дұрыс істемегенде....
29
Ақаулықтарды жою бойынша кеңестер!
Уақытыңыз бен қаражатыңызды үнемдеңіз!
29
Төмендегідей жағдайларда бірден қызмет
көрсету орталығына хабарласыңыз

ҚОЛДАНАР АЛДЫНДА
7
ҚАЗАҚ ТІЛІ
Жұмысқа дайындау
• Орнату үшін орнату жөніндегі маманға хабарласыңыз.
• Арнайы тізбекті пайдаланыңыз.
Қолданыс
• Ұзақ уақыт бойы тікелей ауа ағынының əсеріне ұшырау сіздің денсаулығыңызға қауіпті болуы мүмкін.
Тұрғындардың, үй жануарларының немесе өсімдіктердің ұзақ уақыт бойы тікелей ауа ағынының əсерінде
болуына жол бермеңіз.
• Ас үй пеші немесе басқа да жылыту құрылғыларымен бірге пайдаланғанда, оттегі жетіспеушілігі пайда
болуына байланысты, бөлмені желдетіп тұрыңыз.
• Бұл ауа салқындатқышын өзге де мақсаттарға пайдаланбаңыз (мысалы, дəлдік құрылғыларын, азықтүлікті, үй жануарларын, өсімдіктерді жəне өнер туындыларын сақтау үшін). Ондай қолданыс элементтерді
зақымдауы мүмкін.
Тазалау жəне техникалық қызмет көрсету
• Сүзгісін алып жатқанда, құрылғының металл бөліктерін ұстамаңыз. Өткір металл шеттерді пайдаланғанда
жарақаттану қаупі бар.
• Ауа салқындатқышының ішін тазалау үшін суды пайдаланбаңыз. Суды пайдалану оқшаулауды зақымдап,
электр тогының соғуына себеп болуы мүмкін.
• Құрылғыны тазалаған кезде, алдымен қуат көзі мен автоматты ажыратқыш өшіп тұрғанына көз жеткізіңіз.
Жұмыс істеп тұрғанда желдеткіш өте жоғары жылдамдықта айналады. Құрылғының ішкі бөлшектерін
тазалау кезінде құрылғы қуаты кездейсоқ қосылып кетсе жарақат орын алуы мүмкін.
Қызмет көрсету
Жөндеу жəне техникалық қызмет көрсету үшін, өкілетті қызмет көрсету дилеріне хабарласыңыз.
ҚОЛДАНАР АЛДЫНДА

ӨНІМГЕ КІРІСПЕ
8
ӨНІМГЕ КІРІСПЕ
Бөлшектердің аты мен функциясы
7
6
1
ҚАЗАҚ ТІЛІ
1 Ішкі блок
2 Сыртқы блок
3 Қашықтықтан басқарылатын контроллер
4 Ауа тартқыш
5 Ауаны бұрушы
6 Тоңазытқыш агенттің құбыршегі, жалғау электр сымы
7 Су ағызу құбыры
8 Жерге тұйықтау сымы
Электр тогы соғуының алдын алу үшін, сыртқы блокты жерге тұйықтаңыз
5
4
4
3
2
8

ӨНІМГЕ КІРІСПЕ
Операцияны анықтау шамдары
Қосу/Өшіру : жүйе жұмысы кезінде жанады.
Сүзгі белгісі : құрылғыны алғаш қолданған уақыттан бастап 2400 сағат өткеннен кейін
жанады.
Таймер : таймер жұмыс істеп тұрғанда жанады.
Мұздан еріту режимі : Мұздан еріту режимі немесе Ыстық күйінде іске қосу кезінде
көрсеткіш жанады. (Жылыту сорғысымен жабдықталған
модельдерде ғана)
Мəжбүрлі түрде : Қашықтықтан басқару пультін кез келген себеп үшін қолжетімсіз
болғанда, өнімді басқару үшін.
9
ҚАЗАҚ ТІЛІ

ӨНІМГЕ КІРІСПЕ
10
1 ҚАЛАҚ БҰРЫШЫ түймесі
Əрбір қанат бұрышын орнату үшін қолданылады.
2 ФУНКЦИЯ ПАРАМЕТРІ түймесі
Автоматты тазалау, Смарт тазалау, электр қыздырғышын
немесе жеке қанат бұрышын басқару функцияларын орнату
немесе тазалау үшін қолданылады.
3 ҚОСУ/ӨШІРУ түймесі
Құрылғыны қосу/өшіру үшін пайдаланылады.
4 АҒЫНДЫ САЛҚЫНДАТУ түймесі
Жылдам салқындату əрекеті айрықша жоғары жылдамдықпен
жұмыс істейді.
5 СОЛ/ОҢ ЖАҚ АУА АҒЫНЫ түймесі (ҚОСЫМША)
Қажет сол/оң жақ (көлденең) ауа ағынының бағытын орнату
үшін пайдаланылады.
6 ЖОҒАРЫ/ТӨМЕН АУА АҒЫНЫ түймесі
Желдеткіш қозғалысын тоқтату немесе іске қосу жəне қажетті
жоғарғы/төменгі ауа ағыны бағытын орнату үшін
пайдаланылады.
7 ҚОСУ ТАЙМЕРІ түймесі
Іске қосу əрекетінің уақытын орнату үшін пайдаланылады.
8 ҰЙЫҚТАУ ТАЙМЕРІ түймесі
Ұйқы əрекетінің уақытын орнату үшін пайдаланылады.
9 ОРНАТУ/ЖОЮ түймесі
Таймерді орнату/жою үшін пайдаланылады.
Ағымдық уақытты орнату үшін пайдаланылады (3 секундқа кіру
болса)
10 ПЛАЗМА түймесі (ҚОСЫМША)
Плазманы тазалау функциясын іске қосу не тоқтату үшін
пайдаланылады.
11 БӨЛМЕ ТЕМПЕРАТУРАСЫН ОРНАТУ түймесі
Бөлме температурасын таңдау үшін пайдаланылады.
12 ЖҰМЫС РЕЖИМІН ТАҢДАУ түймесі
Жұмыс режимін таңдау үшін пайдаланылады.
13 ІШКІ ЖЕЛДЕТКІШ ЖЫЛДАМДЫҒЫН ТАҢДАУ түймесі
Желдеткіш жылдамдығының төрт деңгейін яғни төмен, орташа,
жоғары жəне ретсіз деңгейін таңдау үшін пайдаланылады.
14 БӨЛМЕ ТЕМПЕРАТУРАСЫН ТЕКСЕРУ түймесі
Бөлме температурасын тексеру үшін пайдаланылады.
15 ӨШІРУ ТАЙМЕРІ түймесі
Тоқтату əрекетінің уақытын орнату үшін пайдаланылады.
16 ТАЙМЕР БАПТАУЛАРЫ (Жоғары/Төмен)/ЖАРЫҚ
батырмасы
Таймерді орнату үшін пайдаланылады.
Жарықтығын реттеу үшін пайдаланылады.(егер ол уақытты
реттеу режимі болмаса)
17 ҚАЛПЫНА КЕЛТІРУ түймесі
Қашықтан басқару пультін қайта орнату үшін пайдаланылады.
Сымсыз қашықтан басқару пульті
ҚАЗАҚ ТІЛІ
1
2
3
10
11
12
4
5
6
7
8
13
14
15
16
9
17
Жұмыс істеу режимі
Салқындату режимі
Автоматты режим немесе Автоматты түрде ауысу режимі
Ылғалсыздандыру режимі
Жылыту режимі
Желдеткіш режимі
• Салқындату үлгісі( ), Жылыту сорабының үлгісі( )
 Loading...