

LG TU515T Owner’s Manual
TU515 U S E R G U I D E
TU51 5
USE R GU ID E
E N G L I S H
www.lgmobile.com
P/N : MMBB0226127(1.0
TU515
Some of contents in this manual may differ from your phone depending
on the software of the phone or your service provider.
H
)
U S E R G U I D E

TU 5 15 U s er G uide
- English
This document is the user guide for the LG TU515 3G Video Mobile
Phone. All rights for this document are reserved by LG Electronics.
Copying, modifying and distributing this document without the consent
of LG Electronics are prohibited.

2
Table of Contents
Guidelines for safe and efficient
use 6
Parts of the phone 1
Getting started 1
Installing the USIM card and
battery
Charging the battery 1
Disconnecting the charger 1
How to use a microSD memory
card
Turning your handset on 2
Turning your handset off 2
Access codes
Display information 2
General functions 26
Making and answering calls
Entering text 2
Main menu 32
Audio & Ringtones 3
Table of Contents
My Stuff 35
Graphics
4
Videos 3
7
Audio & Ringtones 37
Music Player 3
All Songs
8
9
Playlists
Artists
Albums
1
Genres
2
Games
3
Applications
Other Files 4
Memory Card
8
Recent Calls 41
Missed Calls
4
Dialed Calls
Received Calls
All Calls
Call Duration
6
8
39
0

Last Call
Received Calls
Dialed Calls
All Calls
Messaging 43
New Message
Inbox 4
Email Inbox 4
Drafts 4
Outbox
Sent 4
Voicemail
Videomail
Templates
Text Templates
Multimedia Templates
Signature
Message Settings
Text Message
Multimedia Message
42
Email
Voicemail
Videomail
Service messages
Info. service
My Place 55
4
Address Book 5
5
Contact List
7
New Contact
Caller Groups
8
Speed Dial List
Copy All Contacts
Move All Contacts 57
Delete All Contacts
Service Dial Numbers
49
View Options
Tools 58
Alarm Clock
Calendar
51
54
6
Table of Contents
3

4
Table of Contents
Tasks 59
Notepad 6
Calculator
Tip Calculator 6
Unit Converter
World Clock
Stop Watch 6
Date Finder
D-Day Counter
Camera 63
Take Photo
Record Video 6
Record Voice
Check Memory
Common
Memory Card
Table of Contents
Settings 67
Audio & Ringtones
Ring Tunes 67
0
Volume
Message Alert Tones
Alert type
1
Key Tones
Increasing Ring Tune
Power On/Off Tones
2
Display 68
Date & Time 6
Set Date
Date Format
Set Time
Time Format
4
Auto Update
65
Call
Send My Number
Auto Redial
66
Answer Mode
Video Call
Minute Minder
Call Waiting
Call Divert
9
70

5
Call Reject
Send DTMF Tones
Security
Lock Handset
PIN code request
Fixed Dial Number
Change Codes
Connection 74
Network Profiles
USB Connection Mode
Network
Streaming
PDP Settings
Bluetooth
Flight mode 79
Memory Status
Common
Reserved
SIM
Memory Card
Handset Information
Internet
BigPond
71
Bookmarks
Saved Pages
Go to URL
Security
Settings
Reset Settings 84
72
Troubleshooting 85
Accessories 8
Technical data 8
MANUFACTURER’S
75
WARRANTY
Australia &
New Zealand 9
80
82
83
7
8
2
Table of Contents

6
Guidelines for safe and efficient use
Please read these simple guidelines.
Not following these guidelines may be
dangerous or illegal. Further detailed
information is given in this manual.
Certification information (SAR)
THIS DEVICE MEETS INTERNATIONAL
GUIDELINES FOR EXPOSURE TO
RADIO WAVES
Your mobile device is a radio transmitter
and receiver. It is designed and
manufactured not to exceed the limits
for exposure to radio frequency (RF)
recommended by international guidelines
(ICNIRP). These limits are part of
Guidelines for safe and efficient use
comprehensive guidelines and establish
permitted levels of RF energy for the
general population. The guidelines were
developed by independent scientific
organizations through periodic and thorough
evaluation of scientific studies.
The guidelines include a substantial safety
margin designed to assure the safety of
all persons, regardless of age and health.
The exposure standard for mobile devices
employs a unit of measurement known as
the Specific Absorption Rate, or SAR.
The SAR limit stated in the international
guidelines is 2.0 W/kg*. Tests for SAR
are conducted using standard operating
positions with the device transmitting
at its highest certified power level in all
tested frequency bands. Although the
SAR is determined at the highest certified
power level, the actual SAR of the device
while operating can be well below the
maximum value. This is because the device
is designed to operate at multiple power
levels so as to use only the power required
to reach the network.
In general, the closer you are to a base
station, the lower the power output of
the device.

7
Before a phone model is available for
sale to the public, compliance with the
European R&TTE directive must be shown.
This directive includes as one essential
requirement the protection of the health
and the safety for the user and any other
person. The highest SAR value for this
device when tested for use at the ear is
0.495 W/kg.
This device meets RF exposure guidelines
when used either in the normal use
position against the ear or when positioned
at least 1.5 cm away from the body. When
a carry case, belt clip or holder is used for
body-worn operation, it should not
contain metal and should position the
product at least 1.5 cm away from your
body. In order to transmit data files or
messages, this device requires a quality
connection to the network. In some cases,
transmission of data files or messages
may be delayed until such a connection is
available.
Ensure the above separation distance
instructions are followed until the
transmission is completed. The highest
SAR value for this device when tested for
use at the body is 0.843 W/kg.
* The SAR limit for mobile devices used by
the public is 2.0 watts/kilogram (W/kg)
averaged over ten grams of body tissue.
The guidelines incorporate a substantial
margin of safety to give additional
protection for the public and to account
for any variations in measurements.
SAR values may vary depending on
national reporting requirements and the
network band. For SAR information in
other regions please look under product
information at www.lgmobile.com.
Guidelines for safe and efficient use

8
Guidelines for safe and efficient use
v
Product care and maintenance
WARNING! Only use batteries,
chargers and accessories approved for
use with this particular phone model. The
use of any other types may invalidate
any approval or warranty applying to the
phone, and may be dangerous.
v
Do not disassemble this unit. Take it to a
qualified service technician when repair
work is required.
v
Keep away from electrical appliances
such as a TV’s, radios or personal
computers.
v
The unit should be kept away from heat
Guidelines for safe and efficient use
sources such as radiators or cookers.
v
Never place your phone in a microwave
oven as it will cause the battery to
explode.
v
Do not drop.
v
Do not subject this unit to mechanical
vibration or shock.
The coating of the phone may be
damaged if covered with wrap or vinyl
wrapper.
v
Do not use harsh chemicals (such as
alcohol, benzene, thinners, etc.) or
detergents to clean your phone. There is
a risk of this causing a fire.
v
Do not subject this unit to excessive
smoke or dust.
v
Do not subject this unit to excessive
smoke or dust.
v
Do not keep the phone next to credit
cards or transport tickets; it can affect
the information on the magnetic strips.
v
Do not tap the screen with a sharp object
as it may damage the phone.
v
Do not expose the phone to liquid or
moisture.
v
Use accessories, such as earphones
and headsets, with caution. Ensure that
cables are tucked away safely and do not
touch the antenna unnecessarily.
v
Please remove the data cable before
powering on the handset.

9
Efficient phone operation
To enjoy optimum performance with
minimum power consumption please:
v
Do not hold the antenna when the phone
is in use. If you hold it, it can affect call
quality, it may also cause the phone to
operate at a higher power level than
needed and shorten talk and standby
times.
Electronic devices
All mobile phones may get interference,
which could affect performance.
v
Do not use your mobile phone near
medical equipment without requesting
permission. Avoid placing the phone over
pacemakers (i.e. in your breast pocket.)
v
Some hearing aids might be disturbed by
mobile phones.
v
Minor interference may affect TVs,
radios, PCs, etc.
Road safety
Check the laws and regulations on the
use of mobile phones in the areas when
you drive.
v
Do not use a hand-held phone while
driving.
v
Give full attention to driving.
v
Use a hands-free kit, if available.
v
Pull off the road and park before making
or answering a call if driving conditions
so require.
v
RF energy may affect some electronic
systems in your motor vehicle such as a
car stereo or safety equipment.
v
If your vehicle is equipped with an air
bag, do not obstruct it with installed
or portable wireless equipment. It can
cause serious injury due to improper
performance.
If you are listening to music whilst out and
about, please ensure that the volume is at
a reasonable level so that you are aware
of your surroundings. This is particularly
imperative when attempting to cross the
street.
Guidelines for safe and efficient use

10
Guidelines for safe and efficient use
Avoid damage to your hearing
Damage to your hearing can occur if you
are exposed to loud sound for long periods
of time. We therefore recommend that you
do not turn on or off the handset close to
your ear. We also recommend that music
and call volumes are set to a reasonable
level.
Blasting area
Do not use the phone where blasting is in
progress. Observe restrictions, and follow
any regulations or rules.
Guidelines for safe and efficient use
Potentially explosive
atmospheres
v
Do not use the phone at a refueIling
point. Don’t use near fuel or chemicals.
v
Do not transport or store flammable gas,
liquid, or explosives in the compartment
of your vehicle, which contains your
mobile phone and accessories.
In aircraft
Wireless devices can cause interference
in aircraft.
v
Turn off your mobile phone before
boarding any aircraft.
v
Do not use it on the ground without crew
permission.
Children
Keep the phone in a safe place out of small
children’s reach. It includes small parts
which if detached may cause a choking
hazard.

11
Emergency calls
Emergency calls may not be available under
all mobile networks. Therefore, you should
never depend solely on your mobile phone
for emergency calls. Check with your local
service provider.
Battery information and care
v
You do not need to completely discharge
the battery before recharging. Unlike
other battery systems, there is no
memory effect that could compromise
the battery’s performance.
v
Use only LG batteries and chargers. LG
chargers are designed to maximize the
battery life.
v
Do not disassemble or short-circuit the
battery pack.
v
Keep the metal contacts of the battery
pack clean.
v
Replace the battery when it no longer
provides acceptable performance. The
battery pack may be recharged hundreds
of times until it needs replacing.
v
Recharge the battery if it has not
been used for a long time to maximize
usability.
v
Do not expose the battery charger to
direct sunlight or use it in high humidity,
such as the bathroom.
v
Do not leave the battery in hot or cold
places, this may deteriorate the battery
performance.
Guidelines for safe and efficient use

12
Guidelines for safe and efficient use
v
Driver Safety Tips
Your wireless telephone gives you the
powerful ability to communicate by voice
- almost anywhere, anytime. But an
important responsibility accompanies the
benefits of wireless phones, one that every
user must uphold.
When driving a car, driving is your first
responsibility. When using your wireless
phone behind the wheel of a car, practice
good common sense and remember the
following tips:
v
Use a hands free device. If possible,
add an additional layer of convenience
Guidelines for safe and efficient use
and safety to your wireless phone with
one of the many hands free accessories
available today.
Let the person you are speaking with
know you are driving; if necessary,
suspend the call in heavy traffic or
hazardous weather conditions. Rain,
sleet, snow, ice and even heavy traffic
can be hazardous.
v
Do not take notes or look up phone
numbers while driving. Jotting down
a “to do” list or flipping through your
address book takes attention away from
your primary responsibility, driving safely.
v
If possible, place calls when you are
not moving or before pulling into traffic.
Try to plan calls when you will not be
driving.
v
Do not engage in stressful or emotional
conversations that may be distracting.
Make people you are talking with
aware you are driving and suspend
conversations that have the potential to
divert your attention from the road.

13
v
Use your wireless phone to call
emergency services for yourself or
others. Dial 0-0-0 local emergency
number in the case of fire, traffic
accident or medical emergencies.
Remember, it is a free call on your
wireless phone! Dial 1-1-1 for local
emergency number in New Zealand.
v
Use your wireless phone to help others in
emergencies, if you see an auto accident
crime in progress or other serious
emergency where lives are in danger,
call 0-0-0 to call emergency number, as
you would want others to do for you.
Dial 1-1- 1 for local emergency number in
New Zealand.
v
Call roadside assistance or a special
nonemergency wireless assistance
number when necessary. If you see a
broken down vehicle posing no serious
hazard, a broken traffic signal, a minor
traffic accident where no one appears
injured, or a vehicle you know to be
stolen, call roadside assistance or other
special non-emergency wireless number.
Guidelines for safe and efficient use
14
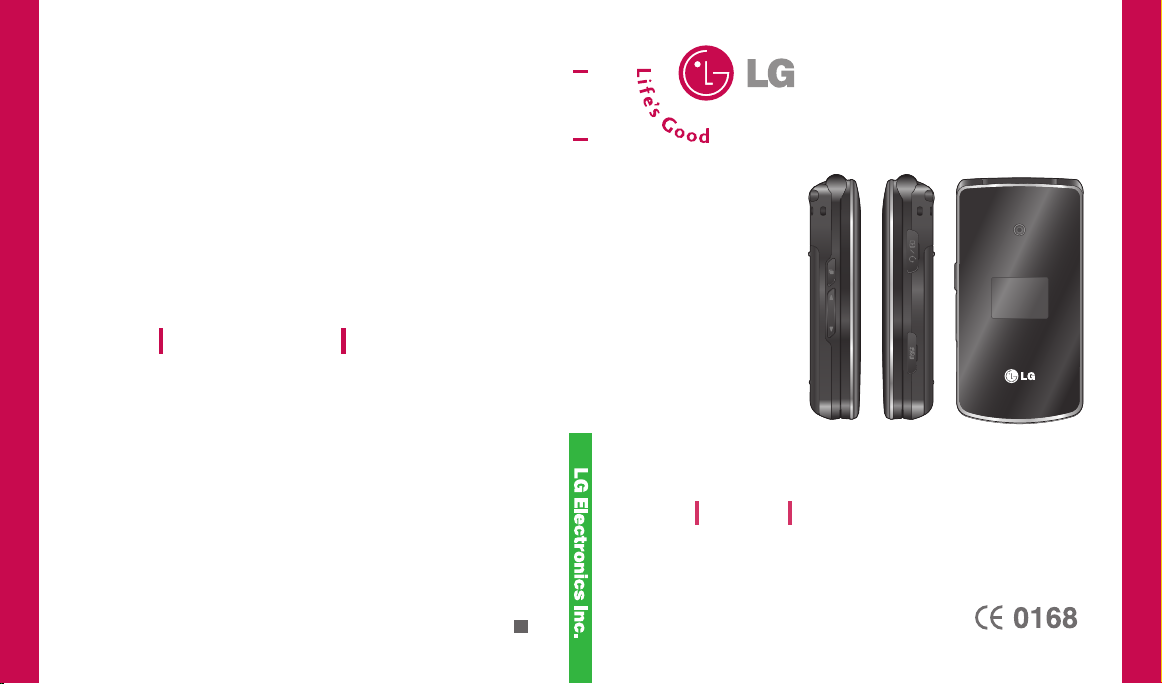
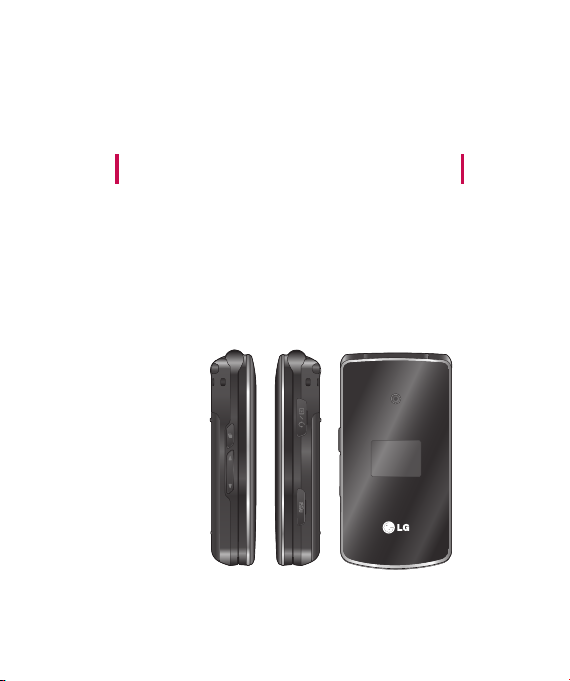
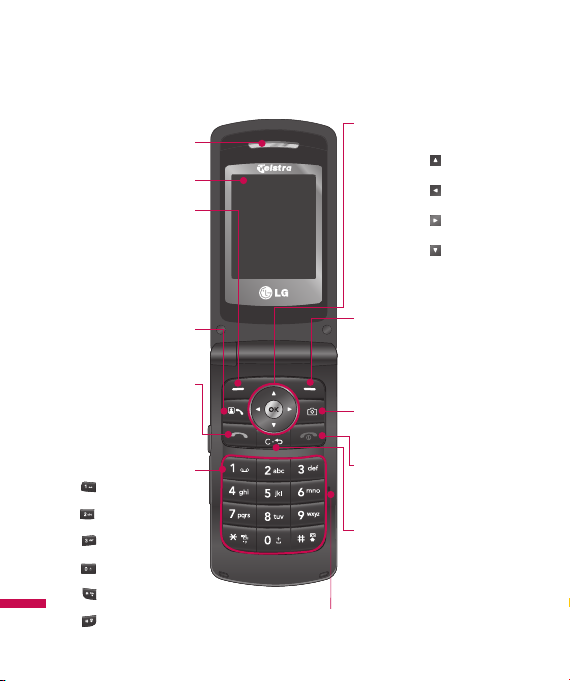
Parts of the phone
Front view
Left side view
Multitasking key
You can start and operate
multiple applications
Parts of the phone
concurrently.
Volume keys
You can control the volume
of sound.
Camera lens
Front screen
Stereo headset
connector
Note
Connect jack to fi t
the shape of terminal.
Otherwise, product can
be damaged.
Memory card
15
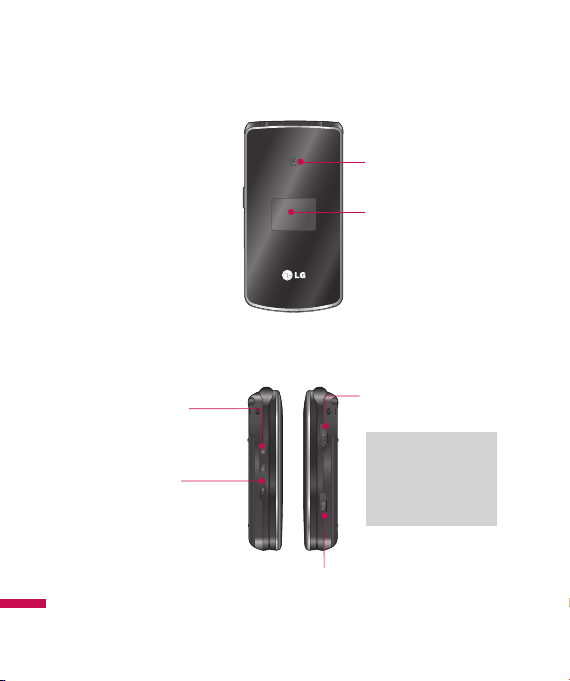
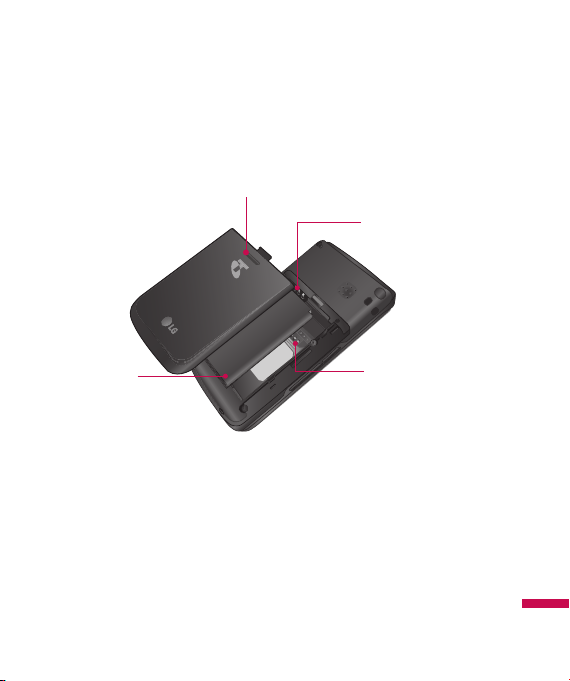
Rear view
Back cover
release latch
Battery
terminals
Battery
USIM card
socket
Parts of the phone
16
Parts of the phone
Open view
Earpiece
Display screen
Left soft key
v
In standby mode:
Connects to FOXTEL
v
In menu: Performs
the function indicated
in the bottom of the
display.
Video call key
Makes a video call by
pressing this key.
Send key
Short: Go to Recent
calls list
Long
: Calling to latest
number of Recent calls
Alpha Numberic keys
Parts of the phone
key(Long): Calling to
Voice mail center
key(Long): Calling to
Video messaging mailbox
key(Long): USSD Ser-
vice - International M Bank
key(Long): International
call character “+”
key(Long): Switches to
Vibrating Mode
key(Long):Short-cut for
Voice recorder
Microphone
Navigation key/OK key
v
In standby mode:
Direction key ( )
Short-cut for My Place
Direction key ( )
Short-cut for Mailbox
Direction key ( )
Connects to Messaging menu
Direction key ( )
Short-cut for address book search
v
In menu: Enables scrolling and moving
the cursor up and down, right and left.
Right soft key
v
In standby mode: Connects to
Telstra BigPond
v
In menu: Performs the function indicated in the bottom of the display.
Camera key
Activates the camera menu directly.
End/Power key
Short: Go to Idle screen/Exit
Long
: Power on/off
Clear key
Short: Deletes a character.
Back to previous menu.
Long: Deletes all characters
17
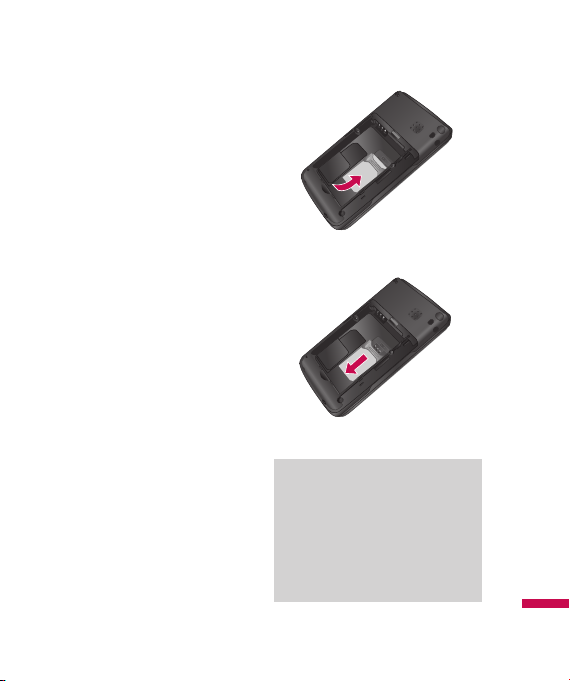
Installing the USIM card and
battery
1. Install the USIM card.
Your USIM card contains your phone
number, service details and contacts and
must be inserted into your handset.
If your USIM card is removed then your
handset becomes unusable (except
emergency calls) until a valid USIM is
inserted. Always disconnect the charger
and other accessories from your handset
before inserting and removing your
USIM card.
Slide the USIM card into the USIM card
holder. Make sure that the USIM card is
properly inserted and the gold contact
area on the card is facing downwards.
To remove the USIM card, press down
lightly and pull it in the reverse direction.
Getting started
To insert the USIM card
To remove the USIM card
Notice
Before installing always make sure that
the phone is switched off and remove the
battery. The metal contact of the USIM
card can be easily damaged by scratches.
Pay special attention to the USIM card
while handling and installing. Follow the
instructions supplied with the USIM card.
Getting started
18
Getting started
2. Install the battery.
Insert the battery aligning the gold
contacts on the battery with the battery
terminals (gold contacts) in the battery
compartment. Then push down the top of
the battery until it snaps into space.
To remove the battery
Turn the power off. (If power is left on,
there is a chance you could lose the stored
telephone numbers and messages.) Press
the back cover release latches and open
the back cover. Then remove the battery.
Getting started
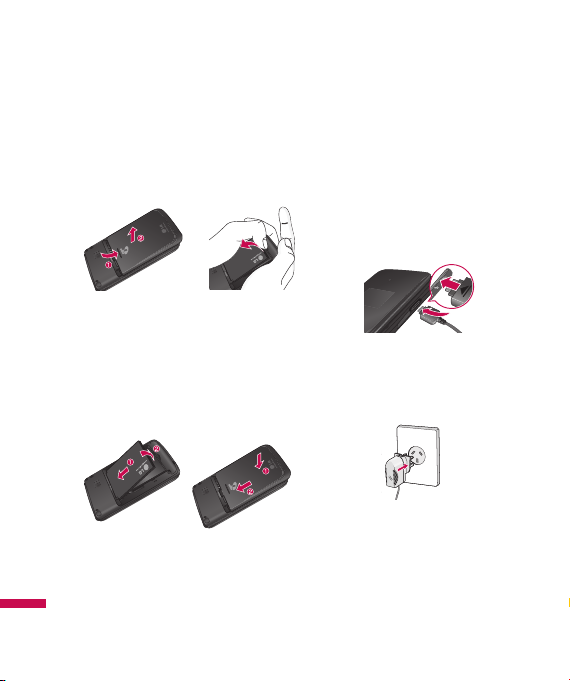
Charging the battery
To connect the travel adapter to the phone,
you must install the battery.
1. With the battery in position in the phone,
connect the lead from the travel adapter
to the socket on the left side of the
phone. Check that the arrow on the lead
connector is facing towards the front of
the phone.
2. Connect the other end of the travel
adapter to the mains socket. Only use
the charger included in the box.
19
Warning!
Do not force the connector as this may
damage the phone and/or the travel
adapter.
Please note that the handset can take up to 35
seconds to commence charging if the handset
is off when connected to the charger.
Disconnecting the charger
Disconnect the charger from the phone by
pulling the lead connector out as shown.
Note
Ensure the battery is fully charged before
using the phone.
Do not remove your battery or the USIM
card while charging.
The moving bars of the battery icon will
stop after charging is complete.
If the battery is completely discharged,
the charge could take some minutes
before starting.
If the battery does not charge, switch
the phone off and ensure the battery is
fitted correctly.
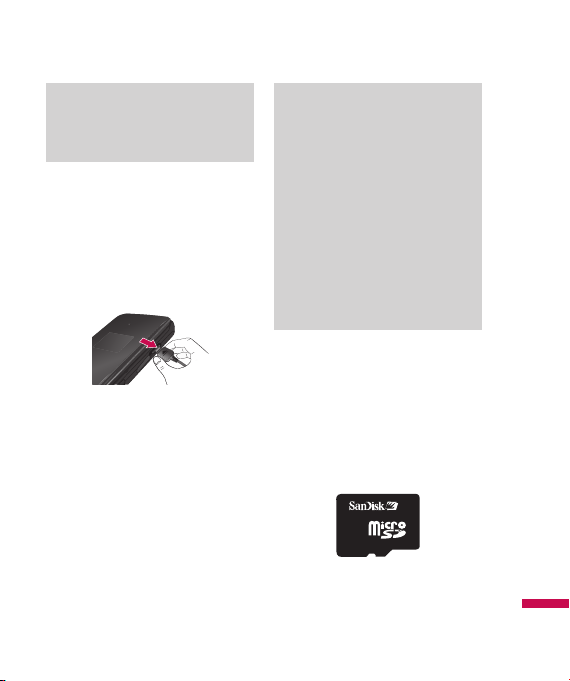
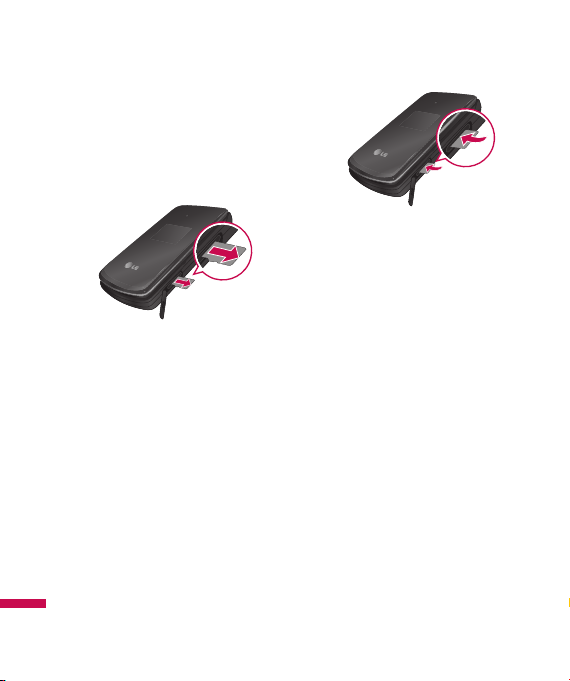
How to use a microSD memory
card
The TU515 supports the microSD memory
card. The memory card can be inserted into
the side of the TU515 device. You can use
this card to save data files.
Getting started
<MicroSD memory card>
20
Getting started
How to insert a microSD memory
card
1. Power off the phone.
2. Lift the plastic cover which protects the
microSD slot.
3. Insert the memory card in the slot. The
gold contacts must be kept on the back
of the microSD. Don’t push the microSD
too much. If it cannot enter easily in the
slot, you may be trying to insert it in the
wrong way or there could be a foreign
object in the slot.
Getting started
4. Once inserted, push the memory card
until you hear a “click”, meaning that the
microSD has been correctly locked.
5. Close the slot plastic protection.
6. To remove the memory card, power off
the phone, open the slot protection and
push the microSD to unlock it. Carefully
extract the memory card.

21
Attention:
v
Avoid using the Flash Memory Card
when the battery is low.
v
When writing to the card, wait for the
operation to complete before removing
the card.
v
The card is designed to fit easily into the
system one way only.
v
Do not bend the card or force it into
the slot.
v
Do not insert any other kind of memory
cards different from microSD.
For more information on the microSD,
please refer to the instructions manual of
the memory card.
Memory card formatting
Before start using memory card, it’s
necessary to format it. After you insert
memory card, select Menu - Settings
- Reset settings - Clear memory
- Memory card, then press OK. This
operation should be done only when you
insert memory card for the first time. During
formatting various folders will be created
for different data types.
Turning your handset on
Ensure that your USIM card is in your
handset and the battery is charged. Press
and hold the key until power is on.
Enter the USIM PIN code that was supplied
with your USIM card if PIN code setting
is on. After a few seconds you will be
registered on the network.
Getting started

22
Getting started
Turning your handset off
Press and hold the key until power
is off. There may be a few seconds delay
while the handset powers down.
Do not re-power the handset during this
time.
Access codes
You can use the access codes described
in this section to avoid unauthorized use
of your phone. The access codes (except
PUK and PUK2 codes) can be changed
by selecting Settings → Security →
Change Codes.
Getting started
PIN code (4 to 8 digits)
The PIN (Personal Identification Number)
code protects your USIM card against
unauthorized use. The PIN code is usually
supplied with the USIM card. When the
PIN Code Request is set to Enable, your
phone will request the PIN code every
time it is switched on. When the PIN Code
Request is set to Disable, your phone
connects to the network directly without
the PIN code.
PIN2 code (4 to 8 digits)
The PIN2 code, supplied with some USIM
cards, is required to access functions such
as Fixed Dial Number. These functions
are only available if supported by your
USIM card.
PUK code (4 to 8 digits)
The PUK (PIN Unblocking Key) code is
required to unlock a blocked PIN code. The
PUK code may be supplied with the USIM
card. If not, contact your network operator’s
customer service for the code. If you lose
the code, contact your network operator’s
customer service.

23
PUK2 code (4 to 8 digits)
The PUK2 code, supplied with some USIM
cards, is required to unlock a blocked PIN2
code. If you lose the code, contact your
network operator’s customer service.
Security code (4 digits)
The security code protects the unauthorized
use of your phone. The default security
code is set to ‘0000’ and the security code
is required to delete all phone entries and
to restore the handset to factory setting.
Display information
No USIM idle screen
This is the initial screen of the phone
that appears when there is no USIM card
installed in the phone, or the installed
USIM card is invalid. In this screen, users
can only make emergency calls, and turn
the phone off. To turn off the phone, press
and hold the End key for a few seconds.
Screen structure
If there is no USIM card installed, an
animation telling you to insert a USIM card
appears. If the USIM card inserted into the
phone is invalid, a popup screen appears
with “Invalid USIM”.
Emergency call function
Emergency calls can be made with or
without a SIM in the handset. When in
Australia, key 000 then press the Send
key. To access the local emergency service
when roaming, key 112 then press Send
key.
Idle screen
The idle screen appears when you have
installed a proper USIM card and turned
the phone on.
Screen structure
Idle screen consists of the operator’s name,
indicators, date and time on a background
image. You can change the wallpaper in
the display settings menu.
Getting started

24
Getting started
Numbering screen
The numbering screen appears when a
number key is pressed in the idle screen.
Screen structure
The numbering screen consists of status
indicators, dialled number, and soft menu.
Status indicators are the same as that of
the idle screen. You can change the size
and colour of the dialling font in the display
settings menu. You can make a call while
dialling a phone number by pressing the
Send or Video Call key.
Soft key
You can use the soft keys for several
functions while dialling a number.
Using the right soft key, you can save the
current number to Contacts, you can send a
message to the number, you can search for
the number in Contacts and you can make
a voice call/video call.
Getting started
Handset lock screen
When the Handset Lock function is
selected, you can only make an emergency
call, release the lock, and turn off the
phone in this screen. As always, you can
turn the phone off by pressing and holding
the End key for a few seconds.
Screen structure
The screen structure of the Handset Lock
screen is the same as that of the idle
screen, except that the lock message
appears instead of the idle screen.
Emergency call function
You can still make an emergency call when
the handset is locked. Simply dial 000 or
112 emergency numbers as normal, then
press the Send key. Only Emergency calls
are allowed to be dialled when the handset
is locked.

25
Unlock function
If you press the left soft key, a popup
screen appears asking you to input the
Security code to unlock the phone. The
Security code is configured by selecting
Settings → Security → Change Codes.
If you key in an incorrect Security Code, the
phone will remain in Handset Lock status.
If you key in the correct Security Code, the
phone will be unlocked, and the idle screen
will be displayed. If you have turned the
phone off in the Handset Lock status, you
will find the phone remains in Handset Lock
status when you turn it on.
Getting started

26
General functions
Making and answering calls
Ensure you tell the other party before
recording a voice call.
Making and answering a video call
You can make a video call in a 3G covered
service area. If the called user has a 3G
video phone in a 3G covered service area,
the call will be established. You can also
answer a video call for video incoming
call. To make/answer a video call, do the
following.
1. Input the phone number using the
keypad, or select the phone number from
the calls made/received lists.
v
To correct mistakes, press the
key briefly to delete the last number, or
press and hold the key to delete
all numbers.
2. If you do not want to use the
General functions
speakerphone, ensure you have the
headset plugged in.
3. To start the video function, press the left
soft key [Video Call] .
v
You will be notified that you will need
to close other applications to make the
video call.
Note
The video call may take some time
to connect. Please be patient. The
connection time will also depend on how
quickly the other party answers the call.
While the video call is connecting, you
will see your own images; after the other
party has answered, their image will be
displayed on screen.
4. Adjust the camera position if necessary.
5. You can access the following options by
pressing the right soft key [Options].
v
End Call
v
Mute
v
Hide My Picture
v
Hold
v
Capture
v
View sender number
v
Settings: You can set the camera related
options.
- Zoom: x1 / x2
- Night Mode: On / Off
- Quality: Super Fine / Fine

27
v
Others
- Contacts: You can save the number in
the Address Book.
- Messaging: You can send a text
message or a multimedia message.
6. Press the
close the handset.
key to finish the call, or
Making a voice call
1. Enter the number including the full
area code.
v
To delete a digit, press the key.
To delete all digits, press and hold the
key.
2. Press the
3. Press the
close the handset.
Note
To activate/deactivate the speakerphone
during a call, press the OK key shortly.
key to make the call.
key to finish the call, or
Making a voice/video call from
Contacts
It is easy to call anyone whose number you
have stored in your Contacts.
Press the down navigation key to access
the contacts list. Scroll to your chosen
contact. Press the key to make a
voice call, or press the right soft key [Video
Call] key to make a video call. Press the
key to finish the call.
Making international calls
1. Press and hold the key for the
international prefix. The ‘+’ character
can be replaced with the international
access code.
2. Enter the country code, area code, and
the phone number.
3. Press the
key.
Adjusting the volume
During a call, if you want to adjust the
earpiece volume, use the side keys of the
handset. In idle mode with the slide open,
you can adjust the key volume using the
side keys.
General functions
28
General functions
Answering a call
When you receive a call, the phone rings
and the flashing phone icon appears on the
screen. If the caller can be identified, the
caller’s phone number (or name if stored in
your Contacts) is displayed.
1. Open the slide and press the
answer an incoming call. If the answer
mode is set to Press any key, any key will
answer a call except for the key.
Note
To reject an incoming call, press the
key or the right soft key twice.
If you set “Answer Mode” as “Slide
Open” (Menu 9.4.3), you can answer the
call simply by opening the slide.
2. End the call by closing the handset or
pressing the key.
General functions
Note
You can answer a call while using the
Contacts or other menu features.
Signal strength
If you are inside a building, being near a
window may give you better reception.
You can see the strength of your signal by
the signal indicator see the strength ( )
on your handset’s display screen.
key to
Using the hands-free
During a voice call, the center soft key is
labelled Spk. On. Pressing the OK key
activates the speaker so that you can use
the handset in handsfree mode. The center
soft key will change to Spk. Off. When the
speaker is active, press the OK key again to
resume normal handset conversation mode.
Entering text
You can enter alphanumeric characters
using the keypad. For example, storing
names in the Contacts, writing a message,
creating a personal greeting or scheduling
events in the calendar all require entering
text. Following text input methods are
available in the handset.
 Loading...