

LG TCD1870QGS, TCD1870CGG, TCD1870QGG, TCD1870CGS Owner's Manual

ENGLISH FRANÇAIS ESPAÑOL
OWNER’S MANUAL
COMMERCIAL DRYER
Before beginning installation, read these instructions carefully. This will
simplify installation and ensure that the dryer is installed correctly and
safely. Leave these instructions near the dryer after installation for future
reference.
MODEL
TCD1870QGS TCD1870CGS
TCD1870QGG TCD1870CGG
www.lg.com
MFL67863709
Copyright © 2016 - 2017 LG Electronics Inc. All Rights Reserved.

2
PRODUCT FEATURES
PRODUCT FEATURES
ARTISTIC DESIGN
Modern front panel look and big clear glass door make your dryer look stylish
EASY OF USE
An entire selection of user-friendly functions makes operating the dryer easy.

ENGLISH
IMPORTANT SAFETY INSTRUCTIONS
3
WARNING
:
For your safety the information in this manual must be followed
to minimize the risk of fire or explosion or to prevent property damage, personal
injury or death.
– Do not store or use gasoline or other flammable vapors and liquids in the vicinity of
this or any other appliance.
– WHAT TO DO IF YOU SMELL GAS
· Do not try to light any appliance.
· Do not touch any electrical switch; do not use any phone in your building.
· Clear the room, building or area of all occupants.
· Immediately call your gas supplier from a neighbor’s phone. Follow the gas
supplier’s instructions.
· If you cannot reach your gas supplier, call the fire department.
– Installation and service must be performed by a qualified installer, service agency or
the gas supplier.
FOR YOUR SAFETY
Do not store or use gasoline or other ammable vapors and liquids in the vicinity of
this or any other appliance.
Caution: Label all wires prior to disconnection when servicing controls. Wiring errors
can cause improper operation.
Note :Purchaser shall post in a prominent location instructions to be Followed in the
event the user smells gas. The information to be posted shall be obtained by
consulting with the local gas supplier.
AVERTISSEMENT
:
Assurez-vous de bien suivre les instructions données dans
cette notice pour réduire au minimum le risqué d’incendie our d’explosion ou pour
éviter tout dommage matériel, toute blessure ou la mort.
– Ne pas entreposer ni utiliser d’essence ni d’autres vapeurs ou liquids inammables à
proximité de cet appareil ou de tout autre appareil.
– QUE FAIR SE VOUS SENTEZ UNE ODEUR DE GAZ:
Ne pas tenter d’allumer d’appareils.
Ne touchez à aucun interrupteur. Ne pas vous server des téléphones se trouvant
dans la bâtiment.
Évacuez la pièce, le bâtiment ou la zone.
Appelez immédiatement votre fournisseur de gaz depuis un voisin.
Suivez les instructions du fournisseur.
Si vous ne pouvez rejoindre le fournisseur de gaz, appelez le service des incendies.
– L’installation et l’entretien doivent être assurés par un installateur ou un service
d’entretien qualié ou par le fournisseur de gaz.
POUR VOTRE SÉCURITÉ
Ne pas entreposer ni utiliser d’essence ni d’autres vapeurs ou liquids inammables à
proximité de cet appareil ou de tout autre appareil.
Attention: Au moment de l’entretien des commandes, étiquetez tous les ls avant de les
débrancher. Des erreurs de câblage peuvent entraîner un fonctionnement inadéquat.

4
IMPORTANT SAFETY INSTRUCTIONS
ADVERTENCIA
:
Para su seguridad, debe seguir la información de este manual
para disminuir el riesgo de fuego, explosión, descargas eléctricas o para prevenir
daños a la propiedad, lesiones a personas o pérdida de la vida.
– No almacene ni use gasolina u otros vapores y líquidos inflamables cerca de este ni
de ningún otro aparato.
– QUÉ HACER SI HUELE GAS
· No trate de encender ningún aparato.
· No toque ningún interruptor eléctrico; no use ningún teléfono en su edificio.
· Despeje la habitación, el edificio o el área de todos sus ocupantes.
· Llame de inmediato a su proveedor de gas desde el teléfono de un vecino. Siga las
instrucciones del proveedor de gas.
· Si no puede comunicarse con el proveedor de gas, llame a los bomberos.
– La instalación y el servicio debe realizarlos un instalador calificado, agencia de
servicio o el proveedor de gas.
PARA SU SEGURIDAD
No almacene ni use gasolina u otros vapores y líquidos inamables cerca de este ni
de ningún otro aparato.
Precaución:
Etiquete todos los cables antes de desconectar el aparato al realizar el servicio
de los controles. Los errores de cableado pueden causar el mal funcionamiento del aparato.
Nota :El comprador colocará en una ubicación visible los pasos que deben seguirse
en caso de que el usuario huela gas. La información sobre dichos pasos se obtendrá
del proveedor de gas local.

ENGLISH
IMPORTANT SAFETY INSTRUCTIONS
5
IMPORTANT SAFETY INSTRUCTIONS
READ ALL INSTRUCTIONS BEFORE USE
WARNING
For your safety, the information in this manual must be followed to minimize the risk of fire or explosion, electric
shock, or to prevent property damage, injury to persons, or death.
BASIC SAFETY PRECAUTIONS
WARNING
To reduce the risk of fire, electric shock, or injury to persons when using this appliance, follow basic precautions,
including the following:
• Read all instructions before using the dryer.
• Before use, the dryer must be properly installed as
described in this manual.
• Do not place items exposed to cooking oils in your
dryer. Items contaminated with cooking oils may
contribute to a chemical reaction that could cause a
load to catch fire.
• Do not dry articles that have been previously cleaned
in, washed in, soaked in, or spotted with gasoline, drycleaning solvents, or other flammable or explosive
substances as they give off vapors that could ignite or
explode.
• Do not reach into the dryer if the drum or any other
part is moving.
• Do not repair or replace any part of the dryer
or attempt any servicing unless specifically
recommended in this Use and Manual or in published
user-repair instructions that you understand and have
the skills to carry out.
• Do not tamper with controls.
• Before the dryer is removed from service or discarded,
remove the door to the drying compartment.
• To reduce the risk of serious injury, install lockable
door(s) to prevent public access to rear of tumblers.
• Failure to install, maintain, and/or operate this machine
according to manufacturer’s instructions may result
in conditions which can produce serious injury, death
and/or property damage.
• Do not operate tumbler if airflow switch is faulty.
An explosive gas mixture could collect in tumbler if
airflow switch does not operate properly.
• Do not allow children to play on or in the dryer. Close
supervision of children is necessary when the dryer is
used near children.
• Do not use fabric softeners or products to eliminate
static unless recommended by the manufacturer of
the fabric softener or product.
• Do not use heat to dry articles containing foam
rubber or similarly textured rubber-like materials.
• Keep area around the exhaust opening and adjacent
surrounding areas free from the accumulation of lint,
dust, and dirt.
• The interior of the dryer and exhaust vent should be
cleaned periodically by qualified service personnel.
• Do not install or store the dryer where it will be
exposed to the weather.
• Always check the inside of the dryer for foreign
objects.
• Always clean the lint filter daily
• Do not store plastic, paper, or clothing that may
burn or melt on top of the dryer during operation.
• Check all pipe connections, internal and external,
for gas leaks using a non-corrosive leak detection
fluid. To reduce the risk of explosion or fire, DO NOT
USE AN OPEN FLAME TO CHECK FOR GAS LEAKS!
Gas connections should be checked twice a year for
leakage.
• The tumbler must not be operated if the airflow
switch does not operate properly. Faulty airflow switch
operation may cause an explosive gas mixture to
collect in the tumbler.
CALIFORNIA SAFE DRINKING WATER AND TOXIC ENFORCEMENT ACT
This act requires the governor of California to publish a list of substances known to the state to cause cancer, birth
defects, or other reproductive harm and requires businesses to warn customers of potential exposure to such
substances.
Gas appliances can cause minor exposure to four of these substances, namely benzene, carbon monoxide,
formaldehyde, and soot, caused primarily by the incomplete combustion of natural gas or LP fuels.
Properly adjusted dryers will minimize incomplete combustion. Exposure to these substances can be minimized
further by properly venting the dryer to the outdoors.
WARNING:
other reproductive harm.
This product contains chemicals known to the State of California to cause cancer and birth defects or
Wash hands after handling.

6
IMPORTANT SAFETY INSTRUCTIONS
IMPORTANT SAFETY INSTRUCTIONS
READ ALL INSTRUCTIONS BEFORE USE
WARNING
For your safety, the information in this manual must be followed to minimize the risk of fire or explosion, electric
shock, or to prevent property damage, injury to persons, or death.
GROUNDING INSTRUCTIONS
This appliance must be grounded. In the event of
malfunction or breakdown, grounding will reduce
the risk of electric shock by providing a path of least
resistance for electric current. This appliance must be
equipped with a cord having an equipment-grounding
conductor and a grounding plug. The plug must be
plugged into an appropriate outlet that is properly
installed and grounded in accordance with all local
codes and ordinances.
WARNING
Improper connection of the equipment-grounding conductor can result in a risk of electric shock. Check with a
qualified electrician or service person if you are in doubt that the appliance is properly grounded.
Do not modify the plug provided with the appliance. If
it will not fit the outlet, have a proper outlet installed by
a qualified electrician.
This appliance must be connected to a grounded metal,
permanent wiring system or an equipment-grounding
conductor must be run with the circuit conductors and
connected to the equipment-grounding terminal or
lead on the appliance.
Electric shock can result if the dryer is not properly
grounded.
SAFETY INSTRUCTIONS FOR INSTALLATION
WARNING
To reduce the risk of fire, electric shock, or injury to persons when using this appliance, follow basic precautions,
including the following:
• Properly ground dryer to conform with all
governing codes and ordinances. Follow details in
the installation instructions. Electric shock can result if
the dryer is not properly grounded.
• Before use, the dryer must be properly installed as
described in this manual. Electric shock can result if
the dryer is not properly grounded.
• Install and store the dryer where it will not be
exposed to temperatures below freezing or
exposed to the weather.
• All repairs and servicing must be performed
by an authorized servicer unless specifically
recommended in this Owner’s Manual. Use only
authorized factory parts. Failure to follow this
warning can cause serious injury, fire, electric shock, or
death.
• To reduce the risk of electric shock, do not install
the dryer in humid spaces. Failure to follow this
warning can cause serious injury, fire, electric shock, or
death.
• Connect to a properly rated, protected, and sized
power circuit to avoid electrical overload. Improper
power circuit can melt, creating electric shock and/or
fire hazard.
• To reduce the risk of fire due to increased static
pressure, we do not recommend installation of in-line
secondary lint filters or lint collectors. If secondary
systems are mandated, clean the system to assure safe
operation.
• Remove all packing items and dispose of all
shipping materials properly. Failure to do so can
result in death, explosion, fire, or burns.
• Place dryer at least 18 inches above the floor for
a garage installation. Failure to do so can result in
death, explosion, fire, or burns.
• Keep all packaging from children. Packaging
material can be dangerous for children. There is a risk
of suffocation.
• Do not install near another source of heat such as
stove, ove radiator, ect. Failure to do so can cause
deform, smoke and fire.
• Do not place candles, smoking materials, or other
flammables on top of the product. Dripping wax,
smoke, or fire can result.
• Remove all protective vinyl film from the product.
Failure to do so can cause product damage, smoke or
fire.

ENGLISH
IMPORTANT SAFETY INSTRUCTIONS
7
IMPORTANT SAFETY INSTRUCTIONS
READ ALL INSTRUCTIONS BEFORE USE
WARNING
For your safety, the information in this manual must be followed to minimize the risk of fire or explosion, electric
shock, or to prevent property damage, injury to persons, or death.
SAFETY INSTRUCTIONS FOR INSTALLATION
WARNING
To reduce the risk of injury to persons, follow all industry recommended safety procedures including the use of long
sleeved gloves and safety glasses. Failure to follow all of the safety warnings in this manual could result in property
damage, injury to persons or death.
Exhaust/Ducting:
• Gas dryers MUST be exhausted to the outside.
Failure to follow these instructions can result in fire or
death.
• The dryer exhaust system must be exhausted
to the outside of the dwelling. If the dryer is not
exhausted outdoors, some fine lint and large
amounts of moisture will be expelled into the
laundry area. An accumulation of lint in any area of
the home can create a health and fire hazard.
• Use only rigid metal or flexible metal 6-inch
diameter ductwork inside the dryer cabinet or for
exhausting to the outside. Use of plastic or other
combustible ductwork can cause a fire. Punctured
ductwork can cause a fire if it collapses or becomes
otherwise restricted in use or during installation.
• Ductwork is not provided with the dryer, and you
should obtain the necessary ductwork locally. The
end cap should have hinged dampers to prevent
backdraft when the dryer is not in use. Failure to
follow these instructions can result in fire or death.
• The exhaust duct must be 6-inches (15.24cm) in
diameter with no obstructions. The exhaust duct
should be kept as short as possible. Make sure
to clean any old ducts before installing your new
dryer. Failure to follow these instructions can result in
fire or death.
• Rigid or semi-rigid metal ducting is recommended
for use between the dryer and the wall. In special
installations when it is impossible to make a
connection with the above recommendations, a ULlisted flexible metal transition duct may be used
between the dryer and wall connection only. The
use of this ducting will affect drying time. Failure to
follow these instructions can result in fire or death.
• DO NOT use sheet metal screws or other fasteners
which extend into the duct that could catch lint and
reduce the efficiency of the exhaust system. Secure
all joints with duct tape. For complete details, follow
the Installation Instructions. Failure to follow these
instructions can result in fire or death.
• To reduce the risk of fire or explosion, if the tumbler
is to be connected to Liquefied Petroleum (L.P.) gas,
a vent to the outdoors must be provided in the room
where the dryer is installed.

8
IMPORTANT SAFETY INSTRUCTIONS
IMPORTANT SAFETY INSTRUCTIONS
READ ALL INSTRUCTIONS BEFORE USE
WARNING
For your safety, the information in this manual must be followed to minimize the risk of fire or explosion, electric
shock, or to prevent property damage, injury to persons, or death.
SAFETY INSTRUCTIONS FOR CONNECTING ELECTRICITY
WARNING
To reduce the risk of fire, electric shock, or injury to persons when using this appliance, follow basic precautions,
including the following:
• Do not, under any circumstances, cut or remove
the ground prong from the power cord. To prevent
injury to persons or damage to the dryer, the electrical
power cord must be plugged into a properly grounded
outlet.
• For personal safety, this dryer must be properly
grounded. Failure to do so can result in electric shock
or injury.
• Refer to the installation instructions in this manual
for specific electrical requirements for your model.
Failure to follow these instructions can create an
electric shock hazard and/or a fire hazard.
• This dryer must be plugged into a properly
grounded outlet. Electric shock can result if the
dryer is not properly grounded. Have the wall
outlet and circuit checked by a qualified electrician
to make sure the outlet is properly grounded.
Failure to follow these instructions can create an
electric shock hazard and/or a fire hazard.
• The dryer should always be plugged into its own
individual electrical outlet which has a voltage
rating that matches the rating plate. This provides
the best performance and also prevents overloading
house wiring circuits which could cause a fire hazard
from overheated wires.
• Never unplug your dryer by pulling on the power
cord. Always grip plug firmly and pull straight out
from the outlet. The power cord can be damaged,
resulting in a risk of fire and electric shock.
• Repair or replace immediately all power cords that
have become frayed or otherwise damaged. Do not
use a cord that shows cracks or abrasion damage
along its length or at either end. The power cord can
melt, creating an electric shock and/or fire hazard.
• When installing or moving the dryer, be careful not
to pinch, crush, or damage the power cord. This will
prevent injury and prevent damage to the dryer from
fire and electric shock.
WARNING
To reduce the risk of electric shock, fire, explosion, serious injury or death:
• Disconnect electric power to the tumbler before
servicing.
• Close gas shut-off valve to gas tumbler before
servicing.
WARNING
This product contains chemicals known to the State of California to cause cancer and birth defects or other
reproductive harm. Wash hands after handling.
SAVE THESE INSTRUCTIONS
• Never start the tumbler with any guards/panel
removed.
• Whenever ground wires are removed during servicing,
these ground wires must be reconnected to ensure
that the tumbler is properly grounded.

ENGLISH
CONTENTS
9
CONTENTS
2 PRODUCT FEATURES
3 IMPORTANT SAFETY
INSTRUCTIONS
4 BASIC SAFETY PRECAUTIONS
4 CALIFORNIA SAFE DRINKING WATER AND
TOXIC ENFORCEMENT ACT
5 GROUNDING INSTRUCTIONS
5 SAFETY INSTRUCTIONS FOR INSTALLATION
7 SAFETY INSTRUCTIONS FOR CONNECTING
ELECTRICITY
9 ACCESSORIES
9 Accessories
10 INTRODUCING YOUR DRYER
10 Specifications
31 9. Value of coin 1
32 10. Value of coin 2
(Set up for top off price and e-suds coin
pulse)
33 11. Penny increment pricing offset
(Use only for card type)
34 12. Top off time
35 13. Beep volume
36 14. Time to keep the coin (Use only for coin
type)
37 15. How to enter the tyPE
38 16. Cooling down time set up
39 17. Thermistor control temperature set up
40 18. Cooling down temperature set up
(Use only for OPL type)
41 PROGRAMMING MODE - Test Mode
42 1. Lqc1
43 2. Factory reset - EEPt
44 3. Time Set Up
45 4. Courtesy cycle
46 5. Cycle Kill
47 Programming Mode - Collect Mode
11 CONTROL PANEL FEATURES
14 OPERATING YOUR DRYER
15 PROGRAMMING MODE
16 Card / Coin type
17 OPL type
18 PROGRAMMING MODE - Setup Mode
18 1. How to change regular price
19 2. How to change special price
20 3. How to enter the FEA1
21 3-1. Special price day setup
22 3-2. Vend type setup - card type or coin
type setup
23 3-3. Sensor dry apply or not setup
(Use only for OPL type)
24 3-4. Top off apply or not setup
25 4. How to enter the special price day setup
26 4-1. How to change sunday
27 5. Special price beginning time setup
28 6. Special price ending time setup
29 7. Regular priced dryer cycle time
30 8. Special priced dryer cycle time
49 MAINTENANCE
50 OUTLET DUCT, SECURITY
HOLDER INSTALLATION
51 ERROR MODE
51 POWER FAIL RECOVERY
51 DEFAULT DRYER SETTINGS
10
ACCESSORIES
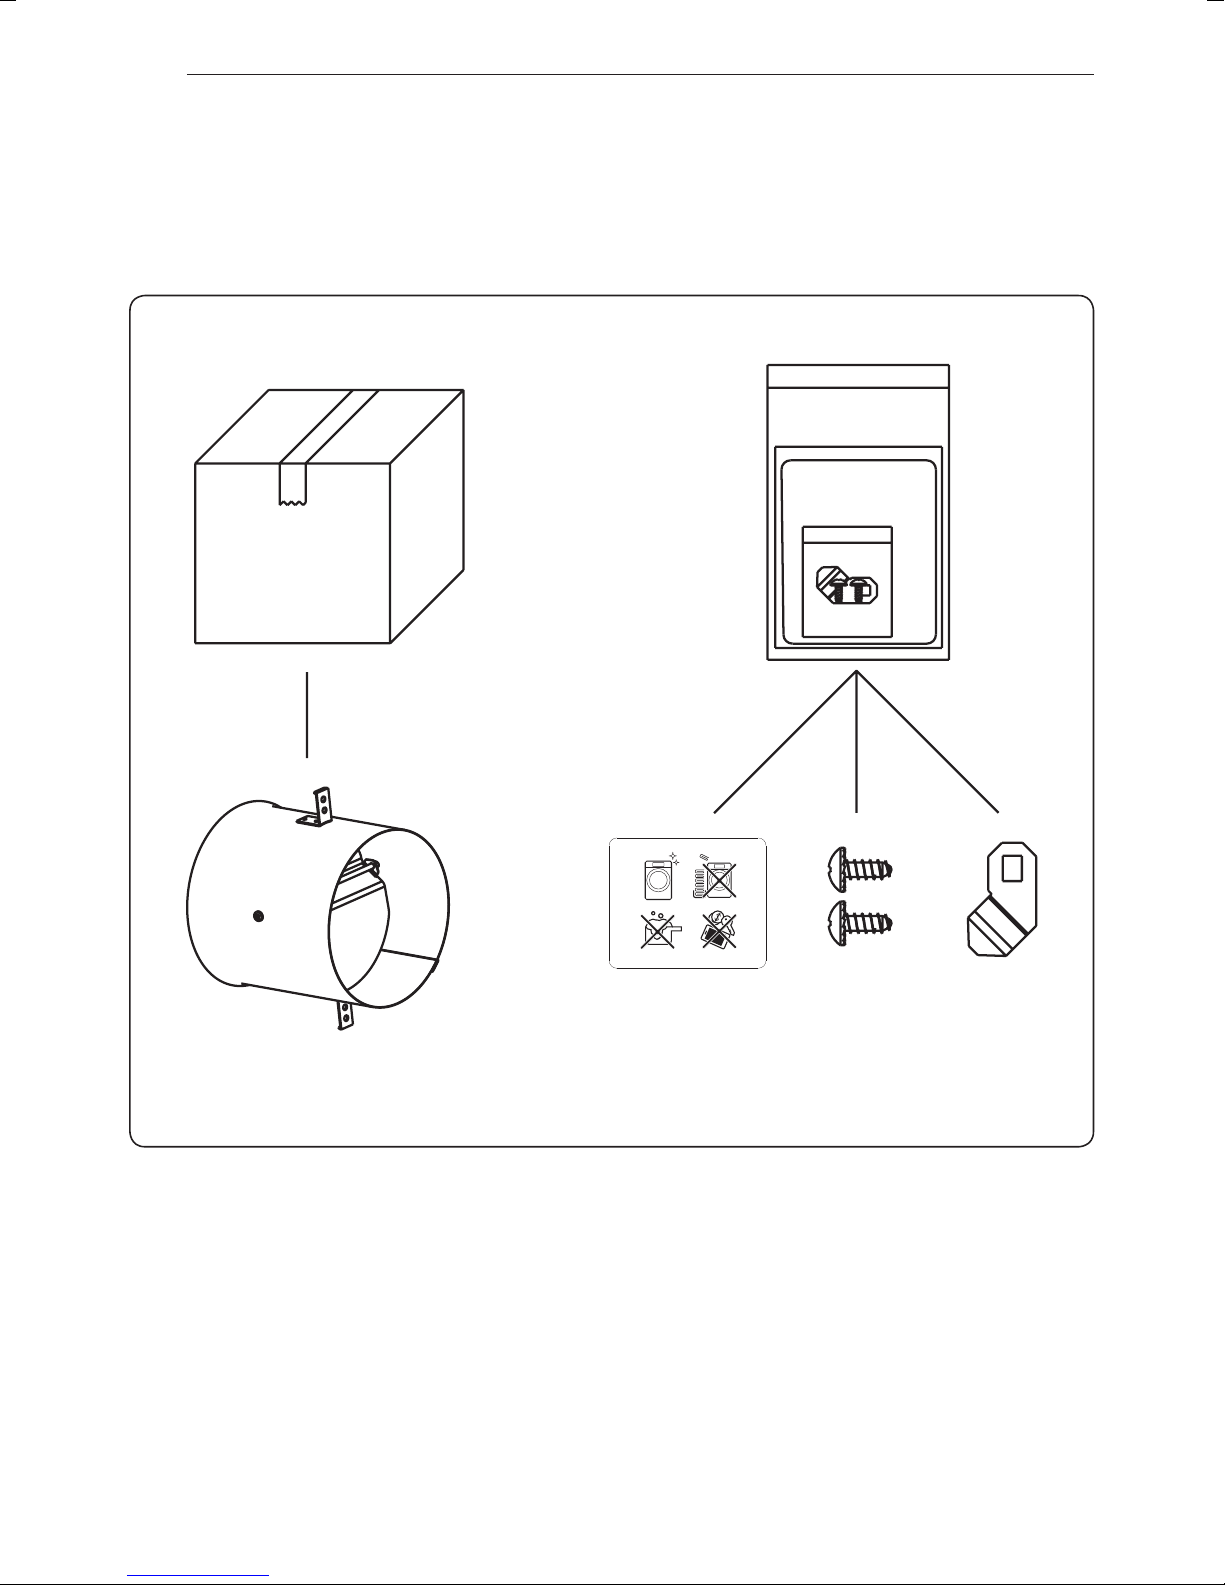
ACCESSORIES
Accessories
Outlet duct
Deco sheet Security
Screw 2ea
holder

ENGLISH
INTRODUCING YOUR DRYER
11
INTRODUCING YOUR DRYER
Specifications
Type : Gas Dryer
Rating : Please refer to the rating label regarding detailed information.
Single dryer size : 737mm (W) x 1090mm (D) x 1022mm (H)
29in (W) x 42
Stack dryer size : 737mm (W) x 1090mm (D) x 2040mm (H)
29in (W) x 42
Capacity : IEC 9.0 cu.ft. (30lb)
Weight : Side by side – 220 lbs (100kg)
Stack – 440 lbs (200kg)
Specifications are subject to change by manufacturer.
NOTE
Specifications subject to change by manufacturer.
15
/16in (D) x 401/4in (H)
15
/16in (D) x 805/16in (H)
12
1 3
4 2
CONTROL PANEL FEATURES
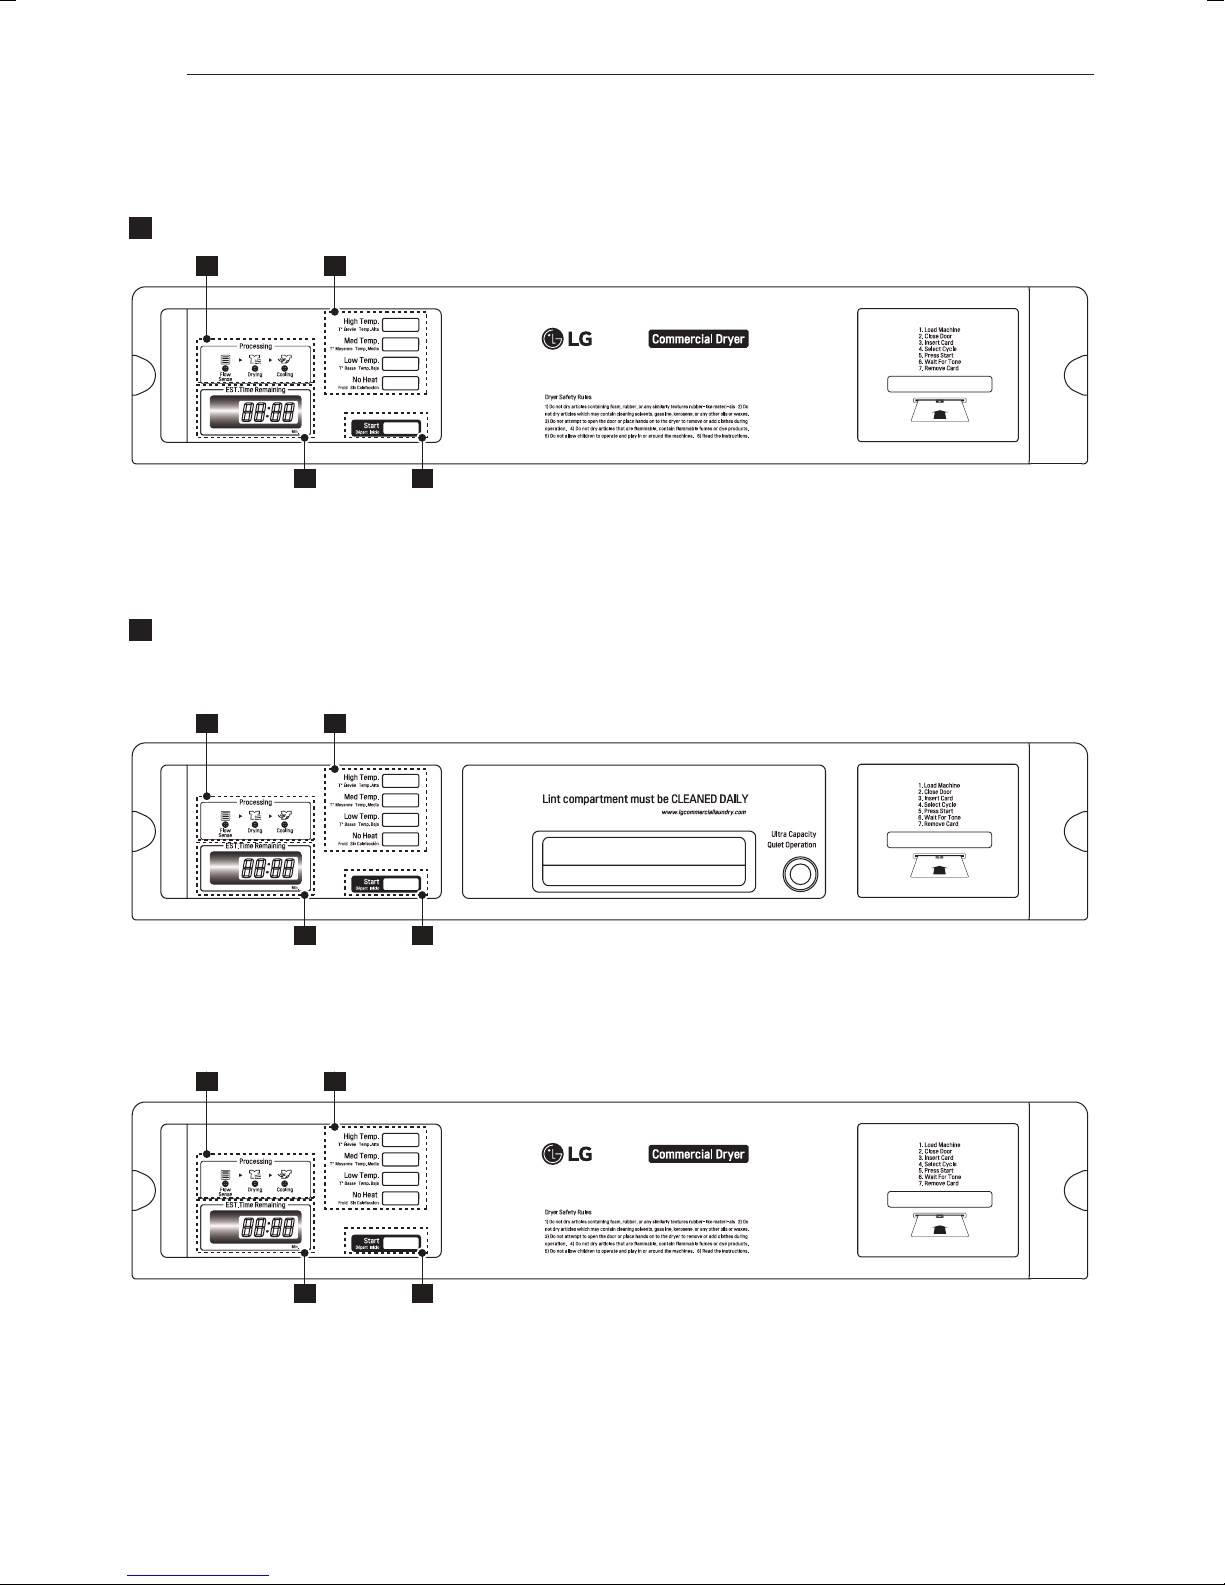
CONTROL PANEL FEATURES
Card/OPL type
Side by side (TCD1870CGS)
4 2
1 3
Stack (TCD1870CGG)
- Upper
- Lower
4 2
1 3
4 2
1 3
1. Display LED
2. Cycle button
3. Start button
4. Status LED
ENGLISH
1 3
4 2
1 3
4 2
1 3
4 2
1 3
4 2
1 3
4 2
1 3
4 2
1 3
4 2
1 3
4 2
CONTROL PANEL FEATURES
13
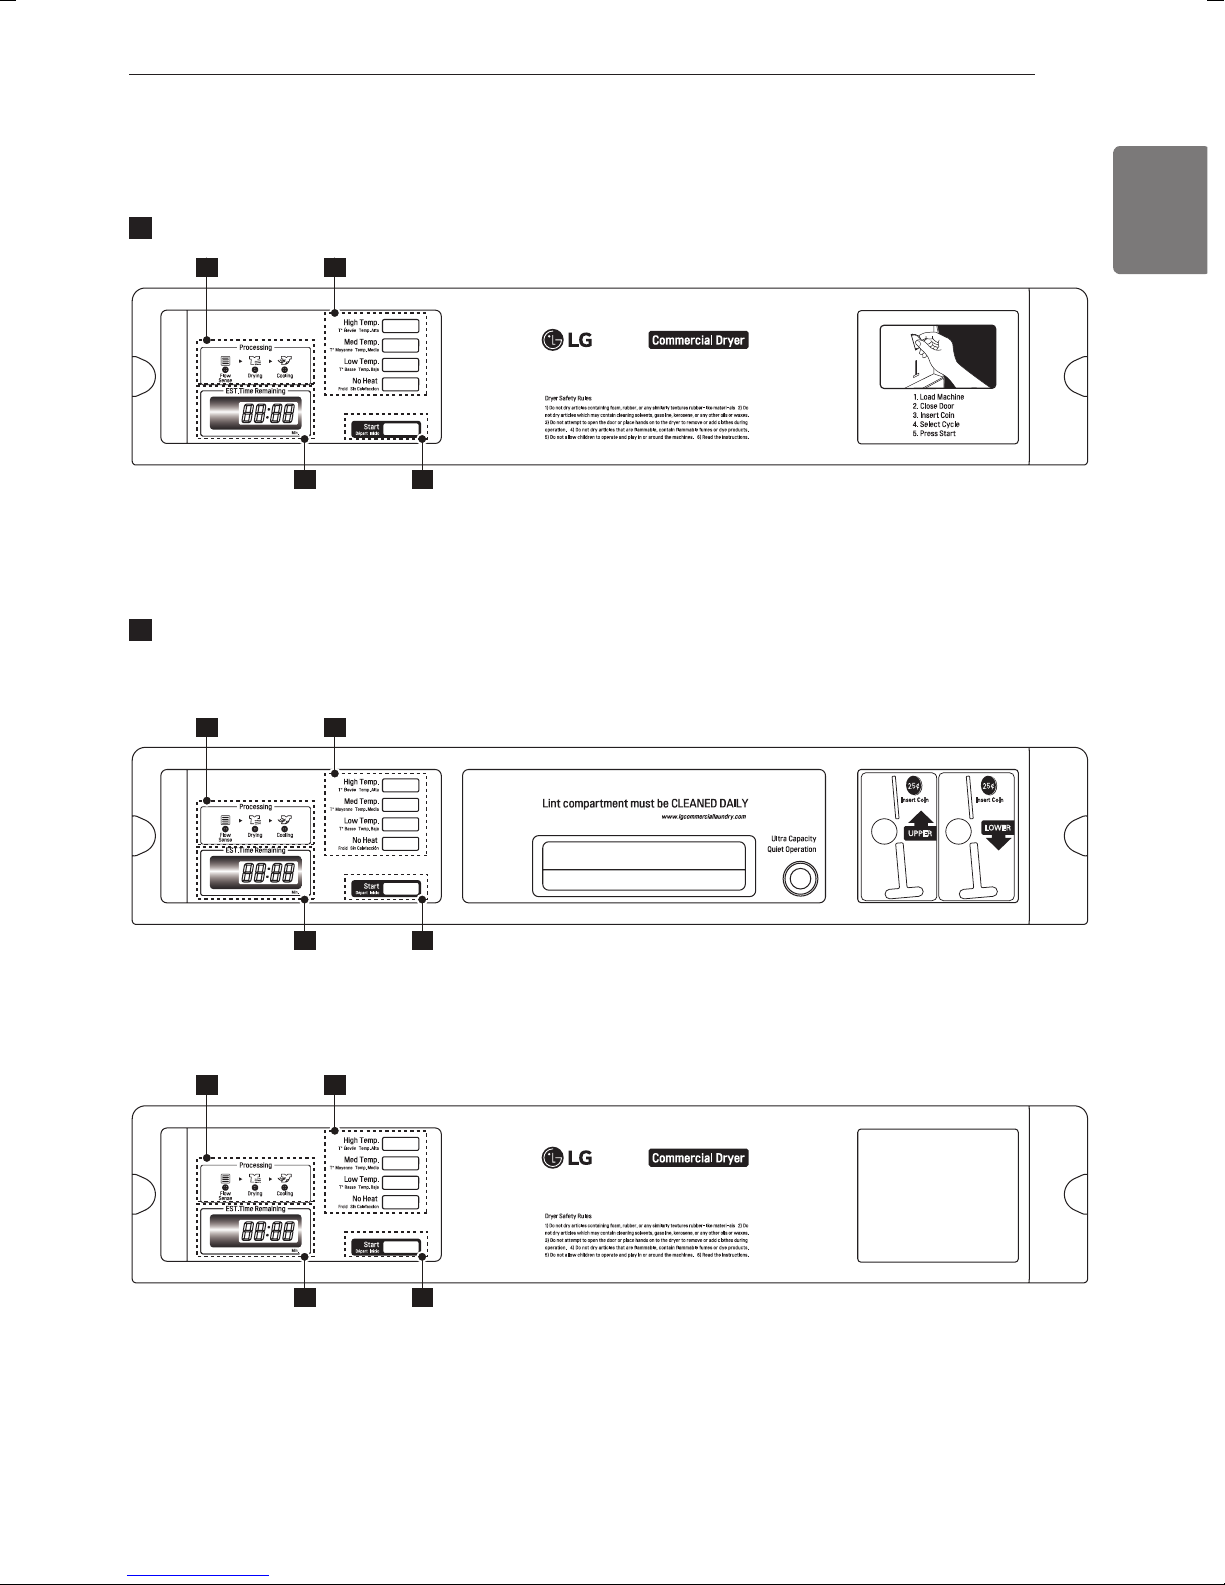
CONTROL PANEL FEATURES
Coin type
Side by side (TCD1870QGS)
4 2
Stack (TCD1870QGG)
- Upper
4 2
1 3
- Lower
1. Display LED
2. Cycle button
1 3
4 2
1 3
3. Start button
4. Status LED
14
CONTROL PANEL FEATURES
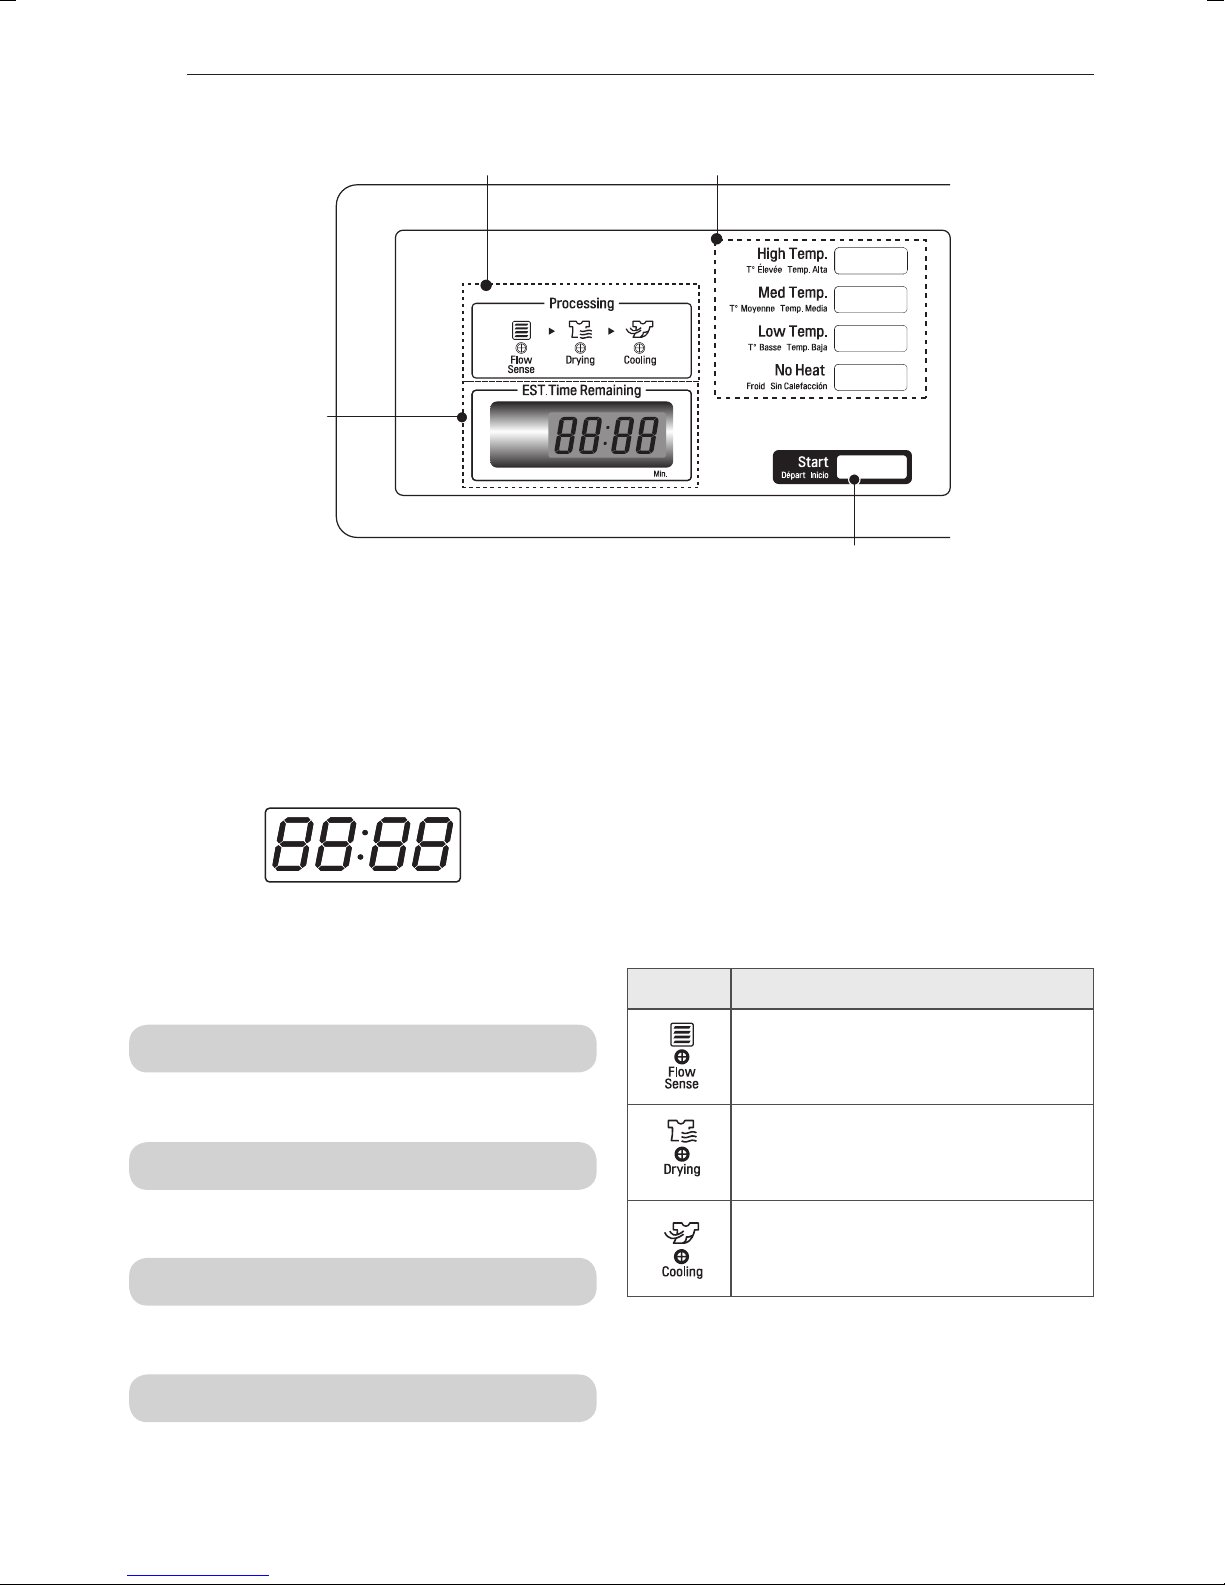
Status LED
Display LED
Display LED
The display shows the vend price, remaining time, and
programming options.
Error codes are also displayed here.
Cycle button
Start button
Start button
The Start LED flashes when the full vend price has been
satisfied then the cycle has been chosen or the machine
is paused.
The Start LED flashes when a card is inserted to add time
to the current cycle.
Cycle button
Press the cycle button to select the desired cycle based
on laundry types and conditions.
High Temp.
Use this cycle to get high heat for heavy fabrics, such
as jeans, corduroys, or work clothes (High heat).
Med Temp.
Use for drying sturdy fabrics such as work casual
clothes (Medium heat).
Low Temp.
Use for drying synthetic fabrics,washable knit fabrics
and noiron finishes (Low heat).
No Heat
Use for items that require heat-free drying such as
plastics or rubber.
Status LED
LED Description
LED flashes when the duct is blocked by
lint.
Check and clean the duct.
LED flashes whenever the heating cycle
is in operation.
LED flashes whenever the cool down
cycle is in operation.
ENGLISH
OPERATING YOUR DRYER
15
OPERATING YOUR DRYER
1. Ready mode
1) Coin / Card type
- The cycle LEDs flash at the same time, when the
price of cycles are equal.
2) OPL type
- The cycle LEDs is lit at the same time, and displayed
PUSH.
2. Insert card/coin/token
(not for OPL type)
Insert a cash card that has a sufficient balance.
The card balance should be more than the
programmed vend price for a selected cycle.
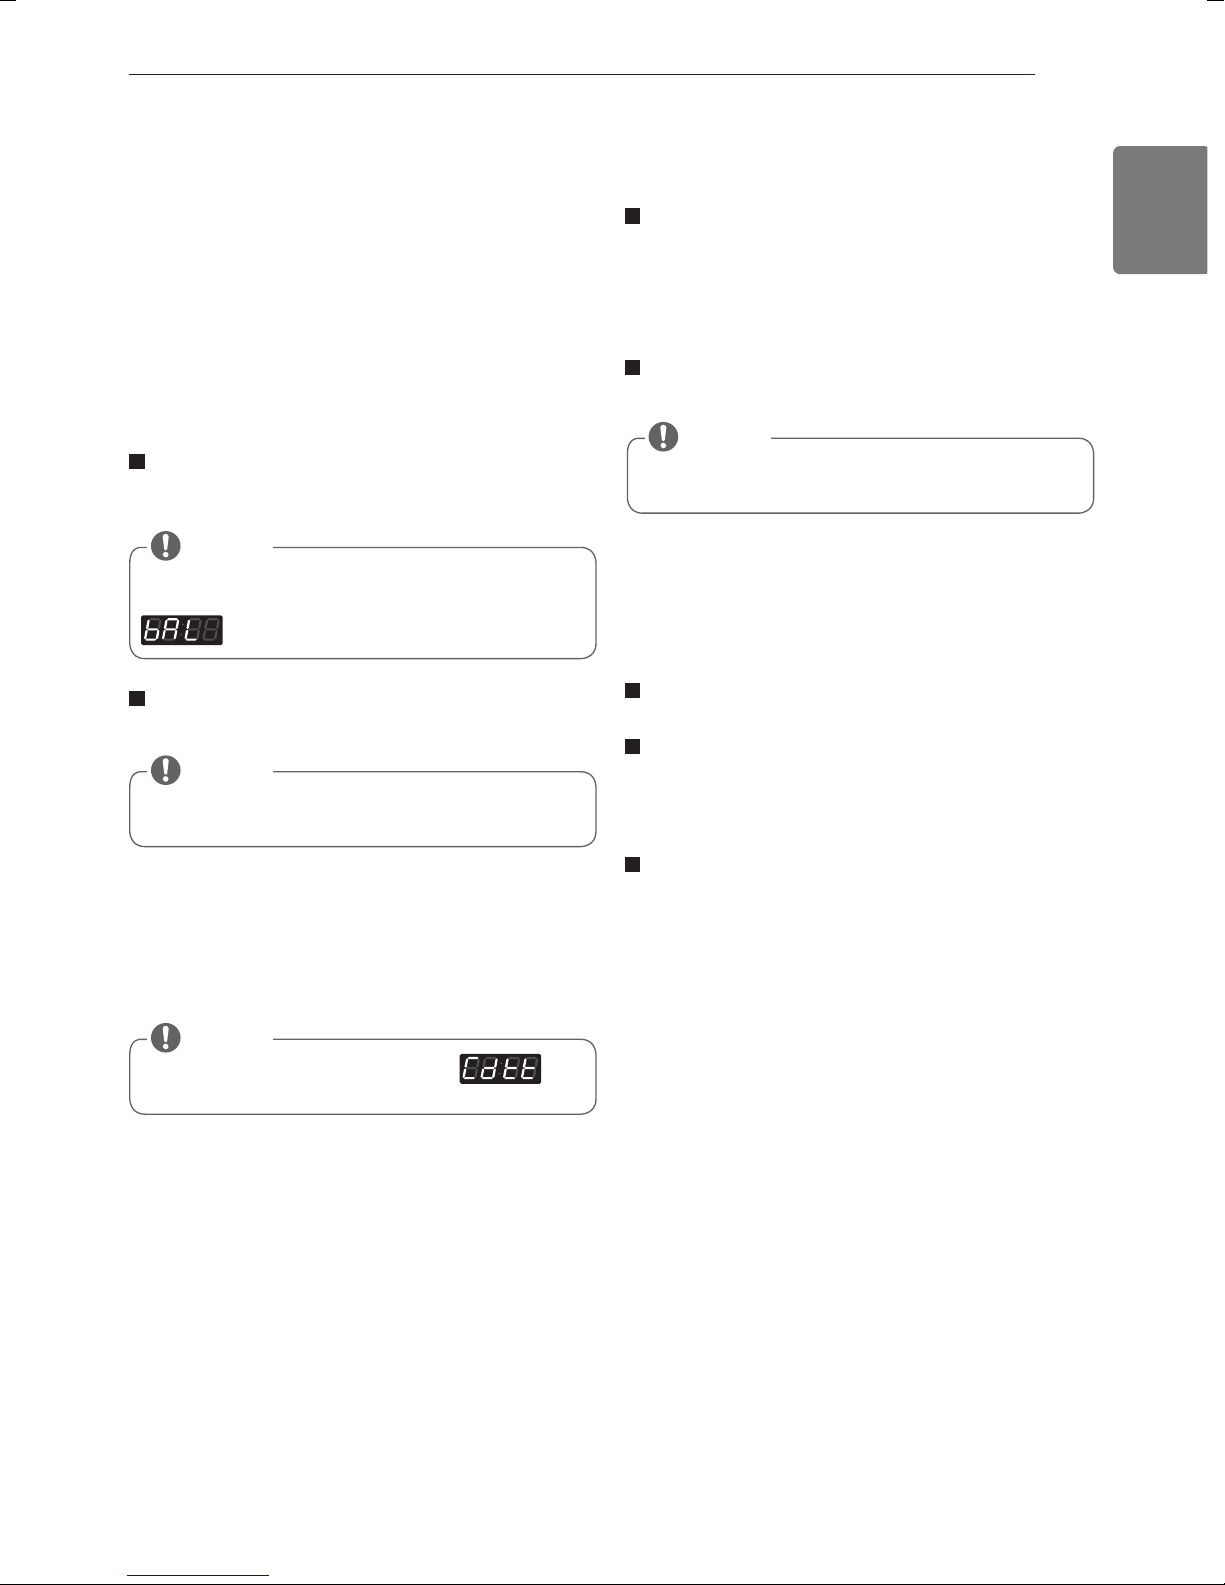
NOTE
When the card balance is not enough, machine
displays the balance for 5 seconds and then displays
message repetitively.
Insert a sufficient amount of change that is a more
than the programmed vend price for a selected cycle.
NOTE
When the coin amount is not enough, the machine
will not start.
3. Select the cycle
Press the desired cycle and the start button. The display
LED will show the remaining time and the selected cycle
starts.
4. Top off (To add more time)
After a debit card is inserted, the operating time can
be increased to 5 minutes/ 25¢ (default), when the
Start button or the chosen course button has been
pressed.
(The card should have enough balance to satisfy
increasing time.)
The operating time can be increased to 5 minutes/
25¢ (default) by adding more coins.
NOTE
Owner can control the additional time and money
setting (top off price).
When the COOL DOWN has been working, if time is
added, it goes back to the DRYING.
Time can be added up 99 minutes.
5. Change cycle
You cannot change the cycle while the machine is
running.
But if the door is opened, the machine stops
temporarily and the cycle can be changed.
6. Cycle finish
After the COOL DOWN of cycle, the machine stops
and LED display shows End.
If you press any key or open the door, the dryer
defaults to the ready mode.
NOTE
Owner can control the cooling time in of
progamming mode.
16
PROGRAMMING MODE
PROGRAMMING MODE
Programming mode
You can check machine information or change setting on program setup or diagnostic test.
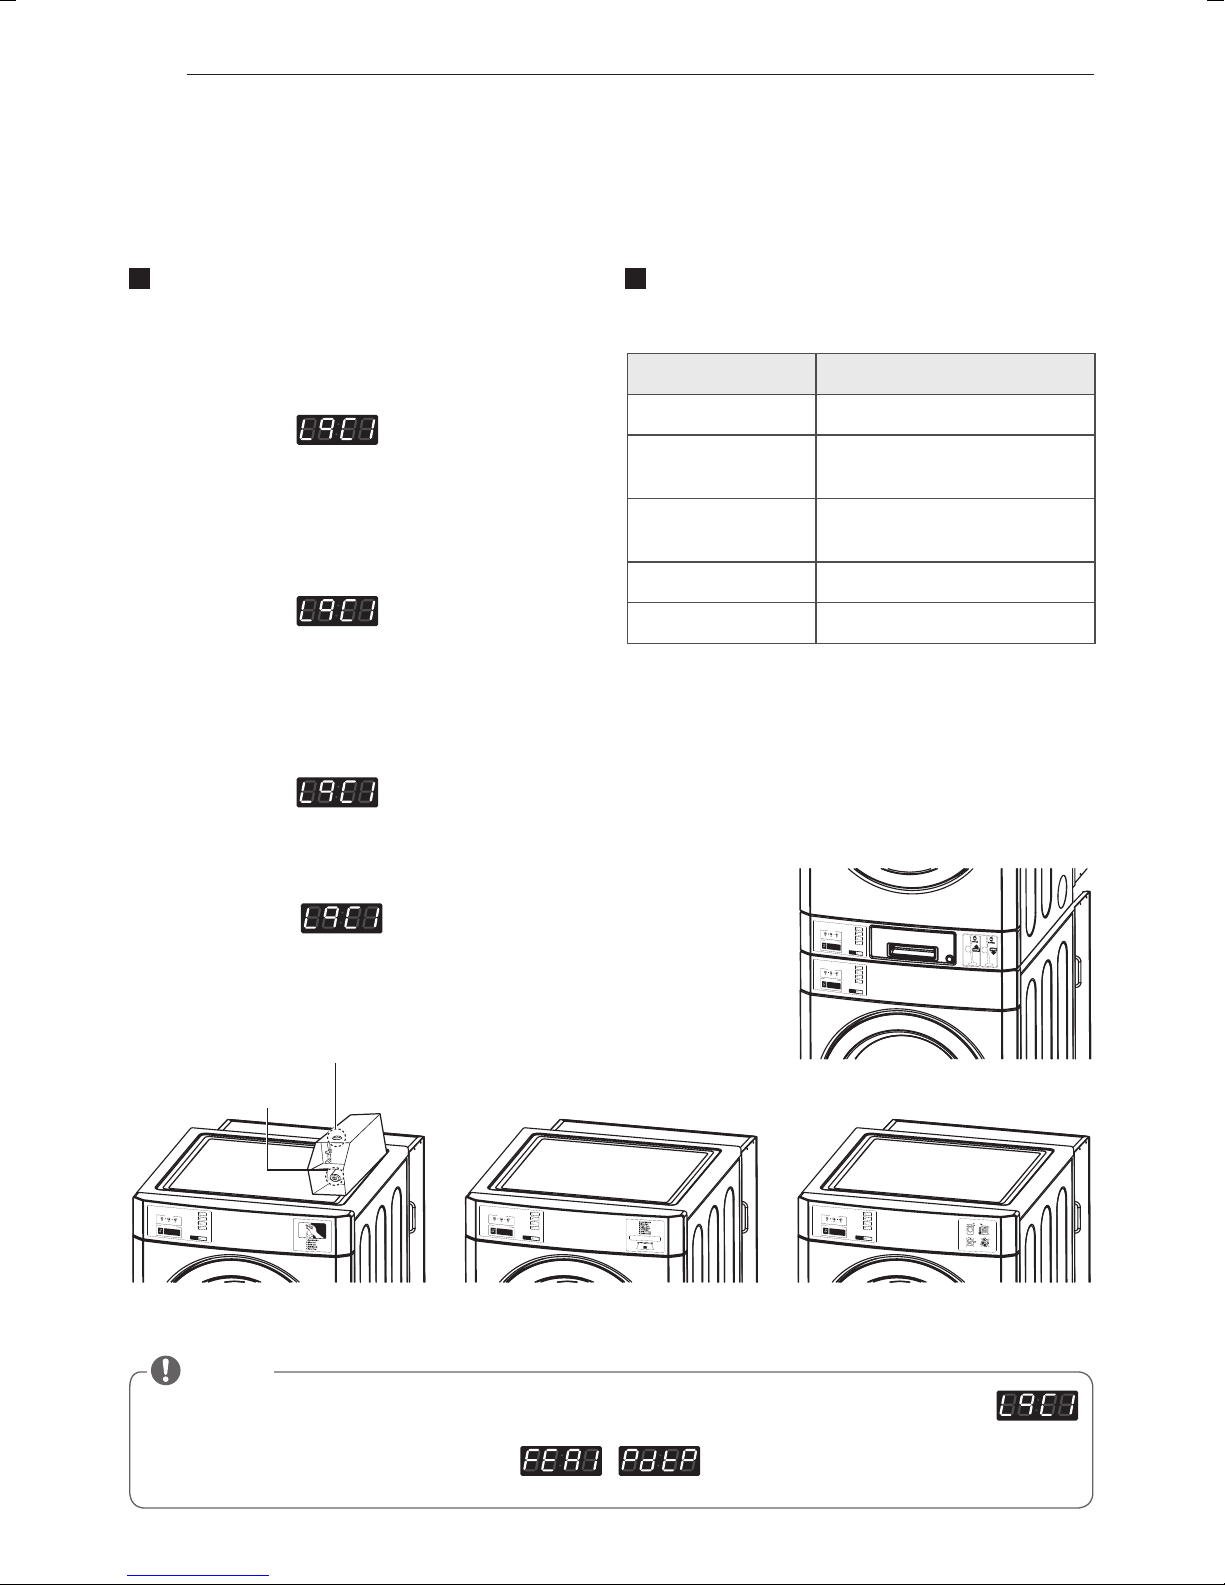
There are two methods that you can enter programming mode.
How to enter Programming mode
You can enter programming mode only for Idle state
and pause state.
- Card Type
1) Insert service card.
2) Display will show
- Coin Type
1) Dissemble upper coin box key.
2) Take out the coin drop from the coin box.
3) Turn on/off the toggle switch at the back of the coin
box.
4) Display will show
- OPL/Coin Type
1) Push the High Temp. and Low Temp. button at the
same time.
2) Push the Med Temp. button 3 times.
3) Push the Start button.
4) Display will show
- Stack Type
1) Open control panel.
2) Turn on/off toggle switch in front of panel frame.
3) Display will show
How to use button
You can change dryer vend price, cycle time and cycle
parameters, etc.
Press button Description
High Temp. Move to upper level
Med Temp.
Low Temp.
No Heat -
Start Enter the selected mode
Move to the mode in the
same level (+)
Move to the modes in the
same level (-)
Coin Box Key
Coin Vault
Openinngs close
Coin type Card type OPL type
NOTE
• If you turn on the power without connecting the meter case for the first time, the machine will display .
• When the machine comes from the factory, it is set in the coin type. You can change Card/Coin type by button.
(For more information refer to SETUP modes
• The machine will display PUSH for OPL type
Stack coin type
/ .)

ENGLISH
PROGRAMMING MODE
17
Card / Coin type
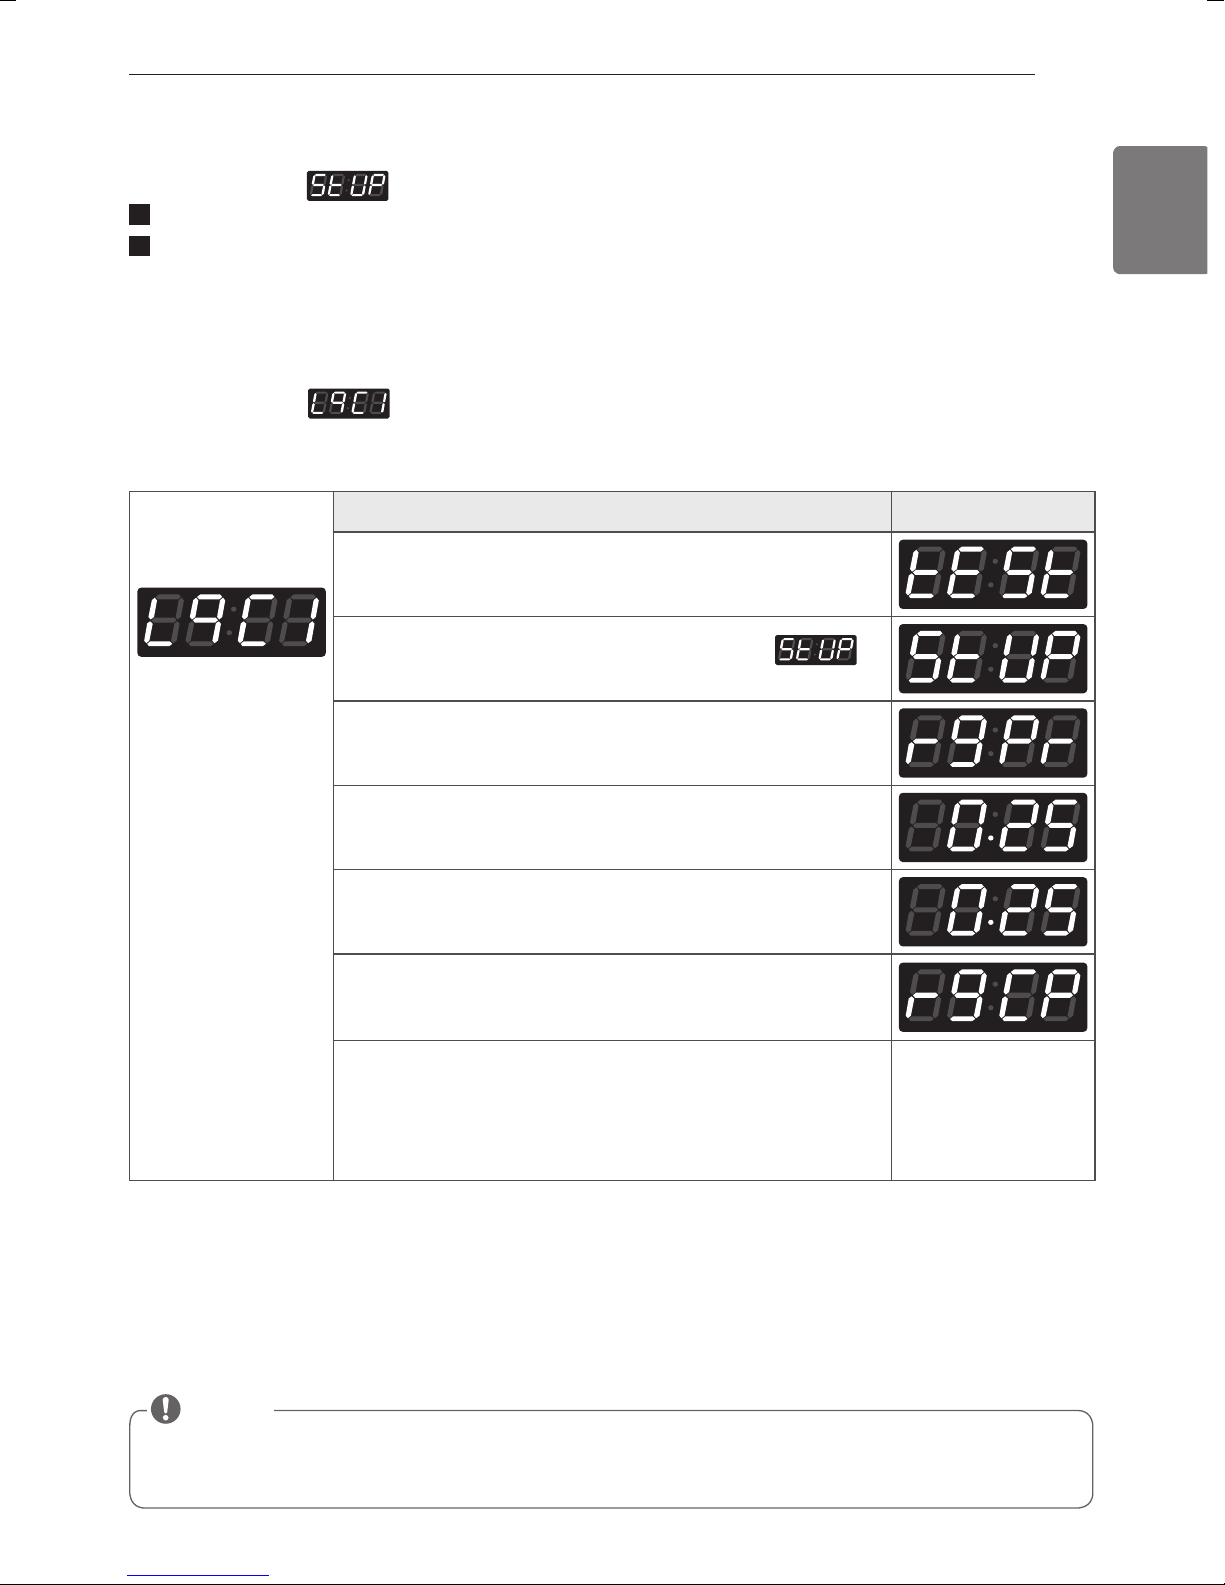
Algorithm Flow Chart shows how to control programming mode.
Before program set, check the structure of programming mode.
1. Turn on/off toggle switch or Insert the service card to entering set up mode.
2. Press High Temp. button to move the upper level.
3. Press Med Temp.(+) or Low Temp.(-) button if you want to be at the same level.
4. Press Start button to enter the details of set up, diagnostic tests mode.
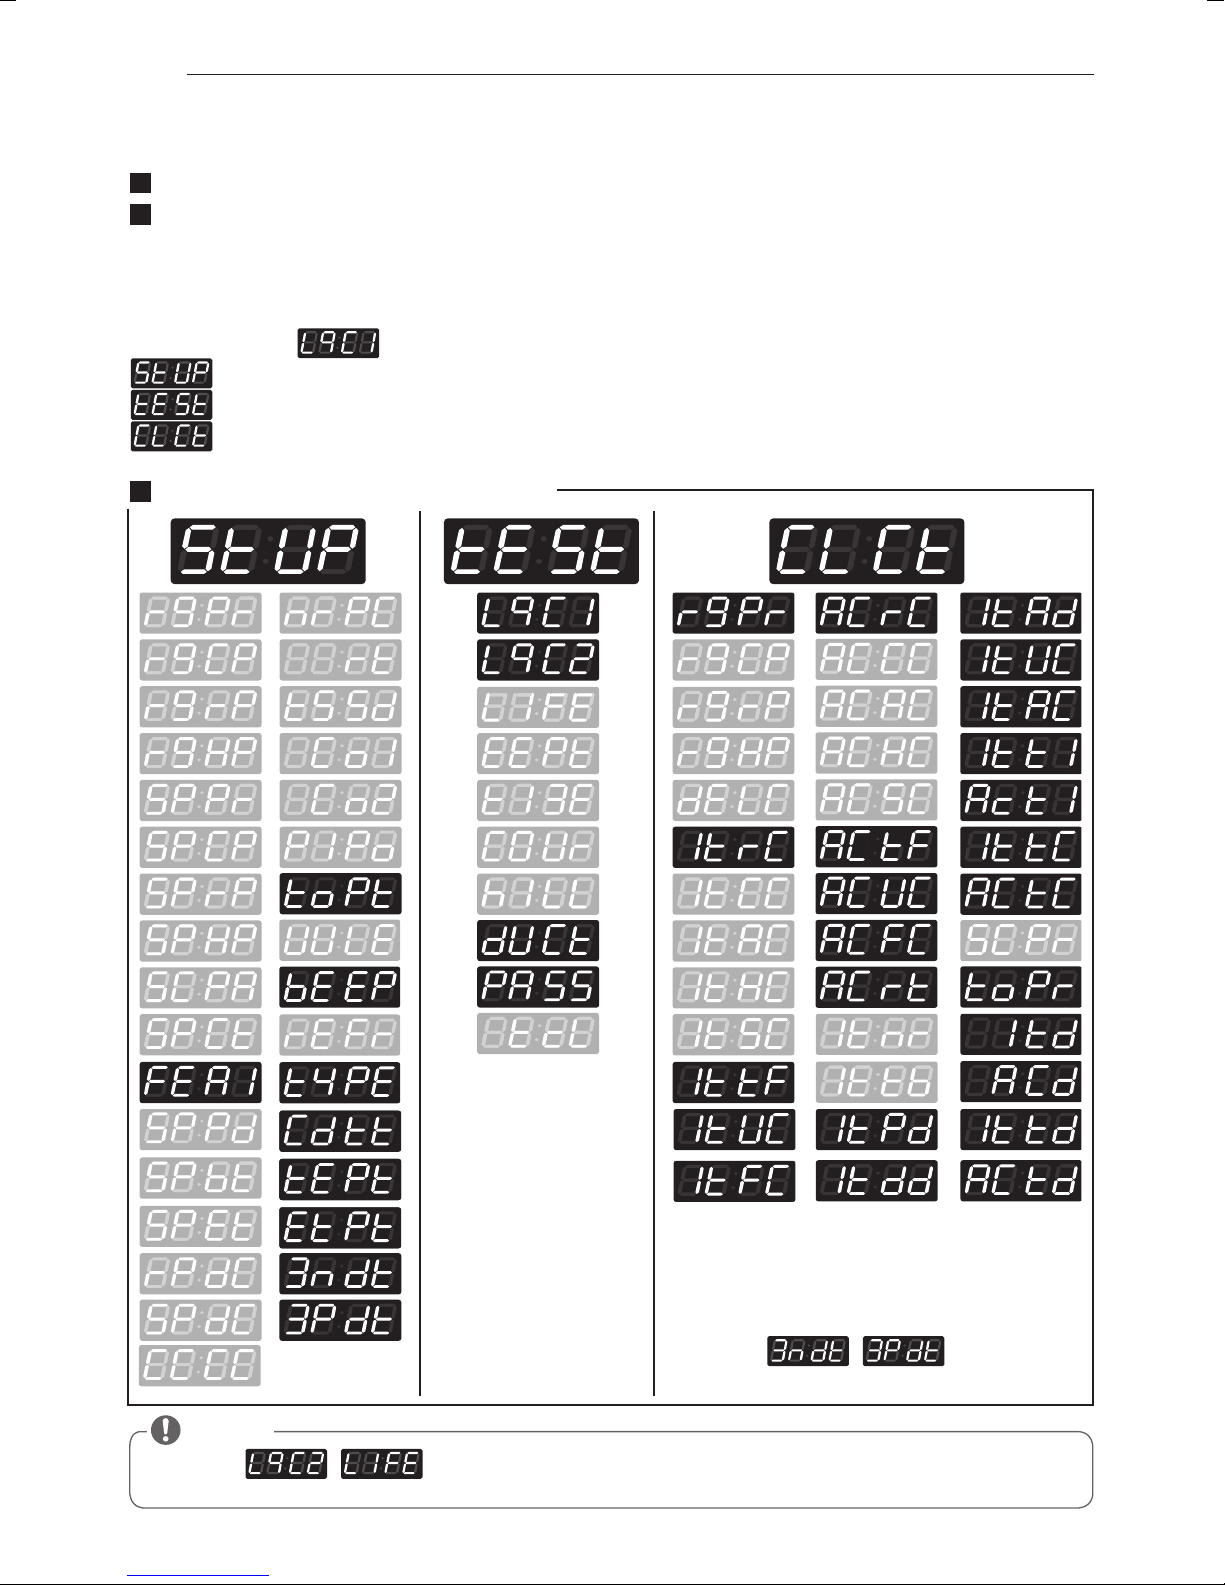
is to set price value, time value and vend type etc.
consists of line test, reset, free cycle and kill cycle.
Is to collect the usage data.
Structure of Programming mode
NOTE
• Do not use , .
• It is only used in inspecting the machine.
Do not use , without a
qualified professional.
18
PROGRAMMING MODE
OPL type
Algorithm Flow Chart shows how to control programming mode.
Before program set, check the structure of programming mode.
OPL/Coin Type
1) Push the High Temp. and Low Temp. button at the same time.
2) Push the Med Temp. button 3 times.
3) Push the Start button.
4) Display will show
is to set price value, time value and vend type etc.
consists of line test, reset, free cycle and kill cycle.
Is to collect the usage data.
Structure of Programming mode
NOTE
• Do not use , .
• It is only used in inspecting the machine.
Do not use , without a
qualified professional.
ENGLISH
PROGRAMMING MODE
19
PROGRAMMING MODE - Setup Mode
Setup Mode : (display)
You can change dryer vend price, cycle time, and cycle parameters, etc.
Entering set up mode
• Coin type - Turn on/off toggle switch.
• Card type - Insert the service card.
• Stack type - Take off control panel, and turn on/off toggle switch.
• OPL/Coin Type – Push High Temp. + Low Temp. and the 3.
• Then, dryer displays
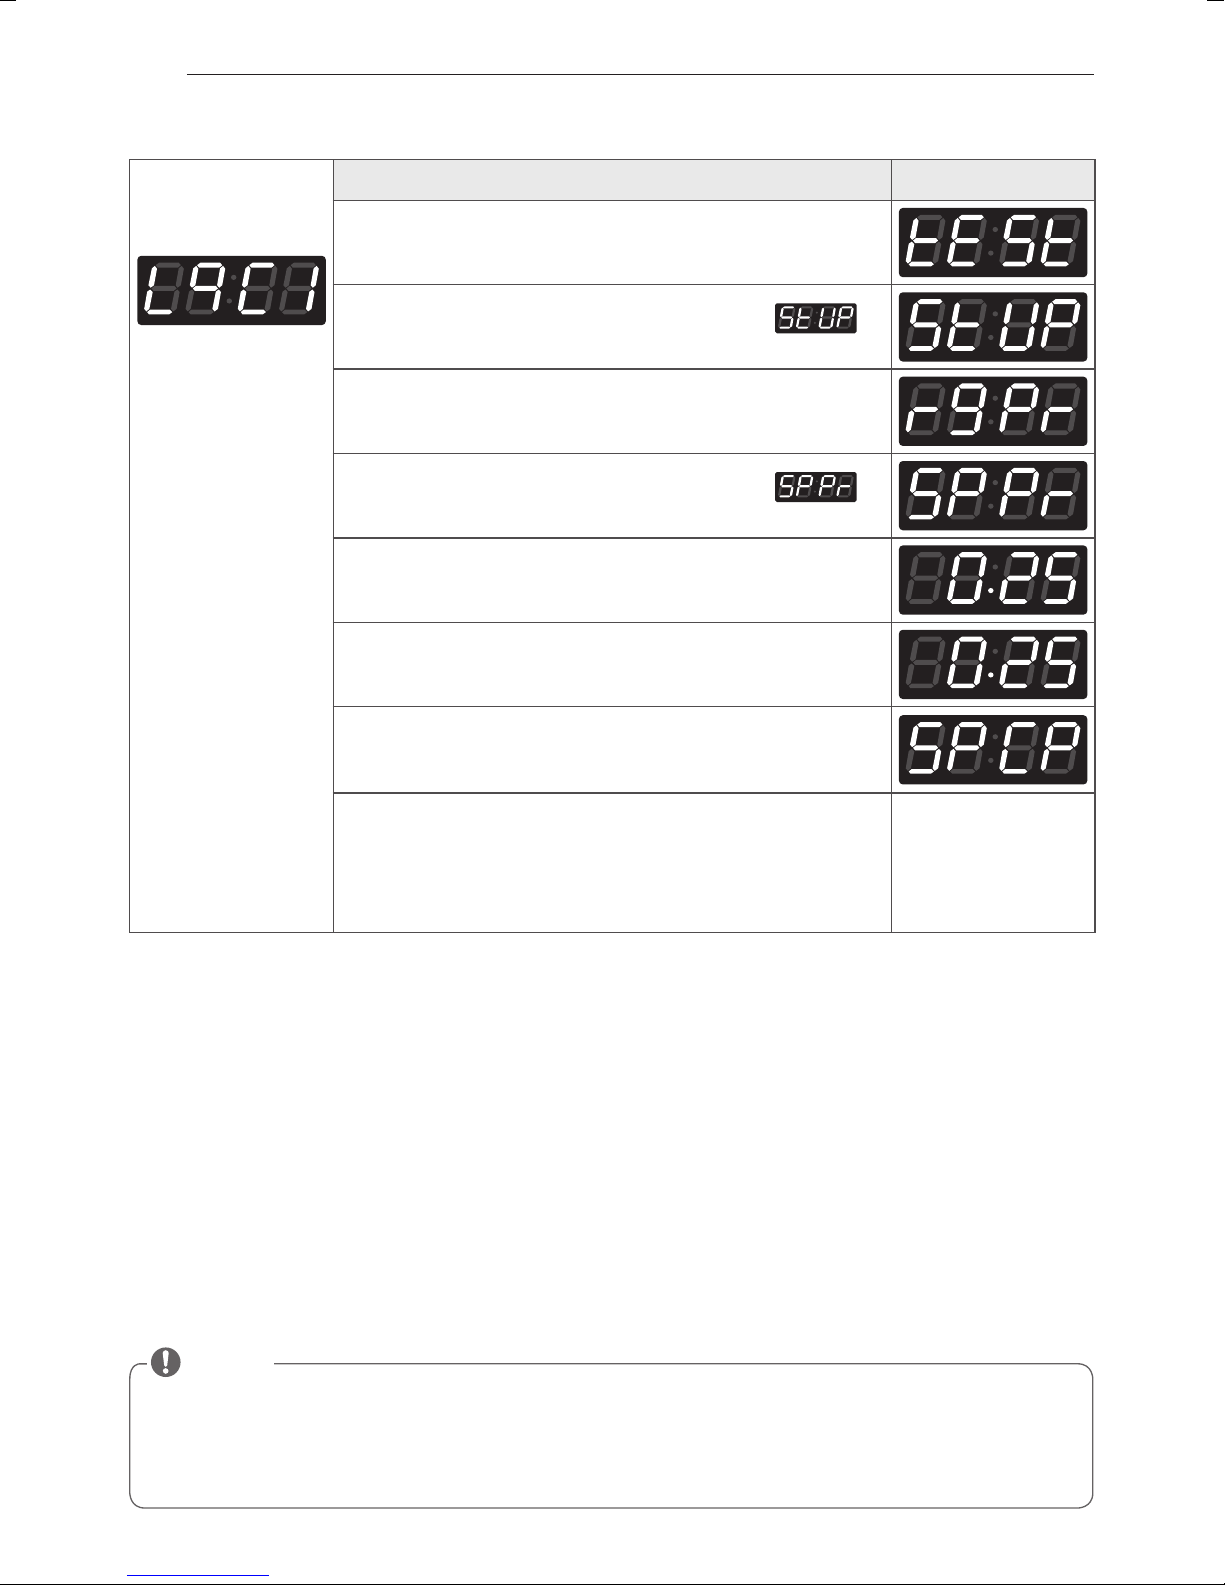
1. How to change regular price
Entering set up
mode.
You will see LqC1
.
Button Display
Press the High Temp. button.
Press the Med Temp. or the Low Temp. button until
appears in the display.
Press the Start button.
Press the Start button.
Display previous regular price.
Press Med Temp.(+) or Low Temp.(-) button to set regular price.
(The vend price can be set from 0 to $9.95 in 5¢ increments.)
Press the Start button.
The machine sets up the regular price, then advances to the next
process automatically.
1. Continue to set up the next price.
2. Stop the change of setup value and go back to ready mode.
• Coin type - Turn on/o toggle switch
• Card type - Pull the service card
• OPL/Coin type – Press “High Temp.” twice
NOTE
• rgCP (regular cold price) is not available in dryer.
• rgrP (regular warm price) is not available in dryer.
• rgHP (regular hot price) is not available in dryer.
20
PROGRAMMING MODE
2. How to change special price
Entering set up
mode.
You will see LqC1
Button Display
Press the High Temp. button.
Press the Med Temp. or the Low Temp. button until
appears in the display.
Press the Start button.
Press the Med Temp. or the Low Temp. button until
appears in the display.
Press the Start button.
Display previous special price.
Press Med Temp.(+) or Low Temp.(-) button to set special price.
(The vend price can be set from 0 to $9.95 in 5¢ increments.)
Press the Start button.
The machine sets up the regular price, then advances to the next
process automatically.
1. Continue to set up the next price.
2. Stop the change of setup value and go back to ready mode.
• Coin type - Turn on/o toggle switch
• Card type - Pull the service card
• OPL/Coin type – Press “High Temp.” twice
NOTE
• SPCP (special cold price) is not available in dryer.
• SPrP (special warm price) is not available in dryer.
• SPHP (special hot price) is not available in dryer.
• SCPA (add super cycle price) is not available in dryer.
• SPCt (add super wash type) is not available in dryer.
ENGLISH
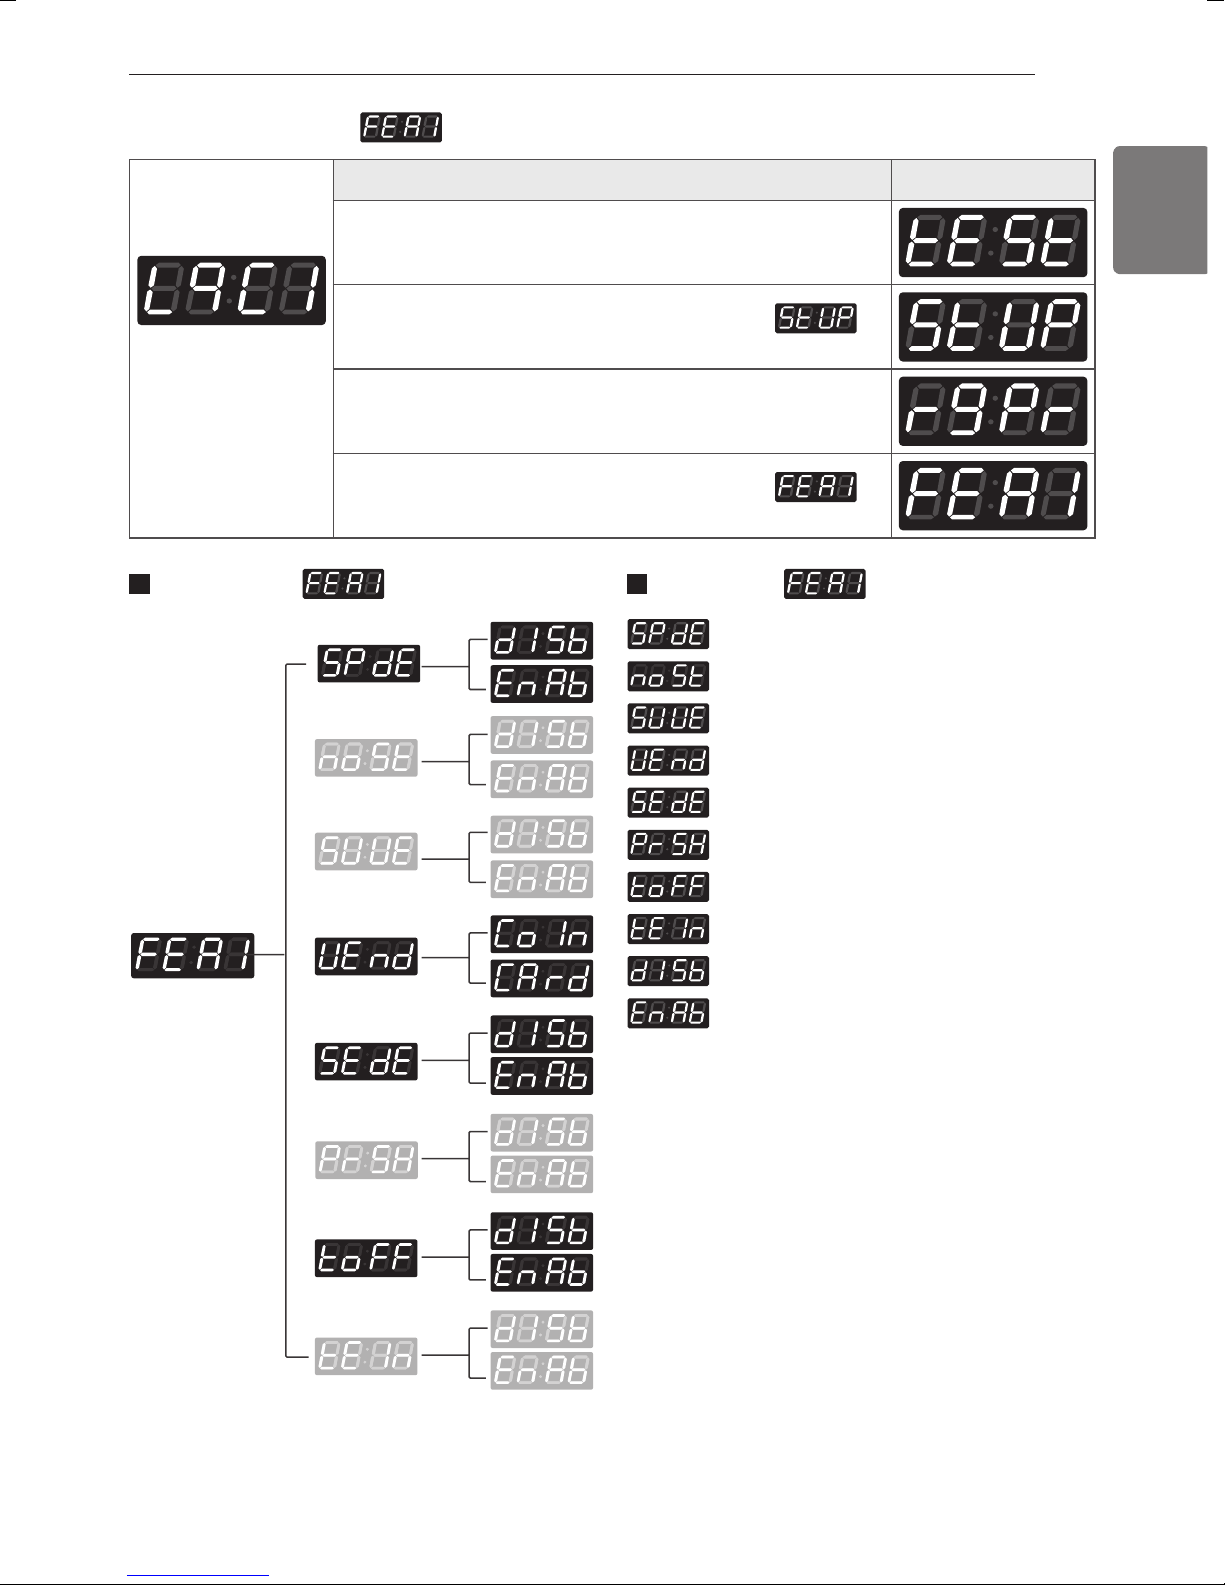
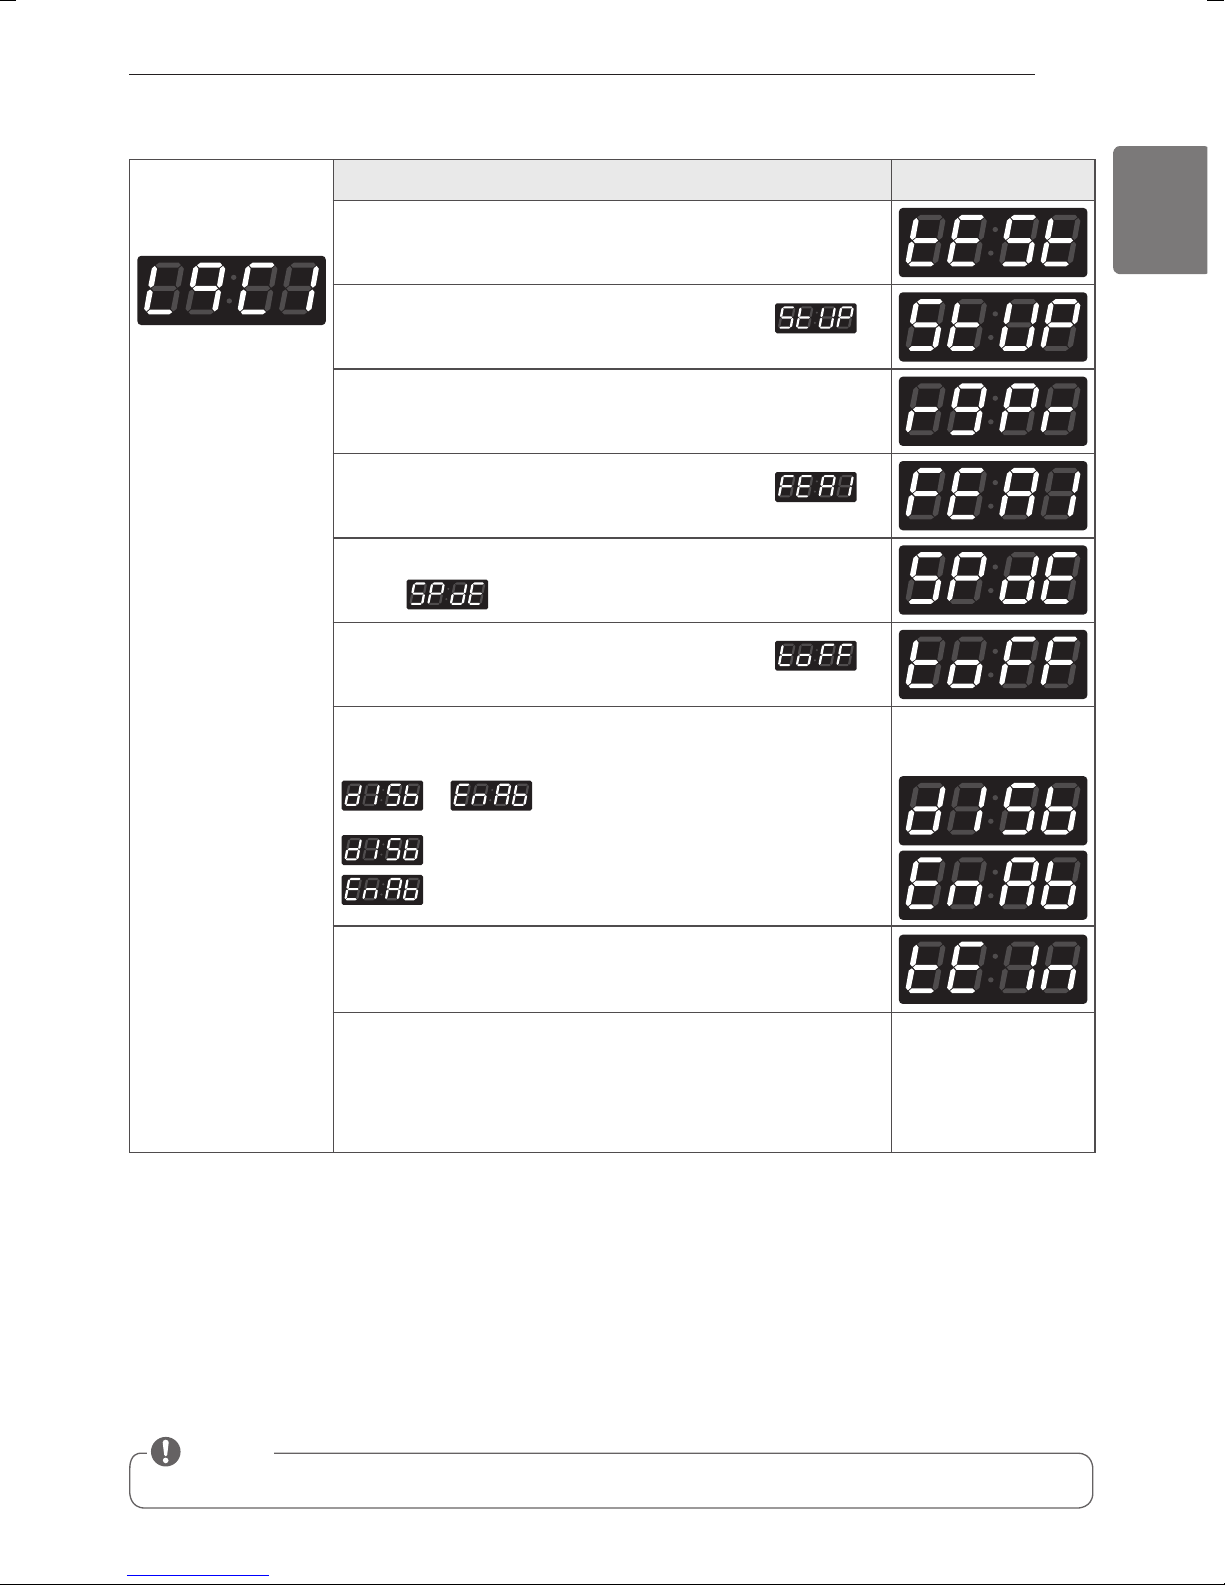
3. How to enter the
Entering set up
mode.
You will see LqC1
Press the High Temp. button.
Press the Med Temp. or the Low Temp. button until
appears in the display.
Press the Start button.
Press the Med Temp. or the Low Temp. button until
appears in the display.
Button Display
Structure of Content of
• Special price days apply or not
PROGRAMMING MODE
21
• Non-stop wash apply or not (only for washer)
•
Add super wash apply or not (only for washer)
• Select vend type
• Sense dry apply or not (only for washer)
• Pre-wash apply or not (only for washer)
• Top off apply or not (only for dryer)
• Disable
• Disable
• Enable
22
PROGRAMMING MODE
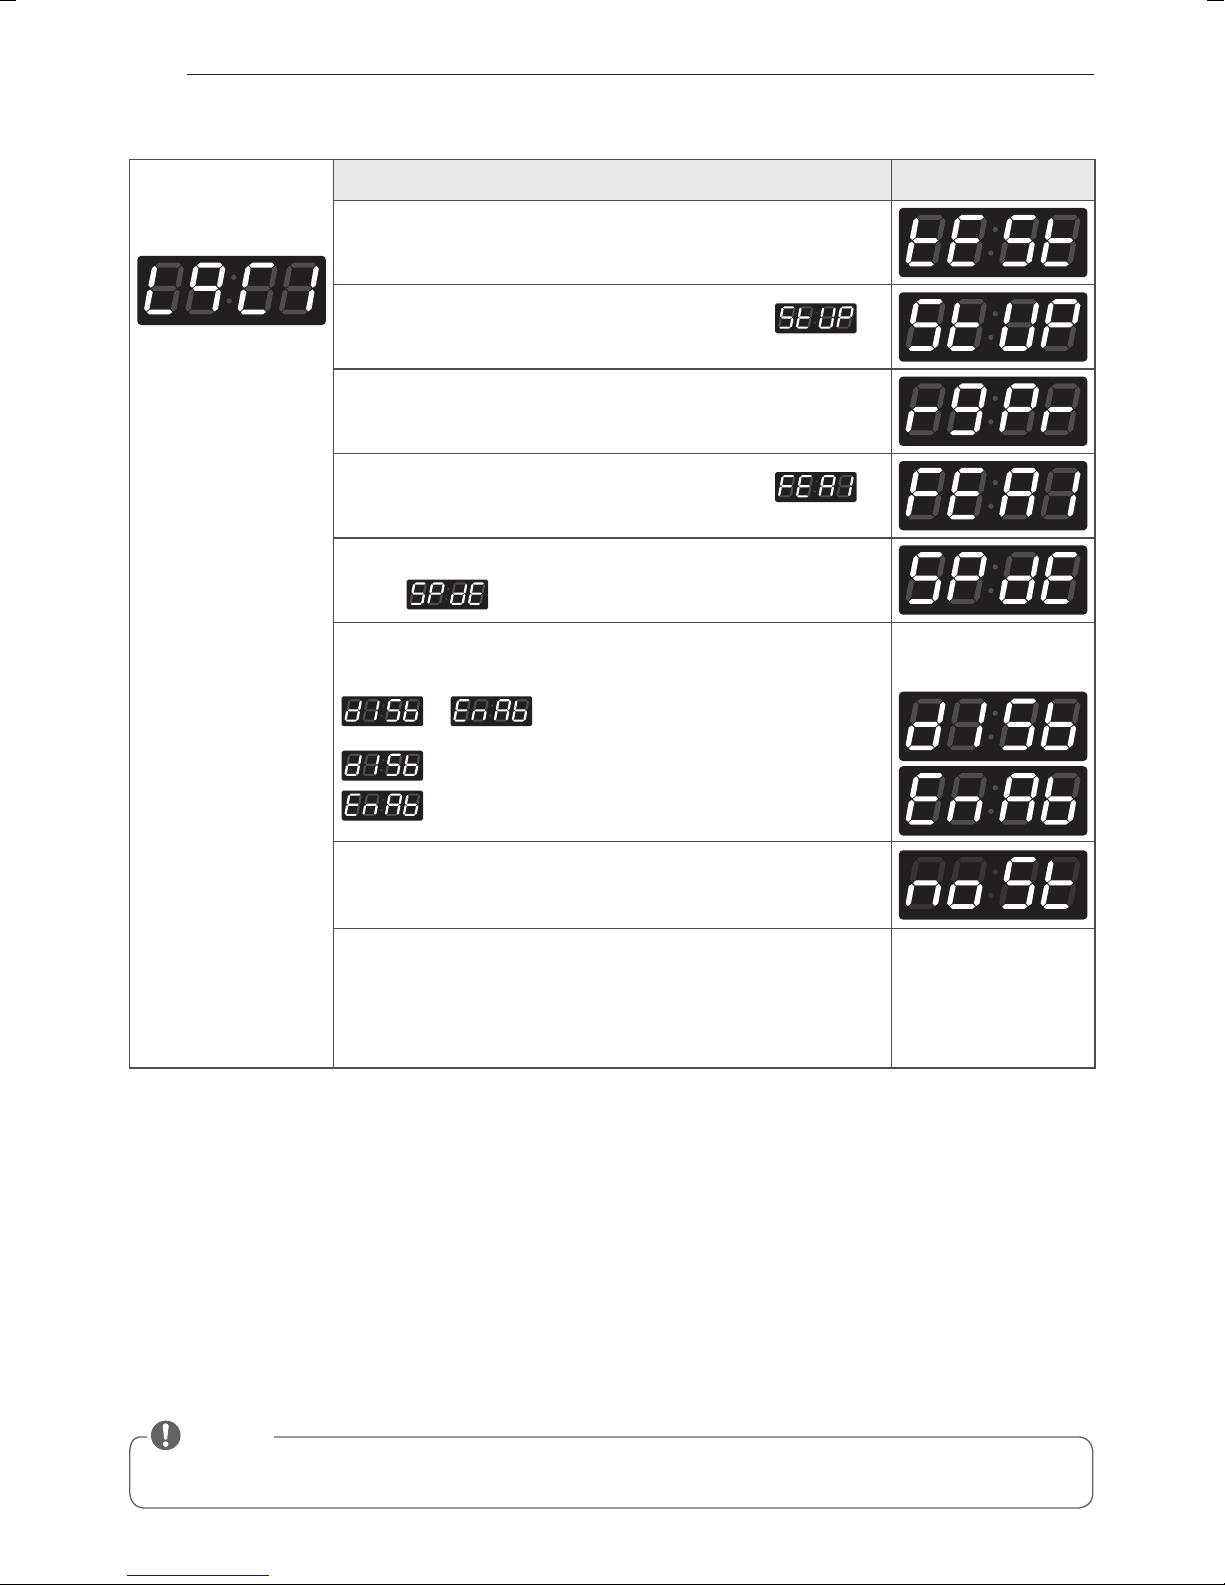
3-1. Special price day setup
Entering set up
mode.
You will see LqC1
Button Display
Press the High Temp. button.
Press the Med Temp. or the Low Temp. button until
appears in the display.
Press the Start button.
Press the Med Temp. or the Low Temp. button until
appears in the display.
Press the Start button.
Display
Press the Start button.
Press Med Temp. or Low Temp. button and then select
or .
.
One or the other will
display.
Coin type
Card type
Press the Start button.
The machine sets up the special price, then advances to the next
process automatically.
1. Continue to set up the next mode.
2. Stop the change of setup value and go back to ready mode.
• Coin type - Turn on/o toggle switch
• Card type - Pull the service card
• OPL/Coin type – Press “High Temp.” twice
NOTE
• CLEE (clear escrow enable or not) is not available in dryer.
• SUUE (add super wash apply or not) is not available in dryer.
ENGLISH
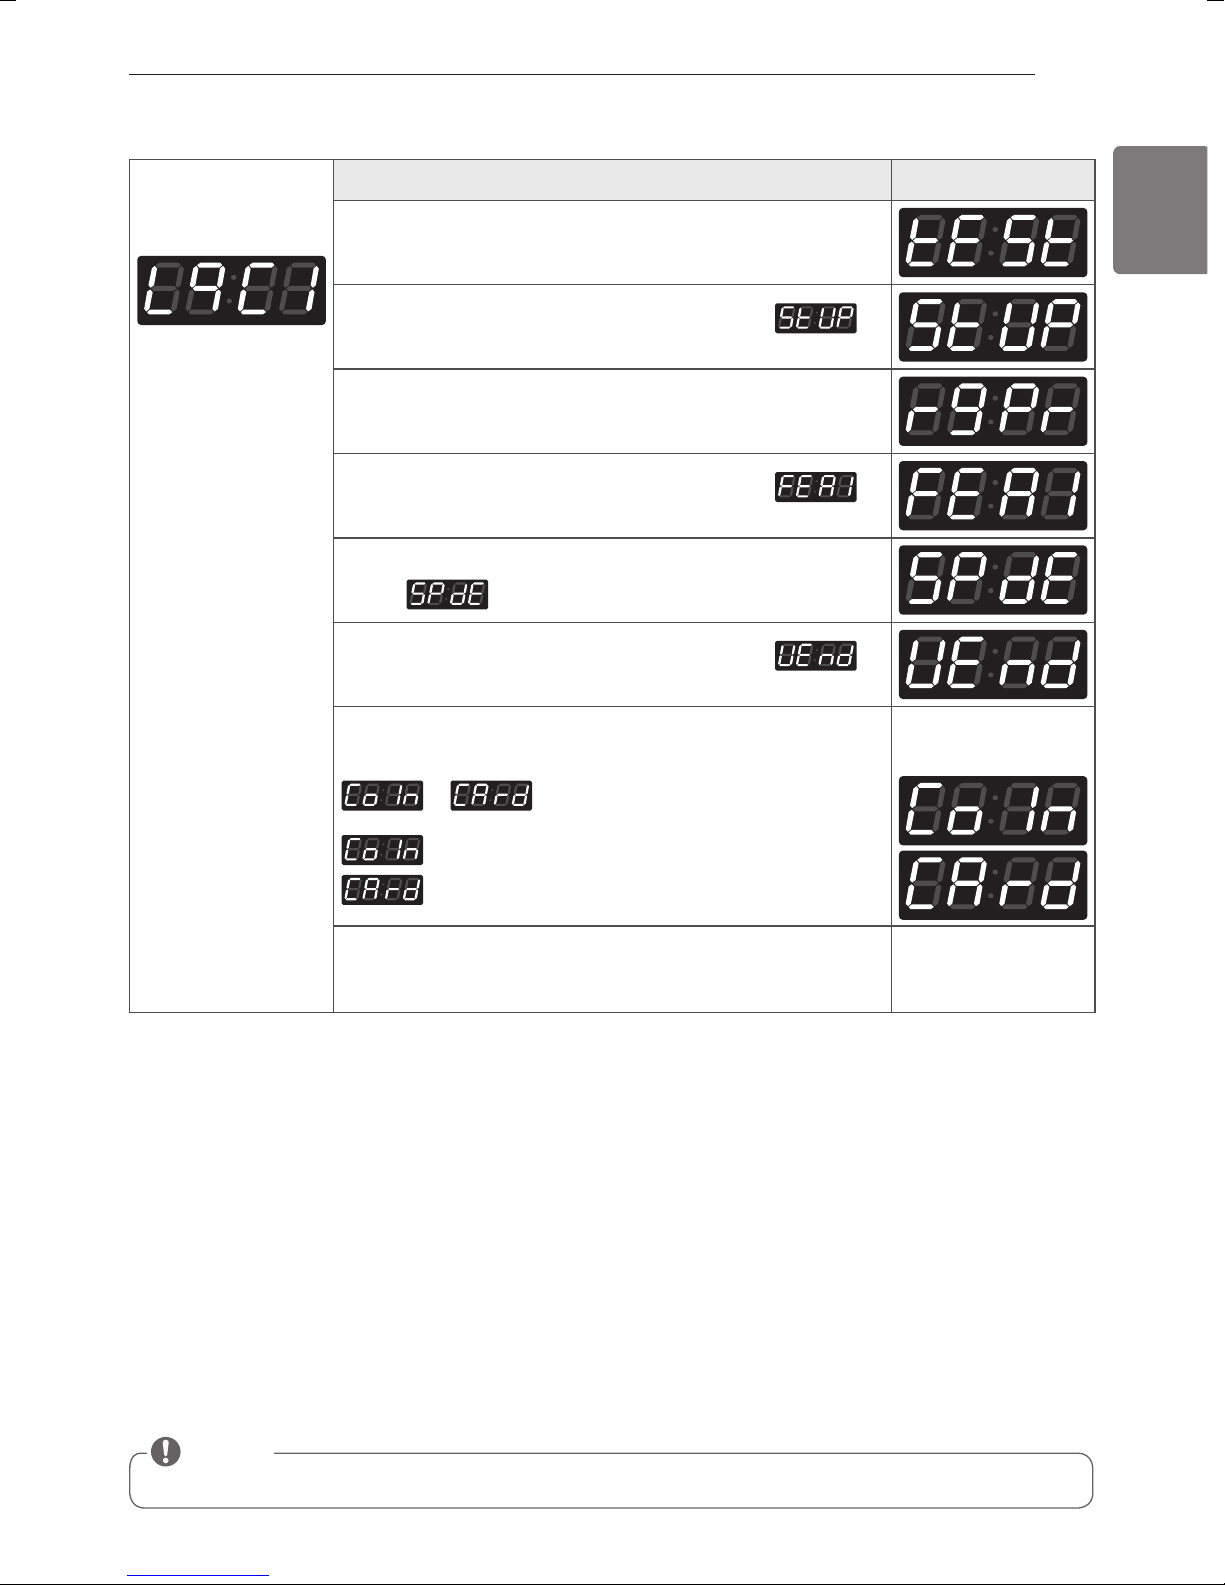
3-2. Vend type setup - card type or coin type setup
Entering set up
mode.
You will see LqC1
Press the High Temp. button.
Press the Med Temp. or the Low Temp. button until
appears in the display.
Press the Start button.
Press the Med Temp. or the Low Temp. button until
appears in the display.
Press the Start button.
Display
.
Button Display
PROGRAMMING MODE
Press the Med Temp. or the Low Temp. button until
appears in the display.
Press the Start button.
Press Med Temp. or Low Temp. button and then select
or .
Disable
Enable
Press the Start button.
The machine sets up the vend type, then go to the idle mode
automatically.
One or the other will
display.
NOTE
• After setting the Value to VEND, vend type is changed directly without power on/off.

24
PROGRAMMING MODE
3-3. Sensor dry apply or not setup (Use only for OPL type)
Entering set up
mode.
You will see LqC1
Button Display
Press the High Temp. button.
Press the Med Temp. or the Low Temp. button until
appears in the display.
Press the Start button.
Press the Med Temp. or the Low Temp. button until
appears in the display.
Press the Start button.
Display
Press the Med Temp. or the Low Temp. button until
appears in the display.
Press the Start button.
Press Med Temp. or Low Temp. button and then select
or .
.
One or the other will
display.
Disable
Enable
Press the Start button.
The machine sets up the Vend type, then advances to the next
process automatically.
1. Continue to set up the next mode.
2. Stop the change of setup value and go back to ready mode.
• Coin type - Turn on/o toggle switch
• Card type - Pull the service card
• OPL/Coin type – Press “High Temp.” twice
NOTE
• PrSH (Pre-wash apply or not) is not available in dryer.
ENGLISH
3-4. Top off apply or not setup
Entering set up
mode.
You will see LqC1
Press the High Temp. button.
Press the Med Temp. or the Low Temp. button until
appears in the display.
Press the Start button.
Press the Med Temp. or the Low Temp. button until
appears in the display.
Press the Start button.
Display
PROGRAMMING MODE
25
Button Display
.
Press the Med Temp. or the Low Temp. button until
appears in the display.
Press the Start button.
Press Med Temp. or Low Temp. button and then select
or .
Disable
Enable
Press the Start button.
The machine sets up the Vend type, then advances to the next
process automatically.
1. Continue to set up the next mode.
2. Stop the change of setup value and go back to ready mode.
• Coin type - Turn on/o toggle switch
• Card type - Pull the service card
• OPL/Coin type – Press “High Temp.” twice
One or the other will
display.
NOTE
• tEIn (Twin spray apply or not) is not available in dryer.
26
PROGRAMMING MODE
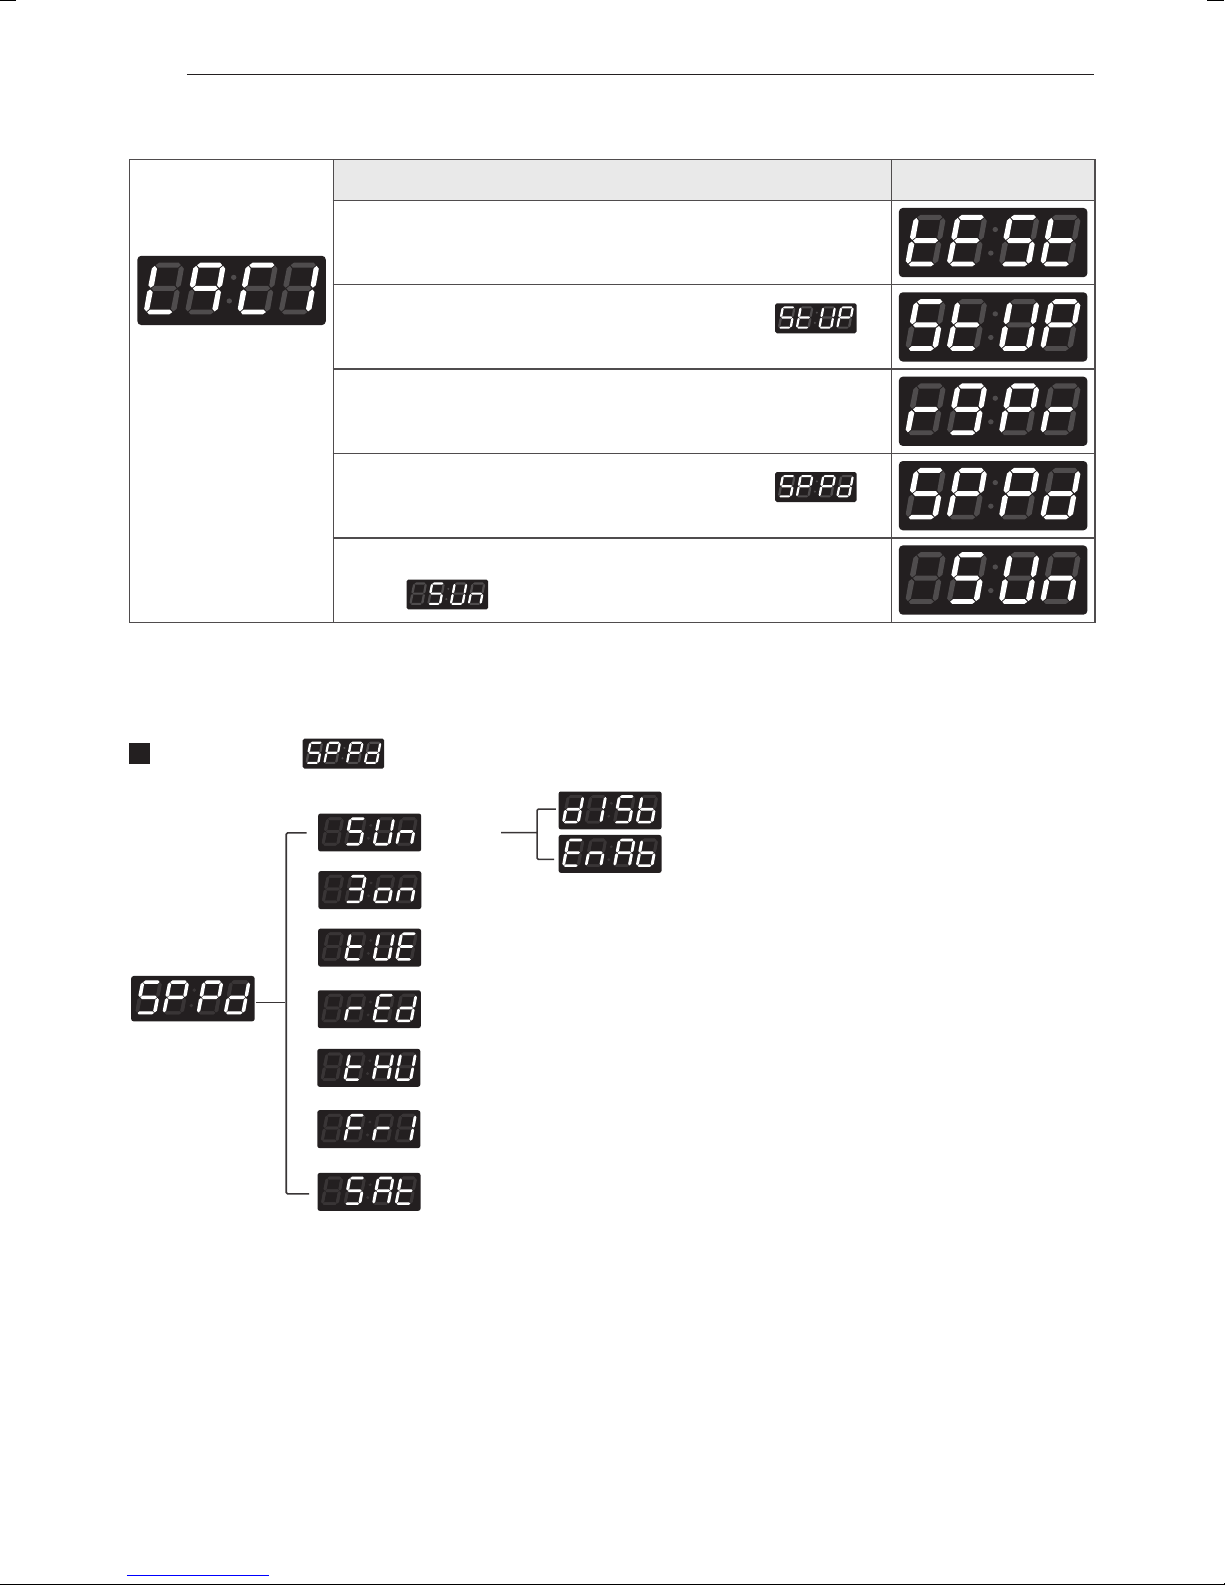
4. How to enter the special price day setup
Entering set up
mode.
You will see LqC1
Structure of
Button Display
Press the High Temp. button.
Press the Med Temp. or the Low Temp. button until
appears in the display.
Press the Start button.
Press the Med Temp. or the Low Temp. button until
appears in the display.
Press the Start button.
Display
.
Sunday
Monday
Tuesday
Wednesday
Thursday
Friday
Saturday

ENGLISH
4-1. How to change sunday
Entering set up
mode.
You will see LqC1
Press the High Temp. button.
Press the Med Temp. or the Low Temp. button until
appears in the display.
Press the Start button.
Press the Med Temp. or the Low Temp. button until
appears in the display.
Press the Start button.
Display
PROGRAMMING MODE
27
Button Display
.
Press the Start button.
Press Med Temp.(+) or Low Temp. button and then select
or .
Disable
Enable
Press the Start button.
The machine sets up the special price day (Sunday), then
advances to the next process automatically.
1. Continue to set up the next mode.
2. Stop the change of setup value and go back to ready mode.
• Coin type - Turn on/o toggle switch
• Card type - Pull the service card
• OPL/Coin type – Press “High Temp.” twice
One or the other will
display.
NOTE
As explained on the previous page, other days can be set up by the same method.
28
PROGRAMMING MODE
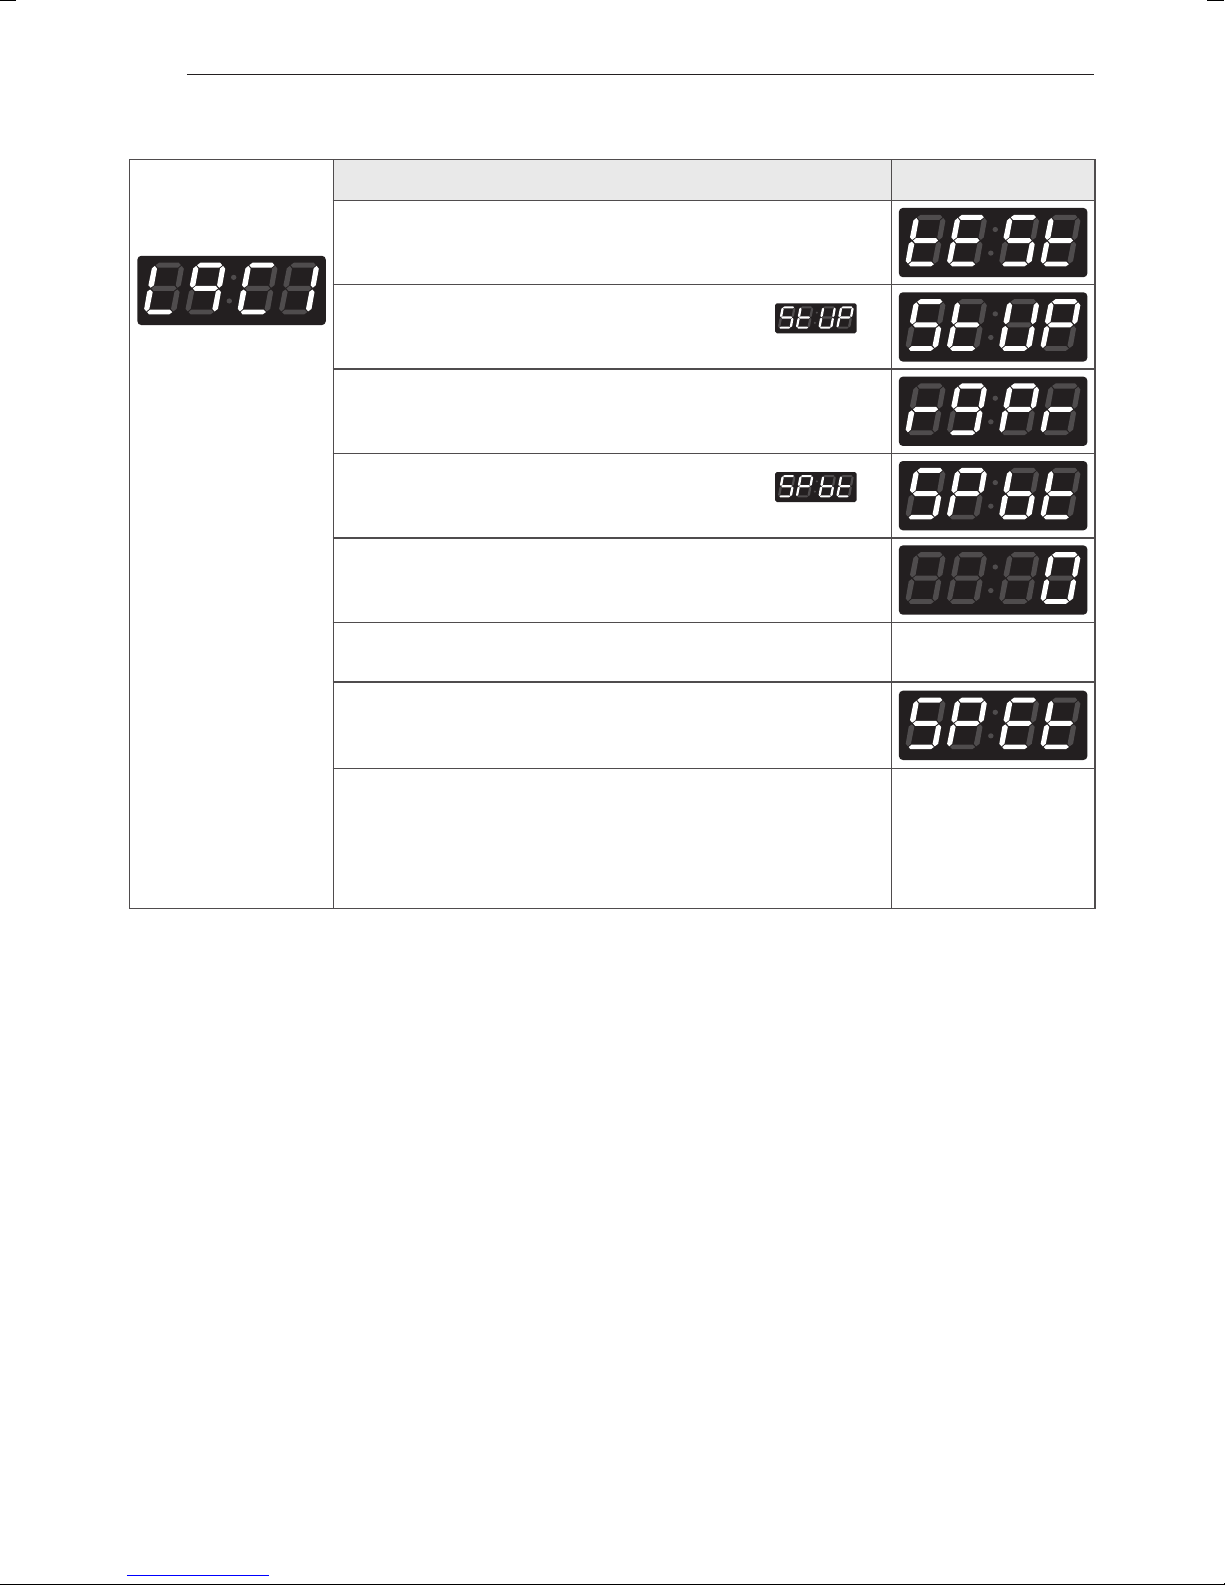
5. Special price beginning time setup
Entering set up
mode.
You will see LqC1
Button Display
Press the High Temp. button.
Press the Med Temp. or the Low Temp. button until
appears in the display.
Press the Start button.
Press the Med Temp. or the Low Temp. button until
appears in the display.
Press the Start button.
Display previous special price beginning time.
Press Med Temp.(+) or Low Temp.(-) button to
select time between 0 and 23.
Press the Start button.
The machine sets up the special price beginning time, then
advances to the next process automatically.
1. Continue to set up the next mode.
2. Stop the change of setup value and go back to ready mode.
• Coin type - Turn on/o toggle switch
• Card type - Pull the service card
• OPL/Coin type – Press “High Temp.” twice

ENGLISH
6. Special price ending time setup
Entering set up
mode.
You will see LqC1
Press the High Temp. button.
Press the Med Temp. or the Low Temp. button until
appears in the display.
Press the Start button.
Press the Med Temp. or the Low Temp. button until
appears in the display.
Press the Start button.
Display previous special price ending time.
PROGRAMMING MODE
Button Display
29
Press Med Temp.(+) or Low Temp.(-) button to select time
between 1 and 24.
Press the Start button.
The machine sets up the special price ending time, then advances
to the next process automatically.
1. Continue to set up the next mode.
2. Stop the change of setup value and go back to ready mode.
• Coin type - Turn on/o toggle switch
• Card type - Pull the service card
• OPL/Coin type – Press “High Temp.” twice
NOTE
When setting up a special price period, the ending time must be later than the beginning time.

30
PROGRAMMING MODE
7. Regular priced dryer cycle time
Entering set up
mode.
You will see LqC1
Button Display
Press the High Temp. button.
Press the Med Temp. or the Low Temp. button until
appears in the display.
Press the Start button.
Press the Med Temp. or the Low Temp. button until
appears in the display.
Press the Start button.
Display previous regular priced dryer cycle time.
Press Med Temp.(+) or Low Temp.(-) button to select
time between 1 and 99.
Press the Start button.
The machine sets up the regular priced dryer cycle time, then
advances to the next process automatically.
1. Continue to set up the next mode.
2. Stop the change of setup value and go back to ready mode.
• Coin type - Turn on/o toggle switch
• Card type - Pull the service card
• OPL/Coin type – Press “High Temp.” twice
 Loading...