

LG T80 User Manual

Touch DVB T80
OWNER’S MANUAL
MODEL: T80
Please read this manual carefully before operating
your set.
Retain it for future reference.
Designs and specifications are subject to change
without notice for improvement.
cool
Warning
- To reduce the risk of fire or electric shock, do not expose this appliance to rain or moisture.
Caution
- The appliance is not intended for use by young children or infirm
persons without supervision.
- Young Children should be supervised to ensure that they do not
play appliance.
- Use of controls or adjustments or performance of procedures other
than those specified herein may
result in hazardous radiation ex-
posure.
Disposal of your old appliance
1. When this crossed-out wheeled bin symbol is attached to a product it
means the product is covered by the European Directive 2002/96/EC.
2. All electrical and electronic products should be disposed of separately
from the municipal waste stream via designated collection facilities
appointed by the government or the local authorities.
3. The correct disposal of your old appliance will help prevent potential
negative consequences for the environment and human health.
4. For more detailed information about disposal of your old appliance,
please contact your city office, waste disposal service or the shop
where you purchased the product.
- The lithium battery contains lithium and can explode if it is not properly
handled of disposed of.
- Replace only with a battery of the type recommended by LG.
- Caution: Danger of explosion if battery is incorrectly replaced. Replace
only the rechargeable lithium battery with Amperex Technology Ltd. or
LG, Part No.(LGEIP-A1100E) having the cell, 553450. Use of Another
Cell May Present a Risk of Fire or Explosion.
CAUTION
RISK OF ELECTRIC SHOCK
DO NOT OPEN
CAUTION: TO REDUCE THE RISK
OF ELECTRIC SHOCK
DO NOT REMOVE COVER (OR BACK)
NO USER-SERVICEABLE PARTS INSIDE
REFER SERVICING TO QUALIFIED SERVICE
PERSONNEL.
This product is manufactured to comply with the EMC
DIRECTIVE 2004/108/EC and Low voltage Directive
2006/95/EC.
European representative :
LG Electronics Service Europe B.V. Veluwezoom 15,
1327 AE Almere, The Netherlands
(Tel : +31-036-547-8940)
2
IMPORTANT SAFETY INSTRUCTIONS
style

cool
style
Table of Contents
3
Safety tips . . . . . . . . . . . . . . . . . . . . . . . . . . . . .4
General information of MP3 player . . . . . . . . .5
Name of each component . . . . . . . . . . . . . . . .6
Installing software . . . . . . . . . . . . . . . . . . . . .7-8
Before installing the operating program . . . . . . . . . . . . . .7
About LG Media Center . . . . . . . . . . . . . . . . . . . . . . . . .7
Installing LG Media Center . . . . . . . . . . . . . . . . . . . . .7-8
Installation of the Adobe Acrobat Reader . . . . . . . . . . . . .8
View the manual . . . . . . . . . . . . . . . . . . . . . . . . . . . . . . .8
Connecting to the PC . . . . . . . . . . . . . . . . .9-12
To connect the USB cable . . . . . . . . . . . . . . . . . . . . . . . .9
To disconnect the USB cable . . . . . . . . . . . . . . . . . . . . . .9
To download files-MTP mode . . . . . . . . . . . . . . . . . .10-11
To download files - MSC mode . . . . . . . . . . . . . . . . . . .11
To download files-LG Media Center . . . . . . . . . . . . . . . .12
Converting video files . . . . . . . . . . . . . . . . . .13
Charging the MP3 player . . . . . . . . . . . . . . . .14
Basic operation . . . . . . . . . . . . . . . . . . . . .15-16
Turning on/off the power . . . . . . . . . . . . . . . . . . . . . . . .15
Lock feature . . . . . . . . . . . . . . . . . . . . . . . . . . . . . . . . . .15
Reset feature . . . . . . . . . . . . . . . . . . . . . . . . . . . . . . . . .15
Changing battery . . . . . . . . . . . . . . . . . . . . . . . . . . . . . .15
Home menu screen . . . . . . . . . . . . . . . . . . . . . . . . . . . .16
General operations of Home menu . . . . . . . . . . . . . . . .16
Playing music . . . . . . . . . . . . . . . . . . . . . .17-20
Music playing screen . . . . . . . . . . . . . . . . . . . . . . . . . . .17
Music menu . . . . . . . . . . . . . . . . . . . . . . . . . . . . . . . . . .17
Playing music files . . . . . . . . . . . . . . . . . . . . . . . . . . . .18
Pausing . . . . . . . . . . . . . . . . . . . . . . . . . . . . . . . . . . . . .18
Playing the previous or next file . . . . . . . . . . . . . . . . . .18
Speed search . . . . . . . . . . . . . . . . . . . . . . . . . . . . . . . .19
Playing from a specific point . . . . . . . . . . . . . . . . . . . . .19
Volume control . . . . . . . . . . . . . . . . . . . . . . . . . . . . . . .19
EZ menu . . . . . . . . . . . . . . . . . . . . . . . . . . . . . . . . . . . .20
Playing movie . . . . . . . . . . . . . . . . . . . . . .21-24
Movie playing screen . . . . . . . . . . . . . . . . . . . . . . . . . .21
Playing movie files . . . . . . . . . . . . . . . . . . . . . . . . . . . .21
Pausing . . . . . . . . . . . . . . . . . . . . . . . . . . . . . . . . . . . . .22
Playing the previous or next file . . . . . . . . . . . . . . . . . . .22
Speed search . . . . . . . . . . . . . . . . . . . . . . . . . . . . . . . .23
Playing from a specific point . . . . . . . . . . . . . . . . . . . . .23
A-B section repeat . . . . . . . . . . . . . . . . . . . . . . . . . . . .23
Volume control . . . . . . . . . . . . . . . . . . . . . . . . . . . . . . . .24
EZ menu . . . . . . . . . . . . . . . . . . . . . . . . . . . . . . . . . . . .24
Enjoying DVB-T . . . . . . . . . . . . . . . . . . . . .25-29
DVB-T broadcasting screen . . . . . . . . . . . . . . . . . . . . .25
Entering the DVB-T mode . . . . . . . . . . . . . . . . . . . . . . .25
Viewing the channel list for TV/Radio . . . . . . . . . . . . . .26
Moving to the previous/next channel . . . . . . . . . . . . . . .26
Capturing the screen display . . . . . . . . . . . . . . . . . . . .27
Muting sound . . . . . . . . . . . . . . . . . . . . . . . . . . . . . . . .27
Volume control . . . . . . . . . . . . . . . . . . . . . . . . . . . . . . . .27
EZ menu . . . . . . . . . . . . . . . . . . . . . . . . . . . . . . . . . .27-29
Viewing photo . . . . . . . . . . . . . . . . . . . . . .30-33
Photo viewing screen . . . . . . . . . . . . . . . . . . . . . . . . . .30
Viewing photo files . . . . . . . . . . . . . . . . . . . . . . . . . . . . .30
Enlarging/Reducing the photo size . . . . . . . . . . . . . . . .30
Setting the slide show . . . . . . . . . . . . . . . . . . . . . . . . . .31
Viewing the previous or next file . . . . . . . . . . . . . . . . . .31
Viewing photos while listening to music/radio . . . . . . . .31
Volume control . . . . . . . . . . . . . . . . . . . . . . . . . . . . . . . .32
EZ menu . . . . . . . . . . . . . . . . . . . . . . . . . . . . . . . . . . . .33
Listening to the FM radio (Optional) . . . .34-36
FM radio reception screen . . . . . . . . . . . . . . . . . . . . . . .34
Setting preset channels . . . . . . . . . . . . . . . . . . . . . . . . .34
Listening to the FM radio . . . . . . . . . . . . . . . . . . . . . . . .34
Muting sound . . . . . . . . . . . . . . . . . . . . . . . . . . . . . . . . .34
Searching the FM the radio stations . . . . . . . . . . . . . . .35
Volume control . . . . . . . . . . . . . . . . . . . . . . . . . . . . . . .36
EZ menu . . . . . . . . . . . . . . . . . . . . . . . . . . . . . . . . . . . .36
Viewing text . . . . . . . . . . . . . . . . . . . . . . . .37-40
Text viewing screen . . . . . . . . . . . . . . . . . . . . . . . . . . . .37
Viewing text files . . . . . . . . . . . . . . . . . . . . . . . . . . . . . .37
Enlarging/Reducing the text display size . . . . . . . . . . . .37
Viewing the previous or next page . . . . . . . . . . . . . . . . .38
Skipping pages automatically . . . . . . . . . . . . . . . . . . . .38
Speed search . . . . . . . . . . . . . . . . . . . . . . . . . . . . . . . .38
Viewing texts while listening to music/radio . . . . . . . . . .39
Volume control . . . . . . . . . . . . . . . . . . . . . . . . . . . . . . . .39
EZ menu . . . . . . . . . . . . . . . . . . . . . . . . . . . . . . . . . . . .40
Recording . . . . . . . . . . . . . . . . . . . . . . . . . . . .41
Recording screen . . . . . . . . . . . . . . . . . . . . . . . . . . . . .41
How to record . . . . . . . . . . . . . . . . . . . . . . . . . . . . . . . .41
EZ menu . . . . . . . . . . . . . . . . . . . . . . . . . . . . . . . . . . . .41
Checking up all files . . . . . . . . . . . . . . . . . . . .42
Playing games . . . . . . . . . . . . . . . . . . . . . . . . .42
Advanced setting . . . . . . . . . . . . . . . . . . . .43-44
Music . . . . . . . . . . . . . . . . . . . . . . . . . . . . . . . . . . . . . . .43
Movie . . . . . . . . . . . . . . . . . . . . . . . . . . . . . . . . . . . . . .43
DVB-T . . . . . . . . . . . . . . . . . . . . . . . . . . . . . . . . . . . . . .43
Photo . . . . . . . . . . . . . . . . . . . . . . . . . . . . . . . . . . . . . . .43
Text . . . . . . . . . . . . . . . . . . . . . . . . . . . . . . . . . . . . . . . .43
Radio . . . . . . . . . . . . . . . . . . . . . . . . . . . . . . . . . . . . . . .43
Record . . . . . . . . . . . . . . . . . . . . . . . . . . . . . . . . . . . . . .44
Time . . . . . . . . . . . . . . . . . . . . . . . . . . . . . . . . . . . . . . . .44
Display setting . . . . . . . . . . . . . . . . . . . . . . . . . . . . . . . .44
General . . . . . . . . . . . . . . . . . . . . . . . . . . . . . . . . . . . . .44
Additional information . . . . . . . . . . . . . . . . . .45
Upgrading firmware automatically . . . . . . . . . . . . . . . . .45
Upgrading firmware manually . . . . . . . . . . . . . . . . . . . .45
Troubleshooting . . . . . . . . . . . . . . . . . . . . . . .46
Error code . . . . . . . . . . . . . . . . . . . . . . . . . . . .47
Specifications . . . . . . . . . . . . . . . . . . . . . .48-49
Supported file specification . . . . . . . . . . . . . . . . . . . . . .49
cool
style
Safety tips
4
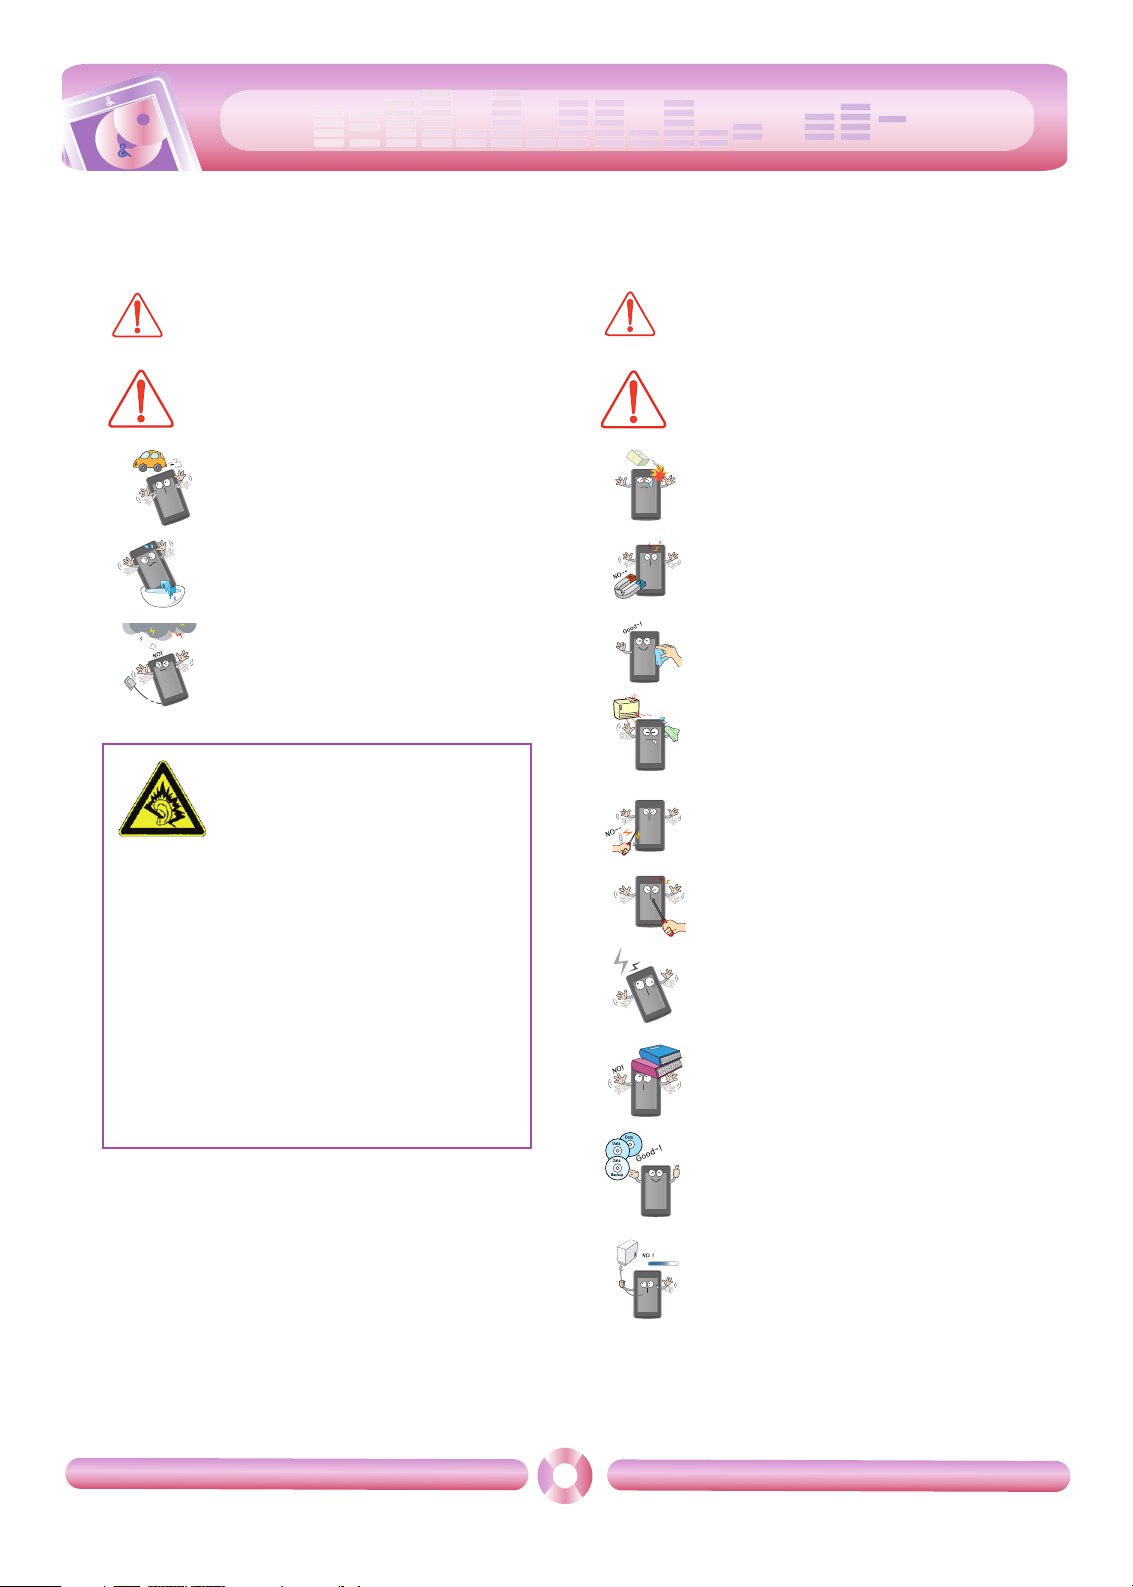
Please follow the safety tips closely to reduce the risk of accidents or damage to equipment.
Safety instructions are divided into Warning and Caution.
Keep this manual in an easily accessible place.
Do not use the Player and connect with the
cable or AC adapter when the rain is pouring
down and thunderstorms produce lightning.
Do not use this product while driving.
Do not operate the Player near water, dust, or
soot.
Not following the safety tips may result
in a light accident or damage.
Not following the safety tips may result
in death or serious injury.
Do not place the player near a magnet or within the
magnetic field.
Note that the player may malfunction in an electrostatic environment.
Do not disconnect the USB cable. Do not turn off the
player while the USB cable is connected. Otherwise,
the data may get lost.
Back up important data. (Note that the manufacturer
is not responsible for the loss of major data caused
by the user's mistake.)
Do not insert a metallic object (coins or hair pins,
etc.) or flammable objects in the product.
Do not drop such objects on the product either.
Do not place an object on the product.
Keep this product away from heat.
Clean the Player with soft cloth.
Do not disassemble, repair, or remodel the product.
Do not drop an object or give shock on the
product.
Do not use the earphones loud while
walking,especially on the crosswalks.
Stop using earphones or lower the
volume when you have ringing in your ears.
Careful that headphones or earphones do not
slip into the subway doors or automatic doors.
Listening to the music loud for a long time may
compromise your hearing ability.
Do not use earphones while riding bicycles
and motor cycles or driving a car.
Check the volume before using a
headphone. If headphones are used at high
volume for more than 30 minutes, it may result
in noise induced hearing damage.
Warning
Caution
Warning
Caution
cool
style
General information of MP3 player
5
Features
Portable Data Storage
Easy storage and transfer of any file type.
USB 1.1 and 2.0
You can download files at a fast speed. (USB 2.0 high speed)
LG 3D Sound
3D sound effects, low tones, and low frequency sound provide greater
sound quality.
Various background setting
Users can select a desired background image among various supported items or even create unique one to their likings.
DVB-T
DVB-T (Digital Video Broadcasting – Terrestrial) is the DVB European
consortium standard for the broadcast transmission of digital terrestrial
television. You can enjoy high quality digital audio and digital video
broadcasting simultaneously.
Text Viewer
Convenient display of text files (.txt) for reading on the go.
Wide 3.0" Color TFT LCD
Photos and video are reproduced in vivid detail on the highly portable
260,000 color TFT LCD.
Touch screen
You can use the menus and functions of MP3 player by touching the
LCD.
FM Reception(Optional)
With auto frequency selection feature, you can conveniently listen to
the FM radio broadcasting.
Voice Recording
With the built-in microphone, you can record your voice and FM radio
broadcasting anywhere.
Photo Viewer
Store and display photos on the vivid display for entertaining slide
shows.
File Format Flexibility
- Music: MP3, OGG, WMA, WAV
- Video: LG AVI (
The player can be only played the video files converted
via LG Media Center.), WMV
- Photo: JPG, BMP
- Text: TXT
Media Device(MTP) Mode / Removable Disk(MSC)
Mode
What is the Media Device(MTP) mode?
The MTP stands for the Media Transfer Protocol. It applies the latest
technology defined by Microsoft to support multimedia devices.
- Windows XP / SP1 or higher OS, and Windows Media Player 10 or
higher.
- To use the MSC mode, select the MSC mode in the PC Connection
Setting menu.
- If the Windows OS does not support the MTP, the player will function
in the MSC mode although the player is set in the MTP mode (Select
the MSC mode for the USB in the setup menu for Windows 2000).
What is the Removable Disk(MSC) mode?
The MSC stands for the Mass Storage Class. The device in MSC
mode functions like a portable memory.
Converting video file
MP3 player can be only played the video files converted via LG Media
Center.
For details about conversion, see the Help menu [Converting video
file] on LG Media Center.
PC Connection Setting
Media Device(MTP) Mode
You should download music files via LG Media Center or Windows
Media Player 10 or higher.
You should download video, photo, and text files via LG Media Center.
You can copy data files to the Data folder.
Removable Disk(MSC) Mode
You can copy the Media file to the Removal Disc. (But you should
download video files via LG Media Center.)
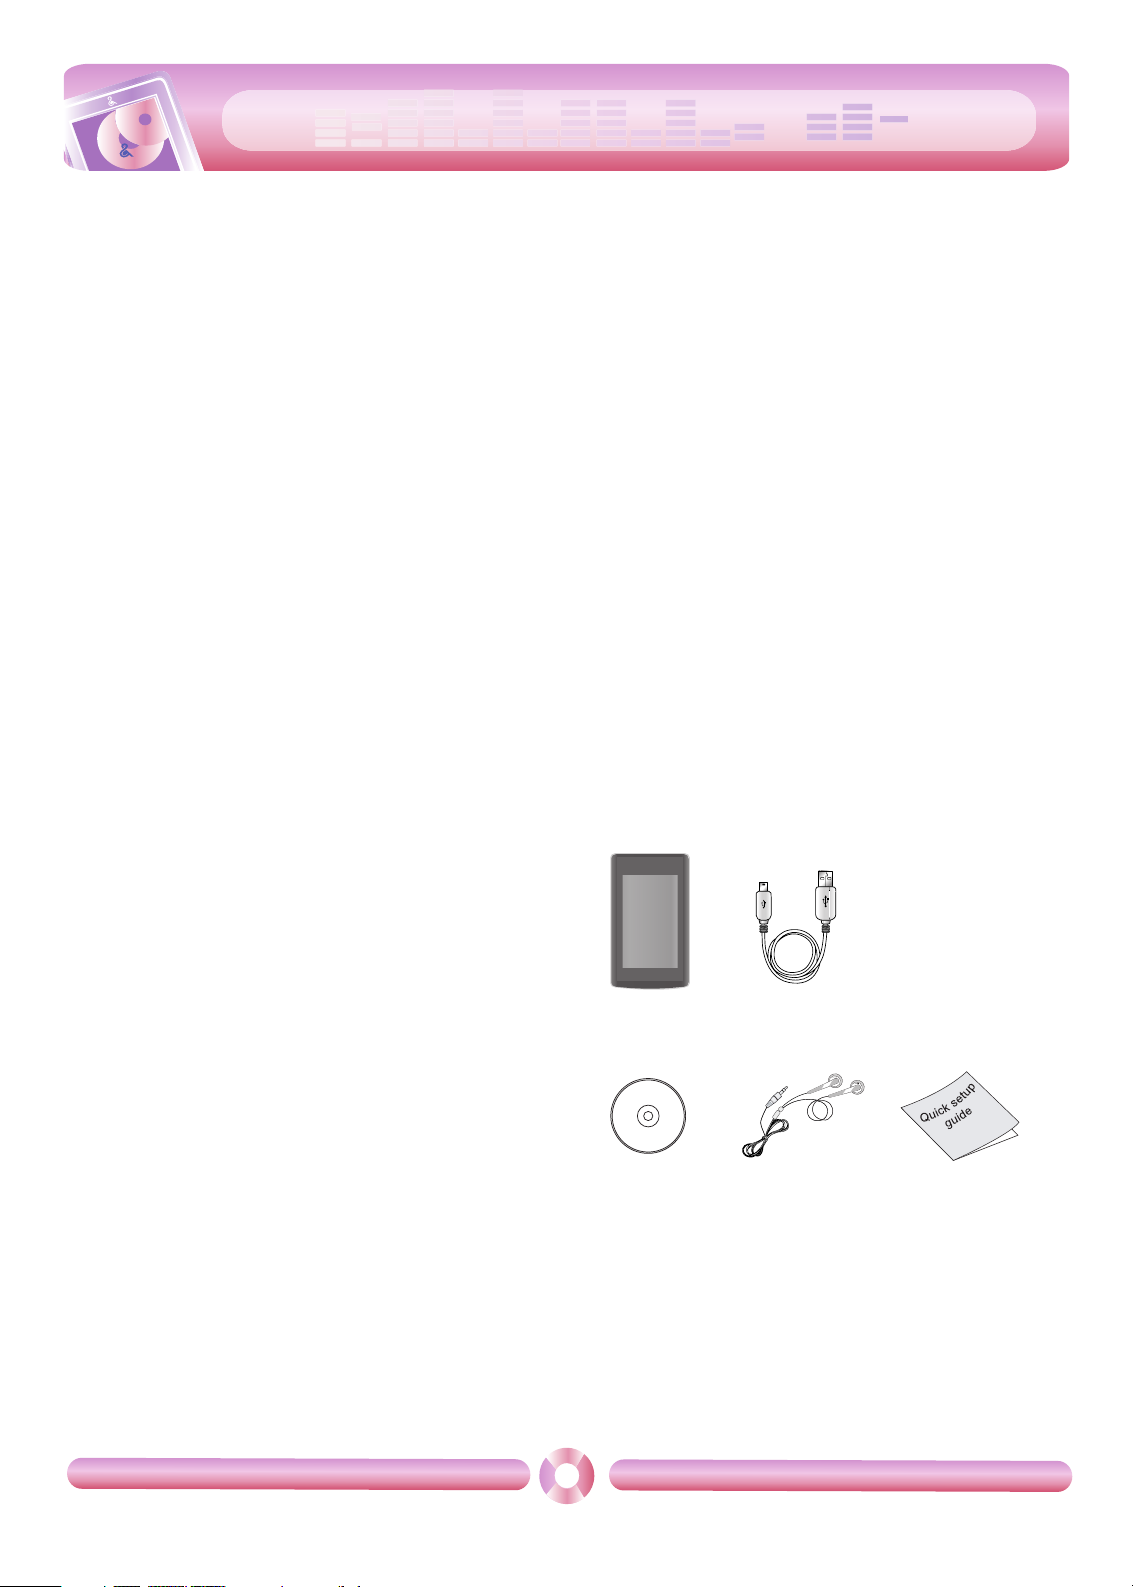
Package contents
- The images inserted herein are examples to make users understand
the more easily and may be little bit different from the real product.
- The contents of the product are subject to change without prior no-
tice for functional improvement.
- Contact with one of call centers supplied with this manual to buy bat-
teries.
T80 USB cable
Software CD Kernel type earphones Quick Setup Guide

cool
style
Name of each component
6
* Precautions in using the touch screen
Do not tap on the touch screen with your fingers unclean or gloves on.
- Otherwise, the selected function may not operate in any way. Use it with bare hands lightly.
Do not press the touch screen hard to make it work.
- If you apply too much strength, it can damage the sensor of the touch screen.
Touch the point that you want to work in order to operate the function correctly.
Do not touch the screen with sharp objects like pins, or it cause scratches on the screen.
1 Display screen (*Touch Screen)
2 Earphone jack
3 DVB-T antenna
4 • Power on/off
• Hold switch ( )
5 External antenna jack(for DVB-T)
6 Microphone hole/RESET hole
7 Battery cover
8 Volume button
9 Record (REC) button
10 USB port
10 9 8
1 2 3 4 5
6
7
cool
style
Installing software
7
Before installing the operating program
Check the specifications of your PC before using
the Player.
Minimum system requirements
- CD-ROM Drive
- Pentium ΙΙΙ or higher level CPU / 128MB or larger memory
- 300MB or larger hard disc space, 800 X 600 mode
- Hi-color (16 bit) or higher level video card, Sound card
Operating environment
- The MTP mode is applied to the PC equipped with Windows XP
(SP1) or higher-version OS or the Windows Media Player 10/11.
To the lower-version OS, the MSC mode is applied.
Windows Media Player 10/11
- You can download the file using Synchronize with Windows Media
Player 10/11 menu.
- For more information, see the Help menu of Windows Media Player
10/11.
LG Media Center
- Windows 2000/XP/Vista
- Windows Media Player 10/11/ Internet Explorer 6.0
- Windows Media Player or Internet Explorer will be
automatically installed during installation of the LG Media Center.
Internet connection must be connected in order to install Internet
Explorer.
About LG Media Center
The LG Media Center program is an integrated data
management program developed for users to more
conveniently use the MP3 player.
Features of the LG Media Center
You can efficiently manage music, video, and photo files through the
Media Library rule and download them to the MP3 player.
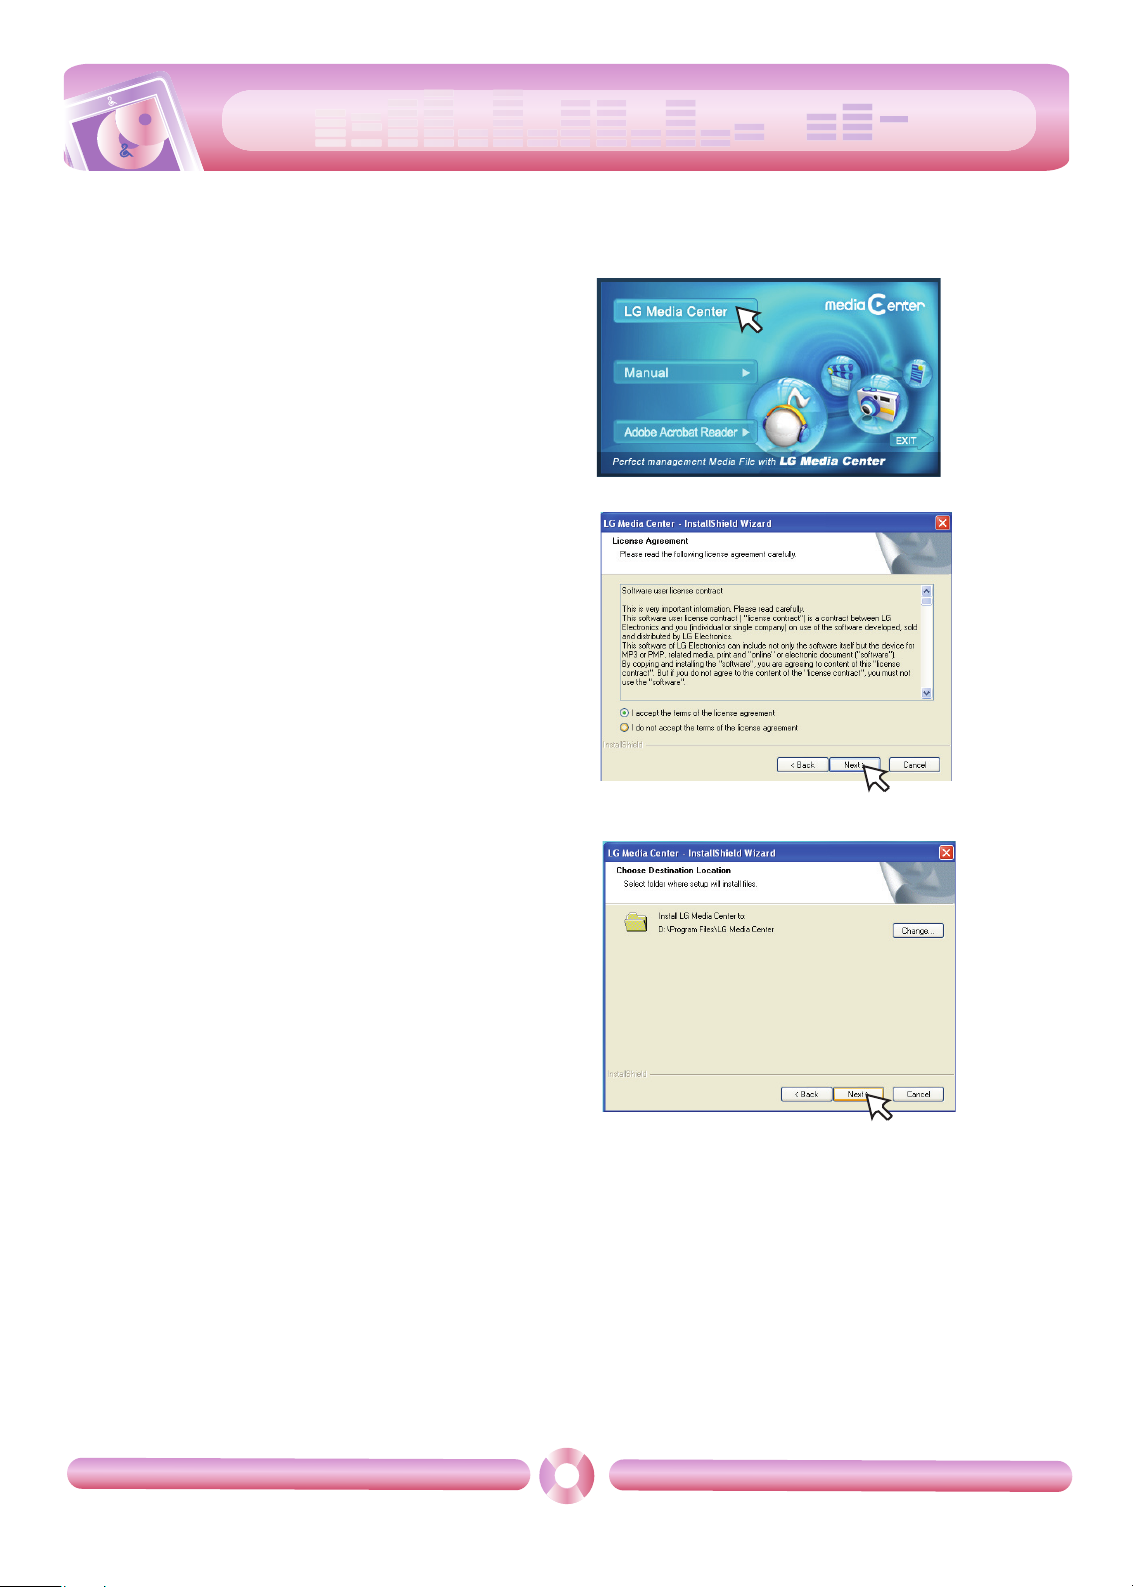
Installing LG Media Center
1 Insert the operation program CD into the CD-ROM.
2 Select [LG Media Center].
3 Read the License Agreement. Select the check box and click [Next].
4 Select the installation path and click [Next].
cool
style
Installing software
8
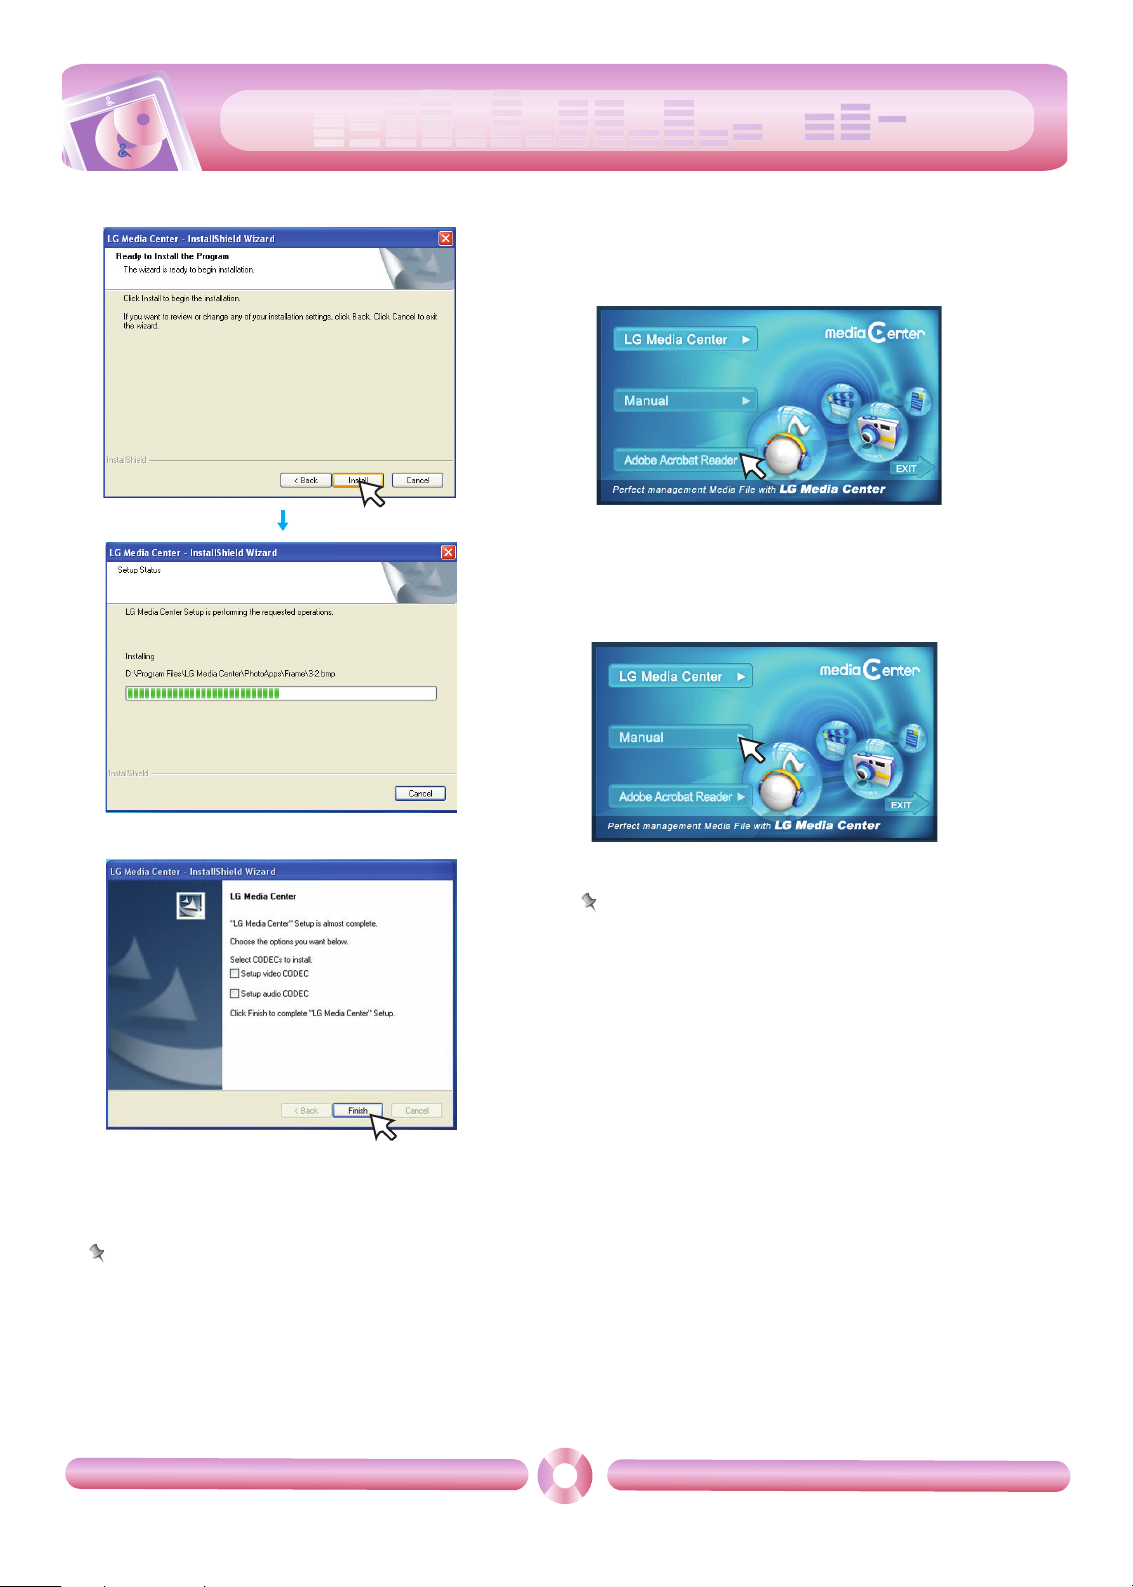
5 Click [Install] to start installation.
6 After finishing the installation, click [Finish].
- You can install CODEC if it is not installed on PC.
7 Click [Start] k [All Programs] k [LG Media Center] to start the
program.
Note
- During installation of the LG Media Center, you can install the Windows Media Player and the Internet Explorer for an operating environment.
- The pop up image may be different depending on the OS of PC.
Installation of the Adobe Acrobat Reader
1 Insert the operation program CD into the CD-ROM.
2 Select [Adobe Acrobat Reader].
3 Follow the displayed instructions.
View the manual
1 Insert the operation program CD into the CD-ROM.
2 Select [Manual].
3 You can see the manual.
Note
You must install the Adobe Acrobat Reader to read the manual.
cool
style
Connecting to the PC
9
To connect the USB cable
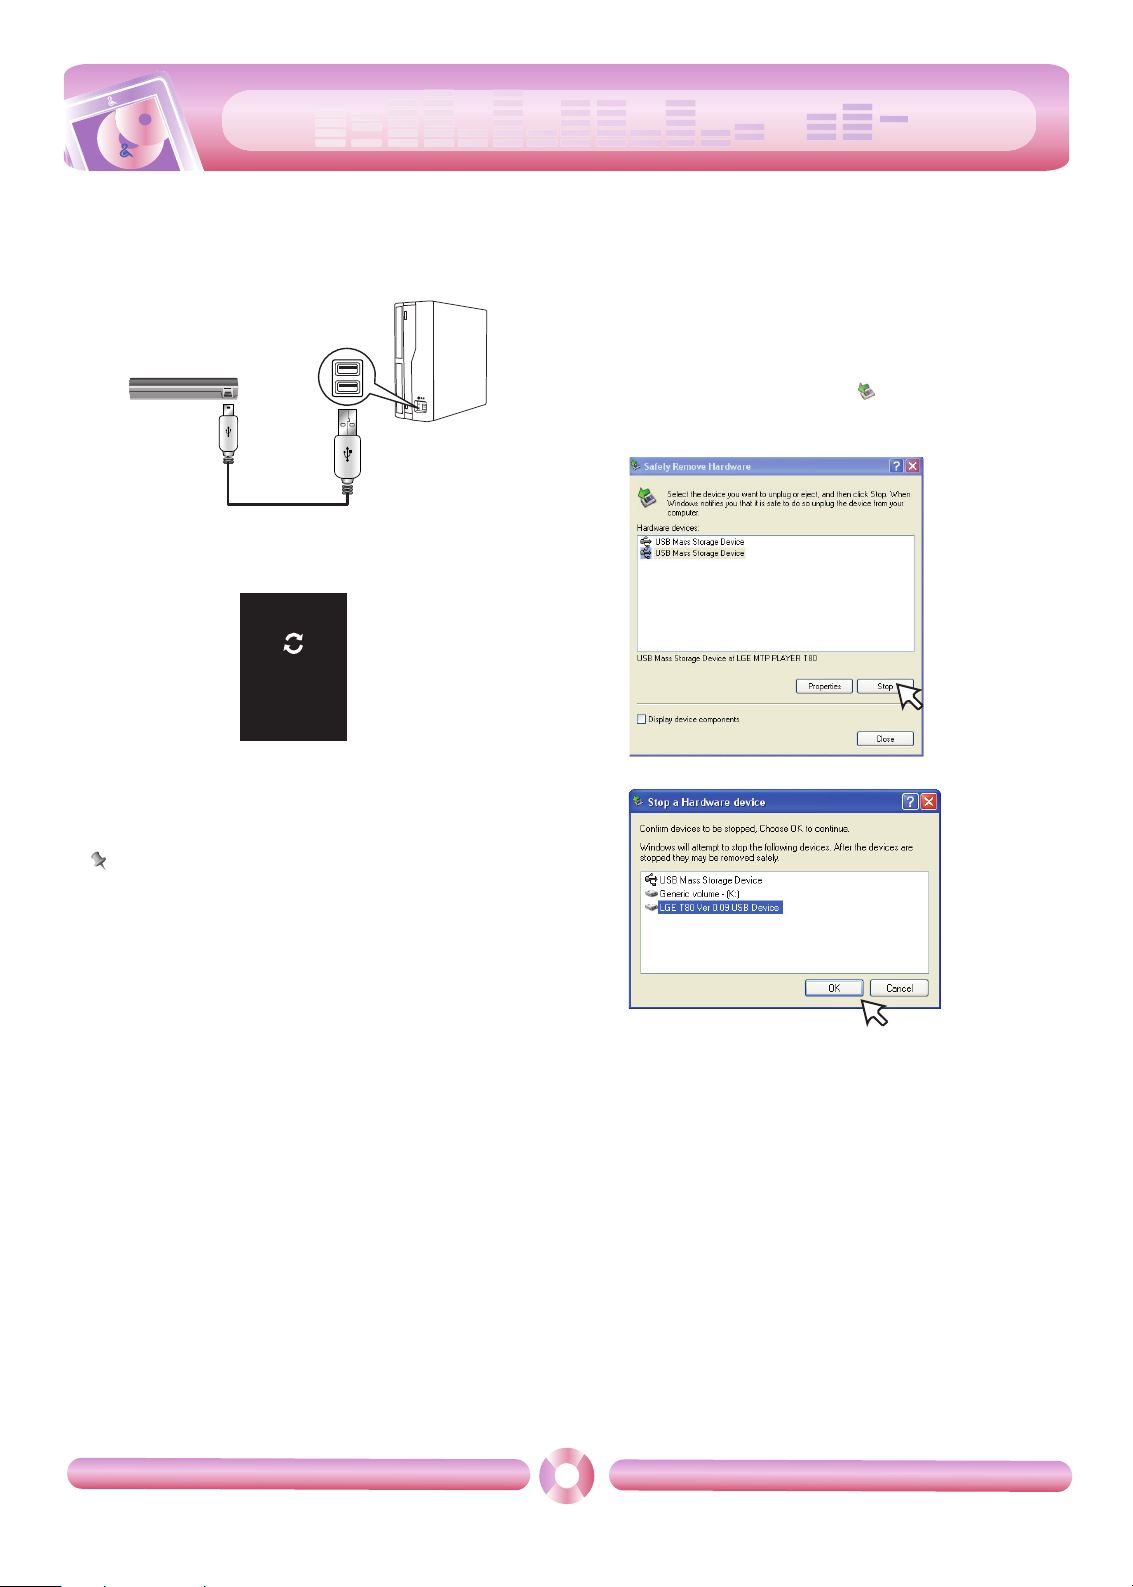
1 Connect one end of the USB cable to the USB port of the PC and
the other to the USB port of the player.
- Check whether both ends are correctly plugged in.
2 If the USB device is normally recognized after the cable is con-
nected, the following will be displayed.
- The software version is displayed on screen.
3 In case of a correct connection, an icon will be displayed on the
task bar of the PC.
- The icon shapes on the task bar may differ depending on the OS of the
PC.
Note
- In case you connect the device to PC with an extended usb cable or
non-certified usb hub, it may not operate.
To disconnect the USB Cable
Media Device(MTP) mode
Disconnect the USB cable from the PC after checking whether a file is
transferring.
If the file is transferring, disconnect it after the transfer is completed.
Removable Disk(MSC) mode
This feature is to safely remove MP3 player from the PC after uploading or downloading the files.
1 Double-click on the Remove Hardware icon on the task bar of
the PC.
2 Click [Stop] when the window appears.
3 Click [OK].
4 After a message that the large-capacity USB storage can be safely
removed is displayed, remove MP3 player from the PC.
- If the USB cable is disconnected while storing or deleting the file, the
data may get lost.
USB Connected
cool
style
Connecting to the PC
10
To download files - MTP mode
MP3 player will be recognized as a mobile device, not a mass storage, and will interwork with the Windows Media Player 10/11.
1 Connect one end of the USB cable to the USB port of the PC and
the other to the USB port of MP3 player.
- Check whether both ends of the cable are correctly plugged in.
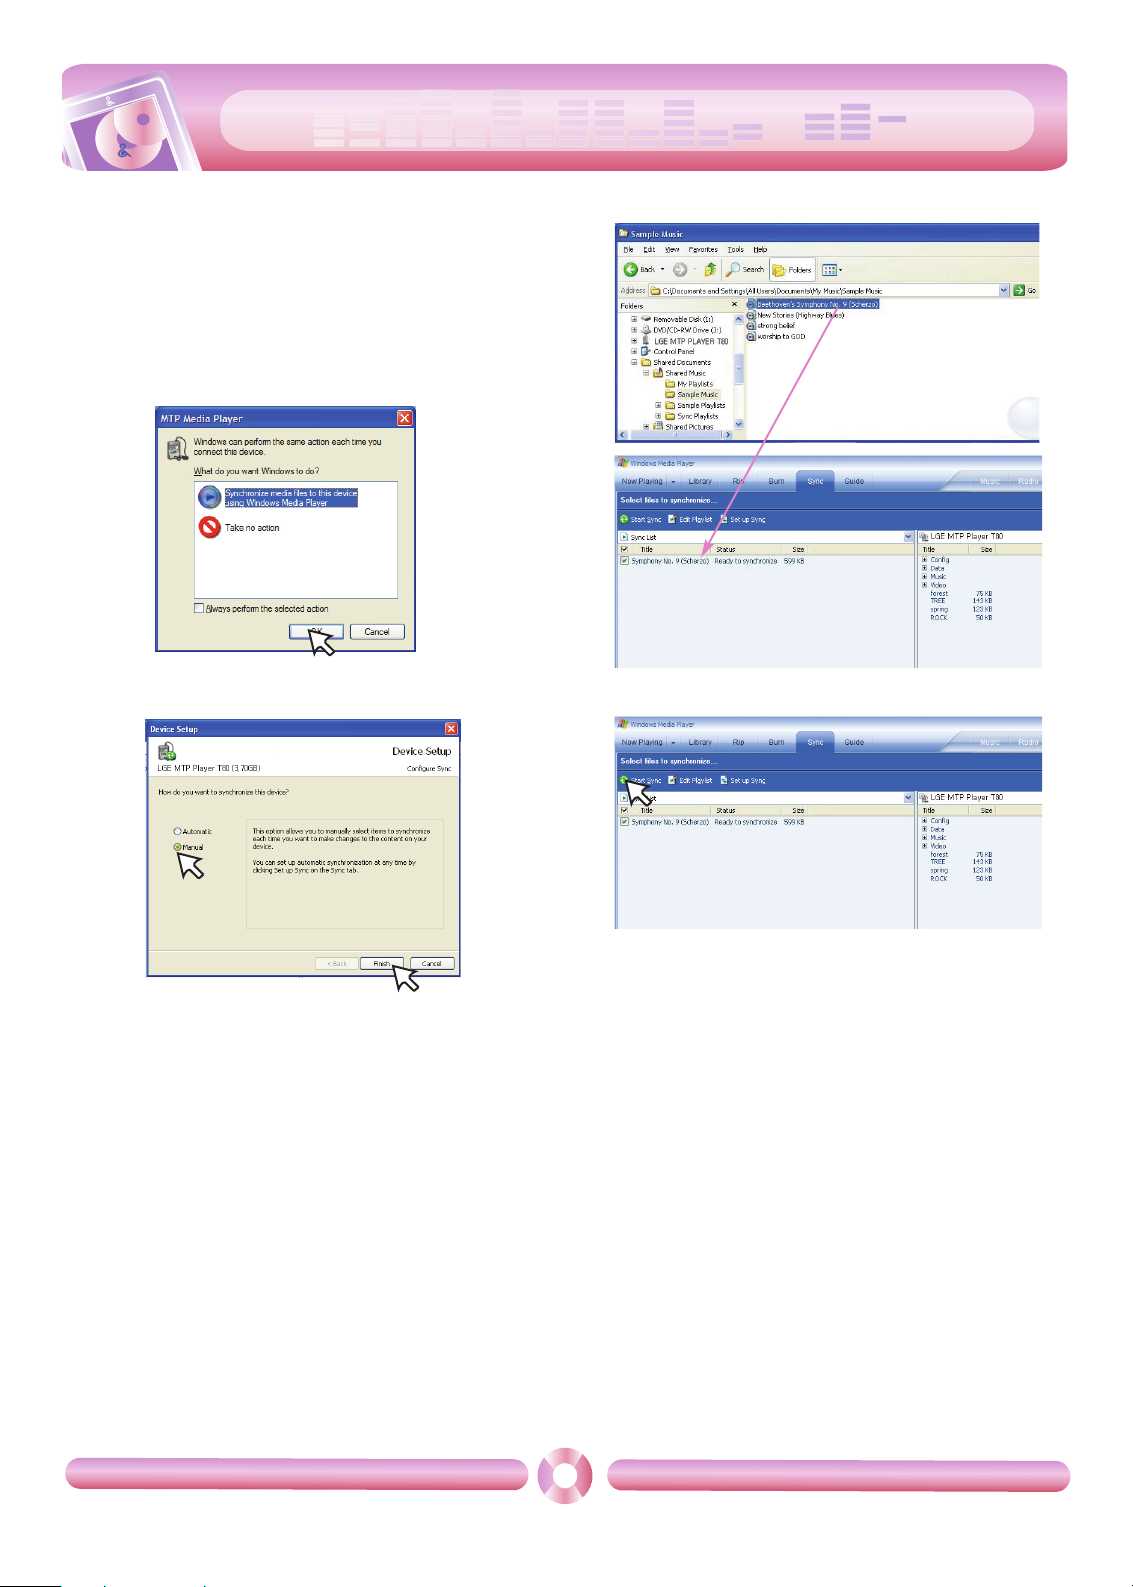
2 The window “MTP Media Player” appears in the PC.
1) a. “Synchronize media files to this device” k “OK”
b. “Manual” k “Finish”
c.
Drag the synchronizing files to the left window.
d. Click
“Start Sync”.
cool
style
Connecting to the PC
11
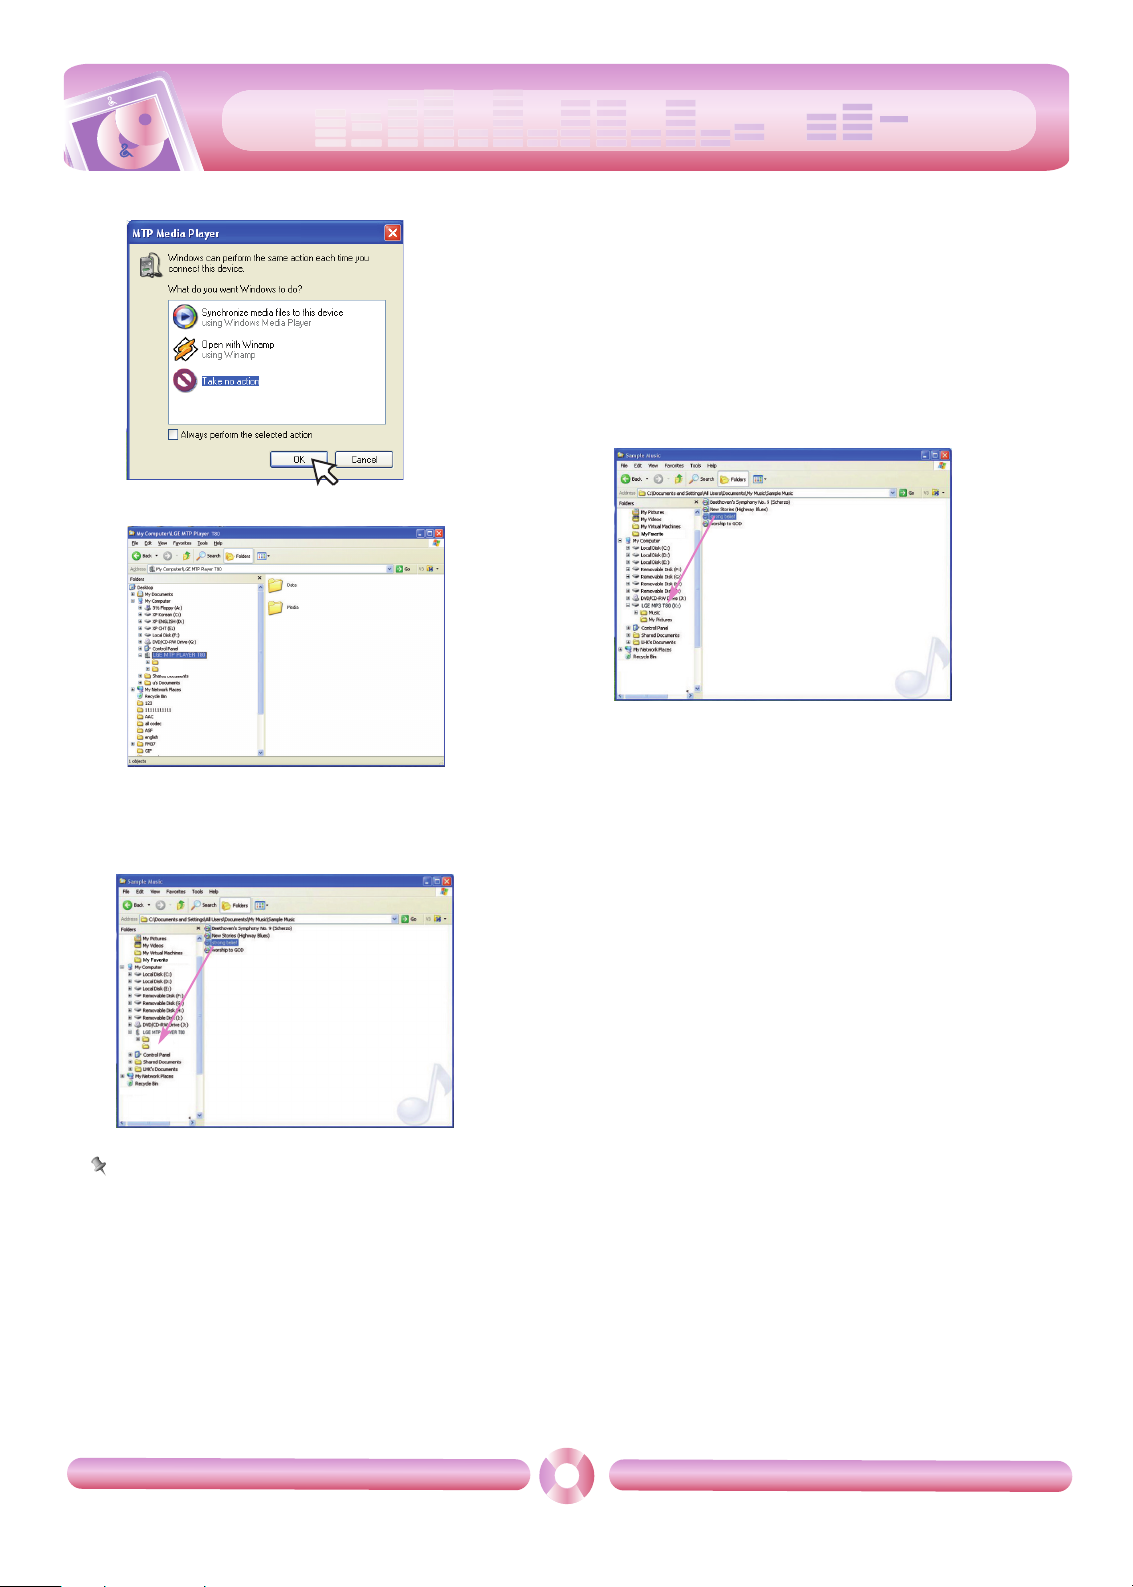
2) a. “Take no action” k “OK”
b. Click “LGE MTP Player T80”
.
- Data folder: You can download or upload all data files.
- Media folder: You can download only the file that Windows Media Player
10 supports.
3 Drag the file to copy to the portable media drive.
Note
- When you cannot check the downloaded files on Media folder,
download it to the Data folder again.
- When you connect the device with Windows Media Player 11 or
higher version, you can download files directly to the Internal Storage. That is, lower folders below the device are not separated to
Data and Media on Window Media Player 11 or higher.
To download files - MSC mode
1 Check whether the device is connected through the MSC mode.
-[Settings] of Home Menu k [General] k
[PC Connection Setting] k Removable Disk (MSC)
2 Connect one end of the USB cable to the USB port of the PC and
the other to the USB port of MP3 player.
-
Check whether both ends of the cable are correctly plugged in.
3 Check whether a new drive has been added in the Windows Ex-
plorer in the PC.
- The drive name may differ depending on the OS.
4 Drag the file to copy to the removable disc drive.
- Disconnecting the USB cable while the file is being copied may cause
malfunction of MP3 player.
- MP3 player will be charged when connected to the PC through the
USB cable.
- Download video files from LG Media Center.
- Download the JANUS DRM-applied files through the
Windows Media Player 10 or higher, or LG Media Center (MTP Mode
only)
- Download X-Sync DRM-applied files through the LG Media Center.
Data
Media
Data
Media
cool
style
Connecting to the PC
12
To download files - LG Media Center
You can download from MP3 player the files you want via LG Media
Center.
For details, see the Help menu on LG Media Center.
- You can check the downloaded files in the Music, Video, Photo, or
Document folder.
- OGG files only are supported in MSC mode.
1 Connect one end of the USB cable to the USB port of the PC and
the other to the USB port of MP3 player.
-
Check whether both ends of the cable are correctly plugged in.
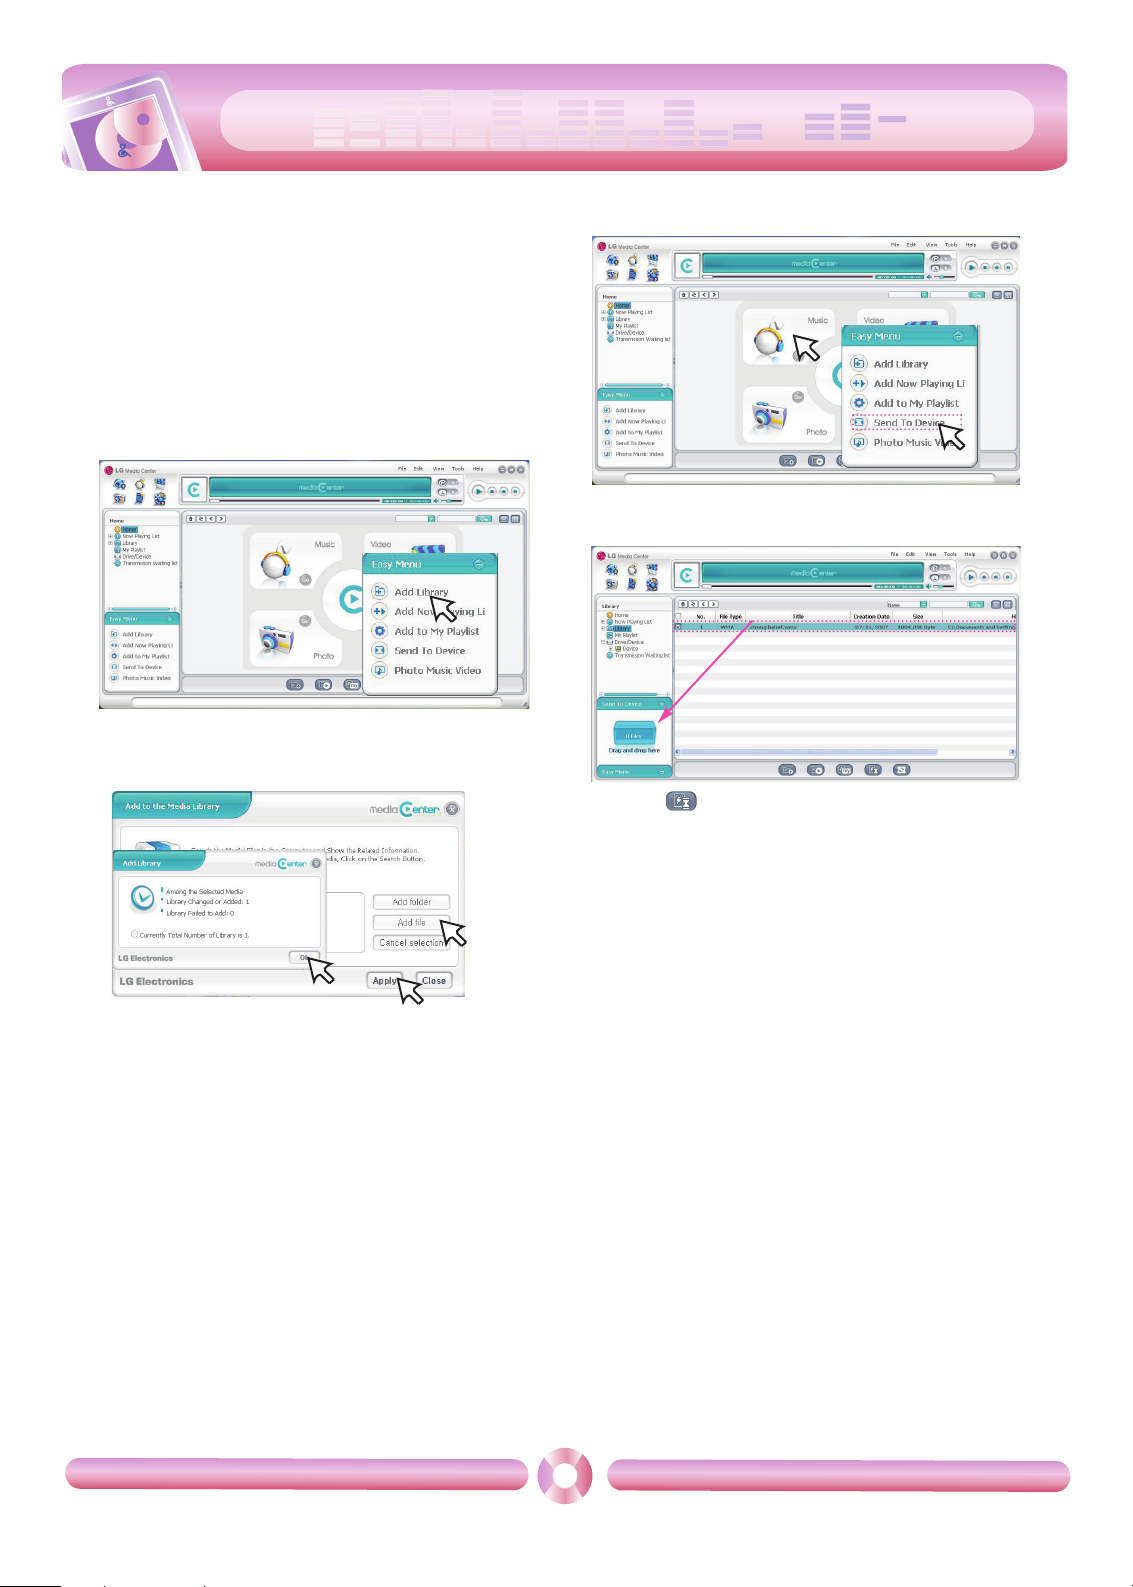
2 Execute the LG Media Center and then click [Add Library].
3 [Add file/folder] k Selecting the downing file (Ex: Music file) k
[Apply] k [Ok].
4 [Music] k [Send to Device]
5 Drag the files to the [Send to Device].
- Or press on the bottom of the LG Media Center, you can
send the file into the player.
cool
style
Converting video files
13
MP3 player can only play the video files converted via LG Media Center.
For details about conversion, see the Help menu [Converting video
file] on LG Media Center.
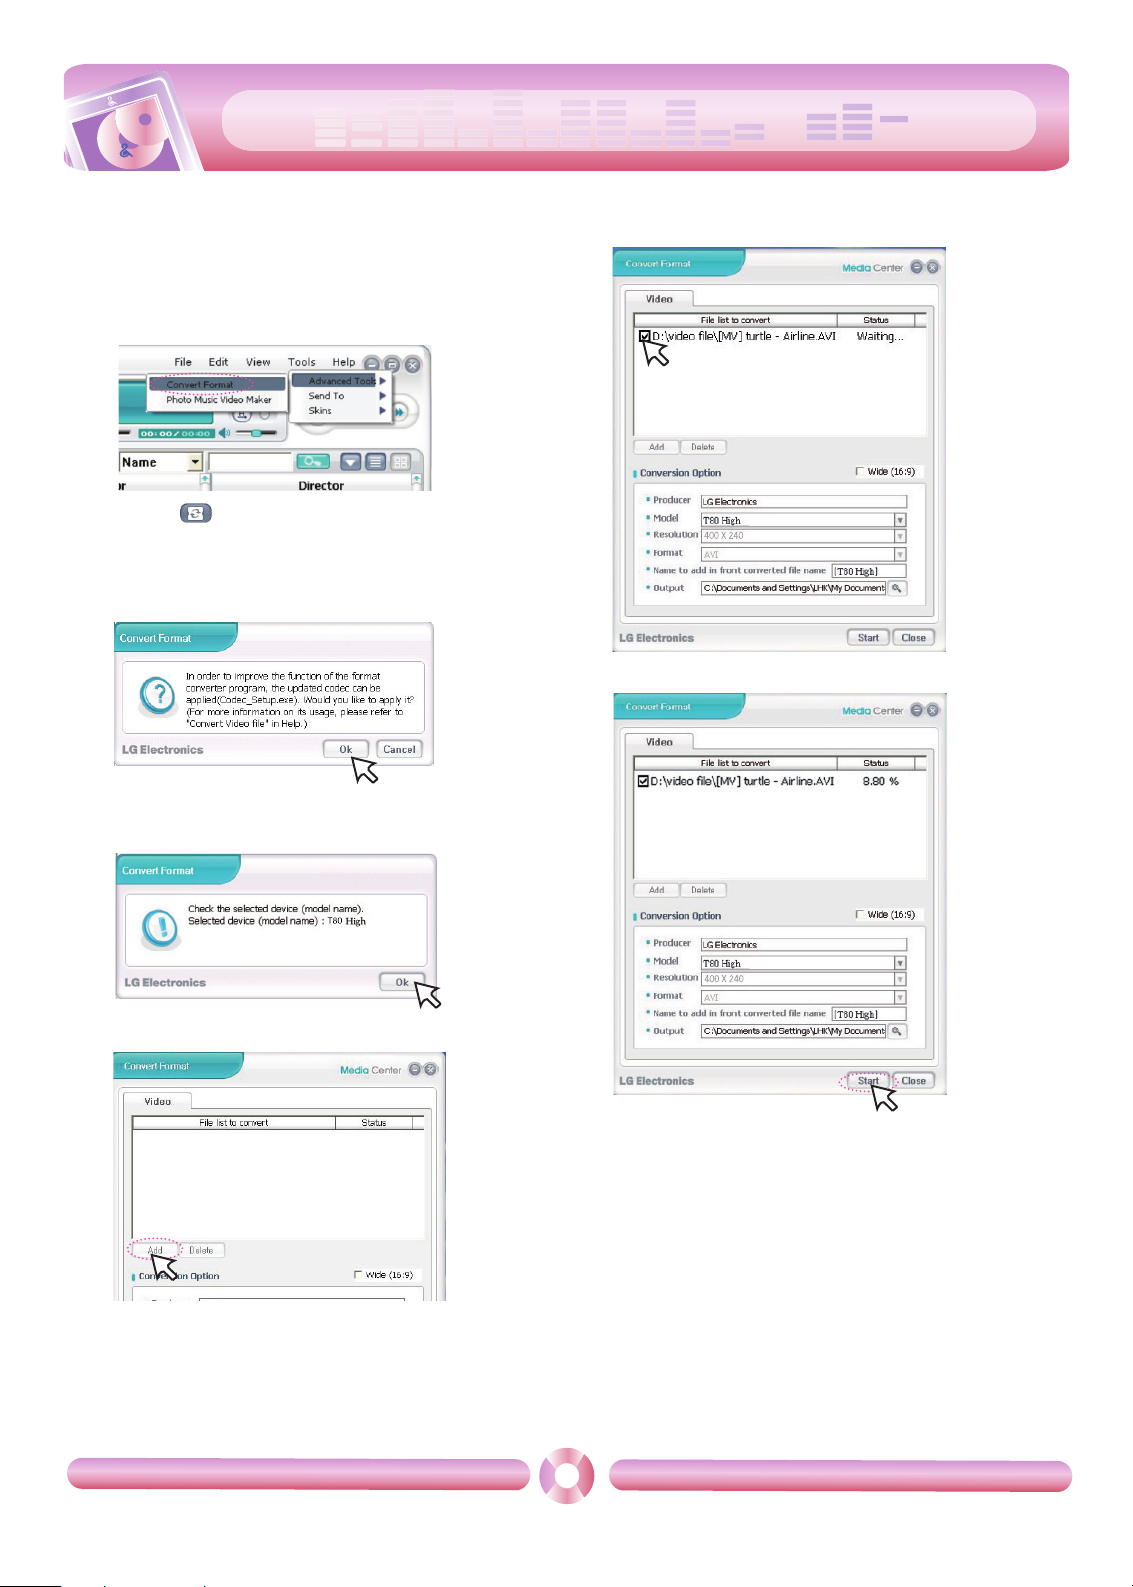
1 Execute the LG Media Center.
2 Selecting [Tools] k [Advanced Tools] k [Convert Format].
- Or press on the bottom of the LG Media Center, you can
also activate the converting format program.
3 In case that the converting codec is not installed or the latest ver-
sion, the pop-up window appears as below.
Click [Ok].
4 Install the latest updated version.
5 Click [Ok].
6 Click [Add] to select a video file you want to convert.
7 Check the video file and then select conversion options.
8 Click [Start], the selected video file start converting.
- After converting, check the video file where the file is .
- For details, see the Help menu on LG Media Center.

cool
style
Charging the MP3 player
14
USB cable
MP3 player will be also automatically charged when connecting
the PC and MP3 player with USB cable.
- On the display of MP3 player, the charging status will be displayed
as follows: (Charging time : about 4 hours)
Note
- MP3 player may completely discharged first time you purchase the
product. Charge the battery first.
- Charging time may vary according to PC system requirements or operating environment. If your PC is suspended, MP3 player is not
charged.
-
Do not charge MP3 player for longer than 12 hours. Overcharge and
overdischarge may shorten the battery life.
-
After checking the state of a remaining battery of note book, connect
the USB cable and charge it.
-
Do not charge it when the remaining battery of the note book is not
enough.
-
If you transfer files on charging, the charging time will be extended.
-
Charge the battery in a place with a normal temperature.
- In case you connect the device to PC with an extended usb cable or
non-certified usb hub, it may not operate.
AC adapter(Not supplied)
1 Connect the AC adapter to the AC outlet.
2 Connect the USB cable of AC adapter to the USB port of MP3
player.
- On the display of MP3 player, the charging status will be displayed
as follows: (Charging time: about 4 hours)
Note
- Do not disconnect AC Adapter before booting of MP3 player is completed. The data may get lost.
-
Use the confirmed AC adapter(EAY34275101) when you charge the
MP3 player, otherwise the MP3 player may malfunction.
-
Do not charge MP3 player for longer than 12 hours. Overcharge and
overdischarge may shorten the battery life.
-
Charge the battery in a place with a normal temperature.
USB Connected
Firmware Ver. S 0.42
Charging status
2
1
Power-on status
Power-off status
Charging
Charging status
cool
style
Basic operation
15
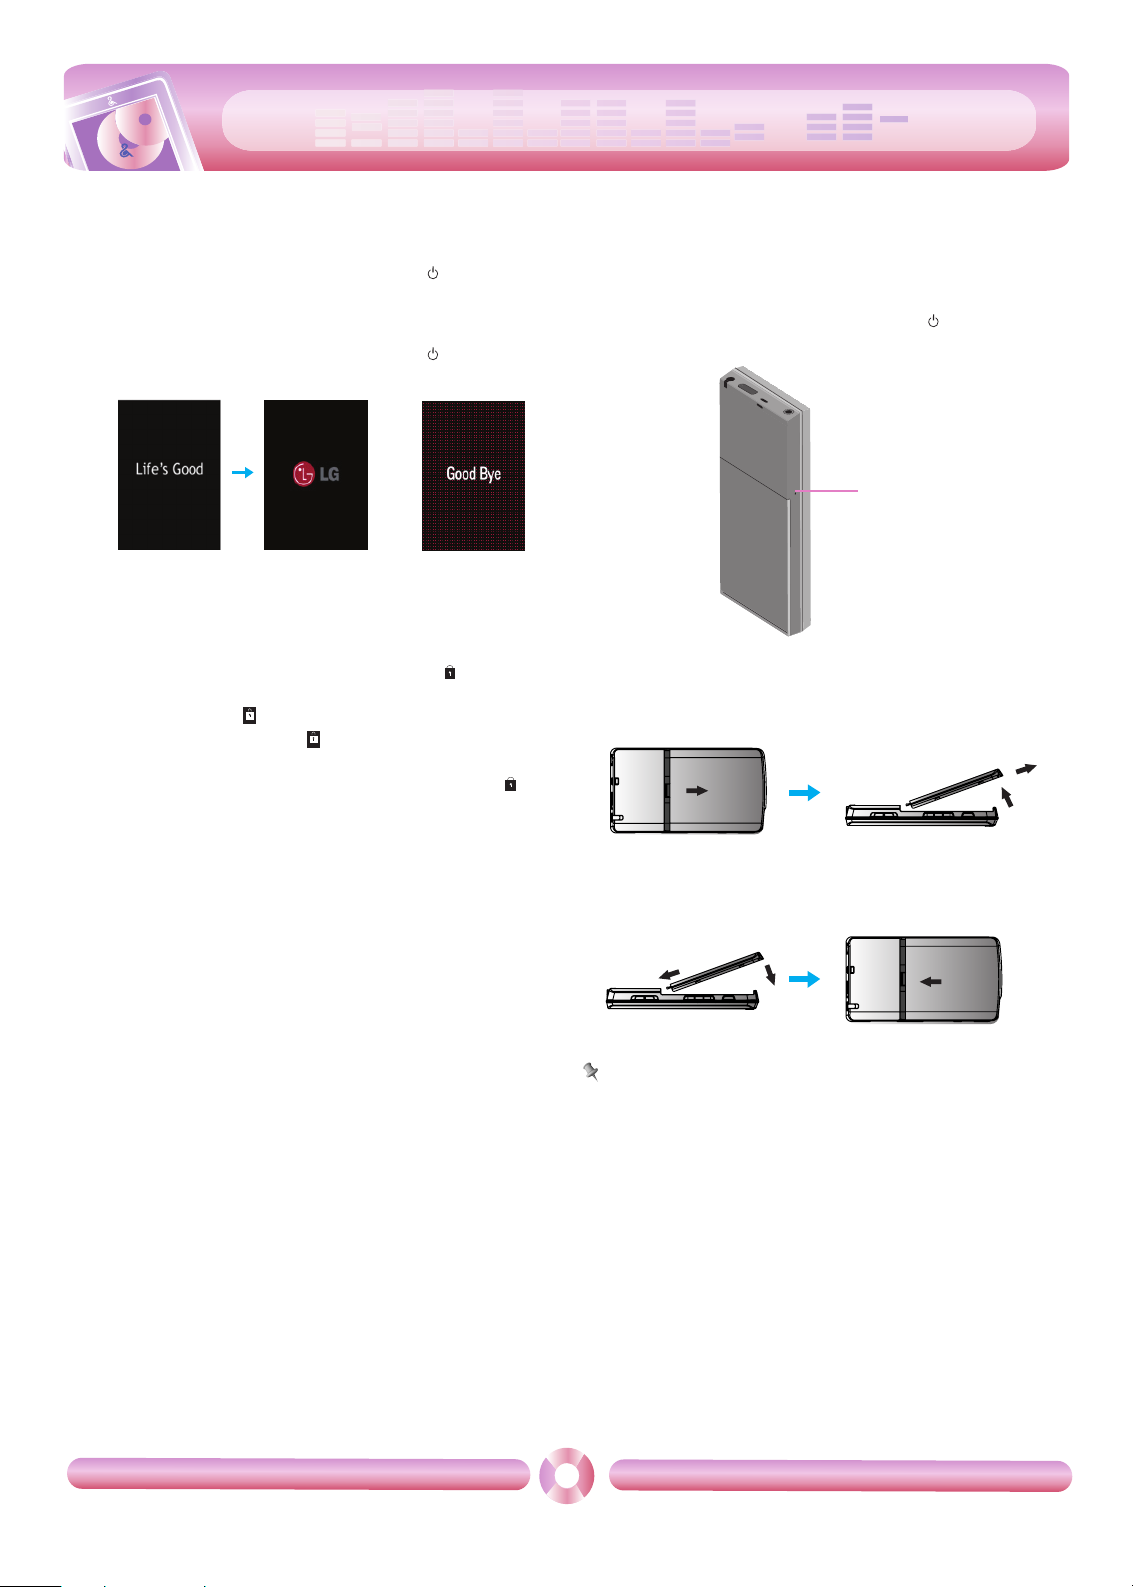
Turning on/off the power
Turning on the power
Push the power on/off switch in the direction of the until MP3 player
is turned on.
Turning off the power
Push the power on/off switch in the direction of the until MP3 player
is turned off.
Lock feature
This feature locks MP3 player to prevent it from operating when
you accidentally press a button.
1 Push the power on/off switch in the direction of the to lock MP3
player.
- Upon locked status, will be displayed on LCD.
Upon pressing of each button, will appear for two seconds and disappear.
2 Push the power on/off switch in the opposite direction of the but-
ton to unlock the device.
Reset feature
This feature is to reset the player when the MP3 player does not
operate normally.
Prick the hole with a sharp object when the MP3 player does not operate normally.
- Push the power on/off switch in the direction of the for about 10
minutes if you do not have not any sharp object.
Changing battery
1 Pull the battery cover in the direction of the arrow and lift up gently.
2 Detach the battery and insert a new one with +/- aligned.
3 Fit the fitting protrusion to the fitting grove of the player and push it
gently as shown below.
Note
- Make sure to turn the player off when changing the battery. Or it may
cause errors on the DRM file playback.
- Do not use a non-certified battery. Or it may damage the player or
battery and cause the battery to explode.
- Contact with one of call centers supplied with this manual to buy batteries.
Power On
Power Off
RESET hole
Locked
Locked
 Loading...