LG RW120 User Manual

RW120

Wall Mounting Bracket

Installation and Setup Guide

P/NO : 3828TUL255E(1002-REV02)

Printed in Korea

/Wall mounting bracket

/ Accessories

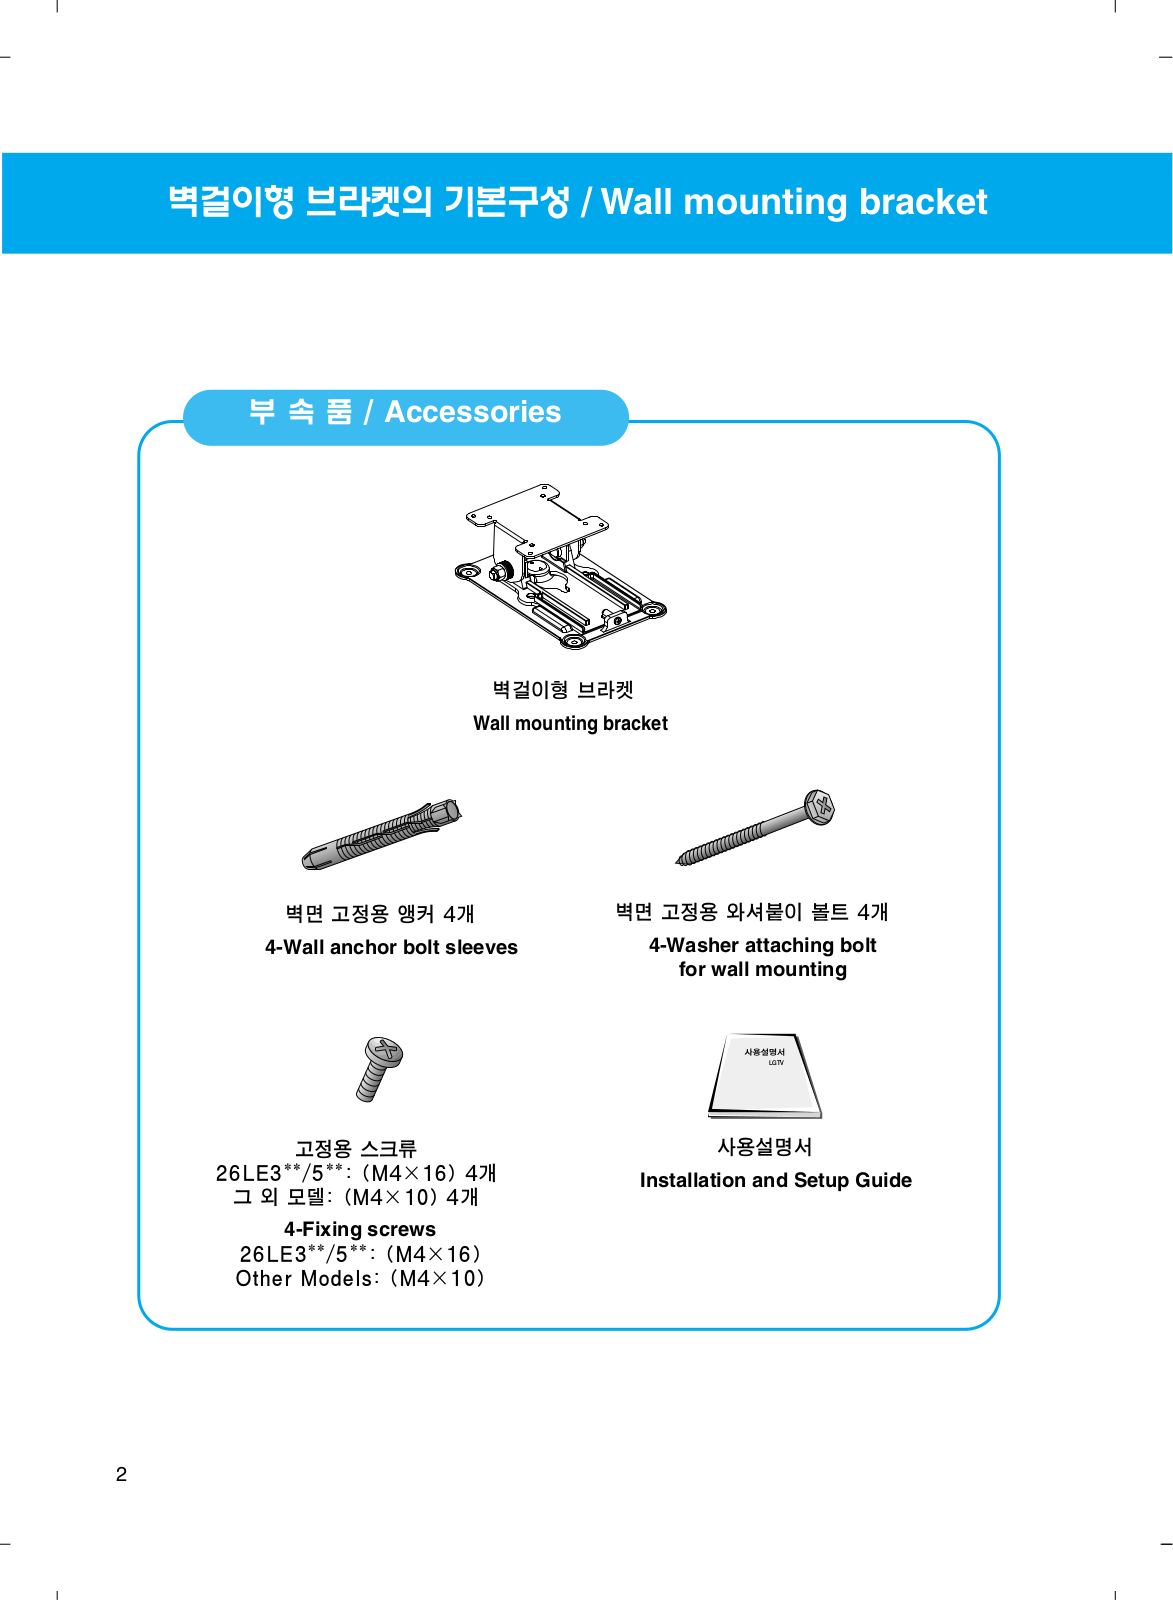
Wall mounting bracket

4

4

4-Wall anchor bolt sleeves

4-Washer attaching bolt


for wall mounting


26LE3**/5**: (M4×16) 4

Installation and Setup Guide

: (M4×10) 4


4-Fixing screws


26LE3**/5**: (M4×16)


Other Models: (M4×10)


2

/Contents

/ First step

Safety Instructions

/ Installation

Installing Wall monuting bracket

61. .

Detach the units

72.

Assemble a product with the product fixing bracket

83. .

Fix anchors after marking the positions where units are mounted on the wall.

94.

Install the wall mounting bracket on the wall

10 5.

Assemble a product with the wall mounting bracket.

/ Others

Adjusting Tilt Angle

Adequate installation space from wall

Product specification

3

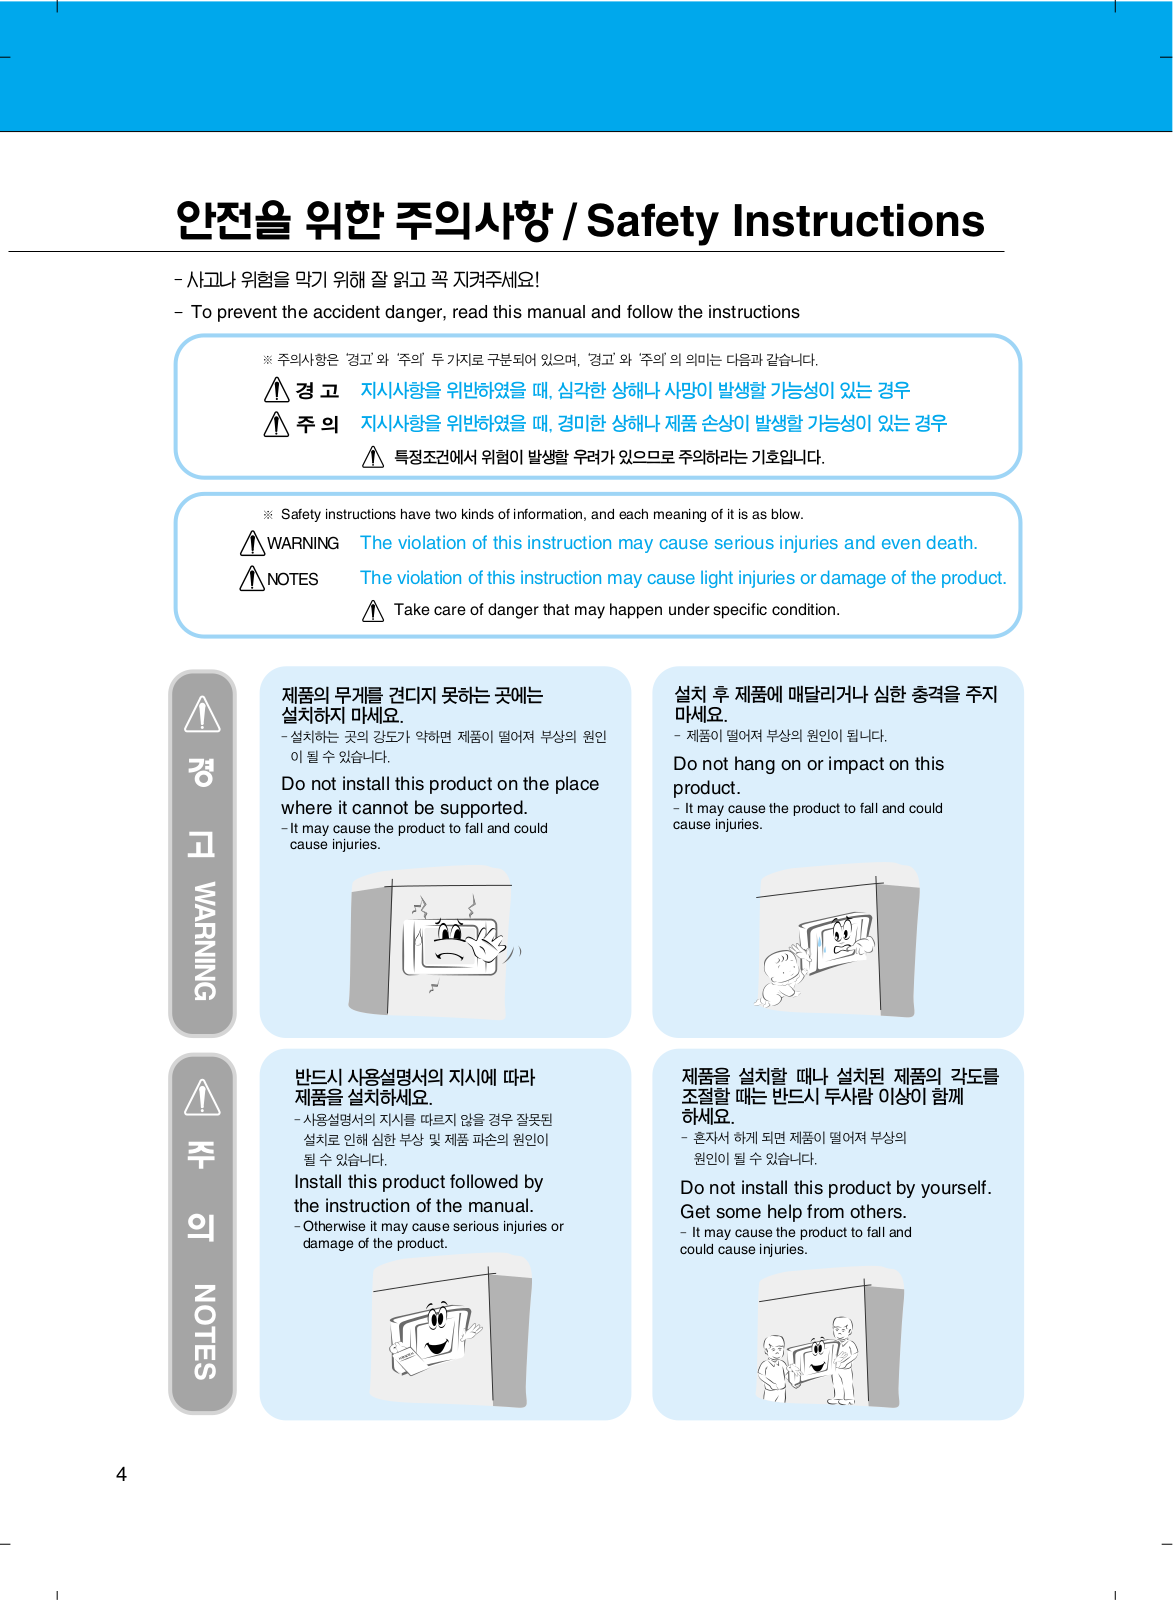
/Safety Instructions

-!

-To prevent the accident danger, read this manual and follow the instructions

‘ ’‘ ’ ,‘ ’‘ ’ .

,

,

.

Safety instructions have two kinds of information, and each meaning of it is as blow.

WARNING The violation of this instruction may cause serious injuries and even death.

NOTES The violation of this instruction may cause light injuries or damage of the product.

Take care of danger that may happen under specific condition.

마세요.

- .

Do not install this product on the place where it cannot be supported.

-It may cause the product to fall and could

cause injuries.

Do not hang on or impact on this product.

- It may cause the product to fall and could cause injuries.

WARNING

.

.

Install this product followed by the instruction of the manual.

-Otherwise it may cause serious injuries or damage of the product.

NOTES

하세요.

.

Do not install this product by yourself. Get some help from others.

- It may cause the product to fall and could cause injuries.

4

WARNING

확인하고,, .

,

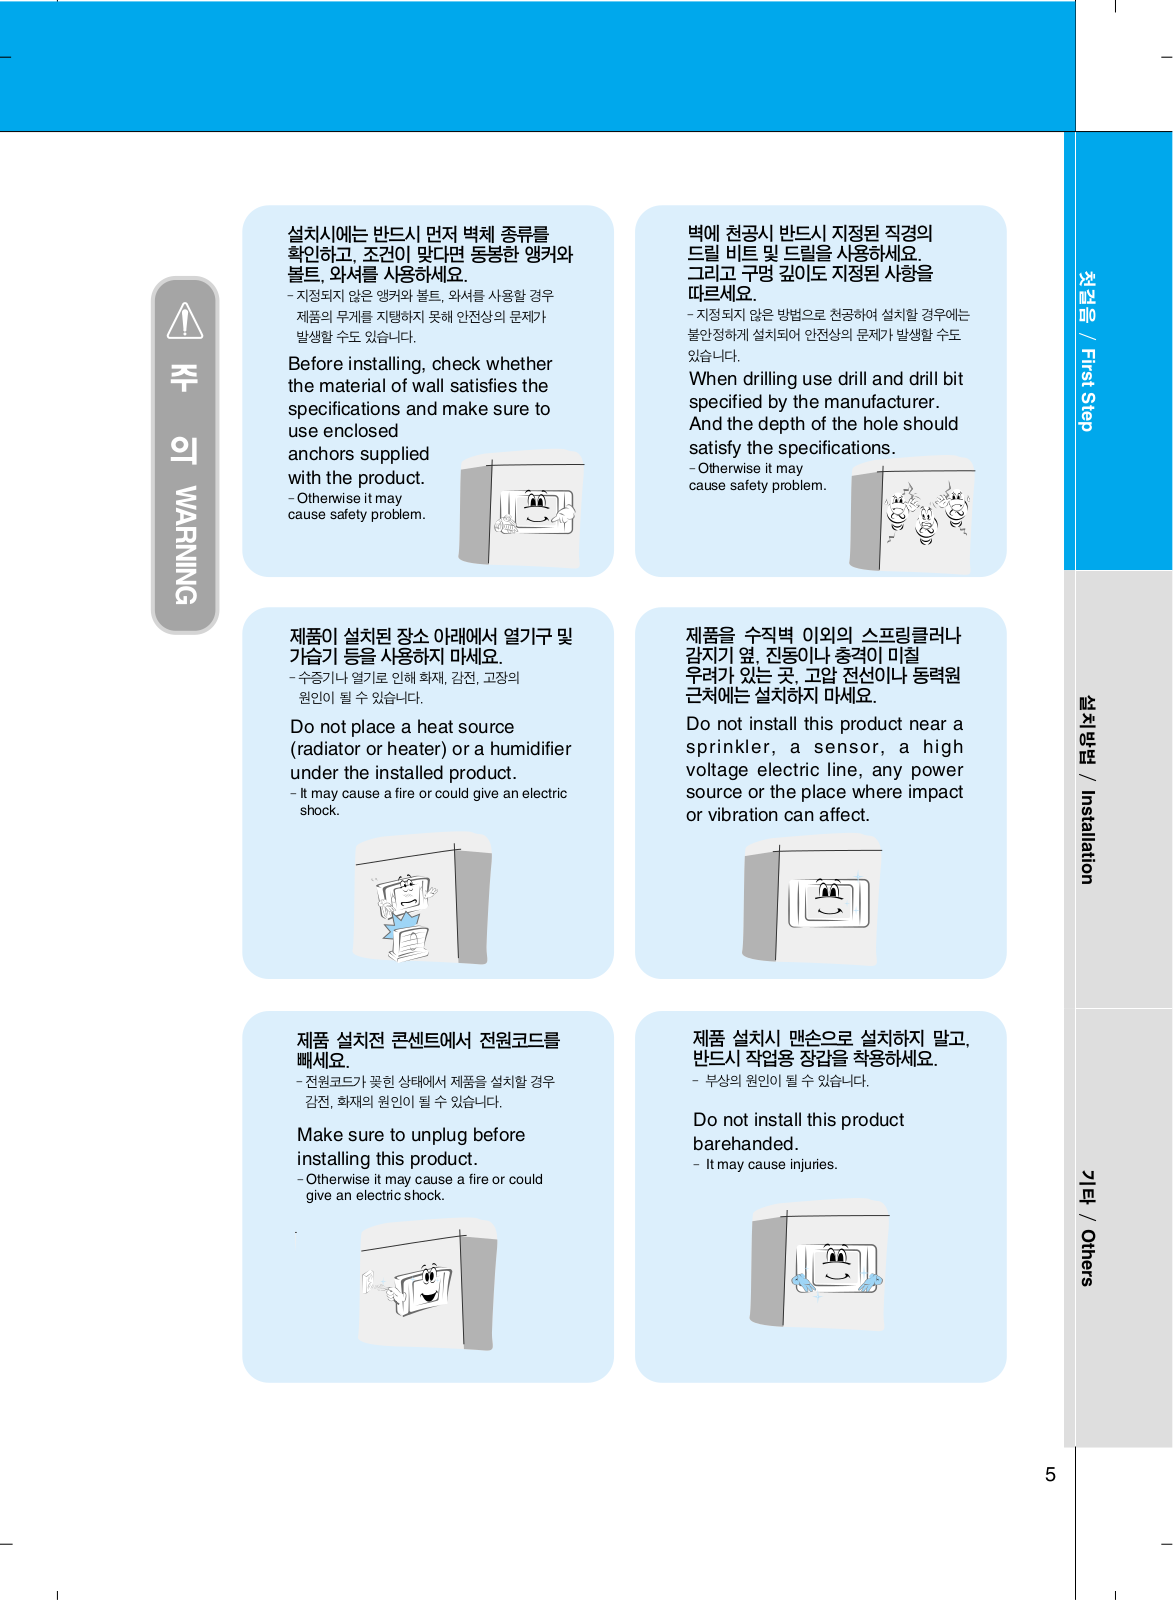
Before installing, check whether the material of wall satisfies the specifications and make sure to use enclosed

anchors supplied with the product.

-Otherwise it may cause safety problem.

.

-, ,.

Do not place a heat source (radiator or heater) or a humidifier under the installed product.

-It may cause a fire or could give an electric shock.

빼세요.

- 감전, .

Make sure to unplug before installing this product.

-Otherwise it may cause a fire or could give an electric shock.

..

-

.

When drilling use drill and drill bit specified by the manufacturer. And the depth of the hole should satisfy the specifications.

-Otherwise it may cause safety problem.

, , .

Do not install this product near a sprinkler, a sensor, a high voltage electric line, any power source or the place where impact or vibration can affect.

,.

- .

Do not install this product barehanded.

- It may cause injuries.

Step First /

Installation /

Others /

5

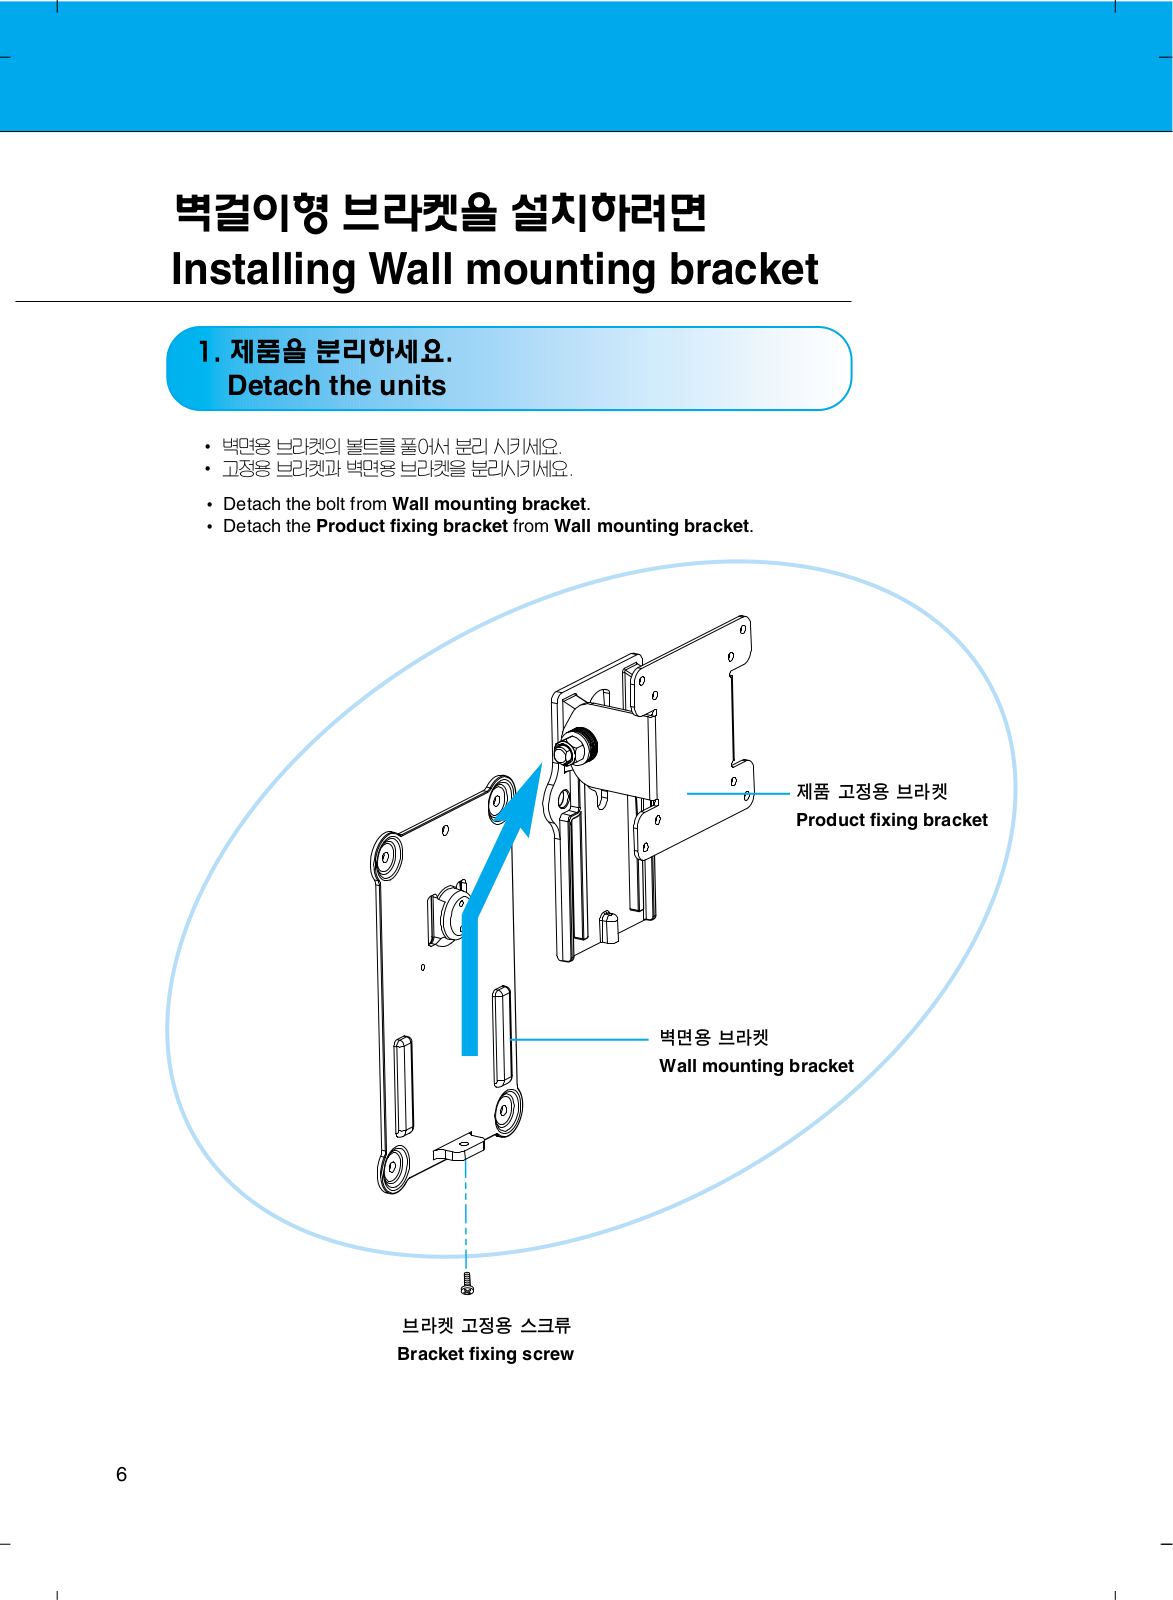
Installing Wall mounting bracket

1. .

Detach the units

.

.

Detach the bolt from Wall mounting bracket.

Detach the Product fixing bracket from Wall mounting bracket.

Product fixing bracket

Wall mounting bracket

Bracket fixing screw

6

2. .

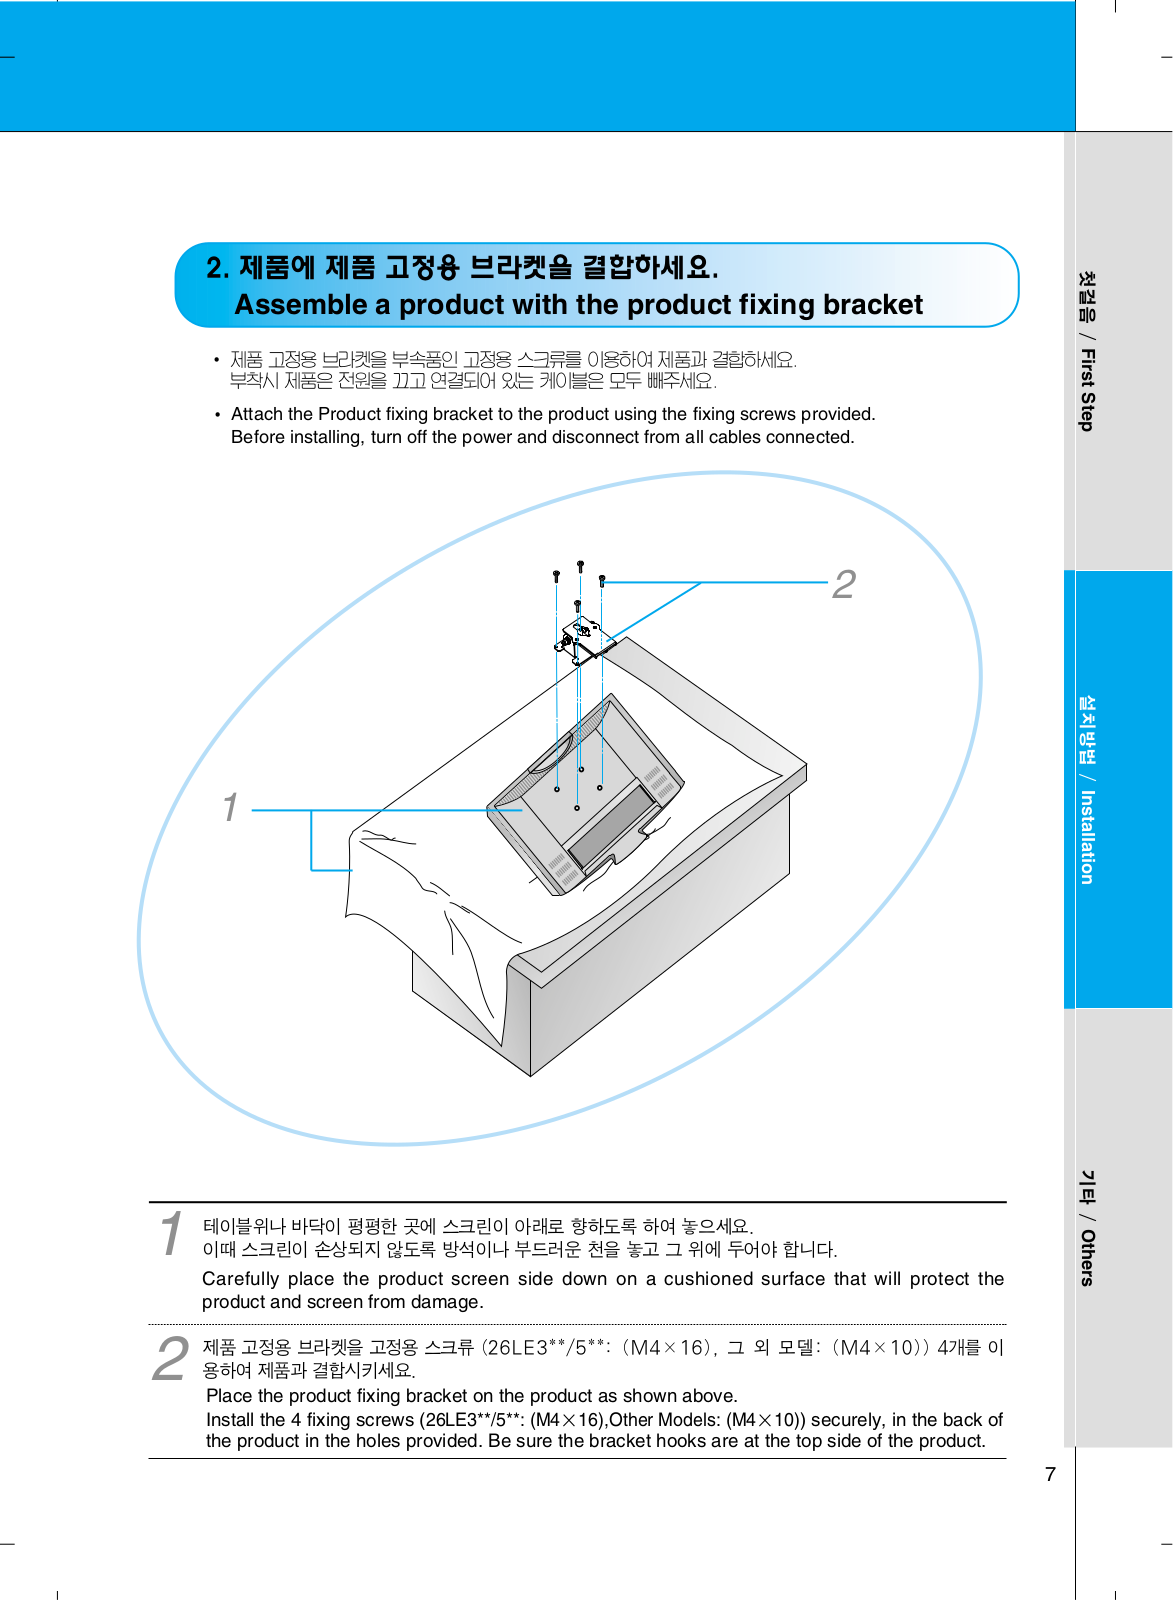
Assemble a product with the product fixing bracket

..

Attach the Product fixing bracket to the product using the fixing screws provided. Before installing, turn off the power and disconnect from all cables connected.

2

1

1

.

.

Carefully place the product screen side down on a cushioned surface that will protect the


product and screen from damage.

2

(26LE3**/5**: (M4×16), : (M4×10)) 4

.

Place the product fixing bracket on the product as shown above.

Install the 4 fixing screws (26LE3**/5**: (M4×16),Other Models: (M4×10)) securely, in the back of the product in the holes provided. Be sure the bracket hooks are at the top side of the product.

Step First /

Installation /

Others /

7

LG RW120 User Manual

3. .

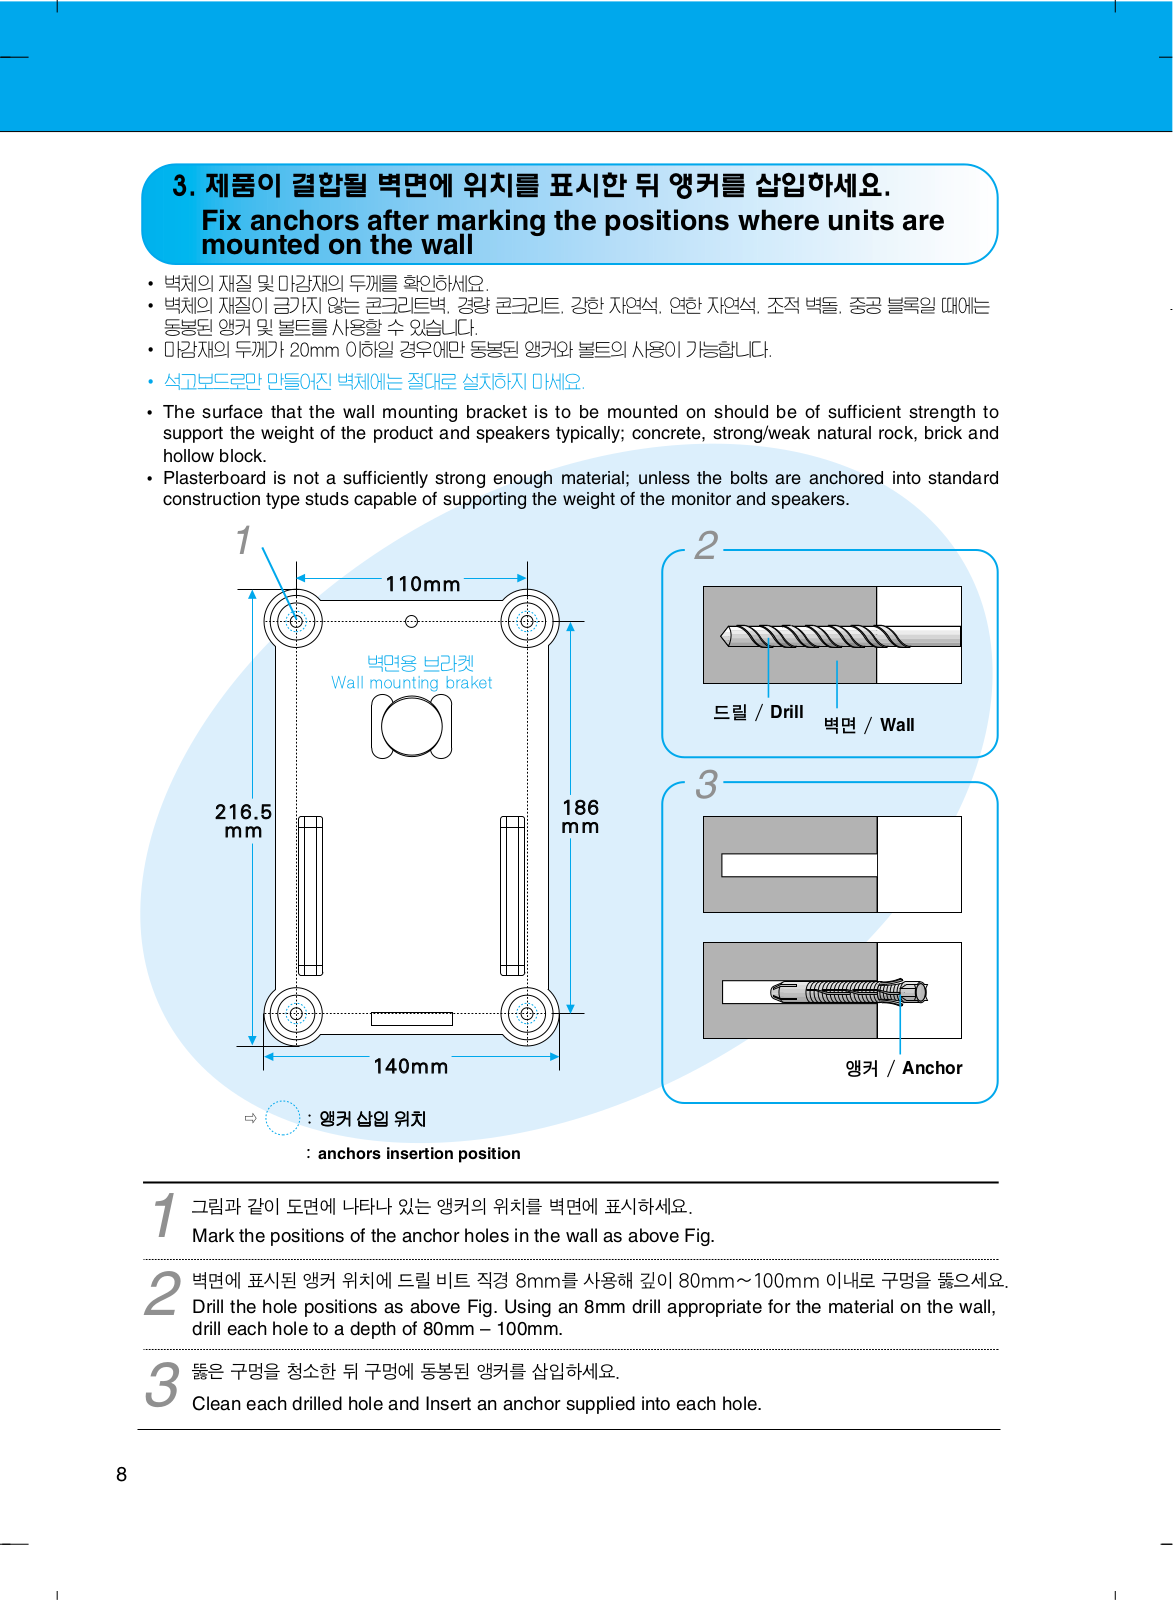
Fix anchors after marking the positions where units are mounted on the wall

.

, , , , ,.

20mm .

.

The surface that the wall mounting bracket is to be mounted on should be of sufficient strength to support the weight of the product and speakers typically; concrete, strong/weak natural rock, brick and hollow block.

Plasterboard is not a sufficiently strong enough material; unless the bolts are anchored into standard construction type studs capable of supporting the weight of the monitor and speakers.

1

2

110mm

Wall mounting braket

/ Drill / Wall

3

216.5

186

mm

mm


140mm


/ Anchor


:

:anchors insertion position

1.

Mark the positions of the anchor holes in the wall as above Fig.

28mm 80mm~100mm .

Drill the hole positions as above Fig. Using an 8mm drill appropriate for the material on the wall, drill each hole to a depth of 80mm – 100mm.

3.

Clean each drilled hole and Insert an anchor supplied into each hole.

8

Loading...
+ 16 hidden pages