

LG Rumor LX260, Rumor Owner's Manual

W 01/08 (1.3)
Sprint Voicemail
Setting Up Your Sprint Voicemail
1. Press and hold . You will b e conne cted to the
Sprint Voicemail system.
2. Follow the system p rompt s to create your pa ssco de
and record your greeting and name announcement.
Retrieving Your Sprint Voicemail Messages
From your Sprint Phone: When you have new
voicemail message s waiti ng, your phone’s di splay
will notify you. Pre ss and hold to di al your
voicemail box. Follow the system prompts to
retrieve your messages.
From another phone: Dial your Sprint Phone
number. When your vo icemail answers, press
and enter your passcode to access your voice mail
box. Fol low the s ystem p rompt s to retrieve
your messages.
Calling Options
Call Waiting
To respond t o an incoming ca ll whil e you’re on a c all:
1. The scree n displ ays the incoming call and a tone
is played . Pres s to acce pt the c all and p lace
your exis ting ca ll on hol d.
2. To switch bet ween caller s, press .
3. When finis hed, press .
Sprint Vision
®
service is not included. Depending on the
plan and options selected, additional charges may apply.
Coverage is not available everywhere.
©2007 Sprint Nextel. All rights reserved. SPRINT,
and their trademarks are trademarks of Sprint Nextel.
All other trademarks are the property of their
respective owners.
Using SMS Text Messaging
Sending SMS Text Messages
1. From stand by mode, press and
select Messaging.
2. Select Send Message, then Text Message.
3. Select Go to Contacts or press New Addr
to enter your rec ipient’s mob ile pho ne numb er or
email address, then press Continue . (You
may enter up to 25 rec ipien ts.)
4. Press Continue when you a re fini shed
adding r ecipients .
5. Compose a m essage or use t he canned (pre -set)
messages, recent messages and/or
smileys (icons).
• Use Mode to selec t an input mode.
• Press Mode , sele ct a cat egor y, highlig ht the
desired mess age or emoticon, and p ress .
6. Review the m essa ge, sel ect you r delivery option s
(such as c allback number or pri orit y) and press
Send to send the text messag e.
Accessing SMS Text Messages
To read an inco ming text mes sage:
When you r ecei ve a mess age, it will auto matically
appear on your ph one’s scr een. Us e your navigati on
key to scro ll down a nd view t he entire mes sage.
To reply to a tex t message:
1. While the messag e is open, sele ct Reply .
2. Follow ste ps 5- 6 in “Sending SMS Text
Messages” above.
Using the Phone Book
Saving Phone Numbers
To save a number in your phone’s internal phone book:
1. From stand by mode, use the key pad to enter a
phone number.
2. Scroll dow n to Save and press .
3. Select either New Entry or Existing Entry.
4. Select a Ph one Type La bel (Mobile, Home, O ffi ce).
5. Enter a name and pres s .
6. Press Save to save the e ntr y.
Calling From Your Phone Book
To place a cal l from your phone book:
1. Press the key.
2. Scroll to Contact s icon.
3. Press .
4. Select Find/Add entry.
5. Highlight the lis ting yo u want to c all and p ress .
You can also access your contacts dire ctly f rom th e
idle sc reen by p ressing Contacts.
Using Call History
Making a Call From Call History
Call His tory keeps tr ack of the last 50 phone c alls
you’ve ma de, rec eived or missed. From yo ur Call
History lists, you can redial calls, return calls, save
number s to your Phone Bo ok and mo re.
To make a call from your Ca ll Hist ory list:
1. From stand by mode, press a nd select
Call History.
2. Select t he Call Histor y list you’re looking f or (Missed,
Incom ing, Ou tgoing or Rece nt) and press .
3. Highlight the lis ting yo u want to c all and p ress .
Sprint Vision
®
®
®
homepage, select
®
session
Phone User Guide
PERFORATIONPERFORATION
3.5"3.5"

Phone User Guide
www.sprint.com
© 2007 Sprint Nextel. All rights reserved. SPRINT, the N EXTEL name and logo,
and other trademarks are trademarks of Sprint Nextel.
Printed in the U.S.A.
RUMOR™
LX260_OM 1.3.qxp 1/14/08 8:35 AM Page A

Table of Contents
Introduction . . . . . . . . . . . . . . . . . . . . . . . . . . . . . . . . . . . . . .i
Your Phone’s Menu . . . . . . . . . . . . . . . . . . . . . . . . . . . . . . .iii
Section 1: Getting Started . . . . . . . . . . . . . . . . . . . . . . . . . .1
1A. Setting Up Service . . . . . . . . . . . . . . . . . . . . . . . . . . . . . . . . .2
Setting Up Your Phone . . . . . . . . . . . . . . . . . . . . . . . . . . . . . . . . . . . . . . .3
Activating Your Phone . . . . . . . . . . . . . . . . . . . . . . . . . . . . . . . . . . . . . . .4
Setting Up Your Voicemail . . . . . . . . . . . . . . . . . . . . . . . . . . . . . . . . . . . .5
Sprint Account Passwords . . . . . . . . . . . . . . . . . . . . . . . . . . . . . . . . . . .6
Getting Help . . . . . . . . . . . . . . . . . . . . . . . . . . . . . . . . . . . . . . . . . . . . . . . .7
Section 2: Using Your Phone . . . . . . . . . . . . . . . . . . . . . . . .9
2A. Phone Basics . . . . . . . . . . . . . . . . . . . . . . . . . . . . . . . . . . . . .10
Your Phone . . . . . . . . . . . . . . . . . . . . . . . . . . . . . . . . . . . . . . . . . . . . . . . .11
Viewing the Display Screen . . . . . . . . . . . . . . . . . . . . . . . . . . . . . . . . .15
Features of Your Phone . . . . . . . . . . . . . . . . . . . . . . . . . . . . . . . . . . . . .17
Turning Your Phone On and Off . . . . . . . . . . . . . . . . . . . . . . . . . . . . . .19
Using Your Phone’s Battery and Charger . . . . . . . . . . . . . . . . . . . . .20
Navigating Through Phone Menus . . . . . . . . . . . . . . . . . . . . . . . . . .23
Displaying Your Phone Number . . . . . . . . . . . . . . . . . . . . . . . . . . . . .24
Making and Answering Calls . . . . . . . . . . . . . . . . . . . . . . . . . . . . . . . .25
Entering Text . . . . . . . . . . . . . . . . . . . . . . . . . . . . . . . . . . . . . . . . . . . . . .37
2B. Controlling Your Phone’s Settings . . . . . . . . . . . . . . . . . .42
Sound Settings . . . . . . . . . . . . . . . . . . . . . . . . . . . . . . . . . . . . . . . . . . . .43
Display Settings . . . . . . . . . . . . . . . . . . . . . . . . . . . . . . . . . . . . . . . . . . . .46
Location Settings . . . . . . . . . . . . . . . . . . . . . . . . . . . . . . . . . . . . . . . . . .51
Messaging Settings . . . . . . . . . . . . . . . . . . . . . . . . . . . . . . . . . . . . . . . .52
Airplane/Music Mode . . . . . . . . . . . . . . . . . . . . . . . . . . . . . . . . . . . . . .55
TTY Use With SprintService . . . . . . . . . . . . . . . . . . . . . . . . . . . . . . . .56
Phone Setup Options . . . . . . . . . . . . . . . . . . . . . . . . . . . . . . . . . . . . . . .57
2C. Setting Your Phone’s Security . . . . . . . . . . . . . . . . . . . . . .60
Accessing the Security Menu . . . . . . . . . . . . . . . . . . . . . . . . . . . . . . . .61
LX260_OM 1.3.qxp 1/14/08 8:35 AM Page B

Using Your Phone’s Lock Feature . . . . . . . . . . . . . . . . . . . . . . . . . . . . .61
Using Special Numbers . . . . . . . . . . . . . . . . . . . . . . . . . . . . . . . . . . . . .63
Erasing Private Browser Data . . . . . . . . . . . . . . . . . . . . . . . . . . . . . . .63
Erasing Contacts . . . . . . . . . . . . . . . . . . . . . . . . . . . . . . . . . . . . . . . . . . .64
Resetting Your Picture Mail Account . . . . . . . . . . . . . . . . . . . . . . . . .64
Resetting Default Settings . . . . . . . . . . . . . . . . . . . . . . . . . . . . . . . . . .65
Resetting Your Phone . . . . . . . . . . . . . . . . . . . . . . . . . . . . . . . . . . . . . . .65
Security Features for Sprint Vision . . . . . . . . . . . . . . . . . . . . . . . . . . .66
2D. Controlling Your Roaming Experience . . . . . . . . . . . . . . .67
Understanding Roaming . . . . . . . . . . . . . . . . . . . . . . . . . . . . . . . . . . .68
Setting Your Phone’s Roam Mode . . . . . . . . . . . . . . . . . . . . . . . . . . .69
Using Call Guard . . . . . . . . . . . . . . . . . . . . . . . . . . . . . . . . . . . . . . . . . . .70
Using Data Roam Guard . . . . . . . . . . . . . . . . . . . . . . . . . . . . . . . . . . . .71
2E. Managing Call History . . . . . . . . . . . . . . . . . . . . . . . . . . . .72
Viewing History . . . . . . . . . . . . . . . . . . . . . . . . . . . . . . . . . . . . . . . . . . .73
Call History Options . . . . . . . . . . . . . . . . . . . . . . . . . . . . . . . . . . . . . . . .74
Making a Call From Call History . . . . . . . . . . . . . . . . . . . . . . . . . . . . .74
Saving a Phone Number From Call History . . . . . . . . . . . . . . . . . . .75
Prepending a Phone Number From Call History . . . . . . . . . . . . . . .76
Erasing Call History . . . . . . . . . . . . . . . . . . . . . . . . . . . . . . . . . . . . . . . . .76
2F. Using Contacts . . . . . . . . . . . . . . . . . . . . . . . . . . . . . . . . . . .77
Adding a New Contacts Entry . . . . . . . . . . . . . . . . . . . . . . . . . . . . . . .78
Finding Contacts Entries . . . . . . . . . . . . . . . . . . . . . . . . . . . . . . . . . . . .79
Contacts Entry Options . . . . . . . . . . . . . . . . . . . . . . . . . . . . . . . . . . . . .81
Adding a Phone Number to a Contacts Entry . . . . . . . . . . . . . . . . .82
Editing a Contacts Entry’s Phone Number . . . . . . . . . . . . . . . . . . . .82
Assigning Speed Dial Numbers . . . . . . . . . . . . . . . . . . . . . . . . . . . . . .83
Editing a Contacts Entry . . . . . . . . . . . . . . . . . . . . . . . . . . . . . . . . . . . .84
Selecting a Ringer Type for an Entry . . . . . . . . . . . . . . . . . . . . . . . . . .85
Selecting a Text Tone for an Entry . . . . . . . . . . . . . . . . . . . . . . . . . . . .85
Dialing Sprint Services . . . . . . . . . . . . . . . . . . . . . . . . . . . . . . . . . . . . . .86
Wireless Backup . . . . . . . . . . . . . . . . . . . . . . . . . . . . . . . . . . . . . . . . . . .87
LX260_OM 1.3.qxp 1/14/08 8:35 AM Page C

2G. Using the Phone’s Tools . . . . . . . . . . . . . . . . . . . . . . . . . . .89
Using Your Phone’s Calendar . . . . . . . . . . . . . . . . . . . . . . . . . . . . . . . .90
Using Your Phone’s Alarm Clock . . . . . . . . . . . . . . . . . . . . . . . . . . . . .93
Using Your Phone’s Notepad . . . . . . . . . . . . . . . . . . . . . . . . . . . . . . . .94
Using EZ Tips . . . . . . . . . . . . . . . . . . . . . . . . . . . . . . . . . . . . . . . . . . . . . . .95
Using the Calculator . . . . . . . . . . . . . . . . . . . . . . . . . . . . . . . . . . . . . . .95
Using the World Clock . . . . . . . . . . . . . . . . . . . . . . . . . . . . . . . . . . . . . .96
Using the D-Day Counter . . . . . . . . . . . . . . . . . . . . . . . . . . . . . . . . . . .96
Using the UnitConverter . . . . . . . . . . . . . . . . . . . . . . . . . . . . . . . . . . .96
2H. Using Your Phone’s Voice Services . . . . . . . . . . . . . . . . . .97
Managing Voice Memos . . . . . . . . . . . . . . . . . . . . . . . . . . . . . . . . . . . .98
2I. Using the microSD Card . . . . . . . . . . . . . . . . . . . . . . . . . .100
Using Your Phone’s microSD Card and Adapter . . . . . . . . . . . . . .101
microSD Settings . . . . . . . . . . . . . . . . . . . . . . . . . . . . . . . . . . . . . . . . .103
microSD Folders . . . . . . . . . . . . . . . . . . . . . . . . . . . . . . . . . . . . . . . . . .104
Connecting Your Phone to Your Computer . . . . . . . . . . . . . . . . . .104
2J. Using the Built-in Camera . . . . . . . . . . . . . . . . . . . . . . . .106
Taking Pictures . . . . . . . . . . . . . . . . . . . . . . . . . . . . . . . . . . . . . . . . . . .107
Recording Videos . . . . . . . . . . . . . . . . . . . . . . . . . . . . . . . . . . . . . . . . .112
Storing Pictures and Videos . . . . . . . . . . . . . . . . . . . . . . . . . . . . . . . .115
Sending Sprint Picture Mail . . . . . . . . . . . . . . . . . . . . . . . . . . . . . . . .120
Managing Sprint Picture Mail . . . . . . . . . . . . . . . . . . . . . . . . . . . . . .123
Printing Pictures Directly From Your Phone . . . . . . . . . . . . . . . . .128
Settings and Info . . . . . . . . . . . . . . . . . . . . . . . . . . . . . . . . . . . . . . . . .130
2K. Using Bluetooth . . . . . . . . . . . . . . . . . . . . . . . . . . . . . . . .131
Turning Bluetooth On and Off . . . . . . . . . . . . . . . . . . . . . . . . . . . . .132
Using the Bluetooth Settings Menu . . . . . . . . . . . . . . . . . . . . . . . .133
Bluetooth Profiles . . . . . . . . . . . . . . . . . . . . . . . . . . . . . . . . . . . . . . . .135
Pairing Bluetooth Devices . . . . . . . . . . . . . . . . . . . . . . . . . . . . . . . . .137
Sending All Contacts Using Bluetooth . . . . . . . . . . . . . . . . . . . . . .138
Section 3: Sprint Service Features . . . . . . . . . . . . . . . . .139
3A. SprintService Features: The Basics . . . . . . . . . . . . . . . .140
Using Voicemail . . . . . . . . . . . . . . . . . . . . . . . . . . . . . . . . . . . . . . . . . .141
LX260_OM 1.3.qxp 1/14/08 8:35 AM Page D

Using SMS TextMessaging . . . . . . . . . . . . . . . . . . . . . . . . . . . . . . . .149
Using SMS Voice Messaging . . . . . . . . . . . . . . . . . . . . . . . . . . . . . . .152
Using Caller ID . . . . . . . . . . . . . . . . . . . . . . . . . . . . . . . . . . . . . . . . . . . .154
Responding to Call Waiting . . . . . . . . . . . . . . . . . . . . . . . . . . . . . . . .154
Making a Three-Way Call . . . . . . . . . . . . . . . . . . . . . . . . . . . . . . . . . .155
Using Call Forwarding . . . . . . . . . . . . . . . . . . . . . . . . . . . . . . . . . . . . .156
3B. Sprint Vision . . . . . . . . . . . . . . . . . . . . . . . . . . . . . . . . . . . .157
SprintVision Applications . . . . . . . . . . . . . . . . . . . . . . . . . . . . . . . . .158
Getting Started With Sprint Vision . . . . . . . . . . . . . . . . . . . . . . . . .159
Accessing Messaging . . . . . . . . . . . . . . . . . . . . . . . . . . . . . . . . . . . . .165
Downloading Premium Services Content . . . . . . . . . . . . . . . . . . .169
Exploring the Web . . . . . . . . . . . . . . . . . . . . . . . . . . . . . . . . . . . . . . . .173
SprintVision FAQs . . . . . . . . . . . . . . . . . . . . . . . . . . . . . . . . . . . . . . . .177
3C. Sprint Music and Your Player . . . . . . . . . . . . . . . . . . . . . .179
Using Sprint Music Manager . . . . . . . . . . . . . . . . . . . . . . . . . . . . . .180
Playing Music on Your Phone . . . . . . . . . . . . . . . . . . . . . . . . . . . . . .182
Section 4: Safety and Warranty Information . . . . . . . .183
4A. Important Safety Information . . . . . . . . . . . . . . . . . . . .184
General Precautions . . . . . . . . . . . . . . . . . . . . . . . . . . . . . . . . . . . . . .185
Maintaining Safe Use of and Access to Your Phone . . . . . . . . . .186
Using Your Phone With a Hearing Aid Device . . . . . . . . . . . . . . . .188
Caring for the Battery . . . . . . . . . . . . . . . . . . . . . . . . . . . . . . . . . . . . .190
Radio Frequency (RF) Energy . . . . . . . . . . . . . . . . . . . . . . . . . . . . . . .191
Owner’s Record . . . . . . . . . . . . . . . . . . . . . . . . . . . . . . . . . . . . . . . . . . .194
Phone Guide Proprietary Notice . . . . . . . . . . . . . . . . . . . . . . . . . . .194
4B. Manufacturer’s Warranty . . . . . . . . . . . . . . . . . . . . . . . .195
Manufacturer’s Warranty . . . . . . . . . . . . . . . . . . . . . . . . . . . . . . . . .196
Index . . . . . . . . . . . . . . . . . . . . . . . . . . . . . . . . . . . . . . . . . .199
LX260_OM 1.3.qxp 1/14/08 8:35 AM Page E

LX260_OM 1.3.qxp 1/14/08 8:35 AM Page F
Introduction
This Phone User Guide introduces you to Sprint® Service and
all the features of your new phone. It’s divided into four
sections:
Section 1: Getting Started
Section 2: Using Your Phone
Section 3: Sprint Service Features
Section 4: Safety and Warranty Information
Throughout this guide, you’ll find tips that highlight special
shortcuts and timely reminders to help you make the most
of your new phone and service. The Table of Contents and
Index will also help you quickly locate specific information.
You’ll get the most out of your phone if you read each section.
However, if you’d like to get right to a specific feature, simply
locate that section in the Table of Contents and go directly to
that page. Follow the instructions in that section, and you’ll
be ready to use your phone in no time.
WARN ING
Please refer to the Important Safety Information
section on page 184 to learn about information that
will help you safely use your phone. Failure to read
and follow the Important Safety Information in this
phone guide may result in serious bodily injury,
death, or property damage.
Phone
Guide
Note
Because of updates in phone software, this printed
guide may not be the most current version for your
phone. Visit www.sprint.comand log on to My Sprint
Wireless
to access the most recent version of the phone
user guide.
i
LX260_OM 1.3.qxp 1/14/08 8:35 AM Page i

ii
Want to keep track of
your minutes?
It’s easy to check right
from your phone!
Dial
You’ll hear a summary of your service plan minutes and
the minutes remaining in your current billing cycle, along
with your phone’s individual usage if you’re on a shared
plan. You’ll also hear a summary of your account balance
and your most recent payment information.
Use Your Phone’s Web Browser
From the SprintVision Home Page, select My Account
(Option 0). You’ll see many helpful categories including
Payment Due, Current Usage, and Plan Overview. Select a
topic to display the latest information.
Note
Reported minutes and balances are estimates only. Please
consult your Sprint Invoice for actual minutes used.
LX260_OM 1.3.qxp 1/14/08 8:35 AM Page ii
Your Phone’s Menu
The following table outlines your phone’s menu structure in
Grid View. For more information about using your phone’s
menus, see “Navigating Through Phone Menus”on page 23.
1: WEB
2: MESSAGING
1: VOICEMAIL
1: Call Voicemail
2: Voicemail Details
3: Clear Icon
2: SEND MESSAGE
1: Text Message
2: Email
3: Picture Mail
4: VoiceSMS
3: TEXT MESSAGING
1: Inbox
2: Sent
3: Outbox
4: Draft
5: Edit Folder
6: Send Message
4: EMAIL
5: INSTANT MESSAGING
iii
LX260_OM 1.3.qxp 1/14/08 8:35 AM Page iii

iv
6: FACEBOOK
7: PICTURE MAIL
1: Inbox
2: Sent Mail
3: Saved Mail
4: Pending Messages
8: VOICESMS
9: PREMIUM MSGS
0: SETTINGS
1: Notification
2: Delivery Receipt
3: Callback Number
4: Auto-Delete
5: Message Reminder
6: Signature
7: Preset Messages
8: VoiceSMS Options
1: Speakerphone 2: From Name
3: MEDIA PLAYER
4: CALL HISTORY
1: MISSED CALLS
2: INCOMING CALLS
3: OUTGOING CALLS
4: RECENT CALLS
5: DELETE CALLHISTORY
1: Missed Calls 2: Incoming Calls 3: Outgoing Calls
4: Recent Calls 5: Delete All
LX260_OM 1.3.qxp 1/14/08 8:35 AM Page iv
v
5: MISSED ALERTS
6: CONTACTS
1: FIND/ADD ENTRY
2: SPEED DIAL #'S
3: GROUPS
4: MYPHONE #
5: MYNAME CARD
6: SERVICES
1: Customer Service 2: Dir Assistance 3. Pay by Phone
4: Account Info 5: Sprint Operator 6: Voice Command
7: Community Info 8: Non Emergency 9: Traffic Info
0: Repair Service
*
: TTY Relay Service #: One Call Service
7: SEND ALL CONTACTS
8: WIRELESS BACKUP
1: Subscribe 2: Learn More
7: PICTURES
1: CAMERA
Select Options(right softkey) and press the navigation key up and down to display
the following options:
1: Self Timer
Off 5 seconds 10 seconds
2: Color Tone
Normal Black & White Negative
Sepia
3: Image Controls
1: Brightness 2: White Balance
4: Settings
1: Resolution 2: Quality 3: Shutter Sound
4: Image Enhancer 5:Status Bar
LX260_OM 1.3.qxp 1/14/08 8:35 AM Page v

vi
5: Review/Send Media
6: Camcorder Mode
2: CAMCORDER
Video Mail
1: Self Timer 2: Color Tone 3: Image Controls
4: Settings 5: Review/Send Media 6: Camera Mode
Long Video
1: Self Timer 2: Color Tone 3: Image Controls
4: Settings 5: Review/Send Media 6: Camera Mode
3: PICTURE MAIL
Inbox
Sent Mail
Saved Mail
Pending Messages
4: MYALBUMS
In Phone
Memory Card
Online Albums
5: PICTBRIDGE
6: ORDER PRINTS
7: SETTINGS & INFO
Auto-Save to
Status Bar
Account Info
8: MY CONTENT
GAMES
Get New My Content Manager
RINGERS
Get New My Content Manager
LX260_OM 1.3.qxp 1/14/08 8:35 AM Page vi
vii
SCREEN SAVERS
Get New My Content Manager
APPLICATIONS
Get New My Content Manager
IM & EMAIL
Get New My Content Manager
CALL TONES
<OPTIONS>
Memory Status Get New My Content Manager
9: SETTINGS/TOOLS
1: SETTINGS
1: Display
1: Main Screen
1: Screen Saver 2: Slide Show 3: Backlight
4: Skins 5: Menu Styles 6: Foregrounds
7: Incoming Calls
2: Font Size
1: Messaging 2: Browser 3: Notepad
3: Keypad Light
4: Language
1: English 2: Español
5: Status Light
2: Sounds
1: Volume
1: Ringer 2: Earpiece 3: Speakerphone
4: Alerts 5: Applications 6: Power On/Off
2: Ringer Type
1: Voice Calls 2: Messages
3: Alerts
1: Beep Each Minute 2: Out of Service 3: Connect
4: Signal Fade/Call Drop
LX260_OM 1.3.qxp 1/14/08 8:35 AM Page vii
viii
4: Keytones
1: Tone Length 2: Tone Volume
5: Slide Sound
3: Airplane/Music Mode
4: Bluetooth
1: On/Off 2: Visibility 3: Device Name
4: Device Info 5: Exchange FTP Folder
5: Messaging
1: Notification 2: Delivery Receipt 3: Callback Number
4: Auto-Delete 5: Message Reminder 6: Signature
7: Preset Messages 8: VoiceSMS Options
6: Auto Keyguard
7: Text Entry
1: Auto-Capital 2: Auto-Space 3: Word Choice List
4: Word Prediction 5: Word Completion 6: Use My Words
7: My Wo rds 8: Help
8: Phone Information
1: Phone Number 2: Icon Glossary 3: Version
4: My Account 5: Advanced
9: More…
1: Accessibility
1: TTY 2: Font Size
2: Call Setup
1: Auto-Answer 2: Abbreviated Dialing 3: Call Answer
4: Contacts Match
3: Data
1: On/Off 2: Net Guard 3: Update Data Profile
4: Location
5: Navigation Keys
6: Restrict and Lock
1: Restrict Voice 2: Lock Data 3: Lock Pictures
4: Lock My Phone
LX260_OM 1.3.qxp 1/14/08 8:35 AM Page viii
ix
7: Roaming
1: Set Mode 2: Call Guard 3: Data Roaming
8: Security
1: Lock My Phone 2: Change Lock Code 3: Special Numbers
4: Edit Contacts List 5: Erase/Reset
9: Wireless Backup
1: Subscribe 2: Learn More
2: TOOLS
1: Memory Card Manager
2: Alarm Clock
1: Alarm 1 2: Alarm 2 3: Alarm 3
4: Quick Alarm 5: Reset All
3: USB Mode
1: Transfer Music
2: Mass Storage
3: Phone as Modem
4: PictBridge
4: Calculator
5: Ez Tip Calculator
6: Bluetooth
1: <Add New>
2: <Settings>
1: On/Off 2: Visibility 3: Device Name
4: Device Info 5: Exchange FTP Folder
7: Scheduler
8: Voice Memo
LX260_OM 1.3.qxp 1/14/08 8:35 AM Page ix

x
9: Notepad
0: World Clock
*: Utilities
1: D-Day Counter
2: Unit Converter
#: Update Firmware
IN USE MENU
Select Optionsto display the following options:
1: Mute/Unmute 2: Speaker On/Off 3: 3-Way Call
4: Contacts 5: Recent Calls 6: Send Message
7: Record Voice Memo 8: Notepad 9: Menu
LX260_OM 1.3.qxp 1/14/08 8:35 AM Page x

Section 1
Getting Started
LX260_OM 1.3.qxp 1/14/08 8:35 AM Page 1

2 Section 1A: Setting Up Service
Section 1A
Setting Up Service
In This Section
Setting Up Your Phone (page 3)
Activating Your Phone (page 4)
Setting Up Your Voicemail (page 5)
SprintAccount Passwords (page 6)
Getting Help (page 7)
Setting up service on your new phone is quick and easy. This
section walks you through the necessary steps to set up and
turn on your phone, set up your voicemail, establish
passwords, and contact Sprint for assistance with your
Sprint service.
LX260_OM 1.3.qxp 1/14/08 8:35 AM Page 2
Section 1A: Setting Up Service 3
Setting Up Your Phone
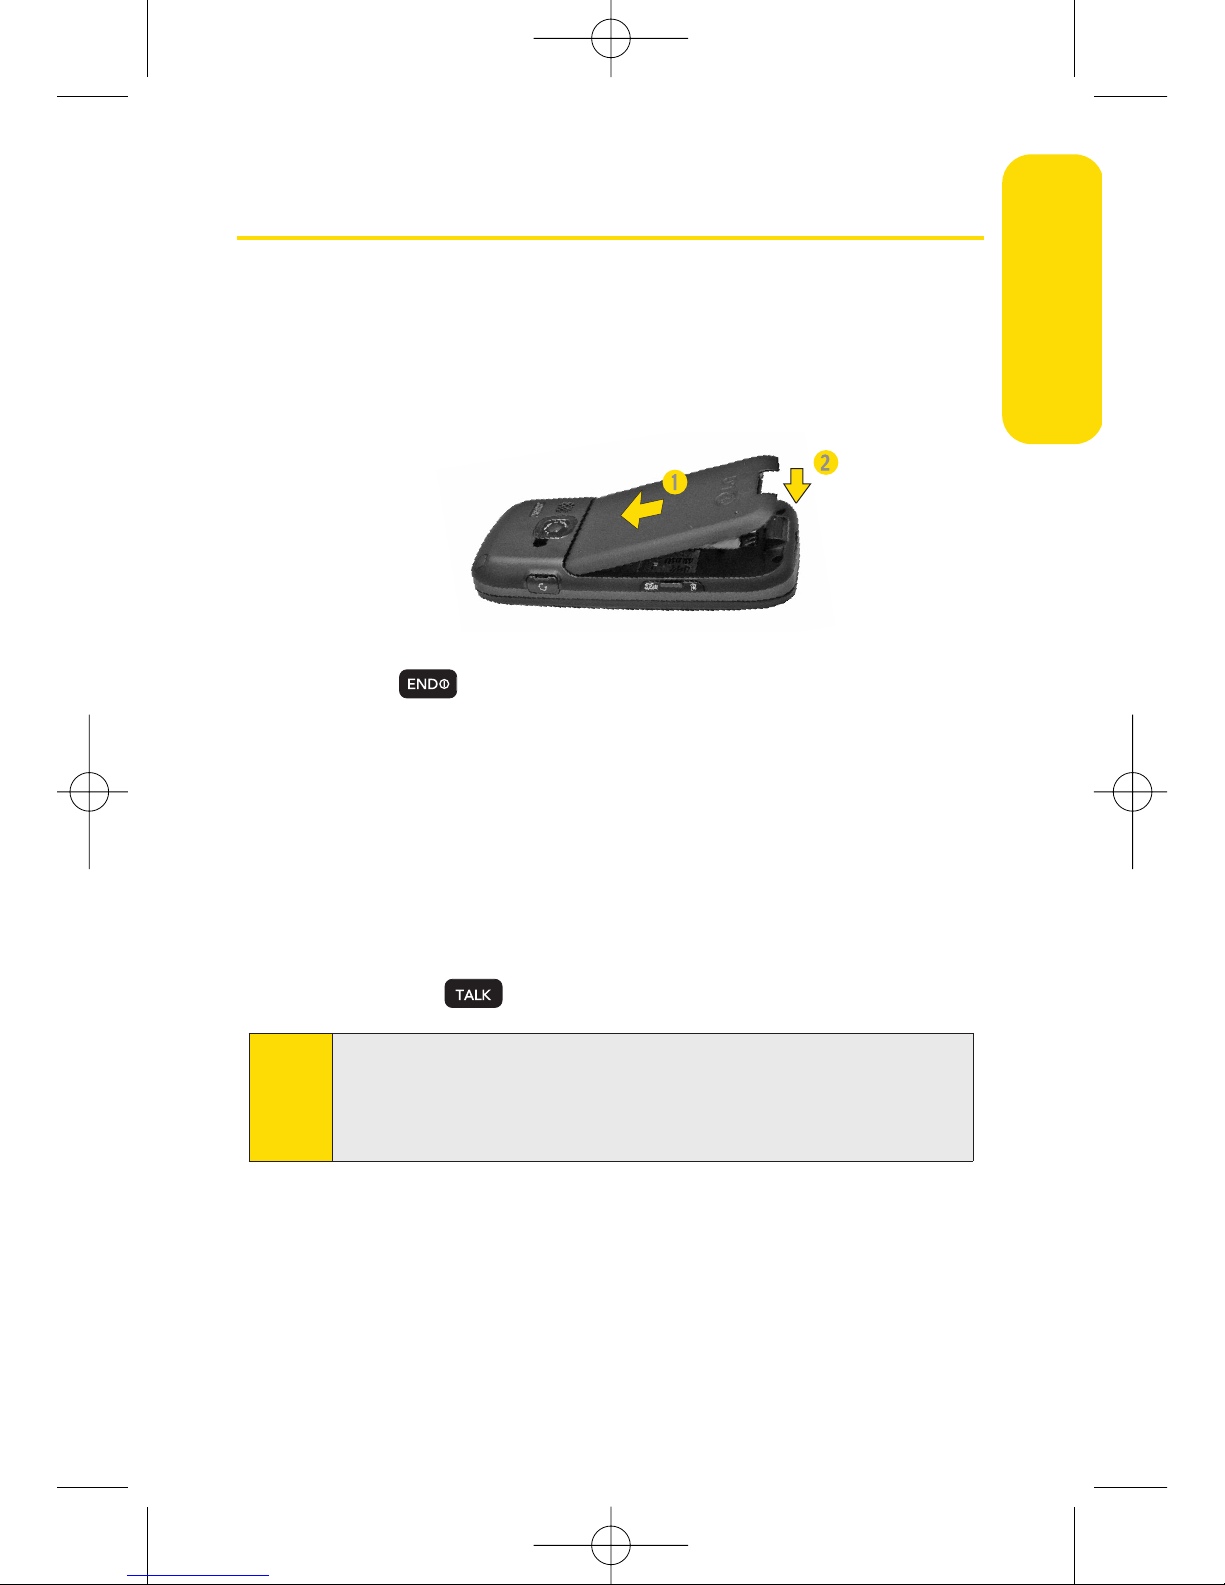
1. Install the battery (if necessary).
Insert the battery into the opening, making sure the
connectors align. Gently press down to secure the
battery.
2. Press to turn the phone on.
If your phone is activated, it will turn on, search for
Sprint service, and enter standby mode.
If your phone is not yet activated, or if it is locked, see
“Activating Your Phone”on the following page for
more information.
3. Make your first call.
Use your keypad to enter a phone number.
Press .
Note
Your phone’s battery should have enough charge to turn on,
find a signal, set up your voicemail, and make a call. You
should fully charge your battery as soon as possible. See
“Charging the Battery”on page 22 for details.
Setting Up Service
LX260_OM 1.3.qxp 1/14/08 8:35 AM Page 3

4 Section 1A: Setting Up Service
Activating Your Phone
If you purchased your phone at a Sprint Store, it is
probably activated and ready to use.
If you received your phone in the mail, it may activate
automatically when you first turn it on, or you may need
to perform a few simple activation steps.
1. Press to turn the phone on.
If your phone activates automatically, you will see a
brief message and your phone will enter standby
mode. Proceed to step 4.
If you do not see an activation message, please
proceed to step 2.
2. Press Menu > Web. (There is no charge to use this service
during phone activation.)
3. Follow the onscreen prompts to update your profile and
activate your phone.
4. To confirm your activation, make a phone call.
For assistance with phone activation, call Sprint Customer
Service at 1-800-SPRINT1 (1-800-777-4681) from any other
phone.
Note
You can also confirm your activation through the phone’s
menu. Press Menu > Settings/Tools > Settings > Phone
Information > Phone Number
.
●
If Phone Number displays 000-000-####, your phone is not
yet activated.
●
If your wireless phone number is displayed, your phone is
ready to use.
Tip
Do not press [END] while the phone is being activated.
Pressing [END] cancels the activation process.
LX260_OM 1.3.qxp 1/14/08 8:35 AM Page 4
Section 1A: Setting Up Service 5
Setting Up Your Voicemail
All unanswered calls to your phone are automatically
transferred to your voicemail, even if your phone is in use or
turned off. Therefore, you will want to set up your voicemail
and personal greeting as soon as your phone is activated.
1. From standby mode, press and hold .
2. Follow the system prompts to:
Create your passcode.
Record your name announcement.
Record your greeting.
Choose whether to activate One-Touch Message
Access (a feature that lets you access messages
simply by pressing and holding , bypassing the
need for you to enter your passcode).
For more information about using your voicemail, see “Using
Voicemail” on page 141.
Note
Voicemail Passcode
If you are concerned about unauthorized access to your
voicemail account, Sprint recommends that you enable your
voicemail passcode (do not activate One-Touch Message
Access).
Setting Up Service
LX260_OM 1.3.qxp 1/14/08 8:35 AM Page 5

6 Section 1A: Setting Up Service
Sprint Account Passwords
As a Sprint customer, you enjoy unlimited access to your
personal account information, your voicemail account, and
your Sprint Vision® account. To ensure that no one else has
access to your information, you will need to create passwords
to protect your privacy.
AccountPassword
If you are the account owner, you will create an account
username and password when you sign on to
www.sprint.com.
(Click Need to register for access? to get started.) If you are not
the account owner (if someone else receives the bill for your
Sprint service), you can get a sub-account password at
www.sprint
.com
.
Voicemail Password
You’ll create your voicemail password (or passcode) when you
set up your voicemail. See “Setting Up Your Voicemail” on
page 5 or page 141 for more information on your voicemail
password.
Sprint Vision Password
With your SprintVision Phone, you may elect to set up an
optional Sprint Vision password to control Vision access and
authorize Premium Service purchases.
For more information, or to change your passwords, sign
on to
www.sprint.com or call Sprint Customer Service at
1-800-SPRINT1 (1-800-777-4681).
LX260_OM 1.3.qxp 1/14/08 8:35 AM Page 6
Section 1A: Setting Up Service 7
Getting Help
Managing Your Account
Online: www.sprint.com
Access your account information.
Check your minutes used (depending on your Sprint
service plan).
View and pay your bill.
Enroll in Sprint online billing and automatic payment.
Purchase accessories.
Shop for the latest Sprint phones.
View available Sprint service plans and options.
Learn more about Sprint Vision and other great products
like Sprint Picture Mail, games, ringers, screen savers, and
more.
From Your Sprint Phone
Press to check minute usage and account
balance.
Press to make a payment.
Press to access a summary of your Sprint
service plan or get answers to other questions.
From Any Other Phone
Sprint Customer Service: 1-800-SPRINT1 (1-800-777-4681).
Business Customer Service: 1-800-927-2199.
Setting Up Service
LX260_OM 1.3.qxp 1/14/08 8:35 AM Page 7
8 Section 1A: Setting Up Service
Sprint 411
Sprint 411 gives you access to a variety of services and
information through your phone, including residential,
business, and government listings; movie listings or
showtimes; driving directions, restaurant reservations, and
major local event information. You can get up to three pieces
of information per call, and the operator can automatically
connect your call at no additional charge.
There is a per-call charge to use Sprint 411, and you will be
billed for airtime.
To call Sprint 411:
Press .
Sprint Operator Services
Sprint Operator Services provides assistance when placing
collect calls or when placing calls billed to a local telephone
calling card or third party.
To access Sprint Operator Services:
Press .
For more information or to see the latest in products and
services, visit us online at
www.sprint.com.
LX260_OM 1.3.qxp 1/14/08 8:35 AM Page 8

Section 2
Using Your Phone
LX260_OM 1.3.qxp 1/14/08 8:35 AM Page 9

10 Section 2A: Phone Basics
Section 2A
Phone Basics
In This Section
Your Phone (page 11)
Viewing the Display Screen (page 15)
Features of Your Phone (page 17)
Turning Your Phone On and Off (page 19)
Using Your Phone’s Battery and Charger (page 20)
Navigating Through Phone Menus (page 23)
Displaying Your Phone Number (page 24)
Making and Answering Calls (page 25)
Entering Text (page 37)
Your phone is packed with features that simplify your life
and expand your ability to stay connected to the people and
information that are important to you. This section will guide
you through the basic functions and calling features of
your phone.
LX260_OM 1.3.qxp 1/14/08 8:35 AM Page 10
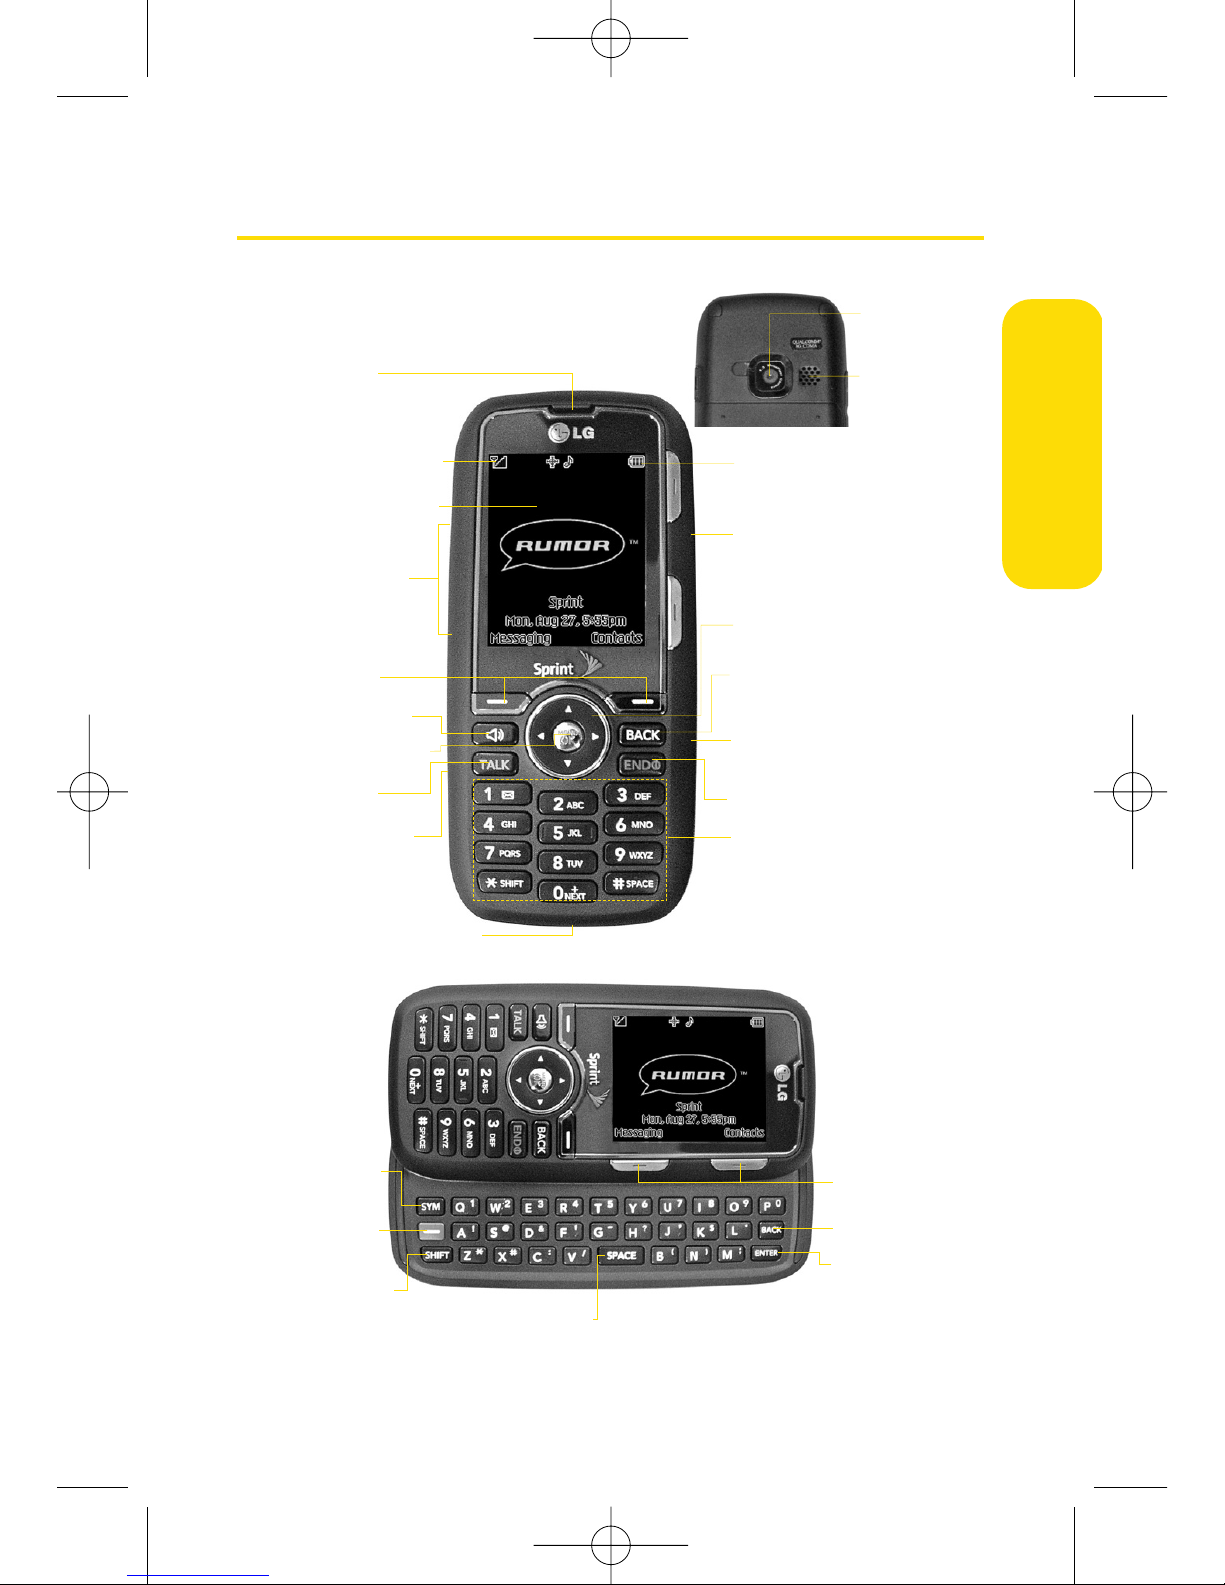
Your Phone
Section 2A: Phone Basics 11
Phone Basics
16. BACK Key
15. Navigation Key
2. Signal Strength
Indicator
1. Earpiece
10. Charger/Accessory
Jack
3. Display Screen
5. Softkeys
24. Softkeys
26. ENTER Key
4. Side Volume
Key
11. Camera
Lens
6. Speaker Key
8. TALK Key
20. SYM Key
21. Function
Key
22. SHIFT Key
23. SPACE Key
25. BACK Key
9. Side Camera
Key
7. Menu/OK Key
18. END/POWER Key
13. Battery Strength
Indicator
12. Speaker
14. Headset Jack
17. microSD Slot
19. Keypad
LX260_OM 1.3.qxp 1/14/08 8:35 AM Page 11

12 Section 2A: Phone Basics
Key Functions
1. Earpiece lets you hear the caller and automated prompts.
2. Signal Strength Indicator represents the signal strength by
displaying bars. The more bars displayed, the better the
signal strength.
3. Display Screen displays all the information needed to
operate your phone, such as the call status, the Contacts
list, the date and time, and the signal and battery strength.
4. Side Volume Key allows you to adjust the ringer volume in
standby mode or adjust the voice volume during a call. The
volume key can also be used to scroll up or down to
navigate through the different menu options.
5. Softkeys let you select softkey actions or menu items
corresponding to the bottom left and right lines on the
display screen.
6. Speaker Key lets you place or receive calls in speakerphone
mode.
7. MENU/OK lets you access the phone’s menus and selects
the highlighted choice when navigating through a menu.
8. TALK Key allows you to place or receive calls, answer Call
Waiting, use Three-Way Calling.
9. Side Camera Key lets you activate the camera and video
mode and take pictures and videos.
10. Charger/Accessory Jack allows you to connect the phone
to the phone charger and to optional accessories, such as a
USB cable. CAUTION! Inserting an accessory into the
incorrect jack may damage the phone.
11. Camera Lens, as part of the built-in camera, lets you take
pictures and videos.
LX260_OM 1.3.qxp 1/14/08 8:35 AM Page 12
 Loading...