

Page 1

User Guide
LG EzSign 2.0 Editor
www.lg.com
Page 2

2
Contents
Contents
3 Before Using
3 What is LG EzSign 2.0 Editor?
3 Installing LG EzSign 2.0 Editor
3 System Requirements
4 Installation
4 Delete
5 Using LG EzSign 2.0 Editor
5 Running LG EzSign 2.0 Editor
5 Using the Quick Guide
5 Starting EzSign 2.0 Editor
6 Creating EzSign Content
12 Network Setting
13 Managing Content
13 Saving Content on TV Memory
13 Viewing Content on TV
13 Viewing Content Saved in the USB Device
14 Viewing Content Saved on the TV Memory
16 Checking the Location of the Content Being Played
Deleting EzSign Content from the TV Memory
Playing Video from Content
Page 3
Before Using
Before Using
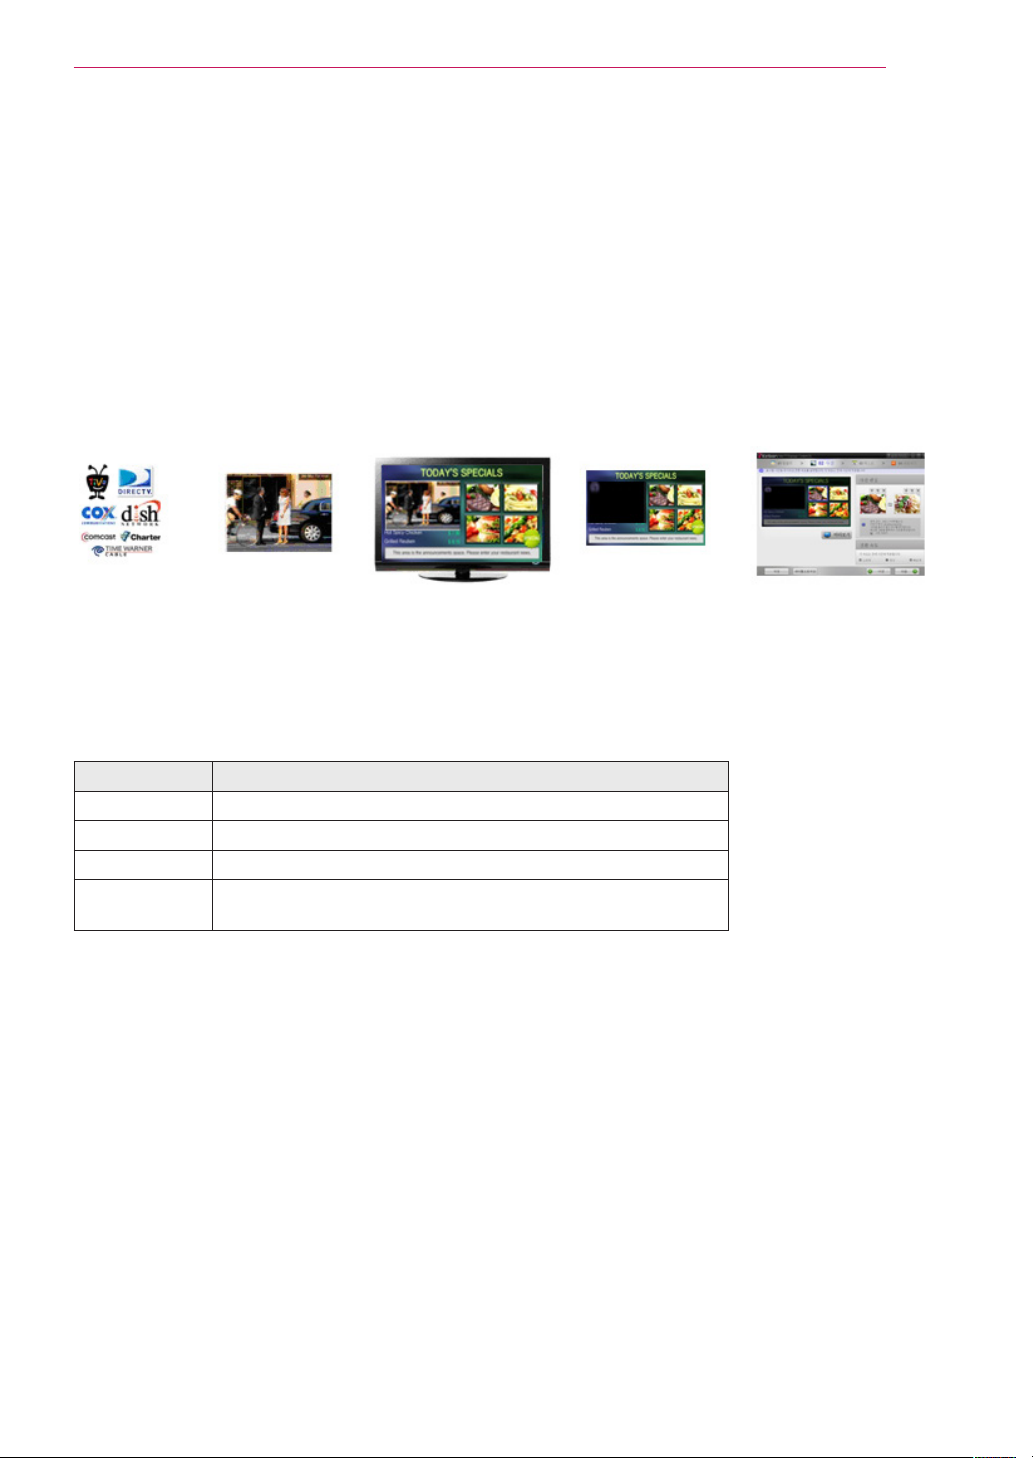
What is LG EzSign 2.0 Editor?
LG EzSign 2.0 Editor allows you to create advertising content quickly and easily.
LG EzSign 2.0 Editor provides a wizard-type user interface for ease of use.
Start LG EzSign 2.0 Editor and simply follow the wizard's steps to create and preview your own content.
Content created using LG EzSign 2.0 Editor can be played on an LG EzSign TV without the need for any
separate hardware or software, or it can also be played along with live broadcasting programs.
You can transfer content files from a PC to the TV using a wireless network.
LG EzSign 2.0 TV
3
Installing LG EzSign 2.0 Editor
System Requirements
Item Requirements
CPU Pentium M, Pentium 4 or higher
RAM 512 MB or more
Network N/A
Operating
System
Windows XP SP2/SP3, Windows Vista, Windows 7
Page 4

4
Before Using
Installation
1 Go to My Computer > Digital_LG > Software >
EzSign 2.0 Editor and double click the Setup.
exe file.
2 Click the drop-down menu in the pop-up win-
dow to select a preferred language, and click
OK.
3 In the LG EzSign 2.0 Editor Wizard screen, click
NEXT.
NOTE
ꔈ If a previous version of the program is already
installed on your computer, click Yes in the
pop-up window to remove it before installing
the current version. All the content and program information stored in the previous version
will be deleted. Ensure that you save the content you need separately before removing/reinstalling the program.
6 If Adobe AIR is not installed on your computer,
an installation window appears. In the installation window, click Accept to install Adobe AIR.
ꔈ If the latest version of Adobe AIR is already
installed on your computer, click Close in the
installation window.
ꔈ If you do not have the latest version of
Adobe AIR installed on your computer, click
Update for a version update.
7 When the installation is complete, click Finish.
4 When the License Agreement screen appears,
click I Agree.
5 Select the directory in which to install the pro-
gram, and click Install.
The program will be installed automatically.
NOTE
ꔈ If you use Windows 7 as your operating system,
reboot the computer after installing LG EzSign
2.0 Editor.
Delete
To remove LG EzSign 2.0 Editor from your computer, click Start > All Programs > LG EzSign 2.0
Editor > Remove LG EzSign 2.0 Editor.
Page 5
Using LG EzSign 2.0 Editor
Using LG EzSign 2.0 Editor
You can easily create and play advertising content using the LG EzSign 2.0 Editor.
5
Running LG EzSign 2.0 Editor
To run LG EzSign 2.0 Editor, go to Start > All
Programs > LG EzSign 2.0 Editor.
NOTE
ꔈ To close LG EzSign 2.0 Editor, click at the
top right of the window.
ꔈ 1024 x 768 or higher resolution is recommend-
ed for LG EzSign 2.0 Editor. if not, the screen
may not be displayed normally.
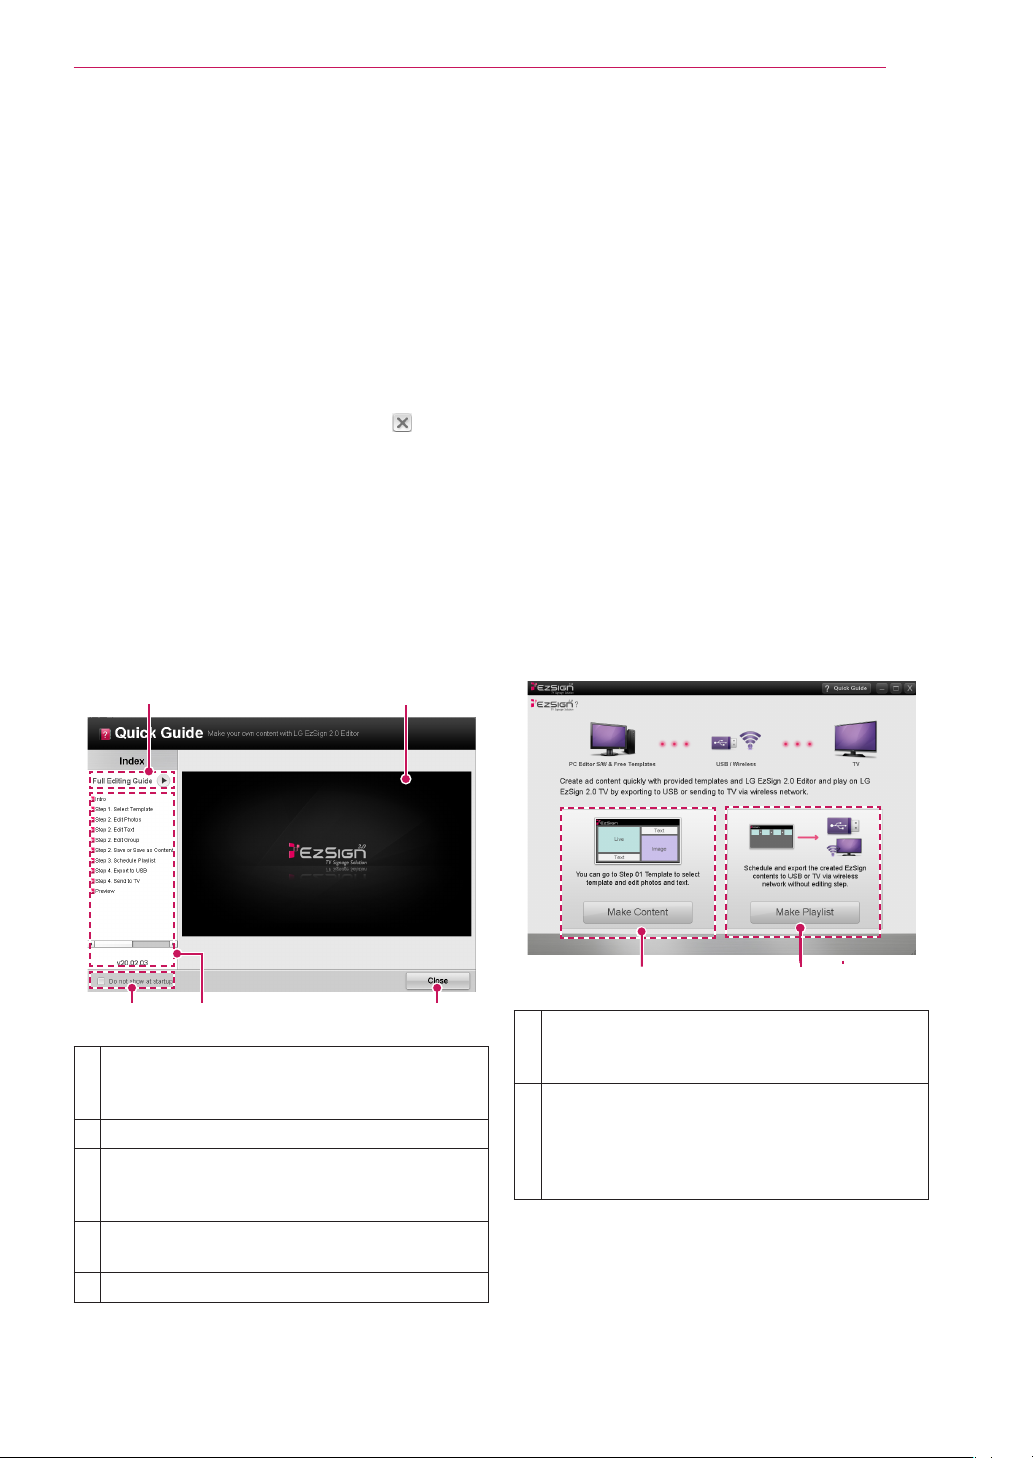
Using the Quick Guide
The Quick Guide window appears when starting LG
EzSign 2.0 Editor for the first time. Help for using
LG EzSign 2.0 Editor is available.
NOTE
ꔈ If you do not want the Quick Guide window to
appear automatically when LG EzSign 2.0
Editor starts, click the Do not show at startup
checkbox at the bottom left of the Quick Guide
window.
ꔈ To see Help while using LG EzSign 2.0 Editor,
click Quick Guide at the top right of the window.
Starting EzSign 2.0 Editor
You can create a TV content file by starting LG
EzSign 2.0 Editor or you can open and edit an
existing content file.
The new or edited content file can be sent to the
TV for playback using
Click Full Editing Guide to watch the video
tutorial which shows how to create media
content using LG EzSign Editor.
Video tutorial display area.
Click this checkbox if you do not want the
Quick Guide to appear automatically next
time you start the program.
Click a step in the editing guide pane to view
a specific step in the video tutorial.
Close the Quick Guide.
Click Make Content to begin the first step in
creating an EzSign content file. Select and
edit a template and export the content file.
By clicking Make Playlist, you can proceed to
the exporting content files step without editing a template. You can set up the playback
duration of existing content and export it to
the USB device.
Page 6
6
Using LG EzSign 2.0 Editor
Creating EzSign Content
You can easily create content using default templates provided by LG EzSign 2.0 Editor. For
detailed information about creating EzSign content
files, see the EzSign Editor Quick Guide.
Make sure you read the NOTE below before creating a content file.
NOTE
ꔈ If you place the cursor over a menu or option
item while creating content, a help balloon
appears.
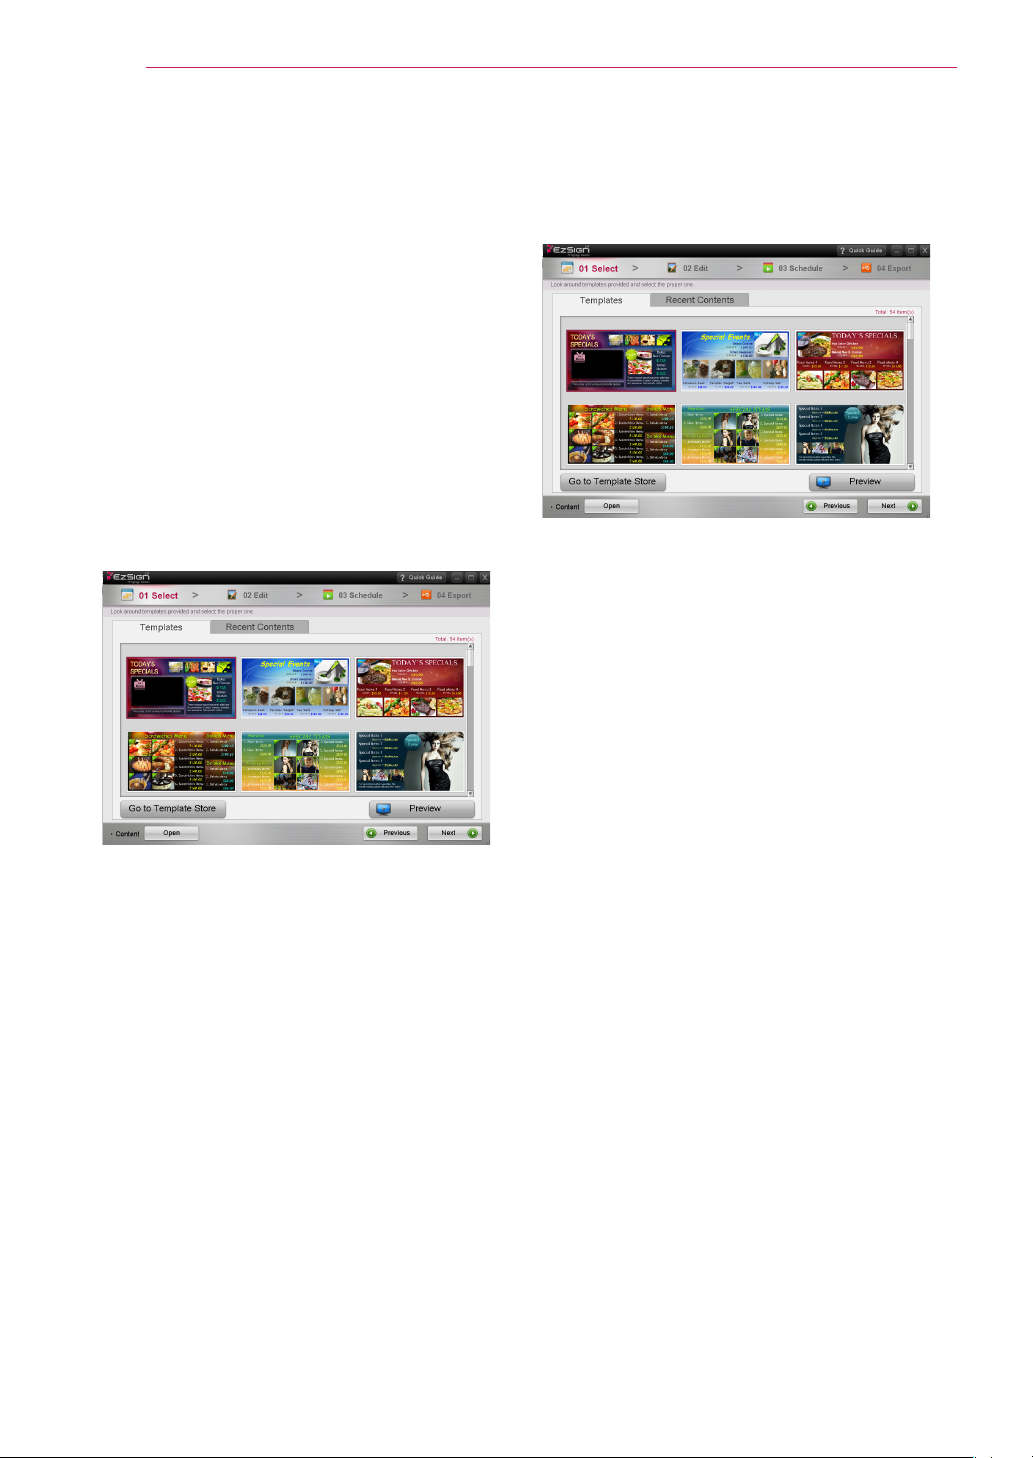
Selecting Template or Content/Opening
Content
You can select either user templates or the default
templates provided by LG EzSign 2.0 Editor.
Opening Content
You cannot open a template file or an exported
content file using Open. You can only open a saved
file using the Save or Save As buttons.
NOTE
ꔈ You can use LG EzSign 2.0 Editor to open a
content file saved by LG EzSign Editor.
NOTE
ꔈ Click Buy Template at the bottom left of the
screen to go to the template purchase site to
buy and download a new template set. (If the
user's computer is not connected to the
Internet, the Buy Template button is not activated.)
ꔈ Close LG EzSign 2.0 Editor, and run the down-
loaded template set file (.exe file) to automatically add the new templates. Run LG EzSign
2.0 Editor once installation of the template set
is complete. You will then see the added templates. (The newly added templates are displayed with a "new" symbol for 7 days.)
ꔈ If no template or content is selected, the NEXT
button is disabled and you cannot proceed to
the next step.
ꔈ Check the version when purchasing. If the tem-
plate set version does not comply with the version of the editor, the template is not added to
LG EzSign 2.0 Editor.
ꔈ Check if the latest version of EzSign 2.0 Editor
is available and always use the latest version.
Page 7

Using LG EzSign 2.0 Editor
7
Editing Content
NOTE
ꔈ The file formats supported for images are GIF,
JPEG, PNG, and BMP.
ꔈ Selected GIF or BMP files are automatically
converted to JPEG files before being shown.
The conversion may decrease the image quality
depending on the quality of the original file.
ꔈ 4-bit BMP files are not recommended due to
poor quality.
ꔈ Images larger than 4095 pixels in width or
height are not allowed.
ꔈ If you upload a single image or two of the
same image to the editing zone, you cannot
switch the image over. Do not display static
images on the screen for long periods of time.
This can cause image sticking.
ꔈ Uploading photos saved in the Network folder
to the photo area may not work, depending on
the network settings. If an error occurs, upload
the photos after copying them to the local PC.
ꔈ Editable areas (photo, text, photo and text
group) are displayed to the left; to the right,
property settings which you can additionally set
for the selected area are displayed.
ꔈ Each area -such as a photo or photo and text
group -has two property sets. The two property
sets will be displayed in turn when a content file
is played. In this case, you can select the following options: 1) Configure the time to the right
when the content file is displayed. 2) Select one
image area from the two areas below. What you
select on the right is displayed on the left.
ꔈ If a photo is bigger than the image area, its
aspect ratio is automatically adjusted, resulting
in degrading the picture quality.
ꔈ If two images which are the same are added to
both areas, image-sticking may occur.
ꔈ For the font area, the input length may vary
depending on the font size.
ꔈ If the entered text exceeds the maximum
length of the input box without the Flow Speed
function enabled, the text will be truncated
when the content is displayed on TV.
ꔈ You can only enter a limited amount of text.
(Up to 2700 pixels). If the entered text exceeds
the maximum length, the text input will be limited.
ꔈ The following elements affect the text length.
Number of characters, font size, font type,
bold/italic properties
ꔈ When a font is installed in the system, it is also
added to the Editor and displayed in the font
list. It is recommended that you install the general TTF (True Type Font).
ꔈ Depending on the font type or system environ-
ment, some characters cannot be displayed or
will be displayed as □ while others can be displayed but without formatting. If this happens,
you will need to select an existing font or install
a new font which supports these characters so
that they can be displayed properly.
ꔈ Setting the input direction, also determines the
text flow. When the direction is set from left to
right, the text flows to the right whereas, if it is
set to the opposite direction, the text flows to
the left.
ꔈ You can modify the text properties to the right;
you can edit text to the left.
ꔈ If you use the same color as the Panel Saver
content text font, image-sticking may occur. It
is recommended to use a different color.
ꔈ In the left area, you can edit the text which
appears when an image is selected in the right
area.
ꔈ If the content file being edited is not in the
playlist, it is automatically added when you click
the NEXT button.
Page 8

8
Using LG EzSign 2.0 Editor
Viewing Clearer Text
To see text more clearly, disable ClearType by following the steps below.
XP
1 Right-click anywhere on the desktop and select
Property from the menu.
2 Click the Appearance tab, then click the Effects
button.
3 Select Use the following method to smooth
edges of screen fonts and click the down arrow
to select Standard from the drop-down list.
4 Click OK, and then click OK again.
Vista
1 Click Start and go to Control Panel >
Appearance and Personalization >
Personalization > Window Color and
Appearance, and open Appearance Settings.
If the Appearance Settings dialog box is not
displayed, at the bottom of the page, click
Open classic appearance properties.
2 Click the Effects button.
3 In the Effects dialog box, select Use the follow-
ing method to smooth edges of screen fonts.
4 In the list, select Standard then click OK.
Windows 7
1 Click Start and go to Control Panel > Fonts >
Adjust ClearType text.
2 If Adjust ClearType text is selected, disable it.
3 On each page, click the text sample that looks
best to you. On the last page of the tuner, click
Finish to save the setup. When the admin password message is displayed, enter the password
or click OK.
Scheduling Content Playback Order
You can set up the playback order by adding content files to the playlist. Set daily schedule to duration or time.
NOTE
ꔈ If you set the playback duration to 60 minutes
or less, the Panel Saver function is disabled,
which may cause image sticking on the screen.
It is therefore recommended to set the playback duration to 70 minutes or longer.
ꔈ The playlist also contains the files required for
the content file to be played.
ꔈ If a content file is not saved in the playlist, you
cannot open a new playlist or save the playlist
under a different name.
This is possible only when the content file is
saved in the playlist.
ꔈ A playlist must be 20 MB or less, and up to ten
content files can be saved in a playlist.
ꔈ You can set the TV/Movie mode to be played in
full-screen mode between content files.
The total number of content files and TV/Movie
files cannot exceed 20.
ꔈ You can add the same content file to the playl-
ist more than once. The latest thumbnail may
not be displayed for a content file which is not
saved.
ꔈ If a playlist cannot be added due to the size or
number of content files currently being edited,
you cannot proceed to the next step by clicking
the NEXT button.
Page 9

Using LG EzSign 2.0 Editor
9
Exporting to a USB device
You can create a list of the content files created
using LG EzSign 2.0 Editor, set up the playback
order and playback time of each file, and export to
a USB device. Then, on TV, you can check the list
and select the content files you want to play.
NOTE
ꔈ You can watch content exported using LG
EzSign Editor on both LG EzSign and LG
EzSign Gold TVs. However, some content files
may not play normally. You cannot watch content exported using LG EzSign 2.0 Editor on
LG EzSign TVs.
ꔈ If the Preview function is used for each step,
the Preview window will be displayed for 5 minutes and then close automatically.
ꔈ The playback duration of the actual content file
played on the LG EzSign TV may be different
from what is configured in the editor.
ꔈ If you set the playback duration to 60 minutes
or less, the Panel Saver function is disabled,
which may cause image sticking on the screen.
It is recommended to set the playback duration
to 70 minutes or longer.
ꔈ If the USB storage device already contains a
content list, the existing list is deleted and
replaced by a new one.
ꔈ If multiple USB devices are connected, you can
select the one you would like to use by clicking
the drop-down menu.
ꔈ If no USB device is connected, the Insert USB
Memory message appears at the bottom of the
drop-down menu.
ꔈ Do not change the default settings on the USB
device for the "save" directory location. If the
"save" directory is changed it will prevent the
content from playing automatically.
Panel Saver
Image sticking is when an image or outline of a
previous image appears on the screen even after
the image has changed. To prevent image sticking,
LG EzSign 2.0 Editor plays the content whose right
and left side images are switched each other in a
different background color for five minutes after the
content has been played for one hour. After five
minutes, the content is played in its original format.
<Original Content>
Page 10

10
PC Edito r S/W
USB Wi-Fi Do ngle
Using LG EzSign 2.0 Editor
Exporting to TV
Using a wireless network, you can transfer content
files saved on a PC to the TV without having to
connect a USB device. To use this function, you
must first connect a wireless dongle to the TV in
order to connect to the wireless network. 12 Page
See the network configuration.) The PC must also
be connected to a router via a wired or wireless
connection.
NOTE
ꔈ If a wireless dongle is used, EzSign content files
saved on a USB device cannot be played.
ꔈ If a content file is transferred via the wireless
dongle, the file is immediately saved in the TV
memory.
ꔈ The connection may not be established
depending on wireless signal interference or
strength.
2 Connect the PC to the router via a wireless/
wired connection.
3 In EzSign 2.0 Editor, select Send To TV.
4 Select TV Auto Scan to automatically search for
the TV connected to the router. You can manually enter an IP by selecting
+ Add TV for connection.
IMPORTANT
ꔈ If there is wireless signal interference, check
whether the router is operating normally. When
there is a wall or another router between the
router and the TV, it may not work properly so
remove any obstacles before installing it.
ꔈ When multiple TVs are connected to a single
router, make sure that the rounder is working
properly before setting a network.
ꔈ Wi-Fi connection is only available through an
AP.
ꔈ External Internet environment is not supported.
ꔈ A password must be set for the router to pre-
vent other devices from being connected.
ꔈ When content files in the existing playlist 1 are
played on TV, contents files in another playlist 2
can be sent to the TV. When it happens, the
files in the playlist 2 are played as scheduled by
replacing the files being played without a popup window displayed.
1 Connect a wireless dongle to the TV which is to
be connected to the router. You can check the
network connection status from the TV's network menu. (The network must be connected to
the minimum gateway.)
5 Select the TV you want to connect and then
select Send to Selected TV.
395FDKSJ34
6 When the transfer is complete, the transferred
content file is immediately played on TV.
IMPORTANT
ꔈꔈ ꔈThe TV name will first be displayed as its serial
number. You can change it as desired (up to 16
characters) by clicking the cell.
Page 11

Using LG EzSign 2.0 Editor
11
NOTE
ꔈ In EzSign 2.0 Editor, you can select a TV to
send content files to.
You can transfer the same or different content
files to all the TVa scanned. After transfer, all
the existing content files saved on the TV are
replaced with the new files.
ꔈ If an error occurs during transfer, a pop-up
message will appear and the previous file is
played.
ꔈ The PC and the TV must be connected to the
same router.
ꔈ The router IP address must be configured to
192.168.XXX.XXX.
ꔈ To check the TV's serial number, select Menu >
Customer Support > Product/Service
Information.
ꔈ If this is the first time Export to TV is used, an
empty TV list will be displayed.
ꔈ If you proceed to another step and return dur-
ing checking transfer availability, checking is
resumed.
ꔈ The TV name will first be displayed as its serial
number. You can change it as desired (up to 16
characters) by clicking the cell.
ꔈ It may take more than a minute to scan
automatically according to the network
environment. If the network is not strong
enough, the TV Auto Scan function may fail to
search all of the TVs connected to the router. If
this happens, retry TV Auto Scan or select Add
+TV to manually input an IP.
ꔈ TVs which already exist in the list are not added
again, even when detected during Auto Scan.
ꔈ To add a TV manually, enter its IP address.
ꔈ Depending on the network or TV condition, the
IP search may fail.
If this happens, check the network environment
and try again.
ꔈ If the Preview function is used for each step,
the Preview window will be displayed for 5 minutes and will close automatically.
Notes When Transferring to a TV
ꔈ It may take longer than 5 minutes depending
on the size of content playlist to transfer or the
network environment.
ꔈ Even when transferring to a TV in the list, the
transfer may fail depending on the network or
TV condition. If the transfer fails, check the
error code displayed on the screen and follow
its instructions.
Error code
Error
code
-100 TV busy The TV is performing a
-200 Network error Check the PC, TV, and
-300 Editor error An error has occurred
-400 TV error Select
-500 PC error An error has occurred
-600 TV error An error has occurred
Description Actions
network operation. Try
again later.
If this reoccurs, turn the
TV off and back on.
router network connections.
If this reoccurs, turn the
TV off and back on.
during file transfer.
Restart EzSign Editor.
Menu>General>Initial
Setting to reset the
EzSign TV.
during file editing. Reboot
the PC.
during file reception.
Restart the EzSign TV.
Page 12

12
Using LG EzSign 2.0 Editor
Network Setting
Wireless network connection
Connect a wireless dongle to configure the wireless
network.
A wireless router must be installed and working at
this time. Refer to the wireless router user manual
to see how to install a wireless router.
The network setting and connection may be different depending on the network environment. Set up
the router according to the wireless router user
manual.
Wireless network setting
1 Press the Menu button.
2 Use theorbutton to select the
Network and press the OK button.
3 Use theorbutton to select
Network Setting and press the OK button.
4 Use the orbutton to select Setting from
the wireless router (AP) list and press the OK
button.
PIN mode connection
1 Follow steps 1 - 4 of "Wireless network setting".
2 Go to PIN mode connection.
3 In the web page of the wireless router (AP) you
want to connect, enter the PIN number displayed on the screen and select Connect.
PIN mode connection
In the web page of the wireless router (AP) you want to
connect, enter the PIN number and select "Connect".
PIN Number: 19730704
Connecting Device
For more details, refer to the router (AP) manual.
ꕣ PREVIOUS
ꔉ NEXT
ꕯ Exit
4 When the network setting is complete, select
re-connection. The new network is then set up.
5 Select IP Auto Setting or IP Manual Setting.
- If you select IP Manual Setting, manually enter
information such as an IP address.
6 When this is complete, press Exit.
Select wireless network setting
Select how to set up the wireless network.
Setup in the Wireless router (AP) list
Quick Setting (WPS-button mode)
ꔉ NEXT
ꕣ PREVIOUS
ꕯ Exit
5 Use the or button to select
Wireless Router and press the OK button.
Select wireless router (AP)
Select a wireless router (AP) to connect.
Enter manually
iptime
ASW
Network1
� PIN mode connection
ꕣ PREVIOUS ꕯ Exit
page 1/1
Search wireless
router (AP)
ꔉ NEXT
6 Enter a security key and press the OK button.
Quick Setting (WPS-button mode)
You can use a nearby wireless router, without having to
select a wireless router's (AP) name.
1 Follow steps 1 - 3 of "Wireless network setting".
2 Use the
(WPS-button mode) and then press the OK button.
button to select Quick Setting
3 Press the WPS-button mode button of the wireless
router (AP) you want to connect and then click Connect.
4 Follow steps 5 - 6 of "PIN mode connection".
IMPORTANT
How to Enter Letters or Numbers
* You can move the cursor on the screen to enter the
required items, by pressing the Volume button on
the remote control.
Page 13

Managing Content
Managing Content
13
* The On-Screen Display (OSD) in this manual is an
example to help you understand how to operate
the product, and may be slightly different from your
projector depending on models.
Saving Content on TV Memory
1 Connect the USB device on which the EzSign
content is stored to the TV USB port. You will
see the following on the TV screen.
USB
EzSign TV Movie List Photo List Music List
2 Select EzSign TV using the TV remote control.
3 Select Copy to TV memory & Play in the USB
tab to save the content files exported to the
USB device in the TV memory.
The files are saved in the TV memory and the
list of files available for playing is displayed
automatically
TV Memory
Do you want to copy the EzSign content to TV memory
Copy to TV memory & Play Play
NOTE
ꔈ The USB tab is selected by default and shown
when a USB device is connected to TV.
ꔈ If the TV memory does not have a sufficient
free space, a Copy Failed! message is displayed
for 5 seconds to return to the previous screen.
.
USB
and play?
Close
Viewing Content on TV
You can play the content saved in the USB device
or TV memory on LG EzSign TV. If you play a file
from the USB device while a file in the TV memory
is being played, the currently playing file stops and
the file on the USB device starts playing.
You can play the TV content again while the USB
content is playing.
Viewing Content Saved in the USB Device
1 Insert the USB device containing the EzSign TV
content into the USB port on the television.
The following is displayed on the TV screen.
USB
EzSign TV Movie List Photo List Music List
2 Select EzSign TV using the TV remote control.
3 Select Play from the USB tab.
You can set the schedule mode to either dura-
tion or time. If the schedule is set to duration,
the content file is played in sequence from the
first file in the list; if it is based on time, it is
played according to the time set on the TV. In
addition, when the schedule is set to time but
no time is set up on the TV or if the time is not
correct, the file may not be played at the
expected time. Make sure you use the schedule
mode after correctly setting the current time on
the TV.
IMPORTANT
ꔈ While loading or copying data to/from a USB
device or dongle, if you remove it forcefully,
EzSign may not work properly.
ꔈ
Page 14

14
Managing Content
You can select the files you want to play from
the file list using the TV remote control.
Press the Play button after selecting the files
you want to play, and the selected files are
played in order. (However, if the schedule mode
is set to time, the files are played according to
the time currently set.)
Once all the files have been played, the first one
starts again.
Select or deselect content files using the
remote control.
Show the file information of the files included
in the list, such as name, playback time, etc.
Check the video list and select videos to play.
Current time set on the TV.
If the time is not correct, set it again by going
to Menu > Time.
Play the selected file.
Viewing Content Saved on the TV Memory
You must first copy the content files to the TV
memory.
1 Press the Menu button on the remote control.
2 Select My Media using the remote control.
3 Select EzSign TV.
USB
EzSign TV Movie List Photo List Music List
4 Select TV Memory tab.
TV Memory
EzSign content exists. Do you want to play it?
Play Delete
5 Select Play.
The list of playable files is displayed as follows,
and the files are played in sequence from the
first one in the list.
You can set up the schedule mode to either
duration or time. If the schedule is set to duration, the content file is played in sequence from
the first one in the list; if it is based on time, it
is played according to the time set on the TV. In
addition, when the schedule is set to time but
no time is set on the TV or if the time is not
correct, the file may not be played at the
expected time. Make sure you use the schedule
mode after correctly setting the current time on
the TV.
USB
Close
NOTE
ꔈ It is recommended that you copy files to the TV
memory before playing them, as playing directly
from the USB memory for an extended period
of time may cause the device to overheat.
ꔈ The files in the playlist are played by either dura-
tion or time, according to the schedule.
ꔈ The Program Guide/Information keys are always
available.
ꔈ Press the Channel and Volume Control keys to
make adjustments. However, the content keys
may not work while a channel is switched over.
ꔈ If you press the Volume or Channel key while
the panel saver is displayed, the screen may
appear abnormally.
Page 15

Managing Content
15
NOTE
ꔈ You can switch to EzSign mode or TV mode or
see the file information while a file is being
played from a USB device or the TV memory
by pressing any button on the TV remote control.
ꔈ When you turn on a TV which has been set to
the factory default, any content files on the TV
are automatically played.
ꔈ If there are several files in the playlist, you can
proceed to the next page.
Exit
Portal
Program
Guide
Information
Returns to the previous TV mode
or Movie mode when the file is
being played.
Switches to EzSign mode and the
file is played.
Displays or hides the file list and
playback information on the TV
screen.
Displays or hides the information
on the TV remote control buttons
and the file status information
while being played on the TV
screen.
ꔈ EzSign mode indicates that a content file is
being played. You can play the file at any time
since the Program Guide and Information buttons are always available.
ꔈ In TV mode, the content file is stopped and a
regular TV program is displayed in full-screen
mode. You can play the file at any time since
the
Program Guide and Information buttons are
always available.
ꔈ In Movie mode, the content file playback is
stopped, just as in TV mode, and the movie is
played in full-screen mode. However, the control buttons (play, stop, rewind, etc.) related to
playing movies are only available in this mode.
Checking the Location of the Content
Being Played
1 Press the Menu button on the TV remote con-
trol while playing the content file.
2 Select My Media using the remote control.
3 Select EzSign TV.
USB
EzSign TV Movie List Photo List Music List
When you press the Information button on the
remote control, the following screen is displayed.
Shows the content title.
Displays the play mode.
(with an EzSign mode / TV mode / Movie
mode icon)
Provides the information on the remote control button.
4 The highlighted tab with the ꔐ symbol indicates
the location of the file currently being played.
<Playing from TV memory>
ꔐ TV Memory
EzSign content exists. Do you want to play it?
Play Delete
<Playing from USB device>
TV memory
Do you want to copy the EzSign content to TV memory
Copy to TV memory & Play Play
and play?
NOTE
ꔈ Press the Program Guide button on the remote
control to check the EzSign Content information at the top of the playlist screen and locate
the saved files.
USB
Close
ꔐ USB
Close
ꔈ
Page 16

16
Managing Content
Deleting EzSign Content from
the TV Memory
1 Press the Menu button on the TV remote con-
trol.
2 Select My Media using the remote control.
3 Select EzSign TV.
USB
EzSign TV Movie List Photo List Music List
4 Select TV Memory tab.
TV memory
EzSign content exists. Do you want to play it?
Play Delete
5 Select Delete.
6 In the pop-up window, enter the 4-digit TV
password, and select Close.
Enter Password
* * * *
Close
After the password input, the message below
appears for 5 seconds before the TV is turned
off and on again automatically.
USB
Close
Playing Video from Content
You can play a video file while playing a content file.
Play the content file first. Refer to the TV Manual
for more information on how to play a video file.
1 Press the Menu button on the TV remote con-
trol.
2 Select My Media using the remote control.
3 Select EzSign TV.
My Media
EzSign TV Movie List Photo List Music List
4 Play a content file.
5 When a content file is played from USB, check
if a video file is stored on the connected USB
device. If a content file is played from the TV
memory, you can connect a USB device which
holds another video file.
6 After pressing the Program Guide button on
the remote control, select Open Movie on the
screen.
7 When you select a video file to play, the video is
played along with the content file.
TV will reboot soon.
NOTE
ꔈ For more details on how to set and change a
TV password, refer to the TV Manual.
ꔈ You cannot delete individual content files sepa-
rately. All files saved in the TV memory are
deleted when you select Delete.
Page 17

 Loading...