

Page 1

PLASMA
TV
OWNER'S
Please
Retainitfor
Record
See
mation
Model
Serial
the
number
read
model
label
to
your
number
this
future
manual
reference.
number
attached
dealer
:
:
carefully
and
on
the
when
MANUAL
before
serial
number
back
cover
you
require
operating
of
the
and
quote
service.
BZ03
your
set.
this
set.
infor-
Page 2

Safety
Warnings
Safety
Safety
-
Use
the
sound.
W
WARNING
Do
not
-
This
any
This
This
electric
If
electric
If
er
place
may
use
not
place
may
antenna
may
wire
the
earth
grounding
should
sources
-
Do
or
-
Bend
building
-
Earth
-
Instructions
Instructions
set
at
the
place
such
to
cause
shock.
shock
cause
the
cause
prevent
should
wire
be
the
as
whereitis
causedbythe
methods
employed
set
heat
a
fire.
in
set
a
fireorcould
cable
water
be
is
not
in
registers,
damp
between
rain
damaged
connected.
connected,
are
not
and
lower
direct
place
likely
give
from
current
possible,
installed
than
sunlight
stove
such
to
get
an
inside
flowing
inside
the
there
leakage.
byaqualified
the
altitude
or
and
so
as
a
wet.
electric
shock.
and
in.
set
and
is
possibleadanger
a
separate
near
on.
bathroom
outside
could
circuit
electrician.
give
break-
heat
of
6562
feet
Do
-
This
shock.
In
case
off
it
dealerorservice
-
This
Do
an
your
-
This
shock.
of
Duringalightning
wall
-
This
shock.
(2000m)
use
not
water
cause
may
of
smoke
may
attempt
may
may
it
cause
cause
and
cause
,unplug
not
dealerorservice
outlet
to
get
while
damaged
or
from
center.
a
fireorcould
to
damaged
don't
damaged
the
best
cleaning
strange
the
service
center.
thunder,
touch
qualityofpicture
the
the
set
or
could
smell
outlet
give
the
set
unplug
an
set
an
set
or
antenna
or
from
electric
could
could
wall
the
the
set.
give
the
and
contact
shock.
yourself.
give
the
set
cable.
give
set,
an
switch
Contact
an
from
an
and
electric
your
electric
the
electric
-
Do
set.
-
Do
-
Do
-
Do
pipe.
not
This
not
This
not
This
not
connect
place
may
insert
may
place
may
groundtotelephone
anything
cause
a
fireorcould
any
object
cause
a
fireorcould
heavy
cause
serious
containing
objects
injury
into
to
Short-circuit
wires,
an
give
the
an
give
on
the
a
childoradult.
breaker
liquid
electric
exhaust
electric
set.
Power
supplier
lightning
on
shock.
vent.
shock.
rods
top
or
gas
of
the
2
PLASMA
TV
Page 3

Safety
Warnings
*
Safety
NOTES
Never
-
This
Disconnect
before
tions
Do
not
bookcase
-
Ventilation
When
place
-
This
adult,
instructions
WARNING
NOTES
touch
cause
may
from
place
or
required.
installing
the
edge
cause
may
and
serious
the
power
an
moving.
the
set
rack.
the
of
the
damage
have
The
The
product.
Take
electric
mains
the
in
set
its
stand.
set
to
two
violation
violation
care
plug
shock.
a
built-in
on
fall,
causing
to
the
with
and
a
kinds
of
table,
set.
of
information,
of
this
of
this
danger
a
hand.
wet
remove
installation
be
serious
instruction
instruction
that
all
such
careful
injury
may
to
connec-
a
and
happen
as
not
child
each
meaning
may
may
under
Ensure
objects
-
This
Do
aged
loose.
a
-
This
Dispose
from
-
In
When
carry
-
This
adult,
Unplug
to
ing.
-
This
or
Contact
internal
-
Accumulated
cause
cause
may
not
or
may
eating
case
holding
may
Do
may
specific
the
like
plug
moving
and
this
not
ofitisasbelow.
serious
light
injuriesordamage
condition.
power
a
heater.
cause a
fire
when
the
connecting
cause a
fire
of
used
them.
that
it
eats
the
the
cause
the
serious
damage
product
use
liquid
cause
damaged
service
the
of
the
part
dust
can
injuries
cord
or
an
the
power
or
an
batteries
take
them,
assembled
set
speakers.
set
to
fall,
from
cleaners
the
center
set.
cause
doesn't
electric
part
electric
carefully
it
to
causing
to
the
the
set
once
mechanical
and
shock.
cord
of
shock.
see a
Monitor.
wall
or
or
could
even
trail
or
the
doctor
with
serious
outlet
aerosol
a
of
across
the
power
to
protect
speakers
give
year
failure.
death.
the
any
plug
outlet
immediately.
to
injury
before
cleaners.
an
electric
clean
to
is
a
do
a
dam-
child
child
clean-
shock.
hot
is
not
or
the
Do
not
head
power
cuits.
-
This
There
antenna
touching
-
This
Do
not
-
This
place
may
should
may
pull
may
and
the
cause
cause
cause
the
an
lines
be
power
latter
outside
an
enough
an
cord
a
fire.
or
other
electric
even
electric
but the
lines
antenna
shock.
distance
when
electric
to
keep
the
shock.
plug
in
between
antenna
when
the
light
vicinity
the
of
or
power
an
outside
former
falls.
unplugging.
over-
from
cir-
The
distance
5~7
about
screen.
-
If
not,
Unplug
tended
-
Accumulated
deteriorationorelectric
eyes
the
and
times
will
set
unused
dust
between
strain.
from
eyes
as
longasdiagonal
wall
the
for
long
cause
may
leakage.
and
outlet
periods
a
fire
the
whenitis
or
an
screen
of
time.
electric
Owner's
should
length
shock
left
of
unat-
from
Manual
be
the
3
Page 4

Contents
Contents
Contents
Safety
Introduction
Installation
Operation
Channel
Picture
Sound
Warnings
SafetyInstructions.......................2~3
RemoteControlKeyFunctions................6
LocationandFunctionofControls
External
Displayable
Accessories.............................14
Equipment
Monitor
Viewing
Specification
InstallationOptions.......................15
TurningontheSet........................16
On-Screen
Menu
Menu
Options
Language
AutoProgrammeTuning...................17
ManualProgrammeTuning.................17
FineTuning.............................18
AssigningaStationName..................18
Booster(option)..........................18
ProgrammeEdit..........................19
FavouriteProgramme.....................19
CallingtheProgrammeTable................19
Menu
PSM(PictureStatusMemory)...............20
AdjustingAutoColourControl.
Manual
sRGB
Fleshtone...............................21
Manual
SSM(SoundStatusMemory)................22
BBE...................................22
AVL(AutoVolumeLeveler).................22
Adjusting
Options
..................................20
Colour
(RGB[PC],
Picture
Menu
Options
Sound
Temperature
Control
DVI[PC]
Control
Control
mode
(User
(User
Stereo/DualReception.....................23
NICAMReception(option)..................23
. . . . . . . . . .
. . . . . . . .
Setups
. . . . . . . . . . . .
Selection
. . . . . . . . . . . . .
(User
only)
option)
option)
. . . . . . . .
option)
. . . . . . . .
. . . . . . . . .
. . . . . . . .
. . .
.7~8
.9~12
.13
.16
.20
.20
.21
.21
.22
Time
Menu
Options
SettingtheClock.........................24
SettingtheOn/OffTimer...................24
AutoSleep..............................24
SleepTimer.............................24
Special
Screen
PIP
Teletext
Menu
ChildLock..............................25
ISM
LowPower..............................26
Auto
SettingPictureFormat.....................27
ScreenPosition..........................27
Manual
Selecting
ScreenAdjustments.......................28
Cinema................................28
Luminance
Initializing
Options
Options
(RGB
VGA/XGA
to
Minimization)
[PC]
(RGB
[PC]
mode
Reduction
original
mode
(RGB
(option)
factory
(Image
Sticking
Demo.............................26
Menu
adjustment
Configure
Wide
Noise
(Reset
mode
Method
only)
only)
[PC]
value)
mode
. . . . . . . . .
SplitZoom..............................29
for
Signal
Feature
Sub
Source
Picture
(PIP
. . . . . . . . .
for
the
. . . . . . . . . . .
mode
(Picture-in-Picture)
WatchingPIP............................30
Programme
Selecting
MovingthePIP(PIPmodeonly).
PictureSize.............................30
Adjusting
Switchon/off............................31
Selection
an
PIP
(option)
Input
Transparency
SIMPLEText(option)......................31
TOPText(option).........................31
FASTEXT..............................32
SpecialTeletextFunctions..................32
Miscellaneous
ExternalControlDeviceSetup
. . . . . . . . . . .
IRCode(NECFormat)..................39~40
TroubleshootingChecklist..................42
ProductSpecifications.....................43
. . . . .
. . . . . . .
. . . . . .
only)
. . . . .
PIP
only)
.
. . .
. . .
.33~38
.25
.27
.28
.28
.29
.29
.30
.30
.30
.30
4
The
set
date
sumer.
After
al,
keep
where
always
PLASMA
working
is
7
of
reading
the
contact
lifeofthis
years
delivery
this
itinthe
user
TV
since the
to
con-
manu-
place
can
easily.
Page 5

Introduction
Introduction
Introduction
isaPlasma
What
If
voltage
is
emitted.APlasma
light
-
160°
Wide
A
Plasma
direction.
installation
Easy
A
Plasma
at
the
desired
screen
Big
The
screen
Multimedia
A
Plasma
and
so
on.
The
explanation
The
PDP
in
the
manufacture
manufacturers
to
sponds
We
promise
is
inputted
angle
Display
Display
place.
ofaPlasma
Plasma
Display
whichisthe
and
this
standard
that
we'll
Display
to
gas
range
provides
is
much
Display
can
be
about
display
of
the
would
is
do
in
glass
Display
of
more
lighter
Display
connected
coloured
deviceofthis
PDP.
not
regarded
our
best
?
is
Several
mean
panels,
a
next
vision
than
and
is
42"
as
to
develop
ultraviolet
generation
160°
angle
smaller
than
so
(or
50")
with
a
computer
dots
may
productiscomposed
coloured
that
the
PDP
acceptable.
our
is
rays
outputted
flat
Display
of
range
other
same
that
you
so
that
be
present
dots
visibleonthe
is
faulty.Wehope
It
means
technology
and
this
using
visionsothat
class
can
vivid
get
can
you
on
PDP
of
0.9to2.2
screen
thatitcould
to
minimize
fused
withafluorescent
phenomenon.
can
you
products
so
experience
useitasascreen
screen
million
would
will
not
the
understand
be
cell
you
a
get
that
as
cells
be
changed
defects.
substance.Atthis
without
picture
can
you
install
if
areina
you
for
conference,
andafew
acceptable,
that
or
refunded.
the
distortion
the
theater.
cell
in
line
product
Plasma
game,
defects
with
which
moment,
from
can
other
any
Display
internet
occur
PDP
corre-
The
explanation
In
the
same
reliability
any
noise
of
negative
from
acceptable.
TO
AVOID
OF
TIME.
WARNING
ThisisClass
case
the
WARNING
TO
REDUCE
RAIN
OR
about
thatafanisused
way
this
product.
effectonits
the
fansisnormalinthe
It
means
thatitis
BURNING
IMAGE
user
IMAGE
AFTER
B
product.
may
THE
MOISTURE.
noise
Therefore,
efficiency
not
INTO
BURN
Inadomestic
be
required
RISK
OF
of
inaPC
a
certain
and
operation
changeable
THE
WILL
NOT
to
FIRE
42"
(or
liability
DISPLAY,
BE
take
AND
50")
to
the
keep
levelofnoise
and
it's
of
this
nor
refundable.
DO
COVERED
environment
adequate
ELECTRIC
PDP
CPU
also
cool,
could
determined
the
occur
product.Wehope
NOT
HAVEASTILL
UNDER
WARRANTY
this
product
measures.
SHOCK,
PDP
when
to
you
DO
have
IMAGE
may
is
the
will
NOT
equipped
fan
no
difficulty
understand
ON
ie.Menus,
cause
EXPOSE
with
is
cooling
operated.
while
thatacertain
SCREEN FOR
Video
radio
THIS
fans
This
noise
using
EXTENDED
BordersorLOGOS
games,
interference
PRODUCT
to
this
level of
improve
doesn't
product.
noise
PERIOD
in
which
TO
the
have
The
is
Owner's
Manual
5
Page 6

Introduction
Remote
Remote
-
When
-
There's
Switches
Selects
the
switches
Selects the
switches
Displays
Δ
a
switches
your
/
programme
selects
accepts
Adjusts
Enlarge
Switches
Selects
a
programme
Alternates
Selects
the
using
maybe
Component,
the
TV, AV,
the
Ε
(Programme
the
Φ/Γ
adjusts
selection
the
according
the
the
Selects
between
input
Adjusts
the
remote
a
defectinconsecutive
the
sound
MULTIMEDIA
set
on
from
Component,
or
set
on
from
the
programme
oramenu
set
on
from
(Volume
adjusts
menu
or
current
factory
preset
SPLIT
screen
sub
picture
PIPorDW
for
the
main
mode
for
the
sub
Control
Control
on
RGB
standby.
DVI
standby.
Up/Down)
standby.
Up/Down)
the
settings.
displays
to
the
with
on
PIPPR+/-
sub
and sub
PIP
the
WIN.SIZE
picture
POSITION
MovesthesubpicturetoΔ/ΕorΦ/Γ
control
MUTE
or
off.
or
DVI
modes.
TV/AV
RGB
modes.
LIST
table.
item.
volume.
OK
the
mode.
PSM
picture
room.
ZOOM
regular
ration.
PIP/DW
or
off.
modes.
picture.
SWAP
pic-
ture.
INPUT
sub
pic-
ture.
size.
direction.
aim
itatthe
operation
Key
Key
remote
Functions
Functions
control
sensor
of
remote
control
MUTE
TV/AV
MULTIMEDIA
LIST
ARC
PR
OK
VOL
PR
123
456
7
89
PSM
0
SPLIT
ZOOM
PIP/DW
REVEAL
PIP
?
WIN.
SIZE
PIP
POSITION
SWAP
HOLD
PIP
INPUT
of
the
set.
POWER
MENU
VOL
in
specified
I/II
brightness
POWER
switches
off
I/II
Selects
guage
Selects
ARC
Changes
MENU
Displays
one.
Exits
Memorizes
NUMBER
SSM
To
your
according
to
select
the
standby.
the
broadcast.
the
the
on
the
current
the
viewing
to
this
set
language
sound
picture
screen
menu
buttons
sound
programme
set
on
from
during
output.
format.
menus
menu.
changes.
appropriate
feature.
standby
one
character.
dual
or
lan-
by
to
SSM
SLEEP
Sets
SLEEP
TEXT/
PR+
MIX
PR-
TIME
INDEX
i
the
TEXT/*
These
For
further
section.
:
Note
SWAP
+/-,
used
for
SWAP
Returnstothe
programme.
Note
when
set
to
this
button
favorite
timer.
sleep
buttons
are
details,
In
teletext
mode,
and
PIP
teletext function.
previously
:
This
function
Favourite
Otherwise
Off.
will
programme.
used
see
INPUT
programme
each
select
the
for
the
works
teletext.
'Teletext'
PIP
buttons
viewed
press
a
stored
PR
are
only
is
of
Installing
6
PLASMA
Batteries
TV
?
Open
insert
?
Install
batteries
the
the
two
battery
batteries
1.5V
with
compartment
alkaline
new
batteries.
with
correct
batteriesofAAA
cover
on
polarity.
the
type.
back
Don't
side
mix
and
used
Page 7

Introduction
Location
Location
and
and
Function
Function
<Front
Panel
of
of
Controls>
Controls
Controls
Main
Power
ON/OFF
Button
Remote
Control
Sensor
Power
Illuminates
mode,
when
the
Standby
red
Illuminates
set
is
Indicator
in
standby
green
turned
TV/AV
TV/AV
TV/AV
Selects
RGB
played,
on
MENU
MENU
MENU
Displays
Exits
Memorizes
Button
the
TV,
or
AV,
DVI
modes.IfOSDisdis-
selects
menu
or
on
the
current
Component,
item.
screen
menu
VOL
VOL
menus
menu.
changes.
selects
switches
onebyone.
Ε
Δ
/
a
programme
Φ/Γ
(Programme
the
set
on
(Volume
adjusts
adjusts
oramenu
from
the
menu
PR
PR
Up/Down)
standby.
Up/Down)
volume.
settings.
item.
Owner's
Manual
7
Page 8

Introduction
Location
Location
and
and
Function
Function
<Back
of
Panel>
Controls
of
Controls
AV2
S-VIDEO
VIDEO
L/MONO
AUDIO
R
8
1.
CONTROL
2.
RS-232C
Connect
3.
DVI
Connect
PUTER
Note:
mend
core
4.
COMPONENT
Connect
INPUT
5.
AUDIO/VIDEO
Connect
these
S-VIDEO/AUDIO
Connect
socket.
Connect
ets
RS-232C
REMOTE
CONTROL
1
INPUT
(CONTROL/SERVICE)
2
LOCK/REMOTE
INPUT(CONTROL/SERVICE)
to
the
RS-232C
INPUT/AUDIO
the
monitor
to
this
socket.
If
want
you
with
to
use
separete
you
that
along
INPUT
DVD
video
and
audio
outputs
IN
the
audio/video
sockets.
IN
the
S-VIDEO
the
as
audio
in
AV1.
DVI
INPUT
INPUT/RGB
output
use
RGB/DVI
the
cable
outputs
SOCKETS
out
SOCKETS
out
out
socketsofthe
COMPONENT
INPUT
AUDIO
INPUT
RGB
3 4 5
2
INPUT
COMPONENT
INPUT
1
VIDEO
CONTROL
PORT
on a
port
PC.
INPUT
socketofthe
that
has
cable.
to
Y,
to
Audio
(AV1)
socketsofexternal
socket
PERSONAL
we
audio,
PB,
socketsofAUDIO
strongly
a
or
core,
PRofCOMPONENT
the
ofanVCRtothe
VCRtothe
COM-
recom-
EMI
INPUT.
equipment
S-VIDEO
audio
Fillter
to
sock-
R
L
AUDIO
6.
ANTENNA
7.
POWER
This
cated
the
8.
AUDIO/VIDEO
S-VIDEO/AUDIO
R
AUDIO
Monitor
on
Monitor
MONITOR
OUTPUT
A/V
INPUT1
L/MOND
VIDEO
INPUT
CORD
operates
the
Specifications
on
S-VIDEO
SOCKET
DC
IN
power.
SOCKETS
IN
SOCKETS
AC
INPUT
Antenna
76
on
an
AC
page.
power.
Never
The
is
voltage
indi-
attempttooperate
(AV2)
8
PLASMA
TV
Page 9

Installation
External
External
Antenna
-
Watching
-
-
-
-
-
-
Be
careful
VHF
UHF
When
Audio
Connect
If
you
If
you
to
the
Use
ture
If
a
To
avoid
4:3
Connection
for
antenna
antenna
VCR
connecting
(R)
-red).
the
have
connect
Video
the
orbiter
fromaVCR.
picture
picture
the
bronze
Apartments
(connecting
wall
outdoor
Private
(connecting
the
VIDEO
a
INPUT
mono
VCR,
an
S-VIDEO
input.
functiontoAvoid
(Refer
format
noise
Equipment
Equipment
wire
not
to
be
bended
wall
to
antenna
socket)
antenna
socket
RF
coaxial
wire
antenna
house
wall
to
outdoor
antenna)
Monitortoexternal
socket
VCRtothe
having
p.
25)
the
(yellow)
the
audio
S-VIDEO
a
fixed
image
leave
connect
to
is
used;
(interference),
in
(75
ohms)
equipment,
to
the
cable
fixed
image
may
an
adequate
V
Viewing
connecting
match
VIDEO
INPUT
from
the
the
input,
remain
remain
visibleonthe
distance
iewing
to
antenna
Antenna
the colours
on
VCR
picture
the
to
the
AUDIO
qualityisimproved;
on
the
screen
between
input
AC
<
Back
of
connecting
set.
for
screen.
the
Setups
Setups
port.
INPUT
of
the
panel
set
ports
(L/MONO)
compared
a
period
long
VCR
and
set.
>
(Video-yellow,
on
input
the
to
connectingaregular
of
time.
Typically
set.
Audio
a
(L)
frozen
-
white,
still
VCR
pic-
Watching
-
Turn
want.
Watching
1.
Use
select
-
If
both
connected
the
S-VIDEO
2.
Insertavideo
PLAY
(See
TV
programmes
the
set
VCR
the
TV/AV
AV1
or
S-VIDEO
to
the
buttononthe
VCR
owner's
on
AV2.
can
tape
and
button
and
S-VHS
be
manual)
select
on
VIDEO
VCR
received.
into
VCR.
the
programme
the
remote
sockets
simultaneously,
the
VCR
and
control
have
press
been
only
you
the
<
Back
to
CO
MPONENT
INPUT
RGB
2
INPUT
COMPONENT
INPUT
1
VIDEO
R
L
AUDIO
<VCR>
MONITOR
OUTPUT
A/V
INPUT1
R
L/MOND
AUDIO
VIDEO
Owner's
of
the
set
Antenna
Manual
>
AC
9
panel
S-VIDEO
Page 10

Installation
External
External
Watching
-
After
-
For
RGB
Cable
subscribing
further
COMPONENT
INPUT
INPUT
COMPONENT
INPUT
informationofcable
2
1
TV
foralocal
VIDEO
Equipment
Equipment
cableTVstation
contact
TV,
R
AUDIO
<
Cable
R
L
AUDIO
box
>
the
MONITOR
OUTPUT
A/V
INPUT1
L/MOND
VIDEO
and
local
S-VIDEO
installing
<
Back
V
iewing
Viewing
a
converter
cableTVstation.
of
the
panel
Antenna
set
AC
Setups
Setups
can
watch
cable
cable
TV/AV
cable
box.
TV.
TV
button
on
the
remote
control
or
AV2.
service
provided
channels
to
using
you
To
>
watch
1.
Use
the
select
Tune
the
AV1
to
cable
2.
Watching
-
When
on
the
How
1.
Use
select
2.
Operate
See
external
connecting
audio/video
use
to
the
TV/AV
AV1
the
external
AV
the
set
equipment:
button
or
AV2.
corresponding
equipment
source
to
on
operating
an
external
Video
the
external
remote
source,
=
yellow,
guide.
match
Audio
control
equipment.
to
the
coloursofAUDIO/VIDEO
=
white,
(Left)
DIO
INPUT
Camcorder
Video
Audio
game
RGB
INPUT
(Right)
COMPONENT
INPUT
COMPONENT
INPUT
set
on
the
set
with
input
red.
jacks
R
VIDEO
AUDIO
AUDIO VIDEO
R
L
L
=
2
1
the
output
jacks
<
Back
R
AUDIO
of
the
set
panel
MONITOR
OUTPUT
A/V
INPUT1
L/MOND
VIDEO
>
S-VIDEO
10
PLASMA
TV
Page 11

Installation
Watching
How
to
connect
Connect
NENT
INPUT
AUDIO
INPUT.
How
use
to
1.
Turnonthe
2.
Use
TV/AV
controltoselect
Refer
to
instructions.
?
Component
You
can
DVD
player
Component
Video
of
DVD
DVD
DVD
the
get
video
and
DVD
or
MULTIMEDIA
DVD
Input
better
with
set
output
player
outputs
audio
player,
Component
player's
ports
component
of
ports
ports
outputs
and
picture
the
to
Y,
PB,
to
Audio
insertaDVD.
button
1
or
Component
manual
quality
input
ports
YPBPR
Y
Y
Y
Y
PRofCOMPO-
sockets
on
the
for
operating
if
connect
you
as
below.
Pr
Pb
R-Y
B-Y
Cr
Cb
PR
PB
remote
<
Back
panel
of
the
set
>
of
AC
Antenna
S-VIDEO
R
AUDIO VIDEO
>
MONITOR
OUTPUT
A/V
INPUT1
L/MOND
2.
COMPONENT
INPUT
RGB
2
INPUT
COMPONENT
INPUT
1
VIDEO
R
L
AUD
O
<
DVD
player
Watching
-
To
watch
How
1.
Use
jack
nector.
How
1.
Turnonthe
the
2.
Use
Component
<
Back
to
connect
the
for
use
to
digital
TV/AV
panel
S-232C
INPUT
ONTROL/SERVICE)
DTV
(option)
digitally
monitor's
video
make
Then,
digital
set-top
or
of
the
set
DVI
(R)
broadcast
COMPONENT
connections,
the
set-top
box.)
MULTIMEDIA
1,
Component
>
INPUT
AUDIO
(L)
programs,
(Y,
depending
corresponding
box.
(Refer
on
the
2orRGB.
AU
DIO
INPUT
RGB
DTV
OUTPUT
<
Digital
purchase
PB,
PR)
on
audio
to
remote
INPUT
Set-top
and
INPUT,
your
set-top
connections.
the
owner's
controltoselect
COMPONENT
INPUT
2
COMPONENT
INPUT
1
VIDEO
(R)
box
connect
RGBorDVI
AUDIO
(L)
>
box
manual
R
AUD O
a
digital
con-
for
L
Y
set-top
L/MOND
R
AUDIO
PB
box.
?
DTV
Mode
MONITOR
OUTPUT
A/V
INPUT1
VIDEO
P
R
Input
Terminal
576p(50Hz)
1080i(50Hz)
1152i(50Hz)
S-VID
signal
Component
o
o
o
RGB
(DTV)
o
o
o
Owner's
Manual
11
Page 12

Installation
External
External
Connecting
-
To
-
Avoid
the
-
Connect
PC
-
There
mode
picture
manufacturer
-
The
Setup
-
We
In
-
If
-
Connect
output
-
Connect
-
If
-
This
automatically
-
DDC
-
If
-
If
INPUT
If
is
-
DOS
vivid
enjoy
keeping
useascreen
screen;
PCtothe
accordingly.
might
into
other
is
clean.Ifthe
synchronization
Instructions
recommend
RT-42PX10/11/20/21
the
resolutionofPC
the
of
port
the
a
sound
using
set
apply
protocol
required,
graphic
graphic
set
adjust
cardonthePCdoes
to
display
cardonthePCdoes
to
Plug
mode
may
PC
picture
a
fixed
beanoise
resolution
of
the
to
using
signal
the
PCtothe
audio
card,
a
VESA
to
use
is
preset
the
the
and
Play
not
Equipment
Equipment
and
image
RGB
refresh
PC
input
Connect
1024x768,
is
cable
cable
adjust
Plug
this
for
set
PConthe
INPUT(PC
according
graphic
series,
over
from
set.
sound,
on
saver
or
change
rate
form
a
we
UXGA,
from
the
DVI
the
PC
and
RGB
settings
connect
the
when
to
of
card.
for
Horizontal
PC
60Hz
recommend
monitor
INPUT
PCtothe
sound
Play
(Analog
for
not
set.
output
automatically
work
depending
set's
possible.
INPUT)
some
the
the
to
your
for
there
port
as
Solution.
Plug
output
analog
the
by
on
video
a
PCtothe
screen
or
resolution,
refresh
PC
graphic
and
set
the
will
output
on
Audio
required.
RGB),
and
analog
and
set.)
for
a
DVI
INPUT(DIGITAL
rate
Vertical
PC
mode,
using
be
no
port
the
set.
input
The
set
DVI
(Digital
Play
functionally.
and
digital
card
if
V
iewing
Viewing
set.
long
vertical
into
card
period
other
can
of
pattern,
rate
not
frequencies
they
provide
the
on
RGB
on
PCtothe
the
RGB)
RGB
a
DVI-I
60Hz
the
set.
EDID
mode.
simultaneously,
640x480,
picture
of
provides
digital
using
time.
The
fixed
RGB
INPUT)
contrast
or
be
changed,
is
the
for
set.
RGB
(Audio
datatothe
adjust
separate.
best
the
PC
INPUT
cables
or
the
picture
mode,
simultaneously,
set
cable.
Setups
Setups
may
image
of
the
port
brightness
brightness
the
change
quality.
they
provide
of
the
port
are
not
included
PC
connect
the
system
set
withaDDC
only
to
become
set;
change
inPCmode.
and
contrast
PC
graphic
set
or
with
one
either
RGB
permanently
the
cardorconsult
the best
the
signal
the
protocol.
of
both
or
resolution
Then
on
the
picture
cable
set).
RGB
DVI;
change
menu
from
The
INPUT
(the
imprinted
output
the
until
ittothe
quality.
the
PC
adjusts
or
other
mode
on
of
PC
the
DVI
DVI
<
Back
C
INPUT
SERVICE)
panel
of
the
set
>
COMPONENT
INPUT
AUDIO
INPUT
DVI
INPUT
RGB
2
NPUT
COMPONENT
INPUT
1
VIDEO
R
L
AUDIO
PC
Setup
1.
TurnonthePCand
2.
Turnonthe
the
set's
the
the
remote
TV/AV
resolution
x
1024,
3.
Use
controltoselect
4.
Set
(1280
display
control.
or
the
60Hz).
apply
by
pressing
MULTIMEDIA
RGB
output
(Refer
power
or
of
DVI
the
to
p.
to
the
PCtoSXGA
the
set.
POWER
buttononthe
source.
input
13)
button
remote
or
on
under
12
PLASMA
TV
Page 13

Displayable
Displayable
Monitor
Monitor
Specification
Specification
Installation
RGB/DVI
mode
Resolution
640x350
720x400
640x480
848x480
852x480
800x600
832x624
1024x768
1360x768
(XGA)
1366x768
(XGA)
1152x864
(RGB)
1152x870
1280x768
(XGA)
1280x960
1280x1024
RT-42PX10/11/12X/20/21
(RGB)
(RGB)
(RGB)
Horizontal
Frequency(KHz)
31.468
37.861
31.469
37.927
31.469
35.000
37.861
37.500
43.269
31.500
37.799
39.375
31.500
37.799
39.375
35.156
37.879
48.077
46.875
53.674
49.725
48.363
56.476
60.023
68.677
47.700
59.625
47.700
59.625
54.348
63.995
67.500
77.487
68.681
47.693
60.091
68.504
60.023
63.981
series
Vertical
Frequency(Hz)
70.09
85.08
70.08
85.03
59.94
66.66
72.80
75.00
85.00
60.00
70.00
75.00
60.00
70.00
75.00
56.25
60.31
72.18
75.00
85.06
74.55
60.00
70.06
75.02
85.00
60.00
75.02
60.00
75.02
60.05
70.01
75.00
85.00
75.06
60.00
75.00
85.00
60.02
60.02
RGB/DVI
Resolution
640x350
720x400
640x480
848x480
852x480
800x600
832x624
1024x768
1360x768
1366x768
1152x864
1152x870
1280x768
1280x960
1280x1024
mode
Horizontal
Frequency(KHz)
31.468
37.861
31.469
37.927
31.469
35.000
37.861
37.500
43.269
31.500
37.799
39.375
31.500
37.799
39.375
35.156
37.879
48.077
46.875
53.674
49.725
48.363
56.476
60.023
68.677
47.700
59.625
68.500
47.700
59.625
69.500
54.348
63.995
67.500
77.487
68.681
47.693
60.091
68.504
60.023
63.981
Vertical
Frequency(Hz)
70.09
85.08
70.08
85.03
59.94
66.66
72.80
75.00
85.00
60.00
70.00
75.00
60.00
70.00
75.00
56.25
(RGB)
60.31
72.18
75.00
85.06
74.55
60.00
70.06
75.02
85.00
60.00
75.02
85.00
60.00
75.02
85.00
60.05
70.01
75.00
85.00
75.06
60.00
75.00
85.00
60.02
60.02
RT-50PX10/11/20/21
series
Owner's
Manual
13
Page 14

Installation
Accessories
Accessories
LG
TV
AS
mark
D-sub
Owner's
15
pin
cable
Manual
(Optional)
Alkaline
Power
1.5V
1.5V
batteries
Cord
Remote
DVI
Cable
POWER
MUTE
TV/AV
MULTIMEDA
LIST
ARC
PR
OK
VOL
PR
123
456
7
89
PSM SSM
0
SPLIT
ZOOM
PP/DW SLEEP
REVEAL
PIP
PR+
?
WIN.SIZE
PIPPR-
POSITION
HOLD
PIP
INPUT
Control
(Optional)
I/II
MENU
VOL
TEXT/
MIX
TIMESWAP
INDEX
i
2-TV
bracket
handset
2-TV
2-Wall
bolts
brackets
brackets
Joinning
-
Secure
Optional
-
Optional
added.
-
Contract
the
the
Extras
extras
your
TV
TV
assembly
assembly
can
dealer
be
for
by
joinning
changed
buying
wall
to
the
or
these
it
to
modified
items.
a
to
wall
for
protect
by
using
?
After
as
Insert
Install
as
Match
Check
?
Secure
(not
quality
the
the
the
shown.
the2bolts
the
shown.
the
to
the
supplied
improvement
set
tumbling
TV/Wall
set
must
wall
bracketsonthe
height
be
sure
TV
assembly
with
brackets.
be
mounted
and
tighten
of
theTVbrackets
the
brackets
to
the
product),
without
on
securely,
wall
are
the
wall
as
notification
any
s
desk
in
the
with
4
and
tightened
with
strong
shown.
top,
upper
bolts*,
the
wall
securely.
new
install
theTVbracketsonthe
holesonthe
(not
supplied
brackets.
or
optional
wound
extras
strings
bracket.
with
can
wire
the
cables,
be
TV
product),
40
4250 40 42 50
Tilt
wall
mounting
14
PLASMA
42
40
bracket
Video
cables
Audio
cables
bracket
Ceiling
4
0
42
50
mounting
TV
Page 15

Installation
Installation
?
The
set
can
set
this
set
is
designed
be
?
?
Install
This
Options
Options
installedindifferent
inalocation
only
so
that
it
can
where
ways
be
such
adequate
mounted
as
on a
ventilationisavailable.
either
orona
wall,
horizontallyorvertically.
desktop
Installation
etc.
Wall
Mount:
?
The
(For
Mounting
?
Speakers
only.
set
further
Horizontal
can
be
information,
Bracket
are
optional,
installed
Installation
Installation
on
a
wallasshown
refertothe
and
and
are
shown
optional
Setup
Guide'.)
for
illustration
above.
'Wall
Desktop
?
The
(For
Stand
?
Speakers
are
Pedestal
set
can
further
Installation
shown
Installation
be
mounted
information,
and
speaker
for
example
and
on a
refertothe
Setup
stands
only.
deskasshown
optional
Guide'.)
shown
are
above.
'Desktop
optional,
and
To
Mount
Wall
quate
10cm
on
mount
ventilation.
a
Wall
minimum
10cm
10cm
allowable
clearances
10cm
for
ade-
To
3cm
Install
Pedestal
adequate
on
a
mount
ventilation.
Desktop
minimum
allowable
clearances
Owner's
for
Manual
15
Page 16

Operation
T
urning
Turning
-
When
using
on
the
Δ
/
control
on
set
the
set
the
the
power
Ε
buttononthe
the
was
was
TV/AV,
Turning
1.
Connect
2.
Press
PR
remote
Turning
1.
If
the
?
Press
2.
If
the
?
Press
POWER,
the
set
ON/OFF
set
ON/OFF
turned
ON/OFF
on
on
remote
just
cord
correctly.
and
then
(power
turned
MULTIMEDIA,
the
the
aim
control,
after
installation
buttononthe
set
or
press
the
set
will
cord
off
with the
buttononthe
off
with the
buttononthe
is
PR
itatits
still
remote
Set
Set
sensor
set.
At
the
POWER,
switch
connected)
ON/OFF
settoturn
set
and
Ε
Δ
/
this
on.
control
then
or
NUMBER
on
moment,
button
the
press
the
TV/AV,
set
and
on.
the
set.
the
set
is
MULTIMEDIA,
on
the
set
ON/OFF
the
TV/AV
buttononthe
switched
or
PR
button
Δ
remote
to
PR
Δ
Ε
/
control
standby
mode.
Ε
or
NUMBER
/
on
the
set
buttononthe
to
turn
Press
buttonsonthe
set
or
the
set
the
press
on.
TV/AV
the
or
On-Screen
On-Screen
-
The
menus
can
1.
Press
the
MENU
2.
Press
theΓbutton
3.
Press
theΓbutton
From
this
point
4.
Repeatedly
be
press
shown
on,
button
and
and
the
the
Menu
Menu
on
the
and
then
then
on-screen
MENU
use
use
screen
then
button
Language
Language
in
the
selected
use
Δ
Δ
menus
Ε
Δ
/
Ε
buttontoselect
/
Ε
buttontoselect
/
willbeshowninthe
to
return
language.
buttontoselect
Language.
your
to
normal
TV
Selection
Selection
First
the
SPECIAL
desired
language.
language
viewing.
select
your
language.
menu.
of
choice.
your
16
PLASMA
TV
Page 17

Operation
Channel
Channel
Auto
Programme
-
All
stations
installationofthis
1.
Press
2.
3.
the
Press
theΓbutton
Press
theΓbuttontoselect
L
:
SECAM
BG:PAL
/Australia)
I
:
PAL
DK
:
PAL
M
:
(USA
4.
Press
theΕbuttontoselect
with
the
5.
Press
theΕbuttontoselect
6.
Press
theΓbutton
All
receivable
:
Note
a.Insome
Programme
tion
name
C
(V/UHF
b. In
Australia,
assigned
tion
to
assign
To
stop
When
auto
screen.
that
can
MENU
B/G,
I/II
(U.K.
D/K,
/
Korea
Φ/Γ
models,
Service),
can
01-69)
and
auto
programming,
programming
See
the
Menu
Menu
Tuning
be
received
set.
button
and
and
then
L/L'
SECAM
buttonorNUMBER
stations
stored
the
B/G
/
Ireland
SECAM
/
Philippines)
to
begin
are
the
PDC
be
assigned
or
S
(Cable
ifnostation
as
station
'Programme
D/K
station
-----
name.
are
storedbythis
then
Δ
Ε
/
System.
(Europe
/
Hong
(East
(option)
Storage
Start.
auto
programming.
stored.
name
(Programme
to
a
station,
01-47),
name
followed
the
press
is
completed,
edit'
Options
Options
use
Ε
Δ
/
buttontoselect
buttontoselect
SelectaTV
/
East
Europe
/
South
Kong
/
Europe
China/Africa
from.
Select
buttonsonthe
is
stored
Delivery
the
channel
followed
can
be
assigned
a
number
by
MENU
button.
the
sectiontoedit
Programme
method.Itis
Auto
system
/
Asia/New
Africa)
the
Storage
for
stations
Control)
number
a
number.
by
to
a
see
the stored
recommended
the
STATION
programme.
with
the
Φ
Γ
/
Zealand/M.East/Africa
/
CIS)
beginning
which
or
station,
'Assigning
from
TELETEXT
is
edit
programme
menu.
broadcast
assigned
the
channel
a
station
menu
programme.
button;
data.
and
appears
that
menu.
VPS
name'
number
If
stored
number
you
(Video
no
sta-
sec-
on
the
use
auto
programme
STATION
PICTURE
SOUND
TIME
SPECIAL
SCREEN
PIP/DW
as
Auto
Manual
Programme
Favourite
MENU
programme
programme
Prev.
during
edit
programme
Γ
System
Storage
Start
BG
from
2
is
Manual
-
Manual
assign
1.
Press
2.
Press
3.
Press
Φ
4.
Press
L
BG
Africa
I
DK
M
5.
Press
as
6.
Press
the
with
7.
Press
Ifastationisfound
8.
Press
9.
To
Programme
programme
a
station
the
theΓbutton
theΓbuttontoselect
Γ
/
buttonorNUMBER
theΕbuttontoselect
:
SECAM
:
/
:
PAL
:
:
(USA
theΕbuttontoselect
required.
theΕbuttontoselect
Φ
/
the
theΕbuttontoselect
theOKbutton
store
lets
name
MENU
L/L'
PAL
B/G,
Australia)
I/II
(U.K.
PAL
D/K,
/
Korea
Γ
buttonorNUMBER
number
buttons.
another
Tuning
you
manually
with
five
button
and
and
then
SECAM
/
Ireland
SECAM
/
Philippines)
the
search
to
store
station,
tune
characterstoeach
then
use
Ε
Δ
buttontoselect
/
Storage.
buttonsonthe
System.
B/G
(Europe
/
Hong
Kong
D/K
(East
Europe
(option)
Band.
Press
Channel.
buttons.
Search.
will
stop.
it.
repeat
steps
and
arrange
Ε
Δ
/
Select the
Storage
SelectaTV
/
East
/
South
/
the
You
can
If
possible,
Press
the
3to8.
the
stationsinwhatever
programme
buttontoselect
Manual
desired
programme
menu.
system
/
Europe
Asia/New
Africa)
China/Africa
Φ
Γ
/
buttontoselect
select
the
desired
select
Φ/Γ
button
number.
the
Programme.
with
/
CIS)
the
channel
to
STATION
number
Φ/Γ
the
Zealand/M.East
V/UHF
channel
number
commence
order
menu.
with
button;
or
Cable
number
directly
searching.
you
the
with
/
desire.
STATION
PICTURE
SOUND
TIME
SPECIAL
SCREEN
PIP/DW
Also
you
Auto
Manual
Programme
Favourite
MENU
Owner's
programme
programme
Prev.
can
programme
Γ
edit
Manual
System
Band
Channel
Fine
Search
Name
Booster
BG
V/UHF
1
C01
Off
17
2
Storage
Page 18

Operation
Channel
Channel
Fine
Tuning
-
Normally
1.
2.
3.
4.
5.
fine
Repeat
Press
theΓbutton
Press
the
Press
the
Repeatedly
The
finely
selection.
Assigning
1.
Repeat
2.
Press
theΓbutton
3.
Press
4.
5.
6.
7.
theΓbutton
Press
theΔbutton.
9.
With
theΕbutton
Select
the
ond
character,
Press
the
Repeatedly
the
a
Station
the
tuning
'Manual
Φ/Γ
OK
press
tuned
'Manual
next
OK
press
Menu
Menu
is
only
programme
and
buttontofine
button.
the
MENU
programme
Name
programme
and
to
display
You
can
you
position
and
so
on.
button
in
the
MENU
necessary
then
Δ
button
then
Δ
can
use
selectinthe
by
pressing
twice.
button
the
Options
Options
if
reception
steps
tuning'
Ε
buttontoselect
/
tune
for
the
best
to
return
willbeindicated
steps
tuning'
Ε
buttontoselect
/
Name
a
blank,
menu.
+,
opposite
theΓbutton
to
return
1to2.
to
1to2.
the
-,
to
is
poor.
Fine.
picture
normal
by
yellow
Name.
alphabet
direction.
and
normal
and
sound.
TV
viewing.
number
AtoZ
then take
TV
viewing.
during
and
choiceofthe
your
the
programme
numeric
sec-
STATION
Auto
programme
Manual
programme
Programme
Favourite
Auto
Manual
Programme
Favourite
programme
programme
edit
programme
edit
programme
PICTURE
SOUND
TIME
SPECIAL
SCREEN
PIP/DW
STATION
PICTURE
to
0
SOUND
TIME
SPECIAL
SCREEN
PIP/DW
Storage
System
Band
Channel
Fine
Search
Name
Booster
Store
Storage
System
Band
Channel
Fine
Search
Name
Booster
2
BG
V/UHF
1
C01
Off
2
BG
V/UHF
1
C01
Off
Prev.
Booster
In
some
If
the
1.
2.
3.
5.
6.
(option)
models,
reception
the
Repeat
Press
theΓbutton
Press
the
Press
the
Repeatedly
Booster
is
poor
'Manual
Φ/Γ
OK
press
button.
is
an
the
optional
fringe
at
programme
and
then
buttontoselect
the
MENU
area
tuning'
Ε
Δ
/
OnorOff.
button
function.
TV
signal,
steps
Only
1to2.
of
buttontoselect
to
return
to
a
select
normal
set
with
Booster
Booster.
TV
Booster
to
viewing.
On.
can
perform
this
function.
STATION
PICTURE
SOUND
TIME
SPECIAL
SCREEN
PIP/DW
Auto
Manual
Programme
Favourite
programme
programme
edit
programme
Storage
System
Band
Channel
Fine
Search
Name
Booster
2
BG
V/UHF
1
C01
On
ΦΓ
Store
18
PLASMA
TV
Page 19

Operation
Programme
-
This
function
gramme
1.
Press
2.
Press
3.
Press
Deleting
1.
Select
2.
Press
The
position.
Copying
1.
Select
2.
Press
All
Moving
1.
Select
2.
Press
3.
Move
4.
Press
Skipping
1.
Select
2.
Press
3.
Press
When
the
directly
gramme
Favourite
-
This
function
1.
Press
2.
Press
3.
Press
4.
Press
5.
Press
6.
Selectadesired
under
7.
To
You
8.
Press
9,
Repeatedly
Repeatedly
numbers
the
theΓbutton
theΓbutton
a
programme
a
the
selected
a
programme
a
the
the
following
a
programme
a
the
the
the
a
a
the
the
a
programme
Ε
Δ
/
enter
editortable
Programme
lets
the
theΓbutton
theΓbutton
theΓbutton
the
10
store
another
can
storeupto
the
Edit
enables
MENU
programme
RED
programme
programme
GREEN
programme
YELLOW
programme
YELLOW
programme
programme
BLUE
BLUE
button
the
you
MENU
Ε
Δ
/
is
entered
OK
press
press
to
you
or
a
copy
button
and
then
to
display
to
button
twice.
to
button.
programmes
to
button.
to
button
number
number
button.
button
number
normal
during
programme
menu.
select
your
button
and
and
to
display
buttontoselect
programme
withanumeric
programme,
8
programmes.
button.
the
MENU
the
SWAP
delete
blank
station
and
then
Ε
Δ
/
the
be
deleted
is
deleted,
be
copied
are
be
moved
the
desired
again
to
be
The
skipped
to
again
is
skipped
TV
number
favourite
and
then
then
Δ
/
then
Δ
/
the
with
repeat
button
buttontoselect
or
the
skip
data
Ε
use
Δ
/
buttontoselect
Programme
with
the
all
the
with
the
shifted
down
with
the
programme
to
release
skipped
programme
release
the
it
means
viewing.
with
programmes
use
Δ
/
Ε
buttontoselect
Ε
buttontoselect
Favourite
--
-----.
Φ/Γ
the
'0'
(or
'00')
steps
to
return
stored
programmes.
into
the
selected
buttontoselect
Programme
edit
Ε
orΦ/
Δ
/
following
Ε
Δ
orΦ/
/
one
position.
Δ
Ε
orΦ/
/
number
this
function.
with
the
Δ
turns
skipped
that
If
want
you
the
NUMBER
directly.
Ε
buttontoselect
Favourite
On.
programme
buttonorNUMBER
in
front
5to6.
to
normal
stored
favorite
Also
programme
the
STATION
Γ
edit.
button.
menu.
programmes
Γ
button.
Γ
button.
with
the
Δ
Ε
/
to
programme.
you
to
Γ
orΦ/
button.
blue.
willbeunabletoselect
select
the
the
skipped
STATION
buttonsorselectitin
programme.
menu.
buttons.
of
i.e.
'05'
it,
TV
viewing.
programmes.
are
/
(or
you
Ε
can
number.
shifted
orΦ/
programme,
Any
'005')
menu.
menu.
move some
up
Γ
button.
it
using
the
pro-
number
for
5.
one
stationstoother
Programme
----
0-
1BLN2
2C01
3C04
4C05
Delete
Move
Prev.
MENU
STATION
Auto
programme
Manual
PICTURE
Programme
Favourite
SOUND
TIME
SPECIAL
SCREEN
PIP/DW
programme
programme
edit
pro-
edit
5C05
6C07
7C55
8S27
9S29
Copy
Skip
On
Off
ΦΓ
0BLN2
--
---- --
--
---- --
--
---- --
--
---- --
--
---- --
--
---- --
--
---- --
Prev.
Calling
-
You
Displaying
Press
The
?
You
programme
?
Some
there
Selecting
Select
Then
The
Paging
There
Pressing
Press
the
can
check
the
programme
may
isnostation
a
press
Plasma
through
are
the
Programme
the
programme
LIST
button
table
find
some
edit
programmes
a
programme
programme
theOKbutton.
Display
10
programme
Ε
the
Δ
/
LIST
button
programmes
mode.
name
with
switches
a
programme
orΦ/
table
to
display
appears
blue
with
in
the
Γ
to
return
Table
table
storedinthe
the
on
the
highlighted
the
channel
assigned.
the
programme
Ε
Δ
orΦ/
/
to
the
chosen
table
pages
button
repeatedly
to
normal
Programme
screen.
programmes
number
Γ
in
which
TV
memory
table
button.
programme
contain
turns
viewing.
table
shown
by
shown.
the
displaying
menu.
They
in
the
number.
100
programmes.
pages.
the
have
programme
programme
been
table
table.
----
0-
1BLN2
set
in
the
up
indicate
2C01
3C04
4C05
Owner's
5C05
6C07
7C55
8S27
9S29
Manual
19
Page 20

Operation
Picture
Picture
PSM
(Picture
-
This
function
-
When
adjusting
is
automatically
1.
Press
the
?
Each
press
Dynamic
?
You
can
?
Picture
the
factory
-
You
can
On.
1.
Press
Press
Press
Repeatedly
enjoy
selecting
the
the
theΓbutton
-
When
to
2.
3.
4.
Status
adjusts
PSM
of
also
options
and
the
MENU
Γ
press
Menu
Menu
the
picture
changed
button
the
PSM
select
Dynamic,
cannot
vivid
picture
button
button
the
Memory)
set
options
to
User.
button
Dynamic,
be
and
hi-definition
options
and
and
then
and
then
MENU
to
the
(contrast,
changes
Standard,
Standard
changed.
(Dynamic,
then
use
use
button
Options
Options
best
picture
appearance.
brightness,
the
screen
Standard
Mild
and
Mild
with
picture
Standard
Ε
use
Δ
buttontoselect
/
Ε
Δ
buttontoselect
/
Ε
buttontoselect
Δ
/
to
return
to
colour,
or
are
LG's
normal
display
User
preset
excellent
and
XD.
On
TV
sharpness
as
shown
in
the
and
Mild)
the
or
Off.
viewing.
and
below.
Mild
PICTURE
programmed
Digital
in
PICTURE
PICTURE
tint
menu.
Reality
menu,
menu.
(NTSC
for
processor
good
input
XD
picture
is
only))
manually,
User
quality
technology.
automatically
STATION
PICTURE
SOUND
TIME
SPECIAL
SCREEN
PIP/DW
MENU
at
changed
PSM
CSM
Fleshtone
Contrast
Brightness
Colour
Sharpness
PSM
Γ
On
Off
100
60
50
50
Prev.
Adjusting
-
To
initialize
1.
Press
2.
Press
3.
Press
ture.
4.
Repeatedly
?
Each
Manual
-
You
can
1.
Press
2.
Press
3.
Press
4.
Press
?
The
5.
Repeatedly
Auto
values
the
MENU
theΓbutton
theΓbutton
of
press
Cool
Colour
adjust
the
MENU
theΓbutton
theΓbutton
theΓbutton
adjustment
Colour
(reset
button
and
and
the
press
Ε
Δ
button
/
Temperature
red,
green,
button
and
and
and
range
the
press
Control
to
default
and
then
then
MENU
or
and
then
then
then
of
MENU
then
use
use
button
changes
Normal
Control
blue
to
then
use
use
use
Red,
button
settings),
use
Δ
Ε
Δ
buttontoselect
/
Ε
buttontoselect
Δ
/
to
return
the
screen
(User
colour
any
use
Δ
Ε
Δ
buttontoselect
/
Ε
Δ
buttontoselect
/
Φ
Γ
/
buttontomake
and
Green
to
return
select
the
Ε
buttontoselect
/
to
normal
display
option)
temperature
Ε
buttontoselect
/
Blue
to
normal
Warm
is
Normal
-30~+30.
option.
the
CSM.
the
desired
TV
viewing.
as
shown
you
prefer.
the
CSM.
User.
appropriate
TV
viewing.
PICTURE
colour
below.
PICTURE
adjustments.
menu.
tempera-
User
menu.
STATION
PICTURE
SOUND
TIME
SPECIAL
SCREEN
PIP/DW
STATION
PICTURE
SOUND
TIME
SPECIAL
SCREEN
PIP/DW
PSM
CSM
Fleshtone
Contrast
Brightness
Colour
Sharpness
MENU
PSM
CSM
Fleshtone
Contrast
Brightness
Colour
Sharpness
MENU
Γ
Cool
Normal
100
Warm
60
50
User
50
Prev.
Γ
100
60
50
50
Prev.
Red
Green
Blue
Cool
Normal
Warm
User
Red
Green
Blue
-10
0
10
-10
0
10
20
PLASMA
TV
Page 21

Operation
sRGB
-
When
the
1.
Press
2.
Press
3.
Press
4.
Repeatedly
Fleshtone
-
Adjust
-
This
TV,
AV1, AV2,
1.
Press
2.
Press
3.
Press
?
4.
Repeatedly
(RGB[PC],
the
set
equal
image
the
theΓbutton
theΓbutton
the
Fleshtone
function
the
theΓbutton
theΓbutton
The
adjustment
DVI[PC]
was
connected
each
MENU
button
the
press
COMPONENT
press
to
button
range
the
worksinthe
MENU
mode
only)
to
other.
external
and
then
and
then
use
and
then
use
MENU
button
select
the
following
480i/480p/576i/576p/720p/1080i.
and
then
and
then
use
and
then
use
of
Fleshtone
MENU
button
use
Δ
Δ
desired
mode:
use
Δ
Φ/Γ
/
/
to
/
to
equipment
Ε
Δ
/
Ε
buttontoselect
Ε
buttontoselect
return
skin
Ε
Δ
/
Ε
buttontoselect
buttontomake
is
0~3.
return
with
sRGB
buttontoselect
sRGB.
On
to
normal
TV
colour
option.
buttontoselect
Fleshtone.
appropriate
to
normal
TV
function,
the
PICTURE
or
Off.
viewing.
the
PICTURE
viewing.
It's
adjusted
menu.
menu.
adjustments.
a
colour
difference
STATION
PICTURE
SOUND
TIME
SPECIAL
SCREEN
PIP/DW
STATION
PICTURE
SOUND
TIME
SPECIAL
SCREEN
PIP/DW
to
PSM
CSM
sRGB
Contrast
Brightness
Colour
MENU
PSM
CSM
Fleshtone
Contrast
Brightness
Colour
Sharpness
MENU
display
Prev.
Prev.
Γ
On
Off
100
60
50
Γ
100
0
60
50
50
Manual
-
You
-
In
1.
2.
3.
4.
Picture
can
adjust
the
broadcasting
Press
the
Press
theΓbutton
Press
theΓbutton
Repeatedly
picture
MENU
press
Control
system
button
contrast,
and
and
the
MENU
(User
PAL/SECAM,
and
then
then
then
option)
brightness,
use
use
button
the
use
Δ
Ε
Δ
/
Φ
Γ
/
to
colour,
sharpness
item
picture
Ε
buttontoselect
/
buttontoselect
buttontomake
return
to
normal
and
Tint
tint
doesn't
the
the
desired
appropriate
TV
viewing.
(NTSC
work.
PICTURE
picture
adjustments.
input only)
menu.
option.
to
the
levels
you
prefer.
STATION
PSM
CSM
PICTURE
SOUND
TIME
SPECIAL
SCREEN
PIP/DW
Fleshtone
Contrast
Brightness
Colour
Sharpness
MENU
Prev.
Owner's
Γ
100
60
50
50
Manual
21
Page 22

Operation
Sound
Sound
SSM
(Sound
-
This
function
appropriate
-
When
1.
Press
2.
Press
?
You
?
The
and
-
TruSurround
-
TruSurround
BBE
-
BBE
High
1.
Press
2.
Press
3.
Press
4.
Repeatedly
Status
lets
sound
adjusting
the
SSM
the
SSM
SRS
TSXT
can
also
sound
cannot
R
isatrademark
XT
XT
Definition
the
MENU
theΓbutton
theΓbutton
Manufactured
Menu
Menu
Memory)
you
enjoy
option
sound
options
button.
buttontoselect
select
SRS
TSXT,
be
changed.
technology
Sound
button
and
and
the
press
under
SRS
of
MENU
the
based
Flat,
SRS
is
restores
and
then
then
Options
Options
best
sound
on
the
and
(treble
your
Flat
TSXT,
Flat,
Music,
Labs,
incorporated
clarity
then
use
use
Δ
use
Δ
button
license
from
without
program
bass)
desired
Music
Music,
Movie
Inc.
under
and
presence
Ε
Δ
/
Ε
buttontoselect
/
Ε
buttontoselect
/
to
return
BBE
Sound,
any
special
content.
manually,
SSM
sound.
Movie,
Speech
license
Speech
from
and
for
buttontoselect
BBE.
On
to
normal
TV
Inc.
adjustment
is
automatically
Movie
are
programmed
SRS
better
the
or
Off.
viewing.
or
User
Labs,
speech
SOUND
because
the
changed
Speech
in
the
SOUND
for
good
Inc.
intelligibility
menu.
and
set
automatically
to
User.
menu.
sound
reproduction
musical
STATION
PICTURE
SOUND
TIME
SPECIAL
SCREEN
PIP/DW
User
realism.
SSM
BBE
AVL
Balance
Treble
Bass
MENU
selects
at
Prev.
the
the
factory
Γ
0
50
50
On
Off
AVL
(Auto
-
This
feature
1.
Press
2.
Press
3.
Press
4.
Repeatedly
Adjusting
1.
Press
2.
Press
3.
Press
4.
Repeatedly
:
Note
22
PLASMA
Volume
maintains
the
MENU
theΓbutton
theΓbutton
press
Sound
the
MENU
theΓbutton
theΓbutton
press
BassorBBE
Treble,
TV
Leveler)
an
button
and
and
the
Control
button
and
and
the
equal
MENU
MENU
and
then
then
(User
and
then
then
aren't
volume
then
use
use
button
then
use
use
button
use
Δ
/
Δ
/
to
option)
use
Δ
/
Φ/Γ
to
suitable
even
level;
Ε
Δ
buttontoselect
/
Ε
buttontoselect
Ε
buttontoselect
return
to
Ε
Δ
buttontoselect
/
Ε
buttontoselect
buttontomake
return
to
to
use
if
normal
normal
SRS
you
TSXT.
channels.
change
the
AVL.
or
On
Off.
TV
viewing.
the
the
desired
appropriate
TV
viewing.
SOUND
SOUND
sound
adjustments.
menu.
menu.
item.
STATION
PICTURE
SOUND
TIME
SPECIAL
SCREEN
PIP/DW
STATION
PICTURE
SOUND
TIME
SPECIAL
SCREEN
PIP/DW
MENU
MENU
SSM
BBE
AVL
Balance
Treble
Bass
SSM
BBE
AVL
Balance
Treble
Bass
Γ
On
Off
0
50
50
Prev.
0
50Γ
50
Prev.
Page 23
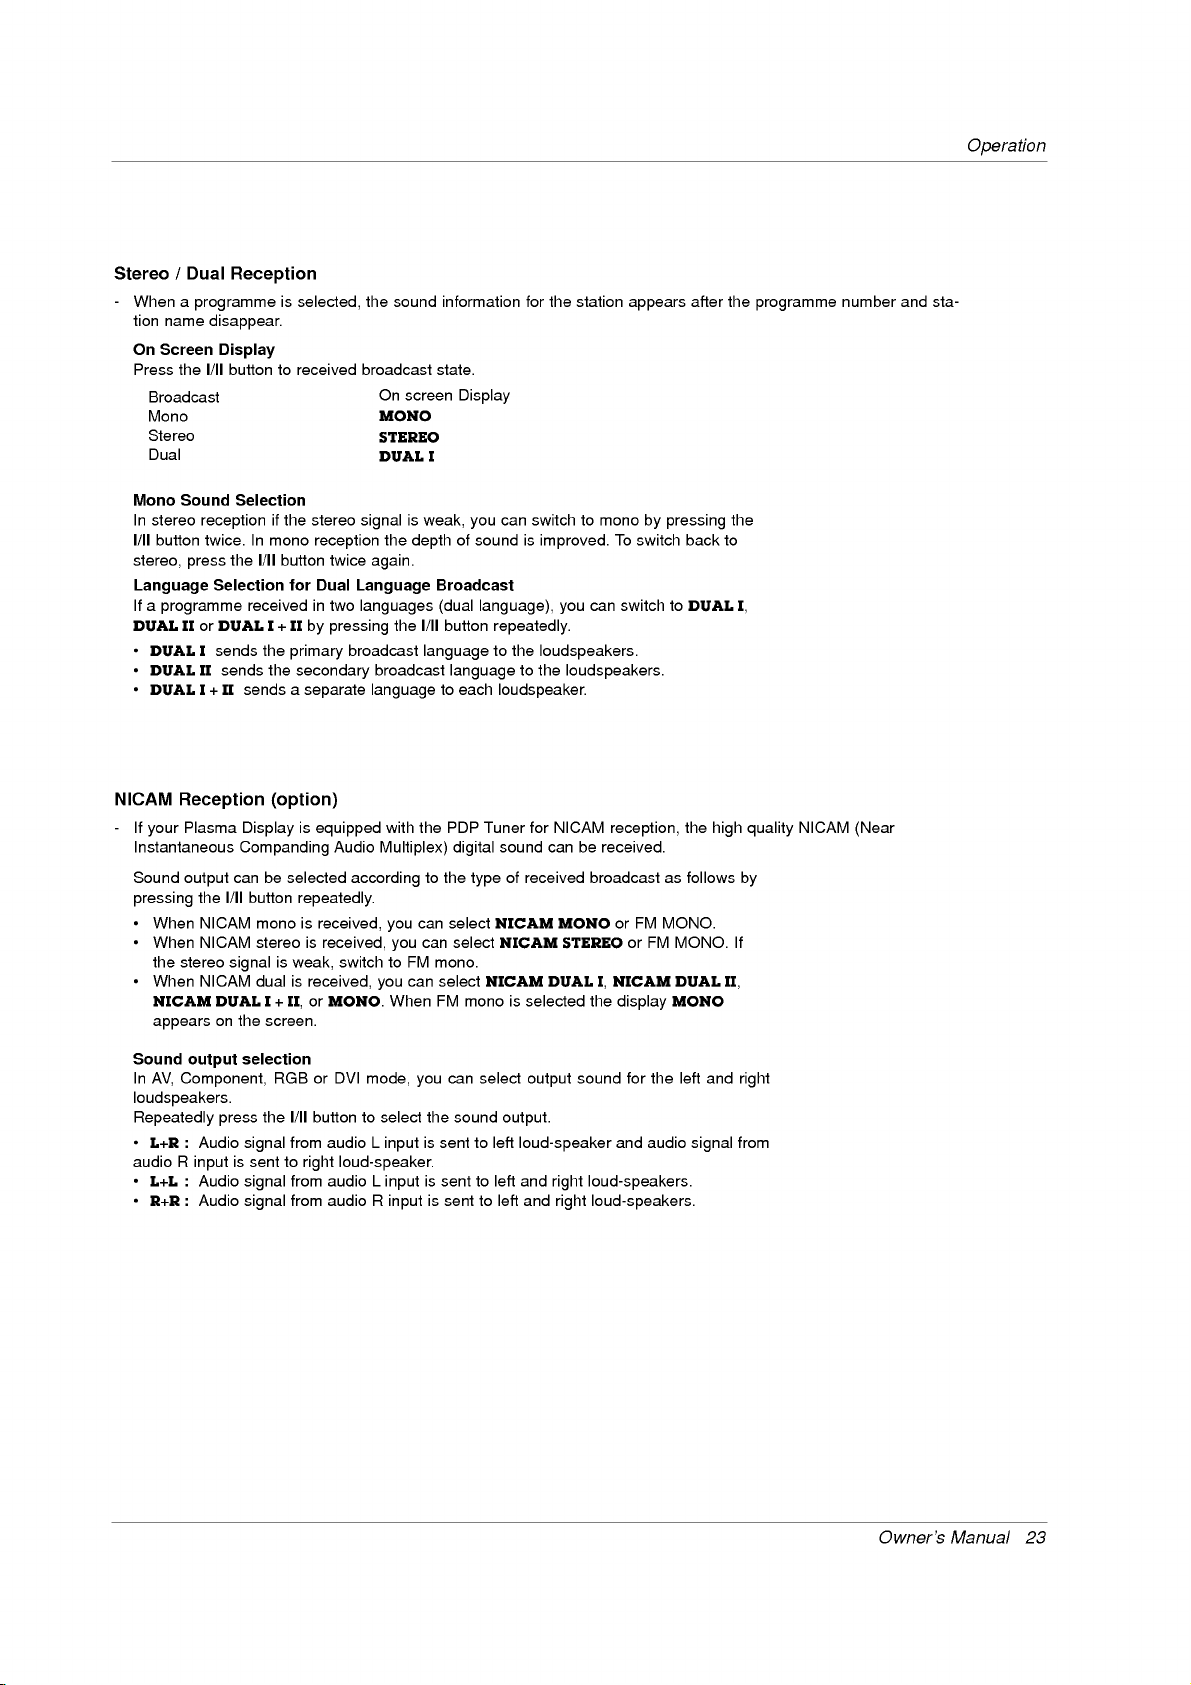
Stereo
-
When
tion
On
Press
Mono
In
I/II
stereo,
Language
If
DUAL
?
?
?
/
name
Screen
Broadcast
Mono
Stereo
Dual
stereo
button
a
programme
DUAL
DUAL
DUAL
Dual
a
programme
the
I/II
Sound
reception
twice.
press
II
or
I
II
I+II
disappear.
Display
Selection
DUAL
sends
sends
Reception
is
selected,
buttontoreceived
Selection
if
the
stereo
In
mono
I/II
I+II
the
the
reception
button
for
in
by
primary
secondary
a
separate
Dual
the
received
sends
the
broadcast
signal
twice
again.
Language
two
languages
pressing
broadcast
broadcast
language
sound
On
MONO
STEREO
DUAL
the
the
screen
I
is
weak,
depth
I/II
language
information
state.
Display
you
of
sound
Broadcast
(dual
language),
button
language
to
each
for
the
can
switch
is
improved.
you
repeatedly.
to
the
loudspeakers.
to
the
loudspeaker.
station
appears
to
mono
by
To
switch
can
switch
loudspeakers.
after
pressing
back
to
DUAL
the
the
to
programme
I,
number
and
Operation
sta-
NICAM
-
If
your
Instantaneous
Sound
pressing
?
When
?
When
the
?
When
NICAM
appears
Sound
In
AV,
loudspeakers.
Repeatedly
?
L+R
audio
?
L+L
?
R+R
Reception
Plasma
can
output
the
I/II
NICAM
NICAM
stereo
signal
NICAM
DUAL
on
output
Component,
press
:
Audio
R
is
input
:
Audio
:
Audio
(option)
Displayisequipped
Companding
be
button
mono
stereo
dual
I
the
screen.
selection
the
signal
sent
signal
signal
selected
repeatedly.
is
received,
is
received,
is
weak,
is
received,
+
or
II,
RGB
or
I/II
buttontoselect
from
to
right
from
from
Audio
switchtoFM
MONO.
DVI
audio
loud-speaker.
audio
audio
with
Multiplex)
according
you
you
you
When
mode,
L
input
L
input
R
input
the
PDP
Tuner
for
NICAM
sound
of
received
NICAM
NICAM
is
selected
output
output.
left
loud-speaker
left
and
left
and
can
DUAL
digital
to
the
type
can
select
can
select
mono.
can
select
NICAM
FM
mono
can
you
select
the
sound
is
sent
to
is
sent
to
is
sent
to
be
received.
broadcast
MONO
STEREO
I,
the
sound
loud-speakers.
right
loud-speakers.
right
reception,
or
NICAM
display
and
for
the
high
as
follows
FM
MONO.
or
FM
MONO.
DUAL
MONO
the
audio
left
signal
If
II,
and
from
quality
by
right
NICAM
(Near
Owner's
Manual
23
Page 24

Operation
T
ime
T
ime
Setting
-
If
current
ton
on
1.
Press
2.
Press
3.
Press
4.
Press
5.
Repeatedly
Clock
the
time
the
set,
the
MENU
theΓbutton
theΓbutton
theΓbutton
Menu
Menu
setting
reset
press
is
the
button
and
and
and
the
Options
Options
erased
by
clock.
and
then
then
use
then
use
then
use
MENU
button
a
power
use
Δ
Ε
Δ
/
Ε
Δ
/
Ε
Δ
/
to
return
ifTVis
failure,
Ε
buttontoselect
/
buttontoselect
button
to
adjust
button
to
adjust
to
normal
unplugged
the
Clock.
the
hour.
the
minute.
TV
viewing.
TIME
or
if
the
set
is
turned
off
with
the
menu.
STATION
PICTURE
SOUND
TIME
SPECIAL
SCREEN
PIP/DW
ON/OFF
Clock
Off
time
On
time
Auto
sleep
Prev.
MENU
but-
-- --
Γ
:
Setting
-
Timer
-
Off
Timer
-
The
1.
Press
2.
Press
3.
Press
4.
Press
5.
Press
6.
Only
gramme
7.
Repeatedly
-
To
Press
-
Two
unlessabutton
Auto
Sleep
-
If
there
1.
Press
2.
Press
3.
Press
4.
Repeatedly
the
function
set
must
the
theΓbutton
theΓbutton
theΓbutton
theΓbutton
On
cancel
the
hours
is
the
theΓbutton
theΓbutton
On/Off
function
be
MENU
time
number
Off/On
Δ
after
no
input
MENU
Timer
operates
overrides
in
standby
button
function;
or
volume
the
press
time
Ε
buttontoselect
/
the
set
has
signal,
button
and
and
the
press
and
and
and
and
been
only
MENU
function
is
the
then
then
MENU
if
current
on
Timer
mode
and
then
then
then
then
then
Press
level.
button
switched
pressed.
monitor
and
then
use
use
button
time
has
function
for
theOnTimertowork.
use
use
Δ
use
Δ
use
Δ
use
Δ
Ε
Δ
/
Ε
buttontoselect
/
Ε
buttontoselect
/
Ε
button
/
Ε
button
/
theΓbutton
to
return
in
Off
step
on
theontime
by
turn
off
use
Δ
Δ
Ε
Δ
/
Ε
buttontoselect
/
Ε
buttontoselect
/
to
return
been
already
if
are
they
buttontoselect
to
adjust
to
adjust
and
then
to
normal
3.
functionitwill
automatically
buttontoselect
Auto
On
to
normal
set.
set
to
the
same
the
Off
timeorOn
On.
the
hour.
the
minute.
use
TV
Ε
Δ
/
viewing.
after10minutes.
the
sleep.
or
Off.
TV
viewing.
time.
TIME
menu.
time.
button
to
automatically
TIME
menu.
adjust
pro-
switch
back
STATION
PICTURE
SOUND
TIME
SPECIAL
SCREEN
PIP/DW
to
standby
STATION
PICTURE
SOUND
TIME
SPECIAL
SCREEN
PIP/DW
Clock
Off
time
On
Auto
MENU
Γ
time
sleep
Prev.
On
Off
12
Volume
Programme
:
00
30
1
mode
Clock
Off
time
On
time
Auto
MENU
sleep
Prev.
ΓOn
Off
Sleep
-
Sleep
-
Press
lowed
selected.
a.
b.Tocancel
c.
24
Timer
To
If
you
PLASMA
timer
the
by
check
turns
SLEEP
10,
20,
the
the
turn the
TV
the
set
offatthe
buttontoselect
30,
60, 90,
remaining
time,
sleep
set
off
after
180
120,
time,
sleep
repeatedly
setting
preset
the
and
the
time.
number
240
press
press
sleep
of
minutes.
minutes.
The
theOKbutton
the
SLEEP
the
timer,
The
timer
once.
button
setting
display
to
begins
until
the
willbeerased.
zz
---
Min
count
display
down
will
zz
---
appear
from
Min
the
appears.
on
number
the
screen,
of
fol-
minutes
Page 25

Special
Special
Child
Lock
-
The
set
can
be
1.
Press
the
MENU
2.
Press
theΓbutton
3.
Press
theΓbutton
4.
Repeatedly
-
This
set
Child
programmed
lock
Δ
the
Child
while
/
-
In
MEDIA,
-
With
pressed
set
press
'On',
Ε
or
lock
viewing
Menu
Menu
so
up
button
and
and
the
if
NUMBER
to
On,
MENU
the
the
that
and
then
then
remember
set
the
it
can
only
then
Δ
Ε
Δ
/
Ε
Δ
buttontoselect
/
button
which
is
turned
buttonsonthe
display
set.
Options
Options
be
used
with
the
Ε
buttontoselect
/
buttontoselect
Child
On
to
return
to
normal
it
was
option
press
Child
remote
the
lock
TV/AV,
control.
on'
off,
'
remote
or
last
the
Off.
TV
appears
control.
SPECIAL
lock.
viewing.
settoevent
Ε
Δ
buttononthe
/
on
the
Operation
menu.
if
turn
the
set
if
any
set
or
POWER,
buttononthe
you
screen
off.
STATION
PICTURE
SOUND
TIME
SPECIAL
SCREEN
PIP/DW
TV/AV,
MENU
front
Language
Child
ISM
Low
Set
MULTI-
lock
Method
power
ID
Demo
Prev.
panel
ΓOn
Off
is
ISM
-
1.
2.
3.
4.
(Image
Frozen
image
a
long
Press
Press
Press
Orbiter
?
White
White
Note:
Wash.
?
Orbiter
Orbiter
image
screen
?
Inversion
Thisisthe
ically
Repeatedly
Sticking
still
picture
remaining
of
period
the
MENU
theΓbutton
theΓbutton
or
Inversion.
Wash
Wash
An
excessive
:
may
to
remain
will
move
functiontoinvert
inverted
press
Minimization)
fromaPC/video
even
time.
button
and
and
:
removes
help
prevent
on
every
:
every
the
when
you
and
then
then
If
you
permanent
permanent
ghost
the
screen.
2
minutes.
30
minutes.
MENU
game
change
then
use
Ε
Δ
/
Ε
Δ
/
unnecessary
images
image
images.
To
the
panel
button
Method
displayed
the
image.
Ε
Δ
buttontoselect
/
buttontoselect
buttontoselect
to
set
from
the
be
may
impossible
However,
avoid
a
permanent
colorofthe
to
return
to
on
Avoid
this
normal
the
ISM
either
function,
screen.
itisbest
screen.
screen
allowing
Method.
Normal,
to
not
image
The
TV
viewing.
the
set
clear
on
for
a
SPECIAL
Normal.
entirely
to
allow
the
panel
prolonged
fixed
image
White
with
any
screen,
color
menu.
wash,
fixed
the
is
periods
to
White
automat-
remain
will
result
on
the
STATION
PICTURE
SOUND
TIME
SPECIAL
SCREEN
PIP/DW
in
set's
an
screen
Language
Child lock
ISM
Low
Set
MENU
ghost
Method
power
ID
Demo
Prev.
for
Γ
Normal
White
wash
Orbiter
Inversion
Owner's
Manual
25
Page 26

Operation
Special
Special
Low
Power
-
Thisisthe
1.
2.
3.
4.
-
Use
1.
2.
3.
4.
Press
the
Press
theΓbutton
Press
theΓbutton
Repeatedly
Demo
it
to
see
Press
the
Press
theΓbutton
Press
theΓbutton
To
stop
functiontoreduce
MENU
the
MENU
XD
press
difference
Demo,
Menu
Menu
button
and
and
the
MENU
button
and
to
begin
press
and
then
then
between
and
then
the
the
Options
power
then
use
use
Δ
/
Ε
use
Δ
/
button
to
XD
then
use
use
Δ
/
XD
Demo.
MENU
Options
consumption
Ε
Δ
/
Ε
buttontoselect
buttontoselect
return
demo
Ε
Δ
/
Ε
buttontoselect
button.
of
buttontoselect
to
normal
on
and
XD
buttontoselect
the
On
set.
Low
TV
Demo
XD
the
power.
or
Off.
viewing.
off.
the
Demo.
SPECIAL
SPECIAL
menu.
menu.
STATION
PICTURE
SOUND
TIME
SPECIAL
SCREEN
PIP/DW
STATION
PICTURE
SOUND
TIME
SPECIAL
SCREEN
PIP/DW
Language
Child lock
ISM
Low
Set
MENU
Language
Child lock
ISM
Low
Set
MENU
Method
ID
Method
power
ID
ΓOn
power
Demo
Prev.
Demo
Prev.
Off
Γ
To
start
26
PLASMA
TV
Page 27

Operation
Screen
Screen
Auto
adjustment
-
Automatically
1.
Press
2.
Press
3.
Press
?
When
?
If
the
4.
If
picture
the
Manual
5.
Repeatedly
-
Although
-
The
Auto
You
You
You
Picture
can
can
can
Setting
-
-
-
Auto
When
your
mat
tobesent.
4:3
Following
appearing
16:9
(Wide)
Following
entire
screen
14:9
You
can
screen
14:9
Zoom
Following
screen.
-
You
can
-
You
can
adjusts
the
MENU
theΓbutton
theΓbutton
Auto
position
needstobe
Config..
press
the
image
config.
Format
watch
the
repeatedly
also
select
TV
receives
(Not
selection
at
both the
selection
(useful
the
enjoy
is
viewed
selection
However,
select
only
select
only
Menu
Menu
(RGB
picture
button
and
to
start
config.
of
the
image
adjusted
the
MENU
is
still
and
screen
the
press
Auto,
the
availableinall
will
lead
left
will
lead
for
viewing
picture
just
will
lead
the
top
and
4:3
16:9
4:3,
[PC]
and
then
has
not
the
in
ARC
4:3,
wide
and
format
like
and
16:9
mode
position
then
use
Auto
finished,
is
still
more
button
correct,
Manual
various
buttontoselect
16:9
screen
countries)
to
you
sides.
right
to
you
4:3
of
that
the
to
you
bottom
(Wide)
(Wide)
Options
Options
only)
and
minimizes
Δ
/
Ε
buttontoselect
/
willbeshown
Ok
correct,
after
Auto
to
return
set
your
Config.
formats;
14:9
signal,
a
picture
the
or
screen
the
portions
in
RGB,
Zoom
Ε
buttontoselect
try
adjustment
to
is
functioning
functions
your
and
it
will
picture
DVDs).
general
4:3
picture
of
the
DVI.
in
use
Δ
config..
not
picture
(Wide),
view
adjust
formatted
14:9
view
and
image
on
Auto
adjustment
normal
don't
Auto,
desired
Zoom
be
automatically
with
an
horizontally,
TV
programme
is
magnified
without
picture
Component
shaking.
the
SCREEN
Auto
config..
screen.
again.
in
RGB
(PC),
TV
viewing.
but
properly
needs
needtobe
16:9
4:3,
in
picture
the
SCREEN
(Wide),
format.
changed
4:3
original
aspect
inalinear
through
to
the
left
/
alternation,
any
will
be
cropped.
480p/576p/720p/1080i.
menu.
can
you
further
run
for
14:9
menu.
to
ratio,
proportion,
the
right.
while
adjust
adjustment.
DVI
mode.
and
Zoom.
the
picture
with
14:9
mode.
filling
gray
to
the
bars
fill
The
entire
for-
the
STATION
PICTURE
SOUND
TIME
SPECIAL
SCREEN
PIP/DW
Auto
ARC
Position
Manual
Reset
MENU
config.
config.
Prev.
Γ
To
set
Screen
-
This
RGB-PC
1.
2.
3.
4.
Position
function
or
Press
the
Press
theΓbutton
Press
theΓbutton
Repeatedly
worksinthe
COMPONENT
MENU
press
following
480p/576p/720p/1080i.
button
and
then
and
then
Δ
/
and
then
Δ
/
the
MENU
button
mode:
Ε
Δ
/
Ε
buttontoselect
Φ/Γ
Ε
or
to
return
buttontoselect
Position.
button
to
adjust
to
normal
the
TV
SCREEN
the
position.
viewing.
menu.
STATION
PICTURE
SOUND
TIME
SPECIAL
SCREEN
PIP/DW
Auto
ARC
Position
Manual
Reset
MENU
Owner's
config.
config.
Prev.
Γ
Manual
Δ
Φ
Γ
Ε
27
Page 28

Operation
Screen
Screen
Manual
-
-
If
the
phase
To
correct
1.
Press
2.
Press
3.
Press
4.
Press
?
?
5.
Repeatedly
Configure
picture
manually.
The
The
Selecting
-
To
see a
-
In
some
1.
Press
2.
Press
3.
Press
4.
Repeatedly
isn't
the
screen
the
MENU
theΓbutton
theΓbutton
Φ/Γ
the
adjustment
adjustment
press
Wide
VGA/XGA
normal
picture,
models,
theΓbutton
it's
the
MENU
theΓbutton
press
Menu
Menu
[PC]
auto
adjust
and
then
then
mode
adjustment
Clock.
then
Δ
/
Δ
/
clear
(RGB
after
size,
button
and
and
buttontomake
of
MENU
Phase
of
Clock
button
range
range
the
mode
match
not
button
and
and
the
the
availabletoselectionofXGA
and
then
then
use
Δ
then
use
MENU
button
Options
Options
only)
and
especially
Ε
Δ
buttontoselect
/
Ε
buttontoselect
Ε
buttontoselect
appropriate
is
is
(RGB[PC]
resolutionofRGB
use
Ε
/
Δ
/
adjustments.
0~30.
-127~+128.
to
return
to
Ε
buttontoselect
Δ
/
buttontoselect
Ε
buttontoselect
to
return
to
mode
normal
normal
Manual
Phase
mode
mode.
TV
only)
VGA
the
TV
that
characters
the
SCREEN
config..
or
Clock.
viewing.
and
selectionofVGA/XGA
the
SCREEN
Mode
(or
desired
VGA/XGA
viewing.
XGA
are
menu.
still
menu.
Mode).
resolution.
trembling,
mode.
adjust
STATION
PICTURE
SOUND
TIME
SPECIAL
SCREEN
PIP/DW
STATION
PICTURE
SOUND
TIME
SPECIAL
SCREEN
PIP/DW
the
picture
Auto
config.
ARC
Position
Manual
Reset
MENU
Auto
config.
ARC
Position
Manual
Reset
VGA
Mode
MENU
Prev.
config.
Prev.
config.
Γ
Γ
640x480
848x480
852x480
0
Phase
0
Clock
Screen
-
Use
-
This
TV,
1.
2.
3.
4.
Cinema
-
When
-
This
TV,
1.
2.
3.
4.
Adjustments
this
function
function
AV2
AV1,
Press
the
Press
theΓbutton
Press
theΓbutton
?
Select
?
Select
Repeatedly
you
function
AV2orCOMPONENT
AV1,
Press
the
Press
theΓbutton
Press
theΓbutton
Repeatedly
worksinthe
or
Component
MENU
the
VCR
the
TV
press
watch
worksinthe
MENU
press
to
option
the
correct
button
and
and
option
the
movie,
button
the
jittering
following
and
then
then
if
for
MENU
following
and
and
then
and
then
MENU
or
mode:
480i/576i.
then
use
use
Δ
use
Δ
watching
other
equipment.(Except
button
this
function
mode:
480i/576i.
then
use
use
Δ
use
Δ
button
picture
instability
Ε
Δ
/
Ε
buttontoselect
/
Ε
buttontoselect
/
a
VCR.
to
return
adjusts
Δ
Ε
/
Ε
buttontoselect
/
Ε
buttontoselect
/
to
return
while
buttontoselect
Screen
TV
VCR)
to
normal
TV
the
set
to
the best
buttontoselect
Cinema.
On
to
normal
TV
viewing
the
adj..
or
VCR.
viewing.
the
or
Off.
viewing.
a
video
SCREEN
picture
SCREEN
tape.
menu.
appearance.
menu.
STATION
PICTURE
SOUND
TIME
SPECIAL
SCREEN
PIP/DW
STATION
PICTURE
SOUND
TIME
SPECIAL
SCREEN
PIP/DW
Screen
ARC
Cinema
YNR
Reset
MENU
Screen
ARC
Cinema
YNR
Reset
MENU
ΓTV
adj.
Prev.
adj.
Prev.
VCR
ΓOn
Off
28
PLASMA
TV
Page 29

Operation
Luminance
-
You
can
-
This
TV,
1.
2.
3.
4.
select
function
AV2
AV1,
Press
the
Press
theΓbutton
Press
theΓbutton
Repeatedly
Initializing
This
function
To
initialize
1.
2.
3.
Press
Press
Press
?
You
and
the
the
theΓbutton
theΓbutton.
can
sub
Noise
OnorOff
worksinthe
or
Component
MENU
press
(Reset
operates
adjusted
MENU
initialize
picture
Reduction
to
following
button
and
then
and
then
the
MENU
to
original
in
current
value
button
and
then
Position,
sizeoftwin
reduce
480i/576i.
and
then
use
use
mode.
and
then
Δ
SPLIT
picture.
(option)
the
mode:
use
Δ
/
Δ
/
button
factory
Δ
Ε
buttontoselect
/
ZOOM,
noise
picture
Ε
Δ
buttontoselect
/
Ε
buttontoselect
Ε
buttontoselect
to
return
to
value)
Ε
buttontoselect
/
PIP
normal
size,
which
YNR.
Reset.
PIP
may
appear
the
OnorOff.
TV
viewing.
the
SCREEN
position,
SCREEN
PIP
on
the
screen
menu.
menu.
Transparency
during
watching
STATION
PICTURE
SOUND
TIME
SPECIAL
SCREEN
PIP/DW
STATION
PICTURE
SOUND
TIME
SPECIAL
SCREEN
PIP/DW
the
MENU
MENU
TV.
Screen
adj.
ARC
Cinema
YNR
Reset
Screen
ARC
Cinema
YNR
Reset
ΓOn
Off
Prev.
adj.
Γ
To
set
Prev.
Split
-
Thisisthe
-
It's
-
With
-
If
a
1.
Zoom
available
2-SPLIT
screen
Press
?
Each
In
function
to
to
use
this
ZOOM,
is
enlarged,
the
SPLIT
of
you
2-Split
of
the
choose
SPLIT
zoom
1
4
9-Split
number
press
case
Press
If
usingtheΔ/Ε
zoom
9-Split
123
456
789
enlarge
function
you
a
screen
ZOOM
Δ
Ε
Zoom:
No.5,
Δ
ΦΓ
Ε
the
screen
in
only
every
move
can
can
button.
ZOOM
button
buttontoselect
the5section
orΦ/Γbutton.
move
with
input
the
changes
In
case
regular
screen
without
the
is
enlarged
of
source.
the
section
choosing
ration.
into
upside
selecting
screen
zoom
4-Split
1
2
4
5
you
and
the
No.5
a
display
Δ
Ε
ΦΓ
want
also
or
section
to
can
downside.
of
as
enlarge.
move
The5section
screen.
shown
the
is
below.
enlarged
changed
to
9-Split
123
456
789
screen
a
full
zoom
screen.
ΦΓ
with
Δ
Ε
Owner's
Manual
29
Page 30

Operation
PIP
PIP
-
PIP
lets
-
It's
not
Watching
Press
the
?
Each
press
Programme
Press
the
picture.
(Picture-in-Picture)
(Picture-in-Picture)
view2different
you
available
inputs
to
use
this
(sources)
functioninTELETEXT
on
set
your
mode.
PIP
PIP/DW
PIP
buttontoshow
of
PIP/DW
Selection
PR
+
/-
button
changes
PIP
for
Sub
buttontoselect
the
sub
Off
Picture
a
programme
picture.
the
screen
display
for
the
sub
screen
as
at
the
shown
DW1
Moving
Press
Repeatedly
tionisachieved.
Feature
Feature
same
time.
below.
DW2
the
the
POSITION
press
PIP
The
(PIP
the
button.
Δ
/
sub
mode
Ε
or
picture
only)
Φ/Γ
moves
button
until
up/down
desired
or
left/right.
posi-
SelectinganInput
Press
the
sub
?
?
?
Adjusting
1.
2.
3.
4.
PIP
picture.
In
main
NENT
In
ture,
480i/480p/576i/576p/720p/1080i,
ture.
You
picture
?
RGB,
TV,
Press
Press
Press
The
picture,
480i/576i
AV1,
you
can't
the
theΓbutton
theΓbutton
adjustment
DVI
can
select
simultaneously.
PIP
MENU
Repeatedly
Signal
INPUT
buttontoselect
and
COMPONENT
can
you
for
sub
AV2
and
select
TV,
the
same
Transparency
button
and
and
range
the
press
select
picture.
COMPONENT
AV1,
(except
and
then
then
of
MENU
Source
modes
for
the
RGB
AV1
10:30
480p/576p/720p/1080i
AV2,
AV1,
COMPONENT
RGB
for
AV2
480i/576i
and
main
TV,
TV)
mode
(PIP
then
Δ
Φ
PIP
button
Ε
Δ
/
Ε
buttontoselect
/
Γ
button
/
Transparency
to
PIP
the
source
input
and
COMPO-
for
DVI
for
pictue
only)
buttontoselect
to
adjust
is
return
to
normal
main
sub
and
0~10.
for
the
for
pic-
pic-
sub
the
PIP
Transparency.
PIP
transparency.
TV
PIP/DW
viewing.
Picture
Press
sub
picture
With
picture
PIP
mode,
menu.
Size
the
WIN.SIZE
is
WIN.SIZE
size.
adjusted
sub
picture
Win.
button
button
in
simultaneously.
is
adjusted.
position
ΦΓ
and
DW1,
Win.
Φ
Δ
Ε
Φ
DW2
With
Γ
/
modes,
WIN.SIZE
button
main
to
adjust
and
button
the
sub
in
then
size
Γ
30
PLASMA
TV
Page 31

eletext
T
Teletext
-
Teletext
broadcast.
-
Teletext
television
-
The
consists
TEXT
(or
isafree
teletext
ofanumber
are
TOP
programmes,
decoder
more
(option)
(option)
is
an
text)
service
modern
of
of
broadcast
share
this
pages
methods
optional
set
prices
can
which
allowing
function,
most
by
and
many
support
are
selected
TV
the
quick
therefore
stations
other
SIMPLE,
by
and
the
only
which
topics.
directly
easy
gives
TOP
entering
selectionofteletext
set
with
the
up-to-the-minute
and
FASTEXT
the
corresponding
teletext
systems.
information.
system
information
SIMPLE
page
can
number.
receive
on
news,
(standard
TOP
the
teletext
weather,
teletext)
and
Operation
FAS-
Press
?
Press
on/off
The
Two
line.
page
Switch
SIMPLE
selection
Page
1.
Enter
during
and
2.
The
TOP
Text
The
user
The
yellow
Block
1.
With
2.
Use
block.
3.
With
flowtothe
4.
The
used.)
Direct
Corresponding
number
digit
the
TEXT/*
initial
page
numbers,
page
The
first
displayed.
the
TEXT/*
Text
(option)
the
desired
selection
then
reenter
Ε
Δ
button
/
(option)
guide
field
/
group/page
the blue
the
yellow
the
green
next
red
button
selection
page
using
buttontoswitchtoteletext.
or
last
number
page
buttontoswitch
page
you
the
can
displays
denotes
selection
button
button
button
group.
permits
to
the
SIMPLE
the
NUMBER
appears
page
TV
station
name,
indicates
number
a
press
wrong
correct
page
alsobeusedtoselect
four
fields-red,
the
next
group
can
you
to
you
progress
proceed
can
proceed
(Alternatively
to
return
to
text
buttonsinTOP
on
your
off
teletext.
as
a
number,
number.
green,
and
to
the
theΔbutton
previous
mode,
the
date
selection,
three
the blue
from
next
to
you
screen.
and
time
are
displayed
while
the
number
digit
you
the
yellow
blocktoblock.
group
the
next
selection.
can
select
mode.
with
must
complete
precedingorfollowing
and
blueatthe
field
indicates
with
automatic
existing
can
be
used.)
(Alternatively
a
page
second
the
the
the
page
by
bottomofthe
entering
on
the
screen
shows
the
NUMBER
overflowtothe
with
theΕbutton
three
next
digit
page.
block.
automatic
it
buttons.
as
head-
current
number
screen.
over-
can
a
three
If
next
be
Owner's
Manual
31
Page 32

Operation
FASTEXT
The
teletext
pressing
Page
1.
Press
2.
You
coloured
3.
Corresponding
digit
4.
The
the
selection
the
can
page
Δ
/
are
pages
corresponding
buttontoselect
i
select
the
buttons.
to
the
number
button
with
can
Ε
colour
coded
NUMBER
the
text
index
are
along
button.
coloured
which
pages
SIMPLE
the
alsobeusedtoselect
the
bottomofthe
page.
colour
coded
you
can
the
mode,
buttonsinFASTEXT
screen
and
the
bottom
page
line
by
along
select
a
mode.
precedingorfollowing
are
selected
with
entering
page.
the
its
by
same
three
Special
Teletext
REVEAL
Press
puzzles.
Press
SIZE
Selects
Press
Press
Press
UPDATE
Displays
Press
HOLD
Stops
more
shown
is
displayed
change
To
continue
MIX
Displays
To
switch
TIME
This
button
When
a)
right
In
b)
number
press
tion.
Functions
this
this
double
this
this
this
the
this
the
sub
on
is
the
viewing
hand
teletext
is
the
automatic
pages.
the
inhibited.
the
RED/
button
to
display
button
again
height
button
to
button
button
buttontoview
corner
enlarge
againtoenlarge
again
TV
picture
page
The
screen
at
the
top
this
press
teletext
TV
picture
has
two
functions:
a
TV
of
the
mode,
press
displayed
GREEN
to
text.
to
on
number
below
left-hand
button
pages
off
programme,
screen.
at
the
or
concealed
remove
the
the
halfofthe
top
the
return
to
the
the
screen
the
updated
which
change
of
sub
time.
pages
corner
the
again.
superimposed
this
press
press
Press
this
buttontoselectasub
bottomofthe
Ε
buttons.
Δ
/
information,
information
bottom
normal
while
waiting
teletext
will
occurifa
and
When
this
of
the
on
button
again.
this
this
button
screen.
Press
suchassolutionsofriddles
from
the
display.
page.
halfofthe
page.
display.
for
the
new
teletext
page.
teletext
is
to
display
page
button
page
pressed
and
to
remove
number.
or
page
displayed
the
the
change
again
the
button
the
button
screen
TV
To
this
sub
picture.
again
hold
page.
consists
is,
the
stop
automatic
timeatthe
the
display.
The
the
sub
to
exit
of
usually,
symbol
sub
page,
this
2
page
top
page
func-
or
or
32
PLASMA
TV
Page 33

Miscellaneous
External
External
-
Connect
and
How
?
?
?
control
to
Connect
RS-232C
The
the
connect
set
remote
computer
RS-232C
the
set's
the
serial
connection
or
other
Control
input
functions
external
port
control
external
<
Back
REMOTE
CONTROL
Control
to
an
jack
externally.
control
equipment
of
the
control
cables
are
front
device.
of
the
RS-232C
(CONTROL/SERVICE)
not
panel
set
INPUT
and
panel
external
devicetothe
supplied
controls
>
DVI
INPUT
Device
Device
control
device
RS-232C
with
the
set.
(except
AUDIO
INPUT
main
(such
RGB
jack
power)
INPUT
as
on
Setup
Setup
a
computer
the
Monitor
will
not
be
or
an
A/V
control
back
panel.
functionalifthe
system)
Monitoriscontrolled
a
PC
by
Type
RS-232C
of
connector;
No.
Pin
1
No
2
RXD
3
TXD
4
DTR
5
GND
6
DSR
7
RTS
8
CTS
9
No
configurations
RXD
TXD
GND
DTR
DSR
RTS
CTS
D-Sub
name
connection
(Receive
(Transmit
(DTE
(DCE
data)
data)
side
side
(Readytosend)
(Cleartosend)
Connection
7-wire
(Standard
PC
2
3
5
4
6
7
8
9-pin
ready)
ready)
configuration
RS-232C
male
3-wire
configuration
(Not
cable)
PDP
TXD
RXD
GND
DSR
DTR
CTS
RTS
3256487
TXD
GND
RXD
DTR
DSR
RTS
CTS
PC
2
3
5
4
6
7
8
standard)
1
5
9
6
PDP
TXD
RXD
GND
DTR
DSR
RTS
CTS
3254678
D-Sub
9
D-Sub
9
D-Sub
9
D-Sub
Owner's
9
Manual
33
Page 34

Miscellaneous
ID
Set
-
Use
this
-
Referto'Real
1.
Press
2.
Press
3.
Press
monitorIDnumber.
?
The
4.
Repeatedly
function
Data
the
MENU
theΓbutton
theΓbutton
adjustment
press
to
specify
Mapping
button
and
and
range
the
MENU
and
then
then
of
a
1'.
Set
set
ID
See
then
use
use
IDis1~99.
button
number.
page
use
Δ
/
Φ/Γ
to
the
Ε
return
38.
Ε
Δ
buttontoselect
/
buttontoselect
button
to
adjust
to
normal
Set
Set
TV
the
ID.
ID
to
viewing.
choose
SPECIAL
the
menu.
desired
STATION
PICTURE
SOUND
TIME
SPECIAL
SCREEN
PIP/DW
Language
Child lock
ISM
Low
Set
MENU
Method
power
ID
Γ
Demo
Prev.
1
Communication
?
Baud
?
Data
?
Parity
*
Useacrossed
Command
01.
Power
02.
Input
03.
Aspect
04.
Screen
05.
Volume
06.
Volume
07.
Contrast
08.
Brightness
09.
Colour
10.
Tint
11.
Sharpness
12.
OSD
13.
Remote
14.
PIP/DW
15.
Split
16.
PIP
Position
17.
Treble
18.
Bass
19.
Balance
20.
Colour
21.
Red
Adjustment
22.
Green
23.
Blue
24.
PIP
input
25.
Abnormal
26.
ISM
Method
27.
Low
28.
Orbiter
29.
Orbiter
30.
Picture
D/W
31.
Auto
32.
Programme
33.
Programme
for
sub
*
When
screen.
34
PLASMA
rate
length
:
None
Reference
Select
Ratio
Mute
Mute
Control
Select
control
Zoom
Temperature
Adjustment
Adjustment
Source
Status
Power
Time
Setting
Pixel
Setting
Size
Setting
Mode
Configure
selection
selection
picture
the
setting
TV
:
lock
9600
:
Parameters
bps
8
bits
(reverse)
COMMAND
mode
(CSM)
for
~
25
33,
(UART)
cable.
List
k
k
k
k
k
k
k
k h
k
k
k k
k
k
k
k
k
k
k
k
k
k
k
k
k
k
j
j
j
j
j
j
m
m
a
menu
1
COMMAND
doesn't
a
b
c
d
e
f
g
i
j
l
m
n
p
q
r
s
t
u
v
w
$
y
z
p
q
r
s
t
u
a
b
2
(Hexadecimal)
display
?Stopbit:1bit
?
Communication
DATA
0~1
0~6
0~4
0~1
0~1
0~64
0~64
0~64
0~64
0~64
0~64
0~1
0~1
0~3
0~99
0~3
0~64
0~64
0~64
0~3
0~3C
0~3C
0~3C
0~6
0~a
0~3
0~1
1~FE
1~9
0~14(1Eor20)
1
0~63
0~63
on
code:ASCII
Transmission
/
Receiving
Transmission
[Command1][Command2][
*
[Command
*
[Command
*
[Set
ID]
*
[DATA]
*
[Cr]
*[]
OK
Acknowledgement
[Command2][
*
The
Monitor
this
format
dataisdata read
the
dataisdata
1]
2]
][Set
transmits
when
:
:
:
:
:
:
write
computer.
Error
Acknowledgement
[Command2][
*
The
Monitor
this
format
non-viable
Data
1:
2:
3:
][Set
transmits
when
receiving
functionsorcommunication
Code
Illegal
not
support
Wait
more
code
Protocol
][Set
ID][
First
command
(jork)
Second
You
can
desired
menu.
Adjustment
When
selecting
connected
SetIDis
menu
andasHexa
on
transmission/receiving
To
transmit
Transmit
command.
Carriage
ASCII
code
ASCII
code
ID][
][OK][Data][x]
ACK
receiving
it
mode,
mode,
ID][
][NG][Data][x]
ACK
function
time
to
command
the
adjust
monitorIDnumber
See
previous
range
Set
PDP
set
indicatedasdecimal
command
'FF'
datatoread
Return
'0x0D'
'space
(acknowledgement)
normal
data.Atthis
indicates
it
returns
(acknowledgement)
abnormal
][Data][Cr]
control
PDP
to
control
setIDto
page.
is
1~99.
ID
'0',
is
controlled.
decimal
protocol.
data.
status
(0x20)'
status
present
the
dataofthe
data
from
errors.
set.
PDP
choose
in
special
every
(1~99)
(0x0~0x63)
of
based
time,
data.
based
set.
on
on
if
the
If
PC
on
Page 35
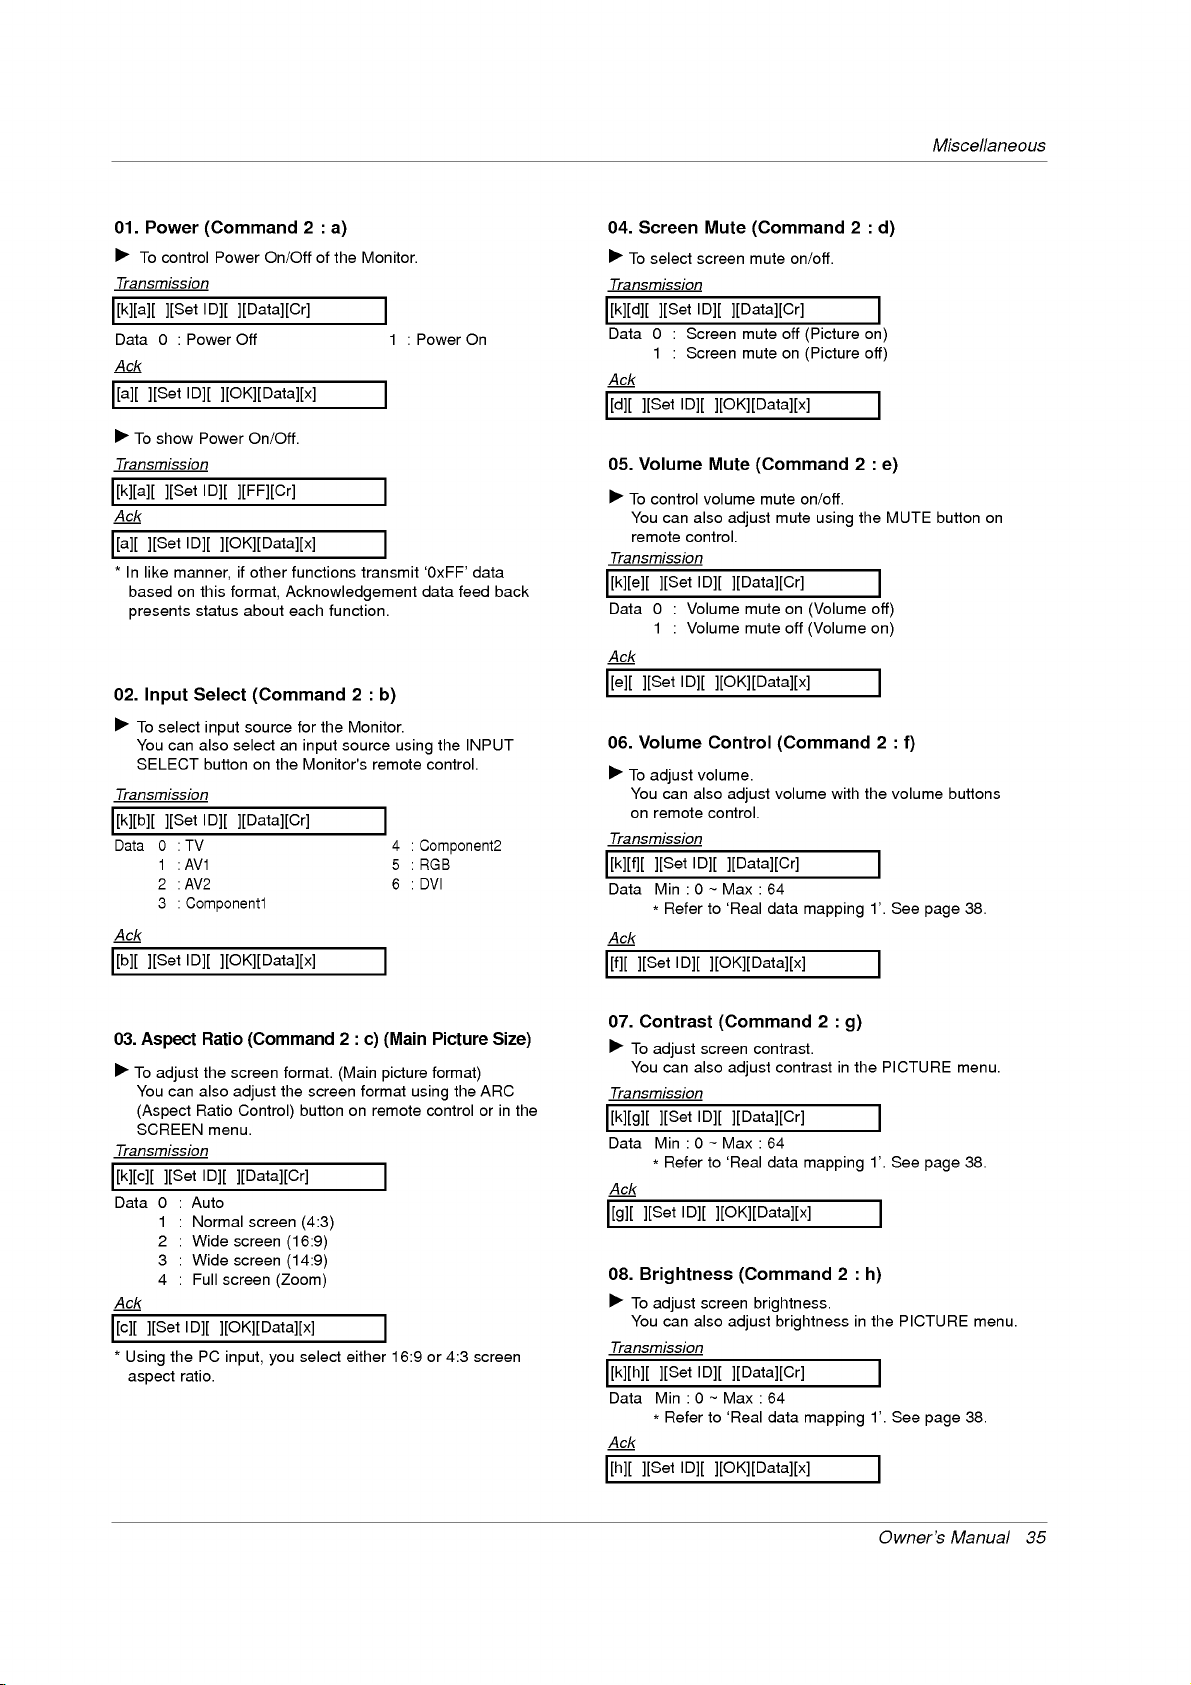
01.
Power
Γ
To
control
Transmission
[k][a][
][Set
Data
0
:
Ack
[a][
][Set
Γ
To
show
Transmission
[k][a][
][Set
Ack
[a][
][Set
*
In
like
manner,
based
on
presents
02.
Input
Γ
To
select
You
can
SELECT
Transmission
[k][b][
][Set
Data0:TV
1
:AV1
2
:AV2
3
:
Ack
[b][
][Set
(Command
Power
ID][
][Data][Cr]
Power
Off
ID][
][OK][Data][x]
Power
ID][
][FF][Cr]
ID][
][OK][Data][x]
if
this
format,
status
about
Select
input
also
select
buttononthe
ID][
][Data][Cr]
Component1
ID][
][OK][Data][x]
On/Offofthe
On/Off.
other
functions
Acknowledgement
each
(Command
source
for
an
2
:
a)
function.
the
input
Monitor's
Monitor.
transmit
2
Monitor.
source
:
b)
remote
1:PowerOn
'0xFF'
data
using
4
:
Component2
5
:RGB
6
:DVI
the
control.
feed
data
INPUT
back
04.
Screen
Γ
To
select
Transmission
[k][d][
][Set
Data
0
1
Ack
[d][
][Set
05.
Volume
Γ
To
control
You
remote
Transmission
[k][e][
Data
0
1
Ack
[e][
][Set
06.
Volume
Γ
To
adjust
You
on
remote
Transmission
[k][f][
][Set
Data
Min:0~Max:64
*
Ack
[f][
][Set
Mute
screen
ID][
:
Screen
:
Screen
ID][
][OK][Data][x]
Mute
volume
can
also
adjust
control.
][Set
ID][
:
Volume
:
Volume
ID][
][OK][Data][x]
Control
volume.
can
also
adjust
control.
ID][
][Data][Cr]
Referto'Real
ID][
][OK][Data][x]
(Command
mute
on/off.
][Data][Cr]
mute
off
mute
on
(Command
mute
mute
][Data][Cr]
mute
on
mute
off
(Command
volume
data
(Picture
(Picture
on/off.
using
(Volume
(Volume
with
mapping
2
2
the
:
on)
off)
:
off)
on)
2
the
1'.
d)
e)
MUTE
volume
See
:
f)
Miscellaneous
button
on
buttons
38.
page
03.
Aspect
Γ
To
adjust
You
(Aspect
SCREEN
Transmission
[k][c][
][Set
Data
0
1
2
3
4
Ack
[c][
][Set
*
Using
aspect
can
the
:
Auto
:
Normal
:
Wide
:
Wide
:
Full
ID][
ratio.
Ratio
the
also
Ratio
ID][
PC
(Command
screen
format.
the
adjust
Control)
menu.
][Data][Cr]
screen
screen
screen
screen
(Zoom)
][OK][Data][x]
input,
you
screen
button
(4:3)
(16:9)
(14:9)
select
2
:
(Main
format
on
either
c)
remote
(Main
picture
Picture
format)
using
controlorin
16:9or4:3
the
ARC
screen
Size)
the
07.
Contrast
Γ
To
adjust
You
Transmission
[k][g][
Data
Min:0~Max:64
*
Ack
][Set
[g][
08.
Brightness
Γ
To
adjust
You
Transmission
[k][h][
Data
Min:0~Max:64
*
Ack
[h][
][Set
(Command
screen
can
also
adjust
][Set
ID][
Referto'Real
ID][
][OK][Data][x]
screen
can
also
adjust
][Set
ID][
Referto'Real
ID][
][OK][Data][x]
contrast.
contrast
][Data][Cr]
data
(Command
brightness.
brightness
][Data][Cr]
data
2
:
in
mapping
2
mapping
g)
the
:
in
1'.
h)
the
1'.
Owner's
PICTURE
See
PICTURE
See
page
page
menu.
38.
38.
Manual
menu.
35
Page 36

Miscellaneous
09.
Colour
Γ
To
adjust
You
can
Transmission
[k][i][
][Set
Data
Min:0~Max:64
*
Referto'Real
Ack
[i][
][Set
ID][
10.
Tint
Γ
To
adjust
You
can
Transmission
][Set
[k][j][
Data
Red:0~Green:64
*
Referto'Real
Ack
][Set
[j][
11.
Γ
Transmission
[k][k][
Data
Ack
[k][
12.
Γ
ID][
Sharpness
To
adjust
You
can
][Set
Min:0~Max:64
*
Referto'Real
][Set
OSD
To
select
trolling
(Command
the
screen
also
adjust
ID][
][Data][Cr]
][OK][Data][x]
(Command
the
screen
also
adjust
ID][
][Data][Cr]
][OK][Data][x]
the
screen
also
adjust
ID][
][Data][Cr]
ID][
][OK][Data][x]
Select
OSD
remotely.
colour.
colourinthe
data
2
tint.
tintinthe
data
(Command
sharpness.
sharpness
data
(Command
Screen
(On
2
:
mapping
:
j)
(option)
mapping
mapping
i)
PICTURE
2
:
k)
in
2
:
Display)
PICTURE
1'.
See
1'.
See
the
1'.
See
l)
on/off
menu.
PICTURE
page
page
page
when
menu.
38.
38.
38.
menu.
con-
14.PIP/DW(Command2:n)
Γ
To
control
the
You
can
on
the
Transmission
[k][n][
][Set
Data0:PIP/DW
1:
PIP
2:
DW1
3:
DW2
Ack
[n][
][Set
15.
Split
Γ
To
operate
section
Transmission
[k][p][
][Set
Data
Min:
ex.
?
Referto'Real
Ack
[p][
][Set
*
Real
0
21
24
41
42
44
45
91
PIP
also
control
remote
controlorin
ID][
][Data][Cr]
off
ID][
][OK][Data][x]
Zoom
(Command
zoom
split
number.
ID][
][Data][Cr]
~
0
Max:
Data
21:
ID][
][OK][Data][x]
data
mapping
:
Reset
split
:
Selection1of
:
Selection4of
:
Selection1of
:
Selection2of
:
Selection4of
:
Selection5of
:
Selection1of
99
Selection1of
(PictureInpicture)/DW.
the
data
zoom
PIP/DW
function
mapping
2
2
split
2
split
4
split
4
split
4
split
4
split
9
split
the
2
and
zoom
zoom
zoom
zoom
zoom
zoom
zoom
using
PIP/DW
:
p)
2
split
2'.
the
menu.
select
zoom.
the
PIP/DW
split
button
zoom
Transmission
[k][l][
][Set
Data0
Ack
[l][
][Set
13.
Remote
Γ
To
lock
control.
Transmission
[k][m][
Data
0
Ack
[m][
][Set
*
If
you're
When
released.
36
PLASMA
:OSDoff
ID][
][Set
:
Lock
not
main
ID][
the
ID][
ID][
][Data][Cr]
][OK][Data][x]
front
lock
panel
control
][Data][Cr]
off
][OK][Data][x]
the
using
power
remote
is
on/off,
TV
1:OSDon
mode
(Command
controlsonthe
1:Lockon
control,
external
monitor
use
control
this
lock
2
and
mode.
99
:
Selection9of
16.
PIP
Position
Γ
To
select
can
][Set
0
1
2
3
][Set
sub
also
menu.
ID][
:
Right
:
Left
down
:
Left
up
:
Right
ID][
][OK][Data][x]
adjust
down
up
You
:
m)
remote
WIN.POSITION
PIP/DW
Transmission
[k][q][
Data
Ack
[q][
is
9
(Command
picture
position
the
buttononthe
][Data][Cr]
on
screen
on
screen
on
screen
on
screen
split
sub
zoom
2
for
picture
remote
:
q)
PIP.
position
controlorin
using
the
Page 37
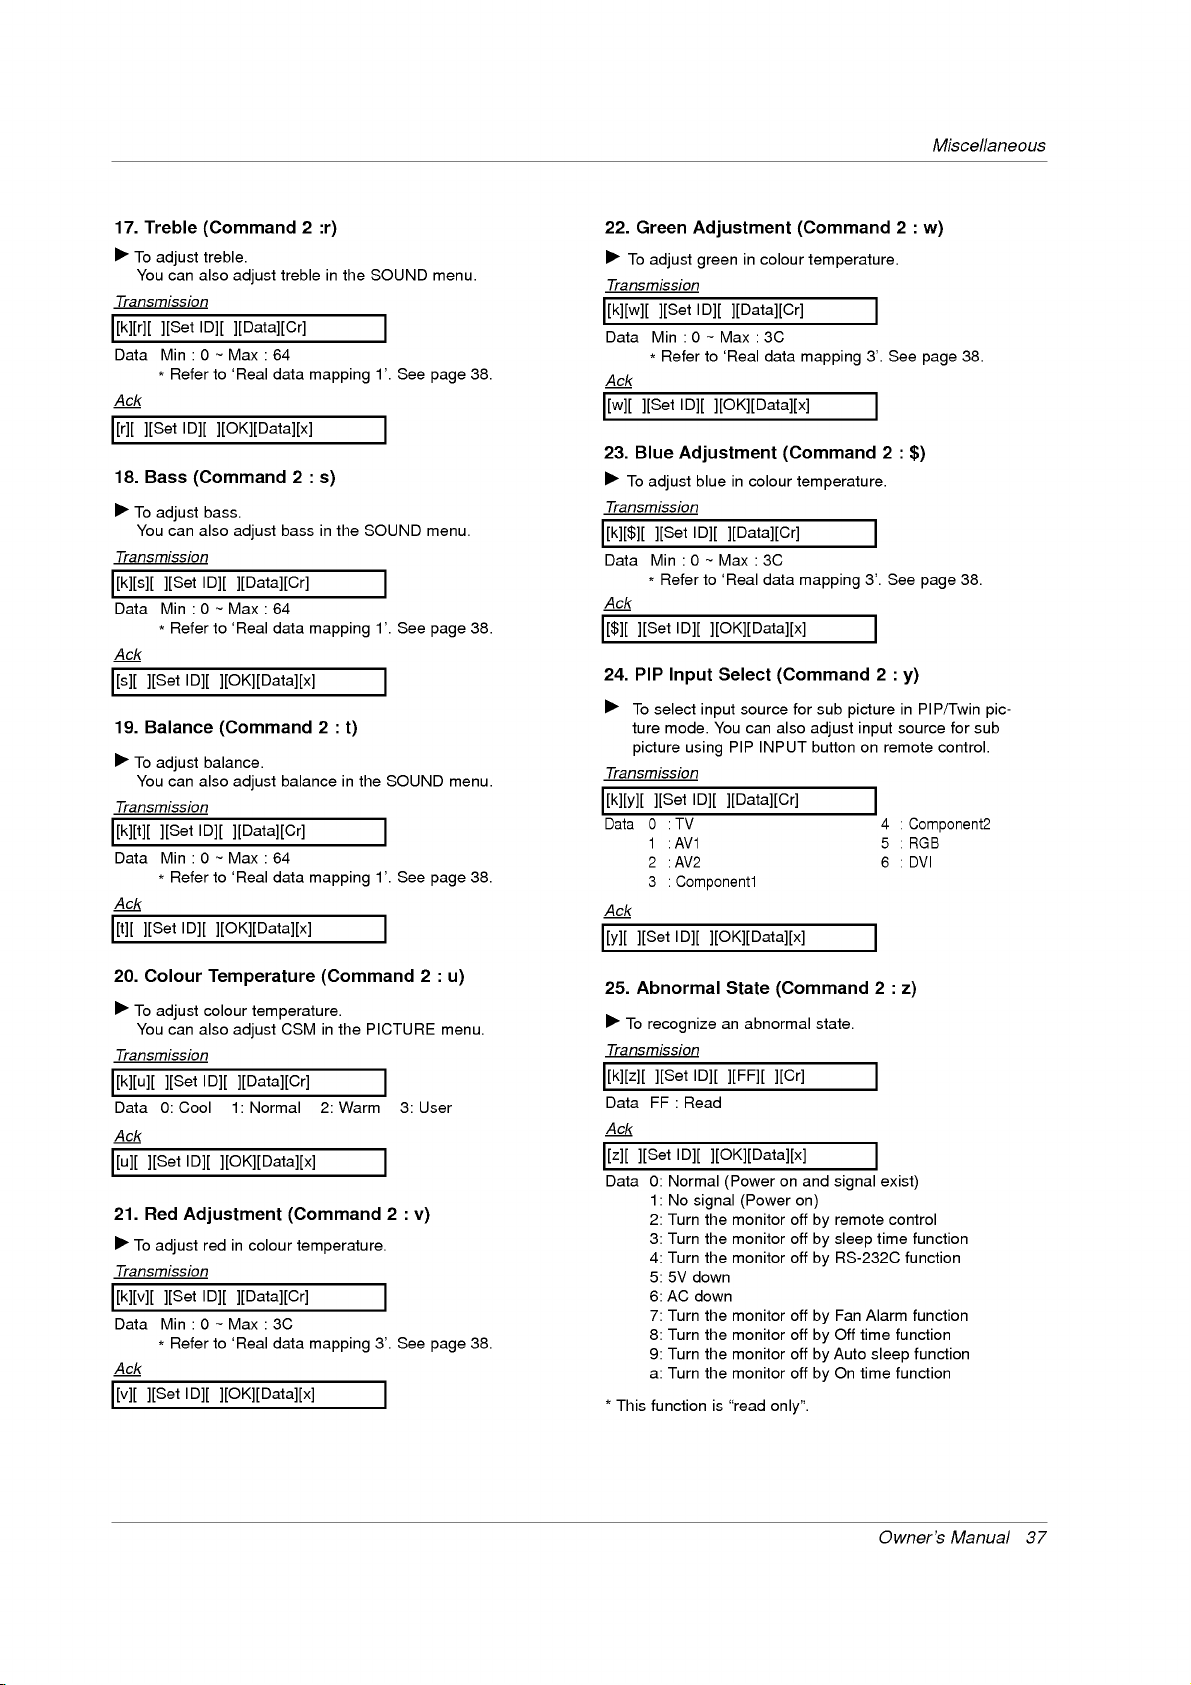
17.
Treble
Γ
To
adjust
You
Transmission
[k][r][
][Set
Data
Min:0~Max:64
*
Ack
[r][
][Set
18.
Bass
Γ
To
adjust
You
Transmission
[k][s][
][Set
Data
Min:0~Max:64
*
Ack
[s][
][Set
19.
Balance
Γ
To
adjust
You
Transmission
[k][t][
][Set
Data
Min:0~Max:64
*
Ack
[t][
][Set
(Command
treble.
can
also
adjust
ID][
][Data][Cr]
Referto'Real
ID][
][OK][Data][x]
(Command
bass.
can
also
adjust
ID][
][Data][Cr]
Referto'Real
ID][
][OK][Data][x]
(Command
balance.
can
also
adjust
ID][
][Data][Cr]
Referto'Real
ID][
][OK][Data][x]
2
:r)
trebleinthe
data
mapping
2
:
s)
bassinthe
data
mapping
2
:
balanceinthe
data
mapping
t)
SOUND
1'.
SOUND
1'.
1'.
See
See
SOUND
See
page
menu.
page
page
menu.
menu.
38.
38.
38.
22.
Green
Γ
To
adjust
Transmission
[k][w][
][Set
Data
Min:0~Max:3C
*
Referto'Real
Ack
[w][
][Set
23.
Blue
Γ
To
adjust
Transmission
[k][$][
][Set
Data
Min:0~Max:3C
*
Referto'Real
Ack
[$][
][Set
24.
PIP
Γ
To
select
ture
mode.
picture
Transmission
[k][y][
][Set
Data0:TV
1
2
3
Ack
[y][
][Set
Adjustment
green
ID][
ID][
][OK][Data][x]
Adjustment
blueincolour
ID][
ID][
][OK][Data][x]
Select
Input
input
You
using
ID][
][Data][Cr]
:AV1
:AV2
:
Component1
ID][
][OK][Data][x]
in
colour
][Data][Cr]
data
(Command
][Data][Cr]
data
(Command
source
can
also
PIP
INPUT
(Command
temperature.
mapping
temperature.
mapping
for
sub
picture
input
adjust
button
3'.
3'.
on
2
2
remote
4
5
6
2
See
:
See
:
in
source
:
:RGB
:DVI
Miscellaneous
:
w)
page
$)
page
y)
PIP/Twin
for
control.
Component2
38.
38.
sub
pic-
20.
Colour
Γ
To
adjust
You
Transmission
[k][u][
][Set
Data
0:
Ack
[u][
][Set
21.
Red
Γ
To
adjust
Transmission
[k][v][
][Set
Data
Min:0~Max:3C
*
Ack
[v][
][Set
Temperature
colour
can
also
adjust
ID][
][Data][Cr]
Cool
1:
ID][
][OK][Data][x]
Adjustment
redincolour
ID][
][Data][Cr]
Referto'Real
ID][
][OK][Data][x]
temperature.
CSMinthe
Normal
(Command
temperature.
data
mapping
(Command
PICTURE
2:
Warm
3'.
2
:
u)
menu.
3:
User
2
:
v)
See
page
38.
25.
Abnormal
Γ
To
recognize
Transmission
[k][z][
][Set
Data
FF:Read
Ack
[z][
][Set
ID][
Data0:Normal
1:
No
2:
Turn
3:
Turn
4:
Turn
5:
5V down
6:
AC
7:
Turn
8:
Turn
9:
Turn
a:
Turn
*
This
functionis"read
State
an
abnormal
ID][
][FF][
][OK][Data][x]
(Power
(Power
signal
the
monitor
the
monitor
the
monitor
down
the
monitor
the
monitor
the
monitor
the
monitor
(Command
state.
][Cr]
on
and
on)
off
by
off
by
offbyRS-232C
offbyFan
offbyOff
offbyAuto
offbyOn
only".
signal
remote
sleep
time
time
2
exist)
time
Alarm
sleep
Owner's
:
z)
control
function
function
function
function
function
function
Manual
37
Page 38

Miscellaneous
26.
ISM
Method
(Command
Γ
To
control
MethodinSPECIAL
Transmission
][Set
[j][p][
Data
0
:
Normal
1
:
White
Ack
[p][
][Set
ID][
27.
Low
Power
(Command
Γ
To
reduce
can
also
Transmission
][Set
[j][q][
Data
0:Off
1:On
Ack
[q][
][Set
ID][
28.
Orbiter
(Command
Γ
To
adjust
Transmission
][Set
[j][r][
Data
Min:
*
Referto'Real
Ack
[r][
][Set
ID][
29.
Orbiter
(Command
Γ
To
adjust
Transmission
][Set
[j][s][
Data
Min:1~Max:9
*
Referto'Real
Ack
[s][
][Set
ID][
30.
Picture
(Command
Γ
To
select
You
can
WIN.SIZE
Transmission
][Set
[j][t][
1
:
the
ISM
ID][
][Data][Cr]
Mode
Wash
][OK][Data][x]
1
:
the
power
Low
adjust
ID][
][Data][
][OK][Data][x]
Time
Setting
1
:
orbiter
operation
ID][
][Data][
~
1
Max:
][OK][Data][x]
Pixel
Setting
1
:
number
pixel
ID][
][Data][Cr]
][OK][Data][x]
Size
Setting
1
:
the
PIP
picture
also
select
on
the
ID][
][Data][Cr]
Command
j,
method.
j,
You
menu.
Command
consumption
PowerinSPECIAL
][Cr]
Command
j,
time
][Cr]
FE
data
mapping
Command
j,
in
orbiter
data
mapping
for
Command
j,
format.
the
PIP
remote
control.
2
can
2
3
2
of
2
term.
1'.
2
function.
1'.
DW
Mode
2
picture
:
p)
also
:
Orbiter
:
Inversion
:
q)
the
:
r)
:
s)
:
t)
format
adjust
monitor.
menu.
using
ISM
You
the
Data
Min:0~Max:14(1Eor20)
*
Referto'Real
Ack
[t][
][Set
ID][
31.
Auto
Configure
(Command
Γ
To
adjust
picture
automatically.
Transmission
][Set
[j][u][
Data1:To
Ack
[u][
32.
ID][
set
][Set
ID][
Programme
(Command
Γ
To
select
a
Transmission
[m][a][
][Set
ID][
Data
Min:0~Max:63(0~C7,200Prison)
*
Referto'Real
Ack
[a][
][Set
ID][
33.
Programme
(Command
Γ
To
select
a
Transmission
[m][b][
][Set
ID][
Data
Min:0~Max:63(0~C7,200Prison)
*
Referto'Real
Ack
[b][
][Set
ID][
*
Real
data
0
:Step0
A
:Step10(SetID10)
F
:Step15(SetID15)
data
][OK][Data][x]
1
:
j,
position
It
works
][Data][Cr]
][OK][Data][x]
selection
1
:
m,
programme
][Data][Cr]
][OK][Data][x]
selection
1
:
m,
programme
][Data][Cr]
data
][OK][Data][x]
mapping
10:Step16(SetID16)
64
:
100
Step
6E
:
110
Step
73
:
115
Step
74
:
116
Step
C7
:
199
Step
Command
data
mapping
only
Command
for
mapping
Command
for
mapping
1
and
in
the
the
minimize
RGB
for
main
sub
*
1'.
2
1'.
sub
1'.
Real
0:-30
1:-29
2:-28
1E:0
3A:+28
3B:+29
3C:+30
:
u)
image
mode.
(PC)
2
:
a)
picture.
picture
2
:
b)
picture.
data
shaking
mapping
3
38
PLASMA
TV
Page 39

IR
IR
How
Γ
Remote
Code
Code
to
connect
Connect
Control
your
(NEC
(NEC
wired
remote
IR
Code
controltothe
(NEC
Format)
Format)
Remote
Format)
Control
port
Miscellaneous
on
the
Monitor.
Γ
Output
Single
Γ
Configuration
?
1st
Lead
code
?
Repeat
Γ
Lead
Γ
Repeat
waveform
modulated
pulse,
of
frame
Low
custom
C0
C1C2C3C4C5C6C7C0C1C2C3C4C5C6C7D0D1D2D3D4D5D6D7D0D1D2D3D4D5D6D7
frame
code
code
frame
code
TC
T1
Repeat
9ms
with
37.917KHz
code
at
signal
Carrier
FCAR=1/TC=fOSC/12
ratio=T1/TC=1/3
Duty
High
custom
code
455KHz
frequency
4.5
Data
code
Tf
ms
0.55
ms
Data
code
Γ
Bit
description
?
Bit
"0"
Γ
Frame
The
waveformistransmitted
interval
9ms
0.56
ms
1.12
ms
:
Tf
as
as
a
long
Tf Tf
2.25
ms
?
Bit
"1"
keyisdepressed.
Tf=108ms
@455KHz
0.56
ms
2.24
ms
Owner's
Manual
39
Page 40

Miscellaneous
Code
(Hexa)
00H
01H
02H
03H
08H
C4H
C5H
09H
10H
11H
12H
13H
14H
15H
16H
17H
18H
19H
0BH
98H
BFH
D4H
C6H
D5H
D6H
5AH
D0H
0AH
0EH
43H
44H
4DH
52H
53H
20H
2AH
22H
24H
26H
62H
64H
65H
70H
60H
61H
63H
71H
72H
7BH
79H
76H
77H
AFH
Function
PR+
(Δ)
PR-
(Ε)
VOL+
(Γ)
VOL-
(Φ)
POWER
POWER
POWER
MUTE
Number
Number
Number
Number
Number
Number
Number
Number
Number
Number
TV/AV
MULTIMEDIA
COMPONENT1
COMPONENT2
DVI
RGB
TV
AV1
AV2
I/II
SLEEP
MENU
OK(Α)
PSM
SSM
LIST
TEXT/*
REVEAL
MODE
MIX
TIME
UPDATE/WIN.POSITION
SIZE/WIN.SIZE
HOLD
INDEX
PIP/DW
PIP
SWAP
PIP
PIP
SPLIT
ARC
ARC
ARC
ARC
INPUT
PR+
PR-
ZOOM
(4:3)
(16:9)
(Zoom)
ON
OFF
Key
Key
Key
Key
Key
Key
Key
Key
Key
Key
0
1
2
3
4
5
6
7
8
9
Note
R/C
Button
R/C
Button
R/C
Button
R/C
Button
R/C
Button
DiscreteIRCode
DiscreteIRCode
R/C
R/C
R/C
R/C
R/C
R/C
R/C
R/C
R/C
R/C
R/C
R/C
R/C
DiscreteIRCode
DiscreteIRCode
DiscreteIRCode
DiscreteIRCode
DiscreteIRCode
DiscreteIRCode
DiscreteIRCode
R/C
R/C
R/C
R/C
R/C
R/C
R/C
R/C
R/C
R/C
R/C
R/C
R/C
R/C
R/C
R/C
R/C
R/C
R/C
R/C
R/C
R/C
R/C
DiscreteIRCode
DiscreteIRCode
DiscreteIRCode
(Power
Button
Button
Button
Button
Button
Button
Button
Button
Button
Button
Button
Button
Button
Button
Button
Button
Button
Button
Button
Button
Button
Button
Button
Button
Button
Button
Button
Button
Button
Button
Button
Button
Button
Button
Button
Button
On/Off)
Power
(Only
(Only
(Input
(Input
(Input
(Input
(InputTVSelection)
(Input
(Input
(Only
(Only
(Only
Power
COMPONENT1
COMPONENT2
DVI
Selection)
RGB
AV1
Selection)
AV2
Selection)
4:3
mode)
16:9
mode)
Zoom
On)
Off)
Selection)
mode)
Selection)
Selection)
40
PLASMA
TV
Page 41

Notes
Notes
Miscellaneous
Owner's
Manual
41
Page 42

Miscellaneous
T
roubleshooting
Troubleshooting
The
No
No
Picture
No
remote
doesn't
picture
sound
sound
OK
control
work
&
&
Checklist
Checklist
?
Check
?
Power
?
another
Plug
cord
was
?
Press
the
?
Sound
?
Check
causing
?
Check
(Refertop.6)
?
Checkifthe
?
Install
new
whether
cord
inserted
plugged
VOLUME
muted?
to
see
obstruction.
to
see
remote
batteries.
the
set
product's
in.
(Γ)
Press
if
there
if
the
batteries
control
is
turned
into
wall
outlet?
cord
power
button.
MUTE
button.
is
any
object
are
handset
(Refertop.6)
on.
into
between
installed
is
the
wall
the
with
setupto
the
outlet
set
correct
correct
where
and
the
the
remote
polarities.
mode.
set's
power
control
Picture
after
No
or
appears
switching
or
Poor
Poor
Horizontal/vertical
or
picture
No
output
from
speakers
slowly,
colour
picture
shaking
one
?
Thisisnormal
?
Please
minutes.
Select
on
contact
Colour
as
your
in
the
the
image
service
PICTURE
is
muted
centre,
menu
during
if
the
and
the
picture
press
startup
has
not
the
VOLUME
process
appeared
of
(Γ)
the
after
button.
set.
five
(Refertop.21)
?
a
certain
bars
of
the
?
?
?
Keep
Activate
still
(If
Check
Adjust
any
picture
for
local
Balance
distance
function
isonthe
interference
between
to
restore
screen
in
the
SOUND
such
for
the
the
more
as an
menu.
set
and
brightness
than
electrical
(Refertop.22)
the
of
5
minutes,
VCR.
the
picture.
appliance
the
screen
or
power
gets
dark.)
tool.
?
Unusual
42
PLASMA
inside
TV
sound
the
from
set
A
at
the
change
the
set.
time
in
ambient
of
switching
humidity
off
or
or
temperature
on
of
the
result
may
set
and
does
inanunusual
not
indicateafault
noise
with
Page 43

Product
Product
Specifications
Specifications
Miscellaneous
Width
Height
Depth
Weight
Power
Operating
Operating
MODEL
(inches/mm)
(inches/mm)
(inches/mm)
(pounds
requirement
Resolution
Colour
Temperature
Humidity
MODEL
/
kg)
Range
Range
RT-42PX10/11/H
RT-42PX20/21/H
852x480
16,770,000
RT-50PX10/11/H
(Dot)
48.4/1210
27.6/701
3.8/96
66/29.9
AC100-240V,
(256
steps
~
32
104°F
Less
50/60Hz
of
(0~40°C)
than
80%
eachR,G
RT-50PX20/21/H
RT-42PX12X/H
RT-42PX20/H
1024x768
and
(Dot)
B)
?
The
Operating
Width
(inches/mm)
Height
Depth
(inches/mm)
Weight
Power
Resolution
Temperature
Operating
specifications
(inches/mm)
(pounds
/
requirement
Colour
Humidity
Range
shown
kg)
Range
above
may
be
changed
16,770,000
without
notice
55.1/1400
32.3/821
3.9/99
115/52.15
AC100-240V,
1366x768
(256
steps
~
32
104°F
Less
for
quality
50/60Hz
(Dot)
of
eachR,G
(0~40°C)
than
80%
improvement.
and
B)
Owner's
Manual
43
Page 44

 Loading...