

LG RH398H-M Owner’s Manual
ENGLISH
RH398H-M
P/NO : MFL56778718
http://www.LG.ca
For questions
about this
product,
please call.
11--888888--554422--22662233
RH398H-M.BCANLLK_ENG 6/11/08 11:08 AM Page 1
2
CAUTION: TO REDUCE THE RISK OF ELECTRIC SHOCK DO NOT REMOVE
COVER (OR BACK) NO USER-SERVICEABLE PARTS INSIDE REFER SERVICING TO QUALIFIED SERVICE PERSONNEL.
This lightning flash with arrowhead symbol within an equilateral triangle
is intended to alert the user to the presence of uninsulated dangerous
voltage within the product’s enclosure that may be of sufficient magnitude to constitute a risk of electric shock to persons.
The exclamation point within an equilateral triangle is intended to alert
the user to the presence of important operating and maintenance (servicing) instructions in the literature accompanying the product.
WARNING: TO PREVENT FIRE OR ELECTRIC SHOCK HAZARD, DO NOT
EXPOSE THIS PRODUCT TO RAIN OR MOISTURE.
WARNING: Do not install this equipment in a confined space such as a book
case or similar unit.
CAUTION: Do not block any ventilation openings. Install in accordance with the
manufacturer's instructions.
Slots and openings in the cabinet are provided for ventilation and to ensure reliable operation of the product and to protect it from over heating. The openings
should be never be blocked by placing the product on a bed, sofa, rug or other
similar surface. This product should not be placed in a built-in installation such
as a bookcase or rack unless proper ventilation is provided or the manufacturer's instruction has been adhered to.
CAUTION:CLASS 3B VISIBLE AND INVISIBLE LASER
RADIATION WEN OPEN AND INTERLOCKS
DEFEATED AVOID EXPOSER TO THE BEAM.
CAUTION: This product employs a Laser System.
To ensure proper use of this product, please read this owner’s manual carefully
and retain it for future reference. Should the unit require maintenance, contact
an authorized service center.
Use of controls, adjustments or the performance of procedures other than those
specified herein may result in hazardous radiation exposure.
To prevent direct exposure to laser beam, do not try to open the enclosure.
Visible laser radiation when open. DO NOT STARE INTO BEAM.
CAUTION: The apparatus should not be exposed to water (dripping or splashing) and no objects filled with liquids, such as vases, should be placed on the
apparatus.
CAUTION concerning the Power Cord
Most appliances recommend they be placed upon a dedicated circuit;
That is, a single outlet circuit which powers only that appliance and has no additional outlets or branch circuits. Check the specification page of this owner's
manual to be certain. Do not overload wall outlets. Overloaded wall outlets,
loose or damaged wall outlets, extension cords, frayed power cords, or damaged or cracked wire insulation are dangerous. Any of these conditions could
result in electric shock or fire. Periodically examine the cord of your appliance,
and if its appearance indicates damage or deterioration, unplug it, discontinue
use of the appliance, and have the cord replaced with an exact replacement
part by an authorized service center. Protect the power cord from physical or
mechanical abuse, such as being twisted, kinked, pinched, closed in a door, or
walked upon. Pay particular attention to plugs, wall outlets, and the point where
the cord exits the appliance. To disconnect power from the mains, pull out the
mains cord plug. When installing the product, ensure that the plug is easily
accessible.
Open source software notice
This product includes
Freetype library : copyright © 2003 The FreeType Project (www.freetype.org).
Zlib compression library developed by Jean-loup Gailly and Mark Adler.
Copyright (C) 1995-2005 Jean-loup Gailly and Mark Adler
Doubly Linked List licensed by Artistic license.
You can download this software from http://freshmeat.net/projects/linklist/
CAUTION
RISK OF ELECTRIC SHOCK
DO NOT OPEN
RH398H-M.BCANLLK_ENG 6/11/08 11:08 AM Page 2
3
IMPORTANT SAFETY
INSTRUCTIONS
1. Read these instructions.
2. Keep these instructions.
3. Heed all warnings.
4. Follow all instructions.
5. Do not use this apparatus near water.
6. Clean only with dry cloth.
7.
Do not block any ventilation openings. Install in accordance with the
manufacturer’s instructions.
8. Do not install near any heat sources such as radiators, heat registers,
stoves, or other apparatus (including amplifiers) that produce heat.
9. Do not defeat the safety purpose of the polarized or grounding-type
plug. A polarized plug has two blades with one wider than the other.
A grounding type plug has two blades and a third grounding prong.
The wide blade or the third prong are provided for your safety.
If the provided plug does not fit into your outlet, consult an electrician
for replacement of the obsolete outlet.
10. Protect the power cord from being walked on or pinched particularly at
plugs, convenience receptacles, and the point where they exit from the
apparatus.
11. Only use attachments/accessories specified by the manufacturer.
12. Use only with the cart, stand, tripod, bracket, or table specified by the
manufacturer, or sold with the apparatus. When a cart is used, use
caution when moving the cart/apparatus combination to avoid injury
from tip-over.
13. Unplug this apparatus during lightning storms or when unused for
long periods of time.
14.
Refer all servicing to qualified service personnel. Servicing is required
when the apparatus has been damaged in any way, such as
power-supply cord or plug is damaged, liquid has been spilled or
objects have fallen into the apparatus, the apparatus has been
exposed to rain or moisture, does not operate normally, or has been
dropped.
Copyrights
Recording equipment should be used only for lawful copying and you are
advised to check carefully what is lawful copying in the area in which you are
making a copy. Copying of copyright material such as films or music is unlawful unless permitted by a legal exception or consented to by the rights owner.
This product incorporates copyright protection technology that is protected by
method claims of certain U.S. patents and other intellectual property rights
owned by Macrovision Corporation and other rights owners. Use of this copyright protection technology must be authorized by Macrovision Corporation,
and is intended for home and other limited viewing uses only, unless otherwise authorized by Macrovision corporation. Reverse engineering or disassembly is prohibited.
CONSUMERS SHOULD NOTE THAT NOT ALL HIGH DEFINITION TELEVI-
SION SETS ARE FULLY COMPATIBLE WITH THIS PRODUCT AND MAY
CAUSE ARTIFACTS TO BE DISPLAYED IN THE PICTURE. IN CASE OF
525 PROGRESSIVE SCAN PICTURE PROBLEMS, IT IS RECOMMENDED
THAT THE USER SWITCH THE CONNECTION TO THE ‘STANDARD DEFINITION’ OUTPUT. IF THERE ARE QUESTIONS REGARDING OUR TV SET
COMPATIBILITY WITH THIS MODEL 525p HDD/DVD RECORDER,
PLEASE CONTACT OUR CUSTOMER SERVICE CENTER.
Manufactured under license from Dolby Laboratories. Dolby and the doubleD symbol are trademarks of Dolby Laboratories.
RH398H-M.BCANLLK_ENG 6/11/08 11:08 AM Page 3

4
Contents
Before you start . . . . . . . . . . . . . . . . . . . . . . . . . . . . . . . . . . .5-6
Remote control . . . . . . . . . . . . . . . . . . . . . . . . . . . . . . . . . . . .7
Main Unit . . . . . . . . . . . . . . . . . . . . . . . . . . . . . . . . . . . . . . . . .8
Hooking up the unit . . . . . . . . . . . . . . . . . . . . . . . . . . . . . .9-13
Operating USB Flash Drive . . . . . . . . . . . . . . . . . . . . . . . . . .13
Auto setup . . . . . . . . . . . . . . . . . . . . . . . . . . . . . . . . . . . . . . .14
Using the Home Menu . . . . . . . . . . . . . . . . . . . . . . . . . . . .14-15
Adjust the SETUP settings . . . . . . . . . . . . . . . . . . . . . . .15-19
Displaying disc Information . . . . . . . . . . . . . . . . . . . . . . .19-20
Play a disc . . . . . . . . . . . . . . . . . . . . . . . . . . . . . . . . . . . .20-21
Playing DivX
®
movie files . . . . . . . . . . . . . . . . . . . . . . . . .22-23
Listening to a music . . . . . . . . . . . . . . . . . . . . . . . . . . . . . . .24
Viewing a photo . . . . . . . . . . . . . . . . . . . . . . . . . . . . . . . . . .25
Recording . . . . . . . . . . . . . . . . . . . . . . . . . . . . . . . . . . . . .26-28
Editing a title . . . . . . . . . . . . . . . . . . . . . . . . . . . . . . . . . .28-31
Dubbing a title . . . . . . . . . . . . . . . . . . . . . . . . . . . . . . . . . . .32
Language Codes . . . . . . . . . . . . . . . . . . . . . . . . . . . . . . . . . .33
Area Codes . . . . . . . . . . . . . . . . . . . . . . . . . . . . . . . . . . . . . .33
Troubleshooting . . . . . . . . . . . . . . . . . . . . . . . . . . . . . . . .34-35
Specifications . . . . . . . . . . . . . . . . . . . . . . . . . . . . . . . . . . . .36
Before connecting, operating or adjusting this product,
please read this instruction booklet carefully and completely.
RH398H-M.BCANLLK_ENG 6/11/08 11:08 AM Page 4

5
Before you start
Recordable and Playable discs
This unit can play and record all widely-used DVD types. The table below shows some specific compatibility differences depending on the disc types.
Playable discs
The table below shows the file formats and media types that this unit can playback.
HDD DVD-R DVD-RW DVD-RAM DVD+R DVD+R(DL) DVD+RW
Symbol used in
this manual
Logos
Re-Writable
Formatting Mode
(new discs)
Editing
Play on other
players
Recommended
discs
Yes No Yes Yes No No Yes
– Video mode Video mode VR mode Auto Auto Auto
Yes Limited Yes Yes Limited Limited Yes
– The player must compatible with corresponding media and the media has to be finalized.
Mitsubishi(8x,16x) Mitsubishi(4x) Mitsubishi(3x) Mitsubishi(8, 16x) Mitsubishi(2.4x, 8x) Mitsubishi(4x)
– Verbatim(8x,16x) Verbatim(4x) Maxell(5x) Verbatim(8x,16x) HP(4x)
JVC(4x) Verbatim(4x)
Maxell(4x) Ricoh(4x)
+RW+R+RRAM-RW
Video
-RW
VR
-RHDD
DVD Audio CD Data disc (DivX, JPEG, MP3 or WMA)
Symbol used in
this manual
Logos
Characteristics
WMAMP3
JPEG
DivXACDDVD
Music CDs or CD-R/RWs
in music CD format that
can be purchased
Discs such as movies
that can be
purchased or rented.
Discs that contain DivX, JPEG, MP3 or WMA
files.
RH398H-M.BCANLLK_ENG 6/11/08 11:08 AM Page 5

6
Notes on discs
Depending on the conditions of the recording equipment or the CD-R/RW (or
DVD±R/RW) disc itself, some CD-R/RW (or DVD±R/RW) discs cannot be
played on the unit.
Do not attach any seal or label to either side (the labeled side or the record-
ed side) of a disc.
Do not use irregularly shaped CDs (e.g., heart-shaped or octagonal). Doing
so may result in malfunctions.
Depending on the recording software & the finalization, some recorded discs
(CD-R/RW or DVD±R/RW) may not be playable.
DVD-R/RW, DVD+R/RW and CD-R/RW discs recorded using a personal
computer or a DVD or CD Recorder may not play if the disc is damaged or
dirty, or if there is dirt or condensation on the Unit’s lens.
If you record a disc using a personal computer, even if it is recorded in a
compatible format, there are cases in which it may not play because of the
settings of the application software used to create the disc. (Check with the
software publisher for more detailed information.)
This unit requires discs and recordings to meet certain technical standards
in order to achieve optimal playback quality. Pre-recorded DVDs are automatically set to these standards. There are many different types of recordable disc formats (including CD-R containing MP3 or WMA files) and these
require certain pre-existing conditions (see above) to ensure compatible
playback.
Customers should note that permission is required in order to download
MP3 / WMA files and music from the Internet. Our company has no right to
grant such permission. Permission should always be sought from the copyright owner.
Availability of copying or moving feature
From To MP3/WMA JPEG DivX Title*
1
HDD DISC - - - Yes
DISC HDD Yes Yes Yes Yes
USB drive HDD Yes Yes Ye s -
*1 The title is recorded from this unit.
Restrictions on copying
Some video material is copy-once protected: Such material cannot be copied to
HDD or DVD. You can identify copy-once protected material during playback by
displaying disc information on-screen.
PAL format signals from the analog or the DV inputs are not recorded
correctly with this unit.
About the Symbol Display
“ ” may appear on your TV display during operation and indicates that the
function explained in this owner’s manual is not available on that specific media.
Regional Codes
This unit has a regional code printed on the rear of the unit. This unit can play
only DVD discs labeled same as the rear of the unit or “ALL”.
Most DVD discs have a globe with one or more numbers in it clearly visible
on the cover. This number must match your unit’s regional code or the disc
cannot play.
If you try to play a DVD with a different regional code from the unit, the mes-
sage “Incorrect region code. Can’t play back” appears on the TV screen.
Remote Control Operation
Point the Remote Control at the remote sensor and press the buttons.
Remote Control Battery Installation
Remove the battery cover on the rear of the Remote Control, and insert R03
(size AAA) battery with 3 and # matched correctly.
RH398H-M.BCANLLK_ENG 6/11/08 11:08 AM Page 6
7
Remote control
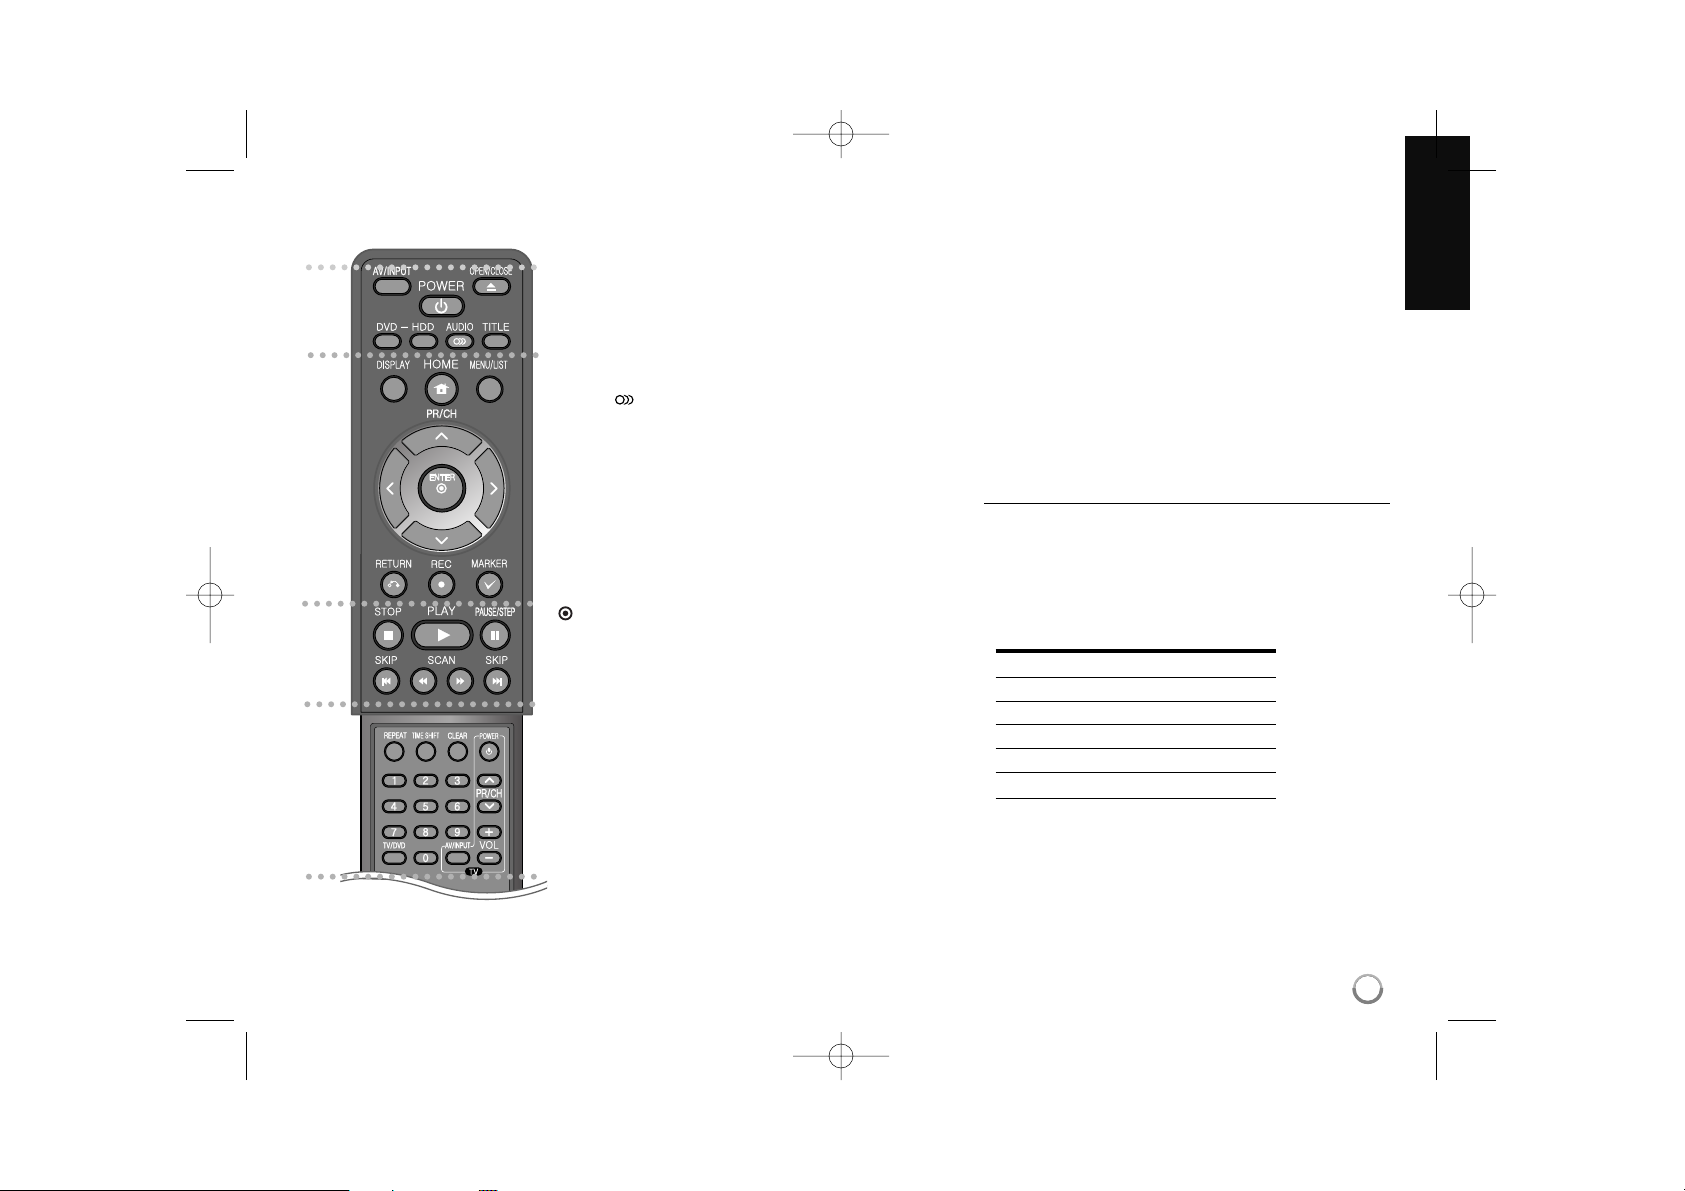
a
AV/INPUT: Changes the input source (Tuner, AV1-2, or
DV IN).
OPEN/CLOSE: Opens and closes the disc tray.
POWER: Switches the unit ON or OFF.
DVD: Selects the unit’s mode to DVD.
HDD: Selects the unit’s mode to HDD.
AUDIO ( ): Selects an audio language or audio channel.
TITLE: Displays the disc’s Title menu, if available.
b
HOME: Accesses or removes the HOME menu.
DISPLAY: Accesses On-Screen Display.
MENU/LIST: Accesses menu on a DVD disc. Switches
between Title List-Original and Title List-Playlist menu.
b / B / v / V (left/right/up/down):
Used to navigate on-screen displays.
(ENTER): Acknowledges menu selection.
PR/CH (v/V): Scans up or down through memorized
channels.
RETURN (O): Removes the on-screen displays.
REC (z): Starts recording. Press repeatedly to set the
recording time.
MARKER: Selects multiple files/titles on the list.
c
PLAY (N): Starts playback.
STOP (x): Stops playback or recording.
PAUSE/STEP (X): Pause playback or recording temporarily.
SCAN (m / M): Search backward or forward.
SKIP (. / >): Go to next or previous chapter/track/file.
d
REPEAT: Repeat sequence, chapter, track, title, all.
TIMESHIFT: Activates pause live TV/playback (timeshift) for
a live TV program.
CLEAR: Removes a track number on the Program List.
0-9 numerical buttons: Selects numbered options in a
menu.
TV/DVD: Press to switch between ‘TV mode’, in which you
get the picture and sound from the TV’s tuner, and ‘DVD
mode’, in which you get picture and sound from this unit.
TV Control Buttons: You can control the sound level, input
source, and power switch of your TV.
Setting up the remote to control your TV
You can operate your TV with the supplied remote control.
If your TV is listed in the table below, set the appropriate
manufacturer code.
While holding down TV POWER button, and press the manufacturer code for your TV with the numerical buttons (see
the table below). Release the TV POWER button to complete setting.
Manufacturer Code Number
LG / GoldStar 1 (Default), 2
Zenith 1, 3, 4
Samsung 6, 7
Sony 8, 9
Hitachi 4
Depending on your TV, some or all buttons may not function
on the TV, even after entering the correct manufacturer
code. When you replace the batteries of the remote, the
code number you have set may be reset to the default setting. Set the appropriate code number again.
a
b
c
d
RH398H-M.BCANLLK_ENG 6/11/08 11:08 AM Page 7
8
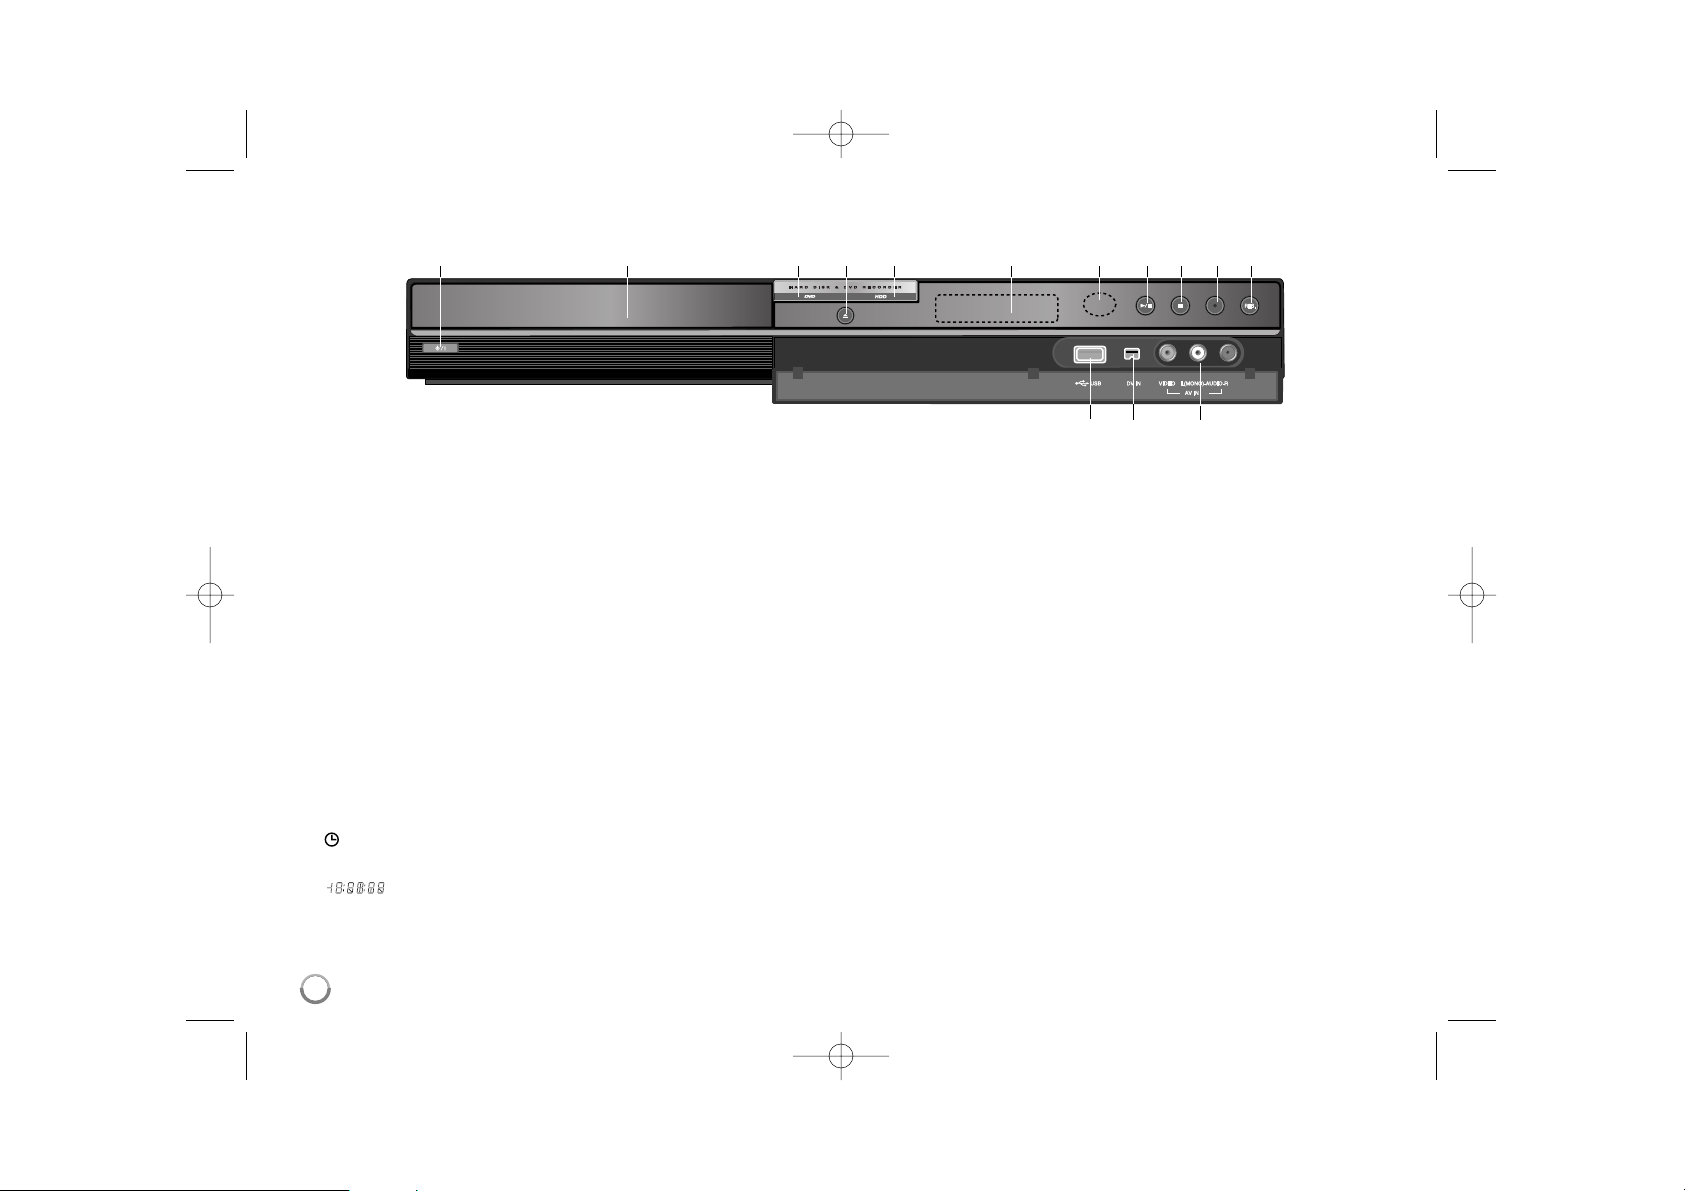
a
11
/ I (POWER button)
Switches the unit ON or OFF.
b Disc Tray
Insert a disc here.
c DVD
Set the recorder’s mode to DVD.
d OPEN/CLOSE (Z)
Opens or closes the disc tray.
e HDD
Set the recorder’s mode to HDD.
f Display window
Shows the current status of the unit.
T/S: Indicates the timeshift mode.
REC: The unit is recording.
HDD: The unit is HDD mode.
DVD: The unit is DVD mode.
HDD bBDVD: The unit is dubbing.
: Indicates when the unit is in timer recording or a timer recording is
programmed.
: Indicates clock, total playing time, elapsed time, title number,
chapter/track number, channel, etc.
g Remote Sensor
Point the remote control here.
h N / X (PLAY / PAUSE)
Starts playback.
Pause playback or recording temporarily,
press again to exit pause mode.
i x (STOP)
Stops playback or recording.
j z (REC)
Starts recording. Press repeatedly to set the recording time.
k RESOLUTION
Sets the output resolution for HDMI and COMPONENT OUTPUT jacks.
- HDMI: 480i, 480p, 720p, 1080i, 1080p
- COMPONENT: 480i, 480p
l USB Port
Connect an USB Flash Drive.
m DV IN
Connect the DV output of a digital camcorder.
n AV IN 2 (VIDEO IN/AUDIO IN (Left/Right))
Connect the audio/video output of an external source (Audio system, TV/
Monitor, VCR, Camcorder, etc.).
Main Unit
2
abcdefghijk
lm n
RH398H-M.BCANLLK_ENG 6/11/08 11:08 AM Page 8
9
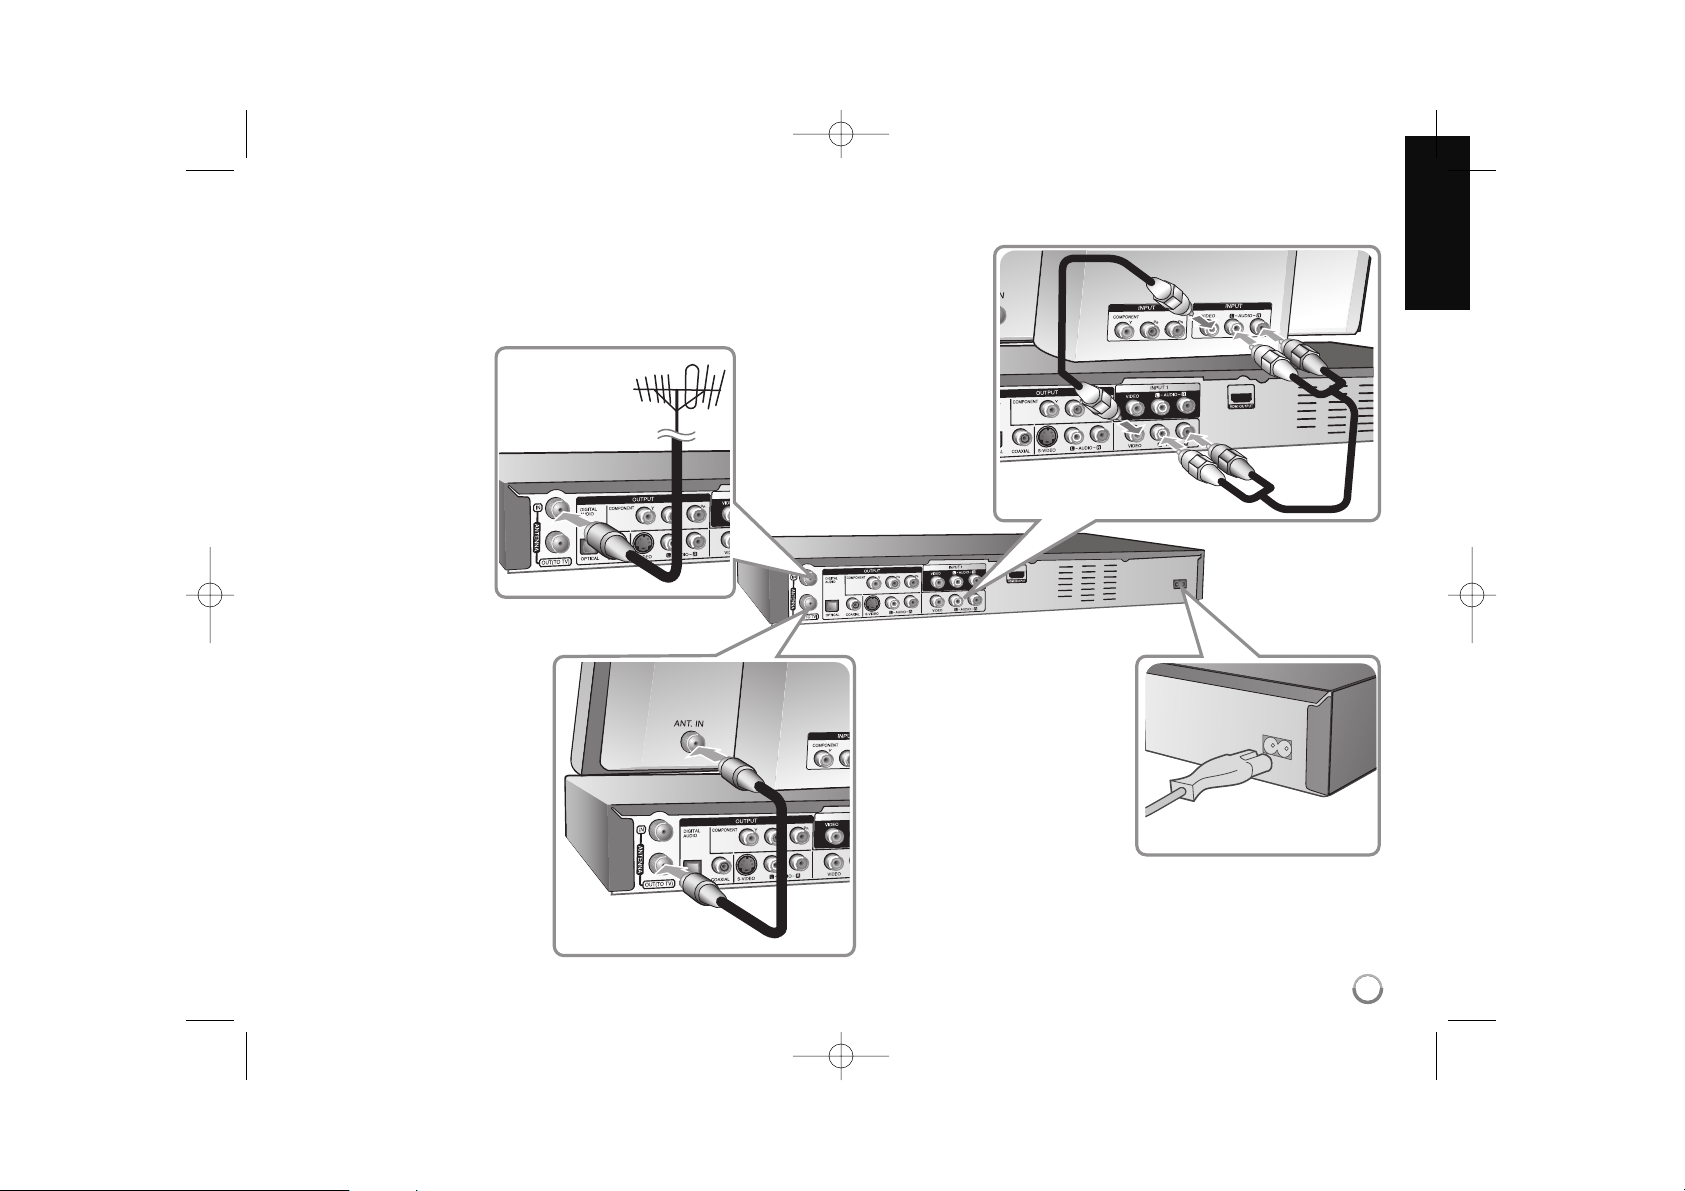
Hooking up the unit
a Antenna connection
Connect the Terrestrial
TV antenna to the
ANTENNA IN jack on
the unit.
If your antenna cable is
flat wire type, use a
300-ohm to 75-ohm
antenna adaptor.
b Antenna connection to
your TV
Connect one end of the RF
cable to ANTENNA OUT jack
on the unit and other end to
ANTENNA IN jack on your
TV.
Passes the signal from the
ANTENNA IN jack to your
TV/monitor.
c Audio/Video connection
Connect one end of the
video(yellow) cable to the
VIDEO OUTPUT jack on the
unit and other end to the
VIDEO INPUT jack on your
TV.
Connect one ends of the
audio cables (red and white)
to the analog AUDIO OUTPUT jack on the unit and
other ends to the AUDIO
INPUT jack on your TV.
d Power cord connection
Connect the mains lead to
the AC IN terminal on the
unit. Then plug the power
cord into the mains.
RH398H-M.BCANLLK_ENG 6/11/08 11:08 AM Page 9
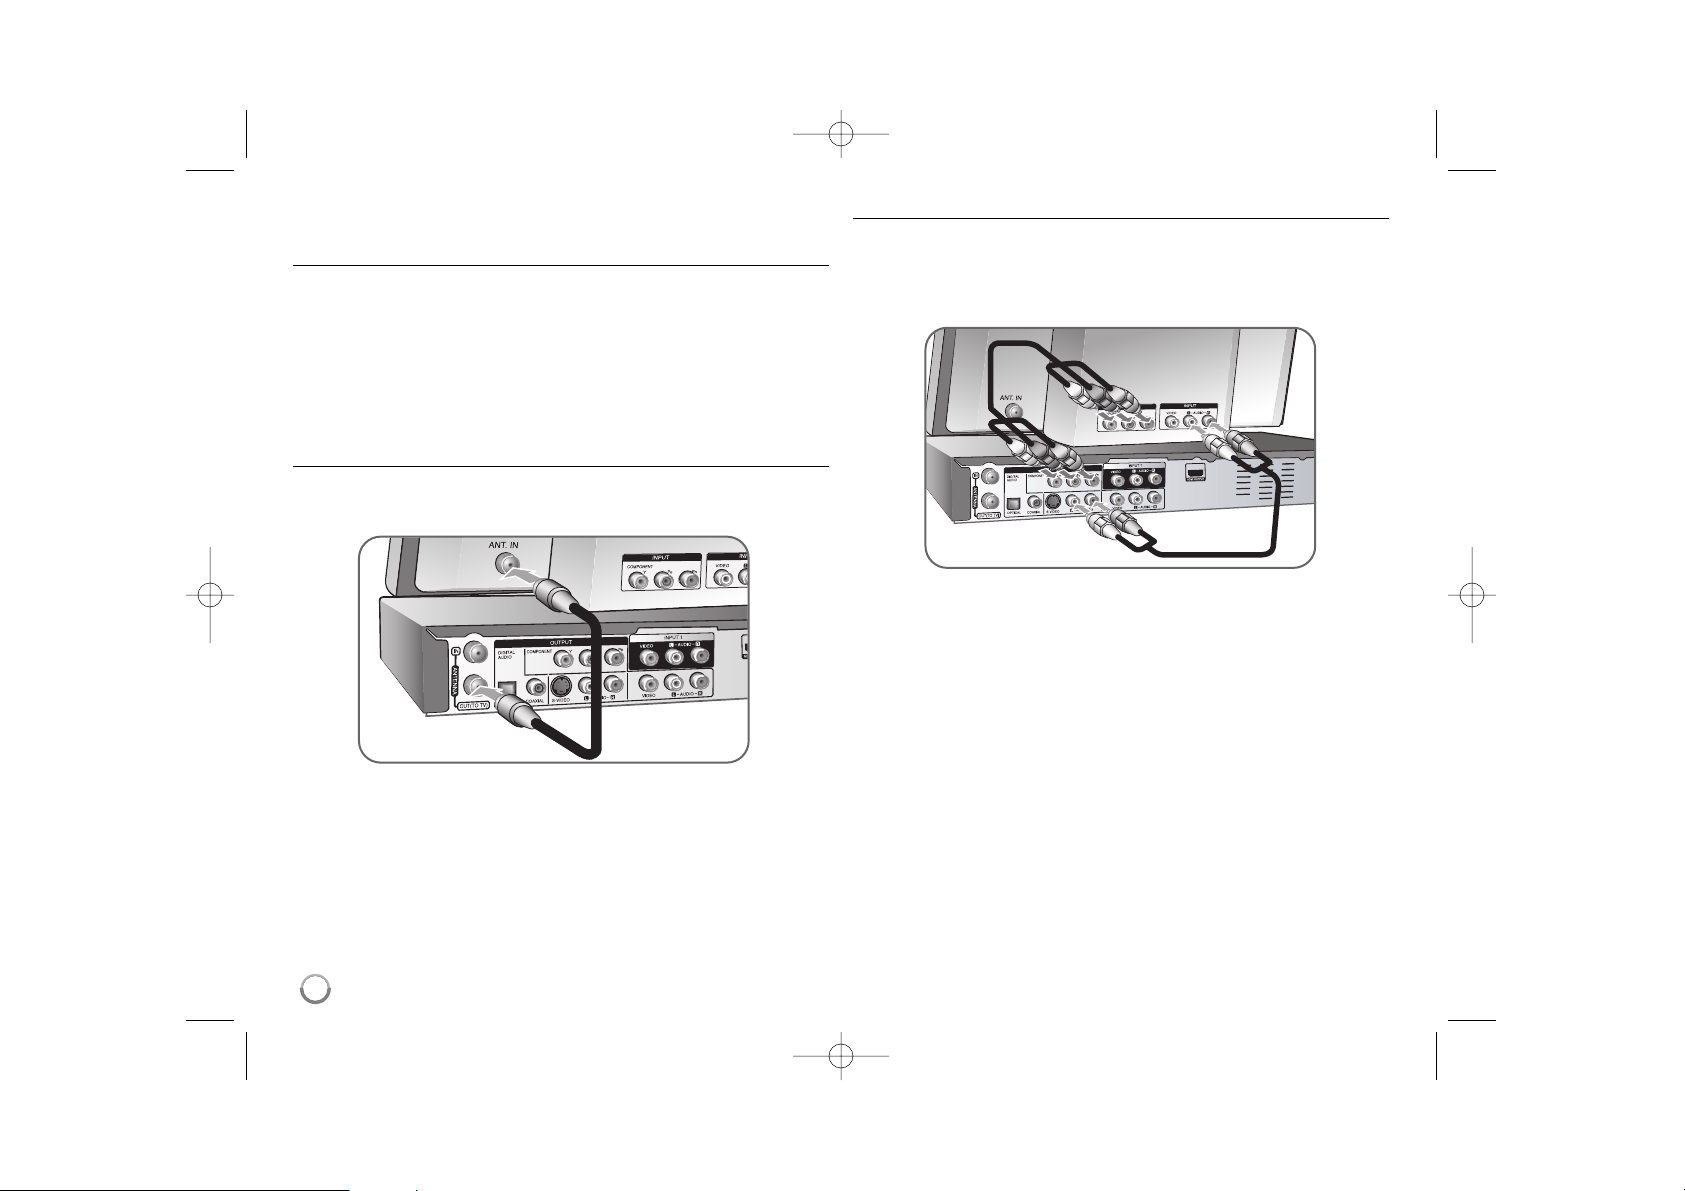
Hooking up the unit - More functions
Connecting a Cable Box
If a cable box is required for reception the cable channels, connect a coaxial
cable from the wall jack to the IN connector on the cable box and a coaxial
cable from the OUT connector on the cable box to the ANT. IN on the recorder.
To view or record a cable channel through RF output from the cable box, tune
the recorder must be tuned to the cable box output channel (usually channel 3
or 4). Select a channel using the cable box. With this connection, you cannot
record one channel while viewing another.
RF coaxial connection
Connect one end of the RF cable to the ANTENNA OUT jack on the unit and
other end to the ANTENA IN jack on your TV. You can get Audio and Video
signals together with this connection.
To set the recorder ’s RF output, press and hold PR/CH (V/v) on the remote
control for more than five seconds. The [ch03] or [ch04] appears in the display
window. Press PR/CH (V/v) to change the RF output channel (ch03 or ch04)
and then tune the TV to the selected channel.
Component connection
Connect one end of the component(Y PB PR) cable to the COMPONENT OUTPUT jack on the unit and other end to the COMPONENT INPUT jack on your
TV.
Connect one ends of the audio cables (red and white) to the analog AUDIO
OUTPUT jack on the unit and other ends to the AUDIO INPUT jack on your TV.
If your television is a high-definition or “digital ready” television, you may take
advantage of the unit’s progressive scan output for the highest video resolution
possible. If your TV does not accept the Progressive Scan format, the picture
will appear scrambled with the progressive signal.
Set the resolution to 480p using RES. button on the front panel to obtain the
progressive signal.
10
RH398H-M.BCANLLK_ENG 6/11/08 11:08 AM Page 10
11
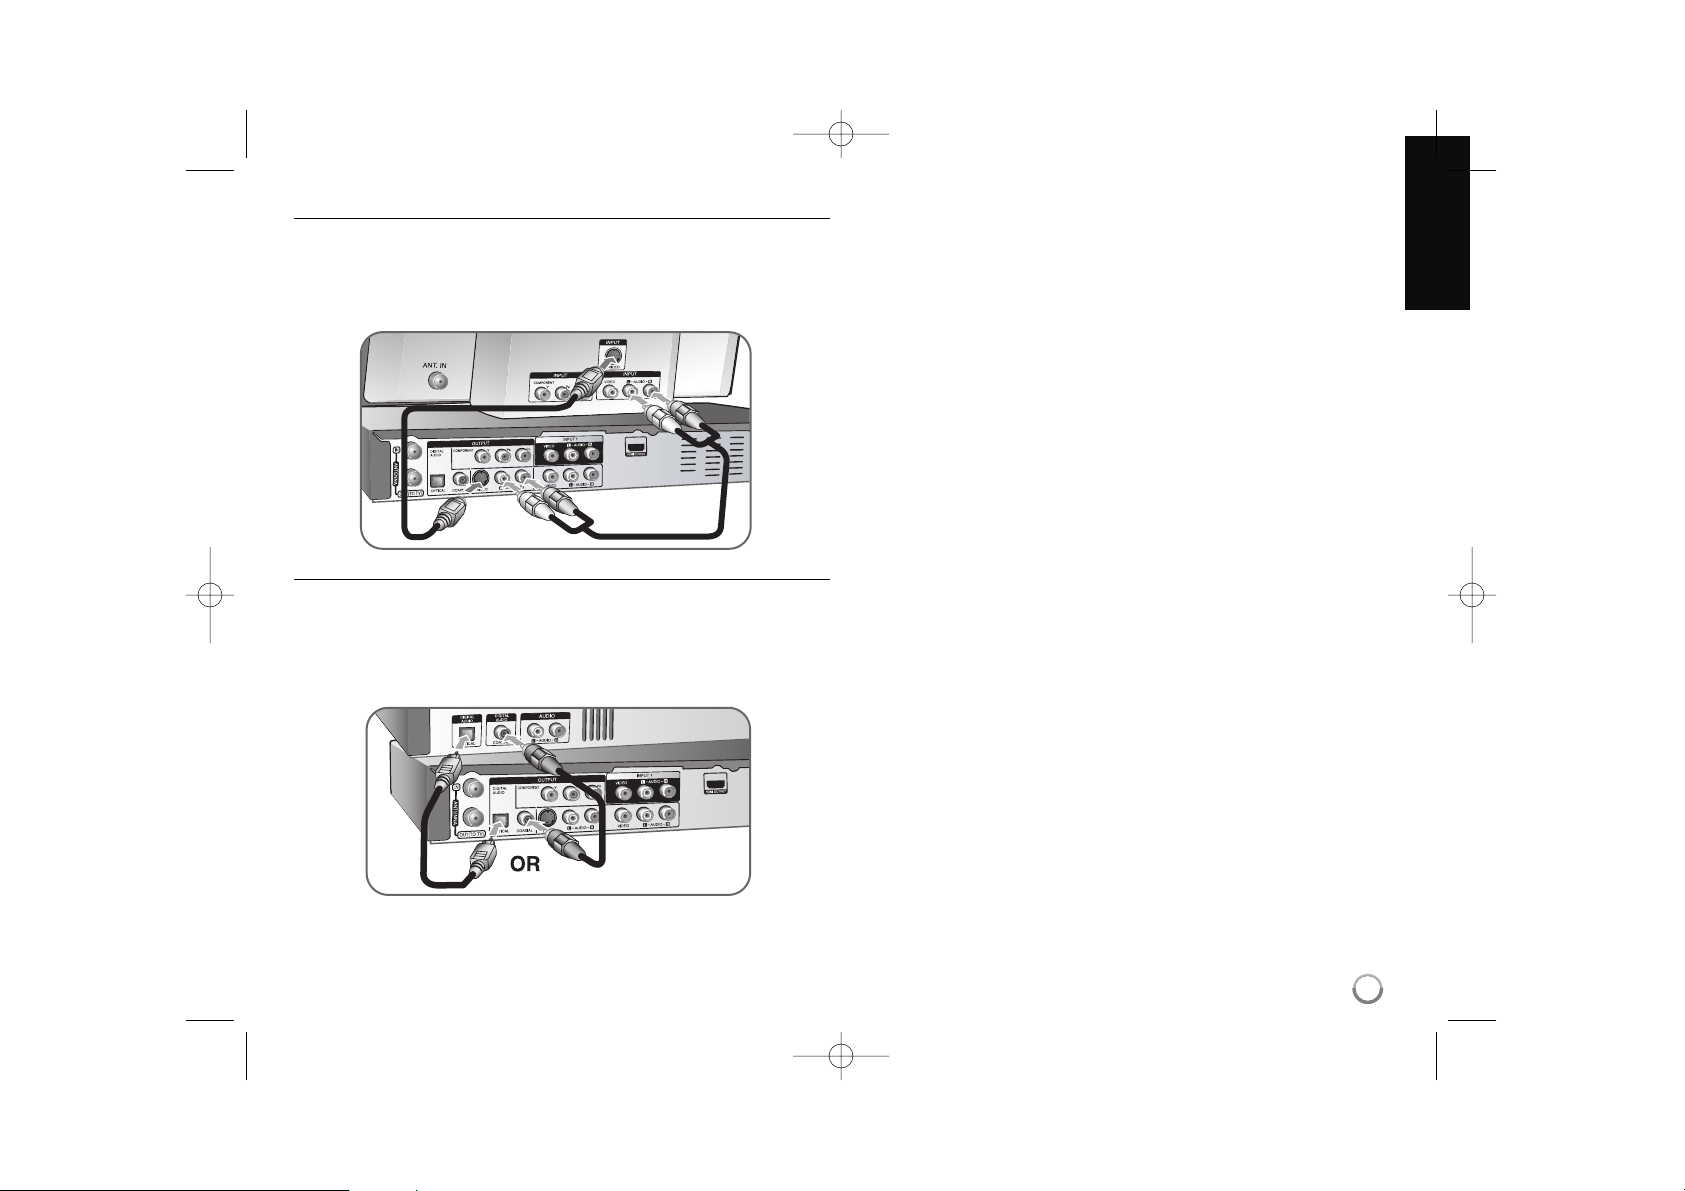
S-Video connection
Connect one end of the S-Video cable to the S-VIDEO OUTPUT jack on the
unit and the other end to the S-Video INPUT jack on your TV.
Connect one ends of the audio cables (red and white) to the analog AUDIO
OUTPUT jack on the unit and the other ends to the AUDIO INPUT jack on your
TV(see component connection on the left).
Digital audio connection
Connecting to an amplifier/receiver, Dolby Digital/MPEG/DTS decoder or other
equipment with a digital input.
Connect one end of the digital audio cables (COAXIAL or OPTICAL) to the digital audio output jack (COAXIAL or OPTICAL) on the unit and other end to the
digital audio input jack (COAXIAL or OPTICAL) on your amplifier.
This recorder does not perform internal (2 channel) decoding of a DTS sound
track. To enjoy DTS multi channel surround, you must connect this recorder to a
DTS compatible receiver via one of this recorder’s digital audio outputs.
RH398H-M.BCANLLK_ENG 6/11/08 11:08 AM Page 11
 Loading...