

LG RH2T160 User Manual

RH2T5.2T8-WL-NA2ALLB-ENG
DVB-T HDD/DVD
RECORDER
OWNER’S MANUAL
MODEL; RH2T80
RH2T160
RH2T250
Before connecting, operating or adjusting this product,
piease read this instruction bookiet carefuiiy and compieteiy.
DJB
Digital Video
Broadcasting
HDD
HARD DISK DRIVE
RW
DVD+ReWritable
□□jP.oj-fXI Hnmi“ TsimPLinK
D I G I T A L DEFINITION MULTIMEDIA INTERFACE ESSy LG TV COIltrOl
COMPATIBLE
The Clear Choice In Digital Video™
I
IM

CAUTION
RISK OF ELECTRIC SHOCK
AI
CAUTION: TO REDUCE THE RISK
DO NOT REMOVE COVER (OR BACK)
NO USER-SERVICEABLE PARTS INSIDE
REFER SERVICING TO OUALIFIED SERVICE
This lightning flash with arrowhead symbol within
A
WARNING: TO PREVENT FIRE OR ELECTRIC SHOCK
HAZARD, DO NOT EXPOSE THIS PRODUCT TO RAIN
OR MOISTURE.
WARNING: Do not install this equipment in a confined space
such as a book case or similar unit.
CAUTION:
Do not block any ventilation openings. Install in accordance
with the manufacturer's instructions.
Slots and openings in the cabinet are provided for ventilation
and to ensure reliable operation of the product and to protect
it from over heating.
The openings should be never be blocked by placing the
product on a bed, sofa, rug or other similar surface.This
product should not be placed in a built-in installation such as
a bookcase or rack unless proper ventilation is provided or
the manufacturer's instruction have been adhered to.
an equilateral triangle is intended to alert the user
to the presence of uninsulated dangerous voltage
within the product’s enclosure that may be of
sufficient magnitude to constitute a risk of electric
shock to persons.
The exclamation point within an equilateral
triangle is intended to alert the user to the
presence of important operating and maintenance
(servicing) instructions in the literature
accompanying the product.
DO NOT OPEN
OF ELECTRIC SHOCK
PERSONNEL.
A
CAUTION: The apparatus should not be exposed to water
(dripping or splashing) and no objects filled with liquids, such
as vases, should be placed on the apparatus.
CAUTION concerning the Power Cord
Most appliances recommend they be placed upon a
dedicated circuit;
That is, a single outlet circuit which powers only that
appliance and has no additional outlets or branch circuits.
Check the specification page of this owner's manual to be
certain.
Do not overload wall outlets. Overloaded wall outlets, loose
or damaged wall outlets, extension cords, frayed power
cords, or damaged or cracked wire insulation are dangerous.
Any of these conditions could result in electric shock or fire.
Periodically examine the cord of your appliance, and if its
appearance indicates damage or deterioration, unplug it,
discontinue use of the appliance, and have the cord replaced
with an exact replacement part by an authorized service
centre.
Protect the power cord from physical or mechanical abuse,
such as being twisted, kinked, pinched, closed in a door, or
walked upon. Pay particular attention to plugs, wall outlets,
and the point where the cord exits the appliance.
To disconnect power from the mains, pull out the mains cord
plug. When installing the product, ensure that the plug is
easily accessible.
• The appliance is not intended for use by young
chiidren or infirm persons without supervision.
• Young Chiidren shouid be supervised to ensure
that they do not piay with appiiance.
• if the appiiance is suppiied from a cord extension
set or an eiectricai portabie outiet device, the cord
extension set on eiectricai portabie outiet device
must be positioned so that it is not subject to
spiashing or ingress of moisture.
CLASS 1 LASER PRODUCT
KLASSE 1 LASER PRODUKT
LUOKAN 1 LASER LAITE
KLASS 1 LASER APPARAT
CLASSE1 PRODUIT LASER
CAUTION:
CLASS 3B VISIBLE AND INVISIBLE LASER RADIATION
WHEN OPEN AND INTERLOCKS DEFEATED AVOID
DIRECT EYE EXPOSURE TO THE BEAM.
CAUTION:
This product employs a Laser System.
To ensure proper use of this product, please read this
owner’s manual carefully and retain it for future reference.
Should the unit require maintenance, contact an authorized
service centre.
Performing controls, adjustments, or carrying out procedures
other than those specified herein may result in hazardous
radiation exposure.
To prevent direct exposure to laser beam, do not try to open
the enclosure. Visible laser radiation when open. DO NOT
STARE INTO BEAM.
©

Contents
Introduction........................................................................4-9
About the 0 symbol display.............................................4
Symbol Used in this Manual...........................................4
Notes on Discs
Recordable and Playable Discs
Playable Discs................................................................6
Regional Code
Availability of copying or moving feature
About the internal hard disk drive...................................7
Remote Control Operation
Front Panel ....................................................................8
Remote Control
Hook-up and Settings
Rear Panel ...................................................................10
General about connection............................................11
Connecting to the Antenna ............................................11
Connections to Your TV
RDM I connection ........................................................13
Connecting to an Amplifier
Accessory Audio/Video (AA/) Connections
Auto Setup....................................................................15
Using the Home Menu .................................................16
Initial Settings
General Operation .................................................16
General Settings .....................................................17-20
Auto Programming
Manual Channel Add .............................................17
Program Edit.....................................................18-19
Auto Clock Set / Manual Clock Set
TV Aspect ..............................................................19
Power Save Mode .................................................20
Antenna feed 5V / Initialization
Language Settings
Display Menu
Disc Menu/Audio/Subtitle ......................................20
DTV Audio / DTV Closed Caption / DivX Subtitle .20
Audio Settings
Dolby Digital/DTS/MPEG
Sampling Frequency..............................................21
DRC (Dynamic Range Control)
Vocal .....................................................................21
Lock (Parental Control) Settings
Lock System .........................................................21
DVD Rating ...........................................................21
Parental Guidance
Set Password.........................................................22
Area Code
DivX Registration Code .........................................22
Recording Settings
Record Mode Set / Record Aspect
DV Recording Audio / TV Recording Audio
Auto Chapter .........................................................23
Timeshift / MPEG4
Disc Settings
Disc Format............................................................24
Finalize ..................................................................24
Disc Label / Disc Protect / PBC
Network Settings
Software Update
System Information
Displaying Information .................................................26
Displaying Information while TV viewing
Displaying Disc Information on-screen
...............................................................
....................................
................................................................
........................
............................................
.............................................................
...................................................
..............................................
..........................................
.................
...............................................................
.................................................
.......................
.............................
.......................................................
.........................................................
...............................................................
.....................................
............................
............................
................................................
.............................................................
.......................................................
.......................
...........
.................................................
...........................................................
............................
.........................................................
...................................................
...............................................
...............
.................
10-26
12
14
15
16
17
19
20
20
20
21
21
21-22
24-25
TV Viewing.....................................................................27-29
Program Guide (Digital program only)
Program Selection .........................................................28
Program List
Teletext Operation
4
Playback
5
6
6
7
9
21
22
22
23
23
23
23
25
25
25
25
26
26
General Playback Features.....................................30-33
Playing a DivX Movie File.............................................34
Playing an Audio CD or MP3A/\/MA file
Program Playback with Audio CD and MP3/WMAfile .36
Viewing a JPEG File ...............................................37-38
Editing a MP3/WMA, JPEG, DivX file
Recording ......................................................................41-48
About DVD recording
About HDD recording...................................................41
Timeshift
Basic Recording from a TV
Instant Timer Recording
Timer Recording
Checking Timer Recording Details ..............................45
Recording from an External Input
Simultaneous recording and playback
Playback another title during recording
Time Slip ................................................................46
MPEG4 Recording .......................................................47
Recording from DV Input .............................................48
Editing ...........................................................................49-56
Title List and Chapter List Menu Overview ..................49
HDD, VR Mode: Original and Playlist Editing
Adding Chapter Markers ..............................................50
Changing the Title Thumbnails ....................................50
Making a New Playlist .................................................51
Adding Additional Title/Chapters to the Playlist
Deleting an Original or Playlist Title/Chapter
Deleting a Part..............................................................52
Naming a Title
Time Search .................................................................53
Sort
Combining Two Titles Into One
Combining Two Chapters Into One
Divide One Titles Into Two
Moving a Playlist Chapter.............................................55
Hide a Chapter/Title
Protect a Title
Additional functions for the recordable DVD discs ... .56
Dubbing
Before Dubbing ............................................................57
Dubbing from HDD to DVD
Dubbing from DVD to HDD
One Touch Copy (HDD to DVD)
One Touch Copy (DVD to HDD)
Reference
Additional Information...................................................60
Language Codes .........................................................61
Area Codes
Controlling Your TV with the Supplied
Remote Control
Troubleshooting.......................................................63-64
Specifications
.................................................................
.......................................................
.......................................................................
....................................................
......................................................................
..........................................
..............................................
...........................................................
.............................................................
..............................................................................
..........................................
....................................................
...............................................................
.........................................................................
.........................................
..........................................
......................................................................
Overwriting Recording ...........................................60
Viewing Title List menu displayed on other
DVD Recorders or Players ....................................60
Playing Your Recordings on Other DVD
Players (Finalizing a Disc)
.................................................................
...........................................................
...............................................................
.........................
.....................
................................
.........................
....................................
..............................
.................................
.................................
....................................
30-40
......................
39-40
.................
.............
..........
...............
57-59
60-65
27
28
29
35
41
42
43
43
44
46
46
46
50
51
52
53
54
54
54
55
56
56
58
58
59
59
60
61
62
65
©
Introduction
Notes on Discs
To ensure proper use of this product, please read this
owner’s manual carefully and retain for future reference.
This manual provides information on the operation
and maintenance of your recorder. Should the unit
require service, contact an authorized service location.
About the 0 Symbol Display
“ 0 ” may appear on your TV display during operation
and indicates that the function explained in this
owner’s manual is not available on that specific media.
Symbol Used in this Manual
Note:
Indicates special notes and operating features.
Tip:
Indicates tips and hints for making the task easier.
A section whose title has one of the following symbols
are applicable only to the disc represented by the
symbol.
liji^ Titles recorded on the HDD
uriiFiH J All DVD discs listed below.
DVD-RAM disc
-RWvr
-RWvideo
li^ilUtl MP3 files
mggg jpeg files
DVD-RW with VR recording mode
DVD-RW with Video recording mode
DVD-i-RW disc
DVD-R disc
DVD-i-R (DL) disc
¡1 DVD-Video disc
Video CDs
Audio CDs
DivX files
WMA files
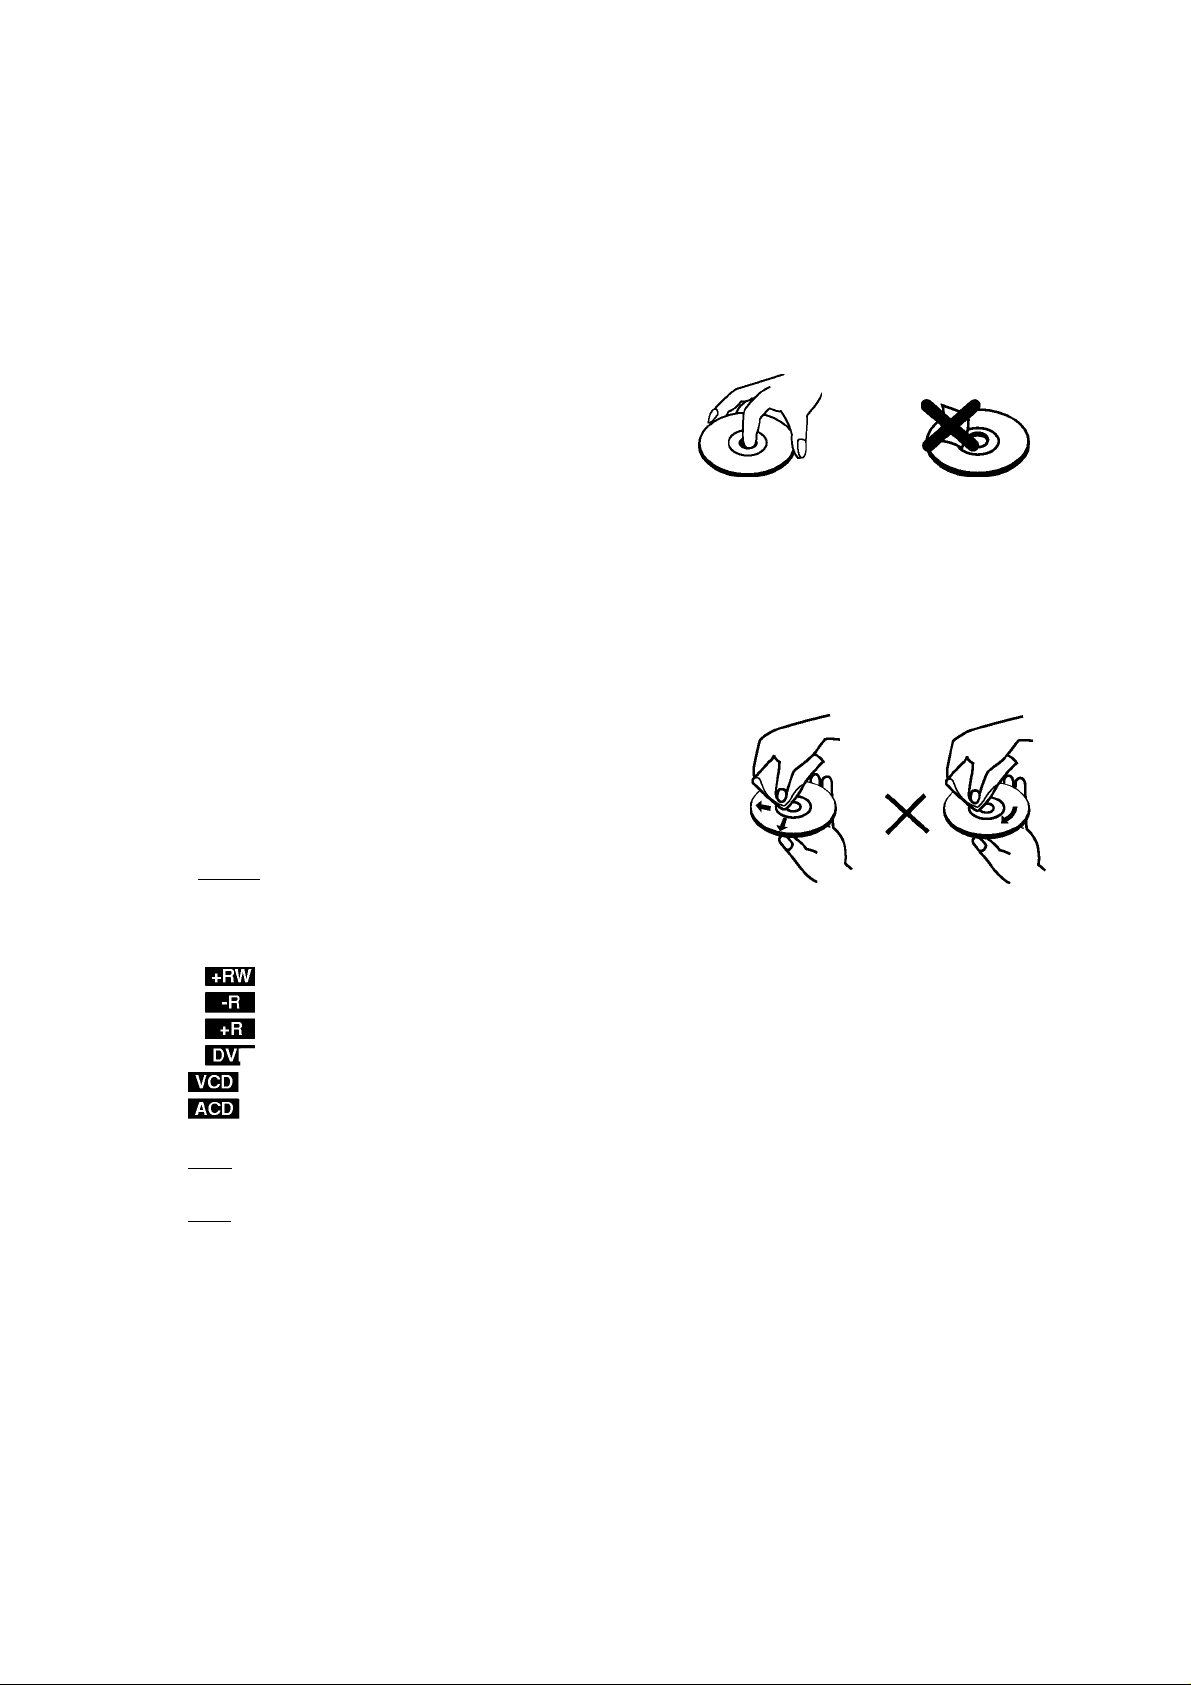
Handling Discs
Do not touch the playback side of the disc. Hold the
disc by the edges so that fingerprints do not get on
the surface. Never stick paper or tape on the disc.
Storing Discs
After playing, store the disc in its case. Do not expose
the disc to direct sunlight or sources of heat and never
leave it in a parked car exposed to direct sunlight.
Cleaning Discs
Fingerprints and dust on the disc can cause poor
picture quality and sound distortion. Before playing,
clean the disc with a clean cloth. Wipe the disc from
the centre out.
o
Do not use strong solvents such as alcohol, benzine,
thinner, commercially available cleaners, or anti-static
spray intended for older vinyl records.
Moisture Condensation
Never operate this product immediately after
moving it from a cold location to a warm location.
Leave it for two or three hours without operating it.
If you use this product in such a situation, it may
damage discs and internal parts.
©
(^imPLinK
What is SIMPLINK?
Some functions of this unit are controlled by TV’s remote control when this unit and LG TV with
SIMPLINK are connected through HDMI connection.
• Controllable functions by LG TV’s remote control; Play, Pause, Scan, Skip, Stop, Power Off, etc.
• Refer to the TV owner’s manual for the details of SIMPLINK function.
• LG TV with SIMPLINK function has the logo as shown above.

Recordable and Playable Discs
DVD-RW (Digital Video Disc - Rewritable):
DVD-RW discs can be formatted for VR mode recording or Video mode recording.
These Discs can be recorded on repeatediy. Recordings can be erased, then you can record again
on the same Disc.
[VR mode]
Recordings can be extensiveiy edited
Piayabie oniy on VR mode compatibie piayers (after finaiization)
[Video mode]
Piayabie on reguiar DVD piayers (after finaiization)
Limited editing features
DVD-R (Digital Video Disc - Recordable)
These Discs can be recorded oniy once. After you finaiize a DVD-R, you cannot record on it or edit it.
DVD-R discs can be oniy formatted to Video mode.
Piayabie on reguiar DVD piayers (after finaiization)
Limited editing features
DVD-RAM (DVD - Random Access Memory)
DVD-RAM discs can be formatted for VR mode recording.
These Discs can be recorded on repeatediy. Recordings can be erased, then you can record again on
the same Disc.
Piayabie on DVD-RAM compatibie piayers.
Recordings can be extensiveiy edited.
Oniy DVD-RAM standard Version 2.0, 2.1 and 2.2 discs can be used in this unit.
You cannot use the cartridge-type DVD-RAM disc in this unit.
DVD+RW (Digital Video Disc + Rewritable)
DVD+RsWritable
These Discs can be recorded on repeatediy. Recordings can be erased, then you can record again
on the same Disc.
Piayabie on DVD-i-RW compatibie piayers (automaticaiiy finaiization)
The edited contents are piayabie on DVD-i-RW compatibie piayers oniy after finaiization
Recordings can be edited the titie/chapter
DVD+R (Digital Video Disc + Recordable)
These Discs can be recorded oniy once. After you finaiize a DVD-i-R, you cannot record on it or edit
it any more.
Piayabie on DVD-i-R compatibie piayers (after finaiization)
Any edited contents are not be compatibie on DVD-i-R compatibie piayers. (Hide, chapter combine,
added chapter mark, etc.)
Limited titie/chapter editing features.
DVD+R DL (Digital Video Disc + Recordable; Double Layer)
These Discs can be recorded oniy once. After you finaiize a DVD+R DL, you cannot record on it or
edit it any more.
Storage space is neariy doubied with doubie iayer DVD+R media, aiiowing consumers to record up
to 8.5GB of video on a singie DVD+R disc.
Piayabie on DVD+R DL compatibie piayers (after finaiization)
Any edited contents are not be compatibie on DVD+R DL compatibie piayers. (Hide, chapter
combine, added chapter mark, etc.)
Limited titie/chapter editing features.
Recommended recordable DVD discs
DVD-R DVD+R DVD-RW DVD+RW DVD+R(DL) DVD-RAM
Mitsubishi (8x, 16x) Mitsubishi (8x, 16x) Mitsubishi (4x) Mitsubishi (4x) Mitsubishi (2.4x) Fujifilm (2x)
That's (8x, 16x) Ricoh (8x, 16x) Verbatim (4x) SONY (2.4x) Maxell (2.4x) Mitsubishi (3x)
SONY (16x) SONY (16x) JVC (4x) Verbatim (2.4x)
- -
Victor (4x) Ricoh (2.4x, 4x)
Maxell (4x)
- -
- -
Note: if a DVD-RW/DVD+RW discs is recorded using a personai computer or other DVD recorder, you cannot
format the disc using this recorder. So if you want to use the disc on this recorder, you must format the disc
using the originai recorder.
©

Playable Discs
DVD (8 cm /12 cm disc)
Discs such as movies that can be purchased or rented
n COMPACT
mm
[DIGITAL VIDEDi
DIGITAL AUDIO
DIGITAL AUDIO
[ReWritablJ
Notes:
• Depending on the conditions of the recording equipment or the CD-R/RW (or DVD±R/RW) disc itseif, some
CD-R/RW (or DVD±R/RW) discs cannot be piayed on the unit.
• Do not attach any seai or iabei to either side (the iabeiied side or the recorded side) of a disc.
• Do not use irreguiariy shaped CDs (e.g., heart-shaped or octagonai). Doing so may resuit in maifunctions.
• Depending on the recording software & the finaiization, some recorded discs (CD-R/RW or DVD±R/RW) may
not be piayabie.
• DVD-R/RW, DVD-i-R/RW and CD-R/RW discs recorded using a personai computer or a DVD or CD Recorder
may not piay if the disc is damaged or dirty, or if there is dirt or condensation on the Recorder’s iens.
• if you record a disc using a personai computer, even if it is recorded in a compatibie format, there are cases
in which it may not piay because of the settings of the appiication software used to create the disc. (Check
with the software pubiisher for more detaiied information.)
• This recorder requires discs and recordings to meet certain technicai standards in order to achieve optimai
piayback quaiity. Pre-recorded DVDs are automaticaiiy set to these standards. There are many different types
of recordabie disc formats (inciuding CD-R containing MP3 or WMA fiies) and these require certain
pre-existing conditions (see above) to ensure compatibie piayback.
• Customers shouid note that permission is required in order to downioad MP3 / WMA fiies and music from the
internet. Our company has no right to grant such permission. Permission shouid aiways be sought from the
copyright owner.
Video CD (VCD) (8 cm /12 cm disc)
ViDEO CDs or CD-Rs/CD-RWs in ViDEO CD/Super ViDEO CD format
Audio CD (8 cm /12 cm disc)
Music CDs or CD-Rs/CD-RWs in music CD format that can be purchased
CD-R/CD-RW (8 cm /12 cm disc)
CD-R/CD-RW discs that contain audio tities, DivX, MP3, WMA, or JPEG fiies.
Regional Code
This unit has a regionai code printed on the rear of the unit. This unit can piay oniy DVD discs iabeiied same as
the rear of the unit or “ALL”.
Notes on Regional Codes
• Most DVD discs have a giobe with one or more numbers in it cieariy visibie on the cover. This number must
match your unit’s regionai code or the disc cannot piay.
• if you try to piay a DVD with a different regionai code from the unit, the message “incorrect region code. Can’t
piay back” appears on the TV screen.
Availability of copying or moving feature
From To MP3/WMA JPEG DivX Audio CD Video CD Titie*'
HDD Disc No No No No No
Disc HDD
*1 The titie is recorded from this unit.
Yes Yes Yes
No No
©
Yes
Yes

About the internal hard disk drive
The internal hard disk drive (HDD) is a fragile piece of
equipment. Please use the recorder following the
guidelines below to protect against possible HDD
failure.
We recommend that you back up your important
recordings onto DVD discs in order to protect against
accidental loss.
• Do not move the recorder while it is on.
• Install and use the recorder on a stable, level
surface.
• Do not block the rear vent/cooling fan.
• Do not use the recorder in excessively hot or humid
places, or in places that may be subject to sudden
changes in temperature. Sudden changes in
temperature can cause condensation to form inside
the recorder. This can be a cause of HDD failure.
• While the recorder is switched on, do not unplug
from the wall socket or switch the electricity off from
the breaker switch.
• Do not move the recorder immediately after
switching it off. If you need to move the recorder,
please follow the steps below:
1. After the message POWER OFF is shown in the
display, wait at least two minutes.
2. Unplug from the wall socket.
3. Move the recorder.
• If there’s a power failure while the recorder is on
there is a chance that some data on the HDD will
be lost.
• The HDD is very delicate. If used improperly or in
an unsuitable environment, it is possible that the
HDD will fail after a few years of use. Signs of
problems include playback unexpectedly freezing
and noticeable block noise (mosaic) in the picture.
However, sometimes there will be no warning signs
of HDD failure.
If the HDD fails, no playback of recorded material
will be possible. In this case it will be necessary to
replace the HDD unit.
Remote Control Operation
Point the Remote Control at the remote sensor and
press the buttons.
Caution
Do not mix old and new batteries. Never mix different
types of batteries (standard, alkaline, etc.).
Remote Control Battery Installation
Remove the battery cover on the
rear of the Remote Control, and
insert two R03 (size AAA)
batteries with O and O matched
correctly.
0

Front Panel
B B □ BQQQQEQ ED
VEK '--------------------------------------------------------------------------------------------------------------------1
<bP(
a
e
V
n (1) POWER
Switches the recorder ON or OFF.
B Disc Tray
Insert a disc here.
B Display window
Shows the current status of the recorder.
T/S: Indicates the timeshifting mode.
REC: The recorder is recording.
HDD: The recorder is HDD mode.
DVD: The recorder is DVD mode.
HDD ◄ ► DVD: The recorder is dubbing.
© : Indicates when the recorder is in timer
recording or a timer recording is programmed.
: Indicates clock, total playing
time, elapsed time, title number, chapter/track
number, channel, etc.
Q Remote Sensor
Point the recorder remote control here.
B ± (OPEN/CLOSE)
Opens or closes the disc tray.
□ HDD/DVD
Set the recorder’s mode to HDD or DVD.
r
---------------------------
-----------------
i-
^ (© ©
(
DV N VIDEO L(K )N№WDIO-R
,
; c ic
1
----
AV 12
------
1
j ®
ED ED
Q RESOLUTION
Sets the output resolution for HDMI and
COMPONENT OUTPUT jacks.
- HDMI: 5761, 576p, 720p, 10801
- COMPONENT: 5761, 576p
□ ► / II (PLAY / PAUSE)
Starts playback.
Pause playback or recording temporarily,
press again to exit pause mode.
□ ■ (STOP)
Stops playback or recording.
ED • (REC)
Starts recording. Press repeatedly to set the
recording time.
ED PROG. (T/A)
Scans up or down through memorized channels.
ED DV IN
Connect the DV output of a digital camcorder.
ED AV IN 2 (VIDEO IN/AUDIO IN (Left/RIght))
Connect the audio/video output of an external
source (Audio system, TV/ Monitor, VCR,
Camcorder, etc.).
▼ PnOQ. A
©
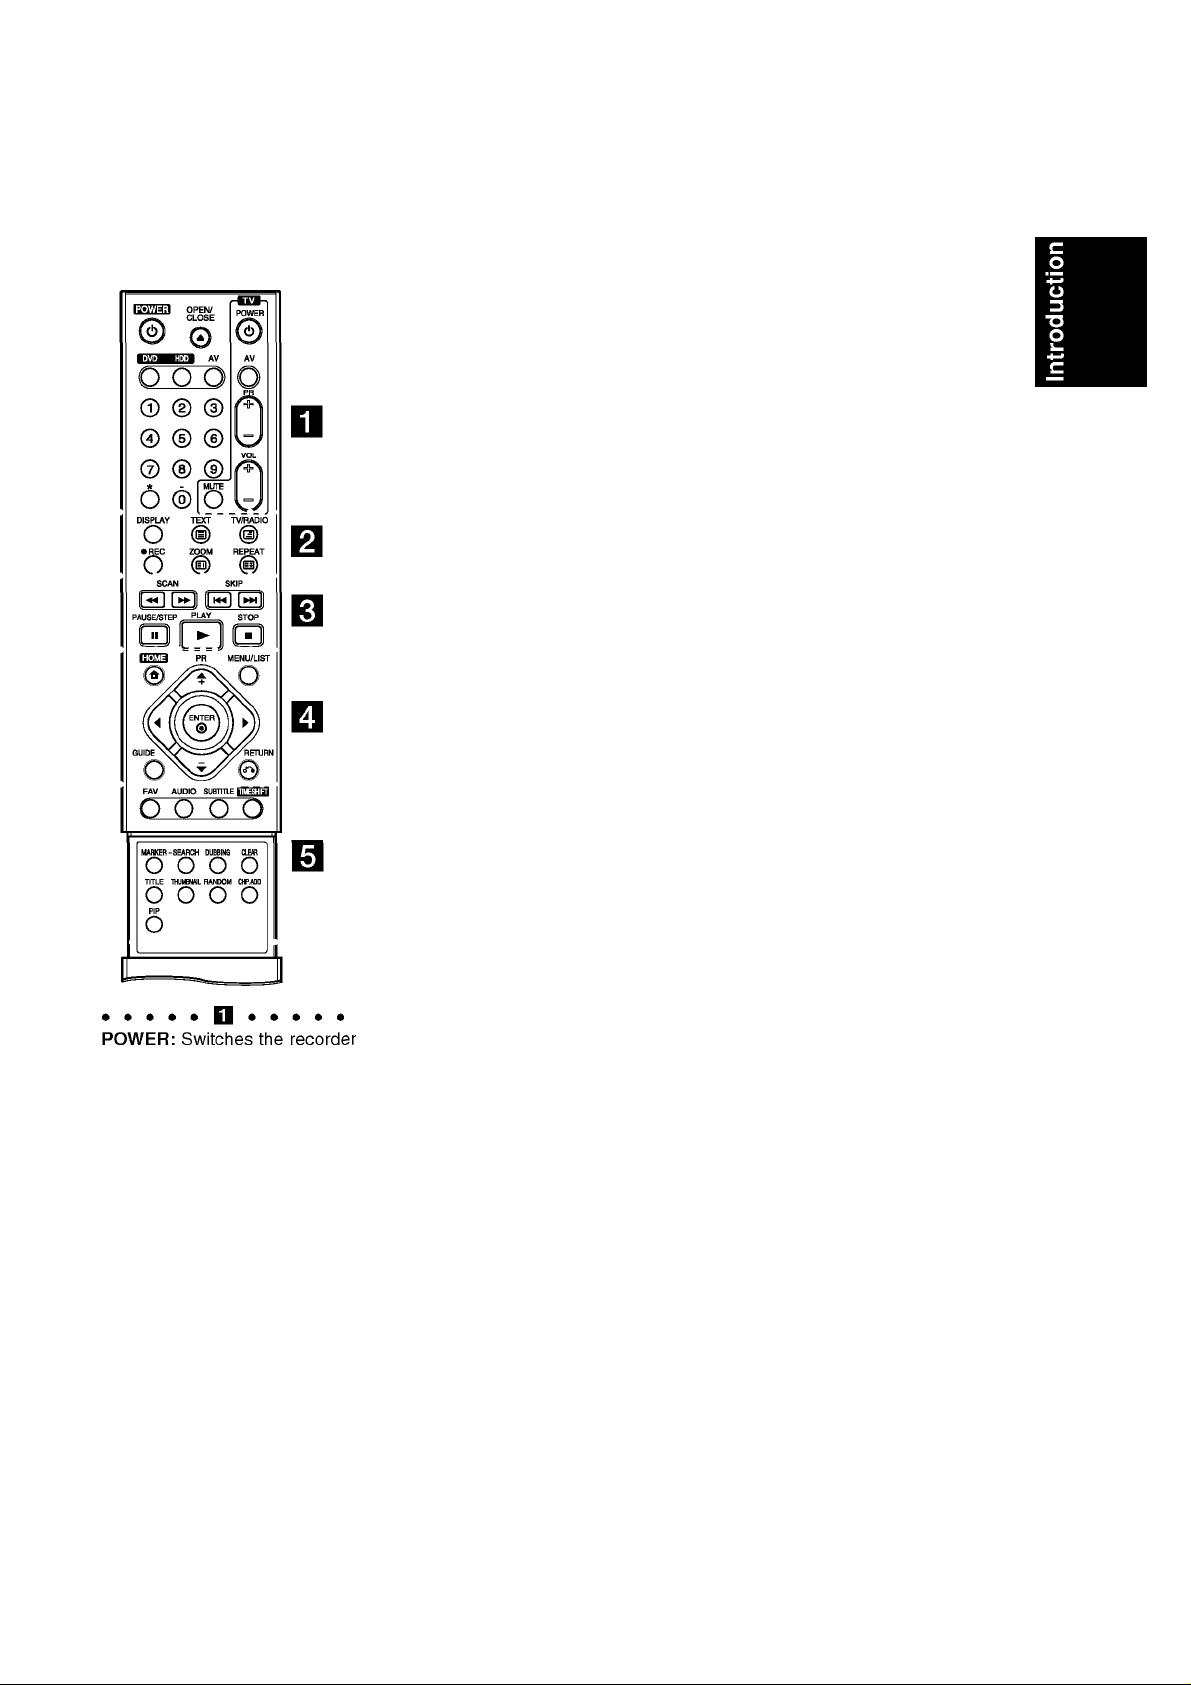
Remote Control
ON or OFF.
OPEN/CLOSE i±): Opens and
closes the disc tray.
DVD: Selects the unit’s function
mode to DVD.
HDD: Selects the unit’s function
mode to HDD.
AV: Changes the input to use for
recording (Tuner, AVI-2, or DV
IN).
0-9 numerical buttons: Selects
numbered options in a menu.
TV Control Buttons: See page
62.
DISPLAY: Accesses On-Screen
Display.
REC (•): Starts recording.
ZOOM: Enlarges video image.
REPEAT: Repeat chapter, track,
title, all.
TV/RADIO: Switches between TV
and Radio modes.
Teletext Buttons
- ID (INDEX): Moves to Index
screen. If Index page is not
present, moves to page 100.
- tD (TEXT): Switches between
teletext mode and normal TV
viewing.
- IS (FREEZE): Holds the teletext
display and stops the automatic
page change in the teletext
mode.
- (D (MIX): Selects the
background for teletext screen
(Opaque, User Transparency,
Transparency).
>>>>>RI>>>>>
SCAN (◄◄ / ►►): Search
backward or forward.
SKIP (!◄◄ / ►«): Go to next or
previous chapter or track.
PAUSE/STEP(II) : Pause
playback or recording temporarily.
PLAY (►): Starts playback.
STOP (■): Stops playback or
recording.
>>>>>H>>>>>
HOME: Accesses or removes the
HOME menu.
MENU/LIST: Accesses menu on a
DVD disc. Switches between Title
List-Original and Title List-Playlist
menu.
◄ / ► / A / T (left/rlght/up/down):
Selects an option in the menu.
ENTER (©): Acknowledges menu
selection.
PR (+/-): Scans up or down
through memorized channels.
GUIDE: Displays the Program
Guide.
RETURN (<Ti): Removes the
menu.
FAV: Changes to the favourite
program.
AUDIO: Selects an audio
language or audio channel.
SUBTITLE: Selects a subtitle
language.
TIMESHIFT: Activates pause live
TV/playback (timeshift) for a live
TV program.
MARKER: Marks any point during
playback.
SEARCH: Displays Marker Search
menu.
DUBBING: Copies DVD to HDD
(or HDD to DVD).
CLEAR: Removes a track number
on the Program List or a mark on
the Marker Search menu.
TITLE: Displays the disc’s Title
menu, if available.
THUMBNAIL: Selects a thumbnail
picture.
RANDOM: Plays tracks in random
order.
CHP. ADD: Inserts a chapter
marker when playing.
PIP: Selects PIP function on or off.
©
Hook-up and Settings
Rear Panel
B B □ B
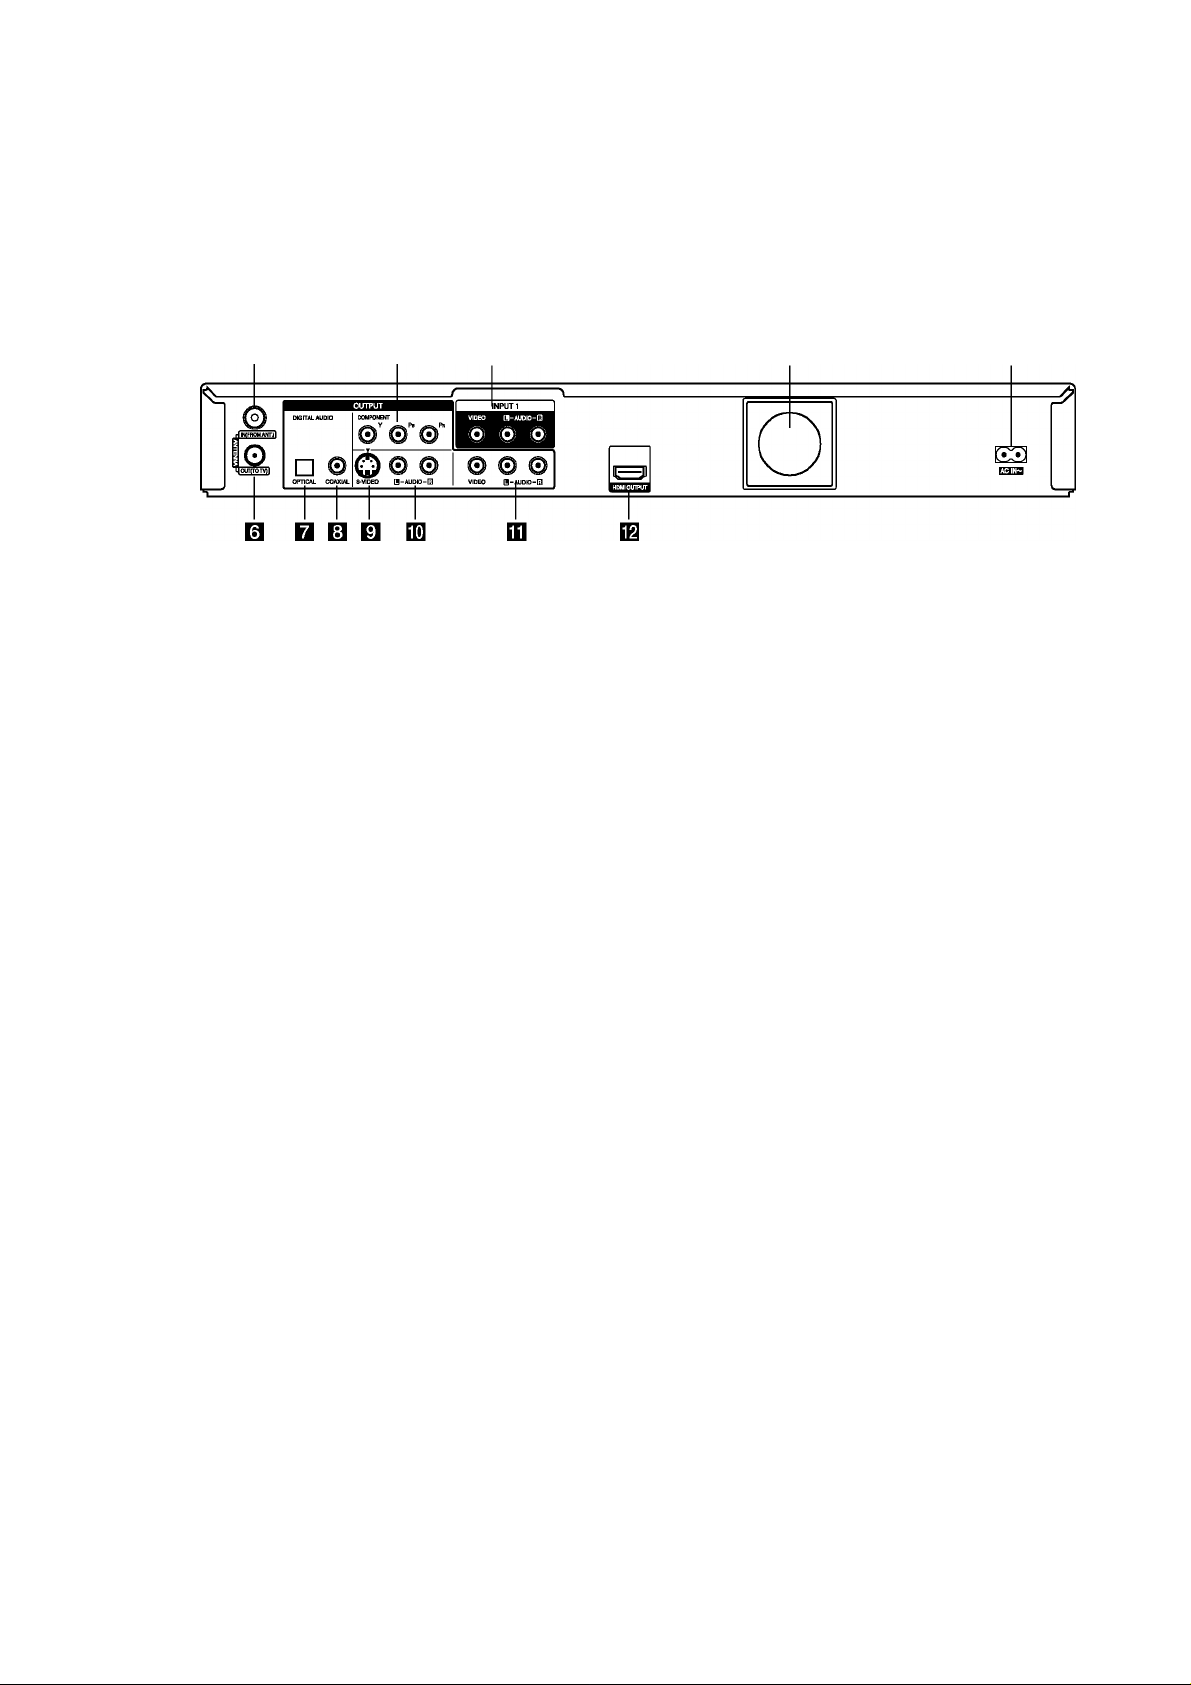
□ ANTENNA IN
Connect the antenna to this terminal.
B COMPONENT OUTPUT (Y Pb Pr)
Connect to a TV with Y Pb Pr inputs.
B INPUT 1 (VIDEO IN/AUDIO IN (Left/Right))
Connect the audio/video output of an external
source (Audio system, TV/ Monitor, VCR,
Camcorder, etc.).
Q Cooling fan
B AC IN ~
Plug into the power source.
□ ANTENNA OUT
Passes the signal from the ANTENNA IN to your
TV/monitor
Q OPTICAL (Digital audio out jack)
Connect to digital (optical) audio equipment.
Q COAXIAL (Digital audio out jack)
Connect to digital (coaxial) audio equipment.
□ S-VIDEO OUTPUT
Connect to a S-Video Input on TV.
EQ AUDIO OUTPUT (Left/Right)
Connect to a TV with audio inputs.
ED VIDEO / AUDIO OUTPUT (Left/Right)
Connect to a TV with video/audio inputs.
ED HDMI Connector (Type A)
HDMI output providing a high quality interface for
digital audio and video.
(5)
General about connection
Picture and sound
Digital TV is a transmission technology that replaces
the traditional analogue technique.
This means that several TV channels, radio channels
and other digital services can be transmitted on the
same space as just one channel took up before. As a
consumer you get access to many more channels and
services than before at the same time as they are
received with perfect picture and audio quality.
The recorder converts the digital signal into a format
that is suitable for your TV and sound system.
Connecting your recorder is just as simple as
connecting for example a video recorder. You get the
best picture quality by using a HDMI cable for
connection to your TV-set. The best audio experience
is obtained by connecting an optical cable to your
sound system.
Coverage
Before buying this product it is anticipated that you
have made sure that there are digital transmissions
covering your region.
Antenna / Signal source
Depending on the reception your recorder may be
connected to a simple indoor antenna or to an existing
outdoor antenna system. If you live in a flat you should
make sure that the digital terrestrial signals are
distributed to your wall antenna outlet. If you have
your own antenna system you must make sure that it
is equipped with antennas, filter and/or amplifier that
can handle those frequencies that the digital channels
are transmitted on.
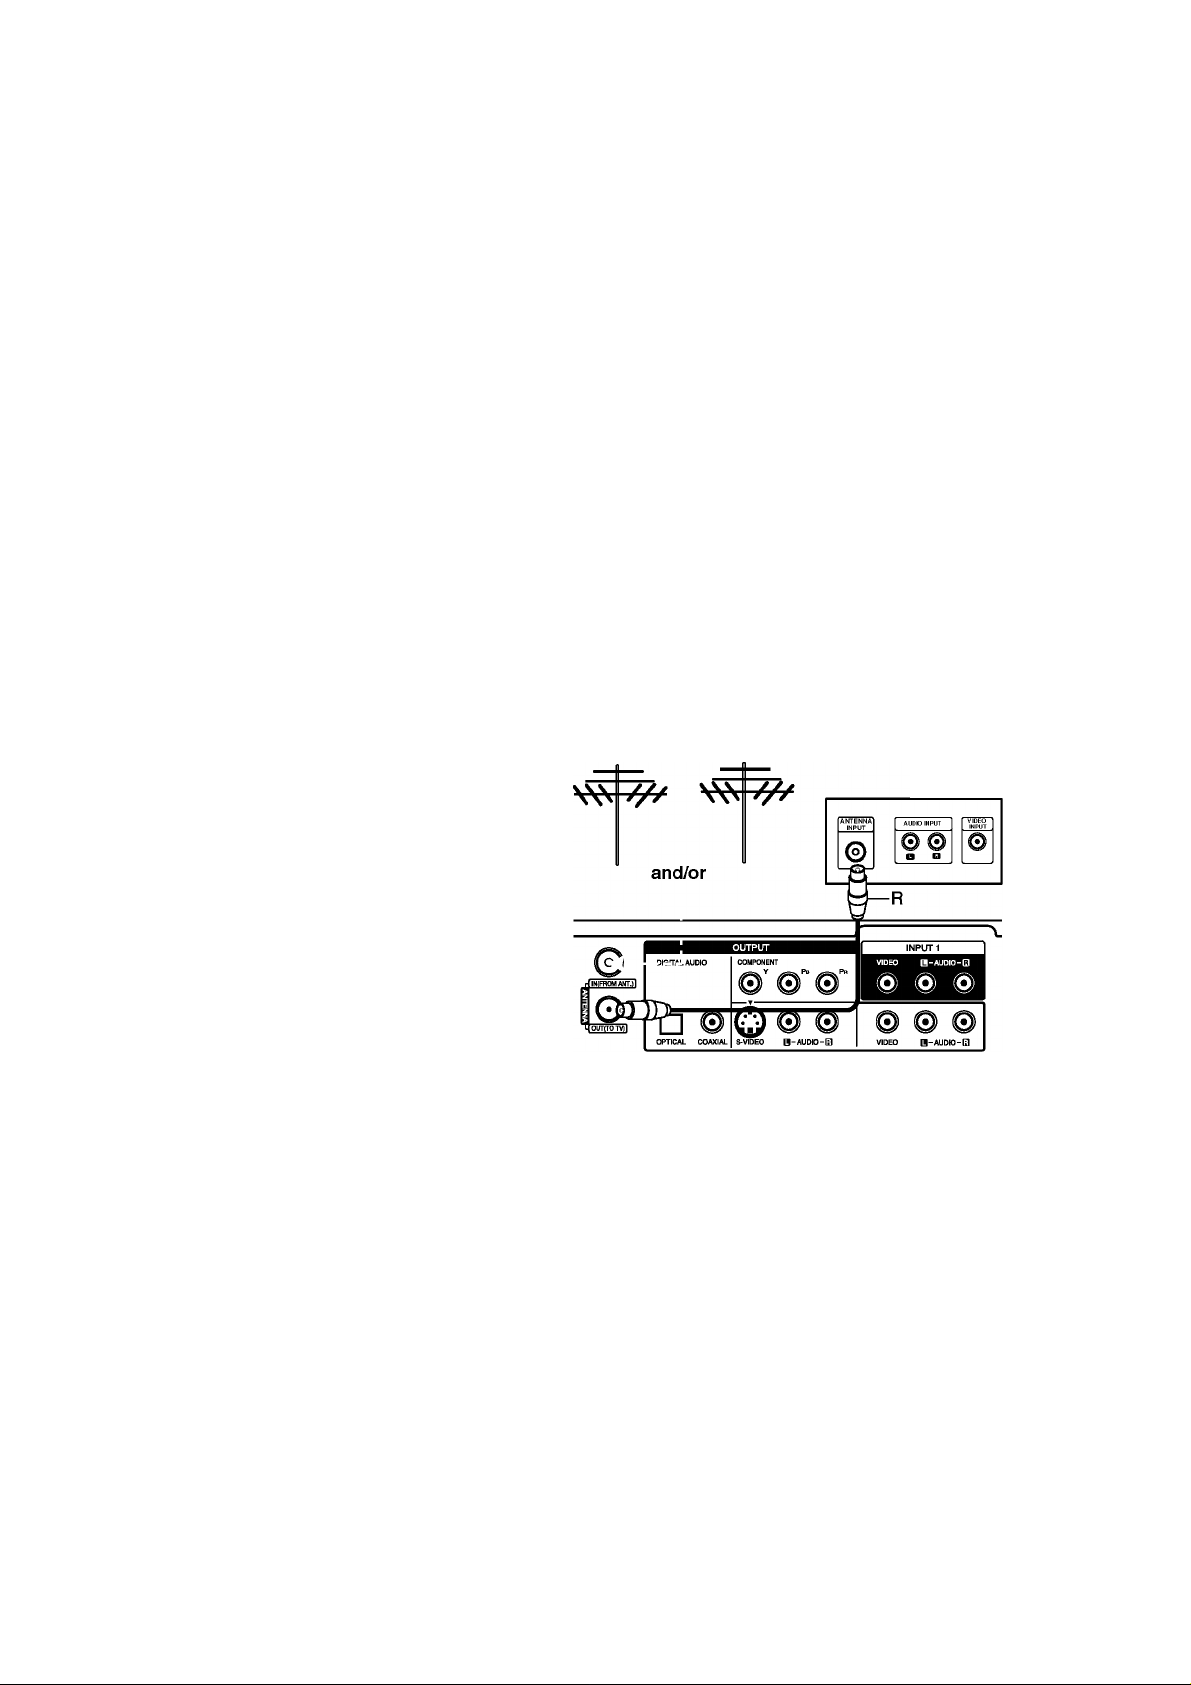
Connecting to the antenna
Remove the antenna cable plug from your TV set and
insert it into the antenna socket at the back of the
recorder. Plug one end of the antenna cable into the
TV socket on the recorder and the other end into the
antenna input socket on your TV set.
Caution
The ANTENNA IN jack supply the antenna feed (DC
5V/100mA) and the antenna feed is switch able via
setup menu. If your digital antenna is not an active
antenna, you must set the [Antenna feed 5V] option to
[OFF].
RF coaxial connection
Connect the ANTENNA OUT jack on the recorder to
the antenna input jack on the TV using the 75-ohm
Coaxial Cable supplied (R). The ANTENNA OUT jack
passes the signal through from the ANTENNA IN jack.
Antenna
(Digital)
Antenna
(Analogue)
Rear of TV
Cable-TV
Please observe that this recorder is not designed for
the reception of regular digital cable-TV signals (QAMsignal). Despite this, operators of smaller cable
networks may have chosen to distribute the digital
terrestrial signals (COFDM-signal) in the network. In
this case this recorder may well be used.
Check with your landlord if you are insecure about
what type of TV-signal that is provided in the wall
antenna outlet.
Rear of the recorder
©
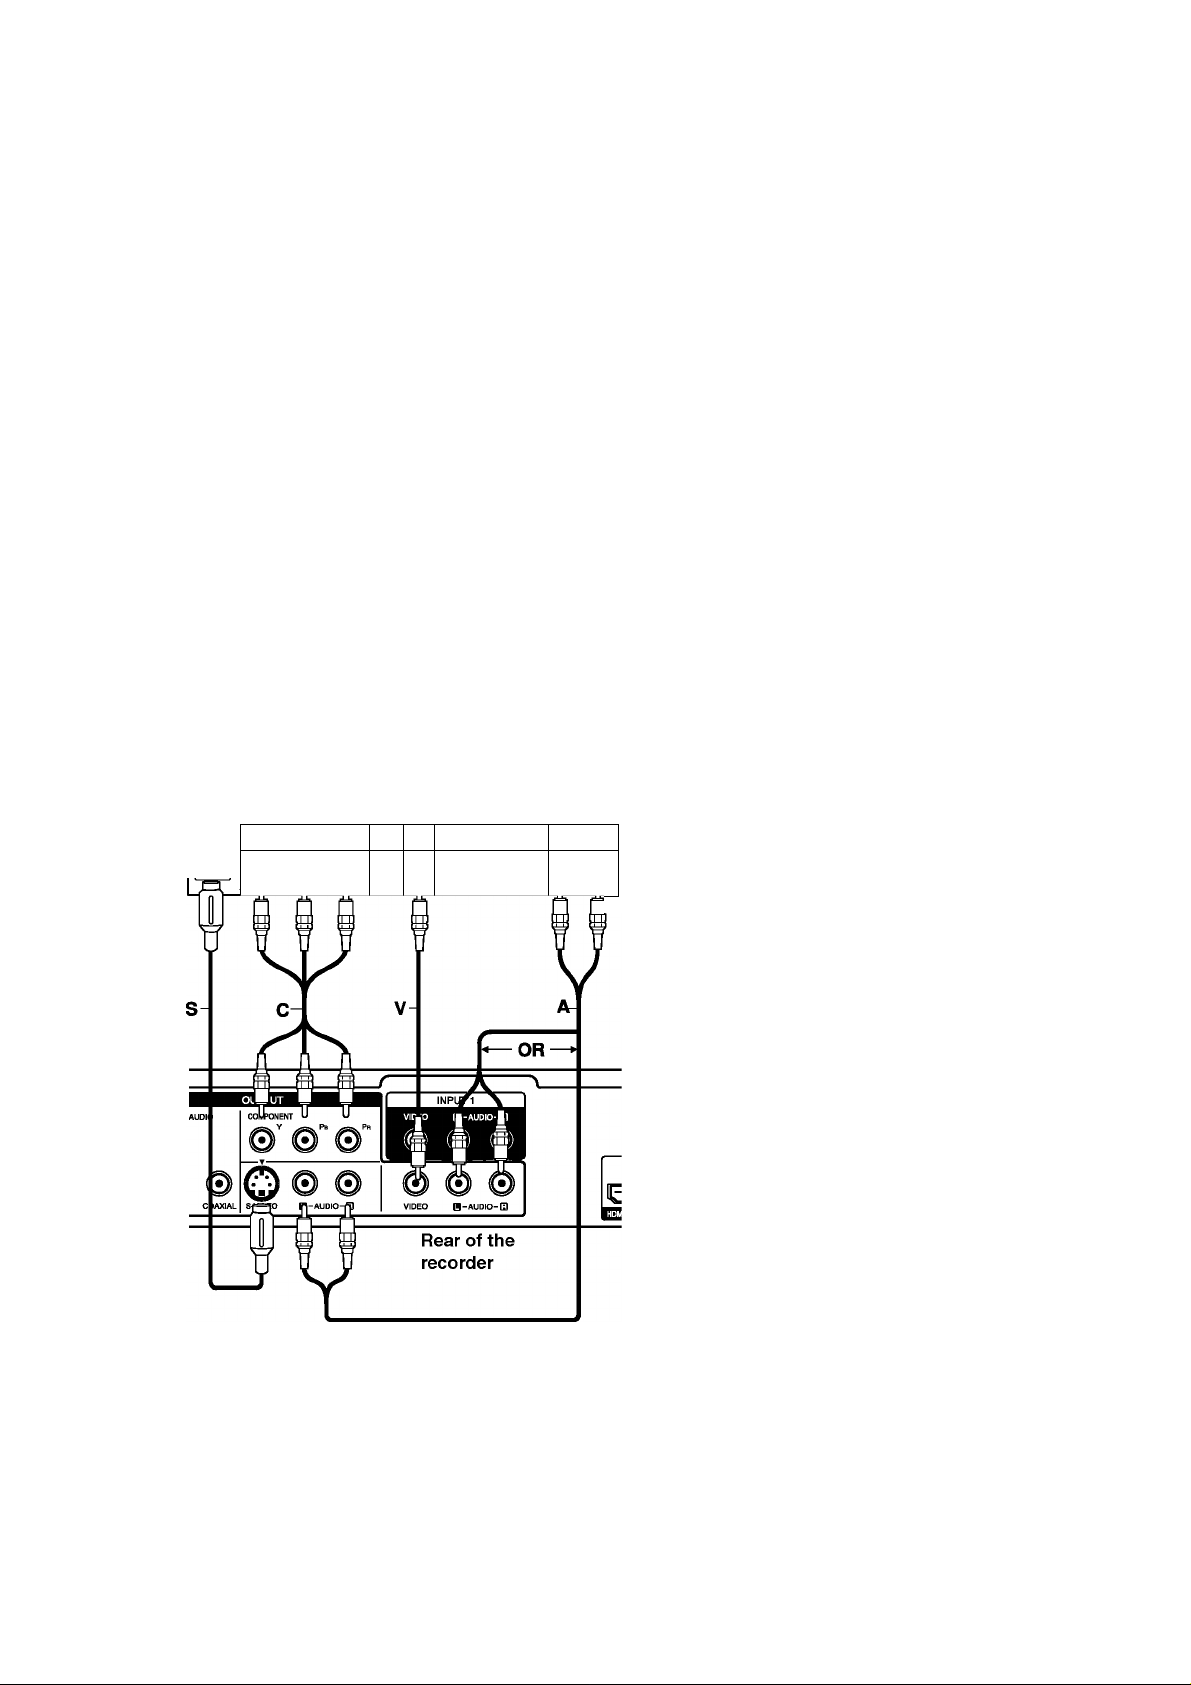
Connections to Your TV
Make one of the following connections, depending on
the capabilities of your existing equipment.
Tips
• Depending on your TV and other equipment you
wish to connect, there are various ways you could
connect the recorder. Use only one of the
connections described below.
• Please refer to the manuals of your TV, VCR,
Stereo System or other devices as necessary to
make the best connections.
Caution
- Make sure the recorder is connected directly to the
TV. Tune the TV to the correct video input channel.
- Do not connect the recorder’s AUDIO OUTPUT jack
to the phono in jack (record deck) of your audio
system.
- Do not connect your recorder via your VCR. The
DVD image could be distorted by the copy
protection system.
Rear of TV
COMPONENT VIDEO INPin*
l^p)
Y Pb Pr
VIDEO
© 0©
AUDIO INPUT
a o
Video connection
Connect the VIDEO OUT jack on the recorder to the
video in jack on the TV using the video cable (V).
S-Video connection
Connect the S-VIDEO OUTPUT jack on the recorder
to the S-Video in jack on the TV using the S-Video
cable (S).
Audio (Left/Right) Connection
Connect the left and right AUDIO OUTPUT jacks of
the recorder to the audio left and right IN jacks on the
TV using the audio cables
(A). Do not connect the
recorder’s AUDIO OUTPUT jack to the phono in jack
(record deck) of your audio system.
Component Video connection
Connect the COMPONENT OUTPUT jacks on the
recorder to the corresponding input jacks on the TV
using an Y Pb Pr cable (C).
If your television is a high-definition or “digital ready”
television, you may take advantage of the recorder’s
progressive scan output for the highest video
resolution possible. If your TV does not accept the
Progressive Scan format, the picture will appear
scrambled if you try Progressive Scan on the recorder.
• Set the resolution to 576p for progressive signal
using RES. button on the front panel.
Note:
Progressive scan does not work with the analogue
video connections (VIDEO OUTPUT and S-VIDEO
OUTPUT jacks).
112)
Caution:
If the resolution is set to 720p or 1080i, the VIDEO
OUTPUT, S-VIDEO OUTPUT and COMPONENT
OUTPUT connections are not available.
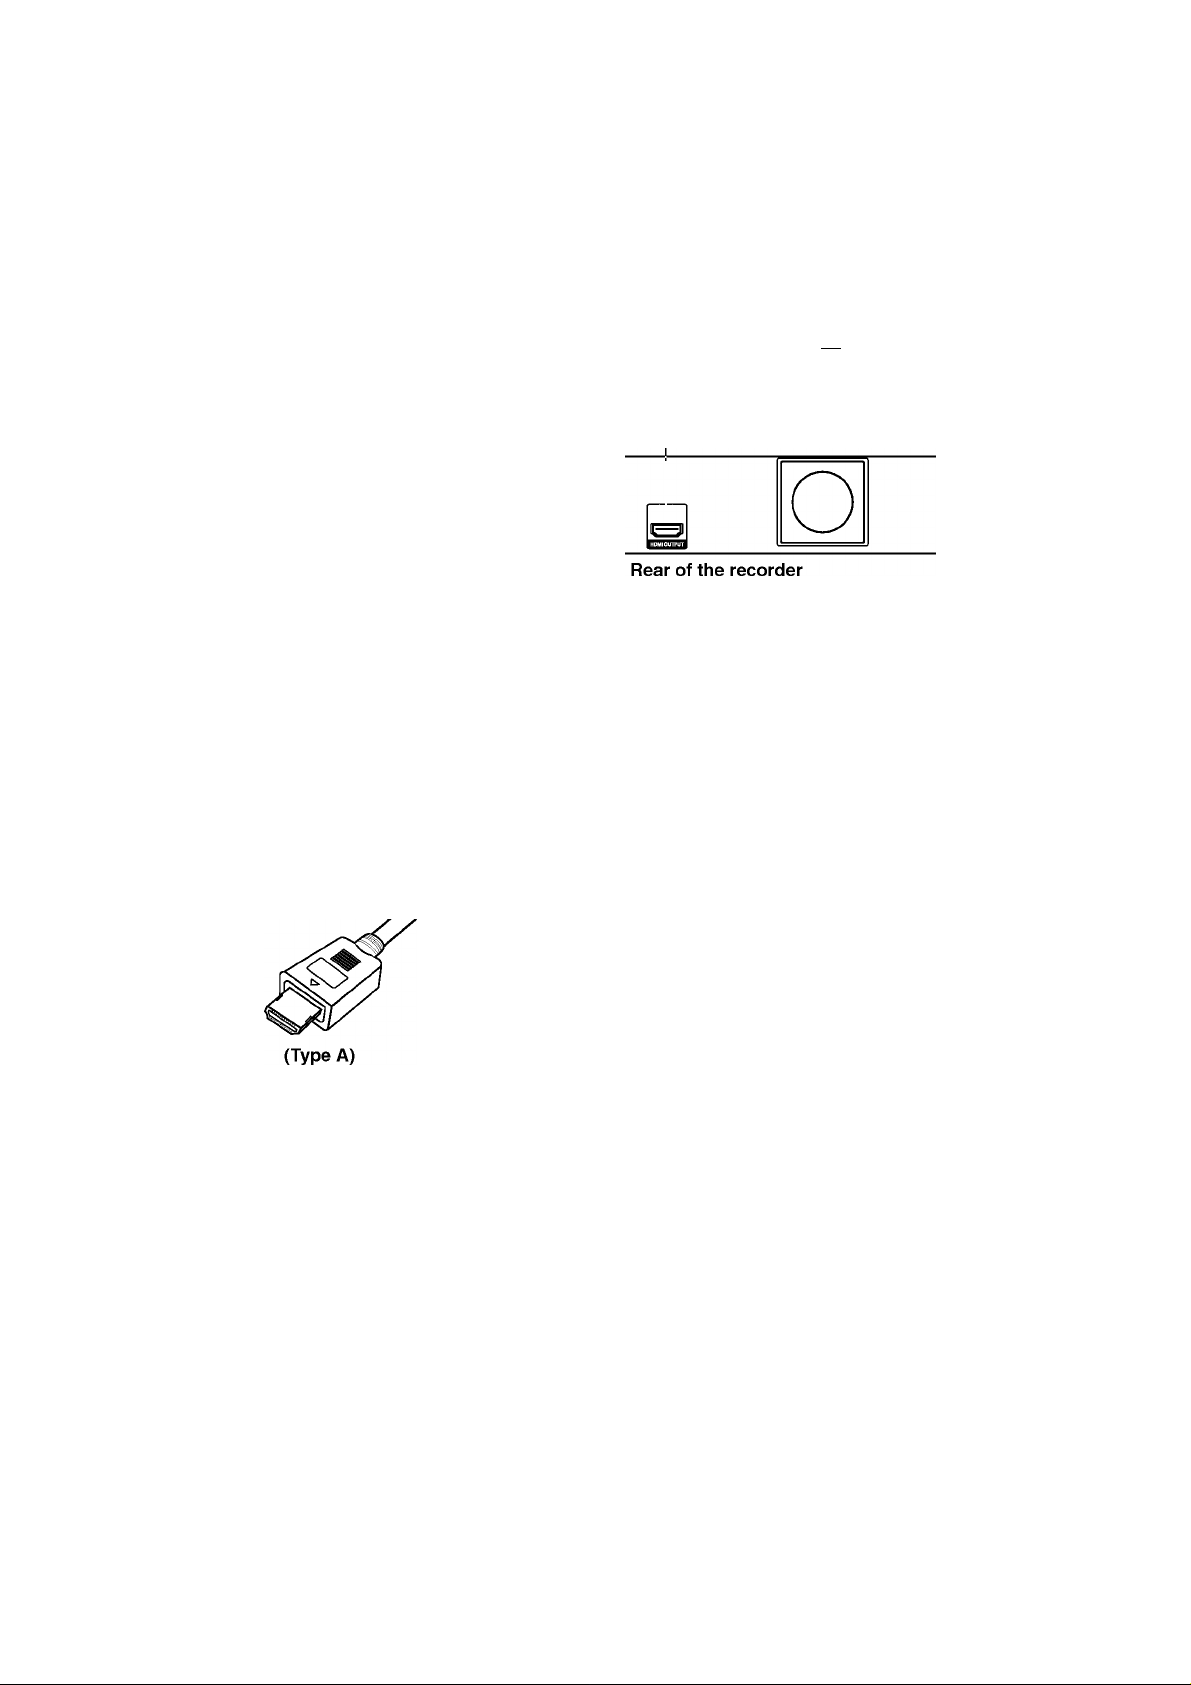
HDMI connection
If you have an HDMI TV or monitor, you can connect It
to this recorder using an HDMI cable.
1. Connect the HDMI OUTPUT jack on the recorder
to the HDMI INPUT jack on a HDMI compatible TV
or monitor (H).
2. Set the TV’s source to HDMI (refer to TV’s Owner’s
manual).
Notes:
• If your TV Is NOT capable of handling 96 kHz
sampling frequency, set the [Sampling Freq.j option
to [48 kHz] on the setup menu (See page 21).
When this choice Is made, this unit will
automatically convert any 96 kHz signals to 48 kHz
so your system can decode them.
• If your TV Is not equipped with Dolby Digital and
MPEG decoder, set the [Dolby Digital] and [MPEG]
options to [PCM] on the setup menu (See page 21).
• If your TV Is not equipped with DTS decoder, set
the [DTS] options to [OFF] on the setup menu (See
page 21). To enjoy DTS multi channel surround, you
must connect this recorder to a DTS compatible
receiver via one of this recorder’s digital audio
outputs.
• The arrow on the cable connector body should face
up for correct alignment with the connector on the
recorder.
HOMI***»
/' \
[Si
HDMI compatible TV
i~~r
About HDMI
HDMI (High Definition Multimedia Interface) supports
both video and audio on a single digital connection for
use with DVD Players, Set-Top Boxes, and other AV
devices.
HDMI was developed to provide the technologies of
HDCP (High Definition Contents Protection). HDCP Is
used to protect digital content transmitted and
received.
HDMI has the capability to support standard, enhanced,
or high-definitlon video plus standard to multi-channel
surround-sound audio, HDMI features Include
uncompressed digital video, a bandwidth of up to 5
gigabytes per second, one connector (Instead of several
cables and connectors), and communication between the
AV source and AV devices such as DTVs.
If there Is noise or lines on the screen, please check
the HDMI cable.
Tip:
When you use the HDMI connection, you can change
the resolution (5761, 576p, 720p, or 10801) for the
HDMI output using RES. button on the front panel.
Caution:
Changing the resolution when the recorder Is
connected with HDMI connector may result In
malfunctions. To solve the problem, turn off the
recorder and then turn It on again.
HDMI, the HDMI logo and High-Definition Multimedia
Interface are trademarks or registered trademarks of
HDMI licensing LLC.
Adclitionai Information for HDMI
• When you connect an HDMI or DVI compatible
device make sure of the followings:
- Try switching off the HDMI/DVI device and this
recorder. Next, switch on the HDMI/DVI device
and leave It for around 30 seconds, then switch
on this recorder.
- The connected device’s video Input Is set
correctly for this unit.
- The connected device Is compatible with
720(1440)x576l, 720x576p, 1280x720p, or
1920x10801 video Input.
• Not all HDCP-compatIble DVI devices will work with
this recorder.
- The picture will not be displayed properly with
non-HDCP device.
113)
 Loading...