

Page 1

HDD/DVD
RECORDER
OWNER’S MANUAL
MODEL: RH266
RH265
Before connecting, operating or adjusting this product,
please read this instruction booklet carefully and completely.
RH266.265SL_NA3FLL_ENG
Page 2
2
This lightning flash with arrowhead symbol within
an equilateral triangle is intended to alert the user
to the presence of uninsulated dangerous voltage
within the product’s enclosure that may be of
sufficient magnitude to constitute a risk of electric
shock to persons.
The exclamation point within an equilateral
triangle is intended to alert the user to the
presence of important operating and maintenance
(servicing) instructions in the literature
accompanying the product.
WARNING: Do not install this equipment in a confined space
such as a book case or similar unit.
CAUTION:
Do not block any ventilation openings. Install in accordance
with the manufacturer's instructions.
Slots and openings in the cabinet are provided for ventilation
and to ensure reliable operation of the product and to protect
it from over heating.
The openings should be never be blocked by placing the
product on a bed, sofa, rug or other similar surface.This
product should not be placed in a built-in installation such as
a bookcase or rack unless proper ventilation is provided or
the manufacturer's instruction have been adhered to.
CAUTION:
CLASS 3B VISIBLE AND INVISIBLE LASER RADIATION
WHEN OPEN AND INTERLOCKS DEFEATED AVOID
EXPOSURE TO THE BEAM.
CAUTION:
This product employs a Laser System.
To ensure proper use of this product, please read this
owner’s manual carefully and retain it for future reference.
Should the unit require maintenance, contact an authorized
service center.
Performing controls, adjustments, or carrying out procedures
other than those specified herein may result in hazardous
radiation exposure.
To prevent direct exposure to laser beam, do not try to open
the enclosure. Visible laser radiation when open. DO NOT
STARE INTO BEAM.
CAUTION: The apparatus should not be exposed to water
(dripping or splashing) and no objects filled with liquids, such
as vases, should be placed on the apparatus.
CAUTION concerning the Power Cord
Most appliances recommend they be placed upon a
dedicated circuit;
That is, a single outlet circuit which powers only that
appliance and has no additional outlets or branch circuits.
Check the specification page of this owner's manual to be
certain.
Do not overload wall outlets. Overloaded wall outlets, loose
or damaged wall outlets, extension cords, frayed power
cords, or damaged or cracked wire insulation are dangerous.
Any of these conditions could result in electric shock or fire.
Periodically examine the cord of your appliance, and if its
appearance indicates damage or deterioration, unplug it,
discontinue use of the appliance, and have the cord replaced
with an exact replacement part by an authorized servicer.
Protect the power cord from physical or mechanical abuse,
such as being twisted, kinked, pinched, closed in a door, or
walked upon. Pay particular attention to plugs, wall outlets,
and the point where the cord exits the appliance.
To disconnect power from the mains, pull out the mains cord
plug. When installing the product, ensure that the plug is
easily accessible.
Disposal of your old appliance
1. When this crossed-out wheeled bin symbol is
attached to a product it means the product is
covered by the European Directive 2002/96/EC.
2. All electrical and electronic products should be
disposed of separately from the municipal
waste stream via designated collection facilities
appointed by the government or the local
authorities.
3. The correct disposal of your old appliance will
help prevent potential negative consequences
for the environment and human health.
4. For more detailed information about disposal of
your old appliance, please contact your city
office, waste disposal service or the shop
where you purchased the product.
This product is manufactured to comply with
the EEC DIRECTIVE 89/336/EEC, 93/68/EEC
and 73/23/EEC.
CAUTION
RISK OF ELECTRIC SHOCK
DO NOT OPEN
WARNING: TO PREVENT FIRE OR ELECTRIC SHOCK
HAZARD, DO NOT EXPOSE THIS PRODUCT TO RAIN
OR MOISTURE.
CAUTION: TO REDUCE THE RISK
OF ELECTRIC SHOCK
DO NOT REMOVE COVER (OR BACK)
NO USER-SERVICEABLE PARTS INSIDE
REFER SERVICING TO QUALIFIED SERVICE
PERSONNEL
.
Page 3

3
Introduction
Contents
Introduction . . . . . . . . . . . . . . . . . . . . . . . . . . . . .4-9
About the symbol display . . . . . . . . . . . . . . . .4
Symbol Used in this Manual . . . . . . . . . . . . . . . .4
Notes on Discs . . . . . . . . . . . . . . . . . . . . . . . . . .4
Recordable and Playable Discs . . . . . . . . . . . . .5
Playable Discs . . . . . . . . . . . . . . . . . . . . . . . . . .6
Regional Code . . . . . . . . . . . . . . . . . . . . . . . . . .6
Availability of copying or moving feature . . . . . . .6
About the internal hard disk drive . . . . . . . . . . . .7
Front Panel . . . . . . . . . . . . . . . . . . . . . . . . . . . . .8
Remote Control . . . . . . . . . . . . . . . . . . . . . . . . .9
Remote Control Operation . . . . . . . . . . . . . . . . .9
Hookup and Settings . . . . . . . . . . . . . . . . . . .10-22
Rear Panel . . . . . . . . . . . . . . . . . . . . . . . . . . . .10
Connecting to the Antenna . . . . . . . . . . . . . . . .10
Connections to Your TV . . . . . . . . . . . . . . . . . .11
Connecting to an Amplifier . . . . . . . . . . . . . . . .12
Accessory Audio/Video (A/V) Connections . .13-14
Auto Setup . . . . . . . . . . . . . . . . . . . . . . . . . . . .14
Using the Home Menu . . . . . . . . . . . . . . . . . . .15
Initial Settings . . . . . . . . . . . . . . . . . . . . . . . . . .15
General Operation . . . . . . . . . . . . . . . . . . . .15
General Settings . . . . . . . . . . . . . . . . . . . . .15-18
Auto Programming . . . . . . . . . . . . . . . . . . .15
Program Edit . . . . . . . . . . . . . . . . . . . . . . . .16
Clock Set . . . . . . . . . . . . . . . . . . . . . . . . . .17
TV Aspect / AV2 Connection . . . . . . . . . . . .17
Video Output Format / Power Save Mode . .17
Progressive Scan . . . . . . . . . . . . . . . . . . . .17
Initialization . . . . . . . . . . . . . . . . . . . . . . . . .18
Language Settings . . . . . . . . . . . . . . . . . . . . . .18
Display Menu . . . . . . . . . . . . . . . . . . . . . . .18
Disc Menu/Audio/Subtitle . . . . . . . . . . . . . . .18
Audio Settings . . . . . . . . . . . . . . . . . . . . . . . . .18
Dolby Digital / DTS / MPEG . . . . . . . . . . . .18
Sampling Frequency . . . . . . . . . . . . . . . . . .18
DRC (Dynamic Range Control) . . . . . . . . . .18
Lock (Parental Control) Settings . . . . . . . . . . . .19
Rating / Set Password / Area Code . . . . . . .19
DivX Registration Code . . . . . . . . . . . . . . .19
Recording Settings . . . . . . . . . . . . . . . . . . . . . .20
Record Mode Set / Record Aspect . . . . . . . .20
Auto Chapter . . . . . . . . . . . . . . . . . . . . . . .20
Timeshift . . . . . . . . . . . . . . . . . . . . . . . . . . .20
Disc Settings . . . . . . . . . . . . . . . . . . . . . . . . . .21
Disc Format . . . . . . . . . . . . . . . . . . . . . . . .21
Finalize / Disc Label . . . . . . . . . . . . . . . . . .21
Disc Protect / PBC . . . . . . . . . . . . . . . . . . .21
General Explanation of On-Screen Display . . . .22
Playback . . . . . . . . . . . . . . . . . . . . . . . . . . . . .23-33
General Playback Features . . . . . . . . . . . . .23-26
Playing a DivX Movie File . . . . . . . . . . . . . . . . .27
Playing an Audio CD or MP3/WMA file . . . . . . .28
Program Playback with Audio CD and
MP3/WMA file . . . . . . . . . . . . . . . . . . . . . . . . . .29
Viewing a JPEG File . . . . . . . . . . . . . . . . . .30-31
Editing a MP3/WMA, JPEG, DivX file . . . . . .32-33
Recording . . . . . . . . . . . . . . . . . . . . . . . . . . . .34-39
About DVD recording . . . . . . . . . . . . . . . . . . . .34
About HDD recording . . . . . . . . . . . . . . . . . . . .34
Timeshift . . . . . . . . . . . . . . . . . . . . . . . . . . . . . .35
Basic Recording from a TV . . . . . . . . . . . . . . . .36
Instant Timer Recording . . . . . . . . . . . . . . . . . .36
Timer Recording . . . . . . . . . . . . . . . . . . . . . . . .37
Checking Timer Recording Details . . . . . . . . . .38
Recording from an External Input . . . . . . . . . . .38
Simultaneous recording and playback . . . . . . . .39
Playback another title during recording . . . .39
Time Slip . . . . . . . . . . . . . . . . . . . . . . . . . . .39
Editing . . . . . . . . . . . . . . . . . . . . . . . . . . . . . . .40-47
Title List and Chapter List Menu Overview . . . .40
HDD, VR Mode: Original and Playlist Editing . . .41
Adding Chapter Markers . . . . . . . . . . . . . . . . .41
Changing the Title Thumbnails . . . . . . . . . . . . .41
Making a New Playlist . . . . . . . . . . . . . . . . . . . .42
Adding Additional Title/Chapters to the Playlist .42
Deleting an Original or Playlist Title/Chapter . . .43
Deleting a Part . . . . . . . . . . . . . . . . . . . . . . . . .43
Naming a Title . . . . . . . . . . . . . . . . . . . . . . . . .44
Time Search . . . . . . . . . . . . . . . . . . . . . . . . . .44
Sorting the Title List . . . . . . . . . . . . . . . . . . . . .45
Combining Two Titles Into One . . . . . . . . . . . . .45
Divide One Title Into Two . . . . . . . . . . . . . . . . .45
Combining Two Chapters Into One . . . . . . . . . .46
Additional functions for the recordable
DVD discs . . . . . . . . . . . . . . . . . . . . . . . . . . . .46
Moving a Playlist Chapter . . . . . . . . . . . . . . . . .47
Hide a Chapter/Title . . . . . . . . . . . . . . . . . . . . .47
Protect a Title . . . . . . . . . . . . . . . . . . . . . . . . . .47
Dubbing . . . . . . . . . . . . . . . . . . . . . . . . . . . . . .48-50
Before Dubbing . . . . . . . . . . . . . . . . . . . . . . . . .48
Dubbing from HDD to DVD . . . . . . . . . . . . . . .49
Dubbing from DVD to HDD . . . . . . . . . . . . . . . .49
One Touch Copy (HDD to DVD) . . . . . . . . . . . .50
One Touch Copy (DVD to HDD) . . . . . . . . . . . .50
Reference . . . . . . . . . . . . . . . . . . . . . . . . . . . .51-56
Additional Information . . . . . . . . . . . . . . . . . . . .51
Viewing Title List menu displayed on other
DVD Recorders or Players . . . . . . . . . . . . .51
Playing Your Recordings on Other DVD
Players (Finalizing a Disc) . . . . . . . . . . . . . .51
Language Codes . . . . . . . . . . . . . . . . . . . . . . .52
Area Codes . . . . . . . . . . . . . . . . . . . . . . . . . . .52
Controlling Your TV with the Supplied
Remote Control . . . . . . . . . . . . . . . . . . . . . . . .53
Troubleshooting . . . . . . . . . . . . . . . . . . . . . .54-55
Specifications . . . . . . . . . . . . . . . . . . . . . . . . . .56
Page 4
4
Introduction
To ensure proper use of this product, please read this
owner’s manual carefully and retain for future
reference.
This manual provides information on the operation
and maintenance of your recorder. Should the unit
require service, contact an authorized service location.
About the Symbol Display
“ ” may appear on your TV display during
operation and indicates that the function explained in
this owner’s manual is not available on that specific
media.
Symbol Used in this Manual
Note:
Indicates special notes and operating features.
Tip:
Indicates tips and hints for making the task easier.
A section whose title has one of the following symbols
are applicable only to the disc represented by the
symbol.
Titles recorded on the HDD
All DVD discs listed below.
DVD-RW with VR recording mode
DVD-RW with Video recording mode
DVD+RW disc
DVD-R disc
DVD+R disc
DVD-Video disc
Video CDs
Audio CDs
DivX files
MP3 files
WMA files
JPEG files
Notes on Discs
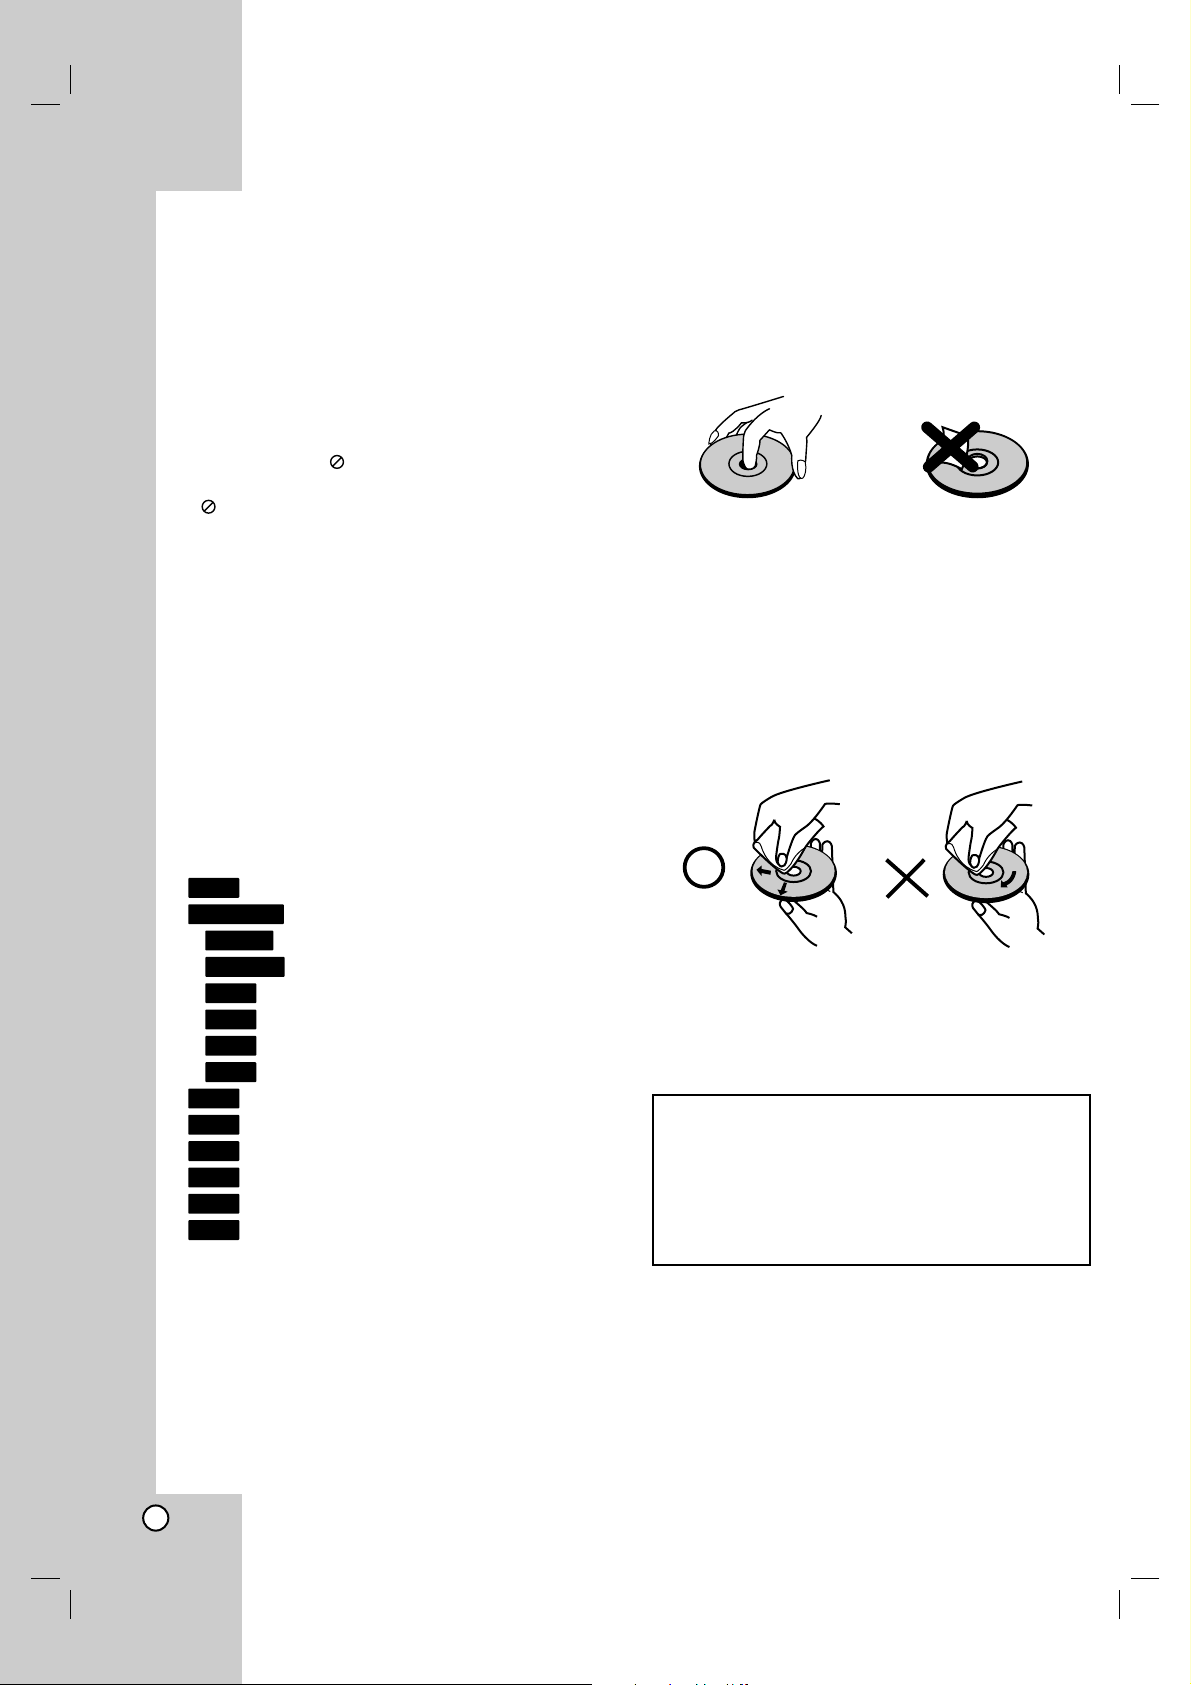
Handling Discs
Do not touch the playback side of the disc. Hold the
disc by the edges so that fingerprints do not get on
the surface. Never stick paper or tape on the disc.
Storing Discs
After playing, store the disc in its case. Do not expose
the disc to direct sunlight or sources of heat and never
leave it in a parked car exposed to direct sunlight.
Cleaning Discs
Fingerprints and dust on the disc can cause poor
picture quality and sound distortion. Before playing,
clean the disc with a clean cloth. Wipe the disc from
the center out.
Do not use strong solvents such as alcohol, benzine,
thinner, commercially available cleaners, or anti-static
spray intended for older vinyl records.
JPEG
WMA
MP3
DivX
ACD
VCD
DVD
+R
-R
+RW
-RW
Video
-RW
VR
DVD ALL
HDD
Moisture Condensation
Never operate this product immediately after
moving it from a cold location to a warm location.
Leave it for two or three hours without operating it.
If you use this product in such a situation, it may
damage discs and internal parts.
Page 5
5
Introduction
Recordable and Playable Discs
DVD-RW (Digital Video Disc - ReWritable):
DVD-RW discs can be formatted for VR mode recording or Video mode recording.
These Discs can be recorded on repeatedly. Recordings can be erased, then you can record again
on the same Disc.
[VR mode]
Recordings can be extensively edited
Playable only on VR mode compatible players (after finalization)
[Video mode]
Playable on regular DVD players (after finalization)
Limited editing features
DVD-R (Digital Video Disc - Recordable)
These Discs can be recorded only once. After you finalize a DVD-R, you cannot record on it or edit
it.
DVD-R discs can be only formatted to Video mode.
Playable on regular DVD players (after finalization)
Limited editing features
DVD+RW (Digital Video Disc + ReWritable)
These Discs can be recorded on repeatedly. Recordings can be erased, then you can record again
on the same Disc.
Playable on DVD+RW compatible players (automatically finalization)
The edited contents are playable on DVD+RW compatible players only after finalization
Recordings can be edited the title/chapter
DVD+R (Digital Video Disc + Recordable)
These Discs can be recorded only once. After you finalize a DVD+R, you cannot record on it or edit
it any more.
Playable on DVD+R compatible players (after finalization)
Any edited contents are not be compatible on DVD+R compatible players. (Hide, chapter combine,
added chapter mark, etc.)
Limited title/chapter editing features.
Recommended recordable DVD discs
DVD-R DVD+R DVD-RW DVD+RW
Mitsubishi (8x, 16x) Mitsubishi (8x, 16x) Mitsubishi (4x) Mitsubishi (4x)
That’s (8x, 16x) Ricoh (8x, 16x) Verbatim (4x) SONY (2.4x)
SONY (16x) SONY (16x) JVC (4x) Verbatim (2.4x)
--Victor (4x) Ricoh (2.4x, 4x)
--Maxell (4x) -
Page 6

6
Playable Discs
DVD (8 cm / 12 cm disc)
Discs such as movies that can be purchased or rented
Video CD (VCD) (8 cm / 12 cm disc)
VIDEO CDs or CD-Rs/CD-RWs in VIDEO CD/Super VIDEO CD format
Audio CD (8 cm / 12 cm disc)
Music CDs or CD-Rs/CD-RWs in music CD format that can be purchased
CD-R/CD-RW (8 cm / 12 cm disc)
CD-R/CD-RW discs that contain audio titles, DivX, MP3, WMA, or JPEG files.
Notes:
Depending on the conditions of the recording equipment or the CD-R/RW (or DVD±R/RW) disc itself, some
CD-R/RW (or DVD±R/RW) discs cannot be played on the unit.
Do not attach any seal or label to either side (the labeled side or the recorded side) of a disc.
Do not use irregularly shaped CDs (e.g., heart-shaped or octagonal). Doing so may result in malfunctions.
Depending on the recording software & the finalization, some recorded discs (CD-R/RW or DVD±R/RW) may
not be playable.
DVD-R/RW, DVD+R/RW and CD-R/RW discs recorded using a personal computer or a DVD or CD Recorder
may not play if the disc is damaged or dirty, or if there is dirt or condensation on the Recorder’s lens.
If you record a disc using a personal computer, even if it is recorded in a compatible format, there are cases
in which it may not play because of the settings of the application software used to create the disc. (Check
with the software publisher for more detailed information.)
This recorder requires discs and recordings to meet certain technical standards in order to achieve optimal
playback quality. Pre-recorded DVDs are automatically set to these standards. There are many different types
of recordable disc formats (including CD-R containing MP3 or WMA files) and these require certain preexisting conditions (see above) to ensure compatible playback.
Customers should note that permission is required in order to download MP3 / WMA files and music from the
Internet. Our company has no right to grant such permission. Permission should always be sought from the
copyright owner.
Regional Code
This unit has a regional code printed on the rear of the unit. This unit can play only DVD discs labeled same as
the rear of the unit or “ALL”.
Notes on Regional Codes
Most DVD discs have a globe with one or more numbers in it clearly visible on the cover. This number must
match your unit’s regional code or the disc cannot play.
If you try to play a DVD with a different regional code from the unit, the message “Incorrect region code. Can’t
play back” appears on the TV screen.
Availability of copying or moving feature
From To MP3/WMA JPEG DivX Audio CD Video CD Title*
1
HDD DISC No No No No No Yes
DISC HDD Yes Yes Yes No No Yes
*1 The title is recorded from this unit.
Page 7

7
Introduction
About the internal hard disk
drive
The internal hard disk drive (HDD) is a fragile piece of
equipment. Please use the recorder following the
guidelines below to protect against possible HDD
failure.
We recommend that you back up your important
recordings onto DVD discs in order to protect against
accidental loss.
Do not move the recorder while it is on.
Install and use the recorder on a stable, level
surface.
Do not block the rear vent/cooling fan.
Do not use the recorder in excessively hot or humid
places, or in places that may be subject to sudden
changes in temperature. Sudden changes in
temperature can cause condensation to form inside
the recorder. This can be a cause of HDD failure.
While the recorder is switched on, do not unplug
from the wall socket or switch the electricity off from
the breaker switch.
Do not move the recorder immediately after
switching it off. If you need to move the recorder,
please follow the steps below:
1. After the message POWER OFF is shown in the
display, wait at least two minutes.
2. Unplug from the wall socket.
3. Move the recorder.
If there’s a power failure while the recorder is on
there is a chance that some data on the HDD will
be lost.
The HDD is very delicate. If used improperly or in
an unsuitable environment, it is possible that the
HDD will fail after a few years of use. Signs of
problems include playback unexpectedly freezing
and noticeable block noise (mosaic) in the picture.
However, sometimes there will be no warning signs
of HDD failure.
If the HDD fails, no playback of recorded material
will be possible. In this case it will be necessary to
replace the HDD unit.
Page 8

8
a
11
/ I (POWER button)
Switches the recorder ON or OFF.
b Disc Tray
Insert a disc here.
c Display window
Shows the current status of the recorder.
T/S: Indicates the timeshifting mode.
REC: The recorder is recording.
HDD: The recorder is HDD mode.
DVD: The recorder is DVD mode.
HDD bBDVD: The recorder is dubbing.
TV: Indicates when the recorder is in TV tuner
mode.
: Indicates when the recorder is in timer
recording or a timer recording is programmed.
: Shows the current status of the recorder
(clock, program number, etc).
d Remote Sensor
Point the recorder remote control here.
e AV IN 3 (VIDEO IN/AUDIO IN (Left/Right))
Connect the audio/video output of an external
source (Audio system, TV/ Monitor, VCR,
Camcorder, etc.).
f Z (OPEN/CLOSE)
Opens or closes the disc tray.
g N (PLAY)
Starts playback.
h z (REC)
Starts recording. Press repeatedly to set the
recording time.
Front Panel
abcdefgh
Page 9

9
Introduction
a
POWER: Switches the recorder
ON or OFF.
OPEN/CLOSE (Z): Opens and
closes the disc tray.
DVD: Selects the unit’s function
mode to DVD.
HDD: Selects the unit’s function
mode to HDD.
AV/INPUT: Changes the input to
use for recording (Tuner, AV1-3).
0-9 numerical buttons: Selects
numbered options in a menu.
DUBBING: Copies DVD to HDD
(or HDD to DVD).
TV Control Buttons: See page
53.
b
SCAN (m / M): Search
backward or forward.
SKIP (. / >): Go to next or
previous chapter or track.
PAUSE/STEP (X) : Pause
playback or recording temporarily.
PLAY (N): Starts playback.
STOP (x): Stops playback or
recording.
c
HOME: Accesses or removes the
HOME menu.
MENU/LIST: Accesses menu on a
DVD disc. Switches between Title
List-Original and Title List-Playlist
menu.
b / B / v / V (left/right/up/down):
Selects an option in the menu.
ENTER ( ): Acknowledges menu
selection.
PR/CH (+/-): Scans up or down
through memorized channels.
DISPLAY: Accesses On-Screen
Display.
RETURN (O): Removes the
menu.
TIMESHIFT: Activates pause live
TV/playback (timeshift) for a live
TV program.
AUDIO ( ): Selects an audio
language or audio channel.
SUBTITLE ( ): Selects a subtitle
language.
CHP. ADD: Inserts a chapter
marker when playing.
d
REC (z): Starts recording.
REC MODE: Selects the recording
mode.
TITLE: Displays the disc’s Title
menu, if available.
THUMBNAIL: Selects a thumbnail
picture.
ZOOM: Enlarges video image.
MARKER: Marks any point during
playback.
SEARCH: Displays Marker Search
menu.
CLEAR: Removes a track number
on the Program List or a mark on
the Marker Search menu.
REPEAT: Repeat chapter, track,
title, all.
A-B: Repeat sequence.
TV/DVD: To view channels
selected by the recorder tuner or
by the TV tuner.
*
These buttons are not available
for this recorder.
Remote Control
Remote Control Operation
Point the Remote Control at the remote sensor and
press the buttons.
Caution
Do not mix old and new batteries. Never mix different
types of batteries (standard, alkaline, etc.).
Remote Control Battery Installation
Remove the battery cover on the
rear of the Remote Control, and
insert two R03 (size AAA)
batteries with and matched
correctly.
a
b
c
d
Page 10

10
Connecting to the antenna
Remove the antenna cable plug from your TV set and
insert it into the antenna socket at the back of the
recorder. Plug one end of the antenna cable into the
TV socket on the recorder and the other end into the
antenna input socket on your TV set.
RF coaxial connection
Connect the ANTENNA OUT jack on the recorder to
the antenna input jack on the TV using the 75-ohm
Coaxial Cable supplied (R). The ANTENNA OUT jack
passes the signal through from the ANTENNA IN jack.
a ANTENNA IN
Connect the antenna to this terminal.
b COMPONENT OUTPUT (Y P
B PR)
Connect to a TV with Y P
B PR inputs.
c AV 2 DECODER SCART jack
Connect the audio/video output of an external
source (Pay-TV decoder, Set Top Box, VCR, etc.).
d Cooling fan
e AC Power Cord
Plug into the power source.
f ANTENNA OUT
Passes the signal from the ANTENNA IN jack to
your TV/monitor.
g COAXIAL (Digital audio output jack)
Connect to digital (coaxial) audio equipment.
h AUDIO OUTPUT (Left/Right)
Connect to a TV with audio inputs.
i AV 1 SCART jack
Connect to a TV with SCART jack.
Rear Panel
Hookup and Settings
abc d e
fgh i
Aerial
ANTENNA
INPUT
SCART INPUT
R
Rear of TV
AUDIO INPUT
R
L
VIDEO
INPUT
Rear of the recorder
Page 11

11
Hookup and
Settings
Connections to Your TV
Make one of the following connections, depending
on the capabilities of your existing equipment.
When using the COMPONENT OUTPUT jacks, set
the Video Output Format option in the setup menu
to YP
BP
R. When using the SCART jack, set the
Video Output Format option in the setup menu to
RGB.
Tips
Depending on your TV and other equipment you
wish to connect, there are various ways you could
connect the recorder. Use only one of the
connections described below.
Please refer to the manuals of your TV, VCR,
Stereo System or other devices as necessary to
make the best connections.
Caution
– Make sure the recorder is connected directly to the
TV. Tune the TV to the correct video input channel.
– Do not connect the recorder’s AUDIO OUTPUT jack
to the phono in jack (record deck) of your audio
system.
– Do not connect your recorder via your VCR. The
DVD image could be distorted by the copy
protection system.
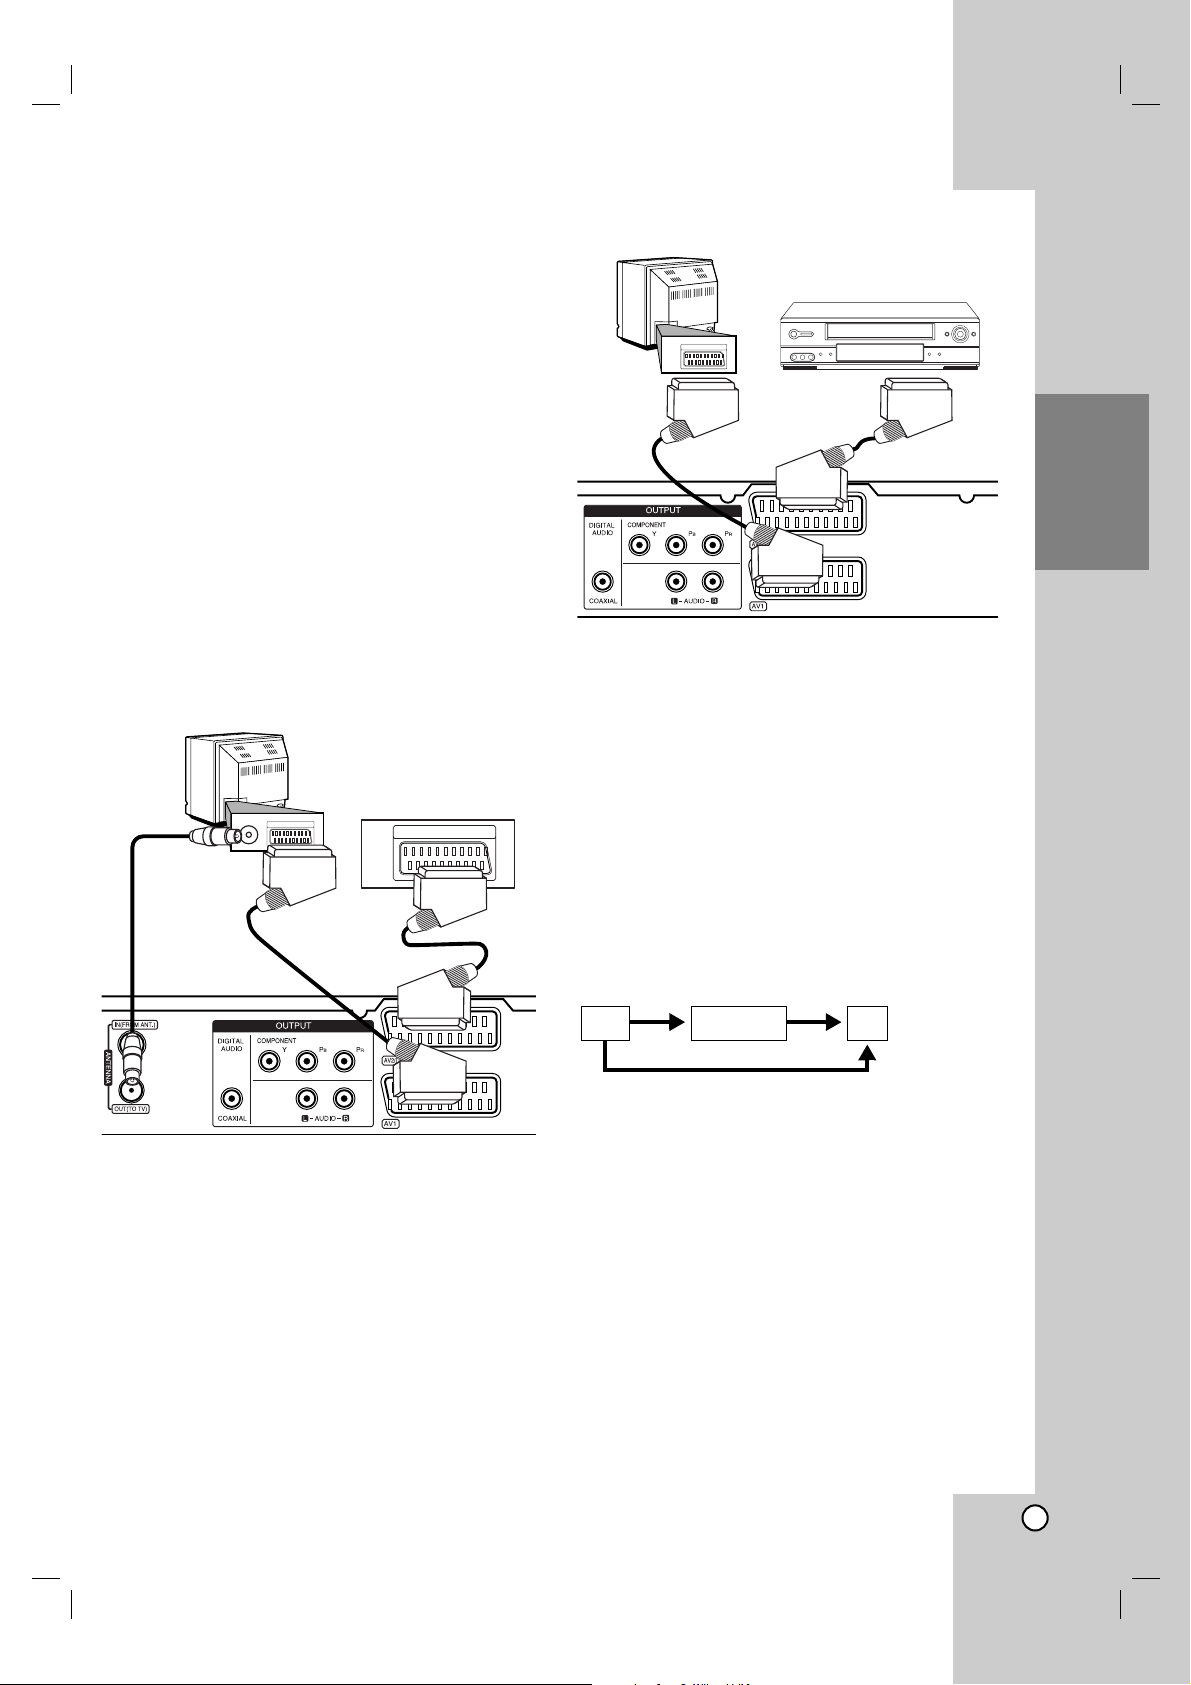
SCART connection
Connect the AV1 SCART jack on the recorder to the
corresponding in jacks on the TV using the scart cable
(T).
Audio (Left/Right) Connection
Connect the left and right AUDIO OUTPUT jacks of
the recorder to the audio left and right IN jacks on the
TV using the audio cables (A). Do not connect the
recorder’s AUDIO OUTPUT jack to the phono in jack
(record deck) of your audio system.
Component Video connection
Connect the COMPONENT OUTPUT jacks on the
recorder to the corresponding input jacks on the TV
using an Y P
B PR cable (C).
If your television is a high-definition or “digital ready”
television, you may take advantage of the recorder’s
progressive scan output for the highest video
resolution possible. If your TV does not accept the
Progressive Scan format, the picture will appear
scrambled if you try Progressive Scan on the recorder.
Set the Progressive Scan to [ON] on the setup
menu for progressive signal, see page 17.
Caution
Once the setting for Progressive Scan output is
entered, an image will only be visible on a
Progressive Scan compatible TV or monitor. If you set
Progressive Scan to [ON] in error, you must reset the
recorder. First, remove the disc in the recorder. Next,
press STOP (x) and hold it for five seconds before
releasing it. The video output will be restored to the
standard setting, and a picture will once again be
visible on a conventional analog TV or monitor.
Rear of TV
COMPONENT VIDEO INPUT
Y
Pr
Pb
SCART INPUT
AUDIO INPUT
L
R
C
T
A
Rear of the recorder
Page 12

12
Connecting to an Amplifier
Connecting to an amplifier equipped with two
channel analog stereo or Dolby Pro Logic ll/
Pro Logic
Connect the Left and Right AUDIO OUTPUT jacks on
the recorder to the audio left and right in jacks on your
amplifier, receiver, or stereo system, using the audio
cables (A).
Connecting to an amplifier equipped with two
channel digital stereo (PCM) or to an Audio/
Video receiver equipped with a multi-channel
decoder (Dolby Digital™, MPEG 2, or DTS)
1. Connect one of the recorder’s DIGITAL AUDIO
OUTPUT jacks (COAXIAL X) to the corresponding
in jack on your amplifier. Use an optional digital
(coaxial X) audio cable.
2. You will need to activate the recorder’s digital
output. (See “Audio Settings” on page 18).
Digital Multi-channel sound
A digital multi-channel connection provides the best
sound quality. For this you need a multi-channel
Audio/Video receiver that supports one or more of the
audio formats supported by your recorder (MPEG 2,
Dolby Digital and DTS). Check the receiver manual
and the logos on the front of the receiver.
Caution:
Due to the DTS Licensing agreement, the digital
output will be in DTS digital out when DTS audio
stream is selected.
Notes:
– If the audio format of the digital output does not
match the capabilities of your receiver, the receiver
will produce a strong, distorted sound or no sound
at all.
– Six Channel Digital Surround Sound via digital
connection can only be obtained if your receiver is
equipped with a Digital Multi-channel decoder.
–To see the audio format of the current DVD in the
on-screen display, press AUDIO.
– This recorder does not perform internal (2 channel)
decoding of a DTS sound track. To enjoy DTS
multi channel surround, you must connect this
recorder to a DTS compatible receiver via one of
this recorder’s digital audio outputs.
Manufactured under license from Dolby
Laboratories. “Dolby”, “Pro Logic”, and the doubleD symbol are trademarks of Dolby Laboratories.
“DTS” and “DTS Digital Out” are trademarks of
Digital Theater Systems, Inc.
Rear of the recorder
X
COAXIAL
A
R
L
AUDIO INPUTDIGITAL INPUT
Amplifier (Receiver)
Page 13
13
Hookup and
Settings
Accessory Audio/Video (A/V)
Connections
Connecting a PAY-TV/Canal Plus Decoder
You can watch or record PAY-TV/Canal Plus
programmes if you connect a decoder (not supplied)
to the recorder. Disconnect the recorder’s mains lead
from the mains when connecting the decoder.
To watch or record PAY-TV/Canal Plus programmes,
set [AV2 Connection] option to [Decoder] (see page
17) and set the program’s [Decoder On/Off] option to
[On] on the Setup menu (page 16).
Tip:
You do not need to turn on the recorder to view the
signals from the connected tuner on your TV.
Note:
If you disconnect the recorder’s mains lead, you will
not be able to view the signals from the connected
decoder.
Connecting to the AV2 DECODER jack
Connect a VCR or similar recording device to the AV2
DECODER jack of this recorder.
To watch or record the source from AV2 DECODER
jack, set [AV2 Connection] option to [Others] (see
page 17).
Tip:
You do not need to turn on the recorder to view the
signals from the connected tuner on your TV.
Notes:
Pictures containing copy protection signals that
prohibit any copying cannot be recorded.
If you pass the recorder signals via the VCR, you
may not receive a clear image on your TV screen.
Be sure to connect your VCR to the recorder and
your TV in the order shown below. To watch video
tapes, watch the tapes through a second line input
on your TV.
When you record to a VCR from this recorder, do
not switch the input source to TV by pressing the
TV/DVD button on the remote.
If you are using a B Sky B tuner, be sure to connect
the tuner’s VCR SCART jack to the AV2 DECODER
jack.
If you disconnect the recorder’s mains lead, you will
not be able to view the signals from the connected
VCR or tuner.
TV
VCR RECORDER
Line input 1
Line input 2
TV
PAY-TV/Canal Plus
Decorder
SCART AV
TV
VCR, Cable Box, or
Satellite Tuner, etc.
Rear of the recorder
Rear of the recorder
Page 14

14
Connecting to the AV IN 3 Jacks
Connect the input jacks (AV IN 3) on the recorder to
the audio/video out jacks on your accessory
component, using audio/video cables.
Auto Setup
After the POWER is pressed for the first time to turn
on the unit or resetting the unit, the Initial Setup
Wizard function sets the language, clock and tuner
channels automatically.
1. Select a language for the Setup menu and onscreen display. Use v / V to select a language
then press ENTER.
2. Please check your antenna connections.
Press ENTER to move next step.
3. Enter the necessary information for date and time.
b / B (left/right): Moves the cursor to the previous
or next column.
v / V (up/down): Changes the setting at the
current cursor position.
Press ENTER to confirm your setting.
4. Use v / V to select a country and press B button
then press ENTER while [Start] option is selected.
The tuner will automatically cycle through all
available channels in the area and place them in
the tuner’s memory.
5. Press ENTER to finish the setup.
Jack panel of Accessory Component
(VCR, Camcorder, etc.)
AUDIO
OUTPUT
R
L
VIDEO
OUTPUT
Front of
the recorder
Page 15
15
Hookup and
Settings
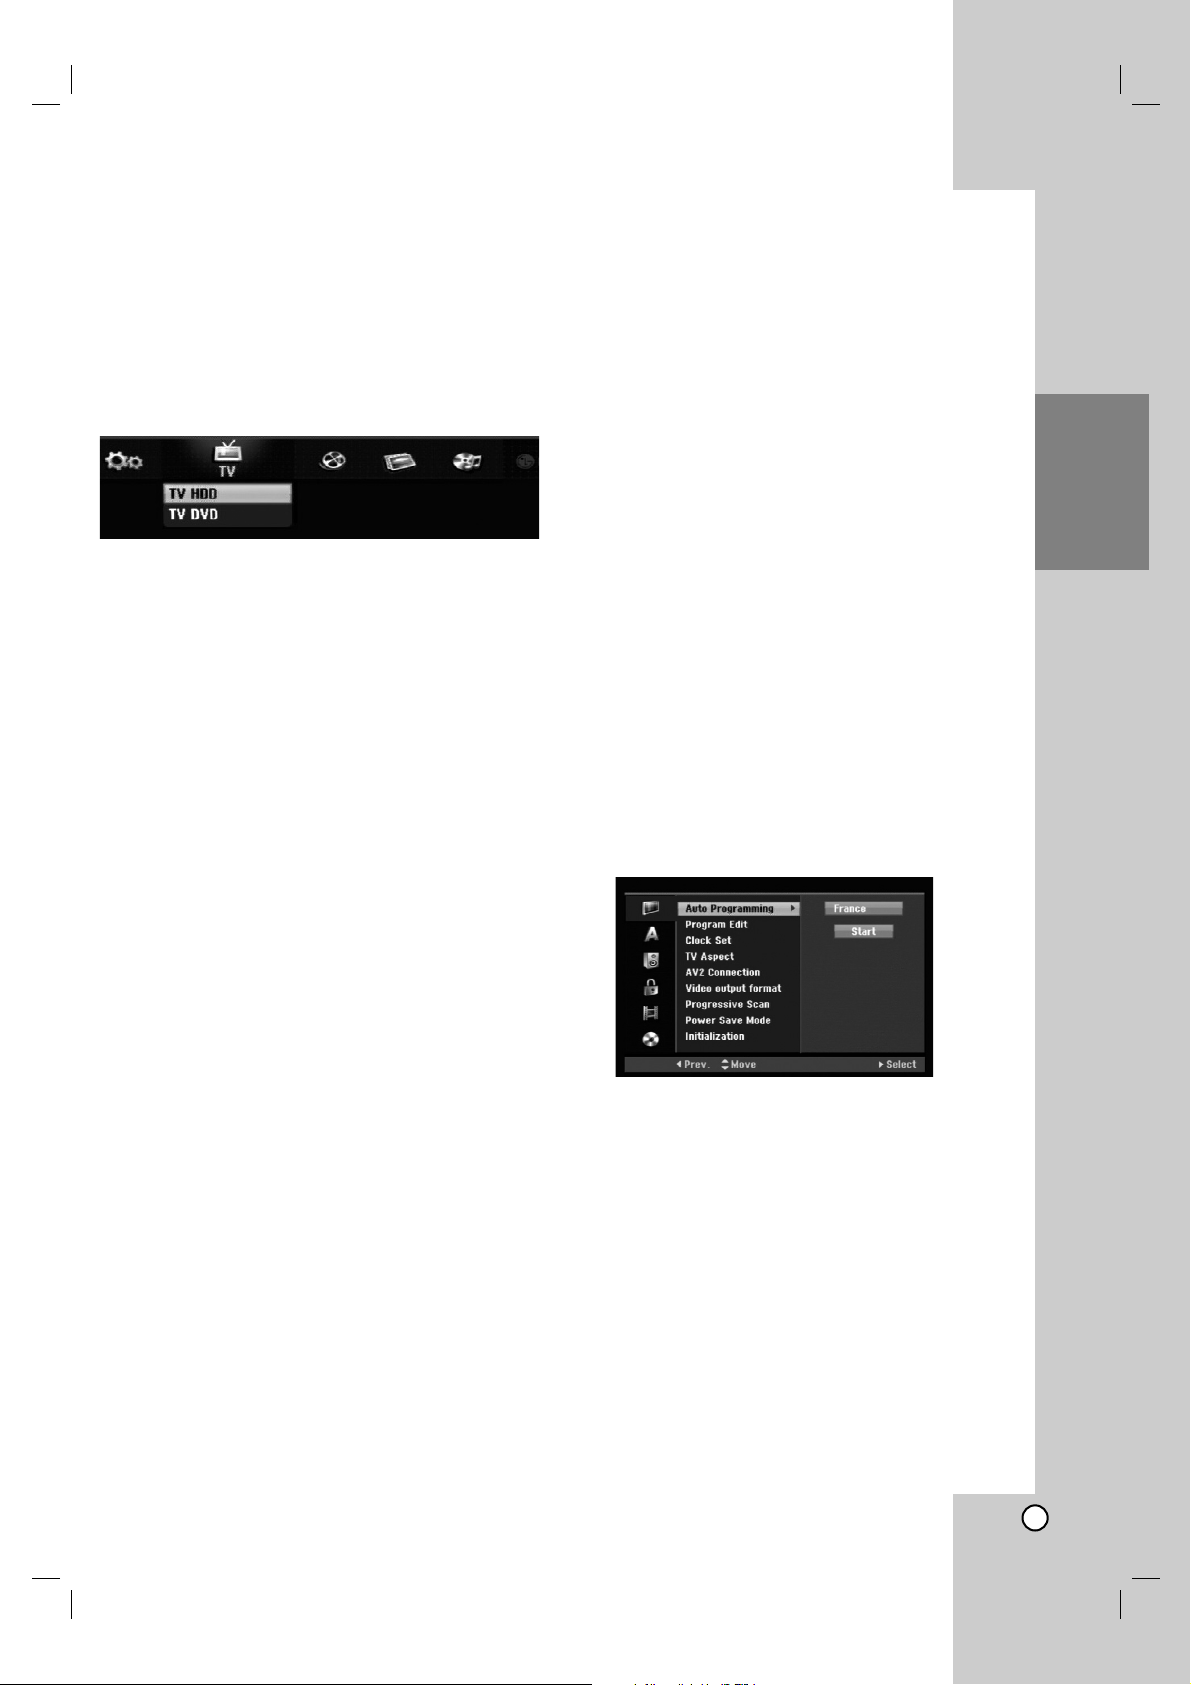
Using the Home Menu
From the Home Menu screen you can access all the
Media for playback and recording of the recorder.
1. Press HOME to display the Home Menu screen.
2. Use the b / B buttons to select a main option you
want. Sub options appears.
3. Use the v / V and ENTER buttons to select the
sub option you want.
4. To exit the HOME menu, press HOME.
TV
TV HDD: Returns to live TV viewing in HDD mode.
Pressing the HDD button on the remote control will
also allow you to directly choose this option.
TV DVD: Returns to live TV viewing in DVD mode.
Pressing the DVD button on the remote control will
also allow you to directly choose this option.
MOVIE
HDD: Displays the Title List menu for HDD.
(page 40)
HDD DivX: Displays the [Movie List] menu for HDD.
(page 27)
DISC:
- Displays Title List menu for recordable disc.
(page 40)
- Displays [Movie List] menu for DivX disc.
(page 27)
-Plays Video CD or DVD-Video disc (page 23-26).
PHOTO (See page 30)
HDD: Displays [Photo List] menu for HDD.
DISC: Displays [Photo List] menu for disc.
MUSIC (See page 28)
HDD: Displays [Music List] menu for HDD.
DISC: Displays [Music List] (or Audio CD) menu for
disc.
Easy Menu (See page 15)
SETUP: Displays Setup menu.
Timer Record: Displays Timer Record menu.
Initial Settings
In this menu system, there are several ways to
customize the settings provided. Most menus consist
of three levels to set up the options, but some require
greater depth for the variety of settings.
General Operation
1. Select the SETUP option in the HOME menu.
The setup menu appears.
2. Use v / V to select the desired option.
3. While the desired item is selected, press B to
move to the second level.
4. Use v / V to select the second desired option.
5. Press B to move to the third level.
6. Use v / V to select the desired setting then press
ENTER to confirm your selection.
Some items require additional steps.
7. Press RETURN to exit the Setup menu.
Note:
Press b to go back to the previous level.
General Settings
Auto Programming
This recorder is equipped with a frequency
synthesized tuner capable of receiving up to 88 TV
channels.
Preparation:
Connect the recorder to the desired type of
antenna, as shown in Connecting to the Antenna on
page 10.
1. Select the [Auto Programming] option.
2. Press B to move to the third level.
[Country] option is highlighted.
3. Use v / V to select a country then press B.
[Start] icon is highlighted.
If your country is not listed, select [Others]
4. Press ENTER to begin the channel search.
The tuner will automatically cycle through all
available channels in the area and place them in
the tuner’s memory.
Note:
If you skip the Auto Setup menu and access the
Setup menu for the first time, you can only set the
[Auto Programming] option. You can set the other
options after finishing [Auto Programming].
Page 16

16
General Settings (Continued)
Program Edit
You can edit a channel manually (add, delete, name,
move, etc.).
1. Select [Program Edit] option then press B.
2. Press ENTER while [Edit] is selected.
The Program List menu appears.
3. Use v / V to select a PR number then press
ENTER.
4. Use v / V to select the program option then press
ENTER.
[Program Edit] Sets the channel manually. See
“Program Edit” on the right.
[Station Rename] Changes the station name.
The display for entering characters appears.
To enter characters, see page 44.
Names can be up to 5 characters long.
[Move] Sorts the programme positions on the
Program List. Press v / V to move the selected
programme position to a new location.
[Delete] Disables a programme position you do
not need.
[Decoder On/Off] Sets the channels for the
decoder. You need this setting to watch or
record PAY-TV/Canal Plus programmes.
Press ENTER so [Decoder] appears on the
display. Press ENTER again to turn off the
setting.
5. Press RETURN (O) repeatedly to exit Program
List menu.
Program Edit
You can perform a search to select and store TV
channels manually.
When you select [Program Edit] in step 4 above, the
display for setting channels appears.
1. Use b / B to select the item and press v / V to
change the setting.
[PR] indicates the selected programme position.
[Seek] Searches for a channel automatically.
Searching stops when the recorder tunes in a
channel.
[Ch.] Changes the channel number.
[MFT] Fine tunes the channel to obtain a clearer
picture.
[PAL/SECAM] Changes TV signal system (PAL
or SECAM).
2. Choose OK then press ENTER to confirm the
setting and returns to the Program List menu.
AV1 Decoder
Sets the AV1 scart jack for inputting encoded video
signals.
1. Press AV/INPUT while the Program List menu
appears.
2. Press ENTER so [Canal+] appears on the display.
Press ENTER again to turn off the setting.
Off: Inputs the signals from the AV1 scart jack.
Normally select this.
On: The encoded video signal input from the
AV1 scart jack is output to the AV2 DECODER
jack for decoding.
The decoded signal is then input back through
the AV2 DECODER jack so you can record or
view PAY-TV/Canal Plus programmes.
Page 17

17
Hookup and
Settings
General Settings (Continued)
Clock Set
1. Select [Clock set] option then press B.
2. Enter the necessary information for date and time.
b / B (left/right): Moves the cursor to the previous
or next column.
v / V (up/down): Changes the setting at the
current cursor position.
3. Press ENTER to confirm your setting.
TV Aspect
Selects the aspect ratio of the connected TV (4:3
standard or wide).
[4:3 Letter Box] Select this when connecting to a 4:3
screen TV. Displays a wide picture with bands on
the upper and lower portions of the screen.
[4:3 Pan Scan] Select this when connecting to a 4:3
screen TV. Automatically displays a wide picture on
the entire screen and cuts off the portions that do
not fit.
[16:9 Wide] Select this when connecting to a wide-
screen TV or TV with a wide mode function.
AV2 Connection
You can connect a decoder or other device to the
AV2 DECODER jack on the back.
[Decoder] Select [Decoder] if you connect the
recorder’s AV2 DECODER jack to a PAY-TV or
Canal Plus decoder.
[Others] Select [Others] if you connect the
recorder’s AV2 DECODER jack to a VCR or similar
recording device.
Video Output Format
Select the Video output format option according ro the
connection type of this unit
[YPBPR] When your TV is connected with the
COMPONENT OUTPUT jack on this unit.
[RGB] When your TV is connected with the
SCART(RGB signal) jack on this unit.
Power Save Mode
You can set up the unit into an economic power save
mode. Nothing is displayed in the display window
when the unit is turned off.
[OFF] Power Save Mode is not active.
[ON] Power Save Mode is active.
Notes:
The encoded television signals (CANAL+ or
PREMIERE) are not decoded in the Power Save
Mode.
The Power Save Mode is not available in the
standby mode for the timer recording and when
power off of the unit after receiving the encoded
television signals (CANAL+ or PREMIERE).
Progressive Scan
Progressive Scan Video provides the highest quality
pictures with less flickering.
If you are using the COMPONENT OUTPUT jacks,
but are connecting the recorder to a standard (analog)
television, set Progressive Scan to [OFF].
If you are using the COMPONENT OUTPUT jacks for
connection to a TV or monitor that is compatible with
a progressive scan signal, set Progressive Scan to
[ON].
Note:
Progressive Scan will be disable in the setup menu
when the Video Output Format in the setup menu is
set to RGB.
Caution
Once the setting for Progressive Scan output is
entered, an image will only be visible on a
Progressive Scan compatible TV or monitor. If you set
Progressive Scan to [ON] in error, you must reset the
recorder. First, remove the disc in the recorder. Next,
press STOP (x) and hold it for five seconds before
releasing it. The video output will be restored to the
standard setting, and a picture will once again be
visible on a conventional analog TV or monitor.
Page 18

18
General Settings (Continued)
Initialization
You can reset the recorder to its original factory
settings and initialize the HDD.
[Factory Set] If you need to, you can reset the
recorder to all its factory settings. Some options
cannot be reset. (Rating, Password, and Area
Code)
[HDD format] Initializes the HDD (Hard Disk Drive):
everything recorded on the HDD will be erased.
1. Select [Initialize] option then press B.
2. Press v / V to select the desired option then press
ENTER.
The confirm message will appear.
3. Use b / B to select [Yes] or [No] then press
ENTER.
Language Settings
Display Menu
Select a language for the Setup menu and on-screen
display.
Disc Menu/Audio/Subtitle
[Original] Refers to the original language in which
the disc was recorded.
[Other] To select another language, press number
buttons then ENTER to enter the corresponding
4-digit number according to the language code list
in the reference chapter (see page 52). If you enter
the wrong language code, press CLEAR.
[Off] (for Disc Subtitle) : Turn off Subtitle.
Audio Settings
Each DVD disc has a variety of audio output options.
Set the recorder’s Audio Output according to the type
of audio system you use.
Dolby Digital / DTS / MPEG
[Bitstream]: Select “Bitstream” if you connect the
recorder’s DIGITAL AUDIO OUT jack to an amplifier
or other equipment with a Dolby Digital, DTS or
MPEG decoder.
[PCM] (for Dolby Digital / MPEG): Select when
connected to a two-channel digital stereo amplifier.
DVDs encoded in Dolby Digital or MPEG will be
automatically downmixed to two-channel PCM
audio.
[Off] (for DTS): If you select “Off”, the DTS signal is
not output through the DIGITAL AUDIO OUT jack.
Sampling Frequency
If your receiver or amplifier is NOT capable of
handling 96 kHz signals, select [48 kHz]. When this
choice is made, this unit will automatically convert any
96 kHz signals to 48 kHz so your system can decode
them.
If your receiver or amplifier is capable of handling
96 kHz signals, select [96 kHz]. When this choice is
made, this unit will pass each type of signal through
without any further processing.
DRC (Dynamic Range Control)
With the DVD format, you can hear a program’s
soundtrack in the most accurate and realistic
presentation possible, thanks to digital audio
technology. However, you may wish to compress the
dynamic range of the audio output (the difference
between the loudest sounds and the quietest ones).
Then, you may listen to a movie at a lower volume
without losing clarity of sound. Set DRC to [ON] for
this effect.
Page 19

19
Hookup and
Settings
Lock (Parental Control) Settings
Rating
Blocks playback of rated DVDs based on their
content. Not all discs are rated.
1. Select [Rating] option then press B.
2. To access the Rating, Password and Area Code
features, you must input the 4-digit security code
you created.
If you have not yet entered a security code you
are prompted to do so. Input a 4-digit code and
press ENTER. Enter it again and press ENTER to
verify. If you make a mistake before pressing
ENTER, press CLEAR.
3. Select a rating using the v / V buttons.
[1] - [8]: Rating one (1) has the most restrictions
and rating eight (8) is the least restrictive.
[No Limit]: If you select [No Limit], parental control
is not active and the disc plays in full.
4. Press ENTER to confirm your rating selection.
Note:
If you set a rating for the recorder, all disc scenes with
the same rating or lower are played. Higher rated
scenes are not played unless an alternate scene is
available on the disc. The alternative must have the
same rating or a lower one. If no suitable alternative is
found, playback stops. You must enter the 4-digit
password or change the rating level in order to play
the disc.
Set Password
1. Select [Set Password] option then press B.
2. Follow step 2 as shown “Rating”.
To change the password, select the [Change],
press ENTER and input the new 4-digit code then
press ENTER. Input it again to verify.
To delete the password, select [Delete] then press
ENTER.
If you forget your 4-digit code
If you forget your password, to clear the current
password, follow the procedure below.
1. Display Setup menu then select an 1 level icon.
2. Use the Number buttons to enter the 6-digit
number “210499”.
3. Select [Yes] then press ENTER. The 4-digit
password is cleared. Enter a new code.
Area Code
Enter the code of an area whose standards were used
to rate the DVD video disc, referring to the list (See
“Area Codes”, page 52.).
1. Select [Area Code] option then press B.
2. Follow step 2 as shown “Rating”.
3. Select the first character using the v / V
buttons.
4. Shift the cursor using B buttons and select the
second character using v / V buttons.
5. Press ENTER to confirm your area code selection.
DivX Registration Code
We provide you the DivX® VOD (Video On Demand)
registration code that allows you to rent and purchase
videos using the DivX® VOD service. For more
information, visit www.divx.com/vod.
1. Select [DivX Reg. Code] option then press B.
2. Press ENTER while [View] is selected and the
registration code will appear.
3. Use the registration code to purchase or rent the
videos from Divx® VOD service at
www.divx.com/vod. Follow the instructions and
download the video onto a disc for playback on
this unit.
Note:
All the downloaded videos from DivX® VOD can only
be played back on this unit.
Page 20

20
Recording Settings
Record Mode Set
You can set the picture quality for recording;
XP (Excellent Play), SP (Standard Play),
LP (Long Play), EP (Extended Play),
MLP (Maximum Long Play)
XP – Highest quality setting, gives about
1 hour of recording time on a DVD (4.7GB).
SP – Default quality, sufficient for most applications,
gives about 2 hours of recording time on a DVD
(4.7GB).
LP – Slightly lower video quality, gives about 4
hours of recording time on a DVD disc (4.7GB).
EP – Low video quality, gives about 6 hours of
recording time on a DVD (4.7GB).
MLP – The longest recording time with the lowest
video quality, gives about 11 hours of recording time
on a DVD (4.7GB).
Note:
You may see a fragmented picture or distorted subtitle
during playing back the contents recorded in EP and
MLP mode.
Record Aspect
When DVD recording, you can set the recording
aspect ratio to suit the material you’re recording (16:9
or 4:3).
Auto Chapter
When DVD recording, chapter markers are put in
specified setting. You can change this interval to 5
minutes, 10 minutes or 15 minutes. If you select
[None], switch off automatic chapter marking
altogether with the [None] setting.
Timeshift
Set this option to [ON] make this unit to use the
Timeshift function automatically without pressing the
TIMESHIFT button. The Timeshift function will start
automatically about 10 seconds after the TV tuner
mode is start.
If you want to use this function manually, see
“Timeshift” on page 35.
[ON] Use Timeshift function automatically.
[OFF] Use Timeshift function manually.
Page 21

21
Hookup and
Settings
Disc Settings
Disc Format
If you load a completely blank disc, the recorder will
initialize the disc.
DVD-R: The recorder initialize the disc to Video
mode. The recording mode will always be Video
mode.
DVD-RW/DVD+RW/DVD+R: The Initialize menu will
appears. Select [OK] then press ENTER.
DVD-RW disc is initialized to Video mode.
Also, you can reformat the DVD-RW/DVD+RW from
the Setup menu as below.
1. Select [Disc Format] option then press B.
2. Press ENTER while [Start] is selected.
Format Disc menu appears.
3. Use b / B to select a desired mode (VR Mode or
Video Mode) then press ENTER.
Confirm message will appear.
For DVD+RW discs, go to step 4.
4. Use b / B to select [OK] then press ENTER.
It takes a few moments to initialize the disc.
Caution
If you want to change the disc format, everything
recorded on the disc will be erased.
Finalize
Finalizing ‘fixes’ the recordings in place so that the
disc can be played on a regular DVD player or
computer equipped with a suitable DVD-ROM drive.
Finalizing a disc creates a menu screen for navigating
the disc. This is accessed by pressing MENU/LIST or
TITLE.
Caution
Once you have finalized a DVD-R and DVD+R disc,
you cannot edit or record anything else on that disc.
You can record and edit a DVD-RW disc by
choosing [Unfinalize] option.
You can edit or record on the DVD+RW disc even
after finalizing.
1. Select [Finalize] option then press B.
2. Press ENTER while [Finalize] is selected.
Finalize menu appears.
3. Select [OK] then press ENTER.
The recorder starts finalizing the disc.
Note:
How long finalization takes depends on the type of
disc, how much is recorded on the disc, and the
number of titles on the disc.
Tips
If you load a DVD-RW that has already been
finalized, you can ‘Unfinalize’ it by choosing
Unfinalize from the Finalize menu. After doing this,
you can edit and re-record onto the disc.
You cannot unfinalize a DVD-R and DVD+R disc.
If [Disc Protect] option is set to [ON], the finalize is
not available. To finalize, set [Disc Protect] option to
[OFF].
Disc Label
Use this to enter a name for the disc. This name
appears when you load the disc and when you display
disc information on-screen.
The disc name can be up to 32 characters long.
For discs formatted on a different recorder, you will
see only a limited character set.
1. Select [Disc Label] option then press B.
2. Press ENTER while [Edit] is selected.
Keyboard menu appears.
To enter characters, see page 44.
Disc Protect
When recording in DVD+RW / +R disc or VR mode
formatted DVD-RW disc, set to [ON] to prevent
accidental recording, editing or deleting of the disc
loaded. If you need to unlock the disc to make edits,
select [OFF].
PBC
PBC stands for Playback Control and refers to special
menus and navigation features that are available on
some Video CDs.
[ON] Video CDs are played according to the PBC, if
available.
[OFF] Video CDs are played the same way as Audio
CDs.
Page 22
22
General Explanation of
On-Screen Display
This manual gives basic instructions for operating the
recorder. Some DVDs require specific operation or
allow only limited operation during playback. When
this occurs, the symbol appears on the TV screen,
indicating that the operation is not permitted by the
recorder or is not available on the disc.
Displaying Information While Watching TV
During viewing the TV, press DISPLAY to
display/remove the information displayed
on-screen.
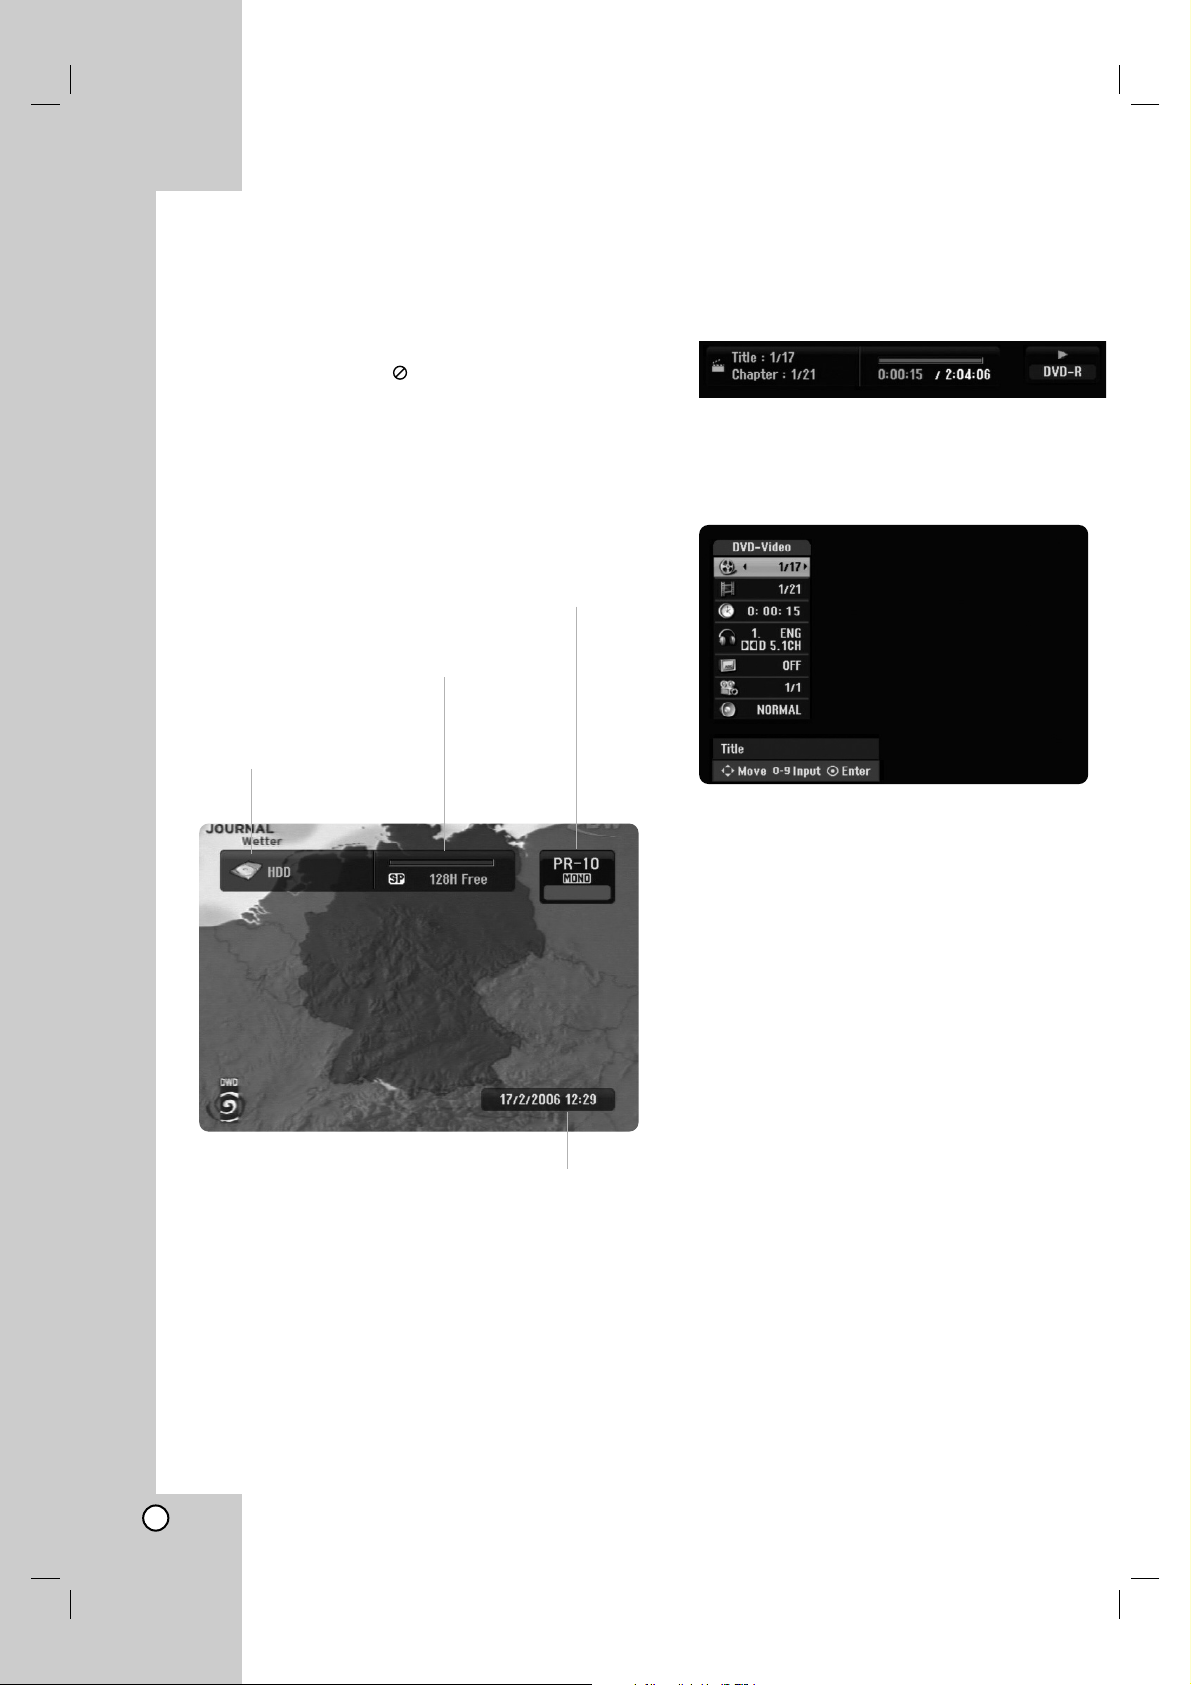
Displaying Disc Information on-screen
You can display various information about the disc
loaded on-screen.
1. Press DISPLAY once to show current status.
2. Press DISPLAY once again to show various
playback information.
The items displayed differ depending on the disc
type or playing status.
3. You can select an item by pressing v / V and
change or select the setting by pressing b / B.
For details about each item, see the pages in
parenthesis.
[Title]: Current title (or track) number/total
number of titles (or tracks) (page 23, 25)
[Chapter]: Current chapter number/total number
of chapters (page 23)
[Time]: Elapsed playing time (page 25)
[Audio]: Selected audio language (DVD VIDEO
only) or audio channel (page 24)
[Subtitle]: Selected subtitle (page 24)
[Angle]: Selected angle/total number of angles
(page 25)
[Sound]: Selected sound mode (page 26)
Note:
If no button is pressed for 10 seconds, the on-screen
display disappears.
Indicates disc name
and format.
Indicates the record mode,
free space, and elapsed
time progress bar.
Indicates channel number, station name, and
audio signal (MONO) received by the tuner.
Indicates current date and time.
Page 23

23
Playback
Playback
General Playback Features
1. Load your chosen disc in the tray, with the playback side down.
2. Starts playback using HOME menu (see page 15).
3. To stop the playback, press STOP (x).
The unit records the stopped point, depending on the disc. “Xx” appears on the screen briefly.
Press PLAY (N) to resume playback (from the scene point). If you press STOP (x) again or unload the disc
(“x” appears on the screen.), the unit will clear the stopped point.
4. Press OPEN/CLOSE (Z) to remove the disc.
Press OPEN/CLOSE (Z) to close disc tray or press POWER (1), the disc tray closes automatically and unit
turns off.
Note:
If Parental Control is set and the disc is not within the Rating settings (not authorized), the 4-digit code must be
entered and/or the disc must be authorized (see “Rating”, on page 19).
Buttons Operations
OPEN / CLOSE (Z) Opens or closes the disc tray.
PAUSE/STEP (X) During playback, press PAUSE/STEP (X) to pause
playback.
Press PAUSE/STEP (X) repeatedly to play Frame-by-Frame.
Tip:
You can advance or back up the picture frame-by-frame by
pressing b / B repeatedly during PAUSE mode.
The picture frame-by-frame in reverse is not available for
Video CD.
SKIP (. / >) During playback, press SKIP (. or >) to go to the next
chapter/track or to return to the beginning of the current
chapter/track.
Press SKIP . twice briefly to step back to the previous
chapter/track.
Tips:
To go directly to any chapter during DVD playback, press
DISPLAY twice and press v / V to select the chapter
icon. Then, input the chapter number or use b / B.
On an Audio CD, to go directly to any track, enter the
track number using the numbered buttons (0-9) during
playback.
SCAN (m / M) During playback, press SCAN (m or M) repeatedly to
select the required scan speed.
HDD, DVD; 5 steps
DivX; 4 steps
Video CD, Audio CD; 3 steps
While the playback is paused, press SCAN (m or M)
repeatedly to play in slow motion.
HDD, DVD; 4 steps
Video CD; 3 steps (Forward only)
ZOOM During playback or pause mode, press ZOOM to enlarge
the video image.
(x1 size → x2 size → x4 size → x1 size (normal size)
You can move through the zoomed picture using bBvV
buttons.
Discs
All Discs
All Discs and
VCDDVD ALLHDD
VCDDVD ALLHDD
ACDDivX
VCDDVD ALLHDD
WMA
MP3ACDDivX
VCDDVD ALLHDD
VCDDVD ALLHDD
HDD
Page 24

24
General Playback Features (Continued)
Buttons Operations
REPEAT During playback, press REPEAT repeatedly to select a
desired repeat mode.
HDD (Title/Off)
DVD, Video mode DVD-R/RW (Chapter/Title/Off)
VR mode DVD-RW, DVD+R/RW (Chapter/Title/All/Off)
Video CD, Audio CD (Track/All/Off)
MP3/WMA (Track/Folder/Off)
Notes:
On a Video CD with PBC, you must set PBC to [OFF] in the
Setup menu to use the Repeat function. See page 21.
If you press SKIP (>) once during Repeat Chapter
(Track) playback, the repeat playback cancels.
A-B During playback, each press of A-B button to select point A
and point B and repeats a sequence from point A (Starting
point) to point B (End point). Press A-B to stop A-B repeat.
Note:
You cannot select a sequence less than 5 seconds.
TITLE If the current DVD title has a menu, the title menu appears
on the screen. Otherwise, the disc menu may appears.
MENU/LIST The disc menu appears on the screen.
SUBTITLE ( ) During playback, press SUBTITLE then press b / B
repeatedly to select a desired subtitle language.
AUDIO ( ) Press AUDIO then press b / B repeatedly to hear a
different audio language, audio track or encoding method.
Note:
Some discs feature both Dolby Digital and DTS
soundtracks. There is no analog audio output when DTS is
selected. To listen to the DTS soundtrack, connect this
recorder to a DTS decoder via one of the digital outputs.
See page 12 for connection details.
Press AUDIO then press b / B repeatedly during playback
to hear a different audio channel (STEREO, LEFT or
RIGHT).
With DVD-RW discs recorded in VR mode and HDD that
have both a main and a Bilingual audio channel, you can
switch among Main (L), Sub (R), or Main+sub (L+R).
Press AUDIO repeatedly during playback to hear a different
audio channel (STEREO, LEFT or RIGHT).
Discs
WMAMP3ACD
VCDDVD ALLHDD
DivXDVD
DVD
DVD
DVD
ACD
VCDDVD ALLHDD
WMAMP3ACD
VCDDVD ALLHDD
Page 25

25
Playback
If a menu screen is displayed
The menu screen may be displayed first after loading a
DVD or Video CD which contains a menu.
Use the b / B / v / V buttons to select the
title/chapter you want to view, then press ENTER to
start playback.
Press TITLE or MENU/LIST to return to the menu
screen.
Use the number buttons to select the track you want
to view.
Press RETURN (O) to return to the menu screen.
Menu setting and the exact operating procedures
for using the menu may differ depending on the
disc. Follow the instructions on the each menu
screen. You may also set PBC to [OFF] under
Setup menu (see page 21).
Moving to another TITLE
When a disc has more than one title, you can move to
another title as follows:
Press DISPLAY twice during playback then use
v / V to select the title icon. Then, press the
appropriate numbered button (0-9) or b / B to
select a title number.
Time Search
To start playing at any chosen time on the disc:
1. Press DISPLAY twice during playback. The time
search box shows the elapsed playing time.
2. Press v / V to select the time clock icon
and “0:00:00” appears.
3. Input the required start time in hours, minutes, and
seconds from left to right.
If you enter the wrong numbers, press b
/
B to
move the under bar (_) to the wrong number. Then
enter the correct numbers.
4. Press ENTER to confirm. Playback starts from the
selected time.
Marker Search
To enter a Marker
You can start playback from up to six memorized
points. To enter a marker, press MARKER at the
desired point on the disc. The Marker icon appears on
the TV screen briefly. Repeat to enter up to six
markers.
To Recall or Clear a Marked Scene
1. During disc playback, press SEARCH. The marker
search menu appears on the screen.
2. Use b / B / v / V to select a marked scene that
you want to recall or clear.
3. Press ENTER and playback starts from the
marked scene.
or
Press CLEAR and the confirm message will
appear. Select [OK] and press ENTER to erase
the scene from the marker search menu.
Camera Angle
If the disc contains scenes recorded at different
camera angles, you can change to a different camera
angle during playback.
1. Press DISPLAY twice during playback. The OnScreen Display appears on the TV screen.
2. Use v / V to select the Angle icon in the OnScreen Display.
3. Use b / B to select a desired angle.
The number of the current angle appears on the
TV screen.
Tip:
The ANGLE indicator will blink on the TV screen at
scenes recorded at different angles to indicate that
angle switching is possible.
DVD
VCDDVD ALLHDD
DivXDVD ALLHDD
DivXDVD ALLHDD
VCD
DVD
VCDDVD
Page 26

26
3D Surround
This unit can produce a 3D Surround effect, which
simulates multi-channel audio playback from two
conventional stereo speakers, instead of the five or
more speakers normally required to listen to multichannel audio from a home theater system.
1. Press DISPLAY twice during playback. The OnScreen Display appears on the TV screen.
2. Use v / V to select the Sound icon in the OnScreen Display.
3. Use b / B to select “3D SUR”.
To turn off the 3D Surround effect, select
“NORMAL”.
Instant Skip
Press B repeatedly during playback to skip forward 15
seconds.
In HDD playback or Timeshift mode, each press b / B
skips forward or reverse 5 minutes.
Note:
If the remaining playback time of current HDD title is
less than 5 minutes (15 seconds for DVD title), this
function will not be operated.
Last Condition Memory
This recorder memorizes the user settings for the last
disc that you have viewed. Settings remain in memory
even if you remove the disc from the recorder or
switch off the recorder. If you load a disc that had its
settings memorized, the latest stop position is
automatically recalled.
Notes:
Settings are stored in memory for use any time.
This recorder does not memorize settings of a disc,
if you press STOP twice or switch off the recorder
before commencing to play it.
DVD
DVD ALLHDD
DivXVCDDVD ALL
Page 27

27
Playback
Playing a DivX Movie File
The recorder can play DivX files. Before playing DivX
files, read “DivX file requirement” on right.
1. Press HOME then select [MOVIE] option.
2. Select a media that contains DivX file(s) then
press ENTER.
The [Movie List] menu appears on the TV screen.
3. Press v / V to select a folder, and press ENTER.
A list of files in the folder appears. If you are in a
file list and want to return to the Folder list, use the
v / V buttons on the remote to highlight and
press ENTER.
4. If you want to view a particular file,
press v / V to highlight a file and press
PLAY (N).
You can use variable playback functions. Refer to
pages 23-26.
5. Press STOP to stop the playback. The [Movie List]
menu appears.
To exit the menu screen, press HOME and
select [TV DVD] or [TV HDD] option then press
ENTER.
Notice for displaying the DivX subtitle
If the subtitle does not display properly, please follow
the steps below.
1. Press PAUSE/STEP when the subtitle appears.
2. Press and hold SUBTITLE about 3 seconds.
The language code will appear.
3. Press b / B to select another language code until
the subtitle is displayed properly.
4. Press PLAY (N) to continue playback.
Note:
The DivX subtitle file name has to be identified with
the DivX file name to display by this unit.
Movie List menu options
1. Press v / V to select a folder/file on the [Movie
List] menu then press ENTER.
[Movie List] menu options appear.
The menu options displayed differ depending on
the selected media.
2. Press v / V / b / B to select an option, and press
ENTER.
[Play] Start playback the selected title.
[Open] Opens the folder and a list of files in the
folder appears.
[Delete] Deletes the file(s) or folder(s) from the
media.
[Rename] Edits the file name. (page 32)
[Move] Moves the file(s) to another folder or
media. (page 33)
[Copy] Copies the file(s) to another folder or
media. (page 33)
DivX file requirement
Available resolution size: 720x576 (W x H) pixel
DivX file extensions: “.avi”, “.divx”
Playable DivX subtitle: “.smi”, “.srt”,
“.sub (Micro DVD format only)”,
“.txt (Micro DVD format only)”
Playable Codec format: “DIV3”, “MP43”, “DIVX”,
“DX50”
Playable Audio format: “AC3”, “PCM”, “MP2”,
“MP3”, “WMA”
Sampling frequency:
within 8 - 48 kHz (MP3), within 32 - 48kHz (WMA)
Bit rate:
within 8 - 320kbps (MP3), within 32 - 192kbps (WMA)
CD-R Format: ISO 9660 and JOLIET.
DVD±R/RW Format: ISO 9660 (UDF Bridge format)
Maximum Files/Disc: Less than 1999 (total number
of files and folders)
Notes on DivX format
If the number of the screen frame is over 29.97
frames per second, this unit may not operate
normally.
If the video and audio structure of DivX file is not
interleaved, returns to the menu screen.
If there is impossible code to express in the DivX
file name, it may be displayed as “_” mark.
If the file is encoded with GMC, the unit supports
only 1-point of the record level.
*
GMC?
GMC is the acronym for Global Motion
Compensation. It is an encoding tool specified in
MPEG4 standard. Some MPEG4 encoders, like
DivX, have this option.
There are different levels of GMC encoding,
usually called 1-point, 2-point, or 3-point GMC.
Page 28

28
Playing an Audio CD or MP3/WMA
file
The recorder can play audio CDs and MP3/WMA files.
Before playing MP3/WMA files, read “MP3/WMA audio
file requirement” on right.
1. Press HOME.
The HOME menu appears.
2. Select [MUSIC] option.
3. Select a media that contains MP3/WMA or audio
title then press ENTER.
The [Music List] menu appears on the TV screen.
4. Use v/V to select a track then press PLAY (N).
Playback starts.
You can use variable playback functions. Refer to
pages 23-26.
Tips:
Press DISPLAY to view ID3-Tag information for
the MP3 file. If ID3-Tag information is not
present, [ID3-Tag: None] will appear. If you
select a folder, the number of subfolders and
number of MP3/WMA files in the folder are
displayed. Press DISPLAY again to remove the
information screen.
If you want to move to the upper directory, use
the v / V to highlight and press ENTER.
You also display HOME menu to select another
media by pressing HOME.
To exit the menu screen, press HOME and
select [TV DVD] or [TV HDD] option then press
ENTER.
5. To stop playback at any time, press STOP.
Tip:
You can create new folder. Select [New Album] option
on the Music-HDD menu then press ENTER.
“NONAME##” folder is created.
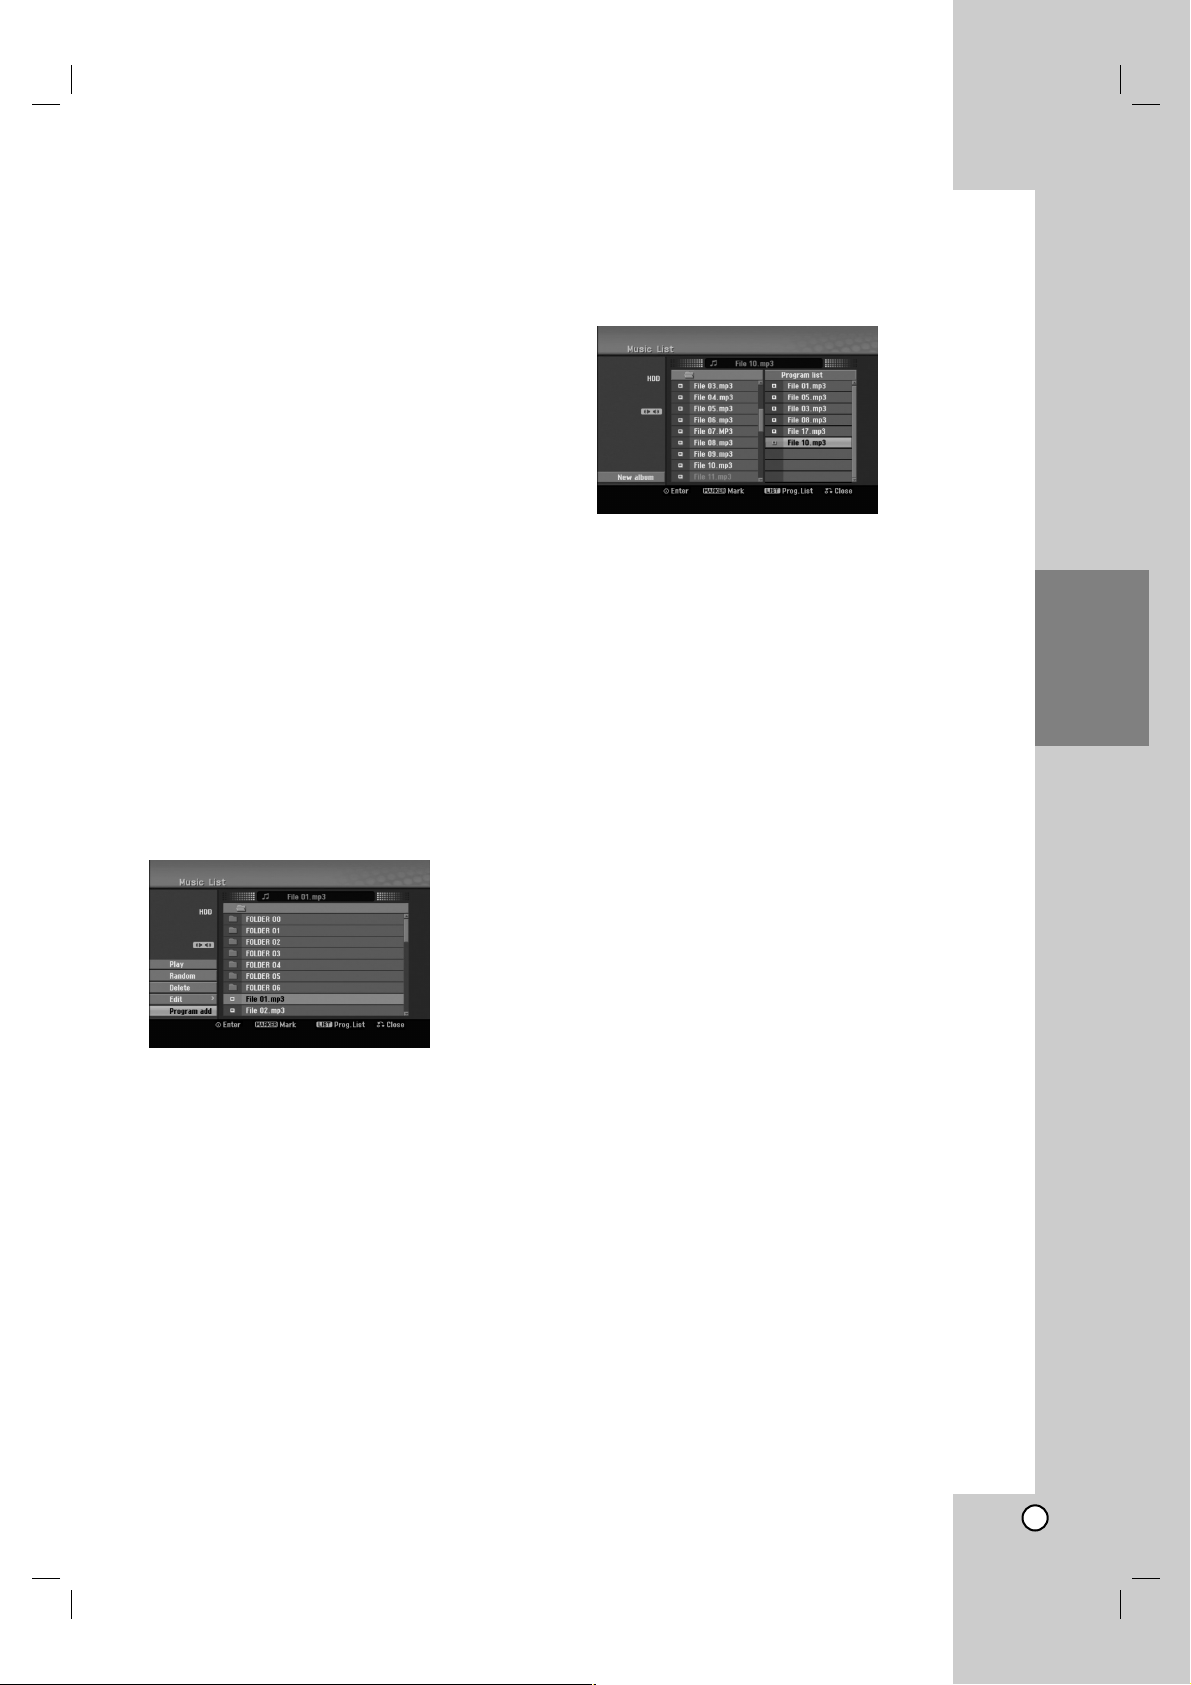
Audio CD and Music menu options
1. Press v / V to select a folder/file on the Audio CD
or Music menu then press ENTER.
The menu options appear.
The menu options displayed differ depending on
the selected media.
2. Press v / V / b / B to select an option, and press
ENTER.
[Play] Start playback the selected title.
[Random] Start or stop random playback.
[Open] Opens the folder and a list of files in the
folder appears
[Delete] Deletes the file(s) from the media.
[Rename] Edits the file name. (page 32)
[Move] Moves the file(s) to another folder or
media. (page 33)
[Copy] Copies the file(s) to another folder or
media. (page 33)
[Program Add] Adds the track(s) to Program List.
(page 29)
Random
1. Press v / V to select a file then press ENTER.
The menu options appear.
2. Press v / V to select [Random] option then press
ENTER.
The unit automatically begins random playback
and “RANDOM” appears on the menu screen.
3. To return to normal playback, select [Random]
option again then press ENTER.
Tip:
By pressing SKIP > during Random playback, the
unit selects another track and resumes Random
playback.
MP3/WMA audio file requirement
File extensions
“.mp3”, “.wma”.
Sampling frequency:
within 8 - 48 kHz (MP3), within 32 - 48kHz (WMA)
Bit rate:
within 8 - 320kbps (MP3), within 32 - 192kbps (WMA)
CD-R Format:
ISO 9660 and JOLIET.
DVD±R/RW Format:
ISO 9660 (UDF Bridge format)
Maximum Files/Disc:
Less than 1999 (total number of files and folders)
Page 29
29
Playback
Program Playback with Audio
CD and MP3/WMA file
Program Playback enables you to make custom
playlists of Audio CD or MP3/WMA tracks. Programs
can contain up to 99 Audio CD tracks or 256
MP3/WMA files.
1. Use v / V to select a track/file (or folder) on the
Audio CD or Music menu.
You can select all MP3/WMA files and folders on
the Music menu by pressing CLEAR button. To
cancel the selections, press CLEAR again.
Selecting multiple files/tracks (folders)
1. Press MARKER.
A check mark appears on the file/track or
folder. Press MARKER again to cancel the
marked file/track or folder.
2. Repeat step 1 to mark additional file/track
(folders).
2. Press ENTER.
The options appear on the left side of the menu.
3. Use v / V to select the [Program Add] option then
press ENTER.
4. Repeat steps 1-3 to mark additional tracks.
Note:
If you select a folder for Programmed Playback, all
tracks/files in the folder are added to the Program List.
5. Use B to move to the Program list.
The programmed track you selected last is
highlighted on the program list.
6. Use v / V to select the track you want to start
playing.
7. Press PLAY (N) to start.
Playback stops after playing the last programmed
track in the program list.
8. To exit Program Playback and resume normal
playback, select a track on the List and press
PLAY (N).
Tip:
You can access or remove the Program List screen by
pressing MENU/LIST.
Program List menu options
1. Press v / V to select a track/file on the Program
List then press ENTER.
The menu options appear.
2. Use v / V to select an option then press ENTER
to confirm your selection.
[Play] Playback begins in the order in which you
programmed the tracks from the selected track.
[Random] Start or stop random playback.
[Delete] Deletes the track(s) from the Program
List menu.
[Move] Moves the track(s) to change the
program order.
[Save] Memorizes the program list. (HDD only)
Repeat Programmed Tracks
Press REPEAT to select the desired Repeat mode.
[TRACK] Repeats the current track.
[ALL] Repeats all tracks on the Program List.
[OFF] Cancels Repeat mode (no display).
Erasing a Track from the Program List
1. Select the track you wish to erase from the
Program List. Use MARKER button to select
multiple tracks.
2. Press ENTER. The menu options appears
3. Select [Delete] option then press ENTER.
Changing Track Order in the Program List
1. Select the track you wish to move on the Program
List. Use MARKER button to select multiple tracks.
2. Press ENTER. The menu options appears
3. Select [Move] option then press ENTER.
4. Use v / V to move the yellow bar to the desired
location, then press ENTER.
Save Your Program List (HDD only)
This recorder memorizes the user program list that
you have programmed.
1. Select a track on the Program List.
The menu options appear.
2. Select [Save] option then press ENTER.
The Program List is saved in the HDD’s
PROGRAM folder.
Page 30

30
Viewing a JPEG File
The recorder can play JPEG files. Before playing
JPEG recordings, read “Photo file requirement” on
right.
1. Press HOME.
The HOME menu appears.
2. Select [PHOTO] option.
3. Select a media that contains JPEG file then press
ENTER.
The [Photo List] menu appears on the TV screen.
4. Use b / B / v / V to select a file, then press
ENTER.
The menu options appear on the left side of the
menu.
Tips:
If you want to move to the upper directory, use the
b / B / v / V to highlight and press ENTER.
You can also display HOME menu to select another
media by pressing HOME.
5. Use v / V to select [Full Screen] then press
ENTER.
The selected image is displayed in full screen.
Depending upon the size and number of JPEG
files, it could take a long time for the recorder to
read the files.
6. To stop viewing at any time, press STOP.
The [Photo List] menu appears.
To exit the menu screen, press HOME and
select [TV DVD] or [TV HDD] option then press
ENTER.
Photo List menu options
1. Press v / V to select a file on the [Photo List]
menu then press ENTER.
The menu options appear.
The menu options displayed differ depending on
the selected media.
You can select all files and folders on the menu by
pressing CLEAR button. To cancel the selections,
press CLEAR again.
Selecting multiple files (folders)
1. Press MARKER.
A check mark appears on the file or folder.
Press MARKER again to cancel the marked file
or folder.
2. Repeat step 1 to mark additional file (folders).
2. Use v / V to select an option then press ENTER
to confirm your selection.
[Open] Opens the folder and a list of files in the
folder appears
[Full Screen] Shows the selected file as full
screen.
[Delete] Deletes the selected file from the media.
[Slide Show] Displays Slide Show menu.
[Rename] Edits the file name. (page 32)
[Move] Moves the file(s) to another folder
(album) or media. (page 33)
[Copy] Copies the file(s) to another folder or
media. (page 33)
Tip:
You can create new folder in the HDD .
Select [New Album] option then press ENTER.
“NONAME##” folder is created.
Press ENTER to appear or disappear this menu
during viewing the full screen.
Photo file requirement
File extensions
“.jpg”
Photo size:
Less than 4MB recommended
CD-R Format:
ISO 9660 and JOLIET.
DVD±R/RW Format:
ISO 9660 (UDF Bridge format)
Maximum Files/Disc:
Less than 1999 (total number of files and folders)
Notes on JPEG file
Progressive and lossless compression JPEG
image files are not supported.
Depenfing on the size and number of the JPEG
files, it may take several minutes to read the
contents of the media.
Page 31

31
Playback
Skip Images
While viewing a picture, press SKIP (.or >)
once to advance to the next file or return to the
previous file.
Rotate Images
Use v / V while viewing a picture to flip the picture
clockwise or counterclockwise.
View Slide Shows
1. Select [Slide Show] option on the [Photo List] menu
(Refer to “Photo List menu options” on page 30).
2. Press ENTER.
The Slide Show menu appears.
3. Use b / B / v / V to set the options.
[Object] option:
[Selected] Views slide show only selected files.
Use the MARKER button to select multiple files.
[All] Views slide show all files.
[Speed] option:
Sets the Slide Show speed to [Slow], [Normal], or
[Fast].
4. Select the [Start] option then press ENTER to start
the Slide Show.
5. Press STOP to stop the Slide Show and returns to
the [Photo List] menu.
To Pause the Slide Show
1. Press PAUSE/STEP (X) to pause slide show.
2. When you want to continue slide show, press
PLAY (N).
To listen to music while slide show
simultaneously
You can display photo files while listening to
MP3/WMA music files recorded on HDD.
1. Select [Slide Show] option on the [Photo List] menu
(Refer to “[Photo List] menu options” on page 30).
2. Press ENTER.
The Slide Show menu appears.
3. Select [Simultaneous Music play] option on the
Slide Show menu
4. Press ENTER.
Simultaneous Music play menu appears.
5. Press MARKER to select multiple files.
Select [Select All] option to select all tracks then
press ENTER.
Select [Deselect All] option to deselect all
selected tracks then press ENTER.
Select [Cancel] option to exit this menu then
press ENTER.
6. Use b / B / v / V to highlight [Start] option then
press ENTER.
7. Press STOP to stop the Slide Show and return to
the [Photo List] menu.
Page 32

32
Editing a MP3/WMA, JPEG, DivX
file
These descriptions are MP3 file’s operation for
example, other kind’s files are operated same way.
Erasing a file(s)/folder(s) from the HDD
You can erase MP3/WMA, JPEG or DivX file(s)/
folder(s) on the HDD.
1. Select a file you wish to erase on the menu.
You can select all files and folders on the menu by
pressing CLEAR button. To cancel the selections,
press CLEAR again.
Selecting multiple files (folders)
1. Press MARKER.
A check mark appears on the file or folder.
Press MARKER again to cancel the marked file
or folder.
2. Repeat step 1 to mark additional file (folders).
2. Press ENTER.
The menu options appear on the menu.
3. Select [Delete] option then press ENTER.
The confirm message for deleting will appear.
Use b / B to select [Yes] then press ENTER.
The selected file(s) is deleted.
Naming a file on the HDD
You can name MP3/WMA files on the HDD
independently. Names can be up to 32 characters
long.
1. Select a file you wish to rename on the menu.
2. Press ENTER.
The menu options appear on the menu.
3. Select [Edit] option then press ENTER.
Edit options appears.
4. Select [Rename] option then press ENTER.
Keyboard menu appears.
To enter characters, see page 44.
Page 33

33
Playback
Copying a file(s) to the HDD
You can copy a file(s)/folder(s) to the HDD.
1. Select a file you wish to copy on the menu.
You can select all files and folders on the menu by
pressing CLEAR button. To cancel the selections,
press CLEAR again.
Selecting multiple files (folders)
1. Press MARKER.
A check mark appears on the file or folder.
Press MARKER again to cancel the marked file
or folder.
2. Repeat step 1 to mark additional file (folders).
2. Press ENTER.
The menu options appear on the menu.
3. Select [Edit] option then press ENTER.
Edit options appears.
4. Select [Copy] option then press ENTER.
Copy menu appears.
5. You can select a album (folder) to copy.
1. After selecting a media then press ENTER.
The album (folder) list appears.
2. Select a folder.
Also, you can create new album (folder). Select
[New Album] option on the Copy menu then
press ENTER.
“NONAME##” folder is created.
6. Select [Copy] option then press ENTER to begin
copying.
Note:
If a folder’s depth is more than 5 level, the copy is not
available.
Moving a file(s) to the other folder on the
HDD
You can move a file(s)/folder(s) to the other folder on
the HDD. After moving, the file(s)/folder(s) are deleted
from the current location.
1. Follow steps 1-3 as shown left.
2. Press ENTER.
The options appear on the left side of the menu.
3. Select [Edit] option then press ENTER.
Edit options appears.
4. Select [Move] option then press ENTER.
Move menu will appear.
5. You can select a album (folder) to move.
1. After selecting a media then press ENTER.
The album (folder) list appears.
2. Select a folder.
Also, you can create new album (folder). Select
[New Album] option on the Move menu then
press ENTER.
“NONAME##” folder is created.
6. Select [Move] option then press ENTER to begin
moving.
Page 34

34
Recording
About DVD recording
Notes:
This recorder cannot make recordings on CD-R or
CD-RW discs.
Our company takes no responsibility for recording
failure due to power outages, defective discs, or
damage to the Recorder.
Fingerprints and small scratches on a disc can
affect playback and/or recording performance.
Please take proper care of your discs.
Disc types and recording formats, modes,
and settings
This recorder can play various kinds of DVD discs:
pre-recorded DVD-Video discs, DVD-RW,
DVD-R, DVD+RW and DVD+R discs. The disc format
for DVD-R, DVD+R, DVD+RW discs is always “Video
format”—the same as pre-recorded DVD-Video discs.
This means that once finalized, you can play a
DVD-R, DVD+R, or DVD+RW in a regular DVD
player.
By default, the DVD-RW disc format is Video format,
though you can change this to Video Recording (VR)
format, if required. (Reinitializing the disc will erase
the contents of the disc.)
The recording mode is closely related to the disc
format. If the disc format is Video Recording format,
then the recording mode is VR mode; if the disc
format is Video mode, then the recording mode is
Video mode (except for DVD-Video, which is not
recordable, and so does not have a recording mode).
Within the recording modes (which are fixed for them
whole disc) are the record settings. These can be
changed as required for each recording and
determine the picture quality and how much space the
recording will take up on the disc.
About HDD recording
Recording to the internal hard disk drive (HDD) is
basically similar to recording to a VR mode DVD-RW
disc. You have the full choice of recording quality
options, including the manual mode, and of course
you can record, erase and re-record as many times as
you like. The capacity of the hard disk drive means
that you can store many hours of video on it, even in
the higher quality recording modes. To help you
organize the contents, the HDD is divided into ten
genre. You can name and use these genres as you
like—for example, you might have a genre for movies,
another for TV shows, and one for camcorder
recordings.
Notes:
The maximum number of titles that can be recorded
on the HDD is 255.
Using the HDD allows you to record a maximum of
12 hours continuously.
Notes for recording
The recording times shown are not exact because
the recorder uses variable bit-rate video
compression. This means that the exact recording
time will depend on the material being recorded.
When recording a TV broadcast, if the reception is
poor or the picture contains interference, the
recording times may be shorter.
If you record still pictures or audio only, the
recording time may be longer.
The displayed times for recording and time
remaining may not always add up to exactly the
length of the disc.
The recording time available may decrease if you
heavily edit a disc.
If using a DVD-RW disc, make sure you change the
recording format (Video mode or VR mode) before
you record anything on the disc. See page 21 (Disc
Format) for how to do this.
When using a DVD-R or DVD+R disc, you can keep
recording until the disc is full, or until you finalize the
disc. Before you start a recording session, check
the amount of recording time left on the disc.
When using a DVD-RW disc in Video mode,
recording time available will only increase if you
erase the last title recorded on the disc.
The Delete Title option in the Title List (Original)
menu only hides the title, it does not actually erase
the title from the disc and increase the recording
time available (except for the last recorded title on a
DVD-RW disc in Video mode).
When using a DVD+R/RW, the recorder will execute
the Menu-making operation to update the new title
and editing when removing the disc from the recorder
or turn off the recorder. So you must remove the disc
after selecting the recorder’s operation mode to DVD
mode.
This unit can record TV program to HDD only. If you
try to record TV program in DVD mode, the unit
automatically change the mode to HDD then start
recording.
Page 35

35
Recording
Timeshift
Do not miss a scene from a live broadcast. If the
telephone rings while you are watching your favorite
live broadcast, just press “TIMESHIFT” and “PAUSE”
before answering the phone. The timeshift function will
be activated and the broadcast is then recorded for
later viewing.
After the phone call or viewing interruption, press
“PLAY” or “SCAN” to watch the program.
Press “STOP” to return to the live broadcast.
Timeshift (Pause, Live TV/Playback)
Operation
You can store a program in the HDD storage cache
temporarily.
Press TIMESHIFT while watching a TV program.
The Progress Bar display appears on the screen as
shown below. The Progress Bar changes to timeshift
icon after 5 seconds.
1. Indicates playback mode.
2. Indicates current Timeshift position.
3. Indicates Timeshift start time.
4. Indicates Timeshift elapsed time.
5. Indicates the time that is one hour from Timeshift
start time.
Tips:
You can use trick play functions (Slow, Scan, etc.)
during timeshift. Refer to Playback Operation on
pages 23-26.
You can edit the cached clip during Timeshift to
retain the program on the HDD. Refer to Clip
Record on the right.
Notes:
If there is no free space on the HDD, the oldest
timeshift section of the cache will be incrementally
deleted.
If no button is pressed for 6 hours, the Timeshift will
stop automatically.
If the TimeShift option in the Setup menu is set to
[ON], the unit will starts this function automatically
without pressing the TIMESHIFT button.
Marker Search in Timeshift mode
You can mark one in Timeshift mode. Press MARKER
at the desired point during Timeshift.
Press SEARCH to recall the marked scene.
Clip Record
You can edit during Timeshift to store the program on
the HDD (Hard Disk Drive).
1. During Timeshift, use pause step, search and
slow-motion to find the starting point.
2. Press REC at the starting point of the section you
want to record.
Progress of the edit is indicated in red on the
Progress Bar.
3. Use pause step, search and slow-motion to find
the ending point.
4. Press REC at the ending point of the section you
want to stop recording.
Normal playback continues.
5. Repeat steps 1 and 4 to make several Clip
Records of a program.
6. Press STOP to stop Timeshift.
Confirm message will appear.
7. Use b / B to select [Yes] then press ENTER. Or,
press STOP again.
The current broadcast is displayed on the screen.
Notes:
Selected sections are recorded on the HDD.
If you want to stop Clip recording, press the STOP
button. If you press POWER to stop Clip recording,
the program may not be recorded on the HDD.
Clip records cannot be made for sections lasting
less than 5 seconds.
Jump to Start or End during Timeshift
1. Press ENTER during timeshift. The menu will
appear.
2. Press b and playback starts from the very
beginning of the timeshift.
Press B and jumps to the very end of the timeshift
then goes to pause mode.
To Exit the Timeshift
1. Press STOP to exit Timeshift function.
Confirm message will appear.
2. Use b / B to select [Yes] then press ENTER.
The current broadcast is displayed on the screen.
HDD
HDD
HDD
34 5
12
Page 36

36
Basic Recording from a TV
Follow the instructions below to record a TV program.
Recording starts immediately and continues until the
disc is full or you stop the recording.
Note:
This unit can record only a mono audio content from
the built-in tuner system.
1. Set a recording mode as necessary by pressing
REC MODE repeatedly. (XP, SP, LP, EP or MLP)
2. Use PR/CH (+/-) buttons to select the TV channel
to record.
3. Press REC (z) once.
Recording will start. (The REC indicator lights in
the display window.)
Recording continues until you press STOP (x)
or the HDD is full.
To record for a fixed length of time, see Instant
Timer Recording on right.
4. Press STOP (x) to stop recording.
To Pause the Recording
1. Press PAUSE/STEP (X) to pause recording.
2. When you want to continue recording, press
PAUSE/STEP (X).
To record one TV program while
watching another
1. Press TV/DVD to select the TV mode during
recording. The TV indicator appears.
2. Using the TV, select the channel to be viewed.
Instant Timer Recording
Instant Timer Recording allows you to make a
recording easily of a preset length without using the
program timer.
1. Follow steps 1-2 as shown left (Basic Recording
from a TV).
2. Press REC (z) repeatedly to select the recording
time length.
Recording starts after the first press. Each
subsequent press increases the recording time
within free space (maximum 240 minutes).
The recording time is displayed on the TV screen.
At the end of the recording, the recorder will stop
recording and shut off.
Checking the Recording Time
Press REC (z) once to check the recording time. The
recalled setting will automatically return to the TV
screen for a moment.
Also, remaining time of recording is shown in the
display window.
To Extend the Recording Time
The recording time can be extended anytime by
pressing REC (z).
Each subsequent press increases the recording time
within free space (maximum 240 minutes).
Caution
If the recorder is unplugged (or there is a power
failure) while the recorder is recording, the recording
will be lost.
HDD
HDD
Page 37

37
Recording
Timer Recording
This recorder can be programmed to record up to 16
programs within a period of 1 month. For unattended
recording, the timer needs to know the channels to be
recorded, the starting and ending time.
1. Select [Timer Record] option in the [HOME] menu.
The [Timer Record List] menu will appear.
2. Use v / V to select the [NEW] then press ENTER.
The [Timer Record] menu will appear.
[Media] The media option is not selectable.
[PR] Choose a memorized program number, or
one of the external inputs from which to record.
[Date] Choose a date up to
1 month
in advance.
[Start Time] Set the start time.
[End Time] Set the end time.
[Repeat] Choose a desired repeat (Once,
Daily (Monday - Friday), or Weekly).
3. Enter the necessary information for your timer
recording(s).
b / B (left/right) – move the cursor left/right
v / V (up/down) – change the setting at the
current cursor position
Press RETURN (O) to exit the Timer Record
menu.
Press ENTER after filling in all the program
information.
Select [Timer Record] option in the [HOME]
menu to display Timer Record List.
4. Set a recording mode as necessary by pressing
REC MODE repeatedly. (XP, SP, LP, EP or MLP)
5. Press ENTER, the program will be memorized by
the recorder.
To check the programming, the Timer Record List
will appear.
Check field’s “Rec. OK” on the Timer Record List
indicates that the timer recording is programmed
correctly.
6. Press RETURN (O) to exit the Timer Record List.
7. Make sure that you press POWER to switch your
unit to Standby.
Notes:
The timer indicator lights in the display window
when the recorder is in standby with the timer
active. (Nothing is displayed while the [Power Save
Mode] is ON.)
For TV recording with bilingual, set audio channel
from the [TV Rec Audio] in sub-menu of the Setup
menu (see page 20).
You can stop a timer recording in progress.
Press STOP and the confirm message will appear.
Press ENTER to stop the recording or
press RETURN (O) to continue the recording.
HDD
Page 38

38
Checking Timer Recording
Details
Programming can be checked whenever the recorder
is turned on.
Select [Timer Record] option in the [HOME] menu.
The [Timer Record List] menu will appear.
Use v / V to select a timer recording.
Press ENTER to edit the selected program.
Timer Record menu appears.
Press CLEAR to delete the selected program
from the Timer Record List.
If you select [NEW] then press ENTER, you can
program a new timer record (see page 38).
Canceling a Timer Recording
You can clear a timer setting anytime before the
recording actually starts.
Use v / V to select a program you want to erase on
the Timer Recorder List.
Press CLEAR and the confirm message will appear.
Press ENTER while the [OK] is selected to erase
the recording.
Stopping a Timer Recording in Progress
After a timer recording has started, you can still
cancel the program.
You can stop a timer recording in progress.
Press STOP and the confirm message will appear.
Press ENTER to stop the recording or
press RETURN (O) to continue the recording.
Timer Recording Troubleshooting
Even though the timer is set, the recorder will not
record when:
There is no free space on the HDD. (see page 21).
Power is turned on.
There are already 255 titles recorded on the HDD.
You cannot enter a timer program when:
A recording is already underway.
The time you’re trying to set has already passed.
There are already 16 timer programs set.
If two or more timer programs overlap:
The earlier program takes priority.
When the earlier program finishes, the later
program starts.
If two programs are set to start at exactly the same
time, the program entered first takes priority.
Recording from an External
Input
Recording from External Components
You can record from an external component, such as
a camcorder or VCR, connected to any of the
recorder’s external inputs.
1. Make sure that the component you want to record
from is connected properly to the recorder. See
page 13-14.
2. Press AV/INPUT repeatedly to select the external
input to record from.
Tuner: Built-in tuner
AV1: AV1 scart jack mounted on back panel
AV2: AV2 DECODER scart jack mounted on
back panel
AV3: AV IN 3 (VIDEO, AUDIO (L/R)) mounted on
front panel
3. Select the recording mode as necessary by
pressing REC MODE repeatedly. (XP, SP, LP, EP
or MLP)
4. Press REC (z) once.
Recording will start. (The REC indicator lights in
the display window.)
Recording continues until you press STOP (x)
or the HDD is full.
To record for a fixed length of time, see “Instant
Timer Recording” on page 36.
5. Press STOP (x) to stop recording.
Note:
If your source is copy-protected using CopyGuard,
you will not be able to record it using this recorder.
See Copyright on page 48 for more details.
HDD
Page 39

39
Recording
Simultaneous recording and
playback
Playback another title during recording
While the recording is in progress, you can playback a
source from other media at the same time.
1. Start recording.
2. Press HOME to display the Home Menu screen.
3. Use the v / V / b / B and ENTER buttons to
select a media type that you want to play.
4. Start Playback.
The recording will continue while playing the
media from the other mode.
Notes:
You cannot use simultaneous playback and
recording while copying, dubbing or timer
recording.
You cannot edit programs during simultaneous
recording and playback.
Time Slip
You can play back the currently recording title.
1. Start HDD recording.
2. Press PLAY (N).
The playback starts and the recording will continue
while playing back.
You can use PAUSE (X) and SCAN (m / M)
buttons for pause, scan, slow-motion during
playback.
3. Press STOP (x).
The playback will stop then returns to the current
recording position.
Note:
Playback cannot be started until 15 seconds after
recording starts.
HDD
Page 40

40
Editing
Title List and Chapter List Menu
Overview
Using the Title List menu you can edit video content.
The editing features available in the Title List menu
depend on whether you are editing video on DVD, or
the HDD, and whether you’re editing Original content,
or a Playlist.
There are two ways to edit VR mode DVD-RW discs.
You can directly edit the Original content of the disc,
or you can create and edit a Playlist. The Playlist
doesn’t actually change any of the content on the
disc, but just controls how the content is played back.
Editing material recorded on the HDD is similar to
editing the Original content of a VR mode DVD-RW,
with similar commands for erasing and naming titles,
as well as fine control over the content of chapters
within titles for DVD disc.
Note:
During recording, if you display the Title List menu for
the HDD, some of the titles may appear with a mark.
These titles were recorded with a Line Input setting
different to the current setting of the recorder.
During recording, these titles cannot be played.
1. Press MENU/LIST to display the Title List menu.
Playback should be stopped when you do this.
You can also access it using HOME menu,
select [MOVIE] option then select [HDD] or
[DVD] option and press ENTER.
When selecting titles, use the v / V buttons to
display the previous/next page if there are more
than six titles.
If you are editing a VR mode disc, press
MENU/LIST to switch between Original and
Playlist menu.
On the left side of the screen are the menu options.
The main part of the screen shows thumbnails of the
titles (or chapter) on the DVD or HDD. You can
change these thumbnails using the THUMBNAIL
button—see Changing Title Thumbnails on page 41.
Press DISPLAY to display the information of selected
title on the Title List menu.
After selecting a title or chapter on the Title List or
Chapter List menu, then press ENTER. The menu
options appears on the left side of the menu. Use
v / V to select a option then press ENTER to confirm
your selection.
2. To exit the Title List menu, press RETURN (O)
repeatedly.
1. Menu options: To display menu option, select a
title or chapter then press ENTER. The options
displayed differ depending on the disc type.
[Combine] Combines two titles or chapters into one
(page 45, 46).
[Delete] Deletes the title or chapter. (page 43)
[Delete Part] Deletes a part of the Title (page 43).
[Divide] Divides a title into two (page 45).
[Dubbing] Copies the title to another media. (page 49)
[Full Play] Starts playback of the selected title
including the hidden chapters.
[Hide (Show)] Hides (or Shows) the selected title or
chapter. (page 47)
[Move] Moves a chapter on the Chapter List-Playlist
menu to a position on the menu. (page 47)
[Play] Start playback of the selected title or chapter.
The hidden titles and chapters on the DVD+R/RW
cannot be play back.
[Playlist Add] Adds the title or chapter to the Playlist.
(page 42)
[Protect] Protects accidental recording, editing or
deleting of the title. (page 47)
[Rename (Title Name)] Edits the title name. (page 44)
[Search]
- [Chapter]; Displays Chapter List of the Title.
- [Time]; Search time for you want start point
of the title. (page 44)
[Sort] Lists the programs on the Title List menu by
Date, Title, or Category. (page 45)
[Title] Displays Title List of the chapter.
2. Indicates the record mode, free space, and
elapsed time progress bar.
3. Current media
4. Currently selected title.
5. Thumbnail
6. Shows the selected title number and total number
of titles.
7. Shows the title name, recorded date, and
recording length.
123 4 5 6 7
Page 41

41
Editing
HDD, VR Mode: Original and
Playlist Editing
Titles, Chapters and Parts
Titles in the disc’s original content contain one or
more chapters. When you insert a disc’s title into the
Playlist, all the chapters within that title also appear. In
other words, chapters in the Playlist behave exactly as
chapters on a DVD-Video disc do. Parts are sections
of Original or Playlist titles. From the Original and
Playlist menu you can add or delete parts. Adding a
chapter or title to the Playlist creates a new title made
up of a section (ie., chapter) of an Original title.
Deleting a part removes part of a title from the
Original or Playlist menu.
Caution
When editing using the Delete, Add and Move
functions, the start and end frames may not be
exactly as set in the start and end point display.
During Playlist playback, you may notice a
momentary pause between edits. This is not a
malfunction.
Is editing a DVD like editing a video
tape?
No. When you edit a video tape you need one video
deck to play the original tape and another to record
the edits. With DVD, you edit by making a ‘Playlist’ of
what to play and when to play it. On playback, the
Recorder plays the disc according to the Playlist.
About word ‘Original’ and ‘Playlist’
Throughout this manual, you will often see the words
Original and Playlist to refer to the actual content and
the edited version.
Original: content refers to what’s actually recorded
on the disc.
Playlist: content refers to the edited version of the
disc — how the Original content is to be played.
Adding Chapter Markers
You can create chapters within a title by inserting
chapter marks at the desired points.
During playing back, at the point you want to start a
new chapter, press CHP ADD.
A chapter marker icon appears on the TV screen.
Note:
Chapter markers are inserted at regular intervals
automatically. You can change this interval from the
Initial Setup menu (see “Auto Chapter” on page 20).
Changing the Title Thumbnails
Each title displayed in the Title List menu is
represented by a thumbnail picture taken from the
start of that title or chapter.
If you prefer, select a different still picture from within
a title.
Press THUMBNAIL to make the currently displayed
picture the one that appears in the Title List menu.
The still picture that you choose appears in both the
Original or Playlist menu.
Tip:
You can also change the thumbnail picture of the title
on the Chapter List menu of VR mode DVD-RW disc.
Select a chapter on the Chapter List menu then press
THUMBNAIL. The thumbnail picture of the title that
includes the chapter is changed.
+R+RW-RW
VR
HDD
+R+RW-RW
VR
HDD
-RW
VR
Page 42

42
Making a New Playlist
Use this function to add an Original title or chapter to
the Playlist. When you do this, the whole title or
chapter are put into the Playlist (you can delete bits
you don’t need later — see Deleting an Original or
Playlist title/chapter on page 43).
The title appears in the Playlist complete with the
chapter markers that appear in the Original. However,
if you add more chapter markers to the Original later,
these are not automatically copied over into the
Playlist title.
You can add up to 999 chapters to one disc .
1. Choose a title or chapter on the Title List-Original
menu or Chapter List-Original menu to put into the
Playlist, then press ENTER.
The menu options appears on the left side of the
menu.
2. Use v / V to select [Playlist Add] option then press
ENTER.
3. Select [New Playlist] then press ENTER.
The new title appears in the updated Playlist. All
chapters of the title are added to the Playlist.
Adding Additional Title/Chapters
to the Playlist
You can add an Original title or chapter to add to a
Playlist title even if it is already registered.
1. Choose a title or chapter on the Title List-Original
menu or Chapter List-Original menu to put into the
Playlist, then press ENTER.
The menu options appears on the left side of the
screen.
2. Use v / V to select [Playlist Add] from menu
options then press ENTER.
3. Choose a Title List-Playlist that is already
registered to insert a title or chapter, then press
ENTER.
4. Repeat steps 1-3 to add additional title or chapter
on the Playlist.
You can view the added chapters on the Chapter
List-Playlist menu.
5. Press RETURN (O) to exit, or MENU/LIST to go
back to the Title List-Original menu.
-RW
VR
-RW
VR
Page 43

43
Editing
Deleting an Original or Playlist
Title/Chapter
When you erase a title or chapter from the Playlist
menu, you only remove it from the Playlist; the
title/chapter remains in the Original menu.
If you choose to delete a title or chapter from the
Original (title/chapter) menu, the title or chapter is
actually deleted from the disc and the remaining time
available for recording increases. Titles/chapters deleted
from the Original are also removed from the Playlist.
Note:
It may not be possible to delete chapters that are less
than 5 seconds long.
1. Use b / B / v / V to choose a chapter or title you
want to delete on the Title List or Chapter List
menu then press ENTER.
The menu options appears on the left side of the
screen.
Selecting multiple titles on HDD
1. Press MARKER.
A check mark appears on the title.
Press MARKER again to cancel the marked title.
2. Repeat step 1 to mark additional title.
You can add the titles up to 10 titles.
2. Select [Delete] option from the options on the
menu.
Example: Title List (HDD)
3. Press ENTER to confirm.
The confirm message for deleting will appear.
4. Use b / B to select [Yes] then press ENTER.
The selected chapter or title is deleted.
After pressing ENTER, the new, updated menu is
displayed.
5. Repeat steps 1 - 4 to continue to delete from the
menu.
6. Press RETURN (O) repeatedly to exit the menu.
Notes:
When DVD+RW recording, the deleted title’s name
is changed to ‘Deleted Title’.
If more than two titles are repeatedly deleted, the
titles are combined into one.
When you are deleting a title or chapter, only the last
one on DVD+RW increases remaining recording time.
Deleting a Part
You can delete a part which you do not want in the
title.
1. Use b / B / v / V to choose a title you want to
delete on the Title List menu then press ENTER.
The options appears on the left side of the menu.
2. Select [Delete Part] in the [Edit] option then press
ENTER. Edit (Delete Part) menu appears on the
TV screen. [Start Point] icon is highlighted.
Example: Edit (Delete Part) (HDD)
3. Use play, pause step, search and slow-motion to
find the starting point.
4. Press ENTER at the starting point of the section
you want to delete.
‘End Point’ icon is highlighted.
The part is indicated on the Progress Bar.
5. Use play, pause step, search and slow-motion to
find the ending point.
6. Press ENTER at the ending point of the section
you want to delete.
You can cancel the selected point, use v / V to
select [Cancel] icon then press ENTER.
Tip:
With HDD recordings, you can delete additional part.
Select [Next Part] icon on the menu then press
ENTER, then repeat steps 3-6.
7. If you finish to edit, select [Done] icon then press
ENTER.
The confirm message for deleting will appear.
Use b / B to select [Yes] then press ENTER.
The selected part is deleted from the title and Title
List menu appears.
Note:
This function is not available for the titles that are less
than 5 seconds long.
-RW
VR
HDD
Page 44

44
Naming a Title
You can name the titles. The names can be up to 32
characters long.
1. Choose the title you want to name on the Title List
menu, then press ENTER.
The menu options appears on the left side of the
menu.
2. Use v/V to select [Rename] or [Title Name] option
then press ENTER.
Keyboard menu appears.
3. Enter a name for the title. Use b / B / v / V to
select a character then press ENTER to confirm
your selection.
Use MENU/LIST button to change keyboard
type.
OK: Select to finish.
Cancel: Cancels all entered characters.
Space: Inserts a space at the cursor position.
Delete: Deletes the previous character at the
cursor position.
b / B: Moves cursor to left or right.
Tip:
Remote control buttons for entering a name
PLAY (N): Inserts a space at the cursor position.
X (PAUSE/STEP): Deletes the after character at
the cursor position.
x (STOP), CLEAR: Deletes the previous
character at the cursor position.
. / >: Moves cursor to left or right.
Numbers (0-9): Enters the corresponding
character at the cursor position.
Tip:
You can add the genre for HDD title name.
If you set the genre for the title, you can easily find
the title on the relevant genre folder of HDD title
list menu.
4. Choose OK then press ENTER to fix the name
and return to the previous menu screen.
5. Press RETURN (O) repeatedly to exit the menu.
Notes:
Names can be up to 32 characters long.
For discs formatted on a different recorder, you will
see only a limited character set.
When recording on DVD-R, DVD+R or DVD+RW
discs, the entered name is displayed on the DVD
player only after finalization.
Time Search
You can select start point of the title.
1. Use b / B / v / V to choose a title on the Title List
menu then press ENTER.
The options appears on the left side of the menu.
2. Select [Time] option then press ENTER.
[Search] menu appears on the TV screen.
Example: Title List (HDD)
3. Use b / B to find the point you want to start.
The point increase 1 minute step.
If you press and hold b / B then the point increase
5 minute step.
4. Press ENTER to start selected point.
+R-R+RW
-RW
Video
-RW
VR
HDD
Current picture
Selected time
Start time
Selected point
End time
Page 45

45
Editing
Sorting the Title List
This function allows you to access show listings
organized by Date, Title, or Category on the Title ListHDD menu. So you can find title you want to watch
easily.
1. Choose any title on the Title List-HDD menu, then
press ENTER.
The menu options appears on the left side of the
menu.
2. Use v/V to select [Sort] option then press ENTER.
Sort options appears.
3. Use v/V to select [Date], [Title] or [Category]
option then press ENTER.
After pressing ENTER, the sorted menu is
displayed.
Combining Two Titles Into One
Use this function to combine two adjacent OriginalHDD titles into one.
Notes:
This function is not available if there is only one
titles within the HDD.
If there are more than 60 titles on the HDD, you
cannot combine the titles.
1. On the Title List-HDD menu, select the first title of
the two titles you want to combine then press
ENTER.
The menu options appears on the left side of the
screen.
2. Select [Combine] option then press ENTER.
3. Select the second title of the two titles you want to
combine then press ENTER.
Confirm message appears.
4. Use b / B to select [Yes] then press ENTER.
After pressing ENTER, the updated menu is
displayed.
Divide One Title Into Two
Use this command to split a title up into two new titles.
1. On the Title List menu, select a title you want to
divide then press ENTER.
The menu options appears on the left side of the
screen.
2. Select [Divide] option.
Example: Title List (HDD)
3. Press ENTER.
Edit (Divide) menu appears. [Divide] option is
highlighted.
4. Use play, pause step, search and slow-motion to
find the point you want to divide the title.
5. Select [Divide] option then press ENTER at the
point.
To reset the point, select [Cancel] option then
press ENTER. Repeat from step 3.
6. Choose [Done] option then press ENTER to fix the
dividing point.
The title is divided into two new titles. It take up to
4 minutes to divide.
Note:
You cannot select dividing point less than 3 seconds.
+RWHDD
HDD
HDD
The first title’s
thumbnail
Current picture
The second title’s
thumbnail
Page 46

46
Combining Two Chapters Into
One
Use this function to combine two adjacent chapters
into one.
1. On the Chapter List menu, select the second
chapter of the two chapters you want to combine
then press ENTER.
The menu options appears on the left side of the
screen.
2. Use v / V to select [Combine] option.
The combine indicator appears between the two
chapters you want to combine.
3. Press ENTER.
Notes:
This function is not available when;
There is only one chapter whthin the title.
The first chapter is selected.
The chapters that you want to combine are created
by deleting a part from an Original title.
The chapters that you want to combine are created
from different titles.
One of the playlist chapter that you want to combine
has been moved.
Additional functions for the
recordable DVD discs
Using the Title List menu, you can use the disc setting
functions without entering the setup menu.
1. On the DVD Title List menu, use b / B / v / V to
select the [Disc] option then press ENTER.
2. Use v / V to select an option then press ENTER
to confirm your selection.
[Disc Format] Format the inserted disc.(page 21)
[Finalize] Finalize the inserted disc.(page 21)
[Unfinalize] Unfinalize the inserted disc.
(page 21)
[Disc Label] Use this to enter a name for the
disc. This name appears when you load the disc
and when you display disc information onscreen.(page 21)
[Protect] Use this to prevent accidental
recording, editing, deleting of the inserted
disc.(page 21)
[Unprotect] Release the protect function.
+R+RW-RW
VR
HDD
Page 47

47
Editing
Moving a Playlist Chapter
Use this function to re-arrange the playing order of
Playlist chapters on the Title List-Playlist menu.
Note:
This function is not available if there is only one
chapter.
1. Select a chapter on the Chapter List-Playlist menu.
2. Press ENTER.
The menu options appears on the left side of the
menu.
3. Use v / V to select [Move] option from Playlist
options then press ENTER.
4. Use b / B / v / V to choose the place you want to
move the chapter to then press ENTER.
After pressing ENTER, the updated menu is
displayed.
Hide a Chapter/Title
You can skip playing chapters or titles without deleting
from the disc.
1. Use vVbBto choose a chapter or title you want
to hide on the Title List or Chapter List menu, then
press ENTER.
Options appear on the left side of the screen.
2. Select [Hide] option.
Example: Title List (DVD+RW)
3. Press ENTER to confirm.
The chapter’s or title’s thumbnail will dim.
Tip
If you select a hidden chapter or title on the Title List
or Chapter List menu, you can ‘show’ it by choosing
[Show] option on the menu. After doing that, you are
able to see the chapter or title.
Protect a Title
Use this function to protect against accidental
recording, editing or deleting of the title.
1. Press MENU/LIST to display the Title List menu.
2. Use vVbBto choose a title you want to protect
then press ENTER.
Options appear on the left side of the screen.
3. Select [Protect] from the options.
4. Press ENTER to confirm.
The lock mark will appears on the title’s thumbnail.
Tip
If you select a title that has already been protected on
the Title List menu, you can ‘unprotect’ it by choosing
[Protect] option from the Title List menu options. After
doing that, you can edit and delete the title.
-RW
VR
+R+RW
+R+RW
-RW
VR
Page 48

48
Dubbing
Before Dubbing
Use the copying features of this recorder to:
Back up important recordings stored on the HDD to
a DVD.
Make a DVD copy of a recording on the HDD to
play in another player.
Transfer video from a DVD to the HDD for editing.
Transfer edited video from the HDD to DVD.
The simplest method of copying is to use the One
Touch Copy feature. Using this you can very simply
copy the title that’s currently playing from HDD to
DVD, or the other way around.
Note:
If the title’s length is less than 5 seconds, the dubbing
is not available. (from HDD to DVD)
Restrictions on copying
Some video material is copy-once protected: Such
material cannot be copied to HDD or DVD.
You can identify copy-once protected material during
playback by displaying disc information on-screen.
NTSC format signals from the analog inputs is not
recorded correctly with this recorder.
Video signals in SECAM format (from the built-in TV
tuner or from the analog inputs) are recorded in PAL
format.
What is ‘CPRM’?
CPRM is a copy protection system (with scramble
system) only allowing the recording of ‘copy once’
broadcast programs. CPRM stands for Content
Protection for Recordable Media.
CPRM recordings can only be made on DVD-RW
discs formatted in VR mode discs, and CPRM
recordings can only be played on players that are
specifically compatible with CPRM.
Copyright
Recording equipment should be used only for lawful
copying and you are advised to check carefully what
is lawful copying in the area in which you are
making a copy. Copying of copyright material such
as films or music is unlawful unless permitted by a
legal exception or consented to by the rights owner.
This product incorporates copyright protection
technology that is protected by method claims of
certain U.S. patents and other intellectual property
rights owned by Macrovision Corporation and other
rights owners. Use of this copyright protection
technology must be authorized by Macrovision
Corporation, and is intended for home and other
limited viewing uses only, unless otherwise
authorized by Macrovision corporation. Reverse
engineering or disassembly is prohibited.
CONSUMERS SHOULD NOTE THAT NOT ALL
HIGH DEFINITION TELEVISION SETS ARE FULLY
COMPATIBLE WITH THIS PRODUCT AND MAY
CAUSE ARTIFACTS TO BE DISPLAYED IN THE
PICTURE. IN CASE OF 625 PROGRESSIVE SCAN
PICTURE PROBLEMS, IT IS RECOMMENDED
THAT THE USER SWITCH THE CONNECTION TO
THE ‘STANDARD DEFINITION’ OUTPUT. IF
THERE ARE QUESTIONS REGARDING OUR TV
SET COMPATIBILITY WITH THIS MODEL 625p
HDD/DVD RECORDER, PLEASE CONTACT OUR
CUSTOMER SERVICE CENTER.
Fast copying (Maximum 12x)
Copying between DVD and HDD is a completely
digital process and therefore involves no loss of
quality in the audio or video. This means that you can
transfer back and forth without having to worry about
the quality getting worse with each copy ‘generation’.
It also means that copying can be carried out at the
maximum speed possible.
When copying from HDD to DVD, the speed of
copying depends on the recording mode and the kind
of DVD disc you’re using.
Minimum fast copying times
The table below shows the minimum HDD to DVD
copying time for 2 hours of video recorded with SP
mode.
Disc Disc Copying Time
Type Speed (Record Speed)
DVD-R / DVD+R 16x 6.5 min. (12x)
DVD-R / DVD+R / DVD+RW 8x 8 min. (8x)
DVD-RW 6x 12 min. (6x)
DVD-R / DVD+R 4x 13 min. (4x)
DVD-RW / DVD+RW
DVD+R / DVD+RW 2.4x 21 min. (2.4x)
DVD-R / DVD-RW 2x 25 min. (2x)
Notes:
All times in the above table are approximate.
Actual copy speed varies with the part of the disc
being recorded.
There may be cases where even 4x/6x/8x/16x
compatible discs do not copy at full speed.
Fast copying may not be possible when using disc
initialized on another recorder.
Page 49

49
Dubbing
Dubbing from HDD to DVD
1. On the Title List-HDD menu, select a title you want
to dub then press ENTER.
Selecting multiple titles on HDD
1. Press MARKER.
A check mark appears on the title.
Press MARKER again to cancel the marked
title.
2. Repeat step 1 to mark additional title.
You can add the titles up to 10 titles.
The menu options appears on the left side of the
screen.
2. Use v / V to select [Dubbing] option then press
ENTER.
Dubbing menu appears.
3. Use b / B to select record mode (XP, SP, LP, EP,
MLP, AUTO or Fast), then press V.
‘Start’ icon is highlighted.
Fast: See page 48 for more information on Fast
copying.
4. When [Start] icon is highlighted, press ENTER.
Dubbing starts.
5. To stop dubbing at any other time, press
STOP (x).
Notes:
The recording time of [Fast] mode could be varied
depending on data size of source.
Stopping dubbing in [Fast] mode partway through
will cancel the recording and any data recorded up
to that point will be lost.
If the remaining space on the disc is insufficient, the
[Fast] mode is not available.
When you dub the title on the HDD to VR mode
DVD-RW disc, the [Fast] mode is not available for
edited HDD title and Clip Recording title.
Dubbing from DVD to HDD
1. On the Title List menu, select a title you want to
dub then press ENTER.
Menu options appears on the left side of the
screen.
2. Use v / V to select [Dubbing] option then press
ENTER.
Dubbing menu appears.
3. Use b / B to select record mode (XP, SP, LP, EP,
MLP, AUTO or Fast), then press V.
‘Start’ icon is highlighted.
Fast: Only available when copying VR mode disc
to HDD. (See page 48 for more information on
Fast copying.)
4. When [Start] icon is highlighted, press ENTER.
Dubbing starts.
5. To stop dubbing at any other time, press
STOP (x).
Notes:
Depending on the conditions of the recording
equipment or the disc itself, the dubbing may not be
capable.
Stopping dubbing in [Fast] mode partway through
will cancel the recording and any data recorded up
to that point will be lost.
The recording time of [Fast] mode can take up to 19
minutes.
The [Fast] mode is not available for edited title on
the DVD-RW with VR recording mode.
Page 50

50
One Touch Copy (HDD to DVD)
The One Touch Copy feature copies the currently
playing title from the HDD to DVD. The whole title is
copied, regardless of where in the title you start
copying. The recorder copies at the maximum speed
possible.
For One Touch Copy to work, make sure that a
recordable DVD disc is loaded.
During HDD playback, press DUBBING to copy the
current title to DVD.
The on-screen display indicates that the title is being
copied. Playback continues while copying.
You cannot use the One Touch Copy function to
copy a title if any part of the title is copy-once
protected.
One Touch Copy (DVD to HDD)
One Touch Copy from DVD to HDD copies a single
title to the HDD in real time. When you start copying,
playback jumps back to the start of the title, then
continues through to the end of the title, when
recording automatically stops. The copy will be made
in the recording mode (XP, SP, LP, EP or MLP) that is
currently set.
During DVD playback, press DUBBING to copy the
current title to HDD.
Playback starts again from the beginning of the
current title. The on-screen display indicates that the
title is being copied.
Notes:
Video CD cannot be copied to HDD.
The copying stops when then recorder detects a
badly scratched or copy protected part.
If some part of the title being copied is copy-
protected, copying will start, but the copy-protected
portions will not be copied.
During Playlist title’s playback, One Touch Copy is
not available.
Tip:
To stop dubbing at any other time, press STOP (x).
Page 51

51
Reference
Reference
Additional Information
Viewing Title List menu displayed on
other DVD Recorders or Players
You can view the Title List menu displayed on the
other DVD player that is capable of playing DVD+RW
or DVD+R discs.
1. Insert DVD+R or DVD+RW disc recorded already.
2. Press TITLE in play or stop mode.
Title List menu will appear as shown below.
Tip
You can remove the Title List menu by pressing
STOP (x).
3. To play back a title, select the title you want then
press ENTER or PLAY (N).
Playing Your Recordings on Other DVD
Players (Finalizing a Disc)
Most regular DVD players can play finalized discs
recorded in Video mode, finalized DVD+R or
DVD+RWs. A small number of players can also play
DVD-RW discs recorded in VR mode, finalized or not.
Check the manual that came with the other player to
check what formats of discs it will play.
Finalizing ‘fixes’ the recordings and editings in place
so that the disc can be played on a regular DVD
player or computer equipped with a suitable DVDROM drive.
Finalizing a Video mode disc creates a menu screen
for navigating the disc. The menu can be accessed by
pressing MENU/LIST or TITLE.
To finalize a disc, refer to “Finalize” on page 21.
Notes:
Unfinalized DVD+RW is playable on regular DVD
players.
The edited contents of a DVD+RW disc is
compatible on regular DVD players only after
finalization.
Any edited contents of the DVD+R disc are not
compatible on regular DVD players. (Hide, chapter
combine, added chapter mark, etc.)
How long finalization takes depends on the type of
disc, how much is recorded on the disc, and the
number of titles on the disc.
+R+RW
Page 52

52
Area Code
Afghanistan AF
Argentina AR
Australia AU
Austria AT
Belgium BE
Bhutan BT
Bolivia BO
Brazil BR
Cambodia KH
Canada CA
Chile CL
China CN
Colombia CO
Congo CG
Costa Rica CR
Croatia HR
Czech Republic CZ
Denmark DK
Ecuador EC
Egypt EG
El Salvador SV
Area Code
Ethiopia ET
Fiji FJ
Finland FI
France FR
Germany DE
Great Britain GB
Greece GR
Greenland GL
Heard and McDonald Islands
HM
Hungary HU
India IN
Indonesia ID
Israel IL
Italy IT
Jamaica JM
Japan JP
Kenya KE
Kuwait KW
Libya LY
Luxembourg LU
Area Code
Malaysia MY
Maldives MV
Mexico MX
Monaco MC
Mongolia MN
Morocco MA
Nepal NP
Netherlands NL
Netherlands Antilles AN
New Zealand NZ
Nigeria NG
Norway NO
Oman OM
Pakistan PK
Panama PA
Paraguay PY
Philippines PH
Poland PL
Portugal PT
Romania RO
Russian Federation RU
Area Code
Saudi Arabia SA
Senegal SN
Singapore SG
Slovak Republic SK
Slovenia SI
South Africa ZA
South Korea KR
Spain ES
Sri Lanka LK
Sweden SE
Switzerland CH
Thailand TH
Turkey TR
Uganda UG
Ukraine UA
United States US
Uruguay UY
Uzbekistan UZ
Vietnam VN
Zimbabwe ZW
Area Codes
Choose an area code from this list.
Language Code
Abkhazian 6566
Afar 6565
Afrikaans 6570
Albanian 8381
Ameharic 6577
Arabic 6582
Armenian 7289
Assamese 6583
Aymara 6588
Azerbaijani 6590
Bashkir 6665
Basque 6985
Bengali; Bangla 6678
Bhutani 6890
Bihari 6672
Breton 6682
Bulgarian 6671
Burmese 7789
Byelorussian 6669
Cambodian 7577
Catalan 6765
Chinese 9072
Corsican 6779
Croatian 7282
Czech 6783
Danish 6865
Dutch 7876
English 6978
Esperanto 6979
Estonian 6984
Faroese 7079
Language Code
Fiji 7074
Finnish 7073
French 7082
Frisian 7089
Galician 7176
Georgian 7565
German 6869
Greek 6976
Greenlandic 7576
Guarani 7178
Gujarati 7185
Hausa 7265
Hebrew 7387
Hindi 7273
Hungarian 7285
Icelandic 7383
Indonesian 7378
Interlingua 7365
Irish 7165
Italian 7384
Japanese 7465
Javanese 7487
Kannada 7578
Kashmiri 7583
Kazakh 7575
Kirghiz 7589
Korean 7579
Kurdish 7585
Laothian 7679
Latin 7665
Latvian, Lettish 7686
Language Code
Lingala 7678
Lithuanian 7684
Macedonian 7775
Malagasy 7771
Malay 7783
Malayalam 7776
Maltese 7784
Maori 7773
Marathi 7782
Moldavian 7779
Mongolian 7778
Nauru 7865
Nepali 7869
Norwegian 7879
Oriya 7982
Panjabi 8065
Pashto, Pushto 8083
Persian 7065
Polish 8076
Portuguese 8084
Quechua 8185
Rhaeto-Romance 8277
Rumanian 8279
Russian 8285
Samoan 8377
Sanskrit 8365
Scots Gaelic 7168
Serbian 8382
Serbo-Croatian 8372
Shona 8378
Sindhi 8368
Language Code
Singhalese 8373
Slovak 8375
Slovenian 8376
Somali 8379
Spanish 6983
Sudanese 8385
Swahili 8387
Swedish 8386
Tagalog 8476
Tajik 8471
Tamil 8465
Tatar 8484
Telugu 8469
Thai 8472
Tibetan 6679
Tigrinya 8473
Tonga 8479
Turkish 8482
Turkmen 8475
Twi 8487
Ukrainian 8575
Urdu 8582
Uzbek 8590
Vietnamese 8673
Volapük 8679
Welsh 6789
Wolof 8779
Xhosa 8872
Yiddish 7473
Yoruba 8979
Zulu 9085
Language Codes
Use this list to input your desired language for the following initial settings:
Disc Audio, Disc Subtitle, Disc Menu.
Page 53

53
Reference
Controlling Your TV with the
Supplied Remote Control
You can control the sound level, input source, and
power switch of your LG TV with the supplied remote.
You can control your TV using the buttons below.
By pressing You can
POWER Turn the TV on or off.
AV/INPUT Switch the TV’s input source
between the TV and other input
sources.
PR/CH +/– Scans up or down through
memorized channels.
VOL +/– Adjust the volume of the TV.
Controlling other TVs with the remote
You can control the sound level, input source, and
power switch of non-LG TVs as well. If your TV is
listed in the table below, set the appropriate
manufacturer code.
1. While holding down TV POWER button, press the
number buttons to select the manufacturer code
for your TV (see the table below).
2. Release TV POWER button.
Code numbers of controllable TVs
If more than one code number is listed, try entering
them one at a time until you find the one that works
with your TV.
Manufacturer Code Number
LG / GoldStar 1 (Default), 2
Zenith 1, 3, 4
Samsung 6, 7
Sony 8, 9
Hitachi 4
Notes:
Depending on your TV, some or all buttons may not
function on the TV, even after entering the correct
manufacturer code.
If you enter a new code number, the code number
previously entered will be erased.
When you replace the batteries of the remote, the
code number you have set may be reset to the
default setting. Set the appropriate code number
again.
TV Control
Buttons
Page 54

54
Cause
The power cord is disconnected.
TV/DVD mode for the recorder is set
to TV.
The TV is not set to receive recorder
signal output.
The video cable is not connected
securely.
The connected TV power is turned off.
The equipment connected with the
audio cable is not set to receive
recorder signal output.
The audio cables are not connected
securely.
The power of the equipment connected
with the audio cable is turned off.
The audio connecting cord is damaged.
The disc is dirty.
No disc is inserted.
An unplayable disc is inserted.
The disc is placed upside down.
The disc is not placed within the
guide.
The disc is dirty.
The Rating level is set.
The video signal from the external
component is copy-protected.
Those channels are not stored in the
recorder.
Antenna or cables are loose.
Solution
Plug the power cord into the wall
outlet securely.
Press TV/DVD on the remote control
repeatedly to choose DVD mode. TV
indicator disappears in the display
window.
Select the appropriate video input mode
on the TV so the picture from the
recorder appears on the TV screen.
Connect the video cable securely.
Turn on the TV.
Select the correct input mode on the
audio receiver so you can listen to the
sound from the recorder.
Connect the audio cable securely.
Turn on the equipment connected
with the audio cable.
Replace it with new one.
Clean the disc.
Insert a disc. (Check that the disc
indicator in the display window is lit.)
Insert a playable disc. (Check the disc
type, color system, and regional code.)
Place the disc with the playback side
down.
Place the disc on the disc tray
correctly inside the guide.
Clean the disc.
Cancel the Rating function or change
the rating level.
You cannot connect via this recorder.
Connect the component directly to
your TV.
Restore channels. See “Program Edit”
on page 16.
Tighten connections or replace cable.
Troubleshooting
Check the following guide for the possible cause of a problem before contacting service.
Symptom
No power.
No picture.
No sound.
The playback picture is
poor.
The recorder does not
start playback.
The picture from the
external input is
distorted
Some channels are
skipped over when
using PR/CH (+/-).
The picture or sound of
broadcasting channel is
weak or missing.
Page 55

55
Reference
Symptom
Cannot play a disc
recorded using this
recorder on another
player.
Cannot record or did
not record successfully.
Timer recording is not
possible.
The remote control
does not work properly.
Cause
The disc was recorded in Video mode.
Some players will not play even a
finalized disc recorded in Video mode.
The disc was recorded in VR mode,
Discs recorded with copy-once material
cannot be played on other players.
The remaining blank space on the
disc is insufficient.
The source you are trying to record is
copy protected.
When setting the recording channel, the
channel is tuned on the TV’s own tuner.
When recording to a Video mode disc,
programs that are copy-once
protected cannot be recorded.
Clock in recorder is not set to correct
time.
Timer has been programmed
incorrectly.
Timer record indicator light does not
appear after programming timer.
The remote control is not pointed at
the remote sensor of the recorder.
The remote control is too far from the
recorder.
There is an obstacle in the path of the
remote control and the recorder.
The batteries in the remote control
are exhausted.
Solution
Finalize the disc. (page 21)
No solution.
The other player must be RW
compatible in order to play it.
No solution.
Use another disc.
You cannot record the source.
Select the channel on the recorder’s
built-in TV tuner.
Use a VR mode formatted disc for
copy-once material.
Set clock to correct time. See “Clock
Set” on page 17.
Reprogram Timer. See “Timer
Recording” on page 37.
Reprogram Timer.
Point the remote control at the remote
sensor of the recorder.
Operate the remote control within
7 m.
Remove the obstacle.
Replace the batteries with new ones.
Resetting the recorder
If you observe any of the following symptoms...
The unit is plugged in, but the power will not turn
on or off.
The front panel display is not working.
The recorder is not operating normally.
...you can reset the recorder as follows:
Press and hold the POWER button for at least five
seconds. This will force the unit to power off then
turn the unit back on.
Unplug the power cord, wait at least five seconds,
and then plug it in again.
Page 56

56
Specifications
General
Power requirements AC 200-240V, 50/60 Hz
Power consumption 30W
Dimensions (approx.) 430 X 54 X 275 mm (w x h x d) without foot
Net weight (approx.) 4 kg
Operating temperature 5˚C to 35˚C
Operating humidity 5 % to 90 %
Television system PAL I, B/G, I/I, SECAM D/K, K1, SECAM L color system
Recording format PAL
Recording
Recording format DVD Video Recording, DVD-VIDEO
Recordable media HDD (80/160GB), DVD-ReWritable, DVD-Recordable, DVD+ReWritable,
DVD+Recordable
Recordable time DVD (4.7GB): Approx. 1 hour (XP mode), 2 hours (SP mode),
4 hours (LP mode), 6 hours (EP mode), 11 hours (MLP mode)
HDD (80/160GB, MPEG2 Recording): Approx. 21/43 hours (XP mode),
41/84 hours (SP mode), 80/164 hours (LP mode),
144/233 hours (EP mode), 233/477 hours (MLP mode)
Video recording format
Sampling frequency 27MHz
Compression format MPEG 2 (VBR support)
Audio recording format
Sampling frequency 48kHz
Compression format Dolby Digital
Playback
Frequency response DVD (PCM 48 kHz): 8 Hz to 22 kHz, CD: 8 Hz to 20 kHz
DVD (PCM 96 kHz): 8 Hz to 44 kHz
Signal-to-noise ratio More than 100 dB (AUDIO OUT connector)
Harmonic distortion Less than 0.008% (AUDIO OUT connector)
Dynamic range More than 95 dB (AUDIO OUT connector)
Inputs
ANTENNA IN Antenna input, 75 ohms
VIDEO IN 1.0 Vp-p 75 ohms, sync negative, RCA jack x 1 / SCART x 2
AUDIO IN 2.0 Vrms more than 47 kohms, RCA jack (L, R) x 1 / SCART x 2
Outputs
COMPONENT VIDEO OUT (Y) 1.0 V (p-p), 75 Ω, sync negative, RCA jack x 1
(P
B)/(PR) 0.7 V (p-p), 75 Ω, RCA jack x 2
Audio output (digital audio) 0.5 V (p-p), 75 Ω, RCA jack x 1
Audio output (analog audio) 2.0 Vrms (1 KHz, 0 dB), 600 Ω, RCA jack (L, R) x 1 / SCART x 2
Accessory:
Scart cable . . . . . . . . . . . . . . . . . . . . . . . . . . . . .1 RF Coaxial Cable . . . . . . . . . . . . . . . .1
Remote control . . . . . . . . . . . . . . . . . . . . . . . . . .1 Batteries . . . . . . . . . . . . . . . . . . . . . .2
Design and specifications are subject to change without notice.
P/NO : MFL36926505
Page 57

GRAVEUR
HDD/DVD
MANUEL DU
PROPRIÉTAIRE
MODÈLE: RH266
RH265
Veuillez lire l’ensemble des instructions de ce manuel
attentivement avant de raccorder de mettre un fonctionnement
ou de régler cet appareil.
RH266.265SL_NA3FLL_FRE
Page 58

2
Le symbole du flash lumineux en forme de flèche
dans un triangle équilatéral indique à l’utilisateur
la présence dans l’appareil, d’éléments à haute
tension non-isolés, d’une puissance suffisante
pour provoquer un choc électrique.
Le point d’exclamation dans un triangle équilatéral
indique à l’utilisateur la présence, dans le guide
accompagnant le produit, d’instructions
importantes relatives au fonctionnement et à
l’entretien (SAV).
ATTENTION: Ne pas installer cet équipement à un endroit
confiné tel qu’une bibliothèque ou similaire.
ATTENTION:
Ne pas bloquer les ouvertures d’aération. Installez l’appareil
en respectant les instructions du constructeur.
Les fentes et les ouvertures de l’appareil ont été conçues
pour assurer une bonne ventilation et un bon fonctionnement
du produit en le protégeant de toute surchauffe.
Les ouvertures ne doivent jamais être bloquées en installant
le produit sur un lit, un canapé, un tapis ou sur toute autre
surface similaire. Cet appareil ne doit pas être installé dans
un emplacement fermé comme une bibliothèque ou une
étagère à moins que vous assuriez une ventilation particulière
ou que les instructions de constructeur l’autorisent.
ATTENTION:
RADIATIONS LASER DE CATÉGORIE 3B VISIBLES ET
INVISIBLES LORSQUE LE BOÎTIER EST OUVERT OU
LORSQUE LES CROCHETS SONT DÉFECTUEUX. ÉVITEZ
DE REGARDER DIRECTEMENT LE FAISCEAU.
ATTENTION:
Ce produit est doté d’une technologie Laser.
Pour garantir une utilisation convenable du produit, veuillez
lire le manuel de l’utilisateur attentivement et le conserver
pour référence future. Si l’appareil doit être réparé, contactez
un centre de réparation agréé.
Effectuer des contrôles, des réglages ou toute autre
manipulation autre que celles spécifiées dans le présent manuel
peut entraîner une exposition dangereuse à des radiations.
Afin d’éviter toute exposition directe avec le faisceau laser, ne
pas essayer d’ouvrir le boîtier. Les rayons sont visibles
lorsque le boîtier est ouvert. Ne pas regarder le faisceau laser.
AVERTISSEMENT: Cet appareil ne doit pas rentrer en
contact avec de l’eau (suintement ou éclaboussure). Les
objets contenant des substances liquides, comme des vases,
ne doivent pas être placés sur l’appareil.
AVERTISSEMENT concernant le câble d’alimentation.
Il est conseillé de brancher la plupart des appareils
électroménagers sur un circuit dédié;
C’est-à-dire, un circuit qui est relié uniquement à cet appareil
et qui n’a pas d’autres prises ni d’autres circuits de
dérivation. Vérifiez la page concernant ce sujet dans le
présent manuel.
Ne pas surcharger les prises murales. Des prises murales
surchargées, mal fixées ou endommagées, les rallonges
électriques, les câbles d’alimentation élimés, le revêtement
abîmé ou déchiré des fils électriques, constituent un danger.
Chacun de ces facteurs peut provoquer un choc électrique
ou un incendie. Examinez périodiquement le câble
d’alimentation de votre appareil, et s’il présente des signes
de détérioration, débranchez-le et cessez d’utiliser l’appareil.
Faites remplacer le câble d’alimentation par un réparateur
agréé.
Protégez le câble d’alimentation de mauvais traitements
physiques ou mécaniques. Evitez qu’il ne soit tordu, vrillé,
pincé, coincé dans une porte ou que l’on marche dessus.
Faites particulièrement attention aux prises, et à l’endroit où
le câble sort de l’appareil.
Pour déconnecter l’appareil du réseau électrique, retirez la
prise du câble d’alimentation. Lors de l’installation de
l’appareil, assurez-vous que la prise soit facilement
accessible.
Élimination de votre ancien appareil
1. Ce symbole, représentant une poubelle sur
roulettes barrée d'une croix, signifie que le produit
est couvert par la directive européenne
2002/96/EC.
2. Les éléments électriques et électroniques
doivent être jetés séparément, dans les
vide-ordures prévus à cet effet par votre
municipalité.
3. Une élimination conforme aux instructions
aidera à réduire les conséquences négatives et
risques éventuels pour l'environnement et la
santé humaine.
4. Pour plus d'information concernant l'élimination
de votre ancien appareil, veuillez contacter
votre mairie, le service des ordures ménagères
ou encore la magasin où vous avez acheté ce
produit.
Ce produit a été fabriqué en conformité avec les
directives européennes 89/336/EEC, 93/68/EEC
et 73/23/EEC.
ATTENTION: Afin d’éviter tout risque d’incendie ou de
choc électrique, ne pas exposer ce produit à la pluie ou à
la moisissure.
Avertissement: Afin de réduire le risque de choc
électrique, ne pas ouvrir le boîtier de protection.
L’appareil ne comprend aucun élément pouvant être réparé
par l’utilisateur. Toute réparation doit être faite
par un personnel qualifié.
ATTENTION
RISQUE DE CHOC
ÉLECTRIQUE. NE PAS
OUVRIR.
Page 59

3
Introduction
Contenus
Introduction . . . . . . . . . . . . . . . . . . . . . . . . . . . . . . . . . .4-9
À propos de l’affichage du symbole . . . . . . . . . . . .4
Symboles utilisés dans ce manuel . . . . . . . . . . . . . . . .4
Remarques sur les Disques . . . . . . . . . . . . . . . . . . . . .4
Disques lisibles et disques enregistrables . . . . . . . . . . .5
Disques lisibles . . . . . . . . . . . . . . . . . . . . . . . . . . . . . .6
Code Régional . . . . . . . . . . . . . . . . . . . . . . . . . . . . . . .6
Disponibilité des fonctionnalités de copie ou de
déplacement . . . . . . . . . . . . . . . . . . . . . . . . . . . . . . . .6
À propos du lecteur de disque dur intégré . . . . . . . . . . .7
Panneau avant . . . . . . . . . . . . . . . . . . . . . . . . . . . . . . .8
Télécommande . . . . . . . . . . . . . . . . . . . . . . . . . . . . . .9
Fonctionnement de la télécommande . . . . . . . . . . . . . .9
Branchements et réglages . . . . . . . . . . . . . . . . . . . .10-22
Panneau arrière . . . . . . . . . . . . . . . . . . . . . . . . . . . . .10
Branchement à une antenne . . . . . . . . . . . . . . . . . . . .10
Raccordements à votre téléviseur . . . . . . . . . . . . . . . .11
Raccordement à un amplificateur . . . . . . . . . . . . . . . .12
Raccordement à d’autres appareils
audio/vidéo (A/V) . . . . . . . . . . . . . . . . . . . . . . . . . .13-14
Configuration Auto . . . . . . . . . . . . . . . . . . . . . . . . . . .14
Utilisation du Menu Accueil . . . . . . . . . . . . . . . . . . . . .15
Réglages initiaux . . . . . . . . . . . . . . . . . . . . . . . . . . . .15
Fonctionnement général . . . . . . . . . . . . . . . . . . . .15
Réglages généraux . . . . . . . . . . . . . . . . . . . . . . . .15-18
Programmation automatique . . . . . . . . . . . . . . . . .15
Éditer un programme . . . . . . . . . . . . . . . . . . . . . .16
Réglage Horloge . . . . . . . . . . . . . . . . . . . . . . . . .17
Format de l’image / Connection AV2 . . . . . . . . . . .17
Format sortie vidéo /
Mode économique . . . . . . . . . . . . . . . . . . . . . . . .17
Balayage progressif . . . . . . . . . . . . . . . . . . . . . . .17
Initialisation . . . . . . . . . . . . . . . . . . . . . . . . . . . . .18
Réglage de la langue . . . . . . . . . . . . . . . . . . . . . . . . .18
Menu d’affichage . . . . . . . . . . . . . . . . . . . . . . . . .18
Langu. Menu disque/audio/soustitres . . . . . . . . . .18
Réglages audio . . . . . . . . . . . . . . . . . . . . . . . . . . . . .18
Dolby Digital / DTS / MPEG . . . . . . . . . . . . . . . . .18
Fréquence d’échantillonnage . . . . . . . . . . . . . . . .18
DRC [Réglage de la compression dynamique] . . .18
Réglage du verrouillage enfants
(commande parentale) . . . . . . . . . . . . . . . . . . . . . . . .19
Classement / Réglage du mot de passe /
Code de région . . . . . . . . . . . . . . . . . . . . . . . . . .19
Code d’enregistrement DivX . . . . . . . . . . . . . . . . .19
Réglages de l’enregistrement . . . . . . . . . . . . . . . . . . .20
Mode d’enregistrement / Format de l’image . . . . .20
Chapitrage auto . . . . . . . . . . . . . . . . . . . . . . . . . .20
Time shift . . . . . . . . . . . . . . . . . . . . . . . . . . . . . . .20
Réglages du disque . . . . . . . . . . . . . . . . . . . . . . . . . .21
Formater le disque . . . . . . . . . . . . . . . . . . . . . . . .21
Finalisation / Nommer le disque . . . . . . . . . . . . . .21
Protection du disque /
PBC (Commande de lecture) . . . . . . . . . . . . . . . .21
Explications générales concernant l’affichage
à l’écran . . . . . . . . . . . . . . . . . . . . . . . . . . . . . . . . . . .22
Lecture . . . . . . . . . . . . . . . . . . . . . . . . . . . . . . . . . . . .23-33
Fonctions de lecture de base . . . . . . . . . . . . . . . . .23-26
Lecture d’un fichier d e cinema DivX . . . . . . . . . . . . . .27
Lecture d’un CD Audio ou d’un fichier MP3/WMA . . . .28
Lecture programmée de disques CD Audio et
de fichiers MP3/WMA . . . . . . . . . . . . . . . . . . . . . . . . .29
Visionnement d’un fichier JPEG . . . . . . . . . . . . . . .30-31
Édition d’un fichier MP3/WMA, JPEG ou DivX . . . .32-33
Enregistrement . . . . . . . . . . . . . . . . . . . . . . . . . . . . .34-39
À propos de l’enregistrement DVD . . . . . . . . . . . . . . .34
À propos de l’enregistrement sur
le disque dur (HDD) . . . . . . . . . . . . . . . . . . . . . . . . . .34
Timeshift (Lecture différée) . . . . . . . . . . . . . . . . . . . . .35
Enregistrement de base d’un téléviseur . . . . . . . . . . .36
Enregistrement instantané par minuterie . . . . . . . . . . .36
Enregistrement programmé . . . . . . . . . . . . . . . . . . . .37
Vérification des détails de l’enregistrement
programmé . . . . . . . . . . . . . . . . . . . . . . . . . . . . . . . . .38
Enregistrement à partir d’une entrée extérieure . . . . . .38
Enregistrement et lecture simultanés . . . . . . . . . . . . .39
Lecture d’un autre titre pendant l’enregistrement . .39
Time Slip . . . . . . . . . . . . . . . . . . . . . . . . . . . . . . .39
Édition . . . . . . . . . . . . . . . . . . . . . . . . . . . . . . . . . . . .40-47
Vue d’ensemble du menu liste de titres et liste de
chapitres . . . . . . . . . . . . . . . . . . . . . . . . . . . . . . . . . .40
Disque dur, mode VR: Édition du contenu original
et de la liste de lecture . . . . . . . . . . . . . . . . . . . . . . . .41
Ajout de repères de chapitres . . . . . . . . . . . . . . . . . . .41
Modification des vignettes de titres . . . . . . . . . . . . . . .41
Création d’une nouvelle liste de lecture . . . . . . . . . . . .42
Ajout de titres/chapitres supplémentaires à la
liste de lecture . . . . . . . . . . . . . . . . . . . . . . . . . . . . . .42
Effacement d’un titre/chapitre du contenu
original ou de la liste de lecture . . . . . . . . . . . . . . . . .43
Effacement d’une partie . . . . . . . . . . . . . . . . . . . . . . .43
Attribution d’un nom à un titre . . . . . . . . . . . . . . . . . . .44
Recherche Temps . . . . . . . . . . . . . . . . . . . . . . . . . . .44
Classer la Liste des Titres . . . . . . . . . . . . . . . . . . . . . .45
Combinaison de deux titres en un . . . . . . . . . . . . . . . .45
Diviser Un Titre en Deux . . . . . . . . . . . . . . . . . . . . . . .45
Combinaison de deux chapitres en un . . . . . . . . . . . .46
Fonctionnalités supplémentaires pour DVD
enregistrables . . . . . . . . . . . . . . . . . . . . . . . . . . . . . . .46
Déplacement d’un chapitre sur la liste de lecture . . . .47
Masquage d’un chapitre/titre . . . . . . . . . . . . . . . . . . . .47
Protection d’un titre . . . . . . . . . . . . . . . . . . . . . . . . . .47
Copie . . . . . . . . . . . . . . . . . . . . . . . . . . . . . . . . . . . .48-50
Avant d’effectuer une copie . . . . . . . . . . . . . . . . . . . .48
Copie à partir du disque dur vers un DVD . . . . . . . . . .49
Copie à partir d’un DVD sur un disque dur . . . . . . . . .49
Copie à une touche (du disque dur vers un DVD) . . . .50
Copie à une touche (du DVD vers le disque dur) . . . .50
Référence . . . . . . . . . . . . . . . . . . . . . . . . . . . . . . . . . .51-56
Informations Supplémentaires . . . . . . . . . . . . . . . . . . .51
Visionnement du menu liste de titres affiché sur
d’autres graveurs ou lecteurs de DVD . . . . . . . . .51
Lecture de vos enregistrements sur d’autres
lecteurs de DVD (finalisation d’un disque) . . . . . . .51
Codes des langues . . . . . . . . . . . . . . . . . . . . . . . . . . .52
Code des régions . . . . . . . . . . . . . . . . . . . . . . . . . . . .52
Utilisation de votre téléviseur à l’aide de la
télécommande fournie . . . . . . . . . . . . . . . . . . . . . . . .53
Dépannage . . . . . . . . . . . . . . . . . . . . . . . . . . . . . .54-55
Spécifications . . . . . . . . . . . . . . . . . . . . . . . . . . . . . . .56
Page 60

4
Introduction
Pour assurer une utilisation appropriée de l’appareil,
veuillez lire ce manuel du propriétaire soigneusement
et le conserver pour une référence ultérieure.
Ce manuel fournit des informations sur le
fonctionnement et l’entretien de votre graveur. Si
l’unité a besoin d’entretien, contactez un centre de
service technique agréé
À propos de l’affichage du
symbole
Il se peut que “ ” apparaisse sur l’affichage de votre
téléviseur pendant son fonctionnement. Cela indique
que la fonction spécifiée dans le manuel de
l’utilisateur n’est pas disponible sur cet appareil.
Symboles utilisés dans ce
manuel
Remarque:
Indique des remarques particulières et des
caractéristiques du fonctionnement.
Conseil:
Indique des conseils et des idées qui facilitent le
travail.
Une section dont le titre contient l’un des symboles
suivants ne concerne que le disque représenté par le
symbole en question.
Titres enregistrés sur le disque dur (HDD)
Tous les disques DVD listés ci-après.
Disques DVD-RW avec mode
d’enregistrement vidéo (EV)
Disques DVD-RW avec mode
d’enregistrement Vidéo
Disques DVD+RW
Disques DVD-R
Disques DVD+R
Disques DVD-Vidéo
Disques CD Vidéo
Disques CD Audio
Fichiers DivX
Fichiers MP3
Fichiers WMA
Fichiers JPEG
Remarques sur les Disques
Manipulation des disques
Ne touchez pas la face enregistrée du disque.
Prenez le disque par les bords, de manière à ne pas
laisser vos empreintes digitales sur la surface. Ne collez
jamais d’étiquette ni de ruban adhésif sur le disque.
Stockage des disques
Après la lecture, gardez le disque dans sa pochette.
N’exposez pas le disque à la lumière directe du soleil,
ni à des sources de chaleur ; ne le laissez pas non
plus à l’intérieur d’une voiture garée sous la lumière
directe du soleil.
Nettoyage des disques
Les empreintes digitales et la poussière sur la surface
du disque peuvent réduire la qualité de l’image et
distordre le son. Pour éviter cela, nettoyez le disque
avant la lecture, au moyen d’un chiffon propre.
Essuyez le disque en allant du centre vers la
périphérie.
N’utilisez pas de dissolvants forts tels que l’alcool, la
benzine, le diluant, les produits de nettoyage
courants, ou les vaporisateurs antistatiques pour les
disques de vinyle.
JPEG
WMA
MP3
DivX
ACD
VCD
DVD
+R
-R
+RW
-RW
Video
-RW
VR
DVD ALL
HDD
Condensation d’humidité
Ne mettez jamais l’appareil en marche juste après
l’avoir déplacé d’un endroit froid à un endroit chaud.
Attendez deux ou trois heures avant de le mettre en
fonctionnement.
Si vous utilisez ce produit dans une telle situation,
vous pouvez endommager les disques et les
composants internes.
Page 61

5
Introduction
Disques lisibles et disques enregistrables
DVD-RW (Disque vidéo numérique – Réenregistrable)
Les disques DVD-RW peuvent être formatés pour un enregistrement en mode EV ou Vidéo.
Ces disques peuvent être enregistrés à plusieurs reprises. Les enregistrements peuvent être
effacés pour enregistrer de nouveau sur le même disque.
[mode EV]
Les enregistrements peuvent être édités à plusieurs reprises.
Lisibles seulement sur des lecteurs compatibles avec le mode EV (une fois finalisés).
[mode Vidéo]
Lisibles sur des lecteurs DVD courants (une fois finalisés)
Fonctions d’édition limitées
DVD-R (Disque vidéo numérique - Enregistrable)
Ces disques peuvent être enregistrés une seule fois. Une fois finalisés, les disques DVD-R ne
peuvent pas être réenregistrés ni édités.
Les disques DVD-R peuvent être formatés en mode Vidéo seulement.
Lisibles sur des lecteurs DVD courants (une fois finalisés)
Fonctions d’édition limitées
DVD+RW (Disque vidéo numérique + Réenregistrable)
Ces disques peuvent être enregistrés à plusieurs reprises. Les enregistrements peuvent être
effacés pour enregistrer de nouveau sur le même disque.
Lisibles sur des lecteurs DVD+RW compatibles (finalisation automatique)
Les contenus édités peuvent être lus sur des lecteurs DVD+RW compatibles seulement après
finalisation.
Les enregistrements peuvent être édités au niveau des titres/chapitres
DVD+R (Disque vidéo numérique + Enregistrable)
Ces disques peuvent être enregistrés une seule fois. Une fois finalisés, les disques DVD+R ne
peuvent plus être réenregistrés ni édités.
Lisibles sur des lecteurs DVD+R compatibles (une fois finalisés)
Les contenus édités ne sont pas compatibles avec les lecteurs DVD+R courants. (Cacher,
Combiner des chapitres, Ajouter des repères de chapitre, etc.)
Fonctions d’édition des titres/ chapitres limitées.
Disques DVD enregistrables recommandés
DVD-R DVD+R DVD-RW DVD+RW
Mitsubishi (8x, 16x) Mitsubishi (8x, 16x) Mitsubishi (4x) Mitsubishi (4x)
That’s (8x, 16x) Ricoh (8x, 16x) Verbatim (4x) SONY (2.4x)
SONY (16x) SONY (16x) JVC (4x) Verbatim (2.4x)
--Victor (4x) Ricoh (2.4x, 4x)
--Maxell (4x) -
Page 62

6
Disques lisibles
DVD (disque de 8 cm / 12 cm)
Des disques tels que ceux des films, pouvant être achetés ou loués.
CD Vidéo (VCD) (disque de 8 cm / 12 cm)
Des disques CD VIDÉO ou CD-R/CD-RW au format CD VIDÉO / Super CD VIDÉO
CD Audio (disque de 8 cm / 12 cm)
Des disques CD musique ou CD-R/CD-RW au format CD musique pouvant être achetés.
CD-R/CD-RW (disque de 8 cm / 12 cm)
Des disques CD-R/CD-RW contentant des titres audio, ou des fichiers DivX, MP3, WMA, ou JPEG.
Remarques:
En fonction des conditions liées à l’équipement d’enregistrement ou aux disques CD-R/RW (ou DVD±R/RW),
certains disques CD-R/RW (ou DVD±R/RW) ne peuvent pas être lus par cet appareil.
Ne collez pas de papier ou d’étiquette sur aucune des deux faces du disque (face étiquetée ou face
enregistrée).
N’utilisez pas de disques ayant des formes irrégulières (par exemple, en forme de cœur ou octogonale).
Autrement, cela peut entraîner des défauts de fonctionnement.
En fonction du logiciel d’enregistrement et de la finalisation, il se peut que certains disques enregistrés
(CD-R/RW (ou DVD±R/RW) ne puissent pas être lus.
Il se peut que les disques DVD-R/RW, DVD+R/RW et CD-R/RW enregistrés à partir d’un ordinateur
personnel ou d’un graveur DVD ou CD ne puissent pas être lus s’ils sont endommagés ou sales, ou si la
lentille du graveur est sale ou humide.
Si vous enregistrez un disque à l’aide d’un ordinateur personnel, même si vous le faites sur un format
compatible, il se peut qu’il ne puisse pas être lu en raison des réglages du logiciel d’application utilisé pour
créer le disque. (Contactez l’éditeur du logiciel pour des informations plus détaillées.)
Pour assurer une qualité de lecture optimale, ce graveur requiert le respect de certaines normes techniques
en matière de disques et d’enregistrements. Les disques DVD préenregistrés respectent automatiquement
ces règles. Il existe différents types de formats de disques enregistrables (y compris les disques CD-R
contenant des fichiers MP3 ou WMA) et pour assurer une compatibilité de lecture, certaines conditions
préalables s’imposent (voir ci-dessus).
Vous devez également noter que le téléchargement de fichiers MP3 / WMA et de musique d’Internet est
soumis à une autorisation. Notre compagnie n’est pas habilitée à octroyer ce droit. Dans tous les cas, il
convient de demander cette autorisation au détenteur des droits d’auteur.
Code Régional
Cet appareil dispose d’un code régional imprimé à l’arrière de l’unité. Il peut donc lire uniquement les DVD
étiquetés avec la même zone ou avec “TOUTE ZONE”.
Remarques sur les codes régionaux
La plupart des disques DVD disposent d’un globe avec un ou plusieurs chiffres clairement visible sur la
pochette. Ce chiffre doit correspondre à la zone de l’appareil ou bien le disque ne pourra être lu.
Si vous essayez de lire un DVD de zone différente, le message ‘Code région erroné. Ne peut pas lire.’
apparaît sur votre écran de télévision.
Disponibilité des fonctionnalités de copie ou de déplacement
À partir de Vers MP3/WMA JPEG DivX CD Audio CD Vidéo Titre*
1
HDD DISQUE Non Non Non Non Non Oui
DISQUE HDD Oui Oui Oui Non Non Oui
*1 Le titre est enregistré à partir de cet appareil.
Page 63

7
Introduction
À propos du lecteur de disque
dur intégré
Le disque dur intégré (HDD) est une pièce fragile de
l’équipement. Veuillez utiliser ce graveur en
respectant les directives ci-dessous, pour éviter
d’endommager le disque dur.
Nous vous conseillons de sauvegarder vos
enregistrements importants sur des disques DVD de
manière à être protégé contre les pertes
accidentelles.
Ne déplacez pas le graveur tant qu’il est allumé.
Installez et utilisez le graveur sur une surface stable
et nivelée.
N’obstruez pas la grille de ventilation située à
l’arrière de l’appareil.
N’utilisez pas le graveur dans des endroits
excessivement chauds ou humides, ni dans ceux
pouvant être sujets à des changements brusques
de température. De la condensation peut se former
à l’intérieur du graveur à cause des changements
brusques de température. Ceci peut provoquer le
dysfonctionnement du disque dur.
Ne mettez pas le graveur hors tension en le
débranchant de la prise murale ou en coupant le
disjoncteur.
Ne déplacez pas l’appareil immédiatement après
l’avoir mis hors tension. Si vous avez besoin de
déplacer le graveur, veuillez suivre les pas suivants:
1. Une fois que le message POWER OFF s’affiche
à l’écran, attendez au moins deux minutes.
2. Débranchez le cordon d’alimentation de la prise
murale.
3. Déplacez le graveur.
En cas de panne de courant pendant que l’appareil
est sous tension, il peut y avoir une perte de
certaines données enregistrées sur le disque dur.
Le disque dur est très fragile. L’utilisation de
manière inappropriée ou dans un environnement
inadéquat peut réduire considérablement la durée
de vie du disque dur. La congélation inattendue des
images en cours de lecture ainsi qu’un bruit de bloc
(mosaïque) évident constituent des signes d’un
problème au niveau du disque dur.
Cependant, parfois, il se peut qu’il n’y ait aucun
avertissement indiquant un dysfonctionnement du
disque dur.
Si le disque dur tombe en panne, la lecture du
matériel enregistré s’avérera impossible. Dans ce
cas, il faudra remplacer le disque dur.
Page 64

8
Panneau avant
a
11
/ I (Touche POWER)
Permet de mettre le graveur hors ou sous tension.
b Plateau à disque
Insérez-y un disque.
c Écran d’affichage
Affiche l’état actuel du graveur.
T/S: Indique le mode Timeshifting (Lecture
différée).
REC: Le graveur est en train d’enregistrer.
HDD: Le graveur est mode disque dur.
DVD: Le graveur est en mode DVD.
HDD bBDVD: Le graveur est en train de
réenregistrer.
TV: Indique que le graveur est en mode
syntoniseur du téléviseur.
: Indique que le graveur est en mode
d’enregistrement programmé ou que
l’enregistrement par minuterie est programmé.
: Montre le statut actuel de l’enregistreur
(horloge, numéro de programme, etc.).
d Capteur infrarouge
Pointez la télécommande du graveur dans cette
direction.
e AV IN 3 (ENTRÉE VIDÉO/ENTRÉE AUDIO
(Gauche/Droite))
Raccordez-y la sortie audio/vidéo d’une source
extérieure (système audio, téléviseur/moniteur,
magnétoscope, caméscope, etc.).
f OPEN/CLOSE (Z) (OUVRIR/FERMER)
Permet d’ouvrir et de refermer le plateau à disque.
g N (PLAY)
Pour commencer la lecture.
h z (REC)
Pour commencer l’enregistrement.
Appuyez-y à plusieurs reprises pour régler le
temps d’enregistrement.
abcdefgh
Page 65

9
Introduction
a
POWER: Permet de mettre le
graveur hors ou sous tension.
OPEN/CLOSE (Z): Permet
d’ouvrir et de refermer le plateau à
disque.
DVD: Pour sélectionner le mode
de fonctionnement DVD pour
l’appareil.
HDD: Pour sélectionner le mode
de fonctionnement HDD pour
l’appareil.
AV/INPUT: Permet de changer
l’entrée utilisée pour
l’enregistrement (Syntoniseur,
AV1-3).
Touches numériques 0-9:
Permettent de sélectionner une
option numérotée dans un menu.
DUBBING: Pour copier un DVD
sur le disque dur (ou le contenu du
disque dur sur un DVD).
Touche de commande du
téléviseur: Voir page 53.
b
SCAN (m / M): Pour faire une
recherche en avant ou en arrière.
SKIP (. / >): Pour aller au
chapitre ou à la piste précédente
ou suivante.
PAUSE/STEP (X): Pour arrêter
momentanément la lecture ou
l’enregistrement.
PLAY (N): Pour commencer la
lecture.
STOP (x): Pour arrêter la lecture
ou l’enregistrement.
c
HOME: Permet d’accéder ou de
quitter le menu HOME.
MENU/LIST: Permet d’accéder au
menu sur un disque DVD, et de
choisir parmi le menu Title ListOriginal (Liste originale de titres) et
le menu Title List-Playlist (Liste de
titres de la Liste de lecture).
b / B / v / V (gauche/droite/
haut/bas): Permet de sélectionner
une option dans un menu.
ENTER ( ): Confirme la sélection
d’un menu.
PR/CH (+/-): Permet de balayer
les chaînes mémorisées vers le
haut ou vers le bas.
DISPLAY: Permet d’accéder à
l’écran d’affichage.
RETURN (O): Pour quitter un
menu.
TIMESHIFT: Active le mode pause
pendant le visionnement d’une
émission télévisée en direct
(pause en direct).
AUDIO ( ): Pour sélectionner
une langue ou bien une chaîne
audio.
SUBTITLE ( ): Permet de
sélectionner une langue de
sous-titres.
CHP. ADD: Pour insérer un
chapitre pendant la lecture.
d
REC (z): Pour commencer
l’enregistrement.
REC MODE: Permet de
sélectionner le mode
d’enregistrement.
TITLE: Permet de sélectionner le
mode d’enregistrement.
THUMBNAIL: Sélectionnez une
photo pour la miniature.
ZOOM: Pour agrandir l’image
vidéo.
MARKER: Pour insérer un repère
en un point quelconque pendant la
lecture.
SEARCH: Permet d’afficher le
menu Recherche des repères.
CLEAR: Efface un numéro de
plage de la Liste de Programmes
ou un repère du menu Recherche
des repères.
REPEAT: Pour répéter un chapitre,
une plage, un titre ou tout.
A-B: Pour répéter une séquence.
TV/DVD: Pour voir les chaînes
sélectionnées par le syntoniseur
du graveur ou celui du téléviseur.
Le bouton *n’est pas disponible.
Télécommande
Fonctionnement de la
télécommande
Pointez la télécommande vers le capteur infrarouge et
appuyez sur les touches.
Attention
Ne mélangez pas de piles neuves et de piles usées.
Ne mélangez jamais non plus différents types de piles
(standard, alcalines, etc.).
Installation des piles de la télécommande
Retirez le couvercle du
compartiment à piles sur la partie
arrière de la télécommande et
insérez deux piles R03
(format AAA) en veillant à bien
orienter les polarités.
a
b
c
d
Page 66

10
Branchement à une antenne
Retirez la prise du câble de l’antenne de votre
téléviseur et insérez-le dans la prise antenne à
l’arrière de l’enregistreur. Branchez un bout dans la
prise TV de l’enregistreur et l’autre bout dans la prise
d’entrée de l’antenne de votre téléviseur.
Raccordement coaxial RF
Reliez la prise ANTENNA OUT de l’enregistreur à la
prise d’entrée de l’antenne de la télévision à l’aide du
câble coaxial 75-ohm fourni (R). La prise ANTENNA
transmet le signal via la prise d’entrée ANTENNA IN.
a ANTENNA IN
Branchez l’antenne à ce terminal.
b COMPONENT OUTPUT (Y P
B PR)
Reliez à un téléviseur avec des prises d’entrée
YPB P
R.
c Prise AV 2 DECODER SCART
Pour raccorder la sortie audio/vidéo d’une source
extérieure (décodeur de télévision payante, boîtier
décodeur, magnétoscope, etc.).
d Ventilateur
e Cordon d’alimentation secteur
Branchez-le à la source d’alimentation électrique.
f ANTENNA OUT
Transmet le signal de la prise ANTENNA IN à
votre TV/écran.
g COAXIAL (Prise de sortie audio numérique)
Reliez à un équipement audio numérique (coaxial)
h AUDIO OUTPUT (Gauche/Droite)
Branchez à une TV avec des câbles audio.
i Prise AV 1 SCART
Pour raccorder un téléviseur avec prise péritel
(SCART).
Panneau arrière
Branchements et réglages
Panneau arrière du téléviseur
Panneau arrière du graveur
Antenne
abc d e
fgh i
Aerial
ANTENNA
INPUT
SCART INPUT
Rear of TV
AUDIO INPUT
R
L
R
VIDEO
INPUT
Rear of the recorder
Page 67

11
Branchements
et réglages
Raccordements à votre
téléviseur
Effectuez l’un des raccordements suivants, en
fonction des capacités de vos appareils actuels.
Lorsque vous utilisez les prises de sortie
COMPONENT OUTPUT, réglez l’option Format de
la Sortie Vidéo dans le menu de configuration sur
YP
BP
R.
Lorsque vous utilisez la prise SCART, réglez
l’option Format sortie vidéo dans le menu de
configuration RGB.
Conseils
En fonction de votre téléviseur et des autres
appareils que vous souhaitez raccorder, il y a
plusieurs manières de connecter ce graveur.
Effectuez seulement un des raccordements décrits
ci-dessous.
Veuillez vous rapporter aux manuels d’utilisation de
votre téléviseur, magnétoscope, système stéréo ou
tout autre dispositif, le cas échéant, afin d’effectuer
les connexions appropriées.
Attention
–Veillez à connecter le graveur directement au
téléviseur. Réglez le téléviseur sur le canal d’entrée
vidéo approprié.
– Ne raccordez pas la prise AUDIO OUTPUT du
graveur à la prise d’entrée phono (platine
d’enregistrement) de votre système audio.
– Ne raccordez pas le graveur par l’intermédiaire de
votre magnétoscope. L’image DVD risque d’être
déformée par le système de protection contre la
copie.
Raccordement SCART [PÉRITEL]
Raccordez la prise péritel AV1 SCART du graveur aux
prises d’entrée correspondantes du téléviseur à l’aide
du câble péritel (T).
Raccordement audio (Gauche/Droite)
Raccordez les prises AUDIO OUTPUT gauche et
droite du graveur aux prises d’entrée audio gauche et
droite du téléviseur à l’aide des câbles audio (A). Ne
raccordez pas la prise AUDIO OUTPUT du graveur à
la prise d’entrée phono (platine d’enregistrement) de
votre système audio.
Branchement du Composant Vidéo
Reliez les prises de sortie COMPONENT OUTPUT de
l’enregistreur vers les prises d’entrée correspondantes
de la télévision en utilisant un câble Y P
B PR
(C).
Si vous possédez une télévision haute définition ou «
compatible avec la technologie numérique », vous
pouvez profiter de la sortie scan progressif de
l’enregistreur pour obtenir la meilleure résolution vidéo
possible. Si votre téléviseur ne reconnaît pas le format
Scan Progressif, l’image sera troublée sir vous
essayez la fonction Scan Progressif sur votre
enregistreur.
Pour régler le Balayage Progressif sur [MARCHE]
dans le menu de réglage du signal progressif, lisez
la page 17.
Attention
Une fois la sortie Balayage Progressif réglée, les
images pourront être visionnées seulement sur
téléviseur ou moniteur compatible avec le Balayage
Progressif. Si vous réglez le Balayage Progressif sur
[Marche] par erreur, vous devez réinitialiser le
graveur. Tout d’abord, retirez le disque du graveur.
Ensuite, appuyez sur STOP (x) et maintenez cette
touche enfoncée pendant cinq secondes avant de la
relâcher. La sortie vidéo reviendra au réglage
standard et l’image sera visible à nouveau dans un
téléviseur ou moniteur analogue conventionnel.
Panneau arrière du téléviseur
Panneau arrière
du graveur
Rear of TV
COMPONENT VIDEO INPUT
Y
Pr
Pb
SCART INPUT
AUDIO INPUT
L
R
C
Rear of the recorder
T
A
Page 68

12
Raccordement à un
amplificateur
Raccordement à un amplificateur équipé de
stéréo analogique à deux voies ou de Dolby
Pro Logic ll/ Pro Logic.
Raccordez les prises AUDIO OUTPUT gauche et
droite du graveur aux prises d’entrée audio gauche et
droite de votre amplificateur, récepteur ou système
stéréo, à l’aide des câbles audio (A).
Raccordement à un amplificateur équipé de
stéréo numérique à deux voies (PCM) ou à un
récepteur Audio/ Vidéo équipé d’un décodeur
multivoie (Dolby Digital™, MPEG 2 ou DTS).
1. Raccordez l’une des prises DIGITAL AUDIO
OUTPUT (COAXIALE X) à la prise d’entrée
correspondante de votre amplificateur. Utilisez un
câble audio numérique en option (coaxial X).
2. Il vous faut activer la sortie numérique de ce
graveur. (Rapportez-vous à la section “Réglages
audio”, page 18)
Son multivoie numérique
La connexion multivoie numérique assure une qualité
sonore optimale. Pour cela, vous devez disposer d’un
récepteur audio/vidéo multivoie acceptant un ou
plusieurs formats audio reconnus par votre graveur
(MPEG 2, Dolby Digital et DTS). Consultez le mode
d’emploi du récepteur et les logos figurant sur le
panneau avant de cet appareil.
Attention:
En raison de l’accord de licence DTS, la sortie
numérique est réglée en DTS lorsque le train binaire
audio DTS est sélectionné.
Remarques:
–
Si le format audio de la sortie numérique est
incompatible avec votre récepteur, ce dernier émettra
un son puissant et déformé ou bien restera muet.
– Le son ambiophonique numérique à six voies par
l’intermédiaire d’une connexion numérique n’est
possible que si votre récepteur est équipé d’un
décodeur numérique multivoie.
– Pour connaître le format audio du disque DVD en
cours dans l’écran d’affichage, appuyez sur AUDIO.
– Ce graveur n’effectue pas le décodage interne
(2 canaux) d’une plage sonore DTS. Pour profiter
de l’effet de son ambiophonique multivoie DTS,
vous devez raccorder ce graveur à un récepteur
DTS compatible, à travers l’une des sorties audio
numériques du graveur.
Fabriqué sous licence de Dolby Laboratories.
“Dolby”, “Pro Logic”, et le symbole double-D sont
marques déposées de Dolby Laboratories.
“DTS” et “DTS Digital Out” sont marques déposées
de Digital Theater Systems, Inc.
Panneau arrière du graveur
Amplificateur (Récepteur)
Rear of the recorder
X
COAXIAL
Amplifier (Receiver)
A
R
L
AUDIO INPUTDIGITAL INPUT
Page 69

13
Branchements
et réglages
Raccordement à d’autres
appareils audio/vidéo (A/V)
Raccordement d’un décodeur pour
télévision payante/ Canal Plus
Vous pouvez regarder ou enregistrer des émissions
du service de télévision payante/Canal Plus en
raccordant un décodeur (non fourni) au graveur.
Débranchez le graveur du secteur lors du
raccordement du décodeur.
Pour regarder ou enregistrer les émissions de PAY-TV
ou de Canal Plus, réglez l’option [Connexion AV2] sur
[Décoder] (voir page 17) et réglez l’option [Décoder
Marche/Arrêt] de l’émission sur [Marche] dans le
menu du configuration (voir page 16).
Conseil:
Vous n’avez pas besoin d’allumer le graveur pour voir
sur votre téléviseur les signaux du syntoniseur
raccordé.
Remarque:
Si vous débranchez le graveur du secteur, vous ne
pourrez pas voir les signaux du décodeur raccordé.
Raccordement à la prise AV2 DECODER
[DÉCODEUR AV2]
Raccordez un magnétoscope ou un dispositif
d’enregistrement similaire à la prise AV2 DECODER
de ce graveur.
Pour regarder ou enregistrer la source à partir de la
prise AV2 DECODER, réglez l’option [Connection
AV2] sur [Autres] (voir page 17).
Conseil:
Vous n’avez pas besoin d’allumer le graveur pour voir
sur votre téléviseur les signaux du syntoniseur raccordé.
Remarques:
Les images contenant des signaux de protection
contre la copie interdisant toute copie ne pourront
pas être enregistrées.
Si les signaux du graveur sont transmis à travers le
magnétoscope, il se peut que les images reçues sur
l’écran de votre téléviseur ne soient pas nettes.
Assurez-vous de connecter votre magnétoscope au
graveur et à votre téléviseur dans l’ordre montré
ci-dessous. Pour visionner des cassettes vidéo,
faites-le par la deuxième entrée de ligne de votre
téléviseur.
Lorsque vous enregistrez sur un magnétoscope
depuis le graveur, ne réglez pas la source d’entrée
sur ‘TV’ en appuyant sur la touche TV/DVD de la
télécommande.
Si vous utilisez un syntoniseur “B Sky B”,
assurez-vous de raccorder la prise VCR SCART du
syntoniseur à la prise du AV2 DECODER.
Si vous débranchez le graveur du secteur, vous ne
pourrez pas voir les signaux du magnétoscope ou
du syntoniseur raccordé.
TV
VCR RECORDER
Line input 1
Line input 2
Décodeur de
télévision
payante/Canal Plus
Panneau arrière du graveur
Magnétoscope, Boîte de
raccordement,
Syntoniseur satellite, etc.
Panneau arrière du graveur
Entrée de ligne 2
Entrée de ligne 1
Magnét
oscope
DVD
TV
PAY-TV/Canal Plus
Decorder
SCART AV
TV
VCR, Cable Box, or
Satellite Tuner, etc.
Rear of the recorder
Rear of the recorder
Page 70

14
Branchement aux prises AV IN 3
Reliez les prises d’entrée (AV IN 3) de l’enregistreur
aux prises de sortie audio/vidéo de votre accessoire
avec les câbles audio/vidéo.
Configuration Auto
Après avoir appuyé pour la première fois sur POWER
pour allumer ou réinitialiser l’appareil, l’Assistant de
Configuration règle la langue, l’heure et les chaînes
automatiquement.
1. Sélectionnez une langue pour le menu de
Configuration et pour l’affichage à l’écran.
Utilisez v / V pour sélectionner une langue puis
appuyez sur ENTER.
2. Veuillez vérifier les branchements de l’antenne.
Appuyez sur ENTER pour passer à l’étape
suivante.
3. Entrez l’information nécessaire pour la date et
l’heure.
b / B (gauche/droite): pour déplacer le curseur
vers la colonne précédente ou suivante.
v / V (haut/bas): pour changer le réglage à
l’emplacement du curseur.
Appuyez sur ENTER pour confirmer votre réglage.
4. Utilisez v / V pour sélectionner un pays et
appuyez sur la touche B puis appuyez sur ENTER
pendant que l’option [Lect.] est sélectionnée.
Le tuner va scanner automatiquement toutes les
chaînes disponibles dans votre région et les
garder en mémoire.
5. Appuyez sur ENTER pour terminer la
configuration.
Tableau de connexions des appareils
accessoires (magnétoscope, caméscope, etc.)
Panneau avant du
graveur
Jack panel of Accessory Component
(VCR, Camcorder, etc.)
AUDIO
OUTPUT
R
L
VIDEO
OUTPUT
Front of
the recorder
Page 71

15
Branchements
et réglages
Utilisation du Menu Accueil
À partir Menu Accueil, vous pouvez accéder à tous les
médias de l’enregistreur pouvant être lus ou
enregistrés.
1. Appuyez sur HOME pour afficher le Menu Accueil.
2. Utilisez les touches b / B pour sélectionner
l’option principale que vous souhaitez.
3. Utilisez les touches v / V et ENTER pour
sélectionner la option secondaire désirée.
4. Pour quitter le Menu Accueil, appuyez sur HOME.
TV
TV HDD: Pour revenir à la position TV en mode
HDD. Appuyer sur la touche HDD de la
télécommande vous permettra également de choisir
directement cette option.
TV DVD: Pour revenir à la position TV en mode
HDD. Appuyer sur la touche HDD de la
télécommande vous permettra également de choisir
directement cette option.
CINEMA
HDD: Pour afficher le menu de la Liste des Titres
du HDD (page 40).
HDD DivX: Pour afficher le menu [Liste de fims] du
HDD (page 27).
DISQUE:
- Pour afficher le menu Liste des Titres pour les
disques enregistrables (page 40).
- Pour afficher le menu [Liste de fims] pour les
disques DivX (page 27)
- Pour lire les CD Vidéos ou les DVD Vidéos (pages
23-26).
PHOTO (Voir page 30)
HDD: Pour afficher le menu [Liste de photos] du
HDD
DISQUE: Pour afficher le menu [Liste de photos] du
disque
MUSIQUE (Voir page 28)
HDD: Pour afficher le menu [Liste de musiques] du
HDD
DISQUE: Pour afficher le menu [Liste de musiques]
(ou CD Audio) du disque.
Menu facile (Voir page 15)
Réglages: Pour afficher le menu de configuration.
Program. enregis.: Pour afficher le menu
d’enregistrement programmé.
Réglages initiaux
Il y a plusieurs manières d’adapter les réglages
fournis sur ce système menu. La plupart des menus
se composent de trois niveaux pour configurer les
options, mais certains exigent plus de niveaux à
cause de la variété de réglages.
Fonctionnement général
1. Sélectionnez l’option SETUP dans le menu HOME.
Le menu de configuration apparaît.
2. Sélectionnez l’option souhaitée à l’aide des
touches v / V.
3.
Une fois que l’option souhaitée a été sélectionnée,
appuyez sur B pour vous déplacer au deuxième niveau.
4. Sélectionnez la deuxième option souhaitée à l’aide
des touches v / V.
5. Appuyez sur B pour vous déplacer au troisième
niveau.
6. Sélectionnez vos réglages à l’aide des touches v / V
puis appuyez sur ENTER pour confirmer votre choix.
Certains menus exigent des pas supplémentaires.
7. Appuyez sur RETURN pour quitter le menu de
configuration.
Remarque:
Appuyez sur b pour revenir au niveau précédent.
Réglages généraux
Programmation automatique
Ce graveur est équipé d’un syntoniseur synthétisé de
fréquences capable de recevoir jusqu’à 88 chaînes de
télévision.
Preparation:
Reliez l’enregistreur à l’antenne désirée comme le
montre la section Branchement à l’Antenne, page
10.
1. Sélectionnez l’option [Program. Auto.].
2. Appuyez sur B pour vous déplacer au troisième
niveau.
L’option [Pays] s’affiche en surbrillance.
3. Sélectionnez un pays à l’aide des touches v / V
puis appuyez sur B.
L’icône [Lect.] s’affiche en surbrillance.
Si votre pays n’est pas sur la liste, sélectionnez [Autres].
4. Appuyez sur ENTER pour démarrer la recherche
des chaînes.
Le syntoniseur balayera automatiquement toutes
les chaînes disponibles dans la région et les
stockera dans sa mémoire.
Remarque:
Si vous passez le menu Configuration Auto, et
accédez au menu Configuration pour la première fois,
vous pouvez régler uniquement l’option [Program.
Auto.] Vous pouvez régler les autres options après
avoir terminé la [Program. Auto.].
Page 72

16
Réglages Généraux (suite)
Éditer un programme
Vous pouvez éditer une chaîne de façon manuelle
(ajouter, effacer, nommer, déplacer, etc.).
1. Sélectionnez l’option [Editer un programme] puis
appuyez sur B.
2. Appuyez sur ENTER avec l’option [Editer]
sélectionnée.
Le menu Liste de programmes s’affiche.
3. Sélectionnez un numéro PR à l’aide des touches
v / V puis appuyez sur ENTER.
4. Sélectionnez l’option programme à l’aide des
touches v / V puis appuyez sur ENTER.
[Program Edit] Pour régler la chaîne de façon
manuelle. Lisez “Éditer un programme”
ci-contre.
[Renommer la station] Pour changer le nom de
la station.
Une fenêtre permettant d’introduire des
caractères s’affiche.
Pour introduire des caractères, rapportez-vous à
la page 44.
Les noms peuvent comporter jusqu’à 5
caractères.
[Déplacer] Pour ranger les positions des chaînes
sur la Liste de chaînes. Appuyez sur v / V pour
déplacer le programme sélectionné à une
nouvelle position.
[Effacer] Pour neutraliser une position de
programme dont vous n’avez pas besoin.
[Décoder Marche/Arrêt] Pour régler les chaînes
en fonction du décodeur. Ce réglage vous
permet de regarder ou d’enregistrer des chaînes
de la télévision payante/Canal Plus. Appuyez
sur ENTER; [Décoder] apparaît sur l’afficheur.
Appuyez à nouveau sur ENTER pour quitter le
réglage.
5. Appuyez sur RETURN (O) à plusieurs reprises
pour quitter le menu Liste de programmes.
Éditer un programme
Vous pouvez effectuer une recherche pour
sélectionner et stocker des chaînes de télévision
manuellement.
Lorsque vous sélectionnez [Program Edit] (étape 4 cidessus), la fenêtre de réglage des chaînes s’affiche.
1. Sélectionnez les options à l’aide des touches b / B
et appuyez sur v / V pour changer les réglages.
[PR] indique la position du programme
sélectionné.
[Seek] Pour rechercher une chaîne de façon
automatique.
La recherche s’arrête lorsque le graveur
syntonise une chaîne.
[Ch.] Pour changer le numéro de chaîne.
[MFT] Effectue une syntonisation raffinée de la
chaîne, pour obtenir une image plus nette.
[PAL/SECAM] Changent le système de
signalisation de télévision (PAL ou SECAM).
2. Sélectionnez OK puis appuyez sur ENTER pour
confirmer les réglages effectués et revenir au menu
Liste de programmes.
Décodeur AV1
Pour régler la prise péritel AV1 pour l’entrée des
signaux vidéo codés.
1. Appuyez sur AV/INPUT lorsque le menu Liste de
programmes s’affiche.
2. Appuyez sur ENTER afin que [Canal +]
apparaisse à l’écran.
Appuyez de nouveau sur ENTER pour éteindre la
configuration.
Arrêt: Envoie des signaux à partir de la prise
péritel AV1. Sélectionnez cette prise
normalement.
Marche: Les signaux vidéos codés sont arrivent
par la prise péritel AV1 et sortent par la prise
AV2 DECODER pour être décodés.
Le signal décodé rentre ensuite par la prise
AV2 DECODER; vous pouvez alors enregistrer
ou regarder des chaînes de la télévision
payante/Canal Plus.
Page 73

17
Branchements
et réglages
Réglages Généraux (suite)
Réglage Horloge
1. Sélectionnez l’option [Réglage Horloge] puis
appuyez sur B.
2. Introduisez les informations nécessaires
concernant la date et l’heure.
b / B (gauche/droite): Déplace le curseur à la
colonne précédente ou suivante.
v / V (haut/bas): Permet de changer le réglage de
la position actuelle du curseur.
3. Appuyez sur ENTER pour confirmer votre réglage.
Format de l’image
Sélectionne le rapport hauteur/largeur du téléviseur
raccordé (4:3 standard ou large).
[Boite aux lettres 4:3] Sélectionnez cette option
lorsque l’appareil est relié à un écran 4:3. Permet
d’afficher une grande image avec des bandes en
haut et en bas de l’écran.
[Pan Scan 4:3] Sélectionnez cette option lorsque
l’appareil est relié à un écran 4:3. Permet d’afficher
automatiquement une grande image sur l’intégralité
de l’écran et élimine les parties qui ne rentrent pas.
[Large 16:9] Sélectionnez cette option lorsque
l’appareil est relié à un grand écran ou à une TV
disposant d’une fonctionnalité grand écran.
Connection AV2
Vous pouvez brancher un décodeur ou un autre
appareil à la prise AV2 DECODER située à l’arrière.
[Décoder] Sélectionnez [Décoder] si vous reliez la
prise AV2 DECODER de l’enregistreur à un
décodeur de PAY-TV ou de Canal Plus.
[Autres] Sélectionnez [Autres] si vous reliez la prise
AV2 DECODER de l’enregistreur à un
magnétoscope ou une appareil similaire.
Format sortie vidéo
Sélectionnez l’option Format de la Sortie Vidéo en
fonction du type de connexion de l’appareil.
[YPBPR] Lorsque votre TV est branchée sur la prise
de sortie COMPONENT OUTPUT de cet appareil.
[RGB] Lorsque votre TV est connectée à la prise
SCART(signal RGB) de cet appareil.
Mode économique
Vous pouvez régler l’appareil en mode économie
d’énergie. Rien n’apparaît dans l’écran d’affichage
lorsque l’appareil est éteint.
[Arrêt] Mode Économie d’Énergie n’est pas activé.
[Marche] Mode Économie d’Énergie est en activé
Remarques:
Les signaux de télévision codée (CANAL+ ou
PREMIERE) ne sont pas décodés en mode
économie d’énergie.
Le Mode Économie d’Énergie n’est pas disponible
lorsque l’appareil est en veille pour un
enregistrement programmé ou bien lorsqu’il est
éteint après réception des signaux de télévision
codée (CANAL+ ou PREMIERE).
Balayage progressif
Le Balayage Progressif Vidéo assure la meilleure
qualité d’image et sans papillotement. Si vous utilisez
les prises COMPONENT OUTPUT mais votre graveur
est raccordé à un téléviseur standard (analogue),
réglez le Balayage Progressif sur [Arrêt]. Si vous
utilisez les prises COMPONENT OUTPUT pour
raccorder cet appareil à un téléviseur ou à un
moniteur compatible avec le signal balayage
progressif, réglez le Balayage Progressif sur [Marche].
Remarque:
Progressive Scan (Scanner progressif) peut être
désactivé à partir du menu d’installation si le Format
sortie Vidéo est sur RGB.
Attention
Une fois la sortie Balayage Progressif réglée, les
images pourront être visionnées seulement sur
téléviseur ou moniteur compatible avec le Balayage
Progressif. Si vous réglez le Balayage Progressif sur
[Marche] par erreur, vous devez réinitialiser le
graveur. Tout d’abord, retirez le disque du graveur.
Ensuite, appuyez sur STOP (x) et maintenez cette
touche enfoncée pendant cinq secondes avant de la
relâcher. La sortie vidéo reviendra au réglage
standard et l’image sera visible à nouveau dans un
téléviseur ou moniteur analogue conventionnel.
Page 74

18
Réglages Généraux (suite)
Initialisation
Vous pouvez réinitialiser le graveur pour rétablir les
paramètres d’usine et initialiser le disque dur.
[Réglage usine] S’il vous le faut, vous pouvez
réinitialiser le graveur et rétablir tous les réglages
d’usine. Certaines options ne peuvent pas être
rétablies. (Classification, Mot de passe et Code de
région).
[HDD Format] Initialise le disque dur
(HDD: Hard Disk Drive): tout le contenu enregistré
sur le disque dur sera effacé.
1. Sélectionnez l’option [Initialisation] puis appuyez
sur B.
2. Sélectionnez l’option souhaitée à l’aide des
touches v / V puis appuyez sur ENTER.
Un message de confirmation s’affichera.
3. Sélectionnez [Oui] ou [Non] à l’aide des touches
b / B puis appuyez sur ENTER.
Réglage de la langue
Menu d’affichage
Sélectionnez une langue pour le menu de
configuration et l’affichage sur écran.
Langu. Menu disque/audio/soustitres
[Original] Se rapporte à la langue originale dans
laquelle le disque a été enregistré.
[Autres] Pour sélectionner une autre langue,
appuyez sur les touches numériques puis sur
ENTER pour introduire le numéro à 4 chiffres
correspondant, selon la liste des codes de langue
qui se trouve dans la section Références
(rapportez-vous à la page 52).
Si vous introduisez un code de langue faux,
appuyez sur CLEAR.
[Arrêt] (pour les sous-titres du disque): Élimine les
sous-titres.
Réglages audio
Tous les disques DVD comportent une diversité
d’options de sortie audio.
Réglez la sortie audio de votre graveur en accord
avec le type de système audio que vous utilisez.
Dolby Digital / DTS / MPEG
[Bitstream]: Sélectionnez “Bitstream” si vous
raccordez la prise de DIGITALAUDIO OUT à un
amplificateur ou à un autre dispositif équipé d’un
décodeur Dolby Digital, DTS ou MPEG.
[PCM] (pour Dolby Digital / MPEG): Sélectionnez
cette option lors du raccordement à un amplificateur
stéréo numérique à deux voies.
Les disques DVD encodés sur Dolby Digital ou
MPEG seront automatiquement sous mixés au
format audio PCM sur deux voies.
[Arrêt] (pour DTS): Si vous sélectionnez “Arrêt”, le
signal DTS ne sort pas à travers la prise DIGITAL
AUDIO OUT.
Fréquence d’échantillonnage
Si votre récepteur ou amplificateur NE PEUT PAS
gérer les signaux à 96 KHz, sélectionnez 48 KHz.
Une fois ce choix effectué, cet appareil convertira
automatiquement tous les signaux à 96 kHz en 48
kHz, de sorte que votre système puisse les décoder.
Si votre récepteur ou amplificateur peut gérer les
signaux à 96 KHz, sélectionnez cette option. Une fois
ce choix effectué, l’appareil restituera tous les types
de signaux sans plus de traitement.
DRC [Réglage de la compression dynamique]
En format DVD, la technologie audio numérique vous
permet d’écouter les plages sonores d’un programme
de la manière la plus réaliste et précise possible.
Cependant, il se peut que vous souhaitiez utiliser la
fonction de compression dynamique de la sortie audio
(laquelle équilibre le volume entre les sons les plus
élevés et les plus faibles).
Ainsi, vous pouvez regarder un cinema en maintenant
le volume sonore à un niveau relativement bas sans
nuire à la netteté du son. Pour activer cette fonction,
réglez DRC sur [Marche].
Page 75

19
Branchements
et réglages
Réglage du verrouillage enfants
(commande parentale)
Classement
Pour bloquer la lecture des DVD classifiés en fonction
de leur contenu. Tous les disques ne sont pas
classifiés.
1. Sélectionnez l’option [Niv. contrôle parental] puis
appuyez sur B.
2. Pour accéder au classement, au mot de passe et
au code de région, vous devez introduire le code
de sécurité à 4 chiffres que vous avez créé.
Si vous n’avez pas encore créé de code de
sécurité, vous pouvez le faire à ce moment.
Introduisez un code à 4 chiffres et appuyez sur
ENTER. Introduisez encore une fois le code et
appuyez sur ENTER pour vérifier. Si vous avez fait
une erreur, appuyez sur EFFACER avant
d’appuyer sur ENTER.
3. Sélectionnez un classement à l’aide des touches
v / V.
[1] - [8]: Le niveau un (1) de classement comporte
le plus de restrictions, tandis que le niveau huit (8)
est le moins restrictif.
[Pas de limite]: Si vous sélectionnez [Pas de
limite], la commande parentale est désactivée et le
disque est lu sans restrictions.
4. Appuyez sur ENTER pour confirmer la sélection
de votre classification.
Remarque:
Si vous établissez un classement pour le graveur,
toutes les scènes du disque ayant un classement égal
ou inférieur à celui que vous avez réglé seront lues.
Les scènes ayant un classement supérieur ne seront
pas lues, à moins qu’il y ait une scène alternative
disponible sur le disque. Cette dernière doit avoir un
classement égal ou inférieur à celui que vous avez
réglé. Si aucune scène alternative convenable n’est
trouvée, la lecture s’arrête. Vous devez introduire le
mot de passe à 4 chiffres ou changer le niveau de
classement pour que la lecture du disque continue.
Réglage du mot de passe
1. Sélectionnez l’option [Mot de passe] puis appuyez
sur B.
2. Suivez l’étape 2 de la section [Niv. contrôle
parental].
Pour changer votre mot de passe, sélectionnez
[Modifier] puis appuyez sur ENTER. Introduisez un
nouveau code à 4 chiffres et appuyez à nouveau
sur ENTER. Introduisez-le de nouveau pour vérifier.
Pour effacer le mot de passe, sélectionnez
[Supprimer] puis appuyez sur ENTER.
En cas d’oubli de votre code à 4 chiffres.
Si vous oubliez votre mot de passe, suivez les étapes
ci-dessous pour l’effacer.
1. Menu Configuration Affichage puis sélectionnez
une icône du premier niveau.
2. Utilisez les touches numériques pour indiquer le
numéro à 6 chiffres « 210499 ».
3. Sélectionnez [Oui] et appuyez sur ENTER. Le mot
de passe à 4 chiffres est effacé. Introduisez un
nouveau code.
Code de région
Introduisez le code de la zone dont les normes ont été
utilisées pour classer le disque DVD vidéo. À cet effet,
rapportez-vous à la liste des codes de zone (page 52).
1. Sélectionnez l’option [Aucun contrôle] puis
appuyez sur B.
2. Suivez l’étape 2 de la section [Niv. contrôle
parental].
3. Sélectionnez le premier caractère à l’aide des
touches v / V
4. Déplacez le curseur à l’aide des touches B et
sélectionnez le deuxième caractère à l’aide des
touches v / V.
5. Appuyez sur ENTER pour confirmer votre
sélection de code zone.
Code d’enregistrement DivX
Nous vous fournissons le code d’enregistrement de
DivX® VOD (Vidéo sur demande) qui vous permet de
louer et d’acheter des vidéodisques en utilisant le
service de DivX® VOD. Pour plus d’informations, visitez
www.divx.com/vod.
1. Choisissez l’option [DivX Reg. Code] puis appuyez
sur B.
2. Appuyez sur ENTRER tandis que [Aperçu] est
choisie, alors le code d'enregistrement apparaîtra.
3. Employez le code d’enregistrement pour acheter
ou louer les vidéodisques du service de Divx®
VOD à www.divx.com/vod. Suivez les instructions
et téléchargez le vidéodisque sur un disque pour
la lecture sur cette unité.
Remarque:
Tous les vidéodisques téléchargés de DivX® VOD
peuvent être lus seulement sur cette unité.
Page 76

20
Réglages de l’enregistrement
Mode d’enregistrement
Vous pouvez régler la qualité des images qui seront
enregistrées:
XP (Qualité haute), SP (Qualité standard),
LP (Qualité faible), EP (Qualité améliorée).
MLP (Durée Maximum de Lecture)
XP – Réglage de haute qualité, alloue un temps
d’enregistrement d’environ 1 heure sur un disque
DVD (4.7GB).
SP – Qualité par défaut, suffisante pour la plupart
des applications, alloue un temps d’enregistrement
d’environ 2 heures sur un disque DVD (4.7GB).
LP – Qualité d’enregistrement vidéo légèrement
inférieure, alloue un temps d’enregistrement
d’environ 4 heures sur un disque DVD (4.7GB).
EP – Faible qualité vidéo, donne environ 6 heures
d’enregistrement sur un DVD (4.7GB).
MLP – La plus grande durée d’enregistrement avec
la plus faible qualité vidéo. Environ 11 heures
d’enregistrement sur un DVD (4.7GB).
Remarque:
Il se peut que vous voyiez une image fragmentée ou
des sous-titres décalés pendant la lecture de
contenus enregistrés en mode EP et MLP.
Format de l’image
Pendant l’enregistrement sur DVD, vous pouvez
régler le rapport hauteur/largeur d’enregistrement de
façon à adapter à votre gré le matériel que vous êtes
en train d’enregistrer (16:9 ou 4:3).
Chapitrage auto
Pendant l’enregistrement sur DVD, les repères de
chapitre sont placés suivant le réglage préétabli. Vous
pouvez changer cet intervalle à 5 minutes, 10 minutes
ou 15 minutes. Si vous sélectionnez [Aucun], le
repérage automatique des chapitres et le réglage
[Aucun] seront établis.
Time shift
Régler cette fonction sur [Marche] pour que votre
appareil utilise la fonctionnalité Timeshift
automatiquement sans devoir appuyer sur la touche
TIMESHIFT.
La fonction Timeshift démarrera automatiquement 10
secondes après le démarrage du mode tuner de la
TV.
Si vous souhaitez utiliser cette fonction manuellement,
reportez-vous à la section “Timeshift” page 35.
[Marche] Pour utiliser la fonction Timeshift
automatiquement.
[Arrêt] Pour utiliser la fonction manuellement.
Page 77

21
Branchements
et réglages
Réglages du disque
Formater le disque
Si vous insérez un disque complètement blanc, le
graveur l’initialisera.
DVD-R: Le graveur initialisera le disque en mode
Vidéo.
Le mode d’enregistrement sera toujours le mode
Vidéo.
DVD-RW/DVD+RW/DVD+R: Le menu “Formatage
du disque” s’affichera.
Sélectionnez [OK] et appuyez sur ENTER.
Le disque DVD-RW démarre en mode Vidéo.
Vous pouvez aussi reformater les disques
DVD-RW/DVD+RW à partir du menu de configuration,
tel que montré ci-dessous.
1. Sélectionnez l’option [Formater le disque] puis
appuyez sur B.
2. Appuyez sur ENTER avec l’option [Lect.]
sélectionnée.
Le menu ‘Format du disque’ s’affiche.
3. Sélectionnez le mode souhaité (Mode VR ou
Mode Vidéo) à l’aide des touches b / B puis
appuyez sur ENTER.
Pour les DVD+RW, allez directement à l’étape 4.
4. Sélectionnez l’option [OK] à l’aide des touches
b / B puis appuyez sur ENTER.
Attention
Lors du formatage du disque, tout le contenu du
disque est effacé.
Finalisation
La finalisation du disque ‘fixe’ sur place le contenu
enregistré, de sorte que le disque puisse être lu sur
un lecteur DVD ou un ordinateur courant, équipé d’un
lecteur DVD-ROM approprié.
La finalisation d’un disque crée le menu écran pour
que vous puissiez naviguer le disque. Pour y accéder,
appuyez sur MENU/LIST ou sur TITLE.
Attention
Une fois le DVD-R ou DVD+R finalisé, vous ne pouvez
rien éditer ou enregistrer d’autre sur ce disque.
Vous pouvez enregistrer et éditer un disque
DVD-RW en choisissant l’option [Définaliser].
Vous pouvez éditer ou enregistrer sur un disque
DVD+RW même après l’avoir finalisé.
1.
Sélectionnez l’option [Finaliser] puis appuyez sur B.
2. Appuyez sur ENTER avec l’option ‘Finaliser’
sélectionnée.
Le menu ‘Finaliser’ s’affiche.
3. Sélectionnez [OK] et appuyez sur ENTER.
Le graveur commence la finalisation du disque.
Remarque:
Le temps de finalisation dépend du type de disque, de
la quantité de contenu enregistré et du nombre des
titres du disque.
Conseils
Si vous insérez un disque DVD-RW qui a déjà été
finalisé, vous pouvez le ‘Définaliser’ en sélectionnant
l’option ‘Définaliser’ à partir du menu [Finaliser]. Après
cela, vous pourrez éditer et réenregistrer le disque.
Vous ne pouvez pas ‘Définaliser’ un disque DVD-R
ou DVD+R.
Si l’option [Protection du disque] est réglée sur
[Marche], la fonction de finalisation n’est pas
disponible. Pour activer la fonction de finalisation,
réglez l’option [Protection du disque] sur [Arrêt].
Nommer le disque
Utilisez-la pour nommer le disque.
Ce nom apparaît lorsque vous insérez le disque et
lorsque vous affichez l’écran d’information du disque.
Le nom du disque peut contenir jusqu’à 32
caractères.
Dans le cas des disques formatés dans un autre
graveur, vous pourrez voir une série limitée de
caractères.
1. Sélectionnez l’option [Nommer le disque] puis
appuyez sur B.
2. Appuyez sur ENTER avec l’option [Editer]
sélectionnée.
Le menu du clavier s’affiche.
Pour introduire des caractères, rapportez-vous à la
page 44.
Protection du disque
Lorsque vous enregistrez sur un disque DVD+RW /
+R ou sur un disque DVD-RW formaté en mode VR,
sélectionnez [Marche] pour prévenir des
enregistrements, des éditions ou des effacements
involontaires du disque inséré. Si vous avez besoin de
débloquer le disque pour pouvoir l’éditer, sélectionnez
[Arrêt].
PBC (Commande de lecture)
PBC (Playback Control) se traduit par Commande de
lecture et se rapporte aux caractéristiques spéciales
des menus et de navigation disponibles sur certains
disques CD VIDÉO.
[Marche] Les disques CD Vidéo sont lus selon la
fonction PBC, si elle est disponible.
[Arrêt] Les disques CD Vidéo sont lus de la même
manière que les CD Audio.
Page 78

22
Explications générales
concernant l’affichage à l’écran
Ce manuel donne des instructions de base pour
actionner le graveur. Certains disques DVD exigent un
fonctionnement spécifique ou ne permettent qu’un
fonctionnement limité pendant la lecture. Lorsque ceci
arrive, le symbole s’affiche sur l’écran du téléviseur,
pour indiquer qu’une fonction déterminée n’est pas
autorisée par le graveur ou n’est pas disponible pour le
disque inséré.
Affichage des informations pendant le
visionnement de la télévision
En mode TV, appuyez sur DISPLAY pour
afficher/retirer l’information à l’écran.
Affichage à l’écran des informations du
disque
Vous pouvez afficher à l’écran des informations
variées concernant le disque inséré.
1. Appuyez sur DISPLAY une fois pour connaître
l’état actuel.
2. Appuyez de nouveau sur DISPLAY pour connaître
plusieurs informations de lecture.
Les informations pouvant être affichées diffèrent
en fonction du type de disque ou du statut de
lecture.
3. Vous pouvez sélectionner une option en appuyant
sur v / V et changer ou sélectionner les réglages
en appuyant sur b / B.
Pour plus de détails concernant chaque option,
rapportez-vous aux pages indiquées entre
parenthèses.
[Titre]: Titre actuel (ou plage), numéro/nombre
total de titres (ou de plages) (page 23, 25)
[Chapitre]: Numéro de chapitre actuel/numéro
total de chapitres (page 23)
[Heure]: Temps de lecture écoulé (page 25)
[Audio]: Langue audio sélectionnée
(DVD VIDÉO seulement) ou canal audio
sélectionné (page 24)
[Soustitre]: Sous-titres sélectionnés (page 24)
[Angle]: Angle sélectionné/nombre total d’angles
(page 25)
[Son]: Mode de son sélectionné (page 26)
Remarque:
L’affichage sur écran disparaît si aucune touche n’est
pressée au bout de 10 secondes.
Indique le nom du
disque et le format.
Indique le mode
d’enregistrement, l’espace
disponible sur le disque et
la barre de progression du
temps écoulé.
Indique le numéro de chaîne, le nom de la
station et le signal audio (MONO) reçu par
le syntoniseur.
Indique la date et l’heure actuelles.
Page 79

23
Lecture
Lecture
Fonctions de lecture de base
1. Insérez le disque choisi dans le plateau à disque, avec la face enregistrée orientée vers le bas.
2. Démarrez la lecture du disque depuis le menu HOME (rapportez-vous à la page 15).
3. Pour arrêter la lecture, appuyez sur STOP (x).
Selon le disque, l’unité garde en mémoire le point d’arrêt. “Xx” s’affiche brièvement à l’écran.
Appuyez sur PLAY (N) pour reprendre la lecture (à partir du dernier point de la scène lu). Si vous appuyez
de nouveau sur STOP (x) ou si vous retirez le disque (“x” s’affiche à l’écran), le point d’arrêt est effacé.
4. Appuyez sur OPEN/CLOSE (Z) pour retirer le disque.
Appuyez sur OPEN/CLOSE (Z) pour refermer le plateau à disque ou bien appuyez sur POWER (1) pour
que celui-ci se referme automatiquement, et que l’unité s’arrête.
Remarque:
Si la commande parentale est réglée et que le disque est en dehors du classement réglé (il n’est pas autorisé),
vous devez introduire votre code à 4 chiffres et/ou autoriser la lecture du disque. (Rapportez-vous à la section
''Classement'', à la page 19).
Touches Fonctionnement
OPEN / CLOSE (Z) Permet d’ouvrir et de refermer le plateau à disque.
PAUSE/STEP (X) Pendant la lecture, appuyez sur PAUSE/STEP (X) pour
faire une pause.
Appuyez à plusieurs reprises sur PAUSE/STEP (X) pour
une lecture en mode image par image.
Conseil:
Il est possible de faire avancer ou revenir en arrière une
scène image par image en appuyant sur b / B à plusieurs
reprises en mode PAUSE.
Le visionnement d’une scène en mode image par image en
marche arrière n’est pas disponible sur les disques CD Vidéo.
SKIP (. / >) Appuyez sur SKIP (. ou >) en cours de lecture pour
sélectionner le chapitre/la plage suivant ou pour revenir au
commencement du chapitre/de la plage en cours de lecture.
Appuyez sur SKIP . deux fois brièvement pour revenir
au chapitre/à la plage précédent(e).
Conseils:
Pour aller directement à n’importe quel chapitre pendant
la lecture d’un disque DVD, appuyez deux fois sur
DISPLAY puis sur v / V pour sélectionner l’icône du
chapitre. Ensuite, introduisez le numéro de chapitre ou
utilisez les touches b / B.
Dans le cas des CD Audio, pour aller directement en
cours de lecture à n’importe quelle plage, introduisez le
numéro de la plage à l’aide des touches numériques (0-9).
SCAN (m / M) Appuyez sur SCAN (m ou M) à plusieurs reprises pour
sélectionner la vitesse souhaitée.
Disque dur, DVD; 5 étapes
DivX; 4 étapes
CD Vidéo, CD Audio; 3 étapes
En mode pause de lecture, appuyez sur SCAN (m ou M)
à plusieurs reprises pour une lecture en mode ralenti.
HDD, DVD; 4 étapes
Video CD; 3 étapes (marche avant seulement)
ZOOM En cours de lecture ou en mode pause, appuyez sur ZOOM
pour agrandir l’image vidéo.
(taille x1 → taille x2 → taille x4 → taille x1 (taille normale)
Utilisez les touches bBvVpour vous déplacer à travers
l’image agrandie.
Disques
Tous les disques
Tous les disques et
VCDDVD ALLHDD
VCDDVD ALLHDD
ACDDivX
VCDDVD ALLHDD
WMA
MP3ACDDivX
VCDDVD ALLHDD
VCDDVD ALLHDD
HDD
Page 80

24
Fonctions de lecture de base (suite)
Touches Fonctionnement
REPEAT En cours de lecture, appuyez sur REPEAT à plusieurs
reprises pour sélectionner un mode souhaité de lecture
répétée.
HDD (Titre/Off)
DVD, Mode Vidéo DVD-R/RW (Chapitre/Titre/Off)
Mode VR DVD-RW, DVD+R/RW (Chapitre/Titre/Tout/Off)
CD Vidéo, CD Audio (Plage/Tout/Arrêt)
MP3/WMA (Plage/Dossier/Arrêt)
Remarques:
Sur un CD Vidéo avec PBC, vous devez régler l’option
PBC sur [Arrêt] dans le menu de configuration pour
pouvoir utiliser la fonction de lecture répétée. Consultez
la page 21.
Lorsque vous appuyez une fois sur SKIP (>) pendant
la lecture répétée du chapitre (plage), vous annulez cette
fonction.
A-B En cours de lecture, appuyez sur la touche A-B pour
sélectionner un point A et un point B et répéter une
séquence depuis le point A (point de démarrage) et
jusqu’au point B (point d’arrêt).
Appuyez sur A-B pour arrêter la répétition A-B.
Remarque:
Vous pouvez sélectionner une séquence inférieure à 5
secondes.
TITLE Si le titre en cours de lecture du disque DVD contient un
menu, celui-ci s’affichera à l'écran du téléviseur. Sinon, le
menu du disque peut ne pas s’afficher.
MENU/LIST Le menu du disque s’affiche à l’écran du téléviseur.
SUBTITLE ( ) En cours de lecture, appuyez sur SUBTITLE puis sur b / B
à plusieurs reprises pour sélectionner la langue de sous-
titrage désirée.
AUDIO ( ) Appuyez sur AUDIO puis sur b / B à plusieurs reprises
pour écouter langue audio, une piste ou une méthode
d’encodage différente.
Remarque:
Certains disques proposent des bandes sonores aussi bien
Dolby Digital que DTS. Il n’y a pas de sortie audio analogue
lorsque DTS est sélectionné. Pour écouter une bande
sonore DTS, raccordez cet enregistreur à un décodeur DTS
à travers l’une des sorties numériques. Rapportez-vous à la
page 12 pour plus de détails concernant la connexion.
Appuyez sur AUDIO puis sur b / B à plusieurs reprises
pendant la lecture pour régler un canal audio différent
(STÉRÉO, GAUCHE ou DROIT).
Dans le cas des disques DVD-RW enregistrés en mode EV
et du disque dur ayant un canal audio principal et un autre
bilingue, vous pouvez choisir parmi Main (G) [Principal],
Sub (D) [Secondaire], ou Main+sub (G+D) [Principal +
secondaire].
Appuyez sur AUDIO à plusieurs reprises pendant la lecture
pour régler un canal audio différent (STÉRÉO, GAUCHE ou
DROIT).
Discs
WMAMP3ACD
VCDDVD ALLHDD
DivXDVD
DVD
DVD
DVD
ACD
VCDDVD ALLHDD
WMAMP3ACD
VCDDVD ALLHDD
Page 81

25
Lecture
Lorsqu’un écran menu est affiché
L’écran menu peut s’afficher après insertion d’un
disque DVD ou d’un CD Vidéo contenant un menu.
Sélectionnez le titre/chapitre que vous voulez
visionner à l’aide des touches b / B / v / V, puis
appuyez sur ENTER pour que la lecture démarre.
Appuyez sur TITLE ou sur MENU/LIST pour revenir à
l’écran menu.
Sélectionnez la plage que vous voulez visionner à
l’aide des touches numériques.
Appuyez sur RETURN (O) pour revenir à l’écran
menu.
Les réglages du menu, ainsi que les procédures
exactes de fonctionnement du menu peuvent varier
en fonction du disque. Suivez les instructions sur
chaque écran menu. Vous pouvez aussi régler la
Commande de lecture PBC sur [Arrêt] depuis le
menu de configuration. Consultez la page 21.
Déplacement vers un autre TITRE
Lorsqu’un disque contient plus d’un titre, vous pouvez
vous déplacer vers un autre titre de la façon suivante:
Appuyez deux fois sur DISPLAY en cours de
lecture puis sélectionnez l’icône du titre à l’aide des
touches v / V. Ensuite, appuyez sur la touche
numérique appropriée (0-9) ou sur b / B pour
sélectionner un numéro de titre.
Recherche par l’heure
Cette fonction vous permet de commencer la lecture à
tout moment du disque.
1. Appuyez deux fois sur DISPLAY pendant la
lecture. La fenêtre de recherche par l’heure affiche
le temps de lecture écoulé.
2. Appuyez sur v / V pour sélectionner l’icône de
l’horloge; “0:00:00” s’affiche.
3. Introduisez le temps de départ souhaité, en
précisant les heures, les minutes et les secondes
de gauche à droite.
Si vous entrez des numéros faux, appuyez sur
b
/
B pour situer le tiret (_) sur le numéro erroné.
Ensuite, introduisez les bons numéros.
4. Appuyez sur ENTER pour confirmer. La lecture
commence à partir de l’heure sélectionnée.
Recherche des repères
Pour introduire un repère
Vous pouvez commencer la lecture à partir de jusqu’à
six points mémorisés. Pour placer un repère, appuyez
sur ‘MARKER’ au point souhaité du disque. L’icône du
repère s’affiche brièvement à l’écran du téléviseur.
Répétez cette action pour placer jusqu’à six repères.
Rappel ou suppression d’une scène dotée d’un
repère
1. Appuyez sur Recherche pendant la lecture du
disque. Le menu de recherche des repères
s’affiche sur l’écran.
2. Sélectionnez une scène dotée d’un repère que
vous voulez rappeler ou effacer à l’aide des
touches b / B / v / V.
3. Appuyez sur ENTER pour que la lecture commence
à partir de la scène en question.
ou
Appuyez sur CLEAR et un message de
confirmation apparaît. Sélectionnez [OK] puis
appuyez sur ENTER pour effacer la scène du
menu de recherche par marqueur.
Angle de prises de vue
Si le disque contient des séquences enregistrées avec
de différents angles de prise de vue, vous pouvez
choisir un angle de vue différent pendant la lecture.
1. Appuyez sur DISPLAY à deux reprises pendant la
lecture. L’affichage à l’écran apparaît sur votre
téléviseur.
2. Utilisez les touches v / V pour sélectionner l’icône
Angle sur l’écran d’affichage.
3. Sélectionnez l’angle désiré à l’aide des touches
b
/
B.
Le numéro de l’angle en cours s’affiche à l’écran
du téléviseur.
Conseil:
Le témoin de l’angle de vue (ANGLE) clignotera sur
l’écran du téléviseur lors du visionnement d’une scène
enregistrée avec de différents angles de vue pour
indiquer que vous pouvez sélectionner un autre angle.
DVD
VCDDVD ALLHDD
DivXDVD ALLHDD
DivXDVD ALLHDD
VCD
DVD
VCDDVD
Page 82

26
Son ambiophonique 3D
Cet appareil peut produire un effet de son
ambiophonique 3D, simulant la lecture audio multivoie
au moyen de deux enceintes stéréo conventionnelles,
au lieu de cinq enceintes ou plus, requises
normalement pour écouter le son multivoie d’un
système de cinéma à domicile.
1. Appuyez sur DISPLAY à deux reprises pendant la
lecture. L’affichage à l’écran apparaît sur votre
téléviseur.
2. Utilisez les touches v / V pour sélectionner l’icône
Son sur l’écran d’affichage.
3. Sélectionnez l’option “3D SUR” à l’aide des
touches b / B.
Pour annuler l’effet de son ambiophonique 3D,
sélectionnez “NORMAL”.
Instant Skip
Appuyez à plusieurs reprises sur B pendant la lecture
pour avancer de 15 secondes.
En mode lecture HDD ou Timeshift, chaque pression
de b / B vous fait avancer ou reculer de 5 minutes.
Remarque:
Si la durée de lecture restante du titre HDD en cours
est inférieure à 5 minutes (15 secondes pour un titre
DVD), cette fonction ne sera pas activée.
Mémorisation du dernier état
Ce graveur mémorise les réglages que vous avez
effectués sur le dernier disque visionné. Les réglages
sont stockés dans la mémoire du graveur même si
vous enlevez le disque ou si vous mettez hors tension
l’appareil. Si vous insérez un disque dont les réglages
ont été mémorisés, la dernière position d’arrêt est
rappelée automatiquement.
Remarques:
Les réglages sont stockés dans la mémoire du
graveur pour les utiliser à tout moment.
Cet enregistreur ne mémorise pas la configuration
d’un disque si vous appuyez deux fois sur STOP ou
si vous éteignez l’appareil avant de démarrer la
lecture.
DVD
DVD ALLHDD
DivXVCDDVD ALL
Page 83

27
Lecture
Lecture d’un fichier d e cinema
DivX
Ce graveur peut lire des fichiers DivX. Avant de lancer
la lecture des fichiers DivX, lisez la section
‘’Conditions des fichiers de film DivX’’, à droite.
1. Appuyez sur HOME puis sélectionnez l’option
[CINEMA].
2. Sélectionnez un support contentant un/des
fichier(s) DivX et appuyez sur ENTER.
Le menu [Liste de fims] s’affiche à l’écran du
téléviseur.
3. Appuyez sur v / V pour sélectionner un dossier, puis
sur ENTER. Une liste des fichiers contenus dans le
dossier s’affiche. Si vous êtes sur une liste de fichiers
et que vous souhaitez revenir à la liste de dossiers,
affichez-la en surbrillance à l’aide des touches v / V
de la télécommande et appuyez sur ENTER.
4. Si vous souhaitez consulter un fichier en
particulier, appuyez sur v / V pour l’afficher en
surbrillance et ensuite sur PLAY (N).
Vous pouvez utiliser des fonctions de lecture
diverses. Rapportez-vous aux pages 23-26.
5. Appuyez sur STOP pour arrêter la lecture.
Le menu [Liste de fims] s’affiche.
Pour quitter le menu écran, appuyez sur
ACCUEIL et sélectionnez l’option [TV DVD] ou
[TV HDD] puis appuyez sur ENTER.
Information concernant l’affichage des
sous-titres d’un disque DivX
Au cas où les sous-titres ne s’afficheraient pas
correctement, veuillez suivre les pas ci-dessous.
1. Appuyez sur PAUSE/STEP lors de l’affichage des
sous-titres.
2. Appuyez sur la touche SUBTITLE et maintenez-la
enfoncée pendant environ 3 secondes.
Le code de la langue s’affiche.
3. Appuyez sur b / B pour sélectionner un autre
code de langue, et ce jusqu’à ce que les
sous-titres s'affichent correctement.
4. Appuyez sur PLAY (N) pour reprendre la lecture.
Remarque:
Le nom du fichier des sous-titres du DivX doit être
identifié dans le nom du fichier DivX pour pouvoir être
affiché par cet appareil.
Options du menu Liste de fims
1. Appuyez sur v / V pour sélectionner un
dossier/fichier dans le menu [Liste de fims], puis
sur ENTER.
Les options du menu [Liste de fims] s’affichent.
Les options du menu qui s’affichent sont en
fonction du support sélectionné.
2. Appuyez sur v / V / b / B pour sélectionner une
option, puis sur ENTER.
[Lecture] Commence la lecture du titre
sélectionné.
[Ouvrir] Ouvre le dossier ; la liste des fichiers
contenus dans le dossier s’affiche.
[Supprimer] Efface le(s) fichier(s) ou les
dossier(s) du support.
[Renommer] Édite le nom du fichier. (page 32)
[Déplacer] Déplace le(s) fichier(s) à un autre
dossier ou support. (page 33)
[Copier] Copie le(s) fichier(s) dans un autre
dossier ou support. (page 33)
Conditions des fichiers DivX
Taille de résolution disponible: 720x576 (L x H)
pixels
Extensions des fichiers: “. avi”, “. divx”
Sous-titres DivX pris en charge: “. smi”, “. srt”,
“. sub (format DVD Micro seulement)”,
“.txt (format DVD Micro seulement)”
Formats codec pris en charge: “DIV3”, “MP43”,
“DIVX”, “DX50”
Formats audio pris en charge: “AC3”, “PCM”,
“MP2”, “MP3”, “WMA”
Fréquence d’échantillonnage:
entre 8 et 48 kHz (MP3), entre 32 et 48kHz (WMA)
Débit binaire:
entre 8 et 320kbps (MP3), entre 32 et 192kbps (WMA)
Format CD-R: ISO 9660 et JOLIET.
Format DVD ±R/RW: ISO 9660 (format UDF Bridge)
Nombre maximum de fichiers/disque: Moins de
1999 (nombre total de fichiers et de dossiers)
Remarques sur le format DivX
Si le nombre d’images à l’écran est de plus de
29.97 images par seconde, cette unité peut ne
pas fonctionner correctement.
Si les structures audio et vidéo du fichier DivX ne sont
pas intercalées, l’affichage revient au menu écran.
Si le nom du fichier DivX contient un code
impossible à lire, il se peut qu’il soit transcrit avec
le symbole « _ ».
Si le fichier est encode en GMC, l’appareil reconnaît
uniquement 1 niveau d’enregistrement.
*
GMC?
GMC est un acronyme pour Global Motion
Compensation [Compensation globale de
mouvements]. C’est un outil de codage spécifié ne
standard MPEG4. Certains encodeurs MPEG4,
tels que DivX, comportent cette option.
Il y a différents niveaux de codage GMC, appelés
normalement 1-point, 2-point, ou 3-point GMC.
Page 84

28
Lecture d’un CD Audio ou d’un
fichier MP3/WMA
Ce graveur peut lire des CD audio et des fichiers
MP3/WMA. Avant de démarrer la lecture des fichiers
MP3/WMA, lisez la section ‘’Conditions des fichiers
audio MP3/WMA’’, à droite.
1. Appuyez sur HOME.
Le menu HOME s’affiche.
2. Sélectionnez l’option MUSIC [MUSIQUE].
3. Sélectionnez un support contenant des titres
MP3/WMA ou audio puis appuyez sur ENTER.
Le menu [Liste de musiques] s’affiche à l’écran du
téléviseur.
4. Sélectionnez une plage à l’aide des touches v/V
puis appuyez sur PLAY (N).
La lecture commence.
Vous pouvez utiliser des fonctions de lecture
diverses. Rapportez-vous aux pages 23-26.
Tips:
Appuyez sur DISPLAY pour voir les
informations d’étiquette ID3 du fichier MP3.
Si l’information d’étiquette ID3 n’est pas
disponible, le message “[ID3-Tag: None]”
s’affichera. Lorsque vous sélectionnez un
dossier, le nombre de sous-dossiers ainsi que
celui de fichiers MP3/WMA du dossier
s’affichent. Appuyez de nouveau sur DISPLAY
pour enlever l’information de l’écran.
Si vous voulez vous déplacer au répertoire
supérieur, mettez-le en surbrillance à l’aide des
touches v / V et appuyez sur ENTER.
Vous pouvez aussi afficher le menu HOME pour
sélectionner un autre support en appuyant sur
HOME.
Pour quitter le menu, appuyez sur HOME et
sélectionnez l’option [TV DVD] ou [TV HDD],
puis appuyez sur ENTER.
5. Pour arrêter la lecture à tout moment, appuyez sur
STOP.
Conseil:
Vous pouvez créer un nouveau dossier. Sélectionnez
l’option [Nouvel album] dans le menu Musique-HDD
menu puis appuyez sur ENTER.
Le dossier “NONAME##” est créé.
Options des menus CD Audio et Musique
1. Appuyez sur v / V pour sélectionner un
dossier/fichier dans le menu ‘Audio CD’ ou
‘Musique’, puis appuyez sur ENTER.
Les options du menu s’affichent.
Les options du menu qui s’affichent sont en
fonction du support sélectionné.
2. Appuyez sur v / V / b / B pour sélectionner une
option, puis sur ENTER.
[Lecture] Commence la lecture du titre sélectionné.
[Aléatoire] Pour démarrer ou arrêter la lecture
aléatoire.
[Ouvrir] Ouvre le dossier ; la liste des fichiers
contenus dans le dossier s’affiche.
[Supprimer] Efface le(s) fichier(s) du support.
[Renommer] Édite le nom du fichier. (page 32)
[Déplacer] Déplace le(s) fichier(s) à un autre
dossier ou support. (page 33)
[Copier] Copie le(s) fichier(s) dans un autre
dossier ou support. (page 33)
[Ajout progr.] Ajoute une/des plage(s) à la Liste
de Programmes. (page 29)
Lecture aléatoire
1. Sélectionnez un fichier à l’aide des touches v / V
puis appuyez sur ENTER.
Les options du menu s’affichent.
2. Sélectionnez l’option [Aléatoire] à l’aide des
touches v / V puis appuyez sur ENTER.
L’unité commence automatiquement à lire de façon
aléatoire et “Aléatoire’’ s’affiche sur l’écran menu.
3. Pour revenir au mode de lecture normale,
sélectionnez de nouveau l’option [Aléatoire] puis
appuyez sur ENTER.
Conseil:
Si vous appuyez sur SKIP > pendant la lecture en
mode aléatoire, l’appareil choisit une autre plage et
reprend la lecture au hasard.
Conditions des fichiers audio MP3/WMA
Extensions des fichiers
“.mp3”, “.wma”.
Fréquence d’échantillonnage:
entre 8 et 48 kHz (MP3), entre 32 et 48kHz (WMA)
Débit binaire:
entre 8 et 320kbps (MP3), entre 32 et 192kbps (WMA)
Format CD-R:
ISO 9660 et JOLIET.
Format DVD ±R/RW:
ISO 9660 (format UDF Bridge)
Nombre maximum de fichiers/disque:
Moins de 1999 (nombre total de fichiers et de dossiers)
Page 85

29
Lecture
Lecture programmée de disques
CD Audio et de fichiers MP3/WMA
La fonction de lecture programmée vous permet de
créer des listes d’écoute personnalisées des plages
MP3/WMA ou des disques CD Audio. Les programmes
peuvent contenir jusqu’à 99 plages dans le cas des
disques CD Audio ou 256 fichiers MP3/WMA.
1. Sélectionnez une plage/un fichier (ou dossier)
dans le menu ‘CD Audio’ ou ‘Musique’ à l’aide des
touches v / V.
Vous pouvez sélectionner tous les fichiers et
dossiers MP3/WMA dans le menu Music [Musique]
en appuyant sur la touche CLEAR.
Pour annuler les choix effectués, appuyez de
nouveau sur CLEAR.
Sélection de plusieurs fichiers/plages
(dossiers)
1. Appuyez sur ‘MARKER’.
Un signet de vérification apparaît sur le fichier/
la plage ou le dossier. Appuyez de nouveau
sur MARKER pour annuler le fichier/la plage
ou le dossier marqués.
2. Répétez l’étape 1 pour marquer d’autres
fichiers/plages (dossiers).
2. Appuyez sur ENTER.
Les options s’affichent sur le côté gauche du menu.
3. Sélectionnez l’option ‘Ajout progr.’ à l’aide des
touches v / V puis appuyez sur ENTER.
4. Répétez les étapes 1-3 pour marquer d’autres plages.
Remarque:
Si vous incluez un dossier dans la Liste de lecture
programmée, tout(e)s les plages/fichiers contenus
dans ce dossier s’ajoutent à la Liste de programmes.
5. Utilisez la touche B pour vous déplacer vers la
Liste de Programmes.
La plage programmée que vous avez sélectionnée
en dernier reste allumée en surbrillance dans la
liste de programmes.
6. Sélectionnez une plage de votre choix à l’aide des
touches v / V pour commencer la lecture.
7. Appuyez sur PLAY (N) pour commencer.
La lecture s’arrête une fois que la dernière plage
programmée dans la liste de programmes est lue.
8. Pour annuler la Lecture Programmée et reprendre
la lecture normale, sélectionnez une plage sur la
Liste et appuyez sur PLAY (N).
Conseil:
Vous pouvez accéder à l’écran de la Liste de Programmes
ou le quitter en appuyant sur MENU/LIST.
Options du menu de la Liste de programmes
1. Appuyez sur v / V pour sélectionner un(e)
plage/fichier dans la Liste de Programmes, puis
appuyez sur ENTER.
Les options du menu s’affichent.
2. Sélectionnez une option à l’aide des touches v / V
puis appuyez sur ENTER pour confirmer votre choix.
[Lecture] Les plages sélectionnées sont lues dans
l’ordre dans lequel vous les avez programmées.
[Aléatoire] Pour démarrer ou arrêter la lecture
aléatoire.
[Supprimer] Efface la/les plage(s) du menu Liste
de programmes.
[Déplacer] Déplace la/les plage (s) pour changer
l’ordre du programme.
[Sauvegarder] Garde en mémoire la liste de
programmes. (seulement sur le disque dur)
Lecture répétée des plages programmées
Appuyez sur ‘REPEAT’ pour sélectionner
un mode souhaité de lecture répétée.
[TRACK] Répète la plage en cours de lecture.
[ALL] Répète toutes les plages de la Liste de
programmes.
[Arrêt] Annule le mode de lecture répétée (pas
d’affichage).
Suppression d’une plage de la Liste de
programmes
1. Sélectionnez une plage que vous voulez supprimer
de la Liste de programmes. Sélectionnez plusieurs
plages à l’aide de la touche ‘MARKER’.
2. Appuyez sur ENTER.
Les options du menu s’affichent.
3. Sélectionnez l’option [Supprimer] et appuyez sur
ENTER.
Changement de l’ordre des plages dans la
Liste de programmes
1. Sélectionnez une plage que vous voulez déplacer
dans la Liste de programmes. Sélectionnez plusieurs
plages à l’aide de la touche ‘MARKER’.
2. Appuyez sur ENTER.
Les options du menu s’affichent.
3.
Sélectionnez l’option [Déplacer] et appuyez sur ENTER.
4.
Utilisez les touches (v / V) pour déplacer la barre jaune
à la position souhaitée, puis appuyez sur ENTER.
Stockage de votre Liste de programmes (sur
le disque dur seulement)
Ce graveur garde en mémoire les listes de
programmes créées par l’utilisateur.
1. Sélectionnez une plage dans la Liste de programmes.
Les options du menu s’affichent.
2. Sélectionnez l’option [Sauvegarder] et appuyez sur
ENTER. La Liste de programmes est sauvegardée
dans le dossier PROGRAM du disque dur.
Page 86

30
Visionnement d’un fichier JPEG
Ce graveur peut lire des fichiers JPEG. Avant de
lancer la lecture des enregistrements JPEG, lisez la
section ‘’Conditions des fichiers Photo’’, à droite.
1. Appuyez sur HOME.
Le menu HOME s’affiche.
2. Sélectionnez l’option [PHOTO].
3. Sélectionnez un support contentant des fichiers
JPEG et appuyez sur ENTER.
Le menu [Liste de photos] s’affiche à l’écran du
téléviseur.
4. Sélectionnez un fichier à l’aide des touches
b / B / v / V puis appuyez sur ENTER.
Les options du menu s’affichent sur le côté gauche
du menu.
Conseils:
Si vous voulez vous déplacer au répertoire
supérieur, mettez-le surbrillance à l’aide des
touches b / B / v / V et appuyez sur ENTER.
Vous pouvez aussi afficher le menu HOME pour
sélectionner un autre support en appuyant sur HOME.
5. Sélectionnez l’option [Plein ecran] à l’aide des
touches v / V puis appuyez sur ENTER.
L’image sélectionnée s’affiche en plein écran.
Selon la taille et le nombre de fichiers JPEG,
l’enregistreur peut tarder plusieurs minutes à lire le
contenu du fichers.
6. Pour annuler le visionnement à tout moment,
appuyez sur STOP.
Le menu [Liste de photos] s’affiche.
Pour quitter le menu, appuyez sur HOME et
sélectionnez l’option [TV DVD] ou [TV HDD],
puis appuyez sur ENTER.
Options du menu Liste de photos
1. Appuyez sur v / V pour sélectionner un fichier
dans le menu Photo List [Liste des photos], puis
appuyez sur ENTER. Les options du menu
s’affichent. Les options du menu qui s’affichent
sont en fonction du support sélectionné.
Vous pouvez sélectionner tous les fichiers et dossiers
dans le menu en appuyant sur la touche ‘CLEAR’.
Pour annuler les choix effectués, appuyez de
nouveau sur CLEAR.
Sélection de plusieurs fichiers (dossiers)
1. Appuyez sur ‘MARKER’.
Un signet de vérification apparaît sur le fichier
ou le dossier.
Appuyez de nouveau sur MARKER pour
annuler le fichier ou le dossier marqués.
2. Répétez l’étape 1 pour marquer d’autres
fichiers (dossiers).
2. Sélectionnez une option à l’aide des touches v / V
puis appuyez sur ENTER pour confirmer votre choix.
[Ouvrir] Ouvre le dossier ; la liste des fichiers
contenus dans le dossier s’affiche.
[Plein ecran] Montre le fichier sélectionné en
plein écran.
[Supprimer] Efface du support le fichier sélectionné.
[Diaporama] Affiche le menu [Diaporama].
[Renommer] Édite le nom du fichier. (page 32)
[Déplacer] Déplace le(s) fichier(s) à un autre
dossier (album) ou support. (page 33)
[Copier] Copie le(s) fichier(s) dans un autre
dossier ou support. (page 33)
Conseil:
Vous pouvez créer un nouveau dossier sur le disque
dur. Sélectionnez l’option [Nouvel album] et appuyez
sur ENTER.
Un dossier “NONAME##” est créé.
Appuyez sur ENTER pour afficher ou quitter ce menu
pendant le visionnement en plein écran.
Conditions des fichiers Photo
Extensions des fichiers
“.jpg”
Taille des photos:
Moins de 4MO recommandé
Format CD-R:
ISO 9660 et JOLIET.
Format DVD ±R/RW:
ISO 9660 (format UDF Bridge)
Nombre maximum de fichiers/disque:
Moins de 1999 (nombre total de fichiers et de
dossiers)
Remarques sur les fichiers JPEG
Les fichiers d’image JPEG à compression
progressive sans perte de structure ne sont pas
supportés.
En fonction de la taille et du nombre de fichiers
JPEG, la lecture du média peut prendre plusieurs
minutes.
Page 87

31
Lecture
Saut d’images
Pendant le visionnement d’une image, appuyez sur
SKIP (. ou >) une seule fois pour avancer vers
le fichier suivant ou pour revenir au fichier précédent.
Rotation d’images
Pendant le visionnement d’une image, utilisez les
touches v / V pour effectuer la rotation d’une image
dans le sens des aiguilles d’une montre ou en sens
inverse.
Visionnement en mode diaporama
1. Sélectionnez l’option [Diaporama] dans le menu
[Liste de photos] (Reportez-vous à la section
“Options du menu Liste de photos” à la page 30).
2. Appuyez sur ENTER.
Le menu [Diaporama] s’affiche.
3. Réglez les options souhaitées à l’aide des touches
b / B / v / V.
[Objet] option:
[Sélect] Montre en mode diaporama seulement
les fichiers sélectionnés.
Sélectionnez plusieurs fichiers à l’aide de la
touche ‘MARKER’ [REPÈRE].
[Tout] Montre en mode diaporama tous les fichiers.
[Vitesse] option:
Règle la vitesse de défilement des diaporamas sur
[Lent], [Normal], ou [Rapide].
4. Sélectionnez l’option [Commencer] et appuyez sur
ENTER pour lancer le visionnement en mode
diaporama.
5. Appuyez sur STOP pour annuler le mode
Diaporama et revenir au menu [Liste de photos].
Pour faire une pause dans le visionnement des
diaporamas
1. Appuyez sur PAUSE/STEP (X) pour faire une
pause dans le visionnement des diaporamas.
2. Pour reprendre le visionnement des diaporamas,
appuyez sur PLAY (N).
Pour écouter de la musique tout en regardant des
diaporamas
Vous pouvez regarder des fichiers photos tout en
écoutant des fichiers musicaux MP3/WMA enregistrés
sur le disque dur.
1. Sélectionnez l’option [Diaporama] dans le menu
[Liste de photos]. (Rapportez-vous à la section
“Options du menu Liste de photos” à la page 30).
2. Appuyez sur ENTER.
Le menu [Diaporama] s’affiche.
3. Sélectionnez l’option [Lect. musique simultanée]
dans le menu [Diaporama].
4. Appuyez sur ENTER.
Le menu [Lect. musique simultanée] s’affiche.
5. Appuyez sur ‘MARKER’ pour sélectionner
plusieurs fichiers.
Sélectionnez l’option [Sélec tout] pour sélectionner
toutes les plages et appuyez sur ENTER.
Sélectionnez l’option [Désélec tout] pour
désélectionner toutes les plages sélectionnées
et appuyez sur ENTER.
Sélectionnez l’option [Annuler] pour quitter ce
menu et appuyez sur ENTER.
6. Utilisez les touches b / B / v / V pour allumer en
surbrillance l’option [Commencer] puis appuyez
sur ENTER.
7. Appuyez sur STOP pour annuler le mode
Diaporama et revenir au menu [Liste de photos].
Page 88

32
Édition d’un fichier MP3/WMA,
JPEG ou DivX
Cet exemple décrit la procédure à suivre pour les
fichiers MP3, mais les autres types de fichiers suivent
la même procédure.
Suppression de fichier(s)/dossier(s) du
disque dur
Vous pouvez effacer des fichier(s)/dossier(s)
MP3/WMA, JPEG ou DivX contenus dans le disque
dur.
1. Sélectionnez dans le menu un fichier que vous
voulez supprimer.
Les options du menu s’affichent.
Vous pouvez sélectionner tous les fichiers et
dossiers dans le menu en appuyant sur la touche
‘CLEAR’. Pour annuler les choix effectués,
appuyez de nouveau sur CLEAR.
Sélection de plusieurs fichiers (dossiers)
1. Appuyez sur ‘MARKER’.
Un signet de vérification apparaît sur le fichier
ou le dossier.
Appuyez de nouveau sur MARKER pour
annuler le fichier ou le dossier marqués.
2. Répétez l’étape 1 pour marquer d’autres
fichiers (dossiers).
2. Appuyez sur ENTER.
Les options du menu s’affichent dans le menu.
3. Sélectionnez l’option [Supprimer] puis appuyez sur
ENTER.
Le message de confirmation de la suppression
apparaît.
Utilisez b / B pour sélectionner [Oui] puis appuyez
sur ENTER.
Le(s) fichier(s) sélectionné(s) sont effacé(s).
Attribution de nom à un fichier sur le
disque dur
Vous pouvez nommer des fichiers MP3/WMA du
disque dur de façon indépendante. Les noms peuvent
contenir jusqu’à 32 caractères.
1. Sélectionnez dans le menu un fichier que vous
voulez renommer.
2. Appuyez sur ENTER.
Les options du menu s’affichent dans le menu.
3. Sélectionnez l’option [Editer] et appuyez sur
ENTER.
Les options d’édition s’affichent.
4. Sélectionnez l’option [Renommer] et appuyez sur
ENTER.
Le menu du clavier s’affiche.
Pour introduire des caractères, reportez-vous à la
page 44.
Page 89

33
Lecture
Copier un fichier sur le disque dur
Vous pouvez copier un ou plusieurs fichiers/dossiers
sur le disque dur.
1. Sélectionnez dans le menu un fichier que vous
voulez copier.
Les options du menu s’affichent.
Vous pouvez sélectionner tous les fichiers et dossiers
dans le menu en appuyant sur la touche ‘CLEAR’.
Pour annuler les choix effectués, appuyez de
nouveau sur CLEAR.
Sélection de plusieurs fichiers (dossiers)
1. Appuyez sur ‘MARKER’.
Un signet de vérification apparaît sur le fichier
ou le dossier.
Appuyez de nouveau sur MARKER pour
annuler le fichier ou le dossier marqués.
2. Répétez l’étape 1 pour marquer d’autres
fichiers (dossiers).
2. Appuyez sur ENTER.
Les options du menu s’affichent dans le menu.
3. Sélectionnez l’option [Editer] et appuyez sur
ENTER.
Les options d’édition s’affichent.
4. Sélectionnez l’option [Copier] et appuyez sur
ENTER.
Le menu [Copier] s’affiche.
5.
Vous pouvez sélectionner et copier un album (dossier).
1. Sélectionnez un support et appuyez sur ENTER.
La liste de l’album (dossier) s’affiche.
2. Sélectionnez un dossier.
Vous pouvez aussi créer un nouvel album
(dossier). Sélectionnez l’option [Nouvel album]
dans le menu [Copier] et appuyez sur ENTER.
Un dossier “NONAME##” est créé.
6. Sélectionnez l’option [Copier] et appuyez sur
ENTER pour lancer la copie.
Remarque:
Si le dossier comporte une profondeur supérieure à 5
niveaux, ceci rend la copie impossible.
Déplacer un ou plusieurs fichiers vers un
autre dossier du disque dur
Vous pouvez déplacer un ou plusieurs
fichiers/dossiers vers un autre dossier du disque dur.
Une fois déplacés, le(s) fichier(s)/dossier(s) sont
effacés de la position originale.
1. Suivez les étapes 1 à 3 telles que montrées à
gauche.
2. Appuyez sur ENTER.
Les options s’affichent sur le côté gauche du menu.
3. Sélectionnez l’option [Editer] et appuyez sur
ENTER.
Les options d’édition s’affichent.
4. Vous pouvez sélectionner et déplacer un album
(dossier).
5. Vous pouvez sélectionner un album (dossier) à
déplacer.
1. Sélectionnez un support et appuyez sur ENTER.
La liste de l’album (dossier) s’affiche.
2. Sélectionnez un dossier.
Vous pouvez aussi créer un nouvel album
(dossier). Sélectionnez l’option [Nouvel album]
dans le menu [Déplacer] et appuyez sur
ENTER.
Un dossier “NONAME##” est créé.
6. Sélectionnez l’option [Déplacer] et appuyez sur
ENTER pour lancer le déplacement.
Page 90

34
Enregistrement
À propos de l’enregistrement DVD
Remarques:
Cet Enregistreur ne peut pas enregistrer sur des
disques CD-R ou CD-RW.
Nous ne pourrons être tenus responsables des
enregistrements ratés à cause d’une panne de
courant, des disques défectueux ou du graveur abîmé.
Les empreintes digitales ainsi que les petites
éraflures sur la surface du disque peuvent nuire à la
qualité de lecture et /ou d’enregistrement.
Veuillez manipuler vos disques avec soin.
Types de disques et formats, modes et
réglages d’enregistrement
Cet enregistreur peut lire plusieurs types de DVD:
DVD - disques Vidéos préenregistrés, DVD-RW,
DVD-R, DVD+RW et DVD+R. Ce graveur peut lire
cinq genres différents de disques DVD: disques
DVD-Vidéo préenregistrés, DVD-RW, DVD-R,
DVD+RW et DVD+R. Le format de disque pour les
disques DVD-R, DVD+R, DVD+RW est toujours le
“Format Vidéo”- de même que pour les disques
DVD-Vidéo préenregistrés.
Cela veut dire qu’une fois finalisés, vous pouvez lire
les disques DVD-R, DVD+R, ou DVD+RW sur un
lecteur DVD courant.
Par défaut, un disque DVD-RW est au format Vidéo,
mais vous pouvez le changer et le passer au format
Enregistrement Vidéo (VR) si nécessaire. (La
réinitialisation du disque effacera tous ses contenus).
Le mode d’enregistrement est étroitement lié au format
du disque. Si le format du disque est le format
Enregistrement Vidéo, alors le mode d’enregistrement est
le mode VR ; si par contre le format du disque est le
format Vidéo, alors le mode d’enregistrement est le mode
Vidéo (sauf pour les disques DVD Vidéo, lesquels, n’étant
pas enregistrables, n’ont pas de mode d’enregistrement).
Les réglages d’enregistrement sont en rapport avec les
modes d’enregistrement (lesquels sont invariables pour
tout le disque). Les réglages d’enregistrement peuvent
être modifiés en fonction de chaque enregistrement et
déterminent la qualité d’image ainsi que la quantité
d’espace sur le disque que l’enregistrement occupera.
À propos de l’enregistrement
sur le disque dur (HDD)
L’enregistrement sur le disque dur intégré (HDD) est
en gros similaire à l’enregistrement sur un disque
DVD- RW en mode VR. Vous pouvez choisir les
options de qualité d’enregistrement, y compris le mode
manuel, et naturellement, vous pouvez enregistrer,
effacer et réenregistrer le disque dur autant de fois que
vous voudrez. La capacité du lecteur de disque dur
vous permet d’y stocker un grand nombre d’heures
d’enregistrements vidéo, même en mode
d’enregistrement de haute qualité. Pour vous aider à
organiser le contenu, le disque dur est divisé en dix
genres. Vous pouvez renommer et utiliser ces genres
à votre gré –par exemple, vous pourriez avoir un genre
pour les films, un autre pour les shows télévisés, et un
autre pour les enregistrements avec un caméscope.
Remarques:
Le nombre maximum des titres pouvant être
enregistrés sur le disque dur est de 255.
L’utilisation du disque dur vous permet d’enregistrer
un maximum de 12 heures sans interruption.
Remarques sur l’enregistrement
Les temps d’enregistrement affichés ne sont pas
exacts parce que le graveur utilise une compression
vidéo à taux d’échantillonnage variable. Cela veut
dire que le temps d’enregistrement exact dépendra
du matériel en train d’être enregistré.
Lors de l’enregistrement d’une émission télévisée, si
la réception est faible ou si l’image présente des
interférences, les temps d’enregistrement peuvent
être plus courts.
Si vous enregistrez seulement du son audio ou des
images fixes, le temps d’enregistrement peut être
plus long.
Il se peut que le temps affichés correspondant aux
enregistrements effectués et au temps restant ne
coïncident pas toujours exactement avec la capacité
du disque.
Le temps d’enregistrement disponible peut diminuer
si vous faites une édition chargée du disque.
Lorsque vous utilisez un disque DVD-RW, assurez-
vous de changer le format d’enregistrement (mode
Vidéo ou mode VR) avant d’effectuer le premier
enregistrement sur le disque. Raaportez-vous à la page
21 (Format du Disque) pour en connaître la procédure.
Lors de l’utilisation des disques DVD-R ou DVD+R,
vous pouvez continuer à enregistrer jusqu’à ce que
le disque soit plein ou jusqu’à le finaliser. Avant de
commencer une séance d’enregistrement, vérifiez la
quantité de temps d’enregistrement restant sur le
disque.
Lors de l’utilisation d’un disque DVD-RW en mode
Vidéo, le temps d’enregistrement disponible
augmentera seulement si vous effacez le dernier
titre enregistré sur le disque.
L’option ‘Delete Title’ [Effacer le titre] dans le menu
‘Title List’ [Liste de titres] (Original) ne fait que cacher
le titre ; en effet, elle n’efface pas le titre du disque et
ne fait pas augmenter le temps d’enregistrement
disponible (à l’exception du dernier titre enregistré sur
un disque DVD-RW en mode Vidéo).
Lors de l‘utilisation des disques DVD+R/RW, le
graveur exécutera la fonction ‘Menu-making’ pour
mettre à jour le nouveau titre et l’éditer lors de
l’enlèvement du disque du graveur ou de la mise hors
tension de ce dernier. Ainsi, vous devez retirer le
disque une fois que vous avez sélectionné le mode
DVD comme mode de fonctionnement du graveur.
Cet appareil peut enregistrer des émissions de TV
uniquement sur le disque dur. Si vous essayez
d’enregistrer une émission de TV en mode DVD,
l’appareil passera automatiquement au mode HDD
(disque dur) avant de démarrer l’enregistrement.
Page 91

35
Enregistrement
Timeshift (Lecture différée)
Ne ratez pas une scène d’une émission en direct. Si le
téléphone commence à sonner alors que vous regardez
votre émission en directe préférée, vous n’avez qu’à
appuyer sur “TIMESHIFT” et “PAUSE” avant de décrocher
le téléphone. Lorsque la fonction ‘Timeshift’ [Lecture
différée] est activée, l’émission en direct commence à être
enregistrée pour être regardée plus tard.
Après l’appel téléphonique ou toute autre interruption
du visionnement, appuyez sur “PLAY” ou “SCAN” pour
regarder l’émission.
Appuyez sur “STOP” pour revenir à l’émission en direct.
Fonctionnement du Timeshift (Pause,
Émission télévisée en direct/Lecture)
Vous pouvez stocker temporairement une émission
dans l’antémémoire du disque dur.
Appuyez sur TIMESHIFT pendant le visionnement
d’une émission télévisée.
La barre de progression s’affiche sur l’écran tel que
montré ci-dessous. L’icône de ‘timeshift’ apparaît à la
place de la barre de progression après 5 secondes.
1. Indique le mode de lecture.
2. Indique la position ‘Timeshift’ en cours.
3. Indique le temps ‘Timeshift’ de départ.
4. Indique le temps ‘Timeshift’ écoulé.
5. Indique le temps qui est à une heure du temps
‘Thimeshift’ de départ.
Conseils:
Vous pouvez utiliser les fonctions de lecture truquée
(Lente, Balayée, etc.) pendant le ‘Timeshift’ [Lecture
différée]. Consultez la section ‘Lecture’ (pages
23-26
)
Vous pouvez éditer une séquence stockée dans
l’antémémoire pendant le ‘Timeshift’ et la
sauvegarder dans le disque dur. Lisez
‘Enregistrement d’une séquence’ ci-contre.
Remarques:
S’il n’y a pas d’espace libre sur le disque dur, la
plus ancienne section timeshift du cache sera efface
petit à petit.
Si aucune touche n’est pressée au bout de 6 heures,
le mode ‘Timeshift’ s’arrête automatiquement.
Si l’option TimeShift dans le menu Configuration est
réglée sur [Marche], l’appareil lancera cette fonction
automatiquement sans que vous appuyiez sur la
touche TIMESHIFT.
Recherche des repères en mode Timeshift
Vous pouvez placer un repère en mode ‘Timeshift’.
En mode ‘Timeshft’, appuyez sur ‘MARKER’ au point
souhaité. Appuyez sur Recherche pour rappeler la
scène dotée d’un repère.
Enregistrement d’une séquence
Vous pouvez éditer une émission en mode ‘Timeshift’
et la stocker dans le disque dur (HDD).
1. En mode ‘Timeshift’, utilisez les fonctions de
pause, recherche et ralenti pour retrouver le point
de départ.
2. Appuyez sur REC au point de départ de la section
que vous voulez enregistrer.
La progression de l’édition est indiquée en rouge
sur la barre de progression.
3. Utilisez les fonctions de pause, recherche et
ralenti pour retrouver le point d’arrêt.
4. Appuyez sur REC à la fin de la section que vous
souhaitez enregistrer.
La lecture normale continue.
5. Répétez les pas 1 et 4 pour effectuer plusieurs
enregistrements de séquences d’une émission.
6.
Appuyez sur STOP pour annuler le mode ‘Timeshift’.
Un message de confirmation s’affichera.
7. Sélectionnez l’option [Oui] à l’aide des touches
b / B puis appuyez sur ENTER. Ou bien, appuyez
de nouveau sur STOP.
L’émission en cours s’affiche à l’écran.
Remarques:
Les sections sélectionnées sont enregistrées dans
le disque dur.
Appuyez sur la touche STOP pour arrêter l’enregistrement
de séquence. Si vous appuyez sur POWER pour arrêter
l’enregistrement de séquence, l’émission ne pourra pas
être enregistrée sur le disque dur.
Vous ne pouvez pas faire d’enregistrements de séquence
avec des sections durant moins de 5 secondes.
Sauter au début ou à la fin en mode Timeshift
1. Appuyez sur ENTER en mode ‘Timeshift’ [Lecture
différée]. Le menu s’affiche.
2. Appuyez sur bbpour que la lecture commence
exactement dès le début de la pause en direct
(Timeshift).
Appuyez sur BBpour sauter exactement à la fin de la
pause en direct (Timeshift) ; le mode pause s’active.
Pour annuler la fonction Timeshift
1. Appuyez sur STOP pour annuler la fonction
Timeshift (Lecture différ ée).
Un message de confirmation s’affichera.
2. Sélectionnez l’option [Oui] à l’aide des touches
b / B puis appuyez sur ENTER.
L’émission en cours s’affiche à l’écran.
HDD
HDD
HDD
34 5
12
Page 92

36
Enregistrement de base d’un
téléviseur
Suivez les instructions ci-dessous pour enregistrer
une émission de télévision. L’enregistrement
commence immédiatement et se poursuit jusqu’à ce
que le disque soit plein ou jusqu’à ce que vous
arrêtiez l’enregistrement.
Remarque:
Cet appareil peut uniquement enregistrer un contenu
audio mono à partir du système son intégré.
1. Réglez un mode d’enregistrement en fonction de
vos besoins en appuyant sur REC MODE à
plusieurs reprises. (XP, SP, LP, EP ou MLP)
2. Utilisez les touches PR/CH (+/-) pour sélectionner
un canal de télévision à enregistrer.
3. Appuyez une fois sur REC (z).
L’enregistrement commence. (Le témoin REC
s’allume sur l’écran d’affichage).
L’enregistrement continue jusqu’à ce que vous
appuyiez sur STOP (x) ou jusqu’à ce que le
disque ou le disque dur soit plein.
Pour faire un enregistrement d’une durée
déterminée, consultez “Enregistrement
instantané par minuterie” ci-contre.
4. Appuyez sur STOP (x) pour arrêter
l’enregistrement.
Pour faire une pause dans
l’enregistrement
1. Appuyez sur PAUSE/STEP (X) pour faire une
pause dans l’enregistrement.
2. Pour reprendre l’enregistrement, appuyez sur
PAUSE/STEP (X).
Enregistrement d’une émission télévisée
tout en regardant une autre
1. Appuyez sur TV/DVD pendant l’enregistrement
pour sélectionner le mode du téléviseur. Le témoin
du téléviseur s’affiche.
2. Sélectionnez sur le téléviseur la chaîne que vous
voulez regarder.
Enregistrement instantané par
minuterie
L’enregistrement instantané par minuterie vous
permet de faire des enregistrements aisément, d’une
durée déterminée, sans avoir à utiliser la minuterie de
programmation.
1. Suivez les pas 1-2 tel que montré à gauche
(Enregistrement de base d’une émission
télévisée).
2. Appuyez sur REC (z) à plusieurs reprises pour
sélectionner la durée d’enregistrement.
L’enregistrement commence après la première
pression de la touche REC. Chaque fois que vous
appuyez sur REC, le temps d’enregistrement
augmente dans l’espace libre (240 minutes
maximum).
Le temps d’enregistrement s’affiche à l’écran du
téléviseur.
Lorsque l’enregistrement se complète, le graveur
cesse d’enregistrer et s’éteint.
Vérification du temps d’enregistrement
Appuyez une fois sur REC (z) pour vérifier le temps
d’enregistrement. Le réglage demandé s’affichera
automatiquement à l’écran du téléviseur pendant un
moment. Le temps d’enregistrement restant s’affiche
également à l’écran d’affichage.
Pour prolonger le temps
d’enregistrement
Le temps d’enregistrement peut être prolongé à tout
moment en appuyant sur REC (z). Chaque fois que
vous appuyez sur REC, le temps d’enregistrement
augmente dans l’espace libre (240 minutes
maximum).
Attention
Si le graveur est débranché (ou s’il se produit une
panne de courant) tandis qu’il est en train
d’enregistrer, l’enregistrement en cours sera raté.
HDD
HDD
Page 93

37
Enregistrement
Enregistrement programmé
Ce graveur peut être programmé pour enregistrer
jusqu’à 16 programmes au cours d’un mois. Pour les
enregistrements sans surveillance, le programmateur
doit savoir quelles sont les chaînes à enregistrer, et
connaître l’heure de départ et d’arrêt des
enregistrements.
1. Sélectionnez l’option [Program. enregis.] dans le
menu [HOME].
Le menu [Pistes á enregistrer] apparaît.
2. Utilisez v / V pour sélectionner [NOUVEAU] puis
appuyez sur ENTER.
Le menu [Program. enregis.] apparaît.
[Médias] L’option Média ne peut pas être
sélectionnée.
[PR] Choisissez le numéro d’une chaîne
mémorisée, ou l’une des entrées extérieures
depuis laquelle vous allez enregistrer.
[Date] Choisissez une date comprise dans un
délai d’un mois.
[Heure de début] Réglez l’heure de départ de
l’enregistrement.
[Fin d’enreg.] Réglez l’heure d’arrêt de
l’enregistrement.
[Répéter] Sélectionnez un mode de répétition
souhaité (Une fois, Tous les jours (Lundi Vendredi), ou Hebdomadaire).
3. Introduisez les informations nécessaires pour
votre/vos enregistrement(s) par minuterie.
b / B (gauche/droite) – déplace le curseur à
gauche ou à droite.
v / V (vers le haut/bas) – change le réglage de
la position actuelle du curseur.
Appuyez sur RETURN (O) pour quitter le
menu ‘Enregistrement programmé’.
Appuyez sur ENTER après avoir rempli toutes
les informations concernant l’émission à
enregistrer.
Sélectionnez l’option [Program. enregis.] dans
le menu [HOME] pour afficher la Liste des
Enregistrements Programmés.
4. Réglez un mode d’enregistrement en fonction de
vos besoins en appuyant sur REC MODE à
plusieurs reprises. (XP, SP, LP, EP ou MLP)
5. Appuyez sur ENTER pour que le graveur garde en
mémoire les émissions programmées.
La liste des enregistrements programmés s’affiche
pour que vous puissez vérifier la programmation.
Le champ “Enreg. OK” coché sur la liste des
enregistrements par temporisateur indique que les
enregistrements par minuterie sont correctement
programmés.
6. Appuyez sur RETURN (O) pour quitter la liste
Timer Record [Pistes á enregistrer].
7. Assurez-vous d’appuyer sur POWER pour mettre
l’appareil en veille.
Remarques:
Le témoin de la minuterie s’allume à l’écran
d’affichage lorsque le graveur est en mode veille et
que la minuterie est programmée. (Aucune
information ne s’affiche lorsque le mode [Mode
économique] est activé.
Pour l’enregistrement des émissions bilingues,
réglez le canal audio depuis l’option [Enreg. TV
Audio] du sous-menu du menu de configuration
(voir page 20).
Vous pouvez arrêter l’enregistrement programmé en
cours.
Appuyez sur STOP et le message de confirmation
apparaît.
Appuyez sur ENTER pour arrêter l’enregistrement
ou sur RETURN (O) pour le continuer.
HDD
Page 94

38
Vérification des détails de
l’enregistrement programmé
Vous pouvez vérifier la programmation lorsque le
graveur est allumé.
Sélectionnez l’option [Program. enregis.] dans le
menu [HOME].
Le menu [Pistes á enregistrer] va apparaître.
Sélectionnez un enregistrement programmé à l’aide
des touches v / V.
Appuyez sur ENTER pour éditer le programme
sélectionné.
Le menu ‘Program. enregis.’ s’affiche.
Appuyez sur ‘CLEAR’ pour effacer le programme
sélectionné de la liste des pistes á enregistrer.
Si vous sélectionnez [NEW] puis appuyez sur
ENTER, vous pouvez programmer un nouvel
enregistrement (voir page 38).
Pour annuler l’enregistrement programmé
Vous pouvez effacer un enregistrement programmé à
tout moment avant que l’enregistrement ne commence.
Utilisez les touches v / V pour sélectionner le
programme que vous souhaitez supprimer de la
Liste des Enregistrements Programmés.
Appuyez sur CLEAR et le message de confirmation
apparaît. Appuyez sur ENTER pendant que [OK] est
sélectionné pour effacer l’enregistrement.
Pour arrêter un enregistrement programmé
en cours
Même si l’enregistrement programmé a commencé,
vous pouvez toujours l’annuler.
Vous pouvez arrêter un enregistrement programmé
en cours. Appuyez sur STOP et le message de
confirmation apparaît.
Appuyez sur ENTER pour arrêter l’enregistrement
ou bien appuyez sur RETURN (O) pour continuer
l’enregistrement.
Solution des problèmes concernant
l’enregistrement programmé
Même si le programmateur est réglé, le graveur
n’enregistrera pas dans les cas ci-dessous:
Disque dur plein (voir page 21).
L’appareil est allumé.
Il y a déjà 255 titres enregistrés sur le disque dur.
Vous ne pouvez pas programmer un
enregistrement lorsque:
Un enregistrement est déjà en cours.
L’heure que vous essayez de régler est déjà passée.
Vous avez déjà réglé 16 enregistrements
programmés.
Lorsque deux enregistrements programmés ou
plus se chevauchent:
C’est celui qui commence plus tôt qui a la priorité.
Lorsque l’émission qui a commencé plus tôt finit,
l’enregistrement de l’autre commence.
Si vous avez réglé le commencement de deux
enregistrements programmés exactement à la
même heure, c’est celui que vous avez réglé en
premier lieu qui a la priorité.
Enregistrement à partir d’une
entrée extérieure
Enregistrement à partir des dispositifs
extérieurs
Vous pouvez enregistrer à partir d’un dispositif
extérieur, tel qu’un caméscope ou un magnétoscope,
raccordé à l’une des sorties extérieures du graveur.
1. Assurez-vous que le dispositif à partir duquel vous
voulez enregistrer est correctement raccordé au
graveur. Consultez les pages 13-14.
2. Appuyez sur AV/INPUT à plusieurs reprises pour
sélectionner l’entrée extérieure d’enregistrement.
Tuner [Syntoniseur]: Syntoniseur intégré
AV1: La prise AV1 située sur le panneau arrière
AV2: La prise AV2 DECODER située sur le
panneau arrière
AV3: La prise AV IN 3 (VIDEO, AUDIO (L/R))
située sur le panneau avant
3. Sélectionnez le mode d’enregistrement en fonction
de vos besoins en appuyant sur REC MODE à
plusieurs reprises. (XP, SP, LP, EP ou MLP)
4. Appuyez une fois sur REC (z).
L’enregistrement commence. (Le témoin REC
s’allume à l’écran d’affichage).
L’enregistrement continue jusqu’à ce que vous
appuyiez sur STOP (x) ou jusqu’à ce que le
HDD soit plein.
Pour faire un enregistrement d’une durée
déterminée, consultez la section
“Enregistrement instantané par minuterie” à la
page 36.
5. Appuyez sur STOP (x) pour arrêter l’enregistrement.
Remarque:
Si votre source est protégée contre la copie par
CopyGuard, vous ne pourrez pas enregistrer le
matériel en utilisant ce graveur. Pour plus de détails
sur le Copyright, consultez la page 48.
HDD
Page 95

39
Enregistrement
Enregistrement et lecture
simultanés
Lecture d’un autre titre pendant
l’enregistrement
Pendant l’enregistrement, vous pouvez lire la source
d’un autre appareil en simultané.
1. Commencez l’enregistrement.
2. Appuyez sur HOME pour afficher le menu Accueil.
3. Utilisez v / V / b / B et la touche ENTER pour
sélectionner le type de média que vous souhaitez
lire.
4. Commencez la lecture.
L’enregistrement continuera pendant la lecture de
l’autre media sélectionné.
Remarques:
Vous ne pouvez pas utiliser la lecture et
l’enregistrement simultané lorsque vous êtes en
train de faire une copie, de doubler ou pendant
un enregistrement instantané.
Vous ne pouvez pas éditer les programmes
pendant le mode de lecture et d’enregistrement
simultanés.
Time Slip
Vous pouvez lire le titre en cours d’enregistrement.
1. Lancez l’enregistrement HDD.
2. Appuyez sur PLAY (N).
La lecture démarre et l’enregistrement continue
pendant la lecture.
Vous pouvez utiliser les touches PAUSE (X) et
SCAN (m / M) pendant la lecture pour
passer en mode pause, scan ou avance image
par image.
3. Appuyez sur STOP (x).
La lecture s’arrête puis revient à la position
d’enregistrement actuelle.
Remarque:
Vous pouvez lancer la lecture qu’au bout de 15
secondes après le début de l’enregistrement.
HDD
Page 96

40
Édition
Vue d’ensemble du menu liste
de titres et liste de chapitres
À l’aide du menu liste de titres vous pouvez éditer le
contenu vidéo.Les fonctions d’édition disponibles dans
le menu liste de titres dépendent du fait que l’édition
vidéo soit effectuée sur un DVD ou sur le disque dur,
et du fait que l’édition porte sur le contenu original ou
sur la liste de lecture.
Il y a deux manières d’éditer les disques DVD-RW
enregistrés en mode
VR
(enregistrement vidéo). Vous
pouvez éditer directement le contenu original du disque
ou bien créer et éditer une liste de lecture. En fait, la
liste de lecture ne modifie pas le contenu du disque, elle
ne fait que contrôler la manière dont ce contenu est lu.
L’édition du matériel enregistré sur un disque dur
ressemble à l’édition du contenu original d’un disque
DVD-RW enregistré en mode VR. On utilise des
commandes similaires pour effacer ou nommer les
titres, ainsi que pour le contrôle fin du contenu des
chapitres dans les titres sur le disque DVD.
Remarque:
Si vous affichez le menu liste de titres pour le disque dur
au cours de l’enregistrement, certains titres pourraient
apparaître avec un repère. C’est que ces titres-là ont été
enregistrés avec une configuration d’entrée de ligne
différente de la configuration actuelle du graveur. Il est
impossible de lire ces titres au cours de l’enregistrement.
1. Appuyez sur MENU/LIST pour afficher le menu de
la liste de titres. La lecture doit être alors arrêtée.
Vous pouvez aussi y avoir accès depuis le menu
HOME: sélectionnez l’option [FILM] puis
sélectionnez l’option HDD [disque dur] ou [DVD]
et appuyez sur ENTER.
Lors de la sélection de titres, utilisez les boutons
v / V pour afficher la page précédente/suivante
si le disque comporte plus de six titres.
Si vous êtes en train d’éditer un disque
enregistré en mode VR, appuyez sur
MENU/LIST pour basculer entre les menus
original et liste de lecture.
Les options du menu sont affichées dans la partie gauche
de l’écran. La partie principale de la fenêtre montre les
vignettes des titres (ou des chapitres) sur le disque DVD
ou sur le disque dur. Vous pouvez modifier ces vignettes
à l’aide du bouton THUMBNAIL. Voir la section
“Modification des vignettes de titres” à la page
41
.
Appuyez sur DISPLAY pour afficher l’information du
titre sélectionné dans le menu liste de titres.
Une fois le titre ou le chapitre sélectionné dans le
menu de la liste de titres ou de chapitres, appuyez sur
ENTER. Les options du menu s’afficheront dans la
partie gauche du menu. Utilisez les boutons v / V
pour sélectionner une option, puis appuyez sur
ENTER pour confirmer votre sélection.
2. Pour quitter le menu liste de titres, appuyez à
plusieurs reprises sur RETURN (O).
1. Options du menu: Pour afficher les options du
menu, sélectionnez un titre ou un chapitre, puis
appuyez sur ENTER. Les options affichées
peuvent varier en fonction du type de disque.
[Assembler] Pour combiner deux titres ou deux
chapitres en un (page 45, 46).
[Supprimer] Pour effacer un titre ou un chapitre
(page 43)
[Suppr. Séq] Pour effacer une partie d’un titre (page 43).
[Diviser] Pour diviser un titre en deux (page 44).
[Copie] Pour copier un titre sur un autre support
(page 49)
[Lec. Complète] Pour lancer la lecture du titre
sélectionné, même des chapitres masqués.
[Masquer (Afficher)] Pour masquer (ou afficher) le titre
ou le chapitre sélectionné (page 47)
[Déplacer] Pour déplacer un chapitre dans le menu
liste de chapitres – liste de lecture vers une autre
position dans le menu (page 47)
[Lecture] Pour lancer la lecture du titre ou chapitre
sélectionné. Les titres et chapitres masqués sur le
DVD+R/RW ne peuvent pas être lus.
[Ajout titre] Pour ajouter des titres ou des chapitres à
la liste de lecture (page 42)
[Protéger] Cette fonction sert à protéger le titre de tout
enregistrement, édition ou effacement accidentel
(page 47)
[Renommer (Titre)] Pour éditer le nom du titre (page 44)
[Chercher]
- [Chapitre]; Pour afficher la Liste des Chapitres du Titre.
- [Heure] ; Pour rechercher le moment que vous
souhaitez identifier comme point de démarrage du
titre. (page 44).
[Sort] Pour lister les programmes dans le menu liste de
titres, en les triant par date, titre ou catégorie (page 45)
[Titre] Pour afficher la liste de titres ou de chapitres.
2. Zone d’affichage du mode d’enregistrement, de
l’espace libre et de la barre de progression du
temps écoulé.
3. Support actuel.
4. Titre actuellement sélectionné.
5. Vignette.
6. Affichage du numéro du titre sélectionné et du
nombre total de titres.
7. Affichage du nom du titre, de la date
d’enregistrement et de la durée de l’enregistrement.
123 4 5 6 7
Page 97

41
Édition
Disque dur, mode VR: Édition
du contenu original et de la liste
de lecture
Titres, chapitres et parties
Les titres du contenu original du disque comportent un
ou plusieurs chapitres. Lorsque vous insérez un titre
du disque dans la liste de lecture, tous les chapitres à
l’intérieur du titre sont également affichés. En d’autres
mots, les chapitres sur la liste de lecture agissent
exactement comme le font les chapitres sur un disque
DVD vidéo. Les parties sont des sections des titres
originaux ou des titres de la liste de lecture. À l’aide
des menus original et liste de lecture, vous pouvez
ajouter ou effacer des parties. En ajoutant un chapitre
ou un titre à la liste de lecture, vous créez un nouveau
titre élaboré à partir d’une section (par ex. un
chapitre) d’un titre original.
Si vous effacez une partie, vous enlevez une partie
d’un titre du menu original ou liste de lecture.
Attention
Lors de l’édition à l’aide des fonctions effacer,
ajouter et déplacer, les images de démarrage et
d’arrêt pourraient ne pas être exactement comme
établies sur l’affichage des points de démarrage et
d’arrêt
Lors de la lecture de la liste de lecture, vous
pourriez percevoir une pause momentanée entre les
parties éditées. Ce n’est pas un dysfonctionnement.
L’édition d’un DVD est similaire à
l’édition d’une cassette vidéo ?
Non. Lorsque vous éditez une cassette vidéo, il vous
faut un magnétoscope pour lire la cassette vidéo
originale et un autre pour enregistrer les éditions.
L’édition des DVD consiste à créer une “liste de
lecture” de ce que vous désirez voir et de l’ordre dans
lequel ceci sera lu. Au cours de la lecture, le graveur
lit le disque suivant la liste de lecture.
À propos des expressions “Original” et
“Liste de lecture”
Tout au long de ce manuel vous rencontrerez souvent
les expressions “original” et “liste de lecture”, qui font
référence au contenu actuel et à la version éditée,
respectivement.
Original: Il s'agît du contenu actuel.
Liste de lect (Playlist): Ce contenu est la version
éditée du disque, c’est-à-dire, la manière dont le
contenu original doit être lu.
Ajout de repères de chapitres
Vous pouvez créer des chapitres à l’intérieur d’un titre
en insérant des repères de chapitres sur les points
désirés.
Pendant la lecture, appuyez sur CHP ADD au point où
vous souhaitez démarrer un nouveau chapitre.
L’icône du repère de chapitre s’affiche alors sur
l’écran du téléviseur.
Remarque:
Les repères de chapitre sont automatiquement
insérés à des intervalles réguliers. Vous pouvez
modifier ces intervalles à l’aide du menu configuration
initiale (voir “Repérage automatique des chapitres” à
la page 20).
Modification des vignettes de
titres
Chaque titre affiché dans le menu liste de titres est
représenté par une image en vignette prise du début
de ce titre ou chapitre.
Si vous le désirez, vous pouvez sélectionner un autre
arrêt sur image dans un titre.
Appuyez sur THUMBNAIL pour faire apparaître dans
le menu liste de titres uniquement la vignette actuelle.
L’arrêt sur image que vous avez sélectionnez s’affiche
en même temps dans le menu original et dans le
menu liste de lecture.
Conseil:
Vous pouvez également changer l’image d’aperçu du
titre dans le menu Liste des Chapitres du mode du VR
des DVD-RW. Sélectionnez un chapitre dans le menu
liste de chapitres, puis appuyez sur THUMBNAIL.
L’image de la vignette du titre incluant ce chapitre
sera modifiée.
+R+RW-RW
VR
HDD
+R+RW-RW
VR
HDD
-RW
VR
Page 98

42
Création d’une nouvelle liste de
lecture
Utilisez cette fonction pour ajouter un Titre ou un
Chapitre original à la liste de lecture. Lorsque vous
réalisez cette opération, le titre ou le chapitre entier
s’ajoute dans la liste de lecture (vous pouvez effacer
ultérieurement les parties que vous ne voulez pas –
voir Effacer un Original ou un chapitre/titre de la liste
de lecture page 43).
Le titre s’affiche sur la liste de lecture, avec les
mêmes repères de chapitres qu’il comportait dans le
contenu original. Cependant, si vous ajoutez plus tard
d’autres repères de chapitres sur le contenu original,
ces repères-là ne seront pas automatiquement copiés
sur le titre dans la liste de lecture.
Vous pouvez ajouter jusqu’à 999 chapitres sur un
disque.
1. Choisissez un titre ou un chapitre de la liste de
titres (menu original) ou de la liste de chapitres
(menu original) pour l’intégrer sur la liste de
lecture, puis appuyez sur ENTER. Les options du
menu s’afficheront dans la partie gauche du menu.
2.
Utilisez les boutons v / V pour sélectionner l’option
[Ajout titre], puis appuyez sur ENTER.
3. Sélectionnez [Nouv. liste lect.], puis appuyez sur
ENTER. Le nouveau titre s’affichera sur la liste de
lecture mise à jour. Tous les chapitres du titre
seront ajoutés à la liste de lecture.
Ajout de titres/chapitres
supplémentaires à la liste de
lecture
Vous pouvez ajouter un titre ou un chapitre original aux
titres de la liste de lecture si celle-ci a déjà été créée.
1. Choisissez un titre ou un chapitre de la liste de
titres (menu original) ou de la liste de chapitres
(menu original) pour l’intégrer sur la liste de
lecture, puis appuyez sur ENTER.
Les options du menu s’afficheront dans la partie
gauche du menu.
2. Utilisez les boutons v / V pour sélectionner [
Ajout
titre
] parmi les options du menu, puis appuyez sur
ENTER.
3. Choisissez une liste de titres (liste de lecture) déjà
créée pour y insérer un titre ou un chapitre, puis
appuyez sur ENTER.
4. Répétez les étapes 1 à 3 pour ajouter d’autres
titres ou chapitres à la liste de lecture.
Vous pouvez voir les chapitres ajoutés sur la liste
de chapitres (liste de lecture) du menu liste de
lecture.
5. Appuyez sur RETURN (O) pour quitter cette
fonction, ou sur MENU/LIST pour revenir à la liste
de titres du menu original.
-RW
VR
-RW
VR
Page 99

43
Édition
Effacement d’un titre/chapitre
du contenu original ou de la
liste de lecture
Si vous effacez un titre ou un chapitre du menu de la
liste de lecture, vous ne l’enlevez que de la liste de
lecture, ce titre/chapitre restant donc dans le menu du
contenu original.
Si vous choisissez d’effacer un titre ou chapitre du menu
original (titre/chapitre), ce titre ou chapitre est effacé du
disque et l’espace libre pour effectuer d’autres
enregistrements augmente. Les titres/chapitres effacés du
contenu original sont aussi enlevés de la liste de lecture.
Remarque:
Il pourrait être impossible d’effacer des chapitres dont
la durée soit inférieure à 5 secondes.
1. Utilisez les touches b / B / v / V pour choisir le
chapitre ou le titre que vous voulez effacer du
menu liste de titres ou liste de chapitres, puis
appuyez sur ENTER.
Les options du menu s’afficheront dans la partie
gauche du menu.
Sélection de plusieurs titres sur le disque
dur
1. Appuyez sur MARKER.
Une coche apparaît sur le titre.
Appuyez de nouveau sur MARKER pour
annuler la sélection du titre.
2. Répétez l’étape 1 pour marquer d’autres titres.
Vous pouvez ajouter jusqu’à 10 titres.
2. Sélectionnez l’option [Supprimer] parmi les options
dans le menu.
Exemple: Titres (disque dur)
3.
Appuyez sur ENTER pour confirmer votre sélection.
Le message de confirmation de l’effacement s’affichera.
4.
Utilisez les boutons b / B pour sélectionner [Oui],
puis appuyez sur ENTER.
Le chapitre ou le titre sélectionné sera alors effacé.
Après avoir appuyé sur ENTER, le nouveau menu
mis à jour sera affiché.
5. Répétez les étapes 1 à 4 pour continuer à effacer
d’autres chapitres ou titres dans le menu.
6. Appuyez à plusieurs reprises sur RETURN (O)
pour quitter le menu.
Remarques:
Lors de l’enregistrement de disques DVD+RW, le
nom du titre effacé change à “Titre Supprimmé”.
Si vous effacez successivement plus de deux titres,
ces titres sont combinés en un.
Lors de l’effacement d’un titre ou d’un chapitre, seul le
dernier titre ou chapitre dans le DVD+RW fait augmenter
l’espace libre pour d’autres enregistrements.
time.
Effacement d’une partie
Vous pouvez effacer une partie du titre.
1. Utilisez les touches b / B / v / V pour choisir le
titre que vous voulez effacer du menu liste de
titres, puis appuyez sur ENTER.
Les options s’afficheront à gauche de l’écran.
2. Sélectionnez [Effacer Partie] dans l’option [Editer]
puis appuyez sur ENTER. La fenêtre d’édition
(supprimer partie) s’affiche sur l’écran du
téléviseur.
L’icône [Repère début] est mis en surbrillance.
Exemple: Editer (supprimer partie) (disque dur)
3. Utilisez les fonctions lecture, pause, recherche et
avance pour trouver le point de départ.
4. Appuyez sur ENTER au point de démarrage de la
section que vous voulez supprimer.
L’icône “Repère fin” est mis en surbrillance.
La partie est indiquée sur la barre de progression.
5. Utilisez les fonctions lecture, pause, recherche et
avance pour trouver le point d’arrêt.
6. Appuyez sur ENTER au point d’arrêt de la section
que vous voulez supprimer.
Vous pouvez annuler le point sélectionné: utilisez
les boutons v / V pour sélectionner l’icône
[Annuler], puis appuyez sur ENTER.
Conseil:
Pour les enregistrements sur le disque dur, vous
pouvez effacer d’autres parties.
Sélectionnez l’icône [Partie suiv] dans le menu, puis
appuyez sur ENTER, répétez ensuite les étapes 3 à
6.
7. Une fois l’édition conclue, sélectionnez l’icône
[Effectué], puis appuyez sur ENTER.
Le message de confirmation de l’effacement
s’affichera. Utilisez les boutons b / B pour
sélectionner [Oui], puis appuyez sur ENTER.
La partie sélectionnée est effacée du titre et le
menu liste de titres s’affiche.
Remarque:
Cette fonction n’est pas disponible pour les titres de
moins de 5 secondes.
-RW
VR
HDD
Page 100

44
Attribution d’un nom à un titre
Vous pouvez dénommer les titres. Les noms peuvent
contenir jusqu’à 32 caractères.
1. Choisissez le titre auquel vous voulez attribuer un
nom dans le menu liste de titres, puis appuyez sur
ENTER. Les options du menu s’afficheront dans la
partie gauche du menu.
2. Utilisez v/V pour sélectionner l’option [Renommer]
ou [Nom du Titre] puis appuyez sur ENTER.
Le menu clavier s’affichera.
3. Saisissez un nom pour le titre. Utilisez les boutons
b / B / v / V pour sélectionner un caractère, puis
appuyez sur ENTER pour confirmer votre
sélection.
Utilisez le bouton MENU/LIST pour modifier le
type de clavier.
OK: Appuyez sur ce bouton pour conclure.
Annuler: Pour annuler tous les caractères
introduits.
Espace: Pour insérer un espace dans la
position du curseur.
Effacer: Pour effacer le caractère précédent à la
position du curseur.
b / B: Pour déplacer le curseur vers la gauche
ou vers la droite.
Conseil:
Boutons de la télécommande pour saisir un nom
PLAY (N): Pour insérer un espace dans la
position du curseur.
X (PAUSE/STEP):
Pour effacer le caractère
suivant à la position du curseur.
x (STOP), CLEAR: Pour effacer le caractère
précé- dent à la position du curseur.
. / >: Pour déplacer le curseur vers la
gauche ou vers la droite.
Numéros (0-9): Pour saisir le caractère corresp-
ondant à la position du curseur.
Conseil:
Vous pouvez ajouter le genre pour le nom du
titre HDD. Si vous réglez le genre du fichier, vous
pourrez facilement retrouver le titre dans le dossier
correspondant au genre du menu de la liste des
titres du HDD.
4. Choisissez OK, puis appuyez sur ENTER pour
enregistrer le nom et revenir à l’écran du menu
précédent.
5. Appuyez à plusieurs reprises sur RETURN (O)
pour quitter le menu.
Remarques:
Les noms peuvent comporter jusqu’à 32 caractères.
Pour les disques formatés sur un graveur différent,
vous ne verrez qu’un nombre limité de caractères.
Lors de l’enregistrement sur un disque DVD-R,
DVD+R ou DVD+RW, le nom saisi n’est affiché sur
l’écran d’affichage du lecteur de DVD qu’après avoir
finalisé le disque.
Recherche Temps
Vous pouvez sélectionner le point de démarrage du
titre.
1. Utilisez les flèches b / B / v / V pour choisir un
titre dans le menu Liste des Titres, puis appuyez
sur ENTER.
Les options apparaissent sur le côté gauche du
menu.
2. Sélectionnez l’option [Heure] puis appuyez sur
ENTER.
Le menu [Chercher] apparaît sur l’écran de
télévision.
Exemple: Titres (HDD)
3. Utilisez les touches b / B pour trouver le moment
à partir duquel vous souhaitez démarrer.
Le contenu défile par tranches de 1 minute.
Si vous maintenez appuyée la touche b / B, le
contenu défile par tranche de 5 minutes.
4. Appuyez sur ENTER pour démarrer à partir de
l’endroit sélectionné.
+R-R+RW-RW
Video
-RW
VR
HDD
Image en
cours
Heure sélectionnée
Heure de début
Point sélectionné
Heure de fin
 Loading...