

Page 1
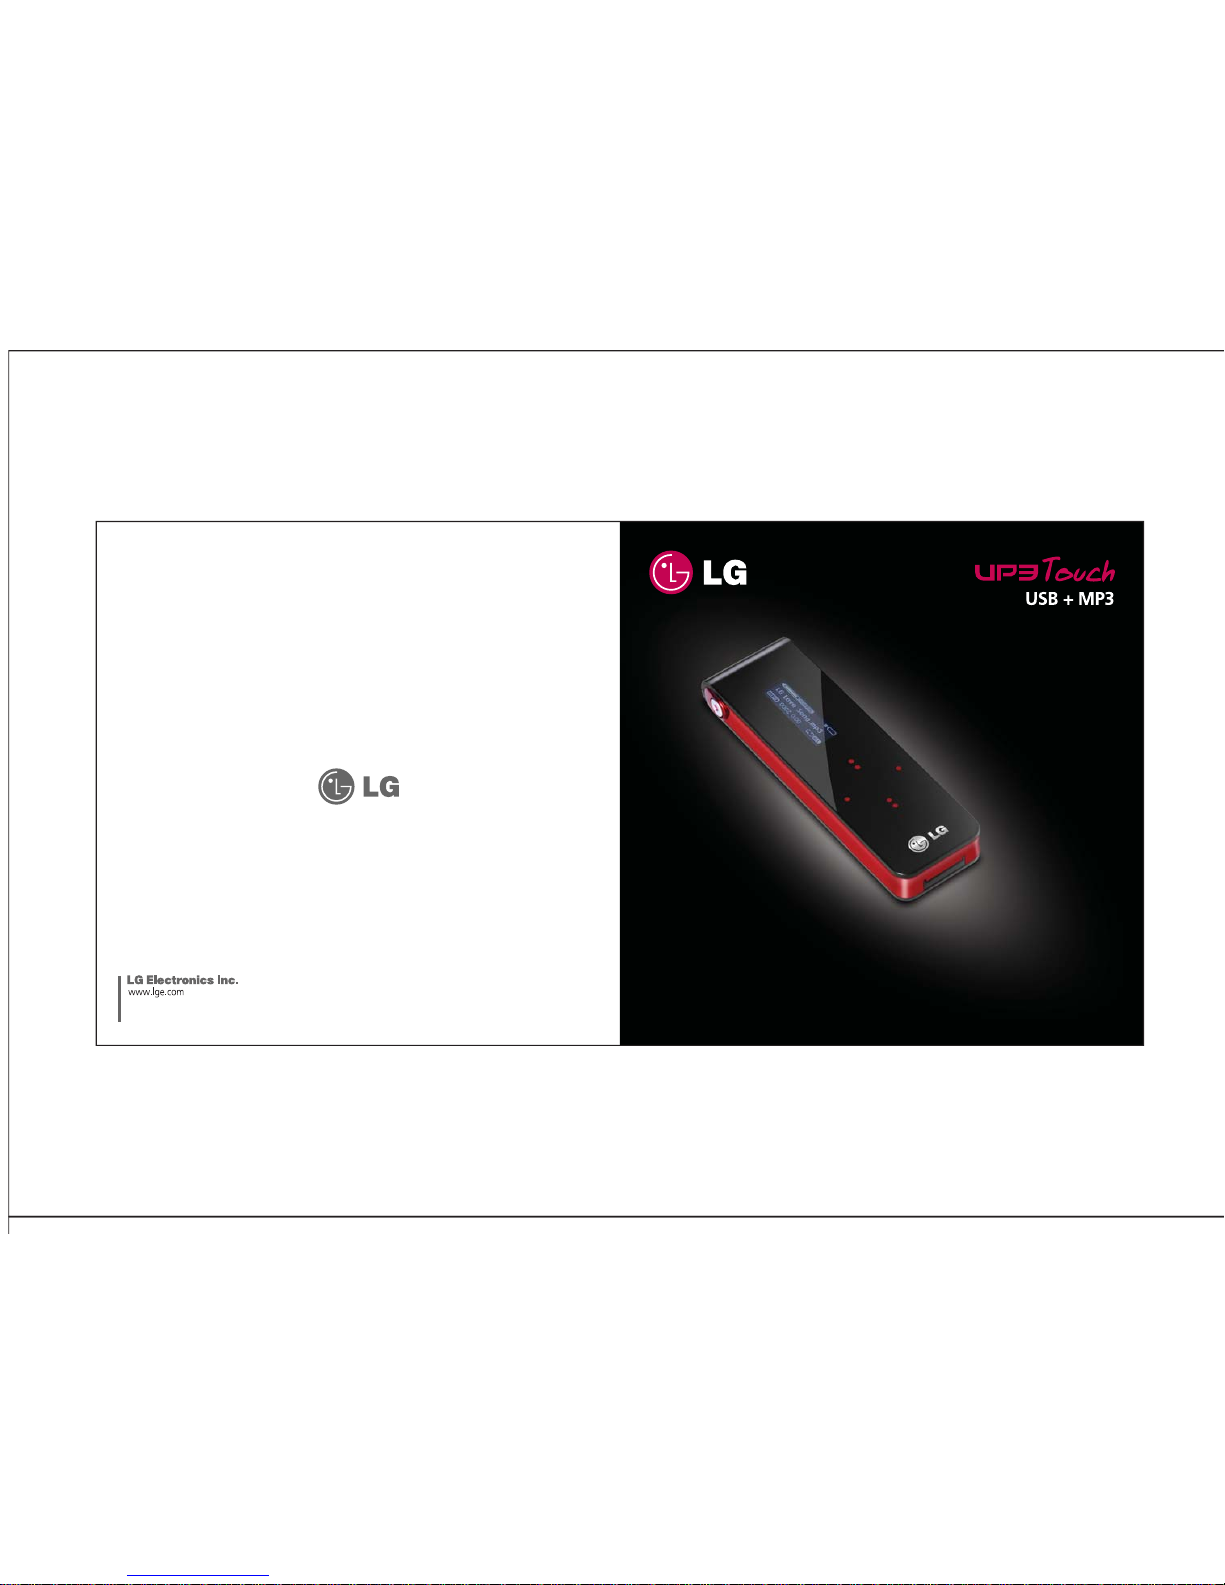
- Thank you for purchasing this product.
- This user manual contains instructions on how to use the product properly.
- Please read this manual carefully. Be sure to follow the instructions and notices.
- Disable the lock before use (refer to p. 20).
This user manual is subject to
change without prior notice
.
Page 2
Table of Contents Table of Contents
1. Before
Using the
Product
Safety Cautions
Product Feature
s
Product Components
Names of Parts
Connecting the USB (MSC)
Removing the USB (MSC)
File Import (MTP)
Recharging/Battery Use
Installing Windows 98SE Driver
1
3
5
6
7
9
10
11
13
15
Display
16
2. Basic Use
Reset/Lock
Volume Control/Previous or Next Track
Menu Mode
Listening to Music
Listening to FM Radio
Recording FM Radio
Recording Voice
File Search
19
20
21
22
23
25
26
27
28
3. Setting
Play Setting/Equalizer Setting
Power Setting
Record Setting
FM Setting/Play Speed Setting
Music Title Setting/Language Setting
Reset/About the Product
USB Mode Setting
4. Customer
Support
Firmware Upgrade
How to Upgrade the Firmware
Troubleshooting
Menu Structure
Product Specication
Warranty
31
32
34
35
36
37
38
41
42
43
45
46
47
48
User Rights
Page 3
We shall not be responsible for any loss of or damage to saved or recorded data caused
by product defect, product repair, or any other reason.
1 2
Cautions During Use
Before Using the Product Before Using the Product
Cautions During Use
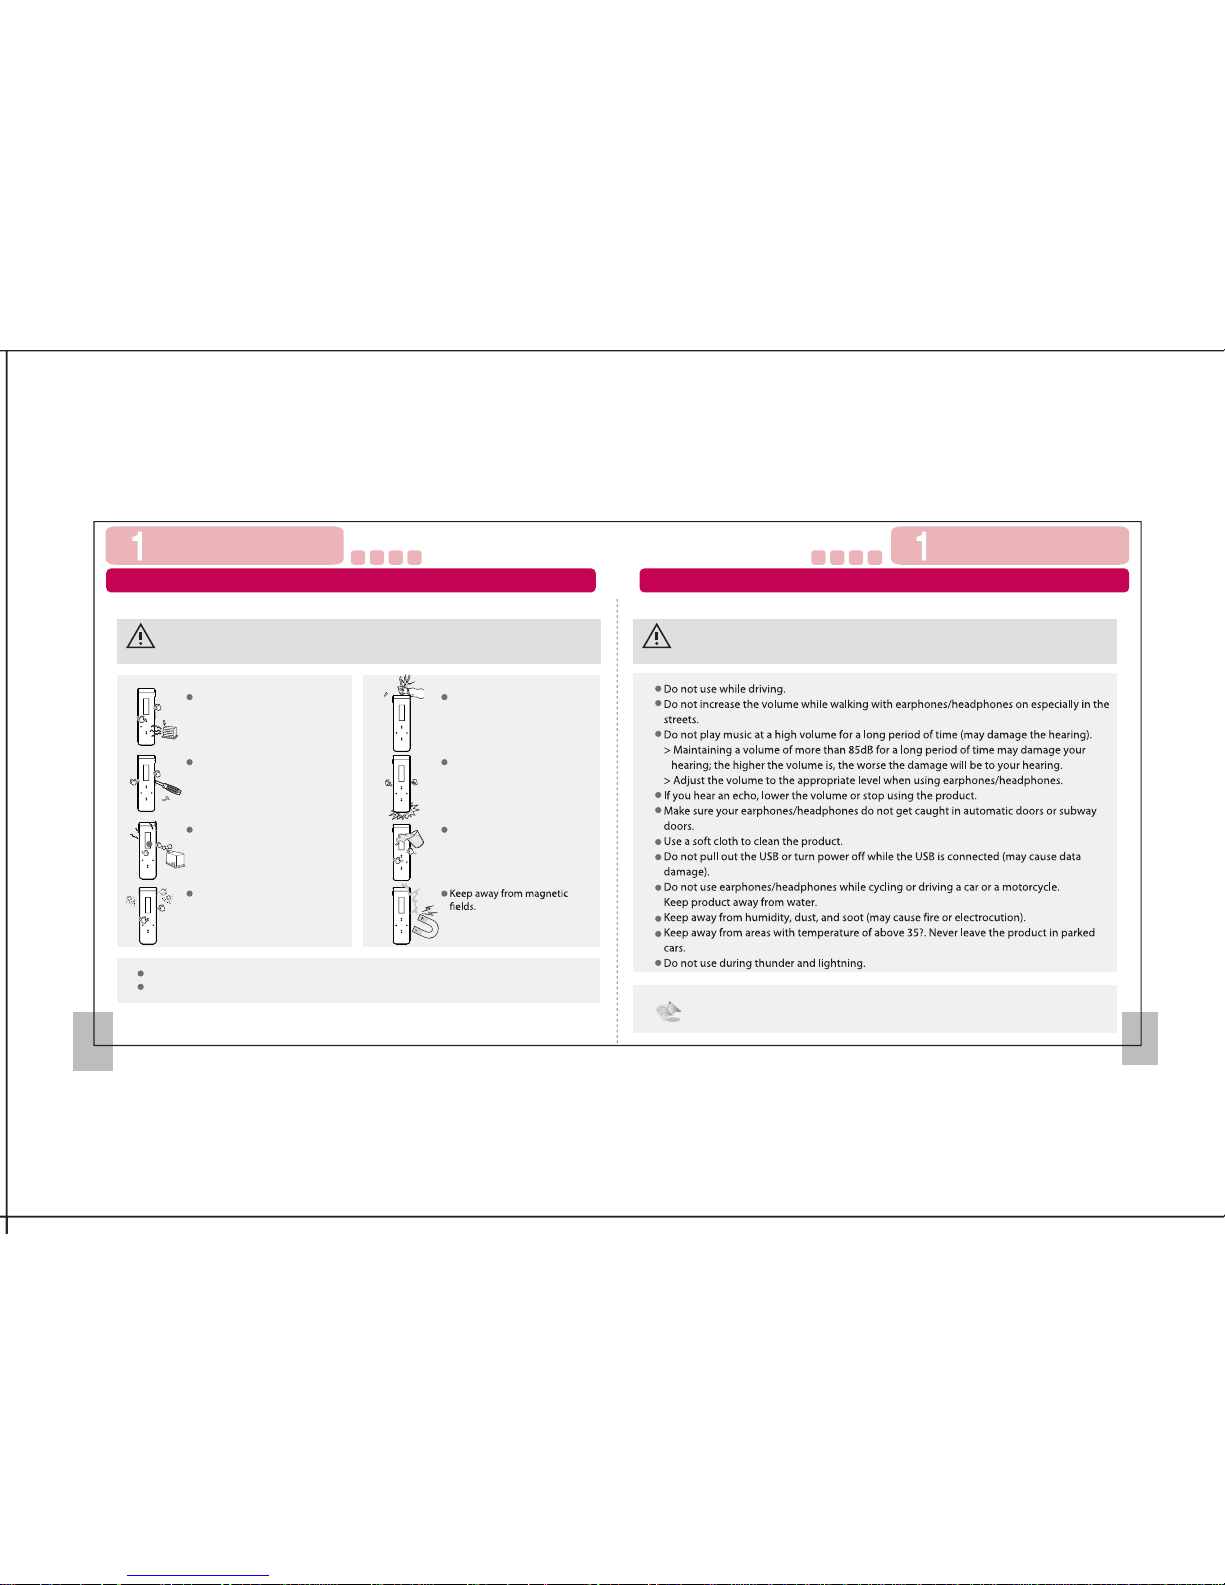
Failure to follow the instructions below may result in injuries or
product damage.
Warning
Keep away from water.
Do not drop the product or
place heavy objects on it.
Do not disassemble, repair,
or rebuild
.
When using the product on a
neck strap hung around the
neck, do not apply too much
pressure on the neck strap.
Keep away from heat.
Keep away from humidity,
dust, and soot.
Make sure no dust or other
foreign matter gets inside the
product.
Failure to follow the instructions below may result in injuries or
product damage.
Warning
The product may not work properly in areas with high static electricity.
Keep important data separately.
Page 4
3 4
Product Features 제품구성품
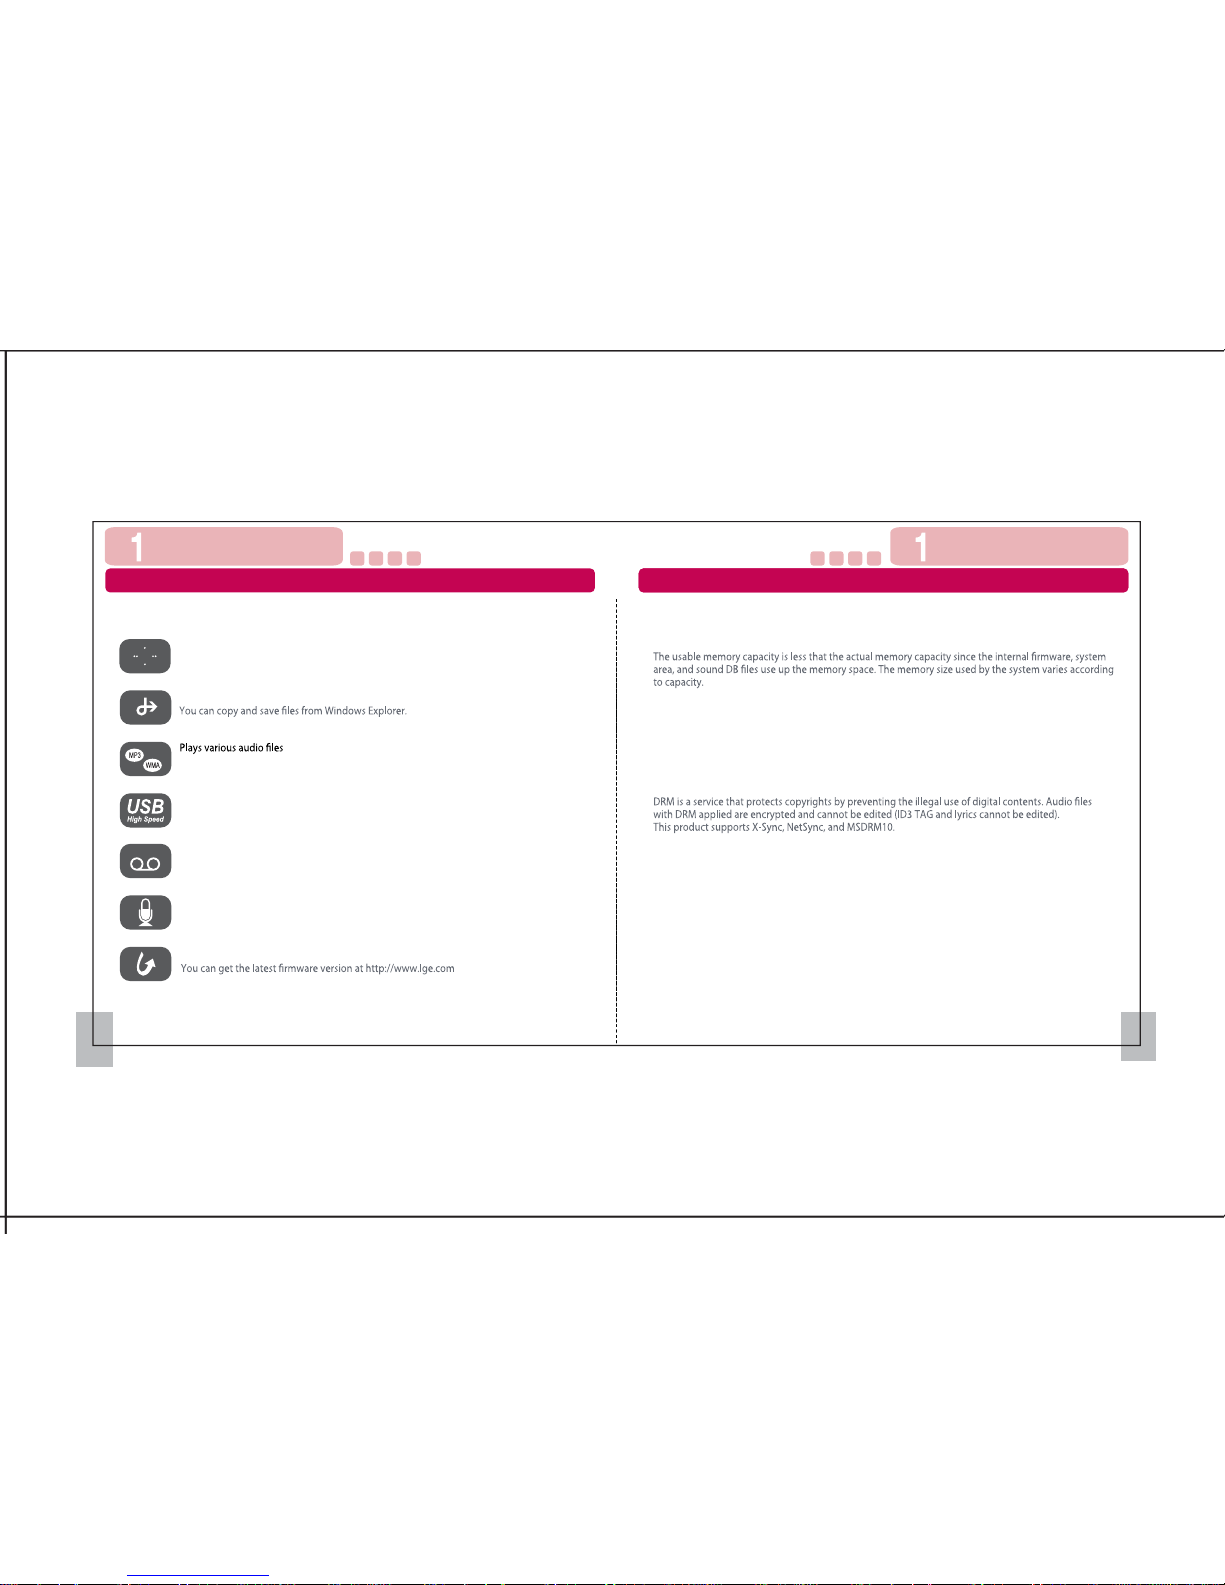
Internal memory capacity
What is the Media Transfer Protocol (MTP) mode?
MTP mode is a mode with the latest Microsoft technology supporting multimedia devices. It is read as a
mobile device rather than as a general mobile storage device and is compatible with Windows Media
Player 10 or higher.
What is the Mass Storage Class (MSC) mode?
MSC mode is a mode that works as a general mobile storage device.
Digital Right Management (DRM) supported
Product Features
Firmware update supported
FM Radio supported
Supports FM radio and recording
Recording supported
Voice recording is supported to record voice anytime, anywhere.
USB 1.1/2.0 supported
USB2.0 speed is supported for fast upload and download; no need to wait for data to be
transmitted to/from the computer
Supports MP3 (8 ~ 320kbps), WMA (32~192kbps), ASF (Only Audio), and OGG
(Q1~Q10) formats
Mobile storage device
Slim design and touch buttons
The design is slim and simple, with touch buttons. Use the touch buttons to access various
menus and features.
Before Using the Product Before Using the Product
Page 5
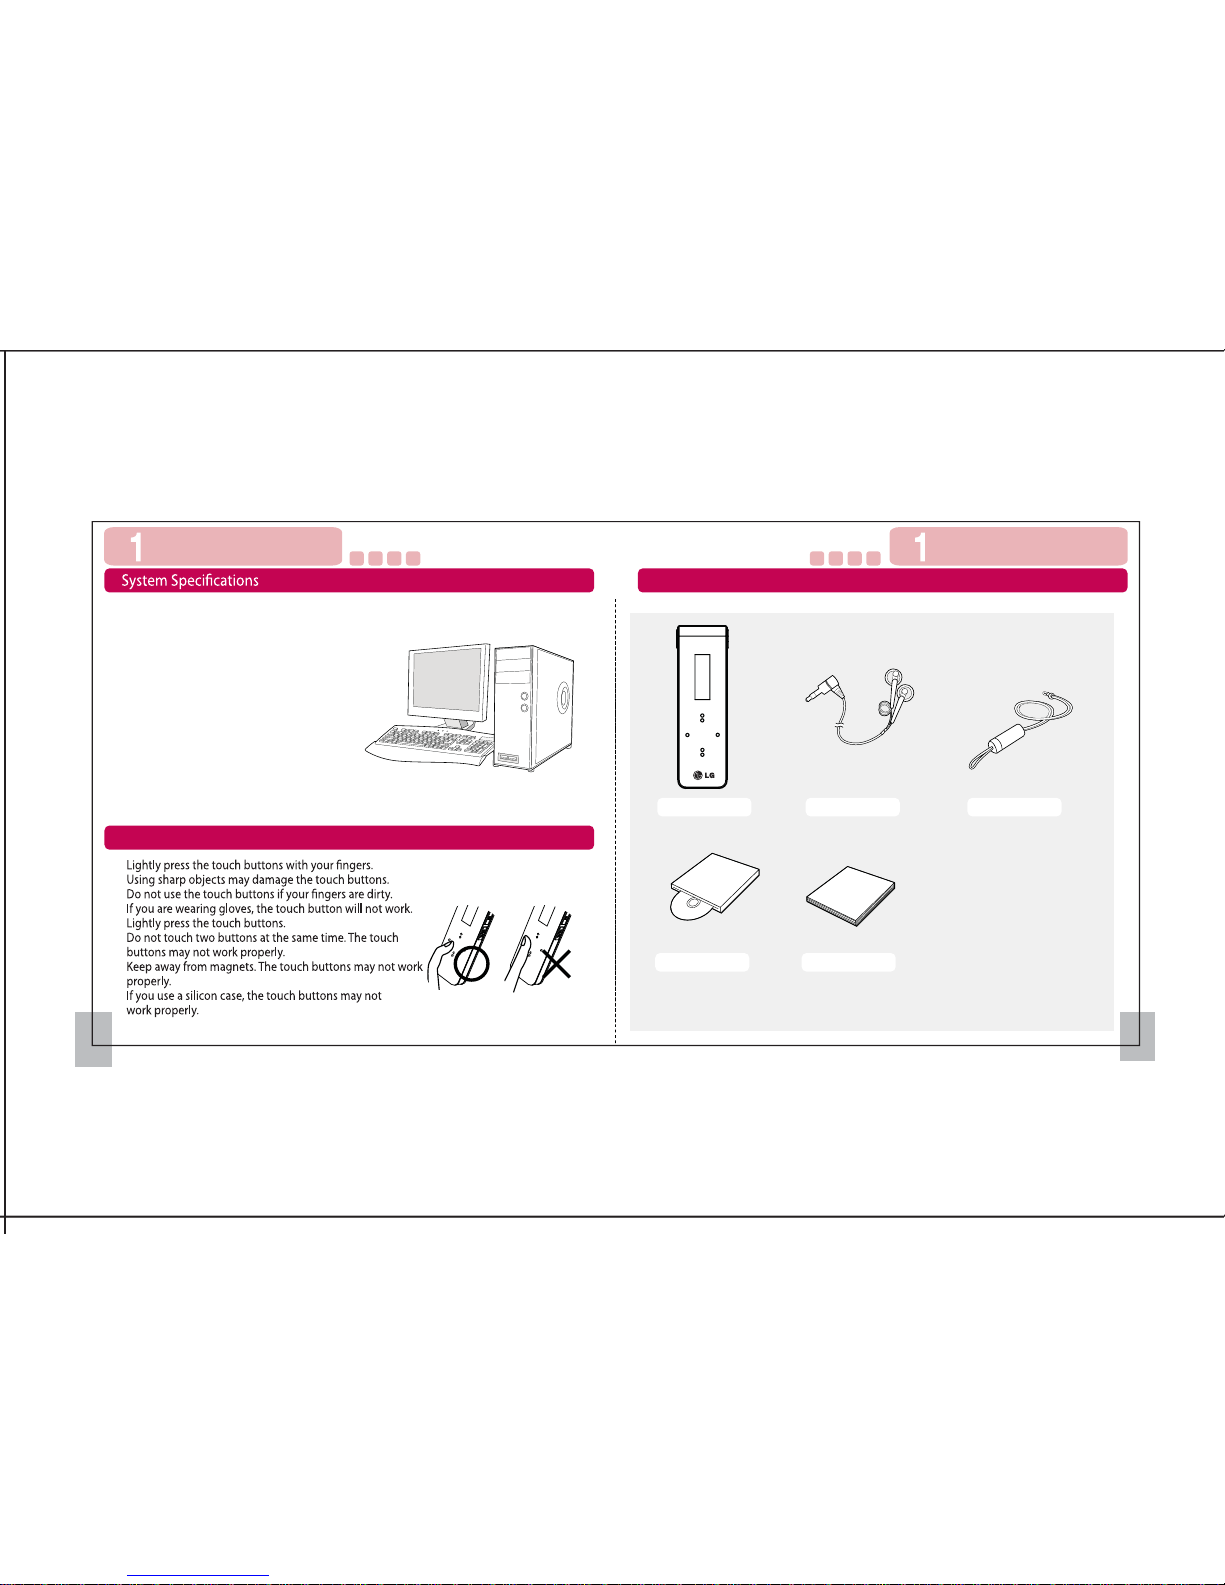
5 6
200MHz Pentium Processor or higher
- Windows 98SE/ME/2000/XP/Vista (32bit/64bit)
- Mac OS X (ver 10.0 or higher supported)
- Linux Kernel 2.6 or higher
USB port
SVGA graphic card
64MB main memory or more
Mouse
CD-ROM driver (2X speed)
HDD 100MB or more of space
※ The components are subject to change without prior notice.
※ Window 98SE users must install the driver in the CD.
Product Components
Software CD Quick Guide
Earphones Neck StrapDevice
.
Press lightly with your nger tips.
Before Using the Product Before Using the Product
Caution when using the touch buttons
Page 6
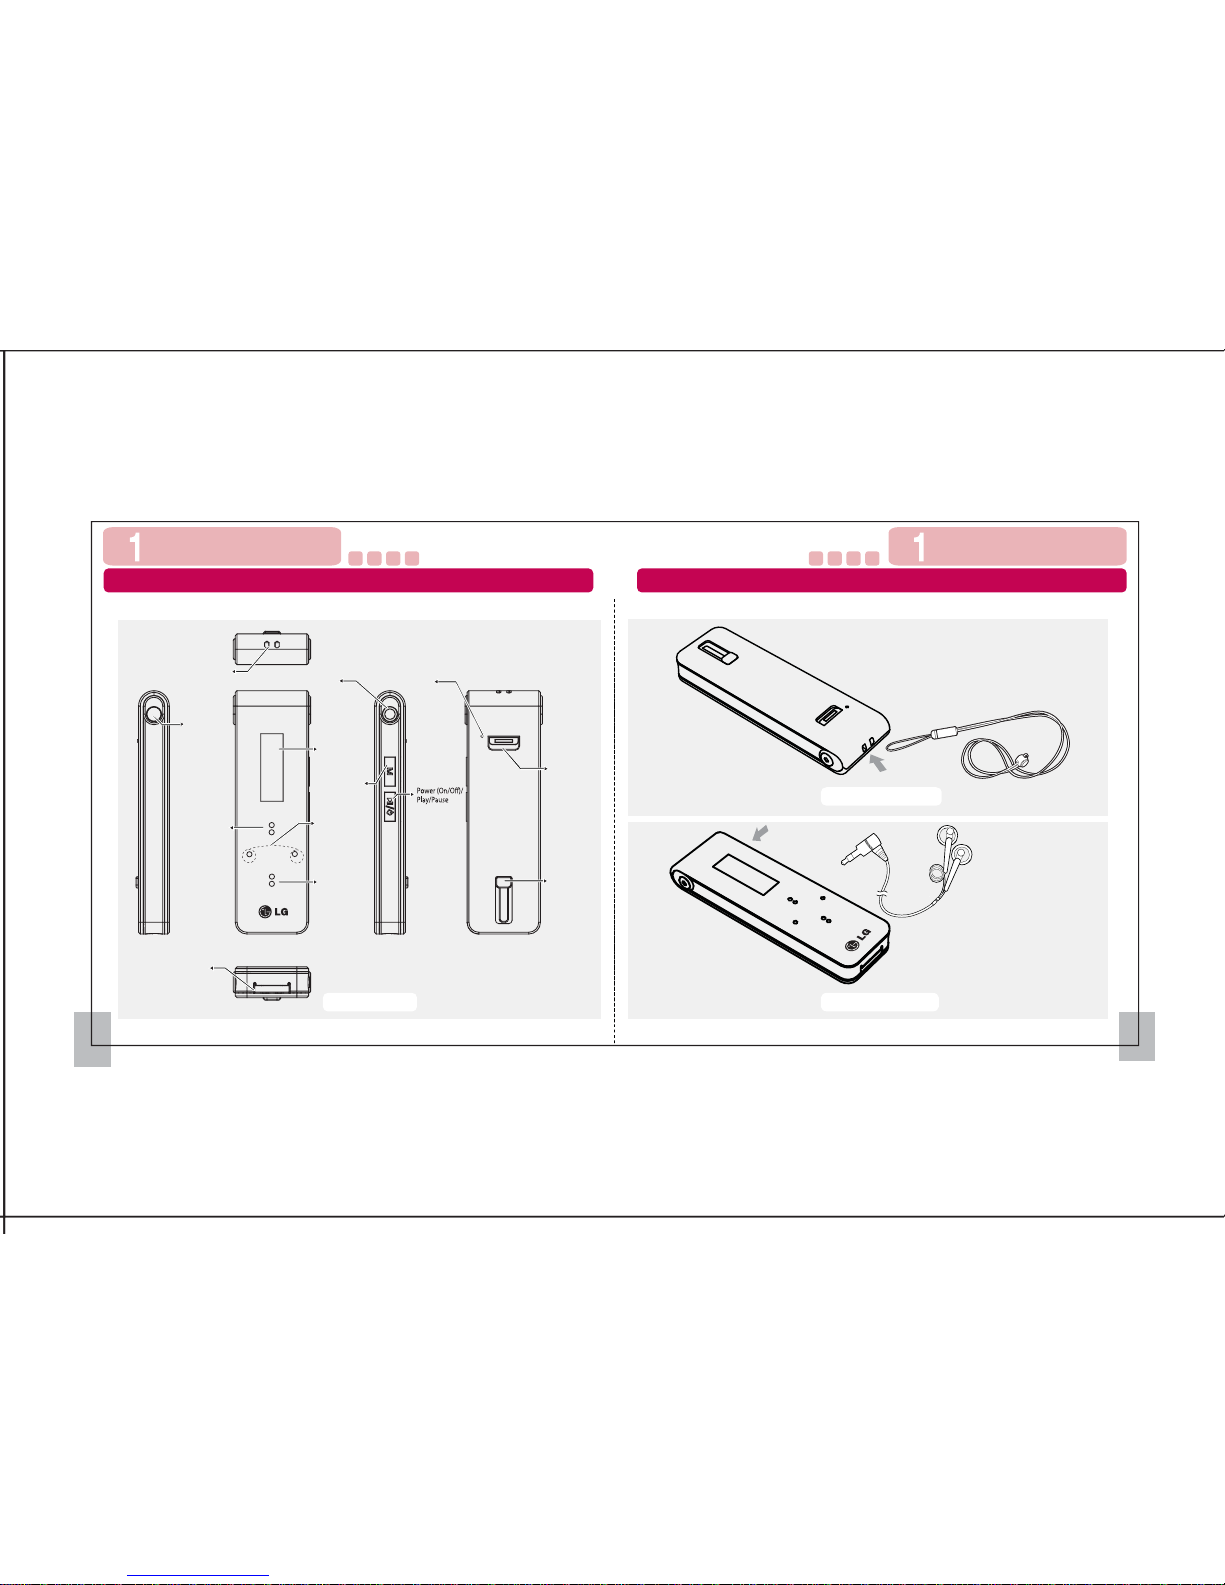
Earphone connection
Neck Strap connection
Earphones
Neck Strap
7 8
Names of Parts Names of Parts
Names of Parts
Record button
Repeat A-B
USB port
Menu/Previous
menu
Lock (Hold)
Neck strap
link
REW button
FF button
Volume control/
Up, Down
Earphone jack
USB slide
button
Display
window
MIC/
Reset hole
Before Using the Product Before Using the Product
Page 7
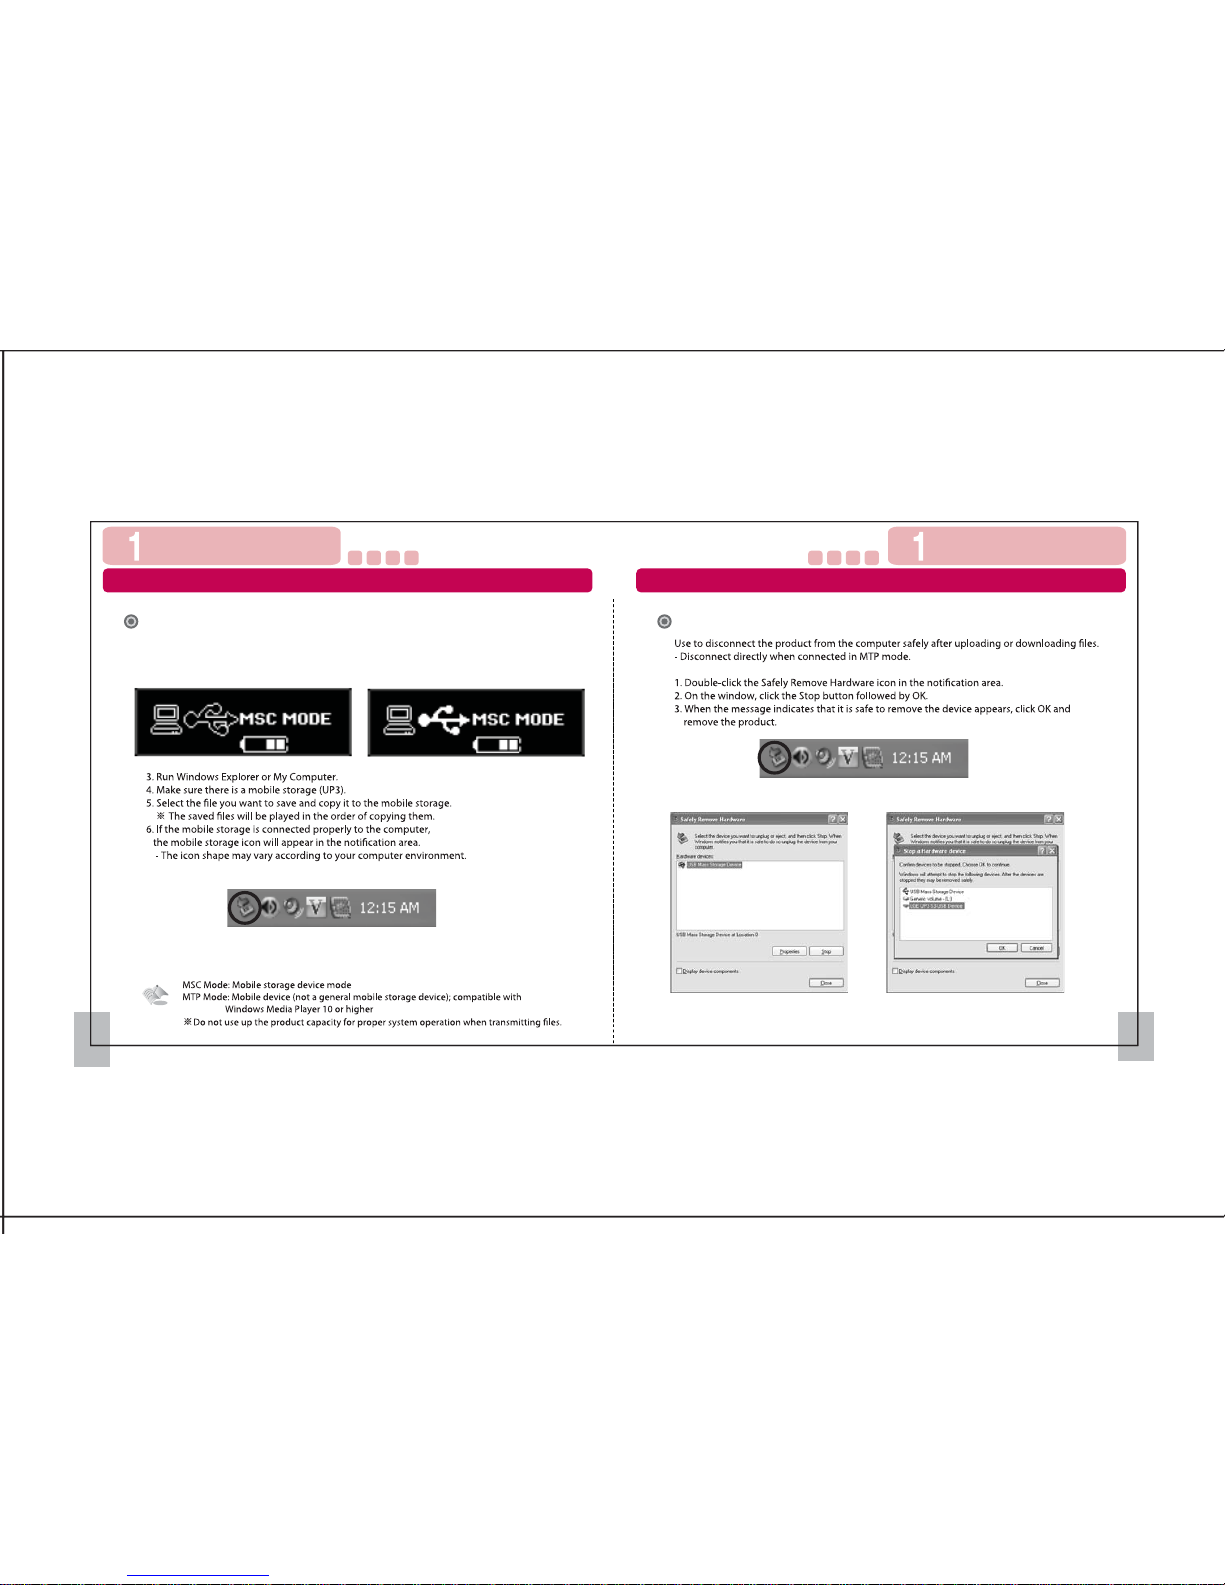
9 10
When used as mobile storage device
1. Connect the UP3 product to the USB port of the computer.
2. The following window will then appear.
Removing the USB
Connecting the USB (MSC) Removing the USB (MSC)
Before Using the Product Before Using the Product
Page 8
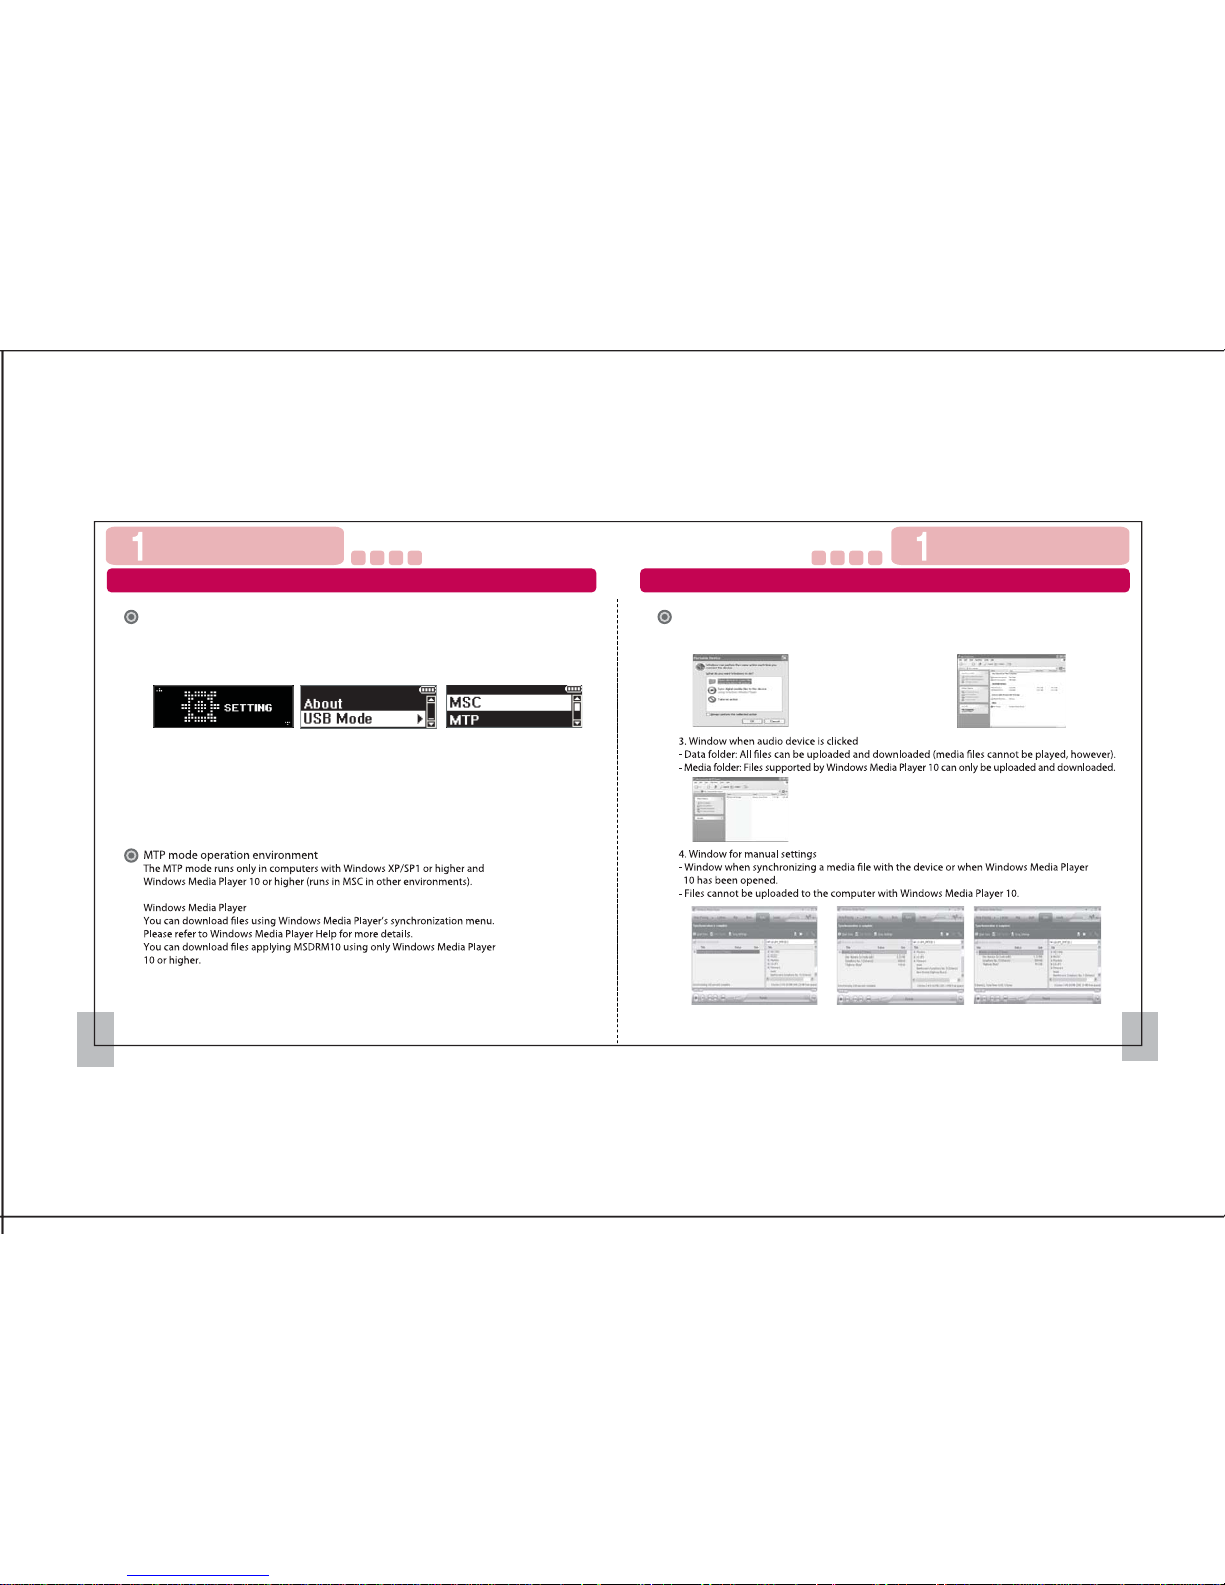
Supported in Windows XP/SP1 or higher and Windows Media Player 10 or higher
1. In Setting-> USB Mode, shift to MTP mode. (Refer to the Settings section.)
2. Plug the UP3 into the computer.
- If Windows Media Player 10 or higher is not installed, the UP3 will automatically
shift to MSC mode.
MTP mode environment
1. Window when UP3 is connected to
the computer
2. Window when My Computer is opened
Connecting to MTP Mode
File Import (MTP)
11 12
[Window after synchronization]
File Import (MTP)
Before Using the Product Before Using the Product
Page 9
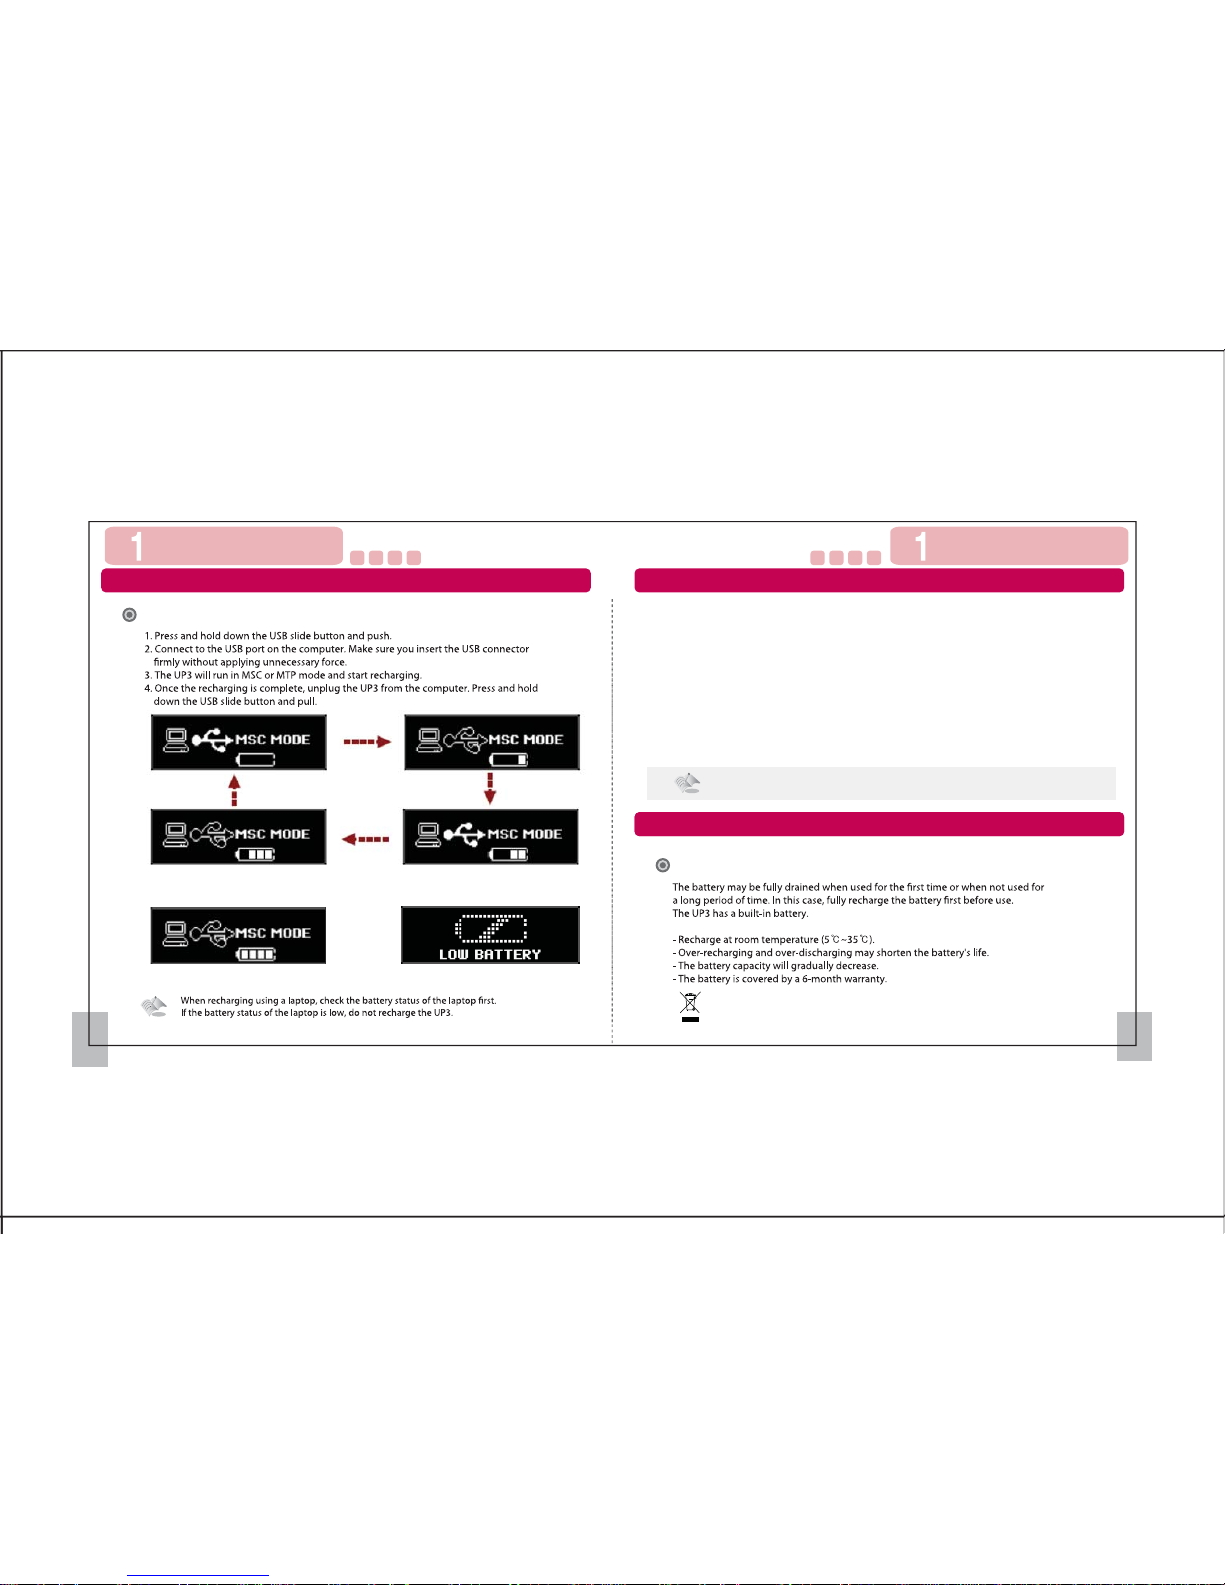
The capacity of the battery and time it takes to recharge the battery fully may vary
according to the usage conditions and environment.
- You can recharge the UP3 by plugging it to the computer.
Recharging the battery fully takes about an hour to an hour and a half.
- When recharging with the recharge station, the recharge icon will appear.
Once the recharging is complete, the battery icon will appear.
- The display may not turn on if the battery is fully drained.
Recharging
13 14
Recharging
Recharging
화면구성
Battery Use
Battery Use
[Recharging status]
[Low battery]
[Recharging completed]
Before Using the Product Before Using the Product
This symbol is applicable in Europe Union.
Please contact authorized LG Electronics service center to replace or remove.
Hand over used batteries to recycling collection point of waste batteries.
Page 10
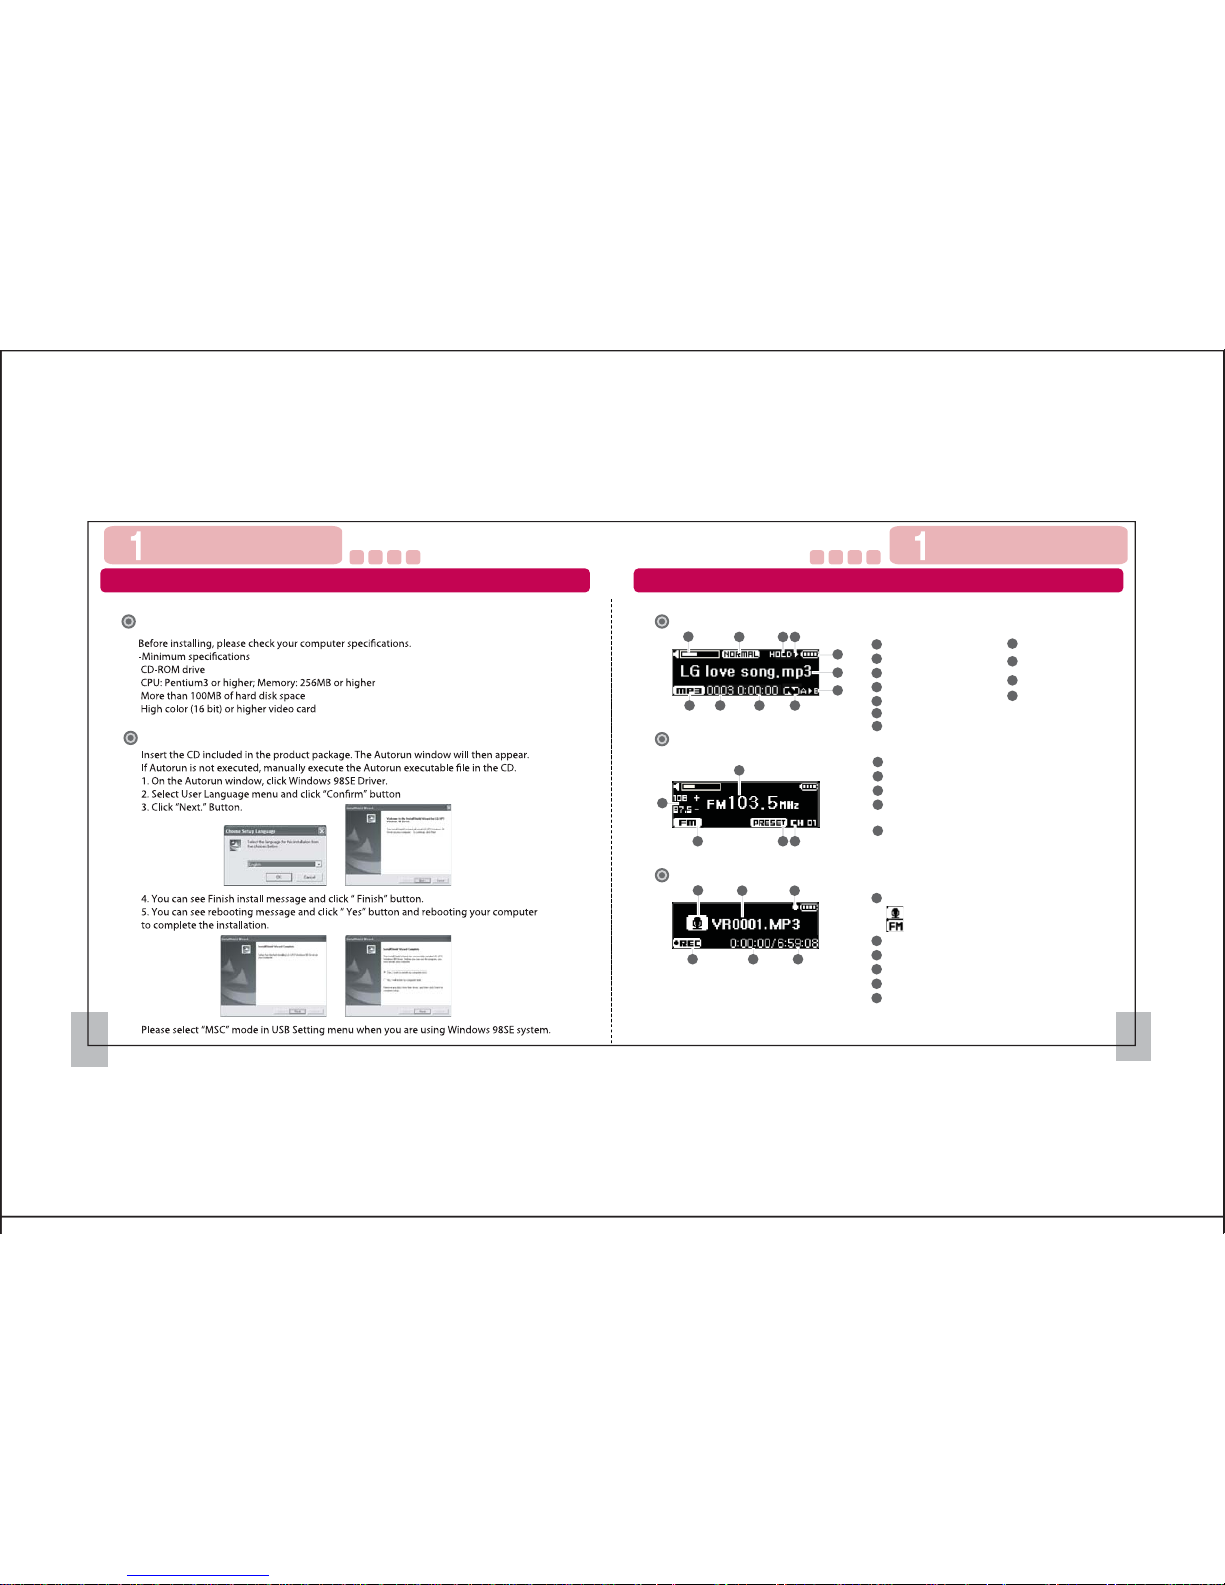
Play
1
2
3
4
5
6
8
9
Recording source
:Voice recording
:Radio recording
File name
Recording status
Remained recording time
Current recording time
Recording mode
Repeat icon
Music mode
6
7
3 4
5
2
1
9 8
1011
FM
1
2
3
4
5
Frequency range
Current frequency
Preset channel number
Preset mode/
Autoscan mode
FM mode
7
Play mode
7
8
9
10
11
1
2
3
4
5
6
Volume
EQ status
Lock status
Play status
Battery status
Filename/Artist name
15 16
Record
2 3
1
Installation
Installing Windows 98SE Driver
Before installing
45 3
2
5 4
6
1
Display
Before Using the Product Before Using the Product
Playing time
Track number
Page 11
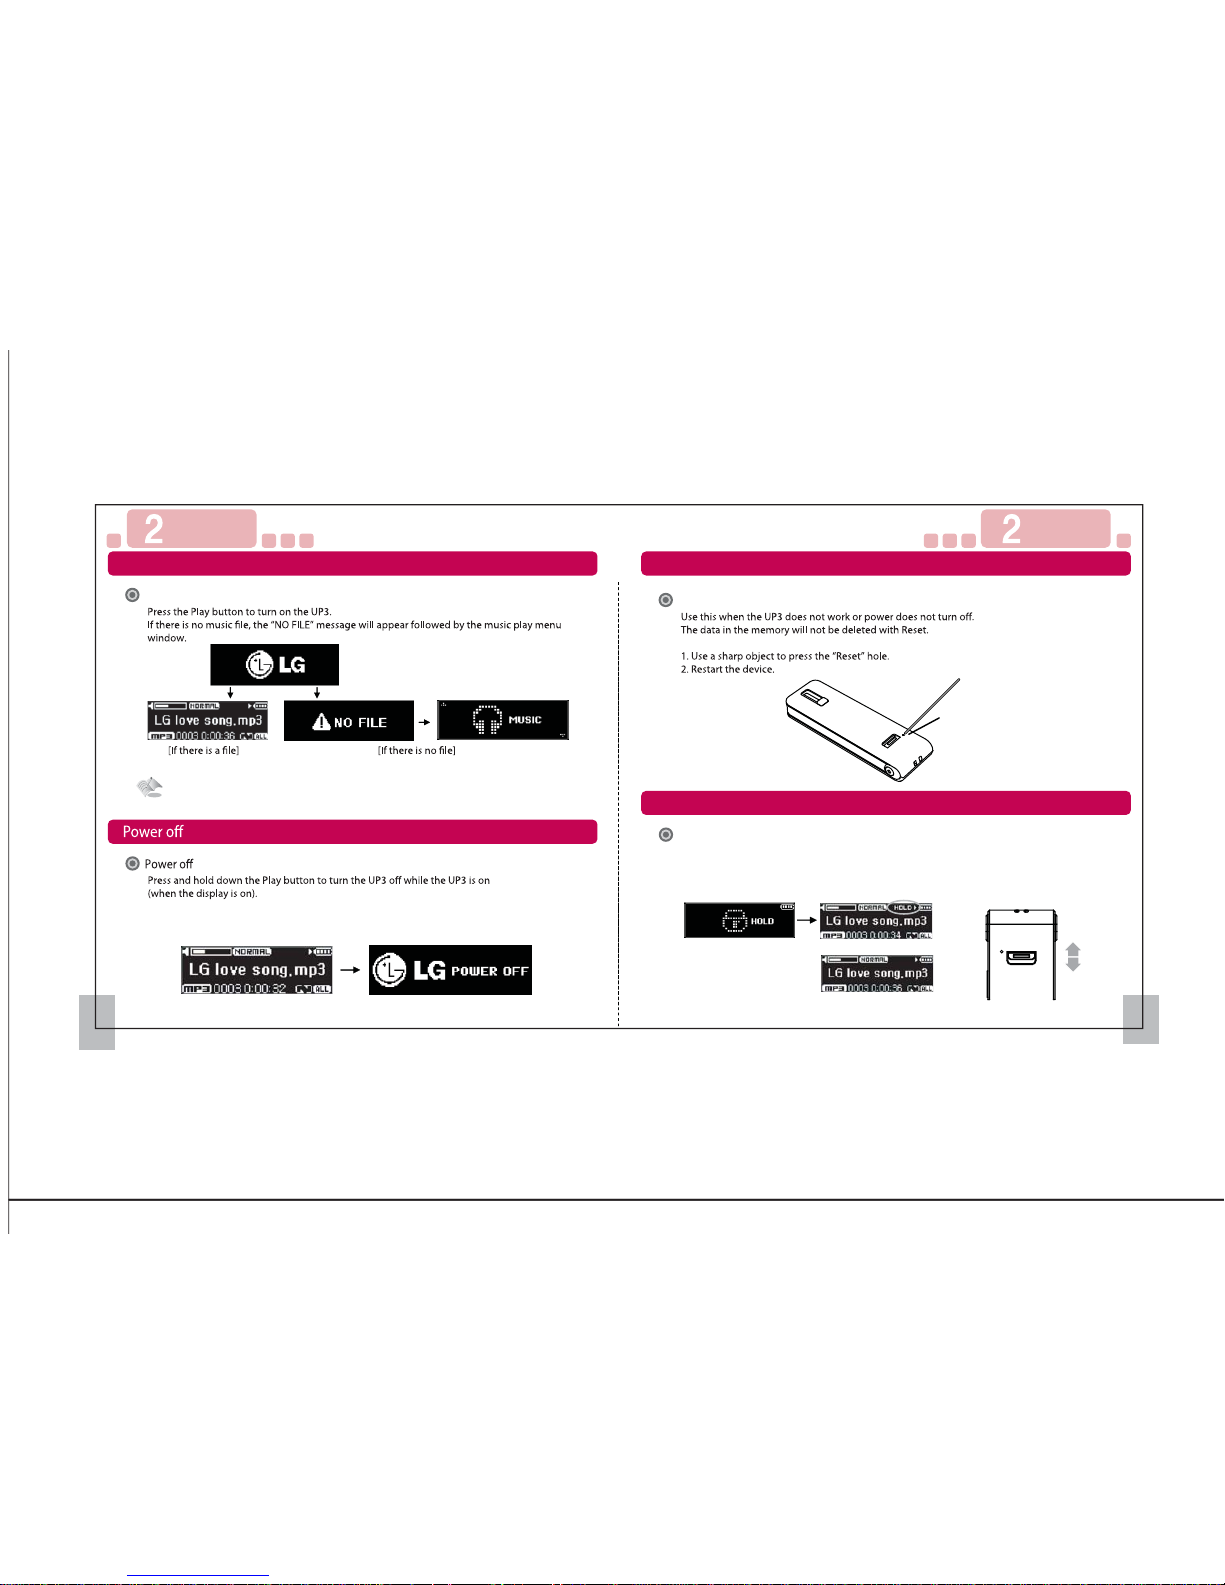
19 20
Basic UseBasic Use
Power on
Reset
Lock feature
Reset
You can lock all the buttons to prevent unintentional wrong operation.
1. Set the Hold switch to the “HOLD” position. (“Hold” will appear on the screen followed
by the Hold icon.)
2. Set the Hold switch to the “OFF" position. (The Hold icon will disappear from the screen.)
Lock feature
Reset hole
Lock switch (Hold) HOLD ON
If you turn the power on, initial booting may take time since nding the saved les may also take time.
S3 supports auto playback when audio le exists. Music starts from the stop point previous.
[Power On]
[Hold ON]
[Hold OFF]
Power on
Page 12
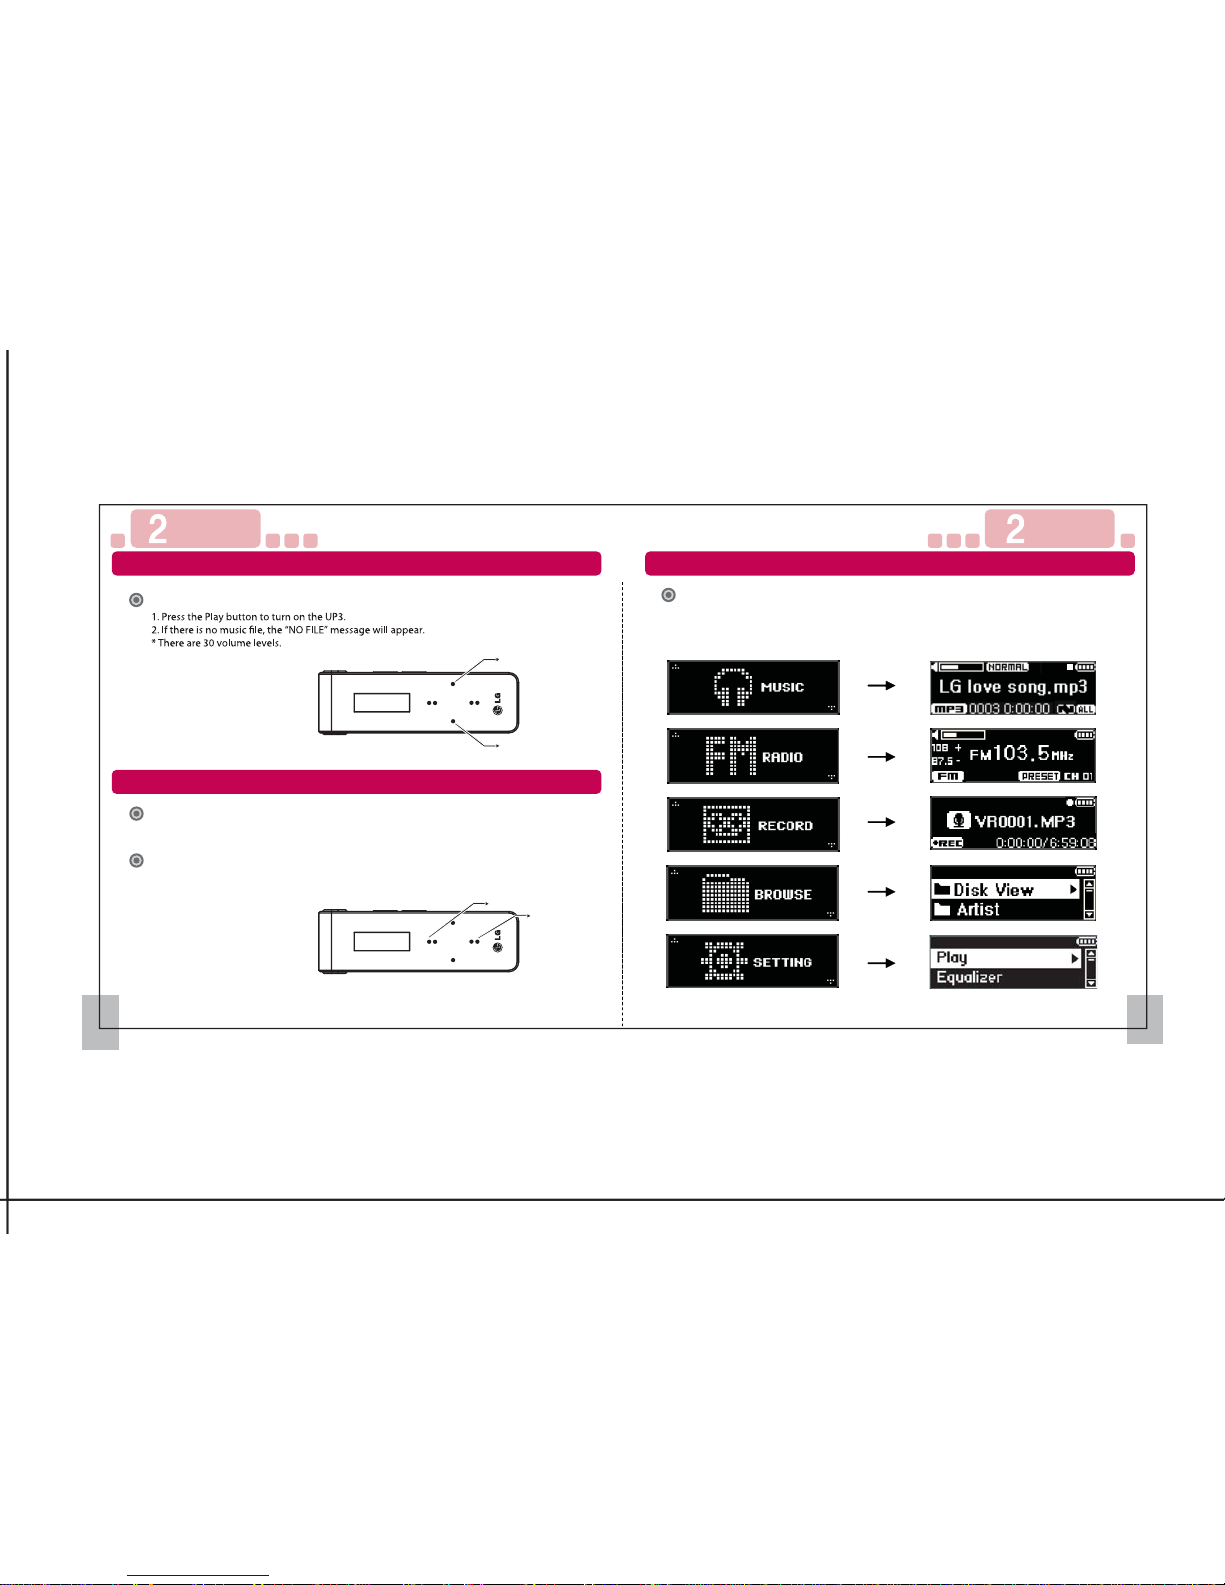
Basic UseBasic Use
[Main menu window] [Move window]
Volume Control
1. Pressing and holding down the Menu button for at least 2 seconds will cause the main
menu to appear.
2. Press the volume buttons to go to the desired menu.
3. Press the FF button to go to the desired menu.
Menu Mode
Volume Control
21 22
Previous/Next Track
- Press the FF button to move to the next track.
- Press and hold down the FF button to explore the next track.
FF
- Press the REW button to move to the previous track.
- Press and hold down the REW button to explore the previous track.
REW
Increase volume
Decrease volume
FF
REW
Menu Mode
Page 13
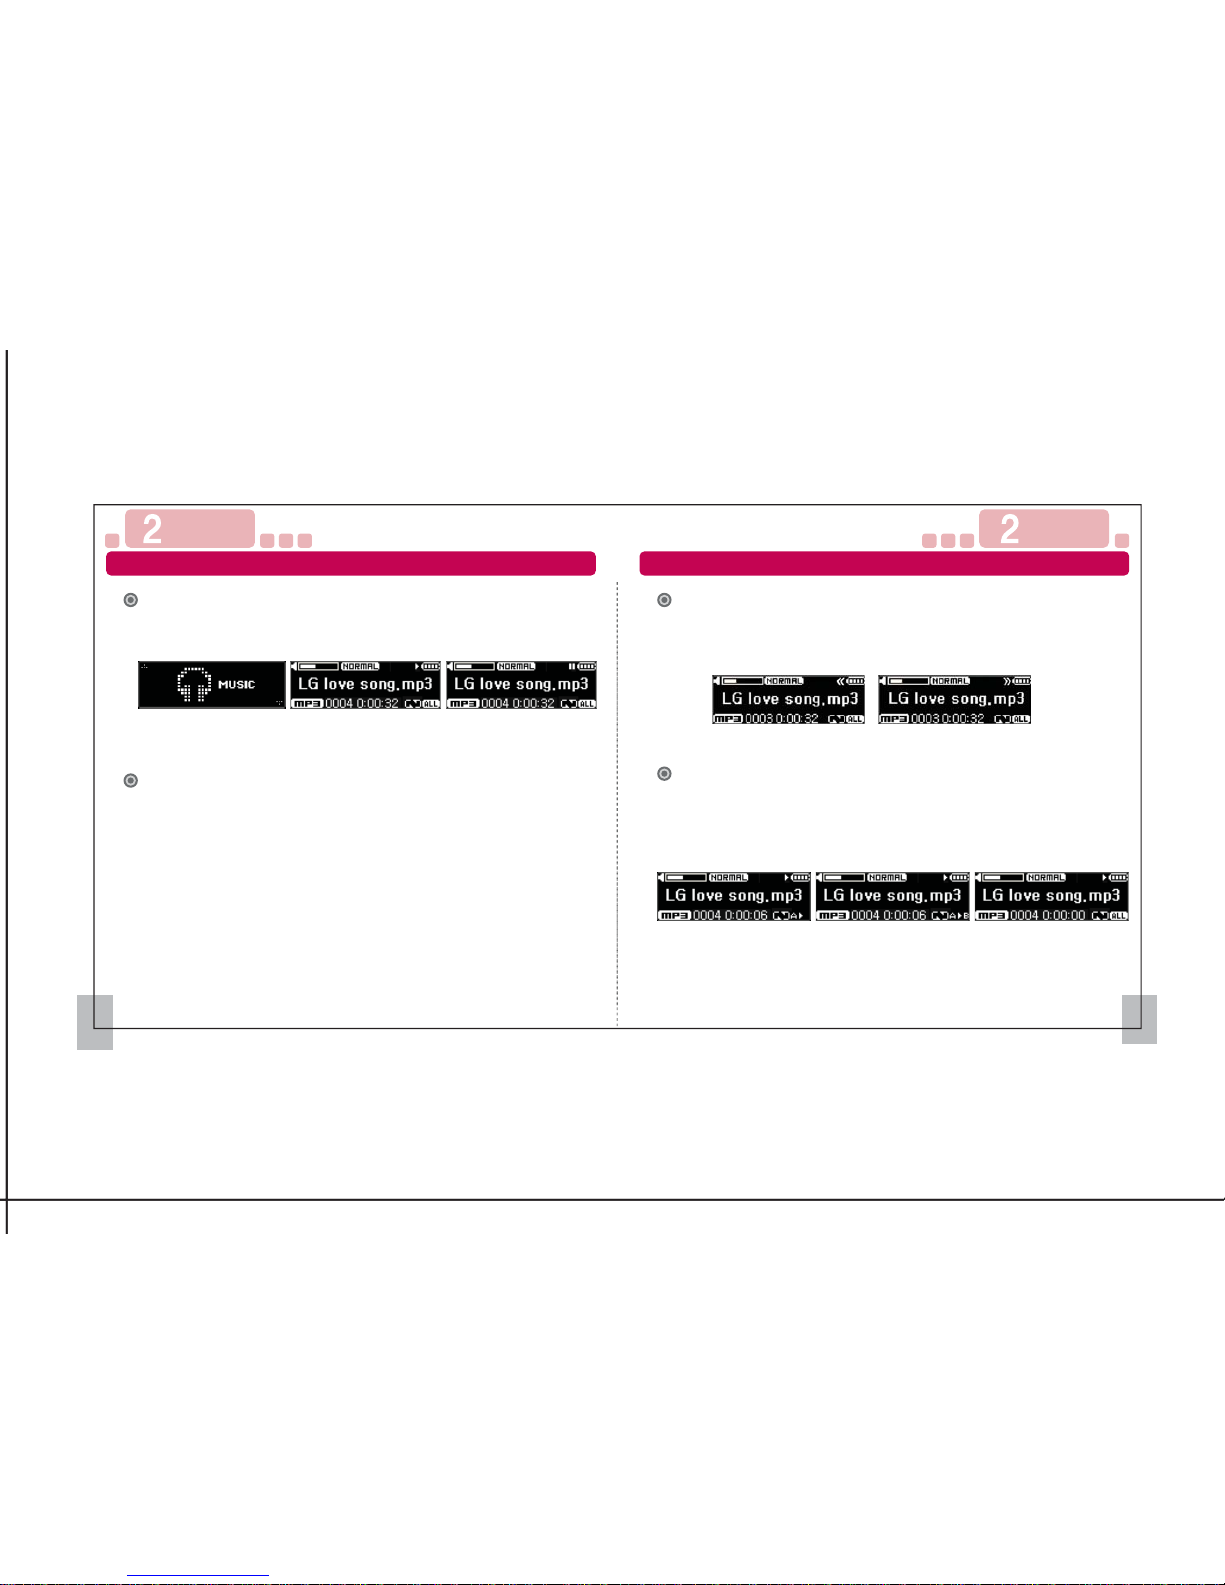
In the main menu, press the FF button in music mode to shift to Music mode.
To play a le, press the Play/Pause button. press it one more time to pause the le.
Listening to Music
Listening to Music
[Play music]
[Pause music]
[Disable repeat][Start section repeat] [Repeat section]
Listening to Music
23 24
Basic UseBasic Use
Press the REW button for 5 seconds after the playback of the current track ends to listen
to the track from the start.
Press the REW button within 5 seconds of playback of the current track to move to
the previous track and the FF button to move to the next track.
Move to the Next/Previous track
You can repeat a section of a track.
- Press the REC button on the starting point of the section you want to repeat.
The Play status icon will display [A▶].
Press the REC button on the ending point of the section you want to repeat.
The Play status icon will change to [A▶B], and the section will be played repeatedly.
- Pressing the REC button again when the repeated section is set disables the repeat.
Repeating a section
Press and hold down the FF or REW button while a track is playing to move fast
forward or rewind the track. (The track will play normally if you release the button.)
If you pass the current track while fast forwarding or rewinding, the previous or next
track will be selected.
Fast Forward/Rewind
[Fast Forward] [Rewind]
Page 14
동영상보기
25 26
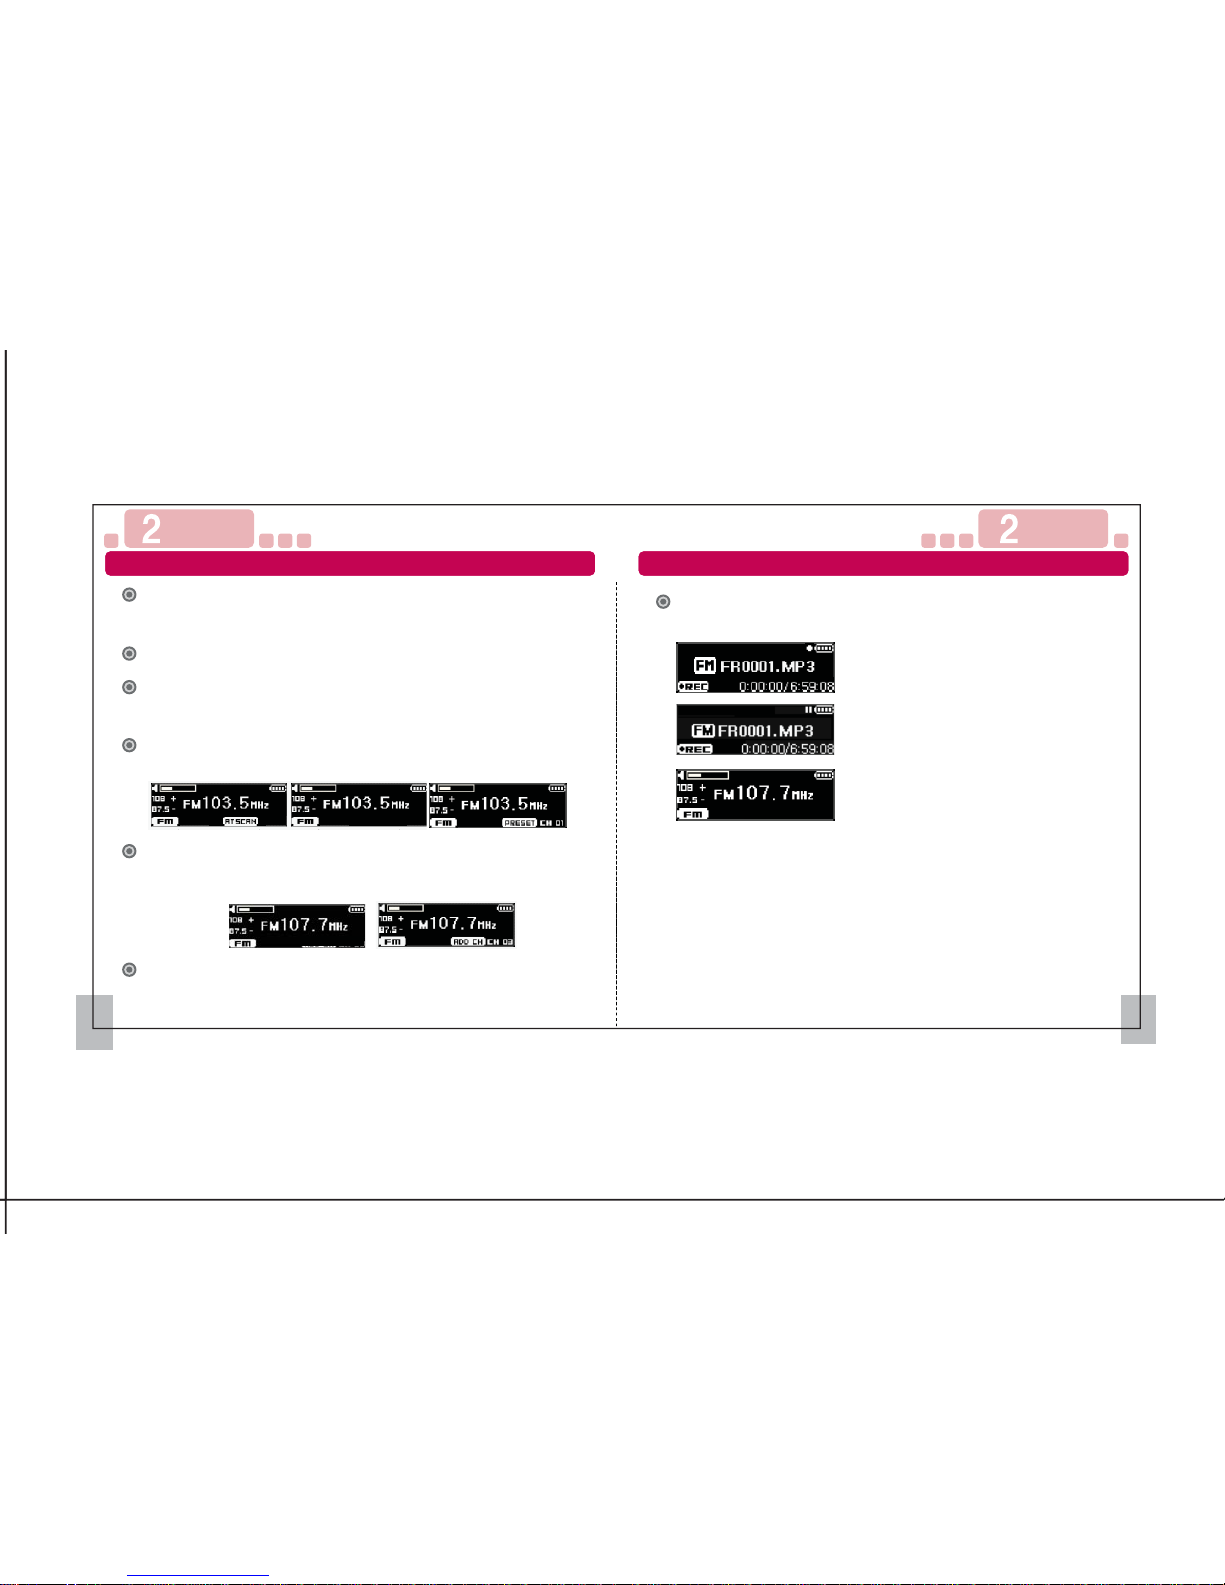
In Manual mode, move to the desired frequency and press the REC button to save the frequency
as preset channel.(Channels are arranged in the order of saving them.)
Ex.> If the last channel you saved is number 09, the next channel you save will be number 10.
Saving channels manually
In Preset mode, select the channel you want to delete and press [REC] button to
delete the selected channel.
Deleting channels manually
In the main menu, press the FF button in FM mode to listen to the radio.
If you have not set a preset channel, automatic scan will be executed.
Up to 30 channels can be saved.
Listening to FM Radio
Press the Play/Pause button to shift to Preset mode and Manual mode.
Manual/Preset mode conversion
In Manual mode, press the FF or REW button to move the frequency one step at a time.
Press and hold down the FF or REW button in Manual mode to select the next or previous
frequency automatically with the radio channel.
Manual/Automatic selection
In Preset mode, press and hold down the FF or REW button. Autoscan will be executed
to scan frequencies and save preset channels in order.
Saving channels automatically
FM 라디오 듣기
The radio program you are listening to can be recorded.
Recording FM Radio
FM 라디오 녹음하기
Basic UseBasic Use
[Add channel][Manual mode]
[Start recording]: In Radio mode, press and hold down
the REC button to shift to Record mode
and start recording the radio program.
[Stop recording]: Press and hold down the REC button
while recording to stop the recording.
[Pause recording]: Press the Play/Pause button while
recording to pause the recording.
To resume recording, press it again.
[Autoscan mode] [Manual mode] [Preset mode]
Listening to FM Radio Recording FM Radio
Page 15
27 28
Basic UseBasic Use
Record is available when there is remained area in the memory(capacity).
The recorded le will be saved in the Record folder.
To go to another menu while recording, pause the recording and go to the menu.
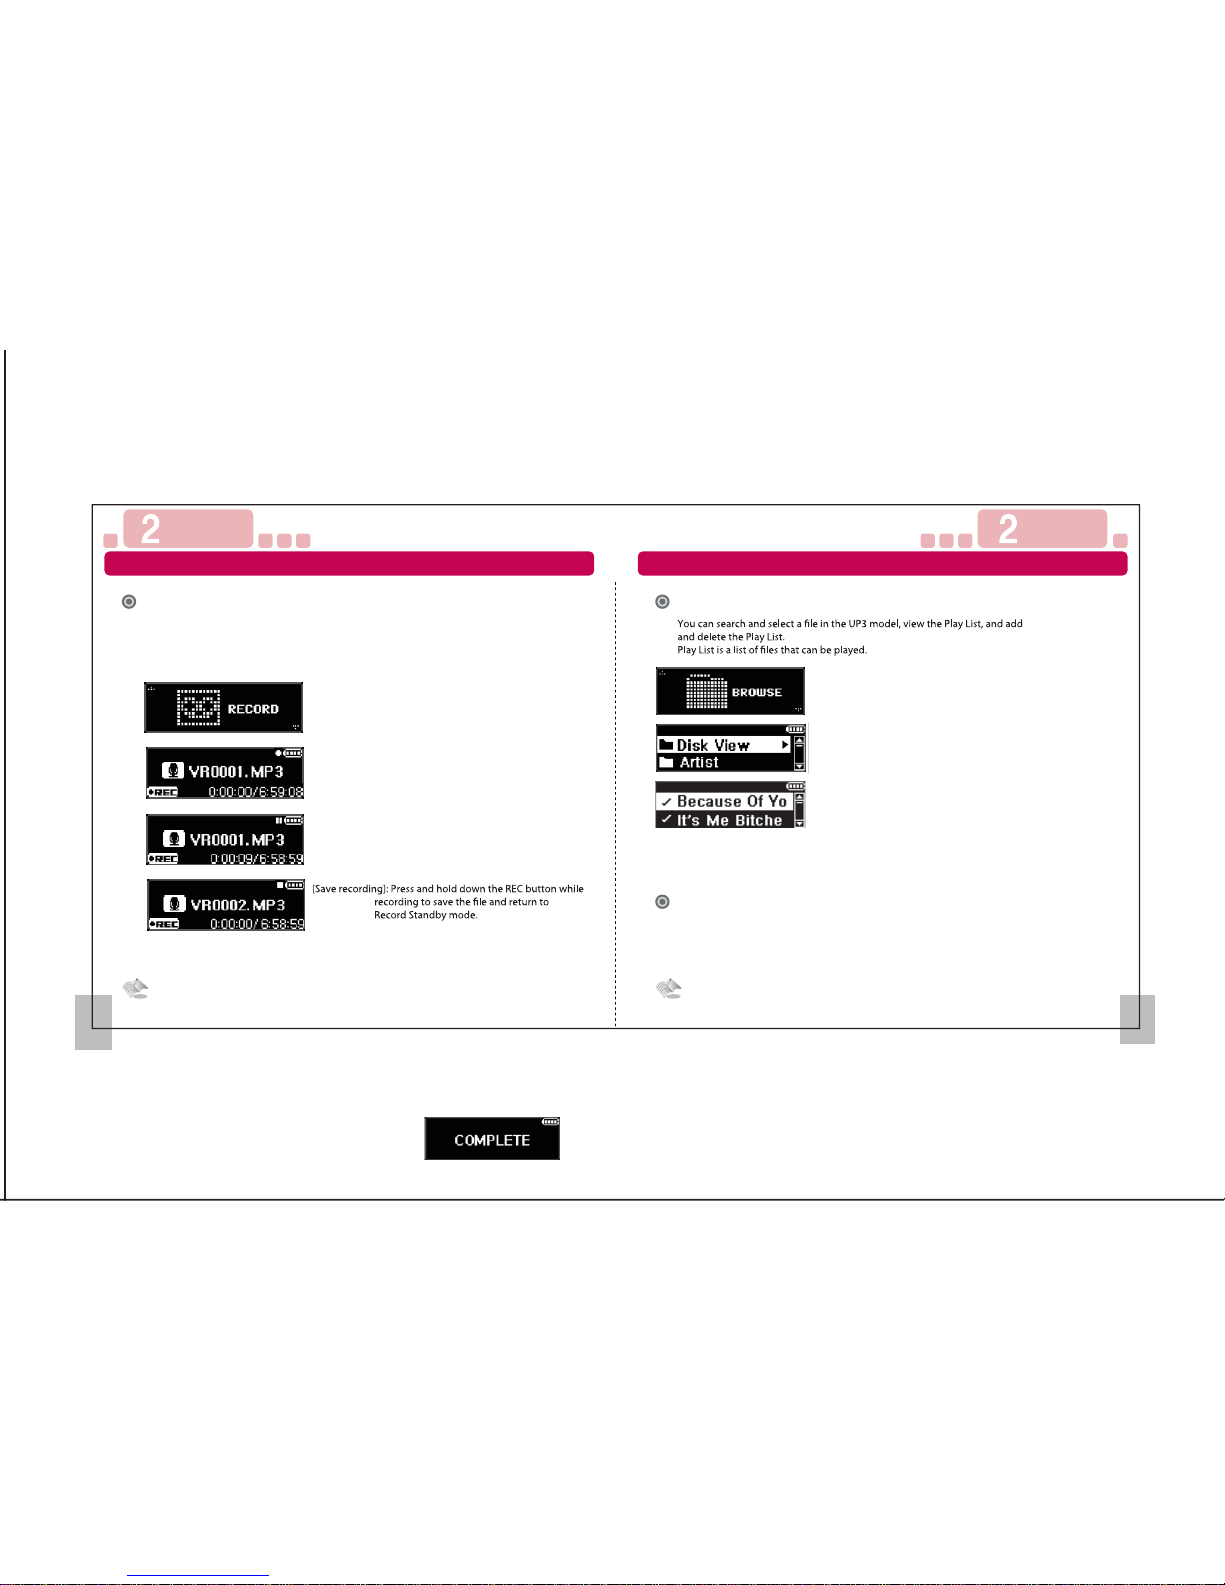
In the menu, select the Record menu to record your voice using the built-in microphone.
You can record a radio program in Radio mode only.
(You can change the recording settings in the Settings menu.)
[Start recording]: In Record Standby mode, press and hold
down the REC button to start recording
.
[Pause recording]: Press the Play/Pause button while
recording to pause the recording.
To resume recording, press it again.
Recording Voice File search
Files in the Audio Play List cannot be added to the Play List; they can only be deleted.
Transfer the les through the USB and turn the device on. The les will be automatically
added to the Play List.
[Disk View]: You can view and select all folders and les and
add them to or delete them from the Play List in
alphabetical order.
[Artist]: You can categorize and select all music les by artist
and add them to or delete them from the Play List in
alphabetical order.
[Album]: You can categorize and select all music les by album
and add them to or delete them from the Play List in
alphabetical order.
[Genre]: You can categorize and select all music les by genre
and add them to or delete them from the Play List in
alphabetical order.
[Record]: You can categorize and select all les in the
Record folder and add them to or delete them
from the Play List in recording order.
[All Audio Files]: You can view and select all audio les and add
them to or delete them from the Play List in
alphabetical order.
Press the Volume Up or Down button to go to the desired folder or le, and then press
the REC button to add or delete les from the Play List.
(Files that can be played can only be added or deleted.)
Adding and deleting les from the Play List
Recording Voice File search
Page 16
Setting Setting
재생설정
31 32
Equalizer
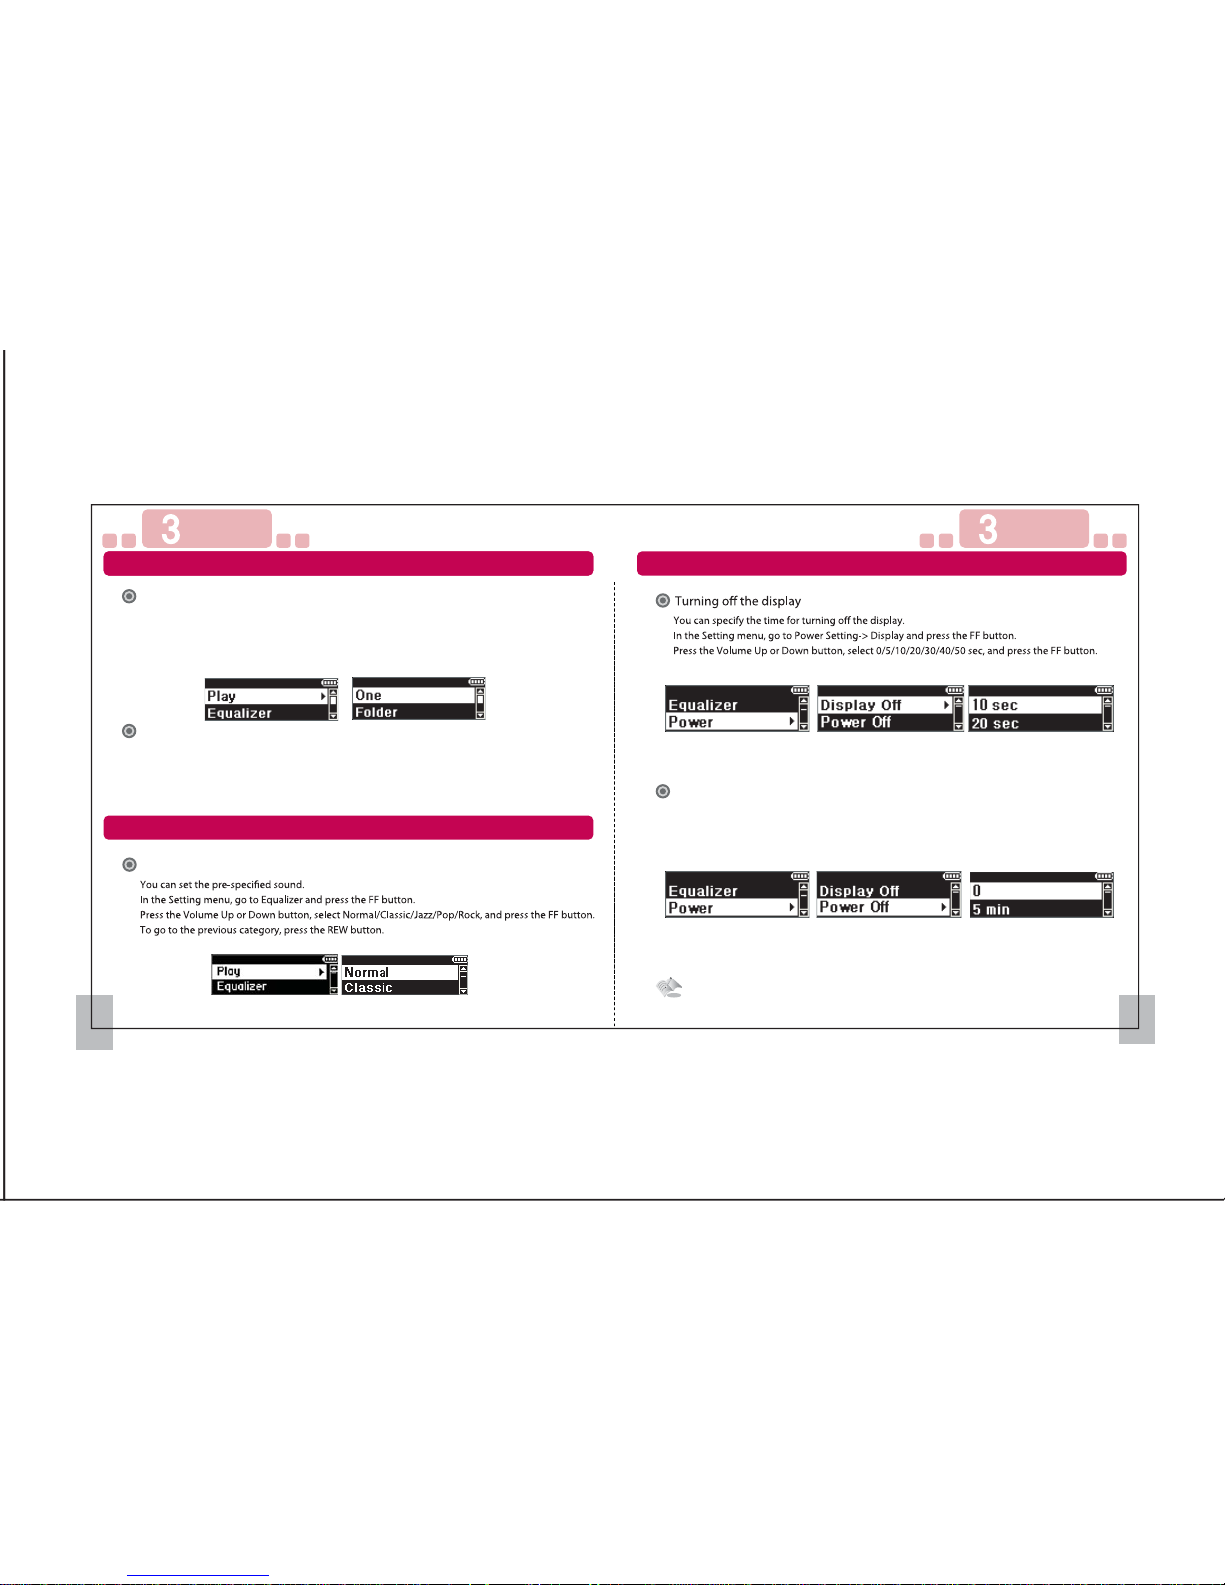
You can set the time for turning o the power automatically after the device is idle for the
specied period of time.
In the Setting menu, go to Power Setting-> Power and press the FF button.
Press the Volume Up or Down button, select 0/5/15/30/45/60 min, and press the FF button.
Turning o power
Play range
You can set the play range.
In the Setting menu, go to Play Setting and press the FF button. Select Play Range and press
the FF button.
Press the Volume Up or Down button, select Onel/Folder/All, and press the FF button.
To go to the previous category, press the REW button.
Play mode
You can set the play mode.
In the Setting menu, go to Play Setting and press the FF button. Select Play Mode and press
the FF button.
Press the Volume Up or Down button, select Normal/Repeat/Random, and press the FF button.
To go to the previous category, press the REW button.
This function does not work in play, record and radio modes.
Play Setting
Equalizer Setting
Power Setting
Page 17
Setting Setting
33 34
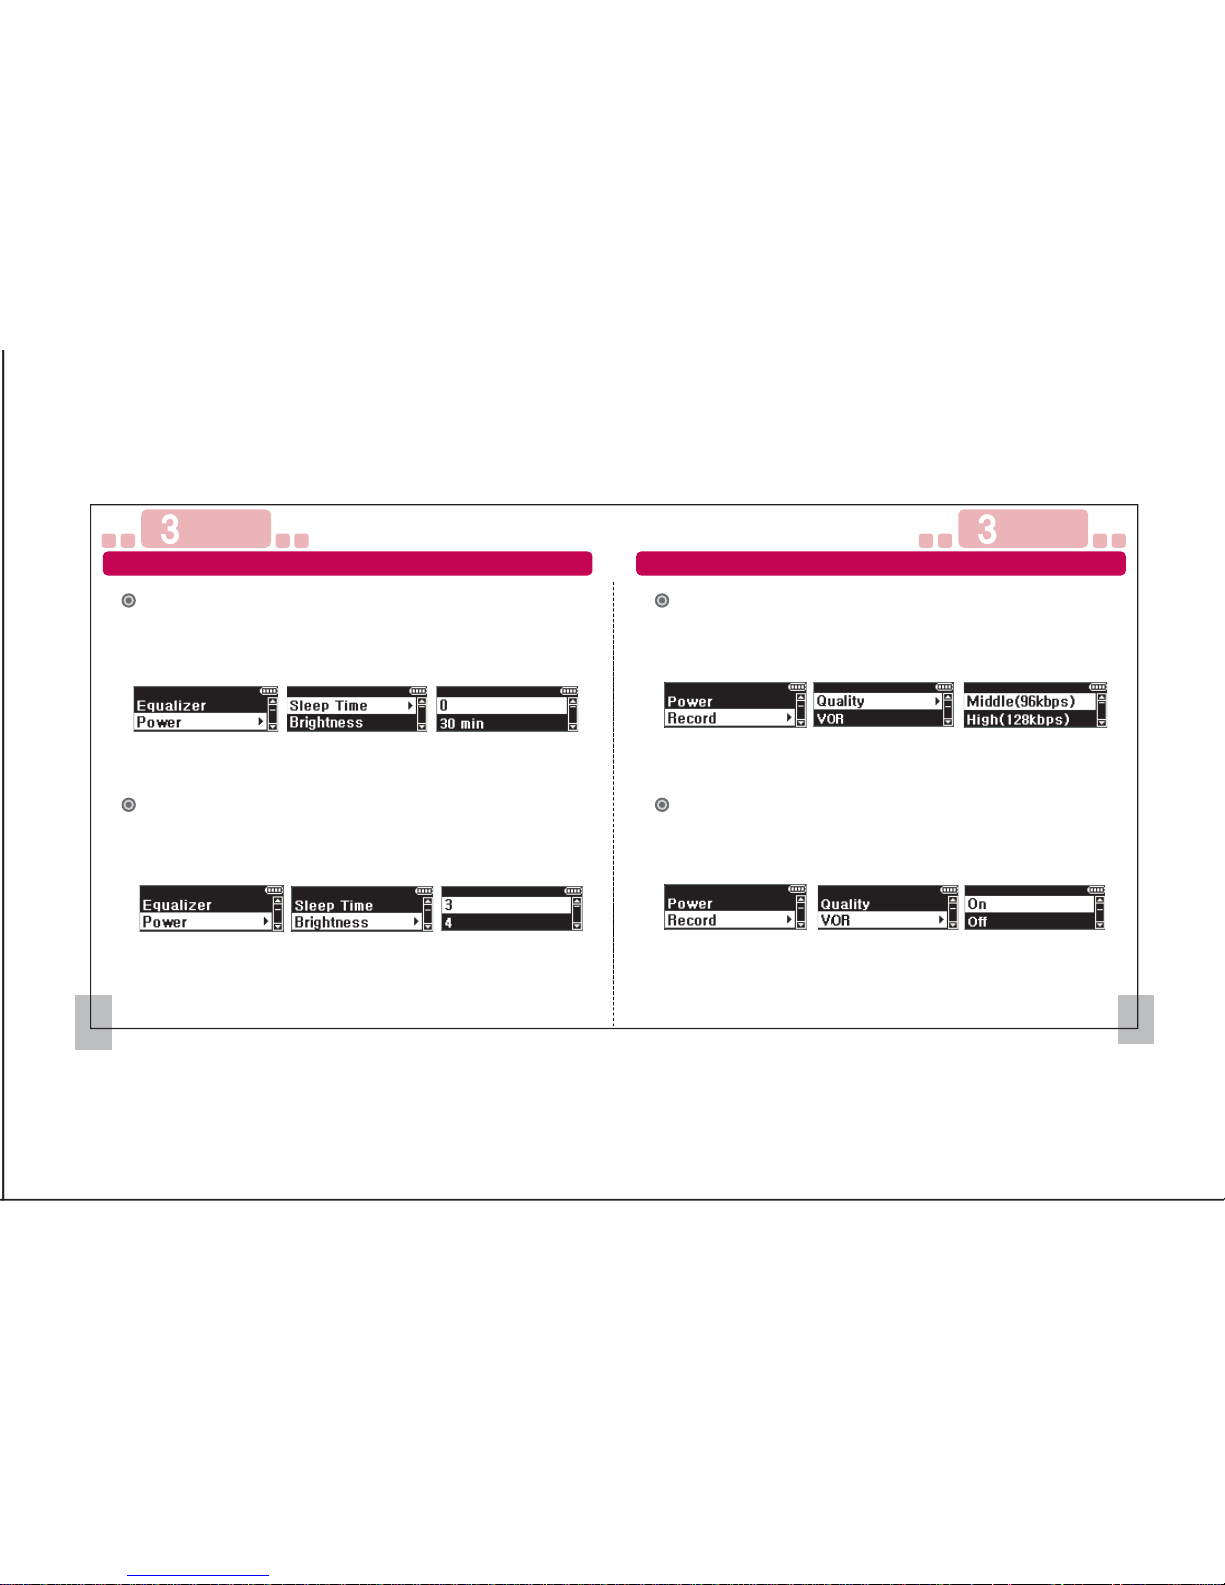
You can set the sleep settings while music or radio is playing.
In the Setting menu, go to Power Setting-> Sleep and press the FF button.
Press the Volume Up or Down button, select 0/30 minutes/1/2/3 hours, and press the FF button.
Sleep setting
You can set the display brightness.
In the Setting menu, go to Power Setting-> Display Brightness and press the FF button.
Press the Volume Up or Down button, select 1/2/3/4/5, and press the FF button.
Display brightness
You can specify the sound quality for recording.
In the Setting menu, go to Record Setting-> Sound Quality and press the FF button.
Press the Volume Up or Down button, select Low (32Kbps)/Middle (96Kbps)/High
(128Kbps), and press the FF button.
Sound quality
You can pause the recording when there is no sound to be recorded.
In the Setting menu, go to Record Setting-> VOR and press the FF button.
Press the Volume Up or Down button, select Enable/Disable, and press the FF button.
VOR
Power Setting Record Setting
Page 18
Setting Setting
35 36
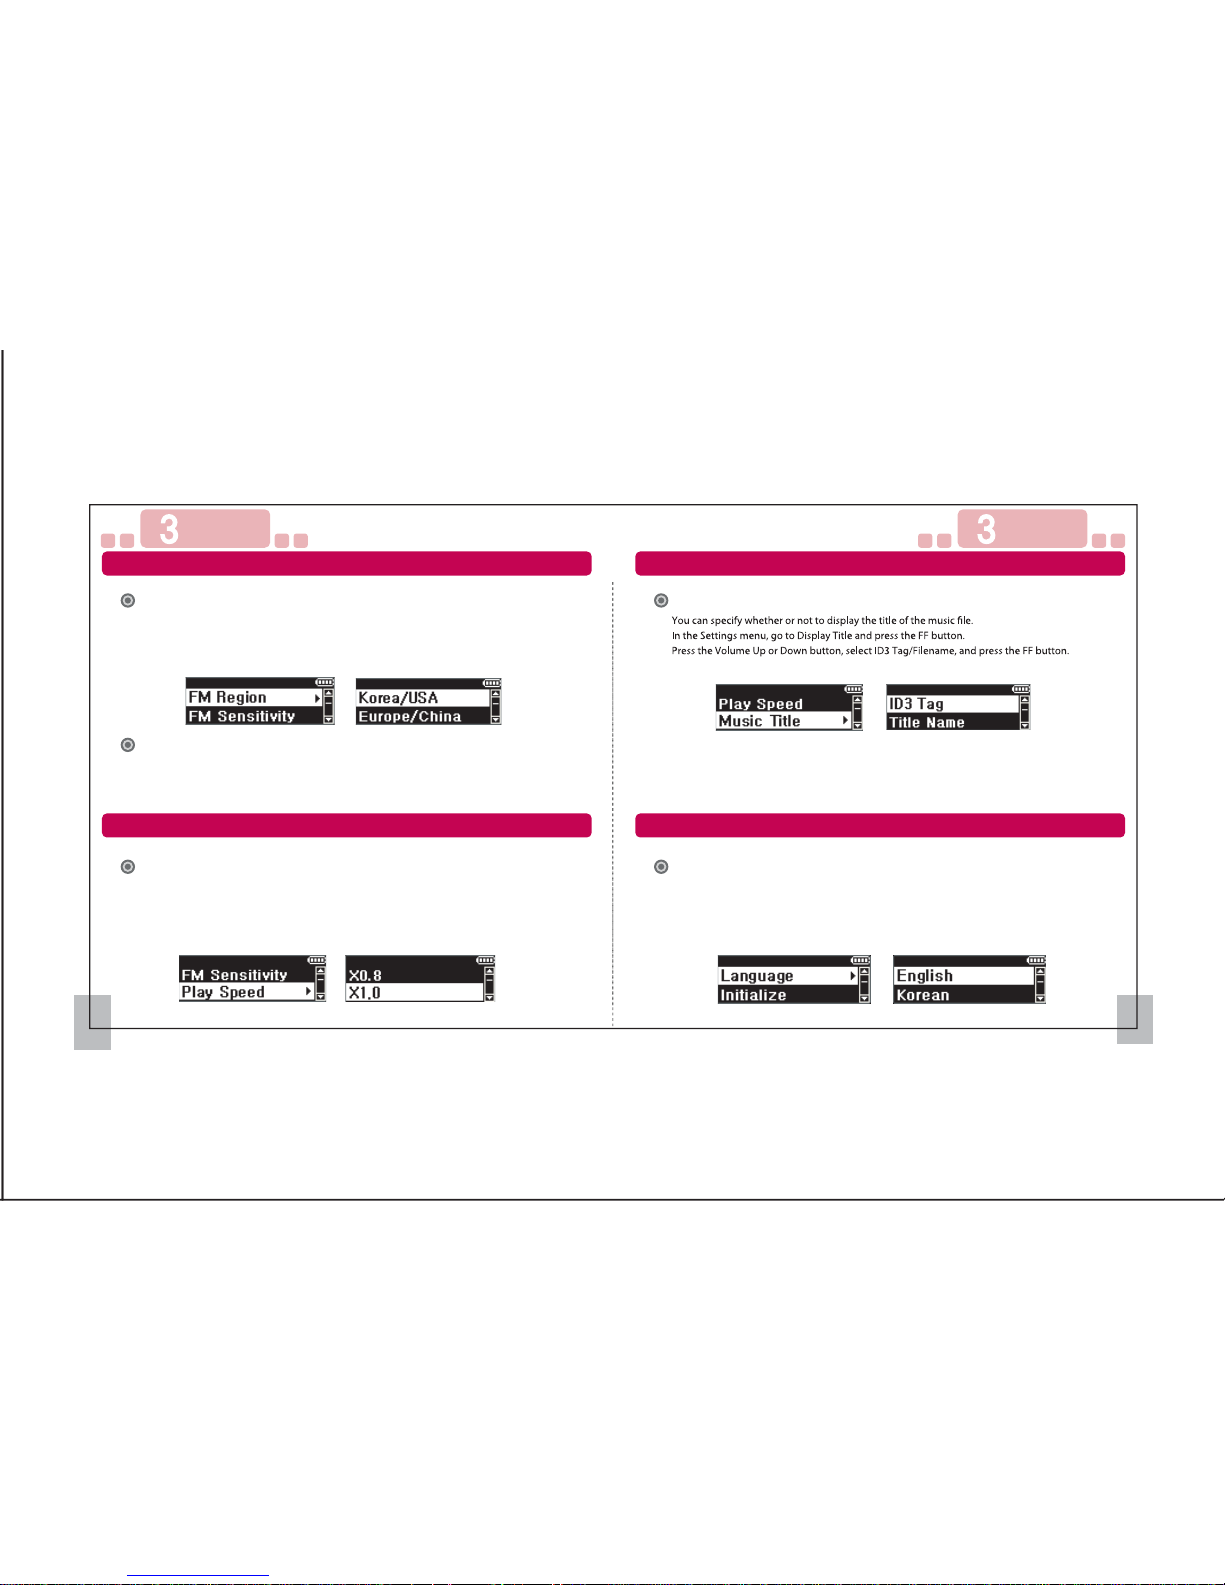
You can set the region for FM radio.
In the Setting menu, go to FM Region and press the FF button.
Press the Volume Up or Down button, select Korea/US, Europe/China, Japan, and press the
FF button.
FM Region
You can set the FM radio sensitivity.
In the Setting menu, go to FM Sensitivity and press the FF button.
Press the Volume Up or Down button, select Low/Middle/High, and press the FF button.
FM Sensitivity
You can specify the play speed for music.
In the Setting menu, go to Play Speed and press the FF button.
Press the Volume Up or Down button, select 0.4/0.6/0.8/1.0/1.2, and press the FF button.
Play speed setting
Music Title Setting
You can specify the language for the display.
Changing the language automatically changes the system language.
In the Setting menu, go to Language and press the FF button.
Press the Volume Up or Down button, select a language, and press the FF button.
Language Setting
FM Setting
Play Speed Setting
Music Title Setting
Language Setting
Page 19
Setting Setting
About the Product
37 38
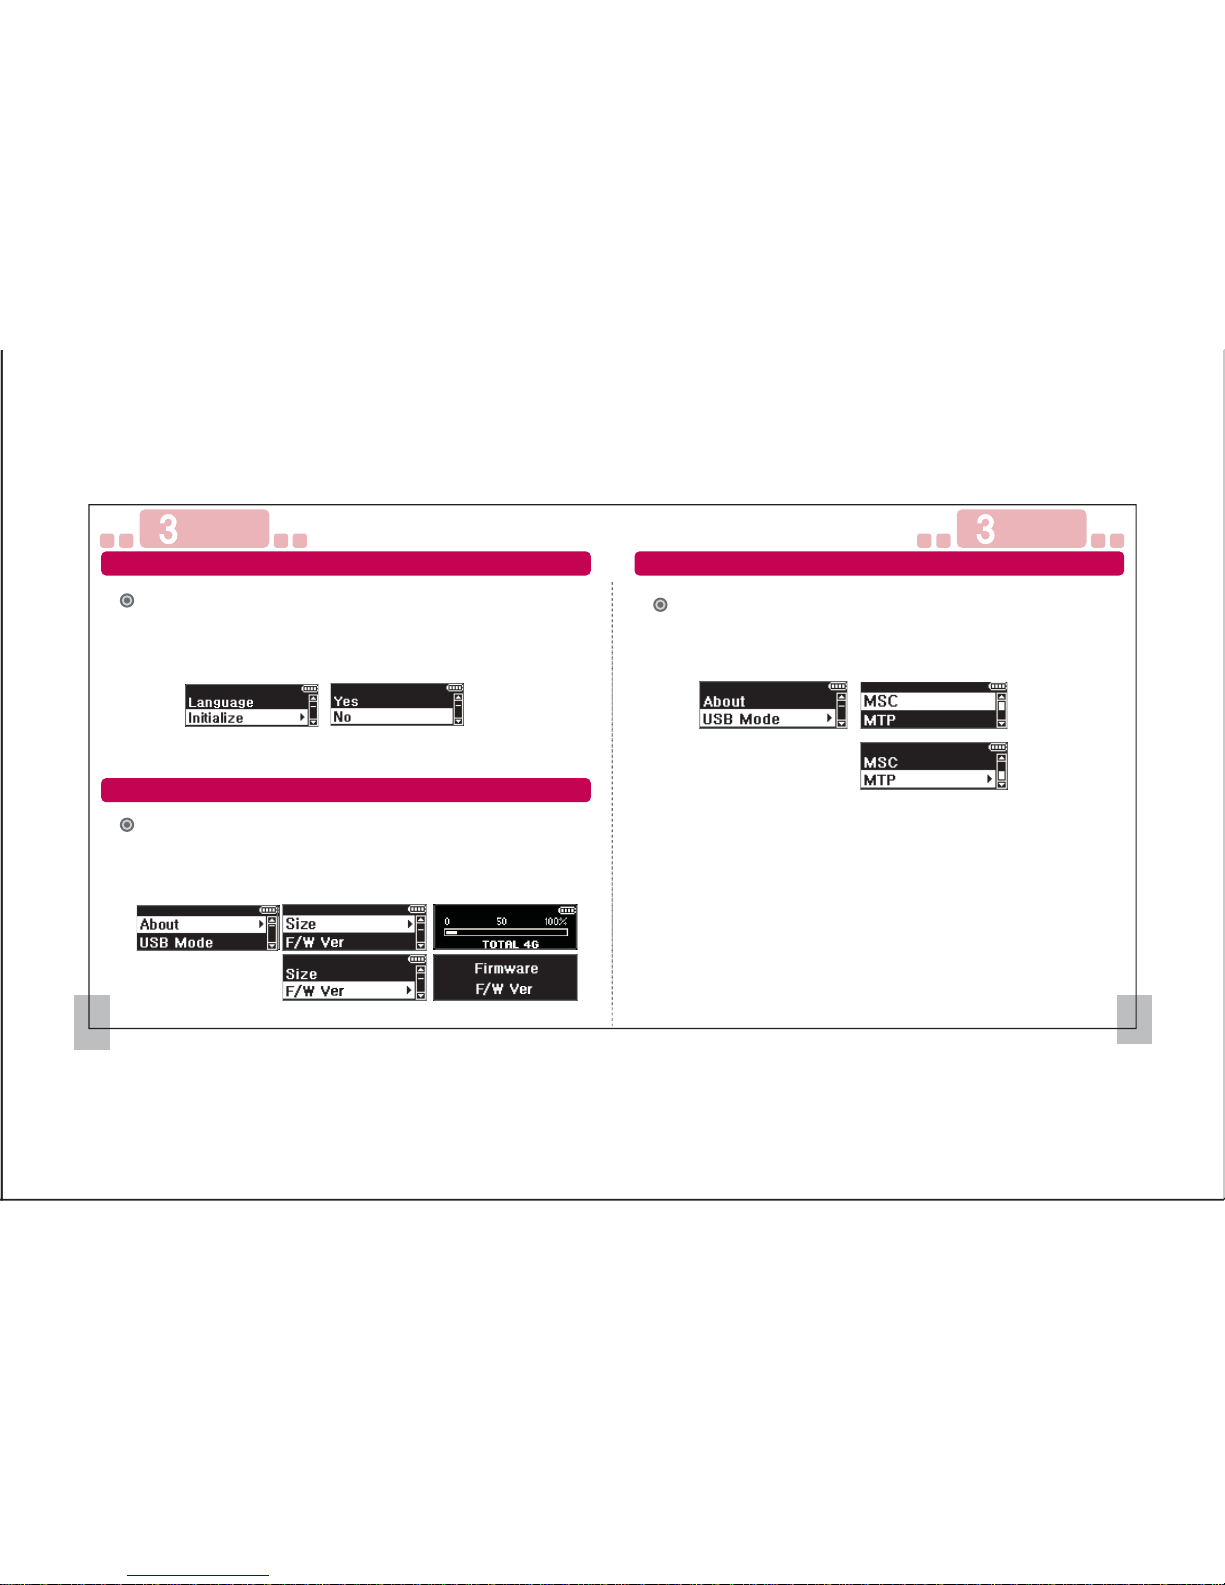
You can reset the settings to default settings.
In the Setting menu, go to Reset and press the FF button.
Press the Volume Up or Down button, select Yes/No, and press the FF button.
The device will then be restarted, and all settings will be changed to the default settings.
Reset
You can check the information on the device.
In the Setting menu, go to About and press the FF button. Select the information you
want to check.
You can check the disk capacity and rmware version.
About the Product
You can set the USB connection mode.
In the Setting menu, shift to USB Mode and press the FF button.
Press the Volume Up or Down button and select MSC/MTP. To select a mode,
press the FF button.
USB Mode Setting
Reset USB Mode Setting
Page 20
Firmware Upgrade
1. What is Firmware?
- Just as an OS is used in the computer to operate it (e.g., Windows 2000, Windows XP,
Linux), a program is needed to operate the MP3 device in an MP3 player. This program
is called rmware.
2. What is rmware update?
- This refers to an update to the latest version of the program that operates the MP3
player. The rmware is updated to enhance the performance and functions of the
MP3 player.
How to Upgrade the FirmwareFirmware Upgrade
41 42
Customer Support
4
Customer Support
4
How to Upgrade the Firmware
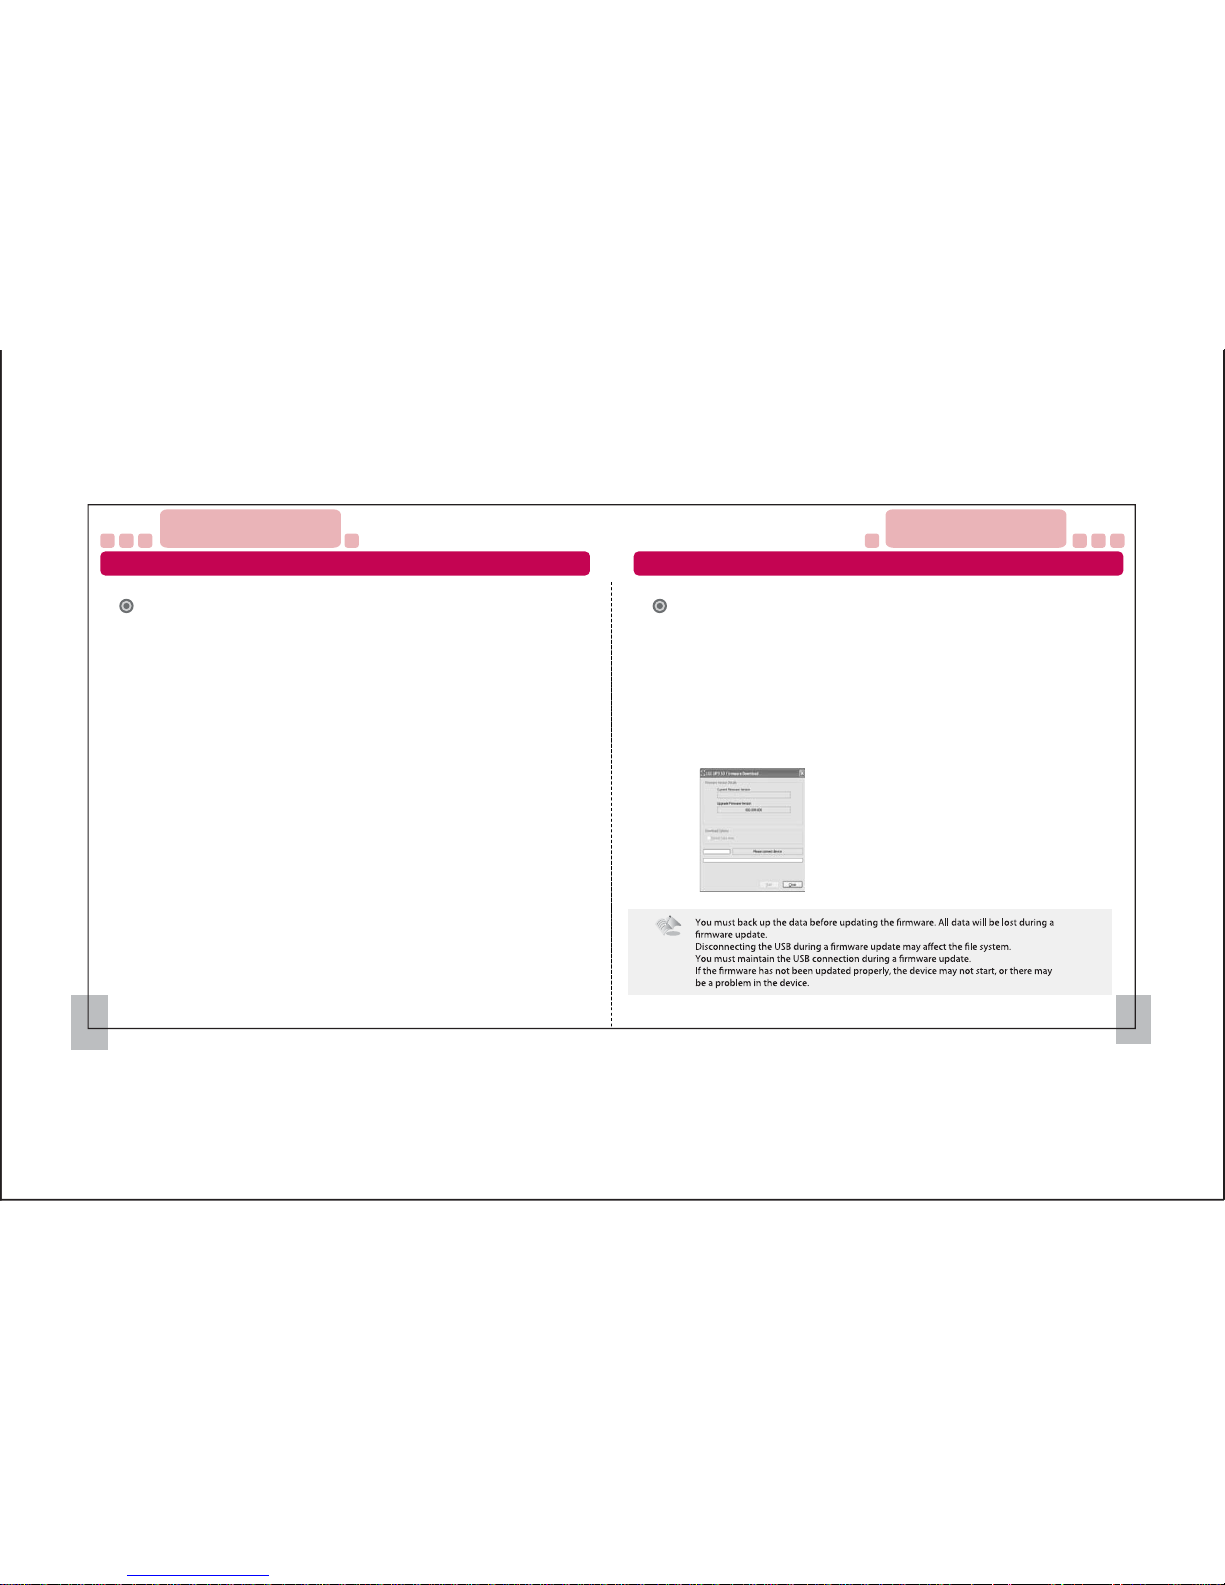
1. Download the latest rmware le and decompress it.
(※ You can get the latest rmware le at www.lge.com.)
2. Run the “LGE UP3 S3 Updater.exe” le in the decompressed folder.
3. Connect the device to the computer.
(※ Do not use the USB hub for connection. Connect directly to the computer.
Otherwise, the rmware update may not proceed properly.)
4. Select the Data Formatting checkbox in the download option.
5. Specify whether or not to format the saved data.
6. Click the Start button to update the rmware.
7. The rmware program will start.
8. You can use the device once the rmware update is nished.
Page 21
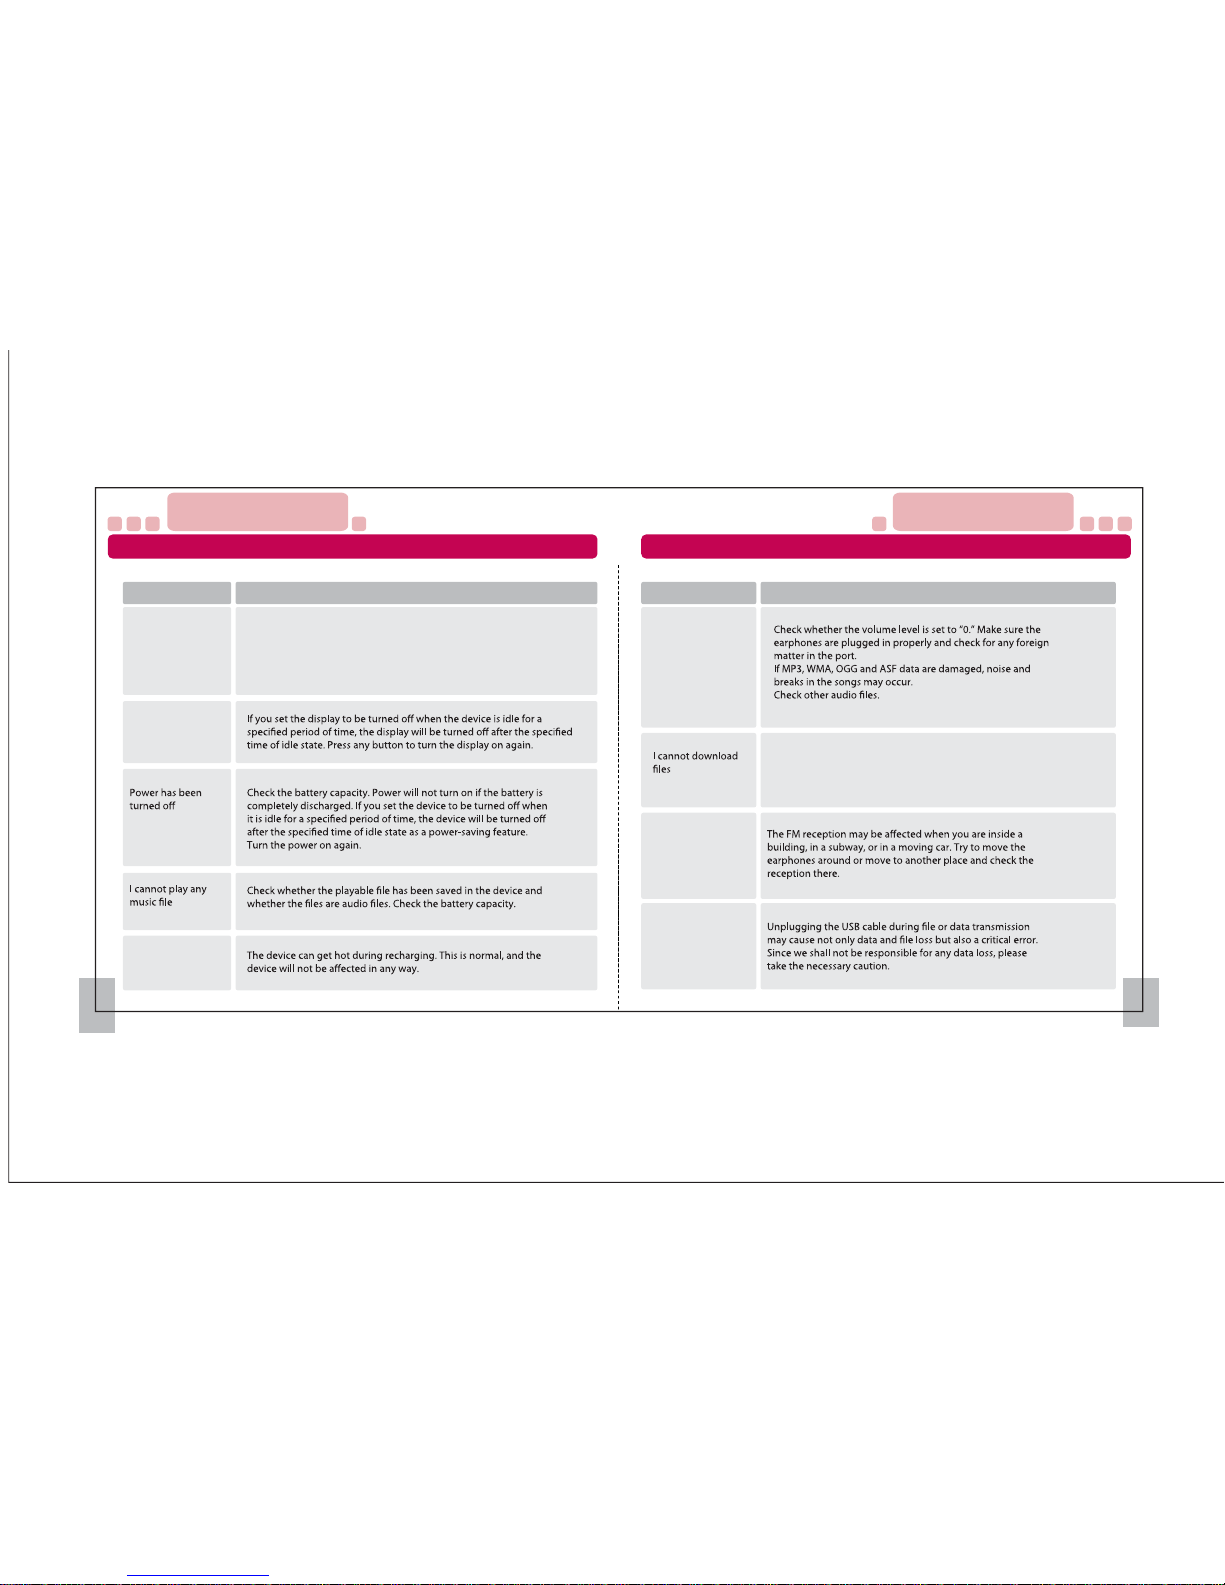
There is no sound,
and I hear other
noise
s
Problems Solutions
Check whether the device is properly connected to the
computer, whether the USB cable between the computer and
device is properly connected, and whether the memory is full.
I hear noise
when I listen to
the radio, and I
cannot access
certain station
s
Files or data
were los
t
Problems Solutions
Power does not
turn on
Power will not turn on if the battery is completely discharged.
Try turning on the power after recharging the battery.
Press the Reset hole and check whether the Hold button is
displayed as [HOLD▶].
I cannot see the
windo
w
The device is ho
t
Troubleshooting
43 44
Troubleshooting
Customer Support
4
Customer Support
4
Page 22
Display
Size
Weight
Memory
Play Time
USB
Earphone Output
DRM
Recording
File
EQ
Play Range
MONO LCD
25 x 83 x 10.8mm
22.7g
1GB, 2GB, 4GB, 8GB
15 Hours for audio (based on the test conducted by LG)
2.0 High Speed (USB 1.1 Compataible)
10mW + 10mW(16Ω), S/N 90dB
MS DRM10, Net-Sync, X-Sync
Voice, FM Radio
Audio Files
Radio
MP3(8 ~ 320kbps), WMA(32~192kbps), ASF(Audio), OGG(Q1~Q10)
FM-Tuner World wide Preset & Recording
Directory Browsing
Normal, Classic, Jazz, Pop, Rock
One Track/Folder/All/Repeat A-B
Play Mod
e Normal/Repeat/Random
The images in this user manual may vary from the actual product (subject to
change without prior notice)
.
46
Menu Structure
45
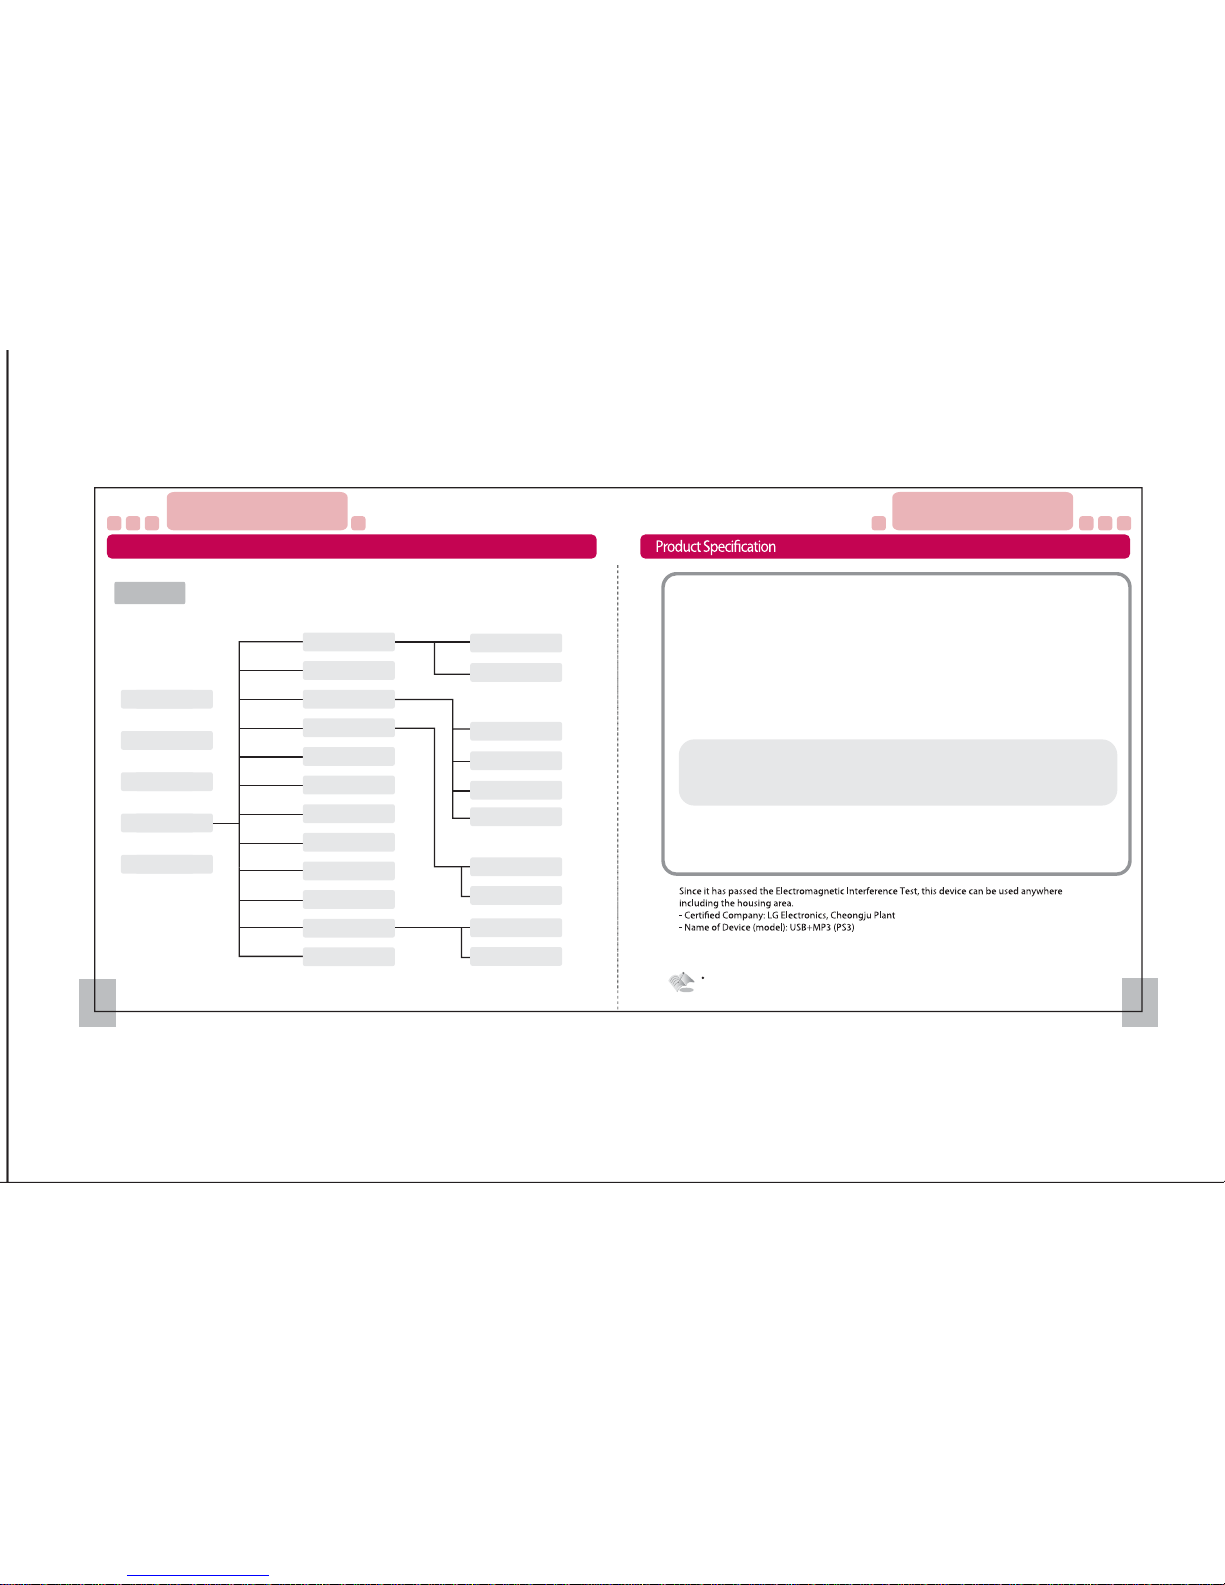
Menu Tree
Play
Music
FM Radio
Record
Setting
Search
Equalizer
Record
FM Region
FM Sensitivity
Play Speed
Music Title
Language
Initialize
About
USB Mode
Play Mode
Display O
Play Range
Power O
Sleep Time
Brightness
Quality
VOR
Size
F/W Ver.
Power
Name of Device
Model
Model No.
MP3 Player
UP3 S3 (PS3)
PS31G, PS32G, PS34G, PS38G
Customer Support
4
Customer Support
4
Page 23
Warranty User Rights
47 48
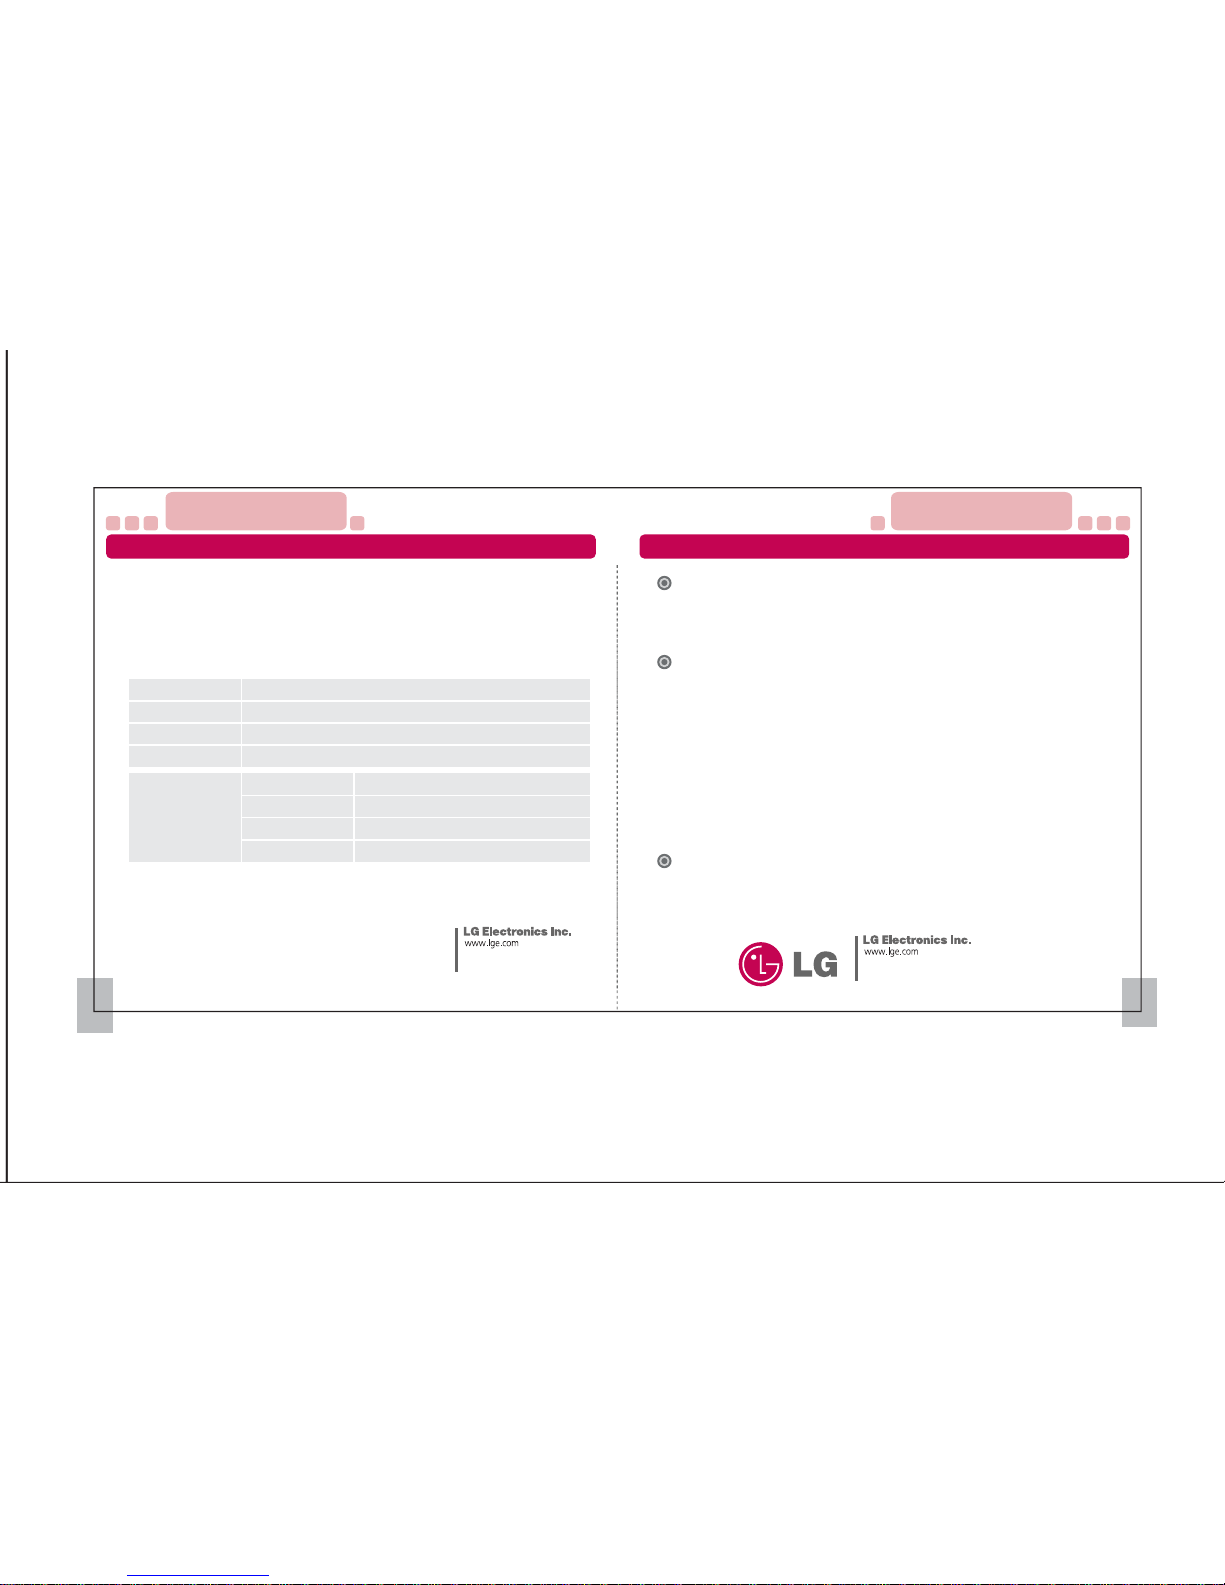
1. This product has passed through strict quality control and testing process.
2. Any defect found after normal use and during the warranty period shall be repaired free of charge.
3. Fees shall be charged for the type of repair other than that covered by the warranty
even during the warranty period.
4. Present this Warranty when requesting for repair.
5. Do not lose this Warranty (we do not reissue warranties).
6. The warranty period for the battery and earphones is 6 months from the date of purchase.
The following repair services shall be provided for a fee:
- Repair of battery after 6 months of date of purchase
- Defect caused by careless use
- Defect caused by repair performed at places other
than the authorized service centers
- Defect caused by the disassembly of the device by the user
- Defect caused by natural disasters such as ood,
re, and earthquake
The user has the right to free repair service for 1 year from the date of purchase
in case of a defect in the device. If the defect is caused by a natural disaster or
due to the careless use of the user, however, repair shall be provided for a fee
even during the warranty period.
User Rights
(1) Defect caused by the penetration of foreign matter into the product (water, drinks,
coee, small parts)
(2) Defect (damage and defect in function) caused by dropping the device or applying force to it
(3) External damage and change in shape caused by thinner and benzene solution
(4) Defect caused by using parts other than the original parts of LG Electronics for repair
(5) Defect caused by using the wrong voltage
(6) Defect caused by the disassembly of the device by the user and loss or damage of parts
for reasons attributed to the user
(7) Defect caused by the repair or alteration of the device by the user
(8) Defect caused by natural disasters (lightning, re, storm, ood, gas, seawater, earthquake)
(9) Defect caused by the failure to follow the Cautions in the User Guide (following the
cautions lets you use the device for a long time)
(10) Defect caused by the user
Paid service (fee paid by the user)
For more information, please visit www.lge.com
LG Electronics Service
Date of purchase
Warranty period
1 year from the date of purchase (6 months for battery and earphones)
Seller
Phone number
Customer
Name
Address
Phone number
E-mail
Customer Support
4
Customer Support
4
This user manual is subject to
change without prior notice.
This user manual is subject to change
without prior notice
.
 Loading...