

Page 1

OWNER’S &
INSTALLATION MANUAL
AIR CONDITIONER
Please read this manual carefully before operating
your set and retain it for future reference.
P/NO : MFL67241904
www.lg.com
TYPE : Wireless Remote Controller
Models : PQWRCQ0FDB
PQWRHQ0FDB
ENGLISH ITALIANO
ESPAÑOL
FRANÇAIS
DEUTSCH
PORTUGUESE
TÜRKÇE
РУССКИЙ ЯЗЫК
Page 2

2 Wireless Remote Controller
Wireless Remote Controller Owner’s & Installation Manual
TABLE OF CONTENTS
■ Safety Precaution.......................................................................................................3
■ Part Description .........................................................................................................4
Wireless Remote Controller.........................................................................................5
■ Operating Instruction ................................................................................................6
How to insert the Batteries...........................................................................................6
Wireless Remote Controller Maintenance ...................................................................6
Operating Method ........................................................................................................6
Installer Setting - Setting Address of Central Control ..................................................7
■ Installation Instructions ............................................................................................7
Installer Setting - Checking Address of Central Control ..............................................7
Installer Setting -How to enter installer setting mode ..................................................8
Installer Setting - Installer Setting Code Table ............................................................9
■ Owner's Instruction .................................................................................................10
Cooling Mode - Standard Operation ..........................................................................10
Cooling Mode - Power Cooling ..................................................................................10
Auto Operation Mode.................................................................................................11
Auto Changeover Mode.............................................................................................12
Auto Changeover Mode - Setting the Mode Change Temperature ...........................13
Dehumidification Mode ..............................................................................................14
Heating Mode ............................................................................................................15
Fan Mode...................................................................................................................16
■ Temperature Setting/Room Temperature checking .............................................17
■ Airflow Setting..........................................................................................................18
Up/Down Airflow Direction Control (Optional)............................................................18
Left/Right Airflow Direction Control (Optional) ...........................................................18
■ Sub function .............................................................................................................19
Plasma Purification(Optional) ....................................................................................19
Auto Clean (Optional) ................................................................................................19
Smart Clean (Optional) ..............................................................................................20
LCD Luminosity Control (Optional) ............................................................................21
Celsius/Fahrenheit Switching ....................................................................................21
Electric heater (Optional) ...........................................................................................21
Individual vane angle control (Optional) ....................................................................22
■ Timer .........................................................................................................................23
Setting the Current Time............................................................................................23
Sleep Timer Setting ...................................................................................................23
On Timer Setting........................................................................................................23
Off Timer Setting........................................................................................................24
To cancel the Timer Setting.......................................................................................24
Page 3
Safety Precautions
Owner’s & Installation Manual 3
ENGLISH
■ Installation
Safety Precautions
• The installation requires expert skills, and it should be installed by the service center or other shops specialized
in the installation and recognized by our company.
• For all the problems arising after installation by someone who has no relevant qualifications, our company will
not provide free service.
• The following safety cautions are provided to prevent unexpected dangers or losses.
: If the user does not follow the mandatory items, it may result in serious injury or death.
: If the user does not follow the mandatory items, it may cause personal injury or property
damage.
: Warning and Caution are to call the user’s attention to the possible danger. Read and follow
them carefully in order to prevent a safety accident.
: Warning and Caution are indicated in this guide and the product itself to help protect the users
from danger.
WARNING
Do not recharge or disassemble the batteries. Do
not dispose of batteries in a fire.
They may burn or explode.
If the liquid from the batteries gets onto your skin
or clothes, wash it well with clean water. Do not
use the remote if the batteries have leaked.
The chemicals in batteries could cause burns or
other health hazards.
Replace the all batteries in the remote control
with new ones of the same type. Do not mix old
and new batteries or different types of batteries.
There is risk of fire or explosion
Do not disassemble, repair, or modify the product
at your discretion in order to prevent fire or an
electric shock.
Push the button at one time.
There will be no operation if
you Several buttons at one
time.
Do not drop or throw the
remote Controller. Do not give
any strong impact and Put
your foot it.
Do not use this at the moisture
and Humidity places.
Do not use this at heating and
Firing conditions.
Do not place the remote
controller in a location exposed
to direct sunlight
Aim at the signal receptor on
the wiress remote controller so
as to operate
The remote control signal can be received at a
distance of up to about 7m
Be sure that there are no obstructions between
the remote controller and the signal receptor
■ Operation
WARNING
CAUTION
Page 4
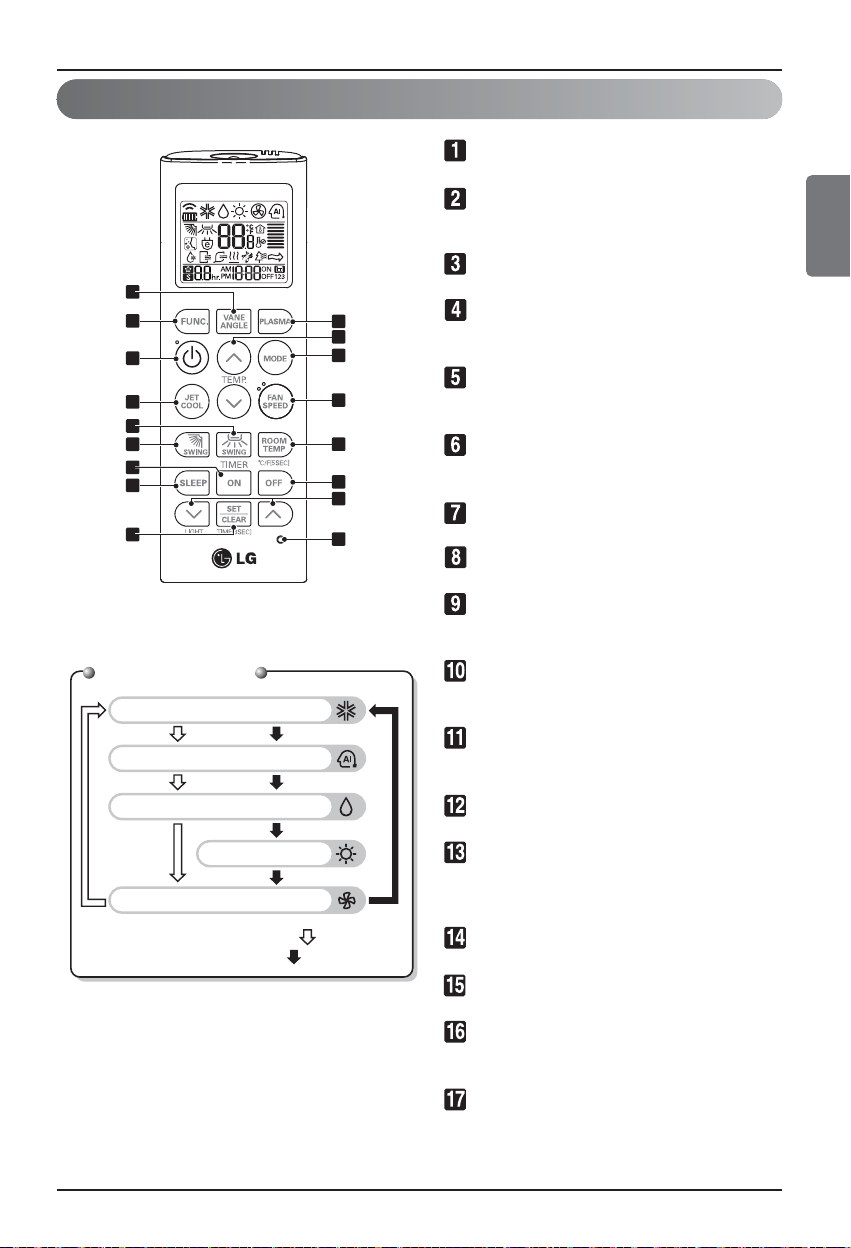
Part Description
Accessory
Part Description
4 Wireless Remote Controller
Holder(1EA) Fixing Screw (2EA) Owner's / Installation
Manual
AAA(1.5V)
Batteries(2EA)
LCD Screen
Wireless Remote Controller
Page 5
Part Description
Owner’s & Installation Manual 5
ENGLISH
Wireless Remote Controller
VANE ANGLE Button
Used to set each vane angle.
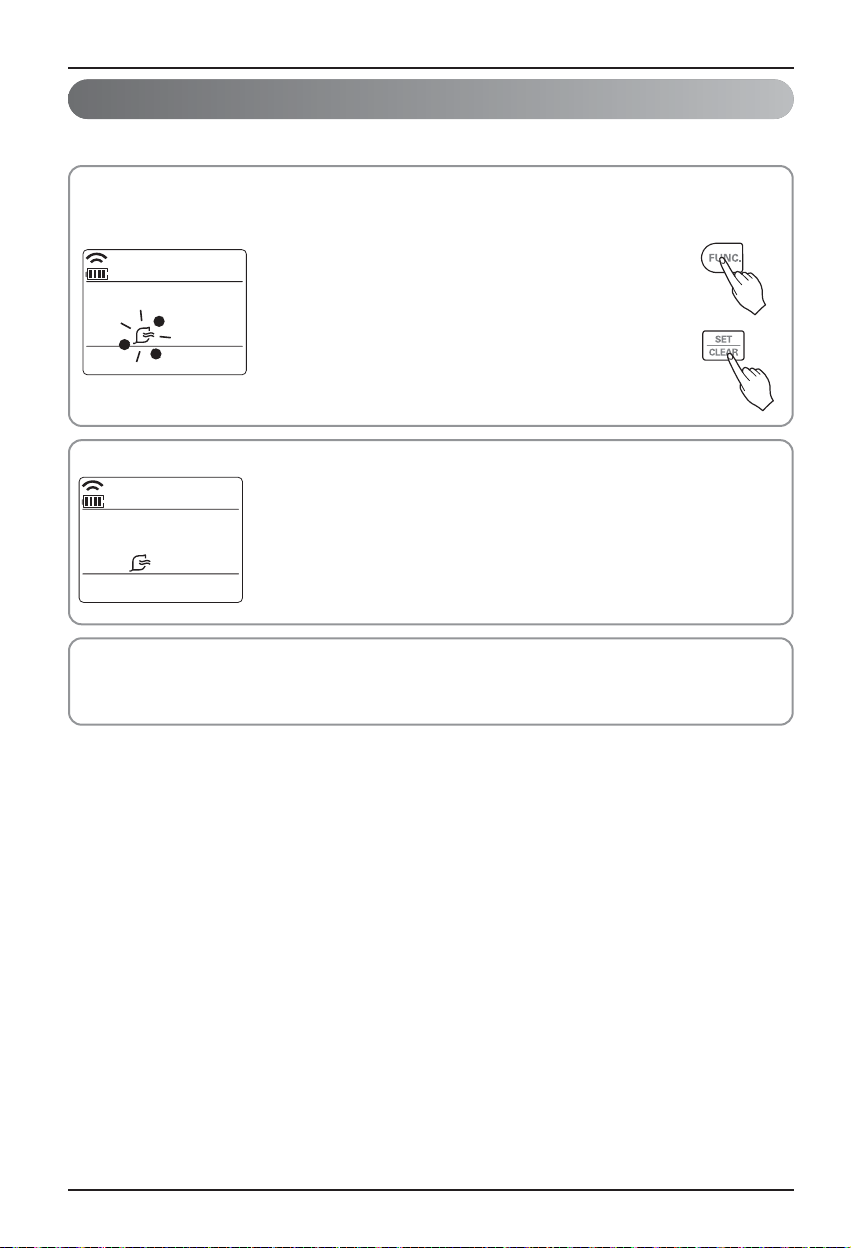
FUNCTION SETTING Button
Used to set or clear Auto Clean, Smart Clean,
Electric heater or Individual vane angle control.
ON/OFF Button
Used to turn on/off the unit.
JET COOL Button
Speed cooling operates super high fan speed.
LEFT/RIGHT AIRFLOW Button (OPTIONAL)
Used to set the desired left/right(horizontal)
airflow direction.
UP/DOWN AIRFLOW Button
Used to stop or start louver movement and set
the desired up/down airflow direction.
ON TIMER Button
Used to set the time of starting operation.
SLEEP TIMER Button
Used to set the time of sleeping operation.
SET / CLEAR Button
Used to set/clear the timer.
Used to set the current time(if it input for 3sec.)
PLASMA Button (OPTIONAL)
Used to start or stop the plasma-purification
function.
ROOM TEMPERATURE SETTING Button
Used to select the room temperature.
OPERATION MODE SELECTION Button
Used to select the operation mode.
INDOOR FAN SPEED SELECTION Button
Used to select fan speed in four steps low,
medium, high and chaos.
ROOM TEMPERATURE CHECKING Button
Used to check the room temperature.
OFF TIMER Button
Used to set the time of stopping operation.
TIMER SETTING(Up/Down)/LIGHT Button
Used to set the timer.
Used to adjust the brightness.(if it is not time
adjust mode)
RESET Button
Used to reset the remote controller.
1
2
3
4
5
6
7
8
9
Operation Mode
Cooling Mode
Auto Mode or Auto Changeover
Dehumidification mode
Heating Mode
Fan Mode
•
Cooling Model( ), Heat Pump Model( )
10
11
12
13
14
15
16
17
Page 6
Operating Instruction
6 Wireless Remote Controller
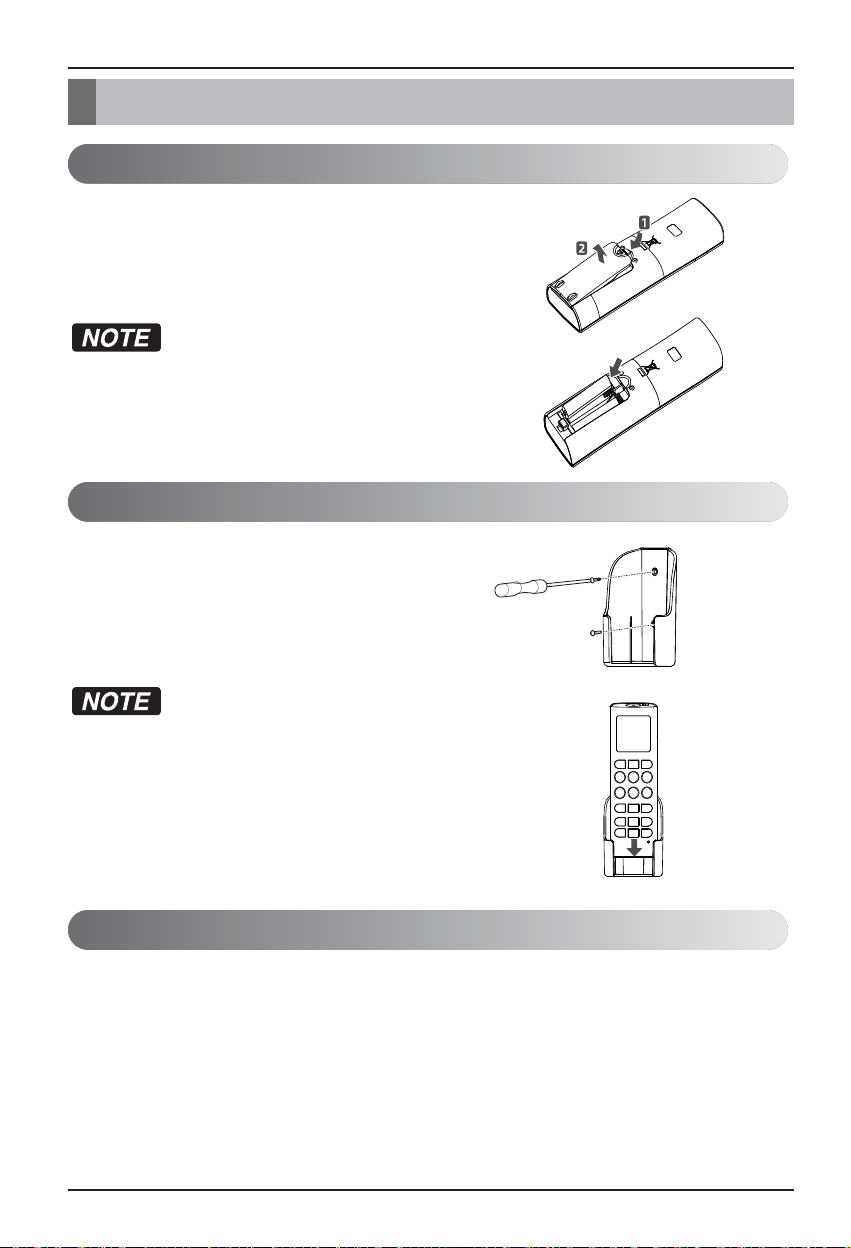
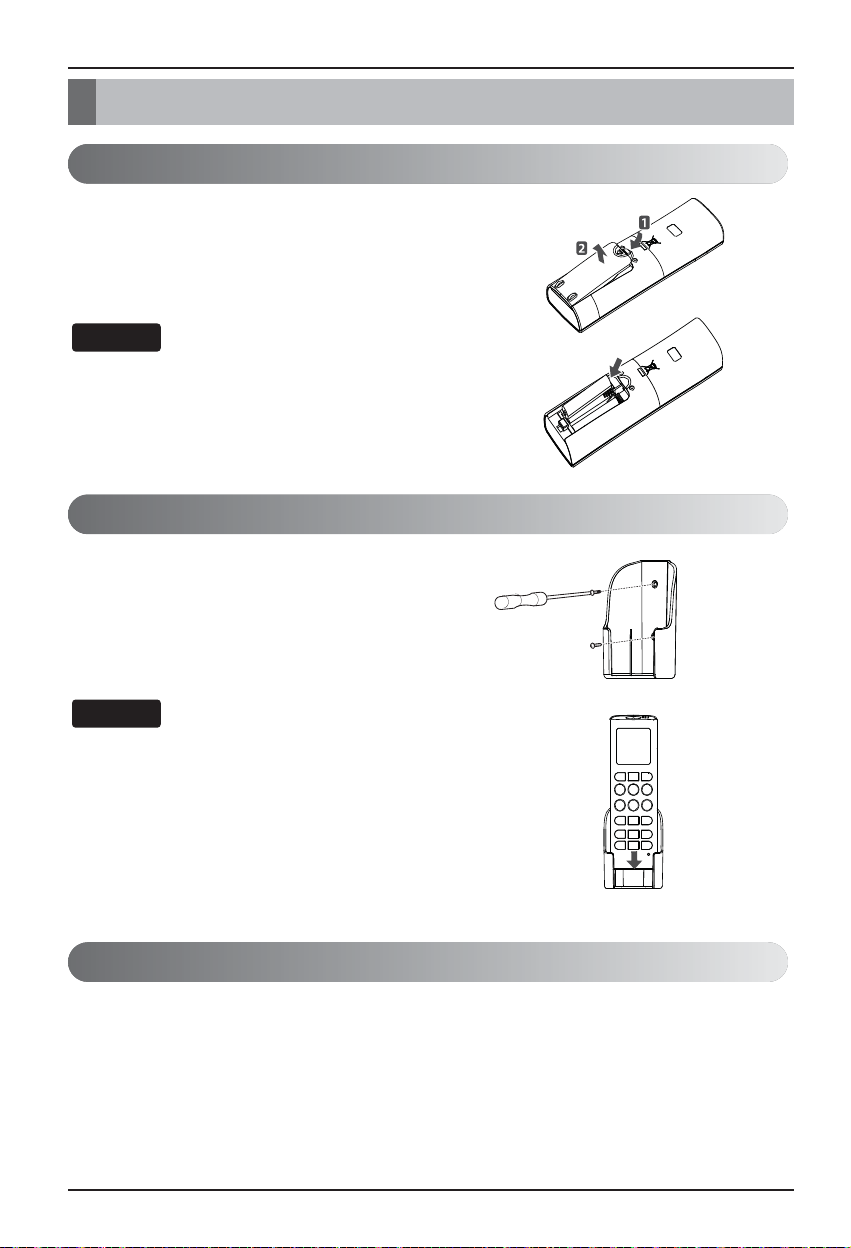
1. Choose a suitable place where its safe & easy
to reach.
2. Fix the holder to wall etc with the supplied
screws firmly.
3. Slide the remote controller inside the holder.
1. Remote controller should never be exposed to
direct sunlight.
2. Signal transmitter & receiver should always be
clean for proper communication. Use a soft
cloth to clean them.
3. In case some other appliances also get
operated with remote control, change their
position or consult your serviceman.
1. The signal receiver is inside the unit.
2.
Aim the remote controller towards the unit to operate it.
There should not be any blockage in between.
1. Remove the battery cover by pulling it according to the arrow
direction.
2. Insert new batteries making sure that the (+) and (-) of battery are
installed correctly.
3. Reattach the cover by sliding it back into position.
1. Always use/replace both batteries of same type.
2. If the system is not to be used for a long time, remove the
batteries to save their working life.
3. If the display screen of remote controller starts, fading replace
both of the batteries.
Operating Method
Wireless Remote Controller Maintenance
How to insert the Batteries
Operating Instruction
Page 7
Installation Instruction
Owner’s & Installation Manual 7
ENGLISH
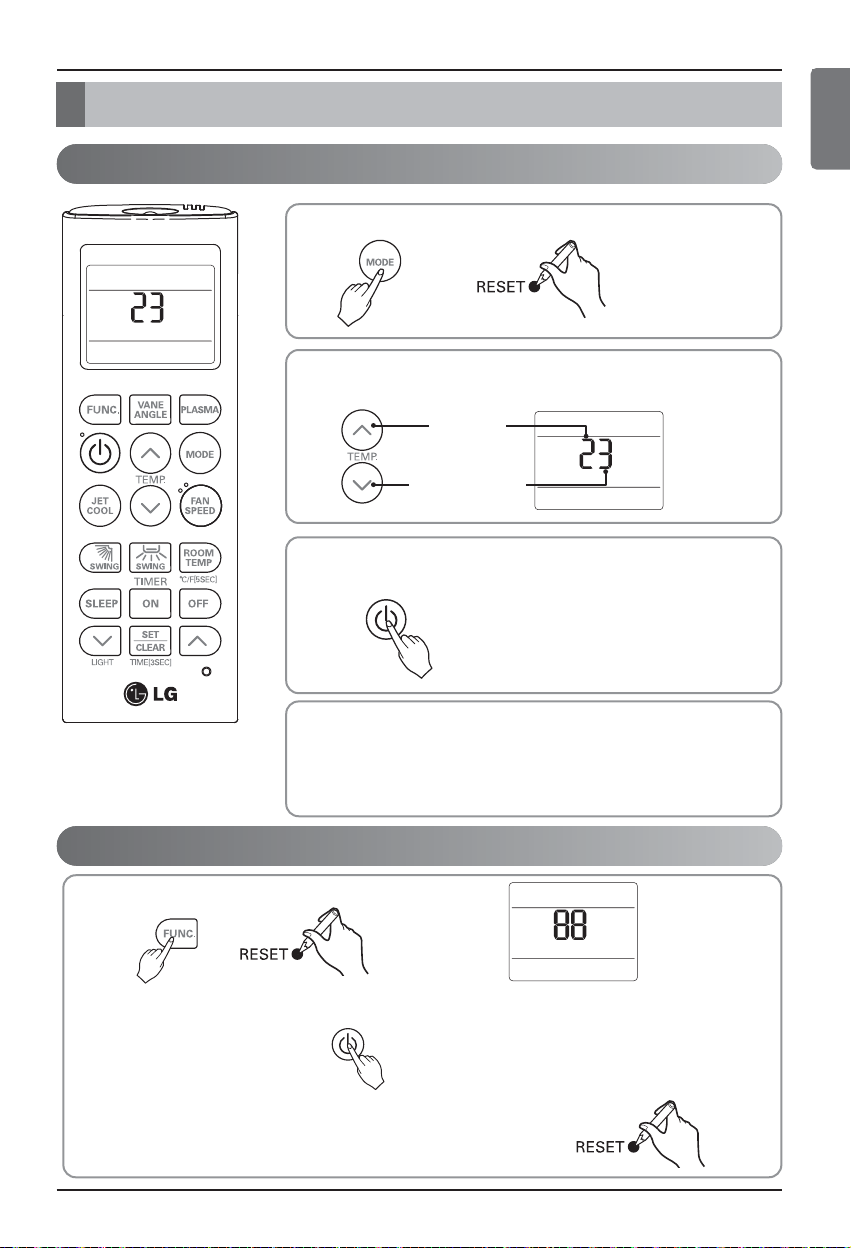
Installer Setting - Checking Address of Central Control
With the MODE button pressed, press the RESET button.
1
When FUNCTION button pressed, press RESET button
1
Press the ON/OFF button toward the indoor unit 1 time, and the indoor unit will display the set
address in the display window.
- The address display time and method can differ by the indoor unit type.
2
Reset the remote controller to use the general operation mode.
3
By using the TEMPERATURE SETTING button, set the indoor unit address.
- Setting range : 00 ~ FF
2
After setting the address, press the ON/OFF button toward the
indoor unit 1 time.
3
The indoor unit will display the set address to complete the address setting.
- The address display time and method can differ by the indoor uint type.
Reset the remote controller to use the general operation mode.
4
5
Installation Instructions
Installer Setting - Setting Address of Central Control
Group No.
Indoor Unit No.
Page 8
Installation Instruction
8 Wireless Remote Controller
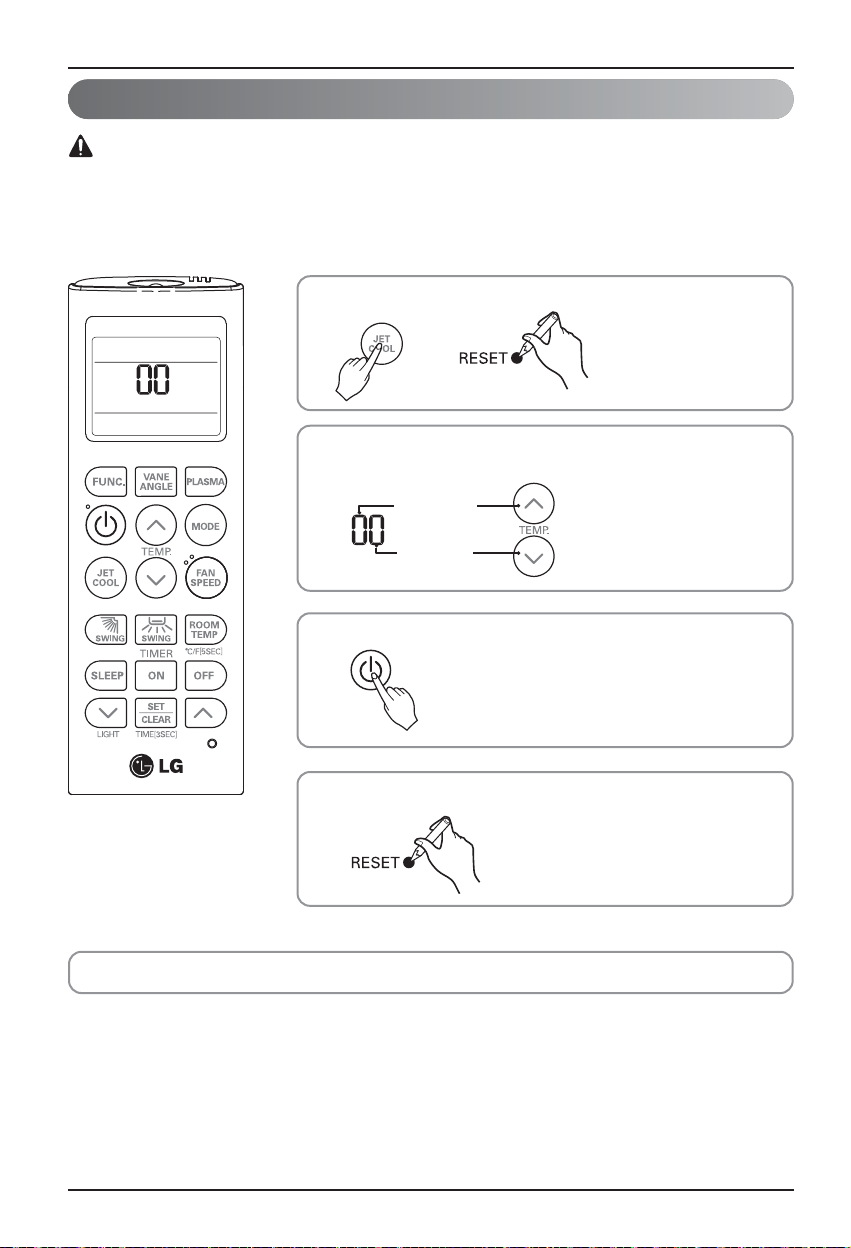
Installer Setting -How to enter installer setting mode
When JET COOL button pressed, press RESET button
1
By using the TEMPERATURE SETTING button, set function code
and setting value. (Please refer the Installer Setting Code Table.)
2
Installer setting mode is to set the detail function of the remote controller.
If the installer setting mode is not set correctly, it can cause problems to the product, user injury or
property damage. This must be set by an certificated installer, and any installation or change that is
carried out by a non-certificated person should be responsible for the results. In this case, free service
cannot be provided.
CAUTION
Press the ON/OFF button toward the indoor unit 1 time.
3
Reset the remote controller to use the general operation mode.
4
Refer to the Installer Setting Code Table on the next page.
Function Code
Setting Code
Page 9
Installation Instruction
Owner’s & Installation Manual 9
ENGLISH
Installer Setting - Installer Setting Code Table
No. Function Function Code Setting Value Remote Controller LCD
0 Mode Override
0 : Set to Master
1 : Set to Slave
1 : Standard
1
2 : Low
3 : High
4 : Super High
0 : Set to Master
Group Control 1 : Set to Slave
2 : Check Master/Slave
3 :
Set to Auxiliary heater
Auxiliary heater 4 :
Cancel Auxiliary heater
2 :
Check Auxiliary heater Installation
Installer Setting Code Table
0
1
2
Ceiling Height
Selection
Mode Override
This Function is only for Non-Auto Changeover H/P model.
Ceiling Height Selection
Indoor unit connected to wired remote controller operate as wired remote controller setting.
Group Control
This function is only for group control. Please don’t set this function in case of non-group control.
After setting Group Control of the product, turn off the power then turn it back on after 1 minute.
Auxiliary heater
This function is only applied to models with Auxiliary Heater function being activated.
2
22
00
01
11
12
13
14
20
21
22
23
24
25
2
Page 10
Owner's Instruction
10 Wireless Remote Controller
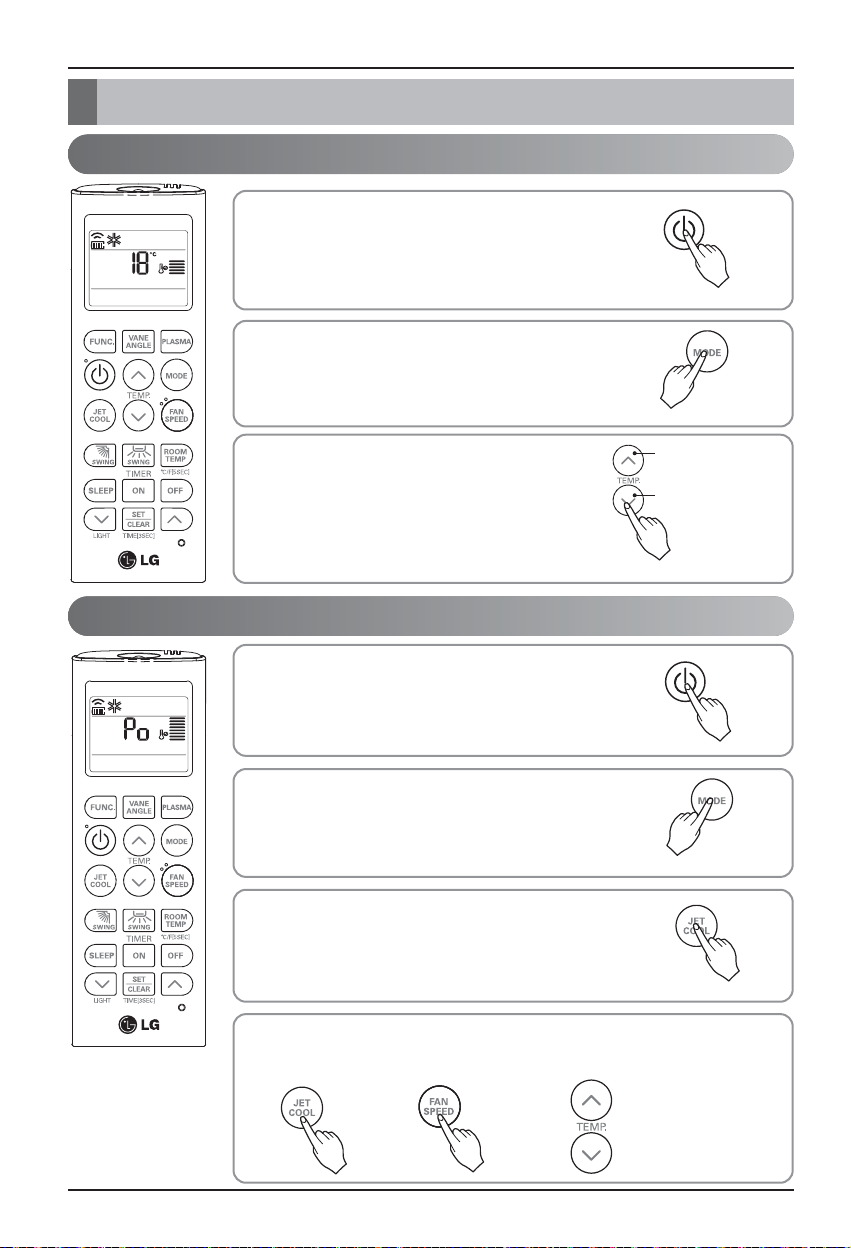
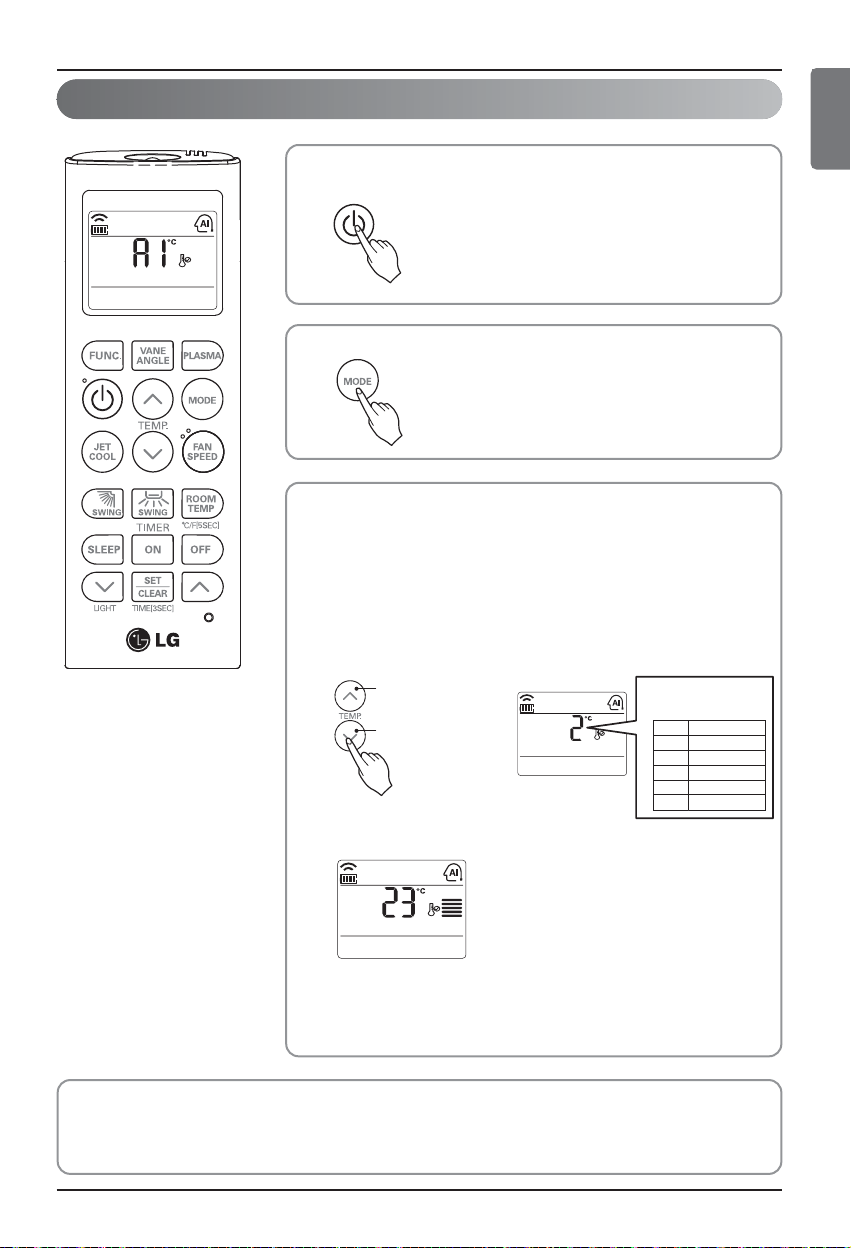
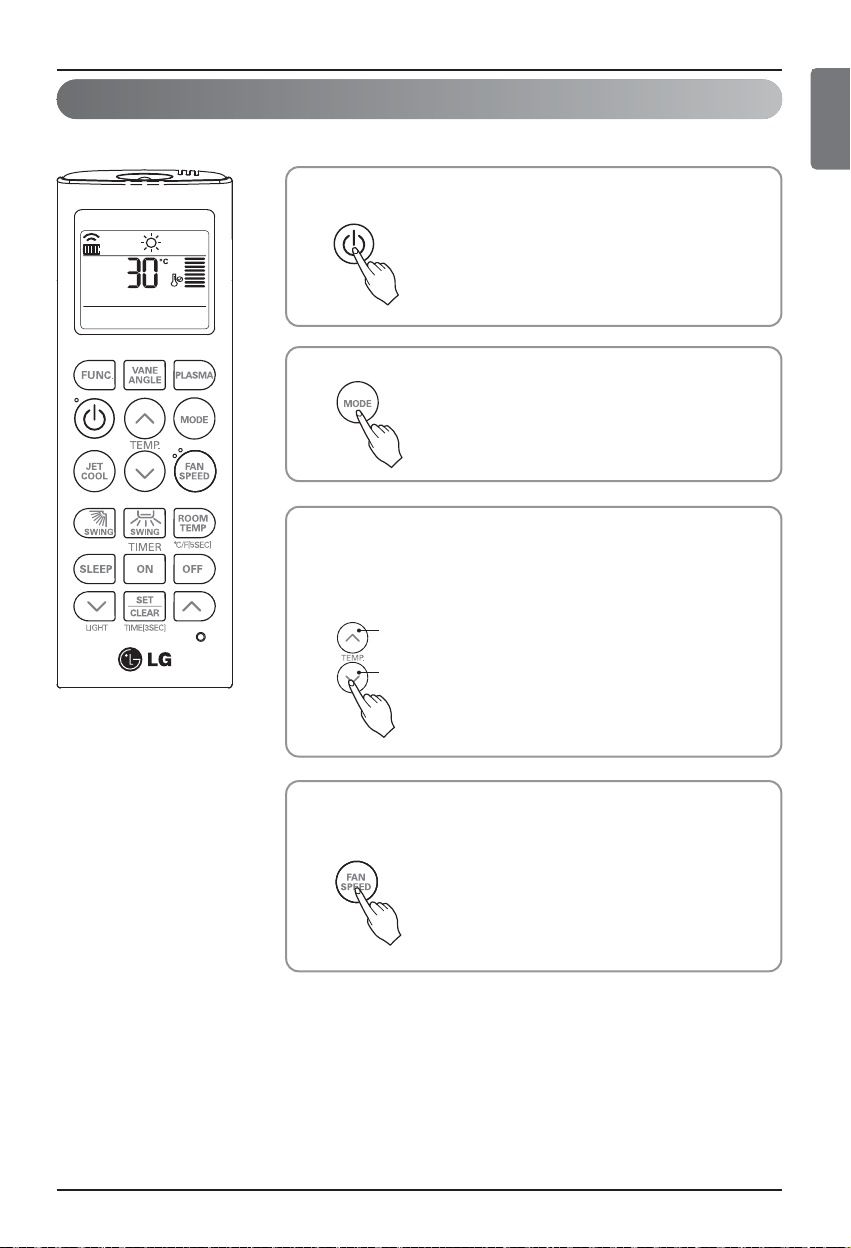
Press the ON/OFF button.
The unit will respond with beep sound.
1
Press MODE button to select Cooling Mode.
2
To lower the temperature
To raise the temperature
Set the desired temperature by pressing TEMP button.
Press ROOM TEMPERATURE CHECKING button to
check the room temperature. When setting the desired
temperature is higher than room temperature, cooling
wind isn’t blow out.
❈ Setting Temp. Range : 18~30°C(64~86°F)
3
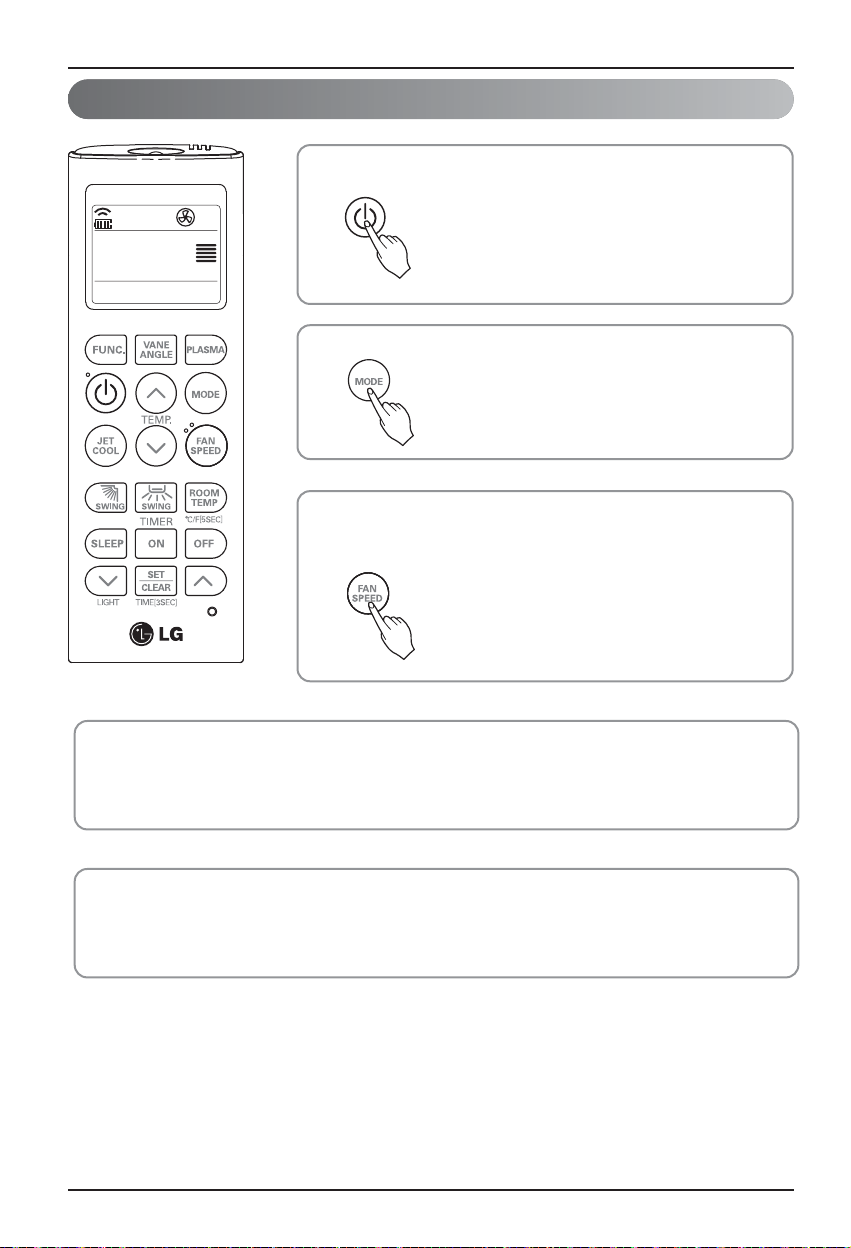
Press the ON/OFF button.
The unit will respond with beep sound.
1
Press MODE button to select Cooling Mode.
2
Press the JET COOL button. The unit will operate in super
high fan speed in cooling mode.
❈ Wall mounted models operate power cooling mode for
30 minutes.
3
To cancel the Power cooling Mode press the Jet Cool button or the fan button
or the room temperature setting button again and the unit will operate in high
fan speed in cooling mode.
4
or or
Cooling Mode - Power Cooling
Cooling Mode - Standard Operation
Owner's Instruction
Page 11
Owner's Instruction
Owner’s & Installation Manual 11
ENGLISH
Auto Operation Mode
Press the ON/OFF button.
The unit will respond with beep sound.
1
Press MODE button to select Auto Operation Mode.
2
During Auto Operation Mode
• If the system is not operating as desired, manually switch to another mode. The system will not
automatically switch from the cooling mode to the heating mode, or from heating to cooling, then you must
set the mode and the desired temperature again.
Set the desired temperature.
<For Cooling Model>
The temperature and fan speed are automatically set by the
electronic controls based on the actual room temperature.
If you feel hot or cold, press TEMPERATURE SETTING buttons for
more cooling or heating effect.
You cannot switch the indoor fan speed. It has already been set by
the Auto Operation Mode rule.
You can set desired temperature and
indoor fan speed.
Setting Temp. Range : 18~30°C(64~86°F)
<For Heating Model>
3
Code Feel
2 Cold
1 Slightly cool
0 Neutral
-1 Slightly warm
-2 Warm
❈ Please select the code
depend on your feeling.
To raise the temperature
To lower the temperature
Page 12
Owner's Instruction
12 Wireless Remote Controller
Auto Changeover Mode
Press the ON/OFF button. The unit will respond with beep sound.
1
Press MODE button to select Auto Changeover Mode.
2
Set the desired room temperature.
❈ Setting Temp. Range in Auto Changeover Mode : 18~30°C
(64~86°F)
3
During Auto changeover Mode
The air conditioner changes the operation mode automatically to keep indoor temperature. When room
temperature vary over ±2°C(4°F) with respect to setting temperature, air conditioner keeps the room
temperature within ±2°C(4°F) with respect to setting temperature by auto changeover mode.
This Function is only available on some products.
To raise the temperature
To lower the temperature
You can select the fan speed in four steps-low, medium, high and
chaos. Each time the button is pressed, the fan speed mode is
4
shifted.
Page 13
Owner's Instruction
Owner’s & Installation Manual 13
ENGLISH
Auto Changeover Mode - Setting the Mode Change Temperature
This Function is to set the operating mode of the Auto Changeover Mode.
The Mode Change Temperature is the difference of temperature when from cooling mode to heating mode or
from heating mode to cooling mode.
Ex) When setting temperature is 25°C(76°F) and room temperature is 20°C(68°F), then operating mode is
heating. If you set the mode change temperature to 2°C(4°F), when the room temperature up to
27°C(25°C + 2°C)(80°F(76°F + 4°F)), the unit start cooling operation.
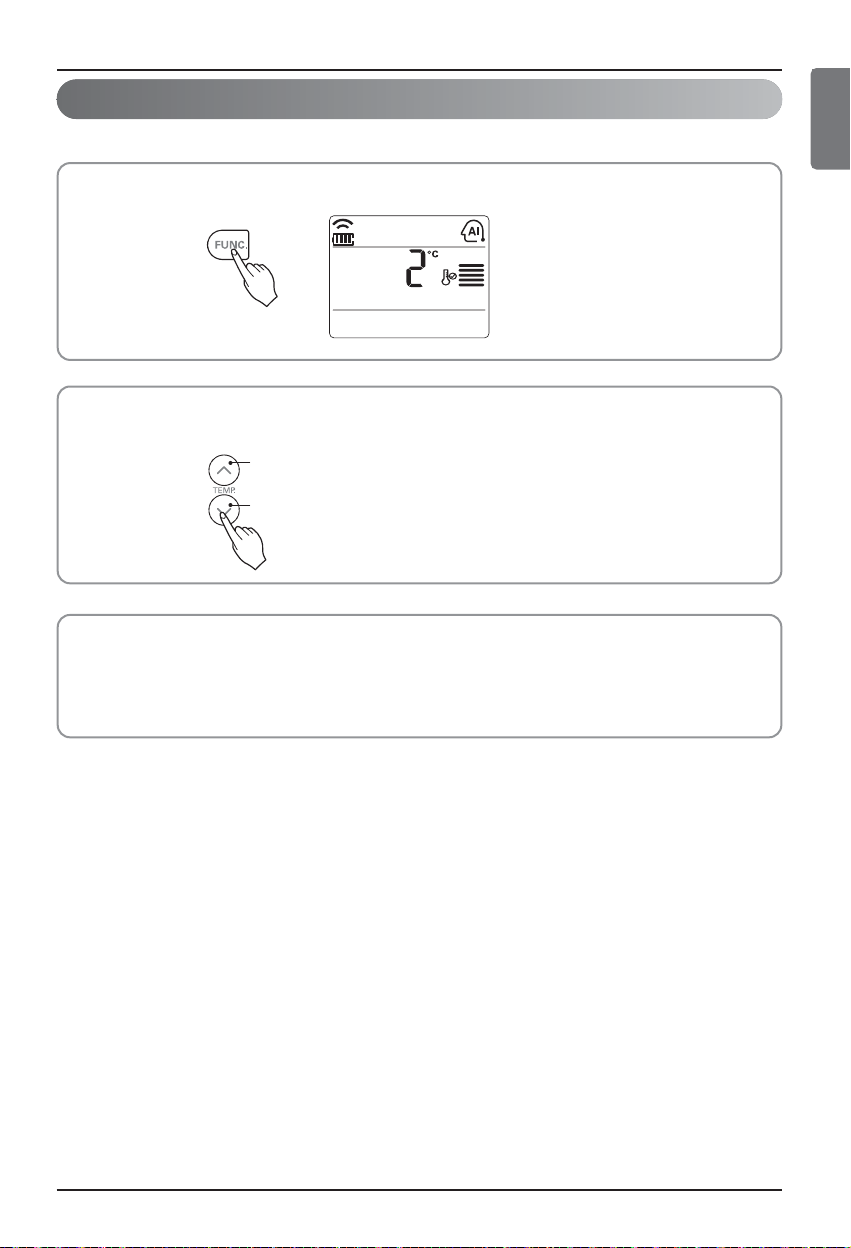
In Auto Changeover Mode, Press FUNCTION button to select
Setting the Mode Change Temperature.
1
Press the TEMPERATURE SETTING button to set desired Mode Change Temperature.
(Default value is 2°C(4°F).)
2
❈ Mode Change Temp. Range
: 1~7°C(2~14°F)
To raise the temperature
To lower the temperature
Page 14
Owner's Instruction
14 Wireless Remote Controller
Dehumidification Mode
Press the ON/OFF button.
The unit will respond with beep sound.
1
Press MODE button to select Dehumidification Mode.
2
Set the fan speed. You can select the fan speed in four steps - low,
medium, high, or chaos. Each time the button is pressed, the fan
speed mode is shifted.
3
During Dehumidification Mode
• If you select the dehumidification mode on the operation selection button, the indoor unit starts to run the
dehumidification function, automatically setting the room temp. and air volume to the best condition for
dehumidification based on the sensed room temp.
In this case, the setting temp. is not displayed in the Remote Controller and you are not able to control the
room temp. either.
• During the healthy dehumidification function, the air volume is automatically set according to the algorithm
responding to the current room temp. and makes the room condition healthy and comfortable even in the
high humidity season.
Page 15
Owner's Instruction
Owner’s & Installation Manual 15
ENGLISH
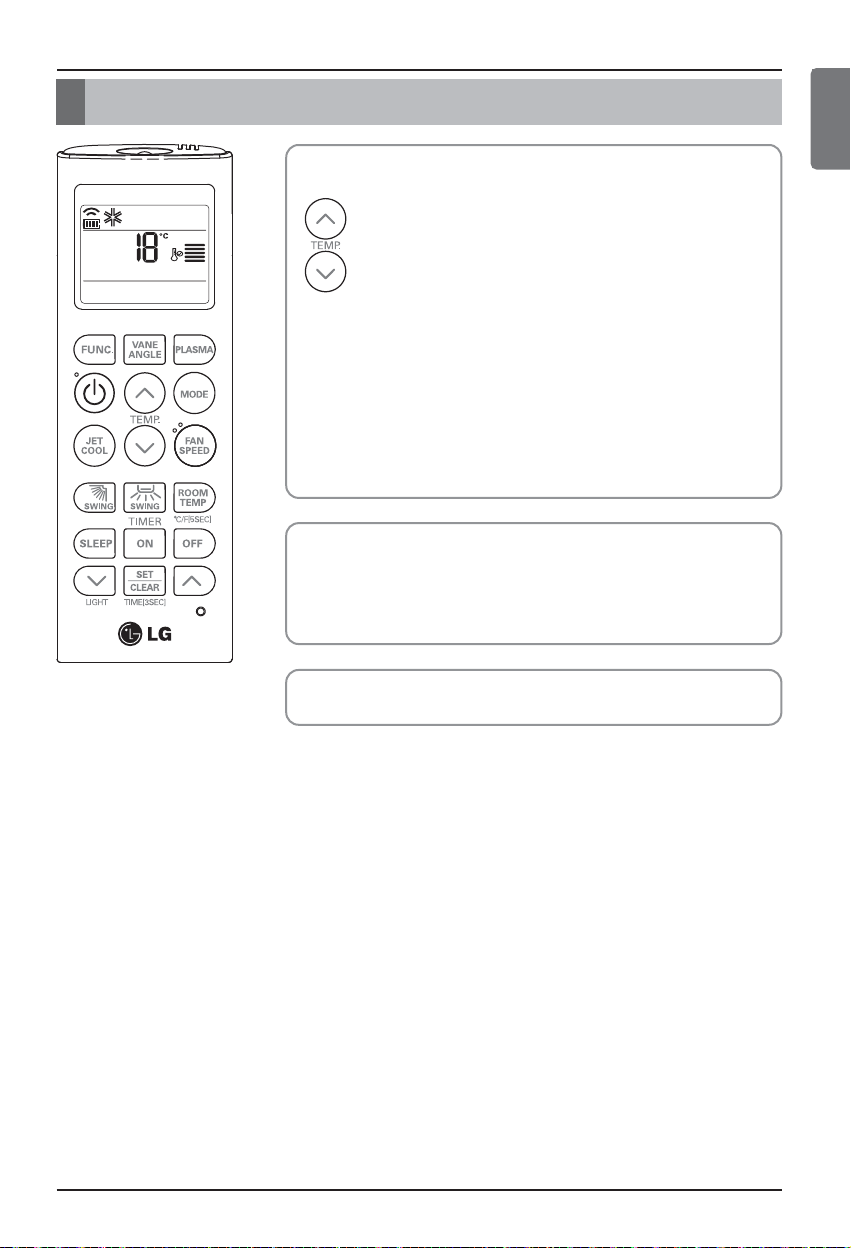
Set the desired temperature by pressing TEMP button.
Press ROOM TEMPERATURE CHECKING button to check the room
temperature.
When setting the desired temperature is lower than room
temperature, heating wind isn’t blow out.
3
Set the fan speed again. You can select the fan speed in four
steps–low, medium, high, or chaos. Each time the button is pressed,
the fan speed mode is shifted.
4
Press the ON/OFF button.
The unit will respond with beep sound.
1
Press MODE button to select Heating Mode.
2
Heating Mode
This Function is only for H/P model.
❈ Setting Temp. Range in
Heating Mode : 16~30°C
(60°F~86°F)
To raise the temperature
To lower the temperature
Page 16
Owner's Instruction
16 Wireless Remote Controller
Fan Mode
Set the fan speed again. You can select the fan speed in four
steps–low, medium, high, or chaos. Each time the button is pressed,
the fan speed mode is shifted.
3
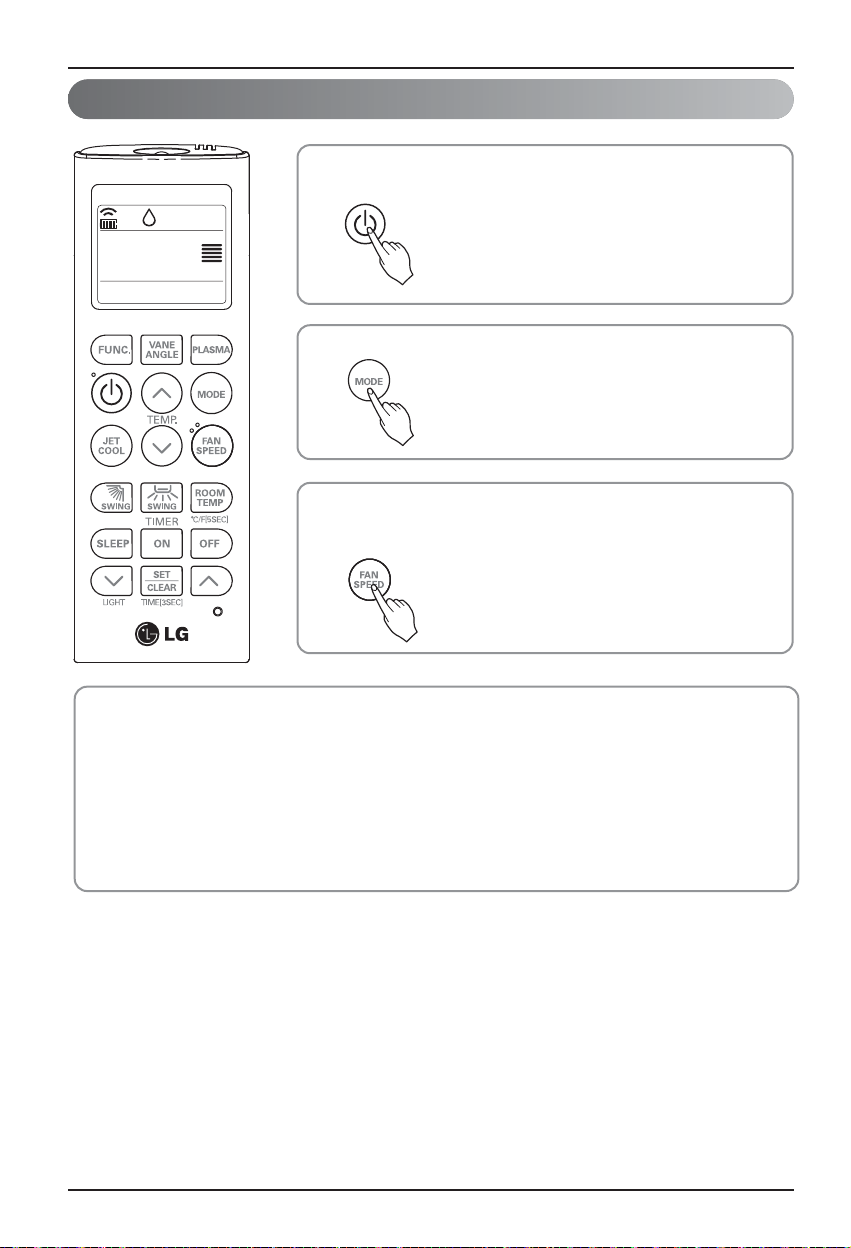
Press the ON/OFF button.
The unit will respond with beep sound.
1
Press MODE button to select Fan Mode.
2
Natural Wind by the chaos Logic
• For more fresh feeling than other fan speed, press the Indoor Fan Speed Selector and set to chaos mode. In
this mode, the wind blows like natural breeze by automatically changing fan speed according to the chaos
logic.
During Fan Mode
• The outdoor compressor doesn't work.
Have a function to circulate the indoor as it sends out the air that doesn't have much temperature difference
with indoor.
Page 17
Owner's Instruction
Owner’s & Installation Manual 17
ENGLISH
We can simply adjust the desired temperature
• Press the buttons to adjust the desired temperature
: Increase Temp. per one time pressing
: Decrease Temp. per one time pressing
Room temp: Indicate the current room temperature
Set temp: Indicate the temperature that user want to set
<Cooling Mode>
The cooling mode doesn't work if desired temperature is higher than
room temperature Please lower the desired temperature
<Heating Mode>
The heating mode doesn't work if desired temperature is lower than room
temperature Please increase the desired temperature
Whenever press ROOM TEMPERATURE button, the room temperature
will be displayed within 5 seconds.
After 5 seconds, it turns to display the desired temperature.
Because of location of remote controller, the real room temperature and
the this displayed value can be different.
Press ROOM TEMPERATURE button for 5 seconds, temperature unit
change Celsius to Fahrenheit or Fahrenheit to Celsius.
Temperature Setting/Room Temperature checking
Page 18
Airflow Setting
18 Wireless Remote Controller
The up/down airflow (Vertical Airflow) can be adjusted by using the remote controller.
1. Press the ON/OFF button to start the unit.
2. Press UP/DOWN AIRFLOW button and the louvers will swing up and down.
Press the UP/DOWN AIRFLOW button again to set the vertical louver at the desired airflow direction.
• If you press the UP/DOWN AIRFLOW button, the horizontal airflow direction is changed automatically based
on the Auto Swing algorithm to distribute the air in the room evenly and at the same time to make the human
body feel more comfortable, as if enjoying a natural breeze.
• Always use the remote controller to adjust the up/down airflow direction. Manually moving the vertical airflow
direction louver by hand, could damage the air conditioner.
• When the unit is shut off, the up/down airflow direction louver will close the air outlet vent of the system.
The left/right(horizontal) airflow can be adjusted by using the remote control.
1. Press the ON/OFF button to start the unit.
2. Press the LEFT/RIGHT AIRFLOW button and the louvers will swing left and right. Press the
Horizontal Airflow Direction Control Button again to set the horizontal louver at the desired
airflow direction.
❈ Up/Down and Left/Right Airflow function isn’t shown on display of remote controller.
Left/Right Airflow Direction Control (Optional)
Up/Down Airflow Direction Control (Optional)
Airflow Setting
Page 19

Sub function
Owner’s & Installation Manual 19
ENGLISH
Press the ON/OFF button.
The unit will respond with beep sound.
1
Press the PLASMA button. Plasma Purification will
start when the button is pressed and stop when the
button is pressed again.
2
PLASMA Purification only
If you press the PLASMA button, Plasma Purification operates.
• Plasma filter is a technology developed by LG to get rid of
microscopic contaminants in the intake air generating a
plasma of high charge electrons. This plasma kills and
destroys the contaminants completely to provide clean and
hygienic air.
• This function can be used in any operation mode and any fan
speed can be used while plasma filter is functioning.
Auto Clean (Optional)
This function operate when the unit is turned off.
Press the FUNCTION SETTING button 1 time.
Auto Clean symbol will blink.
1
Press the SET/CLEAR button to reserve or cancel the Auto Clean function.
If the Auto Clean function is reserved, whenever the unit is turned off, the indoor fan is
still running for about 30 minutes internally without cooling or dehumidification operation.
Also the louver is closed.
This dries up any remains of moisture & cleans the unit internally.
2
Plasma Purification(Optional)
Sub function
Page 20
Sub function
20 Wireless Remote Controller
Smart Clean (Optional)
The Smart Clean function can be used by setting to manual or automatic.
Auto Smart Clean operation
If the accumulated operation time of the product exceeds 30 hours, the Smart Clean automatically starts
when the unit is turned off.
1. Press the FUNCTION SETTING button 2 times.
Smart Clean symbol will blink.
2. Press the SET/CLEAR button to reserve or cancel the Smart
Clean function.
You can set/clear with out on or off.
1. When the unit stop, press the FUNCTION button to select Smart Clean.
Smart Clean symbol blinks, then press SET/CLEAR button.
2. To stop Manual Smart Clean operation, press the FUNCTION button to select
Smart clean and press SET/CLEAR button.
Manual Smart Clean operation
The brush clean a dust from the filter by moving from left to right or from right to left on the filter.
The sucked dust is collected into the dust box.
The operating process of Smart Clean is different from the product type.
Page 21
Sub function
Owner’s & Installation Manual 21
ENGLISH
Electric heater (Optional)
It can only be set during heating operation.
Press the FUNCTION SETTING button 3 times.
Electric heater symbol will blink.
1
Press the SET/CLEAR button to reserve or cancel the Electric heater function.
2
• The indoor unit displays during the heating mode, the Auxiliary heater is automatically turned on, but it is not
displayed on the wireless remote controller separately.
• It operates in Floor heating mode in Console products.
Press the LCD LUMINOSITY button.
It is comfortable when you feel that the display of the unit too bright .
Press the °C/°F SWITCH button to change from Celsius to Fahrenheit or from Fahrenheit to Celsius.
Whenever press TEMPERATURE SETTING button in Fahrenheit mode, the temperature
will increase/drop 2°F.
Celsius/Fahrenheit Switching
LCD Luminosity Control (Optional)
Page 22
Sub function
22 Wireless Remote Controller
• There may be differences between wireless remote controller up/down/left/right buttons and the wind
discharge port directions.
• Set desired angle with checking the vane angle movement of the product.
• The individual vane control function is an additional function of a product, and it may not work in some
products.
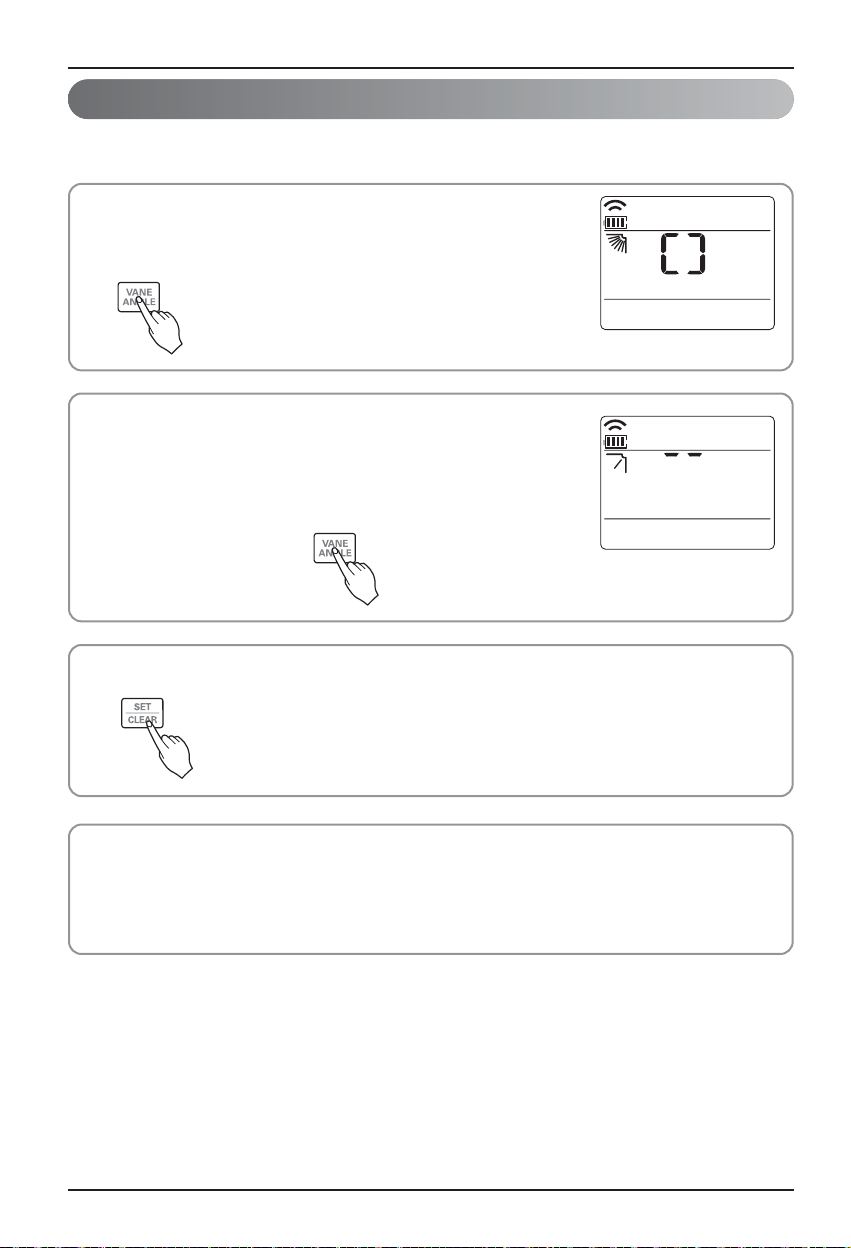
Individual vane angle control (Optional)
Press SET/CLEAR button to reserve or cancel the individual vane angle control function.
3
It is the function that can control 4 vane angles individually in the ceiling type 4Way
cassette product group.
Press the FUNCTION SETTING button 3 times.
(4 times during heating operation)
Individual vane angle control symbol will blink.
• If you press the SET/CLEAR button in that time,
all vanes are set to standard angle.
1
Set each vane angle by pressing up/down/left/right direction keys.
• Every time the button is pressed, corresponding vane angle and set
values are displayed.
• When up direction button is pressed, the display window appears as
of the figure in the right, and the angle can be set to 1~6.
2
Page 23

Timer
Owner’s & Installation Manual 23
ENGLISH
1. Press the SET / CLEAN button for 3 seconds.
2. Press TIME SETTING buttons until the desired
time is set. (If you press down the button for a long
time, it will change quickly in the units of 10 min.)
3. Press the SET / CLEAR button.
Check the indicator for A.M. and P.M.
1. Press the TIMER button to turn timer on or off.
2. Press TIME SETTING buttons until the desired time
is set. (7 hours is the maximum setting)
3. Press the SET / CLEAR button.
1. Press the ON button to turn timer on or off.
2. Press TIME SETTING buttons until the desired time
is set.
3. Press the SET / CLEAR button.
On Timer Setting
Sleep Timer Setting
Setting the Current Time
Timer
Timer Sleep
Timer ON
Page 24
Timer
24 Wireless Remote Controller
To cancel the Timer Setting
• If you wish to cancel all timer setting, press the CLEAR ALL button.
• If you wish to cancel each timer setting, press the
each timer button to turn timer sleep or on or off as you want.
And then press the SET/CLEAR button aiming the remote
controller at the signal receptor.
(The timer lamp on the air conditioner and the display will go off.)
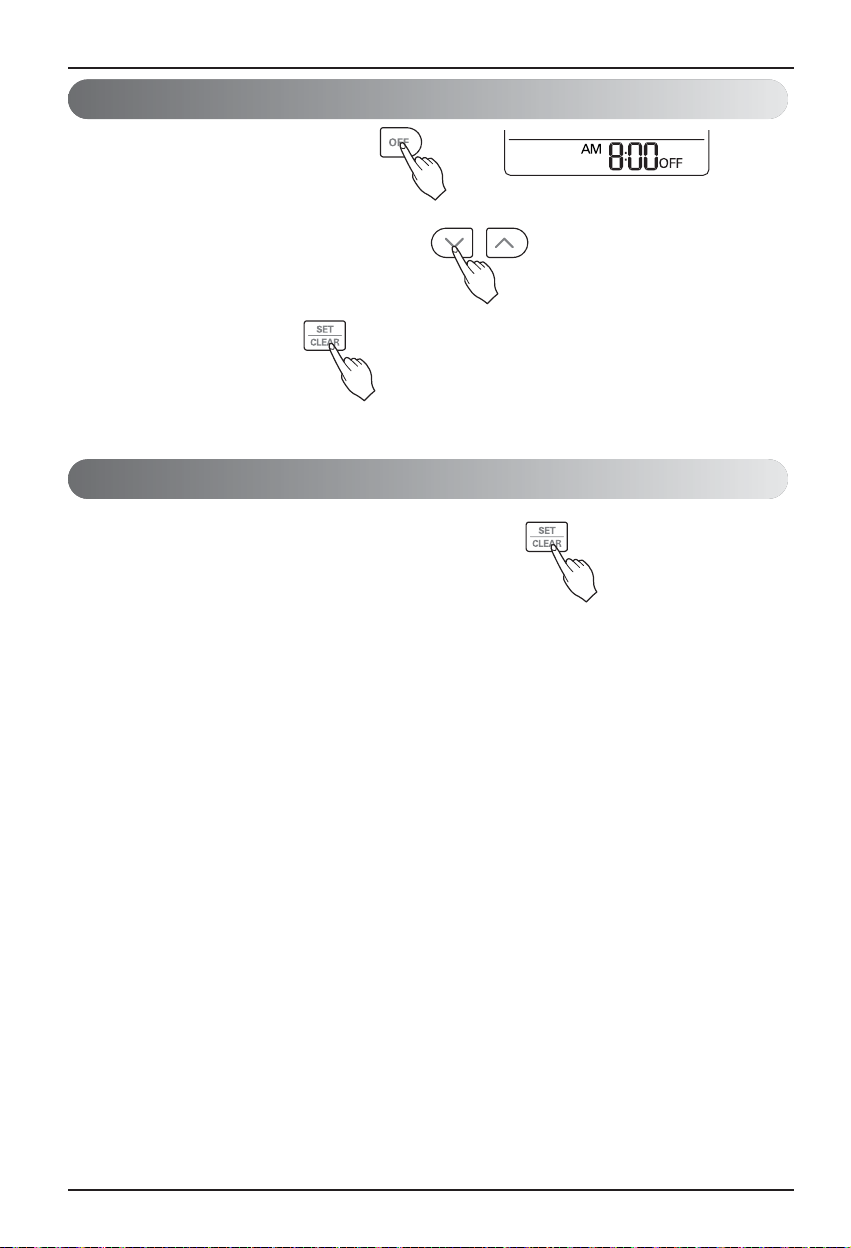
1. Press the OFF button to turn timer on or off.
2. Press TIME SETTING buttons until the desired time
is set.
3. Press the SET / CLEAR button.
Off Timer Setting
Timer OFF
Page 25

MANUALE DELL'UTILIZZATORE
E DI INSTALLAZIONE
CONDIZIONATORE D'ARIA
Leggere attentamente questo manuale e conservarlo
per riferimento futuro.
www.lg.com
TIPO : Telecomando wireless
Modelli : PQWRCQ0FDB
PQWRHQ0FDB
ITALIANO
Page 26

2 Telecomando wireless
Manuale di telecomando wireless & installazione per il proprietario
INDICE
■ Precazione Di Sicurezza............................................................................................3
■ Descrizione delle parti...............................................................................................4
Telecomando wireless .................................................................................................5
■ Istruzione di utilizzo...................................................................................................6
Inserimento delle batterie ............................................................................................6
Manutenzione del telecomando senza fili....................................................................6
Metodo di utilizzo .........................................................................................................6
Impostazioni per Installatore - Indirizzo di Impostazione di Comando Centrale ..........7
■ Istruzioni di installazione ..........................................................................................7
Impostazione per Installatore - Controllare Indirizzo del Comando centrale ...............7
Impostazioni per Installatore - Come inserire il modo di impostazione installatore .....8
Impostazioni per Installatore - Tabella Codici di Impostazione per Installatore...........9
■ Istruzioni per il proprietario ....................................................................................10
Modo di raffreddamento - Utilizzo Standard ..............................................................10
Modo di Raffreddamento - Raffreddamento Elevato .................................................10
Modalità di funzionamento automatico ......................................................................11
Modo di commutazione automatica ...........................................................................12
Modo di Commutazione Automatica - Impostazioni di Modo Modifica Temperatura
..............13
Modalità deumidificazione .........................................................................................14
Modo di riscaldamento...............................................................................................15
Modalità di uso ventilatore .........................................................................................16
■ Impostazioni di temperatura / controllo temperatura ambiente ..........................17
■ Impostazione flusso aria .........................................................................................18
Controllo direzione flusso aria alto/basso (Opzionale) ..............................................18
Controllo direzione flusso aria sinistro/destro (Opzionale) ........................................18
■ Funzione secondaria ...............................................................................................19
Purificazione con plasma (Opzionale) .......................................................................19
Pulizia automatica (Opzionale) ..................................................................................19
Pulizia avanzata (Opzionale) .....................................................................................20
Controllo luminosità LCD (Opzionale) .......................................................................21
Commutazione Celsius/Fahrenheit............................................................................21
Riscaldatore elettrico (Opzionale)..............................................................................21
Controllo individuale angolo palette (Opzionale) .......................................................22
■ Timer .........................................................................................................................23
Impostazione dell’ora corrente...................................................................................23
Impostazione timer di fase attesa (sleep) ..................................................................23
Impostazione timer acceso (On)................................................................................23
Impostazione timer spento (Off) ................................................................................24
Per annullare l'impostazione del timer.......................................................................24
Page 27

Precazione Di Sicurezza
Manuale Dell'utilizzatore e di Installazione 3
ITALIANO
■ Installazione
Precazione Di Sicurezza
• L’installazione richiede personale esperto e l’apparecchio dovrebbe essere installato dal centro di assistenza o
da altri negozi specializzati nell’installazione certificati dalla nostra società.
• Per tutti i problemi che derivino dopo l’installazione da una persona che non abbia le qualifiche adatte, la nostra
società non fornirà alcun servizio gratuito.
• Le seguenti precauzioni di sicurezza sono fornite per evitare pericoli o perdite insospettate.
: Se l’utente non segue le operazioni obbligatorie, si può provocare un ferimento o la morte.
: Se l’utente non segue le operazioni obbligatorie, si può provocare un ferimento o danni alla
proprietà.
: L’avvertenza o la cautela servono per richiamare l’attenzione dell’utente sul possibile pericolo.
Leggere e seguire le istruzioni per evitare un incidente di sicurezza.
: L’avvertenza o la cautela sono indicate in questa guida e sul prodotto stesso per proteggere
gli utenti dal pericolo.
AVVERTENZA
Non ricaricare o smontare le batterie.
Non gettare le batterie nel fuoco.
Possono provocare fiammate o esplodere.
In caso di contatto del liquido delle batterie con la pelle o
gli indumenti, lavare accuratamente con acqua pulita.
Non utilizzare il telecomando se le batterie presentano
delle perdite. Le sostanze chimiche delle batterie
potrebbero causare scottature o altri rischi per la salute.
Sostituire sempre tutte le batterie del telecomando
con batterie nuove dello stesso tipo. Non mescolare
batterie nuove e usate o batterie di tipo diverso.
Esiste in rischio di incendi o danno per l’unità.
Non smontare, riparare o modificare il prodotto a
propria discrezione per evitare incendio o scossa
elettrica.
Premere il pulsante una volta.
Si potrebbe annullare il
funzionamento se sono premuti
diversi tasti.
Non far cadere o lanciare il
telecomando. Non urtare con
forza il prodotto o non mettere
i piedi su esso.
Non usare questo prodotto in
luoghi umidi e bagnati.
Non usare questo prodotto in
condizioni di riscaldamento e di
incendio.
Non installare il telecomando in
una posizione esposta alla luce
solare diretta.
Puntare il ricevitore di segnali
sul telecomando wireless per
far funzionare l’apparecchio.
Il segnale del telecomando può essere ricevuto
ad una distanza fino a 7 metri.
Accertare che non siano presenti ostruzioni fra il
telecomando e il ricevitore di segnali.
■ Utilizzo
AVVERTENZA
CAUTELA
Page 28

Descrizione delle parti
Accessorio
Descrizione delle parti
4 Telecomando wireless
Supporto (1EA) Viti di fissaggio (2EA) Manuale dell’utente /
Installazione
Batterie AAA
(1,5V) (2EA)
Schermo LCD
Telecomando wireless
Page 29
Descrizione delle parti
Manuale Dell'utilizzatore e di Installazione 5
Telecomando wireless
Pulsante ANGOLO PALETTE
Usato per impostare l’angolo delle palette.
Pulsante IMPOSTAZIONE FUNZIONE
Usato per impostare o calcellare pulizia automatica, pulizia precisa,
comando riscaldatore elettrico o angolo individuale delle palette.
Pulsante ON/OFF
Usato per accendere e spegnere l’unità.
Pulsante RAFFREDDAMENTO RAPIDO
Il raffreddamento rapido funziona con velocità di
ventilatore molto elevate.
Pulsante SINISTRO/DESTRO FLUSSO ARIA (OPZIONALE)
Usato per impostare la direzione di flusso aria
sinistra/destra (orizzontale) desiderata.
Pulsante FLUSSO ARIA ALTO/BASSO
Usato per arrestare o avviare il movimento della bocchetta e
impostare la direzione del flusso d’aria alto/basso desiderato.
Pulsante TIMER INSERITO
Usato per impostare funzionamento di avviamento.
Pulsante per TIMER IN ATTESA
Usato per impostare l’attesa per il funzionamento.
Pulsante AZZERA/CANCELLA
Usato per impostare / annullare il timer.
Usato
per impostare l’ora attuale (se essa si immette per 3 s)
Pulsante per PLASMA (OPZIONALE)
Usato per avviare o fermare la funzione di
purificazione al plasma.
Pulsante D'IMPOSTAZIONE DELLA
TEMPERATURA AMBIENTE
Usato per selezionare la temperatura ambiente.
Pulsante SELEZIONE MODO FUNZIONAMENTO
Usato per selezionare il modo di funzionamento.
Pulsante SELEZIONE VELOCITÀ VENTOLA
UNITÀ INTERNA
Usato per selezionare la velocità del ventilatore
in Quattro fasi: lento, medio, alto e caos.
Pulsante di CONTROLLO TEMPERATURA AMBIENTE
Usato per controllare la temperatura ambiente.
Pulsante SPEGNIMENTO TIMER
Usato per impostare l’ora di arresto di funzionamento.
Pulsante IMPOSTAZIONE TIMER (alto/basso) / SPIA
Usato per impostare il timer. Usato per regolare la
luminosità. (Se non si usa il modo di regolazione dell’ora)
Pulsante di RESET
Usato per resettare il telecomando.
ITALIANO
1
2
3
4
5
6
7
8
9
Modo operativo
Modo di raffreddamento
Modo automato o commutazione automatica
Modalità deumidificazione
Modo di riscaldamento
Modalità di uso ventilatore
•
Modello con raffreddamento ( ),
Modello a pompa di calore ( )
10
11
12
13
14
15
16
17
Page 30
Istruzione di utilizzo
6 Telecomando wireless
1. Scegliere un posto adatto per sicurezza e facilità
di intervento.
2. Fissare saldamente il sostegno al muro con le
viti fornite.
3. Far scorrere il telecomando nel supporto.
1. Il telecomando non deve essere esposto alla
luce diretta del sole.
2. La traiettoria tra telecomando e ricevitore di
segnali deve essere libera per garantire una
corretta comunicazione. Utilizzare un panno
soffice per la pulizia di entrambi.
3. In caso di altre apparecchiature comandate
con telecomando, cambiarne la posizione o
consultare un tecnico dell'assistenza.
1. Il ricevitore del segnale si trova dentro l'unità.
2.
Puntare il telecomando verso l'unità da comandare.
Non devono esservi ostacoli tra essi.
NOTA
1. Rimuovere il coperchio delle batterie estraendolo nella direzione
della freccia.
2. Inserire batterie nuove facendo attenzione alla corretta
installazione dei poli (+) e (-).
3. Reinserire il coperchio facendolo scorrere in posizione.
1.
Utilizzare/sostituire entrambe le batterie con batterie dello stesso tipo.
2. Se il sistema non deve essere utilizzato per un periodo di tempo
prolungato, rimuovere le batterie per aumentarne la loro durata.
3. Se il display del telecomando inizia ad affievolirsi, sostituire
entrambe le batterie.
NOTA
Metodo di utilizzo
Manutenzione del telecomando senza fili
Inserimento delle batterie
Istruzione di utilizzo
Page 31

Istruzioni di installazione
Manuale Dell'utilizzatore e di Installazione 7
ITALIANO
Impostazioni per Installatore - Indirizzo di Impostazione di Comando Centrale
Con il pulsante MODO premuto, premere il pulsante RESET.
1
Quando viene premuto il pulsante di FUNZIONE, premere il pulsante RESET
1
Premere il pulsante ON/OFF verso il tempo di unità interna 1, e l’unità interna indicherà l’indirizzo
nella finestra del display.
- L’ora del display di indirizzo e il metodo possono essere diversi in base al tipo di unità interna.
2
Reimpostare il telecomando per usare il modo di funzionamento generale.
3
Usando il pulsante di IMPOSTAZIONE DI TEMPERATURA, regolare l’indirizzo dell’unità interna.
- Campo di impostazione : 00 ~ FF
2
Dopo l’impostazione dell’indirizzo, premere pulsante ON/OFF verso
il tempo dell’unita interna 1.
3
L’unità interna indicherà l’indirizzo impostato per completare l’impostazione di indirizzo.
- Il tempo e metodo di visualizzazione dell’indirizzo possono essere diversi
dal tipo dell’unità interna.
Impostare il telecomando per usare il modo di utilizzo generale.
4
5
Istruzioni di installazione
Impostazione per Installatore - Controllare Indirizzo del Comando centrale
N° gruppo
N° unità interna
Page 32

Istruzioni di installazione
8 Telecomando wireless
Impostazioni per Installatore - Come inserire il modo di impostazione installatore
Quando viene premuto il pulsante RAFFREDDAMENTO RAPIDO,
premere il pulsante RESET.
1
Usando il pulsante di IMPOSTAZIONE DI TEMPERATURA,
impostare il codice di funzione e il valore di impostazione.
(Fare riferimento a tabella codici impostazione per installatore.)
2
Il modo di impostazione dell'installatore serve per regolare il funzionamento dettagliato del telecomando.
Se il modo di impostazione dell’installatore non è impostato correttamente, questo potrebbe provocare
problemi nell’unità, danno dell’utente e danno alla proprietà. Deve essere impostata da un installatore
certificato e qualsiasi persona non certificata che effettua l'installazione o qualsiasi cambiamento deve
assumersi la responsabilità dei risultati. In questo caso non viene fornito il nostro servizio gratuito di
riparazione.
CAUTELA
Premere pulsante ON/OFF verso l’ora di unità interna 1.
3
Impostare il telecomando per usare il modo di funzionamento generale.
4
Vedere tabella di codice di impostazione per installatore alla pagina successiva.
Codice funzione
Impostare codice
Page 33

Istruzioni di installazione
Manuale Dell'utilizzatore e di Installazione 9
ITALIANO
Impostazioni per Installatore - Tabella Codici di Impostazione per Installatore
No. Funzione Codice funzione Valore di impostazione LCD di telecomando
0
0 : Impostare su Master
1 : Impostare su Slave
1 : Standard
1
2 : Basso
3 : Alto
4 : Molto alto
0 : Impostare su Master
Controllo gruppo 1 : Impostare su Slave
2 :
Controllare Master/Slave
3 :
Impostare su riscaldatore ausiliario
4 :
Cancellare riscaldatore ausiliario
Tabella codici impostazione installatore
0
1
2
Scelta altezza
soffitto
Modo di esclusione automatico
Questa funzione è valida solo per modello H/P di commutazione non automatica.
Riscaldatore ausiliario
Questa funzione è solo applicata ai modelli con funzione di riscaldatore ausiliario che è attivato.
Scelta altezza soffitto
Unità interna collegata a telecomando cablato funziona come impostazione di controllore remoto cablato.
Controllo gruppo
Questa funzione serve solo per controllo di gruppi. Non impostare questa funzione in caso di controllo non a gruppi.
Dopo impostazione di controllo di gruppi del prodotto, spegnere l’alimentazione quindi riaccendere dopo 1 minuto.
2
00
01
11
12
13
14
20
21
22
23
24
25
2
Modo di esclusione
automatico
Riscaldatore
ausiliario
2 :
Controllare installazione
diriscaldatore ausiliario
Page 34

Istruzioni per il proprietario
10 Telecomando wireless
Premere pulsante ON/OFF.
L’unità fornirà un beep.
1
Premere pulsante MODO per selezionare modo di
raffreddamento.
2
Per aumentare la temperatura
Per ridurre la temperatura
Impostare la temperatura desiderata premendo il pulsante TEMP.
Premere pulsante di CONTROLLO TEMPERATURA AMBIENTE
per controllare la temperatura ambiente. Quando si imposta la
desiderata temperatura che è superiore alla temperatura ambiente,
il vento di raffreddamento non verrà fornito.
❈ Impostazione di campo di Temp. : 18~30°C (64~86°F)
3
Premere pulsante ON/OFF.
L’unità fornirà un beep.
1
Premere pulsante MODO per selezionare il modo di
raffreddamento.
2
Premere il pulsante RAFFREDDAMENTO RAPIDO. L’unità funzionerà
con velocità del ventilatore molto alta nel modo di raffreddamento.
❈ I modelli montati a parete usano il modo di raffreddamento
elevato per 30 minuti.
3
Per annullare il modo di raffreddamento elevato premere il pulsante di raffreddamento
rapido o il pulsante del ventilatore o il pulsante di impostazione di temperatura ambiente
nuovamente e l’unità funzionerà a velocità di ventilatore elevata in modo di raffreddamento.
4
Oppure Oppure
Modo di raffreddamento - Raffreddamento elevato
Modo di raffreddamento - Utilizzo Standard
Istruzioni per il proprietario
Page 35

Istruzioni per il proprietario
Manuale Dell'utilizzatore e di Installazione 11
ITALIANO
Modalità di funzionamento automatico
Premere pulsante ON/OFF.
L’unità fornirà un beep.
1
Premere pulsante MODO per selezionare il modo di funzionamento
automatico.
2
Durante modo di funzionamento automatico
• Se il sistema non sta funzionando come desiderato, commutare manualmente su altro modo. Il sistema non
passerà automaticamente dal modo di raffreddamento a modo di riscaldamento o da riscaldamento a
raffreddamento, allora si deve impostare nuovamente il modo e la temperatura desiderata.
Impostare la temperatura desiderata.
<Per Modello con raffreddamento>
La temperatura e la velocità della ventola vengono impostate
automaticamente dai controlli elettronici che si basano sulla
temperatura corrente dell'ambiente.
Se si sente caldo o freddo, premere i tasti di IMPOSTAZIONE
TEMPERATURA per un maggiore effetto di raffreddamento o
riscaldamento.
Non è possibile modificare la velocità della ventola interna.
Essa è già impostata secondo la regola di modalità in funzionamento
automatico.
Potete impostare la temperatura desiderata
e la velocità del ventilatore interno.
Impostare campo di temperature
: 18~30°C (64~86°F)
<Per modello con riscaldamento >
3
Code Feel
2 Cold
1 Slightly cool
0 Neutral
-1 Slightly warm
-2 Warm
❈ Please select the code
depend on your feeling.
a
Per ridurre la temperatura
Per aumentare la temperatur
Page 36

Istruzioni per il proprietario
12 Telecomando wireless
Modo di commutazione automatica
Premere il pulsante ON/OFF. L’unità fornirà un beep.
1
Premere pulsante MODO per selezionare il modo di commutazione
automatico.
2
Impostare la temperatura ambiente desiderata.
❈ Impostare campo di temperature in modo commutazione
automatica: 18~30°C (64~86°F)
3
Potete selezionare la velocità del ventilatore in quattro passi:
bassa, media, alta o molto alta. Ogni volta che il pulsante viene
premuto, la modalità di velocità ventilatore viene commutata.
4
Questa Funzione non è disponibile in alcuni prodotti
a
Durante modo di funzionamento automatico
Il condizionatore d’aria cambia il modo di funzionamento automaticamente per mantenere la temperatura
interna. Quando la temperatura ambiente varia per oltre ±2°C(4°F) rispetto alla temperatura impostata, il
condizionatore mantiene la temperatura ambiente entro ±2°C(4°F) rispetto alla temperatura impostata con
modo di commutazione automatica.
Per ridurre la temperatura
Per aumentare la temperatur
Page 37

Istruzioni per il proprietario
Manuale Dell'utilizzatore e di Installazione 13
ITALIANO
Modo di Commutazione Automatica- Impostazioni di Modo Modifica Temperatura
Questa funzione serve per impostare il modo di funzionamento del modo di
commutazione automatica.
Il modo di cambio di temperatura è la differenza di temperatura quando si passa dal modo di raffreddamento
al modo di riscaldamento o dal modo di riscaldamento al modo di raffreddamento.
Es.) quando la temperatura impostata è 25°C(76°F) e la temperatura ambiente è 20°C(68°F), allora il modo di
funzionamento è di riscaldamento. Potete impostare il modo di cambio di temperatura su 2°C(4°F),
quando la temperatura ambiente è fino a 27°C(25°C + 2°C)(80°F(76°F + 4°F)), l’unità avvia il
funzionamento di raffreddamento.
Nel modo di commutazione automatica, premere pulsante FUNZIONE per selezionare il modo di
cambio di temperatura.
1
Premere il pulsante di IMPOSTAZIONE DI TEMPERATURA per impostare il modo di cambio di
temperatura. (valore di origine è 2°C(4°F).)
2
❈ Modo cambio Temp. Campo
: 1~7°C(2~14°F)
a
Per ridurre la temperatura
Per aumentare la temperatur
Page 38

Istruzioni per il proprietario
14 Telecomando wireless
Modalità deumidificazione
Premere il pulsante ON/OFF.
L’unità fornirà un beep.
1
Premere il pulsante MODO per selezionare il modo di
deumidificazione.
2
Impostare la velocità del ventilatore. Potete selezionare la velocità del
ventilatore in quattro passi, - basso, medio, alto, o caos. Ogni volta
che il pulsante viene premuto, la modalità di velocità ventilatore viene
commutata.
3
Durante il modo di deumidificazione
• Potete selezionare il modo di deumidificazione con il pulsante di selezione di funzionamento, l’unità interna
si avvia per avviare la funzione di deumidificazione, impostando automaticamente la temperatura ambiente
e il volume d’aria alla condizione migliore per la deumidificazione basata sulla temperatura ambiente
rilevata. In questo caso, tuttavia, la temperatura di impostazione non viene visualizzata sul telecomando e
non è quindi possibile controllare la temperatura dell’ambiente.
• Durante la funzione di deumidificazione salubre, il volume d’aria viene automaticamente impostato secondo
l’algoritmo che risponde alla temperatura ambiente attuale e rende salubre la condizione dell’ambiente
anche nella stagione di elevata umidità.
Page 39

Istruzioni per il proprietario
Manuale Dell'utilizzatore e di Installazione 15
ITALIANO
Impostare la temperatura desiderata premendo il pulsante TEMP.
Premere il pulsante CONTROLLO TEMPERATURA AMBIENTE per
controllare la temperatura ambiente.
Quando si imposta la temperatura desiderata che è inferiore alla
temperatura ambiente, viene soffiato il vento di riscaldamento.
3
Impostare nuovamente la velocità del ventilatore.
Potete selezionare la velocità del ventilatore in quattro passi, - basso,
medio, alto, o caos. Ogni volta che il pulsante viene premuto, la
modalità di velocità del ventilatore viene commutata.
4
Premere il pulsante ON/OFF.
L’unità fornirà un beep.
1
Premere pulsante MODO per selezionare il modo di riscaldamento.
2
Modo di riscaldamento
Questa funzione è solo per modello H/P.
a
❈ Impostare campo di
temperatura in modo di
riscaldamento
: 16~30°C (60°F~86°F)
Per ridurre la temperatura
Per aumentare la temperatur
Page 40

Istruzioni per il proprietario
16 Telecomando wireless
Modalità di uso ventilatore
Impostare nuovamente la velocità del ventilatore.
Potete selezionare la velocità del ventilatore in quattro fasi: - bassa,
media, alta o caos. Ogni volta che il pulsante viene premuto, la
modalità di velocità ventilatore viene commutata.
3
Premere il pulsante ON/OFF.
L’unità fornirà un beep.
1
Premere il pulsante MODO per selezionare il modo ventilatore.
2
Vento naturale tramite la logica del caos
• Per una migliore sensazione di fresco rispetto alle altre velocità del ventilatore, premere il selettore di
energia di ventilatore, e impostare il modo caos. In questo modo, il vento soffia come una brezza naturale
modificando automaticamente la velocità del ventilatore secondo la logica del caos.
Durante in modo ventilatore
• Il compressore esterno non funziona.
Avere una funzione di circolazione interna quando esso invia l’aria all'esterno che non ha molta differenza di
temperatura con l’ambiente interno.
Page 41

Owner's Instruction
Manuale Dell'utilizzatore e di Installazione 17
ITALIANO
Si deve semplicemente regolare la temperatura desiderata.
• Premere i pulsanti per regolare la temperatura desiderata.
: Aumentare la temperatura per un tempo di pressione
: Ridurre la temperatura per un tempo di pressione
Temperatura ambiente : Indicare la temperatura ambiente attuale
Impostare temperatura: Indicare la temperatura che si vuole impostare
<Modo di raffreddamento>
Il modo di raffreddamento non funziona se la temperatura desiderata è
superiore alla temperatura ambiente ridurre la temperatura desiderata.
<Modo di riscaldamento>
Il modo di riscaldamento non funziona se la temperatura desiderata è
inferiore alla temperatura ambiente. Aumentare la temperatura
desiderata.
Se si preme il pulsante TEMPERATURA AMBIENTE, la temperatura
ambiente verrà visualizzata entro 5 secondi.
Dopo 5 secondi, si visualizza la temperatura desiderata.
A causa della posizione del telecomando, la temperatura reale
dell’ambiente e questo valore visualizzato possono essere differenti.
Premere il pulsante TEMPERATURA AMBIENTE per 5 secondi, l’unita di
temperatura cambia in Fahrenheit o Fahrenheit in Celsius.
Impostazione di temperatura / controllo temperatura ambiente
Page 42

Airflow Setting
18 Telecomando wireless
Il flusso aria alto/basso (flusso aria verticale) può essere regolato usando il telecomando.
1. Premere il pulsante ON/OFF per avviare l’unità.
2. Premere il pulsante FLUSSO ARIA ALTO/BASSO e le bocchette gireranno verso l'alto e verso il basso.
Premere il pulsante FLUSSO ARIA ALTO/BASSO nuovamente per impostare la bocchetta verticale per la
desiderata direzione del flusso aria.
• Se premete il pulsante FLUSSO ARIA ALTO/BASSO la direzione del flusso d’aria viene modificata
automaticamente in base all’algoritmo di rotazione automatica per distribuire l’aria nell’ambiente in modo
regolare e nello stesso tempo rendere l’ambiente migliore per il corpo umano, come se si godesse di una
brezza naturale.
• Usare sempre il telecomando per regolare la direzione del flusso d’aria alto/basso. Spostando manualmente la
bocchetta della direzione del flusso d'aria verticale, si potrebbe danneggiare il condizionatore d’aria.
• Quando l’unità viene fermata, la bocchetta di direzione del flusso aria alto/basso chiuderà lo sfiato di uscita
dell’aria del sistema.
Il Premere il flusso aria alto/basso (orizzontale) può essere regolata usando il telecomando.
1. Premere il pulsante ON/OFF per avviare l’unità.
2. Premere il pulsante FLUSSO ARIA SINISTRA/DESTRA e le bocchette gireranno a sinistra
e a destra. Premere il pulsante di controllo di direzione di flusso aria orizzontale
nuovamente per impostare la bocchetta orizzontale nella direzione di flusso d’aria
desiderata.
❈ La funzione di flusso d’aria alto/basso e sinistra/destra non è indicata sul display del telecomando.
NOTA
Controllo direzione flusso aria sinistro/destro (opzionale)
Controllo direzione flusso aria alto/basso (Opzionale)
Impostazione flusso aria
Page 43

Sub function
Manuale Dell'utilizzatore e di Installazione 19
ITALIANO
Premere il pulsante ON/OFF.
L’unità fornirà un beep.
1
Premere il pulsante PLASMA. La purificazione con
plasma verrà avviata quando il pulsante viene
premuto e si arresterà quando il pulsante viene
nuovamente premuto.
2
Solo purificazione con PLASMA
Se si preme il pulsante PLASMA, la purificazione con plasma
verrà attivata.
• Il filtro a plasma è una tecnologia sviluppata dalla LG per
ottenere una eliminazione del contaminanti microscopici
nell’aria di ammissione che genera un plasma con carica
elevata di elettroni. Questo plasma uccide e distrugge i
contaminanti completamente per fornire aria pulita e igienica.
• Questa funzione può essere usata in qualsiasi modo di
funzionamento e qualsiasi velocità del ventilatore può essere
usata mentre il filtro a plasma sta funzionando.
Pulizia automatica (Opzionale)
Questa funzione opera quando l’unità viene spenta.
Premere il pulsante IMPOSTAZIONE FUNZIONE 1 volta.
Il simbolo di pulizia automatica lampeggerà.
1
Premere il pulsante IMPOSTA/PULISCI per applicare o annullare la funzione di pulizia automatica.
Se la funzione di pulizia e automatica viene applicata, quando l’unità viene spenta, il
ventilatore interno è ancora in funzione per circa 30 minuti internamente senza
operazione di raffreddamento o deumidificazione.
Anche la bocchetta viene chiusa.
Quesa azione asciuga qualsiasi residuo di umidità e l'unità viene pulita internamente.
2
Purificazione con plasma (Opzionale)
Funzione secondaria
Page 44

Sub function
20 Telecomando wireless
Pulizia avanzata (Opzionale)
La funzione di pulizia avanzata può essere usata impostando su manuale o automatico.
Utilizzo di pulizia avanzata
Se un tempo di funzionamento cumulativo del prodotto supera 30 ore, la pulizia avanzata automaticamente
si avvia quando l’unità viene spenta.
1. Premere il pulsante IMPOSTAZIONE FUNZIONE per 2 volte.
Il simbolo di pulizia avanzata lampeggerà.
2. Premere il pulsante IMPOSTA/CANCELLA per programmare o
annullare la funzione di pulizia avanzata. Potete
impostare/annullare con funzione acceso o spento.
1. Quando l’unità si arresta, premere il pulsante FUNZIONE per la selezionare la
pulizia avanzata. Il simbolo di pulizia avanzata lampeggia, quindi premere il
pulsante IMPOSTA/CANCELLA.
2. Per arrestare la operazione di pulizia avanzata in manuale, premere il
pulsante FUNZIONE per selezionare la pulizia avanzata e premere
IMPOSTA/CANCELLA.
Operazione di pulizia avanzata in manuale
La spazzola consente di pulire una polvere del filtro spostandola da sinistra a destra o da destra a sinistra
sul filtro. La polvere aspirata viene raccolta nella scatola delle polvere.
Il processo di funzionamento della pulizia avanzata è differente in base al tipo di prodotto.
Page 45

Sub function
Manuale Dell'utilizzatore e di Installazione 21
ITALIANO
Riscaldatore elettrico (Opzionale)
Potete impostarlo solo durante l’operazione di riscaldamento.
Premere il pulsante IMPOSTAZIONE FUNZIONE per 3 volte.
Il simbolo del riscaldatore elettrico lampeggerà.
1
Premere il pulsante IMPOSTA/CANCELLA per programmare o annullare la funzione di riscaldatore
elettrico.
2
• L’unità interna visualizza durante il modo di riscaldamento, il riscaldatore ausiliario viene accesso
automaticamente, ma non è visualizzato sul telecomando wireless separatamente.
• Esso funzione nel modo di riscaldamento per pavimento nei prodotti con console.
Premere il pulsante di CONTROLLO LUMINOSITÀ LCD.
E’ scomodo quando rilevate che il display sull’unità è troppo luminosa.
Premere il pulsante INTERRUTTORE °C/°F per modificare da Celsius a Fahrenheit o da
Fahrenheit a Celsius.
Quando si preme il pulsante IMPOSTAZIONE TEMPERATURA nel modo Fahrenheit, la
temperatura aumenterà/scenderà di 2°F.
Commutazione Celsius/Fahrenheit
Controllo luminosità LCD (Opzionale)
Page 46

Sub function
22 Telecomando wireless
• Possono esistere differenze fra il controllo wireless remoto alto/basso/sinistra/destra e le direzione del
portello di scarico dell’aria.
• Impostare l'angolo desiderato con il controllo del movimento dell’angolo delle palette del prodotto.
• La funzione di controllo di palette singole è una funzione addizionale di un prodotto, e può non funzionare
in alcuni prodotti.
Controllo individuale angolo palette (Opzionale)
Premere il pulsante IMPOSTA/CANCELLA per programmare o annullare la funzione di controllo di
angolo di palette individuali.
3
E’ la funzione che può controllare 4 angoli di palette individualmente nel gruppo di
prodotti a cassetta a 4 vie tipo per soffitto.
Premere il pulsante IMPOSTAZIONE FUNZIONE per 3 volte.
(4 volte durante operazione di riscaldamento)
Il simbolo di controllo di angolo di palette individuali lampeggerà.
• Se premete il pulsante IMPOSTA/CANCELLA in
tale tempo tutte le palette sono regolate su
angolo standard.
1
Impostare ciascun angolo di palette premendo i pulsanti direzionali
alto/basso/sinistra/destra.
• Ogni volta che il pulsante viene premuto, il corrispondente angolo di
paletta e valori di impostazione sono visualizzati.
• Quando il pulsante direzionale viene premuto, la finestra del display
appare come nella figura sulla destra, e l’angolo può essere
impostato a 1~6.
2
Page 47

Timer
Manuale Dell'utilizzatore e di Installazione 23
ITALIANO
1. Premere il pulsante IMPOSTA/CANCELLA per 3 secondi.
2. Premere i pulsanti per l'IMPOSTAZIONE DELL'ORA fino
ad impostare l'ora desiderata. (Se si preme verso il basso il
pulsante per un tempo lungo, esso cambia rapidamente nelle
unità di 10 min)
3. Premere il pulsante IMPOSTA /CANCELLA.
Verificare l’indicatore per la rappresentazione dell’orario in AM e PM.
NOTA
1. Premere il pulsante TIMER per accendere o
spegnere il timer .
2. Premere i pulsanti per l'impostazione dell'ora fino ad
impostare l'ora desiderata. (7 ore con la
impostazione massima)
3. Premere il pulsante IMPOST. /CANCELLA.
1. Premere il pulsante ON per accendere o spegnere il
timer .
2. Premere i pulsanti per IMPOSTAZIONE ORA fino ad
impostare l'ora desiderata.
3. Premere il pulsante IMPOSTA /CANCELLA
Impostazione timer acceso (On)
Impostazione timer di fase attesa (sleep)
Impostazione dell’ora corrente
Timer
Attesa del timer
Timer accesso (ON)
Page 48

Timer
24 Telecomando wireless
Per annullare l'impostazione del timer
• Per annullare tutte le impostazioni del timer, premere il pulsante CANCELLA TUTTO
• Se volete cancellare ciascuna impostazione del timer ,
premere ciascun pulsante del timer per accendere o spegnere la funzione
di attesa quando lo desiderate.
E quindi premere il pulsante IMPOSTA/CANCELLA che
dirige il telecomando sul ricevitore di segnali.
(La spia del timer sul condizionatore d’aria e sul display si spengono).
1. Premere il pulsante OFF per regolare il timer su
acceso o spento.
2. Premere i pulsanti per l'impostazione dell'ora fino ad
impostare l'ora desiderata.
3. Premere il pulsante IMPOSTA /CANCELLA.
Impostazione timer spento (Off)
Timer OFF
Page 49

MANUAL DEL PROPIETARIO
Y DE INSTALACIÓN
APARATO DE AIRE
ACONDICIONADO
Lea cuidadosamente este manual antes de utilizar el
aparato y guárdelo como referencia para el futuro.
www.lg.com
Tipo: Mando a distancia
Modelos: PQWRCQ0FDB
PQWRHQ0FDB
ESPAÑOL
Page 50

2 Mando a distancia
Mando del propietario y de instalación del mando a distancia
ÍNDICE
■ Precauciones de seguridad ......................................................................................3
■ Descripción de las partes .........................................................................................4
Mando a distancia........................................................................................................5
■ Instrucciones de uso .................................................................................................6
Colocación de las pilas ................................................................................................6
Mantenimiento del mando a distancia .........................................................................6
Método de utilización ...................................................................................................6
Configuración de instalador - Ajuste de la dirección del control central ......................7
■ Instrucciones de instalación.....................................................................................7
Configuración de instalador - Comprobación de la dirección del control central.........7
Configuración de instalador - Entrar en el modo de configuración de instalador ........8
Configuración de instalador - Tabla de códigos de configuración de instalador .........9
■ Instrucciones del propietario..................................................................................10
Modo de refrigeración - Funcionamiento estándar ....................................................10
Modo de refrigeración - Refrigeración rápida ............................................................10
Modo funcionamiento automático..............................................................................11
Modo cambio automático...........................................................................................12
Modo cambio automático - Ajuste de la temperatura de cambio de modo................13
Modo de deshumidificación .......................................................................................14
Modo de calefacción..................................................................................................15
Modo de ventilador ....................................................................................................16
■ Ajuste de temperatura / comprobación de la temperatura de la habitación ......17
■ Ajuste del caudal de aire.........................................................................................18
Control de dirección de aire arriba/abajo (opcional) ..................................................18
Control de dirección de aire izquierda/derecha (opcional) ........................................18
■ Función Sub .............................................................................................................19
Purificación de plasma (opcional)..............................................................................19
Limpieza automática (opcional) .................................................................................19
Limpieza inteligente (opcional) ..................................................................................20
Control de luminosidad de LCD (opcional) ................................................................21
Cambio Centígrados/Fahrenheit................................................................................21
Calefactor eléctrico (opcional) ...................................................................................21
Control de ángulo de aletas individual (opcional) ......................................................22
■ Temporizador ...........................................................................................................23
Ajuste de la hora actual .............................................................................................23
Ajuste del temporizador de apagado automático ......................................................23
Ajuste del temporizador de encendido ......................................................................23
Ajuste del temporizador de apagado .........................................................................24
Para cancelar el ajuste del temporizador ..................................................................24
Page 51

Precauciones de seguridad
Manual Del Propietario Y De Instalación 3
ESPAÑOL
■ Instalación
Precauciones de seguridad
• La instalación requiere conocimientos cualificados y deberá ser realizada por un servicio técnico u otros
profesionales especializados y reconocidos por nuestra empresa.
• Para todos los problemas resultantes de la instalación realizada por una personal no cualificada, nuestra
empresa no facilitará servicio gratuito.
• Las siguientes precauciones de seguridad evitan de antemano peligros o daños imprevistos.
:
Si el usuario no cumple con las instrucciones obligatorias, podría sufrir lesiones graves o mortales.
: Si el usuario no cumple con las instrucciones obligatorias, podría sufrir lesiones graves o
causar daños materiales
: Las advertencias y precauciones sirven para llamar la atención del usuario sobre posibles
peligros. Léalas detenidamente para evitar accidentes.
: Las advertencias y precauciones de esta guía y el producto ayudan a proteger a los usuarios
de posibles peligros.
ADVERTENCIA
No recargue ni desmonte las pilas.
No arroje las pilas a un fuego.
Pueden quemarse o explotar.
Si el líquido de las pilas entra en contacto con la piel
o su ropa, lávela bien con agua limpia.
No utilice el mando a distancias si las pilas tienen
fugas. Los productos químicos de las pilas podrían
causar quemaduras u otros problemas de salud.
Cambie todas las pilas del mando a distancia por
otras del mismo tipo. No combinar pilas nuevas y
usadas o de diferentes tipos. Existe riesgo de
incendio o explosión.
No desmonte, repare o modifique el producto
bajo su propio criterio; de este modo, evitará el
riesgo de incendio o descargas eléctricas.
Pulse un botón cada vez.
No funcionará si se pulsan
varios botones al mismo
tiempo.
No deje caer ni lance el mando
a distancia.
No lo someta a impactos
fuertes ni lo pise.
No lo utilice en lugares con
altos niveles de humedad.
No lo utilice con temperaturas
extremos o en presencia de
llamas.
No coloque el mando a
distancia en una ubicación
expuesta a la luz solar directa.
Oriéntelo al receptor de señal
para que funcione.
La señal del mando a distancia se puede recibir a
una distancia de hasta 7 metros.
Asegúrese de que no haya obstrucciones entre el
mando a distancia y el receptor de señal.
■ Funcionamiento
ADVERTENCIA
PRECAUCIÓN
Page 52

Descripción de las partes
Accesorio
Descripción de las partes
4 Mando a distancia
Soporte (1 unid.) Tornillo de fijación
(2 unid.)
Manual del propietario
/ instalación
Pilas AAA (1,5V)
(2 unid.)
Pantalla LCD
Mando a distancia
Page 53

Descripción de las partes
Manual Del Propietario Y De Instalación 5
Mando a distancia
Botón VANE ANGLE
Se utiliza para ajustar el ángulo de cada aleta.
Botón de CONFIGURACIÓN DE FUNCIONES
Se utilizar para seleccionar Limpieza automática,
Limpieza inteligente, calefactor electrónico o
Control de ángulo de aletas individuales.
Botón de encendido/apagado
Enciende/apaga la unidad.
Botón JET COOL
Refrigeración rápida con alta velocidad del ventilador.
Botón de control de dirección de aire
izquierda/derecha (opcional)
Se utiliza para ajustar la dirección deseada
(izquierda/derecha) del flujo de aire.
Botón de flujo de aire ARRIBA/ABAJO
Se utiliza para detener o iniciar el movimiento
de las aletas y seleccionar la dirección
arriba/abajo del flujo de aire.
Botón de temporizador encendido
Se puede seleccionar el tiempo de finalización
del funcionamiento.
Botón de temporizador de apagado automático
Se puede seleccionar el tiempo de finalización
del funcionamiento.
Botón PLASMA (OPCIONAL)
Se utiliza para configurar/borrar el
temporizador. Se utiliza para ajustar la hora
actual (si la entrada se hace durante 3 s).
PLASMA Button (OPTIONAL)
Se utiliza para iniciar o parar la función de
purificación de plasma.
Botón de ajuste de temperatura interior
Se utiliza para seleccionar la temperatura de la
habitación.
Botón de selección de modo de
funcionamiento
Se utiliza para seleccionar el modo de funcionamiento.
Botón de velocidad del ventilador interior
Se utiliza para seleccionar la velocidad del ventilador
en cuatro niveles: bajo, medio, alto y caos.
Botón de comprobación de temperatura interior
Se utiliza para comprobar la temperatura de la
habitación.
Botón de apagado del temporizador
Se utiliza para seleccionar el tiempo de
finalización del funcionamiento.
Botón de ajuste de temporizador
(arriba/abajo)/Luz
Se utiliza para configurar el temporizador. Se
utiliza para ajustar el brillo. (Si no está en el
modo de ajuste de tiempo)
Botón de reinicio
Se utiliza para reiniciar el mando a distancia.
ESPAÑOL
1
2
3
4
5
6
7
8
9
10
11
12
13
14
15
16
17
Modo de funcionamiento
Modo de refrigeración
Modo automático o cambio automático
Modo de deshumidificación
Modo de calefacción
Modo de ventilador
•
Modo de refrigeración ( ), modelo de bomba de calor ( )
Page 54

Instrucciones de uso
6 Mando a distancia
1. El receptor de señal está en el interior de la unidad.
2.
Dirija el mando a distancia hacia la unidad para su funcionamiento. No debe haber obstáculos entre ellos.
1. Elija un lugar adecuado y accesible para su
utilización.
2. Fije el soporte a la pared, etc con los tornillos
incluidos.
3. Deslice el mando a distancia en el soporte.
1. No exponga el mando a distancia a la luz solar
directa.
2. Para una correcta comunicación, mantenga
limpios el transmisor y el receptor. Utilice un
paño suave para limpiarlos.
3. Si el mando a distancia interfiere con algún
otro aparato, cambie su posición o consulte a
un técnico.
NOTA
1. Deslice la tapa en la dirección de la flecha.
2. Introduzca las pilas nuevas asegurándose de respetar la
polaridad (+) y (-) de las pilas.
3. Vuelva a colocar la tapa deslizándola a su posición.
1. Utilice/cambie pilas del mismo tipo.
2. Si el sistema no se va a utilizar durante un tiempo prolongado,
retire las pilas para que se agoten.
3. Si la pantalla del mando a distancia comienza a oscurecerse,
cambie las pilas.
NOTA
Método de utilización
Mantenimiento del mando a distancia
Colocación de las pilas
Instrucciones de uso
Page 55

Instrucciones de instalación
Manual Del Propietario Y De Instalación 7
ESPAÑOL
Configuración de instalador - Ajuste de la dirección del control central
Con el botón MODE PULSADO, pulse el botón RESET.
1
Con el botón de función pulsado, pulse el botón RESET.
1
Pulse el botón de encendido/apagado una vez con el mando orientado hacia la unidad y la pantalla
de la unidad interior mostrará la dirección seleccionada.
- La pantalla muestra la hora y el método puede variar según el tipo de unidad interior.
2
Reinicie el mando a distancia para su uso en el modo de
funcionamiento general.
3
Con el botón de AJUSTE DE TEMPERATURA, seleccione la
dirección de la unidad interior.
- Rango de ajuste: 00 ~ FF
2
Tras ajustar la dirección, pulse el botón de encendido/apagado una
vez con el mando orientado hacia la unidad.
3
La unidad interior mostrará la dirección ajustada para completa la configuración de dirección.
La pantalla muestra la hora y el método puede variar según el tipo de unidad interior.
Reinicie el mando a distancia para su uso en el modo de funcionamiento
general.
4
5
Instrucciones de instalación
Configuración de instalador - Comprobación de la dirección del control central
Nº de grupo
Número de
unidad interior
Page 56

Instrucciones de instalación
8 Mando a distancia
Configuración de instalador - Entrar en el modo de configuración de instalador
Con el motor JET COOL pulsado, pulse el botón RESET
1
Con el botón de ajuste de temperatura, seleccione el código de
función 2 y el valor de ajuste.
(Consulte la tabla de códigos de la configuración de instalador.)
2
El modo de configuración de instalador sirve para configurar en detalle la función del panel de control.
Si el modo de configuración de instalador no se configura correctamente, podría causar problemas al
producto, daños al usuario o daños materiales. Deberá configurarlo un instalador certificado, y los
resultados de cualquier instalación o modificación realizada por una persona no certificada serán
responsabilidad del mismo. En este caso, no se podrá proporcionar servicio gratuito.
PRECAUCIÓN
Pulse una vez el botón de encendido/apagado una vez con el mando
orientado hacia la unidad.
3
Reinicie el mando a distancia para su uso en el modo de
funcionamiento general.
4
Consulte la tabla de códigos de configuración de instalador de la página siguiente.
Código de función
Configuración
de código
Page 57

Instrucciones de instalación
Manual Del Propietario Y De Instalación 9
ESPAÑOL
Configuración de instalador - Tabla de códigos de configuración de instalador
Nº Función Código de función Valor de configuración LCD de mando a distancia
0
Anulación de modo
0: Configurar a maestro
1: Configurar a esclavo
1 : Estándar
1
2 : Baja
3 : Alta
4 : Súper alta
0 : Configurar a maestro
Control de grupo 1 : Configurar a esclavo
2 : Comprobar maestro/esclavo
3 :
Configurar a calefactor auxiliar
Calefactor auxiliar
4 :
Cancelar calefactor auxiliar
2 : Comprobar instalación de calefactor auxiliar
Tabla de códigos de configuración de instalador
0
1
2
Selección de
altura de techo
Anulación de modo
Esta función sólo sirve para el modelo H/P sin cambio automático..
Selección de altura de techo
La unidad interior conectada al control remoto con cables funciona como un ajuste del control remoto con cables.
Control de grupo
Esta funcione sirve sólo para el control de grupo. No la utiliza si no va a usar el control de grupo. Tras
configurar el control de grupo del producto, apague el aparato y vuelva a encenderlo después de un minuto.
Calefactor auxiliar
Esta función sólo se aplica a modelos con función de calefactor auxiliar activado.
2
22
00
01
11
12
13
14
20
21
22
23
24
25
2
Page 58

Instrucciones del propietario
10 Mando a distancia
Pulse el botón de encendido/apagado.
La unidad responderá con una señal acústica.
1
Pulse el botón MODE para seleccionar el modo de refrigeración.
2
Para subir la temperatura
Para bajar la temperatura
Ajuste la temperatura deseada pulsando el botón TEMP.
Pulse el botón de comprobación de temperatura de la
habitación para comprobar la temperatura interior. Si la
temperatura deseada es superior a la temperatura de la
habitación, no funcionará la refrigeración.
❈ Rango de ajuste de temperatura: 18~30°C (64~86°F)
3
Pulse el botón de encendido/apagado.
La unidad responderá con una señal acústica.
1
Pulse el botón MODE para seleccionar el modo de refrigeración.
2
Pulse el botón JET COOL. La unidad funcionará con velocidad
súper alta del ventilador en modo de refrigeración.
❈ Los modelos de montaje mural funcionan en el modo de
refrigeración rápida durante 30 minutos.
3
Para cancelar el modo de refrigeración rápida, pulse el botón Jet Cool o el botón
del ventilador o el botón de ajuste de temperatura de la habitación de nuevo y la
unidad funcionará en velocidad alta de ventilador en modo de refrigeración.
4
oo
Modo de refrigeración - Refrigeración rápida
Modo de refrigeración - Funcionamiento estándar
Instrucciones del propietario
Page 59

Instrucciones del propietario
Manual Del Propietario Y De Instalación 11
ESPAÑOL
Modo funcionamiento automático
Pulse el botón de encendido/apagado.
La unidad responderá con una señal acústica.
1
Pulse el botón MODE para seleccionar el modo de funcionamiento
automático.
2
Durante el modo funcionamiento automático
• Si el sistema no funciona según lo deseado, cambie a otro modo. El sistema no cambiará automáticamente
desde el modo de refrigeración al modo de calefacción, o de calefacción a refrigeración, y usted deberá
seleccionar el modo y la temperatura de nuevo.
Seleccione la temperatura deseada.
<Para el modo de refrigeración>
La temperatura y la velocidad del ventilador se ajustan
automáticamente con los controles electrónicos según la temperatura
real de la habitación. Si siente frío o calor, pulse los botones de
ajuste de temperatura para lograr un efecto de más frío o calor.
No se puede cambiar la velocidad del ventilador interior. Ya ha sido
configurada por la regla del modo de funcionamiento automático.
Puede seleccionar la temperatura deseada
y la velocidad del ventilador interior.
Rango de ajuste de temperatura
: 18~30°C (64~86°F)
<Para modelo con calefacción>
3
Code Feel
2 Cold
1 Slightly cool
0 Neutral
-1 Slightly warm
-2 Warm
❈ Please select the code
depend on your feeling.
Para bajar la temperatura
Para subir la temperatura
Page 60

Instrucciones del propietario
12 Mando a distancia
Modo cambio automático
Pulse el botón de encendido/apagado.
La unidad responderá con una señal acústica.
1
Pulse el botón MODE para seleccionar el modo de cambio
automático.
2
Seleccione la temperatura deseada para la habitación.
❈ Ajuste de rango de temperatura en el modo de cambio
automático: 18~30°C (64~86°F)
3
Se utiliza para seleccionar la velocidad del ventilador en cuatro
niveles: bajo, medio, alto y caos. Cada vez que se pulsa el botón,
cambia el modo de velocidad del ventilador.
4
Esta función sólo está disponible en algunos productos.
Durante el modo de cambio automático
El aire acondicionado cambia el modo de funcionamiento automáticamente para mantener la temperatura
interior. Cuando la temperatura de la habitación varía más de ±2°C(4°F) con respecto a la temperatura
seleccionada, el aparato mantiene la temperatura dentro de ±2°C(4°F) con respecto a la temperatura
seleccionada por el modo de cambio automático.
Para bajar la temperatura
Para subir la temperatura
Page 61

Instrucciones del propietario
Manual Del Propietario Y De Instalación 13
ESPAÑOL
Modo cambio automático - Ajuste de la temperatura de cambio de modo
Esta función la ajuste el modo de funcionamiento del modo de cambio automático.
La temperatura de cambio de modo es la diferencia de temperatura cuando se cambia de modo de
refrigeración a modo de calefacción y de modo de calefacción a modo de refrigeración.
Ej) cuando la temperatura seleccionada en 25°C(76°F) y la temperatura de la habitación es 20°C(68°F), el
modo de funcionamiento es de calefacción. Si se ajusta la temperatura de cambio de modo a 2°C(4°F),
cuando la temperatura llega hasta 27°C(25°C + 2°C)(80°F(76°F + 4°F)), la unidad inicia el modo de
refrigeración.
En el modo de cambio automático, pulse el botón FUNCTION para seleccionar el ajuste de temperatura
de cambio de modo.
1
Pulse el botón de ajuste de temperatura para seleccionar la temperatura deseada del cambio de
modo. (El valor por defecto es 2°C(4°F).)
2
❈ Rango de tempo de cambio de modo
: 1~7°C(2~14°F)
Para bajar la temperatura
Para subir la temperatura
Page 62

Instrucciones del propietario
14 Mando a distancia
Modo de deshumidificación
Pulse el botón de encendido/apagado.
La unidad responderá con una señal acústica.
1
Pulse el botón MODE para seleccionar el modo de
deshumidificación.
2
Seleccione la velocidad del ventilador. Se utiliza para seleccionar la
velocidad del ventilador en cuatro niveles: bajo, medio, alto y caos.
Cada vez que se pulsa el botón, cambia el modo de velocidad del
ventilador.
3
Modo de deshumidificación
• Si selecciona el modo de deshumidificación en el botón de selección de modo, la unidad interior se pone en
funcionamiento en deshumidificación, ajusta automáticamente la temperatura de la habitación y el volumen
de aire a la mejor condición para la deshumidificación según la temperatura interior detectada.
En este caso, no se muestra el ajuste de temperatura en el mando a distancia y tampoco usted podrá
controlar la temperatura.
• Durante la función de deshumidificación saludable, el volumen de aire se ajusta automáticamente según el
algoritmo en respuesta a la temperatura actual de la habitación y hace que el ambiente sea saludable y
agradable incluso en temporadas de humedad alta.
Page 63

Instrucciones del propietario
Manual Del Propietario Y De Instalación 15
ESPAÑOL
Ajuste la temperatura deseada pulsando el botón TEMP.
Pulse el botón de comprobación de temperatura de la habitación para
comprobar la temperatura interior.
Si la temperatura deseada es inferior a la temperatura de la
habitación, no funcionará la calefacción.
3
Seleccione la velocidad del ventilador. Se utiliza para seleccionar la
velocidad del ventilador en cuatro niveles: bajo, medio, alto y caos.
Cada vez que se pulsa el botón, cambia el modo de velocidad del
ventilador.
4
Pulse el botón de encendido/apagado.
La unidad responderá con una señal acústica.
1
Pulse el botón MODE para seleccionar el modo de calefacción.
2
Modo de calefacción
Esta función es sólo para el modelo H/P.
❈ Configuración de la
temperatura de salida de agua
en el modo de calefacción
: 16~30°C (60°F~86°F)
Para bajar la temperatura
Para subir la temperatura
Page 64

Instrucciones del propietario
16 Mando a distancia
Modo de ventilador
Seleccione la velocidad del ventilador de nuevo. Se utiliza para
seleccionar la velocidad del ventilador en cuatro niveles: bajo, medio,
alto y caos. Cada vez que se pulsa el botón, cambia el modo de
velocidad del ventilador.
3
Pulse el botón de encendido/apagado.
La unidad responderá con una señal acústica.
1
Pulse el botón MODE para seleccionar el modo de ventilador.
2
Viento natural con la lógica caos
• Para lograr una sensación más fresca que con otros ajustes del ventilador, pulse el selector del velocidad
del ventilador interior y seleccione el modo caos. En este modo, el viento sopla como una brisa natural y
cambia automáticamente la velocidad del ventilador según la lógica caos.
Durante el modo de ventilador
• No funciona el compresor exterior.
Tiene una función de circulación de aire que expulsa el aire que no tiene mucha diferencia de temperatura
con el interior.
Page 65

Ajuste de temperatura / comprobación de la temperatura de la habitación
Manual Del Propietario Y De Instalación 17
ESPAÑOL
Se puede ajustar muy fácilmente la temperatura deseada.
• Pulse los botones para ajustar la temperatura deseada.
: La temperatura aumenta cada vez que se pulsa un botón.
: La temperatura se reduce cada vez que se pulsa un botón.
Temperatura de la habitación: Indica la temperatura actual de la habitación.
Temperatura seleccionada: Indica la temperatura seleccionada por el usuario.
<Modo de refrigeración>
El modo de refrigeración no funciona si la temperatura deseada es superior a
la temperatura de la habitación. Seleccione una temperatura más baja.
<Modo de calefacción>
El modo de refrigeración no funciona si la temperatura deseada es inferior a
la temperatura de la habitación. Seleccione una temperatura más alta.
Cuando pulse el botón de temperatura de la habitación, la temperatura se
mostrará durante 5 segundos.
Posteriormente, se mostrará de nuevo la temperatura deseada.
Debido la ubicación del mando de mando a distancia, la temperatura real
de la habitación y el valor mostrado pueden ser diferentes.
Pulse el botón de temperatura de la habitación durante 5 segundos y las
unidades de temperatura cambiar de grados centígrados a Fahrenheit y
viceversa.
Ajuste de temperatura / comprobación de la temperatura de la habitación
Page 66

Ajuste del caudal de aire
18 Mando a distancia
El flujo de aire arriba/abajo (flujo de aire vertical) se puede cambiar con el mando a distancia.
1. Pulse el botón encendido/apagado para poner en funcionamiento la unidad.
2. Pulse el botón ARRIBA/ABAJO y la aletas oscilarán arriba y abajo.
Pulse el botón ARRIBA/ABAJO de nuevo para ajustar la aleta vertical en la dirección deseada.
• Si pulsa el botón de dirección arriba/abajo, la dirección horizontal del aire cambia automáticamente según el
algoritmo de oscilación automáticamente para distribuir el aire de manera uniforme y, al mismo tiempo, para
que resulte más cómodo, como si se tratara de una brisa natural.
• Utilice siempre el mando a distancia para ajustar la dirección arriba/abajo del flujo de aire. Si mueve la aleta
de dirección del flujo de aire manualmente, podría dañar el aparato.
• Cuando se apaga la unidad, la aleta de dirección del aire arriba/abajo cierre la salida de aire del sistema.
El flujo de aire a izquierda/derecha (horizontal) se puede ajustar con el mando a distancia.
1. Pulse el botón encendido/apagado para poner en funcionamiento la unidad.
2. Pulse el botón de dirección IZQUIERDA/DERECHA y las aletas oscilarán a izquierda y
derecha. Pulse el botón de control del flujo de aire horizontal de nuevo para ajustar la aleta
horizontal en la dirección deseada.
❈ La función arriba/abajo e izquierda/derecha no se muestra en la pantalla del mando a distancia.
NOTA
Control de dirección de aire izquierda/derecha (opcional)
Control de dirección de aire arriba/abajo (opcional)
Ajuste del caudal de aire
Page 67

Función Sub
Manual Del Propietario Y De Instalación 19
ESPAÑOL
Pulse el botón de encendido/apagado.
La unidad responderá con una señal acústica.
1
Pulse el botón PLASMA. La purificación de plasma
se pone en funcionamiento cuando se pulsa este
botón, y se apaga cuando se pulsa de nuevo.
2
Sólo purificación de PLASMA
Si pulsa el botón PLASMA, se activa la purificación de plasma.
• El filtro de plasma es una tecnología desarrollada por LG para
la eliminación de contaminantes microscópicos del aire de
entrada y genera un plasma de electrones de carga alta. Este
plasma mata y destruye completamente los contaminantes
para proporcionar aire limpio e higiénico.
• Esta función se puede usar con cualquier modo y cualquier
velocidad del ventilador.
Limpieza automática (opcional)
Esta función sólo puede activarse con el aparato apagado.
Pulse el botón de configuración de funciones una vez.
Parpadeará el símbolo de limpieza automática.
1
Pulse el botón SET/CLEAR para reservar o cancelar el funcionamiento de limpieza automática.
Si se reserva la función de limpieza automática, cada vez que se apaga el aparato,
sigue funcionando el ventilador interior durante 30 minutos internamente, sin
funcionamiento de refrigeración o deshumidificación.
También se cierra la aleta.
Seca la humedad restante y limpia el interior de la unidad.
2
Purificación de plasma (opcional)
Función Sub
Page 68

Función Sub
20 Mando a distancia
Limpieza inteligente (opcional)
La limpieza inteligente se puede usar con la configuración manual o automática.
Funcionamiento de limpieza inteligente automática
Si el tiempo de funcionamiento acumulado del producto es superior a 30 horas, se pone en funcionamiento
automáticamente la limpieza inteligente cuando se apaga el aparato.
1. Pulse el botón de configuración de funciones dos veces.
Parpadeará el símbolo de limpieza inteligente.
2. Pulse el botón SET/CLEAR para reservar o cancelar el
funcionamiento de limpieza inteligente.
Puede configurarla/borrarla sin encender o apagar.
1. Con la unidad parada, pulse el botón FUNCTION y seleccione limpieza
inteligente. Parpadea el símbolo de limpieza inteligente; pulse el botón
SET/CLEAR.
2. Para detener la limpieza inteligente manual, pulse el botón FUNCTION para
seleccionar la Limpieza inteligente y pulse el botón SET/CLEAR.
Funcionamiento de limpieza inteligente manual
El cepillo limpia el polvo del filtro moviéndose de izquierda a derecha en el filtro.
El polvo aspirado se acumula en la caja de recogida.
El proceso de la limpieza inteligente es diferente para los distintos grupos de productos.
Page 69

Función Sub
Manual Del Propietario Y De Instalación 21
ESPAÑOL
Calefactor eléctrico (opcional)
Sólo se puede configurar durante el modo de calefacción.
Pulse el botón de configuración de funciones 3 veces.
Parpadeará el símbolo del calefactor eléctrico.
1
Pulse el botón SET/CLEAR para reservar o cancelar el funcionamiento del calefactor eléctrico.
2
• La unidad interior muestra durante el modo de calefacción que el calefactor eléctrico está encendido, pero
no se muestra en el mando a distancia por separado.
• Funciona en el modo de calefacción de suelo en los productos de consola.
Pulse el botón LCD LUMINOSITY.
Es agradable sentir que la pantalla de la unidad no es demasiado brillante.
Pulse el botón °C/°F para cambiar de Centígrados a Fahrenheit y viceversa.
Cuando pulse el botón de ajuste de temperatura en el modo Fahrenheit, la temperatura
subirá/bajará 2°F.
Cambio Centígrados/Fahrenheit
Control de luminosidad de LCD (opcional)
Page 70

Función Sub
22 Mando a distancia
• Puede haber diferencias entre los botones arriba/abajo/izquierda/derecha del mando a distancia y las
direcciones del orificio de descarga.
• Ajuste el ángulo deseado con la comprobación del movimiento del ángulo de la aleta del producto.
• El control individual del ángulo de las aletas es una función añadida del producto y puede no funcionar en
algunos productos.
Control de ángulo de aletas individual (opcional)
Pulse el botón SET/CLEAR para reservar o cancelar la función de control individual del ángulo
de las aletas.
3
Es la función que permite controlar 4 ángulos de aleta individualmente en el grupo
de productos de cassette de 4 direcciones para techo.
Pulse el botón de configuración de funciones 3 veces.
(4 veces durante el funcionamiento de calefacción)
Parpadeará el símbolo de control individual del ángulo de las aletas.
• Si pulsa el botón SET/CLEAR en ese tiempo, todas
las aletas se colocan en el ángulo estándar.
1
Ajuste el ángulo de cada aleta pulsando las teclas de dirección
arriba/abajo/izquierda/derecha.
• Cada vez que se pulsa el botón, se muestran los valores de ángulo y
ajuste de la aleta correspondiente.
• Cuando se pulsa el botón de dirección arriba, la pantalla aparece
como en la figura de la derecha, y el ángulo se puede ajustar a 1-6.
2
Page 71

Temporizador
Manual Del Propietario Y De Instalación 23
ESPAÑOL
1. Pulse el botón SET / CLEAN durante 3 segundos.
2. Pulse los botones TIME SETTING hasta ajustar la
hora deseada. (Si mantiene el botón pulsado,
cambiará rápidamente en unidades de 10 min.)
3. Pulse el botón SET / CLEAR.
Compruebe el indicador de A.M. y P.M.
NOTA
1. Pulse el botón TIMER para activar o apagar el
temporizador.
2. Pulse los botones TIME SETTING hasta ajustar la
hora deseada. (7 horas es el ajuste máximo)
3. Pulse el botón SET / CLEAR.
1. Pulse el botón ON para activar o apagar el
temporizador.
2. Pulse los botones TIME SETTING hasta ajustar la
hora deseada.
3. Pulse el botón SET / CLEAR.
Ajuste del temporizador de encendido
Ajuste del temporizador de apagado automático
Ajuste de la hora actual
Temporizador
Apagado automático
Temporizador encendido
Page 72

Temporizador
24 Mando a distancia
Para cancelar el ajuste del temporizador
• Si desea cancelar los ajustes del temporizador, pulse CLEAR ALL.
• Si desea cancelar cada ajuste del temporizador, pulse cada botón
del temporizador para encender o apagar el temporizador según lo desee.
Y pulse SET/CLEAR con el mando a distancia orientado al receptor de señal.
(Se apagará la luz del temporizador en el aparato de aire acondicionado y la pantalla.)
1. Pulse el botón OFF para activar o apagar el
temporizador.
2. Pulse los botones TIME SETTING hasta ajustar la
hora deseada.
3. Pulse el botón SET / CLEAR.
Ajuste del temporizador de apagado
Temporizador apagado
Page 73

MANUEL D’INSTALLATION
ET D’UTILISATION
CLIMATISEUR
Veuillez lire attentivement ce manuel avant d'utiliser votre appareil
et conservez-le pour vous y référer ultérieurement.
www.lg.com
TYPE : télécommande sans fil
Modèles : PQWRCQ0FDB
PQWRHQ0FDB
FRANÇAIS
Page 74

2 Télécommande sans fil
Manuel d'installation et d'utilisation – télécommande sans fil
TABLE DES MATIÈRES
■ Précautions et informations sur la sécurité ............................................................3
■ Description des composants....................................................................................4
Télécommande sans fil................................................................................................5
■ Instructions de fonctionnement ...............................................................................6
Insertion des piles........................................................................................................6
Installation de la télécommande sans fil ......................................................................6
Méthode de fonctionnement ........................................................................................6
Réglage d'installation - Réglage de l'adresse de la commande centralisée................7
■ Instructions d'installation .........................................................................................7
Réglage d'installation - Vérification de l'adresse de la commande centralisée ...........7
Réglage d'installation - Accès au mode de réglage de l'installation ............................8
Réglage d'installation - Tableau des codes de réglage d'installation ..........................9
■ Instructions d'utilisation .........................................................................................10
Mode refroidissement - Fonctionnement standard ....................................................10
Mode refroidissement - Refroidissement rapide ........................................................10
Mode de fonctionnement automatique ......................................................................11
Mode d'inversion automatique ...................................................................................12
Mode d'inversion automatique - Réglage de la température de changement du mode
..........13
Mode déshumidification .............................................................................................14
Mode chauffage .........................................................................................................15
Mode ventilation.........................................................................................................16
■ Contrôle de la température réglée/température ambiante ...................................17
■ Réglage du débit d'air..............................................................................................18
Commande verticale de direction du débit d'air (selon les modèles).........................18
Commande horizontale de direction du débit d'air (selon les modèles) ....................18
■ Fonctions annexes ..................................................................................................19
Filtration plasma (selon les modèles) ........................................................................19
Autonettoyage (selon les modèles) ...........................................................................19
Nettoyage intelligent (selon les modèles) ..................................................................20
Contrôle de la luminosité de l'écran LCD (selon les modèles) ..................................21
Affichage en degrés Celsius/Fahrenheit....................................................................21
Chauffage électrique (selon les modèles) .................................................................21
Réglage individuel de l'angle des volets (selon les modèles)....................................22
■ Programmation ........................................................................................................23
Réglage de l'heure.....................................................................................................23
Réglage de la veille programmée ..............................................................................23
Réglage de la mise en marche programmée.............................................................23
Réglage de l'arrêt programmé ...................................................................................24
Annulation des réglages programmés .......................................................................24
Page 75

Consignes de sécurité
Manuel D’installationet D’utilisation 3
FRANÇAIS
■ Installation
Consignes de sécurité
• L'installation nécessite des compétences spécialisées et doit être réalisée par le service après-vente ou par un
installateur agréé par notre entreprise.
• En cas de problèmes découlant d'une installation réalisée par une personne ne possédant pas les qualifications
requises, notre entreprise n'assurera pas le service d'entretien gratuit.
• Les consignes de sécurité suivantes visent à prévenir les dangers ou dommages accidentels.
: le non-respect de ces instructions peut provoquer des blessures graves ou la mort.
: le non-respect de ces instructions peut provoquer des blessures ou des dommages matériels.
: ces précautions et mises en garde servent à attirer l'attention de l'utilisateur sur les dangers
possibles. Lisez-les attentivement et appliquez-les à la lettre pour prévenir les accidents.
: ces précautions et mises en garde figurent dans le présent manuel et sur le produit lui-même
afin de protéger les utilisateurs de tout danger.
AVERTISSEMENT
Ne rechargez pas et ne démontez pas les piles.
Ne les mettez pas au feu.
Elles pourraient brûler ou exploser.
Si le liquide contenu dans les piles entre en contact avec
votre peau ou vos vêtements, nettoyez bien avec de
l'eau propre. N'utilisez pas la télécommande si les piles
présentent une fuite. Les produits chimiques à l'intérieur
des piles pourraient provoquer des brûlures ou
présenter d'autres risques pour la santé.
Remplacez les piles de la télécommande par des piles de
même type. Ne mélangez pas des piles neuves et des
piles usagées ni des types de piles différents. Il existe
un risque d'incendie ou d'explosion.
N'essayez pas de démonter, réparer ou modifier
le produit vous-même, afin de minimiser le risque
d'incendie ou de décharge électrique.
Appuyez sur une touche à la fois.
La télécommande ne répond pas
si vous enfoncez plusieurs
touches en même temps.
Ne faites pas tomber la
télécommande et ne la lancez
pas. Ne la soumettez pas à des
chocs et ne la piétinez pas.
Ne l'utilisez pas dans les lieux
humides.
Ne l'utilisez pas près d'un
chauffage ou d'un feu.
Ne placez pas la télécommande
à un endroit exposé aux rayons
directs du soleil.
Pour vous servir de la
télécommande sans fil, dirigezla vers le récepteur de signal.
Le signal de la télécommande peut être reçu
jusqu'à une distance d'environ 7 mètres.
Veillez à ce qu'il n'y ait pas d'obstacles entre la
télécommande et le récepteur de signal.
■ Fonctionnement
AVERTISSEMENT
ATTENTION
Page 76

Description des composants
Accessoires
Description des composants
4 Télécommande sans fil
Socle (x1) Vis de fixation (x2) Manuel d'installation
et d'utilisation
Piles AAA de 1.5 V
(x2)
Écran LCD
Télécommande sans fil
Page 77

Description des composants
Manuel D’installationet D’utilisation 5
Télécommande sans fil
Touche de réglage de l'angle des volets
Permet de régler l'inclinaison de chaque volet
de manière indépendante.
Touche de réglage des fonctions
Permet de régler ou annuler les fonctions
d'autonettoyage, de nettoyage intelligent, de chauffage
électrique ou de réglage individuel de l'angle des volets.
Touche marche/arrêt
Permet d'allumer ou éteindre l'unité.
Touche de refroidissement rapide
Permet un refroidissement rapide en projetant
de l'air frais à grande vitesse.
Touche de contrôle du débit d'air
gauche/droite (selon les modèles)
Permet de régler le débit d'air dans la direction de votre
choix vers la gauche/droite (commande horizontale).
Touche de contrôle du débit d'air haut/bas
Permet d'arrêter ou de démarrer le mouvement des
volets et de régler le débit d'air dans la direction de
votre choix vers le haut/bas (commande verticale).
Touche de mise en marche programmée
Permet de régler l'heure de démarrage.
Touche de veille programmée
Permet de régler le délai de veille programmée.
Touche de réglage/annulation
Permet de définir ou annuler les réglages programmés.
Permet également de régler l'heure (maintenez la
touche enfoncée pendant 3 secondes).
Touche de filtration plasma (selon les modèles)
Permet de démarrer ou arrêter la fonction de
filtration plasma.
Touches de réglage de la température
Permettent de sélectionner la température de la pièce.
Touche de sélection du mode de fonctionnement
Permet de sélectionner le mode de fonctionnement.
Touche de réglage de la vitesse du
ventilateur intérieur
Permet de régler la vitesse du ventilateur parmi
quatre options : basse, moyenne, élevée et Chaos.
Touche de vérification de la température
Permet de vérifier la température de la pièce.
Touche d'arrêt programmé
Permet de régler l'heure d'arrêt.
Touches de réglage de la programmation
(haut/bas)/luminosité
Permettent d'ajuster les réglages programmés.
Permettent également d'ajuster la luminosité. (Sauf
en mode d'ajustement des réglages programmés.)
Bouton de réinitialisation
Permet de réinitialiser la télécommande.
FRANÇAIS
1
2
3
4
5
6
7
8
9
10
11
12
13
14
15
16
17
Mode de fonctionnement
Mode refroidissement
Mode de fonctionnement automatique ou d'inversion automatique
Mode déshumidification
Mode chauffage
Mode ventilation
•
Modèle avec refroidissement ( ), modèle avec pompe à chaleur ( )
Page 78

Instructions de fonctionnement
6 Télécommande sans fil
1. Le récepteur du signal se trouve à l'intérieur de l'unité.
2.
Pour vous servir de la télécommande, dirigez-la vers l'unité. Il ne doit pas y avoir d'obstacles entre les deux.
1. Choisissez un endroit adapté à la fois sûr et
facile d'accès.
2. Fixez le socle sur un mur ou autre à l'aide des
vis fournies.
3. Glissez la télécommande dans le socle.
1. La télécommande ne doit jamais être exposée
aux rayons directs du soleil.
2. L'émetteur et le récepteur du signal doivent
toujours être propres pour garantir une bonne
communication. Utilisez un chiffon doux pour
le nettoyage.
3. Si d'autres appareils fonctionnent également
avec une télécommande, changez-les
d'emplacement ou contactez un représentant
du service après-vente.
REMARQUE
1. Retirez le couvercle du compartiment des piles en le tirant dans le
sens de la flèche.
2. Insérez des piles neuves en respectant les indications de polarité
(+) et (-).
3. Remettez le couvercle dans sa position d'origine et refermez-le.
1. Utilisez toujours deux piles de même type.
2. En cas d'inutilisation prolongée, retirez les piles pour préserver
leur durée de vie.
3. Si l'afficheur de la télécommande commence à pâlir, remplacez
les deux piles.
REMARQUE
Méthode de fonctionnement
Installation de la télécommande sans fil
Insertion des piles
Instructions de fonctionnement
Page 79

Instructions d'installation
Manuel D’installationet D’utilisation 7
FRANÇAIS
Réglage d'installation - Réglage de l'adresse de la commande centralisée
Tout en maintenant la touche MODE enfoncée, appuyez sur le
bouton RESET.
1
Tout en maintenant la touche FUNC. enfoncée, appuyez sur le bouton RESET.
1
Appuyez une fois sur la touche marche/arrêt en dirigeant la télécommande vers l'unité intérieure.
Celle-ci indiquera l'adresse définie dans l'afficheur.
- La méthode et le moment d'affichage de l'adresse peuvent
différer selon le type d'unité intérieure.
2
Réinitialisez la télécommande pour utiliser le mode de
fonctionnement général.
3
Réglez l'adresse de l'unité intérieure à l'aide des touches de réglage de la
température.
- Plage de réglage : 00~FF
2
Après avoir réglé l'adresse, appuyez une fois sur la
touche marche/arrêt en dirigeant la télécommande
vers l'unité intérieure.
3
L'unité intérieure affichera l'adresse définie pour finaliser le réglage de l'adresse.
- La méthode et le moment d'affichage de l'adresse peuvent différer selon le
type d'unité intérieure.
Réinitialisez la télécommande pour utiliser le mode de fonctionnement
général.
4
5
Instructions d'installation
Réglage d'installation - Vérification de l'adresse de la commande centralisée
Numéro du groupe
Numéro de
l'unité intérieure
Page 80

Instructions d'installation
8 Télécommande sans fil
Réglage d'installation - Accès au mode de réglage de l'installation
Tout en maintenant la touche JET COOL enfoncée, appuyez sur le
bouton RESET.
1
Réglez le code de fonction et la valeur de réglage à l'aide des
touches de réglage de la température.
(Reportez-vous au tableau des codes de réglage de l'installation.)
2
Le mode de réglage de l'installation sert à régler en détail les fonctions de la télécommande. Si le mode
de réglage de l'installation n'est pas correctement défini, il existe un risque de dysfonctionnement du
produit, de blessures corporelles ou de dommages matériels. Il doit être défini par un installateur agréé,
et toute installation ou modification exécutée par une personne non qualifiée relève de la responsabilité
de cette dernière. Dans ce cas, le service d'entretien gratuit ne sera pas assuré.
ATTENTION
Appuyez une fois sur la touche marche/arrêt en dirigeant la
télécommande vers l'unité intérieure.
3
Réinitialisez la télécommande pour utiliser le mode de
fonctionnement général.
4
Reportez-vous au tableau des codes de réglage de l'installation à la page suivante.
Code de fonction
Code de réglage
Page 81

Instructions d'installation
Manuel D’installationet D’utilisation 9
FRANÇAIS
Réglage d'installation - Tableau des codes de réglage d'installation
N° Fonction Code de fonction Valeur de réglage Afficheur de la télécommande
0 Inversion du mode
0 : Définir comme maître
1 : Définir comme esclave
1 : Standard
1
2 : Basse
3 : Elevée
4 : Très élevée
0 : Définir comme maître
Commande de groupe
1 : Définir comme esclave
2 : Vérifier le maître/esclave
3 :
Définir comme chauffage auxiliaire
Chauffage auxiliaire
4 :
Annuler le chauffage auxiliaire
2 : vérifier l'installation du chauffage auxiliaire
Tableau des codes de réglage d'installation
0
1
2
Sélection de la
hauteur de
plafond
Inversion du mode
Cette fonction concerne uniquement les modèles avec pompe à chaleur dépourvus du mode d'inversion
automatique.
Sélection de la hauteur de plafond
Les unités intérieures raccordées à une télécommande filaire fonctionnent conformément aux réglages de la
télécommande filaire..
Commande de groupe
Cette fonction sert uniquement au contrôle du fonctionnement par groupe. Ne réglez pas cette fonction dans
le cas d'un fonctionnement individuel. Après avoir réglé la commande de groupe du produit, coupez
l'alimentation pendant 1 minute, puis réactivez-la.
Chauffage auxiliaire
Cette fonction ne s'applique qu'aux modèles sur lesquels la fonction de chauffage auxiliaire est activée.
2
22
00
01
11
12
13
14
20
21
22
23
24
25
2
Page 82

Instructions d'utilisation
10 Télécommande sans fil
Appuyez sur la touche marche/arrêt.
L'unité émettra un signal sonore.
1
Appuyez sur la touche MODE pour sélectionner le mode
refroidissement.
2
Pour abaisser la température
Pour monter la température
Réglez la température souhaitée à l'aide des touches
de réglage de la température. Appuyez sur la touche
ROOM TEMP pour vérifier la température de la pièce.
Lorsque la température souhaitée est plus élevée que
la température ambiante, l'unité diffuse de l'air à
température ambiante au lieu d'air frais.
❈ Plage de réglage de la température : 18~30°C (64~86°F)
3
Appuyez sur la touche marche/arrêt.
L'unité émettra un signal sonore.
1
Appuyez sur la touche MODE pour sélectionner le mode
refroidissement.
2
Appuyez sur la touche JET COOL.
L'unité projettera de l'air frais à grande vitesse en mode
refroidissement.
❈ Les modèles muraux limitent le mode de refroidissement
rapide à 30 minutes.
3
Pour annuler le mode de refroidissement rapide, appuyez sur la touche JET
COOL, la touche FAN SPEED ou les touches de réglages de la température,
et l'unité ralentira la vitesse de projection d'air frais en mode refroidissement.
4
ou ou
Mode refroidissement - Refroidissement rapide
Mode refroidissement - Fonctionnement standard
Instructions d'utilisation
Page 83

Instructions d'utilisation
Manuel D’installationet D’utilisation 11
FRANÇAIS
Mode de fonctionnement automatique
Appuyez sur la touche marche/arrêt.
L'unité émettra un signal sonore.
1
Appuyez sur la touche MODE pour sélectionner le mode de
fonctionnement automatique.
2
Pendant le mode de fonctionnement automatique
• Si le système ne fonctionne pas comme vous le voulez, permutez manuellement sur un autre mode. Le
système ne permutera pas automatiquement du mode refroidissement au mode chauffage ou inversement,
si bien que vous devrez définir une nouvelle fois le mode et la température souhaitée.
Réglez la température souhaitée.
<Pour les modèles avec refroidissement>
La vitesse du ventilateur et la température sont réglées automatiquement
par les commandes électroniques en fonction de la température
ambiante. Si vous avez trop chaud ou trop froid, utilisez les touches de
réglage de la température pour accentuer l'effet de refroidissement ou de
chauffage. Vous ne pouvez pas modifier la vitesse du ventilateur intérieur.
Celle-ci est réglée par le mode de fonctionnement automatique.
You can set desired temperature and
indoor fan speed.
Setting Temp. Range : 18~30°C (64~86°F)
<For Heating Model>
3
Code Feel
2 Cold
1 Slightly cool
0 Neutral
-1 Slightly warm
-2 Warm
❈ Please select the code
depend on your feeling.
Pour monter la température
Pour abaisser la température
Page 84

Instructions d'utilisation
12 Télécommande sans fil
Mode d'inversion automatique
Appuyez sur la touche marche/arrêt. L'unité émettra un signal
sonore.
1
Appuyez sur la touche MODE pour sélectionner le mode
d'inversion automatique.
2
Réglez la température souhaitée.
❈ Plage de réglage de la température en mode d'inversion
automatique : 18~30 °C (64~86°F)
3
Vous pouvez sélectionner la vitesse du ventilateur parmi quatre
options : basse, moyenne, élevée et Chaos. Le réglage de vitesse
du ventilateur change à chaque pression sur la touche.
4
Cette fonction n'est disponible que sur certains produits.
Pendant le mode d'inversion automatique
Le climatiseur change automatiquement de mode de fonctionnement pour maintenir la température intérieure.
Lorsque la température ambiante dépasse de ±2°C (4°F) la température réglée, le climatiseur utilise le mode
d'inversion automatique pour maintenir la température de la pièce à ±2°C (4°F) de la température réglée.
Pour monter la température
Pour abaisser la température
Page 85

Instructions d'utilisation
Manuel D’installationet D’utilisation 13
FRANÇAIS
Mode d'inversion automatique - Réglage de la température de changement du mode
Cette fonction sert à régler le mode de fonctionnement du mode d'inversion
automatique.
La température de changement du mode est la différence de température qui doit être atteinte pour passer du
mode refroidissement au mode chauffage ou inversement.
Ex. : lorsque la température est réglée à 25°C (76°F) et que la température ambiante est de 20°C (68°F) le
mode de fonctionnement est le chauffage. Si vous réglez la température de changement du mode à
2°C(4°F) et que la température ambiante monte à 27°C(25°C + 2°C)(80°F(76°F + 4°F)), l'unité actionne
le mode refroidissement.
En mode d'inversion automatique, appuyez sur la touche FUNC. pour sélectionner le réglage de la
température de changement du mode.
1
Utilisez les touches de réglage de la température pour régler la température de changement du
mode souhaitée. (La valeur par défaut est 2°C(4°F).)
2
❈ Plage de température de
changement du mode
: 1~7°C (2~14°F)
Pour monter la température
Pour abaisser la température
Page 86

Instructions d'utilisation
14 Télécommande sans fil
Mode déshumidification
Appuyez sur la touche marche/arrêt.
L'unité émettra un signal sonore.
1
Appuyez sur la touche MODE pour sélectionner le mode
déshumidification.
2
Réglez la vitesse du ventilateur. Vous pouvez sélectionner la vitesse
du ventilateur parmi quatre options : basse, moyenne, élevée et
Chaos. Le réglage de vitesse du ventilateur change à chaque
pression sur la touche.
3
Pendant le mode de déshumidification
• Si vous sélectionnez le mode déshumidification via la touche de sélection du mode de fonctionnement,
l'unité intérieure lance la fonction de déshumidification, réglant automatiquement le volume d'air et la
température de la pièce sur les conditions optimales pour la déshumidification, en fonction de la température
ambiante mesurée. Dans ce cas, la température réglée ne s'affiche pas sur la télécommande et vous ne
pouvez pas non plus contrôler la température de la pièce.
• Pendant la fonction de déshumidification saine, le volume d'air est automatiquement ajusté par un
algorithme en fonction de la température ambiante actuelle et rend la pièce saine et agréable, même en
condition de forte humidité.
Page 87

Instructions d'utilisation
Manuel D’installationet D’utilisation 15
FRANÇAIS
Réglez la température souhaitée à l'aide des touches de réglage de
la température. Appuyez sur la touche ROOM TEMP pour vérifier la
température de la pièce. Lorsque la température souhaitée est plus
basse que la température ambiante, l'unité diffuse de l'air à
température ambiante au lieu d'air chaud.
3
Réglez à nouveau la vitesse du ventilateur. Vous pouvez sélectionner
la vitesse du ventilateur parmi quatre options : basse, moyenne,
élevée et Chaos. Le réglage de vitesse du ventilateur change à
chaque pression sur la touche.
4
Appuyez sur la touche marche/arrêt.
L'unité émettra un signal sonore.
1
Appuyez sur la touche MODE pour sélectionner le mode chauffage.
2
Mode chauffage
Cette fonction concerne uniquement les modèles avec pompe à chaleur.
❈ Plage de réglage de la
température en mode
chauffage
: 16~30 °C (60°F~86°F)
Pour monter la température
Pour abaisser la température
Page 88

Instructions d'utilisation
16 Télécommande sans fil
Mode ventilation
Réglez à nouveau la vitesse du ventilateur.
Vous pouvez sélectionner la vitesse du ventilateur parmi quatre
options : basse, moyenne, élevée et Chaos.
Le réglage de vitesse du ventilateur change à chaque pression sur la
touche.
3
Appuyez sur la touche marche/arrêt.
L'unité émettra un signal sonore.
1
Appuyez sur la touche MODE pour sélectionner le mode ventilation.
2
Ventilation naturelle Chaos
• Pour une fraîcheur plus prononcée, appuyez sur la touche de réglage de la vitesse du ventilateur intérieur et
choisissez le mode Chaos. Dans ce mode, l'air est diffusé de manière naturelle en changeant
automatiquement la vitesse du ventilateur conformément à la logique du chaos.
Pendant le mode ventilation
• Le compresseur extérieur ne fonctionne pas.
Une fonction permet de faire circuler l'air intérieur en expulsant vers l'extérieur l'air qui ne présente pas une
grande différence de température avec l'air intérieur.
Page 89

Contrôle de la température réglée/température ambiante
Manuel D’installationet D’utilisation 17
FRANÇAIS
Vous pouvez régler très simplement la température souhaitée.
• Appuyez sur les touches pour régler la température de votre choix.
: Augmente la température à chaque pression.
: Diminue la température à chaque pression.
Température ambiante : indique la température actuelle de la pièce.
Température réglée : indique la température souhaitée par l'utilisateur.
<Mode refroidissement>
Le mode refroidissement ne fonctionne pas si la température souhaitée est plus
élevée que la température de la pièce. Diminuez la température souhaitée.
<Mode chauffage>
Le mode chauffage ne fonctionne pas si la température souhaitée est plus
basse que la température de la pièce. Augmentez la température souhaitée.
Chaque fois que vous appuyez sur la touche ROOM TEMP, la température
de la pièce sera affichée pendant 5 secondes.
Après 5 secondes, elle disparaît au profit de la température souhaitée.
Selon l'emplacement de la télécommande, la température ambiante réelle
peut différer de la valeur affichée.
Appuyez sur la touche ROOM TEMP pendant 5 secondes pour alterner
entre les degrés Celsius et Fahrenheit (ou inversement).
Contrôle de la température réglée/température ambiante
Page 90

Réglage du débit d'air
18 Télécommande sans fil
Vous pouvez ajuster le débit d'air vers le haut/bas (commande verticale) à l'aide de la télécommande.
1. Appuyez sur la touche marche/arrêt pour démarrer l'unité.
2. Appuyez sur la touche de contrôle du débit d'air haut/bas. Les volets se mettent à osciller de haut en bas.
Appuyez une nouvelle fois sur cette touche pour bloquer les volets verticaux dans la direction du débit d'air
souhaitée.
•
Si vous appuyez sur la touche de contrôle du débit d'air haut/bas, la direction horizontale du débit d'air est modifiée
automatiquement en fonction de l'algorithme Auto Swing pour répartir l'air de façon homogène dans la pièce, tout en
offrant un écoulement d'air plus agréable pour le corps humain, comme avec une ventilation naturelle.
• Utilisez toujours la télécommande pour ajuster la direction du débit d'air haut/bas. L'ajustement manuel des
volets de direction du débit d'air verticaux pourrait endommager le climatiseur.
• Lorsque l'unité est éteinte, les volets de direction du débit d'air haut/bas fermeront l'évent de sortie d'air du
système.
Vous pouvez ajuster le débit d'air vers la gauche/droite (commande horizontale) à l'aide de la télécommande.
1. Appuyez sur la touche marche/arrêt pour démarrer l'unité.
2. Appuyez sur la touche de contrôle du débit d'air gauche/droite. Les volets se mettent à
osciller de gauche à droite. Appuyez une nouvelle fois sur cette touche pour bloquer les
volets horizontaux dans la direction du débit d'air souhaitée.
❈ La fonction de commande verticale et horizontale du débit d'air n'apparaît pas dans
l'afficheur de la télécommande.
REMARQUE
Commande horizontale de direction du débit d'air (selon les modèles)
Commande verticale de direction du débit d'air (selon les modèles)
Réglage du débit d'air
Page 91

Fonctions annexes
Manuel D’installationet D’utilisation 19
FRANÇAIS
Appuyez sur la touche marche/arrêt.
L'unité émettra un signal sonore.
1
Appuyez sur la touche PLASMA.
Appuyez une fois sur cette touche pour démarrer la
filtration plasma, et une nouvelle fois pour l'arrêter.
2
Filtration PLASMA uniquement
Si vous appuyez sur la touche PLASMA, la filtration plasma démarre.
• La filtration plasma est une technologie mise au point par LG
pour éliminer les contaminants microscopiques contenus dans
l'air entrant en générant un plasma d'électrons de charge
élevée. Ce plasma élimine et détruit totalement les
contaminants pour diffuser un air propre et sain.
• Cette fonction peut être utilisée dans n'importe quel mode de
fonctionnement, et le ventilateur peut être réglé à n'importe
quelle vitesse pendant que la filtration plasma fonctionne.
Autonettoyage (selon les modèles)
Cette fonction ne s'active que lorsque l'unité est éteinte.
Appuyez une fois sur la touche FUNC.
Le symbole d'autonettoyage se met à clignoter.
1
Appuyez sur la touche SET/CLEAR pour activer ou annuler la fonction d'autonettoyage.
Si la fonction d'autonettoyage est activée, chaque fois que l'unité est éteinte, le
ventilateur intérieur continue de fonctionner en interne pendant environ 30 minutes, sans
activer le mode refroidissement ou déshumidification.
Les volets restent par ailleurs fermés.
Cela permet de sécher ce qu'il reste d'humidité et de nettoyer l'intérieur de l'unité.
2
Filtration plasma (selon les modèles)
Fonctions annexes
Page 92

Fonctions annexes
20 Télécommande sans fil
Nettoyage intelligent (selon les modèles)
La fonction de nettoyage intelligent peut être utilisée en mode manuel ou automatique.
Nettoyage intelligent automatique
Si le temps d'utilisation cumulé de l'appareil dépasse 30 heures, la fonction de nettoyage intelligent démarre
automatiquement lorsque l'unité est éteinte..
1. Appuyez deux fois sur la touche FUNC. Le symbole de
nettoyage intelligent se met à clignoter.
2. Appuyez sur la touche SET/CLEAR pour activer ou annuler la
fonction de nettoyage intelligent.
Vous pouvez activer ou désactiver cette fonction que l'unité
soit allumée ou éteinte.
1. Quand l'unité est éteinte, appuyez sur la touche FUNC. pour sélectionner la
fonction de nettoyage intelligent. Le symbole de nettoyage intelligent se met à
clignoter. Appuyez alors sur la touche SET/CLEAR.
2. Pour arrêter la fonction de nettoyage intelligent manuel, appuyez sur la touche
FUNC. pour sélectionner la fonction de nettoyage intelligent, puis appuyez sur
SET/CLEAR.
Nettoyage intelligent manuel
La brosse enlève la poussière du filtre en balayant le filtre de gauche à droite ou de droite à gauche.
La poussière recueillie est collectée dans le bac à poussière.
Le processus de fonctionnement du nettoyage intelligent diffère selon le type de produits.
Page 93

Fonctions annexes
Manuel D’installationet D’utilisation 21
FRANÇAIS
Chauffage électrique (selon les modèles)
Cette fonction ne peut être réglée que pendant le fonctionnement du mode chauffage.
Appuyez trois fois sur la touche FUNC.
Le symbole du chauffage électrique se met à clignoter.
1
Appuyez sur la touche SET/CLEAR pour activer ou annuler la fonction de chauffage électrique.
2
• L'unité intérieure affiche le symbole correspondant pendant le fonctionnement du mode chauffage, le
chauffage auxiliaire est automatiquement activé, mais il ne s'affiche pas sur la télécommande sans fil.
• Sur les climatiseurs muraux, cette fonction est active dans le mode chauffage au sol.
Appuyez sur la touche de réglage de la luminosité de l'écran LCD.
Elle vous permet de bénéficier d'un éclairage plus doux si vous trouvez l'écran trop lumineux.
Appuyez sur la touche d'alternance °C/°F pour changer les degrés Celsius en Fahrenheit et inversement.
En mode Fahrenheit, chaque fois que vous appuyez sur les touches de réglage de la
température, la température augmente ou diminue de 2 degrés à la fois.
Affichage en degrés Celsius/Fahrenheit
Contrôle de la luminosité de l'écran LCD (selon les modèles)
Page 94

Fonctions annexes
22 Télécommande sans fil
• Il peut y avoir des différences entre les touches haut/bas/gauche/droite de la télécommande sans fil et la
direction des volets.
• Réglez l'angle de votre choix tout en vérifiant le mouvement des volets du produit.
• La fonction de réglage individuel des volets est une fonction annexe et il se peut qu'elle ne soit pas
disponible sur certains produits.
Réglage individuel de l'angle des volets (selon les modèles)
Appuyez sur la touche SET/CLEAR pour activer ou annuler la fonction de réglage individuel de
l'angle des volets.
3
Cette fonction permet de contrôler l'angle des quatre volets individuellement sur les
climatiseurs de type cassette 4 voies.
Appuyez trois fois sur la touche FUNC.
(4 fois pendant le fonctionnement du mode chauffage)
Le symbole de réglage individuel de l'angle des volets se met à clignoter.
• Si vous appuyez à ce moment sur la touche
SET/CLEAR, tous les volets sont réglés sur un angle
standard.
1
Réglez l'angle de chaque volet en utilisant les touches directionnelles
haut/bas/gauche/droite.
• Chaque fois que vous appuyez sur la touche, l'angle et les valeurs de
réglage du volet correspondant s'affichent.
• Lorsque vous appuyez sur la touche directionnelle vers le haut,
l'afficheur apparaît comme dans la figure de droite, et vous pouvez
régler l'angle entre 1 et 6.
2
Page 95

Programmation
Manuel D’installationet D’utilisation 23
FRANÇAIS
1. Appuyez sur la touche SET/CLEAR pendant 3
secondes.
2. Utilisez les touches de réglage de l'heure jusqu'à
ce que la bonne heure soit affichée. (Maintenez la
touche enfoncée pour changer l'heure par
incréments de 10 minutes.)
3. Appuyez sur la touche SET/CLEAR.
Attention aux mentions AM et PM.
REMARQUE
1. Appuyez sur la touche SLEEP pour activer ou
désactiver la veille programmée.
2. Utilisez les touches de réglage de l'heure jusqu'à ce
que le délai souhaité soit affiché. (7 heures est le
réglage maximal.)
3. Appuyez sur la touche SET/CLEAR.
1. Appuyez sur la touche ON pour régler la mise en
marche programmée.
2. Utilisez les touches de réglage de l'heure jusqu'à ce
que l'heure souhaitée soit affichée.
3. Appuyez sur la touche SET/CLEAR.
Réglage de la mise en marche programmée
Réglage de la veille programmée
Réglage de l'heure
Programmation
Veille programmée
Heure de mise en marche programmée
Page 96

Programmation
24 Télécommande sans fil
Annulation des réglages programmés
• Si vous voulez annuler tous les réglages programmés, appuyez sur la touche SET/CLEAR.
• Si vous voulez annuler chaque réglage programmé individuellement, appuyez sur
la touche correspondante pour sélectionner au choix la veille programmée, la mise
en marche programmée ou l'arrêt programmé. Puis, appuyez sur la touche SET/CLEAR
en dirigeant la télécommande vers le récepteur du signal. (Le symbole de programmation
affiché sur le climatiseur et dans l'afficheur disparaîtra.)
1. Appuyez sur la touche OFF pour régler l'arrêt
programmé.
2. Utilisez les touches de réglage de l'heure jusqu'à ce
que l'heure souhaitée soit affichée.
3. Appuyez sur la touche SET/CLEAR.
Réglage de l'arrêt programmé
Heure d'arrêt programmé
Page 97

BEDIENUNGS- UND
MONTAGEANLEITUNG
KLIMAGERÄT
Bitte lesen Sie diese Bedienungsanleitung vor dem Betrieb
des Gerätes aufmerksam durch und bewahren Sie sie zum
späteren Nachschlagen auf.
www.lg.com
TYP: Kabellose Fernbedienung
Modelle : PQWRCQ0FDB
PQWRHQ0FDB
DEUTSCH
Page 98

2 Kabellose Fernbedienung
Kabellose Fernbedienung - Bedienungs- und Montageanleitung
INHALTSVERZEICHNIS
■ Sicherheitshinweise ..................................................................................................3
■ Beschreibung der Bauteile .......................................................................................4
Kabellose Fernbedienung............................................................................................5
■ Bedienungsanleitung ................................................................................................6
Einlegen der Batterien .................................................................................................6
Kabellose Fernbedienung Wartung .............................................................................6
Bedienung....................................................................................................................6
Einstellungsmodus - Adressierung der Zentralsteuerung............................................7
■ Montageanleitung ......................................................................................................7
Einstellungsmodus - Adresse der Zentralsteuerung anzeigen ....................................7
Einstellungsmodus - Einstellungsmodus aufrufen .......................................................8
Einstellungsmodus - Tabelle der Einstellungskennungen ...........................................9
■ Bedienungsanleitung ..............................................................................................10
Kühlungsbetrieb - Normalbetrieb ...............................................................................10
Kühlungsbetrieb - Schnellkühlung .............................................................................10
Automatikbetrieb........................................................................................................11
Automatischer Wechselbetrieb ..................................................................................12
Automatischer Wechselbetrieb - Temperatur für Moduswechsel einstellen ..............13
Entfeuchtungsbetrieb.................................................................................................14
Heizbetrieb.................................................................................................................15
Lüfterbetrieb...............................................................................................................16
■ Temperatureinstellung/Raumtemperatur anzeigen ..............................................17
■ Einstellung der Luftstromrichtung.........................................................................18
Einstellung der Luftstromrichtung auf/ab (Optional) ..................................................18
Einstellung der Luftstromrichtung links/rechts (Optional) ..........................................18
■ Zusatzfunktion .........................................................................................................19
Plasma-Luftreinigung (Optional) ................................................................................19
Automatische Reinigung (Optional) ...........................................................................19
Intelligente Reinigung (Optional) ...............................................................................20
LCD-Helligkeit einstellen (Optional)...........................................................................21
Umschalten zwischen Celsius und Fahrenheit ..........................................................21
Elektrischer Erhitzer (Optional)..................................................................................21
Einzelsteuerung der Flügelstellung (Optional)...........................................................22
■ Timer .........................................................................................................................23
Einstellen der Uhrzeit.................................................................................................23
Einstellen des Sleep-Timers ......................................................................................23
Einschaltzeit...............................................................................................................23
Ausschaltzeit..............................................................................................................24
Timer-Einstellung löschen .........................................................................................24
Page 99

Sicherheitshinweise
Bedienungs- Und Montageanleitung 3
DEUTSCH
■ Montage
Sicherheitshinweise
• Die Montage sollte nur durch erfahrene Benutzer erfolgen, z. B. durch den Servicebetrieb oder durch
spezialisierte und von uns zugelassene Händler.
• Bei Störungen auf Grund einer unsachgemäßen Montage durch nicht qualifizierte Personen erlischt der
Garantieanspruch.
•
Zur Vermeidung unerwarteter Gefahren oder Schäden sollten die folgenden Sicherheitshinweise beachtet werden.
:
Bei Missachtung der erforderlichen Verfahren besteht die Gefahr von schweren Verletzungen bzw. Lebensgefahr.
: Bei Missachtung der erforderlichen Verfahren besteht die Gefahr von Verletzungen bzw.
Sachschäden.
: Die Warnungen und Vorsichtshinweise weisen den Benutzer auf mögliche Gefahren hin. Lesen
und beachten Sie sämtliche Hinweise genau, um Unfälle zu vermeiden.
: Zur Vermeidung von Gefahren wird auf Warnungen und Vorsichtshinweise in diesem Handbuch
sowie auf dem Produkt selbst gesondert hingewiesen.
ACHTUNG
Batterien nicht wieder aufladen oder
auseinandernehmen. Verbrauchte Batterien
niemals in offenes Feuer werfen. Sie könnten
brennen oder explodieren.
Auf die Haut oder Kleidung gelangte Batterieflüssigkeit
gründlich mit Wasser abspülen. Die Fernbedienung
niemals mit ausgelaufenen Batterien verwenden. Die
Chemikalien in den Batterien könnten zu Verbrennungen
oder Gesundheitsschäden führen.
Tauschen Sie alle Batterien der Fernbedienung gegen neue
Batterien desselben Typs aus. Alte und neue Batterien bzw.
unterschiedliche Batterietypen nicht gemeinsam verwenden.
Es besteht Explosions- oder Brandgefahr.
Das Gerät niemals selbst auseinandernehmen,
reparieren oder verändern. Ansonsten besteht die
Gefahr von Bränden oder Stromschlägen.
Stets nur eine Taste zurzeit
drücken. Bei gleichzeitigem
Drücken mehrerer Tasten
erfolgt keine Reaktion.
Die Fernbedienung nicht fallen
lassen oder werfen. Keinen
starken Erschütterungen
aussetzen und nicht darauftreten.
Die Fernbedienung nicht an
feuchten Orten bzw. bei hoher
Luftfeuchtigkeit verwenden.
Die Fernbedienung nicht in der
Nähe von Wärmequellen oder
offenem Feuer verwenden.
Die Fernbedienung keiner
direkten Sonneneinstrahlung
aussetzen.
Richten Sie die kabellose
Fernbedienung auf den
Signalempfänger des Gerätes.
Die Reichweite der Fernbedienung beträgt bis zu
sieben Meter.
Zwischen Fernbedienung und Signalempfänger
dürfen sich keine Gegenstände befinden.
■ Betrieb
ACHTUNG
VORSICHT
Page 100

Beschreibung der Bauteile
Zubehör
Beschreibung der Bauteile
4 Kabellose Fernbedienung
Halterung (1 Stk.) Montageschrauben
(2 Stk.)
Bedienungs- und
Montageanleitung
Batterien Größe AAA
(1,5V) (2 Stk.)
LCD-Anzeige
Kabellose Fernbedienung
 Loading...