

Page 1
USER GUIDE
LM-X210APM
ENGLISH
Copyright ©2018 LG Electronics Inc. All Rights Reserved.
MFL70426401 (1.0) www.lg.com
Page 2

ENGLISH
About this user guide
Thank you for choosing this LG product. Please carefully read this
user guide before using the device for the first time to ensure safe
and proper use.
• Always use genuine LG accessories. The supplied items are
designed only for this device and may not be compatible with
other devices.
• Descriptions are based on the device default settings.
• Default apps on the device are subject to updates, and support for
these apps may be withdrawn without prior notice. If you have any
questions about an app provided with the device, please contact
an LG Service Center. For user-installed apps, please contact the
relevant service provider.
• Modifying the device’s operating system or installing software
from unofficial sources may damage the device and lead to data
corruption or data loss. Such actions will violate your LG license
agreement and void your warranty.
• Some content and illustrations may differ from your device,
depending on the area, service provider, software version, or OS
version, and are subject to change without prior notice.
• Software, audio, wallpaper, images, and other media supplied with
your device are licensed for limited use. If you extract and use
these materials for commercial or other purposes, you may be
infringing copyright laws. As a user, you are fully responsible for
the illegal use of media.
• Additional charges may incur for data services, such as messaging,
uploading, downloading, auto-syncing and location services. To
avoid additional charges, select a data plan suitable to your needs.
Contact your service provider to obtain additional details.
1
Page 3
Instructional notices
WARNING: Situations that could cause injury to the user and third
CAUTION: Situations that may cause minor injury or damage to the
NOTE: Notices or additional information.
parties.
device.
2
Page 4

Table of contents
01
Custom-designed
Features
6 Multi-tasking feature
8 quick share
9 Gallery features
13 Google Assistant
02
Basic Functions
15 Product components and
accessories
16 Parts overview
18 Turning the power on or off
19 Installing the SIM card
21 Inserting the memory card
22 Removing the memory card
22 Battery
26 Touch screen
30 Home screen
39 Screen lock
42 Memory card encryption
43 Taking screenshots
44 Entering text
49 Do not disturb
03
Useful Apps
51 Installing and uninstalling
apps
52 App trash
53 App Shortcuts
54 Phone
58 Messaging
59 Camera
66 Gallery
3
Page 5

69 Chrome
69 Contacts
71 QuickMemo+
73 Tasks
74 Calculator
74 FM Radio
74 File Manager
74 Downloads
75 Clock
76 Calendar
77 Email
78 LG SmartWorld
78 Google Apps
04
Phone Settings
82 Settings
82 Networks
92 Sound & notification
93 Display
94 General
05
Appendix
104 LG Bridge
105 Phone software update
107 Anti-Theft Guide
108 Open Source Software Notice
Information
109 More information
111 FAQ
06
For Your Safety
07
LIMITED WARRANTY
STATEMENT
4
Page 6

01
Custom-designed
Features
Page 7
Multi-tasking feature
Multi-Window
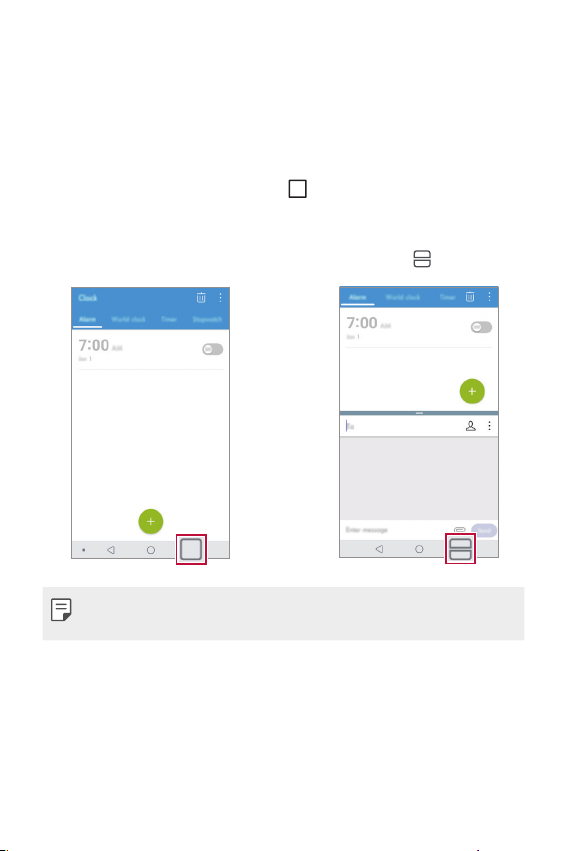
You can use two apps at the same time by separating the screen into
multiple windows.
While using an app, touch and hold
then select an app from the recently-used apps list.
• You can use two apps at the same time.
• To stop the Multi-Window feature, touch and hold
• The Multi-Window feature is not supported by some apps,
including downloaded apps.
from the Home touch buttons,
.
Custom-designed Features 6
Page 8

Overview screen
The Overview screen provides a preview of your recently-used apps.
To view the list of recently-used apps, tap
buttons.
• Touch and hold an app and drag it to the top of the screen to start
the app with the Multi-Window feature. You can also tap
top of each app preview.
on the Home touch
at the
Custom-designed Features 7
Page 9
quick share
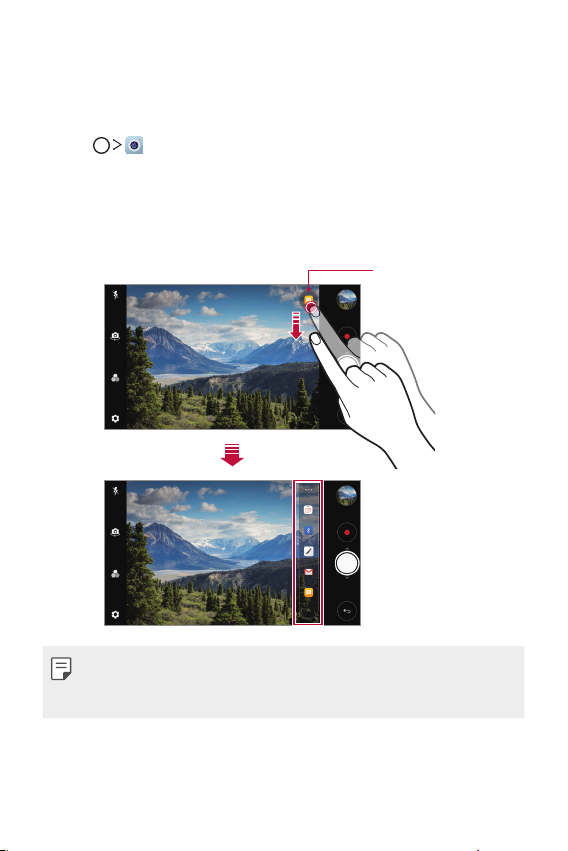
You can share a photo or video using a desired app immediately after
taking it.
Tap , then take a photo or record a video.
1
Tap the app icon that appears on the screen to share it using that
2
app.
You can also swipe the icon towards the opposite direction to see
what other apps you can use to share your photos and videos.
quick share icon
• The app displayed by the quick share icon may vary, depending
on the type and frequency of access to the apps installed on the
device.
Custom-designed Features 8
Page 10
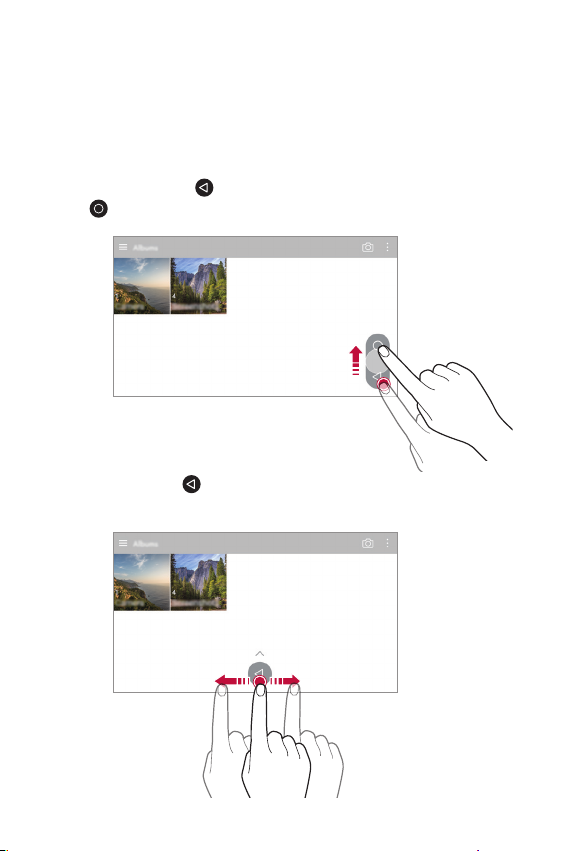
Gallery features
Floating button
You can use the floating button at the lower part of the Gallery app
screen in landscape mode.
• After dragging the
button to return to the Home screen.
the
• You can drag the button to the left or right to move the
floating button as desired.
button upwards, release it when you reach
Custom-designed Features 9
Page 11
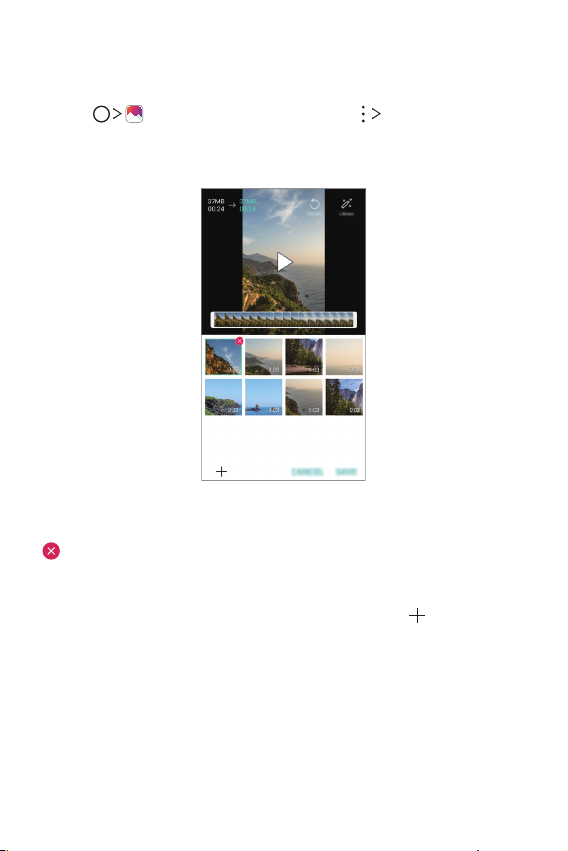
Creating a movie
You can create a new movie by putting images and videos together.
Tap
1
Select images or videos for your movie and tap NEXT.
2
Edit the selected images and videos and then tap SAVE.
3
select an album, and then tap
,
Deleting files
You can select images or videos to delete from your video by tapping
at the top right corner of its thumbnail.
Adding files
You can select images or videos to add after tapping at the
bottom of the screen. You can also select the images or videos you
have already previously added.
Create movie.
Custom-designed Features 10
Page 12
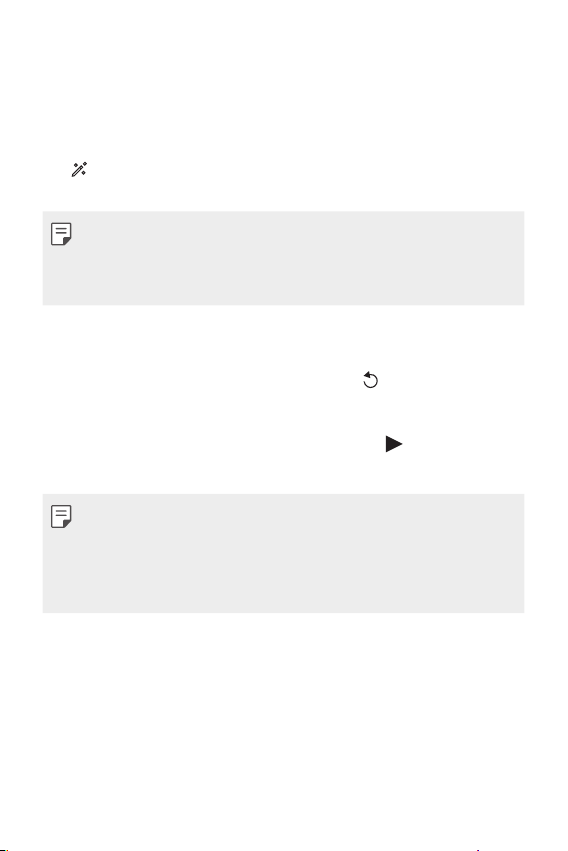
Rearranging files
To rearrange the images and videos, touch and hold the file you want
to move, then drag it to the desired location.
Adding file effects
Tap to add a theme or background music, change the font, and
add a title and author.
• Download the VASSET app from the Play Store to add video
themes, background music or font faces.
If you use mobile data without connecting to a Wi-Fi network, you
may be charged for data usage.
Resetting the movie edits
You can reset the edits made to the movie (e.g. play time, theme,
background music and font effect) by tapping
.
Previewing a file
Check your new video before saving it by tapping . After the
playback time elapses, the next file is played automatically.
• A maximum of 50 images and videos can be used to create a video.
• The playback time for an image is 3 seconds by default and it
cannot be changed. Videos can be trimmed down to a minimum of
1 second.
• This feature may not support some image or video formats.
Custom-designed Features 11
Page 13
Making a GIF file
You can easily make a GIF file using previously recorded video.
At the desired starting point while watching a video, tap .
1
Select the length of the GIF you want to create, if necessary.
2
• The GIF file is generated for the time selected from the current
time.
• For videos less than 5 seconds, GIF images are automatically
generated for the remaining time.
• You may use this feature solely for creative purposes. The use of
this feature involving infringement of any other person’s rights,
such as copyright or defamatory or offensive statements, may be
subject to civil, criminal, or administrative liabilities and/or penalties
under applicable laws. You shall not copy, reproduce, distribute, or
otherwise make illegal use of any copyrighted materials without
permission of the rightful owner or copyright holder. To the fullest
extent permitted by applicable law, LG Electronics disclaims all
expressed and implied warranties as well as liabilities associated
thereto.
You can also create a GIF file from the Gallery.
While viewing an album, tap Create GIF.
1
Select the desired photos and videos to create a GIF file and then
2
tap NEXT.
• You can add more images and adjust the GIF speed, screen
ratio, and file order.
Tap SAVE.
3
• A maximum of 100 images can be used to create a GIF file.
Custom-designed Features 12
Page 14
Google Assistant
You can manage tasks, plan your day, get answers, and much more.
• To use this feature, first connect to the network and sign in to your
Google account.
Launching Google Assistant
Press and hold from the Home screen to launch Google
1
Assistant.
Tap GET STARTED.
2
Follow the on-screen instructions to configure the voice settings.
3
• The device saves your voice data for recognition.
Launching Google Assistant with your voice
Say "Ok Google" when the screen is turned off or locked.
1
Say a command or question when
2
on the screen.
Launching Google Assistant from the Home
screen
Touch and hold from the Home screen.
1
Say a command or question when
2
on the screen.
Hi, how can I help?*
Hi, how can I help?*
appears
appears
• Voice recognition accuracy may decrease if you speak with
an unclear voice or in a noisy place. When you use the voice
recognition feature, increase its accuracy by speaking with a clear
voice in a quiet place.
* The
Hi, how can I help?
software version.
Custom-designed Features 13
message may change depending on the
Page 15

02
Basic Functions
Page 16
Product components and
accessories
The following items are included with your device.
• Device
• Battery
• USB cable
• The items supplied with the device and any available accessories
may vary depending on the area and service provider.
• Always use genuine LG Electronics accessories. Using accessories
made by other manufacturers may affect your device's call
performance or cause malfunctions. This may not be covered by
LG's repair service.
• If any of these basic items are missing, contact the dealer from
which you purchased your device.
• To purchase additional basic items, contact an LG Customer Service
Center.
• To purchase optional items, contact an LG Customer Service Center
for available dealers.
• Some items in the product box are subject to change without
notice.
• The appearance and specifications of your device are subject to
change without notice.
• Device specifications may vary depending on the area or service
provider.
• Be sure to use authentic accessories provided by LG Electronics.
Using third-party accessories may damage the device or cause
malfunctions.
• Remove the protective film on the camera lens if necessary.
• Charger
• Quick Start Guide
Basic Functions 15
Page 17
Parts overview
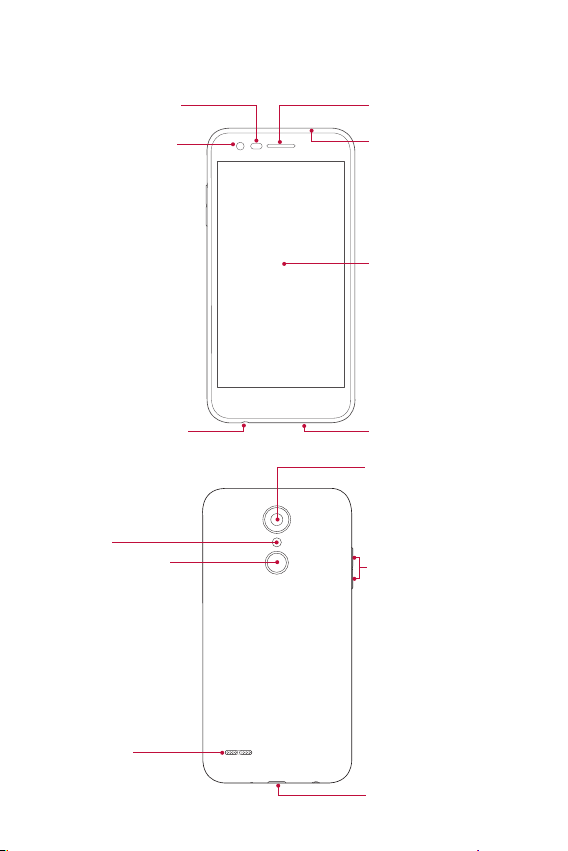
Proximity/Ambient
light sensor
Front camera lens
Stereo headset jack Microphone
Flash
Power/Lock key
Earpiece
Microphone
Touch screen
Rear camera lens
Volume keys (+/-)
Speaker
Charger/USB cable port
Basic Functions 16
Page 18
• Proximity/Ambient light sensor
- Proximity sensor: During a call, the proximity sensor turns off
the screen and disables touch functionality when the device is
in close proximity to the human body. It turns the screen back
on and enables touch functionality when the device is outside a
specific range.
- Ambient light sensor: The ambient light sensor analyzes the
ambient light intensity when the auto-brightness control mode
is turned on.
• Volume keys
- Adjust the volume for ringtones, calls or notifications.
- While using the Camera, gently press a Volume key to take a
photo. To take continuous shots of photos, press and hold the
Volume key.
- Press the Volume Down (-) key twice to launch the Camera app
when the screen is locked or turned off. Press the Volume Up (+)
key twice to launch Capture+.
• Power/Lock key
- Briefly press the key when you want to turn the screen on or off.
- Press and hold the key when you want to select a power control
option.
• Some functions may be restricted for access, depending on the
device specifications.
• Do not put heavy objects on the device or sit on it. Doing so may
damage the touch screen.
• Screen-protective film or accessories may interfere with the
proximity sensor.
• If your device is wet or is being used in a humid place, the touch
screen or buttons may not function properly.
Basic Functions 17
Page 19
Turning the power on or off
Turning the power on
When the power is turned off, press and hold the Power/Lock key.
• When the device is turned on for the first time, initial configuration
takes place. The first booting time for the smart phone may be
longer than usual.
Turning the power off
Press and hold the Power/Lock key, then select Power off.
Power control options
Press and hold the Power/Lock key, then select an option.
• Power off: Turn off the device.
• Restart: Restart the device.
• Turn on Airplane mode: Block telecommunication-related
functions, including making phone calls, messaging and browsing
the Internet. Other functions remain available.
Basic Functions 18
Page 20
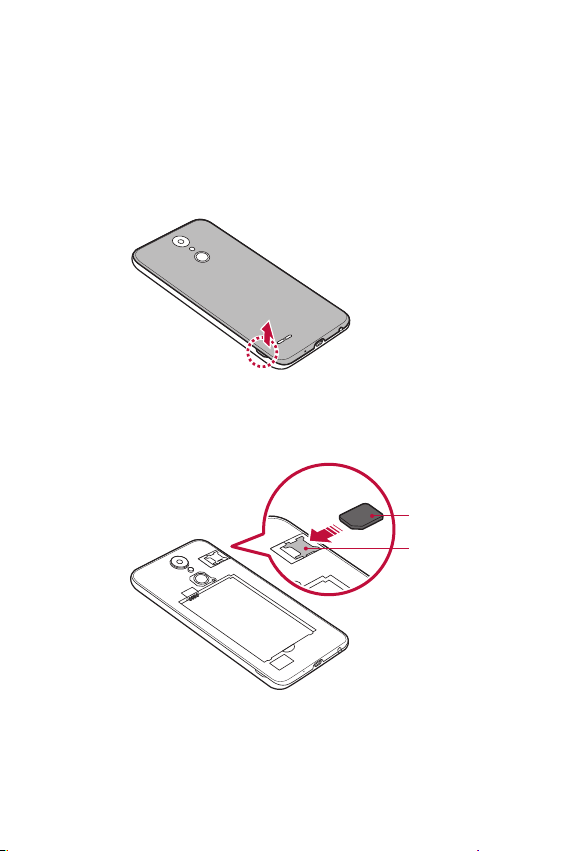
Installing the SIM card
Insert the SIM (Subscriber Identity Module) card provided by your
service provider to start using your device.
To remove the back cover, hold the phone firmly in one hand. With
1
your other hand, lift off the back cover with your thumbnail as
shown in the figure below.
Slide the SIM card into the SIM card slot with the gold-colored
2
contacts facing downwards.
SIM card
Lower slot
Basic Functions 19
Page 21
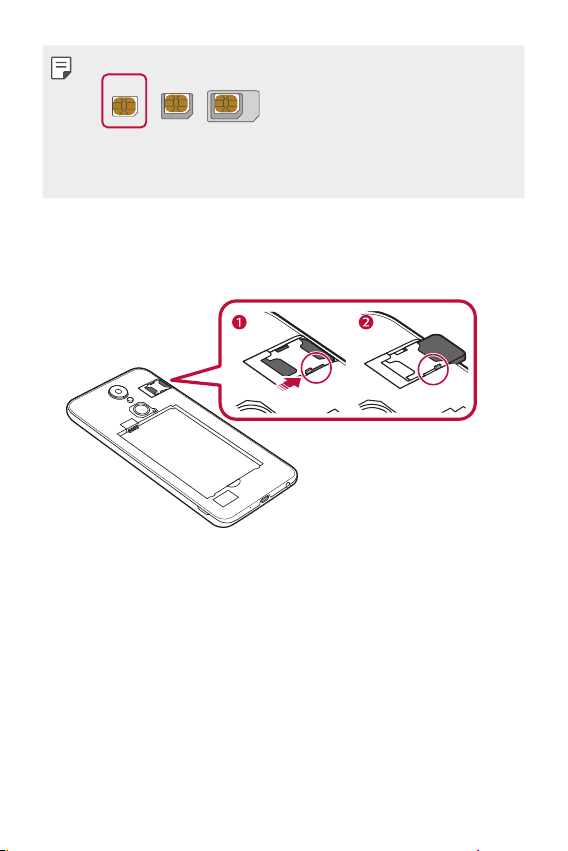
• This device supports only Nano SIM cards.
Nano Micro Standard
• For problem-free performance, it is recommended to use the phone
with the correct type of SIM card. Always use a factory-made SIM
card supplied by the service provider.
To remove the SIM card
Push the pin on the left of the SIM card slot downwards, as indicated
in the image below.
Precautions when using the SIM card
• Do not lose your SIM card. LG is not responsible for damage and
other issues caused by loss or transfer of a SIM card.
• Be careful not to damage the SIM card when you insert or remove
it.
Basic Functions 20
Page 22
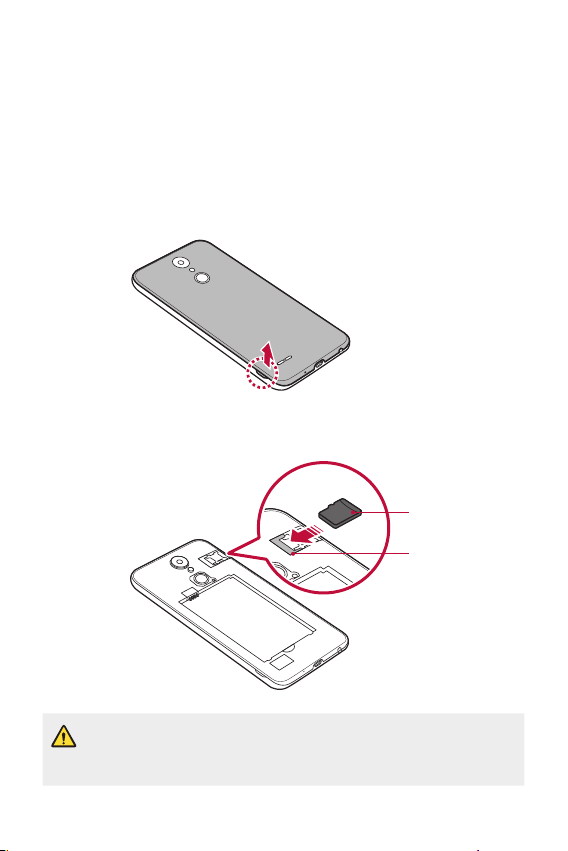
Inserting the memory card
The device can support up to a 32 GB microSD card. Depending on
the memory card manufacturer and type, some memory card may
not be compatible with your device.
To remove the back cover, hold the phone firmly in one hand. With
1
your other hand, lift off the back cover with your thumbnail as
shown in the figure below.
Insert the memory card into the memory card slot.
2
Memory card
(optional)
Upper slot
• Some memory cards may not be fully compatible with the device.
If you use an incompatible card, it may damage the device or the
memory card, or corrupt the data stored in it.
Basic Functions 21
Page 23
• Frequent writing and erasing of data may shorten the memory card
lifespan.
Removing the memory card
Unmount the memory card before removing it for safety.
Tap Settings General Storage .
1
Remove the back cover and pull out the memory card.
2
• Do not remove the memory card while the device is transferring
or accessing information. This may cause data to be lost or
corrupted, or may damage the memory card or the device. LG is not
responsible for losses that result from the abuse or improper use of
memory cards, including the loss of data.
Battery
Installing the battery
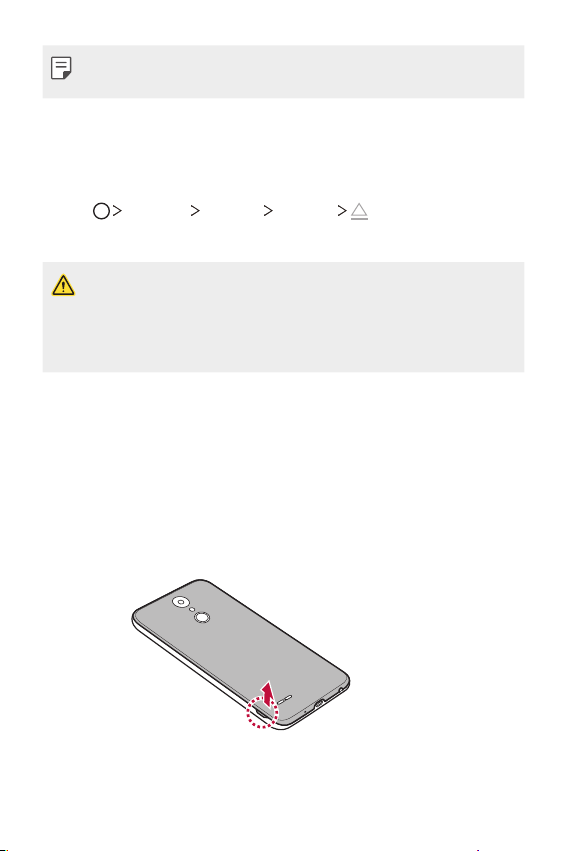
To remove the back cover, hold the phone firmly in one hand. With
1
your other hand, lift off the back cover with your thumbnail as
shown in the figure below.
Basic Functions 22
Page 24
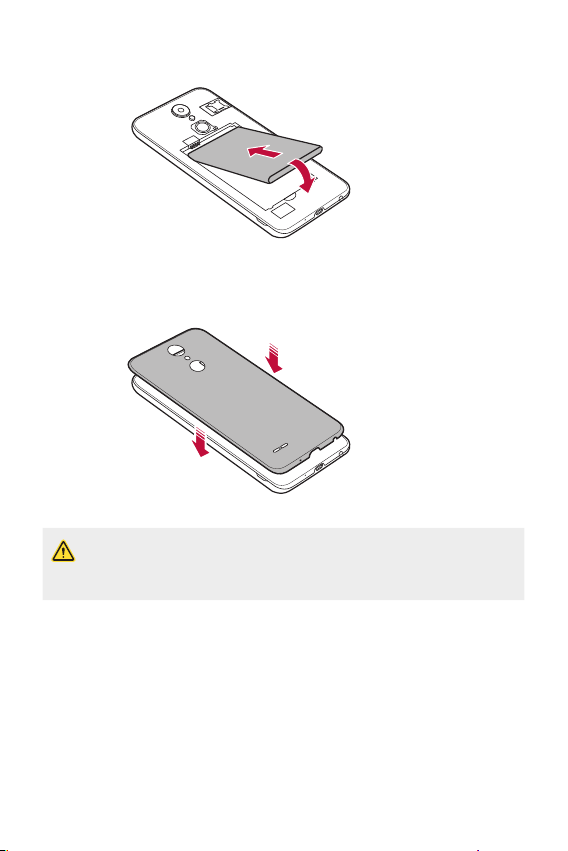
Insert the battery.
2
To replace the cover onto the device, align the back cover over the
3
battery compartment and press it down until it clicks into place.
• Follow the instructions in this user guide cautiously when handling
the device. Failure to do so may damage the device or cause injury
to yourself or others.
Basic Functions 23
Page 25
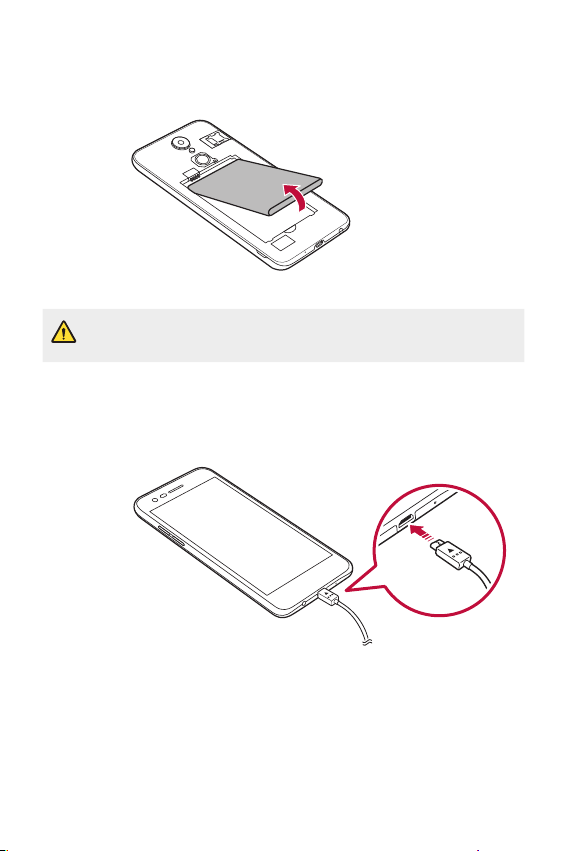
Removing the battery
Open the back cover and pull out the battery.
• Turn off the device before removing the battery. Failure to do so
may damage the device.
Charging the battery
Before using the device, fully charge the battery.
Basic Functions 24
Page 26
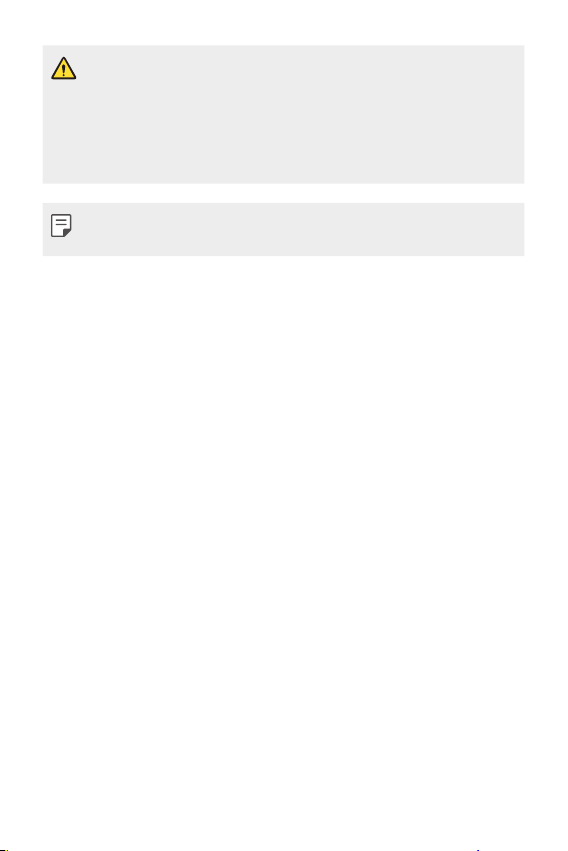
• Make sure to use the USB cable provided with your device.
• Make sure to use an LG-approved charger, battery and charging
cable. Charging the battery with a third-party charger may cause
the battery to explode or may damage the device.
• Using the device when it is charging may cause electric shock. To
use the device, stop charging it.
• Remove the charger from the power socket after the device is fully
charged. This prevents unnecessary power consumption.
Precautions when using the device
• When replacing the battery, take extra care to ensure that no
foreign substances or water enter the device.
• Ensure that the inside of the device does not make contact with a
metallic object or water.
• Make sure to use the USB cable provided; do not use third party
USB cables or chargers with your device. The LG limited warranty
does not cover the use of third party accessories.
• Failure to follow the instructions in this guide and improper use
may damage the device.
Basic Functions 25
Page 27
Using the battery efficiently
Battery lifespan may decrease if you keep many apps and functions
running simultaneously and continuously.
Stop apps and functions from running in the background to increase
battery life.
To minimize battery consumption, follow these tips:
• Turn off the Bluetooth® or Wi-Fi network function when not
using them.
• Set the screen timeout to as short a time as possible.
• Minimize the screen brightness.
• Set a screen lock when the device is not in use.
• Check the battery usage details and close any downloaded apps
that are draining the battery.
Touch screen
You can familiarize yourself with how to control your device by using
touch screen gestures.
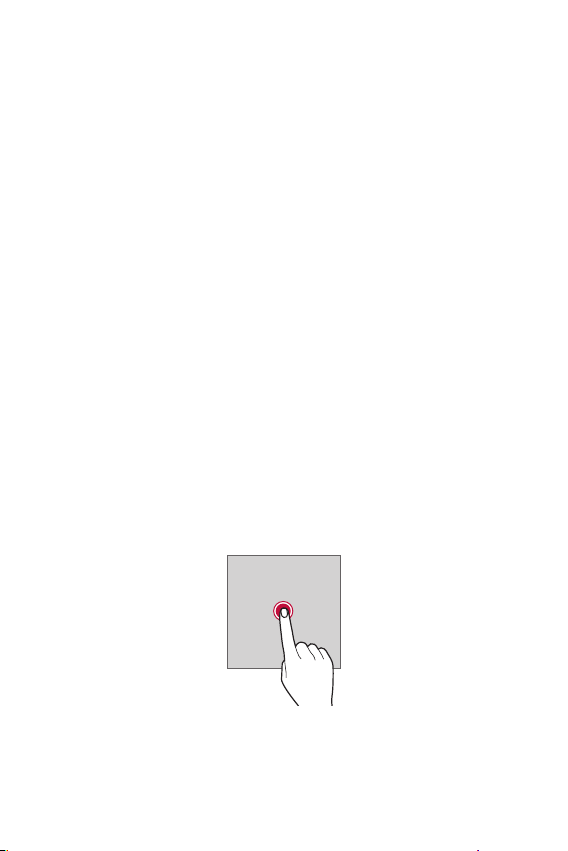
Tapping
Lightly tap with your fingertip to select or run an app or option.
Basic Functions 26
Page 28
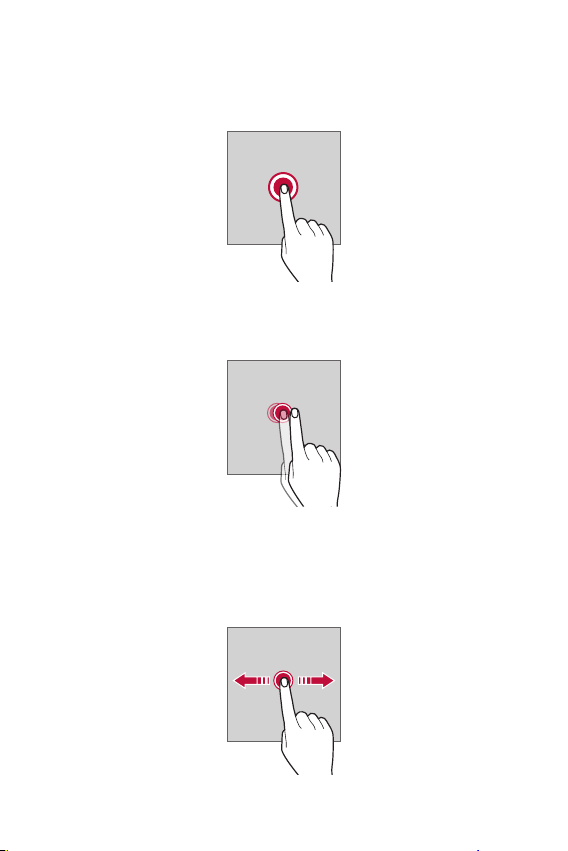
Touching and holding
Touch and hold for several seconds to display a menu with available
options.
Double-tapping
Tap twice quickly to zoom in or out on a web page or map.
Dragging
Touch an item, such as an app or widget, then move your finger to
another location in a controlled motion. You can use this gesture to
move an item.
Basic Functions 27
Page 29
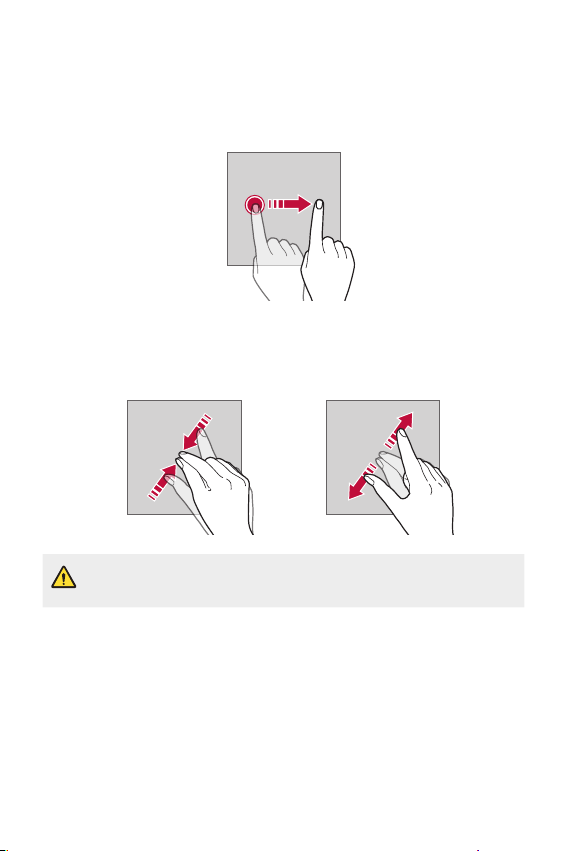
Swiping
Touch the screen with your finger and move it quickly without
pausing. You can use this gesture to scroll through a list, a web page,
photos, screens, and more.
Pinching and spreading
Pinch two fingers to zoom out such as on a photo or map. To zoom in,
spread your fingers apart.
• Do not expose the touch screen to excessive physical shock. You
might damage the touch sensor.
Basic Functions 28
Page 30

• A touch screen failure may occur if you use the device near a
magnetic, metallic or conductive material.
• If you use the device under bright lights, such as direct sunlight,
the screen may not be visible, depending on your position. Use the
device in a shady location or a location with an ambient light that is
not too bright and bright enough to read books.
• Do not press the screen with excessive force.
• Gently tap with your fingertip on the desired option.
• The touch control may not work properly if you tap while wearing a
glove or by using the tip of your fingernail.
• Touch control may not work properly if the screen is moist or wet.
• The touch screen may not function properly if a screen-protective
film or accessory purchased from a third party store is attached to
the device.
Basic Functions 29
Page 31
Home screen
Home screen overview
The Home screen is the starting point for accessing various functions
and apps on your device. Tap
Home screen.
You can manage all apps and widgets on the Home screen. Swipe the
screen left or right to view all installed apps at a glance.
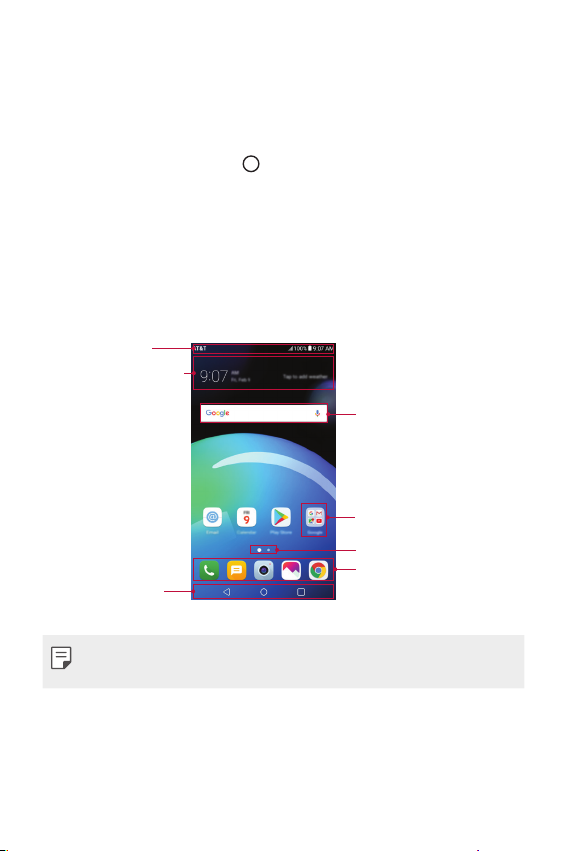
Home screen layout
You can view all apps and organize widgets and folders on the Home
screen.
Status bar
Weather widget
Home touch
buttons
on any screen to directly go to the
Google search widget
Folder
Page icon
Quick access area
• The Home screen may vary, depending on the service provider or
software version.
• Status bar: View status icons, the time and the battery level.
• Weather widget: View the weather information and time for a
specific area.
Basic Functions 30
Page 32
• Google search widget: Perform a Google search by inputting
spoken or written keywords.
• Folder: Create folders to group apps by your preferences.
• Page icon: Display the total number of Home screen canvases.
Tap the desired page icon to go to the page you selected. The icon
reflecting the current canvas will be highlighted.
• Quick access area: Fix main apps at the bottom of the screen so
that they can be accessed from any Home screen canvas.
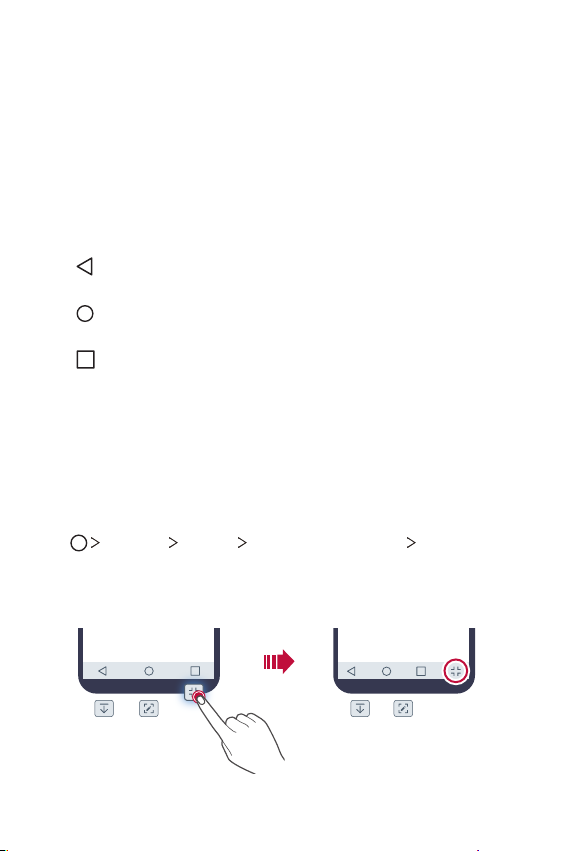
• Home touch buttons
: Return to the previous screen. Close the keypad or pop-up
windows.
: Tap to go to the Home screen. To launch Google search,
touch and hold.
: Tap to view a list of recently used apps or run an app from
the list. To delete all the recently used apps, tap CLEAR ALL. To
use two apps at the same time with the Multi-Window feature,
touch and hold the button while using an app.
Editing the Home touch buttons
You can rearrange the Home touch buttons or add frequently used
functions to the Home touch buttons area.
Settings Display Home touch buttons Button
Tap
combination and customize the settings.
• Several functions, including Notification, Capture+, and QSlide,
are provided. A maximum of two additional items can be added.
Basic Functions 31
Page 33
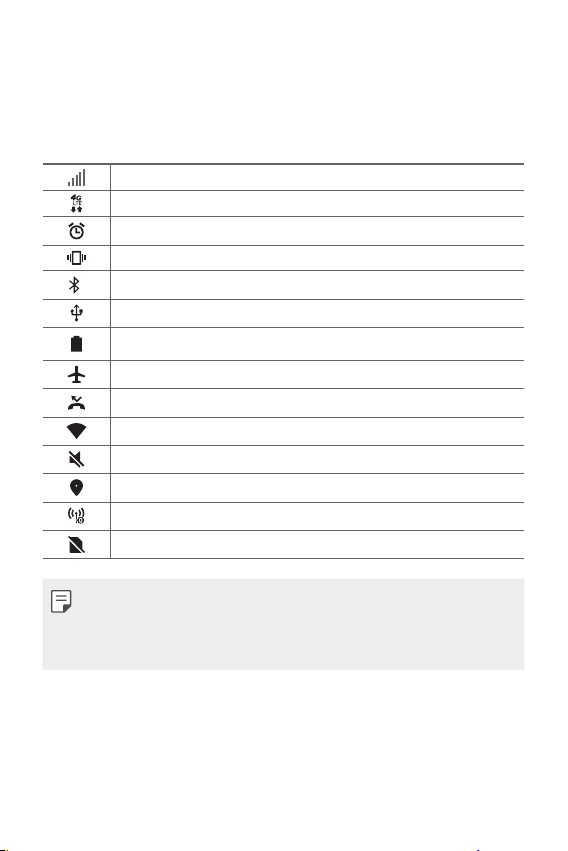
Status icons
When there is a notification for an unread message, calendar event
or alarm, the status bar displays the corresponding notification icon.
Check your device's status by viewing notification icons displayed on
the status bar.
No signal
Data is being transmitted over the network
Alarm is set
Vibrate mode is on
Bluetooth is on
Connected to a computer via USB
Battery level
Airplane mode is on
Missed calls
Wi-Fi is connected
Mute mode is on
GPS is on
Hotspot is on
No SIM card
• Some of these icons may appear differently or may not appear at
all, depending on the device's status. Refer to the icons according to
the actual environment and area in which you are using the device
and your service provider
Basic Functions 32
Page 34
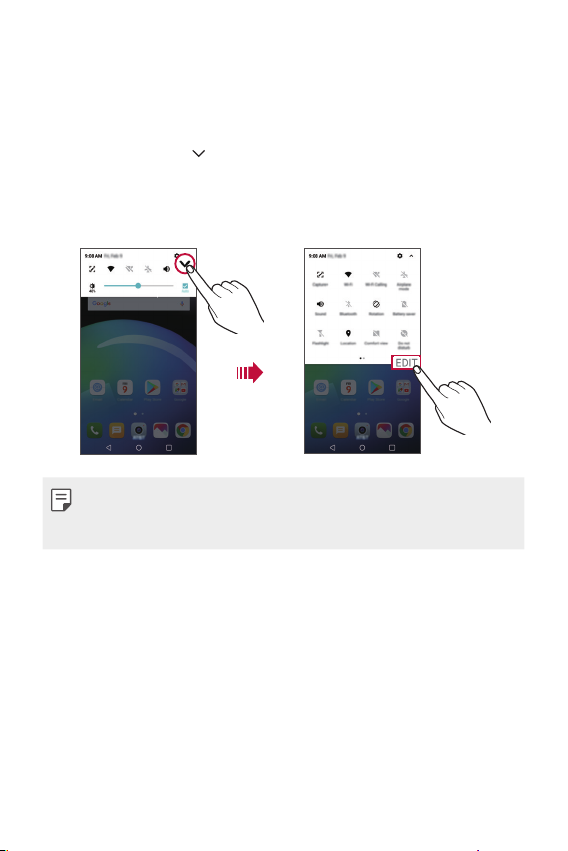
Notifications panel
You can open the notifications panel by dragging the status bar
downward on the main screen.
• To open the quick access icons list, drag the notifications panel
downwards or tap
• If you touch and hold an icon, the settings screen for the
corresponding function appears.
• To rearrange, add, or remove icons, tap EDIT.
• You can use the notifications panel even on the lock screen. Drag
the notifications panel while the screen is locked to quickly access
the desired features.
.
Basic Functions 33
Page 35
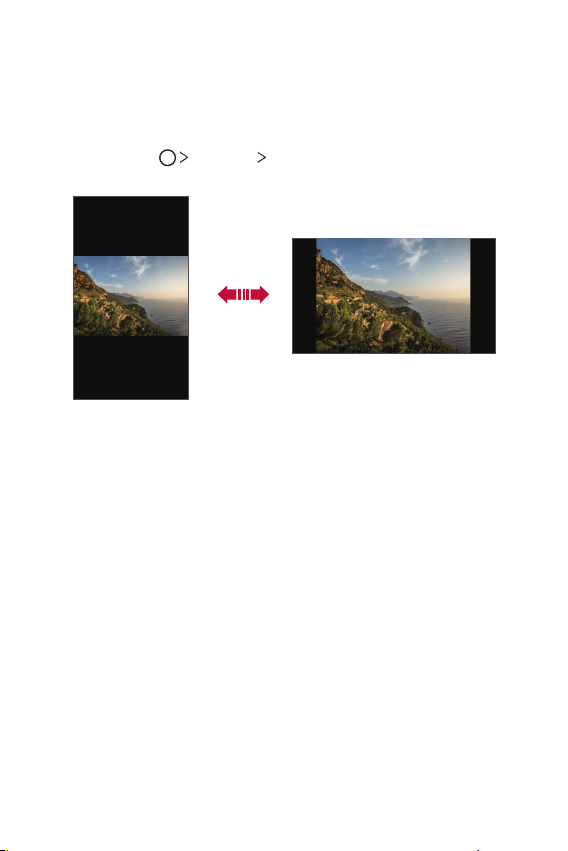
Switching the screen orientation
You can set the screen orientation to automatically switch, depending
on to the device's physical orientation.
On the notification panel, tap Rotation from the quick access icon list.
You can also tap
screen.
Settings Display and activate Auto-rotate
Editing the Home screen
On the Home screen, touch and hold on an empty space, then select
the desired action from below.
• To rearrange the Home screen canvases, drag it to a desired
location.
• To add a widget to the Home screen, select Widgets.
• To change a wallpaper, select Wallpapers.
• To configure the Home screen settings, select Home screen
settings. See
Home screen settings
for details.
Basic Functions 34
Page 36
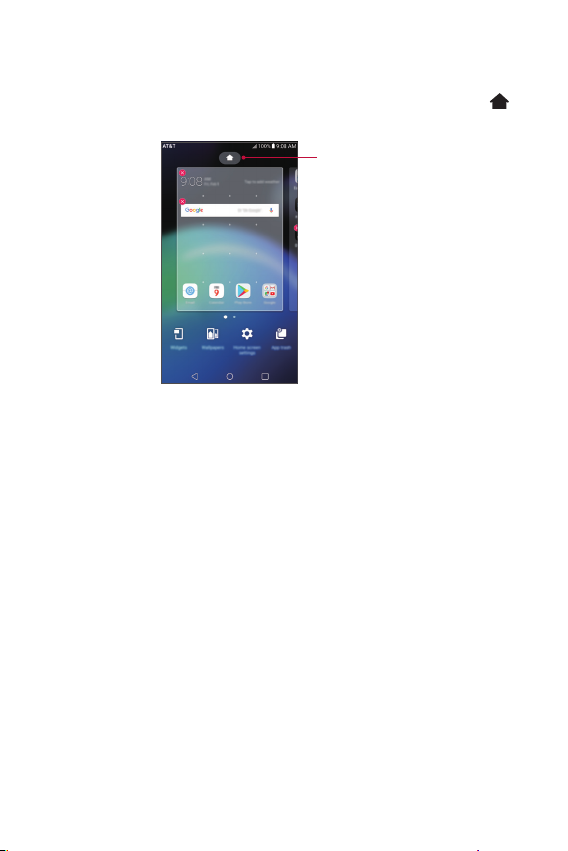
• To view or reinstall the uninstalled apps, select App trash. See
for details.
trash
• To change the default screen, move to the desired screen, tap
then tap the screen once more.
Default screen
App
,
Basic Functions 35
Page 37
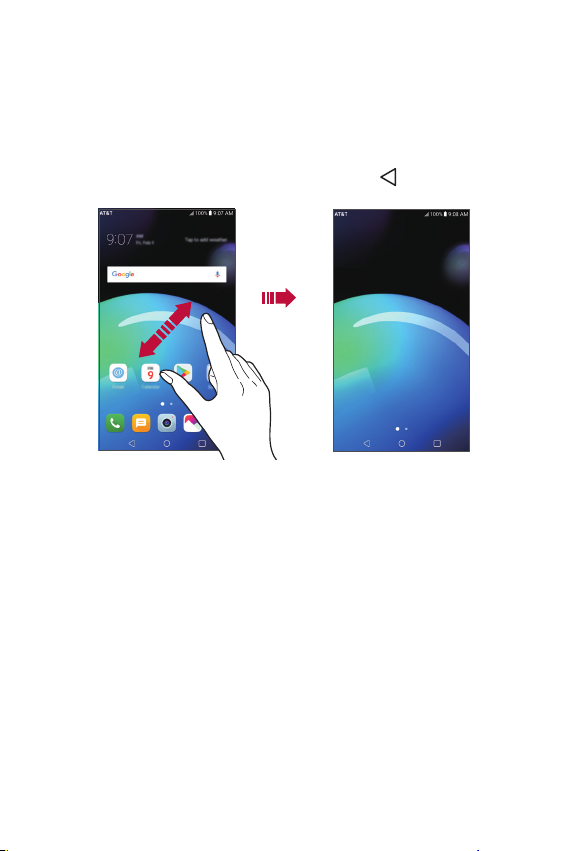
Viewing the background theme
You can view only the background image by hiding the apps and
widgets on the Home screen.
Spread two fingers apart on the Home screen.
• To return to the original screen, which displays apps and widgets,
pinch your fingers on the Home screen or tap
.
Moving apps on the Home screen
On the Home screen, touch and hold an app, then drag it to a desired
location.
• To keep frequently used apps at the bottom of the Home screen,
touch and hold an app, then drag it to the quick access area at the
bottom.
• To remove an icon from the quick access area, drag the icon to the
Home screen.
Basic Functions 36
Page 38
Using folders from the Home screen
Creating folders
On the Home screen, touch and hold an app, then drag it over
another app.
• A new folder is created and the apps are added to the folder.
Editing folders
On the Home screen, tap a folder and do one of the following actions.
• To edit the folder name and color, tap the folder name.
• To add apps, touch and hold an app, then drag it over the folder
and release it.
• To remove an app from the folder, touch and hold the app and drag
it to outside the folder. If there is only one app remaining in the
folder, the folder is removed automatically.
• You can also add or remove apps after tapping
in the folder.
Home screen settings
You can customize Home screen settings.
Tap Settings Display Home screen.
1
Customize the following settings:
2
• Select Home: Select a Home screen mode.
• Wallpaper: Change the Home screen background wallpaper.
• Screen swipe effect: Select an effect to apply when the Home
screen canvas switches.
• Icon shape: Choose if you want icons to have square or
rounded corners.
• Sort apps by: Set how apps are sorted on the Home screen.
• Grid: Change the app arrangement mode for the Home screen.
• Hide apps: Select which apps you want to hide from the Home
screen.
Basic Functions 37
Page 39
• Loop Home screen: Enable to allow continuous Home screen
scrolling (loop back to the first screen after the last screen).
• Search: Search by swiping down on the Home screen.
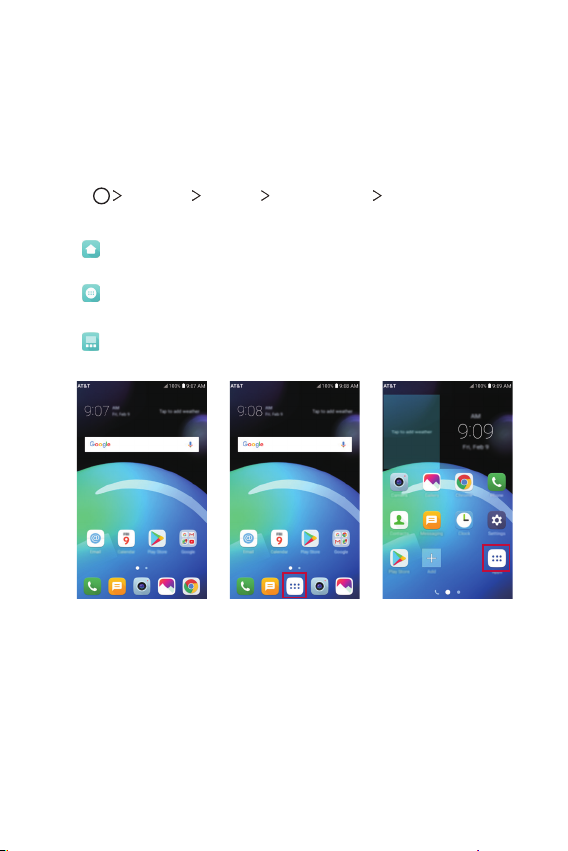
Select home
You can select one of 3 modes.
Tap Settings Display Home screen Select Home.
1
Choose the mode you want to use.
2
Home (default): Provides the standard layout showing all
•
apps.
Home & app drawer: Provides a separate layout for the
•
Home screen and apps list.
EasyHome: Provides a simplified experience for the first-
•
time smartphone user.
Home (default) EasyHomeHome & app drawer
Basic Functions 38
Page 40
Screen lock
Screen lock overview
Your device's screen turns off and locks itself if you press the Power/
Lock key. This also happens after the device is left idle for a specified
period of time.
If you press the Power/Lock key when a screen lock is not set, the
Home screen appears immediately.
To ensure security and prevent unwanted access to your device, set a
screen lock.
• A screen lock prevents unnecessary touch input on the device
screen and reduces battery consumption. We recommend that you
activate the screen lock while not using the device.
Setting a screen lock
There are several options available when setting a screen lock.
Tap Settings Display Lock screen Select screen lock.
1
Select the preferred method and customize it as desired.
2
• None: Deactivate the screen lock function.
• Swipe: Swipe on the screen to unlock the screen.
• Pattern: Draw a pattern to unlock the screen.
• PIN: Enter a numeric password to unlock the screen.
• Password: Enter an alphanumeric password to unlock the
screen.
• If you incorrectly attempt to unlock the device 5 times, the screen
is blocked for 30 seconds.
Basic Functions 39
Page 41

Secure start-up settings
For additional security for your device, you can enable the Secure
start-up option when setting a screen lock.
• You cannot use all functions, except for emergency calls, until you
unlock the device.
• If you forget your decryption password, you cannot restore
encrypted data and personal information.
Precautions for the secure start-up feature
• If you forget your decryption password, you cannot restore
encrypted data and personal information.
• Be sure to keep your screen lock passwords separately.
• If you enter the screen lock passwords incorrectly more than
the specified times, the device automatically resets itself and
the encrypted data and your personal information are deleted
automatically and they cannot be restored.
• Be cautious not to enter incorrect screen lock passwords more
than the specified times.
• When you turn on the device right after the device reboots,
encryption also starts. If you stop the encryption arbitrarily,
the data may be damaged. Be sure to wait until the reboot is
completed.
Lock screen settings
You can customize the following lock screen settings.
Tap Settings Display Lock screen.
1
Customize the following settings:
2
• Select screen lock: Select a screen lock method.
Basic Functions 40
Page 42
• Smart Lock: Select trusted items so that if you are connected
to or near one, the device is automatically unlocked.
• Wallpaper: Change the lock screen background wallpaper.
• Clock: Select the position of the clock on the lock screen.
• Shortcuts: Add an app shortcut and directly access the app
from the lock screen by dragging the app shortcut.
• Screen swipe effect: Set screen transition effects when the
screen is unlocked.
• Contact info for lost phone: Display emergency contact
information on the lock screen.
• Lock timer: Set the amount of idle time after which the device
automatically locks.
• Power key instantly locks: Instantly lock the screen when the
Power/Lock key is pressed.
• Available setting items may vary, depending on the selected screen
lock method.
KnockON
You can turn the screen on or off by double-tapping the screen.
• This option is available only on the Home screen provided by LG. It
may not function properly on a custom launcher or on a third party
Home screen installed by the user.
• When tapping the screen, use your fingertip. Do not use a
fingernail.
• To use the KnockON feature, make sure that the proximity/light
sensor is not blocked by a sticker or any other foreign substance.
Basic Functions 41
Page 43
Turning on the screen
Double-tap the middle of the screen.
• Tapping the top or bottom of the screen may decrease the
recognition rate.
Turning off the screen
Double-tap on an empty space on the Home screen.
You can also double-tap an empty space on the status bar.
Memory card encryption
You can encrypt and protect data saved on the memory card. The
encrypted data in the memory card cannot be accessed from another
device.
Tap Settings General Security Encrypt SD card.
1
Read the on-screen overview of memory card encryption and then
2
tap CONTINUE to continue.
Select an option and tap ENCRYPT NOW.
3
• New data encryption: Encrypt only data that is saved on the
memory card after encryption.
• Full encryption: Encrypt all the data currently saved on the
memory card.
• Exclude media files: Encrypt all files, except for media files
such as music, photos and videos.
Basic Functions 42
Page 44
• To encrypt the memory card, make sure that a screen lock is set
using a PIN or password.
• Once memory card encryption starts, some functions are not
available.
• If the device is turned off while encryption is underway, the
encryption process will fail, and some data may be damaged.
Therefore, be sure to check that the battery level is sufficient
before starting encryption.
• Encrypted files are accessible only from the device where the files
were encrypted.
• The encrypted memory card cannot be used on another device. To
use the encrypted memory card on another mobile device, format
the card.
• You can activate memory card encryption even when no memory
card is installed into the device. Any memory card that is installed
after encryption will automatically be encrypted.
Taking screenshots
You can take screenshots of the current screen you are viewing.
Via a shortcut
Press and hold the Power/Lock key and the Volume Down (-) key at
the same time for at least two seconds.
• Screenshots can be viewed from the Screenshots folder in the
Gallery.
Via Capture+
On the screen where you want to take a screenshot, drag the status
bar downwards, then tap
• When the screen is turned off or locked, you can access Capture+
by pressing the Volume Up (+) key twice. To use this feature, tap
Settings General and turn on Shortcut keys.
Writing notes on a screenshot
• See
Basic Functions 43
.
for details.
Page 45
Entering text
Using the Smart keyboard
You can use the Smart keyboard to enter and edit text.
With the Smart keyboard, you can view text as you type without
bothering to alternate between the screen and a conventional
keyboard. This allows you to easily find and correct errors when
typing.
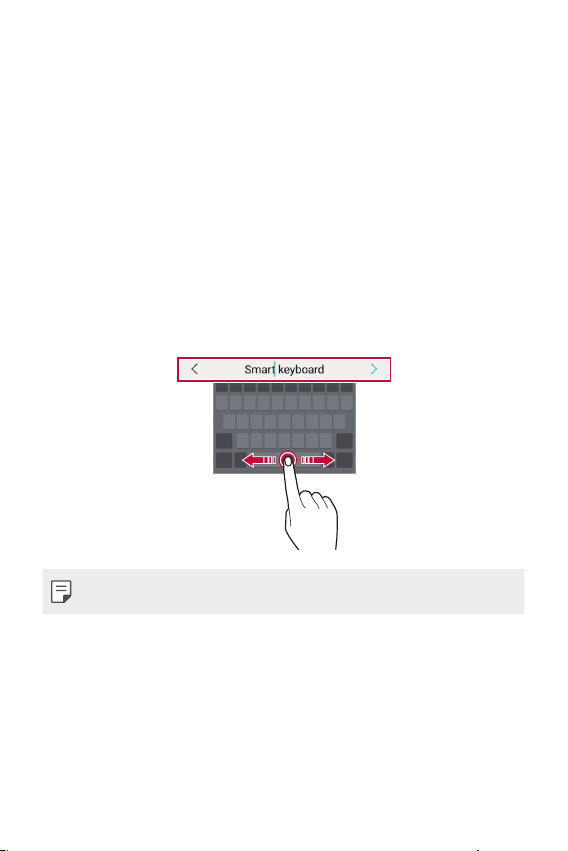
Moving the cursor
With the Smart keyboard, you can move the cursor to the exact
position you want. When typing text, touch and hold on the space
bar and then drag left or right.
• This option is available only on the QWERTY keyboard.
Basic Functions 44
Page 46
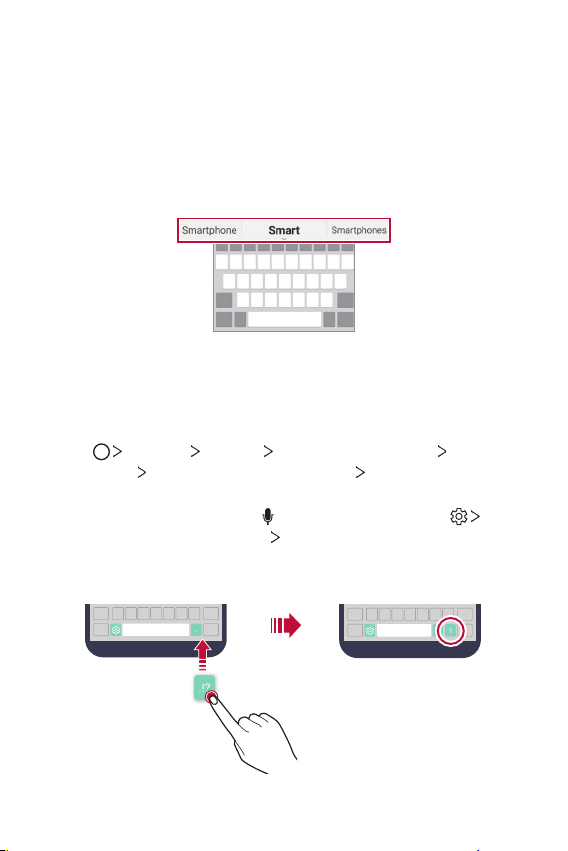
Suggesting words
Smart keyboard automatically analyzes your usage patterns to
suggest frequently used words as you type. The longer you use your
device, the more precise the suggestions are.
Enter text, then tap a suggested word.
• The selected word is automatically entered. You do not need to
manually type every letter of the word.
Changing the QWERTY keyboard layout
You can add, delete or rearrange keys on the bottom row of the
keyboard.
Tap Settings General Language & keyboard LG
1
Keyboard
layout.
You can also touch and hold
Keyboard height and layout
Touch and hold a key on the bottom row, then drag it to a desired
2
position.
Keyboard height and layout QWERTY keyboard
on the keyboard and tap
QWERTY keyboard layout.
Basic Functions 45
Page 47
• This option is available on the QWERTY, QWERTZ and AZERTY
keyboards.
• This function may not be supported for some languages.
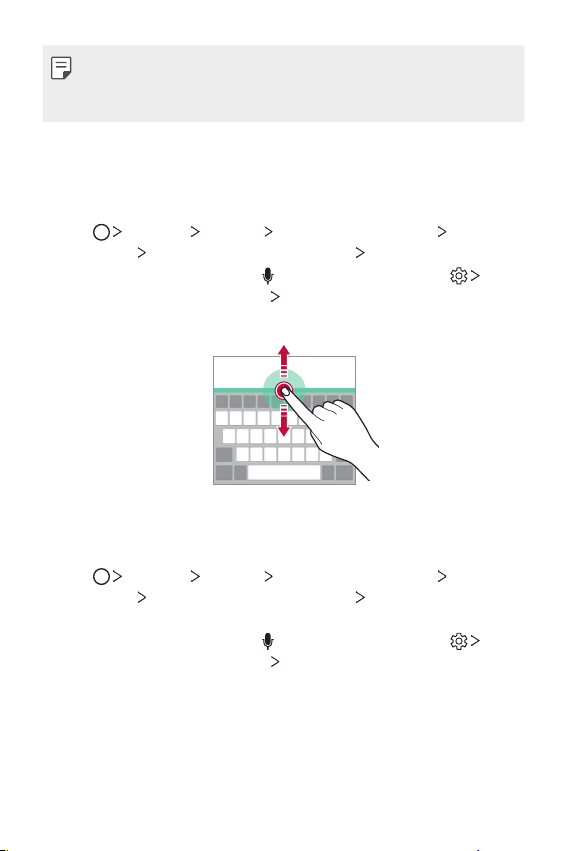
Customizing the keyboard height
You can customize the keyboard height to maximize hand comfort
when typing.
Tap Settings General Language & keyboard LG
1
Keyboard
You can also touch and hold
Keyboard height and layout
Adjust the keyboard height.
2
Keyboard height and layout Keyboard height.
on the keyboard and tap
Keyboard height.
Selecting a landscape keyboard mode
You can select a landscape keyboard mode from several choices.
Tap Settings General Language & keyboard LG
1
Keyboard
landscape.
You can also touch and hold
Keyboard height and layout
Select a keyboard mode.
2
Keyboard height and layout Keyboard type in
on the keyboard and tap
Keyboard type in landscape.
Basic Functions 46
Page 48
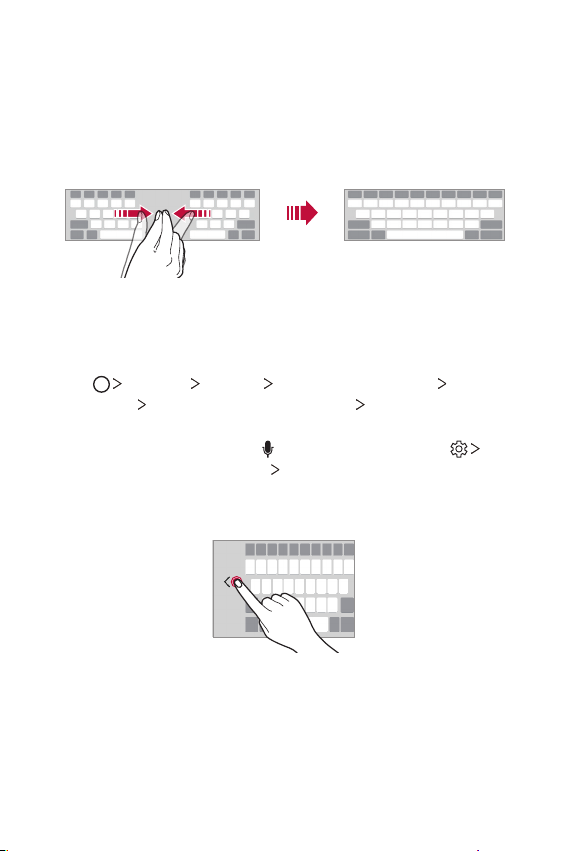
Splitting the keyboard
You can split the keyboard in half and place each piece on either side
of the screen when the screen is in landscape mode.
To split the keyboard, turn the device horizontally and spread two
fingers apart on the keyboard. To join the keyboard, pinch in on the
keyboard.
One-handed operation mode
You can move the keyboard to one side of the screen so that you can
use the keyboard with one hand.
Tap Settings General Language & keyboard LG
1
Keyboard
operation.
You can also touch and hold
Keyboard height and layout
Press the arrow displayed next to the keyboard to move the
2
keyboard in the desired direction.
Keyboard height and layout One-handed
on the keyboard and tap
One-handed operation.
Basic Functions 47
Page 49
Entering text by using voice
On the keyboard, tap .
• To maximize the voice command recognition, speak clearly.
• To enter text with your voice, make sure that your device is
connected to a network.
• To select the language for voice recognition, tap
on the voice recognition screen.
• This function may be not supported, or the supported languages
may differ depending on the service area.
Languages
Adding languages to the keyboard
You can make additional languages available for keyboard input.
Tap Settings General Language & keyboard LG
1
Keyboard
Select the languages you want to use on the keyboard.
2
Select languages.
Copy and Paste
You can cut or copy text from an app, and then paste the text into
the same app. Or you can run other apps and paste the text into
them.
Touch and hold around the text you want to copy or cut.
1
Drag / to specify the area to copy or cut.
2
Select either CUT or COPY.
3
• Cut or copied text is automatically added to the clipboard.
Touch and hold the text input window, then select PASTE.
4
• If there is no item that has been copied or cut, the PASTE option
will not appear.
Basic Functions 48
Page 50
Clip Tray
If you copy or cut an image or text, it is automatically saved to the clip
tray and can be pasted to any space at any time.
On the keyboard, touch and hold and select .
1
You can also touch and hold the text input window, then select
Clip Tray.
Select and paste an item from the clip tray.
2
• A maximum of 20 items can be saved to the clip tray.
to lock saved items in order not to delete them, even
• Tap
when the maximum quantity is exceeded. A maximum of ten
items can be locked. To delete locked items, unlock them first.
to delete the items saved to the clip tray.
• Tap
• The clip tray may not be supported by some downloaded apps.
Do not disturb
You can limit or mute notifications to avoid disturbances for a specific
period of time.
Tap Settings Sound & notification Do not disturb and
1
then tap Use Do not disturb
Tap Mode and select the desired mode.
2
• Priority only: Receive sound or vibrate notifications for the
selected apps. Even when Priority only is turned on, alarms still
sound.
• Total silence: Disable both the sound and vibration.
to activate it.
Basic Functions 49
Page 51

03
Useful Apps
Page 52
Installing and uninstalling apps
Installing apps
Access an app store to search and download apps.
• You can use the SmartWorld, Play Store or the app store provided
by your service provider.
• Some app stores may require you to create an account and sign in.
• Some apps may charge fees.
• If you use mobile data, you may be charged for data usage,
depending on your pricing plan.
• SmartWorld may not be supported depending on the area or
service provider.
Uninstalling apps
Uninstall apps that you no longer use from your device.
Uninstalling with the touch and hold gesture
On the Home screen, touch and hold the app to uninstall, then drag it
over Delete at the top of the screen.
• Uninstalled apps can be reinstalled within 24 hours of
uninstallation. See
App trash
Uninstalling by using the settings menu
Tap Settings General Apps, select an app, then tap
Uninstall.
for details.
Uninstalling apps from the app store
To uninstall an app, access the app store from which you download
the app and uninstall it.
• Some apps cannot be uninstalled by users.
Useful Apps 51
Page 53
App trash
You can view the uninstalled apps on the Home screen. You can also
reinstall apps within 24 hours of uninstallation.
Tap Other apps App trash.
1
Alternatively, you can touch and hold an empty area of the Home
screen, then tap App trash.
Choose the desired option.
2
• Restore: Reinstall the selected app.
: Remove the uninstalled apps permanently from the device.
•
• Uninstalled apps are automatically removed from the device 24
hours after they were uninstalled. If you want to reinstall the
uninstalled apps, you must download them again from the app
store.
• This feature is activated on the default Home screen only. If you
uninstall apps while using the EasyHome screen or other launcher,
they are immediately and permanently removed from the device.
Useful Apps 52
Page 54
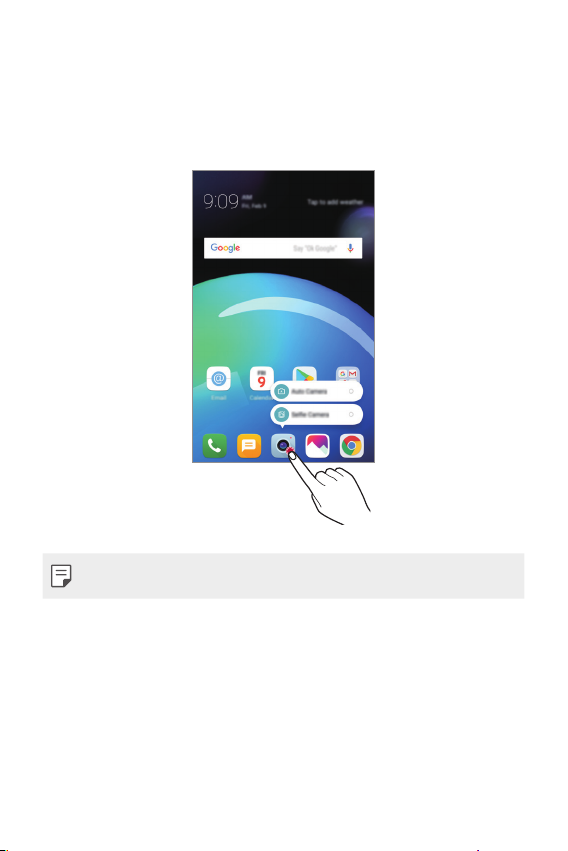
App Shortcuts
On the Home screen, touch and hold an app icon such as Phone,
Message, Camera, Gallery and Settings to display a quick access
menu. Use apps more easily through App Shortcuts.
• This feature is available only on some apps.
Useful Apps 53
Page 55
Phone
Voice call
Make a phone call by using one of the available methods, such as
manually entering a phone number and making a call from the
contact list or the list of recent calls.
Making a call from the keypad
Tap Dial.
1
Make a call by using a method of your choice:
2
• Enter a phone number and tap
• Touch and hold a speed dial number.
• Search for a contact by tapping the initial letter of a contact
name in the contact list, and then tap
• To enter "+" when making an international call, touch and hold
number 0.
• See
Adding contacts
the speed dial list.
for details on how to add phone numbers to
Making a call from the contact list
Tap Contacts.
1
From the contact list, select a contact and tap .
2
.
.
Useful Apps 54
Page 56
Answering a call
To answer a call, drag across the incoming call screen.
• When the stereo headset is connected, you can make calls by
using the call/end button on the headset.
• To end a call simply by pressing the Power/Lock key, tap
Settings
End call with the Power key.
Networks Call Answer and end calls, then turn on
Rejecting a call
To reject an incoming call, drag across the incoming call screen.
• To send a rejection message, drag the rejection message option
across the screen.
• To add or edit a rejection message, tap
Call Call blocking & Decline with message Decline with
message.
• When a call is coming in, press the Volume Up (+), Volume Down
(-) or Power/Lock key to mute ringtone or vibration, or to hold the
call.
Settings Networks
Viewing missed calls
If there is a missed call, the status bar at the top of the screen
displays
To view missed call details, drag the status bar downwards. You can
also tap
.
Call logs.
Useful Apps 55
Page 57
Functions accessible during a call
During a call, you can access a variety of functions by tapping onscreen buttons:
• Hold: Place the current call on hold.
• Switch call type: Switch between a voice and video call (if
supported).
• Contacts: View the contact list during a call.
• End: End a call.
• Dialpad: Display or hide the dial pad.
• Speaker: Turn on the speakerphone function.
• Mute: Mute your voice so that your voice cannot be heard by the
other party.
• Bluetooth: Switch the call to a Bluetooth device that is paired and
connected.
: Access additional call options.
•
• Available setting items may vary depending on the area or service
provider.
Making a three-way calling
You can make a call to another contact during a call.
During a call, tap Add call.
1
Enter a phone number and tap .
2
• The two calls are displayed on the screen at the same time, and
the first call is put on hold.
To start a conference call, tap Merge calls.
3
• You may be charged a fee for each call. Consult with your service
provider for more information.
Useful Apps 56
Page 58
Viewing call records
To view recent call records, tap Call logs. Then, you can use
the following functions:
• To view detailed call records, select a contact. To make a call to the
selected contact, tap
• To delete call records, tap
• The displayed call duration may differ from the call charge. Consult
with your service provider for more information.
.
Delete.
Configuring call options
You can configure various call options.
Tap Dial or Call logs.
1
Tap Call settings and then configure the options to suit your
2
preferences.
Useful Apps 57
Page 59
Messaging
Sending a message
You can create and send messages to your contacts using the
Messaging app.
• Sending messages abroad may incur additional charges. Consult
with your service provider for more information.
Tap .
1
Tap .
2
Specify a recipient and create a message.
3
• To attach files, tap
• To access optional menu items, tap
Tap Send to send the message.
4
Reading a message
You can view exchanged messages organized by contact.
Tap .
1
Select a contact from the message list.
2
Configuring messaging settings
You can change messaging settings to suit your preferences.
Tap .
1
Tap Settings from the message list.
2
.
.
Useful Apps 58
Page 60
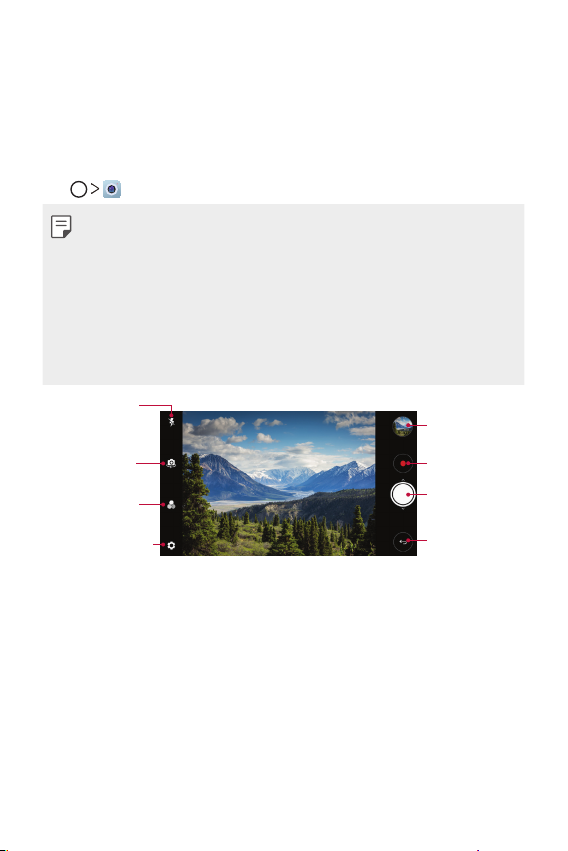
Camera
Starting the camera
You can take a photo or record a video to cherish all of your
memorable moments.
.
Tap
• Before taking a photo or recording a video, wipe the camera lens
with a soft cloth.
• Be careful not to stain the camera lens with your fingers or other
foreign substance.
• Images included in this user guide may be different from the actual
device.
• Photos and videos can be viewed or edited from the Gallery. See
Gallery overview
Turn the flash on
or off.
Switch between
front and rear
cameras.
Apply a film filter
effect.
Change the camera
options.
for details.
Start the Gallery.
Record videos.
Take photos.
Back to the
previous screen.
Useful Apps 59
Page 61
Taking a photo
Select a camera mode and tap the subject to focus the camera on.
1
Tap to take a photo.
2
• You can also press the Volume Down (-) or Volume Up (+) key
to take a photo.
• When the screen is turned off or locked, start the camera by
pressing the Volume Down (-) key twice. To enable this feature, tap
Settings General Shortcut keys.
Recording a video
Select a camera mode and tap the subject to focus the camera on.
1
Tap .
2
• To take a photo while recording a video, tap
• To pause the video recording, tap
recording, tap
Tap to end the video recording.
3
.
. To resume the video
Customizing the camera options
You can customize a variety of camera options to suit your
preferences.
on the screen.
Tap
• Available options vary depending on the selected camera (front or
rear camera) and the selected camera mode.
.
Photo size Select the aspect ratio and size for your photos.
Video resolution Select the resolution and size for your videos.
Useful Apps 60
Page 62

HDR
Obtain photos in vivid colors, and get compensated
effects even when they are taken against the light.
These functions are provided by the High Dynamic
Range (HDR) technology equipped in the device's
camera.
Timer
Cheese shutter Take photos with voice commands.
Tag locations Save the image with GPS location data.
Grid
Storage
Simple view Hide all menus from the camera screen.
Set the timer to automatically take photos after a
specified period of time.
Display guide grids so that you can take photos or
record videos based on the horizontal and vertical
reference lines.
Select if you want to store the pictures and videos in
the Internal storage or SD card.
(Available when the memory card is inserted.)
Additional options on the front camera
Customize the selfie shot settings.
•Gesture shot: Take a photo using the Gesture shot
Selfie shot
Gesture view
Save as flipped Save as flipped images after taking selfies.
feature.
•Auto shot: Take a photo when the camera detects
a face.
Allows you to view the photo immediately after
taking it.
Useful Apps 61
Page 63
Burst shot
You can take continuous shots of photos to create moving pictures.
Touch and hold
• Continuous shots are taken at a fast speed while
• You can take up to 30 photos with the back camera and 20 photos
with the front camera.
.
is held down.
Simple view
Tap Simple view to hide the menus on the camera screen. Tap
to display them.
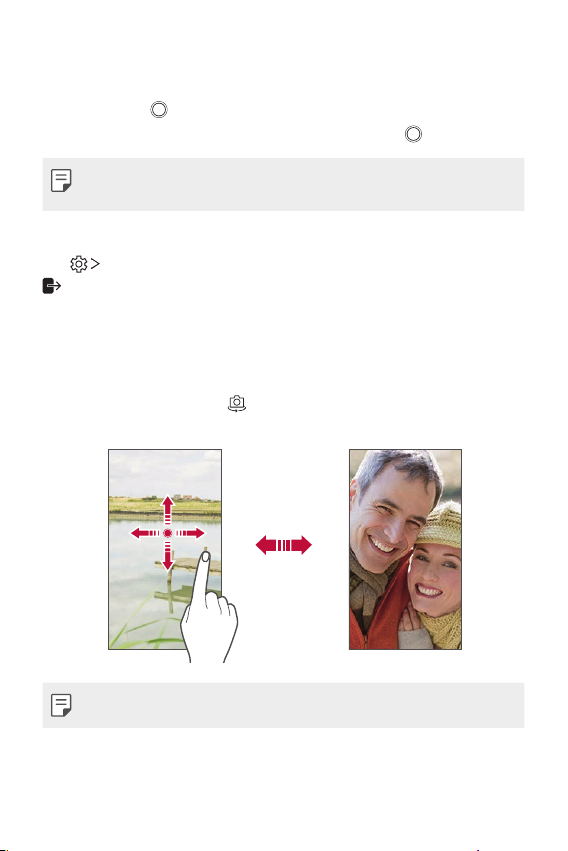
Switching between cameras
You can switch between the front and rear cameras to suit your
environment.
On the camera screen, tap
switch between the front and rear cameras.
or swipe the screen in any direction to
• Use the front camera to take selfies. See
Useful Apps 62
Selfie shot
for details.
Page 64
Zoom in or out
You can use zoom in or out on the camera screen while taking a
photo or recording a video.
• On the camera screen, pinch or spread two fingers to zoom in or
out, then use the displayed +/- slide bar.
• You can also drag the
on the orientation of the phone). This feature is available only in
specific modes.
• The zoom feature is not available when using the front camera in
selfie mode.
button up, down, left or right (depending
Selfie shot
You can use the front camera to take selfies.
Gesture shot
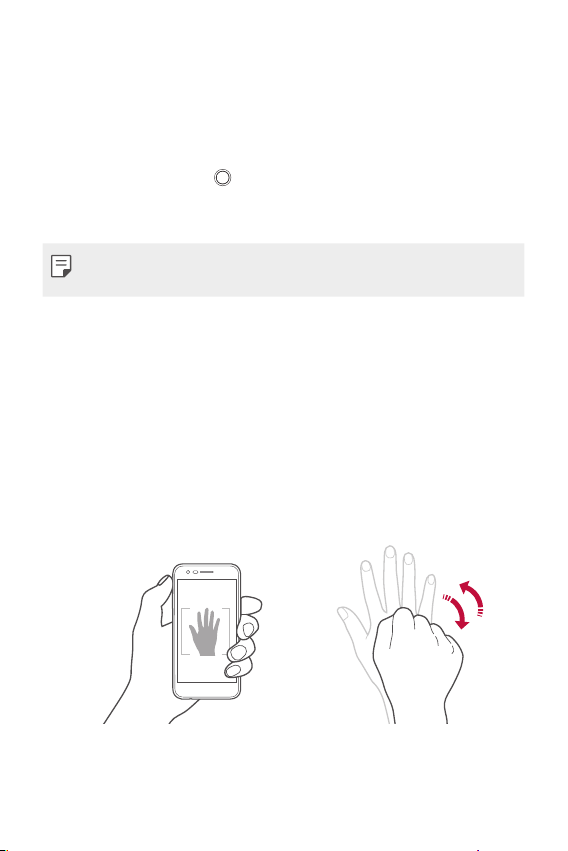
You can take selfies by using gestures.
Show your palm to the front camera and then clench your fist.
You can also clench your fist and then open it towards the front
camera.
• In three seconds, a photo is taken.
Useful Apps 63
Page 65
• To use this feature, switch to the front camera mode, then tap
Selfie shot
• Make sure that your palm and fist are within the reference line so
that the camera can detect them.
• This feature may not be available while using some of the camera
features.
Gesture shot.
Auto shot
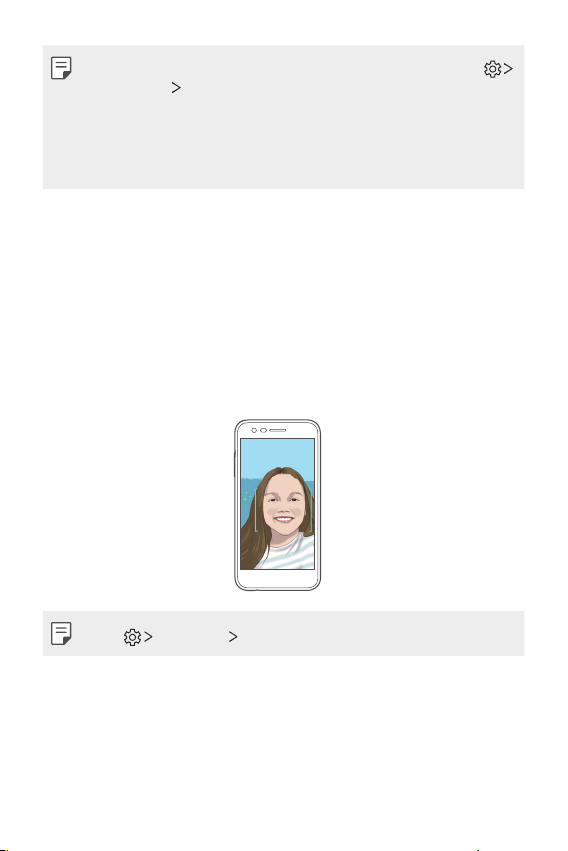
You can use the face detection feature to take selfies easily and
conveniently. You can set the device so that, when you look at
the screen, the front camera detects your face and takes a selfie
automatically.
• The white colored guide frame appears when the front camera
detects your face. If the subject within the guide frame stops
moving, the guide frame color turns green, then the camera takes
a photo.
• Tap Selfie shot Auto shot to enable the Auto shot feature.
Interval shot
You can take selfies at an interval.
While using the front camera with the Gesture shot mode selected,
show your palm to the camera, then clench your fist twice quickly.
Useful Apps 64
Page 66
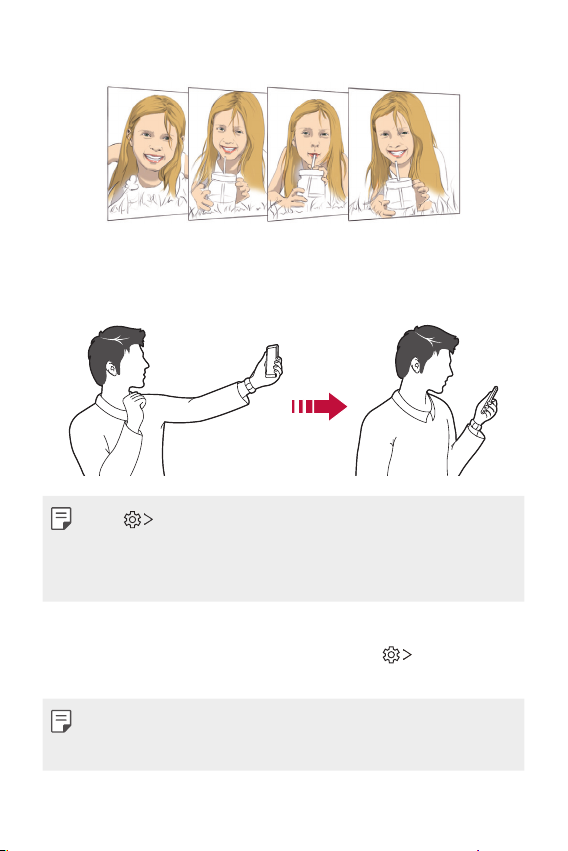
• Four photos are taken at about two second intervals.
Gesture view
After taking a selfie with the front camera, you can preview the selfie
immediately by placing the screen close to your face.
• Tap Gesture view to enable the Gesture view feature.
• Only one preview is available each time a photo is taken.
• If you rotate the device while in preview screen, the screen switches
to camera mode.
Save as flipped
Before taking a photo with the front camera, tap Save as
flipped. The image is flipped horizontally.
• When using the front camera, you can change the selfie shot
settings in the camera options. See
options
for details.
Useful Apps 65
Customizing the camera
Page 67
Gallery
Gallery overview
You can view and manage photos and videos saved on your device.
Tap .
1
• Saved photos and videos are displayed by folder.
Tap a folder and select a file.
2
• View the selected file in full-screen mode.
• While viewing a photo, swipe left or right to view the previous
or next photo.
• While viewing a video, swipe left or right to rewind or fast-
forward the video.
• Some file formats may not be supported, depending on the
installed software and the encoding.
• Files that exceed the size limit may cause an error.
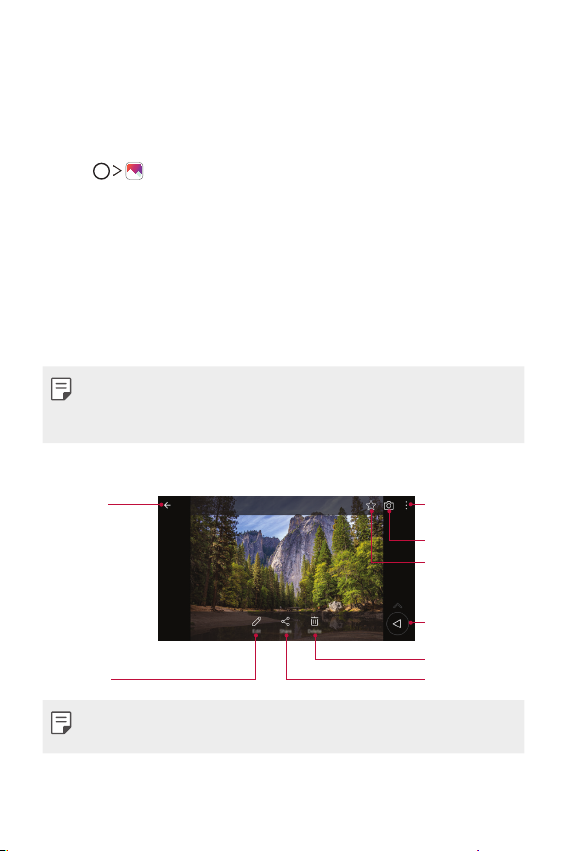
Viewing photos
Back to the
previous screen.
Edit images.
Access additional
options.
Start the camera.
Add to or
remove from
your favorites.
Back to the
previous screen.
Delete images.
Share images.
• To display the menu items, gently tap the screen. To hide the menu
items, tap the screen again.
Useful Apps 66
Page 68
Editing photos
While viewing a photo, tap .
1
Use a variety of effects and tools to edit the photo.
2
Tap SAVE to save changes.
3
• The changes are overwritten to the original file.
• To save the edited photo as another file, tap
Save copy.
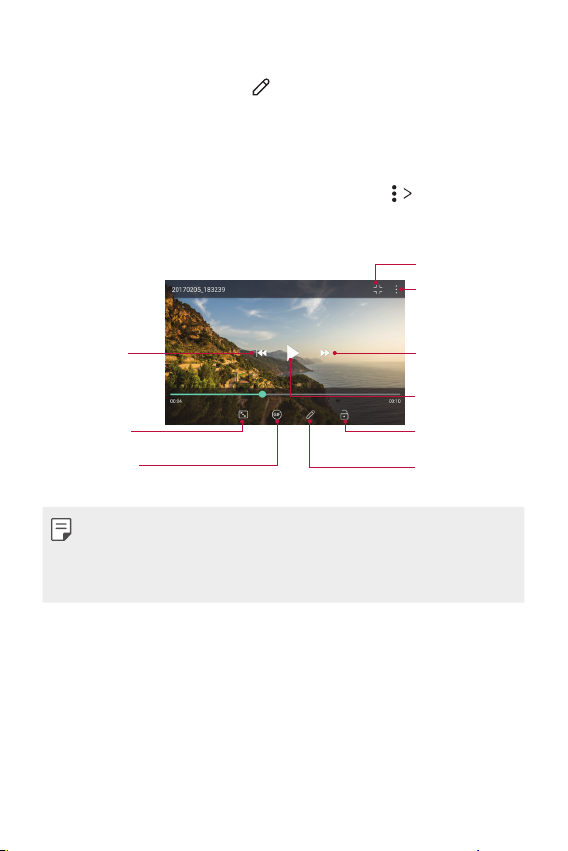
Playing a video
Tap to go to
previous video.
Touch and hold to
rewind.
Choose screen
ratio.
Create a GIF file.
• To adjust the sound volume, drag the right side of the video screen
up or down.
• To adjust the screen brightness, drag the left side of the video
screen up or down.
Open with QSlide.
Access additional
options.
Tap to go to
next video.
Touch and hold
to fast-forward.
Pause or play
the video.
Lock or unlock
the screen.
Edit the video.
Useful Apps 67
Page 69
Editing videos
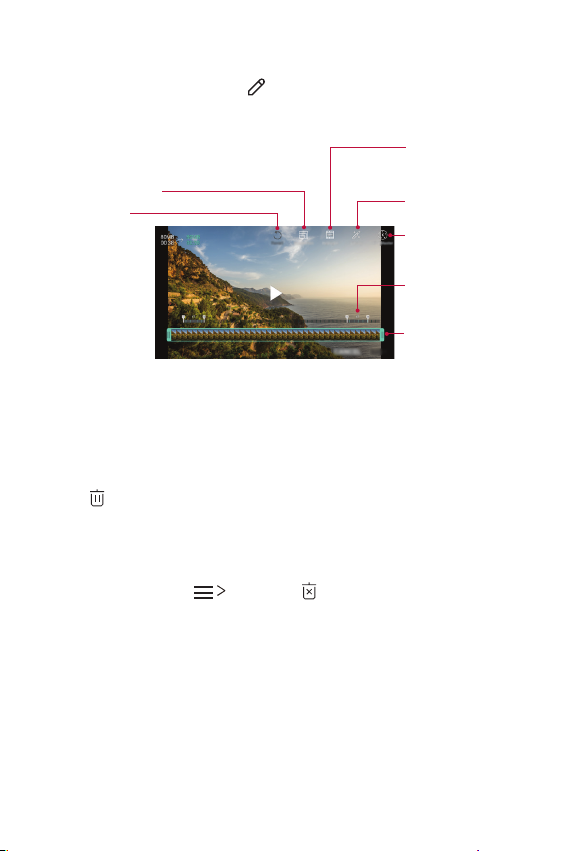
While viewing a video, tap .
1
Use a variety of effects and edit tools to edit the video.
2
Automatically create
a 15 sec, 30 sec or
Adjust the resolution.
Revert the edit.
Tap SAVE to save changes.
3
60 sec video clip.
Create a movie using
various effects.
Launch the
KineMaster video
editor.
Select a section to
change the play
speed.
Adjust the video
duration.
Deleting files
You can delete files by using one of the following options:
• Touch and hold a file from the file list, then tap Delete.
in an album, select files you want to delete, then tap
• Tap
DELETE.
• Deleted files are automatically moved to Trash and they can be
restored to the Gallery within 7 days.
• On the Gallery, tap
files. In this case, the files cannot be restored.
Trash. Tap to permanently delete the
Useful Apps 68
Page 70
Sharing files
You can share files by using one of the following options:
• While viewing a photo, tap
method.
• While viewing a video,
desired method.
in an album to select files and share them using the desired
• Tap
method.
to share the file by using the desired
Share to share the file by using the
Chrome
Sign in to Chrome and import opened tabs, bookmarks and address
bar data from a computer to your device.
Chrome .
Tap
Contacts
Contacts overview
You can save and manage contacts.
Essentials Contacts.
Tap
Adding contacts
Adding new contacts
On the contact list screen, tap .
1
Enter the contact’s details and tap SAVE.
2
Importing contacts
You can import contacts from another storage device.
On the contact list screen, tap Manage contacts Import.
1
Useful Apps 69
Page 71
Select the source and target locations of the contact you want to
2
import, and then tap OK.
Select the vCard file(s) and tap IMPORT.
3
Adding contacts to the speed dial list
On the contact list screen, tap Speed dial.
1
Tap Add contact from a speed dial number.
2
Select a contact.
3
Searching for contacts
You can search for contacts by using one of the following options:
from the top of the contacts list and then enter the contact
• Tap
information or phone number.
• Scroll the contact list up or down.
• From the index of the contact list screen, tap the initial letter of a
contact.
• Tap from the top of the contacts list and then enter the contact
information or phone number to display all search details from call
logs, contacts and groups.
Contacts list
Editing contacts
On the contact list screen, select a contact.
1
On the contact detail screen, tap and edit details.
2
Tap SAVE to save changes.
3
Useful Apps 70
Page 72
Deleting contacts
You can delete contacts by using one of the following options:
• On the contact list screen, touch and hold a contact you want to
delete, then tap Delete contact.
Delete on the contact list screen.
• Tap
Adding favorites
You can register frequently used contacts as favorites.
On the contact list screen, select a contact.
1
On the contact detail screen, tap .
2
Creating groups
On the Groups tab, tap .
1
Enter a new group name.
2
Tap Add members, select contacts, then tap ADD.
3
Tap SAVE to save the new group.
4
QuickMemo+
QuickMemo+ overview
You can make creative notes by using a variety of options on
this advanced notepad feature, such as image management and
screenshots, which are not supported by the conventional notepad.
Creating a note
Tap Essentials QuickMemo+.
1
Tap to create a note.
2
: Save a note.
•
: Undo the last action.
•
Useful Apps 71
Page 73
• : Redo the last action you undid.
: Enter a note by using the keypad.
•
: Write notes by hand.
•
: Erase handwritten notes.
•
: Crop parts of a handwritten note.
•
: Access additional options.
•
Tap to save the note.
3
Writing notes on a photo
Tap Essentials QuickMemo+.
1
Tap to take a photo, then tap OK.
2
• The photo is automatically attached into the notepad.
Tap or to write notes on the photo.
3
• Write notes by hand on the photo.
• Enter text below the photo.
Tap to save the note.
4
Writing notes on a screenshot
While viewing the screen you want to capture, drag the status bar
1
downwards and then tap
• The screenshot appears as the notepad background theme.
Memo tools appear at the top of the screen.
Take notes as desired.
2
• Write notes by hand on the photo.
Tap and save the notes to the desired location.
3
• Saved notes can be viewed in either QuickMemo+ or Gallery.
• To save notes in the same location all the time, select the Use
as default app checkbox and select an app.
.
Useful Apps 72
Page 74
Managing folders
You can view notes grouped by the type of the notes.
Tap Essentials QuickMemo+.
1
At the top of the screen, tap and select a menu item:
2
• All memos: View all notes saved in QuickMemo+.
• My memos: View notes created by QuickMemo+.
• Capture+: View notes created by Capture+.
• Photo memos: View notes created by
• Trash: View deleted notes.
• New category: Add categories.
: Rearrange, add or delete categories. To change the name of
•
a category, tap the category.
• Some folders do not appear when launching QuickMemo+ for
the first time. Disabled folders are enabled and appear when they
contain at least one related note.
.
Tasks
You can register tasks to your device to easily manage schedules.
Tap Essentials Tasks.
1
Tap to add a task.
2
Enter task details and then tap SAVE.
3
Useful Apps 73
Page 75
Calculator
You can use two types of calculators: the simple calculator and the
scientific calculator.
Tap Essentials Calculator.
1
Use the keypad to make a calculation.
2
• To use scientific calculator, drag the blue colored slide bar
located in the right side of the screen to the left.
• To restart a calculation, touch and hold the DEL button.
FM Radio
You can listen to FM radio.
Essentials FM Radio.
Tap
• To use this app, first connect earphones to the device. The
earphones function as the radio antenna.
• This function may not be supported depending on the area.
File Manager
You can view and manage files saved on your device or cloud.
Tap Other Apps File Manager.
1
Tap and select the desired storage location.
2
Downloads
You can view, delete or share files downloaded via the Internet or
apps.
Other Apps Downloads.
Tap
Useful Apps 74
Page 76
Clock
Alarm
You can set an alarm to trigger it at a specified time.
Tap Essentials Clock Alarm.
1
Tap to add a new alarm.
2
Configure the alarm settings and tap SAVE.
3
• If you select a previously set alarm, you can edit the alarm.
• To delete an alarm, tap
touch and hold the alarm.
World clock
You can view the current time in cities around the world.
Tap Essentials Clock World clock.
1
Tap and add a city.
2
Timer
You can set the timer to trigger an alarm after a specified period of
time.
Tap Essentials Clock Timer.
1
Set the time and tap Start.
2
• To pause the timer, tap Pause. To resume the timer, tap Resume.
Tap Stop to stop the timer alarm.
3
at the top of the screen. You can also
Useful Apps 75
Page 77
Stopwatch
You can use the stopwatch to record a lap time.
Tap Essentials Clock Stopwatch.
1
Tap Start to initiate the stopwatch.
2
• To record a lap time, tap Lap.
Tap Pause to pause the stopwatch.
3
• To resume the stopwatch, tap Resume.
• To clear all the records and restart the stopwatch, tap Reset.
Calendar
Calendar overview
You can use the calendar to manage events and tasks.
Adding events
Tap Calendar.
1
Select a date and then tap .
2
Enter event details and tap SAVE.
3
Syncing events
Tap Calendars to sync and select a calendar to sync.
• When your events are saved from the device to your Google
account, they are automatically synced with the Google calendar,
too. Then, you can sync other devices with the Google calendar in
order to make those devices have the same events that your device
has and to manage your events on those devices.
Useful Apps 76
Page 78

Event pocket
You can use the event pocket to create events.
to open the event pocket and then drag content to a date in
Tap
the calendar.
: Manage images, text, memos and temporarily saved events.
•
You can also share text, images and memos from another app and
save them to the pocket. If you tap POCKET when creating an
event, the event is temporarily saved to the pocket.
: Manage tasks that have no deadline, such as events.
•
Email
Use the Email application to send and receive emails from your
webmail or other accounts, using POP3 or IMAP, or access your
Exchange account for your corporate email needs.
Set up Email account
Your phone supports several types of email accounts and allows you
to have multiple email accounts set up at one time.
Before setting up an email account, make sure you have the
username (user ID), password, server name, etc., so you can get set
up successfully.
Tap Email.
1
Follow the onscreen instructions to set up your email account.
2
• The email account is set up and you will begin receiving email.
Useful Apps 77
Page 79
LG SmartWorld
You can download a variety of games, audio content, apps and
fonts provided by LG Electronics. Customize your device to suit your
preferences by using Home themes and fonts.
• If you use mobile data, you may be charged for data usage
depending on your pricing plan.
• This feature may not be supported depending on the area or
service provider.
Tap Other Apps SmartWorld.
1
Tap LG Account, then sign in.
2
Select and download content items.
3
Google Apps
You can use Google apps by setting a Google account. The Google
account registration window appears automatically when you use a
Google app for the first time. If you do not have a Google account,
create one from your device. For details on how to use an app, see
the Help in the app.
• Some apps may not work depending on the area or service provider.
Google
Use Google to search for web pages, images, news and more by
entering or speaking keywords.
Gmail
Register your Google email account to your device to check or send
email.
Useful Apps 78
Page 80

Maps
Find your location or the location of a place on the map. View
geographical information.
YouTube
Search and play videos. Upload videos on YouTube to share them with
people around the world.
Drive
Upload, save, open, share and organize files from your device. Files
accessible from apps can be accessed from anywhere, including online
and offline environments.
Play Music
Purchase music files from the Play Store. Play music files saved on
your device.
Play Movies & TV
Use your Google account to rent or purchase movies. Purchase
content and play it anywhere.
Duo
Make a video call with your family, friends and anyone else who uses
the app.
Photos
View or share photos or albums saved on your device.
Docs
Create documents or edit documents created online or from another
device. Share and edit documents together with others.
Useful Apps 79
Page 81

Sheets
Create spreadsheets or edit spreadsheets created online or from
another device. Share and edit spreadsheets together with others.
Slides
Create presentation material or edit presentation material created
online or from another device. Share and edit presentation material
together with others.
Useful Apps 80
Page 82

04
Phone Settings
Page 83
Settings
You can customize the device settings to fit your preferences.
Settings.
Tap
• Tap and enter a keyword in the search box to access a setting
item.
• Tap
to change the view mode. This user guide assumes that you
are using the Tab view.
Networks
Airplane mode
You can turn off the call and mobile data functions. When this mode
is on, functions that do not involve data, such as games and music
playback, remain available.
On the settings screen, tap Networks Airplane mode.
1
Tap TURN ON in the confirmation screen.
2
Wi-Fi
You can connect to nearby devices over a Wi-Fi network.
Connecting to a Wi-Fi network
On the settings screen, tap Networks Wi-Fi.
1
Tap to activate it.
2
• Available Wi-Fi networks appear automatically.
Phone Settings 82
Page 84
Select a network.
3
• You may need to enter the network's Wi-Fi password.
• The device skips this process for previously accessed Wi-Fi
networks. If you do not want to automatically connect to a
certain Wi-Fi network, tap the network and then tap FORGET.
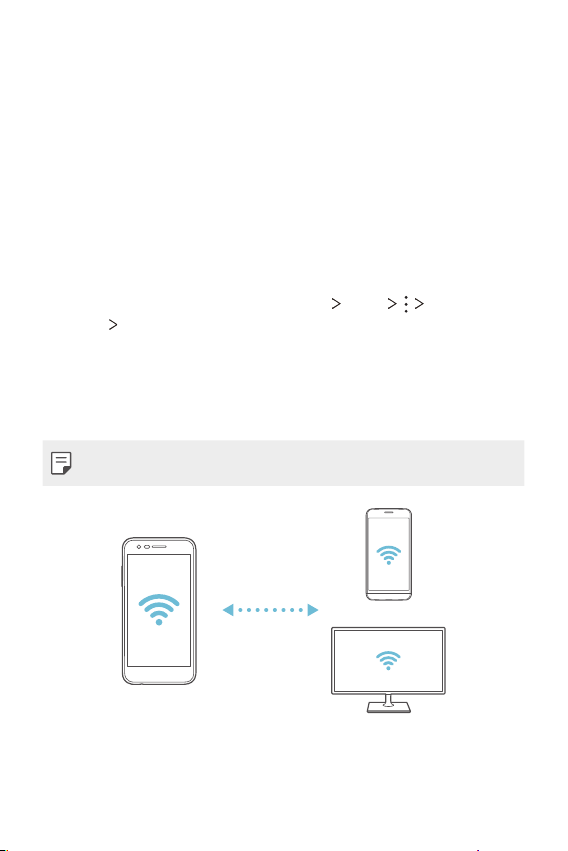
Wi-Fi Direct
You can connect your device to other devices that support Wi-Fi
Direct to share data directly with them. You do not need an access
point. You can connect with more than two devices by using Wi-Fi
Direct.
On the settings screen, tap Networks Wi-Fi Advanced
1
2
Wi-Fi Direct.
Wi-Fi
• Nearby devices that support Wi-Fi Direct automatically appear.
Select a device.
• Connection occurs when the device accepts the connection
request.
• The battery may drain faster when using Wi-Fi Direct.
Phone Settings 83
Page 85
Wi-Fi Calling
Wi-Fi Calling can improve your coverage and allows you to make
phone calls over a Wi-Fi network (when a Wi-Fi network is available).
On the settings screen, tap Networks
Wi-Fi Calling.
Bluetooth
You can connect your device to nearby devices that support
Bluetooth to exchange data with them. Connect your device to a
Bluetooth headset and a keyboard. This makes it easier to control the
device.
Pairing with another device
On the settings screen, tap Networks Bluetooth.
1
Tap to activate it.
2
• Available devices appear automatically.
• To refresh the device list, tap SEARCH.
• Only devices set as visible are displayed on the list.
Select a device from the list.
3
Follow the on-screen instructions to perform authentication.
4
• This step is skipped for previously accessed devices.
Sending data via Bluetooth
Select a file.
1
• You can send multimedia files or contacts.
Tap Bluetooth.
2
Phone Settings 84
Page 86
Select a target device for the file.
3
• The file is sent as soon as the target device accepts it.
• File sharing processes may differ, depending on the file.
Mobile networks
You can customize mobile data settings.
On the settings screen, tap Networks Mobile networks.
1
Customize the following settings:
2
• Mobile data: Turn mobile data on or off.
• Mobile data reminder: Allows you to set when to be reminded
that mobile data is off.
• Review reminder settings: Review the settings whenever
mobile data is turned off.
• International data roaming: Browse the web, use emails,
multimedia messages and other data services overseas.
• Disable 2G: Allows you to disable 2G service on your phone.
• Access Point Names: View or change the access point for
using mobile data services. To change the access point, select a
choice from the access point list.
• Search for AT&T MicroCell: Allows you to search for AT&T
MicroCells to improve your mobile service.
Data Manager
You can turn mobile data on and off. You can also manage mobile
data usage.
Turning on mobile data
On the settings screen, tap Networks Data Manager.
1
Tap to activate it.
2
Phone Settings 85
Page 87
Customizing mobile data settings
On the settings screen, tap Networks Data Manager.
1
Customize the following settings:
2
• Mobile data: Set to use data connections on mobile networks.
• Limit mobile data usage: Set a limit for mobile data usage to
block mobile data if the limit is reached.
: Customize the desired mobile data settings.
•
Call
You can customize call settings, such as voice call and international
call options.
• Some features may not be supported depending on the area or
service provider.
On the settings screen, tap Networks Call.
1
Customize the desired settings.
2
Share & connect
Sharing panel
You can share contents from the Gallery, Music and File Manager with
nearby devices. You can also share content with specific people in
apps that work with Google Direct Share.
On the settings screen, tap Networks Share & connect
1
Sharing panel.
Tap to deactivate each option, if desired.
2
Phone Settings 86
Page 88
LG AirDrive
You can use your LG account to manage files saved on the device
from a computer. You do not need a USB connection.
On the settings screen, tap Networks Share & connect LG
1
AirDrive.
Use a LG account to sign in to LG Bridge on the computer and LG
2
AirDrive on the device.
• LG Bridge software can be downloaded from
Manage files on the device from the computer.
3
www.lg.com
.
Printing
You can connect your device to a wireless printer and print photos or
documents saved on the device.
On the settings screen, tap Networks Share & connect
1
Printing.
• If the desired printer is not in the list, install the printer driver from
the app store.
Select print service.
2
Tap to activate it.
3
Select a printer from the printer list screen.
4
• To search for a printer name, tap
• To add a printer, tap
Settings from the printer list screen.
• Tap
Select a file and tap Print.
5
• The document prints.
Add printer.
Search.
• If you do not have a Google account, tap ADD ACCOUNT to create
an account.
Phone Settings 87
Page 89
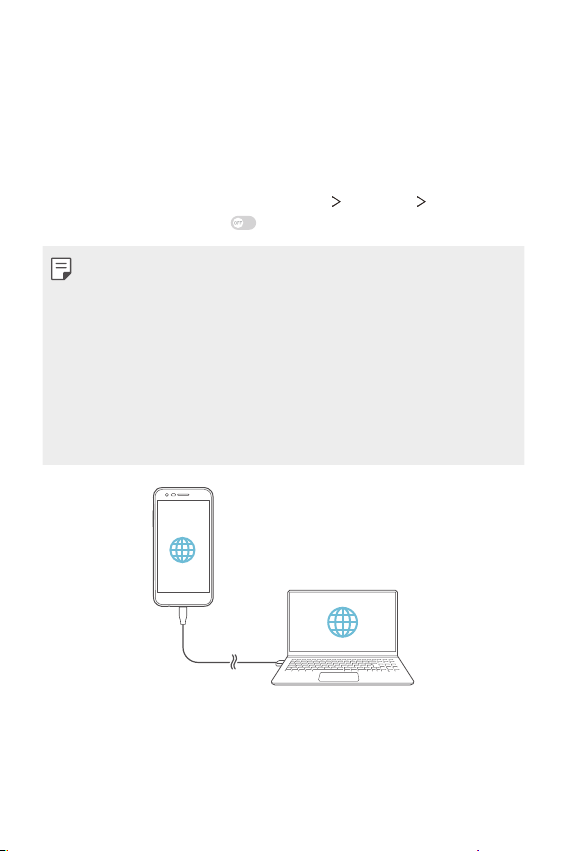
Tethering
USB tethering
You can connect the device to another device via USB and share
mobile data.
Connect your device and other devices via USB cable.
1
On the settings screen, tap Networks Tethering USB
2
tethering and then tap
• This option uses mobile data and may incur data usage fees,
depending on your pricing plan. Consult with your service provider
for more information.
• When connecting to a computer, download the USB driver from
www.lg.com
• You cannot send or receive files between your device and a
computer while USB tethering is turned on. Turn off USB tethering
to send or receive files.
• Operating systems that support tethering are Window XP or
higher, or Linux.
and install it on the computer.
to activate it.
Phone Settings 88
Page 90
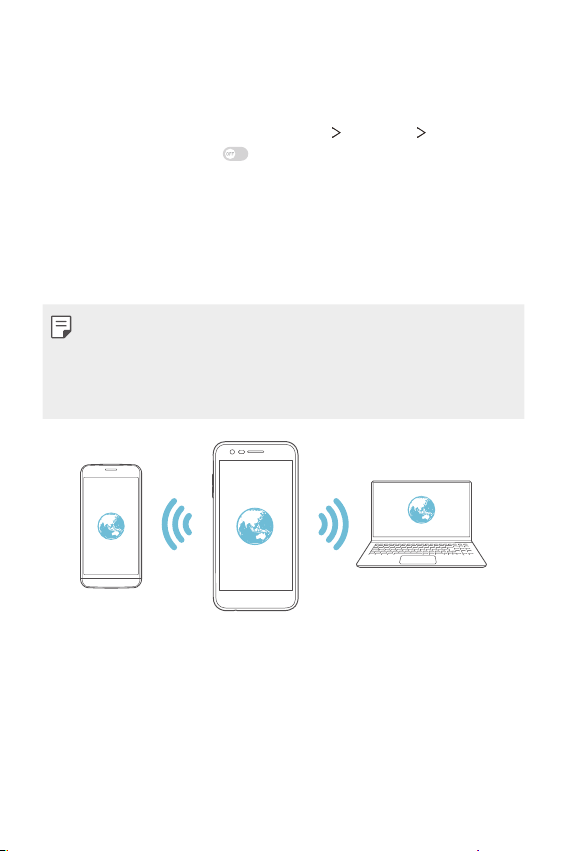
Mobile Hotspot
You can set the device as a wireless router so that other devices can
connect to the Internet by using your device's mobile data.
On the settings screen, tap Networks Tethering Mobile
1
Hotspot and then tap
Tap Set up Mobile Hotspot and enter the Wi-Fi name (SSID) and
2
password.
Turn on Wi-Fi on the other device, and select the name of the
3
device network on the Wi-Fi list.
Enter the network password.
4
• This option uses mobile data and may incur data usage fees,
depending on your pricing plan. Consult with your service provider
for more information.
• More information is available at this web site:
http://www.android.com/tether#wifi
to activate it.
Phone Settings 89
Page 91
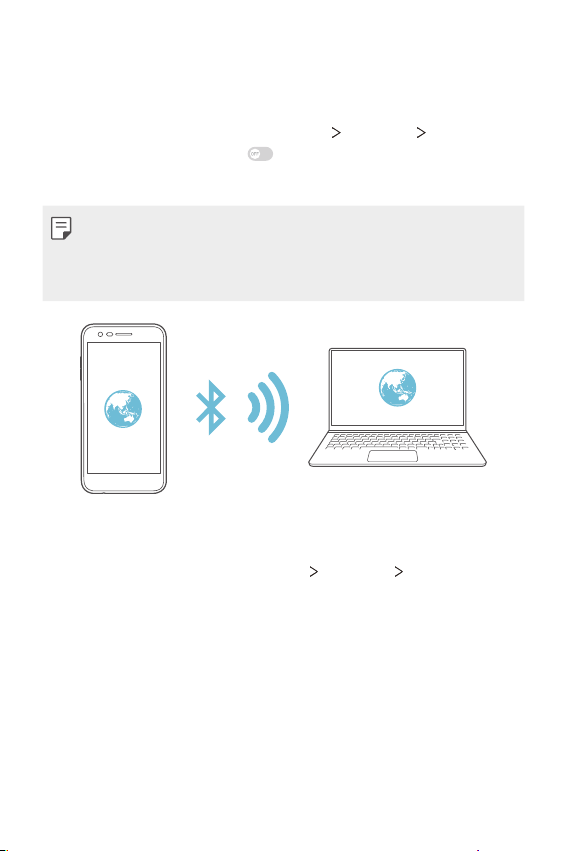
Bluetooth tethering
A Bluetooth-connected device can connect to the internet by using
your device's mobile data.
On the settings screen, tap Networks Tethering Bluetooth
1
tethering and then swipe
Turn on Bluetooth on both devices and pair them.
2
• This option uses mobile data and may incur data usage fees,
depending on your pricing plan.
• More information is available at this web site:
http://www.android. com/tether#Bluetooth_tethering
to activate it.
Help
You can view help on using tethering and hotspots.
On the settings screen, tap Networks
Tethering Help.
Phone Settings 90
Page 92
More
VPN
You can connect to a safe virtual network, such as an intranet. You
can also manage connected virtual private networks.
Adding VPN
On the settings screen, tap Networks More VPN.
1
• If the screen lock is disabled, all VPN information saved on the
device are erased.
Tap Add VPN.
2
• This feature is available only when the screen lock is enabled. If the
screen lock is disabled, a notification screen appears. Tap CHANGE
from the notification screen to enable the screen lock. See
a screen lock
Enter VPN details and tap SAVE.
3
Configuring VPN settings
Tap a VPN from the VPNS list.
1
Enter the VPN user account details and tap CONNECT.
2
• To save the account details, select the Save account
information checkbox.
for details.
Wireless Emergency Alerts
If emergency alerts are issued, those alerts will appear on this menu.
On the settings screen, tap Networks
Emergency Alerts.
More Wireless
Setting
Phone Settings 91
Page 93

Sound & notification
You can customize the sound, vibration and notification settings.
On the settings screen, tap Sound & notification and customize the
following settings:
• Sound profile: Change the sound mode to sound, silent, or vibrate
only.
• Volume: Adjust the sound volume for various items.
• Ringtone: Select a ringtone for incoming calls. Add or delete
ringtones.
• Ringtone ID: Create a ringtone for an incoming call from a
particular contact.
• Sound with vibration: Set the device to vibrate and play a
ringtone simultaneously.
• Vibration type: You can select a vibration type or make your own
vibration pattern.
• Do not disturb: Set the time, range and app type to receive
notification messages. Receive notification messages only on
particular days of the week.
• Lock screen: Display or hide a notification message on the lock
screen. You can also hide private information.
• Apps: Select the apps that can show their notification messages
on the screen and set the priorities of those apps in regard to
notification messages.
• More
• More
• More
Default notification sound: Select a notification ringtone.
Set music saved on the device as a notification ringtone.
Vibrate on tap: Set the device to vibrate when you tap
certain items on the screen.
Sound effects: Select a sound effect to play when you
tap the dialpad or keyboard, select an option, or lock or unlock the
screen.
Phone Settings 92
Page 94

Display
You can customize the settings for the Home screen and Lock screen.
On the settings screen, tap Display and customize the following
settings:
• Home screen: Customize settings for the Home screen. See
Home screen settings
• Lock screen: Customize lock screen settings. See
for details.
settings
• Theme: Select a screen theme for your device.
• Home touch buttons: Rearrange Home touch buttons or change
their background colors.
• Font type: Change the font face.
• Font size: Change the font size.
• Bold text: Bold the text on the screen.
• Display size: Set the items on the screen to a size that is easy for
you to see. Some items may change position.
• Comfort view: Set the device to reduce amount of blue light on
screen to reduce eye strain.
• Brightness: Use the slide bar to change the device's screen
brightness. To automatically adjust screen brightness according to
the ambient light intensity, tap the Auto switch.
• Auto-rotate screen: Automatically rotate the screen according to
the device's orientation.
• Screen timeout: Automatically turn off the screen when the
device is left idle for a specified period of time.
• More
• More
KnockON: Turn on or off the screen by tapping the screen
twice.
Screen saver: Display a screen saver when the device is
connected to the holder or charger. Select a screen saver type to
display.
for details.
Lock screen
Phone Settings 93
Page 95

General
Language & keyboard
You can customize language and keyboard settings for your device.
On the settings screen, tap General Language & keyboard.
1
Customize the following settings:
2
• Language: Select a language to apply for the device.
• Spelling correction: Allows you to set various options for the
Google Spell Checker.
• Current keyboard: View the keyboard currently in use. Select a
keyboard to use when entering text.
• LG Keyboard: Customize the LG keyboard settings.
• Google voice typing: Configure the options for text dictation
by Google.
• Text-to-speech output: Configure the settings for text-to-
speech output.
• Pointer speed: Adjust the pointer speed of a mouse or
trackpad.
• Reverse buttons: Reverse the right mouse button to perform
primary direct-manipulation actions.
Phone Settings 94
Page 96

Location
You can customize how your location information is used by
particular apps.
On the settings screen, tap General Location.
1
Customize the following settings:
2
• Mode: Select a method to provide your location information.
• RECENT LOCATION REQUEST: View apps that recently
requested location information.
• Low power location estimation: Estimate the device location
by using low power consumption.
• Google Location History: Configure the Google location
history settings.
• Google Location Sharing: Share your real-time location with
others.
Accounts & sync
You can add or manage accounts, including a Google account. You can
also sync particular apps or user information automatically.
On the settings screen, tap General Accounts & sync.
1
Customize the following settings:
2
• Auto-sync data: Sync all the registered accounts automatically.
• ACCOUNTS: View a list of registered accounts. To view or
change details of an account, tap the account.
• ADD ACCOUNT: Add accounts.
Phone Settings 95
Page 97
Accessibility
You can manage accessibility plug-ins installed on your device.
On the settings screen, tap General Accessibility.
1
Customize the following settings:
2
• Vision
• Vision
• Vision
• Vision
• Vision
• Vision
• Vision
• Vision
• Vision
• Vision
• Vision
• Vision
• Vision
• Hearing
• Hearing
• Hearing
TalkBack: Set the device to notify screen status or
actions via voice.
Message/call voice notifications: Set the device to
read the caller information or message content via voice.
Font size: Change the font size.
Bold text: Bold the text on the screen.
Display size: Set the items on the screen to a size that
is easy for you to see. Some items may change position.
Touch zoom: Zoom in or out by tapping the screen
three times.
Window zoom: Zoom in or out within a window and
invert the color.
Large mouse pointer: Magnify the mouse pointer.
High contrast screen: Turn the background color into
black for a high contrast screen.
Screen color inversion: Increase the display color
contrast for people with low vision.
Screen color adjustment: Adjust the display color.
Grayscale: Switch the screen to grayscale mode.
End call with the Power key: End a call by pressing
the Power/Lock key.
Captions: Turn on the subtitle service when playing
videos for the hearing impaired.
Flash alerts: Set the device to notify you with a
blinking light for incoming calls and alarms.
Mute all sounds: Mute all sounds and lower volume
on the receiver.
Phone Settings 96
Page 98
• Hearing Audio channel: Select the audio type.
• Hearing
Sound balance: Adjust the audio output balance.
Use the slide bar to change the balance.
• Motor & cognition
Touch assistant: Turn on the touch board
to make buttons and gestures easier to use.
• Motor & cognition
Touch input: Enter text by touching and
holding the screen or modify it by simply touching the screen.
• Motor & cognition
Physical keyboard: Customize the key
settings.
• Motor & cognition
Auto mouse click: Automatically click
where the pointer wherever it stops.
• Motor & cognition
Touch and hold for calls: Answer or
decline calls by touching and holding the call button instead of
dragging it.
• Motor & cognition
Screen timeout: Turn off the screen
automatically when the device is left idle for a specified period
of time.
• Motor & cognition
Touch control areas: Limit the touch area
so that only a particular portion of the screen can be controlled
by touch input.
• Accessibility features shortcut: Quickly access a frequently
used function by tapping
three times.
• Auto-rotate screen: Automatically change the screen
orientation according to the physical position of the device.
• Device Help: Enable the Guide Me feature.
• AT&T Smart Wi-Fi: Enable the AT&T Smart Wi-Fi feature.
• Select to Speak: Allows you to tap items to hear spoken
feedback.
• Switch Access: Create key combinations to control your device.
Phone Settings 97
Page 99
Shortcut keys
You can use the volume keys to directly launch apps when the screen
is turned off or locked.
On the settings screen, tap General Shortcut keys.
1
Tap to activate it.
2
• Press the Volume Down (-) key twice to launch the Camera app
when the screen is locked or turned off. Press the Volume Up
(+) key twice to launch Capture+.
Google services
You can use Google settings to manage your Google apps and
account settings.
On the settings screen, tap General
Google services.
Security
On the settings screen, tap General Security.
1
Customize the following settings:
2
• Lock screen: Allow you to select a screen lock and set its
options.
• Content lock: Set the method to lock files in QuickMemo+.
• Encrypt SD card: Encrypt the memory card to prevent use on
another device. See
• Secure start-up: Protect your device with a lock when it
powers on. See
• Set up SIM card lock: Lock or unlock the SIM card, or change
the password (PIN).
• Make passwords visible: Display a password as you enter it.
• Phone administrators: Allow privileges to restrict the control
or use of the device to particular apps.
• Unknown sources: Allow the installation of apps from non-Play
Store apps.
Memory card encryption
Secure start-up settings
for details.
for details.
Phone Settings 98
Page 100
• Credential protection: View the type of credential protection
currently used.
• Certificate management: Manage the security certificate
saved on the device.
• Trust agents: View and use trust agents installed on the device.
• Screen pin: Fix the app screen so that only the currently active
app can be used.
• Usage access: View details on usage of apps on the device.
Gaming
You can configure settings for game tools, graphics and battery
saving feature.
• Game tools: Tap
feature by tapping the game tool icon at the bottom of the screen
while playing games.
• Game graphics: Adjust the game graphics.
• When you change the resolution on some games, the screen
display feature may not work properly.
• Break time: Reduce the screen brightness and performance
whenever you leave the game running for more than 5 minutes.
to activate this feature. You can launch this
Date & time
You can customize date and time settings for your device.
On the settings screen, tap General Date & time.
1
Customize the desired settings.
2
Storage
You can view and manage internal storage on the device or storage
space of the memory card.
On the settings screen, tap General Storage.
1
Phone Settings 99
 Loading...