

Page 1

OWNER’S MANUAL
AIRCONDITIONER
Please read this manual carefully before operating
your set and retain it for future reference.
TYPE:PORTABLE AIR CONDITIONER
P09UCM0,P12UCM0
P/NO:MFL65920301
www.lg.com
Page 2
INTRODUCTION
IMPORTANT SAFETYINSTRUCTIONS
Basic Safety Precautions . . . . . . . . . . . . . . . . . . . 3, 4
Electrical Safety. . . . . . . . . . . . . . . . . . . . . . . . . . . 4, 6
PARTS AND FEATURES
Key Parts and Components . . . . . . . . . . . . . . . . . . . 7
Control Panel and Remote . . . . . . . . . . . . . . . . . . . . 8
HOW TO USE
Before Using Your Air Conditioner . . . . . . . . . . . . 9, 10
Using the Controls. . . . . . . . . . . . . . . . . . . . . . . 11–13
THANK YOU!
Congratulations on your purchase
and welcome to the LG family.
Your new LG Air Conditioner
combines high-efficiency operation
INSTALLATION INSTRUCTIONS
Preparing for Installation . . . . . . . . . . . . . . . . . . . . . 14
Window Vent Panel and Extensions . . . . . . . . . . . . 15
Installation in Vertical Sliding Windows. . . . . . . 16, 17
Installation in Casement Windows . . . . . . . . . . 18, 19
CARE AND CLEANING
Cleaning the Case. . . . . . . . . . . . . . . . . . . . . . . . . . 20
Cleaning the Air Filter . . . . . . . . . . . . . . . . . . . . . . . 20
Emptying the Water Collection Tank . . . . . . . . . . . . 21
Storing the Air Conditioner . . . . . . . . . . . . . . . . . . . 22
TROUBLESHOOTING
Before Calling for Service. . . . . . . . . . . . . . . . . 23, 24
with portable convenience.
By following the operating and care
instructions in this manual, your air
conditioner will provide you with
many years of reliable service.
2
Page 3
IMPORTANT SAFETY INSTRUCTIONS
READ ALL INSTRUCTIONS BEFORE USE
Your safety and the safety of others is very important.
We have provided many important safety messages in this manual and on your appliance. Always read and
obey all safety messages.
This is the safety alert symbol.
This symbol alerts you to potential hazards that can kill or hurt you and others.
All safety messages will follow the safety alert symbol and either the word “WARNING” or “CAUTION”.
These words mean:
WARNING This symbol indicates the possibility of death or serious injury.
CAUTION This symbol indicates the possibility of injury or damage to property.
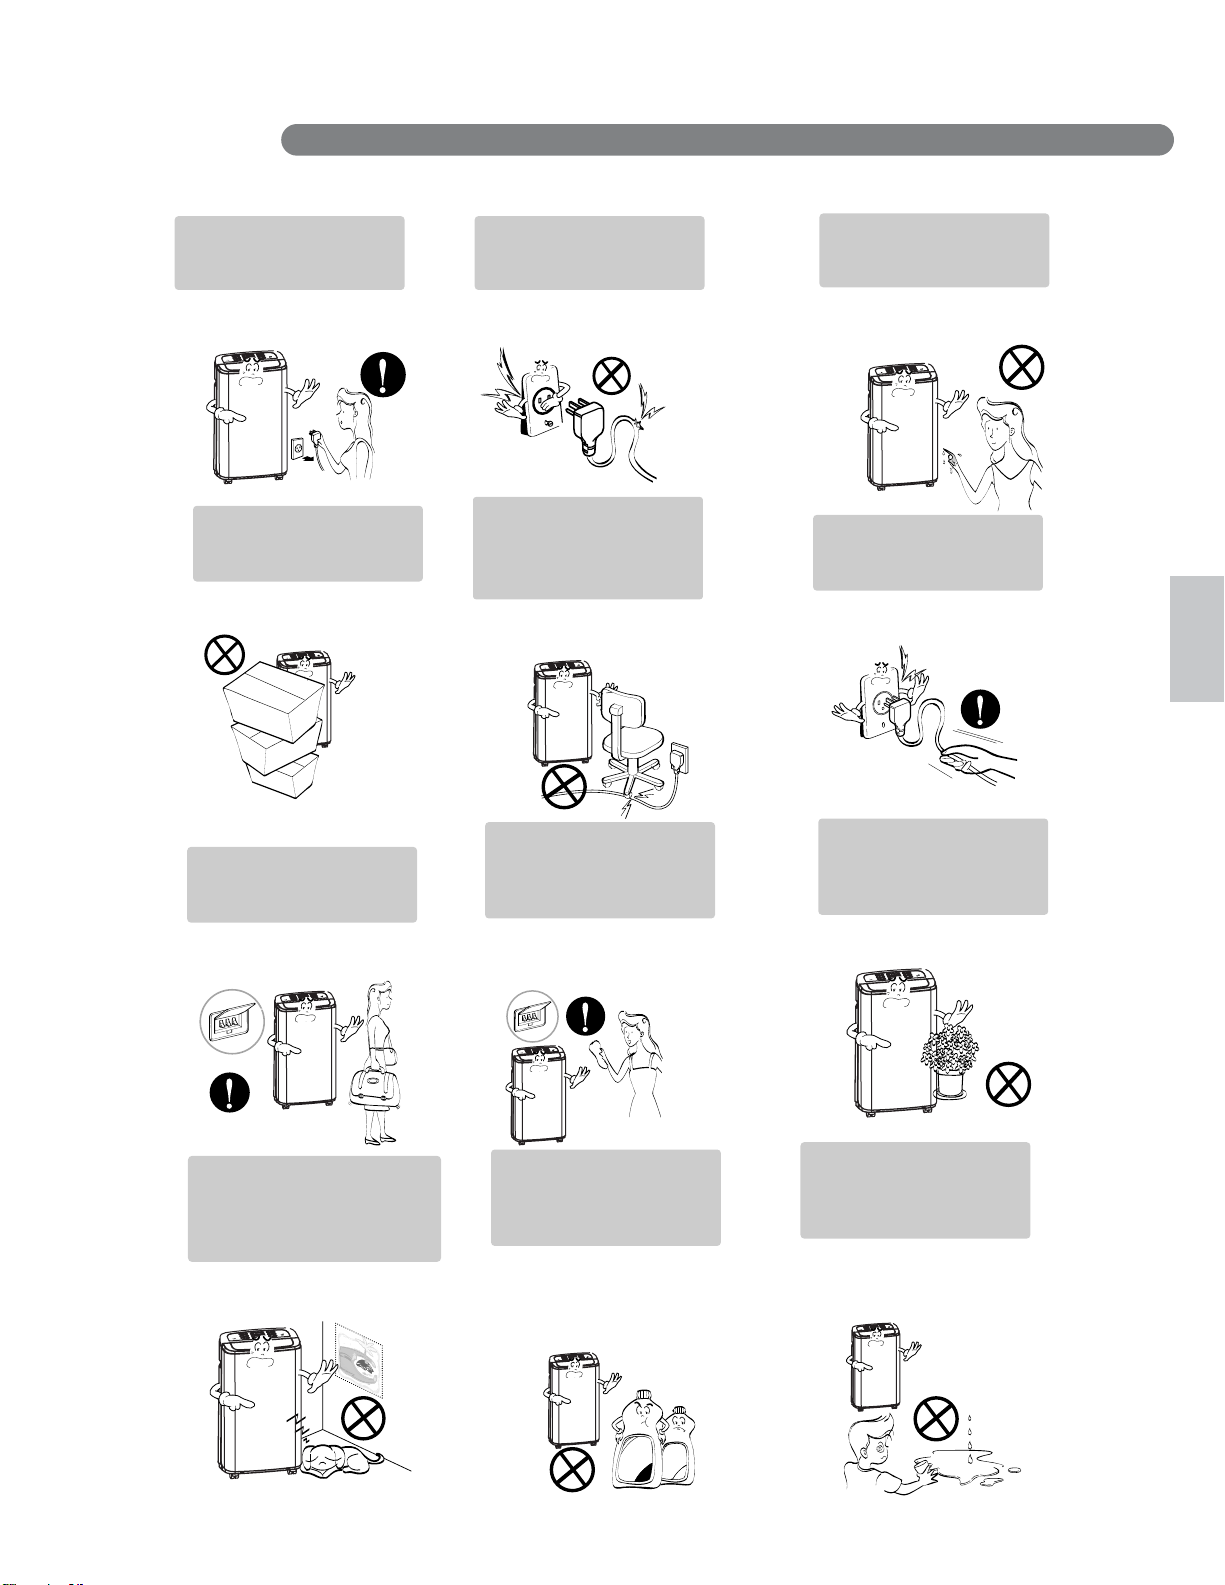
BASIC SAFETY PRECAUTIONS
WARNING To reduce the risk of fire, electric shock, or injury
to persons when using this a pplianc e, follow basic precautions, including the following:
English
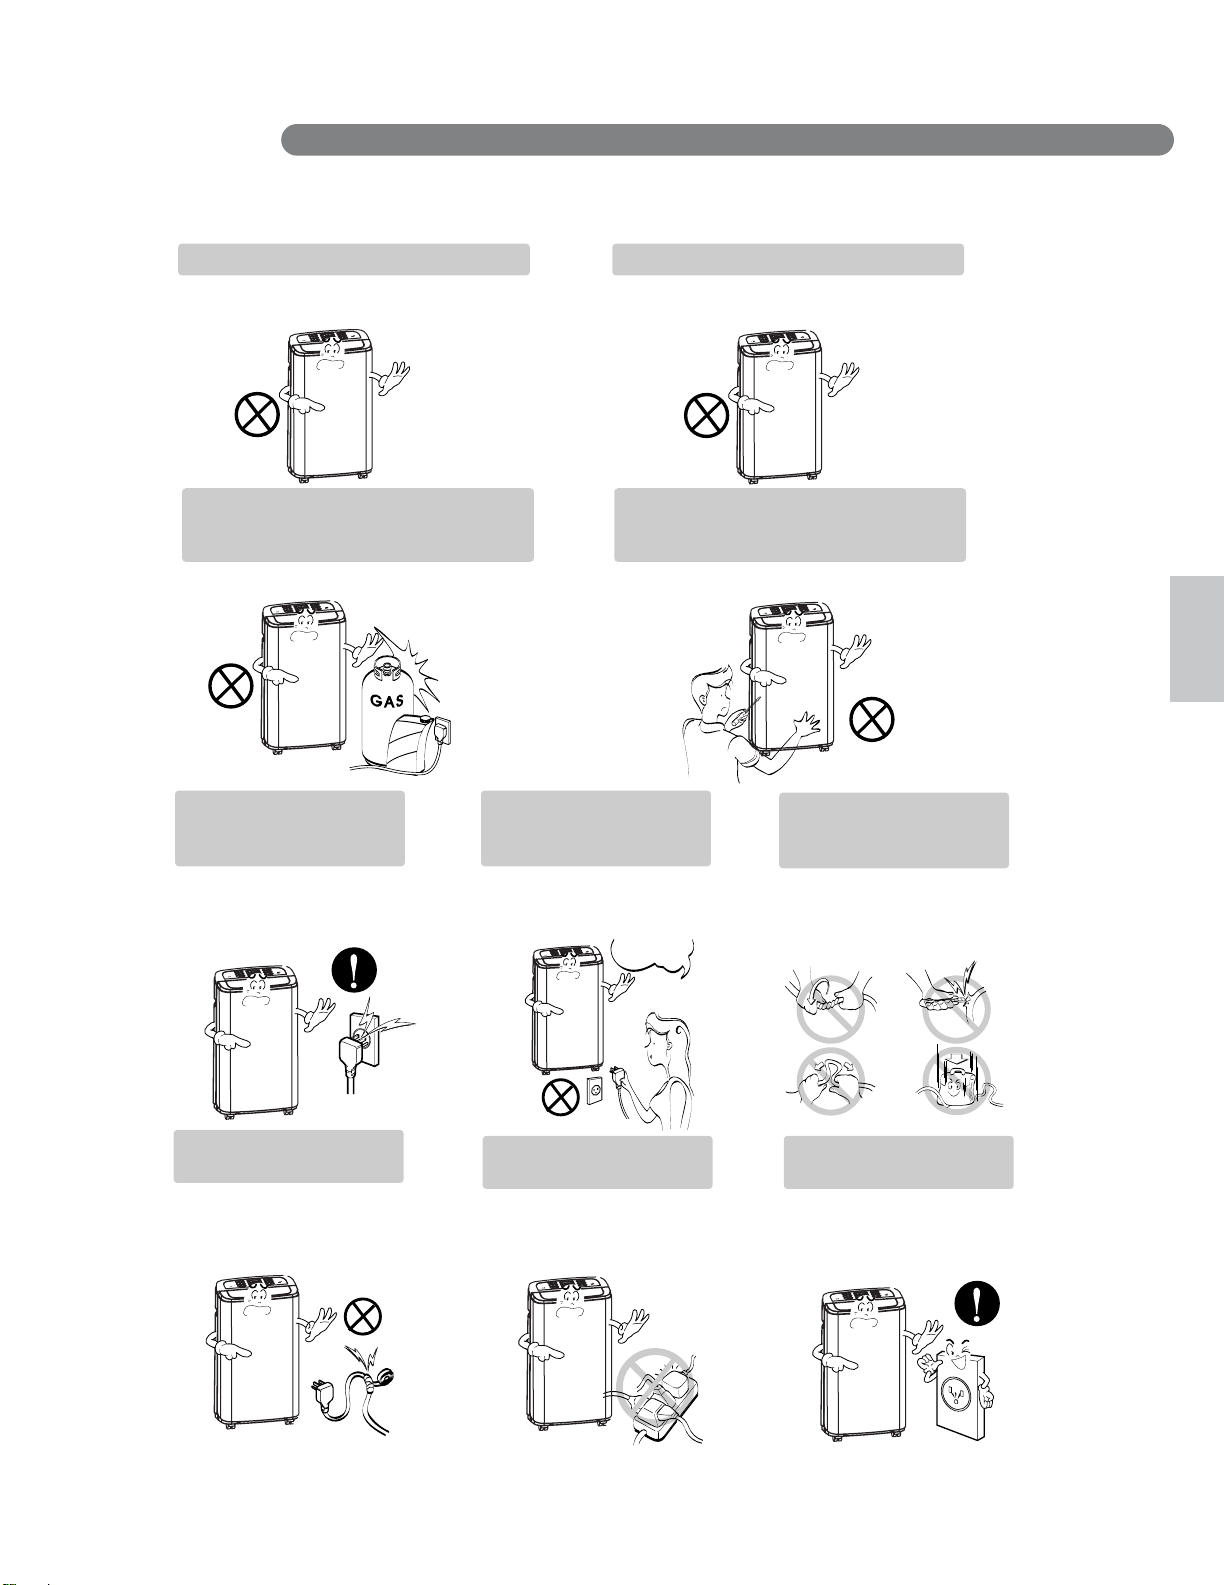
Do not attempt to repair or replace any part
of your air conditioner unless it is specifically
recommended in this manual. All other services
should be referre d to a qualified technician.
If the power cord becomes worn or damaged,
the cord should only be replaced by a qualified
service technician using genuine replacement
parts.
The air conditioner should be plugged into its
own grounded 15A,50Hz,240VACcircuit.
Do not plug other appliances into the same
outlet; it can overload the circuit and cause a fire
or electric shock.
Do not remove the round grounding prong from
the plug. It can result in the risk of electric shock.
This air conditioner is not designed for use by
young children. Young children should be
supervised to ensure that they do not play with
or climb on the air conditioner.
Be sure all packaging materials are removed
from the air conditioner before use. It can result
in personal injury.
Do not disassemble or modify the air conditioner
or the power cord. It can result in the risk of
electric shock or fire.
Do not place the power cord or air conditioner
near a heater, radiator, or other heat source. It
can result in the risk of electric shock or fire.
Do not use this or any appliance near flammable
gases or liquids or other combustibles, such as
gasoline, benzene, thinner, etc. It can result in
the risk of electric shock or fire.
Make sure the power cord is plugged firmly and
completely into the outlet. It can result in the risk
of electric shock or fire.
Do not start or stop operation by plugging in or
unplugging the power cord. It can result in the
risk of electric shock.
If the air conditioner is making unusual sounds
or is emitting smoke or an unusual odor , unplug
it immediately . It can result in the risk of electric
shock or fire.
Do not use if the electrical socket is loose or
damaged. It can result in the risk of electric
shock or fire.
Do not operate with wet hands or in a damp
environment. It can result in the risk of electric
shock.
Do not use this or any electrical appliance if you
smell gas. It can result in the risk of fire or
explosion.
Turn off and unplug the air conditioner before
cleaning to avoid the risk of electric shock.
Do not clean the unit with water. Water can enter
the unit and damage the insulation, creating a
shock hazard. If water enters the unit, unplug it
immediately and contact Customer Service. It
can result in the risk of electric shock.
Use two or more people to lift and install the
unit. Failure to do so can cause back injury or
other injuries.
3
Page 4
IMPORTANT SAFETY INSTRUCTIONS
READ ALL INSTRUCTIONS BEFORE USE
BASIC SAFETY PRECAUTIONS
CAUTION To reduce the risk of fire, electric shock, or injury to persons when
using this appliance, follow basic precautions, including the following:
To avoid possible cuts, avoid contacting the
metal parts of the air conditioner when removing
or reinstalling the filter . It can result in the risk of
personal injury.
Do not block the air inlet or outlet of the air
conditioner. Reduced air flow will result in poor
performance and could damage the unit.
Always grasp the plug when plugging in or
unplugging the air conditioner. Never unplug by
pulling on the cord. It can result in result in the
risk of electrical shock and damage.
Always turn off and unplug the air conditioner
when it will not be used for extended period of
time. This conserves energy and reduces the
chance of accidents.
Secure the wheels with blocks to prevent the air
conditioner from rolling on smooth floors.
Install the air conditioner on a sturdy, level floor
capable of supporting up
Installation on a weak or unlevel floor can result
in result in the risk of property damage and
personal injury.
Make sure the air conditioner is the correct size
for the area you wish to cool. Using an air
conditioner that is the wrong size can waste
energy and damage the air conditioner.
Close all doors and windows to the room for
most efficient operation.
To prevent damage to the surface finish, use only
a soft cloth to clean the air conditioner. Do not
use wax, thinner, or a strong detergent.
to
50 kg
(110 lbs).
To preve nt spills and property damage, be sure
to drain the air conditioner properly.
To prevent the coils from freezing, do not
operate the air conditioner if the room
temperature is below
Do not position the air conditioner so that
pets or house plants are exposed to the
direct air flow. It can result in the risk of injury
to pets or house plants.
This air conditioner is designed for normal
household use. Do not use for cooling p ets,
foods, precision machinery , or art objects.
Do not drink the water from the drain pan.
Dispose of it properly outdoors or down
thedrain.
Do not operate air conditioner without the filter
securely in place. Operation without the filter
could damage the unit.
Clean the filter every two weeks, or more often
if needed.
If you eat the liquid from the batteries, brush your
teeth and see doctor . Do not use the remote if
the batteries have leaked. The chemicals in
batteries could cause burns or other health
hazard.
If the liquid from the batteries gets onto your skin
or clothes, wash it well with clean water. Do not
use the remote if the batteries have leaked. The
chemicals in batteries could cause burns or other
health hazar d.
18°C
(
65°F
).
ELECTRICAL SAFETY
This air conditio ner mu st b e plugged
WARNING
Electrical Shock Hazard
Failure to follow these instru ctio ns can result
in death, fire, or electr ical shock.
This unit must be properly grou nded.
Do not, under any circum stances, cut or
remove the gro und prong .
If you do not have a properly groun ded
outlet, or if th ere is any doubt tha t the outle t
is not proper ly grounded, a qualified
electri cian should check the outlet and
circuit, and, if necessary, install a proper ly
grounded out let.
4
into a grounded 50 Hz, 240 VAC outlet
protected by a 15 amp tim e delay fuse
or circu it breaker.
This air conditio ner mu st b e installed in
accordance with national wiring codes.
Do not alter or modify the plug or cord
of this air conditioner. If the power cord
becomes worn or damaged, the cord should
only be replaced by a qualified service
technician using genuine replacement parts.
Do not use an extension cord.
Page 5
IMPORTANT SAFETY INSTRUCTIONS
Plug in the power plug
properly.
Otherwise, it will cause
electric shock or fire due to
heat generation or electric
shock.
Do not operate or stop the
unit by inserting or pulling
out the power plug.
It will cause electric shock or
fire due to heat generation.
Do not damage or use an
unspecified power cord.
It will cause electric shock or
fire.
ON
READ ALL INSTRUCTIONS BEFORE USE
Always install the expansion panel(s).
No installation may cause fire and electric
shock accident.
Do not use the power cord near flammable
gas or combustibles such as gasoline,
benzene, thinner, etc.
It may cause explosion or fire.
Gasolin
Do not place the power cord near a heater.
It may cause fire and electric shock.
Do not disassemble or modify products.
It may cause failure and electric shock.
English
Do not modify power cord
length.
It will cause electric shock or
fire due to heat generation.
Do not share the outlet with
other appliances.
It will cause electric shock or
fire due to heat generation.
Always plug into a
grounded outlet.
No grounding may cause
electric shock (See
Installation Manual).
5
Page 6
IMPORTANT SAFETY INSTRUCTIONS
READ ALL INSTRUCTIONS BEFORE USE
Unplug the unit if strange
sounds, odors, or smoke
come from it.
Otherwise it may cause fire
and electric shock accident.
Do not block the inlet or
outlet.
It may cause failure of
appliance or accident.
Do not use the socket if it is
loose or damaged.
It may cause fire and electric
shock.
Do not place heavy object
on the power cord and take
care so that the cord should
not be pressed.
There is danger of fire or
electric shock.
Do not operate with wet
hands or in damp
environment.
It will cause electric shock.
Hold the plug by the head
when taking it out.
It may cause electric shock
and damage.
English
Turn off the main power
switch when not using it for
a long time.
Prevent accidental startup
and the possibility of injury.
Do not use this appliance
for special purposes such
as pets, foods, precision
machinery, or objects of art.
It is an air conditioner, not a
precision refrigeration system.
Turn off the power and
breaker firstly when
cleansing the unit.
Since the fan rotates at high
speed during operation, it
may cause injury.
Use a soft cloth to clean. Do
not use wax, thinner, or a
strong detergent.
The appearance of the air
conditioner may deteriorate,
change color, or develop
surface flaws.
Do not put a pet or house
plant where it will be
exposed to direct air flow.
This could injure the pet or
plant.
Do not drink water drained
from air conditioner. / Do
not direct airflow at room
occupants only.
It contains containments and
will make you sick. / This
could damage your health.
Thinner
Wax
6
Page 7
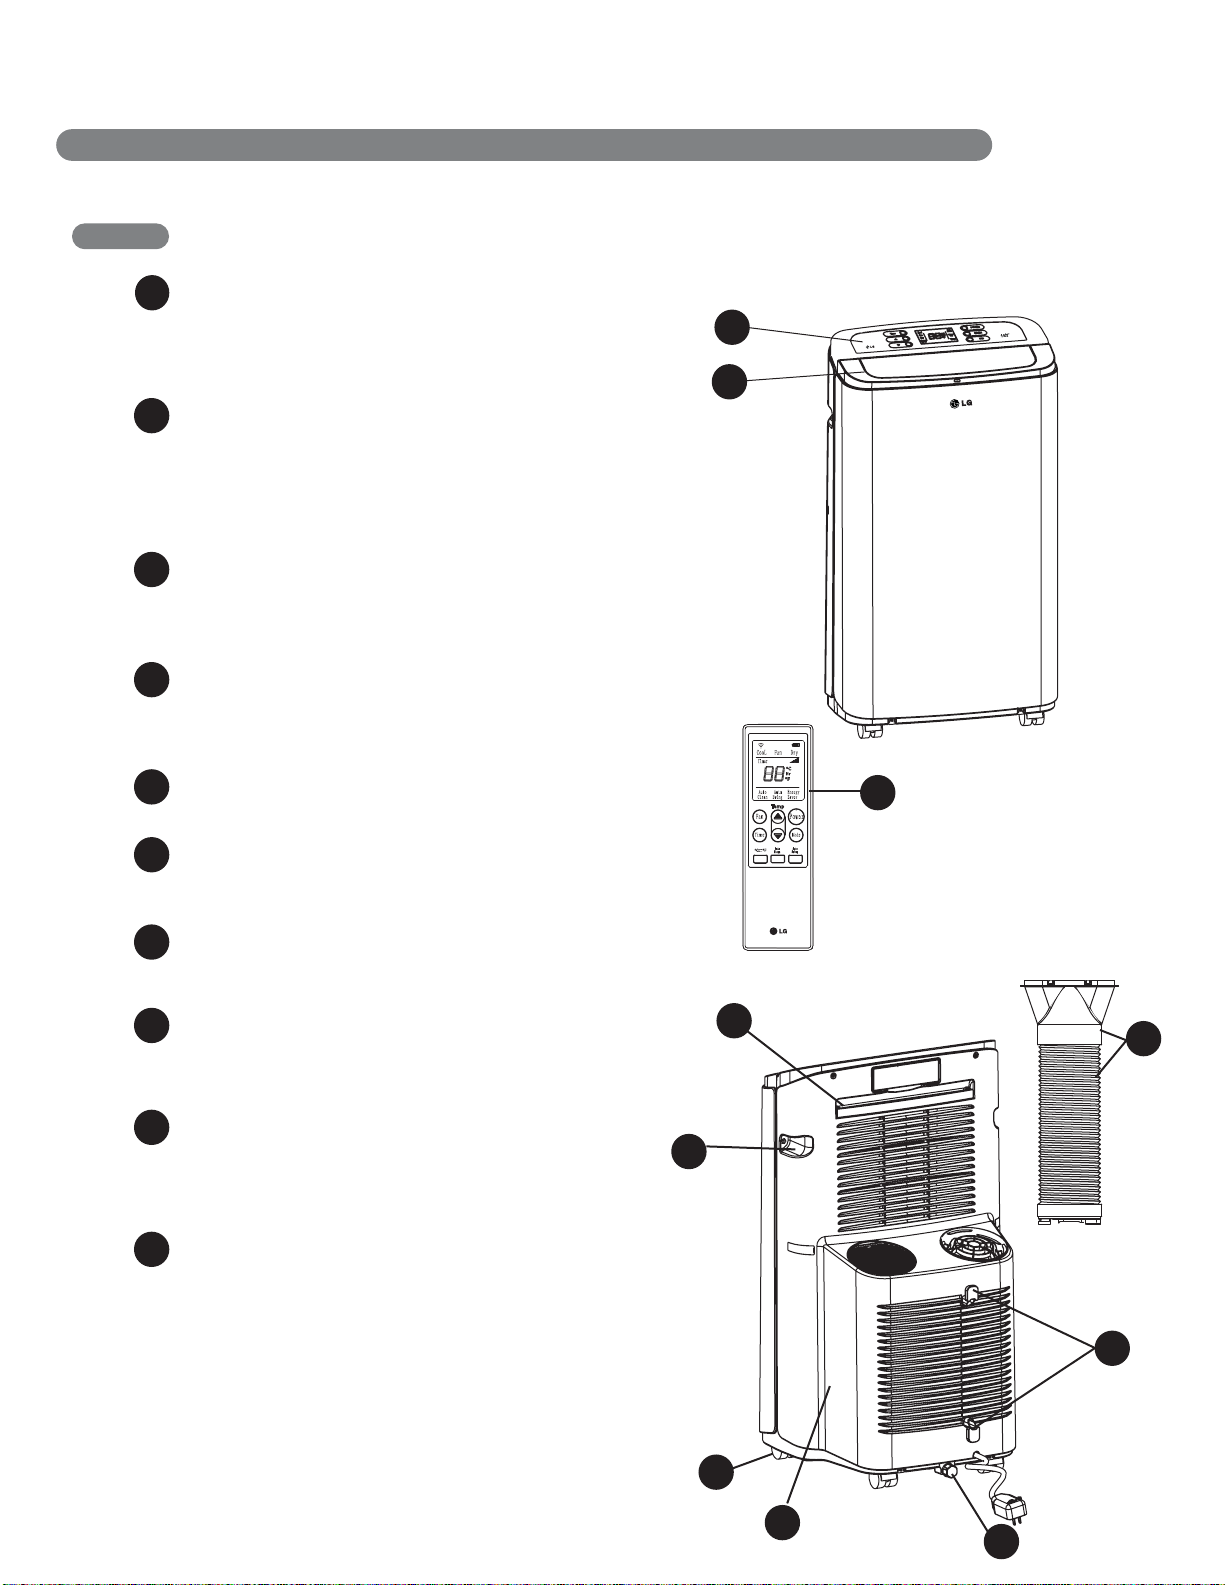
PARTS AND FEATURES
KEY PARTS AND COMPONENTS
1
CONTROL PANEL AND DISPLAY
Easy-to-read white LCD display shows the operation
state. Digital touch buttons make changing settings
quick and easy.
MOTORIZED AIR DISCHARGE
2
The adjustable louvered air discharge opens
automatically when the air conditioner is turned
on, and closes when it is turned off. It can also
be set to oscillate to distribute air more evenly
through the room.
3
INFRARED REMOTE CONTROL
Th
e LCD
temperature and operate most functions of the
air conditioner from across the room.
remote control allows you to adjust the
1
2
HOSE AND DIFFUSER
4
Use the diffuser and hose to connect the air
conditioner to the window installation kit to vent
exhaust air outside.
FILTER
5
You can pull out and insert the filter easily.
HANDLES
6
The handles provide a convenient grip
when lifting the air conditioner.
SWIVELING CASTERS
7
Swiveling casters allow you to move the air
conditioner easily on most floor surfaces.
BOTTOM DRAIN PORT
8
Before moving the unit, drain the internal water
collection tank completely by using bottom drain
port.
9
MULTI-SPEED FANS
The air conditioner features two multi-speed
fans: a circulation fan for moving air inside
the room, and an exhaust fan to vent hot
air outdoors through the hose and diffuser.
10
POWER SUPPLY CORD HOLDER
Wrap power supply cord around the holders for
your convenience.
3
5
4
6
10
7
7
9
8
Page 8
PARTS AND FEATURES
A PART
5
7
6
B PART
Operation of functions is the same when using the remote or the
control panel, unless otherwise stated.
For detailed instructions on each function, see the following pages
POWER ON/OFF
1
Turns the air conditioner on and off. When turning on,
a rising tone will sound to confirm. When turning off,
a descending tone will sound.
AUTO CLEAN
2
The AUTO CLEAN function is used to remove
moisture from the heat exchangers and helps
prevent odor from forming. This function can be
activated from the Remote only.
FAN SPEED
3
Adjusts the circulation fan speed between low (F1),
medium (F2),and high (F3).
1
4
3
English
English
5
6
3
7
8
1
4
9
2
MODE
4
Switches the air conditioner between COOL, F AN,DRY,
and ENERGY SAVER modes. The
shown in the LCD display.
DISPLAY
LCD
5
A PART
fan speed, or the selected TIMER delay .
B PART shows the active mode(COOL,FAN,DRY and
ENERGY SAVER),Auto clean,Water full and Timer.
6
Use these buttons to adjust the set temperature up or
down, or to adjust the timer delay time.
TIMER
7
Allows you to set a delay from 1 to 24 hours that will
turn the air conditioner on or off automatically.
shows the set temp
/ (TEMP/TIMER)
erature ( or ) ,
active mode will be
ć
8
Use this button,the temperature display can be switched
between degrees Celsius(
9
AUTO SWING
Sets the motorized air discharge to oscillate,
improving air circulation in the room. This function
c
an only be activated and displayed from the remote
control.
) and degrees Fahrenheit( )
ć
8
Page 9

HOW TO USE
BEFORE USING YOUR AIR CONDITIONER
PREPARING FOR OPERATION
Refer to the Installation Instructions included in
this manual before using the air conditioner.
Once the air conditioner has been properly
assembled and installed:
Plug the power cord into its own dedicated
1
properly grounded outlet. You will hear a
tone to confirm that the conditioner is
plugged in. Do not plug other appliances
into the same outlet; it could overload the
outlet and create a fire hazard.
Make sure the air conditioner and cord is
2
positioned where it does not create a
tripping hazard and will receive adequate
ventilation. Do not place it directly next to
furniture or objects that could block the
vent openings.
Make sure that any items that could be
3
blown over or damaged by the airflow from
the fan are out of the airflow path.
UNPACKING THE AIR CONDITIONER
Remove and store packing materials for reuse.
Remove any shipping tape before using the
air conditioner. If the tape leaves behind any
adhesive, rub a small amount of liquid dish
soap onto it and wipe with a damp cloth. Do
NOT use sharp instruments, alcohol, thinners,
or abrasive cleaners to remove adhesive.
They could damage the finish.
IMPORTANT:
• Do not remain in the direct airflow from the air
conditioner for extended periods of time.
• To prevent damage or injury to pets and
plants, make sure they are not exposed to
direct airflow from the air conditioner.
• When used at the same time as stoves,
fireplaces, and other combustion devices,
make sure there is a sufficient flow of fresh air
into the room. Do not use in tightly enclosed
spaces with these types of devices.
• This air conditioner is intended for household
use as a consumer comfort appliance. Do not
use it as a precision climate control system,
or for purposes such as cooling precision
equipment, food, pets, plants, artwork, etc.
Such items could be damaged.
• Do not bend the hose downward when
window installation kit is not applied. It may
cause failure of air conditioner or performance
deterioration.
9
Page 10

HOW TO USE
BEFORE USING YOUR AIR CONDITIONER
INSERTINGBATTERIES IN THE REMOTE
Before using your remote, install the provided
AAA batteries:
Press and glide the battery cover on the back
1
of the remote,then you can remove the cover.
Insert two new alkaline AAA batteries into
2
the battery compartment, being sure to note
the proper polarity .
Reattach the battery cover, making sure the
3
locking tab clicks into place.
NOTES:
• Use only alkaline batteries. Do not use
rechargea ble batteries.
• When replacing batteries, always replace both
batteries with new batteries. Do not mix old
and new batteries.
• If the air conditioner will not be used for an
extended period of time, remove the batteries
from the remote.
Be sure to note
proper polarity!
English
REMOTE STORAGE
Your air conditioner has a special place for
convenient storage the remote control.
See Right Figure.
NOTE:
In order to avoide lossing the remote,please
2
put the remote inside of the storage place when
you not use it.
Remove adhesive
backing
CAUTION
• If the liquid fromthe batteriesgetsonto your skin orclothes,wash itwell with cleanwater.
Do not use the remote if the batteries have leaked.
• If you eat the liquid from the batteries, brush your teeth and see doctor.
The chemicals in batteries could cause burns or other health hazards.
10
Page 11

HOW TO USE
USING THE CONTROLS
Control panel buttons shown. Operation
using the remote control is the same, unless
specifically noted.
NOTE:
The remote sensor is
located under the air discharge and on the top
of the front panel.
POWER
Press the POWER button to turn the air
conditioner ON or OFF.When you turn the air
c
onditioner on, an ascending
tone will play and the LCD
display will show the set
temperature and any active
mode.The air discharge on the top of the air
conditioner wil automatically open.
When turning the air conditioner off, you will
hear a descending tone and the air discharge
on the top of the air conditioner will close.
Any control settings such as Mode, Set
Temperature, Auto Swing, etc. will be retained
in memory when the power is off.
NOTE: When turned on after being unplugged,
the air conditioner will automatically reset to
COOL mode, with a temperature setting of 22°C .
Any settings will need to be re-entered.
Always point the remote at the sensor. The
remote may not work if the sensor is in bright
light or if there is not a clear path between the
remote and the sensor.
MODE
Press the MODE button to select the operating
mode (COOL, FAN,DRY or ENERGY SAVER)for
the air conditioner.And you can
see the active mode through the
LCD Display.
The default setting is COOL.
Press the MODE button to
change to FAN, press again to change to DRY,
again to change to ENERGY SAVER,and again
to return to COOL.
Mode Featu res
COOL
FAN
DRY
Compressor runs and cools the room. Use the
/ and FAN buttons to set the desired
temperature and circulation fan speed.
Fan circulates air but compressor does not run.
Use the FAN button to set the desired fan speed.
Dry mode is used to removehumidity from the room
without additional cooling. Once the set temperature
is reached, the compressor and circulation fan turns
off and only the exhaust fan will run. Fan speed is
pre-set and cannot be adjusted.
11
ENERGY
SAVER
Under normal operation, the exhaust fan cycles on
and off with the compressor, and the circulation fan
runs at the set speed.
The mode helps reduce power consumption by
automatically turning off the circulation fan as well
as the exhaust fan when the compressor is off. The
air conditioner will automatically cycle both fans on
and off with the compressor as needed for cooling.
Page 12

USING THE CONTROLS
HOW TO USE
FAN
Pressing the FAN button cycles the circulation
fan speed from low (F1) to medium (F2) to high
(F3).The selected fan speed
will be shown in the LCD display.
The function can be used in
either COOL or FAN modes.
When changing fan speeds, there is a brief
delay before the fan motor changes speed.
/ (TEMP/TIMER)
In COOL and DRYmodes, the
buttons adjust the set temperature up to 30°C or
down to 16°C ,in one degree
increments. The temperatu
be switched between degrees
Fahrenheit and degrees Celsius,
pressing the button and button
at the same time,or pressing °F °C button on the
remote.
When the TIMERfunction is selected, use the
/ (TEMP/TIMER)
time from 1 to 24 hours, in one hour increments.
If you press and hold the
buttons, the set temperature or time will change
automatically after a few seconds.
NOTE: The displayed temperature is the SET
t
emperature, not the room temperature.
DRYor
air conditioner will run the compressor until the
set temperature is reached, then cycle the
compressor on and off to maintain the set
temperature.
ENERGY SAVER
buttons to adjust the delay
mode, the thermostat in the
/ (TEMP/TIMER)
re can
/ (TEMP/TIMER)
In COOL,
TIMER
When the
the air conditioner to either automatically turn
hour increments.
To set an automatic off delay , press the TIMER
button while the air conditioner is running and
use the buttons to adjust the
delay time.Theair
turn OFFafter the
To set an automatic on delay, press the TIMER
button while the air conditioner is off and use
the buttons to adjust the
delay time.
The display will show the number of hours
remaining
air conditioner will automatically turn ON
after the set delay.
If you want to know how many hours you have
setted, press the TIMER button and then you
can see the time through the LCD display.
If you want to change the set timer,press the
TIMER button and adjust the time when the
number is flickering.
To cancel the Timer function,one method is
press the TIMER button and adjust the number
to”0” when the number is flickering,then the
function will be canceled in a few seconds.
Another better method is Press the TIMER
button and Press this button again when the
number is still flickering.
TIMER
/ (TEMP/TIMER)
/ (TEMP/TIMER)
until the unit is set to come on. The
function is selected, you can set
OFFor turn ON after a delay of
up to 24 hours. The display will
show 0.Use the
buttons to adjust the delay
time from 1 to 24 hours, in one
conditioner will automatically
set delay.
/ (TEMP/TIMER)
English
NOTE: Do not unplug the air conditioner when
using the timer function.
12
Page 13

HOW TO U SE
USING THE CONTROLS
AUTOCLEAN
To t urn t he
AUTO CLEAN
each time you wish to run the
function.
AUTO CLEAN
the heat exchange coils. This helps prevent the
formation of mildew and odors.
To use
1
With the air conditioner running in COOL,
DR
AUTO CLEAN
“
2
LCD diplay.
Press the POWER button to turn the air
conditioner off.
the circulation
compressor off for a few minutes after
the power is turned off.
To cancel
AUTO CLEAN
AUTO CLEAN
the
function will not operate if the air conditioner is
already off.
AUTO CLEANfunction on, press the
button while the air conditioner is
running in
SAVER
can only be selected from the
remote
the
is used to remove moisture from
AUTO CLEAN
Y or
ENERGY SAVER
b
AUTO CLEAN
AUTO CLEAN
cycle in process, simply press
button again. The
utton.
” will be displayed in the
AUTO CLEAN
and exhaust fans with the
COOL,DRY or ENERGY
mode. This function
;it is not available from
control panel.It
AUTO CLEAN
mode, press the
,ortostopan
must be set
will run
AUTO CLEAN
AUTO SWING
AUTO SWING
theremote. When this functionis on, theair
remote again.
AUTO SWING
With
adjust the air discharge to the desired position.
It will maintain this position until the air
conditioner is turned off or
is activated.
function can only be activated with
dischar ge will oscillate to
circulate air more evenly
through the room. To turn this
function off, simply press the
AUTO SWING
off, you may also manually
function can only be activated with the
remote.When the displayed
temperature is °C(of °F),you
can press this button to swith
to °F(or °C) .
button with the
AUTO SWING
13
Page 14

INSTALLATION INSTRUCTIONS
PREPARING FOR INSTALLATION
WARNING The air conditioner is heavy! Use two or more people to
lift and install the unit! Failure to do so could result in back injury or other injuries.
EXHAUSTCOMPONENTS
The following components are used for window venting.
Not all components are used for every installation.
Extension
Vent Panel
2 Type A Foam Seals
(adhesive)
Flexible Venting Hose
Large
Extension
Panel
Window Installation Kit
(includes 2 Window Vent
Panel and 2 Extension
Panels)
1 Type B Foam Seal
(non-adhesive)
Vent Panel
English
Diffuser
Small
Extension
Panel
2 Type C Foam Seals
(Adhesive type-Shorter)
Security Bracket
4 TypeA Screws
10 Type A Screws
14
Page 15

INSTALLATION INSTRUCTIONS
WINDOW VENT PANEL AND EXTENSIONS
The window installation kit allows you to install the air conditioner in most vertical-sliding windows 460 mm
to
1220 mm
wide, or casement-style windows from 460mm to 1220 mm high.
Small extension
panel
460 mm
For an
Vent
Panel
460 mm
460 mm
window opening, use the window
Vent
Panel
vent panel by itself.
Large extension
panel
Large
extension
panel
Vent
Panel
610í 740 mm
610 í 740 mm
Vent
Panel
460 í 610 mm
Vent
Panel
Small
extension
panel
460 mmí 610 mm
Vent
Panel
For window openings from 460 mm to 610 mm,
use the window vent panel and the small
extension panel.
Large extension
panel
Large
extension
panel
Vent
Panel
740 í 910 mm
74 í 91 mm
Vent
Panel
Small
extension
panel
Small
extension
panel
English
For window openings from 610 mm to 740 mm,
use the window vent panel and the large
extension panel.
Extension vent
panel
910 í 1220 mm
Extension vent
panel
910í1220 mm
Large
extension
panel
Vent
Panel
Small
extension
panel
Large
extension
panel
Vent
Panel
Small
extension
panel
For window openings from 910 to 1220 mm, use both
vent panels and both extension panels.
For window openings from 740 to 910 mm,usethe
window vent panel and both extension panels.
15
Page 16

Foam seal A
(Adhesivetype)
Foam seal C
(Adhesivetype-shorter)
Foam seal B
(Non-adhesive type)
INSTALLATION INSTRUCTIONS
INSTALLATION IN VERTICAL SLIDING WINDOWS
NOTE: The window installation kit can be used with vertical sliding windows between 450mm
and 1220 mm wide.
1
Cut the foam seal A(adhesive type) &
C(adhesive type-shorter)to the proper
length, and attach it to the window sash and
frame.
Extension panel
(if required)
Insert the vent panel assembly, including
2
extension panels, if needed, into the window
opening. Extend the extension panels, if
used.
Vent
Panel
English
3
16
Type B screws
Carefully lower the window. Secure the vent
panel in place with 4 type B screws, plus
one screw for each extension:
Vent panel only: 4 type B screws
Vent panel and
one extension: 5 type B screws
Vent panel and
two extensions: 6 type B screws
Two vent panels and
two extensions: 9 type B screws
Cut the foam seal B(Non-adhesive type) to
4
the window width. Stuff the foam seal B
between the glass and the window to
prevent air and insects from getting into the
room.
Page 17

INSTALLATION INSTRUCTIONS
INSTALLATION IN VERTICAL SLIDING WINDOWS
Security Bracket
Type A
screw
Insert the oval end of the diffuser into the
Install the security bracket with a type A
5
screw, as shown.
6
window installation kit until the locking tabs
engage.
English
17
Page 18

Foam seal A
(Adhesivetype)
Foam seal C
(Adhesive
type-shorter)
Foam seal B
(Non-adhesive type)
INSTALLATION INSTRUCTIONS
INSTALLATION IN CASEMENT STYLE WINDOWS
NOTE:The window installation kit can be used with casement windows between 460 mm and 1220 mm tall.
1
Cut the foam seal A(adhesive type) &
C(adhesive type-shorter)to the proper
length, and attach it to the window sash and
frame.
Extension panel
(if required)
Vent
Panel
Insert the vent panel assembly, including
2
extension panels, if needed, into the window
opening. Extend the extension panels, if
used.
English
18
Type B screws
3
Carefully close the window. Secure the vent
3
panel in place with 4 type B screws, plus
one screw for each extension:
Vent panel only: 4 type B screws
Vent panel and
one extension: 5 type B screws
Vent panel and
two extensions: 6 type B screws
Two vent panels and
two extensions: 9 type B screws
Cut the foam seal B(Non-adhesive type)to
4
the window height. Stuff the foam seal B
between the glass and the window to
prevent air and insects from getting into the
room.
Page 19

INSTALLATION INSTRUCTIONS
INSTALLATION IN CASEMENT STYLE WINDOWS
Security
bracket
Type A screw
Install the window security bracket with a
5
type A screw, as shown.
Insert the oval end of the diffuser into the
6
window installation kit until the locking tabs
engage.
English
19
Page 20

CARE AND CLEANING
Your air conditioner is designed for year-round
operation with only minimal cleaning and
maintenance.
For maximum efficiency, it is recommended
that you have the cooling coils inspected and
cleaned annually. Your local LG Authorized
Service Center can provide this inspection
and cleaning service for a nominal fee.
WARNING
• Unplug the air conditioner before cleaning or performing any maintenance or servicing.
• Be careful when cleaning coils or removing or reinstalling the filter—the cooling fins
are sharp!
Failure to follow the above precautions could result in electrical shock or personal injury.
CLEANING THE CASE
Wipe the case with a
slightly damp cloth, then
wipe dry with a dry cloth
or towel.
• To prevent damage to the finish, do not use
gasoline, benzene, thinner, etc., or any
abrasive cleansers to clean the air
conditioner; they may damage the finish.
• Never pour water onto or into the unit; it
could damage internal components and
create a shock and fire hazard.
20
CLEANING THE AIR FILTER
The air filter should be cleaned every two weeks;
depending on indoor air quality, more frequent
cleaning may be needed. A dirty air filter will
decrease airflow and reduce efficiency.
Do not operate the air conditioner without
the air filter in place.
Grasp the grip which
1
is in the center and
on the top of the filter
and pull out the filter
directly.
Filter
Use a vacuum cleaner to clean the filter. If
2
the filter is heavily soiled, it can be washed
in warm water using a mild detergent.
Do not use harsh c leaners or very hot
wat er. Do not wash in a dish asher
3
Allow the filter to dry completely before
reinstalling.
Reinsert the filter , making sure that the
4
bottom of the filter is between the tabs and
thecoil guard. Reinstall the filter cover,
making sure it clips into place.
Page 21

English
CARE AND CLEARING
EMPTYING THE WATER COLLECTION TANK
Using the bottom dr
When the internal water collection tank is full, FL
will appear in the display an d the air conditioner
will turn off until the tank is emptied.
Unplug the air conditioner, disconnect
1
the exhaust hose from the back, and move
the air conditioner to a suitable drain
location or outdoors. You may also place
a pan under the drain that will hold up
to 1 quart of water.
Remove the drain cap and the rubber plug
2
from the drain outlet.
Once the water collection tank is drained,
3
reinstall the rubber plug a
making sure it is
Place the air conditioner in the desired
4
location, reconnect the exhaust hose, and
plug in the air conditioner .
5
6
7
on securely.
ain
nd the
port
drain cap,
Drain
Cap
Note:
Drain Outlet
If the water full alarm is often on, there may
be some malfunction about the unit.
Contact the professional service for help.
8
drain location or outdoors.
NOTICE
FL apperars in the display
The water collection tank is full, drain the tank and reset your setting.
NOTES:
When turned on after being unplugged, the air
conditioner will automatically reset to COOL
mode, with a temperature setting of 22°C .
end of the hose a suitable
21
Page 22

CARE AND CLEARING
STORING THE AIR CONDITIONER
If the air conditioner will not be used for an
extended period of time:
Drain the water collection tank completely
1
and leave the bottom drain cap and rubber
plug long enough to allow any residual water
to drain out. Once the tank is completely
drained and no more water flows out,
reinstall the rubber plug and cap.
Remove and clean the filter, allow it to dry
2
completely, then reinstall it.
3
Remove the batteries from the remote.
Store the air conditioner in a cool, dry
4
location, away from direct sunlight, extreme
temperatures, and excessive dust.
Before using the air conditioner again:
Make sure the filter and drain cap are
1
in place.
2
Check the cord to make sure it is in good
condition, with no cracks or damage.
Place new batteries in the remote.
3
Install the air conditioner as described in the
4
Installation Instructions.
22
Page 23

TROUBLESHOOTING
BEFORE CALLING FOR SERVICE
Before you call for service, review this list. It may save you time and expense. This list includes common
occurrences that are not the result of a defect in workmanship or materials.
Problem Possible Causes Solutions
Air conditioner will • The air conditioner plug is • Make sure electrical plug is plugged completely into a
not start not completely inserted in live, properly grounded outlet.
the electrical outlet.
• The house fuse is blown or the • Replace the fuse or reset the circuit breaker. Make sure
circuit breaker has tripped. that there are no other appliances on the same circuit.
• Power failure. • If a power failure occurs, turn the power OFF. When
power is restored, wait 3 minutes before restarting the
air conditioner.
• The integrated circuit breaker in the • Press the RESET button on the air conditioner plug.
plug has tripped. If the reset button will not stay engaged, unplug the air
conditioner and contact a qualified service technician.
• FL appears in the display. • The water collection tank is full. Drain the tank and
reset your settings.
See the Care and Cleaning section.
• Room temperature is less than the • This is normal. The air conditioner automatically
set temperature. shuts off when the room equals or is less than the
set temperature. Adjust the temperature setting,
if needed.
English
Air conditioner does • Airflow is restricted. • Make sure there is sufficient clearance around the
not cool properly air conditioner and that the air inlet and outlet are
not blocked by furniture, curtains, etc.
• The air filter is dirty. • Clean the air filter at least every two weeks. See the
Care and Cleaning section.
• The room is very hot, or not enough • When first turned on, allow the air conditioner
time allowed for cooling. sufficient time to cool the room.
• Cold air is escaping. • Check for open furnace floor registers or cold air
returns, or open windows or doors.
• Cooling coils have iced up. • In especially hot, humid weather and when the air
conditioner is running frequently or for extended
periods, ice can form on the cooling coils, blocking
air flow. Set the controls to High Fan (F3) or High
Cool (F3), and set to a warmer temperature.
Air conditioner runs • Area to be cooled is too large for • Consult your dealer for the air conditioner capacity
too often or too long the air conditioner. necessary to cool the desired area.
• Doors or windows are open. • Make sure doors and windows are closed.
23
Page 24

TROUBLESHOOTING
BEFORE CALLING FOR SERVICE
Problem Possible Causes Solutions
Code appears in
the di splay :
F1, F2, or F3 • Air conditioner is in FAN mode • This is normal. Theair conditioner is working properly.
and the number shown is the set
fan speed.
FL • The water collection tank is full. • Empty the water collection tank. See the
CH01 • Short or open circuit in the indoor • Unplug the air conditioner and contact your authorized
air thermostat. LG service center.
CH02 • Short or open circuit in the indoor • Unplug the air conditioner and contact your authorized
pipe thermostat LG service center.
C are and Cleaning section.
CH03 • The difference between Evaporator
temperature and indoor temperature
is less than 3 C.
• Unplug the air conditioner and contact your authorized
LG service center.
24
Page 25

25
Page 26

26
Page 27

26
Page 28

 Loading...