


OWNER’S MANUAL
CANVAS SPEAKER
Please read this manual carefully before operating your set and retain it
for future reference.
OCF100
P/NO : MFL67980402 (1310-REV00)
Printed in Korea
www.lg.com
ENGLISH
ENG
TABLE OF CONTENTS
2
TABLE OF CONTENTS
3 SAFETY INSTRUCTIONS
5 BEFORE INSTALLATION
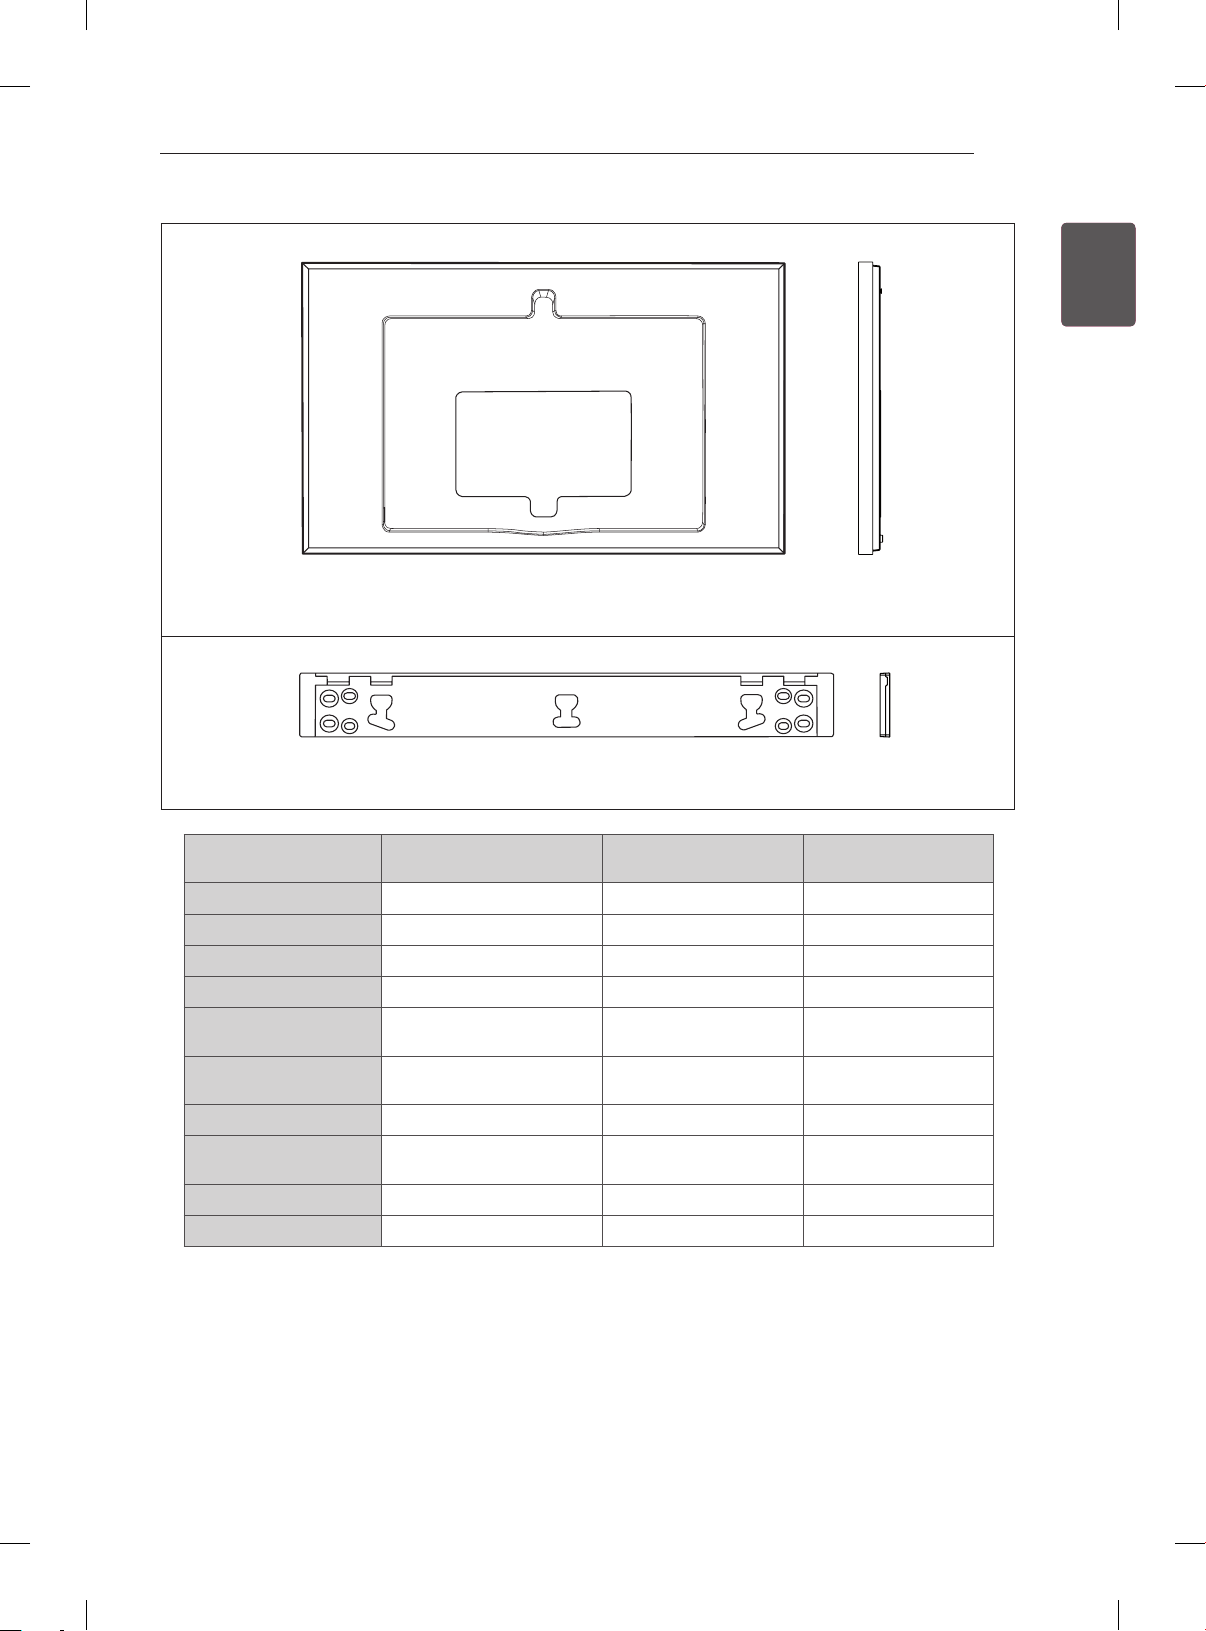
6 UNPACKING
7 INSTALLATION
7 Attaching the Guide Spacer on the TV
8 Attaching Set Protection Cushion
8 Checking the Spots for Fixing Screws on the Wall Using VESA Guide Sheet
9 Fixing Anchors and Screws
9 Installing the Wall Mounting Supporter
10 Assembling the Wall Mounting Supporter and the Canvas Speaker
11 Adjusting the Level of the Product
12 Organizing the Power Cord
13 Fixing the Safety Clip (Bottom)
13 Connecting the Optical Cable
14 Combined Appearance of the Canvas Speaker and TV
14 PRODUCT SPECIFICATIONS
WARNING
yIf you ignore the warning message, you may be seriously injured or there is a possibility of accident
or death.
CAUTION
yIf you ignore the caution message, you may be slightly injured or the product may be damaged.
SAFETY INSTRUCTIONS
SAFETY INSTRUCTIONS
- Make sure the professional installer read this manual before installation.
- After the installation, the professional installer should pass this user manual to the customer and ask the
customer to read the manual carefully and keep it in a safe place.
After reading the user manual, keep the manual in a readily accessible location so the users can refer to
it in the future as required.
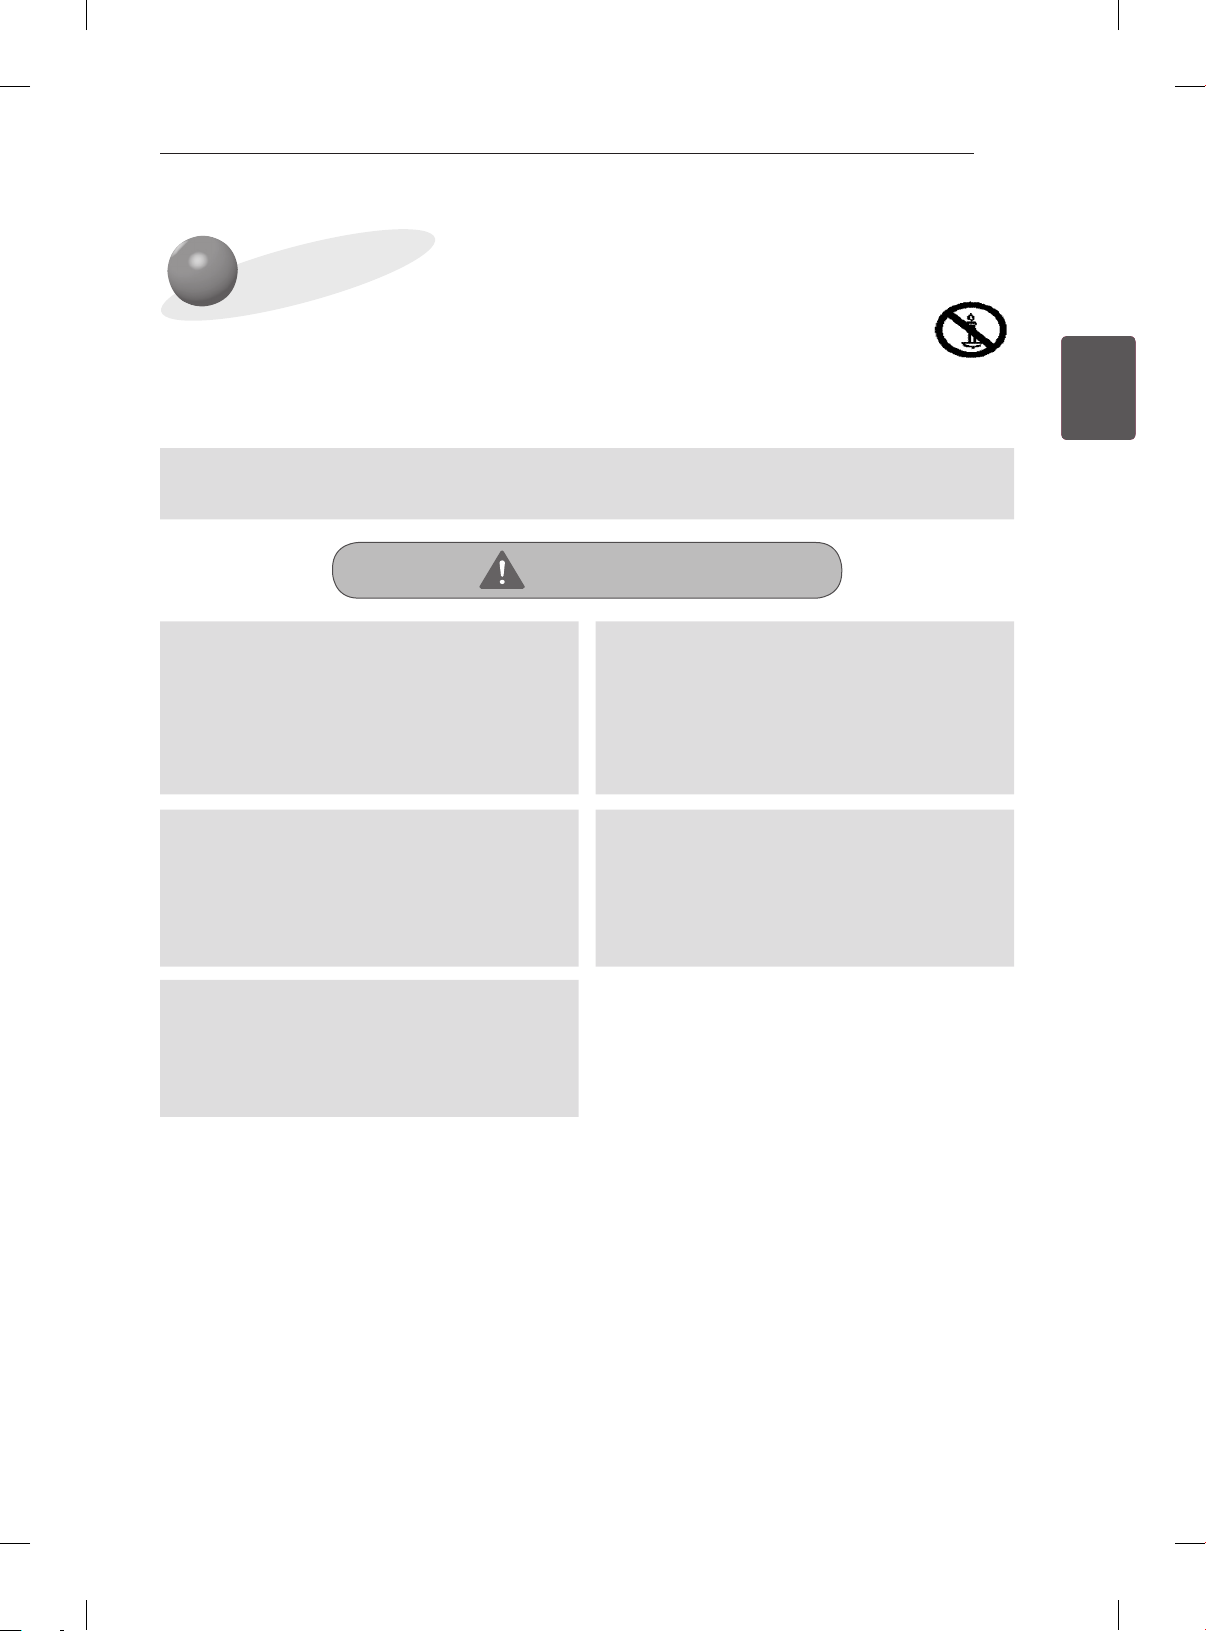
WARNING
3
ENGENGLISH
The product should be installed by a
professional installer designated by the
retailer.
Having the product installed by a non-specialized
installer is very dangerous and can cause a personal
injury.
Contact a professional installer designated by
the retailer to move or replace the product, if
needed.
Installation requires special techniques and moving or
installing the product on your own can cause serious
safety issues.
When installing the wall mount-type product,
never hang the power cable or signal cable on
the rear side of the TV.
The cord can be damaged, resulting in a re, an electric
shock or damage to the product.
Do not install the product where the weight
cannot be supported.
If the location where the product is installed is not stable
and sturdy enough, it may fall causing personal injuries.
After installing the product, do not hang on it
or apply severe impact to the product.
The product may fall causing personal injuries.
ENGLISH
ENG
SAFETY INSTRUCTIONS
4
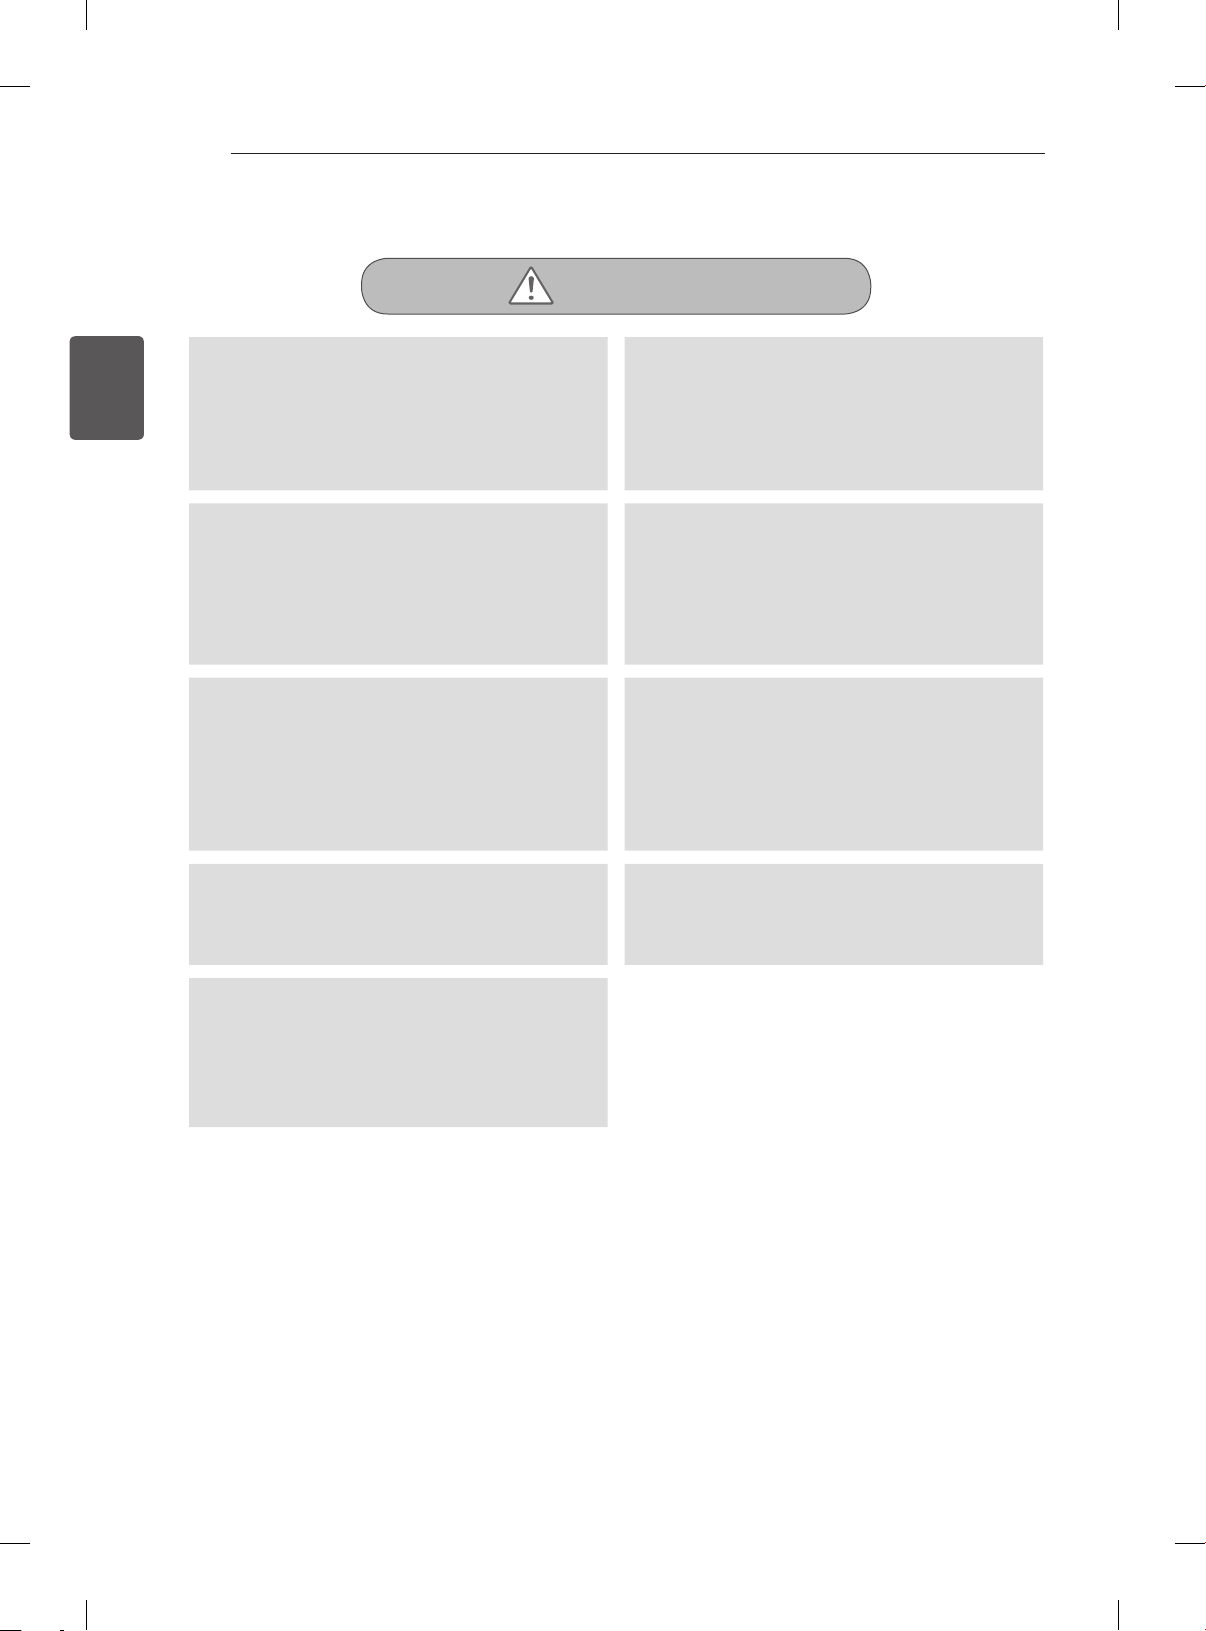
CAUTION
Install the product according to the directions
in this user manual.
Failure to follow the directions in the user manual
may cause a serious personal injury or damage to the
product due to the improper installation.
Check the type of wall material before the
installation and use the provided anchors and
screws if the conditions comply.
If you do not use the designated anchors or screws, they
may not be able to withstand the weight of the product
and cause a safety issue.
Do not wipe the product with a wet towel
and make sure you do not use any heater
or humidier under the location where the
product is installed.
If water ows into the product or moisture and heat are
applied to the product, it may cause a re, an electric
shock or product malfunction.
Unplug the power cord from the power outlet
before installing the product.
If you install the product with the power cord plugged, it
may cause an electric shock or a re.
When you do use other cables than the
provided one to connect the product, the
wall or the connector of the product may be
damaged due to the friction with the wall.
Make sure to use the cable gender provided
with the product.
At least two people must work together when
installing the product or adjusting the height
of the product after the installation.
Working alone may cause the product to fall, resulting in
personal injury or damage to the product.
When drilling holes in the wall, always use a
drill bit and drill in designated diameter.
If you make a hole to install the product without following
the instructions, the product may not be installed stably,
resulting in a safety issue.
Do not install the product in any place other
than the vertical wall, for example, near a
sprinkler or sensor, in a place where may be
affected by vibration or shock, or near any
high voltage power cable or power source.
Do not install the product with bare hands.
Always wear proper work gloves.
Otherwise, this may result in personal injuries.

BEFORE INSTALLATION
BEFORE INSTALLATION
yUse this product only for installing the TV on the wall.
yBe cautious when installing/using the wall mounting product in order to prevent the damage to the
product and avoid safety accidents.
yIf you have not fully read and understood the installation manual, do not install the product and contact
an authorised service centre.
If you have not fully understood after the inquiry, have a specialized installer install the product for you.
y Even if you are not a specialized installer but have experience in mechanical or construction eld, it is
advantageous for you to fully understand this manual and install the product.
y This product is designed to be mounted to walls with standard space between the studs. LG Electronics
is not responsible for any issues occurred by installing the product on the walls where the standard
space is not applicable.
yInstall the wall mounting screws to the wall so that they can be installed at the centre of the both ends of
the studs.
It is recommended to use the stud nder, a separate device.
yWhen installing the bracket on a concrete wall or on any other walls capable of holding the strength
specied in the manual, you may remove the brackets for xing to the wall of studs with standard space
and follow the instructions for attaching the bracket to make the installation easier.
yInstall the product only on a vertical wall.
Do not install the bracket on a wall inclined at an angle, exceeding the standard range, or on the ceiling.
LG Electronics is not liable for any issues occurred due to the installation of the product on a slanted
wall or on the ceiling.
yCheck the accessories provided with the product before installing. LG Electronics is not liable for any
damage to or loss of the accessories after the package has been opened.
yKeep the provided accessories out of reach of babies or children as it may cause safety issues,
including suffocation, from swallowing the parts.
yMake sure that screws are installed securely on the wall.
Applying excessive force to screws may damage the wall, impair the performance or reduce the strength
of the product, or cause it to become damaged.
yBe careful not to install a TV that exceeds the weight restrictions and not to apply external force.
yBe careful when using the tools during installation to prevent accidents or damage.
5
ENGENGLISH
<Tools for Installation>
Philips screwdriver (manual or electric) / 8 mm spanner / drill / Ф 8 mm drill bit for concrete wall Ф 4 mm drill
bit for wood or steel / level / stud nder / slotted screwdriver

ENGLISH
ENG
UNPACKING
6
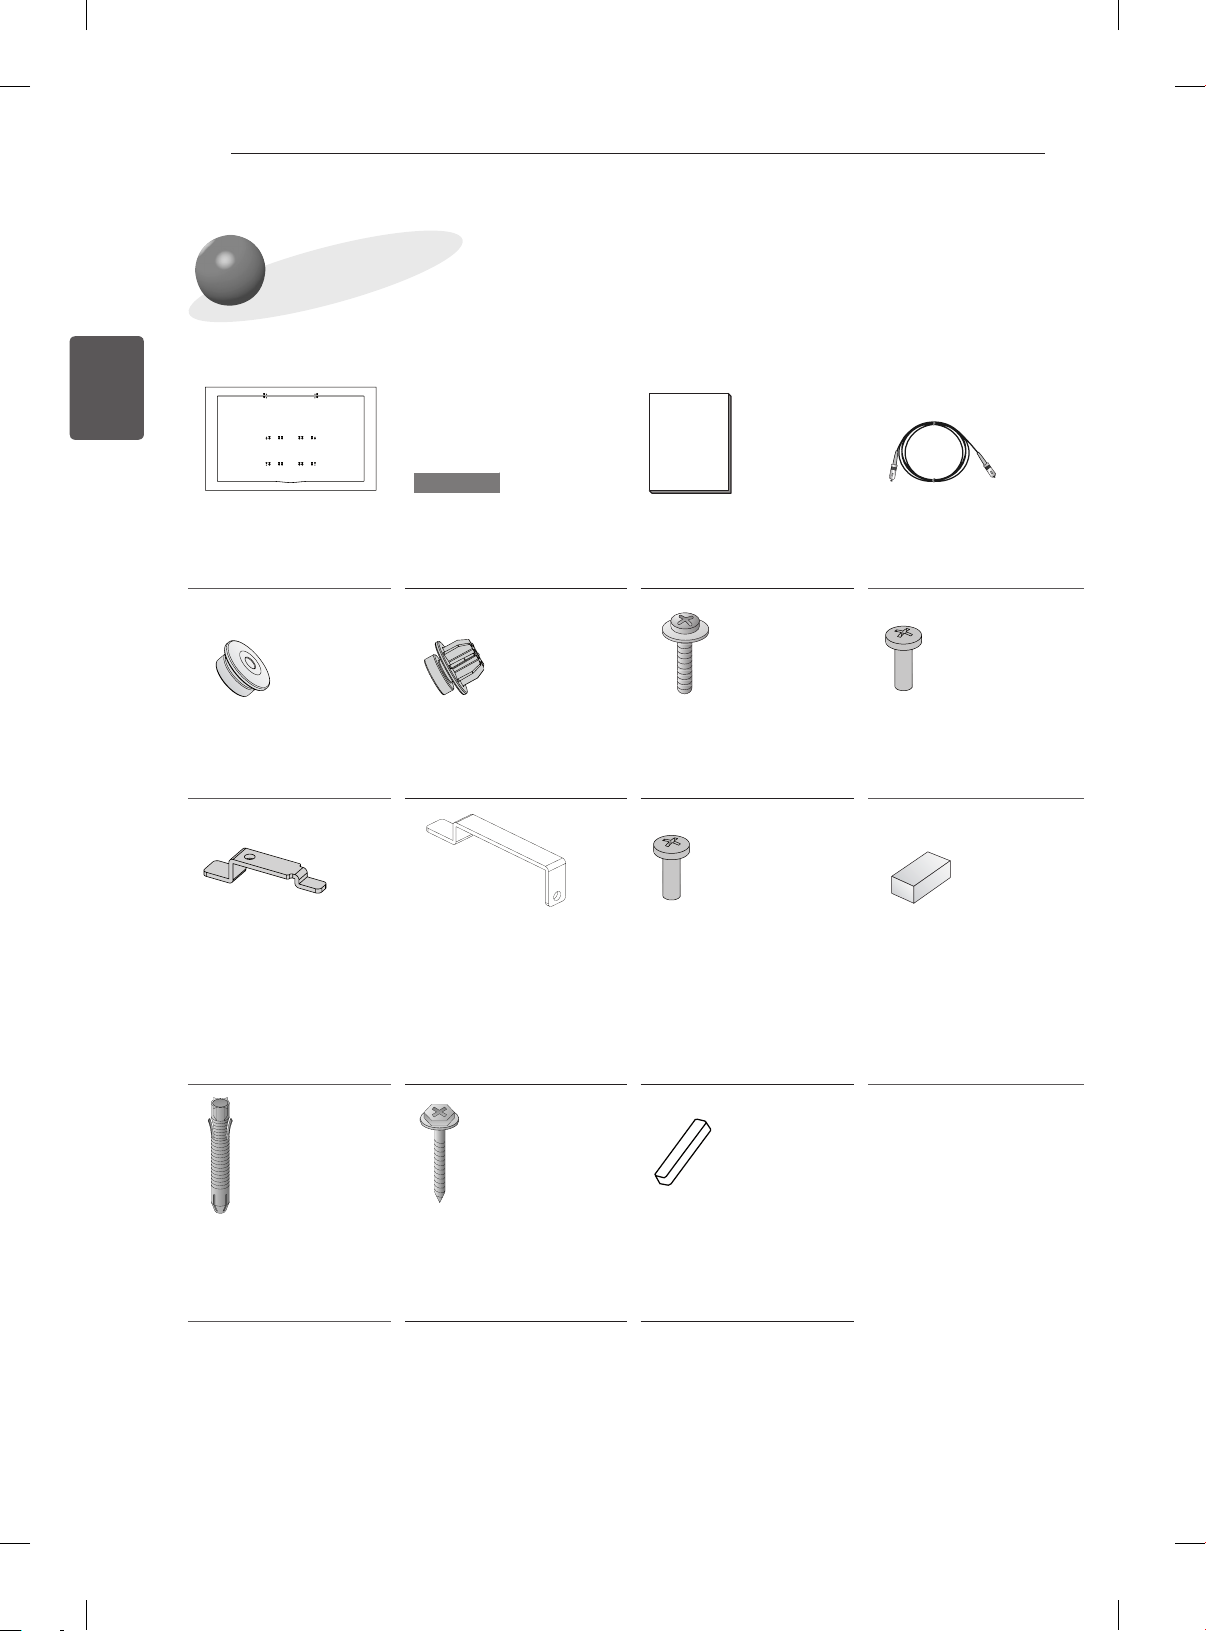
UNPACKING
VESA Guide Sheet
Guide Spacer (Bottom)
2 EA
Safety Clip (Top)
2 EA
Installation Guide Tape
4 EA
Guide Spacer (Top)
2 EA
Safety Clip (Bottom)
2 EA
User Manual Optical Cable
Guide Spacer (Top)
Fixing Screw
2 EA, M6 X 26
Safety Clip (Top/
Bottom) Fixing screw
4 EA, M4 x 12
Guide Spacer (Bottom)
Fixing screw
2 EA, M4 X 20
Set Protection
Cushion (Upper)
2 EA
(thickness: 11 mm)
Set Protection
Cushion (Bottom)
2 EA
(thickness: 1.5 mm)
Wall Mounting Anchor
8 EA
Wall Mounting Screw
8 EA
Rubber
2EA
(thickness: 12 mm)

CAUTION
How to use the Rubber
yIt is recommanded to install the bracket on a concreate wall.
yThe product should be installed by a professional installer
designated by the retailer.
INSTALLATION
7
ENGENGLISH
Attach the rubber here.
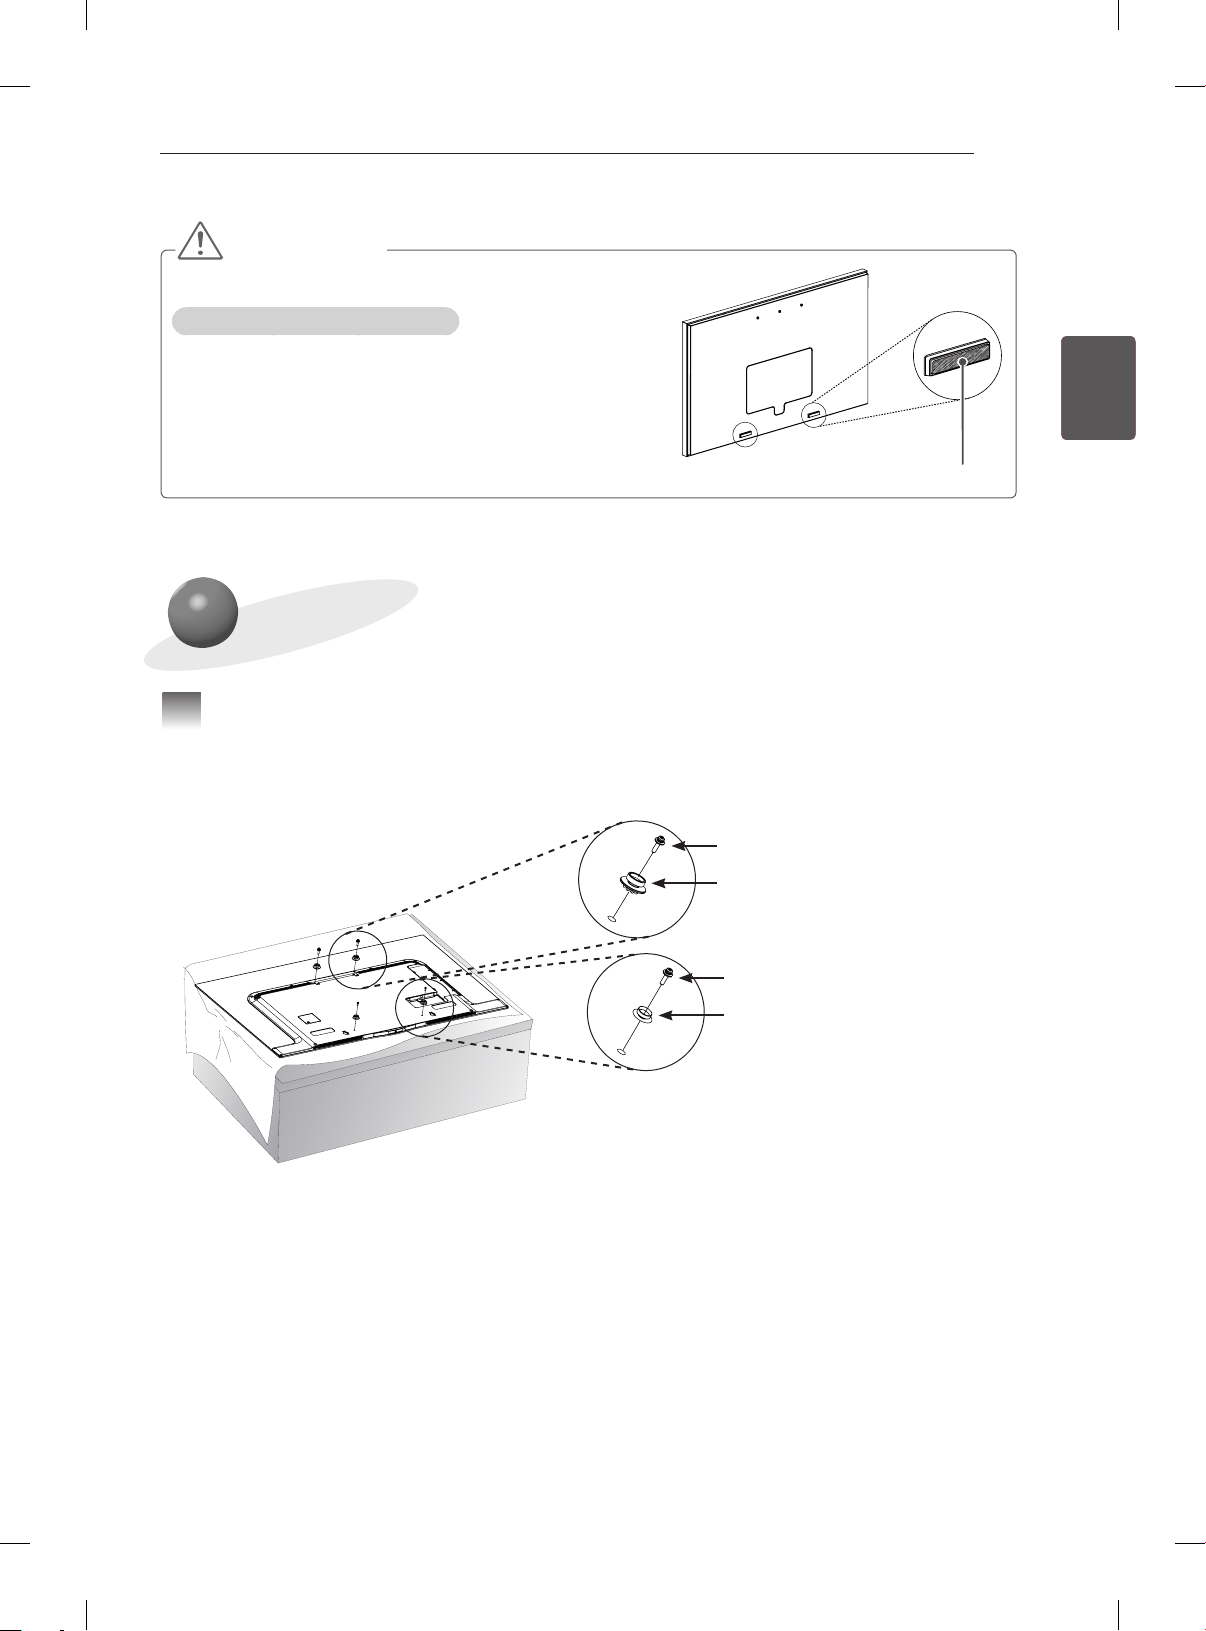
INSTALLATION
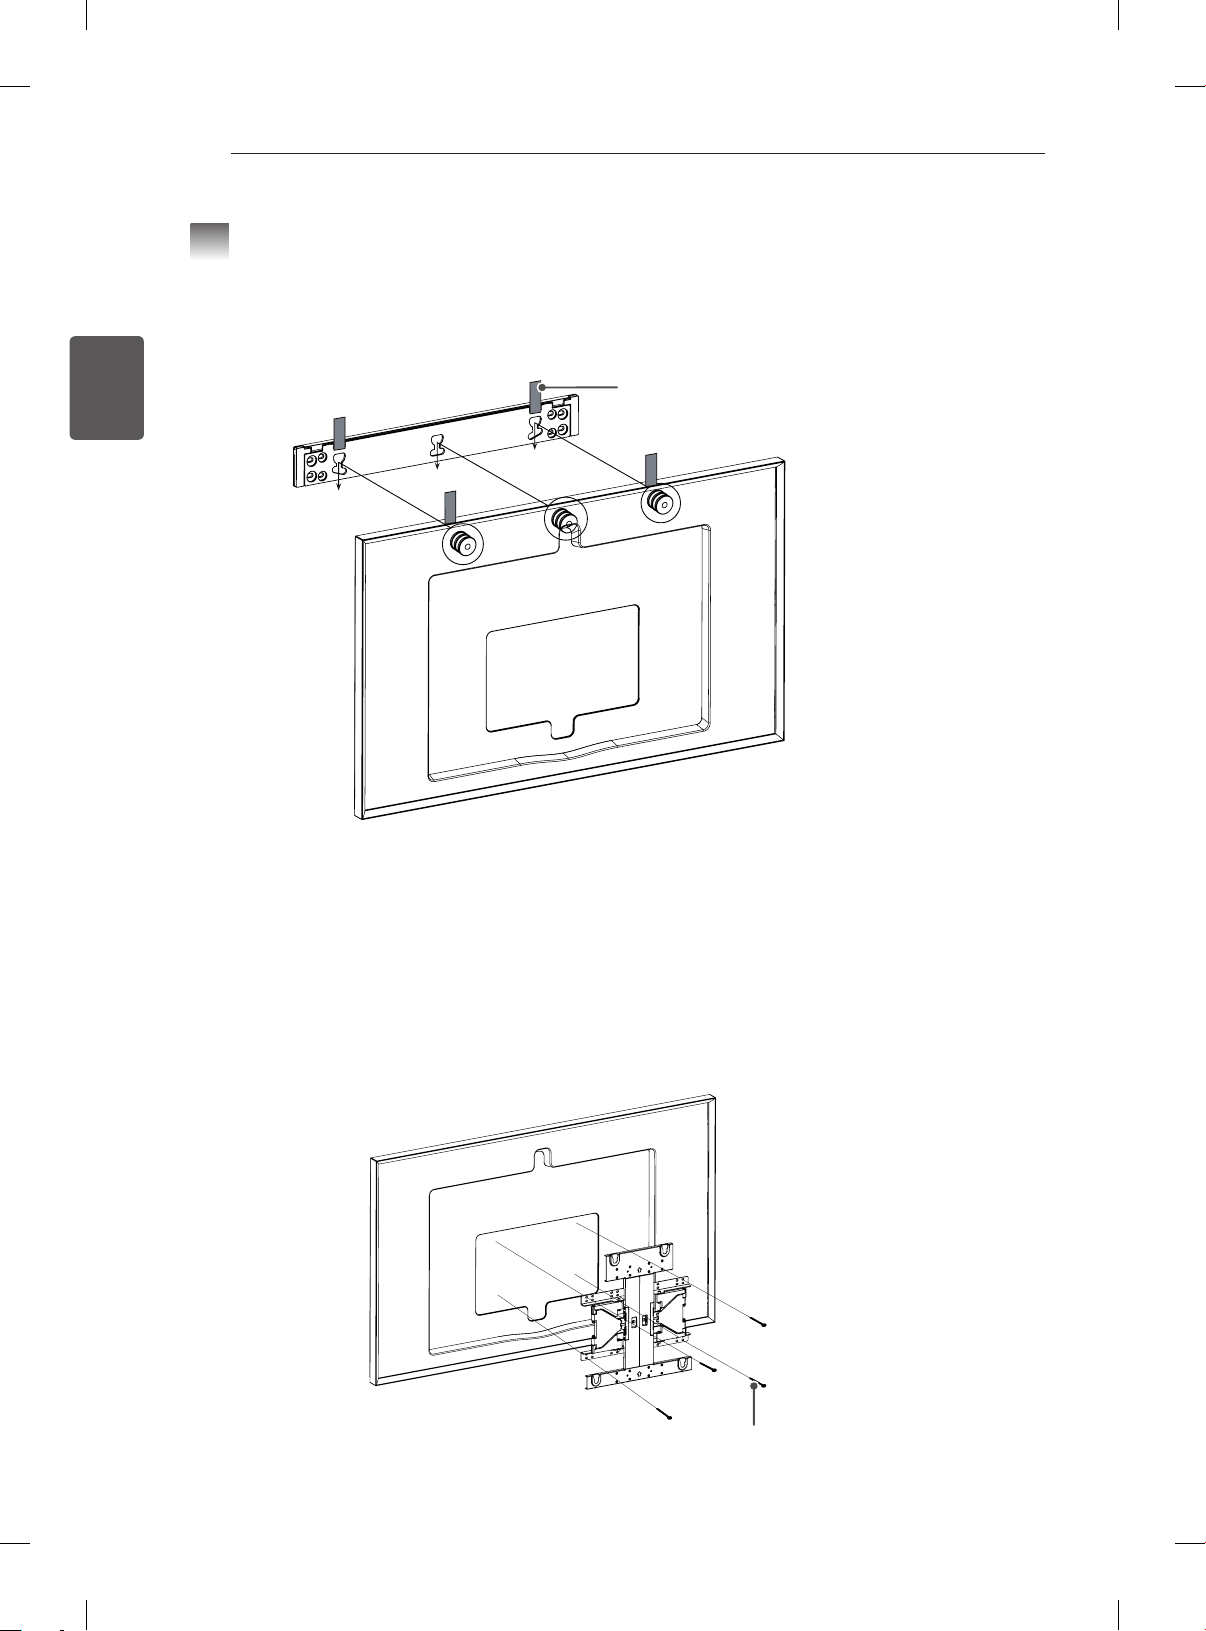
Attaching the Guide Spacer on the TV
1
yIf the screws cannot be fully tightened when xing the guide spacer with them, check the xing depth of
the screws again and refer to the technical service manual.
Guide Spacer (Top) Fixing Screw
Guide Spacer (Top)
Guide Spacer (Bottom) Fixing screw
Guide Spacer (Bottom)
< Procedures >
1 If any screws are installed into the mounting holes, please remove the screws.
2 Fix the guide spacers and the guide spacer xing screws in the order shown in the gure.
- Place the product facing down on a table. To prevent scratches on the screen, place the product on
a cushion or a soft clothes on a flat surface.
- Tighten the screw until the set, guide spacers and screws are joined together securely and stop
tightening.
- Use a Phillips driver (manual or electric) to tighten the screws.
INSTALLATION
8
ENGLISH
ENG
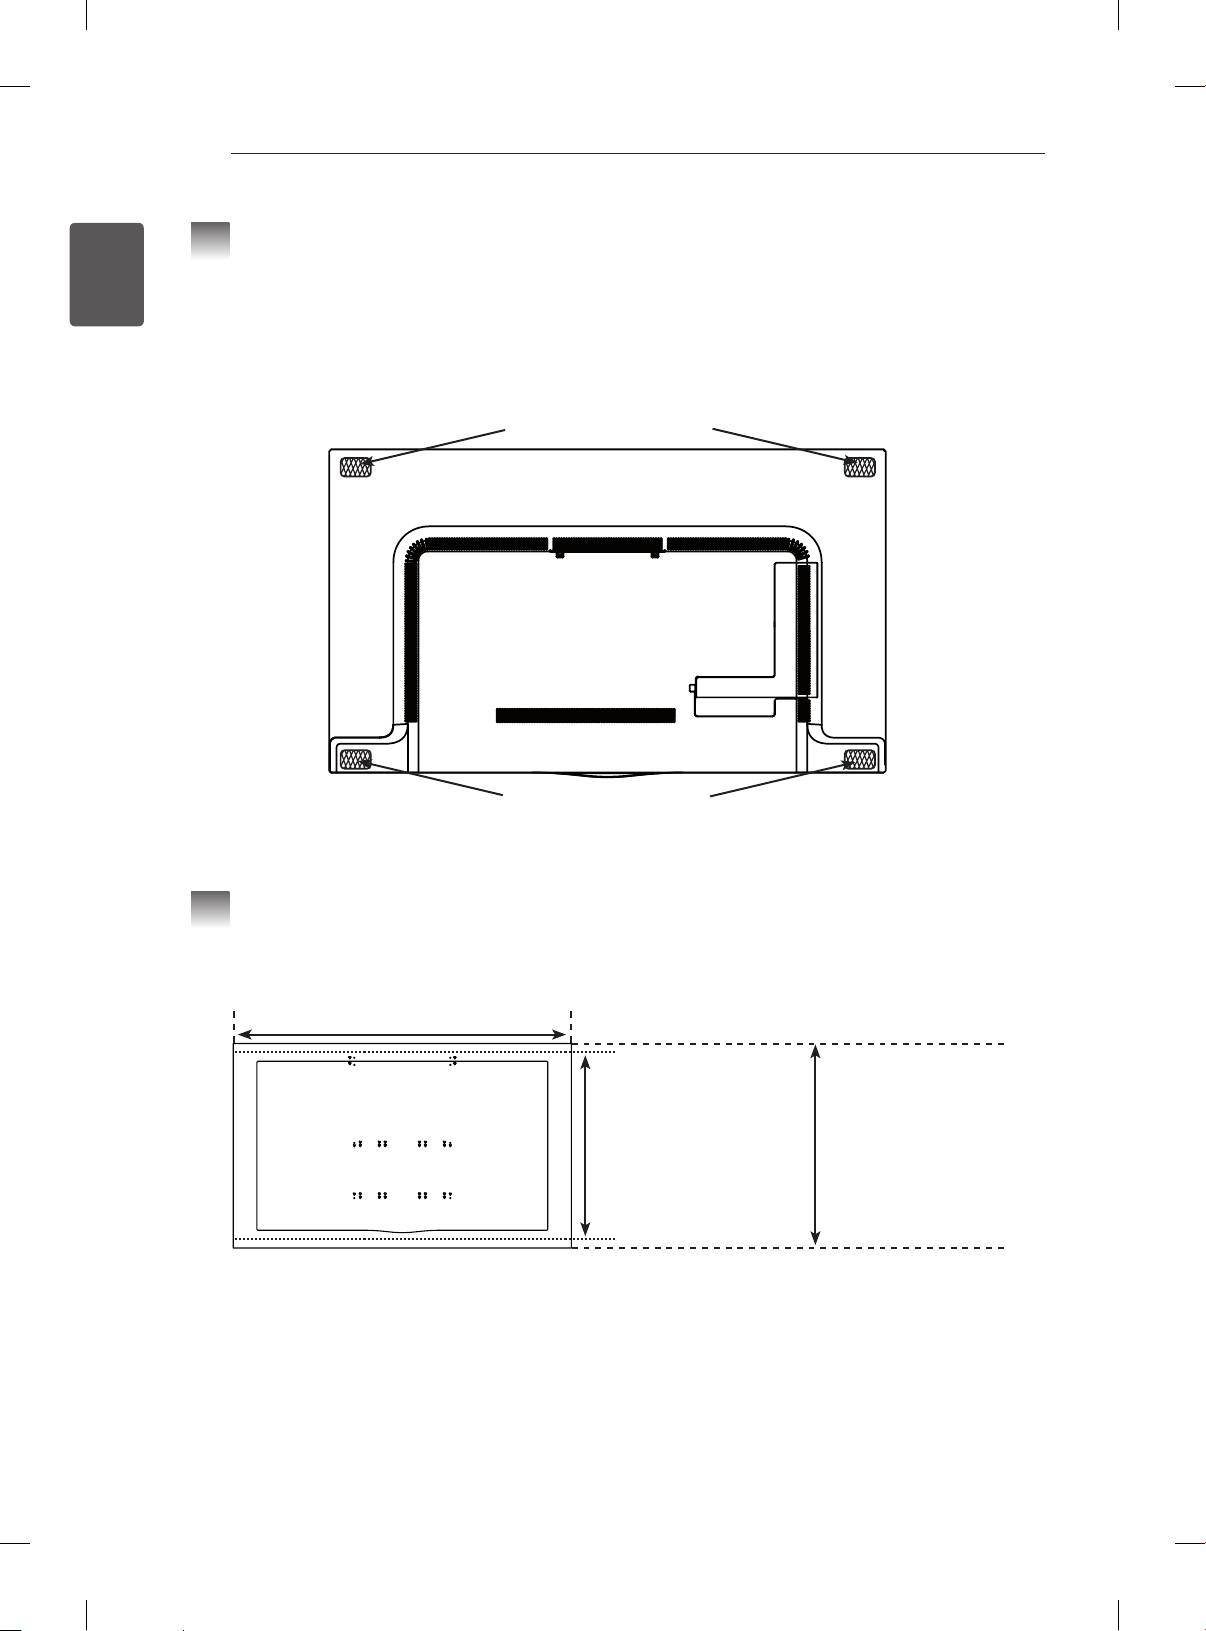
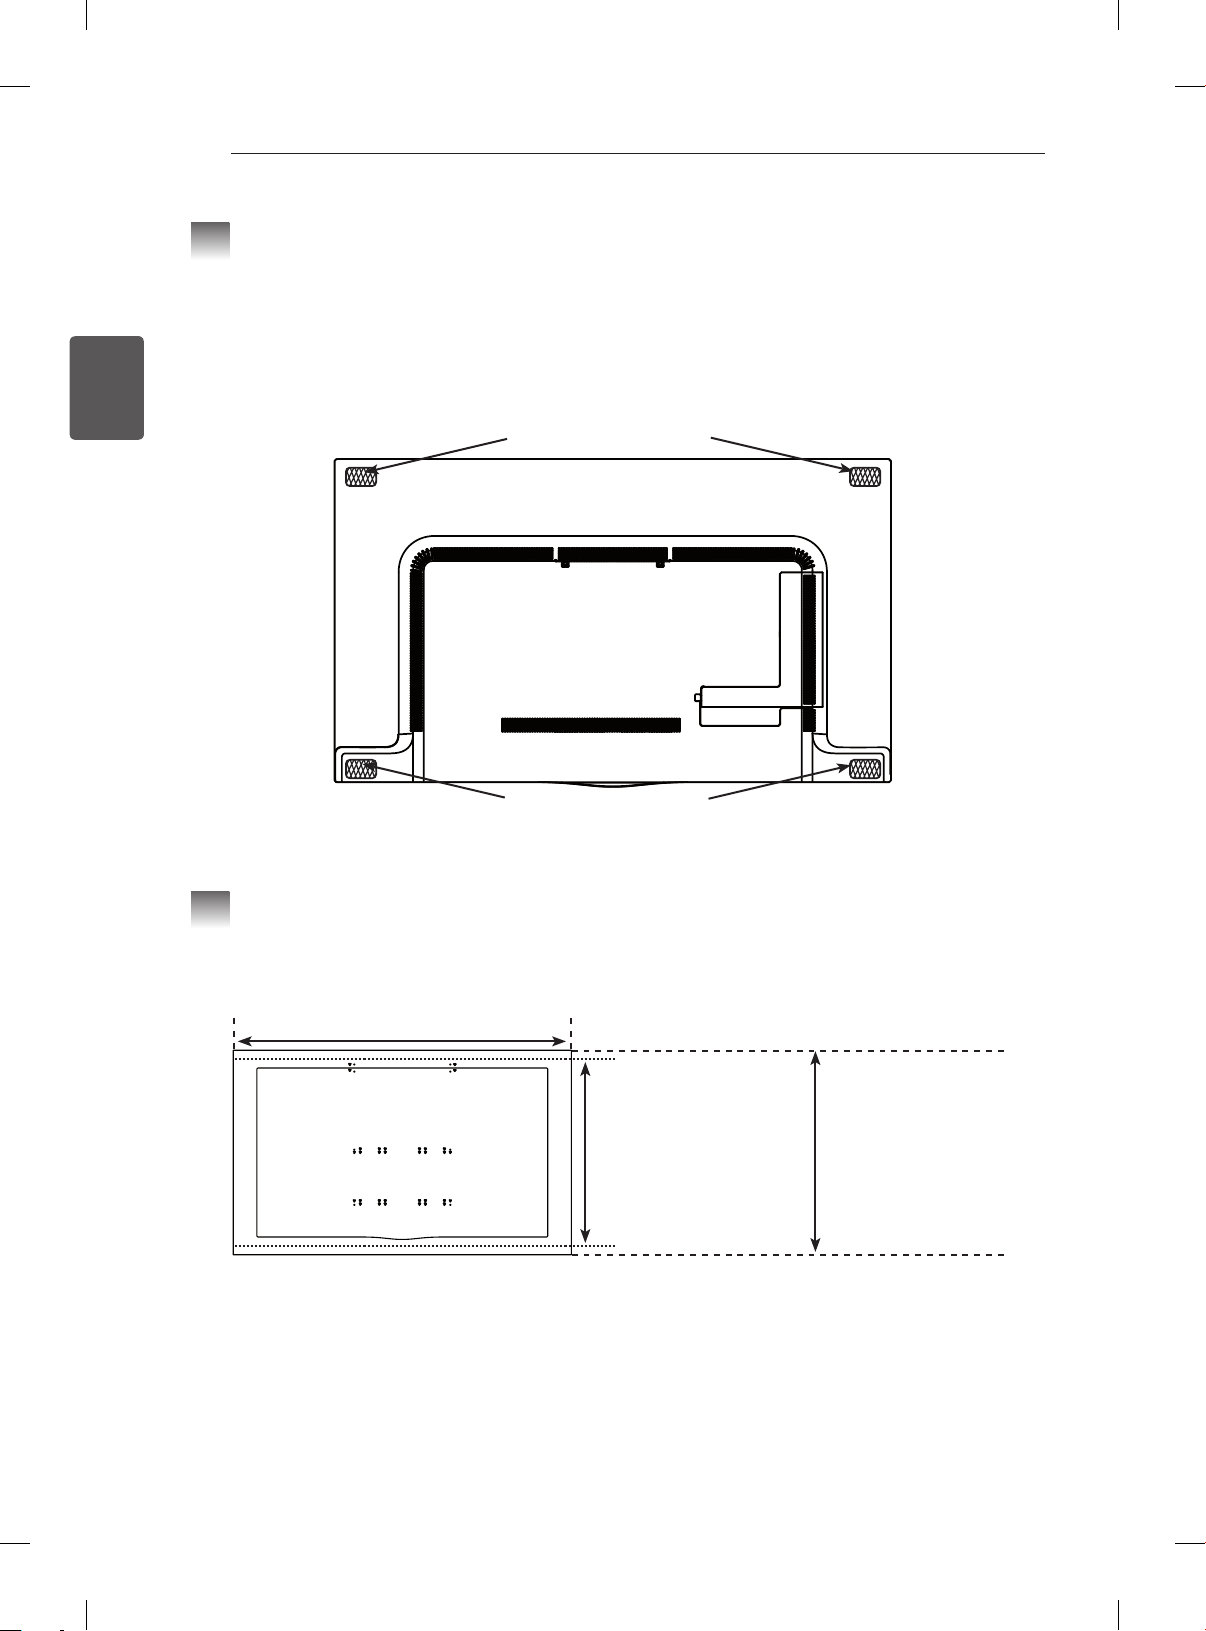
Attaching Set Protection Cushion
2
y Attach the set protection cushion to mitigate the impact between the TV and the Canvas Speaker in
case of bumping against each other when adjusting the angle.
yAttach the protection cushion to the four corners of the back of the set as shown in the gure.
Set Protection Cushion (Upper)
2 EA (thickness: 11 mm)
Set Protection Cushion (Bottom)
2 EA (thickness: 1.5 mm)
Checking the Spots for Fixing Screws on the Wall Using
3
VESA Guide Sheet
1430 mm
840 mm
(VESA guide sheet size)
1 Check the VESA standard for the TV.
2 Mark the wall mounting location on the wall using the VESA guide sheet provided as an accessory.
3 Remove the VESA guide sheet after checking the spots for xing screws on the wall.
865 mm
(Actual product size)
* Please note that the VESA guide sheet is shorter than actual product by 12.4 mm on the top and bottom
sides respectively, when installing the product.
INSTALLATION
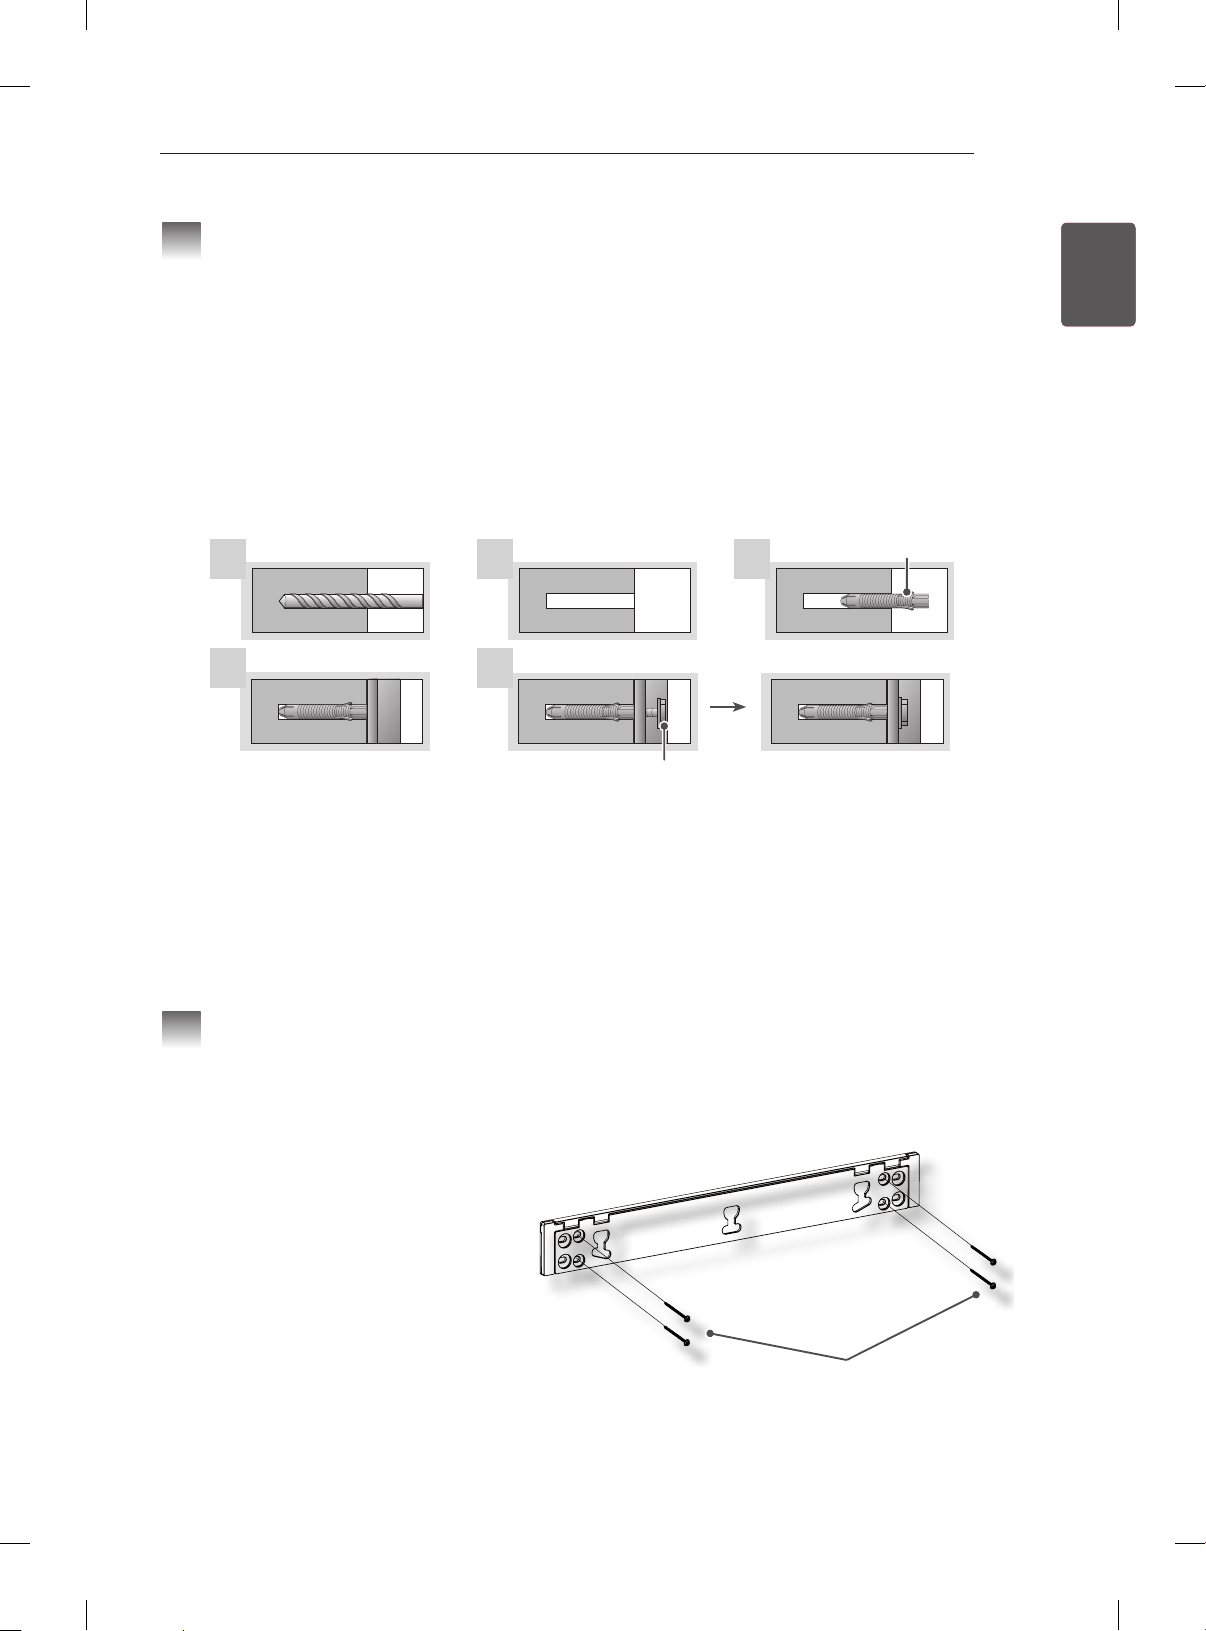
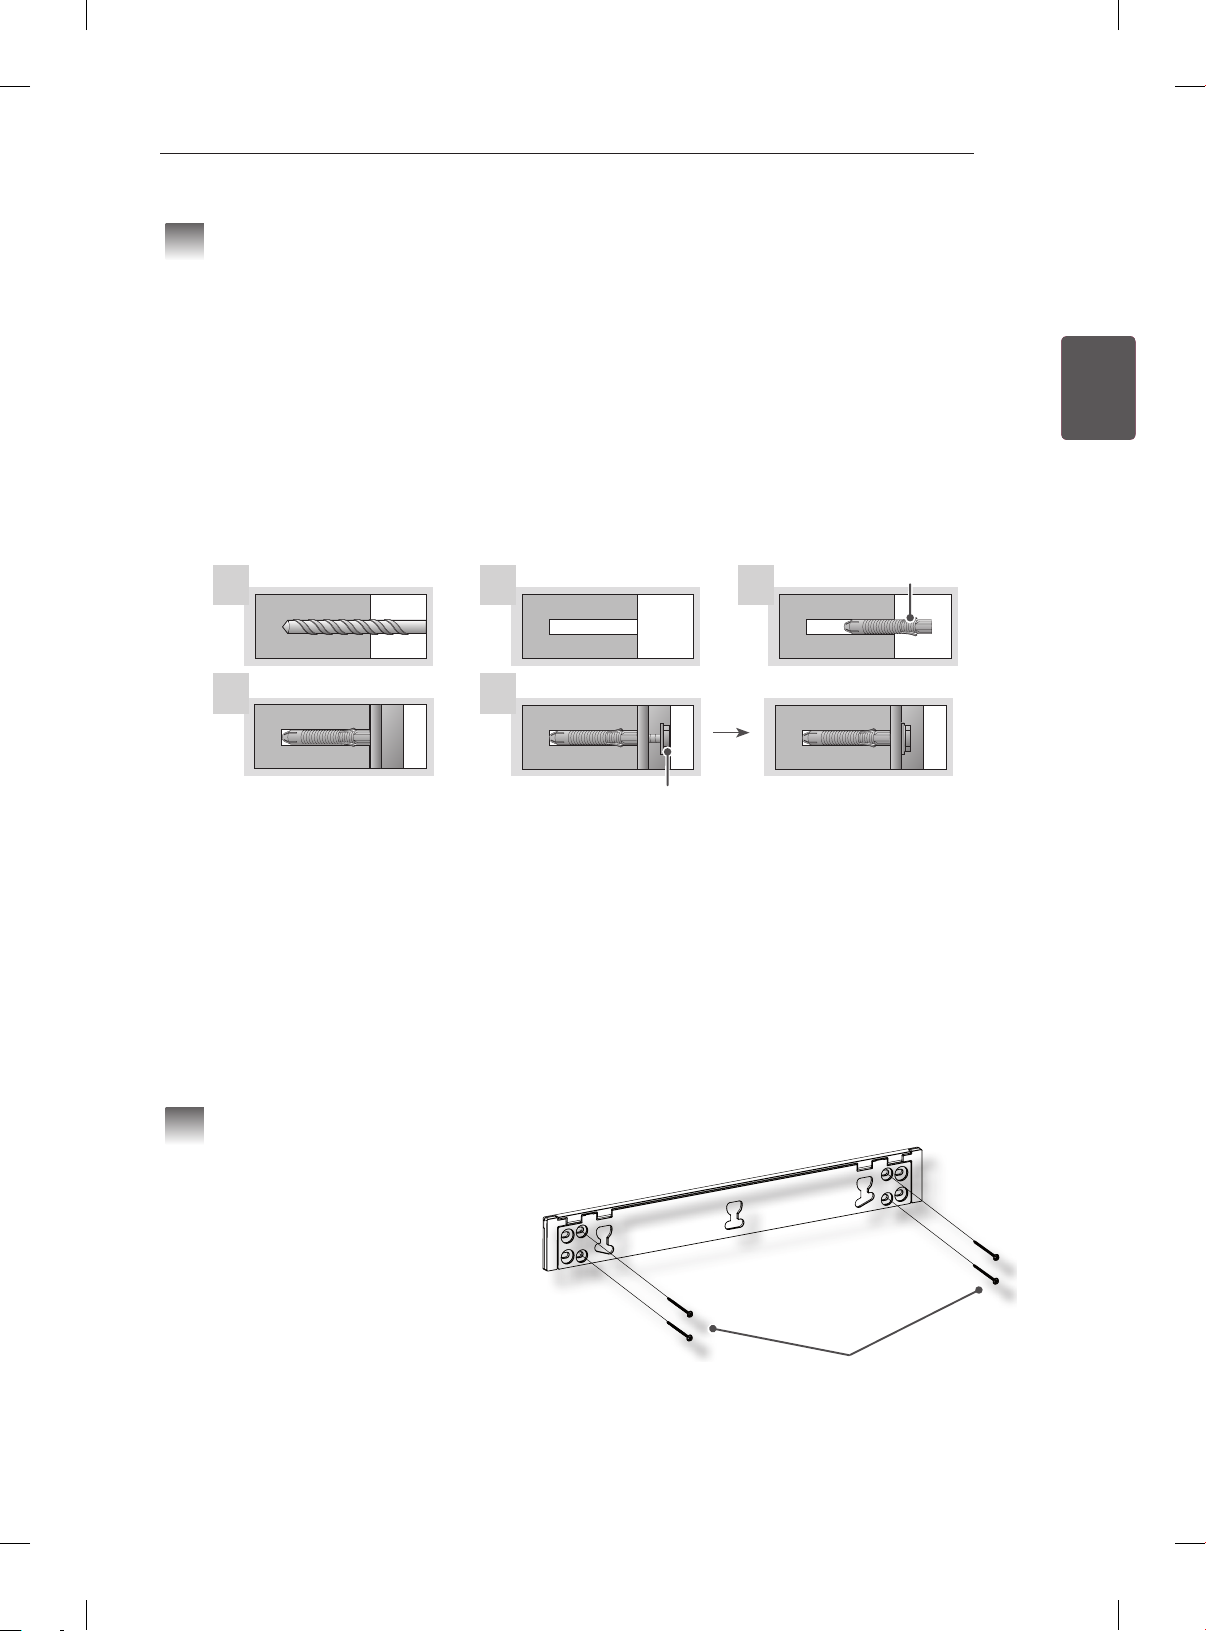
Fixing Anchors and Screws
4
< Please follow the directions below >
y Check the material of the wall and thickness of nishing material.
yYou can use the anchors and screws provided with the TV set for the wall made with concrete,
lightweight concrete, soft eldstone, hard eldstone, brick or cellular block.
yDo not mount on the wall made with plaster board or medium density breboard (MDF). Otherwise, you
must x the anchor screws to the retaining wall (concrete) inside the nishing material. If there is no
retaining wall, you must install a separate hanger rst to x the anchors and screws.
yWhen installing the product on the wall that is not specied in this manual, make sure that each xing
point withstands an pullout load of 70 kgf (686 N) and a shearing load of 100 kgf (980 N) or more.
9
ENGENGLISH
1 2
4
yUse the Ø 8 mm drill bit for concrete wall and hammer (Impact) drill.
1 Use a Ø 8 mm drill bit to make a hole with a depth of 80-100 mm on the anchor position.
2 Clean the drilled holes.
3 Insert the provided anchor in the hole. (Use a hammer when inserting the anchor.)
4 Place the angle adjusting part to face upward. Place the angle adjusting part to face upward.
5 Align the wall mounting screws with the holes to tighten the screws. Tighten the screw using a
recommended torque of 45 kgf/cm - 60 kgf/cm or more.
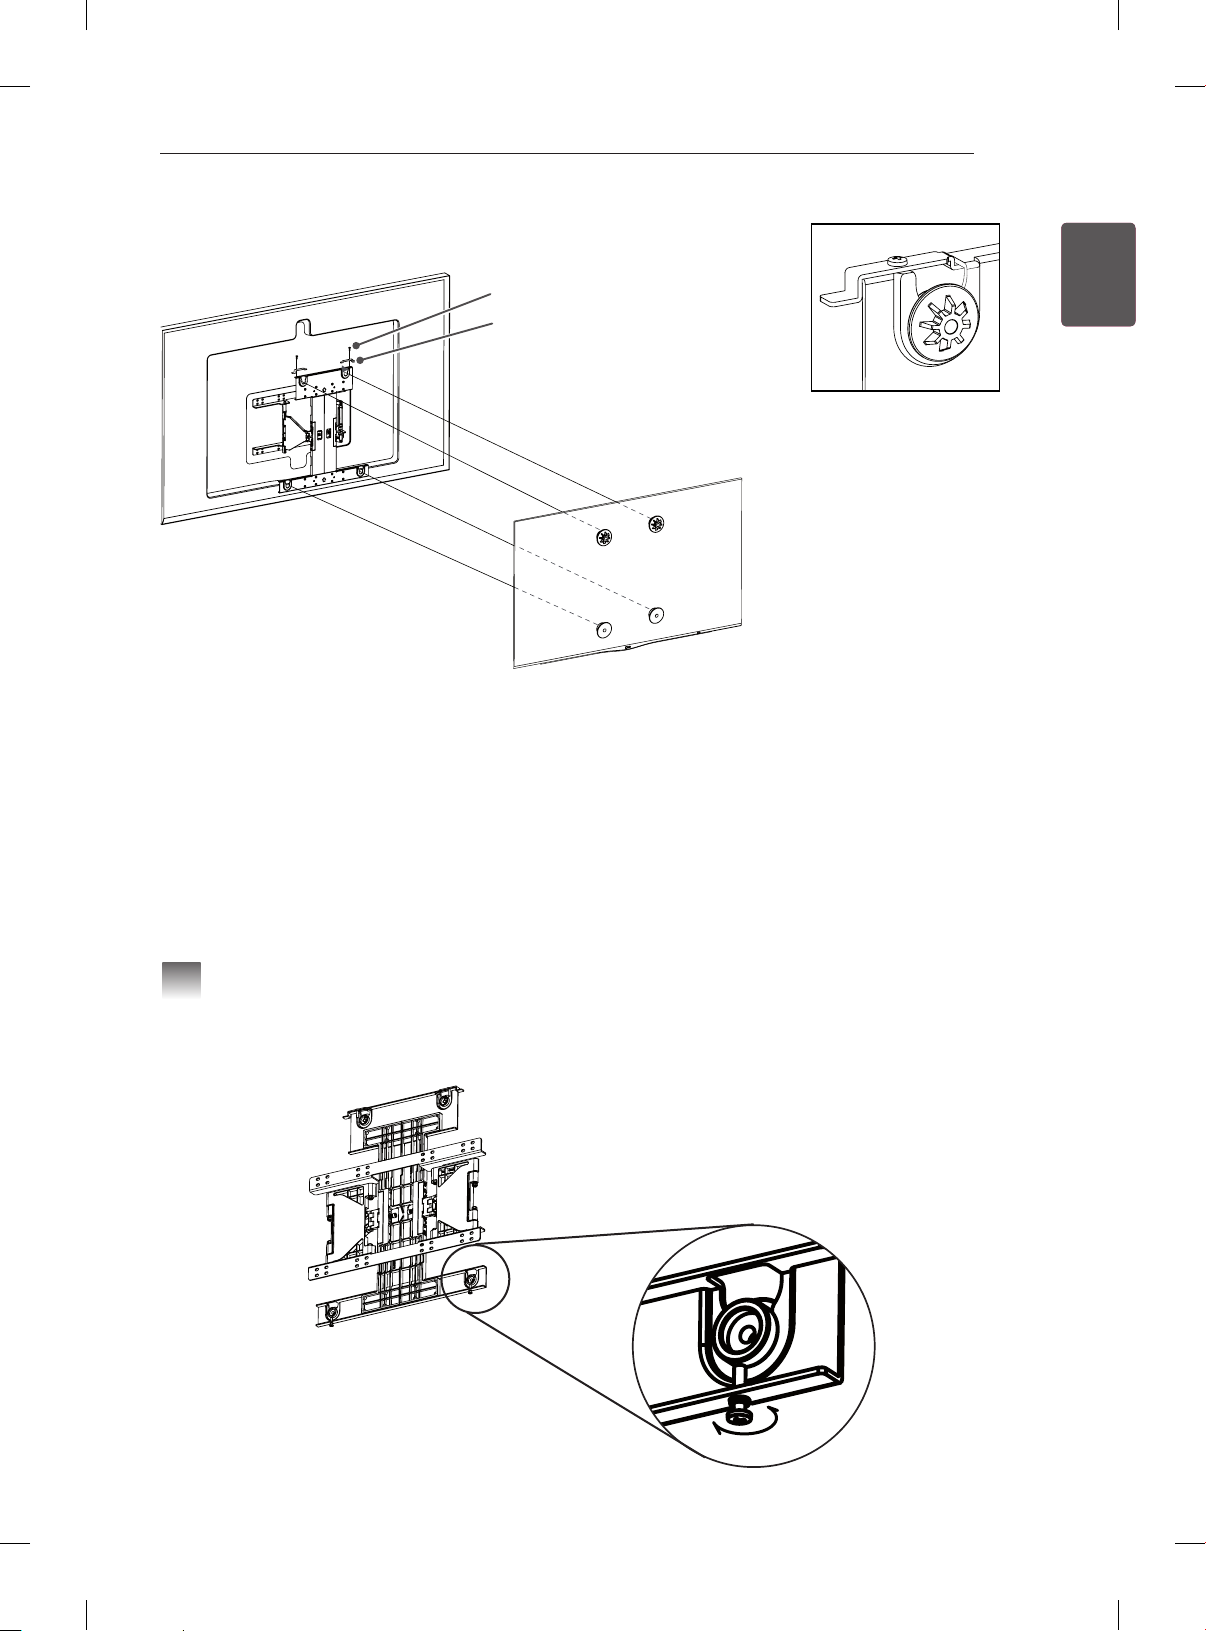
Installing the Wall Mounting Supporter
5
<How to tighten the screws>
yTighten the four wall mounting screws.
y If the screws cannot be xed in the
designated location, move the bracket to
the left or right to x the screws.
yFix the wall mounting supporter using the
wall mounting screws as shown in the
gure.
yTighten the screws until the wall, the wall
mounting supporter and the screws are
joined together securely using a (manual
or electric) Phillips screwdriver or 8 mm
spanner.
5
Wall mounting screw
3
Wall Mounting Screw
Anchor

INSTALLATION
10
ENGLISH
ENG
Assembling the Wall Mounting Supporter and the
6
Canvas Speaker
< Two or more people are needed to lift and install the product >
Installation Guide Tape
1 Place the Canvas Speaker on the wall mounting attached to the wall in the direction of the arrow.
- Attach the guide tape for wall mounting above the left and right holes of the wall mounting and the left
and right VESA of the Canvas Speaker .
- Attach the guide tape for wall mounting side by side as shown in the figure and then install the
product. When the installation is complete, remove the guide tape for wall mounting.
- Check if the product is securely fixed by pulling ou the top of the Canvas Speaker
- If the product is not levelled after the installation, adjust the level by moving the Canvas Speaker left
and right.
Wall Mounting Screw
2 Install the wall mounting bracket using wall mounting screws.
INSTALLATION
Safety Clip (Top) Fixing screw
Safety Clip (Top)
Assemble Safety Clip
between the Wall Mounting
Bracket and the Product
3 Hang the TV assembled with the guide spacers on the wall mounting bracket attached to the wall by
aligning it with the grooves of the bracket in the direction of the arrow. Attach the lower part rst, and
then attach the uppepart by slightly lifting up the set.
4 Insert the safety pin, which is provided in order to prevent the product desorption, in the direction of the
arrow while adjusting the position, and then completely x the safety clip with xing screw for safety clip.
If the safety pin is not xed as shown in the gure, the product may fall.
- Check if the product is securely fixed by pulling ou the bottom of the TV.
When using cables or accessories that are not provided as accessories for this product, make sure to
keep a certain distance from the wall so that excessive force is not applied on cables or accessories.
- Pushing the product with excessive force may cause damage to the product.
11
ENGENGLISH
Adjusting the Level of the Product
7
yIf the product is not levelled after the installation, adjust the level using this screw.
(The product goes up or down, depending on the rotation direction of the screw.)

INSTALLATION
12
ENGLISH
ENG
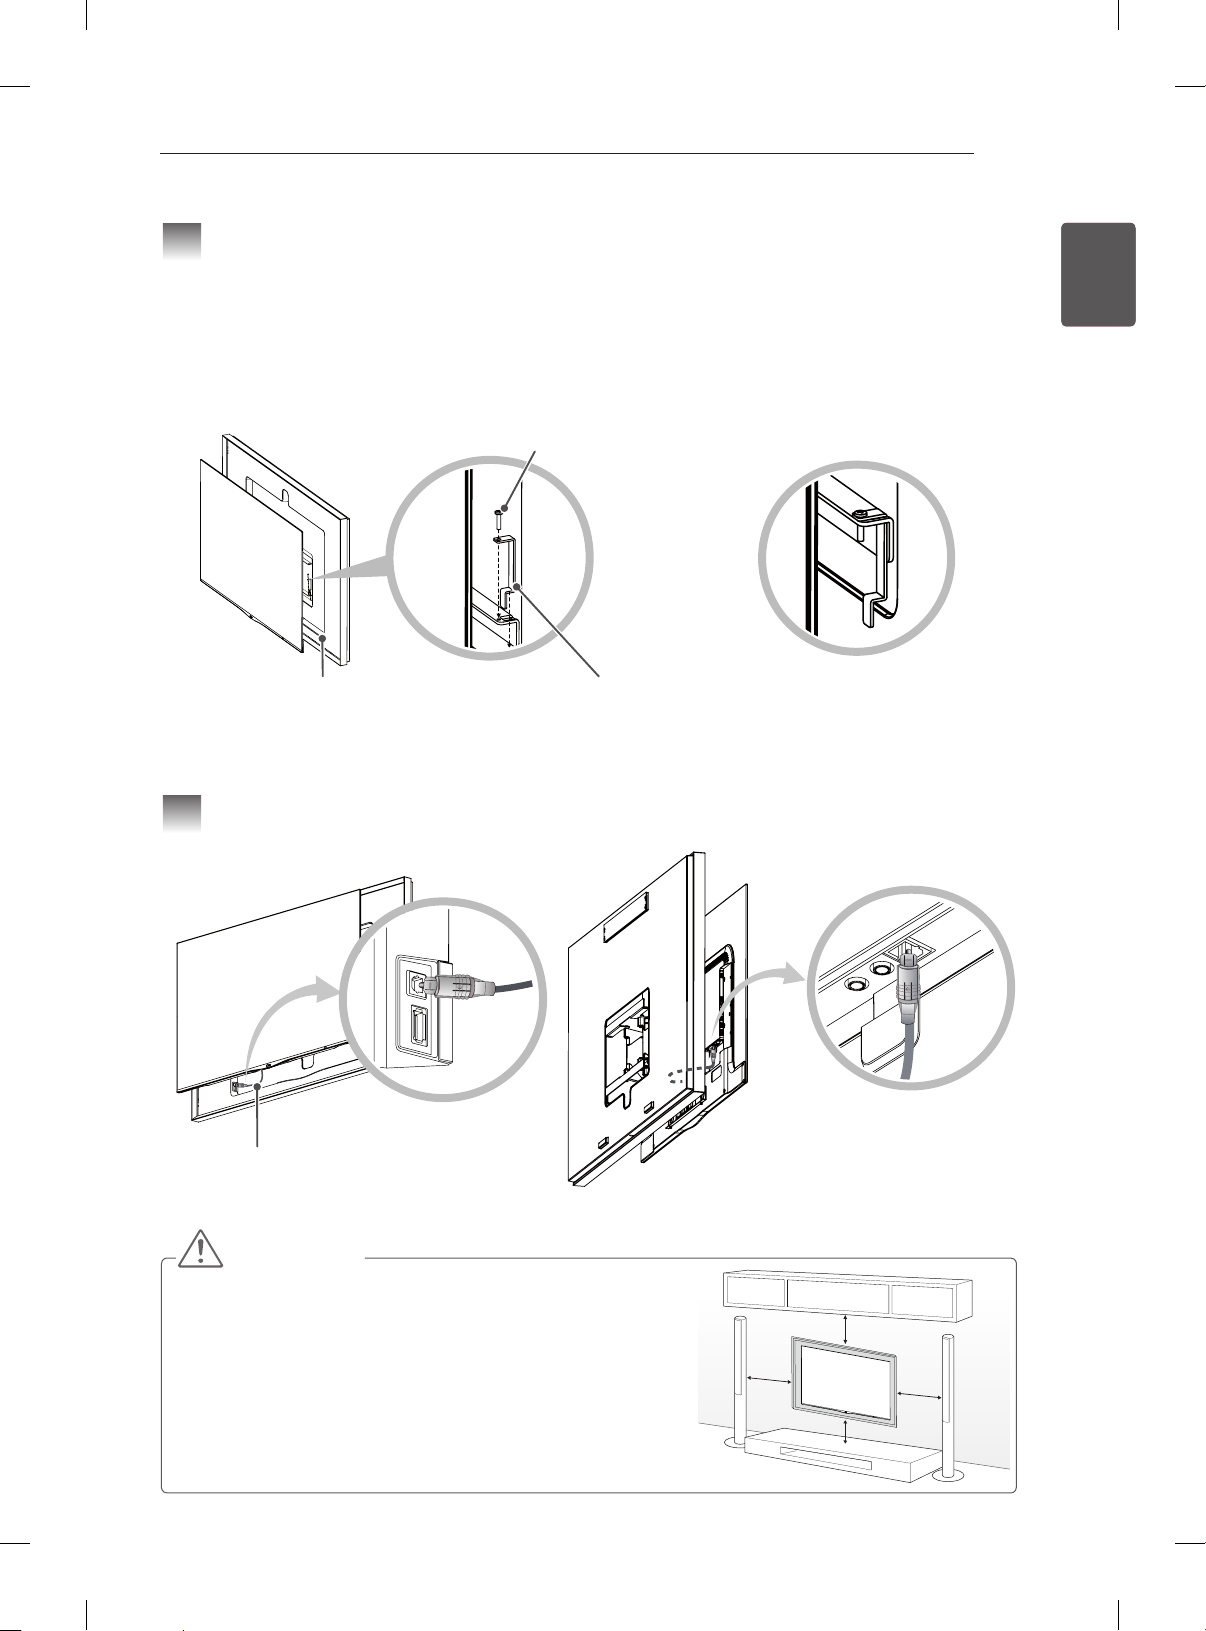
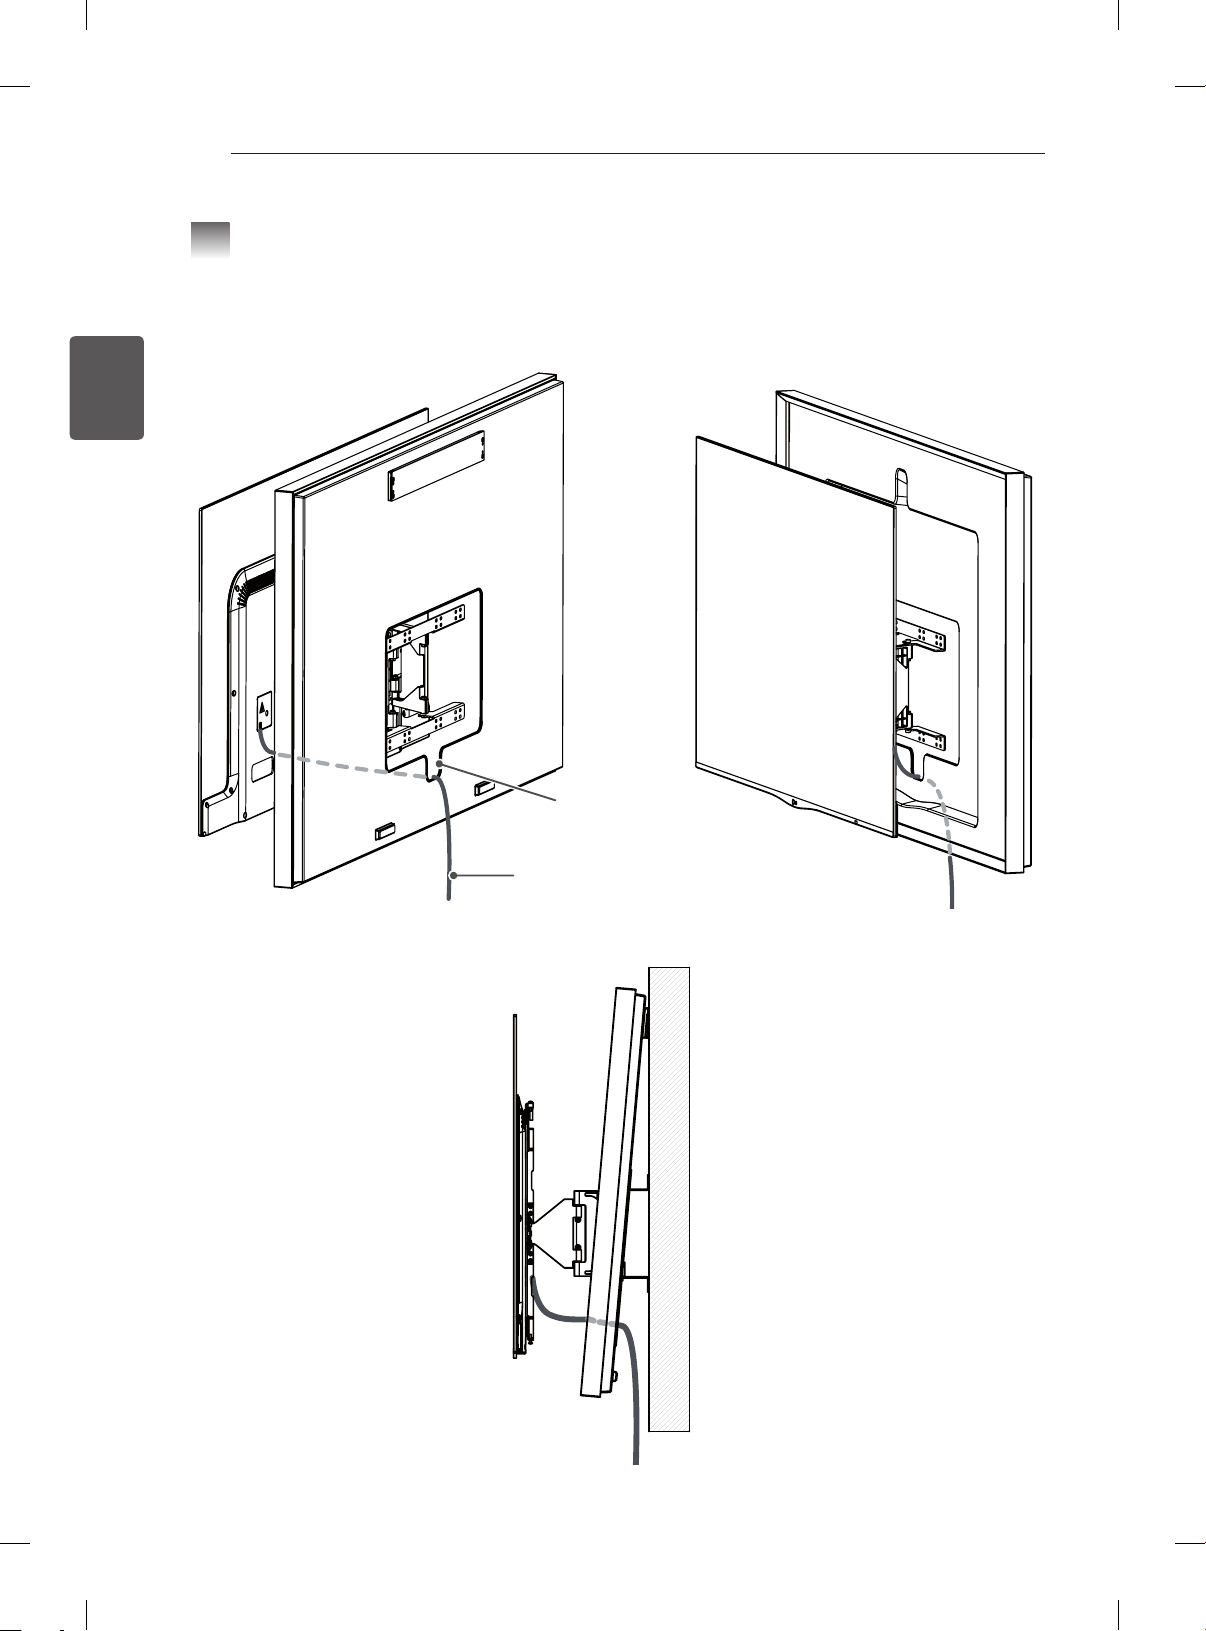
Organizing the Power Cord
8
yPull the Canvas speaker forward.
yDraw out the power cord through the square hole below the Canvas speaker to organize it.
Square hole
below the
Canvas Speaker
TV Power cord
< Back > < Front >
< Side >
INSTALLATION
Fixing the Safety Clip (Bottom)
9
yBe sure to x the safety clip (bottom) after organizing the power cord.
yFix the safety clip (bottom) using the safety clip xing screw in the wall mounting brackets square hole
as shown in the gure.
yFix the clip to make it symmetrical bilaterally.
yPull out the lower part of the canvas speaker to check if the product is securely xed.
Safety Clip Fixing screw
13
ENGENGLISH
Canvas Speaker
Connecting the Optical Cable
10
Optical Cable
< Front > < Side >
Safety Clip (Bottom)
Combined Appearance of the wall
mounting brackets and canvas
speaker, Safety Clip
CAUTION
y Leave a 10 cm (minimum) space from the wall for proper
ventilation.
yDo not place the TV near or on sources of heat, as this may
result in fire or other damage.
10 cm
10 cm
10 cm
10 cm
INSTALLATION / PRODUCT SPECIFICATIONS
° ~ °± °
145
14
14
ENGLISH
ENG
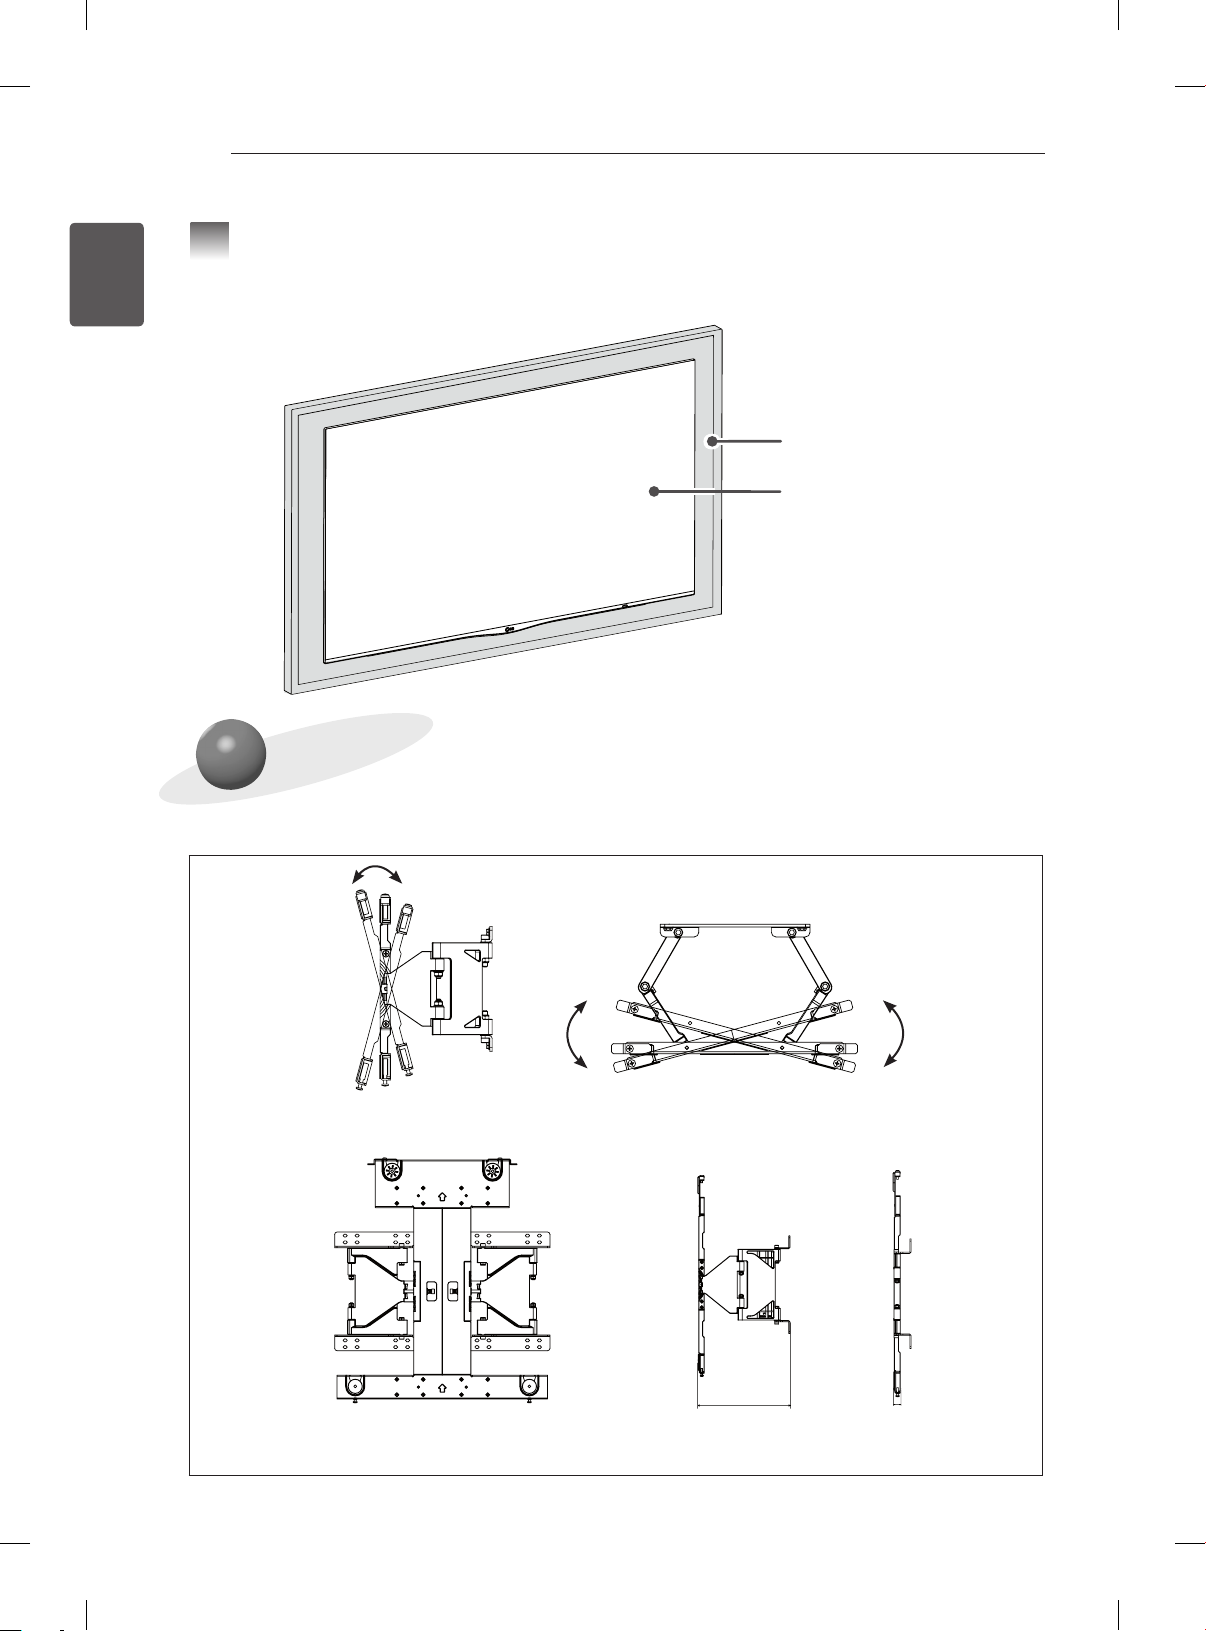
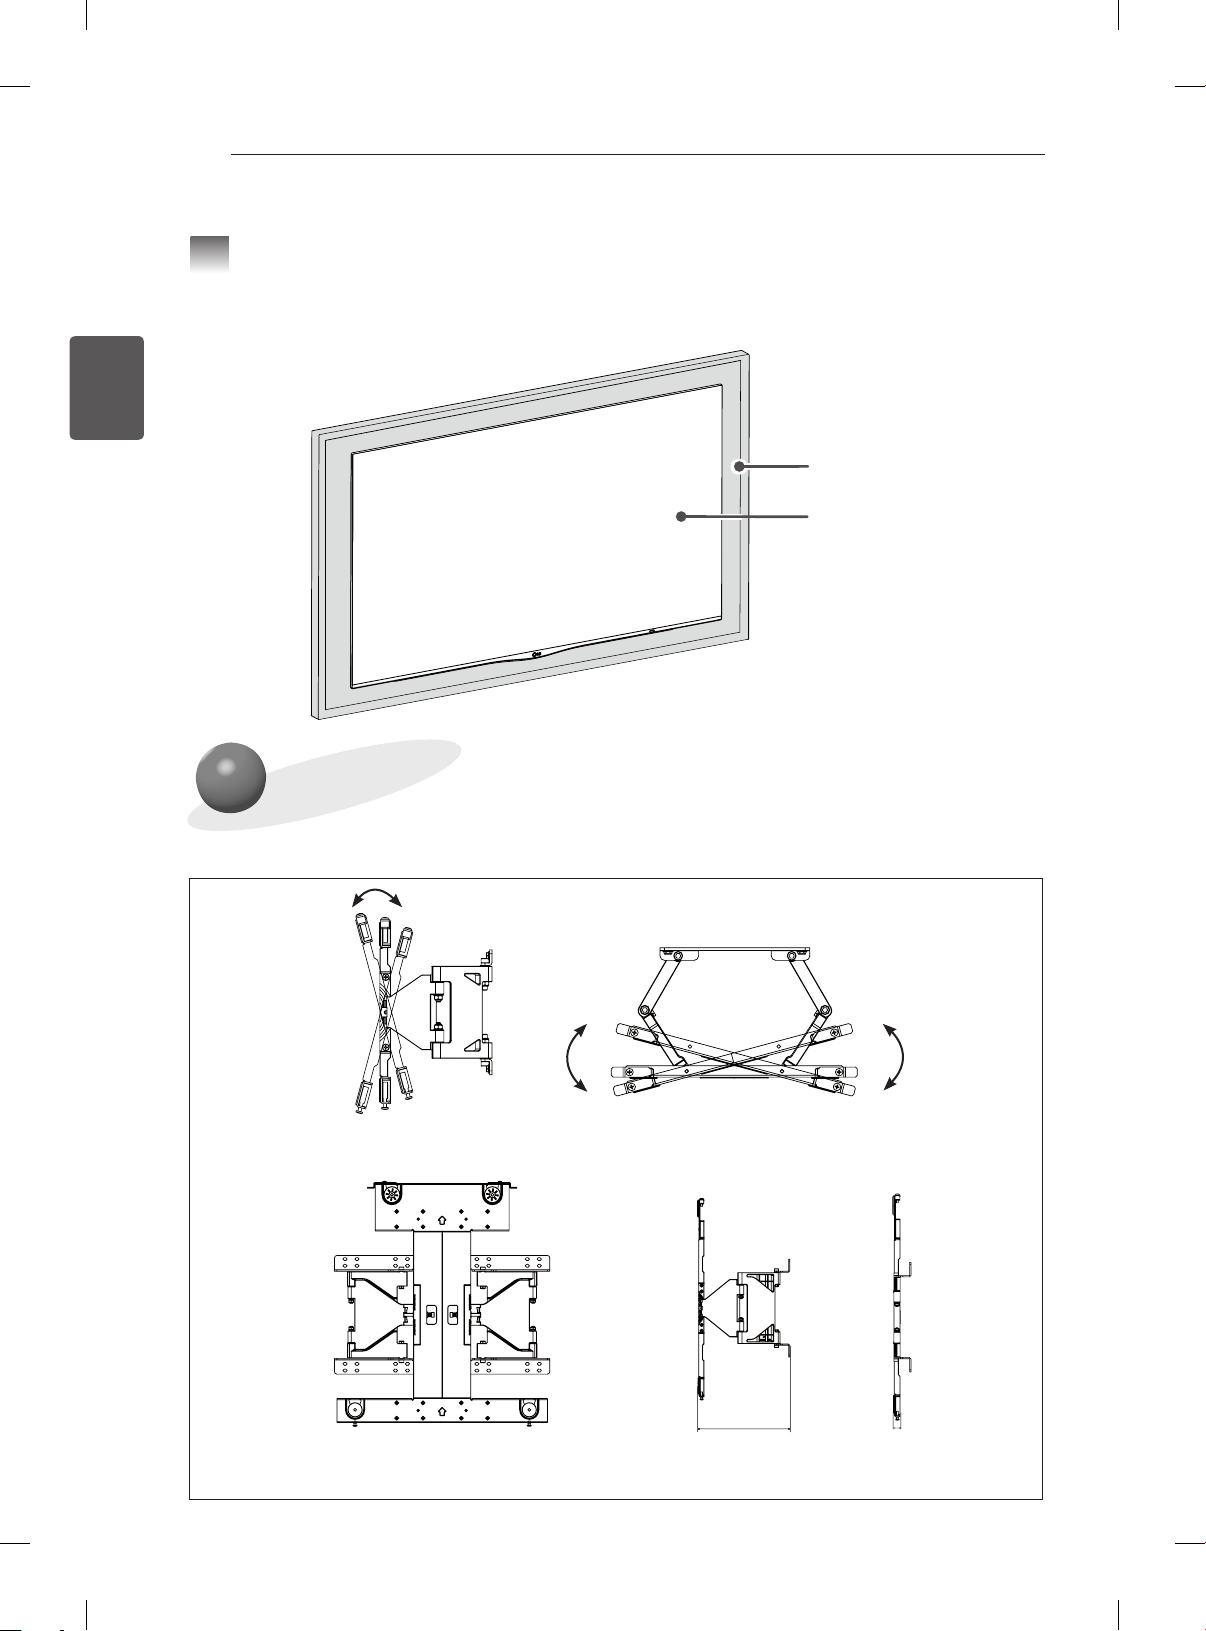
Combined Appearance of the Canvas Speaker and TV
11
Canvas Speaker
TV
PRODUCT SPECIFICATIONS
° ~ °± °
[ Unit : mm ]
° ~ °± °
Maximum Minimum
145
< Wall Mounting Bracket >
< Canvas Speaker >
PRODUCT SPECIFICATIONS
15
ENGENGLISH
< Wall Mounting Supporter >
Model Name Canvas Speaker
Width (mm) 1430 450 500
Height (mm) 865 500 64
Depth (mm)
Weight (kg)
Wall Mounting VESA
Specifications
Max.UL Load
Capacity(kg)
Audio Output 100 W - -
Power
Input SPDIF input - -
Front, woofer Impedance: 8 Ω - -
AC 100V~240V 50~60Hz
(SMPS ADPATER)
64 40 9
17.7 5.7 0.6
-
- 50 50
Wall Mounting
Bracket
210 (Top)
/ 364 (Bottom) * 450
- -
Wall Mounting
Supporter
-


BENUTZERHANDBUCH
BILDSCHIRM-LAUTSPRECHER
Lesen Sie dieses Handbuch aufmerksam durch, bevor Sie Ihr Gerät
zum ersten Mal verwenden und bewahren Sie es zur späteren
Verwendung auf.
www.lg.com
2
DEUTSCH
ENG
3 SICHERHEITSVORKEHRUNGEN
5 VOR DER INSTALLATION ZU BEACHTEN
6 ZUBEHÖRTEILE
7 INSTALLATION
7 Anbringen des Abstandhalters am TV-Gerät
8 Anbringen des Polsterbandes
8 Überprüfen geeigneter Stellen zur Befestigung der Schrauben an der Wand unter Verwendung der
9 Befestigung der Dübel und Schrauben
9 Montage der Wandhalterungsträger
10 Anbringen der Wandhalterungsträger und des Bildschirm-Lautsprechers
11 Ausrichten des Produkts
12 Ordnen des Netzkabels
13 Befestigen des Sicherheitsclips (unten)
13 Anschließen des Glasfaserkabels
14 Gemeinsame Darstellung des Bildschirm-Lautsprechers und des TV-Geräts
INHALTSVERZEICHNIS
INHALTSVERZEICHNIS
VESA - Schablone
14 PRODUKTSPEZIFIKATIONEN
WARNUNG
yBei Nichtbeachtung drohen schwere Verletzungen, Unfälle und Tod.
VORSICHT
yBei Nichtbeachtung drohen leichte Verletzungen oder eine Beschädigung des Produkts.
SICHERHEITSVORKEHRUNGEN
SICHERHEITSVORKEHRUNGEN
- Dieses Handbuch muss vor der Installation vom zuständigen Techniker gelesen werden.
- Nach der Installation sollte das Handbuch an den Kunden übergeben werden. Dieser sollte es sorgfältig
lesen und sicher aufbewahren.
Das Handbuch sollte nach dem Lesen für den weiteren Gebrauch an einem leicht zugänglichen Ort
aufbewahrt werden.
WARNUNG
3
ENGDEUTSCH
Das Produkt sollte ausschließlich von einem
professionellen Techniker installiert werden,
der Ihnen von einem Händler zugewiesen
wurde.
Bei der Installation durch jede andere Person
besteht höchste Gefahr, und es kann zu
Körperverletzungen kommen.
Wenden Sie sich an einen vom Händler
empfohlenen Techniker, wenn Sie das Produkt
umpositionieren oder entfernen wollen.
Die Installation bedarf spezieller Vorgehensweisen.
Eigenständiges Umpositionieren oder Installieren kann
daher zu schwerwiegenden Sicherheitsproblemen
führen.
Hängen Sie bei Produkten, die an der
Wand montiert werden, nie das Netz- oder
Signalkabel auf die Rückseite des Fernsehers.
Anderenfalls kann es passieren, dass die Kabel
beschädigt werden, und Brand, Stromschläge oder
Produktbeschädigungen verursachen.
Installieren Sie das Produkt nicht an einem mit
unzureichender Tragfähigkeit.
Wenn das Produkt an einem Ort installiert wird, der
nicht ausreichend stabil und fest ist, kann es u.U.
herunterfallen und Körperverletzungen verursachen.
Setzen Sie das Produkt nach der Installation
keinerlei Zug- oder Druckbelastung aus.
Anderenfalls kann es passieren, dass es herunterfällt
und Verletzungen verursacht.
SICHERHEITSVORKEHRUNGEN
4
VORSICHT
DEUTSCH
ENG
Installieren Sie das Produkt gemäß den
Beschreibungen im Benutzerhandbuch.
Wenn Sie sich nicht an die Beschreibungen im
Benutzerhandbuch halten, kann es aufgrund
einer fehlerhaften Installation zu schweren
Körperverletzungen oder Beschädigungen des Produkts
kommen.
Überprüfen Sie vor der Installation die
Beschaffenheit der Wand, und verwenden Sie
zur Installation nur die beiliegenden Dübel und
Schrauben.
Andere als die vorgesehenen Dübel und Schrauben
halten u.U. dem Gewicht des Produkts nicht stand, was
zu Sicherheitsproblemen führen kann.
Wischen Sie das Produkt nie mit einem nassen
Tuch ab, und halten Sie es von Heizungen oder
Luftbefeuchtern fern.
Bei Kontakt mit Nässe, Feuchtigkeit oder Hitze
besteht die Gefahr von Brand, Stromschlägen oder
Fehlfunktionen.
Ziehen Sie vor der Installation das Netzkabel
aus der Steckdose.
Wenn das Produkt bei eingestecktem Netzkabel
installiert wird, besteht Stromschlag- oder Brandgefahr.
Zur Installation oder Höhenanpassung des
Produkts sind mindestens zwei Personen
erforderlich.
Anderenfalls kann es zu Körperverletzungen oder
Beschädigungen des Produkts kommen.
Verwenden Sie zum Bohren der Löcher stets
eine Bohrmaschine und einen Bohrer mit
passendem Durchmesser.
Wenn Sie sich beim Bohren der Löcher nicht an
die folgenden Beschreibungen halten, ist das
Produkt u.U. nicht stabil befestigt, und es kann zu
Sicherheitsproblemen kommen.
Installieren Sie das Produkt nur an einer
senkrechten Wand und nie beispielsweise
in der Nähe eines Sprinklers oder Sensors,
an einem Ort, an dem es Erschütterungen
oder Schlägen ausgesetzt sein könnte bzw.
in der Nähe von Hochspannungskabeln oder
Stromquellen.
Installieren Sie das Produkt nie mit bloßen
Händen. Tragen Sie stets geeignete
Arbeitshandschuhe.
Anderenfalls kann es zu Körperverletzungen kommen.
Wenn Sie zum Anschließen des Produkts
andere als die beiliegenden Kabel verwenden,
kann die Wand oder der Anschluss des
Produkts durch Reibung beschädigt werden.
Verwenden Sie ausschließlich die beiliegenden
Kabelkomponenten.

VOR DER INSTALLATION ZU BEACHTEN
montieren Sie das Produkt nicht, und kontaktieren Sie ein autorisiertes Service Center.
sie mittig an beiden Enden der Ständer angebracht werden können.
geneigten Wand, deren Neigung die Standardwerte überschreitet, und auch nicht an der Decke.
VOR DER INSTALLATION ZU BEACHTEN
5
yVerwenden Sie dieses Produkt nur zur Wandmontage des TV-Geräts.
ySeien Sie vorsichtig, wenn Sie das Produkt zur Wandmontage verwenden, um Beschädigungen am
Produkt und Unfälle zu vermeiden.
yWenn Sie die Installationsanleitung nicht vollständig gelesen und verstanden haben,
Wenn Sie nach der Anfrage nicht sicher sind, wie Sie das Produkt montieren sollen, lassen Sie es von
einem Fachmann montieren.
ySelbst wenn Sie kein Techniker sind, sich aber mit Konstruktionen dieser Art gut auskennen, ist es von
Vorteil, diese Anleitung vor der Installation vollständig verstanden zu haben.
y Dieses Produkt wurde für die Wandmontage mit einem Standardabstand zwischen den Ständern
konstruiert. LG Electronics übernimmt keine Verantwortung für entstehende Probleme, wenn der
Standardabstand bei der Installation nicht eingehalten wurde.
yBefestigen Sie die Wandmontageschrauben an der Wand, sodass
Es wird empfohlen einen Balkensucher/Leitungssucher, ein separat erhältliches Gerät, zu verwenden.
yWenn Sie die Halterung an einer Betonwand oder einer anderen Wand installieren, die das im Handbuch
angegebene Gewicht tragen kann, können Sie den Standardabstandhalter für die Ständerwandmontage
abnehmen und gemäß den Anweisungen zum Anbringen der Halterung vorgehen, um die Installation
einfacher zu gestalten.
yMontieren Sie das Gerät nur an einer senkrechten Wand.Montieren Sie die Halterung nicht an einer
LG Electronics übernimmt keine Haftung für Probleme, die daraus entstehen, dass das Produkt an einer
geneigten Wand oder an der Decke montiert wurde.
yPrüfen Sie vor der Installation das im Lieferumfang enthaltene Zubehör. LG Electronics übernimmt
keine Haftung für Beschädigungen oder Verlust von Zubehör, nachdem das Paket geöffnet wurde.
yHalten Sie die mitgelieferten Zubehörteile von Babys und Kindern fern, da diese zu Gefahren wie
Ersticken durch das Verschlucken von Kleinteilen führen können.
yStellen Sie sicher, dass die Schrauben sicher an der Wand befestigt sind.
Wenn die Schrauben zu fest angezogen werden, kann dies die Wand beschädigen, die Leistung oder
Stärke des Produkts beeinträchtigen oder zu Beschädigungen am Produkt führen.
yInstallieren Sie kein TV-Gerät, das die Gewichtsbeschränkungen überschreitet, und vermeiden Sie
jegliche äußere Krafteinwirkung.
ySeien Sie vorsichtig, wenn Sie während der Installation Werkzeuge verwenden, um Unfälle oder
Beschädigungen zu vermeiden.
ENGDEUTSCH
<Werkzeuge für die Installation>
Kreuzschlitzschraubendreher (manuell oder elektrisch)/8 mm Schraubenschlüssel/Bohrer/8-mm-Bohrer für
Beton, 4-mm-Bohrer für Holz oder Stahl/Wasserwaage/Balkennder/Schlitzschraubendreher
6
DEUTSCH
ENG
ZUBEHÖRTEILE
ZUBEHÖRTEILE
VESA-Schablone Führungsklebeband zur
Installation
4 Stk.
Abstandhalter (unten)
2 Stk.
Sicherheitsclip
(oben)
2 Stk.
Abstandhalter (oben)
2 Stk.
Sicherheitsclip (unten)
2 Stk.
Benutzerhandbuch Glasfaserkabel
Abstandhalter (oben)
Befestigungsschraube
2 Stk., M6 x 26
Sicherheitsclip
(oben/unten)
Befestigungsschraube
4 Stk., M4 x 12
Abstandhalter (unten)
Befestigungsschraube
2 Stk., M4 x 20
Polsterband (oben)
2 Stk.
(Stärke: 11 mm)
Polsterband (unten)
2 Stk.
(Stärke: 1,5 mm)
Wandmontagedübel
8 Stk.
Wandmontageschraube
8 Stk.
Schutzgummi
2 Stk.
(Stärke: 12 mm)
VORSICHT
Verwendung des Schutzgummis
INSTALLATION
7
yEs wird empfohlen, die Halterung an einer Betonwand
anzubringen.
yDas Produkt sollte ausschließlich von einem professionellen
Techniker installiert werden, der Ihnen von einem Händler
zugewiesen wurde.
Bringen Sie das Schutzgummi hier an.
INSTALLATION
Anbringen des Abstandhalters am TV-Gerät
1
yWenn die Schrauben beim Anbringen des Abstandhalters nicht vollständig angezogen werden können,
überprüfen Sie die Bohrtiefe der Schrauben, und sehen Sie im technischen Service-Handbuch nach.
Befestigungsschraube für
Abstandhalter (oben)
Abstandhalter (oben)
ENGDEUTSCH
Befestigungsschraube für
Abstandhalter (unten)
Abstandhalter (unten)
<Vorgehensweise>
1 Sollten sich bereits Schrauben in den Montagelöchern benden, entfernen Sie die Schrauben.
2 Befestigen Sie die Abstandhalter und die entsprechenden Befestigungsschrauben in der abgebildeten
Reihenfolge.
- Legen Sie das Gerät mit dem Bildschirm nach unten auf einen Tisch. Um Kratzer auf dem
Bildschirm zu vermeiden, legen Sie das Produkt vorsichtig auf eine Decke oder eine weiche
Unterlage auf einer flachen Oberfläche.
- Ziehen Sie die Schrauben fest, bis das TV-Gerät, die Abstandhalter und Schrauben sicher
miteinander verbunden sind, jedoch nicht fester.
- Verwenden Sie einen Kreuzschlitzschraubendreher (manuell oder elektrisch), um die Schrauben
festzuziehen.
8
DEUTSCH
ENG
INSTALLATION
Anbringen des Polsterbandes
2
y Bringen Sie das Polsterband an, um Stöße zwischen dem TV-Gerät und dem Lautsprecher abzufedern,
die bei der Anpassung des Winkels auftreten können.
yBringen Sie das Polsterband an den vier Ecken an der Rückseite des TV-Geräts an, wie in der
Abbildung dargestellt.
Polsterband (oben)
2 Stk. (Stärke: 11 mm)
Polsterband (unten)
2 Stk. (Stärke: 1,5 mm)
Überprüfen geeigneter Stellen zur Befestigung der
3
Schrauben an der Wand unter Verwendung der VESA-
Schablone
1430 mm
840 mm
(Größe der VESASchablone)
1 Überprüfen Sie den VESA-Standard für das TV-Gerät.
2 Markieren Sie die Position für die Wandmontage an der Wand. Verwenden Sie dafür die VESA-
Schablone.
3 Entfernen Sie die VESA-Schablone, nachdem Sie die für die Anbringung der Schrauben geeigneten
Stellen überprüft haben.
865 mm
(Tatsächliche
Produktgröße)
* Bitte beachten Sie bei der Montage, dass die VESA-Schablone oben und unten jeweils 12,4 mm kürzer
ist als das Gerät.
INSTALLATION
Befestigung der Dübel und Schrauben
4
< Befolgen Sie die Anweisungen unten >
yÜberprüfen Sie vor der Installation die Beschaffenheit der Wand sowie die Stärke des Obermaterials.
yDie mitgelieferten Dübel und Schrauben sind für Wände aus Beton, Leichtbeton, hartem oder weichem
Feldstein, Backstein oder Porenbeton geeignet.
yMontieren Sie die Wandhalterung nicht an Wände aus Gipskarton oder mitteldichten Holzfaserplatten.
In diesem Fall müssen Dübel und Schrauben an der Stützwand (aus Beton) unter dem Obermaterial
befestigt werden. Falls es keine Stützwand gibt, müssen Sie zunächst die Wand vor der Anbringung der
Dübel und Schrauben verstärken.
yBei der Montage an einer Wand, die hier nicht aufgeführt ist, stellen Sie sicher, dass jeder Montagepunkt
für eine Last von 70 Nm (686 N) und eine Scherkraft von 100 Nm (980 N) oder mehr ausgelegt ist.
9
ENGDEUTSCH
1 2
4
yVerwenden Sie eine Schlagbohrmaschine mit einem 8-mm-Bohrer für Beton.
1 Bohren Sie an der Dübelposition mit einem 8-mm-Bohrer ein 80 mm bis 100 mm tiefes Loch.
2 Entfernen Sie den Staub aus den Bohrlöchern.
3 Setzen Sie die mitgelieferten Dübel in die Bohrungen ein. (Verwenden Sie beim Einsetzen einen
Hammer.)
4 Platzieren Sie den abwinkelnden Teil so, dass er nach oben zeigt. Platzieren Sie den abwinkelnden
Teil so, dass er nach oben zeigt.
5 Richten Sie die Schrauben zur Wandmontage mit den Löchern aus, um die Schrauben festzuziehen.
Es wird empfohlen, die Schrauben mit einem Anzugsmoment von mindestens 0,45 Nm – 0,60 Nm
festzuziehen.
Montage der Wandhalterungsträger
5
5
Schrauben zur Wandmontage
3
Dübel
<Festziehen der Schrauben>
yZiehen Sie die vier Schrauben fest.
y Wenn die Schrauben nicht an der
vorgesehenen Stelle angebracht werden
können, bewegen Sie die Halterung nach
links oder rechts, um die Schrauben
anzubringen.
yBringen Sie die Wandhalterungsträger
mithilfe der Schrauben an, wie in der
Abbildung dargestellt.
yZiehen Sie die Schrauben fest, bis die Wand, die Wandhalterungsträger und die Schrauben sicher
miteinander verbunden sind. Verwenden Sie dazu einen Kreuzschlitzschraubendreher (manuell oder
elektrisch) oder einen 8-mm-Schraubenschlüssel.
Schrauben zur Wandmontage
INSTALLATION
10
Anbringen der Wandhalterungsträger und des
6
Bildschirm-Lautsprechers
DEUTSCH
ENG
< Für das Anheben und die Montage des Produkts sind mindestens zwei Personen erforderlich >
1 Schieben Sie den Bildschirm-Lautsprecher in Pfeilrichtung in die an der Wand befestigte Wandhalterung.
Führungsklebeband für die Montage
- Bringen Sie das Führungsklebeband für die Wandmontage oberhalb des linken und rechten Loches
der Wandhalterung und des linken und rechten VESA-Loches des Bildschirm-Lautsprechers an.
- Bringen Sie das Führungsklebeband für die Wandmontage wie in der Abbildung dargestellt
nebeneinander an, und montieren Sie dann das Produkt. Wenn die Montage abgeschlossen ist,
entfernen Sie das Führungsklebeband für die Wandmontage.
- Überprüfen Sie, ob das Produkt sicher befestigt ist, indem Sie am oberen Teil des BildschirmLautsprechers ziehen.
- Wenn das Produkt nach der Montage nicht richtig ausgerichtet ist, richten Sie es aus, indem Sie den
Bildschirm-Lautsprecher nach links oder rechts bewegen.
Wandmontageschraube
2 Bringen Sie die Wandmontagehalterung mithilfe von Wandmontageschrauben an.

Befestigungsschraube für den
Sicherheitsclip (oben)
Sicherheitsclip (oben)
INSTALLATION
11
Befestigen Sie den
Sicherheitsclip zwischen der
Wandmontagehalterung und
dem Produkt.
3 Hängen Sie das mit dem Abstandhalter verbundene TV-Gerät an die an der Wand befestigten
Wandhalterung, indem Sie das Gerät in Richtung des Pfeils in die Vertiefungen der Halterung einsetzen.
Befestigen Sie zuerst den unteren Teil und dann den oberen, indem Sie das Gerät leicht anheben.
4 Setzen Sie den Sicherheitsstift, der die Trennung des Produkts verhindern soll, in Pfeilrichtung ein, und
stellen Sie die Position ein. Befestigen Sie dann den Sicherheitsclip mit der Befestigungsschraube für
den Sicherheitsclip endgültig. Wenn der Sicherheitsstift nicht wie in der Abbildung dargestellt befestigt
ist, kann das Produkt herunterfallen.
- Überprüfen Sie, ob das Produkt sicher befestigt ist, indem Sie am unteren Teil des TV-Geräts ziehen.
Wenn Sie Kabel oder Zubehör verwenden, die nicht zum Lieferumfang dieses Produkts gehören,
stellen Sie sicher, dass das Produkt in ausreichendem Abstand von der Wand installiert wird, um
übermäßige Krafteinwirkung auf Kabel oder Zubehör zu vermeiden.
- Durch übermäßige Krafteinwirkung kann das Produkt beschädigt werden.
ENGDEUTSCH
Ausrichten des Produkts
7
yWenn das Produkt nach der Montage nicht richtig ausgerichtet ist, richten Sie es mithilfe dieser
Schraube aus.
(Das Produkt wird nach oben oder unten bewegt, je nachdem, in welche Richtung die Schraube gedreht
wird.)
12
DEUTSCH
ENG
INSTALLATION
Ordnen des Netzkabels
8
yZiehen Sie den Bildschirm-Lautsprecher nach vorne.
yZiehen Sie das Netzkabel durch das Vierkantloch unterhalb des Bildschirm-Lautsprechers, um es zu
ordnen.
Vierkantloch unterhalb des
Bildschirm-Lautsprechers
Netzkabel des TV-Geräts
<Rückansicht> <Vorderansicht>
<Seitenansicht>

INSTALLATION
Befestigen des Sicherheitsclips (unten)
9
yBefestigen Sie nach dem Ordnen des Netzkabels unbedingt den Sicherheitsclip (unten).
yBefestigen Sie den Sicherheitsclip (unten) mithilfe der Befestigungsschraube für den Sicherheitsclip wie
in der Abbildung dargestellt im Vierkantloch der Wandmontagehalterung.
yBefestigen Sie den Clip so, dass er zu beiden Seiten symmetrisch ausgerichtet ist.
yZiehen Sie am unteren Teil des Bildschirm-Lautsprechers, um zu überprüfen, ob das Produkt sicher
befestigt ist.
Befestigungsschraube für den Sicherheitsclip
13
ENGDEUTSCH
BildschirmLautsprecher
Anschließen des Glasfaserkabels
10
Glasfaserkabel
<Vorderansicht> <Seitenansicht>
Sicherheitsclip (unten)
Gemeinsame Darstellung der
Wandmontagehalterung und des
Bildschirm-Lautsprechers,
Sicherheitsclip
VORSICHT
y Lassen Sie (mindestens) 10 cm Platz zur Wand, um eine gute
Belüftung zu gewährleisten.
yStellen Sie das TV-Gerät nicht in die Nähe von Wärmequellen,
da dies einen Brand oder Beschädigungen verursachen
könnte.
10 cm
10 cm
10 cm
10 cm
14
und des TV-Geräts
° ~ °± °
145
14
INSTALLATION / PRODUKTSPEZIFIKATIONEN
Gemeinsame Darstellung des Bildschirm-Lautsprechers
11
DEUTSCH
ENG
Bildschirm-Lautsprecher
TV-Gerät
PRODUKTSPEZIFIKATIONEN
[Einheit: mm]
° ~ °± °
< Wandmontagehalterung >
° ~ °± °
Maximum Minimum
145
 Loading...