


User Manual
E-NOTE
English
Please read the safety information carefully before
using the product.
E-NOTE Models
H1000B
www.lg.com
1

Product Components
Basic Components
H1000B contains the following components.
Please check whether all the components are included before using the product.
Main Unit
Cradle
User Manual & Cards
Caution
● Note that the components may look different from those shown here. Some components are subject to change without notice.
● Always use computer detergents when cleaning the product. Using other detergents, such as thinner, benzene and alcohol may result in damage to the product or
deformation.
Battery Stylus Pen
AC Adaptor Power Cord
Screen Protective Films x 2
3
Part Names and Functions
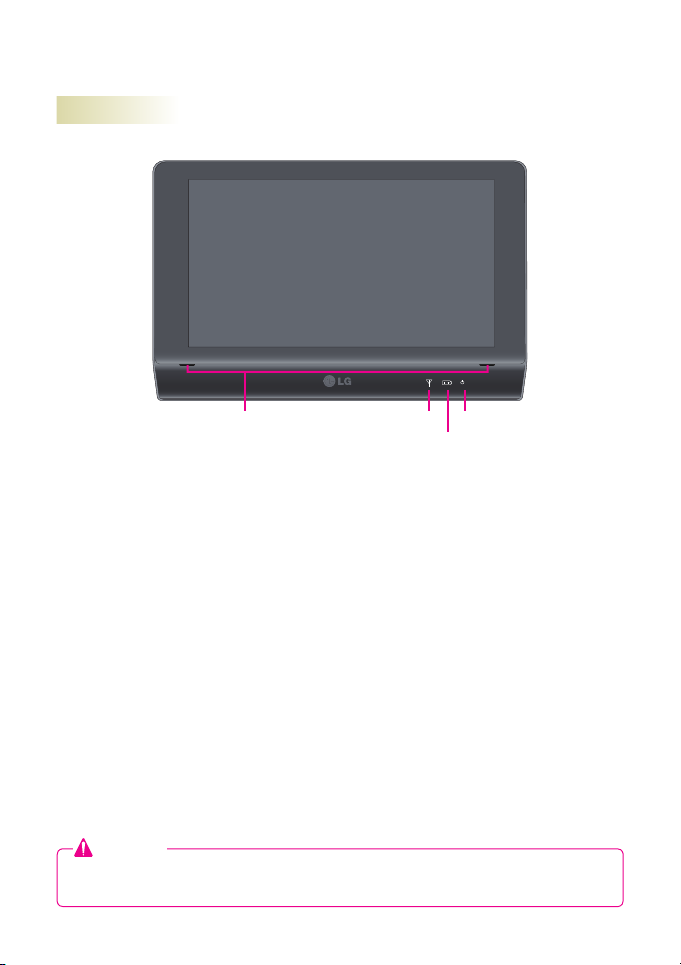
Front
Speaker Holes
Operation Status Indicators
1. Wireless LAN Indicator
- On: Wi-Fi is enabled (radio on).
- Off: Wi-Fi is disabled (radio off).
2. Battery Status Indicator
- On: Battery is recharging.
- Flashing: Battery is discharging and the battery life is below 10%.
(This lamp fl ashes only when the system is powered on or sleeping.)
- Off: All other conditions.
(For example, the battery is fully charged or removed from the product.)
3. Power Indicator
- On: The system is powered on.
- Flashing: The system is in Windows standby mode.
- Off: The system is powered off.
(For example, Windows is shut down or is in hibernation mode.)
Caution
● Do not insert sharp objects into the speaker holes or try to apart them.
The touch function may not work correctly.
Wireless LAN
Indicator
Power Indicator
Battery Status Indicator
4
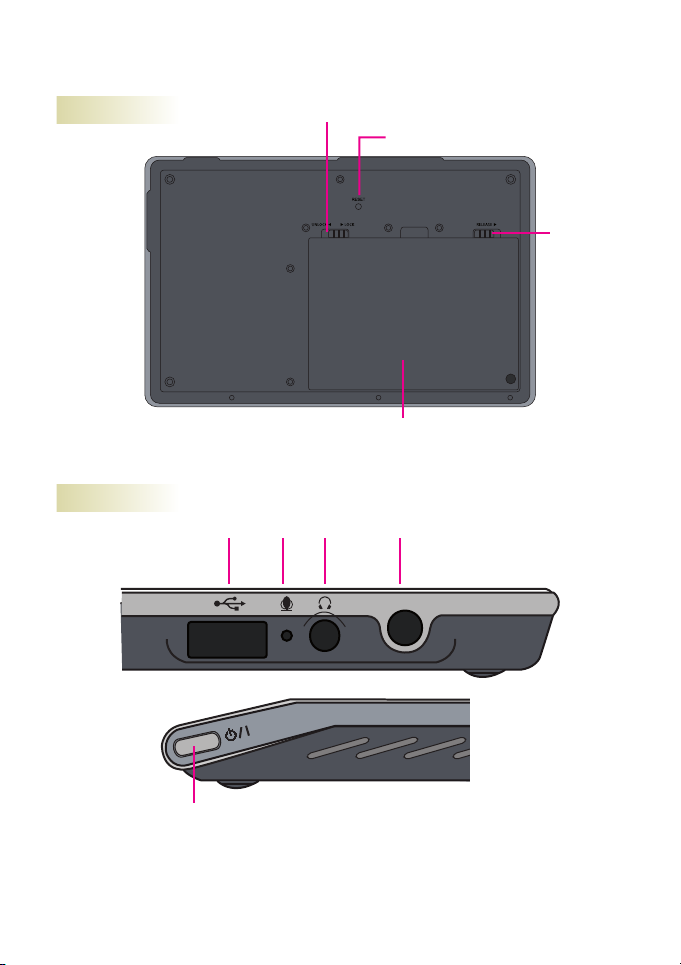
Back
LOCK/UNLOCK
RESET
RELEASE
Battery
Right
USB Port
Power Button
MIC
Headphone
Port
Power Cord
Port
DC-IN
5
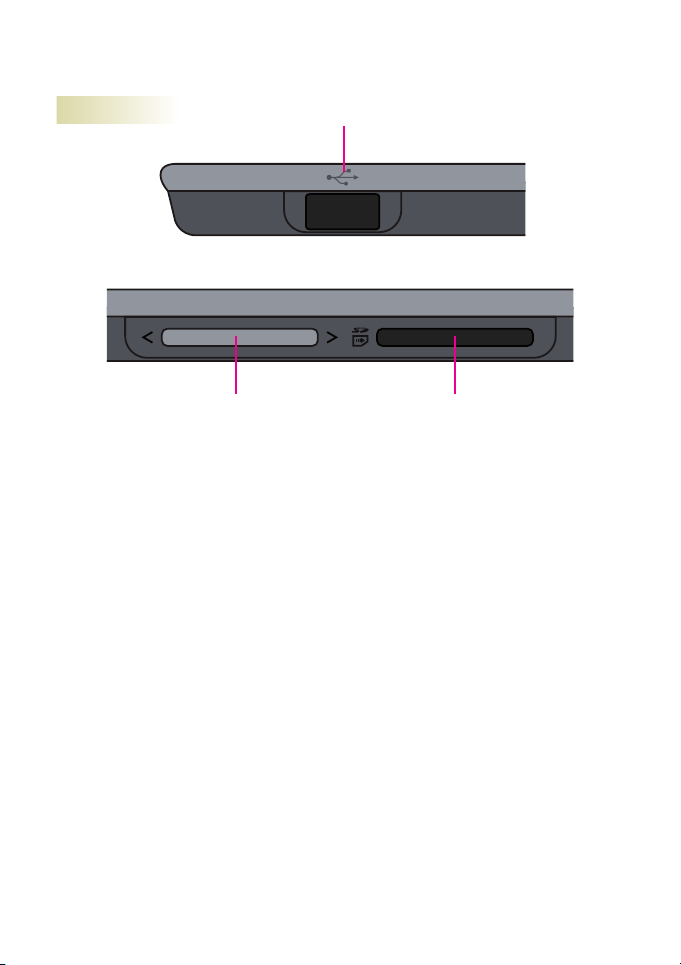
Top
USB Port
Volume Button SD/MMC Card Slot
6
Using the Product
Using the Battery Pack
You must use the “AC adaptor” or the “battery pack” to supply power to the product.
This section contains instructions to be followed before using the product for the rst
time. Please read them. The AC adaptor works for power between 100 V and 240 V.
Make sure to fully charge the battery pack with the AC adaptor before using the product
with the battery pack for the rst time.
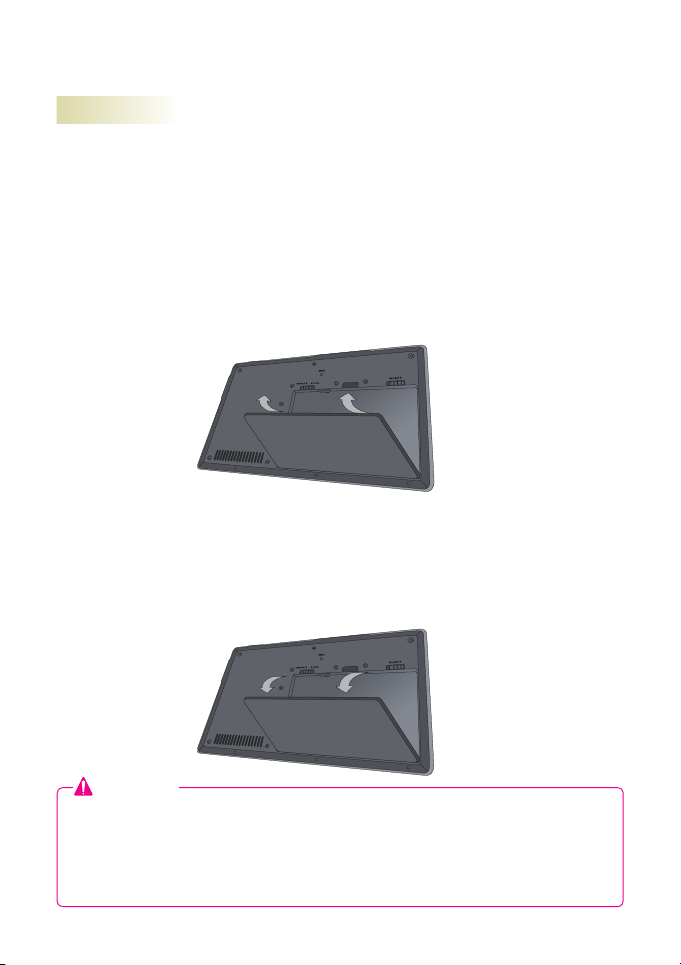
1. Turn the product upside down and slide the left button to UNLOCK.
2. Align the hook on the bottom of the battery pack to the hole on the back cover.
Push the battery pack down in the direction of the arrow as illustrated until you
hear a clicking sound.
3. Slide the left button to LOCK.
4. Turn the product on and check the battery charging status.
If the battery indicator is fl ashing, use the AC adaptor to fully recharge it before
using the product.
5. To removing the battery pack,
Slide the left button to UNLOCK. While pushing the right button to RELEASE,
insert a nger into the hole and pull the battery pack out.
Caution
● Always use batteries approved and certified by LG Electronics, Inc. Using nonapproved batteries may result in explosion.
● The battery pack can be removed or replaced when the power is off. The battery
pack may come off if it is not locked.
● Keep the battery removed from the product if not using product for a long time. Otherwise, this may result in malfunction or battery discharge.
7
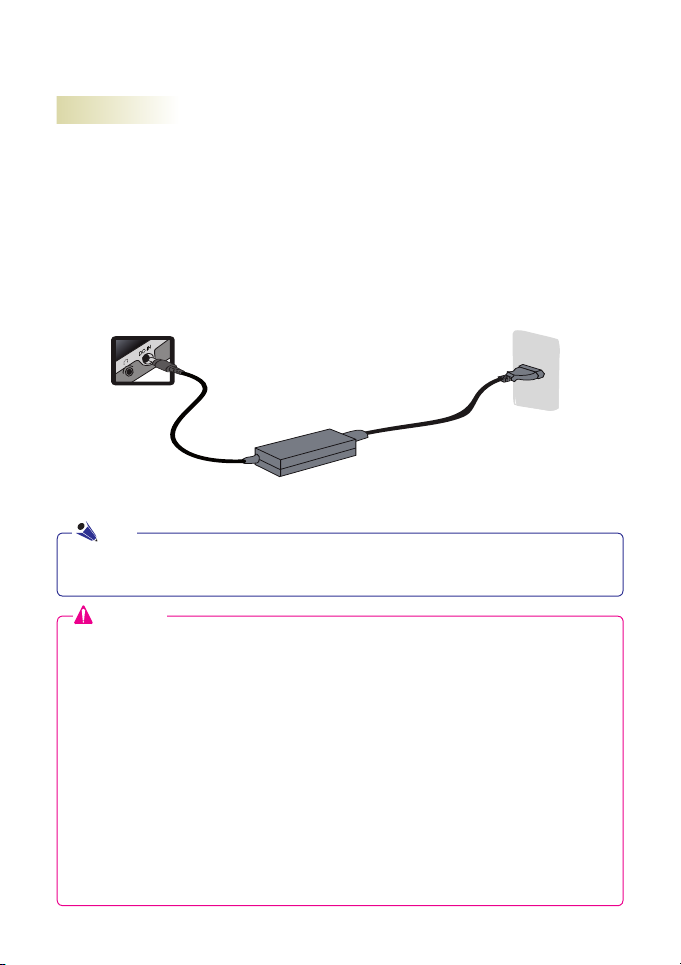
Using the Product and Recharging the Battery with the AC Adaptor
You must use the “AC adaptor” or the “battery pack” to supply power to the product.
This section contains instructions to be followed before using the product for the rst
time. Please read them.
The AC adaptor works for power between 100 V and 240 V.
1. Connect one end of the power cable to the AC adaptor and the other end to the
power source.
2. Connect the AC adaptor jack to the power port of the product.
3. Press the power button on the product to turn it on.
Power Cord
AC adaptor
Note
● To change the input voltage for the AC adaptor from 220 V to 110 V, connect a 110 V plug
to the power cord and connect it to the power connector. (The plug is sold separately.)
Caution
● Always use the AC adaptor provided the LG Electronics, Inc.
- Otherwise, this may result in explosion or fire.
- This may also cause a battery recharge failure or system malfunction.
● Do not place any container containing liquid on top of the product. Otherwise, this
may result in malfunction due to electric shock.
● If the system enters standby mode or hibernation mode while a game is being
played, this may result in a critical error. Make sure to stop playing the game
before entering system standby mode or hibernation mode.
● Never remove the battery pack when using the product only with the battery. Your
work will not be finished normally. Using application programs at low battery level
may result in loss of data or program files. When the battery power is used up, the
power will be turned off even while using application programs. When the warning
message appears, save your work, connect the AC adaptor and continue to use
the product. Or turn the product off and install a fully charged battery.
● Connecting multiple devices to one common power line may cause fire or electric
shock. Never touch the power plug pins when connecting or disconnecting the
power cord. There is risk of electric shock.
8
Attaching the Screen Protective Film
1. Wipe off any dust from the product surface with a soft cloth.
2. Attach the lm slowly from the edges to
prevent bubbles.
Caution
● Always use the product with the screen protective film on the LCD screen.
● Always use the stylus pen provided with the product.
● Never touch the LCD screen with hard or sharp objects.
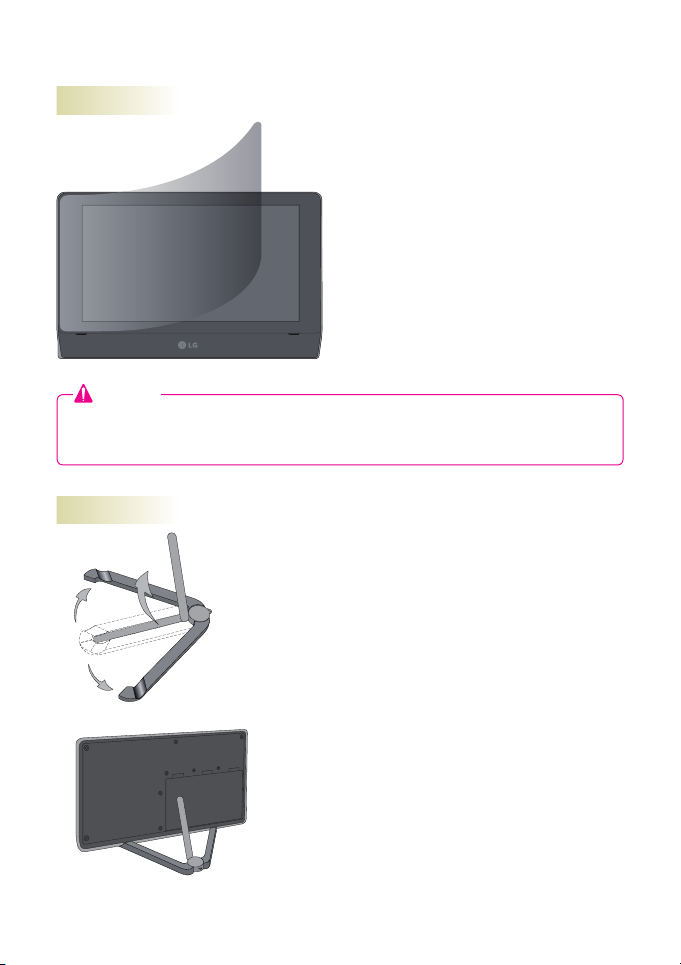
Using the Cradle
1. Open the folded cradle and lift the center
rod all the way as illustrated until you
hear a clicking sound.
You can place the stylus pen on the
cradle’s ring.
2. Place the product on the cradle
grooves for use as illustrated.
9
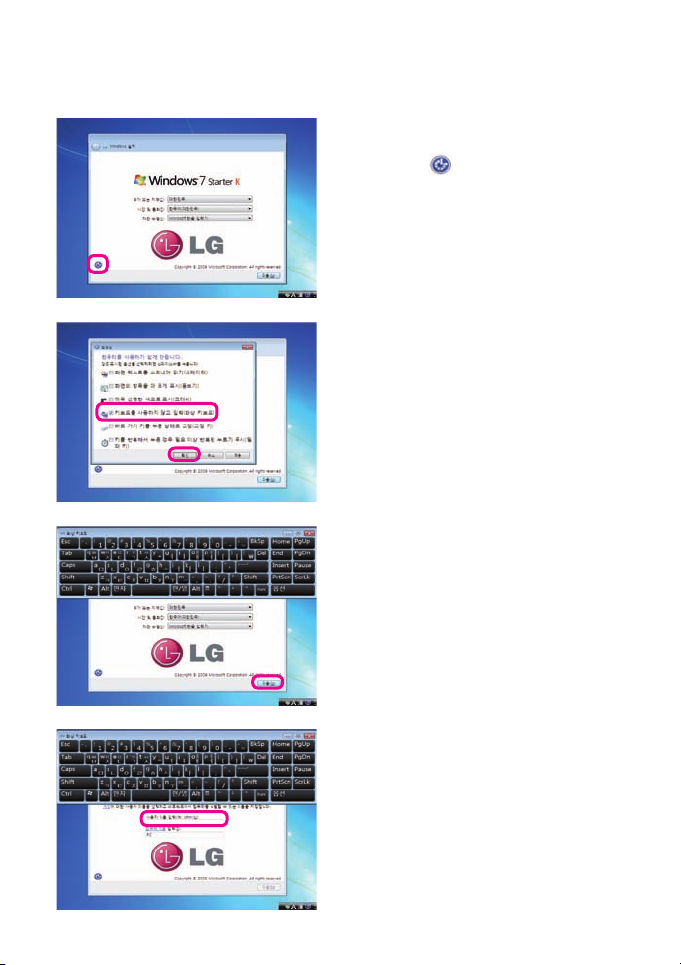
Setting the Product for the First Time
1. Click the button on the bottom left of
the screen.
2. Select [Type without the keyboard (On-
Screen Keyboard)] and click [OK].
3. When the on-screen keyboard appears
on the screen as illustrated, click the
Next button.
10
4. Use the virtual keyboard to enter the
user name and click the Next button.
* Keep the virtual keyboard open as you will
need to use it for entering the password.
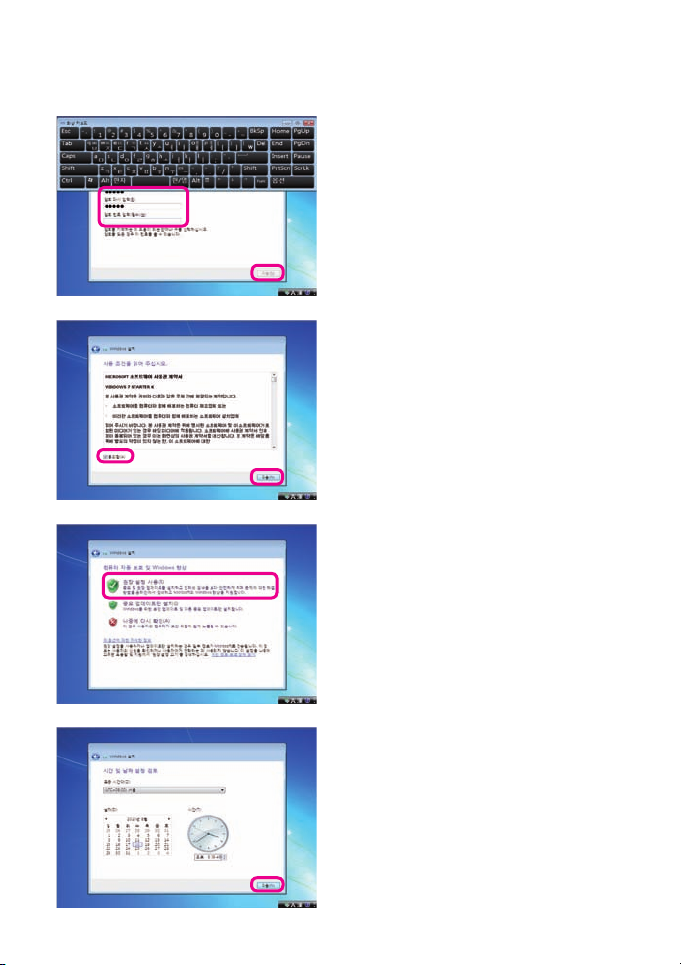
5. Use the virtual keyboard to enter the
password and click the Next button.
6. When the End-User License Agreement
window for Microsoft Software appears,
read the agreement, select the I accept
checkbox and click the Next button.
7. Click Use recommended settings as
illustrated.
8. Set the current date and time and click
the Next button.
11
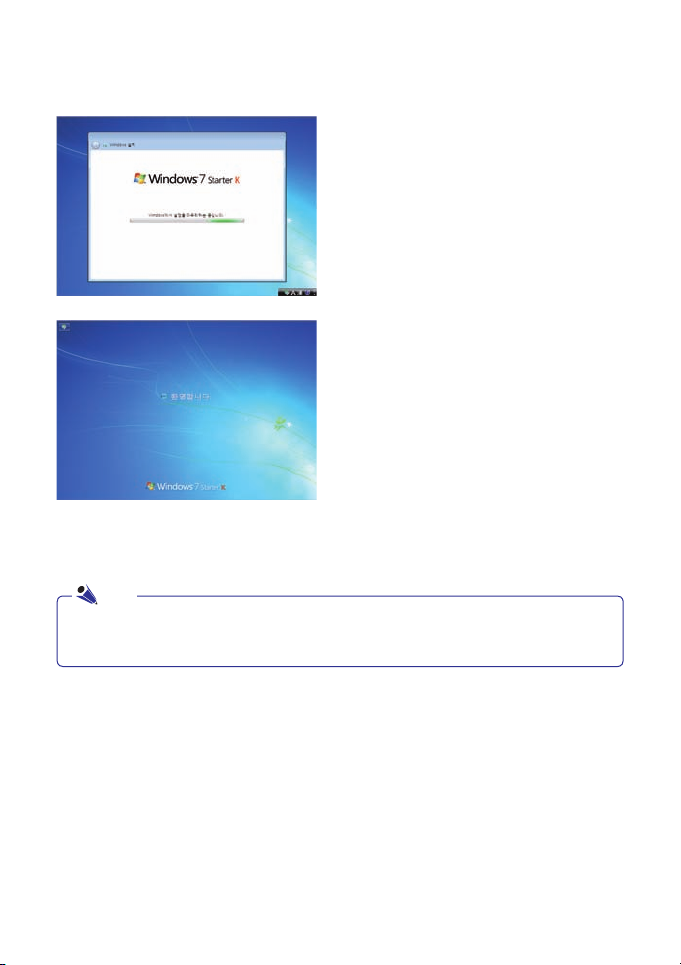
9. The window shown on the left appears
when the setup is complete.
10. The message on the left appears auto-
matically on the desktop.
Note
● The system may not start if a USB memory is connected. Make sure to remove the
USB memory before booting the system.
12

Using Windows® 7
With enhanced information management and security features, Windows® 7 greatly
increases the user’s productivity. Windows® 7 makes it easy to access data on the
personal computer and on the workplace network. It provides stronger security for data.
Note
● The virtual XP Mode for Windows® 7 is available only for the Professional version
or higher and may not be supported depending on CPU capacity.
● Some features, including Aero and Flip 3D, are not supported in Windows® 7
Starter and Home Basic.
● Due to performance constraints on some models, the system may slow down or
the video playback may be lagged when using Windows Aero or Flip 3D.
● For more information on using Windows® 7, see Start > Help and Support.
● Some features may contain operating system messages which are not appropriate
for tablet products.
Windows® 7 Welcome Center
Windows® 7 Welcome Center provides online documentation for Windows® 7’s new
features and the basic tools required for customizing Windows 7 and backing up les.
Click [Start] > [Getting Started] to visit the Welcome Center.
1. Click the arrow button on the right of the [Start] button to selectively use different
functions.
2. Select a function or information to open.
The options presented in the Windows® 7 Welcome Center may vary depending on the
product speci cation.
13
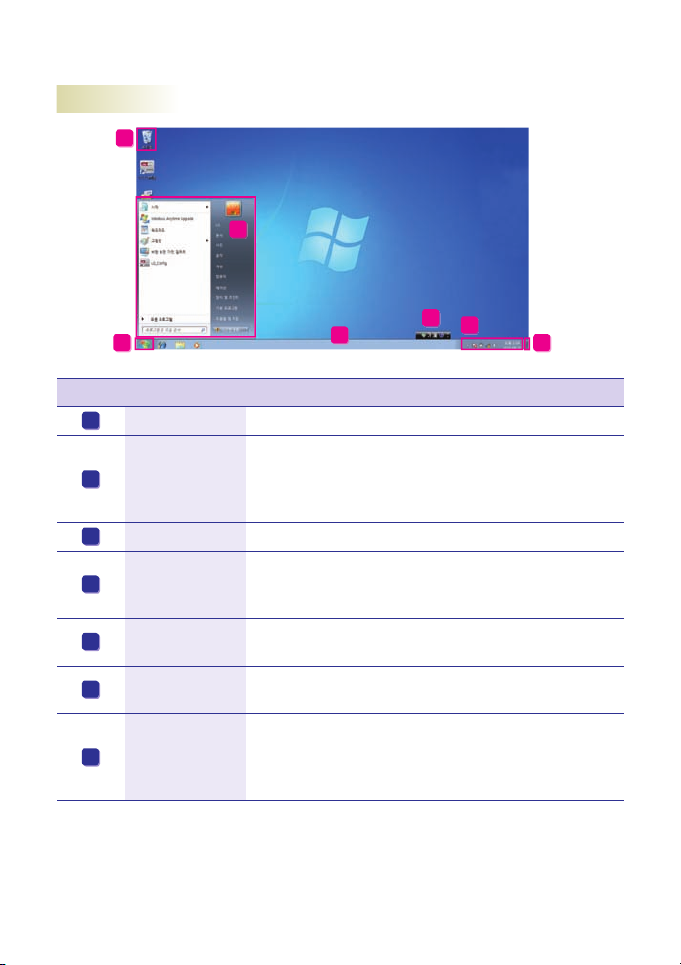
Windows® 7 Desktop
G
B
A
Number Name Description
A
Start button Click this to view the Start menu.
C
D
E
F
14
B
Start menu
C
Taskbar Currently running programs are displayed.
D
Language Bar
Taskbar
E
Icons and clock
F
Show desktop
G
Recycle Bin
You can open a program required for starting Windows.
Type search terms in the search box to nd a speci c application program or le.
When working on a document or entering text, click these
icons to switch between languages or select special characters.
You can set the options for Volume, Power Management
and Backup.
Click this to minimize all open windows and return to your
desktop.
The place in which Windows stores deleted les and folders. You can empty the Recycle Bin to delete them permanently from your computer. Once recycled, the les and
folders cannot be retrieved.
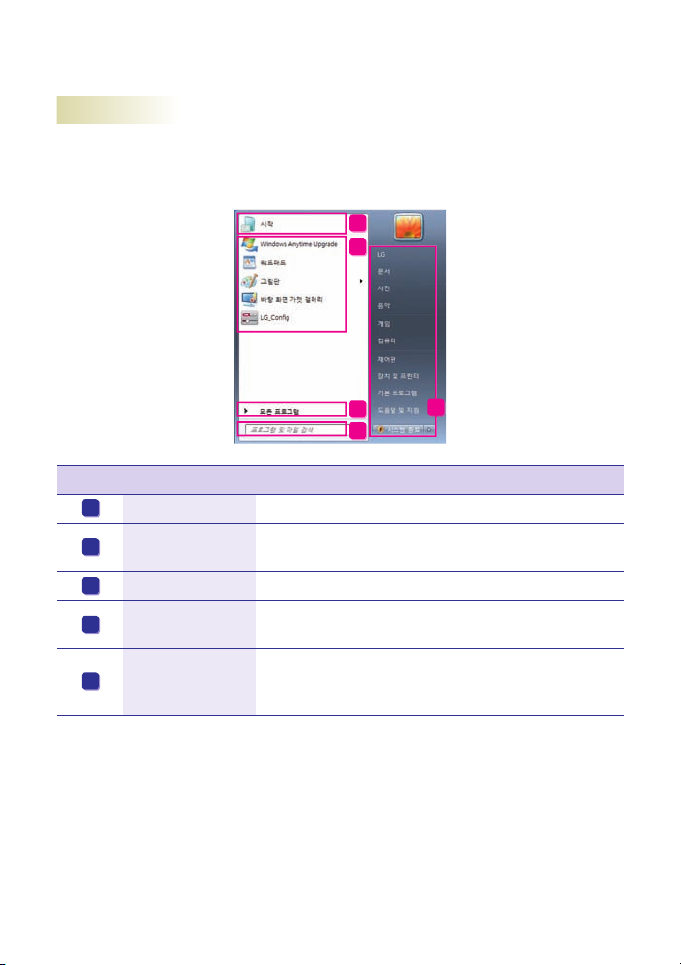
Start Menu
The Start menu contains everything you need to start using Windows.
The Desktop and the Start menu may vary depending on the product speci cation or the
version of the software provided.
A
B
C
D
Number Name Description
A
Pinned programs
Frequently used
B
programs
C
All Programs
D
Instant search box
E
Shortcuts
You can change the position of a program in the list.
You can look for programs, les and favorites by typing
in search terms.
You can access all your documents, pictures and music
directly without remembering the exact location of the
items.
E
15

Help and Support
Click Help and Support to learn how to use Windows, get troubleshooting information,
or receive technical support. Please read through before using the computer.
1. Click the Start button and click
Help and Support in the Start
menu.
2. Use the Help and Support function following the instructions in the window.
This function helps you learn new fea-
tures of Windows® 7 and troubleshoot
various problems.
You can also access information from
Microsoft.
Taskbar Thumbnail Preview
Windows® 7 groups multiple windows of the same program (e.g., Internet Explorer, My
Computer, and Windows Explorer) and shows them as a single icon on your taskbar,
making it organized and giving it more space.
1. Previewing Explorer windows
Small thumbnail previews of opened
windows are displayed on your taskbar
when you hover your mouse on taskbar
icons. If you click one of the thumbnail
previews, the selected window opens on
your desktop.
16
2. Previewing My Computer and Windows
Explorer windows
Small thumbnail previews of opened
windows are displayed on your taskbar
when you hover your mouse on taskbar
icons. If you click one of the thumbnail
previews, the selected window opens on
your desktop.

Windows® 7 Power Management
Windows® 7 provides simpler and yet more reliable power management features than
previous versions of Windows. Use Power Management to manage the power consumption more ef ciently.
1. Go to Start > Control Panel and select View by > Small icons. Then, click Power Options.
2. When the [Select a power plan] window opens, select one you want under Plans
shown on the battery meter.
If the [High performance] plan is hidden, click the little arrow to the right of [Show
additional plans].
Balanced: Automatically balances perfor-
Power saver: Saves energy by reducing your
High performance: Favors performance and
mance with energy consumption
on capable hardware.
computer's performance where
possible. Using this plan gives
you the maximum battery life.
response speed, but may
use more energy.
17

System Shutdown Options
Windows® 7 provides a shortcut menu to log off the user, lock the computer, restart the
computer, or quickly switch users without logging the previous user off.
Click the right-arrow button to the right of the [Shut down] button to display the additional
options for system shutdown.
Number Name Description
A
Switch user Logs in with another user account registered in the system.
B
Log off Closes all open programs and logs off the current user account.
C
Lock Locks the user account.
D
Restart Closes all open programs and safely restarts the system.
E
Sleep
F
Hibernate Saves the user programs and switches the system power off.
Caution
● There may be times when Windows does not shut down properly. In this case,
press and hold the power button for 5 seconds or more to force shut down the system. This should be used in emergency cases only as it can adversely affect the
system. It is best to shut down the computer by clicking the [Start] button on the
desktop and then selecting the [Shut down] button. If you do not use the [Shut
down] button to correctly power off the computer, data on your hard disk may get
damaged. If a program stops responding, press the Ctrl-Alt-Delete key combination
to quit the program in the Windows Task Manager or restart the system.
If Windows or an application is damaged by an abnormal shutdown, reinstall
Windows or the application. LG Electronics is not liable for any loss of data caused
by the user's actions.
● If you insert a USB memory stick just before entering the standby mode, the computer may not enter the standby mode.
Switches the power off for the unused devices to minimize power
consumption.
18

Setting the On-Screen Keyboard
If you set a password for the product, follow the instructions below to enter the password
with the on-screen keyboard.
1. Click the button on the bottom
left of the screen.
2. Select [Type without the keyboard (On-
Screen Keyboard)] and click [OK].
3. When the on-screen keyboard appears
on the screen as illustrated, enter the
password.
19

Connecting Accessories
Connecting USB
You can connect a USB-type keyboard, hub, digital camera and other devices that support USB.
Caution
● Spilling water, coffee, juice or any liquid on the surface of the product may result in
damage to the product, malfunction, or electric shock.
● Precautions for using the touchpad
- Do not touch the touchpad with a sharp object, such as the tip of a pen. Do not
peel off the cover sheet of the surface. The touchpad may get damaged. Do not
use two or more fingers at the same time or use gloved hands or wet hands. The
touchpad may not work properly. The touchpad also may not work properly
because of grease or dirt at the tip of your finger. Move the cursor by gently
touching the touchpad. Applying excessive force or using the touchpad in an
incorrect posture may injure your finger or wrist.
20

Con guring the System Setup
Phoenix SecureCore(tm) Setup Utility
F1 Help Select Item -/+ Change Values F9 Setup Defaults
ESC Exit EnterSelect Menu Select Sub-Menu F10 Save and Exit
Advanced Security Boot Exit
System Time: [ ]
Item Specific Help
<Tab>, <Shift-Tab>, or
<Enter> selects field
System Date:
Product Name:
Processor Type:
Processor Spd:
BIOS Version:
KBC Version:
UUID Number:
Pri Master
Total Memory:
信信=信信=信信
[ ]
信信=信信=信信
信信信 信信信
信信信 信信信
信信1 信信
信信信 信信信信信 信信信信
信信信 信信信信信 信信信信信 信信信信信
信信信 信
信信信
[ ]
信信2信信2
2009
GHz
MB
Main
Entering the System Setup
* Make sure to connect the USB keyboard before use.
Con guring the system setup involves accessing the CMOS RAM where the hardware
con guration is stored. Through the system setup process, the product acquires information about the current date and time, memory capacity, hard disk capacity and type, etc.
This process is used for changing the password, modifying the boot order, or adding a
new device.
The information displayed in the setup window may vary depending on the product speci cation.
Caution
● Do not change the system setup unless necessary. An incorrect system setup may
cause an error so you will have to be careful.
● The CMOS setup menu and the factory default settings may be changed without
prior notice for performance improvement and may differ from the ones shown in
this user manual.
1. Turn the product power on.
2. When the logo appears, press the F2 key.
3. Then, the system setup window appears in a moment.
21

Keys used in system setup
Key Function
Enter Selects the current item.
Esc Closes the current item or returns to the previous screen.
▲,▼,◄,►
(arrow keys)
+,- Increases or decreases a value.
Page Up Moves to the rst item.
Page Down Moves to the last item.
F10 Saves the changes and exits system setup.
F9 Reverts to the factory settings.
Moves the cursor up, down, left or right.
22

Setting the Password
Phoenix SecureCore(tm) Setup Utility
F1 Help Select Item -/+ Change Values F9 Setup Defaults
ESC Exit EnterSelect Menu Select Sub-Menu F10 Save and Exit
Advanced Boot Exit
Supervisor Password Is:
Set Supervisor Password
User Password Is:
Set User Password
Password on boot:
Item Specific Help
Supervisor Password
controls access to the
setup utility.
Main
Security
Clear
[ Enter ]
Clear
[Enter]
[Disabled]
Phoenix SecureCore(tm) Setup Utility
Advanced Boot Exit
Supervisor Password Is:
Set Supervisor Password
Item Specific Help
Main
Security
Clear
[ Enter ]
Set a password so that unauthorized users cannot use the product or change the settings.
You can set your password when starting the system or con guring the system setup.
Caution
● If you forgot your password, you cannot use the system. Write the password down and
keep it in a safe place.
● After setting the password, you must boot the system with a USB keyboard connected.
Set Supervisor Password
Set a password to prevent product access by unauthorized users. By default, no password is set. If an unauthorized user modi es the CMOS setup and sets a new password
when the computer is turned on, this prevents the original user from accessing the
product.
1. Activate the system setup window and
use the arrow keys to move to the
Security section.
2. In the window shown on the left, use
the arrow keys to select [Set Supervisor Password] and press the [Enter]
key.
3. When the message shown on the left
appears, enter a password and press
the [Enter] key. The password can be
up to 8 alphanumeric characters (A - Z,
0 - 9).
4. When the message shown on the left
appears, press the [Enter] key.
5. Press the [F10] key to save the
changes.
6. When the message shown on the left
appears, select [Yes] and press the
[Enter] key. Then, the product restarts.
23

Set User Password
Phoenix SecureCore(tm) Setup Utility
F1 Help Select Item -/+ Change Values F9 Setup Defaults
ESC Exit EnterSelect Menu Select Sub-Menu F10 Save and Exit
Advanced Boot Exit
Supervisor Password Is:
Set Supervisor Password
User Password Is:
Set User Password
Password on boot:
Item Specific Help
Supervisor Password
controls access to the
setup utility.
Main
Security
Clear
[ Enter ]
Clear
[ Enter ]
[Disabled]
Phoenix SecureCore(tm) Setup Utility
Advanced Boot Exit
Supervisor Password Is:
Set Supervisor Password
User Password Is:
Set User Password
Item Specific Help
Supervisor Password
controls access to the
Main
Security
Clear
[ Enter ]
Clear
[ Enter ]
Set User Password allows you to set a password that is lower than Set Supervisor
Password. To set a user password, a supervisor password must be set.
1. Activate the system setup window and
use the arrow keys to move to the
Security section.
2. In the window shown on the left, use
the arrow keys to select [Set User
Password] and press the [Enter] key.
3. When the message shown on the left
appears, enter a password and press
the [Enter] key. The password can be
up to 8 alphanumeric characters (A - Z,
0 - 9).
4. When the message shown on the left
appears, press the [Enter] key.
5. Press the [F10] key to save the
changes.
6. When the message shown on the left
appears, select [Yes] and press the
[Enter] key. Then, the product restarts.
Note
● There are more restrictions for using CMOS setup with user password than with
supervisor password.
Caution
● HDD password is required for protection of privacy and data. ● If you forgot your
password, you cannot use the system. Write the password down and keep it in a
safe place.
24

Password on boot
Phoenix SecureCore(tm) Setup Utility
F1 Help Select Item -/+ Change Values F9 Setup Defaults
ESC Exit EnterSelect Menu Select Sub-Menu F10 Save and Exit
Advanced Boot Exit
Supervisor Password Is:
Set Supervisor Password
User Password Is:
Set User Password
Password on boot:
Item Specific Help
Supervisor Password
controls access to the
setup utility.
Main
Security
Clear
[ Enter ]
Clear
[ Enter ]
[Disabled]
Phoenix SecureCore(tm) Setup Utility
F1 Help Select Item -/+ Change Values F9 Setup Defaults
ESC Exit EnterSelect Menu Select Sub-Menu F10 Save and Exit
Advanced Boot Exit
Supervisor Password Is:
Set Supervisor Password
User Password Is:
Set User Password
Password on boot:
Item Specific Help
Supervisor Password
controls access to the
setup utility.
Main
Security
Clear
[ Enter ]
Clear
[ Enter ]
[ Enter ]
Phoenix SecureCore(tm) Setup Utility
Advanced Boot Exit
Supervisor Password Is:
Set Supervisor Password
User Password Is:
Set User Password
Item Specific Help
Supervisor Password
controls access to the
Main
Security
Clear
[ Enter ]
Clear
[ Enter ]
Phoenix SecureCore(tm) Setup Utility
Advanced Boot Exit
Supervisor Password Is:
Set Supervisor Password
User Password Is:
Set User Password
Password on boot:
Item Specific Help
Supervisor Password
controls access to the
setup utility.
Main
Security
Clear
[ Enter ]
Clear
[ Enter ]
[ Enter ]
Phoenix SecureCore(tm) Setup Utility
Advanced Boot Exit
Supervisor Password Is:
Set Supervisor Password
Item Specific Help
Main
Security
Clear
[ Enter ]
The Password on boot option protects the system by requiring the user to enter the
supervisor password or the user password on boot.
1. Activate the system setup window and
use the arrow keys to move to the
Security section.
2. In the window shown on the left, set
the supervisor password or both of
the supervisor password and user
password.
3. Select the Password on boot option and
use the + and - keys to change it from
Disable to Enable.
Note
● Press [Shift] and [+] at the same time to select [Enabled] or [Disabled].
25

Deleting or Changing the Password
Phoenix SecureCore(tm) Setup Utility
F1 Help Select Item -/+ Change Values F9 Setup Defaults
ESC Exit EnterSelect Menu Select Sub-Menu F10 Save and Exit
Advanced Boot Exit
Supervisor Password Is:
Set Supervisor Password
User Password Is:
Set User Password
Password on boot:
Item Specific Help
Supervisor Password
controls access to the
setup utility.
Main
Security
Clear
[ Enter ]
Clear
[Enter]
[Disabled]
Phoenix SecureCore(tm) Setup Utility
Advanced Boot Exit
Supervisor Password Is:
Set Supervisor Password
Item Specific Help
Main
Security
Clear
[ Enter ]
You can do this only if you already know the password.
1. When changing the password
1. Activate the system setup window, enter
the existing password, and press the
[Enter] key.
2. Change the password in the same way
as setting the password.
2. When deleting the password
1. Activate the system setup window, enter
the previously set password, and press
the [Enter] key.
2. In the system setup window, use the arrow keys to move to the Security section.
3. In the window shown on the left, use
the arrow keys to select [Set Supervisor
Password] and press the [Enter] key.
4. When the message shown on the left
appears, enter the current password in
Enter Current Password.
26
5. Press the [Enter] key for Enter New
Password and Con rm New Password.
6. When the message shown on the left
appears, select [Continue] and press the
[Enter] key.
7. Press the [F10] key to save the changes.
8. When the message shown on the left appears, select [Yes] and press the [Enter]
key. Then, the product restarts.

Restoring to the Factory Settings
If you have unintentionally changed the system setup, you can use this function to revert
to the factory settings.
1. Activate the system setup window and use the arrow keys to move to the Exit section.
2. Use the arrow keys to select Load Setup Defaults and press the [Enter] key.
3. When the message shown on the left appears, select [Yes] and press the [Enter] key.
Then, the system setup reverts to the factory settings.
4. Press the [F10] key to save the changes.
5. When the message shown on the left appears, select [Yes] and press the [Enter] key.
Then, the product restarts.
Note
● Press [F9] to use Load Setup Defaults.
27

Using Wireless LAN
Using Wireless LAN
When using wireless LAN, you can network with many other computers at home or at
work.
Setting Wireless LAN
1. Click the button on the right of the taskbar
to display the list of wireless networks available.
If the wireless network list does not appear,
check that the wireless network device is turned
on and click the
button to detect the wireless networks.
2. By connecting the computer via a wireless network, you can use the basic network functions
such as sharing les, folders and printers.
If a small network is already in place, you can
network your computer with another computer
connected to the Internet and share its Internet
connection.
3. Click the button on the right of the taskbar and check if the wireless network
is connected successfully.
Caution
● Make sure that your network is secure if you want to share your data. Never share
critical data.
28

Virtual Keyboard
Default On-Screen Keyboard (International)
A
B
C FD GE H
Number Name Description
A
Caps Allows you to enter uppercase letters.
I J
B
Shift
C
Ctrl
D
Alt
E
Windows
Language
F
Switch Key
G
Numbers
H
Menu Performs the same task as right-clicking the mouse.
I
Move
J
X Hides the keyboard from the window.
When it is held down, pressing a key except for the Windows,
Ctrl, Alt, up, or down keys releases the key.
When it is held down, pressing a key except for the Windows,
Alt, Shift, up, or down keys releases the key.
When it is held down, pressing a key except for the Windows,
Ctrl, Shift, up, or down keys releases the key.
When it is held down, pressing a key except for the Windows,
Ctrl, Alt, Shift, up, or down keys releases the key.
Switches the language if the current Windows supports multilingual IME.
* If the current window does not support language switch, the
language will not be changed.
This brings up the keyboard for symbols and numbers (see next
page).
Moves to another location. (Only moves up or down according
to the UI scenario.)
29

Special Character Keyboard
● If you press the key above, the keyboard for entering extended special characters
is displayed.
● Press the key again to return to the previous special characters.
If you press Shift in the special characters keyboard, enter the default keyboard
and then return back to the special characters keyboard, Shift will be released.
Continuous Key
● If you press any non-special key for 0.5 seconds or longer, the value of the key is
entered in a row.
While pressing down one key, if you press another key, the new key’s value will be
entered. If you long click a key by touching it, only part of the input is entered as
the continuous key input. For a long click, the keyboard pressing sound does not
go on during the click.
● Special keys: Ctrl, Alt, Windows, KOR, 123?!, Menu, Caps, Shift, function keys
30

Right-Click on the System Tray
Name Description
Exit Exits the program.
Windows keyboard/
LG keyboard
Turns the automatic
virtual keyboard
popup on/off
Turn the translucent
virtual keyboard on/
off
Toggles between the default Windows keyboard
and LG keyboard.
If it is set to on, the small icon for the virtual keyboard is activated when the focus moves to the input field or when the mouse
cursor changes to the I-beam pointer.
(see next page)
If it is set to on, the keyboard window becomes translucent.
Note
● When running the translucent virtual keyboard and a video at the same time, you
may experience lag on video playback.
● Switching language on applications with built-in IME (region-speci c word processors, etc.) does not affect the language on the keyboard.
In this case, use the Windows on-screen keyboard.
31

Auto On Function
● This icon appears when the focus moves to the input field or the mouse cursor
changes to the I-beam pointer. It disappears when you click on outside the
input field.
Click the icon to bring up the virtual keyboard on the screen.
● Depending on the input field type, some fields support different languages
while others do not (e.g., login and password input fields). Even if you press
the language switch key in the input field that does not support language
switch, this does not change the input language.
● The small icon also appears in other boxes or fields where the I-beam pointer
becomes active, such as the Terms of Use box.
Note
● If the icon does not appear automatically, double-click the keyboard icon on the system tray.
● Press the volume up and down keys simultaneously to bring up the virtual keyboard.
For instance, if you wish to exist the full screen mode in programs, such as Adobe
Acrobat Reader, press the volume up and down keys at the same time as above
and press Esc.
32

LG e-Note Con guration
LG Config
Turns on/off the automatic rotation of the screen when you hold
e-Note vertically or horizontally.
On: When on, the pivot is applied automatically whenever you
turn e-Note vertically or horizontally, changing the screen ori-
Pivot On/Off
Virtual Keyboard
On/Off
Note
● If the screen automatically rotates while game, movie or Flash le is being played, you may
experience audio or video lags.
entation.
Off: When off, the screen orientation remains unchanged even if
you turn e-Note vertically or horizontally.
Pivot recognition angle: 28° or more
Rotation information: 0°, 90°, 270°, 180°
Turns on/off the automatic display of the small icon whenever the
focus moves to the input eld.
On: When on, the small icon appears whenever the focus moves
to the input eld. Clicking the icon activates the virtual keyboard.
Off: When off, the small icon does not appear even if the focus
moves to the input eld. The virtual keyboard can only be
activated by clicking the virtual keyboard icon on the system
tray.
33

Bluetooth On/Off
34
Wi-Fi On/Off
Turns Wi-Fi (wireless LAN) on/off.
- When Wi-Fi is off, the Connect to a network icon is displayed
as on the Windows tray.
- When Wi-Fi is on,
If not connected to AP, the Connect to a network icon is dis-
played as on the Windows tray. The antenna symbol for
Wi-Fi in the LG eNote Configuration window is shown in gray.
If connected to AP, the Connect to a network icon is displayed
as on the Windows tray. The antenna symbol for Wi-Fi
in the LG eNote Configuration window is shown in orange,
indicating the strength of the signal.
Turns Bluetooth on/off.
- If Bluetooth is off, the Bluetooth icon ( ) on the Windows tray
disappears.
- If Bluetooth is on, the Bluetooth icon ( ) on the Windows tray
appears.

LCD Backlight Adjusts the brightness of the LCD backlight between 0 and 8.
Note: This also controls the brightness of the LCD backlight in
Windows.
Volume Adjusts the system volume between 0 and 25.
Click the icon to toggle between mute and unmute.
Note: This also controls the volume in Windows.
However, this does not control the volume of Windows Media
Player or other media players.
35

Using End-User Recovery
- This section contains instructions for end-users how to restore the hard disk to the
factory settings.
- Follow the instructions below to enter recovery mode and perform recovery.
Step 1. Entering recovery mode
- When you see the "PRESS F11 KEY TO
RUN LG RECOVERY SYSTEM" on the
top of the display after booting, press the
left and right volume keys on the top of
the product at the same time. Keep the
keys pressed down for 2 or 3 seconds until the "Windows is loading les" message
appears on the bottom of the screen.
Note
● The message is displayed for about 5 seconds. You must press the key within
this period of time in order to enter recovery mode.
Step 2. Initializing
- This is the initialization process.
- It takes about 1 minute or less.
36

Step 3. Main menu
- To start the system recovery, click [Recovery System] > [Start Recovery].
- To backup important data on an external
storage device (e.g., USB memory and
USB external HDD) before performing
system recovery, click the [File Manager]
button.
- To exit recovery mode, click the [Exit]
button.
Note
● The window similar to the one above appears when you run File Manager. Similar
to Windows Explorer, you can copy, move or delete les with this.
Step 4. Starting Recovery
- To start the system recovery, click [Recovery System] > [Start Recovery].
- To return to the main menu, click the
[Previous Page] button.
- To exit recovery mode, click the [Exit]
button.
37

Step 5. Recovery conrmation
- This process asks you whether or not to
continue the system recovery. Click [Yes]
to start the recovery process.
Step 6. Formatting the system
- This process formats the system before
recovering the operating system. It will
begin automatically.
Step 7. Recovering the system
- This process recovers the operating
system. It will begin automatically. Once
the recovery is complete, the system will
automatically restart after 10 seconds.
- A system recovery takes 15 - 28 minutes.
Caution
● Always keep backup copies of important data.
● You cannot perform the recovery function if the system partition size is set smaller than
the minimum size required for operating system installation.
● In addition to using the recovery mode, you can connect a USB keyboard and a USB
mouse to install the operating system manually.
38

Secondary Storage Devices and Memory
MMCplus
HC XC
MMCplus
Using the Memory Card
Checking supported memory cards
This model supports SD and MMC memory cards.
SD™ and MMC™ memory cards are portable storage devices commonly used in a wide
variety of digital products.
Always check the compatibility of the memory card when purchasing.
Supported
Memory Cards
SD(SDHC, SDXC) MMC
Installing and using the memory card
Check the insertion direction of the memory card.
Push the memory card all the way in until it rests
securely within the multi-card slot as illustrated
on the left.
Note
● When you format a memory card, all its data will be deleted.
Always check that there is no critical data before formatting.
● To format a memory card, right-click the memory card drive and select format from
the menu. On the format screen, click Start.
● If the memory card’s write protect tab is locked, formatting, writing or deleting cannot be performed.
● SD™ and MMC™ memory cards can only be used as data storage devices.
Copyright protection is not supported.
Caution
● Hold the MMC™ card with the direction of the arrow (▲). Align the card in
the direction of the slot and insert it. Forcing the MMC™ card may damage the card and/or the product.
● Some memory cards from Transcend™ are made of metallic parts and
may cause short-circuiting with the multi-card slot’s connector. Please
avoid using memory cards with metallic outer layers as they can degrade
the system performance.
39

Removing the memory card
Push the inserted memory card with your nger and release it. The memory card will be
ejected as illustrated below. Pull the ejected memory card in the direction of the arrow.
To removing the memory card safely
1. Click the [Safely Remove Hardware and Eject Media] icon on the taskbar.
2. Click [Eject ****].
3. When the [Safely Remove Hardware] window appears, remove the memory card.
Note
● The device name you inserted will be placed in [Eject ****].
For example, Eject Removable Disk.
40

To use Bluetooth
What is Bluetooth?
Bluetooth is a short-distance wireless networking technology, connecting various devices at the frequency of 2.45 GHz.
In addition to communication devices such as computer, printer, mobile phone, and
PDA, with Bluetooth, various digital appliances at home or at work can easily exchange
data wirelessly each other without using cables.
For more information on Bluetooth, see your Bluetooth device’s user manual.
This product features a Bluetooth communication function, allowing you to access
pictures (*.jpeg) and music on Bluetooth-enabled headset devices and mobile phones
wirelessly without using cables.
● Communication spec: Bluetooth 3.0 + HS (High Speed)
● Output: Bluetooth Speci cation Power Class 2
● Maximum Communication Range: Line of open sight approximately 10
meter (30 feet)
● Frequency band: 2.4 GHz band (2.4 GHz - 2.4835 GHz)
Precautions for Using Bluetooth
- Always use a compatible headset. Using incompatible headsets may cause lip-sync
issues and the coverage will not be guaranteed.
- Always use within the speci ed range (within 10 meters in distance and 45° left and
right in angle). This guarantees the best usage experience. You may experience
communication failures when using the device outside the coverage area or there are
obstacles within the coverage area.
- You may experience communication failures depending on the accessories. Devices
such as a microwave oven and wireless LAN operate in the same frequency band (2.4
GHz) as Bluetooth. This may cause communication failures.
- The time taken for detecting for devices varies by the number and operation conditions
of Bluetooth devices around the TV. The fewer the devices, the faster the detection.
- This wireless device may cause electromagnetic interferences and should not be used
for safety or medical services.
- Try using only one Bluetooth service at a time.
- For information on connecting and using Bluetooth devices other than Bluetooth headsets, see the device user manual.
QDID (Quali ed Design Identity): B016588
41

Precautions for Using Bluetooth Headsets
- Only of cially certi ed Bluetooth headsets can be detected and connected.
- Bluetooth headsets which support A2DP and HSP functions can be connected.
- To connect a Bluetooth headset, the Bluetooth password and the passkey speci ed in
the headset’s user manual must match each other. Connection cannot be established
otherwise. For more information, see your device’s user manual.
- You may experience problems when detecting or connecting if:
there is a strong electromagnetic interference;
there are many Bluetooth devices nearby; or
the headset is turned off, not in the place, or is out of order.
Devices such as a microwave oven, wireless LAN, plasma lamp, and gas range hoods
operate in the same frequency band as Bluetooth. This may cause communication
failures.
- Try using only one Bluetooth headset at a time.
- Bluetooth devices other than a headset cannot be connected simultaneously.
- If the headset is not connected correctly, reconnect it using [Bluetooth Headset].
42

Product Specication
LCD 25.65 cm(10.1 inch) TFT LCD
Resolution 1366 x 768
CPU Intel Atom Z510 (1.1 GHz) / Z530 (1.6 GHz)
Operating System Windows 7 Starter
Memory (SSD) 16 GB SSD (upgradable to 32 GB or 64 GB)
System memory DDR2 1 GB
Graphic Intel GMA 500
Touch screen Resistive Single Touch
Wireless LAN
Input/output ports USB 2.0 x 2, SD/MMC, HP Out, DC-In
Bluetooth
Sound Stereo sound (0.7W * 2), built-in Mic
Accessories
Weight / Depth 850 g / 14.5 mm
AC/DC adaptor
(free voltage)
Battery (Li-ion) 31 Wh (7.4 V/4240 mAh)
Operating and storage
requirements
Realtek RTL8188CEBT
802.11 bgn w/BT Combo (BT 3.0 + HS)
Realtek RTL8188CEBT
Bluetooth 3.0 + HS
Easy Setup Guide,Warranty Card, cradle, stylus pen, AC
adaptor, screen protective lms x 2
Capacity: 40 W
(Input: 100-240 V, 1.2 A / Output: 19 V, 2.1 A)
Operating temperature: 10°C to 35°C
Operating humidity: 20% RH to 80% RH
Storage temperature: -10°C to 60°C
Storage humidity: 10% RH to 80% RH
Power consumption
Operating: Approx. 20 W (when playing video)
Idle: Approx. 10 W (when display is off)
Sleep: < 0.7 W
Power Off: < 0.5 W (Window shut down)
43

FEDERAL COMMUNICATIONS COMMISSION
INTERFERENCE STATEMENT
This equipment has been tested and found to comply with the limits for a Class B
digital device, pursuant to Part 15 of the FCC Rules. These limits are designed to
provide reasonable protection against harmful interference in a residential installation.
This equipment generates, uses and can radiate radio frequency energy and, if not
installed and used in accordance with the instructions, may cause harmful
interference to radio communications. However, there is no guarantee that
interference will not occur in a particular installation. If this equipment does cause
harmful interference to radio or television reception, which can be determined by
turning the equipment off and on, the user is encouraged to try to correct the
interference by one or more of the following measures:
-- Reorient or relocate the receiving antenna.
-- Increase the separation between the equipment and receiver.
-- Connect the equipment into an outlet on a circuit different from that to which the
receiver is connected.
-- Consult the dealer or an experienced radio/TV technician for help.
CAUTION:
To assure continued FCC compliance:
Any changes or modifications not expressly approved by the grantee of this device
could void the user's authority to operate the equipment.
FCC Label Compliance Statement:
This device complies with Part 15 of the FCC Rules. Operation is subject to the
following two conditions: (1) this device may not cause harmful interference, and (2)
this device must accept any interference received, including interference that may
cause undesired operation.
IC Statement
Operation is subject to the following two conditions: (1) this device may not cause
interference, and (2) this device must accept any interference, including interference
that may cause undesired operation of the device.
Specific Absorption Rate
The highest SAR value for H1000B is 0.33 W/kg, and meet the IEEE SAR limit set by
the FCC and by the Canadian regulatory authorities is 1.6 watts per kilogram (W/kg).

Make sure to read the Safety Precautions
before using the product.
Keep th e O wne r ’s Man ual (C D) in an
accessible place for furture reference.
The model and serial number of the SET
is located on the back and one side of
the SET. Record it below should you ever
need service.
MODEL
SERIAL
Temporary noise is normal when
powering ON or OFF this device.
 Loading...