


User Guide | Guía del Usuario
42" and 50" Plasma TV
Spanish
NS-PDP42/50-09
Insignia
NS-PDP42/50-09
42" and 50" Plasma
Safety information
TV
Contents
Introduction . . . . . . . . . . . . . . . . . . . . . . . . . . . . . .3
Safety information . . . . . . . . . . . . . . . . . . . . . . . . .3
Features. . . . . . . . . . . . . . . . . . . . . . . . . . . . . . . . .5
Accessories . . . . . . . . . . . . . . . . . . . . . . . . . . . . . . . 5
Front . . . . . . . . . . . . . . . . . . . . . . . . . . . . . . . . . . . . . 5
Back . . . . . . . . . . . . . . . . . . . . . . . . . . . . . . . . . . . . . 6
Remote. . . . . . . . . . . . . . . . . . . . . . . . . . . . . . . . . . . 6
Installing remote control batteries . . . . . . . . . . . . . . 7
Using the remote control . . . . . . . . . . . . . . . . . . . . . 7
Setting up your TV . . . . . . . . . . . . . . . . . . . . . . . . .8
Installing the stand (42" TV only) . . . . . . . . . . . . . . . 8
Managing the cables . . . . . . . . . . . . . . . . . . . . . . . . 8
Mounting the TV on a wall . . . . . . . . . . . . . . . . . . . . 8
Securing the TV to a wall to prevent falling . . . . . . . 9
Connecting an antenna, cable TV, or satellite TV. . . 9
Connecting external equipment . . . . . . . . . . . . . . . 10
Using your TV . . . . . . . . . . . . . . . . . . . . . . . . . . .15
Turning the TV on and off. . . . . . . . . . . . . . . . . . . . 15
Changing channels. . . . . . . . . . . . . . . . . . . . . . . . . 15
Adjusting the volume . . . . . . . . . . . . . . . . . . . . . . . 15
Using the Q.Menu (Quick Menu) . . . . . . . . . . . . . . 15
Using the on-screen menus . . . . . . . . . . . . . . . . . . 17
Memorizing and setting up channels . . . . . . . . . . . 17
Selecting the input source for your TV . . . . . . . . . . 19
Setting the AV mode. . . . . . . . . . . . . . . . . . . . . . . . 19
Using Simplink to control other AV devices . . . . . . 20
Adjusting picture settings . . . . . . . . . . . . . . . . . . . . 21
Controlling the sound and language. . . . . . . . . . . . 24
Setting the clock. . . . . . . . . . . . . . . . . . . . . . . . . . . 27
Setting locks and parental controls. . . . . . . . . . . . . 29
Maintaining your TV . . . . . . . . . . . . . . . . . . . . . . .35
Cleaning the screen . . . . . . . . . . . . . . . . . . . . . . . . 35
Cleaning the cabinet. . . . . . . . . . . . . . . . . . . . . . . . 35
Troubleshooting . . . . . . . . . . . . . . . . . . . . . . . . . .35
Operation . . . . . . . . . . . . . . . . . . . . . . . . . . . . . . . . 35
Video problems. . . . . . . . . . . . . . . . . . . . . . . . . . . . 35
Audio problems. . . . . . . . . . . . . . . . . . . . . . . . . . . . 36
PC mode problems. . . . . . . . . . . . . . . . . . . . . . . . . 36
Specifications. . . . . . . . . . . . . . . . . . . . . . . . . . . .36
Legal notices . . . . . . . . . . . . . . . . . . . . . . . . . . . .36
One-year limited warranty . . . . . . . . . . . . . . . . . .37
Español . . . . . . . . . . . . . . . . . . . . . . . . 41
Introduction
Congratulations on your purchase of a
high-quality Insignia product. Your
NS-42/50PDP-09 represents the state of the art
in television design, and is designed for reliable
and trouble-free performance.
Warning
To reduce the risk of electric shock, do not remove the cover or
back. There are no user-serviceable parts inside. Refer
servicing to qualified service personnel.
To reduce the risk of fire or electric shock, do not expose your
TV to rain or moisture.
Caution
To prevent electric shock, match the wide blade on the power
cord plug to the wide slot on an electric outlet. If the plug does
not fit, consult a licensed electrician to replace the obsolete
outlet. Do not modify the power cord plug, or you will defeat
this safety feature.
This symbol indicates that dangerous
voltage constituting a risk of electric shock
is present within your TV. This label is
located on the back of your TV.
This symbol indicates that there are
important operating and maintenance
instructions in the literature accompanying
your TV.
Warnings
• Use of controls or adjustments or performance of
procedures other than those specified herein may result in
hazardous radiation exposure.
• The TV should be connected to an AC power outlet with a
protective grounding connection.
• To prevent injury, this apparatus must be securely attached
to the floor/wall in accordance with the installation
instructions.
• Always place the TV on the floor or a sturdy, level, stable
surface that will support the weight of the unit.
• Installing the TV requires special skill that should only be
performed by qualified service personnel.
• Customers should not attempt to do the work themselves.
Insignia bears no responsibility for improper mounting or
mounting that results in accident or injury.
Caution
The AC power plug is used as the disconnect device, so the
AC power plug shall always remain readily operable.
Read instructions
Read all of the safety and operating instructions
before you use your TV.
Retain instructions
Retain safety and operating instructions for
future reference.
Follow warnings and instructions
Follow all warnings on your TV and in the
operating instructions. Follow all operating and
use instructions.
Water and moisture
Do not use your TV near water. For example, do
not use it near a bath tub, wash bowl, kitchen
sink, laundry tub, in a wet basement, or near a
swimming pool.
www.insignia-products.com
3

Insignia NS-PDP42/50-09 42" and 50" Plasma TV
Cleaning
Unplug your TV before cleaning. Do not use
liquid or aerosol cleaners. Use only a damp cloth
to clean the exterior of your TV.
Ventilation
Slots and openings in the cabinet and the back
or bottom are provided for ventilation, reliable
operation, and protection from overheating.
These openings must not be blocked or covered.
Do not block the openings by placing your TV on
a bed, sofa, rug, or other similar surface. Do not
place your TV near or over a radiator or heat
register. Do not place your TV in a built-in
installation, such as a bookcase or rack, unless
you provide correct ventilation or follow the
manufacturer’s instructions.
Heat
Make sure that your TV is located away from
heat sources such as radiators, heat registers,
stoves, or other products (including amplifiers)
that produce heat.
Grounding or polarization
Do not defeat the safety purpose of the polarized
or grounding-type plug. A polarized plug has two
blades with one wider than the other. A
grounding type plug has two blades and a
grounding prong. The wide blade or grounding
prong are provided for your safety. If the plug
does not fit, contact an electrician to replace the
obsolete outlet.
Power cord protection
Route power cords so that they are not likely to
be walked on or pinched by items placed on or
against them. Pay particular attention to cords at
plugs, convenience receptacles, and the point
where they exit from your TV.
Attachments
Use only attachments recommended by
Insignia.
Stand
Do not place your TV on an unstable
cart, stand, tripod, bracket, or table.
Your TV may fall, causing serious
personal injury and serious damage
to your TV. Use only with a cart,
stand, tripod, bracket, or table recommended by
the manufacturer, or sold with your TV. If you
mount your TV to the wall, follow the
manufacturer’s instructions and use a mounting
accessory recommended by the manufacturer.
Your TV and cart combination should be moved
with care. Quick stops, excessive force, and
uneven surfaces may cause your TV and cart
combination to overturn.
Lightning
For added protection for your TV’s receiver
during a lightning storm, or when it is left
unattended and unused for long periods of time,
unplug it from the power outlet and disconnect
the antenna or cable system. This helps prevent
damage to your TV from lightning and power line
surges.
Servicing
Do not attempt to service your TV yourself
because opening or removing covers may
expose you to dangerous voltage or other
hazards. Refer all servicing to qualified service
personnel.
Replacement parts
When replacement parts are required, make
sure that the service technician uses
replacement parts specified by the manufacturer
that have the same characteristics as the
original part. Unauthorized substitutions may
result in fire, electric shock, personal injury, or
other hazards.
Overloading
Do not overload power outlets and extension
cords because this can result in a risk of fire or
electric shock.
Object and liquid entry
Never push objects of any kind into your TV
through openings because objects may touch
dangerous voltage points or short out parts that
could result in a fire or electric shock. Never spill
liquid of any kind on your TV.
Damage requiring service
Unplug this TV from the power outlet and refer
servicing to qualified service personnel under
the following conditions:
• When the power supply cord or plug is
damaged or frayed.
• If liquid has been spilled or objects have
fallen into your TV.
• If your TV has been exposed to rain or water.
• If your TV does not operate normally by
following the operating instructions. Adjust
only those controls that are covered by the
operating instructions because incorrect
adjustment of other controls may result in
damage and will often require extensive work
by a qualified technician to restore your TV to
its normal operation.
• If your TV has been dropped or damaged in
any way.
• When your TV exhibits a distinct change in
performance.
Safety check
After completing any service or repair to this TV,
ask the service technician to perform routine
safety checks to determine that your TV is in
correct operating condition.
Power source
Operate your TV only from the type of power
source indicated on the marking label. If you are
not sure of the type of power supplied to your
home, consult your TV dealer or local power
company.
Screen protection
Your TV’s screen is made of glass. Do not drop
your TV or hit the glass screen. If the screen
breaks, be careful of broken glass.
4
www.insignia-products.com
Insignia NS-PDP42/50-09 42" and 50" Plasma TV
Outdoor antenna grounding
If an outside antenna or cable system is
connected to your TV, make sure that the
antenna or cable system is grounded to provide
some protection against voltage surges and
built-up static charges. Article 810 of the
National Electrical Code, ANSI/NFPA No. 70,
provides information with respect to correct
grounding of the mast and supporting structure,
grounding of the lead-in wire to an antenna
discharge unit, size of grounding conductors,
location of the antenna-discharge unit,
connection to grounding electrodes, and
requirements for the grounding electrode.
1
1 Electric service equipment
Features
Accessories
Make sure that the following accessories are
provided in the package:
•Power cord
• 75 ohm round cable
• Remote control and batteries (2 × AAA)
•User manual
• CD manual
• Protection cover
• Bolts for stand assembly
• Cable holders
• Cable management clip
7
6
5
4
3
2
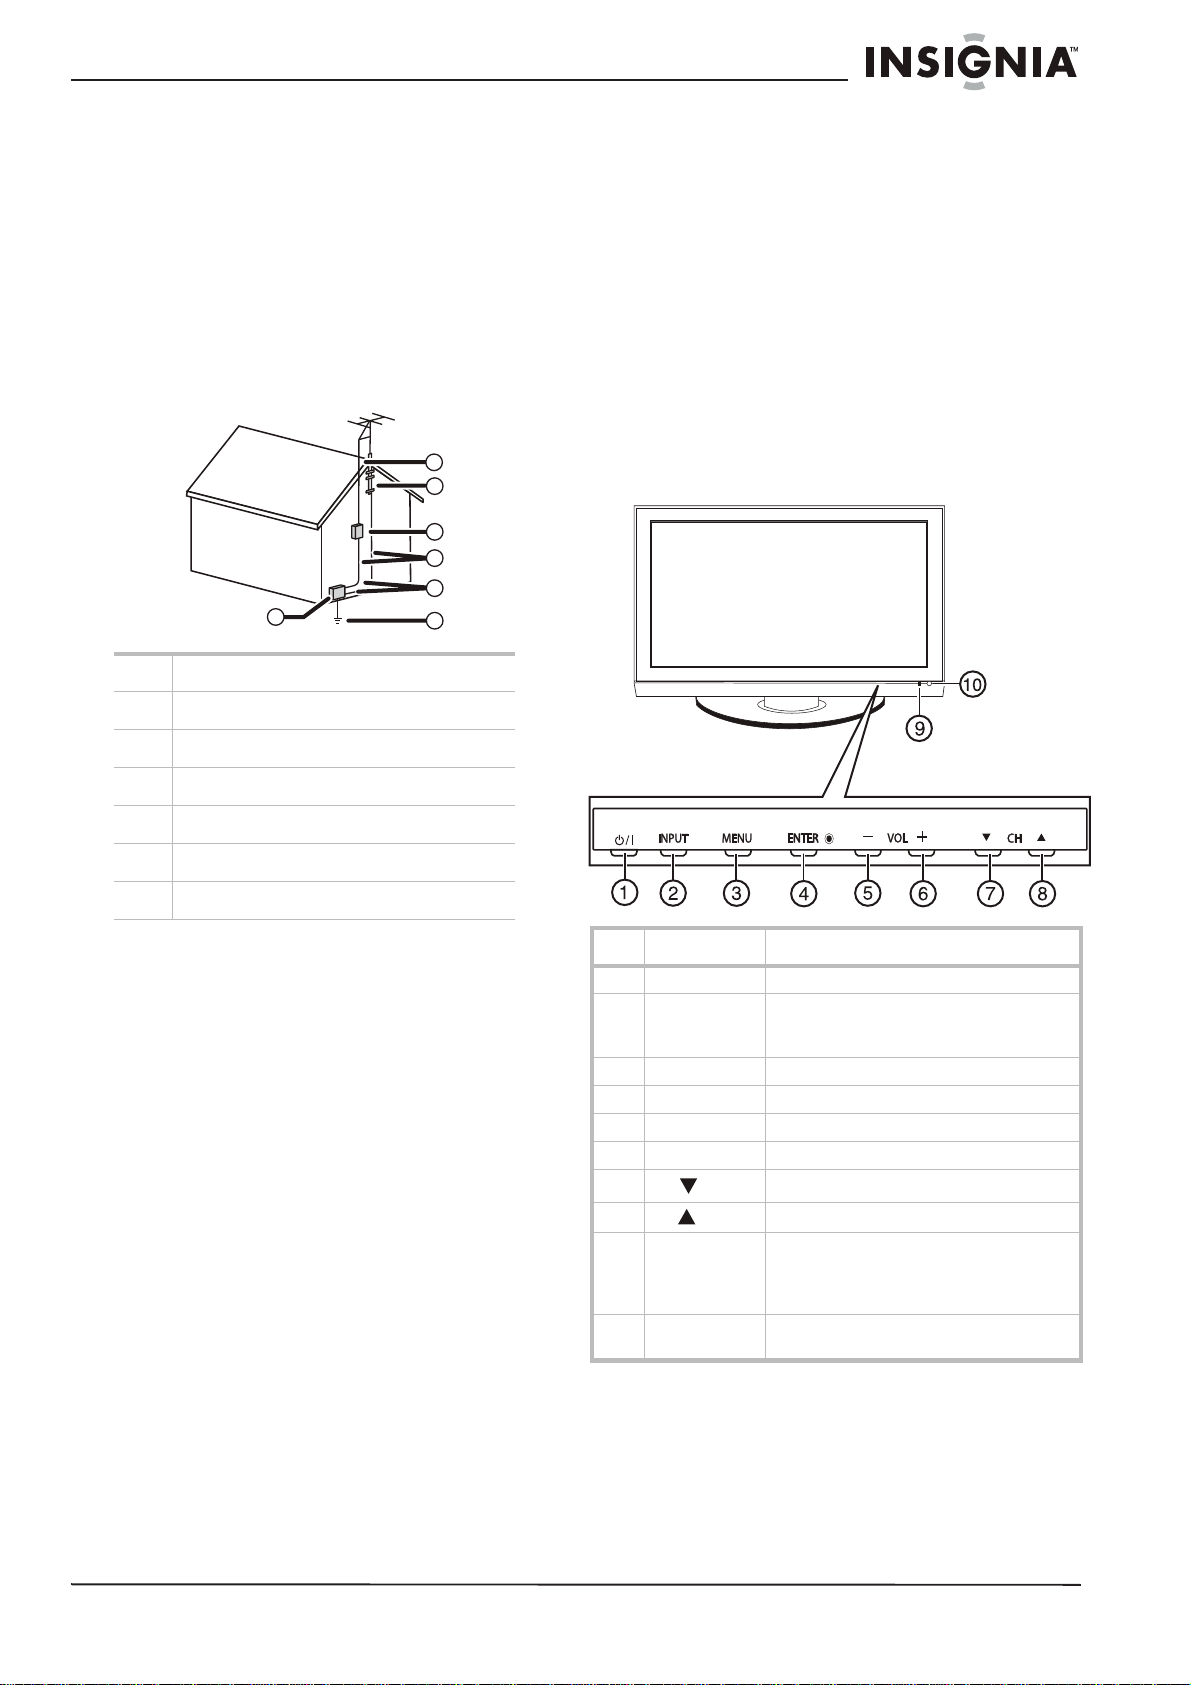
Front
2 Power service grounding electrode system
3 Ground clamps
4 Grounding conductors
5 Antenna discharge unit
6 Grounding clamp
7 Antenna lead-in wire
Note to CATV system installer
This reminder is provided to call the CATV
system installer’s attention to Article 820-40 of
the NEC that provides guidelines for correct
grounding and in particular, specifies that the
cable ground must be connected to the
grounding system of the building as close to the
point of cable entry as practical.
End of life directives
Your new TV contains materials which can be
recycled and reused. At the end of your TV’s life,
specialized companies can dismantle the
discarded TV to concentrate the reusable
materials and to minimize the amount of
materials to be disposed of. Dispose of your old
TV according to local regulations.
# Item Description
1 POWER button Press to turn your TV on or off.
2 INPUT button Press to select the AV signal input. You can
3 MENU button Press to open the on-screen menu.
4 ENTER Press to confirm your selections.
5 VOL - Press to decrease the volume.
6 VOL + Press to increase the volume.
7
CH
8
CH
9 Power/Standby
indicator
10 IR sensor Receives signals from the remote control.
select TV, AV1, AV2, S-Video, Component,
DVD, HDMI, or PC.
Press to change to a lower channel.
Press to change to a higher channel.
Lights when your TV is plugged into a
power outlet. When your TV is on, the
indicator is blue. When your TV is in
standby mode, the indicator is red.
Do not block.
www.insignia-products.com
5

Insignia NS-PDP42/50-09 42" and 50" Plasma TV
R
Back
USB
SERVUCE ONLY
HDMI IN 3
AUDI O
L/MONO
VIDEO
AV IN 2
# Description Function
10 COMPONENT IN - 1 and
2 (Y, Pb, Pr, AUDIO L,
and AUDIO R)
11 HDMI/DVI IN - 1 and 2 Connect an HDMI cable to this
Connect component video cables
to the Y, Pb, and Pr jacks and
audio L/R cables to the AUDIO IN
jacks.
connector. Supports HD video
and digital audio. Does not
support 480i. Accepts DVI video
using an adapter or HDMI-to-DVI
cable (not included).
Remote
POWER
RATIO
SOUND
Q. MENU MENU
SLEEP
PICTURE
INPUT
ENTER
AV MODERETURN
# Description Function
1 USB (service only) Used for software updates.
2 HDMI IN 3 Connect an HDMI cable to this
3 AV IN 2 (composite
video and L/R audio)
4 Digital audio (optical)
output
5 RS-232 IN (control and
service only)
6 REMOTE CONTROL IN Connect a wired remote control
7 RGB (PC) IN Connect a VGA (D-sub) cable
8 ANTENNA/CABLE IN
(coaxial antenna)
9 AV IN 1 (S-Video,
composite video, and
L/R audio)
connector. Supports HD video
and digital audio. Does not
support 480i. Accepts DVI video
using an adapter or HDMI-to-DVI
cable (not included).
Connect analog composite video
(480i) and audio input to these
jacks.
Connect to an amplifier or home
theater system to this jack. (Does
not work in standby mode.)
Used by third-party devices.
to this jack.
from your PC to this connector
(analog PC). Connect a 1/8"
headphone plug to the AUDIO IN
jack for analog PC audio.
Connect a 75 ohm cable from an
antenna, cable TV wall jack, or
cable box to this jack.
Connect a video cable (analog
composite video - 480i) or
an
S-Video cable (better quality
480i) to the appropriate jack.
Connect L/R audio cables to the
AUDIO IN jacks for either
connection.
FAV
VOL
MUTE
CH
P
A
G
E
123
456
7809
FLASHBK
# Button Description
1
POWER
2 RATIO Press to change the aspect ratio of the
3 SOUND Press to change the preset sound mode.
4 Q.MENU Press to open the Q.MENU (Quick menu).
5 MENU Press to open the on-screen TV menus.
6
7 ENTER Press to confirm your selections.
Press to turn your TV on or off.
picture.
Press again to return to normal viewing.
Press to navigate the on-screen menus.
6
www.insignia-products.com
Insignia NS-PDP42/50-09 42" and 50" Plasma TV
# Button Description
8
RETURN
9 Simplink Press to open the Simplink menu, showing
10 VOL +/- Press to adjust the volume.
11 MUTE Press to mute the sound. Press again to
12 Number
buttons
13 - Press to view digital sub-channels. First
14
15
16
(Stop)
(Play)
(Fast
Reverse)
17 SLEEP Press to set the amount of time before
18 PICTURE Press to change the preset picture mode.
19 INPUT Press to cycle through the available source
20 AV MODE Press to cycle through the available preset
21 FAV Press to display your favorite channels list.
22
CH /
23 FLASHBK Press to return to the previous channel.
24 Press to record a DVD, VCR, or CD with
25
26
(Pause)
(Fast
Forward)
Press to return to the previous menu.
a list of AV devices connected to your TV.
restore the sound.
Press to enter channel numbers.
enter the main channel number, then press
this button, then enter the sub-channel
number.
Press to stop DVD, VCR, or CD playback
with Simplink.
Press to play a DVD, VCR, or CD with
Simplink.
Press to fast reverse a DVD, VCR, or CD
with Simplink.
your TV turns off.
inputs.
AV modes.
Press to change the channel.
Simplink.
Press to pause a DVD, VCR, or CD with
Simplink.
Press to fast forward a DVD, VCR, or CD
with Simplink.
Installing remote control batteries
Notes
• Do not mix batteries of different types.
• Do not mix old and new batteries.
• Remove batteries when the charge is depleted.
• Battery chemicals can cause a rash. If the
batteries leak, clean the battery compartment
with a cloth. If chemicals touch your skin, wash
immediately.
• If the remote control is not going to be used for
an extended period of time, remove the
batteries.
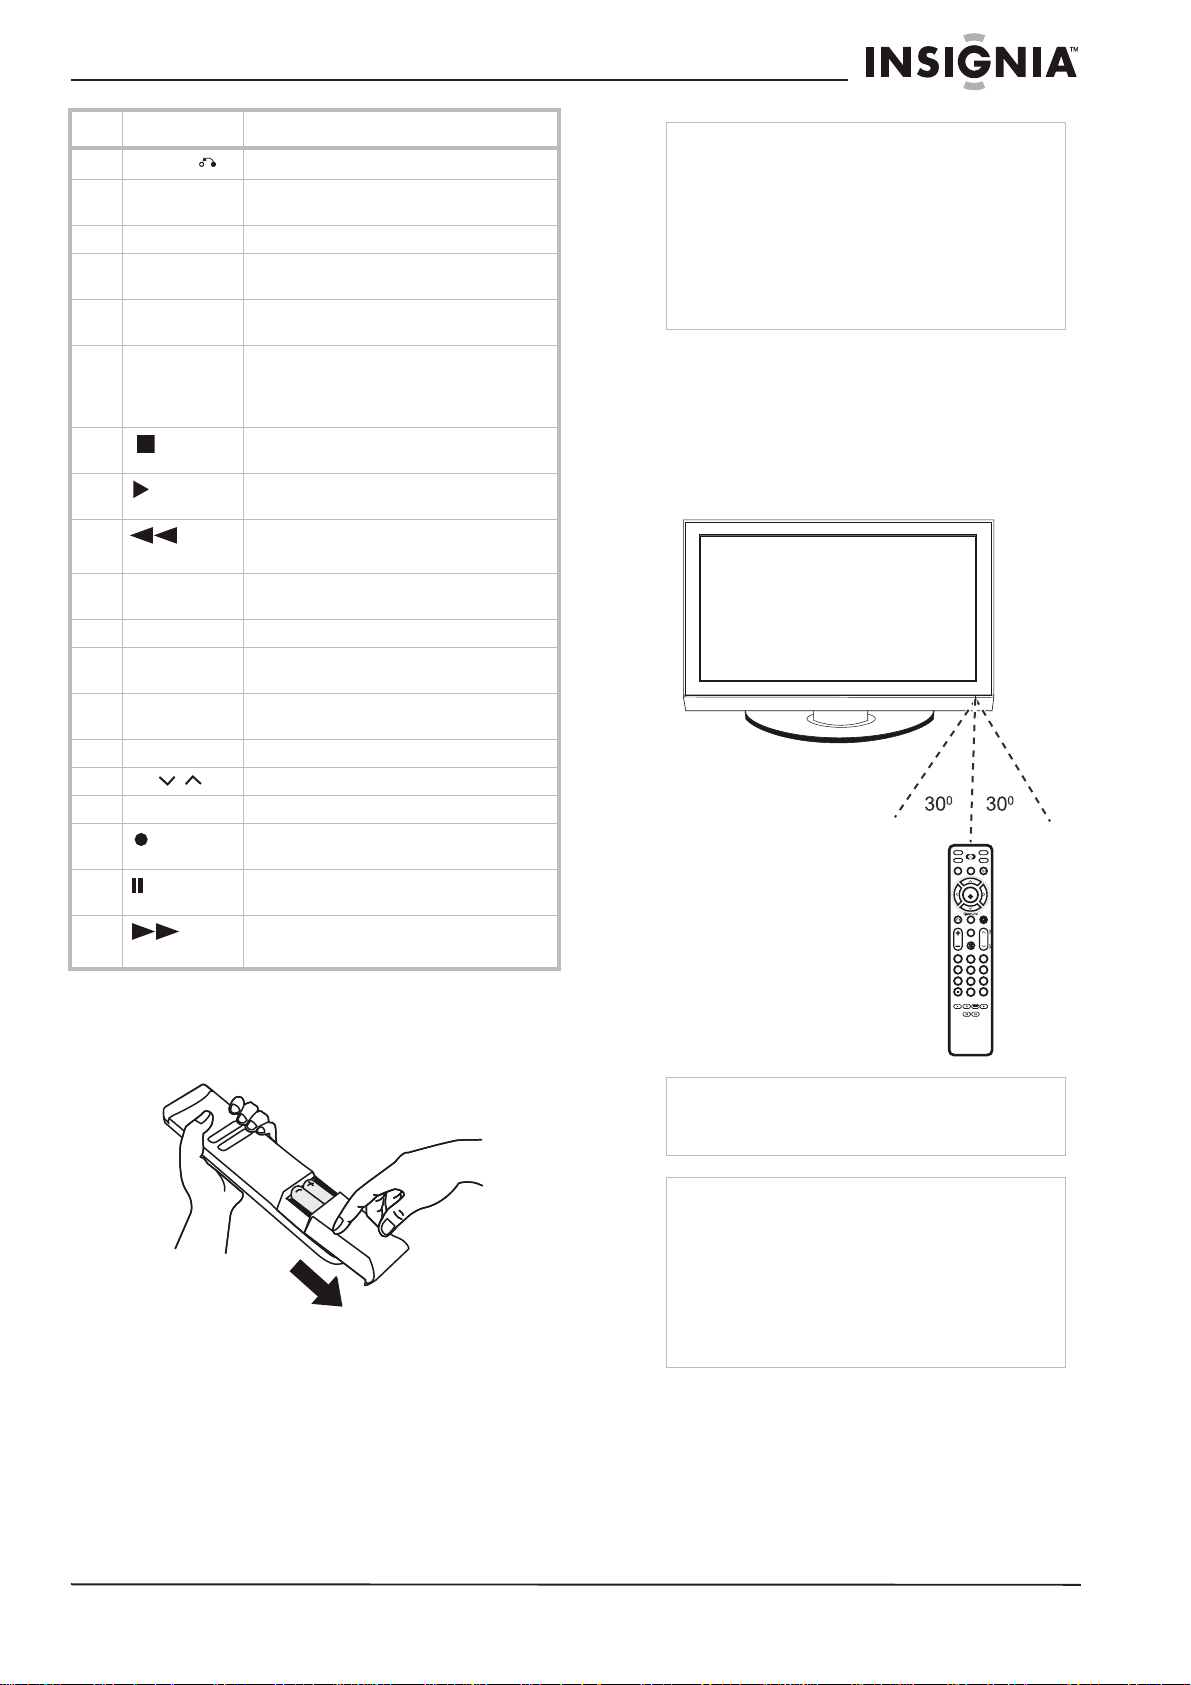
Using the remote control
To use the remote control:
• Point the remote control directly at your TV,
within a 60° angle horizontally (30° to either
side) and within 30° vertically of the remote
control sensor on the front of your TV, and
within 26.25 feet (8 m) of your TV.
POWER
RATIO
SOUND
Q. MENU MENU
ENTER
FAV
VOL
MUTE
123
456
7809
SLEEP
PICTURE
INPUT
AV MODERETURN
P
A
G
CH
E
FLASHBK
To install the remote control batteries:
1 Remove the battery cover.
2 Insert two 1.5 V AAA batteries into the
battery compartment. Make sure that you
match the + and – symbols on the batteries
with the + and – symbols in the battery
compartment.
3 Replace the cover.
www.insignia-products.com
Caution
Do not expose the remote control to liquids, direct
sunlight, or shock. Do not mix batteries of different
types.
Notes
• Objects between the remote control and the
remote control sensor may block the remote
control signal.
• The range of the remote control may be
diminished if direct sunlight or other strong light
is shining on the remote control sensor. In this
case, change the angle of the lighting, move
your TV, or operate the remote control closer to
the remote control sensor.
7
 Loading...