

LG NS9550W, CM9550, NS9550F/S Owner's Manual

www.lg.com
Please read this manual carefully before operating
your set and retain it for future reference.
CM9550 (CM9550, NS9550F/S, NS9550W)
OWNER’S MANUAL
MINI HI-FI
SYSTEM
Getting Started
2
Getting Started
1
Safety Information
CAUTION
RISK OF ELECTRIC SHOCK
DO NOT OPEN
CAUTION: TO REDUCE THE RISK OF ELECTRIC
SHOCK DO NOT REMOVE COVER (OR BACK) NO
USER-SERVICEABLE PARTS INSIDE REFER SERVICING
TO QUALIFIED SERVICE PERSONNEL.
This lightning ash with
arrowhead symbol within an
equilateral triangle is intended to
alert the user to the presence of
uninsulated dangerous voltage
within the product’s enclosure
that may be of sucient
magnitude to constitute a risk of
electric shock to persons.
The exclamation point within an
equilateral triangle is intended
to alert the user to the presence
of important operating and
maintenance (servicing)
instructions in the literature
accompanying the product.
WARNING: This product contains chemicals known
to the State of California to cause cancer and birth
defects or other reproductive harm. Wash hands
after handling.
WARNING: TO PREVENT FIRE OR ELECTRIC SHOCK
HAZARD, DO NOT EXPOSE THIS PRODUCT TO RAIN
OR MOISTURE.
WARNING: Do not install this equipment in a
conned space such as a book case or similar unit.
CAUTION: The apparatus should not be exposed to
water (dripping or splashing) and no objects lled
with liquids, such as vases, should be placed on the
apparatus.
CAUTION: This product employs a Laser System.
To ensure proper use of this product, please read
this owner’s manual carefully and retain it for future
reference. Shall the unit require maintenance,
contact an authorized service center.
Use of controls, adjustments or the performance of
procedures other than those specied herein may
result in hazardous radiation exposure.
To prevent direct exposure to laser beam, do not
try to open the enclosure.
CAUTION: Do not block any ventilation openings.
Install in accordance with the manufacturer’s
instructions.
Slots and openings in the cabinet are provided for
ventilation and to ensure reliable operation of the
product and to protect it from over heating. The
openings shall be never be blocked by placing the
product on a bed, sofa, rug or other similar surface.
This product should not be placed in a builtin installation such as a bookcase or rack unless
proper ventilation is provided or the manufacturer’s
instruction has been adhered to.

Getting Started
3
Getting Started
1
CAUTION concerning the Power Cord
Most appliances recommend they be placed upon
a dedicated circuit;
That is, a single outlet circuit which powers only
that appliance and has no additional outlets or
branch circuits. Check the specication page of this
owner’s manual to be certain. Do not overload wall
outlets. Overloaded wall outlets, loose or damaged
wall outlets, extension cords, frayed power cords, or
damaged or cracked wire insulation are dangerous.
Any of these conditions could result in electric
shock or re. Periodically examine the cord of your
appliance, and if its appearance indicates damage
or deterioration, unplug it, discontinue use of the
appliance, and have the cord replaced with an
exact replacement part by an authorized service
center. Protect the power cord from physical or
mechanical abuse, such as being twisted, kinked,
pinched, closed in a door, or walked upon. Pay
particular attention to plugs, wall outlets, and
the point where the cord exits the appliance. To
disconnect power from the mains, pull out the
mains cord plug. When installing the product,
ensure that the plug is easily accessible.
This device is equipped with a portable battery or
accumulator.
Safety way to remove the battery or the
battery from the equipment: Remove the
old battery or battery pack, follow the steps
in reverse order than the assembly. To prevent
contamination of the environment and bring on
possible threat to human and animal health, the
old battery or the battery put it in the appropriate
container at designated collection points. Do
not dispose of batteries or battery together with
other waste. It is recommended that you use
local, free reimbursement systems batteries and
accumulators. The battery shall not be exposed to
excessive heat such as sunshine, re or the like.
Grounding
(Except for devices which are not grounded.)
Ensure that you connect the earth ground wire
to prevent possible electric shock (i.e. a Audio
with a three-prong grounded AC plug must be
connected to a three-prong grounded AC outlet).
If grounding methods are not possible, have a
qualied electrician install a separate circuit breaker.
Do not try to ground the unit by connecting it to
telephone wires, lightening rods, or gas pipes.

Getting Started
4
Getting Started
1
IMPORTANT SAFETY
INSTRUCTIONS
1. Read these instructions.
2. Keep these instructions.
3. Heed all warnings.
4. Follow all instructions.
5. Do not use this apparatus near water.
6. Clean only with dry cloth.
7. Do not block any ventilation openings.
Install in accordance with the manufacturer’s
instructions.
8. Do not install near any heat sources such
as radiators, heat registers, stoves, or other
apparatus (including amplifiers) that produce
heat.
9. Do not defeat the safety purpose of the
polarized or grounding-type plug. A polarized
plug has two blades with one wider than the
other. A grounding type plug has two blades
and a third grounding prong. The wide blade or
the third prong are provided for your safety. If
the provided plug does not fit into your outlet,
consult an electrician for replacement of the
obsolete outlet.
10. Protect the power cord from being walked on
or pinched particularly at plugs, convenience
receptacles, and the point where they exit from
the apparatus.
11. Only use attachments/accessories specified by
the manufacturer.
12. Use only with the cart, stand, tripod, bracket, or
table specified by the manufacturer, or sold with
the apparatus. When a cart is used, use caution
when moving the cart/apparatus combination
to avoid injury from tip-over.
13. Unplug this apparatus during lightning storms
or when unused for long periods of time.
14. Refer all servicing to qualified service personnel.
Servicing is required when the apparatus has
been damaged in any way, such as powersupply cord or plug is damaged, liquid has been
spilled or objects have fallen into the apparatus,
the apparatus has been exposed to rain or
moisture, does not operate normally, or has
been dropped.

Getting Started
5
Getting Started
1
FCC Compliance Statement
This device complies with part 15 of the FCC
rules. Operation is subject to the following two
conditions:
(1) This device may not cause harmful interference,
and
(2) This device must accept any interference
received, including interference that may cause
undesired operation.
NOTE: This equipment has been tested and found
to comply with the limits for a Class B digital device,
pursuant to Part 15 of the FCC Rules. These limits are
designed to provide reasonable protection against
harmful interference in a residential installation. This
equipment generates, uses, and can radiate radio
frequency energy and, if not installed and used
in accordance with the instructions, may cause
harmful interference to radio communications.
However, there is no guarantee that interference
will not occur in a particular installation.
If this equipment does cause harmful interference
to radio or television reception, which can be
determined by turning the equipment o and
on, the user is encouraged to try to correct the
interference by one or more of the following
measures:
yReorient or relocate the receiving antenna.
yIncrease the separation between the equipment
and receiver.
yConnect the equipment into an outlet on a
circuit dierent from that to which the receiver is
connected.
yConsult the dealer or an experienced radio/TV
technician for help.
CAUTION : Any changes or modications not
expressly approved by the party responsible for
compliance could void the user’s authority to
operate this equipment.
FCC WARNING: This equipment may generate
or use radio frequency energy. changes or
modications to this equipment may cause harmful
interference unless the modications are expressly
approved in the instruction manual. The user could
lose the authority to operate this equipment if an
unauthorized change or modication is made.
FCC RF Radiation Exposure Statement : This
equipment complies with FCC radiation exposure
limits set forth for an uncontrolled environment.
This equipment should be installed and operated
with minimum distance 20 cm between the
radiator and your body. End users must follow the
specic operating instructions for satisfying RF
exposure compliance. This transmitter must not be
co-located or operating in conjunction with any
other antenna or transmitter.
CAUTION: Regulations of the FCC and FAA prohibit
airborne operation of radio-frequency wireless
devices because their signals could interfere with
critical aircraft instruments.
Responsible Party :
LG Electronics USA, Inc. 1000 Sylvan Avenue
Englewood Clis, NJ 07632
TEL. : +1-800-243-0000

Table of Contents
6
Table of Contents
1 Getting Started
2 Safety Information
8 Unique Features
8 Accessories
9 Playable file Requirement
9 – Music file requirement
9 – Compatible USB Devices
9 – USB device requirement
10 Remote control
12 Front panel
14 Rear panel
2 Connecting
15 How to Affix the Ferrite Core
15 – Affix the Ferrite Core for power cord
and speaker cables
15 Connecting to speakers
15 – Attaching the speaker light cables to
the unit
16 – Stacking the speakers
17 Optional Equipment Connection
17 – AUX IN Connection
17 – PORT. IN Connection
18 – USB Connection
18 – Antenna Connection
3 Operating
19 Basic Operations
19 – CD/USB Operations
20 – Selecting a folder and
an MP3/WMA file
21 – Deleting an MP3/WMA file
21 Playback effect
21 – DJ EFFECT
21 – SCRATCH Effect
22 – AUTO DJ
23 Using Bluetooth® wireless technology
23 – Listening to music stored on the
Bluetooth devices
25 – Pairing your unit and Bluetooth device
through NFC Tag
26 Using the Music Flow Bluetooth App
26 – Install “Music Flow Bluetooth” App
onto Your Bluetooth Device
27 – Activate Bluetooth with “Music Flow
Bluetooth” App
28 Radio Operations
28 – Listening to the radio
28 – Improving poor FM reception
28 – Presetting the Radio Stations
28 – Deleting all the saved stations
29 Sound adjustment
29 – Setting the sound mode
29 – Setting the USER EQ
30 Advanced Operations
30 – Recording to USB
32 – JUKE BOX Playback

Table of Contents
7
1
2
3
4
5
33 Other Operations
33 – Turn off the sound temporarily
33 – CHILDSAFE Mode
33 – Displaying file information
(ID3 TAG)
33 – DEMO
34 – Using Microphone
34 – Switching on and off the BEAT
LIGHTING
34 – Using X-FLASH
35 Setting the Clock
35 – Setting the Clock through “Music
Flow Bluetooth” App
35 – Using your player as an alarm clock
35 – Sleep Timer Setting
35 – Dimmer
36 Auto power down
36 – AUTO POWER On
36 – Auto function change
37 LG Sound Sync
4 Troubleshooting
38 Troubleshooting
38 – General
5 Appendix
40 General specifications
41 Speakers specifications
41 Trademarks and Licenses
42 Maintenance
42 – Notes on Discs
42 – Handling the Unit

Getting Started
8
Getting Started
1
Unique Features
Bluetooth®
Listens to music stored on your bluetooth device.
Portable In
Listens to music from your portable device. (MP3,
Notebook, etc.)
Playback effects
Listens to music with various sound and playback
eects.
USB Direct Recording
Records music to your USB device.
Music Flow Bluetooth
Music Flow Bluetooth is an App designed to let you
take control of some of LG’s latest Audio devices.
Refer to page 26.
LG Sound Sync
Controls volume level of this unit by the remote
control of your LG TV that is compatible with LG
Sound Sync.
Accessories
Please check and identify the supplied accessories.
FM Antenna (1) Batteries (2)
Remote Control (1) Rubber foot (8)

Getting Started
9
Getting Started
1
Playable file
Requirement
Music file requirement
MP3/WMA le compatibility with this unit is limited
as follows.
ySampling frequency : within 32 to 48 kHz (MP3),
within 32 to 48 kHz (WMA)
yBit rate : within 32 to 320 kbps (MP3),
40 to 192 kbps (WMA)
yMaximum les : Data CD : 999 / USB : 2000
yMaximum folders : Data CD : 99 / USB : 200
yFile ex tensions : “.mp3”/ “.wma”
yCertain MP3/WMA les may not be played
depending on the type or format of the le.
yCD-ROM le format : ISO 9660/ JOLIET
yWe recommend that you use Easy-CD Creator,
which creates an ISO 9660 le system.
The DTS is not supported. In case of DTS audio
format, audio is not output.
You have to set the disc format option to [Mastered]
in order to make the discs compatible with the LG
players when formatting rewritable discs. When
setting the option to Live File System, you cannot
use it on LG players.
(Mastered/Live File System : Disc format system for
Windows Vista)
Compatible USB Devices
yMP3 Player : Flash type MP3 player.
yUSB Flash Drive :
Devices that support USB2.0 or USB1.1.
yThe USB function of this unit does not support
all USB devices.
USB device requirement
yDevices which require additional program
installation when you have connected it to a
computer, are not supported.
yDo not extract the USB device while in operation.
yFor a large capacity USB, it may take longer than
a few minute to be searched.
yTo prevent data loss, back up all data.
yIf you use a USB extension cable or USB hub, the
USB device is not recognized.
yUsing NTFS le system is not supported. (Only
FAT(16/ 32) le system is supported.)
yThis unit recognizes up to 2000 les.
yExternal HDD, Card readers, Locked devices, or
hard type USB devices are not supported.
yUSB port of the unit cannot be connected to PC.
The unit cannot be used as a storage device.
ySome USB may not work with this unit.
Getting Started
10
Getting Started
1
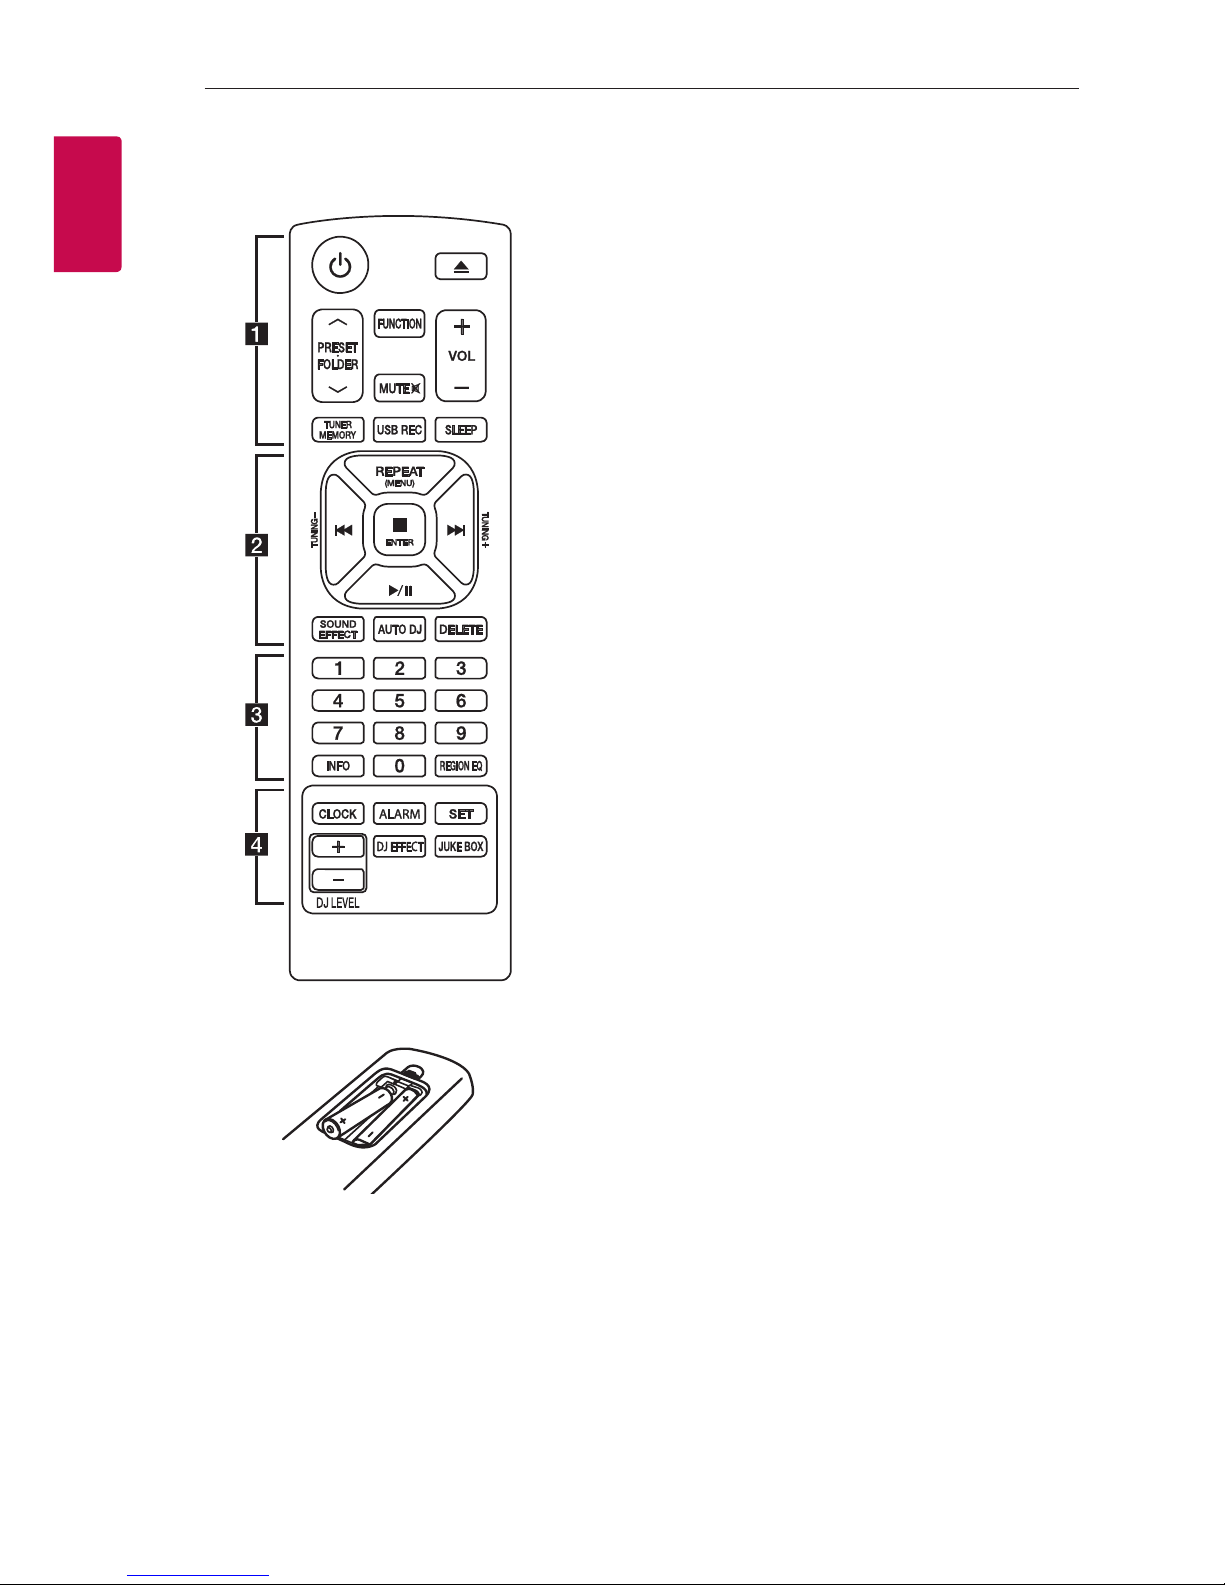
Remote control
Battery Installation
Remove the battery cover on the rear of the
Remote Control, and insert two (size AAA) batteries
with 4 and 5 matched correctly.
• • • • • • • • • • a • • • • • • • • •
1
(Power) : Switches the unit ON or OFF.
B
(Open/Close) : Opens and closes the disc tray.
PRESETFOLDER W/S :
-Searches for a folder of MP3/WMA les. When
a CD/USB containing MP3/WMA les in several
folders is being played, press PRESETFOLDER
W/S
to select the folder you want to play.
-Chooses a preset number for a radio station.
FUNCTION : Selects the function and input source.
MUTE @ : Mutes the sound.
VOL +/- : Adjusts speaker volume.
TUNER MEMORY :
-Stores radio stations.
-Deletes all the saved stations.
USB REC : USB direct recording.
SLEEP : Sets the system to turn off automatically at
a specified time.
(Dimmer : The display window will be darkened by
half.)

Getting Started
11
Getting Started
1
• • • • • • • • • • b • • • • • • • • •
REPEAT (MENU) : Listens to your tracks/les
repeatedly or randomly.
TUNING-/+ : Selects the radio stations.
C/V
(Skip/Search) :
-Skips Fast backward or Forward.
-Searches for a section within a track/le.
Z
ENTER :
-Stops playback or recording.
-Cancels DELETE function.
d/M
(Play/Pause) :
-Starts or pauses playback.
-Selects STEREO/MONO.
SOUND EFFECT : Chooses sound impressions.
AUTO DJ : Selects the AUTO DJ mode. (For more
information refer to page 22)
DELETE :
-Deletes MP3/WMA les. (USB only).
-Deletes a song on the JUKE BOX list.
• • • • • • • • • • c • • • • • • • • •
0 to 9 numerical buttons : Selects numbered tracks,
les, or preset number.
INFO
-Sees informations about your music. An MP3 le
often come with ID3 tag. The tag gives the Title,
Artist, Album or Time information.
-Sees the address of connected Bluetooth device
in Bluetooth mode.
REGION EQ : Chooses region equalizer.
• • • • • • • • • • d • • • • • • • • •
CLOCK : Sets a clock and checks a time.
ALARM : With the ALARM function you can turn
CD, USB play and Tuner reception on at a desired
time.
SET : Conrms the setting.
DJ EFFECT : Selects DJ EFFECT mode. (Refer to
page 21)
JUKE BOX :
-Selects JUKE BOX mode.
-Makes your favorites list.
DJ LEVEL +/- : Adjusts the level of DJ EFFECT
sound.

Getting Started
12
Getting Started
1
Front panel
BLUETOOTH
FUNCTION
BEAT LIGHTING
/ DEMO
I
Y U
z
SCRATCH
USB REC
MASTER VOLUME
ENTER DELETE
FILE SEARCH
BASS BLASTLATIN EQAUTO DJX-FLASH
MIC VOL.MIC.PORT.IN
USER EQ
USER EQ LEVEL
DJ EFFECT
DJ EFFECT CONTROL
FOLDER
JUKE
BOX
B
R

Getting Started
13
Getting Started
1
a 1/!
(Power)
b
Display window
c
FUNCTION
Selects the function and input source.
BLUETOOTH
Turns to BLUETOOTH function.
d
SCRATCH
Turn clockwise or counterclockwise to make
Scratch sound.
e I
(Stop)
Stops playback or cancels DELETE function.
f
DJ EFFECT
Selects DJ EFFECT mode. (For more informaion
refer to page 21).
g
DJ EFFECT CONTROL
Adjust the DJ EFFECT level.
h Y
(Skip/Search)
- Searches backward.
- Skips to the previous track/file.
i
BEAT LIGHTING / DEMO
- Turn on/off the lighting effects.
- Shows Demo mode
(BEAT LIGHTING : The red LED lights up of
Speaker.)
j
X-FLASH
- Selects a X-FLASH mode.
- Selects a X-FLASH level. (Refer to page 34.)
(X-FLASH : The white LED lights up of the
speakers.)
AUTO DJ
Selects the AUTO DJ mode. (For more
informaion refer to page 22).
k
PORT. IN jack
MIC. jack
MIC VOL.
l
You can easily connect to Bluetooth devices
through NFC Tag. (Refer to page 25)
m
FOLDER
Moves to folder and file in selection mode.
JUKE BOX
- Makes your favorites list.
- Switches on and off JUKE BOX.
n
USB 1/2 Port
You can play or record sound les by
connecting the USB device.
USB REC
Records to USB.
o
MASTER VOLUME
Adjusts speaker volume.
p
ENTER
Selects a folder when searching a file.
DELETE
- Deletes a song on the JUKE BOX list.
- Deletes MP3/WMA files. (USB only).
q
FILE SEARCH
Searches a folder and a file on CD/USB function.
r T
- Starts or pauses playback.
- Selects Stereo/Mono.
s
USER EQ
Controls sound register.
t
USER EQ LEVEL
Adjusts BASS, MIDDLE, TREBLE sound level when
setting USER EQ.
u U
(Skip/Search)
- Searches forward.
- Skip to the next track/file.
v B
Opens and closes the disc tray.
w
LATIN EQ
Chooses locally special equalizer.
BASS BLAST
Selects BASS BLAST or STANDARD effect directly.
x
Disc tray
 Loading...