

Page 1

http://au.lge.com(AUSTRALIA)
http://nz.lge.com(NEW ZEALAND)
MICROWAVE OVEN
OWNER'S MANUAL & COOKING GUIDE
MODEL : MS3448GRK
PLEASE READ THIS OWNER’S MANUAL
THOROUGHLY BEFORE OPERATING.
MS3448XRK
Page 2

PRECAUTIONS
Precautions to avoid possible exposure to excessive microwave energy.
You cannot operate your oven with the door open due to the safety interlocks built into the door
mechanism. These safety interlocks automatically switch off any cooking activity when the door is opened;
which in the case of a microwave oven could result in harmful exposure to microwave energy.
It is important not to tamper with the safety interlocks.
Do not place any object between the oven front face and the door or allow food or cleaner residue to
accumulate on sealing surfaces.
Do not operate your oven if it is damaged. It is particularly important that the oven door closes properly and
that there is no damage to the: (1) door(bent), (2) hinges and latches (broken or loosened), (3) door seals
and sealing surfaces.
Your oven should not be adjusted or repaired by anyone except qualified service personnel.
Warning
Please ensure cooking times are correctly set as over cooking may result in the FOOD catching
fire and subsequent damage to your oven.
When heating liquids, e.g. soups, sauces and beverages in your microwave oven, overheating the liquid
beyond boiling point can occur without evidence of bubbling. This could result in a sudden boil over of the
hot liquid. To prevent this possibility the following steps should be taken:
1. Avoid using straight sided containers with narrow necks.
2. Do not overheat.
3. Stir the liquid before placing the container in the oven and again halfway through the heating time.
4. After heating, allow to stand in the oven for a short time, stir or shake them again carefully and check the
temperature of them before consumption to avoid burns (especially, contents of feeding bottles and baby
food jars).
Warning
Always allow food to stand after being cooked by microwaves and check the temperature of
them before consumption. Especially contents of feeding bottles and baby food jars.
How the Microwave Oven Works
Microwaves are a form of energy similar to radio and television waves and ordinary daylight. Normally,
microwaves spread outwards as they travel through the atmosphere and disappear without effect.
Microwave ovens, however, have a magnetron which is designed to make use of the energy in microwaves.
Electricity, supplied to the magnetron tube, is used to created microwave energy.
These microwaves enter the cooking area through openings inside the oven. A turntable or tray is located
at the bottom of the oven. Microwaves cannot pass through metal walls of the oven, but they can penetrate
such materials as glass, porcelain and paper, the materials out of which microwave-safe cooking dishes are
constructed.
Microwaves do not heat cookware, though cooking vessels will eventually get hot from the heat generated
by the food.
A very safe appliance
Your microwave oven is one of the safest of all home appliances. When the door is opened, the
oven automatically stops producing microwaves. Microwave energy is converted completely to
heat when it enters food, leaving no “left over” energy to harm you when you eat your food.
2
Page 3

CONTENTS
PRECAUTIONS 2
CONTENTS 3
UNPACKING & INSTALLING 4
FEATURE DIAGRAM 6
CONTROL PANEL 6
OPERATING INSTRUCTIONS 7
SETTING CLOCK 7
MORE/LESS 7
TIMED COOKING 8
MICROWAVE POWER LEVELS 8
CHILD LOCK 9
SENSOR COOK OPERATION INSTRUCTION 9
SENSOR COOK 9
SENSOR COOK MENU INSTRUCTIONS 10
SENSOR REHEAT 13
SENSOR REHEAT MENU INSTRUCTIONS 13
AUTO COOK 14
AUTO COOK MENU INSTRUCTIONS 15
AUTO REHEAT 18
AUTO REHEAT MENU INSTRUCTIONS 18
QUICK DEFROST 19
QUICK DEFROST MENU INSTRUCTIONS
KEEP MOISTURE
KEEP MOISTURE MENU INSTRUCTIONS
AUTO DEFROST 22
QUICK START 22
AUTO DEFROST MENU INSTRUCTIONS 23
COOKING TIPS 25
MICROWAVE-SAFE UTENSILS 29
FOOD CHARACTERISTICS & MICROWAVE COOKING 30
19
20
20
SAFETY PRECAUTIONS 32
QUESTION & ANSWERS 33
PLUG WIRING INFORMATION/TECHNICAL SPECIFICATIONS 34
MANUFACTURER’S WARRANTY 35
3
Page 4
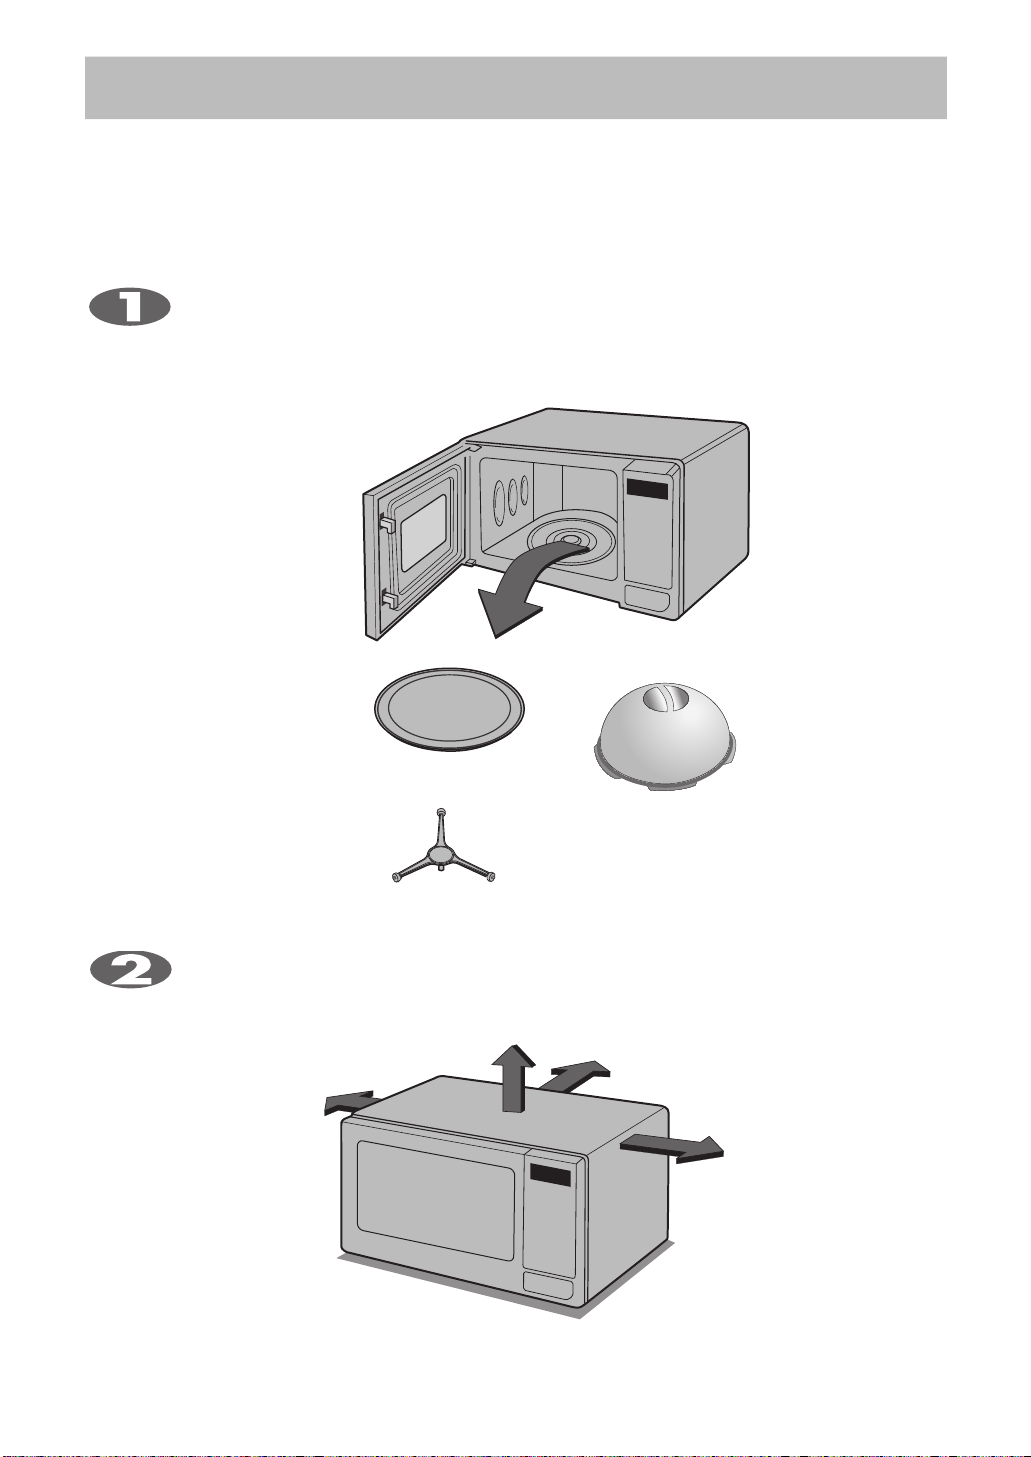
UNPACKING & INSTALLING
By following the basic steps on these two pages you will be able to quickly check that your oven
is operating correctly. Please pay particular attention to the guidance on where to install your
oven. When unpacking your oven make sure you remove all accessories and packing.
Check to make sure that your oven has not been damaged during delivery.
Unpack your oven and place it on a flat level surface.
GLASS TRAY
KEEP MOISTURE
ROTATING RING
Place your oven on a flat, level surface but make sure there is at least 10 cm of space on the
top, rear and sides so there is air flow for ventilation. Exhaust outlets are located in the back and
side of your oven. Blocking the outlets can damage your oven. THIS OVEN IS DESIGNED FOR AN
INDIVIDUAUL BUILT IN APPLICATION. IT SHOULD NOT BE PART OF A WALL OVEN ENCLOSURE
WITHOUT SEPERATION.
THIS OVEN SHOULD NOT BE USED FOR COMMERCIAL
CATERING PURPOSES
4
Page 5
5
UNPACKING & INSTALLING
Open your oven door by pressing the DOOR OPEN button.
Place the ROTATING RING inside the oven and
place the GLASS TRAY on top.
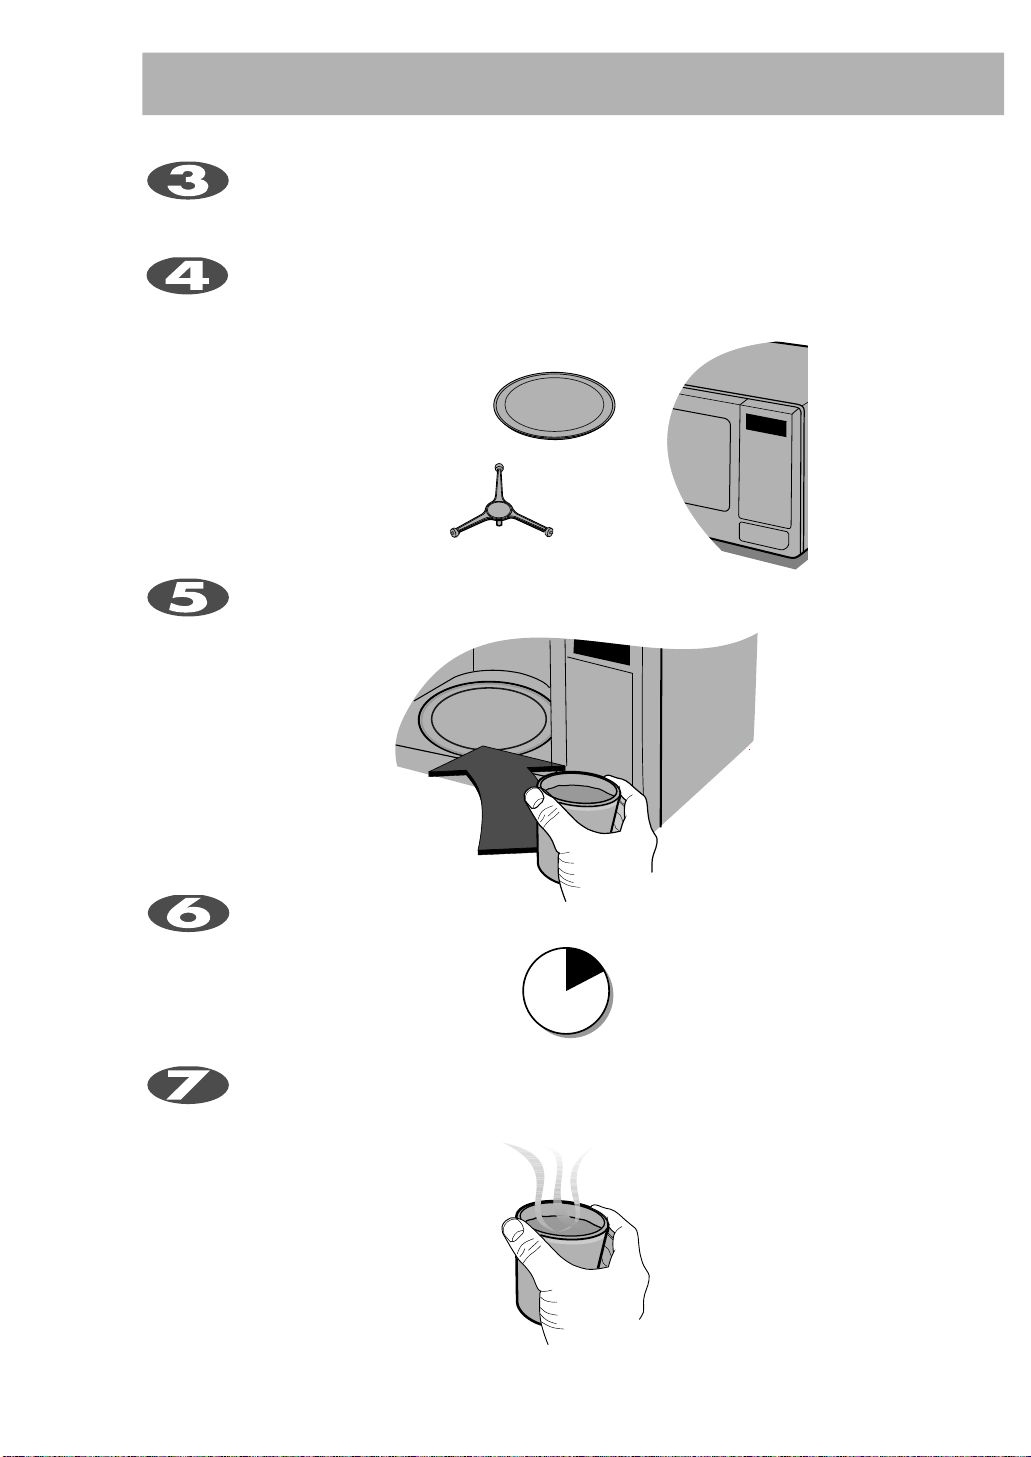
Plug your oven into a standard household socket. Make sure your oven is the only appliance
connected to the socket. If your oven does not operate properly, unplug it from the
electrical socket and then plug it back in.
The DISPLAY will count down from 30 seconds. When it reaches 0 it will sound three BEEPS.
Open the oven door and test the temperat
ure of the water. If your oven is operating the water
should be HOT. Be careful when removing the container it may be hot.
YOUR OVEN IS NOW INSTALLED
Fill a microwave safe container with 300 ml (1/2 pint) of water. Place on the GLASS TRAY
and close the oven door. If you have any d
oubts about what type of container to use please
refer to page 27.
Enter the time by touching [3] and [0].
And touch START.
automatically.
30
SECONDS
Page 6
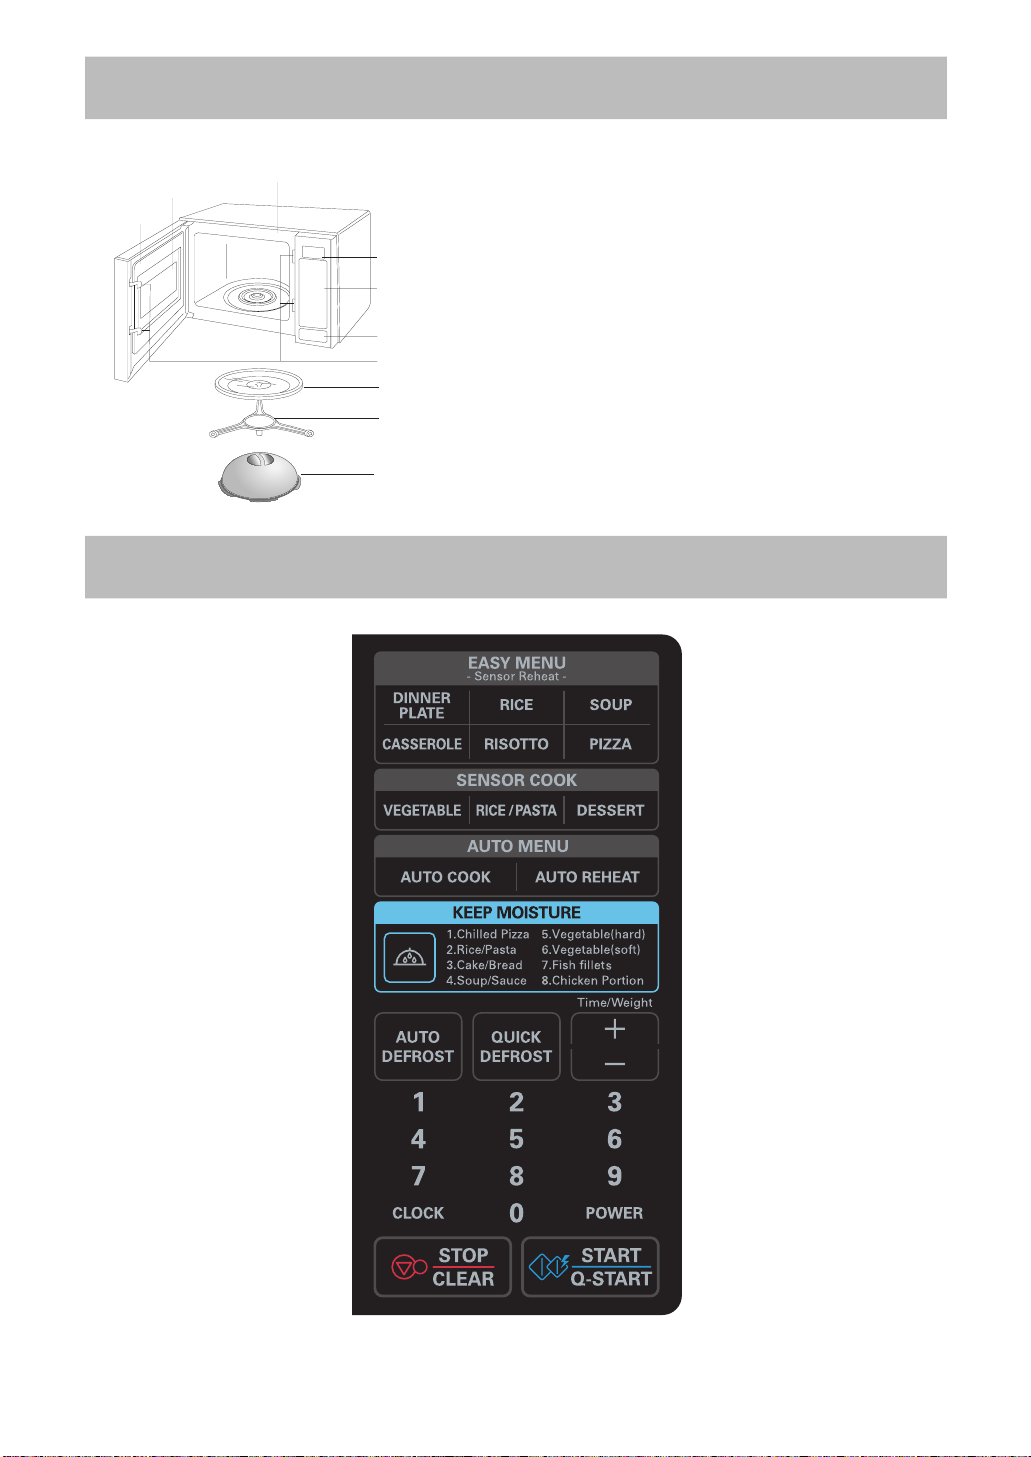
FEATURE DIAGRAM
Window Door Screen
Door Seal
Oven Front Plate
Remove your Microwave Oven and all
material from the shipping carton.
Your oven will be packed with the
following materials:
Display Window
Control Panel
Glass Turntable .........................1 each
Owner's Manual &
Cooking Guid
Door Open Button
Safety Door Lock System
Glass Turntable
Rotating Ring
Rotating Rin
Keep Moisture.............................1 each
This microwave oven is designed
for household use only. It is not
recommended for commercial
Keep Moisture
purposes.
CONTROL PANEL
e...........................1 each
g.............................1 each
NOTE: A beep sounds when a pad on the control panel
is touched to indicate setting has been entered.
6
Page 7
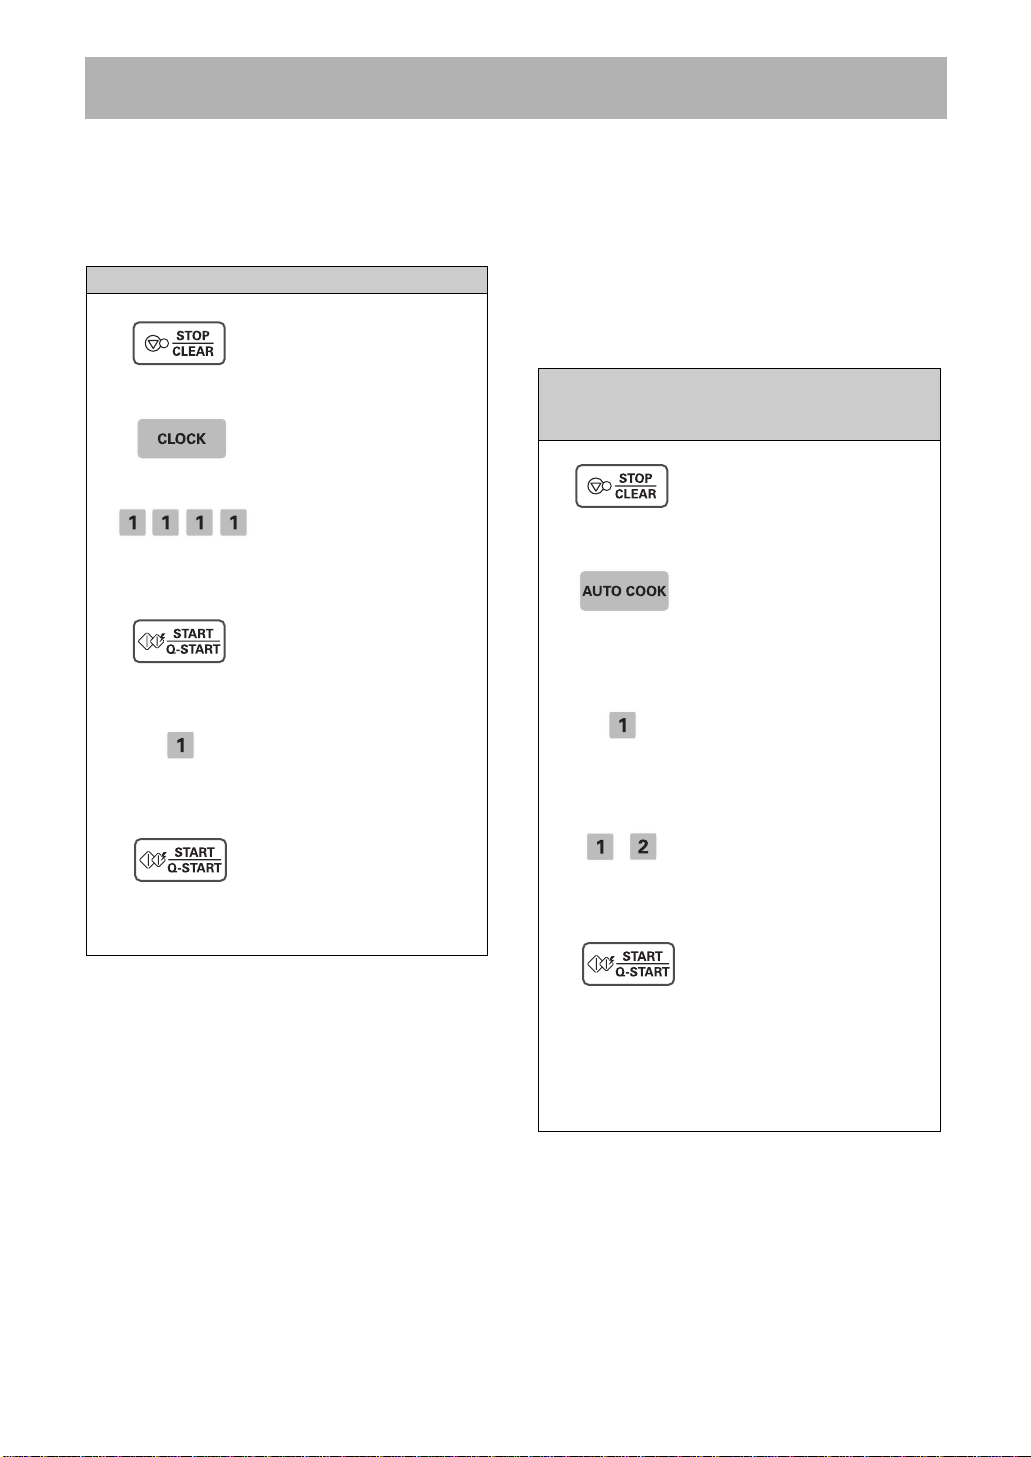
OPERATING INSTRUCTIONS
1. Touch STOP/CLEAR.
2. Touch AUTO COOK.
SELECT MENU 1 TO 8
--SEE COOKING
GUIDE
scrolls in the display.
➠ ➠➠
➠
3. Touch 1.
CORNED BEEF
ENTER WEIGHT scrolls
in the display.
4. Touch [1], [2].
1.2 kg TOUCH START
scrolls in the display.
5. Touch START.
NOTE: Press the or pad
during time countdown.
Example:To set 11:11 AM.
NOTE :
You can select AM or PM by touching 1 OR 2.
TOUCH 2
3. Enter the time by using
the number key pads.
11:11 TOUCH START
will scrolls in the display.
AM TOUCH 1 ,PM
1. Touch STOP/CLEAR.
2. Touch CLOCK one time.
ENTER TIME OF
DAY will scrolls in the
display.
will scrolls in
the display.
4. Touch START.
➠
➠
➠
➠
5. Touch 1.TOUCH START
will scrolls in the display.
6. Touch START.
(AM:”11:11”)
("11:11")
➠
The clock starts
counting.
-
+
( )
( )
SETTING CLOCK
When your oven is plugged in for the first time or
when power resumes after a power interruption,
the numbers in the display reset to ":".
MORE/LESS
By using the or keys,
AUTO COOK, AUTO REHEAT,
program can be
or shorter time Pressing
to the cooking time each time you press it. Pressing
( )
will subtract 10 seconds of cooking time each
-
time you press it.The max time could be 99min99sec.
To adjust the autocook (ex. Corned Beef
1.2 kg) cooking time for a longer time,
( ) ( )
+
-
adjusted to cook food for a longer.
or for a shorter time
KEEP MOISTURE
TIMED COOK
( )
will add 10 seconds
+
7
Page 8
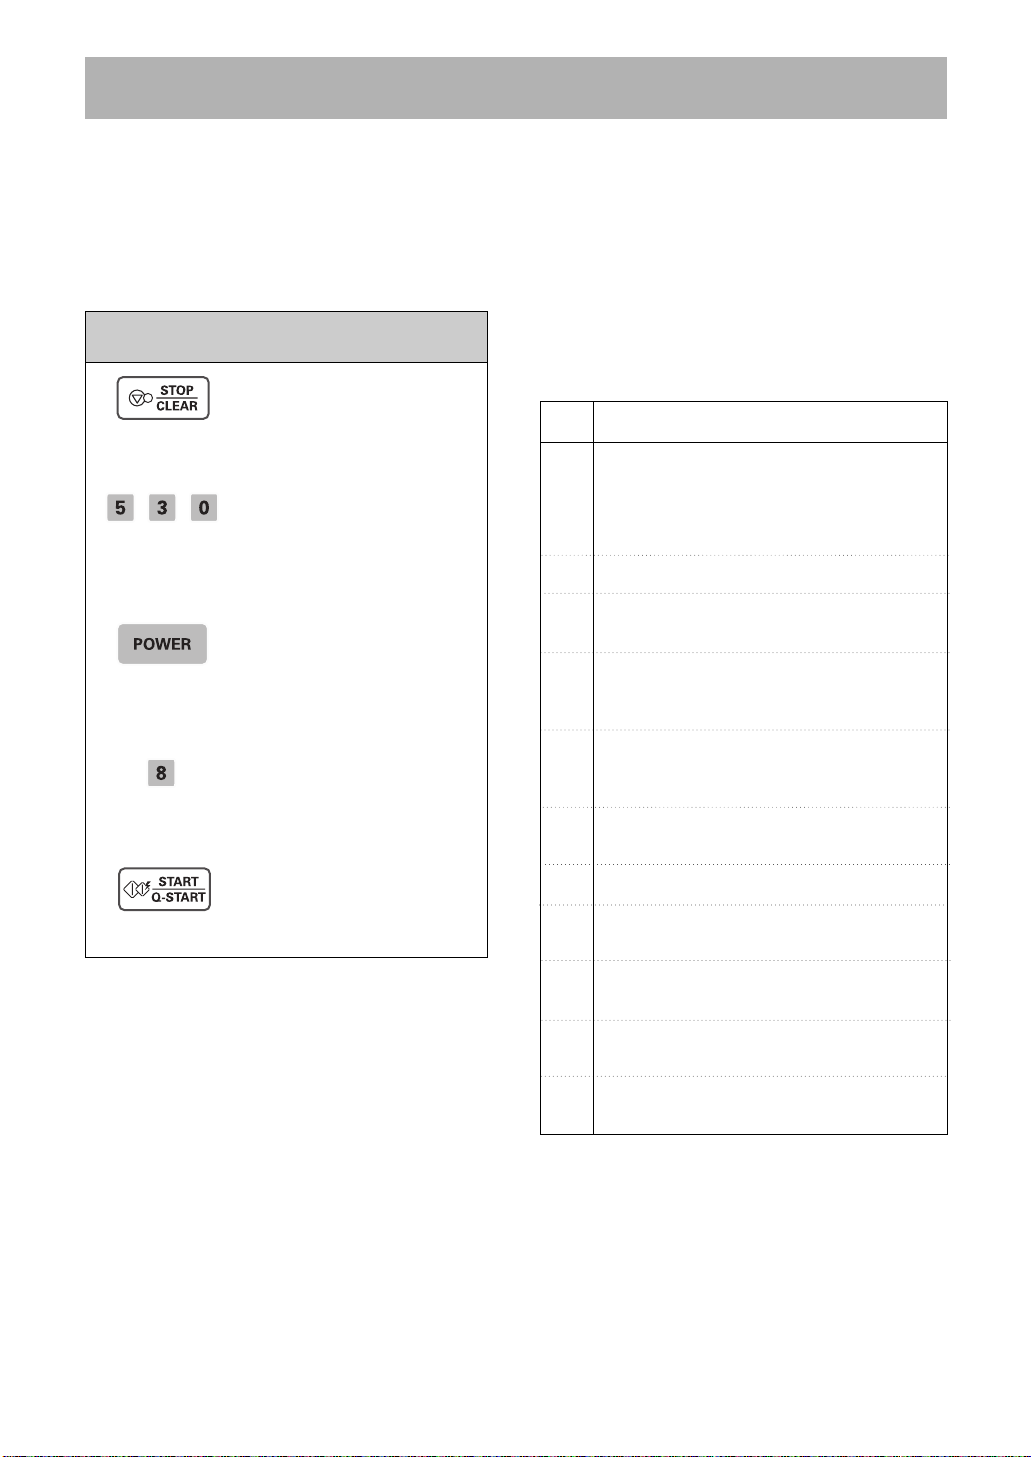
OPERATING INSTRUCTIONS (CONT’D)
1. Touch STOP/CLEAR.
2. Enter 5 minutes
30 seconds by touching
[5], [3],and [0].
5 : 30 TOUCH START OR
POWER scrolls in
the display.
3. Touch POWER.
ENTER POWER
LEVEL 1 TO 10 scrolls in
the display.
4. Touch 8.
To select power level 80%.
Display scrolls POWER 80
TOUCH START.
5. Touch START.
➠➠ ➠ ➠
100%
( )
TIMED COOKING
This function allows you to cook food for a desired
time. And in order to give you the best results,
there are 10 power level settings in addition to
HI-POWER because many food need slower
cooking (at less than HI-POWER).
Example:To cook food on 80% Power
(Power8) for 5 minutes 30 seconds.
MICROW AVE POWER LEVELS
Your microwave oven is equipped with eleven
power levels to give you maximum flexibility and
control over cooking. The table below will give you
some idea of which foods are prepared at each of
the various power levels.
* The chart below shows the power level settings
for your oven.
MICROWAVE POWER LEVEL CHART
Power
Level
* Boiling water.
* Browning ground beef.
High
* Making candy.
*
Cooking poultry pieces, fish, & vegetables.
* Cooking tender cuts of meat.
* Reheating rice, pasta, & vegetables.
9
* Reheating prepared foods quickly.
8
* Reheating sandwiches.
* Cooking egg, milk and cheese dishes.
7
* Cooking cakes, breads.
* Melting chocolate.
* Cooking veal.
* Cooking whole fish.
6
* Cooking puddings and custard.
* Cooking ham, whole poultry, lamb.
5
* Cooking rib roast, sirloin tip.
Use
When the cooking time is over, two short and one
long tone sounds. The word COOK END shows in
the display window. Then the oven shuts itself off.
NOTE :
If you do not select the power level, the oven will
operate at power HIGH. To set HI-POWER
cooking, skip steps 3 & 4 above.
8
* Thawing meat, poultry and seafood.
4
* Cooking less tender cuts of meat.
3
* Cooking pork chops, roast.
* Taking chill out of fruit.
2
* Softening butter.
*
Keeping casseroles and main dishes warm.
1
* Softening butter and cream cheese.
* Standing time.
0
* Independent timer.
Page 9
OPERATING INSTRUCTIONS (CONT’D)
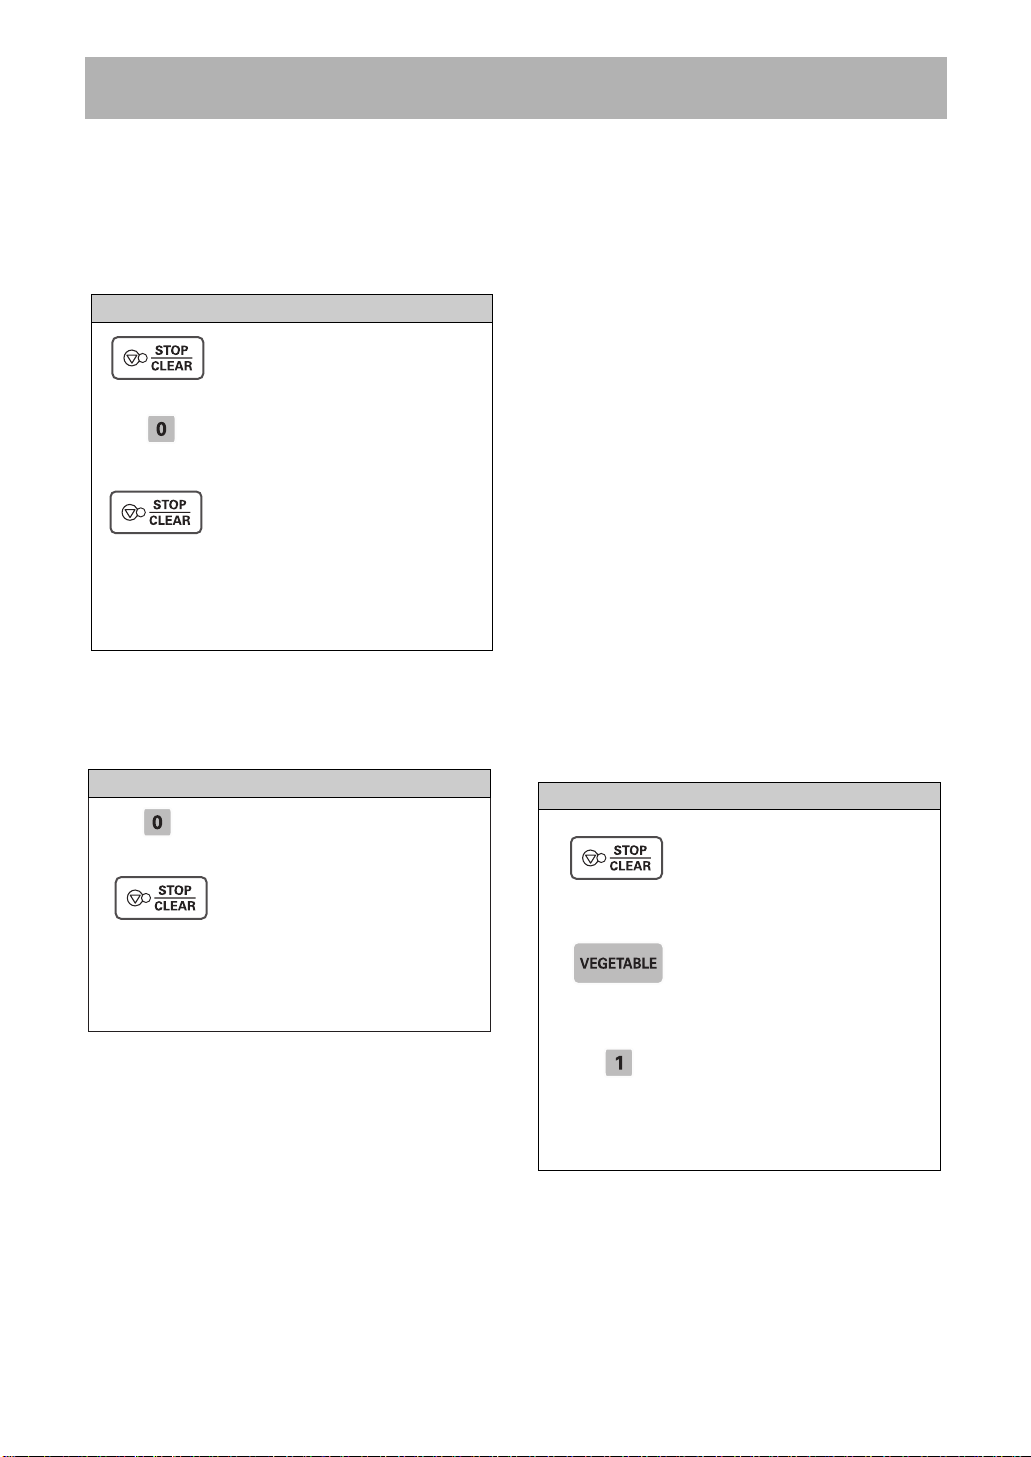
Touch and hold 0 ,or
disappears in the display.
1. Touch STOP/CLEAR.
2. Touch and hold 0,or
STOP/CLEAR
appears in the display
and two beeps are heard.
If the time of day was
already set, the time of
day will return to the
display window. After you
touch another cooking
pad.
or
➠
until
LOCKED
or
STOP/CLEAR
until LOCKED
CHILD LOCK
This is a unique safety feature that prevents
unwanted oven operation such as used by
children. Once the CHILD LOCK is set, no
cooking can take place.
To set the child lock
If the CHILD LOCK was already set and you
touched another cooking pad, the word LOCKED
shows in the display. Then you can cancel the
CHILD LOCK according to below procedure.
To cancel the child lock
Categories:
Sensor Reheat
Sensor Cook
For most Sensor Cooking programs, a chart with
specific food examples and cooking instructions is
provided in the next new pages.
1. The Sensor Cook system works by detecting a
build-up of vapor.
2. Make sure the door remains closed.
3. Once the vapor is detected, two beeps will
sound.
4. Opening the door or touching the STOP/CLEAR
pad before the vapor is detected will abort the
process. The oven will stop.
5. Before using Sensor Touch, make sure the
glass turntable is dry, to assure the best results.
SENSOR COOK
COOK allows you to cook most of your favorite
foods without having to select cooking times and
power levels. This oven automatically determines
required cooking times for each food item. This
feature has 15 food categories.
To cook VEGETABLES/JACKET POTATO
After the CHILD LOCK is turned off, the time of
day will return to the display window. The oven
will operate normally.
SENSOR COOK
OPERATION INSTRUCTION
Sensor cooking provides exciting new features to
make microwaving easier. Your new microwave
oven will guide you, step by step, whether it be
simply to reheat food or cook food.
and sensor menu with all the popular food choices
helps you to cook perfectly because it has been
pre-programmed and can tell how long to cook or
reheat food items.
1. Touch STOP/CLEAR.
➠
➠
9
2. Touch VEGETABLES.
SELECT MENU 1 TO 5
- - SEE COOKING
GUIDE
scrolls in the display.
3. Touch 1.
then, the oven will cook
food automatically by
sensor system.
Page 10
OPERATING INSTRUCTIONS (CONT’D)
SENSOR COOK MENU INSTRUCTIONS - VEGETABLE
Code
1
Menu
Jacket Potato
Potatoes
(whole)
Weight
Limit
1 - 4 pieces
(175 g per
piece)
Initial
Temperature
Room 1 piece = 3
Wash & pat potatoes dry with paper towel. Pierce
each potato 3 times with a fork. Place potatoes
around the outer edge of the turntable.
After cooking potatoes should still be firm. Wrap in
foil and stand.
Instructions
Standing Time
(minutes)
2 pieces = 5
3 pieces = 5
4 pieces = 7
Mashed Potato
2
2- 4 serves Room
Ingredients 2 serves 3 serves 4 serves
Potato 450 g 675 g 900 g
Hot Milk
Butter 50 g 75 g 100 g
Salt 7 ground black pepper
Peel potatoes and cut into 2cm cubes. Place the
potato into a microwave- safe dish with 2
tablespoons of water. Place a sheet of damp paper
towel directly onto the surface and cover the dish
with lid or plastic wrap loosely. After cooking allow
potatoes to stand. Drain. Mash the potatoes until
smooth. Stir in hot milk and butter. Season with salt
and pepper.
Fresh Vegetable
3
0.2 - 0. 8 kg Room 3
Carrots,
Broccoli,
Cauliflower,
Zucchini,
Beans, Peas
Prepare vegetables. Cut vegetables into even size
pieces. Wash the vegetables and arrange in
microwave- safe dish just large enough to contain the
vegetables so they are no more than 2 - 3 layers deep.
Add 2 tablespoons of water. Cover with lid or plastic
wrap loosely. If cooking more than 1 kind of vegetable,
place the harder vegetables around the outer edge of
the dish with the softer vegetables in the centre.
4
Frozen
Vegetable
Carrots,
Broccoli,
Cauliflower,
Beans,Peas
0.2 - 0. 8 kg Frozen 3
Separate the vegetables into single pieces. Arrange the
vegetables in a microwave- safe dish just large enough
to contain them so they are no more than 2 layers
deep. Add 2 tablespoon water. Cover with lid or plastic
wrap loosely. If cooking more than 1 kind of vegetable,
place the harder vegetables around the outer edge of
the dish with the softer vegetables in the centre,
1 - 3
1
/
cup
2
2
/
cup
3
3
/
cup
4
Fresh Soup
5
2 - 6 serves
Room -
Pumpkin Soup
Serves
Ingredients
Pumpkin 500 g 750 g 1 kg
Brown onion
Chicken stock 2 cups 3 cups 4 cups
Cream 2 tbs
Ground nutmeg,
Salt & ground black pepper
2 serves 4 serves 6 serves
1
/
small 1 small 1 medium
2
1
/
4
To taste
tbs
1
/
tbs
3
Peel & remove the seeds from the pumpkin. Finely
chop the onion. Place the pumpkin, onion and stock
into a heatproof, microwave- safe bowl. Cover with lid
or two layers of plastic wrap loosely. After cooking,
blend or process to desired consistency. Stir in cream,
nutmeg and season with salt and pepper.
For potato leek soup, replace the pumpkin with desire
potatoes & replace the onion with leek.
For carrot & sweet potato soup, replace the pumpkin
with equal quantities of carrot and sweet potato. Omit
the cream. Replace the nutmeg with ground cumin.
10
Page 11
OPERATING INSTRUCTIONS (CONT’D)
6
Instant Noodle
(1 packet=
approx. 85g)
1 packet
Water :
hot tap water
(60°C)
1 - 2
Place unpackaged noodles into a large
microwave-safe bowl.Cook uncovered. When the
Oven beeps,the noodles should be stired well,before
pressing Start to continue the remaining cooking time.
Noodles 1 packet
Boiling water
(1 cup=250 ml)
2 cups
After cooking has finished, briefly stand and
stir before serving.
SENSOR COOK MENU INSTRUCTIONS - RICE / PASTA
Code
1
Menu
White Rice
Weight
Limit
1
/
- 2 cups
2
Initial
Temperature
Rice : Room
Water : Room
1
Rice
Tap water
2 cup 1 cup 1
/
3
/4 cup 11/4 cups 2 cups 21/2 cups
Wash the rice under cold water until the water runs
clear. Place the rice and water in a microwave-safe
rice cooker or 3-litre bowl. Cover with lid or double
layer of plastic wrap loosely. After cooking allow the
rice to stand without removing the lid or wrap. After
standing stir with a fork to separate the grains.
Replace the water with stock for more flavour.
Instructions
1
2 cups 2 cups
/
Standing Time
(minutes)
3 - 5
Porridge
2
Dry Pasta
3
Fresh Pasta
4
Tortellini
Ravioli
Fettuccine
Frozen Pasta
5
Tortellini
Ravioli
1 - 4 serves
1 - 4 cups
1 - 4 cups
1 - 4 cups
Oats : Room
Milk : Cold
Water :
hot tap water
(60°C)
Water :
hot tap water
(60°C)
Water :
hot tap water
(60°C)
1 serve 2 serves 3 serves 4 serves
1
Oats
Cold Milk
/2 cup2/3 cup 1 cup 11/3 cups
3
4 cup 1
/
1
2 cups 2
/
1
4 cups 3 cups
/
Place the oats and milk in a deep 3-litre heatproof
microwave-safe bowl. Cook uncovered. The oven
will beep, stir the oats well and press start to
continue. After cooking, stir well and top with brown
sugar or honey.
Place into a microwave-safe large bowl. Pour hot
tap water into a bowl. Cooked uncovered. The oven
will beep, stir well and press start to continue. After
cooking, stand and stir.
Pasta 1 cup 2 cups 3 cups 4 cups
Hot tap water(60°C)
(1 cup=250 ml)
1
/3 cup 4 cups 5 cups 6 cups
2
Place into a microwave-safe large bowl. Pour hot
tap water into a bowl. Cooked uncovered. The oven
will beep, stir well and press start to continue. After
cooking, stand and stir.
Pasta 1 cup 2 cups 3 cups 4 cups
Hot tap water(60°C)
(1 cup=250 ml)
1
/3 cup 4 cups 5 cups 6 cups
2
Place into a microwave-safe large bowl. Pour hot
tap water into a bowl. Cooked uncovered. The oven
will beep, stir well and press start to continue. After
cooking, stand and stir.
Pasta 1 cup 2 cups 3 cups 4 cups
Hot tap water(60°C)
(1 cup=250 ml)
1
/3 cup 4 cups 5 cups 6 cups
2
1 - 3
2 - 4
2 - 4
2 - 4
11
Page 12

OPERATING INSTRUCTIONS (CONT’D)
SENSOR COOK MENU INSTRUCTIONS - DESSERT
Code
1
Cake
Packet
Cake Mix
Menu
Weight
Limit
1 packet Room 5
Initial
Temperature
Prepare the cake following the microwave
instructions on the side of the packet, ignoring the
cooking instructions. Place the cake, uncovered,
onto a microwave- safe rack or upturned plate about
2cm off the turntable. At the end of the cooking time,
remove the cake from the microwave oven, cover
with a plate or piece of foil and stand for 5 minutes
or until the sticky centre portion is completely
cooked.
Instructions
Standing Time
(minutes)
2
3
Brownies
Pudding
Self- saucing
sponge pudding
1 packet =
250- 260g
About
10 brownies
1 packet Room 5
Room 10
100g butter
100g soft brown sugar
25g cocoa, sifted
50g self- raising flour, sifted
1 egg
1 table spoon milk
25g walnuts, finely chopped
Icing
1. Place the butter in a basin and melt on full for
2. Mix together the sugar, cocoa and flour. Beat
3. Spread in a greased and base- lined shallow dish
4. For the icing, place the chocolate and coffee in a
5. Spread the icing over the cake. When almost set
Prepare the pudding following the microwave
instructions on the side of the packet, ignoring the
cooking instructions. Spoon the pudding batter into
an 8- cup (2 litre) heatproof, microwave- safe bowl.
Top with the sauce mix and boiling water. Place the
cake, uncovered, onto a microwave- safe rack or
upturned plate about 2cm off the turntable. At the
end of the cooking time, remove the pudding from
the microwave oven, cover with a plate or piece of
foil and stand for 5 minutes or until the sticky centre
portion is completely cooked.
100g plain chocolate
1 table spoon black coffee
walnut halves to decorate
1
/
about 1- 1
together the egg and milk. Stir into the flour
mixture, together with the butter, walnuts and
raisins.
measuring 18 x 28cm / 7 x 11 in. Cook
uncovered. At the end of the cooking time,
remove the brownies from the microwave. Stand
or until cooled.
basin and cook on full for 3- 4 minutes.
cut the brownies into squares and top each
portion with a piece of walnut.
minutes.
2
Stewed Fruit
4
0.2 - 1.0 kg Room 1 - 3
Peel core and roughly chop the fruit. Sprinkle the
fruit with 2- 4 tsp caster sugar. Cover with a lid or
plastic wrap. At the end of the cooking time, allow to
stand.
12
Page 13

1. Touch STOP/CLEAR.
2. Touch DINNER PLATE
pad.
DINNER PLATE scrolls in
the display.
Then the oven will reheat
food automatically by
sensor system.
➠
OPERATING INSTRUCTIONS (CONT’D)
SENSOR REHEAT
To reheat DINNER PLATE
SENSOR REHEAT MENU INSTRUCTIONS
Code
1
Menu
Dinner Plate
Weight
Limit
1 serve Refrigerated 2
Initial
Temperature
This feature allows you to reheat precooked
room-temperature or refrigerated foods without
selecting cooking times and power levels. This
feature has 6 categories : dinner plate, rice, soup,
casserole, risotto, pizza.
Instructions
1 serve
Meat or chicken 125 g
Mashed potato 200 g
Vegetable, cooked 200 g
Arrange the food on a microwave- safe plate. Cover
loosely with plastic wrap. After reheating, allow to
stand.
Standing Time
(minutes)
2
3
4
Rice
Soup
Casserole
1- 4 cups
1- 4 cups
(1 cup=
250 ml)
1- 4 cups
Room 1
Room 1 - 2
Room 2 - 3
Place the cooked rice into a microwave- safe,
heatproof dish.Cover with a lid or double layer of
plastic wrap loosely. After reheating stir well before
serving.
Note : If reheating rice from the fridge add extra
2- 6 minutes (depending on serving size)
on 50% power.
When reheating 1 or 2 serves soup place into
individual microwave- safe cups or bowls and cover
with plastic wrap loosely. When reheating 3- 4
serves of soup place into 1 large heatproof,
microwave- safe bowl. Cover loosely with two layers
of plastic wrap. After heating stir well before serving.
Note : If reheating soup from the fridge add extra
2- 5 minutes (depending on serving size) on
70% power.
Place the casserole into a microwave- safe,
heatproof dish. Cover with a lid or double layer of
plastic wrap loosely. After reheating stir well before
serving.
Note : If reheating casserole from the fridge add
extra 2- 6 minutes (depending on serving
size) on 50% power.
13
Page 14

OPERATING INSTRUCTIONS (CONT’D)
SENSOR REHEAT MENU INSTRUCTIONS
Code
5
Risotto
Menu
Weight
Limit
1- 4 cups
Initial
Temperature
Room 1
Instructions
Place the cooked risotto into a microwave- safe,
heatproof dish.Cover with a lid or double layer of
plastic wrap loosely.After reheating stir well before
serving.
Note : If reheating risotto from the fridge add extra
2- 6 minutes (depending on serving size)
on 50% power.
Standing Time
(minutes)
6
Pizza
(1 piece=
100 - 120 g)
1 - 4 pieces
Refrigerated
Place pizza onto a sheet of non- recycled paper
towel directly on the turntable. Reheat uncovered.
Note: The weight and thickness of pizza varies
considerably, if pizza is not hot enough add
extra time on 50% power.
AUTO COOK
This feature allows to cook foods that you select by touching AUTO COOK pad. It has 8 foods categories.
To cook four slices of Roast Lamb.
3. Touch number 3.
1. Touch STOP/CLEAR.
➠
ROAST LAMB ENTER
WEIGHT shows in the
display.
➠
2. Touch AUTO COOK.
then
SELECT MENU 1 TO 8
- - SEE COOKING
GUIDE
scrolls in the display.
➠
4. Touch number [1], [2].
1.2 kg TOUCH START
scrolls in the display.
5. Touch START.
14
Page 15

OPERATING INSTRUCTIONS (CONT’D)
AUTO COOK MENU INSTRUCTIONS
Code
1
Menu
Corned Beef
Weight
Limit
1.0 - 2.0 kg Refrigerated 15 - 20
Initial
Temperature
Instructions
Corned beef 1 kg 1. 5 kg 2 kg
Warm water 3 cups 4 cups 6 cups
Brown sugar 2 tbs 3 tbs 3 tbs
Malt vinegar 2 tbs 3 tbs 4 tbs
Whole cloves 4 5 6
Peppercorns 6 8 10
Dry bay leaves 2 3 3
Sprigs fresh parsley 3 4 5
Place the corned silverside into an oven bag with
ingredients shown above. Place the bag into a deep
heatproof, microwave- safe bowl. Halfway through
the oven will beep and display turn food over.
Remove the dish from the microwave oven, carefully
turn the beef over. Press start to continue cooking.
At the end of the cooking time allow beef to stand
15 - 20 minutes before serving.
Standing Time
(minutes)
Seasoned Meat
2
1.0 - 2.0 kg Refrigerated 15 - 20
1.0 - 2.0 kg Refrigerated 15 - 20
Fruity Beef
Sauce
topside beef
125 ml fruit chutney
1 tbs oil
1 tbs Worcestershire Sauce
1 tbs curry powder
2 tbs mustard powder
1 tbs sweet sherry
Prepare beef to be seasoned by cutting a pocket in the
centre. Mix sauce Ingredients together and put to one
side. Prepare enough seasoning by following
instructions on the packet. Place loosely into prepared
packet. Tie meat with string. Brush sauce over meat.
Place the meat on a small roasting rack fat side down
in a deep heatproof, microwave- safe bowl. Halfway
through the oven will beep and display turn food over.
Remove the dish from the microwave, carefully turn
the beef over. Press start to continue cooking. At the
end of the cooking time loosely cover the meat with foil
and allow to stand 15 - 20 minutes before serving.
Apple and Sage Pork
Seasoning
Boned loin pork ( with rind on)
1- 2 cups sage and onion stuffing mix
1
/
cup dried apples, chopped
2
8 - 10 prunes, pitted and chopped
125 g toasted silvered almonds
Following instructions on the packet prepare stuffing.
Add apples, prunes and almonds. Mix well. Pack
loosely down the centre of meat. Roll up tightly and
secure with string. Sprinkle rind with salt. Place the
meat on a small roasting rack fat side down in a deep
heatproof, microwave- safe bowl. Halfway through the
oven will beep and display turn over. Remove the dish
from the microwave oven, carefully turn the meat over.
Press start to continue cooking. At the end of the
cooking time loosely cover the meat with foil and allow
to stand 15- 20 minutes before serving.
Seasoning
1
1
/
cups stuffing mix
2
Water to mix
15
Page 16

OPERATING INSTRUCTIONS (CONT’D)
AUTO COOK MENU INSTRUCTIONS
Code
Seasoned Meat
2
Menu
Weight
Limit
1.0 - 2.0 kg Refrigerated
Initial
Temperature
Instructions
Apricot Lamb
Loin of forequarter lamb (deboned)
1 packet dried apricots
250 ml apricot nectar
1 tbs cornflour
Unroll meat. Place dried apricots down the centre 2
rows deep. Roll up tightly and secure with string.
Mix apricot nectar with corn flour and heat for 3 - 4
minutes on HIGH or until boil. Allow to cool slightly.
Pour apricot juice over the meat and marinade 1 - 2
hours. Remove meat from the marinade, place the
meat on a small roasting rack fat side down in a deep
heatproof, microwave- safe bowl. Halfway through the
oven will beep and display turn food over. Remove the
dish from the microwave oven, carefully turn the meat
over. Press start to continue cooking. At the end of the
cooking time loosely cover the meat with foil and allow
to stand 15 - 20 minutes before serving.
Standing Time
(minutes)
15 - 20
Roast Lamb
3
Roast Chicken
4
Chicken Pieces
5
(thigh or cutlets)
1.0 - 2.0 kg Refrigerated 15 - 20
1.0 - 2.5 kg Refrigerated 10
0.2 - 0.8 kg Refrigerated 2 - 3
Brush both sides of the lamb with olive oil and season
with salt and pepper. Shield the knuckle with foil,
making sure the foil is secure & will not touch the
interior oven walls when rotating. Place the lamb skinside side down onto a microwave- safe roasting rack or
upturned plate. Halfway through cooking the oven will
beep and display turn food over. Remove the lamb
from the microwave oven, turn the lamb over and
remove the foil from the knuckle. Press start to
continue cooking. At the end of the cooking time
loosely cover the lamb with foil and allow to stand or
place the lamb into a preheated oven 200°C for 5 - 10
mins to crispen the surface. Allow to stand 15 - 20
minutes before serving
Wash and pat the chicken dry with paper towel. Brush
both sides of the chicken with olive oil and season with
salt and pepper. Tie the legs together with string.
Shield the legs and wings with foil. Place chicken
breast side down onto a microwave- safe roasting rack
or upturned plate. Halfway through the oven will beep
and display turn food over. Remove the chicken from
the microwave oven, turn the chicken over and remove
the foil from legs and wings. Press start to continue
cooking. At the end of the cooking time, place the
chicken into a preheated oven 200°C for 5- 10 mins to
crispen the skin. Allow to stand 10 minutes before
serving.
Brush the chicken pieces with olive oil and season with
salt and pepper. Place chicken skin side up onto a
microwave- safe roasting rack. At the end of cooking.
remove the chicken from the microwave and allow to
stand 2- 3 minutes or place into a preheated oven
200°C for 5 - 10 minutes to crispen the skin
16
Page 17

OPERATING INSTRUCTIONS (CONT’D)
AUTO COOK MENU INSTRUCTIONS
Code
6
Menu
Fish Fillets
fresh
Weight
Limit
0.2 - 0.6 kg Refrigerated 2 - 3
Initial
Temperature
Instructions
Place each fish fillet onto a square of baking paper,
tuck the tail end under. Drizzle with fresh lemon or
lime juice and season with salt and pepper. Wrap
each fillet in the paper forming a parcel. Place the
fish in a single onto a microwave- safe plate. After
cooking allow to stand 3 mins before carefully
unwrapping the parcel to serve.
Standing Time
(minutes)
Bacon
7
1 thick rasher= 80 g
1 thin rasher= 45 g
Casserole
8
1 thick or 2
thin rashers /
2 thick or 4
thin rashers
Refrigerated
Remove the rind from the bacon and cut the rasher
in half crossways. Place between 2 sheets on nonrecycled paper towel on a microwave- safe plate.
After cooking check the result. If you like the bacon
a little more cooked, return to the microwave and
cook in for 20 seconds at a time on 100% power.
1 - 4 serves Refrigerated 2 - 3
Tuna & Noodle
Ingredients 1 serve 2 serves 3 serves 4 serves
Noodles(pasta),boiled) 140 g 280 g 420 g 560 g
Cream of Mushroom Soup
Can or equivalent,
Starkist Chunk Light Tuna,
in spring water, drained
Milk 125 ml 250 ml 375 ml 500 ml
140 g 280 g 420 g 560 g
60 g 120 g 180 g 240 g
Combine cream of mushroom soup, tuna and milk
in microwave- safe a deep and large bowl. Add
boiled noodles and stir thoroughly. Cover with wrap
or glass lid. Halfway through the oven will beep and
display stir. Press start to continue cooking. At the
end of the cooking time, stand and stir.
Beef Stroganoff
Ingredients 1 serve 2 serves 3 serves 4 serves
Rump steak, cubed
Plain flour
Small onion,
finely chopped
Tomato puree
Beef stock
Red wine
Mushroom, sliced
Sour cream
Salt, Pepper
250 g 500 g 750 g 1000 g
1
/4cup 1/3cup1/2cup
2 tbsp
1
/
1 1 1
2
2 ts 1 tbsp 1
125 ml 200 ml 250 ml 375 ml
60 ml 60 ml 60 ml 60 ml
25 g 50 g 75 g 100 g
75 ml 150 ml 200 ml 300 ml
1
/2tbsp 2 tbsp
2 - 3
Toss steak with plain flour, salt and pepper in a flat
dish until coated. Place steak, left flour, chopped
onion, puree, beef stock, red wine and mushroom
into a microwave-safe deep & large dish. Cover with
wrap or glass lid. Halfway through the oven will
beep and display stir. Press start to continue
cooking. At the end of the cooking time, stand and
stir.
17
Page 18

OPERATING INSTRUCTIONS (CONT’D)
AUTO REHEAT
Your oven’s menu has been preprogrammed to automatically reheat food. Tell the oven what you want
and how many items there are. Then let your microwave oven reheat your selections.
Be sure to close the door before selecting categories.
Example: To reheat two pies of pie,
simply follow the step below.
1. Touch STOP/CLEAR.
➠
2. Touch AUTO REHEAT
SELECT MANU 1 TO 4
- - SEE COOKING
GUIDE
will scrolls in the display.
AUTO REHEAT MENU INSTRUCTIONS
Code
1
Menu
Pie
(meat pie,
1 pie = 190g)
Weight
Limit
1 - 4 pies
Initial
Temperature
Room 1
➠➠
3. Touch 1.
PIE TOUCH 1 TO 4
PIES will scrolls in the
display.
4. Touch 2.
2 PIES will scrolls in the
display.
The oven begins the
cooking you selected
without the need to touch
START.
Instructions
Place pie( s) between two sheets of non recycled
paper towel on a microwave- safe plate.
Note:
If reheating pies from the fridge add extra
2- 6 minutes (depending on serving size) on
50% power.
Standing Time
(minutes)
Beverage
2
(1 cup = 250 ml)
Frozen Muffin
3
(1 muffin =
75 - 80 g)
Fresh Muffin
4
(1 muffin =
75 - 80 g)
1 - 4 cups
1 - 4 muffins
1 - 4 muffins
Room
Frozen
Room
Make sure the cup is microwave- safe. Place a
wooden skewer or paddle pop stick into each cup to
break the beverage surface. Heat uncovered. After
heating stir well before serving.
Space the muffins evenly around the outer edge of
the microwave turntable.
Space the muffins evenly around the outer edge of
the microwave turntable.
18
Page 19

OPERATING INSTRUCTIONS (CONT’D)
QUICK DEFROST
Example: To defrost 0.5 kg meat.
1. Touch STOP/CLEAR.
➠
2. Touch QUICK
DEFROST.
QUICK DEFROST MENU INSTRUCTIONS
Code
1
Menu
Minced Meat
Weight
Limit
0.5 kg
Initial
Temperature
Frozen 5 - 20
Three Quick Defrost sequences are preset in the
oven. The Quick Defrost feature provides you with
the express defrosting method for 500g frozen
foods. The oven automatically sets the defrosting
time for each food.
NOTE:
The oven will beep during the DEFROST CYCLE.
At this time open the door and turn over, separate,
or rearrange the food.
Quick Defrost provides just enough defrosting that
the foods can be used in recipes or for cooking.
There will be some ice crystals remaining.
Instructions
Use this function to defrost mince meat.
Remove the meat completely from it’s wrapping.
Place the mince onto a microwave- safe rack over a
plate or shallow dish. During the program the oven
will beep and display ‘turn food over’. At this point
remove the mince from the microwave oven,
remove any defrosted mince to a plate, cover and
set aside. Turn the frozen mince over and return to
the microwave oven. Press start to continue. At the
end of the program remove the mince from the
microwave oven, cover with foil and allow to stand
5- 20 minutes or until completely thawed.
Standing Time
(minutes)
19
Page 20

OPERATING INSTRUCTIONS (CONT’D)
KEEP MOISTURE
To reheat Chilled Pizza
1. Touch STOP/CLEAR.
➠
2. Touch AUTO COOK.
then
SELECT MENU 1 TO 8
- - SEE COOKING
GUIDE
scrolls in the display.
KEEP MOISTURE MENU INSTRUCTIONS
Category
Reheat
Menu
Chilled pizza
Weight
Limit
0.3~0.6kg Refrigerated
Initial
Temperature
➠
3. Touch number 1.
1
➠
4
CHILLED PIZZA
ENTER WEIGHT
scrolls in the
4. Touch number [4].
0.4 kg TOUCH START
scrolls in the display.
➠
5. Touch START.
Instructions
1. Pour 30ml water on the keep moist plate
2. Place food on microwave - safe plate and put it
on the keep moist plate and cover.
3. After reheating, stand for 1 minute.
display.
Standing Time
(minutes)
1
Rice /Pasta
Cake / Bread
Soup / Sauce
0.1-0.3kg
0.1-0.3kg
0.2-0.6kg
Refrigerated
Refrigerated
Refrigerated
1. Pour 30ml water on the keep moist plate
2. Place food on microwave - safe plate and put it
on the keep moist plate and cover.
3. After reheating, stand for 1 minute.
1. Pour 30ml water on the keep moist plate
2. Place food on microwave - safe plate and put it
on the keep moist plate and cover.
3. After reheating, stand for 1 minute.
1. Pour 30ml water on the keep moist plate
2. Place food on microwave - safe bowl and put it
on the keep moist plate and cover.
3. After reheating, stand for 3 minute.
20
1
1
3
Page 21

OPERATING INSTRUCTIONS (CONT’D)
KEEP MOISTURE MENU INSTRUCTIONS
Category
Cook
Menu
Vegetable
(hard)
Vegetable
(soft)
Fish fillets
Chicken
portion
Weight
Limit
0.2-0.4kgRoom
0.2-0.4kg
0.2-0.6kg
0.2-0.6kg
Initial
Temperature
Room
Refrigerated
Refrigerated
Instructions
1. Pour 30ml water on the keep moist plate.
2. Place food on microwave- safe plate(or bowl)
and put it on the keep moist plate and cover.
3. After cooking, stand for 2 minute.
1. Pour 30ml water on the keep moist plate.
2. Place food on microwave- safe plate(or bowl)
and put it on the keep moist plate and cover.
3. After cooking, stand for 2 minute.
1. Pour 30ml water on the keep moist plate
2. Place food on microwave- safe plate and put it
on the keep moist plate and cover.
1. Pour 30ml water on the keep moist plate
2. Place food on microwave- safe plate and put it
on the keep moist plate and cover.
Standing Time
(minutes)
2
2
21
Page 22

1. Touch STOP/CLEAR.
2. Touch
AUTO DEFROST.
SELECT MENU 1 TO 7
- -SEE COOKING
GUIDE
scrolls in the display.
3. Touch 1.
MINCED MEAT ENTER
WEIGHT scrolls in the
display.
4. Enter the weight by
touching [1] and [2].
1.2 kg TOUCH START
appears in the display.
5. Touch START.
Defrosting starts.
➠➠➠➠
OPERATING INSTRUCTIONS (CONT’D)
AUTO DEFROST
Three defrost sequences are preset in the oven.
The defrost feature provides you with the best
defrosting method for frozen foods. The cooking
guide will show you which defrost sequence is
recommended for the food you are defrosting.
With the Auto Defrost feature, the oven
automatically sets the defrosting time and power
levels for you.
The oven automatically determines required
defrosting times for each food item according to
the weight you enter.
For added convenience, the Auto Defrost
includes a built-in beep mechanism that reminds
you to check, turn over, separate, or rearrange.
Three different defrosting levels are provided.
1 Minced Meat 4. Roast Beef
2 Steak/Chops 5. Whole Chicken
3 Roast Lamb 6. Chicken Pieces
7. Sliced Bread
Example: To defrost 1.2 kg of Minced Meat,
select Meat menu, enter the
weight, and press START
NOTE:
When you touch the START pad, the display
changes to defrost time count down. The oven
will beep twice during the DEFROST cycle. At
each beep, open the door and turn, separate, or
rearrange the food.
Remove any portions that have thawed.
Return frozen portions to the oven and touch
START to resume the defrost cycle.
*For best results, remove fish, shellfish, meat,
and poultry from its original closed paper or
plastic package (wrapper). Otherwise, the wrap
will hold steam and juice close to the foods,
which can cause the outer surface of the foods
to cook.
*For best results, shape your ground meat into
the form of a doughnut before freezing. When
defrosting, scrape off thawed meat when the
beep sounds and continue defrosting.
*Place foods in a shallow container or on a
microwave roasting rack to catch drippings.
*Food should still be somewhat icy in the center
when removed from the oven.
QUICK START
The QUICK START feature allows you to set 30 seconds
intervals of HIGH power cooking with a touch of the
START/Q-START.
Example: Set 2 minutes of cooking on high power.
1.
2.
During QUICK START cooking,you can extend the
cooking time up to 10 minutes by repeatedly pressing
the START/Q-START key.
Time of day.
Four times
You oven will start before you have finished the
fouth press.
Select 2minutes on
high power.
22
Page 23

OPERATING INSTRUCTIONS (CONT’D)
AUTO DEFROST MENU INSTRUCTIONS
Code
1
Menu
Minced Meat
Weight
Limit
0.1 - 2.0 kg
Initial
Temperature
Frozen 5 - 20
Remove the meat completely from it’s wrapping.
Place the mince onto a microwave- safe rack over a
plate or shallow dish. During the program the oven
will beep and display turn food over. At this point
remove the mince from the microwave, remove any
defrosted mince to a plate, cover and set aside.
Turn the frozen mince over and return to the
microwave oven. Press start to continue. At the end
of the program remove the mince from the
microwave oven, cover with foil and allow to stand
5- 20 minutes or until completely thawed.
Instructions
Standing Time
(minutes)
Steak/ Chops
2
Roast Lamb
3
Roast Beef
4
0.1- 1.5kg
1.0 - 2.0 kg
1.0 - 2.0 kg
Frozen 5 - 30
Room 5 - 45
Frozen 5 - 45
Remove the meat completely from it’s wrapping.
Using thin strips of foil, shield the fatty areas with the
foil, making sure the foil is secure. Place the meat
onto a microwave- safe rack over a plate or shallow
dish. During the program the oven will beep and
display ‘turn food over’. At this point remove the
meat from the microwave, remove any defrosted
steak or chops to a plate, cover and set aside. Turn
the meat over and return to the microwave oven.
Press start to continue. At the end of the program
remove the meat from the microwave oven, cover
with foil and allow to stand 5- 30 minutes or until
completely thawed.
Remove the lamb completely from it’s wrapping.
Using a piece of foil wrap the shank to prevent
cooking. Place the lamb onto a microwave- safe
rack over a plate or shallow dish. During the
program the oven will beep and display ‘turn food
over’. At this point remove the lamb from the
microwave oven and turn over. Press start to
continue. At the end of the program remove the
lamb from the microwave oven, cover with foil and
allow to stand 5 - 45 minutes or until completely
thawed.
Remove the beef completely from it’s wrapping.
Using strips of foil, shield fatty areas with foil to
prevent cooking. Place the beef onto a microwavesafe rack, fat side down over a plate or shallow dish.
During the program the oven will beep and display
‘turn food over’. At this point remove the beef from
the microwave oven and turn over. Press start to
continue. At the end of the program remove the
beef from the microwave oven, cover with foil and
allow to stand 5- 45 minutes or until completely
thawed.
23
Page 24

OPERATING INSTRUCTIONS (CONT’D)
AUTO DEFROST MENU INSTRUCTIONS
Code
Whole Chicken
5
Menu
Weight
Limit
1.0 - 2.5 kg
Initial
Temperature
Frozen 5 - 40
Instructions
Remove the chicken completely from it’s wrapping.
Place a thin strip of foil down the centre of the
breast. Place the chicken breast side down onto a
microwave- safe rack over a plate or shallow dish.
During the program the oven will beep and display
‘turn food over’. At this point remove the chicken
from the microwave oven and turn over. Press start
to continue. At the end of the program remove the
chicken from the microwave oven, cover with foil
and allow to stand 5- 40 minutes or until completely
thawed.
Standing Time
(minutes)
Chicken Pieces
6
Sliced Bread
7
1 piece = 30g
0.1 - 2.0 kg
1- 4 pieces
Frozen 5 - 10
Frozen
Remove the chicken pieces completely from it’s
wrapping. Place the chicken Pieces onto a
microwave- safe rack over a plate or shallow dish.
During the program the oven will beep and display
‘turn food over’. At this point remove the chicken
pieces from the microwave oven and turn over.
Press start to continue. At the end of the program
remove the chicken pieces from the microwave
oven, cover with foil and allow to stand 5- 10
minutes hour or until completely thawed.
Separate the frozen bread into single pieces. Place
in a single layer directly on the microwave turntable.
At the end of the program remove the bread from
the microwave oven, stand
1
/
- 1minute.
2
1
/
- 1
2
24
Page 25

OPERATING INSTRUCTIONS (CONT’D)
WARNING: Do not use aluminum foil during cooking cycle.
COOKING TIPS
Meat
1. No special techniques are required. Meat
should be prepared as with conventional
cooking. Season if desired. Always thoroughly
defrost meat before cooking.
2. Place the meat on a microwave roasting rack or
microwave-proof plate and place on the
turntable.
3. Cook according to the Meat Cooking Chart
(below). Use the longer time for large meats
and the shorter time for smaller meats. For
thicker chops, use the longer time.
4. Turn the meat once halfway through the
cooking time.
5. Let stand for 5-10 minutes wrapped in foil after
cooking. The standing time is very important as
it completes the cooking process.
6. Make sure meat, especially pork, is thoroughly
cooked before eating.
Meat Cooking Chart
Meat
BEEF
Standing/Rolled Rib
– Rare
– Medium
– Well-done
Ground Beef (to
brown for casserole)
Hamburgers,
Fresh or defrosted
(112 g each)
– 2 patties
– 4 patties
PORK
Loin, Leg
Bacon
– 4 slices
– 6 slices
NOTE: The times listed above are only a guide.
Allow for difference in individual tastes and
preferences. The times may also vary due to the
shape, cut, and composition of the food.
Microwave
Power
8
8
8
HIGH(100%)
HIGH(100%)
HIGH(100%)
8
HIGH(100%)
HIGH(100%)
Cooking Time
Per 0.5 kg
8to 10 minutes
9 to11 minutes
10 to 13 minutes
1
1
5
/
-8
/
minutes
2
2
2 to 4 minutes
3 to 5 minutes
12 to 16 minutes
2 to 3 minutes
3 to 4 minutes
Poultry
1. No special techniques are required. Poultry
should be prepared as with conventional
cooking. Season if desired.
2. Poultry should be thoroughly defrosted.
Remove giblets and any metal clamps.
3. Prick the skin and brush lightly with vegetable
oil unless the poultry is self-basting.
4. All poultry should be placed on a microwave
roasting rack or a microwave-proof plate and
placed on the turntable.
5. Cook according to the instructions in the Poultry
Cooking Chart below. Turn over halfway
through the cooking time. Because of its shape,
poultry has a tendency to cook unevenly,
especially in very bony parts.Turning during
roasting helps to cook these areas evenly.
6. Let stand for 5-10 minutes wrapped in foil after
cooking before carving. The standing time is
very important, as it completes the cooking
process.
7. Make sure poultry is thoroughly cooked before
eating. Whole poultry is completely cooked
when the juices run clear from the inside thigh
when it is pierced with a sharp knife. Poultry
pieces should be pierced with a sharp knife
through the thickest part to ensure that the
juices are clear and the flesh is firm.
Poultry Cooking Chart
Microwave
Poultry
CHICKEN
Whole
Breast (boned)
Portions
TURKEY
Whole
NOTES:
• The times listed above are only a guide. Allow for
difference in individual tastes and preferences.
The times may also vary due to the shape, cut,
and composition of the food.
• If whole poultry is stuffed, the weight of the
stuffed bird should be used when calculating the
cooking time.
Power
8
8
8
8
Cooking Time
Per 0.5 kg
10 to 14 minutes
9 to 13 minutes
10 to 16 minutes
10 to 14 minutes
25
Page 26

OPERATING INSTRUCTIONS (CONT’D)
COOKING TIPS (continued)
Fish
1. Arrange fish in a large shallow non-metallic dish or casserole.
2. Cover with pierced microwave plastic wrap or casserole lid.
3. Place the dish on the turntable.
4. Cook according to the instructions in the Fresh Fish Cooking Chart below. Flakes of butter can be added
to the fish if desired.
5. Let stand as directed in the Cooking Chart before serving.
6. After standing time, check to see that the fish is thoroughly cooked. The fish should be opaque and flake
easily.
Fish Cooking Chart
Fish
Fish Fillets
Whole Mackerel,
Cleaned and Prepared
Whole Trout,
Cleaned and Prepared
Salmon Steaks
Microwave
Power
HIGH
HIGH
HIGH
HIGH
Cooking Time
Per 0.5 kg
4 to 7 minutes
4 to 7 minutes
5 to 8 minutes
5 to 7 minutes
Butter
Add 15 to 30 ml (1 to 2 tbsp.) lemon juice
–
–
Add 15 to 30 ml (1 to 2 tbsp.) lemon juice
Standing
Time
2 to 3 minutes
3 to 4 minutes
3 to 4 minutes
3 to 4 minutes
26
Page 27

OPERATING INSTRUCTIONS (CONT’D)
To heat or reheat successfully in the microwave, it is important to follow several guidelines. Measure the
amount of food in order to determine the time needed to reheat. Arrange the food in a circular pattern for
best results. Room temperature food will heat faster than refrigerated food. Canned foods should be taken
out of the can and placed in a microwavable container. The food will be heated more evenly if covered with
a microwavable lid or plastic wrap and vented. Remove cover carefully to prevent steam burns. Use the
following chart as a guide for reheating cooked food.
Items Cook time Special Instructions
(at HIGH)
Sliced meat Place sliced meat on microwavable plate.
3 slices (0.5 cm thick) 1-2 minutes Cover with plastic wrap and vent.
*Note: Gravy or sauce helps to keep meat juicy.
Chicken pieces
1
/
1 breast 2-3
1 leg and thigh 1
Fish fillet Place fish on microwavable plate. Cover with plastic wrap and
(230 g) 2-4 minutes vent.
Lasagna Place lasagna on microwavable plate. Cover with plastic wrap
1 serving (300 g) 4-6 minutes and vent.
Casserole
1 cup 1-3
4 cups 5-8 minutes through cooking.
Casserole –
cream or cheese
1 cup 1
4 cups 3
Sloppy Joe or
Barbecued beef Reheat filling and bun separately.
1 sandwich 1 -2
1
/
cup meat filling) bun as directed in chart below.
(
2
without bun
Mashed potatoes
1 cup 1-3 minutes COOK covered in microwavable casserole. Stir once halfway
4 cups 5-8 minutes through cooking.
Baked beans
1 cup
Ravioli or pasta in sauce
1 cup 2
4 cups 7
Rice
1 cup 1
4 cups 4-6
Sandwich roll or bun Wrap in paper towel and place on glass mircrowavable rack
1 roll
Vegetables
1 cup
4 cups 4-6 minutes
Soup COOK covered in microwavable casserole. Stir once halfway
1 serving (230 g) 1
minutes Place chicken pieces on microwavable plate. Cover with plastic
2
1
/
-3 minutes wrap and vent.
2
1
/
minutes COOK covered in microwavable casserole. Stir once halfway
2
1
/
-3 minutes COOK covered in microwavable casserole. Stir once halfway
2
1
1
/
-5
/
minutes through cooking.
2
2
1
/
minutes Cook filling covered in microwavable casserole. Stir once. Heat
2
COOK covered in microwavable casserole
1
1
/
-3 minutes
2
1
/
-4 minutes COOK covered in microwavable casserole. Stir once halfway
2
1
/
-11 minutes through cooking.
2
1
1
/
-3
/
minutes COOK covered in microwavable casserole. Stir once halfway
2
2
1
/
minutes through cooking.
2
through cooking.
Stir once halfway
.
15-30 seconds
1
1
/
-2
/
2
minutes
2
COOK covered in microwavable casserole. Stir once halfway
1
through cooking.
1
1
/
-2
/
minutes through cooking.
2
2
27
Page 28

OPERATING INSTRUCTIONS (CONT’D)
Vegetable Amount Instructions
Cook time Standing
at HIGH Time
Artichokes 2 medium 5~8 Trim. Add 2 tsp water and 2 tsp juice. Cover. 2-3 minutes
(230 g each) 4 medium 10~13
Asparagus, 450 g 3~6 Add
1
/
cup water. Cover. 2-3 minutes
2
Fresh, Spears
Beans, Green & 450 g 7~11 Add
1
/
cup water in 1
2
1
/
qt. casserole. Stir 2-3 minutes
2
Wax halfway through cooking.
Beets, Fresh 450 g 12~16 Add
1
/
cup water in 1
2
1
/
qt. covered casserole. 2-3 minutes
2
Rearrange halfway through cooking.
1
/
Broccoli, Fresh, 450 g 4~8 Place broccoli in baking dish. Add
cup water. 2-3 minutes
2
Spears
Cabbage, Fresh, 450 g 4~7 Add
1
/
cup water in 1
2
1
/
qt. covered casserole. 2-3 minutes
2
Chopped Stir halfway through cooking.
1
/
Carrots, Fresh, 2 cups 2~4 Add
cup water in 1 qt. covered casserole. 2-3 minutes
4
Sliced Stir halfway through cooking.
1
/
Cauliflower, 450 g 7~11 Trim. Add
cup water in 1 qt. covered casserole. 2-3 minutes
4
Fresh, Whole Stir halfway through cooking.
Flowerettes, Fresh 2 cups
1
/
/
2
Slice. Add
2
~4
2
1
/
cup water in 1
2
1
/
qt. covered casserole. 2-3 minutes
2
1
Celery, Fresh, 4 cups 6~8 Stir halfway through cooking.
Sliced
Corn, Fresh 2 ears 5~9 Husk. Add 2 tbsp water in 1
1
/
qt. baking dish. 2-3 minutes
2
Cover.
Mushrooms, 230 g 2~3
1
/
Place mushrooms in 1
2
1
/
qt. covered casserole. 2-3 minutes
2
Fresh, Sliced Stir halfway through cooking.
Parsnips, Fresh, 450 g 4~8 Add
1
/
cup water in 1
2
1
/
qt. covered casserole. 2-3 minutes
2
Sliced Stir halfway through cooking.
Peas, Green, 4 cups 7~10 Add
1
/
cup water in 1
2
1
/
qt. covered casserole. 2-3 minutes
2
Fresh Stir halfway through cooking.
Sweet Potatoes 2 medium 5~10 Pierce potatoes several times with fork. 2-3 minutes
Whole Baking 4 medium 7~13 Place on 2 paper towels. 2-3 minutes
(170~230 g each) Turn over halfway through cooking.
White Potatoes, 2 potatoes 5~8 Pierce potatoes several times with fork. 2-3 minutes
Whole Baking 4 potatoes 10~14 Place on 2 paper towels. 2-3 minutes
(
170~230 g
Spinach, Fresh, 450 g 4~7 Add
each) Turn over halfway through cooking.
1
/
cup water in 2 qt. covered casserole. 2-3 minutes
2
Leaf
Squash, Acorn or 1 medium 6~8 Cut squash in half. Remove seeds. 2-3 minutes
Butternut, Fresh Place in 8 x 8-inch baking dish. Cover.
Zucchini, Fresh, 450 g
1
/
/
2
2
4
~7
Add
1
/
2
cup water in 1
1
/
qt. covered casserole. 2-3 minutes
2
1
Sliced Stir halfway through cooking.
Zucchini, Fresh, 450 g 6~9 Pierce. Place on 2 paper towels. 2-3 minutes
Whole Turn zucchini over and rearrange halfway through
cooking.
28
Page 29

MICROWAVE-SAFE UTENSILS
Never use metal or metal trimmed utensils in
your microwave oven
Microwaves cannot penetrate metal. They will
bounce off any metal object in the oven and
cause arcing, an alarming phenomenon that
resembles lightning.
Most heat resistant non metallic cooking utensils
are safe for use in your microwave oven.
However, some may contain materials that
render them unsuitable as microwave cookware.
If you have any doubts about a particular utensil,
there’s a simple way to find out if it can be used
in your microwave oven.
Place the utensil in question next to a glass bowl
filled with water in the microwave oven.
Microwave at power HIGH for 1 minute. If the
water heats up but the utensil remains cool to the
touch, the utensil is microwave-safe. However, if
the water does not change temperature but the
utensil becomes warm, microwaves are being
absorbed by the utensil and it is not safe for use
in the microwave oven. You probably have many
items on hand in your kitchen right now that can
be used as cooking equipment in your microwave
oven. Just read through the following checklist.
Dinner plates
Many kinds of dinner-ware are microwave-safe. If
in doubt consult the manufacturer’s literature or
perform the microwave test.
Glassware
Glassware that is heat-resistant is microwavesafe. This would include all brands of oven
tempered glass cookware. However, do not use
delicate glassware, such as tumblers or wine
glasses, as these might shatter as the food
warms.
Plastic storage containers
These can be used to hold foods that are to be
quickly reheated. However, they should not be
used to hold foods that will need considerable
time in the oven as hot foods will eventually warp
or melt plastic containers.
Paper
Paper plates and containers are convenient and
safe to use in your microwave oven, provided that
the cooking time is short and foods to be cooked
are low in fat and moisture. Paper towels are also
very useful for wrapping foods and for lining
baking trays in which greasy foods such as bacon
are cooked. In general, avoid colored paper
products as the colour may run. Some recycled
paper products may contain impurities which
could cause arcing or fires when used in the
microwave oven.
Plastic cooking bags
Provided they are made specially for cooking,
cooking bags are microwave safe. However, be
sure to make a slit in the bag so that steam can
escape. Never use ordinary plastic bags for
cooking in your microwave oven, as they will melt
and rupture.
Plastic microwave cookware
A variety of shapes and sizes of microwave
cookware are available. For the most part, you
can probably use items you already have on
hand rather than investing in new kitchen
equipment.
Pottery, stoneware and ceramic
Containers made of these materials are usually
fine for use in your microwave oven, but they
should be tested to be sure.
CAUTION
Some items with high lead or iron content are
not suitable for cooking utensils.
29
Page 30

FOOD CHARACTERISTICS & MICROW A VE COOKING
Keeping an eye on things
The recipes in this book have been formulated
with great care, but your success in preparing
them depends on how much attention you pay to
the food as it cooks. Always watch your food
while it cooks. Your microwave oven is equipped
with a light that turns on automatically when the
oven is in operation so that you can see inside
and check the progress of your food. Directions
given in recipes to elevate, stir, and the like
should be thought of as the minimum steps
recommended. If the food seems to be cooking
unevenly, simply make the necessary
adjustments you think appropriate to correct the
problem.
Factors affecting microwave cooking times
Many factors affect cooking times. The
temperature of ingredients used in a recipe
makes a big difference in cooking times. For
example, a cake made with ice-cold butter, milk,
and eggs will take considerably longer to bake
than one made with ingredients that are at room
temperature. All of the recipes in this book give a
range of cooking times. In general, you will find
that the food remains under-cooked at the lower
end of the time range, and you may sometimes
want to cook your food beyond the maximum time
given, according to personal preference. The
governing philosophy of this book is that it is best
for a recipe to be conservative in giving cooking
times. While overcooked food is ruined for good.
Some of the recipes, particularly those for bread,
cake, and custards, recommend that food be
removed from the oven when they are slightly
undercooked. This is not a mistake. When
allowed to stand, usually covered, these foods
will continue to cook outside of the oven as the
heat trapped within the outer portions of the food
gradually travels inward. If the food is left in the
oven until it is cooked all the way through, the
outer portions will become overcooked or even
burnt. You will become increasingly skilful in
estimating both cooking and standing times for
various foods.
Density of food
Light, porous food such as cakes and bread cook
more quickly than heavy, dense foods such as
roasts and casseroles. You must take care when
microwaving porous food that the outer edges do
not become dry and brittle.
Height of food
The upper portion of tall food, particularly roasts,
will cook more quickly than the lower portion.
Therefore, it is wise to turn tall food during
cooking, sometimes several times.
Moisture content of food
Since the heat generated from microwaves tends
to evaporate moisture, relatively dry food such as
roasts and some vegetables should either be
sprinkled with water prior to cooking or covered to
retain moisture.
Bone and fat content of food
Bones conduct heat and fat cooks more quickly
than meat. Care must be taken when cooking
bony or fatty cuts of meat that they do not cook
unevenly and do not become overcooked.
Quantity of food
The number of microwaves in your oven remains
constant regardless of how much food is being
cooked. Therefore, the more food you place in
the oven, the longer the cooking time. Remember
to decrease cooking times by at least one third
when halving a recipe.
Shape of food
Microwaves penetrate only about 2.5 cm into
food, the interior portion of thick foods are cooked
as the heat generated on the outside travels
inward. Only the outer edge of food is cooked by
microwave energy; the rest is cooked by
conduction. The worst possible shape for a food
that is to be microwaved is a thick square. The
corners will burn long before the centre is even
warm . Round thin foods and ring shaped foods
cook successfully in the microwave.
Covering
A cover traps heat and steam which causes food
to cook more quickly. Use a lid or microwave
cling film with a corner folded back to prevent
splitting.
Browning
Meats and poultry that are cooked fifteen minutes
or longer will brown lightly in their own fat. Food
that is cooked for a shorter period of time may be
brushed with a browning sauce such as
Worcestershire sauce, soy sauce or barbecue
sauce to achieve an appetizing colour. Since
relatively small amounts of browning sauce is
added to food, the original flavour of the recipe is
not altered.
Covering with greaseproof paper
Greaseproofing effectively prevents spattering
and helps food retain some heat. But because it
makes a looser cover than a lid or clingfilm, it
allows the food to dry out slightly.
Arranging and spacing
Individual foods such as baked potatoes, small
cakes and hors d’oeuvres will heat more evenly if
placed in the oven an equal distance apart,
preferably in a circular pattern. Never stack foods
on top of one another.
30
Page 31

FOOD CHARACTERISTICS & MICROWAVE COOKING
after cleaning.
Stirring
Stirring is one of the most important of all
microwaving techniques. In conventional cooking,
food is stirred for the purpose of blending.
Microwaved food, however, is stirred in order to
spread and redistribute heat. Always stir from the
outside towards the centre as the outside of the
food heats first.
Turning over
Large, tall foods such as roasts and whole
chickens should be turned so that the top and
bottom will cook evenly. It is also a good idea to
turn cut up chicken and chops.
Placing thicker portions facing outwards
Since microwaves are attracted to the outside
portion of food, it makes sense to place thicker
portions of meat, poultry and fish to the outer
edge of the baking dish. This way, thicker
portions will receive the most microwave energy
and the food will cook evenly.
Shielding
Strips of aluminium foil (which block microwaves)
can be placed over the corners or edges of
square and rectangular food to prevent those
portions from overcooking. Never use too much
foil and make sure the foil is secured to the dish
or it may cause ‘arcing’ in the oven.
Elevating
Thick or dense foods can be elevated so that
microwaves can be absorbed by the underside
and centre of the foods.
Piercing
Foods enclosed in a shell, skin or membrane are
likely to burst in the oven unless they are pierced
prior to cooking. Such foods include yolks and
whites of eggs, clams and oysters and whole
vegetables and fruits.
Testing if cooked
Food cooks so quickly in a microwave oven, it is
necessary to test it frequently. Some foods are
left in the microwave until completely cooked, but
most foods, including meats and poultry, are
removed from the oven while still slightly
undercooked and allowed to finish cooking during
standing time. The internal temperature of foods
will rise between 3°C and 8°C during standing
time.
Standing time
Foods are often allowed to stand for 3 to 10
minutes after being removed from the microwave
oven. Usually the foods are covered during
standing time to retain heat unless they are
supposed to be dry in texture (some cakes and
biscuits, for example). Standing allows foods to
finish cooking and also helps flavour blend and
develop.
To Clean Your Oven
1 Keep the inside of the oven clean
Food spatters or spilled liquids stick to oven walls
and between seal and door surface. It is best to
wipe up spillovers with a damp cloth right away.
Crumbs and spillovers will absorb microwave
energy and lengthen cooking times. Use a damp
cloth to wipe out crumbs that fall between the
door and the frame. It is important to keep this
area clean to assure a tight seal. Remove greasy
spatters with a soapy cloth then rinse and dry. Do
not use harsh detergent or abrasive cleaners.
The glass tray can be washed by hand or in the
dishwasher.
2 Keep the outside of the oven clean
Clean the outside of your oven with soap and
water then with clean water and dry with a soft
cloth or paper towel. To prevent damage to the
operating parts inside the oven, the water should
not be allowed to seep into the ventilation
openings. To clean control panel, open the door
to prevent oven from accidentally starting, and
then wipe the control panel with a damp cloth,
followed immediately by a dry cloth. Press STOP
3 If steam accumulates inside or around the
outside of the oven door, wipe the panels with a
soft cloth. This may occur when the microwave
oven is operated under high humidity conditions
and in no way indicates a malfunction of the unit.
4 The door and door seals should be kept clean.
Use only warm, soapy water, rinse then dry
thoroughly.
DO NOT USE ABRASIVE MATERIALS, SUCH
AS CLEANING POWDERS OR STEEL AND
PLASTIC PADS.
Metal parts will be easier to maintain if wiped
frequently with a damp cloth.
31
Page 32

SAFETY PRECAUTIONS
WARNING
Please ensure cooking times are correctly set as over cooking may result in FIRE and
subsequent DAMAGE to the OVEN.
1 Do not attempt to tamper with, or make any
adjustments or repairs to the door, control panel,
safety interlock switches or any other part of the
oven. Repairs should only be undertaken by a
qualified service technician.
2 Do not operate the oven when empty. It is best to
leave a glass of water in the oven when not in
use. The water will safety absorb all microwave
energy, if the oven is accidentally started.
3 Do not use the oven for the purpose of
dehumidification. It can be the cause of serious
damage of safety. (ex. Operating the microwave
oven with the wet newspapers, clothes, toys, pet
or portable electric devices, etc.)
4 Do not cook food wrapped in paper towels,
unless your cook book contains instructions, for
the food you are cooking.
5 Do not use newspaper in place of paper towels
for cooking.
6 Do not use wooden containers. They may heat-
up and char. Do not use ceramic containers
which have metallic (e.g. gold or silver) inlays.
Always remove metal twist ties. Metal objects in
the oven may arc, which can cause serious
damage.
7 Do not operate the oven with a kitchen towel, a
napkin or any other obstruction between the door
and the front edges of the oven, which may
cause microwave energy leakage.
8 Do not use recycled paper products since they
may contain impurities which may cause sparks
and/or fires when used in cooking.
11 Be certain to place the oven so the front of the
door is 8 cm or more behind the edge of the
surface on which it is placed, to avoid accidental
tipping of the appliance.
12 Before cooking, pierce the skin of potatoes,
apples or any such fruit or vegetable.
13 Do not cook eggs in their shell. Pressure will
build up inside the egg which will burst.
14 Do not attempt deep fat frying in your oven.
15 Remove the plastic wrapping from food before
cooking or defrosting. Note though that in some
cases food should be covered with plastic film,
for heating or cooking.
16 If the oven door is damaged, the oven must not
be operated until it has been repaired by a
qualified service technician.
17 If smoke is observed, keep the oven door
closed and switch off or disconnect the oven
from the power supply.
18 When food is heated or cooked in disposable
containers of plastic, paper or other combustible
materials look at the oven frequently to check if
the food container is deteriorating.
19 The appliance is not intended for use by young
children or infirm persons without supervision;
Young Children should be supervised to ensure
that they do not play with appliance.
20 Liquids or other foods must not be heated in
sealed containers since they are liable to
explode.
9 Do not rinse the turntable by placing it in water
just after cooking. This may cause breakage or
damage.
10 Small amounts of food require shorter cooking
or heating time. If normal times are allowed they
may overheat and burn.
21 If the appliance is supplied from a cord extension
set or an electrical portable outlet device,the cord
extension set on electrical portable outlet device
must be positioned so that it is not subject to
splashing or ingress of moisture.
32
Page 33

QUESTION & ANSWERS
Q What’s wrong when the oven light will not
glow?
A There may be several reasons why the oven light
will not glow.
Light bulb has blown.
Door is not closed.
Q Does microwave energy pass through the
viewing screen in the door?
A No. The holes, or ports, are made to allow light
to pass; they do not let microwave energy
through.
Q Why does the beep tone sound when a pad
on the Control Panel is touched?
A The beep tone sounds to assure that the setting
is being properly entered.
Q Will the microwave oven be damaged if it
operates empty?
A Yes. Never run it empty or without the glass
tray.
Q Why do eggs sometimes pop?
A When baking, frying, or poaching eggs, the yolk
may pop due to steam build up inside the yolk
membrane. To prevent this, simply pierce the
yolk before cooking. Never microwave eggs in
the shell.
Q Why is standing time recommended after
microwave cooking is over?
A After microwave cooking is finished, food keeps
on cooking during standing time. This standing
time finishes cooking evenly throughout the food.
The amount of standing time depends on the
density of the food.
1 Popcorn-popping utensils designed specifically
for microwave cooking.
2 Prepackaged commercial microwave popcorn
that contains specific times and power outputs
needed for an acceptable final product.
FOLLOW EXACT DIRECTIONS GIVEN BY
EACH MANUFACTURER FOR THEIR
POPCORN PRODUCT. DO NOT LEAVE THE
OVEN UNATTENDED WHILE THE CORN IS
BEING POPPED. IF CORN FAILS TO POP
AFTER THE SUGGESTED TIMES,
DISCONTINUE COOKING. OVERCOOKING
COULD RESULT IN THE CORN CATCHING
FIRE.
CAUTION
NEVER USE A BROWN PAPER BAG FOR
POPPING CORN. NEVER ATTEMPT TO POP
LEFTOVER KERNELS.
Q Why doesn’t my oven always cook as fast as
the cooking guide says?
A Check your cooking guide again to make sure
you’ve followed directions correctly, and to see
what might cause variations in cooking time.
Cooking guide times and heat settings are
suggestions, chosen to help prevent
overcooking, the most common problem in
getting used to a microwave oven. Variations in
the size, shape, weight and dimensions of the
food require longer cooking time. Use your own
judgement along with the cooking guide
suggestions to test food condition, just as you
would do with a conventional cooker.
Q Is it possible to pop corn in a microwave
oven?
A Yes, if using one of the two methods described
below:
33
Page 34

PLUG WIRING INFORMATION
Warning
This appliance must be earthed
The wires in this mains lead are colored in accordance with the following codes
BLUE ~ Neutral
BROWN ~ Live
GREEN & YELLOW ~ Earth
As the colours of the wires in the mains lead of this appliance may not correspond with the
coloured markings identifying the terminals in your plug proceed as follows:
The wire which is colored BLUE must be connected to the terminal which is marked with
the letter N or Colored BLACK.
The wire which is colored BROWN must be connected to the terminal which is marked
with the letter L or colored RED.
The wire which is colored GREEN & YELLOW or GREEN must be connected to the
terminal which is marked with the letter E or .
TECHNICAL SPECIFICATIONS
MODEL
Power Supply
Rated Power Consumption
Microwave Output
Frequency
Overall Dimensions(WXHXD)
Oven Cavity Dimensions(WXHXD)
NET WEIGHT
SHIPPING WEIGHT
*IEC 60705 RATING STANDARD
Specifications subject to change without prior notice.
MS3448GRK/MS3448XRK
230 / 240 V~ 50 Hz
1600 W
*1100 W
2450 MHz
556 X 320 X 438 (mm)
374 X 254 X 406 (mm)
17.6 Kg
19.0 Kg
34
Page 35

LG MICROWAVE OVEN
MANUFACTURER'S WARRANTY
Complete the details on this form and retain in the event of warranty service being required
(purchase receipt attached).
PURCHASER’S NAME
ADDRESS
CITY STATE POST CODE
MODEL NO SERIAL NO
DATE OF PURCHASE INVOICE/SALES DOCKET NO
RETAILER’S NAME
ADDRESS
CITY STATE POST CODE
TERMS OF WARRANTY
MANUFACTURER’S WARRANTY
Should a defect become apparent,due to either
FAULTY MATERIAL or WORKMANSHIP,
within the period of 2 years from the date of original
purchase of the product,LG will then rectify the
manufacturing defect without cost to you for either
labour or material,at the premises of LG or their
Authorised Service Center
Subject to:
1. Particulars of the model and serial number, the
date of original purchase and invoice/sales
docket number being given to the authorised
service centre when a claim under warranty is
made. Purchase receipt must be produced.
2. All (a) damage resulted from incorrect installation
or misuse other than in accordance with the
operating instructions issued by the Company (b)
consequential damage being excluded from this
Warranty.
3. The Warranty being rendered invalid if the
product is misused or if any unauthorized
alteration, modification, or substitution of the
product is defaced or altered.
4. Costs of transportation both ways to and from the
authorized service centre being are paid by the
owner if it is necessary to return the product or
any part to an authorized service centre.
5. A charge being accepted by the owner for
travelling expenses incurred in connection with
warranty service at the user’s home.
6. The warranty not applying except to the serving
within Australia or New Zealand of products
purchased in Australia or New Zealand.
7. The authorised serviced agent will provide
service during normal business hours, Monday to
Friday. If any legislation whether Federal or State
to applies to this transaction, certain nonexcludable conditions may be implied and certain
non-excludable rights may arise but except for
such conditions, warranties and rights, all
conditions and warranties which might otherwise
be implied in this transaction are hereby
excluded and negated.
8. This warranty is not transferable and applies to the
original purchaser only.
IMPORTANT NOTICE
1. LG ELECTRONICS AUSTRALIA PTY. LTD has
arranged for authorised service centres to
perform all after sales and warranty service on its
behalf.
2. The authorised service centre can accept no
responsibility for damage in transit to and from
his premises.
3. If the product or any parts returned to an
authorised service centre for any cause not
covered by this warranty, all costs involved,
including a charge for inspection and handing
must be paid to the authorised service centre.
4. Changes not covered by the terms of this
Warranty must be borne by the owner. Such
charges may arise through the cost of any
service all where (a) the product is found to be in
good installation, or (b) maladjustment of user
controls, or failure to follow operating
instructions, mains supply defects or external
interference has occurred.
5. No retailer has authority to vary the terms of the
above warranty.
6. For warranty service please contact LG service on
1800 643 156(AUSTRALIA),or
0508 643 156(NEW ZEALAND).
35
Page 36

FOR WARRANTY SERVICE PLEASE CONTACT
LG ELECTRONICS AUSTRALIA PTY LTD (LGEAP)
2 Wonderland Drive EASTERN CREEK NSW 2766
LGEAP
(ABN : 98 064 531 264)
LG SERVICE ON 1800-643-156(AUSTRALIA),or 0508 643 156(NEW ZEALAND)
Printed in ChinaP/NO : MFL40258002
 Loading...