

Page 1

MAGNETRON OVEN
GEBRUIKERSHANDLEIDING
LEES DEZE GEBRUIKERSHANDLEIDING AANDACHTIG VÓÓR GEBRUIK.
FOUR À MICRO-ONDES
MANUEL DE L’UTILISATEUR
LISEZ ATTENTIVEMENT LE PRESENT MANUEL DE L’UTILISATEUR AVANT D’UTILISER L’APPAREIL.
MICROWAVE OVEN
OWNER’S MANUAL
PLEASE READ THIS OWNER’S MANUAL THOROUGHLY BEFORE OPERATING.
MS-2387AR
MS-2387ARS
MS-2387ARB
MS-2387TR
P/No.: MFL38460101
Page 2

You cannot operate your oven with the door open due to the safety interlocks
built into the door mechanism. These safety interlocks automatically switch off
any cooking activity when the door is opened; which in the case of a
microwave oven could result in harmful exposure to microwave energy.
It is important not to tamper with the safety interlocks.
Do not place any object between the oven front face and the door or allow
food or cleaner residue to accumulate on sealing surfaces.
Do not operate your oven if it is damaged. It is particularly important that the
oven door closes properly and that there is no damage to the: (1) door(bent),
(2) hinges and latches (broken or loosened), (3) door seals and sealing
surfaces.
Your oven should not be adjusted or repaired by anyone except qualified
service personnel.
Warning
Precautions to avoid possible exposure to excessive microwave energy.
When heating liquids, e.g. soups, sauces and beverages in your microwave
oven, delayed eruptive boiling can occur without evidence of bubbling. This
could result in a sudden boil over of the hot liquid. To prevent this possibility
the following steps should be taken:
1 Avoid using straight sided containers with narrow necks.
2 Do not overheat.
3 Stir the liquid before placing the container in the oven and again halfway
through the heating time.
4 After heating, allow to stand in the oven for a short time, stir or shake
them(especially the contents of feeding bottles and baby food jars) again
carefully and check the temperature of them before consumption to avoid
burns (especially, contents of feeding bottles and baby food jars).
Be careful when handling the container.
Warning
Always allow food to stand after being cooked by
microwaves and check the temperature of them
before consumption. Especially contents of feeding
bottles and baby food jars.
Please ensure cooking times are correctly set as
over cooking may result in the FOOD catching fire
and subsequent damage to your oven.
3
Precautions
GB
Page 3

Contents
Your microwave oven is one of the safest of all home
appliances. When the door is opened, the oven
automatically stops producing microwaves. Microwave
energy is converted completely to heat when it enters
food, leaving no “left over” energy to harm you when
you eat your food.
4
GB
How the Microwave Oven Works
Microwaves are a form of energy similar to radio and television waves and
ordinary daylight. Normally, microwaves spread outwards as they travel
through the atmosphere and disappear without effect. Microwave ovens,
however, have a magnetron which is designed to make use of the energy in
microwaves. Electricity, supplied to the magnetron tube, is used to created
microwave energy.
These microwaves enter the cooking area through openings inside the oven.
A turntable or tray is located at the bottom of the oven. Microwaves cannot
pass through metal walls of the oven, but they can penetrate such materials
as glass, porcelain and paper, the materials out of which microwave-safe
cooking dishes are constructed.
Microwaves do not heat cookware, though cooking vessels will eventually get
hot from the heat generated by the food.
A very safe appliance
Page 4
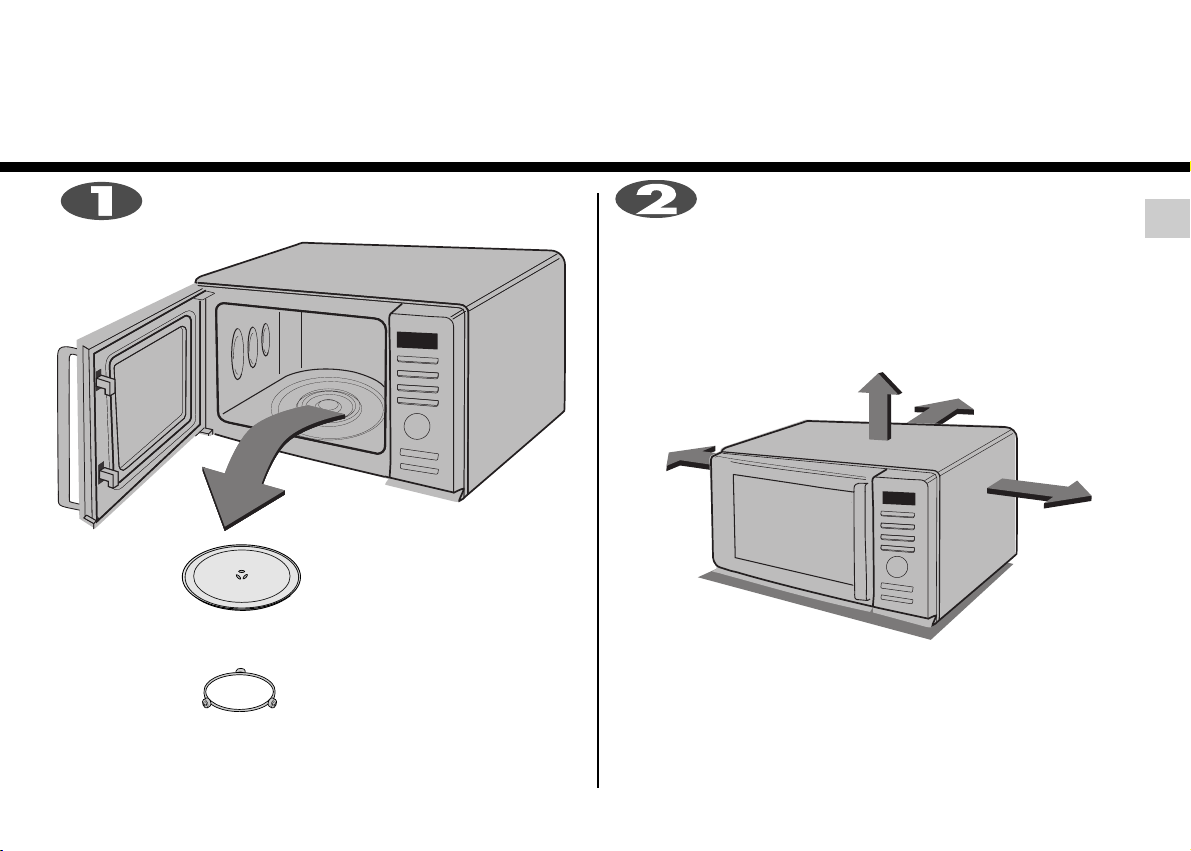
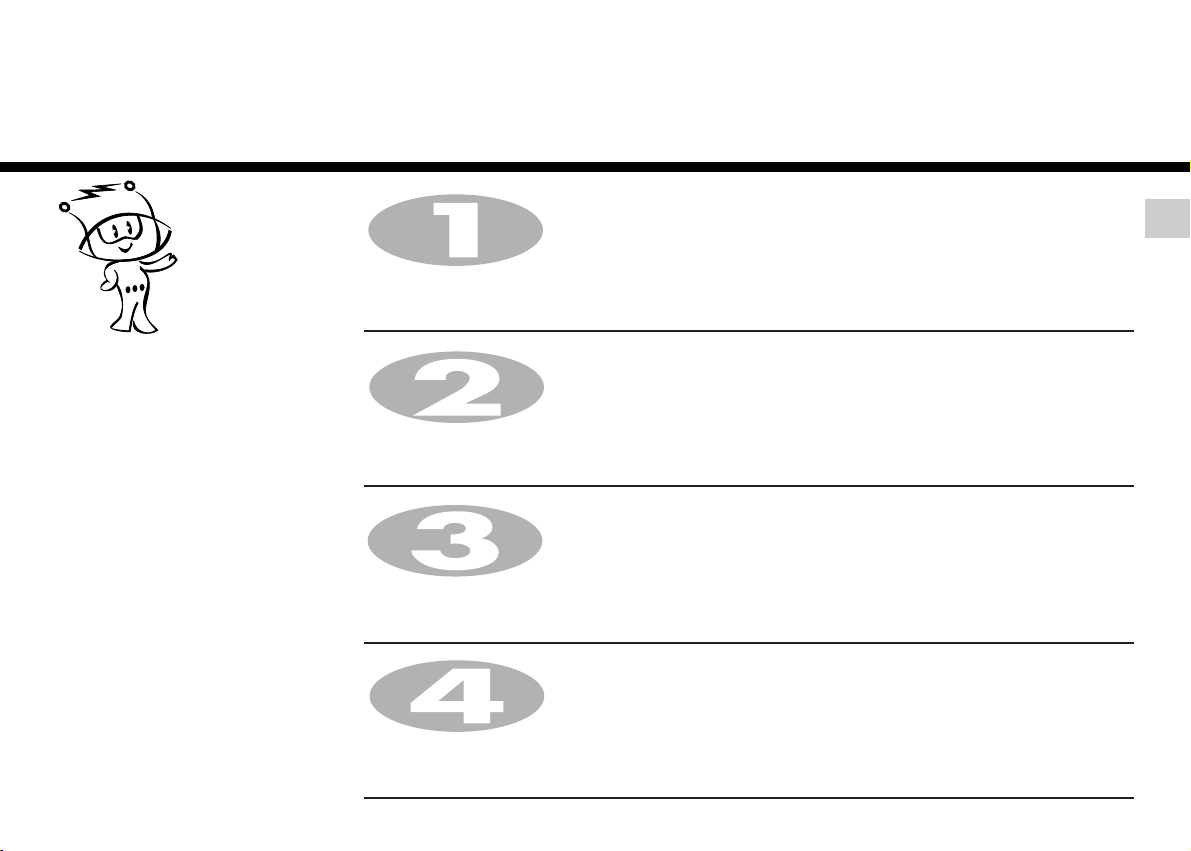
Place the oven in the level location of your choice with
more than 85cm height but make sure there is at least
30cm of space on the top and 10cm at the rear for proper
ventilation. The front of the oven should be at least 8cm from the
edge of the surface to prevent tipping.
An exhaust outlet is located on top or side of the oven. Blocking
the outlet can damage the oven.
Unpack your oven and place it on a flat level
surface.
By following the basic steps on these two pages you will be able to quickly check that your oven is operating
THIS OVEN SHOULD NOT BE USED FOR COMMERCIAL CATERING
PURPOSES
GLASS TRAY
ROTATING RING
5
correctly. Please pay particular attention to the guidance on where to install your oven. When unpacking your
oven make sure you remove all accessories and packing. Check to make sure that your oven has not been
damaged during delivery.
Unpacking &
Installing
GB
Page 5

Open your oven door by pulling the DOOR HANDLE.
Place the ROLLER REST inside the oven and place the
GLASS TRAY on top.
Plug your oven into a standard household socket.
Make sure your oven is the only appliance
connected to the socket. If your oven does not operate
properly, unplug it from the electrical socket and then plug it
back in.
6
GB
Fill a microwave safe container with
300 ml (1/2 pint) of water. Place on
the GLASS TRAY and close the oven door. If you
have any doubts about what type of container to
use please refer to page 28.
to set
of cooking
time.
Press the START
button once
30 seconds
30
MINU TOS
Seconds
oven door and test the temperature of the water. If your
oven is operating the water should be warm. Be careful
when removing the container it may be hot.
YOUR OVEN IS NOW INSTALLED
The DISPLAY will count down from 30 seconds
When it reaches 0, BEEP sounds. Open the
Page 6
You can set either 12 hour clock or 24 hour clock.
In the following example I will show you how to set the time for 14:35 when using the 24 clock.
Make sure that you have removed all packaging from your oven.
When your oven is plugged in for the
first time or when power resumes after a
power cut, a ‘0’ will be shown in the
display; you will have to reset the clock.
If the clock (or display) shows any
strange looking symbols, unplug your
oven from the electrical socket and plug
it back in and reset the clock.
Make sure that you have correctly installed your oven as described
earlier in this book.
Press STOP/CLEAR.
Press CLOCK once.
(If you want to use different option, Press CLOCK once more.
If you want to change different option after setting clock, you have to
unplug and plug it back in.)
Turn DIAL until display shows “14: ”.
Press START for hour confirmation.
Turn DIAL until display shows “14:35”.
Press STRAT.
The clock starts counting.
7
Setting the
Clock
GB
Page 7

Child
Lock
Press and hold STOP/CLEAR until “L” appears on the display and
BEEP sounds.
The CHILD LOCK is now set.
The time will disappear on the display if you have set the clock.
“L” remains on the display to let you know that CHILD LOCK is set.
To cancel CHILD LOCK press and hold STOP/CLEAR until “L” disappears.
You will hear BEEP when it’s released.
Your oven has a safety feature that
prevents accidental running of the oven.
Once the child lock is set, you will be
unable to use any functions and no
cooking can take place.
However your child can still open the
oven door.
Press STOP/CLEAR.
8
GB
Page 8

Make sure that you have correctly installed your oven as described earlier
in this book.
Press STOP/CLEAR.
Press START.
Your oven has five microwave Power
settings. High power is automatically
selected but repeated presses of the
key will select a different power
level .
In the following example I will show you how to cook some food on 80% power for 5 minutes and 30 seconds.
POWER
HIGH
MAX
M
EDIUM
HIGH
MEDIUM
DEFROST
MEDIUM LOW
L
OW
%
100%
80%
60%
40%
20%
Power Output
850W
680W
510W
340W
170W
Make sure that you have correctly installed your oven as described earlier
in this book.
Press STOP/CLEAR.
Press twice to select 80% power.
“680” appears on the display.
9
Micro Power
Cooking
Turn DIAL until display shows “5:30”.
GB
Page 9

Micro Power
Your microwave oven is equipped with 5 power levels to give you maximum flexibility and control over cooking.
The table below shows the examples of food and their recommended cooking power levels for use with this
microwave oven.
POWER LEVEL
POWER LEVEL
(%)
HIGH * Boil Water
* Brown minced beef
* Cook poultry pieces, fish, vegetables
* Cook tender cuts of meat
MEDIUM HIGH * All reheating
* Roast meat and poultry
* Cook mushrooms and shellfish
* Cook foods containing cheese and eggs
MEDIUM * Bake cakes and scones
* Prepare eggs
* Cook custard
* Prepare rice, soup
DEFROST/ * All thawing
MEDIUM LOW * Melt butter and chocolate
* Cook less tender cuts of meat
LOW * Soften butter & cheese
* Soften ice cream
* Raise yeast dough
USE
POWER O UTPUT
100%
80%
60%
40%
20%
850W
680W
510W
340W
170W
10
GB
Level
Page 10
In the following example I will show you how to set 2 minutes of cooking on high power.
Press STOP/CLEAR .
Press START four times to select 2 minutes on HIGH power.
Your oven will start before you have finished the fourth press.
During QUICK START cooking, you can extend the cooking time by repeatedly
pressing the START button.
The QUICK START feature allows you to
set 30 seconds intervals of HIGH power
cooking with a touch of the START
button.
11
Quick
Start
GB
Page 11
AUTO REHEAT allows you to cook most of
your favorite food easily by selecting the
food type and entering the weight of the
food.
Press STOP/CLEAR .
“rh-2” appears on the display.
Turn DIAL until display shows “0.6”.
Press START.
Press START.
Press
time
times
times
Category
CHILLED MEAL
FROZEN MEAL
CHILLED PIZZA
Press
AUTO REHEAT
time
times
times
12
GB
Auto
In the following example I will show you how to cook 0.6kg of Frozen Meal.
Reheat
Press AUTO REHEAT twice to select Frozen Meal.
Page 12

FUNCTION CATEGORY WEIGHT LIMIT UTENSILS FOOD TEMP. INSTRUCTIONS
1. CHILLED
MEAL
2. FROZEN
MEAL
3. CHILLED
PIZZA
AUTO
REHEAT
Refrigerated
Frozen
Refrigerated
Own tray
Own tray
Low rack
Pierce using a skewer on the surface.
Place food on the glass turntable. After cooking, allow to standfor 2-3 minutes
before serving.
- Stirrable e.g : Spaghetti bolognese, Beef stew
- Non-stirrable e.g : Lasagne, Cottage pie
Note :
For food contained in bag(s), pierce meat portion and rice/pasta portions, etc.
- For stirrable foods, stir at beep.
- Non-stirrable foods, it is not necessary to stir at beep.
Same as above.
This function is for reheating leftover chilled pizza. Place chilled pizza on the
low rack over the metal tray.
After cooking, take food out immediately. Stand for 2~3 minutes.
0.3 kg ~ 0.6 kg
0.3 kg ~ 0.6 kg
0.2 kg ~ 0.4 kg
13
GB
Page 13
AUTO COOK allows you to cook most of
your favorite food easily by selecting the
food type and entering the weight of the
food.
In the following example I will show you how to cook 0.6kg of fresh vegetable.
Press STOP/CLEAR .
Press AUTO COOK twice to select Fresh vegetable.
Turn DIAL until display shows “0.6”.
Press START.
Auto
Cook
Category
JACKET POTATO
FRESH VEGETABLE
FROZEN VEGETABLE
RICE
FRESH FISH
Press
AUTO COOK
time
times
times
times
times
time
times
times
times
times
14
GB
Page 14

FOOD CATEGORY WEIGHT LIMIT UTENSILS FOOD TEMP. INSTRUCTIONS
1. JACKET
POTATO
2. FRESH
VEGETABLE
3. FROZEN
VEGETABLE
4. RICE
Room
Room
Frozen
Room
Microwave-
safe bowl
Microwave-
safe bowl
Choose medium sized potatoes 170 -200g.
Wash and dry potatoes. Pierce the potatoes several times with fork. Place the potatoes on
the glass turntable. Adjust weight and press start. After cooking, remove the potatoes from
the oven. Let stand covered with foil for 5 minutes.
Place vegetables in a microwave-safe bowl. Add water.
Cover with wrap. After cooking, stir and allow to stand for
2 minutes. Add amount of water according to the quantity.
** 0.2kg - 0.4kg : 2 Tablespoon
** 0.5kg - 0.8kg : 4 Tablespoon
Place vegetables in a microwave-safe bowl. Add water.
Cover with wrap. After cooking, stir and allow to stand for
2 minutes. Add amount of water according to the quantity.
** 0.2kg - 0.4kg : 2 Tablespoon
** 0.5kg - 0.8kg : 4 Tablespoon
Wash rice. Darin water.
Place rice & boiling water in a deep and large bowl.
** Rice - After cooking, stand covered for 5 minutes or until water is absorbed.
kg ~ 1.0 kg
kg ~ 0.8 kg
0.2 kg ~ 0.8 kg
0.1 kg ~ 0.3 kg
Weight 100g 200g 300g Cover
Boiling water 200ml 400ml 600ml Yes /Vent corner
15
0.2
Microwave-
safe bowl
5. FRESH FISH
0.2
kg ~ 0.6 kg
0.2
Microwave-
safe bowl
Microwave-
safe flan dish
Refrigerated
Whole fish, steaks
- Oily fish : salmon, mackerel
- White fish : cod, haddock
Arrange in a single layer in a large microwave-safe flan dish.
Cover dish tightly with plastic wrap and pierce in several places.
Place on the glass turntable. Adjust weight and press start.
After cooking, remove the dish from the oven. Allow to stand for 3 minutes before serving.
GB
Page 15

Auto
Defrost
The temperature and density of food varies, I would recommend that the food is checked before cooking
commences. Pay particular attention to large joints of meat and chicken, some foods should not be
completely thawed before cooking. The BREAD programme is suitable for defrosting small items such as
rolls or a small loaf. These will require a standing time to allow the centre to thaw. In the following
example I will show you how to defrost 1.4 Kg of frozen poultry.
Your oven has four microwave defrost
settings:- MEAT, POULTRY, FISH and
BREAD; each defrost category has
different power settings. Repeated
presses of the AUTO DEFROST button
will select a different setting.
Category
MEAT
POULTRY
FISH
BREAD
Press
DEFROST
time
times
times
times
Enter the weight of the frozen food that you are about to defrost.
Turn DIAL until display shows “1.4”.
Press START.
During defrosting your oven will “BEEP”, at which point open the oven door, turn food over and separate to
ensure even thawing. Remove any portions that have thawed or shield them to help slow down thawing. After
checking close the oven door and press START to resume defrosting.
Your oven will not stop defrosting (even when the beep sounded) unless the door is opened.
Press AUTO DEFROST twice to select the POULTRY defrosting
programme.
Press STOP/CLEAR.
Weight the food that you are about to defrost. Be certain to remove any
metallic ties or wraps; then place the food in your oven and close the
oven door.
GB
16
Page 16

AUTO W EIGHT DEFROST G UIDE
* Food to be defrosted should be in a suitable microwave proof conta iner and pla ce uncovered on the glass turnta ble.
* If necessa ry, shield small areas of meat or poultry with flat pieces of aluminum foil. This will prevent thin area s becoming warm during defrosting. Ensure the
foil does not touch the oven walls.
* Separa te items like minced meat, chops, sausages and bacon as soon as possible.
W hen BEEP, at this piont remove the food fromthe microwave oven,turn the food over and return to the microwave oven. Press start to continue. At the end of
the program, remove the food from the microwave oven, cover with foil a nd allow to stand until completely thawed.
To thaw completely, for example joints of meat and whole chickens should STAN D for a minimum of 1 hour before cooking.
Category Weight Limit Utensil Food
0.1 ~ 4.0 kg
Microwave ware
(Flat plate)
Meat
Minced beef, Fillet steak, Cubes for stew, Sirloin steak, Pot roast, Rump roast, Beef burger
Pork chops, Lamp chops, Rolled roast, Sausage, Cutlets(.2cm)
Turn food over at beep.
After defrosting, let stand for 5-15 minutes.
Poultry
Whole chicken, Legs, Breasts, Turkey breasts(under 2.0kg)
Turn food over at beep.
After defrosting, let stand for 20-30 minutes.
Fish
Fillets, Steaks, Whole fish, Sea foods
Turn food over at beep.
After defrosting, let stand for 10-20 minutes.
Meat
Poultry
Fish
0.1 ~ 0.5 kg
Paper towel
or flat plate
Sliced bread, Buns, Baguette, etc.
Bread
GB
17
Separate slices and place between paper towel or flat plate.
Turn food over at beep.
After defrosting, let stand for 1-2 minutes.
Page 17

Quick
Your oven has a microwave quick
defrost setting (
Press STOP/CLEAR.
Weight the food that you are about to defrost. Be certain to remove
any metallic ties or wraps; then place the food in your oven and close
the oven door.
Press QUICK DEFROST.
The oven will start automatically.
During defrosting your oven will “BEEP”, at which point open the oven door, turn food over and separate to
ensure even thawing. Remove any portions that have thawed or shield them to help slow down thawing. After
checking close the oven door and press START to resume defrosting.
Your oven will not stop defrosting (even when the beep sounded) unless the door is opened.
GB
Minced meat
18
Defrost
Use this function to thaw only 0.5kg of Minced meat very quickly.
This will require a standing time to allow the center to thaw. In the following example will show you how to defrost
0.5kg of frozen minced meat.
).
Page 18

UTENSIL INSTRUCTIONS
Minced meat
Microwave ware
Remove the meat completely from it's wrapping. Place the mince onto a microwave-safe plate. When BEEP, at this point remove the mince from the microwave
oven, turn the mince over and return to the microwave oven . Press start to continue. At the end of the program remove the mince from the microwave oven ,
cover with foil and allow to stand 5-15 minutes or until completely thawed.
Minced meat
A
UTO W
EIGHT DEFROST GUIDE
GB
19
CATEGORY WEIGHT
0.5kg
(Flat plate)
Turn food over at beep
After defrosting, let stand for 5-15 minutes
Page 19

Press STOP/CLEAR .
Press START.
Turn DIAL select weight of food
GB
European
Menu
CATEGORY
Oatmeal
Pasta
Baked bean
Hotdog
Stew
Scrambled eggs
Press
European menu
time
times
times
times
times
times
time
times
times
times
times
times
20
In the following example I will show you how to cook 0.5 kg of Baked beans.
European Cook allows you to cook most
of your favorite food easily by selecting
the food type and seleting the weight of
the food.
Press European Menu three times.
“Sc-3” appears on the display.
Page 20

FOOD CATEGORY WEIGHT LIMIT UTENSILS FOOD TEMP. INSTRUCTIONS
1. OATMEAL
2. PASTA
3. BAKED BEAN,
4. HOTDOG
5. STEW
6. SCRAMBLED
EGGS
Room
Room
Room
Room
Room
Refrigerated
Microwave-
safe bowl
Microwave-
safe bowl
Microwave-
safe dish
Microwave-
safe bowl
Microwave-
safe bowl
Microwave-
safe bowl
Place the oats and milk in a deep microwave- safe bowl.
Cook uncovered. The oven will beep, stir the oats well and press start to
continue. After cooking, stir well and stand for 1 minute before serving.
Place pasta and boiling water with 1/4 to 1 teaspoon salt in a deep and large bowl.
Cook uncovered. The oven will beep, stir the pasta well and press start to continue. After
cooking, stir and stand for 1 minute if required. Rinse pasta with cold water.
Pour beans into the microwave- safe dish. Cover.
Place dish on the glass tray.
After reheating, stir and then stand for 1- 2 minutes with cover.
Place contents of can including brine in a microwave- save bowl.
Heat uncovered. After heating, stir well. Drain and serve.
Place stew in a microwave- save bowl. Cover with wrap loosely.
After heating, stir well and stand for 2 minutes.
Place desired number of eggs and milk into a large bowl. Whisk slightly.
Cover with wrap. After cooking, remove from the oven.
Stir well and stand for 1- 2 minutes with cover until firm.
Add amount of milk according to the quantity.
** 1 egg : 1 Tablespoon of milk
2 eggs : 2 Tablespoons of milk
3 eggs : 3 Tablespoons of milk
4 eggs : 4 Tablespoons of milk
1- 4 serves
0. 1 kg - 0. 3 kg
0.2 kg - 0. 8 kg
0.2 kg - 0. 6kg
0.2 kg - 0.6 kg
1- 4 eggs
Oats 1 package
Approx. 40g
Cold Milk
1 serve
1/3 cup
(1 package)
3/4 cup
(180ml)
2 serves
2/3 cups
(2 packages)
1 1/2 cups
(360ml)
3 serves
1 cup
(3 packages)
2 1/2 cups
(540ml)
4 serves
1 1/3 cups
(4 packages)
3 cups
(720ml)
Weight 100g 200g 300g Cover
Boiling water 400ml 700ml 1000ml No
21
GB
Page 21

Children
Press Stop/Clear.
22
GB
Cook
In the following example I will show you how to cook Sandwich .
Page 22

UTENSIL
INSTRUCTIONS
AUTO W EIGHT DEFROST G UIDE
23
CATEGORY
WEIGHT
GB
Page 23

Item
Cook time
Special Instructions
(at HIGH)
To heat or reheat successfully in the microwave, it is important to follow severa l guidelines. M easure the amount of
food in order to determine the time needed to reheat. A rrange the food in a circula r pa ttern for best results. Room
temperature food will hea t fa ster than refrigerated food. Ca nned foods should be taken out of the can and placed in a
microwavable container. The food will be heated more evenly if covered with a microwavable lid or vented pla stic
wrap. Remove cover carefully to prevent steam burns. Use the following cha rt as a guide for reheating cooked food.
Heating or Reheating
Guide
Sliced meat
3 slices
(0. 5cm thick)
Chicken pieces
1 breast
1 leg and thigh
Fish fillet
(17 0-2 30g)
La sagne
1 serving(3 00g)
Ca sserole
1 cup
4 cups
Ca sserole
cream or cheese
1 cup
4 cups
Sloppy Joe or
Barbecued beef
1 sandwich
(
1
/ 2
cup meat filling)
without bun
1~2 minutes
2~3 minutes
3~3
1
/ 2
minutes
1~2 minutes
4~6 minutes
1
1
/ 2
~3 minutes
4
1
/ 2
~7minutes
1~2
1
/ 2
minutes
3
1
/ 2
~6 minutes
1~2
1
/ 2
minutes
Place sliced meat on microwa vable plate.
Cover with pla stic wra p a nd vent.
¥
Place chicken pieces on microwa vable plate.
Cover with pla stic wra p a nd vent.
Place fish on microwa vable plate.
Cover with pla stic wra p a nd vent.
Place la sagne on microwa va ble plate.
Cover with pla stic wra p a nd vent.
CO O K covered in microwavable casserole dish.
Stir once ha lfwa y through cooking.
CO O K covered in microwavable casserole dish.
Stir once ha lfwa y through cooking.
Reheat filling a nd bun sepa rately.
CO O K covered in microwavable casserole dish.
Stir once. Hea t bun a s directed in chart below.
Item
Cook time
Special Instructions
(at HIGH)
Mashed potatoes
1 cup
4 cups
Baked beans
1 cup
Ravioli or pasta in sauce
1 cup
4 cups
Rice
1 cup
4 cups
Sandwich roll or bun
1 roll
Vegetables
1 cup
4 cups
Soup
1 serving (8 oz.)
2
1
/2~31/2 minutes
6~9 minutes
1
1
/2~3 minutes
2
1
/2~4 minutes
7
1
/2~11minutes
1~1
1
/2 minutes
3
1
/2~5 minutes
15~30 seconds
1
1
/2~21/2 minutes
3
1
/2~51/2 minutes
1
1
/2~2 minutes
COOK covered in microwavable casserole dish.
Stir once halfway through cooking.
COOK covered in microwavable casserole dish.
Stir once halfway through cooking.
COOK covered in microwavable casserole dish.
Stir once halfway through cooking.
COOK covered in microwavable casserole dish.
Stir once halfway through cooking.
Wrap in paper towel and place on glass tray.
COOK covered in microwavable casserole dish.
Stir once halfway through cooking.
COOK covered in microwavable casserole dish.
Stir once halfway through cooking.
24
GB
N ote: G ravy or sauce helps to keep meat juicy.
Page 24

Fresh Vegetable
Guide
Vegetable Amount
Cook time
Instructions
Standing
(at HIGH)
Time
Corn, Fresh
Mushrooms,
Fresh, Sliced
Parsnips, Fresh,
Sliced
Peas, Green,
Fresh
Sweet Potatoes
Whole Baking
(170~230g each)
White potatoes,
Whole Baking
(170~230g each)
Spinach, Fresh,
Leaf
Courgette, Fresh,
Sliced
Courgette, Fresh,
Whole
Husk. Add 2 tbsp water in 1.5 litre
baking dish. Cover.
Place mushrooms in 1.5 litre covered
casserole dish. Stir halfway through
cooking.
Add
1
/2
cup water in 1.5 litre covered
casserole dish. Stir halfway through
cooking.
Add
1
/2
cup water in 1.5 litre covered
casserole dish. Stir halfway through
cooking.
Pierce potatoes several times with fork.
Place on 2 paper towels.
Turn over halfway through cooking.
Pierce potatoes several times with fork.
Place on 2 paper towels.
Turn over halfway through cooking.
Add
1
/2
cup water in 2 litre covered
casserole dish.
Add
1
/2
cup water in 1.5 litre covered
casserole dish. Stir halfway through
cooking.
Pierce. Place on 2 paper towels.
Turn courgette over and rearrange
halfway through cooking.
2~3 minutes
2~3 minutes
2~3 minutes
2~3 minutes
2~3 minutes
2~3 minutes
2~3 minutes
2~3 minutes
2~3 minutes
4 ~ 8
1
1
/2 ~ 21/2
4 ~ 7
6 ~ 9
4 ~ 9
6~ 12
5
1
/2 ~ 71/2
9
1
/2
~ 14
4
1
/2 ~ 71/2
4
1
/2
~ 7
1
/2
6 ~ 9
2 ears
230g
450g
4 cups
2 medium
4 medium
2 potatoes
4 potatoes
450g
450g
450g
Vegetable Amount
Cook time
Instructions
Standing
(at HIGH)
Time
Artichokes
(230g each)
Asparagus,
Fresh, Spears
Green Beans
Beats, Fresh
Broccoli, Fresh,
Spears
Cabbage, Fresh,
Chopped
Carrots, Fresh,
Sliced
Cauliflower,
Fresh, Whole
Fresh, Flowerettes
Celery, Fresh,
Sliced
Trim. Add 2 tsp water and 2 tsp juice.
Cover.
Add 1 cup water. Cover.
Add
1
/2 cup water in 1.5 litre casserole
dish. Stir halfway through cooking.
Add
1
/2
cup water in 1.5 litre covered
casserole dish. Rearrange halfway
through cooking.
Place broccoli in baking dish.
Add
1
/2
cup water.
Add
1
/2
cup water in 1.5 litre covered
casserole dish. Stir halfway through
cooking.
Add
1
/4
cup water in 1.5 litre covered
casserole dish. Stir halfway through
cooking.
Trim. Add
1
/4
cup water in 1.5 litre
covered casserole dish. Stir halfway
through cooking.
Slice. Add
1
/2
cup water in 1.5 litre
covered casserole dish. Stir halfway
through cooking.
2~3 minutes
2~3 minutes
2~3 minutes
2~3 minutes
2~3 minutes
2~3 minutes
2~3 minutes
2~3 minutes
2~3 minutes
4
1
/2
~ 7
10 ~ 12
2
1
/2
~ 6
7 ~ 11
11 ~ 16
5 ~ 8
5
1
/2~
7
1
/2
2 ~ 3
5 ~ 7
11 ~ 16
2 medium
4 medium
450g
450g
450g
450g
450g
200g
450g
2 cups
4 cups
25
GB
Page 25

Important safety instructions
26
GB
Read carefully and keep for future reference
WARNING
Please ensure cooking times are correctly
set as over cooking may result in FIRE and
subsequent DAMAGE to the OVEN.
1 Do not attempt to tamper with, or make any adjustments or repairs to the
door, control panel, safety interlock switches or any other part of the oven.
It is hazardous for anyone to carry out any service or repair operation
which involves the removal of any cover which gives protection against
exposure to microwave energy. Repairs should only be undertaken by a
qualified service technician.
2 Do not operate the oven when empty. It is best to leave a glass of water in
the oven when not in use. The water will safely absorb all microwave
energy, if the oven is accidentally started.
3 Do not dry clothes in the microwave oven, which may become carbonized
or burned if heated too long.
4 Do not cook food wrapped in paper towels, unless your cook book
contains instructions, for the food you are cooking.
5 Do not use newspaper in place of paper towels for cooking.
6 Do not use wooden containers. They may heat-up and char. Do not use
ceramic containers which have metallic (e.g. gold or silver) inlays. Always
remove metal twist ties. Metal objects in the oven may arc, which can
cause serious damage.
7 Do not operate the oven with a kitchen towel, a napkin or any other
obstruction between the door and the front edges of the oven, which may
cause microwave energy leakage.
8 Do not use recycled paper products since they may contain impurities
which may cause sparks and/or fires when used in cooking.
9 Do not rinse the turntable by placing it in water just after cooking. This
may cause breakage or damage.
10 Small amounts of food require shorter cooking or heating time. If normal
times are allowed they may overheat and burn.
11 Be certain to place the oven so the front of the door is 8 cm or more
behind the edge of the surface on which it is placed, to avoid accidental
tipping of the appliance.
12 Before cooking, pierce the skin of potatoes, apples or any such fruit or
vegetable.
13 Do not cook eggs in their shell. Pressure will build up inside the egg which
will burst.
14 Do not attempt deep fat frying in your oven.
15 Remove the plastic wrapping from food before cooking or defrosting. Note
though that in some cases food should be covered with plastic film, for
heating or cooking.
16 If the oven door or door seals are damaged, the oven must not be
operated until it has been repaired by a qualified service technician.
17 If smoke is observed, switch off or disconnect the oven from the power
supply and keep the oven door closed in order to stifle any flames.
18 When food is heated or cooked in disposable containers of plastic, paper
or other combustible materials, check the oven frequently due to the
possibility of the food container is deteriorating.
19 Only allow children to use the oven without supervision when adequate
instructions have been given so that the child is able to use the oven in a
safe way and understands the hazards of improper use.
20 Liquids or other foods must not be heated in sealed containers since they
are liable to explode.
21 Do not operate the oven, if the door seals and adjacent parts of the
microwave oven are faulty, until the oven has been repaired by a qualified
service technician.
22 Check the utensils are suitable for use in microwave ovens before use.
23 Do not touch the oven door, outer cabinet, rear cabinet, oven cavity,
accessories and dishes during grill mode, convection mode and auto cook
operations, unless wearing thick oven gloves, as they will become hot.
Before clearing make sure they are not hot.
Page 26

WARNING
27
Please ensure cooking times are correctly
set as over cooking may result in FIRE and
subsequent DAMAGE to the OVEN.
Important safety instructions
Read carefully and keep for future reference
24 Only use utensils that are suitable for use in microwave ovens.
25 When heating food in plastic or paper containers, keep an eye on the
oven due to the possibility of ignition.
26 If smoke is observed, switch off or unplug the appliance and keep the
door closed in order to stifle any flames.
27 Microwave heating of beverages can result in delayed eruptive boiling,
therefore care must be taken when handing the container.
28 The contents of feeding bottles and baby food jars shall be stirred or
shaken and the temperature checked before consumption, in order to
avoid burns.
29 Eggs in their shell and whole hard-boiled eggs should not be heated in
microwave ovens since they may explode, even after microwave heating
has ended.
30 Details for cleaning door seals, cavities and adjacent parts.
31 The oven should be cleaned regularly and any food deposits removed.
32 Failure to maintain the oven in a clean condition could lead to
deterioration of the surface that could adversely affect the life of the
appliance and possibly result in a hazardous situation.
33 Only use the temperature probe recommended for this oven (for
appliances having a facility to use a temperature-sensing probe).
34 If heating elements are provided, during use the appliance becomes hot.
Care should be taken to avoid touching heating elements inside the
oven.
35 The appliance is not intended for use by young children or infirm
persons without supervision.
WARNING: If the door or door seals are damaged, the oven must not be
operated until it has been repaired by a competent person.
WARNING: It is hazardous for anyone other than a competent person to
carry out any service or repair operation that involves the
removal of a cover which gives protection against exposure to
microwave energy.
WARNING: Liquids and other foods must not be heated in sealed
containers since they are liable to explode.
WARNING: Only allow children to use the oven without supervision when
adequate instructions have been given so that the child is able
to use the oven in a safe way and understands the hazards of
improper use.
GB
Page 27

Microwave-safe
Utensils
Never use metal or metal trimmed utensils in your
microwave oven
Microwaves cannot penetrate metal. They will bounce off any metal object in the
oven and cause arcing, an alarming phenomenon that resembles lightning.
Most heat resistant non metallic cooking utensils are safe for use in your microwave
oven. However, some may contain materials that render them unsuitable as
microwave cookware. If you have any doubts about a particular utensil, there’s a
simple way to find out if it can be used in your microwave oven.
Place the utensil in question next to a glass bowl filled with water in the microwave
oven. Microwave at power HIGH for 1 minute. If the water heats up but the utensil
remains cool to the touch, the utensil is microwave~safe. However, if the water does
not change temperature but the utensil becomes warm, microwaves are being
absorbed by the utensil and it is not safe for use in the microwave oven. You
probably have many items on hand in your kitchen right now that can be used as
cooking equipment in your microwave oven. Just read through the following
checklist.
Dinner plates
Many kinds of dinner-ware are microwave-safe. If in doubt consult the
manufacturer’s literature or perform the microwave test.
Glassware
Glassware that is heat-resistant is microwave-safe. This would include all brands of
oven tempered glass cookware. However, do not use delicate glassware, such as
tumblers or wine glasses, as these might shatter as the food warms.
Plastic storage containers
These can be used to hold foods that are to be quickly reheated. However, they
should not be used to hold foods that will need considerable time in the oven as hot
foods will eventually warp or melt plastic containers.
Paper
Paper plates and containers are convenient and safe to use in your microwave oven,
provided that the cooking time is short and foods to be cooked are low in fat and
moisture. Paper towels are also very useful for wrapping foods and for lining baking
trays in which greasy foods such as bacon are cooked. In general, avoid coloured
paper products as the colour may run. Some recycled paper products may contain
impurities which could cause arcing or fires when used in the microwave oven.
Plastic cooking bags
Provided they are made specially for cooking, cooking bags are microwave safe.
However, be sure to make a slit in the bag so that steam can escape. Never use
ordinary plastic bags for cooking in your microwave oven, as they will melt and
rupture.
Plastic microwave cookware
A variety of shapes and sizes of microwave cookware are available. For the most
part, you can probably use items you already have on hand rather than investing in
new kitchen equipment.
Pottery, stoneware and ceramic
Containers made of these materials are usually fine for use in your microwave oven,
but they should be tested to be sure.
CAUTION
Some items with high lead or iron content are not suitable for cooking
utensils.
Utensils should be checked to ensure that they are suitable for use in
microwave ovens.
GB
28
Page 28

Keeping an eye on things
The recipes in the book have been formulated with great care, but your success in
preparing them depends on how much attention you pay to the food as it cooks.
Always watch your food while it cooks. Your microwave oven is equipped with a
light that turns on automatically when the oven is in operation so that you can see
inside and check the progress of your food. Directions given in recipes to elevate,
stir, and the like should be thought of as the minimum steps recommended. If the
food seems to be cooking unevenly, simply make the necessary adjustments you think
appropriate to correct the problem.
Factors affecting microwave cooking times
Many factors affect cooking times. The temperature of ingredients used in a recipe
makes a big difference in cooking times. For example, a cake made with ice-cold
butter, milk, and eggs will take considerably longer to bake than one made with
ingredients that are at room temperature. All of the recipes in this book give a range
of cooking times. In general, you will find that the food remains under-cooked at the
lower end of the time range, and you may sometimes want to cook your food beyond
the maximum time given, according to personal preference. The governing
philosophy of this book is that it is best for a recipe to be conservative in giving
cooking times. While overcooked food is ruined for good. Some of the recipes,
particularly those for bread, cake, and custards, recommend that food be removed
from the oven when they are slightly undercooked. This is not a mistake. When
allowed to stand, usually covered, these foods will continue to cook outside of the
oven as the heat trapped within the outer portions of the food gradually travels
inward. If the food is left in the oven until it is cooked all the way through, the outer
portions will become overcooked or even burnt. You will become increasingly skilful
in estimating both cooking and standing times for various foods.
Density of food
Light, porous food such as cakes and breads cook more quickly than heavy, dense
foods such as roasts and casseroles. You must take care when microwaving porous
food that the outer edges do not become dry and brittle.
Height of food
The upper portion of tall food, particularly roasts, will cook more quickly than the
lower portion. Therefore, it is wise to turn tall food during cooking, sometimes several
times.
Moisture content of food
Since the heat generated from microwaves tends to evaporate moisture, relatively dry food
such as roasts and some vegetables should either be sprinkled with water prior to cooking
or covered to retain moisture.
Bone and fat content of food
Bones conduct heat and fat cooks more quickly than meat. Care must be taken when
cooking bony or fatty cuts of meat that they do not cook unevenly and do not become
overcooked.
Quantity of food
The number of microwaves in your oven remains constant regardless of how much food is
being cooked. Therefore, the more food you place in the oven, the longer the cooking time.
Remember to decrease cooking times by at least one third when halving a recipe.
Shape of food
Microwaves penetrate only about 2.cm into food, the interior portion of thick foods are
cooked as the heat generated on the outside travels inward. Only the outer edge of food in
cooked by microwave energy; the rest is cooked by conduction. The worst possible shape
for a food that is to be microwaved is a thick square. The corners will burn long before the
centre is even warm . Round thin foods and ring shaped foods cook successfully in the
microwave.
Covering
A cover traps heat and steam which causes food to cook more quickly. Use a lid or
microwave cling film with a corner folded back to prevent splitting.
Browning
Meats and poultry that are cooked fifteen minutes or longer will brown lightly in their own
fat. Foods that are cooked for a shorter period of time may be brushed with a browning
sauce such as worcestershire sauce, soy sauce or barbecue sauce to achieve an appetizing
colour. Since relatively small amounts of browning sauces are added to food the original
flavour of the recipe is not altered.
Covering with greaseproof paper
Greaseproofing effectively prevents spattering and helps food retain some heat. But
because it makes a looser cover than a lid or clingfilm, it allows the food to dry out slightly.
Arranging and spacing
Individual foods such as baked potatoes, small cakes and hors d’oeuvres will heat more
evenly if placed in the oven an equal distance apart, preferably in a circular pattern. Never
stack foods on top of one another.
Food characteristics &
Microwave cooking
GB
29
Page 29

Food characteristics &
Microwave cooking
Stirring
Stirring is one of the most important of all microwaving techniques. In conventional cooking,
food is stirred for the purpose of blending. Microwaved food, however, is stirred in order to
spread and redistribute heat. Always stir from the outside towards the centre as the outside
of the food heats first.
Turning over
Large, tall foods such as roasts and whole chickens should be turned so that the top and
bottom will cook evenly. It is also a good idea to turn cut up chicken and chops.
Placing thicker portions facing outwards
Since microwaves are attracted to the outside portion of food, it makes sense to place
thicker portions of meat, poultry and fish to the outer edge of the baking dish. This way,
thicker portions will receive the most microwave energy and the food will cook evenly.
Shielding
Strips of aluminium foil (which block microwaves) can be placed over the corners or edges
of square and rectangular foods to prevent those portions from overcooking. Never use too
much foil and make sure the foil is secured to the dish or it may cause ‘arcing’ in the oven.
Elevating
Thick or dense foods can be elevated so that microwaves can be absorbed by the underside
and centre of the foods.
Piercing
Foods enclosed in a shell, skin or membrane are likely to burst in the oven unless they are
pierced prior to cooking. Such foods include yolks and whites of eggs, clams and oysters
and whole vegetables and fruits.
Testing if cooked
Food cooks so quickly in a microwave oven, it is necessary to test it frequently. Some foods
are left in the microwave until completely cooked, but most foods, including meats and
poultry, are removed from the oven while still slightly undercooked and allowed to finish
cooking during standing time. The internal temperature of foods will rise between 5
0
F (30C)
and 15
0
F (80C) during standing time.
Standing time
Foods are often allowed to stand for 3 to 10 minutes after being removed from the
microwave oven. Usually the foods are covered during standing time to retain heat unless
they are supposed to be dry in texture (some cakes and biscuits, for example). Standing
allows foods to finish cooking and also helps flavour blend and develop.
To Clean Your Oven
1 Keep the inside of the oven clean
Food spatters or spilled liquids stick to oven walls and between seal and door
surface. It is best to wipe up spillovers with a damp cloth right away. Crumbs and
spillovers will absorb microwave energy and lengthen cooking times. Use a damp
cloth to wipe out crumbs that fall between the door and the frame. It is important to
keep this area clean to assure a tight seal. Remove greasy spatters with a soapy cloth
then rinse and dry. Do not use harsh detergent or abrasive cleaners. The glass tray
can be washed by hand or in the dishwasher.
2 Keep the outside of the oven clean
Clean the outside of your oven with soap and water then with clean water and dry
with a soft cloth or paper towel. To prevent damage to the operating parts inside the
oven, the water should not be allowed to seep into the ventilation openings. To clean
control panel, open the door to prevent oven from accidentally starting, and wipe a
damp cloth followed immediately by a dry cloth. Press STOP/CLEAR after cleaning.
3 If steam accumulates inside or around the outside of the oven door, wipe the panels
with a soft cloth. This may occur when the microwave oven is operated under high
humidity conditions and in no way indicates a malfunction of the unit.
4 The door and door seals should be kept clean. Use only warm, soapy water, rinse
then dry thoroughly.
DO NOT USE ABRASIVE MATERIALS, SUCH AS CLEANING POWDERS OR
STEEL AND PLASTIC PADS.
Metal parts will be easier to maintain if wiped frequently with a damp cloth.
GB
30
Page 30

Questions &
Answers
Q What’s wrong when the oven light will not glow?
A There may be several reasons why the oven light will not glow.
Light bulb has blown
Door is not closed
Q Does microwave energy pass through the viewing screen in the door?
A No. The holes, or ports, are made to allow light to pass; they do not let
microwave energy through.
Q Why does the beep tone sound when a pad on the Control Panel is
touched?
A The beep tone sounds to assure that the setting is being properly entered.
Q Will the microwave oven be damaged if it operates empty?
A Yes Never run it empty or without the glass tray.
Q Why do eggs sometimes pop?
A When baking, frying, or poaching eggs, the yolk may pop due to steam
build up inside the yolk membrane. To prevent this, simply pierce the yolk
before cooking. Never microwave eggs in the shell.
Q Why is standing time recommended after microwave cooking is over?
A After microwave cooking is finished, food keeps on cooking during
standing time. This standing time finishes cooking evenly throughout the
food. The amount of standing time depends on the density of the food.
Q Is it possible to pop corn in a microwave oven?
A Yes, if using one of the two methods described
below
1 Popcorn-popping utensils designed specifically for microwave cooking.
2 Prepackaged commercial microwave popcorn that contains specific
times and power outputs needed for an acceptable final product.
FOLLOW EXACT DIRECTIONS GIVEN BY EACH MANUFACTURER FOR
THEIR POPCORN PRODUCT. DO NOT LEAVE THE OVEN UNATTENDED
WHILE THE CORN IS BEING POPPED. IF CORN FAILS TO POP AFTER
THE SUGGESTED TIMES, DISCONTINUE COOKING. OVERCOOKING
COULD RESULT IN THE CORN CATCHING FIRE.
CAUTION
NEVER USE A BROWN PAPER BAG FOR POPPING CORN. NEVER
ATTEMPT TO POP LEFTOVER KERNELS.
Q Why doesn’t my oven always cook as fast as the cooking guide says?
A Check your cooking guide again to make sure you’ve followed directions
correctly, and to see what might cause variations in cooking time.
Cooking guide times and heat settings are suggestions, chosen to help
prevent overcooking, the most common problem in getting used to a
microwave oven. Variations in the size, shape, weight and dimensions of
the food require longer cooking time. Use your own judgement along with
the cooking guide suggestions to test food condition, lust as you would do
with a conventional cooker.
GB
31
Page 31

Plug wiring information/
Technical Specifications
The wires in this mains lead are colored in accordance with the
following codes
BLUE ~ Neutral
BROWN ~ Live
GREEN & YELLOW ~ Earth
As the colours of the wires in the mains lead of this appliance may
not correspond with the coloured markings identifying the terminals
in your plug proceed as follows:
The wire which is colored BLUE must be connected to the terminal
which is marked with the letter N or Colored BLACK.
The wire which is colored BROWN must be connected to the
terminal which is marked with the letter L or colored RED.
The wire which is colored GREEN & YELLOW or GREEN must be
connected to the terminal which is marked with the letter E or .
If the supply cord is damaged, it must be replaced by the
manufacturer or its service agent or a similarly qualified person in
order to avoid a hazard;
Warning
Technical Specification
This appliance must be earthed
GB
<English>
Disposal of your old appliance
1. When this crossed-out wheeled bin symbol is attached to a product it
means the product is covered by the European Directive 2002/96/EC.
2. All electrical and electronic products should be disposed of separately from
the municipal waste stream via designated collection facilities appointed by
the government or the local authorities.
3. The correct disposal of your old appliance will help prevent potential
negative consequences for the environment and human health.
4. For more detailed information about disposal of your old appliance, please
contact your city office, waste disposal service or the shop where you
purchased the product.
32
Power Input
Output
Microwave Frequency
Outside Dimension
Power Consumption
Microwave
230 V AC /50Hz
850 W (IEC60705 rating standard)
2450 MHz
507 mm(W) X 283mm(H) X 43 5mm(D)
1250 Watts
Page 32

Categorie Gewicht Benodigdheden Richtlijnen
RICHTLIJNEN VOOR
Kinderen
Koken
86
NL
Gebruik deze functie om snel warme broodjes voor kinderen te maken.
Warme broodjes 3 stuks Papieren servet
(Voedsel: kamer)
Ingrediënten:
Witbrood - 3 sneetjes
Aardappel – 1 stuks
Kaas – 50 gram
Boter – 25 gram
Zout en groen naar smaak toevoegen
Voorbereiding:
1. Doorprik aardappel op verschillende
plaatsen. Kook 5-6 minuten op 100%
vermogen.
2. Rasp kaas en gepelde aardappel met
grove rasp. Bestrooi aardappel met zout.
3. Beleg boterhammen met
achtereenvolgens boter, geraspte
aardappel, kaas.
4. Plaats broodjes op papieren servet in
de oven.
5. Kies menu en druk op Start.
Page 33

NL
Voedsel
Kooktijd
Speciale richtlijnen
(HIGH)
Om voedsel met succes te verwarmen of op te warmen in de magnetron, is het belangrijk dat u bepaalde richtlijnen
Lapjes vlees
3 lapjes
(0,5 cm dik)
Stukken kip
1 borst
1 poot en bil
Visfilet
(170-230 gr)
Lasagne
1 portie (300 gr)
Stoofschotel
1 kop
4 koppen
Stoofschotel
met room of kaas
1 kop
4 koppen
Broodje gehakt of
geroosterd
rundvlees
1 sandwich (1/2
kop vleesvulling)
zonder broodje
1 tot 2 minuten
2 tot 3 minuten
3 tot 3
1
/2 minuten
1 tot 2 minuten
4 tot 6 minuten
1
1
/2 tot 3 minuten
4
1
/2 tot 7minuten
1 tot 2
1
/2 minuten
3
1
/2 tot 6 minuten
1 tot 2
1
/2 minuten
Leg de lapjes vlees op een magnetronbestendig bord.
Dek af met plastic folie en doorprik de folie.
• Opmerking: jus of saus helpt om het vlees sappig te houden.
Leg de stukken kip op een magnetronbestendig bord.
Dek af met plastic folie en doorprik de folie.
Leg de vis op een magnetronbestendig bord.
Dek af met plastic folie en doorprik de folie.
Leg de lasagne op een magnetronbestendig bord.
Dek af met plastic folie en doorprik de folie.
KOOK in een afgedekte magnetronbestendige schotel.
Eenmaal omroeren halverwege het koken.
KOOK in een afgedekte magnetronbestendige schotel.
Eenmaal omroeren halverwege het koken.
Warm de vulling en het broodje afzonderlijk op.
KOOK in een afgedekte magnetronbestendige schotel.
Eenmaal omroeren. Warm het broodje op volgens de
richtlijnen in de hiernavolgende tabel.
Voedsel
Kooktijd
Speciale richtlijnen
(HIGH)
Aardappelpuree
(350 gr)
Gebakken bonen
1 kop
Ravioli of pasta in saus
1 kop
4 koppen
Rijst
1 kop
4 koppen
Sandwich of broodje
1 broodje
Groenten
1 kop
4 koppen
Soep
1 portie (1/4 l)
4 tot 4
1
/2 minuten
1
1
/2 tot 3 minuten
2
1
/2 tot 4 minuten
7
1
/2 tot 11minuten
1 tot 1
1
/2 minuten
3
1
/2 tot 5 minuten
15 tot 30 seconden
1
1
/2 tot 21/2 minuten
3
1
/2 tot 51/2 minuten
1
1
/2 tot 2 minuten
KOOK in een afgedekte magnetronbestendige schotel.
Eenmaal omroeren halverwege het koken.
KOOK in een afgedekte magnetronbestendige schotel.
Eenmaal omroeren halverwege het koken.
KOOK in een afgedekte magnetronbestendige schotel.
Eenmaal omroeren halverwege het koken.
KOOK in een afgedekte magnetronbestendige schotel.
Eenmaal omroeren halverwege het koken.
In keukenpapier wikkelen en op het glazen
draaiplateau plaatsen.
KOOK in een afgedekte magnetronbestendige schotel.
Eenmaal omroeren halverwege het koken.
KOOK in een afgedekte magnetronbestendige schotel.
Eenmaal omroeren halverwege het koken.
87
volgt. Meet de hoeveelheid voedsel af om te bepalen hoeveel tijd er nodig is om het op te warmen. Plaats het voedsel in
cirkelvorm voor optimale resultaten. Het opwarmen van voedsel op kamertemperatuur duurt minder lang dan het
opwarmen van gekoeld voedsel. Verwijder ingeblikt voedsel uit het blik en doe het in een magnetronbestendige schaal.
Het voedsel zal sneller opwarmen als u het afdekt met een magnetronbestendig deksel of plasticfolie met luchtgaten.
Verwijder de afdekking voorzichtig om verbranding door stoom te voorkomen. Gebruik de onderstaande tabel als
richtlijn voor het opwarmen van gekookt voedsel.
verwarmen of opwarmen
Richtlijnen voor
Page 34

NL
Richtlijnen voor
verse groenten
Groente
Hoeveelheid
Kooktijd
Richtlijnen Standtijd
(HIGH)
Maïs, vers
Champignons,
vers, schijfjes
Pastinaak, vers,
gesneden
Groene erwten,
vers
Zoete aardappelen,
hele (170 tot 230
gr per stuk)
Witte aardappelen,
hele (170 tot 230
gr per stuk)
Spinazie, vers,
bladspinazie
Courgette, vers,
gesneden
Courgette, vers,
heel
Schillen. 2 eetlepels water toevoegen in
een schotel van 1,5 liter. Afdekken.
Champignons in schotel van 1,5 liter
doen en afdekken. Halverwege tijdens
het koken omroeren.
1/2 kop water toevoegen in een schotel
van 1,5 liter en afdekken. Halverwege
tijdens het koken omroeren.
1/2 kop water toevoegen in een schotel
van 1,5 liter en afdekken. Halverwege
tijdens het koken omroeren.
Enkele malen in de aardappelen prikken
met een vork. Op 2 stukken
keukenpapier plaatsen. Halverwege
tijdens het koken omkeren.
Enkele malen in de aardappelen prikken
met een vork. Op 2 stukken
keukenpapier plaatsen. Halverwege
tijdens het koken omkeren.
1/2 kop water toevoegen in een schotel
van 2 liter en afdekken.
1/2 kop water toevoegen in een schotel
van 1,5 liter en afdekken. Halverwege
tijdens het koken omroeren.
Doorprikken. Op 2 stukken
keukenpapier plaatsen. Halverwege het
koken de courgette omkeren en
herschikken.
2tot3 minuten
2tot3 minuten
2tot3 minuten
2tot3 minuten
2tot3 minuten
2tot3 minuten
2tot3 minuten
2tot3 minuten
2tot3 minuten
4 tot 8
1
1
/2 tot 21/2
4 tot 7
6 tot 9
4 tot 9
6 tot 12
5
1
/2 tot 71/2
9
1
/2
tot 14
4
1
/2 tot 71/2
4
1
/2 tot 71/2
6 tot 9
2 kolven
230 gr
450 gr
4 koppen
2 middelgrote
4 middelgrote
2aardappelen
4aardappelen
450 gr
450 gr
450 gr
Groente
Hoeveelheid
Kooktijd
Richtlijnen Standtijd
(HIGH)
Artisjokken
(230 gr per stuk)
Asperges,
vers, stengels
Groene bonen
Bieten, vers
Broccoli, vers,
stengels
Kool, vers,
gesneden
Wortelen, vers,
gesneden
Bloemkool,
vers, heel
Vers,
bloemkoolroosjes,
selder, vers,
gesneden
Schoonmaken. 2 eetlepels water en 2
eetlepels sap toevoegen. Afdekken.
1 kop water toevoegen. Afdekken.
1/2 kop water toevoegen in schotel van 1,5
liter. Halverwege tijdens het koken omroeren.
1/2 kop water toevoegen in een schotel
van 1,5 liter en afdekken. Herschikken
halverwege het koken.
Doe de broccoli in een ovenschotel.
1/2 kop water toevoegen.
1/2 kop water toevoegen in een schotel
van 1,5 liter en afdekken. Halverwege
tijdens het koken omroeren.
1/4 kop water toevoegen in een schotel
van 1,5 liter en afdekken. Halverwege
tijdens het koken omroeren.
Schoonmaken. 1/4 kop water toevoegen in
een schotel van 1,5 liter en afdekken.
Halverwege tijdens het koken omroeren.
In stukken snijden. 1/2 kop water
toevoegen in een schotel van 1,5 liter en
afdekken. Halverwege tijdens het koken
omroeren.
2tot3 minuten
2tot3 minuten
2tot3 minuten
2tot3 minuten
2tot3 minuten
2tot3 minuten
2tot3 minuten
2tot3 minuten
2tot3 minuten
4
1
/2
tot 7
10 tot 12
2
1
/2
tot 6
7 tot 11
11 tot 16
5 tot 8
5
1
/2tot
7
1
/2
2 tot 3
5 tot 7
11 tot 16
2 middelgrote
4 middelgrote
450 gr
450 gr
450 gr
450 gr
450 gr
200 gr
450 gr
2 koppen
4 koppen
88
Page 35

11. Plaats de oven zodanig dat de voorkant van de deur zich op minimaal 8
cm van de rand van het oppervlak bevindt waarop de oven staat, om te
voorkomen dat hij per ongeluk omkantelt.
12. Doorprik aardappelen, appelen of ander dergelijk fruit of groenten vóór
u ze kookt.
13. Kook eieren niet in hun schaal. Er zal dan druk in het ei ontstaan,
waardoor het zal barsten.
14. Probeer niet te frituren in uw oven.
15. Verwijder de plastic verpakking van etenswaren vóór u ze kookt of
ontdooit. Soms moeten etenswaren echter worden afgedekt met plastic
folie vóór u ze opwarmt of kookt.
16. Als de ovendeur of de deurafdichtingen beschadigd zijn, mag de oven
niet meer worden gebruikt voordat hij is gerepareerd door een
gekwalificeerde onderhoudstechnicus.
17. Als u rook opmerkt, moet u de oven uitschakelen of de stekker uit het
stopcontact trekken en de ovendeur dicht houden om de vlammen te
smoren.
18. Wanneer etenswaren worden opgewarmd of gekookt in plastic
wegwerpschaaltjes, papier of ander brandbaar materiaal, moet u de
oven regelmatig controleren in verband met brandgevaar.
19. Kinderen mogen de oven alleen gebruiken onder toezicht en nadat ze
duidelijke instructies hebben gekregen, zodat ze de oven veilig kunnen
bedienen en zich bewust zijn van de gevaren van verkeerd gebruik.
20. Vloeistoffen of andere etenswaren mogen niet worden opgewarmd in
gesloten houders, want dit houdt ontploffingsgevaar in.
1. Knoei niet met de deur, het bedieningspaneel, de veiligheidsschakelaars
of enig ander onderdeel van de oven en voer er evenmin aanpassingen of
reparaties aan uit. Het uitvoeren van onderhoud of reparaties waarvoor
beschermingen tegen microgolfenergie moeten worden verwijderd, is
gevaarlijk. Reparaties mogen uitsluitend worden uitgevoerd door een
gekwalificeerd onderhoudstechnicus.
2. Bedien de oven niet terwijl hij leeg is. U laat het best een glas water in de
oven staan wanneer u hem niet gebruikt. Het water zal alle
microgolfenergie veilig absorberen als de oven per ongeluk wordt gestart.
3. Droog geen kleren in de magnetronoven. Als deze te lang worden
verwarmd, kunnen ze verkolen of verbranden.
4. Kook geen voedsel dat in keukenpapier is gewikkeld, tenzij dit volgens de
instructies in uw kookboek zo hoort.
5. Gebruik geen krantenpapier in plaats van keukenpapier om te koken.
6. Gebruik geen houten houders. Deze kunnen warm worden en
verbranden. Gebruik geen keramische houders met metalen inlegwerk
(bv. goud of zilver). Verwijder altijd metalen verpakkingsdelen. Metalen
voorwerpen kunnen vonken en aldus ernstige schade veroorzaken.
7. Bedien de oven niet met een stuk keukenpapier, een servet of enig ander
obstakel tussen de deur en de voorste randen van de oven. Dit kan
lekkage van microgolfenergie veroorzaken.
8. Gebruik geen gerecycleerd papier. Dit kan immers onzuiverheden
bevatten die vonken en/of brand kunnen veroorzaken tijdens het koken.
9. Spoel het draaiplateau niet af in water onmiddellijk na het koken. Dit kan
breuk of beschadiging veroorzaken.
10. Hoe kleiner de etenswaren, des te korter de kook- of verwarmingstijd.
Als men de normale kooktijden aanhoudt, kan dit oververhitting en
brand veroorzaken.
WAARSCHUWING
89
Zorg ervoor dat u de kooktijden correct instelt.
Te lang koken kan immers BRAND en bijgevolg SCHADE
aan de OVEN veroorzaken.
Veiligheidsvoorschriften
NL
Page 36

30. Gebruik uitsluitend de voor deze oven aanbevolen temperatuurpijl (voor
apparaten die uitgerust zijn met een temperatuursensor mogelijkheid).
31. Indien u de meegeleverde verwarmingselementen gebruikt, zal het
apparaat heet worden. Zorg ervoor dat u de verwarmingselementen
binnen de oven niet aanraakt.
32. Het toestel mag niet zonder toezicht worden gebruikt door jonge
kinderen of door geestelijke gehandicapte mensen.
21. Gebruik uitsluitend gereedschappen die voor het magnetron zijn
bedoeld.
22. Wanner u eten in plastiek-of papierbakjes voorverwarmt, houd de oven
in de gaten om brand te voorkomen.
23. Indien u rook opmerkt, schakel het apparaat uit of trek de stekker uit het
stopcontact en houd de deur dicht om eventuele vlammen te doven.
24. Het verwarmen van drank in de magnetron kan een vertraagde maar
plotselinge kookreactie veroorzaken, waardoor u het bakje voorzichtig
dient te verwijderen.
25. Om verbranding te voorkomen, dient u, vóór consumptie, de inhoud van
voedingsflesjes en potjes babyvoeding te roeren en te schudden en de
temperatuur af te laten nemen.
26. Verwarm nooit eieren in hun dop of hele gekookte eieren in de
magnetron, want ze kunnen ontploffen, zelfs nadat de verwarmingstijd
van de magnetron is beëindigd.
27. Details over het schoonmaken van deurafsluitingen, hoekjes en
aanliggende delen.
28. De oven moet regelmatig worden schoongemaakt en alle voedselrestjes
worden verwijderd.
29. Indien u de oven niet schoon houd, kan het oppervlakte van het
apparaat verslechteren, waardoor het toestel minder lang mee gaat en
een gevaarlijke situatie kan veroorzaken.
Veiligheidsvoorschriften
WAARSCHUWING: Indien de deur of de deurafsluiting is beschadigd, zal
de oven niet werken tot een bevoegde technicus het
probleem heeft verholpen.
WAARSCHUWING: Het is gevaarlijk voor niet bevoegde personen het
apparaat te openen of het deksel te verwijderen om
het toestel te repareren, want het deksel beschermt
tegen de magnetron uitstraling.
WAARSCHUWING: Verwarm nooit vloeistof en etenswaren in afgedekte
bakjes, want ze kunnen ontploffen.
WAARSCHUWING: Laat kinderen alleen de oven zonder toezicht gebruiken
nadat u duidelijke instructies heeft gegeven zodat het
kind de oven op een veilige manier kan gebruiken en
de gevaren van een onjuist gebruik begrijpt.
90
NL
Page 37

Magnetronbestendig
Gebruik nooit metalen of met metaal afgewerkt kookgerei in uw
magnetronoven
Microgolven dringen immers niet door metaal. Metalen voorwerpen in de oven
zullen de microgolven weerkaatsen, waardoor een vonkoverslag ontstaat, een
verschijnsel dat vergelijkbaar is met bliksem. De meeste hittebestendige niet-metalen
houders zijn geschikt voor gebruik in uw magnetronoven. Sommige houders kunnen
echter materiaal bevatten waardoor ze ongeschikt zijn voor de magnetron. Als u
twijfelt of een bepaalde houder geschikt is voor de magnetron, dan kunt u hierover
op een eenvoudige manier zekerheid krijgen. Plaats de houder in kwestie naast een
glazen schaal gevuld met water in de magnetronoven. Laat de magnetron
gedurende 1 minuut met hoog vermogen (HIGH) werken. Als het water warm wordt,
maar de houder koud aanvoelt, dan is hij geschikt voor de magnetron. Als het water
echter niet van temperatuur verandert, maar de houder warm wordt, worden de
microgolven opgeslorpt door de houder en is hij niet geschikt voor gebruik in de
magnetronoven. Wellicht hebt u reeds heel wat kookgerei in uw keuken dat geschikt
is voor gebruik in uw magnetronoven. Overloop gewoon even de volgende
controlelijst.
Servies
Vele soorten serviezen zijn magnetronbestendig. Lees in geval van twijfel de
documentatie van de fabrikant of doe de magnetrontest.
Glaswerk
Hittebestendig glaswerk is geschikt voor de magnetron. Dit omvat alle merken van in
de oven gehard glaswerk. Gebruik echter geen fragiele glazen, zoals tuimelglazen
of wijnglazen. Deze kunnen immers barsten wanneer het voedsel warm wordt.
Plastic opbergdozen
Deze kunnen worden gebruikt voor voedsel dat snel moet worden opgewarmd.
Gebruik ze echter niet voor voedsel dat een aanzienlijke tijd in de oven moet staan.
Door de warmte van het voedsel kunnen de plastic dozen immers vervormen of
smelten.
Papier
Papieren borden en houders zijn handig en kunnen veilig in uw magnetronoven
worden gebruikt, op voorwaarde dat de kooktijd kort is en dat het te koken voedsel
vet- en vochtarm is. Keukenpapier is ook erg handig om etenswaren in te wikkelen
en voor het bedekken van bakschotels waarin vette etenswaren, bijvoorbeeld spek,
worden gekookt. U vermijdt het best gekleurd papier, aangezien de kleur kan
uitlopen. Gerecycleerd papier kan onzuiverheden bevatten die vonken en/of brand
kunnen veroorzaken bij gebruik in de magnetronoven.
Plastic kookzakjes
Kookzakjes zijn magnetronbestendig mits ze speciaal voor het koken bestemd zijn.
Maak echter een insnijding in het zakje zodat de stoom kan ontsnappen. Gebruik
geen gewone plastic zakjes in uw magnetronoven, want deze zullen smelten en
barsten.
Plastic magnetron-kookgerei
Magnetron-kookgerei bestaat in verschillende vormen en formaten.
Doorgaans kunt u het keukengerei gebruiken dat u al heeft, zodat u geen
nieuwe dingen hoeft te kopen.
Aardewerk, steengoed en keramiek
Houders die uit deze materialen zijn gemaakt zijn gewoonlijk geschikt voor gebruik
in uw magnetronoven. Niettemin voert u best een test uit.
OPGELET
Sommige houders met hoog lood- of ijzergehalte zijn niet geschikt voor
de magnetron. Controleer de houders om zeker te zijn dat ze geschikt
zijn voor gebruik in een magnetronoven.
91
kookgerei
NL
Page 38

Houd het voedsel in het oog
De recepten in het boek zijn met veel zorg opgesteld. Het welslagen ervan hangt echter af
van de mate waarin u het voedsel tijdens het koken in het oog houdt. Houd uw voedsel
steeds in het oog tijdens het koken. Uw magnetronoven is uitgerust met een lamp die
automatisch gaat branden wanneer de oven in werking is. Zo kunt u in de oven kijken en
het kookproces volgen. De aanwijzingen in recepten betreffende het hoger plaatsen van
voedsel, roeren en dergelijke, moeten worden beschouwd als minimale aanbevelingen. Als
het voedsel ongelijkmatig lijkt te koken, voert u gewoon de aanpassingen uit die u nodig
acht om het probleem op te lossen.
Factoren die de kooktijd in de magnetron beïnvloeden
Er zijn vele factoren die de kooktijd beïnvloeden. De temperatuur van de bij het recept
gebruikte ingrediënten maakt een groot verschil uit voor de kooktijd. Wanneer bijvoorbeeld
ijskoude boter, melk en eieren zijn gebruikt om een cake te maken, zal het langer duren om
hem te bakken dan wanneer de ingrediënten op kamertemperatuur zijn. Alle recepten in dit
boek vermelden steeds een minimale en een maximale kooktijd. Over het algemeen zal u
merken dat het voedsel te licht gekookt is na de minimale kooktijd, en soms zult u het
voedsel langer willen koken dan de maximumtijd, naar gelang van uw persoonlijke
voorkeur. De vuistregel die in dit boek wordt gevolgd, is dat men het best conservatief is in
het geven van kooktijden. Voedsel dat te lang heeft gekookt, is immers onherroepelijk
verkwist. In sommige recepten, vooral die voor brood, cake en vla, wordt aangeraden het
voedsel uit de oven te halen wanneer het nog niet helemaal doorgekookt is. Dit is geen
vergissing. Dit soort voedsel blijft immers, meestal afgedekt, nog doorkoken buiten de oven
doordat de warmte aan de buitenkant zich geleidelijk naar binnen toe verspreidt. Als het
voedsel in de oven blijft staan tot het helemaal is doorgekookt, zal de buitenkant te hard
gekookt zijn of kan het voedsel zelfs aanbranden. Na verloop van tijd zult u erg bedreven
worden in het schatten van zowel de kooktijd als de standtijd van verschillende soorten
voedsel.
Dichtheid van voedsel
Het duurt minder lang om licht en poreus voedsel zoals cake en brood te koken dan zwaar
en compact voedsel als gebraad en stoofschotels. Let bij het koken van poreus voedsel in de
magnetronoven op dat de buitenste randen niet droog en breekbaar worden.
Hoogte van het voedsel
Het bovenste deel van hoog voedsel, bijvoorbeeld gebraad, zal sneller koken dan het
onderste deel. Daarom is het aangewezen hoog voedsel enkele malen om te keren tijdens
het koken.
Vochtgehalte van voedsel
Vocht heeft de neiging te verdampen onder invloed van de warmte van de microgolven.
Daarom moet relatief droog voedsel, zoals gebraad en sommige groenten, vóór het koken
worden besprenkeld met water of worden afgedekt om het vocht vast te houden.
Benen en vet
Benen geleiden de warmte en vet kookt sneller dan vlees. Let tijdens het koken van vlees met
een been of vet op dat het vlees niet ongelijkmatig of te lang wordt gekookt.
Hoeveelheid voedsel
Het aantal microgolven in uw oven blijft constant, ongeacht de hoeveelheid voedsel die u
kookt. Dus, hoe meer voedsel in de oven, hoe langer de kooktijd. Denk eraan de kooktijd
minstens met één derde te verminderen wanneer u maar de helft van een recept klaarmaakt.
Vorm van het voedsel
Microgolven dringen slechts ongeveer 2 cm door in het voedsel. De binnenkant van dik
voedsel wordt gekookt naarmate de warmte aan de buitenkant zich naar binnen toe
verspreidt. Alleen de buitenkant van het voedsel wordt gekookt door microgolfenergie. de
rest wordt gekookt door geleiding. De slechtst mogelijke vorm van voedsel voor de
magnetron is dik en rechthoekig. De hoeken zullen aanbranden lang voor het midden zelfs
maar warm is. Voedsel met een dunne ronde vorm of ringvorm kan wel met succes worden
klaargemaakt in de magnetron.
Afdekken
Door het voedsel af te dekken, worden de warmte en de stoom vastgehouden, waardoor het
voedsel sneller kookt. Gebruik een deksel of speciale magnetronfolie en plooi een hoekje om,
om te voorkomen dat de folie scheurt.
Bruinen
Vlees en gevogelte dat vijftien minuten of langer wordt gekookt, zal lichtjes bruinen in zijn
eigen vet. Voedsel dat gedurende een kortere tijd wordt gekookt, kan worden bestreken met
een bruineersaus, zoals worcestersaus, sojasaus of barbecuesaus, om het een smakelijke
kleur te geven. Aangezien een relatief kleine hoeveelheid bruineersaus aan het voedsel
wordt toegevoegd, zal de oorspronkelijke smaak van het recept niet veranderen.
Afdekken met vetbestending papier
Door voedsel af te dekken met vetbestendig papier voorkomt u spatten en houdt het voedsel
de warmte vast. Het dekt het voedsel echter niet zo goed af als een deksel of speciale folie,
waardoor het voedsel lichtjes uitdroogt.
Schikken en ruimte laten
Losse etenswaren zoals gebakken aardappelen, cakejes en hapjes worden gelijkmatiger
opgewarmd als u ze op gelijke afstand van elkaar en bij voorkeur in cirkelvorm in de oven
plaatst. Plaats nooit etenswaren boven op elkaar.
Eigenschappen van voedsel en
92
NL
koken in de magnetron
Page 39

Eigenschappen van voedsel en
Roeren
Roeren is één van de belangrijkste technieken tijdens het koken in de magnetron. Bij
gewoon koken, roert u om het voedsel te mengen. Bij het koken in de magnetron dient het
roeren echter om de warmte te verspreiden en te herverdelen. Roer steeds van de buitenkant
naar het midden, aangezien de buitenkant van het voedsel het eerst warm wordt.
Omkeren
Groot, hoog voedsel, bijvoorbeeld gebraad of een hele kip, moet worden omgekeerd zodat
de boven- en de onderkant gelijkmatig kunnen koken. Het verdient ook aanbeveling stukken
kip of vleeslapjes om te keren.
Dikkere stukken aan de buitenkant plaatsen
Aangezien microgolven worden aangetrokken door de buitenkant van het voedsel, is het
aangewezen dikkere stukken vlees, gevogelte en vis aan de buitenste rand van de
bakschotel te plaatsen. Op die manier vangen de dikkere stukken het meeste
microgolfenergie op en kan het voedsel gelijkmatig koken.
Afschermen
U kunt strookjes aluminiumfolie (die de microgolven tegenhouden) aanbrengen aan de
hoeken of randen van rechthoekig voedsel om te voorkomen dat deze te hard worden
gekookt. Gebruik nooit te veel folie en zorg ervoor dat de folie vastzit aan de schotel, om
'vonkoverslag' in de oven te voorkomen.
Hoger plaatsen
Dik of compact voedsel kan hoger worden geplaatst, zodat de microgolven kunnen worden
geabsorbeerd door de onderkant en het midden van het voedsel.
Doorprikken
Etenswaren die in een schaal, schil of vlies zitten barsten makkelijk open in de oven als u ze
niet vooraf doorprikt. Voorbeelden hiervan zijn eierdooiers en eiwit, mosselen en oesters en
hele stukken groenten en fruit.
Controleren of het voedsel gaar is
Voedsel wordt zo snel gaar in een magnetronoven dat u het regelmatig moet controleren.
Bepaalde etenswaren blijven in de magnetron tot ze volledig gaar zijn, maar de meeste
etenswaren, bijvoorbeeld vlees en gevogelte, worden uit de oven gehaald terwijl ze nog niet
helemaal gaar zijn en koken verder gedurende de 'standtijd'. De inwendige temperatuur
van het voedsel zal tijdens de standtijd stijgen met 5˚F (3˚C) tot 15˚F (8˚C).
Standtijd
Vaak moeten etenswaren nadat u ze uit de oven hebt gehaald nog 3 tot 10 minuten blijven
staan. Gewoonlijk wordt het voedsel gedurende deze standtijd afgedekt om de warmte te
bewaren, tenzij het voedsel moet drogen (cakes en koekjes, bijvoorbeeld). Door het voedsel
nog even te laten staan, wordt het gelijkmatig gekookt en krijgt het zijn volle smaak.
Uw oven reinigen
1. Houd de binnenkant van de oven schoon
Spatten van etenswaren of gemorste vloeistof koeken vast aan de ovenwanden
en tussen de afdichting en het deuroppervlak. U veegt gemorst voedsel het best
onmiddellijk weg met een vochtige doek. Kruimels en spatten slorpen
microgolfenergie op en verlengen de kooktijd. Veeg kruimels die tussen de
deur en het frame vallen weg met een vochtige doek. Het is belangrijk dat u dit
deel schoon houdt met het oog op een goede afdichting van de oven.
Verwijder vetspatten met een in zeepwater gedrenkte doek. Daarna afspoelen
en laten drogen. Gebruik geen agressieve schoonmaakmiddelen of
schuurmiddelen. Het glazen draaiplateau mag worden afgewassen met de
hand of in de vaatwasmachine.
2. Houd de buitenkant van de oven schoon
Reinig de buitenkant van uw oven met zeepwater. Spoel de oven af met zuiver
water en droog hem af met een zachte doek of keukenpapier. Om schade aan
de werkende delen binnen in de oven te voorkomen, moet u vermijden dat het
water door de ventilatieopeningen naar binnen sijpelt. Om het
bedieningspaneel te reinigen, opent u de deur om te voorkomen dat de oven
per ongeluk start en veegt u het paneel eerst met een vochtige en meteen
daarna met een droge doek schoon. Druk na het reinigen op de STOP/CLEARtoets.
3. Als de ovendeur aan de binnenkant of aan de buitenkant beslaat, veegt u de
deurpanelen schoon met een zachte doek. Dit kan gebeuren wanneer de
magnetronoven wordt gebruikt bij hoge vochtigheid en duidt geenszins op een
defect.
4. Houd de deur en de deurafdichtingen schoon. Gebruik alleen warm water met
zeep. Vervolgens goed afspoelen en afdrogen. GEBRUIK GEEN
SCHUURMIDDELEN, ZOALS REINIGINGSPOEDER OF STALEN EN PLASTIC
SCHUURSPONSJES. Metalen delen zijn makkelijker te onderhouden als u ze
regelmatig schoonveegt met een vochtige doek.
93
koken in de magnetron
NL
Page 40

Vragen en
antwoorden
V Wat is er mis wanneer de ovenlamp niet gaat branden?
A Als de ovenlamp niet brandt, kan dit verschillende oorzaken hebben.
De lamp is doorgebrand
De deur is niet gesloten
V Dringt de microgolfenergie door het kijkvenster in de deur?
A Nee. De openingen, of doorgangen, zijn bedoeld om licht door te laten;
zij laten echter geen microgolven door.
V Waarom weerklinkt er een pieptoon wanneer men een toets op het
bedieningspaneel aanraakt?
A De pieptoon bevestigt dat de instelling juist is ingevoerd.
V Wordt de magnetronoven beschadigd als men hem leeg gebruikt?
A Ja. Laat de oven nooit leeg of zonder het glazen draaiplateau werken.
V Waarom spatten eieren soms open?
A Wanneer u eieren bakt, kookt of pocheert, kan de dooier openspatten als
gevolg van de stoom die in het dooiervlies wordt opgebouwd. Om dit te
voorkomen, doorprikt u de dooier gewoon vóór het koken. Kook nooit
eieren in hun schaal in de magnetronoven.
V Waarom is het aan te bevelen dat men voedsel na het koken in de
magnetron nog even laat staan?
A Wanneer u voedsel nadat het in de magnetron is gekookt nog even laat
staan, blijft het doorkoken. Deze standtijd zorgt ervoor dat het voedsel
gelijkmatig wordt gekookt. De duur van de standtijd varieert naar gelang
van de dichtheid van het voedsel.
V Kan men popcorn maken in een magnetronoven?
A Ja, op één van de twee hierna beschreven manieren
1 Door gebruik te maken van kookgerei dat speciaal bedoeld is voor het
maken van popcorn in de magnetron.
2 Door in de winkel verkrijgbare voorverpakte magnetron-popcorn te
gebruiken, waarop de juiste kooktijden en vermogens zijn vermeld voor
een goed resultaat.
VOLG NAUWGEZET DE RICHTLIJNEN VAN DE FABRIKANT VAN HET
POPCORNPRODUCT. BLIJF BIJ DE OVEN TIJDENS HET POFFEN VAN
MAÏS. STOP MET KOKEN ALS DE MAÏS NIET POFT BINNEN DE
VOORGESCHREVEN TIJD. DOOR TE LANG TE KOKEN, KUNNEN DE
MAÏSKORRELS VUUR VATTEN.
OPGELET
GEBRUIK NOOIT EEN BRUINE PAPIEREN ZAK VOOR HET POFFEN VAN
MAÏS. PROBEER NOOIT OVERSCHOTJES MAÏSKORRELS TE POFFEN.
V Waarom kookt mijn oven soms minder snel dan vermeld in het
kookboek?
A Lees nogmaals de aanwijzingen in uw kookboek om te zien of u ze
nauwkeurig hebt gevolgd en om na te gaan wat het verschil in kooktijd
kan veroorzaken. De tijden en warmte-instellingen die in kookboeken
staan vermeld, zijn richtlijnen die te lang koken voorkomen. Dit is
namelijk het voornaamste probleem bij het leren koken met de
magnetron. Door verschillen in grootte, vorm, gewicht en afmetingen van
het voedsel kan een langere kooktijd vereist zijn. Tracht aan de hand van
de richtlijnen in het kookboek de toestand van het voedsel zelf te
beoordelen, net als bij gewoon koken.
94
NL
Page 41

De draden in de voedingskabel zijn gekleurd overeenkomstig de
volgende kleurcodes
BLAUW ~ Nulleider
BRUIN ~ Stroomdraad
GROEN EN GEEL ~ Aarding
Wanneer de kleuren van de draden van de voedingskabel niet
overeenstemmen met de kleuren van de aansluitingen in uw stekker,
gaat u als volgt te werk:
Sluit de BLAUWE draad aan op de met N gemerkte of ZWART
gekleurde aansluiting.
Sluit de BRUINE draad aan op de met L gemerkte of ROOD
gekleurde aansluiting.
Sluit de GROEN EN GELE of GROENE draad aan op de met E of
gemerkte aansluiting.
Als de voedingskabel beschadigd is, moet hij worden vervangen
door de fabrikant of zijn vertegenwoordiger of een ander bevoegd
persoon, om gevaar te vermijden;
Waarschuwing
Technische gegevens
Dit apparaat moet worden geaard
Ingangsspanning
Vermogen
Microgolffrequentie
Buitenafmetingen
Stroomv-erbruik
230 V AC, 50Hz
850 W (IEC60705-norm)
2450 MHz
507 mm(B) X 283mm(H) X 435
mm(D)
1250 Watts
<Dutch>
Uw oude toestel wegdoen
1. Als het symbool met de doorgekruiste verrijdbare afvalbak op een product
staat, betekent dit dat het product valt onder de Europese Richtlijn
2002/96/EC.
2. Elektrische en elektronische producten mogen niet worden meegegeven
met het huishoudelijk afval, maar moeten worden ingeleverd bij speciale
inzamelingspunten die door de lokale of landelijke overheid zijn
aangewezen.
3. De correcte verwijdering van uw oude toestel helpt negatieve gevolgen
voor het milieu en de menselijke gezondheid voorkomen.
4. Wilt u meer informatie over de verwijdering van uw oude toestel? Neem
dan contact op met uw gemeente, de afvalophaaldienst of de winkel waar
u het product hebt gekocht.
95
Informatie over de stekker/
Technische gegevens
NL
Page 42

 Loading...