


OWNER’S MANUAL
MICROWAVE OVEN
PLEASE READ THIS OWNER’S MANUAL THOROUGHLY BEFORE OPERATING.
MS-2344B
MS-2344BS
3828W5A6112
www.lg.com

2
You cannot operate your oven with the door open due to the safety interlocks
built into the door mechanism. These safety interlocks automatically switch off
any cooking activity when the door is opened; which in the case of a
microwave oven could result in harmful exposure to microwave energy.
It is important not to tamper with the safety interlocks.
Do not place any object between the oven front face and the door or allow
food or cleaner residue to accumulate on sealing surfaces.
Do not operate your oven if it is damaged. It is particularly important that the
oven door closes properly and that there is no damage to the: (1) door(bent),
(2) hinges and latches (broken or loosened), (3) door seals and sealing
surfaces.
Your oven should not be adjusted or repaired by anyone except qualified
service personnel.
Warning
Precautions to avoid possible exposure to excessive microwave energy.
Precautions
When heating liquids, e.g. soups, sauces and beverages in your microwave
oven, overheating the liquid beyond boiling point can occur without
evidence of bubbling. This could result in a sudden boil over of the hot
liquid. To prevent this possibility the following steps should be taken:
1 Avoid using straight sided containers with narrow necks.
2 Do not overheat.
3 Stir the liquid before placing the container in the oven and again halfway
through the heating time.
4 After heating, allow to stand in the oven for a short time, stir or shake
them again carefully and check the temperature of them before
consumption to avoid burns (especially, contents of feeding bottles and
baby food jars).
Be careful when handling the container.
Warning
Always allow food to stand after being cooked by
microwaves and check the temperature of them
before consumption. Especially contents of feeding
bottles and baby food jars.
Please ensure cooking times are correctly set as
over cooking may result in the FOOD catching fire
and subsequent damage to your oven.
3
How the Microwave Oven Works
Microwaves are a form of energy similar to radio and television waves and
ordinary daylight. Normally, microwaves spread outwards as they travel
through the atmosphere and disappear without effect. Microwave ovens,
however, have a magnetron which is designed to make use of the energy in
microwaves. Electricity, supplied to the magnetron tube, is used to created
microwave energy.
These microwaves enter the cooking area through openings inside the oven.
A turntable or tray is located at the bottom of the oven. Microwaves cannot
pass through metal walls of the oven, but they can penetrate such materials
as glass, porcelain and paper, the materials out of which microwave-safe
cooking dishes are constructed.
Microwaves do not heat cookware, though cooking vessels will eventually
get hot from the heat generated by the food.
A very safe appliance
Contents
Your microwave oven is one of the safest of all home
appliances. When the door is opened, the oven
automatically stops producing microwaves. Microwave
energy is converted completely to heat when it enters
food, leaving no “left over” energy to harm you when
you eat your food.
Precautions 2
Contents 3
Unpacking & Installing 4 ~ 5
Setting the Clock 6
Child Lock 7
Micro Power Cooking 8
Micro Power Level 9
Two Stage Cooking 10
Quick Start 11
Quick Menu 12 ~ 13
Auto Cook 14 ~ 15
Auto Defrost 16 ~ 17
Quick Defrost 18 ~ 19
Auto Reheat 20 ~ 21
More or Less Cooking 22
Heating or Reheating Guide 23
Fresh Vegetable Guide 24
Important safety instructions 25
Microwave - safe Utensils 26
Food characteristics & Microwave cooking 27 ~ 28
Questions & Answers 29
Plug Wiring Information/Technical Specifications 30
4
Place the oven in the level location of your choice with
more than 85cm height but make sure there is at least
30cm of space on the top and 10cm at the rear for proper
ventilation. The front of the oven should be at least 8cm from the
edge of the surface to prevent tipping.
An exhaust outlet is located on top or side of the oven. Blocking
the outlet can damage the oven.
Unpacking &
Installing
Unpack your oven and place it on a flat level
surface.
By following the basic steps on these two pages you will be able to quickly check that your oven is operating
correctly. Please pay particular attention to the guidance on where to install your oven. When unpacking your
oven make sure you remove all accessories and packing. Check to make sure that your oven has not been
damaged during delivery.
THIS OVEN SHOULD NOT BE USED FOR COMMERCIAL
CATERING PURPOSES
GLASS TRAY
ROLLER REST
5
The DISPLAY will count down from 30 seconds.
When it reaches 0, BEEP sounds. Open the
oven door and test the temperature of the water. If your
oven is operating the water should be warm. Be careful
when removing the container it may be hot.
YOUR OVEN IS NOW INSTALLED
Fill a microwave safe container with
300 ml (1/2 pint) of water. Place on
the GLASS TRAY and close the oven door. If you
have any doubts about what type of container to
use please refer to page 26.
Press the START
button once
to set 30 seconds
of cooking
time. You will
hear a BEEP
when you
press the button.
Open your oven door by pulling the DOOR HANDLE.
Place the ROLLER REST inside the oven and place the
GLASS TRAY on top.
Plug your oven into a standard household socket.
Make sure your oven is the only appliance
connected to the socket. If your oven does not operate
properly, unplug it from the electrical socket and then plug it
back in.
30
Seconds
6
Setting the
Clock
You can set either 12 hour clock or 24 hour clock.
In the following example I will show you how to set the time for 14:35 when using the 24 clock.
Make sure that you have removed all packaging from your oven.
When your oven is plugged in for the
first time or when power resumes after a
power cut, a ‘0’ will be shown in the
display; you will have to reset the clock.
If the clock (or display) shows any
strange looking symbols, unplug your
oven from the electrical socket and plug
it back in and reset the clock.
During clock setting the colon will flash,
After setting, the colon will stop flashing.
Make sure that you have correctly installed your oven as described
earlier in this book.
Press Stop/Clear.
Press Clock once.
(If you want to use a 12 hour clock, Press Clock once more.
If you want to change different option after setting clock,
you have to unplug and plug it back in.)
Press 10 min fifteen times.
Press 1 min three times.
Press 10 sec five times.
Press Clock or Start/Quick Start to set the time.
The clock starts counting.
7
Child
Lock
Press and hold Stop/Clear until “L” appears on the display and BEEP
sounds.
The CHILD LOCK is now set.
The time will disappear on the display if you have set the clock.
“L” remains displayed to let you know that CHILD LOCK is set.
To cancel CHILD LOCK press and hold Stop/Clear until “L” disappears.
You will hear BEEP when it’s released.
Your oven has a safety feature that
prevents accidental running of the oven.
Once the child lock is set, you will be
unable to use any functions and no
cooking can take place.
However your child can still open the
oven door!
Press Stop/Clear.
L
8
Micro Power
Cooking
Make sure that you have correctly installed your oven as described
earlier in this book.
Press Stop/Clear.
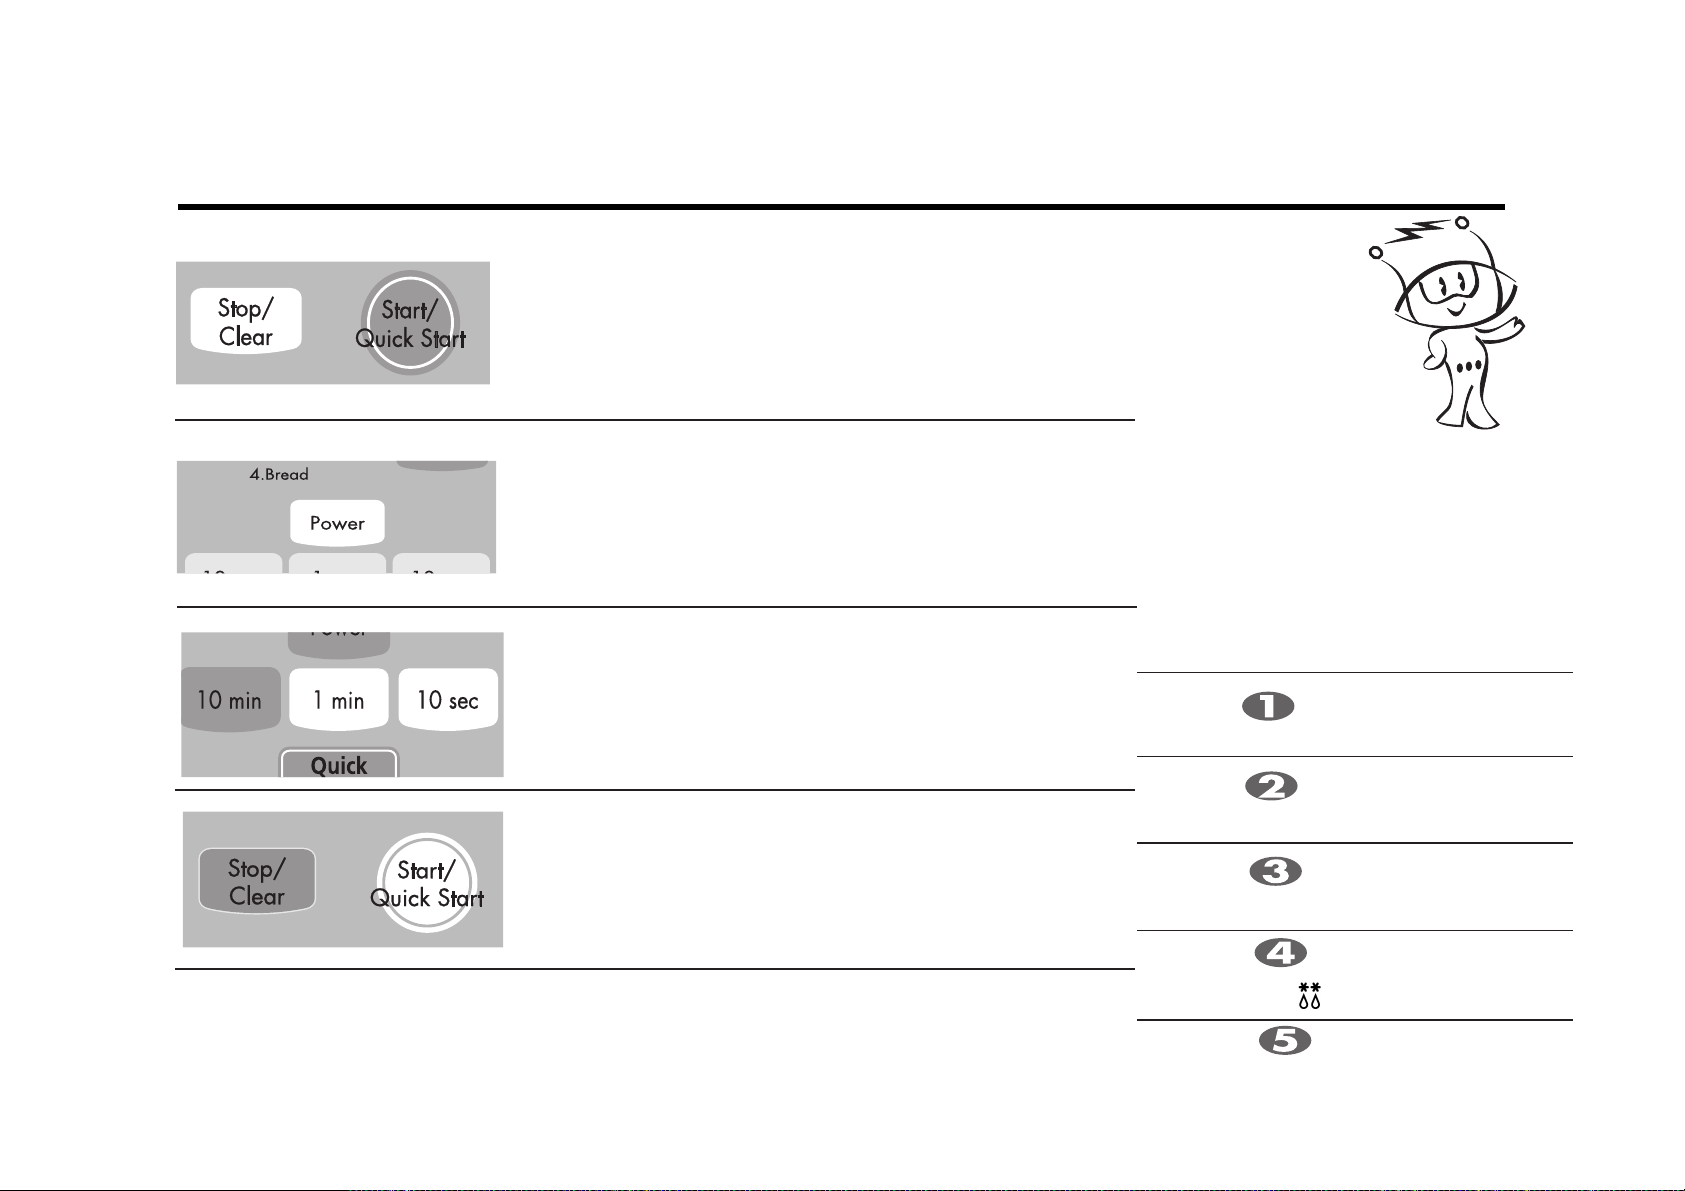
Press Power twice to select 80% power.
“680” appears on the display.
Press 1 min five times.
Press 10 sec three times.
Press Start/Quick Start.
After cooking is over, End Reminder Beep Sounds per 1 minute for
5 minutes until the oven door is opened.
Your oven has five microwave Power
settings. High power is automatically
selected but repeated presses of the
Power button will select different power
levels.
In the following example I will show you how to cook some food on 80% power for 5 minutes and 30 seconds.
time
times
times
times
times
850W
680W
510W
340W
170W
POWER
HIGH
MAX
MEDIUM
HIGH
MEDIUM
DEFROST
MEDIUM LOW
L
OW
Press
Power
POWER
OUTPUT
%
100%
80%
60%
40%
20%
9
Micro Power
Level
Your microwave oven is equipped with 5 power levels to give you maximum flexibility and control over cooking.
The table below shows the examples of food and their recommended cooking power levels for use with this
microwave oven.
POWER LEVEL
POWER LEVEL
(%)
HIGH * Boil Water
* Brown minced beef
* Cook poultry pieces, fish, vegetables
* Cook tender cuts of meat
MEDIUM HIGH * All reheating
* Roast meat and poultry
* Cook mushrooms and shellfish
* Cook foods containing cheese and eggs
MEDIUM * Bake cakes and scones
* Prepare eggs
* Cook custard
* Prepare rice, soup
DEFROST/ * All thawing
MEDIUM LOW * Melt butter and chocolate
* Cook less tender cuts of meat
LOW * Soften butter & cheese
* Soften ice cream
* Raise yeast dough
USE
POWER OUTPUT
100%
80%
60%
40%
20%
850W
680W
510W
340W
170W
10
Two stage
Cooking
Press STOP/CLEAR.
Set the power and the cooking time for stage1.
Press Power once to select HIGH power.
Press 10 min once.
Press 1 min once.
Set the power and the cooking time for stage2.
Press Power four times to select 340 power.
Press 10 min three times.
Press 1 min five times.
Press Start/Quick Start..
During two stage cooking the oven door
can be opened and food checked. Close
the oven door and press Start/Quick
Start and the cooking stage will
continue.
At the end of stage1, BEEP sounds and
stage 2 commences.
Should you wish to clear the programme
press Stop/Clear twice.
In the following example I will show you how to cook some food in two stages. The first stages will cook your
food for 11 minutes on HIGH; the second will cook for 35 minutes on 340.
11
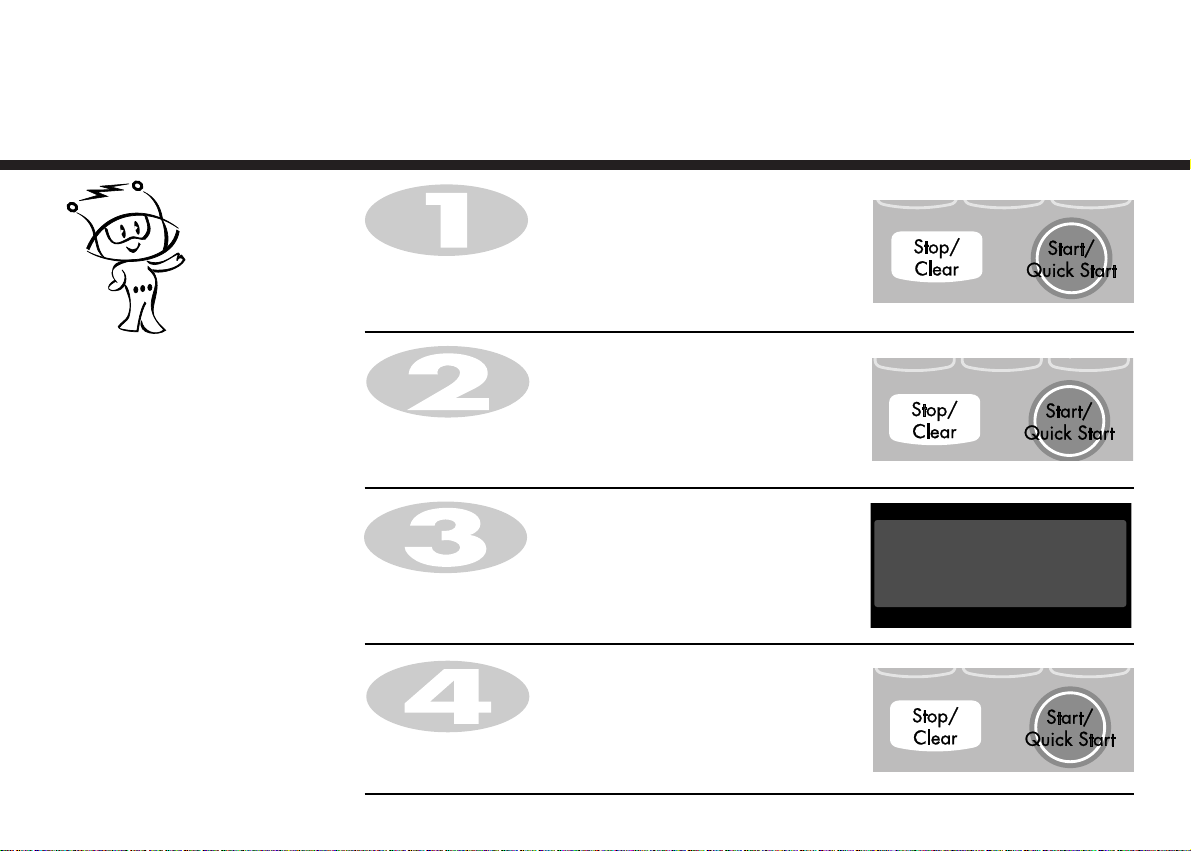
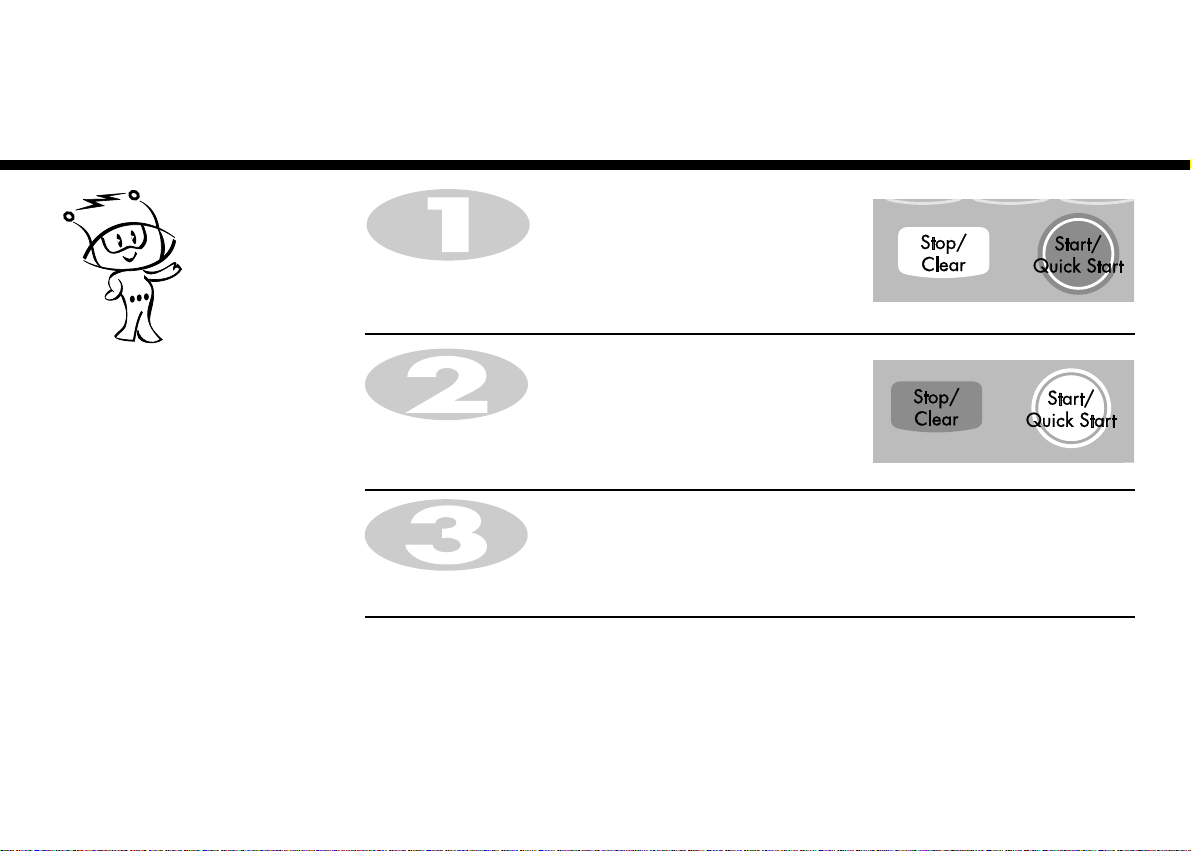
Quick
Start
Press Stop/Clear.
Press Start/Quick Start four times to select 2 minutes on HIGH power.
Your oven will start before you have finished the fourth press.
During QUICK START cooking, you can extend the cooking time up to
10 minutes by repeatedly pressing the Start/Quick Start key.
The QUICK START feature allows you to
set 30 seconds intervals of HIGH power
cooking with a touch of the Start/Quick
Start.
In the following example I will show you how to set 2 minutes of cooking on high power.
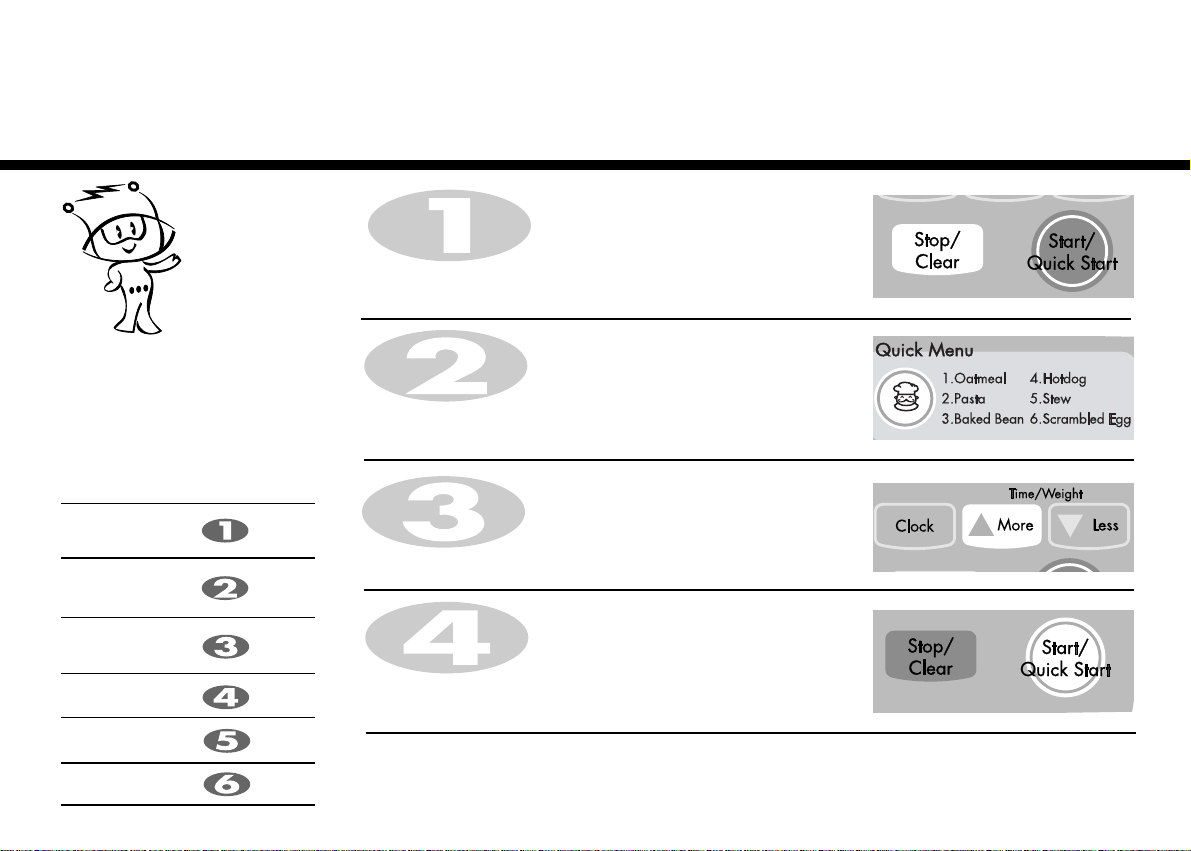
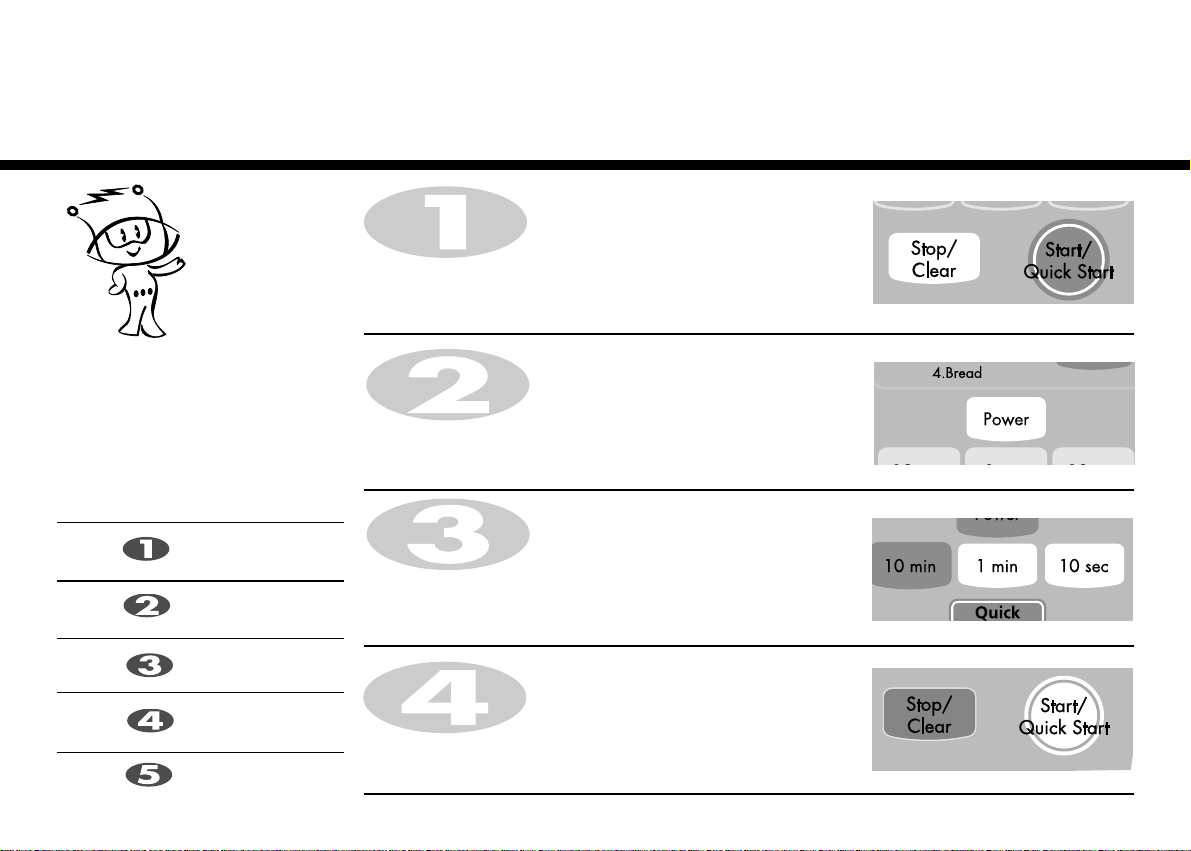
12
Quick
Menu
Press Stop/Clear.
Press Quick Menu three times.
“Sc-3” appears on the display.
Select desired weight of Baked beans.
Press More key five times to enter 0.5kg.
Quick Menu allows you to cook most
of your favorite food easily by selecting
the food type and entering the weight of
food by pressing the More/Less key.
In the following example I will show you how to cook 0.5 kg of Baked beans.
Press Start/Quick Start.
CATEGORY
Oatmeal
Pasta
Baked bean
Hotdog
Stew
Scrambled egg
Press
Quick menu
time
times
times
times
times
times
13
FOOD CATEGORY WEIGHT LIMIT UTENSILS FOOD TEMP. INSTRUCTIONS
1. OATMEAL
2. PASTA
3. BAKED BEAN,
REHEAT
4. HOTDOG
INCLUDING
BRINE
5. STEW
6. SCRAMBLED
EGG
Room
Room
Room
Room
Room
Refrigerated
Microwave-
safe bowl
Microwave-
safe bowl
Microwave-
safe dish
Microwave-
safe bowl
Microwave-
safe bowl
Microwave-
safe bowl
Place the oats and milk in a deep microwave- safe bowl.
Cook uncovered. The oven will beep, stir the oats well and press start to
continue. After cooking, stir well and stand for 1 minute before serving.
Place pasta and boiling water with 1/4 to 1 teaspoon salt in a deep and large bowl.
Cook uncovered. The oven will beep, stir the pasta well and press start to continue. After
cooking, stir and stand for 1 minute if required. Rinse pasta with cold water.
Pour beans into the microwave- safe dish. Cover.
Place dish on the glass tray.
After reheating, stir and then stand for 1- 2 minutes with cover.
Place contents of can including brine in a microwave- save bowl.
Heat uncovered. After heating, stir well. Drain and serve.
Place stew in a microwave- save bowl. Cover with wrap loosely.
After heating, stir well and stand for 2 minutes.
Place desired number of eggs and milk into a large bowl. Whisk slightly.
Cover with wrap. After cooking, remove from the oven.
Stir well and stand for 1- 2 minutes with cover until firm.
Add amount of milk according to the quantity.
** 1 egg : 1 Tablespoon of milk
2 eggs : 2 Tablespoons of milk
3 eggs : 3 Tablespoons of milk
4 eggs : 4 Tablespoons of milk
1- 4 serves
0. 1 kg - 0. 3 kg
0.2 kg - 0. 8 kg
0.2 kg - 0. 6 kg
0.2 kg - 0.6 kg
1- 4 eggs
Oats 1 package
Approx. 40g
Cold Milk
1 serve
1/3 cup
(1 package)
3/4 cup
(180ml)
2 serves
2/3 cups
(2 packages)
1 1/2 cups
(360ml)
3 serves
1 cup
(3 packages)
2 1/2 cups
(540ml)
4 serves
1 1/3 cups
(4 packages)
3 cups
(720ml)
Weight 100g 200g 300g Cover
Boiling water 400ml 700ml 1000ml No
14
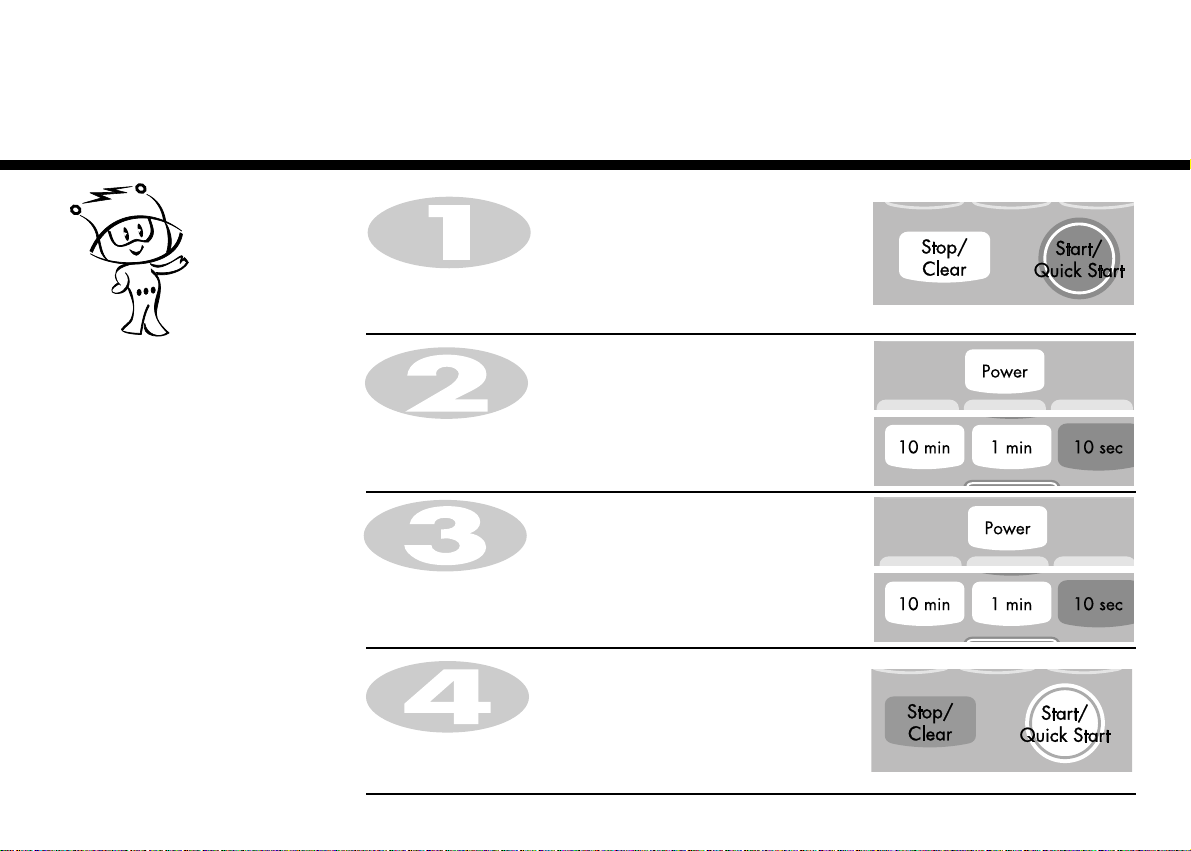
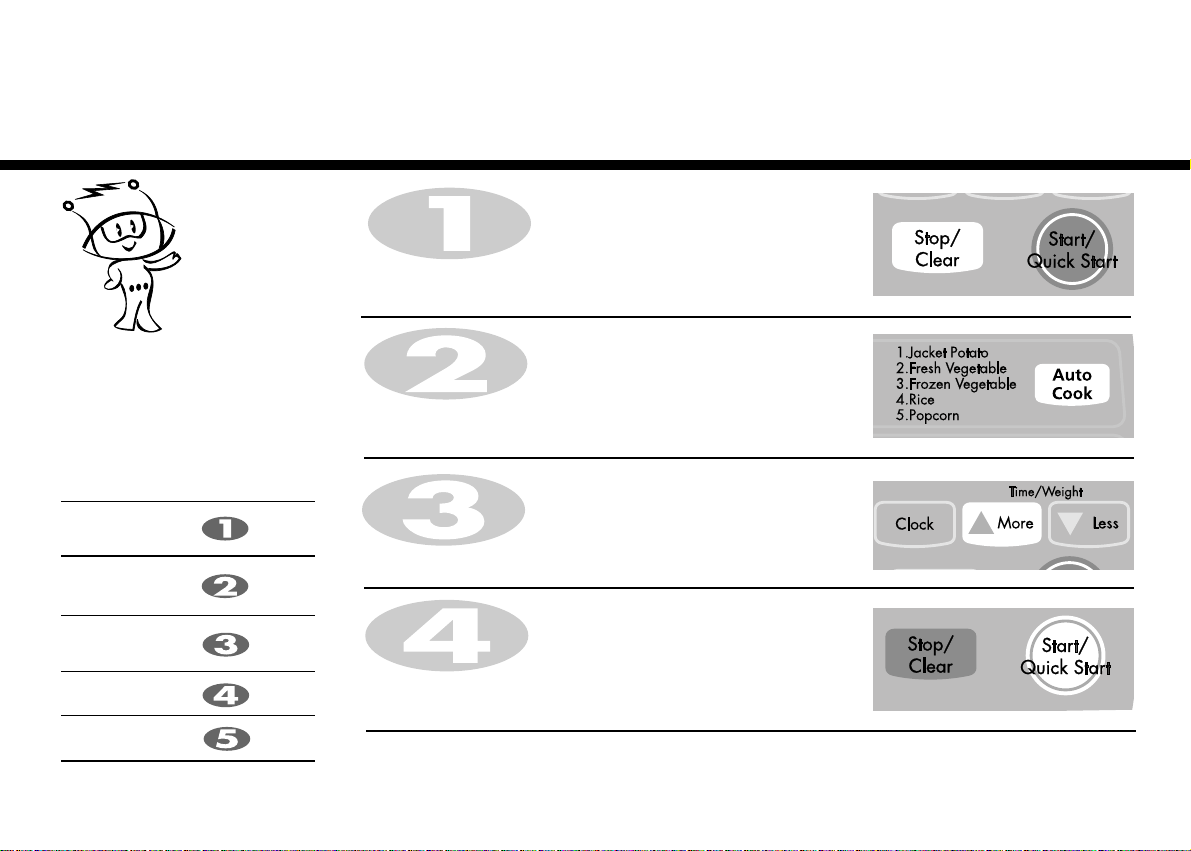
Auto
Cook
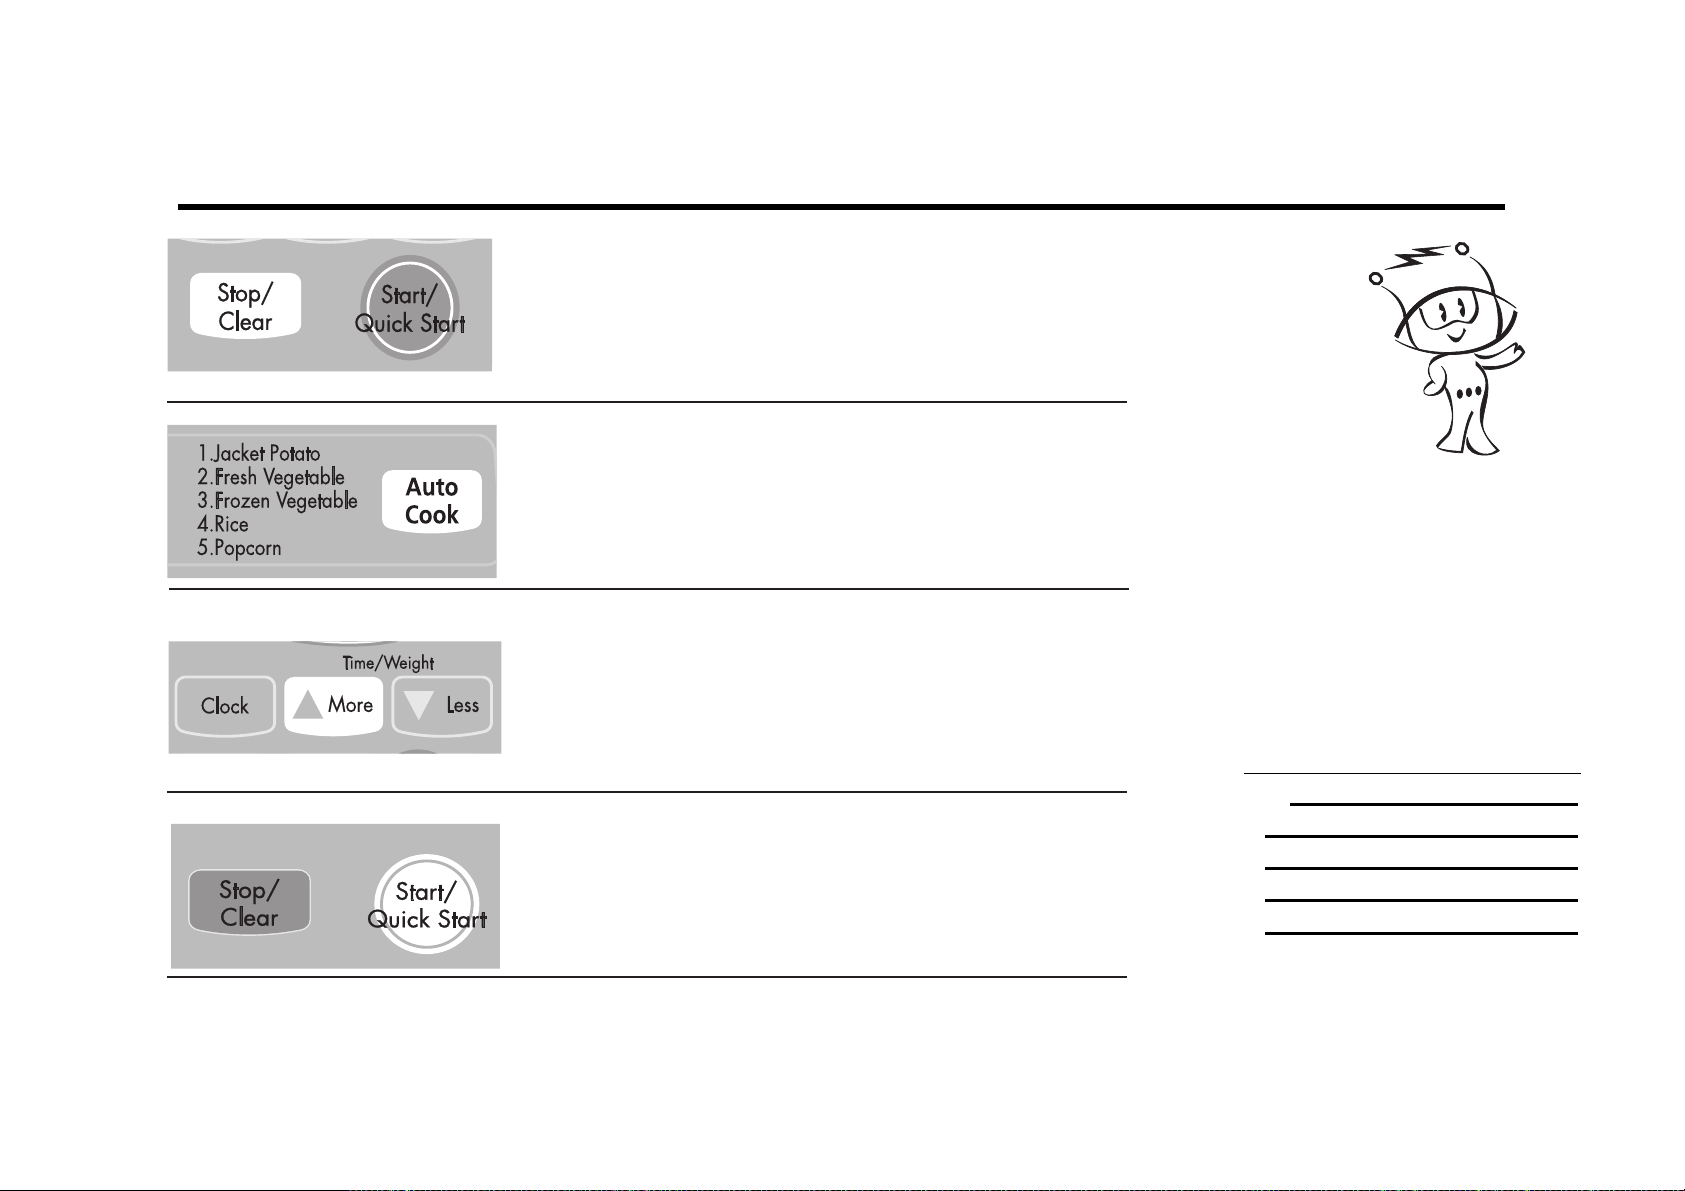
Press Stop/Clear.
Press Auto Cook one time.
“Ac-1” appears on the display.
Select desired weight of potato.
Press More key five times to enter 0.5kg.
AUTO COOK allows you to cook most of
your favorite food easily by selecting the
food type and entering the weight of the
food by pressing the More/Less key.
In the following example I will show you how to cook 0.5 kg of jacket potato.
Press Start/Quick Start.
CATEGORY
JACKET
POTATO
FRESH
VEGETABLE
FROZEN
VEGETABLE
RICE
POPCORN
Press
Auto Cook
time
times
times
times
times
15
FOOD CATEGORY WEIGHT LIMIT UTENSILS FOOD TEMP. INSTRUCTIONS
1. JACKET
POTATO
2. FRESH
VEGETABLE
3. FROZEN
VEGETABLE
4. RICE
5. POPCORN
Room
Room
Frozen
Room
Room
_
Microwave-
safe bowl
Microwave-
safe bowl
Microwave-
safe bowl
_
Choose medium sized potatoes 170 -200g.
Wash and dry potatoes. Pierce the potatoes several times with fork. Place the potatoes on
the glass turntable. Adjust weight and press start. After cooking, remove the potatoes from
the oven. Let stand covered with foil for 5 minutes.
Place vegetables in a microwave-safe bowl. Add water.
Cover with wrap. After cooking, stir and allow to stand for
2 minutes. Add amount of water according to the quantity.
** 0.2kg - 0.4kg : 2 Tablespoon
** 0.5kg - 0.8kg : 4 Tablespoon
Place vegetables in a microwave-safe bowl. Add water.
Cover with wrap. After cooking, stir and allow to stand for
2 minutes. Add amount of water according to the quantity.
** 0.2kg - 0.4kg : 2 Tablespoon
** 0.5kg - 0.8kg : 4 Tablespoon
Wash rice. Darin water.
Place rice & boiling water in a deep and large bowl.
** Rice - After cooking, stand covered for 5 minutes or until water is absorbed.
Use popcorn product for microwave oven.
Remove plastic overwrap.Place unfolded bag on the glass tray.
(Follow the package directions)
After popping, remove bag from the oven.
CAUTION : Product is HOT! Open bag carefully by pulling diagonally on corners.
0.1 kg ~ 1.0 kg
0.2 kg ~ 0.8 kg
0.2 kg ~ 0.8 kg
0.1 kg ~ 0.3 kg
one bag
Weight 100g 200g 300g Cover
Boiling water 200ml 400ml 600ml Yes /Vent corner
16
Auto
Defrost
Your oven has four microwave defrost
settings:- MEAT, POULTRY, FISH and
BREAD; each defrost category has
different power settings. Repeated
presses of the Auto Defrost buttons will
select different settings.
The temperature and density of food varies, I would recommend that the food is checked before cooking
commences. Pay particular attention to large joints of meat and chicken, some foods should not be completely
thawed before cooking. For example fish cooks so quickly that it is sometimes better to begin cooking while still
slightly frozen. The BREAD programme is suitable for defrosting small items such as rolls or a small loaf. These will
require a standing time to allow the centre to thaw. In the following example I will show you how to defrost 1.4Kg
of frozen poultry.
Category
MEAT
POULTRY
FISH
B
READ
Press
Auto Defrost
time
times
times
times
Press Stop/Clear.
Weigh the food that you are about to defrost. Be certain to remove any
metallic ties or wraps; then place the food in your oven and close the
oven door.
Press Auto Defrost twice to select the POULTRY defrosting programme.
“dEF2” appears on the display window.
Enter the weight of the frozen food that you are about to defrost.
Press More fourteen times to enter 1.4 Kg.
Press Start/Quick Start.
During defrosting your oven will “BEEP”, at which point open the oven door, turn food over and separate to
ensure even thawing. Remove any portions that have thawed or shield them to help slow down thawing.
After checking close the oven door and press Start/Quick Start to resume defrosting.
Your oven will not stop defrosting (even when the beep sounds) unless the door is opened.
17
CATEGORY WEIGHT LIMIT UTENSIL FOOD
AUTO WEIGHT DEFROST GUIDE
0.1 ~ 4.0 kg
Microwave ware
(Flat plate)
Meat
Minced beef, Fillet steak, Cubes for stew, Sirloin steak, Pot roast, Rump roast, Beef burger
Lamp chops, Rolled roast, Cutlets(2cm)
Turn food over at beep.
After defrosting, let stand for 5-15 minutes.
Poultry
Whole chicken, Legs, Breasts, Turkey breasts(under 2.0kg)
Turn food over at beep.
After defrosting, let stand for 20-30 minutes.
Fish
Fillets, Steaks, Whole fish, Sea foods
Turn food over at beep.
After defrosting, let stand for 10-20 minutes.
Meat
Poultry
Fish
0.1 ~ 0.5 kg
Paper towel
or flat plate
Sliced bread, Buns, Baguette, etc.
Separate slices and place between paper towel or flat plate.
Turn food over at beep.
After defrosting, let stand for 1-2 minutes.
Bread
* Food to be defrosted should be in a suitable microwave proof container and place uncovered on the glass turntable.
* If necessary, shield small areas of meat or poultry with flat pieces of aluminum foil. This will prevent thin areas becoming warm during defrosting.
Ensure the foil does not touch the oven walls.
* Separate items like minced meat, chops as soon as possible.
* When BEEP, at this point remove the food from the microwave oven, turn the food over and return to the microwave oven. Press start to continue.
At the end of the program, remove the food from the microwave oven, cover with foil and allow to stand until completely thawed.
To thaw completely , for example joints of meat and whole chickens should STAND for a minimum of 1 hour before cooking.

18
Quick
Defrost
Use this function to thaw only 0.5kg of Minced meat very quickly.
This will require a standing time to allow the center to thaw. In the following example will show you how to
defrost 0.5kg of forzen minced meat.
Press Stop/Clear.
Weight the food that you are about to defrost. Be certain to remove any
metallic ties or wraps; then place the food in your oven and close
the oven door.
Press Quick Defrost to select the Meat defrosting programme.
The oven will starts automatically.
During defrosting your oven will “BEEP”, at which point open the oven door, turn food over and separate to ensure even
thawing. Remove any portions that have thawed or shield them to help slow down thawing. After checking close the oven
door and press Start/Quick Start to resume defrosting.
Your oven will not stop defrosting (even when the beep sounded) unless the door is opened.

19
CATEGORY WEIGHT UTENSIL INSTRUCTIONS
QUICK DEFROST GUIDE
0.5kg
Microwave ware
(Flat plate)
Minced meat
Turn food over at beep.
After defrosting, let stand for 5-15 minutes.
Use this function to defrost quickly for minced meat.
Remove the meat completely from it’s wrapping. Place the mince onto a microwave-safe plate. When BEEP, at this point remove the mince from the microwave
oven, turn the mince over and return to the microwave oven. Press start to continue. At the end of the program remove the mince from the microwave oven,
cover with foil and allow to stand 5-15 minutes or until completely thawed.
Minced Meat

20
Auto
Reheat
Press Stop/Clear.
Press Auto Reheat.
Press More key four times to enter 0.4 Kg.
Press Start/Quick Start.
Auto Reheat cooking makes food
reheating convient and easy to use.
The oven has been pre-programmed to
automatically reheat food.
Your oven has three Auto Reheat
settings: Chilled Pizza, Sauce and
Curry.
In the following example I will show you how to cook 0. kg of Chilled Meal.
4

21
CATEGORY WEIGHT LIMIT UTENSIL FOOD TEMP. INSTRUCTIONS
1. CHILLED
PIZZA
2. SAUCE
3. CURRY
Refrigerated
Room
Room
Microwave-
safe
flat dish
Microwave-
safe bowl
Microwave-
safe dish
This function is for reheating leftover chilled pizza.
Place chilled pizza on the flat dish.
After heating, stand for 1-2 minutes.
Pour the sauce into a microwave-safe bowl.
Cover with lid or plastic wrap.
After heating, stir. Stand for 2 minutes with cover.
And then stir again.
Pour curry into the microwave-safe dish. Cover.
Place dish on the glass tray.
After reheating, stir and then stand for 1-2 minutes with cover.
0.1 kg - 0.4 kg
0.2 kg - 0.6 kg
0.2 kg - 0.8 kg

22
More or Less
Cooking
In the following example I will show you how to change the preset of Auto Cook programme for a longer or
shorter cooking time.
If you find that your food is over or
undercooked when using the Auto Cook
or Auto Reheat programme. You can
increase or decrease cooking time by
pressing the More/Less key.
When manual cooking you can extend
the cooking time at any point by using
the More/Less key.
There is no need to stop the cooking
process.
Press More( ).
The cooking time will increase by 10 seconds for each press of the key.
Press Less( ).
The cooking time will decrease by 10 seconds for each press of the key.
Press Stop/Clear.
Set the required Auto Cook programes.
(Select weight of food)
Press Start/Quick Start.

23
Heating or Reheating
Guide
To heat or reheat successfully in the microwave, it is important to follow several guidelines. Measure the amount of
food in order to determine the time needed to reheat. Arrange the food in a circular pattern for best results. Room
temperature food will heat faster than refrigerated food. Canned foods should be taken out of the can and placed in a
microwavable container. The food will be heated more evenly if covered with a microwavable lid or vented plastic
wrap. Remove cover carefully to prevent steam burns. Use the following chart as a guide for reheating cooked food.
Item
Cook time
Special Instructions
(at HIGH)
Sliced meat
3 slices
(0.5cm thick)
Chicken pieces
1 breast
1 leg and thigh
Fish fillet
(170-230g)
Lasagne
1 serving(300g)
Casserole
1 cup
4 cups
Casserole
cream or cheese
1 cup
4 cups
Sloppy Joe or
Barbecued beef
1 sandwich
(
1
/2 cup meat filling)
without bun
1~2 minutes
2~3 minutes
3~3
1
/2 minutes
1~2 minutes
4~6 minutes
1
1
/2~3 minutes
4
1
/2~7minutes
1~2
1
/2 minutes
3
1
/2~6 minutes
1~2
1
/2 minutes
Place sliced meat on microwavable plate.
Cover with plastic wrap and vent.
• Note: Gravy or sauce helps to keep meat juicy.
Place chicken pieces on microwavable plate.
Cover with plastic wrap and vent.
Place fish on microwavable plate.
Cover with plastic wrap and vent.
Place lasagne on microwavable plate.
Cover with plastic wrap and vent.
COOK covered in microwavable casserole dish.
Stir once halfway through cooking.
COOK covered in microwavable casserole dish.
Stir once halfway through cooking.
Reheat filling and bun separately.
COOK covered in microwavable casserole dish.
Stir once. Heat bun as directed in chart below.
Item
Cook time
Special Instructions
(at HIGH)
Mashed potatoes
350g
Baked beans
1 cup
Ravioli or pasta in sauce
1 cup
4 cups
Rice
1 cup
4 cups
Sandwich roll or bun
1 roll
Vegetables
1 cup
4 cups
Soup
1 serving (8 oz.)
4~4
1
/2 minutes
(at Medium High)
1
1
/2~3 minutes
2
1
/2~4 minutes
7
1
/2~11minutes
1~1
1
/2 minutes
3
1
/2~5 minutes
15~30 seconds
1
1
/2~21/2 minutes
3
1
/2~51/2 minutes
1
1
/2~2 minutes
COOK covered in microwavable casserole dish.
Stir once halfway through cooking.
COOK covered in microwavable casserole dish.
Stir once halfway through cooking.
COOK covered in microwavable casserole dish.
Stir once halfway through cooking.
COOK covered in microwavable casserole dish.
Stir once halfway through cooking.
Wrap in paper towel and place on glass tray.
COOK covered in microwavable casserole dish.
Stir once halfway through cooking.
COOK covered in microwavable casserole dish.
Stir once halfway through cooking.

24
Fresh Vegetable
Guide
Vegetable Amount
Cook time
Instructions
Standing
(at HIGH)
Time
Corn, Fresh
Mushrooms,
Fresh, Sliced
Parsnips, Fresh,
Sliced
Peas, Green,
Fresh
Sweet Potatoes
Whole Baking
(170~230g each)
White potatoes,
Whole Baking
(170~230g each)
Spinach, Fresh,
Leaf
Courgette, Fresh,
Sliced
Courgette, Fresh,
Whole
Husk. Add 2 tbsp water in 1.5 litre
baking dish. Cover.
Place mushrooms in 1.5 litre covered
casserole dish. Stir halfway through
cooking.
Add
1
/2
cup water in 1.5 litre covered
casserole dish. Stir halfway through
cooking.
Add
1
/2
cup water in 1.5 litre covered
casserole dish. Stir halfway through
cooking.
Pierce potatoes several times with fork.
Place on 2 paper towels.
Turn over halfway through cooking.
Pierce potatoes several times with fork.
Place on 2 paper towels.
Turn over halfway through cooking.
Add
1
/2
cup water in 2 litre covered
casserole dish.
Add
1
/2
cup water in 1.5 litre covered
casserole dish. Stir halfway through
cooking.
Pierce. Place on 2 paper towels.
Turn courgette over and rearrange
halfway through cooking.
2~3 minutes
2~3 minutes
2~3 minutes
2~3 minutes
2~3 minutes
2~3 minutes
2~3 minutes
2~3 minutes
2~3 minutes
4 ~ 8
1
1
/2 ~ 21/2
4 ~ 7
6 ~ 9
4 ~ 9
6~ 12
5
1
/2 ~ 71/2
9
1
/2
~ 14
4
1
/2 ~ 71/2
4
1
/2
~ 7
1
/2
6 ~ 9
2 ears
230g
450g
4 cups
2 medium
4 medium
2 potatoes
4 potatoes
450g
450g
450g
Vegetable Amount
Cook time
Instructions
Standing
(at HIGH)
Time
Artichokes
(230g each)
Asparagus,
Fresh, Spears
Green Beans
Beats, Fresh
Broccoli, Fresh,
Spears
Cabbage, Fresh,
Chopped
Carrots, Fresh,
Sliced
Cauliflower,
Fresh, Whole
Fresh, Flowerettes
Celery, Fresh,
Sliced
Trim. Add 2 tsp water and 2 tsp juice.
Cover.
Add 1 cup water. Cover.
Add
1
/2 cup water in 1.5 litre casserole
dish. Stir halfway through cooking.
Add
1
/2
cup water in 1.5 litre covered
casserole dish. Rearrange halfway
through cooking.
Place broccoli in baking dish.
Add
1
/2
cup water.
Add
1
/2
cup water in 1.5 litre covered
casserole dish. Stir halfway through
cooking.
Add
1
/4
cup water in 1.5 litre covered
casserole dish. Stir halfway through
cooking.
Trim. Add
1
/4
cup water in 1.5 litre
covered casserole dish. Stir halfway
through cooking.
Slice. Add
1
/2
cup water in 1.5 litre
covered casserole dish. Stir halfway
through cooking.
2~3 minutes
2~3 minutes
2~3 minutes
2~3 minutes
2~3 minutes
2~3 minutes
2~3 minutes
2~3 minutes
2~3 minutes
4
1
/2
~ 7
10 ~ 12
2
1
/2
~ 6
7 ~ 11
11 ~ 16
5 ~ 8
5
1
/2~
7
1
/2
2 ~ 3
5 ~ 7
11 ~ 16
2 medium
4 medium
450g
450g
450g
450g
450g
200g
450g
2 cups
4 cups

25
10 Small amounts of food require shorter cooking or heating time. If normal
times are allowed they may overheat and burn.
11 Be certain to place the oven so the front of the door is 8 cm or more behind
the edge of the surface on which it is placed, to avoid accidental tipping of
the appliance.
12 Before cooking, pierce the skin of potatoes, apples or any such fruit or
vegetable.
13 Do not cook eggs in their shell. Pressure will build up inside the egg which
will burst.
14 Do not attempt deep fat frying in your oven.
15 Remove the plastic wrapping from food before cooking or defrosting. Note
though that in some cases food should be covered with plastic film, for
heating or cooking.
16 If the oven door or door seals are damaged, the oven must not be operated
until it has been repaired by a qualified service technician.
17 If smoke is observed, switch off or disconnect the oven from the power supply
and keep the oven door closed in order to stifle any flames.
18 When food is heated or cooked in disposable containers of plastic, paper or
other combustible materials, check the oven frequently due to the possibility
of the food container is deteriorating.
19 Only allow children to use the oven without supervision when adequate
instructions have been given so that the child is able to use the oven in a safe
way and understands the hazards of improper use.
20 Liquids or other foods must not be heated in sealed containers since they are
liable to explode.
Important safety instructions
Read carefully and keep for future reference
1 Do not attempt to tamper with, or make any adjustments or repairs to the
door, control panel, safety interlock switches or any other part of the oven. It is
hazardous for anyone to carry out any service or repair operation which
involves the removal of any cover which gives protection against exposure to
microwave energy. Repairs should only be undertaken by a qualified service
technician.
2 Do not operate the oven when empty. It is best to leave a glass of water in the
oven when not in use. The water will safely absorb all microwave energy, if
the oven is accidentally started.
3 Do not use the oven for the purpose of dehumidification. It can be the cause of
serious damage of safety. (ex. Operating the microwave oven with the wet
newspapers, clothes, toys, pet or portable electric devices, etc.)
4 Do not cook food wrapped in paper towels, unless your cook book contains
instructions, for the food you are cooking.
5 Do not use newspaper in place of paper towels for cooking.
6 Do not use wooden containers. They may heat-up and char. Do not use
ceramic containers which have metallic (e.g. gold or silver) inlays. Always
remove metal twist ties. Metal objects in the oven may arc, which can cause
serious damage.
7 Do not operate the oven with a kitchen towel, a napkin or any other
obstruction between the door and the front edges of the oven, which may
cause microwave energy leakage.
8 Do not use recycled paper products since they may contain impurities which
may cause sparks and/or fires when used in cooking.
9 Do not rinse the turntable by placing it in water just after cooking. This may
cause breakage or damage.
WARNING
Please ensure cooking times are correctly
set as over cooking may result in FIRE and
subsequent DAMAGE to the OVEN.

26
Microwave-safe
Utensils
Never use metal or metal trimmed utensils in your
microwave oven
Microwaves cannot penetrate metal. They will bounce off any metal object in the
oven and cause arcing, an alarming phenomenon that resembles lightning.
Most heat resistant non metallic cooking utensils are safe for use in your microwave
oven. However, some may contain materials that render them unsuitable as
microwave cookware. If you have any doubts about a particular utensil, there’s a
simple way to find out if it can be used in your microwave oven.
Place the utensil in question next to a glass bowl filled with water in the microwave
oven. Microwave at power HIGH for 1 minute. If the water heats up but the utensil
remains cool to the touch, the utensil is microwave~safe. However, if the water does
not change temperature but the utensil becomes warm, microwaves are being
absorbed by the utensil and it is not safe for use in the microwave oven. You
probably have many items on hand in your kitchen right now that can be used as
cooking equipment in your microwave oven. Just read through the following
checklist.
Dinner plates
Many kinds of dinner-ware are microwave-safe. If in doubt consult the
manufacturer’s literature or perform the microwave test.
Glassware
Glassware that is heat-resistant is microwave-safe. This would include all brands of
oven tempered glass cookware. However, do not use delicate glassware, such as
tumblers or wine glasses, as these might shatter as the food warms.
Plastic storage containers
These can be used to hold foods that are to be quickly reheated. However, they
should not be used to hold foods that will need considerable time in the oven as hot
foods will eventually warp or melt plastic containers.
Paper
Paper plates and containers are convenient and safe to use in your microwave oven,
provided that the cooking time is short and foods to be cooked are low in fat and
moisture. Paper towels are also very useful for wrapping foods and for lining baking
trays in which greasy foods such as bacon are cooked. In general, avoid coloured
paper products as the colour may run. Some recycled paper products may contain
impurities which could cause arcing or fires when used in the microwave oven.
Plastic cooking bags
Provided they are made specially for cooking, cooking bags are microwave safe.
However, be sure to make a slit in the bag so that steam can escape. Never use
ordinary plastic bags for cooking in your microwave oven, as they will melt and
rupture.
Plastic microwave cookware
A variety of shapes and sizes of microwave cookware are available. For the most
part, you can probably use items you already have on hand rather than investing in
new kitchen equipment.
Pottery, stoneware and ceramic
Containers made of these materials are usually fine for use in your microwave oven,
but they should be tested to be sure.
CAUTION
Some items with high lead or iron content are not suitable for cooking
utensils.
Utensils should be checked to ensure that they are suitable for use in
microwave ovens.

27
Keeping an eye on things
The recipes in the book have been formulated with great care, but your success in
preparing them depends on how much attention you pay to the food as it cooks.
Always watch your food while it cooks. Your microwave oven is equipped with a
light that turns on automatically when the oven is in operation so that you can see
inside and check the progress of your food. Directions given in recipes to elevate,
stir, and the like should be thought of as the minimum steps recommended. If the
food seems to be cooking unevenly, simply make the necessary adjustments you think
appropriate to correct the problem.
Factors affecting microwave cooking times
Many factors affect cooking times. The temperature of ingredients used in a recipe
makes a big difference in cooking times. For example, a cake made with ice-cold
butter, milk, and eggs will take considerably longer to bake than one made with
ingredients that are at room temperature. All of the recipes in this book give a range
of cooking times. In general, you will find that the food remains under-cooked at the
lower end of the time range, and you may sometimes want to cook your food beyond
the maximum time given, according to personal preference. The governing
philosophy of this book is that it is best for a recipe to be conservative in giving
cooking times. While overcooked food is ruined for good. Some of the recipes,
particularly those for bread, cake, and custards, recommend that food be removed
from the oven when they are slightly undercooked. This is not a mistake. When
allowed to stand, usually covered, these foods will continue to cook outside of the
oven as the heat trapped within the outer portions of the food gradually travels
inward. If the food is left in the oven until it is cooked all the way through, the outer
portions will become overcooked or even burnt. You will become increasingly skilful
in estimating both cooking and standing times for various foods.
Density of food
Light, porous food such as cakes and breads cook more quickly than heavy, dense
foods such as roasts and casseroles. You must take care when microwaving porous
food that the outer edges do not become dry and brittle.
Height of food
The upper portion of tall food, particularly roasts, will cook more quickly than the
lower portion. Therefore, it is wise to turn tall food during cooking, sometimes several
times.
Food characteristics&
Microwave cooking
Moisture content of food
Since the heat generated from microwaves tends to evaporate moisture, relatively dry food
such as roasts and some vegetables should either be sprinkled with water prior to cooking
or covered to retain moisture.
Bone and fat content of food
Bones conduct heat and fat cooks more quickly than meat. Care must be taken when
cooking bony or fatty cuts of meat that they do not cook unevenly and do not become
overcooked.
Quantity of food
The number of microwaves in your oven remains constant regardless of how much food is
being cooked. Therefore, the more food you place in the oven, the longer the cooking time.
Remember to decrease cooking times by at least one third when halving a recipe.
Shape of food
Microwaves penetrate only about 2.cm into food, the interior portion of thick foods are
cooked as the heat generated on the outside travels inward. Only the outer edge of food in
cooked by microwave energy; the rest is cooked by conduction. The worst possible shape
for a food that is to be microwaved is a thick square. The corners will burn long before the
centre is even warm . Round thin foods and ring shaped foods cook successfully in the
microwave.
Covering
A cover traps heat and steam which causes food to cook more quickly. Use a lid or
microwave cling film with a corner folded back to prevent splitting.
Browning
Meats and poultry that are cooked fifteen minutes or longer will brown lightly in their own
fat. Food that are cooked for a shorter period of time may be brushed with a browning
sauce such as worcestershire sauce, soy sauce or barbecue sauce to achieve an appetizing
colour. Since relatively small amounts of browning sauces are added to food the original
flavour of the recipe is not altered.
Covering with greaseproof paper
Greaseproofing effectively prevents spattering and helps food retain some heat. But
because it makes a looser cover than a lid or clingfilm, it allows the food to dry out slightly.
Arranging and spacing
Individual foods such as baked potatoes, small cakes and hors d’oeuvres will heat more
evenly if placed in the oven an equal distance apart, preferably in a circular pattern. Never
stack foods on top of one another.

28
Food characteristics &
Microwave cooking.
Stirring
Stirring is one of the most important of all microwaving techniques. In conventional cooking,
food is stirred for the purpose of blending. Microwaved food, however, is stirred in order to
spread and redistribute heat. Always stir from the outside towards the centre as the outside
of the food heats first.
Turning over
Large, tall foods such as roasts and whole chickens should be turned so that the top and
bottom will cook evenly. It is also a good idea to turn cut up chicken and chops.
Placing thicker portions facing outwards
Since microwaves are attracted to the outside portion of food, it makes sense to place
thicker portions of meat, poultry and fish to the outer edge of the baking dish. This way,
thicker portions will receive the most microwave energy and the food will cook evenly.
Shielding
Strips of aluminium foil (which block microwaves) can be placed over the corners or edges
of square and rectangular foods to prevent those portions from overcooking. Never use too
much foil and make sure the foil is secured to the dish or it may cause ‘arcing’ in the oven.
Elevating
Thick or dense foods can be elevated so that microwaves can be absorbed by the underside
and centre of the foods.
Piercing
Foods enclosed in a shell, skin or membrane are likely to burst in the oven unless they are
pierced prior to cooking. Such foods include yolks and whites of eggs, clams and oysters
and whole vegetables and fruits.
Testing if cooked
Food cooks so quickly in a microwave oven, it is necessary to test it frequently. Some foods
are left in the microwave until completely cooked, but most foods, including meats and
poultry, are removed from the oven while still slightly undercooked and allowed to finish
cooking during standing time. The internal temperature of foods will rise between 5
0
F (30C)
and 15
0
F (80C) during standing time.
Standing time
Foods are often allowed to stand for 3 to 10 minutes after being removed from the
microwave oven. Usually the foods are covered during standing time to retain heat unless
they are supposed to be dry in texture (some cakes and biscuits, for example). Standing
allows foods to finish cooking and also helps flavour blend and develop.
To Clean Your Oven
1 Keep the inside of the oven clean
Food spatters or spilled liquids stick to oven walls and between seal and door
surface. It is best to wipe up spillovers with a damp cloth right away. Crumbs and
spillovers will absorb microwave energy and lengthen cooking times. Use a damp
cloth to wipe out crumbs that fall between the door and the frame. It is important to
keep this area clean to assure a tight seal. Remove greasy spatters with a soapy cloth
then rinse and dry. Do not use harsh detergent or abrasive cleaners. The glass tray
can be washed by hand or in the dishwasher.
2 Keep the outside of the oven clean
Clean the outside of your oven with soap and water then with clean water and dry
with a soft cloth or paper towel. To prevent damage to the operating parts inside the
oven, the water should not be allowed to seep into the ventilation openings. To clean
control panel, open the door to prevent oven from accidentally starting, and wipe a
damp cloth followed immediately by a dry cloth. Press STOP/CLEAR after cleaning.
3 If steam accumulates inside or around the outside of the oven door, wipe the panels
with a soft cloth. This may occur when the microwave oven is operated under high
humidity conditions and in no way indicates a malfunction of the unit.
4 The door and door seals should be kept clean. Use only warm, soapy water, rinse
then dry thoroughly.
DO NOT USE ABRASIVE MATERIALS, SUCH AS CLEANING POWDERS OR
STEEL AND PLASTIC PADS.
Metal parts will be easier to maintain if wiped frequently with a damp cloth.

29
Questions &
Answers
Q What’s wrong when the oven light will not glow?
A There may be several reasons why the oven light will not glow.
Light bulb has blown
Door is not closed
Q Does microwave energy pass through the viewing screen in the door?
A No. The holes, or ports, are made to allow light to pass; they do not let
microwave energy through.
Q Why does the beep tone sound when a pad on the Control Panel is
touched?
A The beep tone sounds to assure that the setting is being properly entered.
Q Will the microwave oven be damaged if it operates empty?
A Yes Never run it empty or without the glass tray.
Q Why do eggs sometimes pop?
A When baking, frying, or poaching eggs, the yolk may pop due to steam
build up inside the yolk membrane. To prevent this, simply pierce the yolk
before cooking. Never microwave eggs in the shell.
Q Why is standing time recommended after microwave cooking is over?
A After microwave cooking is finished, food keeps on cooking during
standing time. This standing time finishes cooking evenly throughout the
food. The amount of standing time depends on the density of the food.
Q Is it possible to pop corn in a microwave oven?
A Yes, if using one of the two methods described
below
1 Popcorn-popping utensils designed specifically for microwave cooking.
2 Prepackaged commercial microwave popcorn that contains specific
times and power outputs needed for an acceptable final product.
FOLLOW EXACT DIRECTIONS GIVEN BY EACH MANUFACTURER FOR
THEIR POPCORN PRODUCT. DO NOT LEAVE THE OVEN UNATTENDED
WHILE THE CORN IS BEING POPPED. IF CORN FAILS TO POP AFTER
THE SUGGESTED TIMES, DISCONTINUE COOKING. OVERCOOKING
COULD RESULT IN THE CORN CATCHING FIRE.
CAUTION
NEVER USE A BROWN PAPER BAG FOR POPPING CORN. NEVER
ATTEMPT TO POP LEFTOVER KERNELS.
Q Why doesn’t my oven always cook as fast as the cooking guide says?
A Check your cooking guide again to make sure you’ve followed directions
correctly, and to see what might cause variations in cooking time.
Cooking guide times and heat settings are suggestions, chosen to help
prevent overcooking, the most common problem in getting used to a
microwave oven. Variations in the size, shape, weight and dimensions of
the food require longer cooking time. Use your own judgement along
with the cooking guide suggestions to test food condition, lust as you
would do with a conventional cooker.

30
Plug wiring information/
Technical Specifications
The wires in this mains lead are colored in accordance with the
following codes
BLUE ~ Neutral
BROWN ~ Live
GREEN & YELLOW ~ Earth
As the colours of the wires in the mains lead of this appliance may
not correspond with the coloured markings identifying the terminals
in your plug proceed as follows:
The wire which is colored BLUE must be connected to the terminal
which is marked with the letter N or Colored BLACK.
The wire which is colored BROWN must be connected to the
terminal which is marked with the letter L or colored RED.
The wire which is colored GREEN & YELLOW or GREEN must be
connected to the terminal which is marked with the letter E or .
If the supply cord is damaged, it must be replaced by the
manufacturer or its service agent or a similarly qualified person in
order to avoid a hazard;
Warning
This appliance must be earthed
Technical Specification
Power Input 230 V AC / 50 Hz
Output 850 W (IEC60705 rating standard)
Microwave Frequency 2450 MHz
Outside Dimension 507 mm(W) X 283 mm(H) X 435 mm(D)
Power Consumption 1250 Watts
MS-2344B / MS-2344BS

MS-2344B
MS-2344BS
3828W5A6112

ורקימ תיגרנאל תירשפא הפישח תעינמל תוריהז יעצמא
םילזונ לגורקימב םיממחמ רשאכ)םיקרמ ,תואקשמו םיבטר( ,
רבדהו תועוב תעפוה אלל החיתר רצוויהל הלולע םורגל לוכי
לזונה לש תימואתפ השילגל . טוקנל שי השילג עונמל תנמ לע
םיאבה םידעצב:
1. תורשי תויווז ילעב םילכב שומישהמ וענמיה) םיעבורמ
וכו' (רצ חתפ ילעב.
2. הדימה לע רתי וממחת לא.
3. םעפו רונתב לכימל ותסנכה ינפל לזונה תא ושחב
םומיחה ןמז תיצחמכ ףולחב תפסונ.
4. םומיחה םויסב ןמז ךשמל רונתב ילכה תא וריאשה
רצק , םוחה תא וקדבו תוריהזב בוש ורענ וא ושחב
תויווכ עונמל תנמ לע הייתשה ינפל ילכב) דחוימב
תוקוניתל ןוזמ תונצנצו םיקובקב.(
לכימב םילפטמ םתא רשאכ
ורהזה.
5. רחאל החל תילטמ םע רונתה את םינפ תא וקנ
שומישה.
6. אלל רונתה תא וליעפת לא םלועל תיכוכזה שגמ
תבשותה קושיחו1 לולע הזש םושמ תכתמה לכימ
תוצוצינל םורגל.
הרהזא
ךשמל לגורקימב ןוזמה תא וריאשה לושיבה םויסב
תוקד רפסמ , ינפל הרוטרפמטה תגרד תא וקדבו
תוריהז יעצמא
כ רונתה תא ליעפהל ןתינ אל ינקתהל תודוא החותפ תלדהש
תלדה ןונגנמה םיאצמנה תוחיטב.
תלועפ לש תיטמוטוא הקספהל םימרוג הלא םינקתה
תלדה תחיתפ םע לגורקימה.
לגורקימ רונת לש הרקמב , איבהל הלוכי תלד תחיתפ
ורקימ ילג לש היגרנאל הקיזמ הפישחל.
תוחיטבה ילעונ םע קסעתהל אל בושח .
נתה ןיב רבד וחינת
המיטאה יחטשמ לע רבטצהל יוקינ ירמוח וא.
רונתה תא ליעפהל ןיא קזנ לש הרקמב . אדוול דחוימב בושח
ל קזנ םרגנ אלשו ןוכנ ןפואב תרגסנ תלדהש–) 1 ( תלד
המיטאה יחטשמו תותלדה.
ומגפנש עקתו ילמשח לבכ ףילחהלו.
םינוכנ לושיבה ינמזש ואדו אנא .
לא ןוזמ יריישל ורשפאת לאו תלדה ןיבל רו
)המוקע) (2 ( םיחירבו םיריצ)םיפפור וא םירובש) (3 ( ימטא
קרונקתל וא רונתה תא ןווכל יאשר ךמסומ תוריש תווצ
הרהזא
השגהה . םיקובקב קודבל םייתעבש ודיפקה
תוקוניתל.
2
רונתל קזנו הקילדל םורגל יושע לושיב ףדוע.

3
ה
ע
נ
י
נ
י
ם
תו
כן
מ
יקר
וגל תנו
ר
פו
ע
ל
כיצד
מ
י
ק
גלירדיו לגלי הדו
מה א
נרגי
ה צו
רת ה
ם רו,
טלווי
זיה
ג
לי
שמ
ש
ו
אנרגי
ת.
בתנ
וע
תם מ
ת
פ
שט
ים ה
מי
ק
רו גלי
ב
א
טמוס
פ
ר
ה, ונע
ל
מים
. ש
מי
וע
ד מ
ג
נט
רון
יש מיקרוגל ל
תנור
י
ה
מיקרו
גלי
עוצמת
את
לנצ
ל
. ה
מגנט
רו
ן
לצי
נור
ה
מג
י
ע
חשמ
ל
מי
קרו גליש
ל א
נרגיה לי
צור מ
ש
מ
ש.
ה
בישול
ל
א
זור נכנס
י
ם
אלה
גלים
התנור ב
תו
ך
פ
תח
ים
דרך.
מ
סת
ו
ב
ב
מג
ש נמ
צא הת
נור בת
ח
תי
ת
.
י
כול
ים
א
ינ
ם ה
גלים
זכו
כי
ת
כגו
ן ל
חומ
ר
י
ם לחדור
,
ונייר
פו
ר
צ
לן
,
מ
ה
ם
הח
ומרי
ם
מ
י
קרו
גל לתנ
ורי
ה
מ
תאי
מים ביש
ול
כל
י ע
ש
ויי
ם
.
ה
ב
י
שול
כליאת מ
ח
מים אינם
ה
מ
יקרו
שגלי אף ע
ל
, הם
א
ה
מ
ו
ע
ב
ר
ה
מזו
ן
של מ
ה
ח
ו
ם ד
ב
ר
ש
ל
ב
סו
פו י
תח
מ
מוליה
ם
.
מא
וד ב
ט
ו
ח
מ
כש
י
ר
הביתיים הח
ש
מ
ל מ
מכ
שירי א
ח
ד הוא
ה
מי
ק
רו
ג
ל
תנו
ר
ביותר הבט
וחי
ם.
נפ
תח
ת הדל
ת כ
אש
ר
,
ל
יצר
מ
פ
סי
ק ה
ת
נ
ור
א
וט
ו
מ
ט
י
ב
אופן
גלי
ם
,
ל
חו
ם
כו
לה
הופכ
ת
ה
מי
ק
ר
וג
ל א
נ
רגי
ת
ל
מ
ז
ון
נכנ
ס
ת ה
יא
כ
א
שר
,
אכיל
ת
ב
זמ
ן מזיקות
ש
א
רי
ו
ת ל
ל
א
המזון.
זה
ירו
ת אמצ
עי
...........................................2
ה תוכןענינים.............................................
3
והצב
ה
פרי
קה
............................................5
-
4
...........................................
.6
נעילהיל
די
ם מ
פנ
י......................................
.7
ב
בישו
ל
עוצמתמיקרוגל...............................8
ר
מ
תהמיקרוגל עו
צ
מת................................9
שלבי דו ב
יש
ול...........................................01
מ
ה
ירה
ה
פ
על
ה
................
........................
..1
1
מ
היר ת
פ
ריט
.............................................3
1
-
21
אוטומטי בישול..........................................51-4
1
אוטו
מ
טי
ת
הפשרה....................................
.7
1
-
61
מ
הי
רה הפשרה..........................................91-81
אוטומטי חימום
...
.......................................
1
2-0
2
..........................22
מ
חד
ש חי
מו
ם
או חי
מום מ
דרי
ך......................32
ט
ר
יים
ירקות
מדריך
.......
............................
.4
2
............................52
ב
מ
יקרוגל ל
שימ
ו
ש
המת
אימים
כלים
.......
........62
... ...................82-72
ות
ש
ובות
שאלו
ת
.......................................
.9
2
..........03
השע קבי
ע
ת
ו
ן
ה
וספ
ת
/
הפח
ת
ת
ב
י
ש
ו
ל ז
מן
חשובו
ת
בטיחות הוראות
בעתי
ד
לעיון ושמרו
ל
ב בתשו
מ
ת קראו
מזון מאפייני
ב
מ
יקרוגל ובישו
ל
חשמל תקע חיבורי מידע/
טכני מפרט

ןיקת רונתה יכ אדוולו קודבל םכל ועייסי םיאבה םידומעה ינשב םיעיפומה םיבלשה . ומיש
רונתה תבצהו םוקימל דחוימב בל . לכ תא ונממ ואיצוה הזיראהמ רונתה קוריפ ןמזב
הזיראה ירמוחו םירזיבאה.הלבוהה ןמזב קוזינ אל רונתהש ואדוו.
הבצהו הקירפ
ביציו רשי חטשמ לע רונתה תא וביצה . ריאשהל הבוח
תואנ רורווא רשפאל תנמ לע םידדצהמו רונתה .
רונתה לש ידדצהו ירוחאה
םייריכ לעמ רונתה תא ביצהל ןיא)רחא םוח רוקמ וא.(
וקלחב יחתפ םיאצמנ ריוא תטילפ
םח .רורוואה יחתפ תמיסחונתל קזנ םורגל הלולע ר .
לש חוורמ30ס " ו לעמ תוחפל מ10ס " ירוחאמ מ
לע ותוא וביצהו הזיראהמ רונתה תא ואיצוה
ולקשמ תא תאשל לוכיה ביציו רשי חטשמ.
בבוס קושיח
וכז שגמ תיכ
דבלב יתיב שומישל דעוימ רונתה . תורטמל וב שמתשהל ןיא
תורחא)תוירחסמ ,תורחאו גנירטייק.(
4
תחיתפ ןצחל לע הציחל ידי לע רונתה תלד תא וחתפ
תלד)DOOR OPEN ( תא וסינכהו בבוסה קושיחה
ןולחבצתההגו הריפסה עיפות
ךשמב רוחאל3תוקד . םויסב
ועמשי תונכתה3םיפוצפצ . תא וחתפ
םימה תרוטרפמט תא וקדבו תלדה . םא
לעופו ןיקת רונתה ,םימח ויהי םימה.
רונתהמ ילכה תאצוה ןמזב ורהזיה– אוה
דואמ םח תויהל יושע.
הנקתההו הבצהה ךילהת םייתסנ.
)שגמה ךמות(א וילע וחינהו רונתל תיכוכזה שגמ ת.
הלעפה ןצחל לע ץוחלל
ףוצפצ עימשת הציחל
30
Seconds
לועפל ליחתי רונתה
עוציב ינפל תיטמוטוא
תישישה הציחלה , וז
ליגר יתיב עקשל עקתה תא וסינכה . ואדוו
עקשל רבוחמה דיחיה רישכמה אוה לגורקימהש
הז .יוארכ לעופ וניא רונתה םא , תא ואיצוה
ורבחו עקשהמ עקתהתוא רפסמ רחאל תינש ו
תוקד.
ןוויכל3 שי לושיב תוקד
הריהמ)QUICK
START (6םימעפ . לכ
יבגל קפס לש הרקמב
לע ילכה תא וחינהתיכוכזה שגמו ורגס
תלדה תא)
לגורקימל ילכה תמאתה , דומעב ונייע
לגורקימל םיאתמה ילכב ואלמ300
מס"םימ ק .
20.(
)פיב.(
הלקת הניא.
5

לש הרוצתב ימינפ ןועש שי רונתל12 לש הרוצתבו תועש 24תועש . העשה ןוויכל אמגוד ןלהל14:35 .
הבצהה תוארוהל םאתהב בצומו ןקתומ רונתהש ואדו
ןב ןועשב שמתשהל םיצור םתא םא12תועש , לע וצחל
ףיעסב תועיפומה"הבצהו הנקתה."
Stop/Clear
רופסל לחי ןועשה...
לע וצחל
ןצחל לע וצחלCLOCKתחא םעפ .
ןצחלCLOCKתפסונ םעפ . ןועש תרוצת םיצור םתא םא
לע וצחל10 min 15םימעפ .
לע וצחל1 min םימעפ שולש.
לע וצחלCLOCK וא START/Quick Start.
לש ןועש תרוצתב24תועש .הזיראה ירמוח לכ תא םתרסהש ואדו.
ןועשה תעיבק
1
2
)24תועש ( ,בוש ורבחו עקשהמ לבכה עקת תא וקתנ.
3
ל לע וצח10 secםימעפ שמח .
רונתה תא םירבחמ רשאכ
הנושארה םעפב למשחל , וא
ספה רחאללמשח תק , הרפסה
ןועשה תא ןווכל.
ןועשה םא)הגוצתה וא ( םיארמ
הארמל םירזומ םינמיס , וקתנ
עקשמ םכלש רונתה תא
המכ רחאל בוש ורבחו למשחה
ןועשה תא ספאל ישכ תוינש.
"0 "הגוצתה ןולחב גצות , שי
4
6

םידלי ינפמ הליענ
L
)םידלי ידי לע לשמל .( רשאכ
1
2
י םכלש לגורקימה רונתל ש
ענומה ידוחיי יתוחיטב ןקתה
רונתה לש היוצר אל הלעפה
תלעפומ המיסחה , ןתינ אל
רונתה תא ליעפהל , ןתינ םלוא
תלדה תא חותפל.
"L) "לוענ (בג לע עיפות ףוצפצ עמשיו גצה י"פיב."
הליענהםידלי ינפמתלעפומ תעכ .
3
לע וצחלStop/Clear
ןצחל תא וקיזחהו וצחלStop/Clear תואהש דע ץוחל
םלעית העשה תגוצת)ןווכמ ןועשהו הדימב(
תואה"L "תופיצרב גצות , יכ ןייצלםידלי ינפמ הליענה
תלעפומ.
לוטיבל תאהליענהםידלי ינפמ , ןצחל תא וקיזחהו וצחל
"Stop/Clear " ןמיסהש דע ץוחל"L) "לוענ ( םלעי
גצהמ . ילוק יוויח עמשיי הליענה רורחש םע)פיב(
4
7
לגורקימ תמצועב לושיב
האבה המגודב , לש קפסהב לשבל ךיא םכל הארנ80% ךשמב 5 ו תוקד 30תוינש .
ףיעסל םאתהב םינוכנ הבצההו הנקתההש ואדוו
"הנקתהו הבצה "וז תרבוחב ןכ ינפל ראותמכ .
1
ןצחל לע וצחלStop/Clear.
דיוצמ םכלש לגורקימה רונת
לע וצחלPower המצועב רוחבל ידכ םיימעפ 80%
2
)680טאוו (
םייתסי לושיבהש רחאל ,
ידימ עמשי הארתה ףוצפצ
ךשמל הקד 5 רשא דע תוקד
רונתה תלד חתפית.
לע וצחל1 minםימעפ שמח
לע וצחל10 Secפ שולש םימע
ןצחל לע וצחלSTART/Quick Start.
םייתסי לושיבהש רחאל , םויס לילצ)פיב ( ידימ עמשי
ךשמל הקד5רונתה תלד חתפית רשא שע תוקד .
3
הובג ינוניב
4
הובג )םומיסכמ(
80% 680W
60% 510W
ינוניב
(ךומנ ינוניב
100% 850W
40% 340W
הרשפה )
20% 170W
ךומנ
8
ב5המצוע תוגרד .
האיצי קפסהתוציחל רפסמ

ב דיוצמ לגורקימה רונת5המצוע תוגרד , ןתמ ךרוצל תאזוג לע םייברמ הטילשו תושימ
תלושיבה ךילה.
הז םגדב המצועה תוגרד תא הארמ האבה הלבטה שומישל קפסהה תומצוע תומרו
הז לגורקימ רונת תועצמאב.
• םימ תחתרה
100% 850טאוו
80% 680טאוו
60% 510טאוו
40% 340טאוו
20% 170טאוו
• ןוחט רשב תמחשה
• ףוע יקלח ,תוקריו םיגד
• םינידע רשב יחתנ
• ןכומ ןוזמ לש ריהמ םומיח
• תופועו רשב תיילצ
• תוירטפ לושיבופדצות
• הניבגו םיציב ילכאמ
• תוגוע תייפא ,םימחל
• םיציב
• תפרפר
• זרוא תנכה ,םיקרמ
• הרשפהה יגוס לכ
• האמח תסמה ,דלוקוש
• םיסג רשב יחתנ
• הניבגו האמח ךוכיר
• תודילג ךוכיר
• הקצב תחפת
DEFROST MEDIUM
לגורקימה תמצוע תמר
המצוע שומיש המצוע תמר(%) האיצי קפסה
הובג)HIGH (
םומיסכמ
הובג ינוניב
MEDIUM/HIGH
ינוניב
MEDIUM
הרשפה / ךומנ ינוניב
HIGH
ךומנ
LOW
9

האבה המגודבדציכ תוארל ןתינ תינכתב לשבל תיבלש וד לושיב . לושיב עצבי ןושארה בלשה
המצועבההובג )HIGH( ב ךשמ11תוקד , לש המצועב היהי ינשה בלשהו40% )340טאוו (
ךשמב35תוקד .
יבלש וד לושיב
ןצחל לע וצחלStop/Clear
המצועה תאו ןמזה ךשמ תא ונווכרובעןושאר בלש
ןצחל לע תחא םעפ וצחלPower תריחבל המצועההובג
ןצחל לע תחא םעפ וצחל10 min.
ןצחל לע תחא םעפ וצחל1 min.
ינש בלש לש המצועה תאו ןמזה ךשמ תא ונווכ )Stage 2.(
המצועה ןוויכ
וצחל4 ןצחל לע םימעפ POWER המצועב רוחבל ידכ
40%) 340טאוו .(
וצחל3 םימעפ ןצחל לע10 min.
וצחל5 לע םימעפ ןצחל1 min.
ןצחל לע וצחלSTART/Quick Start.
)Stage 1.(
)HIGH(.
1
2
3
4
תינכת ךלהמב וד לושיב
בצמ תא קודבל ידכ תלדה
הב םוקמהמ תינכתה ךשמהל
התוא םתרצע , תא ורגס
ןצחל לע וצחלו תלדה
START/Quick Start.
בלש םויסב1וצפצ עמשיי ף
תא לטבל םכנוצרב םא
תיבלש , תא חותפל ןתינ
לושיבה ,ןוזמב לפטל , ךופהל
ותוא ,ו ותוא דירפהלוכ' .
רחאל דיימווי בלש ליחתי 2.
תינכתה , לע םיימעפ וצחל
ןצחל STOP/CLEAR.
10
הריהמ הלעפה
ההובג המצועב לושיב תוקד יתש עובקל דציכ גצוי האבה המגודב.
ןצחל לע וצחלStop/Clear
1
וצחלSTART/Quick Start תריחבל םימעפ עברא 2
ההובג המצועב תוקד . ינפל דוע לועפל לחי םכלש רונתה
תיעיברה הציחלה תא ץוחלל ומייסתש.
ועצמאב לושיב ךלהמבהריהמ הלעפה , םילוכי םתא
יבה ןמז תא לידגהל דע לוש10 תוציחל ידי לע תוקד
ןצחל לע תונשנו תורזוחSTART/Quick Start.
2
לושיב עצבל םכל תרשפאמ
לש םיחוורמב ההובג המצועב
3
הריצע ןצחל)STOP.(
ה תנוכתהריהמה הלעפה
)QUICK START (
30וינש לע עגמ ידי לע לש ת
11

האבה המגודב , לשבל דציכ וארת0.5ק "היופא תיעועש לש ג
ריהמ טירפת
ןצחל לע וצחלStop/Clear
1
וצחל Quick Menu םימעפ שולש
Sc-3הגוצתה לע עיפוי .
היופאה תיעועשה לש יוצרה לקשמה תא ורחב.
שקמ לע וצחלMove סינכהל ידכ םימעפ שמח 0.5ק "ג
ןצחל לע וצחלSTART/Quick Start.
2
ףדעומה ןוזמה תא
תריחב ידי לע תולקב םכילע
לקשמ תסנכהו ןוזמה גוס
ןצחל לע הציחל ידי לע ןוזמה
3
4
טירפת ריהמ
) QUICK MENU (
שפאמ לשבל םכל ר
לעוש תלוביש חמק
היופא תיעועש
תשקשוקמ הציב
רתוי/ תוחפ(More/Less)
הירוגטק ןצחלה לע תוציחל רפסמ
הטספ
נקנ היקי
דיזנ
12

תוארוה
ןוזמ
לושיב ילכ פמט .
לקשמ
רדח לגורקימב שומישל החוטב הרעקב בלחו סקלפנרוקה תא וחינה.
הסוכמ אל ולשב .ףצפצי רונתה , וצחלו בטיה סקלפנרוקה תא ובברעSTART
ךישמהל .לושיב רחאל ,השגה ינפל תחא הקד ךשמל ודימעהו בטיה ובברע.
2
/
םילפס
11/
3
)4תוזירא (
דחא לפס
)3תוזירא (
םילפס 3םילפס
2
לפס
3
)2תוזירא (
םילפס 21/
2
1
/
דע 1 הקומעו הלודג הרעקב חלמ תיפכ.
4
1
/
לפס
3
תחא סקלפנרוק
)תחא הזירא(
3
/
לפס 11/
4
םיחתור םימ 400מ "ל 700מ "ל 1000מ "ל אל
תחא הנמ 2תונמ 3תונמ 4תונמ
תזירא
- כ 40םרג
רק בלח
רדח הטספ ומיש םע םיחתור םימו
לקשמ 100םרג 200םרג 300םרג הסוכמ
שומישל
לגורקימל
החוטב הרעק
שומישל
לגורקימל
0.1ק " ג-
0.3ק "ג
ןוזמ תירוגטק תלבגמ
1 - 4תונמ החוטב הרעק
תלוביש חמק
קלפנרוקס
1 .
לעוש-
2 .
הטספ
הסוכמ אל ולשב .ףצפצי רונתה , וצחלו בטיה הטספה תא ובברעSTART ידכ
ךישמהל .לושיב רחאל ,ךרוצ שי םא תחא הקד ךשמל ודימעהו ובברע . הטספ ופטש
םירק םימ םע.
רדח לגורקימב שומישל החוטב הרעק ךותל תיעועש וכפש .וסכ.
תיכוכזה שגמ לע ילכה תא וחינה.
םומיח רחאל , ךשמל הסוכמ ודימעה ןכמ רחאלו ובברע1 - 2תוקד .
רדח לגורקימל שומישל החוטב הרעקב חלמה ימ ללוכ לכימה ןכות תא וחינה .
הסוכמ אל וממח .םומיח רחאל ,בטיה ופטש .ושיגהו ושבי.
החוטב הרעק
שומישל
לגורקימל
רעק החוטב ה
שומישל
לגורקימל
רדח לגורקימל שומישל החוטב הרעקב דיזנה תא וחינה .תועצמאב וסכ ררחושמ דמצנ ןוליינ
תולק.
םומיח רחאל , ל ודימעהו בטיה ובברע2תוקד .
החוטב הרעק
שומישל
לגורקימל
ררקמ לגורקימל שומישל החוטב הרעקב בלחו היוצרה םיציבה תומכ תא וחינה .תולק ופרט.
דמצנ ןוליינב וסכ .לושיב רחאל ,רונתהמ וריסה.
בטיה ובברע ךשמל ודימעהו 1 - 2השקתי רשא דע הסוכמ תוקד .
שומישל
לגורקימל
0.2ק " ג-
0.8ק "ג
היופא תיעועש ,
3 .
שדחמ םומיח
0.2ק " ג-
0.6ק "ג
ימב תויקינקנ
4 .
חלמ
0.2ק " ג-
0.6ק "ג
1 - 4םיציב החוטב הרעק
5 .
דיזנ
6 .
הציב
תשקשוקמ
תומכל םאתהב בלח תומכ ופיסוה.
תחא הציב- 1בלח תיפכ .
2 םיציב - 2בלח תויפכ .
3 םיציב - 3בלח תויפכ .
4 םיציב - 4בלח תויפכ .
13
יטמוטוא לושיב
האבה המגודב , לשבל דציכ תוארל ולכות0.5ק "יופא המדא חופת לש ג.
ןצחל לע וצחלStop/Clear.
לע וצחלAUTO COOKתחא םעפ .
Ac-1הגוצתה לע עיפוי .
יוצרה המדא חופתה לקשמ תא ורחב.
ןצחל לע וצחלMore 5 סינכהל ידכ םימעפ 0.5ק "ג.
ןצחל לע וצחלSTART/Quick Start.
1
יטמוטוא לושיב םכל רשפאמ
2
ףדעומה ןוזמה בור תא לשבל
תריחב ידי לע תולקב םכילע
ןוזמה לקשמ תסנכהו ןוזמה גוס
ל לע הציחל ידי לע ןצח
3
4
More/Less.
הירוגטק יטמוטוא לושיב
יופא דופת םעפ1
םיירט תוקרי 2םימעפ
םיאופק תוקרי 3םימעפ
ןרוקפופ 5םימעפ
לע וצחל
זרוא 4םימעפ
14
תוארוה
לושיב ילכ פמט .
ןוזמ
- רדח ינוניב לדוגב המדא יחופת ורחב170 - 200םרג .
המדאה יחופת תא ושביו ופטש . תועצמאב תומוקמ רפסמב המדאה יחופת תא ובקנ
תלבגמ
לקשמ
0.1ק " ג ~
1.0ק "ג
גלזמ .תיכוכזה תחלצ לע המדאה יחופת תא וחינה .הלעפה לע וצחלו לקשמ ונווכ .
ירוגטק ת
ןוזמ
1 .
יופא דופת
לושיב רחאל ,פת תא ואיצוהרונתהמ המדאה יחו . ךשמל ררקתהל םהל וחינה5תוקד .
רדח לגורקימב לושיבל הניסח הרעקב תוקריה תא וחינה .םימ ופיסוה.
דמצנ ןוליינב וסכ .לושיב רחאל , ךשמב דומעל וחינהו ובברע2תוקד .
םאתהב םימ תומכ ופיסוהתומכל;
החוטב הרעק
שומישל
לגורקימל
0.2ק " ג ~
0.8ק "ג
םיירט תוקרי
2 .
**0.2ק " ג ~0.4ק "ג :2תופכ .
**0.5ק " ג ~0.8ק "ג :4תופכ .
אופק לגורקימב לושיבל המיאתמ תרעקב תוקרי ומקמ .םימ ופיסוה.
דמצנ ןוליינב וסכ .לושיב רחאל , ךשמב דומעל וחינהו ובברע2תוקד .
פיסוהתומכל םאתהב םימ תומכ ו;
החוטב הרעק
שומישל
לגורקימל
0.2ק " ג ~
0.8ק "ג
3 .
תוקרי
םיאופק
**0.2ק " ג ~0.4ק "ג :2תופכ .
**0.5ק " ג ~0.8ק "ג :4תופכ .
החוטב הרעק
1
םע םיחתור םימו זרוא ודימעה
הקומעו הלודג הרעקב חלמ תיפכ .
/
4
לקשמ 100םרג 200םרג 300םרג הסוכמ
םימםיחתור 200מ "ל 400מ "ל 600מ "ל ןכ / הניפ וררווא
רדח זרואה תא ופטש ,םימה תא וזקנ.
שומישל
לגורקימל
0.1ק " ג ~
0.3ק "ג
4 .
זרוא
** זרוא-לושיב רחאל ,כמ ודימעהוגפסי םימהש דע וא תוקד שמחל הסו
תחא תיקש - רדח לג ורקימ רונת רובע רצוימה ןרוקפופב ושמתשה.
קיטסלפה יופיצ תא וריסה .ע תלפוקמ אל תיקש וחינהתיכוכזה שגמ ל.
ןרוקפופ
5 .
)רצומה תזירא לע תויחנהה יפ לע ולעפ(
לושיבה רחאל ,רונתה ךותמ תיקשה תא ואיצוה.
הרהזא :םח רצומה !תוניפב תינוסכלא הכישמ ידי לע תוריהזב תיקשה תא וחתפ.
15

םילישבתה לכב םיווש םניא ותופיפצו ןוזמה תרוטרפמט . ינפל הרוטרפמטה תגרד תא קודבל ץלמומ
לושיבה תליחת .םילודג ףועו רשב יחתנל דחוימב בל ומיש . םה רשאכ לשבל שי םילישבתהמ קלח
ירמגל םירשפומ םניא .וסמ הייהשה ןמז שרדיי הז ןוזמל לש הרשפהה םויס תא רשפאל ידכ םי
, תרשפה םיגדנ1.4ק "אופק ףוע לש ג.
ולוכ ןוזמה)םייזכרמה םיקלחה ללוכ .(ונינפלש המגודב
תיטמוטוא הרשפה
ןצחל לע וצחלStop/Clear.
רישפהל םכנוצרב םתאש ןוזמה תא ולקש . ריסהל שי
הזיראהמ תכתמה ירגוס תא הליחת ,ה ןוזמה תא וחינ
תלדה תא ורגסו רונתב.
ןצחל לע םיימעפ וצחלAuto Defrost) הרשפה
תיטמוטוא ( תינכתב רוחבל ידכPOULTRY) ףוע .(
םכנוצרבש אופקה ןוזמה לש לקשמה תא וסינכה
רישפהל.
תפסות ןצחל לע וצחל)More ( עיפוי הגוצתה לעש דע
ןצחל לע וצחלSTART/Quick Start.
הרשפהה ןמזב ,ףוצפצ עימשי רונתה .וז הדוקנב ,תלדה תא וחתפ , תא ודירפהו ןוזמה תא וכפה
םיחתנה ,הדיחא הרשפה רשפאל תנמ לע . תנמ לע םתוא וסכ וא םירשפומה םיקלחה תא ואיצוה
הרשפהה ךילהת תא טאהל .הרשפהה ךשמהל , ןצחל לע וצחלו תלדה תא ורגסSTART.
עמשי םא םג (תלדה תא וחתפת רשא דע.
הרשפהה ךילהת תא קיספי אל רונתה)לוצלצ
1
יוויח"dEF2 "רישכמה תגוצתב גצוי.
2
תויורשפא עבראב דיוצמ רונתה
AUTO DEFROST) הרשפה
הנוש המצוע. ןצחל לע הציחל לכ
3
האבה תורשפאל.
1.4ק "ג.
4
5
הרשפה :רשב ,תופוע, םיגד
וםחל. תגרד שי הצובק לכל
יטמוטואת ( םכתא ריבעת
הירוגטקסמ . ןצחלה לע תוציחל
רשב
תופוע
םיגד
םחל
16

תיטמוטוא הליקש הרשפה ךירדמ
וזמה תא חינהל שי םיחוטש תיכוכז ילכב אופקה ן לגורקימב םומיחל םיאתמה תנמ לע לגורקימה לש היילצה תינבת לע וא
רונתה תיתחתל םילזונה לש ףוטפט עונמל.
הרשפהה ךילהת לש םייטמוטואה הטילשהו ןוויכה איה תיטמוטואה הרשפהה תנוכת ,הליגר הרשפהל המודב םלוא , שי
הרשפהה ןמזב ןוזמה תא קודבל.
תלבקלתויבטימ תואצות :םיגד איצוהל ץלמומ ,המוטאה תירוקמה ןוליינה וא ריינה תזיראמ תופועו רשב , אלש תנמ לע
ינוציחה קלחה לע םידאו םילזונ ורבטצי ,הז בלשב לושיבל םורגל לולעה רבד.
1
הרשפהה ןמזמ ) תליחתב גצב גצומ ןמזה ךשמ
/
4
הרשפהה ךילהת םויסב ,ןנוצ ראשיהל ךירצ ןוזמה לש ימינפה קלחה.
מ הפיטעה תא ריסהל ןתינ אל רשאכןוזמה , כ ךשמב זורא ורישפהל שי
הרשפהה .(הפיטעה תא וריסהו רונתהמ ןוזמה תא ואיצוה ןכמ רחאל.
הירוגטק לקשמ תלבגמ ילכ ןוזמ
רשב
ןוחט רשב ,הליפ קיטס ,ב תויבוקדיזנל רש ,ןוילריס קיטס ,
)החוטש תחלצ(
0.1ק " ג ~4.0ק "ג לגורקימל םיאתמ ילכ
ילצ רשב ,רירש רשב ,רגרובמה ,הלט תועלצ ,לגע תועלצ ,
רשב
ףוע
גד
תויקינקנ ,באבק.
לילצ עמשי רשאכ רשבה תא וכפה"פיב."
וחינה5 - 15תוקד .
הרשפה רחאל : ךשמל דומעל
ףוע
המלש תלוגנרת ,םילגר ,הזח , ודוה הזח) ל תחתמ2.0ק "ג(
לילצ עמשי רשאכ ןוזמה תא וכפה"בפי."
הרשפה רחאל , ךשמל דומעל וחינה20 - 30תוקד .
גד
הליפ ,קיטס ,םלש גד ,םי תוריפ
לילצ עמשי רשאכ ןוזמה תא וכפה"פיב."
הרשפה רחאל , ךשמל דומעל וחינה10 - 20תוקד .
םחל תוסורפ ,תוינמחל ,וכו םיטגב'...
וסורפ ודירפהחוטש חטשמ וא ריינ ינובגמ ןיב וחינהו ת.
החוטש
םחל 0.1ק " ג ~0.5ק "ג תחלצ וא ריינ תבגמ
ףוצפצה עמשהב ןוזמה תא וכפה)פיב(.
17

רישפהל ידכ וז הנוכתב ושמתשה0.5ק "הבר תוריהמב ןוחט רשב לש ג.
רישפהל םינווכתמ םתאש ןוזמה תא ולקש . ריסהל ודיפקה
תופיטע וא תכתמ יקדהמ ; ורגסו רונתה ךותב ןוזמה תא ומקמ
תיטמוטוא לועפל לחי רונתה.
הדיחא הרשפה רשפאל . תא ואיצוה םתוא םיקלח ורשפוהשל תנמ לע םתוא וסכ וא ךילהת תא טאה
הרשפהה ךילהת תא קיספי
דכ הדימע ןמז שורדי הזרישפהל זכרמל רשפאל י. רישפהל דציכ גצוי האבה המגודב0.5ק " ג
אופק ןוחט רשב.
ןצחל לע וצחלStop/Clear.
1
תלדה תא.
וצחלQuick Defrost רשב תרשפה תינכות תריחבלMeat .
2
הרשפהה ןמזב ,ףוצפצ עימשי רונתה .וז הדוקנב ,תלדה תא וחתפ , תנמ לע ודירפהו ןוזמה תא וכפה
הרשפהה .הרשפהה ךשמהל , ןצחל לע וצחלו תלדה תא ורגסSTART/Quick Startשדחל ידכ
הלועפה..
אל רונתה)לוצלצ עמשי םא םג (םא אלאתלדה תא וחתפת .
3
פהרשהריהמ ה
18

הריהמ הרשפה ךירדמ
וז הנוכתב ושמתשהתוריהמב ןוחט רשב רישפהל ידכ.
ותזיראמ הצוחה רשבה תא וריסה .רקימב שומישל החוטב תחלצב ןוחטה רשבה תא וחינהלגו .ףוצפצ עמשי רשאכ , תא ואיצוה
לגורקימהמ רשבה ,לגורקימל הרזח ותוא וריזחהו ותוא וכפה . וצחלStartךישמהל ידכ .תינכותב ףוסב , רשבה תא ואיצוה
דמצנ ןוליינב וסכ5 - 15 תוקד ירמגל רישפיש דע וא.
ןוחט רשב.
ףוצפצ עמשי רשאכ ןוזמה תא ובבוס)פיב(
הרשפה רחאל , ךשמל דומעל וחינה5 - 15
תוקד.
לגורקימב שומישל
לגורקימה רונתמ , ךשמל דומעל וחינהן
הירוגטק לקשמ ילכ תוארוה
ןוחט רשב 0.5ק "ג החוטב החוטש תחלצ
19

המגודבהאבה , לשבל דציכ רבסומ0.4ק "האופק החורא לש ג.
יטמוטוא םומיח
ןצחל לע וצחלStop/Clear.
1
לע וצחלAuto Reheat.
תפסות ןצחל לע וצחל) More ( ידכ םימעפ עברא
לש לקשמ עובקל0.4ק "ג.
ןצחל לע וצחלSTART/Quick Start.
2
ןוזמ לש שדחמ םומיח תוחונב
םמחל ידכ שארמ תנכות רונתה
3
4
יטמוטוא םומיח עצבל רשפאמ
אופק לשובמ.
םומיח יבצמ לש :תננוצ הציפ ,
ןוזמ.
לש רונתל תורדגה שולש שי םכ
בטור ,יראק לישבת .
20

תוארוה
ןוזמ
ררקמ הראשנש הציפ םומיחל תדעוימ וז הנוכת . לע תננוצה הציפה תא ומקמ
תכתמ שגמ לעמ ןותחתה ףדמה .
לושיב רחאל ,תידיימ ןוזמה תא ואיצוה . ךשמל ודימעה2 - 3תוקד .
ילכ תרוטרפמט
תחלצ
החוטש
החוטב
לקשמ
0.1ק " ג ~
0.4ק "ג
הירוגטק תלבגמ
1 .
הציפ
נוצתנ
שומישל
לגורקימב
רדח לגורקימב שומישל החוטב הרעקל בטורה תא וכפש.
דמצנ ןוליינ תעיריב וא הסכמב וסכ.
םומיח רחאל ,ובברע .הסוכמ תוקד יתש ךשמל ודימעה.
בוש ובברע
רדח לגורקימב שומישל החוטב הרעקל יראקה לישבת תא וכפש.
וכזה שגמ לע ילכה תא וחינהתיכ.
םומיח רחאל ,ובברע . ךשמל ודימעה1 - 2הסוכמ תוקד .
הרעק
החוטב
שומישל
לגורקימב
תחלצ
החוטב
שומישל
0.2ק " ג ~
0.6ק "ג
0.2ק " ג ~
0.8ק "ג
2 .
בטור
)SAUCE(
3.
יראק
)CURRY(
לגורקימב
21

22
האבה המגודב , תינכותה תא תונשל דציכ תוארל ולכותAUTO COOK) יטמוטוא לושיב ( ךשמל
רתוי רצק וא רתוי ךורא לושיב ןמז.
ןצחל לע וצחלSTOP/CLEAR.
יטמוטואה לושיבה תינכות תא ועבק)Auto Cook (
השורדה.
ןצחל לע וצחלSTART/Quick Start.
ןצחל לע וצחל דוע)MORE (U
ב הלעי לושיבה ןמז10שקמה לע הציחל לכ רובע תוינש .
ןצחל לע וצחל תוחפ)LESS (V
לושיבה ןמזתחפי ב 10שקמה לע הציחל לכ רובע תוינש .
1
2
) לקשמ תא ורחבןוזמה(
3
םישמתשמ םתא רשאכ ידימ
ןמז תא ןיטקהל וא לידגהל
ןצחל לע הציחל ידי לע
תינדי םילשבמ רשאכ , םתא
לושיבה ןמז תא לידגהל םילוכי
ןצחל לע הציחל ידי לע תע לכב
ךילהת ידכ ךות רישכמה
תפסוה /תתחפה
לושיב ןמז
ואצמת םא םתממחש ןוזמהש
תינכותביטמוטוא םומיח וא
תיטמוטוא הילצ , םילוכי םתא
לושיבה
More/Less.
More/Less.
וצ לכ ןיא תלועפ תא רוצעל ךר
םמוח טעמ וא הדימה לע רתי
לושיבה.

לגורקימב םומיחל םיאתמה לכימ ךותב
תודחוימ תויחנה
לושיבל םיאתמ ילכ ךותב הסוכמ ולשב
לגורקימב . ןמז תיצחמב תחא םעפ ובברע
לושיבה.
לושיבל םיאתמ ילכ ךותב הסוכמ ולשב
לגורקימב . ןמז תיצחמב תחא םעפ ובברע
לושיבה.
לושיבל םיאתמ ילכ ךותב הסוכמ ולשב
לגורקימב . ןמז תיצחמב תחא םעפ ובברע
לושיבה.
לושיבל םיאתמ ילכ ךותב הסוכמ ולשב
לגורקימב . ןמז תיצחמב תחא םעפ ובברע
לושיבה.
לושיבל םיאתמ ילכ ךותב הסוכמ ולשב
לגורקימב . ןמז תיצחמב תחא םעפ ובברע
לגורקימב שדחמ םמחל וא םמחל ידכ ,םיחנמ םיווק המכ יפ לע לועפל דואמ בושח . תומכ תא ודדמ
םומיחל שורדה ןמזה תא עובקל הרטמב ןוזמה .דס האצותה תגשהל תילגעמ הרוצב ןוזמה תא ור
רתויב הבוטה .ררקממ ןוזממ רתוי רהמ םמחתי רדחה תרוטרפמטב ןוזמ . איצוהל שי רמושמ ןוזמ
חינהלו םירומישה תספוקמ . רתוי הווש ןפואב םמחתי ןוזמה
ל םיאתמה קיטסלפ הסכמב וא דמצנ ןוליינב הסוכמ היהי םאלגורקימ . תוריהזב הסכמה תא וריסה
םידא תצירפ תעינמל .לשובמ ןוזמ לש שדחמ םומיחל ךירדמכ האבה הלבטב ושמתשה .
טירפ לושיב ןמז
)ההובג המצועב(
11/2 - 3תוקד
21/2 - 4תוקד
71/2 - 11תוקד
תוקד
1 - 11/
2
31/2 - 5תוקד
15 - 30תוינש תבגמב ופטעתיכוכז שגמ לע ומקמו ריינ
תוקד
תוקד
11/2 - 21/
2
31/2 - 51/
2
11/2 - 2תוקד
הלושיב.
תוינטק
לפס1
וא ילויבר
הטספ
בטורב
לפס1
זרוא
לפס1
וא ךירכ
הינמחל
ךירכ1
תוקרי
לפס1
קרמ
תחא הנמ
4םילפס
4םילפס
4םילפס
תודחוימ תויחנה
יסיסע ראשהל רשבל.
לגורקימ תחלצ לע ףוע תוכיתח וחינה.
ררוואמו דמצנ ןוליינ יופיצב וסכ.
לגורקימ תחלצ לע גדה תא וחינה.
ררוואמו דמצנ ןוליינ יופיצב וסכ.
ררוואמו דמצנ ןוליינ יופיצב וסכ.
םיאתמ ילכ ךותב הסוכמ ולשב לושיבל
לושיבל םיאתמ ילכ ךותב הסוכמ ולשב
יבל םיאתמ ילכ ךותב הסוכמ ולשב לוש
שדחמ םומיח וא םומיח
)ההובג המצועב(
1 - 2תוקד ומקמ תחלצ לע רשבה תוסורפ תא
לגורקימל . דמצנ ןוליינ יופיצב וסכ
ררוואמו.
הרעה : םיעייסמ לושיב יצימ וא בטור
2 - 3תוקד
3 - 3.5תוקד
1 - 2תוקד
תא וחינההינזלה לגורקימ תחלצ לע.
4 - 6תוקד
11/2 - 3תוקד
לגורקימב . ןמז תיצחמב תחא םעפ ובברע
לושיבה.
תוקד
לגורקימב . ןמז תיצחמב תחא םעפ ובברע
לושיבה.
41/2 - 7תוקד
1 - 11/
2
31/2 - 6תוקד
41/2 - 5תוקד
לגורקימב . ןמז תיצחמב תחא םעפ ובברע
לושיבה.
תינוניב המצועב
ההובג
ךירדמ
טירפ לושיב ןמז
סורפ רשב
יבוע0.5ס "מ
תוכיתח
ףוע
קד הליפ
םרג(
הינזל
תחא הנמ
לישבת
לישבת
וא תנמש
הניבג
תיחמ
יחופת
המדא
3 תוסורפ
1 הזח
1ךריו לגר
)170 - 230
)300םרג (
1 לפס
4םילפס
23

םיירט תוקרי
הדימע ןמז
24
תויחנה
2 - 3תוקד
לושיבה ןמז תיצחמב.
2 - 3תוקד
2 - 3תוקד
2 - 3תוקד
2 - 3תוקד
2 - 3תוקד
2 - 3תוקד
2 - 3תוקד
2 -3
דיזנ ילכל תוירטפ וחינה1.5
לושיבה ןמז תיצחמב.
לושיבה ןמז תיצחמב.
המדאה יחופת תא ובקנ
תרזעב תומוקמ המכב
נ ינובגמ יתש לע וחינהריי.
המדאה יחופת תא ובבוס
לושיבה ןמזמ יצחב
המדאה יחופת תא ובקנ
תרזעב תומוקמ המכב
ריינ ינובגמ יתש לע וחינה.
המדאה יחופת תא ובבוס
לושיבה ןמזמ יצחב
ילכל םימ לפס יצח ופיסוה
ילכל םימ לפס יצח ופיסוה
לושיבה ןמז תיצחמב.
לושיבה ןמז תיצחמב ודיצ
ךירדמ
לושיב ןמז
) בHIGH(
4 - 8 ופלק . ופיסוה2 םימ תויפכ
דיזנ ילכל1.5רטיל . ובברע
11/2 -
1
2
/
רטיל . ןמז תיצחמב ובברע
םיחלק
230
2
םרג
טירפ תומכ
ירט סרית 2
תוירטפ
לושיבה.
4 - 7 ילכל םימ ףכ יצח ופיסוה
דיזנ1.5רטיל . ובברע
450
םרג
הירט תפל ,
הדימע ןמז
2 - 3תוקד
תוירט ,
תוכותח
הכותח
2 - 3ד תוק
2 - 3תוקד
תויחנה
תחא םימ סוכ ופיסוה.
םימ סוכ
ופיסוה2 ו םימ תויפכ
1
ופיסוה
/
2
דיזנ ילכל1.5רטיל .
6 - 9 ילכל םימ ףכ יצח ופיסוה
דיזנ1.5רטיל . ובברע
4
םילפס
פא הנו
הקורי
הירט
4 - 9
5
71/
6 - 12
1
/
2 -
2
גלזמ .
גלזמ .
41/
2 -
71/
דיזנ2רטיל .
דיזנ1.5רטיל . ובברע
41/
71/
2
2 -
2
6 - 9 ובקנ . יבג לע ומקמ2 ינובגמ
יינר . לע אושיקה תא ובבוס
2
םיינוניב
4
םיינוניב
2
םיינוניב
4
םיינוניב
450
םרג
450
םרג
450
םרג
יחופת
המדא
םיקותמ
םייופא
םאולמב
יחופת
המדא
םינבל
םייופא
םאולמב
ירט דרת ,
ירט אושיק ,
ירט אושיק ,
)170 - 230
םרג(
)170 - 230
םרג(
םילע
ךותח
םלש
ןמז תיצחמב ובברע
םימ סוכ
2 - 3תוקד
ןמז תיצחמב ובברע
2 - 3תוקד
םימ סוכ
2 - 3תוקד
ןמז תיצחמב ובברע
םימ סוכ
2 - 3תוקד
ןמז תיצחמב ובברע
2 - 3תוקד
דיזנ ילכל םימ1.5
לושיבה.
1
ופיסוה
/
2
דיזנ ילכל1.5רטיל .
לושיבה.
היפא ילכב , ופיסוה
םימ לפס יצח.
1
ופיסוה
/
2
דיזנ ילכל1.5רטיל .
לושיבה.
1
ופיסוה
/
4
דיזנ ילכל1.5רטיל .
לושיבה.
רטיל . תיצחמב ובברע
לושיבה ןמז.
לושיב ןמז
2הת תויפכ .
וסכ.
) בHIGH(
41/2 - 7
10 - 12
2
םיינוניב
4
טירפ תומכ
םיקושיטרא
םיינוניב
21/2 - 6
וסכ
7 - 11
11 - 16
5 - 8 וקורבה תא וחינה יל
450
םרג
450
םרג
450
םרג
450
סוגרפסא
תיעועש
ילוקורב
םרג
ירלס יחלק
2
ירט בורכ ,
תיבורכ
51/
71/
11 - 16 וכתח . ףכ יצח ופיסוה
450
2 -
2
5 - 7
םרג
450
םרג
םילפס
4
םילפס
ירט ,
הקורי
הנופא
הירט
ירט
ץוצק
הירט ,
המלש
םיירט
םיסורפ
)230םרג (

הרהזא :
הפירשל םורגל לולע רתי לושיבש תויה לושיבה ינמז תא ןוכנ םתנוויכ יכ ואדו
ףאוקזנ רונתל.
11. רתוי םירצק לושיב יכשמ תושורד ןוזמ לש תונטק תויומכ .
הדימה לע רתי ולשוביש הדימב ,ףרשיהל םילולע םה.
12. כ קחורמ היהי תלדה ינפש ךכ רונתה תא ביצהל שי8ס " מ
ךכל וכמסוהש םיאנכט ידי לע קר ועצבתי םינוקית ידי לע
הה חטש הצקמ רתוי ואהבצ , תליפנ תא עונמל ידכ תאזו
רישכמה.
13. המדא חופת לש תופילק בקנל שי ,םיחופת ,תוקריו תוריפ .
14. ןתפילקב םיציב לשבל ןיא . ץחל רוציל לולע לושיבה ךילהת
תוצצופתהל םורגיש.
15. קומע ןמשב לגורקימב ןגטל ןיא.
16. הרשפה וא לושיב ינפל ,ןוזמהמ תוזיראה תא ריסהל שי ,
שי ןוזמהמ קלח םלואלושיבל וא םומיחל תוסכל.
17. רונתה תלד םא ,וקוזינ םיריצה וא , רונתה תא ליעפהל ןיא
דבלב תורישה תדבעמב ןקותי קזנהש דע .
18. רונתהמ עקובה ןשעב םתנחבה םא ,תלדה תא חותפל ןיא .
למשחהמ רונתה תא וקתנ הז הרקמב.
19. םיימעפ דח םילכב ןוזמ םילשבמ וא םיממחמ רשאכ
קיטסלפ םייושעה ,א ריינרחא קילד רמוח ו , םיתיעל וקדב
סרהנ אלו ןיקת ילכהש אדוול תנמ לע תובורק.
20. החגשה אלל רונתה תא ליעפהל םידליל רשפאל ןיא.
21. םימוטא םיקובקבב וא םילכב םילזונ רונתב םמחל ןיא , םה
ץצופתהל םילולע.
22. שומישל םימיאתמ םילכהש ואדולגורקימ ךותב.
23. רונתה תלדב ועגת לא ,ינוציחה הטעמה,רישכמה בג , את
רונתה ,יטמוטוא לושיב תלעפהו לירג בצמב םילכו םירזע ,
תוקד רונת תופפכ םידנוע םתא ןכ םא אלא , םהש םושמ
םימח תויהל םילולע .יוקינ ינפל ,םימח םניא םהש ואדוו.
תובושח תוחיטב תוארוה
דיתעב ןויעל ורמשו בל תמושתב וארק
1. זיזהל תוסנל ןיא ,ו תלדה תא ןקתל וא תונשל/ חול תא וא
הרקבה ,רונתה לש רחא קלח לכ וא הליענה ןונגנמ תא ,
הרבחה .
2. קיר רונתה תא ליעפהל ןיא . ךותב םימ סוכ ריאשהל ץלמומ
רונתה .תועטב הלעפה לש הרקמב , לכ תא וגפסי םימה
ורקימה תיגרנא.
3. לגורקימב םידגב שבייל ןיא.
4. ריינ תובגמב ףוטעה ןוזמ לשבל ןיא , ןיוצ ןכ םא אלא
תרחא.
5. לושיבה ןמזב , תבגמב םוקמב ןותיע ריינב שמתשהל ןיא
ריינ.
6. ץע םייושעה םילכב שמתשהל ןיא . םמחתהל םילולע םה
ףרשיהל ףאו .תכתממ םילכב שמתשהל ןיא , סרח ילכב וא
תכתממ םירוטיע םע)ףסכ וא בהז .( ירגוס תא וריסה
תויקשה לש תכתמה .קזנ םורגל םילולע םייתכתמ םיצפח ,
הקילדל ףאו תוצוצינ.
7. חבטמ תבגמ רשאכ רונתה תא ליעפהל ןיא , תיפמ ץפח וא
רונתה לש ימדקה קלחל תלדה ןיב עוקת והשלכ , רבד
היגרנא תפילדל םורגל לולעה.
8. לושיבל ריינ ינובגמב םוקמב ןותיע ריינב שמתשהל ןיא.
9. רזחוממ ריינ ירצומב שמתשהל ןיא , ליכהל םילולעה
ויכו תרפוע תלוכת ילעב וא םיקילד םירמוח" םילולעה ב
רונתב הקילד וא תוצוצינל םורגל.
10. יא לושיבה םויסב דיימ םימב בבותסמה שגמה תא ץוחרל ן
דואמ םח אוהשכ .רבשיהל ףאו קדסיהל לולע אוה.
25

לגורקימב שומישל םיחוטבו םיחונ םה ריינ ילכ , ךשמש יאנתב
רצק לושיבה ,םיכומנ ןמושהו םילזונה תלוכתשו . ריינ תובגמ
םישגמו היפא תוינבת ףוטעל םג תוישומש . אל ץלמומ תיללכ
םיינועבצ ריינ ילכב שמתשהל)דרוי בצה.(
היפאו לושיבל ןוליינ תויקש
לגורקימב שומישל תודעוימה תויקשב קר שמתשהל ודיפקה .
יודיא רשפאל תנמ לע תיקשה תא ררחל שי . שמתשהל ןיא
תוליגר ןוליינ תויקשב , לגורקימל תומיאתמ אל ןה) תוסמנ
םוחב.(
יאתמה קיטסלפ ילכלגורקימב שומישל םימ
שומישל םימיאתמה םילדגו םילכ לש בחר ןווגמ םייק
שיש יאדול בורק
לגורקימב . בורבו םימיאתמ םילכ םכתושרב
םישדח םילכ שוכרל וא עיקשהל ךרוצ ןיא םירקמה.
סרח ילכ ,הקימרקו ןבא
לגורקימב שומישל םימיאתמ םניא ולא םילכ ללככ , םלוא
תהה תקידב תא עצבל ץלמומהמא.
תוריהז
לושיבל םימיאתמ םניא לזרב וא תרפוע תלוכת ילעב םילכ
לגורקימב.
שומישל םימיאתמ ןכא םהש אדוול ידכ םילכ קודבל שי
לגורקימ רונתב
תוחיטבלגורקימ
לגורקימב שומישל םימיאתמה םילכ
םירוטיע םע וא תכתממ םילכ רונתל סינכהל ןיאתכתממ
תכתמ םירדוח םניא ורקימ ילג ,תוצוצינל םורגל םילולע םהו ,
תכתמ תנטנאב םיקרב תעיגפ הריכזמה העפות.
לגורקימב םהב שמתשהל:
רונתה ךותב םימ תרעק דיל ילכה תא וחינה , תמצוע תא ונווכ
םיאתמ ןכא אוה םמחתמ אל ילכהו , תרוטרפמט םא םלוא
םמחתמ ילכה ךא הנתשמ הניא םימה , ילג יכ איה תועמשמה
שומישל םיאתמ אוה ןיאו ילכה ידי לע םיגפסנ ורקימה
לגורקימל םתמאתה תדימו םינושה םילכה
לגורקימב שומישל םימיאתמ תוחלצה יגוסמ רכינ קלח
.
תקידב תא ועצב וא ןרציה תוארוה תא וארק קפס לש הרקמב
לגורקימב שומישל םימיאתמ םוחב םידימע תיכוכז ילכ , ללוכ
רונתב םומיחל םידעוימה סקרייפ ילכ , שמתשהל ןיא םלוא
רבשיהל םילולע םה יכ ןיי תוסוכ ומכ םינידע תיכוכז ילכב.
תא סימהל לולע םח ןוזמש ןוויכ ךורא ןמזל רונתל םסינכהל
קפס לש הרקמב , ןתינ םא קודבל הטושפ ךרד תמייק
HIGHתחא הקד ךשמל .מה םא םיממחתמ םי
ל לגורקימה
לגורקימב המאתהה.
תיכוכז ילכ
קיטסלפ ילכ
םמחל ןתינרהמ םיממחתמה ןוזמ יגוס םהב
, ןיא םלוא
קיטסלפה ילכ.
לגורקימב.
תוחלצ
ריינ ילכ
26

ןוזמה תומכ
לשבתמה ןוזמה תומכל רשק אלל העובק רונתב ורקימה ילג תומכ .
רתוי הלודג ןוזמה תומכש לככ ךכיפל ,רתוי ךורא היהי לושיבה ךשמ.
ןוזמה תרוצ
קר םירדוח ורקימה ילג כ 2.5ס "ןוזמה ךותל מ . ןוזמה לש ימינפה קלחה
המינפ רדוח םוחהש ןמזב לשבתמ . ןוזמה לש ינוציחה קלחה קר
ורקימה תיגרנא תועצמאב לשבתמ ,םוח תכלוה תועצמאב ראשהו . תרוצ
הבע עוביר איה לגורקימל המיאתמ תוחפה ןוזמה . ןמז וככרתי תוניפה
םמחתהל קיפסי יזכרמה קלחהש ינפל בר .יסה ילאמיטפואה רוד
יתעבט הנבמב ןוזמ רודיס וא קדו לוגע לכוא לש אוה לגורקימל הסנכהל.
יוסיכ
םידאהו םוחה תא אלוכ יוסיכ וא הסכמ ,לושיבה ךילהת תצאהל םרוגו.
המחשה
לע םילועה ןמז יקרפ םילשבתמה תופועו םירשב15 םימיחשמ תוקד
תולק .ןובאית ררועל תנמ לע ךשמשו םימיחשמ םניאש ןוזמ יגוס לש
רתוי רצק םהלש לושיבה ,המחשה בטורב שמתשהל שי , וא היוס בטור
ויקיברב בטור .
דואמ הנטק איה המחשהה בטור תומכש תויה , אל לישבתה םעט
הנתשמ.
הוועש ריינב יוסיכ
אוה הז יוסיכש תויה ךא םוחה לע רומשל עייסמו הזתה ענומ הוועש ריינ
תוי ףפורדמצנ קיטסלפמ וא הסכממ ר ,שבייתהל ןוזמל רשפאמ אוה.
ןוזמה חווירו רודיס
םייופא המדא יחופת ןוגכ תוישיא תונמ , ןפואב וממחתי םינבאתמו תויגוע
הזמ הז הווש קחרמב רונתב וחנוי םא דיחא ,הלוגע הרוצב ץלמומ , ןיא
ינשה לע דחא ןוזמ יטירפ חינהל.
השיחב
תובושחה תולועפה תחא וזלגורקימב לושיבה לש רתויב .ליגר רונתב ,
לישבתה בוברעל תשמשמ השיחבה תלועפ ,לגורקימה רונתב וליאו ,
הדיחא הרוצב םוחה תצפהו רוזיפל תשמשמ השיחבה תלועפ . ושחב
זכרמה יפלכ ץוחהמ דימת , םמחתמ ןוזמה לש ינוציחה קלחהו תויה
םדוק.
ןוזמ ינייפאמ
לגורקימב לושיבו
םיטרפל בל ומיש
הבר הדיפקב וננכותו ורחבנ וז תרבוחב םינוכתמה , םתחלצה םלוא
תדימב היולתלושיבה ךילהתל ושידקתש בלה תמושת . לע חיגשהל שי
ולוכ ךילהתה.
תרשפאמו רונתה תלעפה םע תיטמוטוא תקלדנה הרונ היוצמ רונתב
ךילהתה תומדקתהב תופצל .
שוחבל ןוגכ םינוכתמב תונתינה תוארוהה ,בברעל ,דכו ךופהל ,'
עצבל שי ןתואש תילאמינימה המרב תוצלמהה . ןוזמהש םכל הארנ םא
לושיבה ךשמ לע םיעיפשמה םימרוג
לושיבה ךשמ לע םיעיפשמ םימרוג רפסמ.
ןווכתמב םישמשמה םיביכרה לש םוחה תגרד , הבר העפשה ילעב םה
לושיבה ךשמ לע.
ןוזמה תוסיחד
תוגועו םימחל ןוגכ ירירוואו לק ןוזמ ,שבתמ רתוי הבר תוריהמב םיל
םילישבתו ילצ ןוגכ םיסוחדו םידבכ ןוזמ יגוס רשאמ , דיפקהל שי
םילק ןוזמ יגוס לש םינוציחה םיקלחהש)הזב אצויכו הפאמ ירבד ( אל
ושקתי אלו ושבייתי.
ןוזמה הבוג
שבויו תוחלה יודיאל םרוג ורקימה תייגרנאמ האצותכ רצונה ברה םוחה
רהמ רתוי לשבתמ ןמושו םוח תוריבעמ תומצערשבמ . ןוזמש רומשל שי
לשבתי אלו דיחא יתלב ןפואב לשבתי אל ינמוש רשב וא תומצע ליכמה
ןוזמה לש ןוילעה קלחה)המגוד :רשב ילצ ( רשאמ רתוי רהמ לשבתי
ןותחתה וקלח ,ופהל ץלמומ ןכל תינכת ךלהמב םימעפ רפסמ ןוזמה תא ך
ןוזמב םילזונה תלוכת
ופרשי אלש.
ןוזמב ןמושו םצע
הדימה לע רתי.
בתמהדיחא אל הרוצב לש , םכתעדלש םירודיסה וא םינוקיתה תא ועצב
םישרדנ.
לושיבה.
רונתב , תנמ לע תוקריו ילצ ןוגכ םישבי ןוזמ יגוסל םימ ףיסוהל שי ךכיפל
27

רונתה יוקינ
רונתה תונפדל םיקבדנ םילזונ וא ןוזמ יזתנ , יחטשמלו תלדל
המיטאה .החל תילטמ םע דיימ תורחא תויראשו ךולכל בגנל שי .
ומרגיו ורקימ תיגרנא וגפסיו רונתב םיראשנה םיזתנו םירוריפ
לושיבה ךשמ תכראהל .החל תילטמב ושמתשה םירוריפ בוגינל.
סו תלדה ןויקינ לע דיפקהל שי הבוט הליענ חיטבהל תנמ לע התביב
תיתוחיטבו.
תוקזח יוקינ תוצמוח םע תוקנל ןיא ,ךיפה יתלב קזנל םורגי רבדה.
םילכ חידמב וא דיב תוקנל ןתינ תיכוכזה שגמ תא.
םילכ לזונו םימ םע ינוציחה קלחה תא וקנ . וא החל תילטמ םע ובגנ
ריינ תבגמ .זנ תעינמלרונתה ךותב םיענה םיקלחהמ ק , רשפאל ןיא
רורוואה יחתפל םימ תרידח .
הרקבה חול יוקינל , תלדה תא וחתפ) רונתה תלעפה תעינמל
תועטב( ,ריינ תבגמ תועצמאב ובגנו .יוקינה תלועפ םויסב , לע וצחל
ןצחלSTOP.הבוטר תילטמב תוקנל ןיא .
הכר .םיהובג תוחל יאנתב לעופ רונתה רשאכ תורקל לולע רבדה ,
רישכמה לש םגפ וא הלקת הווהמ וניאו.
םילכ לזונו .בגנלו ףוטשל.
יוקינ תוקבא ןוגכ יוקינ ירמוחב שמתשהל ןיא ,טיירב שטוקס וא ,
שפשל םילולעהף , לש תינוציחה יופיצה תבכשב עוגפל וא טורשל
רונתה.
1. מינפה קלחה יוקינרונתה לש י
דיחא ןפואב ולשבתי ןותחתהו ןוילעה קלחהש . יחתנ ךופהל םג ץלמומ
ילודגו םיהובג ןוזמ יגוס ךופהל שיםימלש תופועו ילצ ןוגכ ם , תנמ לע
ןוזמה תכיפה
תועלצו ףוע.
ץוח יפלכ רתוי םיבעה םיקלחה תחנה
ןוזמה לש םיינוציחה םיקלחה לע םילעופ ורקימה ילגש תויה , ץלמומ
רשב יקלח חינהל ,תינבתה לש ינוציחה קלחב םיגדו תופוע .וז הרוצב ,
דיחא ןפואב לשבתי ןוזמהו םיבעה םיחתנל רודחת היגרנאה בור.
ןוזמה יוסיכו הנגה
תעינמל תאזו םוינימולא ריינ יספב ןוזמ לש םינידע םיקלח תוסכל ןתינ
הכירחו רתי לושיב.
ההבגה
גפסיהל ורקימה ילגל רשפאל ידכ תאזו סוחד וא הבע ןוזמ היבגהל ןתינ
2. רונתה לש ינוציחה קלחה יוקינ
לישבתה זכרמבו ךומנה קלחב םג.
בוקינ
הפילקב ןוזמ ,רונתב ץצופתהל םילולע םורקב וא רועב , ךרוצ שי ןכל
לושיב ינפל םבקנל .תוריפ םה בקנל שיש ןוזמה יגוס ,תוקרי ,םיציב ,
דועו המדא יחופת.
ןוזמ תונכומ תקידב
ההובג תוריהמב לגורקימב לשבתמ ןוזמה , ותוא קודבל שי ךכיפלו
3. תלדה ביבס וא לע םידא תורבטצה לש הרקמב , ובגנ תילטמ םע
ןוזמה יגוס בור תא םלוא)תופועו רשב ללוכ ( אוהשכ רונתהמ םיאיצומ
תובורק םיתעל . ריאשהל שי ןוזמהמ קלחלושיבה םויסל דע רונתב .
ויד לשובמ םרט ,ךילהתה םויס ךרוצל הייהשה ןמז םיריאשמו . ןמזב
היהשהה , ןיב הלעת ןוזמה תרוטרפמט3 – 8תולעמ .
4. םימטאהו תלדה ןויקינ לע רומשל שי . םירשופ םימ םע קר תוקנל שי
ןיב לש היהשה ןמז םישרוד ןוזמה יגוס בור3 ל 10ה רחאל תוקד םתאצו
היהשה ןמז
רונתהמ.
היהשהה ךילהתב , הסוכמ ללכ ךרדב ראשנ ןוזמה) לע רומשל תנמ לע
םוחה( , ןוזמה תושבייתה רשפאל שי םהב םירקמב םלוא) תוגוע
תומיוסמ ,וכו םיטיווקסיב'( , לושיבה ךילהת תא םייסמ היהשהה ךילהת
ונממ דרפנ יתלב קלח השעמל הווהמו .
28
הבושת
ךישממ ןוזמההיהשהה ןמזב לשבתהל .לושיבה תינכת םויסב , ןמז
לושיבה םויס רשפאמ היהשהה . תוסיחדב יולת היהשהה ךשמ
ןוזמה .
הלאש
לגורקימב ןרוקפופ ןיכהל ןתינ םאה?
הבושת
ןכ .תואבה תוטישהמ תחאב םישמתשמ םא:
םינושה םינרציל ,ןרוקפופה תנכה ןפוא יבגל תונוש הנכה תוארוה .
הנכהה תוארוה תא אורקל שי . רונתה תא ריאשה ןיא אלל
לע עיפומה ןמזה רחאל םיחצפתמ אל םיניערגה םא
החגשה .
הזיראה ,רונתה תא ובכ.
הקילדל םורגל לולע רתי לושיב.
הרהזא:
המוח ריינ תיקשב ןרוקפופ ןיכהל ןיאהליגר . חצפל תוסנל ןיא
תמדוקה םעפב וחצפתה אלש םיניערג..
הלאש
םינוכתמה תרבוחב הבוקנה תוריהמב לשבמ וניא רונתה עודמ?
הבושת
רחא קיודמב םתאלמש ואדוו םינוכתמה תרבוח תא בוש וקדב
לושיבה תוארוה , ןמז יכשמב םייונישל םורגל היה לוכי המ וקדבו
לושיבה.
תגרדו לושיבה יכשמ ורחבנש דבלב תוצלמה םה לגורקימה תמצוע
רתי לושיב עונמל ידכ ,רתויב הצופנה היעבה איה וזש , ןמזב
רונתה לש תונושה תויורשפאל תולגתסהה .לדוגב םילדבה , הרוצב
לקשמבו ,םינוש לושיבו הנכה ינמז םישרוד . תוצלמהב ורזעיה
ךירדמב תועיפומה.
תובושתו תולאש
הלאש
תקלוד הניא רונתה תרונש ךכל הביסה המ?
הבושת
תויורשפא יתש תומייק:
• הפורש הרונה
• הרוגס הניא תלדה.
הלאש:
תלדבש תיכוכזה ןולחה ךרד תרדוח ורקימה תיגרנא םאה?
1. לגורקימב ןרוקפופ תנכהל ודעונש םילכ.
2. קימב הנכהל דחוימב זראנו ןכוהש ןרוקפופלגור.
הבושת
אל ,א רוא ריבעמ ןולחהלגורקימ תיגרנא ריבעמ וניא ך.
הלאש
הרקבה חולב והשלכ ןצחל לע םיצחול רשאכ ףוצפצ עמשנ עודמ?
הבושת
הרשואו העצוב ךתריחב יכ רשאמ ףוצפצה.
הלאש
קיר לעפוי אוה םא רונתל קזנ םרגי םאה?
הבושת
ןכ .קיר ללחהש רונתה תא ליעפהל ןיא.
הלאש
לגורקימב ץצופתהל תולולע םיציב עודמ?
הבושת
הייפא ןמזב ,ןוגיט ,םיציב תחתרה וא , ץצופתהל לולע ןובלחה
םורקה ךותב םידא תורבטצהמ האצותכ .וז העפות תעינמל , שי
לושיבה ינפל ןומלחה תא בקנל.
ןתפילקב םיציבה תא לשבל ןיא הרקמ םושב.
הלאש
לגורקימב לושיבה םויסב הייהשה ןמז תתל שי עודמ?
29

ינכט טרפמ
למשח עקת ירוביח עדימ /
ינכט טרפמ
םגד MS-2344B / MS-2344BS
תוינוציח תודימ בחור507מ "מ , הבוג283מ "מ , קמוע436מ "מ
םיאבה םידוקל םאתהב םיעובצ למשחה לבכב םיטוחה יעבצ:
הקראה םע עקשל רישכמה תא רבחל הבוח
הקראהו טוויח
למשחה לבכ לש ותוניקת תא םעפ ידמ קודבל שי . ןיא
קוזינ למשחה לבכש הרקמב רישכמב שמתשהל . ןוקית
וא תדבעמב קרו ךא ועצובי למשחה לבכ לש הפלחה
לוחכ–ספא .
םוח–הזאפ .
קורי + בוהצ–הקראה .
תכמסומ תוריש . תוריש תודבעמ תמישר ואר ףוסב
וז תרבוח.
30

וירחא תדועת ירצומל ת
חוקל/דבכנ ה/ה ,תובר םינשל האנה רוקמ הווהי תשכרש רישכמהש םיווקמו ךתיינק לע ךתוא םיכרבמ וננה.
ךבל תמושתל:
1. השיכר תינובשח תגצהב הנתומ וז הדועת ףקות.
2. ףקות לכ תללושמ היהת םיירוקמה םינותנב םייוניש הב ועצובש הדועת.
חוקלה םש :.......................... ..........................................תבותכ :.........................................................................
ןופלט /סקפ / .E-mail :......................................................................................................................................
ד םגMB-2344B
רצומה רואית /םגד : לגורקימ רונתLG
סמ .רישכמ : ...............................השיכר ךיראת: ............................ רכומה תמתוחו המיתח :.....................................
תוירחא תדועת
תרבחגייא לטיגיד גאמירב 'עב"מ ,חר ' המקשה19, רוזא 58001 ,רומאה רישכמה לש הניקתה תוליעפל תאזב תיארחא ,
ןלהלד םיאנתל םאתהב:
6. ןניא רשא תושירד וא תויוכז הנקמ הניא וז תוירחא
הז תוירחא בתכב תולולכ.
7. לע תורישה תדבעמל רישכמה תא איבהל חוקלה לע
ונובשח לעו ותוירחא.
8. הפקת וז הדועתהינק תינובשח תגצה םע קר.
9. הלעפהה תוארוה תא ןויעב אורקל שי.
10. ותקוזחתו רישכמה ןויקינ הסכמ הניא וז תוירחא.
11. קוזחתמ האצותכ םרגנש קזנ לכ הסכמ הניא וז תוירחא
יוקל .
12. ורבשנש קיטסלפ יקלחל קזנ לע הסכמ הנא וז תוירחא
לוקיש יפל רשאו םוגפ ונל הארי רשא קלח לכ םולשת
םאתהב םינוכנ שומיש יאנתב םגפנ ידעלבה ונתעד
רישכמל תופרוצמה הלעפהה תוארוהל .
ימוג יקלח ללוכ וניא קלח תרדגה ,תיכוכזו קיטסלפ .
ןוכנ אל שומישמ האצותכ.
האצותכ וא
הרבחה לש השרומ.
תונלשרו ןוילע.
טרפ םדא לכהרבחה לש השרומ יאנכטל
היינקה .
1. לש הפוקתל איה תוירחאה תדועת12 ךיראתמ םישדוח
2. ץיפמ ידי לע המותח איהשכ קר ףקותב איה וז תוירחא
3. ףילחהלו םינוקית תוריש ןתמל םיבייחתמ ונא ,ל אל
4. הליפנמ האצותכ םרגנש קזנ הסכמ הניא וז תוירחא , חוכ
5. הלטב וז תוירחא ,םאב רישכמה תא ןקתל הסני וא ןקתי
ןוכנ יתלב שומישמ ,הכרדהה רפסב רבסומכ .
31

32
תורישה תונחת תמישר
03-5501662
03-5589484
02-6252451
טנרטניאב ונתבותכwww.brimag.co.il
08-6282891
03-9666492
08-9452108
03-6194518
09-8337733
04-8621547
04-6790469
09-9582149
08-6378448
04-8757168
03-9225123
04-6322252
08-6722211
09-7603387
08-9250430
08-8533976
03-7515112
03-7511145
04-9826746
08-6881270
04-6903674
052-250925
04-6522537
℡/ 03-5606931
℡
℡
℡
℡
℡
℡
℡
℡
℡
℡
℡
℡
℡
℡
℡
℡
℡
℡
℡
℡
℡
℡
℡
ª
℡
עב תיבל םיתוריש סיוורס לטיגיד"מ , בוחר ןדסה3 ,ןולוח
ביבא לת- הריכמו תורש גייא לטיגיד גאמירבעב"מ
חר 'יטנובל ן11 ,ביבא לת
ןולוח ,םיפדוע תריכמו תוריש
םילשורי- ,לכ תורש , םדיגה1 ,םילשורי
עבש ראב-סקימ ורקימ , ץולחה102 ,עבש ראב
ןויצל ןושאר- ירדגוב ורטקלא , רקסניפ4 ,ןויצל ןושאר
תובוחר-יסדג יתוריש , לצרה125 ,תובוחר
קרב ינב-ונכט -סקימ ,חר ' אביקע יבר72 ,קרב ינב
הינתנ-רב -םחנמ , זמר15 ,הינתנ
הפיח-לצרה ןדלא , לצרה67 ,הפיח
הירבט-ןוקית -לכ ,חר ' יאכז ןב ןנחוי3 ,הירבט
הילצרה-סקימ ונכמ , בולוקוס95 ,הילצרה
תליא-בידא תוריש ,שדחה היישעתה רוזא ,תליא
תוירק-ריהמ תוריש , זול שידק11 ,ןיקצומ תירק
הוקת חתפ-ריאמה , רטרופקנרפ2 ,הוקת חתפ
הרדח-חטיא םיחא , אישנה53 ,הרדח
ןולקשא-א תוריש תודבעמ .ש .חר ' זמר)םקשה ןוינק ( תונח29 ,ןולקשא
הננער-לט תודבעמ -רוא , הזוחא72 ,הננער
ןג תמר-קרב ורטקלא ,ז' יקסניטוב89 ,ןג תמר
הירהנ-תשש , לצרה51 ,הירהנ
תג תירק-תג תורוא ,דש ' שיכל7/3 ,תג תירק
הנומש תירק-טוזוז םייח ,וקסר 44 ,הנומש תירק
הלופע- למשח ירצומ יקיצנישוד ,דש ' בורולורוא6 ,הלופע
דול-לארשי תודבעמ , ילאערזיד14 ,דול
א דודש-למשח ינוקיתל זכרמה ,ירחסמ זכרמ ,דודשא
 Loading...