

LG MS-1243KSY Owner’s Manual

MICROWAVE
OVENS
TABLE
OF
Specifications
and
Proper
Important
SECTION
Safety
1
Unpacking
Turntable
Control
Setting
Child
SECTION
Quick
Quick
Quick
Quick
Panel
Installation
Electrical
Clock
Lock-Out
Utensils
2
Touch
Touch
Touch
Touch
Microwaving
Auto
Cook
Add
Minute
Auto
Defrost
Express
Kitchen
More/Less
Melt
Soften
Defrost
Timer
Option
Time
Cooking
Multi-Power
Using
Multi-Power
Multi-Stage
SECTION
Questions
Care
and
Before
Cooking
Quick
Soups
Calling
Techniques
Touch
and
SECTION
Vegetables
Ground
Baked
SECTION
Quick
Quick
Auto
Auto
Conversion
Kenmore
Kenmore
Meat,
Goods
Touch
Touch
Cook
Defrost
Service
Warranty
CONTENTS
Safe
UseOfYour
Instructions
-
SETTING
YOUR
and
Names
and
Grounding
-
OPERATING
Sensor
Sensor
Sensor Reheat
Sensor
Made
Setting
Cooking
-
3
CARE
and
Answers
Cleaning
for
-
4
COOKING
Sensor
Sandwiches
and
Rice
Poultry
and
-
5
CHARTS
Sensor
Sensor Reheat
Chart
Chart
Table
MICROWAVE
Features
Instructions
Operation
Cook
Popcorn
Easy
Levels
Guide
OF
Service
Recipes
and
Desserts
Cook
Oven
UP&GETTING
of
Oven
Parts
INSTRUCTIONS
Instruction
YOUR
MICROWAVE
GUIDES
Fish
AND
TABLES
Chart
Chart
AND
OVEN
TO
RECIPES
KNOW
OVEN
Inside
Back
cover
cover
Use
and
Instruction
and
Cooking
Care
Manual
Guide
Model
87440/87449
No:
Part
No:
3828W5A8026
Model
Power
Power
Maximum
Dimensions
Net
Weight
Oven
Capacity(Cu.
According
The
oven
The
turntable
the
oven
Place
handle
When
at
least
Carefully
accompany
cause
may
The
oven
make
open.
Do
not
Use
only
Popcorn
When
them
place
example,
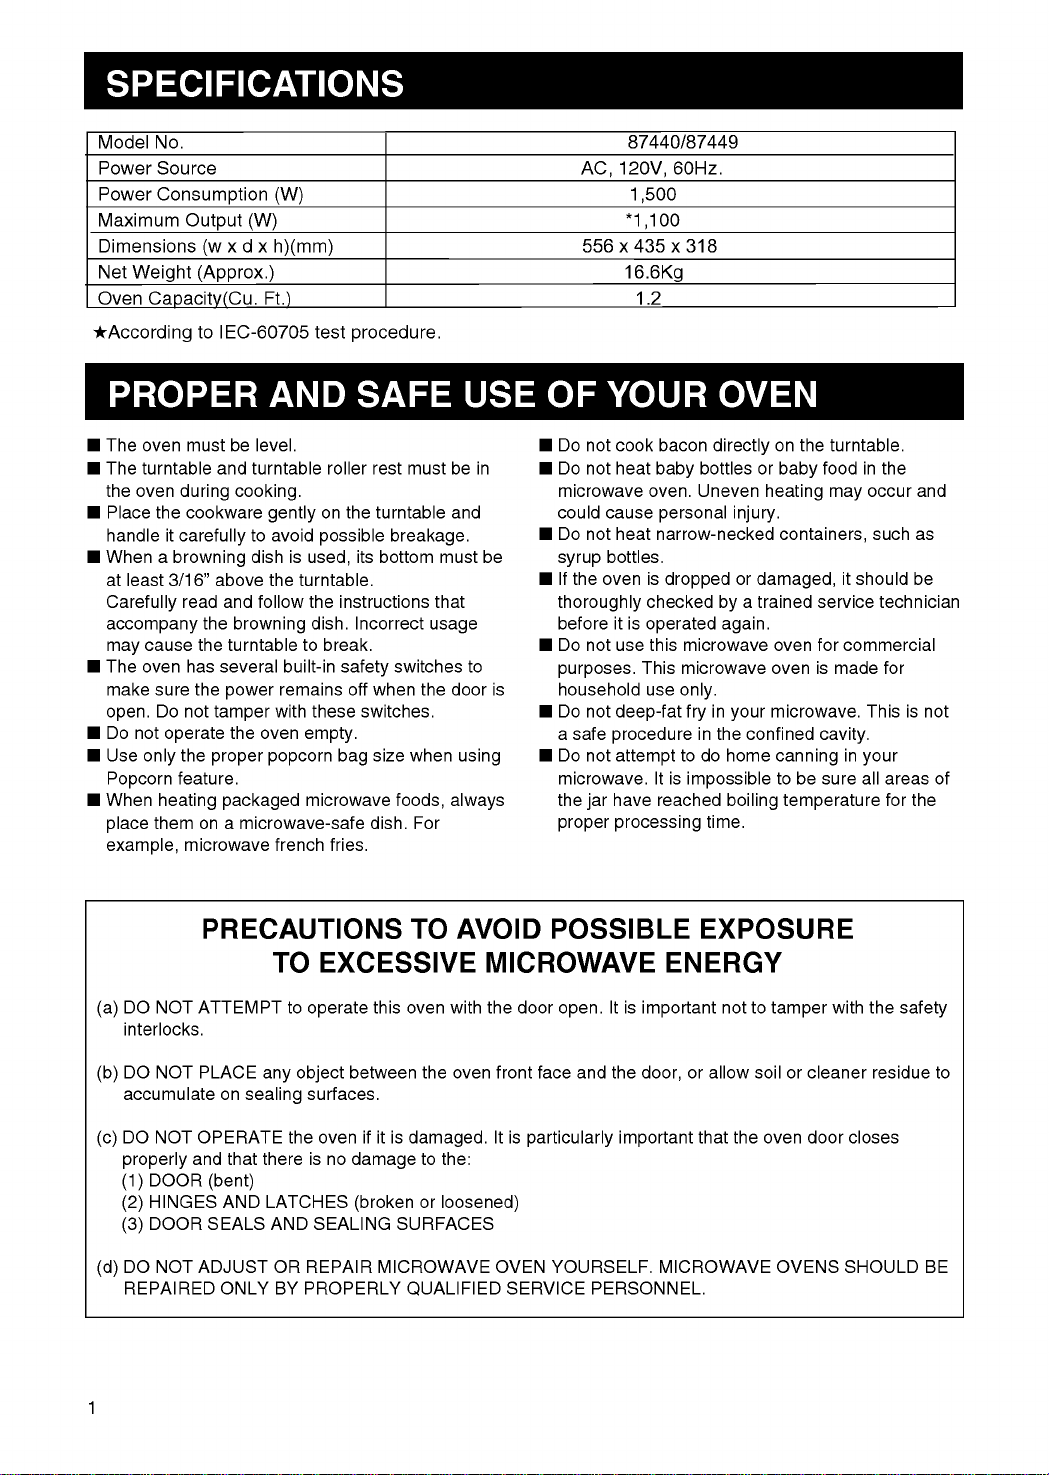
No.
Source
Consumption
Output
xdx
(w
(Approx.)
to
IEC-60705
must
be
and
during
the
cookware
it
carefully
a
browning
3/16"
above
read
and
the
the
turntabletobreak.
has
several
sure
the
not
the
proper
feature.
on a
microwave
power
tamper
the
packaged
Do
operate
heating
(W)
(W)
h)(mm)
Ft.)
level.
turntable
cooking.
gently
to
avoid
dish
is
the
turntable.
follow
browning
built-in
remains
with
oven
popcorn
microwave-safe
french
test
roller
on
the
possible
used,
the
instructions
dish.
safety
these
empty.
bag
microwave
fries.
procedure.
rest
must
turntable
breakage.
its
bottom
Incorrect
switches
off
when
switches.
size
when
foods,
dish.
For
the
must
that
usage
be
in
and
be
to
door
using
always
87440/87449
120V,
60Hz.
AC,
1,500
*1,100
556x435x318
16.6Kg
1.2
Do
not
cook
bacon
Do
not
heat
microwave
could
Do
not
syrup
If
the
thoroughly
beforeitis
Do
not
is
purposes.
household
Do
not
a
safe
Do
not
microwave.
the
jar
proper
oven.
cause
heat
bottles.
oven
is
checked
operated
use
this
This
use
deep-fat
procedure
attempt
have
processing
directly
bottles
baby
Uneven
personal
narrow-necked
droppedordamaged,
microwave
microwave
only.
in
fry
in
to
do
It
is
impossible
reached
time.
injury.
a
by
again.
your
the
confined
home
boiling
on
the
or
baby
heating
containers,
trained
oven
oven
microwave.
canning
to
be
temperature
turntable.
foodinthe
occur
may
such
it
should
service
for
commercial
is
made
This
cavity.
in
your
sure
all
and
as
be
technician
for
is
not
areas
for
the
of
(a)
(b)
(c)
(d)
1
DO
NOT
interlocks.
DO
NOT
accumulate
DO
NOT OPERATE
properly
DOOR
(1)
HINGES
(2)
DOOR
(3)
DO
NOT
REPAIRED
PRECAUTIONS
TO
ATTEMPT
PLACE
and
ADJUST
on
that
(bent)
AND
SEALS
ONLY
any
sealing
there
LATCHES
AND
OR
BY
EXCESSIVE
to
operate
object
surfaces.
the
oven
is
no
SEALING
REPAIR
PROPERLY
TO
AVOID
MICROWAVE
this
oven
with
the
between
damage
(brokenorloosened)
if it
is
MICROWAVE
the
damaged.
to
SURFACES
QUALIFIED
oven
the:
door
front
face
It
is
particularly
OVEN
SERVICE
POSSIBLE
It
open.
and
the
important
YOURSELF.
PERSONNEL.
ENERGY
is
important
door,
MICROWAVE
EXPOSURE
not
or
allow
that
the
to
tamper
soilorcleaner
oven
door
OVENS
with
closes
SHOULD
the
residue
safety
to
BE
When
should
using
be
electrical
followed,
appliances
including
basic
the
following:
safety
precautions
WARNING
1.
Read
all
2.
Read
and
AVOID
MICROWAVE
3.
As
with
supervision
fireinthe
NOTE:
*
*
*
a.
ifafire
the
Keep
Turn
the
Disconnect
fuseorcircuit
The
following
all
times:
DO
NOT
firesinthe
oven's
activities,
other
combustibles
-
To
to
persons
instructions
follow
POSSIBLE
most
cooking
is
necessary
oven
should
oven
door
oven
off.
the
breaker
overcook
oven
reduce
the
specific
EXPOSURE
ENERGY"
cavity.
start:
closed.
power
rules
should
foods,
cavity.
especially
are
the
risk
or
exposure
before
using
"PRECAUTIONS
found
appliances,
to
reduce
cordorshut
panel.
be
since
Carefully
if
paper,
inside.
of
burns,
to
the
TO
EXCESSIVE
on
page
close
the
off
power
kept
this
could
attendtothe
plastic
electric
excessive
appliance.
1.
risk
of
a
at
in
mind
at
cause
or
shock,
microwave
TO
the
fire,
injury
5.
Install
provided
6.
Some
or
fat,
may
in
this
7.
Use
described
chemicals
8.
As
with
necessary
9.
Do
damaged
or
(c)
10.
This
qualified
Sears
adjustment.
energy:
this
products
sealed
explode
oven.
this
any
not
operate
has
appliance
Service
appliance
installation
such
containers
and
appliance
in
the
or
vapors
appliance,
when
this
cord
or
been
damaged
should
service
Centre
only
instructions.
as
therefore
only
manual.
in
this
close
children
appliance
plug,
(b)
personnel.
for
in
accordance
whole
and
closed
should
for
its
intended
Do
not
appliance.
supervision
are
involved.
if it
is
not
or
dropped.
be
serviced
Contact
examination,
eggs,
use
(a)
working
water
glass
not
corrosive
has
only
your
with
jars
be
heated
use
is
a
properly
by
repair
the
with
as
nearest
oil
or
b.
DO
cookies,
strikes
turn
b.
DO
inspect
remove
4.
This
properly
INSTRUCTIONS"
NOT
store
etc.,
the
ON.
NOT
use
purchased
before
appliance
grounded
inside
power
wire
combustible
the
lines
it
twist-tiesinthe
items
be
outlet.
on
page
theminthe
placing
must
items,
because
oven,
cause
may
for
wire
grounded.
See
"GROUNDING
6.
SAVE
such
oven.
twist
oven.
Connect
the
ties
THESE
as
bread,
if
lightning
oven
Be
sure
and
only
11.
to
12.
13.
to
14.
15.
to
16.
INSTRUCTIONS
Do
not
Do
not
a
swimming
Do
not
Keep
Do
not
counter.
When
use
only
applied
and
Cleaning"
cover
use
outdoors,
immerse
cord
away
let
cord
cleaning
mild,
with
or
block
openings
in
a
wet
pool.
cord
or
plug
from
heated
over
hang
door
non-abrasive
a
sponge
instructionsinSection
and
or
edge
interior
soaps
soft
on
the
basement,
in
water.
surfaces.
of
table
oven
or
cloth.
appliance.
or
or
surfaces,
detergents
"Care
(See
3.)
near
2

Remove
Your
Turntable
Turntable
Instruction
Easy
Door
your
oven
comes
Use
See-Through
Seal
oven
and
with
---------------------------------------------------
Roller
Rest
Manual
Chart
(English/French)
all
materials
the
following
-----------------------------------
(English/French)
Oven
Door
from
accessories:
-------------------
Front
----------------
Face
the
shipping
Interior
carton.
1
1
1
2
Light
Control
Panel
Safety
Interlock
System
Shuts
off
The
turntable
rotates
programs.
oven
during
during
SECTION 1 - SETTING UP & GETTING TO KNOW YOUR MICROWAVE OVEN
opened
All
food
are
always
turntable
Turntable
Place
cavity
glass
be
used
and
placed
for
the
roller
bottom
turntable.
with
containers
cooking.
Roller
the
on
rest
to
support
It
turntable.
of
the
must
food
Rest
on
the
the
always
if
power
operations.
door
automatically
all
cooking
is
Turntable
Made
of
special
Place
glass.
the
roller
bottom.
cavity
turntable
The
turntable
clockwise
counterclockwise;
heat-resistant
this
turntable
rest
in
the
center
NEVER
upside-down.
sometimes
and
sometimes
over
of
the
the
place
rotates
thisisnormal.
3

CONTROL
PANEL
AND
(For
87440/87449)
FEATURES
SECTION 1 - SETTING UP & GETTING TO KNOW YOUR MICROWAVE OVEN
4
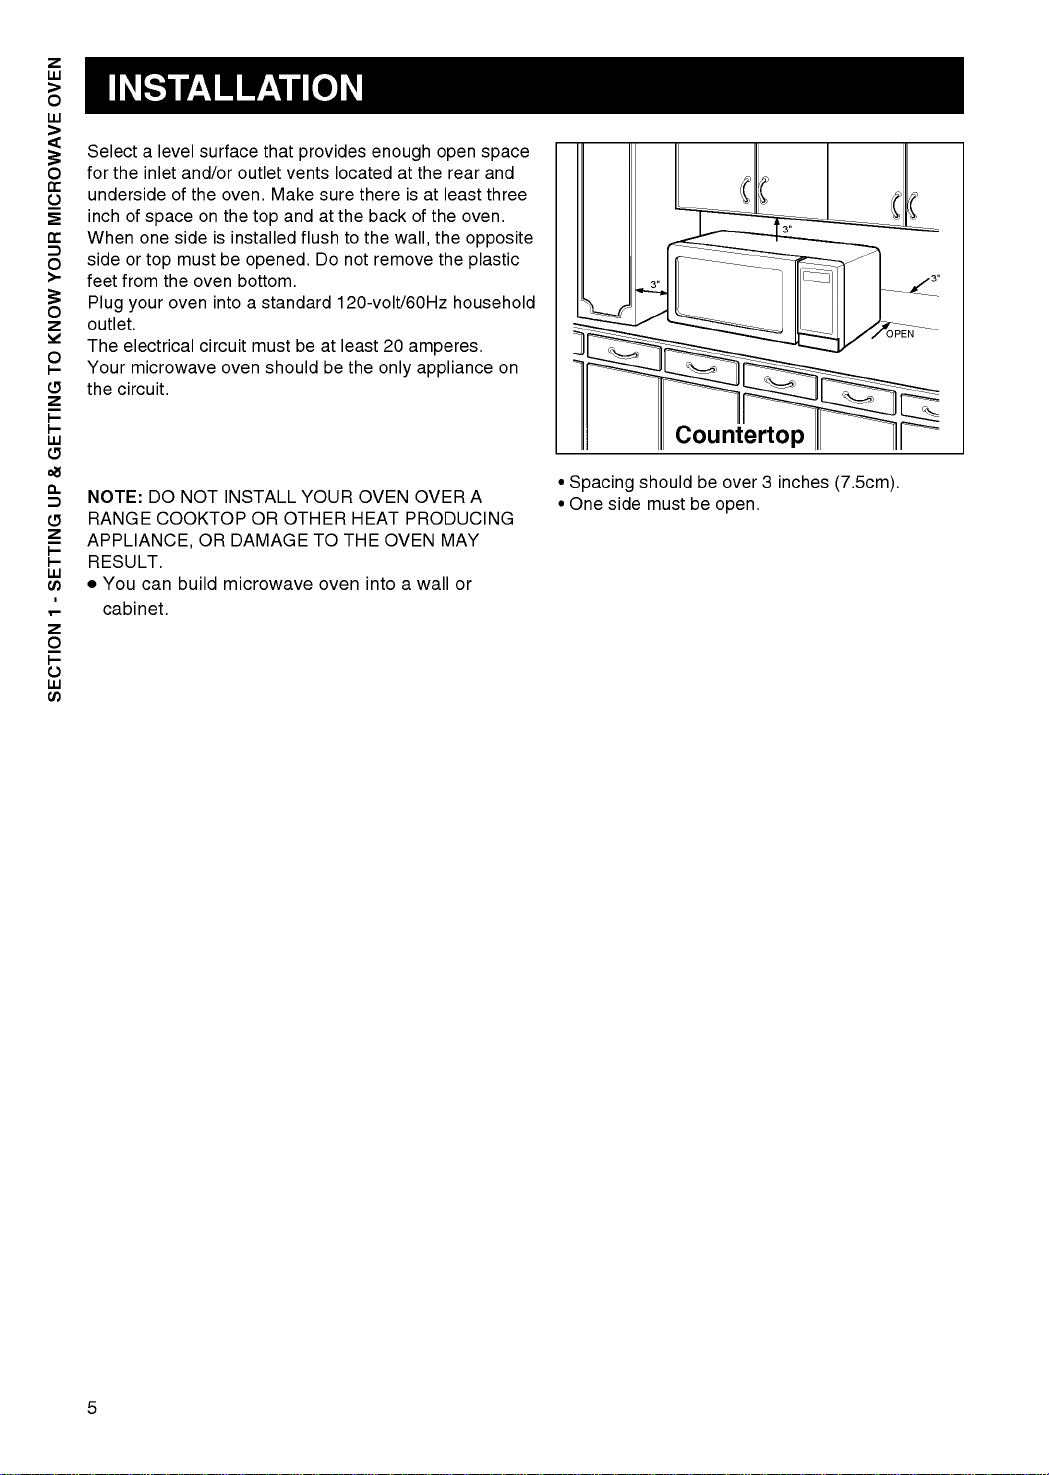
Selectalevel
for
the
inlet
underside
inch
When
side
feet
Plug
outlet.
The
Your
the
of
space
one
or
top
from
the
your
electrical
microwave
circuit.
of
sideisinstalled
oven
surface
and/or
the
oven.
on
the
must
be
oven
intoastandard
circuit
oven
that
outlet
Make
top
opened.
bottom.
must
should
provides
vents
locatedatthe
sure
andatthe
flushtothe
Do
120-volt/60Hz
beatleast
be
enough
there
backofthe
not
remove
20
the
only
open
isatleast
the
wall,
amperes.
appliance
rear
oven.
opposite
the
household
space
and
three
plastic
on
3"
Countertop
3"
3"
OPEN
NOTE:
RANGE
APPLIANCE,
RESULT.
You
can
cabinet.
DO
COOKTOP
NOT
build
OR
INSTALL
OR
DAMAGE
microwave
OTHER
YOUR
TO
oven
OVEN
HEAT
THE
intoawall
OVEN
OVER
PRODUCING
MAY
?
A
or
Spacing
?
One
side
should
must
be
over
3
inches
be
open.
(7.5cm).
SECTION 1 - SETTING UP & GETTING TO KNOW YOUR MICROWAVE OVEN
5
This
appliance
electrical
risk
of electric
wire
for
equipped
with
a
plugged
and
grounded.
short
shock
the
electric
withacord
grounding
intoanoutlet
must
be
circuit,
by
current.
plug.
grounded.
grounding
providing
This
that
has
The
plug
that
is
If
reduces
an
appliance
a
grounding
must
properly
there
escape
be
installed
the
is
is
wire
an
PROPERLY
AND
GROUNDED
POLARIZED
OUTLET
Consult
grounding
understood
properly
provided
entangled
Longer
used
with
If
a
long
The
should
appliance.
The
The
over
children
a
qualified
instructions
as
grounded.
to
reduce
in
or
cord
sets
the
cord
marked
be
extension
longer
the
countertop
or
electricianifin
to
whether
A
the
tripping
or
extension
following
or
extension
electrical
equal
cord
cord
should
tripped
are
not
completely
the
risk
over
appliance
power
of
becoming
a
longer
cords
short
precautions.
cordisused:
rating
to
or
higher
must
be
be
or
tabletop
over
accidentally.
doubtorif
is
supply
cord.
may
of
the
cord
than
the
a
grounding-type
arranged
where
the
cord
be
electrical
so
thatitwill
it
can
is
set
be
or
extension
rating
3
wire
not
pulledonby
Three-Pronged
cord
of
the
cord.
drape
Ensure
proper
exists
before
(Grounding)
ground
use
plug
SECTION 1 - SETTING UP & GETTING TO KNOW YOUR MICROWAVE OVEN
The
punched
WARNING
electrical
or
-
power
crushed
Improper
electrical
cord
in
any
use
shock.
must
of
way.
the
be
kept
grounding
dry
and
plug
must
not
be
can
result
in
6

Toset:
1.
Touch
2.
Touch
DAY
3.
Enter
key
Example:
key
TOUCH
4.
Touch
AM
the
5.
Touch
6.
Touch
STOP/CLEAR.
CLOCK.
scrollsinthe
the
time
pads.
To
pads
[3],[1]
START
START.
TOUCH1
display.
number
START.
ENTER
display.
by
using
set
3:15,
and
[5].
scrollsinthe
PM
TOUCH2
1.
TIME
the
touch
OF
number
number
display.
scroll
in
SECTION 1 - SETTING UP & GETTING TO KNOW YOUR MICROWAVE OVEN
This
is
prevents
Once
cooking
When
can't
input
unique
the
can
the
safety
accidental
child
lock
take
child
any
key.
place.
lock
feature
running
-
out
-
out
that
of
the
oven.
is
no
set,
is
set,
you
Toset:
1.
Touch
2.
Touch
LOCKED
appears
are
already
to
the
To
cancel
1.
Touch
LOCKED
disappears
CHILD
of
day
window.
normally.
STOP/CLEAR.
and
hold
in
the
heard.Ifthe
the
set,
display
child
and
hold
in
LOCK
will
return
The
START
display
time
time
window.
lock
START
the
is
turned
to
oven
and
of
day
of
day
-
out
display.
off,
the
display
will
operate
until
:
until
After
two
was
will
the
beeps
return
the
time
7
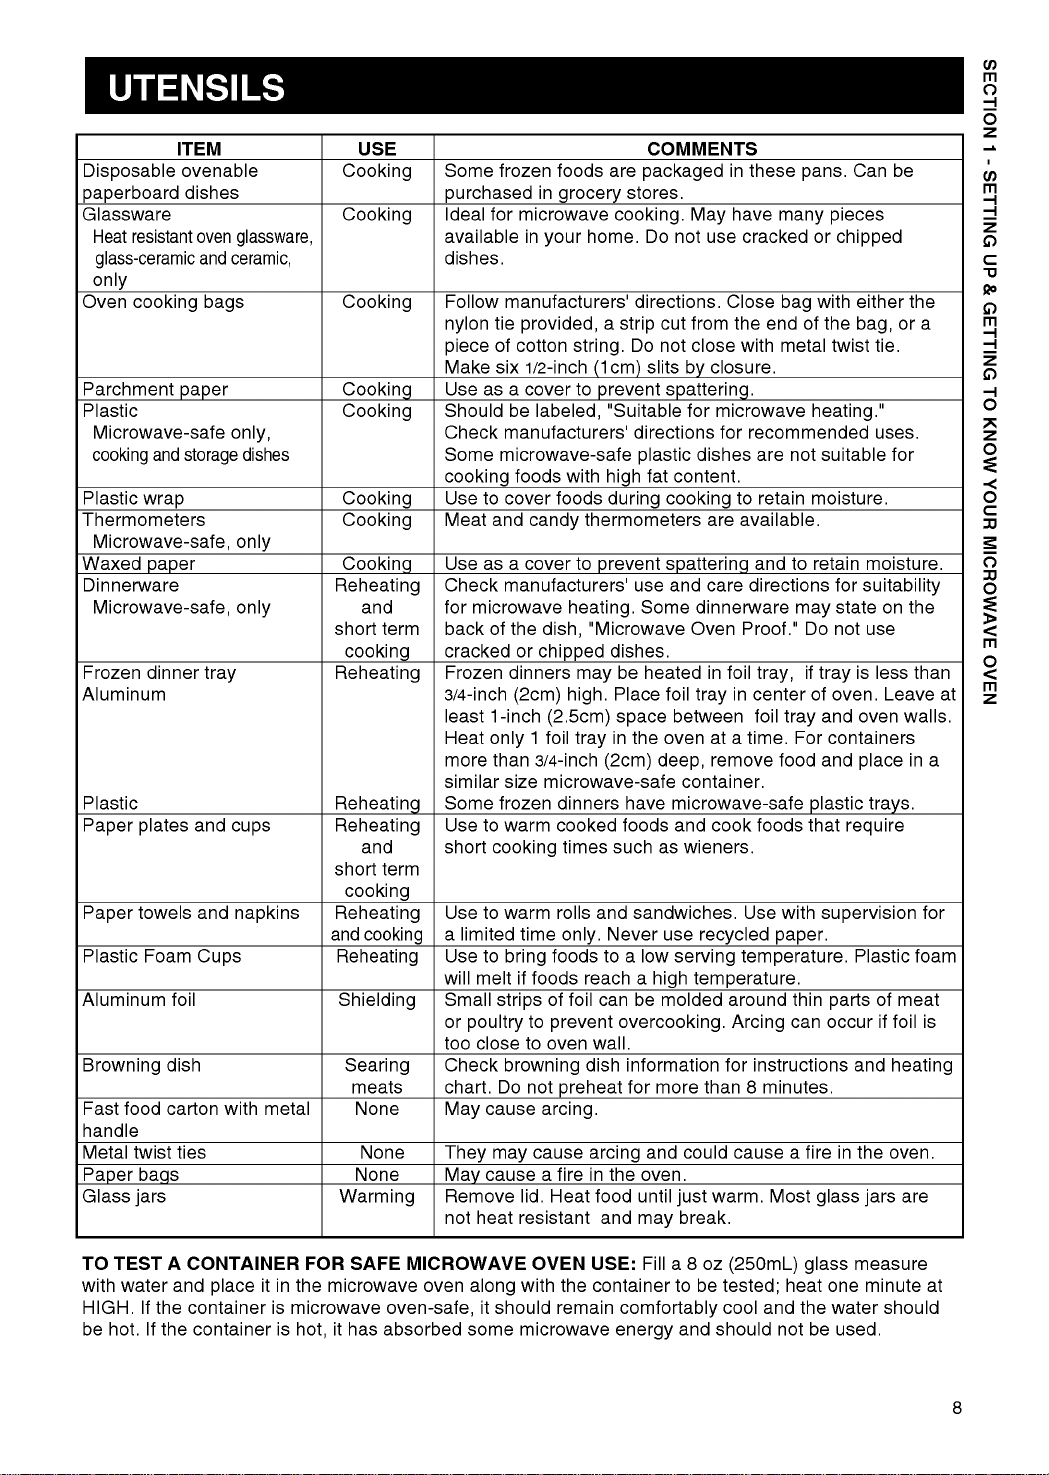
ITEM
Disposable
paperboard
Glassware
Heat
resistant
glass-ceramic
only
Oven
cooking
Parchment
Plastic
Microwave-safe
and
cooking
Plastic
Thermometers
wrap
Microwave-safe,
Waxed
Dinnerware
paper
Microwave-safe,
Frozen
Aluminum
Plastic
Paper
Paper
Plastic
Aluminum
Browning
Fast
handle
Metal
Paper
Glass
plates
towels
food
twist
bags
jars
dinner
Foam
foil
dish
carton
ties
ovenable
dishes
oven
and
bags
paper
storage
tray
and
and
Cups
glassware,
ceramic,
only,
dishes
only
only
cups
napkins
with
metal
USE
Cooking
Cooking
Cooking
Cooking
Cooking
Cooking
Cooking
Cooking
Reheating
and
short
term
cooking
Reheating
Reheating
Reheating
and
short
term
cooking
Reheating
and
cooking
Reheating
Shielding
Searing
meats
None
None
None
Warming
Some
frozen
purchased
Ideal
for
available
dishes.
Follow
tie
nylon
of
piece
Make
six
Use
as a
Should
Check
Some
microwave-safe
cooking
Use
to
Meat
and
Use
as a
Check
for
microwave
back
of
cracked
Frozen
3/4-inch
least
1-inch
Heat
only
more
than
similar
Some
frozen
Use
to
short
cooking
Use
to
a
limited
Use
to
will
meltiffoods
Small
strips
or
poultry
too
close
Check
chart.
Do
cause
May
They
may
cause
May
Remove
not
heat
foods
are
in
grocery
microwave
in
manufacturers'
your
home.
provided,astrip
cotton
string.
1/2-inch
cover
be
manufacturers'
foods
cover
candy
cover
manufacturers'
to
labeled,
with
foods
to
(1cm)
prevent
"Suitable
high
during
thermometers
prevent
heating.
the
or
dinners
(2cm)
dish,
chipped
may
high.
"Microwave
dishes.
(2.5cm)
1
foil
tray
3/4-inch
size
warm
warm
time
bring
to
to
browning
not
(2cm)
microwave-safe
dinners
cooked
times
rolls
and
Never
only.
foods
to
reach
of
foil
can
prevent
oven
wall.
dish
preheat
arcing.
cause
arcing
a
fireinthe
lid.
Heat
food
resistant
and
COMMENTS
packaged
stores.
cooking.
May
Do
not
directions.
cut
from
Do
not
close
slitsbyclosure.
spattering.
for
directions
plastic
fat
content.
cooking
spattering
use
and
Some
Oven
be
heated
Place
foil
between
space
in
the
oven
deep,
container.
have
microwave-safe
foods
and
such
as
wieners.
sandwiches.
use
a
low
serving
a
high
be
molded
overcooking.
information
for
more
and
could
oven.
until
just
break.
may
in
these
have
cracked
Close
the
with
for
recommended
are
to
retain
available.
andtoretain
directions
Proof."
foil
tray,iftray
in
center
foil
a
time.
foods
Use
many
bag
endofthe
metal
food
with
paper.
use
microwave
dishes
are
care
dinnerware
in
tray
at
remove
cook
recycled
temperature.
temperature.
around
Arcing
for
instructions
than8minutes.
cause
warm.
Most
pans.
or
with
heating."
not
suitable
moisture.
may
Do
of
and
tray
For
and
plastic
that
supervision
thin
can
a
fireinthe
glass
Can
pieces
chipped
either
bag,
twist
tie.
uses.
moisture.
for
suitability
state
not
use
is
less
oven.
oven
containers
place
trays.
require
Plastic
of
parts
occur
and
jars
be
the
or
for
on
the
Leave
walls.
in
meat
if
foil
heating
oven.
are
a
than
for
foam
is
at
SECTION 1 - SETTING UP & GETTING TO KNOW YOUR MICROWAVE OVEN
a
TO
TEST
with
water
HIGH.Ifthe
be
hot.Ifthe
A
CONTAINER
and
container
place
container
itinthe
is
microwave
is
hot,
FOR
microwave
it
SAFE
has
MICROWAVE
oven
oven-safe,
absorbed
along
it
some
should
OVEN
with
the
remain
microwave
USE:
Fill
container
comfortably
energy
a8oz
to
be
and
(250mL)
tested;
cool
should
and
not
heat
glass
the
be
one
water
used.
measure
minute
at
should
8

Quick
microwave
menu
can
tell
Touch
with
how
oven
all
Sensor
the
long
cooking
will
guide
popular
to
cookorreheat
provides
you,
food
exciting
stepbystep,
choices
food
helps
items.
new
featurestomake
whetheritbe
to
cook
you
simply
perfectly
to
reheat
because
microwave
oven
foodorcook
it
has
been
easier.
Your
food
and
pre-programmed
new
sensor
and
most
Quick
Quick
sure
oven
using
TOUCH
you
food
cooking
This
food
iteminthe
Cook
Vegetable
:
is
the
will
to
required
categories.
Vegetable
Entree
Categories
For
instructions
1.
The
SECTION 2 - OPERATING INSTRUCTIONS
2.
Make
3.
Opening
The
4.
Before
QUICK
allows
favorite
select
levels.
determines
for
each
has6food
Food
Sensor
1.
Potato
2.
Rice
3.
Popcorn
4.
Fresh
5.
Frozen
6.
Frozen
Quikck
Quikck
Quikck
Touch
provided
Touch
the
door
door
stop.
Quick
SENSOR
cook
without
times
oven
automatically
item.
Quick
menu
Touch
Touch
Touch
Sensor
in
Sensor
remains
or
touching
Touch
most
having
and
cooking
This
include:
Sensor
Sensor
Sensor
SECTION
of
power
feature
Touch
Cooking
system
closed.
Sensor,
COOK
your
to
times
Cook
the
Reheat
Popcorn
programs,
5.
works
STOP/CLEAR
make
EXAMPLE
1.
2.
The
selected
START.
Menu
a
chart
by
detectingabuild-up
before
pad
sure
the
glass
:
To
steps
Touch
STOP/CLEAR.
Touch
FRESH
oven
begins
without
with
specific
the
turntable
cook
below.
VEGETABLE.
the
cooking
the
need
FRESH
of
vapor
is
to
food
vapor.
is
dry,
VEGETABLE,
you
touch
examples
detected
to
assure
will
the
and
abort
best
simply
cooking
the
results.
follow
process.
the
This
feature
precooked
refrigerated
cooking
feature
9
times
has
Code
1
2
3
allows
-
room
food
without
and
3
categories.
Category
Dinner
Soup/Sauce
Casserole
to
reheat
you
temperature
selecting
levels.
power
plate
EXAMPLE:
or
This
1.
Touch
2.
Touch
SELECT
--
scrollinthe
3.
Touch
DINNER
The
selected
START.
SEE
oven
To
reheat
STOP/CLEAR.
REHEAT.
MENU
COOKING
display.
number
PLATE
begins
without
dinner
1TO3
GUIDE
1.
scrollinthe
the
cooking
the
need
plate.
display.
you
to
touch

QUICK
This
feature
microwave
quick...
The
automatic
power
one
only.
makes
popcorn
bag
popcorn
TOUCH
preparation
simple
at
a
time.
uses
and
the
SENSOR
of
HI
Place
on
The
1.
a
Touch
one
bag
microwave-safe
package
should
STOP/CLEAR.
POPCORN
only(50-100g)ofprepackaged
/
oven-safe
be
at
room
dishonthe
temperature.
microwave
turntable.
popcorn
The
popping
the
display.
When
the
End
and
popping
one
shows.
short
and
automatically.
time
long
Oven
counts
time
tones
is
shuts
down
over,
sound
off
in
two
2.
NOTE
Touch
:
If
popcorn
instructions
Do
not
other
Do
not
Do
not
Prepare
Do
not
this
Do
not
POPCORN.
use
feature
attempt
reuse
one
use
feature.
leave
bag
and
POPCORN
bag.
bag
popcorn
microwave
size
do
key
pads.
to
reheat
Overcooking
only
is
not
not
key
at
popping
known,
use
this
pad
or
cook
a
time.
devices
unattended
follow
feature.
in
combination
any
can
manufacturers'
unpopped
result
in
microwave
while
with
in
an
cooking
any
kernels.
oven
oven
popcorn.
SECTION 2 - OPERATING INSTRUCTIONS
fire.
with
CAUTION
:
Never
When
Place
oven
the
use
popping
carefully
walls.
center
a
top
brown
Fold
of
paper
prepackaged
so
the
bag
each
endofthe
the
bag.
bag
does
for
popcorn;
not
bag
popping
touch
in
half
corn.
the
toward
10

Oven
oven
indicator
And
an
it
has
-
guided
will
guide
informs
easy-to-use
been
pre-programmed
cooking
you,
step-by-step,
youofevery
menu
is
a
group
with
stage
and
of
all
knows
exciting
whetheritbe
are
you
the
popular
how
new
featurestomake
to
simply
at
in
the
process,
food/beverage
to
cook,
long
reheat
microwaving
food
and
prompts
choice
defrostorreheat
helps
easier.
Your
new
microwave
or
to
defrost
and
cook
food.
A
you
you
various
along,
to
cook
food
each
more
items.
of
step
perfectly
blinking
the
way.
because
Called:
For
most
Oven-Guided
in
provided
SECTION 2 - OPERATING INSTRUCTIONS
Auto
menu
automatically
what
there
cook
Food
include:
1.
Bacon
2.
Frozen
3.
Fresh
4.
Beverage
5.
Chicken
6.
Hot
SECTION
Cook
made
has
been
cook
want
you
are.
Then
selections.
your
itemsinthe
Roll/Muffin
Roll/Muffin
Pieces
Cereal
and
Cooking
5.
Your
easy!
preprogrammed
food.
Tell
how
your
Auto
many
microwave
COOK
let
oven's
the
items
menu
AUTO
ADD
AUTO
EXPRESS
programs
to
oven
oven
COOK
MINUTE
DEFROST
a
DEFROST
chart
EXAMPLE:
1.
Touch
2.
Touch
SELECT
--
SEE
scrollinthe
3.
Touch
BACON
in
the
with
STOP/CLEAR.
AUTO
COOKING
number
TOUCH
display.
specific
To
cook4slices
simply
COOK.
MENU
display.
1.
food
follow
1TO6
GUIDE
2TO6
examples
of
the
steps
SLICES
and
bacon,
below.
scroll
cooking
instructions
is
4.
Touch
number
The
oven
without
11
begins
the
4.
the
needtotouch
cooking
START.
you
selected
 Loading...