

Page 1

Table of Contents
Table of Contents 1
Phone Overview 2
Menus Overview 3
Getting Started with Your
Phone 4
The Battery 4
Installing the Battery 4
Removing the Battery 4
Charging the Battery 5
Entering and Editing
Information 6
Text Input 6
Key Functions 6
Phone Menus 7
Safety 15
TIA Safety Information 15
Antenna Care 15
Phone Operation 15
Tips on Efficient Operation 15
Driving 15
Electronic Devices 16
Pacemakers 16
Persons with pacemakers: 16
Hearing Aids 16
Consumer Information on
SAR 17
Limited Warranty
Statement 20
Table of Contents
1
Page 2

Phone Overview
Phone Overview
2
Earpiece
LCD Screen
Left Soft Key
Speakerphone Key
SEND Key
Alphanumeric
Keypad
Vibrate Only
Key
Headset Jack
Volume Keys
Accessory Port
Navigation Keys
Favorites/
Right Soft Key
OK Key
Voice Command
PWR/END Key
CLR Key
Lock Mode Key
Camera Key
Charger/
Camera Lens
Speaker
Page 3

Menus Overview
Messaging
1. New Text Message
2. New Picture
Message
3. Email
4. IM
5. Inbox
6. Outbox
5. Drafts
6. Voicemail
9. Web Message
0. Templates
*. Settings
#.Delete All
Call History
1. Missed Calls
2. Received Calls
3. Dialed Calls
4. All Calls
5. Call Timer
6. Data Counter
Contacts
1. New Contact
2. Contact List
3. Favorites
4. Groups
5. Metro411
6. Speed Dials
7. My vCard
@metro App
Store
MetroWEB
Multimedia
1. Take Photo
2. Record Voice
3. Images
4. Audios
Voice Command
1. Start Command
2. Command Mode
3. Announce Alert
4. Train Word
5. Best Match
My Schedule
1. Calendar
2. Notepad
3. Alarm Clock
My Menu
Bluetooth
1. Paired Devices
2. Power
3. My Visibility
4. My Bluetooth Info
Tools
1. Ez Tip Calc
2. Calculator
3. World Clock
4. Stopwatch
5. Unit Converter
Settings
1. Sound
2. Display
3. Security
4. Call Settings
5. System
6. Memory
7. Phone Info
Menus Overview
3
Page 4
Getting Started with Your Phone
The Battery
Note
It is important to fully charge the
battery before initial use of the
phone.
Getting Start ed with Your Phone
The phone comes with a
rechargeable battery. The battery
charge level is shown at the top
right of the LCD screens when
the phone is on.
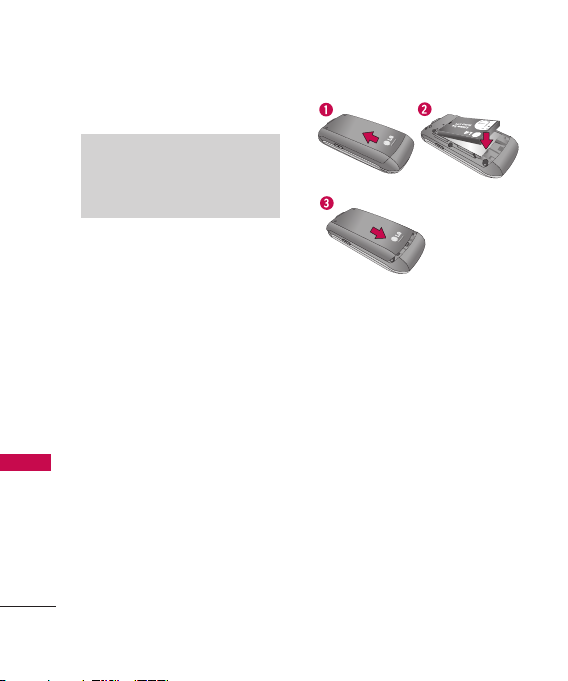
Installing the Battery
Remove the battery cover by
pressing down below the LG logo
and sliding the cover up (see
figure 1). Insert the top of the
battery into the battery
compartment, making sure to
align the battery contacts with
the phone terminals, and push
the battery down until it clicks
into place (2). Align the battery
cover then slide it downward
until it clicks into place (3).
4
Removing the Battery
Turn the phone off. Slide the
battery cover upward to remove
it. Remove the battery from the
battery compartment by lifting
the bottom of the battery using
the fingertip cutout.
Page 5
Charging the Battery
Use the charger provided with
your phone. To charge your
phone:
Warning! Use only the charger
provided with the phone. Using
any charger other than the one
included with the MN180 may
damage your phone or battery.
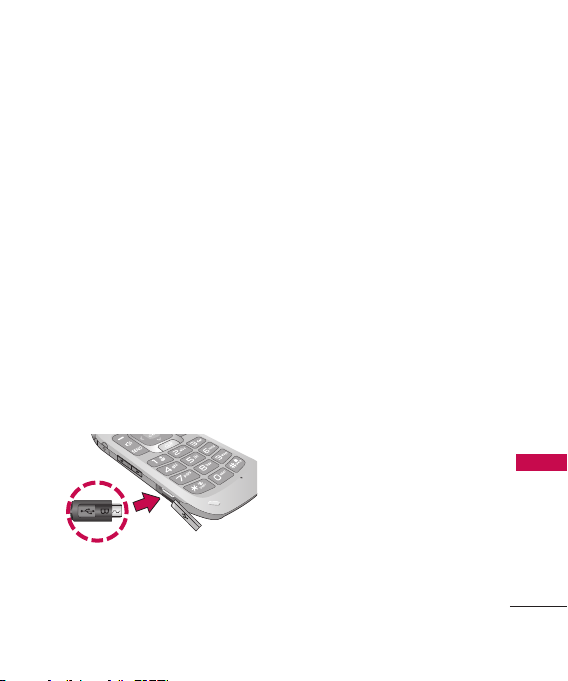
1. Gently uncover the
charger/accessory port, then
plug the end of the adapter
into the phone’s charger port
and the other end into an
electrical outlet.
Notice
Please make sure that the 'B' Side faces up
before inserting a charger or data cable into
the charger port of y
our phone.
The charge time varies
depending upon the battery
level.
Getting Start ed with Your Phone
5
Page 6

Entering and Editing Information
Text Input
While entering text, the following
options are available:
Key Functions
Entering and Editing Information
Left Soft Key:
Press to change the text
input mode to one of the
following:
T9Word: T9WORD/
T9Word/ T9word
Abc: ABC/ Abc/ abc
123
Symbols
6
: Press to change
Shift Key
the text capitalization.
T9Word
: T9Word ->
T9WORD -> T9word
Abc : Abc -> ABC -> abc
Next: In T9word mode,
press to select the next
matching word.
Space: Press to complete
a word and insert a space.
Clear: Press to delete a
single space or character.
Press and hold to delete
all of the message.
Punctuation: Press to
enter punctuation marks
or some of the available
special characters.
Page 7
Menu Description
, ,
, ,
, ,
, ,
, ,
, ,
, ,
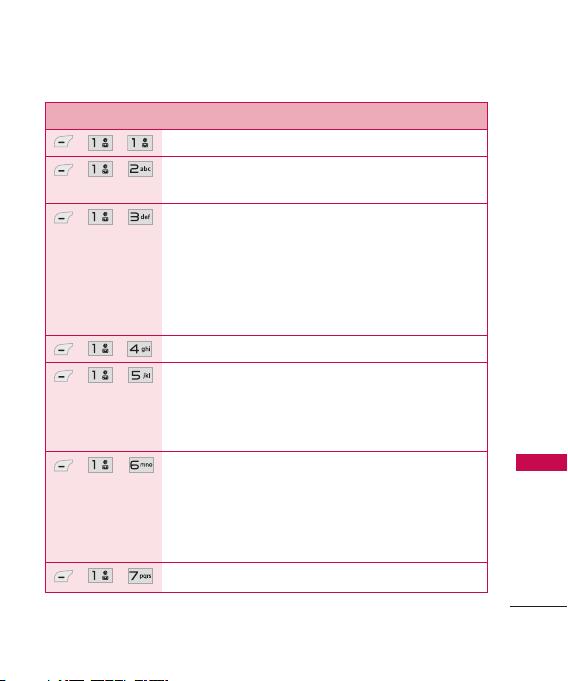
Allows you to send text and e-mail messages.
Allows you to send messages with text, images,
and audio clips.
Allows you to send an email via your favorite email
provider. Don't miss an important email. Thanks to
Email, you can get your emails on your phone,
while you're on the go. Email works with many
providers, including Yahoo! Mail, AOL Mail,
Hotmail and more.
Allows you to send and receive Instant Messages.
Use this menu to view received messages. Up to
700 messages (500 SMS, 100 MMS, and 100
MMS notification messages) can be stored in this
folder.
View the contents of sent messages and verify
whether the transmission was successful or not (if
verification is supported by network). Up to 100
sent messages(50 SMS + 50 MMS) can be stored
in the Outbox folder.
This folder contains saved message drafts.
Phone Menus
Phone Menus
7
Page 8
Phone Menus
Menu Description
, ,
, ,
, ,
, ,
Phone Menus
8
, ,
, ,
, ,
, ,
, ,
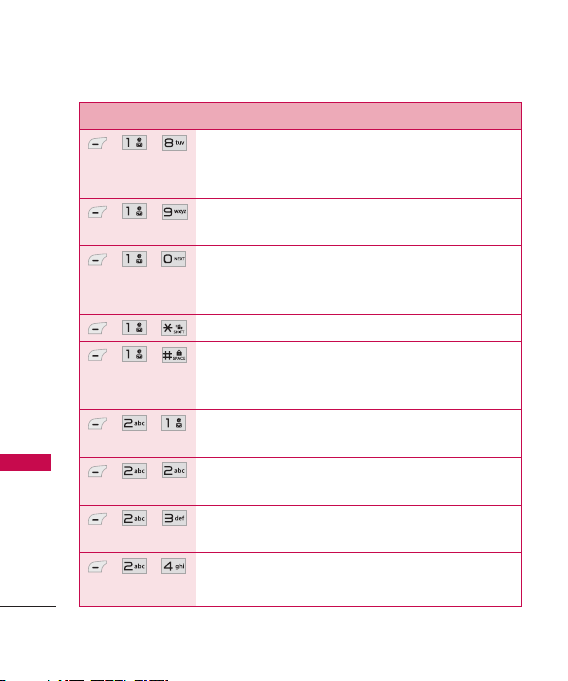
Allows you to hear new voice messages recorded in
your voice mail box. Your phone will alert you
when you receive a new voice message.
Allows you to view any received web messages or
alerts.
Allows you to display, edit, and add templates.
These templates allow you to reduce manual text
input into messages.
Allows you to configure settings for Messaging.
Allows you to erase the messages stored in your
Inbox, Sent, or Drafts folders. You can also erase
all messages at the same time.
Allows you to view the most recent missed calls;
up to 40 entries.
Allows you to view the most recent received calls;
up to 40 entries.
Allows you to view the most recent dialed calls; up
to 40 entries.
Allows you to view a list of the most recently
missed, received and dialed calls.
Page 9

Menu Description
, ,
, ,
, ,
, ,
, ,
, ,
, ,
, ,
Allows you to view the duration of the different
call types.
Allows you to view the amount of received and
sent data.
Allows you to add a new contact to your Contact
List.
Allows you to view your Contact List.
Allows you to add Contact entries or Contact
groups to your list of Favorites to easily view, call,
or send messages.
Allows you to add a new group, change the name
of a group, delete a group, or send a message to
everyone in the selected group.
Get directory assistance information quickly and
easily with one of these MetroPCS Directory
Assistance Services.
Allows you to view your Speed Dials list, designate
new Speed Dials, or remove Speed Dials
designations entered in your Contacts.
Phone Menus
9
Page 10

Phone Menus
Menu Description
, ,
,
,
Phone Menus
, ,
, ,
, ,
, ,
, ,
10
Allows you to view and edit your vCard, which you
can then send to others via Bluetooth.
Allows you to download new applications from the
@metro App Store
downloaded applications on the
MetroWeb allows you to view Internet content.
Access and selections within this feature are
dependent upon your service provider. For specific
information on Web access through your phone,
contact your service provider.
Allows you to use the built-in camera and take
pictures.
Allows you to record a new sound.
Allows you to view and manage images stored in
the phone.
Allows you to access saved audio clips and record
new ones.
Starts the phone's Voice Command feature.
. You can also access any
my apps
tab.
Page 11

Menu Description
, ,
, ,
, ,
, ,
, ,
, ,
, ,
,
Allows you to set Command Mode to Normal or
Speed (The Speed setting allows you to access and
use the Voice Command functions more quickly with
a faster non-verbal prompt).
Allows you to customize Announce Alert.
Announce Alert lets your hear more information
about an incoming call or message instead of, or
along with, your ringtone.
Allows your to train words for improved Voice
Command responses.
Allows you to choose whether the phone displays
only the closest match or up to 4 of the closest
matches when using the "Call" function.
Allows you to store and access your My Schedule
Calendar.
Allows you to add, read, edit, and erase notes.
Allows you to set up to five alarms.
Allows you quick access to your favorite menus or
functions. A maximum of 12 shortcuts can be set
in My Menu.
Phone Menus
11
Page 12

Phone Menus
Menu Description
, ,
, ,
, ,
, ,
, ,
Phone Menus
, ,
, ,
, ,
, ,
12
Allows you to view devices paired to the phone
and establish and pair new devices to the phone.
Allows you to set Bluetooth power to On/Off.
Allows you to set the visibility of your Bluetooth
function.
Allows you to view information regarding the
Bluetooth functionality.
Allows you to quickly and easily calculate the tip
and total amount of a bill by inputting the bill
amount, the tip percentage, and dividing it by the
number of people paying.
Allows you to perform simple mathematical
calculations.
Allows you to determine the current time in
another time zone or city.
Allows you to use your phone as a stopwatch.
Allows you to convert units of Currency, Area,
Length, Mass, Temperature, Volume and Velocity to
other measurements.
Page 13

Menu Description
, ,
, ,
, ,
Options to customize your phone's sounds.
1.1 Ringers 1.2. Volume
1.3. Message Alerts 1.4. Alert Type
1.5. Service Alerts
1.5.1 Minute Beep 1.5.2 Call Connect
1.5.3 Back to Top 1.5.4 Low Battery
1.5.5 Roam Alert 1.6. Power On/Off Tone
1.7 Flip Tone
Options to customize your phone's display screen.
2.1 Shortcuts Display 2.2 Wallpaper
2.3 Banner 2.4 Backlight
2.5 Menu Style 2.6 Languages (Idiomas)
2.7 Clocks & Calendar 2.8 Font Settings
2.9 Name Match for Dialing
The Security menu allows you to secure the phone
electronically.
3.1 Lock Phone 3.2 Auto Device Lock
3.3 Restrictions 3.4 Emergency Numbers
3.5 Change Lock Code 3.6 Reset Default
Phone Menus
13
Page 14

Phone Menus
Menu Description
, ,
, ,
Phone Menus
, ,
, ,
14
The Call Settings menu allows you to designate
how the phone handles both incoming and
outgoing calls.
4.1 Answer Options 4.2 Auto Retry
4.3 One-Touch Dial 4.4 Airplane Mode
4.5 TTY Mode
The System menu allows you to designate specific
system network settings.
5.1 Network
5.1.1 System Select 5.1.2 Set NAM
5.1.3 Serving System
5.2 Location
Allows you to check the memory status of your
phone.
The Phone Info menu provides you with specific
information pertaining to your handset and
software.
Page 15

Safety
TIA Safety Information
The following is the complete
TIA Safety Information for
wireless handheld phones.
Antenna Care
Use only the supplied or an
approved replacement antenna.
Unauthorized antennas,
modifications, or attachments
could damage the phone and
may violate FCC regulations.
Phone Operation
NORMAL POSITION: Hold the
phone as you would any other
telephone with the antenna
pointed up and over your
shoulder.
Tips on Efficient Operation
For your phone to operate
most efficiently:
Don’t touch the antenna
unnecessarily when the phone is
in use. Contact with the antenna
affects call quality and may cause
the phone to operate at a higher
power level than otherwise
needed.
Driving
Check the laws and regulations
on the use of wireless phones in
the areas where you drive and
always obey them. Also, if using
your phone while driving, please
observe the following:
●
Give full attention to driving -driving safely is your first
responsibility;
●
Use hands-free operation, if
available;
●
Pull off the road and park
before making or answering a
call if driving conditions or the
law require it.
Safety
15
Page 16

Safety
Electronic Devices
Most modern electronic
equipment is shielded from RF
signals. However, certain
electronic equipment may not be
shielded against the RF signals
from your wireless phone.
Pacemakers
The Health Industry
Manufacturers Association
recommends that a minimum
separation of six (6) inches be
maintained between a handheld
Safety
wireless phone and a pacemaker
to avoid potential interference
with the pacemaker. These
recommendations are consistent
with the independent research
by and recommendations of
Wireless Technology Research.
Persons with pacemakers:
●
Should ALWAYS keep the
phone more than six (6)
16
inches from their pacemaker
when the phone is turned ON;
●
Should not carry the phone in
a breast pocket;
●
Should use the ear opposite
the pacemaker to
minimize the potential for
interference;
●
Should turn the phone OFF
immediately if there is any
reason to suspect that
interference is taking place.
Hearing Aids
Some digital wireless phones may
interfere with some hearing aids.
In the event of such interference,
you may want to consult your
service provider (or call the
customer service line to discuss
alternatives).
Page 17

Consumer Information
on SAR
(Specific Absorption Rate)
This Model Phone Meets the
Government’s Requirements for
Exposure to Radio Waves.
wireless phone is a radio
transmitter and receiver. It is
designed and manufactured not
to exceed the emission limits for
exposure to radiofrequency (RF)
energy set by the Federal
Communications Commission
(FCC) of the U.S. Government.
These FCC exposure limits are
derived from the
recommendations of two expert
organizations, the National
Counsel on Radiation Protection
and Measurement (NCRP) and
the Institute of Electrical and
Electronics Engineers (IEEE). In
both cases, the
recommendations were
developed by scientific and
Your
engineering experts drawn from
industry, government, and
academia after extensive reviews
of the scientific literature related
to the biological effects of RF
energy.
The exposure Limit for wireless
mobile phones employs a unit of
measurement known as the
Specific Absorption Rate, or SAR.
The SAR is a measure of the rate
of absorption of RF energy by
the human body expressed in
units of watts per kilogram
(W/kg). The FCC requires
wireless phones to comply with a
safety limit of 1.6 watts per
kilogram (1.6 W/kg). The FCC
exposure limit incorporates a
substantial margin of safety to
give additional protection to the
public and to account for any
variations in measurements.
Tests for SAR are conducted
using standard operating
positions specified by the FCC
Safety
17
Page 18

Safety
with the phone transmitting at its
highest certified power level in all
tested frequency bands.
Although SAR is determined at
the highest certified power level,
the actual SAR level of the phone
while operating can be well below
the maximum value. Because the
phone is designed to operate at
multiple power levels to use only
the power required to reach the
network, in general, the closer
you are to a wireless base station
antenna, the lower the power
output.
Safety
Before a phone model is available
for sale to the public, it must be
tested and certified to the FCC
that it does not exceed the limit
established by the governmentadopted requirement for safe
exposure. The tests are
performed in positions and
locations (e.g., at the ear and
worn on the body) as required
by the FCC for each model.
18
This device was tested for typical
body-worn operations with the
back of the phone kept 0.79
inches (2.0 cm) between the
user’s body and the back of the
phone. To comply with FCC RF
exposure requirements, a
minimum separation distance of
0.79 inches (2.0 cm) must be
maintained between the user s
body and the back of the phone.
Third-party belt-clips, holsters,
and similar accessories
containing metallic components
should not be used. Body-worn
accessories that cannot maintain
0.79 inches (2.0 cm) separation
distance between the user's
body and the back of the phone,
and have not been tested for
typical body-worn operations
may not comply with FCC RF
exposure limits and should be
avoided.
The FCC has granted an
Equipment Authorization for this
Page 19

model phone with all reported
SAR levels evaluated as in
compliance with the FCC RF
emission guidelines.
The highest SAR value for this
model phone when tested for
use at the ear is 0.92 W/kg and
when worn on the body, as
described in this user’s manual, is
0.51 W/kg. While there may be
differences between SAR levels of
various phones and at various
positions, they all meet the
government requirement for safe
exposure.
SAR information on this model
phone is on file with the FCC
and can be found under the
Display Grant section of
http://www.fcc.gov/oet/ea/fccid/
after searching for the FCC ID.
To find information that pertains
to a particular model phone, this
site uses the phone FCC ID
number which is usually printed
somewhere on the case of the
phone. Sometimes it may be
necessary to remove the battery
pack to find the number. Once
you have the FCC ID number for
a particular phone, follow the
instructions on the website and
it should provide values for
typical or maximum SAR for a
particular phone.
Additional information on
Specific Absorption Rates (SAR)
can be found on the Cellular
Telecommunications Industry
Association (CTIA) website at
http://www.ctia.org/
*In the United States and
Canada, the SAR limit for mobile
phones used by the public is 1.6
watts/kg (W/kg) averaged over
one gram of tissue. The standard
incorporates a substantial margin
of safety to give additional
protection for the public and to
account for any variations in
measurements.
Safety
19
Page 20

Limited Warranty Statement
1. WHAT THIS WARRANTY
COVERS:
LG offers you a limited warranty
that the enclosed subscriber unit
and its enclosed accessories will
be free from defects in material
and workmanship, according to
Limited Warranty Statement
the following terms and
conditions:
(1) The limited warranty for the
product extends for TWELVE
(12) MONTHS beginning on
the date of purchase of the
product with valid proof of
purchase, or absent valid
proof of purchase, FIFTEEN
(15) MONTHS from date of
manufacture as determined
by the unit’s manufacture
date code.
(2) The limited warranty extends
only to the original
purchaser of the product
and is not assignable or
20
transferable to any
subsequent purchaser/end
user.
(3) This warranty is good only
to the original purchaser of
the product during the
warranty period as long as it
is in the U.S, including
Alaska, Hawaii, U.S.
Territories and Canada.
(4) The external housing and
cosmetic parts shall be free
of defects at the time of
shipment and, therefore,
shall not be covered under
these limited warranty terms.
(5) Upon request from LG, the
consumer must provide
information to reasonably
prove the date of purchase.
(6) The customer shall bear the
cost of shipping the product
to the Customer Service
Page 21

Department of LG. LG shall
bear the cost of shipping
the product back to the
consumer after the
completion of service under
this limited warranty.
2. WHAT THIS WARRANTY
DOES NOT COVER:
(1) Defects or damages
resulting from use of the
product in other than its
normal and customary
manner.
(2)
Defects or damages from
abnormal use, abnormal
conditions, improper
storage, exposure to
moisture or dampness,
unauthorized modifications,
unauthorized connections,
unauthorized repair, misuse,
neglect, abuse, accident,
alteration, improper
installation, or other acts
which are not the fault of
LG, including damage caused
by shipping, blown fuses,
spills of food or liquid.
(3) Breakage or damage to
antennas unless caused
directly by defects in
material or workmanship.
(4) That the Customer Service
Department at LG was not
notified by consumer of the
alleged defect or
malfunction of the product
during the applicable limited
warranty period.
(5) Products which have had the
serial number removed or
made illegible.
(6) This limited warranty is in
lieu of all other warranties,
express or implied either in
fact or by operations of law,
statutory or otherwise,
Limited Warranty Statement
21
Page 22

Limited Warranty Statement
including, but not limited to
any implied warranty of
marketability or fitness for a
particular use.
(7) Damage resulting from use
of non-LG approved
Limited Warranty Statement
accessories.
(8) All plastic surfaces and all
other externally exposed
parts that are scratched or
damaged due to normal
customer use.
(9) Products operated outside
published maximum ratings.
(10)Products used or obtained
in a rental program.
(11) Consumables (such as
fuses).
3. WHAT LG WILL DO:
“LG will, at its sole option, either
repair, replace or refund the
22
purchase price of any unit that
does not conform to this limited
warranty. LG may choose at its
option to use functionally
equivalent re-conditioned,
refurbished or new units or parts
or any units. In addition, LG will
not re-install or back-up any
data, applications or software
that you have added to your
phone. It is therefore
recommended that you back-up
any such data or information
prior to sending the unit to LG
to avoid the permanent loss of
such information.”
4. STATE LAW RIGHTS:
No other express warranty is
applicable to this product. THE
DURATION OF ANY IMPLIED
WARRANTIES, INCLUDING THE
IMPLIED WARRANTY OF
MARKETABILITY, IS LIMITED TO
THE DURATION OF THE
EXPRESS WARRANTY HEREIN.
Page 23

LG SHALL NOT BE LIABLE FOR
THE LOSS OF THE USE OF THE
PRODUCT, INCONVENIENCE,
LOSS OR ANY OTHER
DAMAGES, DIRECT OR
CONSEQUENTIAL, ARISING
OUT OF THE USE OF, OR
INABILITY TO USE, THIS
PRODUCT OR FOR ANY
BREACH OF ANY EXPRESS OR
IMPLIED WARRANTY,
INCLUDING THE IMPLIED
WARRANTY OF MARKETABILITY
APPLICABLE TO THIS
PRODUCT.
Some states do not allow the
exclusive limitation of incidental
or consequential damages or
limitations on how long an
implied warranty lasts; so these
limitations or exclusions may not
apply to you. This warranty gives
you specific legal rights and you
may also have other rights which
vary from state to state.
5. HOW TO GET WARRANTY
SERVICE:
To obtain warranty service,
please call or fax to the following
telephone numbers from
anywhere in the continental
United States:
Tel. 1-800-793-8896 or Fax.
1-800-448-4026
Or visit http://us.lgservice.com.
Correspondence may also be
mailed to:
LG Electronics Service- Mobile
Handsets
P.O. Box 240007, Huntsville, AL
35824
DO NOT RETURN YOUR
PRODUCT TO THE ABOVE
ADDRESS
for the location of the LG
authorized service center nearest
you and for the procedures for
obtaining warranty claims.
. Please call or write
Limited Warranty Statement
23
Page 24

MEMO
Page 25

MEMO
 Loading...