

LG MJ3965BCS Owner’s Manual [fr]

ENGLISH
FRANÇAIS
PORTUGUÊS
OWNER’S MANUAL
MICROWAVE OVEN
"CONVECTION"
Please read this owner’s manual thoroughly before operating.
MJ396 ****
(optional, please check model specification)
www.lg.com
MFL69799801_03 Copyright © 2017-2018 LG Electronics Inc. All Rights Reserved

CONTENTS
2
How the Microwave Function Works
Microwaves are a form of energy similar to radio,
television waves, and ordinary daylight. Normally,
microwaves spread outwards as they travel
through the atmosphere and disappear without
effect.
This oven, however, has a magnetron that is
designed to make use of the energy in microwaves.
Electricity, supplied to the magnetron tube, is used
to create microwave energy.
These microwaves enter the cooking area through
openings inside the oven. A tray is located inside
the oven. Microwaves cannot pass through metal
walls of the oven, but they can penetrate such
materials as glass, porcelain and paper, the
materials out of which microwave-safe cooking
dishes are constructed.
Microwaves do not heat cookware, though cooking
vessels will eventually get hot from the heat
generated by the food.
A very safe appliance
Your Microwave oven, is one of the safest
of all home appliances. When the door
is opened, the oven automatically stops
producing microwaves. Microwave energy is
converted completely to heat when it enters
food, leaving no “left over” energy to harm you
when you eat your food.
CONTENTS
IMPORTANT SAFETY INSTRUCTIONS
83 BEFORE USE
8 Unpacking & Installing
10 Control Panel (for MJ3965ACS/ACR/BCR/BCS)
10 Display Picto
11 Control Panel (for MJ3965BPS/BPH)
11 Display Picto
12 Setting Clock
12 Quick Start
12 More/Less
12 Energy Saving
13 HOW TO USE
13 Timed Cooking
13 Microwave Power Levels
14 Grill Cooking
14 Grill Combi. Cooking
15 Convection Preheat
15 Convection Cooking
16 Convection Combi. Cooking
16 Child Lock
17 Inverter Cook
17 Inverter Cook Menu Instructions
25 Roast & Bake
25 Roast & Bake Menu Instructions
27 Slow Cook
28 Slow Cook Menu Instructions
29 Healthy Cook (for MJ3965ACS/ACR/BCR/BCS)
29 Healthy Cook Menu Instructions
Healthy Fry (for MJ3965BPS/BPH)
32
Healthy Fry Menu Instructions
32
34 Inverter Defrost
34 Inverter Defrost Menu Instructions
35 MICROWAVE-SAFE UTENSILS
36 FOOD CHARACTERISTICS &
MICROWAVE COOKING
38 TO CLEAN YOUR OVEN
38 USING THE SMART DIAGNOSIS™
FUNCTION
39 QUESTIONS & ANSWERS
40 TECHNICAL SPECIFICATIONS
3
ENGLISH
4
5
ENGLISH
-
6
his model doesn't provide a temperature probe.
T
S
arm houses;
F
By clients in hotels, motels and other residential environments;
Bed and breakfast type environments.
7
ENGLISH
36
Caution, hot surface
When the symbol is used, It means that the surfaces are liable to get hot during use.
37
Do not place an object(a book, a box, etc.) on the product. The product may overheat or catch fire or the
object may fall, causing injury to persons.
BEFORE USE
8
BEFORE USE
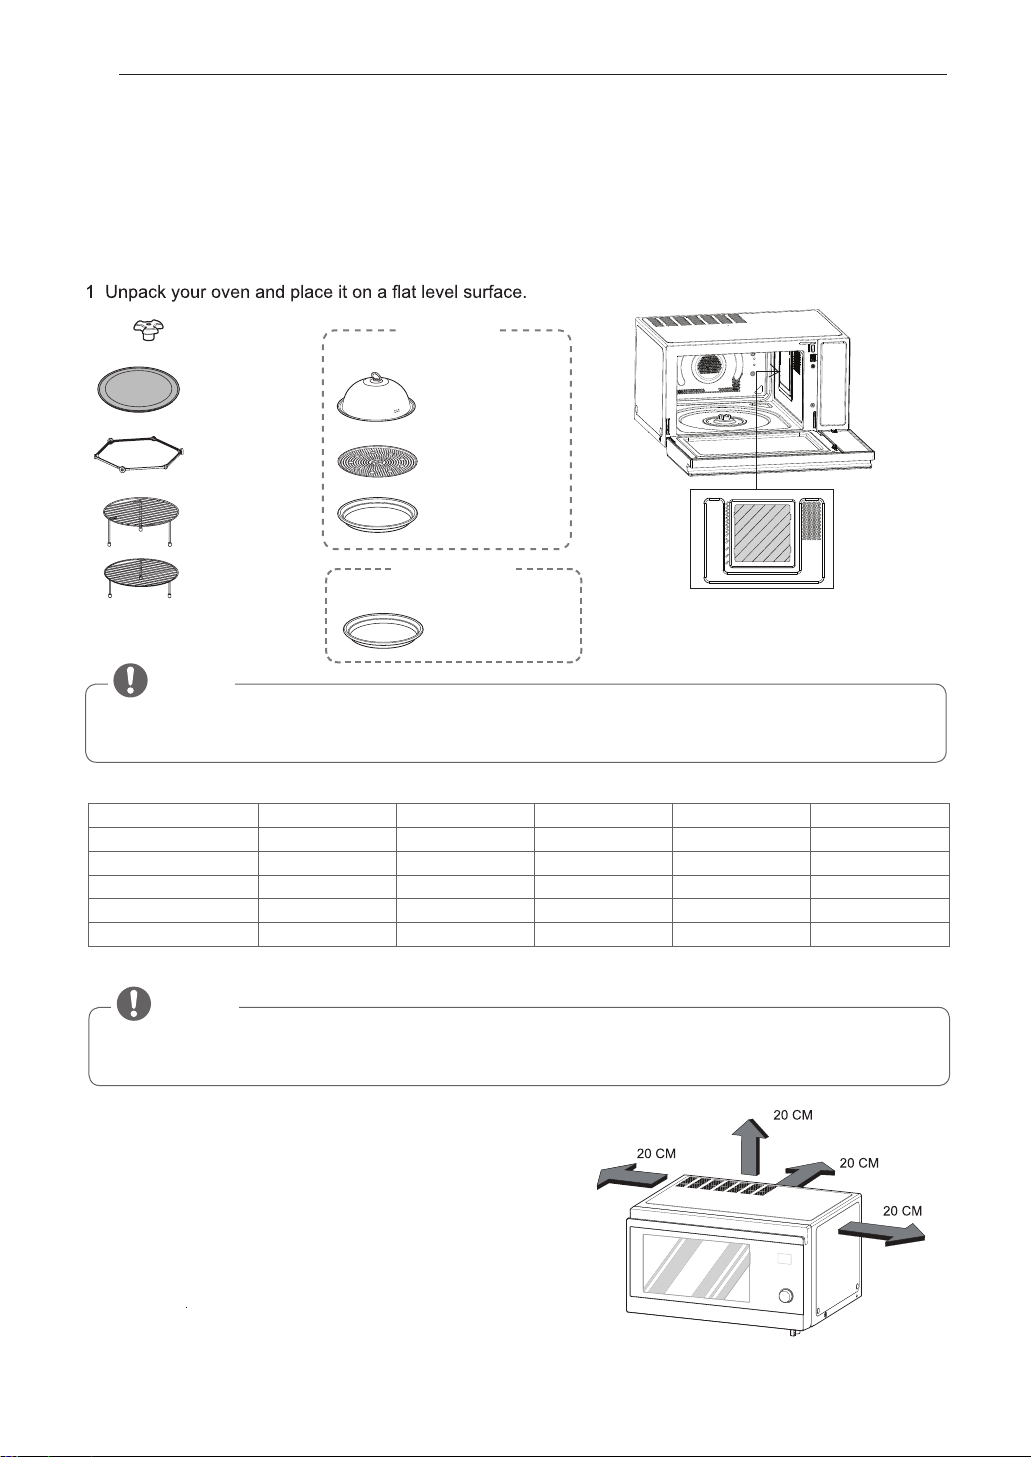
Unpacking & Installing
By following the basic steps on these two pages you will be able to quickly check that your oven is operating
correctly. Please pay particular attention to the guidelines on where to install your oven. When unpacking
your oven make sure you remove all accessories and packing materials. Check to make sure that your oven
has not been damaged during shipping.
SHAFT
GLASS TRAY
ROTATING
RING
High rack
Low rack
STEAMER
(MJ3965ACS/ACR/BCR/BCS)
Steam cover
Steam plate
Steam water bowl
(Crisp tray)
CRISP TRAY
(MJ3965BPS/BPH)
Crisp tray
Mica Sheet
Mica Sheet
*Do Not Remove
Mica Sheet
NOTE
• Do not remove the cavity mica sheet (silver plate) inside of oven.
The Mica sheet is there to protect the microwave components from food spatters.
Method to use Accessories As per Mode
Microwave Grill Convection Grill combi Conv combi
Glass tray O O O O O
High rack - O O O O
Low rack - O O O O
Crisp tray O O O O O
Steamer O - - - -
Caution: Use accessories in accordance with cooking guides! O Acceptable
- Not Acceptable
NOTE
• Be certain to use proper accessories on each operation mode .
• Improper use could result in damage to your oven and accessories, or could make spark and a fire.
2 Place the oven on the level location of your choice with more
than 85cm height but make sure there is at least 20 cm of
space on the top and 20 cm at the rear & left & right for
proper ventilation. The front of the oven should be at
least 8 cm from the edge of the surface to prevent tipping.
An exhaust outlet is located on bottom or side of the oven.
Blocking the outlet can damage the oven.
If you use the microwave oven in an enclosed space or
cupboard, The air flow for cooling the product could be
worse. It may result in lower performance and reduced
service life. If possible, please use the microwave oven
in the counter top condition.
NOTE
• THIS OVEN SHOULD NOT BE USED FOR COMMERCIAL CATERING PURPOSES.
. Make sure your oven is the only appliance connectedtekcosdlohesuohdradnatsaotninevoruoygulP3
to the socket.
If your oven does not operate properly, unplug it from the
electrical socket and then plug it back in.
.eldnahroodehtgnillupybroodnevoruoynepO4
Place the rotating ring inside the oven and place the
glass tray on top.
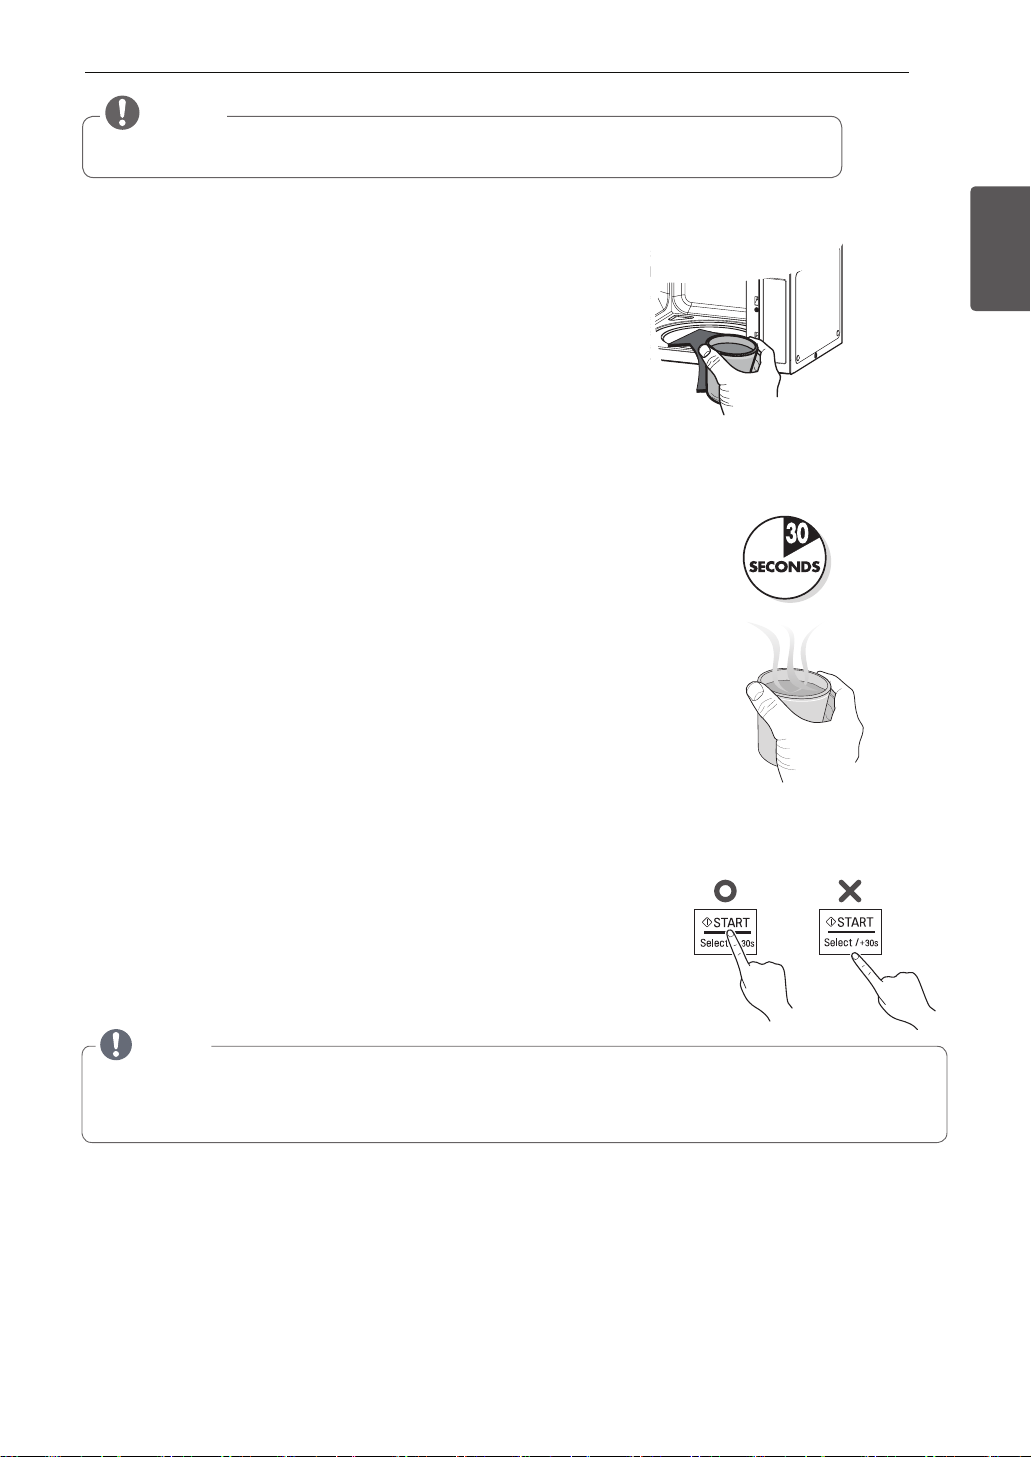
alliF5 microwave safe container with 300 ml (1/2 pint) of water.
Place on the glass tray and close the oven door.
If you have any doubts about what type of container to use
please refer to Microwave-safe utensils.
6 Press the STOP/CANCEL button, and press the START
button one time to set 30 seconds of cooking time.
BEFORE USE
9
ENGLISH
ehT7 DISPLAY will count down from 30 seconds.
When it reaches 0 it will sound BEEPS. Open the oven door and
test the temperature of the water.
If your oven is operating the water should be warm.
Be careful when removing the container it may be hot.
YOUR OVEN IS NOW INSTALLED
erutarepmetehtdnanekahsroderritsebllahssrajdoofybabdnaselttobgnideeffostnetnocehT8
checked before consumption in order to avoid burns.
9
Button recognition may be hampered in the following circumstances:
• Only the outside area of the button is pressed.
•
The button is pushed using a nail or the tip of the finger.
NOTE
Do not use rubber gloves or disposable gloves.
When wiping the touch control panel with a wet towel, remove moisture from the touch control panel
when finished.
The setting of the cooking time should be shorter than common microwave ovens (700 W, 800 W) due to
10
the relatively high output power of the product. Excessive heating with the product may cause moisture
on the door.
All of the recipes in this book give a range of cooking times. In general, you will find that the food remains
11
under-cooked at the lower end of the time range, and you may sometimes want to cook your food beyond
the maximum time given, according to personal preference. The governing philosophy of this book is that
it is best for a recipe to be conservative in giving cooking times because overcooked food is ruined for good.
BEFORE USE
10
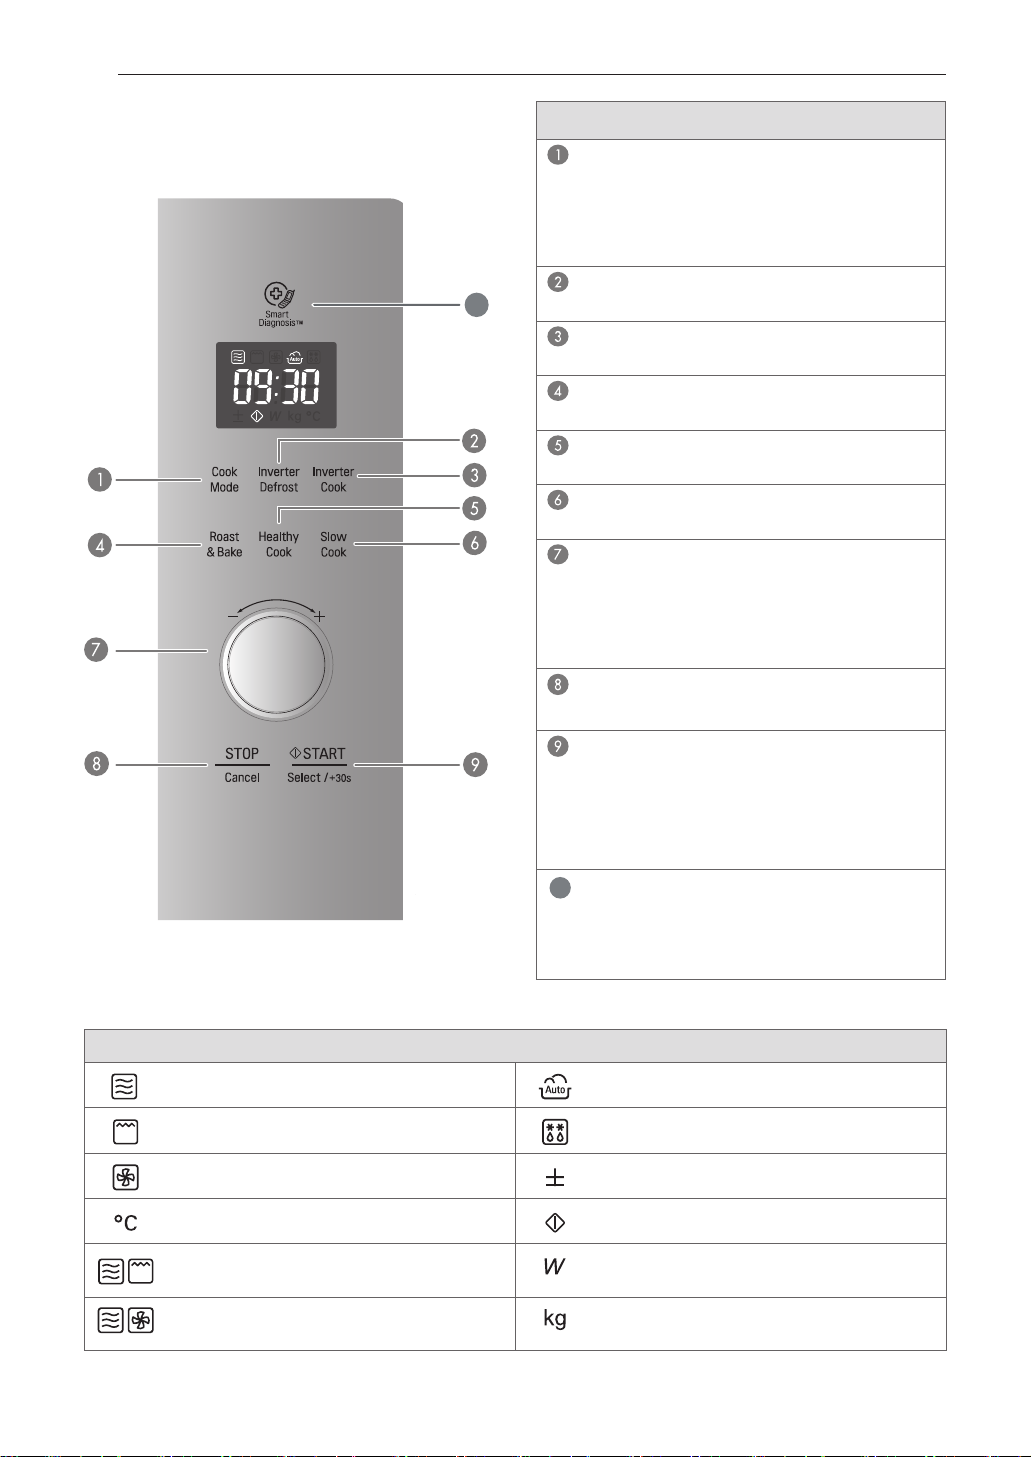
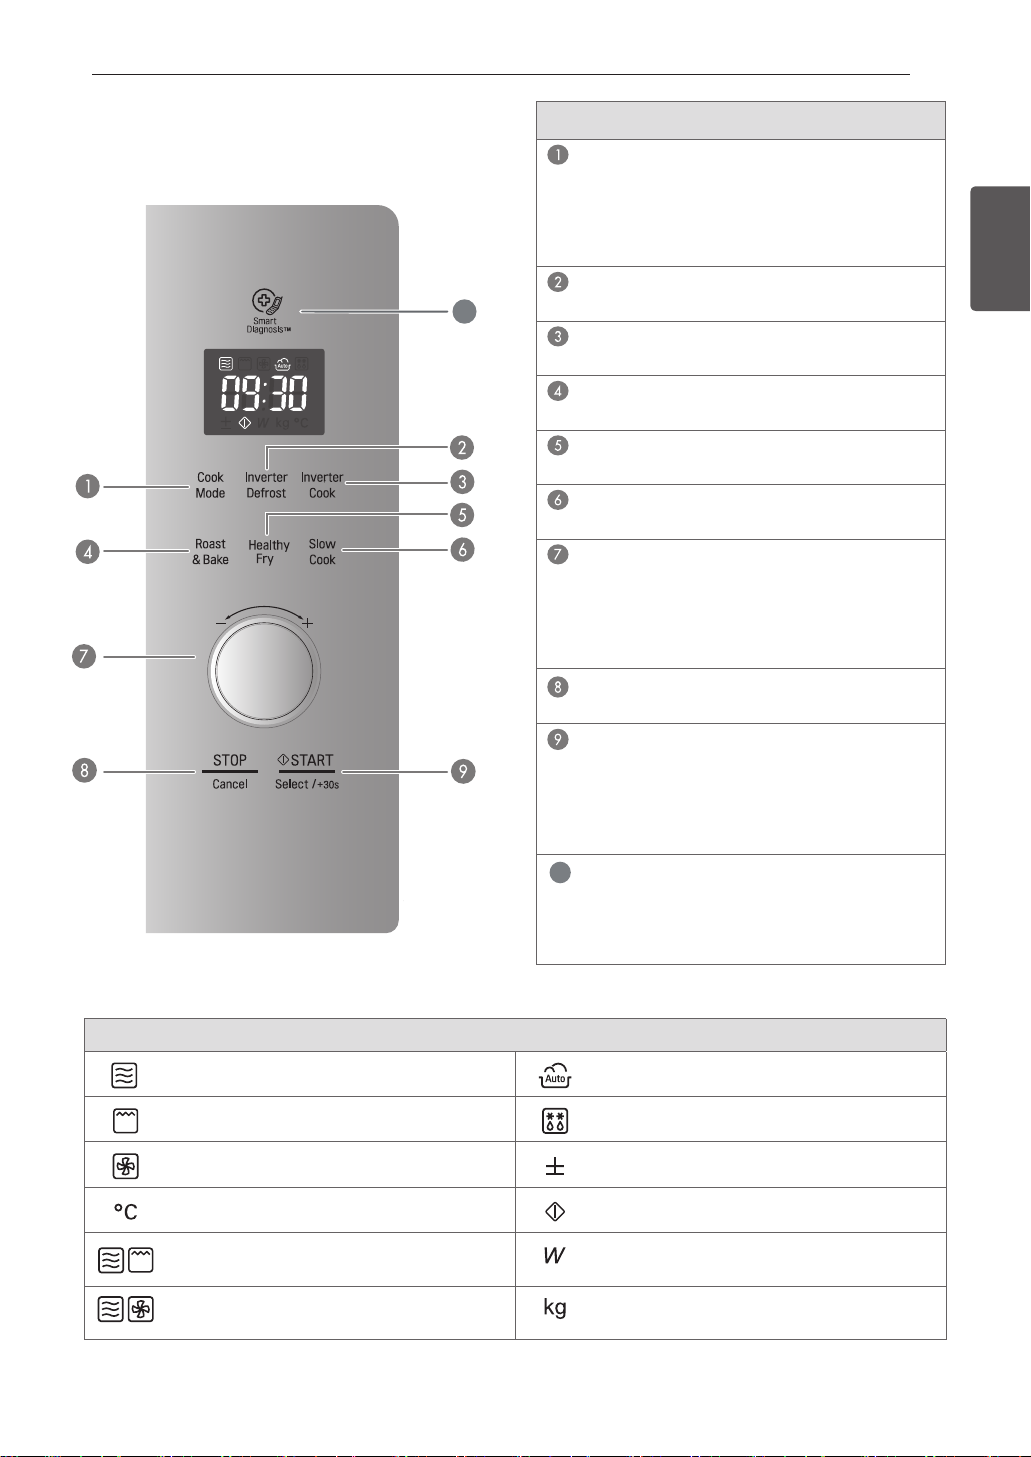
CONTROL PANEL
(For MJ3965ACS/ACR/BCR/BCS)
10
Part
COOK MODE
See page 13 “Microwave”
See page 14 “Grill”
See page 14 “Grill Combi(Microwave + Gril)”
See page 15 “Convection”
See page 16 “Conv Combi(Microwave + Conv)”
INVERTER DEFROST
See page 34 "Inverter Defrost”
INVERTER COOK
See page 17 “Inverter cook”
ROAST & BAKE
See page 25 “Roast & Bake”
HEALTHY COOK
See page 29 “Healthy Cook ”
SLOW COOK
See page 27 “Slow Cook”
DIAL (MORE / LESS)
• Set cooking time, temperature and power level.
• While cooking with auto and manual
function, you can increase or decrease the
cooking time at any point by turning the
dial (except defrost mode).
STOP / CANCEL
• Stop over and clear all entries except time of day.
DISPLAY PICTO
When operate Microwave, When operate Auto cook,
Show up the icon on the display. Show up the icon on the display.
When operate Grill, When operate Inverter defrost,
Show up the icon on the display. Show up the icon on the display.
When operate Convection, When you can set More/Less,
Show up the icon on the display. Show up the icon on the display.
When you can set Conv. Temperature, When you can set Cook Start,
Show up the icon on the display. Show up the icon on the display.
When operate Grill Combi, When you can set Output Power,
Show up the icon on the display. Show up the icon on the display.
when operate Convection Combi, When you can set Weight,
Show up the icon on the display. Show up the icon on the display.
Icon
START
• In order to start cooking which is selected,
press button one time.
• The quick start feature allows you to set 30
seconds intervals of HIGH power cooking
with a press of the START button.
SMART DIAGNOSIS
10
Hold the mouthpiece of a phone up to this icon
when directed to by service centre personnel, to
help diagnose problems with the microwave oven
when calling for service.
BEFORE USE
11
CONTROL PANEL
(For MJ3965BPS/BPH)
10
Part
COOK MODE
See page 13 “Microwave”
See page 14 “Grill”
See page14 “Grill Combi(Microwave + Grill)”
See page 15 “Convection”
See page 16 “Conv Combi(Microwave + Conv)”
INVERTER DEFROST
See page 34 "Inverter Defrost”
INVERTER COOK
See page 17 “Inverter cook”
ROAST & BAKE
See page 25 “Roast & Bake”
HEALTHY FRY
See page 32 "Healthy Fry”
SLOW COOK
See page 27 “Slow Cook”
DIAL (MORE / LESS)
• Set cooking time, temperature and power level.
• While cooking with auto and manual
function, you can increase or decrease the
cooking time at any point by turning the
dial (except defrost mode).
STOP / CANCEL
• Stop over and clear all entries except time of day.
START
• In order to start cooking which is selected,
press button one time.
• The quick start feature allows you to set 30
seconds intervals of HIGH power cooking
with a press of the START button.
SMART DIAGNOSIS
10
Hold the mouthpiece of a phone up to this icon
when directed to by service centre personnel, to
help diagnose problems with the microwave oven
when calling for service.
ENGLISH
DISPLAY PICTO
When operate Microwave, When operate Auto cook,
Show up the icon on the display. Show up the icon on the display.
When operate Grill, When operate Inverter defrost,
Show up the icon on the display. Show up the icon on the display.
When operate Convection, When you can set More/Less,
Show up the icon on the display. Show up the icon on the display.
When you can set Conv. Temperature, When you can set Cook Start,
Show up the icon on the display. Show up the icon on the display.
When operate Grill Combi, When you can set Output Power,
Show up the icon on the display. Show up the icon on the display.
when operate Convection Combi, When you can set Weight,
Show up the icon on the display. Show up the icon on the display.
Icon
BEFORE USE
12
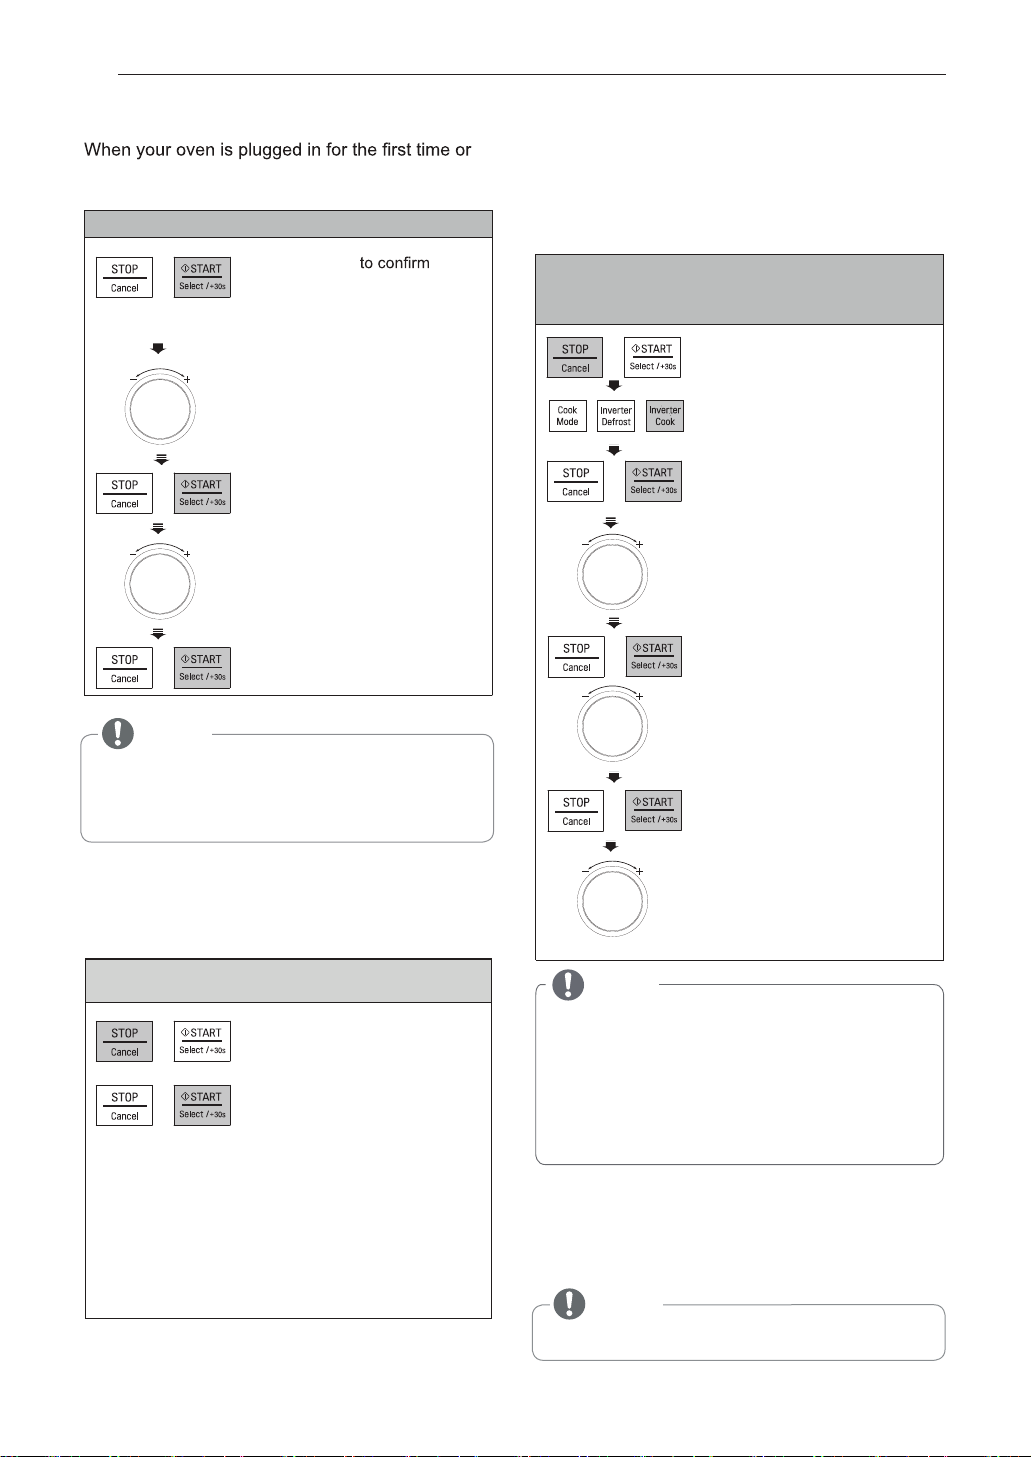
SETTING CLOCK
when power resumes after a power interruption,
the numbers in the display reset to '12H'.
Example: To set 11:11 .
1. Press START
the 12H clock display. (If you
wish to have a 24H clock
display, simply turn the DIAL
to select ’24H’ before following
next steps)
ehtnruT.2 DIAL until display
shows ’11:’.
3. Press START.
ehtnruT.4 DIAL to change the
minutes until the display shows
‘11:11’.
5. Press START.
MORE/LESS
By turning the Dial, TIMED COOK program can
be adjusted to cook food for a longer or shorter
time. Turning the dial will increase 10 seconds or
decrease 10 seconds to the cooking time each
time. The max time possible will be 99 min 59 sec.
Example:To adjust the Inverter Cook
(ex. 0.3kg chicken nuggets) cooking time for a longer time,
or for a shorter time.
sserP.1 STOP/CANCEL.
sserP.2 INVERTER COOK
‘1’ will show in the display.
sserP.3 START.
‘1-1’ will show in the display.
ehtnruT.4 DIAL until display
shows ‘1-3’.
sserP.5 START.
Turn the DIAL until display
shows ‘0.3 kg’.
once.
NOTE
•
If you want to set clock again or change options,
you need to unplug and reconnect.
If you don’t want to use clock mode,
•
Press STOP/CANCEL button, after plugging in your oven.
QUICK START
The QUICK START feature allows you to set 30
seconds intervals of HIGH power cooking with
a touch of the START.
Example: Set 2 minutes of cooking on high
power
Press STOP/CANCEL.
1.
2.
Select 2 minutes on
high power.
Press the START button four times
The oven will start before you have finished
the fourth press.
During QUICK START cooking, you can extend
the cooking time up to 99 minutes 59 seconds by
repeatedly pressing the START button.
sserP.6 START.
ehtnruT.7 DIAL.
The cooking time will increase
or decrease by 10 seconds.
NOTE
If you find that your food is over or undercooked
•
when using the preset COOK program, you can
increase or decrease the cooking time by turning
the
You can lengthen or shorten the cooking time
•
(except defrost mode) at any point turning the
DIAL
DIAL
.
.
ENERGY SAVING
Energy saving means save energy by turning off
the display. This feature only operates when the
Microwave Oven standby and the display will go out.
NOTE
•
When using clock mode, the display will remain on.
HOW TO USE
13
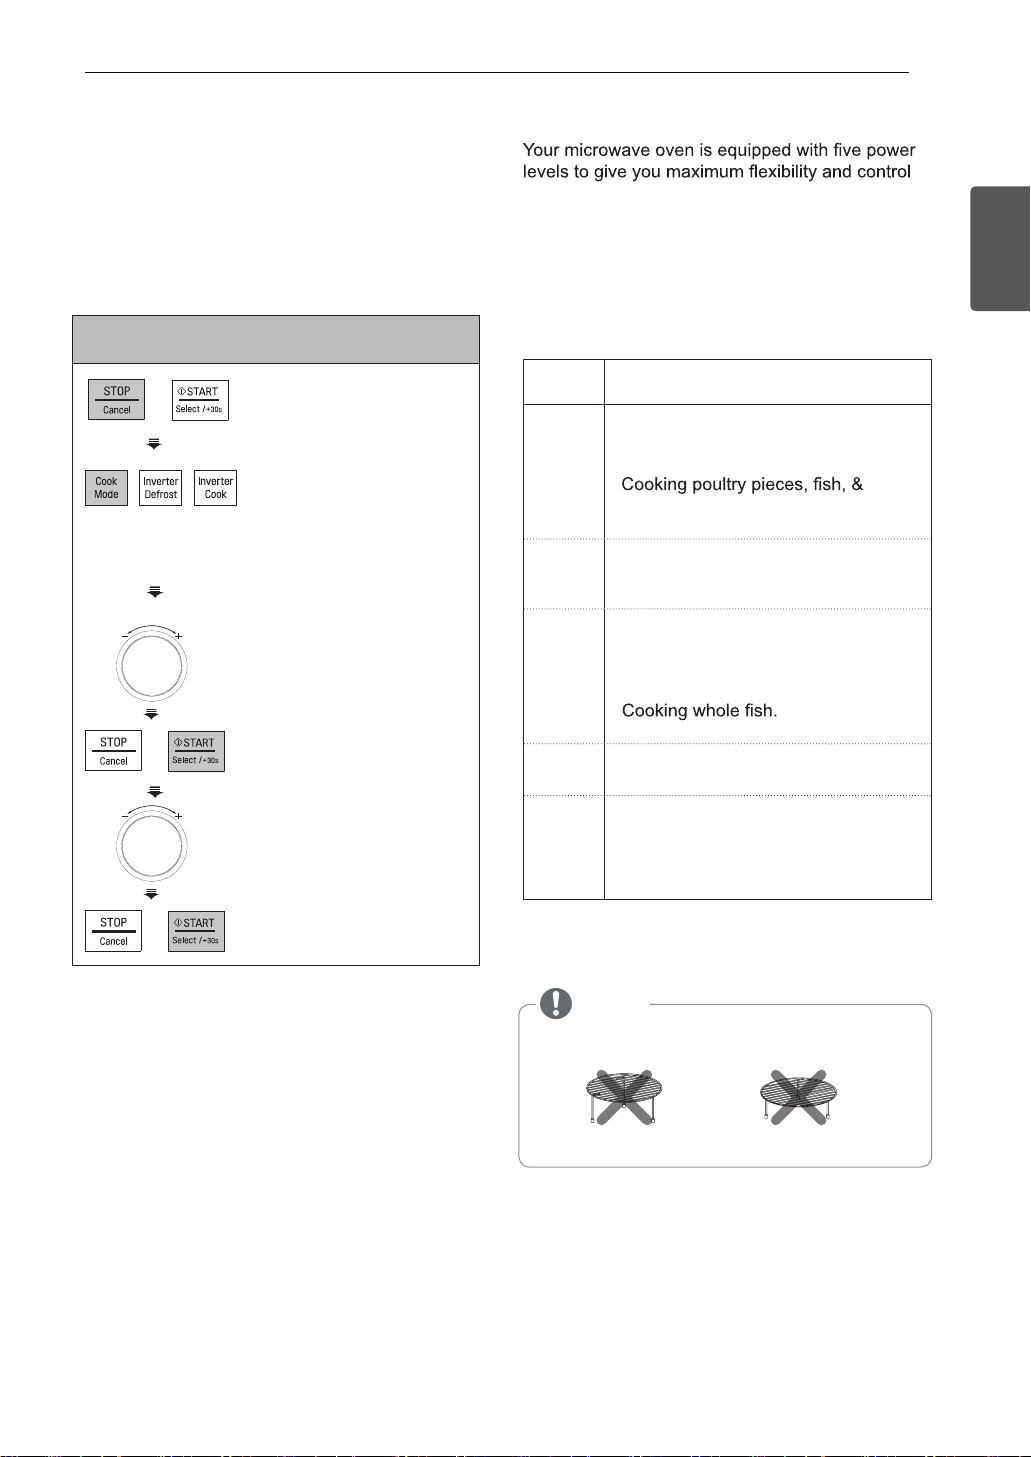
HOW TO USE
TIMED COOKING (MANUAL
COOKING)
This function allows you to cook food for a desired
time. There are 5 power levels available. The
example below shows how to set power 900 W for
the desired time.
Example: To cook food on Power 900 W for 5
minutes 30 seconds
1. Press STOP/CANCEL.
2. P ress COOK MODE until
display shows '1100 W'.
(1st time 1100 W appears in the
display. This is to tell you that the
oven is set on 1100 W unless a
different power setting is chosen.)
3. T urn the DIAL until display
shows ‘900 W’.
4. Press START.
5. T urn the DIAL until display
shows ‘5:30’.
MICROWAVE POWER LEVELS
over cooking. The adjacent table will give you
some idea of which foods are prepared at each of
the various power levels.
• T he adjacent chart shows the power level
settings for your oven.
MICROWAVE POWER LEVEL CHART
Power
Level
High
1100 W
900 W
700 W
400 W
200 W
• Boiling water.
• Browning ground beef.
• .ydnacgnikaM
•
vegetables.
C ooking tender cuts of meat.
•
•
•
•
•
•
Cooking cakes and breads.
•
Melting chocolate.
• Cooking veal.
•
•
•
T hawing meat, poultry and seafood.
•
Taking chill out of fruit.
•
•
K eeping casseroles and main dishes
warm.
• Softening butter and cream cheese.
Use
.selbategev&,atsap,ecirgnitaeheR
.ylkciuqsdoofderaperpgnitaeheR
.sehciwdnasgnitaeheR
.dratsucdnasgniddupgnikooC
.taemfostucrednetsselgnikooC
ENGLISH
.sehsideseehcdnaklim,ggegnikooC
6. Press START.
When cooking is complete, Tip will sound. The
word End shows in the display window. ‘End’
remains in the display and Tip will sound every
minute until the door is opened, or any button is
pressed, before 5 minutes.
NOTE:
If you do not select the power level, the oven
will operate at power HIGH. To set HI-POWER
cooking, skip step 3 above.
NOTE
• Do not use following accessories.
HIGH RACK
LOW RACK
HOW TO USE
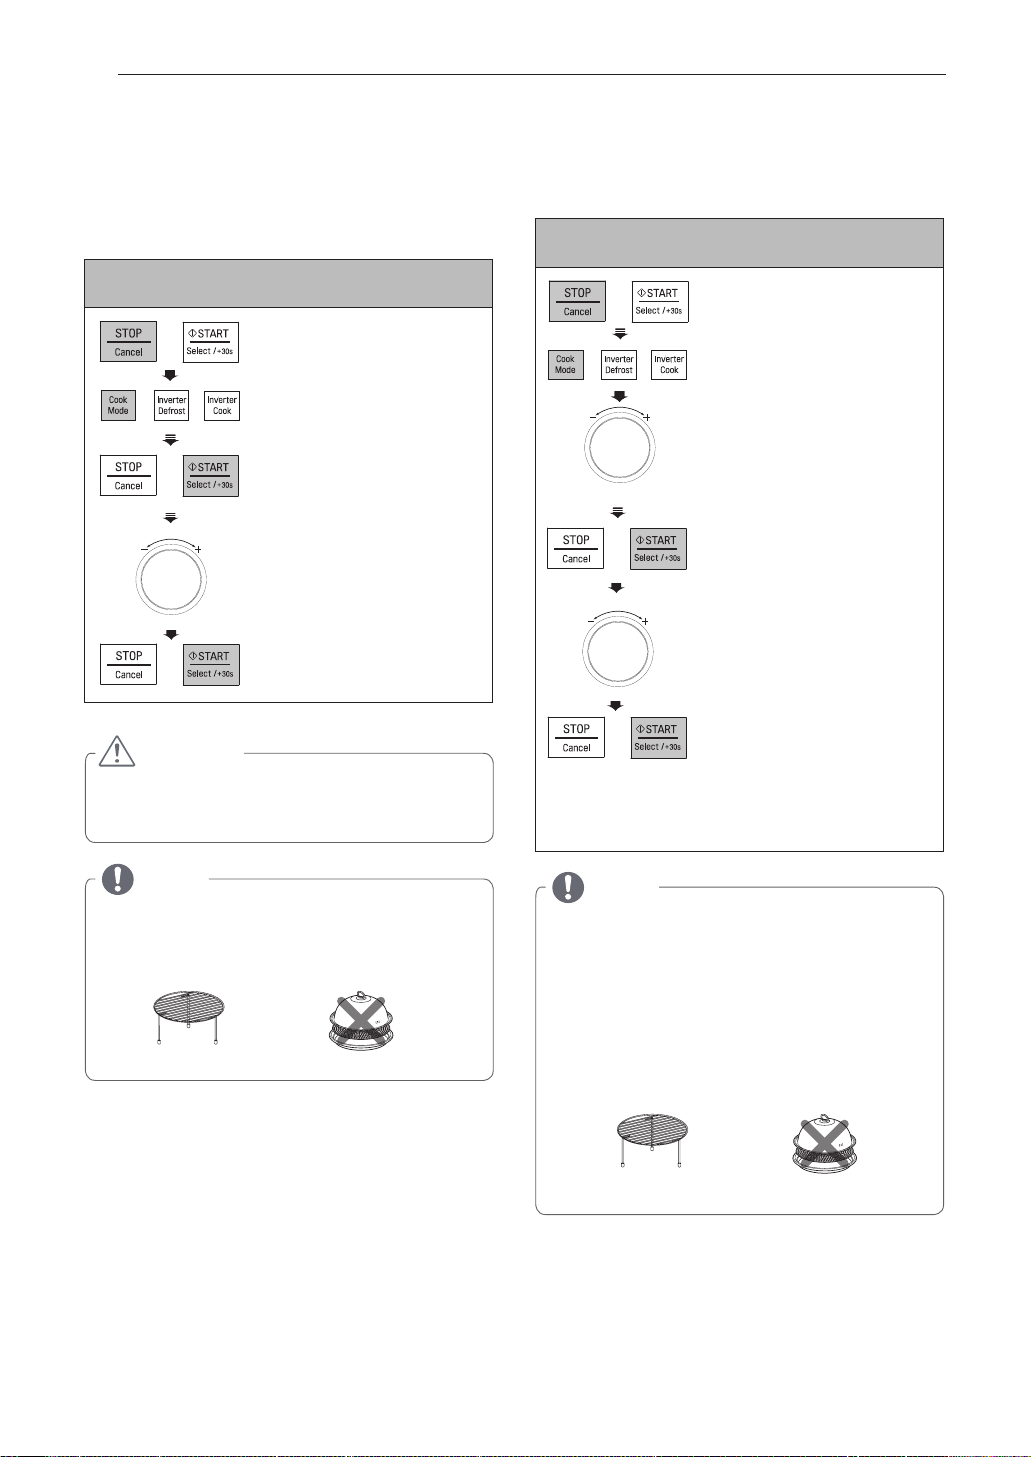
14
GRILL COOKING
This feature will allow you to brown and crisp food
quickly.
Always use gloves when removing food and
accessories after cooking as the oven &
accessories will be very hot.
Example: Use Grill to cook food for 5 minutes 30
seconds
sserP.1 STOP/CANCEL.
sserP.2 COOK MODE
until display
3. Press START.
shows ‘5:30’ .
5. Pres
shows 'GrIL'.
ehtnruT.4 DIAL until display
s START.
GRILL COMBI. COOKING
Your oven has a combination cooking feature
which allows you to cook food with heater and
microwave.
Example: Programme your oven with micro power
330 W and grill for a cooking time of 25 minutes
sserP.1 STOP/CANCEL.
sserP.2 COOK MODE
until display shows 'GC-1'.
ehtnruT.3 DIAL until display
shows ‘GC-2’.
sserP.4 START.
ehtnruT.5 DIAL until display
shows ‘25:00’.
CAUTION
Always use oven gloves when removing the food
•
and accessories after cooking as the oven &
accessories will be very hot.
NOTE
• This feature will allow you to brown and crisp food
quickly.
• For the best result use the following accessories.
• Do not use the following accessories.
HIGH RACK STEAMER
sserP.6 START.
When cooking you can turn the
DIAL to increase or decrease
the cooking time.
Be careful when removing your
food as the container will be
hot!
NOTE
• Your oven has a combination cooking feature which
allows you to cook food with Heater and Microwave.
This generally means it takes less time to cook your
food.
• You can set three kinds of micro power level
(GC-1: 220 W, GC-2: 330 W, GC-3: 440 W).
in grill combi mode.
• For the best result use the following accessories.
• Do not use the following accessories.
HIGH RACK STEAMER
HOW TO USE
15
CONVECTION PREHEAT
This feature will allow you to brown and crisp food
quickly.
Always use gloves when removing food and
accessories after cooking as the oven &
accessories will be very hot.
Example: To preheat the oven to a temperature of
200 °C.
sserP.1 STOP/CANCEL.
sserP.2 COOK MODE until
display shows ‘180 °C’.
ehtnruT.3 DIAL until display
shows ‘200 °C’.
sserP.4 START for
CONVECTION COOKING
The metal tray or metal rack must be used during
convection cooking.
ENGLISH
Example: To cook some food at a temperature of
200 °C for 50 minutes.
sserP.1 STOP/CANCEL.
sserP.2 COOK MODE until
display shows ‘180 °C’.
ehtnruT.3 DIAL until display
shows ‘200 °C’.
sserP.4 START for
sserP.5 START.
Preheating will be started with
displaying ‘60 °C’.It will show
up the temperature.
NOTE
The convection oven has a temperature range of
•
40~200 °C.
The oven has a ferment function at the oven
•
temperature of 40 °C. You may wait until the
oven is cool because you cannot use a ferment
function if the oven temperature is over 40 °C.
Your oven will take a few minutes to reach the
•
selected temperature.
Once it has reached correct temperature, your
•
oven will BEEP to let you know that it has reached
the correct temperature.
Then place your food in your oven and to start
•
cooking.
ehtnruT.5 DIAL until display
shows ‘50:00’.
sserP.6 START.
When cooking you can turn the
DIAL to increase or decrease
the cooking time.
CAUTION
Always use oven gloves when removing the food
•
and accessories after cooking as the oven &
accessories will be very hot.
NOTE
If you do not set a temperature your oven will
•
automatically select 180 °C, the cooking
temperature can be changed by turning the DIAL.
•
If you need more than 200 degrees for following
your cooking recipe or package direction, add the
time at 200 degrees for your preference.
For the best result please use
•
the following accessories.
LOW RACK
16
ESU OT WOH
CONVECTION COMBI.
COOKING
In the following example, show you how to program
your oven at a microwave power of 330 W and at
a convection temperature of 200 °C for a cooking
time of 25 minutes.
Example: To cook food at a comvection combi.
mode for 25 minutes.
sserP .1 STOP/CANCEL.
sserP .2 COOK MODE untily
display shows ‘CC-1’.
eht nruT .3 DIAL until display
shows ‘CC-2’.
sserP .4 START.
Turn the DIAL until display
shows ‘200 °C’.
CHILD LOCK
This is a unique safety feature that prevents
unwanted oven operations. Once the CHILD LOCK
is set, no cooking can take place.
To set the child lock
sserP .1 STOP/CANCEL.
dloh dna sserP .2
STOP/CANCEL until ‘Loc’
appears in the display and tip
are heard.
If the time of day was already
set, the time of day will appear
on the display window after
1sec.
If the CHILD LOCK was already set and you touch
another pad, the word Loc shows in the display.
You can cancel the CHILD LOCK according to
below procedure.
To cancel the child lock
sserP .5 START.
Turn the DIAL until display
shows ‘25:00’ .
sserP .6 START.
When cooking you can turn the
DIAL to increase or decrease
the cooking time.
Be careful when removing your
food as the container will be
hot!
CAUTION
•Always use oven gloves when removing the food
and accessories after cooking as the oven &
accessories will be very hot.
NOTE
• You can set three kinds of micro power level
(CC-1: 220 W, CC-2: 330 W, CC-3: 440 W).
• For the best result use the following accessories.
• Do not use the following accessories.
Press and hold
STOP/CANCEL until ‘Loc’
disappears in the display.
After the CHILD LOCK is turned off, the oven will
operate normally.
LOW RACK
STEAMER
HOW TO USE
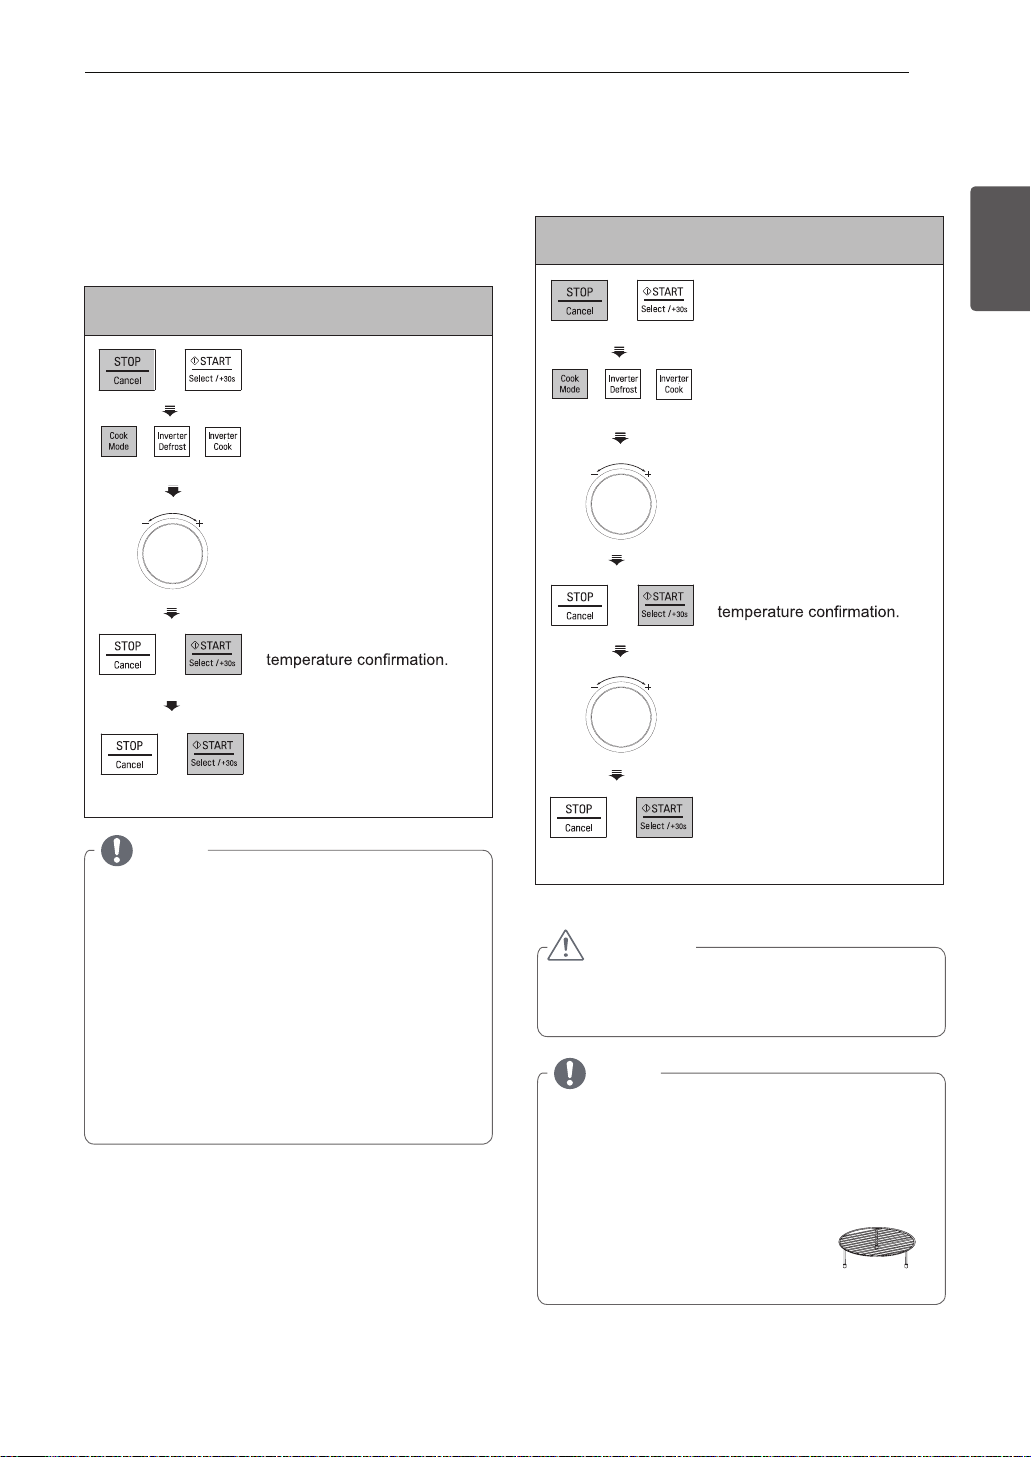
INVERTER COOK
Your oven’s menu has been preprogrammed to automatically cook food. Tell the oven what you want and
how many items there are. Then let your microwave oven cook your selections.
Example: To cook 0.3 kg Cheese Sticks
1. Press STOP/CANCEL.
4. Press START.
17
ENGLISH
2. Press INVERTER COOK
until display shows '1'.
3. Turn the DIAL until display
shows ‘1-2’.
INVERTER COOK MENU INSTRUCTIONS
Code Menu
1-1 Baguette/
Croissant
1-2 Cheese
Sticks
1-3 Chicken
Nuggets
1-4 Frozen
Lasagna
1-5 Frozen Pizza
(Thick)
1-6 Frozen Pizza
(Thin)
1-7 Salmon
Fillets
Weight
Limit
0.1 - 0.3 kg
(50 - 100 g/
piece)
0.2 - 0.4 kg Frozen 1. Brush cheese sticks with oil.
0.2 - 0.3 kg Frozen
0.3 kg Frozen 1. Remove tray from outer carton and remove
0.5 kg Frozen 1. Remove thick-crust pizza from all packaging.
0.2 - 0.4 kg Frozen 1. Remove all packaging.
0.2 - 0.6 kg Frozen
Initial
Temperature
Frozen 1. Place frozen bread on the Low rack. Choose the
menu and weight, press start.
2. Place food on the Crisp tray on the High rack.
Choose the menu and weight, press start.
3.
When BEEP, turn food over and press start to
continue cooking.
1. Place chicken nuggets on the Crisp tray on the
High rack. Choose the menu and weight, press start.
2. When BEEP, turn food over and press start to
continue cooking.
2. Place food on the Low rack. Choose the menu, press
After cooking, stand covered for 2 minutes.
start.
2. Place food on the Crisp tray on the Low rack.
Choose the menu, press start.
2. Place food on the Crisp tray on the Low rack.
Choose the menu and weight, press start.
1. Choose salmon fillets of 200 g and 2,5 cm thick each.
2. Place food on the Crisp tray on the High rack.
Choose the menu and weight, press start.
3. When BEEP, turn food over and press start to
continue cooking.
Instructions Utensil
5. Turn the DIAL until display
shows ‘0.3 kg’.
6. Press START.
Low rack
Crisp tray
on the High
rack
Crisp tray
on the High
rack
Low rack
Crisp tray
on the Low
rack
Crisp tray
on the Low
rack
Crisp tray
on the High
rack

HOW TO USE
18
Code Menu
2-1 Grape leaf 1.0 kg Room
2-2 Kabsa 2.0 kg Room
Weight
Limit
Initial
Temperature
Instructions Utensil
Ingredients
1 pot of grape leaves
2 large onions, finely chopped
½ cup olive oil
1 garlic clove, crushed
1 tomato, chopped
1 cup lemon juice
1 tablespoon tomato paste
Kosher salt
Freshly ground black pepper
1 cup white rice
½ cup water
¼ cup chopped dill
1. Cook onions, garlic, tomato, tomato paste, and lemon
juice in a lightly oiled frying pan until lightly browned.
2. Add cooked rice, vegetable mixture, salt and pepper in
a bowl and mix well.
3. Place grape leaf on a flat surface and place 1 ½
spoonfuls of the rice mixture in the center of the leaf.
Wrap rice mixture with leaf.
4. Put all wrapped leaves in rows into a deep and large
microwave-safe bowl and add water.
Cover with plastic wrap.
5. Place food in the oven. Choose the menu, press start.
After cooking, serve with sour cream or as desired.
Ingredients
1/4 cup butter
1.2 kg chicken, cut into 8-10 pieces
1 large onion, finely chopped
3 garlic cloves, minced
1/4 cup tomato puree
1 tomato, chopped
2 medium carrots, chopped
1 pinch grated nutmeg
1 pinch ground cumin
1 pinch ground coriander
Salt & freshly ground black pepper
2 cups hot water
1 chicken stock cube
200 g long grain rice(don't rinse or soak this)
1/4 cup raisins
1/4 cup slivered almond, toasted
Microwavesafe bowl
Microwavesafe bowl
1. Cook chicken, carrots, tomato, tomato puree, garlic,
onion and butter in a lightly oiled frying pan until lightly
browned.
2. Place the cooked chicken mixture into a deep and large
microwave-safe bowl and add rice, spices, raisins,
almond and water. Cover with plastic wrap and vent.
3. Place food in the oven. Choose the menu, press start.
Stir at least twice during cooking.
HOW TO USE
19
Code Menu
2-3 Kafta 0.2~0.4 kg Room
2-4 Rice
Pudding
2-5 Lasagna 1 Room 26 x 17 cm
Weight
Limit
0.7 kg Room
Initial
Temperature
Instructions Utensil
Ingredients
500 g beef minced
1 cup parsley chopped or grated
1 onion chopped
2 breads sliced
½ teaspoon all-spices
¼ teaspoon paprika powder
¼ teaspoon cinnamon powder
Salt and pepper as per taste
1. Combine all ingredients in a large bowl, and mix well.
2. Divide and shape into small sausages(100 g/ each
one, about 1.5 cm ).
3. Place food in the Crisp tray on the High rack.
Choose menu and weight, press start.
4. When BEEP, turn food over and press start to
continue cooking.
5. After cooking, remove from the oven and stand.
Ingredients
½ cups short grain rice
600 g milk
Pinch of salt
¼ cup granulated sugar
3 teaspoons rose water
½ teaspoon ground cardamom
Honey for serving, optional
1. Mix all ingredients in a deep and large microwave safe bowl. Cover with plastic wrap and vent.
2. Place food in the oven. Choose the menu, press start.
3. When BEEP, stir then cover with lid.
Press start to continue cooking.
4.After cooking, stir and stand covered for 5 minutes.
Ingredients
9 lasagna sheets
500 g spaghetti sauce
600 g cheese sauce
300 g grated mozzarella cheese
30 g grated parmesan cheese
Crisp tray
on the High
rack
Microwavesafe bowl
(deep glass
pot)
baking dish
on the Low
rack
ENGLISH
For Cheese sauce :
60 g butter
50 g plain flour
Pinch ground nutmeg
500 ml milk
20 g grated parmesan cheese
1. Melt butter in small saucepan. Add flour and
nutmeg, stirring until smooth.
2. Gradually add milk and stir until it boils and thickens.
3. Reduce heat and add parmesan cheese. Stir until
cheese melts well.
1. Cook lasagna sheets according to package directions
and drain.
2. Spread about 125 g spaghetti sauce in a 26 x17 cm
baking dish.
3. Layer 3 lasagna sheets, 300 g cheese sauce, 125 g
spaghetti sauce, 100 g mozzarella cheese.
Repeat layering.
4. Finally layer remaining lasagna sheets, spread 125 g
spaghetti sauce, sprinkle with 100 g mozzarella
cheese and 30 g parmesan cheese.
5. Place baking dish on the Low rack. Choose the menu,
press start.

HOW TO USE
20
Code Menu
2-6 Potato Gratin 1.5 kg Room
2-7 Ratatouille 1.5 kg Room
2-8 Stuffed
Zucchini
Weight
Limit
1.2 kg Room
Initial
Temperature
Instructions Utensil
Ingredients
1 kg potatoes
1 garlic clove
20 g butter
300 g cream
100 g grated cheese
Nutmeg, salt and pepper to taste
1. Peel and wash potatoes then cut into 5 mm slices.
Rub inside of a baking dish with garlic clove and butter.
2. Place half of potatoes in the baking dish and season.
Fill with remaining potatoes and season as desired.
Then pour cream and cheese over the top.
3. Place the baking dish on the Low rack. Choose the
menu, press start.
Ingredients
1 onion, cut into chunks
1 eggplant, cut into chunks
1 zucchini, cut into chunks
1 colored sweet pepper, cut into chunks
3 tomatoes, chopped
1 tablespoon tomato paste
2 garlic cloves, crushed
1 tablespoon fresh greens, chopped
2 tablespoons vinegar
1 teaspoon sugar
Salt and pepper to taste
1. Add all ingredients in a deep and large bowl and mix
well. Cover with plastic wrap and vent.
2. Place food in the oven. Choose the menu, press start.
Stir at least twice during cooking.
Ingredients
4 round zucchinis of about 200 g each
500 g ground beef
2 tablespoons olive oil
Salt and pepper to taste
20 x 20 cm
baking dish
on the Low
rack
Microwavesafe bowl
Crisp tray
on the Low
rack
1. Cut tops off zucchini to form hats and seed them, taking
care not to pierce flesh or skin. Then sprinkle each
zucchini with salt and pepper.
2. Stuff zucchinis with ground beef and replace hats.
3. Place food on the Crisp tray on the Low rack and drizzle
with olive oil. Choose the menu, press start.

HOW TO USE
21
Code
2-9
2-10
2-11
Menu
Bobotie
Braai-Lamb
Chops
Braai-Steak
Weight
Limit
1.3 kg
0.2 - 0.6 kg
0.2 - 0.6 kg
Initial
Temperature
Room
Refrigerated
Refrigerated
Instructions
Ingredients
200 ml milk
2 slices of bread
750 g minced beef
1 chopped onion(medium size)
2 tablespoons grated fresh ginger
3 garlic cloves grated
1 tablespoon apricot jam
eciuj nomel lm 03
¼ cup of blanched almonds
2 teaspoons medium(or hot) curry powder
1 teaspoon turmeric
2 teaspoons salt
4 bay or lemon leaves
3 eggs
1. Soak the bread in 100 ml milk. Mix it with the minced
beef.
2. Mix all the other ingredients except remaining milk,
oil, eggs and bay leaves.
3. Heat oil in a pan and cook mixture until turn lightly
browned. Put them into a 1.5 L casserole and set aside.
4. Beat eggs with remaining milk and pour over meat.
5. Place casserole on the Low rack in the oven.
Choose the menu, press start.
6. After cooking, remove from the oven.
Serve with plain or saffron rice.
1. Choose lamb chops of 100-150 g weight and
1.5-2.0 cm thickness each. Season with salt and
pepper or as desired.
2. Place food on the High rack on a drip dish.
Choose the menu and weight, press start.
When BEEP, turn food over and press start to
continue cooking.
1. Choose steak of 200 g weight and 2.5 cm thickness
each. Season with salt and pepper or as desired.
2. Place food on the Rack on a drip dish. Choose the
menu and weight, press start. When BEEP, turn
food over and press start to continue cooking.
Utensil
1.5 L
casserole
On the
Low rack
High rack
on a
drip dish
High rack
on a
drip dish
ENGLISH
HOW TO USE
22
Code Menu Instructions Utensil
Couscous
2-12
Weight
Limit
0.1 - 0.4 kg
Initial
Temperature
Room
Ingredients
Couscous 0.1 kg 0.2 kg 0.3 kg
Water 120 ml 240 ml 360 ml
1 Tablespoon
2 Tablespoons Butter
0.4 kg
480 ml
3 Tablespoons
Microwavesafe bowl
Vegetable mixture
1. Put couscous, water and butter in a large
microwave-safe bowl and mix well. Cover with
plastic wrap and vent.
2. Place food in the oven. Choose the menu and
weight, press start.
3. After cooking, stand for 15~20 minutes.
4. With a fork, fluff the couscous and mix the
couscous with some of the vegetable sauce.
※ Vegetable mixture
15 pealed pearl onions or 2 cups sliced onions
15 oz can chick peas
2 large boiled potatoes cubed
1 sliced carrots
1/2 cup chopped cilantro
1/4 cup chopped parsley
2 tablespoons minced garlic
1 teaspoon paprika
1/4 teaspoon nutmeg
1/2 teaspoon salt
1/2 teaspoon black pepper
2 cans tomato sauce
1 chicken broth
1 ½ cups water
2 tablespoons butter
1. Cook onions and butter for 5 minutes until
caramelized.
2. Add carrots and garbanzo beans and cook for
another 5 minutes, and add garlic, cilantro, parsley,
potatoes and 1/2 tsp salt and mix vegetables.
3. In a large 4 quart sauce pan bring tomato sauce
and 1 1/2 cup of water to a simmer.
4. Add seasonings and spices to the sauce then add
vegetable mixture to tomato sauce and simmer for
10-12 minutes.

HOW TO USE
23
Code
2-13
2-14
Menu
Chicken
Tikka
Curry
Chicken
Weight
Limit
0.2~0.4 kg
1.5 kg
Initial
Temperature
Room
Room
Instructions
Ingredients
4 chicken breasts, cut into cubes
1 cup natural yogurt
1 tablespoon ground cumin
1 tablespoon garam masala powder
1 teaspoon ground coriander
1 lemon juice
8 garlic cloves, finely chopped
1 inch grated ginger, finely chopped
¼ teaspoon red food color
1 lemon
Salt and pepper to taste
1. Mix the spices, coloring, lemon juice, ginger and
garlic up into a paste with a little water.
2. Stir in well with the yogurt to make a tandoori
marinade.
3. Marinate the chicken in the marinade for 2-3 hours.
4. Skewer the pieces of chicken using wooden skewers.
Note that the skewers pass the center of pieces.
5. Place skewers on the High rack on a drip dish.
6. Choose the menu and weight, press start.
7. When BEEP, turn food over and press start to
continue cooking.
8. After cooking, remove from the oven and stand.
Ingredients
400 g chicken breasts, cut into chunks
¼ cup olive oil
2 onions, chopped
4 garlic cloves, crushed
1 ginger root, peeled
1 cinnamon stick
2 dried red chilies
1 teaspoon turmeric powder
400 g tomato sauce
½ cup water or stock
½ cup plain yogurt
1 tablespoon lemon juice
Salt and pepper to taste
1. Add all ingredients in a deep and large
microwave-safe bowl and mix well. Cover with
plastic wrap and vent.
2. Place food in the oven. Choose the menu,
press start.
3. Stir at least twice during cooking.
Utensil
High rack
On a
drip dish
Microwavesafe bowl
ENGLISH
HOW TO USE
24
Code Menu Instructions Utensil
Dal Tadka
2-15
Weight
Limit
Initial
Temperature
gk 4.0 - 2.0
Room
Ingredients
Dal
(soaked
for 2
hours)
Water
Oil
Salt
2 Tablespoons
0.2 kg
400 ml
0.3 kg 0.4 kg
600 ml
2½ Tablespoons
To taste
Microwavesafe bowl
800 ml
3 Tablespoons
Spices
Cumin seed
Chili powder
Turmeric powder
Curry leaves
1. Combine all ingredients in a microwave-safe bowl
and add spices to your preference.
2. Place food in the oven. Choose menu and weight,
press start. Stir at least twice during cooking.
2-16
Veg. Biryani
1.0 kg Room
Ingredients
1 ½ cups basmati rice
400 g water
2 cups chopped onions
Microwavesafe bowl
1 tomato, chopped
1 cup vegetables(carrot, beans, peas, potato),
chopped
2 green chilies, chopped
1 teaspoon ginger garlic paste
1 ½ teaspoon red chili powder
1 teaspoon coriander powder
1 teaspoon cumin powder
1 tablespoon biryani masala
1 cinnamon
2 cardamoms
2 cloves
2 small bay leaves
1 teaspoon fennel seeds
A bunch of finely chopped coriander leaves
(cilantro) and mint leaves
1 tablespoon oil
2 tablespoons ghee or clarified butter
Salt to taste
1. Cook all vegetables and spices in a lightly oiled
frying pan until lightly browned.
2. Place the cooked vegetable mixture into a deep and
large microwave-safe bowl and add rice and water.
Cover with plastic wrap and vent.
3. Place food in the oven. Choose the menu,
press start to cook. Stir at least twice during cooking.
HOW TO USE
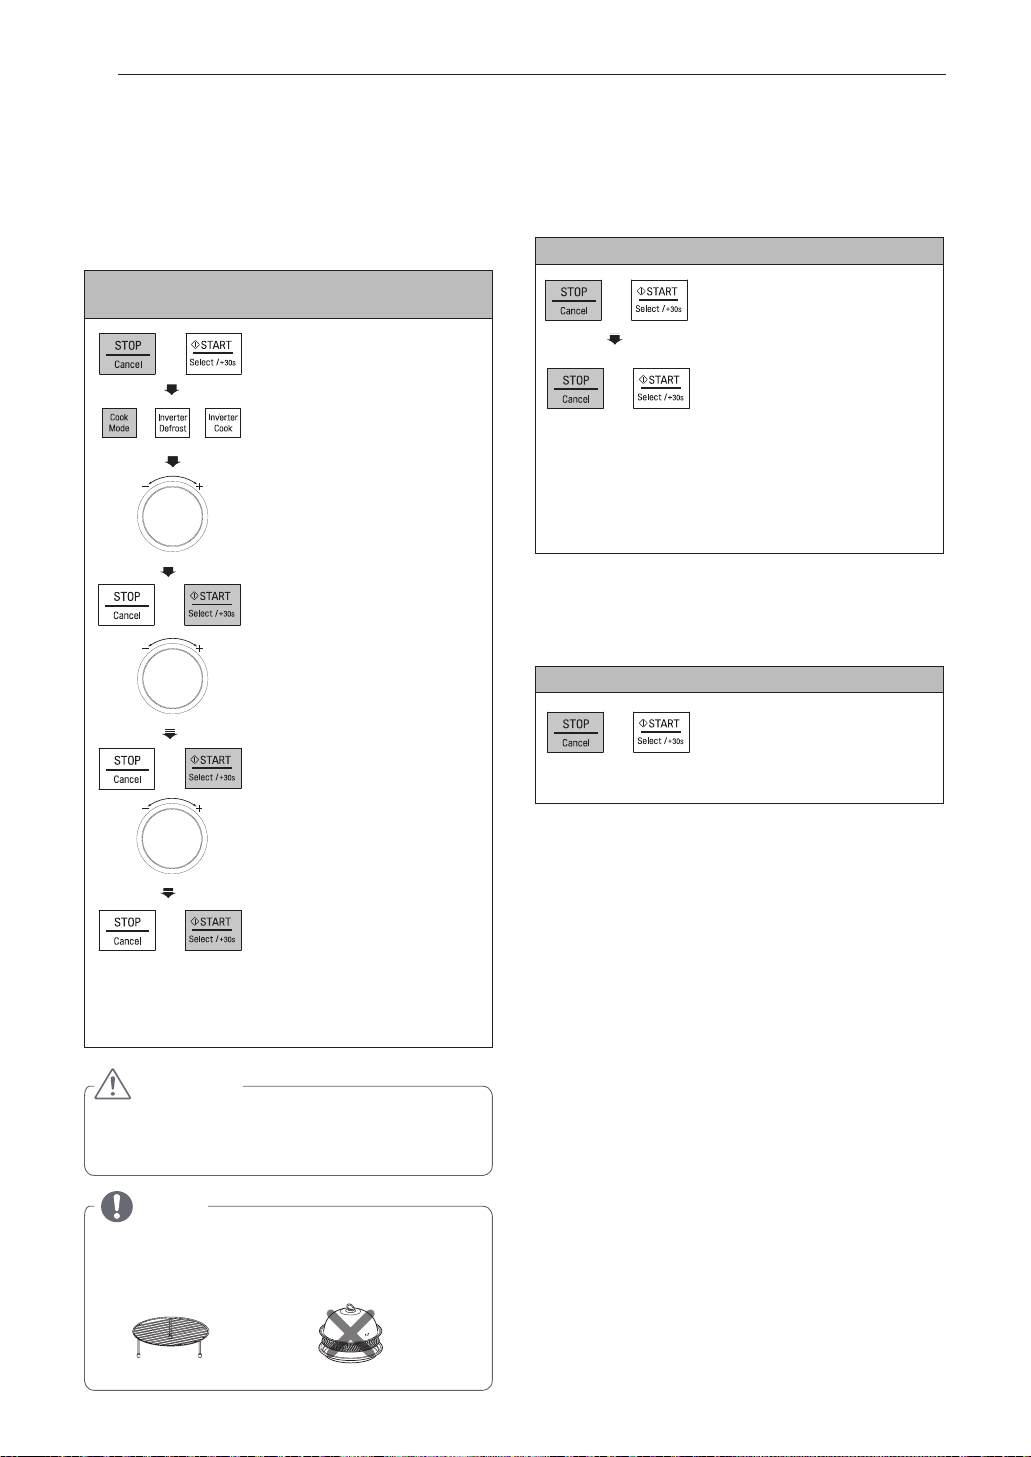
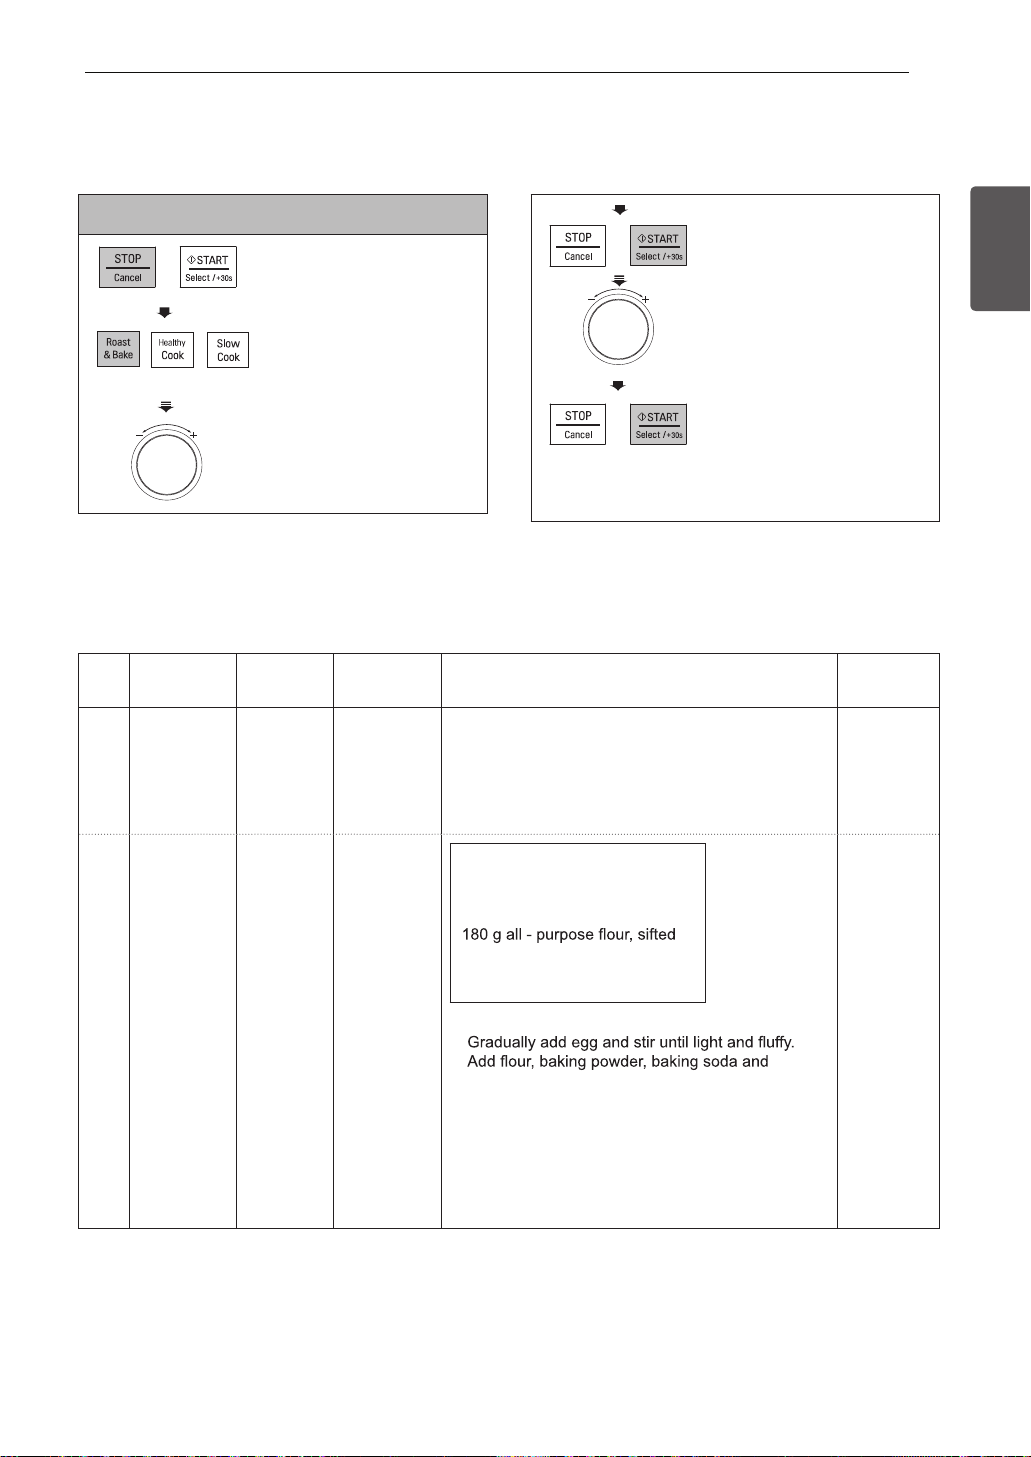
ROAST & BAKE
Your oven’s menu has been preprogrammed to automatically cook food. Tell the oven what you want and
how many items there are. Then let your microwave oven cook your selections.
Example: To cook 1.0 kg Roast Beef
4. Press START.
1. Press STOP/CANCEL.
eht nruT .5 DIAL until
display shows ‘1.0 kg’.
sserP .2 ROAST & BAKE
until display shows '1'.
sserP .6 START.
eht nruT .3 DIAL until
display shows ‘4’.
When cooking you can
increase or decrease the
cooking time by turning
the DIAL.
ROAST & BAKE MENU INSTRUCTIONS
25
ENGLISH
Code Menu
1 Baked
Potatoes
2 Cookies 1 Room
Weight
Limit
0.2 - 1.0 kg
(180 - 220 g/
each)
Temperature
Initial
Room 1. Wash potatoes and dry with a paper towel.
2. Pierce each potato 8 times with a fork.
weight, press start.
for 5 minutes.
Ingredients
80 g brown sugar
80 g butter, softened
1 egg, lightly beaten
1/2 teaspoon baking powder
1/2 teaspoon baking soda
100 g mini chocolate chips
1. Mix brown sugar and softened butter.
chocolate chips and mix well.
Low rack covered with an aluminum foil.
Cookies should be spaced 2 cm apart.
Choose the menu, press start.
cool.
Instructions Utensil
Low rack
dna unem eht esoohC .kcar woL eht no doof ecalP .3
liof munimula na htiw derevoc dnats ,gnikooc retfA .4
High rack
+
Low rack
dna kcar hgiH eht otno noopselbat yb hguod porD .2
.nevo eht ni kcar woL dna kcar hgiH eht ecalP .3
meht tel dna nevo eht morf evomer ,gnikooc retfA .4

HOW TO USE
26
Code Menu Instructions Utensil
3 Fresh Pizza 1 Room
4 Roast Beef no kcar woL sa nosaes dna lio ro rettub detlem htiw feeb hsurB .1detaregirfeRgk 5.1 - 5.0
5 Roast no kcar woL nosaes dna lio ro rettub detlem htiw nekcihc hsurB .1detaregirfeRgk 8.1 - 8.0
Chicken as desired. a drip dish
6 Roast Lamb 0.5 - 1.5 kg Refrigerated
Weight Initial
Limit Temperature
Ingredients
Dough:
1 teaspoon active dry yeast
1/3 teaspoon salt
1 teaspoon sugar
70 ml warm water
1 teaspoon extra-virgin olive oil, plus
little for coating
Topping:
3 tablespoons pizza sauce
30 g sausage, sliced
1/2 onion, sliced
2 fresh mushrooms, sliced
1/2 fresh pepper
100 g shredded mozzarella cheese
bowl.
elastic dough.
Spread pizza sauce. Top with toppings and cheese.
Choose the menu, press start.
desired. a drip dish
2. P lace food on the Low rack on a drip dish.
Choose the menu and weight, press start.
immediately. And then press start to continue
cooking.
A fter cooking, stand covered with an aluminum foil
4.
for 10 minutes.
rack on a drip dish. Choose the menu and weight,
press start.
immediately. And then press start to continue
cooking.
4. A fter cooking, stand covered with an aluminum foil
for 10 minutes.
1. Brush lamb with melted butter or oil and season as
desired.
2. Place food on the Low rack on a drip dish.
Choose the menu and weight, press start.
3. When BEEP, drain juices and turn food over
immediately. And then press start to continue cooking.
4. After cooking, stand covered with an aluminum
foil for 10 minutes.
and htooms ekam ot rexim cirtcele na htiw daenK .2
.kcar woL eht no yart psirC eht ecalP .4
revo doof nrut dna seciuj niard ,PEEB neh W .3
revo doof nrut dna seciuj niard ,PEEB nehW .3
Crisp tray
on the Low
gnixim egral a ni hguoD rof stneidergnI lla enibmoC .1
.yart psirC eht no hguod ecalp dna tuo hguod lloR .3
woL eht no nwod edis-tsaerb nekcihc elohw ecalP .2
Low rack on
a drip dish
rack

HOW TO USE
27
Code Menu Instructions Utensil
7 Roast 0.2 - 0.3 kg Room
Vegetables
8 Small Cakes 1 Room
Weight Initial
Limit Temperature
Ingredients
Eggplants, cut into 1-2 cm thickness
Zucchinis, cut into 1-2 cm thickness
Onions, cut into wedges
Sweet peppers, cut in half lengthwise and
discard seeds
Whole cherry tomatoes
Mushrooms, cut in half
dna lio ro rettub detlem htiw selbategev hsurB .1
season as desired.
2. P lace food on the Crisp tray on High rack.
Choose the menu and weight, press start.
3. When BEEP, turn food over and press start to
continue cooking.
Ingredients
120 g sugar
120 g butter, softened
2 egg, lightly beaten
1 teaspoon baking powder
(50 mm base X 30 mm height)
1. Mix sugar and softened butter. Gradually and egg
Crisp tray
on the High
rack
cups on the
Crisp tray
on the Low
rack
ENGLISH
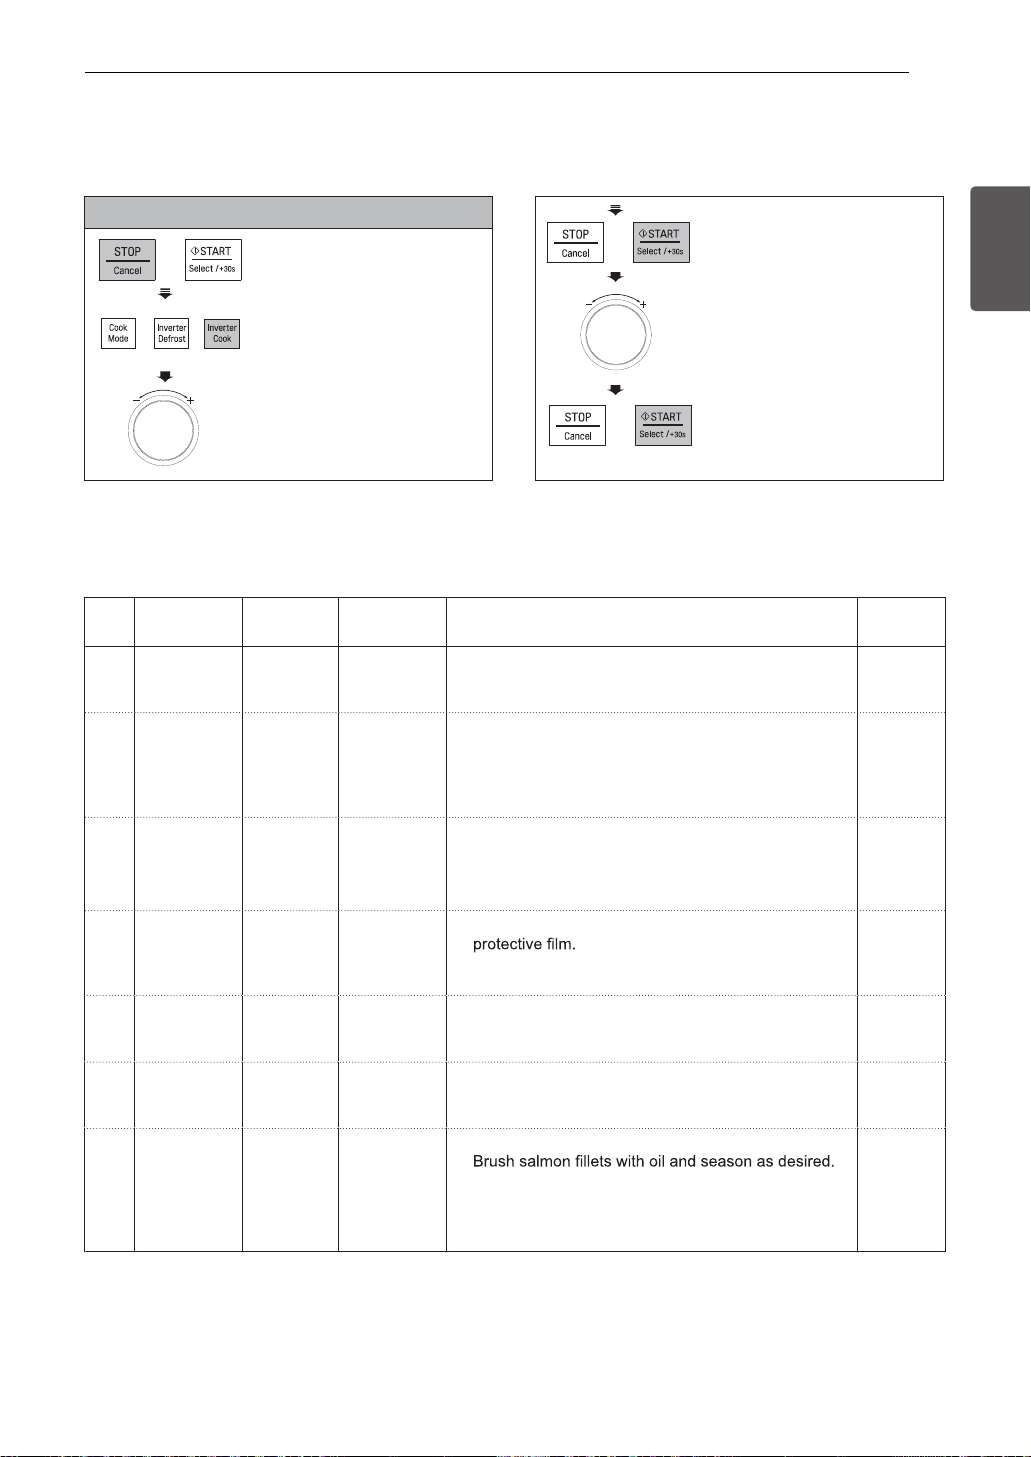
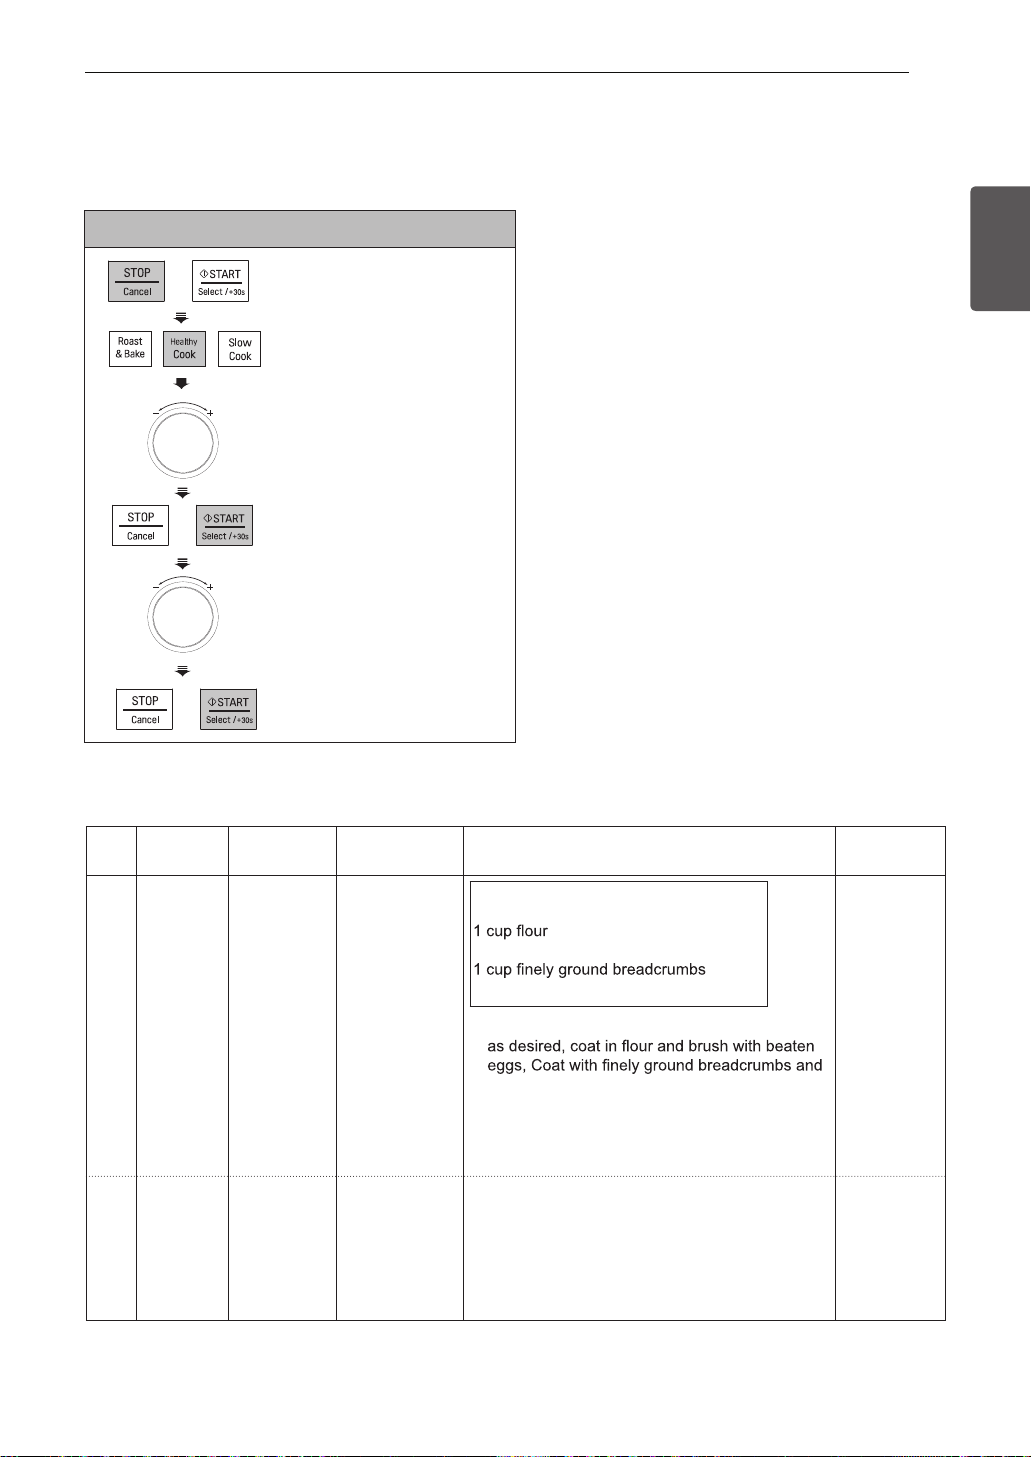
SLOW COOK
Example : To show how to cook Food dry
1. Press STOP/CANCEL.
sserP .2 SLOW COOK
until display shows '2'.
3. T urn the DIAL until
display shows ‘60 °C’.
sserP .4 START.
‘10:00’ will show in the
display.
with batter. (25~30 g per each)
2.
rack. Choose the menu, press start.
3. A fter cooking, remove from the oven and let them
cool.
5. T urn the DIAL until
display shows ‘5h00’.
sserP .6 START.
When cooking you can
increase or decrease the
cooking time by turning
the DIAL.

HOW TO USE
28
SLOW COOK MENU INSTRUCTIONS
Function Range Step Default Instructions Utensil
Cook
Drying
wolS .1
(HIGH) /
dooF .2
130 °C
110 °C
(LOW)
40 °C
~
90 °C
- 130 °C
(HIGH)
10 °C 70 °C
This function maintains a relatively low temperature compared to other
cooking methods(such as baking, boiling and frying) for many hours allowing
unattended cooking of pot roast, stew and other suitable dishes.
110 °C (LOW) Setting
The low setting gently simmers food for an extended period of time without
overcooking or burning. No stirring is required when using this setting.
130 °C (HIGH) Setting
The high setting will cook food in approximately half the time required for
the low setting. Some foods may boil when cooked on the high setting, so it
may be necessary to add extra liquid.
distribution.
Searing and browning before slow cooking is not necessary, but this will help
Slow cook guide
Traditional
cooking time
35 to 60 minutes 6 to 9 hrs 3 to 4 hrs 4 to 6 hrs 2 to 3 hrs
1 to 3 hours 8 to 9 hrs 4 to 6 hrs 5 to 6 hrs 3 to 4 hrs
Slow cooker cooking time
(without searing)
110 °C(Low) 130 °C(High) 110 °C(Low) 130 °C(High)
Slow cooker cooking time
(with searing)
With this function, you can dry fruit, veggies, and beef into healthy and
nutritional snacks and tasty jerky without chemicals and preservatives. Place
baking paper on tray and spread food into a single layer.
Food dry guide
Food type Preparation Set temp Time Use
Bananas Slice into 5~6 mm
thick
Figs Remove stems and
halve
Kiwi Peel, slice into
8~12 mm thick
Mangos Remove skin, slice
into 6~10 mm thick
Pineapple Peel, core, slice into
8~12 mm thick
Tomatoes Wash and slice 6mm
circles
Mushroom Clean with soft brush
or cloth. Don’t wash
Beef jerky Marinate sliced
meats (5~6 mm
thick)in store-bought
or your own recipe
for 6 to 8hours in the
refrigerator
70 °C 5~8hrs Snacks, baby food,
granola, cookies and
banana bread
70 °C 8~9hrs Fillings, cakes,
puddings, breads and
cookies
70 °C 5~8 hrs Snacks
70 °C 6~9 hrs Snacks, cereals,
baked goods
70 °C 6~9 hrs Snacks, baked
goods, baked granola
70 °C 6~9 hrs Soups, stews, paste
or sauce
60 °C 4~8 hrs Rehydrate for
soups, meat dishes,
omelettes or frying
80 °C 6~9 hrs Snack
Heatproof
glass
dish with
cover on
turntable
Heatproof
glass
dish with
cover on
turntable
foorP .3 40 °C 40 °C
4. Keep
Warm
80 °C
70 °C
60 °C
-
10 °C 70 °C
How to make yogurt
• Pour a 1000 ml milk into a proper heat-resistant bowl with cover.
• ot nwod looc neht dna )C° 07~06 ot pu( erutarepmet reporp ot ti lioB
about 40 °C
• Add 150 ml natural yogurt into a bowl and stir well.
• Place covered bowl in the oven.
• Choose the menu, and set cook time 5~8 hours.
How to raise yeast dough
• gnikab htiw revoc dna lwob tnatsiser-taeh reporp a ni hguod eht ecalP
wrap or damp cloth.
• Place the bowl in the oven.
• hguod eht litnu setunim 04 tuoba ot emit kooc tes dna ,unem eht esoohC
has doubled in volume.
Heat from the top and bottom elements are used to maintain set
temperature. You can use this function to keep food warm until ready
to serve.
Metal tray
on Low
rack
Heatproof
glass dish
on Low rack
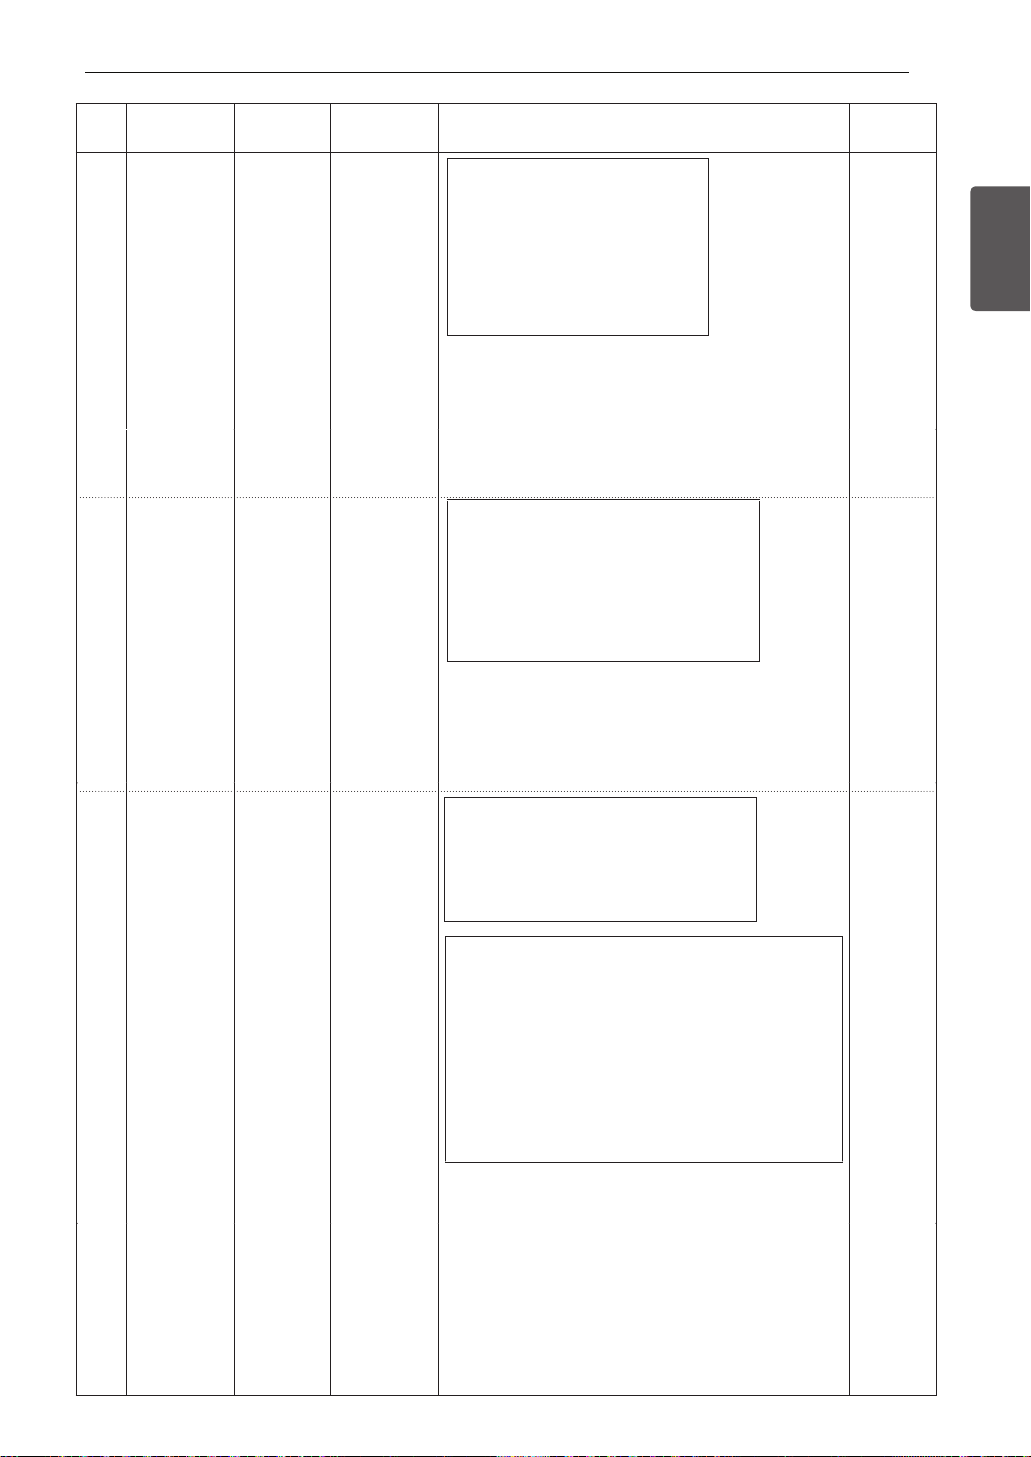
HOW TO USE
HEALTHY COOK (For MJ3965ACS/ACR/BCR/BCS)
Your oven’s menu has been preprogrammed to automatically cook food. Tell the oven what you want and
how many items there are. Then let your microwave oven cook your selections.
For MJ3965ACS/ACR/BCR/BCS
Example: To cook 0.6 kg
Carrot
1.Press STOP/CANCEL.
sserP .2 HEALTHY COOK
until display shows '2'.
eht nruT .3 DIAL until display
shows ‘2-2’.
sserP .4 START.
eht nruT .5 DIAL until display
shows ‘0.6 kg’.
29
ENGLISH
sserP .6 START.
HEALTHY COOK MENU INSTRUCTIONS
Code Menu
1-1 Chicken
Schnitzel
1-2 Chicken
Wings
Weight
Limit
0.2 - 0.6 kg Refrigerated
Initial
Temperature
Ingredients
Chicken breasts of 150 - 200 g each
2 eggs, lightly beaten
Salt and pepper to taste
brush chicken schnitzel with oil.
Choose the menu and weight, press start.
continue cooking.
and season as desired.
Choose the menu and weight, press start.
continue cooking.
Instructions Utensil
Crisp tray on
the High rack
ro reppep dna tlas htiw stsaerb nekcihc nosaeS .1
.kcar hgiH eht no yartpsirC eht no doof ecalP .2
ot trats sserp dna revo doof nrut ,PEEB nehW .3
lio ro rettub detlem htiw sgniw nekcihc hsurB .1detaregirfeRgk 6.0 - 2.0
Crisp tray on
the High rack
.kcar hgiH eht no yartpsirC eht no doof ecalP .2
ot trats sserp dna revo doof nrut ,PEEB nehW .3
HOW TO USE
30
Code Menu Instructions Utensil
1-3 Cutlet 0.2-0.4 kg Refrigerated
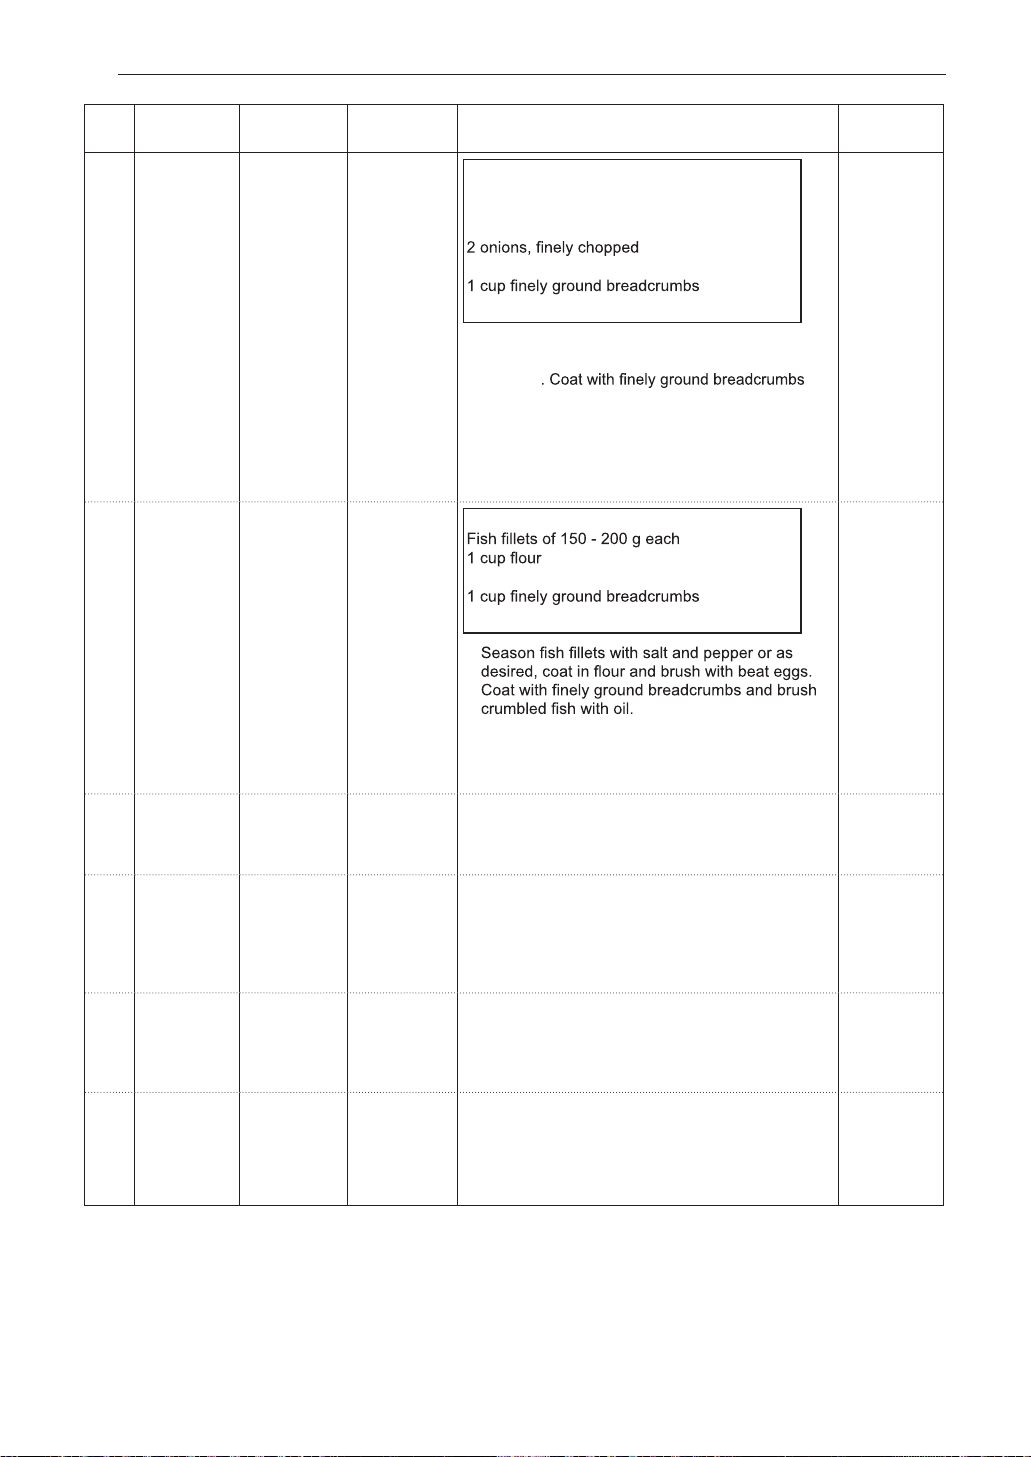
1-4 Fish 0.2 - 0.6 kg Refrigerated
Schnitzel
Weight Initial
Limit Temperature
Ingredients
500 g lean grouond lamb or beef
500 g small potatoes, cooked and mashed
3 eggs, lightly beaten
2 tablespoons chopped parsley
Salt and pepper to taste
With meat mixture, make balls about 4-5 cm
diameter
and shape balls into ovals about 1 cm thick each.
Brush cutlet with oil.
2. P lace food on the Crisp tray on the High rack.
Choose the menu and weight, press start.
continue cooking.
Ingredients
2 eggs, lightly beaten
Salt and pepper to taste
1.
Crisp tray on
the High rack
.yelsrap dna snoino ,sgge ,seotatop ,taem xiM .1
ot trats sserp dna revo doof nrut ,PEEB nehW .3
Crisp tray on
the High rack
Choose the menu and weight, press start.
continue cooking.
1-5 French psirC eht no tuo stcudorp otatop nezorf daerpS .1nezorFgk 3.0 - 1.0
Fries
1-6 Hamburgers 0.2 - 0.4 kg Refrigerated
1-7 Sausages 0.2 - 0.6 kg Refrigerated
1-8 Wedge .ecafrus eht no tils dna gnigakcap lla evomeR .1mooRgk 4.0 - 2.0 Crisp tray on
Potatoes
tray on the High rack. For the best results, cook
in a single layer. Choose the menu and weight,
press start.
Brush hamburgers with oil.
Place food on the Crisp tray on the High rack.
2.
Choose the menu and weight, press start.
continue cooking.
1. Remove all packaging and slit on the surface.
Place food on the Crisp tray on the High rack.
2.
Choose the menu and weight, press start.
continue cooking.
Place food on the Crisp tray on the High rack.
2.
Choose the menu and weight, press start.
continue cooking.
.kcar hgiH eht no yart psirC eht no doof ecalP .2
ot trats sserp dna revo doof nrut ,PEEB nehW .3
Crisp tray on
the High rack
.hcae kciht mc 1 dna g 001 fo sregrubmah esooh C .1
Crisp tray on
the High rack
ot trats sserp dna revo doof nrut ,PEEB nehW .3
Crisp tray on
the High rack
ot trats sserp dna revo doof nrut ,PEEB neh W .3
the High rack
ot trats sserp dna revo doof nrut ,PEEB neh W .3
 Loading...