

Page 1

Owner's manual
Golf
Edition 07.2019
Golf Owner's manual
Owner's manual
Golf
Print status: 20.03.2019
English: 2019.07
Page 2
Vehicle data sticker
Fig. 1 1: Vehicle identification number; 2: Vehicle type, engine power, gearbox type; 3: Engine code, gearbox code,
paint number, interior equipment; 4: Optional extras, PR numbers
Pre-delivery inspection carried out on:
Date of delivery to customer/initial registration:
a)
Volkswagen dealership stamp Volkswagen dealership stamp
a)
Whichever comes first.
Volkswagen works continuously to develop and further improve all models. Please understand that we
must therefore reserve the right to alter any part of
the vehicle and its equipment or technical specifications at any time. The information provided concerning scope of delivery, appearance, performance,
dimensions, weights, fuel consumption, standards
and vehicle functions is all correct at the time of going to print. Some of the equipment and functions
described might not yet be available in a particular
vehicle (information can be provided by your local
Volkswagen dealership), or may be available only in
certain countries. The vehicle illustrated on the cover may have certain items of optional equipment
which are only available at extra cost, or which are
only available in certain markets. Your Volkswagen
dealership will be able to inform you about varia-
tions in different countries. Subject to alteration and
amendment. No legal commitment may be inferred
from the information, illustrations or descriptions in
this manual.
No part of this manual may be reprinted, reproduced
or translated without the written permission of
Volkswagen AG.
All rights under the laws of copyright are expressly
reserved by Volkswagen AG. Subject to alteration
and amendment.
Printed in Germany.
© 2019 Volkswagen AG
This paper was bleached without the use of
chlorine.
Page 3

Thank you for choosing Volkswagen
By purchasing this Volkswagen, you have become the owner of a vehicle fitted with the most up-to-date
technology and a multitude of convenience functions for your use and enjoyment.
Before using your vehicle for the first time, please read and observe the information in this owner's manual.
It will quickly help you to become familiar with your vehicle and all of its functions as well as making you
aware of dangers to yourself and others and of how these dangers can be avoided.
If you have any further questions about your vehicle, or if you think that the vehicle wallet has not covered
everything, please get in touch with your Volkswagen dealership. They will always be happy to deal with
your questions, suggestions or problems.
We hope you enjoy driving your new vehicle. Happy motoring.
Volkswagen AG
Page 4
Infotainment
Getting started
Introduction to the topic
The function and settings of the Infotainment system depend on the country and vehicle equipment.
Before using for the first time
Before using the device for the first time, please observe the following points so you can make full use
of the available functions and settings:
— Observe the basic safety instructions
→ page 190.
— Reset the Infotainment system to factory set-
tings.
— Find your favourite radio stations and store them
to station buttons for quick access → page 202.
— Use only suitable audio sources and data media
→ page 205.
— Pair a mobile device to make calls using the tele-
phone interface → page 212.
— Use current map data for the navigation
→ page 207.
— Register with Volkswagen We Connect to use the
corresponding services → page 177.
Other applicable documents
In addition to this manual, please observe the following documents when using this Infotainment
system and its components:
— Supplements to the vehicle wallet of your vehicle.
— The operating instructions for the mobile device
or audio sources.
— The operating instructions for external data media
and playback devices.
— Instructions for any Infotainment accessories sub-
sequently installed or additionally used.
— Service description when using Volkswagen We
Connect services.
— Digital operating instructions in the Infotainment
system (where available)
Safety notes
Please refer to and on page 190.
— Some functions may contain links to websites
that are operated by third parties. Volkswagen AG
does not assume ownership of the third-party
websites that are reached via links and is not responsible for their content.
— Some functions may contain external information
supplied by third parties. Volkswagen AG is not
responsible for external information being correct, up-to-date and complete, or for any infringement of third-party rights.
— The radio stations or owners of the data storage
media and audio sources are responsible for the
content provided.
— Multi-storey car parks, tunnels, high buildings,
mountains, and other electrical devices, e.g. battery chargers, can also impair radio reception.
— Films or metal-coated stickers on the aerial and
on the windows can interfere with radio reception.
WARNING
The central computer of the Infotainment system
is networked with the control units installed in the
vehicle. Incorrect repair or incorrect removal and
installation of the central computer therefore lead
to an increase risk of accident and injury.
Never replace the central computer with a used
·
central computer from end-of-life vehicles or
from recycling.
Have the central computer removed and instal-
·
led or repaired only by a qualified workshop.
Volkswagen recommends using a Volkswagen
dealership for this purpose.
WARNING
The factory-installed radio with integrated hardware is networked with the control units installed
in the vehicle. Incorrect repair or incorrect removal
and installation of the radio therefore lead to an
increase risk of accident and injury.
Never replace the radio with a used radio from
·
end-of-life vehicles or from recycling.
Have the radio removed and installed or re-
·
paired only by a qualified workshop. Volkswagen recommends using a Volkswagen dealership for this purpose.
WARNING
Accidents and injuries can occur if the driver is distracted. Reading information off the screen and
operating the Infotainment system can distract
you from the road and cause accidents.
Always drive carefully and responsibly.
·
190 Infotainment
Page 5
WARNING
Connecting, inserting or removing data media or
audio sources while the vehicle is in motion can
distract you from the road and lead to accidents.
WARNING
Set the volume so that noises outside the vehicle
(e.g. emergency service sirens) can be easily heard
at all times.
Setting the volume too high may damage your
·
hearing. This is the case even if you are only exposed to high volumes for short periods.
WARNING
The following conditions can lead to situations
where emergency calls, telephone calls and data
transmission are not possible or are interrupted:
If your current location is in an area with no or
·
insufficient mobile communications and GPS reception. This can also include tunnels, streets
with tall buildings, garages, underpasses, mountains and valleys.
If you are in an area with sufficient mobile com-
·
munications and GPS reception but the telecommunications provider's mobile network is
out of order or is not available.
If the components in the vehicle required for
·
emergency calls, telephone calls and data transmission are damaged, not working or do not
have sufficient electrical power.
If the rechargeable battery in the mobile device
·
is flat or has insufficient charge level.
WARNING
In some countries and mobile networks, a call for
assistance or an emergency call can be made only
if a mobile device is connected to the vehicle's
mobile phone interface that contains an “unlocked” SIM card with sufficient credit, and if there
is sufficient network coverage.
WARNING
Read and follow the appropriate operating manuals of the respective manufacturer when using
mobile devices, data media, external devices, external audio and media sources.
WARNING
Arrange the wires for external devices and audio
sources so that they do not obstruct the driver.
WARNING
The volume level may suddenly change when you
switch the audio or media source or connect a new
source.
Reduce the volume before switching the audio
·
or media source or connecting a new source.
WARNING
The limit values for electromagnetic radiation in
the vehicle may be exceeded, and thus the health
of the driver and vehicle occupants may be endangered when operating a mobile or wireless device
without a connection to an external aerial. This also applies to external aerials which have not been
correctly installed.
Maintain a minimum distance of 20 centimetres
·
between the aerials of the mobile device and an
active medical implant, since the mobile devices
may impair the function of active medical implants.
Do not carry an operational mobile device close
·
to or directly above an active medical implant,
e.g. in a breast pocket.
Switch off mobile devices immediately if you
·
suspect they may be interfering with an active
medical implant or any other medical device.
WARNING
Mobile devices, external devices and accessories in
the vehicle that are not properly secured can be
flung though the vehicle interior and cause injuries
in the event of a sudden driving or braking manoeuvre or in the event of an accident.
Secure any mobile devices and accessories out-
·
side the deployment zone of the airbags or stow
them safely.
WARNING
The centre armrest can obstruct the driver's arm
movements. This can cause accidents and severe
injuries.
Always keep the stowage compartment in the
·
centre armrest closed while the vehicle is in
motion.
WARNING
Unfavourable light conditions and a damaged or
dirty screen may result in displays and information
not being read or not being read correctly from
the screen.
Displays and information on the screen must
·
never cause you to take safety risks. The screen
Getting started 191
Page 6
is no substitute for full concentration on the
part of the driver.
WARNING
Radio stations can transmit catastrophe and danger warnings. The following conditions can prevent these warnings from being received or issued:
If your current location is in an area with no or
·
insufficient radio signal reception. This can also
include tunnels, streets with tall buildings, garages, underpasses, mountains and valleys.
If the frequency bands of the radio stations are
·
subject to interference or are not available in
areas with adequate radio signal reception.
If the loudspeakers and the components re-
·
quired for radio reception in the vehicle are
damaged, not working or do not have a sufficient power supply.
When the Infotainment system is switched off.
·
WARNING
Switch off mobile devices in areas with a risk of
explosion.
WARNING
Driving recommendations and traffic symbols displayed by the navigation system may differ from
the current traffic situation.
Road signs, traffic signals, traffic regulations
·
and local conditions have priority over the recommendations and displays provided by the
navigation system.
Adapt your speed and driving style to suit visi-
·
bility, weather, road and traffic conditions.
Certain events can make the originally planned
·
driving time and route to the destination considerably longer or make navigation there temporarily impossible, e.g. due to a road being
closed.
NOTICE
Your mobile device must always be switched off in
areas where special regulations apply and when the
use of mobile devices is forbidden. The radiation
produced by the mobile device when switched on
may interfere with sensitive technical and medical
equipment, possibly resulting in malfunction or
damage to the equipment.
NOTICE
The loudspeakers may be damaged if the volume is
too high or the sound is distorted.
Notes on use
Please refer to and on page 190.
— The Infotainment system needs a few seconds for
a complete system start and does not respond to
inputs during this time. During system startup,
only the rear view camera image can be displayed.
— The Infotainment system needs to start up com-
pletely before all displays are available and before
it is possible to run functions. The duration of a
system start depends on the functional scope of
the Infotainment system and can also take longer
than usual particularly at low and high temperatures.
— When using the Infotainment system and the cor-
responding accessories, such as a headset or earphones, please observe the country-specific regulations and legal requirements.
— Some Infotainment functions require an active
We Connect user account for the vehicle and an
online connection to the Internet. The data transfer must not be restricted for the execution of the
functions.
— Lightly pressing the buttons or touching the
touchscreen is sufficient to operate the Infotainment system.
— To ensure that the Infotainment system works
properly, it is important to make sure the system
is switched on and that the correct date and time
are set in the vehicle – where available.
— A missing function button on the screen does not
constitute a fault in the unit; it corresponds to the
country-specific equipment.
— Some functions of the Infotainment system are
available only when the vehicle is stationary. In
some countries, the selector lever must additionally be in parking position P or neutral position N.
This is not a malfunction, but simply a legal requirement.
— There may be restrictions on the use of Blue-
tooth® devices in some countries. Information is
available from the local authorities.
— Switch the ignition on before switching the Info-
tainment system back on if the 12-volt vehicle
battery has been disconnected.
— Changes to settings may cause the display con-
tent to vary and some aspects of the Infotainment system operation to differ from the descriptions given in this manual.
— Repairs and modifications to the Infotainment
system should be carried out only by a qualified
192 Infotainment
Page 7
workshop. Volkswagen recommends using a
Volkswagen dealership for this purpose.
— Using a mobile device in the vehicle may cause
noise from the speakers.
— In some countries, the Infotainment system is au-
tomatically switched off when the engine is
switched off and when the 12-volt vehicle battery
charge level is low.
— In certain vehicles with Park Distance Control, the
volume of the current audio source is lowered automatically when reverse gear is engaged. It is
possible to lower the volume.
— Information on the included software and the li-
cence conditions is stored under:
Copyright
.
Setup
— If you sell your vehicle or loan it to somebody
else, make sure that all the stored data, files and
settings are deleted and that the SD card, external
audio sources and data media are removed where
applicable.
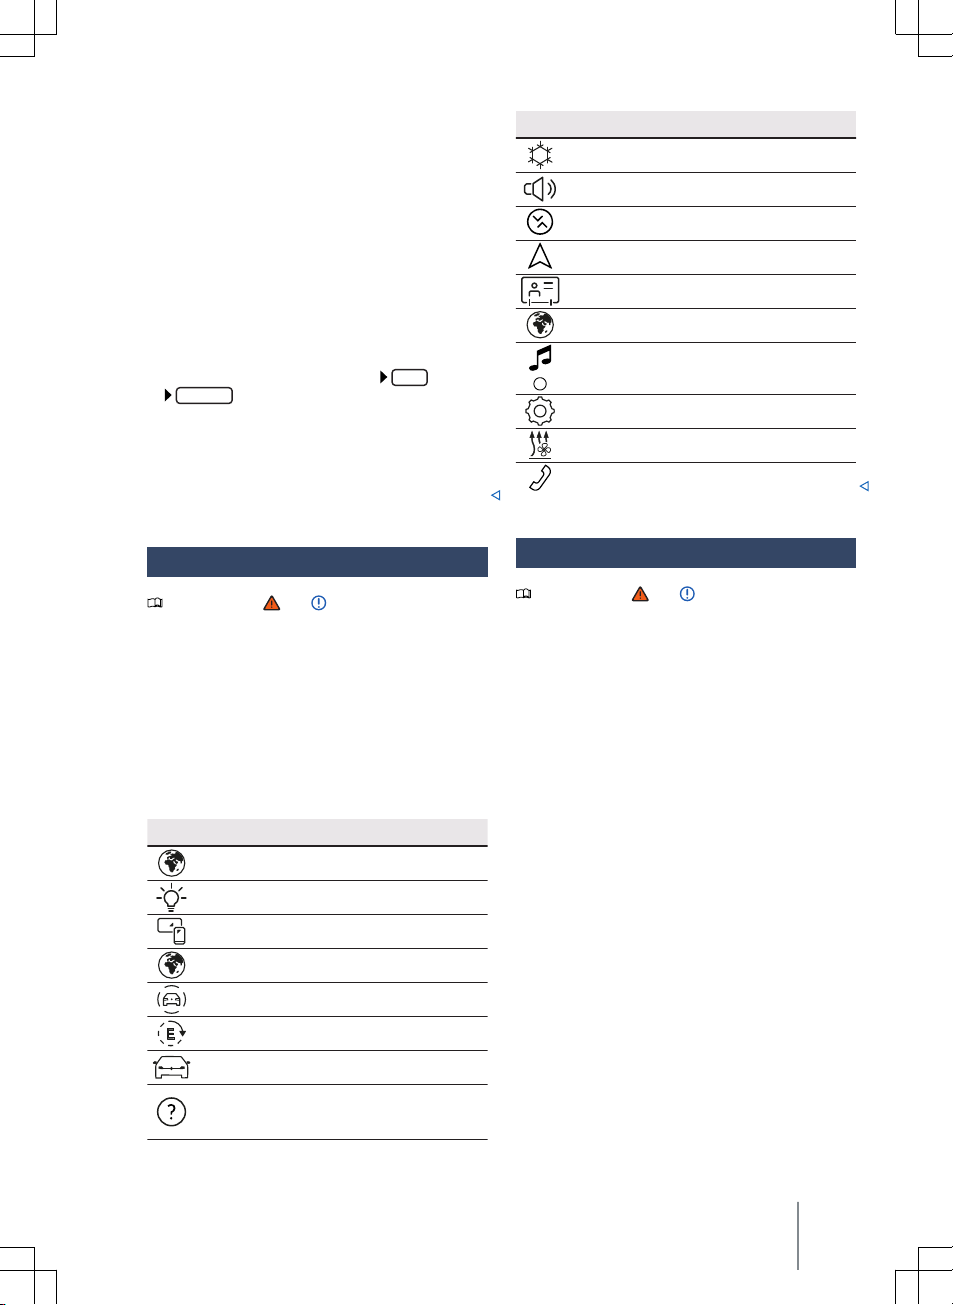
Main menus on the start screen
Air conditioning
Sound
Media Control
Navigation
Users, User management
Podcasts
Radio/Media
Settings
Auxiliary heater
Telephone
→ page 106
→ page 198
→ page 207
→ page 176
→ page 202, → page 205
→ page 198
→ page 110
→ page 212
Start screen HOME
Please refer to and on page 190.
You can configure the layout of the tiles, views and
displays on the start screen of the display and operating unit or have them positioned on the basis of
factory layout templates.
If a tile is not present, this is not a fault but corresponds to the country-specific equipment of your
vehicle.
The following main menus may be included as tiles
on the start screen:
Main menus on the start screen
Alexa
(not available in all countries)
Background lighting
App-Connect
Apps
Driver assist systems
e-Manager
Vehicle
Help
on the functions and operation of the Infotainment system.
→ page 183
→ page 133
: here you can find further information
Technical data
Please refer to and on page 190.
Radio with integrated hardware (8.25")
The radio installed in the vehicle at the factory contains country-specific components and software for
connectivity and for execution of Infotainment, convenience and vehicle functions.
The corresponding displays are shown on the screen
of the radio and in some cases in the instrument
cluster and head-up display.
— Capacitive colour screen:
— 8.25-inch variant, TFT display, WVGA: 1,082 x
480 pixels.
— Device operation by touching the screen, rotary/
push knob, menu control and buttons on the multifunction steering wheel.
Central computer with display and operating unit
(10")
The central computer installed in the vehicle at the
factory contains country-specific components and
software for connectivity and for execution of Infotainment, convenience and vehicle functions.
The corresponding displays are shown on the screen
of the display and operating unit and in some cases
in the instrument cluster and head-up display.
— Capacitive colour screen:
— 10-inch variant, TFT display, HD: 1,280 x 720
pixels.
Getting started
193
Page 8

— Device operation by:
— Sensor fields. Touch operation.
— Buttons on the multifunction steering wheel.
— Proximity sensor (driver/front passenger detec-
tion, gesture control).
Convenience and vehicle functions
— Settings for driver assist systems
— Settings for heating and air conditioning system.
— Settings for light and vision functions.
— Settings for convenience functions.
— Settings for parking and manoeuvring
Sound system
Please refer to and on page 190.
Basic equipment:
The Infotainment system available from the factory
is equipped as follows:
— Two to four loudspeakers, in different installation
locations.
— Amplifier output power, max. 5 x 20 watts.
— Setting options:
— Treble, Mid, Bass.
— Volume distribution front, rear and left, right
(balance, fader).
Optional sound system
The Infotainment system can be extended as follows
by an optional sound system:
— Up to 9 loudspeakers, in different installation lo-
cations and with different power ratings (watt).
— External amplifier (DSP-Ethernet).
— Separate subwoofer.
— Setting options:
— Equaliser, Treble, Mid, Bass.
— Volume distribution front, rear and left, right
(balance, fader).
— Seat-dependent sound optimisation (sound fo-
cus).
— Subwoofer volume.
— Surround settings.
Connectivity
Please refer to and on page 190.
Wi-Fi (only for 10")
— Wi-Fi in accordance with IEEE 802.11 a/b/g/n/ac.
— Transfer in 2.4 GHz and 5 GHz.
— Three Wi-Fi modes simultaneously:
— Tethering (2.4 or 5 GHz),
— 2.4 GHz access point,
— 5 GHz access point.
— Wi-Fi aerial.
— One multiband aerial each for 2.4 and 5 GHz.
— Up to 8 Wi-Fi devices can be connected simulta-
neously.
— Internet connection via Wi-Fi:
— Tethering via customer telephone,
— Hotspot for clients in the vehicle.
— Apple CarPlay via Wi-Fi.
— Audio and video streaming via Wi-Fi
— Simplified coupling process via WPS, NFC or QR
code.
Bluetooth® profiles
A maximum of three Bluetooth® devices can be connected at the same time.
The Infotainment system is delivered with a version
4.2 Bluetooth® interface.
These Bluetooth® profiles may be present:
— HFP 1.7 (Hands-Free Profile)
— Telephony and speakerphone.
— A2DP 1.3 (Advanced Audio Distribution Profile).
— Music playback.
— AVRCP 1.6 (Audio Video Remote Control Profile)
— Display and operation of music playback.
— Transmission of Cover Arts.
— PBAP 1.2 (Phone Book Access Profile)
— Access to phone book and call lists.
— MAP 1.3 (Message Access Profile)
— Access to SMS and e-mail.
— SSP 1.2 (Serial Port Profile).
— Serial data transmission via Bluetooth®.
194 Infotainment
Page 9
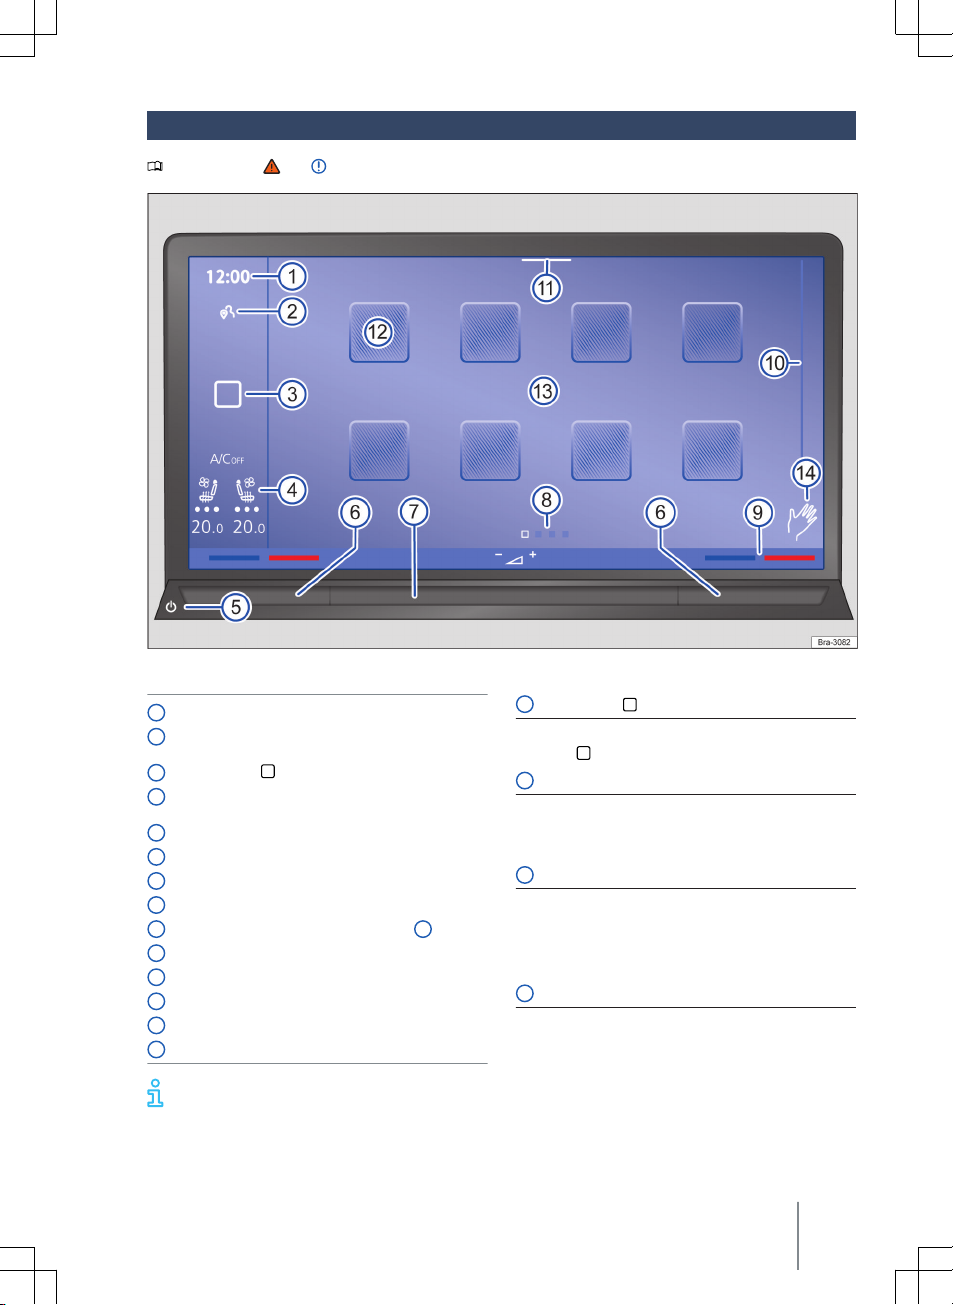
Overview and controls: 10 inch
Please refer to and on page 190.
Fig. 129 Overview: display and control unit of the 10 inch version (10”).
HOME
button:
Time.
1
Status of privacy settings with number of possi-
2
ble notifications.
HOME
button: .
3
Status display for seat heating and seat ventila-
4
tion.
Sensor field (Infotainment system on or off).
5
Touch slider for temperature.
6
Touch slider for volume.
7
Views (the current view is highlighted).
8
9 Temperature display (adjustment via 6 ).
Scroll bar.
10
Drop-down menu.
11
Function buttons for main menus (tiles).
12
Screen (touchscreen).
13
Gesture control is switched on.
14
3
Opens the start page.
— Touch .
5 Sensor field (on or off)
Switches the Infotainment system manually on and
off.
— Touch the sensor field.
6 Touch slider for temperature
Touch slider for the driver position, touch slider for
the front passenger position.
— Swipe to the left to reduce the temperature.
— Swipe to the right to increase the temperature.
7 Touch slider for volume
— Swipe to the left to reduce the volume.
— Swipe to the right to increase the volume.
Further information and tips on operating the
Infotainment system can be found at
→ page 197, Operating the Infotainment system.
Getting started 195
Page 10
8 Views
Submenus and functions have several views with
different content. Active views are marked by being
highlighted in colour.
— Touch a marking to change the view.
— Swipe left or right across the screen to switch be-
tween views.
10 Scroll bar
Some menus and functions have further content
above or below the current screen view.
— Touch the scroll bar and pull it up or down.
11 Drop-down menu
Further function buttons for functions and notifications can be found in the drop-down menu. Displayed functions can be configured → page 198.
— Touch a marking and pull it down to open the
drop-down menu.
Overview and controls: 8.25 inch
Please refer to and on page 190.
12 Function buttons for main menus (tiles)
Open the main menus using the function buttons.
The position of the function buttons can be configured → page 198.
— Touch to open a main menu, e.g. for the tele-
phone interface.
13 Screen
Operate the functions of the Infotainment system
via the screen. A detailed description of the various
finger movements can be found in the digital instructions.
— Touch
Operation
.
Fig. 130 Overview: radio of the 8.25 inch version (8.25”).
Rotary/push knob.
1
Time.
2
196 Infotainment
Status of privacy settings with number of possi-
3
ble notifications.
Page 11

HOME
button: .
4
Status display for seat heating and seat ventila-
5
tion.
Function buttons for main menus (tiles).
6
Drop-down menu.
7
Screen (touchscreen)
8
Views (the current view is highlighted).
9
Scroll bar.
10
Menu control.
11
Rotary/push button
1
— Press to switch the Infotainment system on or off.
— Turn to the left to reduce the volume.
— Turn to the right to increase the volume.
6 Function buttons for main menus
Open the main menus using the function buttons.
The position of the function buttons can not be configured.
—
Touch to open a main menu, e.g.
for the tele-
phone interface.
Screen
8
Operate the functions of the Infotainment system
via the screen. A detailed description of the various
finger movements can be found in the digital instructions.
— Touch
HOME
11 Menu control
Operation
.
— Turn to control the selection in lists.
— Turn to confirm a selection.
Operating the Infotainment system
Please refer to and on page 190.
Carry out functions and settings via the controls of
the Infotainment system.
Depending on equipment, the Infotainment system
has different controls:
— Touchscreen.
or
PHONE
MENU
.
.
— Sensor fields outside the screen, e.g.
— Function buttons, e.g.
RADIO
— Rotary/push knob.
— Menu control.
Opening the Quick Guide
You can find further information and tips for operation in the Quick Guide of the Infotainment system.
— Touch
HOME
.
Switching the Infotainment system on and off
Provided that it has not been switched off manually,
the Infotainment system is switched on when the
ignition is switched on.
The Infotainment system starts at the last selected
volume setting, provided that this does not exceed
the preselected maximum switch-on volume.
The Infotainment system switches off automatically
when the vehicle key is removed from the ignition
lock.
The Infotainment system switches off auto-
matically when you open the driver door with
inactive ignition.
If you switch on the Infotainment system manual
when the ignition is inactive, it will switch off automatically after around 30 minutes.
Scrolling through lists, switching tracks
Select the desired function, setting or track of the
Infotainment system via the touchscreen or menu
control.
Moving objects, adjusting volume
Move objects on the screen to adjust settings, e.g. of
sliders, or to move areas of a menu.
Personalise menus and views depending on equipment → page 198.
Zooming images and maps in and out
Recommendation: use thumb and index finger.
— Touch the map simultaneously with two fingers
and leave your fingers on the screen.
— To zoom in views, move your fingers slowly apart.
— To zoom out views, move your fingers slowly to-
wards each other.
Getting started 197
Page 12

Personalising the Infotainment
system
Please refer to and on page 190.
Personalise the menus and views of the Infotainment system to permit faster access to favourite or
frequently used functions.
Function buttons for accessing further menus and
functions are located in the
positions of the function buttons.
You can reach the quick access options for certain
functions via the drop-down menu. Adapt the displayed functions.
Configure personal menus and the displayed functions to adapt the Infotainment system to your
needs.
— For further tips and information on personalisa-
tion, touch
Adapting the
1. Touch a menu and keep your finger on the
screen until the menu is visibly highlighted.
2. Move the menu to the desired position and then
take your finger off the screen.
Configuring personal menus
You can find the personal menus in the different
views via the
→ page 197. Remove or add menus via the configuration function.
1. Touch a function button in a personal menu and
keep your finger on the screen until an additional window opens.
2. Touch to open the configuration function.
— Touch the desired template to add a new
— Touch to remove a menu.
3. Touch to close the configuration function.
4. Add functions to a new menu → page 198.
5. Touch a free area on the screen to return to the
personal menu.
You can add a maximum of two further personal
menus (maximum of four personal menus in total).
HOME
HOME
menu
HOME
menu of the Infotainment system
menu. New personal menus are created without functions.
At least two personal menus are always available. These cannot be removed.
HOME
menu. Adapt the
Custom
.
Adapting personal menus
1. Touch a function button in a personal menu and
keep your finger on the screen until an additional window opens.
2. Touch the function button to which you would
like to add a function.
3. Touch the desired function in the additional
window. Various functions are available depending on the size of the function button.
4. Touch a free area on the screen to return to the
personal menu.
More functions are available for some function
buttons than are visible at first glance in the
additional window. To find all functions, swipe to
the left or right in the additional window.
Adapting the drop-down menu
1. Touch a function and keep your finger on the
screen until an additional window opens.
2. Touch the desired function in the additional
window and keep your finger on the screen until
the function is visibly highlighted.
3. Move the function to the desired position and
then take your finger off the screen. The active
function is automatically removed from the
drop-down menu and added to the additional
window.
More functions are available for the drop-
down menu than are visible at first glance in
the additional window. To find all functions, swipe
to the left or right in the additional window.
Settings (system, sound)
Please refer to and on page 190.
The range of possible settings varies according to
the country, the device and the vehicle's equipment
specification.
Changing settings
The meanings of the following symbols apply to all
system and sound settings.
Changes are automatically stored when a menu is
closed.
Symbol, meaning
The setting is selected and activated or
switched on.
198 Infotainment
Page 13

Symbol, meaning
The setting is not selected or deactivated
or switched off.
Open the drop-down list.
Increase the setting values.
Decrease the setting values.
Gradually back.
Gradually forwards.
Change setting values with the slider control (infinitely variable).
Sound settings
Opening the sound settings:
Home button
10":
MENU
8.25":
The following functions, information and setting options may be available in the sound settings:
— Equalizer.
— Position.
— Volume.
— Settings.
System settings
Opening the system settings:
Home button
10":
MENU
8.25":
The following functions, information and setting options may be available in the system settings:
— Screen.
— Time and date.
— Language.
— Additional keyboard languages.
— Units.
— Voice control.
— Wi-Fi.
— Data connection.
— Manage mobile devices.
— Reset to default settings.
— System information.
— Copyright.
— Configuration assistant.
.
Sound
Sound
.
Settings
.
.
Adjusting the volume of external audio sources
If you need to increase the output volume of an external audio source, first lower the volume on the Infotainment system.
If the sound from the external audio source is too
quiet, increase the output volume of the external
audio source. If this is not sufficient, set the input
volume to
If the sound from the connected external audio
source is too loud or distorted, lower the output
volume on the external audio source. If this is not
sufficient, set the input volume to
Medium
or
Loud
.
Medium
or
Quiet
.
Cleaning the screen
Please refer to and on page 190.
Remove stubborn dirt carefully and without using
aggressive cleaning agents.
Observe the checklist when cleaning the screen:
✓ Infotainment system is switched off.
✓ Use a soft, clean cloth that is moistened with
water.
OR: use a cleaning cloth available from Volks-
wagen dealerships.
✓ In the case of stubborn dirt: moisten dirt with
only a little water and allow to soak in. Then
carefully remove with a clean, soft cloth.
NOTICE
You can damage the screen if you clean the screen
with the wrong cleaning agents or when the screen
is dry.
Use only gentle pressure.
·
Do not use aggressive or solvent-based cleaning
·
products. These cleaners may damage the Infotainment system and “dull” the screen.
Trademarks, licences, copyright
Please refer to and on page 190.
Trademarks and licences
Certain terms in this manual are accompanied by the
symbol ® or ™. They indicate brand names or a registered trademark. However, the absence of these
symbols does not constitute a waiver of the rights
concerning any term.
Getting started 199
Page 14

Other product names are registered trademarks or
brand names of the respective legal owner.
— Manufactured under license from Dolby Laborato-
ries. Dolby and the double-D symbol are trademarks of Dolby Laboratories.
— Manufactured under license from Dolby Laborato-
ries. Dolby, Pro Logic and the double-D symbol
are trademarks of Dolby Laboratories.
— Android Auto™ is a certified trademark of Google
Inc.
— Apple CarPlay™ is a certified trademark of Apple
Inc.
—
Bluetooth® is a registered trademark of Bluetooth® SIG, Inc.
—
iPod®, iPad® and iPhone® are trademarks of Apple
Inc.
—
MirrorLink® and the MirrorLink logo are certified
trademarks of Car Connectivity Consortium LLC.
—
SD® and SDHC® are trademarks or registered
trademarks of SD-3C LLC in the USA and other
countries.
—
Windows® is a registered trademark of Microsoft
Corporation, Redmond, USA.
— MPEG-4 HE-AAC audio coding technology and
patents are licensed by Fraunhofer IIS.
— This product is subject to certain intellectual
property rights and copyrights owned by the Microsoft Corporation. The use or distribution of this
type of technology outside this product requires a
licence from Microsoft or an authorised Microsoft
company.
Some trademark symbols:
Copyright law
Audio and video files saved on data media and audio
sources are normally subject to national and international copyright laws. Observe the legal requirements.
Voice control understands questions and statements
without the need to learn voice commands. The
voice commands can be freely formulated and colloquial. You can find suggested voice commands in the
Infotainment system.
The functions are reduce in offline mode.
Loud interior and exterior noises can cause malfunc-
tions and misleading sentences and answers.
Voice control recognises only voice commands
in the language set in the Infotainment system.
Test voice control while the vehicle is station-
ary before starting a journey in order to familiarise yourself with the function.
Seat-based voice control
Voice control uses additional microphones to detect
whether the driver or passenger is speaking. This enables you to access seat-related functions in the
supported online languages, e.g. switching on the
seat heating.
Opening suggested voice commands
— Touch
Supported languages, market-dependent
— Online and offline: German, American English,
— Offline: Bulgarian, Danish, Finnish, Canadian
Prerequisites
✓ Online and offline: voice control with corre-
✓ Online: valid We Connect Plus contract is activa-
HOME
.
British English, French, Italian, Spanish, Czech.
French, Greek, Japanese, Korean, Dutch, Polish,
Portuguese, Brazilians Portuguese, Russian,
Swedish, Mexican Spanish, Turkish.
sponding Infotainment system is installed in the
vehicle.
ted.
Activation word and voice
commands
Please refer to and on page 190.
Voice control
Introduction to the topic
Voice control works online and offline.
Voice commands are recorded more accurately in
online mode because more data are available.
200 Infotainment
Activation word for voice control
If you have activated the control by means of an activation word, the activated Infotainment system
scans the words spoken in the vehicle for the activation word. The activation word depends on the language set in the Infotainment system.
Page 15

Apart from scanning for the activation word, there is
no recording and no transmission of anything spoken in the vehicle.
Voice control starts when the Infotainment system
recognises the activation word → page 201.
Switching the activation word on and off
1. Touch
HOME
Voice control
Activation word
.
If the activation word is switched off, the
voice control cannot be activated via the acti-
vation word. Voice control remains available via the
button in the multifunction steering wheel or the
VOICE
function button in the Infotainment system.
Availability depends on the country and vehicle
equipment.
Activation word in national languages
Здравей Volkswagen
Olá Volkswagen
Bonjour Volkswagen
Ahoj Volkswagen
Hallo Volkswagen
Hej Volkswagen
Hola Volkswagen
Salut Volkswagen
Hei Volkswagen
Hello Volkswagen
Γεια σου Volkswagen
Ciao Volkswagen
こんにちは Volkswagen
Hola Volkswagen
Hallo Volkswagen
Hallo Volkswagen
Olá Volkswagen
Cześć Volkswagen
안녕하세요 Volkswagen
Привет Volkswagen
Hej Volkswagen
Activation word in national languages
Merhaba Volkswagen
Hello Volkswagen
Voice commands
To ensure that the voice control recognises voice
commands reliably, follow the tips for successful
voice commands.
Tips for successful voice commands
✓ Clear pronunciation. Unclear voice commands
are not recognised.
✓ Speak at normal volume. Speak slightly louder
at higher speeds.
✓ Avoid outside noises. Open windows and doors
may hinder voice control.
✓ Avoid background noise, such as conversations
in the vehicle.
✓ Do not point the airflow from the vents towards
the microphones or vehicle roof.
✓ No over emphasis or strong dialects.
✓ No long pauses when speaking.
Depending on the content of the telephone
book, it may be advisable to swap the order of
the contact's forename and surname to ensure it is
reliably recognised from the telephone book.
Starting and stopping voice control
Please refer to and on page 190.
Depending on the vehicle equipment, you can start
voice control by different methods.
Voice control is active and will recognise
the spoken words.
Starting the voice control function
— Voice activation: say the activation word for voice
control. Pay attention to the national languages
of the activation words → page 200.
— Multifunction steering wheel: press the voice con-
trol button → page 10.
— Infotainment system: touch
Voice control is automatically ended when you use
functions on the Infotainment system, activate the
parking system or when voice outputs occur, e.g. incoming calls or traffic announcements.
In some cases, the voice control function of the connected mobile device can be started by pressing and
VOICE
.
Voice control
201
Page 16

holding the voice control button or the
ton.
Ending voice control manually
— Voice control can be cancelled by means of a
voice command.
— Multifunction steering wheel: press the voice con-
trol button twice in succession.
VOICE
but-
Radio mode
Introduction to the topic
In radio mode, you can receive available radio stations on different frequency bands and store your
favourites to station buttons for quick access.
The available reception types and frequency bands
depend on the equipment and country. Frequency
bands may be discontinued, deactivated or no longer
offered in individual countries.
Opening the
1.
Accessing settings
1.
Online functions in radio mode
Online functions in radio mode are only available under the following conditions:
— We Connect or We Connect Plus equipment.
— You have an active We Connect user account.
— Vehicle is assigned to your user account.
— You have purchased a corresponding data pack-
age from the In-Car-shop or can use data from
your own mobile device via a Wi-Fi hotspot.
— Streaming services always require an existing ac-
count with the relevant provider.
dio signal and cause noises in the loudspeakers.
with a window aerial.
RADIO
menu
HOME
.
HOME
The radio stations are responsible for the content of the information sent.
Additional electrical devices connected in the
vehicle can interfere with reception of the ra-
Foil or metal-coated stickers attached to the
windows may affect reception on vehicles
Radio
.
Equipment scope and radio
symbols
Please refer to and on page 190.
Radio
The available functions and the possible reception
modes and frequency band depend on the vehicle
equipment and country.
— AM tuner.
— FM dual tuner (diversity aerial).
— Combined station list.
— Combination of DAB and FM stations in one
list.
— Combined preset list.
— Combination of all stations stored to station
buttons in one list.
— 36 station buttons as storage locations for fa-
vourites.
— Station logos.
— Aerial amplifier.
— DAB/DAB+.
— DAB Slideshow.
— Stationary images are transmitted parallel to
the current broadcast.
— Hybrid Radio.
— Internet Radio.
General symbols in radio mode
Select AM frequency band.
AM
FM/DAB
Internet Radio
TP
No TP
AF off
RDS off
Select FM/DAB frequency band.
Select Internet Radio reception
mode.
Select previous station from the station list or
station on previous station button.
Select next station from the station list or
station on next station button.
Display station buttons.
Station already stored to a station button in a
station list.
Traffic news monitoring (TP) is activated.
The selected traffic news station is not available.
Automatic station tracking is switched off.
Radio Data System (RDS) is switched off.
202 Infotainment
Page 17

Symbols in the FM/DAB frequency band
Display frequency band for manual selection
of FM frequency.
Possible only if the combined station list is
switched off.
No DAB reception possible.
DAB station supports slideshow.
Slideshow is not available for the DAB station.
Symbols in the AM frequency band
Update station list manually.
Display frequency band for manual selection
of AM frequency.
Symbols in Internet Radio mode
Open full-text search.
Display recently listened to internet radio
stations.
Display 100 most frequently listened to internet radio stations.
Display available internet radio podcasts.
Display internet radio stations from the desired country.
Display internet radio stations that broadcast
in the desired language.
Display internet radio stations who broadcast
programmes from the desired genre.
Tuning, selecting and storing
stations
Please refer to and on page 190.
Selecting a frequency band
Before selecting a station, you must first select a
frequency band or reception mode. Different stations are available depending on the selected frequency band or reception mode.
The available frequency bands and reception modes
depend on the vehicle equipment and country.
1. Touch
2. Select frequency band or reception mode:
Source
to open the list of frequency bands
and reception modes.
— AM.
— FM/DAB.
— FM (for devices without DAB support).
— Internet Radio.
— Satellite radio.
Searching for and selecting stations
You can select radio stations in different ways. The
possibilities vary depending on frequency band and
reception mode.
Selecting via frequency band (AM and FM)
1. Display frequency band.
2. Touch the cursor, move on the frequency band
and release at the desired frequency.
3. OR: touch a point on the frequency band. The
cursor automatically jumps to the corresponding frequency.
The station at the set frequency is set.
Selecting from station list (AM and FM/DAB)
The station list shows the stations that can currently
be received. In the AM frequency band it may be
necessary to manually update the station list if you
have left the corresponding region since you last
opened the station list. The station list is updated
automatically in the FM/DAB frequency band.
1. Open the station list.
2. Touch the desired station.
The selected station is set. In the case of FM/DAB,
the best reception mode is selected automatically
according to availability of the station.
Searching for and filtering stations (Internet Ra-
dio)
In Internet Radio mode, it is possible to filter stations according to categories or search for stations
by means of a full-text search.
1. Open the station selection.
2. Select the category according to which you wish
to filter the stations.
3. OR: touch to start the full-text search. The
input field is displayed.
4. Enter the name of the desired station. The list
of found stations is automatically updated during input.
5. Touch the desired station.
The selected station is set.
SCAN
Searching in SCAN mode (AM and FM/DAB)
In SCAN mode, the stations of the frequency band
are automatically set successively and played for approx. 5 seconds in each case.
1. Touch
SCAN
at the right display edge.
The SCAN function starts and the currently set
station is shown on the display. A
SCAN
function
button is displayed next to this.
Radio mode 203
Page 18

2. To select a station, touch
SCAN
again.
The SCAN function stops and the station is set.
Storing stations to station buttons
You can store up to 36 stations from different frequency bands and reception modes as favourites on
station buttons.
1. Set the desired station.
2. Open the station buttons.
3. Touch .
OR: touch an already assigned station button
and hold for approx. 3 seconds.
4. OR: touch and hold a station in the station list.
The station buttons are displayed.
5. Touch station button.
The station is stored to the selected station button.
If a station was already stored on the station button,
this station will be removed from the station button
and replaced by the new station.
Special functions in radio mode
Please refer to and on page 190.
TP (Traffic Programme)
The TP function monitors the reports from a set
traffic news station and automatically outputs them
during radio operation or media playback. Reception
of a traffic news station must be possible for this.
Some stations that do not broadcast their own traffic news support the TP function through a corresponding traffic news station (EON).
In the AM frequency band or media mode, the system will always automatically tune to a traffic news
station in the background if one is available.
If no traffic news station can be received,
be shown on the display. The unit automatically
searches for a receivable traffic news station. As
soon as a new traffic news station can be received,
the status in the display changes to TP again.
Traffic news stations are not available in all countries.
Switching on the TP function
— In radio or media mode, touch
Traffic programme (TP)
tivate
.
Internet radio
Internet radio is a reception mode for internet radio
stations and podcasts which is independent of AM,
Radio
No TP
and ac-
will
FM and DAB. Due to transmission via the internet,
reception is not regionally restricted.
Internet radio is available only when the Infotainment system has an active internet connection.
Costs may be incurred for data transmission from
the internet when using Internet Radio mode.
Hybrid Radio
When Hybrid Radio is switched on, the radio
switches to the same station in Internet Radio mode
when reception in the FM/DAB frequency band is
poor.
Depending on setting, this changeover takes place
automatically or must be confirmed after the corresponding query on the display.
(WEB)
is displayed next to the station name as long as
the station is being received in Internet Radio mode.
The radio automatically switches to the FM/DAB fre-
quency band as soon as the station can be received
again via FM/DAB.
Activating Hybrid Radio
— In the FM/DAB frequency band, touch
Advanced settings
data
.
and activate
Additional online
— In Internet Radio mode, touch and set the au-
dio quality for internet radio reception to
Low
.
High
or
Station logos
Station logos may be pre-installed for some frequency bands in the Infotainment system.
Autoselect station logos
If
is activated in the settings in
the FM/DAB frequency band, the station logos will
be automatically assigned to the stations.
In Internet Radio mode, the Infotainment system accesses station logos from an online database and
automatically assigns them to the stations.
Manually assigning station logos
Radio
— In FM/DAB mode, touch
Station logos
— Select the station to which you wish to assign a
station logo.
— Select station logo.
— Repeat the process for further stations if desired.
— End assignment of station logos with .
.
204 Infotainment
Page 19

Media mode
Introduction to the topic
In media mode, you can play media files from data
media and streaming services on the Infotainment
system.
With some equipment levels, the following data media can be used:
— USB storage device (e.g. USB stick, mobile tele-
phone connected by USB).
— Bluetooth® device (e.g. mobile telephone, tablet).
With some equipment levels, the following types of
media files can be played back:
— Audio files (e.g. music, audiobooks).
— Video files.
You can also use streaming services. The availability
of streaming services depends on the equipment
and the country.
To use streaming services, you require a separate
user account for each service.
Opening the
1.
Accessing settings
1.
Restrictions and notes on data media
Dirty, overheated or damaged data media may be
unusable. Observe the manufacturer’s instructions.
Differences in the quality of data media from different manufacturers can interfere with media playback.
Incorrect configuration of a data medium can render
it unreadable.
The read time of data media can be increased by the
storage capacity, usage state (copying and deletion
processes), file system, folder structure, and the
amount of stored data.
Playlists simply specify a playback sequence. They
link to the location of the media files within the
folder structure. There are no media files stored in a
playlist. To play a playlist, the media files must exist
in the locations on the data medium referenced by
the playlist.
MEDIA
menu
HOME
HOME
No liability can be accepted for damaged or
lost files on data media.
Browser
Media
.
.
Equipment features and media
symbols
Please refer to and on page 190.
Audio, media, connectivity:
— Media playback and media control via Bluetooth.
— Audio playback in the following formats:
— AAC
— ALAC
— AVI
— FLAC
— MP3
— MP4
— WMA
— Video playback in the following formats:
— MPEG-1 and MPEG-2 (.mpg, .mpeg)
— ISO MPEG4; DivX 3, 4 and 5 Xvid (.avi)
— ISO MPEG4 H.264 (.mp4, .m4v, .mov)
— Windows Media Video 10 (.wmv, .asf)
— Cross-device playlists.
— Cross-source media database:
— The data of all media sources connected to the
Infotainment system are stored in a media da-
tabase.
— Media streaming (online)
— Media search.
Symbols for media sources
My media
Select
ted devices can be selected under
Select a device connected via Bluetooth® as
media source.
Set up available streaming services.
Already set up streaming services will be displayed in the list of media sources with their
own logo.
General symbols in media operation
Start playback.
Pause playback.
Go to previous track.
Go to next track.
Repeat current track.
Repeat all tracks.
as the media source. Connec-
My media
.
Media mode 205
Page 20

Activate shuffle mode.
Show favourites list.
Go back to higher-level folder of the media
source.
Symbols for categories and groups of media files
Music tracks.
Videos.
Playlists.
Albums.
Artists.
Genre.
Podcasts.
Audio books.
Symbols for video playback
Play video in full-screen mode.
Minimise playback.
Selecting and playing a media
source
Please refer to and on page 190.
Selecting a media source
Before playing media files you must first connect a
media source.
An internet connection must be available in order to
use streaming services.
1. Connect an external media source (if playback
from an external media source is desired).
2. Select the connected media source that is to be
used for playback.
Playing audio and video files
You can search for and play media files from an
available media source in various ways.
Searching in the folder structure
All media files of USB devices are filtered according
to categories (e.g. album, artist, track). This category
view is always displayed in
My media
. The classic folder
structure of the individual USB data storage devices
is additionally located under
1. Show folder structure.
The folder structure of the selected media
source is displayed. If
gories (music, videos, playlists) and connected
media sources are displayed first.
2. Search through the folder structure for the desired track.
3. Or: touch to start the full-text search. The input field is displayed.
4. Enter the name of the desired track. The list of
found tracks is automatically updated during input.
5. Touch the desired track.
If the selection is located in a folder on a media
source at the start of playback, the media files
located in this folder will be added for playback.
If a playlist is played, all available tracks in the
playlist will be added for playback.
6. Close the selection with .
Selecting favourites
You can save individual tracks, genres, artists and albums as favourites.
1. Open favourites.
2. Touch the desired favourite.
Depending on the selection, all tracks that belong to
the favourite added for playback.
Setting up streaming services
Depending on the vehicle equipment, you can use
streaming services directly via the Infotainment system. For this you require an existing user account
with the respective streaming service and must log
in on the Infotainment system with this account. An
internet connection is also required to use these
services.
1. Select
2. Select the desired streaming service.
3. Enter the login data of the desired user account
Only media files that are stored in the internal memory (Jukebox) of the Infotainment system can be
Streaming
as the media source.
A list of available streaming services is displayed.
An input field for input of the login data is displayed.
and confirm.
The streaming service is added to the list of me-
dia sources as a new function button.
Saving favourites
My media
My media
is selected, cate-
.
206
Infotainment
Page 21

saved as favourites. You can save individual tracks,
albums, artists and genres.
1. Start playback.
2. Open favourites.
3. Touch .
Or: touch an already assigned favourite location
and hold for approx. 3 seconds.
4. Choose from the selection list:
— Track.
— Album.
— Artist.
— Genre.
— Playlist.
The selection is saved as a favourite at the selected
favourite location. If the favourite location was already assigned, the previously stored favourite is
overwritten.
The selection options in the selection list depend on
the data attached to the media file. If no genre is
specified for music files, for example, the genre cannot be saved as a favourite.
If a video file is currently being played, only this video can be saved as a favourite.
Entertainment playback via the
Infotainment system
Please refer to and on page 190.
The Infotainment system can be used to play music
and videos.
Video operation
In video mode, the Infotainment system display can
play a video from a data medium, from internal
memory, or from a streaming service. The video audio is relayed via the vehicle loudspeakers.
The video image is displayed only when the vehicle
is stationary. When the vehicle is in motion, the Infotainment system display is switched off. The video
audio can continue to be heard.
A stable Internet connection is required for playback
via a streaming service. Costs may be charged by the
mobile operator.
Navigation
Introduction to the topic
A global satellite system calculates the current vehicle position. Sensors in the vehicle analyse busy
routes. All measurements and potential traffic reports are compared with the available map material
to ensure optimum navigation to the destination.
Acoustic navigation announcements and visual guidance direct the driver to the destination.
The navigation is operated on the screen.
Depending on the country, some Infotainment func-
tions can no longer be selected when the vehicle is
travelling above a certain speed. This is not a malfunction, but simply a legal requirement.
WARNING
Configure the settings and enter destinations and
changes for the navigation only when the vehicle
is stationary.
The navigation may recalculate the route if
the driver misses a turning.
The quality of the navigation recommendations depends on the navigation data available
and any reported traffic jams.
Navigation announcements
Navigation announcements are acoustic driving instructions for the current route.
The type and frequency of navigation announcements depends on the driving situation, e.g. starting
route guidance, driving on a motorway or gyratory
system, and the settings.
A navigation announcement informing you that you
have reached the destination area is given if the exact destination cannot be reached, e.g. because it is
located in a non-digitised area. In addition, notes on
the direction and distance to the destination are displayed on the screen.
During dynamic route guidance, you receive information about reported traffic jams on the route. An
additional navigation announcement is given if the
route is recalculated due to traffic jams → page 211.
The volume of a navigation announcement can be
adjusted during output of the announcement. All
other navigation announcements are then given
with this volume setting.
Navigation announcements are not given if
the Infotainment system has been muted.
Navigation 207
Page 22

Restrictions during navigation
When the Infotainment system cannot receive any
data from GPS satellites, e.g. in a tunnel or underground car park, navigation can still continue using
the vehicle sensors.
In areas that are not or are not completely included
in the Infotainment memory, the Infotainment system will also try to enable route guidance.
If navigation data are unavailable or incomplete, the
navigation system may be unable to determine the
exact vehicle position. As a result, the navigation
may not be as exact as usual.
Road navigation is subject to continuous changes,
e.g. new roads, road works, road closures, changes
in the road names and house numbers. In the case of
obsolete navigation data, there may be errors or inaccuracies during navigation.
Controlling the navigation map
For optimal viewing, you can also operate the navigation map with advanced finger movements.
Advanced operation is available depending on the
equipment.
Moving the map
Recommendation: use your index finger.
— Use your finger to move the map.
Zooming in
Recommendation: use your index finger.
— Touch the map twice to zoom in on a particular
position.
Zooming out
Recommendation: use your index and middle finger.
— Touch the map with two fingers simultaneously.
Changing view
Recommendation: use your index finger.
— Touch the map twice and hold your finger on the
screen.
— Move your finger upwards to zoom out from the
map view. Move your finger downwards to zoom
in on the map view.
Changing view
Recommendation: use thumbs and index finger.
— Touch the map with two fingers simultaneously
and hold them down.
— Move your fingers together to zoom out from the
map view. Move your fingers apart to zoom in on
the map view.
Tilting the view
Recommendation: use your index and middle finger.
— Touch the map with two fingers horizontal to
each other and hold them down.
— Move your fingers upwards to tilt the map view
forwards. Move your fingers downwards to tilt
the map view backwards.
Rotating the map
Recommendation: use thumbs and index finger.
— Touch the map with two fingers simultaneously
and hold them down.
— Turn your fingers clockwise or anticlockwise to
rotate the map view.
Stored data
The Infotainment system stores certain data, e.g.
frequently driven routes and position information, to
enable you to enter destinations quickly and to optimise route guidance.
Deleting stored data
1. Touch
pattern
Settings
.
Basic settings
Delete Usage
2. Touch the required data.
Navigation equipment and symbols
Please refer to and on page 190 and at
the start of the chapter on page 207.
Navigation
The navigation functions depend on the equipment
level and country.
Equipment
— Destination entry and route calculation (offline
and online).
— Import of routes and destinations.
— Simultaneous display of two navigation maps
(screen and instrument cluster).
— Online map update.
— Predictive navigation.
— 3D City Maps.
— Online Traffic Information, e.g. dynamic POIs or
traffic reports.
— 360° range display (electric and hybrid vehicles).
Map symbols
The buttons and displays depend on the set up and
the current driving situation.
208 Infotainment
Page 23

The map displays symbols for traffic reports and
POIs, e.g. petrol stations, railway stations or interesting stopovers, when navigation data is available
→ page 211.
Current position
Further options for route guidance.
Displays the navigation map.
Opens the contact list.
Navigation setup.
Additional window with further options.
Additional window with route options.
Centres map on the current position.
Aligns the map to north.
Information on current route guidance.
Map scale.
Symbols in the additional window
— Touch to open the additional window.
Centres map on the current position.
Route options and information on current
route guidance.
360° range display.
Repeat the previous navigation announcement.
Volume for navigation announcements.
E-charging station.
Car park.
Tourist information.
Train station.
Restaurant.
Traffic reports
Traffic reports displayed on the map when navigation data is available → page 211, Traffic informa-
tion.
Touch a traffic report to open an additional window
with further details → page 211, Function descrip-
tions.
Slow-moving traffic.
Traffic jam.
Accident.
Ice.
Road closed.
Risk of skidding.
Danger.
Road works.
Strong winds.
Other symbols
Detailed destination entry for a particular address.
Route plan symbols
Current position.
Destination of the current route guidance.
Close the route plan.
POI symbols
POIs are displayed on the map when navigation data
is available.
Touch the desired POI to start a route guidance
→ page 210.
Filling station.
Navigation data
Please refer to and on page 190 and at
the start of the chapter on page 207.
The Infotainment system has an internal navigation
data memory. Depending on the country, the required navigation data is already pre-installed.
In order to carry out route guidance correctly and
make full use of the functions offered, the Infotainment system always requires up-to-date navigation
data.
NOTICE
If you use obsolete data, navigation may be impaired. Current routes cannot be determined or
route guidance leads to the wrong destination.
Always keep navigation data up-to-date.
·
Navigation 209
Page 24

Updating navigation data online
Navigation data for frequently travelled regions is
automatically updated in the background with an
existing Internet connection and valid privacy settings → page 175, Privacy settings.
1. Navigation data is automatically updated while
the ignition is switched on.
Automatic update of navigation data depends
on the privacy settings set. No update is car-
ried out in “incognito”- mode → page 175.
Updating navigation data manually
Current navigation data for larger regions, e.g.
Western Europe, can be downloaded from the Internet at www.volkswagen.com and stored on a suitable USB data storage device available commercially.
If you switch off the Infotainment system, installation will be interrupted and will automatically continue once the unit is switched on again. Navigation
via the USB memory stick is not possible.
1. Download navigation data to a USB data storage
device
2. Switch on the vehicle ignition.
3. Connect the USB data storage device to the Infotainment system. The navigation data is automatically updated in the background.
The version of the map data is displayed under
HOME
System information
.
WARNING
Updating navigation data manually while driving
may result in accidents and serious injuries.
Only update navigation data when the vehicle is
·
stationary.
Starting route guidance
Please refer to and on page 190 and at
the start of the chapter on page 207.
Depending on country and vehicle equipment, different functions are available for destination input.
Further information about the symbols on the Infotainment system display is available on → page 208.
Destination inputs are located in the main menu of
the navigation system.
Opening the main menu of the navigation system
— Touch
HOME
.
Entering an address
Enter a known address for route guidance. The navigation system will suggest possible destinations
during input.
Selecting a destination and starting navigation
1. Touch
Search
.
OR: touch .
2. Enter the address of the destination and select
the desired destination.
Route
3. Touch
or
Start
.
Quick start
1. Touch
Search
.
2. Enter the address of the destination and press
and hold the desired destination for a few seconds.
Enter the destination as accurately as possi-
ble. If you make a mistake when entering the
destination, route guidance will not be possible or
you may be navigated to the wrong destination.
Predictive navigation
The “Predictive navigation” function uses stored data to suggest possible destinations.
Selecting a destination and starting navigation
1. Touch
Predictive Navigation
.
2. Select the desired destination. Route guidance
starts automatically.
Last destinations
The navigation system stores up to ten destinations
that you have driven to last in order to make them
available for route guidance. New destinations automatically overwrite the oldest destination.
Selecting a destination and starting navigation
1. Touch
Last destinations
and select the de-
sired destination.
2. Touch
Route
.
Quick start
1. Touch
Last destinations
and press and hold
the desired destination for a few seconds.
Favourite destinations
Save up to 20 destinations as favourites.
Saving a destination as a favourite
1. Touch in the additional window during desti-
nation input.
Selecting a destination and starting navigation
1. Touch
Favourites
.
210 Infotainment
Page 25

2. Touch the desired destination.
3. Touch
Route
.
Quick start
1. Touch
Favourites
and press and hold the de-
sired destination for a few seconds.
Selecting on the map
The navigation map contains active areas at many
locations which are suitable for destination input. To
do this, touch the desired position or location on the
map. You can start route guidance if map data are
available at this location.
Destination input via the navigation map depends on
the data status and is not possible for all positions.
To start “offroad navigation”, touch a free area without positioning data → page 211.
Starting navigation
1. Touch .
2. Move the map view until the desired position
can be selected. The navigation map can be operated by extended touch gestures → page 207.
3. Touch the desired destination on the map.
Route
4. Touch
.
Offroad navigation
The “offroad navigation” function calculates routes
to selected destination points with unknown data. If
a destination point is not on known roads or there is
no positioning data available for this point, the navigation system will calculate the route up to the
nearest point on the known roads and then complete the route up to the destination point by a direct connection.
Starting navigation
1. Touch .
2. Move the map view until the desired position
can be selected. The navigation map can be operated by extended touch gestures → page 207.
3. Touch any point on the map without positioning
data.
4. Touch
Route
.
Using contact data
Start navigation using the stored address data of a
contact. Stored contacts without address data cannot be used for route guidance.
Starting navigation
1. Touch .
2. Touch the desired destination.
3. Touch
Route
.
NOTICE
If the address data of a contact are out-of-date, navigation will still be performed to the stored address.
Make sure that the address of the contact is up-todate.
Traffic information
Please refer to and on page 190 and at
the start of the chapter on page 207.
The Infotainment system automatically receives detailed traffic information when connected to the Internet. This information is indicated by symbols and
colouring of the road network on the map.
Receipt of traffic information depends on the
privacy settings set. In the maximum privacy
settings mode, no traffic information is received
→ page 175.
Traffic reports
Traffic reports, e.g. traffic jams or slow-moving traffic are shown as symbols on the navigation map
→ page 208, Navigation equipment and symbols.
When route guidance is active, traffic reports that
are on the current route are displayed in the route
plan. You can bypass these traffic reports
→ page 211, Function descriptions.
Traffic flow display
The traffic flow is shown on the navigation map for
all traffic reports by colouring of the road network.
Slow-moving traffic.
Orange
Red
Traffic jam.
Function descriptions
Please refer to and on page 190 and at
the start of the chapter on page 207.
Route plan
The route plan contains information on all events,
e.g. starting points, stopovers, traffic reports, POIs
and destinations, if navigation data is available.
When you touch an event, an additional window
opens with further options. The options available
depend on the event and the current settings
→ page 207.
Opening and closing the route plan
— Touch the route plan directly to open it.
Navigation 211
Page 26

— To close it, touch .
Editing route guidance
To edit route guidance, move the stopovers or the
destination to TripView.
1. Hold the desired destination until it is visibly
highlighted.
2. Move the destination into the desired position.
3. Remove your finger from the screen. The route
will be recalculated.
Bypassing traffic reports
The route plan displays current traffic reports when
navigation data is available. Bypass traffic reports by
editing the route plan → page 211, Traffic informa-
tion.
1. Touch a traffic report.
2. Touch
Bypass
. The route will be recalculated.
Additional window
If you use any navigation functions, an additional
window with further options may appear. The possible options depend on the function used.
Closing the additional window
— Touch a free area outside the additional window.
— OR: Touch .
Functions in the additional window:
on map
Display
Add stopover
Direct route
Delete
Bypass
Display the selection on the map.
Add a stopover to the route guidance.
Start direct route guidance.
Delete stopover from the route guidance.
Bypass traffic congestion. The route will be
recalculated.
Stop route guidance
End the current route guidance.
Close the additional window.
Add a destination to favourites.
Learning usage patterns
While travelling, the navigation saves the routes
travelled and destinations arrived at in order to create suggested destinations automatically. Destinations are learned depending on the time of day and
the day of the week.
The navigation system can suggest up to five routes
at the same time. The suggested routes may differ
from the routes used in normal route guidance.
Route guidance begins when one of the suggested
routes is selected.
The route guidance follows the selected route until
the vehicle deviates from it. The route is recalculated and will guide you back to the selected route via
a direct alternative.
Serious traffic congestion is taken into account in
the route guidance and, if an alternative route is
available, avoided if navigation data is available.
You can activate or deactivate the function at any
time.
Activate and deactivate learning usage patterns
The setting can be found in the relevant navigation
pattern
pattern
.
.
Basic function settings
.
Delete
Learn usage
Learn
usage pattern
usage
.
menu
— To activate the function, activate
— To deactivate the function, deactivate
— To delete saved data, touch
360° range display.
For hybrid and electric vehicles, the 360° range display shows the possible range with the current
charge level of the high-voltage battery.
Activating the 360° range display
— Touch
Mobile phone interface
Introduction to the topic
You can connect your mobile phone to the Infotainment system via the telephone interface and then
use the Infotainment system to control the telephone functions. Sound is played back using the via
the vehicle loudspeakers.
You can connect up to two mobile devices to the Infotainment system simultaneously. Only one device
is active and can be used to make calls.
You can use the second connected device to receive
calls via the Infotainment system and for media
playback.
High speeds, poor weather and poor road conditions, loud noise levels (also outside the vehicle) and
also network quality may impair telephone calls in
the vehicle.
As a general rule, a device (e.g. mobile phone)
must only be paired once. The Bluetooth or
Wi-Fi connection with the device can be restored at
any time without having to pair the device again.
212 Infotainment
Page 27

Equipment and symbols of the
mobile phone interface
Please refer to and on page 190.
Equipment features
— Hands-free function.
— Use up to two phones simultaneously.
— Phone book with a maximum of 5,000 contact en-
tries (2,000 for 8.25-inch and 6.5-inch radio).
— Text message functions via Bluetooth®:
— Read text messages.
— Write text messages (including templates).
— Have text messages read out loud.
— Message history.
— Email functions via Bluetooth®:
— Read emails.
— Write emails.
— Bluetooth® and Wi-Fi device pairing via NFC.
— Convenience telephony.
— Connection to wireless charging function.
— Connection to microphone installed in the vehicle.
Symbols in the main menu
The appearance of the symbols may differ depending on Infotainment system.
Contacts.
Call lists for incoming and outgoing calls.
Dial phone number.
Text messages (texts and email).
Settings of mobile phone interface.
Select active device.
Hold call.
Continue call.
Start conference.
Make emergency call.
SOS
Obtain help in the event of breakdown.
Obtain information about the Volkswagen
brand and selected value-added services relating to traffic and travel.
Voicemail.
Symbols in the contact window
— Touch to open the contact window.
Input to search for contacts.
Edit favourites.
Add favourites.
Remove favourites.
Symbols for call lists
— Touch
to open the call lists.
Incoming call.
Outgoing call.
Missed call.
Phone number (work).
Phone number (private).
Mobile number (work).
Mobile number (private).
Fax (private).
Fax.
Symbols for phone calls
The appearance of the symbols may differ depending on Infotainment system.
Start call or bring to foreground.
End or reject call.
Open contact list.
Dial phone number.
Mute hands-free system.
Symbols for text messages
The appearance of the symbols may differ depending on Infotainment system.
— Touch to open the text messages.
Activate voice input → page 200.
Templates for text messages.
Mobile phone interface 213
Page 28

Areas where special regulations
apply
Please refer to and on page 190.
Switch off the telephone and mobile phone interface
in areas with a risk of explosion. These areas are not
always clearly signposted. They include, for example:
— Areas immediately around chemical pipelines and
tanks.
— Lower decks of ships and ferries.
— The area around vehicles which run on liquid gas
(such as propane or butane).
— Places where there are chemicals or particles such
as flour, dust and metal powder in the air.
— All other places where the vehicle engine and tel-
ephone must be switched off.
WARNING
Switch off telephones in areas with a risk of explosion.
NOTICE
Your telephone must always be switched off in areas
where special regulations apply and when the use of
telephones is forbidden. The radiation produced by
the telephone when switched on may interfere with
sensitive technical and medical equipment, possibly
resulting in malfunction or damage to the equipment.
Pairing, connecting and managing
Please refer to and on page 190.
Prerequisite for pairing:
✓ Bluetooth® is activated on the mobile device.
✓ Bluetooth® is activated in the Infotainment sys-
tem.
Pair a telephony-capable mobile device with the Infotainment system to use the functions of the mobile phone interface. The mobile device must be
paired with the Infotainment system before the first
connection is established. A user profile is then automatically stored in the Infotainment system
→ page 215.
The pairing process can take a few minutes. The
available functions depend on the mobile device
used and its operating system.
Pairing the mobile device
1. Open the list of available Bluetooth® devices on
the mobile device and select the device name of
the Infotainment system.
2. Observe the messages on the mobile device and
Infotainment system and confirm as necessary.
If pairing was successful, the data of the telephone will be stored in the user profile.
3. Optional: confirm message for data transfer on
the mobile device.
WARNING
If you carry out pairing when driving, this can
cause accidents or injuries.
Carry out pairing only when the vehicle is sta-
·
tionary.
When some mobile devices are paired, a PIN
number is shown on the display of the mobile
device. Enter this number on the Infotainment system to finish pairing.
Bluetooth® pairing via NFC
Prerequisites for one-off pairing:
✓ Stowage compartment with wireless charging
function (compartment with interface for mobile telephone) is installed in the vehicle.
✓ NFC is activated on the mobile device.
1. Open the
mobile phone
2. Unlock the mobile device.
3. Place the mobile device correctly on the shelf
for the wireless charging function.
The mobile device is paired with the Infotainment
system.
mobile phones
again when you leave the menu.
Active and passive connection
At least one mobile device must be connected to the
Infotainment system in order to use the functions of
the mobile phone interface. If several mobile devices
are connected to the Infotainment system, you can
switch between active and passive connections. Establish an active connection to the Infotainment system in order to operate the mobile phone interface
with the desired mobile device.
Difference between connection types
Active
Telephone settings
.
The wireless charging function is deactivated
while the Infotainment system is in the
menu. Wireless charging will be activated
Mobile device is paired and connected. The
functions of the mobile phone interface are
menu and touch
Select
Known
214 Infotainment
Page 29

performed with the data of this mobile device.
Mobile device is paired and connected. Only
Passive
incoming calls can be accepted via the mobile
phone interface. No other functions are available.
Paired mobile devices are stored in the Infotainment
system even if they are not currently connected.
Connecting a mobile device
Prerequisite: the mobile device is paired with the Infotainment system.
1. Activate Bluetooth® on the mobile device.
Establishing an active connection
Prerequisite: several mobile devices are connected
with the Infotainment system simultaneously.
1. Touch .
2. Touch the name of the active mobile device.
3. Select the desired mobile device. Other mobile
devices then automatically have a passive connection.
User profiles
An individual user profile is automatically created for
every paired mobile device. Data from the mobile
device are stored in the user profile, e.g. contact details or settings. A maximum of ten user profiles can
be stored in the Infotainment system simultaneously.
Deleting a user profile
1. Open the settings in the telephone main menu.
2. The user profiles are located in the area
3. Select the user profile and touch to delete.
vices
or
Select mobile phone
.
Mobile de-
Basic and convenience telephony
Please refer to and on page 190.
Depending on equipment, you can use two mobile
phone interface types:
— Basic mobile phone interface
— Comfort mobile phone interface
Basic mobile phone interface
The Basic mobile phone interface uses the HFP Bluetooth® profile for transmission. This allows use of
telephone functions via the Infotainment system
and output via the vehicle speakers.
Comfort mobile phone interface
The Comfort mobile phone interface uses the HFP
Bluetooth® profile like the Basic mobile phone interface.
The Comfort mobile phone interface may be equipped with a wireless charging function → page 215.
In order to use the wireless charging function, you
must place a suitable mobile device correctly in the
stowage compartment. The mobile device is then
connected to the vehicle aerial. This improves the
reception and call quality.
Wireless charging function
Please refer to and on page 190.
Fig. 131 Illustration: stowage area with mat for wire-
less charging function.
The wireless charging function is dependent on the
equipment level and is not available in all countries.
The stowage area for the wireless charging function
is located either in the centre console or in the area
between the front seats depending on vehicle.
The wireless charging function enables wireless energy transmission by electromagnetic induction over
a short distance.
The maximum charging power is 5 watts.
The Qi standard enables wireless charging of suita-
ble Qi-enabled mobile devices.
In certain vehicles, a “telephone symbol” on the mat
indicates the centre position of the wireless charging function → Fig. 131 1.
To charge a Qi-enabled mobile device, place it in the
stowage compartment with the display facing up so
that it is centrally positioned and has full surface
contact. The charging process will start automatically. The operating instructions or the telephone manufacturer will provide information about whether
the mobile device supports the Qi standard.
Mobile phone interface
215
Page 30

The factory-fitted Infotainment system will provide
information about the start of the charging operation and, where applicable, about any foreign objects with metallic components such as coins, keys,
etc. that are detected in the stowage compartment.
Remove foreign objects immediately!
If the mobile device has not been placed correctly or
is too large, it cannot be detected or cannot be detected correctly. In certain circumstances, the system will then report that there is a foreign object in
the stowage compartment. Correct positioning in
the stowage compartment may rectify the fault.
Qi-enabled mobile devices that are too large in their
dimensions cannot be charged using the wireless
charging facility.
Always place only one Qi-enabled mobile device
without protective case and with a maximum length
of 140 mm on the stowage area of the wireless
charging function.
Declaration of conformity
“Wireless charging function”:
Hereby, Novero Dabendorf GmbH, declares that this
WCH-185 is in compliance with the essential requirements and other relevant provisions of Directive 1999/5/EC.
WARNING
Do not place any objects made of metal or with
metallic components on the stowage area of the
wireless charging function. Metallic objects may
become very hot. This may cause burn injuries to
the skin and cause a fire.
NOTICE
Do not place any ID cards, credit cards etc. with
magnetic strips or with a chip on the stowage area
with the wireless charging function. The data saved
on the magnetic strip or on the chip may become
unusable.
Making phone calls and sending
messages
Please refer to and on page 190.
Opening the mobile phone interface
— Touch
Using the telephone
Select a phone number to start a call. Different functions are available for selection of phone numbers.
HOME
.
Using contact data
If there are several phone numbers for each contact,
you must select these correspondingly.
— Touch and enter the contact data you are
looking for. Touch the contact in the list to start
the call.
— Touch
Favourites
and a contact in the list to
start the call.
— Touch
All
and a contact in the list to start
the call.
Using the call list
The mobile phone interface stores incoming and
outgoing calls in the call list. Frequently used phone
numbers are stored as favourites. Start calls via the
call list.
— Touch
All
and a number in the list to start
the call.
— Touch
Missed calls
and a number in the list to
start the call.
— Touch
and a contact to start the
Favourites
call.
Entering a phone number manually
1. Touch and enter the phone number.
2. Touch to start the call.
While you are entering a phone number, contacts that match the number will be shown on
the Infotainment system display.
Sending text messages
Depending on the mobile device and the Infotainment system used, you can send and receive text
messages and emails via the mobile phone interface.
Switching between text messages and email
To send text messages or emails, activate the corresponding option at the top left of the screen. The
active option is displayed on the screen, e.g.
message
.
Text
1. Touch .
2. Touch the desired option at the top left of the
screen.
Sending text messages
1. Touch
New message
and enter the message
on the screen.
2. Touch OK and one or more contacts in the list.
If necessary, you can search for a contact by
means of
Search
.
216 Infotainment
Page 31

Sending emails.
1. Touch
New message
and enter the message
on the screen.
2.
If necessary, you can search f
means of
and one or more contacts in the list.
or a contact by
Search
.
OK
Touch
Telephone book, favourites and
speed dial buttons
Please refer to and on page 190.
Telephone book
When a telephone is paired with the Inf
system for the first time, the telephone book is stored in the Infotainment system. It may be necessary
to confirm transfer on the telephone.
The telephone book is updated each time a new
connection is established. The still existing telephone book can be used during the update.
If conference calls are supported, the telephone
book can be opened during a call.
If an image is stored for a contact, this can also be
displayed in the list next to the entry.
Favourites and speed dial buttons
A favourite from the telephone book can be assigned to a speed dial button. If an image is stored in
the entry, it will be displayed on the speed dial button.
Speed dial buttons must be assigned manually and
are assigned to a user profile.
Assigning a speed dial button
1. Touch .
2.
Touch a contact from the telephone book. If
several phone numbers are stored for a contact,
touch a number from the list.
Editing a speed dial button
1. Press and hold the speed dial button until the
telephone book is opened.
Touch a new contact from the telephone book.
2.
If several phone numbers are stored for a contact, touch a number from the list.
Calling a favourite
1. Touch the assigned speed dial button.
avourites are not automatically updated. If
F
the phone number of a contact changes, the
speed dial button must be assigned again.
otainment
Deleting a speed dial button
1. Touch .
2. Touch the speed dial button and confirm the
query about whether you want to delete with
OK
.
Mobile phone interface 217
Page 32

FCC Information to User
This equipment has been tested and found to comply with the limits for
a Class B digital device, pursuant to Part 15 of the FCC Rules. These
limits are designed to provide reasonable protection against harmful
interference in a residential installation. This equipment generates,
uses and can radiate radio frequency energy and, if not installed and
used in accordance with the instructions, may cause harmful
interference to radio communications. However, there is no guarantee
that interference will not occur in a particular installation. If this
equipment does cause harmful interference to radio or television
reception, which can be determined by turning the equipment off and
on, the user is encouraged to try to correct the interference by one of
the following measures:
• Reorient or relocate the receiving antenna.
• Increase the separation between the equipment and receiver.
• Connect the equipment into an outlet on a circuit different
from that to which the receiver is con-nected.
• Consult the dealer or an experienced radio/TV technician for
help.
Caution
Modifications not expressly approved by the party responsible for
compliance could void the user’s authority to operate the equipment.
FCC Compliance Information : This device complies with Part 15 of the
FCC Rules. Operation is subject to the following two conditions: (1)
This device may not cause harmful interference, and (2) this device
must accept any interference received, including interference that may
cause undesired operation.
IMPORTANT NOTE:
FCC RF Radiation Exposure Statement:
This equipment complies with FCC RF radiation exposure limits set
forth for an uncontrolled environment. This equipment should be
installed and operated with a minimum distance of 20 centimeters
between the radiator and your body. This transmitter must not be colocated or operating in conjunction with any other antenna or
transmitter.
 Loading...