


OWNER'S MANUAL
MFL65920563
English
Česky
Microwave oven with grill
PLEASE READ THIS OWNER’S MANUAL THOROUGHLY BEFORE OPERATING.
MH6883AAF
Slovenčina
www.lg.com
You cannot operate your oven with the door open due to the safety interlocks
built into the door mechanism. These safety interlocks automatically switch off
any cooking activity when the door is opened; which in the case of a
microwave oven could result in harmful exposure to microwave energy.
It is important not to tamper with the safety interlocks.
Do not place any object between the oven front face and the door or allow
food or cleaner residue to accumulate on sealing surfaces.
Do not operate your oven if it is damaged. It is particularly important that the
oven door closes properly and that there is no damage to the: (1) door(bent),
(2) hinges and latches (broken or loosened), (3) door seals and sealing
surfaces.
Your oven should not be adjusted or repaired by anyone except qualified
service personnel.
Precautions
When heating liquids, e.g. soups, sauces and beverages in your microwave
oven, delayed eruptive boiling can occur without evidence of bubbling. This
could result in a sudden boil over of the hot liquid. To prevent this possibility
the following steps should be taken:
1 Avoid using straight sided containers with narrow necks.
2 Do not overheat.
3 Stir the liquid before placing the container in the oven and again halfway
through the heating time.
4 After heating, allow to stand in the oven for a short time, stir or shake
them(especially the contents of feeding bottles and baby food jars) again
carefully and check the temperature of them before consumption to avoid
burns (especially, contents of feeding bottles and baby food jars).
Be careful when handling the container.
Always allow food to stand after being cooked by
microwaves and check the temperature of them
before consumption. Especially contents of feeding
bottles and baby food jars.
Please ensure cooking times are correctly set as
over cooking may result in the FOOD catching fire
and subsequent damage to your oven.
2
Precautions to avoid possible exposure to excessive microwave energy.
Warning
Warning
Contents
3
How the Microwave Oven Works
Microwaves are a form of energy similar to radio and television waves and
ordinary daylight. Normally, microwaves spread outwards as they travel
through the atmosphere and disappear without effect. Microwave ovens,
however, have a magnetron which is designed to make use of the energy in
microwaves. Electricity, supplied to the magnetron tube, is used to created
microwave energy.
These microwaves enter the cooking area through openings inside the oven.
A turntable or tray is located at the bottom of the oven. Microwaves cannot
pass through metal walls of the oven, but they can penetrate such materials
as glass, porcelain and paper, the materials out of which microwave-safe
cooking dishes are constructed.
Microwaves do not heat cookware, though cooking vessels will eventually get
hot from the heat generated by the food.
A very safe appliance
Your microwave oven is one of the safest of all home
appliances. When the door is opened, the oven
automatically stops producing microwaves. Microwave
energy is converted completely to heat when it enters
food, leaving no “left over” energy to harm you when
you eat your food.
Precautions
Contents
Important safety instructions
Unpacking & Installing
Setting the Clock
Child lock
Micro Power Cooking
Micro Power Level
Two Stage Cooking
Quick Start
Energy Saving
Grill Cooking
Combination Cooking
Auto Cook
Auto Defrost
Quick Defrost
Defrost & Grill
Taste Saver
Microwave - safe Utensils
Food characteristics & Microwave cooking
Questions & Answers
Technical Specifications
2
3
4 ~ 8
9 ~ 10
11
12
13
14
15
16
17
18
19
20 ~ 22
23 ~ 24
25 ~ 26
27 ~ 28
29
30
31 ~ 32
33
34
Important Safety
4
Instructions
This is the safety alert symbol. This symbol alerts you to potential hazards that can kill or hurt you and others.
All safety messages will follow the safety alert symbol and either the word “WARNING” or “CAUTION”. These word means :
Please keep for future reference. Read and follow all instructions before using your oven
toprevent the risk of fire, electric shock, personal injury, or damage when using the oven.
This guide does not cover all possible conditions that may occur. Always contact yourservice
agent or manufacturer about problems that you do not understand.
WARNING
CAUTION
This symbol will alert you to hazards or unsafe practices which could cause serious bodily harm or death.
This symbol will alert you to hazards or unsafe practices which could cause bodily injury or property damage.
WARNING
1.D
o not attempt to tamper with, or make any adjustments or repairs to the
door, door seals, control panel, safety interlock switches or any other part
of the oven which would involve the removal of any cover protecting
against exposure to of the microwave oven are faulty. Repairs should only
be undertaken by a qualified service technician.
Unlike other appliances, the microwave oven is a high-voltage and a highelectrical-current piece of equipment. Improper use or repair could result in
harmful exposure to excessive microwave energy or in electric shock.
2.D
o not use the oven for the purpose of dehumidification. (ex. Operating
the microwave oven with wet newspapers, clothes, toys, electric devices,
pet or child etc.)
It can be the cause of serious damage to safety such as a fire, a burn or a
sudden death due to an electric shock.
3.T
he appliance is not intended for use by young children or elderly persons.
Only allow children to use the oven without supervision when adequate
instructions have been given so that the child is able to use the oven in a
safe way and understands the hazards of improper use.
Improper use may cause damage such as a fire, electric shock or burn.
4.A
ccessible parts may become hot during use. Young children should be
kept away.
They may get a burn.
5.L
iquids or other foods must not be heated in sealed containers since they
are liable to explode. Remove the plastic wrapping from food before
cooking or defrosting. Note though that in some cases food should be
covered with plastic film, for heating or cooking.
They could burst.
6.B
e certain to use proper accessories on each operation mode
Improper use could result in damage to your oven and accessories, or could
make spark and a fire.
7.T
he children should not allow to play with accessories or hang down
from the door handle.
They may get hurt.
Please keep for future reference. Read and follow all instructions before using your oven
toprevent the risk of fire, electric shock, personal injury, or damage when using the oven.
This guide does not cover all possible conditions that may occur. Always contact yourservice
agent or manufacturer about problems that you do not understand.
5
Important Safety
Instructions
WARNING
8. If the door or door seals are damaged, the oven must not be operated
until it has been repaired by a competent person.
9. It is hazardous for anyone other than a competent person to carry out
any service or repair operation that involves the removal of a cover
which gives protection against exposure to microwave energy.
10. When the appliance is operated in the combination mode, children
should only use the oven under adult supervision due to the
temperatures generated.
CAUTION
1. You cannot operate your oven with the door open due to the safety
interlocks built into the door mechanism. It is important not to tamper
with the safety interlocks.
It could result in harmful exposure to excessive microwave energy. (Safety
interlocks automatically switch off any cooking activity when the door is
opened.)
2. Do not place any object (such as kitchen towels, napkins, etc.) between
the oven front face and the door or allow food or cleaner residue to
accumulate on sealing surfaces.
It could result in harmful exposure to excessive microwave energy.
3. Do not operate your oven if it is damaged. It is particularly important
that the oven door closes properly and that there is no damage to the:
(1) door(bent), (2) hinges and latches (broken or loosened), (3) door
seals and sealing surfaces.
It could result in harmful exposure to excessive microwave energy.
4. Please ensure cooking times are correctly set, Small amounts of food
require shorter cooking or heating time.
Over cooking may result in the food catching on fire and subsequent
damage to your oven.
5. When heating liquids, e.g. soups, sauces and beverages in your
microwave oven,
* Avoid using straight sided containers with narrow necks.
* Do not overheat.
* Stir the liquid before placing the container in the oven and again
halfway through the heating time.
* After heating, let it stand in the oven for a short time; stir or shake it
again carefully and check the temperature of it before consuming to
avoid burns (especially, contents of feeding bottles and baby food jars).
Be careful when handling the container. Microwave heating of beverages
can result in delayed eruptive boiling without evidence of bubbling.
This could result in hot liquids suddenly boiling over.
6. An exhaust outlet is located on the top, bottom or side of the oven.
Don’t block the outlet.
It could result in damage to your oven and poor cooking results.
7. Do not operate the oven when empty. It is best to leave a glass of water
in the oven when not in use. The water will safely absorb all microwave
energy, if the oven is accidentally started.
Improper use could result in damage to your oven.

CAUTION
Important Safety
Instructions
Please keep for future reference. Read and follow all instructions before using your oven
toprevent the risk of fire, electric shock, personal injury, or damage when using the oven.
This guide does not cover all possible conditions that may occur. Always contact yourservice
agent or manufacturer about problems that you do not understand.
6
8. Do not cook food wrapped in paper towels, unless your cook book
contains instructions for the food you are cooking. And do not use
newspaper in place of paper towels for cooking.
Improper use can cause an explosion or a fire.
9.
D
o not use wooden containers and ceramic containers that have metallic
(e.g. gold or silver) inlays. Always remove metal twist ties. Check that the
utensils are suitable for use in microwave ovens before use.
They may heat-up and char. Metal objects in particular may arc in the
oven, which can cause serious damage.
10. Do not use recycled paper products.
They may contain impurities which may cause sparks and/or fires when
used in cooking.
11. Do not rinse the tray and rack by placing it in water just after
cooking. This may cause breakage or damage.
Improper use could result in damage to your oven.
12. Be certain to place the oven so the front of the door is 8 cm or
more behind the edge of the surface on which it is placed, to avoid
accidental tipping of the appliance.
Improper use could result in bodily injury and oven damage.
13. Before cooking, pierce the skin of potatoes, apples or any such fruit or
vegetable.
They could burst.
14. D o not cook eggs in their shell. Eggs in their shell and whole
hardboiled eggs should not be heated in microwave ovens since they
may explode, even after microwave heating has ended.
Pressure will build up inside the egg which will burst.
15. Do not attempt deep fat frying in your oven.
This could result in a sudden boil over of the hot liquid.
16. I f smoke is observed, switch off or disconnect the oven from the power
supply and keep the oven door closed in order to stifle any flames.
It can cause serious damage such as a fire or electric shock.
17. When food is heated or cooked in disposable containers made of
plastic, paper or other combustible materials, keep an eye on the oven
and check it frequently.
Your food may be poured due to the possibility of container
deterioration, which also can cause a fire.
18. The temperature of accessible surfaces may be high when the
appliance is operating. Do not touch the oven door, outer cabinet,
rear cabinet, oven cavity, accessories and dishes during grill mode,
convection mode and auto cook operations, before clearing make sure
they are not hot.
As they will become hot, there is the danger of a burn unless wearing
thick culinary gloves .
19. The oven should be cleaned regularly and any food deposits should
be removed.
Failure to maintain the oven in a clean condition could lead to
deterioration of the surface. This could adversely affect the life of the
appliance and possibly result in a hazardous situation.
CAUTION
Please keep for future reference. Read and follow all instructions before using your oven
toprevent the risk of fire, electric shock, personal injury, or damage when using the oven.
This guide does not cover all possible conditions that may occur. Always contact yourservice
agent or manufacturer about problems that you do not understand.
7
If the supply cord is damaged, it must be replaced by the
20. Only use the temperature probe recommended for this oven.
You can not ascertain that the temperature is accurate with an unsuitable
temperature probe.
21. Follow exact directions given by each manufacturer for their popcorn
product. Do not leave the oven unattended while the corn is being
popped. If corn fails to pop after the suggested times, discontinue
cooking. Never use a brown paper bag for popping corn. Never
attempt to pop leftover kernels.
Overcooking could result in the corn catching a fire.
22. This appliance must be earthed.
The wires in the mains lead are colored in accordance with the
following codes
BLUE ~ Neutral
BROWN ~ Live
GREEN & YELLOW ~ Earth
As the colours of the wires in the mains lead of this appliance may not
correspond with the coloured markings identifying the terminals in
your plug proceed as follows:
The wire which is colored BLUE must be connected to the terminal
which is marked with the letter N or Colored BLACK. The wire which
is colored BROWN must be connected to the terminal which is marked
with the letter L or colored RED. The wire which is colored GREEN &
YELLOW or GREEN must be connected to the terminal which is marked
with the letter E or
.
manufacturer, a service agent or a similarly qualified person in order
to avoid potential hazards.
Improper use may cause serious electric damage.
23. This oven should not be used for commercial catering purposes.
Improper use could result in damage to your oven.
24. T he microwave oven must be operated with the decorative door open
if the microwave oven is placed in a cabinet.
If the door is closed while operating, the airflow will get worse possibly
resulting in a fire or damage to your oven and the cabinet.
25. The connection may be achieved by having the plug accessible or
by incorporating a switch in the fixed wiring in accordance with the
wiring rules.
Using improper plug or switch can cause an electric shock or a fire.
26. Should be monitored to ensure that children do not play with the device.
27. T he devices are not intended to be operated by an external timer or
by a separate control.
28. Only use utensils that are suitable for use in microwave ovens.
29. The microwave oven shall not be placed in a cabinet unless it has
been tested in a cabinet.
Important Safety
Instructions
CAUTION
8
Important Safety
Instructions
Please keep for future reference. Read and follow all instructions before using your oven
toprevent the risk of fire, electric shock, personal injury, or damage when using the oven.
This guide does not cover all possible conditions that may occur. Always contact yourservice
agent or manufacturer about problems that you do not understand.
30. This appliance is not intended for use by persons (including children)
with reduced physical, sensory or mental capabilities, or lack of
experience and knowledge, unless they have been given supervision
or instruction concerning use of the appliance by a person responsible
for their safety.Cleaning and user maintenance shall not be made by
children unless they are aged from 8 years and above and supervised.
31. The minimum height of free space necessary above the top surface of
the oven.
32. The microwave oven is intended to be used freestanding.
33. The temperature of accessible surfaces may be high when the
appliance is operating.
34. Keep the appliance and its cord out of reach of children less than 8
years.
35. The door or the outer surface may get hot when the appliance is
operating.
Place the oven in the level location of your choice with
more than 85cm height but make sure there is at least
30cm of space on the top and 10cm at the rear for proper
ventilation. The front of the oven should be at least 8cm from the
edge of the surface to prevent tipping.
An exhaust outlet is located on top or side of the oven. Blocking
the outlet can damage the oven.
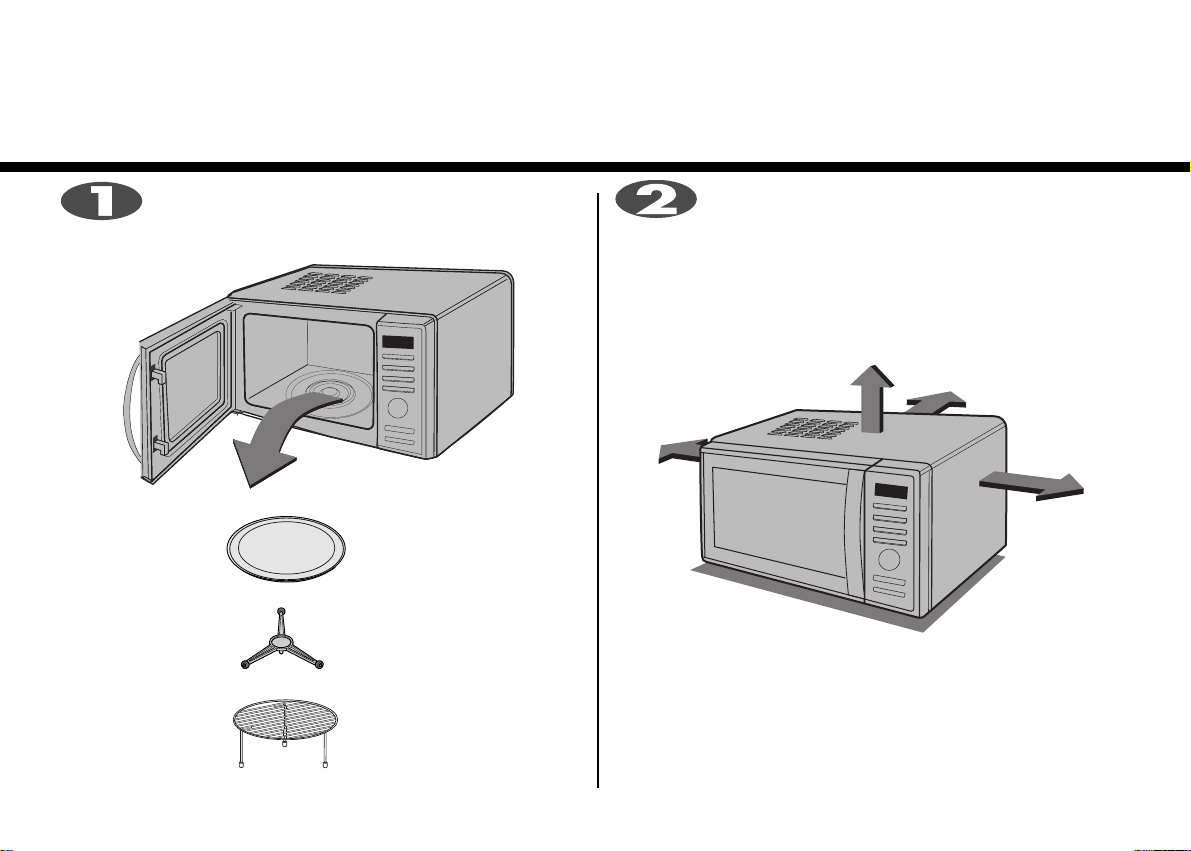
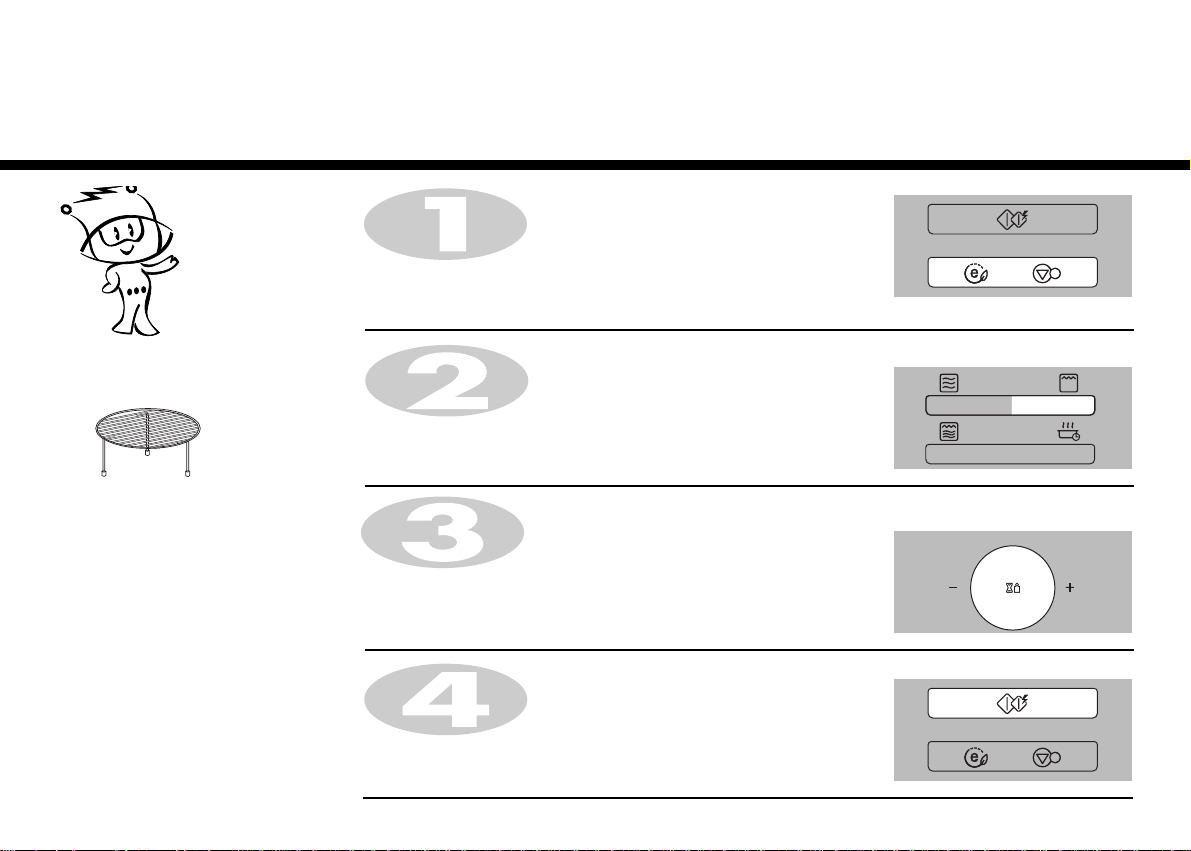
Unpack your oven and place it on a flat level
surface.
By following the basic steps on these two pages you will be able to quickly check that your oven is operating
THIS OVEN SHOULD NOT BE USED FOR COMMERCIAL CATERING
PURPOSES
Unpacking &
Installing
GLASS TRAY
RACK
9
correctly. Please pay particular attention to the guidance on where to install your oven. When unpacking your
oven make sure you remove all accessories and packing. Check to make sure that your oven has not been
damaged during delivery.
ROTATING RING
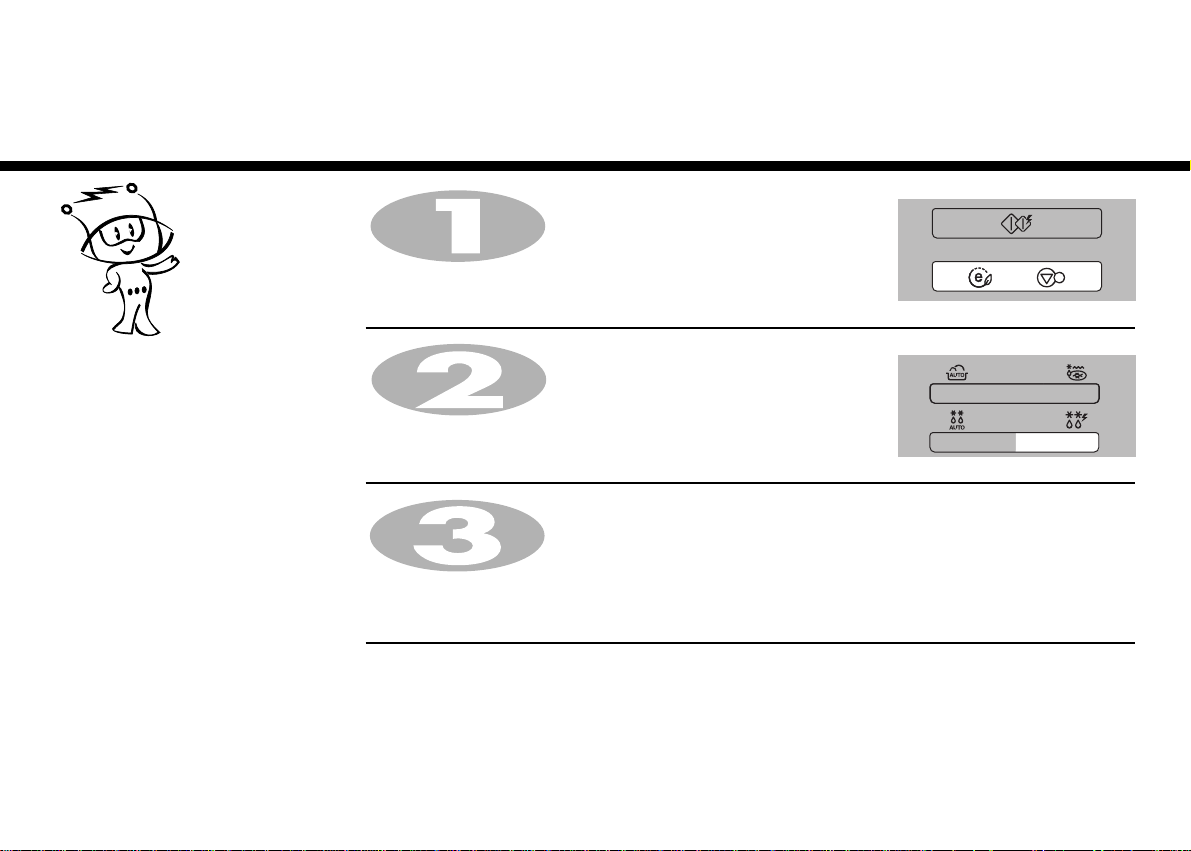
Open your oven door by pulling the DOOR HANDLE.
Place the ROLLER REST inside the oven and place the
GLASS TRAY on top.
Plug your oven into a standard household socket.
Make sure your oven is the only appliance
connected to the socket. If your oven does not operate
properly, unplug it from the electrical socket and then plug it
back in.
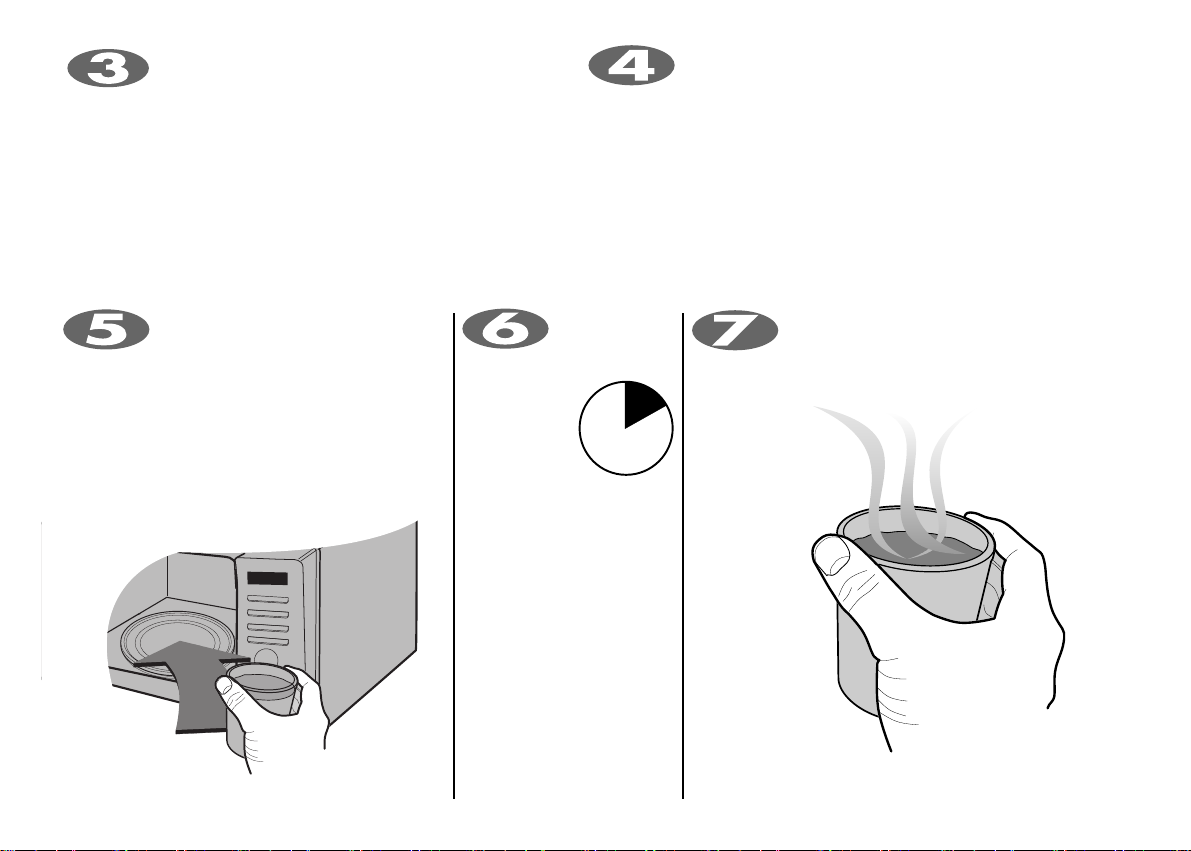
10
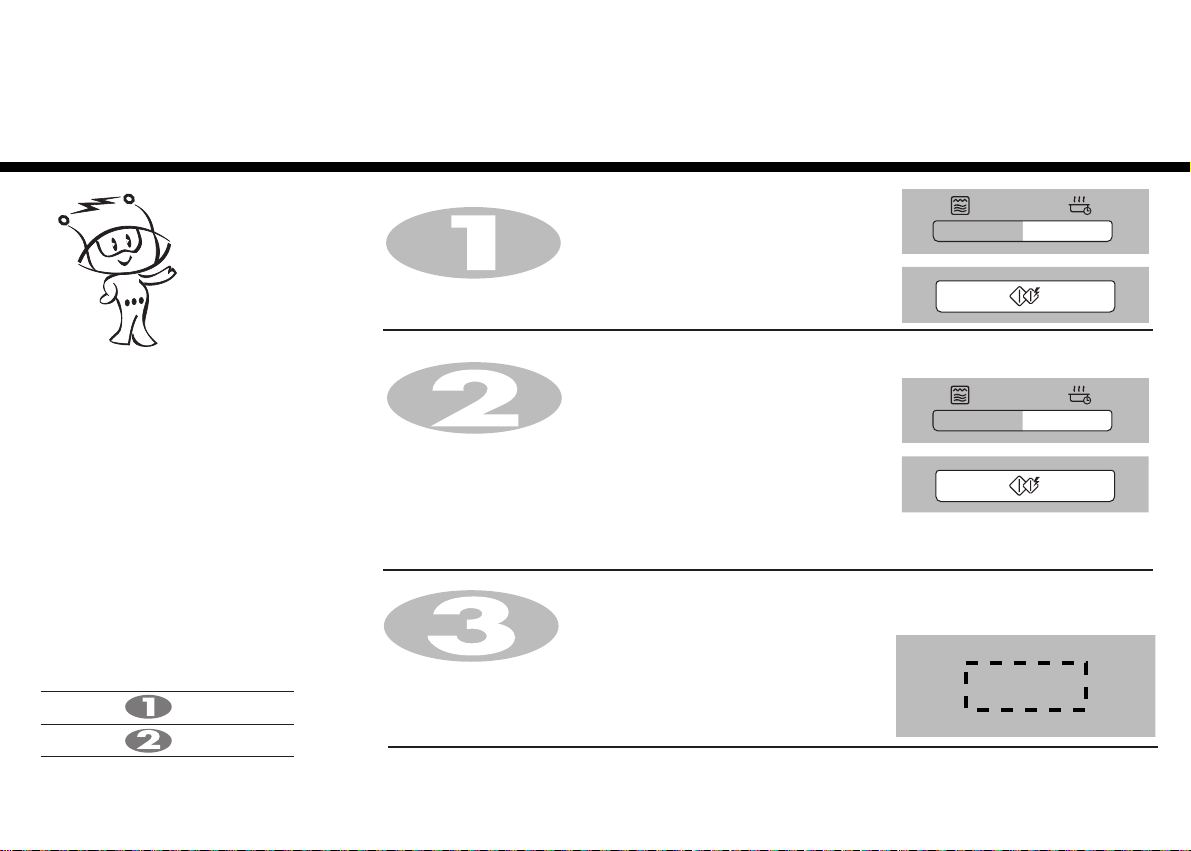
Fill a microwave safe container with
300 ml (1/2 pint) of water. Place on
the GLASS TRAY and close the oven door. If you
have any doubts about what type of container to
use please refer to page 30.
to set
30 seconds
of cooking
time.
Press the START
button once
30
MINU TOS
Seconds
The DISPLAY will count down from 30 seconds
When it reaches 0, BEEP sounds. Open the
oven door and test the temperature of the water. If your
oven is operating the water should be warm. Be careful
when removing the container it may be hot.
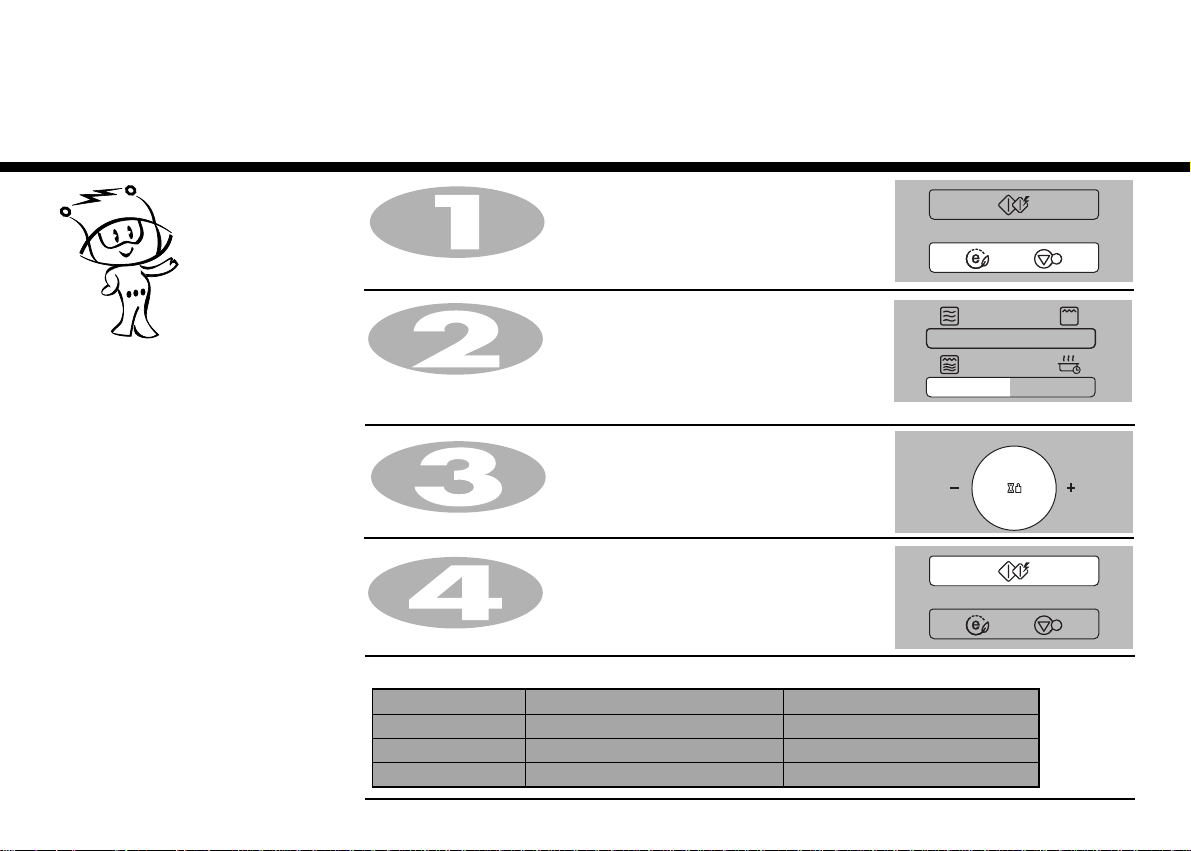
YOUR OVEN IS NOW INSTALLED
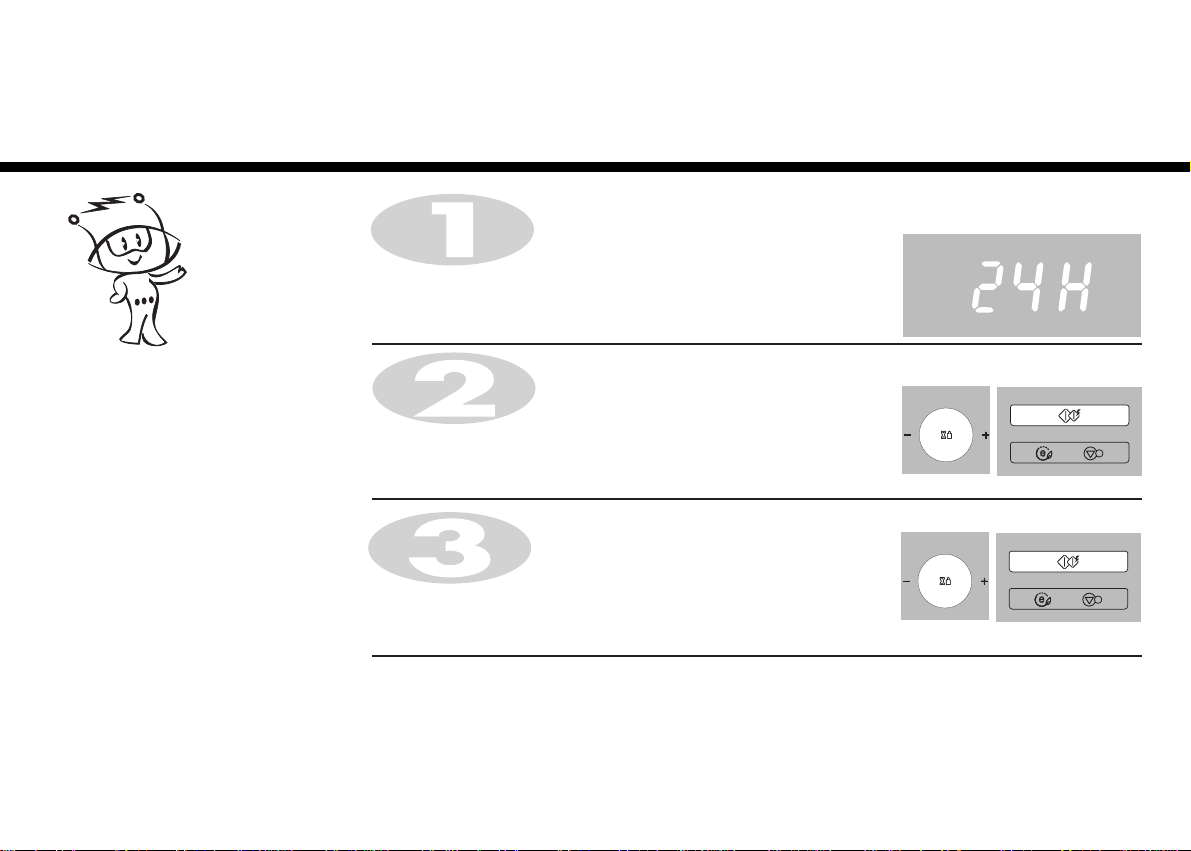
You can set either 12 hour clock or 24 hour clock.
11
In the following example I will show you how to set the time for 14:35 when using the 24 clock.
Make sure that you have removed all packaging from your oven.
Make sure that you have correctly installed your oven asdescribed earlier
in this book.
Plug in your oven for the first time.
"24H" appears on the display.
(If you want to use different option,Press
If you want to change different option after setting clock,
you have to unplug and plug it back in.)
Taste saver.
Setting the
Clock
When your oven isplugged in for the
first time or when power resumes after a
power cut, a ‘24H’ will be shown in the
display; you can reset the clock.
If the clock (or display) shows any
strange looking symbols, unplug your
oven from the electrical socket and plug
it back in and reset theclock.
Turn DIAL
Press for hour confirmation.
Turn DIAL
Press .
The clock starts counting.
until display shows “14: ”.
START
until display shows “14:35”.
START
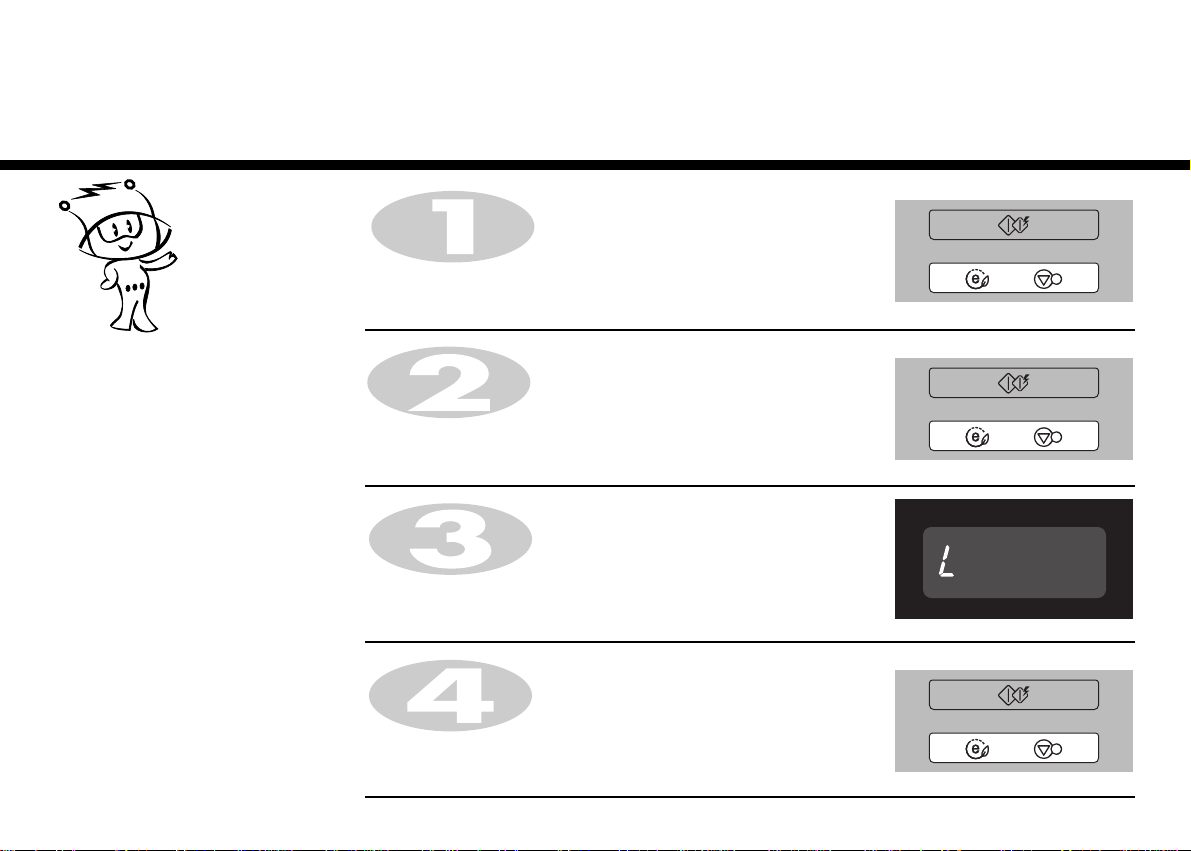
Child
Press and hold STOP/CLEAR until “L” appears on the display and
BEEP sounds.
The CHILD LOCK is now set.
The time will disappear on the display if you have set the clock.
“L” remains on the display to let you know that CHILD LOCK is set.
To cancel CHILD LOCK press and hold STOP/CLEAR until “L” disappears.
You will hear BEEP when it’s released.
Your oven has a safety feature that
prevents accidental running of the oven.
Once the child lock is set, you will be
unable to use any functions and no
cooking can take place.
However your child can still open the
oven door.
Press STOP/CLEAR.
12
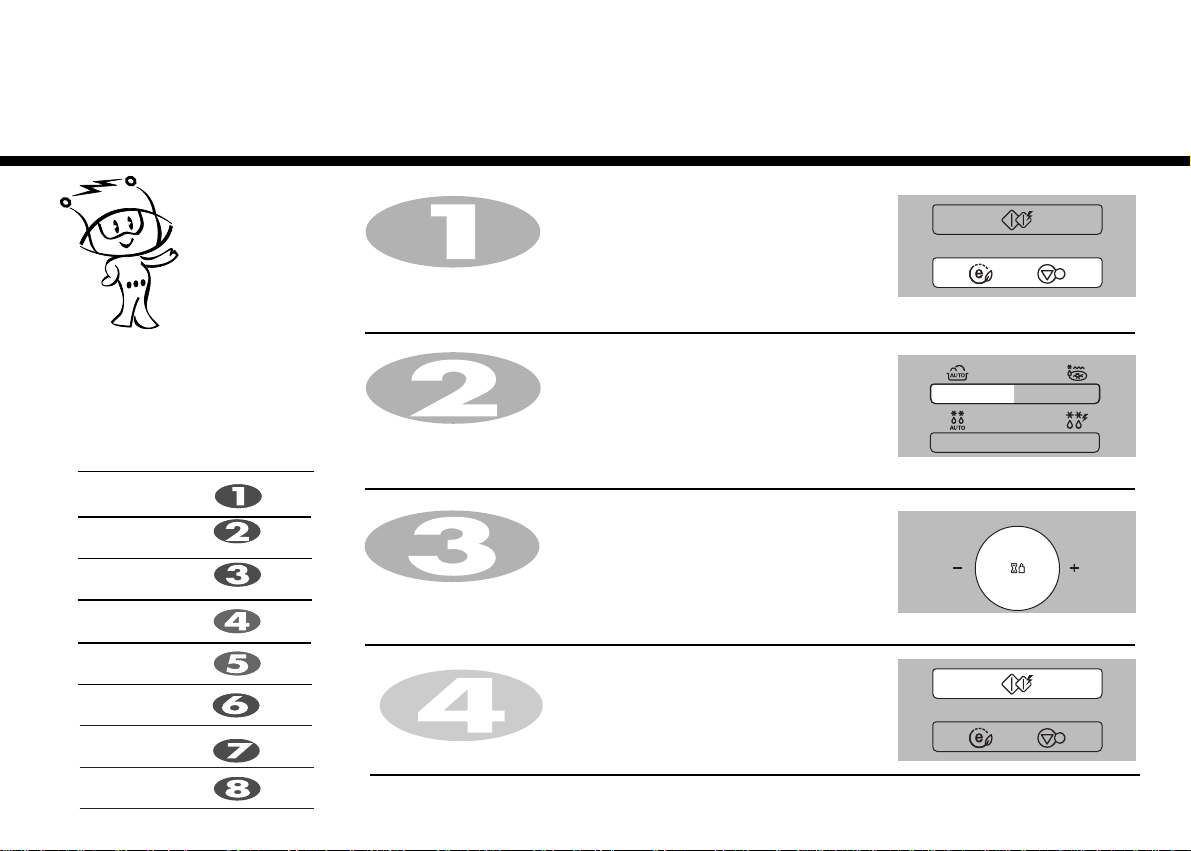
Lock
Micro Power
Cooking
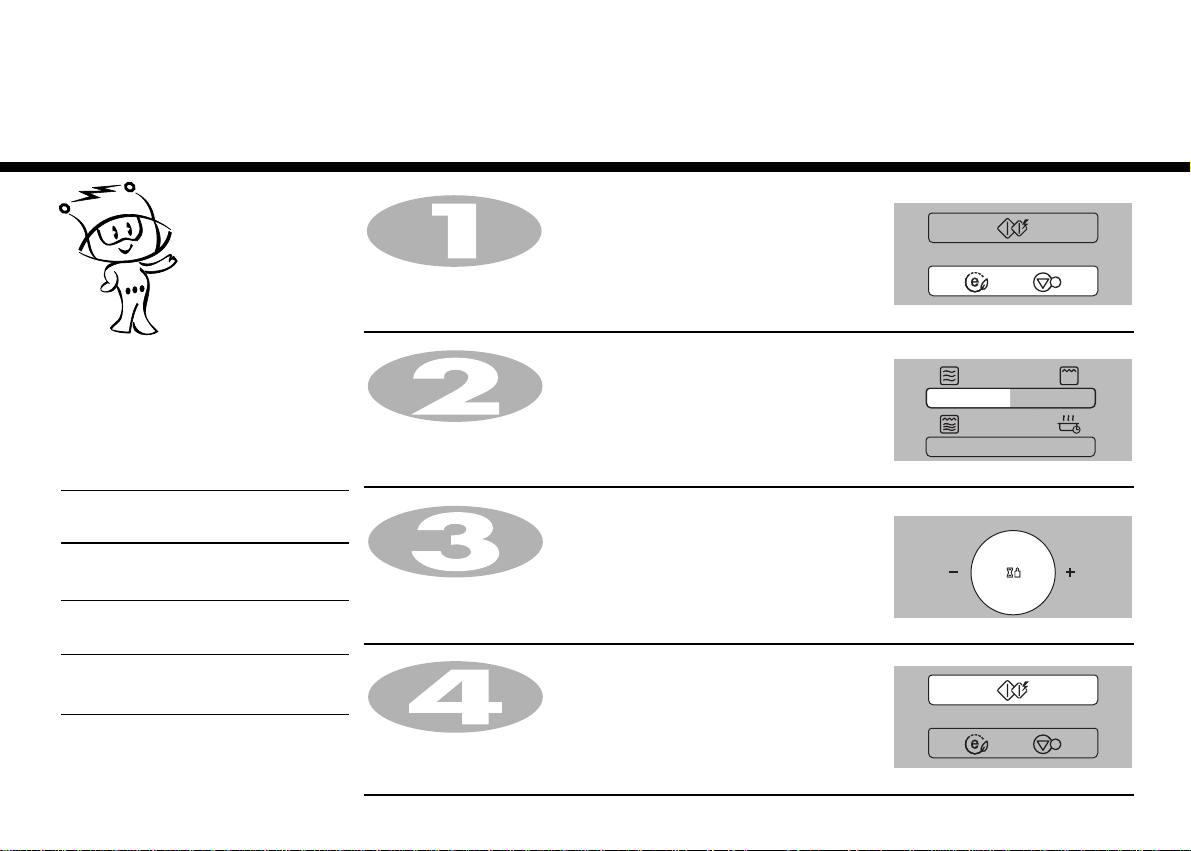
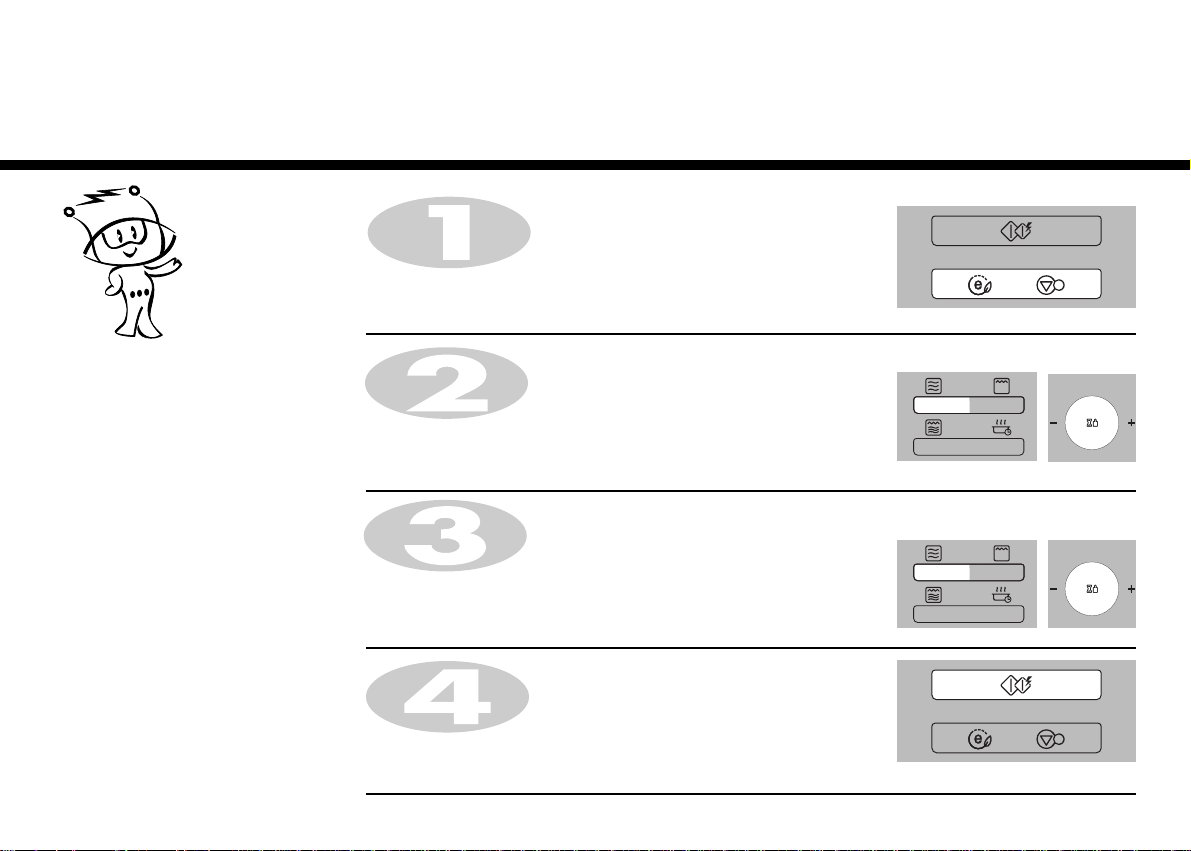
In the following example I will show you how to cook some food on 80% power for 5 minutes and 30 seconds.
13
Make sure that you have correctly installed your oven as described
earlier in this book.
Press STOP/CLEAR.
Your oven has five microwave Power
settings.
POWER
HIGH
MAX
M
EDIUM
HIGH
MEDIUM
MEDIUM LOW
L
OW
%
100%
80%
60%
40%
20%
Power Output
900W
720W
540W
360W
180W
Press MICRO twice to select 720 power.
“0” appears on the display.
Turn DIAL until display shows “5:30”.
Press START.
Micro Power
14
Level
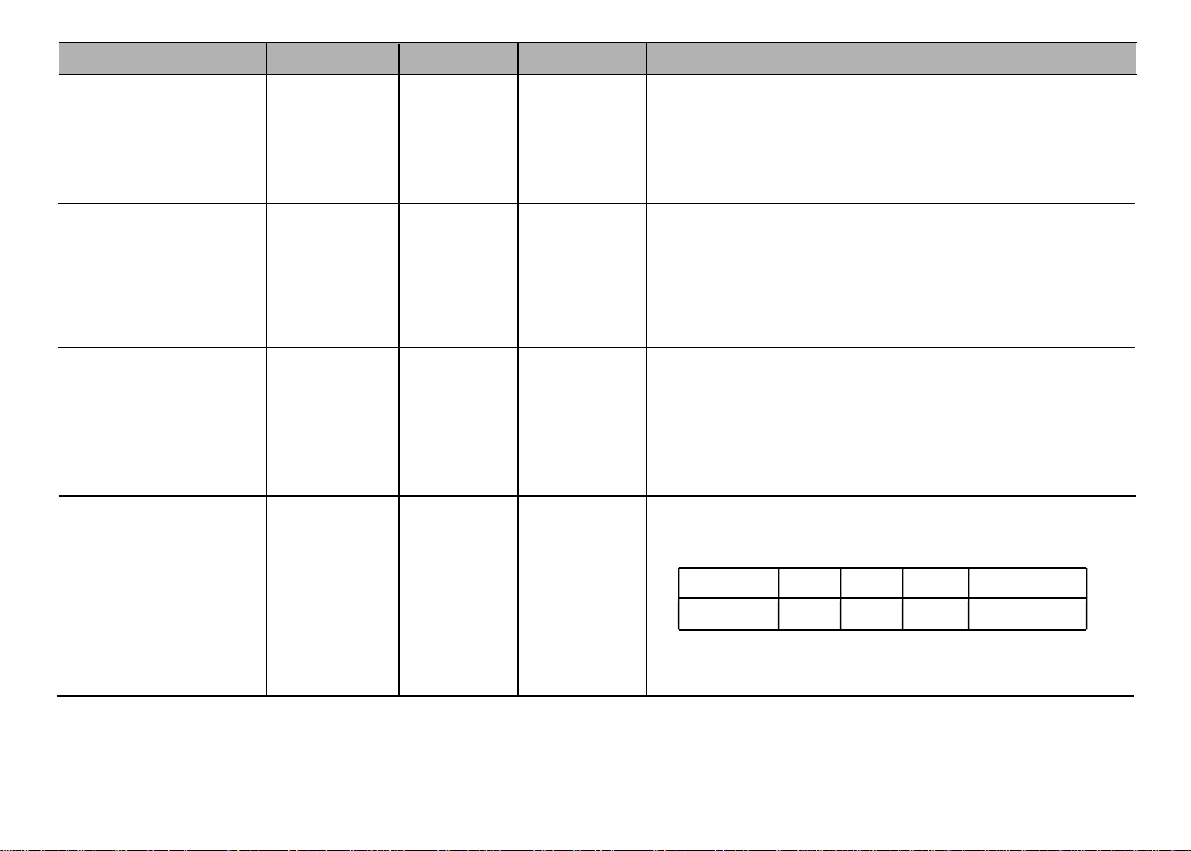
Your microwave oven is equipped with 5 power levels to give you maximum flexibility and control over cooking.
The table below shows the examples of food and their recommended cooking power levels for use with this
microwave oven.
POWER LEVEL
HIGH * Boil Water
* Brown minced beef
* Cook poultry pieces, fish, vegetables
* Cook tender cuts of meat
MEDIUM HIGH * All reheating
* Roast meat and poultry
* Cook mushrooms and shellfish
* Cook foods containing cheese and eggs
MEDIUM * Bake cakes and scones
* Prepare eggs
* Cook custard
* Prepare rice, soup
MEDIUM LOW
LOW * Soften butter & cheese
* Melt butter and chocolate
* Cook less tender cuts of meat
* All thawing
* Soften ice cream
* Raise yeast dough
USE
POWER LEVEL
(%)
100%
80%
60%
40%
20%
POWER OUTPUT
900W
720W
540W
360W
180W
In the following example I will show you how to cook some food in two stages. The first stages will cook your
15
30
food for 11 minutes on HIGH; the second will cook for 35 minutes on
Press STOP/CLEAR.
.
Two stage
Cooking
During two stage cooking the oven door
can be opened and food checked. Close
the oven door and press START and the
cooking stage will continue.
At the end of stage1, BEEP sounds and
stage 2 commences.
Should you wish to clear the programme
press STOP/CLEAR twice.
Set the power and the cooking time for stage1.
Press MICRO once to select HIGH power.
Turn DIAL until display shows “11:00”.
Set the power and the cooking time for stage2.
Press MICRO four times to select power.
Turn DIAL until display shows “35:00”.
Press START.
30
Quick
Press STOP/CLEAR .
Press START four times to select 2 minutes on HIGH power.
Your oven will start before you have finished the fourth press.
During QUICK START cooking, you can extend the cooking time by repeatedly
pressing the START button.
The QUICK START feature allows you to
set 30 seconds intervals of HIGH power
cooking with a touch of the START
button.
16
Start
In the following example I will show you how to set 2 minutes of cooking on high power.
Energy
17
Saving
ECO ON feature saves energy
by turning off the display.
The display will also turn off
when the unit is not active for
5 minutes.
Press STOP /CLEAR(ECO ON).
“0” appears on the display.
Press STOP /CLEAR(ECO ON).
Press any key to turn the display back on.
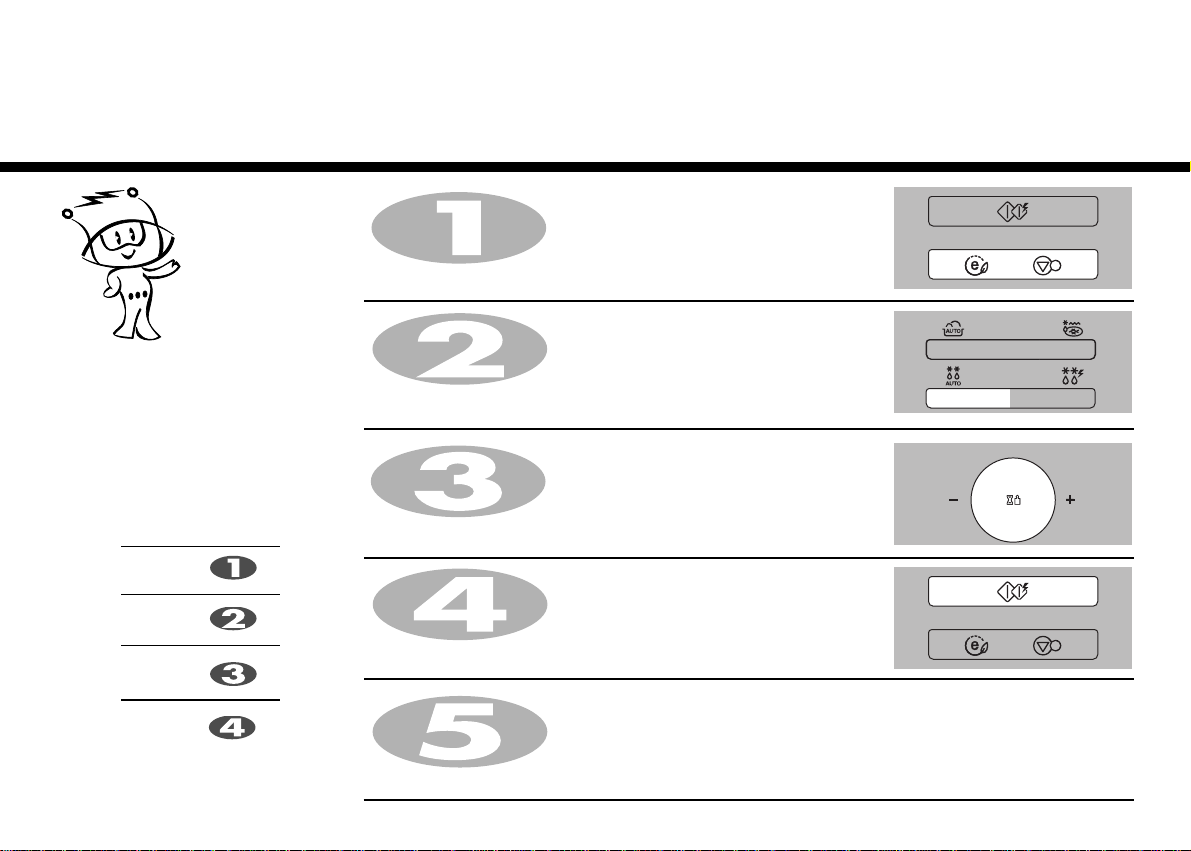
Grill
Cooking
Press STOP/CLEAR.
This feature will allow you to brown and
crisp food quickly.
Press START.
18
In the following example I will show you how to use the grill to cook some food for 12 minutes and 30 seconds.
Press GRILL.
Set the cooking time.
Turn DIAL until display shows “12:30”.
Press STOP/CLEAR .
Your oven has a combination cooking
feature which allows you to cook food
with heater and microwave at the same
time or alternately. This generally means
it takes less time to cook your food.
The sheath heater grills the surface of
the food while microwave heats inside.
Moreover, preheating your oven is not
necessary.
Combination Cooking Mode
CATEGORY MICRO POWER (%) HEATER POWER (%)
Co-1 20 80
Co-2 40 60
Co-3 60 40
Press START.
Be careful when removing your food because the container will be hot!
In the following example I will show you how to programme your oven with combi mode Co-3 for a cooking time
of 25 minutes.
19
Press Combi three times.
“Co-3” appears on the display.
Set the cooking time.
Combination
Cooking
Turn DIAL until display shows “25:00”.
AUTO COOK allows you to cook most of
your favorite food easily by selecting the
food type and entering the weight of the
food.
Press STOP/CLEAR .
Press AUTO COOK twice to select Fresh vegetable.
Auto
Cook
Press START.
20
In the following exa mple I will show you how to cook 0 .6kg of fresh vegetable.
Category
Jacket potato
Fresh vegetable
Frozen vegetable
Rice
Fish
Roast beef
Roast pork
Chicken legs
Press
AUTO COOK
time
times
times
times
times
times
times
times
Turn DIAL until display shows “0.6”.
FOOD CATEGORY FOOD TEMP. UTENSILS
WEIGHT LIMIT
INSTRUCTIONS
Room
Room
Frozen
On Glass tray
Microwave-
safe bowl
Microwave-
safe bowl
Choose medium sized potatoes 170-200g .
Wash and dry potatoes. Pierce the potatoes several times with fork. Place
the potatoes on the glass try. Adjust weight and press start. After cooking,
Place vegetables in a microwave-safe bowl. Add water.
Cover with wrap. After cooking, stir and allow to stand for 2 minutes.
Add amount of water according to the quantity.
** 0.2kg - 0.4kg : 2 Tablespoon
** 0.5kg - 0.8kg : 4 Tablespoon
Place vegetables in a microwave-safe bowl. Add water.
Cover with wrap. After cooking, stir and allow to stand for 2 minutes.
Add amount of water according to the quantity.
** 0.2kg - 0.4kg : 2 Tablespoon
** 0.5kg - 0.8kg : 4 Tablespoon
0.2 kg ~ 0.8 kg
0.2 kg ~ 0.8 kg
21
1. Jacket p tato
o
(Ac-1)
0.2 kg ~ 1.0 kg
remove the potatoes from the oven. Let stand covered with foil for 5 min-
utes.
2. Fresh vegetable
(Ac-2)
3. Frozen
vegetable
(Ac-3)
4. Rice
(Ac-4)
Room
Microwave-
safe bowl
0.1 kg ~ 0.3 kg
Wash rice. Darin water.
Plase rice & boiling water in a deep and large bowl.
Weight
Boiling water
** Rice -- After cooking, stand covered for 5 minutes or until water is
absorbed.
100g
200ml
200g
400ml
300g
600ml Yes/Vent corner
Cover

FOOD TEMP. UTENSILS
WEIGHT LIMIT
INSTRUCTIONS
FOOD CATEGORY
22
5. Fish
(Ac-5)
6. Roast
Beef
(Ac-6)
7. Roast
Pork
(Ac-7)
8. Chicken
Legs
(Ac-8)
Refrigerated
Refrigerated
Refrigerated
Refrigerated
Microwave-
safe flan dish
rack
rack
rack
0.2 kg ~ 0.6 kg
0.5 kg ~ 1.5 kg
0.5 kg ~ 1.5 kg
0.2 kg ~ 0.8 kg
Whole fish, steaks
- Oily fish : salmon, mackerel
- White fish : cod, haddock
Arrange in a single layer in a large microwave-safe flan dish.
Cover dish tightly with plastic wrap and pierce in several places.
Place on the glass turntable. Adjust weight and press start.
After cooking, remove the dish from the oven. Allow to stand for 3 minutes
before serving.
Brush the beef with melted margarine or butter.
The oven will beep, turn food over and press start to continue.
After cooking, stand covered with foil for 10 minutes before serving.
Brush the with melted margarine or butter.
The oven will beep, turn food over and press start to continue.
After cooking, stand covered with foil for 10 minutes before serving.
Wash and dry skin. Brush the chicken legs with melted margarine or butter.
Place on the Place microwave-safe
container for
And then press start to continue cooking.
After cooking, stand covered with foil for 2-5 minutes.
pork
rack over the glass turntable.
dropping meat juice under the rack. When BEEP, turn food over.
Place on the rack.
Place on the rack.
Your oven has four microwave defrost
settings:- MEAT, POULTRY, FISH and
BREAD; each defrost category has
different power settings. Repeated
presses of the AUTO DEFROST button
will select a different setting.
The temperature and density of food varies, I would recommend that the food is checked before cooking
Category
MEAT
POULTRY
FISH
BREAD
Press
DEFROST
time
times
times
times
Enter the weight of the frozen food that you are about to defrost.
Press START.
During defrosting your oven will “BEEP”, at which point open the oven door, turn food over and separate to
ensure even thawing. Remove any portions that have thawed or shield them to help slow down thawing. After
checking close the oven door and press START to resume defrosting.
Your oven will not stop defrosting (even when the beep sounded) unless the door is opened.
Press AUTO DEFROST twice to select the POULTRY defrosting
programme.
Press STOP/CLEAR.
Weight the food that you are about to defrost. Be certain to remove any
metallic ties or wraps; then place the food in your oven and close the
oven door.
23
commences. Pay particular attention to large joints of meat and chicken, some foods should not be
completely thawed before cooking. The BREAD programme is suitable for defrosting small items such as
rolls or a small loaf. These will require a standing time to allow the centre to thaw. In the following
example I will show you how to defrost 1.4 Kg of frozen poultry.
Turn DIAL until display shows “1.4”.
Auto
Defrost

AUTO W EIGHT DEFROST GUIDE
* Food to be defrosted should be in a suitable microwave proof container and place uncovered on the gla ss turntable.
* If necessary, shield small areas of meat or poultry with flat pieces of aluminum foil. This will prevent thin areas becoming warm during defrosting. Ensure the
foil does not touch the oven wa lls.
* Separate items like minced meat, chops, sa usages a nd bacon as soon as possible.
W hen BEEP, at this piont remove the food fromthe microwave oven,turn the food over and return to the microwave oven. Press sta rt to continue. At the end of
the program, remove the food from the microwave oven, cover with foil and allow to stand until completely thawed.
To tha w completely, for example joints of mea t a nd whole chickens should STAN D for a minimum of 1 hour before cooking.
Category Weight Limit Utensil Food
0.1 ~ 4.0 kg
Microwave ware
(Flat plate)
Meat
Minced beef, Fillet steak, Cubes for stew, Sirloin steak, Pot roast, Rump roast, Beef burger
Pork chops, Lamp chops, Rolled roast, Sausage, Cutlets(.2cm)
Turn food over at beep.
After defrosting, let stand for 5-15 minutes.
Poultry
Whole chicken, Legs, Breasts, Turkey breasts(under 2.0kg)
Turn food over at beep.
After defrosting, let stand for 20-30 minutes.
Fish
Fillets, Steaks, Whole fish, Sea foods
Turn food over at beep.
After defrosting, let stand for 10-20 minutes.
0.1 ~ 0.5 kg
Paper towel
or flat plate
Sliced bread, Buns, Baguette, etc.
24
Meat
(dEF1)
Poultry
(dEF2)
Fish
(dEF3)
Bread
(dEF4)
Separate slices and place between paper towel or flat plate.
Turn food over at beep.
After defrosting, let stand for 1-2 minutes.
Use this function to thaw only 0.5kg of Minced meat very quickly.
Your oven has a microwave quick
defrost setting (MEAT).
Press STOP/CLEAR.
Weight the food that you are about to defrost. Be certain to remove
any metallic ties or wraps; then place the food in your oven and close
the oven door.
Press QUICK DEFROST.
The oven will start automatically.
During defrosting your oven will “BEEP”, at which point open the oven door, turn food over and separate to
ensure even thawing. Remove any portions that have thawed or shield them to help slow down thawing. After
checking close the oven door and press START to resume defrosting.
Your oven will not stop defrosting (even when the beep sounded) unless the door is opened.
25
This will require a standing time to allow the center to thaw. In the following example will show you how to defrost
0.5kg of frozen minced meat.
Quick
Defrost

UTENSIL INSTRUCTIONS
Minced meat
Microwave ware
Use this function to defrost quickly for minced meat.
Remove the meat completely from it's wrapping. Place the mince onto a microwave-safe plate. When BEEP, at this point remove the mince from the microwave
oven, turn the mince over and return to the microwave oven . Press start to continue. At the end of the program remove the mince from the microwave oven ,
cover with foil and allow to stand 5-15 minutes or until completely thawed.
Minced meat
AUTO W EIGHT DEFROST GUIDE
26
CATEGORY WEIGHT
0.5kg
(Flat plate)
Turn food over at beep
After defrosting, let stand for 5-15 minutes

In the following example I will show you how to cook 0.3kg of "Salmon Fillet".
27
Defrost & Grill allows you to cook most
of your favorite food easily by selecting
the food type and entering the weight of
food by turn the dial.
Category
Salmon Fillet
Shrimp
Hamburger Patties
Sausage
Press
Defrost & Grill
time
times
times
times
Defrost & Grill
Press STOP/CLEAR.
Press Defrost & Grill once.
Turn DIAL until display shows "0.3kg".
Press START.

Category
28
Salmon fillet 0.2-0.6kg
(dG-1)
Shrimp
(dG-2)
Hamburger
Patties
(dG-3)
Quantity
0.1-0.4kg
1-4 piece
Utensil
Rack
TEMP.
Frozen
Frozen
Frozen
Choose salmon fillet of 200gl weight and 2.5cm
thickness each. Frozen it. Place food on rack.
Choose the menu and weight,
press start. After cooking, remove from the oven
and stand.
Clean and de-vein shrimps. Place on the rack.
When beep, turn food over.
Place hamburger Patties on the rack.
Choose the menu and weight, press start.
After cooking, remove from the oven and stand.
Instructions
FOOD
Sausage
(dG-4)
0.2-0.6kg
Frozen
Remove all packages and slit on the surface.
Place on the rack.
When beep, turn food over.
In the following example I will show you how to use the taste saver function to warm food at
29
high level in 90 min.
Taste saver manually
Put some food into the micro-wave oven,press
“taste saver
Press “start”.
” two times,
HO-H”appears on the display.
“
Taste saver
If you
w ant to warm your food when
the AUTO COOK programme,you can get the
warming food by pressing the key.
When the food without Auto function need
warming you can set warming at any point
by pressing the key.
Taste saver function has only one time
level-90 minutes. But the function will
stop when you open the door.
LEV E L
Low level
High level
Press
Ta ste sa ver
time
times
Display
——
| |
| | |
——
——
| |
| | |
——
——
——
| | |
| | |
——
——
——
| | |
| | |
——
using
Taste saver after AUTO COOK
1.Set the required AUTO COOK programme.
Press“start”. And after the AUTO COOK programme,it will
automatically run Taste saver function when five minutes
later after AUTO COOK is over.
2.When the AUTO COOK is over, you can also press “taste saver ”,
and “HO-H”appears on the display.
Press “start”.
*TIME display
When Taste saver is running,it will display
And then you press “taste saver
Taste saver will appear on the display.
again,left time of
”
-----
|
|
-----
|
|
Microwave-safe
Never use metal or metal trimmed utensils in your
microwave oven
Microwaves cannot penetrate metal. They will bounce off any metal object in the
oven and cause arcing, an alarming phenomenon that resembles lightning.
Most heat resistant non metallic cooking utensils are safe for use in your microwave
oven. However, some may contain materials that render them unsuitable as
microwave cookware. If you have any doubts about a particular utensil, there’s a
simple way to find out if it can be used in your microwave oven.
Place the utensil in question next to a glass bowl filled with water in the microwave
oven. Microwave at power HIGH for 1 minute. If the water heats up but the utensil
remains cool to the touch, the utensil is microwave~safe. However, if the water does
not change temperature but the utensil becomes warm, microwaves are being
absorbed by the utensil and it is not safe for use in the microwave oven. You
probably have many items on hand in your kitchen right now that can be used as
cooking equipment in your microwave oven. Just read through the following
checklist.
Dinner plates
Many kinds of dinner-ware are microwave-safe. If in doubt consult the
manufacturer’s literature or perform the microwave test.
Glassware
Glassware that is heat-resistant is microwave-safe. This would include all brands of
oven tempered glass cookware. However, do not use delicate glassware, such as
tumblers or wine glasses, as these might shatter as the food warms.
Plastic storage containers
These can be used to hold foods that are to be quickly reheated. However, they
should not be used to hold foods that will need considerable time in the oven as hot
foods will eventually warp or melt plastic containers.
Paper
Paper plates and containers are convenient and safe to use in your microwave oven,
provided that the cooking time is short and foods to be cooked are low in fat and
moisture. Paper towels are also very useful for wrapping foods and for lining baking
trays in which greasy foods such as bacon are cooked. In general, avoid coloured
paper products as the colour may run. Some recycled paper products may contain
impurities which could cause arcing or fires when used in the microwave oven.
Plastic cooking bags
Provided they are made specially for cooking, cooking bags are microwave safe.
However, be sure to make a slit in the bag so that steam can escape. Never use
ordinary plastic bags for cooking in your microwave oven, as they will melt and
rupture.
Plastic microwave cookware
A variety of shapes and sizes of microwave cookware are available. For the most
part, you can probably use items you already have on hand rather than investing in
new kitchen equipment.
Pottery, stoneware and ceramic
Containers made of these materials are usually fine for use in your microwave oven,
but they should be tested to be sure.
Some items with high lead or iron content are not suitable for cooking
utensils.
Utensils should be checked to ensure that they are suitable for use in
microwave ovens.
30
Utensils
CAUTION

Keeping an eye on things
The recipes in the book have been formulated with great care, but your success in
preparing them depends on how much attention you pay to the food as it cooks.
Always watch your food while it cooks. Your microwave oven is equipped with a
light that turns on automatically when the oven is in operation so that you can see
inside and check the progress of your food. Directions given in recipes to elevate,
stir, and the like should be thought of as the minimum steps recommended. If the
food seems to be cooking unevenly, simply make the necessary adjustments you think
appropriate to correct the problem.
Factors affecting microwave cooking times
Many factors affect cooking times. The temperature of ingredients used in a recipe
makes a big difference in cooking times. For example, a cake made with ice-cold
butter, milk, and eggs will take considerably longer to bake than one made with
ingredients that are at room temperature. All of the recipes in this book give a range
of cooking times. In general, you will find that the food remains under-cooked at the
lower end of the time range, and you may sometimes want to cook your food beyond
the maximum time given, according to personal preference. The governing
philosophy of this book is that it is best for a recipe to be conservative in giving
cooking times. While overcooked food is ruined for good. Some of the recipes,
particularly those for bread, cake, and custards, recommend that food be removed
from the oven when they are slightly undercooked. This is not a mistake. When
allowed to stand, usually covered, these foods will continue to cook outside of the
oven as the heat trapped within the outer portions of the food gradually travels
inward. If the food is left in the oven until it is cooked all the way through, the outer
portions will become overcooked or even burnt. You will become increasingly skilful
in estimating both cooking and standing times for various foods.
Density of food
Light, porous food such as cakes and breads cook more quickly than heavy, dense
foods such as roasts and casseroles. You must take care when microwaving porous
food that the outer edges do not become dry and brittle.
Height of food
The upper portion of tall food, particularly roasts, will cook more quickly than the
lower portion. Therefore, it is wise to turn tall food during cooking, sometimes several
times.
Moisture content of food
Since the heat generated from microwaves tends to evaporate moisture, relatively dry food
such as roasts and some vegetables should either be sprinkled with water prior to cooking
or covered to retain moisture.
Bone and fat content of food
Bones conduct heat and fat cooks more quickly than meat. Care must be taken when
cooking bony or fatty cuts of meat that they do not cook unevenly and do not become
overcooked.
Quantity of food
The number of microwaves in your oven remains constant regardless of how much food is
being cooked. Therefore, the more food you place in the oven, the longer the cooking time.
Remember to decrease cooking times by at least one third when halving a recipe.
Shape of food
Microwaves penetrate only about 2.cm into food, the interior portion of thick foods are
cooked as the heat generated on the outside travels inward. Only the outer edge of food in
cooked by microwave energy; the rest is cooked by conduction. The worst possible shape
for a food that is to be microwaved is a thick square. The corners will burn long before the
centre is even warm . Round thin foods and ring shaped foods cook successfully in the
microwave.
Covering
A cover traps heat and steam which causes food to cook more quickly. Use a lid or
microwave cling film with a corner folded back to prevent splitting.
Browning
Meats and poultry that are cooked fifteen minutes or longer will brown lightly in their own
fat. Foods that are cooked for a shorter period of time may be brushed with a browning
sauce such as worcestershire sauce, soy sauce or barbecue sauce to achieve an appetizing
colour. Since relatively small amounts of browning sauces are added to food the original
flavour of the recipe is not altered.
Covering with greaseproof paper
Greaseproofing effectively prevents spattering and helps food retain some heat. But
because it makes a looser cover than a lid or clingfilm, it allows the food to dry out slightly.
Arranging and spacing
Individual foods such as baked potatoes, small cakes and hors d’oeuvres will heat more
evenly if placed in the oven an equal distance apart, preferably in a circular pattern. Never
stack foods on top of one another.
Food characteristics &
31
Microwave cooking

Food characteristics &
Stirring
Stirring is one of the most important of all microwaving techniques. In conventional cooking,
food is stirred for the purpose of blending. Microwaved food, however, is stirred in order to
spread and redistribute heat. Always stir from the outside towards the centre as the outside
of the food heats first.
Turning over
Large, tall foods such as roasts and whole chickens should be turned so that the top and
bottom will cook evenly. It is also a good idea to turn cut up chicken and chops.
Placing thicker portions facing outwards
Since microwaves are attracted to the outside portion of food, it makes sense to place
thicker portions of meat, poultry and fish to the outer edge of the baking dish. This way,
thicker portions will receive the most microwave energy and the food will cook evenly.
Shielding
Strips of aluminium foil (which block microwaves) can be placed over the corners or edges
of square and rectangular foods to prevent those portions from overcooking. Never use too
much foil and make sure the foil is secured to the dish or it may cause ‘arcing’ in the oven.
Elevating
Thick or dense foods can be elevated so that microwaves can be absorbed by the underside
and centre of the foods.
Piercing
Foods enclosed in a shell, skin or membrane are likely to burst in the oven unless they are
pierced prior to cooking. Such foods include yolks and whites of eggs, clams and oysters
and whole vegetables and fruits.
Testing if cooked
Food cooks so quickly in a microwave oven, it is necessary to test it frequently. Some foods
are left in the microwave until completely cooked, but most foods, including meats and
poultry, are removed from the oven while still slightly undercooked and allowed to finish
cooking during standing time. The internal temperature of foods will rise between 5
0
F (30C)
and 15
0
F (80C) during standing time.
Standing time
Foods are often allowed to stand for 3 to 10 minutes after being removed from the
microwave oven. Usually the foods are covered during standing time to retain heat unless
they are supposed to be dry in texture (some cakes and biscuits, for example). Standing
allows foods to finish cooking and also helps flavour blend and develop.
To Clean Your Oven
1 Keep the inside of the oven clean
Food spatters or spilled liquids stick to oven walls and between seal and door
surface. It is best to wipe up spillovers with a damp cloth right away. Crumbs and
spillovers will absorb microwave energy and lengthen cooking times. Use a damp
cloth to wipe out crumbs that fall between the door and the frame. It is important to
keep this area clean to assure a tight seal. Remove greasy spatters with a soapy cloth
then rinse and dry. Do not use harsh detergent or abrasive cleaners. The glass tray
can be washed by hand or in the dishwasher.
2 Keep the outside of the oven clean
Clean the outside of your oven with soap and water then with clean water and dry
with a soft cloth or paper towel. To prevent damage to the operating parts inside the
oven, the water should not be allowed to seep into the ventilation openings. To clean
control panel, open the door to prevent oven from accidentally starting, and wipe a
damp cloth followed immediately by a dry cloth. Press STOP/CLEAR after cleaning.
3 If steam accumulates inside or around the outside of the oven door, wipe the panels
with a soft cloth. This may occur when the microwave oven is operated under high
humidity conditions and in no way indicates a malfunction of the unit.
4 The door and door seals should be kept clean. Use only warm, soapy water, rinse
then dry thoroughly.
DO NOT USE ABRASIVE MATERIALS, SUCH AS CLEANING POWDERS OR
STEEL AND PLASTIC PADS.
Metal parts will be easier to maintain if wiped frequently with a damp cloth.
32
Microwave cooking
5 Do not use any steam cleaner.

Questions &
Q What’s wrong when the oven light will not glow?
A There may be several reasons why the oven light will not glow.
Light bulb has blown
Door is not closed
Q Does microwave energy pass through the viewing screen in the door?
A No. The holes, or ports, are made to allow light to pass; they do not let
microwave energy through.
Q Why does the beep tone sound when a pad on the Control Panel is
touched?
A The beep tone sounds to assure that the setting is being properly entered.
Q Will the microwave oven be damaged if it operates empty?
A Yes Never run it empty or without the glass tray.
Q Why do eggs sometimes pop?
A When baking, frying, or poaching eggs, the yolk may pop due to steam
build up inside the yolk membrane. To prevent this, simply pierce the yolk
before cooking. Never microwave eggs in the shell.
Q Why is standing time recommended after microwave cooking is over?
A After microwave cooking is finished, food keeps on cooking during
standing time. This standing time finishes cooking evenly throughout the
food. The amount of standing time depends on the density of the food.
Q Is it possible to pop corn in a microwave oven?
A Yes, if using one of the two methods described
below
1 Popcorn-popping utensils designed specifically for microwave cooking.
2 Prepackaged commercial microwave popcorn that contains specific
times and power outputs needed for an acceptable final product.
FOLLOW EXACT DIRECTIONS GIVEN BY EACH MANUFACTURER FOR
THEIR POPCORN PRODUCT. DO NOT LEAVE THE OVEN UNATTENDED
WHILE THE CORN IS BEING POPPED. IF CORN FAILS TO POP AFTER
THE SUGGESTED TIMES, DISCONTINUE COOKING. OVERCOOKING
COULD RESULT IN THE CORN CATCHING FIRE.
NEVER USE A BROWN PAPER BAG FOR POPPING CORN. NEVER
ATTEMPT TO POP LEFTOVER KERNELS.
Q Why doesn’t my oven always cook as fast as the cooking guide says?
A Check your cooking guide again to make sure you’ve followed directions
correctly, and to see what might cause variations in cooking time.
Cooking guide times and heat settings are suggestions, chosen to help
prevent overcooking, the most common problem in getting used to a
microwave oven. Variations in the size, shape, weight and dimensions of
the food require longer cooking time. Use your own judgement along with
the cooking guide suggestions to test food condition, lust as you would do
with a conventional cooker.
33
Answers
CAUTION

Technical Specifications
Technical Specification
<English>
Disposal of your old appliance
1. When this crossed-out wheeled bin symbol is attached to a product it
means the product is covered by the European Directive 2002/96/EC.
2. All electrical and electronic products should be disposed of separately from
the municipal waste stream via designated collection facilities appointed by
the government or the local authorities.
3. The correct disposal of your old appliance will help prevent potential
negative consequences for the environment and human health.
4. For more detailed information about disposal of your old appliance, please
contact your city office, waste disposal service or the shop where you
purchased the product.
34
Power Input
Output
Microwave Frequency
Outside Dimension
Power Consumption
Microwave
Grill
Combination
Group 2 equipment: group 2 contains all ISM RF equipment in which
radio-frequency energy in the frequency range 9 kHz to 400GHz is
intentionally generated and used or only sed, in the form of
uelectromagnetic radiation, inductive and / or capacitive coupling,
for the treatment of material or inspection/analysis purposes.
Class B equipment is equipment suitable for use in domestic
establishments and in establishments directly connected to a low
voltage power supply network which supplies buildings used for
domestic purposes.
MH6883AAF
230 V AC /50Hz
900 W (IEC60705 rating standard)
2,450 MHz +/- 50MHz(Group 2/Class B)
510 mm(W) X 286mm(H) X 444mm(D)
1,300 Watts
1,000 Watts
1,450 Watts

NÁVOD K OBSLUZE
Mikrovlnná trouba s grilem
Před uvedením trouby do provozu si důkladnĕ přečtĕte tento návod k obsluze.
MH6883AAF
Česky
www.lg.com

Nepokou‰ejte se uvádût troubu do provozu pfii otevfien˘ch dvífikách,
protoÏe dvefie jsou zaji‰tûny bezpeãnostním blokovacím systémem.
Tento bezpeãnostní blokovací systém automaticky vypne troubu pfii
kterémkoliv zpÛsobu vafiení jakmile se dvífika otevfiou. Do‰lo by totiÏ pfii
úniku mikrovlnné energie ke ‰kodlivému pÛsobení na pfiítomné osoby.
NesnaÏte se jak˘mkoliv zpÛsobem manipulovat s dvefiním
bezpeãnostním blokovacím systémem.
Nevkládejte Ïádné pfiedmûty mezi dvífika a ãelní stûnu trouby a zamezte
usazování, hromadûní zbytkÛ jídel a ãistících prostfiedkÛ na povrchu
tûsnicích ploch.
NepouÏívejte troubu, jestliÏe je po‰kozena. Je velmi dÛleÏité, aby dvífika
trouby fiádnû doléhala a následující ãásti byly bez po‰kození: (1) dvífika
(záhyby), (2) dvefiní závûsy a západky zámkÛ (nesmí b˘t zlomené nebo
uvolnûné), (3) tûsnûní dvífiek nebo tûsnící plochy.
Ve‰kerá sefiizování a opravy trouby smí provádût pouze odborn˘ servis.
Bezpeãnostní
Ohfiíváte-li v mikrovlnné troubû tekutiny, napfi. polévky, omáãky a
nápoje, mÛÏe dojít k náhlému a velmi prudkému vzkypûní bez
pfiedchozího viditelného bublání. MÛÏe také dojít náhlému vystfiíknutí
vafiící tekutiny. Pfiedejít v˘‰e uveden˘m jevÛm mÛÏete dodrÏením
následujících pokynÛ:
1. NepouÏívejte vysoké nádoby s úzk˘m hrdlem.
2. Tekutiny nepfiehfiívejte.
3. Pfied vloÏením nádoby do trouby promíchejte tekutinu a pak ji
promíchejte je‰tû jednou asi v polovinû celkové doby ohfievu.
4. Po ohfievu tekutinu nechejte je‰tû krátkou dobu v troubû, znova ji
opatrnû zamíchejte nebo s ní zatfiepte (zvlá‰È u kojeneck˘ch lahví a
nádob s dûtskou v˘Ïivou) a zkontrolujte teplotu pfied konzumací, aby
nedo‰lo k opafiení (zvlá‰È u kojeneck˘ch lahví a nádob s dûtskou
v˘Ïivou). Dávejte pozor pfii manipulaci s nádobami.
VÏdy nechejte potraviny chvíli stát po ohfievu v
mikrovlnné troubû a pfied konzumací vÏdy
zkontrolujte teplotu. Zvlá‰È u kojeneck˘ch
lahví a nádob s dûtskou v˘Ïivou
Dbejte na to, aby doba vafiení byla vÏdy
správnû nastavena, jelikoÏ pfiíli‰ dlouhá doba
ohfievu mÛÏe zpÛsobit vznícení POTRAVIN a
následné po‰kození trouby.
36
pokyny
Pokyny k zabránûní vystavení osob moÏnému pÛsobení mikrovlnné
energie.
Upozornûní
Upozornûní

Obsah
37
Jak pracuje mikrovlnná trouba.
Mikrovlny jsou formou elektromagnetické energie podobné radiov˘m
nebo televizním vlnám a obyãejnému dennímu svûtlu. Normálnû se
mikrovlny pfii prÛchodu atmosférou rozpt˘lí a ztrácejí se bez uÏitku.
Mikrovlnné trouby v‰ak obsahují magnetron, kter˘ je zkonstruován tak,
aby umoÏnil vyuÏití energie obsaÏené v mikrovlnách, které generuje.
Elektrická energie se mûní pomocí magnetronu na mikrovlnnou energii.
Mikrovlny vstupují do vnitfiního prostoru trouby otvory v jejích stûnách.
Otoãn˘ talífi nebo podnos je umístûn ve spodní ãásti trouby. Mikrovlny
nemohou procházet kovov˘mi stûnami trouby, ale pronikají materiály jako
je sklo, porcelán a papír, ze kter˘ch se vyrábí nádobí vhodné pro pfiípravu
pokrmÛ v mikrovlnné troubû.
Mikrovlny varné nádobí pfiímo nezahfiívají. To se zahfiívá teplem
vznikajícím v pokrmu.
Jde o velmi bezpeãné zafiízení.
Mikrovlnná trouba je jedním z nejbezpeãnûj‰ích
domácích spotfiebiãÛ. Jakmile se dvífika otevfiou,
generování mikrovln se automaticky zastaví. V
prÛbûhu ohfievu potravin se mikrovlnná energie
zcela pfiemûní na teplo. Îádn˘ ‰kodliv˘
"zbytek" mikrovln nikdy nezÛstává v pokrmech a
nemÛÏe po‰kodit va‰e zdraví pfii konzumaci
tûchto potraviny.
Bezpeãnostní pokyny
Obsah
Ïité
DÛle
Vybalení a instalace
Nastavení hodin
Dûtská pojistka
Vafiení
Úrovnû v˘konu mikrovln
Dvoufázové
Rychl˘ start
Úspora energie
Grilování
Kombinované vafiení
Automatické vafiení
Automatické rozmrazování
Rychlé rozmrazování
Rozmrazování a gril
Funkce taste saver
Nádobí vhodné pro mikrovlnnou troubu
Charakteristika potravin a vafiení v
mikrovlnné troubû
Otázky a odpovûdi
Technické údaje
bezpeãnostní pokyny
pomocí mikrovln
Vafiení
36
37
38 ~ 42
43 ~ 44
45
46
47
48
49
50
51
52
53
54 ~ 56
57 ~ 58
59 ~ 60
61 ~ 62
63
64
65 ~ 66
67
68

Důležité bezpečnostní
pokyny
Uchovejte si tuto knížečku pro další potřebu. Přečtěte si a dodržujte všechny pokyny
předtím, než začnete troubu používat, abyste zabránili riziku požáru, elektrického šoku,
zranění nebo škod. Tato příručka nepokrývá všechny možné stavy, které se mohou
vyskytnout. V případě nesrozumitelných problémů se vždy obraťte na servisního
zástupce či výrobce.
38
Toto je symbol výstrahy. Symbol upozorňuje na potenciální rizika, která mohou zabít nebo zranit vás či ostatní. Všechny bezpečnostní
pokyny následují za tímto symbolem nebo slovy VAROVÁNÍ či UPOZORNĚNÍ. Tato slova znamenají:
VAROVÁNÍ
UPOZORNĚNÍ
Tento symbol vás upozorní na rizika či nebezpečné praktiky, které mohou způsobit vážné zranění či smrt.
Tento symbol vás upozorní na rizika či nebezpečné praktiky, které mohou způsobit zranění či škody.
VAROVÁNÍ
1. Nesnažte se nijak upravovat nebo opravovat dvířka, zámky
dvířek, ovládací panel, bezpečnostní zámky nebo jiné součásti
trouby, jestliže to zahrnuje odstranění jakéhokoliv krytu
chránícího před vystavením mikrovlnému záření. Opravy smí
provádět pouze kvalikovaný servisní technik.
Na rozdíl od ostatních spotřebičů je mikrovlná vysokovoltážní a
vysokoproudé elektrické zařízení. Nesprávné použití nebo opravy by
mohly mít za výsledek vystavení se škodlivé mikrovlnné energii nebo
elektrickému šoku.
2. Nepoužívejte troubu pro odstraňování vlhkosti. (např. používání
trouby k sušení vlhkých novin, oblečení, hraček, elektrických
zařízení, domácích miláčků nebo dětí atd.)
Může způsobit vážné poškození, požár, spáleniny nebo smrt elektrickým šokem.
3. Spotřebič není určen k používání malými dětmi nebo starými
osobami. Děti smí troubu používat pouze za dohledu dospělých
a po podání pokynů, tak aby dítě bylo schopné troubu používat
bezpečně a chápalo rizika nesprávného používání.
Nesprávné používání může způsobit škody jako jsou požár, elektrický
šok nebo popáleniny.
4. Během provozu mohou být některé přístupné části horké.
Udržujte děti z jejich dosahu.
Mohly by se spálit.
5. Tekutiny a ostatní jídla nesmí být ohřívány v utěsněných
nádobách, jinak může dojít k výbuchu. Odstraňte plastový
obal z jídla předtím, než jej budete ohřívat nebo rozmrazovat.
V některých případech ale musí být jídlo přikryté plastovým
krytem, kvůli ohřívání nebo vaření.
Může prasknout.
6. Ujistěte se, že používáte vhodné příslušenství pro každý z pro-
vozních režimů.
Nesprávné používání může mít za následek poškození trouby a
příslušenství, nebo dokonce vytvořit jiskření a požár.
7. Děti si nesmí hrát s příslušenstvím nebo se zavěšovat za dvířka.
Mohly by se zranit.

Důležité bezpečnostní
pokyny
Uchovejte si tuto knížečku pro další potřebu. Přečtěte si a dodržujte všechny pokyny
předtím, než začnete troubu používat, abyste zabránili riziku požáru, elektrického šoku,
zranění nebo škod. Tato příručka nepokrývá všechny možné stavy, které se mohou
vyskytnout. V případě nesrozumitelných problémů se vždy obraťte na servisního
zástupce či výrobce.
39
VAROVÁNÍ
8. Jsou-li dvířka nebo zámek dvířek poškozeny, nesmí být trouba
provozována, dokud nebudou opraveny kompetentní osobou.
9. Pro kohokoliv kromě kompetentní osoby je provádění
jakýchkoliv oprav zahrnujících odstranění krytů nebezpečné,
protože se tím vystavuje mikrovlnné energii.
10.Když je spotřebič provozován v kombinačním režimu, smí děti
používat troubu pouze za dozoru dospělé osoby (kvůli vysokým
teplotám).
UPOZORNĚNÍ
1. Troubu nelze používat s otevřenými dvířky, protože je vybavena
bezpečnostním zámkem dvířek. Je důležité nijak tento zámek
neupravovat.
Mohlo by dojít k vystavení se nadměrnému a škodlivému mikrovlnnému záření. (Bezpečnostní zámky automaticky vypnout ohřívání,
jakmile jsou otevřená dvířka.)
2. Neumísťujte žádné předměty (např. kuchyňské utěrky, ubrousky
atd.) mezi přední část trouby a dvířka. Na těsnících površích se
nesmí usadit zbytky jídla nebo čisticího prostředku.
Mohlo by dojít k vystavení se nadměrnému a škodlivému mikrovlnnému záření.
3. Nepoužívejte troubu, jestliže je poškozená. Je důležité, aby
se dvířka trouby správně dovírala a aby nebylo poškozeno
následující: (1) dvířka (ohnutá), (2) panty a západky (zlomené
nebo povolené), (3) zámky dvířek a těsnicí povrchy.
Mohlo by dojít k vystavení se nadměrnému a škodlivému mikrovlnnému záření.
4. Ujistěte se, že jsou časy ohřívání správně nastaveny.
Malá množství jídla vyžadují kratší dobu ohřevu.
Přehřátí může způsobit zapálení jídla a následné poškození trouby.
5. Při ohřívání kapalin, např. polévek, šťáv a nápojů v mikrovlnné
troubě
* se vyhýbejte používání nádob s rovným povrchem a úzkým
hrdlem.
* Nesmí dojít k přehřání.
* Zamíchejte kapalinu předtím, než ji vložíte do trouby a poté
znovu v poločase ohřevu.
* Po zahřátí ji nechte stát v troubě po krátkou dobu. Poté ji znovu
zamíchejte a zkontrolujte teplotu, než ji budete konzumovat,
aby nedošlo k popálení (zejména u dětských lahví a pokrmů
pro mimina).
Při manipulaci s nádobou buďte opatrní. Mikrovlnný ohřev nápojů
může mít za následek zpožděné eruptivní vaření bez bublinek. To
může způsobit, že horké kapaliny znenadála varem vytečou.
6. Na horní, spodní a boční straně trouby jsou větrací otvory.
Neblokujte tyto otvory.
Mohlo by to poškodit troubu a ovlivnit výsledek ohřevu.

Důležité bezpečnostní
pokyny
Uchovejte si tuto knížečku pro další potřebu. Přečtěte si a dodržujte všechny pokyny
předtím, než začnete troubu používat, abyste zabránili riziku požáru, elektrického šoku,
zranění nebo škod. Tato příručka nepokrývá všechny možné stavy, které se mohou
vyskytnout. V případě nesrozumitelných problémů se vždy obraťte na servisního
zástupce či výrobce.
UPOZORNĚNÍ
40
7. Nepoužívejte troubu, když je prázdná. Nejlépe je nechat v prázdné
troubě sklenici s vodou. Voda bezpečně absorbuje veškerou
mikrovlnnou energii v případě, že trouba náhodně sepne.
Nevhodné používání může způsobit poškození trouby.
8. Neohřívejte jídlo zabalené do papírových ubrousků, jestliže
to není přímo v pokynech z kuchařky (knihy). A pro ohřívání
nepoužívejte namísto papírových ubrousků noviny.
Nesprávné použití může způsobit výbuch nebo požár.
9. Nepoužívejte dřevěné nádoby a keramické návody s kovovými
prvky (např. zlato nebo stříbro). Vždy odejměte kovové součásti.
Ujistěte se, že náčiní je vhodné pro použití v mikrovlnné troubě.
Může se zahřát a zčernat. Kovové předměty mohou v troubě
způsobovat elektrický oblouk, jenž může způsobit škody.
10.Nepoužívejte výrobky z recyklovaného papíru.
Mohou obsahovat nečistoty, které mohou způsobit jiskření a/nebo
požár.
11. Neoplachujte talíř a mřížku pomocí vody ihned po ohřevu.
Mohlo by dojít k jejich prasknutí nebo poškození.
Nevhodné používání může způsobit poškození trouby.
12.Trouba musí být postavena tak, aby přední část byla 8 cm za
okrajem povrchu, na kterém stojí, aby nedošlo k náhodnému
převrhnutí spotřebiče.
Nesprávné používání může způsobit zranění nebo poškození trouby.
13.Před ohřevem propíchněte slupky brambor, jablek a dalších
podobných plodů.
Mohou jinak prasknout.
14.Nevařte vajíčka ve skořápce. Vajíčka ve skořápce a již uvařená
vajíčka nesmí být v mikrovlnné troubě ohřívány, protože mohou
explodovat (a to i po ukončení ohřevu).
Uvnitř vajíčka se vytvoří tlak a to vybuchne.
15.Nepokoušejte se jídlo v troubě fritovat.
Mohlo by dojít k náhlému vystříknutí horkého oleje.
16.Pozorujete-li kouř, okamžitě vypněte nebo odpojte troubu ze
zásuvky a nechte dvířka trouby zavřená, aby se plameny udusily.
Jinak může dojít k vážným škodám, např. požáru a elektrickému
šoku.
17.Když je jídlo ohříváno nebo vařeno v nádobě z plastu, papíru
nebo jiného hořlavého materiálu, dávejte na troubu často pozor.
Vaše jídlo se může rozlít z důvodu narušení nádoby, a to může
způsobit požár.
18.Během provozu spotřebiče mohou přístupné části mít vysokou
teplotu. Nedotýkejte dvířek, vnějšího krytu, zadního krytu,
vnitřku trouby, příslušenství a talířů během režimu grilu,
konvekce a automatického vaření. Před čištěním se ujistěte, že
nejsou horké.
Protože se tyto části mohou velmi zahřát, existuje zde nebezpečí
popálenin, nepoužíváte-li kuchyňské rukavice.

Důležité bezpečnostní
pokyny
Uchovejte si tuto knížečku pro další potřebu. Přečtěte si a dodržujte všechny pokyny
předtím, než začnete troubu používat, abyste zabránili riziku požáru, elektrického šoku,
zranění nebo škod. Tato příručka nepokrývá všechny možné stavy, které se mohou
vyskytnout. V případě nesrozumitelných problémů se vždy obraťte na servisního
zástupce či výrobce.
UPOZORNĚNÍ
41
19.Trouba by měla být čištěna pravidelně a jakékoliv zbytky jídla
odstraněny.
Zanedbání údržby trouby může způsobit opotřebení povrchů.
To může mít negativní dopad na životnost výrobku a také mít za
následek rizikové situace.
20.Používejte pouze teploměr doporučený k této troubě.
S nevhodným teploměrem nelze přesně stanovit teplotu.
21.Postupujte přesně podle pokynů udaných výrobcem popcornu.
Neponechávejte troubu bez dozoru, když popcorn praská.
Jestli popcorn po doporučeném čase stále nepraská, zastavte
ohřev. Nikdy nepoužívejte na popcorn hnědé papírové sáčky.
Nepokoušejte se znovu ohřívat již prasklý popcorn.
Přehřátí může způsobit zapálení popcornu.
22.Zařízení musí být uzemněno.
Vodiče u napájecího kabelu jsou označeny dle následujícího kódu:
MODRÝ - neutrální
HNĚDÝ - živý
ZELENO-ŽLUTÝ - uzemnění
Jestliže barvy vodičů v zásuvce neodpovídají barvám koncovek
kabelu zařízení, postupujte následovně:
Vodič, který je označen MODŘE, musí být připojen ke koncovce,
která je označena písmenem N nebo ČERNĚ. Vodič, který
je označen HNĚDĚ, musí být připojen ke koncovce, která je
označena písmenem L nebo ČERVENĚ. Vodič, který je označen
ZELENO-ŽLUTĚ, musí být připojen ke koncovce, která je
označena písmenem E nebo
Jestliže je přívodní kabel poškozen, musí být nahrazen
výrobcem, servisním technikem nebo podobně kvalikovanou
osobou, aby nedošlo k rizikům.
Nesprávné používání může způsobit vážné elektrické škody.
.
23.Tato trouba nesmí být používána pro profesionální účely.
Nevhodné používání může způsobit poškození trouby.
24.Mikrovlnná trouba musí být provozována s otevřenými dvířky,
jestliže je zabudována do skříňky.
Jestliže jsou dvířka během provozu zavřená, naruší se průtok vzduchu a může dojít k požáru nebo poškození trouby či skříňky.
25.Zapojení lze provést pouze tehdy, je-li zástrčka přístupná a je-li
zaveden vypínač obvodu (jistič) v souladu elektrotechnickými
normami.
Použití nevhodné zástrčky nebo přepínače může způsobit elektrický
šok nebo požár.

Důležité bezpečnostní
42
pokyny
Uchovejte si tuto knížečku pro další potřebu. Přečtěte si a dodržujte všechny pokyny
předtím, než začnete troubu používat, abyste zabránili riziku požáru, elektrického šoku,
zranění nebo škod. Tato příručka nepokrývá všechny možné stavy, které se mohou
vyskytnout. V případě nesrozumitelných problémů se vždy obraťte na servisního
zástupce či výrobce.
UPOZORNĚNÍ
26.Je třeba dávat pozor, aby si děti se zařízením nehrály.
27.Zařízení nesmí být ovládáno externím časovačem nebo
zvláštním ovladačem.
28.Používejte pouze takové kuchyňské náčiní a nádobí, které je
vhodné do mikrovlnek.
29.Mikrovlnná trouba nesmí být umístěna do skříňky, pokud nebyla
k tomu testována.
30.Tento spotřebič není určen k používání osobami (včetně dětí)
se sníženou fyzickou, senzorickou nebo mentální schopností,
nebo s nedostatkem zkušeností či znalostí, pokud nejsou pod
dohledem nebo jim nebyly dány pokyny ohledně bezpečného
používání a jejich bezpečnosti. Čištění a údržbu nesmí provádět
děti mladší 8 let nebo bez dohledu.
31.Minimální výška volného prostoru nad vrchní částí trouby.
32.Mikrovlnná trouba je určena k samostatnému stání.
33.Během provozu spotřebiče mohou přístupné části mít vysokou
teplotu.
34.Zařízení a jeho napájecí kabel musí být mimo dosah dětí
mladších 8 let.
35.Dvířka a vnější povrch mohou být horké, když zařízení pracuje.

Umístûte troubu na zvolené vodorovné místo o
minimální svûtlé v˘‰ce 85 cm ale pfiesvûdãete se, Ïe
nad troubou zÛstane alespoÀ 30 cm a za ní alespoÀ 10 cm voln˘
prostor pro zaji‰tûní náleÏitého vûtrání. âelní strana musí b˘t
alespoÀ 8 cm od hrany desky, na které je trouba umístûna, aby
nedocházelo k náhodnému doteku horké trouby.
V˘stupní vûtrací otvor se nachází na vrchní nebo boãní stûnû
trouby. Zakrytí tohoto otvoru by mohlo zpÛsobit po‰kození trouby
Tato mikrovlnná trouba se nesmí pouÏívat pro úãely
komerãního stravování.
Vybalte troubu z pfiepravní krabice a postavte
ji na vodorovnou plochu.
Pokud budete postupovat podle následujících základních krokÛ uveden˘ch na této dvoustranû, pak budete
43
schopni velice rychle zkontrolovat, jestli va‰e trouba správnû funguje. Obzvlá‰È dodrÏujte rady ohlednû
umístûní trouby. Pfii rozbalování trouby odstraÀte v‰echny doplÀky a ve‰ker˘ balicí materiál. Zkontrolujte,
zda trouba nebyla bûhem pfiepravy po‰kozena.
Vybalení a
instalace
SKLENùN¯ TALͤ
ROTAâNÍ PODPùRA
GRILOVACÍ STOJÁNEK

Troubu zapojte do normalizované jednofázové
44
zásuvky. Dbejte, aby mikrovlnná trouba byla
jedin˘m spotfiebiãem v obvodu. Pokud trouba
nefunguje správnû, vytáhnûte vidlici síÈové ‰ÀÛry ze
zásuvky a znovu ji zasuÀte.
ZataÏením za MADLO otevfiete dvífika trouby a do
vnitfiního prostoru vloÏte ROTAâNÍ PODPùRU a na
ni SKLENùN¯ TALͤ.
Do poháru vhodného pro
mikrovlnou troubu nalijte asi 300
ml vody. PoloÏte pohár s vodou na
SKLENùN¯ TALͤ a uzavfiete dvífika trouby.
Pokud si nejste jisti, jak˘ pohár smíte pouÏívat,
pfieãtûte si informace na stranû 64.
Stisknûte
tlaãítko
STOP a
zmáãknûte 1
krát za sebou
tlaãítko
START, tím
nastavíte dobu vafiení na
30 sekund
. Pfii kaÏdém
zmáãknutí tlaãítka usly‰íte
ZVUKOV¯ SIGNÁL.
Mikrovlnná trouba zaãne
pracovat je‰tû dfiív, neÏ
zmáãknete tlaãítko
po‰esté. Nemusíte se
niãeho obávat, tak je to
správné.
30
Sekund
Na displeji se Vám zaãne od ãas
odeãítat. Jakmile poãítadlo dosáhne 0,
usly‰íte ZVUKOV¯ SIGNÁL. Otevfiete dvífika
trouby a zkontrolujte teplotu vody. Pokud trouba
funguje, voda bude teplá. S pohárem manipulujte
opatrnû, mÛÏe b˘t hork˘.
NYNÍ MÁTE INSTALACI TROUBY UKONâENOU
30 sekund

Hodiny lze nastavit na zobrazování po 12 nebo 24 hodinách.
45
V následujícím příkladu vám ukáži, jak nastavit čas 14:35 na hodinách zobrazujících 24 hodin.
Ujistěte se, že jste vyjmuli veškerý balicí materiál z trouby.
Ujistěte se, že jste správně zapojili a instalovali troubu, tak jak
je popsáno v této knížce.
Zapojte poprvé troubu.
Na displeji se zobrazí „24H“.
(Jestliže chcete použít jinou možnost, stiskněte Taste Saver.
Chcete-li změnit možnost po nastavení hodin,
budete muset zařízení odpojit a znovu připojit k síti.)
Když je vaše trouba poprvé zapojena
nebo když dojde k obnovení dodávky
elektřiny po výpadku, ukáže se na
displeji nápis "24H". Lze vynulovat
hodiny.
Jestliže hodiny (displej) zobrazují
nějaké zvláštní symboly, odpojte troubu
od elektrické sítě a znovu ji zapojte a
vynulujte hodiny.
Otočte knoíkem, dokud neukáže “14: ”.
Stiskněte START pro potvrzení hodin.
Otočte knoíkem, dokud neukáže “14:35“.
Stiskněte START.
Hodiny začnou fungovat.
Nastavení
hodin

Dûtská
Zmáãknûte STOP/CLEAR (ZASTAVIT/VYNULOVAT) a tlaãítko
pfiidrÏte, dokud se neobjeví „L" na displeji a neusly‰íte zvukov˘
signál. DùTSKÁ POJISTKA je aktivní.
Z displeje na chvíli zmizí ãasov˘ údaj a pak se
po nûkolika sekundách znova objeví.
Na displeji zÛstane „L" a signalizuje, Ïe DùTSKÁ POJISTKA je
aktivní.
Zru‰ení funkce DùTSKÉ POJISTKY provedete zmáãknutím a
podrÏením tlaãítka STOP/CLEAR (ZASTAVIT/VYNULOVAT) aÏ „L"
zmizí. Jako potvrzení po uvolnûní usly‰íte zvukov˘ signál.
Trouba je vybavena blokovací
pojistkou, která neumoÏní náhodné
spu‰tûní trouby. Pokud je dûtská
pojistka aktivní, pak nebude moÏné
spustit Ïádnou funkci trouby a nebude
moÏné v ní vafiit.
Dûti mohou dvífika trouby otevfiít i se
zapnutou blokovací pojistkou.
46
pojistka
Zmáãknûte tlaãítko STOP/CLEAR (ZASTAVIT/VYNULOVAT).

Pfiesvûdãete se, Ïe máte správnû instalovanou troubu podle
v˘‰e uvedeného popisu.
Zmáãknûte START (SPUSTIT).
%
100%
80%
60%
40%
20%
Na následujícím návodu Vám ukáÏeme, jak uvafiit libovolné potraviny pfii 80%-ním v˘konu za
VYSOK
¯
ST¤EDNù
VYSOK
¯
ST¤EDNÍ
NÍZK
¯
ST¤EDNù NÍZK¯
V¯KON
zmáãknout
MICRO
V
˘kon
krát
krát
krát
krát
krát
47
5 minut a 30 sekund.
Zmáãknûte tlaãítko STOP/CLEAR (ZASTAVIT/VYNULOVAT).
Vafiení pomocí
mikrovln
Trouba má pût stupÀÛ nastavení
v˘konu. Automaticky je nastaven
vysok˘ v˘kon, ale opakovan˘m
stisknutím tlaãítka V¯KON mÛÏete
zvolit jinou úroveÀ v˘konu.
900W
720W
540W
360W
180W
Stisknûte dvakrát V¯KON, ãímÏ zvolíte 80% v˘kon.
Na displeji se objeví
Otáãejte knoflík DIAL (VOLICÍ KOTOUâ), dokud se na displeji
neobjeví “5:30”.
“720”.

Úrovnû v˘konu
V¯KON
VYSOK¯
• Vafiení vody
• Peãení hovûzí sekané
• Vafiení kouskÛ drÛbeÏe, ryb, zeleniny
• Vafiení jemnû krájeného masa
ST¤EDNù VYSOK¯ 80% • Ve‰keré ohfiívání pokrmÛ
• Peãení masa a drÛbeÏe
• Vafiení hub a plodÛ mofie
• Vafiení jídel obsahujících s˘ry a vejce
ST¤EDNÍ 60% • Peãení koláãÛ a drobného peãiva
• Pfiíprava vajec
• Vafiení vajeãn˘ch krémÛ, pudinkÛ
• Pfiíprava r˘Ïe a polévek
40%
ST¤EDNù NÍZK¯
NÍZK¯ 20%
V¯STUP POUÎITÍ
48
mikrovln
V˘kon mikrovlnné trouby je moÏné regulovat v pûti úrovních, takÏe je zaji‰tûna maximální moÏnost v˘bûru
v˘konu a plná kontrola nad vafiením pokrmÛ. NíÏe uvedená tabulka obsahuje nûkolik pfiíkladÛ potravin a
doporuãené v˘kony mikrovlnného záfiení pro jejich uvafiení.
100%
900W
720W
540W
360W
180W
• Rozpou‰tûní másla a ãokolády
• Vafiení velmi jemnû krájeného masa
• Zmûkãení másla a s˘rÛ
• Zmûkãení mraÏen˘ch krémÛ
• Kynutí tûsta
• Rozmrazování v‰ech pokrmÛ

Dvoufázové
vafiení
V následujícím návodu Vám ukáÏeme, jak uvafiit libovolné potraviny ve dvou fázích. V první fázi
49
budeme vafiit 11 minut pfii VYSOKÉM v˘konu a v druhé fázi 35 minut pfii 360W-ním v˘konu.
Zmáãknûte tlaãítko STOP/CLEAR (ZASTAVIT/VYNULOVAT).
Nastavení v˘konu a doby vafiení pro 1. fázi.
V prÛbûhu dvoufázového vafiení je
moÏné dvífika mikrovlnné trouby otevfiít
a zkontrolovat stav potravin. Po
zavfiení dvífiek a opûtovném zmáãknutí
START prÛbûh vafiení v dané fázi
bude pokraãovat.
Na konci 1. fáze se ozve ZVUKOV¯
SIGNÁL a zaãne druhá fáze vafiení.
Pokud chcete vymazat nastaven˘
program pak staãí dvakrát zmáãknout
STOP/CLEAR.
Pro volbu VYSOKÉHO v˘konu zmáãknûte jednou tlaãítko .
Otáãejte knoflík DIAL (VOLICÍ KOTOUâ), dokud se na displeji
neobjeví “11:00”.
Nastavení v˘konu a doby vafiení pro 2. fázi.
Pro volbu v˘konu zmáãknûte 4-krát tlaãítko
Otáãejte knoflík DIAL (VOLICÍ KOTOUâ), dokud se na displeji
neobjeví “
35:00
360W
”.
V¯KON
. V¯KON
Zmáãknûte START.

Rychl˘
Zmáãknûte tlaãítko STOP/CLEAR (ZASTAVIT/VYNULOVAT).
Zmáãknûte 4 krát za sebou tlaãítko START (SPUSTIT), tím nastavíte
dobu vafiení na 2 minuty pfii VYSOKÉM v˘konu. Mikrovlnná trouba
zaãne pracovat je‰tû dfiív, neÏ zmáãknete tlaãítko poãtvrté.
Funkce QUICK START (RYCHL¯
START) Vám umoÏní jednoduch˘m
maãkáním tlaãítka START nastavit
dobu vafiení pfii VYSOKÉM v˘konu v
intervalech po 30-ti sekundách.
50
start
Na následujícím pfiíkladu ukáÏeme, jak nastavit 2 minuty vafiení pfii vysokém v˘konu.

Úspora
energie
Na displeji se zobrazí “0”.
Stiskněte jakékoliv tlačítko a zapněte znovu displej.
51
Funkce ECO ON slouží k úspoře energie vypínáním displeje.
Displej se rovněž vypne, jestliže
zařízení není používáno déle než 5
minut.
Zmáãknûte tlaãítko STOP/CLEAR (ZASTAVIT/VYNULOVAT) .
Zmáãknûte tlaãítko STOP/CLEAR (ZASTAVIT/VYNULOVAT)
(ECO ON)
(ECO ON)
.

Grilování
Na následujícím pfiíkladu Vám ukáÏeme, jak se pouÏívá gril s nastavením doby 12 minut a 30 sekund.
Tato funkce zajistí rychlé zkfiehnutí a
upeãení povrchu potravin dohnûda.
Otáãejte knoflíkem DIAL (VOLICÍ KOTOUâ) aÏ se objeví na displeji
"12:30".
.
52
Zmáãknûte tlaãítko STOP/CLEAR (ZASTAVIT/VYNULOVAT).
Stisknûte
Zmáãknûte tlaãítko START (SPUSTIT)
GRILL

Na následujícím pfiíkladu Vám ukáÏeme, jak naprogramovat troubu v kombinovaném reÏimu Co- 3 na dobu
Mikrovlnná trouba je vybavena
moÏností kombinovaného vafiení, coÏ
vám umoÏÀuje vafiit jídla s kombinací
nebo postupn˘m pouÏíváním ohfievu a
mikrovln. Tím se dá dosáhnout krat‰í
doby vafiení.
Topné tûleso chránûné krytem griluje
povrch potravin a mikrovlny zároveÀ
ohfiívají jídlo zevnitfi. Není nutné
pfiedhfiívat troubu.
Programy kombinovaného vafiení
Kategorie V˘kon mikrovln (%) V˘kon grilu (%)
Co-1 20 80
Co-2 40 60
Co-3 60 40
S nádobou po vafiení manipulujte opatrnû, mÛÏe b˘t horká.
Otáãejte knoflíkem DIAL (VOLICÍ KOTOUâ), aÏ se na displeji objeví
hodnota "25:00".
Stisknûte
KOMBI
tfiikrát
.
53
vafiení 25 minut.
Zmáãknûte tlaãítko STOP/CLEAR (ZASTAVIT/VYNULOVAT).
Kombinované
vafiení
Zmáãknûte tlaãítko START (SPUSTIT) a tím potvrdíte volbu v˘konu.

Automatické
UTO COOK (AUTOMATICKÉ VA¤ENÍ).
líkem DIAL (VOLICÍ KOTOUâ) aÏ se na displeji objeví
Pečené hovězí
Pečené vepřové
Kuřecí stehna
54
vafiení
Na následujícím pfiíkladu Vám ukáÏeme, jak uvafiit
Zmáãknûte tlaãítko STOP/CLEAR (ZASTAVIT/VYNULOVAT).
0,6 kg syrová zelenina.
Funkce AUTO COOK
(AUTOMATICKÉ VA¤ENÍ) vám
umoÏní jednoduch˘m zpÛsobem uvafiit
vût‰inu va‰ich oblíben˘ch jídel volbou
druhu potraviny a zadáním hmotnosti
této potraviny.
Kategorie
BRAMBORY VE SLUPCE
SYROVÁ ZELENINA
MRAÎENÁ ZELENINA
R¯ÎE, TùSTOVINY
Ryba
zmáãknout
AUTO COOK
krát
krát
krát
krát
krát
krát
krát
krát
Zmáãknûte A
Otáãejte knof
0,6
.
Zmáãknûte tlaãítko START (SPUSTIT).

1. BRAMBORY VE SLUPCE
2. SYROVÁ ZELENINA
3. MRAÎENÁ ZELENINA
4. R¯ÎE, TùSTOVINY
Pokojová
teplota
Pokojová
teplota
MraÏená
potravina
Pokojová
teplota
Sklenûn˘ talífi
Sklenûn˘ talífi
Sklenûn˘ talífi
Nádoba pro
mikrovlnné
trouby
Umyjte brambory a osu‰te je. Propíchejte brambory
nûkolikrát vidliãkou.VloÏte je spoleãnû s tfiemi papírov˘mi
ubrousky na sklenûn˘ talífi.
Po uvafiení je zakryjte folií a nechejte stát 5 minut.
VloÏte pfiipravenou zeleninu do vhodné nádoby.
Pfiidejte 30 ml vody na 200 g zeleniny
Po uvafiení nechejte stát 2 minuty.
VloÏte pfiipravenou zeleninu do vhodné nádoby. Pfiidejte 30
ml vody na 200 g zeleniny. Nádobu zakryjte a uloÏte ji do
stfiedu sklenûného talífie. Po uvafiení nechejte stát 2 minuty.
Properte r˘Ïi a nechejte 30 minut namáãet. Dejte r˘Ïi a vafiící vodu s
1/4 aÏ 1 lÏiãkou soli do hluboké a dostateãnû velké nádoby.
**R˘Ïe – po uvafiení nechejte stát zakryté po dobu 5 minut nebo dokud se
voda nevsákne.
**Tûstoviny – bûhem vafiení nûkolikrát zamíchejte.
Po uvafiení nechejte 1 – 2 minuty stát. Properte
studenou vodou.
0,2 - 1,0 kg
0,2 - 0,8 kg
0,2 - 0,8 kg
0,1 - 0,3 kg
R˘Ïe
Tûstoviny
Voda
Hmotnost
100 g
180 ml
400 ml
200 g
330 ml
800 ml
300 g
480 ml
1200 ml
Pokrievka
Ano
Ne
DRUH NÁDOBA POKYNY
55
(Ac-1)
TEPLOTA
POTRAVIN
MAXIMÁLNÍ
MNOÎSTVÍ
(Ac-2)
(Ac-3)
(Ac-4)

DRUH NÁDOBA POKYNY
56
5. Ryba
(Ac-5)
TEPLOTA
POTRAVIN
Chlazený
Bezpečná
mikrovlnná mísa na
jídlo
MAXIMÁLNÍ
MNOÎSTVÍ
0.2 kg ~ 0.6 kg
Celá ryba, steaky
- Tučné ryby: losos, makrela
- Bílé ryby: treska, treska skvrnitá
Uspořádejte v jedné vrstvě do velké bezpečné mikrovlnné mísy
na jídlo. Mísu těsně zakryjte plastovou fólií a na několika místech
propíchněte. Umístěte na skleněný otočný talíř. Upravte váhu a
stiskněte tlačítko Start. Po uvaření vyjměte mísu z trouby. Asi 3
minuty před podáváním nechte stát.
6. Pečené
hovězí
(Ac-6)
7. Pečené
vepřové
(Ac-7)
8. Kuřecí
stehna
(Ac-8)
Chlazený
Chlazený
Chlazený
Rošt
Rošt
Rošt
0.5 kg ~ 1.5 kg
0.5 kg ~ 1.5 kg
0.2 kg ~ 0.8 kg
Hovězí maso potřete rozpuštěným margarine nebo máslem.
Umístěte na rošt. Když trouba pípne, pokrm otočte, stiskněte
tlačítko Start a pokračujte. Po uvaření nechte před podáváním stát
přikryté fólií asi 10 minut.
Vepřové maso potřete rozpuštěným margarine nebo máslem.
Umístěte na rošt. Když trouba pípne, pokrm otočte, stiskněte
tlačítko Start a pokračujte. Po uvaření nechte před podáváním stát
přikryté fólií asi 10 minut.
Umyjte a osušte kůži. Kuřecí stehna potřete rozpuštěným
margarine nebo máslem. Umístěte na rošt nad skleněným
otočným talířem. Pod rošt umístěte bezpečnostní mikrovlnnou
nádržku na odkapávání šťávy z masa. Po PÍPNUTÍ pokrm otočte.
A pak stiskněte tlačítko Start a pokračujte ve vaření. Po uvaření
zakryjte fólií a nechte stát asi na 2~5 minut.

Mikrovlnná trouba má ãtyfii moÏnosti
nastavení rozmrazování: MEAT (MASO),
POULTRY (DRÒBEÎ) , FISH (RYBA),
BRED (CHLÉB). KaÏdá z tûchto
kategorií má jiné nastavení v˘konu.
Opakovan˘m maãkáním tlaãítka AUTO
DEFROST (AUTOMATICKÉ
ROZMRAZOVÁNÍ) mÛÏete zvolit jedno z
dostupn˘ch pfiedvoleb.
Teplota a hustota potravin b˘vá rÛzná. Doporuãujeme pfied poãátkem vafiení potraviny zkontrolovat.
Kategorie
MASO
DRÒBEÎ
CHLÉB
zmáãknout
DEFROST
krát
krát
krát
ZváÏením zjistûte hmotnost potravin, které chcete rozmrazit.
OdstraÀte ve‰keré kovové spony a obalov˘ materiál. Potom vloÏte
potraviny do mikrovlnné trouby a zavfiete dvífika.
Zmáãknûte tlaãítko
(AUTOMATICKÉ ROZMRAZOVÁNÍ)
dvakrát a tím
zvolíte program rozmrazování POULTRY (DRÒBEÎ) Na displeji se
objeví "dEF2".
Zadejte hmotnost zmraÏené potraviny, kterou chcete rozmrazit.
Otáãejte knoflíkem DIAL (VOLICÍ KOTOUâ) aÏ se na displeji
objeví hodnota
V prÛbûhu rozmrazování usly‰íte zvukov˘ signál, kter˘ znaãí, Ïe máte otevfiít dvífika mikrovlnné trouby,
otoãit vloÏené potraviny a oddûlit jednotlivé kousky, abyste tím zajistili rovnomûrné rozmrazování.
OdstraÀte
v‰echny porce, které jsou jiÏ rozmraÏené nebo je zastiÀte tak, aby se tím zajistilo pomalé rozmraÏení. Po kontrole
zavfiete dvífika a zmáãknûte START (SPUSTIT/RYCHLE) pro dokonãení procesu rozmrazování.
Mikrovlnná trouba nepfieru‰í rozmrazování (i kdyÏ usly‰íte zvukov˘ signál) dokud neotevfiete dvífika.
RYBY
57
Dávejte pozor obzvlá‰tû na velké kusy masa na peãení, kufiata. Nûkteré suroviny by se nemûly úplnû
rozmrazit pfied vafiením. Program DRÒBEÎ je vhodn˘ na rozmrazování men‰ích kouskÛ jako je rohlík
anebo mal˘ plátek chleba. Proces vyÏaduje urãitou dobu odstavení, aby se i vnitfiek rozmrazil. Na
následujícím pfiíkladu ukáÏeme, jak rozmrazit 1,4 kg zmraÏené drÛbeÏe.
Zmáãknûte tlaãítko STOP/CLEAR (ZASTAVIT/VYNULOVAT).
Automatické
rozmrazování
krát
Zmáãknûte tlaãítko START (SPUSTIT).
"1.4".

Kategorie Nádoba Druh zpracování Hmotnost
PRÒVODCE ROZMRAZOVÁNÍM
Nádobí pro
mikrovlnné
trouby
(mûlké talífie)
Papírov˘
ubrousek
nebo mûlk˘
talífi
0,1– 4,0 kg
0,1– 0,5 kg
Maso
Mleté hovûzí maso, fiízky, plátky, kostky na du‰ení, ro‰tûnky, ro‰tûnec, hovûzí zadní, mleté
bifteky, vepfiové kotlety, jehnûãí kotlety, roláda, klobásy, plátky ( do 2 cm)
Po zaznûní zvukového signálu otoãte rozmrazované potraviny
Po rozmraÏení nechejte stát 5 –15 minut.
DrÛbeÏ
Celé kufie, steh˘nka, prsíãka, krÛtí prsa (do 2,0 kg)
Po zaznûní zvukového signálu otoãte rozmrazované potraviny
Po rozmraÏení nechejte stát 20 –30 minut.
Ryby
Filé, steaky, celé ryby, mofiské plody
Po zaznûní zvukového signálu otoãte rozmrazované potraviny
Po rozmraÏení nechejte stát 10 –20 minut.
Krájen˘ chléb, Ïemle, bagety atd.
MASO
CHLÉB
• Potraviny, které chcete rozmrazovat vloÏte do vhodné nádoby pouÏitelné v mikrovlnné troubû a bez zakrytí ji poloÏte na sklenûn˘
otoãn˘ talífi.
• Pokud je to nutné, zastiÀte tenké ãásti masa ploch˘mi kousky hliníkové fólie. Tím se zabrání jejich pfiehfiátí v prÛbûhu rozmrazování.
Zajistûte, aby se fólie nedot˘kaly stûn mikrovlnné trouby.
• Potraviny jako mleté maso, fiízky, klobásky a pláty slaniny od sebe oddûlujte co nejdfiíve.
• Jakmile trouba vydá zvukov˘ signál, otoãte potraviny. RozmraÏené ãásti vyndejte z trouby. Pokraãujte dále v rozmrazování
zb˘vajících potravin.
• Po ukonãení rozmrazovacího procesu nechejte potraviny je‰tû odstát, aby do‰lo k úplnému roztátí.
• Napfiíklad velké kusy masa na peãení a celá kufiata by mûla pfied poãátkem vafiení je‰tû alespoÀ jednu hodinu stát.
58
(dEF1)
DRÒBEÎ
(dEF2)
RYBY
(dEF3)
(dEF4)

rozmrazování
ZváÏením zjistûte hmotnost potravin, které chcete rozmrazit.
OdstraÀte ve‰keré kovové spony ãi obalov˘ materiál, potom vloÏte
potraviny do mikrovlnné trouby a zavfiete dvífika.
zvolíte program MEAT (MASO).
Mikrovlnná trouba je vybavena funkcí
(MEAT - MASO)
Tuto funkci pouÏívejte pouze k velmi rychlému rozmraÏení mletého masa o hmotnosti 0,5 kg.
V prÛbûhu rozmrazování usly‰íte zvukov˘ signál, kter˘ znaãí, Ïe máte otevfiít dvífika mikrovlnné trouby a
otoãit vloÏené potraviny a oddûlit jednotlivé kousky, abyste tím zajistili rovnomûrné rozmrazování.
OdstraÀte v‰echny dávky, které jsou jiÏ rozmraÏené, nebo je zastiÀte, aby se tím zajistilo pomalé
rozmraÏení. Po kontrole zavfiete dvífika a zmáãknûte START, aby byl proces dokonãen.
Mikrovlnná trouba nepfieru‰í rozmrazování (i kdyÏ usly‰íte zvukov˘ signál) dokud neotevfiete dvífika.
59
Poté musí maso je‰tû chvíli stát, aby se i vnitfiní ãást plnû rozmrazila. Na následujícím pfiíkladu Vám
ukáÏeme, jak rozmrazit 0,5 kg zmraÏeného mletého masa.
Zmáãknûte tlaãítko STOP/CLEAR (ZASTAVIT/VYNULOVAT).
Rychlé
rychlé rozmraÏení
Stisknûte
QUICK DEFROST (Rychlé rozmrazování) a tím

PROGRAM DRUH POTRAVINY
MIN/MAX.
Hovûzí
Jehnûãí
Telecí
0,5 kg
Mleté maso
* V˘hodou automatického rozmrazování je automatické nastavení a fiízení rozmrazovacího procesu s tím, Ïe v prÛbûhu
rozmrazování musíte kontrolovat stav potravin, stejnû jako u normálního rozmrazování.
* Pro dosaÏení nejlep‰ích v˘sledkÛ odstraÀte z masa a drÛbeÏe balicí papír a plastové fólie (ve‰ker˘ obalov˘ materiál). Obal by
totiÏ udrÏoval vlhkost a ‰Èávu z masa tûsnû na povrchu potravin a tím by mohlo dojít k uvafiení vnûj‰ího povrchu.
* VloÏte suroviny do mûlké sklenûné mísy ve které se bude shromaÏìovat odkapávající tekutina.
* Potraviny po odstranûní z trouby mohou b˘t uprostfied je‰tû mírnû zmrzlé.
* Po ukonãení programu nechejte potraviny stát 10 minut nebo do doby neÏ se plnû rozmrazí.
1. Maso
RYCHLÉ ROZMRAZOVÁNÍ
60

Rozmrazování
a gril
61
V následujícím příkladu vám ukáži, jak uvařit 0,3kg lososový let.
Zmáãknûte tlaãítko STOP/CLEAR (ZASTAVIT/VYNULOVAT).
Stiskněte jednou Rozmrazování a gril.
Rozmrazování a gril umožňuje ohřívat
oblíbená jídla výběrem druhu potraviny
a zadáním hmotnosti pomocí otáčecího
knoíku.
Otočte knoíkem, dokud neukáže "0,3kg".
Druh
Lososový let
Krevety
Hamburgery
Párky
Stiskněte
Defrost & Grill
krát
krát
krát
krát
Zmáãknûte tlaãítko START (SPUSTIT).

Druh Kvantita Náčiní TEPLOTA Pokyny
Lososový let 0,2-0,6kg
Mřížka
Mražené
Vyberte lososový let s hmotností 200g a tloušťkou 2,5 cm.
Musí být zmražený.
Umístěte jídlo na mřížku.
Vyberte druh a váhu a stiskněte start.
Po uvaření vyndejte z mikrovlnky a nechte stát.
Krevety 0,1-0,4kg Mražené
Očistěte krevety.
Umístěte na mřížku.
Jakmile zařízení zapípá, jídlo otočte.
Hamburgery 1-4 kusy Mražené
Umístěte hamburger (maso) na mřížku.
Vyberte druh a váhu a stiskněte start.
Po uvaření vyndejte z mikrovlnky a nechte stát.
Párky 0,2-0,6kg Mražené
Odstraňte balicí materiál a nařízněte povrch.
Umístěte na mřížku.
Jakmile zařízení zapípá, jídlo otočte.
62
(dG-1)
(dG-2)
(dG-3)
(dG-4)

Funkce taste
saver
Funkce taste saver ručně
Vložte jídlo do mikrovlnné trouby, stiskněte dvakrát
tlačítko "taste saver" a na displeji se zobrazí "HO-H".
Stiskněte START.
Funkce taste saver po AUTO COOK
1. Nastavte požadovaný program AUTO COOK.
Stiskněte START. Po dokončení programu AUTO COOK
se automaticky spustí funkce taste saver, jakmile uběhne
5 minut po AUTO COOK.
2. Jakmile AUTO COOK skončí, můžete stisknout tlačítko
"taste saver" a na displeji se objeví "HO-H".
Stiskněte START.
*Zobrazení ČASU
Když běží funkce taste saver, bude se zobrazovat
.
Když stisknete znovu tlačítko "taste saver", zobrazí se
zbývající čas na displeji.
63
V následujícím příkladu vám ukáži, jak použít funkci taste saver k ohřívání jídla při vysokém
výkonu v 90 min.
Jestliže chcete ohřát jídlo pomocí
programu AUTO COOK, stačí k
tomu stisknout toto tlačítko.
Když potřebujete ohřát jídlo bez
funkce Auto, můžete ohřev nastavit
kdykoliv pomocí tohoto tlačítka.
Funkce taste saver má pouze
jednu úroveň nastavení – 90 minut.
Funkce se ale zastaví, jakmile
otevřete dvířka.
ÚROVEÑ
Nízká úroveň
Vysoká úroveň
Stiskněte
ohřev
krát
krát
Displej

Nádobí vhodné pro
Nikdy nepouÏívejte v mikrovlnné troubû kovové nebo pokovené
nádoby.
Mikrovlnné záfiení nemÛÏe procházet kovov˘m materiálem. Vlny se
odrazí od kovového materiálu v troubû a zpÛsobí v˘boje, tj. jev, kter˘
se podobá blesku.
Vût‰inu nekovov˘ch, tepelnû odoln˘ch varn˘ch nádob je moÏné
pouÏít i v mikrovlnné troubû. Nûkteré materiály v‰ak mohou obsahovat
urãité látky, které z nich ãiní nádoby nevhodné pro mikrovlnné trouby.
Pokud si nejste jisti, Ïe daná nádoba se smí nebo nesmí pouÏívat v
mikrovlnné troubû, uvádíme jednoduch˘ návod, jak tuto skuteãnost
zjistit. VloÏte testovanou nádobu do trouby a pfiidejte sklenûnou
nádobu naplnûnou vodou. SpusÈte mikrovlnnou troubu po dobu 1
minuty pfii vysokém v˘konu (HIGH). Pokud se voda ohfieje, ale
zkoumaná nádoba zÛstane na dotek chladná, pak je vhodná do
mikrovlnné trouby. Pokud voda nezmûní svoji teplotu, ale nádoba se
ohfieje, pak materiál této nádoby absorbuje mikrovlnné záfiení a není
vhodn˘. Ve va‰í kuchyni je pravdûpodobnû mnoho nádobí, které se
dá pouÏít jako varné nádoby do mikrovlnné trouby. Pfieãtete si prosím
následující dûlení nádob.
Jídelní talífie
Velká ãást jídelních talífiÛ se mÛÏe v mikrovlnné troubû pouÏívat.
Pokud máte pochybnosti prostudujte si dokumentaci v˘robce anebo
proveìte test.
Sklenûné nádobí
Varné sklo je vhodné do mikrovlnné trouby. To platí pro v‰echny
druhy tepelnû upraven˘ch sklenûn˘ch varn˘ch nádob. V mikrovlnné
troubû nepouÏívejte jemné sklo, jako skleniãky na likéry ãi na víno,
mohly by se pfii ohfievu tekutin rozbít.
Umûlohmotné zásobníky
Mohou se pouÏívat pro uskladnûní potravin, které mají b˘t rychle
ohfiáté. Nehodí se v‰ak pro uskladnûní potravin, které vyÏadují del‰í
dobu tepelného zpracování v troubû, jelikoÏ mÛÏe dojít k roztavení ãi
deformaci plastové nádoby.
Papír
Papírové tácky a krabiãky vyhovují podmínkám zpracování potravin v mikrovlnné
troubû s tou podmínkou, Ïe doba vafiení je krátká a potraviny uloÏené v
papírov˘ch nádobách obsahují málo tuku a vody. Papírové ubrousky jsou téÏ
velmi uÏiteãné pro obalení potravin a pro obloÏení plechÛ na peãení, ve kter˘ch
se tepelnû zpracovávají potraviny s vysok˘m obsahem tuku, jako napfi. anglická
slanina. Obecnû platí zásada: nepouÏívejte barevné papíry, protoÏe barva mÛÏe
pou‰tût. Nûkteré v˘robky z recyklovaného papíru mohou obsahovat pfiímûsi
zpÛsobující pfii pouÏití v mikrovlnné troubû jiskfiení nebo i vznícení.
Plastové varné sáãky
Sáãky speciálnû vyrábûné pro vafiení vyhovují i pouÏití v mikrovlnné troubû. Pfied
pouÏitím v nich nezapomeÀte udûlat otvor, aby pára mohla unikat. Nikdy
nepouÏívejte v mikrovlnné troubû obyãejné umûlohmotné sáãky, protoÏe by se
spekly anebo by praskly.
Umûlohmotné varné nádoby pro mikrovlnné trouby
V obchodech je k dostání ‰irok˘ v˘bûr rÛzn˘ch druhÛ a velikostí nádob pro
mikrovlnné trouby. Ve vût‰inû pfiípadÛ budete moci pouÏít nádoby, které jiÏ
vlastníte, aniÏ byste museli nakupovat nové vybavení do kuchynû.
Keramické a kameninové nádobí
Nádoby z tûchto materiálÛ se vût‰inou dají pouÏít v mikrovlnné troubû, ale je
lep‰í se pfied jejich pouÏitím pfiesvûdãit pomocí testu.
64
mikrovlnnou troubu
UPOZORNùNÍ:
Vût‰ina nádob s vysok˘m obsahem olova anebo Ïeleza nejsou
vhodné jako varné nádoby.
Nádoby by se mûly pfied pouÏitím vyzkou‰et, zda vyhovují provozu v
mikrovlnné troubû.

Neustál˘ dohled
PfiestoÏe recepty byly sepsány s nejvût‰í péãí, Vበúspûch pfii pfiípravû tûchto jídel
závisí na tom, kolik pozornosti budete vûnovat pokrmÛm v prÛbûhu vafiení. Po celou
dobu vafiení sledujte stav pfiipravovaného pokrmu. Mikrovlnná trouba je vybavena
vnitfiním osvûtlením, které se automaticky rozsvítí, jakmile se trouba zapne. UmoÏní se
tím sledování vnitfiku trouby a prÛbûhu procesu vafiení. V receptech uvádûné pfiíkazy
jako vyjmout, zamíchat apod. jsou uvádûny pouze jako nejniωí nutné doporuãené
mnoÏství krokÛ. Pokud by se pokrm zaãal vafiit nûjak˘m neoãekávan˘m zpÛsobem,
proveìte potfiebné zásahy, abyste napravili odchylku.
Faktory, které ovlivÀují dobu vafiení
Dobu pfiípravy ovlivÀuje mnoho faktorÛ. Teplota pouÏit˘ch surovin v nádobû mÛÏe
velice ovlivnit dobu vafiení. Napfiíklad koláã peãen˘ z ledovû studeného másla, mléka a
vajec bude trvat mnohem déle, neÏ kdyÏ tyto suroviny budou mít pokojovou teplotu. U
v‰ech receptÛ v této pfiíruãce jsou uvedeny ãasové údaje v urãitém rozsahu. MÛÏe se
stát, Ïe kdyÏ pouÏijete spodní ãasov˘ údaj, jídlo zÛstane nedovafiené a moÏná, Ïe
podle Va‰í chuti budete nûkdy volit ãas del‰í, neÏ je uveden jako maximální v této
pfiíruãce. Zásadou této kníÏky je, Ïe co se t˘ãe ãasov˘ch údajÛ vafiení, zÛstávat
konzervativní. Tro‰ku pfievafiené jídlo nemusí b˘t dobré. U nûkter˘ch receptÛ, hlavnû u
chleba, koláãÛ a pudinkÛ je doporuãené vyndat pokrmy z mikrovlnné trouby ponûkud
nedovafiené. To není omyl. KdyÏ necháte pokrm (vût‰inou pfiikryt˘) chvíli stát mimo
troubu, pak je‰tû urãitou dobu bude proces "vafiení" pokraãovat, jelikoÏ teplo
absorbované v okrajov˘ch ãástech potravin bude postupnû prostupovat smûrem
dovnitfi. Pokud pokrm zÛstane v mikrovlnné troubû tak dlouho, dokud se zcela neuvafií
vnitfiek, pak venkovní vrstva bude jíÏ pfievafiená nebo i spálená. Postupnû budete
získávat zku‰enosti, jak u kterého pokrmu nastavit dobu vafiení a následující dobu neÏ
pokrm "dojde".
Hustota potravin
Lehké, porézní pokrmy jako chleba, peãiva jsou hotovy mnohem dfiíve neÏ potraviny s
vysokou hustotou jako k˘ta a gulá‰e. Pfii mikrovlnném zpracování porézních potravin
musíte dávat pozor, aby se okraje nevysu‰ily a neztvrdly.
V˘‰ka pokrmu
Horní ãást vysok˘ch kusÛ potravin , jako napfiíklad k˘ty, se upeãe rychleji neÏ spodní
ãást. Proto doporuãujeme vysoké kusy pokrmÛ v prÛbûhu peãení otoãit, nûkdy i
vícekrát.
Charakteristika potravin
Obsah vody v potravinách
JelikoÏ teplo generované mikrovlnn˘m záfiením odpafiuje vodu z potravin, relativnû suché
potraviny jako ro‰tûnce a nûkteré zeleniny je nutné pfied uvafiením v mikrovlnné troubû
postfiíkat vodou nebo je v nádobû pfiikr˘t.
Kosti a pokrmy s obsahem tuku
Kosti vedou teplo a tuk je dfiíve uvafien neÏ maso. Je nutné pozornû sledovat proces vafiení
pokud se zhotovuje pokrm z kouskÛ masa vãetnû kostí nebo tuku aby nedo‰lo k
neoãekávanému procesu a jídlo nebylo pfievafiené.
MnoÏství potravin
MnoÏství vyzáfieného mikrovlnného záfiení zÛstává konstantní nezávisle na tom, kolik
potravin do trouby vloÏíte. âím více surovin do mikrovlnné trouby vloÏíte, tím víc ãasu budete
potfiebovat k uvafiení jídla. Pokud sníÏíte mnoÏství uvedené v receptu na polovinu,
nezapomeÀte zkrátit ãas pfiípravy alespoÀ o jednu tfietinu.
Plátky potravin
Mikrovlnné záfiení pronikne u potravin maximálnû do hloubky 2 cm , vnitfiní ãásti surovin se
uvafií teplem, které vzniká ve vrchní vrstvû a prostupuje do vnitfiní ãásti pokrmu. Pouze vnûj‰í
povrch je uvafien mikrovlnnou energií, vnitfiek se uvafií díky odvodu tepla do vnitfiních ãástí.
Nejhor‰í formou pro mikrovlnnou troubu je tlust˘ hranol suroviny. Rohy takového kusu jiÏ
budou spálené aniÏ by pfiitom do‰lo k ohfiátí vnitfiku. Potraviny ve formû kulat˘ch tenk˘ch
plátkÛ a jídlo ve formû krouÏkÛ se naopak pfiipravuje velmi dobfie.
Zakrytí
Zakrytím nádoby dojde k zachycení tepla a páry coÏ urychlí proces vafiení. PouÏijte pokliãku
nebo mikrotenovou fólii urãenou pro mikrovlnné trouby s jedním odhrnut˘m rohem, aby
nedo‰lo k jejímu prasknutí.
Hnûdnutí
Peãenû a drÛbeÏ, které se pfiipravují 15 min. nebo i déle, mírnû zhnûdnou ve vlastním tuku.
Jídla která se v mikrovlnné troubû upravují krat‰í dobu, je dobré pomazat prostfiedkem na
zhnûdnutí jako napfi. worchesterová, sojová, barbecue omáãka, aby se dosáhlo potfiebné
barvy. JelikoÏ staãí pfiidat velmi malé mnoÏství, pÛvodní chuÈ pokrmu se nezmûní.
Zakrytí papírem na peãení
Je to ochrana proti rozstfiikování tuku a trochu brzdí i ztrátu tepla u potravin. JelikoÏ toto
zakrytí není tak tûsné jako zakrytí pokliãkou ãi mikrotenovou fólií, umoÏní mírné vysychání
pokrmu.
Rozmístûní a vzdálenosti
Jednotlivé kousky pokrmÛ, jako napfi. opékané brambory, malá peãiva nebo pfiedkrmy
mÛÏete zahfiívat mnohem úãinnûji, kdyÏ je umístíte v mikrovlnné troubû v rovnomûrn˘ch
vzdálenostech od sebe, nejlépe v kruhovém rozloÏení. Nikdy jednotlivé kousky nedávejte na
sebe.
65
a vafiení v mikrovlnné troubû

Charakteristika potravin
Míchání
Míchání potravin je jednou z nejdÛleÏitûj‰ích technologick˘ch krokÛ pfii vafiení v
mikrovlnné troubû. Pfii standardním zpÛsobu vafiení se pouÏívá míchání ke smû‰ování
potravin. Pokrmy v mikrovlnné troubû se musí míchat proto, aby se teplo rozneslo,
rozdûlilo v celé hmotû. Míchejte pokrmy vÏdy smûrem od okrajÛ do vnitfiku, protoÏe
krajní ãásti se ohfiívají jako první.
Obracení
Velké kusy potravin, jako ro‰tûnec nebo celé kufie by se mûlo v mikrovlnné troubû
otáãet. Tím se zajistí stejnomûrné opeãení horní i spodní ãásti. Je dobré obracet i
porcovaná kufiata a kotlety.
Umístûní silnûj‰ích kouskÛ ke kraji
JelikoÏ mikrovlnné záfiení je pohlcováno krajní ãástí potravin, je rozumné pokládat
silnûj‰í plátky masa, drÛbeÏe a ryb ke krajním ãástem nádoby na peãení. Díky tomu
vût‰í kousky dostanou vût‰í dávku mikrovlnného záfiení a pokrm se uvafií rovnomûrnû.
Stínûní
Pomocí prouÏkÛ alobalu (hliníková fólie zabraÀuje prÛchodu mikrovln) je moÏné zabalit
hrany a rohy ãtvercov˘ch nebo hranat˘ch kouskÛ surovin tak, aby se zabránilo spálení
ãi pfievafiení tûchto porcí. NepouÏívejte vût‰í mnoÏství hliníkové fólie a dbejte na to, aby
alobal byl uchycen ve vnitfiku varné nádoby. Pokud bude vyãnívat, mÛÏe zpÛsobit
„jiskfiení".
Zvût‰ení objemu
Velké nebo hutné kusy potravin mohou zvût‰it svÛj objem, a tak mÛÏe b˘t mikrovlnná
energie absorbována na neoãekávan˘ch místech spodku nebo stfiedu suroviny.
Propichování
Potraviny uzavfiené ve skofiápce, kÛfie nebo slupce mohou v mikrovlnné troubû
explodovat, pokud se pfied vafiením jejich slupka nepropíchne. Mezi tyto potraviny
fiadíme Ïloutky a bílky vajec, ‰keble a ústfiice a úplné kusy zeleniny a ovoce.
Jak vyzkou‰et, jestli je pokrm uvafien˘.
ProtoÏe se suroviny v mikrovlnné troubû vafií velice rychle, je nutné ãasto zkou‰et jejich
stav. Nûkteré potraviny se nechávají v mikrovlnné troubû aÏ do úplného uvafiení, av‰ak
vût‰inu potravin, jako maso a drÛbeÏ, je nutné vyndat z trouby je‰tû pfied úpln˘m
uvafiením s tím, Ïe se v dobû odstavení dovafií. Vnitfiní teplota potravin stoupne v dobû
klidu o 3°C aÏ 8°C.
Doba stání
Uvafiená jídla je potfiebné ãasto nechat stát 3 aÏ 10 minut po vyjmutí z mikrovlnné
trouby. Vût‰inu jídel je nutné nechat v zakrytém stavu, aby se tím zabránilo jejich
vychladnutí. V˘jimku tvofií potraviny, které mají b˘t suché, jako napfi. su‰enky, suchary,
atp. Odstání umoÏní jídlu, aby se zcela dovafiilo a také napomáhá smí‰ení a plnému
rozvinutí chutí.
âi‰tûní mikrovlnné trouby
1. UdrÏujte vnitfiní povrch trouby v ãistotû
OdstraÀujte skvrny od jídel a rozstfiíknuté ãásti tekutin ze stûn trouby a z míst
mezi dvífiky a tûsnûním. Nejlep‰í je vyteklé zbytky jídla ihned odstranit vlhk˘m
hadfiíkem. Úlomky a skvrny absorbují mikrovlnnou energii a tím prodlouÏí dobu
vafiení. Vlhk˘m hadfiíkem odstraÀte drobky, které spadnou mezi dvífika a rám.
Tato místa je nutné ãistit zvlá‰È peãlivû, aby u dvífiek bylo zaji‰tûno dokonalé
tûsnûní. Mastné skvrny odstraÀujte hadfiíkem navlhãen˘m v saponátu, pak jej
otfiete pouze ãistou vodou a troubu nakonec osu‰te. NepouÏívejte Ïádná
agresivní rozpou‰tûdla a ãistící prostfiedky s brusn˘m úãinkem. Sklenûn˘ talífi
mÛÏete um˘t ruãnû nebo v myãce nádobí.
2. UdrÏujte vnûj‰í povrch trouby v ãistotû
Vnûj‰í povrch trouby oãistûte hadfiíkem navlhãen˘m v saponátu a vodû, pak jej
vytírejte pouze ãistou vodou a troubu nakonec osu‰te jemn˘m hadfiíkem nebo
papírov˘m ubrouskem. Abyste pfiede‰li po‰kození funkãních ãástí vnitfiku
mikrovlnné trouby, dbejte na to, aby se nikdy nedostala voda do vûtracích
otvorÛ. Pokud budete utírat ovládací panel, nejdfiíve otevfiete dvífika, abyste
pfiede‰li nechtûnému zapnutí mikrovlnné trouby. Panel oãistûte vlhk˘m
hadfiíkem a okamÏitû jej osu‰te hadfiíkem such˘m.
3 JestliÏe se pára nahromadí na vnitfiní stranû dvífiek nebo kolem vnûj‰í ãásti
dvífiek, pak otfiete panely jemn˘m hadfiíkem. To se stane v pfiípadû, Ïe
mikrovlnná trouba se pouÏívá ve velmi vlhkém prostfiedí, ale pfiitom nic
nesignalizuje poruchu zafiízení.
4 Dvífika a dvefiní tûsnûní je nutné udrÏovat v ãistotû. K om˘vání pouÏívejte pouze
teplou vodu se saponátem, otfiete hadfiíkem s ãistou vodou a pak je peãlivû
vytfiete do sucha.
NEPOUÎÍVEJTE ABRAZIVNÍ MATERIÁLY JAKO JSOU âISTÍCÍ PRÁ·KY
NEBO KOVOVÉ A PLASTOVù STùRKY.
Kovové ãásti se udrÏují snadnûji ãisté ãastûj‰ím vytíráním vlhk˘m hadfiíkem.
66
a vafiení v mikrovlnné troubû
5
NepouÏívejte parní ãistiã.

Otázky a
OTÁZKA: Co se stalo, nesvití-li vnitfiní osvûtlení trouby za provozu?
ODPOVùë: MÛÏe b˘t více dÛvodÛ proã nesvítí.
Îárovka je prasklá.
Dvífika nejsou úplnû zavfiená.
OTÁZKA: MÛÏe mikrovlnná energie pronikat pfies prÛhledné okno
dvífiek?
ODPOVùë: Ne. Otvory dovolují prÛchod svûtla, ale nedovolí prÛnik
mikrovlnné energie ven.
OTÁZKA: Proã je sly‰et zvukov˘ signál, kdyÏ se zmáãkne tlaãítko na
ovládacím panelu?
ODPOVùë: Zvukov˘ signál dává zpûtnou informaci, Ïe volba byla
správnû provedena.
OTÁZKA: MÛÏe se mikrovlnná trouba po‰kodit, pokud je uvedena do
ãinnosti prázdná?
ODPOVùë: Ano. Nikdy ji nezapínejte prázdnou nebo bez sklenûného
otoãného talífie.
OTÁZKA: Proã vejce pfii vafiení prasknou?
ODPOVùë: KdyÏ se vejce peãou, smaÏí nebo vafií jako ztracená vejce,
pak Ïloutek mÛÏe prasknout v dÛsledku nahromadûné páry
pod blánou. MÛÏete tomu pfiedejít propíchnutím ÏloutkÛ
pfied vafiením. Nikdy nevafite celá vejce ve skofiápce.
OTÁZKA:Proã se doporuãuje nechat jídlo stát po ukonãení vafiení?
ODPOVùë: Po ukonãení zpracování v mikrovlnné troubû bude
pokraãovat proces vafiení (peãení) je‰tû po vyjmutí z trouby.
Tato doba stání dokonãí uvafiení vnitfiku rovnomûrn˘m
zpÛsobem. âas stání závisí na hustotû dané suroviny.
OTÁZKA: Je moÏné dûlat popcorn v mikrovlnné troubû?
ODPOVùë: Ano, pokud pouÏijete jednu ze dvou následujících metod
1. PouÏití speciální nádoby urãené pro zpracování popcornu v
mikrovlnné troubû.
2. PouÏití pfiedem prÛmyslovû zabalené kukufiice, která má na obalu
uveden pfiesn˘ ãas a v˘kon mikrovlnného ohfievu pro získání
Ïádoucího koneãného v˘sledku.
DODRÎUJTE NÁVODY JEDNOTLIV¯CH V¯ROBCÒ POPCORNU
PRO JEJICH V¯ROBKY. NENECHÁVEJTE TROUBU BEZ
DOZORU OD MOMENTU, KDY KUKU¤IâNÁ SEMÍNKA ZAâNOU
PUKAT. POKUD BY KUKU¤ICE PO UPLYNUTÍ DOBY DANÉ
NÁVODEM NEZAâALA PUKAT, OKAMÎITù VYPNùTE TROUBU.
P¤EPÁLENÍ BY MOHLO ZPÒSOBIT VZNÍCENÍ KUKU¤ICE.
NIKDY NEPOUÎÍVEJTE HNùDÉ PAPÍROVÉ SÁâKY K PRAÎENÍ
KUKU¤ICE. NEZKOU·EJTE ZNOVA OPRAÎIT ZBYLÁ
KUKU¤IâNÁ SEMENA.
OTÁZKA: Proã mikrovlnná trouba nevafií vÏdy tak rychle jak uvádí
recept?
ODPOVùë: Znovu se podívejte na recept v kuchafiské knize a
pfiesvûdãete se, Ïe jste se jím pfiesnû fiídili; pak mÛÏete
zji‰Èovat, co zpÛsobilo rozdílné doby vafiení. Kuchafiské
pfiedpisy spolu s uvedením ãasu ohfievu jsou informativní a
mají za úkol zabránit pfiipálení - to je totiÏ nejãastûj‰í
problém pfii pouÏívání mikrovlnn˘ch trub. Rozdílné velikosti,
tvary, hmotnosti a rozmûry mohou vyÏadovat del‰í dobu
vafiení. Posuìte sami dle doby uvedené v kuchafice, v
jakém stavu je pokrm, právû tak, jako jste byli zvyklí pfii
bûÏném zpÛsobu vafiení.
67
odpovûdi
UPOZORNùNÍ

Technické údaje
Likvidace star˘ch spotfiebiãÛ
1. Pokud je u v˘robku uveden symbol pojízdného kontejneru v pfie‰krtnutém
poli, znamená to, Ïe na v˘robek se vztahuje smûrnice Evropské unie ãíslo
2002/96/EC.
2. V‰echny elektrické a elektronické v˘robky by mûly b˘t likvidovány
oddûlenû od bûÏného komunálního odpadu prostfiednictvím sbûrn˘ch
zafiízení zfiízen˘ch za tímto úãelem vládou nebo místní samosprávou.
3. Správn˘ zpÛsob likvidace starého elektrického spotfiebiãe pomáhá
zamezit moÏn˘m negativním dopadÛm na Ïivotní prostfiedí a zdraví.
4. Bliωí informace o likvidaci starého spotfiebiãe získáte u místní
samosprávy, ve sbûrném zafiízení nebo v obchodû, ve kterém jste v˘robek
zakoupili.
68
Technické údaje
MH6883AAF
Napájecí napûtí
V˘kon
Frekvence mikrovln
2450 MHz +/- 50 MHz (skupina 2/třída B)
Vnûj‰í rozmûry
Mikrovlny
Gril
Pfiíkon
Kombinace
Zařízení skupiny 2: skupina 2 obsahuje veškerá zařízení ISM
RF, ve kterých je cíleně generována energie radiové frekvence
při frekvenčním rozsahu 9 kHz až 400 GHz, a to ve formě
elektromagnetické radiace, induktivní a/nebo kapacitní vazby,
za účelem úpravy materiálu nebo inspekce/analýzy.
Zařízení třídy B je takové zařízení, které je vhodné k použití v
domácnostech a prostorách, které jsou přímo připojeny k
nízkovoltážnímu zdroji elektřiny, který slouží k napájení budov
pro domácí účely.
230 V stfiídavé/50 Hz
900 W (dle normy IEC60705)
510mm(W) X 28 6mm(H) X 444mm(D)
1300 W
1000 W
W
1450
Informace pro zákazníka.
Hlučnost dle Evropské normy:
-norma EN 60704-2-10 46dB(A)
<Česky>

www.lg.com
NÁVOD NA OBSLUHU
Mikrovlnná rúra s grilom
Pred uvedením rúry do prevádzky si dôkladne preãítajte tento návod na obsluhu.
MH6883AAF
Slovenčina

BEZPEâNOSTNÉ
Nepokú‰ajte sa uvádzaÈ rúru do prevádzky pri otvoren˘ch dvierkach, pretoÏe dvere sú zaistené bezpeãnostn˘m blokovacím systémom. Tento bezpeãnostn˘ blokovací systém automaticky vypne rúru pri ktoromkoºvek spôsobe
varenia akonáhle sa dvierka otvoria. Do‰lo by totiÏ pri úniku mikrovlnnej
energie k ‰kodlivému pôsobeniu na prítomné osoby.
NesnaÏte sa ak˘mkoºvek spôsobom manipulovaÈ s dvern˘m bezpeãnostn˘m blokovacím systémom.
Nevkladajte Ïiadne predmety medzi dvierka a ãelnú stenu rúry a zamedzte
usadzovaniu, hromadeniu zvy‰kov jedál a ãistiacich prostriedkov na povrchu
tesniacich plôch.
NepouÏívajte rúru, ak je po‰kodená. Je veºmi dôleÏité, aby dvierka rúry riadne doliehali a nasledujúce ãasti boli bez po‰kodenia: (1) dvierka (záhyby), (2)
dverné závesy a uzávery zámkov (nesmú byÈ zlomené alebo uvoºnené), (3)
tesnenie dvierok alebo tesniace plochy.
V‰etky nastavovania a opravy rúry smie vykonávaÈ iba odborn˘ servis.
Ak ohrievate v mikrovlnnej rúre tekutiny, napr. polievky, omáãky a nápoje,
môÏe dôjsÈ k náhlemu a veºmi prudkému vzkypeniu bez predchádzajúceho
viditeºného bublania. MôÏe tieÏ dôjsÈ k náhlemu vystrieknutiu vriacej tekutiny.
PredísÈ vy‰‰ie uveden˘m javom môÏete dodrÏaním nasledujúcich pokynov:
1. NepouÏívajte vysoké nádoby s úzkym hrdlom.
2. Tekutiny neprehrievajte.
3. Pred vloÏením nádoby do rúry premie‰ajte tekutinu a potom ju premie‰ajte e‰te raz asi v polovici celkovej doby ohrevu.
4. Po ohreve tekutinu nechajte e‰te krátky ãas v rúre, znova ju opatrne
zamie‰ajte alebo s Àou zatrepte (zvlá‰È u dojãensk˘ch flia‰ a nádob
s detskou v˘Ïivou) a skontrolujte teplotu pred konzumáciou, aby nedo‰lo k opareniu (zvlá‰È u dojãensk˘ch flia‰ a nádob s detskou v˘Ïivou).
Dávajte pozor pri manipulácii s nádobami.
Dbajte na to, aby doba varenia bola vÏdy správne
nastavená, lebo príli‰ dlhá doba ohrevu môÏe spôsobiÈ
vznietenie POTRAVÍN a následné po‰kodenie rúry.
VÏdy nechajte potraviny chvíºu stáÈ po ohreve v mikrovln-
nej rúre a pred konzumáciou vÏdy skontrolujte teplotu.
Zvlá‰È u dojãensk˘ch flia‰ a nádob s detskou v˘Ïivou.
70
POKYNY
energie.ovlnnej mikrpôsobeniu moÏnému osôb vystaveniu zabránenie na Pokyny
UPOZORNENIE:
UPOZORNENIE:

Mikrovlnná rúra je jedn˘m z najbezpeãnej‰ích domácich
spotrebiãov. Akonáhle sa dvierka otvoria, generovanie
mikrovæn sa automaticky zastaví. V priebehu ohrevu
potravín sa mikrovlnná energia úplne premení na teplo.
Îiadny ‰kodliv˘ "zvy‰ok" mikrovæn nikdy nezostáva
v pokrmoch a nemôÏe po‰kodiÈ va‰e zdravie pri
konzumácii t˘chto potravín.
Ako pracuje mikrovlnná rúra.
Mikrovlny sú formou elektromagnetickej energie podobnej rádiov˘m alebo
televíznym vlnám a obyãajnému dennému svetlu. Normálne sa mikrovlny pri
prechode atmosférou rozpt˘lia a strácajú sa bez úÏitku. Mikrovlnné rúry
v‰ak obsahujú magnetrón, ktor˘ je skon‰truovan˘ tak, aby umoÏnil vyuÏitie
energie obsiahnutej v mikrovlnách, ktoré generuje. Elektrická energia sa
mení pomocou magnetrónu na mikrovlnnú energiu.
Mikrovlny vstupujú do vnútorného priestoru rúry otvormi v jej stenách.
Otoãn˘ tanier alebo podnos je umiestnen˘ v spodnej ãasti rúry. Mikrovlny
nemôÏu prechádzaÈ kovov˘mi stenami rúry, ale prenikajú materiálmi ako je
sklo, porcelán a papier, z ktor˘ch sa vyrába riad vhodn˘ na prípravu
pokrmov v mikrovlnnej rúre.
Mikrovlny varn˘ riad priamo nezahrievajú. Ten sa zahrieva teplom vznikajúcim v pokrme.
Ide o veºmi bezpeãné zariadenie.
71
OBSAH
_______________
____________________________ypokyn Bezpeãnostné
_______________
________________________________________HOBSA
DôleÏité bezpeãnostné pokyny
Vybalenie a in‰talácia __________________________________________
Nastavenie ______________________________________________
Detská poistka _________________________________________________
Varenie pomocou mikrovæn _______________________________________
Úrovne v˘konu mikrovæn
času
Dvojfázového varenie
R˘chly ‰tart ___________________________________________________
Šetrič energie
Grilovanie_____________________________________________________
Kombinované varenie __________________________________________
Automatické varenie
Automatické rozmrazovanie
rozmrazovanie
ýchle
R
Rozmrazovanie a gril
Zachovanie chuti
Riad vhodn˘ pre mikrovlnnú rúru ________________________________
Charakteristika potravín a varenie v mikrovlnnej rúre ________________
Otázky a odpovede ___________________________________________
Technické údaje
______________________________________________
__________________________________________
__________________________________________
______________________________________________
______________________________________________
________________________________
________________________________________
______________________________________________
______________________________________
_____________________________________________
70
71
72 ~ 76
77 ~ 78
79
80
81
82
83
84
85
86
87
88 ~ 90
91 ~ 92
93 ~ 94
95 ~ 96
97
98
99 ~ 100
101
102

Informácie si uschovajte pre budúce použitie. Všetky pokyny si prečítajte ešte
pred použitím rúry a dodržujte ich, aby ste sa pri jej používaní vyhli požiaru, úrazu
elektrickým prúdom, poraneniu osoby alebo poškodeniu. Táto príručka nezahŕňa všetky
možné okolnosti, ktoré by mohli nastať. V prípade problémov sa obráťte v prvom rade
na zástupcu servisnej služby alebo výrobcu.
Dôležité bezpečnostné
72
pokyny
Toto je bezpečnostný výstražný symbol. Používa sa na upozornenie na hroziace riziká smrteľného úrazu alebo vážneho zranenia
obsluhujúcej alebo inej osoby. Všetky bezpečnostné pokyny sú v tejto príručke uvedené pri tomto bezpečnostnom výstražnom symbole
a slovách „VAROVANIE“ alebo „VÝSTRAHA“. Tieto slová znamenajú:
VAROVANIE
UPOZORNENIE
Tento symbol označuje nebezpečnú situáciu alebo činnosti, ktoré môžu viesť k vážnemu zraneniu
alebo smrteľnému úrazu osôb.
Tento symbol označuje nebezpečnú situáciu alebo činnosti, ktoré môžu viesť k vážnemu zraneniu
osôb alebo poškodeniu majetku.
VAROVANIE
1. Nepokúšajte sa upravovať alebo opravovať dvierka, tesnenie
dvierok, ovládací panel, bezpečnostné blokovacie spínače alebo
akúkoľvek inú časť rúry alebo do nej inak zasahovať, ak by to
zahŕňalo zloženie krytu chrániaceho pred vystavením mikrovlnám. Opravy musí vykonať kvalikovaný servisný technik.
Mikrovlnná rúra je na rozdiel od iných spotrebičov vysokonapäťové
zariadenie s vysokým elektrickým prúdom. Nesprávne používanie by
mohlo viesť k škodlivému vystaveniu nadmernej mikrovlnnej energii
alebo úrazu elektrickým prúdom.
2. Rúru nepoužívajte na sušenie. (napr. na mokré noviny, šaty,
hračky, elektrické zariadenia, domácich miláčikov alebo deti atď.)
Môže to vážne ohroziť bezpečnosť napríklad požiarom, popáleninami
alebo náhlym úmrtím následkom úrazu elektrickým prúdom.
3. Prístroj nie je určený na používanie malými deťmi a staršími os-
obami. Deťom dovoľte používať rúru bez dozoru iba po poskytnutí primeraných pokynov tak, aby dieťa zvládlo používanie rúry
bezpečným spôsobom a chápalo riziká nesprávneho používania.
Nesprávne použitie môže spôsobiť napr. požiar, úraz elektrickým
prúdom alebo popálenie.
4. Dostupné časti môžu byť počas používania horúce. Malé deti by
ste od nich mali držať ďalej.
Mohli by sa popáliť.
5. Tekuté alebo iné jedlá sa nesmú zohrievať v uzavretých ná-
dobách, pretože majú tendenciu vybuchnúť. Pred varením alebo
rozmrazovaním zložte z jedla plastový obal. Všimnite si však, že
v niektorých prípadoch by jedlo pri zohrievaní alebo varení malo
byť prikryté tenkou plastovou vrstvou.
Mohlo by prasknúť.
6. Uistite sa, že používate príslušenstvo vhodné pre daný
prevádzkový režim.
Nesprávne použitie by mohlo viesť k poškodeniu rúry a príslušenstva
alebo by mohlo roznietiť iskru a spôsobiť požiar.
7. Nedovoľte deťom hrať sa s príslušenstvom alebo vešať sa na
rúčku dvierok.
Mohli by sa zraniť.

Informácie si uschovajte pre budúce použitie. Všetky pokyny si prečítajte ešte
73
pred použitím rúry a dodržujte ich, aby ste sa pri jej používaní vyhli požiaru, úrazu
elektrickým prúdom, poraneniu osoby alebo poškodeniu. Táto príručka nezahŕňa
všetky možné okolnosti, ktoré by mohli nastať. V prípade problémov sa obráťte v
prvom rade na zástupcu servisnej služby alebo výrobcu.
3. Rúru nepoužívajte, ak je poškodená. Je obzvlášť dôležité, aby
VAROVANIE
8. Ak sú dvierka alebo tesnenie dvierok poškodené, rúra sa nesmie
používať, kým ich neopraví kompetentná osoba.
9. Je nebezpečné, aby niekto iný ako kompetentná osoba
vykonal servis alebo opravy, ktoré zahŕňajú odstránenie krytu
chrániaceho pred vystavením mikrovlnnej energii.
10.
Keď sa zariadenie používa v kombinovanom režime, deti
ho môžu používať iba pod dozorom dospelého z dôvodu
generovaných teplôt.
4. Zaistite správne nastavenie časov prípravy jedla, malé
5. Pri zohrievaní tekutín napr. polievok, omáčok a nápojov v
UPOZORNENIE
1. Rúra sa nemôže používať s otvorenými dvierkami kvôli
bezpečnostnému blokovaniu zabudovanému v mechanizme
dvierok. Je dôležité, aby ste nezasahovali do bezpečnostného
blokovania.
Mohlo by to mať za následok vystavenie nadmernej mikrovlnnej energii. (Bezpečnostné blokovanie automaticky vypne činnosti spojené
s prípravou jedla pri otvorení dvierok.)
2. Medzi prednú stranu a dvierka nedávajte žiadne predmety
(ako kuchynské utierky, vreckovky atď.) ani nedovoľte, aby sa
na tesniacich povrchoch usadzovali pozostatky jedla alebo
čistiacich prostriedkov.
Mohlo by to mať za následok vystavenie nadmernej mikrovlnnej
energii.
6. Vyústenie výfuku je umiestnené na vrchnej, spodnej alebo
Dôležité bezpečnostné
pokyny
sa dvierka poriadne zatvárali a neboli poškodené: (1) dvierka
(ohnuté), (2) pánty a západky (zlomené alebo uvoľnené), (3)
tesnenia dvierok a tesniace povrchy.
Mohlo by to mať za následok vystavenie nadmernej mikrovlnnej
energii.
množstvá vyžadujú kratší čas prípravy alebo zohrievania.
Nadmerná príprava jedla môže mať za následok vzplanutie jedla a
následné poškodenie rúry.
mikrovlnnej rúre
* Vyhnite sa nádobám s rovnými stenami a úzkymi hrdlami.
* Neprehrievajte ich.
* Tekutinu premiešajte pred umiestnením nádoby do rúry a
znovu v polovici zohrievania.
* Po zohriatí ju nakrátko nechajte postáť v rúre, znovu ju
dôkladne premiešajte alebo ňou zatraste a pred konzumáciou
skontrolujte teplotu, aby ste predišli popáleniu (predovšetkým
pri obsahu detských fliaš a nádob s jedlom pre deti).
Pri manipulácii s nádobou buďte opatrný. Mikrovlnné zohrievanie
nápojov môže zapríčiniť oneskorené vybuchujúce vrenie bez
náznakov bublania. Mohlo by to spôsobiť náhle vykypenie horúcich
tekutín.
bočnej strane rúry. Nezablokujte výfuk.
Mohlo by to poškodiť vašu rúru a zapríčiniť slabé výsledky pri
príprave jedla.

Dôležité bezpečnostné
74
pokyny
Informácie si uschovajte pre budúce použitie. Všetky pokyny si prečítajte ešte
pred použitím rúry a dodržujte ich, aby ste sa pri jej používaní vyhli požiaru, úrazu
elektrickým prúdom, poraneniu osoby alebo poškodeniu. Táto príručka nezahŕňa všetky
možné okolnosti, ktoré by mohli nastať. V prípade problémov sa obráťte v prvom rade
na zástupcu servisnej služby alebo výrobcu.
UPOZORNENIE
7. Rúru nepoužívajte prázdnu. Keď ju nepoužívate, najlepšie
je nechať v nej pohár vody. Voda bezpečne pohltí všetku
mikrovlnnú energiu, ak sa rúra neúmyselne zapne.
Nesprávne použitie by rúru mohlo poškodiť.
8. Nepripravujte jedlo zabalené v papierových vreckovkách, pokiaľ
kuchárska kniha neobsahuje pokyny pre jedlo, ktoré pripravujete.
A pri príprave nepoužívajte noviny ako náhradu za papierové
vreckovky.
Nesprávne použitie môže spôsobiť výbuch alebo požiar.
9. Nepoužívajte drevené a keramické nádoby s kovovými vložkami
(napr. zlatými alebo striebornými). Vždy odstráňte kovové
sťahovacie komponenty. Riady pred použitím skontrolujte, či sú
vhodné na použitie v mikrovlnných rúrach.
Mohli by sa roztopiť a spáliť. Predovšetkým kovové predmety môžu v
rúre vytvoriť elektrický oblúk a spôsobiť vážne poškodenie.
10.Nepoužívajte výrobky z recyklovaného papiera.
Môžu obsahovať nečistoty, ktoré pri príprave jedla môžu spôsobiť
iskry a/alebo požiar.
11. Podnos a rošt neoplachujte vodou ihneď po príprave jedla.
Mohli by sa zlomiť alebo poškodiť.
Nesprávne použitie by rúru mohlo poškodiť.
12.Ubezpečte sa, že ste rúru umiestnili tak, aby bola predná
časť dvierok 8 cm alebo viac od okraja povrchu, na ktorom je
položená, aby ste zabránili prevráteniu zariadenia.
Nesprávne použitie by mohlo spôsobiť zranenie osôb a poškodiť
rúru.
13.Pred prípravou prepichnite kožu zemiakov, jabĺk alebo
podobného ovocia alebo zeleniny.
Mohla by prasknúť.
14.Vajíčka nevarte v škrupine. Vajcia v škrupine a celé vajcia
uvarené natvrdo by sa nemali zohrievať v mikrovlnných rúrach,
lebo môžu explodovať dokonca aj po dokončení zohrievania.
Tlak zhromaždený vnútri vajíčka vybuchne.
15.Nepokúšajte sa o fritovanie v rúre.
Mohlo by to spôsobiť náhle vykypenie horúcej tekutiny.
16.Pri spozorovaní dymu rúru vypnite alebo ju odpojte od
elektrickej energie a nechajte dvierka zatvorené, aby ste udusili
plamene.
Môže to spôsobiť vážnu škodu, napríklad požiar alebo úraz elektrickým prúdom.
17.Keď sa jedlo zohrieva alebo pripravuje v jednorazových
nádobách z plastu, papiera alebo iných horľavých materiálov,
dávajte na rúru dobrý pozor a často ju kontrolujte.
Jedlo môže vytiecť alebo sa vysypať kvôli možnému poškodeniu
nádoby a spôsobiť požiar.

Informácie si uschovajte pre budúce použitie. Všetky pokyny si prečítajte ešte
pred použitím rúry a dodržujte ich, aby ste sa pri jej používaní vyhli požiaru, úrazu
elektrickým prúdom, poraneniu osoby alebo poškodeniu. Táto príručka nezahŕňa
všetky možné okolnosti, ktoré by mohli nastať. V prípade problémov sa obráťte v
prvom rade na zástupcu servisnej služby alebo výrobcu.
75
Dôležité bezpečnostné
pokyny
UPOZORNENIE
18.Teplota dostupných povrchov môže byť počas používania
zariadenia vysoká. Nedotýkajte sa dvierok rúry, vonkajšej
skrinky, zadnej skrinky, dutiny rúry, príslušenstva a
riadov počas režimu gril, konvekčného režimu a úkonov
automatického varenia. Pred čistením sa uistite, že tieto časti
nie sú horúce.
Keď sa zohrejú, mohli by ste sa popáliť, ak nebudete mať hrubé
rukavice na varenie.
19.Rúru by ste mali čistiť pravidelne a odstrániť všetky pozostatky
jedál.
Neudržiavanie rúry čistej by mohlo viesť k poškodeniu povrchu a viesť k nepriaznivému vplyvu na životnosť zariadenia a
nebezpečným situáciám.
20.Používajte iba teplotný snímač odporúčaný pre túto rúru.
Nevhodným teplotným snímačom nemôžete zistiť presnú teplotu.
21.Pri výrobe pukancov postupujte podľa konkrétnych pokynov
daného výrobcu. Rúru počas praskania kukurice nenechávajte
bez dozoru. Ak kukurica nepraskne do odporúčaného času,
prerušte prípravu jedla. Na praskajúcu kukuricu nikdy
nepoužívajte hnedé papierové vrecko. Nikdy sa nepokúšajte
vypukať zvyšnú kukuricu.
Nadmerná príprava by mohla spôsobiť zapálenie kukurice.
22.Toto zariadenie musí byť uzemnené.
Vodiče v sieťovom kábli sú farebne označené v súlade s
nasledovnými farebnými kódmi:
MODRÝ ~ neutrálny
HNEDÝ ~ živý
ZELENÝ a ŽLTÝ ~ uzemnený
Pretože farebné označenie vodičov v sieťovom kábli tohto
zariadenia nemusí korešpondovať s farebným označením
koncoviek zástrčky, postupujte nasledovným spôsobom:
MODRÝ kábel sa musí pripojiť ku koncovke označenej
písmenom N alebo s ČIERNYM farebným značením. HNEDÝ
kábel sa musí pripojiť ku koncovke označenej písmenom
L alebo s ČERVENÝM farebným značením. ZELENÝ a ŽLTÝ
alebo ZELENÝ kábel sa musí pripojiť ku koncovke označenej
písmenom E alebo
Ak je napájací kábel poškodený, musí ho vymeniť výrobca,
servisný zástupca alebo podobne kvalikovaná osoba, aby sa
predišlo potenciálnemu nebezpečenstvu.
Nesprávne použitie môže spôsobiť vážne elektrické poškodenie.
.
23.Rúru by ste nemali používať na účely komerčného stravovania.
Nesprávne použitie by rúru mohlo poškodiť.
24.Mikrovlnná rúra sa musí používať s otvorenými dekoratívnymi
dvierkami, ak je mikrovlnná rúra umiestnená v skrinke.
Ak sú dvierka počas prevádzky zatvorené, prúdenie vzduchu sa
zhorší a môže zapríčiniť požiar alebo poškodiť rúru a skrinku.

Dôležité bezpečnostné
76
pokyny
Informácie si uschovajte pre budúce použitie. Všetky pokyny si prečítajte ešte
pred použitím rúry a dodržujte ich, aby ste sa pri jej používaní vyhli požiaru, úrazu
elektrickým prúdom, poraneniu osoby alebo poškodeniu. Táto príručka nezahŕňa všetky
možné okolnosti, ktoré by mohli nastať. V prípade problémov sa obráťte v prvom rade
na zástupcu servisnej služby alebo výrobcu.
UPOZORNĚNÍ
25.Spojenie môžete dosiahnuť dostupnou zástrčkou alebo
začlenením vypínača v pevnom prepojení v súlade s predpismi
pre domovú elektroinštaláciu.
Použitie nesprávnej zástrčky alebo vypínača môže spôsobiť úraz
elektrickým prúdom alebo požiar.
26.Mali by ste kontrolovať, či sa deti zo zariadením nehrajú.
27.Zariadenia nie sú určené na používanie s externým časovačom
alebo samostatným ovládaním.
28.Používajte iba riady vhodné na použitie v mikrovlnných rúrach.
29.Mikrovlnná rúra sa nesmie umiestniť do skrinky, ak nebola
testovaná v skrinke.
30.Toto zariadenie nie je určené na používanie osobám (vrátane
detí) so zníženými fyzickými, vnemovými alebo duševnými
schopnosťami, alebo ktorým nedostatok skúseností a
vedomostí bráni v bezpečnom používaní zariadenia bez toho,
aby boli pod dozorom alebo inštruované v súvislosti s použitím
zariadenia osobou zodpovednou za ich bezpečnosť. Čistenie
a bežnú údržbu nesmú vykonávať deti, pokiaľ nemajú aspoň 8
rokov a nie sú pod dozorom.
31.Nevyhnutná minimálna výška voľného priestoru nad vrchným
povrchom rúry.
32.Mikrovlnná rúra je určená na používanie ako voľne stojace
zariadenie.
33.Teplota dostupných povrchov môže byť počas používania
zariadenia vysoká.
34.Zariadenie a zástrčku držte mimo dosahu detí mladších ako 8
rokov.
35.Dvierka alebo vonkajší povrch sa počas používania môžu
zohriať.

schopníbudete potom dvojstrane, tejto na uveden˘ch okov krzákladn˘ch nasledujúcich a podºpostupovaÈ budete Pokiaº
Vybaºte rúru z prepravnej krabice a postavte ju na vodorovnú
plochu.
Umiestite rúru na zvolené vodorovné miesto s minimálnou
svetlou v˘‰kou 85 cm ale presvedãite sa, Ïe nad rúrou
zostane aspoÀ 30 cm a za Àou aspoÀ 10 cm voºn˘ priestor pre zaistenie
náleÏitého vetrania. âelná strana musí byÈ aspoÀ 8 cm od hrany dosky,
na ktorej je rúra umiestnená, aby nedochádzalo k náhodnému dotyku
horúcej rúry.
V˘stupn˘ vetrací otvor sa nachádza na vrchnej alebo boãnej stene rúry.
Zakrytie tohto otvoru by mohlo spôsobiÈ po‰kodenie rúry
Táto mikrovlnná rúra sa nesmie pouÏívaÈ pre úãely komerãného
stravovania.
77
ovaníozbaºrPri . rúryumiestnenia adom ohºrady dodrÏujte Obzvlá‰È funguje. správne rúra va‰a ãi olovaÈ, skontrr˘chlo mi veº
po‰kodená.epravy prpoãas nebola rúra ãi olujte, Skontrmateriál. baliaci v‰etok a doplnky v‰etky odstráÀte rúry
ybalenie V
a in‰talácia
SKLENEN¯ TANIER
ROTAâNÁ PODPERA
GRILOVACÍ STOJANâEK

Rúru zapojte do normalizovanej jednofázovej zásuvky.
Dbajte, aby mikrovlnná rúra bola jedin˘m spotrebiãom
v obvode. Pokiaº rúra nefunguje správne, vytiahnite
vidlicu sieÈového kábla zo zásuvky a znova ju
zasuÀte.
Zatiahnuním za RUKOVÄË otvorte dvierka rúry a do
vnútorného priestoru vloÏte ROTAâNÚ PODPERU
a na Àu SKLENEN¯ TANIER.
78
strane na informácie si
98
sekúnd. 30
kaÏdom Pri
poãuÈ budete
správne.
sekúnd
30
od zaãne vám sa displeji NatlaãidloStlaãte ovlnnúmikre prvhodného pohára Do
03
ãas
0,dosiahne poãítadlo Akonáhle odpoãítavaÈ. stlaãte a STOPPoloÏte. vodyml 300 asi nalejte rúru
Otvorte. SIGNÁLZVUKOV¯ poãuÈ budete tlaãidlo sebou za krát 1ANIERTSKLENEN¯ na vodou s pohár
Pokiaº. vodyteplotu olujte skontra rúry dvierka t˘m , TAR·Tstenie si Pokiaº . rúrydvierka uzavrite a
ompohárS teplá. bude voda funguje, rúra dobu nastavíte eãítajteprpouÏívaÈ, smiete pohár ak˘ istí,
horúci.byÈ môÏe ne, opatrmanipulujte na enia var.
Sekúnd
tlaãidla stlaãení
. SIGNÁLZVUKOV¯
praco-zaãne rúra ovlnná Mikr
tla-stlaãíte ako , skôre‰te vaÈ
Nemusíte‰iestykrát. po ãidlo
toje tak obávaÈ, niãoho sa

Môžete nastaviť 12-hodinový alebo 24-hodinový formát času. V nasledujúcom príklade vám ukážem, ako
Keď je rúra zapojená po prvýkrát alebo
po obnovení energie po výpadku
prúdu, na displeji sa zobrazí "24H" a vy
môžete hodiny nastaviť znovu.
Ak hodiny (alebo displej) zobrazujú
zvláštne symboly, odpojte rúru z
elektrickej zásuvky, zapojte ju a hodiny
nastavte znovu.
79
nastaviť čas 14:35 pri použití 24-hodinového formátu. Uistite sa, že ste z rúry odstránili všetok obalový
materiál.
Ubezpečte sa, že ste rúru správne nainštalovali, ako je popísané vyššie.
Zapojte rúru po prvýkrát.
Na displeji sa objaví "24H".
(Ak chcete použiť inú možnosť, stlačte zachovanie chuti Ak chcete z
meniť inú možnosť po nastavení hodín, musíte ju odpojiť a znova zapojiť.)
Otáãajte gombík DIAL (VOLIACI KOTÚâ),
kým sa na displeji nezobrazí "14: ".
Stlaãte tlaãidlo START (SPUSTIË)
Otáãajte gombík DIAL (VOLIACI KOTÚâ),
kým sa na displeji nezobrazí "14:35".
Stlaãte tlaãidlo START (SPUSTIË).
Hodiny začnú bežať.
na potvrdenie hodín.
Nastavenie
času

poistka
Rúra je vybavená blokovacou poistkou,
ktorá neumoÏní náhodné spustenie rúry.
Pokiaº je detská poistka aktívna, potom
nebude moÏné spustiÈ Ïiadnu funkciu
rúry a nebude moÏné v nej variÈ.
Deti môÏu dvierka rúry otvoriÈ aj
so zapnutou blokovacou poistkou.
Stlaãte STOP/CLEAR (ZASTAVIË/VYNULOVAË) a tlaãidlo pridrÏte,
k˘m sa neobjaví „L" na displeji a nebudete poãuÈ zvukov˘ signál.
DETSKÁ POISTKA je aktívna.
Z displeja na chvíºu zmizne ãasov˘ údaj a potom sa po niekoºk˘ch
sekundách znova objaví.
Na displeji zostane „L" a signalizuje, Ïe DETSKÁ POISTKA je aktívna.
Zru‰enie funkcie DETSKEJ POISTKY vykonáte stlaãením a podrÏaním
tlaãidla STOP/CLEAR (ZASTAVIË/VYNULOVAË) aÏ „L" zmizne. Ako
potvrdenie po uvoºnení budete poãuÈ zvukov˘ signál.
80
Detská
Stlaãte tlaãidlo STOP/CLEAR (ZASTAVIË/VYNULOVAË).

sekúnd.30 aminút 5 za
Presvedãite sa, Ïe máte správne in‰talovanú rúru podºa vy‰‰ie
uvedeného popisu.
Stlaãte tlaãidlo STOP/CLEAR (ZASTAVIË/VYNULOVAË).
V¯KON stlaãiÈ MICRO V¯KON %
VYSOK¯
STREDNE
VYSOK¯
STREDN¯
STREDNE NÍZKY
NÍZKY
81
v˘kone 80%-nom pri potraviny né ubovoººuvariÈ ako ukáÏeme, vám návode nasledujúcom Na
ovænmikr
pomocou arenie V
Rúra má päť stupňov nastavenia
výkonu. Automaticky sa nastavuje
vysoký výkon, avšak opakovaným
stláčaním tlačidla V¯KON môžete
zvoliť inú úroveň výkonu.
raz
krát 80%
krát 60%
krát 40%
krát 20%
900 W
720 W
540 W
360 W
180 W
100%
Stlačte dvakrát tlačidlo V¯KON pre nastavenie výkonu 80%.
Na displeji sa objaví
Otáãajte gombík DIAL (VOLIACI KOTÚâ), k˘m sa na displeji
neobjaví "5:30".
Stlaãte tlaãidlo START (SPUSTIË).
“
720
.
”

v˘konu Úrovne
V¯KON V¯STUP POUÎÍVANIE
VYSOK¯ 100% • Varenie vody
• Peãenie hovädzej sekanej
• Varenie kúskov hydiny, r˘b, zeleniny
• Varenie jemne krájaného mäsa
STREDNE VYSOK¯ 80% • V‰etko ohrievanie pokrmov
• Peãenie mäsa a hydiny
• Varenie húb a plodov mora
• Varenie jedál obsahujúcich syry a vajcia
STREDN¯ 60% • Peãenie koláãov a drobného peãiva
• Príprava vajec
• Varenie vajeãn˘ch krémov, pudingov
• Príprava ryÏe a polievok
STREDNE NÍZKY 40%
NÍZKY 20%
82
ovænmikr
maximálna zaistená je takÏe úrovniach, piatich v regulovaÈ moÏné je y rúrmikrovlnnej ˘kon V
obsahujetabuºka uvedená Niωie . pokrmovvarením nad kontrola plná a v˘konu v˘beru moÏnosÈ
uvarenie.ich pre Ïiarenia mikrovlnného v˘kony odporúãané a potravín príkladov niekoºko
900W
720W
540W
360W
180W
• Rozpustenie masla a ãokolády
• Varenie veºmi jemne krájaného mäsa
• Zmäkãenie masla a syrov
• Zmäkãenie mrazen˘ch krémov
• Kysnutie cesta
• Rozmrazovanie v‰etk˘ch pokrmov

Na nasledujúcom návode vám ukážeme, ako uvariť ľubovoľné potraviny v dvoch fázach.
83
V prvej fáze budeme variť 11 minút pri VYSOKOM výkone a v druhej fáze 35 minút pri výkone 40%
Stlaãte tlaãidlo STOP/CLEAR (ZASTAVIË/VYNULOVAË).
Dvojfázové
varenie
V priebehu dvojfázového varenia
je možné dvierka mikrovlnnej rúry otvoriť
a skontrolovať stav potravín. Po zatvorení
dvierok a opätovnom stlačení ·TART
bude varenie v danej fáze pokračovať.
Na konci 1. fázy sa ozve ZVUKOV¯
SIGNÁL a začne 2. fáza varenia.
Pokiaľ chcete vymazať nastavený
program, stačí dvakrát stlačiť
STOP/CANCEL.
Nastavte výkon a čas varenia pre fázu 1.
Jedenkrát stlačte tlačidlo , aby ste zvolili VYSOKÝ výkon.
Otáãajte gombík DIAL (VOLIACI KOTÚâ), k˘m sa na displeji
neobjaví "11:00 ".
Nastavte výkon a čas varenia pre fázu 2.
Štyrikrát stlačte tlačidlo , aby ste zvolili výkon 360 .
Otáãajte gombík DIAL (VOLIACI KOTÚâ), k˘m sa na displeji
neobjaví "
Stlaãte tlaãidlo START (SPUSTIË).
35:00
".
V¯KON
V¯KON

‰tart
Funkcia QUICK START (R¯CHLY
·TART) vám umoÏní jednoduch˘m
stláãaním tlaãidla START nastaviÈ dobu
varenia pri VYSOKOM v˘kone
v intervaloch po 30-tich sekundách.
Stlaãte tlaãidlo STOP/CLEAR (ZASTAVIË/VYNULOVAË).
Stlaãte 4 krát za sebou tlaãidlo START (SPUSTIË), t˘m nastavíte
dobu varenia na 2 minúty pri VYSOKOM v˘kone. Mikrovlnná rúra
zaãne pracovaÈ e‰te skôr, ako stlaãíte tlaãidlo po ‰tvrt˘krát.
84
˘chly R
v˘kone.vysokom pri varenia minúty 2 nastaviÈ ako ukáÏeme, príklade nasledujúcom Na

Šetrič
energie
85
Funkcia ECO ON (Eko zapnuté) šetrí
energiu vypnutím displeja. Displej sa
vypne aj vtedy, keď zariadenie nie je
aktívne 5 minút.
Stlaãte tlaãidlo STOP/CLEAR (ZASTAVIË/VYNULOVAË)
Na displeji sa objaví "0".
Stlaãte tlaãidlo STOP/CLEAR (ZASTAVIË/VYNULOVAË)
Stlačte ktorékoľvek tlačidlo na opätovné zapnutie displeja.
(Eko zapnuté).
(Eko zapnuté).

Táto funkcia zaistí r˘chle skrehnutie
a upeãenie povrchu potravín dohneda.
Grilovanie
Otáãajte gombíkom DIAL (VOLIACI KOTÚâ) aÏ sa objaví na displeji
"12:30".
86
sekúnd.30 a minút 12 doby nastavením s gril pouÏíva sa ako ukáÏeme, vám príklade nasledujúcom Na
Stlaãte tlaãidlo STOP/CLEAR (ZASTAVIË/VYNULOVAË).
Stlačte tlačidlo Grill.
Stlaãte tlaãidlo START (SPUSTIË).

Mikrovlnná rúra je vybavená moÏnosÈou kombinovaného varenia, ão vám
umoÏÀuje variÈ jedlá s kombináciou
alebo postupn˘m pouÏívaním ohrevu
a mikrovæn. T˘m sa dá dosiahnuÈ krat‰í
ãas varenia.
Vykurovacie teleso chránené krytom
griluje povrch potravín a mikrovlny
zároveÀ ohrievajú jedlo z vnútra.
Nie je nutné predhrievaÈ rúru.
minút.25
Otáãajte gombíkom DIAL (VOLIACI KOTÚâ), aÏ sa na displeji objaví
hodnota "25:00".
Stlaãte START (SPUSTIË) a t˘m potvrdíte voºbu v˘konu.
S nádobou po varení manipulujte opatrne, môÏe byÈ horúca.
Programy kombinovaného varenia
Kategória V˘kon mikrovæn (%) V˘kon grilu (%)
Co-1 20 80
Co-2 40 60
Co-3 60 40
Trikrát stlačte tlačidlo C ombi.
87
vareniadobu na Co-1 reÏime kombinovanom v rúru naprogramovaÈ ako ukáÏeme, vám príklade nasledujúcom Na
Stlaãte tlaãidlo STOP/CLEAR (ZASTAVIË/VYNULOVAË).
Kombinované
enie var

Automatické
Kategória stlaãiÈ
AUTO COOK
ZEMIAKY V ·UPKE
SUROVÁ ZELENINA
MRAZENÁ ZELENINA
Stlaãte AUTO COOK (AUTOMATICKÉ VARENIE).
Otáãajte gombíkom DIAL (VOLlACI KOTÚâ) aÏ sa na displeji objaví
" ".
Ryby
Bravčová pečienka
Kuracie stehná
88
enievar
Funkcia AUTO COOK (AUTOMATICKÉ
VARENIE') vám umoÏní jednoduch˘m
spôsobom uvariÈ väã‰inu va‰ich obºúben˘ch jedál voºbou druhu potraviny
a zadaním hmotnosti tejto potraviny.
kg 6 0, uvariÈ ako ukáÏeme, vám príklade nasledujúcom Na
Stlaãte tlaãidlo STOP/CLEAR (ZASTAVIË/VYNULOVAË).
A.ZELENIN ÁVSURO
RYÎA, CESTOVINY
Hovädzia pečienka
raz
krát
krát
krát
krát
krát
krát
krát
6 0,
Stlaãte tlaãidlo START (SPUSTIË).

1. ZEMIAKY V ·UPKE
2. SUROVÁ ZELENINA
3. MRAZENÁ ZELENINA
4. RYÎA, CESTOVINY
- 1,0 kg
- 0,8 kg
0,2 - 0,8 kg
0,1 - 0,3 kg
Umyte zemiaky a osu‰te ich. Prepichnite zemiaky niekoºkokrát
vidliãkou. VloÏte ich spoloãne s troma papierov˘mi obrúskami
na sklenen˘ tanier.
Po uvarení ich zakryte fóliou a nechajte stáÈ 5 minút.
VloÏte pripravenú zeleninu do vhodnej nádoby.
Pridajte 30 ml vody na 200 g zeleniny.
Po uvarení nechajte stáÈ 2 minúty.
VloÏte pripravenú zeleninu do vhodnej nádoby. Pridajte 30 ml
vody na 200 g zeleniny. Nádobu zakryte a uloÏte ju do stredu
skleneného taniera. Po uvarení nechajte stáÈ 2 minúty.
Premyte ryÏu a nechajte 30 minút namáãaÈ. Dajte ryÏu a vriacu
vodu s 1/4 aÏ 1 lyÏiãkou soli do hlbokej a dostatoãne veºkej nádoby.
HmotnosÈ 100 g 200 g 300 g Pokrievka
Voda RyÏa 180 ml 330 ml 480 ml Áno
Cestoviny
400 ml 800 ml 1200 ml Nie
**RyÏa – po uvarení nechajte stáÈ zakryté 5 minút alebo k˘m
sa voda nevsiakne.
**Cestoviny – poãas varenia niekoºkokrát zamie‰ajte.
Po uvarení nechajte 1 – 2 minúty stáÈ.
Premyte studenou vodou.
Izbová teplota
Izbová teplota
Mrazená
potravina
Izbová teplota
Sklenen˘ tanier
Sklenen˘ tanier
Sklenen˘ tanier
Nádoba pre
mikrovlnné rúry
DRUHDRUH NÁDOBANÁDOBA
89
DRUHDRUH NÁDOBANÁDOBA
(Ac-1)
(Ac-2)
(Ac-3)
TEPLOTTEPLOTAA
TEPLOTTEPLOTAA
POTRAVÍN
POTRAVÍN
MAXIMÁLNEMAXIMÁLNE
MAXIMÁLNEMAXIMÁLNE
MNOÎSTVOMNOÎSTVO
MNOÎSTVOMNOÎSTVO
0,2
0,2
POKYNYPOKYNY
POKYNYPOKYNY
(Ac-4)

DRUHDRUH NÁDOBANÁDOBA
90
DRUHDRUH NÁDOBANÁDOBA
Ryby
5.
(Ac-5)
6. Hovädzia
pečienka
(Ac-6)
7. Bravčová
pečienka
(Ac-7)
8. Kuracie
stehná
(Ac-8)
TEPLOTTEPLOTTEPLOTTEPLOTAAAA
POTRAPOTRAVÍNVÍN
Chladené
Chladené
Chladené
Chladené
Bezpečnostná
zapekacia misa pre
mikrovlnné rúry
Rošt
Rošt
Rošt
MAXIMÁLNEMAXIMÁLNE
MAXIMÁLNEMAXIMÁLNE
MNOÎSTVOMNOÎSTVO
MNOÎSTVOMNOÎSTVO
0.2 kg ~ 0.6 kg
0.5 kg ~ 1.5 kg
0.5 kg ~ 1.5 kg
0.2 kg ~ 0.8 kg
POKYNYPOKYNY
POKYNYPOKYNY
Celé ryby, rybie lety
- Tučné ryby : losos, makrela
- Biele ryby: rôzne druhy tresiek
Vložte v jednej vrstve do veľké bezpečnostné zapekacej misy
pre mikrovlnné rúry. Misu tesne uzavrite plastovou fóliou na
potraviny a na niekoľkých miestach ju prepichnite. Položte na
sklenený otočný tanier. Nastavte hmotnosť a stlačte tlačidlo štart.
Po upečení vyberte misu z rúry. Odstavte na 3 minúty a potom
servírujte.
Potrite hovädzie rozpusteným margarínom alebo maslom.
Položte na rošt. Rúra zapípa, obráťte pokrm a stlačte tlačidlo štart
pre pokračovanie. Po upečení odstavte zakryté fóliou na 10 minút
a potom servírujte.
Potrite bravčové rozpusteným margarínom alebo maslom.
Položte na rošt. Rúra zapípa, obráťte pokrm a stlačte tlačidlo štart
pre pokračovanie. Po upečení odstavte zakryté fóliou na 10 minút
a potom servírujte.
Opláchnite a osušte kožu. Potrite kuracie stehná rozpusteným
margarínom alebo maslom. Položte na rošt nad skleneným otočným
tanierom. Pod rošt umiestnite bezpečnostnú odkvapkávaciu
nádobu na šťavu z mäsa pre mikrovlnné rúry. Akonáhle rúra zapípa,
pokrm obráťte. Potom stlačte tlačidlo štart pre pokračovanie. Po
upečení odstavte zakryté fóliou na 2 až 5 minút.

Mikrovlnná rúra má ‰tyri moÏnosti
nastavenia rozmrazovania: MEAT
(MÄSO), POULTRY (HYDINA), FISH
(RYBA), BRED (CHLIEB). KaÏdá
z t˘chto kategórií má iné nastavenie
v˘konu. Opakovan˘m stláãaním tlaãidla
AUTO DEFROST (AUTOMATICKÉ
ROZMRAZOVANIE) môÏete zvoliÈ
jednu z dostupn˘ch predvolieb.
Kategória stlaãiÈ
DEFROST
MEAT (MÄSO) raz
POULTRY (HYDINA)
krát
FISH (RYBA) krát
BRED (CHLIEB) krát
ZváÏením zistite hmotnosÈ potravín, ktoré chcete rozmraziÈ. OdstráÀte
v‰etky kovové spony a obalov˘ materiál. Potom vloÏte potraviny do
mikrovlnnej rúry a zavrite dvierka.
Stlaãte tlaãidlo (AUTOMATICKÉ ROZMRAZOVANIE) dvakrát a t˘m
zvolíte program rozmrazovania POULTRY (HYDINA) Na displeji sa
objaví "dEF2".
Zadajte hmotnosÈ zmrazenej potraviny, ktorú chcete rozmraziÈ.
Otáãajte gombíkom DIAL (VOLIACI KOTÚâ), aÏ sa na displeji objaví
hodnota
V priebehu rozmrazovania budete poãuÈ zvukov˘ signál, ktor˘ znamená, Ïe máte otvoriÈ dvierka mikrovlnnej
rúry, otoãiÈ vloÏené potraviny a oddeliÈ jednotlivé kúsky, aby ste t˘m zaistili rovnomerné rozmrazovanie.
OdstráÀte v‰etky porcie, ktoré sú uÏ rozmrazené alebo ich zatieÀte tak, aby sa t˘m zaistilo pomalé rozmrazenie.
Po kontrole zavrite dvierka a stlaãte ·TART (SPUSTIË/R¯CHLO) pre dokonãenie procesu rozmrazovania.
Mikrovlnná rúra nepreru‰í rozmrazovanie (aj keì budete poãuÈ zvukov˘ signál) k˘m neotvoríte dvierka.
91
.hydinyzmrazenej kg 4 1, rozmraziÈ ako ukáÏeme, príklade nasledujúcom Na rozmrazil. vnútraj‰ok aj sa aby
Stlaãte tlaãidlo STOP/CLEAR (ZASTAVIË/VYNULOVAË).
Stlaãte tlaãidlo START (SPUSTIË).
"1.4".
obzvlá‰Èpozor Dávajte skontrolovaÈ. potraviny varenia zaãiatkom pred Odporúãame rôzna. b˘va potravín hustota a eplota T
HYDINAProgram varením. pred rozmraziÈ úplne nemali sa by suroviny Niektoré kurãatá. peãenie, na mäsa kusy veºké na
odstavenia,dobu urãitú vyÏaduje Proces chleba. plátok mal˘ alebo rohlík je ako kúskov men‰ích rozmrazovanie na vhodn˘ je
Automatické
ozmrazovanier

SPRIEVODCA ROZMRAZOVANÍM
• Potraviny, ktoré chcete rozmrazovaÈ vloÏte do vhodnej nádoby pouÏiteºnej v mikrovlnnej rúre a bez zakrytia ju poloÏte na sklenen˘ otoãn˘ tanier.
• Pokiaº je to nutné, zatieÀte tenké ãasti mäsa ploch˘mi kúskami hliníkovej fólie. T˘m sa zabráni ich prehriatiu v priebehu rozmrazovania.
Zaistite, aby sa fólie nedot˘kali stien mikrovlnnej rúry.
• Potraviny ako mleté mäso, rezne, klobásky a pláty slaniny od seba oddeºujte ão najskôr.
• Akonáhle rúra vydá zvukov˘ signál, otoãte potraviny. Rozmrazené ãasti vyberte z rúry. Pokraãujte ìalej v rozmrazovaní zostávajúcich potravín.
• Po ukonãení rozmrazovacieho procesu nechajte potraviny e‰te odstáÈ, aby do‰lo k úplnému roztopeniu.
• Napríklad veºké kusy mäsa na peãenie a celé kurãatá by mali pred zaãiatkom varenia e‰te aspoÀ jednu hodinu stáÈ.
Kategória
MEAT (MÄSO)
POULTRY (HYDINA)
FISH (RYBA)
BRED (CHLIEB)
NÁDOBA
Riad pre
mikrovlnné
rúry (plytké
taniere)
Papierov˘
obrúsok
alebo plytk˘
tanier
HMOTNOSË
0,1 - 4,0 kg
0,1 - 0,5 kg
Druh spracovania
Mäso
Mleté hovädzie mäso, rezne, plátky, kocky na dusenie, ro‰tenky, hovädzie zadné, mleté
bifteky, bravãové kotlety, jahÀacie kotlety, roláda, klobásy, plátky ( do 2 cm)
Po zaznení zvukového signálu otoãte rozmrazované potraviny
Po rozmrazení nechajte stáÈ 5 -15 minút.
HYDINA
Celé kurãa, stehienka, prsia, morãacie prsia (do 2, 0 kg)
Po zaznení zvukového signálu otoãte rozmrazované potraviny
Po rozmrazení nechajte stáÈ 20 -30 minút.
Ryby
Filé, steaky, celé ryby, morské plody
Po zaznení zvukového signálu otoãte rozmrazované potraviny
Po rozmrazení nechajte stáÈ 10 -20 minút.
Krájan˘ chlieb, Ïemle, bagety atì.
92
(dEF1)
(dEF2)
(dEF3)
(dEF4)

Mikrovlnná rúra je vybavená funkciou
rýchle rozmrazovanie (MEAT – MÄSO).
Zistite hmotnosť potravín, ktoré chcete rozmraziť. Odstráňte
všetky kovové spony, či obalový materiál, potom vložte potraviny
do mikrovlnnej rúry a zatvorte dvierka.
Stlačte tlačidlo QUICK DEFROST (Rýchle rozmrazovanie) a tým
zvolíte program MEAT (MÄSO).
ýchlemu rozmrazeniu mletého mäsa s hmotnosťou 0,5 kg. Potom musími rúto funkciu používajte iba k veľT
V priebehu rozmrazovania budete počuť zvukový signál, ktorý znamená, že máte otvoriť dvierka
mikrovlnnej rúry a otočiť vložené potraviny a oddeliť jednotlivé kúsky, aby ste tým zaistili rovnomerné
rozmrazovanie. Odstráňte všetky dávky, ktoré sú už rozmrazené, alebo ich zatieňte, aby sa tým zaistilo
pomalé rozmrazovanie. Po kontrole zatvorte dvierka a stlačte ·TART, aby bol proces dokončený.
Mikrovlnná rúra nepreruší rozmrazovanie (aj keď budete počuť zvukový signál), dokiaľ neotvoríte dvierka.
93
ná časť úplne rozmrazila. Na nasledujúcom príklade vám ukážeme,u stáť, aby sa aj vnútormäso ešte chvíľ
ako rozmraziť 0,5 kg zmrazeného mletého mäsa.
Stlaãte tlaãidlo STOP/CLEAR (ZASTAVIË/VYNULOVAË).
Rýchle
ozmrazovanier

RÝCHLE ROZMRAZOVANIE
PROGRAM
1. Mäso
Hovädzie
JahÀacie
Teºacie
DRUH POTRAVINY
Mleté mäso
MIN/MAX.
0,5 kg
• Výhodou automatického rozmrazovania je automatické nastavenie a riadenie rozmrazovacieho procesu s tým, že v priebehu
rozmrazovania musíte kontrolovať stav potravín, rovnako ako pri normálnom rozmrazovaní.
• Pre dosiahnutie najlepších výsledkov odstráňte z mäsa a hydiny baliaci papier a plastové fólie (všetok obalový materiál).
Obal by totiž udržoval vlhkosť a šťavu z mäsa tesne na povrchu potravín a tým by mohlo dôjsť k uvareniu vonkajšieho
povrchu.
• Vložte suroviny do plytkej sklenenej misy, v ktorej sa bude zhromažďovať odkvapkávajúca tekutina.
• Potraviny po odstránení z rúry môžu byť uprostred ešte mierne zmrznuté.
• Po ukončení programu nechajte potraviny stáť 10 minút, respektíve kým sa úplne rozmrazia.
94

Rozmrazovanie
a gril
kým sa na displeji nezobrazí "0,3 kg".
95
V nasledujúcom príklade vám ukážem, ako pripraviť 0,3 kg "liet z lososa".
Stlaãte tlaãidlo STOP/CLEAR (ZASTAVIË/VYNULOVAË).
Stlačte jedenkrát.
Rozmrazovanie a gril vám umožňuje
pripraviť väčšinu obľúbených jedál
jednoducho výberom druhu jedla a
zadaním jeho hmotnosti otočením
otočného ovládača.
Kategória
Filety z lososa
Krevety
Hamburgerové
placky
Párky
Stlačte
Rozmrazovanie
a gril
raz
krát
krát
krát
Otáãajte gombík DIAL (VOLIACI KOTÚâ),
Stlaãte tlaãidlo START (SPUSTIË).

Kategória Kvantita Riad TEPL. JEDLA Pokyny
96
Vyberte lety z lososa, každú s hmotnosťou 200 g a hrúbkou
2,5 cm. Zamrazte ich. Položte jedlo na rošt.
Filety z lososa 0,2-0,6kg
(dG-1)
Krevety 0,1-0,4kg Zamrznuté
(dG-2)
Hamburgerové
placky
(dG-3)
Párky 0,2-0,6kg Zamrznuté
(dG-4)
1 – 4 kusy Zamrznuté
Rošt
Zamrznuté
Zvoľte ponuku a hmotnosť a stlačte štart.
Po dovarení vyberte z rúry a odstavte.
Očistite krevety a vyberte z nich žilky.
Položte ich na rošt.
Po pípnutí jedlo otočte.
Položte hamburgerové placky na rošt.
Zvoľte ponuku a hmotnosť a stlačte štart.
Po dovarení vyberte z rúry a odstavte.
Odstráňte všetok obalový materiál a prerežte na povrchu.
Položte ich na rošt.
Po pípnutí jedlo otočte.

V nasledujúcom príklade vám ukážem, ako použiť funkciu zachovanie chuti na zohriatie jedla na
vysokej úrovni za 90 minút.
ÚROVEŇ
Stlačte
udržiavanie
teploty
Nízka
úroveň
raz
Vysoká
úroveň
razy
97
Manuálne zachovanie chuti
Do mikrovlnnej rúry vložte jedlo, dvakrát stlačte ,
na displeji sa zobrazí "HO-H".
Stlačte "Š
Zachovanie
chuti
Ak chcete zohriať jedlo pomocou
programu ,
môžete tak urobiť stlačením tlačidla.
Keď potrebujete zohriať jedlo bez
Automatickej funkcie, môžete
kedykoľvek nastaviť zohrievanie
stlačením tlačidla.
Funkcia zachovanie chuti má iba jednu
časovú úroveň – 90 minút. No funkcia
sa zastaví po otvorení dvierok.
Zachovanie chuti po AUTOMATICKOM VARENÍ
1. Nastavte požadovaný program AUTOMATICKÉ VARENIE.
Stlačte "štart".
A po programe AUTOMATICKÉ VARENIE sa automaticky spustí
funkcia Zachovanie chuti päť minút po ukončení
AUTOMATICKÉHO VARENIA.
2. Po ukončení AUTOMATICKÉHO VARENIA môžete aj
stlačiť a na displeji sa zobrazí "HO-H".
Stlačte
*ČASOVÝ displej
Keď beží "Zachovanie chuti", zobrazí sa
Potom znovu stlačte "zachovanie chuti", na displeji sa zobrazí
zvyšný čas.
.

Nikdy nepouÏívajte v mikrovlnnej rúre kovové alebo pokovované nádoby.
Mikrovlnné Ïiarenie nemôÏe prechádzaÈ kovov˘m materiálom. Vlny sa odrazia od kovového materiálu v rúre a spôsobia v˘boje, t. j. jav, ktor˘ sa podobá
blesku.
Väã‰inu nekovov˘ch, tepelne odoln˘ch varn˘ch nádob je moÏné pouÏiÈ aj
v mikrovlnnej rúre. Niektoré materiály v‰ak môÏu obsahovaÈ urãité látky,
ktoré z nich robia nádoby nevhodné pre mikrovlnné rúry. Pokiaº si nie ste istí,
Ïe daná nádoba sa smie alebo nesmie pouÏívaÈ v mikrovlnnej rúre, uvádzame jednoduch˘ návod, ako túto skutoãnosÈ zistiÈ. VloÏte testovanú nádobu
do rúry a pridajte sklenenú nádobu naplnenú vodou. SpusÈte mikrovlnnú
rúru na 1 minútu pri vysokom v˘kone (HIGH). Pokiaº sa voda ohreje, ale skúmaná nádoba zostane na dotyk chladná, potom je vhodná do mikrovlnnej
rúry. Pokiaº voda nezmení svoju teplotu, ale nádoba sa ohreje, potom materiál tejto nádoby absorbuje mikrovlnné Ïiarenie a nie je vhodn˘. Vo va‰ej
kuchyni je pravdepodobne mnoho riadu, ktor˘ sa dá pouÏiÈ ako varné nádoby do mikrovlnnej rúry. Preãítajte si prosím nasledujúce delenie nádob.
Jedálenské taniere
Veºká ãasÈ jedálensk˘ch tanierov sa môÏe v mikrovlnnej rúre pouÏívaÈ. Pokiaº
máte pochybnosti pre‰tudujte si dokumentáciu v˘robcu alebo vykonajte test.
Sklenen˘ riad
Varné sklo je vhodné do mikrovlnnej rúry. To platí pre v‰etky druhy tepelne upraven˘ch sklenen˘ch varn˘ch nádob. V mikrovlnnej rúre nepouÏívajte jemné sklo, ako
poháriky na likéry ãi na víno, mohli by sa pri ohreve tekutín rozbiÈ.
Umelohmotné zásobníky
MôÏu sa pouÏívaÈ na uskladnenie potravín, ktoré majú byÈ r˘chlo ohriate.
Nehodia sa v‰ak na uskladnenie potravín, ktoré vyÏadujú dlh‰iu dobu tepelného spracovania v rúre, keìÏe môÏe dôjsÈ k roztaveniu ãi deformácii plastovej nádoby.
Papier
Papierové tácky a krabiãky vyhovujú podmienkam spracovania potravín
v mikrovlnnej rúre s tou podmienkou, Ïe doba varenia je krátka a potraviny
uloÏené v papierov˘ch nádobách obsahujú málo tuku a vody. Papierové
obrúsky sú tieÏ veºmi uÏitoãné pre obalenie potravín a pre obloÏenie plechov
na peãenie, v ktor˘ch sa tepelne spracovávajú potraviny s vysok˘m obsahom tuku, ako napr. anglická slanina. V‰eobecne platí zásada: nepouÏívajte
farebné papiere, pretoÏe farba môÏe pú‰ÈaÈ. Niektoré v˘robky z recyklovaného papiera môÏu obsahovaÈ prímesi spôsobujúce pri pouÏití v mikrovlnnej
rúre iskrenie alebo aj vznietenie.
Plastové varné vrecú‰ka
Vrecú‰ka ‰peciálne vyrábané pre varenie vyhovujú aj pouÏitiu v mikrovlnnej
rúre. Pred pouÏitím v nich nezabudnite urobiÈ otvor, aby para mohla unikaÈ.
Nikdy nepouÏívajte v mikrovlnnej rúre obyãajné umelohmotné vrecú‰ka, pretoÏe by sa spiekli alebo by praskli.
Umelohmotné varné nádoby pre mikrovlnné rúry
V obchodoch je v ponuke ‰irok˘ v˘ber rôznych druhov a veºkostí nádob pre
mikrovlnné rúry. Vo väã‰ine prípadov budete môcÈ pouÏiÈ nádoby, ktoré uÏ vlastníte bez toho, aby ste museli nakupovaÈ nové vybavenie do kuchyne.
Keramick˘ a kameninov˘ riad
Nádoby z t˘chto materiálov sa väã‰inou dajú pouÏiÈ v mikrovlnnej rúre, ale je
lep‰ie sa pred ich pouÏitím presvedãiÈ pomocou testu.
Väã‰ina nádob s vysok˘m obsahom olova alebo Ïeleza nie je vhodná
ako varné nádoby.
Nádoby by sa mali pred pouÏitím vyskú‰aÈ, ãi vyhovujú prevádzke
v mikrovlnnej rúre.
pre vhodn˘ Riad
98
rúruovlnnú mikr
UPOZORNENIE:

Charakteristika potravín
Neustály dohºad
Hoci recepty boli spísané s najväã‰ou starostlivosÈou, vበúspech pri príprave t˘chto
jedál závisí na tom, koºko pozornosti budete venovaÈ pokrmom v priebehu varenia.
Poãas celého varenia sledujte stav pripravovaného pokrmu. Mikrovlnná rúra je vybavená vnútorn˘m osvetlením, ktoré sa automaticky rozsvieti, akonáhle sa rúra zapne.
UmoÏní sa t˘m sledovanie vnútraj‰ka rúry a priebehu procesu varenia. V receptch
uvádzané príkazy ako vybraÈ, zamie‰aÈ a pod. sú uvádzané iba ako najniωie nutné
odporúãané mnoÏstvo krokov. Pokiaº by sa pokrm zaãal variÈ nejak˘m neoãakávan˘m
spôsobom, vykonajte potrebné zásahy, aby ste napravili odch˘lku.
Faktory, ktoré ovplyvÀujú dobu varenia
Dobu prípravy ovplyvÀuje mnoho faktorov. Teplota pouÏit˘ch surovín v nádobe môÏe
veºmi ovplyvniÈ dobu varenia. Napríklad koláã peãen˘ z ºadovo studeného masla, mlieka a vajec bude trvaÈ omnoho dlh‰ie, ako keì tieto suroviny budú maÈ izbovú teplotu.
Pri v‰etk˘ch receptoch v tejto príruãke sú uvedené ãasové údaje v urãitom rozsahu.
MôÏe sa staÈ, Ïe keì pouÏijete spodn˘ ãasov˘ údaj, jedlo zostane nedovarené
a moÏno, Ïe podºa va‰ej chuti budete niekedy voliÈ ãas dlh‰í, ako je uveden˘ ako maximálny v tejto príruãke. Zásadou tejto kniÏky je, ão sa t˘ka ãasov˘ch údajov varenia,
zostávaÈ konzervatívny. Tro‰ku prevarené jedlo nemusí byÈ dobré. Pri niektor˘ch receptoch, hlavne pri chlebe, koláãoch a pudingoch je odporúãané vybraÈ pokrmy z mikrovlnnej rúry trochu nedovarené. To nie je omyl. Keì necháte pokrm (väã‰inou prikryt˘)
chvíºu stáÈ mimo rúru, potom e‰te urãit˘ ãas bude proces "varenia" pokraãovaÈ, keìÏe
teplo absorbované v okrajov˘ch ãastiach potravín bude postupne prestupovaÈ smerom
do vnútra. Pokiaº pokrm zostane v mikrovlnnej rúre tak dlho, k˘m sa úplne neuvarí vnútraj‰ok, potom vonkaj‰ia vrstva bude uÏ prevarená alebo aj spálená. Postupne budete
získavaÈ skúsenosti, ako u ktorého pokrmu nastaviÈ dobu varenia a nasledujúcu dobu
neÏ pokrm "dôjde".
Hustota potravín
ªahké, porézne pokrmy ako chlieb, peãivo sú hotové omnoho skôr ako potraviny s vysokou hustotou ako stehno a gulá‰e. Pri mikrovlnnom spracovaní poréznych potravín musíte dávaÈ pozor, aby sa okraje nevysu‰ili a nestvrdli.
V˘‰ka pokrmu
Horná ãasÈ vysok˘ch kusov potravín , ako napríklad stehna, sa upeãie r˘chlej‰ie ako
spodná ãasÈ. Preto odporúãame vysoké kusy pokrmov v priebehu peãenia otoãiÈ, niekedy aj viackrát.
Obsah vody v potravinách
KeìÏe teplo generované mikrovlnn˘m Ïiarením odparuje vodu z potravín, relatívne
suché potraviny ako napr. niektoré zeleniny je nutné pred uvarením v mikrovlnnej rúre
postriekaÈ vodou alebo ich v nádobe prikryÈ.
Kosti a pokrmy s obsahom tuku
Kosti vedú teplo a tuk je skôr uvaren˘ ako mäso. Je nutné pozorne sledovaÈ proces
varenia pokiaº sa zhotovuje pokrm z kúskov mäsa vrátane kostí alebo tuku aby nedo‰lo
k neoãakávanému procesu a jedlo nebolo prevarené.
MnoÏstvo potravín
MnoÏstvo vyÏiareného mikrovlnného Ïiarenia zostáva kon‰tantné nezávisle na tom,
koºko potravín do rúry vloÏíte. âím viac surovín do mikrovlnnej rúry vloÏíte, t˘m viac
ãasu budete potrebovaÈ na uvarenie jedla. Pokiaº zníÏite mnoÏstvo uvedené v recepte
na polovicu, nezabudnite skrátiÈ ãas prípravy aspoÀ o jednu tretinu.
Plátky potravín
Mikrovlnné Ïiarenie prenikne u potravín maximálne do hæbky 2 cm , vnútorné ãasti surovín sa uvaria teplom, ktoré vzniká vo vrchnej vrstve a prestupuje do vnútornej ãasti
pokrmu. Iba vonkaj‰í povrch je uvaren˘ mikrovlnnou energiou, vnútraj‰ok sa uvarí
vìaka odvodu tepla do vnútorn˘ch ãastí. Najhor‰ou formou pre mikrovlnnú rúru je
hrub˘ hranol suroviny. Rohy takého kusu uÏ budú spálené bez toho, aby pritom do‰lo
k ohriatiu vnútraj‰ka. Potraviny vo forme guºat˘ch tenk˘ch plátkov a jedlo vo forme
krúÏkov sa naopak pripravuje veºmi dobre. Zakrytie
Zakrytím nádoby dôjde k zachyteniu tepla a pary ão ur˘chli proces varenia. PouÏite
pokrievku alebo mikroténovú fóliu urãenú pre mikrovlnné rúry s jedn˘m odhrnut˘m
rohom, aby nedo‰lo k jej prasknutiu.
Hnednutie
Peãené mäso a hydina, ktoré sa pripravujú 15 min. alebo aj dlh‰ie, mierne zhnednú vo
vlastnom tuku. Jedlá ktoré sa v mikrovlnnej rúre upravujú krat‰í ãas, je dobré pomazaÈ
prostriedkom na zhnednutie ako napr. worchesterová, sójová, barbecue omáãka, aby
sa dosiahla potrebná farba. KeìÏe staãí pridaÈ veºmi malé mnoÏstvo, pôvodná chuÈ
pokrmu sa nezmení.
Zakrytie papierom na peãenie
Je to ochrana proti rozstrekovaniu tuku a trochu brzdí aj stratu tepla u potravín. KeìÏe
toto zakrytie nie je tak tesné ako zakrytie pokrievkou ãi mikroténovou fóliou, umoÏní
mierne vysychanie pokrmu.
Rozmiestnenie a vzdialenosti
Jednotlivé kúsky pokrmov, ako napr. opekané zemiaky, malé peãivo alebo predkrmy
môÏete zahrievaÈ omnoho úãinnej‰ie, keì ich umiestnite v mikrovlnnej rúre v rovnomern˘ch vzdialenostiach od seba, najlep‰ie v kruhovom rozloÏení. Nikdy jednotlivé kúsky
nedávajte na seba.
99
a varenie v mikrovlnné rúre

Mie‰anie
Mie‰anie potravín je jedn˘m z najdôleÏitej‰ích technologick˘ch krokov pri varení v mikrovlnnej rúre. Pri ‰tandardnom spôsobe varenia sa pouÏíva mie‰anie na zmie‰avanie
potravín. Pokrmy v mikrovlnnej rúre sa musia mie‰aÈ preto, aby sa teplo roznieslo, rozdelilo v celej hmote. Mie‰ajte pokrmy vÏdy smerom od okrajov do vnútraj‰ka, pretoÏe
krajné ãasti sa ohrievajú ako prvé.
Obrátenie
Veºké kusy potravín, ako ro‰tenka alebo celé kurãa by sa mali v mikrovlnnej rúre otáãaÈ. T˘m sa zaistí rovnomerné opeãenie hornej aj spodnej ãasti. Je dobré obracaÈ aj
porciované kurãatá a kotlety.
Umiestnenie hrub‰ích kúskov ku kraju
KeìÏe mikrovlnné Ïiarenie je pohlcované krajn˘mi ãasÈami potravín, je rozumné klásÈ
hrub‰ie plátky mäsa, hydiny a r˘b ku krajn˘m ãastiam nádoby na peãenie. Vìaka tomu
väã‰ie kúsky dostanú väã‰iu dávku mikrovlnného Ïiarenia a pokrm sa uvarí rovnomerne.
Tienenie
Pomocou prúÏkov alobalu (hliníková fólia zabraÀuje prechodu mikrovæn) je moÏné zabaliÈ hrany
a rohy ‰tvorcov˘ch alebo hranat˘ch kúskov surovín tak, aby sa zabránilo spáleniu ãi prevareniu t˘chto porcií. NepouÏívajte väã‰ie mnoÏstvo hliníkovej fólie a dbajte na to, aby alobal bol
uchyten˘ vo vnútraj‰ku varnej nádoby. Pokiaº bude vyãnievaÈ, môÏe spôsobiÈ „iskrenie.
Zväã‰enie objemu
Veºké alebo poriadne kusy potravín môÏu zväã‰iÈ svoj objem, a tak môÏe byÈ mikrovlnná energia absorbovaná na neoãakávan˘ch miestach spodku alebo stredu suroviny.
Prepichovanie
Potraviny uzatvorené v ‰krupinke, kôre alebo ‰upke môÏu v mikrovlnnej rúre explodovaÈ, pokiaº sa pred varením ich ‰upka neprepichne. Medzi tieto potraviny radíme Ïætky a
bielka vajec, muãle a ustrice a úplné kusy zeleniny a ovocia.
Ako vyskú‰aÈ, ãi je pokrm uvaren˘.
PretoÏe sa suroviny v mikrovlnnej rúre varia veºmi r˘chlo, je nutné ãasto skú‰aÈ ich stav. Niektoré potraviny sa nechávajú v mikrovlnnej rúre aÏ do úplného uvarenia, av‰ak väã‰inu potravín,
ako mäso a hydina, je nutné vybraÈ z rúry e‰te pred úpln˘m uvarením s t˘m, Ïe sa v dobe
odstavenia dovaria. Vnútorná teplota potravín stúpne v ãase odstavenia o 3 °C aÏ 8 °C.
Doba státia
Uvarené jedlá je potrebné ãasto nechaÈ stáÈ 3 aÏ 10 minút po vybratí z mikrovlnnej rúry.
Väã‰inu jedál je nutné nechaÈ v zakrytom stave, aby sa t˘m zabránilo ich vychladnutiu.
V˘nimku tvoria potraviny, ktoré majú byÈ suché, ako napr. su‰ienky, sucháre, atì. Odstátie
umoÏní jedlu, aby sa úplne dovarilo a tieÏ napomáha zmie‰aniu a plnému rozvinutiu chutí.
âistenie mikrovlnnej rúry
1. UdrÏujte vnútorn˘ povrch rúry v ãistote
OdstraÀujte ‰kvrny od jedál a rozstrieknuté ãasti tekutín zo stien rúry a z miest
medzi dvierkami a tesnením. Najlep‰ie je vyteãené zvy‰ky jedla ihneì odstrániÈ
vlhkou handriãkou. Úlomky a ‰kvrny absorbujú mikrovlnnú energiu a t˘m predlÏujú
dobu varenia. Vlhkou handriãkou odstráÀte odrobinky, ktoré spadnú medzi dvierka
a rám. Tieto miesta je nutné ãistiÈ zvlá‰È starostlivo, aby bolo zaistené dokonalé
tesnenie dvierok. Mastné ‰kvrny odstraÀujte handriãkou navlhãenou v saponáte,
potom rúru utrite iba ãistou vodou a nakoniec osu‰te. NepouÏívajte Ïiadne agresívne rozpú‰Èadlá a ãistiace prostriedky s brúsnym úãinkom. Sklenen˘ tanier
môÏete umyÈ ruãne alebo v um˘vaãke riadu.
Charakteristika potravín
a varenie v mikrovlnné rúre
100
ãistotev rúry ch povrvonkaj‰í UdrÏujte 2.
papi-alebo handriãkou jemnou osu‰te nakoniec rúru a vodou ãistou iba vytierajte
Pokiaº. ovotvorvetracích do voda nedostala nikdy sa aby to, na dbajte , rúryvlnnej
nechcené-edi‰li prste aby dvierka, otvorte najskôr panel, ovládací utieraÈ budete
suchou.handriãkou osu‰te
sucha.do vytrite vo
NepouÏívajte Ïiadny parn˘ ãistiã.
5
.STIERKYPLASTOVÉ A KOVOVÉ
handriãkou.vlhkou vytieraním ãastej‰ím ãisté ah‰ie ºudrÏujú sa ãasti Kovové
hookamÏite a handriãkou vlhkou oãistite Panel . rúryovlnnej mikrzapnutiu mu
dvie-ãasti vonkaj‰ej okolo alebo ok dvierstrane nej vnútorna omadí nahrpara sa Ak 3
zariadenia.poruchu nesignalizuje niã pritom ale edí, ostrprvlhkom mi veºvo pouÏíva sa
ostli-starich potom a vodou ãistou s handriãkou otrite saponátom, so vodu teplú
ALEBOPRÁ·KY âISTIACE SÚ AKO Y TERIÁLMAABRAZÍVNE AJTE NEPOUÎÍV
jupotom vode, a saponáte v navlhãenou handriãkou oãistite rúry ch povronkaj‰í V
o-mikrvnútraj‰ka ãastí funkãn˘ch po‰kodeniu edi‰li prste Aby obrúskom. ov˘m er
rúraovlnná mikrÏe prípade, v stane sa o Thandriãkou. jemnou paneli otrite potom ok, r
ibapouÏívajte om˘vanie Na ãistote. v udrÏiavaÈ nutné je tesnenie né dvera Dvierka 4
 Loading...