

Page 1

MP3 PLAYER
CH01
OWNERÕS MANUAL
MODEL: MF-PD330
Please read this manual carefully
before operating your set.
Retain it for future reference.
Design and specifications are
subject to change without notice
for improvement.
(for CE region)
P/NO: 3828SNB046B P/NO: 3828SNB046B
Page 2

Contents
Warning 3
Precaution 5
Battery Installation 6
What is MP3 PLAYER ? 7
ACCESSORIES SUPPLIED 10
SYSTEM REQUIREMENTS 11
INSTALLING SOFTWARE 12
CONNECTING DATA IN/OUT CABLE
16
OPEN MP3-Explorer 17
USING MP3-Explorer 18
DOWNLOADING FILES 21
UPLOADING FILES 24
MP3 ERROR MESSAGES 27
BEFORE OPERATING 28
PLAYING MP3 FILES 30
OTHER FUNCTIONS 38
Specifications 39
Warning
To reduce the risk of fire or electric shock, do not expose this
appliance to rain or moisture.
CAUTION
RISK OF ELECTRIC SHOCK
DO NOT OPEN
CAUTION
TO REDUCE THE RISK OF ELECTRIC SHOCK, DO NOT
REMOVE COVER(OR BACK) NO USER SERVICEABLE
PARTS INSIDE.
REFER SERVICING TO QUALIFIED SERVICE PERSONNEL.
The graphical symbols marked on the bottom or back of the set
mean the following explanation.
The lightning flash with arrowhead within an equilateral
triangle is intended to alert the user to the presence of
uninsulated Òdangerous voltageÓ within the productÕs
enclosure that may be of sufficient magnitude to
constitute a risk of electric shock to persons.
The exclamation point within an equilateral triangle is
intended to alert the user to the presence of important
operating and maintenance (servicing) instructions in
the literature accompanying the appliance.
To avoid electrical shock; do not open the cabinet. Refer servicing to
qualified personnel.
Shock hazard-do not open.
CAUTION
Use of controls or adjustments or performance of procedures other
than those specified herein may result in hazardous radiation
exposure.
Page 3

Warning
Precaution
For customers in Europe
This product is conformed to EMC regulation 89/336/EEC and is
therefore marked with the CE-label.
Notice for customers in the United Kingdom
WIRING INSTRUCTIONS
This appliance is supplied with a BS1363 approved 3 amp fused
mains plug. When replacing the fuse always use a 3 amp BS1362
approved type. Never use this plug with the fuse cover omitted. To
obtain a replacement fuse cover contact your supplying dealer or
ÒLG Electronics U.K.LtdÓ.
If the mains sockets in your home differ, or are not suitable for the
type of plug supplied, then the plug should be removed and a
suitable type fitted. Please refer to the wiring instructions below:
Warning :
The mains plug severed from the mains lead of this appliance must
be destroyed. A mains plug with bared wires is hazardous if
engaged in a mains output line socket.
IMPORTANT
The wires in this mains lead are coloured in accordance with the
following codes:
As the colours of the wires in the mains lead of this appliance may
not correspond with the coloured markings identifying the terminals
in your plug, proceed as follows:
The wire which is coloured brown must be connected to the
terminal which is marked with the letter L or coloured red.
The wire which is coloured blue must be connected to the terminal
which is marked with the letter N or coloured black.
If a 3 amp BS1363 plug or any other type of plug is used, a 3 amp
BS1362 approved fuse must be fitted either in the plug or at the
distribution board.
Warning :
Do not connect either wire to the earth pin, marked with the letter E
or with the earth symbol or coloured green or green and yellow.
Blue : Neutral
Brown : Live
If you plan not to use the main unit for a long time, remove the
battery to avoid any damage caused by battery leakage and
corrosion.
Avoid listening to the main unit while driving, cycling or
operating any motorized vehicle.
Do not use the unit in places which are extremely hot, cold
dusty or humid.
Unlock the HOLD switch before operating.
Battery Life
(The unit of time:hours)
Battery
Alkaline battery(2EA) 6~7
Rechargeable battery(1120mA) 6
Battery life maybe different according to the using condition,
manufacture corporation and production years and months.
Charge the rechargeable battery or replace the battery with a
new one in the following situations.
The indicator lights.
The operation buttons do not work.
MP3
Playback
Page 4
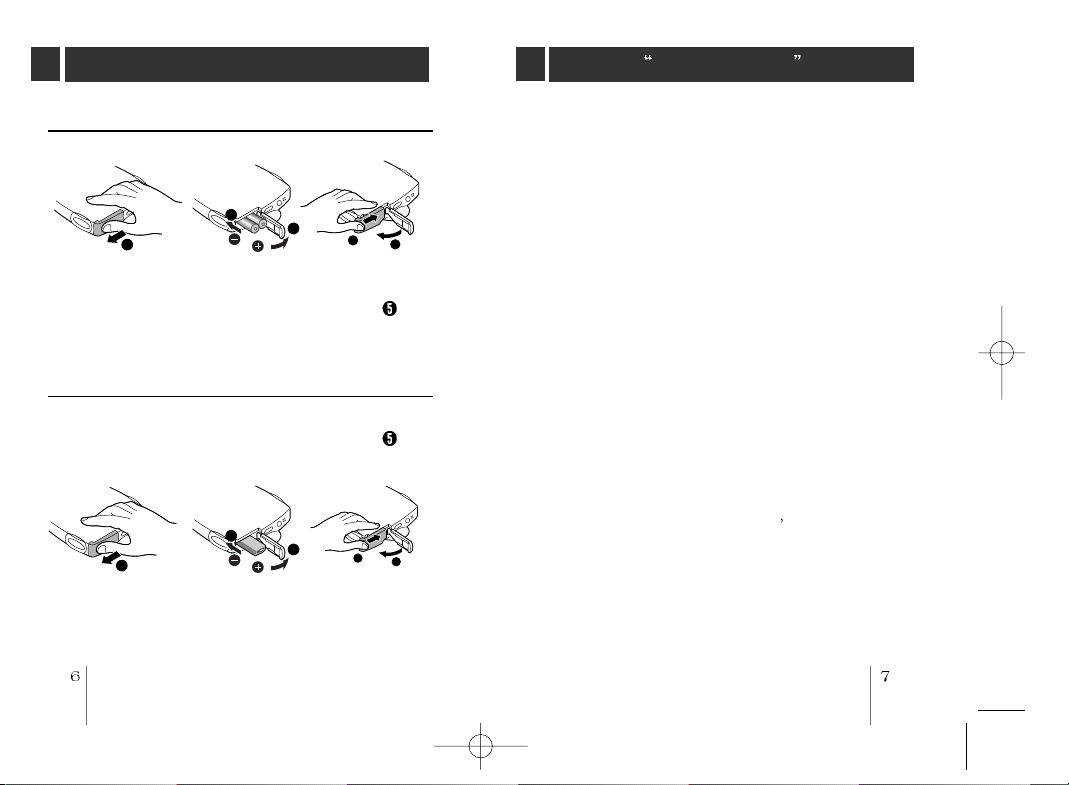
Battery Installation
1
2
3
4
5
1
2
3
4
5
What is MP3 PLAYER ?
To install the battery(AAA/R6)
Open the battery cover, insert the battery and push lock the
battery cover to the direction of the arrow in the NO.
position.
To install the rechargeable battery(Optional)
Open the battery cover, insert the battery and push lock the
battery cover to the direction of the arrow in the NO.
position.
MP3 Player is a palm size audio device that uses no
moving parts for playback and lets you enjoy a high
quality sound product that uses MPEG 3 compression
method for quality internet audio.
MP3 Player is portable digital audio player that plays
MP3 files without requiring the use of tapes or CDs. MP3
Player uses one or two flash memory cards, which is
expandable up to 64MB. MP3 is a well known, high
quality digital audio format. MP3 files can be compressed
up to 12 times the original wave file size. You can get
thousands of MP3 files without leaving your home or
waiting in long lines in record stores. Just download the
files legally from anywhere in the world through your
internet connection. You will have to pay for the
downloaded MP3 files to the MP3 provider. The files can
then be transferred to your player and listened to on your
home stereo, in your car, on the beach, or any where you
wish to go! Also, you can make your own CD quality MP3
files from CD or WAV making use of the MP3 encoder
software.
MP3 Player takes advantage of MP3
s small data size
and CD quality sound.
Page 5
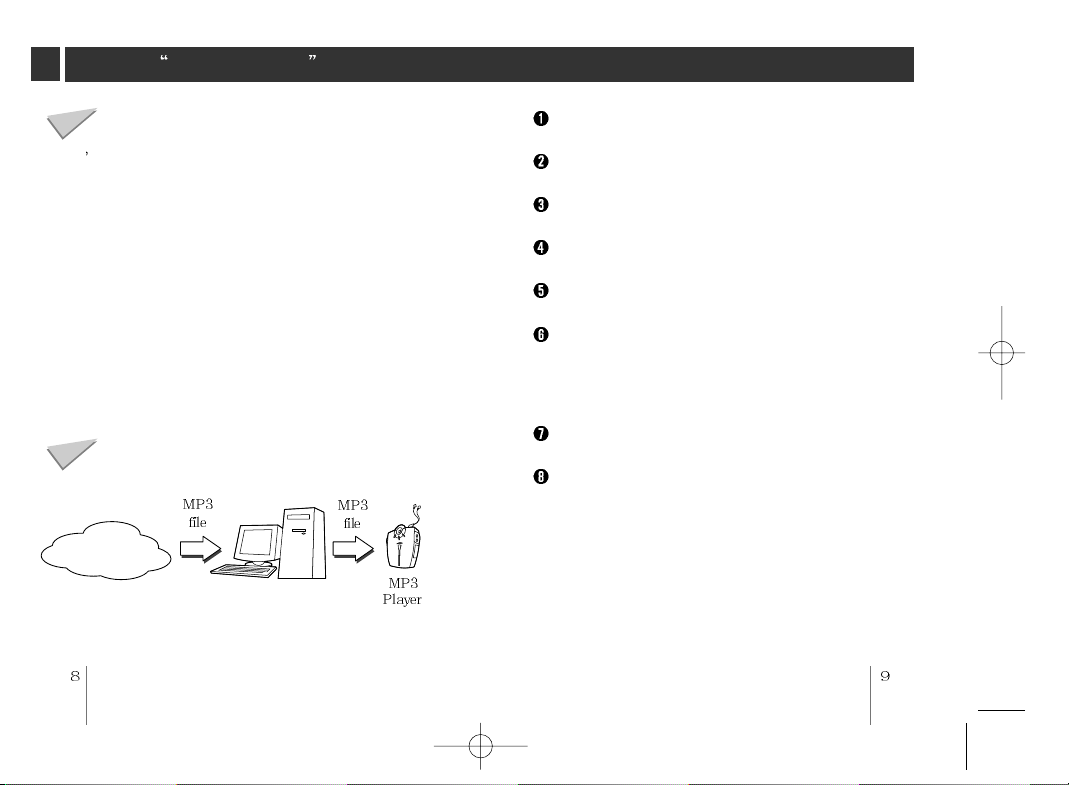
What is MP3 PLAYER ?
How do I use your MP3 Player?
You ll need to have MP3 files stored on your computer,
a data In/Out cable and your MP3 Player.
Using the MP3 Explorer software, select the MP3 files
you wish to transfer from your PC to the MP3 Player.
You can transfer songs or from your PC to your MP3
Player via your parallel port with a data In/Out Cable.
Also, you can transfer data from your MP3 Player to your
PC!
A benefit of using MP3 Player for storage of data,
windows documents, etc. is that when transferring large
data from PC to PC, you can carry an equivalent of more
than 40 floppy disks! A floppy diskette can carry only
1.44MB of data, but you can carry up to 64 Mega Bytes
of data using your MP3 Player.
Characteristics-advantages of MP3 Player
Internet
New generation Digital Audio Player that does not
require tapes or CDs.
Pure sound guaranteed while handling, exercising and
jogging.
Multimedia communication audio player through PC,
network and Internet.
Data storage device when transferring large data from
PC to PC.
Enjoy CD quality sound while listening to MP3 files
anywhere.
You can get thousands of songs at a fraction of CD
prices from various MP3 Internet providers via the
innovative Try & Buy program without leaving home!
You can buy only one song at a time, no more buying
a CD for the one or two songs you want.
You can select your own favorite songs, and change
the order of songs whenever you like.
MP3 Player has no moving parts and will not skip
since it does not require physical movement such as
rotating Tapes or CDs.
Page 6
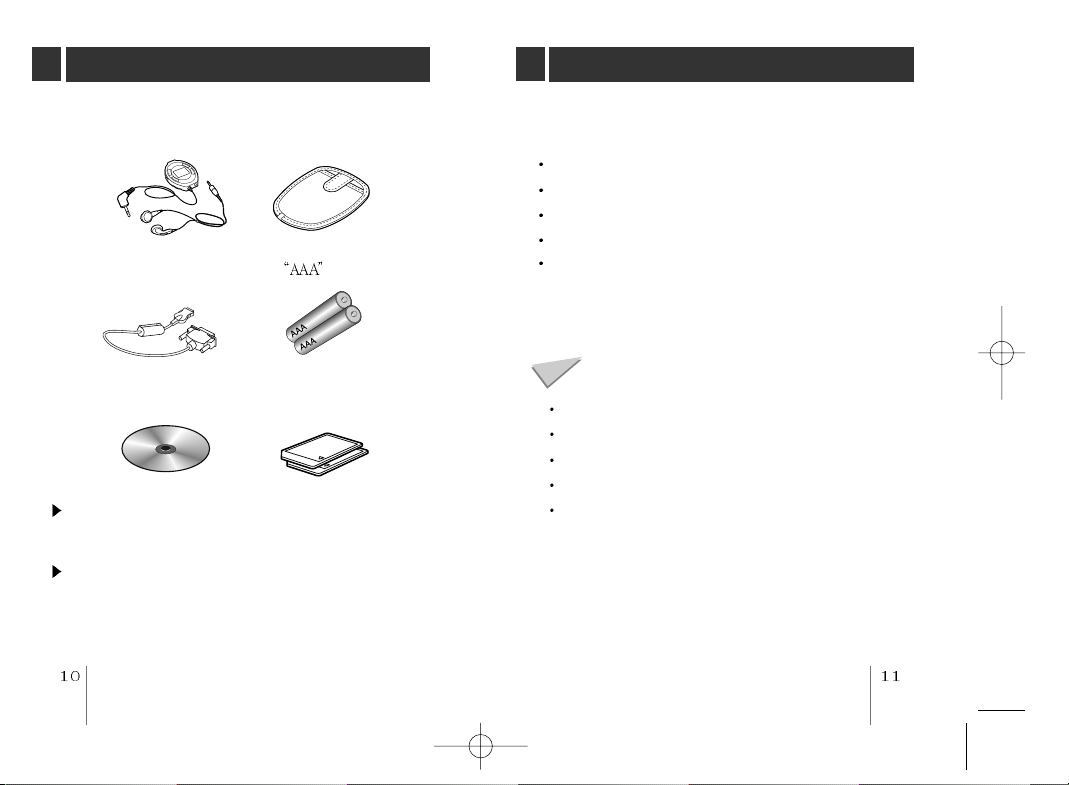
ACCESSORIES SUPPLIED
SYSTEM REQUIREMENTS
Earphones with remote
control
Data In/Out cable
(Parallel cable)
Installation CD Multimedia card
The multimedia card may be damaged by static
electricity. Therefore we recommend that you take care of
it in your static electircity prevention bag supplied.
Keep away the multimedia card from the magnetic
substances, because the data of multimedia card may be
damaged by it.
Carrying case
Battery
(MMC)
Your MP3 Player needs the minimal system requirements
for your computer.
Windows 95/98
CD ROM Drive
486 or higher microprocessor
16MB RAM
Minimum 7MB hard disk space
You will need more hard disk space depending on the size
of the MP3 files you want to download.
Recommended System Requirements
Windows 95/98
586 or higher microprocessor
CD ROM Drive
32MB or higher RAM
Hard disk space more than 7MB
Page 7

INSTALLING SOFTWARE
INSTALLING SOFTWARE
The MP3-Explorer is the communication software that allows
your computer to share information with your MP3 Player. In
order for your MP3 Player to work properly, The MP3Explorer software must be installed correctly under Windows.
The MP3-Explorer software is available for Windows
but itÕs not available to NT
TM
.
95/98,
Installing Automatically
Insert the software CD into drive D:\ (where D:\ is name of
your CD ROM drive). And the install will be run automatically.
Continue installing as the direction of dialog boxes.
Installing Manually
If automatic installing is not run, try manual installing as
following description.
Insert the software CD into drive D:\ (CD ROM drive).
Click D:\ drive (CD ROM drive)
Double-click Setup.exe file.
Click Next button.
Page 8

INSTALLING SOFTWARE
Click Next button.
C:\Program Files\MP3-Explorer directory will be created.
Click Next button.
Click Finish button.
The installation of MP3-Explorer software is completed and
the MP3-Explorer icon is created on the Windows desktop.
Page 9

CONNECTING DATA IN/OUT CABLE
OPEN MP3-Explorer
Connecting your MP3-Player to a PC
To complete setup, you should connect the supplied
Data In/Out cable to a PC from your MP3 Player.
MP3 Player
Data In/Out
cable
DATA
In/Out terminal
Compare the two ends of the cable
Disconnect the printer cable from your PC.
Put your MP3 Player to stop mode.
Open the rubber cover of Data In/Out terminal from
your MP3 Player.
Connect one end with the parallel port on the back of
your PC and then plug the other end into the Data
In/Out terminal of your MP3 Player.
To remove the plug of the MP3 Player
side, push and pull both grips of the plug.
Parallel port
(Printer Port)
The MP3-Explorer is the software that interacts with the
MP3 Player and a PC.
MP3 files or any data files can be downloaded to the MP3
Player or vice versa.
Double-click the MP3-Explorer
icon on the Windows desktop.
In case of first run after the MP3-Explorer installation,
the Parallel port Options dialog box will be displayed.
To communicate between your MP3 Player and your
PC, you must select the Parallel Port option. The
default port is set to LPT1. Make sure your MP3 Player
is properly connected to the Parallel Port of your PC
with the supplied Data In/Out cable.
The first time you open the MP3-Explorer after setup, if
it does not run, check the LPT MODE of the CMOS
SETUP of your PC. And confirm if it is SPP MODE
(STANDARD or OUTPUT ONLY).
* You can check the LPT MODE during the booting of
your PC. Press DEL key during booting of your PC
to enter the CMOS SETUP and then enter to the
MAIN MENU ADVANCED SYSTEM SETUP
INTEGRATED PERIPHERALS LPT MODE (It may
be different according to your PC, refer to User s
Manual of your PC)
Page 10

USING MP3-Explorer
The following figure describes the MP3-Explorer software.
The various features are explained below.
New Folder button
It creates the new folder.
Upper Folder button
Move to upper folder.
Large Icons button
Display the items to the large icon.
Small Icons button
Display the items to the small icon.
List button
Display the items in the directory or folder name only.
Detail button
Display the information of the icons in the display panel.
Refresh button
Change the information of the folder in the display
panel.
Rename button
Changes the name of the selected item.
Mask File button
Displays only the files of the selected information.
Delete button
Deletes the selected item.
About MP3 Explorer button
Displays the MP3-Explorer software information.
MMC Files display panel
Display panel for the data or MP3 files of the selected
multimedia card.
Download button (PC to MP3 Player)
This button will allow you to copy the selected MP3 files
or data on the PC in the local folder onto your MP3
Player. Approximately, the time spent on the copying
process would take about two or three minutes to copy
a 4MB file into your MP3 Player. The download time
may vary depending on your PC.
Page 11

USING MP3-Explorer
CARD IN
OPEN
DOWNLOADING FILES
Upload button (MP3 Player to PC)
The Upload button works the same as the Download
button, but uploads information to the PC instead. This
will allow you to copy the selected MP3 files or data on
the MP3 Player (Multimedia card) into the local
directory as a destination folder. The time spent on the
copying process from the MP3 Player to a PC is much
slower than the download process.
MMC1 button
Select the MMC1 of the MP3 Player. If you press
MMC1 button, the MMC1 files are displayed.
MMC2 button
Select the MMC2.
MMC Format button
Format button for the selected MMC1 or MMC2.
LPT Port button
You can redefine the parallel port.
MMC Free Space display
Displays the selected MMC space.
PC Files display panel
Select the MP3 files or other files of the selected
directory or folder on your PC.
PC Directory display panel
Select the directory or folder where MP3 files or other
files that you want to copy onto the MP3 Player
(Multimedia card) are located.
MMC1 or MMC2 select display
If the MMC is loaded in your MP3 Player it is displayed
in green or white colour. The selected MMC number is
changed in green colour.
To download the MP3 files or data files from PC to MP3
Player, try as the following descriptions.
Preparation
1
Insert the battery into the MP3 Player.
2
Put MP3 Player to the stop mode. (While the MP3
Player is operating you cannot download or upload)
3
Open MMC door and load the MMC 1/2.
To eject MMC, open the MMC door and pull the MMC1/2
eject switch to the lower part.
SLOT
1 2
4
Connect the MP3 Player and your PC with the Data
In/Out cable.
MMC2(SLOT 2) eject swith
MMC1(SLOT 1) eject swith
Page 12

DOWNLOADING FILES
To download files
5
Buy and store the MP3 files on your PC from the
Internet site, CD ROM etc.
6
Double-click the MP3-Explorer
icon to run the software.
(If the remote controller is inserted
into the MP3 Player,
on the remote control display)
Connect the Data In/Out cable before running the
software.
In Data In/Out cable connecting status, if you run the
MP3-Explorer all the buttons of the player are inoperative.
7
Click MMC1 or MMC2 button to download.
PC appears
8
Display the MP3 files or data files on the PC Files
display panel and select a file.
9
Click Download button of the Menu bar. It will be
downloaded into the selected MMC1 or MMC2.
Page 13

UPLOADING FILES
To upload the MP3 files or data files from MP3 Player to
PC, try as the following descriptions.
To upload files
1
Select a directory or folder on the PC Directory
display panel.
(The files of the selected directory or folder will be
displayed on the
PC Files display panel)
2
Click MMC1 or MMC2 button and select a MP3 file or
data file on the
3
Click the Upload button and the selected file(s) will
be uploaded into the selected directory or folder of
your PC.
MMC Files display panel to upload.
Page 14

UPLOADING FILES
Before disconnecting the Data In/Out cable after upload
or download, close the MP3-Explorer.
If there is no battery is in the MP3 Player or battery
supply is insufficient, you cannot upload or download.
At this time the warning message will be displayed on
the desktop. At this time close the MP3 Explorer and
then disconnect the plug of the Data In/Out cable for the
MP3 player and exchange the batteries with new ones.
Information about MP3 files service site
musici.channeli.net (http://musici.channeli.net)
MP3.com (http://www.mp3.com)
MP3-2000.com (http://www.mp3-2000.com)
MP3now.com (http://www.mp3now.com)
MP3 ERROR MESSAGES
The followings are major error messages which may be
displayed while using MP3 Explorer.
Error
Messages
Player isnÕt
ready
Not
initialized.
Not
enough
space in
MMC.
MMC isnÕt
formatted.
Check Points Solutions Remarks
1) Is the cable
connected
correctly?
2) Is the player
stopped?
3) Is the battery
not installed,
or is the
battery low?
1) Check that
the card is
inserted
correctly.
2) Is the cable
connected
correctly?
Is the size of
the file to be
downloaded
larger than the
remaining space
in MMC?
MMC is not formatted. Format
MMC, please.
Re-insert the
cable
correctly.
Stop the
player.
Replace the
battery with
new one.
Insert the
card
correctly.
Re-insert
the cable
correctly.
Replace the
card, or
remove files
in MMC, and
then retry.
After solving
the problem,
press the
[retry] button,
or exit MP3
Explorer and
run it again.
After
inserting,
press [OK] or
[MMC] button
to detect the
card again.
Exit MP3
Explorer and
run it again.
Page 15

BEFORE OPERATING
HOLD
HOLD
X-LIVE
RECALL
M
FM TV
HOLD HOLD
VOL.
HOLD
The hold function locks the main unit and remote control
separately to prevent them from operating when you
accidentally press a button. Unlock it before operating.
If you set the HOLD to lock position or press a button
on the remote control in lock position, the
will blinks 5 times.
UNLOCK
LOCK
LOCK
UNLOCK
Using Earphone
Right(R)
long length
separatable
earphone
MAX
(when unused)
Left(L)
short length
In maximum or minimum status
of the unit volume level, you can
hear the beep sound four times.
<unit volume adjust>
(when using)
To prevent getting the earphone cord tangled, raise
the slide.
You can attach the remote controller with the clip on
the rear of the remote controller.
MIN
<remote controller>
slide
MAX
MIN
Page 16

1
2
X-LIVE
RECALL
M
MP3
RECALL
21
1
CARD IN
OPEN
PLAYING MP3 FILES
To play a MP3 file
1
Open the MMC door and load the multimedia card 1
or(and) 2.
2 Press MP3 button to play MMC1 [ flashes on the display
and you can hear the beep sound one time] If you want to play
the MMC2, press the MP3 button one more time [ flashes
on the display and you can hear the beep sound twice]
MMC1
indicator
3 MP3 files of the MMC1 or MMC2 will be played repeatedly
4 To stop play, press STOP button.
5 If you resume play the MP3 file from the stop status, it is
MMC2
indicator
MP3
PLAY
track number
track playing time
<remote controller>
until you press the STOP button.
STOP
played from the stop point.
STOP
STOP
<unit>
MP3
PLAY
Extensions of files playable in MP3 Player.
Files whose extension is MP3 (*.MP3)
Files whose extension is GU3 (*.GU3) among
encrypted MP3 files (If you download the
encrypted files into PC through DIGICAP service
on the Internet or PC networks, their extensions
will be changed to *.CA. If you download these
*.CA files into MMC of the MP3 player through
MP3 Explorer, their extensions will be changed to
*.GU3.)
MMC1/2 indicator appears in the display only
when playing MP3.
If there is no card when playing, the number of
corresponding MMC doesn
t appear in the display.
If there is no card, or you try to play a card with no
MP3 file, the alarm beeps 4 times.
Page 17

PLAYING MP3 FILES
X-LIVE
RECALL
M
MP3 RPT1
RECALL
21
X-LIVE
RECALL
M
MP3 RPT1
RECALL
21
MP3 Explorer is the application which is used to
download into a portable MP3 player and play any
music file with extensions of MP3 (*.mp3) or CA
(*.ca) stored in PC. If you download any music file
whose extension is CA, it detects the ID of
multimedia card (MMC), changes its extension to
GU3, and saves it. It is to protect against
unauthorized reproduction, which is required by the
organizations related to copyrights of music. You can
play the downloaded music file with the extension of
GU3 in the MP3 player with the sound quality of CD
level. The music files with the extension of GU3
stored in this multimedia card can be played in any
MP3 players made by LG Electronics Inc. But, in
case you upload the music file with the extension of
GU3 onto PC, you cannot play the music file.
If you upload onto PC any GU3 (*.GU3) file which
has been downloaded into an MP3 player, and then,
download it into another card, it will not be played or
playback will be broken up, due to the reproduction
prevention lock.
MP3
MP3 PLAY
PLAY
STOP
<remote controller>
<unit>
Skipping to the beginning of a track
You can locate the beginning of any track on a MMC1 or
MMC2.
Press the or button during MP3 file playing.
To return to the beginning of the current or previous
track
Press the button briefly once (
beginning of the current track.
Pressing briefly once
Press the button briefly and repeatedy to skip track(s)
backward one by one.
) to return to the
Page 18

PLAYING MP3 FILES
X-LIVE
RECALL
M
MP3 RPT1
RECALL
21
X-LIVE
RECALL
M
MP3 RPT1
RECALL
21
X-LIVE
RECALL
M
MP3 RPT1
RECALL
21
X-LIVE
RECALL
M
MP3 RPT1
RECALL
21
X-LIVE
RECALL
M
MP3 RPT1
RECALL
21
X-LIVE
RECALL
M
MP3 RPT1
RECALL
21
Repeat Play
Pressing briefly and repeatedly
To skip tracks
Press the button briefly and repeatedly to skip track(s)
forward one by one.
Increase track number
Intro Scan
Intro scan is the function that introduces the first 10
seconds only for each track of the MP3 files.
Press the or button for about 2 seconds during
MP3 file playing.
ÔintroÕ flashes on the display.
To play a current introducing track continuously, press
the MP3 PLAY button.
Introducing track
REPEAT
repeat one track indicator
MP3
PLAY
To play one track repeatedly
Press the RPT button briefly once during MP3 file
playing, to display ÔRPT1Õ on the display.
To cancel it, press the RPT button briefly once again.
Page 19

PLAYING MP3 FILES
X-LIVE
M
MP3 RPT1
21
RND
M
MP3 RPT1
21
RND
X-LIVE
Random Play
Press the RANDOM button briefly once( ) during MP3 file
playing. All the tracks on all cards (MMC1 and MMC2) in
the compartment from the selected card can be played
randomly.
RANDOM
RANDOM indicator
To cancel random play
Press the RANDOM button briefly once so that RND
indicator on the display goes out.
To skip tracks in the random play mode
Press the or button is pressed, the next track is
selected at random.
MP3 Book Mark function
If you set the Book Mark during MP3 file playing, you can
search the set point of the track automatically.
Press the B MARK button briefly twice( ), to
display
During the other track or the other point of the set
track playing press B
The player automatically search and play the set
point.It works in the current playing card only.
To cancel it, press the B MARK button briefly and
twice (
If the playing card is changed, the Book Mark setting
is cancelled.
, during MP3 file playing.
B MARK
Book Mark indicator
MARK button briefly once ( ).
) so that the disappears.
Page 20

OTHER FUNCTIONS
Specifications
Equalizer
To select your desired sound, press SOUND during
playback.
Press SOUND once to select the X-LIVE
Press SOUND once again to select the normal.
(
X-LIVE will disappear in the display)
MP3 Section
Frequency response 20Hz~20kHz
Distortion
Memory(Multimedia card)
16MB or 32MB
0.1%
(extendable)
General
Power requirements AAA/R6 battery(1.5V)
Output power
Equalizer
Remote control jack
Dimensions(W
Weight(except battery)
Rechargeable battery(1.2V)
2.5mW+2.5mW(1kHz, 0dB/16 )
NORMAL/X-LIVE
3.5mm
H D) 71 95 19mm
60g
Designs and specifications are subject to
change without notice for improvement.
 Loading...