

Page 1

Connect 4G
ENGLISH
ESPAÑOL
MFL67902501 (1.0)
Page 2

&RS\ULJKW/*(OHFWURQLFV,QF$OOULJKWVUHVHUYHG
/*DQGWKH/*ORJRDUHUHJLVWHUHGWUDGHPDUNVRI/*
*URXSDQGLWVUHODWHGHQWLWLHV$OORWKHUWUDGHPDUNVDUHWKH
SURSHUW\RIWKHLUUHVSHFWLYHRZQHUV
Page 3

Important Customer Information
When using this product, the safety precautions below must be taken to
avoid possible legal liabilities and damages.
Retain and follow all product safety and operating instructions. Observe all
warnings in the product operating instructions. To reduce the risk of bodily
injury, electric shock, fire, and damage to the equipment, observe the
following precautions.
ELECTRICAL SAFETY
This product is intended for use when supplied with power from the
designated battery or power supply unit. Other usage may be dangerous
and will invalidate any approval given to this product.
SAFETY PRECAUTIONS FOR PROPER GROUNDING
INSTALLATION
CAUTION: Connecting to improperly grounded equipment can result in an
electric shock to your device. This product is equipped with a USB cable
for connecting to a desktop or notebook computer. Be sure your computer
is properly grounded (earthed) before connecting this product to the
computer. The power supply cord of a desktop or notebook computer has
an equipment-grounding conductor and a grounding plug. The plug must be
plugged into an appropriate outlet which is properly installed and grounded
in accordance with all local codes and ordinances.
SAFETY PRECAUTIONS FOR POWER SUPPLY UNIT
Use the correct external power source
A product should be operated only from the type of power source indicated
on the electrical ratings label. If you are not sure of the type of power
source required, consult your authorized service provider or local power
company. For a product that operates from battery power or other sources,
refer to the operating instructions that are included with the product.
3
Page 4

Important Customer Information
4
Handle battery packs carefully
This product contains a Li-ion battery. There is a risk of fire and burns if
the battery pack is handled improperly. Do not attempt to open or service
the battery pack. Do not disassemble, crush, puncture, short external
contacts or circuits, dispose of in fire or water, or expose a battery pack to
temperatures higher than 60°C (140°F).
WARNING: Danger of explosion if battery is incorrectly replaced. To
reduce risk of fire or burns, do not disassemble, crush, puncture, short
external contacts, expose to temperature above 60°C (140°F), or
dispose of in fire or water. Replace only with specified batteries. Recycle
or dispose of used batteries according to the local regulations or
reference guide supplied with your product.
Take extra precautions
O
Keep the battery or device dry and away from water or any liquid as it
may cause a short circuit.
O
Keep metal objects away so they don’t come in contact with the battery
or its connectors as it may lead to short circuit during operation.
O
The phone should be only connected to products that bear the USB-IF
logo or have completed the USB-IF compliance program.
O
Do not use a battery that appears damaged, deformed, or discolored, or
one that has any rust on its casing, overheats, or emits a foul odor.
O
Always keep the battery out of the reach of babies and small children,
to avoid swallowing of the battery. Consult a doctor immediately if the
battery is swallowed.
O
Only use the battery with a charging system that has been qualified with
the system per this standard, IEEE-Std-1725-200x. Use of an unqualified
battery or charger may present a risk of fire, explosion, leakage or other
hazard.
O
Replace the battery only with another battery that has been qualified with
the system per this standard, IEEE-Std-1725-200x. Use of an unqualified
battery may present a risk of fire, explosion, leakage or other hazard.
Page 5

Important Customer Information
O
Avoid dropping the phone or battery. If the phone or battery is dropped,
especially on a hard surface, and the user suspects damage, take it to a
service center for inspection.
O
If the battery leaks:
Do not allow the leaking fluid to come in contact with skin or clothing. If
contact occurs, flush the affected area immediately with clean water and
seek medical advice.
Do not allow the leaking fluid to come in contact with eyes. If contact
occurs, DO NOT rub; rinse with clean water immediately and seek
medical advice.
Take extra precautions to keep a leaking battery away from fire as there
is a danger of ignition or explosion.
SAFETY PRECAUTIONS FOR DIRECT SUNLIGHT
Keep this product away from excessive moisture and extreme
temperatures. Do not leave the product or its battery inside a vehicle or in
places where the temperature may exceed 140°F (60°C), such as on a car
dashboard, window sill, or behind glass that is exposed to direct sunlight or
strong ultraviolet light for extended periods of time. This may damage the
product, overheat the battery, or pose a risk to the vehicle.
PREVENTION OF HEARING LOSS
CAUTION: Permanent hearing loss may occur if earphones or headphones
are used at high volume for prolonged periods of time.
SAFETY IN AIRCRAFT
Due to the possible interference caused by this product to an aircraft’s
navigation system and its communications network, using this device’s
phone function on board an airplane is against the law in most countries. If
you want to use this device when its use is restricted on board an aircraft,
remember to switch to Airplane Mode which turns off RF functions that
could cause interference.
5
Page 6

Important Customer Information
6
ENVIRONMENT RESTRICTIONS
Do not use this product in gas stations, fuel depots, chemical plants or
where blasting operations are in progress, or in potentially explosive
atmospheres such as fueling areas, fuel storehouses, below deck on
boats, chemical plants, fuel or chemical transfer or storage facilities, and
areas where the air contains chemicals or particles, such as grain, dust, or
metal powders. Please be aware that sparks in such areas could cause an
explosion or fire resulting in bodily injury or even death.
EXPLOSIVE ATMOSPHERES
When in any area with a potentially explosive atmosphere or where
flammable materials exist, the product should be turned off and the user
should obey all signs and instructions. Sparks in such areas could cause an
explosion or fire resulting in bodily injury or even death. Users are advised
not to use the equipment at refueling points such as service or gas stations,
and are reminded of the need to observe restrictions on the use of radio
equipment in fuel depots, chemical plants, or where blasting operations
are in progress. Areas with a potentially explosive atmosphere are often,
but not always, clearly marked. These include fueling areas, below deck on
boats, fuel or chemical transfer or storage facilities, and areas where the air
contains chemicals or particles, such as grain, dust, or metal powders.
ROAD SAFETY
Vehicle drivers in motion are not permitted to use communication services
with handheld devices, except in the case of emergency. In some countries,
using hands-free devices as an alternative is allowed.
Page 7

Important Customer Information
SAFETY PRECAUTIONS FOR RF EXPOSURE
O
Avoid using your phone near metal structures (for example, the steel
frame of a building).
O
Avoid using your phone near strong electromagnetic sources, such as
microwave ovens, sound speakers, TV and radio.
O
Use only original manufacturer-approved accessories, or accessories that
do not contain any metal.
O
Use of non-original manufacturer-approved accessories may violate your
local RF exposure guidelines and should be avoided.
INTERFERENCE WITH MEDICAL EQUIPMENT FUNCTIONS
This product may cause medical equipment to malfunction. The use of this
device is prohibited in most hospitals and medical clinics.
If you use any personal medical device(s), consult the manufacturer of
your device(s) to determine if the device(s) are adequately shielded from
external RF energy. Your physician may be able to assist you in obtaining
this information. Turn your phone OFF in health care facilities when any
regulations posted in these areas instruct you to do so. Hospitals or health
care facilities may be using equipment that could be sensitive to external
RF energy.
HEARING AIDS
Some digital wireless phones may interfere with some hearing aids. In the
event of such interference, you may want to consult your service provider,
or call the customer service line to discuss alternatives.
7
Page 8

Important Customer Information
8
NON-IONIZING RADIATION
Your device has an internal antenna. This product should be operated in its
normal-use position to ensure the radiative performance and safety from
interference. As with other mobile radio transmitting equipment, users are
advised that for satisfactory operation of the equipment and for personal
safety, it is recommended that no part of the human body be allowed to
come too close to the antenna during operation of the equipment.
only the supplied integral antenna. Use of unauthorized or modified antennas
may impair call quality and damage the phone, causing loss of performance
and SAR levels exceeding the recommended limits as well as result in noncompliance with local regulatory requirements in your country.
optimal phone performance and ensure human exposure to RF energy is
within the guidelines set forth in the relevant standards, always use your
device only in its normal-use position. Contact with the antenna area may
impair call quality and cause your device to operate at a higher power level
than needed. Avoiding contact with the antenna area when the phone is IN
USE optimizes the antenna performance and the battery life.
To assure
HAC
This phone has been tested and rated for use with hearing aids for some
of the wireless technologies that it uses. However, there may be some
newer wireless technologies used in this phone that have not been tested
yet for use with hearing aids. It is important to try the different features of
this phone thoroughly and in different locations, using your hearing aid or
cochlear implant, to determine if you hear any interfering noise. Consult
your service provider or the manufacturer of this phone for information on
hearing aid compatibility. If you have questions about return or exchange
policies, consult your service provider or phone retailer.
Use
Page 9

Table of Contents
Important Customer Information..........................................................3
Table of Contents ...................................................................................9
Technical Details ................................................................................... 10
The Basics ............................................................................................. 15
Connecting to Networks and Devices ................................................47
microSD Card ....................................................................................... 51
Calls ...................................................................................................... 54
Web ........................................................................................................63
Communication ....................................................................................69
Entertainment .......................................................................................92
Tools ..................................................................................................... 120
Settings ............................................................................................... 127
Safety ................................................................................................... 147
Specifications ..................................................................................... 169
LIMITED WARRANTY STATEMENT ................................................ 170
9
Page 10
Technical Details
10
Cautions
The user interface of Google applications (Google Search, Google Maps,
Navigation, etc.) can vary depending on its software version.
Locations are inaccurate when GPS and Wi-Fi are not set to On.
With the Android operating system, some available Play Store
applications only operate correctly with phones that have a specific
screen resolution. Please be advised that some of the applications on the
Play Store may not be available for your phone due to an LCD resolution
requirement that does not match your phone. In addition, please be
aware that 3rd party applications with programming defects may cause
issues with your phone, including lock-ups and resets.
Technical Details
CDMA
Standard
Basic Air
Interface
Designator Description
TIA/EIA-95A
TSB-74
ANSI J-STD-008
TIA/EIA-IS2000
CDMA Dual-Mode Air Interface
14.4kbps Radio Link Protocol and Interband Operations
IS-95 Adapted for PCS Frequency Band
CDMA2000 1xRTT Air Interface
Network
TIA/EIA/IS-634
TIA/EIA/IS-651
TIA/EIA/IS-41-C
TIA/EIA/IS-124
MAS-BS
PCSC-RS
Intersystem Operations
Non-Signaling Data Communications
Page 11
Technical Details
11
Service
TIA/EIA/IS-96-B
TIA/EIA/IS-637
TIA/EIA/IS-657
IS-801
TIA/EIA/IS707-A
Speech CODEC
Short Message Service
Packet Data
Position Determination Service (gpsOne)
High Speed Packet Data
CDMA2000 High Rate Packet Data Air
Interface
1x EV-DO Inter-Operability Specification
for HRPD Access Network Interfaces
Recommended Minimum Performance
Standards for HRPD High Rate Packet
Data Access Terminal
1x EV-DO
Related
Interface
TIA/EIA/IS-856
TIA/EIA/IS-878
TIA/EIA/IS-866
TIA/EIA/IS-890
Test Application Specification (TAS) for
High Rate Packet Data Air Interface
LTE Standard Designator Description
Evolved Universal Terrestrial Radio
Access (E-UTRA);
User Equipment (UE) radio
transmission and reception
Evolved Universal Terrestrial Radio
Access (E-UTRA);
Basic
Air Interface
TS 36.101
TS 36.104
Base Station (BS) radio transmission
and reception
Page 12

Technical Details
12
Evolved Universal Terrestrial Radio
Access (E-UTRA);
User Equipment (UE) conformance
specification;
Radio transmission and reception;
Part 1: Conformance testing
Evolved Universal Terrestrial Radio
Access (E-UTRA);
Conformance
Test
TS 36.521-1
TS 36.521-2
User Equipment (UE) conformance
specification;
Radio transmission and reception;
Part 2: Implementation Conformance
TS 36.521-3
Statement (ICS)
Evolved Universal Terrestrial Radio
Access (E-UTRA);
User Equipment (UE) conformance
specification;
Radio transmission and reception;
Part 3: Radio Resource Management
(RRM) conformance testing
FCC RF Exposure Information
Read this information before operating the phone.
WARNING!
In August 1996, the Federal Communications Commission (FCC) of the
United States, with its action in Report and Order FCC 96-326, adopted
an updated safety standard for human exposure to Radio Frequency (RF)
electromagnetic energy emitted by FCC regulated transmitters. Those
guidelines are consistent with the safety standard previously set by both U.S.
and international standards bodies. The design of this phone complies with
the FCC guidelines and those international standards.
Page 13

Technical Details
Vehicle-Mounted External Antenna
(Optional, if available.)
To satisfy FCC RF exposure requirements, keep 8 inches (20 cm) between
the user / bystander and vehicle-mounted external antenna. For more
information about RF exposure, visit the FCC website at www.fcc.gov.
Part 15.19 statement
This device complies with part 15 of FCC rules. Operation is subject to the following
two conditions:
(1) This device may not cause harmful interference, and (2) this device must accept
any interference received, including interference that causes undesired operation.
Part 15.21 statement
Changes or modifications that are not expressly approved by the
manufacturer could void the user’s authority to operate the equipment.
Part 15.105 statement
This equipment has been tested and found to comply with the limits for a
class B digital device, pursuant to Part 15 of the FCC rules. These limits are
designed to provide reasonable protection against harmful interference in
a residential installation. This equipment generates, uses, and can radiate
radio frequency energy and, if not installed and used in accordance with
the instructions, may cause harmful interference to radio communications.
However, there is no guarantee that interference will not occur in a
particular installation. If you experience interference with reception (e.g.,
television), determine if this equipment is causing the harmful interference
by turning the equipment off and then back on to see if the interference is
affected. If necessary, try correcting the interference by one or more of the
following measures:
- Reorient or relocate the receiving antenna.
- Increase the separation between the equipment and receiver.
- Connect the equipment into an outlet on a circuit different from that to
which the receiver is connected.
- Consult the dealer or an experienced radio/TV technician for help.
13
Page 14

Technical Details
14
The LG F7 operates on 4G network, based on Long Term Evolution (LTE)
technology and Mobile Broadband 4G networks in the United States*.
Now you can connect easily at high speeds to the Internet, your corporate
Intranet, and your email while you’re away from the office.
* Service not available everywhere.
* Information subject to change.
Wi-Fi Caution
This device is capable of operating in 802.11a/n mode.
For 802.11a/n devices operating in the frequency range of 5.15 - 5.25 GHz,
they are restricted for indoor operations to reduce any potential harmful
interference for Mobiles Satellite Services (MSS) in the US.
Wi-Fi Access Points that are capable of allowing your device to operate in
802.11a/n mode(5.15 - 5.25 GHz band) are optimized for indoor use only.
If your Wi-Fi network is capable of operating in this mode, please restrict
your Wi-Fi use indoors to not violate federal regulations to protect Mobile
Satellite Services.
Page 15
The Basics
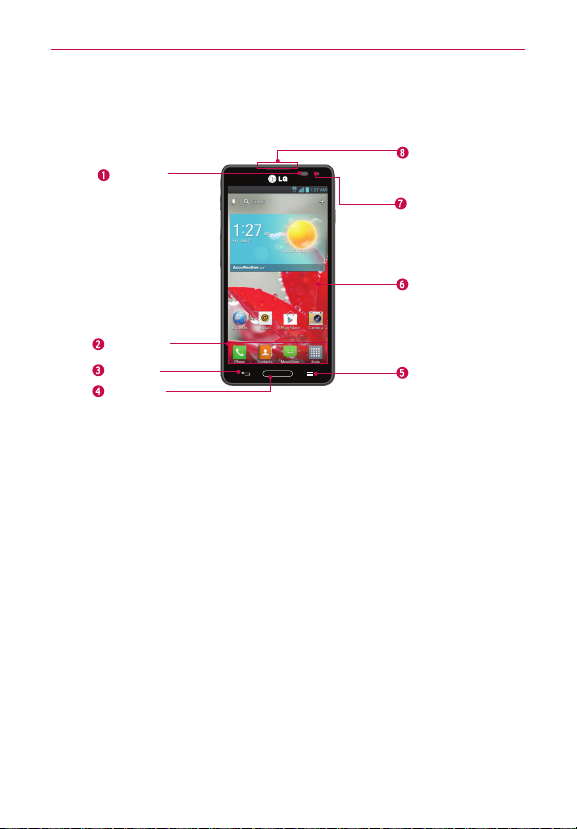
Phone Overview
Front View
Proximity
Sensor
Quick Keys
Back Key
Home Key
All screen shots in this guide are simulated. Actual displays may vary.
NOTES
Instructions To perform tasks in this guide are based on the default phone settings and
may change depending on the software version on your phone.
1. Proximity Sensor Senses proximity towards other objects (such as your
head) so that touch commands are not accidentally activated during a call.
O
NOTES
2. Quick Keys
3. Back Key Returns to the previous screen. Also closes pop-up display
4. Home Key Returns to the Home screen. If you’re already viewing one
Do not block the sensor or near the sensor to avoid problems with the touchscreen.
/
The use of a film cover produced by manufacturers other than LG can cause a
disturbance in touch operation, the display, etc.
Allow quick access to your most used applications. To add
an icon, touch and hold the desired icon and drag it to the Quick Keys bar.
Release it at the desired location. To remove an icon, touch and hold it,
then drag it out of the Quick Keys bar.
items, such as menus and dialog boxes.
of the Home screen extension canvases, it navigates you to the central
Home screen canvas.
Earpiece
Front Camera
Lens
Touchscreen
Menu Key
15
Page 16
The Basics
16
5. Menu Key Opens an Options menu with options that affect the current
screen or application. Touch and hold to access Google Now and Google
search.
6. Touchscreen Displays all the information needed to operate your phone,
such as applications, call status, date, time, signal status, and battery
strength.
7. Front Camera Lens Use to take photos and video of yourself. Keep
clean for optimal performance.
8. Earpiece Lets you hear callers and automated prompts.
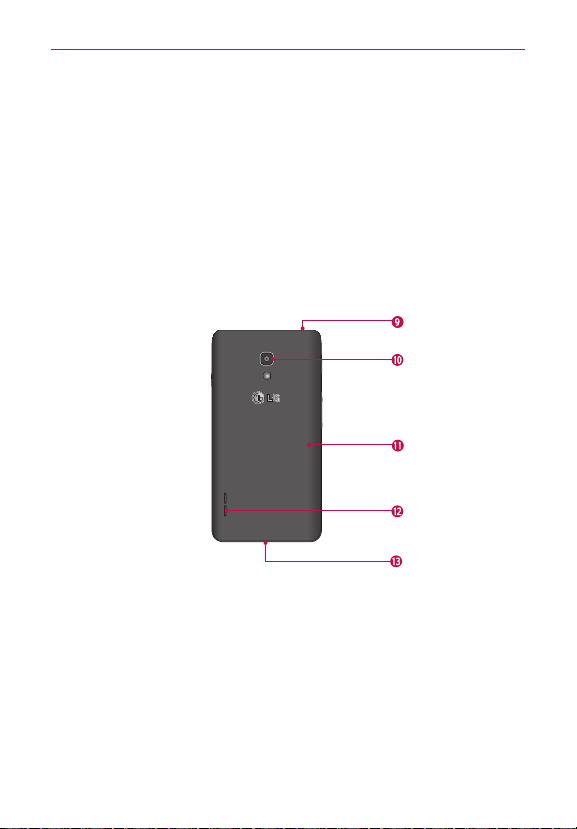
Rear View
3.5mm Headset Jack
Back Camera Lens
Back Cover
Speaker
Microphone
9. 3.5mm Headset Jack Allows you to plug in an optional headset for
convenient, hands-free conversations. You can also plug in headphones
to listen to music.
10. Back Camera Lens Use for taking photos and recording videos. Keep
clean for optimal performance.
11. Back Cover Encloses the battery compartment.
12. Speaker Allows you to hear sounds and ringers. It also allows you
to hear the caller’
s voice when using Speaker mode.
Page 17
The Basics
13. Microphone Transmits your voice to the other caller and allows use for
Voice-activated functions.
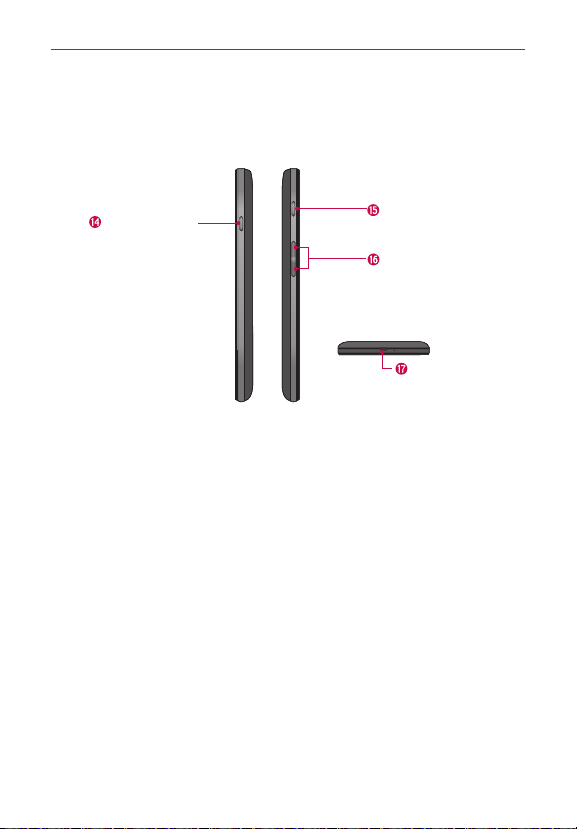
Side View
17
Power/Lock Key
QuickMemo Key
Volume Keys
Accessory/
Charger Port
14. Power/Lock Key Locks the screen with a single press. Press and hold
to open the Phone options menu for the following options: Power off,
Power off and restart, and Turn on/off Airplane mode. You can also
change the ringer type from this menu.
15. QuickMemo Key Allows you to use QuickMemo.
16. Volume Keys Allow you to adjust the ringer, media volumes, or the
in-call volume during a call.
17. Accessory/Charger Port Allows you to connect the phone charger,
USB cable, or other compatible accessories.
Page 18
The Basics
18
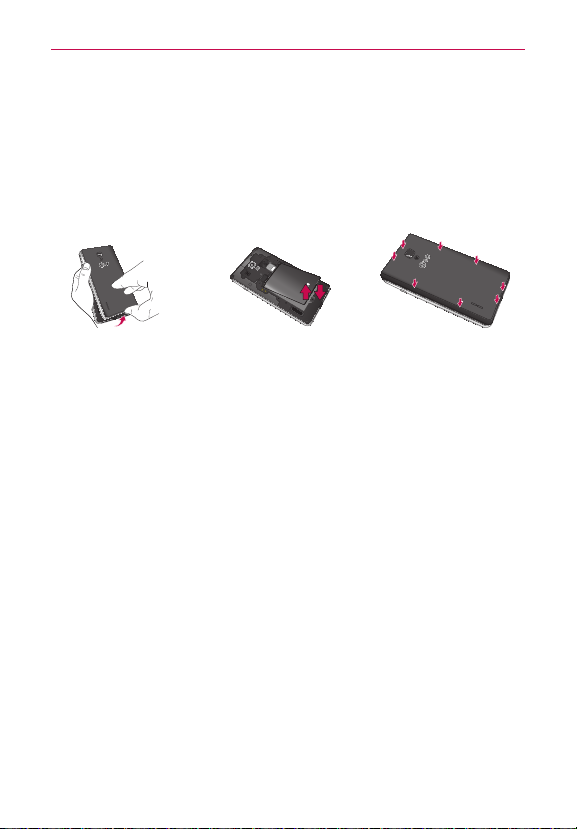
Installing the Battery and microSD Card
It is important to fully charge the battery before initial use of the phone.
NOTE
Installing & removing the battery
The phone comes with a rechargeable battery. Keep the battery charged
while not in use in order to maximize talk, use, and standby time. The
battery charge level is shown at the top right corner of the screen.
Align the battery
Use the Accessory/
1
Charger Port at the
bottom of the phone
to remove the back
cover.
2
contacts with the
terminals in the
battery compartment
and push the battery
down until it clicks
into place.
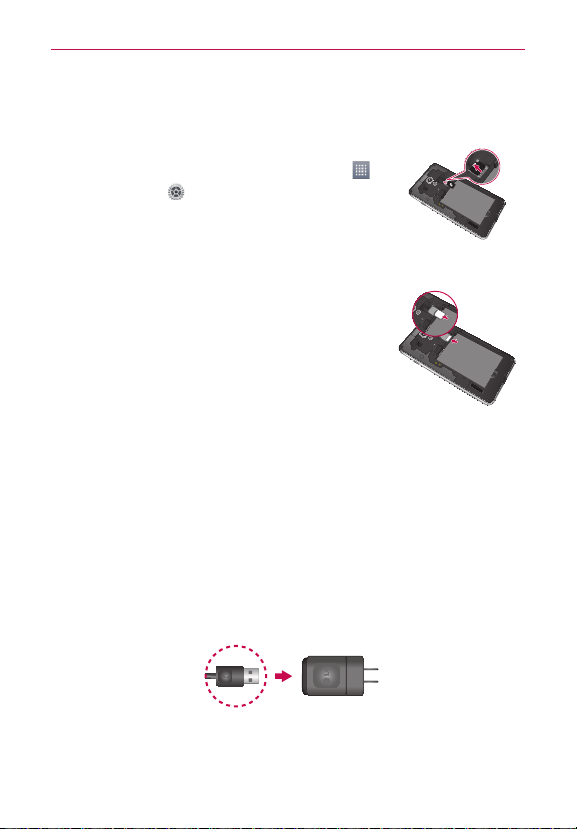
Inserting a microSD card
1. Remove the back cover (as demonstrated in the previous instructions)
and locate the microSD card slot (microSD is inscribed near the slot
opening).
2. Position the microSD card with the label side facing up and slide it into
place until it is fully inserted and locked in place.
The microSD card can be easily damaged by improper operation. Please be careful when
NOTE
inserting, removing or handling it.
microSD cards are optional and sold separately.
NOTE
To remove the microSD card
1. You must first unmount the microSD card prior to removing it (see
section on the next page).
2. Remove the back cover and locate the microSD card slot.
3. Carefully pull the microSD card out to remove it.
Place the back cover
3
over the battery
compartment, then
press it downward
until it clicks into place.
Page 19
The Basics
To unmount the microSD card
It is important to unmount the microSD card to avoid damage to it or data
saved on the card.
1. From the Home screen, touch the Apps Key
2. Touch Settings
> Storage.
.
3. Touch Unmount SD card > OK.
Installing & removing the micro-SIM card
1. Turn the power off and remove the back cover and battery (as
demonstrated in the previous instructions).
2. Locate the micro-SIM card slot (a SIM card graphic
is inscribed near the slot opening).
3. Position the micro-SIM card with the label side
facing up and slide it into place until it is fully
inserted and locked in place.
4. Gently slide the micro-SIM card out to remove it.
Charging the Phone
Your device comes with an adapter and a USB cable which connect
together to charge your phone. To charge your phone:
NOTICE
1. Connect the USB cable into the adapter. When connecting, as shown
Please only use an approved charging accessory to charge your LG phone. Improper
handling of the Accessory/Charger Port, as well as the use of an incompatible charger
may cause damage to your phone and void the warranty.
below, the LG logo on the USB cable should face toward you.
19
,
USB Cable Adapter
2. Plug the USB cable (as shown below) into the phone’s Accessory/
Charger port.
Page 20

The Basics
20
Charging with USB
You can use your computer to charge your phone. To be able to charge with
the USB cable, you need to have the necessary USB drivers installed on
your PC first. Connect one end of the USB cable to the Accessory/Charger
Port on your phone and connect the other end to a USB port on your PC. It
is best to use the rear USB port when connecting to a desktop PC. The USB
hub should be powered by an external power source.
Optimizing Battery Life
You can extend your battery’s life between charges by turning off features
that run in the background. You can also monitor how applications and
system resources consume battery power.
To stop applications from running in the background
From the Home screen, touch the Apps Key > Settings > Apps
> RUNNING tab and select the items that are no longer in use and touch
Stop.
Tips to extend the life of your battery
㻌
Turn off radio communications that you aren’t using. If you aren’t
using Wi-Fi, Bluetooth, or GPS, use the Settings menu to turn them
off (Note that the GPS receiver is only turned on when you’re using an
application that makes use of it).
㻌
Turn down screen brightness and set a shorter screen timeout.
Page 21
The Basics
㻌
Turn off automatic syncing for Gmail, Calendar, Contacts, and other
applications if you don’t need it.
To check the battery charge level
㻌
From the Home screen, touch the Apps Key
About phone > Battery.
The battery status (Charging or Discharging) and level (as a percentage
of fully charged) will be displayed at the top of the screen.
> Settings >
To monitor and control what uses the battery
The Battery use screen allows you to see which applications are consuming
the most battery power. Information on this screen allows you to identify
downloaded applications you may want to turn off when not being used, so
you can get the most out of your battery power.
㻌
From the Home screen, touch the Apps Key
About phone > Battery > Battery
use.
> Settings >
The screen will display battery usage time. A list of applications or
services using battery power are displayed in order of energy used,
from greatest amount to least.
㻌
Touch an application in the Battery use screen to see the details about
its power consumption. Different applications offer different kinds of
information and they may even include options to modify the settings
so you can reduce power consumption by that application.
Setup Wizard
The first time you turn on your phone, the Setup Wizard guides you through
signing in to your Google Account. If you don’t have one, don’t worry, the
Setup Wizard will help you create one.
This phone supports several applications and services. It is recommended that you purchase
NOTE
a data plan that meets your needs. Contact your service provider for details.
1. Press and hold the Power/Lock Key on the right edge of your
phone to turn it on.
21
Page 22
The Basics
22
2. Follow the Setup Wizard to configure your phone set up including
creating or logging in to your Google Account.
If you have an existing Google Account, your contacts from that account are synced to
NOTE
your phone.
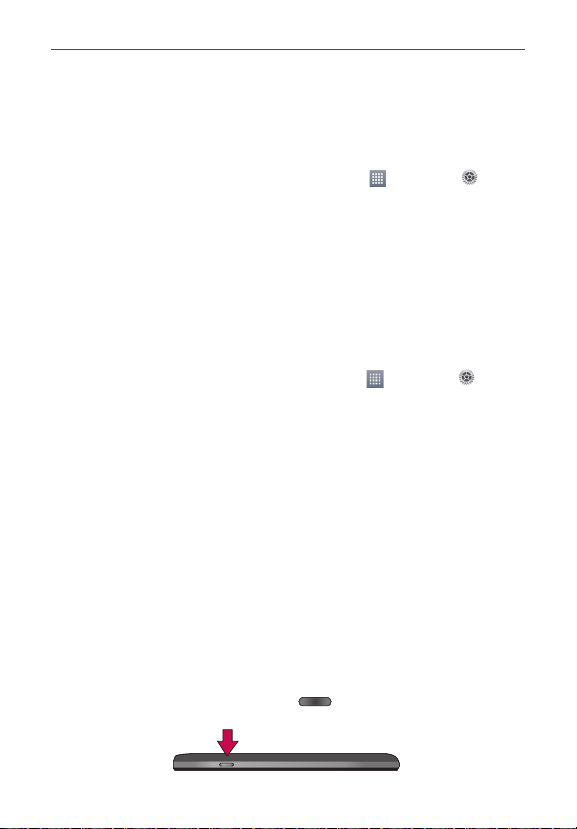
Turning the Phone On and Off
Turning the phone on
㻌
Press and hold the Power/Lock Key
until the screen turns on.
Turning the phone off
1. Press and hold the Power/Lock Key until the Phone options menu
appears.
2. Touch Power off.
3. Touch OK to confirm that you want to turn off the phone.
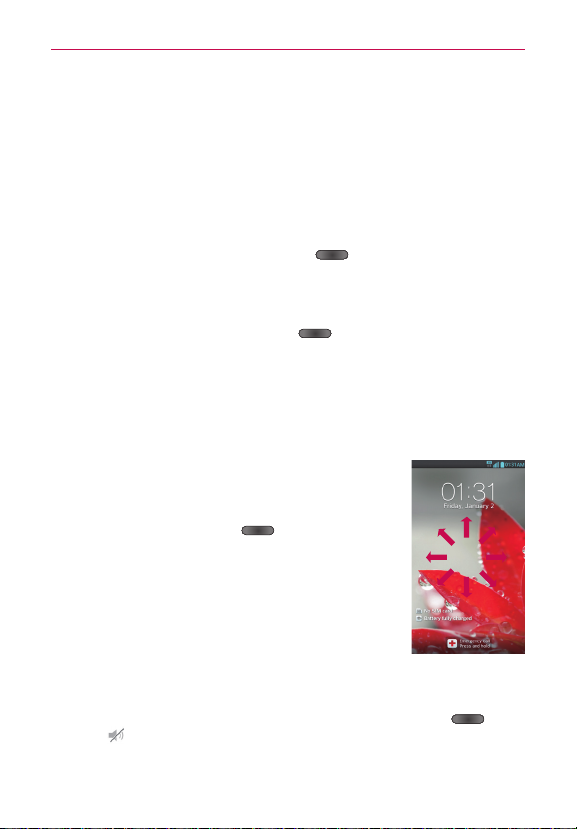
To unlock the phone
If you don’t use the phone for a while, the screen and
backlight will shut off to conserve battery power. To
unlock the phone:
1. Press the Power/Lock Key
.
Your Lock Screen will appear.
2. Swipe in any direction to unlock.
The last screen you were working on opens.
This is the default Lock Screen. If you've set up an Unlock
NOTE
Pattern, use your fingertip to draw the pattern.
To turn the phone sounds off
If you’re in a place where your phone sounds may disturb others, you can
quickly silence your phone from the Home screen.
From the Home screen, press and hold the Power/Lock Key
touch
.
OR
for a couple of seconds
, then
Page 23

The Basics
23
Press the Volume Down Key
until all sounds are turned off or
vibration is set.
OR
Open the Notifications panel and touch the Sound icon until
is
displayed.
Setting Up Your Device
When you turn on your wireless device for the first time, you have the
option to quickly set up various accounts. Simply follow the on-screen
instructions to complete the initial setup of your wireless device.
To set up your device, follow the steps below:
1. On the Welcome screen, select your language and touch Next. You can
also tap Accessibility to set any accessibility options.
2. Set your internet connection settings and touch Next.
3. Tap Ye s if you have a Google Account, then enter your account
information and tap
Account. Then tap Get an account to create one or Not now to skip
to the next step. With a Google Account, Google applications are
automatically synced between your phone and computer regardless of
where you make an update.
4. Set your Google location settings and touch Next.
5. Set up your email accounts and touch Next.
6. Touch Done to start using the phone.
Setting up your Google Account
1. At the setup screen, touch Existing or New.
2. Enter your username and password and any other necessary information
(if creating an account).
Touch the Back Key
NOTE
. Otherwise, tap No if you do not have a Google
to close the keyboard.
Page 24

The Basics
24
3. Touch .
Now your Gmail, Google Contacts, and Google Calendar events will all be
loaded to your phone automatically.
You can use the area below to record your Google Account information for
future reference.
Username:___________________________________@gmail.com
Password:________________________________________________
Your Google Account
You must sign into a Google Account to use Gmail, Google Talk, Google
Calendar, and other Google apps; to download applications from Play Store;
to back up your settings to Google servers; and to take advantage of other
Google services on your phone.
IMPORTANT
If you want to restore your settings to this phone, from another phone that was running
Android release 4.0 or later, you must sign into your Google Account now, during setup.
If you wait until after setup is complete, your settings are not restored.
If you don’t have a Google Account, you’re prompted to create one.
If you have an enterprise account through your company or other organization, your IT
department may have special instructions on how to sign into that account.
When you sign in, your contacts, Gmail messages, Calendar events, and other
information from these applications and services on the web are synchronized with your
phone.
If you don’t sign into a Google Account during setup, you are prompted to sign in or to
create a Google Account the first time you start an application that requires one, such as
Gmail or Play Store.
When you sign in, you’re prompted to enter your username and password, using the
on-screen keyboard.
Page 25
The Basics
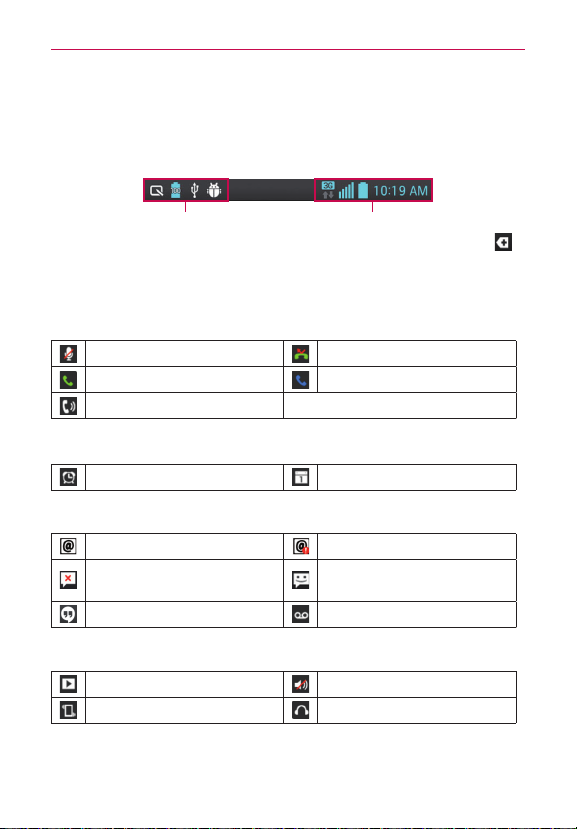
Phone’s Status Icons
The Status Bar appears at the top of every screen. It displays icons
indicating that you’ve received notifications (on the left) and icons indicating
the phone’s status (on the right), along with the current time.
25
Notification icons
If you have more notifications than can fit in the Status Bar, a plus icon
prompts you to open the Notifications panel to view them all.
The following icons indicate the status of your phone.
Status icons
Call icons
Mute microphone during a call Missed call
In call In call using Bluetooth device
Speaker on
Calendar & Alarm icons
Alarm set Calendar event
Email & Messaging icons
New Email received Sending Email failed
Sending message failed
Hangouts message received
New text or multimedia
message received
New voicemail received
Sound icons
Music playing Silent mode
Vibrate mode Phone jack connected
Page 26
The Basics
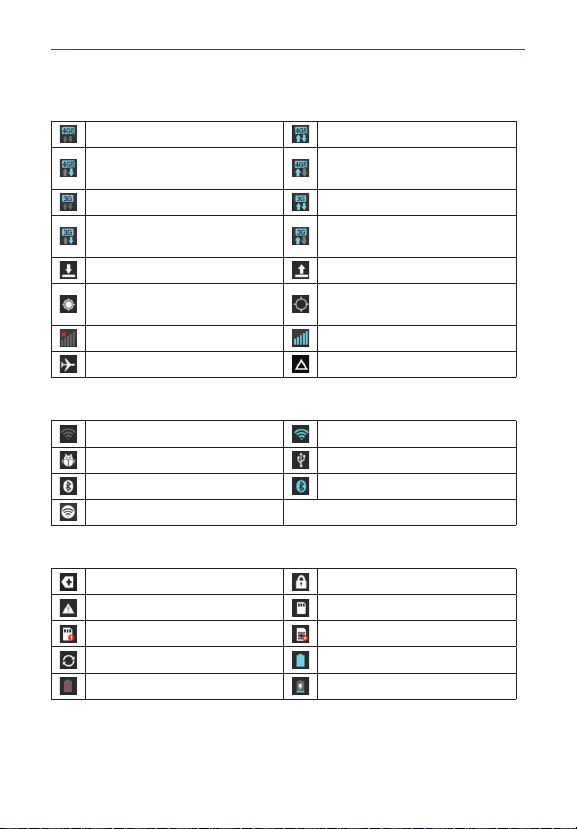
26
Network icons
4G network connected 4G network in use
Downloading data through
4G network
EVDO network connected Using EVDO data network
Download through EVDO
data network
Downloading data Uploading data
GPS on
No service Strong network signal
Airplane mode Roaming
Connectivity icons
Weak Wi-Fi signal Strong Wi-Fi signal
USB debugging connected USB connected
Bluetooth on Bluetooth device connected
Portable Wi-Fi hotspot
System icons
More notifications available System secured
System error Preparing SD card
SD card error No SIM card
Sync in process Battery full
Battery empty Battery charging
Uploading data through 4G
network
Upload through EVDO data
network
Searching the current
location via GPS
Page 27
The Basics
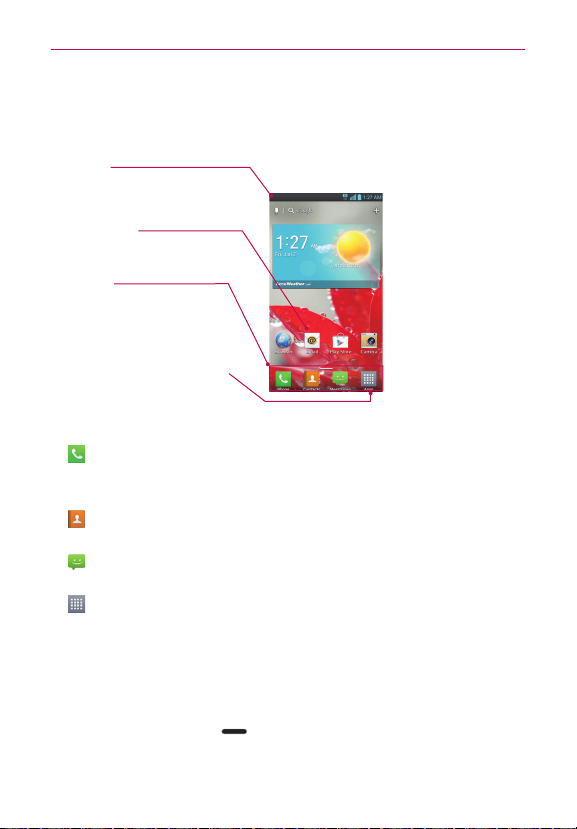
Getting to Know the Home Screen
The Home screen is your starting point to access all the features on your
phone. It displays application shortcuts, icons, widgets, and other features.
Status Bar
Shows device status information,
including the time, signal strength, battery
status, and notification icons.
Application Icon
Touch an icon (application, folder, etc.) to
open the application and use it.
Quick Keys
Provide easy, one-touch access to the
functions you use the most.
Apps Key
Touch to open the Applications screen to
view all of your installed applications.
Quick Keys
The Quick Keys are located at the bottom of the Home screen.
: Opens the Phone application which displays the dial pad so you can
dial an unsaved number. It also provides additional tabs to access the
Call logs, Contacts, Favorites, and Groups.
: Opens the Contacts application. You can access Dial, Call logs,
Favorites, and Groups by touching the tabs across the top of the screen.
: Opens the Messaging application so you can send and receive text
and multimedia messages.
: Opens the Apps screen and displays all pre-installed and
downloaded applications.
NOTE To add an icon, touch and hold the desired icon and drag it to the Quick Keys bar.
Release it at the desired location. T
of the Quick Keys bar.
To return to the Home screen
㻌
Press the Home Key
o remove an icon, touch and hold it, then drag it out
at any time, from any application.
27
Page 28
The Basics
28
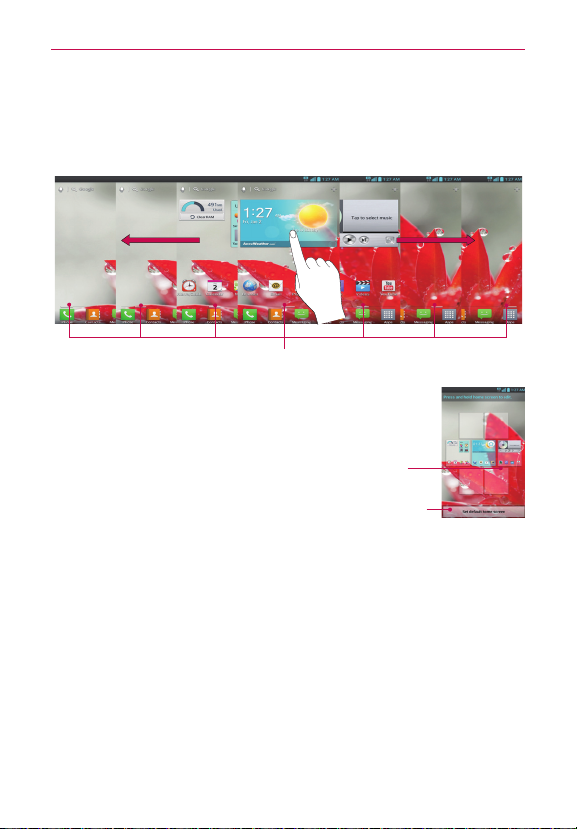
To view other Home screen canvases
㻌
Slide your finger left or right across the Home screen. The Home
screen spans seven screen widths, allowing more space for icons,
widgets, shortcuts, and other items.
The bars near the bottom of the screen indicate which Home screen canvas you are viewing.
Pinch in on the Home screen to display the mini canvas view,
TIP!
then touch the Home screen canvas you want to view
Touch and hold the canvas you want to edit. Drag the canvas to
Remove icon on the top to delete.
Home Screen Pane Indicator
.
Touch here to add another canvas.
Touch here to set the default home screen
canvas.
Touchscreen
Your touchscreen provides an excellent way to interact with and use your
Android phone. With the touch of your finger, you can download and use
available applications, make menu selections, and access data saved to
your phone.
The following terms are used for describing the different available actions
using the touchscreen:
A single finger touch selects items. For example, touch an icon
Touch
(e.g., application or menu item), touch words (e.g., menu selection or to
answer onscreen question), or touch letters and numbers to type.
Page 29
The Basics
29
Touch and hold
and not lifting your finger until an action occurs. For example, to open a
Context menu for editing a contact, touch and hold a contact entry until
the menu pops up.
Touch and hold an item for a moment and then, without lifting your
Drag
finger, move your finger on the screen until you reach the target position.
You can drag items on the Home screen to reposition them.
Swipe or slide
surface of the screen, without pausing when you first touch it (so you
t drag an item instead). For example, you can drag or slide the screen
don’
up or down to scroll a list or browse through the different Home screen
canvases by swiping from left to right (and vice versa).
Double-tap
quickly double-tap a section of a web page to zoom that section to fit the
width of the screen. Y
and in other applications.
Pinch-to-Zoom
motion to zoom in or out when using the a map or photos.
Rotate the screen
rotates with the phone as you turn it from upright to sideways and back
again.
Touch and hold an item on the screen by touching it
To swipe or slide, quickly move your finger across the
Double-tap to zoom a web page or a map. For example,
ou can also double-tap to control the zoom in Maps
Use your index finger and thumb in a pinch or spread
From many applications, the orientation of the screen
Rotate the phone sideways
for landscape orientation.
Rotate the phone upright for portrait
orientation.
Page 30
30
The Basics
Capturing the screen
Power/Lock Key
is captured. You can find the captured image in the Gallery (Note that you
cannot capture an image from some videos and applications).
If you press the Volume Down Key
at the same time, the current image on the screen
and
Text Input Methods
On-screen Keyboard
You can easily enter text using the on-screen keyboard. The on-screen
keyboard displays automatically on the screen when you need to enter text.
To manually display the keyboard, simply touch a text field where you want
to enter text.
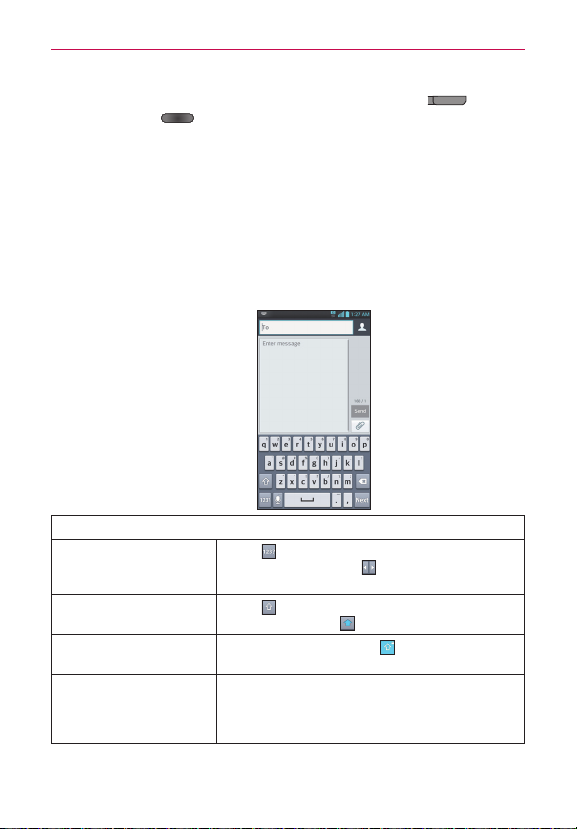
Typing tips
Touch
Enter other characters
Enter one capital letter
Enter all capital letters
Highlight text
to view the Numbers/Symbols
Keyboard. Then touch
symbols.
Touch
to capitalize the next letter. The Shift
Key will change to
Touch the Shift Key until
again to revert to lowercase.
Double-tap a word to highlight it. To highlight a
range of text, double-tap a word, then drag the
blue highlight markers to highlight the text you
want.
to view additional
.
is displayed. Touch
Page 31

The Basics
31
Cut or copy selected
text
Paste cut or copied text
Highlight the desired text, then touch Cut or
Copy.
Touch the location to place the cursor where
you want to paste the text. Then touch and
hold the location and select Paste.
Delete a character Touch the Delete Key
Touch and hold the Language Key
a dialog box to set the languages to toggle
Language toggle
between.
NOTE This key is only available when multiple languages have
been enabled for text entry.
.
to open
Page 32

The Basics
32
Applications: How to View, Open and Switch
All of the applications on your phone, including any applications that you
downloaded and installed from Play Store or other sources, are grouped
together on the Applications screen, which you access from your Home
screen. Swipe to the left or right to view more applications. You can also
touch the Downloads tab to display only downloaded applications or the
Widgets tab to view only widgets.
Home screen
Touch to open the
Applications screen.
Your Home screen
Customizing an application icon from the Home screen
Applications screen
Slide the screen left
or right to display
more icons.
Touch an icon to
open the application.
You can further personalize the Home screen by editing application icons
using the images in your Gallery.
Page 33

The Basics
1. Touch and hold an icon until the canvas grid is displayed, then release the
icon. An editing icon appears at the upper right side of the application
icon.
2. Touch the icon and select the desired icon design.
OR
Touch Create photo icon and select T
ake photo to open the Camera
application and take a picture or Select from Gallery to choose one of
the available photos.
Touch
NOTE
to select bigger icons.
Opening and Closing the Applications screen
Opening the Applications screen
It’s easy to access the Applications screen no matter what feature you’re
currently using. Simply press the
Home Key
, then touch the Apps Key
.
Closing the Applications screen
To manually close the Applications screen, press the Home Key .
The Applications screen closes automatically when you touch an icon to open its application.
NOTE
Dragging an icon onto your Home screen also closes the Applications screen automatically
Customizing the Applications screen
The phone includes a wide variety of applications and you can download
even more applications to your device. You can customize these items on
the Applications screen for faster access (less scrolling) to the applications
you use most often.
33
.
Rearranging the Applications screen icons
You can rearrange the order of the icons on the Applications screen to
provide more convenient access to the applications you use the most.
1. From the Home screen, touch the Apps Key
2. Touch the Apps tab (if necessary), then touch the Settings icon
top right of the screen. The Settings icon changes to a checkmark
.
at the
.
Page 34

The Basics
34
3. Touch and hold the application icon you want to move, drag it to its new
position, then lift your finger. The remaining icons shift to the right.
If you drag the application icon onto another application icon, a folder is created with both
NOTE
of the applications in it.
Sorting applications
You can sort all of your application icons on the Applications screen by
alphabetical order or download date.
1. From the Home screen, touch the Apps Key
to open the Applications
screen.
2. Touch the Menu Key
> Sort by > Alphabetical or Download date.
Changing the icon size
You can change the size of the icons on the Applications screen.
1. From the Home screen, touch the Apps Key
to open the Applications
screen.
2. Touch the Menu Key
> Show small icons (Show large icons) >
Ye s.
Changing the Applications screen wallpaper
You can personalize the Applications screen further by changing the
wallpaper.
1. From the Home screen, touch the Apps Key
screen.
2. Touch the Menu Key
> Apps wallpaper.
3. Select from the available wallpapers.
4. Touch Apply.
to open the Applications
Page 35

The Basics
Checking application information
To check on an application’s information from the Applications screen:
1. From the Home screen, touch the Apps Key
2. Touch the Apps tab, then touch the Setting icon
the screen. The Settings icon changes to a checkmark
.
at the top right of
.
3. Touch any of the application icons to display an information dialog box.
4. Touch OK to exit.
Opening and Switching Applications
Multi-tasking is easy with AndroidTM because open applications keep running
even when you open another application. There’s no need to quit an application
before opening another. You can use and switch among several open
applications. Android manages each application, stopping and starting them as
needed, to ensure that idle applications don’t consume resources unnecessarily.
Opening an application
Open an application simply by touching its icon on the screen.
You can customize your Home screen with the application icons you use most often.
TIP
Applications are located on the Applications screen, but you can copy any application icon
to your Home screen for faster access. No matter where the icon is, on the Applications
screen or your Home screen, just touch it to open and use it.
Opening multiple applications
1. Touch an application icon to open it.
2. Press the Home Key
If the application icon you want is on your Home screen, simply touch the icon to open
NOTE
and use it.
3. From the Home screen, touch the Apps Key .
4. Touch the icon for the other application you want to open.
.
35
Page 36

The Basics
36
Adding application icons to the Home screen
Customize your Home screen with the applications you use most often.
1. Open the Applications screen.
2. Touch and hold the application icon you want to add to your Home
screen. The Applications screen will close so that you can place the icon
on the Home screen.
3. Lift your finger to place it or drag the icon to where you want it on the
screen, then lift your finger.
Moving applications to other Home screen canvases
You can place application icons on any of the Home screen canvases.
Drag: Touch and hold, then drag the icon to the left or right edge of the
screen to advance to the other screen canvases before lifting your finger.
Tilt: Touch and hold an item, then tilt the device to move it to one of the
Home screen canvases in that direction, then lift your finger.
NOTE To be able to use the Tilt method, the Move Home screen items function needs to
be activated. From the Home screen, touch the Menu Key
Gestures > Move Home screen items checkbox.
> System settings >
Page 37

The Basics
Working with Menus
There are two kinds of Android menus: Options menus and Context menus.
Options menus
Options menus contain tools that apply to the activities of the current
screen or application, not to any specific item on the screen. To open the
available options menu, touch the Menu Key
Options menus; if you touch the Menu Key
Options menu, nothing will happen.
Context menus
Context menus contain options that apply to a specific item on the screen.
To open a Context menu, touch and hold an item on the screen. Not all
items have Context menus. If you touch and hold an item that has no
Context menu, nothing will happen.
. Not all applications have
on a screen that has no
37
Page 38

The Basics
38
Managing Notifications
Notification icons report the arrival of new messages, calendar events,
alarms, as well as ongoing events, such as when you are in a call.
When you receive a notification, the notification icon will be displayed in the
Status Bar. You can open the Notifications panel to view a list of all recent
notifications. Depending on your settings, you may hear a notification sound
and/or the phone may vibrate.
To open the Notifications panel
Touch and drag the Status Bar to the bottom of the screen.
The Notifications panel displays a list of your current notifications,
organized into ongoing and event-based notifications.
Touch a notification to
open it.
To respond to a notification
1. Open the Notifications panel. Your current notifications are listed in the
panel, each with a brief description.
2. Touch a notification to view it.
The Notifications panel will close and the application that corresponds to
your response will open. For example, new voicemail notifications dial
your voicemail box and Gmail notifications open the Gmail application so
you can read your new messages.
Page 39

The Basics
To clear all notifications
1. Open the Notifications panel.
2. Touch the Clear icon
.
All event-based notifications will be cleared; ongoing notifications will
remain in the list.
You can also swipe the notifications to the left or right to remove them.
TIP
To close the Notifications panel
Touch and drag the Notification panel handle at the bottom of the
Notifications panel to the top of the screen or just touch the Back Key
The panel will also close when you touch a notification.
The Notifications panel handle at the bottom of screen is sensitive to the drag motion so
NOTE
just beginning the upward drag will close the panel.
Quick settings on the Notifications panel
The top of the Notifications panel includes a Quick settings bar. The icons
in this bar provide a quick, convenient way to change settings without
accessing any applications. The Quick settings bar icons include Wi-Fi,
Bluetooth, GPS, Sound profile, Airplane mode, Accounts & sync, Autorotate screen, Data enabled, and Power saver. If you set more than four
icons on the bar, swipe left and right to scroll through the list. Touch Edit
to add items you want displayed in the Quick settings bar.
Tap any of the Quick settings icons to toggle through the available settings.
39
.
Page 40

The Basics
40
Searching Your Phone and the Web
You can search for information on your phone and on the web by using the
Google search application.
Some applications, such as Gmail and Contacts, have the ability to search
contents within those specific applications.
You can conduct the search by typing in the search terms or saying what
you’re looking for. As you enter text, the search application can provide
suggestions so you don’t necessarily have to type out your full request.
Phone and Web search using text entry
1. Touch the Search Widget at the top of the Home screen or
touch and hold the Menu Key
Google Search will open automatically.
2. Enter the text you’re searching for.
As you type, search results from your phone,
previous search terms, and web search
suggestions appear. Touch an item to activate
that search result.
3. Touch to search for the entered terms.
.
Page 41

The Basics
Locking the Screen
You can lock your screen so that only you can unlock it to make calls,
access your data, buy applications, and prevent unauthorized use.
Setting a lock screen
1. From the Home screen, touch the Apps Key > Settings > Lock
screen.
2. Touch Select screen lock.
3. Touch None, Swipe, Face Unlock, Pattern, PIN or Password.
None: No lock screen is enabled so the screen will never be locked from
use.
Swipe: A swipe motion in any direction on the touchscreen will unlock
the screen.
Face Unlock: Unlocks the screen using face recognition. Keep in mind
that Face Unlock is less secure than a pattern, PIN or password because
it uses generalized shapes and dimensions to verify your face.
Pattern: Unlocks the screen using a pattern you draw with your finger.
The first time you set an unlock pattern, you will see a tutorial with
instructions on how to create it. Read the tutorial and touch the Next
button. Draw your pattern (connect at least 4 dots) and touch the
Continue button. Then redraw your pattern and touch the Confirm
button.
Follow the on-screen instructions to create a backup PIN number in case you forget your
NOTE
pattern.
PIN Unlocks the screen with a number sequence. Enter a PIN (at least 4
digits) and touch the Continue button. Reenter your PIN and touch the
OK button to confirm it.
Password Unlocks the screen with an alphanumeric sequence. Enter a
password (at least 4 characters) and touch the Continue button. Reenter
your password and touch the OK button to confirm it.
From then on, any time you wish to turn the phone on or unlock the
screen, you will need to draw your unlock pattern or enter your PIN or
password to unlock the screen.
41
Page 42

The Basics
42
O
NOTES
-
-
You have 5 opportunities to enter your unlock pattern, PIN or password. If you used
all the 5 opportunities, you can try again after 30 seconds.
O
When you can’t recall your unlock pattern:
If you’ve created a Google Account on the phone, touch Forgot pattern?. Then
you are required to sign in with your Google Account or enter your backup PIN to
unlock your phone.
If you haven’t created a Google Account on the phone, you need to perform a
factory reset (Caution: If you perform a factory reset, all user applications and
user data will be deleted. Please remember to back up any important data before
performing a factory reset).
Hard Reset (Factory Reset)
1. Turn the power off.
2. Press and hold the following keys at the same time:
Power/Lock Key
+ Volume Down Key .
3. Release the keys when the FACTORY HARD RESET screen is displayed.
4. Press the Power/Lock Key
to continue or the Volume Keys
to cancel.
5. Press the Power/Lock Key
to confirm or the Volume Keys
to cancel.
6. Your device will perform the factory reset and reboot.
Changing Your PIN or Password
1. From the Home screen, touch the Apps Key > Settings > Lock
screen.
2. Touch Select screen lock.
3. Enter your current unlock sequence.
4. Touch PIN to change your number lock sequence or touch Password to
change your alphanumeric lock sequence.
5. You’re prompted to enter and reenter your new lock sequence.
From then on, you will need to enter that sequence and touch the OK
button to unlock the screen.
If you have set up a Microsoft Exchange account, you are only allowed to set up a
NOTES
password to unlock the screen.
Page 43

The Basics
Customizing the Home Screen
You can personalize your Home screen by adding application icons,
shortcuts, widgets, and other items to any Home screen canvas. You can
also change the wallpaper.
To add an item to the Home screen
1. Go to the Home screen canvas where you want to add the item.
2. Touch Add
screen canvas.
NOTE
3. In the menu that opens, touch the desired tab.
4. Touch and hold the desired item and drag it to the Home screen.
To remove an item from the Home screen
1.
Touch and hold the item.
2.
Drag the item to the Remove icon
3. When the Remove icon changes to , lift your finger.
. Or just touch and hold an empty spot on the Home
If space is not available on a particular Home screen canvas, you must delete or remove
an item before you can add another item. Or switch to another Home screen canvas.
Slide the screen right or left to view
different screen.
Touch and hold the icon and drag at the
screen you want to put.
Touch to access different tabs.
at the top of the screen.
43
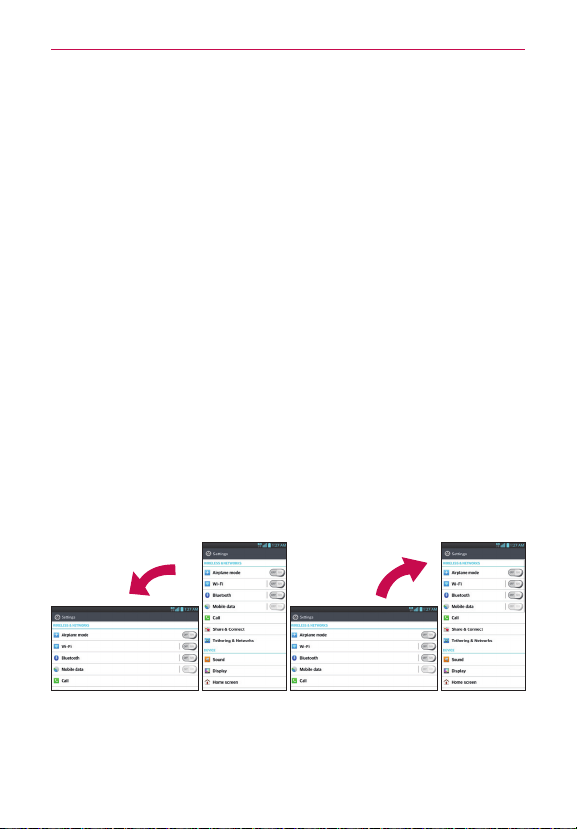
To change the look of your Home screen
From the Home screen, touch the Menu Key > Home screen settings
to access Theme, Screen swipe effect, Wallpaper, Scroll screens
circularly, Portrait view only and Home backup & restore.
Page 44

The Basics
44
QuickMemo
The QuickMemo feature allows you to create memos and capture screen
shots. You can use QuickMemo to easily and efficiently create memos
during a call, with a saved picture or on the current phone screen.
1. While viewing the screen you want to capture and create a memo on,
press the QuickMemo Key
2. Create a memo using the available options.
NOTE Please use a fingertip while using the QuickMemo feature. Do not use your fingernail.
Touch to lock the front keys
(Back Key/ Home Key/ Menu
Key).
on the left side of the phone.
- Touch to keep the memo on top and continue using the phone. Touch
to exit the overlay mode.
- Touch to select if you want to use the current screen as the
background screen or a note image.
- Touch to undo the most recent action.
- Touch to redo the most recently deleted action.
- Touch to select the pen type and color.
Page 45

The Basics
- Touch to erase the memo that you created.
- Touch to share the memo with others via any of the available
applications.
- Touch to save the memo you’ve created.
Touch the Menu Key
QuickMemo” label at the bottom right corner of the screen.
3. Touch
corner. Touch and drag the triangles to the desired part of the screen.
4. Touch
. You can also crop the image using the triangles in each
and select to save the memo.
> Signature off if you want not to display “LG
Viewing the saved QuickMemo
Open the Gallery or Notebook and touch the QuickMemo album.
45
Page 46

The Basics
46
Connecting Quickly With Your Contacts
As you build up your list of contacts on your phone, you can use the Quick
Contact for Android feature to quickly chat, email, text message, place a
call, or locate your contacts. Quick Contact for Android is a special set of
icons that you can use to quickly and easily connect with a contact.
Open your Contacts list and touch the contact’s picture.
Touching the contact’s picture opens a Quick Contact dialog box
displayed with icons for all of the ways you can communicate with
that contact. The available icons depend on the information you have
saved for that contact.
Type in the
name you want
to search.
Contact picture
Touch to open
Quick Contact
for Android for
this contact.
Contact list
Adding a shortcut for a contact to your Home screen allows you to open Quick Contact
TIP
for that contact without opening the Contacts application.
New Contact
Touch to add a new
contact.
Alphabetical
Listing
Slide your finger
vertically along the
letters to view the
entries under a
specific letter.
Quick Contact for
Android
Page 47

Connecting to Networks and Devices
Connecting to Mobile Networks
When you buy your phone and sign up for service, your phone is configured
to use your provider’s mobile networks for voice calls and for transmitting
data.
Different locations may have different mobile networks available.
Initially, your phone is configured to use the fastest mobile network
available for data. You can also configure your phone to access a different
set of networks entirely, or to behave in specific ways when roaming.
Connected to the 4G network (LTE).
Connected to the EVDO network (EVDO revA).
Signal strength - more bars that are lit, the stronger the wireless
signal.
Connected to another wireless service provider’s network
(roaming).
The icons in the Status Bar indicate which kind of data network you’re
connected to and the network signal strength.
When connected to slower networks, you may want to postpone using your
phone for data-intensive tasks until you are connected to a faster network
again or find a Wi-Fi network to connect to.
To disable data when roaming
You can prevent your phone from transmitting data over other carriers’
mobile networks when you leave an area that is covered by your carrier’s
networks. This is useful for controlling expenses if your cell plan doesn’t
include data roaming.
1. From the Home screen, touch the Apps Key
Tethering & Networks > Mobile networks.
2. Touch Data roaming to remove the checkmark from the box. With Data
roaming unchecked, you can still transmit data with a Wi-Fi connection.
> Settings >
47
Page 48

Connecting to Networks and Devices
48
Connecting to Wi-Fi Networks
Wi-Fi is a wireless networking technology that can provide Internet access
at distances of up to 100 meters, depending on the Wi-Fi router and your
surroundings.
To use Wi-Fi on your phone, you must connect to a wireless access point.
Some access points are open and you can simply connect to them. Others
are hidden or implement other security features, so you must configure
your phone so it can connect to them.
Turn off Wi-Fi when you’re not using it to extend the life of your battery.
The following Status Bar icons indicate your Wi-Fi status.
Connected to a Wi-Fi network (waves indicate connection
strength).
An open Wi-Fi network is available and in range.
When you connect to a Wi-Fi network, the phone obtains a network
address and other information it needs from the network, using the DHCP
protocol. To view advanced settings, from the Wi-Fi screen, touch and hold
the connected network > Modify network and check the Show advanced
options.
To turn Wi-Fi on and connect to a Wi-Fi network
1. From the Home screen, touch the Apps Key > Settings > Wi-Fi.
2. If the Wi-Fi button is on the left and the icon is grey-colored, touch the
button to turn on Wi-Fi. The button turns blue and your device scans for
available Wi-Fi networks.
3. Touch a network and then touch Connect to connect to it.
O
If the network is open, you can connect to the network directly by
touching the network name.
O
If the network is secured, you will be prompted to enter a password
(Ask your network administrator for details).
Page 49

Connecting to Networks and Devices
O When you’re connected to a network, you can touch the network
name in the Wi-Fi settings screen for details about the speed, security,
address, and related settings.
To receive notifications when open networks are in range
By default, when Wi-Fi is on, you receive notifications in the Status Bar
when your phone detects an open Wi-Fi network.
1. Turn on Wi-Fi, if it’s not already on.
2. From the Wi-Fi screen, touch the Menu Key
Network notification to checkmark the box. Touch again to remove the
checkmark and stop receiving notifications.
> Advanced >
To add a Wi-Fi network
You can add a Wi-Fi network so the phone will remember it, along with any
security credentials, and connect to it automatically when it is in range. You
can also add a Wi-Fi network manually if it does not broadcast its name
(SSID) or if you want to add a Wi-Fi network when you are out of its range.
To add a secured network, you need to contact the network’s administrator
to obtain the password or other required security credentials.
1. Turn on Wi-Fi, if it’s not already on.
2. From the Wi-Fi screen, touch ADD NETWORK.
3.
Enter the Network SSID (name) of the network. If the network is secured,
touch Security and touch the type of security deployed on the network.
4. Enter the required passwords and security credentials.
5. Touch Save.
The phone will connect to the wireless network. Any credentials that you
entered are saved, so you are connected automatically the next time you
come within range of this network.
49
Page 50

Connecting to Networks and Devices
50
To forget a Wi-Fi network
You can make the phone forget about the details of a Wi-Fi network that
you added. For example, if you don’t want the phone to connect to it
automatically or if it’s a network that you no longer use.
1. Turn on Wi-Fi, if it’s not already on.
2. In the Wi-Fi screen, touch the name of the network that you want to
forget.
3. Touch Forget.
USB connection
USB connection is a feature that allows your device to connect to a PC
using a USB cable.
Allows the phone to be used as Mass storage when a microSD card is
present in the device. It also allows you to transfer unprotected content
from the phone to the PC and vice versa.
User content, such as photos, videos, and voice recordings, can be stored on a
NOTE
removable microSD card that is inserted in the device.
To select a USB mode for a connection
1. From the Home screen, touch the Apps Key > Settings > PC
connection > USB connection type.
2. Touch Media sync (MTP) or Camera (PTP) to connect to the PC.
Touch Charge only to use only the charging function and not the USB
function.
Ask on connection
You can choose to be asked to confirm the USB connection when
connecting to a computer.
When Ask on connection is checkmarked, the USB selection window is
displayed.
Page 51

microSD Card
microSD Card
Unmounting and removing the microSD Card
To safely remove the microSD card from your device, first you need to
unmount the microSD card before removing it from the phone.
1. From the Home screen, touch the Apps Key > Settings > Storage
> Unmount SD card > OK. Now you can safely remove the microSD card.
2. Remove the back cover.
3. Carefully pull the microSD card out of the slot.
You can easily damage the microSD card and its adapter by improper operation. Please
NOTE
be careful when inserting, removing, or handling them.
microSD cards are optional and sold separately.
NOTE
Viewing Memory in the microSD Card
1. From the Home screen, touch the Apps Key > Settings >
Storage.
2. Review the available information.
O
The storage capacity page is divided into two sections: Internal
Storage and SD Card.
Formatting the microSD Card
Formatting a microSD card permanently removes all files stored on the card.
1. From the Home screen, touch the Apps Key > Settings >
Storage.
2. Touch Unmount SD card and OK to release the microSD card from
device use. The icon appears within the Notifications panel to indicate an
unmounted microSD card.
3. Once released, touch Erase SD card (twice)> Erase everything.
O
Once completely formatted, the card is automatically re-mounted
(reconnected for use by the device).
The formatting procedure erases all the data on the microSD card, after which the files
NOTE
CANNOT be retrieved. T
before you format the card.
o prevent the loss of important data, please check the contents
51
Page 52

microSD Card
52
Connecting Your Device to Your Computer
Before using your device’s mass storage capabilities, you need to prepare
your device’s data services to synchronize with your desktop or laptop
computer. Once you have connected the device to the computer, you can
transfer your data to or from the device memory.
To connect your device to a computer via USB
1. Use the USB cable that came with your phone to connect the phone to a
USB port on your computer.
2. Open the Notifications panel and then touch USB connected.
3. Touch the connection mode you want to use to connect to the PC.
Choose from the following options: Charge only, Media sync (MTP),
USB tethering, LG software or Camera (PTP).
Using Media sync (MTP) mode
When you connect the phone and PC using a USB cable and set your
device’s USB connection mode to Media sync (MTP), you will see one
Portable Devices on the PC. You can copy files to/from the removable SD
card.
Page 53

microSD Card
Sending data from your phone using Bluetooth
Sending data using Bluetooth
You can use Bluetooth to send data by opening a corresponding application,
not from the Bluetooth menu as on most other mobile phones.
* Sending pictures: Open the Gallery application, then open the picture
and touch
touch Search for devices. Choose the device you want to send data to
from the list.
* Exporting contacts: Open the Contacts application. Touch the Contact
you want to export. Touch the Menu Key
Check whether Bluetooth is turned on, then touch Search for devices.
Choose the device you want to send data to from the list.
* Sending multiple contacts: Open the Contacts application. To select
more than one contact, touch the Menu Key
contacts you want to share (or touch Share all) > Attach > Bluetooth .
Check whether Bluetooth is turned on, then touch Search for devices.
Choose the device you want to send data to from the list.
* Connecting to FTP (only FTP server is supported on this handset):
From the Home screen, touch the Apps Key
Bluetooth. Touch
your device’s name so you can search for your phone on other devices.
Find the FTP service and connect to the FTP server.
O
If you want to search for this phone from other devices, go to from the
Home screen, touch the Apps Key > Bluetooth. Touch to turn
Bluetooth on and touch the checkbox next to your phone’s name. Your
device will be able to be detected by other devices for 120 seconds.
> Bluetooth. Check whether Bluetooth is turned on, then
> Share > Bluetooth.
> Share > Select the
> Settings >
to turn Bluetooth on and tap the checkbox next to
53
Page 54

Calls
54
Placing and Ending Calls
You can place calls using the Phone application. Calls can be manually
dialed using the Dial tab. You can also dial from your phone’s memory using
the Call logs, Contacts, Favorites, or Groups tabs.
To open the Phone application
From the Home screen, touch the Phone Key in the Quick Keys
bar.
To place a call by dialing
1. From the Home screen, touch the Phone Key to open the Phone
application.
To dial an international number, touch and hold
to enter the plus ( + ) symbol. Then enter the
international prefix for the country; followed by the
full phone number.
Touch to erase a digit. Touch and hold to erase the
entire number.
Touch to send a message
to the number you
entered.
Touch
to dial the number that you entered.
2. Touch the keys on the dial pad to manually enter a phone number.
3. Touch the Call Key
O
You can use other phone features while the call is underway. If you
to dial the number that you entered.
open another application, the Call icon appears in the Status Bar for
the duration of the call.
O
Press the Volume Keys to adjust the call volume.
Page 55

O Use the on-screen buttons to enter additional numbers, place the
call on hold and take an incoming call, add another call, use the
speakerphone, end the call, and other options.
If you opened other applications while on a call, you'll need to return to the Call screen
NOTE
to end the call. You can press the Home Key
Notifications panel down and touch End call
or number at the top right corner of the Home screen.
, then the Phone Key or drag the
. You can also touch the Contact's name
Airplane mode
Some locations may require you to turn off your phone’s wireless
connections by placing your phone in Airplane mode.
1. Press and hold the Power/Lock Key
2. Touch Turn on Airplane mode.
The Wireless & networks menu also has a checkbox to enable or disable Airplane mode.
NOTE
.
Calls
55
Page 56

Calls
56
Answering or Rejecting Calls
When you receive a phone call, the Incoming call screen opens with the
caller ID and any additional information about the caller that you have saved
in the Contacts list. All incoming calls are recorded in the Call log.
To answer a call
O
If the screen is unlocked, simply touch the Answer Key .
O
If the screen is locked, swipe the Answer icon in any direction to
answer the call.
If you were already on a call, touch the Answer Key
first call placed on hold while you answer the new call.
To silence the incoming call ringer, press the V
NOTE
olume Keys.
Unlocked Screen Locked Screen
to place the
Touch to answer the
call.
Swipe in any direction to
answer the call.
Page 57

Calls
To decline a call and divert it to voicemail
O
If the screen is unlocked, simply touch the Decline Key .
O
If the screen is locked, swipe the Decline icon in any direction to
ignore the call.
The caller is sent directly to your voicemail box to leave a message.
Unlocked Screen Locked Screen
Swipe in any
direction to decline
the call.
Touch to decline
the call and send
the caller directly to
your voicemail box
to leave a message.
To silence the ringer, press the V
NOTE
olume Keys.
To decline a call and send a text message
1. When you receive an incoming call and the screen is unlocked, touch the
Decline with message Key . If the screen is locked, touch and drag
the Decline with message icon
2. Touch the text message you want to send in place of answering the call.
This feature can only be used to send a message to another mobile phone. It is not
NOTE
applicable to incoming landline calls.
in any direction.
57
Page 58

Calls
58
Working with the Call Log
The Call log is a list of all of the calls you’ve dialed, received, or missed. It
offers a convenient way to redial a number, return a call, or add a number to
your Contacts.
To open the Call log
From the Home screen, touch the Phone Key (in the Quick Keys
bar) and then the Call logs tab
The most recent calls are located at the top of the list. Scroll down to
see older entries.
The Call log tab
displays the history of
all your calls.
To dial a number in the Call log
From the Call log, touch the Call Key at the right of the call entry.
You can also touch and hold the entry to open a Context menu with
more options to communicate with that contact in other ways.
To add an entry’s number to your Contacts
1. Touch and hold the call entry.
2. Touch Add to Contacts in the Context menu.
3. Touch
to add a new contact or choose an existing contact to add the
new number to.
at the top of the screen.
Page 59

Calls
Calling Your Contacts
Instead of manually dialing phone numbers using the dial pad, you can use
your Contacts list to dial quickly and easily.
You can also quickly call a contact by using Quick Contact.
If you have contacts on the web, they’re synchronized with your phone
when you first synchronize to your Google
To call a contact
1. From the Home screen, touch the Contacts Key from the Quick Keys
bar.
2. Touch the contact you wish to call.
3. Touch the contact’s phone number you want to call.
To call a favorite contact
1. From the Home screen, touch the Contacts Key from the Quick Keys
bar, then touch the Favorites tab.
2. Touch the contact you wish to call.
3. Touch the contact’s phone number you want to call.
TM
Account.
59
Page 60

Calls
60
Options During a Call
Touch to switch between a Bluetooth headset and the
phone.
Touch to mute the microphone during a call. The Mute
Key lights up to indicate that the microphone is muted.
Touch to turn the speakerphone on or off. The Speaker
Key lights up to indicate that the speakerphone is on.
WARNING!
To avoid damage to your hearing, do not hold the phone
against your ear when the speakerphone is turned on.
Managing Multiple Calls
Contact your wireless service provider to learn whether they support
conference calls and how many participants you can include.
To set up a conference call
Contact your wireless service provider to learn whether they support
conference calls and how many participants you can include.
1. Place a call to the first participant.
2. When you’re connected, touch the Menu Key
3. Touch the keys on the dialpad to manually enter a phone number, then
touch the Call Key
.
4. After you’re connected, touch the Merge calls Key
added to the conference call.
> Add call.
. The participant is
Page 61

Calls
Touch here to merge
the calls.
Listening to Your Voicemail
When you have a new voicemail message, the Voicemail notification icon
appears in the Status Bar. If you have not set up your voicemail number,
or if you need to change it, you can do that in the Call settings.
To listen to your Voicemail
Open the Notifications panel and touch New voicemail.
OR
From the Home screen, touch the Phone Key
bar, then touch and hold
.
To set up your Voicemail
1. From the Home screen, touch the Phone Key in the Quick Keys bar
on the Home screen.
2. Touch and hold
3. If you hear a system greeting, touch
4. Follow the setup tutorial.
5. Select a password.
6. Record a voice signature and greetings.
to dial your voice mailbox.
to interrupt it, if applicable.
in the Quick Keys
61
Page 62

Calls
62
To access your voice mail from your wireless device
1. From the Home screen, touch the Phone Key in the Quick Keys bar
on the Home screen.
2. Touch and hold
3. Follow the prompts to enter your password and retrieve your messages.
to dial your voice mailbox.
Page 63

Web
Browser
Browser gives you a fast, full-color world of games, music, news, sport,
entertainment and much more, right on your mobile phone. Wherever you
are and whatever you enjoy.
NOTE
Additional charges apply when connecting to these services and downloading content.
Check data charges with your network provider.
Enter the URL and touch
here to search.
Using the web toolbar
Touch to go back a page.
Touch to go forwards a page, to the page you connected to after the
current one. This is the opposite of what happens when you press the
Back Key
Go to the home page.
Touch to add a new window.
Touch to add your favorite bookmarks.
Using options
Touch the Menu Key to view the following options.
Refresh – Update the current web page.
Save to bookmarks – Add the current web page as bookmark.
Share page – Allows you to share the web page with others.
Find on page – Allows you to find letters or words on the current web page.
Desktop view – Allows you to view the web page in desktop view.
Save for offline reading – Allows you to save the current page offline so
you can read it later.
Settings – Displays Browser settings.
Exit – Exits the web page and closes the Browser.
, which goes to the previous page.
63
Page 64

64
Web
Chrome
The Chrome app allows you to access the internet from your device.
Access and selections within this feature are dependent upon your service
provider. For specific information on Chrome access through your phone,
open Chrome and touch the Menu Key
s Y
NOTES
ou may incur additional charges for accessing the web and downloading media. For
details, contact your service provider.
Browse web pages
1. From the Home screen, touch the Home screen, touch the Apps Key
> Chrome
enter the web address (URL) of the web page, and touch
URL Input Field
Touch here to enter a web
address for the web page
you wish to access.
2. While browsing the web page, the following options are available on the
toolbar and by touching the Menu Key .
To go to the previous page, touch the Menu Key
toolbar or touch the Back Key
To go to a next page in history, touch the Menu Key
To zoom in or out, double-tap the screen. You can also use the
pinch to zoom method. Place your two fingers on the screen and
slowly pinch or spread them apart.
.
To access a specific web page, touch the URL input field,
.
> Help.
Tabs
Allows you to view your open
tabs.
.
.
> Back in the
> Forward
Page 65

Web
65
To open a new window, touch the
Menu Key
> New tab.
If you want to view pages and not have the browser history or search
history save information, you can open an incognito tab. Touch the
Menu Key
To view the list of bookmarks, touch touch the Menu Key
> New Incognito tab.
>
Bookmarks. You can also edit, or delete a bookmark from this menu.
To open tabs, access bookmarks and omnibox data from your
computer, touch the
Menu Key
> Other devices. Sign in if you
have not done so.
To search for text on the web page, touch the
Menu Key
> Find
in page...
To customize the Chrome settings, touch the the Menu Key
>
Settings.
Bookmark your favorite web pages
If you know the web address of the web page, you can manually add a
bookmark. To add a bookmark:
1. Touch the
Menu Key
> .
2. You can edit the label and address (URL). You can also select the account
and folder to add it to.
3. Touch Save.
Maps
Search
Touch to search for locations.
Directions
Touch to get directions to a
destination.
Side menu
Tap the side menu or swipe your
screen from left to right.
Page 66

66
Web
To search for a location
1. From the Home Screen, touch the Apps Key > Maps .
2. Touch the search icon
at the top of screen the screen.
3. In the search box, enter the place you’re looking for. You can enter an
address, a city, or a type of business or establishment. For example,
“theater in New York”.
4. Touch the Search Key
on the keyboard.
Red markers indicate search matches on the map.
You can touch a marker to open a screen with more information about
the location, as well as options for obtaining directions.
To get directions
1. From the Home screen, touch the Apps Key > Maps .
2. Touch Directions
.
3. Enter a starting point in the first box and your destination in the second
box.
When you search for a location in the Maps application, your current location is
NOTE
automatically entered as the starting point and a dialog box displays your recent searches
allowing you to touch one to select it as the destination.
4. Touch the Car icon for driving directions, the Transit icon for
transit directions, or the Walking icon for walking directions.
5. Your route is displayed on a map.
Touch the Back Key
to return to map view.
Switching between common features
The Maps application has icons for easy access to many common features
used when searching for the places you want to go.
Touch the side menu icon
Satellite, Google Earth, Settings and more.
Touch the Directions icon
to access Traffic, Public transit, Bicycling,
icon to get directions.
Maps settings
Access the Maps application, then touch the side menu icon > Settings.
Page 67

Web
Checking the Weather
The Weather application provides weather forecasts. You can place a
Weather widget on your Home screen for a summary of your local weather.
Access the Weather application for more detailed weather information.
To get details about the weather
From the Home screen, touch the Apps Key > Weather .
Swipe right or left to scroll through the weather information for each
of the cities in your list.
Touch the Refresh icon
application screen to update the current weather of the city displayed
on the weather application screen.
To update or add city
The City list screen allows you to manage a list of cities that you want to
monitor. Touch the Add icon to add a new city or update your current
location.
Touch Current location at the top of the screen to update your
current location.
Enter the city, state, or ZIP code to add other cities.
Type in the city, state or ZIP
code to search the name.
in the lower right corner of the Weather
67
Page 68

68
Web
Changing Weather Settings
You can configure a number of settings for the Weather application.
The location and related settings also affect the display of the Weather
widget application.
To open the Weather settings screen, touch the Menu Key > Settings.
Page 69

Communication
Contacts
The Contacts application allows you to store names, phone numbers and
other information in your phone’s memory.
Using Your Contacts
Use the Contacts application to add, view, and communicate with your
friends and acquaintances.
To open your Contacts application
From the Home screen, touch the Apps Key >
OR
Touch Contacts
All of your contacts are displayed alphabetically in a list. If you have a new
phone and haven’t added any contacts yet, the Contacts application will
display hints on how to start adding contacts to your phone.
in the Quick Keys bar on the Home screen.
To open a list of your favorite contacts
Open your Contacts application and touch the Favorites tab at the top
of the screen.
Favorites lists the contacts you’ve added to the list.
To view details about a contact
1. Open your Contacts application.
2. Touch the contact whose details you want to view.
Contacts
.
69
Page 70

Communication
70
3. The Contact’s information will be displayed. The following options are
available.
The Dial icon
The Message icon
Touch the Menu Key for the following menu options: Delete,
Share, Join, Add to default group, Export, and Add to Home
screen.
places a call to the number.
starts a message.
Adding Contacts
You can add contacts on your phone and synchronize them with the
contacts in your Google™ Account, Microsoft Exchange account, or other
accounts that support syncing contacts.
Since your contacts can come from a variety of sources, the Contacts
application attempts to join new information with existing similar contact
entries, to create a single entry. You can also manage that process manually
by joining or splitting entries.
To add a new contact
1. Open the Contacts application.
2. Touch the New contact icon to the right of the Search field.
3. If you have more than one account with contacts, touch
of the screen and choose the account to which you want to add the
contact.
4. Enter the contact’s name.
5. Touch a category of contact information, such as phone number or email
address, to enter that kind of information about your contact.
6. Touch a category’s Add icon
category. For example, in the phone number category, enter a work
number and add a home number. Touch the label field to the right of
the entered information to open a drop-down menu of preset labels. For
example, WORK or HOME for a phone number.
to add more than one entry for that
at the top
Page 71

Communication
7. Touch the Picture icon to select a picture to display next to the name
in your list of contacts and in other applications.
8. When you’re finished, touch the Save button.
Importing, Exporting, and Sharing Contacts
If you have contacts stored in vCard format on a microSD card you can
import them into your Contacts application on your phone. You can also
export contacts in vCard format onto a microSD card.
Export to back them up to a computer or other device or so you can send a
contact via email.
To import contacts from your microSD card
You can copy contacts, in vCard format, onto your microSD card then
import them into your phone.
1. Insert the memory card (that contains the vCard files) into your phone.
2. Open the Contacts application.
3. Touch the Menu Key
4. Touch Import from SD card.
5. If you have more than one account on your phone, touch the account into
which you want to import the contacts.
6. Touch the contacts you want to import to the microSD card. Then touch
Import.
To export contacts to your microSD card
You can export all of the contacts on your phone to your microSD card, as
vCard files. You can then copy this file to a computer or another device that
is compatible with this format, such as an address book application.
1. Open the Contacts application.
2. Touch the Menu Key
3. Touch Export to SD card.
> Import/Export.
> Import/Export.
71
Page 72

Communication
72
4. Touch the contacts you wish to export to the SD card. To export all
contacts, touch Select all in the top left corner of the screen.
5. Touch Export, enter a file name, then touch OK.
To share a contact
You can share a contact with someone by sending it to them as a vCard file.
1. Open the Contacts application.
2. Touch the contact you want to share to view the contact details.
3. Touch the Menu Key
4. Choose the method for sending.
5. Enter the necessary information and share it.
> Share.
Adding a Contact to Your Favorites
The Favorites section contains a short list of the contacts you communicate
with most often.
To add a contact to your favorites list
1. Open the Contacts application.
2. Touch a contact to view its details.
3. Touch the star to the right of the contact’s name.
When the contact is added to your favorites list, the star will be
gold-colored.
To remove a contact from your favorites list
1. Open the Contacts application and touch the Favorites tab.
2. Touch a contact entry to view its details.
3. Touch the gold star to the right of the contact’s name.
The grey-colored star will indicate that the contact was removed from
your Favorites list.
Page 73

Communication
Communicating with Your Contacts
From the Contacts, Groups, or Favorites tab, you can quickly call or send
a text (SMS) or multimedia message (MMS) to a contact’s default phone
number. You can also open a list of all the ways you can communicate with
that contact.
This section describes ways to initiate communication when viewing your
list of contacts. The Contacts application shares your contacts with many
other applications, such as Gmail™ and Messaging.
To connect by using Quick Contact for Android™
1. Touch a contact’s picture to open Quick Contact for Android.
73
Type in the
name you want
to search.
Contact picture
Touch here to
open Quick
Contact for
Android for this
contact.
Contact list
New Contact
Touch here
to add a new
contact.
Alphabetical
Listing
Slide your
finger vertically
along the
letters to view
the entries
under a specific
letter.
Quick Contact for
Android
2. Touch the icon corresponding to the type of communication you want to
start.
The communication icons displayed depend on the types of information
you saved in the contact information.
Page 74

Communication
74
To communicate with a contact
1. Open the Contacts application.
2. Touch the contact with whom you want to communicate.
3. In the contact’s details screen, touch the way to start communicating
with the contact.
The Dial icon
The Message icon
Anytime you see the Dial icon
NOTE
just touch it to call that number.
places a call to the number.
starts a message.
next to a number, such as in your Favorites or Call log,
To call a contact’s default number
1. Open the Contacts application.
2. Touch Dial icon
next to the contact entry you wish to call.
Selecting Which Contacts are Displayed
You can hide contacts that don’t have phone numbers. You can also
configure which groups of contacts you want to display in the Contacts list.
To change which groups are displayed
1. Open the Contacts application.
2. Touch the Menu Key
3. Touch an account to open its list of available groups.
4. Touch All contacts to display contacts from all of your sync’d accounts,
touch a single account, or touch Customize to select more than one (but
not all) account types to display their contacts.
> Settings > Display options.
Page 75

Communication
Joining Contacts
When you add an account or add contacts in other ways, such as by
exchanging emails, the Contacts application attempts to avoid duplication by
joining contact information automatically. You can also join contacts manually.
To join contacts
1. Open the Contacts application.
2. Touch the contact entry to which you want to add information. The
contact name for this entry will remain unchanged after you join with
another contact.
3. Touch the Menu Key
4. Touch the contact whose information you want to join with the first
contact. The information from the two contacts will be merged and
displayed under the name from the first contact.
> Join.
Separating Contact Information
Each contact entry on your phone may contain ‘joined’ information from a
variety of sources.
If contact information from different sources was joined in error, you can
separate the information back into individual contact entries on your phone.
To separate contact information
1. Open the Contacts application.
2. Touch the contact entry whose information you want to separate.
3. Touch the Menu Key
4. Touch Ye s to confirm you want to separate the entries. The contact
information will separated into individual contact entries in the Contacts
list.
> Separate.
75
Page 76

Communication
76
Email
You can use the Email application to read email from providers other than
Gmail. The Email application supports the following account types: POP3,
IMAP and Microsoft Exchange.
To open the Email application
From the Home screen, tap the Apps Key > Email .
The first time you open the Email application, a setup wizard opens to help
you add an email account.
Composing and Sending Email
1. In the Email application, touch Compose .
2. Enter an address for the message’s intended recipient. As you enter
text, matching addresses will be offered from your contacts. Separate
multiple addresses with commas.
3. Touch the Menu Key
4. Touch the text field and enter the text of the message.
5. Touch Attach
6. Touch Send
If you are not connected to a network, for example if you’re working in
airplane mode, the messages you send are stored in your Outbox folder
until you’re connected to a network.
The messages sent using an Exchange account will not be stored on the phone; they will
NOTE
be stored on the Exchange server itself. If you want to see your sent messages in the
Sent folder
, you may need to open the Sent folder and select Refresh from the options
menu.
Working with Account Folders
Each account has Inbox, Drafts, Outbox, Sent, Trash folders. Depending
on the features your account service provider supports, you may have
additional folders.
> Add Cc/Bcc if required.
to attach the file you want to send with your message.
to send the message.
Page 77

Communication
Adding and Editing Email Accounts
To add an email account
1. From the Home screen, touch the Apps Key > Email .
2. Select the desired email provider.
If an email account is already set up, the wizard is not activated
automatically. In this case, tap the Menu Key
Key
> Add account.
To change a single account’s settings
1. Open the Email application and tap the Menu Key > Account
settings.
2. The following settings are available for the individual account.
s Account name: Allows you to change the name of the account.
s My name: Allows you to change the name that appears in outgoing
email.
s Signature: Allows you to add and edit the signature sent with outgoing
email.
s Retrieve interval: Allows you to select the option for retrieving email.
s Account & sync: Allows you to manage account synchronization
settings.
s Maximum mail to show: Allows you to choose the maximum amount
of email messages you want to display.
s Entire settings: Allows you to manage the general settings for all of you
accounts.
s Change login settings: Allows you to change the account login settings.
> Accounts > Menu
77
To change general settings for all accounts
1. Open the Email application and tap the Menu Key > Account
settings.
Page 78

Communication
78
2. Tap Entire settings.
3. The following settings are available. These settings are applied to all of
your accounts.
s ACCOUNTS: Tap an account to view specific settings for that individual
account.
s Set default account: Allows you to set the default email account.
s Roaming: Allows the device to automatically retrieve email while
roaming. Data fees may be charged.
s Split view: Shows email list with email contents in landscape orientation.
s Notifications: Displays notifications for new email messages.
s Notification sound: Allows you to select a sound for notifications.
s Vibrate: Allows you to select if you want the device to vibrate when you
receive email notifications.
s Email permissible range: Allows you to select who to receive
notifications from.
s Ask before deleting: Always ask before deleting email.
s Show images: Always shows external images in email.
s Storage: Allows you to choose the location for saving email attachments.
s Conversational view: Groups and shows email with the same subject
as a thread.
s Email preview: Allows you to select how many lines to display as a
preview.
s Email preview (Split view): Allows you to select how many lines to
display as a preview in Split view.
Page 79

Communication
Gmail
When you open the Gmail application, the most recent conversations
are displayed at the top of your Inbox list. All of your conversations are
displayed in your Inbox unless you delete, archive, or filter them.
To open the Gmail application
From the Home screen, tap the Apps Key > Gmail .
Your Gmail Inbox
The current Google Account is displayed at the top of the Inbox. If you have
more than one account, you can switch accounts to view the messages in
each Inbox. Simply tap the Accounts & labels icon
to select another account or label to display.
Conversations with new messages are displayed with bold subject lines. To
read a message in a conversation, tap its subject line text.
indicates that you were copied on this message.
indicates that this message was sent directly to you.
Tap the letter icon (or contact photo) next to a Gmail message, then you can
tap the Archive icon
You can also tap the Favorite icon
NOTE
favorite message.
, Delete icon , Read/Unread icon , or the .
next to a Gmail message to designate it as a
Gmail Inbox icons
Use the following icons (at the bottom of the screen) while viewing your
Gmail Inbox:
New Gmail Tap to begin a new Gmail message.
Search Tap to search within your Gmail messages.
Accounts and labels Tap to change to another account or label.
Drag the screen downwards to refresh and check for new email.
NOTE
Message search
Tap the Search icon at the top of the screen, enter the text you are
looking for, then tap the Search icon
at the top left corner
on the on-screen keyboard.
79
Page 80

Communication
80
Adding another Google Account
1. From your Gmail Inbox, tap the Menu Key > Settings.
2. Tap ADD ACCOUNT at the top right corner of the screen.
3. Tap Existing or New, then enter the necessary information.
Tap here to add an account.
To switch accounts
Gmail displays conversations and messages from one Google Account at a
time. If you set up more than one Google Account on your device, you can
easily switch between them.
From your Gmail Inbox, tap the Accounts on the Inbox header, then
tap the account that contains the email you want to read.
The number to the right of the selected Google Account indicates the number of unread
NOTE
messages you have in that account.
Accounts
Tap here to open
a list of account
choices and account
labels.
Gmail Inbox
Page 81

Communication
Navigating in the Gmail application
While viewing your Inbox, swipe the screen up and down to scroll through
the list of messages. The following icons are available at the top right of the
Gmail Inbox:
Compose
Search
In addition, while viewing your Inbox you can:
Swipe a Gmail message off the screen to the left or right to quickly
and easily archive the message. Tap Undo to restore it to your Inbox.
Tap the letter icon (or contact photo) to the left of one or more mes-
sages, then tap the Delete icon
While viewing a message, swipe the screen left and right to scroll through
all of your messages and use the following icons:
Archive
Delete
Unread
If you are viewing a message or another label, tap the Back Key
you return to your Inbox.
: Tap to start a new Gmail message.
: Tap to search within the Gmail application.
to delete it/them.
: Tap to send the message to your archive folder.
: Tap to delete the message.
: Tap to return the message to an unread state.
until
Reading Your Messages
Tap a conversation that contains the message you want to read.
The conversation opens to the first new (unread) message, or to the
first starred message, if you’ve previously starred a message in the
conversation.
81
Page 82

Communication
82
Tap to set labels
Tap the Contact's
picture to open
Quick Contact.
for the message to
help organize your
messages.
While viewing a message, tap the message action icons on the
message header to access options which include
favorite,
to reply to the sender, and to access Reply all to reply
to mark it as a
to all addresses and Forward to forward the message to someone
else.
To reread a message
When you open a conversation, messages that you’ve already read are
minimized into a tab that indicates the number of hidden messages.
1. From your Gmail Inbox, tap the conversation you want to view.
2. Tap the contact name to open that message.
While reading a message you can tap the Unread icon
message to the unread state. For example, to remind yourself to read it
again later.
to return a read
Page 83

Communication
Composing and Sending a Message
You can compose and send a message to people or groups with Gmail
addresses or other email addresses.
To compose and send a message
1.
From the Home screen, tap the Apps Key
icon
at the top right corner of the screen.
If you set up more than one Google Account on your device and want to send the
NOTE
message from a different Google Account, tap the current Google Account, then tap the
account you want to use.
2. Enter a recipient’s address.
As you enter text, matching addresses are offered from your Contacts
list. You can tap a suggested address or continue entering text to enter a
new one.
3. Tap the Menu Key
, then tap Add Cc/Bcc to copy (normal or blind
copy) recipients, if necessary.
4. Enter a subject for the message in the Subject field.
5. Enter your email text in the Compose email field.
6. Tap the Menu Key
, then tap Attach picture or Attach video if you
want to add an attachment to your Gmail message.
7. Tap the Send icon
at the top right corner of the screen to send your
message.
If you aren't ready to send the message, tap the Menu Key
NOTE
> Gmail > Compose
, then tap Save draft.
Replying to or Forwarding a Message
Continue an email conversation by replying to a message or by forwarding
it without changing the Subject text. Change the Subject text to start a new
conversation.
The conversation text and previous messages are also included in your reply (or
NOTE
forwarded) message.
To reply to or forward a message
1. Open the message you want to reply to or forward.
83
Page 84

Communication
84
2. On the message header, tap the Reply icon or tap the Menu icon ,
then tap Reply all or Forward.
Add others to an ongoing conversation by replying to all and then
adding the new person’s address(es) to the reply.
3. Tap the Send icon
at the top right corner of the screen to send your
Gmail message.
You can change the message action after you've started the message. Simply tap
NOTE
the message header next to the current message action and tap the one you want. For
example, if you chose Reply but decide you want to Reply all instead.
Google Account settings
1. From the Home screen, tap the Apps Key > Gmail > Menu Key
.
2. Tap Settings.
3. Tap General settings to change the following settings for all accounts.
Archive & delete actions: Choose if you want to display only the archive
option, only the delete option, or both options.
Swipe to archive: Select to archive a conversation when you swipe it.
Sender image: Allows the senders image to be displayed beside the name
in the conversation list.
Reply all: Mark the checkbox to make Reply all the default message action.
Auto-fit messages: Mark the checkbox to shrink the messages to fit the
screen and allow zooming.
Auto-advance: Sets which conversation list is viewed after archive or
deletion.
Message actions: Sets when to show message actions.
Confirm before deleting: Mark the checkbox to ask to confirm before
deleting a message.
Confirm before archiving: Mark the checkbox to ask to confirm before
archiving a message.
in
Page 85

Communication
Confirm before sending: Mark the checkbox to ask to confirm before
sending a message.
OR
Tap an account to change the following settings for that specific account.
Inbox type: Select the default inbox.
Notifications: Mark the checkbox to display notifications for new
messages.
Inbox sound & vibrate: Set the notification settings.
Signature: Set the signature you want to include with every outgoing
email.
Sync Gmail: Mark the checkbox to automatically sync your account.
Days of mail to sync: Choose how many days of email you want to sync.
Manage labels: Allows you to set the sync and notification settings for
your labels.
Download attachments: Mark the checkbox to automatically download
attachments to recent messages via Wi-Fi.
85
Page 86

Communication
86
Messaging
To open Messaging
From the Home screen, touch the Messaging Key in the Quick
Keys bar.
Touch here to create a new message.
Touch New message to start a new text or multimedia message.
Touch an existing message thread to open it.
To delete a message thread from the Messaging window
1. Touch and hold the message thread.
2. Touch Delete in the Context menu that opens.
3. Touch Ye s to confirm you want to delete the message thread.
To send a text message
1. On the Messaging screen, touch New message .
2. Enter a mobile phone number in the To field.
As you enter the mobile phone number, matching contacts appear. You
can touch a suggested recipient or continue entering the phone number.
3. Touch the text field to start entering your message.
Touch here to add contacts
from the contact list.
Displays the number of
characters entered and
amount remaining.
Touch here to attach
the files.
Page 87

Communication
A counter is displayed in the top right corner of the text field to tell you
how many characters are left and the number of pages.
If you touch the Back Key
a draft. Touch the message to resume composing it.
4. Touch Send to send the message.
Your message is displayed and responses appear in the same window,
creating a message thread with that contact.
while composing a message, it’s saved as
To create and send a multimedia message
1. On the Messaging screen, touch New message at the top right
corner of the screen.
2. Enter a mobile phone number, email address, or Contact name in the To
field. As you type, matching contacts appear. You can touch a suggested
contact or continue typing.
3. Touch the text field to start entering your message.
4. Touch the Menu Key
5. Touch the Attachment icon
choose the type of media file to attach to the message.
If you touch Image, you’re prompted to select a picture from your
Gallery.
If you touch Take photo, the Camera application opens so you can
take a picture and attach it.
If you touch Video, you’re prompted to select a video from your Gallery.
If you touch Record video, the Camcorder application opens so you
can record a video and attach it.
If you touch Audio, you’re prompted to select an audio file from your
microSD card and internal storage.
If you touch Record voice, the voice recording function opens and
allows you to record an audio message and attach it.
If you touch Contact, you’re prompted to select the contact(s) you
> Add subject to add a message subject.
to open a dialog box where you can
87
Page 88

Communication
88
want to send as vCard file(s).
If you touch Slide, you can assemble photos, audios, videos, texts
into a slideshow (up to 10 slides) to attach to the message.
6. Touch the Send MMS button to send the message.
To respond to messages you receive
If you’re working in a message window, messages that you receive
from that contact are displayed. Otherwise, you receive a new message
notification and a new message icon
you touch the new message notification, the Message screen opens where
you can reply to the message.
If Auto-retrieve is uncheckmarked, you must touch Download to view the
message.
If the message contains a media file, touch the Play button to view, watch,
or listen to it. Touch and hold the media file to open a Context menu with
additional options.
appears in the Status Bar. When
To view details about a message
1. Touch and hold a message in a message window.
2. Touch View message details in the menu that opens.
Changing Messaging Settings
You can change a number of Messaging settings.
To change the Messaging settings, open the Messaging application,
touch the Menu Key
> Settings.
How to select the type of keyboard you want
1. While entering text, open the Notifications panel and touch Choose
input method.
2. Choose between Google voice typing and LG Keyboard.
You will now be able to enter text using the new keyboard.
Page 89

Communication
89
Touch and drag
down.
Touch Choose
input method.
Choose the type of
keyboard you want.
Page 90

Communication
90
Hangouts
The Hangouts application lets you have real-time text conversations with
your friends.
To Open the Hangouts application
From the Home screen, tap the Apps Key > the Hangouts .
To sign out of Hangouts
From your chatting list, tap the Menu Key > Settings > Sign out.
Chatting with Friends
1. From the Home screen, tap the Apps Key > the Hangouts .
to view your contacts list. It includes all of the Google Accounts
2. Tap
you’ve added.
Tap the name of the person in your contacts list. If your friend is not
yet on Hangouts, you can invite your friend via SMS.
OR
Tap the text field to enter a name, email, or number.
3. Tap Message
4. Tap Send
Hangouts chatting list
Touch and hold the friend in the chat screen. You can set below options.
Tap to turn the notifications off.
Tap to archive the conversation.
Tap to delete the conversation.
Blocking your Friends
To block a friend from exchanging messages with you, tap the friend
in the chatting list. Tap the Menu Key
tap the block option.
, and then enter your message.
.
> People & options. Then
Page 91

Communication
To remove a friend from the blocked list tap the Menu Key from
the chatting list. Then tap Settings > Blocked people > Unblock next
to the person’s name.
Hangouts Settings
From the chatting list, tap the Menu Key to choose from Hangout
request, Snooze notifications, Archived Hangouts, Settings, Send
feedback, and Help.
While chatting, tap the Menu Key
options, New group Hangout, Turn history off, Archive, Delete,
Send feedback, and Help.
to choose from People &
91
Page 92

Entertainment
92
Camera
To open the Camera application, from the Home screen touch the Apps
Key
> Camera .
Getting to know the viewfinder
Time catch shot – Allows you to capture the missing moment by taking five sequential
pictures at once before the shutter key is touched.
Cheese shutter – Take photo with voice command (saying "Cheese", "Smile", "Whisky", "Kimchi" or
"LG").
Swap Camera – Switch between the rear–facing camera lens and the front–facing camera lens.
Mode Switch – Allows you to switch between
camera mode and video mode.
Capture – Takes a photo.
Gallery – Allows you to view the last photo you
captured. This enables you to access your Gallery and
view saved photos within camera mode.
Settings – Access the Settings menu.
Shot mode – Choose from Normal, HDR, Panorama, Continuous shot.
Default resolution is 8M (3264x2448).
NOTE
Photo options
You can make adjustments to optimize your shot. The following options are
available:
O
Edit quick menu : Touch if you want to change the viewfinder menu.
O
Flash : Allows you to turn on the flash when taking a photo in dark
conditions.a
O
Zoom : Zoom in or out.
O
Brightness : Defines and controls the amount of sunlight entering the
photo.
O
Focus : Focuses on a specific spot.
O
Image size : Selects photo resolution. If you choose high resolution,
file size will increase, which means you will be able to store fewer
photos in the memory.
Page 93

Entertainment
O
Scene mode : Finds the appropriate color and light settings for the
current environment.
O
ISO : The ISO rating determines the sensitivity of the camera’s light
sensor. The higher the ISO, the more sensitive the camera. This is useful
in darker conditions when you cannot use the flash.
O
White balance : Improves color quality in various lighting conditions.
O
Color effect : Applies artistic effects to your pictures.
O
Timer : Sets a delay after the capture button is pressed. This is ideal if
you want to be in the photo.
O
Geotagging : Activate this to use your phone’s location-based
services. Take pictures wherever you are and tag them with the location.
If you upload tagged pictures to a blog that supports geo tagging, you
can see the pictures displayed on a map.
O
Shutter sound : Selects a shutter sound.
O
Auto review : Automatically shows you the picture you just took.
O
Storage : Select the storage location where you want to save images.
O
Reset : Restore all camera default settings.
O
Camera help guide : Touch this whenever you want to know how a
function works. This icon will provide you with a quick guide.
Using the focus mode
You can select from the following focus options:
Auto Sets the camera to focus automatically.
Face tracking Sets the camera to detect and focus on human faces
automatically.
93
Taking a quick photo
1. Open the Camera application.
2. Holding the phone horizontally, point the lens toward the subject you
want to photograph.
3. Touch the subject on the screen and a focus box will appear in the
viewfinder.
4. When the focus box turns green, the camera has focused on your
subject.
Page 94

Entertainment
94
5. Touch the Capture button to take the picture.
You can also press the Volume Keys to take a picture.
NOTE
Once you’ve taken the photo
Touch the image preview at the bottom of the screen to view the last photo
you captured.
Touch to share via SmartShare.
Touch to return to Camera mode to take another picture.
Touch to share your photo using any supported applications.
TIP!
If you have a social networking account and set it up on your phone, you can share your
photo with the social networking community
Touch to delete the image.
Touch the Menu Key
to open the following options.
Set image as – Touch to set the image as a Contact photo, Home screen
wallpaper or Lock screen wallpaper.
Move – Touch to move the image to another album.
Copy - Touch to copy the image to another album.
Rename – Touch to edit the name of the selected picture.
Rotate left/right – Touch to rotate the image to the left or right.
Crop – Crop your photo. Move your finger across the screen to select the
area.
Edit - View and edit the pictures.
Improves color qualities in different lighting conditions.
Applies artistic effects to the pictures.
Applies color effects to the pictures.
Applies additional options to the pictures.
Slideshow – Displays your images in a slideshow.
Details – Displays the picture information.
.
Page 95

Entertainment
Video Camera
To open the Video Camera, from the Home screen touch the Apps Key
> Camera
Getting to know the viewfinder
Live effect
Video size – Allows you to choose the video size.
Swap Camera – Switch between the rear–facing camera lens and the front–facing camera
lens.
Settings – Opens the Camcorder settings menu.
Flash
Video options
You can make adjustments to optimize your video. The following options
are available when you touch Settings
Edit quick menu
Zoom
Brightness
White balance
Color effect
Geotagging
. Then touch .
–
Allows you to add various visual effects when recording a video.
Mode Switch – Touch this icon to switch between
Camera mode and Video mode.
Record – Starts video recording.
Gallery – Accesses your saved photos and videos from
video camera mode.
–
Allows you to turn the flash on or off.
on the viewfinder screen:
: Touch if you want to change the viewfinder
menu.
: Zoom in or zoom out.
: Defines and controls the amount of sunlight entering
the video.
: Improves color quality in various lighting condi-
tions.
: Choose a color tone to use for your video.
: Activate this to use your phone’s location-based
services.
95
Page 96

Entertainment
96
Audio recording : Record a video with or without sound.
Auto review
: Auto review automatically shows you the video you
just recorded.
Storage
: Select the storage location where you want to save
videos.
Reset
Video help guide
: Restore all video camera default settings.
: Touch this if you want to know how this func-
tion works. This icon will provide you with a quick guide.
Recording a quick video
1. Open the Video Camera application.
2. The Video camera’s viewfinder will appear on the screen.
3. Holding the phone horizontally, point the lens toward the subject of the video.
4. Touch Record once to start recording.
5. The video length timer begins counting.
6. Touch Stop
NOTE
Touch
TIP!
on the screen to stop recording.
You can also press the Volume Keys to start and stop recording.
to capture image during recording a video.
After recording a video
Touch the image preview at the bottom of the screen to view the last video
you recorded.
Touch to play the video.
Touch to share via SmartShare.
Touch to return to Camera mode to take another picture or record a
video.
Touch to share the video via any supported applications.
Touch to delete the video you just made. Confirm by touching Yes. The
viewfinder reappears.
Touch the Menu Key
Move – Touch to move the video to another album.
Copy - Touch to copy the video to another album.
to access the following options.
Page 97

Entertainment
Rename – Touch to edit the name of the selected video.
Details – Touch to see a detailed information, such as the name, date, time,
size and type.
Adjusting the volume when viewing a video
To adjust the volume of a video while it is playing, use the Volume Keys on
the left side of the phone.
97
Page 98

Entertainment
98
Gallery
Opening Gallery and Viewing Your Albums
Open the Gallery application to view albums of your pictures and videos.
To open Gallery and view your albums
From the Home screen, touch the Apps Key > Gallery .
OR
Open Gallery from the Camera application by touching the thumbnail
image at the bottom right corner of the screen.
The Gallery application presents the pictures and videos saved in your
phone or memory card, including those you’ve taken with the Camera
application and those you downloaded from the web or other locations.
Touch an album to open it and view its contents.
Touch a picture or video in an album to view it.
Return to the main Gallery screen at any time by touching
top left of the screen.
Touch the Menu Key
album, Delete, Hide/Show album, Settings and Help.
To share an album
You can share the entire contents of one or more albums or individual
images or videos from an album.
1. From the Home screen, touch the Apps Key
2. Touch and hold the desired album and then touch Share.
3. Select the method for sharing the album.
to access Search nearby devices, New
> Gallery .
at the
Page 99

Entertainment
Working with photos
Use the Gallery application to view pictures that you’ve taken with the
Camera application, downloaded, copied onto your microSD card or that
are stored in Picasa web albums.
To view and browse photos
1. From the Home screen, touch the Apps Key > Gallery .
2. Open an album and touch a picture.
3. Touch the Menu Key
Rename, Rotate left, Rotate right, Crop, Edit, Slideshow or Details.
Touch here to go to
camera mode.
Touch here to share
via SmartShare.
to access Set image as, Move, Copy,
Touch here to share.
Touch here to delete.
99
To edit pictures
Touch here to go to
undo the last action.
Touch here to redo the previously
undone action.
Touch here to save.
Touch here to access the editing tools.
Page 100

Entertainment
100
Working with Videos
Use the Gallery application to play videos that you’ve taken with the
Camera application and to share them with friends.
To play videos
Open a Gallery album, then touch a video.
The video plays in the orientation you recorded it in.
Touch here to lock the screen.
Touch here to access
SmartShare.
Touch here to use Qslide.
Tap here to change viewing
Touch here to adjust
the volume.
Touch the screen while the video is playing to view the playback
controls.
To share a video
You can share your videos in a variety of ways, including sending it by email
or multimedia message (MMS), or via SmartShare or a Bluetooth device.
You even have the option to share your videos publicly by uploading it to the
TM
YouTube
1. From the Home screen, touch the Apps Key
2. While viewing an album, touch the Share
3. Select the desired videos and touch Share.
4. In the dialog box that opens, touch the application you would like to use
5. Enter the necessary information and share it.
website.
touch an album.
to share the selected videos.
from it's original size to full
screen.
> Gallery , then
.
 Loading...