

Page 1
!!"#"$"#%
Page 2

Safety Information
Page 3

For USA / Canada Users
As an Energy Star Parntner, MINOLTA has determined that this machine meets the
Energy Star Guidelines for Energy Efficiency.
For Another Country Users
this machine meets the *EPA’s Energy Star Guidel ine for ///energy Efficiency. *the U.S.
Environmental Protection Agency.
What is an Energy Star Machine?
Energy Star Machines have a feature that allows them to automatically yurn off or “ go to
sleep” after a period of inactivity, ensuring night and weekend shut off.
I Safety Information
Page 4

IMPORTANT SAFETY INSTRUCTIONS
•
Make sure th at the electric al outlet that you use is loc ated near the Facsimile.
•
Only connect the Facsimile to an earthed socket outlet.
IMPORT SAFETY INSTRUCTIONS IMPORTANT MESURES DE
when using your telephone equipment, basic
safety precauti ons should alway s be followed to
reduced the risk of fire, electric shoc k and
injury to persons, including the following:
1. Do not use this product near water,
for example, near a bath tub, wash
bowl, kitchen sink or laundry tub, in
a wet basement or near a swimming
pool.
2. Avoide using a telephone ( other
than a cordless type ) during an
electrical storm. There may be a
remote risk of electric fr om
lightning.
3. Do not use the telephone to report a
gas leak in the vicinity of the leak.
Certaines mesures de s
curité doivent
é
étre
prises pendant l’utilisation de matérial
téléphonique afin de réduire les risques
d’incendie, de choc électrique et de
blessures. En voici quelquesunes:
1. Ne pas utiliser l’appareil prés de l’eau,
p.ex., pr
d’un
dans un sous-sol humide ou pr
piscine.
2. Éviter d’utiliser le
s d’une baignoire, d’un lavabo,
é
vier de cuisine, d’un bac à lsver,
é
s d’une
é
téléphonique ( sauf
s’il s’agit d’un appareil sans fil )
pendant un orage électrique. Ceci peut
presenter un risque de choc électrique
causé par la foudre.
3. Ne pas utiliser l’appareol
téléphonique
pour signaler une fuite de gaz s’il est
situe prèes de la fuite.
4. Use only the power cord and
batteries Indicated in this manual.
Do not dispose of batteries in a fire.
They may explode. Check with local
codes for possible special disposal
instructions.
SAVE THESE INSTRUCTIONS
Safety Information II
4. Utiliser seulement le cordin d’alimen tation
et le type de piles indiqu
Ne pas jeter les piles dans le feu: elles
peuvent exploser. Se confrmer aux
règlements pertlnents quant à
l’
élimination des poles.
CONSERVER CES INSTRUCTIONS
s dans ce manuel.
é
Page 5

LASER SAFETY
This FAX contains a page printer which operates by means of a laser. There is no
possibility of danger from the laser, provided the FAX is operated according to the
instructions in this manual provided.
Since radiation emitted by the laser is completely confined within protective housing, the
laser beam cannot escape from the machine during any phase of user operation.
This machine is certifie d as a Class 1 l aser product . this means the machine does not
produce hazardous laser radiation.
INTERNAL LASER RADIATION (for all Uers)
Maximum Radiation power:7.3x10 (W) at the laser aperture of the print head unit.
Wave Length:770-810 (nm)
This is a Cla ss lllb Laser Diode Assy. That has an invisible laser besm. The printer hea d
unit is NOT A FIELD SERVICE ITEM. Therefore the printer head unit should not be
opened under any circumst ances.
-4
For United States Users
Laser Safety
This FAX is certified as a Class 1 Laser product under the U.S. Department of Health
Services (DHHS) Radiation Performance Standard according to the Food, Drug and
Cosmetic Act of 1990. This means that the FAX does not produce hazardous radiation.
CDRH Regulations
The Center for Devices and Radiological Health (CDRH) of the U.S. Food and Drug
Administration implemented regulations for laser products on August 2, 1976.
Compliance is mandatory for products marketed in the United States. The label shown
below indicates compliance with the CDRH regulations and must be attached to laser
productd marketed in the United States.
The label shown to page XVI indicates compliance with the CDRH regulations and must
be attached to laser products marketed in the United States.
Use of controls, adjustment or perfo rmance of pr ocedure s other than
those specified in this manual may result in hazardous radiation
exposure.
WARNING:
This is a semiconductor Laser. the maximum power of the Laser diode is 5mW and the
wavelength is 770-810mm.
III Safety Information
Page 6

For users In Other Countries
Use of controls, adjustment or perfo rmance of pr ocedure s other than
those specified in this manual may result in hazardous radiation
exposure.
This is a semiconductor laser. The maximum power of the laser diode is 5mW and the
wavelength is 770-810nm.
For European User
Use of controls, adjustment or perfo rmance of pr ocedure s other than
those specified in this manual may result in hazardous radiation
exposure.
This is a semiconductor laser. The maximum power of the laser diode is 5mW and the
wavelength is 770-810nm.
WARNING:
WARNING:
For Denmark Users
Usynlig laserstråling ved åbning, når sikkerhedsafbrydere er ude af
funktion. Undgå udsættelse for stråling. Klasse 1 laser product der
opfylder IEC60825 sikkerheds kravene.
Dansk. Dette er en halvlderlaser. Laserdiodens hØjeste styrke er 5mW og bØlgeæengde
er 770-810nm.
Klass 1 lader produkt der opfylder IEC825 sikkerheds kravene.
ADVERSEL:
Safety Information IV
Page 7

For Finland, Sweden User
LOUKAN 1 LASERLAITE
KLASS 1 LASER APPARAT
Laitteen käyttäminen muulla kuin tässä käyttöohueessa mainitulla
tavalla saattaa altistaa käyttäjän turvallissuusluokan 1 ylittävälle
näkymättömälle lasersäteilylle.
Tämä on puolijohdelaser. Laserdiodin suurin teho on 5mW ja aallonpituus in
770-810mm.
Om apparaten används på annat sätt än i denna bruksanvisning
specificerats, ken a nvändare n utsätt as för os ynlig l aserstrålnin g som
överskrider gränsen för laser klass 1.
Det här är en halvledarlaser. Den maximala effekten för laserdioden är 5mW och
våglängden är 770-810mm.
VAROITUS:
VARNNING:
For Norway Users
Dette er en halvleder laser. Maksimal eff eckt till laserdiode er 5mW og bØlgekengde er
770-810nm.
VARO!:
Avattaessa ja suojalukitus ohitettaessa olet alttiina näkymättömälle
lasersäteilylle. Äjä katso säteeseen.
VARNING!:
Osynlig laserstråining när denna del är öppnad ochspärren är
urkopplad. Betrakta ej strålen.
ADVARSEL:
Dersom apparatet brukes på annen måte enn spesifisert i denne
bruksanvisning, kan brukeren utsettes for unsynlig laserstråling
som overskrider grensen for laser klass 1.
V Safety Information
Page 8
WARNING LABEL
Safety Information VI
Page 9

CE Marking (Declaration of Conformity)
The product complies with the following EU directives:
89 / 336 / EEC, 73 / 23 / EEC and 93 / 68 / EEC directives.
This declaration is valid for the area of the European Union.
WARNING:
This device must be used with shielded interface cables. The use of
non-shield ed cable is likely to result in interference with radio
communications and is prohibited under the EU Directive rules.
The machine has been ap proved in accordance with Council Decision 19 99/5/EC for panEuropen single terminal connection to the public switched telephone network (PSTN).
However, d ue to dif ferences bet ween the indivi dual PSTNs provid ed in dif ferent countri es,
the approval does not, of itself , give an unconditio nal assurance of su ccessful opera tion on
every PSTN network termination point.
In the event of problems, you should contact your equipment supplier in the first instance.
Note: The manufacturer should ensure that the vender and user of equipment is
clearly informed of the above information by means of packaging and/ or other
forms of user instructions.
This product is approved for DTMF dialing only. When directly connected to the public
switched telephone network (PSTN mode) pulse dialing can not be used.
(Pulse dialing may only be used when this product is connected to a PBX).
If an additional te lephone is connec ted to FAX unit, the LF (Loading Fac tor) shou ld not b e
greater than 30.
VII Safety Information
Page 10

USER INSTRUCTIONS (For U.S.A.Users)
FCC PART15-RADIO FREQUENCY DEVICES WARNING
The following applies to the Facsimile Unit (MINOLTAFAX2800/3800) only without the
Minolta Network option installed.
FCC : Declaration of Conformity
Product Type Facsimile
Product Name MINOLTAFAX2800 / MINOLTAFAX3800
Option / Accessories Second Paper Cassette Unit / Expansion Memory (Max 8MB)
This Devices complies with Part 15 of the FCC Rules. Operation is subject to fo llowing
Conditions:
1. This devices may be not cause harmful interference, and
2. this devices must accept any interference received, including interference that may cause
undesired operation.
Minolta Corporation
101 Williams Drive Ramsey, New Jersey 07446
T e le p hon e number : 201-825-4000
WARNING:
This equip ment has been tested and found to comply with limits for
a Class B digital device, pu rsuant to Par t 15 of the FCC Rules. These
limits are designed to pr ovide r easonabl e prot ection again st harmful
interference in a residential installation. This equipment generates,
users, and radiates radio frequency energy and, if not installed and
used in accordance with the instructions, may cause harmful
interferenc e to radio communications. However, there is no
guarantee that interference will not occur in a particular
installation. If this equipment does cause harmful interference to
radio or television receiption, which can be determined by turning
the equipment off and on, the us er is encouraged to try to cor rect the
interference by one or more following measures:
•
Reorient or relocate the receiving antenna.
•
Increase the separation between the equipment and the rece iver.
•
Connect the equipment in to an outlet on a circuit dif ferent from that to which the
receiver is connected.
•
Consult the dealer or an experienced radi o-TV technician for help.
Safety Information VIII
Page 11

WARNING:
The design and production of this unit conform to FCC regulations,
and any changes or modifications must be registered with FCC and
are subject to FCC control. Any change made by the purchaser or
user without first contacting the manufacture will be subject to
penalty under FCC regulations.
Note: *A LAN adapter (Minolta Network) is to be used only in industrial areas.
Use of a LAN adapter in residential areas.
*This device must be us ed with sh ielde d int erfac e cabl es. The use of non -
shielded cables is likely to result in Interference with radio
communications and is prohibited under FCC Rules.
*The design and production of this unit conforms to FCC regulations,
and any change or modifications must be registered with the FCC and
are subject to FCC control. Any change made by the purchaser or user
without first contacting the manufacturer will be to penalty under FCC
regulations.
FCC PART 15 - RADIO GREQUENCY DEVICES WARNING
The Facsimile Unit (MINOLTAFAX2800/3800) with the Minolta Network option
installed meets t he FCC Class A require ments when t he networ k cable i s atta ched eit her of
the IEEE 802.3 connectors.
WARNING:
This equip ment has been tested and found to comply with limits for
a Class A digital devi ce, pursuant to Part 15 of the F CC Rules. These
limits are designed to pr ovide r easonabl e prot ection again st harmful
interference when the equipment is operated in a commercial
environment. This equipment generate, users, and radiate radio
frequency energy and, if not installed and used in accordance with
the instruction manual, may cause harmful interference to radio
communications.
Operation of this equipment in a residential area is likely to cause
harmful interference at his own expense. This device must be used
with shielded cables likely to result in interference with radio
communications and is pr ohibited under the FCC Rules. The design
and production of this unit conform to FCC regulations, and any
changes or modifications must be registered with the FCC and are
subject to FCC control. Any chang es made by the purchaser or user
without first contacting the manufacturer will be subject to penalty
under FCC regulations.
IX Safety Information
Page 12

FCC PART 68 - TELECOMUNICATION DEVICES
This equipment complie s with Part 68 of the FCC Rules. On the rear panel of this
equipment is a label t hat conta ins, among ot her info rmations, t he FCC regis tration number
and Ringer Equivalence Number (REN) for this equipment. If requested, provide this
information to your telephone company.
This equipment uses THE FOLLOWING USOC JACKS: RJ11C
The REN is useful to de termine t he quanti ty of de vices you may connect to your telephone
line and still have all of tho se devices ring when your number is called. In most , but not all
areas, the sum of the RENs of al l devi ces sho uld not exceed f ive (5 .0). To be certain of the
number of devices you may connect to your line, as determined by the REN, you should
call your local telephone company to determine the maximum REN for your calling area.
If your telephone equi pment causes harm to the telephone network, the Telephone
Company may discontinue your service temporarily. If possible, they will notify you in
advance. But if adva nce noti ce isn’ t pr actical , you will be noti fied as soon so possib le. You
will be advised of your right to file a complaint with the FCC.
Your telephone company may make changes to its facilities, equipment, operations, or
procedures that could affect the proper operation your equipment. If they do, you will be
given advance notice so as to give you an opportunity to maintain uninterrupted service.
If you experience trouble with this equipment, please contact:
Minolta Corporation
101 williams Drive Ramsey.
New Jersey 07446
U.S.A.
The telephone company may ask you to disconnect this equipment from network until
problem has been corrected or you are sure that the equipment is not malfunctioning.
This equipment may not be used on coin service provided by the telephone company.
Connection to party lines is subject to state tariffs. (Contact your state public utility
commission or corporation commission for information.)
CUSTOMER INFORMATION FOR PRIVATELY OWNED COIN PHONES
To comply with state tariffs, the telephone company must be given notification prior to
connection.
In some states, prior app roval of connec tion must be obtai ned fr om the sta te Publ ic Util ity
Commission, Public Service Commission or state Corporation Commission.
Safety Information X
Page 13

WARNING FOR THE SETTING OF HEADER AND FOOTER
The Telephone Consumer Protection Act of 1991 makes it unlawful for any person to use
a computer or other electronic device to send any message via a telephone fax machine
unless such message clearly contains in a margin at the top or bottom of each transmitted
page or on the first page of the transmission, the date and time it is sent and an
identification of the business or other entity, or other individual sending the message and
the telephone number of the sending machine or such business, other entity, or individual.
In order to program this information into your fax machine, you should complete the
following steps.
(Refer to Chapter 4 Facsimile Programming page 4-29 and 4-35)
Telephone line cord
The 26AWG telephone line cord should only be used on this machine.
XI Safety Information
Page 14

USER INSTRUCTIONS (For Canada Users)
INTERFERENCE-CAUSING EQUIPMENT STANDARD (ICES-003 ISSUE 3)
WARNING
The following applies to the Facsimile Unit (MINOLTAFAX2800/3800) only without the
Minolta Network option installed.
This Class B digital apparatus complies with Canadian ICES-003. Cet appa reil
numérique de la classe B est conforme à la norme NMB-003 du Canada.
INTERFERENCE-CAUSING EQUIPMENT STANDARD (ICES-003 ISSUE 3 )
WARNING
The following applies t o the Facsi mile Unit (MI NOLT AFAX2800/3800) with the Minolta
Network optoin installed.
This Class A digital apparatus complies with Canadian ICES-003. Cet appareil
numérique de la classe A est conforme à la norme NMB-003 du Canada.
IC CS-03-TELECOMUNICATION DEVICE
Note: Industry Canad a (IC) lab el i dentif ies certi fied e quipment . Th is ce rtif ic ation
means that the equipment meets certain telecommunications network
protective, operational, and safety requirements. IC does not guarantee the
equipment will operate to the user’s satisfaction.
Before installing this equipment, users should ensure that it is
permissible to be connected to the facilities of the local
telecommunication co mpany . Th e equipment must als o be installe d using
an acceptable met hod of co nnection. In some ca ses, the company’s inside
wiring associated with a single line individual service may be extended
by means of a certifie d connector assembly (telephone extension cord).
The customer should be aware th at co mpliance wi th the a bove condi tions
may not prevent degradation of service in some situations.
Repairs to certified equipment should be made by an authorized
Canadian maintenance facility designated by the supplier. Any repairs or
alterations made by the user to this equipment, or equipment
malfunctions, may gi ve the telecommunicatio ns company cause to
request the user to disconnect the equipment.
Users should ensure for their own protection that the electrical ground
Safety Information XII
Page 15

connections of the power utility, telephone lines, and internal metallic
water pipe system, if present, are connected together. This precaution
may be particularly important in rural areas.
CAUTION
Users should not attempt to make such connections themselves, but should
contact the appropriate electric inspection authority, or electrician, as
appropriate.
Note: The Ringer Equivalence Number (REN) assigned to each terminal device
provides an indication of the maximum number of terminals allowed to be
connected to a telephone interface. The termination on an interface may
consist of any combination of devices subject only to the requirement that
the sum of the Ringer Equivalence Numbers of all the devices does not
exceed 5.This terminal device the REN=0.3.
If you experience trouble with this equipment, please contact:
Minolta Business Equipment (Canada), Ltd.
369 Britannia Road E.
Mississauga, Ontario L42 2H5
Tel: (905)890-6600
HEARING AID-COMPATIBILITY (For U.S.A./ Canada Users)
This equipm ent complies with the FCC / IC guide lines for hearing aid-compatibility.
For Australian Users
The Unit shall be connected to Telecommunication Network through a line cord which
meets the requirements of ACA Technical Standard TS008.
XIII Safety Information
Page 16

For New Zealand Users
The grant of a Telepermit for any item of terminal equipment indicates only that Telecom
has accepted that the item complies with minimum conditions for connection to its
network. It indicates no endorsement of the product by Teleocm, nor does it provide any
sort of warranty. Above all, it provides no assurance that any item will work correctly in
all respects with another item of Telepermitted equipment of a different make or model,
nor does it imply that any product is compatible with all of Telecom’s network services.
This equipment should not be used under circumstances which may constitute a nuisance
to other Telecom customers.
WARNING NOTICE:
This equipment shall not be set up to mak e automatic c alls to the
Telecom “111” Emergency Service.
OZONE RELEASE (For all Users)
During printer operation, a small quantity of ozone is released. This amount is not large
enough to harm being advers el y. However, be sure the room where the FAX is being used
has adequate venti lation, espe cially i f you are pr inting a h igh volume of material s, or if t he
FAX is being used continuously over s long period.
Note: Locate the machine in a well Ventilated Room
A negligible amount of ozone is generated during normal operation of
this machine. An unpleasant odor may, however, be created in poorly
ventilated rooms durin g ext ensiv e machine operat ion. For a comfo rtabl e,
healthy, and safe operating environment that the room well ventilated.
REMARQUE:
Placer l’appareil dans une pi
Une quantit
é d’ozone négligable est dégagée pendant le
è
ce largement ventilée
fonctionnement de l’appareil quand celui-ci est utilisé
normalement. Cependant, une odeur désagréable peut être
ressentie dans les pièces dont l’aération est insuffisante et lorsque
une utilisation prolongée de l’appareil est effectuée. Pour avoir la
certitude de travailler dans un environment réunissant des
conditions de confort, santé et de sécurieé, il est préférable de bien
aérer la pièce ou se trouve l’appareil.
Safety Information XIV
Page 17

Acoustic Noise
For European Users
Machine Norise Regulation 3 GSGV, 18,01,1991: The sound pressure levell at the
opatator position according to EN 27779 is equal to or less than 70dB(A).
XV Safety Information
Page 18

LABELS
Safety Information XVI
Page 19

XVII Safety Information
Page 20
This section contains detailed instructions on the operation and maintenance of this machine. To achieve optimum utility of this device, all operators should carefully read and follow the instructions in this manual. Please
keep this manual in a handy place near the machine.
Please read the next section before using this device. It contains important information related to user safety
and preventing equipment problems.
Make sure you observe all of the precautions listed in this manual.
Note: Please note that some parts of the contents of this section may not correspond with the
purchased product.
Table 1: ■ Warning and Precaution Symbols
Ignoring this warning could cause serious injury or even death.
Ignoring this caution could cause injury or damage to property.
Table 2: ■ Meaning of Symbols
A triangle indicates a danger against which you should take precaution.
This symbol warns against cause burns.
A diagonal line indicates a prohibited course of action.
This symbol warns against dismantling the device.
A black circle indicates an imperative course of action.
This symbol indicates you must unplug the device.
xviii
Page 21
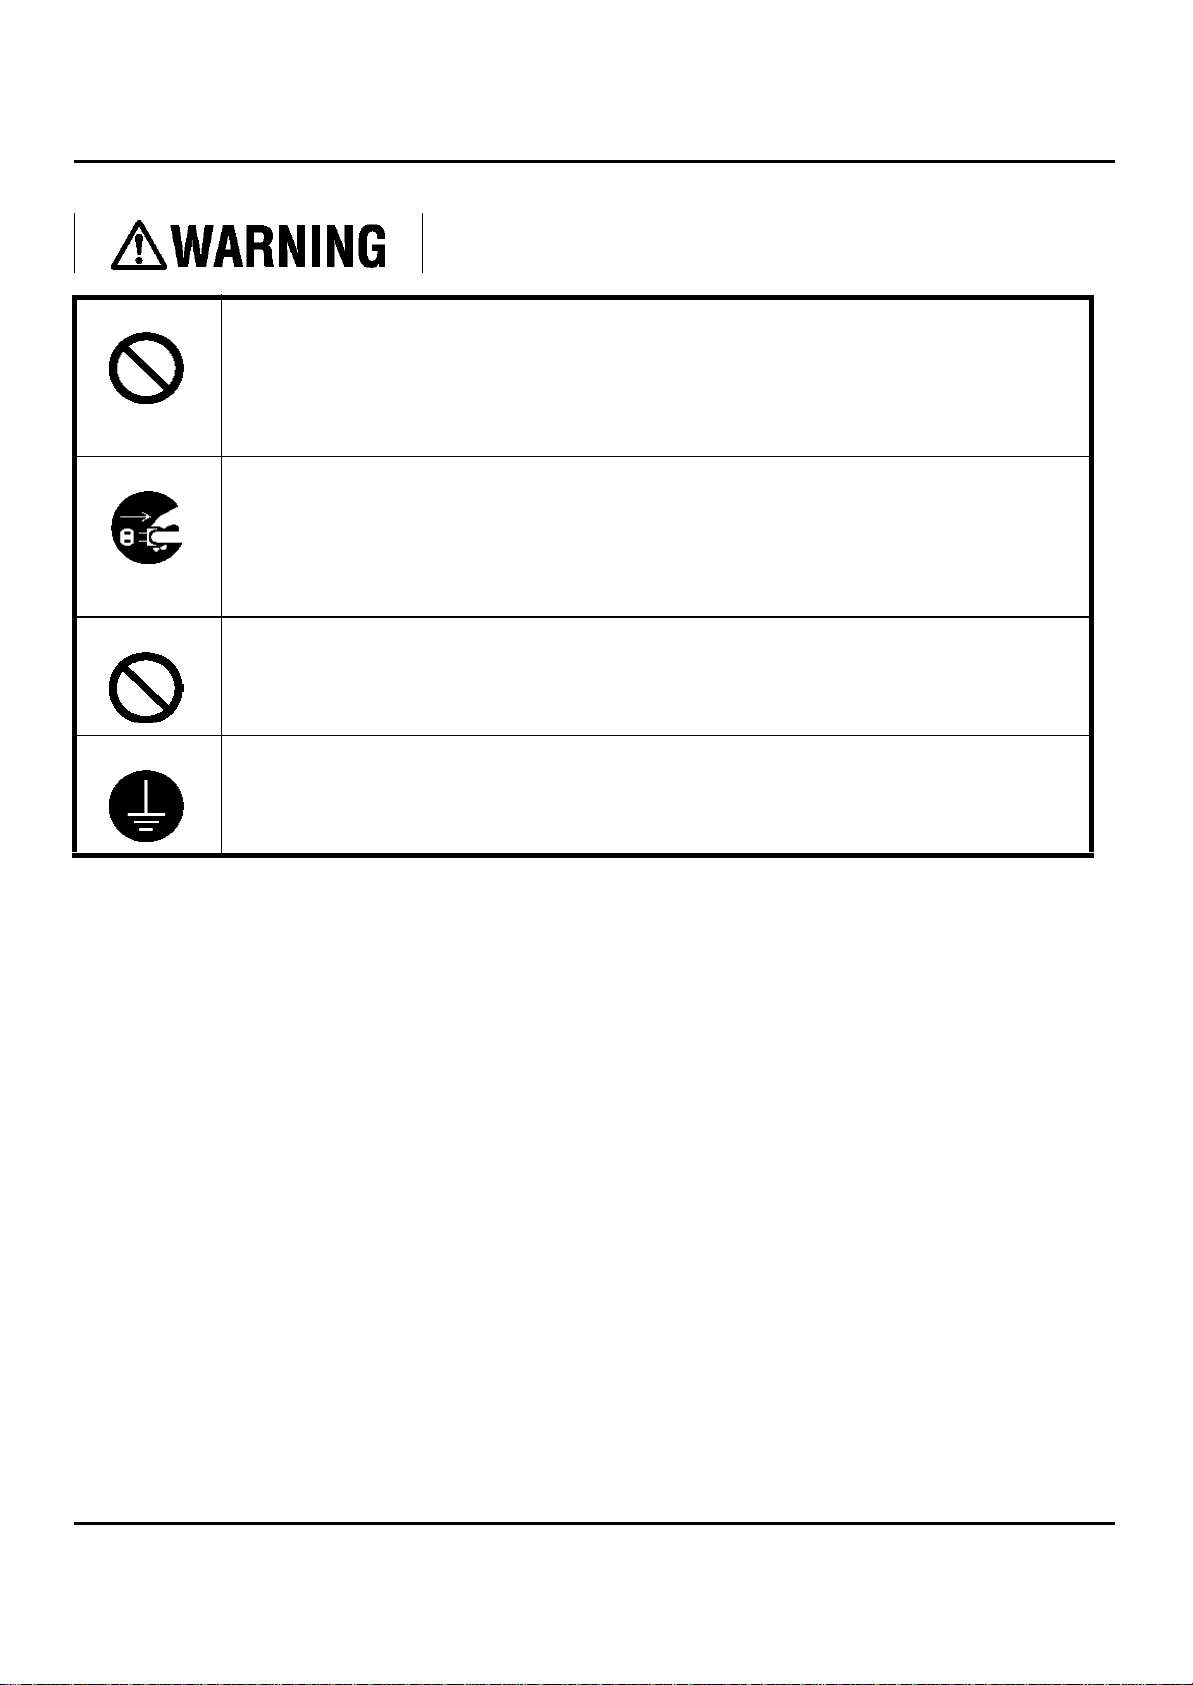
Do not modify this product, as a fire, electrical shock, or breakdown could result. If the product employs a
laser, the laser beam source could cause blindness.
Do not attempt to remove the covers and panels which have been fixed to the product. Some products have
a high-voltage part or a laser beam source inside that could cause an electrical shock or blindness.
Only use the power cord supplied in the package. If a power cord is not supplied, only use the power cord
and plug that is specified in POWER CORD INSTRUCTION. Failure to use this cord could result in a fire
or electrical shock.
Use only the specified power source voltage. Failure to do that could result in a fire or electrical shock.
Do not use a multiple outlet adapter to connect any other appliances or machines. Use of a power outlet for
more than the marked current value could result in a fire or electrical shock.
Do not unplug and plug in the power cord with a wet hand, as an electrical shock could result.
Plug the power cord all the way into the power outlet. Failure to do this could result in a fire or electrical
shock.
Do not scratch, abrade, place a heavy object on, heat, twist, bend, pull on, or damage the power cord. Use
of a damaged power cord (exposed core wire, broken wire, etc.) could result in a fire or breakdown.
Should any of these conditions be found, immediately turn OFF the power switch, unplug the power cord
from the power outlet, and then call your authorized service representative.
In principle, do not use an extension cord. Use of an extension cord could cause a fire or electrical shock.
Contact your authorized service representative if an extension cord is required.
xix
Page 22
Do not place a flower vase or other container that contains water, or metal clips or other small metallic
objects on this product. Spilled water or metallic objects dropped inside the product could result in a fire,
electrical shock, or breakdown.
Should a piece of metal, water, or any other similar foreign matter get inside the product, immediately turn
OFF the power switch, unplug the power cord from the power outlet, and then call your authorized service
representative.
If this product becomes inordinately hot or emits smoke, or unusual odor or noise, immediately turn OFF
the power switch, unplug the power cord from the power outlet, and then call your authorized service
representative. If you keep on using it as is, a fire or electrical shock could result.
If this product has been dropped or its cover damaged, immediately turn OFF the power switch, unplug the
power cord from the power outlet, and then call your authorized service representative. If you keep on
using it as is, a fire or electrical shock could result.
Do not throw the toner cartridge or toner into an open flame. The hot toner may scatter and cause burns or
other damage.
Connect the power cord to an electrical outlet that is equipped with a grounding
terminal.
xx
Page 23
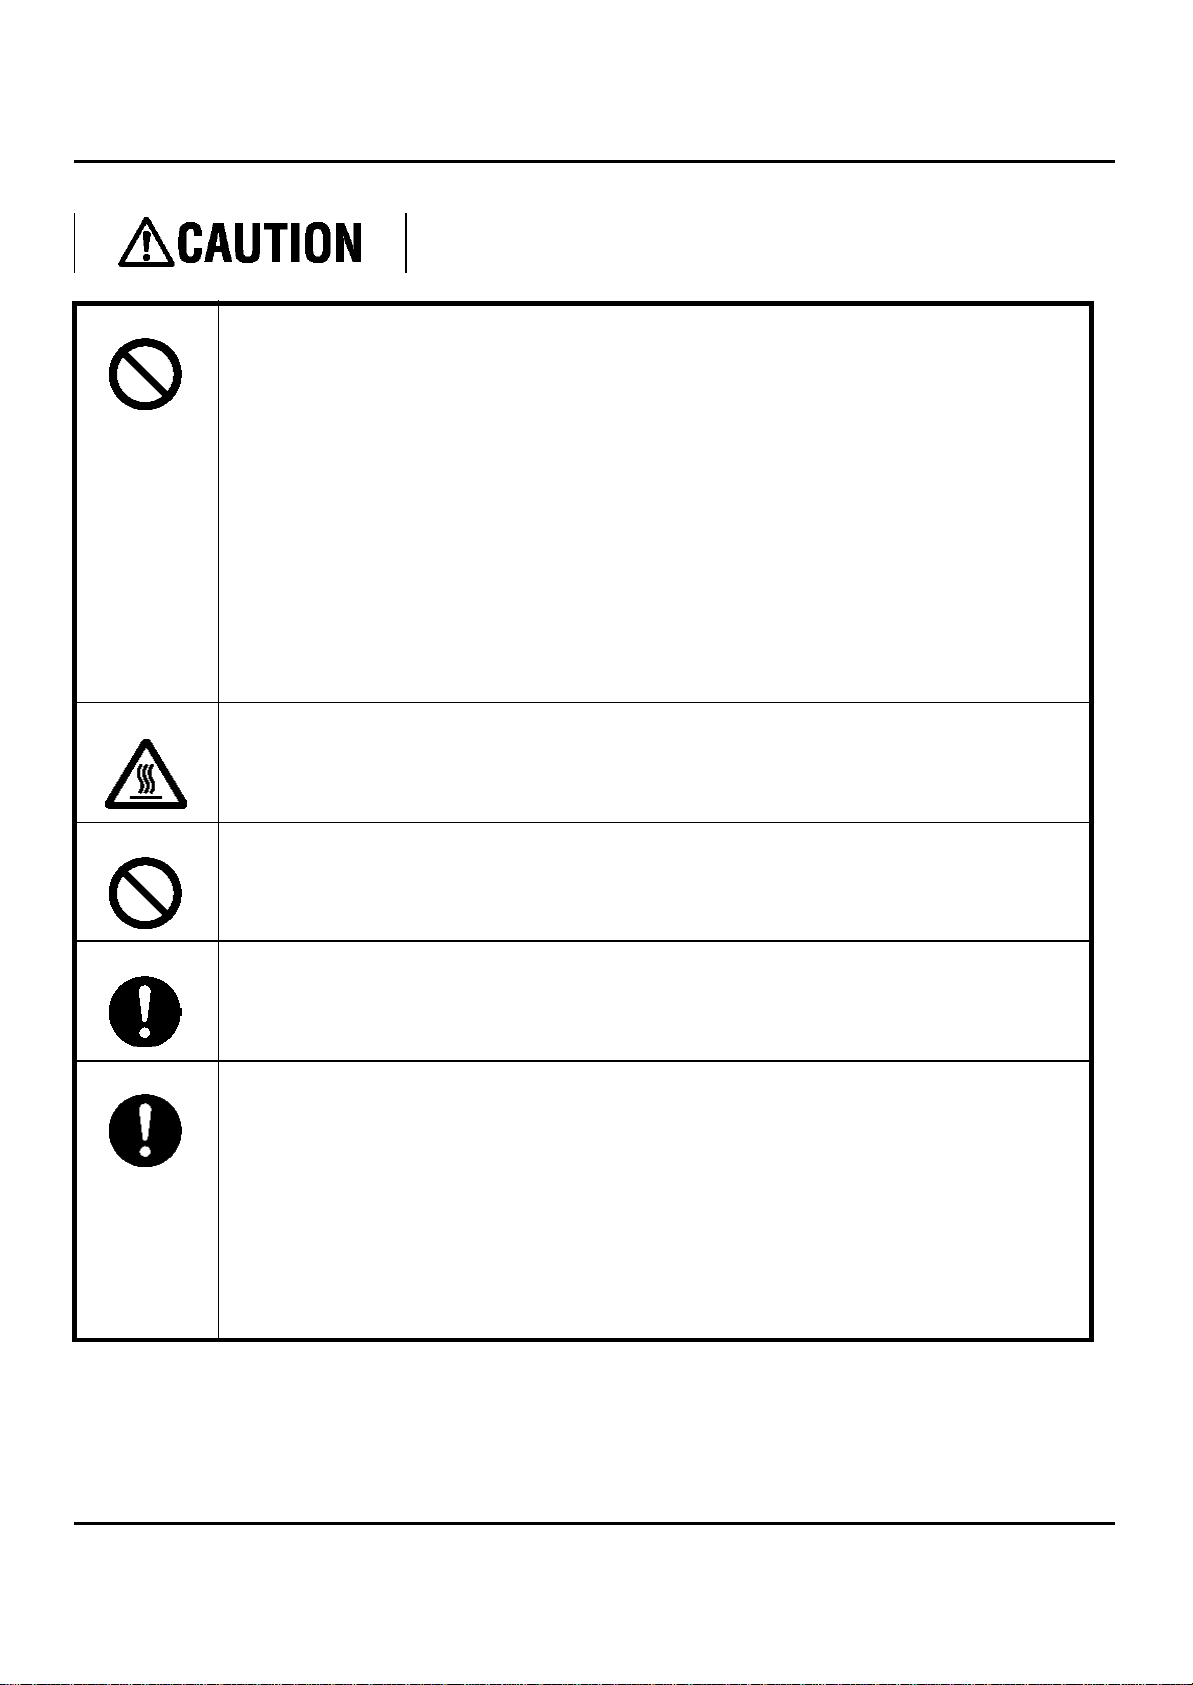
Do not use flammable sprays, liquids, or gases near this product, as a fire could result.
Do not leave a toner unit or drum unit in a place within easy reach of children. Licking or ingesting any of
these things could injure your health.
Do not let any object plug the ventilation holes of this product. Heat could accumulate inside the product,
resulting in a fire or malfunction.
Do not install this product at a site that is exposed to direct sunlight, or near an air conditioner or heating
apparatus. The resultant temperature changes inside the product could cause a malfunction, fire, or
electrical shock.
Do not place the product in a dusty place, or a site exposed to soot or steam, near a kitchen table, bath, or a
humidifier. A fire, electrical shock, or breakdown could result.
Do not place this product on an unstable or tilted bench, or in a location subject to a lot of vibration and
shock. It could drop or fall, causing personal injury or mechanical breakdown.
After installing this product, mount it on a secure base. If the unit moves or falls, it may cause personal
injury.
Do not store toner units and PC drum units near a floppy disk or watch that are susceptible to magnetism.
They could cause these products to malfunction.
The inside of this product has areas subject to high temperature, which may cause burns. When checking
the inside of the unit for malfunctions such as a paper misfeed, do not touch the locations (around the
fusing unit, etc.) which are indicated by a “Caution HOT” caution label.
Do not place any objects around the power plug as the power plug may be difficult to pull out when an
emergency occurs.
The socket-outlet shall be installed near the machine and shall be easily accessible as the power plug may
be difficult to pull out when an emergency occurs.
Always use this product in a well ventilated location. Operating the product in a poorly ventilated room
for an extended period of time could injure your health. Ventilate the room at regular intervals.
Whenever moving this product, be sure to disconnect the power cord and other cables. Failure to do this
could damage the cord or cable, resulting in a fire, electrical shock, or breakdown.
When moving this product, always hold it by the locations specified in the operator’s manual or other
documents. If the unit falls it may cause severe personal injury. The product may also be damaged or
malfunction.
Remove the power plug from the outlet more than one time a year and clean the area between the plug
terminals. Dust that accumulates between the plug terminals may cause a fire.
When unplugging the power cord, be sure to hold onto the plug. Pulling on the power cord could damage
the cord, resulting in a fire or electrical shock.
xxi
Page 24
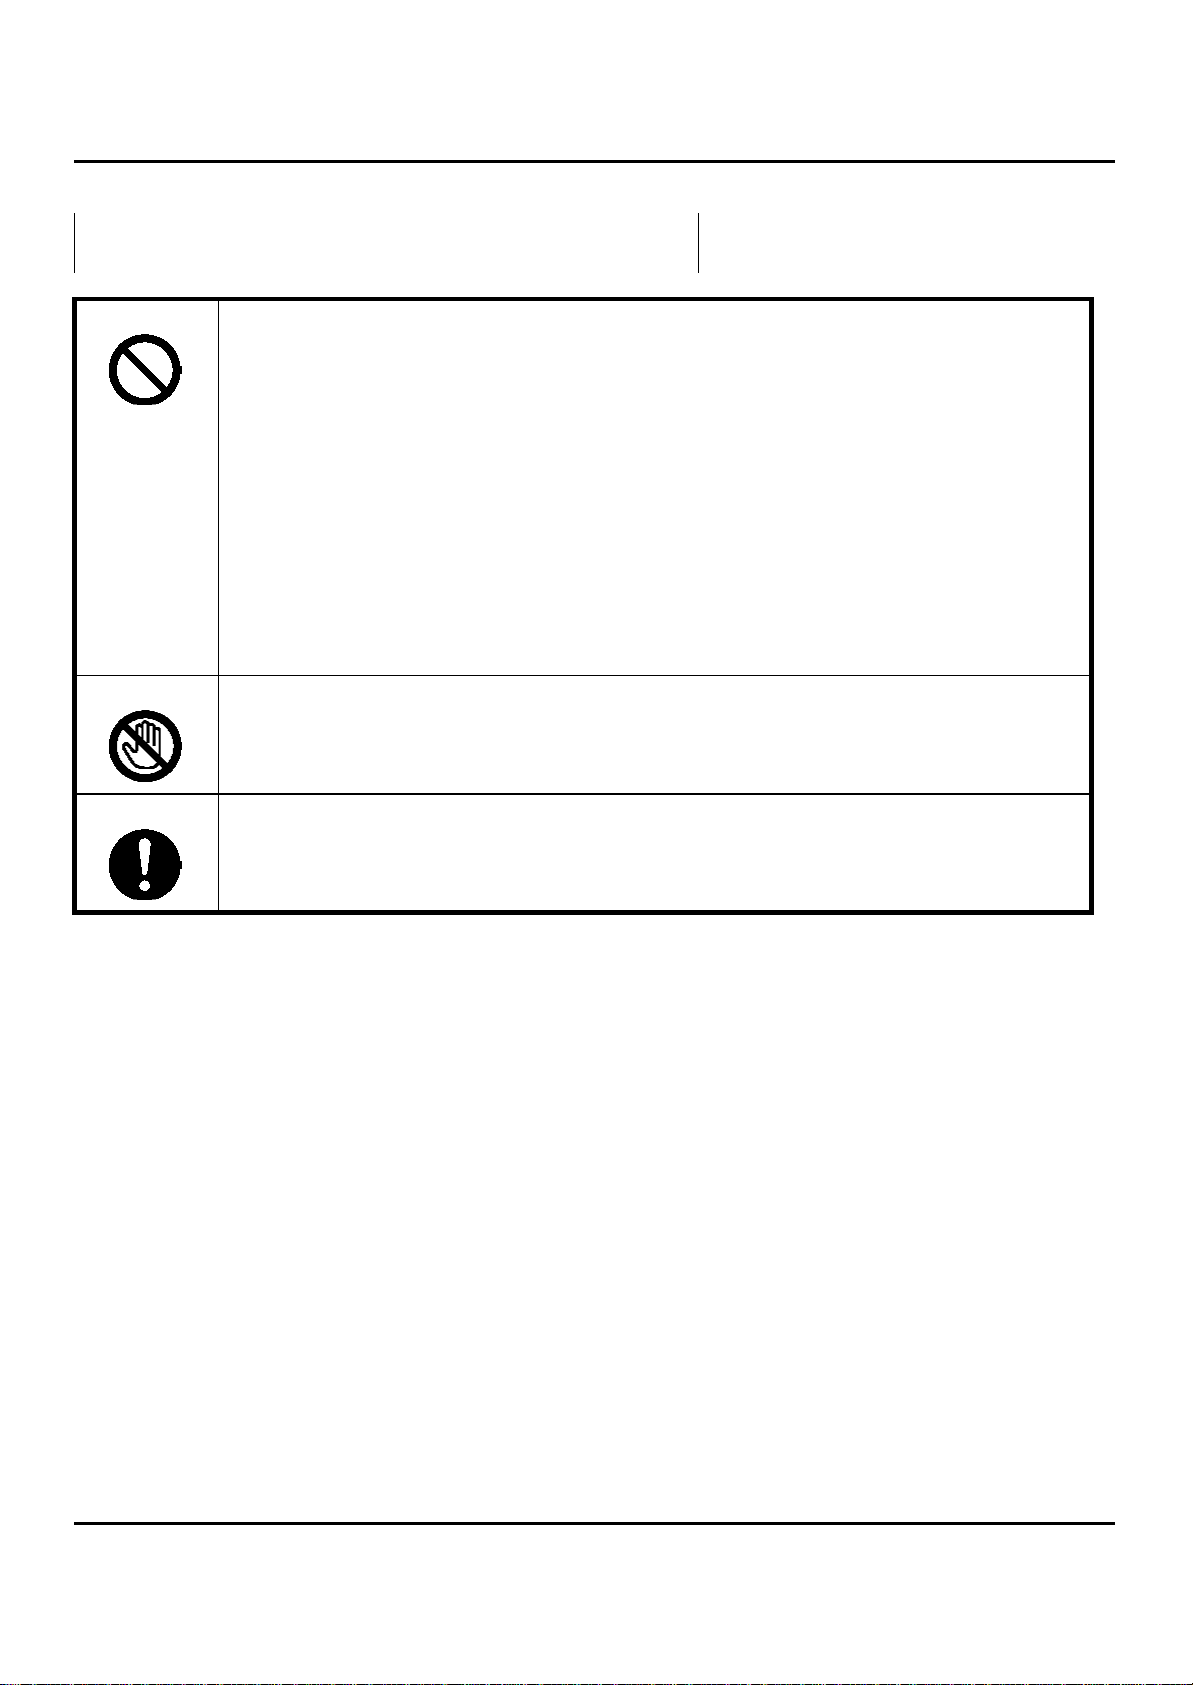
Precautions for Routine Use
Do not store toner units, PC drum units, and other supplies and consumables in a place subject to direct
sunlight and high temperature and humidity, as poor image quality and malfunction could result.
Do not attempt to replace the toner unit and PC drum unit in a place exposed to direct sunlight. If the PC
drum is exposed to intense light, poor image quality could result.
Do not unpack a toner unit or PC drum unit until the very time of use. Do not leave an unpacked unit
standing. Install it immediately or poor image quality could result.
Do not keep toner units and PC drum units in an upright position or upside down, as poor image quality
could result.
Do not throw or drop a toner unit or PC drum unit as poor image quality could result.
Do not use this product in an area where ammonia or other gases or chemicals are present. Failure to do so
may shorten the service life of the product, cause damage or decrease performance.
Do not use this product in an environment with a temperature outside the range specified in the operator’s
manual, as a breakdown or malfunction could result.
Do not attempt to feed stapled paper, carbon paper or aluminum foil through this product, as a malfunction
or fire could result.
Do not touch or scratch the surface of the toner unit, developing roller and the PC drum, as poor image
quality could result.
l Use the supplies and consumables recommended by the dealer. Use of any supply or consumable not
recommended could result in poor image quality and breakdown.
xxii
Page 25

Miscellaneous
Do not rest your weight on the control panel, as a malfunction could result.
Normal international communications may at times not be possible depending on line conditions.
If tap or well water is used in a humidifier, impurities in the water are discharged into the air and may be
deposited inside the printer, resulting in poor image quality. It is recommended that pure water that does
not contain any impurities be used in the humidifier.
The cooling fan may be activated automatically, but this suggests no problems.
Ni-MH (Nickel Metal Hydride) Batteries are installed inside machine as back up memory batteries. Please
dispose according to local, state and federal regulations.
xxiii
Page 26

Table of Contents
Chapter 1 - Introduction
Introduction to the MINOLTAFAX2800 and MINOLTAFAX3800 Units...............................1-1
MINOLTAFAX2800 and MINOLTAFAX3800 Model Differences* .......................1-1
How to Use This Manual ............................................................................................ 1-1
Agency Certification ...................................................................................................1-1
Important Safeguards..................................................................................................................1-2
Multi-Tasking ............................................................................................................................. 1-4
Machine Components .................................................................................................................1-5
Control Panel Layout ..................................................................................................1-8
Definition of Display Symbols .................................................................................1-12
Table of Contents
Chapter 2 - Basic Operations
Sending a Document...................................................................................................................2-1
Using Memory Transmit .............................................................................................2-1
Memory Overflow Transmit ....................................................................................... 2-2
Dialing Methods.........................................................................................................................2-5
Receiving a Document ...............................................................................................................2-6
Auto Receive ............................................................................................................... 2-6
Making Copies ..........................................................................................................................2-10
Chapter 3 - Advanced Facsimile
Using the Function Menu...........................................................................................................3-1
Broadcast....................................................................................................................................3-2
Timer TX (Delay Transmission)................................................................................................3-3
Mailbox TX ................................................................................................................................3-4
Print Mailbox RX.......................................................................................................................3-5
Print Memory RX.......................................................................................................................3-6
Polling TX ..................................................................................................................................3-7
Polling RX ..................................................................................................................................3-9
Relay Initiate ............................................................................................................................3-11
Using Combination Dial...........................................................................................................3-12
JOURNAL Key........................................................................................................................3-13
REPORT Key...........................................................................................................................3-14
Reports......................................................................................................................................3-15
Transmit Message Confirmation ...............................................................................3-15
Manual TX Report ....................................................................................................3-15
SCHEDULE Key......................................................................................................................3-16
PIN CODE Key ........................................................................................................................3-17
SPEAKER Key.........................................................................................................................3-18
F Codes................................................................................................................................ .....3-19
Page 27

Table of Contents
Chapter 4 - Facsimile Programming
Accessing The User Program Area............................................................................................4-1
Menu Navigation ........................................................................................................4-1
Menu Structure ...........................................................................................................4-2
Initial User Data.........................................................................................................................4-5
Entering The Date & Time ......................................................................................... 4-5
Entering Your Telephone Number .............................................................................. 4-5
Entering Your User Name ..........................................................................................4-6
Setting Department PW .............................................................................................. 4-6
Machine Operations ................................................................................................................... 4-7
Setting the LCD Contrast ............................................................................................4-7
Setting the Correct Dialing Type (Tone/Pulse) ..........................................................4-7
Setting the Buzzer (Ring) Volume ..............................................................................4-8
Setting the Line Monitor (Speaker) Volume .............................................................. 4-9
Selecting Remote Monitor .......................................................................................... 4-9
Setting Your Fax Line Type (PSTN/PBX) ............................................................... 4-10
Setting the Power Save Mode ...................................................................................4-11
Setting the Power Save Time ....................................................................................4-12
Setting the Drum Counter .........................................................................................4-12
Document Scan Settings...........................................................................................................4-13
Resolution .................................................................................................................4-13
Scan Contrast ............................................................................................................ 4-14
Print Density .............................................................................................................4-14
Reduction Copy ........................................................................................................4-15
Rec. Paper Size ......................................................................................................... 4-16
Auto Cassette Sel. .....................................................................................................4-16
Dial Registration ...................................................................................................................... 4-17
One-Touch Keys ....................................................................................................... 4-17
Speed Dial Keys ........................................................................................................4-18
Group Dial Keys ....................................................................................................... 4-19
Program Dial ............................................................................................................. 4-20
Batch TX ...................................................................................................................4-23
Relay box .................................................................................................................. 4-25
TX Operation............................................................................................................................4-26
Default TX ................................................................................................................4-26
Closed Network TX ..................................................................................................4-27
Fax Forwarding .........................................................................................................4-27
RX Operation ...........................................................................................................................4-30
Memory RX Mode ....................................................................................................4-30
Two Page Print ..........................................................................................................4-32
Reduction RX ...........................................................................................................4-33
Mailbox RX ..............................................................................................................4-33
Closed Network ........................................................................................................4-34
RX Mode ................................................................................................................... 4-35
Footer (Receive Time Print) .....................................................................................4-35
Line 2 Setting...........................................................................................................................4-38
Line 2 Fax No. ..........................................................................................................4-38
TX Line Priority ........................................................................................................4-38
Line 2 Tone / Pulse ................................................................................................... 4-39
Reports .....................................................................................................................................4-40
Activity Report .........................................................................................................4-40
Reserv. (Reservation) Report ....................................................................................4-40
TX Results Report .................................................................................................... 4-41
Page 28

Table of Contents
RX Results Report ....................................................................................................4-41
Broadcast Report .......................................................................................................4-42
Toner Low Report .....................................................................................................4-42
Chapter 5 - Internet Fax(Option)
Setup ............................................................................................................................5-1
Programming Internet Fax settings .............................................................................5-2
components of Internet Fax .........................................................................................5-2
Setting up the Internet Fax ......................................................................................................... 5-3
E-MAIL SETTING .....................................................................................................5-3
SERVER SETTING ....................................................................................................5-4
POP3 INTERVAL ...................................................................................................... 5-5
TIME OUT SETTING ................................................................................................ 5-5
ERROR REPORT .......................................................................................................5-6
TIME ZONE ............................................................................................................... 5-6
One-Touch Dial ...........................................................................................................5-8
Speed Dial ...................................................................................................................5-9
Group Dial ...................................................................................................................5-9
Program Dial .............................................................................................................5-10
Manual Transmission(Single Location) ....................................................................5-12
Manual Receive .........................................................................................................5-13
Advanced Operations of Internet Fax.......................................................................................5-14
Broadcast ...................................................................................................................5-14
Timer TX ...................................................................................................................5-15
One Touch, Speed Dial, and Group Dial ..................................................................5-15
Automatic Receive ....................................................................................................5-15
Error messages..........................................................................................................................5-16
Error Messages Report ..............................................................................................5-16
LCD Display Messages .............................................................................................5-17
chapter 6 - PC Printing & Scanning
Set Printer...................................................................................................................................6-1
Symbol Set ..................................................................................................................6-2
Font Number ............................................................................................................... 6-3
Print Font .....................................................................................................................6-4
Memory Allocations...................................................................................................................6-7
Standard Memory Configuration Choices .................................................................. 6-7
PCL4 Emulation.........................................................................................................................6-9
Connecting to a Computer ..........................................................................................6-9
Basic Operation .........................................................................................................6-10
Using the Manual Feed Tray to Print ........................................................................6-10
Printing Envelopes ....................................................................................................6-10
Printer Messages.......................................................................................................................6-11
Auto-Select Paper Tray ............................................................................................6-11
GDI Printer Feature(option).....................................................................................................6-12
PC Requirements .......................................................................................................6-12
Installing The Printer Driver .....................................................................................6-13
Printing with your GDI Print Function .....................................................................6-15
Getting Help ..............................................................................................................6-15
Scanning (TWAIN Driver Option)...........................................................................................6-16
PC Requirements for the TWAIN Option .................................................................6-16
Page 29

Table of Contents
Installing the TWAIN Driver ....................................................................................6-16
Class 1 Fax/Modem..................................................................................................................6-18
Class 1 Interface ........................................................................................................6-18
PC Requirements ......................................................................................................6-18
Installing the PC-Fax Software .................................................................................6-19
Using Class 1 Mode ..................................................................................................6-19
Receiving a Fax in Class 1 Mode ............................................................................. 6-20
Scanning in Class 1 Mode ........................................................................................6-20
Chapter 7 - Maintenance & Supplies
Loading the Paper.......................................................................................................................7-1
Paper Tray ...................................................................................................................7-1
Optional Second Paper Cassette Unit(SPCU) ............................................................7-2
Clearing Paper Jams...................................................................................................................7-4
Document Jams ...........................................................................................................7-4
Paper Jams ..................................................................................................................7-5
Changing Toner Cartridge..........................................................................................................7-9
Maintenance.............................................................................................................................7-12
Cleaning Your Fax Unit ............................................................................................7-12
Cleaning the Scanner ................................................................................................ 7-12
Cleaning the White Roller ........................................................................................7-13
Chapter 8 - Troubleshooting
Troubleshooting .........................................................................................................................8-1
Error Indication Types ................................................................................................ 8-1
Error Messages ............................................................................................................8-2
Chapter 9 - specifications
Physical Specifications...............................................................................................................9-1
Operational Specifications.........................................................................................................9-2
Class 1 Interface (RS-232) ..........................................................................................9-4
LAN Interface (Print Server) ......................................................................................9-5
Environmental Specifications....................................................................................................9-8
Appendix - Unpacking & Installation
Unpacking ................................................................................................................................. A-1
Main Carton Contents ................................................................................................A-1
Accessories Box Contents .........................................................................................A-2
Setting Up Fax Unit...................................................................................................................A-3
Removing the Packing Materials ...............................................................................A-3
Installing the Drum Cartridge ....................................................................................A-3
Installing the Toner Cartridge .................................................................................... A-4
Installing the Paper Exit Tray ....................................................................................A-5
Installing the Document Exit Tray .............................................................................A-5
Installing the Document Feed Tray ............................................................................ A-6
Attaching the Power Cord and Telephone Cords ......................................................A-6
Attaching the PC Cables ............................................................................................A-8
Turning Power ON ...................................................................................................A-10
Final Checkout ........................................................................................................................ A-11
Preparing Your Fax Unit ..........................................................................................A-11
Loading a Document ................................................................................................A-11
Setting Up the (Optional) SPCU.............................................................................................A-12
Page 30

Table of Contents
Unpacking the SPCU ............................................................................................... A-12
Installing the SPCU ..................................................................................................A-13
Page 31

Table of Contents
Page 32

Introduction
Chapter 1
Page 33

Introduction to the MINOLTAFAX2800 and MINOLTAFAX3800 Units
Introduction to the MINOLTAFAX2800 and MINOLTAFAX3800
Units
The MINOLTAFAX2800 and MINOLTAFAX3800 are multi-function devices
that in addition to the Fax capability, allow you to Print, Scan and Copy.
MINOLTAFAX2800 and MINOLTAFAX3800 Model Differences*
Item MINOLTAFAX2800 MINOLTAFAX3800
2nd cassette Tray Optional Optional
Page Memory 2 MB 6 MB
Dual Line Mode Optional Standard
Printing Yes Yes
PC-Scanning Optional Optional
Option Fax Memory 8MB 8MB
* Items listed above are for the standard configuration. For information on other
options, refer to the Spec ifications Chapter.
How to Use This Manual
This manual explains the func ti ons and ope rat i on of t he MI NOLTAFAX2800 and
MINOLTAFAX3800 units. It also gives some troubleshooting tips as well as
general precautions to be observed during operations.
To ensure the best performance and effective use of your unit, please read this
manual carefully from cover to cover. After you have read the manual, keep it
near your Fax unit for handy reference. It should be helpful in solving any
operational questions you may have.
This manual is written to cover the base machine with all the options installed. If
your unit does not have these options installed, just skip that section. If you
choose to upgrade your unit in the future, you will already have the necessary
information. Call your Sales or Service Representative to order options and
schedule their installation.
Agency Certification
Your MINOLTAFAX2800 and MINOLTAFAX3800 unit complies with FCC
rules, DOC requirements, and other agency certification requirements. Refer to
the Appendix section of this manual for details.
These units are Energy Star qualified.
1 - 1 Introduction
Page 34

Important Safeguards
Always follow these important safeguards:
1
Read all of these instructions before using your unit.
2
Do not use this unit near water; for example, near a bath tub, sink or swimming pool.
3
Avoid using the telephone during an electrical storm. There may be a
remote risk of electric shock from lighting.
4
Do not use the telephone to report a gas leak in the vicinity of this unit.
5
Use only the power cord and batteries indicated in this manual. Do not dispose of batteries in a fire. They may explode. Check with local codes for
possible special disposal instruction.
Important Safeguards
6
Plug the power cord only into a 3conductor (grounded) outlet rated for at
least 15 amperes.
•
Never ground the power cord to a
gas pipe or a water pipe.
•
Keep the power cord away from hot
surfaces.
•
A void using an exten sion cord if at all
possible. If you must use an
extension cord, use only a 3conductor cord rated for at least 15
amperes. C ords rated for less might overheat and become a fire ha zard.
•
Do not operate your unit if any part of it is damaged, or if any part has
been dropped, until it is checked by a qualified technician.
7
Do not install your unit in areas that are:
•
Damp or humid
•
Exposed to direct sunlight
•
Extremely dusty
•
Poorly ventilated
•
Subject to extreme temperature or humidity changes. For example,
don’t locate your copier near an air conditioner or heater.
8
Install your unit with space around it to provide adequate ventilation.
9
Do not place the unit near a television or radio. If the unit is too close it
Introduction 1 - 2
Page 35

Important Safeguards
may interfere with the reception.
10
Place your unit on a firm, level surface.
11
Do not place heavy objects on the ADF (Automatic Document Feeder) or
the Exit Tray.
12
Do not disassemble your unit or try to repair it yourself, other than as
instructed in this Operat or Guide. Call an Authorized Ser vice Center for all
necessary repairs. Incorrect assembly can cause electrical hazards and possible damage to the machine.
1 - 3 Introduction
Page 36

Multi-Tasking
Operation Concurrent Operation Result
Multi-Tasking
The MINOLTAFAX2800 and MINOLTAFAX3800 can perform multiple
operations at the same time. One operation can run in the foreground, while
another runs in the background. For example, you can scan, copy, or print
documents into memory fo r later transmission while receiving a fax .
Copy Fax Reception
GDI/PCL4 Printing
Memory Fax transmission
PC-Fax Transmission or
Reception
Fax Reception Copy
GDI/PCL4 Printing
Fax Transmission
Fax
Transmission
PC-Fax
Reception
Copy
GDI/PCL4 Printing
Copy
The received fax is stored in memory, and prints once
copy operation is complete.
Print job is stored in memory, and prints once copy
operation is complete.
Faxing begins while copying continues.
Faxing begins while copying continues.
The Copy job will be stored in memory, then printed
out when reception (RX) is complete.
Print document during reception.
Scans document into memory for transmission.
The available memory is shared by both jobs and their
operations happen simultaneously.
The document will be printed from the PC during Fax
operation.
Copy operation starts by scanning document into
memory, and prints as fax is being transmitted.
Parallel Port Printing
Fax Transmission
PC-Fax Transmit Copy
Parallel Port Printing
Fax Transmission
Introduction 1 - 4
Print operation occurs while PC is receiving the fax.
TX works when PC-Fax is complete. Scans document
into memory for transmission.
Copy operation starts by scanning document into
memory first, and prints as fax is being transmitted.
Parallel Port can be used for printing during PC-FAX
operation.
Scans document into memory for transmission.
Page 37

Machine Components
Machine Components
External Components: Front
1 Document Exit Tray
This tray catches the original document after
it passes through the scanner.
2 Control Panel / Scanner Cover
The controls on the panel perform the
various faxing, copying, and printing
functions. Lift this panel lifts to remove
document feed jams.
3 Document Feed Tray
Load your document face down on this tray
for faxing or copying.
4 Document Alignment Guides
Adjust these Guides to fit the width of your
original documents.
5 Paper Tray
You can load up to 250 sheets of Letter-size,
A4, or Legal-size paper into the standard
Tray.
You can add another 500 sheets with the
optional Second Paper Cassette Unit
(SPCU).
6 Bypass Fe ed Tray
Y o u can feed single s heets of special types of
paper. i.e. pre-printed letterhead & envelope s
7 Paper Exit Tray
This Tray catches the paper after printing.
7
3
4
2
1
5
6
1 - 5 Introduction
Page 38

External Components: Rear
Machine Components
8 AC Power Connector
The AC Power Cord plugs in here.
9 Main ON/OFF Switch
Use to turn the your unit ON and OFF.
10 Te lepho ne Line Connector
Plug the telephone cable from t his conn ector
into the wall socket of the telephone line.
11 Telephone Hand Set Connector -or-
External Line
Use this connector to plug in the telephone
cord from the telephone set.
12 Parallel Connector
Provides connection between this unit and a
host computer for GDI printing or PCL4 or
PCL 5e printing.
13 Serial Connector (RS232)
Provides connection between this unit and a
host computer for Class 1 PC faxing and
Twain-compliant scanning. This interface
can also be used for printing.
14 Network Connector (Optional NIC or I-
Fax Card)
Provides connection between the unit and the
Network.
15 Dual Line Connector (Optional)
Plug the telephone cable from this connector
into the wall socket for the second line.
13
14
15
12
11
10
10
9
8
Introduction 1 - 6
Page 39

Machine Components
External Components: Internal and Optional
16 Top Cover / Cover Release Buttons
Press these two buttons to open the Top
Cover to check and clear paper jams, to
change the Toner and Drum, or to clean the
interior of the unit.
17 Toner Cartridge
The Toner Cartridge contains the toner
particles used in imaging.
16
18 Drum Cartridge
This Drum Cartridge transfers toner to the
paper.
19 Second Paper Cassette Unit (SPCU)
When installed, it permits your unit to print
up to 750 uninterrupted pages without
reloading paper. (750 pages of standard
weight Letter/A4 size paper.)
17
18
19
1 - 7 Introduction
Page 40

Control Panel Layout
Machine Components
1
FUNCTION YES NO
PROGRAM
01
02 03 04 05 06
33
A
09
10
41
42
I
17
49
50
Q
25
26
57
58
Y
C
B
11
43
J
51
R
S
27
59
+/-
Z
D
12
44
K
2018 19
52
28
60
-/&
E
13
45
L
M
53
T
U
29
61
@
<
PIN CODE<DELETE
38373634 35
F
14
46
N
2221
54
V
30
62
.
39 40
15
23 24
55
31
63
2 3 6 5 4
FINE
STD
RESOLUTION
SCHEDULE JOURNAL REPORT W AKEUP
0807
G
16
4847
O
56
WX
32
64
CAP
EX-FINE
H
P
HALF TONE
HALF TONE
><
MAIL
SPEED DIAL
REDIAL
/PAU SE
SPEAKER
LIGHT
NORM DARK
TYPE ORG.
GHI
PQRS
1
4
7
*
SLEEP
ABC
2
JKL
5
TUV
8
0
AUTO RX. ERROR
DEF
3
MNO
6
WXYZ
9
#
COPY
STOP
START
Panel Description
1. Display The LCD Display provides you with instructions and information about fax, I-Fax, copying,
printing, programming and operationa l functions.
2. Resolution Keys Press this key to select the desired resolution for scanning:
Standard: Use for normal documents. This is the default.
Fine: Use for documents with fine lines or characters.
Ex-Fine: Use for very fine maps, drawings or extremely detailed originals.
Half Tone: Use for photographs or shaded drawings.
3. Original Type Key Press this key to select the type of original you are using:
Normal: Use this for most of the regular documents.
Light: Use for documents with very fine or light characters.
Dark: Use for documents that are dark.
4. Sleep /Wakeup Key Press this Key to turn the machine in standby mode.
5. Auto RX Light This light indicates the receiving mode of the Facsimile:
ON: The facsimile will receive documents automatically.
OFF: The facsimile will receive documents manually.
6. Error Light The ERROR Light illuminates if there is a problem with the unit such as paper jam. After the
problem has been corrected or when the STOP Key is pressed, the light turns OFF.
Introduction 1 - 8
Page 41

Machine Components
7 8 9 10 11 12 13 14 15
01
02 03 04 05 06
33
AB
09
10
41
42
I
17
49
50
Q
25
26
57
58
Y
PROGRAM
FUNCTION YES NO<PIN CODE<DELETE
C
11
43
J
51
R
S
27
59
+/-
Z
D
12
44
K
L
2018 19
52
T
28
60
-/&
38373634 35
E
13
45
M
53
U
29
61
@
F
14
46
N
2221
54
V
30
62
.
STD
RESOLUTION
SCHEDULE JOURNAL
39 40
G
15
O
23 24
55
W
31
63
FINE
0807
16
4847
56
32
64
CAP
EX-FINE
H
P
X
HALF TONE
HALF TONE
><
MAIL
SPEED DIAL
REDIAL
/PAU SE
SPEAKER
LIGHT
NORM DARK
TYPE ORG.
REPORT
GHI
PQRS
SLEEP
WAKEUP
ABC
1
4
7
*
2
JKL
5
TUV
8
0
AUTO RX. ERROR
DEF
3
MNO
6
WXYZ
9
#
16
COPY
STOP
START
Panel Description
7. Function Key The FUNCTION Key allow access to the Function Menu. Set Functions by pressing the
FUNCTION Key first and then selecting the desired function using numeric keys or the
FUNCTION Key.
8. PROGRAM Key Press the PROGRAM Key to enter the set menu and program your desired function using either
numeric keys or the arrow on the display.
9. YES Key The YES Key is used to accept the selections made under PROGRAM and FUNCTION menus.
10. NO Key The NO Key is used to reject the selections made und er the PROGRAM and FUNCTION m enus.
11. Pin Code Key This key is used to input personal iden tification num ber for some teleph one systems when you dial
an outside number.
12. Delete Key When in a Program mode, it is used to Delete an entry.
13. Schedule Key Press this key to view the transaction in memory file, such as m emory transmission or polling.
14. Journal Press this key to view the transaction result the same as in an activity report. This shows the
session number, remot e ID or dial number and resu lt.
15. Report Key This key is used to choose your desired report, press YES to print out the report if you need.
16. Arrow Keys
( )
1 - 9 Introduction
Used to move cursor to the right or left one position or to scroll through the menu. Use the Key
to enter ITU-T Sub-address in setting One-Touch or Speed Dial Keys.
Page 42

Machine Components
17
01
02 03 04 05 06
33
A
09
10
41
42
I
17
49
50
QR
25
26
57
58
Y
FUNCTION YES NO
PROGRAM
C
B
11
43
J
51
S
27
59
+/-
Z
D
12
44
K
L
2018 19
52
T
28
60
-/&
13
45
53
29
61
PIN CODE<DELETE
38373634 35
E
14
46
M
2221
54
U
30
62
@
<
39 40
F
15
N
23 24
55
V
31
63
.
FINE
STD
RESOLUTION
SCHEDULE JOURNAL
0807
G
16
4847
O
56
W
32
64
CAP
EX-FINE
H
P
X
HALF TONE
HALF TONE
><
MAIL
SPEED DIAL
REDIAL
/PAUSE
SPEAKER
LIGHT
NORM DARK
TYPE ORG.
REPORT
GHI
PQRS
*
SLEEP
WAKEUP
ABC
1
4
7
2
JKL
5
TUV
8
0
AUTO RX. ERROR
DEF
3
MNO
6
WXYZ
9
#
COPY
STOP
START
18 19 20 22 21 23 24 25
Panel Description
17. One-Touch Keys The One-Touch Keys are used to store frequently dialled numbers. Any of the Keys can be
assigned as One-Touch Keys or Group Dial Keys. In addition, the last eight keys can be used as
Program Keys. Each Group Key can hold up to 50 One-Touch or Speed Dial numbers.(32 OneTouch Keys is applicable for MINOLTAFAX2800, 64 One-Touch Keys for MINOLTAFAX3800.)
26
27
28
18. The “+” Key Used to register a combination dial in a One-Touch or Speed Dial Key, This symbol must follow
the initial number and be followed by a number stored in the One-Touch, Speed Dial Key or
entered via the Ten-Key Pad.
19. Mail Key Use this key to receive or transmit E-Mail.(With upgrade I-Fax card)
20. Speed Dial Key Use this to initiate speed dialling. Press the SPEED DIAL key and your three-digit code to start a
transmission.
21. Redial/Pause Key Redial: Press this key to redial the last telephone number called.
Pause: Press this key to insert a pause in the number being stored. When you press this key, a “P”
is inserted within a number causi ng a 2.5 second del ay when diali ng. This is us eful if you mu st dial
a prefix, such as 9 to pause briefly in order to access an outside telephone line. (A “P” after a series
of numbers adds 10 seconds to the normal time the machine waits for a remote receiver to answer
a call.)
22. Speaker Key Press this key to switch the unit to the telephone line for direct (manual) dial from the machine’s
keypad. When pressed first, it also allows you to hear the dialing when using One-Touch, Speed
Dial, etc.
23. “*” Key Press the “*” Key for tone dialing while your unit is set for pulse dialing. (This key is only
effective when the SPEAKER Key is used.)
Introduction 1 - 10
Page 43

Machine Components
Panel Description
24. Keypad These twelve keys work for the internal teleph one in the fa x unit just lik e the keypad on regular
touch tone phones. You can use the keypad to dial a remote unit directly or to assign codes and
telephone numbers to One-Touch and Speed Dial locations.
25. “#” Key Press the “#” Key to access internal line or PSTN line when your unit is set for use over a PBX
line.
26. Copy Key Press the COPY Key to initiate copying documents that are loaded on the Document Feed Tray.
27. STOP Key Use this key to stop copying, transm itting, dialling waiting to dial or scanning. You can also press
the STOP to return from any operation mode back to the standby status.
28. START Key Press the START Key to begin transmitting, scanning, copying or manual fax reception.
1 - 11 Introduction
Page 44

Definition of Display Symbols
The LCD Display shows the date, time of day, amount of memory available for
use, fax numbers, fax conditions and other information by means of either a
message or graphic. The fo ll ow table is a list of icons that ca n appear on the LCD
Display
Signifies a fax or phone number. Shown while the remote fax
Machine Components
number is being rung.
Prompts you to enter a fax
number.
Indicates the pause function is set
into the destination’s fax number.
Example 0P412641267
Indicates when the Internal PBX
function is set into the
destinations’s fax number.
Indicates when the Sub Address
is set into the destination’s fax
number.
Example: 4126412 :8108
Indicates that a polling
transmission function has been
stored in memory.
Indicates when the External PBX
to PSTN function is set into the
destination’s fax number
@
Shown while the user’s local fax is
being rung.
Shows the number of pages.
Example: A single page.
Shown while a document is being
transmitted to the other party.
Shown while a document is being
received from the other party.
Indicates that a document to be
transmitted by the timer
transmission function has been
stored in memory.
Indicates that a document to be
transmitted by the Internet Fax.
Introduction 1 - 12
Page 45

Machine Components
1 - 13 Introduction
Page 46

Basic Operations
Chapter 2
Page 47

Sending a Document
Sending a Document
Using Memory Transmit
Since your fax unit provides multi access capabilities, you can scan documents
into memory for transmission, even if your unit is in the process of transmit ting
data from memory, receiving data or printing a file from the PC.
1
Note: To use some of the fax functions s uch as One-Touch and Speed
Dial you must first program your unit. If your unit has not yet been
programmed, refer to Chapter 4 Progra mming.
Note: If the unit runs out of memory during scanning, you can use
manual transmission by pressing the SPEAKER key or by using the
Direct Transmit ADF TX procedure.
Place your document face down on the
Document Feed Tray.
NOV.07 12:34 100%
-SET DOC. FACE DOWN-
2
Adjust the Document Side Gui des t o
the edges of the document.
3
Use the TYPE ORG. Key to select the desired contrast:
Use this setting for this
Normal Regular documents. (Default)
Dark Documents that are dark.
Light Documents with very fine or light characters.
2 - 1 Basic Operations
Page 48

Sending a Document
4
Use the RESOLUTION Key to select the desired resolution:
Use this setting for this
Standard Documents with standard size characters, such as typed documents.
Fine Documents with smaller size characters, like newsprint.
(Copy Default)
Extra Fine Documents with very fine or light characters.
5
If you are sending a photograph, press the HALF TONE Key for best
results.
6
Enter the remote Fax number using the
numeric Key Pad.
ENTER FAX NO.
or FUNCTION
•
The unit scans the document into
memory and sends it to the location you selected.
•
The unit automatically returns to standby mode when finished
transmitting.
7
T o stop a transmission, pr es s t he STOP Key.
Memory Overflow Transmit
When your unit senses it runs out of memory if a half page of your document is
being scanned in ADF, it will stop
transmission and following LCD
messages appeared, press the STOP key
to recover your machine at stand by state
and press STOP key again to reject your
document out from ADF.
In this situation ADF TX is recommended,
it will scan one page and TX one page and scan one page and so on, refer to page
Note: Prior to placing the original face down on the document feeder for
transmission, the fax number can be entered on the MINOLTAFAX 2800 /
3800. This enables you to reference the fax number on the original, enter the
number and then place the original face down for transmission.
ABC
TUV
2
JKL
5
8
0
DEF
3
MNO
6
WXYZ
9
#
COPY
STOP
START
CAUTION
MEMORY FULL
* CAUTION*
MEM.FULL/TX CANCEL
4-27
Basic Operations 2 - 2
Page 49

Sending a Document
Using the SPEAKER Key
Use the SPEAKER dial sequence when it is necessary to listen to the
“Handshake”. This is an important troubleshooting aid to see if a transmission
fault is phone rel ated o r no t. It is pos sibl e to di al a locat ion usi ng any combinat io n
of TEN-Key, One Touch Dial, or Speed Dial Directories.
1
Place your document face down on the Document Feed Tray.
2
Adjust the Document Side Guides to the edges of the document.
3
Use the TYPE ORG. Key to select the desired contrast:
4
Use the RESOLUTION Key to select the desired resolution:
5
Press the SPEAKER Key.
6
Enter the remote fax number using one of
the entry methods.
7
listen until the remote fax unit answers,
then press the START Key.
8
To stop a transmission already in progress,
press the STOP Key.
SPEED DIAL
REDIAL
/PAUSE
SPEAKER
GHI
PQRS
*
TUV
JKL
5
8
0
4
7
(7776665555)
-PUSH START KEY-
MNO
WXYZ
6
9
#
2 - 3 Basic Operations
Page 50

Using Combination Dial
This is used when the number exceeds the 30 digit limit for a single location. The
number is split between two locations and the two are automatically linked when
the first of the two is used. It is possible to input dialing numbers continuously.
You can enter another One-Touch, Speed Dial or Ten Key followed by the combination dial numbers (phone numbers last digits is ‘+’ in One Touch or Speed Dial
Key). The telephone number limit is 30 digits.
1
Place your document face down on the Document Feed Tray.
2
Adjust the Document Side Guides to the edges of the document.
3
Use the TYPE ORG. Key to select the desired contrast:
4
Use the RESOLUTION Key to select the desired resolution:
5
Press a One-Touch Key.
•
The One-Touch number should have a “+” at the end indicating an
additional Key has been programmed to extend the length of the
number.
Sending a Document
6
Press the second One-Touch key containing the additional numbers and
press START.
•
The unit scans the document into memory and sends it to the location
you selected.
•
The unit automatically returns to standby mode when finished
transmitting.
7
To stop a transmission, press the STOP Key.
Basic Operations 2 - 4
Page 51

Dialing Methods
Dialing Methods
Use this setting for this
1. Key Pad Dial Dial the number of the remote facsimile using the numeric keypad. You
2. One Touch Dial Press a ONE TOUCH Key. Its number will be displayed and the unit
3. Speed Dial Press the SPEED DIAL Key and enter a three-digit dial number from the
4. Group Dial Press a ONE-TOUCH Key. Any One-Touch Key can be programmed for
You can use the following methods to dial a remote facsimile number from your
unit.
can also use the Arrow Key to correct any mistakes. (A maximum of 30
digits are allowed, including the “PAUSE” (P).
scans the document and dials the number automatically. See the
Advanced Operations.
keypad. The Speed Dial number is shown on the display. The unit scans
the document and dials the number automatically.
Group Dialing. The Group Name is shown on the display. The unit scans
the document and dials the numbers automatically.
5. Program Dial Several transmission functions can be programmed in any of th e last eig ht
One-T ouch Keys. To utilize these functions, press the corresponding OneT o uch Ke y.
For example: if you want to set up an after-hours broadcast which is
performed regularly, you can register the necessary functions in a
Program Dial Key.
6. Using Combination Dial If the One-Touch or Speed Dial phone number displays a “+” as the last
character, additional numbers are necessary to complete the dialing. The
additional numbers may be stored in a One-Touch or Speed Dial location,
or may be entered using the key pad.
7. Using the “#” Key In most PBX applications, a prefix is necessary ahead of the outside
phone number in order to access an outside line. Once this prefix number
has been programmed into the machine, pressing the “#” Key
automatically enters it in the string.
2 - 5 Basic Operations
Page 52

Receiving a Document
Use automatic receiving when you want your fax to automatically receive faxes
without any intervention from you.
Auto Receive
1
Make sure your unit is ready to receive.
•
•
When your unit rings, the LCD shows
this message.
If the sending location is recognized,
the blank is filled in with the name or
telephone number of the location.
Receiving a Document
NOV.07 12:34 100%
-SET DOC. FACE DOWN-
( ) 100%
-SET DOC. FACE DOWN-
(CHICAGO) 100%
-SET DOC. FACE DOWN-
•
When the transmission is complete this
message is displayed. The number at
the end of the second line indicates the
number of pages sent.
•
When the document starts to print, the
following message is displayed. The
return of the second line shows that
other operations such as sending a Fax
or making a copy are now available.
•
When the final page prints, the display
shows the following message. The
number shows the number of pages
printed
*RX COMPLETE*
CHICAGO 20P
*PRINT DOC* 90%
-SET DOC. FACE DOWN-
*PRINT COMPLETE*
20P
Basic Operations 2 - 6
Page 53

Receiving a Document
Manual Receive
In the manual receive mode, you can talk to the caller and start the receive the
document after the conversation is over.
1
When your unit rings, answer the phone.
2
If it is evid ent that it is a fa x transmission,
press the START Key on your unit and
then replace the phone on the cradle.
•
An intermittent tone after picking up
the handset indicates a fax call.
•
When your unit recogniz es the signal as
a fax call, the LCD show s t his mes sage .
NOV.07 12:34 100%
-SET DOC. FACE DOWN-
*TALKING*
( ) 100%
-SET DOC. FACE DOWN-
•
If the sending location is recognized,
the blank is filled in with the name or
telephone number of the location.
•
When the transmission is complete this
message is displayed. The number at
the end of the second line indicates the
number of pages sent.
•
When the document starts to print the
following message is displayed. The
return of the second line shows that
other operations such as sending a Fax
or making a copy are now available.
•
When the final page prints, the display
shows the following message. The
number shows the number of pages
printed.
(CHICAGO) 100%
-SET DOC. FACE DOWN-
*RX COMPLETE*
CHICAGO 20P
*PRINT DOC* 90%
-SET DOC. FACE DOWN-
*PRINT COMPLETE*
20P
2 - 7 Basic Operations
Page 54

Memory Receive (Memory Lock)
This option saves all inc oming faxes into memory. To access and print these
documents, you must enter a password.
Note: If you don’t have a pass word, contact your Key Operator to
provide this.
1
With your unit in a ready position, the
following message appear s.
2
When your unit rings, the LCD shows this
message.
3
If the sending location is recognized, the
blank is filled in with the name or
telephone number of the location.
Receiving a Document
<<M-RX>> 100%
-SET DOC. FACE DOWN-
( ) 100%
-SET DOC. FACE DOWN-
(CHICAGO) 100%
-SET DOC. FACE DOWN-
4
When the tr ansmission is complete this
message is displayed. The number at the
end of the secon d line indicate s the nu mber
of pages sent.
5
The document ‘prints’ into memory.
6
When the final page ‘prints’, the display
shows the following message. The number
shows the number of pages pr inted.
Note: If you want to print documents from memory receive, please
refer to chapter3--Print Memory RX.
*RX COMPLETE*
CHICAGO 20P
<<M-RX 10P>> 80%
-SET DOC. FACE DOWN-
*PRINT COMPLETE*
20P
Basic Operations 2 - 8
Page 55

Receiving a Document
Substitute Memory Receive
If the facsimile unit should encounter any of the following situations, it will
switch from direct reception mode to memory reception mode.
•
Machine runs out of paper
•
Machine runs out of toner
•
Printer Cover is open
•
Recording Paper Jam
•
Machine trouble
1
With your unit in a ready position, the
following message appear s.
•
When your unit rings, the LCD shows
this message.
NOV.07 12:34 100%
-SET DOC. FACE DOWN-
( ) 100%
-SET DOC. FACE DOWN-
•
If for any of the abo ve reasons your unit
cannot receive and print the message,
an error message is displayed.
2
Take whatever actions are required to clear the error.
•
When the error is removed, the unit
returns to normal operation and starts
printing the documents stored in
memory.
•
When the final page prints, the display
shows the following message. The
number shows the number of pages
printed.
*MEMORY RX* 15P
RECORDING PAPER JAM
*PRINT DOC. 80%
-SET DOC. FACE DOWN-
*PRINT COMPLETE*
15P
2 - 9 Basic Operations
Page 56

Making Copies
W
Making Copies
With your facsimile unit, you can make from 1 to 99 high quality copies of an
original document. The Document Feeder can hold up to 50 originals.
Procedure
1
Place your document face down on
the Document Feed Tray.
2
Adjust the Document Side Guides to
the edges of the document .
3
The LCD Message Display indi cates
the followin g:
4
Use the TYPE ORG. Key to select
the desired contrast:
•
Use NORM for regular
documents.
•
Use LIGHT for documents with
very fine or light characters.
•
Use DARK for documents that
are dark.
5
Use the RESOLUTION Key to
select the desired resolution:
•
Use STD (Standard) for
documents with standard size
characters, such as typed
documents.
•
Use FINE for documents with
smaller size characters, like
newsprint.
•
Use EX-FINE for documen ts with very f ine character s.
ENTER FAX NO.
or FUNCTION
FINE
RESOLUTION
SCHEDULE JOURNAL
<
DE DELETE
EX-FINE
HALF TONE
HALF TONE
STD
RESOLUTION
SCHEDULE JOURNAL
NORM DARK
LIGHT
TYP E ORG.
REPORT
><
FINE
EX-FINE
HALF TONE
HALF TONE
><
WAKEUP
LIGHT
SLEEP
NORM DARK
TYPE ORG.
REPORT
AUT
Basic Operations 2 - 10
Page 57

Making Copies
6
Use HALF TONE for documents such as photos that have a gray scale.
HALF TONE may be used in combination with Original Types and
Resolution Keys.
7
Press the COPY Key.
ABC
1
2
DEF
3
COPY
STOP
START
8
The LCD readout displays the following:
GHI
PQRS
TUV
JKL
5
8
4
7
MNO
WXYZ
6
9
*COPY* COPIES=01
OK=START
9
Enter the number of copies you ne ed using
the Numeric Keypad.
*COPY* COPIES=02
OK=START(SORT=YES)
10
If you have entered more than “1” as your quantity, press the YES Key to sort the
set, or press START to STACK the sets.
This mode does this
STACK (Default) Copies the original document according to the page number order.
Example: If you are making two copies of pages 1 through 4, the copies
are produced in this order: 1, 1, 2, 2, 3, 3, 4, 4
SORTER Copies the original document according to sort order.
Example: If you are making two copies of pages 1 through 4, the copies
are produced in this order: 1, 2, 3, 4, 1, 2, 3, 4
•
The unit scans the document into memory and then makes copies.
•
The unit automatically returns to standby mode.
2 - 11 Basic Operations
Page 58

Advanced Facsimile
Chapter 3
Page 59

Using the Function Menu
Using the Function Menu
The FUNCTION Key is used to access the most often used fax functions. Listed
below are the menus you will encounter.
FUNCTION 1 BROADCAST
2 TIMER TX
3 MAILBOX TX
4 PRINT MAILBOX RX
5 PRINT MEMORY RX
6 POLLING TX
7 POLLING RX
8 RELAY INITIATE
1
To access these functions, press the
FUNCTION Key.
2
To select an option, perform one of the
following:.
•
Press the number of the item you want.
•
OR, Press FUNCTION a second time and use the arrow keys to go the
menu item you want.
•
OR, Press FUNCTION continually until you reach the menu item you
want.
NOV.06 15:38 100%
-SET DOC. FACE DOWN-
FUNCTION
SEL. 1-8 OR FUNCTION
3 - 1 Advanced Facsimile
Page 60

Broadcast
Broadcast
The Broadcast feature allows you to send the same document to up to 148
destination on the MINOLTAFAX2800 and 180 destination on the
MINOLTAFAX3800 in the same session. The facsimile will scan the document
into memor y and transmit it sequentially to different destinations.
The facsimile can broadcas t to destin ations c onsisti ng of al l One-Touch Dials, 100
Speed Dials and 16 manually dialed numbers.
If you frequently send documents to the same multiple location, you can set up a
Group Dial Key to automatically broadcast to these locations. See the Facsimile
Programming Chapter for m ore info.
Procedure
1
Select the Original Type, Resolution if
necessary and place your document in the
Document Feeder face down.
NOV.06 15:38 100%
-SET DOC. FACE DOWN-
2
Press the FUNCTION Key and enter 1 to
select the Broadcast function.
3
The following message appears briefly to
confirm your selection.
4
Enter the Broadcast location number. This
can be a One-Touch Key, a Speed Dial
Key, a Group Dial Key, a Combination
Dial Key, or manually entered telephone
numbers. Press YES between location.
5
When all the numbers have been entered,
press START to begin your Broadcast
session
FUNCTION
SEL. 1-8 OR FUNCTION
1 BROADCAST
NO.001=_
OK=YES (DEL=NO)
NO.002=_
(Fin.=START)
Advanced Facsimile 3 - 2
Page 61

Timer TX (Delay Transmission)
Timer TX (Delay Transmission)
This feature allows you to set a specified start time within 24 hours to send
documents at a later time. Set the reservation timer using military time (24 hour
format). This functions can also be comb ined with Broadcast, Mailbox TX,
Polling RX, or Relay Initiate.
Procedure
1
Select the Original Type and Resoluti on if
necessary and place your document in the
Document Feeder face down.
2
Press the FUNCTION Key and press 2 to
select the Timer TX menu.
3
The following message appears briefly to
confirm your selection.
NOV.06 15:38 100%
-SET DOC. FACE DOWN-
FUNCTION
SEL. 1-8 OR FUNCTION
2 TIMER TX
4
Enter the time you wish the Transmission
to begin.
5
Enter the destination fax number. If you
press FUNCTION, the available types of
Delay Transmissions are: manually entered
fax number, Broadcast, Mailbox Polling
RX or Relay Initiate.
TIMER=_0:00
OK=YES
ENTER FAX NO.
or FUNCTION
3 - 3 Advanced Facsimile
Page 62

Mailbox TX
Mailbox TX
This operation is normally used to send confidential messages. Mailbox TX
allows the sender the ability to send a fax message to a remote machine to be
stored in memory. Only the user with the correct password can print the
document. This function works only with a compatible fax machine that is set up
for Mailbox recept ion. You need to enter the c orrec t Mailb ox ID and Mail box PW
for successful transmissi on.
Procedure
1
Select the Original Type, Resolution if
necessary and place your document in the
Document Feeder face down.
2
Press the FUNCTION Key and press 3 to
select the Mailbox TX menu.
NOV.06 15:38 100%
-SET DOC. FACE DOWN-
FUNCTION
SEL. 1-8 OR FUNCTION
3
The following message appears briefly to
confirm your selection.
4
Enter the destination fax number.
5
Enter 20-digit the Mailbox ID.
6
Enter the 20-digit Mailbox Password and
press YES.
3 MAILBOX TX
ENTER FAX NO.
OK=YES (DEL=NO)
MAILBOX ID=
OK=YES
PASSWORD=
OK=YES
Advanced Facsimile 3 - 4
Page 63

Print Mailbox RX
Print Mailbox RX
This operation is normally used to receive confidential messages. Mailbox TX
allows the sender th e abi lity to send a fax mes sage t o your mac hin e to be s tored in
memory. Only the user with the correct password can print the document. This
function works only with a compati ble fa x machine a nd yo ur machin e must be s et
up for Mailbox reception. You need to enter the correct Mailbox Password to
access the documents in your Mailbox.
Your fax unit can be programmed with up to 10 virtual mailboxes. Each Mailbox
is assigned a 20-digit Password. This Password is required to access the
documents setting in your Mailbox.
Note: To set up a Mailbox and as sign a Passwor d or to ch ange your
present one, contact your Key Operator for assistance.
Procedure
1
Press the FUNCTION Key and press 4 to
select the Print Mailbox RX menu.
2
The following message appears briefly to
confirm your selection.
3
Enter the 20-digit Mailbox PW to your
Mailbox and press YES.
4
If you enter the wrong PW you are
prompted and then given an opport uni ty to
enter the correct PW number.
5
When the contents of your Mailbox has
printed, you are prompted that printing is
complete.
FUNCTION
SEL. 1-8 OR FUNCTION
4 PRINT MAILBOX RX
MAILBOX PW=_
OK=YES (DEL=NO)
*WRONG MAILBOX PW*
*PRINT COMPLETE*
3 - 5 Advanced Facsimile
Page 64

Print Memory RX
Press the FUNCTION Key and press 5 to select the
1
Print Memory RX menu.
2
The following message appears briefly to confirm
your selection.
3
Enter your Memory RX password (20-digit) and
press YES.
4
When the content of yo ur Memory RX has print ed,
you are prompted that printing is complete.
Print Memory RX
FUNCTION
SEL. 1-8 OR FUNCTION
5 PRINT MEMORY RX
PASSWORD=_
OK=YES (DEL=NO)
*PRINT MEMORY RX*
*PRINT COMPLETE*
Advanced Facsimile 3 - 6
Page 65

Polling TX
Polling TX
Polling TX allows you to set a document to be retrieved by a remote fax machine.
Your fax machine will automatically send the stored document in response to
polling requests from remote devices. You need to set a polling ID and 20-digit
security code to prevent unauthorized polling.
Polling TX offers Single and Multi Modes.
•
In Single Mode, the specified file will be deleted after it has been
successfully transmitted.
•
In Multi Mode, the specified file has to be manually deleted during a
polling TX or by Cancel Reservation Session.
Note: You need to set a 4-digit security code to prevent
unauthorized polling. Contact your Key Operator to have this set
up for you.
Procedure
1
Select the Original Type, Resolution if
necessary and place your document in the
Document Feeder face down.
2
Press the FUNCTION Key and press 6 to
select the Polling TX menu.
3
The following message appears briefly to
confirm your selection.
4
Enter the 20-digit Polling ID.
5
Enter the 20-digit Polling PW and press
YES.
NOV.06 15:38 100%
-SET DOC. FACE DOWN-
FUNCTION
SEL. 1-8 OR FUNCTION
6 POLLING TX
POLLING ID=_
OK=YES (DEL=NO)
POLLING PW=_
OK=YES (DEL=NO)
6
If you enter a regist ered polling ID you are
prompted and then given an opport uni ty to
delete this stored Polling TX or keep as it
is.
3 - 7 Advanced Facsimile
REGISTED! KEEP?
OK=YES (DEL=NO)
Page 66

7
Select either Single or Multi and press YES
to start the Polling session.
8
Your document is scanned into memory,
ready for it to be polled. The “P” in the
Message Display indicated the Polling
Document is in memory.
Polling TX
*SINGLE MULTI
-SELECT&PUSH”YES”-
NOV.06 15:38 100%
-SET DOC. FACE DOWN-
Advanced Facsimile 3 - 8
Page 67

Polling RX
Polling RX
Polling RX allows you to obtain stored documents in another fax by calling the
remote fax and instructing it to transmit. T o receive (poll) the document, you need
to enter the correct polling PW number.
Your unit sends the Polling PW code to the remote unit. The remote unit allows
your unit to poll if your PW code matches the remote unit document PW.
Note: Contact the Key Operator of the remote unit for the correct
Polling PW number.
Procedure
1
Press the FUNCTION Key and press 7 to
select the Polling RX menu.
2
The following message appears briefly to
confirm your selection.
FUNCTION
SEL. 1-8 OR FUNCTION
7 POLLING RX
3
Enter the One-Touch key of the remote fax
unit or enter the phone of the remote unit
manually and press YES.
4
Enter the 20-digit Polling ID.
5
Enter the 2 0-digit Poll ing PW for the
remote location.
If you do not have this PW, you will have
to contact the Key Oper ator for the remote
fax unit for this information.
6
You are given the opportunity to enter
additional loca tions to poll. To finish, press
START.
7
You are given the opportunity to check the
destinations you have selected. To initiate
the Polling session, pr ess START.
NO.001=_
OK=YES (SEP= )
POLLING ID=_
OK=YES (DEL=NO)
POLLING PW=_
OK=YES (DEL=NO)
NO.002=_
(Fin.=START)
CHECK DESTINATIONS?
OK=YES (Fin.=START)
3 - 9 Advanced Facsimile
Page 68

Continuous Polling RX
Your unit can be programmed to continuously poll up to ten groups. Each group
can contain up to ten location. This allows a central unit to poll remote units on a
continuous basis. Any time a document is placed in the remote unit for Polling
TX, your machine will automatically receive it. Refer to the Prog ram section for
programming details. (Refer to page 4-36)
Polling RX
Advanced Facsimile 3 - 10
Page 69

Relay Initiate
Relay Initiate
Relay TX allows the operator to make one long distance call to a remote unit and
the remote unit will relay the message to one or more fax units in the local area.
With this function, you can save valuable time and telephone charges. This
function can also instruct the remote fax machine to send an activity report to one
of its One-Touch or Speed Dial location.
Note: If no One-Touch or Speed Dial Keys were set up, no reports
will be generated.
Procedure
1
Select the Original Type, Resolution if
necessary and place your document in the
Document Feeder face down.
2
Press the FUNCTION Key and press 8 to
select the Relay Initiate menu.
NOV.06 15:38 100%
-SET DOC. FACE DOWN-
FUNCTION
SEL. 1-8 OR FUNCTION
3
The following messages appear briefly to
confirm your selection.
4
Enter the destination fax number.
5
Enter the 20-digit Relay Box ID.
6
Enter the 20-digit password.
8 RELAY INITIATE
ENTER FAX NO.
OK=YES (DEL=NO)
RELAY BOX ID=
OK=YES
PASSWORD=
OK=YES
3 - 11 Advanced Facsimile
Page 70

Using Combination Dial
Because the telephone number in each One-Touch and Speed Dial location is
limited to 30 digits, it might be necessary to combine two or more One-Touch or
Speed Dial lo cations to call one location.
Procedure
1
Select the Original Type, Resolution if
necessary and place your document in the
Document Feeder face down.
2
Press any of the One-Touch or Speed Dial
Keys you have programmed.
3
The following messages appear briefly to
confirm your selection.
Using Combination Dial
NOV.06 15:38 100%
-SET DOC. FACE DOWN-
ONE TOUCH 01
YES / or
ONE TOUCH 01
4
If the displayed number has a “+” as the
last digit, additi onal numbers must be used
to dial this locaiton.
5
At this point, you have the option to ent er the addi tiona l numbers usi ng the
Ten-Key Pad, selecting another One-Touch Key or entering another Speed
Dial number.
6
Enter your selection.
7
To begin transmitting, press START.
1234+
12345678
(TX=START)
Advanced Facsimile 3 - 12
Page 71

JOURNAL Key
2
AB
JOURNAL Key
The Journal Key allows users to press the Up or Down Arrow Keys to check the
transmissi on results of the last 60 communications on the LCD screen. Pressing
the START Key then prints the report.
1
With your unit at a ready condition, press
the Journal Key.
NOV.06 15:38 100%
-SET DOC. FACE DOWN-
2
Using the Up and Down Arrows, select the
TX you wish to check the status on.
3
Press the START Key to print the report.
RESOLUTION
SCHEDULE JOURNAL
08
40
G
HALF TONE
><
MAIL
H
1 (MAR.01 14:00)TX
NY OFFICE -OK
TYPE ORG.
REPORT
1
WA
3 - 13 Advanced Facsimile
Page 72

REPORT Key
A
REPORT Key
The Report Key allows users to press the Up or Down Arrow Keys to print a
desired report. Pressing the YES Key then prints the report.
1
With your unit at a ready condition, press
the Report Key.
NOV.06 15:38 100%
-SET DOC. FACE DOWN-
2
Using the Up and Down Arrows, select the
Report you wish to print. The report in the
order they appear are:
•
TX RESULT REPORT?
•
RX RESULT REPORT?
•
ACTIVITY REPORT?
•
MEMORY DATA LIST?
•
MEMORY IMAGE PRINT?
•
ONE-TOUCH LIST?
•
SPEED DIAL LIST?
•
KEY SETTING LIST?
•
MACHINE STATUS LIST?
•
CONTINU. RX LIST?
•
RELAY BOX LIST?
HALF TONE
EX-FINE
TION
HALF TONE
ULE JOURNAL
>
MAIL
LIGHT
NORM DARK
TYP E ORG.
REPORT
TX RESULT REPORT?
OK=YES
SLEEP
WAKEUP
3
Press the YES Key to print the report.
Advanced Facsimile 3 - 14
Page 73

Reports
Reports
Transmit Message Confirmation
Many of the available reports can be programmed to print automatically. If you
wish to have these set up, contac t you r Key Operat or to set these up or ref er to the
Chapter on Programming.
If TX Message Confirmation Report is turned ON, this unit automatically prints a
Confirmation Report. I f it is turned OFF, y ou can still check transmission results
by printing the Activity Report or pressing the JOURNAL Key to view the
Journal on the LCD.
If the transmissio n is success ful, the un it print s a report wit h the date and time, the
receiver’s number, the number of pages that were sent and other useful
information.
If the document was scann ed into memory, the report prints a copy of the first
page of the transmission on the report for your reference.
If the transmission was not completed , the unit prints out an error report.
Manual TX Report
This function can be used to save paper and bulk in your files by printing the TX
Results on the back of the original.
1
2
3
4
When the document has finished sending,
place it face up in the By-Pass Feed Tray.
Press the JOURNAL Key.
If you are doing this immediately after
sending the document, press START.
If there has been other sessions since your transmission, use the Arrow
Keys to scroll thr ough the list and locate t he p hone number you sent to and
press START.
3 - 15 Advanced Facsimile
Page 74

SCHEDULE Key
O
E
P
SCHEDULE Key
Press this key to view the transaction in memory file, such as memory
transmission or polling. You can press the YES key to cancel this schedule.
1
With your unit at a ready condition, press
the Schedule Key.
NOV.06 15:38 100%
-SET DOC. FACE DOWN-
2
If there are no messages in memory, the
following message appears.
3
Messages in memory, the following
message appears. Press the Up and Down
Arrow Keys to select the desired message.
4
Press the Right Arrow Key to Confirm the
location this message is being set to.
FINE
<
CODE<DELETE
06
38
F
STD
39 40
EX-FINE
RESOLUTION
SCHEDULE JOURNAL
0807
G
H
*NONE*
001[14:55] B-CAST
DELETE or (CONF.= )
001[14:55] B-CAST
DELETE or (CONF.= )
HALF TONE
HALF TONE
><
MAIL
LIGHT
N
TYP
RE
5
Use the Up and Down Arrows t o se le ct the
locations you wish to check and press
YES.
6
If you selected Delete in Step 4, you are
given the opportunity to delete that
transmission.
Advanced Facsimile 3 - 16
001=DALLAS
CHECK FINISH=YES
004[1234] POLL TX
CANCELED
Page 75

PIN CODE Key
PIN CODE Key
The PIN CODE (Personal Identification Number) prevents unauthorized
personnel from making calls. Some office telephone systems require you to enter
not only the phone number but also a PIN number when you dial an outside line.
You can dial a PIN plus fax number, but the PIN will not appear in the LCD or on
any printout.
1
With your unit at a ready condition, press
the PIN CODE Key.
NOV.06 15:38 100%
-SET DOC. FACE DOWN-
2
Enter your PIN Code, make sure it is
correct and press YES.
3
Select the remote locatio n using a OneTouch Key, a Speed Dial Key or manually
entering the number from the 10-Key Pad.
Note: The entry of you r PI N is act ive o nly for t his se ssion a nd must
be re-entered for each new session.
SCHEDULE
G
15
O
YES NO
D
L
PIN CODE<DELETE
05 06
E
13
45
M
<
3837
14
46
39 40
F
N
PIN=_
OK=YES
_
(TX=START)
<
0807
H
16
4847
P
3 - 17 Advanced Facsimile
Page 76

SPEAKER Key
1
2
H
SPEAKER Key
The SPEAKER Key allows the user to transmit manually. The SPEAKER Key
also allows you to verify that the line is properly connected by enabling you to
hear signals from the speaker built into the fax machine.
1
With your unit at a ready condition, press
the Hook Key.
NOV.06 15:38 100%
-SET DOC. FACE DOWN-
16
48
24
56
32
64
CAP
SPEED DIAL
P
REDIAL
/PAUSE
X
SPEAKER
GHI
4
PQRS
7
*
TUV
JKL
5
8
0
2
Enter the number of the remote unit you
wish to transmit to us ing a One-Touch Key ,
Speed Dial Key or manually entering it
using the 10-Key Pad.
3
Once the r emote machin e has answered,
press the START Key to begin the
transmission.
4
Press the Right Arrow Key to Confirm the
location this message is being set to.
•
While the message is being sent you
can hear the tones and this message
appears.
•
While the message is being sent you
can hear the tones and this message
appears.
*SPEAKER*
(DALLAS)
-PUSH START Key-
001[14:55] B-CAST
DELETE or (CONF.= )
001=DALLAS
CHECK FINISH=YES
(DALLAS)
Advanced Facsimile 3 - 18
Page 77

F Codes
F Codes
F codes have been standardized by the Communications Industry Association of
Japan and are based upon sub-address communications. These codes enable
secure communication between devices of varying manufacturers.
This function is available for Mailbox TX/RX, Relay Broadcasting, Polling TX/
RX.
3 - 19 Advanced Facsimile
Page 78

Facsimile Programming
Chapter 4
Page 79

Accessing The User Program Area
Accessing The User Program Area
This section gives step- by- st ep instructions on how to program the number to be stored in
the One-Touch, Speed Dial and Group Dial Keys. In addition, it shows you how to set up
special parameters for each One-Touch Key, including Batch Time and Relay Broadcast.
Menu Navigation
1
Press the PROGRAM Key.
2
Use the Up or Down Arrows to step through the available menu options, or
continue to press the PROGRAM Key to step it to the next menu item. The main
menu items are:
• DIAL REGISTRATION?
• SCANNING & PRINTING?
• TX OPERATION?
• RX OPERATION?
• MACHINE OPERATION?
• REPORT?
• INITIAL USER DATA?
• SET PRINTER?
• LINE 2 SETTING?
• INTERNET FAX?
Note: A more complete menu appears on the next page. See “Menu
Structure.”
DIAL REGISTRATION?
YES / or 1-6
3
When on the Initial User Data option, press YES.
4
Use the Arrows to step through the available menu
items until you find the one you wish to program.
• 1 DATE & TIME?
• 2 USER FAX NO.?
• 3 USER NAME?
• 4 DEPARTMENT PW?
5
Use the Left, Right, Up or Down Arrows to navigate through the menus.
4 - 1 Facsimile Programming
INITIAL USER DATA?
YES / or 1-4
1 DATE & TIME?
OK=YES
Page 80

Accessing The User Program Area
Menu Structure
Listed below are the PROGRAM Menu selections as they appear in your unit. Also
shown are the available selections and the default settings. Once inside each selection,
you will find additional help and guidance.
Menu Group Sub-Menu Selections Choices Available Default
DIAL
REGISTRATION?
SCANNING &
PRINTING?
TX OPERATION? 1 DEFAULT TX
RX OPERATION? 1 MEMORY RX MODE
1 ONE-TOUCH DIAL
2 SPEED DIAL
3 GROUP DIAL
4 PROGRAM DIAL
5 BATCH TX
6 RELAY BOX
1 RESOLUTION
2 SCAN CONTRAST
3 PRINT DENSITY
4 REDUCTION CO PY
5 REC. PAPER SIZE
2 CLOSED NETWORK
3 FAX FORWARDING
4 HEADER
2 NO. of RINGS
3 TWO PAGE PRINT
4 REDUCTION RX
5 MAILBOX RX
6 CLOSED NETWORK
7 RX MODE
8 FOOTER
9 CONTINUE POLL RX
One-Touch
Speed Dial
Group Dial
Program Dial
Start Time
Standard/Fine/Extra Fine
LIGHT/NORMAL/DARK
Dark to Light (6 steps)
On / Off
LETTER / LEGAL / A4
MEM TX / ADF TX
On / Off
On / Off
On / Off
On / Off
1 to 16
On / On(Sort) / Off
On / Off / Cut
Password
On / Off
Auto / Manual
On / Off
ON / Off
Not
Not
Not
Not
Off
Standard
Normal
Step 4
Off
A4 / Letter(USA)
MEMORY TX
Off
On
On (Not applicable
in U.S.A.)
Off
2
Off
On
Not Required
Off
Auto
Off
Off
MACHINE
OPERATIONS?
REPORT? 1 ACTIVITY REPORT
Facsimile Programming 4 - 2
1 LCD CONTRAST
2 TONE / PULSE
3 BUZZER VOLUME
4 LINE MONITOR
5 REMOTE MONITOR
6 PSTN / PBX
7 POWER SAVE MODE
8 POWER SAVE TIME
9 DRUM COUNTER
2 RESERV. REPORT
3 TX RESULT REPORT
4 RX RESULT REPORT
5 BROADCAST REPORT
6 TONER LOW REPORT
DARK LIGHT
T one / Pu lse(10PPS/20)
Hi / Low / Off
Hi / Low / Off
On / Off
PSTN / PBX
Off / Timer (On an d Off)
1 to 120 min
On / Off
On / Off
On / Off
On / Off
On / Off
On / Off + Tel #
Tone
Low
Low
Off
PSTN
Timer
15 min
On
Off
Off
Off
Off
Off
Page 81

Accessing The User Program Area
Menu Group Sub-Menu Selections Choices Available Default
INITIAL USER DATA? 1 DATE & TIME
2 USER FAX NO.
3 USER NAME
4 DEPARTMENT ID
SET PRINTER? 1 AUTO CASSETTE SEL.
2 NUMBER OF COPIES
3 SYMBOL SET
4 FONT NUMBER
5 LINE NUMBER
6 *PRINT FONT*
7 PCL4
8 GDI ENHANCE
LINE 2 SETTING? 1 LINE 2 FAX NO.
2 TX LINE PRIORITY
3 LINE 2 TONE/PULSE
INTERNET FAX? 1 E-MAIL SETTING
2 SERVER SETTING
3 POP3 INTERVAL
4 TIME OUT SETTING
5 ERROR REPORT
6 TIME ZONE
Date & Time
User Fax No.
User Name
On / Off
On / Off
1 to 99
IBM-US(24 types of fonts)
1 to 6
5 to 127
On / Off
On / Off
Line 2 Fax No.
Set Line 1 or Line 2 for TX
Priority
Tone / Pulse
1 to 120 minutes
1 to 5 minutes
ENABLE / DISABLE
Jan 1 1990
Required
Required
Off
Off
1
IBM-US
1
64
Not Required
Off
Off
Line 1 Priority
Tone
ENABLE/30min
3min
ENABLE
4 - 3 Facsimile Programming
Page 82

Entering Numbers and Letters
A
*
7
Q
1
To enter numbers into a numeric field, use
the 10-Key Pad.
Accessing The User Program Area
ABC
1
2
DEF
3
COPY
2
To enter letters into an alpha field,
use the One-Touch Keys.
3
To enter a Space betwee n numbers
or letters, use One-Touch Key #31.
01
33
09
41
17
49
25
57
53
29
61
L
GHI
4
PQRS
7
*
02 03 04 05 06
B
A
I
QR
Y
U
@
11
10
42
43
J
50
51
26
27
58
59
Z
54 56
V
30
62
.
JKL
5
TUV
8
0
C
D
12
13
44
K
S
+/-
55
45
L
2018 19
52
53
T
28
29
60
61
-/&
W
31
63
32
64
CAP
MNO
WXYZ
6
9
STOP
START
#
39 40
G
15
O
23 24
55
W
31
63
/PAUSE
0807
H
16
4847
P
56
X
32
64
CAP
P
38373634 35
F
E
14
46
N
M
2221
54
U
V
30
62
@
.
X
SPEAKER
4
To enter a Symbol, press OneTouch Key 28 and then the number
of the symbol you need.
5
To enter a European Symbol, press
One-Touch Key 29 and then the
number of the symbol you need.
Facsimile Programming 4 - 4
Page 83

Initial User Data
Initial User Data
Entering The Date & Time
When you set the date a nd time, th ey appea r on the LCD when the uni t is in standby mode .
They also print at t he top of each page you transmit to an other location. The date and time
must be set in order to use the Delay Transmit, Broadcast, and Polling functions of your
unit. Follow these instructions for entering the current date and time.
1
2
Use the Menu Navigation pr ocedur e o n page 4-1 to
access the DATE & TIME? menu selection.
Press YES. Enter the Time and Date using the 10Keypad.
1 DATE & TIME?
OK=YES
12:39 ‘90 01 15
SET TIME (OK=YES)
3
After entering this information, check to make sure it is correct . If correct, press YES to
enter it in memory. If it is incorrect, press NO and re-enter the information.
Entering Your Telephone Number
To have your phone number display on the faxes you transmit:
1
Use the Menu Navigation pr ocedur e o n page 4-1 to
access the USER FAX NO.? menu selection.
2
Press YES. Enter your number.
3
After entering your number, check to make sure it is correct. If correct, press YES to enter it
in memory. If the number is incorrect, press NO and re-enter the correct number.
2 USER FAX NO.?
OK=YES
_
OK=YES (DEL=NO)
4 - 5 Facsimile Programming
Page 84

Entering Your User Name
To have your user name display on the faxes you transmit:
1
Use the Menu Navigation pr ocedur e o n page 4-1 to
access the USER NAME? menu selection.
2
Press YES. Enter your name.
3
After entering your name, check to make sure it is correct. If correct, press YES to
enter it in memory. If the name is incorrect, press NO and re-enter the correct name.
Initial User Data
3 USER NAME?
OK=YES
NAME=_
OK=YES (DEL=NO)
Setting Department PW
Note: This function is set by the Key Operator. Please direct all questions to
them.
Facsimile Programming 4 - 6
Page 85

Machine Operations
Machine Operations
This section describes the choices available in the Machine Operations Menu. Some
choices may not be available to you depending on your country’s regulations.
Setting the LCD Contrast
There are four contrast levels that you can select depending on the LCD.
1
Press the PROGRAM Key and scroll through the
menus until you reach the Machine Operation
menu and p r ess YES.
2
Press YES since this is the first menu to appear.
3
Use the Left / Right Arrow Keys to sele ct the
contrast level that you wish to use.
MACHINE OPERATION?
YES / or 1-8
1 LCD CONTRAST?
OK=YES
DARK LIGHT
-SELECT&PUSH”YES”
Setting the Correct Dialing Type (Tone/Pulse)
Select either T ONE or PULSE accordin g to the type of tele phone syst em connecti on to the
facsimile unit.
1
Press the PROGRAM Key and scroll through the
menus until you reach the Machine Operations
menu and p r ess YES.
2
Scroll through the menu options until the TONE/
PULSE options appear and press YES.
3
Use the Left/Right Arrow Keys to select either
TONE or PULSE and press YES.
MACHINE OPERATION?
YES / or 1-8
2 TONE/PULSE
OK=YES
*TONE PULSE
-SELECT&PUSH”YES”-
4 - 7 Facsimile Programming
Page 86

Setting the Buzzer Volume
Use this to set the buzzer volume to the suited level.
1
Press the PROGRAM Key and scroll through the
menus until you reach the Machine Operations
menu and p r ess YES.
2
Press 3 or press the down arrow twice to reach the
Buzzer Volume Menu. Press YES.
3
Use the Left/Right Arrow Keys to select either
HIGH, LOW or OFF and press YES.
Choices Available Description
HIGH Buzzer Volume is set at the loudest setting available.
Machine Operations
MACHINE OPERATION?
YES / or 1-8
3 BUZZER VOLUME?
OK=YES
HIGH *LOW OFF
-SELECT&PUSH”YES”-
LOW Buzzer Volume is set at the lowest setting available.
OFF No sound will be heard.
Facsimile Programming 4 - 8
Page 87

Machine Operations
Setting the Line Monitor (Speaker) Volume
Use this to set the speaker volume while m onitoring the fax activity.
1
Press the PROGRAM Key and scroll through the
menus until you reach the Machine Operations
menu and p r ess YES.
2
Press 4 or press the down arrow three times to
reach the Line Monitor Menu. Press YES.
3
Use the Left/Right Arrow Keys to select either
HIGH, LOW or OFF and press YES.
Choices Av ailab le Description
HIGH Speaker Volume is set at the loudest setting available.
MACHINE OPERATION?
YES / or 1-8
4 LINE MONITOR?
OK=YES
HIGH *LOW OFF
-SELECT&PUSH”YES”-
LOW Speaker Volume is set at the lowest setting available.
OFF No sound will be heard.
Selecting Remote Monitor
This function allows service personnel to access the unit remotely. It is possible for the
Service Representative to monitor and change machine settings. This allows them to fix
your unit over the telephone.
1
Press the PROGRAM Key and scroll through the
menus until you reach the Machine Operations
menu and p r ess YES.
2
Press 5 or press the down a rrow fou r times to r each
the Remote Monitor Menu. Press YES.
3
Use the Left/Right Arrow Keys to select either ON
or OFF and press YES.
MACHINE OPERATION?
YES / or 1-8
5 REMOTE MONITOR?
OK=YES
ON *OFF
-SELECT&PUSH”YES”-
4 - 9 Facsimile Programming
Page 88

Setting Your Fax Line Type (PSTN/PBX)
Select either PSTN or PBX depending on how your phone is connected. If your unit is
connected to the public switch telephone network (PSTN), you should select “PSTN.
Otherwise, you should select “PBX.”
1
Press the PROGRAM Key and scroll through the
menus until you reach the Machine Operations
menu and p r ess YES.
2
Press YES since this is the first menu to appear.
3
Use the Left/Right Arrow Keys to select either
PSTN or PBX and press YES.
Note: With a PBX system. you generally have to dial a prefix number (e.g.
“9”) to access an outside line. If you s et the line type to “PBX”, yo u can set
the prefix number in advance. Then the unit can dial the prefix number for
you whenever you dial. The followi ng table shows you how to dial when using
the PBX mode. The prefix can be up to 4 digits in length.
When you are in the PBX mode, pressing # causes the machine to dial the
programmed access number(s). If you are dialing from within a PBX and
dial the extension number within the PBX the “@” symbol is displayed.
Machine Operations
MACHINE OPERATION?
YES / or 1-8
6 PSTN/PBX?
OK=YES
*PSTN PBX
-SELECT&PUSH”YES”-
Phone Line Telephon e Number LCD Display/Dialing Access Line
PBX mode, prefix=9 123 @123 PBX
PBX mode, prefix=9 #123 9-123 PBX->PSTN
Facsimile Programming 4 - 10
Page 89

Machine Operations
Setting the Power Save Mode
This program allows the user to set their fax unit to aut omatica lly enter the power sav ing
mode at a specified tim e. You can also set th e Power Save Mode to OFF. If th e ON time
and the OFF time are set the same, the Power Save Mode will remain ON continuously.
1
Press the PROGRAM Key and scroll through the
menus until you reach the Machine Operations
menu and p r ess YES.
2
Press 7 or press the down arrow six times to reach
the Power Saver Mode Menu. Press YES.
3
Use the Left/Right Arrow Keys to sele ct either OFF
or TIMER and press YES.
Note: The ON time refers to the time t h e unit wil l go in to Power S ave Mode.
The OFF time is the time it will re-enter a READY or STANDBY mode.
MACHINE OPERATION?
YES / or 1-8
7 POWER SAVE MODE?
OK=YES
OFF *TIMER
-SELECT&PUSH”YES”-
4
Enter the time you wish the unit to enter Power
Save Mode and press YES.
5
Enter the time you wish the unit to leave Power
Save Mode and return to normal operation.
Note: There are three situations to leave Power Save Mode and return to
normal operation.
1.Press Wakeup Key
2.Telephone rings.
3.Time up for Timer TX.
But if I-Fax / PCL4 / GDI / PCL5e is optioned, these devices can not
Wakeup the machine from Power Save Mode, before using these
devices be sure the machine is in normal operation, press Wakeup Key
to Wakeup the machine, if the machine is in Power Save Mode.
ON TIME=_0:00
OK=YES
OFF TIME=_0:00
OK=YES
4 - 11 Facsimile Programming
Page 90

Setting the Power Save Time
The fax unit enters to the Power Save Mode every 15 minutes automatically (default
value). You can reset the Power Save Time from 1 to 120 minutes.
1
Press the PROGRAM Key and scroll through the
menus until you reach the Machine Operations
menu and p r ess YES.
2
Press 8 to reach the Power Saver Mode Menu.
Press YES.
3
You can select Power Save Time from 1 to 120
minutes in your necessary.
Setting the Drum Counter
Machine Operations
MACHINE OPERATION?
YES / or 1-8
8 POWER SAVE TIME?
OK=YES
TIME=__min(1-120)
OK=YES (DEL=NO)
This function allows service personal to check how many sheets of paper has printed.
1
Press the PROGRAM Key and scroll through the
menus until you reach the Machine Operations
menu and p r ess YES.
2
Press 9 or press the down arrow eight times to
reach the Remote Program Menu. Press YES.
3
The following message appears to check to how
many sheets of paper has printed.
4
Press Yes and back to the MACHINE
OPERATION menu.
MACHINE OPERATION?
YES / or 1-8
9 DRUM COUNTER?
OK=YES
DRUM COUNTER=000519
OK=YES (DEL=NO)
MACHINE OPERATION?
YES / or 1-8
Facsimile Programming 4 - 12
Page 91

Document Scan Settings
Document Scan Settings
To optimize scanning resolution and contrast, set according to your individual needs.
Resolution
To assure the best quality document, please set the scanning resolution and contrast
according to the req uiremen ts of you r origi nal doc uments. The defaul t reso luti on sett ing
is Standard and the resolu ti on will return to the defaul t set ti ng after each transmission if
using a differe nt resolution.
Three scanning resolution options are available:
Choices Available Description
STD (Standard) (Default) Normal resolution for standard size characters.
FINE Higher resolution for the small size characters.
EXTRA FINE Highest resolution for image data.
1
Press the PROGRAM Key and scroll through the
menus until you reach the SCANNING &
PRINTING Menu. Press YES to begin
programming.
2
Press 1 or scroll down to the Resolution menu and
press YES.
3
Using the Left and Right arrows, selec t the
resolution you wish to have as the defau lt and pres s
YES to enter this selection into memory.
SCANNING&PRINTING?
YES / or 1-5
1 RESOLUTION?
OK=YES
*STD FINE EX-FINE
-SELECT&PUSH”YES”
4 - 13 Facsimile Programming
Page 92

Scan Contrast
There are three contrast levels of Light, Normal, Dark that you can select depending on
your original document. For documents with very fine or light characters, choose a
lighter level.
1
2
3
Press the PROGRAM Key and scroll through the
menus until you reach the SCANNING &
PRINTING Menu. Press YES to begin
programming.
Press 2 or scroll down to the Scan Cont rast menu
and press YES.
Using the Left and Righ t ar rows, s elect the cont rast
you wish to have as the default and press YES to
enter this selection into memory.
Document Scan Settings
SCANNING&PRINTING?
YES / or 1-5
2 SCAN CONTRAST?
OK=YES
LIGHT *NORMAL DARK
-SELECT&PUSH”YES”
Print Density
Set the print density according to your needs. There are six printing density levels
ranging from Light to Dark.
1
2
3
Press the PROGRAM Key and scroll through the
menus until you reach the SCANNING &
PRINTING Menu. Press YES to begin
programming.
Press 3 or scroll down to the Print Density menu
and press YES.
Using the Left and Right arrows, select the density
you wish to have as the default and press YES to
enter this selection into memory.
SCANNING&PRINTING?
YES / or 1-5
3 PRINT DENSITY?
OK=YES
DARK LIGHT
-SELECT&PUSH”YES”
Facsimile Programming 4 - 14
Page 93

Document Scan Settings
Reduction Copy
This function allows you to have the document printed by one of the two modes
described below:
1
Choices Available Description
ON The facsimile machine will reduce the copy document as
needed to fit on the paper. The maximum reduction proportion
is 70%. If greater reduction is needed, then the remainder o f the
document will be printed on the next page.
OFF The facsimile machine will not reduce the copy document and
will instead print the remainder of the document on the next
page.
Note: Reduction copy capabilities are not available when the resolution
setting is set to Half Tone.
Press the PROGRAM Key and scroll through the
menus until you reach the SCANNING &
PRINTING Menu. Press YES to begin
programming.
SCANNING&PRINTING?
YES / or 1-5
2
Press 4 or scroll down to the Reducti on Copy menu
and press YES.
3
Using the Left and Right arrows, select the option
you wish to have as the default and press YES to
enter this selection into memory.
4 REDUCTION COPY?
OK=YES
*ON OFF
-SELECT&PUSH”YES”-
4 - 15 Facsimile Programming
Page 94

Rec. Paper Size
This function allows you to choose the recording paper size in Tray 1 (standard Paper
Tray) and the optional Tray 2 (Second Paper Cassette Unit) for the first printing after
power ON. After first printing the mach ine remember s the paper size in the Standard
Tray and Optional Paper Cassette.
1
Press the PROGRAM Key and scroll through the
menus until you reach the SCANNING &
PRINTING Menu. Press YES to begin
programming.
2
Press 5 or scroll down to th e Rec. (Recording)
Paper Size menu and press YES.
3
When the SPCU is installed, select HIGH-TRAY
for the standard Paper Cassette, LOW-TRAY for
the SPCU.
Document Scan Settings
SCANNING&PRINTING?
YES / or 1-5
5 REC. PAPER SIZE?
OK=YES
*LOW-TRAY HIGH-TRAY
-SELECT&PUSH”YES”-
4
Using the Left and Right arrows , select the size you
wish to have as the default and press YES to enter
this selection into memory.
Auto Cassette Sel.
Allows users to select the Second Paper Cassette Unit to print out the document when
the facsimile is equipped with the Second Paper Cassette Unit. Users can set the
received FAX or printed PC document to be printed out from either the Standard Paper
Tray or the Second Paper Cassette Unit.
1
Press the PROGRAM Key and scroll through the
menus until you reach the Set Printer menu and
press YES.
2
Press 1 or YES to enter the Auto Cassette Sel. menu.
3
Press YES to select Auto Cassette Selection.
A4 *LETTER LEGAL
-SELECT&PUSH”YES”-
SET PRINTER?
YES / or 1-8
1 AUTO CASS. SEL.?
OK=YES
Facsimile Programming 4 - 16
Page 95

Document Scan Settings
Note: The Optional SPCU must be installed. If
it is not installed, you will receive this message.
4
Using the Left and Right arrows, select ON for
Auto Casse tte Selection, then press YES to enter
this selection into memory. When you select OFF,
you can set cassette for fax and printer.
5
Select the function yo u wish to se t the casset te, an d
press YES.
6
Select the Tray ( Cassette ) you wish to set for the
function, and press YES.
*NOT AVAILABLE*
*ON OFF
-SELECT&PUSH”YES”-
*PRINTER FAX
-SELECT&PUSH”YES”-
*LOW-TRAY HIGH-TRAY
-SELECT&PUSH”YES”-
4 - 17 Facsimile Programming
Page 96

Dial Registration
This section gives instructions on how to program the number to be stored in the OneTouch, Speed Dial and Group Dial Keys. In additi on, i t s hows you how to set up special
parameters for each One-Touch Key, including batch Ti me and Relay Broadcast.
One-Touch Keys
You can program the most frequently dialed fax numbers int o One-Touch Keys, 32 One
Touch Keys is applicable for MINOLTAFAX2800, 64 One Touch Keys for
MINOLTAFAX3800. This allows you to transmit documents simply by pressing a OneTouch Key and the START Key. You can program any of the One-Touch Keys as
Group Dial Keys with up to 50 locations in each.
1
menus until you reach the DIAL REGISTRATION
Menu. Press YES to begin programming.
Dial Registration
Press the PROGRAM Key and scroll through the
DIAL REGISTRATION?
YES / or 1-6
2
Press YES since this is the first menu to appear and
press YES to enter the One-Touch Program.
3
Press the One-Touch Key you wish to program.
4
Press YES to accept your selection.
5
Enter the Telephone number you wish to transmit
to and press YES. If you want to enter the sub-
address, press the down Arrow Key.
6
You can press the sub-address up to 10-digit.
7
Enter the Name you wish associated with this
number and press YES after checking to see it OK.
1 ONE-TOUCH DIAL?
OK=YES
-SELECT REGIST. KEY-
ONE-TOUCH 01
or PRESS “YES”
OK=YES (SUB= )
SUB=_
OK=YES
NAME=_
OK=YES
Facsimile Programming 4 - 18
Page 97

Dial Registration
Speed Dial Keys
Edit/Deleting
1
If you wish to change any entry, a screen allows you to accept or change.
2
If you wish to change a Key that was previously
programmed, this message appears. Press YES to
keep this location as is, or NO i f you wi sh to edit it .
3
If you choose NO, use the arrow keys to select
either EDIT or DELETE and then proceed wi th the
needed changes.
The fax number and other data for a parti cular dest inati on can be progr ammed using a 3digit Speed Dial Number. This feature allows you to transmit a document to the
particular destination by pressing the Speed Dial Key, entering the 3-digit number and
pressing the START Key. You can program a fax number in any of the 100 Speed Dial
locations, number 001 to 100.
REGISTERED! KEEP?
OK=YES (EDIT/DEL=NO)
EDIT *DELETE
-SELECT&PUSH”YES”-
Entering
1
Press the PROGRAM Key and scroll through the
menus until you reach the DIAL REGISTRATION
Menu. Press YES to begin programming.
2
Press 2 or scroll down to the Speed Dial menu and
press YES.
3
Enter the number of the location you want to
program and press YES.
4
Enter the Telephone number you wish to transmit
to and press YES after checking to see its OK. If
you want to enter the sub-address, press the Down
Arrow Key.
5
You can press sub-address up to 10-digit.
DIAL REGISTRATION?
YES / or 1-6
2 SPEED DIAL?
OK=YES
SPEED DIAL =_
OK=YES
OK=YES (SUB= )
SUB=_
OK=YES
4 - 19 Facsimile Programming
Page 98

Dial Registration
6
Enter the Name you wish associated with this
number and press YES after checking to see it OK.
7
You are given the opportunity to program additional locations. Continue to enter additional
Speed Dial locations or press NO to exit.
Edit/Deleting
1
If you wish to change any entry, a screen allows you to accept or change.
2
If you wish to change a Key that was previously
programmed, this message appears. Press YES to
keep this location as is, or NO i f you wi sh to edit it .
3
If you choose NO, use the arrow keys to select
either EDIT or DELETE and then proceed wi th the
needed changes.
NAME=_
OK=YES
REGISTERED! KEEP?
OK=YES (EDIT/DEL=NO)
EDIT *DELETE
-SELECT&PUSH”YES”-
Group Dial Keys
Instead of their r egula r func tions , an y of the One -Touch Keys can be used as Group Dial
Keys. Destinations already stored for One-Touch, Speed Dial can be entered in a Group
Dial Key. Each Group can contain up to 50 locations.
Entering
1
Press the PROGRAM Key and scroll through the
menus until you reach the DIAL REGISTRATION
Menu. Press YES to begin programming.
2
Press 3 or scroll down to the Group Dial menu and
press YES.
3
Press the One-Touch Key you wish to use.
4
Press YES to accept your selection.
DIAL REGISTRATION?
YES / or 1-6
3 GROUP DIAL?
OK=YES
-SELECT REGIST.KEY-
GROUP DIAL 25
or PRESS “YES”
Facsimile Programming 4 - 20
Page 99

Dial Registration
5
Enter the Group Name and press YES to accept.
6
Enter the Key(s) you wish included in this group.
Remember, you can include One-Touch or Speed
Dial alread y in memory.
7
Continue to enter the locations you wish to include and then press YES. You are given the
opportunity to program additional locations. Continue to enter additional Speed Dial
locations or press NO to exit.
Edit/Deleting
1
If you wish to change any entry, a screen allows you to accept or change.
2
If you wish to change a Key that was previously
programmed, this message appears. Press YES to
keep this location as is, or NO i f you wi sh to edit it .
GROUP NAME=_
OK=YES
NO.001=_
REGISTERED! KEEP?
OK=YES (EDIT/DEL=NO)
3
Program Dial
Instead of their regular functions, any of the last eight One-Touch Keys MF3800 (57-
64), MF2800(25-32) can be used as Program Keys. Transmission functions including:
Broadcast, Ti mer TX (Delayed Transmission), Mailbox, Polling RX, and Relay
Initiation can be pr ogrammed into the progra mmed One-Touch Keys. This allows you to
“One-Touch” an operation that normally takes multiple key strokes.
Settings entered into these program keys remain in memory for future use.
Entering
1
If you choose NO, use the arrow keys to select
either EDIT or DELETE and then proceed wi th the
needed changes.
Press the PROGRAM Key and scroll through the
menus until you reach the DIAL REGISTRATION
Menu. Press YES to begin programming.
EDIT *DELETE
-SELECT&PUSH”YES”-
DIAL REGISTRATION?
YES / or 1-6
2
Press 4 or scroll down to the Program Dial menu
and press YES.
4 - 21 Facsimile Programming
4 PROGRAM DIAL?
OK=YES
Page 100

3
Press the One-Touch Key you wish to use.
Remember, it must be one of the last eight.
4
Choose the function you wish to program:
1=Broadcast, 2=Timer TX, 3=Mailbox TX,
7=Polling RX, and 8=Relay Initiate.
Note: To continue with this process, choose the group of steps that match your needs.
For 1=Broadcast:
5
A screen appears to confirm Broadcast was your
selection.
6
Enter the Key(s) you wish included in this group.
Remember, you can include One-Touch or Speed
Dial alread y in memory.
Dial Registration
-SELECT REGIST.KEY-
FUNCTION
SEL. 1/2/3/7/8
BROADCAST
NO.001=_
7
Continue to enter the locations you wish to include and then save. You are given the
opportunity to program additional locations. Continue to enter additional Speed Dial
locations or press NO to exit.
For 2=Timer TX:
5
A screen appears to confirm Timer TX was your
selection.
6
Enter the ti me you wish the transmission to occur
and press YES.
7
Enter the fax number you wish to send to or select a
One-Touch or Speed Dial location and press YES.
Once this function has been programmed, you use it by
simply pressing the One-Touch Key you have just programmed. This is documented in
Chapter 3 Advanced Facsimile.
TIMER TX
TIMER=_0:00
OK=YES
ENTER FAX NO.
or FUNCTION
Facsimile Programming 4 - 22
 Loading...