

Page 1
Owner’s Manual
Please read this manual carefully and
thoroughly before operating this unit.
MC-767W-WS
TM
M I C R O W A VE O VE N S
Page 2

Contents / fo"k; lwph
Contents / fo"k; lwph
Safety Precautions / lqj{kk lkoèkkfu;k¡ 3
Unpacking & Installing/How the Microwave works / vou dks [kksyuk o yxkuk@voj dh dk;Z iz.kkyh 4
Control Panel/Child Lock / dUVªksy iSuy@pkbYM ykWd 5
Micro Power Cooking & Power Level / ekbØks ikoj }kjk Hkkstuk idkuk / ikoj Lrj 6
Food characteristics & Microwave Cooking / Hkkstu dh fof'k"Vrk,¡ o ekbØksoso }kjk Hkkstu idkuk 7
Two stage Cooking/Grill Cooking / nks pj.kksa esa Hkkstu idkuk@fxzy dqfdax 8
Convection Cooking / dUosD'ku }kjk Hkkstu idkuk 9
Combination Cooking / dkWEchus'ku }kjk Hkkstu idkuk 10
Quick Start / Various Cook Functions /fDod LVkVZ/ fofHkUu dqd dk;Ziz.kkfy;ka 11
Auto Cook / vkWVks dqd 12
Auto Defrost/ vkWVks fMÝkWLV 13
Auto Roast /Three recipes for starter / vkWVks jksLV@uofl[kq, ds fy, rhu O;atu 14
Multipurpose Rotisserie Low Rack / eYVhijit jksVsljh yks jSd 15
Clean your Oven/Cookware used in Microwave / vou dks lkQ djuk@ekbØksoso vou esa iz;qDr gksus okys crZu
16
Plug Wiring Information/Technical Specifiations / Iyx-rkj ds ckjs esa lwpuk o rduhdh fof'k"Vrk,¡ 17
List of Authorised Service Centers / vf/kÑr lfoZl dsUæksa dh lwph
2
Page 3

Safety Precautions / lqj{kk lko/kkfu;k¡
Safety Precautions / lqj{kk lko/kkfu;k¡
1. Do not attempt to tamper with, or make any adjustments or repairs to the door, control panel, safety interlock switches or any
other part of the oven. Repairs should only be undertaken by a qualified service technician.
vou ds njokts] fu;U=k.k iSuy] lqj{kk rkys ;k fdlh Hkh nwljs Hkkx ls NsM+[kkuh u djsa] ejEer u djsa ;k rkyesy(adjustment) cSBkus dk
iz;Ru u djsaA ejEer o lfoZl fdlh dq'ky rduhf'k;u ls gh djk;saA
2. Do not operate the oven when empty (except Pre-heat Mode). It is best to leave a glass of water in the oven when not in use.
The water will safely absorb all microwave energy, if the oven is accidentally started.
vou dks dHkh [kkyh u pyk;sa ¼Pre-heat Mode ds vykok½A tc vou dk iz;ksx u dj jgs gksa] rks ,d dk¡p ds fxykl esa ikuh Hkj dj]
vou ds vUnj j[k nsaA vUtkus esa vou pkyw gks tkus ij ikuh ekbØks rjaxksa dh ÅtkZ dks lks[k (absorb) ysxkA
3. Do not operate the oven with a kitchen towel, a napkin or any other obstruction between the door and the front edges of the
oven.
vou ds njokts esa >kM+u] uSifdu] rkSfy;k vkfn dh #dkoV gksus ij vou dHkh u pyk;sAA
4. Do not use recycled paper products.
vou esa dkxt ;k v[kckjksa ds mRiknuksa dk dHkh iz;ksx u djsaA
5. Do not rinse the turntable by placing it in water just after cooking.
Hkkstu idkus ds rqjUr ckn gh dk¡p dh Vªs dks ikuh ds uhps u j[ksaA
6. Be certain to place the oven so the front of the door is 8 cm or more behind the edge of the surface on which it is placed.
vou j[krs le; bl ckr dk fo'ks"k è;ku j[ksa fd vou dk ckgjh fdukjk] Vscy lrg dsx fdukjksa ls de ls de 8 cm vUnj gksaA
7. Do not cook eggs in their shell.
v.Mksa dks fNyds lesr u idk;saA
8. Do not attempt deepfat frying in your oven.
vou esa ryus dk iz;Ru u djsaA
9. Remove the plastic wrapping from food before defrosting.
fMÝkWfLVax ls igys Hkkstu ij yxk;k x;k IykfLVd dk vkoj.k (cling film) gVk nsaA
10. If smoke is observed, switch off or disconnected the oven from the power supply and keep the oven door closed.
vou esa ls èkq¡vk fudyus ij mldk lEcUèk fctyh ls dkV nsa vkSj njoktk cUn j[ksaA
11. Only allow children to use the oven without supervision when adequate instructions have been given so that the child is able to
use the oven in a safe way and understands the hazards of improper use.
cPpksa dks viuh fuxjkuh ds fcuk] vou rHkh iz;ksx djus nsa] tc mUgsa lkjs funsZ'k iwjh rjg ls le>k fn;s x;s gksaA cPpk vou dk mi;ksx
iwjh lkoèkkuh ls djsxk vkSj [krjksa ls cpk jgsxkA
12. Liquids or other foods must not be heated in sealed containers.
rjy [kk| inkFkZ dHkh Hkh cUn fMCcksa esa xeZ u djsaA
13. Always use gloves when removing dish from oven.
fM'k dks vou ls ckgj fudkyrs le; nLrkuksa dk bLrseky djsaA
14. Do not cover the ventillation slots.
osUVhys'ku LyksV~l dks u <dsaA
15. Never use metal or metal trimmed utensils in your microwave oven. (refer Cookware Selection Table at page 16)
ekbØksoso vou esa dHkh Hkh ,sls crZuksa dk iz;ksx u djsa tks /kkrq ds cus gksa ;k muesa /kkrq fdlh Hkh :i esa bLrseky dh xbZ gksA
¼Ñi;k ist 16 ij dqdosvj lySD'ku Vscy ns[ksa½
Warning/
Always allow food to stand after being cooked by microwaves and check the temperature of them
before consumption. Especially contents of feeding bottles and baby food jars.
psrkouh
lw{e rjaxksa }kjk Hkkstu idk;s tkus ds ckn dqN le; ds fy;s <d dj vo'; NksM+ nsaA Hkkstu [kkus ls igys mlds
rkieku dh tk¡p vo'; dj ysaA cPpksa ds Hkkstu o nw/k esa fo'ks"k lko/kkuh cjrsaA
3
Page 4
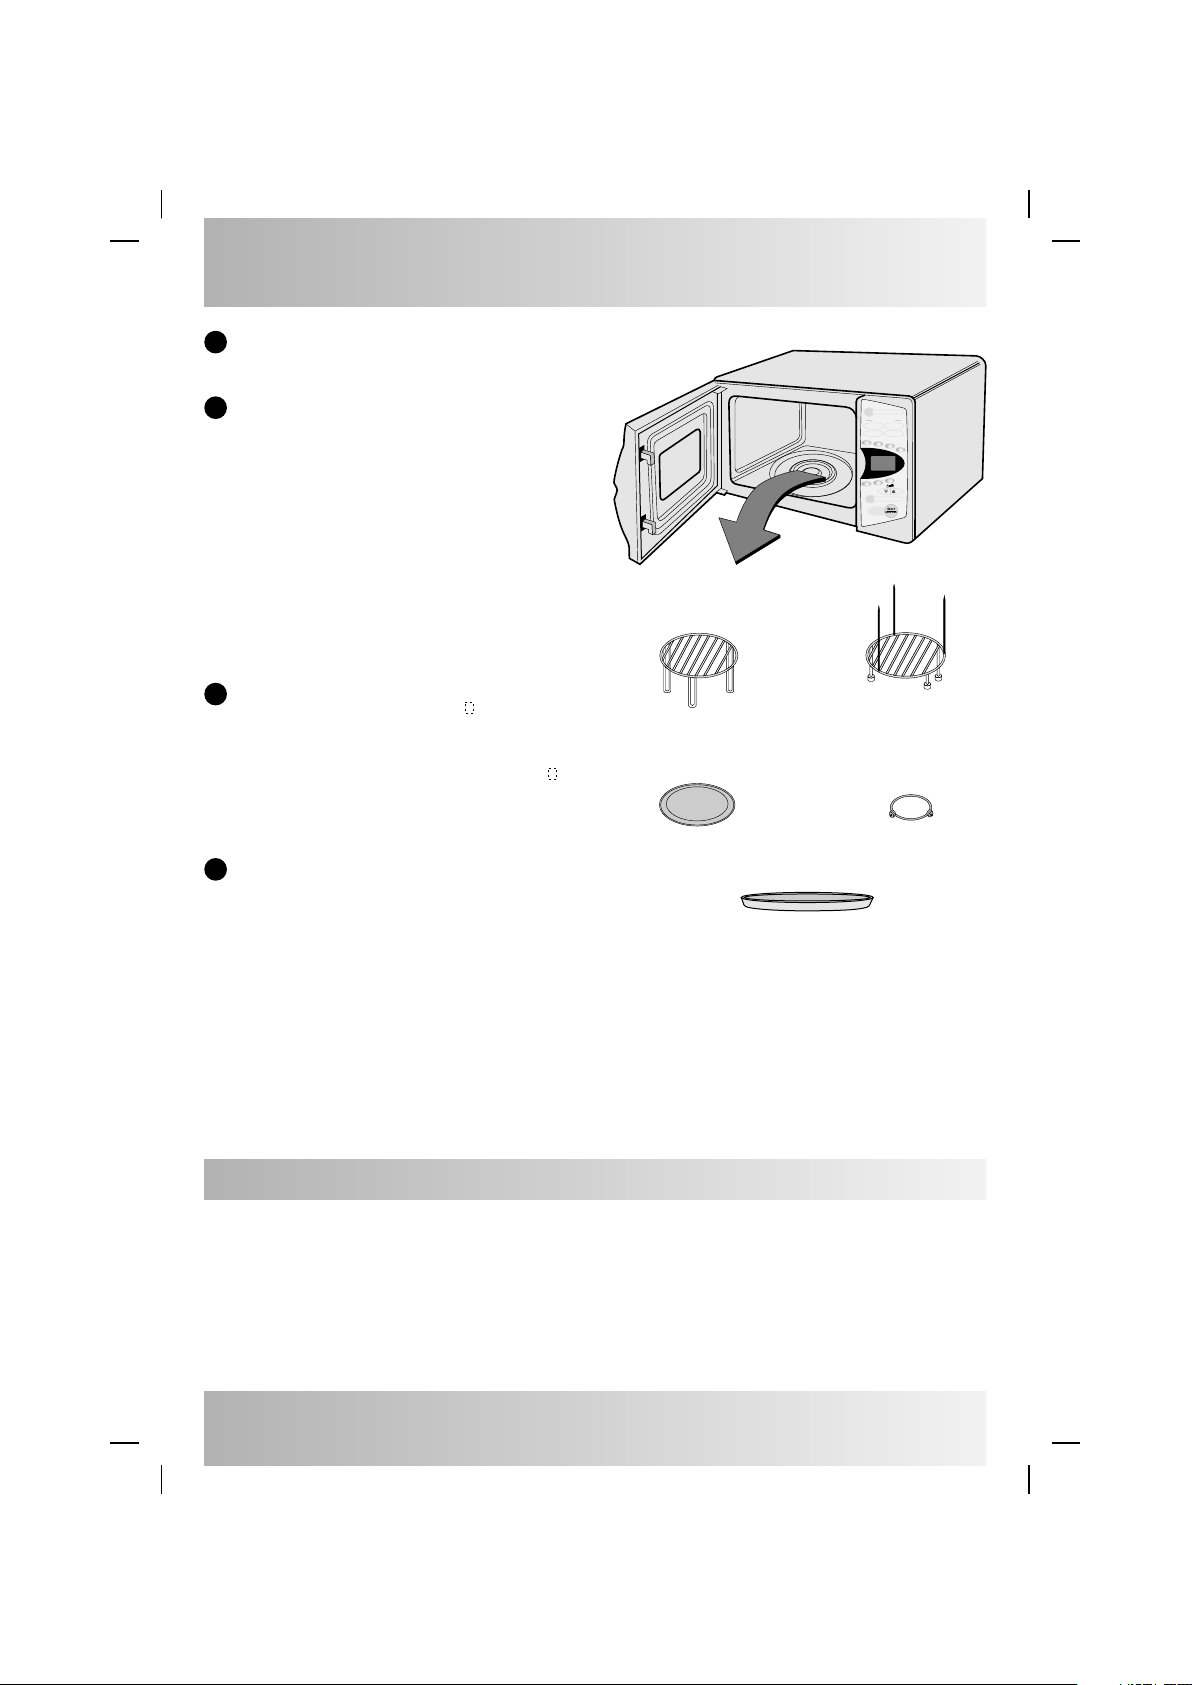
Unpacking & Installing / vou dks [kksyuk o yxkuk
Unpacking & Installing / vou dks [kksyuk o yxkuk
Unpack your oven and place it on a flat level surface.
1
vou dks fMCcs esa ls fudky dj ,d lery (flat) lrg ij j[ksaA
Place the oven on the levelled location of your choice with
2
more than 85cm height but make sure there is at least 30 cm
of space on the top and 10cm at the rear for proper
ventilation. The front of the oven should be at least 8cm from
the edge of the surface to prevent tipping. An exhaust outlet
is located on top or side of the oven. Blocking the outlet can
damage the oven.
vou dks bfPNr Å¡pkbZ ij j[ksaa tks yxHkx 85 ls-eh- ls vfèkd
Å¡pkbZ gks] ijUrq 30 ls-eh- Åij vkSj 10 ls-eh- txg ihNs vo';
NksM+h xbZ gks rkfd gok dk ?kqeko lgh :i ls gks ldsA vou dh
ckgjh Hkkx] lrg ds fdukjksa ls de ls de 8 ls-eh- vUnj dh vksj
gks rkfd vou ds myVus dk Hk; u gksA gok dh fudklh dk ekxZ]
vou dh Åijh-ckgjh lrg ij cuk;k x;k gSA bl ekxZ ds
vo#) gksus ij vou dks {kfr igq¡p ldrh gSA
Plug your oven into a standard household socket. Switch on
3
all the icons glow. Press Stop button, glows. If your oven
does not work properly, unplug it from the electrical socket
and then plug it back in.
HIGH RACK / ^gkbZ* jSd
vou dk Iyx fdlh lkekU; ?kjsyw lkWdsV esa yxk;saA fLop nck;sa]
lkjs fpUg mTtofyr gks tk,axsA Stop cVu nck;sa] fpUg
vk,xkA ;fn vkidk vou lgh :i ls dke u dj jgk gks] rks
mldk Iyx fudky dj nksckjk lkWdsV esa MkysaA
GLASS TRAY / dk¡p dh Vªs
Open your oven door by pulling the DOOR HANDLE. Place
4
the ROTATING RING inside the oven and place the GLASS
TRAY on top.
vou-}kj [kksyus ds fy;s ßMksj gS.MyÞ dk iz;ksx djsaA ?kweus okyh
fjax dks vou esa j[ksa vkSj mlds Åij Xykl@dk¡p dh xksy Vªs
j[ksaA
Note : Accessories shown above are as per model specific.
fVIi.kh % Åij n'kkZbZ xbZ ,lsljht+ fof'k"V ekWMy ds vuq:i gSaA
Auto
Roast
Roast
Chicken
Whole
1.
2.
3.
4.
Meat
Lamb
Legs
Chicken
Roast
Indian Auto Cook
1.Boiled Potato
3.4.Fresh Vegetable
2.Rice Biryani
Frozen Vegetable
5.Chilled Pizza
7.French Fries
6.Frozen Pizza
8.Gratin
Micro
Grill
Combi
Conv.
10 sec
1 min
10 min
Less
More
Auto
1.Meat2.
Poultry3.Fish4.Bread
Defrost
Start
Stop/
Quick Start
Clear
MULTIPURPOSE
ROTISSERIE LOW RACK
eYVhijit
jksVsljh yks jSd
ROTATING RING
jksVsfVax fjax
MULTI COOK TAWA / eYVh dqd rok
How the Microwave Oven works / ekbØksoso vou dh dk;Z iz.kkyh
How the Microwave Oven works / ekbØksoso vou dh dk;Z iz.kkyh
Microwaves are a form of energy similar to radio and television waves and ordinary daylight. Normally, microwaves spread
outwards as they travel through the atmosphere and disappear without effect. Microwave ovens, however, have a magnetron
which is designed to make use of the energy in microwaves. Electricity, supplied to the magnetron tube, is used to create
microwave energy.
lw{e rjaxsa ,d izdkj dh ÅtkZ gSa tks jsfM;ks rjaxksa vkSj lkekU; izdk'k rjaxksa ds leku xfr gksrh gSaA lkekU;r% ;s lw{e rjaxsa ok;qe.My esa
pkfyr gksrs le; ckgjh vksj QSyrh gSa vkSj fcuk dksbZ izHkko Mkys Lor% gh lekIr gks tkrh gSaA ijUrq ekbØksoso vouksa esa eSXusVªksu (magnetron)
bl izdkj yxk;k x;k gS fd og lw{e rjaxksa dh ÅtkZ dk iz;ksx dj ldsA eSXusVªksu dks nh xbZ fo|qr rjaxksa dh ÅtkZ esa ifjofrZr gks tkrh gSA
4
Page 5
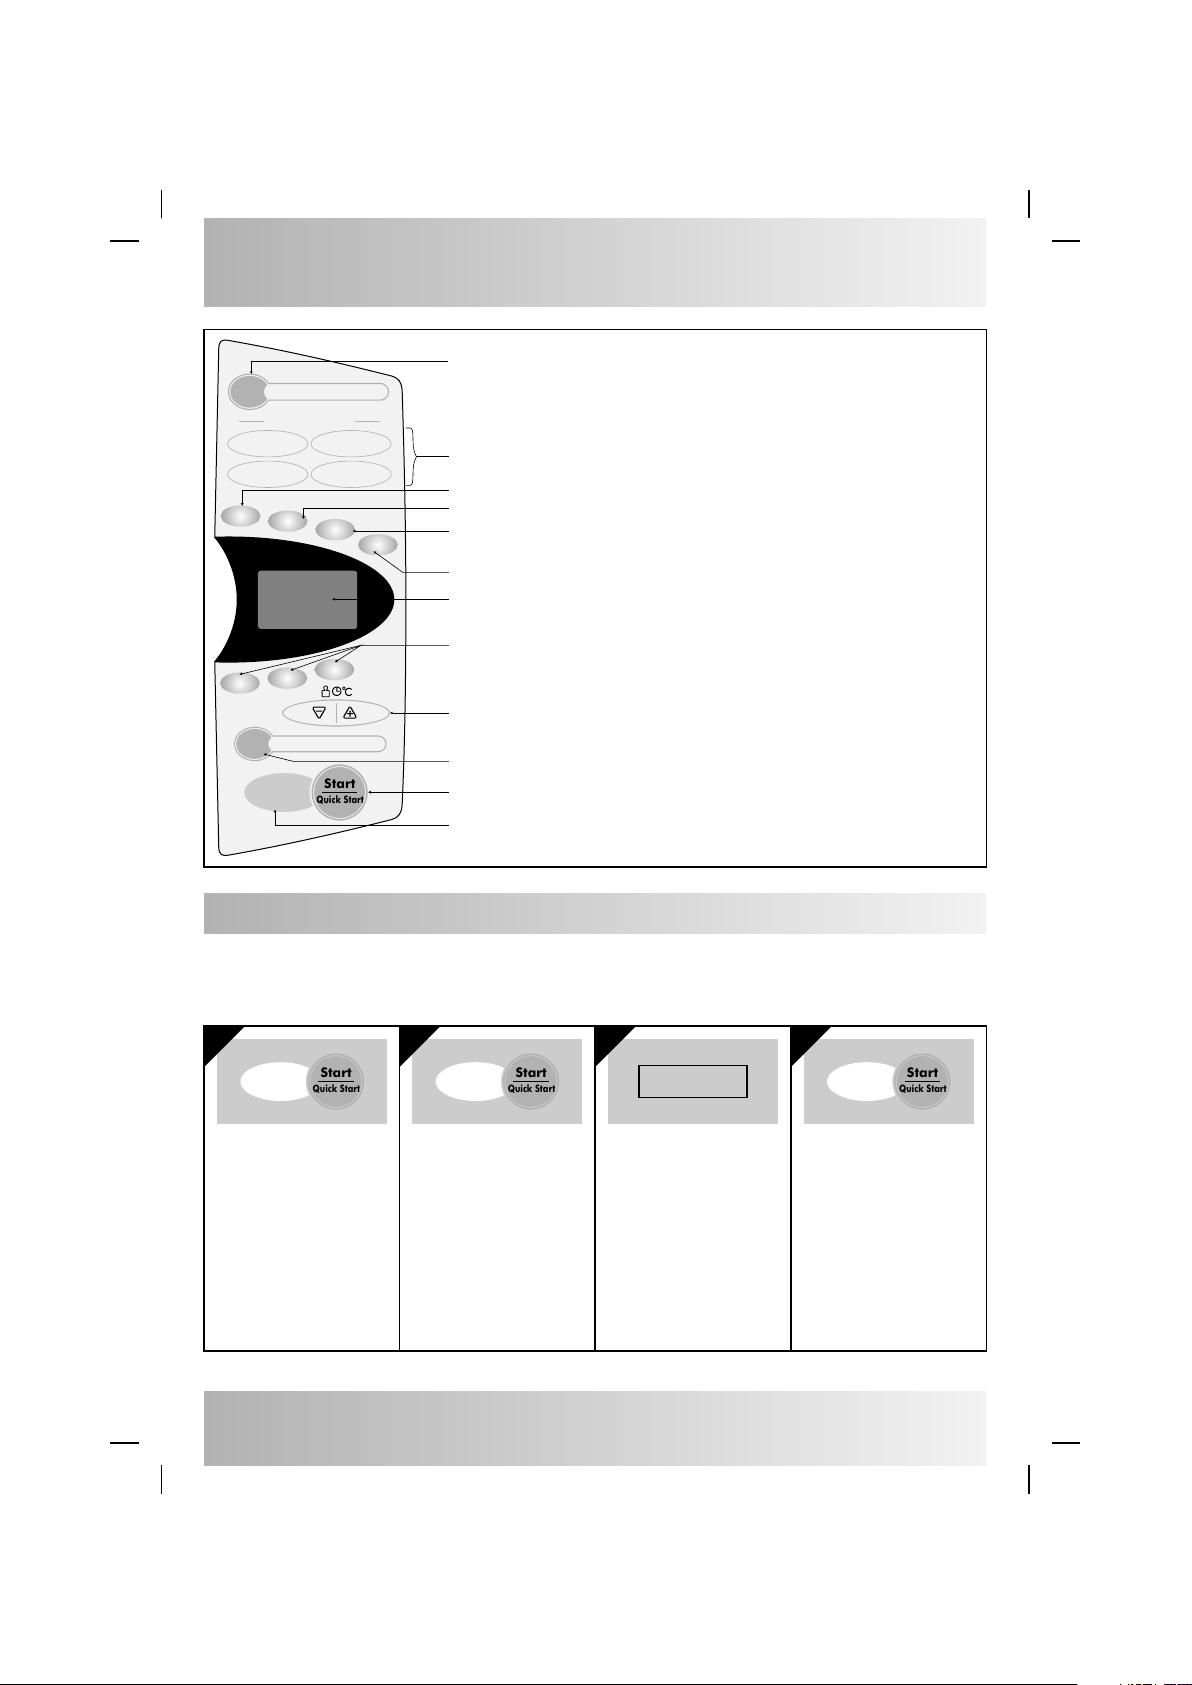
Control Panel / dUVªksy iSuy
Control Panel / dUVªksy iSuy
Grilling for efficient Browning/Roasting
Auto
Roast
1.Boiled Potato
2.Rice Biryani
5.Chilled Pizza
6.Frozen Pizza
Micro
10 min
Auto
Defrost
Roast
Roast
Chicken
1.
2.
3.
Meat
Lamb
Legs
Indian Auto Cook
3.4.Fresh Vegetable
Frozen Vegetable
7.French Fries
8.Gratin
Grill
Combi
10 sec
1 min
Less
1.Meat 2.
Poultry3.Fish4.Bread
Start
Stop/
Quick Start
Clear
4.
Whole
Chicken
Conv.
More
fo'ks"k czkmfuax@jkWfLVax ds fy, fxzy djrk gSA
To select and cook preset recipes at different weights
[kkus ds fofHkUu otuksa ij vk/kkfjr iwoZ fuf'pr O;atuksa dks pquus vkSj idkus ds fy,A
To cook food with 5 levels of Microwave Power.
ekbØksoso ikWoj ds 5 Lrjksa ij [kkuk cukus ds fy,A
Fast
Makes food Brown & Crisp / [kkus dks Hkwjk vkSj dqjdqjk cukrk gSA
Cooks with Micro & Grill, Micro & Convection function simultaneously. /
ekbØksoso ,oa fxzy] ekbØksoso ,oa dUoSD'ku fØ;kvksa }kjk lkFk-lkFk [kkuk idkrk gSA
For Optimum browning of food / [kkus dks vf/kdre Hkwjk djus ds fy,A
Display Panel / fMLIys iSuy
Set Cook Time at multiples of (10 min / 1 min / 10 sec).
izfr (10 fe- / 1 fe- / 10 lS-) ds vUrjky ij [kkuk idkus dk le; fu/kkZfjr djsaA
Increase/decrease Weight/Time/Temp. during Cook Process.
[kkuk cukus ds nkSjku otu@le;@rkieku de ;k T;knk djrk gSA
To select and defrost 4 frozen food category.
fÝt fd;s x;s O;atuksa dh 4 Jsf.k;ksa dks pquus vkSj fMÝkWLV djus ds fy,A
‘Start’ begin Cook operations
^LVkVZ* [kkuk cukus dh izfØ;k 'kq: djrk gSA
To Stand By / Stop Cook functionality
^LVS.M ckbZ* [kkuk cukus dh izfØ;k dks jksdrk gSA
Child Lock / pkbYM ykWd
Child Lock / pkbYM ykWd
Your oven has a safety feature that prevents accidental running of the oven. Once the child lock is set, you will be unable to use any
functions and no cooking can take place. However your child can still open the oven door !
vkids vou esa fo'ks"k lqj{kk O;oLFkk gS tks vou dks vutkus esa pyus ugha nsrhA ^pkbYM ykWd* yxkus ij vou pkyw gh ugha gksxkA ijUrq cPpk
ckgjh }kj vo'; [kksy ik;sxkA
1 2 3 4
Start
Stop/
Quick Start
Clear
Press STOP/CLEAR /
STOP/CLEAR nck;saA
Press and hold STOP/ CLEAR
until “L” appears on the display
and BEEP sounds.
STOP/CLEAR cVu rc rd nck
dj j[ksa tc rd ^fMLIys iSuy* ij
“L” u vk tk;s vkSj ^chi* u lqukbZ
nsA
The CHILD LOCK is now set. /
vc ^pkbYM ykWd* yx x;k gSA
The time will disappear on the
display if you have set the clock.
;fn ?kM+h dh ^lSfVax* dh gqbZ gS rks
^iSuy* ij le; vn`'; gks tk;sxkA
Stop/
Clear
Start
Quick Start
L
“L” appears on the display to
let you know that CHILD
LOCK is set.
iSuy ij “L” vk,xk rkfd vkidks
irk jgs fd pkbYM ykWd yxk gSA
5
Start
Stop/
Quick Start
Clear
To cancel CHILD LOCK press
and hold STOP/CLEAR until “L”
disappears. You will hear BEEP
when it’s released.
pkbYM ykWd dks [kksyus ds fy;s
STOP/CLEAR rc rd nck
dj j[ksa tc rd “L” vn`'; u gks
tk;s vkSj chi lqukbZ u nsaA vkidk
lqj{kk rkyk vc [kqy x;k gSA
Page 6
Micro Power Cooking / ekbØks ikoj dqfdax iz.kkyh
Micro Power Cooking / ekbØks ikoj dqfdax iz.kkyh
Your oven has five microwave power settings. High power is automatically selected but repeated presses of the MICRO key will
select a different power level.
vkids vou esa 5 ikoj Lrj gSaA mPpre ikoj Lrj dk pquko Lor% gh gks tkrk gS] ijUrq ckj-ckj ^ekbØks* cVu nck dj fofHké ikoj Lrjksa dk
pquko fd;k tk ldrk gSA
1 2 3 4
Stop/
Clear
Start
Quick Start
Micro
10 min
1 min
10 sec
Stop/
Clear
Start
Quick Start
Press STOP/CLEAR
STOP/CLEAR nck;saA
Se lec t Micr o Po we r Le vel
(180W, 360W, 540W, 720W,
900W)
Refer Power Level Table given
below.
ekbØks ikoj Lrj (180W, 360W,
540W, 720W, 900W) pqusaA
Set Cooking Time
(:10 Sec to 99:50 Min)
[kkuk idkus dk le; (:10 Sec to
99:50 Min) lSV djsaA
Press Start
Start nck,aA
uhps nh xbZ Power Level Table
ns[ksaA
Power Level / ikoj Lrj
Power Level / ikoj Lrj
Your microwave oven is equipped with 5 power levels to give you maximum flexibility and control over cooking
vkidk ekbØksoso vou 5 ikoj Lrjksa ls ySl gS rkfd Hkkstu vkids vuqdwy o bPNkuqokj id ldsA
uhps nh xbZ lkj.kh esa [kk| inkFkks± ds uke o Hkkstu idkus ds mi;qä ikoj Lrj fn;s tk jgs gSaA
POWER
ikoj
HIGH
MAX
mPpre
MEDIUM
HIGH
e/;e mPp
MEDIUM
e/;e
Press MICRO button
ekbØks cVu nck;sa
times
1
ckj
times
2
ckj
times
3
ckj
USE
ç;ksx
ê Boil Water / ikuh mckyuk
ê Cook poultry pieces, fish, vegetables / eqxkZ] eNyh o lfCt;k¡ idkuk
ê Cook tender cuts of meat / ek¡l ds ueZ VqdM+s idkuk
ê All reheating / Hkkstu nksckjk xeZ djuk
ê Roast meat and poultry / ek¡l o eqxkZ Hkwuuk
ê Cook mushrooms and shellfish / e'k:e o [kksy okyh eNyh idkuk
ê Cook foods containing cheese and eggs / Hkkstu ftlesa v.Ms o pht+ Mkyh xbZ gksa
ê Bake cakes and scones / dsd o ^Ldksu* csd djuk
ê Prepare eggs / v.Ms idkuk
ê Cook custard / dLVMZ idkuk
ê Prepare rice, soup / pkoy o lwi idkuk
% Wattage
% okVst++
P-HI/900W/HI/100%
P-80/720W/MED-HI/80%
P-60/540W/MED/60%
DEFROST/
MEDIUM LOW
Mh ÝkWLV@e/;e U;wu
LOW
U;wure
times
4
ckj
times
5
ckj
ê All thawing / lHkh izdkj ds [kk| inkFkks± dks lkekU; rkieku ij ykuk
ê Melt butter and chocolate / pkWdysV o eD[ku fi?kyuk
ê Cook less tender cuts of meat / ek¡l ds de uje VqdM+s idkuk
ê Soften butter & cheese / eD[ku o pht+ dks uje djuk
ê Soften ice cream / vkblØhe dks uje djuk
ê Raise yeast dough / vkVs esa [kehj mBkuk
P-40/360W/MED-LOW/40%
P-20/180W/LOW/20%
6
Page 7

Food characterstics & Microwave cooking / [kk| inkFkks± dh fo'ks"krk,a vkSj ekbZØksoso }kjk idkus dh çfØ;k
Food characterstics & Microwave cooking / [kk| inkFkks± dh fo'ks"krk,a vkSj ekbZØksoso }kjk idkus dh çfØ;k
Factors which affect Microwave in the following stages of cooking
ikd fofèk ds fuEufyf[kr Lrjksa ij ekbØks rjaxksa dks izHkkfor djus okys dkjd
I. BEFORE COOKING
1. Density of food / [kk| inkFkks± dk ?kuRo
Light, porous food such as cakes and breads cook more quickly than heavy, dense foods such as roasts and casseroles.
gYds o jaèkzksa (pores) okys Hkkstu dks] tSls dsd] czsM vkfn] idus esa de le; yxrk gS] ijUrq vfèkd ?kuRo okys Hkkjh [kk| inkFkks± tSls
^jksLV* vkSj ^dSljksy* vkfn esa vfèkd le; yxrk gSA
2. Height of food / [kk| inkFkks± dh Å¡pkbZ
The upper portion of tall food, particularly roasts, will cook more quickly than the lower portion.
[kk| inkFkks± ds cM+s VqdM+ksa ds Åijh fdukjs] fo'ks"kdj ek¡l ds] uhps ds Hkkx ls] de le; esa id tkrs gSaA
3. Bone and fat content of food / [kk| inkFkks± esa olk (fat) o gìh dh ek=kk
Bones conduct heat and fat cooks more quickly than meat.
gfì;k¡ m"ek lapkfyr djrh gSa vkSj olk (fat) idus esa] ek¡l ls de le; ysrk gSA
4. Quantity of food / [kk| inkFkZ dh ek=kk
The more food you place in the oven, the longer the cooking time.
vou esa j[kh xbZ Hkkstu dh ek=kk ftruh c<+sxh mruh Hkkstu idus ds le; esa o`f) gksxhA
5. Shape of food / [kk| inkFkZ dk vkdkj-izdkj
Microwaves penetrate only about 2 cm into food, the interior portion of thick foods are cooked as the heat generated on the
outside travels inward. Only the outer edge of food is cooked by microwave energy; the rest is cooked by conduction.
ekbØks rjaxsa Hkkstu dks dsoy 2 cm vUnj rd gh Hksn ldrh gSaA blls eksVk ;k pkSM+k [kk| inkFkZ] ckgjh lrg ds fudV okys [k.Mksa ls
lapkfyr m"ek }kjk gh idrk gSA [kk| ds dsoy ckgjh fdukjs gh ekbØks rjaxksa dh ÅtkZ ls idrs gSa] ckdh dk Hkkx m"ek ds lapkyu }kjk gh
idrk gSA
II. DURING COOKING
1. Covering / vkoj.k
A cover traps heat and steam which causes food to cook more quickly.
<Ddu] Hkki o m"ek dks vUnj gh jksd dj j[krk gSA blls Hkkstu tYnh idrk gSA
2. Browning / Hkwjk ;k dqjdqjk djuk
Meats and poultry that are cooked fifteen minutes or longer will brown lightly in their own fat.
ek¡l ;k eqxsZ ds VqdM+s] ftUgsa 15 fe0 ls vfèkd le; ds fy;s idk;k x;k gks] viuh gh pchZ esa Hkwjs gks tk;saxsA
3. Arranging and spacing / Hkkstu dks rjrhc ls j[kuk o [kkyh LFkku NksM+uk
It will heat more evenly if if placed in the oven on equal distance apart, preferably in a circular pattern. Never stack foods on top
of one another.
le:i ls xeZ djus ds fy;s] vou esa leku nwjh ij xksykbZ esa j[ksaA Hkkstu dks dHkh Hkh <sjh ds :i esa u j[ksaA
4. Stirring / fgykuk
Stir in order to spread and redistribute heat. Always stir from the outside towards the centre as the outside of the food heats
first.
Å"ek dks QSykus vkSj iqufoZrfjr djus ds fy, [kkus dks fgyk,aA ges'kk ckgj ls vanj dh rjg Nksyuk pkfg, D;ksafd ckgj dk inkFkZ igys
xeZ gksrk gSA
5. Turning over / iyVuk
Large, tall foods such as roots and whole chickens should be turned so that the top and bottom will cook evenly.
[kkus ds cM+s vkSj yEcs VqdM+ksa tSls tM+sa ,oa lEiw.kZ fpdu( dks iyV dj Hkwuus ls lekurk ykbZ tk ldrh gSA
6. Shielding / <duk
Strips of aluminium foil (which block microwaves) can be placed over the corners or edges of square and rectangular foods to
prevent those portions from overcooking.
,Y;wehfu;e QkWby dk bLrseky inkFkZ ds tyus dks cpkrh gSA
III. AFTER COOKING
1. Standing time / LVsf.Max Vkbe
Foods are often allowed to stand for 3 to 10 minutes after being removed from the microwave oven. Usually the foods are
covered during standing time to retain heat unless they are supposed to be dry in texture (some cakes and biscuits, for
example). Standing allows foods to finish cooking and also helps flavour blend and develop.
O;atu idus ds ckn 3 ls 10 feuV <ddj j[kuk idus dh izfØ;k lekIr djus esa enn djrk gSA bl vofèk dks LVSf.Max Vkbe dgrs gSaA
;g O;atu ds :i dks cjdjkj j[kus esa ennxkj gksrk gSA
7
Page 8

Two stage Cooking / nks pj.kksa esa Hkkstu idkuk
Two stage Cooking / nks pj.kksa esa Hkkstu idkuk
During two stage cooking the oven door can be opened and food checked. Close the oven door and press START and the cooking
stage will continue.
nks pj.kksa esa Hkkstu idkrs le; vki vou [kksy dj Hkkstu tk¡p ldrs gSaA vou dk }kj cUn djsa vkSj ^LVkVZ* nck nsaA Hkkstu idkus dh izfØ;k
iqu% vkjEHk gks tk;sxhA
At the end of stage 1, BEEP sounds and stage 2 commences.
pj.k 1 lekIr gksus ij chi ctsxh vkSj pj.k 2 'kq: gks tk,xkA
Should you wish to clear the programme press STOP/CLEAR twice.
;fn vki funsZ'k feVkuk pkgsa rks STOP/CLEAR nks ckj nck nsaA
e.g. Kheer (Rice 50g, Milk 2 cup, Sugar 3 tsp.) / mnkgj.k ds fy, [khj ¼pkoy 50 xzk] nw/k 2 di] phuh 3 pEep½
1 2 3 4 5 6
Stop/
Clear
Start
Quick Start
Micro Micro
10 min
1 min
10 sec
10 min
1 min
10 sec
Stop/
Clear
Start
Quick Start
Press Stop/Clear
Stop/Clear nck,aA
Grill Cooking / fxzy }kjk Hkkstu idkuk
Grill Cooking / fxzy }kjk Hkkstu idkuk
Select Micro Power
Level (180W, 360W,
540W, 720W, 900W)
ekbØks ikoj Lrj
(180W, 360W, 540W,
720W, 900W) pqusaA
For mak ing Khe er
(Set Power Level PHI)
[khj cukus ds fy,
ikoj Lrj P-HI ij lSV
djsaA
STAGE - 1 STAGE - 2
Set Cooking Time
(:10 Sec to 99:50 Min)
[kkuk idkus dk le;
(:10 Sec to 99:50 Min)
lSV djsaA
For mak ing Khe er
(Set Cook Time 6:00
Min)
[khj cukus ds fy,
6:00 fe- dk le; lSV
djsaA
Select Micro Power
Level (180W, 360W,
540W, 720W, 900W)
ekbØks ikoj Lrj
(180W, 360W, 540W,
720W, 900W) pqusaA
For mak ing Khe er
(Set Po we r Lev el
P-60)
[khj cukus ds fy,
ikoj Lrj P-60 ij lSV
djsaA
Set Cooking Time
(:10 Sec to 99:50 Min)
[kkuk idkus dk le;
(:10 Sec to 99:50 Min)
lSV djsaA
For mak ing Khe er
(Set Cook Time 12:00
Min)
[khj cukus ds fy,
12:00 fe- dk le; lSV
djsaA
This model is fitted with a SHEATH GRILL, so preheating is not needed.
bl e'khu esa ^'khFk fxzy* dk iz;ksx fd;k x;k gS ftls igys ls xeZ djus dh dksbZ vko';drk ugha gksrhA
This feature will allow you to brown and crisp food quickly.
;g fxzy vkids [kk| inkFkks± dks 'kh?kz Hkwjk o dqjdqjk dj nsxhA
The grill rack can be used in two positions - high or low, depending on food type and size.
fxzy jSd vki nks fLFkfr;ksa esa iz;ksx dj ldrs gSa & yks ;k gkbZA bldk p;u [kk| inkFkks± ds vkdkj-izdkj ij fuHkZj djsxkA
The grill rack (high rack) must be used during grill cooking.
fxzy dqfdax djrs le; fxzy jSd ¼gkbZ½ vo'; iz;ksx djsaA
1 2 3 4
Stop/
Clear
Start
Quick Start
Grill
10 min
1 min
10 sec
Stop/
Clear
Press Start
Start nck,aA
Quick Start
Start
Press STOP/CLEAR
STOP/CLEAR nck;saA
Press Grill mode
fxzy eksM nck,aA
Set Cooking Time
(:10 Sec to 99:50 Min)
[kkuk idkus dk le; (:10 Sec to
99:50 Min) lSV djsaA
8
Press Start
Start nck,aA
Page 9

Convection Cooking / dUosD'ku }kjk Hkkstu idkuk
Convection Cooking / dUosD'ku }kjk Hkkstu idkuk
The convection oven has a temperature range of 40 °C and 100 °C~250 °C (180 °C is automatically available when convection
mode is selected).
dUoSD'ku vou esa rkieku lhek 40 °C vkSj 100 °C ~ 250 °C gS (180 °C Lor% lSV gS tc dUoSD'ku lSV djrs gS)A
The oven has a ferment function at the oven temperature of 40 °C. You may wait until the oven is cool because you cannot use a
ferment function if the oven temperature is over 40 °C.
vou esa ngh tekus dh lqfo/kk gSA vki vou ds BaMk gksus rd izrh{kk djsa D;ksafd 40 °C ls Åij rkieku gksus ij ngh ugha tek ldrsA
Your oven will take a few minutes to reach the selected temperature. Once it has reached correct temperature, your oven will BEEP
to let you know that it has reached the correct temperature. Then place your food in your oven; then tell your oven to start cooking.
vkidk vou fuf'pr rkieku ij igq¡pus esa dqN feuV ysxkA tc ;g fuf'pr rkieku ij igq¡psxk rks chi ctsxh vkSj vkidks irk yxsxk fd
vou esa lgh rkieku gSA vc vki vou esa Hkkstu jf[k, vkSj idkuk 'kq: dhft,A
1. To preheat./ igys xeZ djus ds fy,
1 2 3 4
Stop/
Clear
Start
Quick Start
Conv.
Less
More
Stop/
Clear
Start
Quick Start
Press STOP/CLEAR
STOP/CLEAR nck;saA
Press Conv.
Conv. nck;saA
Press ‘More/Less’ key to set
Temperature (40°C to 250°C)
rkieku (40°C to 250°C) lSV
Press Start to Preheat
Start nck,aA
djus ds fy, ‘More/Less’ cVu
nck,aA
If you do not set a temperature your oven will automatically select 180 °C. The cooking temperature can be changed by turning the
Dial key.
;fn vki dksbZ rkieku ugha pqurs rks vou Lor% gh 180 °C pqusxkA idkus dk rkieku Dial ?kqekdj cnyk tk ldrk gSA
The convection rack (low rack) must be used during convection cooking.
dUoSD'ku jSd dk iz;ksx dUoSD'ku dqfdax ds le; vo'; djsaA
2. To cook/ [kkuk idkus ds fy,
1 2 3 4 5
Start
Stop/
Quick Start
Clear
Press STOP/CLEAR
STOP/CLEAR nck;saA
Conv.
Press Conv.
Conv. nck;saA
Less
Press ‘More/Less’ key to
set Temperature (40°C to
250°C)
More
rkieku (40°C to 250°C)
lSV djus ds fy,
‘More/Less’ cVu nck,aA
10 sec
1 min
10 min
Set Cooking Time
(:10 Sec to 99:50 Min)
[kkuk idkus dk le; (:10
Sec to 99:50 Min) lSV
djsaA
Press Start
Start nck,aA
Stop/
Clear
Start
Quick Start
9
Page 10

Combination Cooking / dkWfEcus'ku }kjk Hkkstu idkuk
Combination Cooking / dkWfEcus'ku }kjk Hkkstu idkuk
Your oven has a combination cooking feature which allows you to cook food with heater and microwave at the same time
alternately. This generally means it takes less time to cook your food.
vkids vou esa ;g lqfoèkk bl fy;s iznku dh xbZ gS rkfd vki blds iz;ksx ls Hkkstu dks ghVj o ekbØksoso }kjk ,d gh le; esa ckjh ckjh ls
idk ldsaA lkekU;r% bldk vFkZ gksrk gS fd Hkkstu idus esa yxus okys le; dh cprA
You can set three kinds of micro power level (20%, 40% and 60%) in combi mode.
vki dkWEch eksM esa rhu izdkj ds ekbØks ikoj Lrj ( 20%, 40% vkSj 60%) pqu ldrs gSaA
1. GRILL COMBINATION / fxzy dkWfEcus'ku
1 2 3 4 5 6
Stop/
Clear
Start
Quick Start
Combi
Grill
Micro
10 min
1 min
10 sec
Stop/
Clear
Start
Quick Start
Press Stop/Clear
Stop/Clear nck,aA
Press Combi.
Combi nck;saA
Press Grill mode
fxzy eksM nck,aA
Press Micro to select
Micro Power Level
( 1 8 0 W , 3 6 0 W ,
540W).
ekbØks ikoj Lrj
(180W, 360W, 540W)
pquus ds fy, ekbØks
Set Cooking Time
(:10 Sec to 99:50 Min)
[kkuk idkus dk le;
(:10 Sec to 99:50 Min)
lSV djsaA
nck,aA
2. CONVECTION COMBINATION / dUosD'ku dkWfEcus'ku
1 2 3 4
Start
Stop/
Quick Start
Clear
Press STOP/CLEAR
STOP/CLEAR nck;saA
Press Combi.
Combi nck;saA
Combi
Press Conv.
Conv. nck;saA
Conv.
5 6 7
Micro
10 min
1 min
10 sec
Stop/
Clear
Start
Quick Start
Press Start
Start nck,aA
Less
Press ‘More/Less’ key to set
Temperature (100°C to 250°C)
More
rkieku (100°C to 250°C) lSV
djus ds fy, ‘More/Less’ cVu
nck,aA
Press Micro to select Micro
Power Level (180W, 360W,
540W)
ekbØks ikoj Lrj (180W, 360W,
540W) pquus ds fy, ekbØks
nck,aA
Set Cooking Time
(:10 Sec to 99:50 Min)
[kkuk idkus dk le; (:10 Sec to
99:50 Min) lSV djsaA
Press Start
Start nck,aA
10
Page 11

Quick Start / fDod LVkVZ
Quick Start / fDod LVkVZ
The Quick Start allows you to set 30 seconds interval of HIGH Power Cooking with a touch of 'Quick Start' key.
fDod LVkVZ cVu nck dj 30 lSds.M ds vUrjky esa gkbZ ikoj ij Hkkstu idk ldrs gSaA
1 2
Stop/
Clear
Start
Quick Start
Stop/
Clear
Start
Quick Start
Press STOP/CLEAR
STOP/CLEAR nck;saA
During Quick Start Cooking, you can extend the cooking time upto 99:59 minutes by repeatedly pressing the Quick Start key.
Note :
Press ‘Start/Quick Start’ key.
‘Start/Quick Start’ cVu nck;saA
dsoy Quick Start button dks ckj&ckj nckdj fDod LVkVZ ds nkSjku idkus dk le; 99:59 feuV rd c<+k;k tk ldrk gSA
Various Cook Functions / fofHkUu dqd dk;Ziz.kkfy;ka
Various Cook Functions / fofHkUu dqd dk;Ziz.kkfy;ka
Please follow the given steps to operate cook functions (Auto-Cook, Auto-Defrost & Auto Roast) in your Microwave.
Ñi;k vius ekbØksoso dh fofHkUu dk;Ziz.kkfy;ka (Auto-Cook, Auto-Defrost & Auto Roast) dks pykus ds fy, uhps fn;s x;s pj.kksa dk
vuqlj.k djsaA
COOK
MODE
STEP-1
STEP-2
STEP-3
STEP-4
COOK
MODE
STEP-1
STEP-2
STEP-3
AUTO-COOK AUTO-DEFROST AUTO ROAST
Press Stop/Clear Press Stop/Clear Press Stop/Clear
Press Auto-Cook
to select Category
from (Ac1-Ac8)
Press More/Less
to set Weight
Press Start Press Start Press Start
AUTO-COOK AUTO-DEFROST AUTO ROAST
Stop/Clear nck,a Stop/Clear nck,a Stop/Clear nck,a
(Ac1-Ac8) Js.kh ds
O;atu pquus ds fy,
vkWVks&dqd nck,aA
otu fu/kkZfjr djus ds
fy, More/Less nck,aA
Press Auto-Defrost
to select Category
from (dEF1-dEF4)
Press More/Less
to set Weight
(dEF1-dEF4) Js.kh ds
O;atu pquus ds fy,
vkWVks fMÝkWLV nck,a
otu fu/kkZfjr djus ds
fy, More/Less nck,aA
Press Auto Roast
to select Category
from (Ar1-Ar4)
Press More/Less
to set Weight
(Ar1-Ar4) Js.kh ds
O;atu pquus ds fy,
vkWVks jkWLV nck,a
otu fu/kkZfjr djus ds
fy, More/Less nck,aA
STEP-4
Note / fVIi.kh %
While cooking you can extend the cooking time at any point by pressing MORE/LESS key. There is no need to stop the cooking
process.
Start nck,a Start nck,a Start nck,a
tc vki Hkkstu idk jgs gksa] rks dsoy MORE/LESS cVu nck dj gh le; esa ifjorZu fd;k tk ldrk gSA Hkkstu idkus dh izfØ;k dks jksdus
dh dksbZ vko';drk ugha gSA
11
Page 12

Auto Cook / vkWVks dqd
Auto Cook / vkWVks dqd
Auto Cook allows you to cook most of your favourite food easily by selecting the food type and entering the weight of the food.
Auto Cook vkids euilUn O;atu cM+h vklkuh cukrk gSA vkidks flQZ O;atu dk izdkj vkSj mldk otu Hkjuk gSA
S.No.
Ø-la-
Ac1
,lh 1
Ac2
,lh 2
Ac3
,lh 3
Ac4
,lh 4
Ac5
,lh 5
Food
O;atu
BAKED POTATO
Hkqus gq, vkyw
RICE/BIRYANI
pkoy@fcj;kuh
FRESH VEGETABLE
rkt+k lfCt;ka
FROZEN VEGETABLE
tekbZ gqbZ lfCt;ka
CHILLED PIZZA
BaMk fiT+t+k
WT. Limit
otu
0.1~1.0 kg
0.1~1.0 fdxzk-
0.1~0.3 kg
0.1~0.3 fdxzk-
0.2~0.8 kg
0.2~0.8 fdxzk-
0.2~0.8 kg
0.2~0.8 fdxzk-
0.2~0.4 kg
0.2~0.4 fdxzk-
Utensils
crZu
Glass Tray
dk¡p dh Vªs
Glass Tray/
Ceramic bowl
dk¡p dh Vªs@
fljkfed ckmy
Glass Tray/
Ceramic bowl
dk¡p dh Vªs@
fljkfed ckmy
Glass Tray/
Ceramic bowl
dk¡p dh Vªs@
fljkfed ckmy
Glass Tray/
Ceramic bowl
dk¡p dh Vªs@
fljkfed ckmy
Food
Instructions
Temp.
funsZ'k
rkieku
Room
Wash, dry and prick potatos with fork several times. Place them on three pieces of paper towel in
the centre of Glass tray. After cooking, let stand for 5 minutes to get baked cooked potatos.
lkekU;
/kqys gq, LoPN vkyw dks dkVsa vusd ckj Nsnhr vkyw dks rhu isij Vkoy ds lkFk Xykl Vªs ds e/; j[ks
le; lekIr gksus ij 5 feuV ds fy, j[kk jgus nsaA
Room
Soak plain rice (for Biryani-Rice Mix) in the water for 5 or more minutes. Add required amount of
water and use utensil with lid, adjust weight and press Start. Stir, if necessary while cooking.
lkekU;
After cooking, let the dish stand for 5 minutes. If required, ad- just time by more or less keys.
But do not overheat. Biryani-Rice Mix: spices, chopped vegetables, minced meat, gravy.
^fcj;kuh* ;k ^jkbl feDl* ds fy, 5-6 feuV rd pkoy ikuh esa fHkxk,aA vko';drkuqlkj ikuh feyk;sa]
<Ddunkj crZu bLrseky djsa vkSj otu O;ofLFkr djus ds ckn ^LVkVZ* nck,aA ;fn vko';drk gks rks
idkrs le; fgykrs jgsaA idus ds ckn 5 feuV rd j[kk jgus nsaA vko';drkuqlkj le; fuèkkZfjr djsaA
cgqr T;knk xeZ u djsaA fcj;kuh feDl jkbl % elkys] dVh gqbZ lfCt;ka] dVk gqvk ehV] rjhA
Room
Place in a microwave-safe bowl or casserole. Add 30cc water per 200g. Cover with plastic warp.
After cooking time, let stand covered for 2~3 Min.
lkekU;
ekbØksoso lqjf{kr ;k dSljksy esa j[k nsaA izfr 0.2 fd-xzk- ij 30 lh-lh- ikuh Mkydj IykfLVd doj ls
<d nsaA idus ds ckn 2-3 feuV rd j[kk jgus nsaA
Frozen
Place in a microwave-safe bowl or casserole. Cover with plastic wrap. Let stand for 2~3 minutes.
Ýkstu
ekbØksoso lqjf{kr ckmy ;k dSljksy esa j[k nsaA IykfLVd doj ls <d nsaA 2~3 feuV rd j[kk jgus nsaA
Refrigerated
This function is for reheating leftover chilled pizza. Place chilled pizza on the high rack. After
cooking, take out immediately. Let stand for 2~3 Min.
jsÝhtjsfVM
bl izfØ;k esa cps gq, BaMs fiT+Ttk dks nksckjk xeZ fd;k tkrk gSA BaMs fiT+ts dks gkbZ jSd ij j[k nsaA
idus ds ckn rqjar ckgj fudkysaA 2-3 feuV rd j[kk jgus nsaA
Ac6
,lh 6
Ac7
,lh 7
Ac8
,lh 8
FROZEN PIZZA
Ýkstu iht+k
FRENCH FRIES
ÝSp ÝkbZt
GRATIN
xzsfVu
0.1~0.5 kg
0.1~0.5 fdxzk-
0.2~0.4 kg
0.2~0.4 fdxzk-
0.5~1.2 kg
0.5~1.2 fdxzk-
Glass/Ceramic
bowl + Metal
tray
dk¡p@fljkfed
ckmy + /kkrq dh
Vªs
Glass/Ceramic
bowl
dk¡p@fljkfed
ckmy
Glass Tray/
Ceramic bowl
+ Convection
Rack
dk¡p dh Vªs@
fljkfed ckmy
+++ dUoSD'ku jSd
Frozen
This function is for cooking frozen pizza. Remove all package and place on high rack over metal
tray and glass tray. after cooking, let stand for 1~2 min.
Ýkstu
;g izfØ;k tes gq, ¼Ýkstu fiT+t+k½ dks idkus dh gSA lkjh iSdsftax vyx djds /kkrq vkSj dkap dh Vªs
ds Åij j[k nsaA idus ds ckn 1~2 feuV rd j[kk jgus nsaA
Frozen
Spread potato products out on glass tray. When BEEP, turn food over. For best results, cook in a
single layer. After cooking, remove from the oven and let stand for 1~2 min.
Ýkstu
Xykl Vªs ds Åij vkyw ds mRiknksa dks QSyk nsaA csgrj ifj.kkeksa ds fy, ,d gh rg esa idk;saA idus ds
ckn vksou ls fudky ysaA 1~2 feuV rd j[kk jgus nsaA
Room
Use this key to cook home made Gratins. After cooking, let stand for 1~3 min. (with no cover).
lkekU;
?kj esa xzsfVUl cukus ds fy, bl cVu dk bLrseky djsaA idkus ds ckn 1~3 feuV rd j[kk jgus nsaA
12
Page 13

Auto Defrost / vkWVks fMÝkWLV
Auto Defrost / vkWVks fMÝkWLV
Auto Defrost has four microwave defrost settings based on weight of food to be thawed. It is suggested to closely watch the food
while defrosting. / [kkus ds otu ds vk/kkj ij Auto Defrost dh pkj fMÝkWLV lSfVax gksrh gSaA fMÝkWLV djrs le; [kkus dks utnhd ls ns[kus
dh lykg nh tkrh gSA
S.No.
Ø-la-
dEF1
Mhb,Q 1
dEF2
Mhb,Q 2
dEF3
Mhb,Q 3
dEF4
Mhb,Q 4
l The benefit of this Auto Defrost feature is automatic setting and control of defrosting, but just like conventional defrosting you
Food
O;atu
MEAT
ek¡l
POULTRY
ikWYVªh
FISH
eNyh
BREAD
czSM
WT. Limit
otu
0.1~4 kg
0.1~4 fdxzk-
0.1~4 kg
0.1~4 fdxzk-
0.1~4 kg
0.1~4 fdxzk-
0.1~.5 kg
0.1~.5 fdxzk-
Utensils
crZu
Glass Bowl
dk¡p dk ckmy
Glass Bowl
dk¡p dk ckmy
Glass Bowl
dk¡p dk ckmy
Glass Tray
dk¡p dh Vªs
must check the food during the defrosting time.
l vkWVks fMÝkWLV ls fMÝkWfLVax fofèk dk lapkyu Lo;apkfyr vkSj fu;af=kr gksrk gSA fQj Hkh vkids fujh{k.k dk egRo de ugha gksrkA
l Remove outer shell or packing while defrosting.
l vPNs fMÝkWfLVax ds fy,s iSfdax ;k ckgjh vkoj.k fudky dj inkFkZ dks fMÝkWLV dhft,A
l Place foods in a shallow glass baking dish to catch drippings.
l Hkkstu dks mFkyh dk¡p dh Vªs esa cawnksa dks bdëk djus ds fy, j[ksaA
l Food should still be some what icy in the centre when removed from the oven.
l fMÝkWfLVax ds ckn inkFkZ vanj ls FkksM+h ek=kk esa cQhZyk gksuk pkfg,A
l When it is difficult to remove the wrap from the food, defrost the wrapped food for about a quarter of the total defrost time, which
is displayed at the beginning of the defrost cycle. Then remove the food from the oven and remove the wrap from the food.
l vxj iSfdax ;k ckgjh vkoj.k igys gh vklkuh ls uk fudys rks ,d prqFkZ vofèk ds ckn inkFkZ ckgj fudky dj iSfdax ;k vkoj.k fudkysa] ;g vklku gksxkA
l Sliced bread should be placed between sheets of kitchen towel and bread rolls should be cut in half before defrosting.
l czsM Lykbl fdpu VkWoy ds chp j[ksa rFkk czsM jksYl dks chp ls dkVsaA
Food
Temp.
rkieku
Frozen
Ýkstu
Refrigerated
jsÝhtjsfVM
Refrigerated
jsÝhtjsfVM
Refrigerated
jsÝhtjsfVM
Instructions
funsZ'k
Take the required quantity of meat in Bowl and keep
turning upside down on beeps.
ckmy esa vko';drkuqlkj ek¡l ysa vkSj ^chIl* vkus ij
iyVrs jgsaA
Take the required quantity of poultry in Bowl and keep
turning upside down on beeps.
ckmy esa vko';drkuqlkj ikWYVªh ¼eqxZ] cÙk[k] v.Ms½ bR;kfn ysa
vkSj ^chIl* vkus ij iyVrs jgsaA
Take the required quantity of fish in Bowl and keep turning
upside down on beeps / ckmy esa vko';drkuqlkj eNyh ysa
vkSj ^chIl* vkus ij iyVrs jgsaA
Take the required quantity of bread over the glass tray and
keep turning upside down on beeps.
dk¡p dh Vªks esa vko';drkuqlkj czSM ysa vkSj ^chIl* vkus ij
iyVrs jgsaA
13
Page 14

Auto Roast / vkWVks jkWLV
Auto Roast / vkWVks jkWLV
Auto Roast helps in browning and efficient grilling of the food (preferably for non veg) / Auto Roast [kkus dkss Hkwjk djus vkSj fo'ks"k :i ls
fxzy djus esa lgk;rk djrk gSA
S.No.
Food
Ø-la-
O;atu
ROAST MEAT
Ar1
Hkquk gqvk xks'r
,vkj 1
¼jksLV ehV½
ROAST LAMB
Ar2
Hkquh gqbZ HksM+
,vkj 2
CHICKEN LEGS
Ar3
eqxZ dh Vk¡xsa
,vkj 3
WHOLE
Ar4
CHICKEN
,vkj 4
eqxZ
Three recipes for starter / uofl[kq, ds fy, rhu O;atu
Three recipes for starter / uofl[kq, ds fy, rhu O;atu
NOTE : The time variation during Cooking of recipe depends upon the ingredients, method adopted & type of food category.
WT. Limit
otu
0.5~1.5kg
0.5~1.5 fdxzk-
0.5~1.5kg
0.5~1.5 fdxzk-
0.2~0.8kg
0.2~0.8 fdxzk-
0.8~1.5kg
0.8~1.5 fdxzk-
Utensils
crZu
Glass tray +Glass/
Ceramic Dish + Low Rack
dkap dh Vªs + dkap@fljsfed fMl
+ yks jSd
Glass tray +Glass/
Ceramic Dish + Low Rack
dkap dh Vªs + dkap@fljsfed fMl
+ yks jSd
Glass tray + Metal tray +
High Rack
dkap dh Vªs + /kkrq dh Vªs
+ gkbZ jSd
Glass tray + Metal tray
dkap dh Vªs + /kkrq dh Vªs
Instructions
funsZ'k
Brush meat with melted margarine or butter. Place the low rack over glass/ ceramic dish and
glass tray. After cooking, let stand covered with foil for 10 minutes.
xks'r dks fi?kys ?kh ;k eD[ku esa yisV ysaA /kkrq dh rFkk dkap dh Vªs ds Åij yks jSd ij j[k nsaA
idus ds ckn 10 feuV rd iUuh ¼QkWby½ esa j[kk jgus nsaA
Brush lamb with melted margarine or butter. Place the low rack over the glass/ ceramic plate
and glass tray. After cooking, let stand covered with foil for 10 minutes.
fi?kys ?kh ;k eD[ku esa xks'r dks yisV ysaA /kkrq rFkk dkap dh Vªs ds Åij yks jSd ij j[k nsaA
idus ds ckn 10 feuV rd iUuk ¼QkWby½ esa j[kk jgus nsaA
Wash and dry chicken legs. Arrange thick portions toward the centre of the rack. Brush with
melted butter or seasoning, if desired. When BEEP, turn over immediately. After cooking,
let stand covered with foil for 2-3 minutes.
eqxsZ dh Vk¡xksa dks /kks dj vPNh rjg lq[kk ysaA fQj jSd ij dsUæ dh rjQ eksV Hkkx dks djrs gq,
j[ksaA mUgsa bPNkuqlkj fia?kys gq, eD[ku ;k elkys ls yisV ysaA ^chi* vkus ij mUgsa rqjUr iyV nsaA
idus ds ckn feuV rd iUuk ¼QkWby½ ls <d dj j[kk jgus nsaA
2-3
Brush whole chicken with melted marga- rine, butter or seasonings, if desired. Place the whole
chicken on the metal tray on the glass tray. When BEEP, drain the juices and turn food over
immediately. After cooking, let stand covered with foil for 10 minutes.
eqxZ dks fi?kys ?kh] eD[ku ;k mfpr elkyksa esa yisV ysaA eqxZ dks dkap dh Vªs ds Åij /kkrq dh Vªs esa
j[ksaA chi ds ckn] twl dks fudky dj eqxZ dks iyV nsaA idus ds ckn 10 feuV rd QkWby ¼iUuk½
esa j[kk jgus nsaA
O;atu cukus ds nkSjku] le; ifjorZu [kkus ds rÙo ;k va'k] cukus dh fof/k vkSj [kkus dh Js.kh ij fuHkZj djrk gSA
1 2 3
1. ROASTED PAPAD : Apply little
amount of water evenly on the
both side of papad. Put the papad
on tissue paper on glass tray
properly arranged. Use quick
st ar t se le ct 0.5 -1 .5 minute
depending on no. of papad. After
Roasting remove papad stand for
a minute to gain its crispyness.
Hkqus gq, ikiM+ & ikiM+ ds nksuksa rjQ
dks xhyk djsaA ikiM+ dks fV'kw isij ds
Åij j[kdj dk¡p dh Vªs ij j[ksA
ikiM+ dh la[;k ij quick start dks
0.5-1.5 fe0 ds fy, j[ksaA ,d fe0 ds
fy, Hkqus gq, ikiM+ dks blds dqjdqjs
gksus rd j[ksaA
2. POP CORN : Place the pop corn
bag to the low rack properly as
instructed on packing. Use Quick
start to set 3~4 minutes. remove
the bag after poping sound has
stopped. Take care that bag
corners do not touch sides while
rotating.
(Note: Attend poping process
carefully. Do not overheat as
cause flash fire.)
POP CORN : Pop Corn dk cSx
uhpys rack ij j[ksaA quick start dks
3~4 fe0 ds fy, j[ksaA cSx dks gVk ysa
tc rd Hkquus dh vkokt [kRe gks
tk,A /;ku j[ksa fd cSx ds fdukjs dks
u Nq,saA
uksV & Hkquus dh fØ;k dks /;kuiqoZd
ns[ksaA T;knk u Hkqus D;ksafd blesa vkx
yx ldrh gSA
14
3. FRENCH FRIES : Brush Sliced
potato fingers with oil and spread
potato product out on the metal
tray on glass tray. Use Grill
Combination for 3 Minutes at 40%
Microwave power. Then change
the layer of potato and again cook
f o r 3 M in u t es o n sa m e
co mbi nat io n . A ft e r co o ki ng
remove from the oven and let
stand for 1 to 2 Minutes.
ÝsUp ÝkbZt & dVs gq, vkyw dks rsy
ls xhyk djsA dk¡p dh Vªs ij /kkrq dh
Vªs j[kdj Åij vkyw ds mRiknksa dks
QSyk nsaA 40% ekbØksoso ikoj ij
fxzy dksEcksus'ku 3 feuV ds fy, lSV
djsaA 3 feuV ds ckn vkyw dh rg dks
cnyas vkSj fQj 3 feuV ds fy,
idk;saA idus ds ckn vksou ls
fudky ysaA 1~2 feuV rd cuk ds
j[ksaA
Page 15

Multipurpose Rotisserie Low Rack / eYVhijit jksVsljh yks jSd
Multipurpose Rotisserie Low Rack / eYVhijit jksVsljh yks jSd
This feature can help you in evenly roasting and convection cooking in various mode.
;g Qhpj fofHkUu eksM esa le:i jksfLVax ,oa dUoSD'ku dqfdax esa vkidh enn djrh gSA
Grill mode (High Rack position) / fxzy eksM ¼gkbZ jSd fLFkfr½
Note : Never use Multipurpose Low Rack in the position shown below.
fVIi.kh % uhps n'kkZbZ xbZ fLFkfr esa eYVhijit yks jSd dHkh bLrseky u
djsaA
Incorrect / xyr
How to Use / dSls bLrseky djsa Food / Hkkstu
Convection mode /
dUoSD'ku eksM
Rotisserie mode /
jksVsljh eksM
Convection +
Rotisserie mode /
dUoSD'ku $
jksVsljh eksM
Plain Pizza base, Pizza
sauce and toppings /
Readymade frozen pizza
Iysu fiTt+k csl] fiTt+k
lkWl ,oa VkWfiaXl / rS;kj
Ýkstu fiTt+k
Paneer, Chicken legs,
Boneless Chicken
pieces /
iuhj] eqxsZ dh Vk¡xsa] gìh
jfgr eqxsZ ds VqdM+s
Plain Pizza base, Pizza
sauce and toppings /
Iysu fiTt+k csl] fiTt+k
lkWl ,oa VkWfiaXl
Paneer, Chicken legs,
Boneless Chicken pieces /
iuhj] eqxsZ dh Vk¡xsa] gìh
jfgr eqxsZ ds VqdM+s
Convection / Rotisserie mode (Low Rack position) /
dUoSD'ku@jksVsljh eksM ¼yks jSd fLFkfr½
Correct / lgh
Temperature
rkieku
Frozen
Ýkstu
Frozen
Ýkstu
Refrigerated
jsfÝtjsfVM
Instructions / funsZ'k
Place Pizza (6") over Low Rack and
let it cook in Combi (Micro-360W +
Con-250°C) mode. After cooking,
take out immediately, let stand for 2~3
minutes.
fiTt+k (6") dks yks jSd ds Åij j[kdj
dkWEch eksM (Micro-360W + Con-
250°C) ij idk,aA idus ds ckn 2~3
feuV rd j[kk jgus nsaA
Brush chicken/paneer pieces with
melted margarine or butter. Then
pierce over the vertical pointed bar
and let it roast in Combi (Micro-360W
+ Conv-250°C) mode. After cooking,
let stand covered with foil for 2~3
minutes.
eqxsZ@iuhj ds VqdM+ksa dks fi?kys gq, ?kh
;k eD[ku esa yisV ysaA fQj mUgsa lh/kh
uqdhyh NM+ksa esa Hksn nsa vkSj dkWEch
(Micro-360W + Conv-250°C) eksM esa
idus nsa rFkk 2~3 feuV rd j[kk jgus
nsaA
As exp lai ne d ab ov e for bot h
(Convection & Rotisserie modes).
tSlk fd mijksDr ¼dUoSD'ku ,oa
jksVsljh eksM½ ds fooj.k esa crk;k x;k
gSA
Note : Always use sliced vegetables
as retainers at bottom and in between
Paneer/C hicken pieces over the
vertical pointed bar.
fVIi.kh % lh/kh uqdhy NM+ksa esa
iuhj@eqxsZ ds VqdM+ksa dks yxkrs le;
lgkjk nsus ds fy, lCth ds VqdM+ksa dks
muds uhps vkSj chp esa yxk,aA
15
Page 16

Clean your Oven / vou dks lkQ djuk
Clean your Oven / vou dks lkQ djuk
1 Keep the inside of the oven clean
Food spatters or spilled liquids stick to oven walls and between seal and door surface. It is best to wipe up spillovers with a
damp cloth right away. Crumbs and spillovers will absorb microwave energy and lengthen cooking times. Use a damp cloth to
wipe out crumbs that fall between the door and the frame. It is important to keep this area clean to assure a tight seal. Remove
energy spatters with a soapy cloth then rinse and dry. Do not use harsh detergent or abrasive cleaners. The glass tray can be
washed by hand or in the diswahser.
vou dh njkt (cavity) dks lkQ j[ksaA [kk| inkFkZ dh NhaVsa ;k ty inkFkZ dk fxjuk vke ckr gS blfy, njkt dks xhys diM+s ls lkQ
djsaA njoktk vanj dh rjQ ls iwjh rjg lkQ j[kuk pkfg, ftlls mlds can gksus esa dksbZ ijs'kkuh u gksA
2 Keep the outside of the oven clean / vou dks ckgj ls lkQ j[kuk
Clean the outside of your oven with soap and water then with clean water and dry with a soft cloth or paper towel. To prevent
damage to the operating parts inside the oven, the water should not be allowed to seep into the ventilation openings. To clean
control panel, open the door to prevent oven from accidentally starting, and wipe a damp cloth followed immediately by a dry
cloth. Press STOP/CLEAR after cleaning.
igys xhys diM+s ls lkQ djds rqjar lw[ks diM+s ls iksaN ysuk pkfg,A lQkbZ esa lkcqu dk bLrseky dj ldrs gSa ijarq ikuh vanj u tk,]
bldh lkoèkkuh j[ksaA
3 If steam accumulates inside or around the outside of the oven door, wipe the panels with a soft cloth. This may occur when the
microwave oven is operated under high humidity conditions and in no way indicates a malfunction of the unit.
njokts ij teh Hkki dks uje diM+s ls iksaN ysuk pkfg,A
4 The door and door seals should be kept clean. Use only warm, soapy water, rinse then dry thoroughly.
DO NOT USE ABRASIVE MATERIALS, SUCH AS CLEANING POWDERS OR STEEL AND PLASTIC PADS.
Metal parts will be easier to maintain if wiped frequently with a damp cloth.
njoktk vkSj mlds iqtsZ iwjh rjg ls lkQ j[ksaA
dHkh Hkh nkusnkj ikmMj lk l[r oLrq ls lQkbZ u djsaA
vanj ls lkQ djus ds fy, xhyk diM+k bLrseky djuk vklku rjhdk gSA
Cookware to use in Microwave Oven / ekbØksoso vou esa iz;qDr gksus okys crZu
Cookware to use in Microwave Oven / ekbØksoso vou esa iz;qDr gksus okys crZu
Cookware should be such that it allows the Microwave to pass through. If not the waves will get reflected or absorbed thus no
cooking would take place. Shape & size are again important.[kkuk idkus okys crZu ,sls gksus pkfg, ftuesa ls ekbØksoso izokfgr gks ldsaA
;fn ugha] rks ekbØksoso ijkofrZr ;k la;qDr gks tk;sxh ftlls [kkuk ugha id ldsxkA crZu dh vkÑfr vkSj vkdkj cgqr gh egRoiw.kZ gSaA
COOKWARE SELECTION TABLE
Cookware Microwave Grill Combination
Metal Cookware painted with metallic paints
Glazed / partly glazed pottery
Polystyrene, Melamine, Multilayer container
Aluminium foil
Aluminium foil container
Recycled paper / glued paper product
Oven proof glass, Glass, Ceramic stoneware
Plastic microwave cookware
Cling film, Butter paper
Yes (If recommended
No
No
No
For Shielding
No
No
Yes
by Manufacturer)
Yes
Yes
No
No
For Shielding
For Shielding
No
Yes
No
No
Not recommended
No
No
Yes
Yes
No
Yes
No
No
16
Page 17

Plug wiring information/Technical Specifications / ok;fjax rFkk rduhdh tkudkjh
Plug wiring information/Technical Specifications / ok;fjax rFkk rduhdh tkudkjh
Warning /
psrkouh
This appliance must be earthed / ;g ;U=k vFkZ fd;k tkuk pkfg,
The wires in this mains lead are coloured in accordance with the following codes / esUl (mains) ikoj dkWMZ dk jax fuEu
funsZ'kkuqlkj gksrk gSs &
BLUE/BLACK ~ Neutral BROWN/RED ~ Live GREEN & YELLOW/GREEN ~ Earth
As the colours of the wires in the mains lead of this appliance may not correspond with the coloured markings identifying
with the terminals in your plug proceed as follows / ok;fjax djus dk funsZ'k %
The wire which is coloured BLUE/BLACK must be connected to the terminal which is marked with the letter N or Coloured
BLACK.
BLUE/BLACK jax ds ok;j dk dusD'ku Iyx ds ‘N’ fiu ls
The wire which is coloured BROWN/RED must be connected to the terminal which is marked with the letter L or coloured
RED.
BROWN/RED jax ds ok;j dk dusD'ku Iyx ds ‘L’ fiu ls
The wire which is coloured GREEN & YELLOW or GREEN must be connected to the terminal which is marked with the
letter E or
GREEN & YELLOW/GREEN jax ds ok;j dk dusD'ku Iyx ds ‘E’ ls
Technical Specification / rduhdh tkudkjh
MC-767W/WS
Power Input / ikoj buiqV 230 V AC / 50 Hz
Output / vkmViqV 900 W (IEC705 rating standard)
Microwave Frequency / ekbØksoso fÝDosUlh 2450 MHz
Outside Dimension / ckgjh eki 582 mm(W) X 550 mm(D) X 354 mm(H)
Power Consumption / ikoj datEi'ku
Microwave / ekbØksoso 1350 Watt
Grill / fxzy 1250 Watt
Combination / dkWEchus'ku 2650 Watt
Convection / duosD'ku 1350 Watt
RF Output / vkj,Q vkmViqV 900 Watt
17
Page 18

List of Authorised Service Centres
AHMEDABAD
Baroda
Surat
Rajkot
East AHM
West AHM
Mehsana
Bhavanagar
Junagadh
HUBLI
Shimoga
Hubli
Belgaum
Mangalore
Davanagere
BANGALORE
Mysore
East Bangalore
West Bangalore
North-East Bangalore
BHUWNSHWAR
Rourkela
Behrampur
Cuttack
Bhubneshwar
Sambalpur
CALCUTTA
Durgapur
Hooghly
Asansol
Barrackpore
Kolkata (North)
Siliguri
IT, Siliguri
Kolkata (South)
Port Blair
IT, Kolkata
CHANDIGARH
Chandigarh
Kangra
JAMMU
Jammu
Kashmir
LUDHIANA
Amritsar
Bhatinda
Ferozpur
Jalandhar
Ludhiana
Patiala
CHENNAI
Vellore
Kumbhakonam
Pondicherry
IT, Chennai
Trichy
South Chennai
North Chennai
COIMBATORE
Madurai
Tiruneveli
Salem
Coimbatore
COCHIN
Calicut
Thrissur
Trivandrum
Cochin
Kannur
Kottayam
DELHI
North-West Delhi
North Delhi
West Delhi
IT, Delhi-C
IT, Delhi-M
Central Delhi
South Delhi
East Delhi
IT, Delhi-M
GHAZIABAD
Agra
Dehradun
Bareilly
Meerut
Moradabad
Noida
Ghaziabad
R R Enterprises, 47/2 Arunodaya Society,Near Arunodaya Circle,Alkapuri,Baroda - 390005; Ph : 9825406130, E-mail rrserv@rediffmail.com
Sai Services, 3A, Vithal Nagar Society,Opp. Amidhara Hall, New Rander Road, Surat; Ph : 0261-2695219, 2695229, 2695232, E-mail : omsaiservice@rediffmail.com
Comfort Services, 4-Sardar Nagar (West), "MOTI", Behind Kansagra Hospital, Rajkot; Ph : 0281-2483188, 2695265, E-mail : comserv@spaceonline.co.in
Dhruv Marketing, GF-2/3, Kalgi Complex, Nr. Jayhind School, Daxini Road, Maninagar,Ahmedabad; Ph : 079-5461189, E-mail : dhruvmktg@sifi.com
Digital Care, Narmada Shopping Centre, Nr. Usmanpura Rly Crossing, Behind Nayak Ngr Bus stop, Usmanpura, Ahmedabad, Ph : 079-6468081, 6404986, E-mail : digital_care@email.com
LOGIC CARE, 11,Shubh Complex,Radhanpur Road,Mehsana -2, Ph :02762-240407, E-mail : logiccare@wilnetonline.net
Shreeji Engineering, Swastik Complex Celler, Opp. Greenland Hotel, Dawn, Bhavanagar, Ph : 0278-2510976, E-mail : shreejeeenggbvn@yahoo.com
Perfect Services, Shop No. 5, Takshila Apart, Behind Dwarkadish Market, Near Bus Stand, Junagadh, Ph : 0285-2635372, E-mail : lgperfect_svc@satyam.net.in
Raom Electronics, M. kenchappa Complex, Durgigudi Main Road, Shimoga, Ph : 08182-22133, E-mail : lgsmgsc@yahoo.com
Alpha Service Centre, C/o LGEIL,Balakrishna Compound, Next to Sidheshwar Bldg, P B Road,Hubli, Ph : 0836-242552, E-mail : gsammen@lgezbuy.com
Indian Electronics, # 215/A Gurudev mandir road, Hindwadi, Belgaum, Ph : 0831-469614, 464752, E-mail : lgascbel@sancharnet.in
Mangalore Kings Electronics, opp: Platinum theatre, Below E.C.E. Elevaters, Falnir, Mangalore, Ph : 0824-432359, 432327, E-mail : lgmngssc@vasnet.co.in
Sneha Electronics, Soppina Complex, Shop No. 238/1 & 2, 4th Main, PJ Extension, Davanagere, Ph : 08192-71937, E-mail : lgascdvg@rediffmail.com
JIJ Marketing & Services, No 1346, 1st Cross, Panchamanthra Road, Kuvempunagar, Mysore, Ph : 0821-461144, 461155, E-mail : lgjij123@rediffmail.com
DIGITAL ez SERVICES, # 3, 2nd Cross, Rajaram mohan Roy Extn, OFF KH Road, Bangalore, Ph : 080-2121221, 331, E-mail : lggupta@rediffmail.com
Golden Eye Services, No.57, 41st Cross, 2nd Block, Rajajinagar, Bangalore, Ph : 080-3521333, 3522700, E-mail : lgges@rediffmail.com
Golden Eye Services, 3169/C, 1st main, 60 feet service road, HAL 2 nd stage,Indiranagar, Ph : 080-5202988, 5202987, E-mail : lgges_ind@rediffmail.com
CPC Electronics, AL-36, Basanti Colony, Rourkela, Ph : 0661-24508203, E-mail : rkl_cpcrkp@rediffmail.com
Global Electronics, Church Road, Back side of Telephone Bhavan, Berhampur, Ph : 0680-2223124, E-mail : d_nepak@rediffmail.com
Alpha Service Centre, A-1/6 Swati Villa, Surya Vihar, Link Road, Cuttack, Ph : 0671-2335703, 2335818S, E-mail : lgservicectc@rediffmail.com
Miracle Services, A-17/10, Unit-7, Surya nagar, Behind New Passport office, Bhubneshwar, Ph : 0674-2400461, 2400533, E-mail : bcchacko@hotmail.com
M S Electronics, Near LIC Office, Budharaja, Sambalpur, Ph : 0663-2540125, E-mail : sudarsan_sbp@rediffmail.com
Raj Services, Kamalpur plot, Benajchity, Durgapur, Ph : 0343-2584342, 2586418, E-mail : rajserve <rajserve@sancharnet.net>
KMS Electronics Pvt Ltd., Door No 118A Rishi Bankim Sarani,Serampore,Hooghly, E-mail : kmselectronics2000@yahoo.com
M/s Millinnium Plaza, Gnd Floor,Rashmi apts,S B Gorai Road, Asansol - Dist - Burdwan, Ph : 9832166427, E-mail : aditya_ttarafdar@rediffmail.com
Delight Services, 1/1 A Middle Road, Annandpuri, Barrackpore, Ph : 033-25923873,, E-mail : delight_servicebkp@vsnl.net
Antique, BD-36, Salt Lake, Kolkata, Ph : 033-23212059, 23212040, E-mail : <lgascant@vsnl.net>
Ghosh Electronics, 2 Bidhan Road(opp.Focin Gate), Kanchanjungha Stadium,Siliguri, Ph : 0353-2432308, E-mail : <slg_lgascsil@sancharnet.in>
Digitec Service, Hotel vinayk complex, Hill Road, Siliguri, Ph : 0353-2529472, 2433542, E-mail : anil@mydigitec.com
South End Services, P-537, Raja Basanta Roy Road, Kolkata, Ph : 033-24652727, 28, E-mail : <lgascant@vsnl.net>
Universal Services, Port Blair
Aforeserve.com Limited, Room 13, 1st Floor, 35 Chittaranjan Avenue, Kolkata, Ph : 033-22119948, 22119674, E-mail : dipendu@afforeserve.com
Electro- World, SCO No.-24, Sector - 41D, Chandigarh, Ph : 0172-2626577, E-mail : electrolg@glide.net.in
Shivalik Electro Services, Dharamshala Road, Nr. Petrol Pump, Birta, Kangra, Ph : 01892-62815, E-mail : shivalik3@sancharnet.in
Dolphin International Services, 251-A, Gandhi Nagar, Jammu, Ph : 0191-2456707, 245999, E-mail : psharma21@rediffmail.com
Royal Care, 1A Rajbagh Srinagar, Ph : 0194-2454105
Bhogal Telecare services, Opp. Gill Resaurtant, Batala Road, Amritsar, Ph : 0183-2273591, 2278591, E-mail : lgasr@glide.net.in
Vision Electronics, Bibiwala Road, Near Hotel continental, Bhatinda, Ph : 0164-2213919, E-mail : visionlg@glide.net.in
Saini Electronics, Outside Bagdadi Gate, Opp Water Works Office, Ferozpur, Ph : 01632-223748, E-mail : sainisvc@jla.vsnl.net.in
Electronic Center, 148/1, Shahid Udham Singh Nagar, Jalandhar, Ph : 0181-2236740, 2453389, E-mail : lgsvc@jla.vsnl.net.in
U Like Electronics, 642-L, Model Town, Ludhiana, Ph : 0161-2313238, 2313236, 2454782, E-mail : as_ulike2000@yahoo.com
Richie Electronics, 5, Upper Mall Stadium Road, Patiala, Ph : 0175-2213650, E-mail : lgsvcpat@rediffmail.com
Asia Electronics, No. 3, Post Office Street, Krishna Nagar, Vellore, Ph : 0416 - 2233524, E-mail : lgascvellore@yahoo.com,vlr_shun24@sancharnet.in
Sigma Services, No 15, Kothandapani Street,Kumbhakonam, Ph : 0435-2433414, E-mail : lgsigmaservices@yahoo.com
Sairam Engineers, No. 22, IInd Cross Street, Anna Nagar, Pondicherry, Ph : 0413 - 2204433, E-mail : lgascpondy@sify.com
Systems and solutions, SSR mall, 21 wallers road 2nd floor, Mount road, Chennai, Ph : 044 - 28416768, E-mail : lgitasc@yahoo.com
Mobaile Electronics, 11, Vayalur Main Road, Srinivasa Nagar,Trichy, Ph : 0431 - 2781094, E-mail : lgasctrihy@eth.net
Golden Electronics, No.28, Fourth Main Road, C.I.T. Nagar, Chennai, Ph : 044 - 24356618, 19, E-mail : lgascscche@yahoo.co.in, goldenelect@vsnl.net
Alpha Service Centre, 90,G.N.T. Road, Ponniammanmedu, Madhavaram, Chennai-600110, Ph : 044-25531471, 72, E-mail : lgalphasvcche@yahoo.co.in
Rakesh Electronics, 4, Kamarajar Nagar, 3rd Street,Chinna Chokkikulam, Madurai, Ph : 0452-2526711, E-mail : lgascmdu1@yahoo.com.
Plasma Electronics, No. 50C, Trivandrum Road, Palayamkottai, Tiruneveli, Ph : 0462 - 2581825, E-mail : lgasctvl@yahoo.com
Classic Electronics, F13, Indira Gandhi Road, Fairlands, Salem, Ph : 0427-2335196, 2331586, E-mail : lgascslm@eth.net
Alpha Service Centre, 250A, Kannappa Nagar, Sanganur, Coimbatore, Ph : 0422-2332506, 2331862, E-mail : alphacoimbatore@lgezbuy.com
Encore Services, Malayanadu Kavu Rd;Mankavu;Calicut, Ph : 0495-330729, E-mail : lgclt@eth.net
Digital Electronics, NO.1,VELAN'S ROAD, OPP.MD FURNISHING HOUSE, KOORKENCHERY, KANIMANGALAM.P.O, THRISSUR, Ph : 0487-427984, E-mail : lalujo@zyberway.com
Hitech Services, TC-27/39/Bliss, Pattoor, Trivandrum, Ph : 0471-559256, E-mail : babu@hitech-lg.com
Sincear Services, Mullor Building, opp Cochin tower, Lissy Junction, Ernakulam, Cochin, Ph : 0484-290179, 405204, E-mail : sincereservices@eth.net
Future Vision, Philos Nest, Opp YMCA,Chettipeedika,Pallikunnu PO,Kannur -2
Mariya Electronics, Parayil Building, Kalathitadi, KK Road, Kottayam, Ph : 0481-574717, E-mail : lgktm@zyberway.com
Noble Service centre, 54 Raja Garden, Delhi, Ph : 011-25107707, 25100066, 25100099, E-mail : lgnobleservice@sify.com
Global Service, F1U-170, Pritam Pura, New Delhi, Ph : 011-27347559, 27347534, 27344460 / 61, E-mail : lggobalservice@yahoo.com
Prompt Service, A 4/9, Paschim Vihar, New Delhi, Ph : 011-25270467, 25258821, E-mail : customer@bol.net.in
Challanger Computer, 101, Madhuban, 55 Nehru Place, New Delhi, Ph : 011-26413104, 26236106, E-mail : challenger-id@eth.net/challangersvc@hotmail.com
Microshop System & Services, 204 Shakuntla Appartment 59, Nehru Place, New Delhi, Ph : 011-26280641, 26214369, E-mail : microshop@now-india.net.in / micrshop@id.eth.net.in
Dizitek Service, 754,Main Mathura Road, Jungpura, New Delhi, Ph : 011-24317750, 24322359, 24322058, E-mail : lgdizitek@mantraonline.com
Alpha Service Centre, 221, Okhla Industrial Estate, Phase-III, New Delhi, Ph : 011-26834110, 26838475, E-mail : master asc@lgindia.com
Electro-India, A-12, Priyadarshini Vihar, New Delhi, Ph : 011-22506536, 22506560, 22506625, E-mail : electro_india@hotmail.com/electro_india@mantraonline.com
Microshop System & Services, 202, Satya Bhawan, 36 Community Centre, Wazirpur industrial Centre, Delhi, Ph : 011-27403489, E-mail : microshop@now-india.net.in / micrshop@id.eth.net.in
Alpha Service Centre, 28, Gulmohar Vatika Seetla Road, Near Khandari Crossing, Agra, U.P., Ph : 0562-2530913 , 17, E-mail : Alphaagra@lgezbuy.com/mascagr@yahoo.co.in
Alpha Service Centre, Mohwah Wala, Rourkee road, Dehradun, Ph : 9897070810, E-mail : lgascdeh@yahoo.com
Multitech Service Network, G-64, Kumar complex 116-A, Civil Lines, Bareilly, Ph : 0581-2423141, E-mail : lgascbly@hotmail.com
Akash Electronics, 29, Jaganathpuri, Behind Shankar Ashram, Meerut, Ph : 0121-2645720, E-mail : lgascmer@yahoo.com
Super services network, CM-74, Deen Dayal Nagar, Phase-I, Moradabad, Ph : 0591-2352852, E-mail : lgascmbd@yahoo.co.in
Digital Service Point, I-2, Sec-12, Noida, G.B. Nagar, Ph : 0118-2532546, 2544778, E-mail : lgascn@hotmail.com
Delight Services, R-1/28 Raj Nagar, Ghaziabad, Ph : 0120-2724744, 2752188, E-mail : lgasc_gzb@rediffmail.com, lgascgzb@hotmail.com
Page 19

GUWHATI
Guwahati
Silchar
Tinsukhia
Jorhat
Tejpur
HYDERABAD
Vijaywada
Visakhapatnam
Tirupati
Warrangal
Rajamundhry
Anantpur
Hyderabad-S
IT, Secundrabad
Secundrabad
Hyderabad-P
Secundrabad-P
Nizambad
Nellore
Kurnool
INDORE
Bhopal
Gwalior
Ratlam
Indore
Jabalpur
RAIPUR
Raipur
Bilaspur
JAIPUR
Jodhpur
Sriganganagar
Udaipur
IT, Jaipur
Jaipur
Alwar
Kota
Pali
Sikar
Ajmer
KUNDLI
Faridabad
Karnal
Ambala
Rohtak
Hissar
Gurgaon
Kundli
LUCKNOW
Varanasi
Kanpur
Allahabad
IT, Lucknow
Lucknow
Lucknow-B
Gorakhpur
Jhansi
GOA
Goa
Goa
MUMBAI
Ghatkopar
IT, Mumbai
Goregaon
Mahim
Chandiwali
THANE
Vashi
Thane-A
Thane-S
PATNA
Bhagalpur
Patna
Muzaffarpur
IT, Patna
RANCHI
Jamshedpur
Ranchi
Dhanbad
PUNE
NASIK
Kolhapur
Pune
Pimpri
Aurangabad
NAGPUR
Nagpur
Alpha Service Centre, Birjhora Roller Flour Mills, christan Basti , Guwahati, Ph : 0361-2340140, E-mail : alphaguwahati@lgezbuy.com
Sandhya Electronics, N N Dutta Road, Near Jain Bhavan,Silchar, Ph : 03842-260107, E-mail : sduttalg@sancharnet.in
Satisfaction, Near Bangia Shishu Vidyalaya, Khageswar Road, Tinsukia, Ph : 0374-2331134, E-mail : satisfaction_tsk@yahoo.co.in
R P Electronics, K.B. Road, Jorhat, Ph : 0376-2329047, E-mail : rupmphukan@yahoo.com
Complete Solution, Thana road, Tejpur, Ph : 03712-220991, E-mail : complete_solution@hotvoice.com
Alpha Service Centre, D. No. 40-7-6A, Danka Rd,Moghalrajpuram, Vijaywada-520 010, Ph : 0866-2479530, 2479430, E-mail : alphavijaywada@lgindia.com
Alpha Service Centre, D.NO : 14-1-99, F.NO G 01, Horizions Enclave, Nowrogi Road, Maharnipeta, Visakhapatnam, Ph : 0891-5566466, 5568199
Anjali Electronics, 20-5-746(Gr. Floor)Tirumala By Pass Road, Tirupathi, Ph : 08577-2280592, 2283261, E-mail : lgasctpt@nettlinx.com
Anurag Electronics, D.No.:1-7-1788, Below labour office,Balasamudram Main Road,Hanumakunda, Warrangal, Ph : 0870- 2555994, E-mail : lgascwrl@hd2.dot.net.in
Srri kharpaka Vinayaka service Centre, Door No.75-6-38 ; BVR complex, Nr. Manasa Hospital, Prakash Nagar, Rajahmundry, East Godawari District, Ph : 0883 - 2446120, 2423082, E-mail : lgrjy@hd2.dot.net.in
Royal Electronics, Shop No 5 & 6, 13-695-5, Takai Towers, RF Road, Anantpur, Andhra Pradesh, Ph : 08554-222029, 232614, E-mail : lgascatp@nettlinx.com
Sri Venkateshwar Electronics, D. No. 5-9-84 /2A, "Capoor's Cottage,Chappel Road, ABIDS, Hyderabad, Ph : 040-55588095, 96, E-mail : lgaschyd@vsnl.net
Sun Beam technologies, Flat no 120 Chenoy trade centre, Park Lane, Secundrabad, Ph : 040-55327848, 9, E-mail : sunbeamtech@tatanova.com
Alpha Service Centre, DOOR NO : K / 1 / 1 , I D A (Industrial Developement Area) Beside Modern Bread factory Uppal Main Road, Hyderabad, Ph : 040-27207396, 27207398, 27207399, Email : alphasvc_hyd@rediffmail.com
Parneeth Electronics, Shop No. 11&12, Global Enclave, Aruna Co-Operative Society, Food World Lane, Kukutpally, Hyderabad, Ph : 040-26463382, E-mail : lgasckphb@hotmail.com
Parneeth Electronics, Sri Harsha Enclave , Shop No 1 , Krishnapuri Colony , West Marredpally, Secundrabad, Ph : 040-27806466, E-mail : lgascsec@hotmail.com
Srichakra Electronics, Door No:7-2-198 Marwadi Galli,Ghandhi Chowk,Nizambad, Ph : 08462-2551556, E-mail : lgascnzb@sify.com
Anjali Electronics, Door No : 14/103 Opp:Archana Theator, Nellore, Ph : 0861-2347927, E-mail : lgascnlr@sify.com
Geeta Electronics, 40/139,5&6, opp:z.p.rly station rd,Kurnool, Ph : 08518-221836, E-mail : lgascknl@sify.com
New Concept Services, Plot No. 9, Zone-I, M.P.Nagar, Gnd Floor, Press Complex, Nr. Nai Dunia Press, Bhopal, Ph : 0755-5276845, 5271845, E-mail : vslg@satyam.net.in
Electrocare, Anuj Sadan, Opp.Dainik Bhaskar Press, Bhaskar Lane, Jayendraganj, Gwalior, Ph : 0751-5086771, 2326542, E-mail : lgacsgwl@mantrafreenet.com
S.B. Care Centre, Shop No. 17, Ground Floor, Pushpak Complex,21 Dalumodi Baazar, Ratlam, Ph : 07412-506990, E-mail : sbcarecentre@mantrafreenet.com
Alpha Service Centre, LG-6, Mourya Centre, 16, Race Cource Road, Indore, Ph : 0731-5069881, 5069882, E-mail : lgdynamic@mantramail.com
Techno care, 272,Napier Town,Near navin Vidya Bhavan,Jabalpur, Ph : 0761-5037487, E-mail : bssoni@mantrafreenet.com
B K Electroscan, Dr. Rathi's House, C-10, Sector-II, Devender Nagar, Raipur, Ph : 0771-656776, 655733, E-mail : bklgrpr@mantrafreenet.com
Cyber Services, Near PGBT College, High Court Road, Bilaspur, Ph : 07752-505610, E-mail : cyberservices@sify.com
Bhumika Electronics, 10, Panchwati Colony, Ratanada, Opp NCC Ground, Jodhpur, Ph : 0291-2516615, E-mail : <lgascjdpr@datainfosys.net>
Electro Device Care, 10H Block, Sriganganagar, Ph : 0154-2423384, E-mail: <edcare@sancharnet..in>
Classic Electronics, White House, 18, Hajareshwar Colony,Nyay Marg ( opp. Tele. Exch. ), Udaipur, Ph : 0294-2561958, E-mail : <lgascuda@datainfosys.net>
Solution Computer, P. No. 4, Krishna Nagar-II, Jan Path, Lal Kothi, Jaipur, Ph : 0141-5106388, E-mail : <solutioncomputerlg@yahoo.co.in>
Alpha Service Centre, B-71 Sahkar Marg, Lal Kothi Scheme, Jaipur, Ph : 0141-2743787, 88, E-mail : <mascjpr@lgezbuy.com>
Unique Electronics, Krishana Bhawan, Near jat boarding,Station Road, Alwar, Ph : 0144-2702248, E-mail : <lgascalw@datainfosys.net>
Supreme Electronics, 352, Shopping Centre, Kota, Ph : 0744-2363354, E-mail : <lgascktt@datainfosys.net>
Yukta Electronics, 1-b-53 Housing Board, Pali, Ph : 02932-258377, E-mail : <globalelectronic@sify.com>
Easy Care, Shovasari Street, Near Head Post Office, Jhatiya Bazar, Sikar, Ph : 01572-244396, E-mail : <contactom@rediffmail.com>
Victor Care, 52, Anasagar Link Road, Ajmer, Ph : 0145-2431956, E-mail : easy_svc@yahoo.co.in
Unitech Systems, 1K/76, Phawra Singh Chowk, NIT Faridabad, Ph : 0129-50232251,2491072, E-mail : surenderyadav@eth.net
Digimax, 82 Sector 6 Karnal, Ph : 0184- 2283082, E-mail : ram1318@sify.com
Advance Electronics, A-96, Green Park, Mahesh Nagar, Ambala Cantt, Ph : 0171-2654150, 2655096, E-mail : advancesvc@sify.com
MB Services, Makrouli House, Sonepat Road, opp. Jagmohan Motor, Rohtak, Ph : 01262-246258, E-mail : mbservice@rediffmail.com
Universal Electro Lab, SCS-2, First Floor, Red squere Mkt, Railway Road, Hissar, Ph : 01662-229967, E-mail : sartaj_kumar2001@rediffmail.com
Alpha Service Centre, M-49, Old DLF Colony, Near ITI, Gurgaon, Ph : 0124- 8982201 / 8982202, E-mail : alphaggn@mantraonline.com
Alpha Service Centre, Sunder Cold Store & Ind. Compound, Opp. Sale Tax Barrier, GT Karnal Road, Kundli, Ph : 01264-370370 / 372346 / 372403, E-mail : alphakundli@lgezbuy.com
Kirti Electronics, 45 Shivaji Nagar, Mehmoorganj, Varanasi, Ph : 0542-221744, 224015, E-mail : kirtiele_vns@satyam.net.in
Videotrack, 117/Q/707, 120 ft Road Shardanagar, Kanpur, Ph : 0512-582123, 583616, E-mail : lgsckan@rediffmail.com
Mitra Electro Cottage, 61/60 Shiv Charan lal road, Near wishamber cinema and Anurag Hotel, Allahabad, Ph : 0532-405719, E-mail : lgascall@sancharnet.in
Microworld, 2ND Floor, Shop No. 24, Naza Building, Lucknow, Ph : 0522-294172, E-mail : micro.world@sify.com
Yes Cusomer Care, B-58, Sector--B, Aliganj,Lucknow, E-mail : yescare@sancharnet.in
Altra Digi Services, 537,Hari Kunj,Keshav Nagar,Sitapur Road, Lucknow, Ph :0522-2757559, E-mail : altradigi@indiatimes.com
N.P.N Electronics, 288 L North Street, Opp.Indralok Cinema, Gorakhpur, Ph : 0551-346413, E-mail : npn@ndb.vsnl.net.in
Starnet Technology, 371, Jeevan Shah, Civil Lines , Jhansi, Ph : 2331053, E-mail : starnet_tech@rediffmail.com
Rushel Electronics, Shop No. 7/37B, Kamat Complex, Tonca, Caranzalem, Panji, Goa, Ph : 0832-2462967, E-mail : rushel@goatelcom.com
Alpha Services, C/o LGEIL, Plot No - D3&D4, Rego bagh,Alto St Cruz,Bambolim,Goa
MUMBAI
Aditya Services, Plot no 130, Mahavir Mahal, Garodia Nagar, Opp Pushpa Vihar Hotel, Gathkopar (E), Mumbai, Ph : 022-25158113, 25169957, E-mail : aditya_ser@vsnl.net
Hybrid Electronics, 10/A Janardhan Bldg B-Wing 48/50 Proctor Road Grant Road Mumbai 400007, Ph : 022-23876126, 23811836, E-mail : hybridelectronics@vsnl.net
Siddhivinayak Electronics, Shop No - 1A, Laxmi Commercial Center, Jaiprakash Nagar Road No -1, Goregaon (E), Mumbai, Ph : 022-28726463, 28761965, E-mail: siddhivinayak_lg@vsnl.net
United Services, Shop No-2, Plot No-374, Build Arch Terrace, Sitladevi Temple Road, Mahim(W), Mumbai, Ph : 022-24449798, 24449381, 24463565, E-mail : united93@vsnl.net
Alpha Service Centre, K-Wing, Tex Center, Chandiwali Farm Road, Chandiwali, Andheri (e) Mumbai, Ph : 022-28501637,28511084, 28513141, E-mail : alphamumbai@lgezbuy.com
Anup Electronics, F-Type Market, Shop 12, Sec-4&5, Vashi, Mumbai, Ph : 022-27822222 / 27827404, E-mail : anoopelectronics@rediffmail.com
Alpha Service Centre, Godown 2&3, Raj Laxmi Compound, Kalher Village, Thane-Bhiwandi Road, Porna, Thane, Ph : 02522-271764, E-mail : AlphaThane@lgezbuy.com
Star Services, 3, Mehta Patel Shopping Center, Corner of modi patel Road, Station Road , Bhynder - West, Thane, Ph : 0251-28180589, E-mail : nevillestar_service@rediffmail.com
Diginet SVC, In Front Of LIC Branch-2, RBSSS Road, Bhakanpur, Bhagalpur, Ph : 0641-2306953, E-mail : joydasgupta18@yahoo.co.in
Service Plaza, B-8, S.K.Puri ,Sahedeo Matho Marg, Patna, Ph : 0612-2211373, 2206072, E-mail : service_plaza@yahoo.co.uk
Testron Electronics Pvt. Ltd., Tilak Maidan Road , Moti jheel, Muzaffarpur, Ph : 0621-2247823, E-mail : arbind6@sancharnet.in
Microzone, B-8, Sakara Manzil, S.K.Puri ,Sahedeo Matho Marg, Patna, Ph : 612-2211373, 2204845, E-mail : microzone11@hotmail.com
S P Digital Care, 465, Line No -17 Kashidih, Sakchi , Jamshedpur, Ph : 0657-2425830, 2426713, E-mail : spdigitalcare@yahoo.co.in,
See Cool Service, "PREM KUNJ" Kadru Main Road, Near Nath Hospital, Ranchi, Ph : 0651-2240071, E-mail : seecoolaslam@yahoo.com,
Unique Care Centre, 3 No. J C Mallick Road,Hirapur,Dhanbad, Ph : 0326-2200306, E-mail : dhiraj2k@hotmail.com,
Duru Electronics, Shop No-6, Radha Raman Society, Opp.Telephone Exchange, Canada Corner, Nasik, Ph : 0253 -2577102, E-mail : sawlani_nsk@sancharnet.in
Komal Electronics, 899/3 Shaupuri, 5th Lane Nr. Pant Balakundari Mkt (Gawat Mandai), Kolhapur, Ph : 0231-2667762, E-mail : kpr_bvasant@sancharnet.in,komallg@ip.eth.net
Shree Services, Satishdham, 250/B, Shaniwarpeth, Besides Gandhi Hospital, Pune, Ph : 020-4478481, 82, E-mail : shreesvcpune@sify.com
Shree Samarth Electronics, Gawde-Kunal Garden, Pimpri-Chinchead Link Road, Pimpri, Pune, Ph : 020-7482781, E-mail : lgservicepcmc@eth.net
Hi tech Service Center, Shop No.8, Motiwala Trade Centre New Samarth Nagar, Nirala Bazar, Aurangabad, Ph : 0240-2337515, E-mail : lgservs@sify.com
Shivatronics, Plot no 17, J B Thakkar Marg, Opp. RTO Office, Giripeth, Nagpur, Ph : 0712-2560765, E-mail : shivatrn@nagpur.dot.net.in
Page 20

P/No. : 3828W5A3725
LG Electronics
 Loading...