

Page 1

Make sure to read the Safety Precautions before
using the product.
Keep the User's Guide(CD) in an accessible place
for furture reference.
See the label attached on the product and give the
information to your dealer when you ask for service.
OWNER’S MANUAL
MM22339944AA
MM22779944AA
Page 2

1
PREPARATION
FRONT PANEL CONTROLS
■
This is a simplified representation of the front panel. The image shown may be somewhat different from your
set.
INPUT
MENU
VOL PROK
PROGRAMME
Buttons
VOLUME
Buttons
MENU
Button
OK
Button
INPUT
Button
Power
Button
Headphone
Jack
Page 3
2
PREPARATION
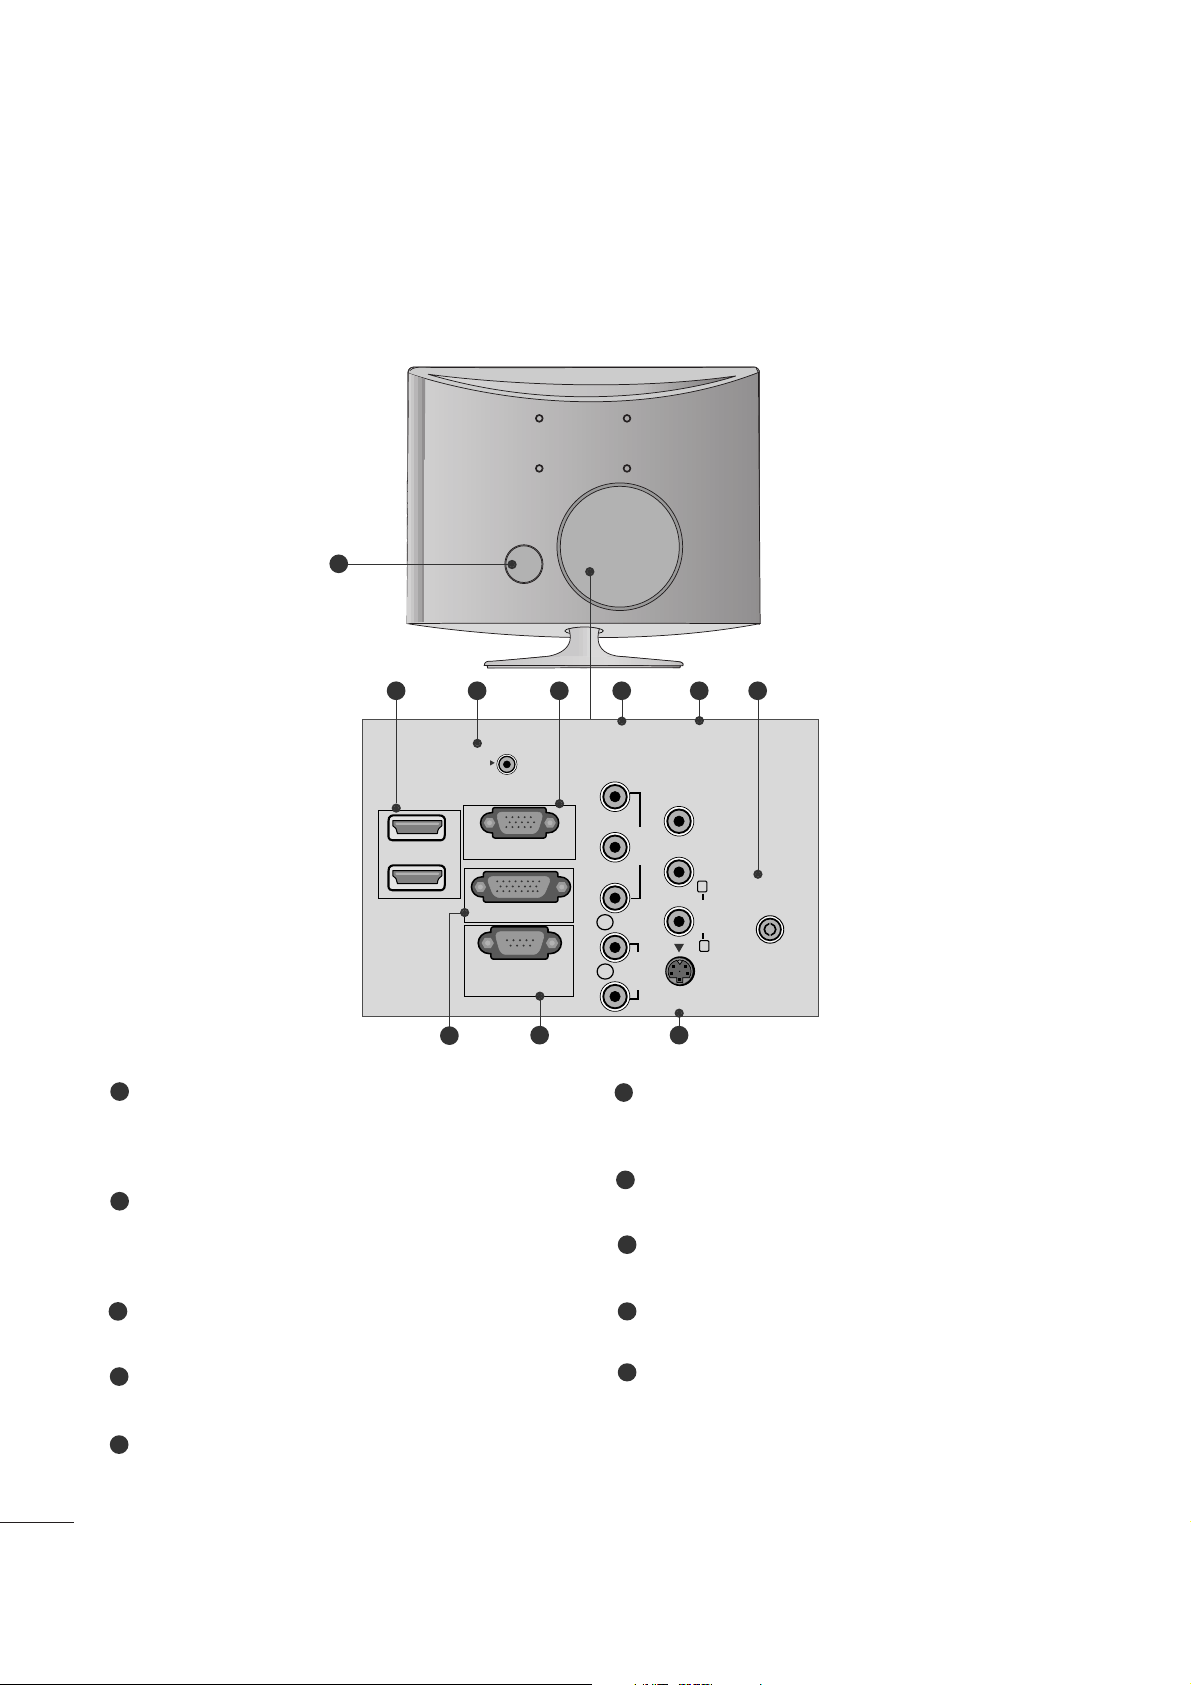
BACK PANEL INFORMATION
■
This is a simplified representation of the back panel. The image shown may be somewhat different from your
set.
2
1
9 10
8
4 6 73 5
PPoowwee rr CCoo rrdd SS oocckk eett
This set operates on AC power. The voltage is indicated on the Specifications page. Never attempt to
operate the set on DC power.
HH DDMMII II nn ppuu tt
Connect a HDMI signal to HDMI .
Or DVI (VIDEO) signal to HDMI with DVI to HDMI
cable.
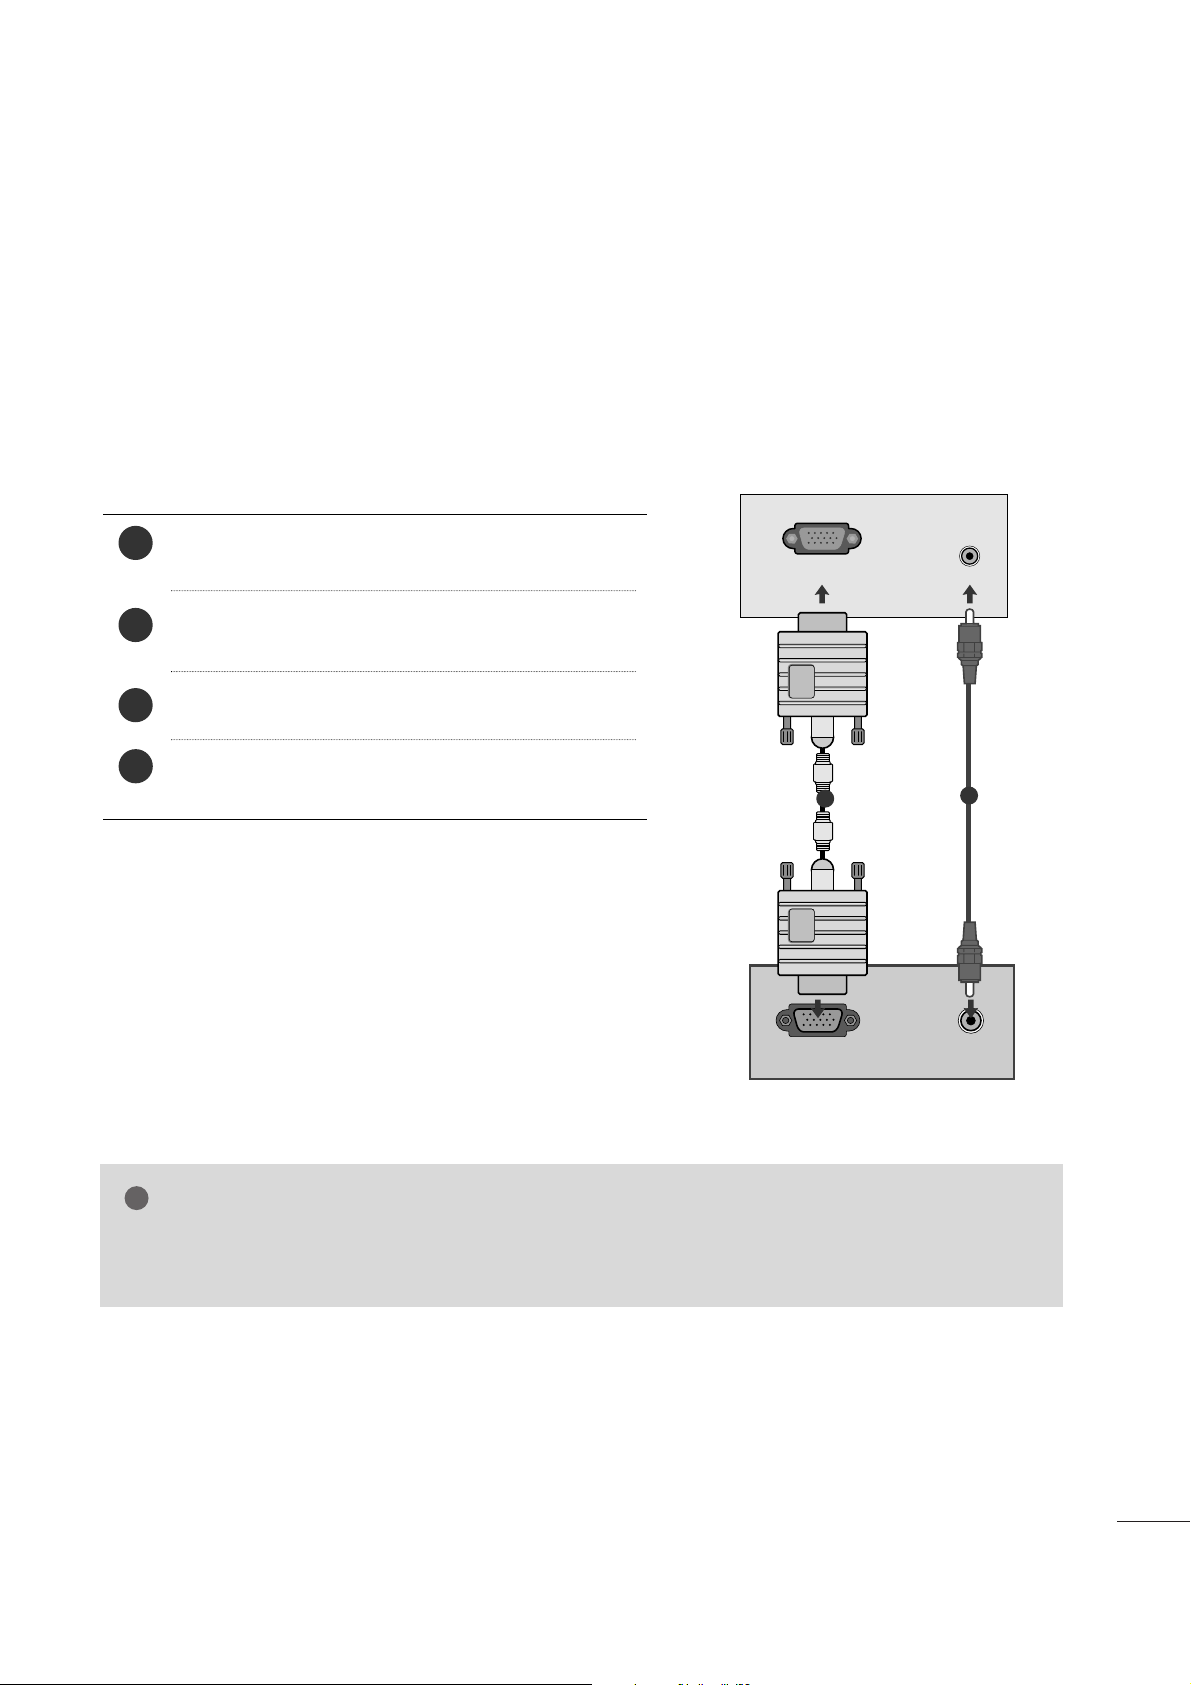
RRGGBB//DD VVII AAuudd iioo II nn ppuutt
Connect the audio from a PC.
RRGGBB II nn ppuutt ((PPCC ))
Connect the output from a PC.
CCoo mmppoonneenntt II nn ppuu tt
Connect a component video/audio device to these
jacks.
AA VV(( AA uu ddiioo//VViiddeeoo)) II nn ppuutt
Connect audio/video output from an external device
to these jacks.
AA nn ttee nn nn aa IInnpp uutt
Connect over-the-air signals to this jack.
DD VVII-- DD II nn ppuutt((PPCC ))
Connect the output from a PC.
RRSS-- 22 3322CC II NN (( CC OONN TT RR OOLL && SSEE RR VVIICCEE )) PPOORR TT
Connect to the RS-232C port on a PC.
SS --VViiddee oo II nnpp uu tt
Connect S-Video out from an S-VIDEO device.
1
2
3
4
5
6
7
8
9
10
AUDIO IN
(RGB/DVI)
1
HDMI
2
(CONTROL & SERVICE)
RGB IN (PC)
DVI-D IN (PC)
RS-232C IN
COMPONENTINAV IN
Y
P
B
VIDEO
P
R
L
AUDIO
R
S-VIDEO
VIDEO AUDIO
(MONO)
L
R
ANTENNA/
CABLE IN
Page 4
3
PREPARATION
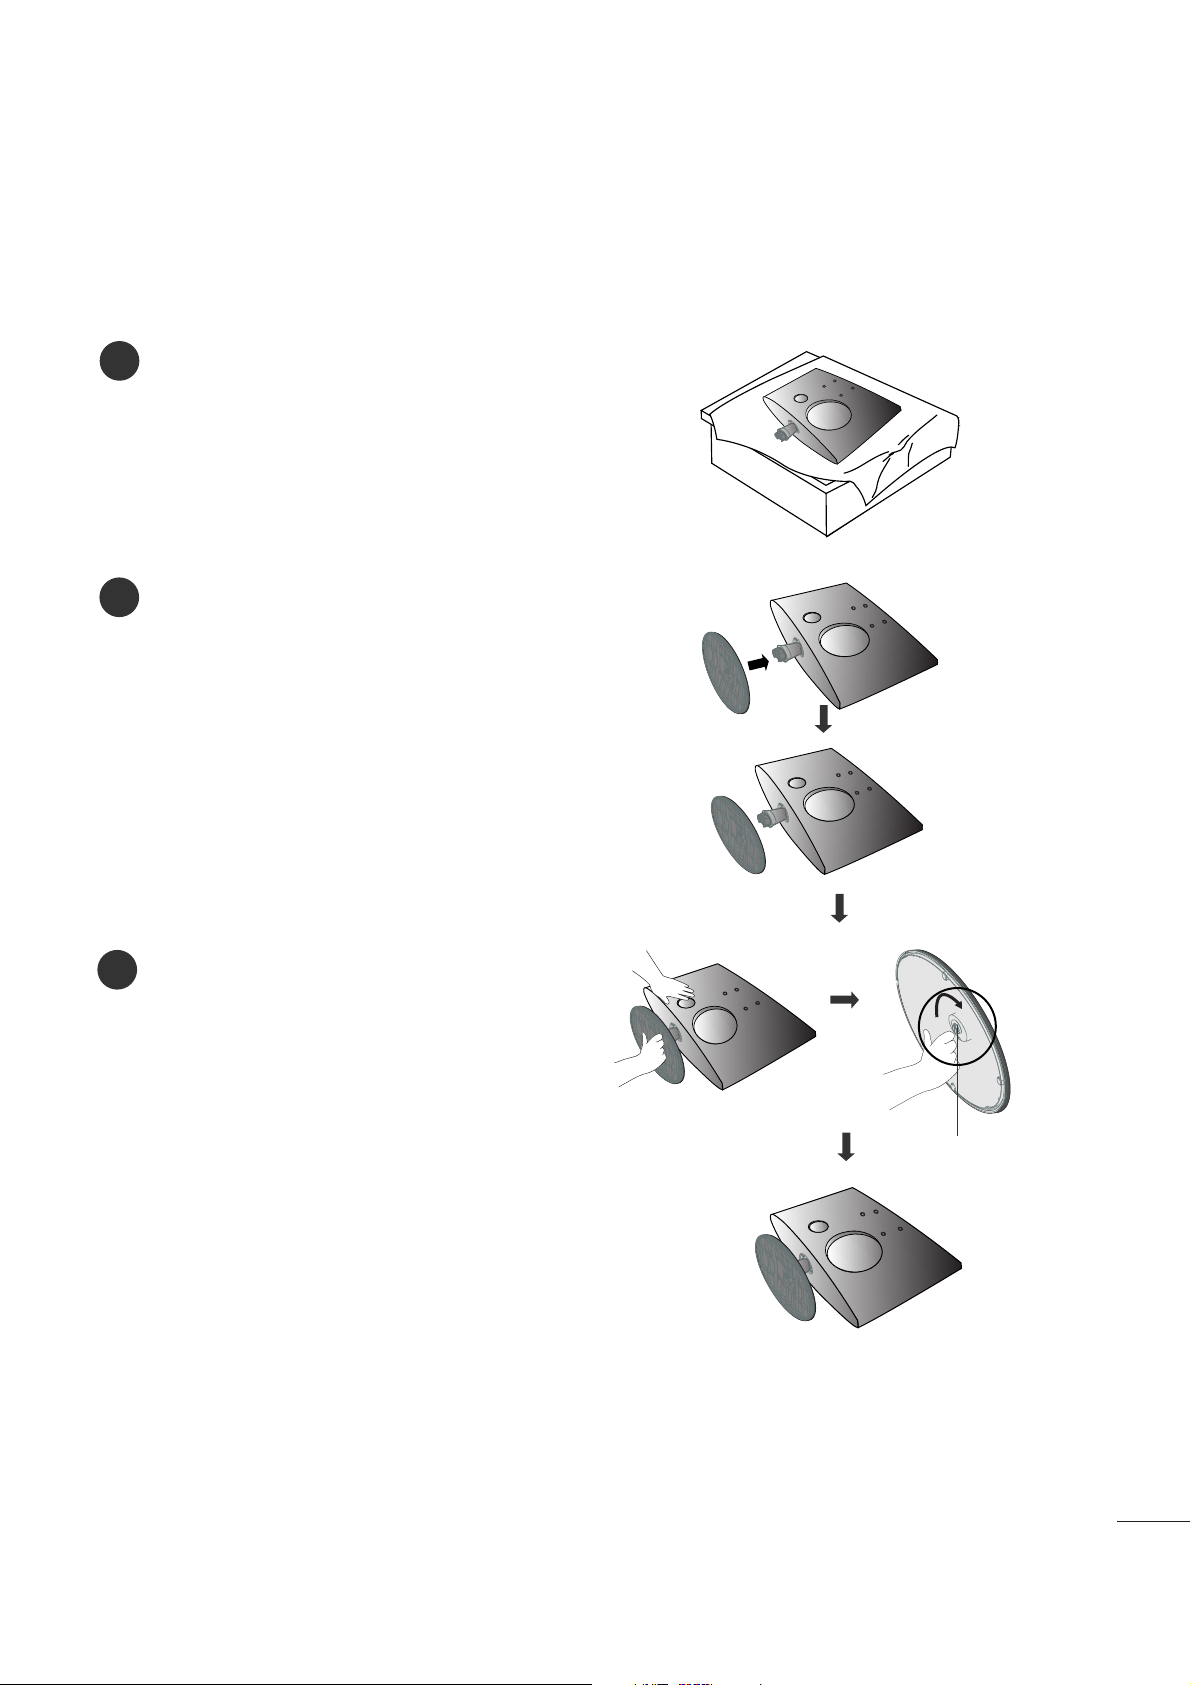
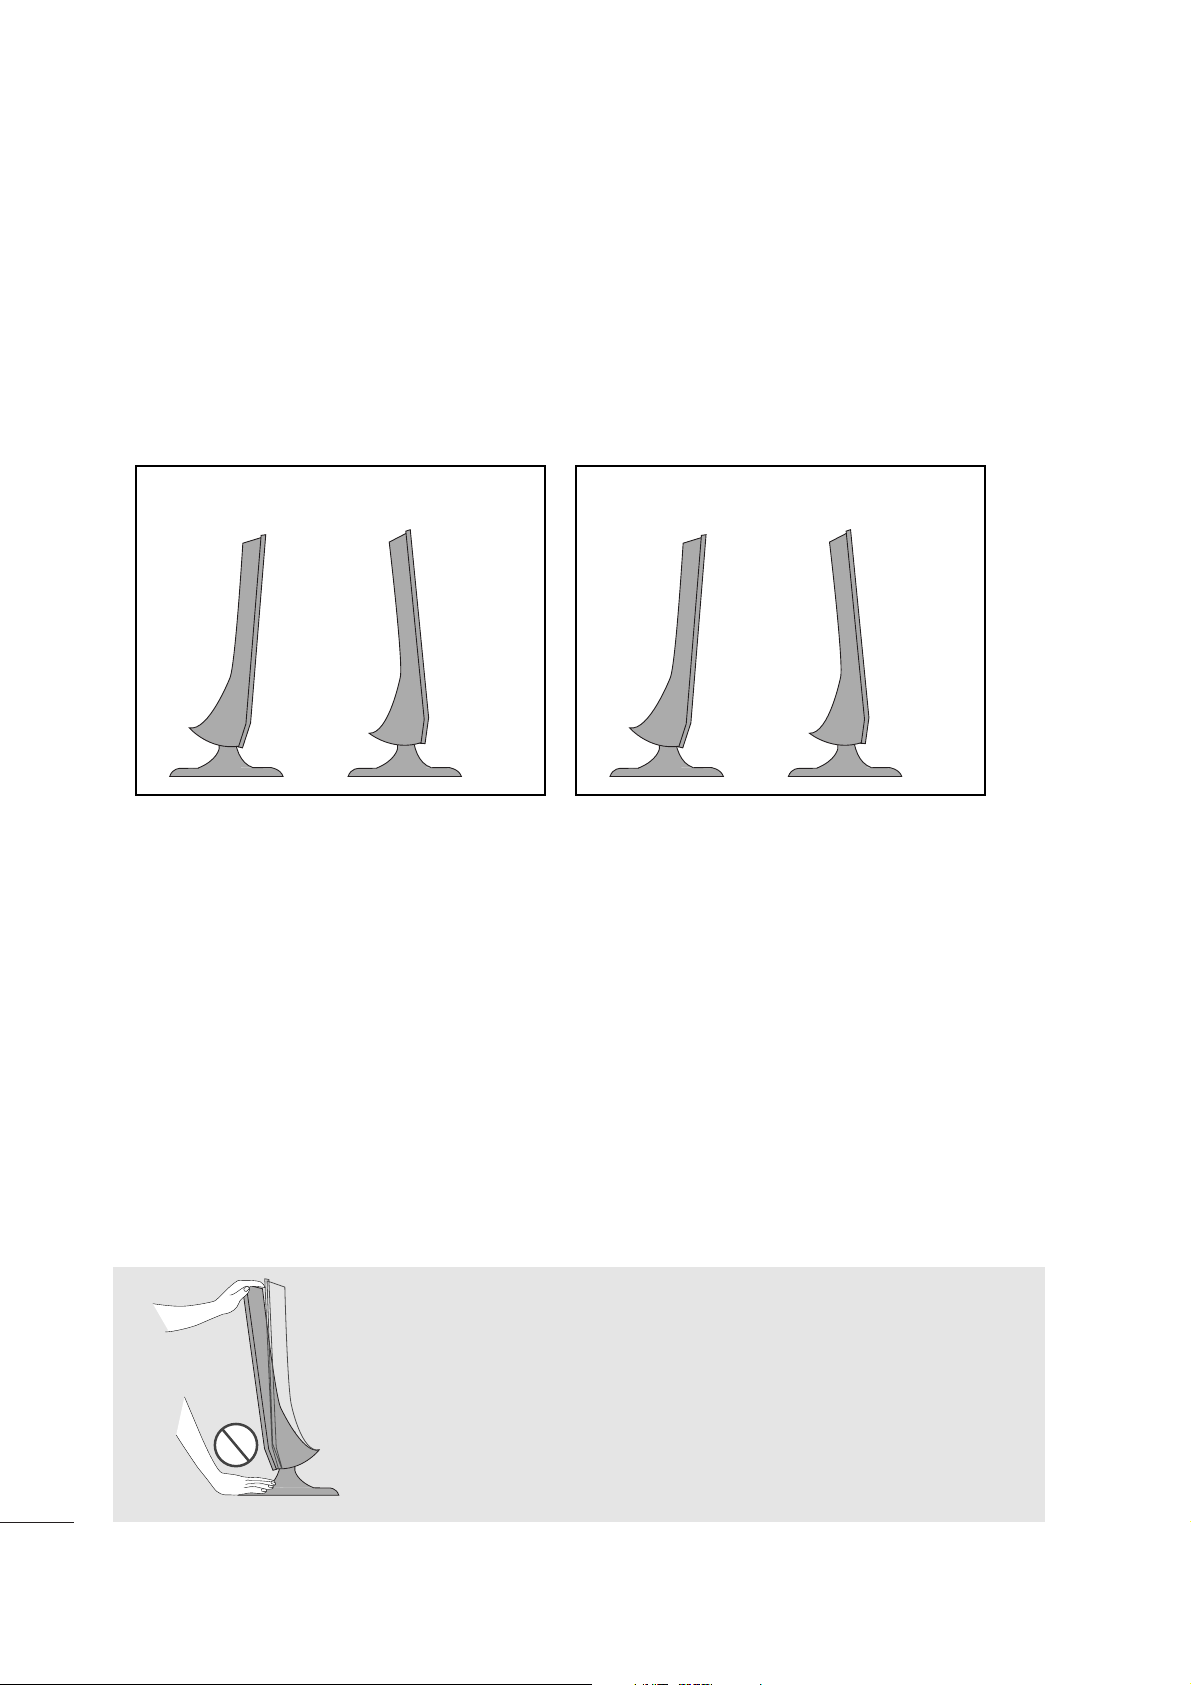
STAND INSTALLATION
■
The image shown may be somewhat different from your set.
1
2
3
Carefully place the product screen side down on a
cushioned surface that will protect product and
screen from damage.
Insert the
sstt aanndd bbaassee
into the product
Attach the monitor to the Stand Base by turning
the screw to the right.
* Turn the screw by using the screw handle
Screw
Page 5
4
PREPARATION
DETACHING STAND
1
2
3
Place the set screen side down on a cushion or
soft cloth.
Detach the monitor to the Stand Base by turning the screw to the left.
Turn the screw by using the screw handle
4
Pull the stand base.
5
■
The image shown may be somewhat different from your set.
Page 6
5
PREPARATION
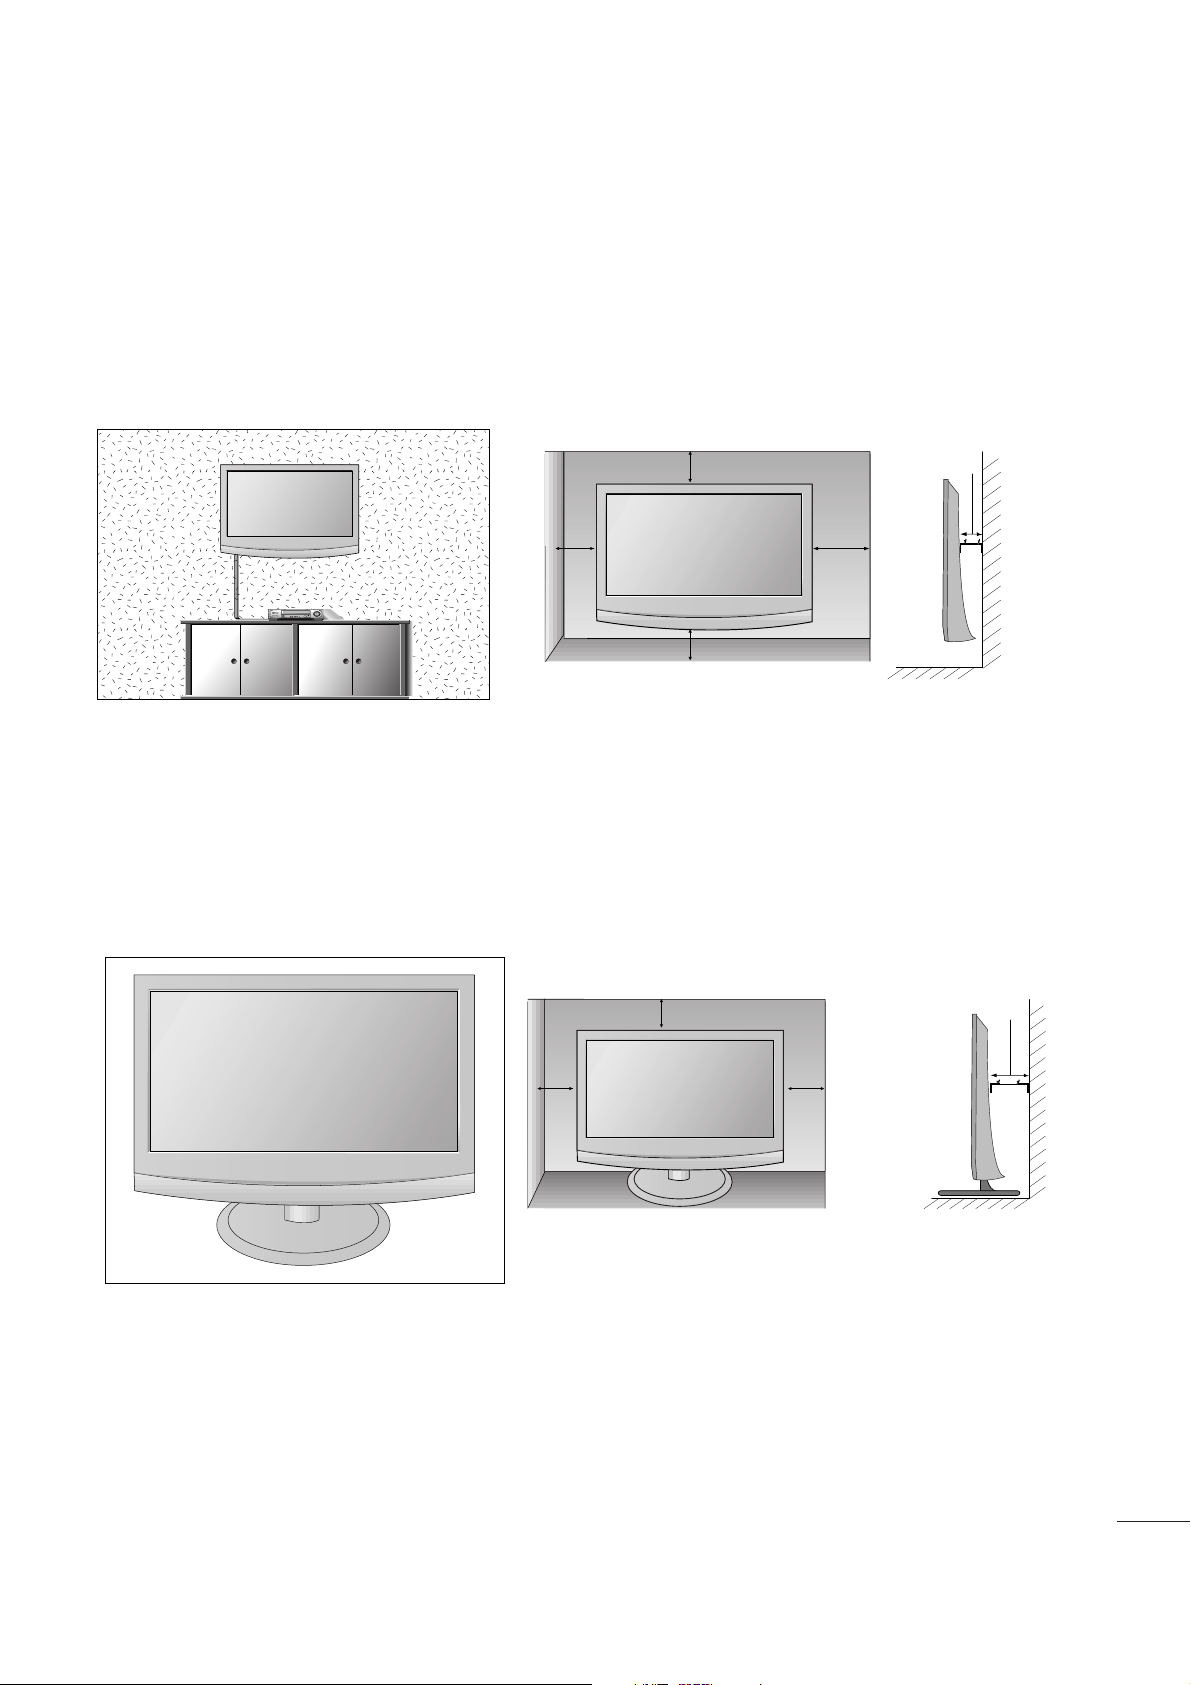
DESKTOP PEDESTAL INSTALLATION
For proper ventilation, allow a clearance of 4 inches on each side and from the wall.
4 inches
4 inches
4 inches
4 inches
WALL MOUNT: HORIZONTAL INSTALLATION
For proper ventilation, allow a clearance of 4 inches on each side and from the wall. Detailed installation
instructions are available from your dealer, see the optional Tilt Wall Mounting Bracket Installation and
Setup Guide.
4 inches
4 inches
4 inches 4 inches
4 inches
Page 7
6
PREPARATION
POSITIONING YOUR DISPLAY
■
The image shown may be somewhat different from your set.
Adjust the position of the panel in various ways for maximum comfort.
•• TT ii ll tt rraannggee
LOCATION
Position your set so that no bright light or sunlight falls directly onto the screen. Care should be taken not to
expose the set to any unnecessary vibration, moisture, dust or heat. Also, ensure that the set is placed in a position to allow a free flow of air. Do not cover the ventilation openings on the back cover.
If you intend to mount the set to a wall, attach Wall mounting interface (optional parts) to the back of the set.
When you install the set using the wall mounting interface (optional parts), attach it carefully so it will not drop.
- Be sure to use screws and a wall mount that meet VESA standards.
- Using screws longer than those recommended might damage the product.
- Using screws that do not meet VESA standards might either damage the product or result in it coming away from
the wall. We will not be held responsible for any damage resulting from failure to follow these instructions.
< Screw Mounting Interface Dimension >
M2394A : 75mm x 75mm hole spacing
M2794A : 100mm x 100mm hole spacing
WW aarrnniinngg::
When adjusting the angle of the screen,do not put your
finger(s)in between the head of the monitor and the stand
body.You can hurt your finger(s).
<M2394A>
-6°~ -2
°
12
°
~ 18
°
<M2794A>
-5°~ -2
°
7
°
~ 13
°
Page 8
7
PREPARATION
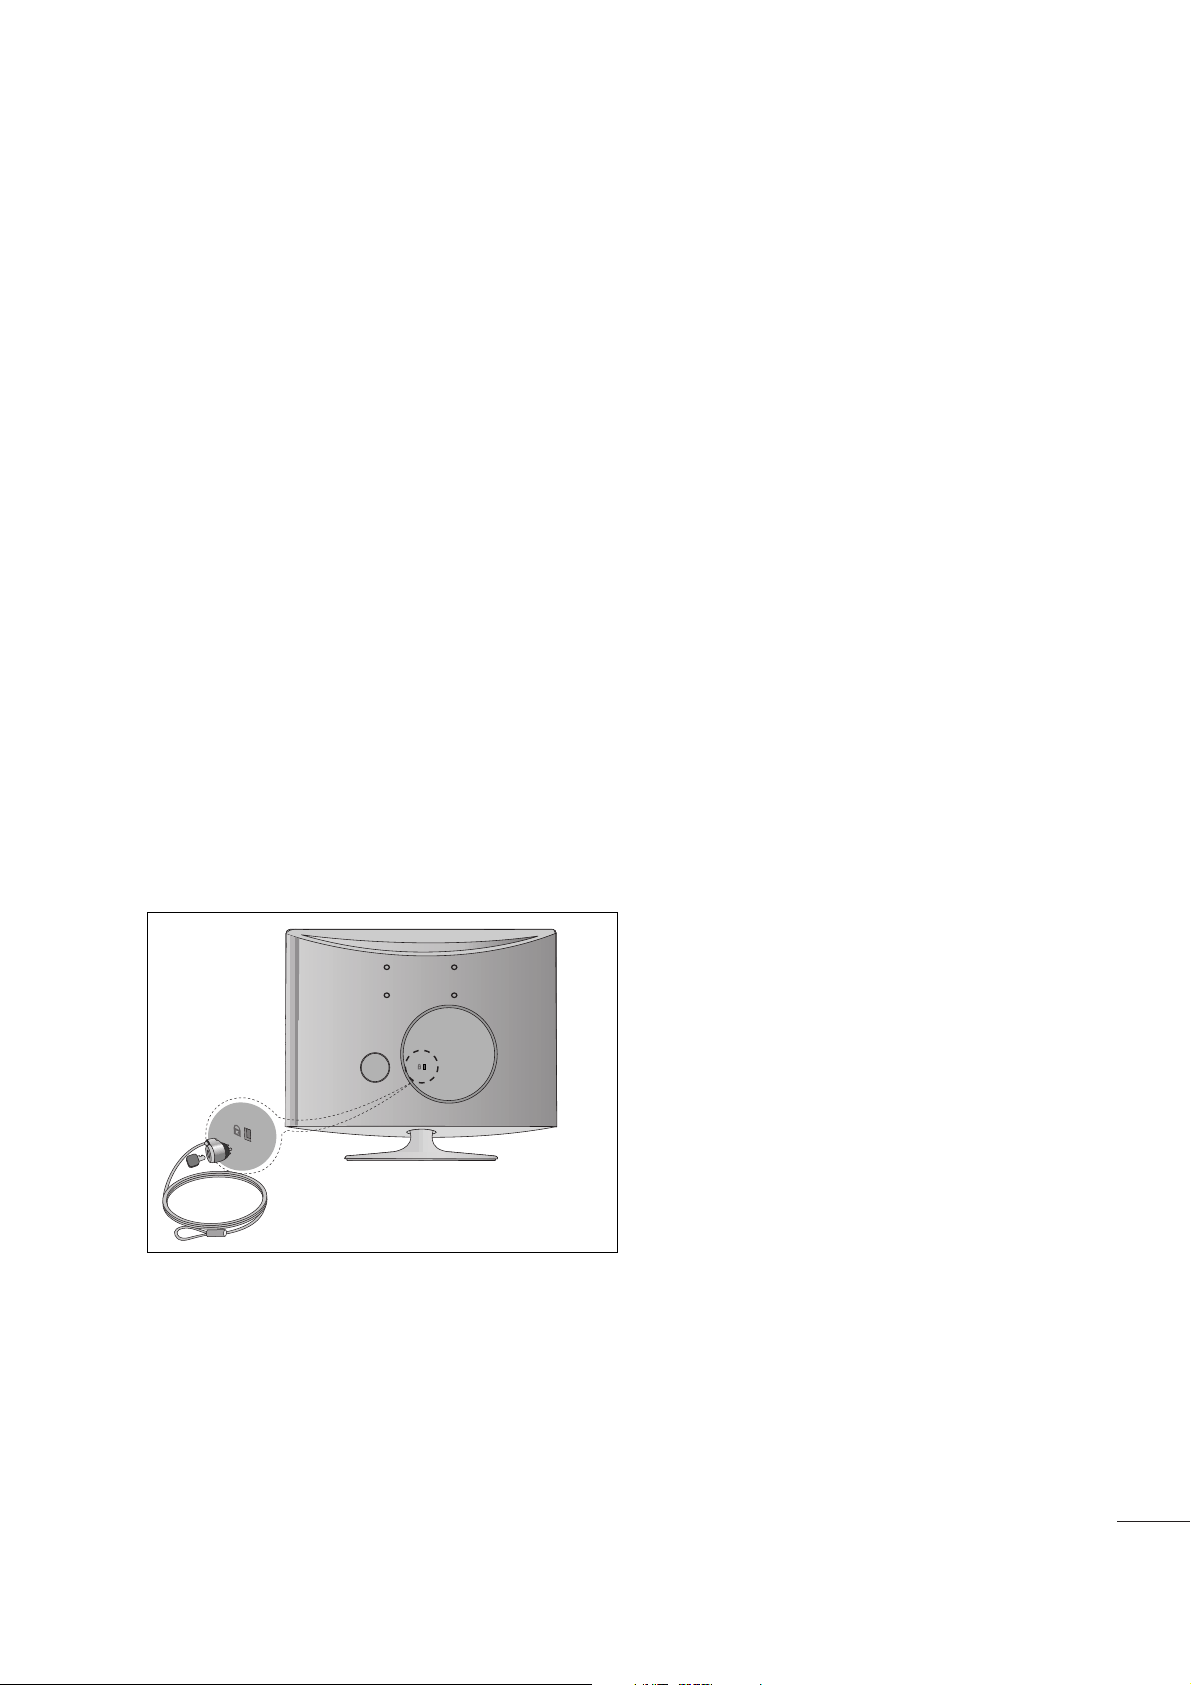
KENSINGTON SECURITY SYSTEM
- The product is equipped with a Kensington Security System connector on the back panel. Connect the
Kensington Security System cable as shown below.
- For detailed installation and use of the Kensington Security System, refer to the user’s guide provided with
the Kensington Security System.
For further information, contact
hh ttttpp ::////ww ww ww.. kkeenn ss ii nnggttoonn .. ccoomm
, the internet homepage of the
Kensington company. Kensington sells security systems for expensive electronic equipment such as notebook PCs and LCD projectors.
NOTE
- The Kensington Security System is an optional accessory.
NOTES
a. If the product feels cold to the touch, there may be a small “flicker” when it is turned on.
This is normal, there is nothing wrong with product.
b. Some minute dot defects may be visible on the screen, appearing as tiny red, green, or blue spots.
However, they have no adverse effect on the monitor's performance.
c. Avoid touching the LCD screen or holding your finger(s) against it for long periods of time.
Doing so may produce some temporary distortion effects on the screen.
Page 9
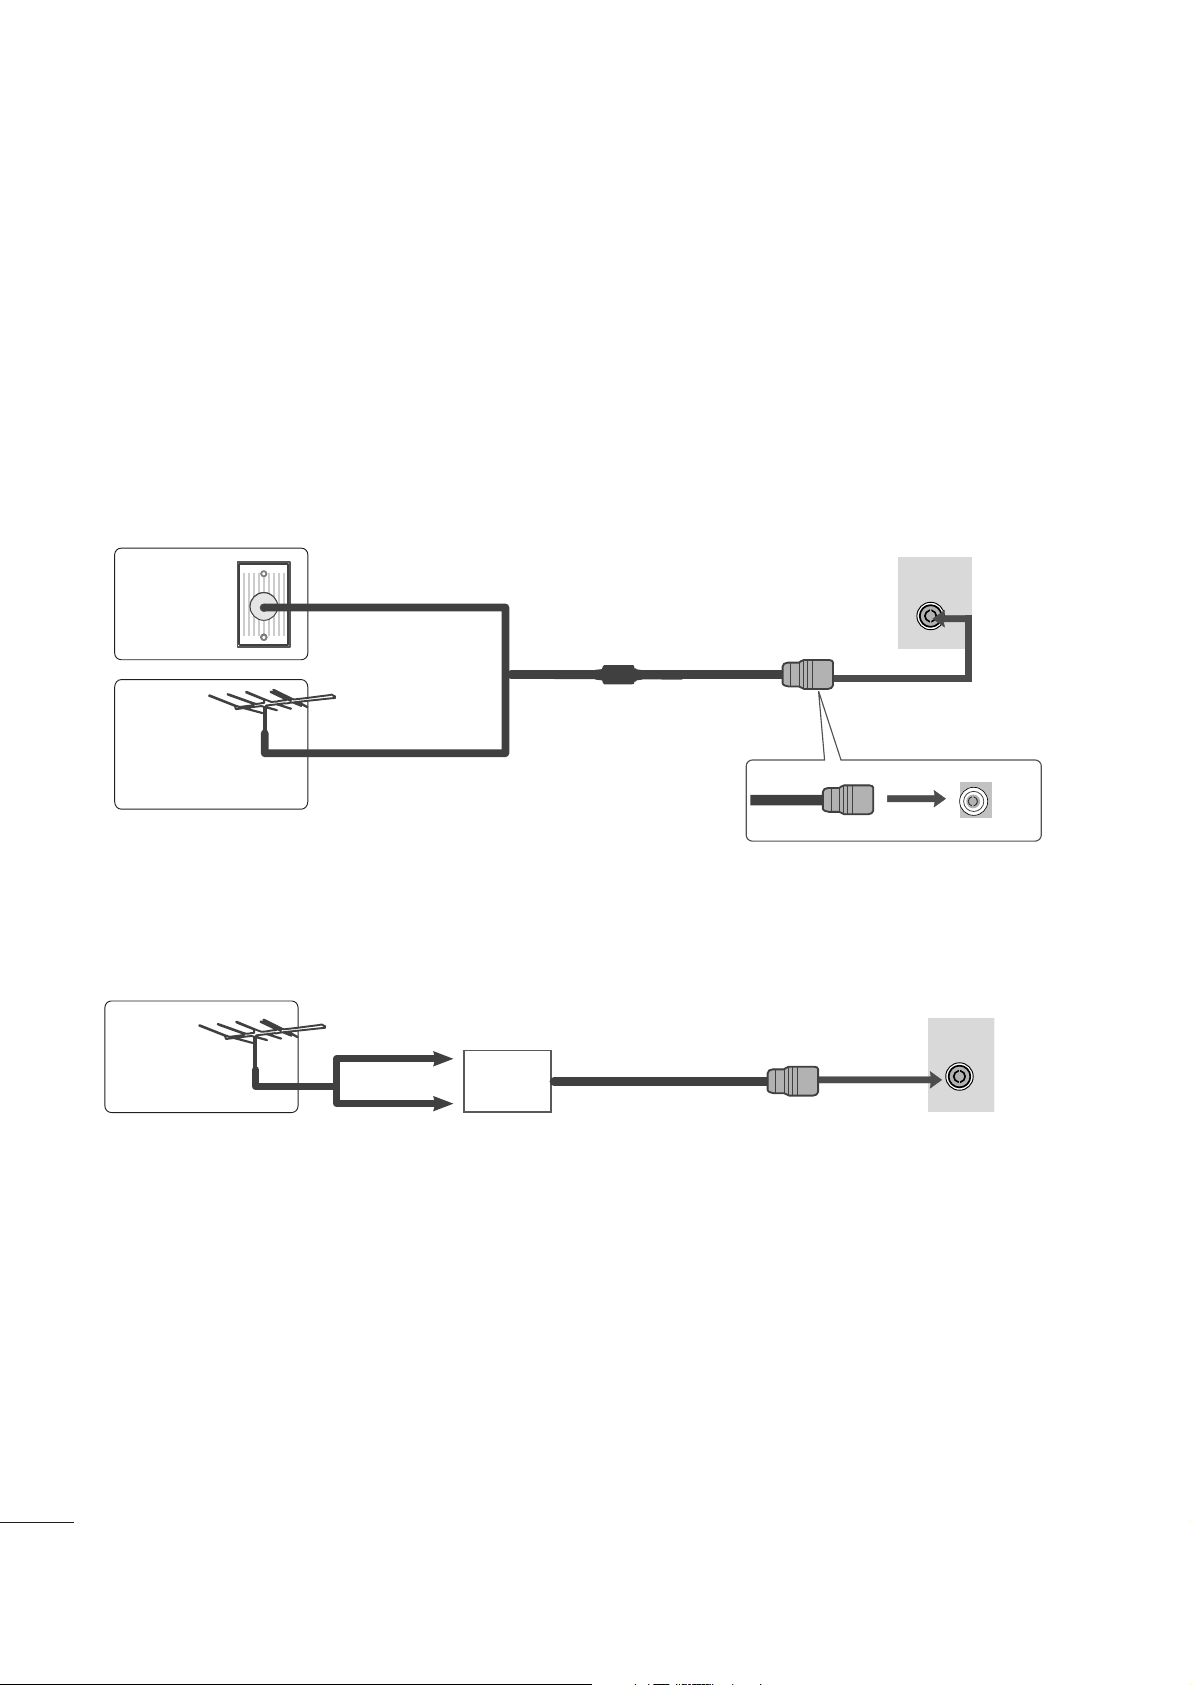
8
EXTERNAL EQUIPMENT SETUP
■
For optimum picture quality, adjust antenna direction.
■
An antenna cable and converter are not supplied.
■
To prevent equipment damage, never plug in any power cords until you have finished connecting all equipment.
Multi-family Dwellings/Apartments
(Connect to wall antenna socket)
Single-family Dwellings /Houses
(Connect to wall jack for outdoor antenna)
Outdoor
Antenna
(VHF, UHF)
Wall
Antenna
Socket
RF Coaxial Wire (75 ohm)
ANTENNA CONNECTION
Antenna
UHF
VHF
■
In poor signal areas, to get better picture quality, install a signal amplifier to the antenna as shown above.
■
If signal needs to be split for two sets, use an antenna signal splitter for connection.
ANTENNA/
CABLE IN
AV 1
AV 1
ANTENNA/
CABLE IN
AV 1
AV 1
Signal
Amplifier
Page 10
9
EXTERNAL EQUIPMENT SETUP
Connect the SET-TOP outputs to the
CCOOMMPPOONNEENNTT IINN
VVIIDD EE OO
sockets (Y P
B PR) on the set.
Connect the audio cable from the SET-TOP to
CCOOMMPPOO--
NNEENN TT II NN AAUUDDIIOO
sockets of the set.
Press the
II NNPPUU TT
button to select
CCoo mm ppoo nn eenn tt..
2
3
1
HD RECEIVER SETUP
■
To prevent the equipment damage, never plug in any power cords until you have finished connecting all equipment.
■
The image shown may be somewhat different from your set.
When connecting with a component cable
Signal
480i/576i
480p/576p
720p/1080i
1080p
Component
Yes
Yes
Yes
Yes
VIDEO
COMPONENT
IN
AUDIO
Y
P
B
P
R
L
R
1
2
Page 11
10
EXTERNAL EQUIPMENT SETUP
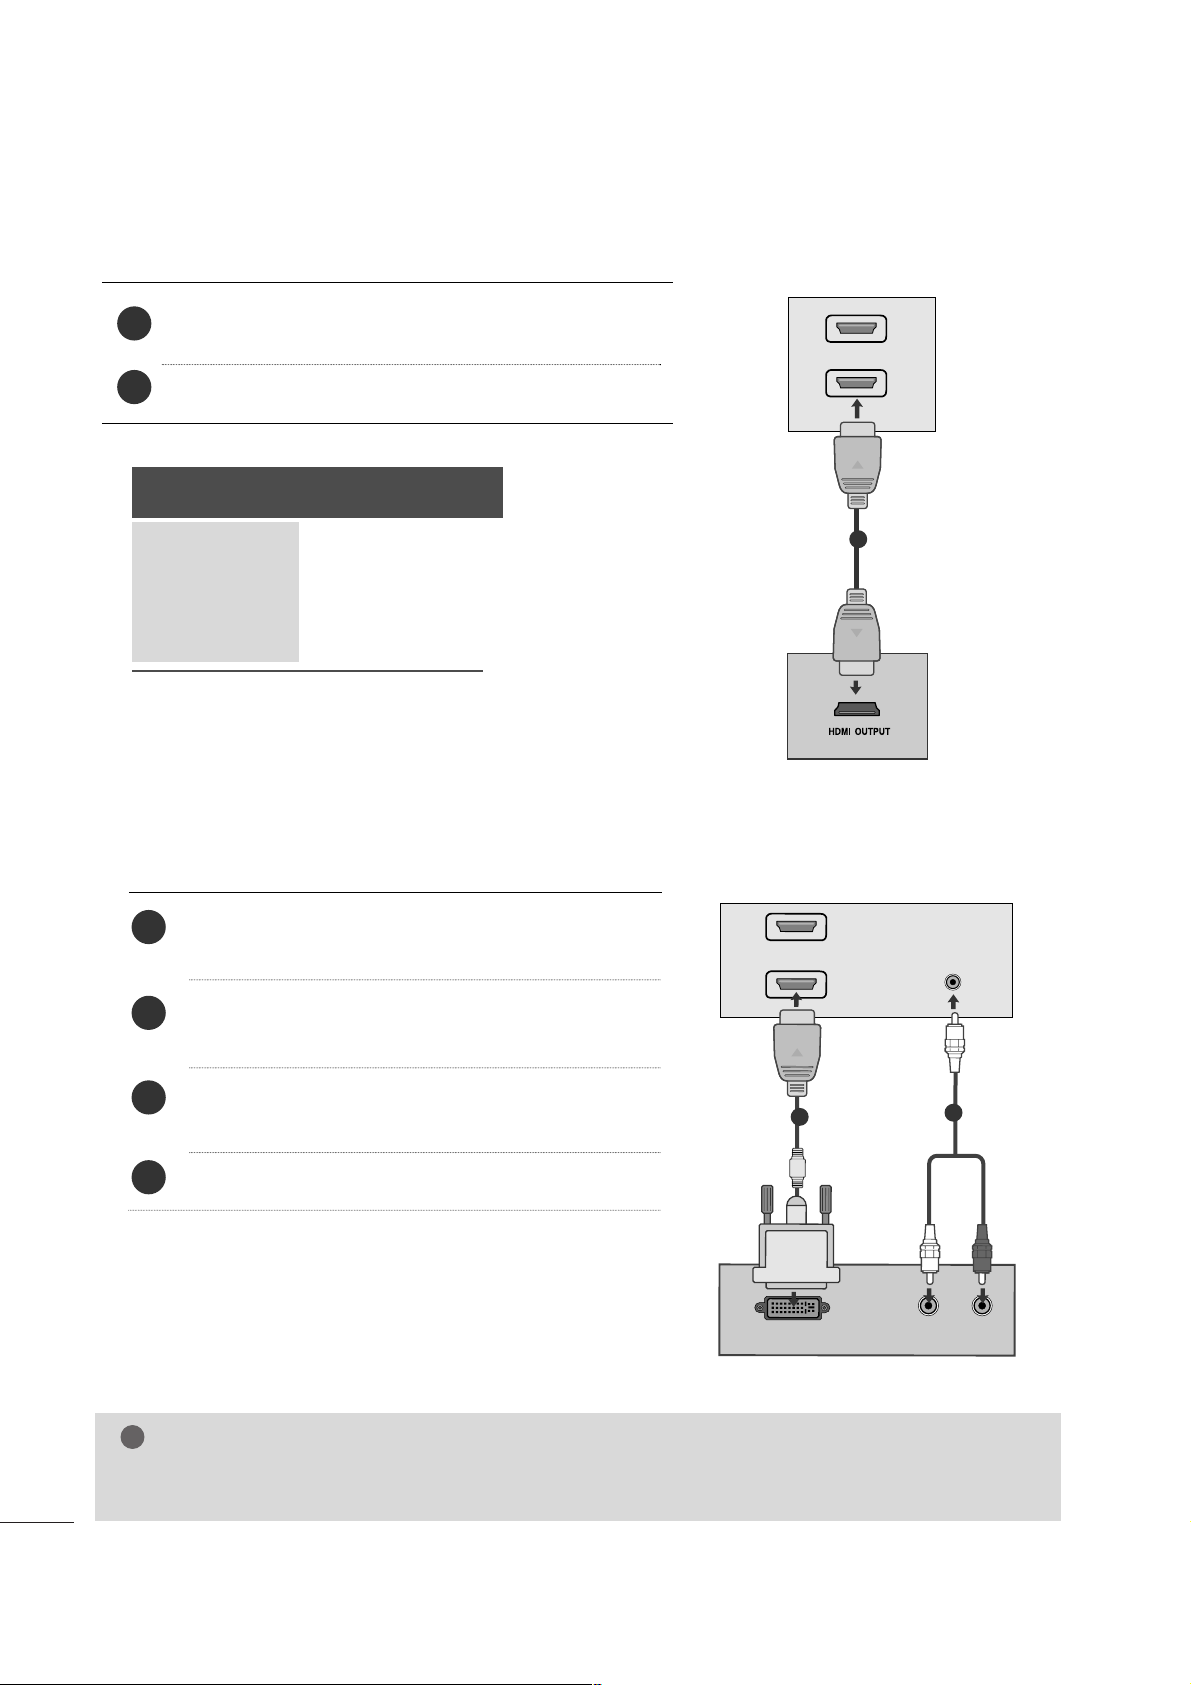
When connecting with a HDMI
Connect the HDMI output of the digital set-top box to the
HH DDMM II
jack on the set.
Press the INPUT button to select HDMI1 or HDMI2.
1
2
Connect the digital set-top box to
HHDDMM II
jack on the
set.
Connect the audio output of the digital set-top box to
the
AA UUDDII OO IINN ((RRGG BB//DDVVII))
jack on the set.
Turn on the digital set-top box. (Refer to the owner’s
manual for the digital set-top box.
)
Press the INPUT button to select HDMI1 or HDMI2.
2
3
4
1
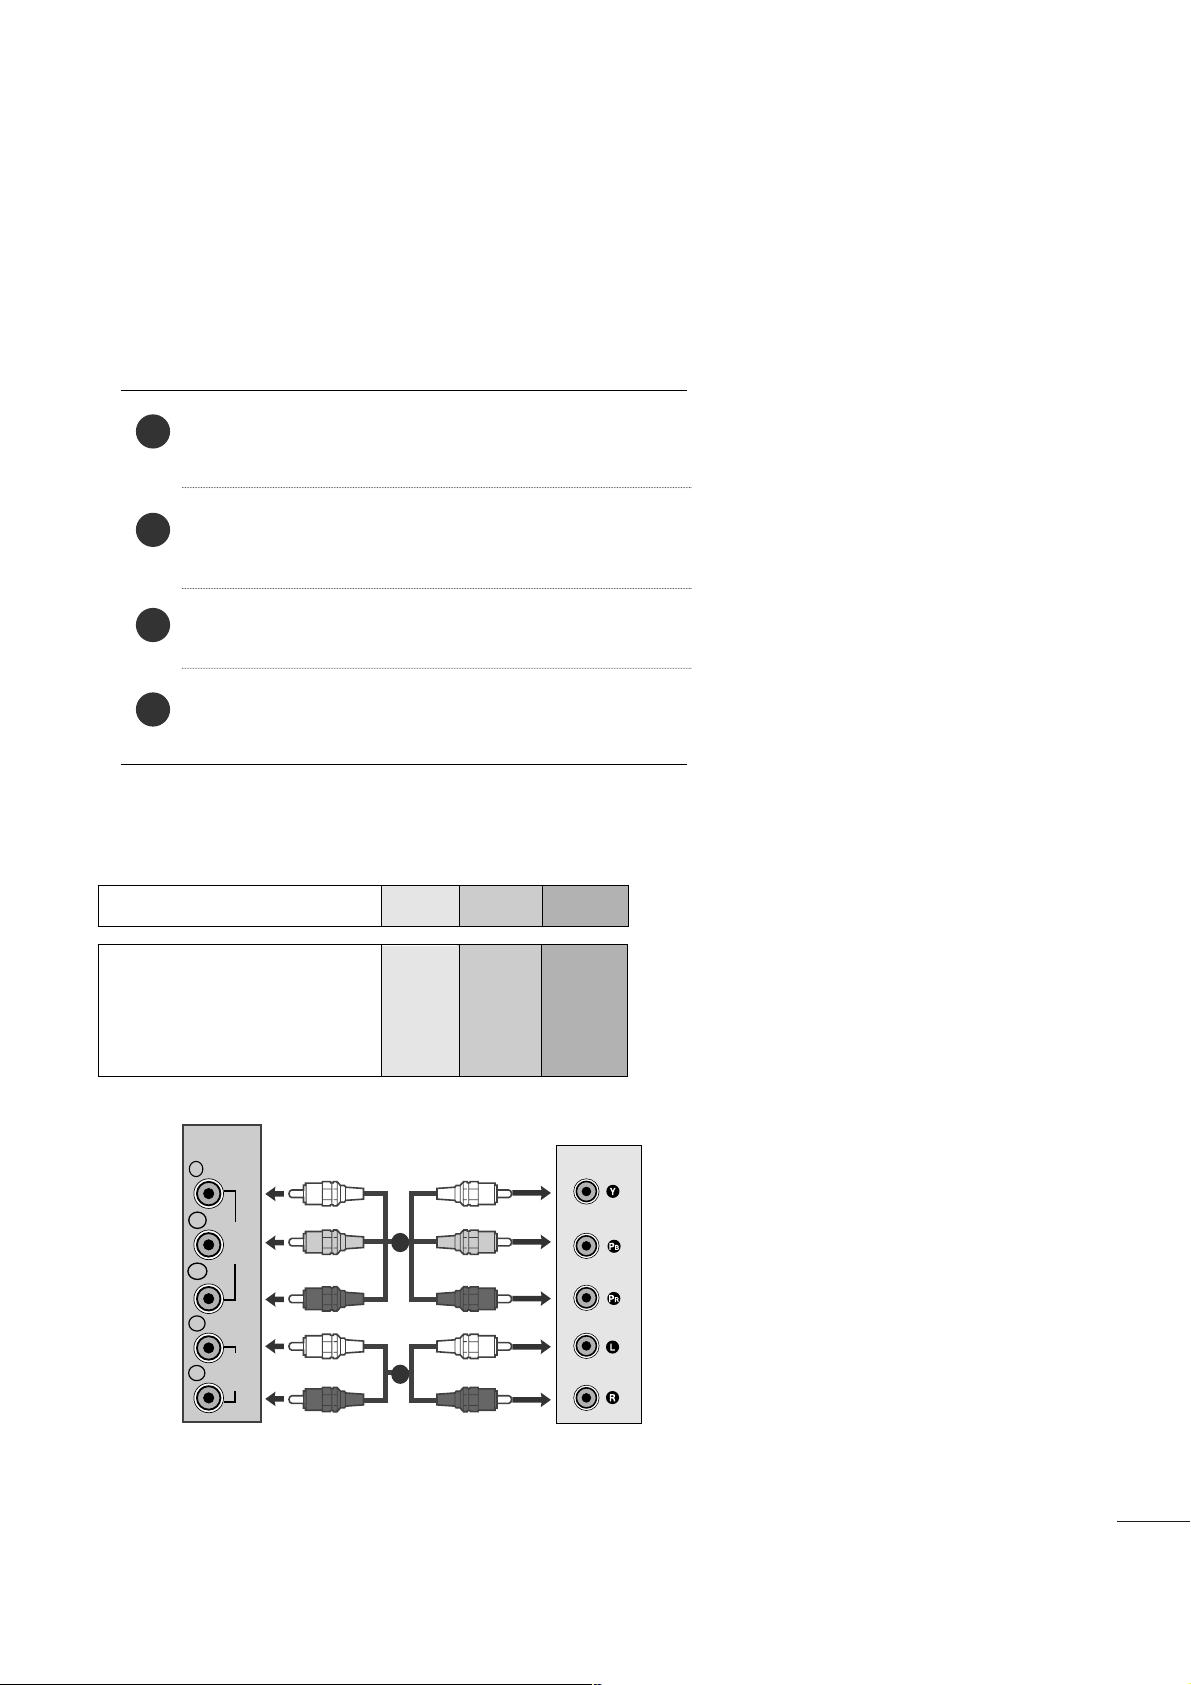
When connecting with a HDMI to DVI cable
HDMI
1
2
1
DVI OUTPUT
AUDIO
R
L
A
U
D
IO
IN
(R
G
B
/D
VI)
HDMI
1
2
1
2
NOTE
!
GG
HDMI Input does not support PC mode. If it is connected PC, the screen may not be displayed properly.
GG
HDMI support PCM audio format only.
Signal
480i/576i
480p/576p
720p/1080i
1080p
HDMI
No
Yes
Yes
Yes
Page 12
11
EXTERNAL EQUIPMENT SETUP
DVD SETUP
When connecting with a component cable
Component Input ports
To get better picture quality, connect a DVD player to the component input ports as shown below.
Component ports on the set
YPBP
R
Video output ports
on DVD player
Y
Y
Y
Y
PB
B-Y
Cb
Pb
P
R
R-Y
Cr
Pr
Connect the video output sockets (Y P
B PR) of the DVD to
the
CCOO MMPP OONN EENNTT IINN VVIIDDEE OO
sockets (Y P
B PR) of the set.
Connect the audio cable from the DVD to
CCOOMMPPOONNEE NNTT
II NN AAUUDDII OO
sockets of the set.
Press the
II NNPPUU TT
button to select
CCoomm pp oonn eenntt
.
Press the
PP LL AA YY
button on the DVD.
The DVD playback picture appears on the screen.
2
3
4
1
VIDEO
COMPONENT
IN
AUDIO
Y
P
B
P
R
L
R
1
2
Page 13
12
EXTERNAL EQUIPMENT SETUP
When connecting HDMI cable
Connect the HDMI output of the DVD to the
HH DDMM II
jack on the set.
Press the INPUT button to select HDMI1 or HDMI2.
GG
Set can receive the video and audio signal simultaneously by using a HDMI cable.
GG
If the DVD player does not support Auto HDMI, you need to set the DVD output resolution appropriately.
GG
HDMI support PCM audio format only.
NOTE
!
HDMI
1
2
1
1
2
Page 14
13
EXTERNAL EQUIPMENT SETUP
VCR SETUP
■
To avoid picture noise (interference), leave an adequate distance between the VCR and set.
■
Typically a still picture is shown on the VCR. If a user uses 4:3 picture format for a long time, an afterimage
may remain on the sides of the screen.
OUTPUT
SWITCH
ANT IN
R
S-VIDEO VIDEO
ANT OUT
L
ANTENNA IN/
CABLE IN
Wall Jack
Antenna
1
2
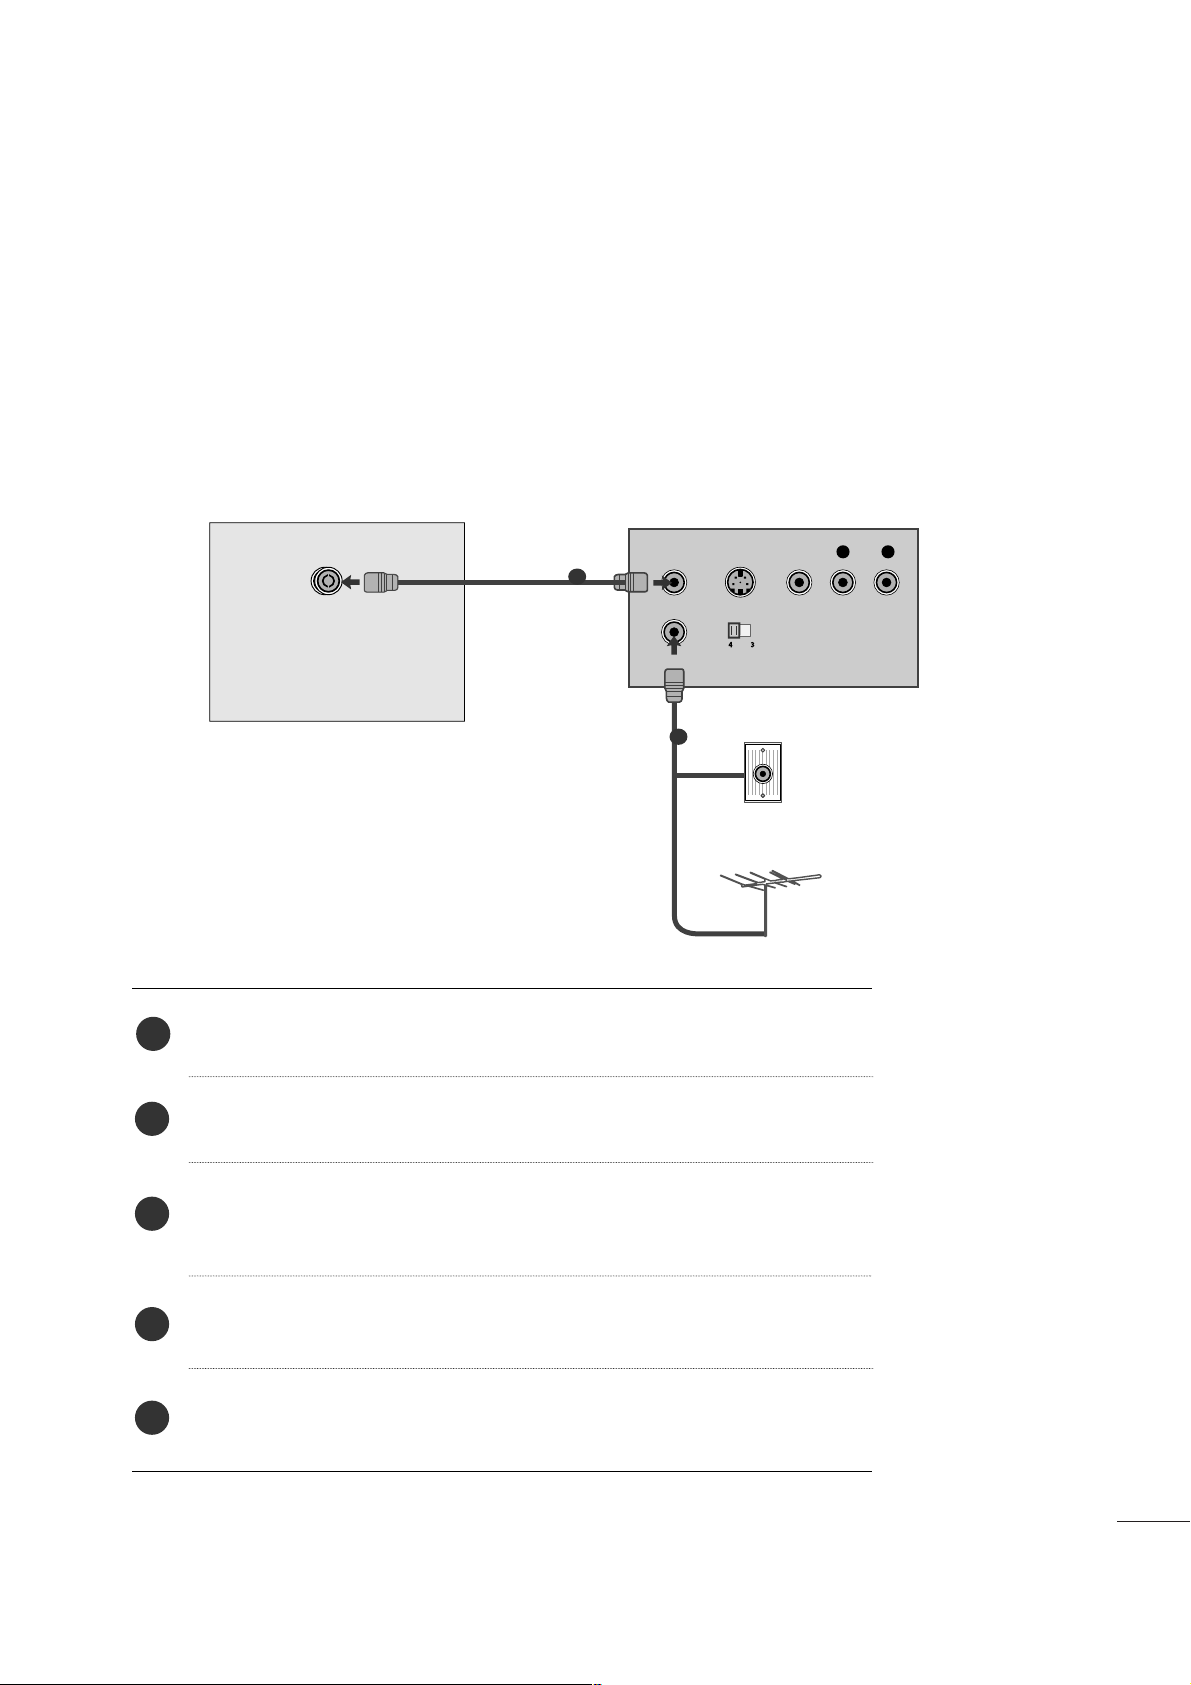
When connecting with an antenna
Connect the RF out socket of the VCR to the aerial socket of the set.
Connect the aerial cable to the RF ANT IN socket of the VCR.
Store the VCR channel on a desired programme number using the ‘Manual
programme tuning’ section.
Select the programme number where the VCR channel is stored.
Press the
PP LL AA YY
button on the VCR.
1
2
3
4
5
Page 15

14
EXTERNAL EQUIPMENT SETUP
When connecting with a RCA cable
Connect the audio/video out sockets of the VCR to
AUDIO/VIDEO in sockets of the set.
Press the INPUT button to select AV.
Press the PLAY button on the VCR.
The VCR playback picture appears on the screen.
2
3
1
When connecting with an S-Video cable
Connect the S-Video socket of the VCR to the SVIDEO socket of the set.
Connect the audio cable from the S-VIDEO VCR to the
AUDIO sockets of the set.
Press the INPUT button to select AV.
Press the PLAY button on the VCR.
The VCR playback picture appears on the screen.
2
3
4
1
NOTE
!
GG
If you have a mono VCR, connect the audio cable from the VCR to the AUDIO L/MONO jack of the set.
VIDEO ANT IN
ANT OUT
S-VIDEO
L
R
VIDEO AUDIO
(MONO)
S-VIDEO
L
R
AV IN
1
VIDEO AUDIO
(MONO)
S-VIDEO
L
R
AV IN
VIDEOANT IN
ANT OUT
OUTPUT
SWITCH
34
S-VIDEO
L
R
1
2
Page 16
15
EXTERNAL EQUIPMENT SETUP
PC SETUP
This product provides Plug and Play capability, meaning that the PC adjusts automatically to the set's settings.
When connecting with a D-sub 15 pin cable
4
Connect the signal cable from the RGB output socket of the
PERSONAL COMPUTER to the RGB IN(PC) of the set.
Connect the audio cable from the PC to the
AA UUDDII OO IINN
((RRGGBB//DDVVII))
jack of the set.
Press the INPUT button to select RGB PC.
Switch on the PC, and the PC screen appears on the set.
The set can be operated as a PC monitor.
2
3
1
RGB OUTPUT
AUDIO
AUDIO IN
(RGB/DVI)
RGB IN (PC)
1
2
NOTE
!
GG
You must use shielded signal interface cables (D sub 15 pin cable, DVI cable) with ferrite cores to maintain standard compliance for the product.
Page 17
16
EXTERNAL EQUIPMENT SETUP
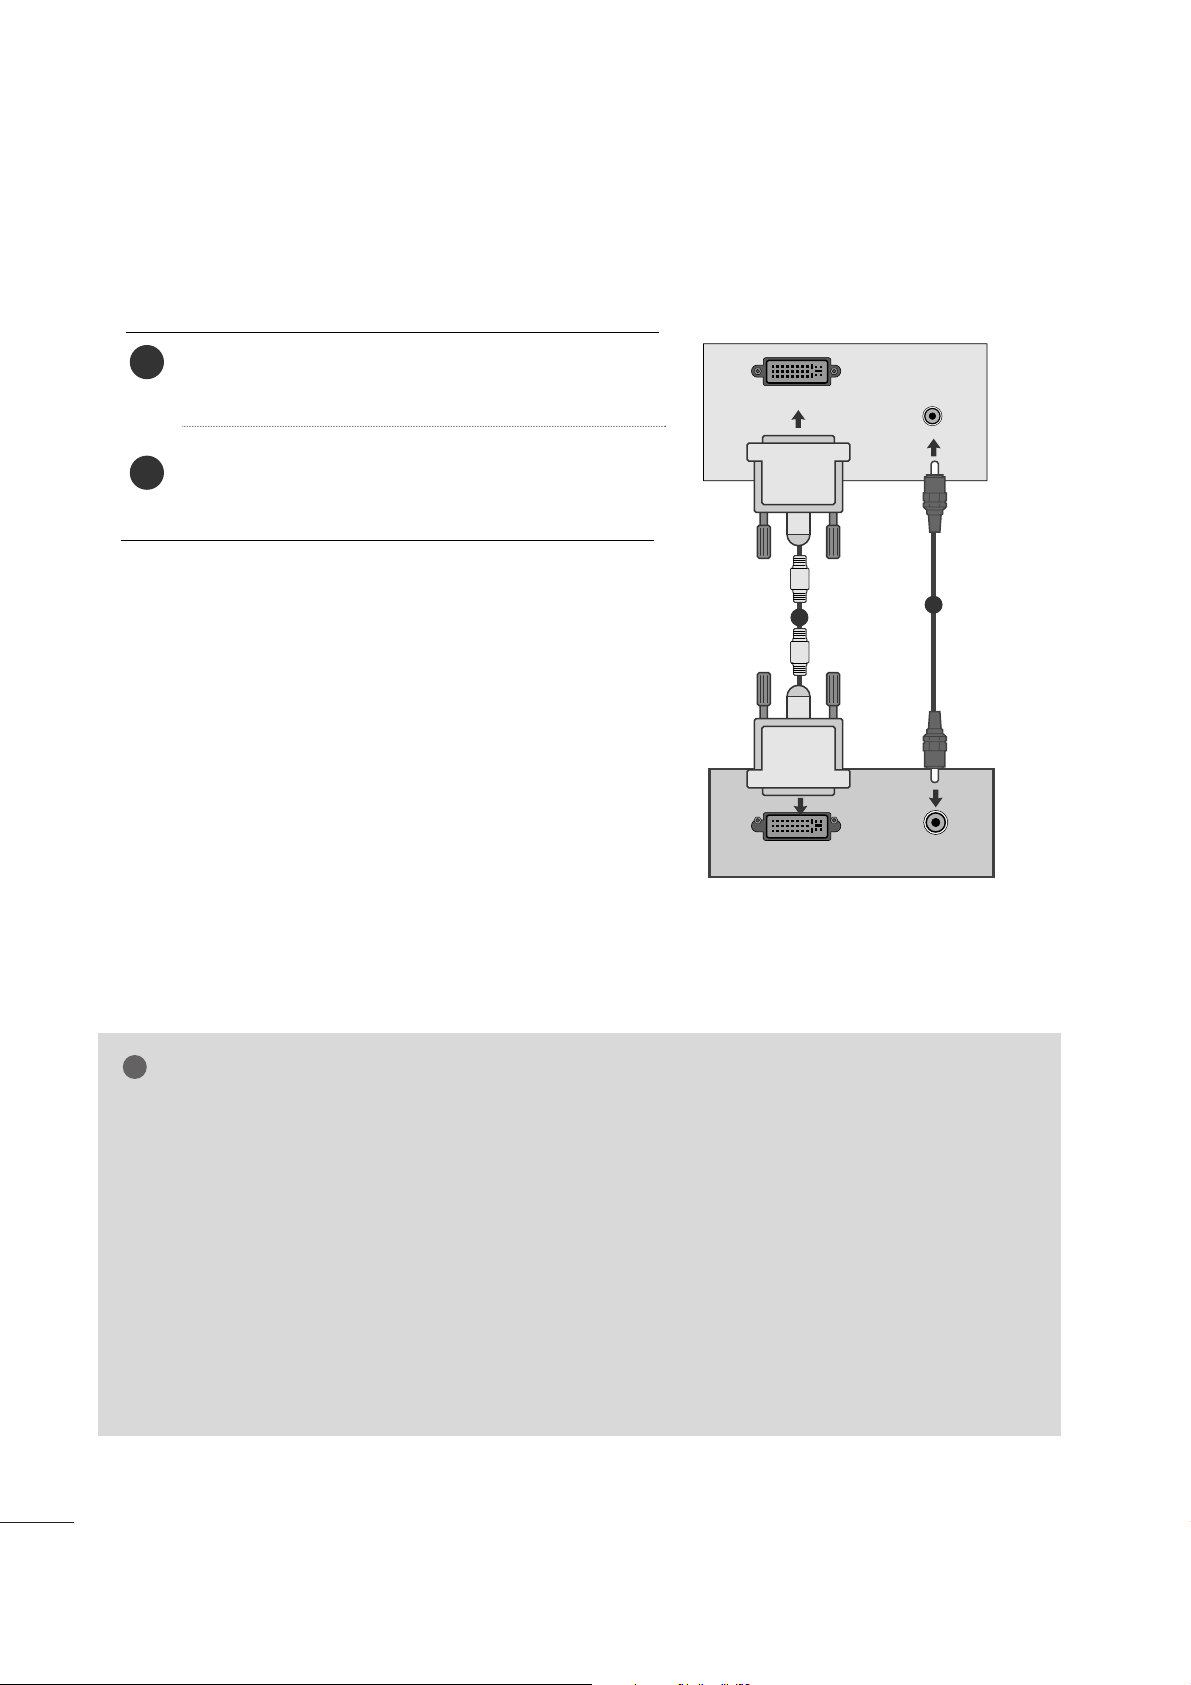
When connecting with a DVI cable
Connect the DVI output of the PC to the
DDVV II--DD IINN
jack on the set.
Connect the audio cable from the PC to the
AA UUDDIIOO
II NN ((RR GGBB//DDVVII))
jack of the set.
2
1
NOTE
!
GG
If the set is cold, there may be a small “flicker”
when the set is switched on. This is normal, there
is nothing wrong with the set.
GG
If possible, use the 1920x1080@60Hz video
mode to obtain the best image quality for your
LCD monitor. If used with other resolutions, some
scaled or processed pictures may appear on the
screen. The set has been preadjusted to the mode
1920x1080@60Hz.
GG
Some dot defects may appear on the screen, like
Red, Green or Blue spots. However, this will have
no impact or effect on the monitor performance.
GG
Do not press the LCD screen with your finger for
a long time as this may produce some temporary
distortion effects on the screen.
GG
Avoid keeping a fixed image on the set’s screen
for prolonged periods of time. The fixed image
may become permanently imprinted on the
screen; use a screen saver when possible.
AUDIO
DVI OUTPUT
AUDIO IN
(RGB/DVI)
DVI-D IN (PC)
1
2
Page 18
17
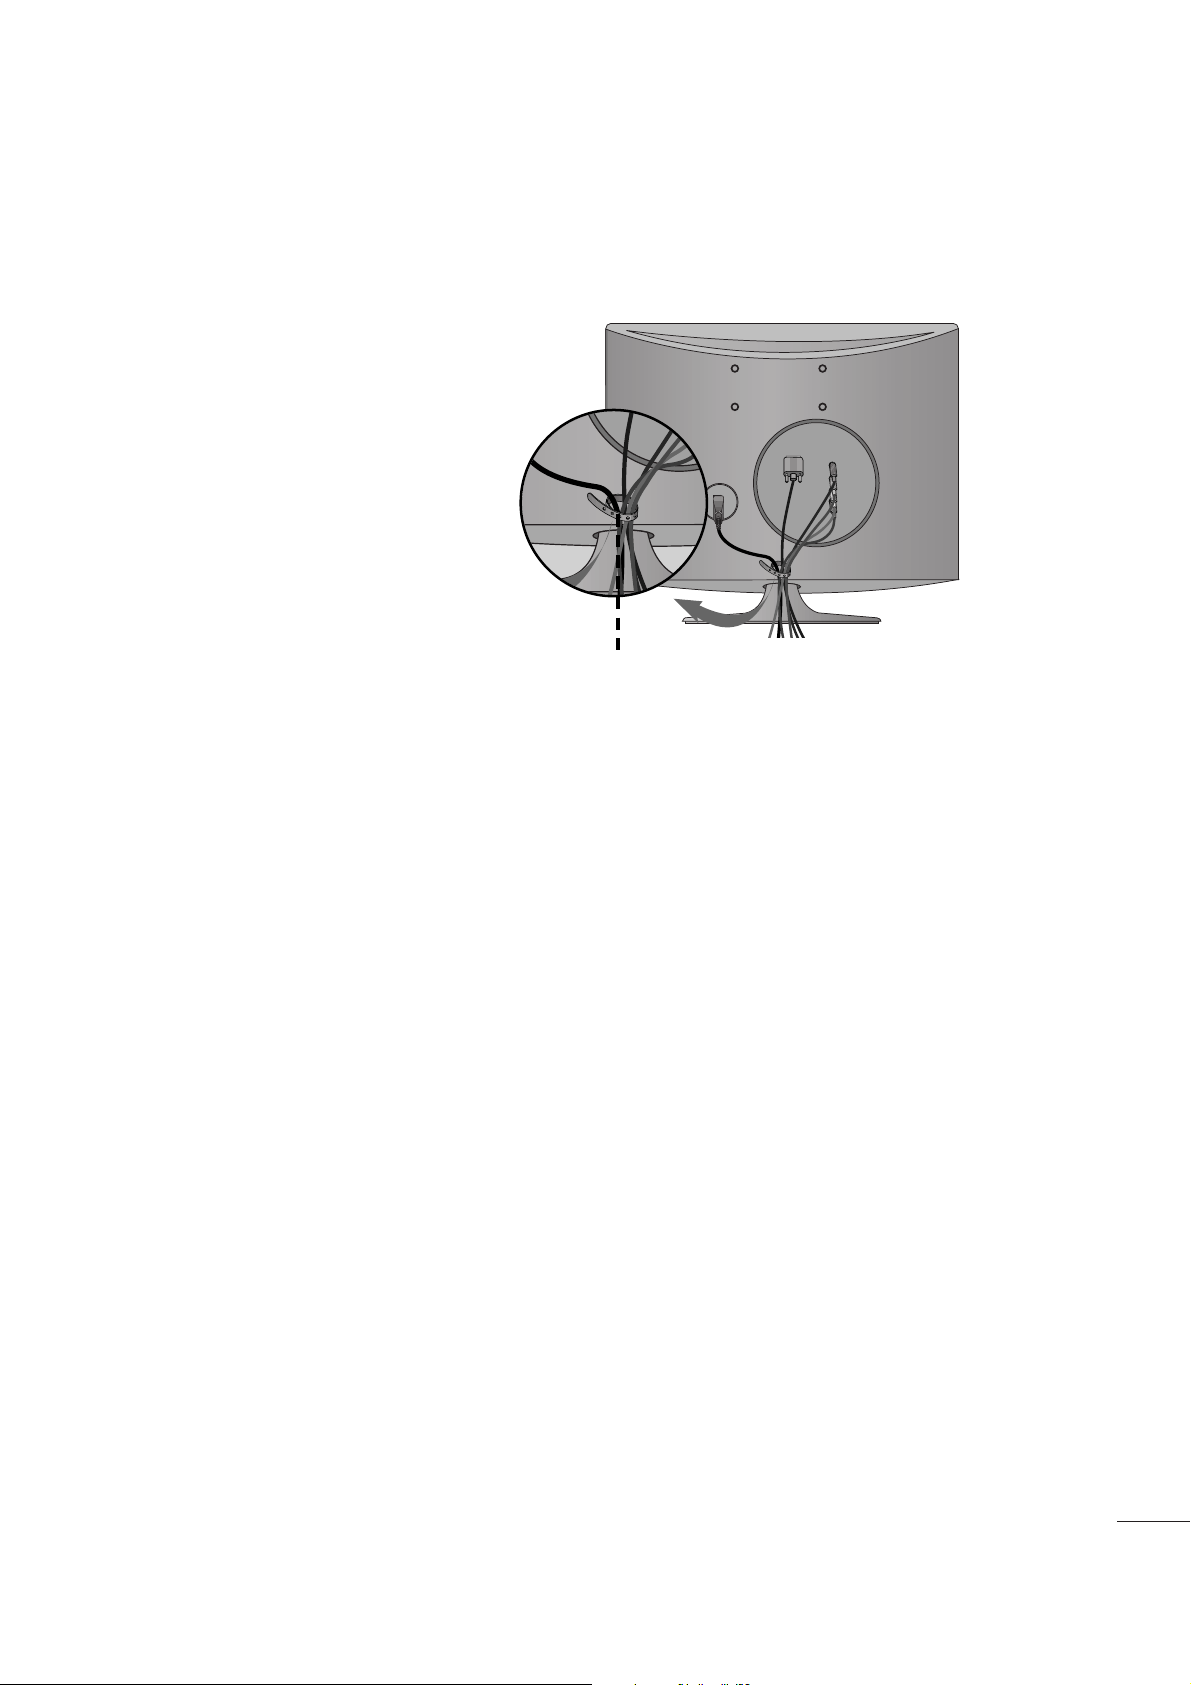
EXTERNAL EQUIPMENT SETUP
Tie cables together with a cable tie as shown in the
illustration.
Cable tie
BACK COVER FOR WIRE ARRANGEMENT
Page 19
18
EXTERNAL EQUIPMENT SETUP
RGB/DVI[PC]
HDMI[DTV] supported mode
Resolution
640x480
800x600
720x40 0
10 2 4 x 7 6 8
Horizontal
Frequency(kHz)
Vertical
Frequency(Hz)
70
60
75
60
75
60
75
75
60
75
60
60
60
60
31.468
31.469
37. 500
37. 879
46.875
48.363
60.123
67. 500
63.981
79.976
64.674
65.290
75.000
66.587
12 8 0 x 10 24
115 2 x 8 6 4
1680x1050
1920x1080
1600x1200
60
60
50
50
60
60
60
60
50
24
30
50
60
60
31.47
31.5
31.25
37. 5
44.96
45
33.72
33.75
28.125
27
33.75
56.25
67. 43
67. 5
Resolution
720x480/60p
720x576/50p
1280x720/60p
1280x720/50p
Horizontal
Frequency(kHz)
Vertical
Frequency(Hz)
1920x1080/60i
1920x1080/50i
1920x1080/24p
1920x1080/30p
1920x1080/50p
1920x1080/60p
Page 20
19
WATCHING TV /PROGRAMME CONTROL
REMOTE CONTROL KEY FUNCTIONS
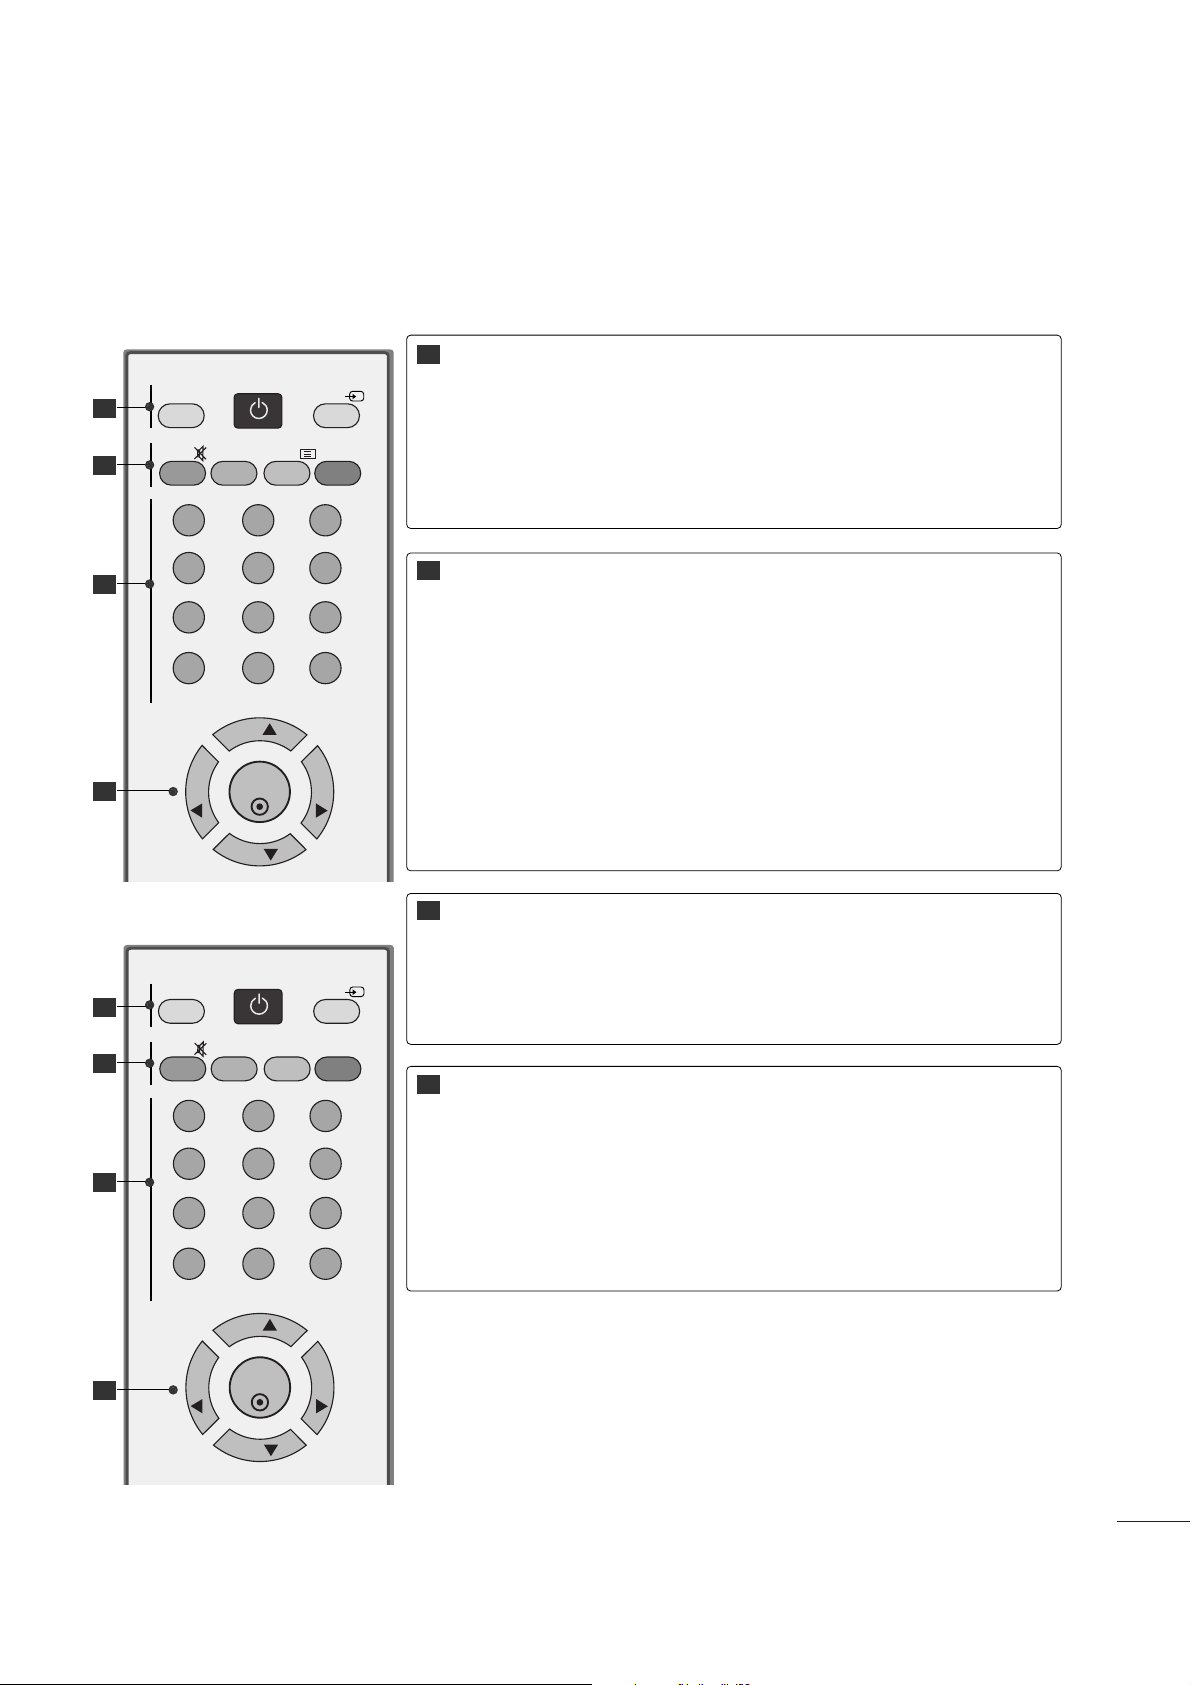
When using the remote control, aim it at the remote control sensor on the set.
((DD eeppeennddss tthhee ccoouunnttrryy tt hhee rreemmoottee ccoonn ttrrooll ccaann bbee pprroovviidd eedd ddiiffff eerreenntt..))
OK
123
456
789
0
Q.VIEW
LIST
PR
VOL VOL
PR
TV/PC
MUTE PIP TEXT I/II
INPUT
POWER
OK
123
456
789
0
Q.VIEW
LIST
PR
VOL VOL
PR
TV/PC
MUTE PIP FAV I/II
INPUT
POWER
TV/PC
POWER
INPUT
AA TT YY PP EE
BB TT YY PP EE
Selects TV or PC mode.
Switches the set on.
Switches the set on or off.
External input mode rotates in regular sequence.
Switches the set on.
MUTE
PIP
TELETEXT
BUTTONS
FAV
I/II
Switches the sound on or off.
Switches the sub picture PIP, DW mode.
(Refer to the p.29)
These buttons are used for teletext.
For further details, see the ‘Teletext’ section. (Refer to
the p.51-53)
Scroll through the programmed Favorite programme.
(Refer to the p.27)
Selects the sound output.(Refer to the p.44)
0~9 number
button
LIST
Q.VIEW
Selects a programme.
Selects numbered items in a menu.
Displays the programme table.(Refer to the p.28)
Returns to the previously viewed programme.
VOLUME UP
/DOWN
Programme
UP/DOWN
OK Button
Adjusts the volume.
Selects a programme.
Accepts your selection or displays the current mode.
Double press the OK button, then Auto Config.
((OOnnll yy
RRGG BB --PPCC iinnpp uu tt))
1
2
3
4
1
2
3
4
1
2
3
4
Page 21
20
WATCHING TV /PROGRAMME CONTROL
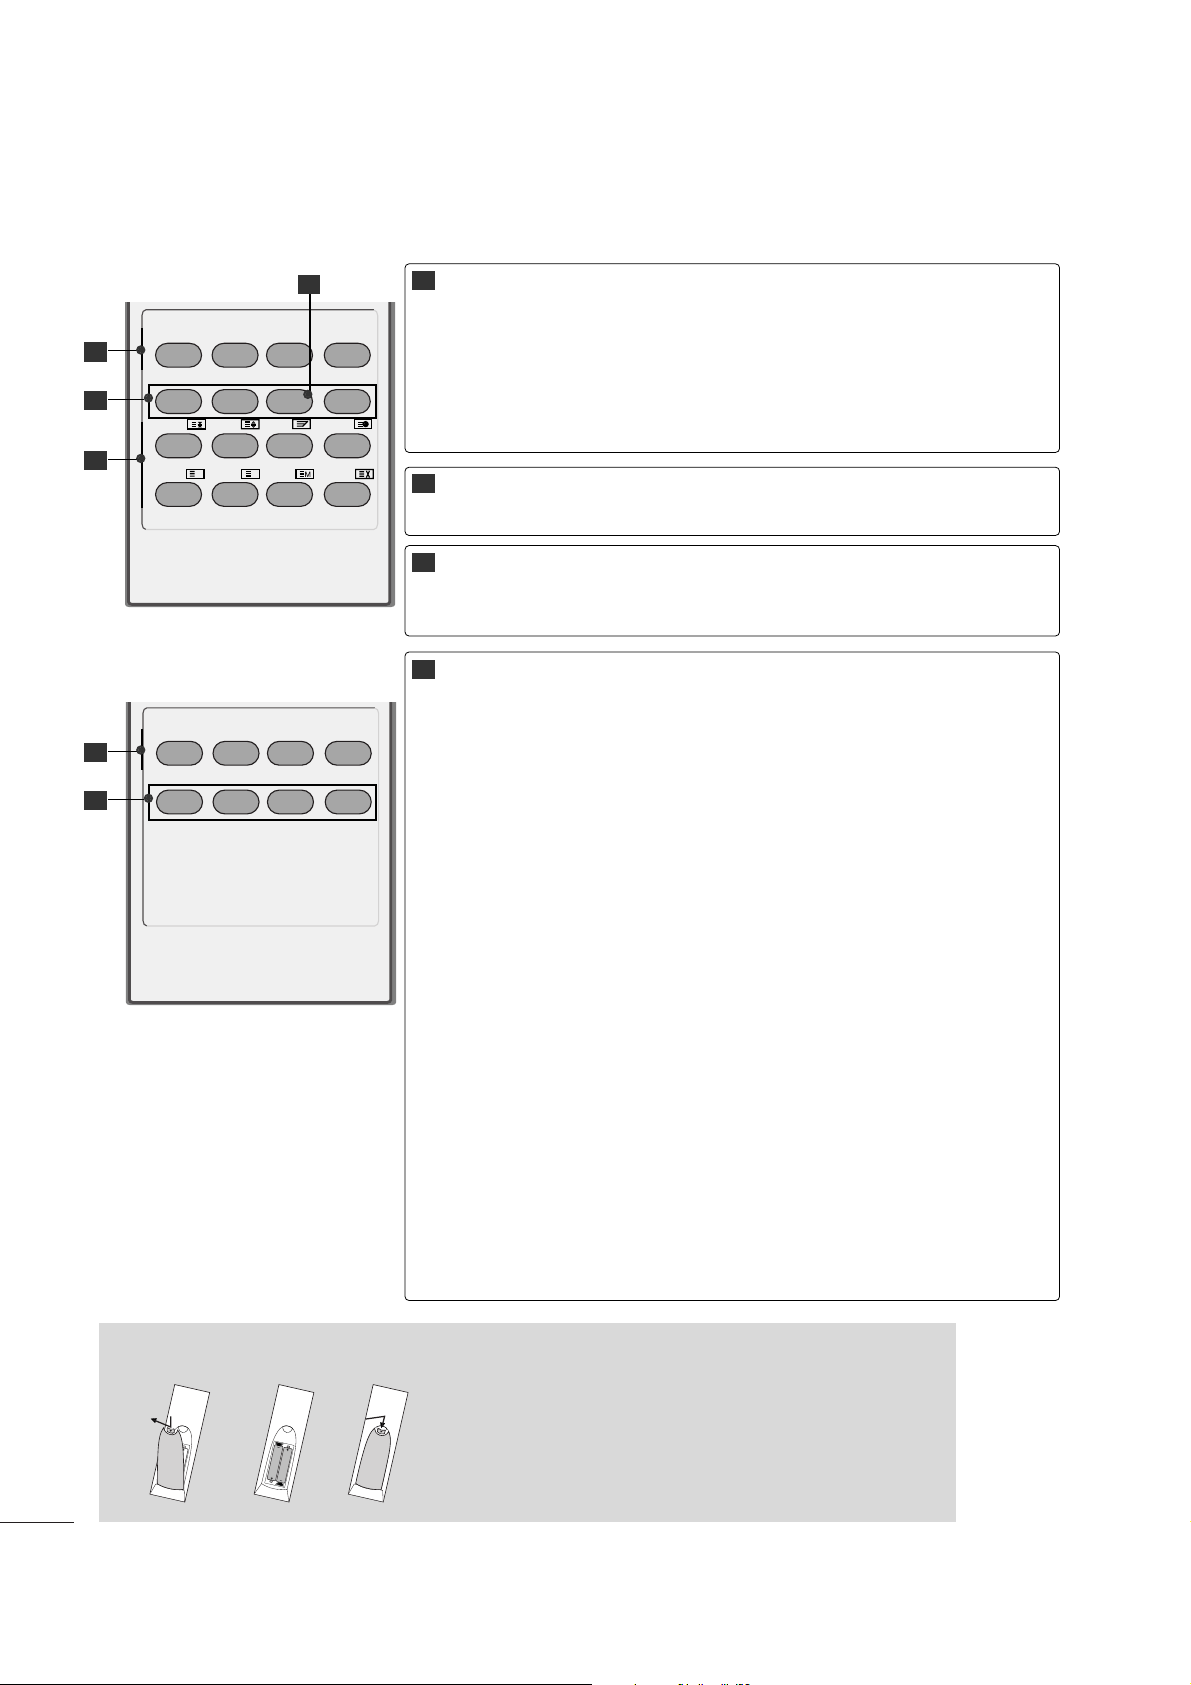
Inserting batteries into remote control.
1. Take out the battery cap.
2. Insert the batteries with correct polarity (+/-).
3. Close the battery cap.
• Dispose of used batteries in the recycle bin to prevent
environmental pollution.
?
i
MENU
HOLD
REVEAL
SIZE
INDEX MODE UPDATE
MIX TIME
SLEEP RETURN
*
ARC/
Colour
Buttons
These buttons are used for teletext or programme edit.
(Refer to the p.26, 51-53)
MENU
SLEEP
ARC/*
RETURN
Selects a menu. (Refer to the p.22)
Sets the sleep timer. (Refer to the p.46)
Selects your desired picture format.(Refer to the p.30,31)
Allows the user to move return one step in an interactive
application or other user interaction function.
((DD eeppeennddss tthhee ccoouunnttrryy tt hhee rreemmoottee ccoonn ttrrooll ccaann bbee pprroovviidd eedd ddiiffff eerreenntt..))
Yellow key
((OOnn llyy AA TT yyppee))
Scroll through the programmed Favorite programme.
HOLD
SIZE
MIX
TIME
REVEAL
INDEX
MODE
UPDATE
Press the button to stop the automatically rotating of the
sub pages. Press the button again to continue the automatic rotating again.
Press the button repeatedly to display the upper part,
the lower part and then to return to the normal page
size.
Display the teletext pages superimposed on the TV picture. To switch the TV picture off press this button again.
Press this button to select a sub page number. The sub
page number is displayed at the bottom of the screen. To
hold or change the sub page, press the RED/GREEN,
DD
//
EE
or NUMBER buttons. Press again to exit this func-
tion.
Press the button to reveal/conceal the hidden information, such as solutions to riddles and puzzles. Press this
button again to remove the information from the display.
To display the main index.
The mode will be switched in the Teletext mode.
Press the button to appear the TV programme. At the
top of screen indicates that you are still in the teletext
mode. Before interrupting teletext, you may select a page
number. When the page has been found, the information
line appears briefly on your screen. Press the button
again to reappear teletext.
5
6
8
7
5
6
7
8
MENU SLEEP RETURN
*
ARC/
5
6
AA TT YY PP EE
BB TT YY PP EE
Page 22

21
WATCHING TV /PROGRAMME CONTROL
Press the
VVOOLL F //
G
button to adjust the volume.
If you wish to switch the sound off, press the
MMUUTTEE
button.
You can cancel the Mute function by pressing the
MMUUTTEE oorr VVOOLL
F //G
button.
PROGRAMME SELECTION
TURNING ON THE SET
When your set is turned on, you will be able to use its features.
Firstly, connect the power cord correctly.
■
To turn set on, press the ,
II NNPPUU TT,PP RR
DD
//
EE
button on the set or press the
PPOOWWEERR, IINNPPUUTT
,
PP RR
DD
//
EE
,
NNUUMMBB EE RR(( 00~99 ))
buttons on the remote control and the set will switch on.
1
VOLUME ADJUSTMENT
Press the
PP RR
DD
//
EE
or
NNUUMMBB EE RR
buttons to select a programme number.
2
3
1
1
Initializing Guide
Note:
a. It will automatically disappear after approx. 40 seconds unless a button is pressed.
b. “In-Store” mode is only for shop display and not for general customer use.
c. "Home” mode is the optimal setting for home environments, and is the set's default mode.
d. "In-Store" mode is the optimal setting for store environments. If a user modifies image quality data,
“In-Store” mode initializes the product to the image quality set by us after a certain period of time.
e. The mode (Home, In-Store) can be changed by executing Factory Reset in the Option menu.
If the OSD (On Screen Display) is displayed on the screen after turning on the set, you can adjust the
LL aanngg uu aaggee, LL ooccaa ttiioonn, AA uu ttoo TTuunniinngg
.
Page 23

22
WATCHING TV /PROGRAMME CONTROL
ON SCREEN MENUS SELECTION AND ADJUSTMENT
Your set's OSD (On Screen Display)may differ slightly from what is shown in this manual.
•
Press the MENU button to close the menu window.
• Press the RETURN button to move to the previous menu screen.
NOTE
!
GG
The OSD (On Screen Display) function enables you to adjust the screen status conveniently since it provides graphical presentation.
GG
In the teletext mode, menus are not displayed.
Picture
DE F G
OO KK RREE TT UU RRNN
Picture Mode
Colour Temperature
XD
Advanced
Aspect Ratio
Picture Reset
Screen
Auto Tuning
Manual Tuning
Programme Edit
Favourite Programme
Setup
DE F G
OO KK RREE TT UU RRNN
Sound Mode
Auto Volume
Balance 0
TV Speaker
Audio
DE F G
OO KK RREE TT UU RRNN
Language
PIP
Key Lock
Set ID
DDC-CI
Power Indicator
Factory Reset
Option
Clock
Off Time
On Time
Sleep Timer
Auto Sleep
Time
DE F G
OO KK RREE TT UU RRNN
DE F G
OK RETURN
<M2394A> <M2794A>
Language
PIP
Key Lock
Set ID
DDC-CI
RTC
Power Indicator
Factory Reset
Option
DE F G
OK RETURN
Press the
MMEENNUU
button and then
DD
//
EE
button to display each menu.
Press the
G
button and then
DD
//
EE
button to select a menu item.
Change the setting of an item in the sub or pull-down menu with
F //G
button.
You can move to a higher level menu by pressing the
OO KK
.
1
2
3
Page 24

23
WATCHING TV /PROGRAMME CONTROL
• Press the MENU button to close the menu window.
• Press the RETURN button to move to the previous menu screen.
Press the
MMEENNUU
button and then
DD
//
EE
button to select the
SSeettuupp
menu.
Press the
G
button and then
DD
//
EE
button to select
AAuuttoo
TTuunniinngg
.
Press the
G
button and then
DD
//
EE
button to select
SSyysstteemm
.
Press the
DD
//
EE
button to select a TV system menu;
BG: PAL B/G, SECAM B/G (Europe / East Europe / Asia /
NewZealand / M.East / Africa / Australia)
I : PAL I/II (U.K. / Ireland / Hong Kong / South Africa)
DK: PAL D/K, SECAM D/K (East Europe / China / Africa / CIS)
M : NTSC M(Taiwan, Philippines, Myanmar)
Press the
DD
//
EE
button to select
SSttoorraaggee FFrroomm
.
Press the
F //G
button or NUMBER buttons to select the initial
programme number. If you use NUMBER buttons, any
number under 10 is entered with a numeric ‘0’ in front of it, i.e.‘
00 55
’
for 5.
Press the
DD
//
EE
button to select
SSeeaarrcchh
.
Press the
G
button to begin auto tuning.
All receivable stations are stored.
To stop auto tuning, press the
RREETTUURRNN
button.
When auto tuning is complete, the Programme edit menu appears
on the screen. See the Programme edit section to edit the stored
programme.
1
2
3
4
5
6
7
8
Up to 100 TV stations can be stored by programme numbers (0 to 99). Once you have preset the
stations, you will be able to use the
PP RR
DD
//
EE
or NUMBER buttons to scan the stations you have
programmed.
Stations can be tuned using automatic or manual modes.
All stations which can be received are stored by this method. It is
recommended that you use Auto tuning during installation of this set.
AUTO PROGRAMME TUNING
Setup
To S et
G
DE F G
OO KK RREE TT UU RRNN
Auto Tuning
Manual Tuning
Programme Edit
Favourite Programme
Auto Tuning
BG
I
DK
M
V
DE F G
OO KK RREE TT UU RRNN
G
System
Storage From
Search
Auto Tuning
C 05 BG
535%
RETURN Stop
Page 25

24
WATCHING TV /PROGRAMME CONTROL
• Press the MENU button to close the menu window.
• Press the RETURN button to move to the previous menu screen.
MANUAL PROGRAMME TUNING
Press the
MMEENNUU
button and then
DD
//
EE
button to select the
SSeettuupp
menu.
Press the
G button and then
DD
//
EE
button to select
MMaannuuaall
TTuunniinngg
.
Press the
G button and then
DD
//
EE
button to select
SSttoorraaggee
.
Press the
F //G button or NUMBER buttons to select the desired
programme number (0 to 99). If you use NUMBER buttons, any number under 10 is entered with a numeric ‘0’ in
front of it, i.e. ‘
00 55
’ for 5.
Press the
DD
//
EE
button to select
SSyysstteemm
.
Press the
DD
//
EE
button to select a TV system menu;
BG: PAL B/G, SECAM B/G (Europe / East Europe / Asia /
NewZealand / M.East / Africa / Australia)
I : PAL I/II (U.K. / Ireland / Hong Kong / South Africa)
DK: PAL D/K, SECAM D/K (East Europe / China / Africa / CIS)
M : NTSC M(Taiwan, Philippines, Myanmar)
Press the
DD
//
EE
button to select
BBaanndd
.
Press the
G button and then
DD
//
EE
button to select
VV//UUHHFF
or
CCaabbllee
.
Press the
DD
//
EE
button to select
CChhaannnneell
.
You can select the desired programme number with the
F //G
button or NUMBER buttons. If possible, select the programme
number directly with the number buttons. Any number under 10 is
entered with a numeric ‘0’ in front of it, i.e. ‘
00 55
’ for 5.
Press the
DD
//
EE
button to select
SSeeaarrcchh
.
Press the
F //G button to commence searching. If a station is
found the search will stop.
Press the
OOKK
button to store it.
To store another station, repeat steps 33to
11 33
.
Manual programme lets you manually tune and arrange the
stations in whatever order you desire.
1
2
3
4
5
6
7
8
9
10
11
12
13
14
Setup
To S et
G
DE F G
OO KK RREE TT UU RRNN
Auto Tuning
Manual Tuning
Programme Edit
Favourite Programme
Manual Tuning
1
DE F G
OO KK RREE TT UU RRNN
G
Storage
System
Band
Channel
Fine
Search
Name
Booster
Page 26

25
1
2
In some models,
BBoooosstteerr
is an optional function. Only a set with
BBoooosstteerr
can perform this function.
If reception is poor select
BBoooosstteerr
to On.
When the signal is strong, select “OFF”.
BOOSTER
Press the Gbutton and then use
DD
//
EE
button to select
BBoooosstteerr
.
Press the
G
button and then use
DD
//
EE
button to select
OO nn
or
OOffff
.
Manual Tuning
OffOnV
DE F G
OO KK RREE TT UU RRNN
G
Storage
System
Band
Channel
Fine
Search
Name
Booster
ASSIGNING A STATION NAME
You can assign a station name up to five characters to each programme number.
Press the Gbutton and then
DD
//
EE
button to select
NNaammee
.
Press the
G
button and then
DD
//
EE
button. You can use a blank, ++,
--
, the number00to 99and the alphabet AAto ZZ.
Press the
F //G
button to select the position and make
your choice of the second character, and so on.
Press the
OO KK
button to store it.
1
2
3
4
Manual Tuning
-----
DE F G
OO KK RREE TT UU RRNN
G
Storage
System
Band
Channel
Fine
Search
Name
Booster
WATCHING TV /PROGRAMME CONTROL
FINE TUNING
Press the
MMEENNUU
button and then
DD
//
EE
button to select the
SSeettuupp
menu.
Press the
G
button and then
DD
//
EE
button to select
MMaannuuaall
TTuunniinngg
.
Press the
G
button and then
DD
//
EE
button to select
FFiinnee
.
Press the
G
button and then
DD
//
EE
button to fine tune for the
best picture and sound.
Press the
OO KK
button to store it.
1
2
3
4
5
Normally fine tuning is only necessary if reception is poor.
•
Press the MENU button to close the menu window.
• Press the RETURN button to move to the previous menu screen.
Setup
To S et
G
DE F G
OO KK RREE TT UU RRNN
Auto Tuning
Manual Tuning
Programme Edit
Favourite Programme
Manual Tuning
F //G
DE F G
OO KK RREE TT UU RRNN
G
Storage
System
Band
Channel
Fine
Search
Name
Booster
Page 27

26
WATCHING TV /PROGRAMME CONTROL
PROGRAMME EDIT
This function enables you to delete or skip stored programmes.
Also you can move some stations to other programme numbers
or copy a blank station data into the selected programme number.
Press the
MMEENNUU
button and then
DD
//
EE
button to select the
SSeettuupp
menu.
Press the
G
button and then
DD
//
EE
button to select
PPrrooggrraammmmee
EEddiitt
.
Press the
G
button to display the Programme edit menu.
AA
DDeelleettiinngg aa pprrooggrraammmmee
1. Select a programme to be deleted with the
DD
// EE//
F //G
button.
2. Press the RED button twice.
The selected programme is deleted, all the following programmes
are shifted up one position.
AA
CCooppyyiinngg aa pprrooggrraammmmee
1. Select a programme to be copied with the
DD
//
EE
//
F //G
button.
2. Press the GREEN button.
All the following programmes are shifted down one position.
AA
MMoovviinngg aa pprrooggrraammmmee
1. Select a programme to be moved with the
DD
//
EE
//
F //G
button.
2. Press the YELLOW button.
3. Move the programme to the desired programme number with
the
DD
// EE//
F //G
button.
4. Press the YELLOW button again to release this function.
AA
SSkkiippppiinngg aa pprrooggrraammmmee nnuummbbeerr
1. Select a programme number to be skipped with the
DD
// EE//
F
//
G
button.
2. Press the BLUE button. The skipped programme turns to blue.
3. Press the BLUE button again to release the skipped programme.
When a programme number is skipped it means that you will be
unable to select it using the
DD
//
EE
button during normal TV
viewing. If you wish to select the skipped programme, directly
enter the programme number with the NUMBER buttons or
select it in the programme edit or table menu.
1
2
3
• Press the MENU button to close the menu window.
• Press the RETURN button to move to the previous menu screen.
Setup
To S et
G
DE F G
OO KK RREE TT UU RRNN
Auto Tuning
Manual Tuning
Programme Edit
Favourite Programme
Programme Edit
DE F G
OK RETURN
Delete
Move
Copy
Skip
0C03 5S69
1 BLN 03 6 S 17
2C12 7S22
3S66 8C09
4S67 9C11
Page 28

27
WATCHING TV /PROGRAMME CONTROL
• Press the MENU button to close the menu window.
• Press the RETURN button to move to the previous menu screen.
FAVOURITE PROGRAMME
Press the
MMEENNUU
button and then
DD
//
EE
button to select the
SSeettuupp
menu.
Press the
G
button and then
DD
//
EE
button to select
FFaavvoouurriittee
PPrrooggrraammmmee
.
Press the
G
button.
Press the
DD
//
EE
button to select - - - - - - -.
Select a desired programme with the
F //G
button or NUMBER
buttons. Any number under 10 is entered with a numeric ‘0’in front
of it, i.e.‘
00 55
’ for 5.
To store another programme, repeat steps
44
to 55.
You can store up to 8 programmes.
This function lets you select your favourite programmes directly.
1
2
3
4
5
6
Setup
-- -----
-- -----
-- -----
-- -----
-- -----
-- -----
-- -----
-- -----
V
G
DE F G
OO KK RREE TT UU RRNN
Auto Tuning
Manual Tuning
Programme Edit
Favourite Programme
Page 29

28
WATCHING TV /PROGRAMME CONTROL
SELECTING THE PROGRAMME LIST
You can check which programmes are stored in the memory by displaying the programme list.
AA
DDiissppllaayyiinngg pprrooggrraammmmee lliisstt
Press the
LLIISSTT
button to display the Programme list menu.
The programme list appears on the screen.
One programme list contains ten programmes as shown.
AA
SSeelleeccttiinngg aa pprrooggrraammmmee iinn tthhee pprrooggrraammmmee lliisstt
Select a programme with the
DD
//
EE
//
F //G
button.
Then press the
OO KK
button. The TV switches to the chosen programme number.
AA
PPaaggiinngg tthhrroouugghh aa pprrooggrraammmmee lliisstt
There are 10 programme table pages in which contain 100 programmes some countryes contain 200 programmes. Pressing the
DD
//
EE
//
F //G
button repeatedly turns
the pages.
Press the
LL II SS TT
button to close the programme list window.
NOTE
!
a. You may find some blue programmes. They have been set up to be
skipped by auto programming or in the programme edit mode.
b. Some programmes with the channel number shown in the
programme list indicate there is no station name assigned.
Programme List
FG DE
OK
RETURN
0C03 5S69
1 BLN 03 6 S 17
2C12 7S22
3S66 8C09
4S67 9C11
Page 30

29
PICTURE CONTROL
Sub Picture Size Adjustment (PIP mode only)
Enter the PIP menu and then press the
DD
// EE//
F //G
button to adjust the sub picture size.
Moving the Sub Picture (PIP mode only)
Enter the PIP menu and then press the
DD
// EE//
F //G
button to adjust the sub picture position.
Input Source Selection for Sub Picture
Enter the PIP menu and then press the
DD
// EE//
F //G
button to select the PIP Input source for the sub picture.
(Sub picture can be selected only TV, AV)
WATCHING PIP (PICTURE-IN-PICTURE)
PIP lets you view 2 different inputs (sources) on your
TV screen at the same time.
One source will be large, and the other source will show
a smaller inset image.
PIP function is available in the RGB-PC, DVI input only.
(It can support TV, AV mode)
Programme Selection for Sub Picture
Enter the PIP menu and then press the
DD
// EE//
F //G
button to select a programme for the sub picture.
The selected programme number is displayed just below RGB-PC or DVI input.
Watching PIP/Double Window
Each time you press the PIP button it will change to PIP -> DW1 -> DW2 -> PIP Off.
PIP Mode
DW1 Mode
PIP Off
DW2 Mode
PIP
PIP Input
PIP PR
PIP Audio
PIP Size
PIP Position
FF
Off
GG
TV
C 07 7
Off
Small
PIP
DDEE
FF GG
RETURN
Audio Source Selection for Sub Picture
Enter the PIP menu and then press the
DD
// EE//
F //G
button to select the PIP Audio source for the sub picture.
NOTE
!
GG
A teletext function does not operate in PIP mode.
GG
In PIP mode, below remote controller keys are not available.
** NNUU MMBBEERR,, FFAAVV,, QQ ..VVIIEEWW
GG
ARC function doesn’t operate DW1, DW2 mode.
Page 31

30
PICTURE CONTROL
PICTURE SIZE (ASPECT RATIO)CONTROL
You can watch the screen in various picture formats;
1166::99,, OOrriiggiinnaall, 44::33, 1144::99, ZZoooomm11//22
and
JJuusstt SSccaann
.
Just Scan works in the following mode:
Component (720p/1080i/1080p), HDMI (720p/1080i/1080p)
If a fixed image is displayed on the screen for a long time, that fixed image may become imprinted on the screen and
remain visible.
You can adjust the enlarge proportion using
DD
//
EE
button.
This function works in the following signal.
•
1166::99
The following selection will allow you to adjust the
picture horizontally, in linear proportion, to fill the
entire screen(useful for viewing 4:3 formatted
DVDs).
•
OOrriiggiinnaall
When your set receives a wide screen signal it will
automatically change to the picture format to be
broadcast.
•
44::33
The following selection will allow you to view a picture with an original 4:3 aspect ration, grey bars will
appear on both the left and right hand of the
screen.
•
1144::99
You can view a picture format of 14:9 or a general
TV programme in the 14:9 mode. The 14:9 screen
is viewed in the same way as in 4:3, but is magnified
to the left and right.
You can adjust
AAssppeecctt RRaattiioo
in the
PPiiccttuurree
menu.
1
16 : 9
Original
4:3
14 : 9
DE
Page 32

31
PICTURE CONTROL
•
ZZoooomm11
The following selection will allow you to view the
picture without any alteration, while filling the entire
screen. However, the top and bottom of the picture
will be cropped.
•
ZZoooomm22
Choose Zoom 2 when you wish the picture to be
altered, both horizontally extended and vertically
cropped. The picture adopting a compromise
between alteration and screen converage.
•
JJuusstt SSccaann
Following Selection will lead to you view the picture
of best quality without loss of original picture in
high resolution image.
Zooml
DE
Zoom2
DE
NOTE
!
GG
You can only select 4:3,16:9 (Wide) in Component, HDMI, RGB(PC) mode.
GG
In HDMI/Component (over 720p)mode, Just Scan is available.
Just Scan
Page 33

32
PICTURE CONTROL
PRESET PICTURE SETTINGS
Picture Mode adjusts the set for the best picture appearance. Select the preset value in the
PPiiccttuurree MMooddee
menu based on the programme category.
Vivid, Standard, Cinema, Sport and Game are programmed for optimum picture reproduction at the factory
and cannot be changed.
Press the
MMEENNUU
button and then
DD
//
EE
button to select the
PPiiccttuurree
menu.
Press the
G
button and then
DD
//
EE
button to select
PPiiccttuurree
MMooddee
.
Press the
G
button and then
DD
//
EE
button to select
VViivviidd,,
SSttaannddaarrdd,, CCiinneemmaa,, SSppoorrtt,, GGaammee,, UUsseerr11
or
UUsseerr22
.
Picture Mode-Preset
1
2
3
• Press the MENU button to close the menu window.
• Press the RETURN button to move to the previous menu screen.
Picture
G
DE F G
OO KK RREE TT UU RRNN
Vivid
Standard
Cinema
Sport
Game
User1
User2
V
Picture Mode
Colour Temperature
XD
Advanced
Aspect Ratio
Picture Reset
Screen
Page 34

33
PICTURE CONTROL
• Press the MENU button to close the menu window.
• Press the RETURN button to move to the previous menu screen.
<TV/AV/Component/HDMI>
MANUAL PICTURE ADJUSTMENT
Press the
MMEENNUU
button and then
DD
//
EE
button to select the
PPiiccttuurree
menu.
Press the
G
button and then
DD
//
EE
button to select
PPiiccttuurree
MMooddee
.
Press the
G
button and then
DD
//
EE
button to select
UUsseerr11
or
UUsseerr22
.
Press the
G
button and then
DD
//
EE
button to select the desired
picture option.
•
TTVV//AAVV//CCoommppoonneenntt//HHDDMMII
:Backlight, Contrast, Brightness,
Colour, Sharpness and Tint
•
RRGGBB--PPCC//DDVVII--PPCC
:Backlight, Contrast, Brightness
Press the
F //G
button to make appropriate adjustments.
Picture Mode-User Mode
BBaacckklliigghhtt
Adjust the brightness of LCD panel to control the brightness of the screen.
CCoonnttrraasstt
Adjusts the difference between light and dark levels in the picture.
BBrriigghhttnneessss
Increases or decreases the amount of white in the picture.
CCoolloouurr
Adjusts intensity of all colours.
SShhaarrppnneessss
Adjusts the level of crispness in the edges between the light and dark areas of the picture. The lower
the level, the softer the image.
TTiinntt
Adjusts the balance between red and green levels.
1
2
3
4
5
Picture
G
DE F G
OO KK RREE TT UU RRNN
Vivid
Standard
Cinema
Sport
Game
User1
User2
V
Picture Mode
Colour Temperature
XD
Advanced
Aspect Ratio
Picture Reset
Screen
User1
DE F G
OO KK RREE TT UU RRNN
G
Backlight 100
Contrast 100
Brightness 50
Colour 70
Sharpness 70
Tint 0
<RGB-PC/DVI-PC>
User1
DE F G
OO KK RREE TT UU RRNN
G
Backlight 100
Contrast 100
Brightness 50
Backlight 100 F
G
E
D
Page 35

34
To initialize values (reset to default settings), select the 6500K option.
This menu is activated after selecting “User1” or “User2” in the Picture Mode.
Press the
G
button and then
DD
//
EE
button to select either
99330000KK,, 66550000KK,, ssRRGGBB
or
UUsseerr
.
1
Auto Colour Tone Control (9300K/6500K/sRGB)
(RGB-PC, DVI-PC mode only)
Picture
G
DE F G
OO KK RREE TT UU RRNN
9300K
6500K
sRGB
User
V
Picture Mode
Colour Temperature
XD
Advanced
Aspect Ratio
Picture Reset
Screen
PICTURE CONTROL
•
Press the MENU button to close the menu window.
• Press the RETURN button to move to the previous menu screen.
To initialize values (reset to default settings), select the Cool option.
Choose one of three automatic colour adjustments. Set to warm to enhance hotter colours such as red, or
set to cool to see less intense colours with more blue.
This menu is activated after selecting “User1” or “User2” in the Picture Mode.
Press the
MMEENNUU
button and then
DD
//
EE
button to select
the
PPiiccttuurree
menu.
Press the
G
button and then
DD
//
EE
button to select
CCoolloouurr
TTeemmppeerraattuurree
.
Press the
G
button and then
DD
//
EE
button to select
either
CCooooll, MMeeddiiuumm, WWaarrmm
or
UUsseerr
.
1
2
3
Auto Colour Tone Control(Cool/Medium/Warm)
Picture
G
DE F G
OO KK RREE TT UU RRNN
Cool
Medium
Warm
User
V
Picture Mode
Colour Temperature
XD
Advanced
Aspect Ratio
Picture Reset
Screen
NOTE
!
GG
Auto colour tone is displayed with cool/medium/warm in the following mode.
RGB-PC(1080i), DVI(480i, 1080i)
Page 36

35
Picture
G
DE F G
OO KK RREE TT UU RRNN
9300K
6500K
sRGB
User
V
Picture Mode
Colour Temperature
XD
Advanced
Aspect Ratio
Picture Reset
Screen
PICTURE CONTROL
To adjust red, green, blue to any colour temperature you prefer.
This menu is activated after selecting “User1” or “User2” in the Picture Mode.
Colour Tone - User Mode
Press the
MMEENNUU
button and then
DD
//
EE
button to select the
PPiiccttuurree
menu.
Press the
G
button and then
DD
//
EE
button to select
CCoolloouurr
TTeemmppeerraattuurree
.
Press the
G
button and then
DD
//
EE
button to select
UUsseerr
.
Press the
G
button and then
DD
//
EE
button to select
RReedd, GGrreeeenn
or
BBlluuee
.
Press the
F //G
button to make appropriate adjustments.
1
2
3
4
5
• Press the MENU button to close the menu window.
• Press the RETURN button to move to the previous menu screen.
Picture
G
DE F G
OO KK RREE TT UU RRNN
Cool
Medium
Warm
User
V
Picture Mode
Colour Temperature
XD
Advanced
Aspect Ratio
Picture Reset
Screen
User
DE F G
OO KK RREE TT UU RRNN
G
Red 0
Green 0
Blue 0
....................
Red 0 F
G
E
D
........................
<TV/AV/Component/HDMI>
<RGB-PC/DVI-PC>
Page 37

36
PICTURE CONTROL
• Press the MENU button to close the menu window.
• Press the RETURN button to move to the previous menu screen.
- PICTURE IMPROVEMENT TECHNOLOGY
Press the MENU button and then
DD
//
EE
button to select the
PPiiccttuurree
menu.
Press the
G
button and then
DD
//
EE
button to select
XXDD
.
Press the
G
button and then
DD
//
EE
button to select
AAuuttoo
or
MMaannuuaall
.
* Manual Selection
Press the Gbutton and then
DD
//
EE
button to select
XX DD
CCoonnttrraasstt,, XXDD CCoolloouurr
or
XXDD NNRR
.
Press the
G
button and then
DD
//
EE
button to select
OOffff,LL ooww
or
HHiigghh
.
Select
OOffff,LL ooww,HHiigghh
or
AAddaappttiivvee
(Only
XXDD NNRR
).
XD is LG electronic's unique picture improving technology to display a real HD source through an advanced digital
signal processing algorithm.
It is not possible to use this function in RGB-PC/DVI input.
This menu is activated after selecting the
UUsseerr11
or
UUsseerr22
of
PPiiccttuurree MMooddee
.
AA
XXDD CCoonnttrraasstt ::
Optimises the contract automatically according to the brightness of the reflection.
AA
XXDD CCoolloouurr ::
Adjusts the colour of the reflection automatically to reproduce as close as possible to natural colours.
AA
XXDD NNRR
: Removes interference up to the point where it does not damage the original picture.
1
2
3
1
2
Picture
G
DE F G
OO KK RREE TT UU RRNN
Auto
Manual
V
Picture Mode
Colour Temperature
XD
Advanced
Aspect Ratio
Picture Reset
Screen
XD
DE F G
OO KK RREE TT UU RRNN
G
XD Contrast
XD Colour
XD NR
V
Off
Low
High
Page 38

37
PICTURE CONTROL
• Press the MENU button to close the menu window.
• Press the RETURN button to move to the previous menu screen.
ADVANCED - GAMMA
High gamma values display whitish images and low gamma values display high contrast images.
It is not possible to use this function in RGB-PC/DVI input.
Press the
MMEENNUU
button and then
DD
//
EE
button to select the
PPiiccttuurree
menu.
Press the
G
button and then
DD
//
EE
button to select
AAddvvaanncceedd
.
Press the
G
button and then
DD
//
EE
button to select
GGaammmmaa
.
Press the
G
button and then
DD
//
EE
button to select
LLooww,,
MMeeddiiuumm
or
HHiigghh..
1
2
3
4
Picture
G
DE F G
OO KK RREE TT UU RRNN
To S et
Picture Mode
Colour Temperature
XD
Advanced
Aspect Ratio
Picture Reset
Screen
Advanced
DE F G
OO KK RREE TT UU RRNN
G
Gamma
Film Mode
Black Level
V
Low
Medium
High
ADVANCED - Film Mode
To set up for the best picture quality for viewing films.
This feature operates only in TV, AV and Component 480i/576i mode.
Press the Gbutton and then
DD
//
EE
button to select
FF iill mm
MMoo dd ee
.
Press the
G
button and then
DD
//
EE
button to select
OO nn
or
OO ffff ..
1
2
Advanced
DE F G
OO KK RREE TT UU RRNN
G
Gamma
Film Mode
Black Level
V
Off
On
Advanced
DE F G
OO KK RREE TT UU RRNN
G
Gamma
Film Mode
Black Level
VLow
High
ADVANCED - BLACK(DARKNESS) LEVEL
When you view a film this function adjust the set to best picture quality. Adjusting the contrast and the brightness of
the screen using the black level of the screen.
This function works in the following mode:
RF(NTSC-M), AV(NTSC-M, NTSC 4.43), Component or HDMI.
Press the Gbutton and then
DD
//
EE
button to select
BBllaacckk LLeevveell
.
Press the
G
button and then
DD
//
EE
button to select
LL ooww
or
HHiigghh..
AA
LL ooww
::
The reflection of the screen gets darker.
AA
HHiigghh
::
The reflection of the screen gets brighter.
1
2
Page 39

38
PICTURE CONTROL
• Press the MENU button to close the menu window.
• Press the RETURN button to move to the previous menu screen.
PICTURE RESET
Press the
MMEENNUU
button and then
DD
//
EE
button to select the
PPiiccttuurree
menu.
Press the
G
button and then
DD
//
EE
button to select
PPiiccttuurree
RReesseett
.
Press the
G
button to initialize the adjusted value.
Returns to the default factory setting for Picture Mode, Colour Temperature, XD, Advanced, Aspect Ratio.
1
2
3
Picture
G
DE F G
OO KK RREE TT UU RRNN
To S et
Picture Mode
Colour Temperature
XD
Advanced
Aspect Ratio
Picture Reset
Screen
Page 40

39
PICTURE CONTROL
• If you don’t want Auto Configure, do
not press OK
22.. UUssii nn gg OO KK((RReemmoo ccoo nn oorr ccoonntt rroo ll kkeeyy))
Press the OK button.
TThhiiss ffuunnccttiioonn iiss aavvaaiillaabbllee ff oorr RRGGBB ssiiggnnaall ss oo nn llyy..
AA uu ttoo iinn pprrooggrreessss
<<11 9922 00 xx 1100 8800 RReessoolluuttiioonn>>
<<OOtthhee rr ss RReessoolluuttiioo nn>>
Auto in progress
For optimal display change
resolution to1920 x 1080
Auto Config. (
OK)
•
Press the MENU button to close the menu window.
•
Press the RETURN button to move to the previous menu screen.
Press the
MMEENNUU
button and then use
DD
//
EE
button to select the
PPiiccttuurree
menu.
Press the
G
button and then use
DD
//
EE
button to select
SSccrreeeenn
.
Press the
G
button and then use
DD
//
EE
button to select
AAuutt oo
CCoonnffiigg..
.
Press the
G
button to start
AAuuttoo CCoonnffiigg
..
• When Auto config. has finished, OK will be shown on screen.
• If the position of the image is still not correct, try Auto adjustment
again.
• If picture needs to be adjusted again after Auto adjustment in RGB
(PC), you can adjust the
MMaannuuaall CCoonnffiigg..
.
Automatically adjusts picture position and minimizes image instability. After adjustment, if the image is
still not correct, your set is functioning properly but needs further adjustment.
AAuutt oo cc oonn ffiigguurree
This function is for automatic adjustment of the screen position, clock, and phase. The displayed image
will be unstable for a few seconds while the auto configuration is in progress.
1
2
3
4
1
Press the OK button.
2
SCREEN SETUP FOR PC MODE
Auto Configure (RGB [PC] mode only)
Screen
To S et
DE F G
OO KK RREE TT UU RRNN
Picture
To S et
G
G
DE F G
OO KK RREE TT UU RRNN
Picture Mode
Colour Temperature
XD
Advanced
Aspect Ratio
Picture Reset
Screen
Auto config.
Manual Config.
Resolution
Reset
11.. UUssii nn gg OO SSDD
Page 41

40
PICTURE CONTROL
• Press the MENU button to close the menu window.
• Press the RETURN button to move to the previous menu screen.
If the picture is not clear after auto adjustment and especially if characters are still trembling, adjust the picture phase
manually.
To correct the screen size, adjust
CC ll oocckk
.
It’s not available to use Phase, Clock function in COMPONENT
(480i/480p/576i/576p/720p/1080i/1080p), HDMI (480p/576p/720p/1080i/1080p).
CC ll oocckk
This function is to minimize any vertical bars or stripes visible on the screen background the horizontal screen size will also change.
PP hh aassee
This function allows you to remove any horizontal noise and clear or sharpen the image of characters.
Press the
MMEENNUU
button and then use
DD
//
EE
button to select the
PPiiccttuurree
menu.
Press the
G
button and then use
DD
//
EE
button to select
SSccrreeeenn
.
Press the
G
button and then use
DD
//
EE
button to select
MMaannuuaall
CCoonnffiigg..
.
Press the
G
button and then use
DD
//
EE
button to select
PPhhaassee
,
CClloocckk, HH--PPoossiittiioonn
or
VV--PPoossiittiioonn
.
Press the
F //G
button to make appropriate adjustments.
1
2
3
4
5
Manual Configure (Adjustment for screen Phase, Clock, Position)
(RGB [PC] mode only)
Screen
Phase 84
Clock 50
H-Position 50
V-Position 50
DE F G
OO KK RREE TT UU RRNN
Picture
To S et
G
G
DE F G
OO KK RREE TT UU RRNN
Picture Mode
Colour Temperature
XD
Advanced
Aspect Ratio
Picture Reset
Screen
Auto config.
Manual Config.
Resolution
Reset
Page 42

41
PICTURE CONTROL
To view a normal picture, match the resolution of RGB mode and selection of Resolution.
This function works in the following mode: RGB-PC input mode.
Press the
MMEENNUU
button and then use
DD
//
EE
button to select the
PPiiccttuurree
menu.
Press the
G
button and then use
DD
//
EE
button to select
SSccrreeeenn
.
Press the
G
button and then use
DD
//
EE
button to select
RReessoolluuttiioonn
Press the
G
button and then use
DD
//
EE
button to select the
desired Resolution.
Selecting Resolution
1
2
3
4
• Press the MENU button to close the menu window.
• Press the RETURN button to move to the previous menu screen.
Screen
1400 x 1050
1680 x 1050
DE F G
OO KK RREE TT UU RRNN
Picture
To S et
G
G
DE F G
OO KK RREE TT UU RRNN
Picture Mode
Colour Temperature
XD
Advanced
Aspect Ratio
Picture Reset
Screen
Auto config.
Manual Config.
Resolution
Reset
V
This function operates in current mode.
To initialize the adjusted value
Press the Gbutton and then use
DD
//
EE
button to select
RReesseett
.
Press the
G
button.
1
2
Initializing (Reset to original factory settings)
Screen
To S et
DE F G
OO KK RREE TT UU RRNN
G
Auto config.
Manual Config.
Resolution
Reset
Page 43

42
SOUND SETTING ADJUSTMENT -USER MODE
Press the Gbutton and then
DD
//
EE
button to select
UUsseerr
.
Press the
G
button.
Select a frequency band by pressing the
F //G
button.
Set the desired sound level with the
DD
//
EE
button.
Adjusting the audio equalizer.
1
2
3
Audio
G
DE F G
OO KK RREE TT UU RRNN
SRS TS XT
Clear Voice
Standard
Music
Cinema
Sport
Game
User
Sound Mode
Auto Volume
Balance 0
TV Speaker
V
User
DE F G
OO KK RREE TT UU RRNN
0.1 0.5 1.5 5.0 10 kHz
GG
is a trademark of SRS Labs, Inc.
GG
TruSurround XT technology is incorporated under license from SRS Labs, Inc.
SOUND CONTROL
• Press the MENU button to close the menu window.
• Press the RETURN button to move to the previous menu screen.
PRESET SOUND SETTINGS-SOUND MODE
You can select your preferred sound setting;
SSRRSS TTSS XXTT,, CClleeaarr VVooiiccee,, SSttaannddaarrdd,, MMuussiicc,, CCiinneemmaa,, SSppoorrtt
or
GGaamm ee
and you can also adjust the frequency of the equalizer.
Sound Mode lets you enjoy the best sound without any Special adjustment as the sets the appropriate sound options based
on the programme content.
TTrruuSSuurrrroouunndd XXTT((SSRRSS TTSS XXTT)), CClleeaarr VVooiiccee, SSttaannddaarrdd, MMuussiicc, CCiinneemmaa, SSppoorrtt
and
GGaammee
are preset for optimum
sound quality at the factory and are not adjustable.
Press the
MMEENNUU
button and then
DD
//
EE
button to select the
AAuuddiioo
menu.
Press the
G
button and then
DD
//
EE
button to select
SSoouunndd
MMooddee
.
Press the
G
button and then
DD
//
EE
button to select
SSRRSS TTSS XXTT
,
CClleeaarr VVooiiccee, SSttaannddaarrdd, MMuussiicc,CCiinneemmaa, SSppoorrtt,, GGaammee
or
UUsseerr
.
1
2
3
Audio
G
DE F G
OO KK RREE TT UU RRNN
SRS TS XT
Clear Voice
Standard
Music
Cinema
Sport
Game
User
Sound Mode
Auto Volume
Balance 0
TV Speaker
V
Page 44

43
TV SPEAKERS ON/OFF SETUP
You can adjust the internal speaker status.
In TV, AV, COMPONENT and HDMI mode, internal speaker audio can be operational even though there is no video signal.
If you wish to use an external hi-fi system, turn off the TV internal speakers.
Press the
G
button and then
DD
//
EE
button to select
TTVV SSppeeaakkeerr
.
Press the
G
button and then
DD
//
EE
button to select
OO nn
or
OOffff
.
1
2
Audio
G
DE F G
OO KK RREE TT UU RRNN
Off
On
Sound Mode
Auto Volume
Balance 0
TV Speaker
V
BALANCE
You can adjust the sound balance of the speakers to the preferred levels.
Press the
G
button and then
DD
//
EE
button to select
BBaallaannccee
.
Press the
G
button and then
F //G
button to make desired adjust-
ment.
1
2
Audio
G
DE F G
OO KK RREE TT UU RRNN
Sound Mode
Auto Volume
Balance 0
TV Speaker
........... ...........
SOUND CONTROL
• Press the MENU button to close the menu window.
• Press the RETURN button to move to the previous menu screen.
AUTO VOLUME LEVELER
Auto Volume automatically remains on the same level of volume if you change programmes.
1
2
3
Press the
MMEENNUU
button and then
DD
//
EE
button to select the
AAuuddiioo
menu.
Press the
G
button and then
DD
//
EE
button to select
AAuuttoo
VVoolluummee
.
Press the
G
button and then
DD
//
EE
button to select
OO nn
or
OOffff
.
Audio
G
DE F G
OO KK RREE TT UU RRNN
Off
On
Sound Mode
Auto Volume
Balance 0
TV Speaker
V
Page 45

44
SOUND CONTROL
I/II
AA
MMoonnoo ssoouunndd sseelleeccttiioonn
If the stereo signal is weak in stereo reception, you can switch to mono. In mono reception, the clarity of sound is improved.
To switch back to stereo.
AA
LLaanngguuaaggee sseelleeccttiioonn ffoorr dduuaall llaanngguuaaggee bbrrooaaddccaasstt
If a programme can be received in two languages (dual language), you can switch to DUAL I, DUAL II or DUAL I+II.
DDUUAALL II
Sends the primary broadcast language to the loudspeakers.
DDUUAALL IIII
Sends the secondary broadcast language to the loudspeakers.
DDUUAALL II++IIII
Sends a separate language to each loudspeaker.
BB rrooaaddccaa sstt
Mono
Stereo
Dual
OOnn SSccrreeeenn DDiissppllaayy
MMOONNOO
SSTTEERREEOO
DDUUAALL II,, DDUUAALL IIII,, DDUU AALL II++IIII
Stereo/Dual Reception
When a programme is selected, the sound information for the station appears with the programme number and station
name.
Press the
II//IIII
button and then
DD
//
EE
button.
1
When NICAM MONO is received, you can select NICAM MONO or FM MONO.
When NICAM stere is received, you can select NICAM STEREO or FM MONO.
If the stereo signal is weak,switch to FM MONO.
When NICAM dual is received, you can select NICAM DUAL I, NICAM DUAL II or
NICAM DUAL I+II or FM MONO.
1
2
3
Speaker Sound Output Selection
NICAM Reception
In AV, Component, RGB-PC, HDMI and DVI mode, you can select output sound for the left and right loudspeakers.
Select the sound output.
LL++RR::
Audio signal from audio L input is sent to the left loudspeaker and audio signal from audio R input is sent to
the right loudspeaker.
LL++LL::
Audio signal from audio L input is sent to left and right loudspeakers.
RR++RR::
Audio signal from audio R input is sent to left and right loudspeakers.
If the set is equipped with a receiver for NICAM reception,high quality NICAM (Near Instantaneous Companding Audio
Multiplex)digital sound can be received.
Sound output can be selected according to the type of broadcast received.
Page 46

45
TIME SETTING
AUTO ON/OFF TIME SETTING
The Off time function automatically switches the set to standby at a preset time.
Two hours after the set is switched on by the on time function it will automatically switch off unless a button has been
pressed.
Once the on time/off time is set, these functions operate daily at the preset time.
The Off time function overrides the On timer function if both are set to the same time.
Press the
G
button and then
DD
//
EE
button to select
OO nn/OOffff
TTiimmee
.
• To cancel
OO nn/OOffff TTiimmee
function, select
OOffff
.
Press the
G
button and then
DD
//
EE
button to set the hour.
Press the
G
button and then
DD
//
EE
button to set the
minutes.
FFoorr OOnn TTiimmee ffuunnccttiioonn oonnllyy
•
PPrrooggrraammmmee
: Press the
G
button and then
DD
//
EE
button to
select the programme.
•
VVoolluummee
: Press the
G
button and then
DD
//
EE
button to adjust
volume level at switch-on.
1
2
3
4
• Press the MENU button to close the menu window.
• Press the RETURN button to move to the previous menu screen.
Time
G
DE F G
OO KK RREE TT UU RRNN
- - : - -
Off
Clock
Off Time
On Time
Sleep Timer
Auto Sleep
Time
G
DE F G
OO KK RREE TT UU RRNN
--:--
PR 1
Vol. 30
Off
Clock
Off Time
On Time
Sleep Timer
Auto Sleep
CLOCK SETUP
Press the
MMEENNUU
button and then
DD
//
EE
button to select the
TTiimmee
menu.
Press the
G
button and then
DD
//
EE
button to select
CClloocckk
.
Press the
G
button and then
DD
//
EE
button to set the hour.
Press the
G
button and then
DD
//
EE
button to set the minute.
You must set the time correctly before using on/off timer function.
If current time setting is erased by a power failure or the set is unplugged, reset the clock.
1
2
3
4
Time
G
DE F G
OO KK RREE TT UU RRNN
- - : - -
Clock
Off Time
On Time
Sleep Timer
Auto Sleep
Page 47

46
• Press the MENU button to close the menu window.
• Press the RETURN button to move to the previous menu screen.
AUTO SHUT-OFF SETTING
If the set is switched on and there is no input signal, it will switch off automatically after 10 minutes.
Press the
G
button and then
DD
//
EE
button to select
AAuuttoo SSlleeeepp
.
Press the
G
button and then
DD
//
EE
button to select
OO nn
or
OOffff
.
1
2
Time
G
DE F G
OO KK RREE TT UU RRNN
Off
On
V
Clock
Off Time
On Time
Sleep Timer
Auto Sleep
TIME SETTING
SLEEP TIMER SETTING
You do not have to remember to switch the set off before you go to sleep. The sleep timer automatically switches the set
off after the preset time has elapsed.
NOTE
!
GG
When you switch the set off, the set releases the preset sleep timer.
Press the
MMEENNUU
button and then
DD
//
EE
button to select the
TTiimmee
menu.
Press the
G
button and then
DD
//
EE
button to select
SSlleeeepp
TTiimmeerr
.
Press the
G
button and then
DD
//
EE
button to set the minute.
1
2
3
Time
G
DE F G
OO KK RREE TT UU RRNN
Off
Clock
Off Time
On Time
Sleep Timer
Auto Sleep
Page 48

47
OPTION SETTING
ON-SCREEN MENU LANGUAGE SELECTION
Press the
MMEENNUU
button and then use
DD
//
EE
button to
select the
OOPPTTIIOONN
menu.
Press the
G
button and then use
DD
//
EE
button to select
LLaanngguuaaggee
.
Press the
G
button and then use
DD
//
EE
//
F //G
button to
select your desired language. The menus can be shown on
the screen in the selected language.
Press the
OOKK
button.
1
2
3
4
Installation guide menu appears on set screen when it is turned on for the first time.
Press the
DD
// EE//
F //G button and then,
OOKK
button to
select your desired language.
1
• Press the MENU button to close the menu window.
• Press the RETURN button to move to the previous menu screen.
Option
G
DE F G
OO KK RREE TT UU RRNN
Language
PIP
Key Lock
Set ID
DDC-CI
Power Indicator
Factory Reset
To S et
Option
G
DE F G
OO KK RREE TT UU RRNN
Language
PIP
Key Lock
Set ID
DDC-CI
RTC
Power Indicator
Factory Reset
To S et
** IIff yyoouu wwaanntt ttoo cchhaannggee LLaanngguuaaggee sseelleeccttiioonn
GG
If you don’t finish set up
IInnssttaallllaattiioonn GGuuiiddee
by pressing
RREETTUURRNN
button or time out of OSD (On Screen Display)
display, it will continuously appear until completing set up whenever the set is turned on.
NOTE
!
<M2394A>
<M2794A>
Page 49

48
OPTION SETTING
• Press the MENU button to close the menu window.
• Press the RETURN button to move to the previous menu screen.
KEY LOCK
NOTE
!
GG
In
KKeeyy LLoocckk ‘OO nn
’, if the set is turned off, press the
rr // II,IINNPPUUTT, PP RR
DD
//
EE
button on the set or
PPOOWWEERR
,
IINNPPUUTT
,
PP RR
DD
//
EE
or NUMBER buttons on the remote control.
GG
With the
KKeeyy LLoocckk OOnn
, the display
‘
KKeeyy LLoocckk OOnn
’
appears on the screen if any button on the right side of set is
pressed while using the set.
The set can be set so that the remote control is needed to control it.
This feature can be used to prevent unauthorized viewing.
This set is programmed to remember which option it was last set to even if you turn the set off.
Press the
MMEENNUU
button and then
DD
//
EE
button to select the
OOppttiioonn
menu.
Press the
G
button and then
DD
//
EE
button to select
KKeeyy LLoocckk
.
Press the
G
button and then
DD
//
EE
button to select
OOnn
or
OOffff
.
1
2
3
Option
G
DE F G
OK RETURN
Language
PIP
Key Lock
Set ID
DDC-CI
Power Indicator
Factory Reset
OffOnV
Option
G
DE F G
OK RETURN
Language
PIP
Key Lock
Set ID
DDC-CI
RTC
Power Indicator
Factory Reset
OffOnV
<M2394A>
<M2794A>
Page 50

49
OPTION SETTING
• Press the MENU button to close the menu window.
•
Press the RETURN button to move to the previous menu screen.
DDC/CI (Display Data Channel Command Interface) is a communication protocol for communications between
PC and set.
DDC/CI makes it possible to adjust and setup detailed functions on PC instead of the set OSD.
Set can be adjusted with PC by connecting communication between PC and set when DDC/CI is ON, and set
cannot be adjusted with PC because communication between PC and set is disconnected when DDC/CI is OFF.
DDC CI(Only RGB, DVI mode)
Option
G
DE F G
OO KK RREE TT UU RRNN
Language
PIP
Key Lock
Set ID
DDC-CI
Power Indicator
Factory Reset
V
Press the
MMEENNUU
button and then
DD
//
EE
button to select the
OOppttiioonn
menu.
Press the
G
button and then
DD
//
EE
button to select
DDDDCC--CCII..
Press the
G
button and then
DD
//
EE
button to select
OO nn
or
OOffff
.
1
2
3
Off
On
If you set ON, you enable the response time control function.
If you set OFF, you disenable the response time control function.
RTC (Only M2794A)
Option
G
DE F G
OO KK RREE TT UU RRNN
Language
PIP
Key Lock
Set ID
DDC-CI
RTC
Power Indicator
Factory Reset
V
Press the Gbutton and then
DD
//
EE
button to select
RRTTCC..
Press the
G
button and then
DD
//
EE
button to select
OO nn
or
OOffff
.
1
2
Off
On
Option
G
DE F G
OO KK RREE TT UU RRNN
Language
PIP
Key Lock
Set ID
DDC-CI
RTC
Power Indicator
Factory Reset
V
Off
On
<M2394A>
<M2794A>
Page 51

50
OPTION SETTING
It helps you control LED when power is turned on.
POWER INDICATOR
Option
G
DE F G
OO KK RREE TT UU RRNN
Language
PIP
Key Lock
Set ID
DDC-CI
Power Indicator
Factory Reset
V
Press the
MMEENNUU
button and then
DD
//
EE
button to select the
OOppttiioonn
menu.
Press the
G
button and then
DD
//
EE
button to select
PPoowweerr
iinnddiiccaattoorr..
Press the
G
button and then
DD
//
EE
button to select
OO nn
or
OOffff
.
1
2
3
Off
On
Option
G
DE F G
OO KK RREE TT UU RRNN
Language
PIP
Key Lock
Set ID
DDC-CI
RTC
Power Indicator
Factory Reset
V
Off
On
Use to quickly reset all the menu options to their original factory preset values.
The function deletes all TV programmes.
FACTORY RESET
Press the Gbutton and then
DD
//
EE
button to select
FFaaccttoorryy
RReesseett
.
Press the
G
button and then
F //G
button to select
YYeess
or
NNoo
.
1
2
Option
G
DE F G
OO KK RREE TT UU RRNN
Language
PIP
Key Lock
Set ID
DDC-CI
Power Indicator
Factory Reset
To S et
Option
G
DE F G
OO KK RREE TT UU RRNN
Language
PIP
Key Lock
Set ID
DDC-CI
RTC
Power Indicator
Factory Reset
To S et
Factory Reset
FG
OO KK RREE TT UU RRNN
Ye s
No
<M2394A>
<M2794A>
<M2394A>
<M2794A>
• Press the MENU button to close the menu window.
• Press the RETURN button to move to the previous menu screen.
Page 52

51
TELETEXT
Press the
TTEEXXTT
button to switch to teletext. The initial page or last page viewed appears on the screen.
Two page numbers, TV station name, date and time are displayed on the screen headline. The first page number indicates your
selection, while the second shows the current page displayed.
Press the
TTEEXXTT
or
RREETTUURRNN
button to switch off teletext. The previous mode reappears.
SWITCH ON/OFF
AA
Page selection
Enter the desired page number as a three digit number with the NUMBER buttons. If during selection you press a wrong
number, you must complete the three digit number and then re-enter the correct page number.
The
PP RR
DD
//
EE
button can be used to select the preceding or following page.
AA
Programming a colour button in LIST mode
If the TV is in SIMPLE text,TOP text or FASTEXT mode, press the butto to switch to LIST mode.
Four teletext page umbers of your choice can be colour coded and easily selected by pressing the corresponding coloured
button on the remote control handset.
Press a coloured button.
Using the NUMBER buttons,select the page you wish to programme.
Press the OK button. The selected page is stored as the selected page umber, blinking once to confirm this.
From now on, you can select this page with the same coloured button.
The three other coloured buttons are programmed in this way.
SIMPLE TEXT
1
2
1
2
3
4
TThhiiss ffeeaattuurree iiss nnoott aavvaaiillaabbllee iinn aallll ccoouunnttrriieess..
Teletext is a free service broadcast by most TV stations which gives up-to-the-minute information on news, weather, television programmes, share prices and many other topics.
The teletext decoder of this TV can support the SIMPLE, TOP and FASTEXT systems. SIMPLE (standard teletext) consists
of a number of pages which are selected by directly entering the corresponding page number. TOP and FASTEXT are more
modern methods allowing quick and easy selection of teletext information.
Page 53

52
TELETEXT
TOP TEXT
The user guide displays four fields-red, green, yellow and blue at the bottom of the screen. The yellow field denotes the next
group and the blue field indicates the next block.
AA
Block / group / page selection
With the blue button you can progress from block to block.
Use the yellow button to proceed to the next group with automatic overflow to the next block.
With the green button you can proceed to the next existing page with automatic overflow to the next group.
Alternatively the
PP RR
DD
button can be used.
The red button return to the previous selection. Alternatively the
PP RR
EE
button can be used.
AA
Direct page selection
As with SIMPLE teletext mode, you can select a page by entering it as a three digit number using the NUMBER buttons in
TOP mode.
44
1
2
3
FASTEXT
The teletext pages are colour coded along the bottom of the screen and are selected by pressing the corresponding coloured
button.
AA
Page selection
Press the button to select the index page.
You can select the pages which are colour coded along the bottom line with corresponding coloured buttons.
As with SIMPLE teletext mode, you can select a page by entering its three digit page number with the NUMBER buttons in
FASTEXT mode.
The
PP RR
DD
//
EE
button can be used to select the preceding or following page.
i
44
1
2
3
Page 54

53
TELETEXT
SPECIAL TELETEXT FUNCTIONS
AA
TTIIMMEE
When viewing a TV programme, press this button to display the time at the top right hand corner of the screen. Press this button again to remove the display. In the teletext mode, press this button to select a sub page number. The sub page number is
displayed at the bottom of the screen. To hold or change the sub page, press the RED/GREEN,
PP RR
DD
//
EE
or NUMBER buttons.
Press again to exit this function.
AA
SSIIZZEE
Selects double height text.
Press this button to enlarge the top half of the page.
Press this button again to enlarge the bottom half of the page.
Press this button again to return to the normal display.
AA
UUPPDDAATTEE
Displays the TV picture on the screen while waiting for a new teletext page. The display will appear at the top left hand corner
of the screen. When the updated page is available then display will change to the page number. Press this button again to view
the updated teletext page.
AA
RREEVVEEAALL
Press this button to display concealed information, such as solutions to riddles or puzzles.
Press this button again to remove the information from the display.
AA
IINNDDEEXX
Select the each index page.
AA
HHOOLLDD
Stops the automatic page change which will occur if a teletext page consists of 2 or more sub pages. The number of sub pages
and the sub page displayed is, usually, shown on the screen below the time. When this button is pressed the stop symbol is displayed at the top left-hand corner of the screen and the automatic page change is inactive. To continue press this button again.
AA
MMII XX
Displays the teletext pages superimposed on the TV picture.
To switch the TV picture off press this button again.
?
i
Page 55

54
No picture &No sound
No color, poor colour,
or poor picture
Poor reception on
some channels
Lines or streaks
in pictures
Horizontal/vertical bars
or picture shaking
Picture appears slowly
after switching on
A
Check whether the product is turned on.
A
Try another channel. The problem may be with the broadcast.
A
Is the power cord inserted into wall power outlet?
A
Check your antenna direction and/or location.
A
Test the wall power outlet, plug another product’s power cord into the outlet
where the product’s power cord was plugged in.
A
This is normal, the image is muted during the product startup process. Please
contact your service centre, if the picture has not appeared after five minutes.
A
Adjust Colour in menu option.
A
Keep a sufficient distance between the product and the VCR.
A
Try another channel. The problem may be with the broadcast.
A
Are the video cables installed properly?
A
Activate any function to restore the brightness of the picture.
A
Check for local interference such as an electrical appliance or power tool.
A
Station or cable product experiencing problems, tune to another station.
A
Station signal is weak, reorient antenna to receive weaker station.
A
Check for sources of possible interference.
A
Check antenna (Change the direction of the antenna).
TROUBLESHOOTING
TThhee ooppeerraattiioonn ddooeess nnoott wwoorrkk nnoorrmmaallllyy..
The remote control
doesn’t work
Power is suddenly
turned off
A
Check to see if there is any object between the product and the remote control causing obstruction. Ensure you are pointing the remote control directly at the set.
A
Ensure that the batteries are installed with correct polarity (+ to +, - to -).
A
Ensure that the correct remote operating mode is set: TV, VCR, etc.
A
Install new batteries.
A
Is the sleep timer set?
A
Check the power control settings. Power interrupted.
A
No broadcast on station tuned with Auto sleep activated.
TThhee vviiddeeoo ffuunnccttiioonn ddooeess nnoott wwoorrkk..
APPENDIX
Page 56

55
APPENDIX
TThhee aauuddiioo ffuunnccttiioonn ddooeess nnoott wwoorrkk..
A
Press the VOL
F //G
button.
A
Sound muted? Press MUTE button.
A
Try another channel. The problem may be with the broadcast.
A
Are the audio cables installed properly?
A
Adjust Balance in menu option.
A
A change in ambient humidity or temperature may result in an unusual noise
when the product is turned on or off and does not indicate a problem with
the product.
Picture OK & No sound
Unusual sound from
inside
the product
No output from one
of the speakers
NNoo iimmaaggee iiss ddiissppllaayyeedd..
A
Adjust brightness and contrast again.
A
If the product is in power saving mode, move the mouse or press any key.
A
The signal from the PC (Video card) is out of the vertical or horizontal
frequency range of the product.
Adjust the frequency range by referring to the Specifications in this user’s guide.
A
The signal cable between PC and product is not connected. Check the signal cable.
A
Press the ‘INPUT’ button in the remote control to check the input signal.
Power is on, power indic-
tor is blue but the screen
appears extremely dark.
Does the ‘Out of range’
message appear?
Does the power indica-
tor look amber?
OOnnllyy RRGGBB//DDVVII mmooddee aapppplliieedd
Does the ‘Check signal
cable’ message appear?
Page 57

56
APPENDIX
TThhee ssccrreeeenn iimmaaggee llooookkss aabbnnoorrmmaall..
A
Adjust the Position menu in OSD.
A
See if the video card resolution and frequency are supported by the product.
If the frequency is out of range, set to the recommended resolution in the
Control Panel-Display-Setting menu.
A
Adjust the Clock menu in OSD.
A
Adjust the Phase menu in OSD.
Is the screen position
wrong?
Horizontal noise appears
or the characters look
blurred.
Do thin lines appear on
the background screen?
SSccrreeeenn ccoolloorr iiss aabbnnoorrmmaall..
A
Set screen color resolution to more than 24 bits (true color)
Select control Panel-Display-Settings-Color Table menu in Windows.
A
Check the connection status of the signal cable.
A
Several pixels (red, green, white or black color) may appear on the screen,
which can be attributable to the unique characteristics of the LCD panel.
It is not a malfunction of the LCD.
Screen has poor color res-
oluion (16_colors).
Do back spots appear on
the screen?
Screen color is unstable
or mono color.
AAfftteerr--iimmaaggee aappppeeaarrss oonn tthhee pprroodduucctt..
A
If you use a fixed image for a long time, the pixels may be damaged quickly.
Use the screen saver function.
After-image appears when
the product is turned off.
‘‘UUnnkknnoowwnn PPrroodduucctt’’ mmeessssaaggee aappppeeaarrss wwhheenn tthhee pprroodduucctt iiss ccoonnnneecctteedd..
A
Install the product driver, which is provided with the product, or download it
from the web site.
(http://www.lge.com)
A
See if the plug_&_play function is supported by referring to the video card
user’s guide.
Did you install the driver?
OOnnllyy RRGGBB mmooddee aapppplliieedd
Page 58

57
MAINTENANCE
Early malfunctions can be prevented. Careful and regular cleaning can extend the amount of time you can
enjoy your new set.
Caution: Be sure to turn the power off and unplug the power cord before you begin any cleaning.
Cleaning the Screen
To keep the dust off your screen for a while, wet a soft cloth in a mixture of lukewarm water and a little fabric softener or dishwashing detergent. Wring the cloth until it’s almost dry, and then use it to wipe the
screen.
Make sure the excess water is off the screen, and then let it air-dry before you turn on your set.
Cleaning the Cabinet
A
To remove dirt or dust, wipe the cabinet with a soft, dry, lint-free cloth.
A
Please be sure not to use a wet cloth.
Extended Absence
G
If you expect to leave your set dormant for a long time (such as a vacation), it’s a good idea to unplug
the power cord to protect against possible damage from lightning or power surges.
CAUTION
2
1
APPENDIX
Page 59

58
APPENDIX
PRODUCT SPECIFICATIONS
<M2394A>
■
The specifications shown above may be changed without prior notice for quality improvement.
Powe r
AC 100-240V ~ 50/60 Hz 1.0A
On Mode : 50W (typ.)
Sleep Mode 1W (RGB)
Off Mode 1W
LCD Panel
Screen Type
Pixel Pitch
23 inches Wide (584.2 mm) TFT (Thin Film Transistor)
LCD (Liquid Crystal Display) Panel
Visible diagonal size : 584.2 mm
0.265(H) x 0.265(V) mm
Max. Resolution
Recommended Resolution
Horizontal Frequency
Vertical Frequency
Synchronization Type
Video Signal
1920 X 1080 @60 Hz
1920 X 1080 @60 Hz
30 - 83 kHz
56 - 75 Hz
Separate Sync, Digital
Input Connector
S-VIDEO, CVBS, TV, D-Sub Analog, DVI-D, HDMI, PC Audio In, Component
Rated Voltage
Power Consumption
Tilt
Tilt Range
-5
~ 15
°
Dimensions (Width x Height x Depth)
Weight
560.8 x 427 x 193.2 mm (22.08 x 16.81 x 7.61 inches)
5.6 kg / 12.35 lbs
10 ~ 35°C
20 ~ 80%
-10 ~ 60°C
5 ~ 90%
Operating Temperature
Operating Humidity
Storage Temperature
Storage Humidity
Environmental
conditions
Page 60

59
APPENDIX
PRODUCT SPECIFICATIONS
<M2794A>
■
The specifications shown above may be changed without prior notice for quality improvement.
Powe r
AC 100-240V ~ 50/60 Hz 1.2A
On Mode : 100W (typ.)
Sleep Mode 1W (RGB)
Off Mode 1W
LCD Panel
Screen Type
Pixel Pitch
27 inches Wide (686 mm) TFT (Thin Film Transistor)
LCD (Liquid Crystal Display) Panel
Visible diagonal size: 686 mm
0.3114(H) x 0.3114(V) mm
Max. Resolution
Recommended Resolution
Horizontal Frequency
Vertical Frequency
Synchronization Type
Video Signal
1920 X 1080 @60 Hz
1920 X 1080 @60 Hz
30 - 83 kHz
56 - 75 Hz
Separate Sync, Digital
Input Connector
S-VIDEO, CVBS, TV, D-Sub Analog, DVI-D, HDMI, PC Audio In, Component
Rated Voltage
Power Consumption
Tilt
Tilt Range
Swivel Range
Swivel
Dimensions (Width x Height x Depth)
Weight
654.1 x 494.6 x 210 mm (25.75 x 19.47 x 8.27 inches)
8.92 kg / 19.66 lbs
Operating Temperature
Operating Humidity
Storage Temperature
Storage Humidity
Environmental
conditions
10 ~ 35°C
20 ~ 80%
-10 ~ 60°C
5 ~ 90%
-5 ~ 10 °
358
°
Page 61

60
APPENDIX
IR CODES
A
Configuration of frame
1st frame
Repeat frame
A
Lead code
A
Repeat code
A
BBiitt ddee ss ccrriipp ttiioo nn
A
FFrraa mm ee iinntt eerrvvaall:: TTff
The waveform is transmitted as long as a key is depressed.
C0 C1 C2 C3 C4 C5 C6 C7 C0 C1 C2 C3 C4 C5 C6 C7 D0 D1 D2 D3 D4 D5 D6 D7 D0 D1 D2 D3 D4 D5 D6 D7
Lead code Low custom code High custom code Data code Data code
Repeat code
Tf
4.5 ms
9 ms
2.25 ms
9 ms
0.55 ms
0.56 ms
1.12 ms
0.56 ms
2.24 ms
Tf Tf
Tf=108ms @455KHz
Bit ”0” Bit ”1”
1. How to Connect
A
Connect your wired remote control to the Remote Control port on the set.
2. Remote Control IR Codes
A
Output waveform
Single pulse, modulated with 37.917KHz signal at 455KHz
T1
Tc
Carrier frequency
FCAR = 1/TC = fOSC/12
Duty ratio = T1/TC = 1/3
Page 62

61
APPENDIX
Code
Function Note
(Hexa)
Code
Function Note
(Hexa)
79
ARC R/C Button
0B INPUT R/C Button
08 POWER R/C Button (Power On/Off)
43 MENU R/C Button
28 RETURN R/C Button
03
VOL
F
R/C Button
02
VOL
G
R/C Button
00
PR
D
R/C Button
01
PR
E
R/C Button
44 OK
( ) R/C Button
72 RED R/C Button
71 GREEN R/C Button
63 YELLOW R/C Button
61 BLUE R/C Button
0F
TV/PC R/C Button
60 PIP R/C Button
09 MUTE R/C Button
53 LIST R/C Button
10 ~ 19 Number Key 0 ~ 9 R/C Button
1A Q.VIEW R/C Button
20 TEXT R/C Button
26 TIME R/C Button
64 SIZE R/C Button
62 UPDATE R/C Button
70 INDEX R/C Button
65 HOLD R/C Button
2A REVEAL R/C Button
24 MIX R/C Button
22 MODE
R/C Button
0A I/II R/C Button
0E SLEEP R/C Button
1E FAV R/C Button
Page 63

62
APPENDIX
EXTERNAL CONTROL THROUGH RS-232C
RS-232C Setup
Connect the RS-232C input jack to an external control device (such as a computer or an A/V control
system) and control the set’s functions externally.
Connect the serial port of the control device to the RS-232C jack on the set back panel.RS-232C
connection cables are not supplied with the set.
RS-232C IN
(CONTROL)
Type of Connector; D-Sub 9-Pin Male
No. Pin Name
1 No connection
2 RXD (Receive data
)
3 TXD (Transmit data
)
4 DTR (DTE side ready
)
5 GND
6 DSR (DCE side ready
)
7 RTS (Ready to send
)
8 CTS (Clear to send
)
9 No Connection
99
1
5
6
Page 64

63
APPENDIX
RS-232C Configurations
7-Wire Configurations (Standard RS-232C cable
)
PC SET
RXD 2 3 TXD
TXD 3 2 RXD
GND 5 5 GND
DTR 4 6 DSR
DSR 6 4 DTR
RTS 7 8 CTS
CTS 8 7 RTS
D-Sub 9 D-Sub 9
3-Wire Configurations(Not standard
)
PC SET
RXD 2 3 TXD
TXD 3 2 RXD
GND 5 5 GND
DTR 4 6 DTR
DSR 6 4 DSR
RTS 7 7 RTS
CTS 8 8 CTS
D-Sub 9 D-Sub 9
Communication Parameters
A
Baud rate : 9600 bps (UART
)
A
Data length : 8 bits
A
Parity : None
A
Stop bit : 1 bit
A
Communication code : ASCII code
A
Use a crossed (reverse) cable.
Set ID
Press the
MMEENNUU
button and then use
DD
//
EE
button to select the
OOppttiioonn
menu.
Press the
G
button and then use
DD
//
EE
button to select
SSeett IIDD
.
Press the
G
button and then use
F //G
button to adjust
SSeett IIDD
to choose the desired Set ID number.
• The adjustment range of SET ID is 1~ 99.
- Use this function to specify a set ID number.
- Refer to ‘Real Data Mapping 1’. See page 67.
1
2
3
Option
G
DE F G
OO KK RREE TT UU RRNN
Language
PIP
Key Lock
Set ID
DDC-CI
Power Indicator
Factory Reset
1
Option
G
DE F G
OO KK RREE TT UU RRNN
Language
PIP
Key Lock
Set ID
DDC-CI
RTC
Power Indicator
Factory Reset
1
<M2394A>
<M2794A>
• Press the MENU button to close the menu window.
• Press the RETURN button to move to the previous menu screen.
Page 65

64
APPENDIX
Command Reference List
CCOO MM MMAANN DD11 CC OOMMMM AA NN DD22
DATA
(Hexadecimal)
CCOO MM MMAANN DD11 CC OOMMMM AA NN DD22
14. Colour Temperature k u Refer to p.66
15. Red Adjustment k v 00 ~ 3C
16. Green Adjustment k w 00 ~ 3C
17. Blue Adjustment k $ 00 ~ 3C
18 .
Abnormal Status
k z FF
19. Auto Configure j u 01
20. Equalize j v Refer to p.67
21 .
Tune Command
m a Refer to p.67
22. Channel Skip m b 00 ~ 01
23. Key m c Key Code
24. Input select (Main) x b Refer to p.67
DATA
(Hexadecimal)
01. Power k a 00 ~ 01
02. Aspect Ratio k c Refer to p.65
03. Screen Mute k d 00 ~ 01
04. Volume Mute k e 00 ~ 01
05. Volume Control k f 00 ~ 64
06. Contrast k g 00 ~ 64
07. Brightness k h 00 ~ 64
08. Colour k i 00 ~ 64
09. Tint k j 00 ~ 64
10. Sharpness k k 00 ~ 64
11. OSD Select k l 00 ~ 01
12 . Remote Control Lock 00 ~ 01
/Key Lock Mode
13. Balance k t 00 ~ 64
k m
Transmission / Receiving Protocol
TTrraann ssmmiiss ssii oonn
[Command 1] : First command to control the set.
(j,k,m or x)
[Command 2] : Second command to control the set.
[Set ID] : You can adjust the set ID to choose desired Set ID
number in Setup menu. Adjustment range is 1
~ 99.
When selecting Set ID ‘0’, every connected set is
controlled. Set ID is indicated as decimal (1
~ 99
)
on menu and as Hexa decimal (0x0
~ 0x63
)
on
transmission/receiving protocol.
[DATA] : To transmit command data.
Transmit ‘FF’ data to read status of comand.
[Cr] : Carriage Return
ASCII code ‘0x0D’
[ ] : ASCII code ‘space (0x20)’
OO KK AAcckknnoowwlleeddggeemmeenntt
The set transmits ACK (acknowledgement) based on this format when receiving normal data. At this time, if the data is
data read mode, it indicates present status data. If the data is
data write mode, it returns the data of the PC computer.
EErr rroorr AA cckknnoowwlleedd ggeemmeenn tt
Set transmits ACK(acknowledgement) based on this format
when receiving abnormal data form non-viable functions or
communication errors.
[Command 2] : use as command.
[Set ID]: use the small character, if set ID is 10, set will send the ‘0’, ‘a’
[Data]: use the small character, if data is 0xab, set will send the ‘a’, ‘b’.
[NG]: use the large character.
[[CCoommmm aa nndd11]][[CCoo mmmmaann dd22]][[ ]][[SSeett II DD]][[ ]][[DD aa ttaa]][[CCrr]]
[[CCoommmm aa nndd22]] [[ ]][[SSeett IIDD]][[ ]][[OO KK]][[ DD aattaa]][[ xx]]
[[CCoommmm aa nndd22]] [[ ]][[SSeett IIDD]][[ ]][[NNGG]][[DDaattaa ]][[xx ]]
Page 66

65
APPENDIX
0011.. PPoowweerr ((CCoommmmaanndd:: kk aa))
To control Power On/Off of the TV.
Data 00 : Power Off Data 01 : Power On
Transmission [k][a][ ][Set ID][ ][Data][Cr]
Acknowledgement [a][ ][Set ID][ ][OK/NG][Data][x]
To show Power On/Off.
Transmission [k][a][ ][Set ID][ ][FF][Cr]
* If there is the time delay between command and
ack message during power on sequence, It should
be described like “Note: In this model, set will send
the Acknowledge after power on processing completion. There might be a time delay between command and acknowledge.”
Acknowledgement [a][ ][Set ID][ ][
OK/NG][Data][x]
0022.. AAssppeecctt RRaattiioo ((CCoommmmaanndd:: kk cc)) ((MMaaiinn ppiiccttuurree ssiizzee))
To adjust the screen format. (Main picture format)
You can adjust the screen format using the Aspect
Ratio in the Picture menu.
Data 01: Normal screen (4:3)
Data 02: Wide screen (16:9)
Data 04: Zoom1
Data 05: Zoom2
Data 06: Original
Data 07: 14:9
Data 09: Just Scan
Transmission [k][c][ ][Set ID][ ][Data][Cr]
Acknowledgement [c][ ][Set ID][ ][OK/NG][Data][x]
* Using the RGB-PC, Component or HDMI input, you
select either 16:9 or 4:3 screen aspect ratio.
* Just Scan works in the following mode:
Component (720p/1080i/1080p),
HDMI (720p/1080i/1080p)
0033.. SSccrreeeenn MMuuttee ((CCoommmmaanndd:: kk dd))
To select screen mute on/off.
Data 00 : Screen mute off (Picture on)
Data 01 : Screen mute on (Picture off)
Transmission [k][d][ ][Set ID][ ][Data][Cr]
Acknowledgement [d][ ][Set ID][ ][OK/NG][Data][x]
0044.. VVoolluummee MMuuttee ((CCoommmmaanndd:: kk ee))
To control volume mute on/off.
You can also adjust mute using the MUTE button on
remote control.
Data 00 : Volume mute on (Volume off)
Data 01 : Volume mute off (Volume on)
Transmission [k][e][ ][Set ID][ ][Data][Cr]
Acknowledgement [e][ ][Set ID][ ][OK/NG][Data][x]
0055.. VVoolluummee CCoonnttrrooll ((CCoommmmaanndd:: kk ff))
To adjust volume.
You can also adjust volume with the volume buttons
on remote control.
Data Min : 00 ~ Max : 64
Refer to ‘Real data mapping 1 ’. See page 67.
Transmission [k][f][ ][Set ID][ ][Data][Cr]
Acknowledgement [f][ ][Set ID][ ][OK/NG
][Data][x]
0066.. CCoonnttrraasstt ((CCoommmmaanndd:: kk gg))
To adjust screen contrast.
You can also adjust contrast in the Picture menu.
Data Min : 00 ~ Max : 64
Refer to ‘Real data mapping 1 ’. See page 67.
Transmission [k][g][ ][Set ID][ ][Data][Cr]
Acknowledgement [g][ ][Set ID][ ][OK][Data][x]
0077.. BBrriigghhttnneessss ((CCoommmmaanndd:: kk hh))
To adjust screen brightness.
You can also adjust brightness in the Picture menu.
Data Min : 00 ~ Max : 64
Refer to ‘Real data mapping 1 ’. See page 67.
Transmission [k][h][ ][Set ID][ ][Data][Cr]
Acknowledgement [h][ ][Set ID][ ][
OK/NG][Data][x]
0088.. CCoolloouurr ((CCoommmmaanndd:: kk ii))
To adjust the screen colour.
You can also adjust colour in the Picture menu.
Data Min : 00 ~ Max : 64
Refer to ‘Real data mapping 1 ’. See page 67.
Transmission [k][i][ ][Set ID][ ][Data][Cr]
Acknowledgement [i][ ][Set ID][ ][OK/NG][Data][x]
0099.. TTiinntt ((CCoommmmaanndd:: kk jj))
To adjust the screen tint.
You can also adjust tint in the Picture menu.
Data Min : 00 ~ Max : 64
Refer to ‘Real data mapping 1 ’. See page 67.
Transmission [k][j][ ][Set ID][ ][Data][Cr]
Acknowledgement [j][ ][Set ID][ ][OK/NG][Data][x]
Page 67

66
1188.. AAbbnnoorrmmaall SSttaattee ((CCoommmmaanndd:: kk zz))
To recognize an abnormal state.
Data FF: Read
Data 00: Normal (Power on and signal exist)
Data 01: No signal (Power on)
Data 02: Turn the set off by remote control
Data 03: Turn the set off by sleep time function
Data 04: Turn the set off by RS-232C function
* This function is “read only”
Transmission [k][z][ ][Set ID][ ][FF][ ][Cr]
Acknowledgement [z][ ][Set ID][ ][
OK/NG][Data][x]
APPENDIX
1111.. OOSSDD SSeelleecctt ((CCoommmmaanndd:: kk ll))
To select OSD (On Screen Display) on/off when
controlling remotely.
Data 00: OSD off
Data 01: OSD on
Transmission [k][l][ ][Set ID][ ][Data][Cr]
Acknowledgement [l][ ][Set ID][ ][OK][Data][x]
1122.. RReemmoottee CCoonnttrrooll LLoocckk//KKeeyy LLoocckk MMooddee ((CCoommmmaanndd:: kk mm))
To lock the remote control and the side key
controls on the set.
Data 00: Lock off Data 01: Lock on
Transmission [k][m][ ][Set ID][ ][Data][Cr]
Acknowledgement [m][ ][Set ID][ ][
OK/NG][Data][x]
1133.. BBaallaannccee ((CCoommmmaanndd:: kk tt))
To adjust balance.
You can also adjust balance in the Audio menu.
Data Min : 00 ~ Max : 64
Refer to ‘Real data mapping 1 ’. See page 67.
Transmission [k][t][ ][Set ID][ ][Data][Cr]
Acknowledgement [t][ ][Set ID][ ][OK/NG][Data][x]
1100.. SShhaarrppnneessss ((CCoommmmaanndd:: kk kk))
To adjust the screen sharpness.
You can also adjust sharpness in the Picture menu.
Data Min : 00 ~ Max : 64
Refer to ‘Real data mapping 1 ’. See page 67.
Transmission [k][k][ ][Set ID][ ][Data][Cr]
Acknowledgement [k][ ][Set ID][ ][OK/NG
][Data][x]
1144.. CCoolloouurr TTeemmppeerraattuurree ((CCoommmmaanndd:: kk uu))
To adjust colour temperature.
You can also adjust Colour Temperature in the Picture
menu.
Data 00: Medium 01: Cool 02: Warm(Don’t operate in RGB, DVI mode)
Data 05: 9300K 06: 6500K 07: sRGB(Operate in RGB, DVI mode)
Transmission [k][u][ ][Set ID][ ][Data][Cr]
Acknowledgement [u][ ][Set ID][ ][
OK/NG][Data][x]
1155.. RReedd AAddjjuussttmmeenntt ((CCoommmmaanndd:: kk vv))
To adjust red in colour temperature.
Data Min: 00 ~ Max: 3C
Refer to ‘Real data mapping 2’. See page 67.
Transmission [k][v][ ][Set ID][ ][Data][Cr]
Acknowledgement [v][ ][Set ID][ ][
OK/NG][Data][x]
1166.. GGrreeeenn AAddjjuussttmmeenntt ((CCoommmmaanndd:: kk ww))
To adjust green in colour temperature.
Data Min: 00 ~ Max: 3C
Refer to ‘Real data mapping 2’. See page 67.
Transmission [k][w][ ][Set ID][ ][Data][Cr]
Acknowledgement [w][ ][Set ID][ ][
OK/NG][Data][x]
1177.. BBlluuee AAddjjuussttmmeenntt ((CCoommmmaanndd:: kk $$))
To adjust blue in colour temperature.
Data Min: 00 ~ Max: 3C
Refer to ‘Real data mapping 2’. See page 67.
Transmission [k][$][ ][Set ID][ ][Data][Cr]
Acknowledgement [$][ ][Set ID][ ][OK/NG][Data][x]
Page 68

67
APPENDIX
1199 .. AAuuttoo CCoonnffiigguurree ((CCoommmmaanndd:: jj uu))
To adjust picture position and minimize image
shaking automatically. It works only in RGB (PC)
mode.
Data 01: To set
Transmission [j][u][ ][Set ID][ ][Data][Cr]
Acknowledgement [u][ ][Set ID][ ][
OK/NG][Data][x]
**
RReeaall dd aa tt aa mmaapp ppii nngg 11
00 : Step 0
32 : Step 50
64 : Step 100
**
RReeaall dd aa tt aa mmaapp ppii nngg 22
00 : -30
1E : 0
3C : +30
22 00.. EE qquuaalliizzee ((
CCoo mmmmaanndd:: jj
vv ))
G To adjust equalize.
MSB LSB
0
Transmission [j][v][ ][Set ID][ ][Data][Cr]
0 0 0 0 0 0 0
Data
Acknowledgement [v][ ][Set ID][ ][OK/NG][Data][x]
Frequency
1’st Band
Remark
2’nd Band
3’rd Band
4’th Band
5’th Band
765
000
001
010
011
100
4Hex
0
0
0
0
0
0
2
4
6
8
Data
Step
321
000
000
001
...
... ... ...
...
111
0
0
1
0
1
0
1
2
F
MSB LSB
0
0 0 0 0 0 0 0
External Input Input Number
2233..
KKeeyy CCooddee
((CCoommmmaanndd:: mm cc))
To send IR remote key code.
Data: Key code - Refer to page 61.
Transmission [m][c][ ][Set ID][ ][Data][Cr]
Acknowledgement [c][ ][Set ID][ ][
OK/NG][Data][x]
Acknowledgement [b][ ][Set ID][ ][OK/NG][Data][x]
2244.. IInnppuutt sseelleecctt ((CCoommmmaanndd:: xx bb))
((MMaaiinn PPiiccttuurree IInnppuutt))
To select input source for set
Data: Structure
Transmission [x][b][ ][Set ID][ ][Data][Cr]
22 22.. CC hhaann nneell SS kk iipp((CCoo mmmmaanndd:: mm bb))
G To set skip status for the current Programme.
Data 00 : Skip 01 : Add
Transmission [m][b][ ][Set ID][ ][Data][Cr]
Acknowledgement [b][ ][Set ID][ ][OK/NG][Data][x]
2211 .. TTuunnee CCoommmmaanndd // CChhaannnneell TTuunniinngg ((CCoommmmaanndd:: mm aa))
Tune Channel to following Physical number.
Data00 Min: 00 ~ Max: 63 (Max : C8 in China area)
(*transmit by Hexadecimal code)
Data01 don’t care
Data02 0 ; Main
1 : Sub
Transmission [m][a][ ][Set ID][ ][Data0][ ][Data1]
[ ][Data2][Cr]
Acknowledgement [a][ ][Set ID][OK][ ][Data0][Data1][x]
[a][ ][Set ID][
NG][ ][Data0][x]
Input
TV
AV
Component
RGB-PC
DVI
HDMI1
HDMI2
[x][b][ ][Set ID][ ][10][Cr]
[x][b][ ][Set ID][ ][20][Cr]
[x][b][ ][Set ID][ ][40][Cr]
[x][b][ ][Set ID][ ][60][Cr]
[x][b][ ][Set ID][ ][80][Cr]
[x][b][ ][Set ID][ ][90][Cr]
[x][b][ ][Set ID][ ][91][Cr]
command
Frequency
Page 69

 Loading...