

Page 1
1
Page 2
LXU800 User’s Manual
Contents
Welcome-------------------------------------------------- 2
• Installation – Windows XP ------------------- 3
• UI Features Introduction -------------------- 10
• Data Connection & Disconnection ------- 11
• Voice call Connection & Disconnection- 14
• SMS Sending -------------------------------- 19
• SMS Receiving ------------------------------- 26
• Phonebook ------------------------------------- 34
• Settings ----------------------------------------- 40
8-1. Data Service Terminal -------- (41)
8-2. SOUND --------------------------- (42)
8-3. SMS ------------------------------- (44)
8-4. LOCK ------------------------------ (45)
8-5. TONE ------------------------------ (46)
8-6. VOICE ----------------------------- (47)
8-7. Others ----------------------------- (48)
9. Information ------------------------------------- 49
9-1. USE -------------------------------- (50)
9-2. Call History ----------------------- (51)
9-3. MODEM --------------------------- (52)
10. Reliance Web Page Connection---------- 53
11. About --------------------------------------------- 54
12. Un-Installation – Windows XP ------------- 56
2
Page 3

Welcome
Thank you for choosing LXU-800 USB Modem, cutting edge CDMA 1X technology with the data speed of up to
153.6 Kbps. You can surf the Internet at high speeds, access e-mails as well as make and receive calls and
SMS on the move.
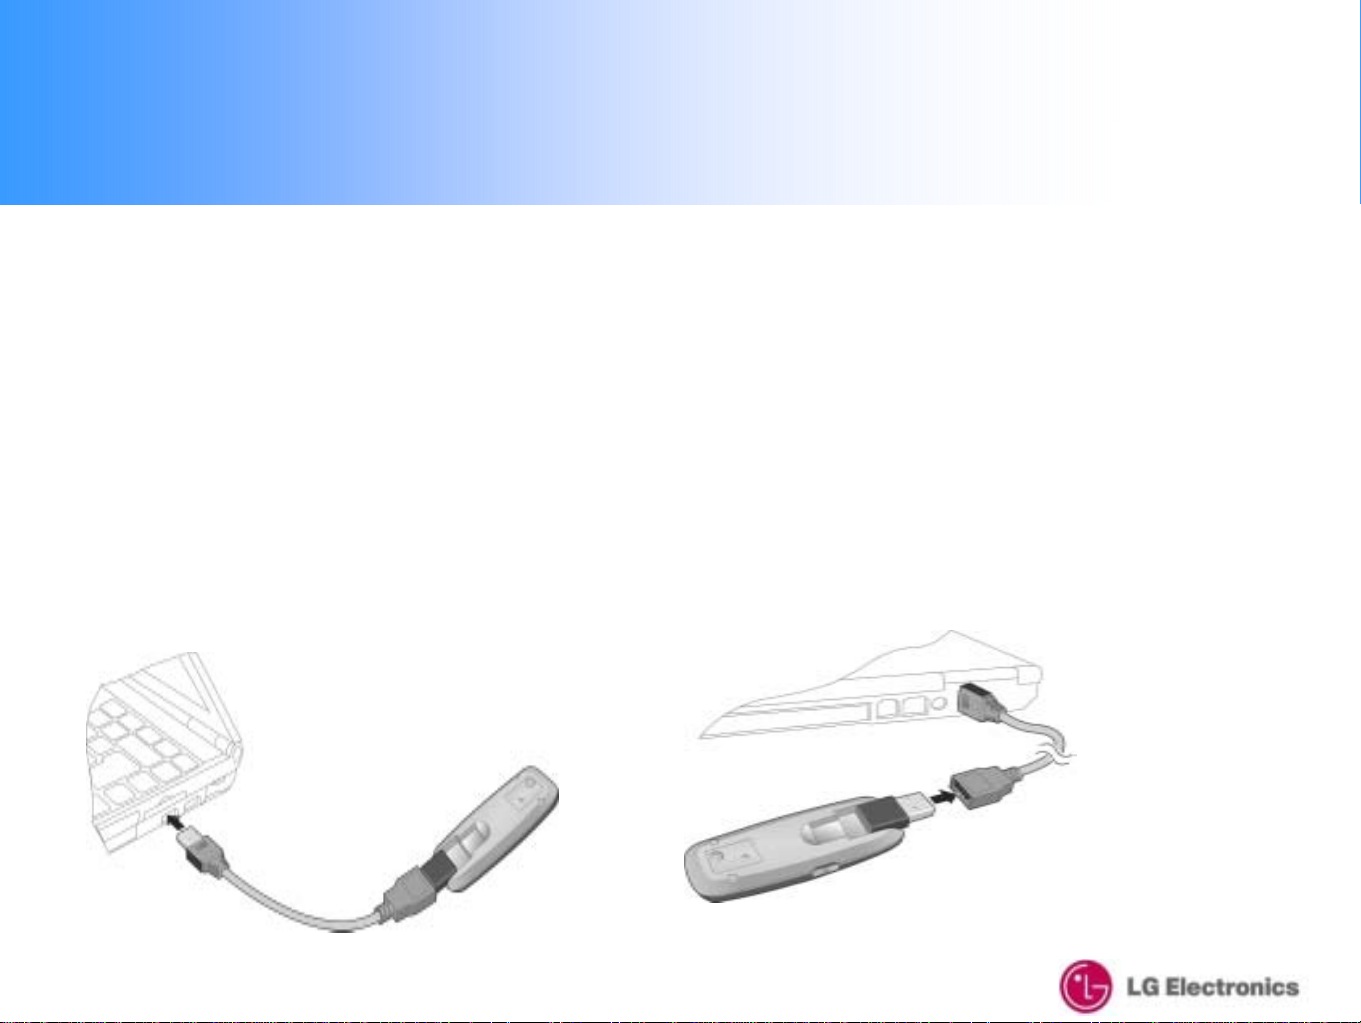
How to Plug LXU-800
Please plug LXU-800 into a PC after installing drivers.
1. Pull out the USB c o nn ector on the back of the modem.
2. Adjust the USB connector to the desired angle.
The USB connector is adjustable to a 45, 90, 135 or
180 degree.
3
Page 4
Welcome
How to Plug LXU-800
Please plug LXU-800 into a PC after installing drivers.
3. Extension Cable
The extension cable provided is specially designed to work with your LXU-800. This is a high
quality USB cable that is capable of delivering high current to the LXU-800 when necessary.
The cable will improve performance.
Note:
Your LXU-800 may not operate correctly if you use a standard USB cable in place of the
provided extension cable. Adjust the USB connector to the desired angle.
The USB c o nnector is adjustable to a 45, 90, 135 or 180 degree.
** USB Length : 50 Cm
4
Page 5
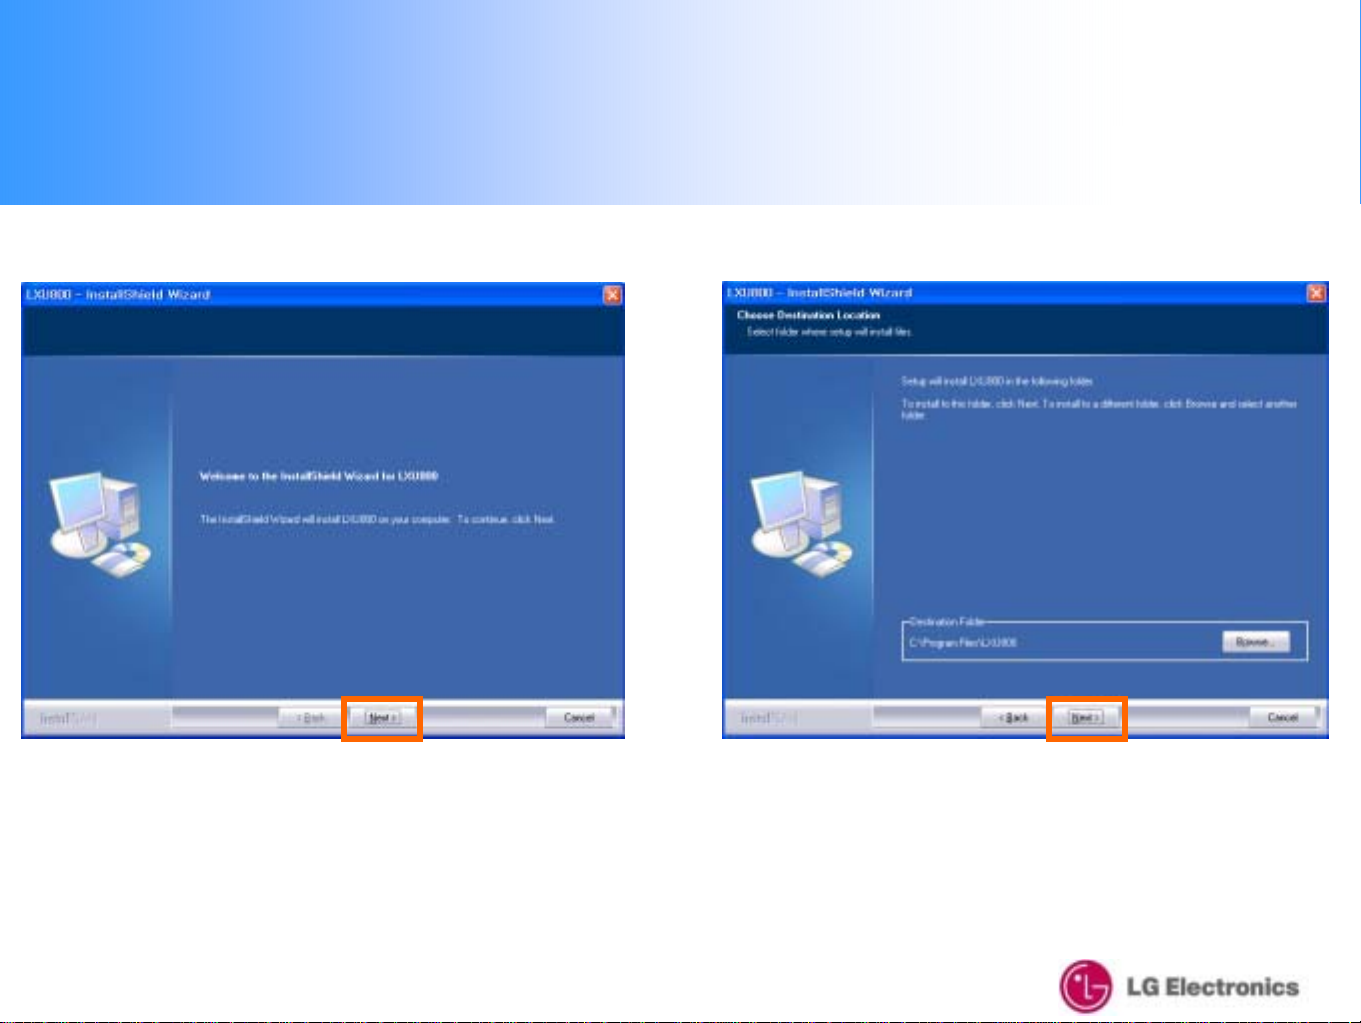
1. Installation – Windows XP
1. Click the "Next" button to install the LXU800
2. Select the installation path (it is recommended to
use the default location) and click the "Next" button
5
Page 6
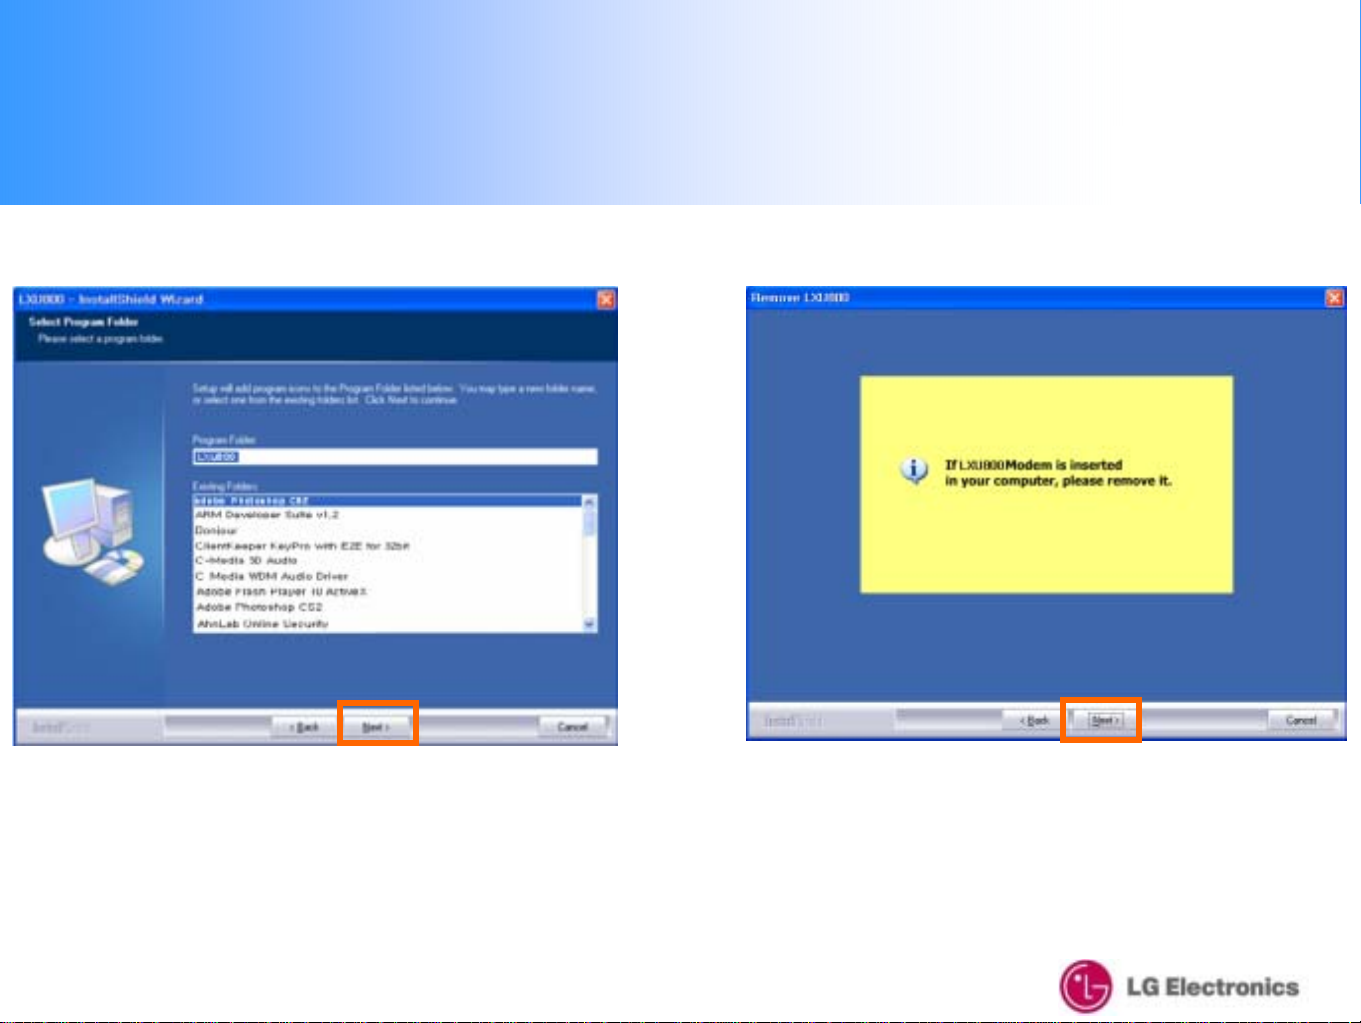
1. Installation – Windows XP
3. Select the Program Fo lder then click the "Next"
button to continue with the installation
4. Before Installation, please remove the modem then
click the "Next" button
6
Page 7
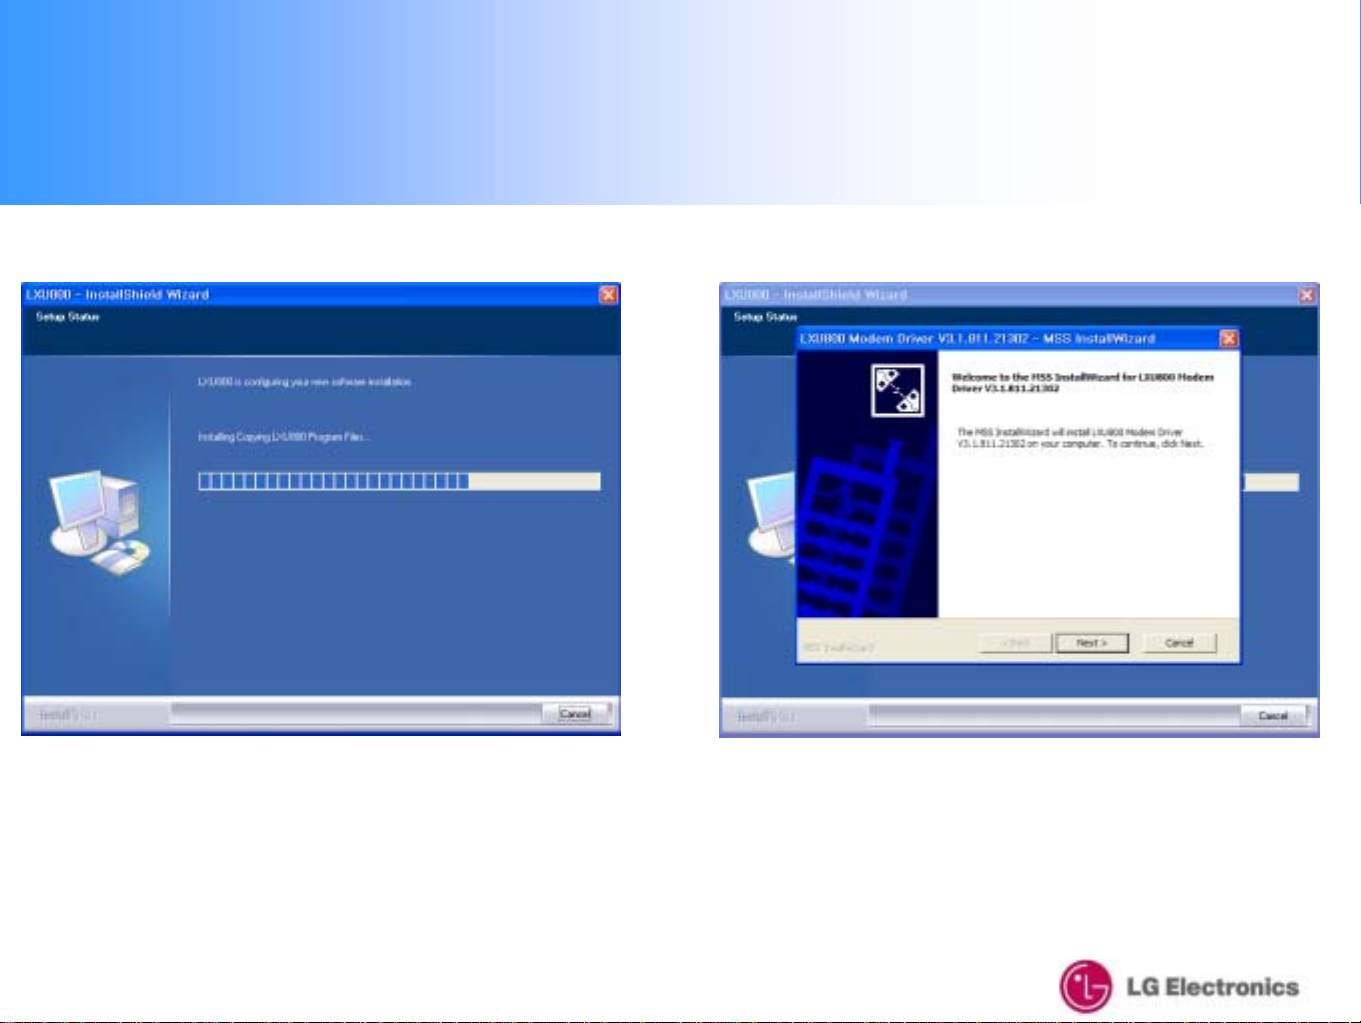
1. Installation – Windows XP
5. Please wait for the Installation to be completed
6. Push the Next button to install the USB driver.
7
Page 8
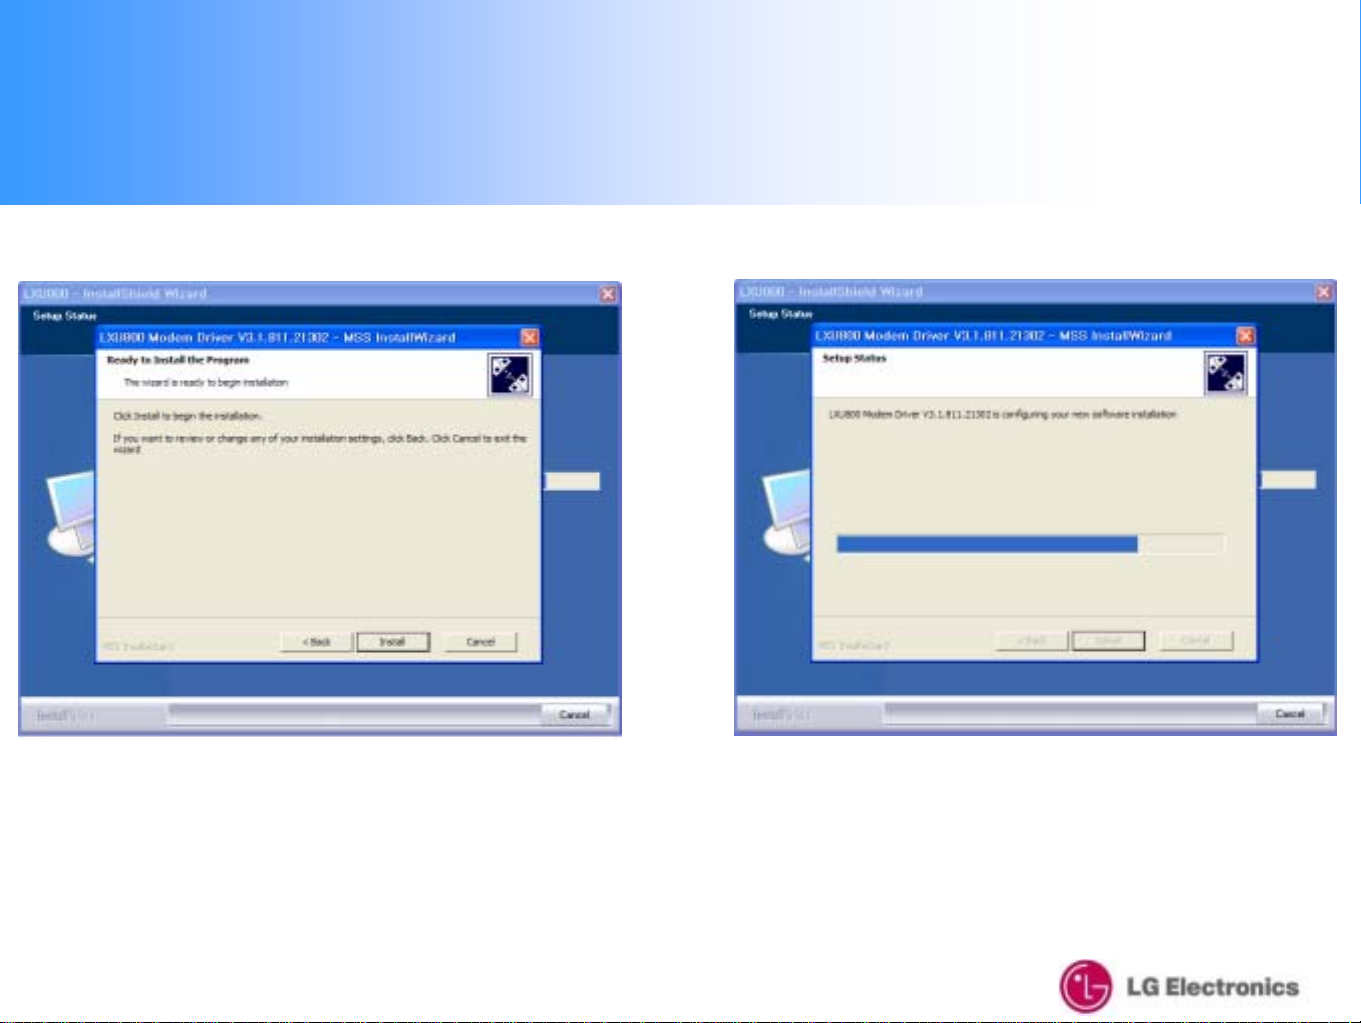
1. Installation – Windows XP
7. Push “Install” button to begin the installation. 8. Please wait for the USB driver Installation progress.
8
Page 9
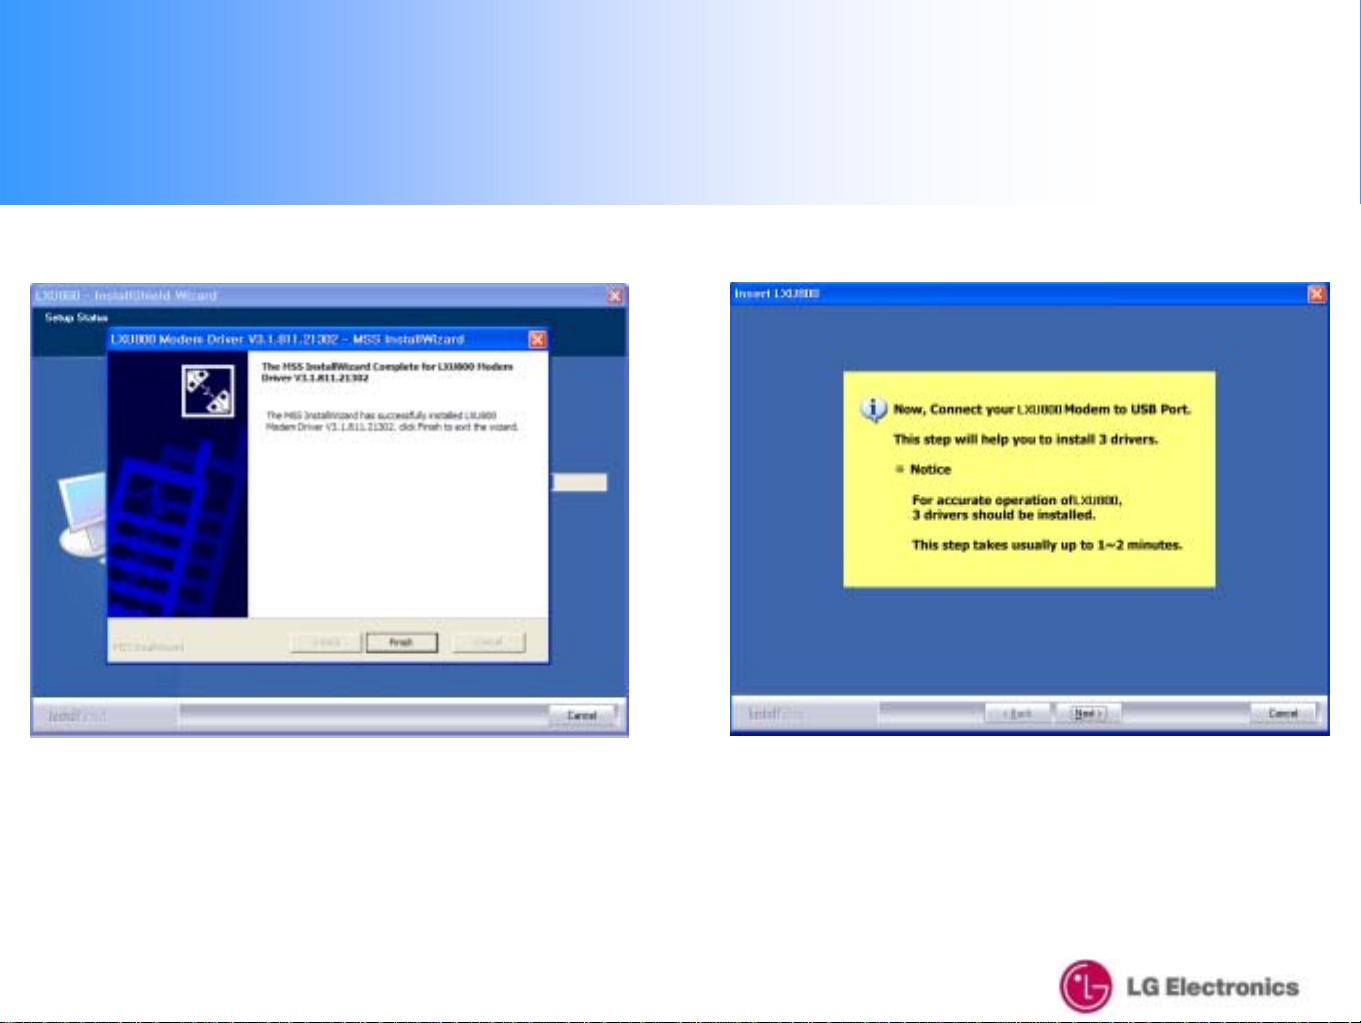
1. Installation – Windows XP
9. Push “Finish” button to finish the USB driver installation.
10. Connect your LXU800 Mod em to the USB port.
Please click the "Next" button once the installation of
all 3 drivers is complete.
9
Page 10
1. Installation – Windows XP
11. Push “Finish” button to complete the installation.
10
Page 11
1. Installation – Windows XP
12. Open Device Manager to check that the driver has
been installed correctly.
13. When you start the GUI, the above screen will be
displayed (the default banner is "Reliance")
11
Page 12
2. UI Features Instruction
Data
Voice
SMS
Receive SMS
Phonebook
Settings
12
Information
www.zapak.com
About
Page 13
3. Data Connection & Disconnection
1. To change the Da ta Connect (Internet) screen,
please click the "Data" icon
2. To connect the Data (Internet), please click
the "Connect" button
※ you must have a valid ID, password and numbers
please see 8-1. Data Service Term inal settings
(
13
)
Page 14
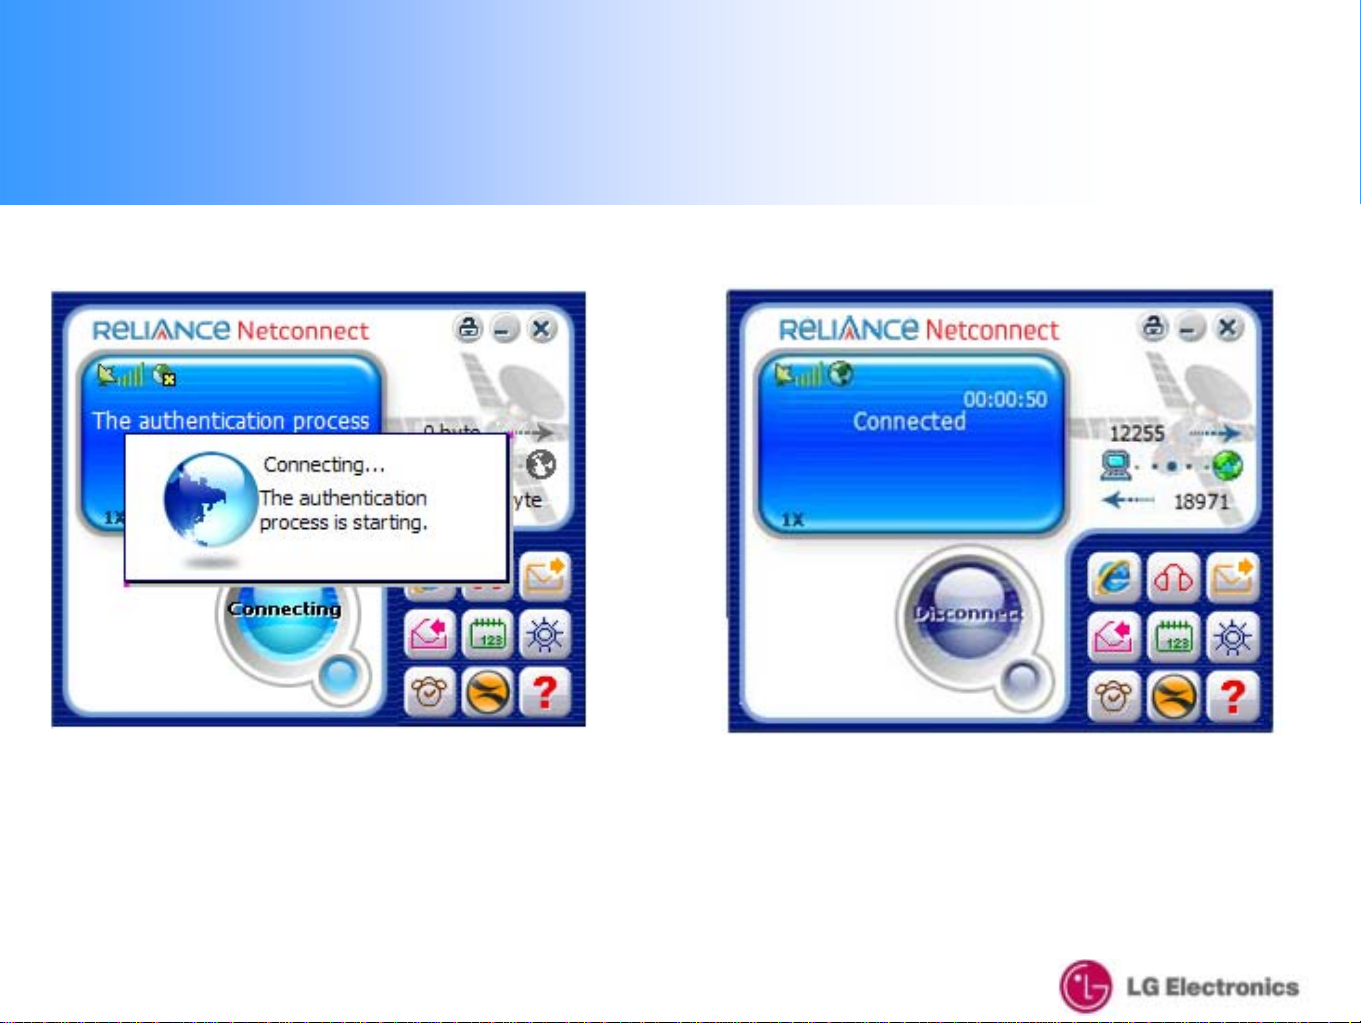
3. Data Connection & Disconnection
3. Data Connec tin g (Internet) process screen Once it is
connected, the Internet Browser will appear
4. If the Data Connection is properly connected,
the "Connected" message will be displayed as above
14
Page 15
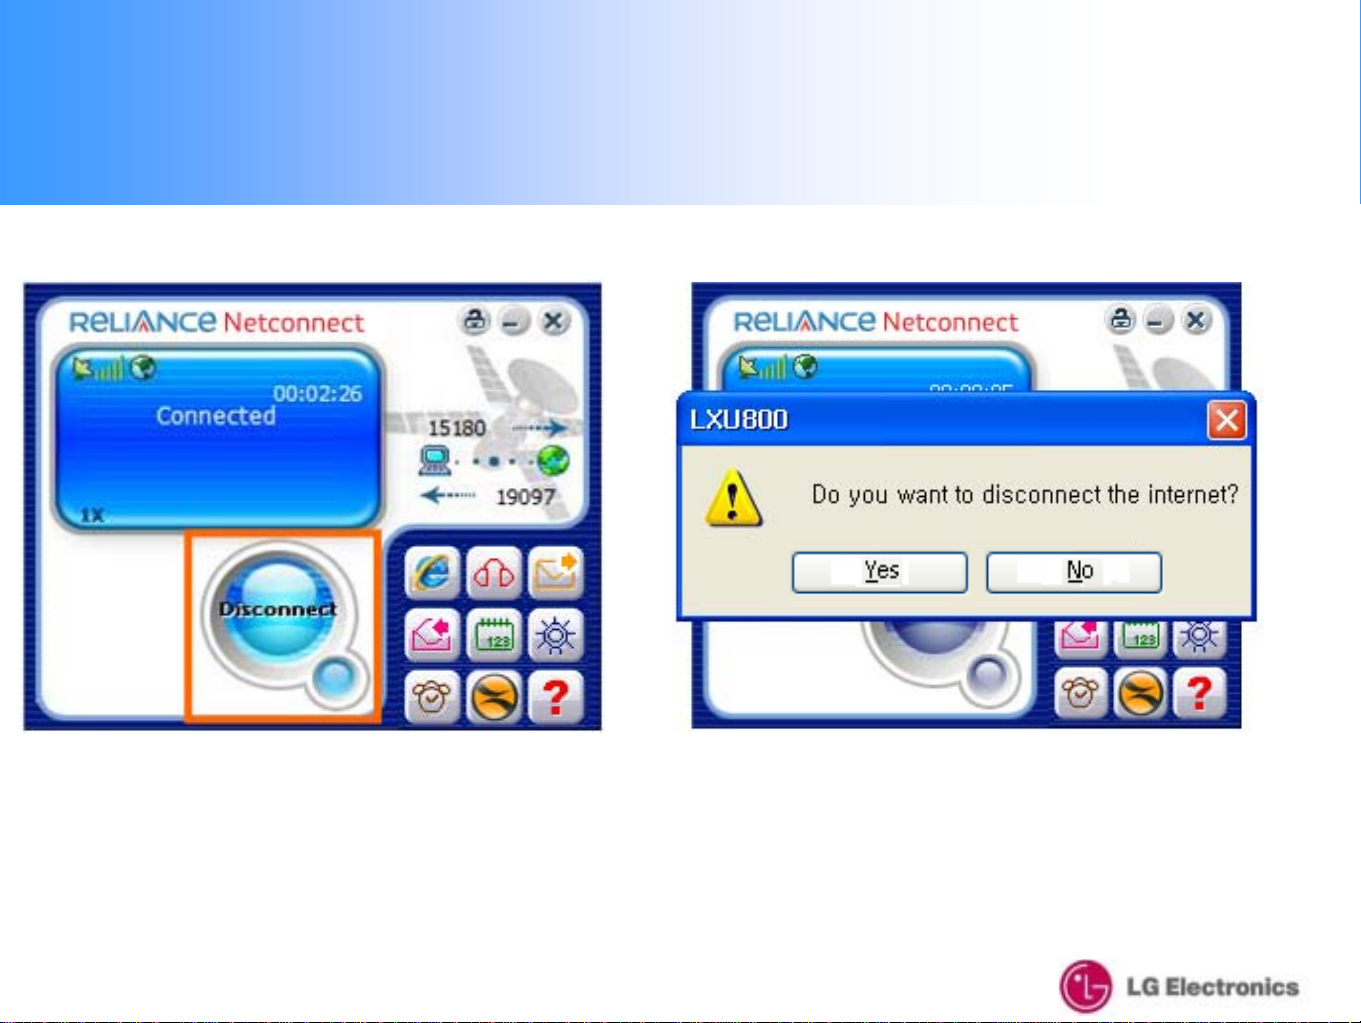
3. Data Connection & Disconnection
5. To disconnect the Data Co nnection (Internet),
click the "Disconnect" button.
6. Click "Yes" to disconnect and "No" to cancel the
disconnection
15
Page 16
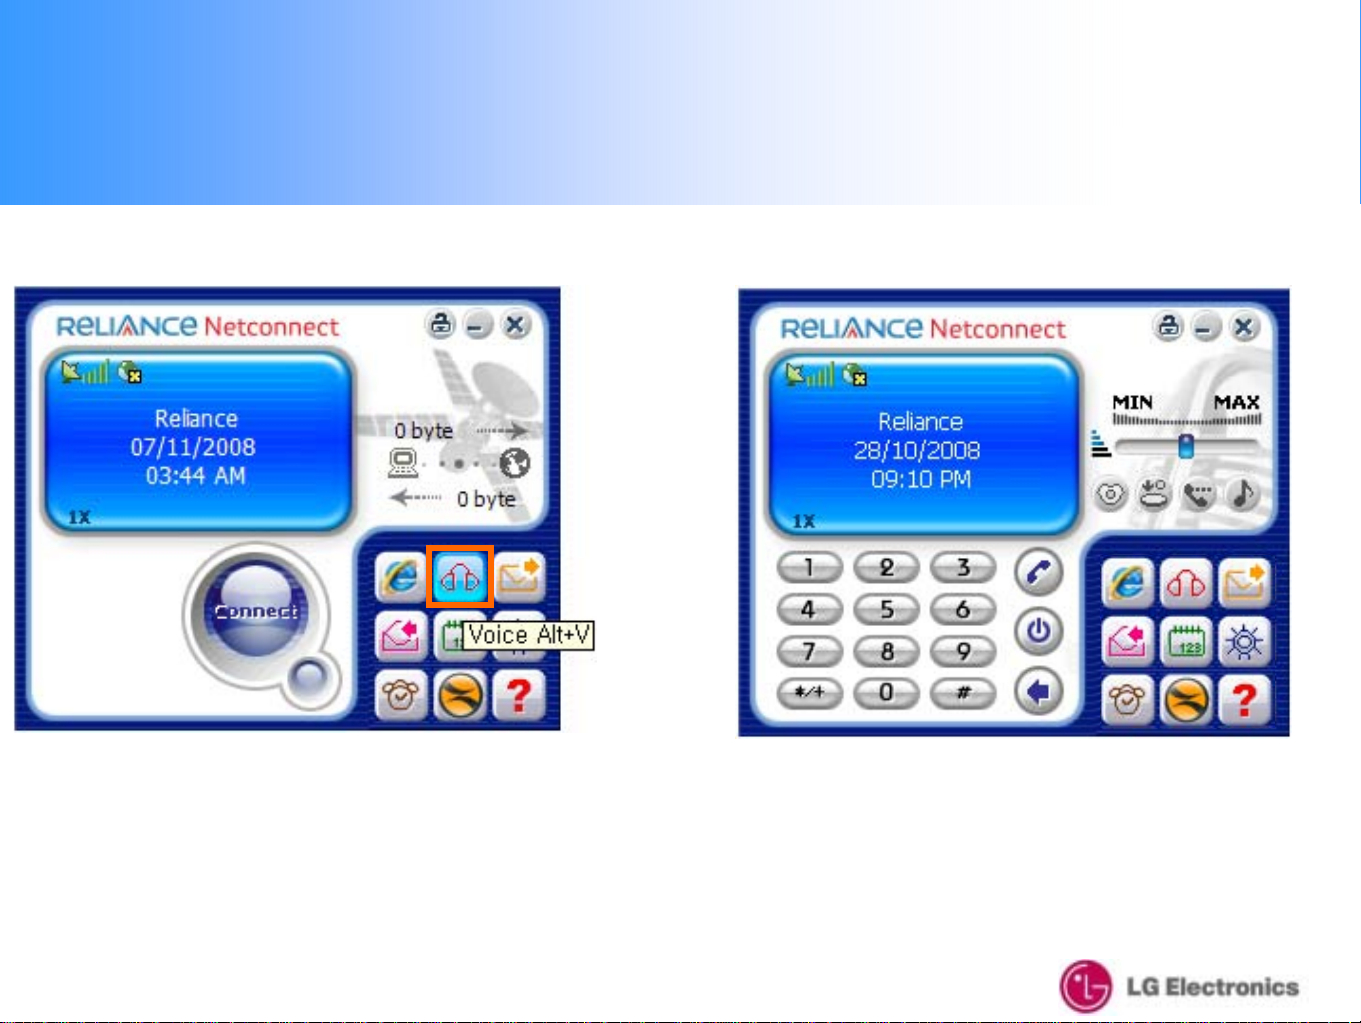
4. Voice call Connection & Disconnection
1. For a voice call, click the "Voice" icon
2. When yo u click the Vo ic e icon, the ab o v e screen will
be displayed with a dial-pad
16
Page 17
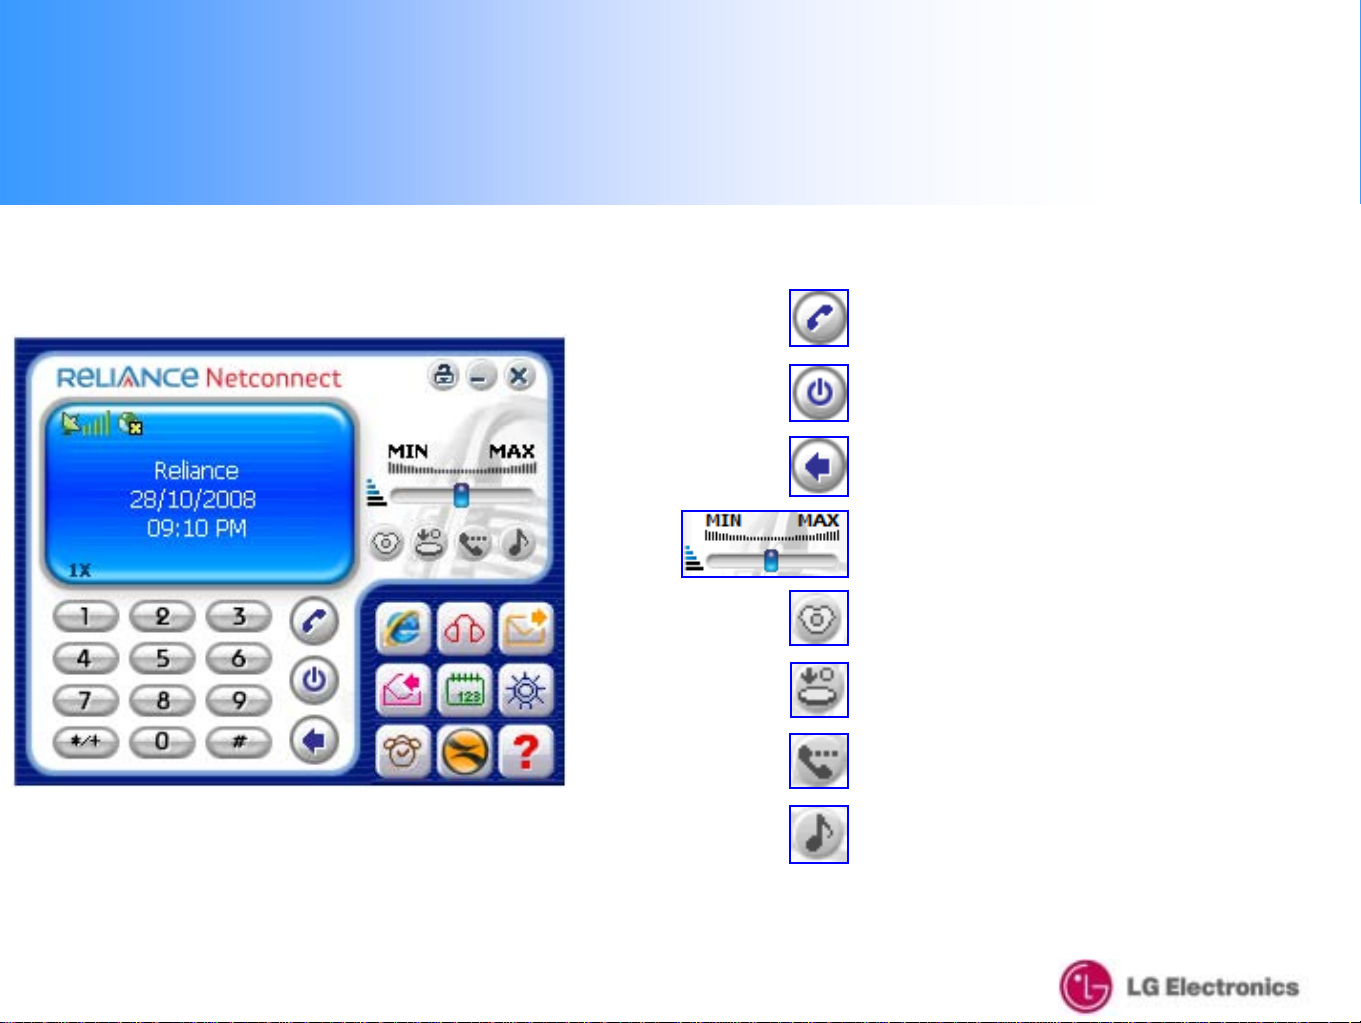
4. Voice call Connection & Disconnection
-Voice call Menu-
Call
End Call
Cancel
Volume (Voice)
Silent (when in Silent mode)
17
Tone silent (when voice calling)
Voice mute (when vo ice c allin g )
Volume (sound & key tone)
Page 18
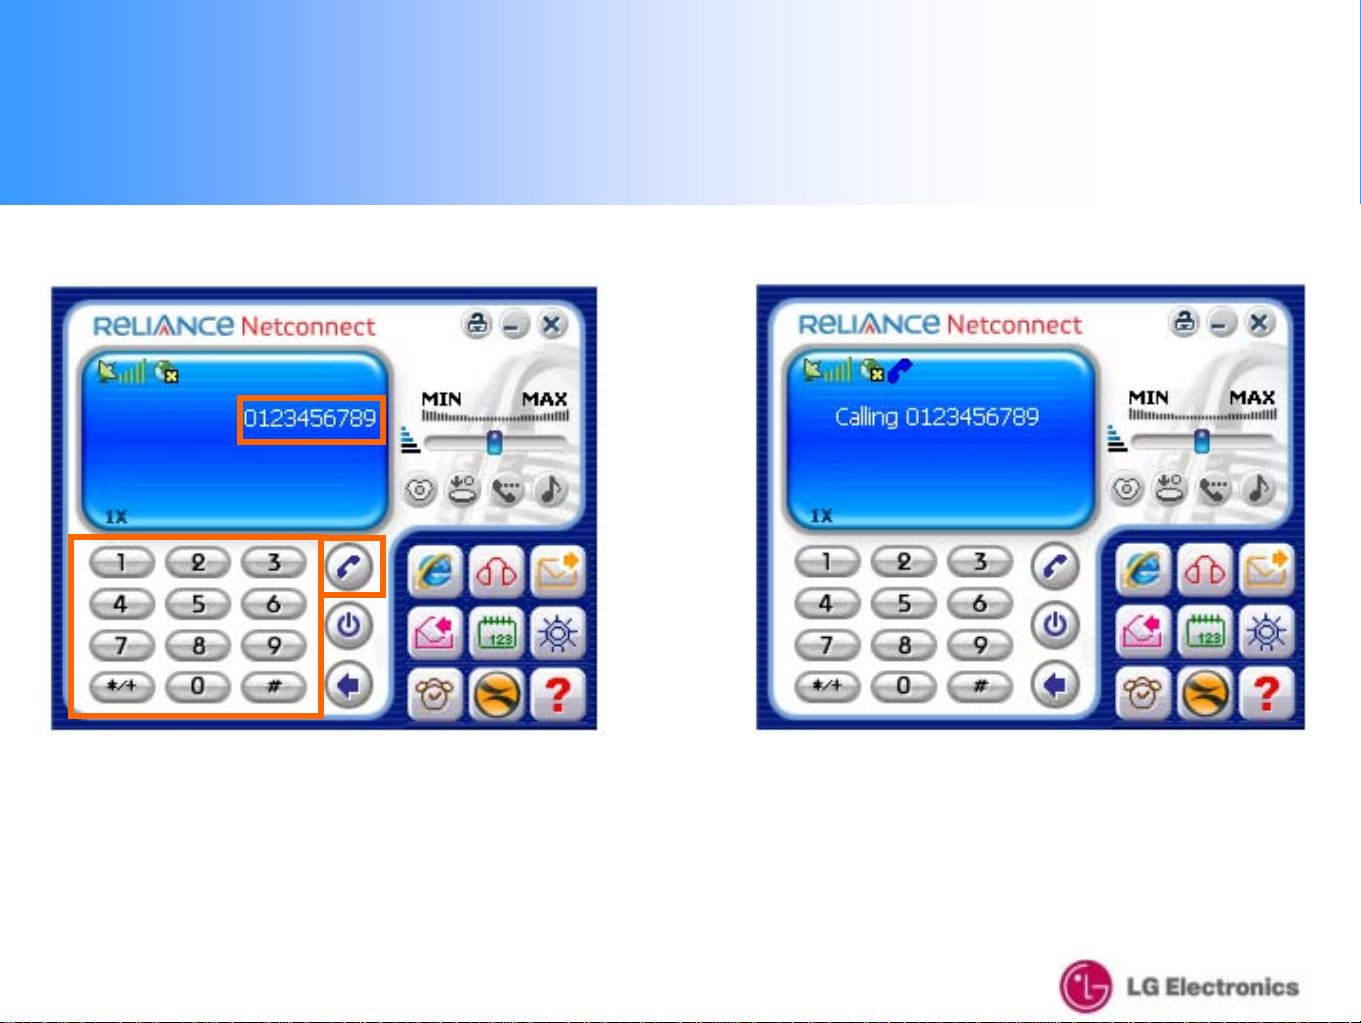
4. Voice call Connection & Disconnection
2
3
1
3. To make a voice call, STEP ① Dial the numbers,
STEP ② Check the numbers, STEP ③ Press call
4. Calling Screen
18
Page 19
4. Voice call Connection & Disconnection
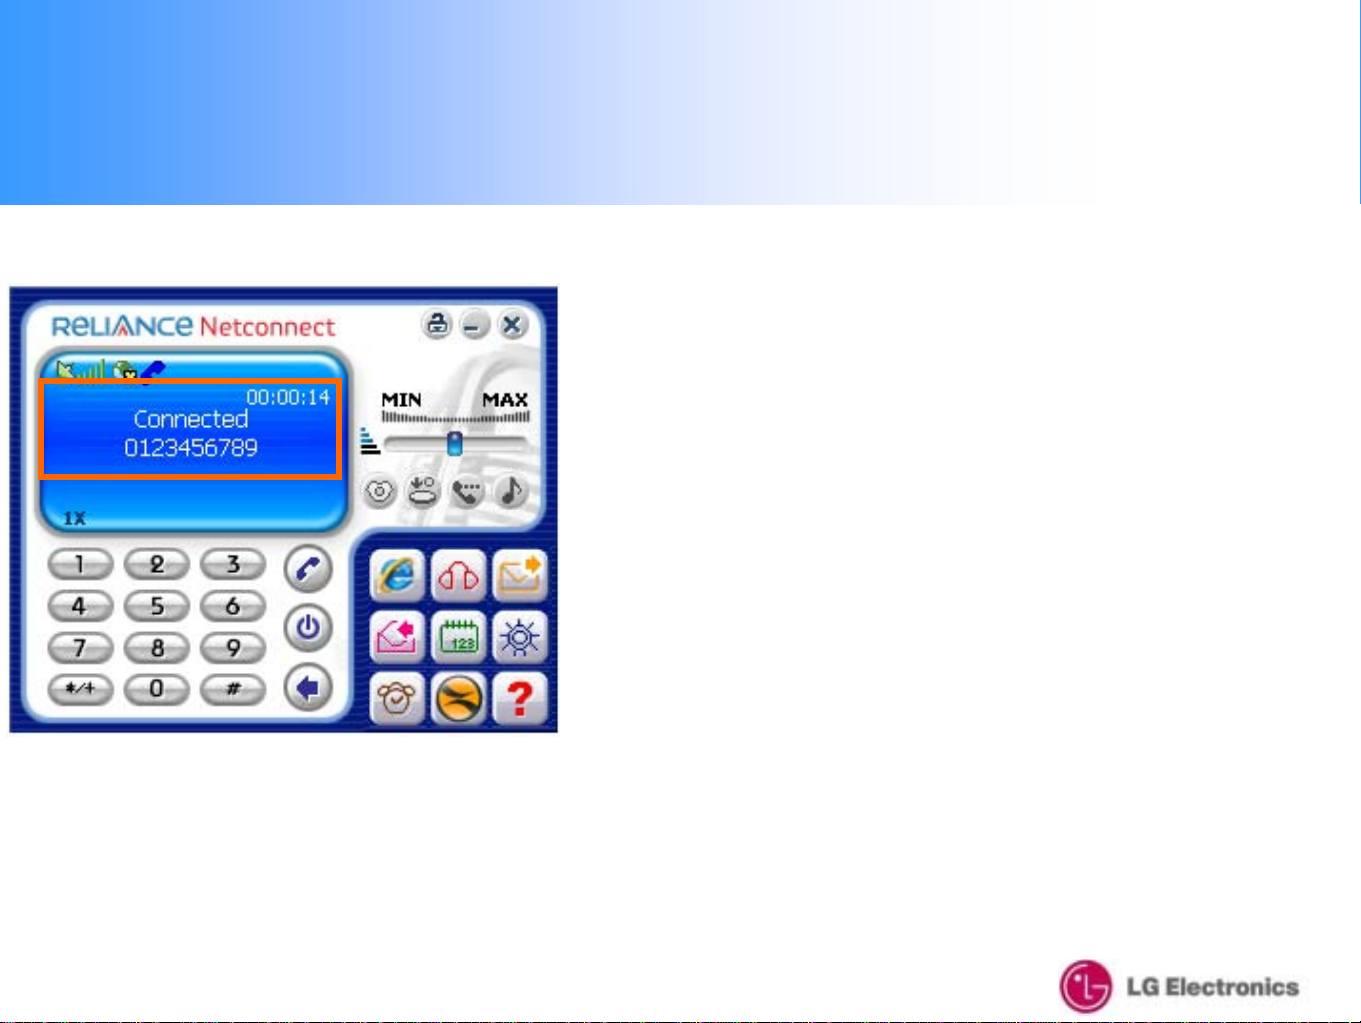
5. Once you are successfully connected to the
desired number, the screen will change as abo ve
19
Page 20

4. Voice call Connection & Disconnection
6. To disconnect the voice call, press the "End"
icon.
7. Once you are properly disconnected, the screen will
change as above
20
Page 21

5. SMS Sending
1. To send SMS, click the "SMS" icon
2. SMS scr een
21
Page 22

5. SMS Sending
-SMS Sending Menu-
Add
Save
Clear all
22
Cancel
Send
Page 23

5. SMS Sending
②
③
④
3. To send SMS, STEP ① Type the message, STEP ②
Choose the message type
4. STEP ③ Type the recipient number, STEP ④
Press the "Send" icon
23
Page 24

5. SMS Sending
5. SMS sending process screen…
6. After sending the SMS, a result window will appear
showing whether it has sent or has failed to sen d
24
Page 25

5. SMS Sending
7. Click the "Add" Icon if you wish to send the sa me
SMS to several phone numbers
If you use this function, a new sc reen will appear as
shown on the right
25
Page 26

5. SMS Sending
Use of these two Icons
8. Type the desired number and click the "Add" icon to
add more numbers
Icon Glossary
9. Once you have entered all the numbers, press
the "Confirm" icon to send the message
26
Page 27

5. SMS Sending
Use Indian Name
10. If you want to search for a number on the device,
click the "Search Phonebook" button
Mention Icon Details u
se for which menu
11. Select the appropriate category and browse for the
phone number
27
Page 28
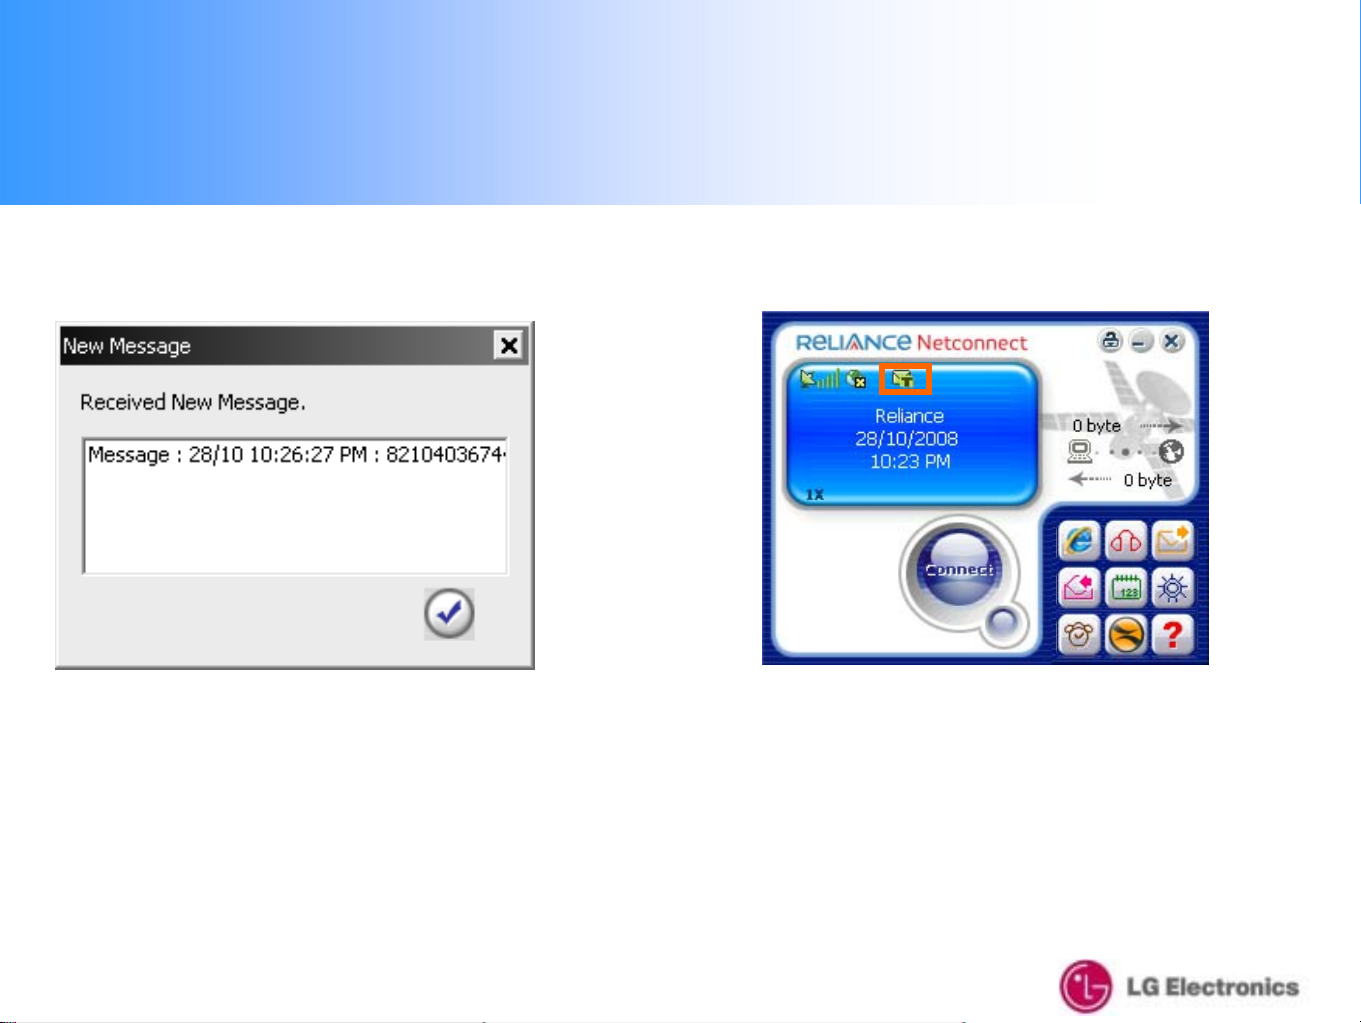
6. SMS Receiving
1. When a new SMS is received, the New Message
window will appear.
The received SMS will be saved in the Received
SMS inbox
2. If there are any unread messages, the "Message"
icon will be displayed as above until the message has
been read
28
Page 29

6. SMS Receiving
3. To read the new SMS, click the "SMS Receive"
icon The read message is automatically saved
4. When you read the message, the time and
sender information is d isp l ayed as above
29
Page 30

6. SMS Receiving
5. From the drop-down menu, you can select option
for "Received SMS" , "Sent SMS", "Unsent SMS"
and "Drafts" .
30
Page 31

6. SMS Receiving
6. If you wish to save the "Received/Sent number" to
your Phonebook, press the "Save" icon then the
screen shown on the right will appear
7. Fill in the in f o rmation as needed
Then press the "Confirm" icon to save
31
Page 32

6. SMS Receiving
8. You can also d irectly forward the n umber
(Choosing "From" or "To") to a voice call using the "Call"
icon
9. Calling process screen…
32
Page 33

6. SMS Receiving
10. When you press the "Forward" icon, the received
message can be sent to another number
11. Type desired number to forward the
message
33
Page 34

6. SMS Receiving
12. If you want to reply to the sender number,
choose "From" or "CB" from the above field then click
the "Reply" icon
13. Type your me ss a g e o n the screen as
indicated in "SMS sending"
34
Page 35

6. SMS Receiving
14. If you want to delete a single SMS, select the SMS
to be deleted and click the "Delete" button
15. You can select not only "Received SMS" but also "Sent
SMS" and "Temp SMS" from the drop-down menu, then
simply delete all selected messages by clicking the "Delete
All" icon
35
Page 36
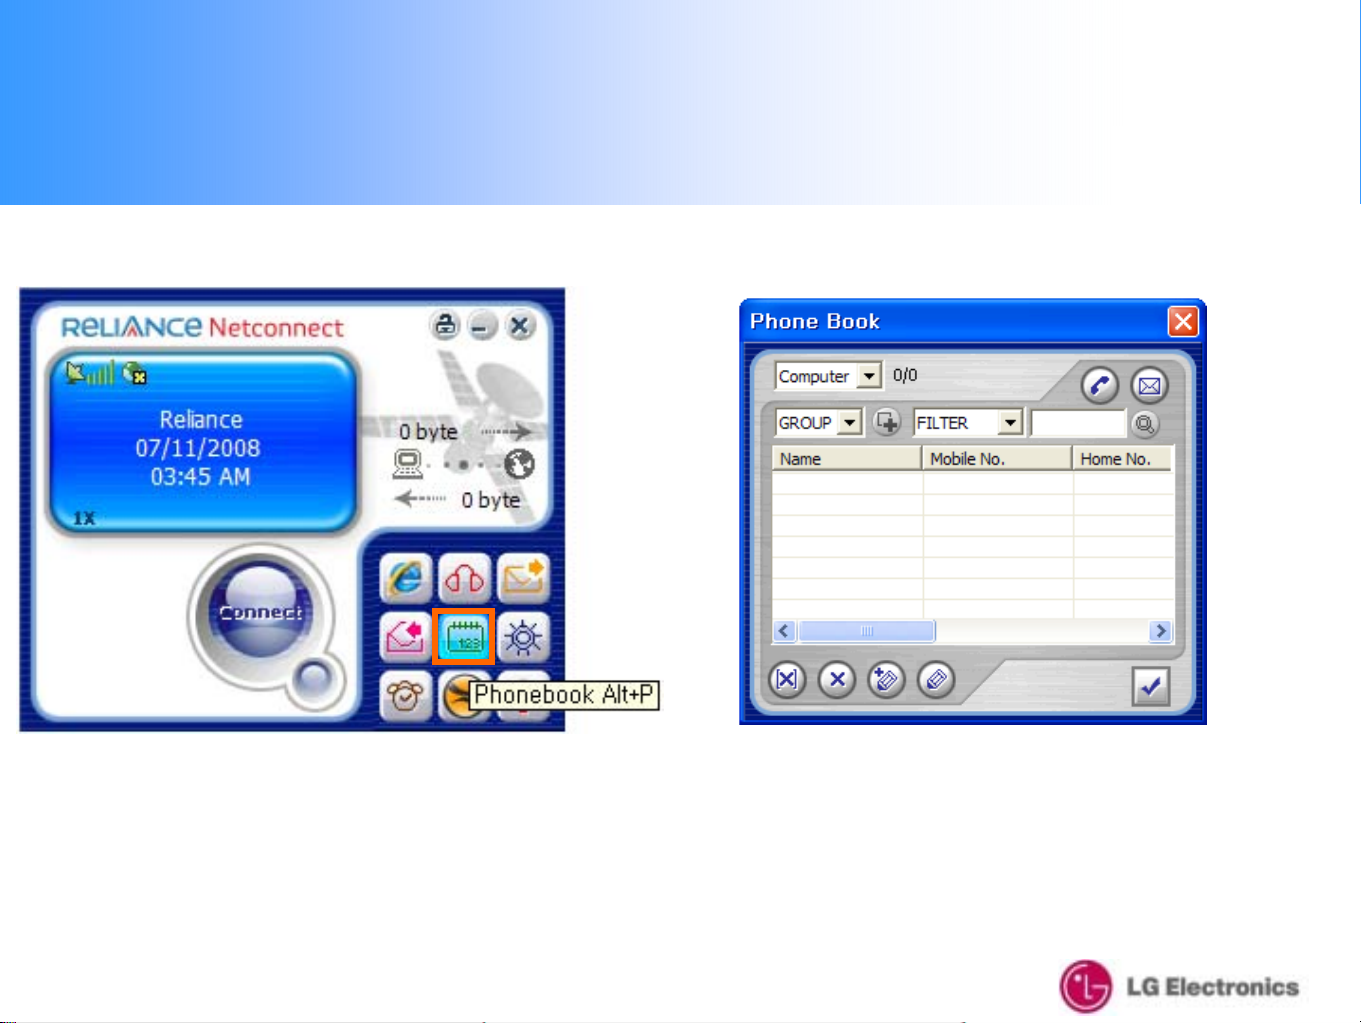
7. Phonebook
1. If you want to ad d/remove nu m b ers from you r
phonebook, click the "Phonebook" icon
2. When you click the "Phonebook" icon, the
Phonebook window will appear as above
36
Page 37

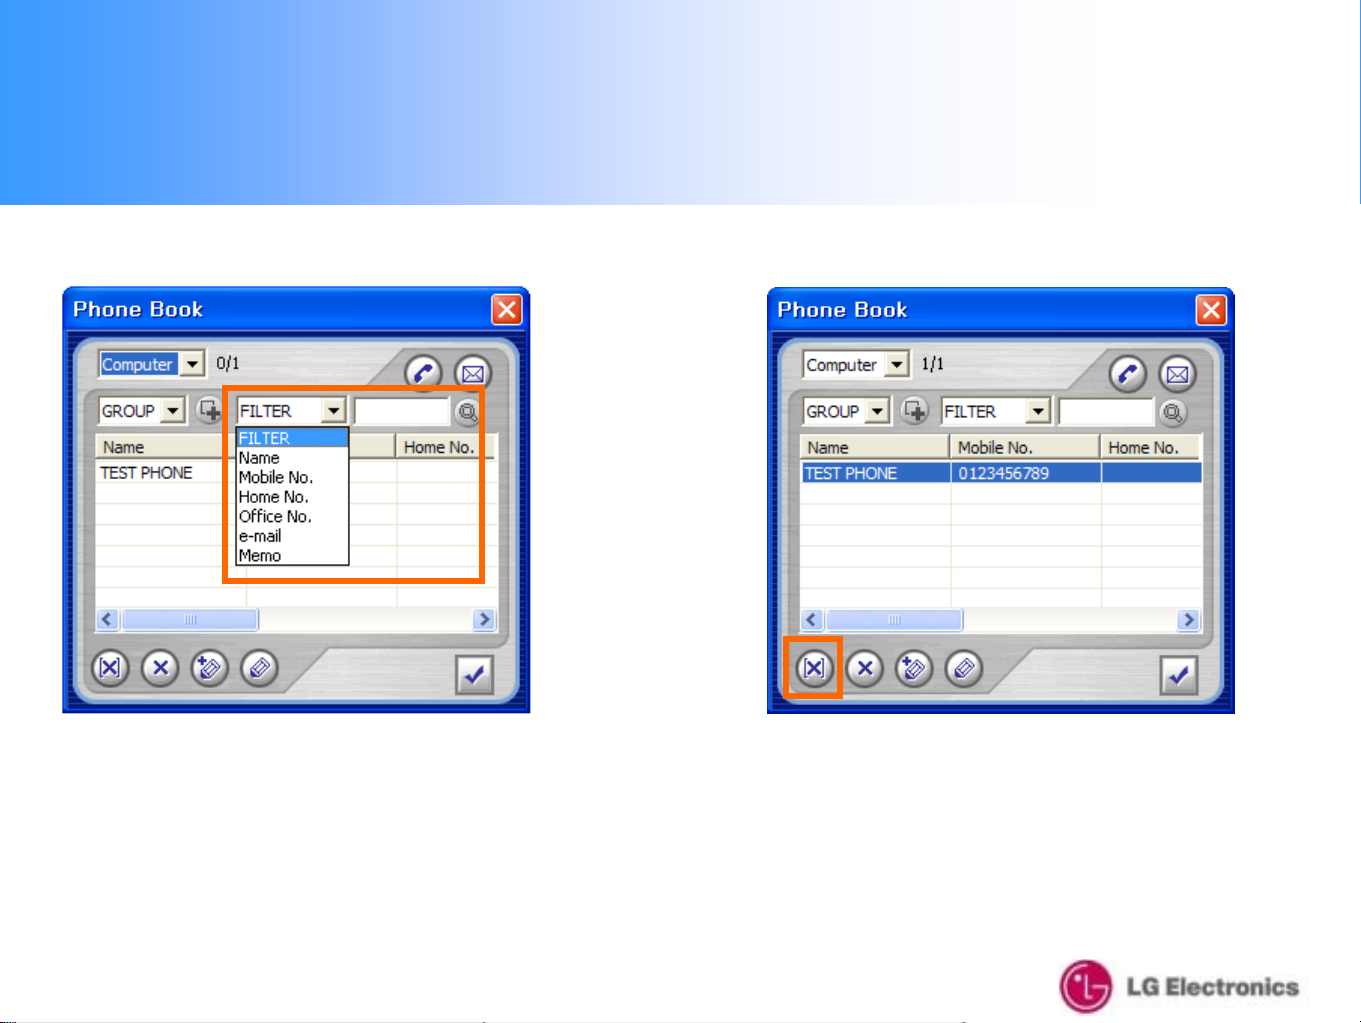
7. Phonebook
3. Select the loc a tio n in which th e list is saved.
4.After creating the new G R O UP as you Select the GROUP or
push the button , select the GROUP.
37
Page 38
7. Phonebook
5. When you want to search the phonebook data, you
select Filter, typ e the search word in the inp u t window
and then push the searc h b utton to get the data y ou
want to search.
6. If you want to delete all the numbers in a specific
group at once, select the desired "Group" then click
the "Delete All" icon
38
Page 39

7. Phonebook
7. If you want to d e lete an individual phone number,
select the number and click the "Delete" button
8. If you want to save a new number, click the "Add"
Icon icon then enter the new number
Once you have entered the nu m b e r, click "Confirm" to
save
39
Page 40

7. Phonebook
9. If you want to modify the stored number and details,
click the "Modify" button
10. When you want to ma ke a call fr o m the Phonebook,
select the number then click the "Call" icon
40
Page 41

7. Phonebook
11. When you want to send an SMS from the Phonebook,
select the number then click the "SMS" icon as shown
above
41
Page 42

8. Settings
1. If you want to check or modify the settings, click
the "Settings" icon as shown above
2. When you enter "Settings", a new window will
appear as above
42
Page 43

8. Settings
8-1. Data Service Termina l
①
②
③
The set up steps are as above
This menu is the part to co nf ig u r e the parameter
related with data connectio n an d internet browser.
To connect to the serve r, yo u need to input a valid
ID & Password only
Both the valid ID an d p assword can be found on
the Reliance Mobile "Prepaid Get Started Card" on
the website
Your Mobile No./MDN is your User ID and
Password .
Note : DO not add Zero as prefix while entering
your user ID / Password.
The number should be #777.
43
Page 44

8. Settings
8-2. SOUND
④
②
③
⑥
Open
1. From the "Settings" menu, you can set the
ringtone [Voice menu] & SMS received alarm
[SMS menu] on the "Sound" tab
The set up steps are as above
Open
⑤
This menu is the p a rt to configure the sound
*.wav file which is used to alarm when
terminating the call.
Open
44
Page 45

8. Settings
8-2. SOUND
④
⑤
②
③
⑥
2. The SMS receiving ala r m is set up as above
This menu is the p a rt to configure the sound
*.wav file which is used to alarm when receiving
SMS.
45
Page 46

8. Settings
8-3. SMS
①
③
This menu is the part to configure the parameter
which is relate d with SMS display and Delive r y
Ack.
When receiving SMS, this can be set up to
check it from the pop-up window or history
list (Change)
When sending an SMS, if "Delivery Ack" is set
to "On", you will get confirmation that the SMS
has been received by the receiver
If you want to delete saved SMS automatically
after a certain period, you can specify the
desired period
The set up steps are as above
46
Page 47

8. Settings
8-4. LOCK
①
②
③
This menu is the p art to config u re the LOCK
Password.
1. You can set a Call-Limit "Lock"
The password is set using a 4-digit number
The set up steps are as above
47
Page 48

8. Settings
8-5. TONE
①
②
This menu is the part to config ure the TONE
which is related with DTMF, Connect Sound,
Disconnect Sound and Earjack Sound.
You can set the length of the button sound to
Long/Short
③
The set up steps are as above
You can set the connection sound to On/Off
when sending or receiving calls
You can set the disconnection sound to
On/Off when disconnecting from a call
You can set the ringtone to On/Off when you
receive calls by earphone
48
Page 49

8. Settings
8-6. VOICE
①
This menu is th e p a rt to configur e the VOICE
environment w h ich includes Auto Answer, Ca ll
Waiting, Call Forwardin g , Call Waiting F orwarding,
Voice Privacy and interna tio n a l prefix code.
This is the part to configure Auto Answer On
(5 seconds) / Off
This is the part to configure Call Waiting
Activate / Deactivate
This is the part to configure Call Forwarding
setup (if you use this function, calls are
forwarded to a set number)
The set up steps are as above
This is the part to configure Call Waiting &
Forwarding feature code(All this feature code
is used for Reliance feature code)
This is the part to configure Voice call lock
and unlock
This is the part to configure the international
prefix code.
49
Page 50

8. Settings
8-7. Others
①
②
③
This menu is th e p art to config u r e
Banner(Default(Reliance), Custom)
Banner Setup Default (Reliance) / Custom If
you select the "Custom" option, you can
enter your own characters up to 16 digits
The set up steps are as above
50
Page 51

9. Information
1. When you click the "Information" icon, you can see
the data usage status, voice call history and modem
information
2. When you click the "Information" icon, a new
window will appear as shown
51
Page 52

9. Information
9-1. USE
1. Information → "Use" tab, you can check your data
status information as above
2. Refresh Button : re fresh the used time and cap ac ity
Initialize Button : initialize the used time and capacity
52
Page 53
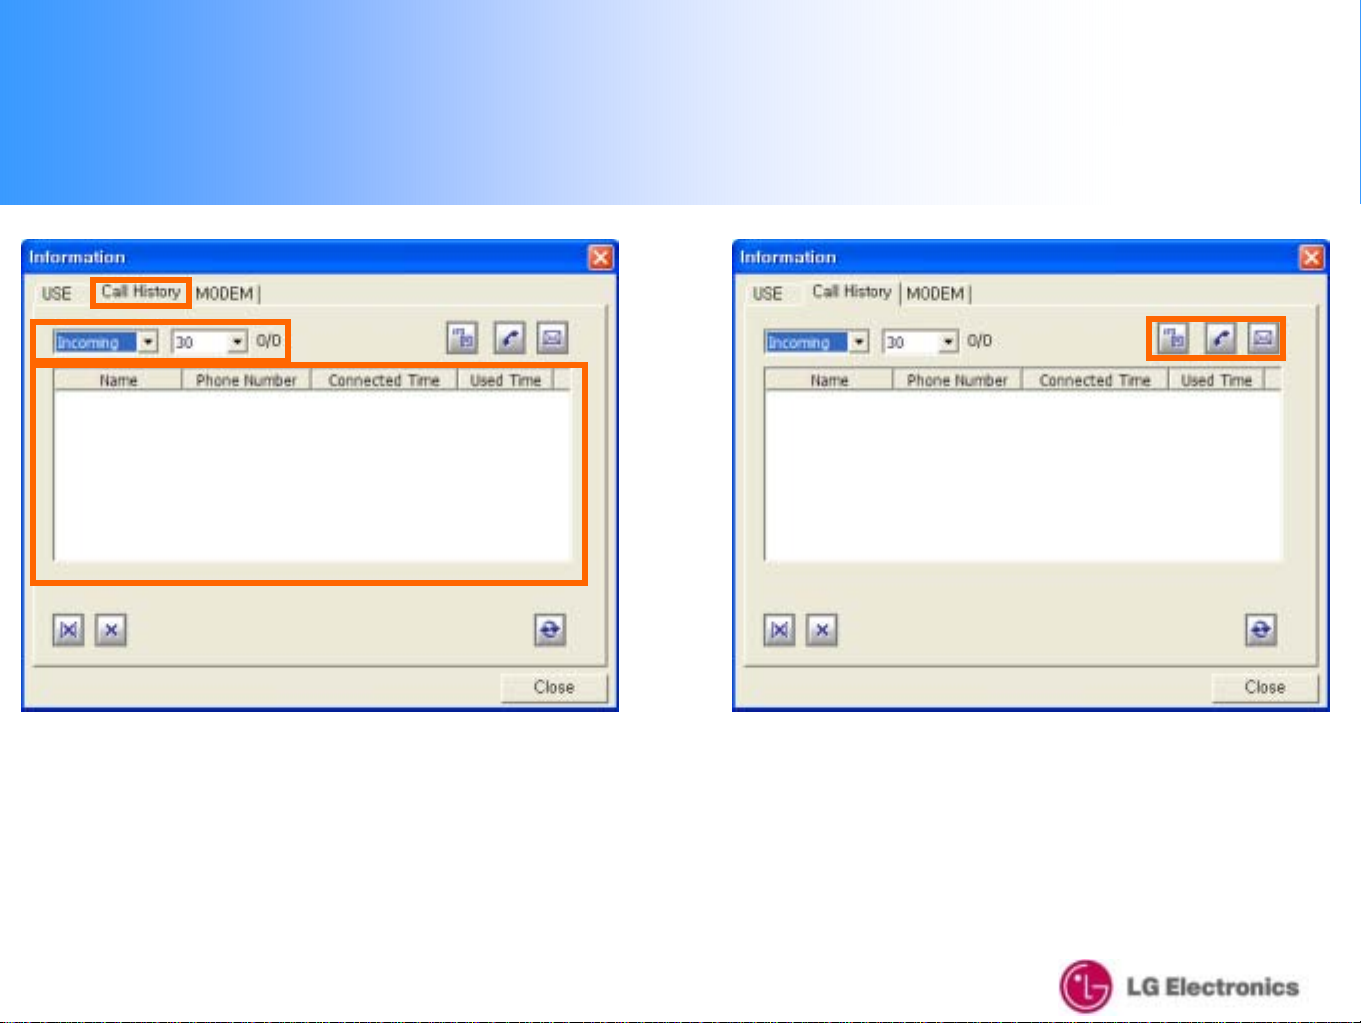
9. Information
9-2. Call H i st or y
1. Information → "Detail" tab, you can check your
Incoming, Outgoing and Missed calls and Data usage
information
You can connect to Vo ice Calls and SMS Sendin g
simply by using the phone number saved in Call History
2. Save Button : save the p hone nu mber o f Call
History into phonebook.
Call Button : use the phone number in Call History to
call.
SMS Button : use the phone number in Call History
to transmit SMS.
53
Page 54

9. Information
9. Information
9-3. MODEM
9-3. MODEM
1. Information → "Modem" tab, you can see the modem
status.
When you click the "Modem Status" button, you can
check the "Hardware Version", "Firmware Version"
and "PRL Version"
54
Page 55

10. Reliance Web Page Connection
1. When your LXU800 is connected to Data, and you would like to connect to
the "Zapak" website, click the "Zapak" icon on the GUI screen You will be taken to
the "Zapak" website (www.zapak.com) in just one click
55
Page 56

11. About
1. If you click on the "About" icon, you can check the
modem information and GUI version as shown on the
right
56
Page 57

11. About
2. If you click the "Inform a tion" button, you can register
your information to the m odem as shown on the right.
3. Once you have entered the information, click the
3. Once you have entered the information, click
the "Confirm" icon.
57
Page 58

12. Un-Installation – Windows XP
1. If you want to uninstall the LXU800 CM program, click “Start -> programs
-> LXU800 -> Uninstall LXU800”.
Note: The LXU8 00 does not need to be connected to the USB port
58
Page 59

12. Un-Installation – Windows XP
2. "My Computer" → Select "Remove" from
the "Modify", "Repair" or "Remove" o ptio n s
When the pop-up appears, click "Yes" as shown on the
right
Note: The LXU8 00 does not need to be connected to the USB port
59
Page 60

12. Un-Installation – Windows XP
3. Push “Next” button to delete driver file.
4. Please wait for the Uninstallation progress.
60
Page 61

12. Un-Installation – Windows XP
5. Once uninstallation is complete, select "Yes, I want
to restart my computer now" then click "Finish"
Note: The LXU8 00 does not need to be connected to the USB port
61
Page 62

Part 15.21 statement "
Change or Modifications that are not expressly approved by the manufacturer could void the user's authority
to operate the equipment. "
Part 15.105 statement
This equipment has been tested and found to comply with the limits for a class B digital device, pursuant to
Part 15 of the FCC Rules. These limits are designed to provide reasonable protection against harmful
interference in a residential installation. This equipment generates uses and can radiate radio frequency
energy and, if not installed and used in accordance with the instructions, may cause harmful interference to
radio communications. However, there is no guarantee that interference will not occur in a particular
installation. if this equipment does cause harmful interference or television reception, which can be
determined by turning the equipment off and on, the user is encouraged to try to correct the interference by
one or more of the following measures:
- Reorient or relocate the receiving antenna.
- Increase the separation between the equipment and receiver.
- Connect the equipment into an outlet on a circuit different from that to which the receiver is connected
- Consult the dealer or an experienced radio/TV technician for help.
FCC Part 15 Class B Compliance
This device and its accessories comply with part 15 of FCC rules. Operation is subject to the following two
conditions: (1) This device and its accessories may not cause harmful interference, and (2) this device and
its accessories must accept any interference received, including interference that may cause undesired
operation.
62
Page 63

FCC RF Exposure Information
WARNING! Read this information before operating the device. In August 1996, the Federal Communications
(FCC) of he United States, with its action in Report and Order FCC 96-326, adopted an updated safety
standard for human exposure to radiofrequency (RF) electromagnetic energy emitted by FCC regulated
transmitters. Those guidelines are consistent with the safety standard previously set by both U.S. and
international standards bodies.
The design of this device complies with the FCC guidelines and these international standards.
CAUTION
Use only the supplied and approved antenna. Use of unauthorized antennas or modifications could impair
cal quality, damage the device, void your warranty and/or result in violation of FCC regulations. Do not use
the device with a damaged antenna. If a damaged antenna comes into contact with skin, a minor burn may
result. Contact your local dealer for a replacement antenna.
Near-Body Operation
This device was tested for typical near-body operations with the back of the device kept 0.5 cm
from the body. To maintain compliance with FCC RF exposure requirements, it must have
a minimum distance including the antenna of 0.5 cm from the body during normal operation.
63
 Loading...