

Page 1

LG
Window-Type Air Conditioner
OWNER'S MANUAL
LG
website http://www.LG.ca
ENGLISH FRANÇAIS
IMPORTANT
Please read through this manual. It contains valuable
information about your air conditioner .This manual may
help save time and money by explaining proper air
conditioner maintenance and preventing improper use.
PRECAUTIONS
Pay close attention to precautions in order to prevent
potential hazards and damage from misuse or improper
installation. LG is not responsible for any damages
caused by misuse of the air conditioner.
MODELS: LV100CE,LV120CE
Page 2
2 Room Air Conditioner
FOR Y OUR RECORDS
Write the model and serial numbers here:
Model #
Serial #
You can find them on a label on the side of each unit.
Dealer's Name
Date Purchased
■ Staple your receipt to this page in the event you need it
to prove date of purchase or for warranty issues.
READ THIS MANU AL
Inside you will find many helpful hints on how to use and
maintain your air conditioner properly. Just a little preventive
care on your part can save you a great deal of time and
money over the life of your air conditioner.
You'll find many answers to common problems in the chart
of troubleshooting tips.If you review our chart of
Troubleshooting Tips first, you may not need to call for
service at all.
PRECAUTION
• Contact the authorized service technician for repair
or maintenance of this unit.
• Contact the installer for installation of this unit.
• The air conditioner is not intended for use by young
children or invalids without supervision.
• Young children should be supervised to ensure that
they do not play with the air conditioner.
• When the power cord is to be replaced, replacement
work shall be performed by authorized personnel only
using only genuine replacement parts.
• Installation work must be performed in accordance
with the National Electric Code by qualified and
authorized personnel only.
Safety Precautions ..........................3
Prior to Operation ...........................7
Introduction ....................................8
Electrical Safety .............................9
Installation ....................................12
Operating Instructions .................17
Maintenance and Service ............20
Window-Type Air Conditioner Owner’s Manual
TABLE OF CONTENTS
Page 3
Owner’s Manual 3
ENGLISH
Safety Precautions
To prevent injury to the user or other people and proper ty damage, the following instructions
must be followed.
■ Incorrect operation due to ignoring instruction will cause harm or damage.The seriousness
is classified by the following indications.
■ Meanings of symbols used in this manual are as shown below.
This symbol indicates the possibility of death or serious injury.
This symbol indicates the possibility of injury or damage to properties only.
■ Installation
Be sure not to do.
Be sure to follow the instruction.
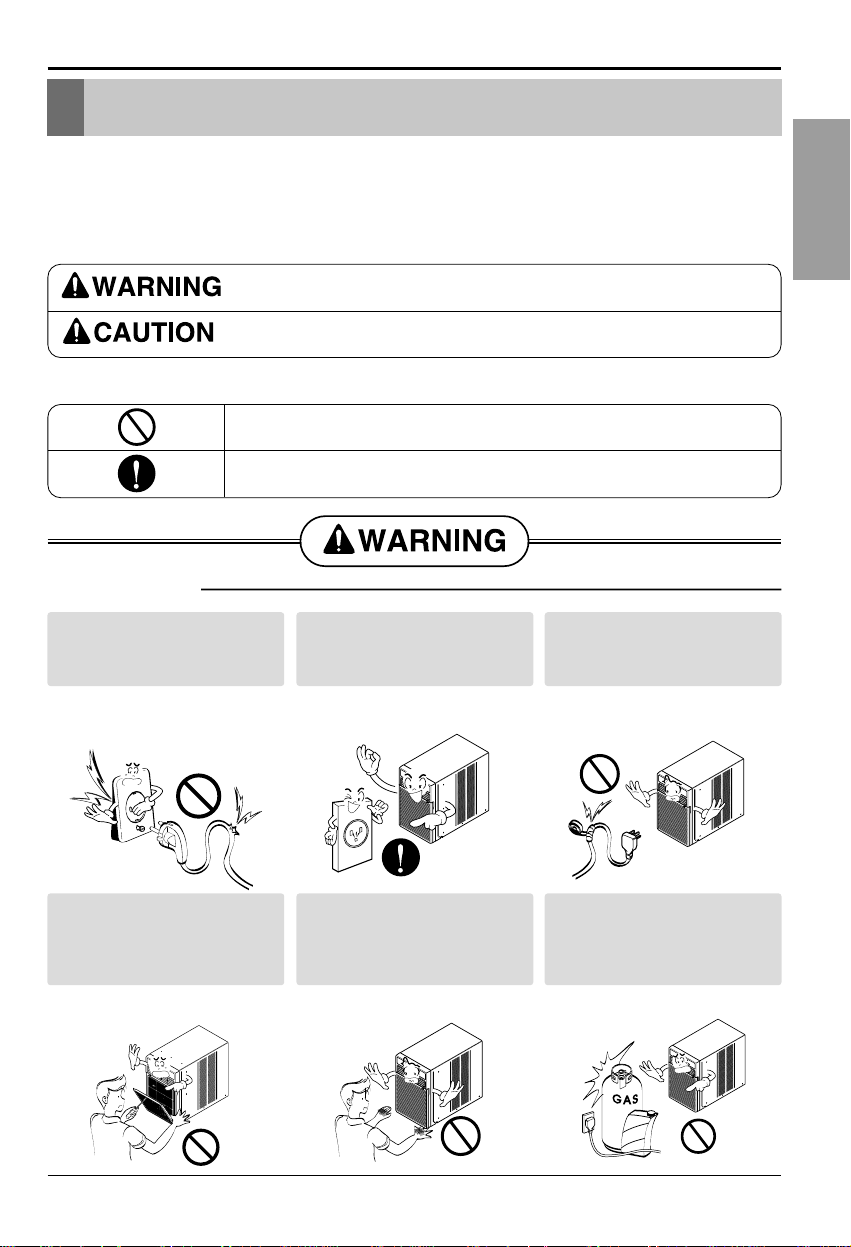
Safety Precautions
Don’t use a power cord, a
plug or a loose socket which
is damaged.
• Otherwise, it may cause a
fire or electrical shock.
Always plug into a grounded
outlet.
• Otherwise, it may cause a
fire or electrical shock.
Do not modify or extend the
power cord length.
• It will cause electric shock or
fire due to heat generation.
Do not disassemble or
modify products.
• It may cause failure and
electric shock.
Be caution when unpacking
and installing.
• Sharp edges may cause
injury.
Do not use the power cord near
flammable gas or combustibles
such as gasoline, benzene,
thinner,etc.
• It may cause explosion or
fire.
Gasolin
Page 4
4 Room Air Conditioner
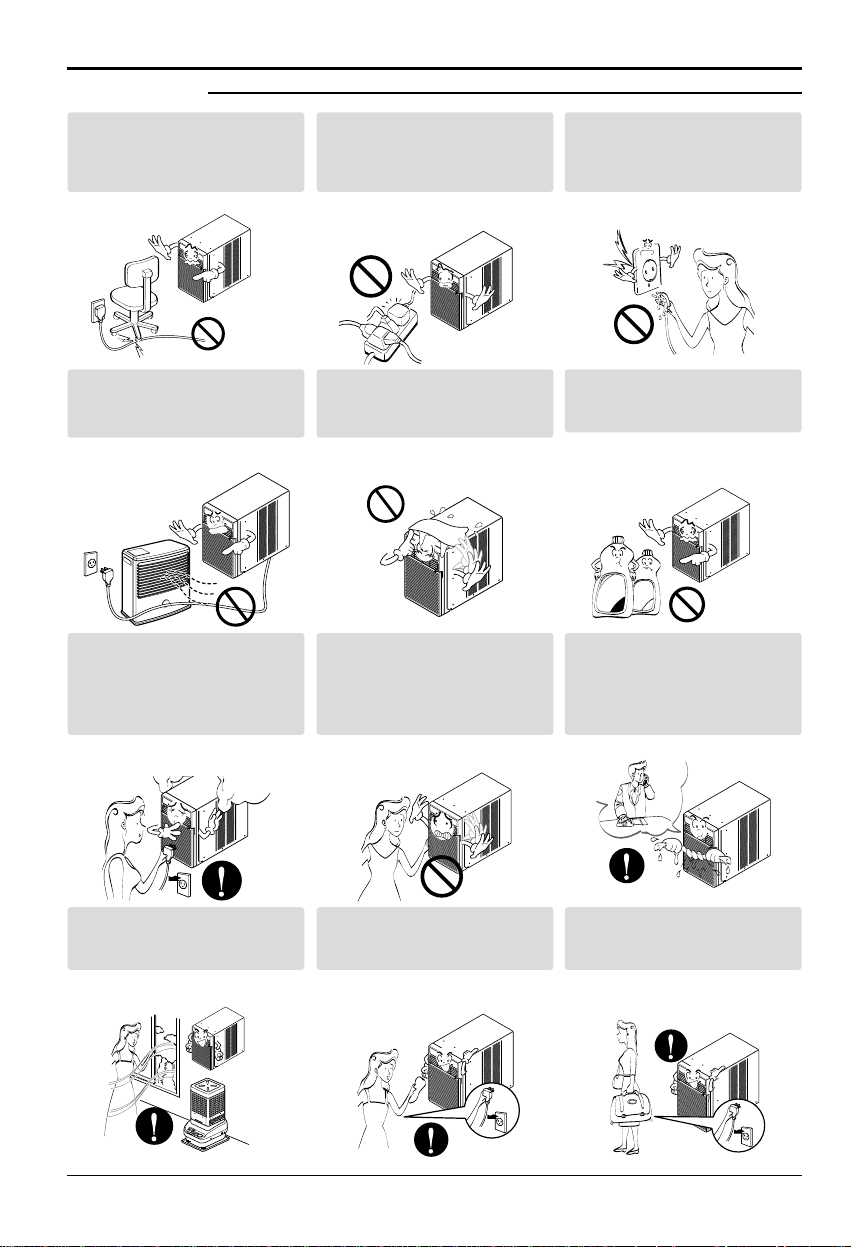
Safety Precautions
■ Operation
Do not place the power cord
near a heater.
• It may cause fire and electric
shock.
Do not allow water to run
into electric parts.
• It will cause failure of machine
or electric shock.
Use a soft cloth to clean. Do
not use wax, thinner, or a
strong detergent.
• The appearance of the air
conditioner may deteriorate,
change color, or develop
surface flaws.
Wax
Thinner
Ventilate the room well when
using this appliance
together with a stove, etc.
• An oxygen shortage may
occur.
Turn off the power and
breaker firstly when
cleansing the unit.
• Since the fan rotates at high
speed during operation, it may
cause injury.
Turn off the main power
switch when not using it for
a long time.
• Prevent accidental startup and
the possibility of injury.
Unplug the unit if strange
sounds, odors, or smoke
come from it.
• Otherwise it may cause fire
and electric shock accident.
Do not open the suction
inlet grill of the product
during operation.
• Otherwise, it may electrical
shock and failure.
If water enters the product, turn
off the the power switch of the
main body of appliance. Contact
service center after taking the
power-plug out from the socket.
Do not place heavy object
on the power cord and take
care so that the cord should
not be pressed.
• There is danger of fire or
electric shock.
Do not share the outlet with
other appliances.
• It will cause electric shock or
fire due to heat generation.
Take the power plug out if
necessary,holding the head
of the plug and do not touch
it with wet hands.
• Otherwise, it may cause a
fire or electrical shock.
Page 5
Owner’s Manual 5
ENGLISH
■ Installation
Safety Precautions
Do not operate or stop the
unit by inserting or pulling
out the power plug.
• It will cause electric shock or
fire due to heat generation.
Do not damage or use an
unspecified power cord.
• It will cause electric shock or
fire.
Do not operate with wet
hands or in damp
environment.
• It will cause electric shock.
Hold the plug by the head
when taking it out.
• It may cause electric shock
and damage.
When gas leaks, open the
window for ventilation
before operating the unit.
• Otherwise, it may cause
explosion, and a fire.
Never touch the metal parts
of the unit when removing
the filter.
• They are sharp and may
cause injury.
Install the product so that the noise or hot
wind from the outdoor unit may not cause
any damage to the neighbors.
• Otherwise, it may cause dispute with the
neighbors.
Keep level parallel in installing the product.
• Otherwise, it may cause vibration or water
leakage.
Page 6

6 Room Air Conditioner
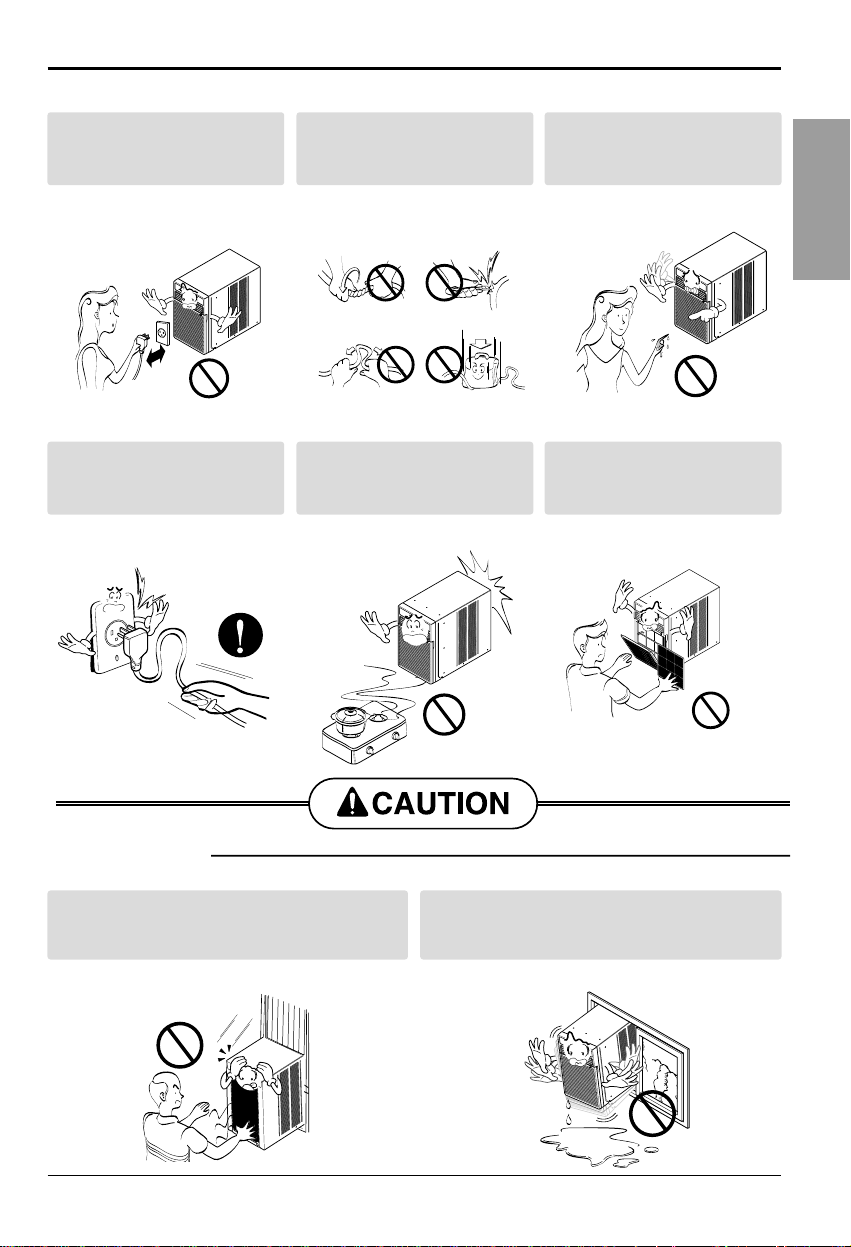
Safety Precautions
■ Operation
Be cautious not to touch the
sharp edges when
installing.
• It may cause injury.
Avoid excessive cooling and
perform ventilation
sometimes.
• Otherwise, it may do harm
to your health.
Do not insert the hands or
bars through the air inlet or
outlet during operation.
• Otherwise, it may cause
personal injury.
Do not put a pet or house
plant where it will be
exposed to direct air flow.
• It may cause injury.
Do not block the inlet or
outlet of air flow.
• It may cause product failure.
Use a soft cloth to clean. Do
not use wax, thinner, or a
strong detergent.
• The appearance of the air
conditioner may deteriorate,
change color, or develop
surface flaws.
Do not step on the
indoor/outdoor unit and do
not put anything on it.
• It may cause an injury
through dropping of the unit
or falling down.
Always insert the filter
securely.
Clean it every two weeks.
• Operation without filters will
cause failure.
Do not drink water drained
from air conditioner.
• It contains containments and
will make you sick.
Page 7

Owner’s Manual 7
ENGLISH
Prior to Operation
1. Contact an installation specialist for installation.
2. Plug in the power plug properly.
3. Use a dedicated circuit.
4. Do not use an extension cord.
5. Do not star t/stop operation by plugging/unplugging the power cord.
6. If the cord/plug is damaged, replace it with only an authorized replacement
part.
1. Being exposed to direct airflow for an extended period of time could be
hazardous to your health. Do not expose occupants, pets, or plants to direct
airflow for extended periods of time.
2. Due to the possibility of oxygen deficiency, ventilate the room when used
together with stoves or other heating devices.
3. Do not use this air conditioner for non-specified special purposes (e.g.
preserving precision devices, food, pets, plants, and art objects). Such usage
could damage the items.
1. Do not touch the metal par ts of the unit when removing the filter. Injuries can
occur when handling sharp metal edges.
2. Do not use water to clean inside the air conditioner. Exposure to water can
destroy the insulation, leading to possible electric shock.
3. When cleaning the unit, first make sure that the power and breaker are turned
off.The fan rotates at a very high speed during operation. There is a
possibility of injury if the unit’s power is accidentally triggered on while
cleaning inner parts of the unit.
For repair and maintenance, contact your authorized service dealer.
Prior to Operation
Preparing for Operation
Usage
Cleaning and Maintenance
Service
Page 8
8 Room Air Conditioner
Introduction
Introduction
This symbol alerts you to the risk of electric shock.
This symbol alerts you to hazards that could cause harm to the
air conditioner.
This symbol indicates special notes.
NOTICE
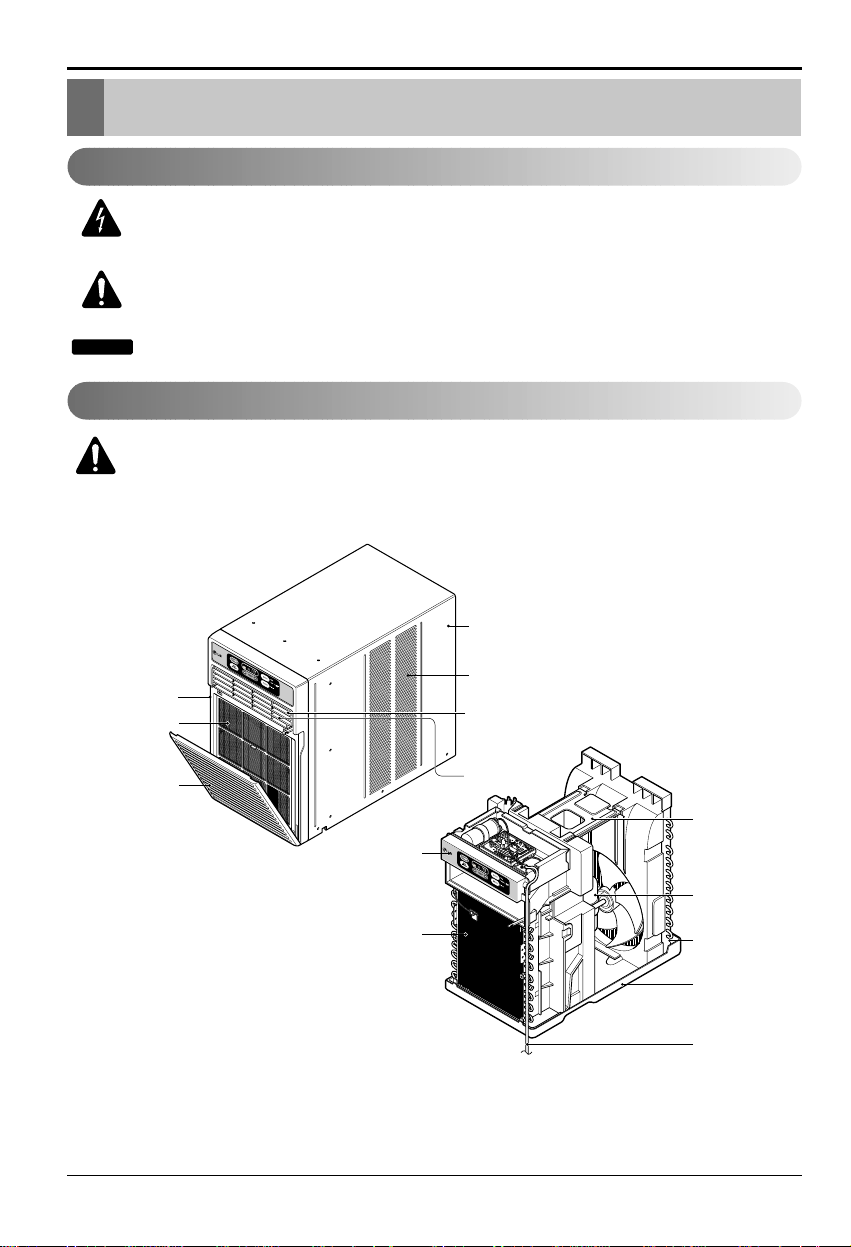
WARNING: This appliance should be installed in accordance with
national wiring regulations.This guide acts as a guide to help to
explain product features.
°
C
CABINET
AIR DISCHARGE
VERTICAL AIR DEFLECTOR
(HORIZONTAL LOUVER)
CONTROL BOARD
CONDENSER
COMPRESSOR
EVAPORATOR
POWER CORD
BASE PAN
BRACE
SIDE LOUVER
FRONT GRILLE
AIR FILTER
AIR INTAKE
(INLET GRILLE)
°C
Symbols Used in this Manual
Features
Page 9
Electrical Safety
Electrical Safety
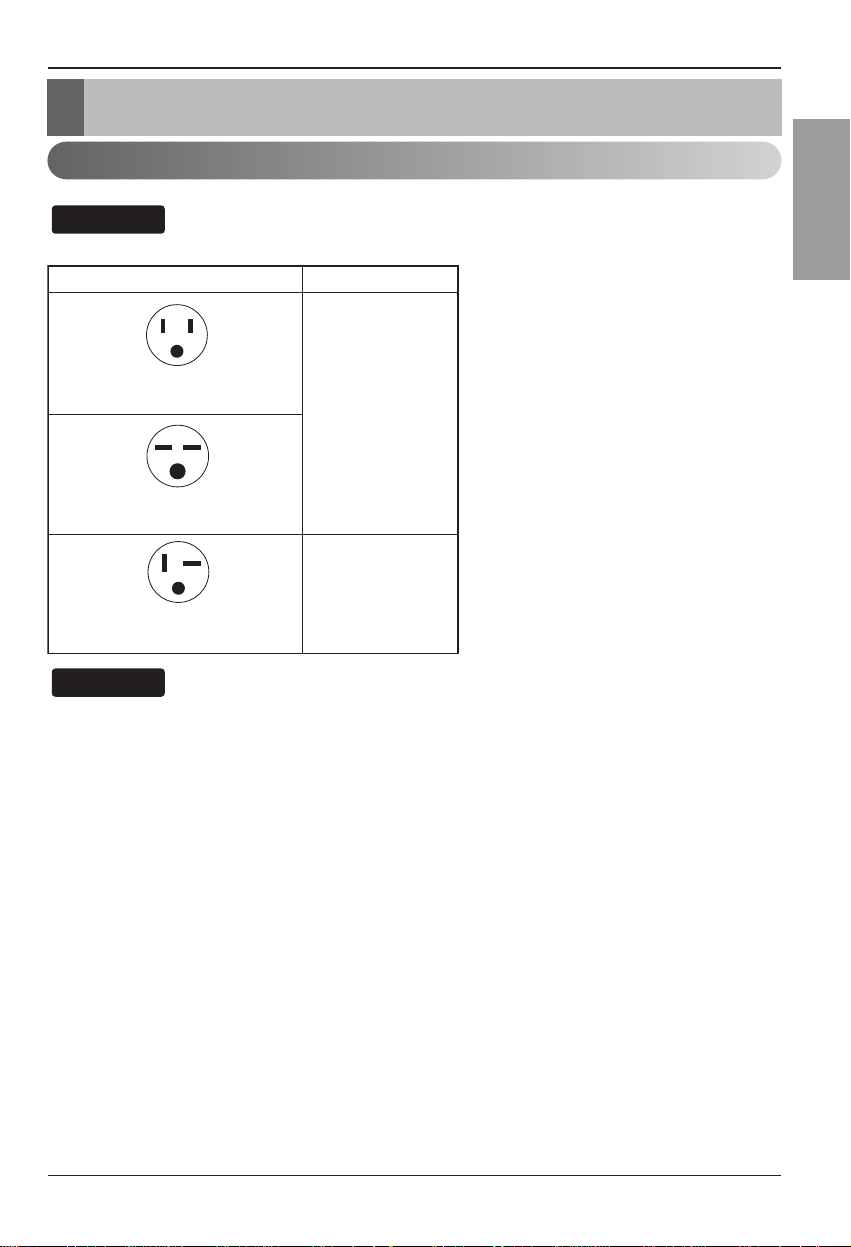
Electrical Data
Use Wall Receptacle Power Supply
Standard 125V, 3-wire grounding
receptacle rated 15A, 125V AC
Standard 250V, 3-wire grounding
receptacle rated 15A, 250V AC
Use 15 AMP. time
delay fuse or 15 AMP.
circuit breaker.
Use 20 AMP. time
delay fuse or 20 AMP.
circuit breaker.
Standard 250V, 3-wire grounding
receptacle rated 20A, 250V AC
The shape may be different according to its model.
NOTICE
DO NOT USE AN EXTENSION CORD on 230, 208, and 230/208 Volt units.
All wiring should be made in accordance with local electrical codes and regulations.
Aluminum house wiring may pose special problems. Consult a qualified electrician.
NOTICE
Owner’s Manual 9
ENGLISH
Page 10
Electrical Safety
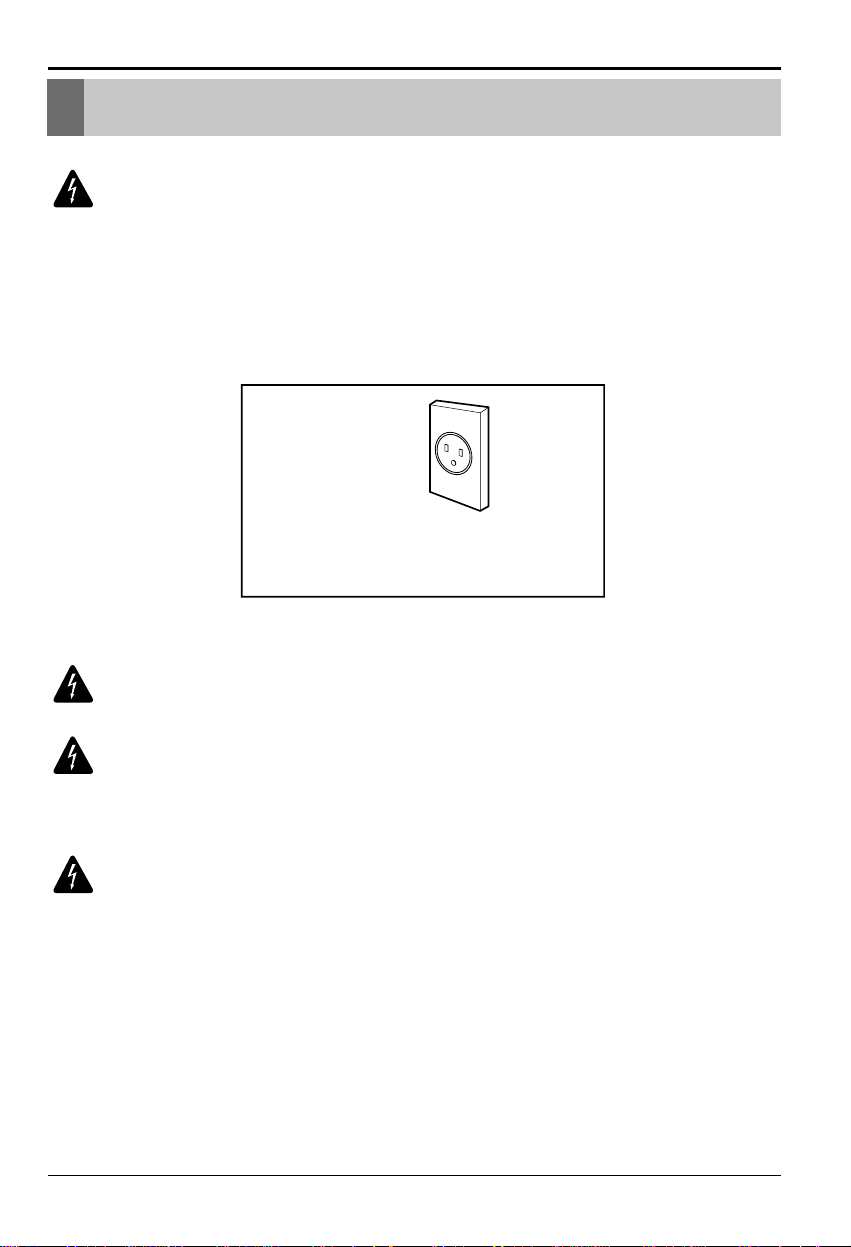
WARNING: This appliance must be properly grounded.
The power cord of this appliance is equipped with a three-prong grounding plug.
To minimize the risk of electr ic shock, use the plug with a standard three-slot
grounding wall power outlet.If the power outlet does not include a grounding slot,
have a qualified electrician replace the outlet before you use the room air
conditioner.
WARNING: Do not cut or remove the grounding prong from the power
plug.
WARNING: Attaching the adapter ground terminal to the wall
receptacle cover screw does not ground the appliance unless the
cover screw is metal and not insulated, and the wall receptacle is
grounded through the house wiring.
WARNING: If you have any doubt whether the air conditioner is
properly grounded, have the wall receptacle and circuit checked by a
qualified electrician.
Preferred method
Ensure proper ground
exists before use
Electrical Safety
10 Room Air Conditioner
Page 11
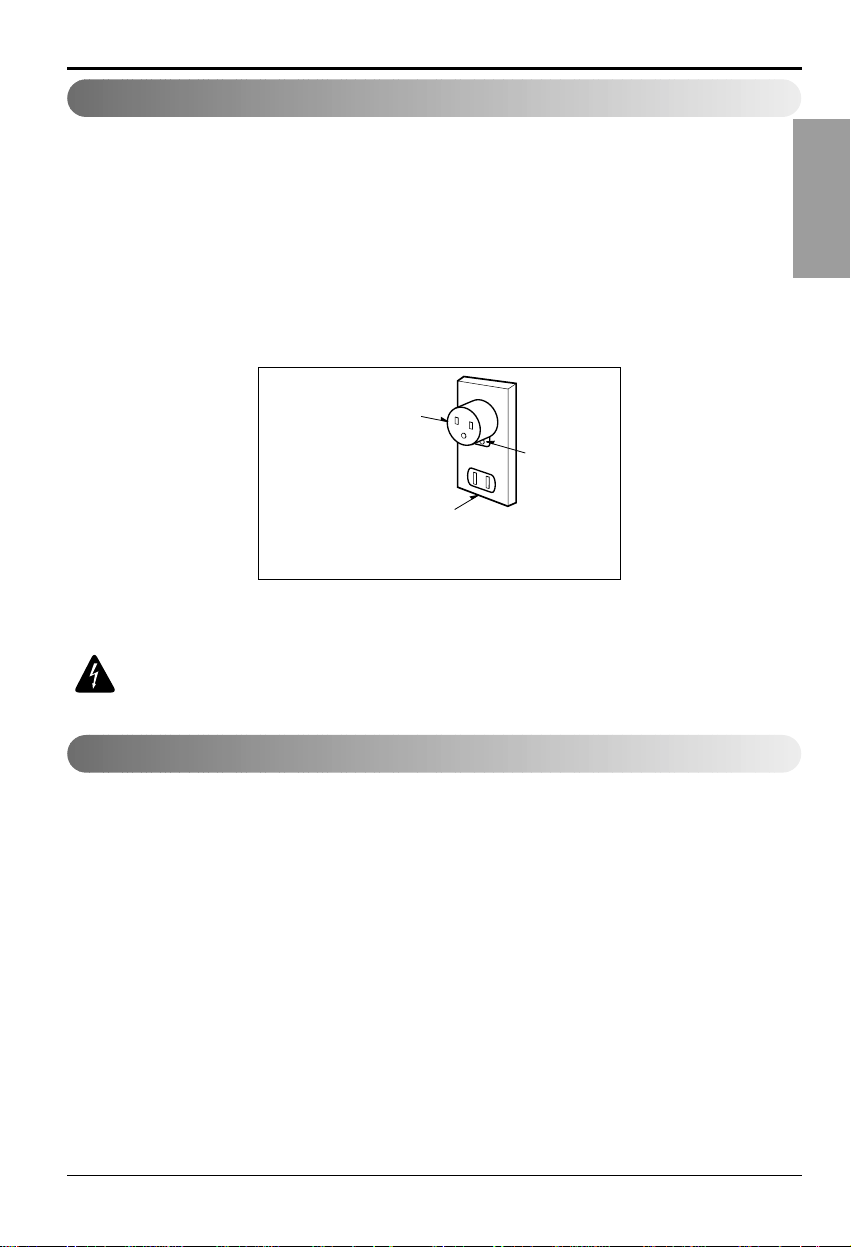
We strongly discourage the use of an adapter due to potential safety hazards.
For temporary connections, use only a UL-listed adapter, available from most
local hardware stores. Ensure that the large slot in the adapter is aligned with
the large slot in the receptacle for a proper polarity connection.
To disconnect the power cord from the adapter, use one hand on each to avoid
damaging the ground terminal. Avoid frequently unplugging the power cord as
this can lead to eventual ground terminal damage.
WARNING: Never use the appliance with a broken adapter.
We strongly discourage the use of an extension cord due to potential safety
hazards. For temporary situations, use only CSA certified and UL listed 3-wire
grounded extension cords, rated 15 A, 125 V.
Temporary method
Adapter Plug
Receptacle Cover
Metal Screw
Temporary Use of an Adapter
Temporary Use of an Extension Cord
Owner’s Manual 11
Electrical Safety
ENGLISH
Page 12
Installation
Installation
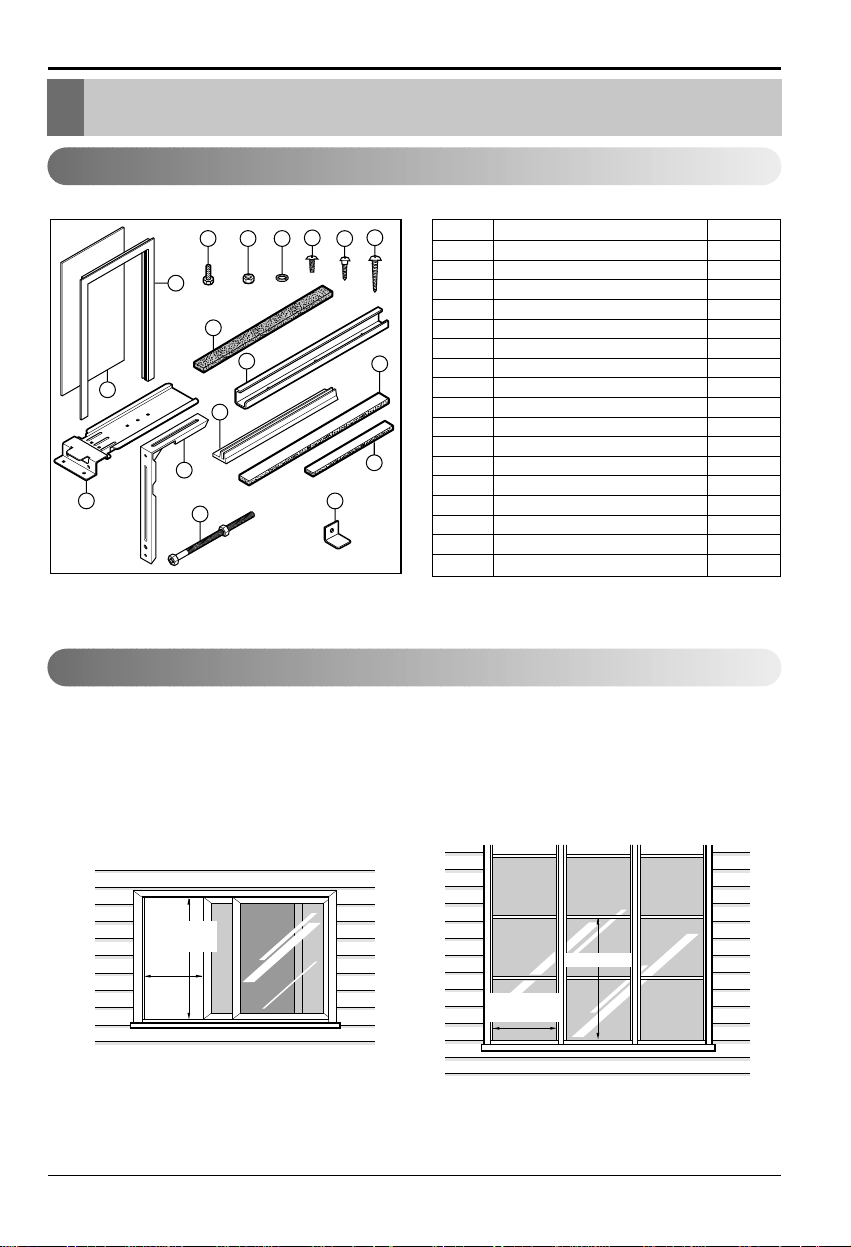
Window Requirements
Installation Parts
879 10
3
12
11
16
17
1
6
13
15
4
14
2
5
21" min.
40 1/2" max.
15 1/2"
min.
21 1/2" min.
15 1/2" min.
16 1/2" max.
Horizontal sliding window Casement window
NO. NAME OF PARTS QTY
1 Curtain 1
2 Curtain Frame 1
3 Upper Guide 1
4 Side Guide 2
5 Support Bracket 1
6Bracket 1
7 Leveling Bolt & Nut 1
8 Bolt 2
9 Nut 2
10 Washer 2
11 Side Guide seal 1
12 Foam Seal Strip 1
13 Window Track Seal 1
14 Window Locking Bracket 1
15 Screw (Type A) 9
16 Screw (Type B) 3
17 Screw (Type C) 8
1.These instructions are for a horizontal sliding
or a casement window.
2.The electrical outlet must be within reach of
the power cord.
For installation in a casement window, the
window frame assembly and the side of the
building must be adequate to support the weight
of the air conditioner.
12 Room Air Conditioner
Page 13
Installation
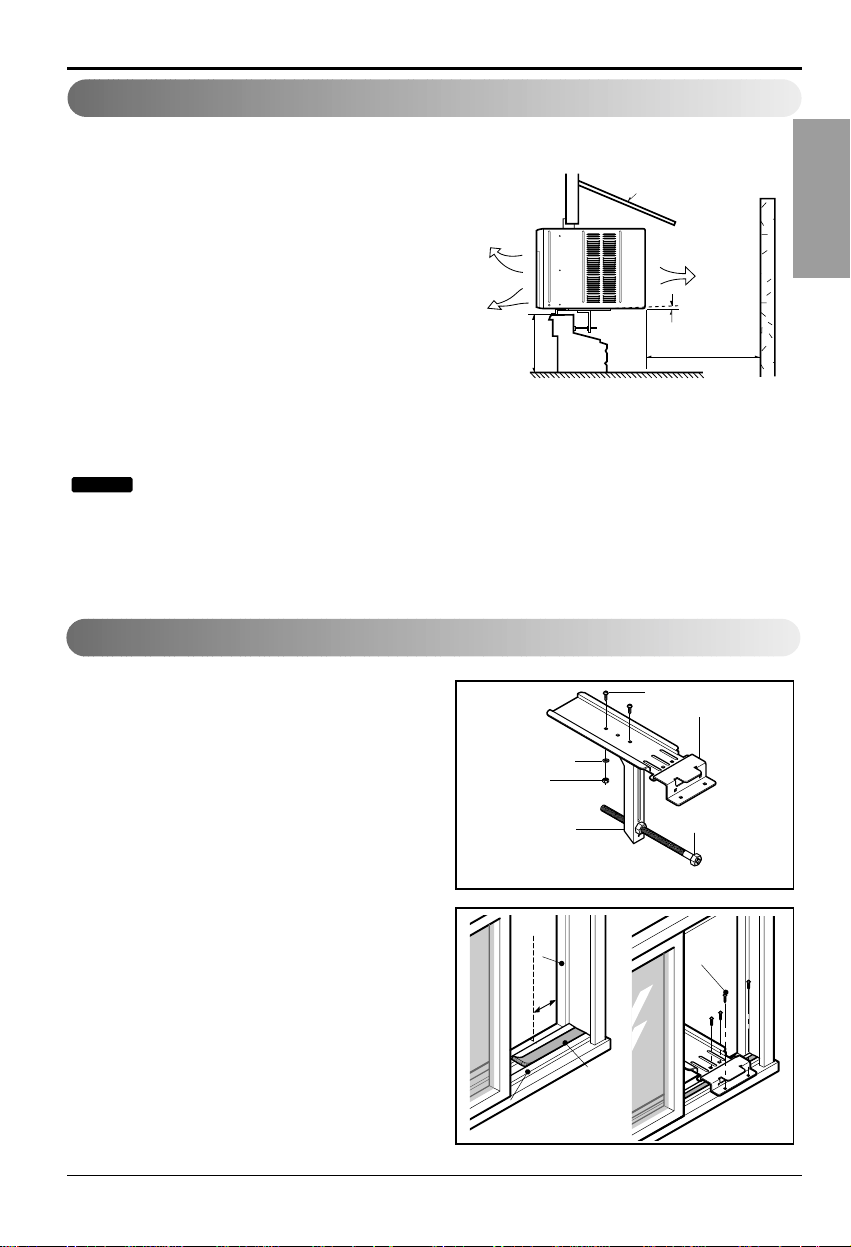
How to Install the Unit
1.To prevent vibration and noise, make sure the
unit is installed securely and firmly
2. Install the unit where the sunlight does not
shine directly on the unit.
3.The outside of the cabinet must extend outward
for at least 14" and there should be no
obstacles, such as a fence or wall, within 20"
from the back of the cabinet because it will
prevent heat radiation of the condenser.
Restriction of outside air will greatly reduce the
cooling efficiency of the air conditioner.
All side louvers of the cabinet must remain exposed to the outside of the structure.
4. Install the unit at a slight incline so the back is slightly lower than the front(about 1/4").
This will force condensed water to flow to the outside.
5. Install the unit with the bottom about 30"~60" above the floor level.
NOTICE
About 1/4"
30"~60"
Awning
Cooled air
Fence
Over 20"
Heat
radiation
Horizontal Sliding Window Installation
1. Loosely attach the Support Bracket to the
bottom of Bracket using Bolts, Washer, and
Nuts. Attach the Leveling Bolt and Nut.(Fig.1)
2. Remove protective backing from Window
Track Seal and apply seal to window track.
(Fig.2)
3. Measure and lightly mark a line 8-1/4 inches
from window jamb.Center the Support
Bracket assembly on the window track and
fasten with 4 Type C screws.(Fig. 2)
81/4 inches inches81/4 inches
WindoWindow JambWindow Jamb
WindoWindow TrackWindow T r ack
WindoWindow Track
Seal
Window T r ack
Seal
Bracket
Support Bracket
Nut
Washer
Leveling Bolt & Nut
Bolt
Type C screwType C screw
Fig. 1
Fig. 2
Owner’s Manual 13
ENGLISH
Page 14
Installation
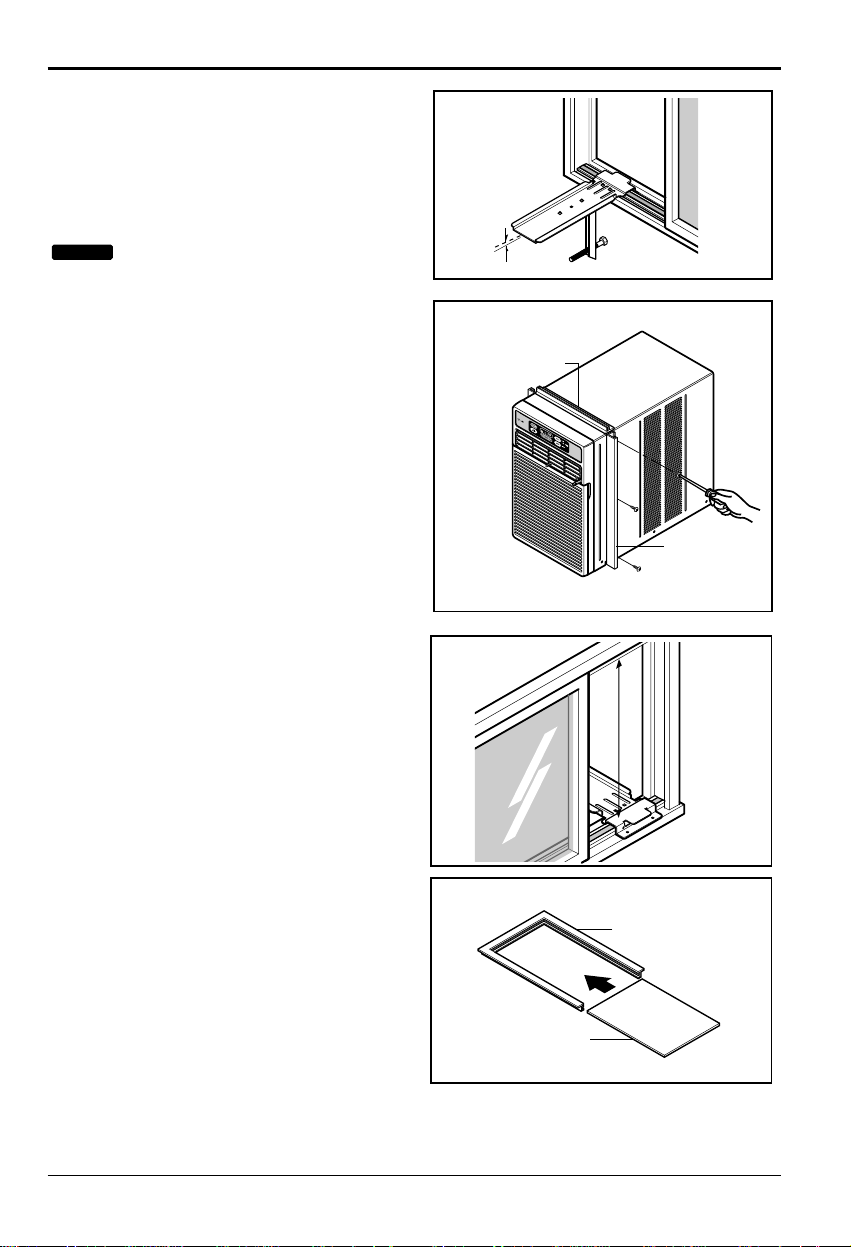
4. Put the Support Bracket against the outside
wall and tighten the Bolts on top of the
Bracket.Adjust the Leveling Bolt so that the
air conditioner will be installed with a very
slight tilt (about 1/4") downward toward the
outside for proper drainage.
Tighten the nut. (Fig. 3)
DO NOT drill a hole in the bottom of
the base pan.The air conditioner is
designed to operate with the bottom
of the base pan approximately half-full
of water.
5. Fasten Side Guides to the sides of the Air
Conditioner using 3 Type A screws per Guide.
Start with first screw at middle of Guide.
(Fig. 4)
6. Fasten Upper Guide on the top of the Air
Conditioner using 3 Type A screws. (Fig. 4)
7. Measure height of window opening from top
of Bracket assembly as shown Fig. 5.
Subtract 20-3/4 inches. Mark this
measurement on Curtain and cut the Cur tain.
(Fig. 5)
8. Slide Curtain into Cur tain Frame. Slide
Curtain Frame assembly into side Guides of
the Air Conditioner cabinet. Make sure
Curtain is firmly enclosed on all sides by the
Frame.(Fig.6)
NOTICE
81/4 inches
Window Jamb
Window T r ack
Window T r ack
Seal
Type C screw
About
1
/4"
Outside Wall
Fastening Side Guides
Upper Guide
Side Guide
°
C
Fig. 3
Fig. 4
Frame Curtain
Curtain
Fig. 5
Fig. 6
14 Room Air Conditioner
Page 15

9. Cut side Guide seal into 2 equal lengths.
Remove protective backing and apply it to the
rear side of cabinet Side Guides, starting just
below Curtain Frame assembly. Pinch off
excess length so seal is even with the bottom
of side Guide. (Fig. 7)
10. Place Air Conditioner in window opening. It
should sit on Bracket assembly so that
Curtain Frame and cabinet Side Guides are
against top and side window jambs. Mate
front of Bracket with Base Guide attached to
the bottom of base pan.
11. Drill 1/8 inch holes in window track through
the existing holes on Base Guide.Screw 4
Type C screws through the holes.(Fig.8)
12. If this is a casement window installation,
proceed to Casement Window Installation.If
not, slide inner window sash firmly against
side of the cabinet.
13. Drill 1/8 inch hole in window jamb to align
with the existing holes in the Curtain Frame.
Attach Curtain Frame to window frame with
2 Type B screws. (Fig. 8)
Apply weather seal
to side guides
just below edge of
Curtain Frame .
Type B screwType B screw
Windo
Type C screw
Window T rac k
°
C
Fig. 7
Fig. 8
Check all seals and plug any
remaining air gaps with a suitable
weatherproof caulk.
14. If this is a casement window installation,
proceed to Casement Window Installation.
If not, stuff the Foam Seal Strip between the
vertical sash and the window glass. (Fig. 9)
15. Attach the L Bracket with a Type B screw.
(Fig. 9)
NOTICE
Foam seal strip
Window
locking
bracket
°
C
Fig. 9
Owner’s Manual 15
ENGLISH
Installation
ENGLISH
Base GuideBase Guide
Base panBase pan
BracketBracket
Windo
w Track
Page 16

ENGLISH
Installation
Installing the Power cord
A
B
Screw (Type A)
°
C
°
C
You can choose between the two methods below according to your preference and window sill
shape.
• Fasten the stopper using Type A screw, and
pass the power cord through slit "A".
• Fasten the stopper using left screw hole, and
rotate properly to pass the power cord through
slit "B".
Using slit "A" Using slit "B"
Casement Window Installation
1. Installation procedure is the same as that described in steps 1 through 11 and step 13 of the
Horizontal Sliding Window installation.
2. If the window opening is wider than 15-3/4 inches you will need to install a filler panel.Make this
panel from 3/4 inch thick wood and run it the full length of the window.
Attach it securely to the window frame and paint it to protect it from the weather.
3. Since styles and sizes of casement windows vary widely, it is advisable to have the air conditioner
installed by someone skilled in this type of installation.
16 Room Air Conditioner
Screw (Type A)
Power cord
Power cord
Page 17

The remote control and control panel will look like those represented in the following pictures.
Operating Instructions
Controls
Remote Control Operations
Power
Tem p
Fan Speed
Timer Mode
1
2
4
3
2
5
6
1
4 5
3
°C
AUTO RESTART
When power is restored after an electrical power failure, the unit will begin to run at its last setting.
1. POWER
• To turn the air conditioner ON, push this button.
To turn the air conditioner OFF, push the button
again.
• This button takes priority over any other button.
• When you first turn it on, the unit is in cool mode,
high fan speed, temperature setting at 22°C.
2.TEMPERATURE SETTING
• Use this button to automatically control the
temperature of the room.
The temperature can be set within a range of
16°C to 30°C by increments of 1°C.
3. MODE
- Every time you push this button, it will cycle
through the following modes: COOL, ENERGY
SAVER and FAN.
- ENERGY SAVER
• The fan stops when the compressor stops
cooling. Approximately every 3 minutes the fan
will turn on and the unit will check the room air to
determine if cooling is needed.
4.
FAN SPEED
• Every time you push this button, it advances the
setting as follows: {High(F3) → Low(F1) →
Med(F2) → High(F3)}
5.TIMER
- SHUT-OFF TIME
• You will usually use shut-off time while you sleep.
• With unit running, use Timer to set number of
hours until shut-off.
• For your sleeping comfort, once Time is set, the
Temperature setting will raise 1°C after 30 min,
and 1°C after another 30 min.
• Every time you push Timer button, it advances
the Timer setting as follows: 1 Hour → 2 Hours →
etc. → 12 Hours maximum.
- START TIME
• With unit not running, use timer to set number of
hours before unit starts.
• Every time you push Timer button, it advances
the Timer setting as follows: 1 Hour → 2 Hours →
etc. → 12 Hours maximum.
6. REMOTE CONTROL SENSOR
Owner’s Manual 17
ENGLISH
Operating Instructions
ENGLISH
Page 18

Inserting the Remote Control Batteries
1. Push out the cover on the back of the remote control with your thumb.
2. Pay attention to polarity and insert two new AAA 1.5V batteries.
3. Reattach the cover.
Do not use rechargeable batteries. Make sure that both batteries
are new.
• In order to prevent discharge, remove the batteries from the remote control
if the air conditioner is not going to be used for an extended period of time
Keep the remote control away from extremely hot or humid places.
To maintain optimal operation of the remote control, the remote sensor
should not be exposed to direct sunlight.
NOTICE
18 Room Air Conditioner
Operating Instructions
Page 19

Additional Features
Drain Pipe
In humid weather, excess water may cause the BASE
PAN to overflow and be splashed on the side louver.
To drain the water, remove the DRAIN CAP and
secure the DRAIN PIPE to the rear hole of the BASE
PAN.
Ventilation
The ventilation lever must be in the CLOSE position in order to
maintain the best cooling conditions.
When fresh air is necessary in the room, set the ventilation
lever to the OPEN position.
When the damper is opened and room air is exchanged with
external air.
Air Direction
The direction of air can be controlled wherever you want to cool
by adjusting the horizontal louver and the vertical louver.
• HORIZONTAL AIR-DIRECTION CONTROL
The horizontal air direction is adjusted by
rotating the vertical louver right or left.
• VERTICAL AIR-DIRECTION CONTROL
The vertical air direction is adjusted by rotating the horizontal
louver forward or backward.
VENTCLOSE
OPEN
Drain pipe
Drain cap
°
C
°
C
Operating Instructions
Owner’s Manual 19
ENGLISH
Page 20

Maintenance and Service
Maintenance and Service
TURN THE AIR CONDITIONER OFF AND REMOVE THE PLUG FROM THE POWER OUTLET.
Air Filter Cleaning
The air filter behind the front grille should be checked and cleaned at least once every 2 weeks or
more often if necessary.
To remove:
1. Open the inlet grille downward by pulling out the top of the inlet grille.
2. Remove the air filter from the front grille assembly by pulling the air filter up slightly.
3. Clean the filter with warm, soapy water below 40°C (104°F).
4. Rinse and gently shake the water from the filter and let it dry before replacing it.
CAUTION:
DO NOT operate the air conditioner without a filter because dirt and lint
will clog it and reduce performance.
NOTE!
Before using the air conditioner secure the front grille with two
screws enclosed with the owner’s manual.
1. Open the inlet grille downward and remove the air filter.
2. Fasten the front grille with screws.
3. Reinstall the air filter.
4. Close the inlet grille.
Inlet Grille
°C
°C
20 Room Air Conditioner
Page 21

Problem
■ The air conditioner is unplugged or
not plugged in completely.
■ The fuse is blown/circuit breaker is
triggered.
■ Power failure.
■ Air flow is restricted.
■ TEMP Control set too higher
number.
■ The air filter is dirty.
■ The air conditioner was just
turned on.
■ Cold air is escaping.
■ Cooling coils are iced up.
■ The cooling coils are iced over.
The air
conditioner
does not
operate at all
Air
conditioner
does not cool
Ice appears
on the air
conditioner.
• Make sure the plug is completely plugged into
the outlet.
• Check the fuse/circuit breaker box and replace
the fuse or reset the breaker.
• In the event of a power failure, set the power
control to OFF. When the power is restored,
wait 3 minutes to restart the air conditioner to
prevent the compressor from overloading.
• Make sure there are no curtains, blinds,
furniture or other obstacles in front of the air
conditioner.
• Set the TEMP control to a lower number.
• Clean the filter at least every 2 weeks.Refer
to the "Care and Maintenance" section (p.18)
of the manual.
• After the air conditioner is turned on, you need
to give the air conditioner some time to cool
the room.
• Check for open furnace floor resisters and
cold air returns.
• CLOSE the air conditioner vent.
• See Ice appears on the air conditioner
below.
• Ice may block the air flow and obstruct the air
conditioner from properly cooling the room.
Set the mode control at High Fan or High Cool
with the high temperature.
What T o DoPossible Causes
Troubleshooting
Normal Operation
Maintenance and Service
• You may hear a pinging noise caused by water being picked up and thrown against the
condenser on rainy days or when the humidity is high.This design feature helps remove
moisture and improve efficiency.
• You may hear the thermostat click when the compressor cycles on and off.
• Water will collect in the base pan during high humidity or on rainy days.The water may overflow
and drip from the outdoor side of the unit.
• The fan may run even when the compressor does not.
Troubleshooting Tips
Save time and money! Review the chart below first and you may not need to call for service.
Owner’s Manual 21
ENGLISH
Page 22

LG
Climatiseur de pièce
MANUEL D'UTILISATION
LG
FRANÇAIS
MODÈLES: LV100CE, LV120CE
Page 23

2
Climatiseur
POUR V OS ARCHIVES
Ecrivez le modèle et le numéro de série ici:
Modèle Nº
Nº de série
Vous les trouverez sur une étiquette dans la partie latérale
de chaque unité.
Nom du distributeur
Date d'achat
■
Agrafez votre reçu à cette page au cas où vous en auriez
besoin pour prouver la date d'achat ou pour vous prévaloir
de la garantie.
LISSEZ CE MANUEL
Vous trouverez dedans plusieurs conseils utiles sur la manière
d'utiliser et d'entretenir correctement votre climatiseur.Seul un
petit soin préventif de votre part peut vous permettre une
grande économie de temps et d'argent pendant la durée de vie
de votre climatiseur. Vous trouverez plusieurs réponses aux
problèmes communs dans la charte de conseils de
dépannage. Si vous lisez d'abord notre charte de Conseils de
dépannage, il est possible que vous n'ayez aucun besoin
d'appeler le service technique.
PRECAUTION
• Contactez un technicien agréé pour la réparation ou maintenance
de cette unité.
• Contactez l'installateur pour l'installation de cette unité.
• Le climatiseur n'est pas destiné à l'usage de petits enfants ou d’
handicapés sans surveillance.
• Vos enfants doivent être surveillés afin de vous assurer qu'ils ne
jouent pas avec le climatiseur.
• Lorsque le cordon d'alimentation doit être remplacé, ce travail de
remplacement ne doit être réalisé que par du personnel autorisé à
l'aide de pièces de rechange d'origine.
• Le travail d'installation doit être réalisé conformément au Normes
Electrique National, seulement par du personnel qualifié et agréé.
Précautions de sécurité..................3
Avant l'utilisation.............................7
Introduction.........................................8
Sécurité électrique...........................9
Guide d'installation........................11
Instructions d'utilisation ...............16
Entretien et réparations ................19
Manuel de l'utilisateur Climatiseur
TABLE DES MATIERES
Page 24

FRANÇAIS
Manuel de l'utilisateur 3
Pour éviter des blessures à l'usager ou à d'autres personnes et des dommages à la propriété, vous
devez suivre les instructions ci-dessous.
■
L’utilisation incorrecte de l’appareil due à la méconnaissance des instructions de ce manuel provoquera des
blessures ou des dommages, dont la gravité est indiquée au moyen des symboles suivants.
■ ß La signification des symboles utilisés dans ce manuel est indiquée ci-dessous.
Ce symbole représente la possibilité de mort ou de blessures graves.
Ce symbole indique la possibilité de blessures ou de dommages uniquement
à la propriété.
■ Installation
Assurez-vous de ne pas faire.
Assurez-vous de suivre l'instruction.
Précautions de sécurité
N’utilisez pas un cordon
d’alimentation, une fiche ou
une prise desserrée qui sont
endommagés.
• Sinon, cela risque de
provoquer une décharge
électrique.
Branchez toujours cette unité
sur une prise reliée à la terre.
• L'absence de mise à la terre
peut provoquer un choc
électrique (Voir le Manuel
d'Installation).
Ne modifiez pas la longueur
du cordon d'alimentation.
• Ceci risque de provoquer un
choc électrique ou un
incendie dû au dégagement
de chaleur.
Ne démontez ni modifiez les
produits.
• Ceci peut provoquer une
défaillance de l'appareil ou un
choc électrique.
Soyez prudent lorsque
vous déballez et installez
ce produit.
• Vous risquez de vous blesser
avec les extrémités
coupantes.
N'utilisez pas le cordon d'alimentation
près de substances inflammables ou
combustibles, comme essence,
benzène, diluant, etc.
• Ceci peut provoquer une
explosion ou un incendie.
Gasolin
Précautions de sécurité Précautions de sécurité Précautions de sécurité
Page 25

4
Climatiseur
■ Fonctionnement
N'utilisez pas le cordon
d'alimentation près d'un
appareil de chauffage.
• Ceci peut provoquer un
incendie ou un choc
électrique.
Ne laissez pas que de l'eau
coule sur les pièces
électriques
• Ceci peut provoquer un
dysfonctionnement de
l'appareil ou un choc
électrique.
Utilisez un chiffon doux
pour le nettoyage. N'utilisez
pas de cire, de diluant ou de
détergents agressifs.
•
L'aspect du climatiseur peut être
détérioré, la couleur peut changer
ou des imperfections peuvent
apparaître sur
la surface.
Wax
Thinner
Ventilez bien la pièce lorsque vous
utilisez cet appareil en même
temps qu’une gazinière, etc.
• Il est possible que vous manquiez
d’oxygène.
Lors du nettoyage de l'unité,
assurez-vous d'abord que
l'interrupteur et le disjoncteur
sont sur la position Arrêt (OFF).
•
Autrement, vous pourriez vous blesser,
le ventilateur tournant à une vitesse
très forte lorsque
l'unité est en marche.
Mettez l'interrupteur principal sur la
position arrêt (off) au cas où le
climatiseur ne serait pas utilisé
pendant une longue période de temps.
• Ceci préviendra un démarrage
accidentel et de possibles
blessures.
Débranchez l'unité si elle
dégage de la fumée, des sons
ou des odeurs étranges.
•
Ceci peut provoquer un incendie
et un incident de choc électrique.
N’ouvrez pas l’orifice
d’aspiration de l’appareil
interne/externe pendant son
fonctionnement.
• Sinon, cela risque de provoquer
une décharge électrique et une
panne.
Si de l'eau entre à l'intérieur du climatiseur,
placez l'interrupteur principal de l'appareil
sur la position arrêt (off). Après avoir
débranché la fiche de la prise de courant,
contactez le centre de service après-vente .
Ne placez pas d'objets lourds
sur le cordon d'alimentation et
faites attention à ce que le
cordon ne soit pas pressé.
•
Ceci risquerait de provoquer
un incendie ou un choc
électrique.
Ne partagez pas la prise de
courant avec d'autres appareils.
•
Ceci risque de provoquer un
choc électrique ou un incendie
dû au dégagement de chaleur.
Débranchez le cordon d’alimentation
si cela s’avère nécessaire, en tenant
le cordon par la fiche, et ne le touchez
pas avec des mains humides.
• Sinon, cela risque de provoquer
un incendie ou une décharge
électrique.
Précautions de sécurité
Page 26

FRANÇAIS
Manuel de l'utilisateur 5
■ Installation
Ne mettez en marche ni arrêtez
l'unité en branchant ou
débranchant la fiche d'alimentation.
• Ceci risque de provoquer un
choc électrique ou un
incendie dû au dégagement
de chaleur.
N'utilisez pas de câbles
électriques endommagés ou
non spécifiés
• Ceci risque de provoquer un
choc électrique ou un
incendie.
N'utilisez pas cette unité
avec les mains humides ou
dans une ambiance humide.
• Ceci risque de provoquer un
choc électrique.
Prenez la fiche par sa tête
lorsque vous la débranchez.
• Autrement vous risquez de
provoquer un choc électrique
et des dommages.
En cas de fuite gaz, ouvrez la
fenêtre afin de ventiler la
pièce avant de mettre
l’appareil en marche.
• Sinon, cela risque de provoquer
une explosion et un incendie.
Ne touchez pas les
composants métalliques de
l'unité lors de l'enlèvement
du filtre.
• Il y a des bords aiguisés
pouvant vous provoquer des
blessures.
Installez le produit de sorte que le bruit ou
le courant d’air chaud ne provoquent
aucune détérioration chez vos voisins.
• Sinon, cela risque de provoquer un litige avec
vos voisins.
Conservez le niveau parallèle lorsque vous
installez le produit.
• Sinon, cela risque de provoquer des vibrations
ou des fuites d’eau.
Précautions de sécurité
Page 27

6
Climatiseur
Prenez soin de ne pas
toucher les bords aiguisés
lors de l'installation.
• Ceci peut provoquer des
blessures.
Evitez tout rafraîchissement
excessif et ventilez de temps
à autre.
• Sinon, cela risque d’être
dangereux pour votre santé.
Ne mettez pas vos mains ou
une barre à l’intérieur de
l’arrivée ou de la sortie d’air
pendant le fonctionnement.
• Sinon, cela risque d’entraîner
une blessure physique.
’exposez pas un animal
domestique ou une plante
au flux direct de l'air.
• Ceci peut nuire à l'animal ou
à la plante.
Ne bloquez pas la grille
d'entrée ou de sortie d'air.
• Ceci peut provoquer une
défaillance de l'appareil ou un
incident.
Utilisez un chiffon doux
pour le nettoyage. N'utilisez
pas de cire, de diluant ou de
détergents agressifs.
•
L'aspect du climatiseur peut être
détérioré, la couleur peut changer
ou des imperfections peuvent
apparaître sur la surface.
Ne marchez pas sur
l’appareil interne/externe et
ne posez rien dessus.
• Cela risque de provoquer une
blessure en cas de chute.
Insérez toujours fermement
les filtres. Nettoyez-les
toutes les deux semaines.
• Faire marcher le climatiseur
sans filtres peut provoquer un
dysfonctionnement.
Ne buvez pas l'eau drainée
du climatiseur.
• Elle contient des polluants et
vous rendra malade.
■ Fonctionnement
Précautions de sécurité
Page 28

FRANÇAIS
Manuel de l'utilisateur 7
Avant l'utilisation
1. Contactez un spécialiste en installations pour l'installation.
2. Branchez correctement la prise d'alimentation.
3. Utilisez un circuit dédié.
4. N'utilisez pas de rallonges.
5. Ne mettez pas en marche ou éteignez cet appareil en branchant/débranchant le cordon
d'alimentation.
6. Si le cordon ou la fiche est endommagé, remplacez-le seulement par une pièce de rechange
autorisée.
1. S'exposer directement sous le flux d'air pour une longue période de temps pourrait entraîner des
risques pour la santé.
N'exposez pas directement les occupants, les animaux ou les plantes au flux d'air pour de
longues périodes de temps.
2. Afin d'éviter de possibles déficiences d'oxygène, aérez la pièce lorsque vous utilisez cette unité
simultanément avec des poêles ou d'autres dispositifs de chauffage.
3. N'utilisez pas ce climatiseur pour des objectifs spéciaux non spécifiés dans ce manuel (p.ex.pour
préserver des dispositifs de précision, des aliments, des animaux, des plantes ou des objets
d'art). Un tel usage pourrait endommager les composants de l'unité.
1. Ne touchez pas aux composants métalliques de l'unité lors de l'enlèvement du filtre.Vous
pourriez vous blesser en manipulant des bords métalliques affilés.
2. N'utilisez pas de l'eau pour nettoyer l'intérieur du climatiseur. Le contact avec de l'eau détruit
l'isolement, entraînant de possibles chocs électriques.
3. Lors du nettoyage de l'unité, assurez-vous d'abord que
l'interrupteur et le disjoncteur sont sur la position Arrêt (OFF). Le ventilateur tourne à une vitesse
très forte pendant que l'unité est en marche.Vous pourr iez vous blesser si l'unité est
accidentellement mise en marche alors que vous nettoyez les parties intér ieures de l'unité-
Pour réparation et maintenance, contactez le service technique agrée de votre revendeur.
Avant l'utilisation
Préparation pour la mise en service
Utilisation
Nettoyage et entretien
Service technique
Page 29

Introduction
Ce symbole vous avertit sur un risque d'électrocution.
Ce symbole vous avertir sur les risques d'endommager le
climatiseur.
Ce symbole indique des notes spéciales.
REMARQUE
ATTENTION: Cet appareil doit être installé conformément à la réglementation
nationale en matière d'installations électriques. Ce manuel joue le rôle d'un
guide vous aidant à comprendre les caractéristiques du produit.
BOÎTIER
GRILLAGE
FRONTAL
FILTRE Á AIR
PRISE
D'ADMISSION
D'AIR
(GRILLAGE
DE LA PRISE)
DÉCHATGE D'AIR
DÉFLECTEUR
D'AIR VERTICAL
(VOLET HORIZONTAL)
PANNEAU DES
COMMANDES
CONDENSEUR
COMPRESSEUR
ÉVAPORATEUR
FIL D'ALIMENTATION
PLATEAU DE
LA BASE
ATTAACHE
PRENDRE PARTI
LOUVER
°
C
°
C
Symboles utilisés dans ce manuel
Caractéristiques
Introduction
8
Climatiseur
Page 30

Sécuritéélectrique
Données électriques
Utilisez une prise murale Alimentation
Prise trifilaire standard de 125 V,
avec mise à la terre, classée 15 A,
pour c.a. de 125 V.
Prise trifilaire standard de 250 V,
avec mise à la terre, classée 15 A,
pour c.a. de 250 V.
Utilisez un fusible à
action différée ou un
coupe-circuit de
15 ampères.
Utilisez un fusible à
action différée ou un
coupe-circuit de
20 ampères.
Prise trifilaire standard de 250 V,
avec mise à la terre, classée 20 A,
pour c.a. de 250 V.
Laformepeutvarierenfonctiondumodèle.
REMARQUE
N'UTILISEZ PAS DE RALLONGE pour des unités à 230, 208 et 230/208 volts.
Tout le câblage doit être effectué conformément aux réglementations et aux codes électriques locaux.
Une installation électrique en aluminium peut poser des problèmes particuliers. Consultez un électricien
qualifié.
REMARQUE
Sécurité électrique
Manuel de l'utilisateur 9
FRANÇAIS
Page 31

ATTTENTION : Cet appareil doit être correctement raccordé à la terre .
Afin de minimiser le risque de décharge électrique, vous devez toujours brancher cet appareil à
une prise secteur raccordée à la terre.
DANGER : Ne coupez pas ou ne retirez pas la fiche de raccordement à
la terre de la prise secteur.
DANGER : Fixer le terminal de raccordement à la terre de l’adaptateur à
la vis de la paroi du couvercle du réceptacle ne raccorde pas l’appareil
à la terre, sauf si la vis du couvercle est métallique et n’est pas isolée,
et si la paroi du réceptacle est raccordée à la terre par le biais du
câblage de la maison.
DANGER : En cas de doute sur le raccordement à la terre du
climatiseur, faîtes vérifier la paroi du réceptacle et le circuit par un
électricien qualifié.
Méthode conseillée
Assurez-vous de l’existence
d’un raccordement à la terre
convenable avant d’utiliser
l’appareil.
Sécurité électrique
10
Climatiseur
Sécurité électrique
Page 32

Sécurité électrique
Nous décourageons fortement l’utilisation d’un adaptateur en raison du danger potentiel.
Pour les branchements temporaires, utilisez un adaptateur homologué par l’UL, disponible chez la
plupart des quincailliers. Assurez-vous que la grande rainure de l’adaptateur est alignée avec la
grande rainure du réceptacle pour respecter les polarités.
Pour débrancher le cordon d’alimentation de l’adaptateur, placez une main sur le cordon et l’autre
sur l’adaptateur afin d’éviter de détériorer la terminaison de raccordement à la terre. Evitez de
débrancher le cordon fréquemment car cela peut finir par entraîner une détérioration de la
terminaison de raccordement à la terre.
DANGER : N’utilisez jamais cet appareil avec un adaptateur détérioré.
Nous décourageons fortement l’utilisation d’un cordon de rallonge en raison du danger potentiel.
Pour des situations temporaires, utilisez uniquement des cordons de rallonge à trois câbles
homologués par le CSA et par l’UL, d’une puissance nominale de 15A et de 125V.
Méthode temporaire
Adaptateur
Couvercle
du réceptacle
Vis métallique
Utilisation temporaire d’un adaptateur
Utilisation temporaire d’un cordon de rallonge
FRANÇAIS
Manuel de l'utilisateur 11
FRANÇAIS
Page 33

Guide d'installation
Guide d'installation
Conditions requises pour l'installation à la fenêtre
Contenu de l'ensemble d'installation
879 10
3
12
11
16
17
1
6
13
15
4
14
2
5
21" min.
40
1
/2" max.
15 1/2"
min.
21 1/2" min.
15 1/2" min.
16 1/2" max.
NO. NOM DES PIÈCES QTÉ
1 Volet 1
2 Cadre-volet 1
3 Guide supérieur 1
4 Guide latéral 2
5 Applique 1
6 Support 1
7 Boulon de nivellement & écrou 1
8 Boulon 2
9 Écrou 2
10 Rondelle 2
11 Joint d'etanchéité guide latéral 1
12 Bande d'étanchéité en mousse 1
13 Joint del coulisse de la fenêtre 1
14
Manette de verrouillage de la fenêtre
1
15 Vis (Type A) 9
16 Vis (Type B) 3
17 Vis (Type C) 8
Fenêtre coulissante horizontale Fenêtre à battant
1. Ces instructions sont pour un coulissement
horizontal ou une fenêtre à battant.
2. La prise de courant doit être à la por tée du
cordon d'alimentation.
Pour l'installation dans une fenêtre à battant,
l'ensemble du châssis de la fenêtre et le côté de
l'édifice. Doivent être appropriés pour supporter
le poids du conditionneur d'air.
12
Climatiseur
Page 34

Guide d'installation
Choisissez le Meilleur Empla Cement
1. Afin d'empêcher les vibrations et le bruit,
installez solidement l'appareil.
2. Installez le climatiseur là où le soleil ne brillera
pas directement dessus.
3. L'extérieur du boîtier doit sortir d'environ 14 po.
et il ne doit pas y avoir d'obstacles, tels qu'un
mur ou une clôture, à une distance d'au moins
20 po.de l'arrière du boîtier; cette distance
minimale permet une propagation adéquate de
la chaleur du condenseur.
Si vous bloquez le rayonnement de la chaleur à
l'extérieur, la capaité de refroidissement de
l'appareil en sera grandement réduite.
Tous les auvents latéraux du boîtier doivent rester exposés à l'extérieur de la structure.
4. Installez l'unité avec une légère inclinaison de haut en bas, l'arrière légèrement plus bas que
l'avant (à peu près 1/4) Ceci forcera l'excédant de condensation de couler à l'extérieur.
5. Installez l'unité avec le fond environ à 30" - 60" au-dessus du niveau d'écoulement.
REMARQUE
Environ 1/4 po.
30~60 po.
Support
Air refroidi
Clôture
Plus que 20 po.
Rayonnement
de la chaleur
1. Attachez sans serrer le support sur le bas de
l’applique en utilisant les boulons et les
rondelles et les écrous. Attachez le boulon de
nivellement et l’écrou. (schéma 1)
2. Enlevez le support protecteur du joint de
coulisse de fenêtre et appliquez le join à la
piste de fenêtre.
3. Mesurez et marquez légèrement une ligne 81/4 pouces à partir de montant de fenêtre.
Centrez l'ensemble applique sur la coulisse
de la fenêtre et serrez avec 4 vis de
type C.(schéma 2)
Installation de fenêtre coulissante horizontale
Support
Applique
Écrou
Rondelle
Boulon de
nivellement
& écrou
Boulon
Montant de fenêtre
81/4 pouces pouces
Joint de coulisse
de la fenêtre
Coulisse de la fenêtre
Type C Vis
Schéma 1
Schéma 2
Montant de fenêtre
81/4 pouces
Joint de coulisse
de la fenêtre
Coulisse de la fenêtre
Type C Vis
FRANÇAIS
Manuel de l'utilisateur 13
FRANÇAIS
Page 35

Guide d'installation
4.Tirez le support contre la proi extérne et
serrez les boulons au sommet de l’applique.
Réglez le boulon de nivellement jusqu’à ce
que le conditionneur d’air soit installé
légèrement penché à l'extérieur (à peu près
1/4") vers le bas pour un drainage correct.
Serrez l'écrou. (schéma 3)
NE PERCEZ PAS d’ouverture au bas
du plateau. Le conditionneur d’air est conçu
pour fonctionner avec le bas du plateau
approximativement plein à moitié d’eau.
5. Attachez les guides latéraux sur les côtés du
conditionneur d’air à l'aide de 3 vis type A par
guide. Commencez par la première vis au
milieu du guide. (schéma 4)
6. Fixez le guide supérieur au sommet du
conditionneur d’air à l’aide de 3 vis du type A.
(schéma 4)
7. Mesurez la hauteur de l’ouverture de la fenêtre
à partir du sommet de l’applique comme montré
sur la Fig. 5. Soustrayez 20-3/4 pouces.
Marquez cette mesure sur le volet et coupez le
volet. (schéma 5)
8. Faites glisser le volet dans le cadre-volet. Faites
glisser l'ensemble du cadre-volet dans les
guides latéraux du boîtier du conditionneur d’air.
Faites attention que le volet soit solidement
enfermé de tous les cotés par les cadres
(schéma 6)
REMARQUE
Montant de fenêtre
81/4 pouces
Joint de coulisse
de la fenêtre
Coulisse de la fenêtre
Type C Vis
à peu
près 1/4"
Extérieur mur
Schéma 3
Fixez les guides latéraux
Guide Supérieur
Guide Latéral
Schéma 4
°
C
Cadre-volet
Volet
Schéma 5
Schéma 6
14
Climatiseur
Page 36

Guide d'installation
9. Coupez les joint d’étanchéité en 2 d’égales
longueurs. Enlevez le revêtement protecteur et
appliquez-le sur le côté arrière au dos des
guides latéraux du boîtier, en commençant juste
au-dessous de l'ensemble cadre-volet.Enlevez
la longueur en excès pour que le joint
d’étanchéité soit au niveau du bas du guide
latéral.(schéma 7)
10. Placez le conditionneur d’air dans l’ouverture
de la fenêtre.Il doit s’appuyer sur l’ensemble
applique pour que le cadre-volet et les guides
latéraux du boîtier soient contre le sommet et
les côtés des montants de fenêtre.Aavant de
Support avec le guide de base qui a attaché le
bas de plateau de la base.
11.Forez les trous de 1/8 pouce dans la coulisse
de la fenêtre par les trous existants du guide de
base.Vissez 4 vis du type C par les trous.
12. Si c'est une installation d’une fenêtre à
battants, procédez à l'installation de la fenêtre
à battants.
Faites glisser le châssis la fenêtre fermement
contre le côté du boîtier.
13. Frez les trous de 1/8 pouce pour aligner avec
les trous existants du cadre-volet.Attachez le
cadre-volet avec des vis de type B. (schéma 8)
Contrôlez tous les joins d'étanchéité
et les prises pour voir s'il reste des
intervalles d'air avec un calfeutrage
résistant aux intempéries.
14. Si c'est une installation d’une fenêtre à
battants, procédez à l'installation de la
fenêtre à battants. Rembourrez la bande
d'étanchéité en mousse entre le cadre
vertical et la vitre de la fenêtre. (schéma 9)
15. Attachez la manette de verrouillage de la
fenêtre avec une vis de Type B. (schéma 9)
REMARQUE
Appliquez le joint
d'étanchéité aux
guides latéraux juste
au-dessous du bord
du rideau en trame.
Schéma 7
Type B Vis
Blateau de la base Blateau de la base
Type C ype C VisVis
SupporSupport
guide de baseguide de base
Blateau de la base
Type C Vis
Support
guide de base
Coulisse de
la fenêtre
Schéma 8
°
C
Bande d'étanchéité
en mouse
Manette
de verrouillage
de la fenêtre
Schéma 9ma 9Schéma 9
°C
FRANÇAIS
Manuel de l'utilisateur 15
FRANÇAIS
Page 37

Guide d'installation
Installation de fenêtre à battant
1. Le procédé de installation est identique comme décrit dans les étapes 1 à 11 et l'etape 13 de
l'installation de fenêtre coulissante horizontale.
2. Si l'ouverture de la fenêtre est plus large que 15-3/4 pouces, vous devrez installer un panneau de
liaison. Réalisez ce panneau en bois d'épaisseur de 3/4 pouce et placez-le sur toute la pour le
protéger des intempéries.
3. Cet installation est aussi typique. Puisque les modèles et les tailles des fenêtres à battants sont
très variées, il est recommandé pour faire installer le climatiseur par quelqu'un habile dans ce
type d'installation.
Fil d'alimentation
Vis (Type A)
Fil d'alimentation
Vis (Type A)
A B
°
C
°
C
Installer le cordon d’alimentation
Vous pouvez choisir entre deux méthodes ci-dessous selon votre forme et préférence de selles de
fenêtre.
• Attachez le taquet en utilisant Type A de vis, et
sortez le cordon d’alimentation de la fente "A".
• Attachez le taquet en utilisant le trou gauche
de vis, et tournez correctement pour sortir le
cordon d’alimentation de la fente "B".
Utilisant la fente "A" Utilisant la fente "B"
Schéma 9
16
Climatiseur
Page 38

La télécommande et le tableau de commande auront l'apparence d'une des deux illustrations suivantes.
Instructions d'utilisation
Fonctionnement
Fonctionnement de la télécommande
Power
Tem p
Fan Speed
Timer Mode
1
2
4
3
2
5
6
1
4 5
3
°C
AUTO-REMISE EN MARCHE
En cas de manque de courant, l’unité reprend ses réglages précédents de fonctionnement.
1. PUISSANCE
• Pour mettre en marche (ON) le climatiseur, poussez ce bouton.
• Pour éteindre le climatiseur (OFF), poussez ce bouton.
• Ce bouton a la priorité sur tous les autres
• Lorsque vous mettez en marche, l’unité est en mode de
refroidissement, le ventilateur est à grande vitesse, la
température à 22 °C.
2. PROGRAMMER LA TEMPERATURE
• Utilisez ce bouton pour commander automatiquement la
température de la pièce. La température peut être programmée
dans une marge de 16°C à 30°C par des incréments de 1°C.
3. MODE
- Chaque fois que vous poussez ce bouton, il se déplacera de la
position COOL( froid) ,ENERGY SAVER ( économie d’énergie)
et FAN(ventilateur).
- ENERGY SAVER( Economie d’énergie)
• Le ventilateur s’arrête lorsque le compresseur s’arrête de
refroidir.Environ toutes les trois minutes le ventilateur se
mettra en marche et l’unité vérifiera la température de la
pièce pour déterminer si le refroidissement est nécessaire.
4.
FAN SPEED( Vitesse du ventilateur )
• Chaque fois que vous poussez ce bouton, le programmation
change comme suit : {High(F3)( Fort) → Low(F1)( Faible) →
Med(F2) Medium→ High(F3)} (Fort)
5.TIMER( Minuterie)
- SHUT-OFF TIME( Heure d’arrêt)
• Vous utiliserez nor malement ce bouton pendant votre
sommeil
• Avec l’unité en marche, utiliser le Timer pour programmer le
nombre d’heures de mise en marche jusqu’à l’arrêt.
• Pour le confort de votre sommeil, une fois que le timer est
programmé, la température augmentera de 1°C chaque 30
minutes.
• Chaque fois que vous poussez ce bouton, la programmation
du timer change comme suit : 1 Heure → 2 Heures → etc.
→ 12 Heures maximum.
- START TIME( Heure de départ)
• Avec l’unité en marche, utilisez le timer pour programmer le
nombre d’heure avant la mise en marche de l’unité.
• Chaque fois que vous poussez ce bouton, la programmation
du timer change comme suit :
1 Heure → 2 Heures → etc. → 12 Heures maximum.
6. CAPTEUR DE TELECOMMANDE
Manuel de l'utilisateur 17
FRANÇAIS
Instructions d'utilisation
FRANÇAIS
Page 39

Remplacement des piles de la télécommande
1. Retirez le couvercle situé à l'arrière de la télécommande avec votre pouce.
2. Notez la polarité des piles et insérez deux piles AAA 1.5V neuves.
3. Replacez le couvercle.
N'utilisez pas de piles rechargeables.Remplacez les deux piles à
la fois.
• Si vous ne prévoyez pas utiliser le climatiseur pour une longue période de
temps, retirez les piles de la télécommande.Assurez-vous de remiser la
télécommande à l'écart des endroits excessivement chauds ou humides.
Pour vous assurer du meilleur rendement possible de votre télécommande,
protégez le capteur de télécommande des rayons directs du soleil.
REMARQUE
18
Climatiseur
Instructions d'utilisation
Page 40

Instructions d'utilisation
Additional features
Comment Utiliser le Tuyau d’évacuation
Par temps humide, la condensation excessive peut
déborder de la plaque de base et être éclaboussée
au dos de l'unité. Pour vidanger la condensation,
enlevez le capuchon de drainage et fixez la pipe de
drainage au trou arrière de la cuvette de base.
La Ventilation
Le levier de ventilation doit être en position FERMÉE
(“CLOSE”) afin de conserver les meilleures conditions de
refroidissement. Lorsque vous avez besoin d'air frais dans la
pièce, réglez le levier à la position OUVERTE (“OPEN”). Le
registre est ouvert et l'air ambiant est expulsé à l'extérieur.
Ajuster la direction d'air
La direction de l'air peut être réglée en ajustant les auvents a
la verticale ou à l'horizontale.
• CONTRÔLE HORIZONTAL DE LA DIRECTION
DE L'AIR
La direction horizontale de l'air peut être ajuster en dirigeant
l'auvent vertical à droite ou à gauche.
• REGLAGE VERTICAL
La direction verticale de l'air peut être ajuster en dirigeant
l'auvent horizontal vers le haut ou vers le bas.
VENTCLOSE
OPEN
Tuyau
d'évacuation
Capuchon d'évacuation
°C
°
C
Manuel de l'utilisateur 19
FRANÇAIS
Page 41

Entretien et réparations
Entretien et réparations
Fermez le climatiseur et dÉbranchez la fiche de la Prise de courant.
Nettoyage de filtre à air
Le filtre à air derrière la grille frontale doit être contrôlé et nettoyé au moins toutes les 2 semaines
ou plus souvent si nécessaire.
Pour l'enlever
1. Ouvrez la grille interne vers le bas en retirant sa partie supérieure.
2. Remueva el filtro de aire de la parrilla frontal halando el filtro suavemente hacia arriba.
3. Nettoyez le filtre avec de l'eau chaude et savonneuse.
4. Rincez et secouez doucement l'eau du filtre et laissez-le sécher complètement avant de la
remettre.
ATTENTION: Ne faites pas fonctionner le conditionneur d'air sans un
filtre parce que la saleté l'obstruerait et réduirait ses performances.
Gril de prise
°
C
°
C
NOTE!
Avant d'utiliser le climatiseur fixez le gril avant avec deux vis
entourées avec le manuel d'owner’s.
1. Ouvrez le gril de prise en bas et retirez le filtre à air à air.
2. Attachez le gril avant avec des vis.
3. Réinstallez le filtre à air à air.
4. Fermez le gril de prise.
20
Climatiseur
Page 42

Problème
■ Le climatiseur est débranché ou mal
branché.
■ Fusible sauté ou disjoncteur ouvert.
■ Panne de courant
■ Le débit d'air est restreint.
■ Commande TEMP réglée à un chiffe
plus élevé.
■ Le filtre à air est encrassé.
■ Le climatiseur vient à peine d'être
allumé.
■ L'air froid se perd.
■ Givrage des serpentins de
refroidissement
■ Givrage des serpentins de
refroidissement
Le climatiseur
ne fonctionne
pas du tout.
Le climatiseur
ne refroidit pas.
Présence de
glace sur le
climatiseur
• Veillez à ce que la fiche soit convenablement insérée
dans la prise de courant murale.
• Contrôlez le fusible ou le disjoncteur et remplacez le
fusible ou refermez le disjoncteur.
• Dans le cas d'une panne de courant, placez la
commande d'alimentation à OFF. Lorsque le courant
revient, attendez 3 minutes avant de redémarrer le
climatiseur afin d'éviter de surcharger le
compresseur.
• Veillez ,a ce qu'il n'y ait aucun r ideau, store, pièce de
mobilier ou autre obstacle placé à l'avant du
climatiseur.
• Touner la commande TEMP à un chiffre bas.
• Nettoyez le filtre à air au moins aux deux semaines.
Reportez-vous à la section “Nettoyage et Entretien”
(p.18) du manuel d'utilisation.
• Une fois le climatiseur allumé, il lui faut un certain
temps pour refroidir la pièce.
• Contrôlez la présence de registres de fournaise et de
retours d'air froid.
• FERMEZ l'orifice de ventilation du climatiseur.
• Vo y ez Présence de glace sur le climatisaeur ci-
dessous.
• La glace peut obstruer le débit d'air et nuire au
refroidissement approprié de la pièce.
Pour dégeler le serpentin, régler le MODE à
Fan(VENTILATEUR) ou <<High Cool>> avec la
commande TEMP à élevé.
SolutionsCauses possibles
Résolution des problèmes
Fonctionnement normal
Entretien et réparations
Quelques conseils pour vous dépunner:
Epargnez temps et argent! Révisez le tableau ci-dessous et vous éviterez peut-être un appel de
service coûteux.
• Il se peut que vous entendiez un cliquettement causé par l'eau qui est soulevée et projetée contre
le condensateur lors des jours de pluie ou lorsque le taux d'humidité est élevé.Cette
caractéristque sert à réduire I'humidité et améliorer l'efficacité de I'appareil.
• Il se peut que vous entendiez le thermostat émettre des déclics lorsque le compresseur se met
en/hors fonction.
• L'eau s'accumulera dans le bac du fond lors des jours très humides ou des jours de pluie. L'eau
peut déborder et s'égoutter à l'extérieur de l'appareil.
• Le ventilateur peut fonctionner même si le compresseur est inactif.
Manuel de l'utilisateur 21
FRANÇAIS
Page 43

Visitez notre site web : www.LG.ca LG Electronics Canada, Inc
GARANTIE LIMITÉE
Si le produit présente un défaut de matériaux ou de fabrication dans des conditions d’utilisation normales pendant
la période de garantie indiquée ci-dessous, laquelle période de garantie est en vigueur à partir de la date d’achat
d’origine, LG Electronics réparera ou remplacera, à sa discrétion, le produit sans frais.
La garantie est valide seulement pour l’acheteur d’origine du produit, pendant la période de garantie, tant et aussi
longtemps que cela soit au Canada.
Période de garantie du climatiseur LG
Composant Pièces Main-d’oeuvre
Toutes les pièces 1 ans 1 ans (service à domicile)
Compresseur 7 ans 1 ans (service à domicile)
Aucune autre garantie n’est applicable à ce produit. LA DURÉE DE TOUTE GARANTIE IMPLICITE, INCLUANT
LA GARANTIE IMPLICITE DE COMMERCIALISATION, EST LIMITÉE À LA DURÉE DE LA GARANTIE
EXPRESSE INDIQUÉE CI-APRÈS. LG ELECTRONICS NE PEUT ÊTRE TENUE RESPONSABLE POUR LA
PERTE D’UTILISATION DE CE PRODUIT, INCONVÉNIENT, PERTE OU TOUT AUTRE DOMMAGE, DIRECT
OU INDIRECTS, SURVENANT À LA SUITE DE L’UTILISATION OU DE L’INHABILITÉ À UTILISER LE
PRODUIT OU POUR TOUT BRIS DE GARANTIE IMPLICITE OU EXPRESSE, INCLUANT LA GARANTIE
IMPLICITE DE COMMERCIALISATION OU À DES FINS PARTICULIÈRES, APPLICABLES À CE PRODUIT.
Certaines provinces ou territoires ne permettent pas l’exclusion ou la limitation de dommages indirects ou accessoires
de limitation sur la durée d’une garantie implicite, par conséquent, ces limitations peuvent ne pas s’appliquer.
Cette garantie vous (l’acheteur d’origine) donne des droits spécifiques légaux et vous pouvez en avoir d’autres qui
varient d’une province ou territoire à un autre.
LA GARANTIE SUSMENTIONNÉE NE S’APPLIQUE PAS :
1. Au déplacement de service à domicile pour livrer ou cueillir, installer, instruire ou remplacer un fusible ou
rebrancher le câblage résidentiel ou la plomberie ou corriger une réparation non autorisée.
2. Aux dommages au produit causés par accident, vermine, incendie, inondation ou actes de Dieu.
3. Aux réparations lorsque le produit LG est utilisé à des fins autres que normales, utilisation résidentielle unifamiliale
ou contraire aux instructions données dans le guide du propriétaire du produit.
4. Aux dommages résultant d’accident, modification, mauvaise utilisation, abus ou installation ou entretien inadéquat.
5. Aux produits modifiés ou dont le numéro de série a été enlevé.
Si le produit est installé à l’extérieur de la zone de service normale, tous frais de déplacement nécessaire pour la
réparation du produit, ou le remplacement d’une pièce défectueuse seront imputés au propriétaire.
INFORMATION D’AIDE À LA CLIENTÈLE :
Conserver la facture comme preuve de la date d’achat.
Une copie de la facture doit être présentée lorsqu’un service sous
garantie est fourni.
Cette garantie n’est pas valide si le numéro de série apposé en usine
a été modifié ou enlevé du produit.
Téléphoner au 1.888.LG.CANADA (542.2623)
Presser l’option du menu approprier, et avoir les numéros de
modèle et de série et votre code postal sous la main.
Aller au site web : www.LG.ca (option service) ou téléphoner au
1.888.LG.CANADA (542.2623)
Presser l’option du menu approprier, et avoir les numéros de
modèle et de série et votre code postal sous la main.
Pour obtenir une garantie :
Pour obtenir de l’aide sur le
ou pour le service à la clientèle :
Pour obtenir le centre de
service autorisé le plus près :
Page 44

Printed in ChinaP/No.: MFL38433204
Visit our web site: www.LG.ca LG Electronics Canada, Inc.
LIMITED WARRANTY
Should your product prove to be defective in materials or workmanship under normal use during the warranty
period listed below, which warranty period runs from the original date of purchase, LG Electronics will, at its
option, repair or replace the product at no charge to you.
The warranty is valid only to the original purchaser of the product, during the warranty period, as long as it is in
Canada.
LG Room Air Conditioner Warranty Period
Components Parts Labor
All Parts 1 Years 1 Years (In-Home Service)
Compressor 7 Years 1 Years (In-Home Service)
No other warranty is applicable to this product. THE DURATION OF ANY IMPLIED WARRANTIES, INCLUDING
THE IMPLIED WARRANTY OF MERCHANTABILITY, IS LIMITED TO THE DURATION OF THE EXPRESS
WARRANTY HEREIN. LG ELECTRONICS SHALL NOT BE LIABLE FOR THE LOSS OF USE OF THE
PRODUCT, INCONVENIENCE, LOSS OR ANY OTHER DAMAGES, DIRECT OR CONSEQUENTIAL,
ARISING OUT OF THE USE OF OR INABILITY TO USE, THIS PRODUCT OR FOR ANY BREACH OF ANY
EXPRESS OR IMPLIED WARRANTY, INCLUDING THE IMPLIED WARRANTY OF MERCHANTABILITY OR
FITNESS FOR A PARTICULAR PURPOSE, APPLICABLE TO THIS PRODUCT.
Some Provinces or Territories do not allow for the exclusion or limitation of incidental or consequential damages of
limitations on how long an implied warranty lasts; so these limitations or exclusions may not apply to you.
This warranty gives you, (the original purchaser) specific legal rights and you may also have other rights, which vary
from province to province or territory to territory.
THE ABOVE WARRANTY DOES NOT APPLY TO:
1. Service trips to your home to deliver and pickup, install, instruct or replace house fuses, or connect house wiring or
plumbing, or correction of unauthorized repairs.
2. Damage to the product caused by accident, pest, fire, floods or acts of God.
3. Repairs when your LG product is used in other that normal, single-family household use or contrary to the
instructions outlined in the product’s owners manual.
4. Damage resulting from accident, alteration, misuse, abuse, or improper installation or maintenance.
5. Products with altered or removed serial numbers.
If the product is installed outside the normal service area, any cost of transportation involved in the repair of the
product, or the replacement of a defective part, shall be borne by you (the owner).
CUSTOMER ASSIST ANCE INFORMA TION:
Retain your Bill of Sale to prove the date of purchase.
A copy of your Sales Receipt must be submitted when warranty
service is provided.
This warranty is invalid if the factory applied serial number has
been altered or removed from the product.
Call 1-888-LG-CANADA (542 2623)
Press the appropriate menu option, and have your product model
and serial numbers and your postal code ready.
Access our web-site at: www.LG.ca (Service Option) or
Call 1-888-LG-CANADA (542 2623)
Press the appropriate menu option, have your product
model & serial numbers & your postal code ready.
To obtain Warranty Coverage:
To obtain Product or Customer
Service Assistance:
To obtain the nearest
Authorized Service Center:
 Loading...