

LG LTNC246PLF3 Owner’s Manual
AIR
CONDITIONER
Please read this manual carefully before operating
your set and retain it for future reference.
TYPE : Highlander Ceiling Cassette Air Conditioner
For single cassette export models
P/No. : MFL62865705_v2
MFL62865705
www.lg.com
Ceiling Cassette Air Conditioner Owner’s Manual
TABLE OF CONTENTS
Safety Precautions.........................3
Prior to Operation ..........................8
Introduction ....................................9
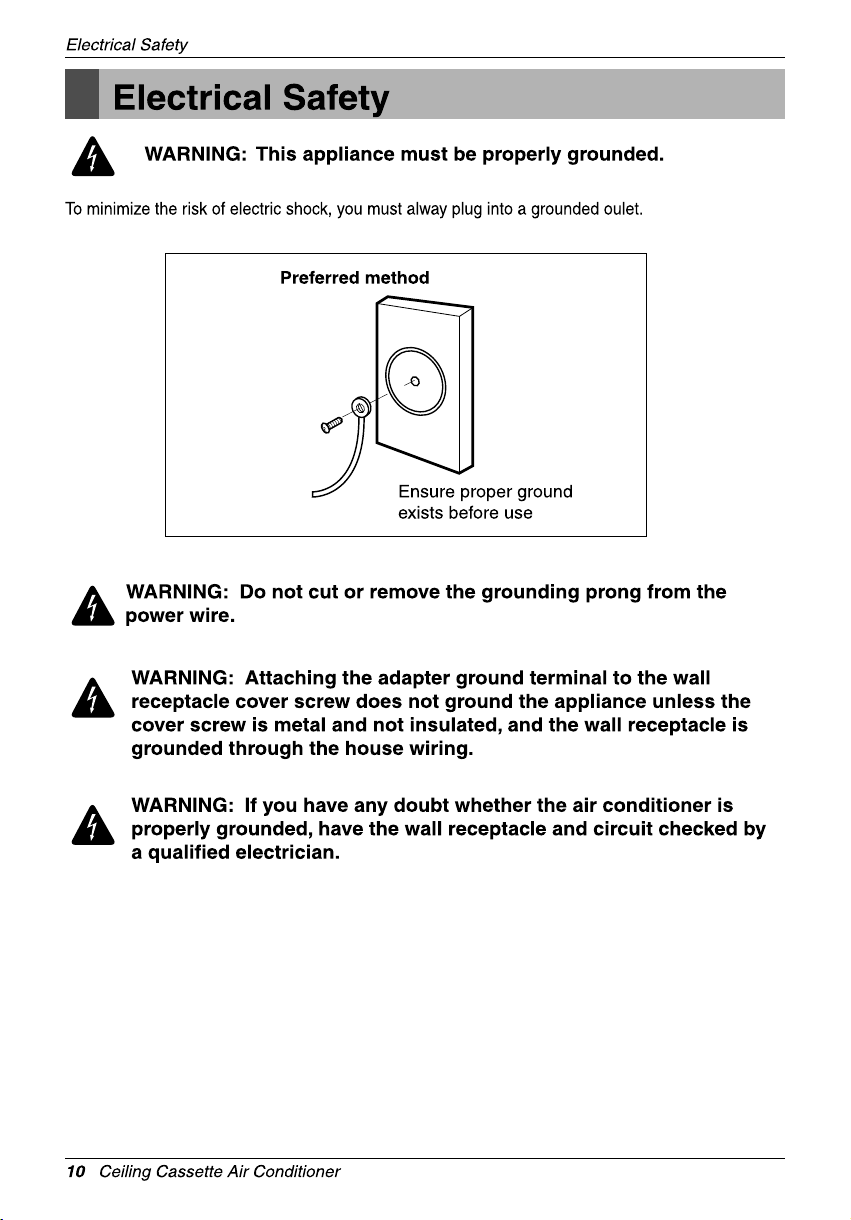
Electrical Safety ...........................10
Operating Instructions.................11
Maintenance and Service ............66
FOR YOUR RECORDS
Write the model and serial numbers here:
Model #
Serial #
You can find them on a label on the side of each unit.
Dealer's Name
Date Purchased
Staple your receipt to this page in the event you need
n
it to prove date of purchase or for warranty issues.
READ THIS MANUAL
Inside you will find many helpful hints on how to use
and maintain your air conditioner properly. Just a little
preventive care on your part can save you a great deal
of time and money over the life of your air conditioner.
You'll find many answers to common problems in the
chart of troubleshooting tips. If you review our chart of
Troubleshooting Tips first, you may not need to call
for service at all.
PRECAUTION
• Contact the authorized service technician for
repair or maintenance of this unit.
• Contact the installer for installation of this unit.
• The air conditioner is not intended for use by
young children or invalids without supervision.
• Young children should be supervised to ensure
that they do not play with the air conditioner.
• When the power cord is to be replaced,
replacement work shall be performed by
authorized personnel only using only genuine
replacement parts.
• Installation work must be performed in
accordance with the National Electric Code by
qualified and authorized personnel only.
2 Ceiling Cassette Air Conditioner
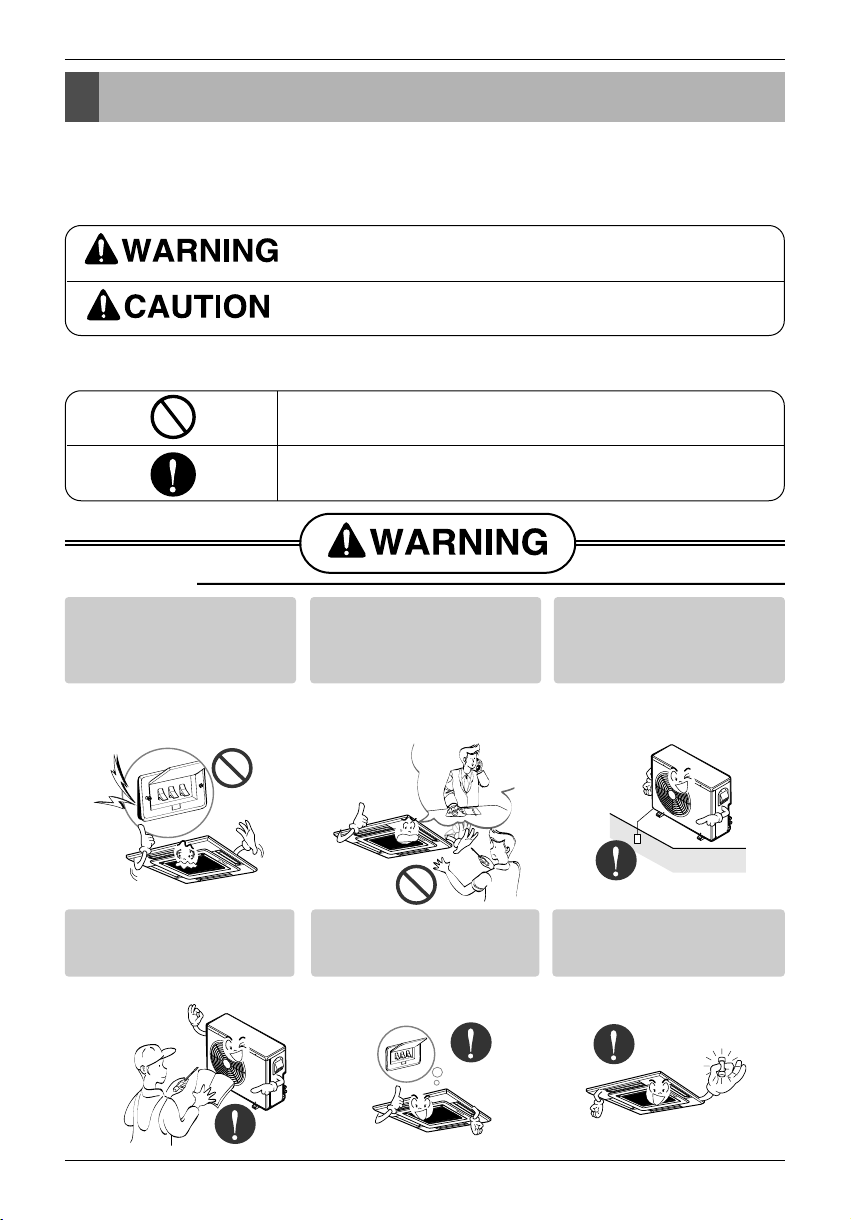
Safety Precautions
Safety Precautions
To prevent injury to the user or other people and property damage, the following instructions
must be followed.
Incorrect operation due to ignoring instruction will cause harm or damage. The seriousness
n
is classified by the following indications.
This symbol indicates the possibility of death or serious injury.
This symbol indicates the possibility of injury or damage.
n Meanings of symbols used in this manual are as shown below.
Be sure not to do.
Be sure to follow the instruction.
n Installation
Do not use a defective or
underrated circuit breaker.
Use this appliance on a
dedicated circuit.
• There is risk of fire or electric
shock.
For electrical work, contact
the dealer, seller, a qualified
electrician, or an Authorized
Service Center.
• Do not disassemble or repair the
product. There is risk of fire or
electric shock.
Always ground the product.
• There is risk of fire or electric
shock.
Install the panel and the
cover of control box
securely.
• There is risk of fire or electric
shock.
Always install a dedicated
circuit and breaker.
• Improper wiring or installation
may cause fire or electric shock
Use the correctly rated
breaker or fuse.
• There is risk of fire or electric
shock.
Owner's Manual 3
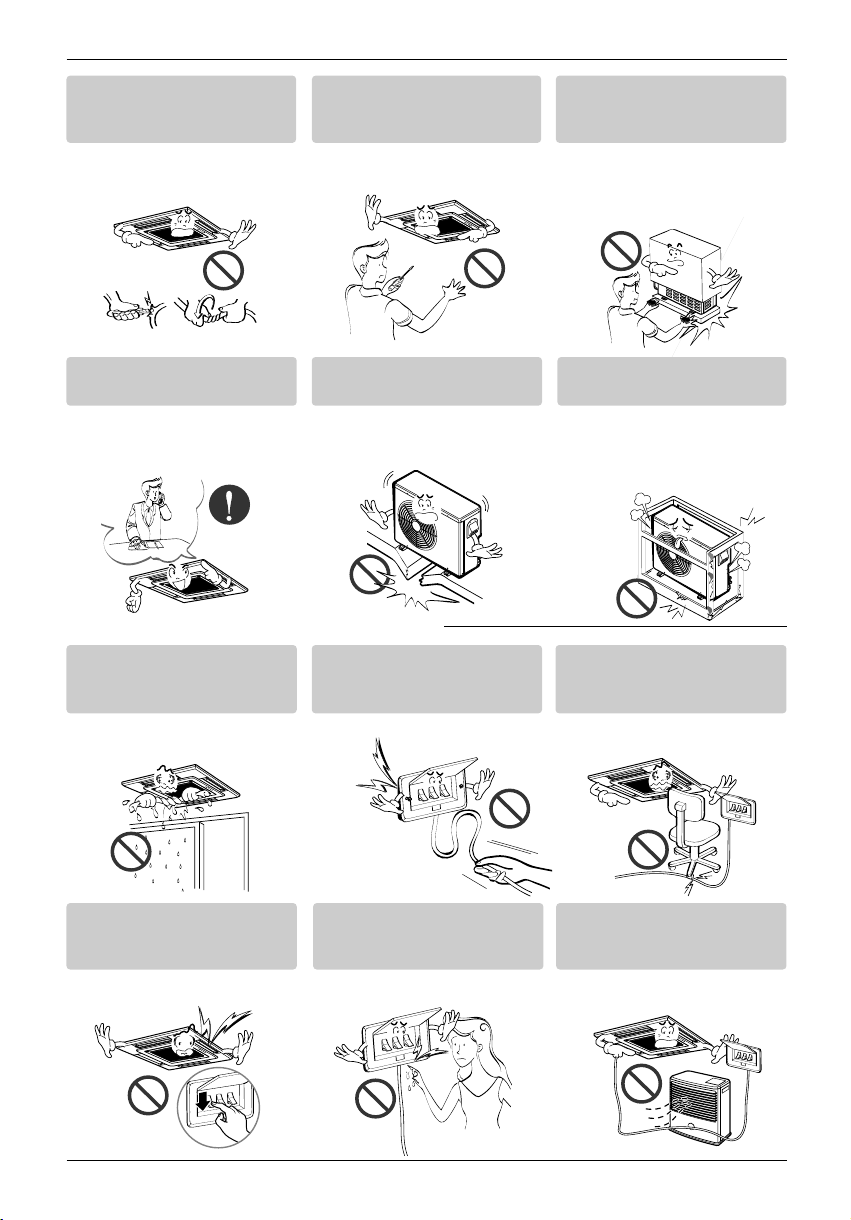
Safety Precautions
Do not modify or extend the
power cable.
• There is risk of fire or electric
shock.
For installation, always contact the
dealer or an Authorized Service Center.
• There is risk of fire, electric
shock, explosion, or injury.
Do not let the air conditioner run for a
long time when the humidity is very high
and a door or a window is left open
• Moisture may condense and wet
or damage furniture.
.
Do not install, remove, or
re-install the unit by yourself
(customer).
• There is risk of fire, electric
shock, explosion, or injury.
Do not install the product on a
defective installation stand.
• It may cause injury, accident, or
damage to the product.
n Operation
Take care to ensure that power
cable could not be pulled out or
damaged during operation.
• There is risk of fire or electric
shock.
Be cautious when unpacking
and installing the product.
• Sharp edges could cause injury.
Be especially careful of the case
edges and the fins on the
condenser and evaporator.
Be sure the installation area
does not deteriorate with age.
• If the base collapses, the air
conditioner could fall with it,
causing property damage,
product failure, and personal
injury.
Do not place anything on
the power cable.
• There is risk of fire or electric
shock.
Do not plug or unplug the
power supply plug during
operation.
• There is risk of fire or electric
shock.
4 Ceiling Cassette Air Conditioner
Do not touch(operate) the
product with wet hands.
• There is risk of fire or electrical
shock.
Do not place a heater or
other appliances near the
power cable.
• There is risk of fire and electric
shock.
Safety Precautions
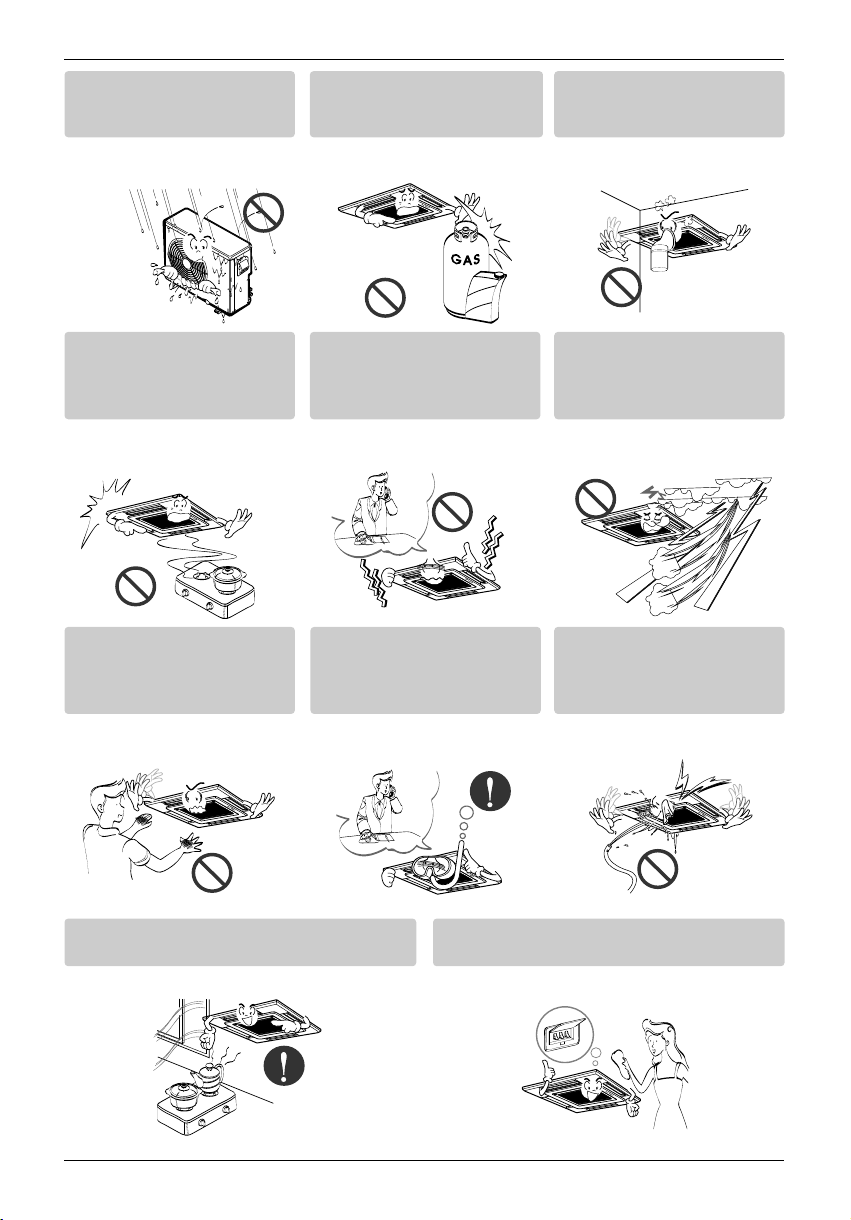
Do not allow water to run
into electric parts.
• It may cause There is risk of fire,
failure of the product, or electric
shock.
When flammable gas leaks,
turn off the gas and open a
window for ventilation
before turn the product on.
• Do not use the telephone or turn
switches on or off.
There is risk of explosion or fire
Do not open the inlet grill of the
product during operation.
(Do not touch the electrostatic
filter, if the unit is so equipped.)
• There is risk of physical injury,
electric shock, or product failure.
Do not store or use flammable
gas or combustibles near the
product.
• There is risk of fire or failure of
product.
n
li
o
as
G
If strange sounds, or small or
smoke comes from product. Turn
the breaker off or disconnect the
power supply cable.
• There is risk of electric shock or
fire.
When the product is soaked
(flooded or submerged),
contact an Authorized
Service Center.
• There is risk of fire or electric
shock.
Do not use the product in a
tightly closed space for a
long time.
• Oxygen deficiency could occur.
Stop operation and close the window
in storm or hurricane. If possible,
remove the product from the window
before the hurricane arrives.
• There is risk of property damage,
failure of product, or electric shock.
Be cautious that water could
not enter the product.
• There is risk of fire, electric shock,
or product damage.
Ventilate the product from time to time when
operating it together with a stove, etc.
• There is risk of fire or electric shock.
Turn the main power off when cleaning or
maintaining the product.
• There is risk of electric shock.
Owner's Manual 5
Safety Precautions
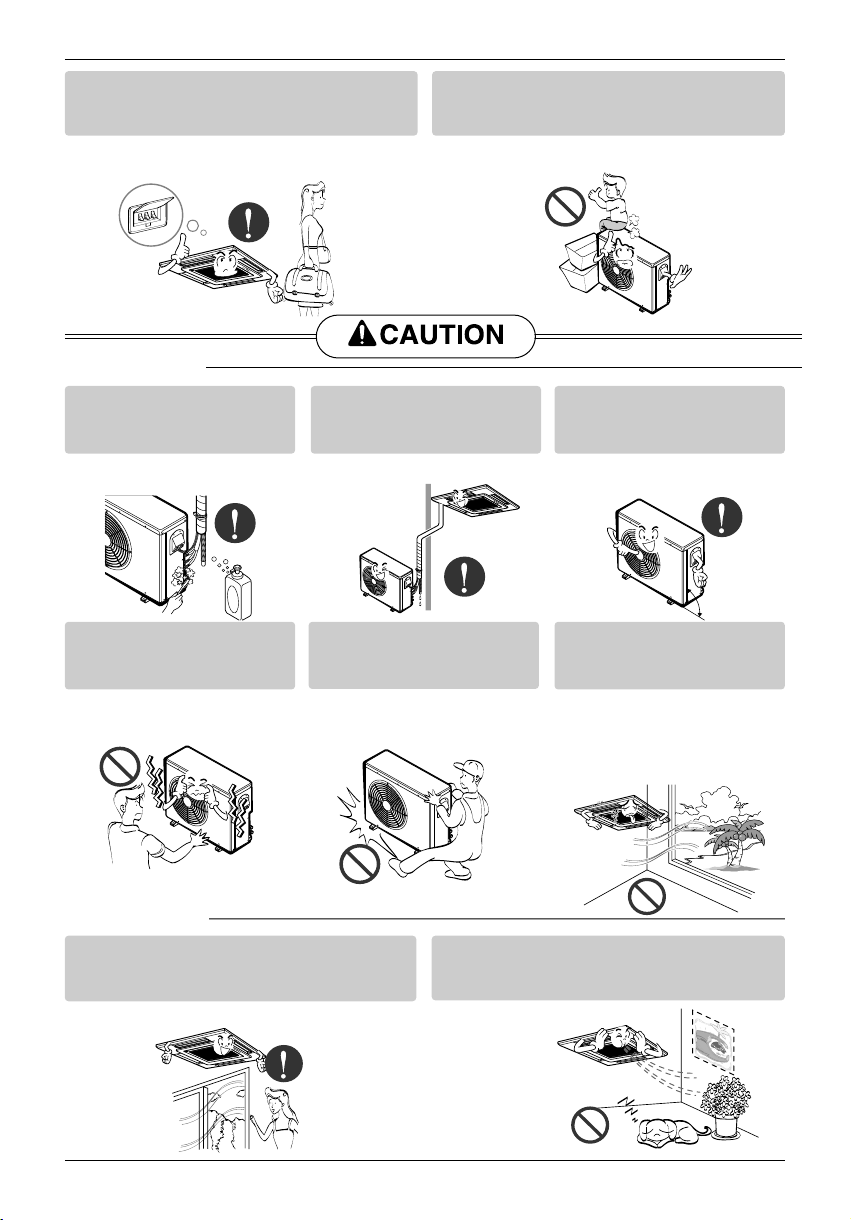
When the product is not be used for a long
time, disconnect the power supply plug or
turn off the breaker.
• There is risk of product damage or failure, or
unintended operation.
n Installation
Always check for gas
(refrigerant) leakage after
installation or repair of product.
• Low refrigerant levels may cause
failure of product.
Do not install the product where the
noise or hot air from the outdoor unit
could damage the neighborhoods.
• It may cause a problem for your
neighbors.
Install the drain hose to
ensure that water is drained
away properly.
• A bad connection may cause
water leakage.
Use two or more people to
lift and transport the
product.
• Avoid personal injury.
Take care to ensure that nobody could step
on or fall onto the outdoor unit.
• This could result in personal injury and product
damage.
Keep level even when
installing the product.
• To avoid vibration or water
leakage.
90°
Do not install the product
where it will be exposed to sea
wind (salt spray) directly.
It may cause corrosion on the
•
product. Corrosion, particularly on
the condenser and evaporator fins,
could cause product malfunction or
inefficient operation.
n Operation
Do not expose the skin directly to cool air
for long periods of time.
(Don't sit in the draft.)
• This could harm to your health.
6 Ceiling Cassette Air Conditioner
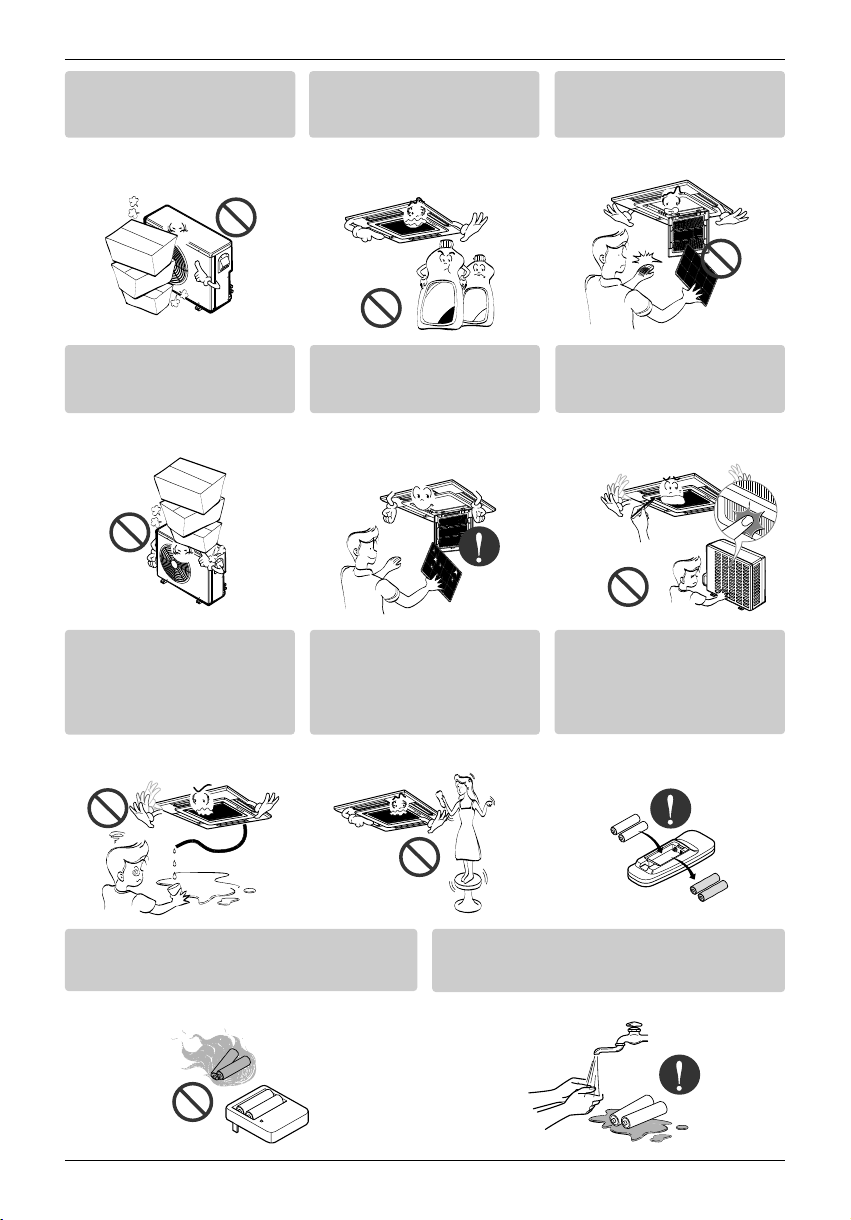
Do not use the product for special purposes, such as
preserving foods, works of art, etc. It is a consumer
air conditioner, not a precision refrigeration system.
• There is risk of
damage or
loss of property.
Safety Precautions
Do not block the inlet or
outlet of air flow.
• It may cause product failure.
Do not step on or put
anyting on the product.
(outdoor units)
• There is risk of personal injury
and failure of product.
Do not drink the water
drained from the product.
• It is not sanitary and could cause
serious health issues.
Use a soft cloth to clean.
Do not use harsh
detergents, solvents, etc.
• There is risk of fire, electric shock,
or damage to the plastic parts of
the product.
ax
r
e
n
n
i
Th
W
Always insert the filter securely.
Clean the filter every two weeks
or more often if necessary.
• A dirty filter reduces the efficiency
of the air conditioner and could
cause product malfunction or
damage.
Use a firm stool or ladder
when cleaning or
maintaining the product.
• Be careful and avoid personal
injury.
Do not touch the metal parts of
the product when removing the
air filter. They are very sharp!
• There is risk of personal injury.
Do not insert hands or other
objects through the air inlet or
outlet while the product is operated.
• There are sharp and moving parts
that could cause personal injury.
Replace the all batteries in the
remote control with new ones
of the same type. Do not mix
old and new batteries or
different types of batteries.
• There is risk of fire or explosion
Do not recharge or disassemble the batteries.
Do not dispose of batteries in a fire.
• They may burn or explode.
If the liquid from the batteries gets onto your
skin or clothes, wash it well with clean water. Do
not use the remote if the batteries have leaked.
• The chemicals in batteries could cause burns or
other health hazards.
Owner's Manual 7

Prior to Operation
Prior to Operation
Preparing for operation
1. Contact an installation specialist for installation.
2. Plug in the power plug properly.
3. Use a dedicated circuit.
4. Do not use an extension cord.
5. Do not start/stop operation by plugging/unplugging the power cord.
6. If the cord/plug is damaged, replace it with only an authorized replacement part.
Usage
1. Being exposed to direct airflow for an extended period of time could be hazardous to
your health. Do not expose occupants, pets, or plants to direct airflow for extended
periods of time.
2. Due to the possibility of oxygen deficiency, ventilate the room when used together
with stoves or other heating devices.
3. Do not use this air conditioner for non-specified special purposes (e.g. preserving
precision devices, food, pets, plants, and art objects). Such usage could damage the
items.
Cleaning and maintenance
1. Do not touch the metal parts of the unit when removing the filter. Injuries can occur
when handling sharp metal edges.
2. Do not use water to clean inside the air conditioner. Exposure to water can destroy
the insulation, leading to possible electric shock.
3. When cleaning the unit, first make sure that the power and breaker are turned off.
The fan rotates at a very high speed during operation. There is a possibility of injury if
the unit’s power is accidentally triggered on while cleaning inner parts of the unit.
Service
For repair and maintenance, contact your authorized service dealer.
8 Ceiling Cassette Air Conditioner
Introduction
Symbols used in this Manual
This symbol alerts you to the risk of electric shock.
This symbol alerts you to hazards that could cause harm to the
air conditioner.
Introduction
NOTICE
This symbol indicates special notes.
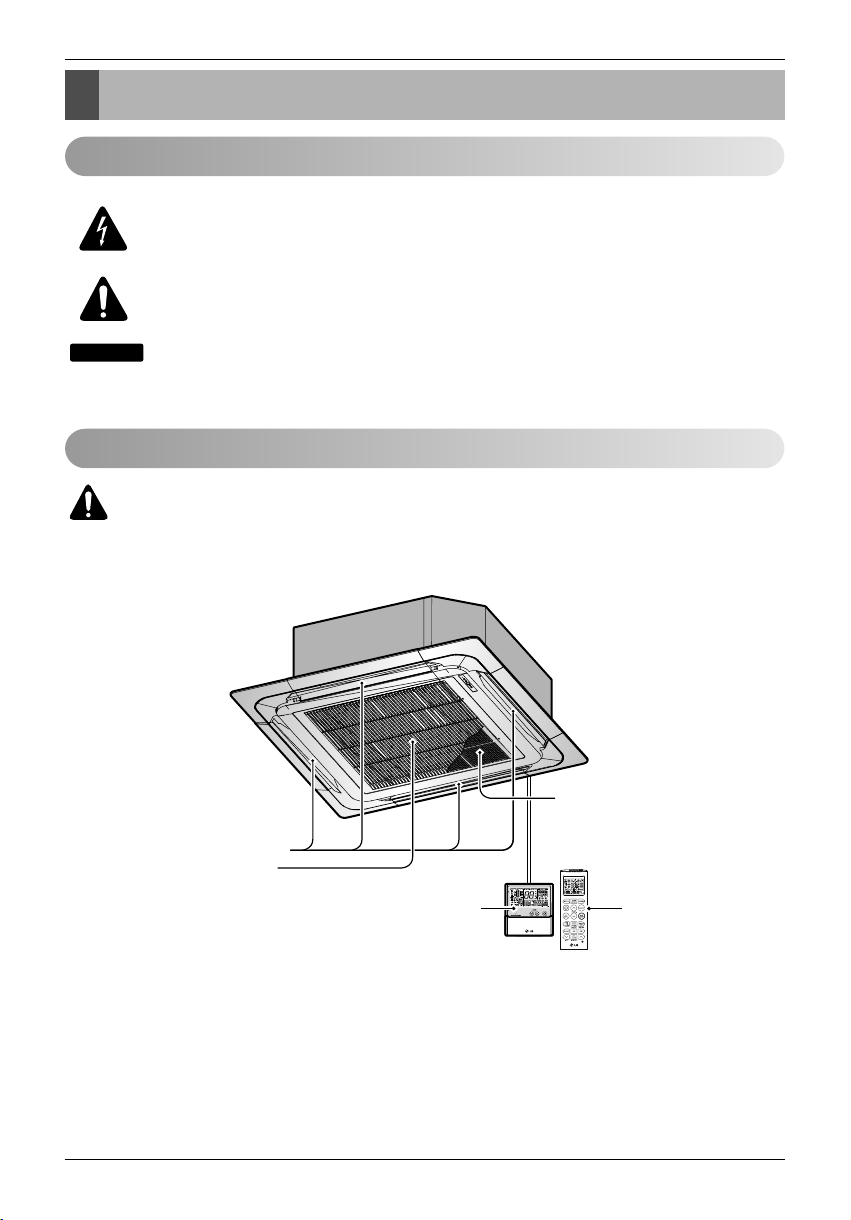
Features
WARNING: This appliance should be installed in accordance with national wiring
regulations. This guide acts as a guide to help to explain product features.
Anti-bacteria
Anti-bacteria
Air Outlet
Air Inlet
Wired
Remote
Controller
(Optional)
Wireless
Remote
Controller
(Standard)
Owner's Manual 9
Operating Instructions
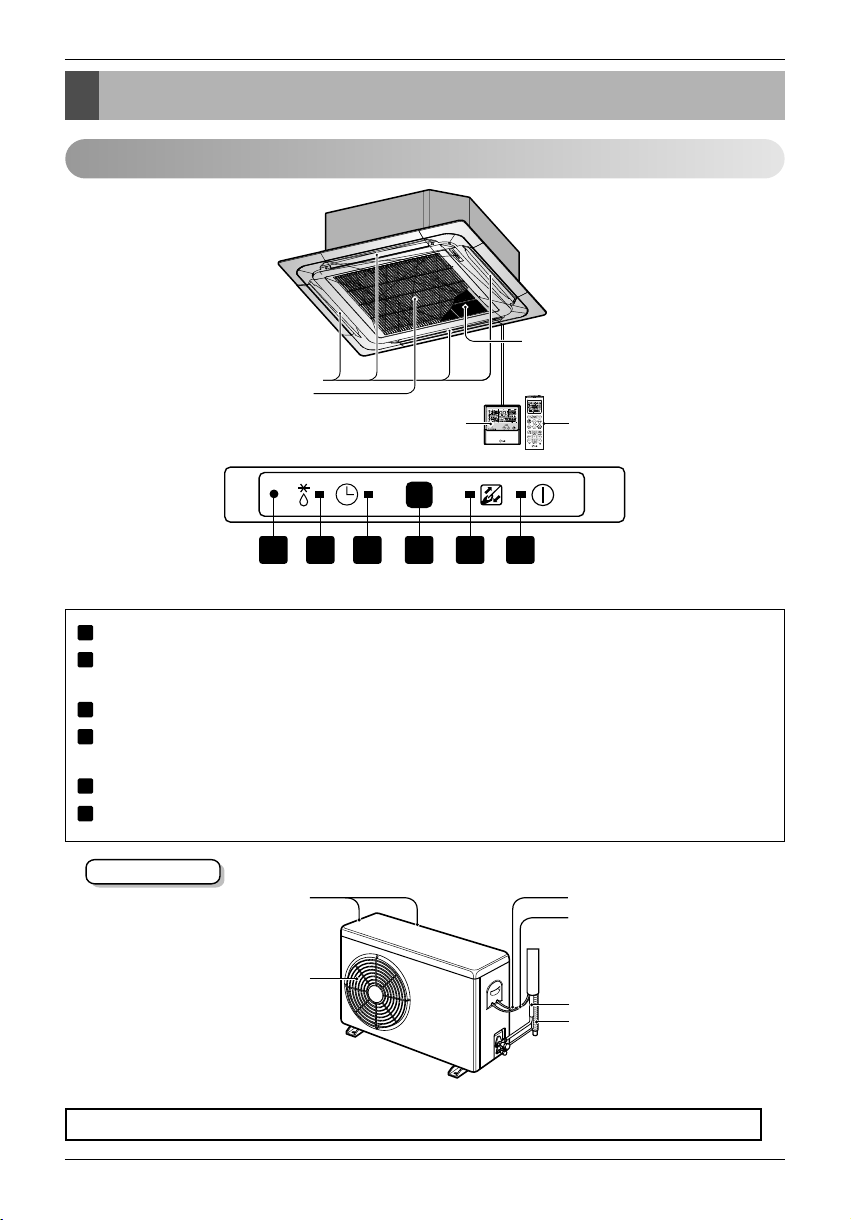
Indoor Unit, Outdoor Unit
Air Outlet
Air Inlet
Wired Remote
Controller (Optional)
Anti-bacteria
Anti-bacteria
Wireless Remote Controller
(Standard)
Operating Instructions
1 2
3
5
4
6
Operation Indication Lamps
1
Forced Operation : Operation procedures when remote control can't be used.
2
Defrost Mode : Lights up during defrost mode or hot start operation.
(heat pump model only)
3
Timer : Lights up during timer operation.
4
Signal Receptor : Receives the signal from remote control (signal receiving sound:
two short beeps and one long beep)
5
Filter Sign : Lights up after 2400 hours from the time of first operation.
6
On/Off : Lights up during system operation.
Outdoor Unit
Air Intake
(side, rear)
Air Outlet
Vents
Connecting Wire
Power Wire
Connection Tube
Drain Hose
Cooling model: Cassette Type Air Conditioner for cooling
Owner's Manual 11
Operating Instructions
Operating Instructions
12 Ceiling Cassette Air Conditioner
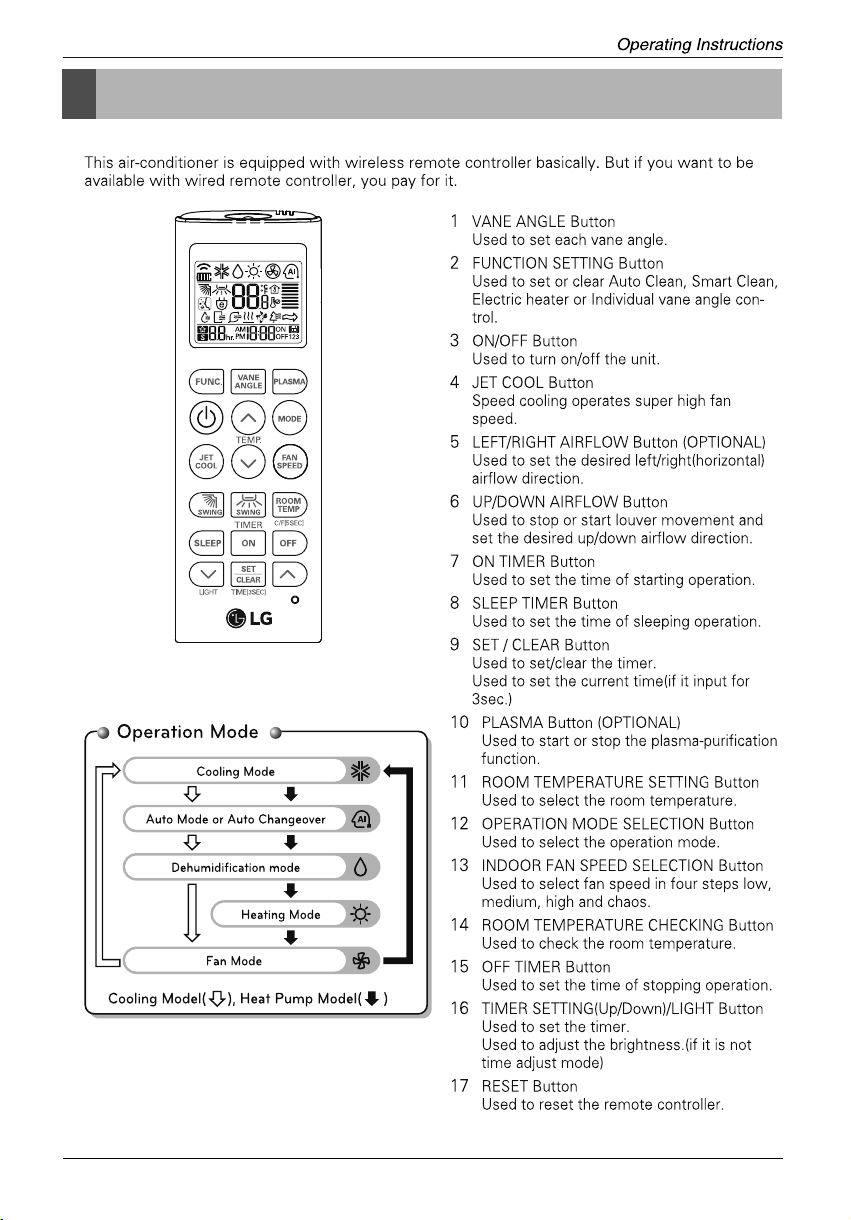
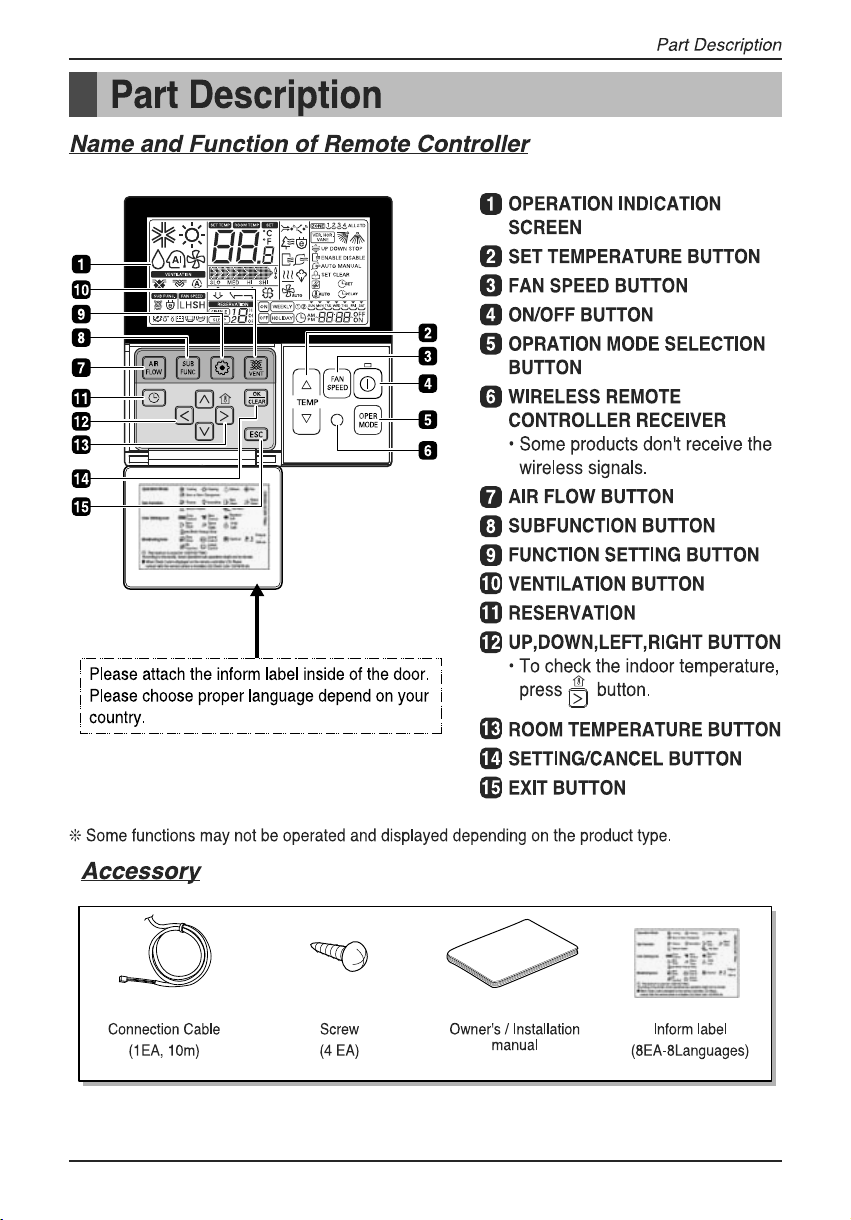
Wireless Remote Controller (Standard)
**Heat Pump functions are optional, not applicable for Cooling only Model.
Owner's Manual 13
Operating Instructions
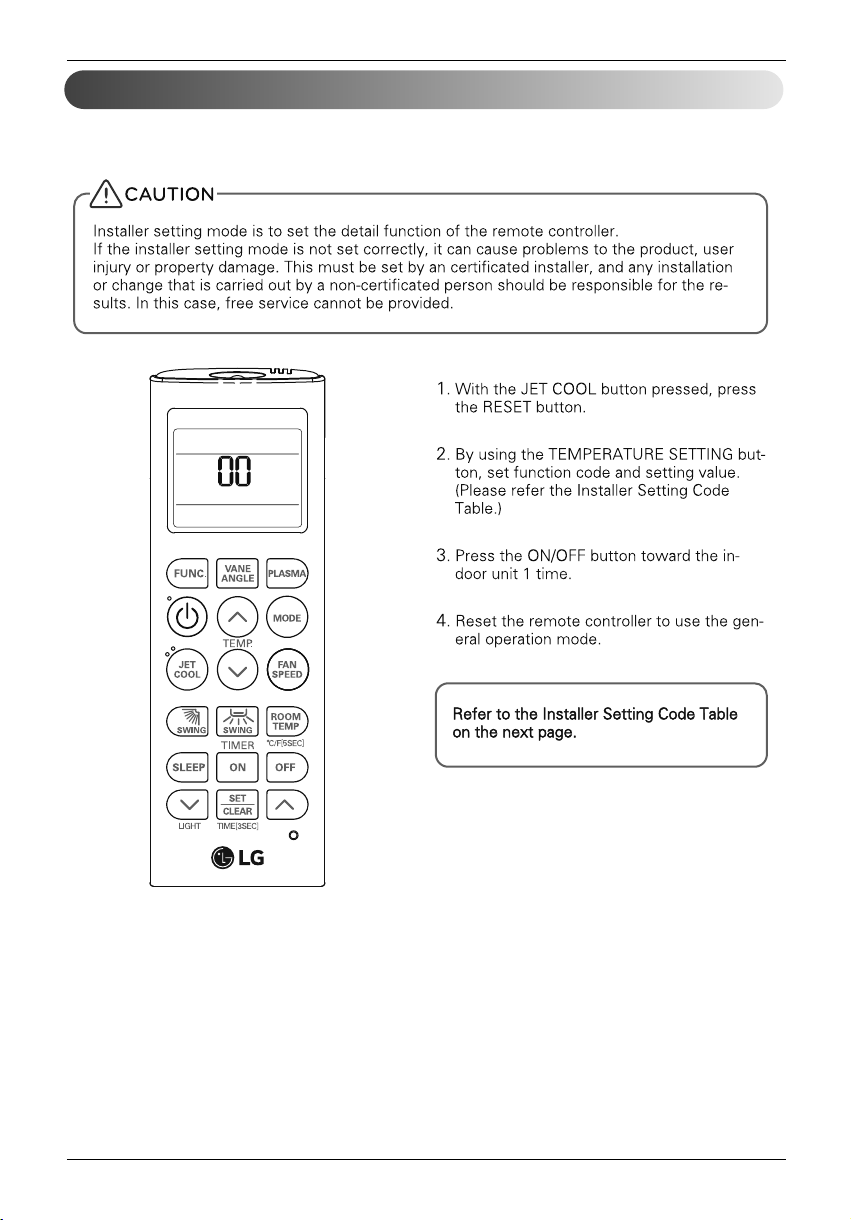
Installer Setting - How to enter installer setting mode
14 Ceiling Cassette Air Conditioner
Operating Instructions
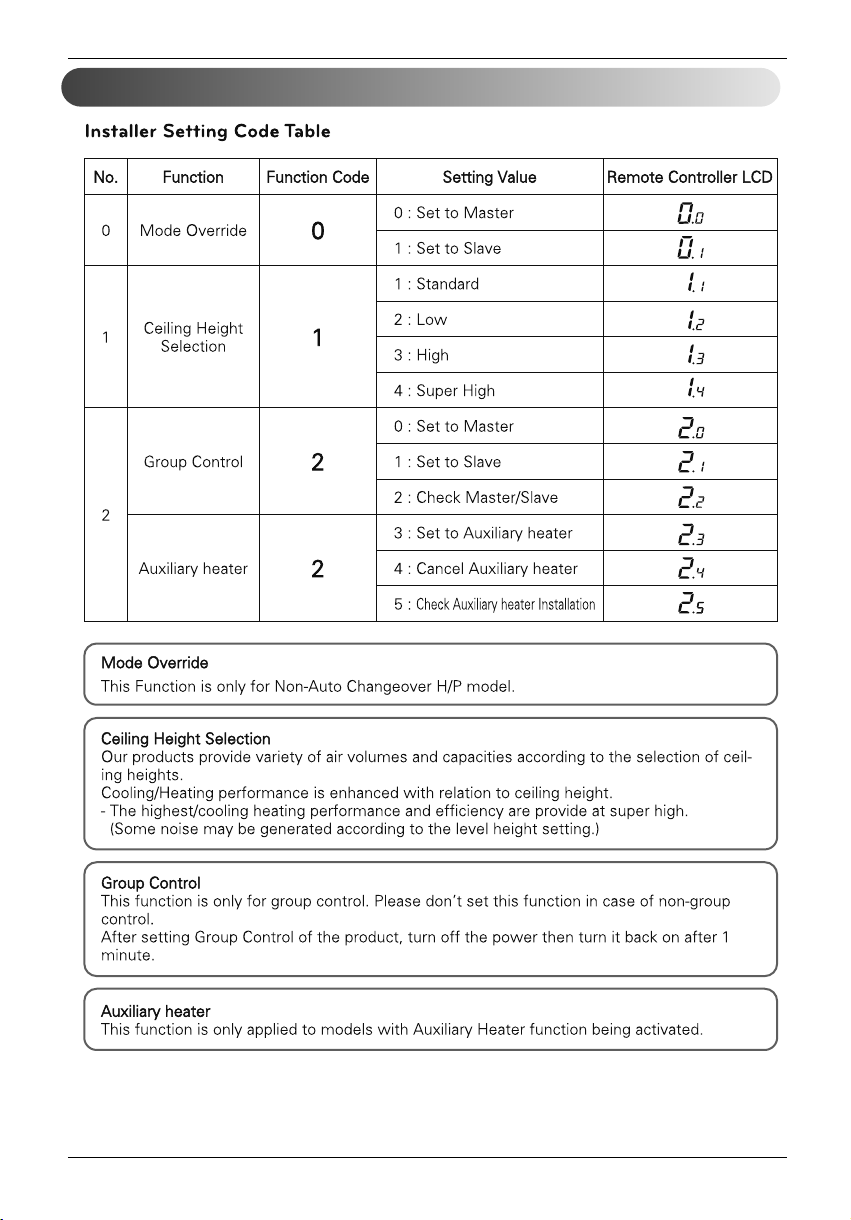
Installer Setting - Installer Setting Code Table
Owner's Manual 15
Operating Instructions
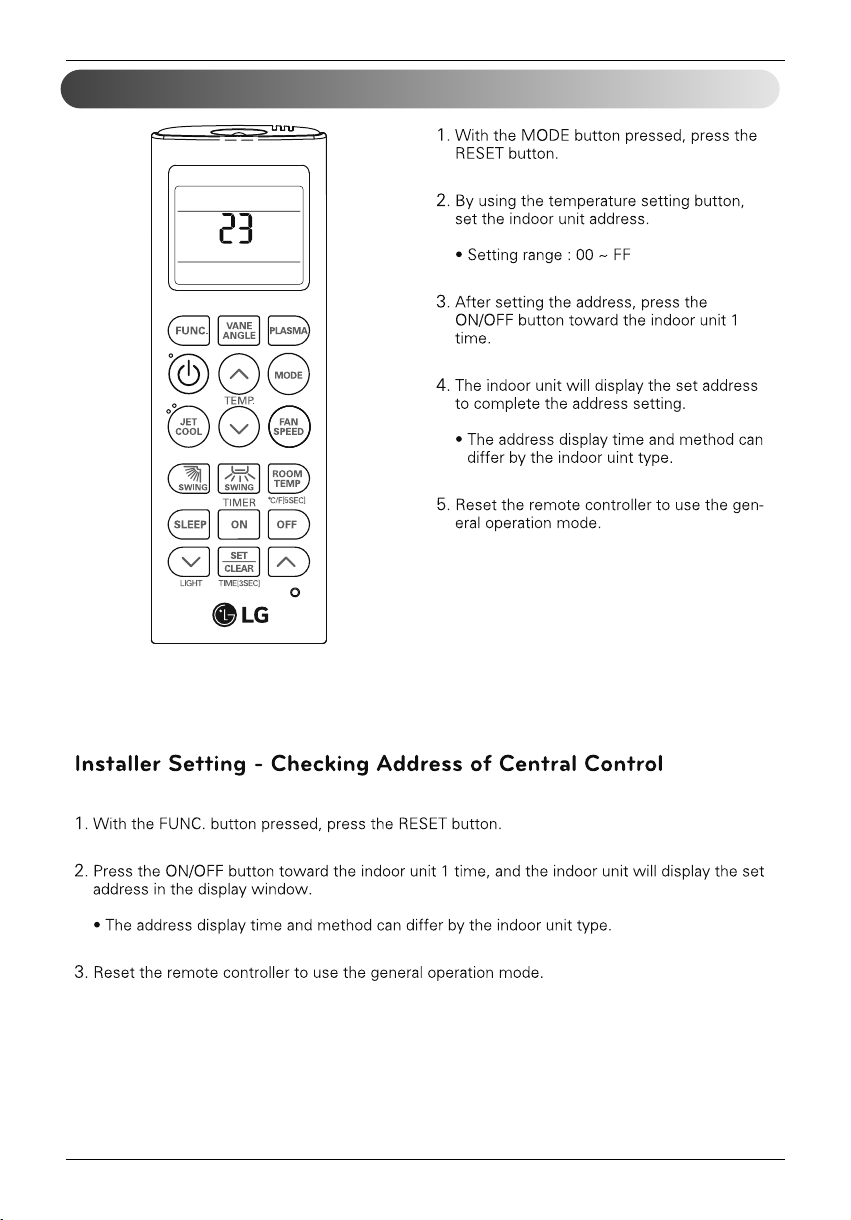
Installer Setting - Setting Address of Central Control
16 Ceiling Cassette Air Conditioner
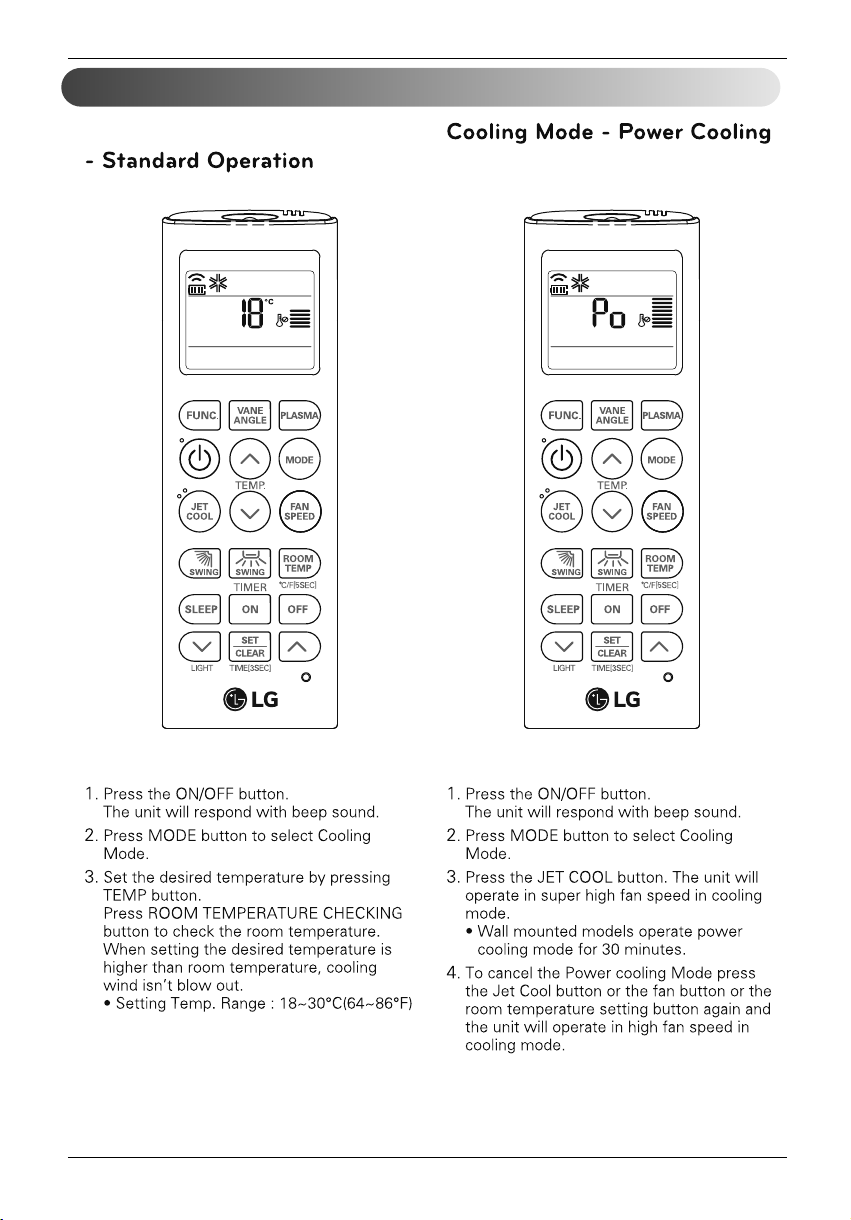
Cooling Mode
Operating Instructions
Owner's Manual 17
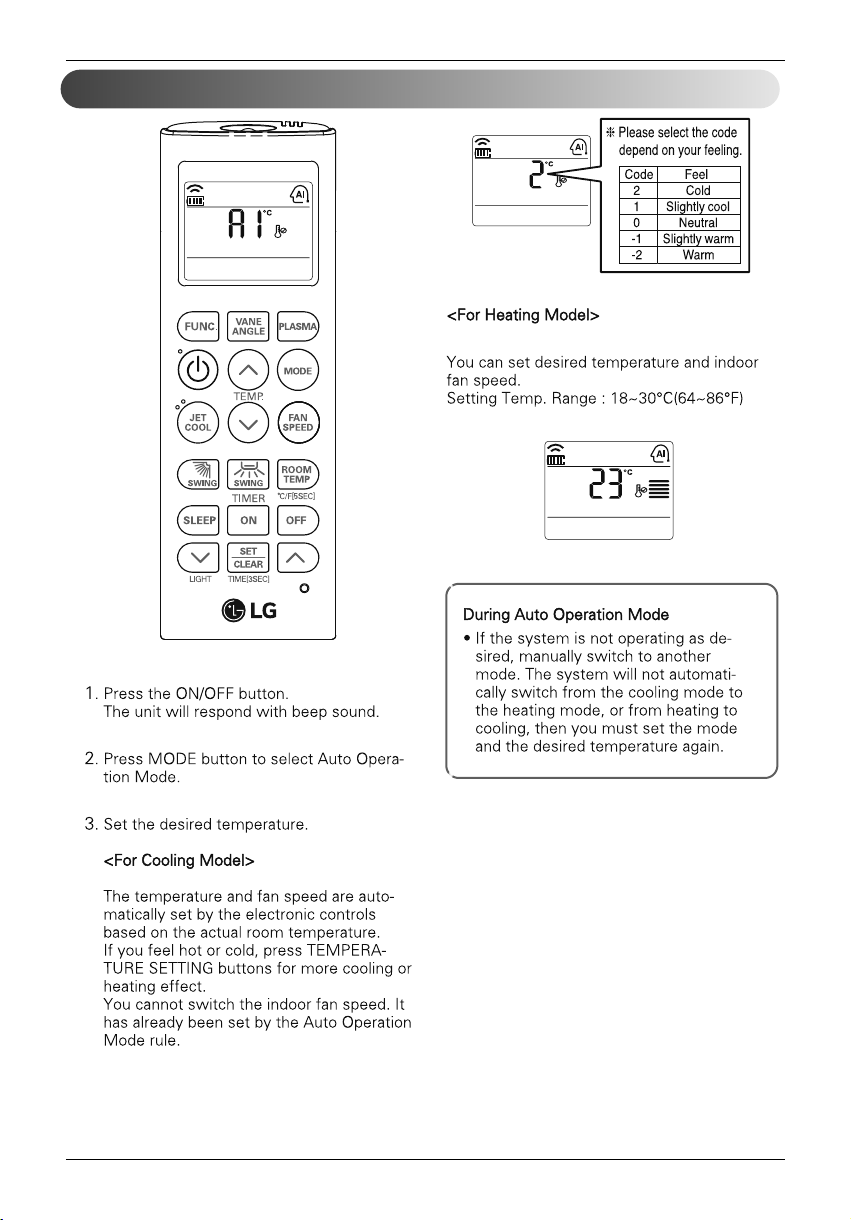
Operating Instructions
Auto Operation Mode
18 Ceiling Cassette Air Conditioner
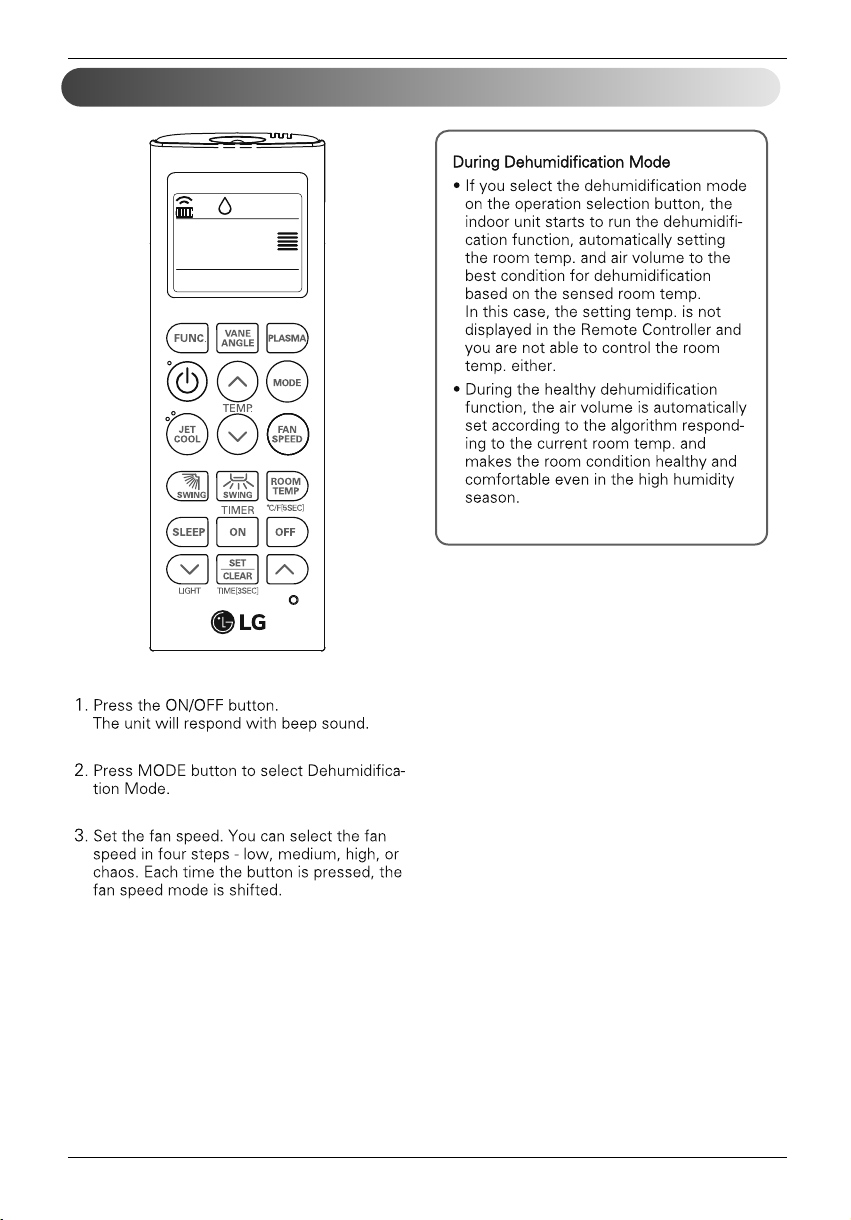
Dehumidification Mode
Operating Instructions
Owner's Manual 19
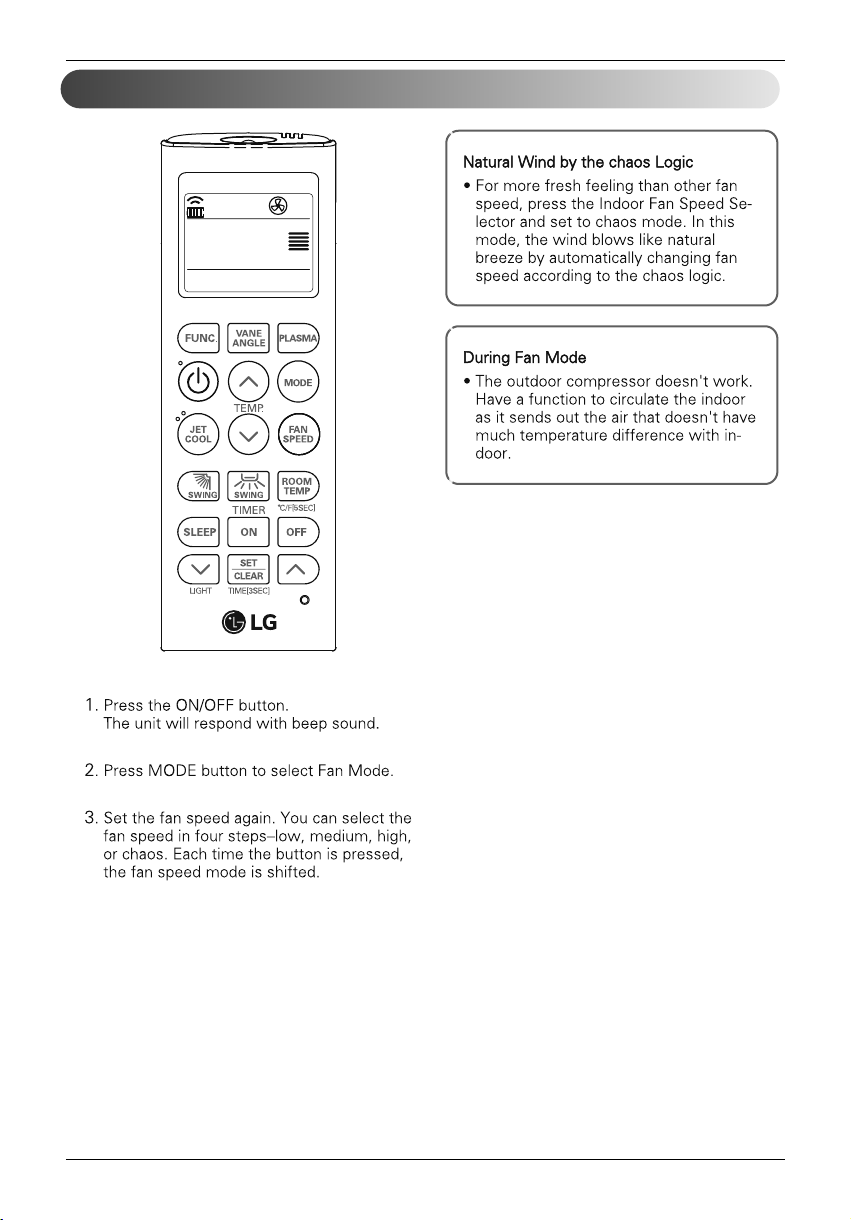
Operating Instructions
Fan Mode
20 Ceiling Cassette Air Conditioner
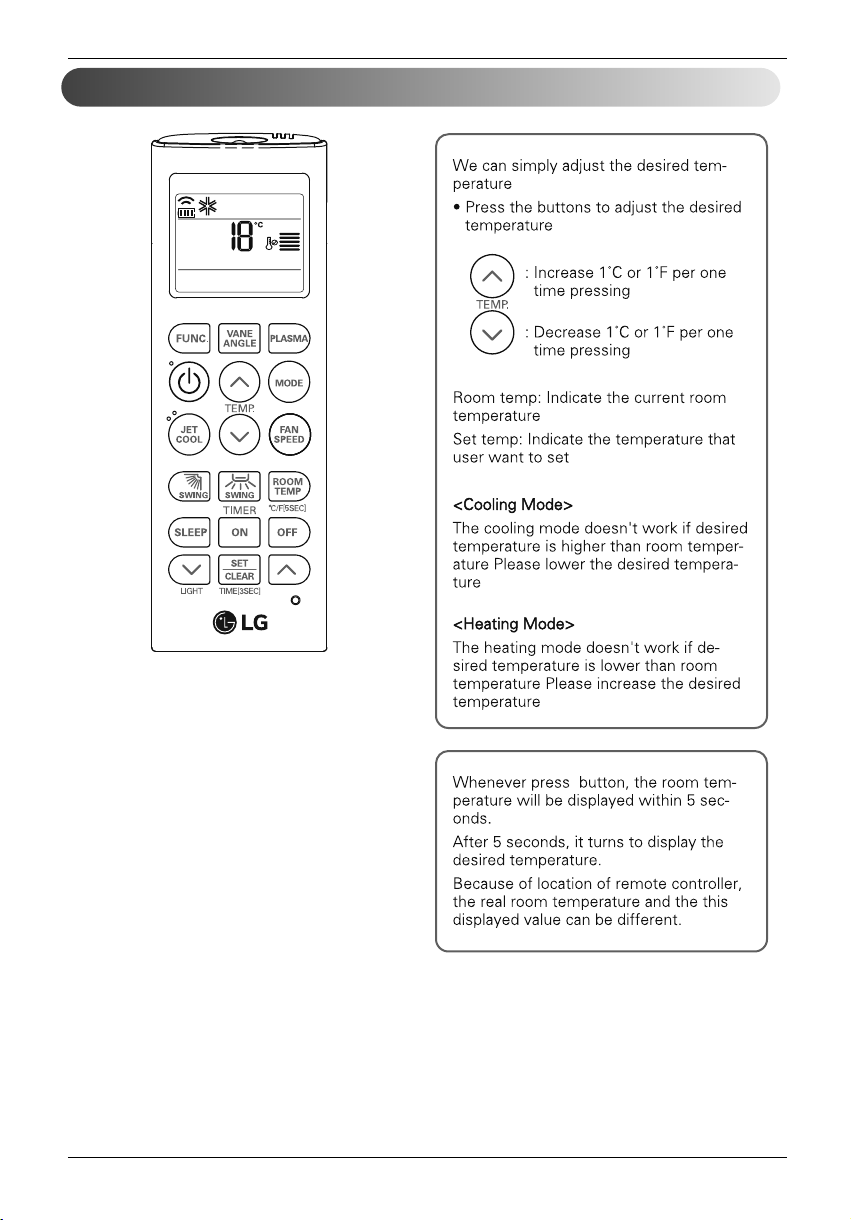
Operating Instructions
Temperature Setting/Room Temperature Checking
Owner's Manual 21
Operating Instructions
Airflow Setting
22 Ceiling Cassette Air Conditioner
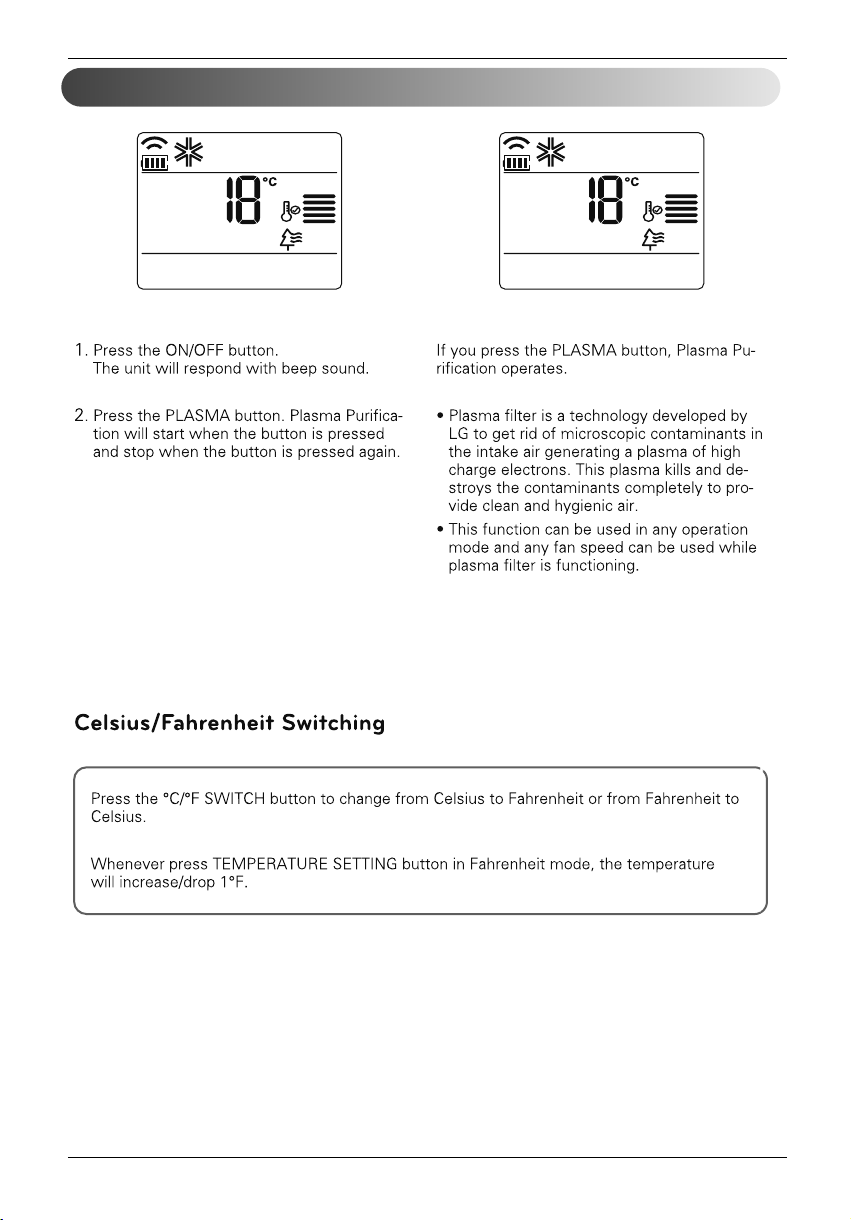
Plasma Purification (Optional)
Operating Instructions
Owner's Manual 23
Operating Instructions
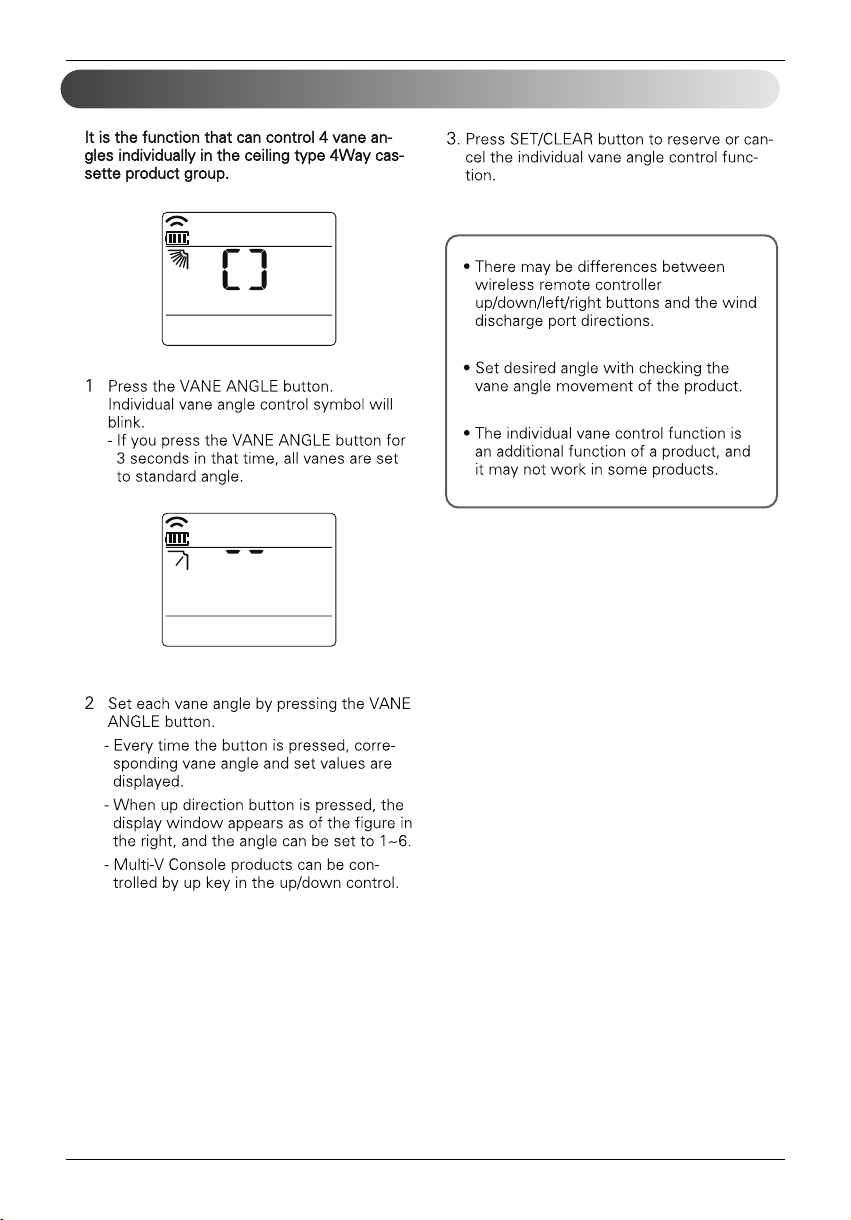
Individual vane angle control
24 Ceiling Cassette Air Conditioner
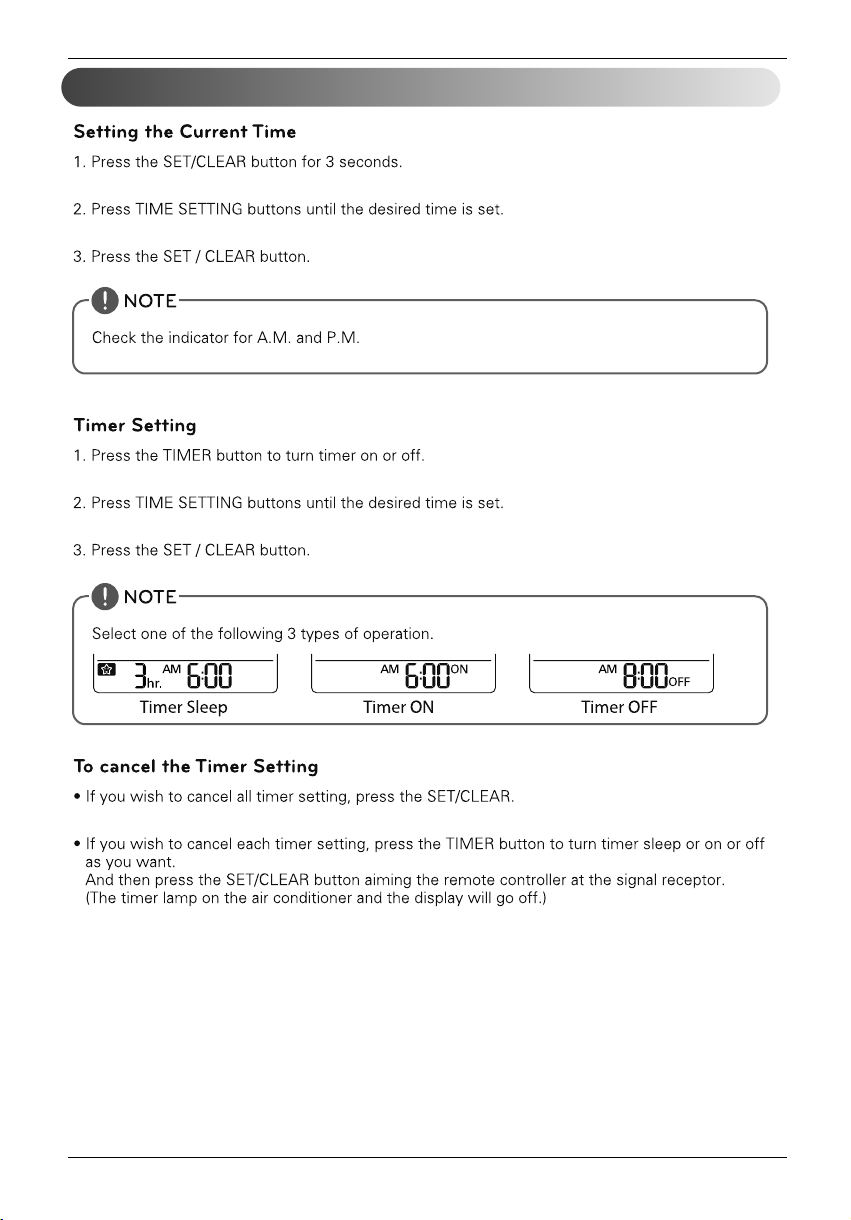
Timer
Operating Instructions
Owner's Manual 25

Wide LCD Wired Remote Controller (Optional)
26 Ceiling Cassette Air Conditioner
Owner's Manual 27
28
Ceiling Cassette Air Conditioner
Installation instruction
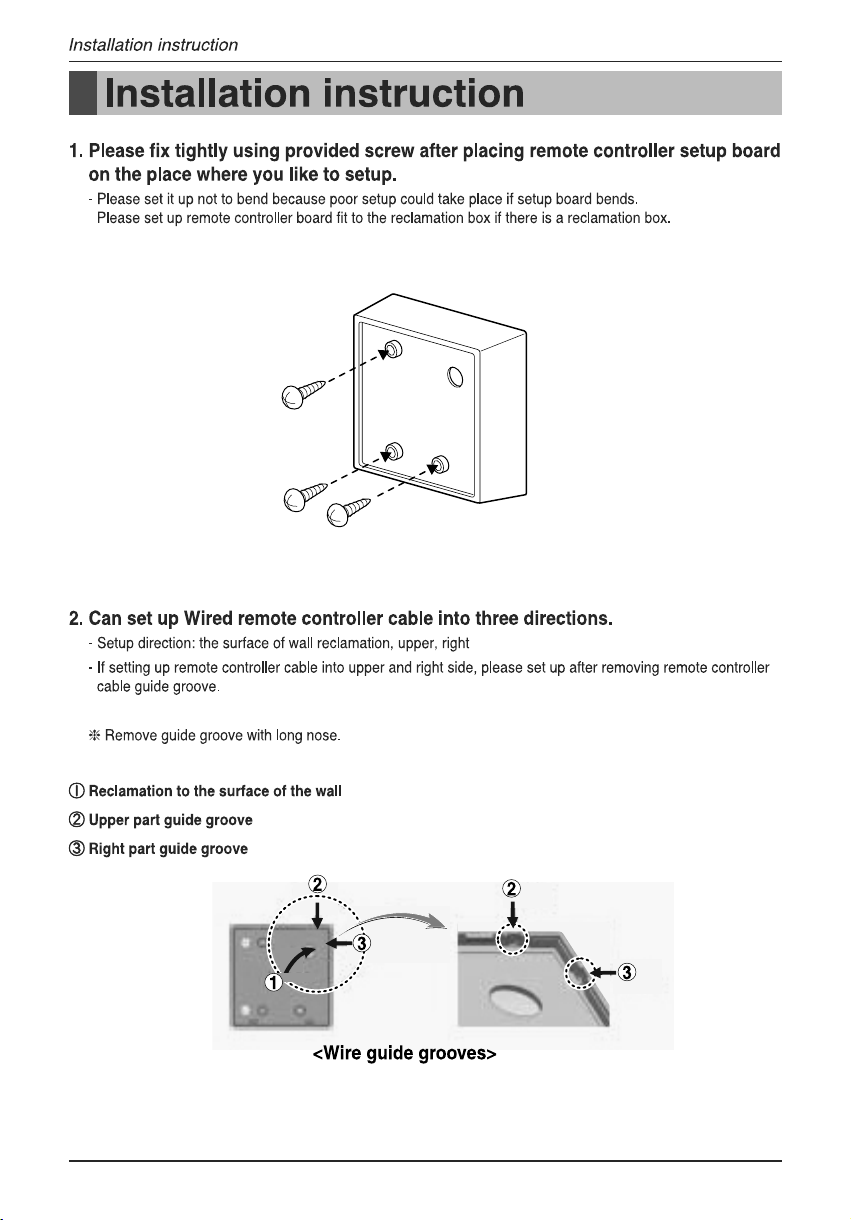
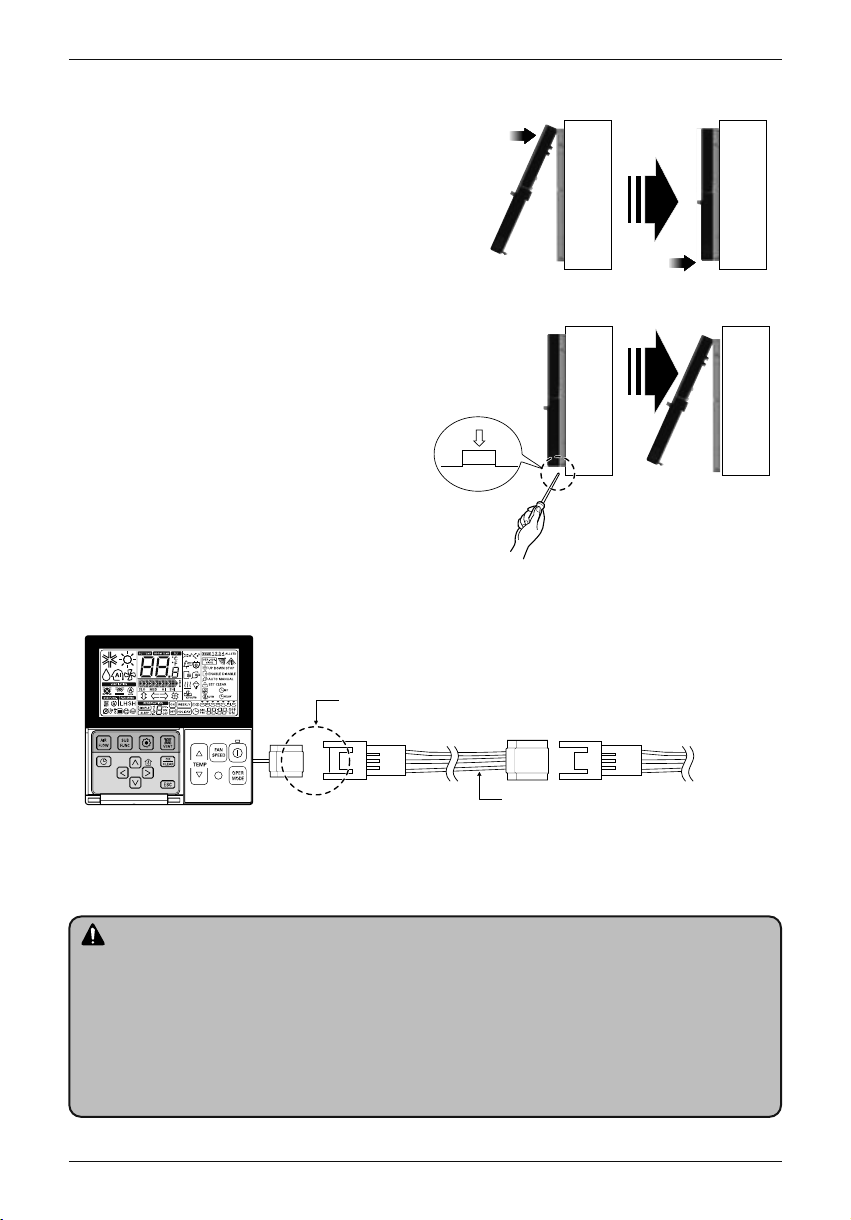
3. Please fix remote controller upper part into
the setup board attached to the surface of the
<Connecting order>
wall, as the picture below, and then, connect
with setup board by pressing lower part.
- Please connect not to make a gap at the remote controller
and setup board?s upper and lower, right and left part.
When separating remote controller from
setup board, as the picture below, after
Wall
Side
<Separating order>
inserting into the lower separating hole using
screw driver and then, spinning clockwise,
remote controller is separated.
- There are two separating holes. Please individually
separate one at a time.
- Please be careful not to damage the inside
components when separating.
Wall
Side
4. Please connect indoor unit and remote controller using connection cable.
Wall
Side
Wall
Side
Please check if connector is normally connected.
Indoor
Unit side
Connecting cable
5. Please use extension cable if the distance between wired remote controller and
indoor unit is more than 10m.
CAUTION
When installing the wired remote controller, do not bury it in the wall.
(It can cause damage in the temperature sensor.)
Do not install the cable to be 50m or above.
(It can cause communication error.)
• When installing the extension cable, check the connecting direction of the connector of the remote controller
side and the product side for correct installation.
• If you install the extension cable in the opposite direction, the connector will not be connected.
• Specification of extension cable: 2547 1007 22# 2 core 3 shield 5 or above.
Owner's Manual
29
Installation instruction
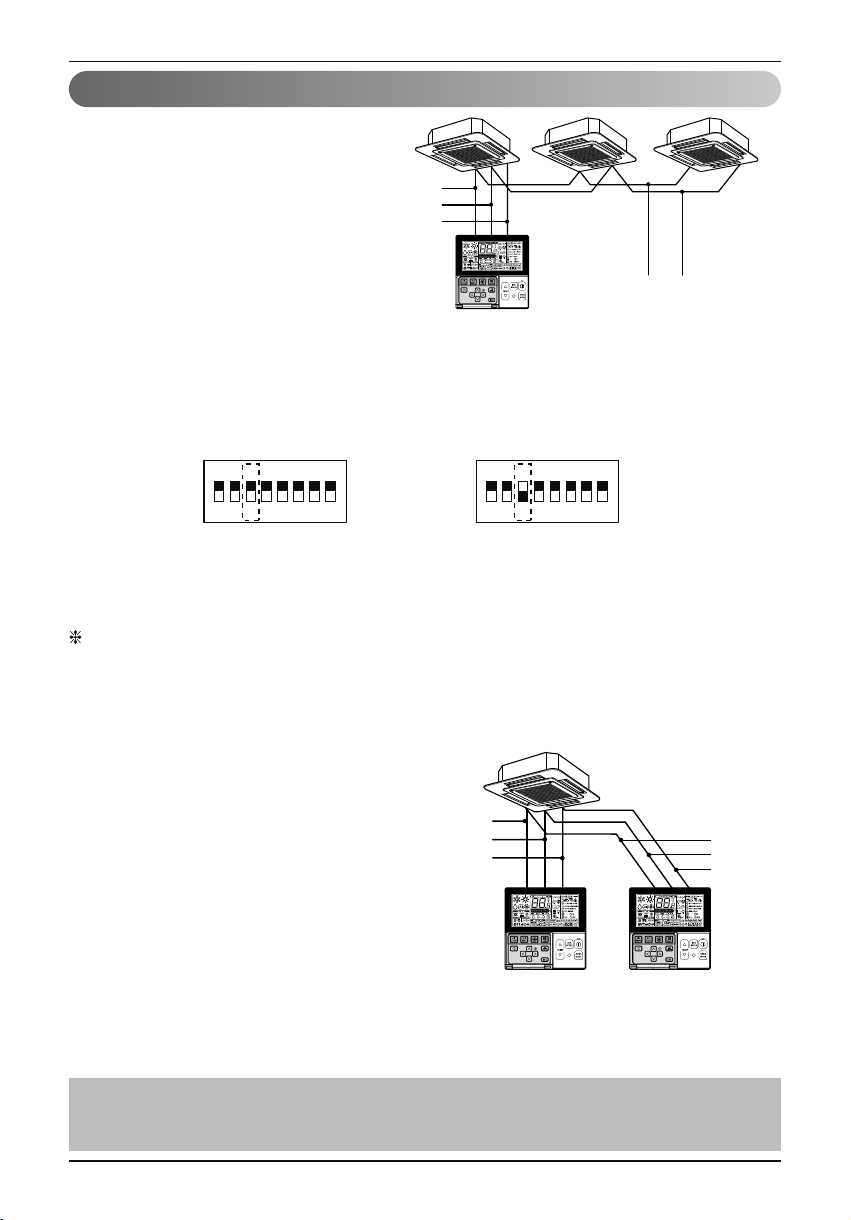
Group control
1. When installing more than 2
units of air conditioner to one
wired remote controller, please
connect as the right figure.
• If it is not event communication
indoor unit, set the unit as slave.
• Check for event communication
through the product manual.
When controlling multiple indoor units with event communication function with one remote
controller, you must change the master/slave setting from the indoor unit.
- Indoor units, the master/slave configuration of the product after completion of indoor unit power
?OFF? and then ?ON? the power after 1 minutes elapsed sign up.
- For ceiling type cassette and duct product group, change the switch setting of the indoor PCB.
1ON2 3 4 5 6 7 8 1ON2 3 4 5 6 7 8
#3 switch OFF: Master
(Factory default setting)
- For wall-mount type and stand type product, change the master/slave setting with the wireless
remote controller. (Refer to wireless remote controller manual for detail)
When installing 2 remote controllers to one indoor unit with event communication function, set
the master/slave of the remote controller. (Refer to remote controller master/slave selection)
When controlling the group, some functions excluding basic operation setting, fan level
Min/Mid/Max, remote controller lock setting and time setting may be limited.
GND
Signal wire
12V
#3 switch ON: Slave
GND
Signal wire
2. When installing more than 2 wired
remote controllers to one air
conditioner, please connect as the
right picture.
• When installing more than 2 units of wired
remote controller to one air conditioner, set
GND
Signal wire
12V
B Y R B Y R
one wired remote controller as master and
the others all as slaves, as shown in the
right picture.
MASTER SLAVE
• You cannot control the group as shown in
the right for some products.
•
Refer to the product manual for more detail.
<When simultaneously connecting
2 sets of wired remote controller>
• When controlling in groups, set the master/slaver of the remote controller. Refer to
Installer setting section on how to set master/slave for more detail.
Ceiling Cassette Air Conditioner
30
GND
Signal wire
12V
 Loading...